- Wondering how to get Monopoly GO! free rolls? Well, you’ve come to the right place. In this guide, we provide you with a bunch of tips and tricks to get some free rolls for the hit new mobile game. We’ll …
Best Roblox Horror Games to Play Right Now – Updated Weekly
By Adele Wilson
Our Best Roblox Horror Games guide features the scariest and most creative experiences to play right now on the platform!The BEST Roblox Games of The Week – Games You Need To Play!
By Sho Roberts
Our feature shares our pick for the Best Roblox Games of the week! With our feature, we guarantee you'll find something new to play!All Grades in Type Soul – Each Race Explained
By Adele Wilson
Our All Grades in Type Soul guide lists every grade in the game for all races, including how to increase your grade quickly!
Youda Legend: The Golden Bird of Paradise Walkthrough
Welcome to Gamezebo's walkthrough of Youda Legend: The Golden Bird of Paradise. General Game Information Hidden Object game, the sequel to Youda Legend: Curse of the Amsterdam Diamond. You are on vacation on a tropical island when suddenly, you find yourself on a quest for a valuable relic: the Golden Bird of Paradise. There is no timer for this game. You can take as much time as you wish. Videos and cutscenes cannot be skipped. If you exit the game during a hidden object scene, it wil…
a:1:i:0;a:2:s:13:”section_title”;s:53:”Youda Legend: The Golden Bird of Paradise Walkthrough”;s:12:”section_body”;s:37135:”
Welcome to Gamezebo’s walkthrough of Youda Legend: The Golden Bird of Paradise.

General Game Information
- Hidden Object game, the sequel to Youda Legend: Curse of the Amsterdam Diamond. You are on vacation on a tropical island when suddenly, you find yourself on a quest for a valuable relic: the Golden Bird of Paradise.
- There is no timer for this game. You can take as much time as you wish.
- Videos and cutscenes cannot be skipped.
- If you exit the game during a hidden object scene, it will return you to the same place you left off. If you exit during a minigame, when you return you revert back to the start of the minigame.
- The list of hidden objects varies each time you play the game. However, there are some constant elements such as gems, inventory items, and multiples of the same object (e.g. 25 beetles).
Game Elements
Options
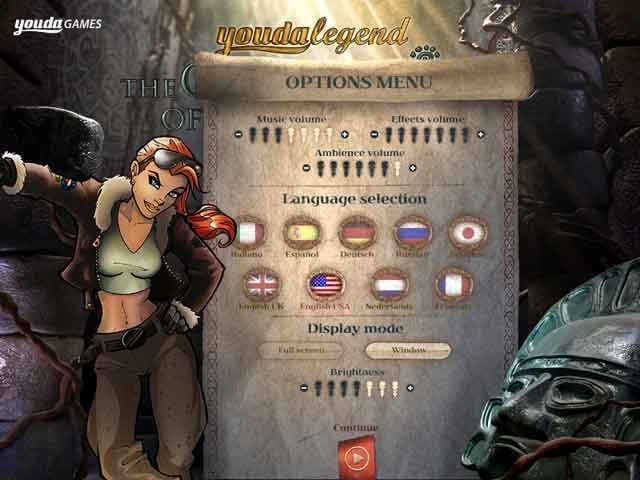
From here you can change the volume, screen brightness, language, and screen display mode (full screen or windowed).You can also access Options anytime from within the game by clicking on the Menu button.
Hints
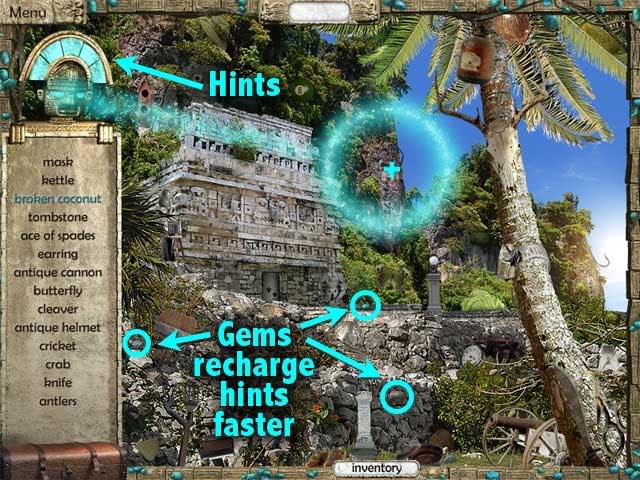
- You have an unlimited number of rechargeable hints.
- Recharging can be sped up by collecting gems. There are 10 gems in each scene.
- It usually takes 4 to 5 gems to fully charge a hint.
- Hints cannot be used within puzzles and minigames.
- When the hint circle appears, the hidden object is located exactly in its center.
Clicking penalties
If you have too many wrong clicks, the cursor will spin around wildly. Also, points will be deducted from your final score.
Inventory
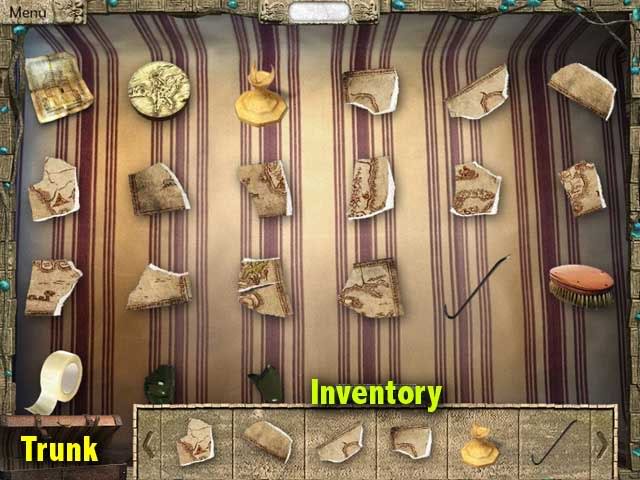
- Access your inventory to use objects, or to combine two objects when needed.
- To use an object, drag it from the inventory to a sparkling area on the screen.
- The inventory shows you only 6 objects at a time.
- To see everything you have in your inventory, click on the Trunk icon.
- Click on the Trunk icon again to return to the scene.
Minigames
- A minigame can be skipped after a certain period of time, when the Skip meter is full.
- To restart a puzzle, simply exit the game, and when you return the puzzle will be reset
- Most minigames have a fixed solution, but there are a few that vary each time you play the game.
- For puzzles that are randomly generated, example solutions are provided in this walkthrough.
WALKTHROUGH
Chapter 1 – Village
A. Airfield
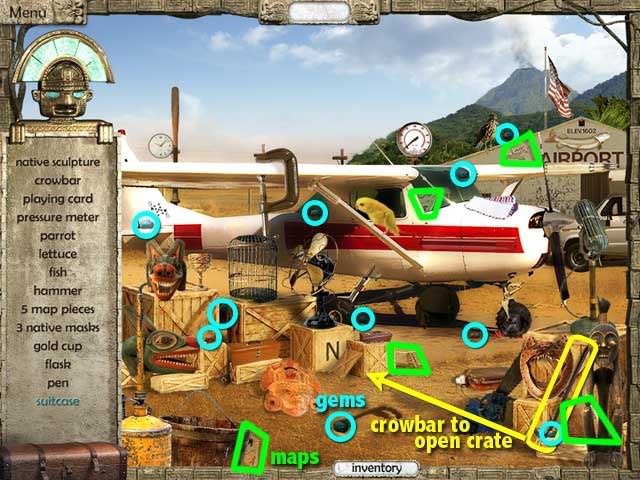
Pick up the crowbar. Open your inventory and drag the crowbar to the sparkling crate. Get the suitcase from the crate.
B. Village Square
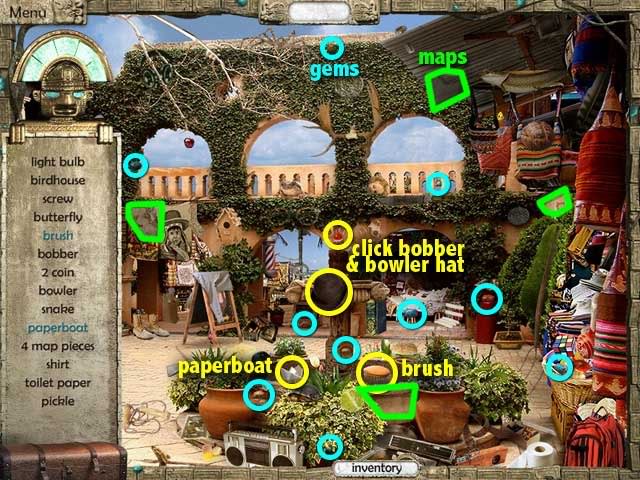
Pick up the bobber & the bowler hat in order to fill the fountain with water. When the paperboat and brush float to the surface, pick them up.
C. Dice minigame
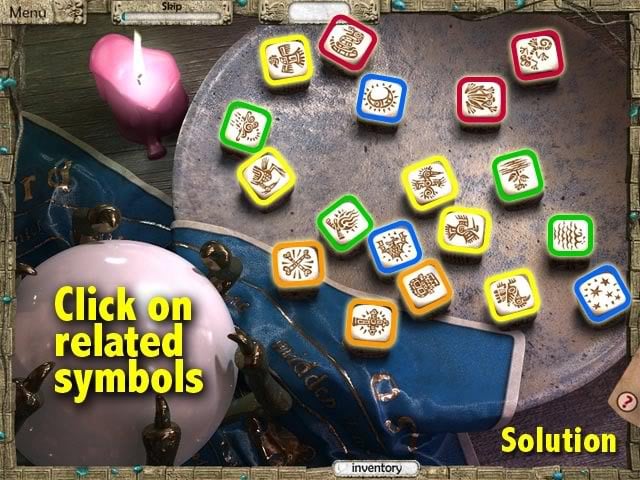
Click on the dice to group related symbols according to theme.
- Birds = eagle, woodpecker, pelican, rooster, stork
- Nature = rain, fire, water, plant
- Mystical = cross, skull, crossbones
- Crawlies = lizard, snake, frog
- Night = moon, stars, bat
If you click on the wrong dice, the board will be reshuffled.
D. Village Shop
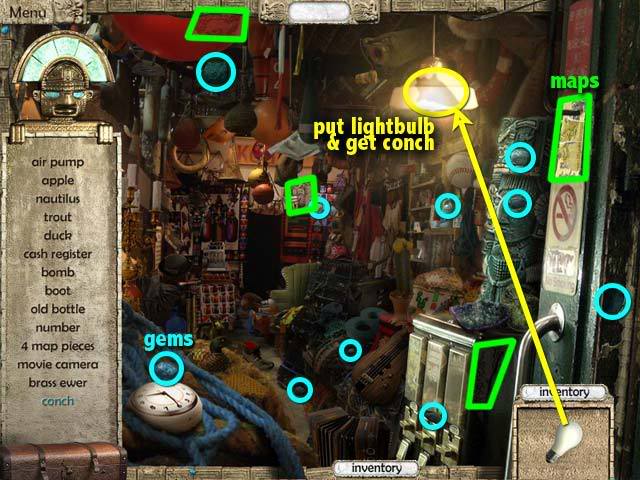
Drag the lightbulb from your inventory into the lamp. Get the conch inside the lamp.
E. Coins minigame
![]()
Before you solve the minigame, you’ll need to prepare the 2 missing coins. Open your inventory. Drag the brush over the two coins to clean them.
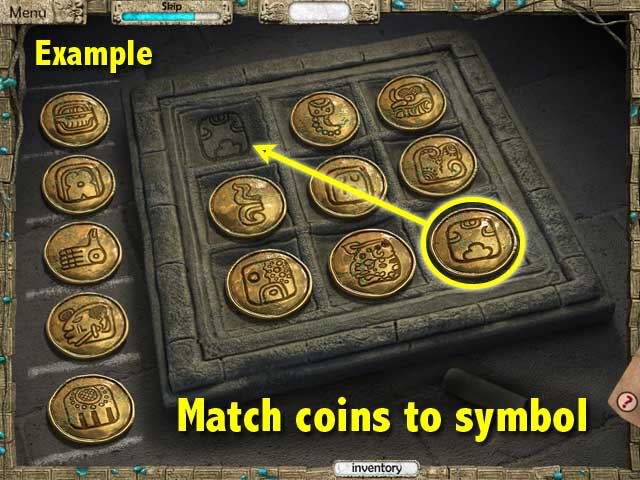
Match the coins to their corresponding symbols on the board. Click on two coins to swap their places. If a coin is in the correct place, it will glow briefly. Use the column on the left as a parking space for coins you don’t need. Solution varies for each game.
F. Bungalow
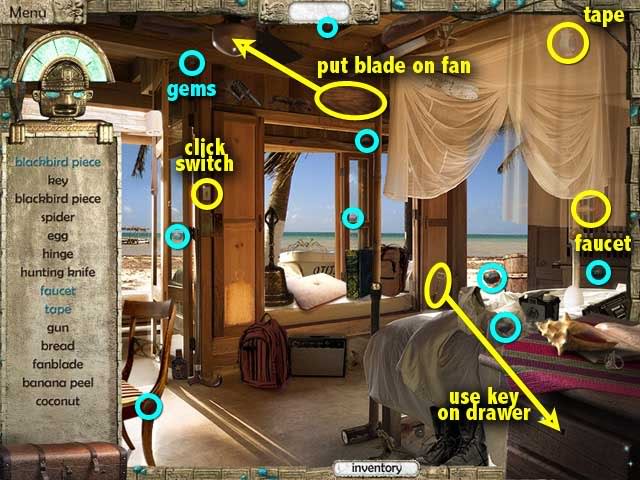
- Get the key. From your inventory, drag the key to open the drawer.
- Pick up the blackbird piece inside the drawer.
- Get the fanblade. From your inventory, drag the fanblade to the ceiling fan.
- Click the switch to turn on the fan. The canopy will reveal more items.
- Pick up the tape and faucet (may not be on the list).
G. Cylinder minigame
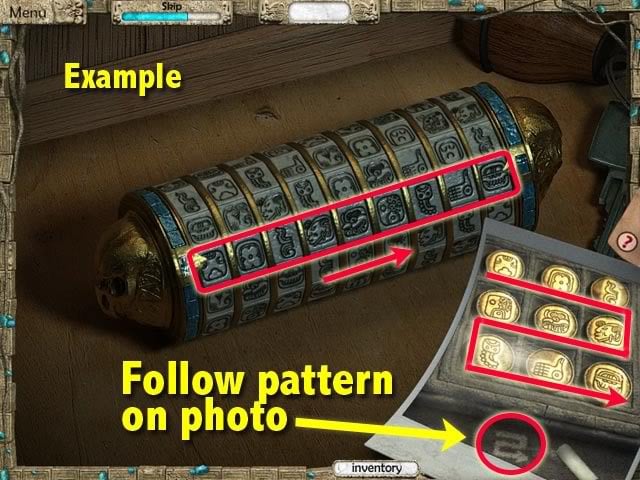
- Click the symbols on the cylinder to match those shown on the photo.
- Follow the pattern indicated at the bottom of the photo.
- The pattern shows you which direction the symbols should go on the cylinder.
- This pattern varies in every game.
- After you complete the puzzle, get the rolled-up note inside the cylinder.
H. Harbor
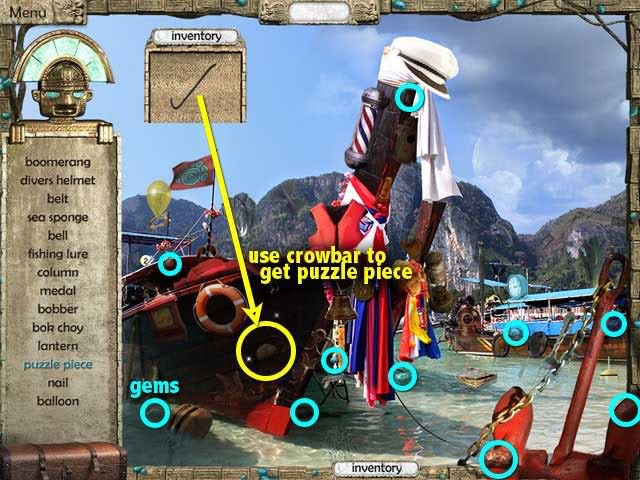
Use the crowbar from your inventory to pry open the loose board on the ship. Get the puzzle piece inside.
I. Map puzzle
![]()
Before you solve the puzzle, you’ll need to fix the missing map piece. Open your inventory. Drag the tape to the torn map piece.
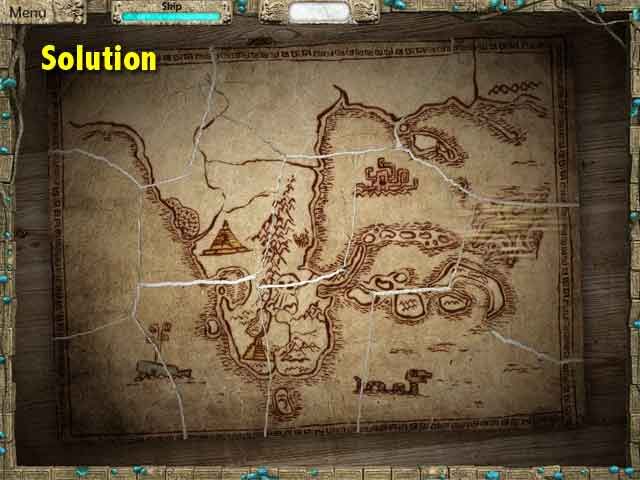
Assemble the map as shown above. Click a map piece to rotate it. A piece will lock when in the correct place.
Chapter 2 – Temple
A. Temple on Shore
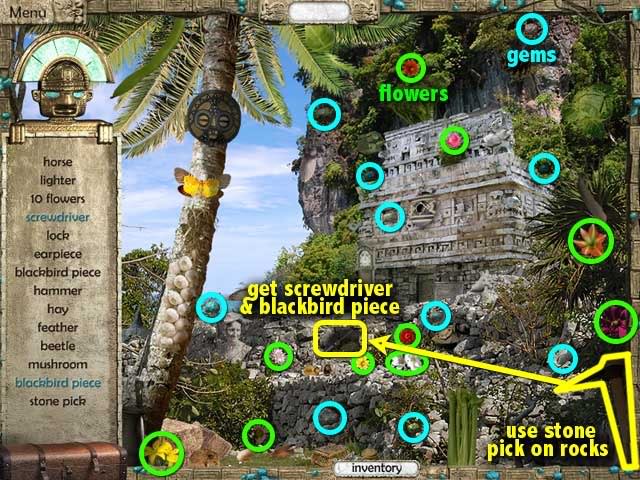
Get the stone pick. From inventory, drag the pick to break the rocks. Get the screwdriver and blackbird piece
B. Path minigame
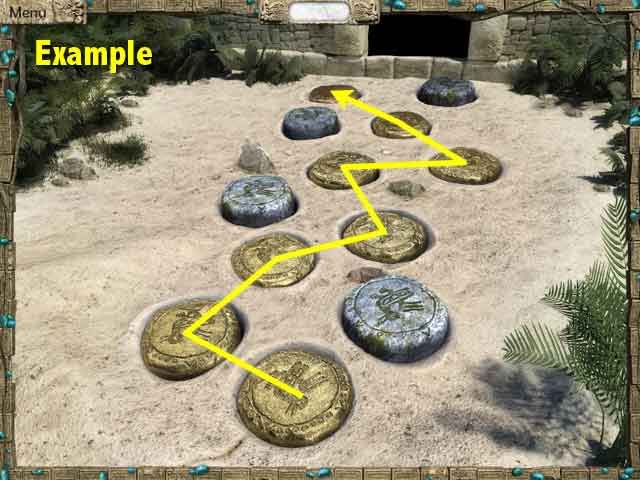
Find a path to the temple by clicking on the stones. If stone is correct, it will turn gold. If wrong, the puzzle will reset. Remember the sequence so you can repeat your previous steps. Solution varies for each game.
C. Dark Tunnel
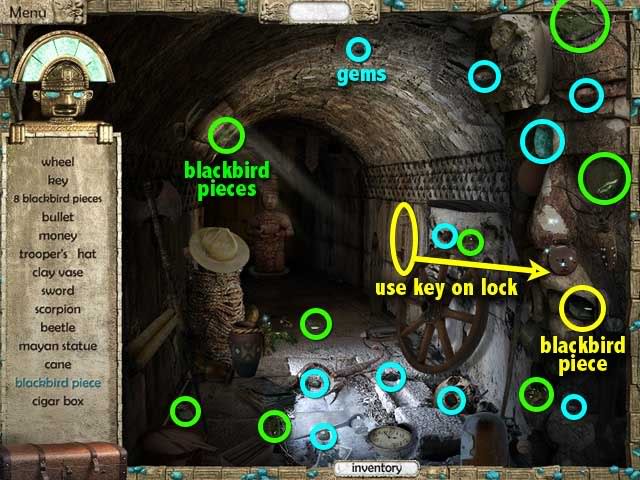
Get the key. From inventory, use the key to open the lock. Get the blackbird piece from the niche that opens up.
D. Blackbird minigame
![]()
Prepare the 2 missing blackbird pieces. Open inventory, drag hammer to the glass piece to break it into two.
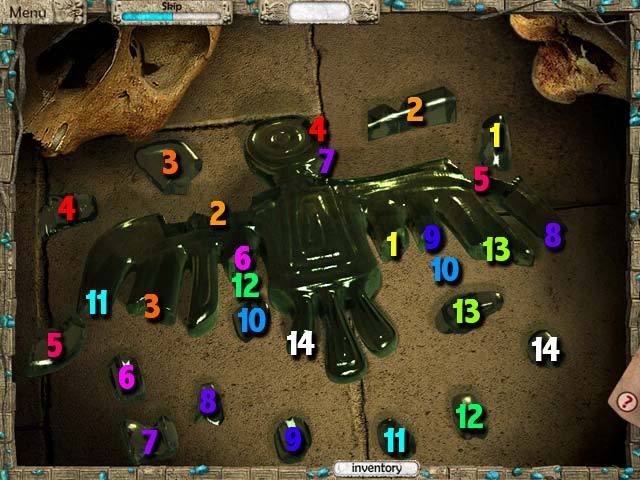
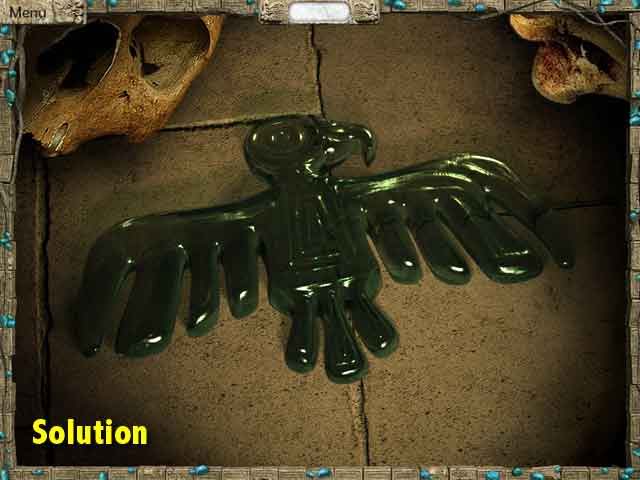
Drag pieces to numbered spots 1 to 14. If a piece doesn’t fit, click the arrows to rotate it. A piece will lock into place when in the correct spot and orientation. See completed blackbird below.
E. Mirrored Temple
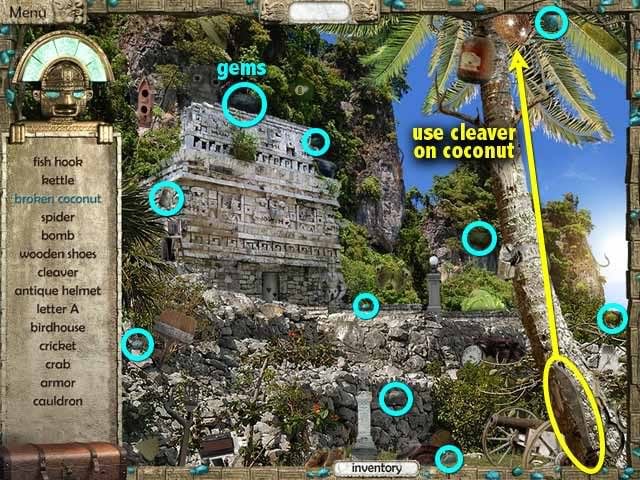
Get the cleaver. From inventory, use the cleaver to cut down the coconut. When the coconut falls on the ground, pick it up.
F. Jungle Machete minigame
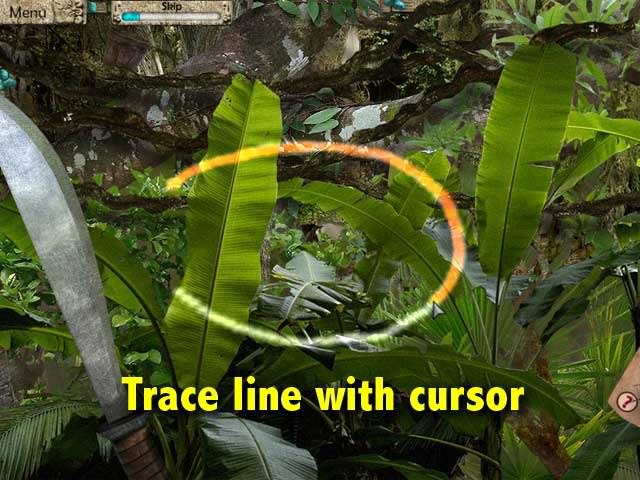
Trace the line with your mouse. Slowly and carefully does the trick. If you trace it accurately, the machete cuts the foliage and you advance to the next shape.
G. Waterfall Lake
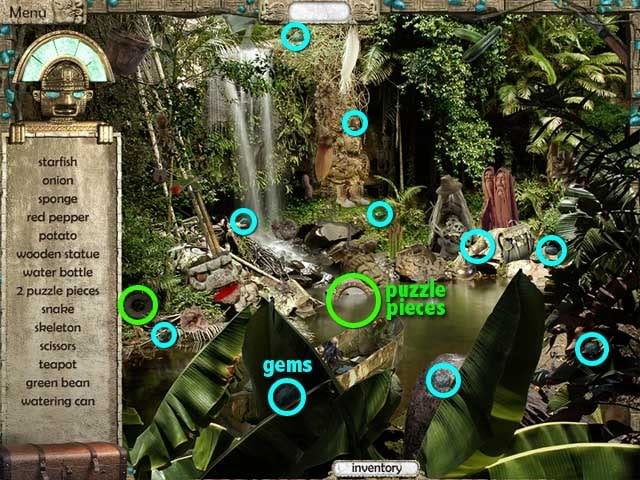
H. Rings minigame
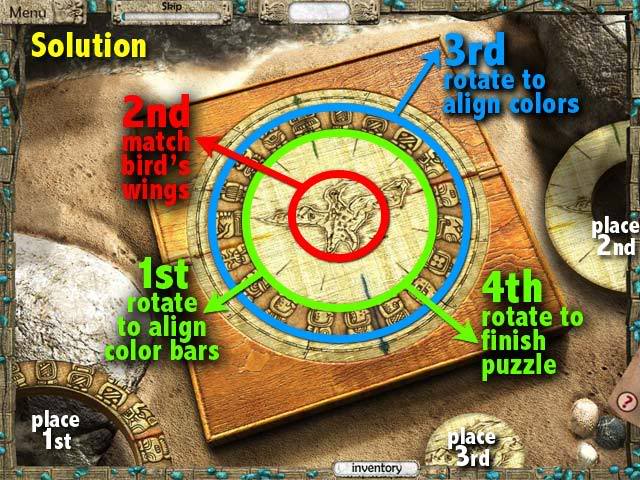
First, drag the rings to the board – 1st large, 2nd medium, 3rd small.
1. Rotate MEDIUM ring to align colored lines with those on the board.
2. Rotate SMALL ring so the bird’s wings are aligned with Medium ring.
3. Rotate LARGE ring to align colored lines with those on the board.
4. Rotate MEDIUM ring again to finish the puzzle.
Chapter 3 – Tribe
A. Airport
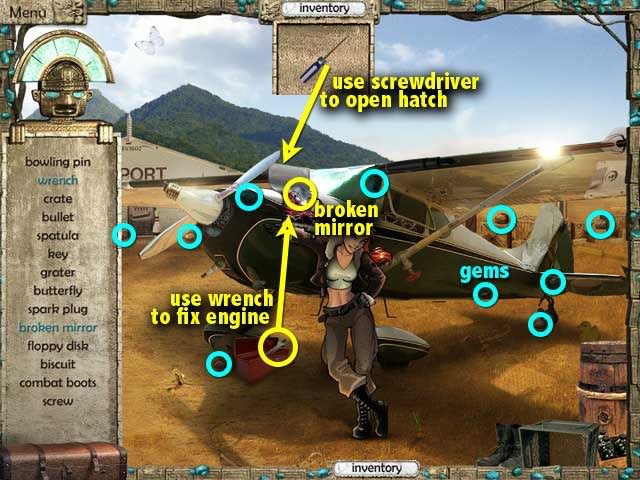
Click the toolbox to open it. Get the wrench inside. From inventory, use the screwdriver to open the hatch. Next, drag the wrench to the engine. Get the broken mirror inside.
B. Airplane cockpit minigame
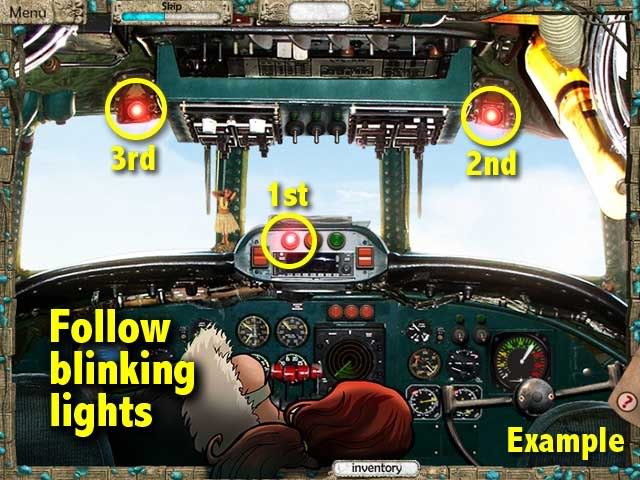
This is a "Simon Says" game. Follow the sequence of blinking lights. Each light will blink 4 times, but you only need to click it once. The sequence varies every game.
C. Airstrip
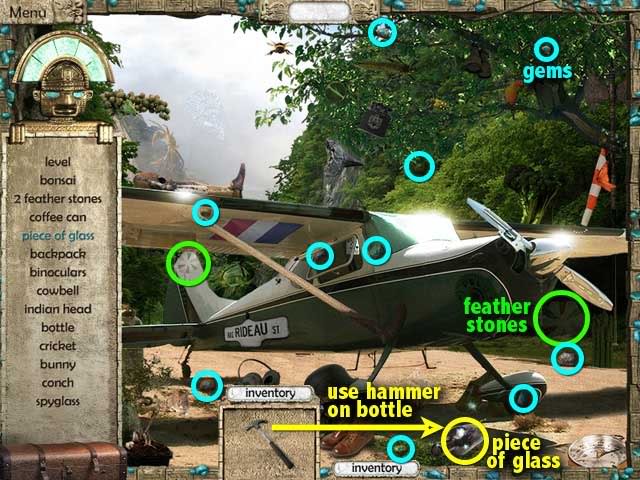
Drag the hammer from your inventory to the bottle to break it. Get the piece of glass.
D. Potions minigame
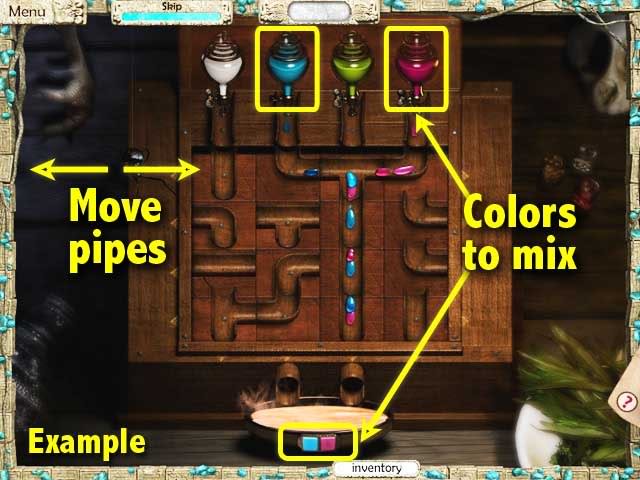
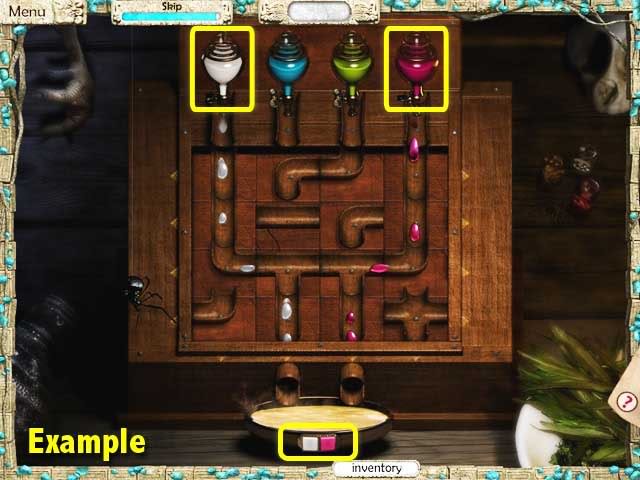
Slide pipes left or right to let the colored potions fall into the bowl. The squares in front of the bowl indicate which colors are needed. Solution varies every game.
E. Hut
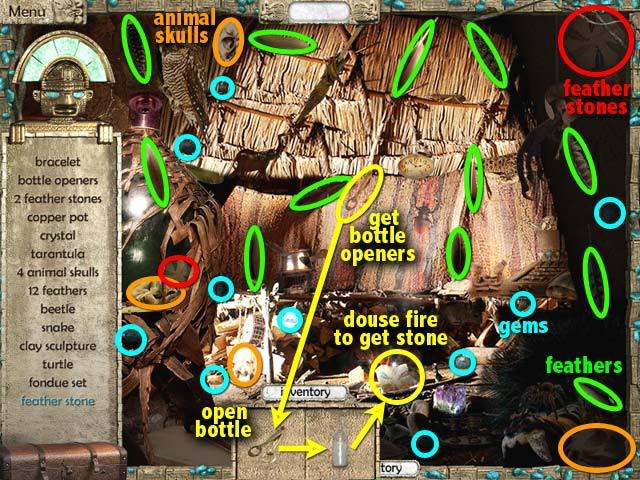
Get the bottle openers. In your inventory, use the bottle openers to open the bottle. Drag the open bottle to the fire. Get the feather stone from the fire’s ashes.
F. Courtyard
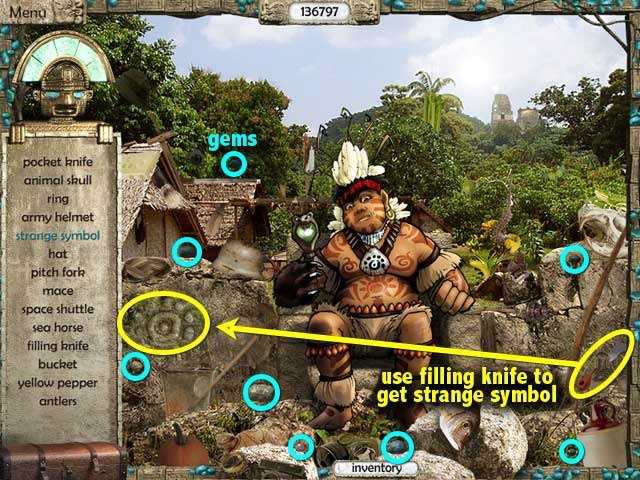
Get the filling knife. From inventory, use the filling knife to scrape the moss off the wall. Pick up the strange symbol that appears.
G. Totem Pole minigame
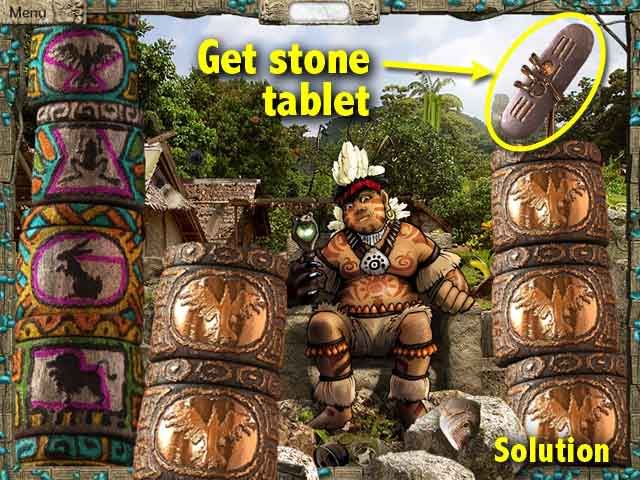
- Identify the right animal from the chief’s clues.
- Find the animal on the totem and trace the pink line around it.
- You’ll need to trace the symbol properly for it to register as correct.
- If correct, the totem symbol turns bronze.
- If incorrect, the totem poles reshuffle.
- Below are the animals and their respective clues.


Do 5 totem symbols correctly to complete the minigame. Get the stone tablet that the chief hands over to you.
Chapter 4 – Bird Island
A. Beach
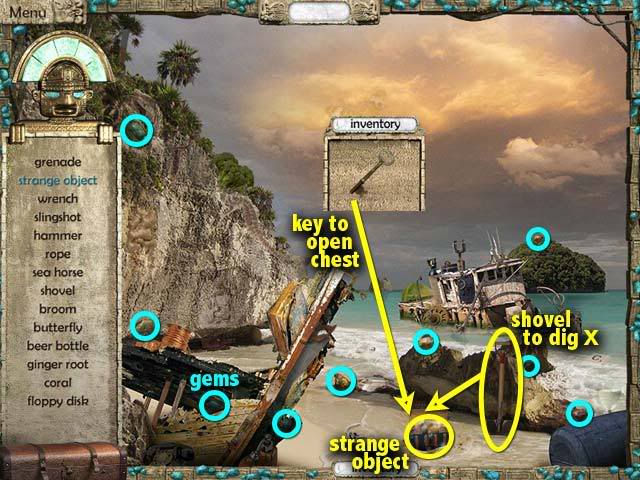
Get the shovel. From inventory, use the shovel to dig on the X mark. A locked chest appears. Use the key from your inventory to open the chest. Pick up strange object inside.
B. Raft minigame
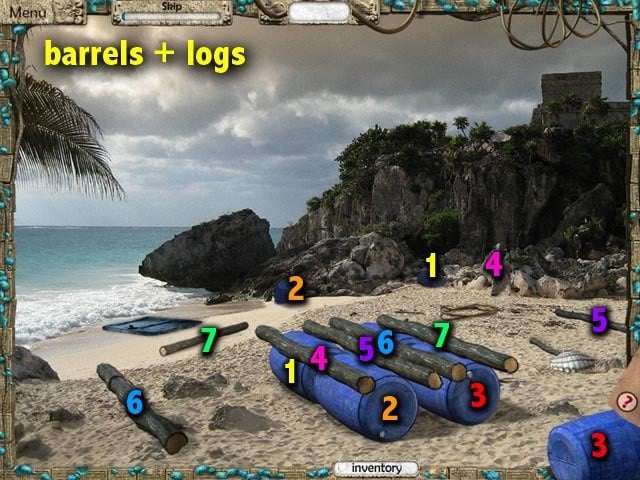
Build a raft from the various objects along the beach. Drag the objects to the numbered spots as shown below.
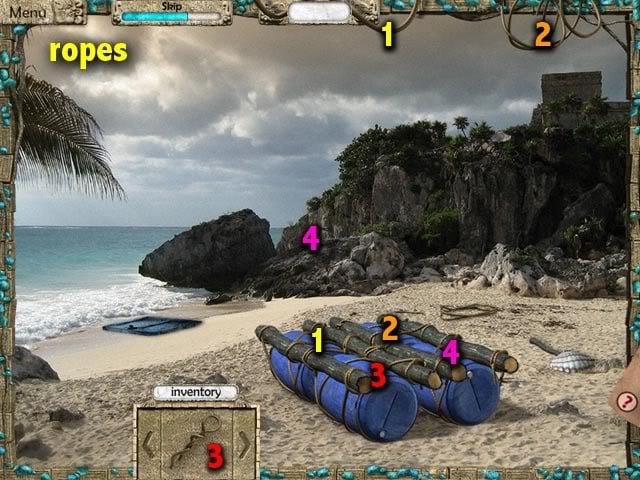
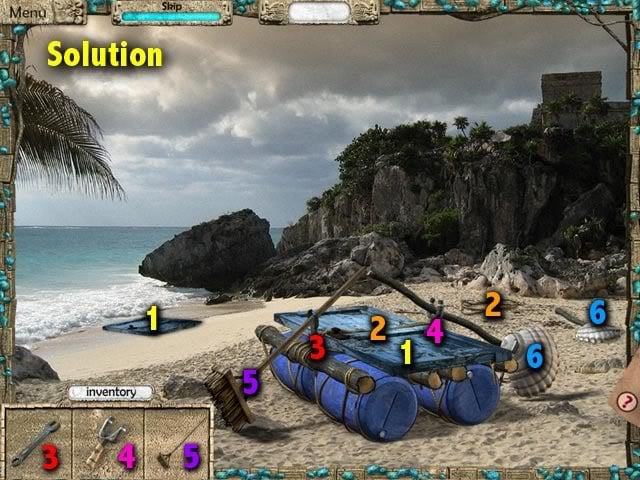
C. Beach Cliffs
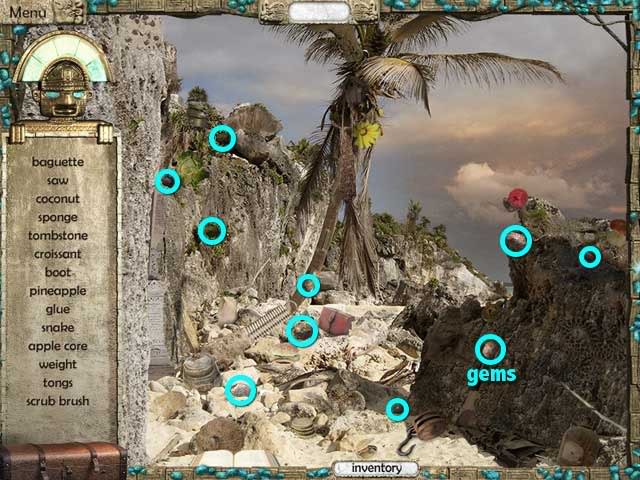
D. Lock slider minigame
Slide the blocks so that the symbols in the windows match the symbols on the stone tablet.
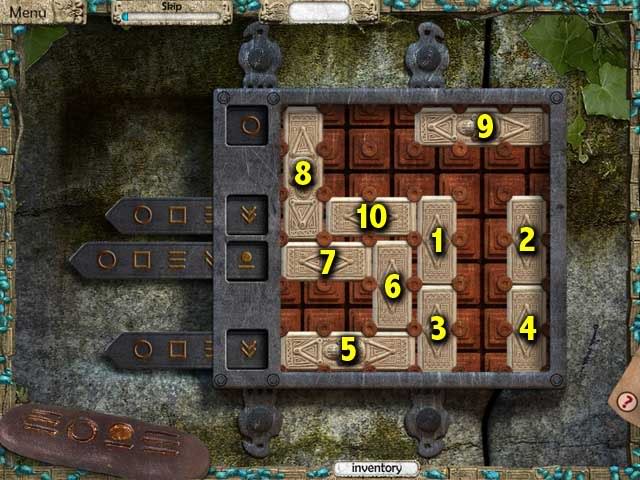
- Slide 1-2-3-4 up.
- Slide 5 all the way to the Right.
- Slide 6 Down.
- Slide 7 Right.
- Slide 8 all the way Down.
- Slide 9 all the way Left.
- Slide 1 & 2 all the way Up.
- Slide 10 Right.
- Slide 1 Down.
- Slide 9 one notch Right.
- Slide 8 Up.
- Slide 7 Left.
- Slide 6 Up.
Finally, slide 5 a bit Left until the triple-bar symbol appears in the window.
E. Path
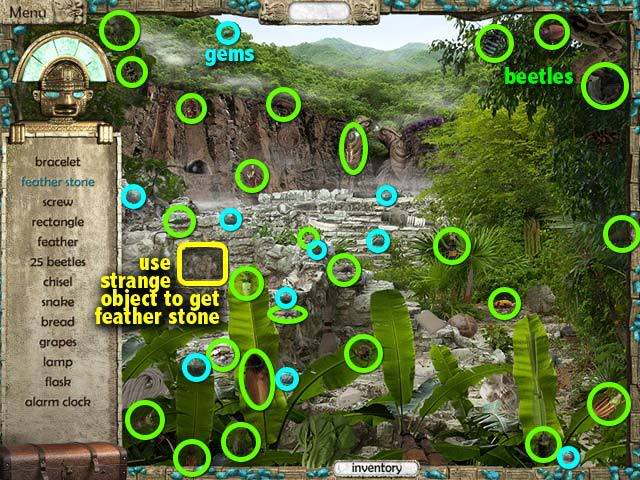
From inventory, drag the strange symbol to the carved stone. When the niche opens up, get the feather stone inside it.
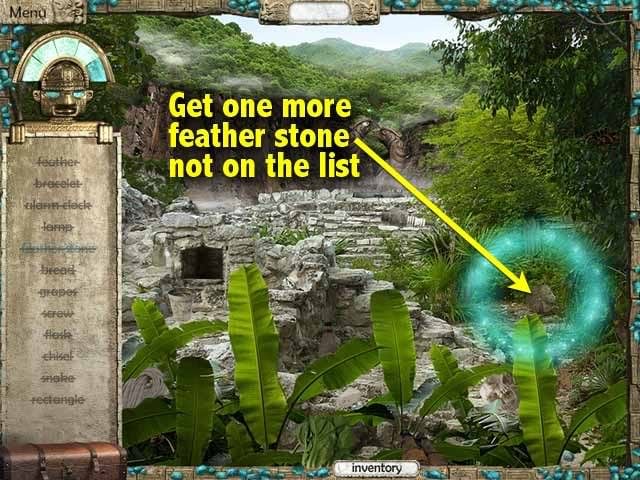
Pick up one last feather stone that is not on the list.
F. Feather stone minigame
![]()
Prepare the 2 missing feather stones: in your inventory, use the brush to clean the dirty feather stones.
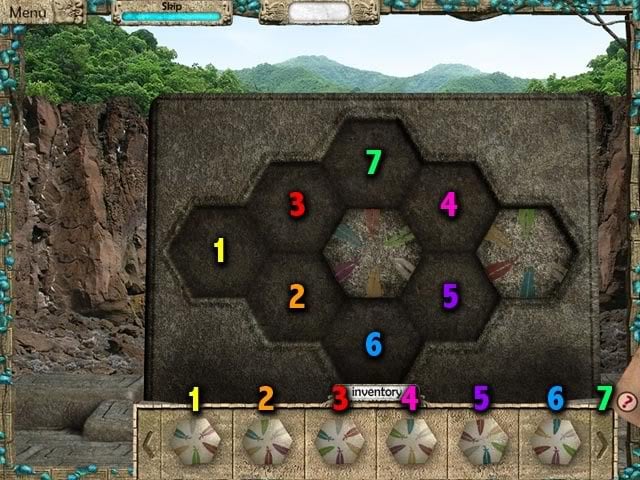
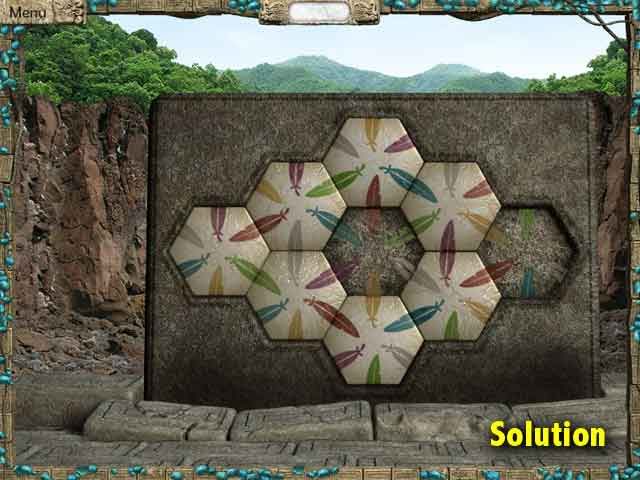
- Arrange the stones so that all the adjacent feather halves are the same color.
- Place stones one by one in the numbered spaces above.
- Starting with stones #4 and #5, rotate each one until the colored feathers match.
- See finished puzzle below.
Chapter 5 – Valley Ruins Civilization
A. Modern Camp
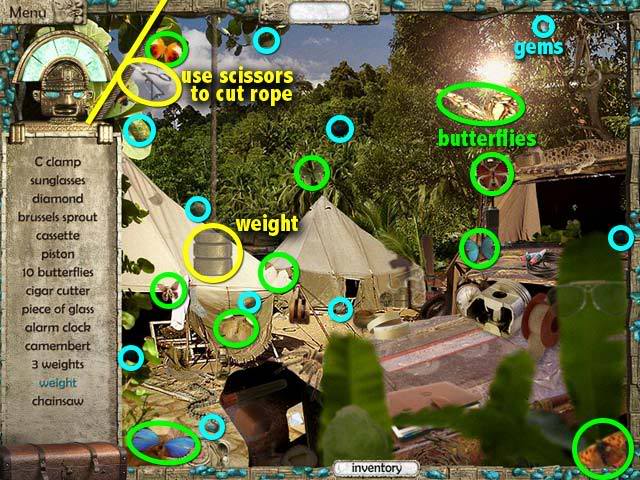
From inventory, drag the scissors to the rope to cut it. A weight will drop down from the rope; pick it up.
B. Camp Tents
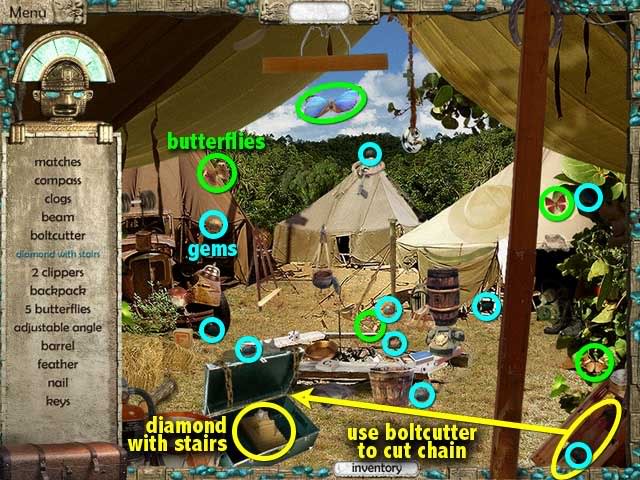
Get the boltcutter. From inventory, drag the boltcutter to the locked chest. Once the chest is open, pick up the diamond with stairs.
C. Model Mirrors minigame
![]()
Prepare the missing model pieces. Glue the broken mirror and stick it to the board.
![]()
Combine the glass shards and the column
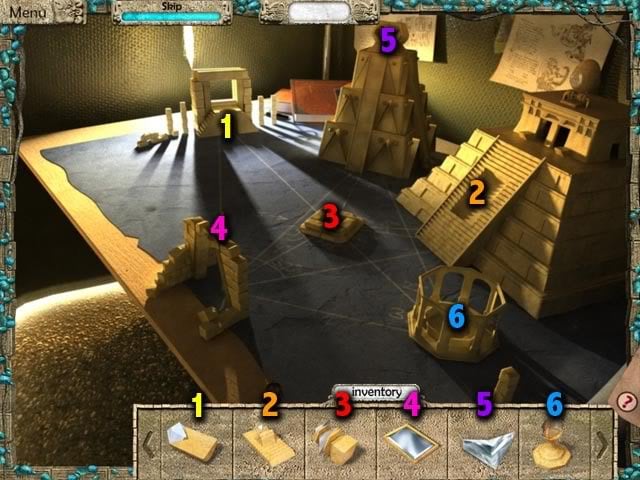
Place the mirrors on the table as numbered above.
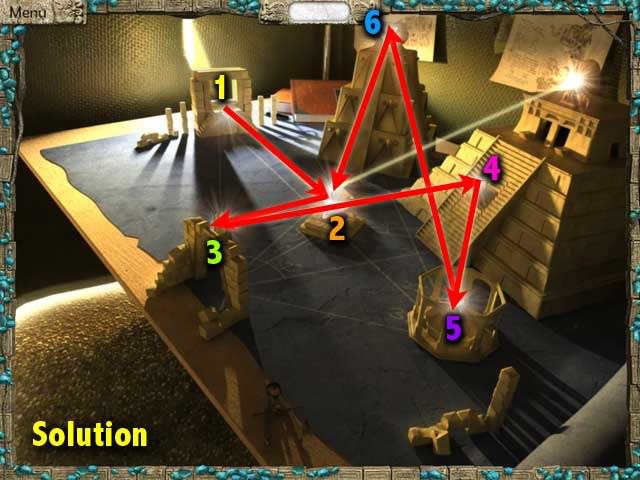
Click each mirror to position the reflecting beams.
- Mirror 1 window = facing mirror 2 center
- Mirror 2 center – facing mirror 3 left
- Mirror 3 left – facing mirror 4 stairs
- Mirror 4 stairs – facing mirror 5 gazebo
- Mirror 5 gazebo – facing mirror 6 temple
- Mirror 6 temple – facing mirror 2 center
D. Wooden Planks minigame
![]()
Prepare the missing beam. Use the saw to cut the log into a beam.
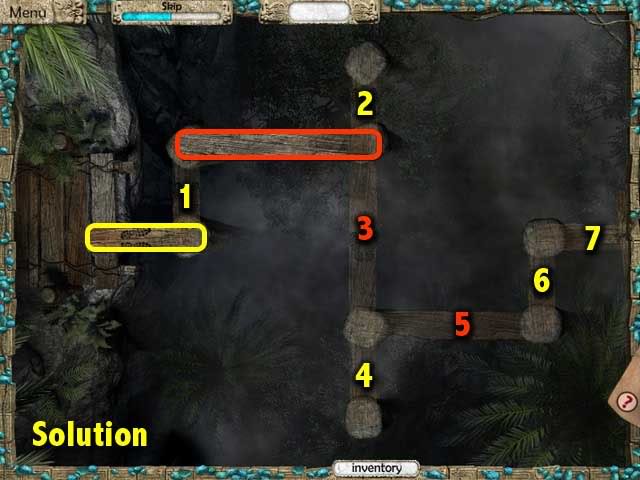
Move planks around to cross safely to other side of the canyon. You can only move a plank if it is adjacent or connected to what you’re standing on. Also, you can only place a plank on a gap that is the right length.
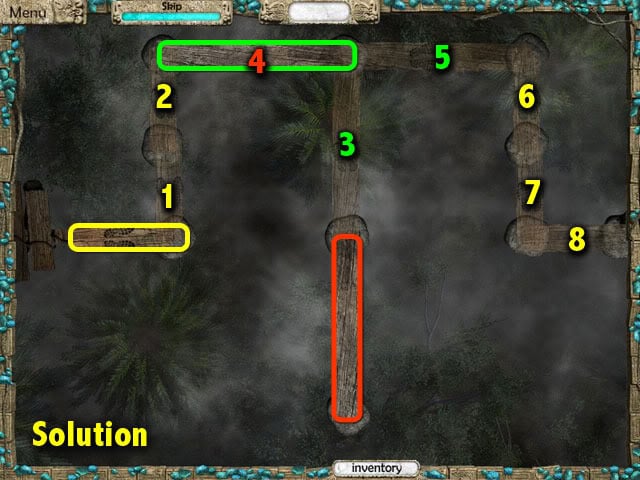
Part 2
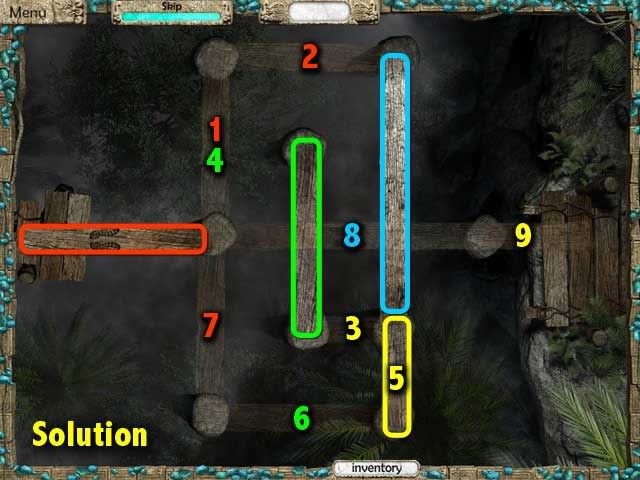
Part 3
E. Temple Door
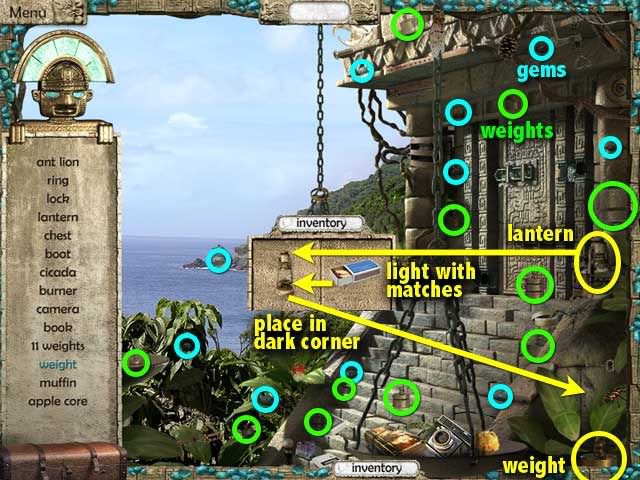
Get the lantern. In your inventory, place the matches on the lantern. Drag lit lantern to the dark corner. When the corner is illuminated, pick up the weight there.
F. Weights minigame
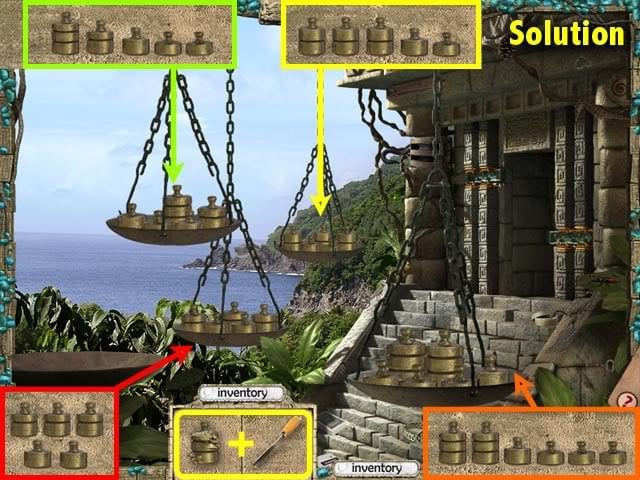
In your inventory, combine the dented weight with the filling knife. Add weights to the scales as shown in solution above. If you have the correct total weight in a scale, its corresponding door lock will turn orange.
G. Corridor
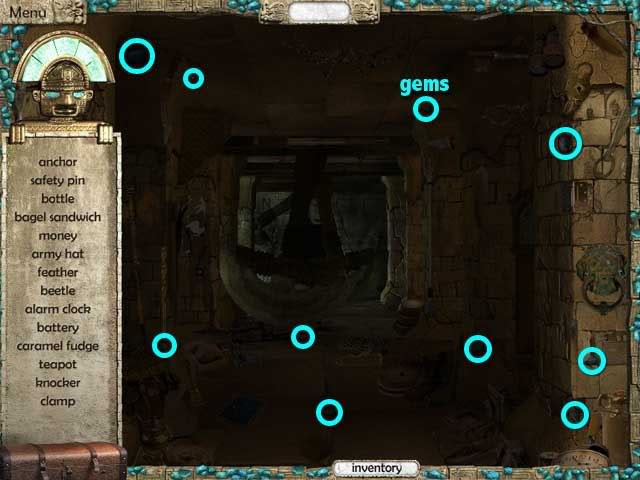
H. Stone slab minigame
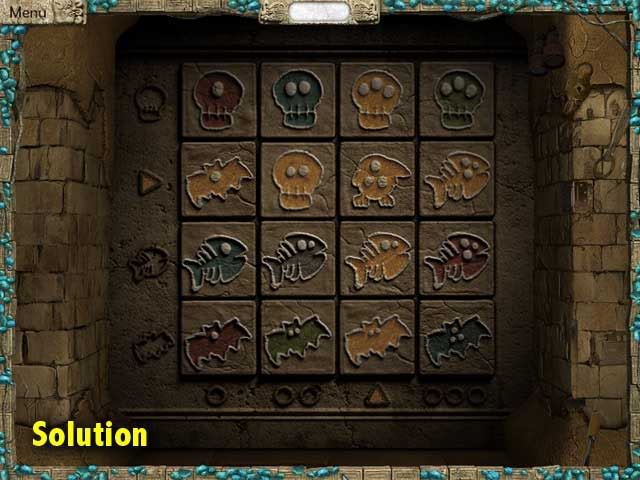
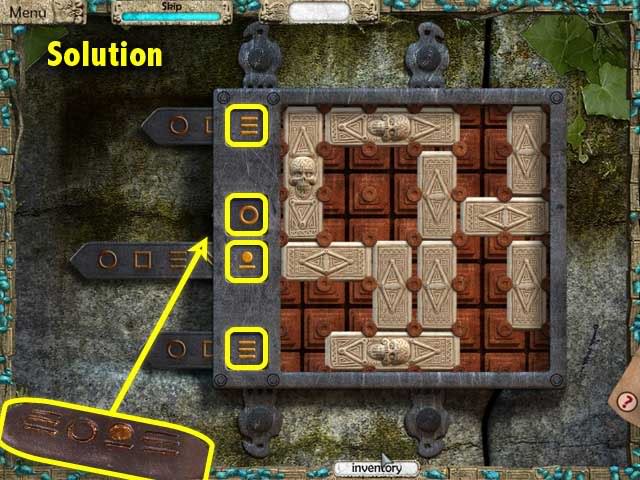
Put the tiles in correct order, following the guides on the margins. Arrange horizontally by symbol type, and vertically by the number of eyes. Place the yellow tiles on the 2nd column and 3rd row. See solution above.
I. Great Hall
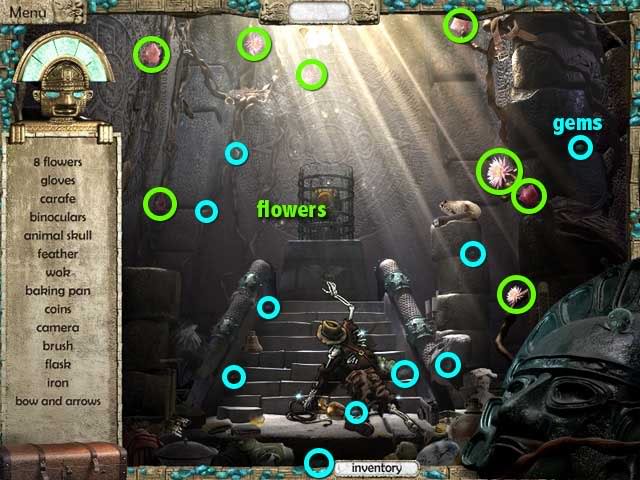
J. Bird puzzle 1: Triangles
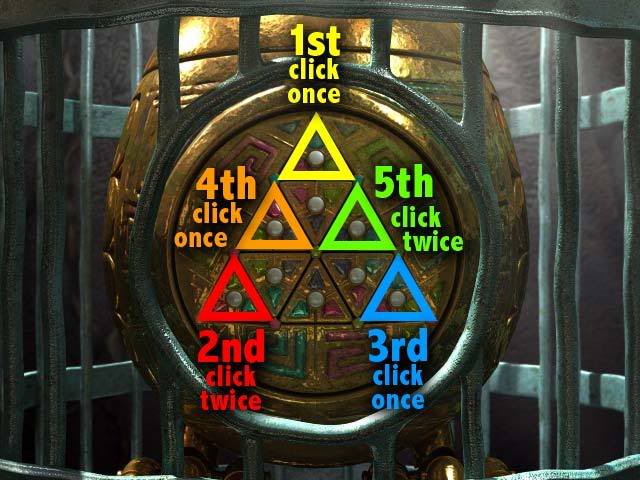
Click each triangle so that the corner gems match the colors on the triangles. See solution below.
- Click the top triangle once.
- Click the bottom left triangle twice.
- Click the bottom right triangle once.
- Click the middle left triangle once.
- Click the middle right triangle twice.
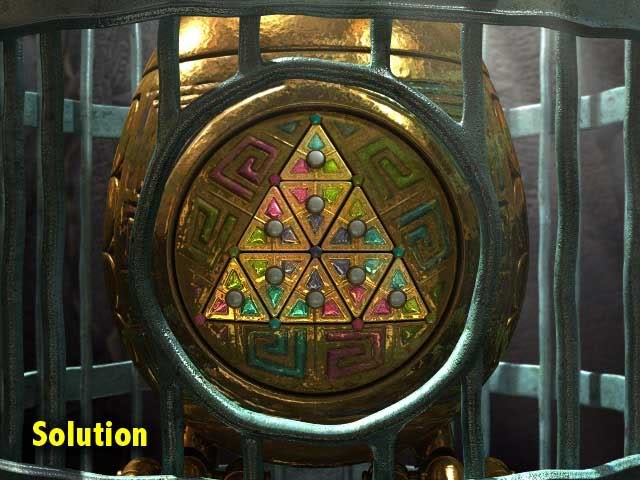
K. Bird puzzle 2: Squares
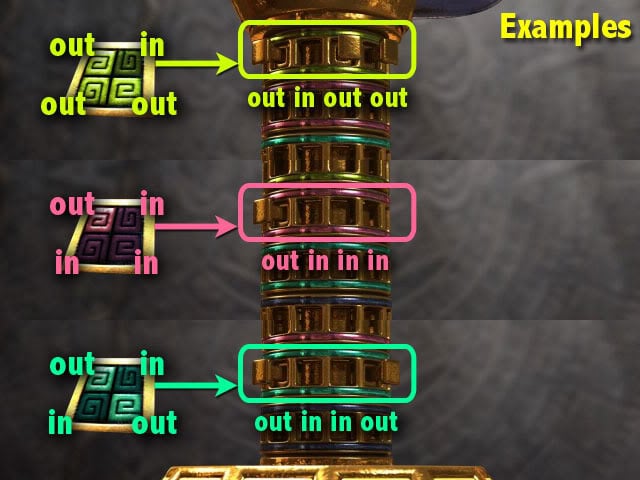
- Click the gold buttons on the bird’s neck to match the squares at the bottom.
- Dark tile = push the gold button IN
- Light tile = pop the gold button OUT
- The colored squares at the bottom correspond to the colored bars on the bird’s neck.
- Simply follow the patterns for each color.
- Tip: Before you start, push all the gold buttons in. It’s easier to work on a clean slate.
L. Bird puzzle 3: Sudoku
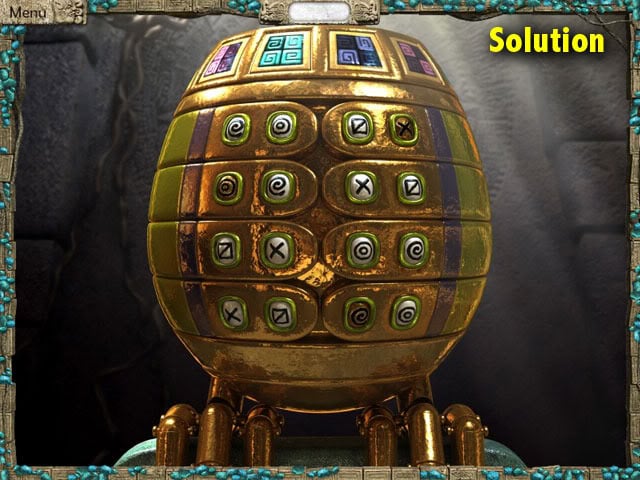
Click the symbols so that they are all different horizontally and vertically. The gold symbols are fixed and cannot be changed. See solution above.
Congratulations!
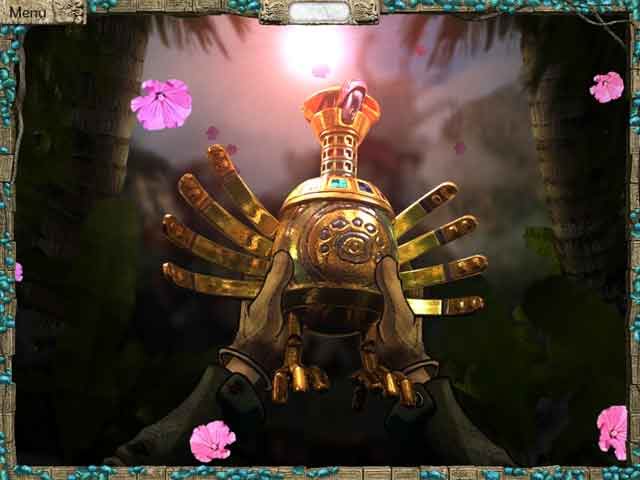
You have successfully completed Youda Legend: The Golden Bird of Paradise.
“;
More articles...
Monopoly GO! Free Rolls – Links For Free Dice
By Glen Fox
Wondering how to get Monopoly GO! free rolls? Well, you’ve come to the right place. In this guide, we provide you with a bunch of tips and tricks to get some free rolls for the hit new mobile game. We’ll …Best Roblox Horror Games to Play Right Now – Updated Weekly
By Adele Wilson
Our Best Roblox Horror Games guide features the scariest and most creative experiences to play right now on the platform!The BEST Roblox Games of The Week – Games You Need To Play!
By Sho Roberts
Our feature shares our pick for the Best Roblox Games of the week! With our feature, we guarantee you'll find something new to play!All Grades in Type Soul – Each Race Explained
By Adele Wilson
Our All Grades in Type Soul guide lists every grade in the game for all races, including how to increase your grade quickly!


