
Best Horror Games On Itch.io – July 2026
Across a bounty of subgenres.![Haze Seas Accessories Tier List [Best Accessories to Equip]](/wp-content/uploads/2026/07/haze-seas-accessories-tier-list.jpg "Haze Seas Accessories Tier List [Best Accessories to Equip]")
Haze Seas Accessories Tier List [Best Accessories to Equip]
The accessories with the best stat buffs in Haze Seas.
![[Roblox] Evomon Shiny Hunting Guide – Including Prismatic and Pris Shinies!](/wp-content/uploads/2026/06/evomon-shiny-hunting-guide.jpg "[Roblox] Evomon Shiny Hunting Guide – Including Prismatic and Pris Shinies!")

Yesterday Walkthrough
Welcome to the Yesterday walkthrough on Gamezebo. Yesterday is a point-and-click adventure game played on PC, Mac and iPad, created by Pendulo Studios. This walkthrough includes tips and tricks, helpful hints, and a strategy guide on how to complete Yesterday.


- Prefer Gamezebo on Google

Game Introduction – Yesterday
Welcome to the Yesterday walkthrough on Gamezebo. Yesterday is a point-and-click adventure game played on PC, Mac and iPad, created by Pendulo Studios. This walkthrough includes tips and tricks, helpful hints, and a strategy guide on how to complete Yesterday.
General Information
To start the game, select one of the four profiles/save slots on the main menu and hit the play button
This game does not feature a tutorial, but basic gameplay help can be found by clicking on the “Yesterday, more info” link in the bottom right of the screen

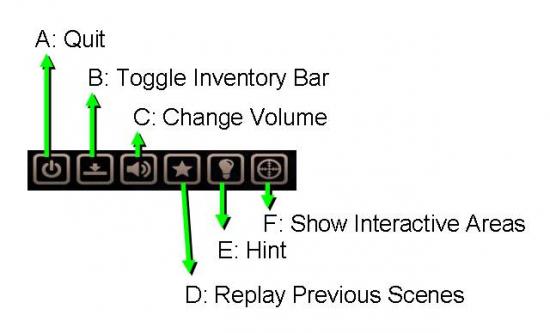
Your game is saved automatically when you quit the game (icon A, see image). When restarting a game you will be instantly taken back to where you left off. However, you can go back to replay previous scenes by clicking on the star icon (D) in the bottom left of your screen. The game will still remember your most advanced progress, so you can choose to continue playing from the scene you selected, or you can use the star icon again to return to your most advanced location
When scanning the scene, your cursor looks like a crosshair. It changes to a red arrow in places where you can move to another scene, and into a magnifying glass at interactive places. If you click the crosshairs icon in the bottom left of the screen (F), all interactive spots in the scene will be briefly marked with a white circle
When you click on an interactive place on the screen you will zoom in on the area of interest. Each zoom has a magnifying glass icon and either a hand icon or a gears icon in the bottom right corner. The magnifying glass will give you additional information on the area. If there is anything in the scene you can take for your inventory, clicking on the hand icon will take whatever item is in there. If there is nothing to take, you will get a message. The gears icon sometimes allows you to immediately interact with the scene. At other times it will tell you what action you need to take
Your inventory is at the bottom of your screen. If you don’t like having the inventory bar blocking your screen you can minimize it by clicking icon B in the bottom left of the screen. Moving your cursor to the bottom of the screen will then temporarily pull up the inventory bar
There are two ways you can interact with inventory items. If you simply click on an item in the inventory bar you will be shown a picture of the item with a brief description. Sometimes you need to inspect an item like this to open it and find its contents. If you want to use an item in the scene, you need to drag it out of the inventory bar by clicking on it and then giving it a quick pull
To use an inventory item, simply drag the item from your inventory and then move it to the place you want to use it. The item will light up when it is over an interactive area. Inventory items are always used in the main scene and never in a zoom
If you are stuck you can click the light bulb icon (E) for a hint. Sometimes clicking the icon again will give you a more specific hint. You can keep clicking the icon to remind yourself of the hint until you have completed the action the hint refers to. After this you will need to do ten actions to recharge the hint button. These actions can be anything you like. So for example you can leave and re-enter a room ten times to quickly recharge the hint button
The speaker icon (C) allows you to change the volume of the music and background noises
Throughout the game, always go through all the dialog options as some options trigger new dialog or actions. If you need to select a specific option to continue, the game will allow you to keep trying until you have selected the right one. You can select some options multiple times to keep getting new information. When a dialog option has been exhausted, a tick will appear in the box beside it.
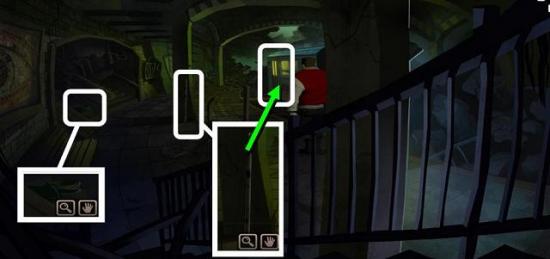
The Subway Station
Henry
Explore the first area, but there is nothing you can do here right now
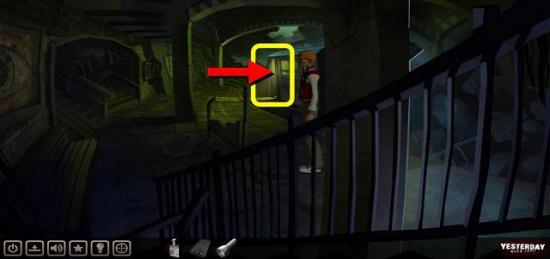
Go right into the abandoned train carriage

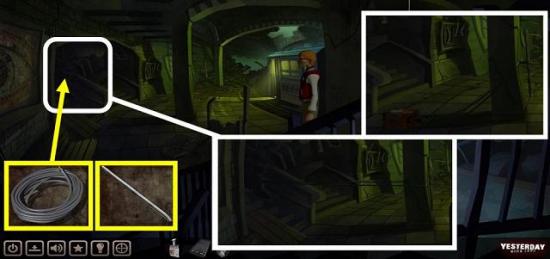
Explore the carriage and pick up the ELECTRICAL CABLE, the CAN and the IRON BAR
Go back to the previous screen
Use the ELECTRICAL CABLE on the rubble on the stairs
Use the IRON BAR on the cable when it’s stretched between the pillars
Click on it to pull out the SUITCASE, which goes into your inventory
Click on the suitcase in the inventory to open it
Inside are a BOX CUTTER, SCREWDRIVER and ELECTRICAL TAPE
Go back into the train carriage and exit through the right door
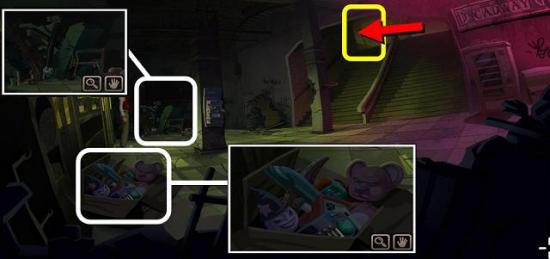
Inspect the box of toys and take out the KEYBOARD
Zoom in on the box again and take the TOY PHONE
Inspect the pile of rubbish in the back and take BATTERY-OPERATED FIGURE
Exit left at the top of the stairs
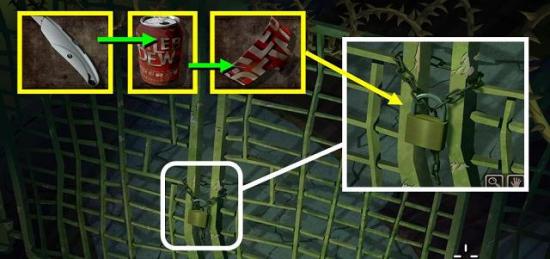
In your inventory, use the BOX CUTTER on the CAN to get a STRIP OF ALUMINUM
Use the STRIP OF ALUMINUM on the padlock to open it
Watch the video
Go through the dialog until you reach the chess puzzles
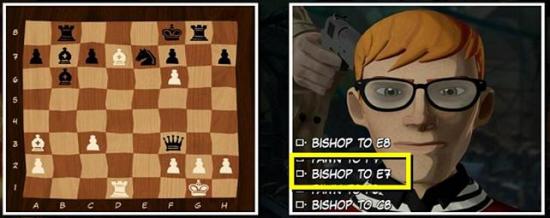
The solution to puzzle 1 is bishop to E7
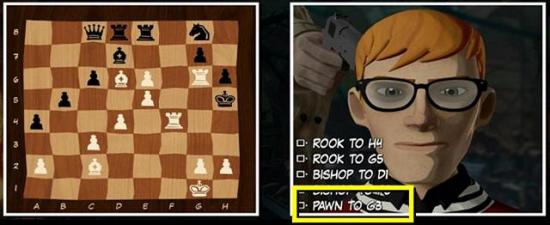
The solution to puzzle 2 is pawn to G3
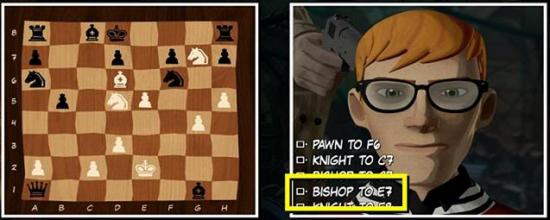
The solution to puzzle 3 is bishop to E7
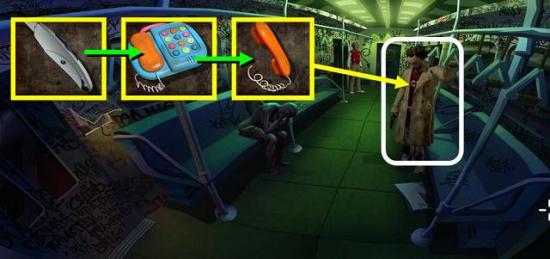
When you’re back in the carriage, use your BOX CUTTER on the TOY PHONE to get the RECEIVER FOR THE TOY PHONE
Give the RECEIVER FOR THE TOY PHONE to Boris
You get a real RECEIVER
While you’re there you can have a chat with Boris for some background information if you like
Exit to the right platform
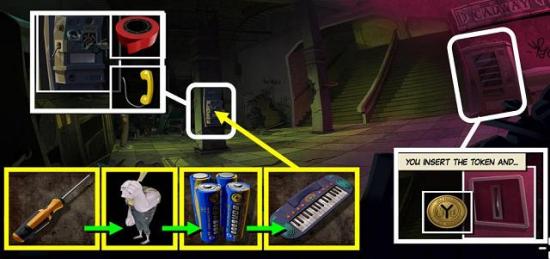
Use the SUBWAY TOKEN Choke gave you on the vending machine
You get a COIN
If you interact with the vending machine again you will get the token back, but you won’t need it anymore
Use the RECEIVER on the payphone and they will be connected with the ELECTRICAL TAPE
Use the SCREWDRIVER on the BATTERY-OPERATED FIGURE to take out the BATTERIES
Use the BATTERIES on the KEYBOARD
Use the KEYBOARD (with batteries) on the payphone and also using the COIN you will be able to call Cooper
Cooper
Click on the tunnel entrance for a little scene. You need a torch
Inspect the trash can and take the RAG
Zoom in on the hole in the fence and take a piece of WIRE
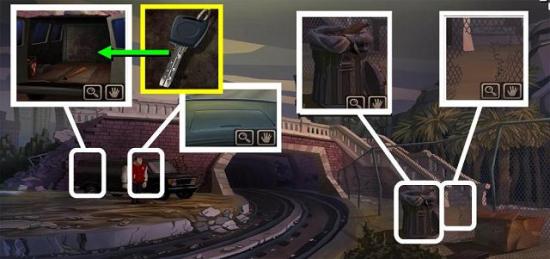
Inspect the front of the van and take the KEY TO THE BACK OF THE VAN and a BOX OF MATCHES from the glove compartment
Use the KEY TO THE BACK OF THE VAN on, well, the back of the van
Inspect the back of the van again and take the BASEBALL BAT and the GASOLINE
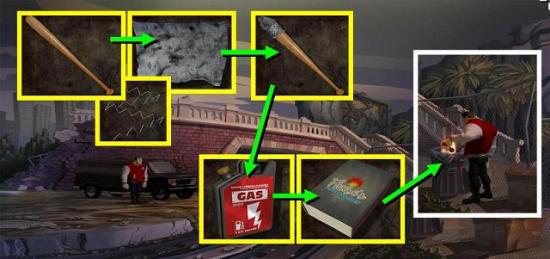
In your inventory, combine the RAG with the BASEBALL BAT and they will be fixed together with the WIRE
Next, combine the bat with the GASOLINE and light it using your MATCHES
Back on the platform, take the IRON BAR and CABLE that Henry left behind
Use the IRON BAR on the door to the train carriage
Enter the carriage
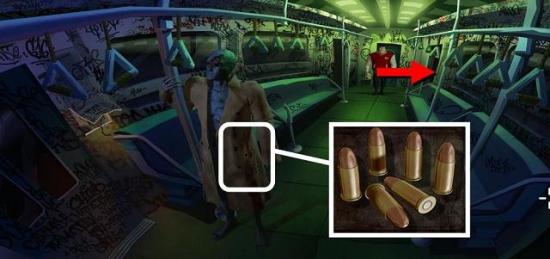
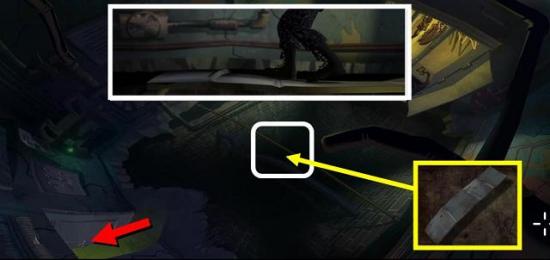
Take the BULLETS from the mannequin’s pocket
If you inspect the mannequin again you can take the phone receiver again, but you won’t need it
Exit to the right
Interact with the broken BASKETBALL HOOP. Unfortunately, it can’t hold Cooper’s weight and it comes off
Inspect the rubble in the back and have Cooper move it
Use the IRON BAR on the door you’ve revealed to open the padlock
Go through the door
Attach the CABLE to the BASKETBALL HOOP and use it on the heavy crossbeam. Nice work, Coop!
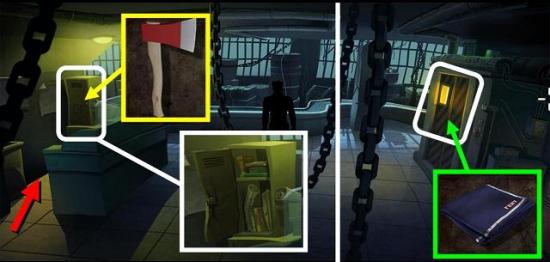
In the locker on the other side of the gap is a uniform, inspect it to find a REVOLVER
Take the DOOR off the locker
Use the DOOR on the metal crossbar and click on the exit
Time to recue Henry! Go to the left at the top of the stairs and watch the scene
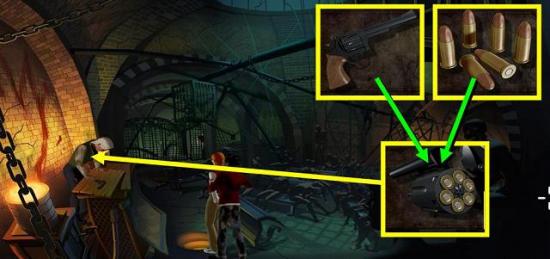
Put the BULLETS in the REVOLVER and shoot Choke
Paris
Hotel Doré
Keep going through all the dialog until you run out of options
In the second set of dialog, keep selecting “your investigations” until it disappears as an option
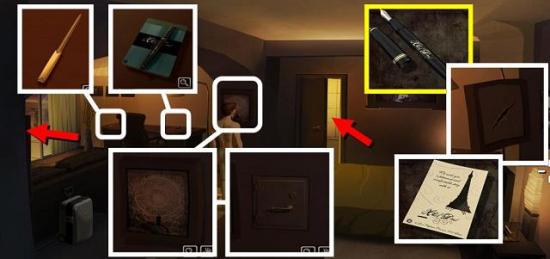
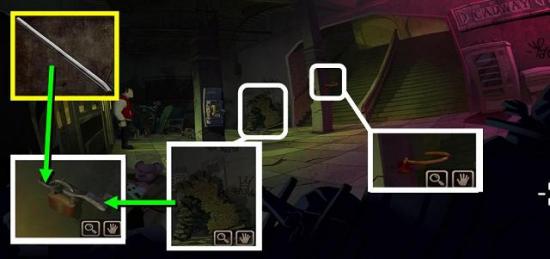
On the left side of the desk you find a LETTER OPENER
On the right side of the desk you can find a NOTEBOOK and a FOUNTAIN PEN
Inspect the painting to the left of the bathroom door. There is a safe behind it. This finding triggers a memory
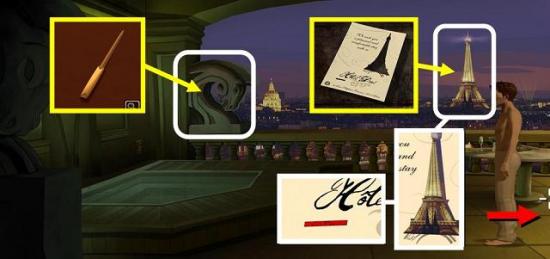
Use the FOUNTAIN PEN on back of the painting covering the safe. This seems like a pointless exercise, but it gives you a CARD WITH CUT-OUTS
Go left onto the balcony
Inspect the table to find a welcome card, which you won’t need for anything
Use the LETTER OPENER on the carved stone horse head to sharpen it
Use the CARD WITH CUT-OUTS on the Eiffel tower in the background to find the word Revolution
Go inside on the right side of the screen and go into the bathroom
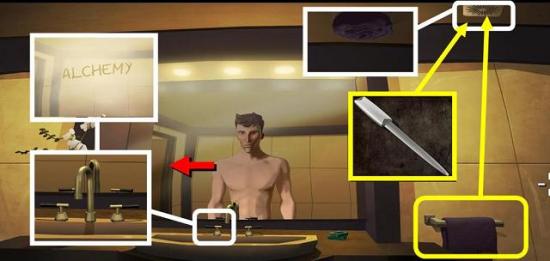
Take the TOWEL
Open the air vent with your sharpened LETTER OPENER and put the TOWEL in it to block the fan
Click on the left tap handle and turn on the hot water
The word Alchemy appears on the mirror
You can take some soap, hand cream and rosemary oil if you like, but you won’t need it
Exit the bathroom by clicking on the door in the mirror
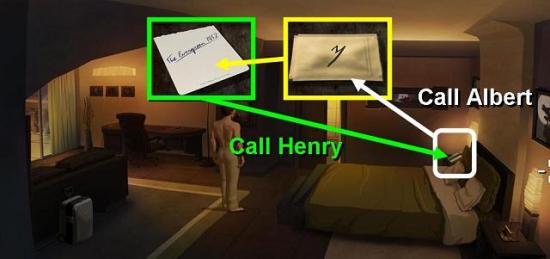
Click on the phone beside the bed and call creepy Albert at the front desk
Talk to him about Alchemy and Revolution and he will bring you an ENVELOPE
Look at the ENVELOPE in your inventory and find that there are SWIM GOGGLES and a note saying THE EVERGREEN, 1852 inside
Call Henry White and talk to him about The Evergreen chess match
You can also call John’s mother for more back story. Talking to one character may trigger new options for other characters, so try everyone a few times to get all information
Go back out to the balcony
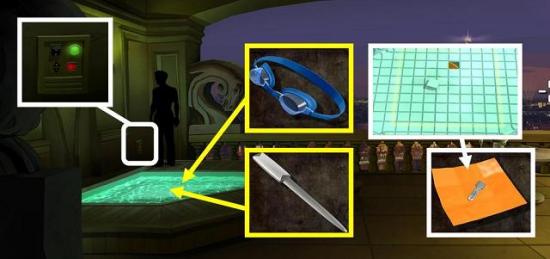
Switch on the Jacuzzi
Use the SWIM GOGGLES on the Jacuzzi when it’s running
After you’ve had a look under the bubbles, use the LETTER OPENER on the Jacuzzi to dislodge a tile
Click on the PACKAGE you find to find a KEY
Go back inside and use the KEY on the safe behind the painting
Le Tout Petit Antiques
Talk to Pauline and go through all the options
She gives you a KEY
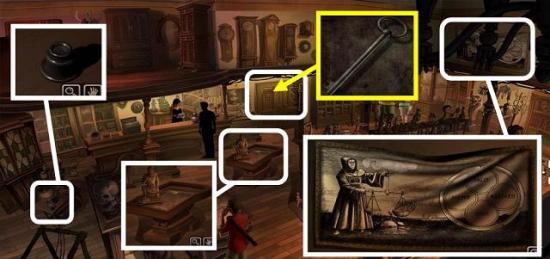
There are a lot of places you can search in this scene, but not all of it is useful
Inspect the display case behind you and pick up some small SCISSORS
A table on the left contains a JEWELER’S LOUPE
In the top right is a tapestry with important alchemical information. Look at it and memorize the four elements and their positions
Use the KEY to open the door to the back room and go into the room
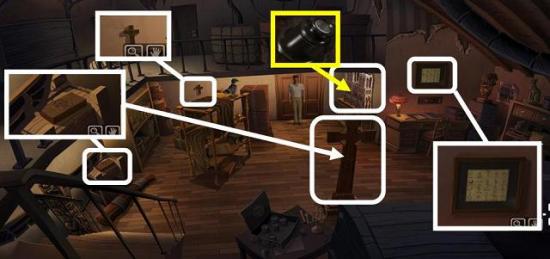
Use the JEWELER’S LOUPE to inspect the model of the Notre Dame to the right of the door
Above the desk is a TABLE OF ALCHEMY ELEMENTS
On a small table to the left is a wooden BOX OF ALCHEMY PIECES
There is a small wooden CROSS hanging on the back wall
Use the BOX OF ALCHEMY PIECES on the large wooden cross in the center of the room
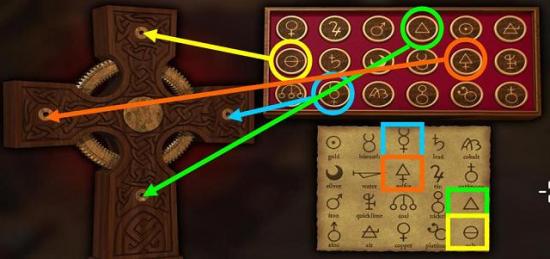
In the next screen, put the TABLE OF ALCHEMY ELEMENTS on the box of pieces. If you don’t yet have it in your inventory, you can leave this screen and go back to it by clicking on the cross again
Remember the tapestry in the main area of the shop. It showed salis, or salt, at the top, mercurii/mercury on the right, ignis/fire at the bottom and sulfur on the left. Find the pieces for salt, mercury, fire and sulfur using the table and place each of them in their correct places
Now put the CROSS in the middle of the larger cross. You find PETIT’S DIARY
Use the SCISSORS on the PETIT’S DIARY to get a RUBBER BAND
There is a hatch behind the desk that contains an ULTRAVIOLET LIGHT
If you use the ULTRAVIOLET LIGHT on the RUBBER BAND you will see it has letters on it, but they’re all scrambled
On the small table at the front you find an interesting looking HEXAGONAL BAR
Wrap the RUBBER BAND around the HEXAGONAL BAR and then use the ULTRAVIOLET LIGHT on it again
You get the message: St Fergus Church, Inverloch Woods, Scotland
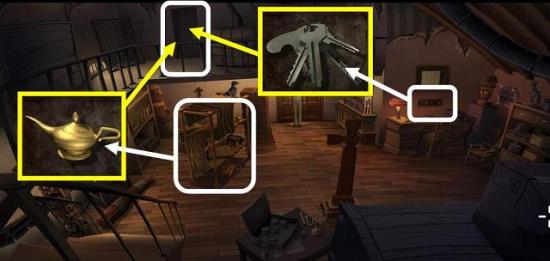
After the scene, check the hatch above the desk again and take the BUNCH OF KEYS
Use the BUNCH OF KEYS on the door upstairs
Go through the opened door The shelving unit contains an OIL LAMP
Use the OIL LAMP on it to oil the hinges
Go through the door again
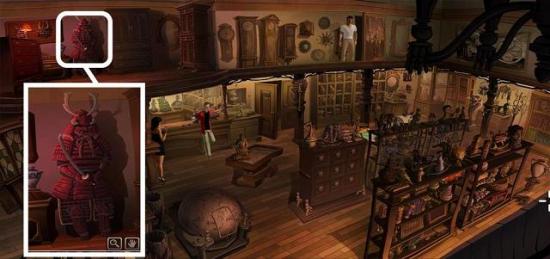
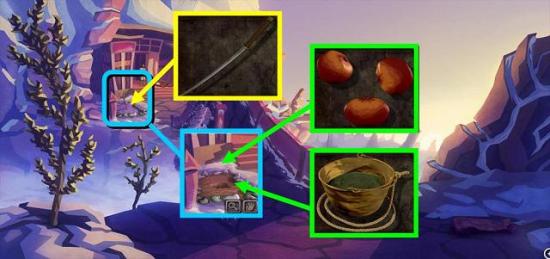
Inspect the Chinese soldier on the left and take his sword
Memories and Flashbacks
The Monastery – Swordsmanship
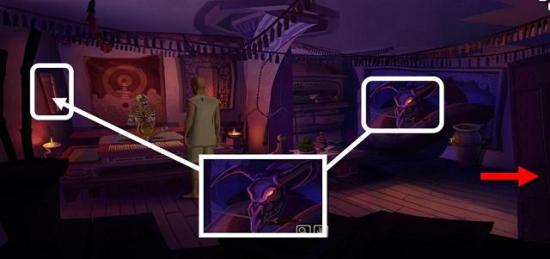
Talk to the Master and make sure you talk to him about the Katana
If you invite him to play, you will each need to guess how many fingers the other holds up behind his back and then give the total. It is unlikely you will win this by just guessing
Inspect the dragon head on the right and take the KATANA
Use the KATANA on the window on the left to open it
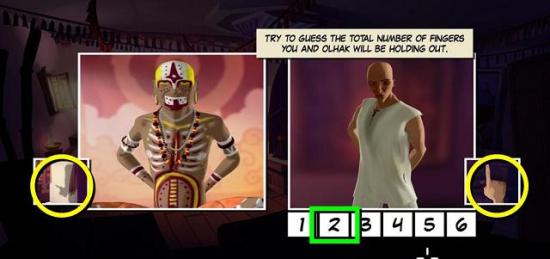
Invite the Master to play again. This time you will be able to see the shadow of one of his hands on the wall. Add the number of fingers you can see on the shadow to your own entry and give the total. So in the image above John is holding up one and so is the Master, so the answer is two
As a reward take the SMALL VICES. You can select the other options if you like, but you won’t need them and you will need to replay
Leave the room on the right. You won’t need to put the Katana back, it will just be crossed out in your inventory
Use your RAZOR on the door you just came through to get the MONSTER FACES and some SCREWS, which will be added to the small vices
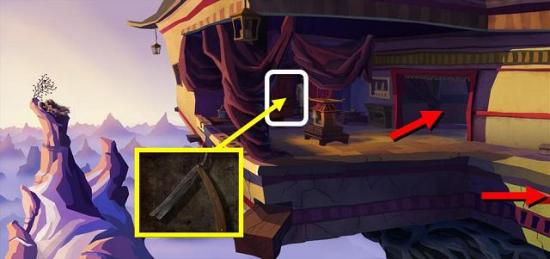
Go through the gap on the right to the bridge
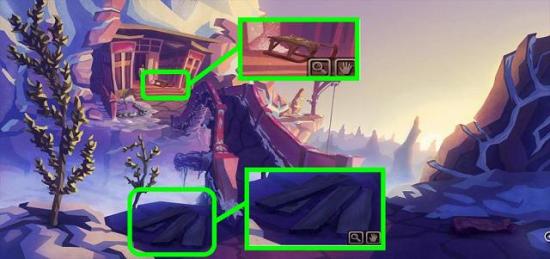
Inspect the sled by the door and take the ROPE
At the front of the bridge you can find some PLANKS
Combine the MONSTER FACES with the PLANKS and you will automatically use the SCREWS to make one long PLANK
Go back inside and now exit right to the bell
Zoom in on the bags on the left and take one BAG. The bag on the far right contains corn, which you won’t need until a later chapter
Use the PLANK on the large log
Then put the BAG on the plank. More bags will automatically be added
Now tie the ROPE to the log
Zoom in on the log and ring the bell
Getting into the Warehouse
After the scene, try to jump to the next building
Oops
Talk to Boris about everything
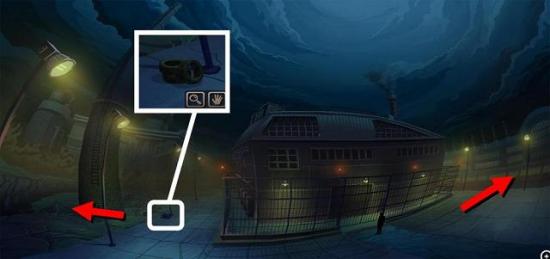
Take the TIRES by the middle lamp post on the left
Go right to the trains
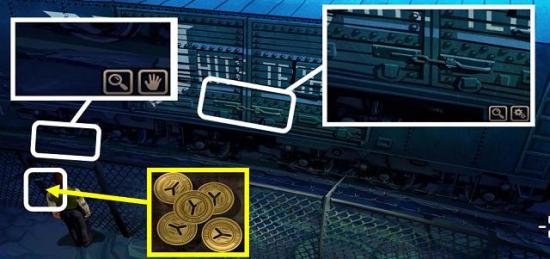
Use one of the TOKENS in your inventory on the CLAMP that holds the fence together
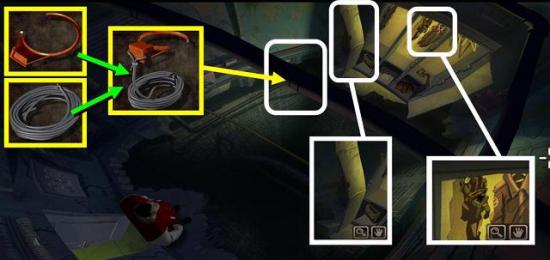
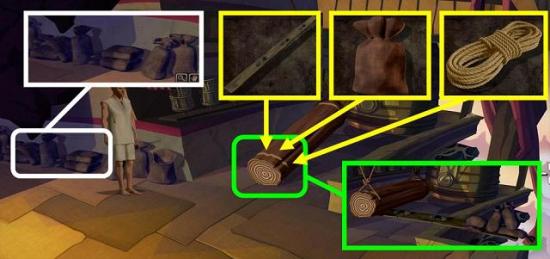
Inspect the railway track on the left and take the WOODEN BEAM
Open the carriage door
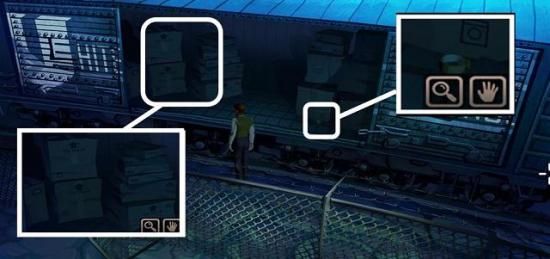
Take the PACKING TAPE from the carriage floor
Inspect the boxes on the left for a CAMERA
Go back to the previous scene and go left to the chimney
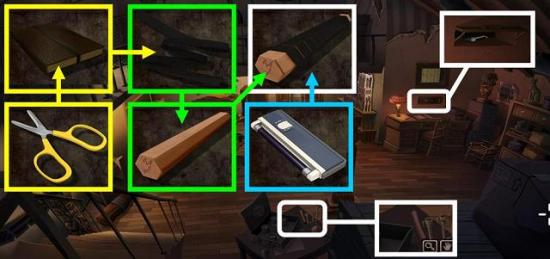
Inspect the pile of junk on the right and find a CIRCULAR SAW BLADE
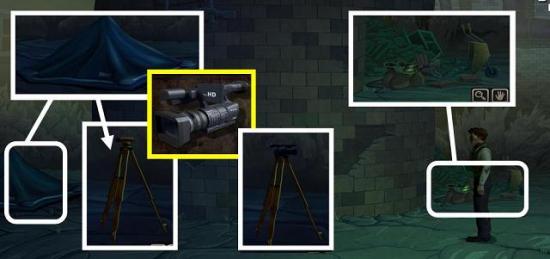
Inspect the tarp on the left and take the CANVAS
You uncover a tripod
Zoom in on the tripod and take off the SURVEYOR’S CAMERA – you won’t need it but you need to be able to mount your CAMERA onto the tripod
Interact with the camera again to record a video message to yourself
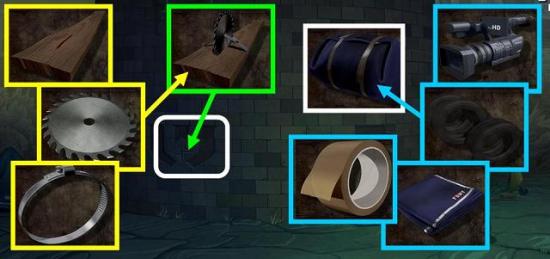
In your inventory, combine the CAMERA with the TIRES, wrap the whole lot in the CANVAS and then make a nice bundle of it with your PACKING TAPE
Also combine the CIRCULAR SAW BLADE with the WOODEN BEAM and fix the two together with the CLAMP
Use the WOODEN BEAM WITH CIRCULAR SAW BLADE on the logo in the chimney wall
Zoom in on the logo and use it to climb the tower

This time at the top of the tower there is a can of PAINT next to you. Pick it up
Use the PAINT on the bundle with your MESSAGE TO YOUR FUTURE SELF to mark it
Throw the MESSAGE TO YOUR FUTURE SELF onto the roof
Jump after it
Inside the Warehouse
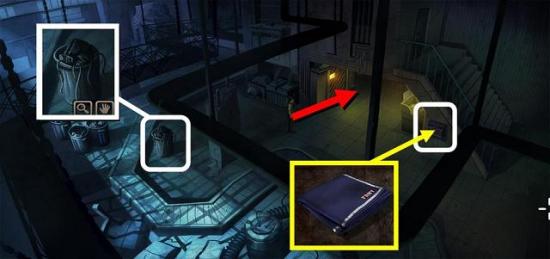
Inspect the trash can and find an RCA CABLE
Use the CANVAS on the box with the emergency axe to break the glass
Take the AXE from the box
Go to the control area in the back
Use the AXE on the locker behind the control panel
You get a PLAN
Walk behind the control panel
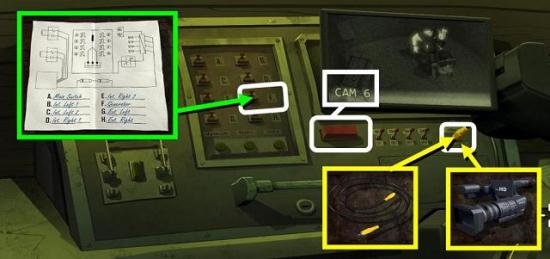
Connect the RCA CABLE to the Video Out port and attach your CAMERA to it
Hit the large red button until find an image of Boris and Cooper (cam 6)
Take the PLAN from your inventory and use it on one of the switches. You will be shown which switch controls which room
Switch F controls the generator room where Cooper and Boris are, so flick this switch
After the scene, exit the control panel and use the CANVAS on the oven door. You can do a lot more like locking and unlocking the oven door and toggling the flames, but none of this is necessary
St. Fergus Church, Scotland
The Ruins
- There are a few things you can inspect on the first screen, but nothing you can actually do, so exit right to the main map
- Go towards the car
- Talk to Pauline if you like
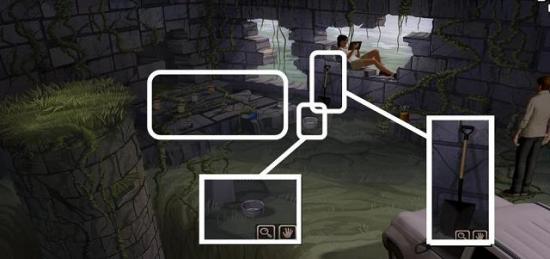
- Take the SHOVEL, the COOKING POT and the little jars containing VINEGAR, SALT, ALCOHOL, MERCURY, and SULFUR
- Go back to the main church map
- Use the COOKING POT on the lake to fill it with water
- While you’re here, also pick up the SCRUB BRUSH that’s leaning against a gravestone on the left
- Go back to Pauline by the car
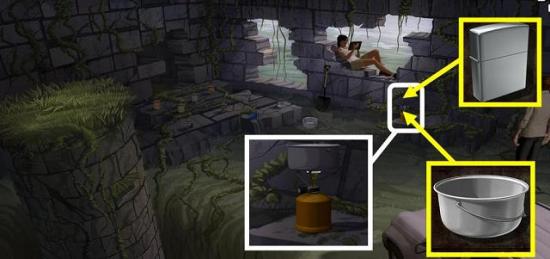
- Put the COOKING POT with water on the little camping stove
- Light the stove with your LIGHTER
- When the water is hot, take the pot off the stove
- Go back to the main map and go to the sunken cross in the middle of the map
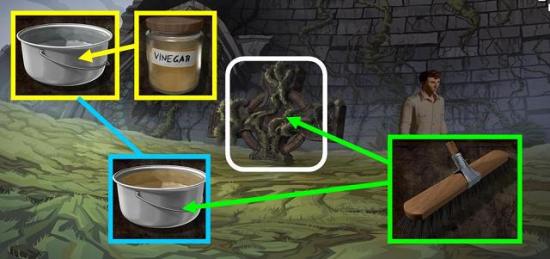
- Add VINEGAR to the water in the pot
- Combine the SCRUB BRUSH with the COOKING POT containing the hot water mixed with vinegar
- Use the wet SCRUB BRUSH on the cross to clean it
- Use the SHOVEL to dig in front of the cross
- You find a COIN
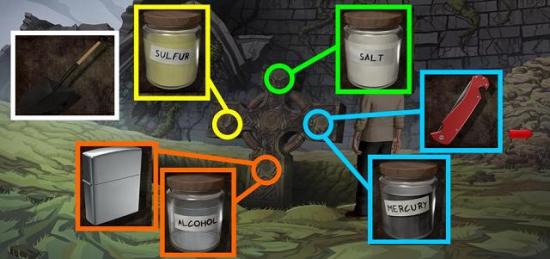
- Remember the tapestry and cross in the antiques shop? They had salt at the top, mercury on the right, sulfur on the left and fire at the bottom
- Use your SALT on the top hole of the cross
- Unplug the right hole of the cross with your KNIFE and then use your MERCURY on it
- Use the ALCOHOL on the bottom hole of the cross and light it with your LIGHTER
The Truth Flower
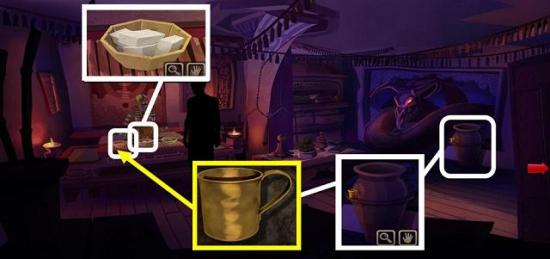
- If you didn’t do so in the previous chapter, inspect the water container and take the LADLE
- Use the LADLE to take some HONEY from the bowl on the left
- Take a block of YAK BUTTER from the bowl in the middle
- Go out to the patio and right to the bell
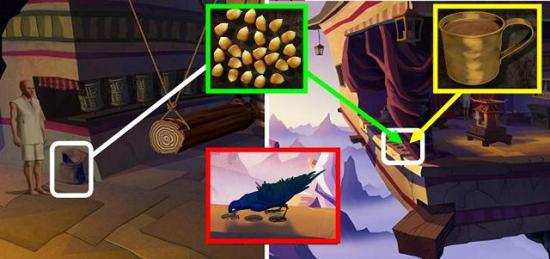
- If you didn’t already do so in the previous chapter, inspect the bag by the wall and take some CORN
- Go back to the patio
- Use the LADLE WITH HONEY on the holes in the wall
- After the honey, use the CORN on the holes in the wall and watch the bird take it
- Go back to the bell to get some more CORN
- Put this CORN on the wall, too
- The bird will leave behind some TRUTH FLOWER SEEDS
- Go out to the bridge
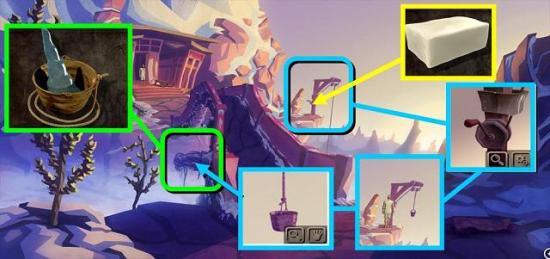
- Use the YAK BUTTER on the crane by the bridge
- Zoom in on the crane again and turn the crank
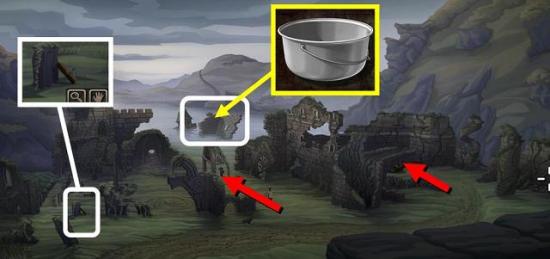
- Use the KATANA to take the BUCKET
- Use the BUCKET on the dragon head on the side of the bridge to collect some icicles
- Go back into the patio area and put the BUCKET WITH ICICLE on the incense burner
- Go back to the bridge
- Use the KATANA on the dead bush
- Put the TRUTH FLOWER SEEDS in the hole
- Use the BUCKET WITH WATER on the hole with the truth flower seeds
The Temple
- Talk to Mrs. Yesterday, Cooper and Henry
- Choose your ending!

More articles...
-
Best Horror Games On Itch.io – July 2026
Across a bounty of subgenres. -
Haze Seas Accessories Tier List [Best Accessories to Equip]
The accessories with the best stat buffs in Haze Seas.