![Digimon UP Tier List [Supports, Buddies, and Partners]](/wp-content/uploads/2026/07/digimon-up-tier-list.jpg "Digimon UP Tier List [Supports, Buddies, and Partners]")
Digimon UP Tier List [Supports, Buddies, and Partners]
These Digimon will get you UP the leaderboard.


![Haze Seas Boss Drops [Chances, Locations, and How to Spawn]](/wp-content/uploads/2026/07/haze-seas-boss-drops.jpg "Haze Seas Boss Drops [Chances, Locations, and How to Spawn]")

Welcome to the Written Legends: Nightmare at Sea walkthrough on Gamezebo. Written Legends: Nightmare at Sea is a Hidden Object game played on the PC and Mac created by Vast Studios. This walkthrough includes tips and tricks, helpful hints, and a strategy guide on how to complete Written Legends: Nightmare at Sea.
Welcome to the Written Legends: Nightmare at Sea walkthrough on Gamezebo. Written Legends: Nightmare at Sea is a Hidden Object game played on the PC and Mac created by Vast Studios. This walkthrough includes tips and tricks, helpful hints, and a strategy guide on how to complete Written Legends: Nightmare at Sea.

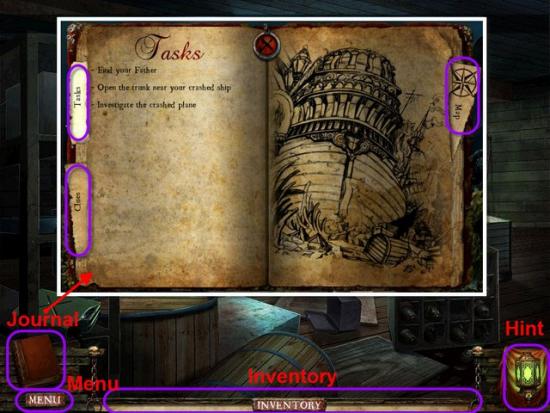
? Options – For a more challenging game play, you can turn off the Glint option.
? Tasks – This will include all your current list of objectives.
? Clues – This will contain any clues you find along the way.
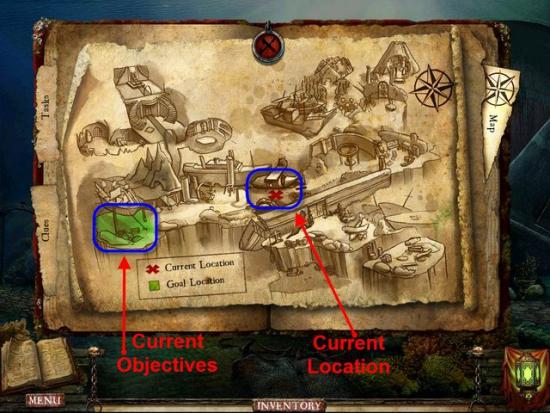
? Map – See Below.
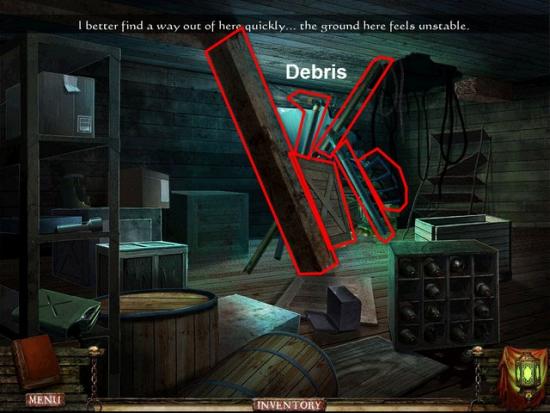
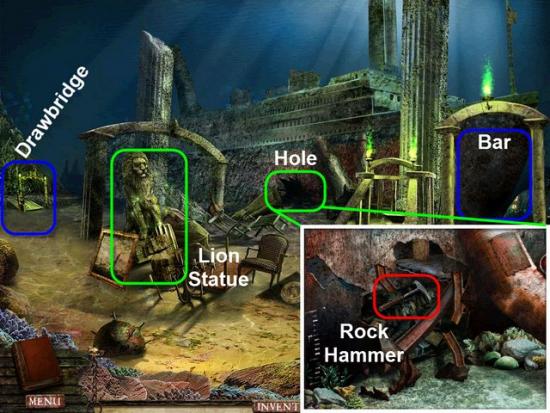
Move the Debris highlighted in Red.
Exit the Ship.
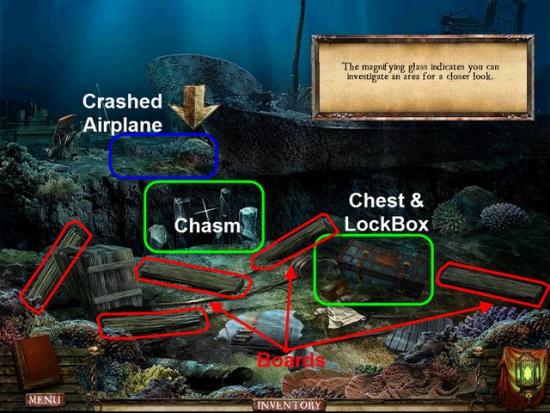
Examine the Chest and Lock-box, highlighted in Green.
Examine the Chasm.
Gather the five Boards highlighted in Red.
Place the five Boards across the Pillars in the Chasm.
Cross the Chasm to the Crashed Airplane.

Examine the Pilot Seat sitting under the Wing of the Plane.
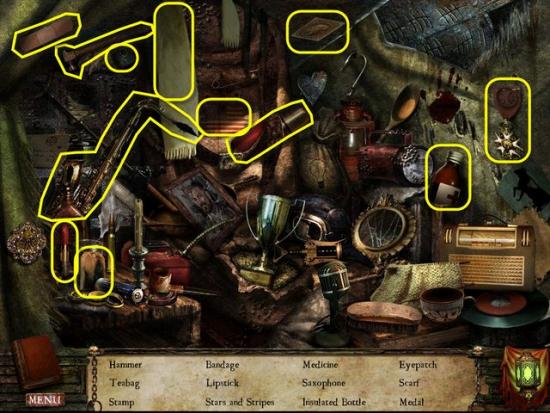
Gather the Hidden Objects highlighted in Yellow.
Receive the Hammer.
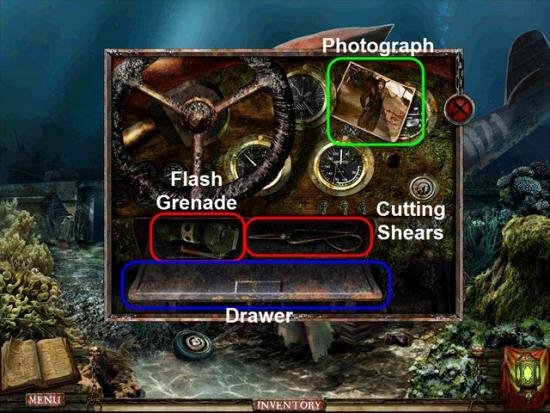
Examine the Cockpit of the Airplane.
Examine the Photograph highlighted in Green.
Open the Drawer.
Gather the Flash Grenade and Cutting Shears highlighted in Red.
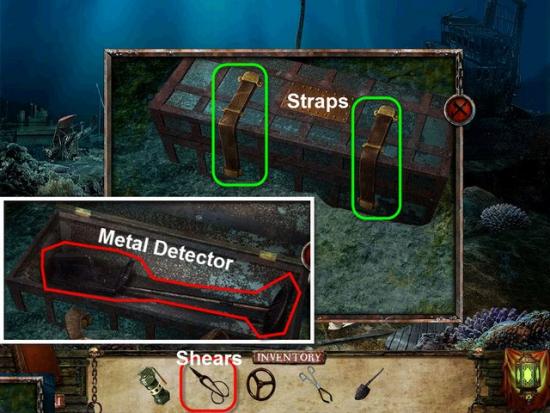
Return to the Shipwreck, Starting Area.
Examine the Chest and Lock-box.
Use the Shears, highlighted in Red, and cut the two Straps, on the Chest, highlighted in Green.
Gather the Metal Detector nestled inside.
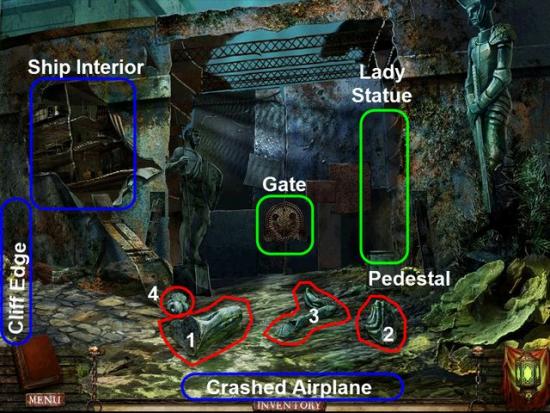
Head back to the Crashed Airplane and talk to Janeway
Head forward to the Gate.
Gather the Pieces of the Broken Statue, highlighted in Red, and place them on the Pedestal, in corresponding order.
Examine the completed Lady Statue.
Examine the Gate highlighted in Green.
Head into the Ship Interior.
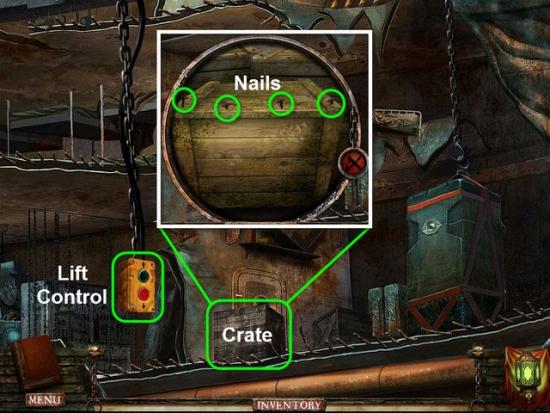
Examine the Lift Control highlighted in Green.
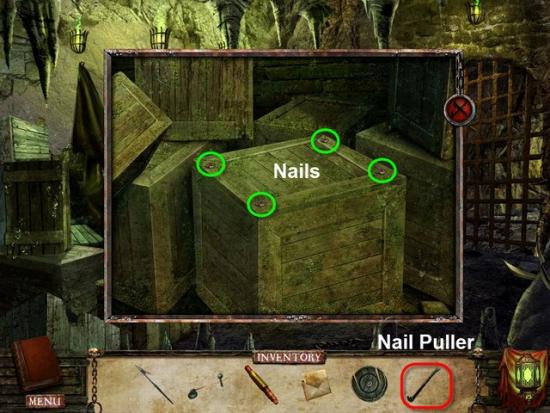
Examine the Crate.
Use the Hammer, from Inventory, to remove the four Nails in the Crate.
Gather the Valve located inside.
Head Back one screen.
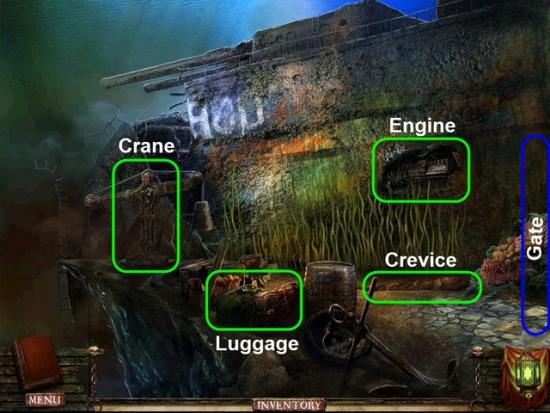
Head to the left, toward the Cliff Edge.
Examine the Crevice and Crane highlighted in Green.
Examine the Luggage.
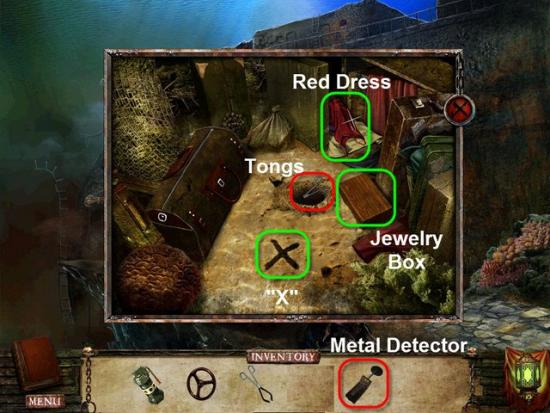
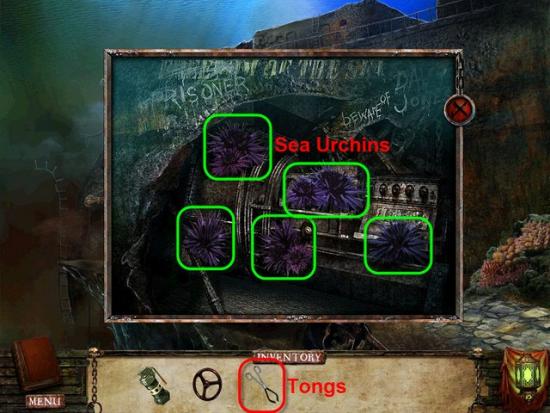
Gather the Tongs highlighted in Red.
Next, use the Metal Detector to scan the Sand, until the “X” appears.
Open the Jewelry Box highlighted in Green.
Open the Suitcase.
Move the Red Dress inside the Suitcase.
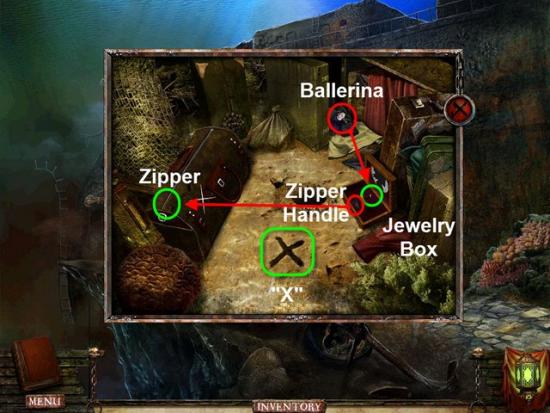
Gather the Ballerina, highlighted in Red, and place in the Jewelry Box, highlighted in Green.
After the Secret Compartment opens, gather the Zipper Handle.
Use the Zipper Handle on the Zipper on the Bag, to open the Bag.
Gather the Shovel located inside.
Use the just gathered Shovel and dig upon the “X” in the Sand.
Gather the Letter Opener located inside the Hole you just dug.
Examine the Engine in the side of the Ship.
Use the Tongs, highlighted in Red, to remove all the Sea Urchins, highlighted in Green.
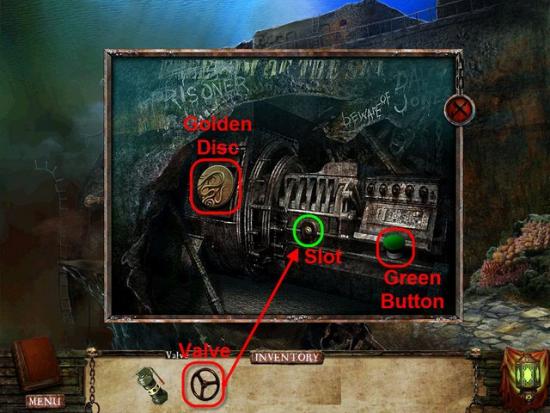
Place the Valve, from Inventory, into the Slot, highlighted in Green.
Gather the Green Button and the revealed Golden Disc highlighted in Red.
Head back to the Right, toward the Gate.
Climb into the Ship Interior.
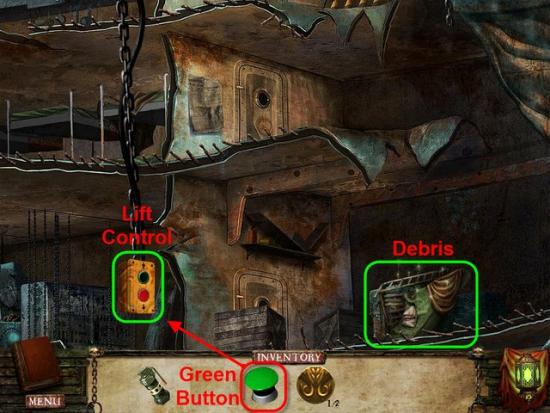
Place the Green Button, highlighted in Red, into the Lift Controls.
Press the Green Button to activate the Lift.
After the crash, examine the Debris, highlighted in Green.

Gather the Hidden Objects highlighted in Yellow.
Receive the second Golden Disc.
Head Back one screen to the Gate.
Examine the Lady Statue once again.
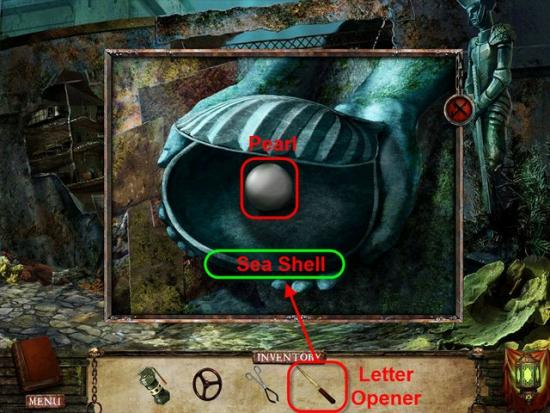
Use the Letter Opener to pry open the Sea Shell in the Lady Statues hands.
Gather the Pearl inside the the Sea Shell.
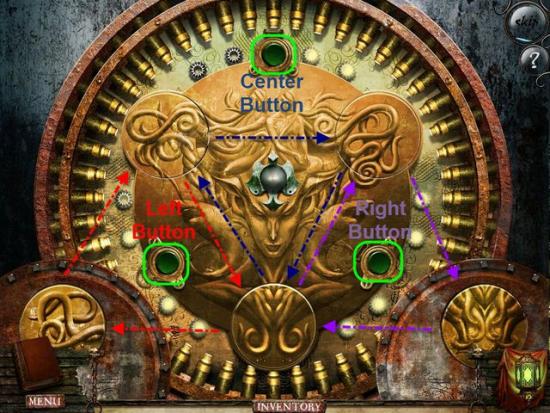
Examine the Gate.
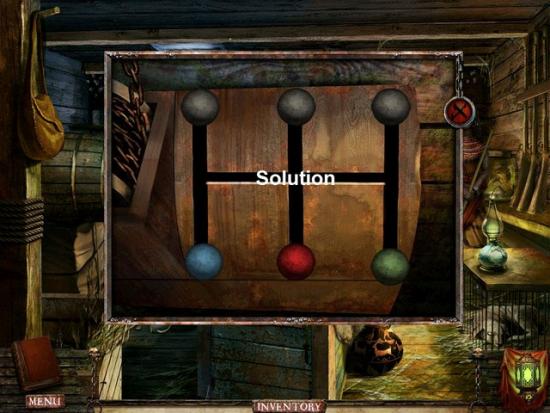
Place the two Golden Discs into the empty spots on the Lock.
Place the Pearl into the Center of the Lock.
For this Mini-Game you will need to rotate the pieces to complete the Image on the Lock.
The three Green Buttons will each rotate the three closest Golden Discs in a Clock-wise pattern.
Solution: Press the Right Button, once. Press the Left Button, once. Press the Center Button, once.
Once you solve the Puzzle, enter though the Gate.
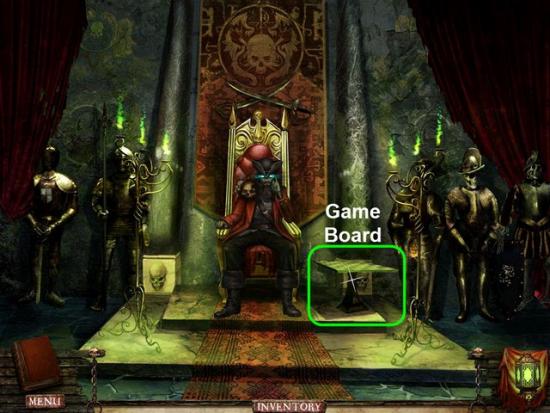
Examine the Game Board next to Davy Jones for the next Mini-Game.

For this Mini-Game you need to slide each of the Dominoes so the Symbol on each Domino aligns with the Symbols on the Board.
Solution:
After solving the Mini-Game will be back in Town.
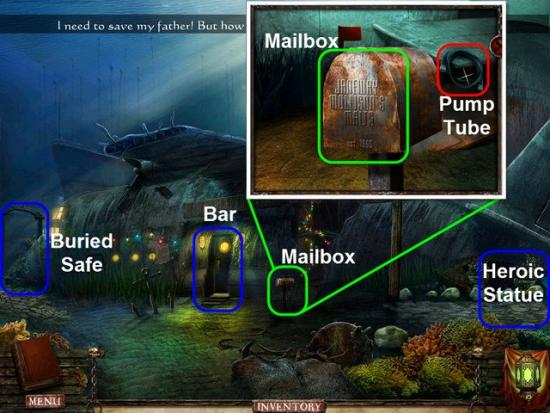
Examine the Mailbox highlighted in Green.
Gather the Pump Tube highlighted in Red.
Examine and Read the Mailbox.
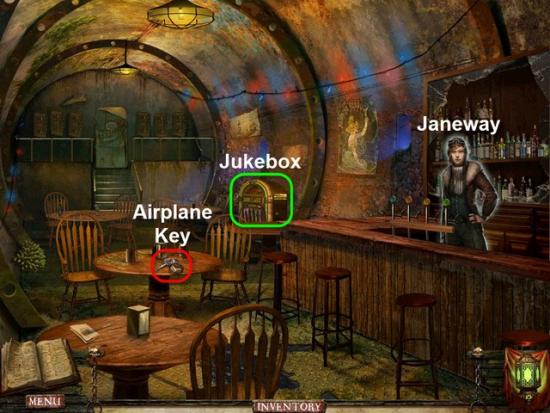
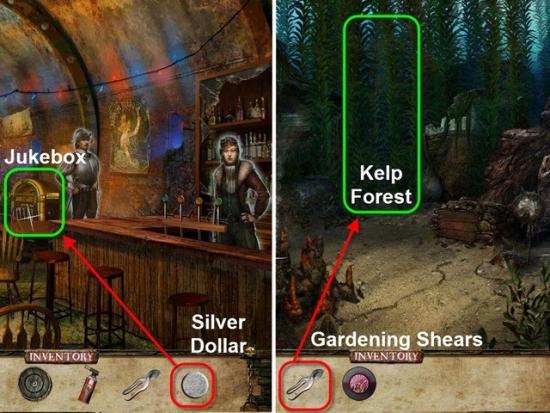
Enter the Bar.
Talk to Janeway behind the Bar.
Examine the Jukebox highlighted in Green.
Gather the Airplane Key highlighted in Red.
Exit the Bar.

Head to the Right to the Heroic Statue.
Examine the Left and Right Walls.
Examine the Plants.
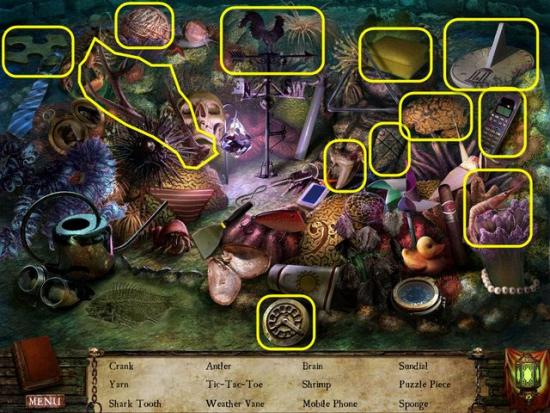
Gather the Hidden Objects highlighted in Yellow.
Receive the Crank.
Examine the Heroic Statue.
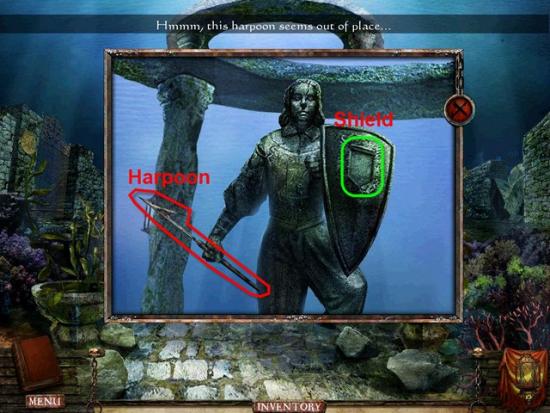
Gather the Harpoon highlighted in Red.
Examine the Shield highlighted in Green.
Head Back to the Bar.
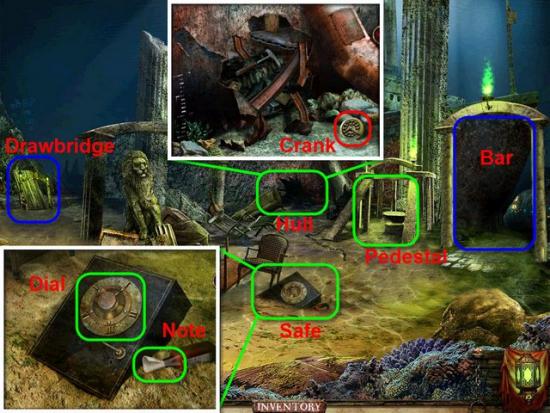
Head Left to the Buried Safe.
Examine the Pedestal highlighted in Green.
Examine the Safe.
Read the Note stuck in the Bottle.
Examine the Safe Dial.
Examine the Hole in the Hull of the Ship.
Gather the second Crank highlighted in Red.
Head Left to the Drawbridge.
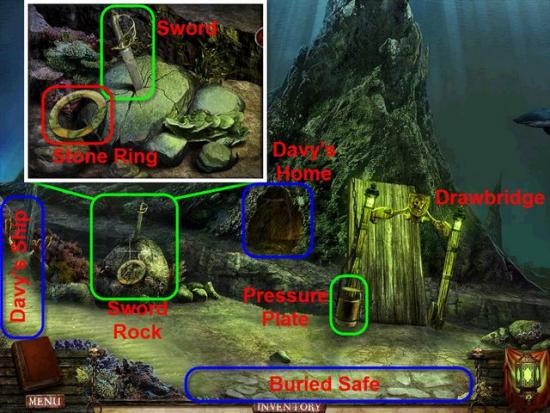
Talk to Staaten.
Examine the Pressure Plate next to the Drawbridge.
Examine the Sword in the Rock.
Examine the Sword.
Gather the Stone Ring highlighted in Red.
Head Left to Davy Jones Ship.
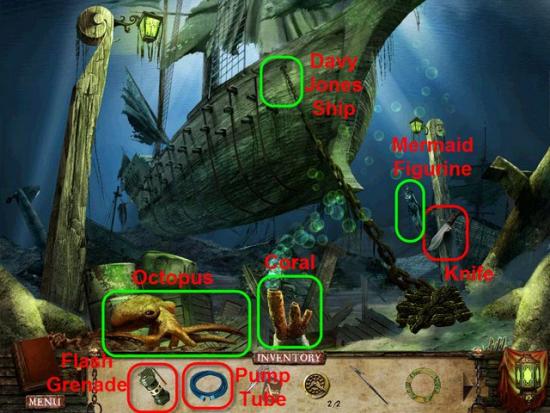
Gather the Hunting Knife highlighted in Red.
Examine the Mermaid Figurine.
Examine Davy Jones Ship.
Use the Flash Grenade on the Octopus.
Next, use the Pump Tube on the Coral to clear the Black Ink.
Examine the Crate and Barrels behind the Black Ink.
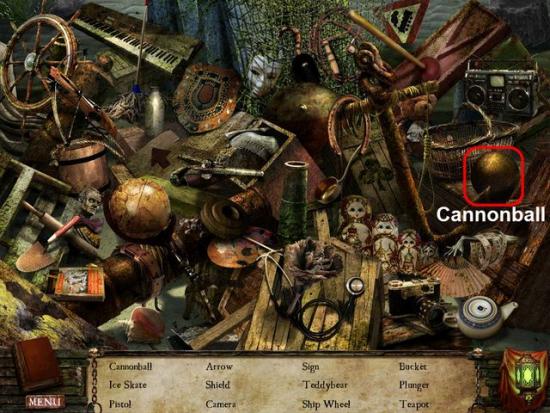
Gather the Cannonball highlighted in Red.
Gather the remaining Hidden Objects.
Return to the Heroic Statue.

Examine the Left Wall.
Place the two Cranks in the Lower Right and Left empty Spots, highlighted in Green, and the Stone Ring into the Puzzle.
To solve this Mini-Game you need to reassemble the Image.
Click and Drag each Ring to place them in the correct order.
Rings are numbered 1 through 4, starting on the Outer Ring.
Ring 1 also affects Ring 2.
Ring 2 also affects Ring 1 and Ring 4.
Ring 3 also affects Ring 4.
Ring 4 turns alone.
Tips: Fist start with Ring 2, followed by Ring 1, and work your way inward. Also, as each Ring finds its correct Location the Ring will glow Yellow.
Once have solved the Puzzle, enter through the Gate in the Left Wall.

Examine the Message on the bottom of the Ship Hull.
Examine the cloud of Lost Souls.
Examine the Chest.
Gather the Glass Cutter.
Examine the Chest Lock.
Examine the Ropes.
Use the Hunting Knife to cut the Ropes.
Examine the Broken Crate.
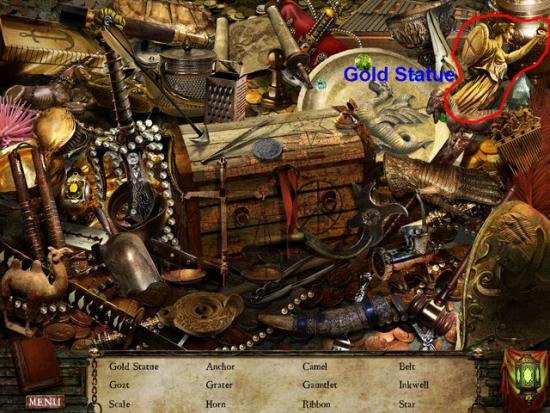
Gather the Gold Statue highlighted in Red.
Gather the remaining Hidden Objects.
Return to the Drawbridge.
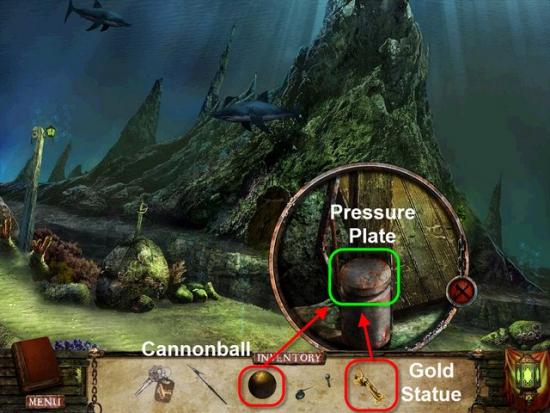
Examine the Pressure Plate next to the Drawbridge.
Place the Cannonball and Gold Statue on the Pressure Plate.
Cross the Drawbridge and enter Davy Jones Home.
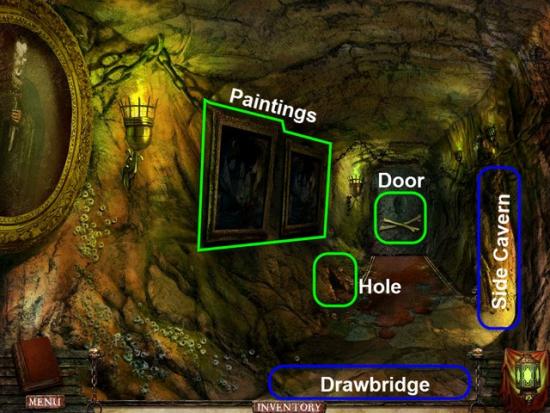
Examine the Paintings, Door, and Hole in the Wall, highlighted in Green.
Head Right into the Side Cavern.
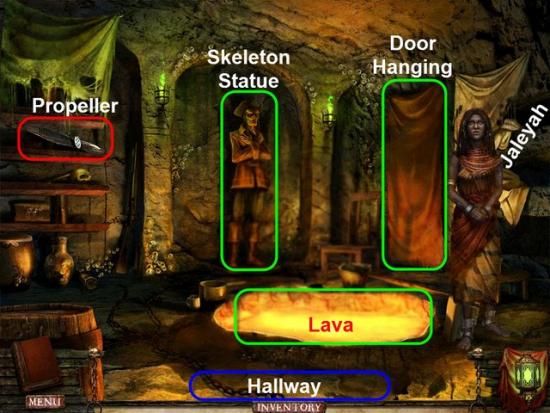
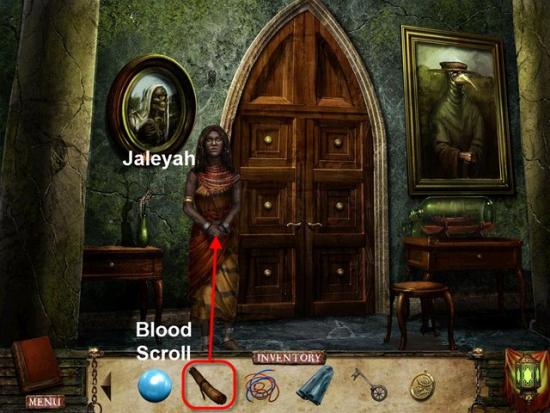
Talk to Jaleyah.
Jaleyah will give you a Skull.
Gather the Propeller highlighted in Red.
Examine the Skeleton Statue, Door Hanging, and Lava, highlighted in Green.
Return to the Hallway.
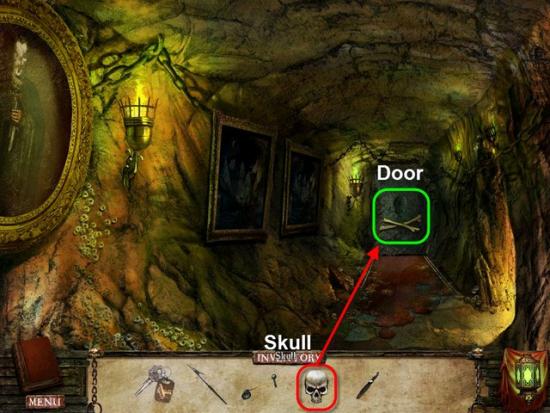
Place the Skull, highlighted in Red, into the Door, highlighted in Green, to open the Door.
Enter the Foyer.
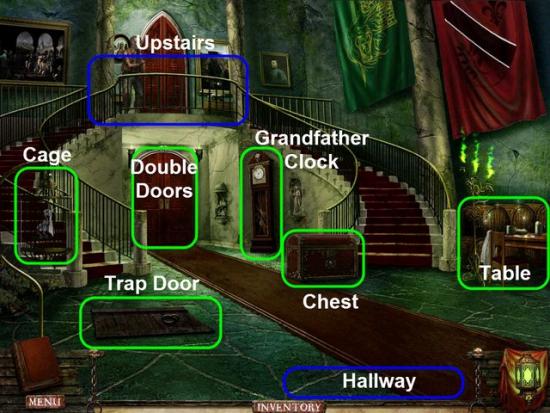
Examine the Cage, Trap Door, Double Doors, Grandfather Clock, and Chest highlighted in Green.
Examine the Table.
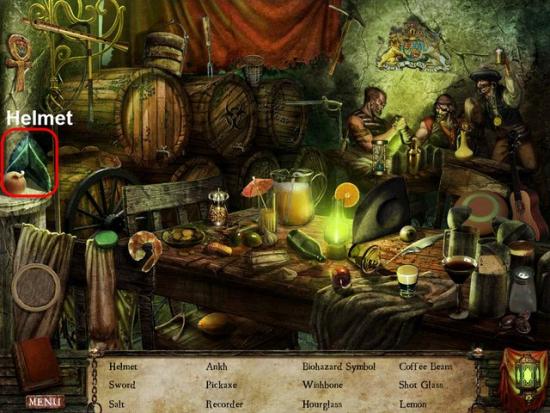
Gather the Helmet highlighted in Red.
Gather the remaining Hidden Objects.
Climb the Staircase.
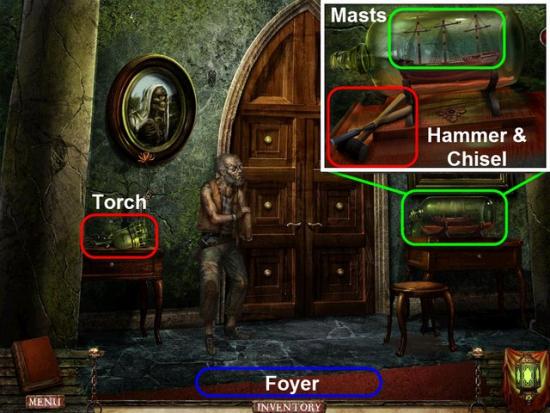
Gather the Torch highlighted in Red.
Examine the Ship in a Bottler.
Gather the Hammer and Chisel.
Examine the Masts of the Ship in the Bottle.
Head Back to the Hallway.
Enter the Side Cavern.
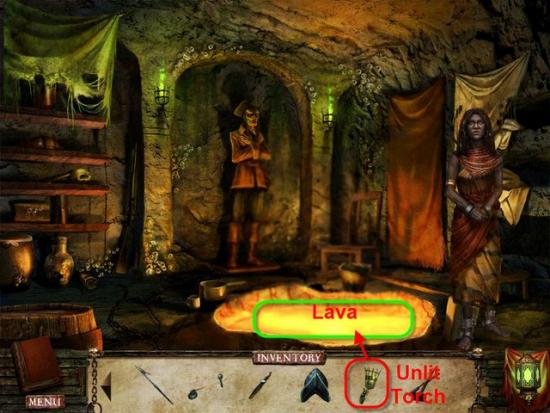
Use the Unlit Torch, highlighted in Red, on the Lava, highlighted in Green.
Receive the Lit Torch.
Head Back to the Hallway.
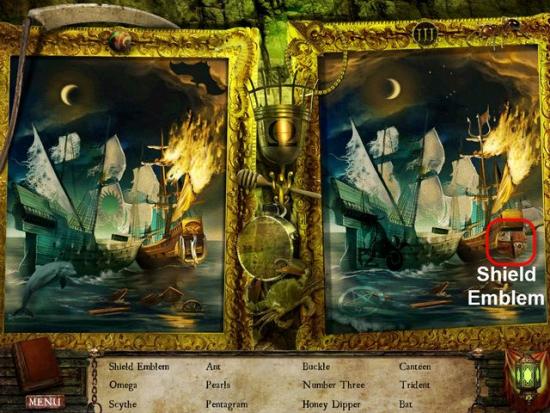
Place the Lit Torch between the Painting on the Wall.
Examine the Paintings.
Gather the Shield Emblem highlighted in Red.
Gather the remaining Hidden Objects highlighted in Yellow.
Head back to the Drawbridge.
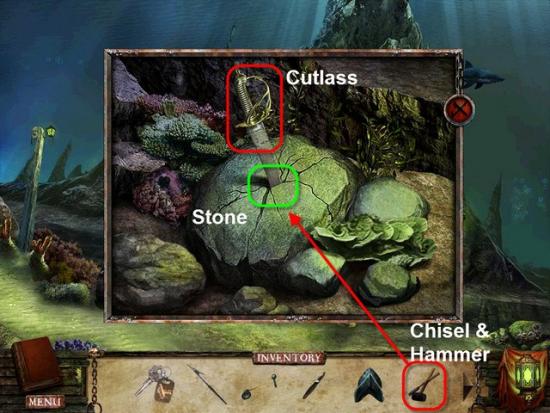
Examine the Sword in the Stone.
Use the Chisel & Hammer on the Stone.
Gather the Cutlass highlighted in Red.
Return to the Crashed Airplane.
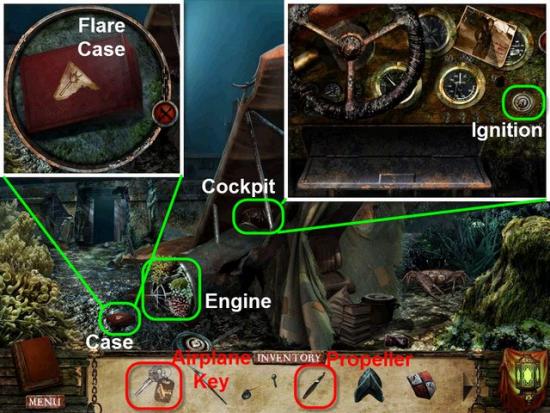
Place the Propeller, from Inventory, onto the Engine Casing.
Next, examine the Cockpit.
Place the Airplane Key, from Inventory, into the Ignition.
Turn the Key to start the Plane.
Once the Dust is clear, a Case is revealed.
Open the Case and retrieve the Flare inside.
Return to the Bar.
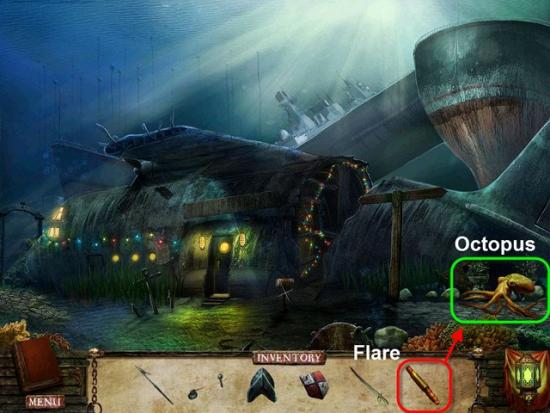
Use the Flare, highlighted in Red, to scare of the Octopus, highlighted in Green.
Head Right toward the Heroic Statue.
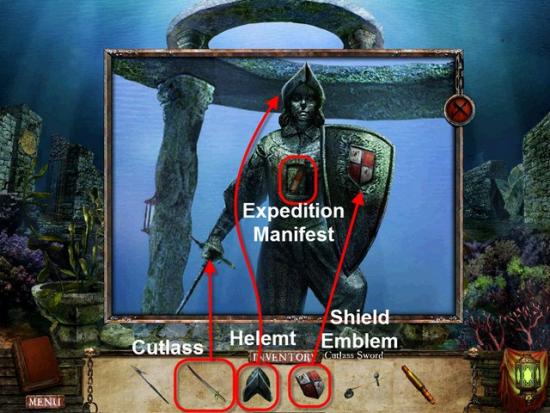
Examine the Heroic Statue.
Place the Cutlass into the Hand.
Place the Helmet on the Head.
Place the Shield Emblem into the depression on the Shield.
A Compartment will open in the Chest of the Statue.
Gather the Expedition Manifest.
Head Left through the Gate.
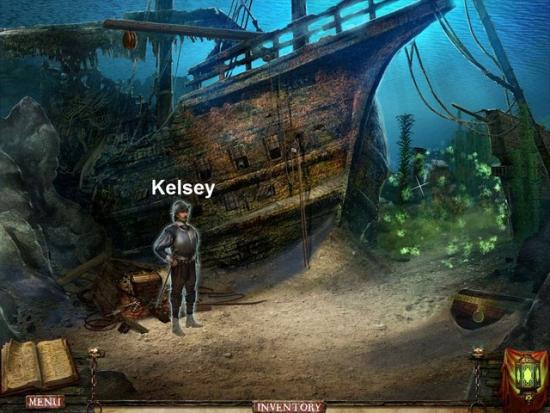
Talk to Kelsey.
Give the Expedition Manifest to Kelsey.
Receive Letter for Nicolette and five Doubloons.
Return to Davy Jones Home.
Enter the Foyer and climb the Stairs.
Give the five Doubloons to Straaten.
The Throne Room Door will open.
Enter the Throne Room.
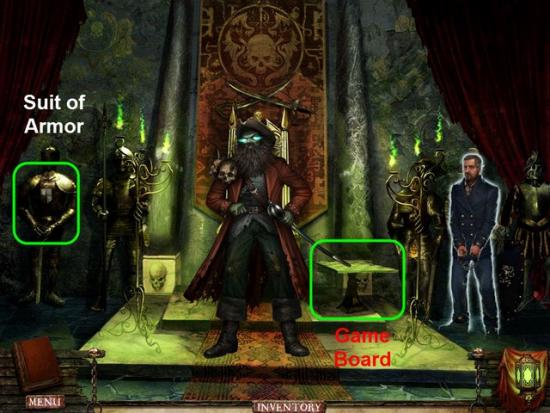
Examine the Suit of Armor.
Examine the Game Board once more.
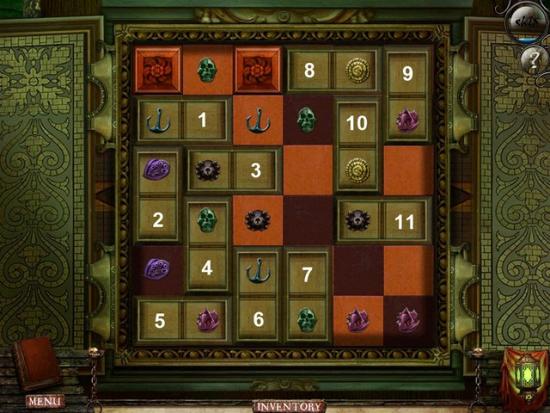
This Mini-Game is just like the previous one, just a little more difficult.
As before, slide the Dominoes and match the Symbols, on the Dominoes, with the Symbols on the Board.
Solution:
You have solved the Puzzle.
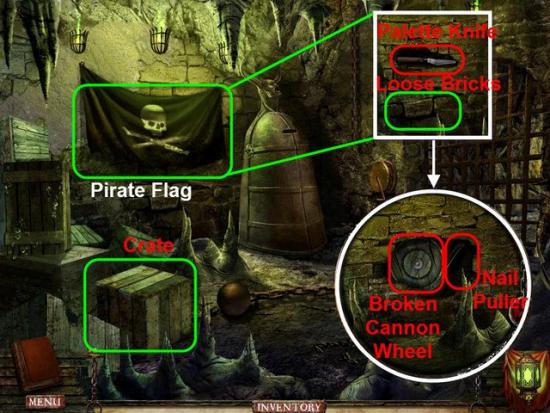
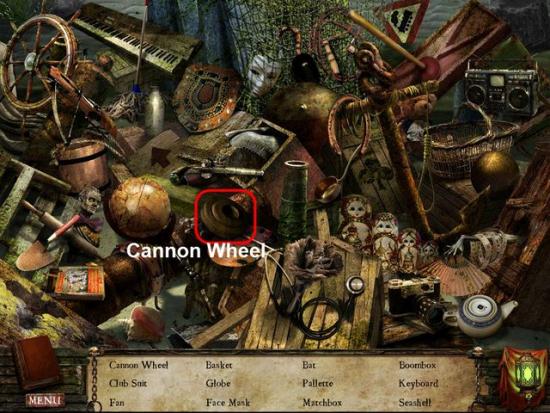
Move the Pirate Flag highlighted in Green.
Gather the Palette Knife highlighted in Red.
Use the Palette Knife on the Loose Bricks.
Gather the Broken Cannon Wheel and Nail Puller.
Examine the Crate highlighted in Green.
Use the Nail Puller, highlighted in Red, to pull up the four Nails, highlighted in Green.
Gather the Bolt Cutters located inside.
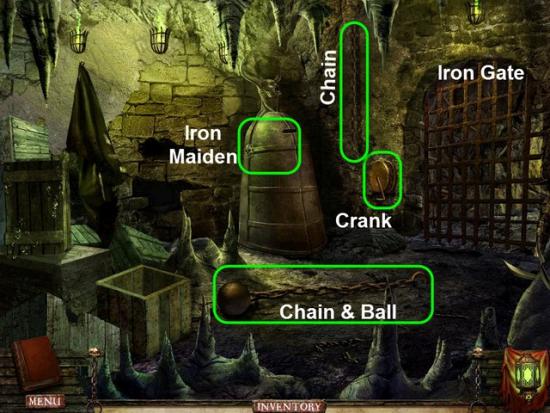
Examine the Iron Maiden.
Use the Bolt Cutters on the Chain & Ball.
Receive the Chain.
Attach the Chain to the Chain hanging near the Iron Gate.
Finally, turn the Crank to raise the Iron Gate.
Exit the Dungeon Cell.
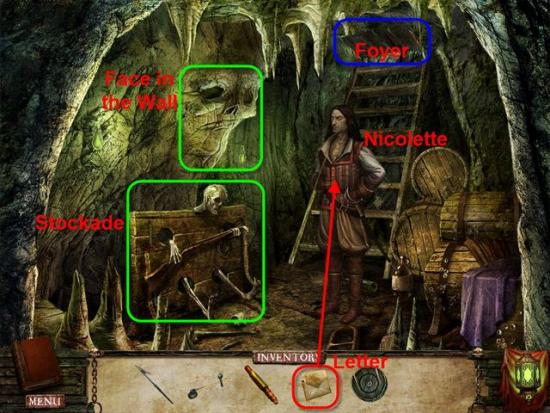
Talk to Nicolette.
Give the Letter to Nicolette.
Exam the Face in the Wall and the Stockade highlighted in Green.
Climb the Stairs into the Foyer of Davy Jones House.
Davy Jones will give you a Dull Medallion.
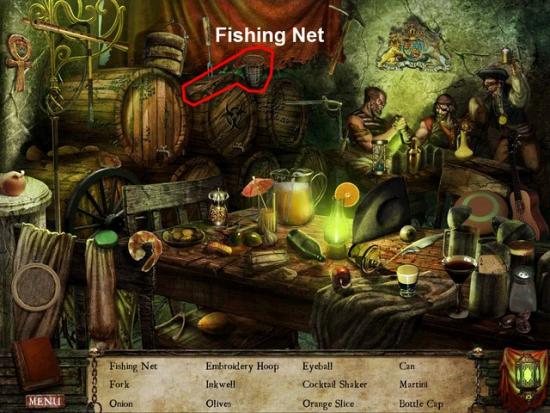
Exam the Table on the Right in the Foyer.
Gather the Fishing Net highlighted in Red.
Gather the remaining Hidden Objects.
Return to the Side Cavern.
Talk to Jaleyah for help.
Leave Davy Jones House, head to the Buried Safe.
Examine the Hole in the Hull of the Cruise Ship.
Use the Fishing Net to gather the Rock Hammer, highlighted in Red.
Examine the Lion Statue.
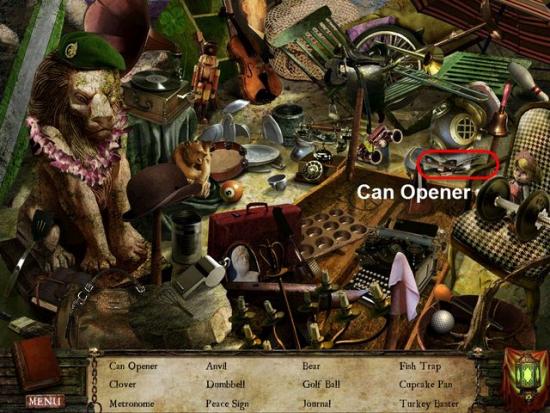
Gather the Can Opener highlighted in Red.
Gather the remaining Hidden Objects.
Examine the Pedestal next to Archway leading to the Bar.
Place the Dull Medallion in the Center of the Puzzle.
To solve this Mini-Game you need to reassemble the Image.
Click and Drag each Ring to place them in the correct order.
Rings are numbered 1 through 4, starting on the Outer Ring.
Ring 1 also affects Ring 2.
Ring 2 also affects Ring 1 and Ring 4.
Ring 3 also affects Ring 4.
Ring 4 turns alone.
Tips: Fist start with Ring 2, followed by Ring 1, and work your way inward. Also, as each Ring finds its correct Location the Ring will glow Yellow.
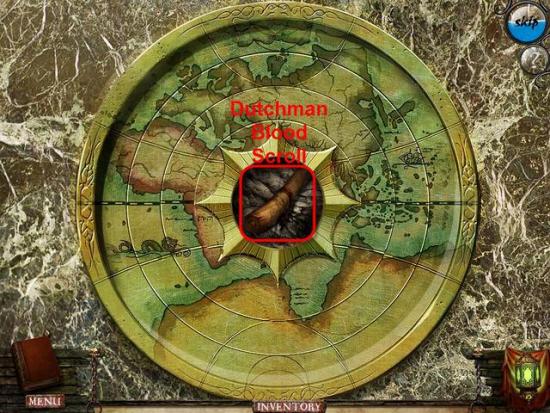
Once have solved the Puzzle, gather the Dutchman Blood Scroll, highlighted in Red, located in the Center of the Puzzle.
Return to the Side Cavern.
Give the Dutchman Blood Scroll to Jaleyah.
Receive the Conch Shell.
Receive the Translated Blood Scroll.

Head to Davy Jones Ship.
Examine the Mermaid Figurine.
Place the Conch Shell into the Mermaid Figurine’s Hands.
Retrieve the Knight Emblem, highlighted in Red, located in the Chest of the Mermaid Figurine.
Return to the Bar.
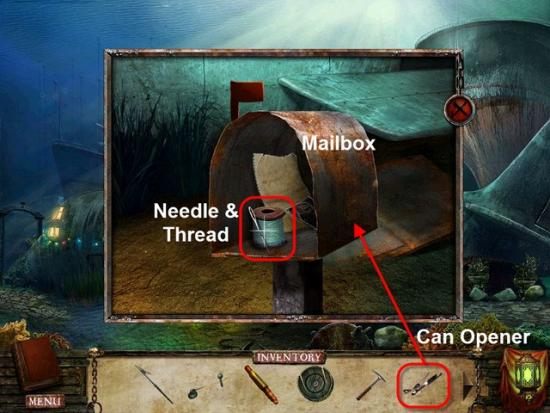
Examine the Mailbox.
Use the Can Opener on the Mailbox.
Gather the Needle & Thread, highlighted in Red, located inside the Mailbox.
Return to the Side Cavern, once more.
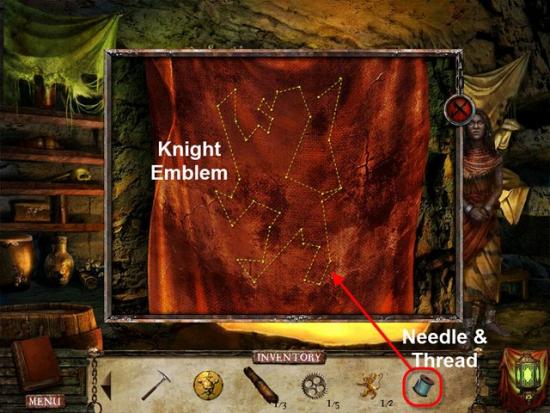
Examine the Door Hanging.
Use the Needle & Thread on the Outline on the Door Hanging.
Use several times until the Image is complete.
Click the Image to receive the second Knight Emblem.
Return to the Throne Room.
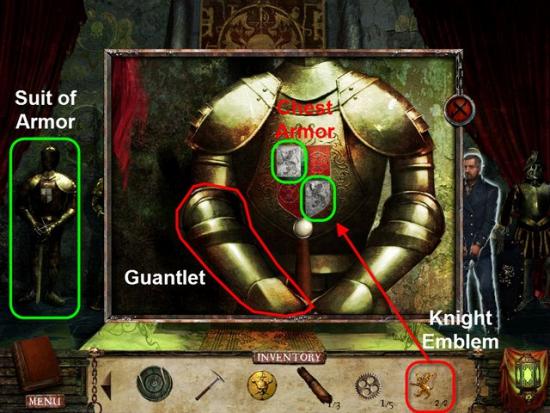
Examine the Suit of Armor, on the far Left of the Throne.
Place the Knight Emblems into the Chest Armor of the Suit of Armor.
Next, gather the Gauntlet highlighted in Red.
Return to the Hallway.
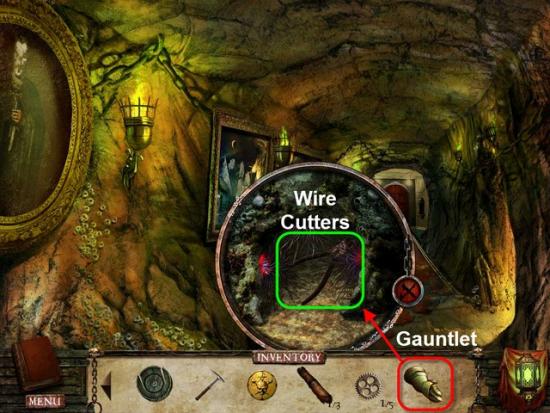
Examine the Hole in the Wall.
Use the Gauntlet, highlighted in Red, in the Hole, to retrieve the Wire Cutters, highlighted in Green.
Head to the Foyer.
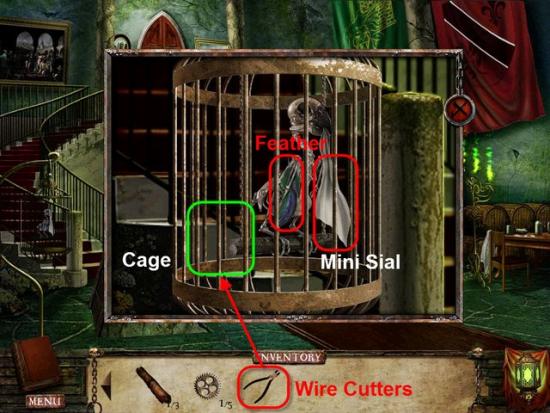
Examine the Bird Cage.
Use the Wire Cutters to cut open the Cage.
Examine the Bird Skeleton.
Receive the Feather and Mini Sail..
Enter the Trap Door.
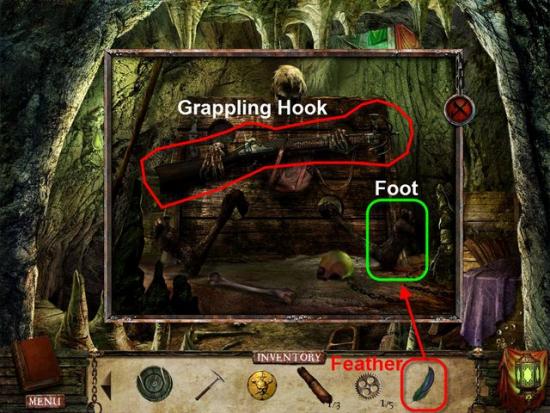
Examine the Stockade.
Use the Father, highlighted in Red, on the Prisoner’s Foot, highlighted in Green.
Gather the Grappling Hook in the Prisoner’s Hands.
Return to Davy Jones Ship.
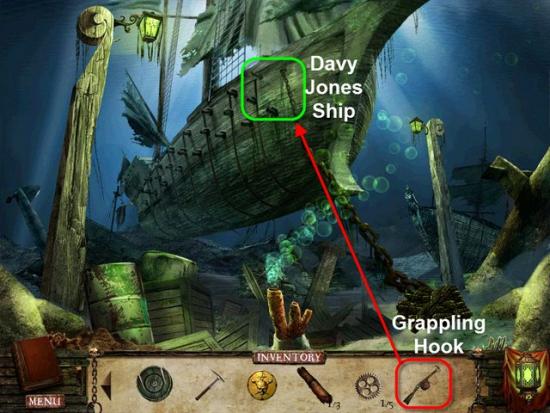
Examine Davy Jones Ship.
Use the Grappling Hook, highlighted in Red, to get on the Ship.
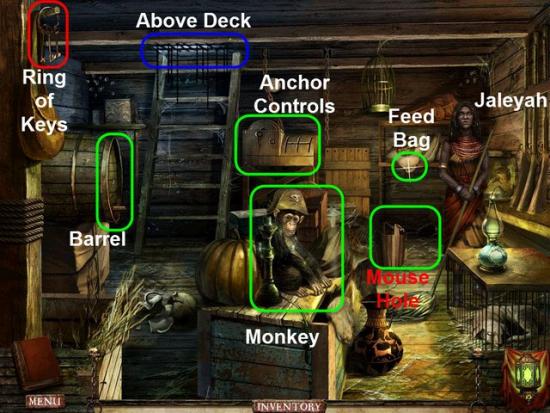
Talk to Jaleyah.
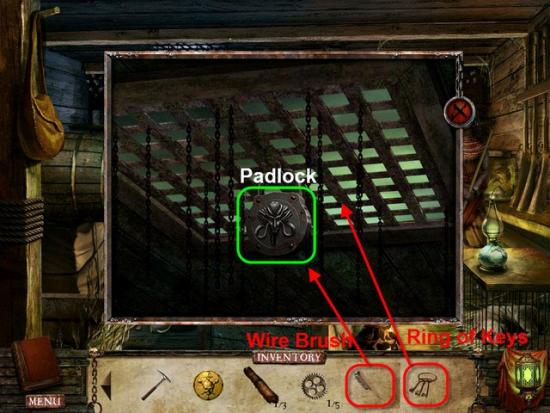
Gather the Ring of Keys highlighted in Red.
Open the Seed Bag.
Examine the Monkey.
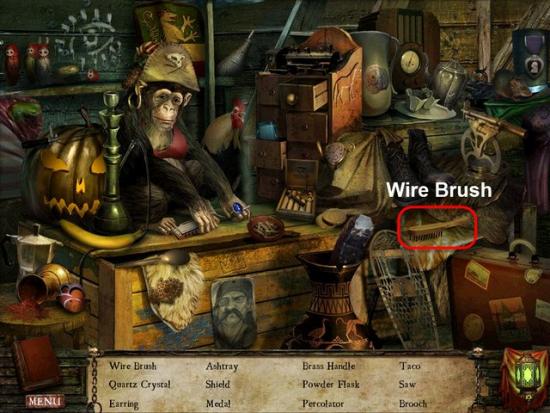
Gather the Wire Brush highlighted in Red.
Gather the remaining Hidden Objects.
Examine the Mouse Hole.
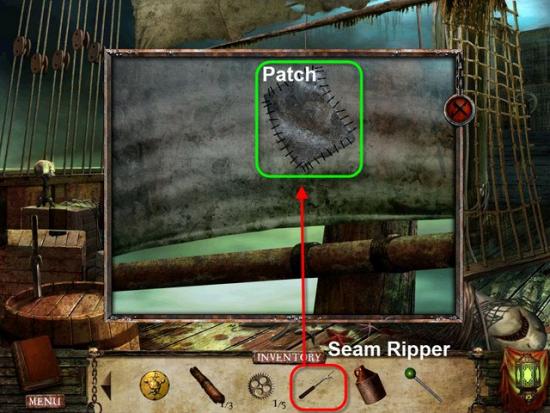
Gather the Seam Ripper highlighted in Red.
mine the Grate covering the Exit to Above Deck.
Use the Wire Brush on the Padlock, to clean it.
Use the Ring of Keys on the Padlock.
Try each Key until find the one the that unlocks the Padlock.
Exit to Above Deck.
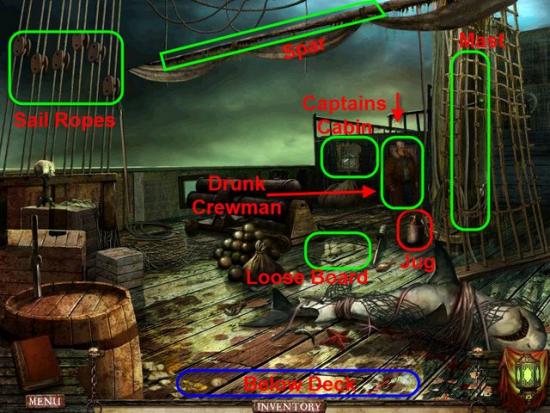
Gather the Jug highlighted in Red.
Examine the Mast highlighted in Green.
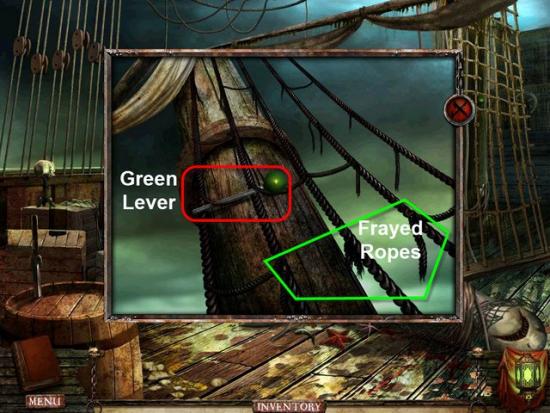
Gather the Green Lever.
Note the Frayed Ropes.
Examine the Spar.
Pull on the Loose Hanging Rope.
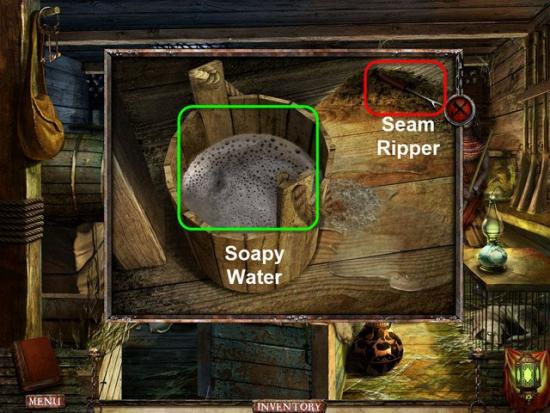
Use the Seam Ripper, highlighted in Red, on the Stitches around the Patch, highlighted in Green.
Gather the Patch and receive a Towel.
Return Below Decks.
Examine the Mouse Hole again.
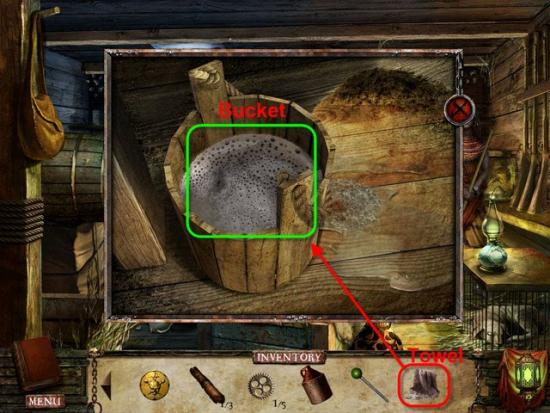
Use the Towel, highlighted in Red, on the Bucket of Soapy Water, highlighted in Green.
Receive a Wet Towel.
Gather the Hand Crank in the bottom of the Bucket.

Use the Hand Crank to drill a Hole into the Barrel of Rum.
Use the Jug on the Hole in the Barrel.
Receive a Jug of Rum.
Return Above Deck.
Give the Jug of Rum to the Drunk Crewman.
Enter the Captains Cabin.

Examine the Desk.
Gather the Scroll of Soul Release and Screwdriver.
Open the Book.
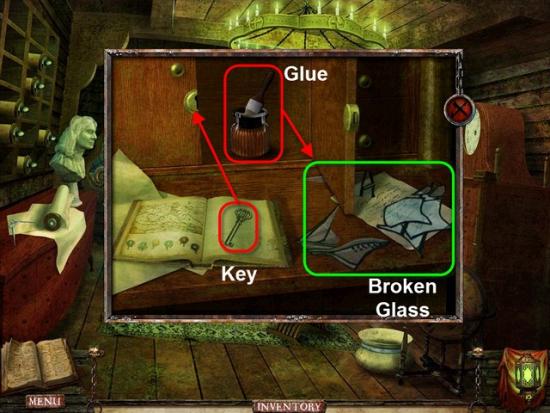
Use the Key in the Book on the Cabinet Door.
Use the Glue, inside the Cabinet, on the Broken Glass.
Gather the repaired Stained Glass Piece.
Examine the Stained Glass Window.
Use the Wet Towel, from your Inventory, to clean the Stained Glass Window.
Place the Stained Glass Piece into the Stained Glass Window.
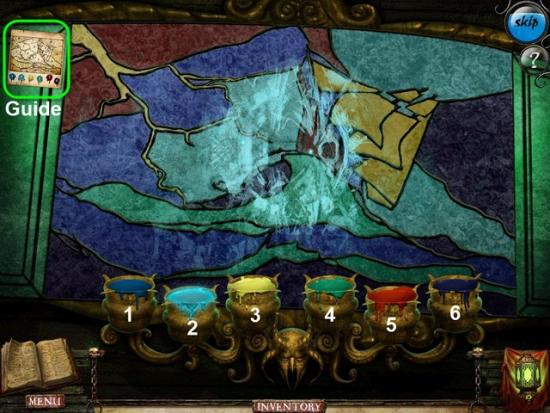
Next, you will need to paint the Stained Glass Window.
This is a simple Paint by Number Task.
Each of the Paints are numbered 1-6.
Using the Guide, in the upper Left Corner, paint the Window.
To Paint, click on the Paint you wish to use, then the Area you wish to Paint.
If you use a Color in the wrong Area, simply click on the correct Paint Color and the Area you need to recolor.
Once the Stained Glass Window is fully Painted, the Sun will shine through the Window, highlighting the Corner of the Rug.
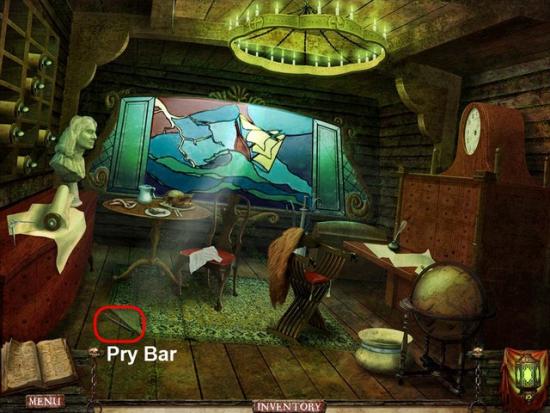
Lift up the Corner of the Rug.
Gather the Pry Bar.
Head Back to the Deck.
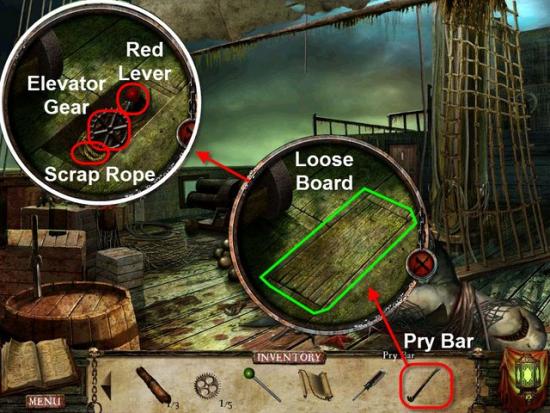
Examine the Loose Board on the Deck.
Use the Pry Bar to remove the Loose Board.
Gather the Red Lever, first Elevator Gear, and Scrap Rope.
Examine the Mast.
Use the Scrap Rope on the Frayed Ropes.
Now climb the Mast to the Crows Nest.
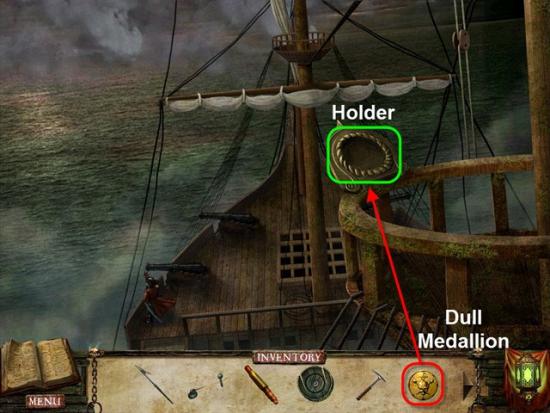
Place the Dull Medallion in the Holder.
Gather the Charged Medallion.
Climb Back Down the Mast.
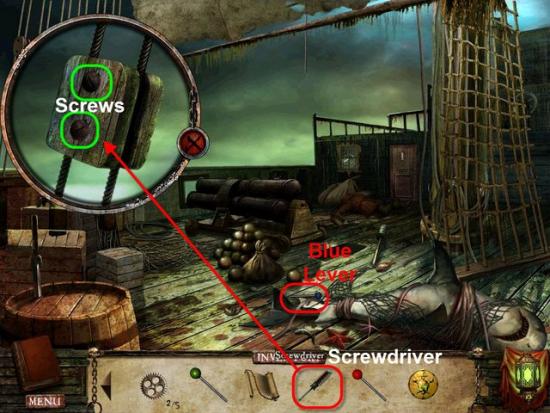
Examine the Sail Ropes.
Use the Screwdriver to remove the two Screws.
A Rope will lower and drop the Blue Lever.
Gather the Blue Lever off the Deck.
Return Below Decks.
Examine the Anchor Controls.
Place the Red, Blue, and Green Lever into the Control Panel.
The goal for this Mini-Game is to move the three Colored Levers down into the corresponding spots.
While moving the Grey Levers to the Top.
Click and Drag the Levers to move them.
See above Image for Solution.
Once all Levers are in correct positions, the ship will sink below the waves.
Examine the Crate and Barrels next to Davy Jones Ship.
Gather the Front Cannon Wheel highlighted in Red.
Gather the remaining Hidden Objects.
Return to the Side Cavern.
Talk to Jaleyah.
Next head to the Foyer.
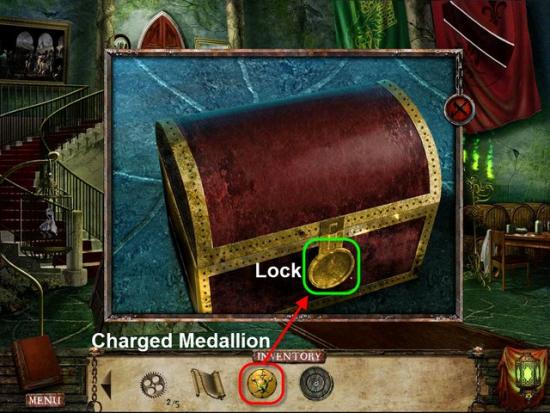
Examine the Chest next to the Right Staircase.
Place the Charged Medallion, highlighted in Red, into the Lock on the Chest, highlighted in Green.
Gather the Prototype Component inside.
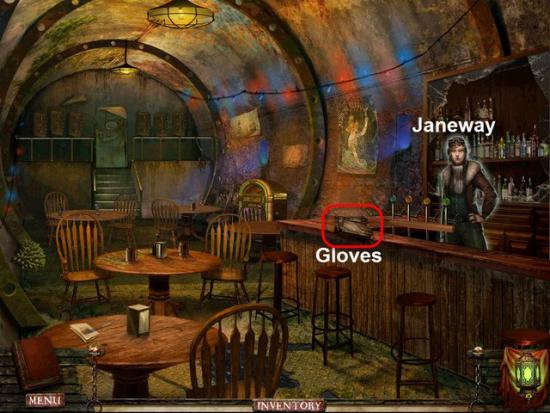
Head Back to the Bar and enter.
Talk to Janeway.
Gather the Aviator Gloves highlighted in Red.
Head to the Heroic Statue.
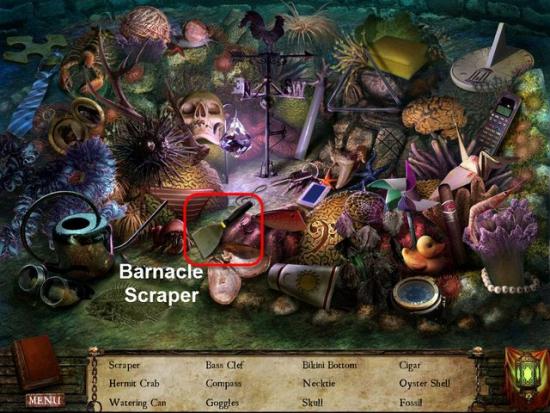
Examine the Plants, on the Right of the Pathway, once more.
Gather the Barnacle Scraper highlighted in Red.
Gather the remaining Hidden Objects.
Head Left through the Gate in the Wall.
Examine the Chest on the Right buried in the Sand.
Use the Charged Medallion in the Lock, just like the last Chest.
Gather the Archeologist Brush located inside.
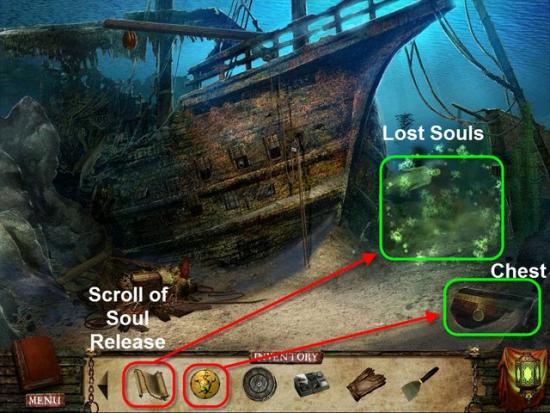
Next, use the Scroll of Soul Release on the Lost Souls.
Head forward toward the Tugboat.
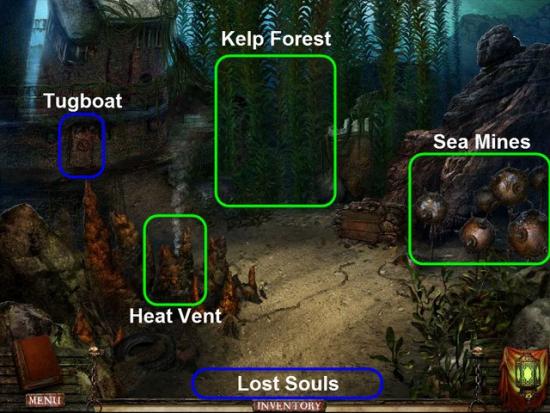
Examine the Sea Mines, Heat Vent and Kelp Forest highlighted in Green.
Head to the Tugboat.
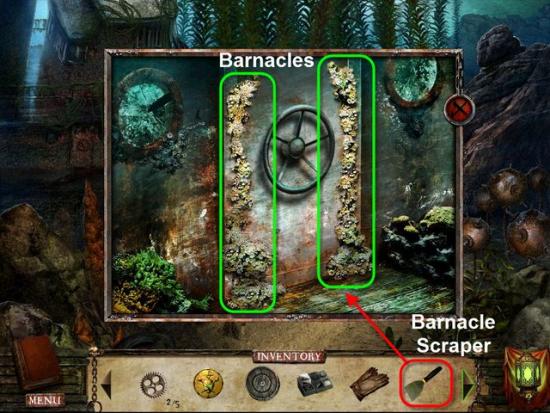
Use the Barnacle Scraper, highlighted in Red, to remove all the Barnacles, highlighted in Green, around the Tugboat Door.
Click the Handle to open the Tugboat Door.
Enter the Tugboat.
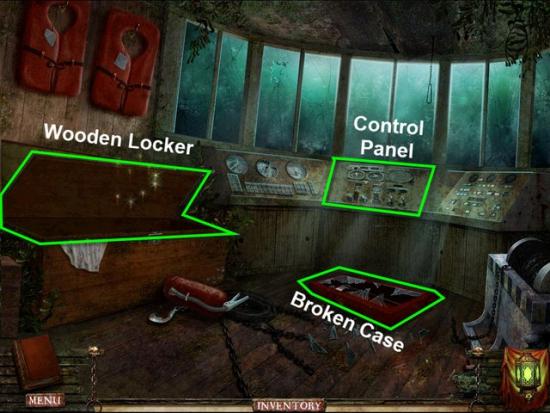
Examine the Wooden Chest.
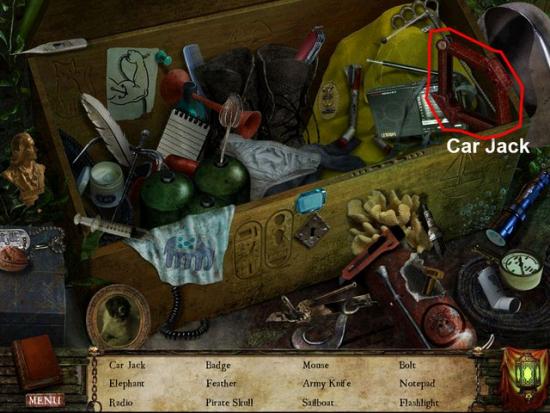
Gather the Car Jack highlighted in Red.
Gather the remaining Hidden Objects.
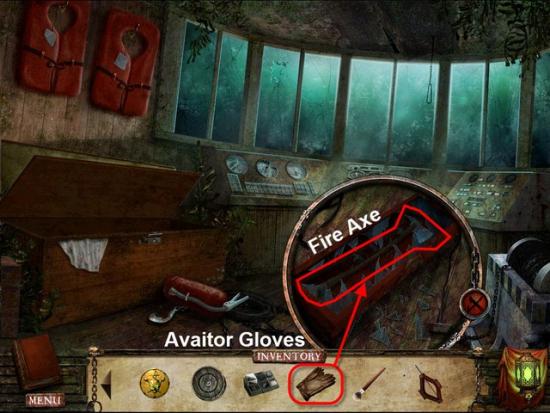
Examine the Broken Case.
Use the Aviator Gloves to retrieve the Fire Axe.
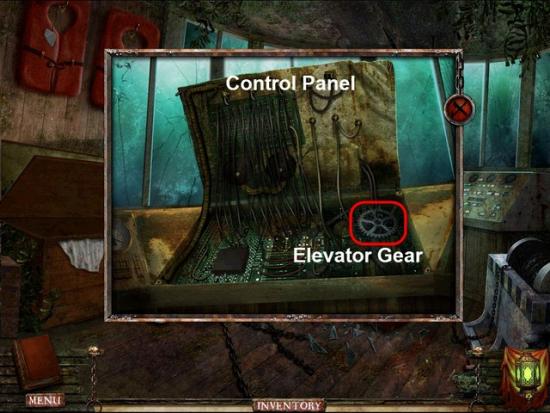
Examine the Control Panel.
Click to Open the Control Panel.
Gather the second Elevator Gear, located inside, highlighted in Red.
Close the Control Panel.
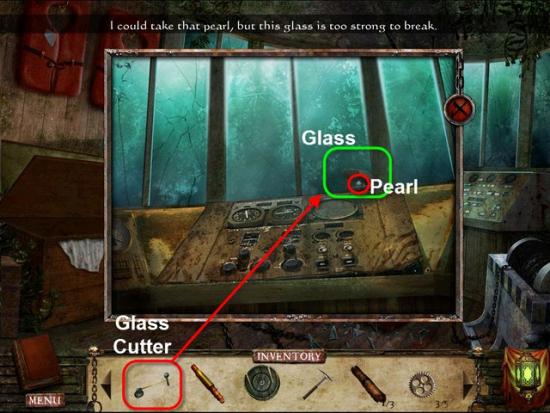
Use the Glass Cutter, from Inventory, on the Glass around the Clam & Pearl.
Gather the Pearl.
Head Back two screens.
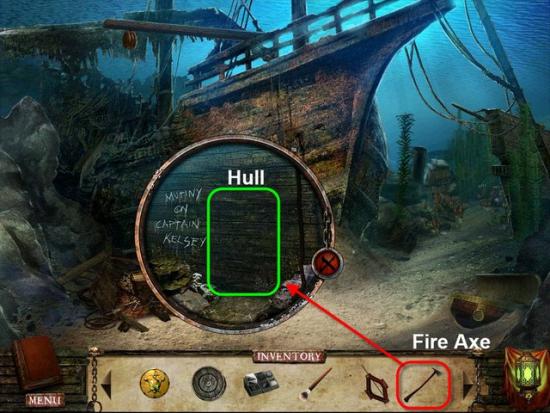
Examine the Hill of the Mutiny Ship.
Use the Fire Axe, highlighted in Red, on the Hull of the Ship, highlighted in Green.
Next, enter the Mutiny Ship.
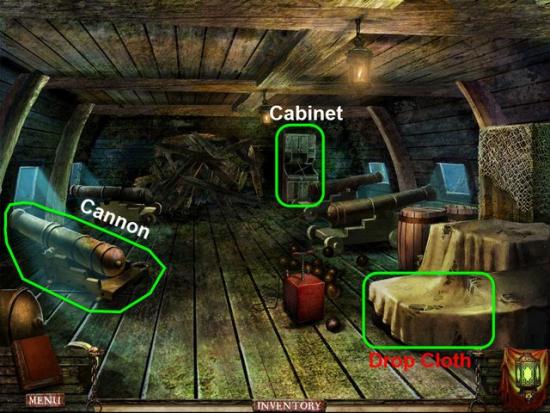
Examine the Cannon and Cabinet highlighted in Green.
Examine the Drop Cloth
Move the Drop Cloth revealing a Wooden Crate.
Open the Wooden Crate and retrieve the Explosives inside.
Return to the Heroic Statue.
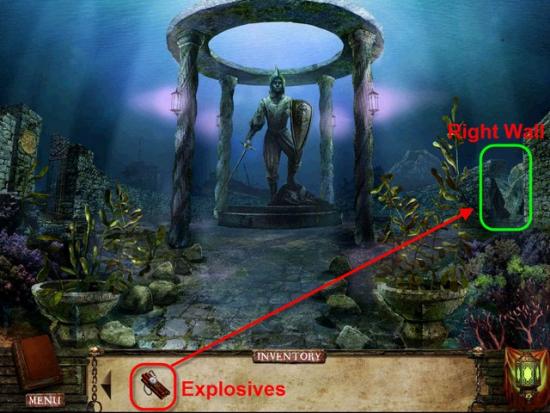
Use the Explosives, highlighted in Red, on the Right Wall, highlighted in Green.
Head through the Hole in the Right Wall.
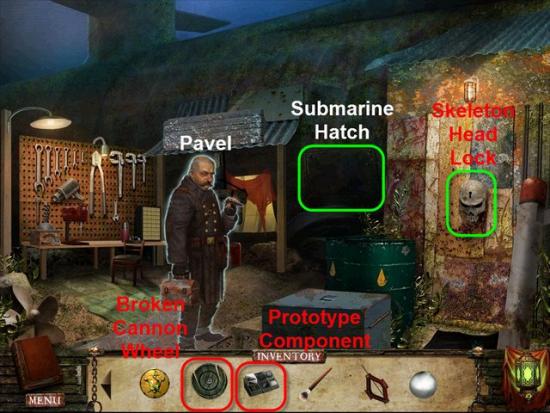
Give the Prototype Component to Pavel.
Receive the Skeleton Key.
Give the Broken Cannon Wheel to Pavel.
Receive the Back Cannon Wheel.
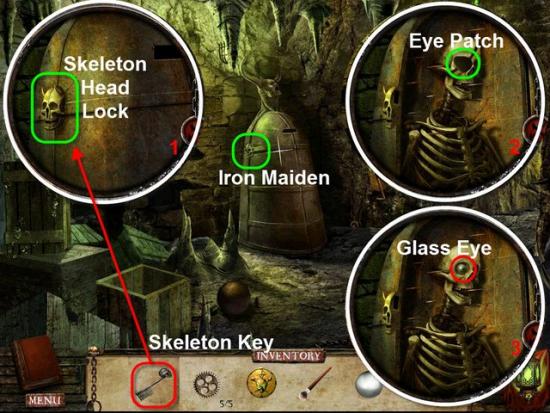
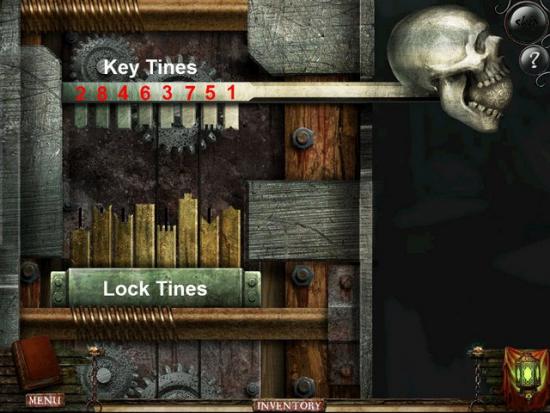
Next, use the Skeleton Key on the Skeleton Head Lock.
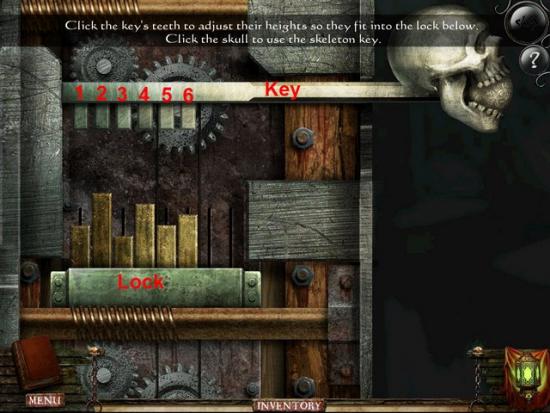
In this Mini-Game the Goal is to Match the Key Tines with the Tines of the Lock.
The Key Tines and Lock Tines need to touch without being to long or short.
Clicking the Key Tines will lengthen the Tines, until a point, then the Tines will reset back to Base.
Once you have the Tines of the Key set, click the Key Handle to Unlock the Lock.
The Key Tines are numbered 1 through 6.
Solution: Tine 1 = 3 Clicks, Tine 2 = 0 Clicks, Tine 3 = 4 Clicks, Tine 4 = 1 Click, Tine 5 = 3 Clicks, and Tine 6 = 2 Clicks.
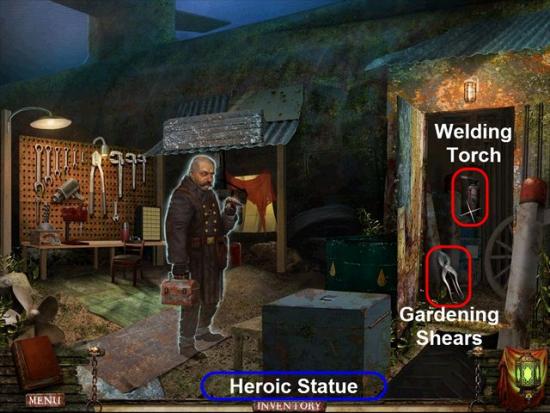
Now that you have unlocked the Shed, gather the Welding Torch and Gardening Shears highlighted in Red.
Return to the Mutineer Ship.
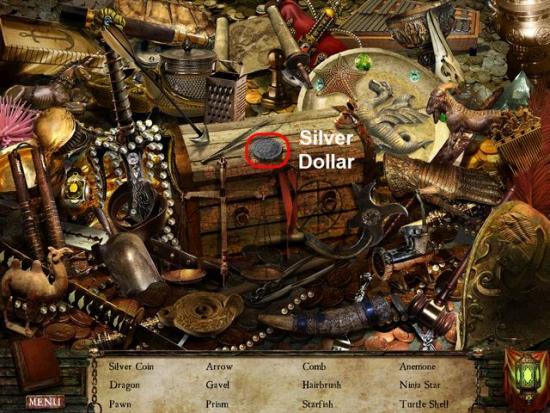
Examine the Broken Crate.
Gather the Silver Dollar highlighted in Red.
Gather the remaining Hidden Objects.
Return to the Bar.
Enter the Bar.
Use the Silver Dollar on the Jukebox.
Receive a Vinyl Record.
Return to the Kelp Forest.
Use the Gardening Shears to cut through the Kelp.
Head Forward into the Kelp Forest.
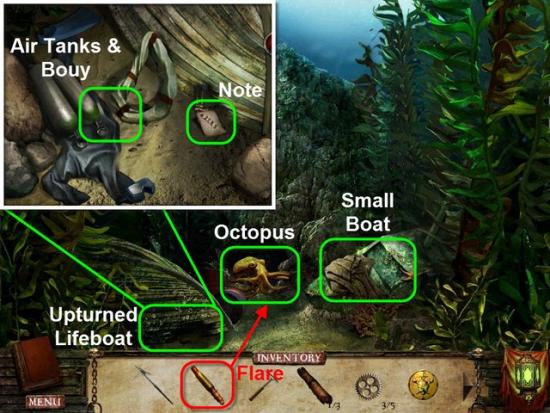
Use the Flare, from Inventory, on the Octopus, to chase him away.
Next, examine the Upturned Lifeboat.
Examine the Air Tanks and Deflated Life Buoy.
Read the Numbered Note next to the Deflated Life Buoy.
The Numbers will be added to your Journal under Clues.
Next, examine the Small Boat.

Gather the Elastic Bands highlighted in Red.
Gather the remaining Hidden Objects.
Head Forward and enter the Crystal Cave.
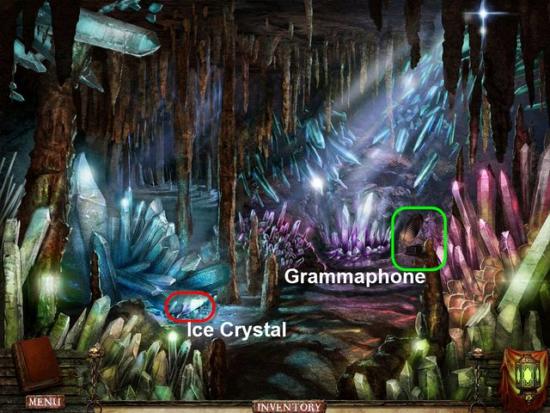
Gather the Ice Crystal highlighted in Red.
Examine the Gramophone highlighted in Green.
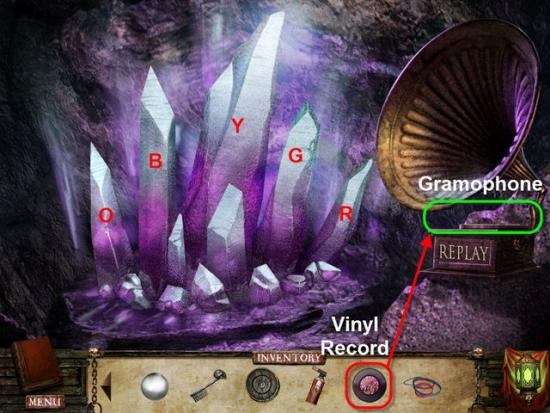
Place the Vinyl Record on the Gramophone to trigger the Mini-Game.
This Mini-Game is a simple Simon-Says Mini-Game.
The Crystals will Light up in a certain order.
Just click on each of the Crystals in the same order.
Click Replay to see the current Pattern you are to copy.
If you click the wrong Crystal in the Pattern you will hear an Error Sound and will have to start from the beginning again.
There is 4 Patterns with each Pattern being the same as the last just adding one extra Crystal to the Pattern.
Note: The Crystal are marked: O-Orange, B-Blue, Y-Yellow, G-Green, and R-Red.
Solution:
After completing the final Pattern, the Orange Crystal will vibrate and break off.
Gather the Vibration Crystal.
Return Back through the Kelp Forest to the Sea Mines.
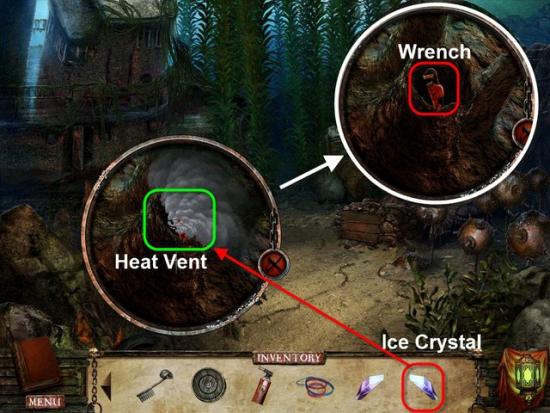
Examine the Heat Vent.
Place the Ice Crystal into the Vent.
After Vent cools off, gather the Wrench inside the Vent.
Head Back to the Mutiny Ship.
Enter the Ship.
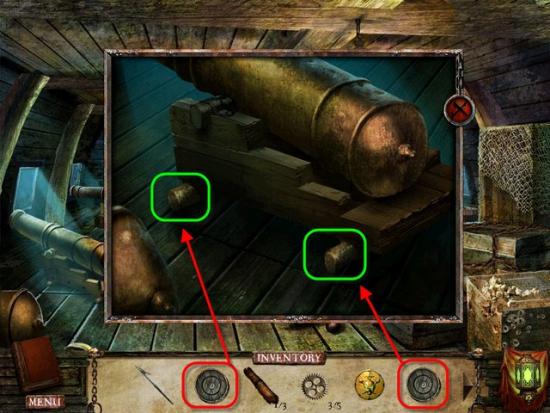
Examine the Cannon.
Place the Front Wheel and Back Wheel, from Inventory, onto the Cannon.
Click to move the Cannon.
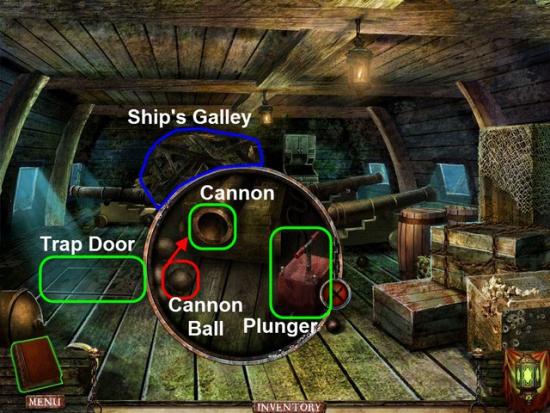
Examine the Trap Door, that was under the Cannon you just moved.
Examine the Cannon you just moved.
Gather the Cannonball and place it in the Cannon.
Next, Push the Plunger Down to fire the Cannon.
Head Forward into the Ship’s Galley.
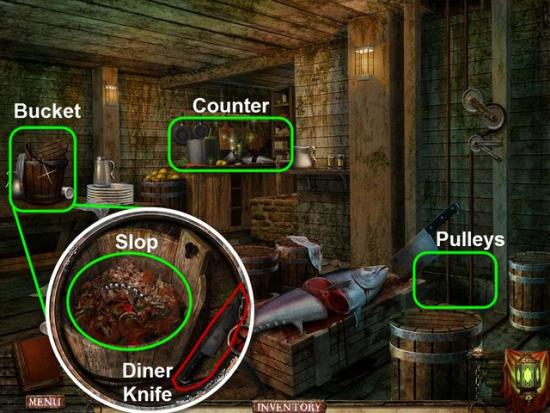
Examine the Pulleys.
Examine the Bucket.
Gather the Dinner Knife highlighted in Red.
Examine the Counter.
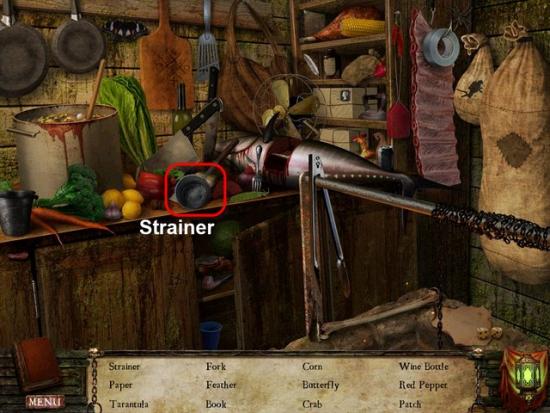
Gather the Strainer highlighted in Red.
Gather the remaining Hidden Objects.
Head Back one screen.
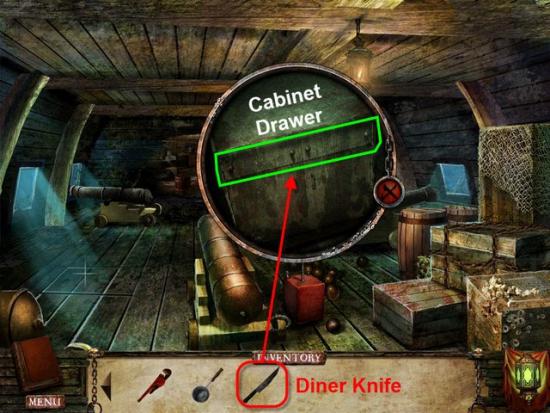
Examine the Cabinet.
Use the Diner Knife, highlighted in Red, on the Cabinet Drawers, highlighted in Green.
Gather the Fireproof Mitt from the Cabinet Drawer.
Head to the Buried Safe.
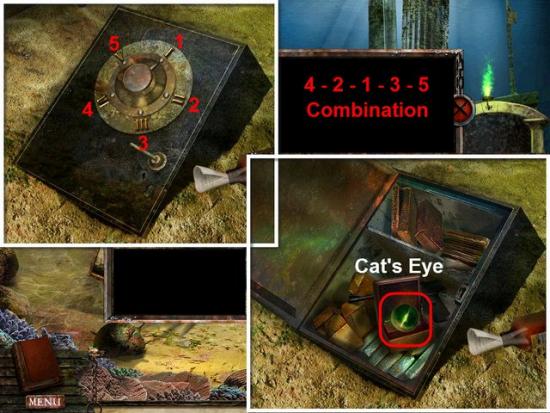
Examine the Buried Safe.
The Combination to the Safe was on the Numbered Note you saw earlier.
Check in your Journal under Clues for the Combination if you don’t remember it.
Hint: The Combination is 4-2-1-3-5.
Click on the Roman Numerals around the Safe Dial in the corresponding order to open the Safe.
Gather the Cat’s Eye highlighted in Red.

Next examine the Hole in the Hull of the Cruise Ship behind the Safe.
Use the Welding Torch, highlighted in Red, on the Weld, highlighted in Green.
Once the Weld melts away, gather the Hose inside.
Return to the Kelp Forest.
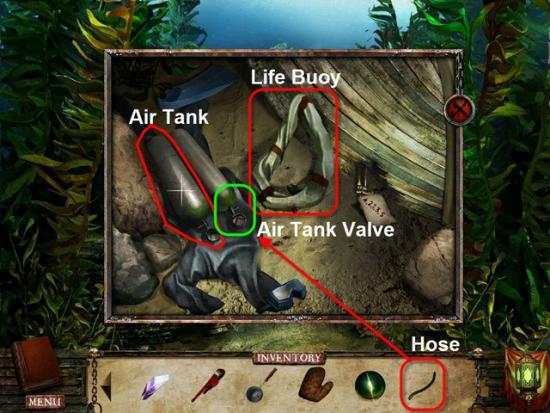
Examine the Upturned Life Boat.
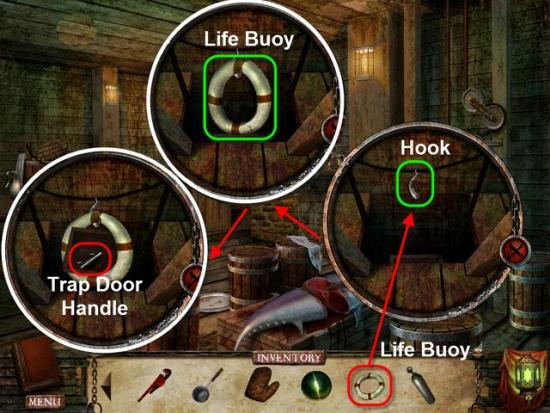
Use the Hose on the Air Tank Valve to inflate the Life Buoy.
Once the Life Buoy is inflated, gather the Life Buoy.
Also, gather the second Air Tank, highlighted in Red.
Head Back to the Mutiny Ship.
Head to the Galley.
Examine the Pulleys.
Place the Life Buoy, from Inventory, on the Hook.
Pull on the Life Buoy.
Once the Life Buoy rises back up, gather the Trap Door Handle in the Bucket.
Head Back one screen.
Examine the Trap Door.
Place the Trap Door Handle on the Trap Door.
Open the Trap Door.
Enter through the Trap Door.
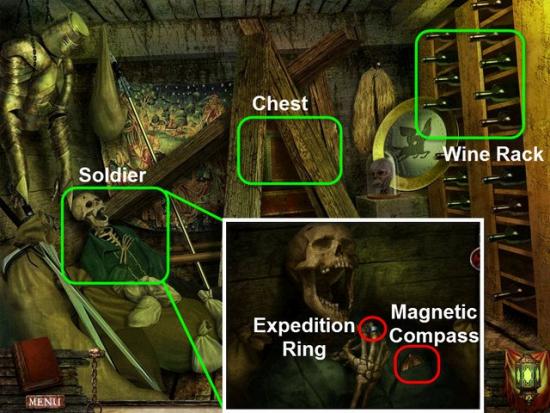
Examine the Soldier.
Gather the Expedition Ring and Magnetic Compass highlighted in Red.
Examine the Chest.
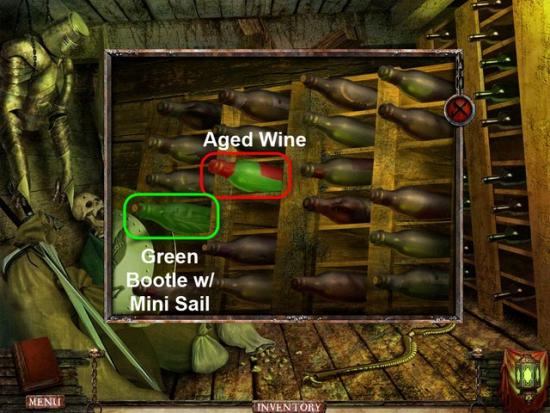
Next, examine the Wine Rack.
Pull out the Green Bottle highlighted in Green,
The Bottle will drop on the Floor, breaking open.
Gather the Mini Sail that was inside the Wine Bottle.
Next, gather the Wine Bottle highlighted in Red.
Receive the Aged Wine.
Return to Pavel.
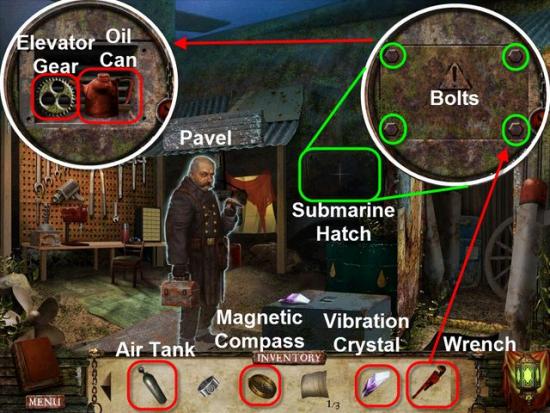
Give the Compressed Air Tank, Magnetic Compass, and the Vibration Crystal to Pavel.
Pavel will give you the Deactivation Device.
Examine the Submarine Hatch.
Use the Wrench to remove all four Bolts.
Remove the Panel.
Gather the third Elevator Gear and the Oil Can located inside.
Return to the Minefield.
Use the Deactivation Device on the Sea Mines.
Head Right through the Deactivated Sea Mines to the Volcano Gates.
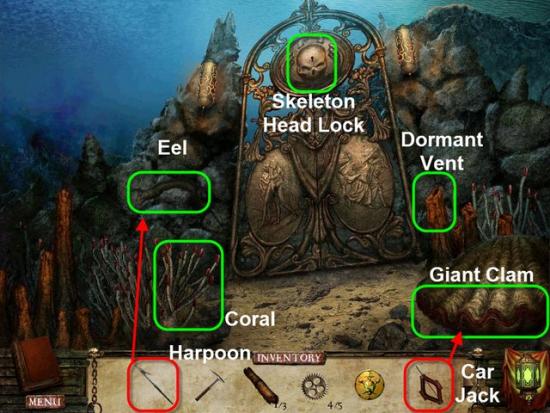
Use the Harpoon to chase off the Eel.
Move the Coral beside the Path.
Use the Car Jack to open the Giant Clam.
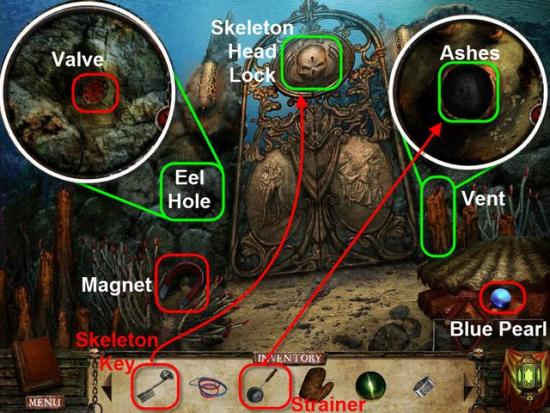
Examine the Hole in the Wall where the Eel used to be.
Gather the Valve there.
Gather the Magnet that was behind the Coral.
Gather the Blue Pearl out of the Giant Clam.
Examine the Vent.
Use the Strainer on the Ashes in the Vent.
Receive a piece of Charcoal.
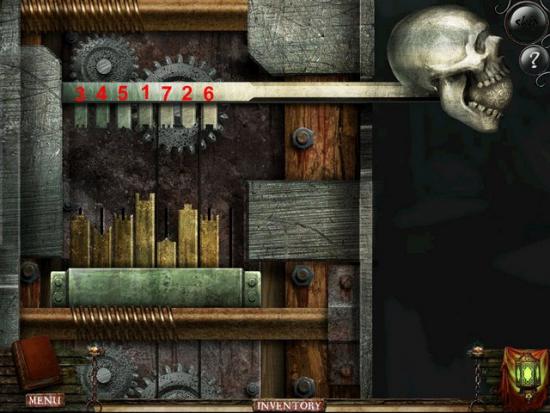
Finally, use the Skeleton Key on the Skeleton Head Lock on the Volcano Gate.
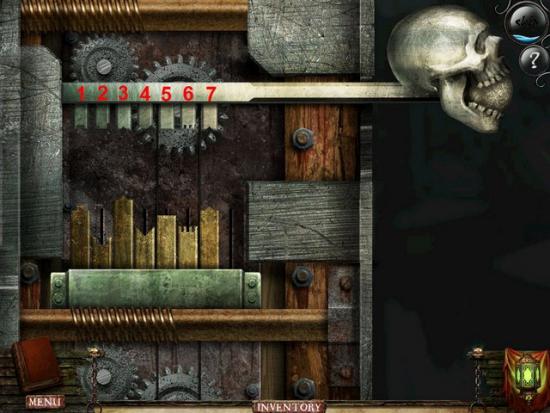
This Mini-Game is just like the previous Skeleton Key Mini-Game but with one difference.
The Tines this time have different Shapes and are not necessarily lined up together.
Move the Tines to their correct Position, Click and Drag the Tine you wish to move to the location in which it belongs.
Once all the Key Tines shapes are matched with the corresponding Lock Tines your goal remains the same as the last Mini-Game.
Your Solution may differ.
The Key Tines are numbered 1 through 7.
Solution: Tine 1 = 1 Clicks, Tine 2 = 4 Clicks, Tine 3 = 0 Clicks, Tine 4 = 3 Click, Tine 5 = 2 Clicks, Tine 6 = 3 Clicks, and Tine 7 = 1 Click.
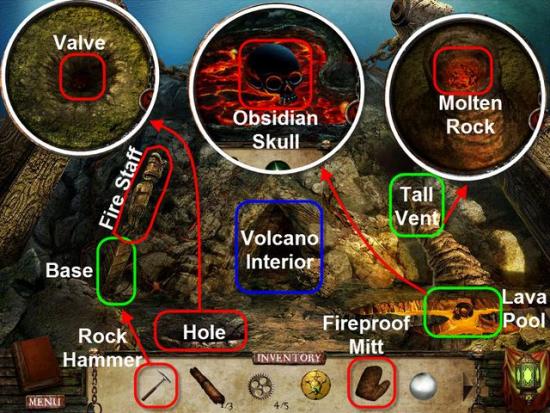
Enter through the Gate toward the Volcano.
Use the Rock Hammer on the Base of the Fire Staff.
Once the Fir Staff falls to the Ground gather the Fire Staff up.
Examine the Hole next to the Fire Staff.
Gather the Valve in the bottom of the Hole.
Examine the Lava Pool.
Use the Fireproof Mitt to retrieve the Obsidian Skull.
Examine the Tall Vent.
Use the Fireproof Mitt, once more, to retrieve the Molten Rock.
Enter the Volcano Interior.
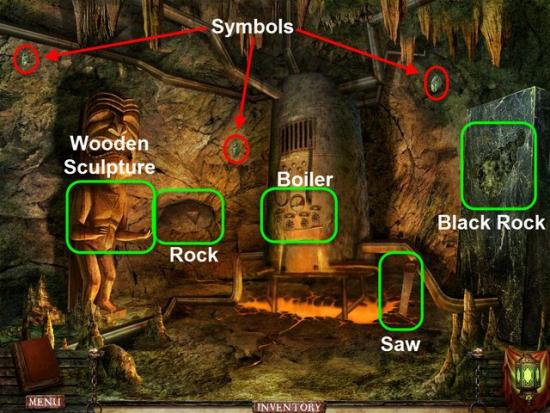
Gather the three Symbols highlighted in Red.
Next, examine the Wooden Sculpture.
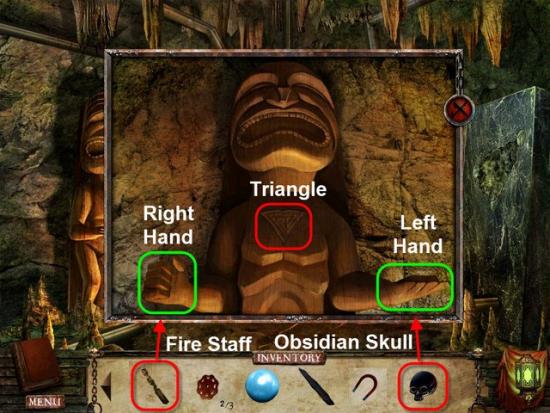
Place the Fire Staff in the Right Hand of the Wooden Sculpture.
Place the Obsidian Skull in the Left Hand of the Wooden Sculpture.
Gather the Wooden Triangle from the Sculptures Chest.
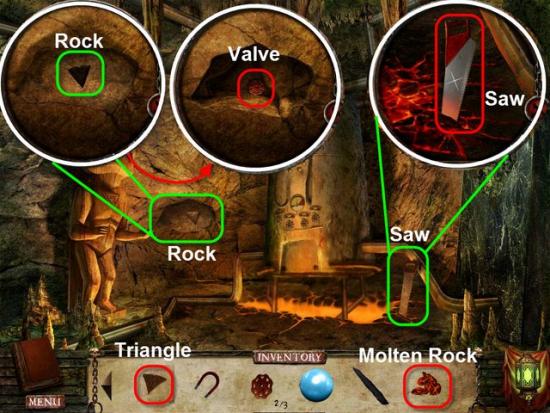
Examine the Rock next to the Wooden Sculpture.
Place the Wooden Triangle, from Inventory, into the Rock.
Gather the Valve inside the Wall.
Examine the Saw.
Use the Molten Rock, from Inventory, on the Saw to loosen it.
Gather the Saw.
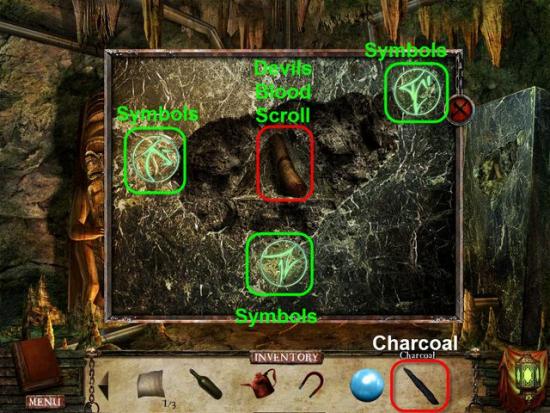
Examine the Black Rock.
Use the Charcoal, from Inventory, to trace the three Symbols, lighting them up.
This will reveal the Devils Blood Scroll.
Gather the Devils Blood Scroll.
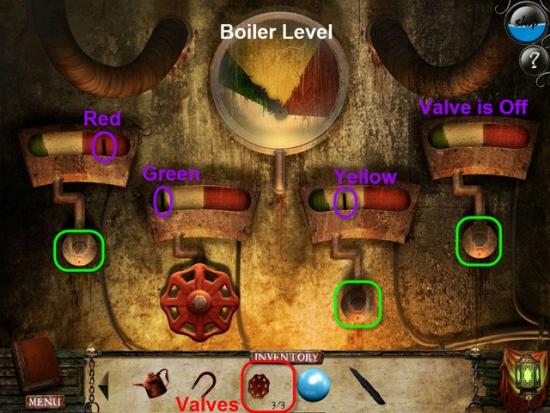
Finally, examine the Boiler.
Start by placing the three Valves, highlighted in Red, on the Empty Spots, highlighted in Green.
For this Mini-Game you need to reduce the Boiler Level from Red to Green.
This will shut down the Volcano.
Click each Valve to adjust its output.
The Valves cycle from Off, Needle is off the Dial, to Red, the Max Output.
See Image for Solution.
Solution: Dial 1 – Red, Dial 2 – Green, Dial 3 – Yellow, and Dial 4 – Off.
Leave the Volcano and return to the Galley of the Mutiny Ship.
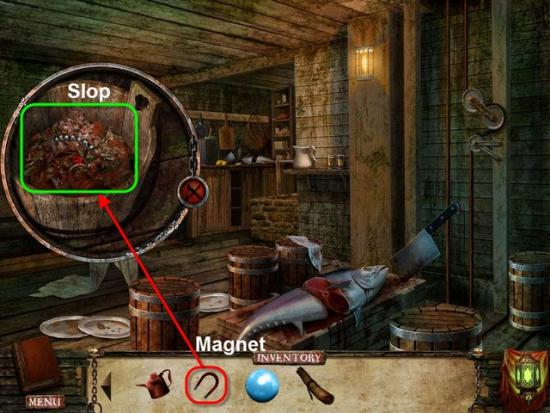
Examine the Bucket of Slop.
Use the Magnet, in Red, on the Bucket of Slop.
Receive the fourth Elevator Gear.
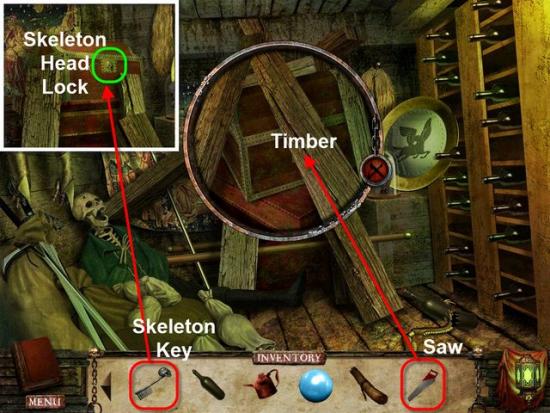
Head Back one screen.
Enter the Trap Door.
Examine the Chest.
Use the Saw to cut the Timber.
Use the Skeleton Key on the Skeleton Head Lock on the Chest.
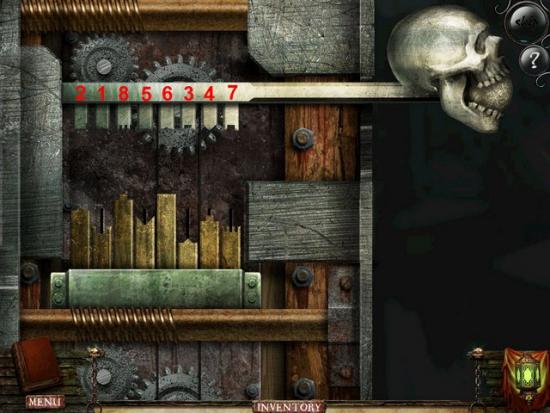
This Mini-Game is just like the previous Skeleton Key Mini-Game.
Move the Tines to their correct Position, Click and Drag the Tine you wish to move to the location in which it belongs.
Once all the Key Tines shapes are matched with the corresponding Lock Tines your goal remains the same.
Your Solution may differ.
The Key Tines are numbered according to the spot on the Key they are supposed to be.
The Key Tines are numbered 1 through 8.
Solution: Tine 1 = 1 Click, Tine 2 = 3 Clicks, Tine 3 = 0 Clicks, Tine 4 = 2 Click, Tine 5 = 0 Clicks, Tine 6 = 4 Clicks, Tine 7 = 2 Click, and Tine 8 = 3 Clicks.
Receive the Navigation Charts.
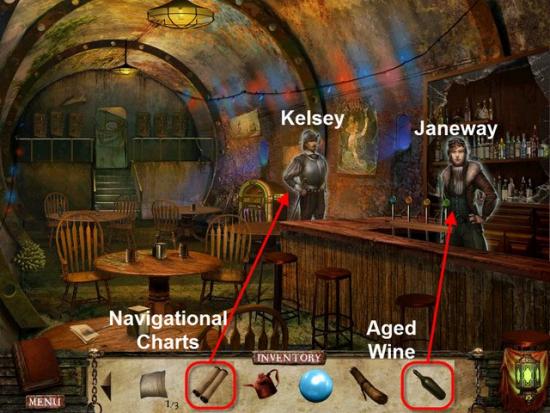
Return to the Bar.
Enter the Bar.
Talk to Janeway.
Give Aged Win to Janeway.
Receive Electrical Wiring.
Talk to Kelsey.
Give the Navigational Charts to Kelsey
Receive the Rolled Charts.
Head to the Buried Safe.
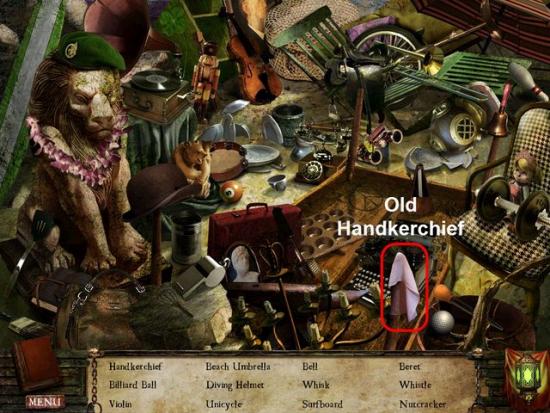
Examine the Lion Statue.
Gather the Old Handkerchief highlighted in Red.
Gather the remaining Hidden Objects.
Enter Davy Jones Home.
Receive Father’s Key.
Examine the Paintings
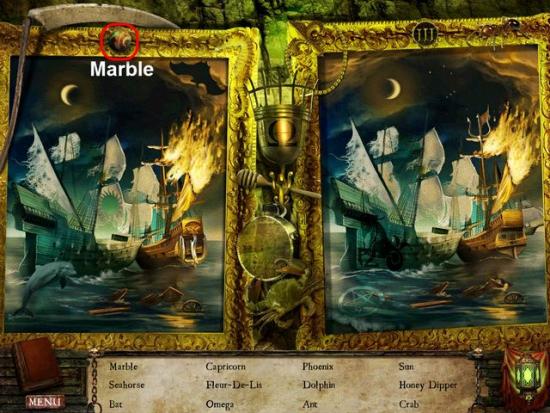
Gather the Marble highlighted in Red.
Gather the remaining Hidden Objects.
Enter the Foyer.
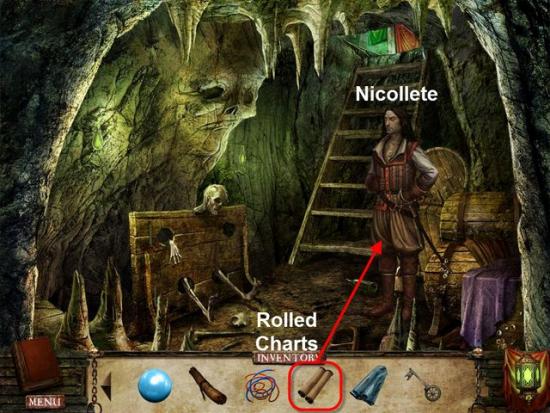
Enter the Trap Door.
Give the Rolled Charts, highlighted in Red, to Nicollete.
Receive the Captains Medal.
Head Upstairs to Davy Jones Throne Room.
Give the Blood Scroll to Jaleyah.
Receive the Translated Blood Scroll.
Enter the Throne Room.
Talk to Davy Jones.
Receive Davy Jones Ring.
Return to the Foyer.
Enter the Trap Door.
Head Back to the Dungeon
Examine the Iron Maiden.
Use the Skeleton Key on the Skeleton Head Lock.
This Mini-Game is just like the previous Skeleton Key Mini-Game.
Move the Tines to their correct Position, Click and Drag the Tine you wish to move to the location in which it belongs.
Once all the Key Tines shapes are matched with the corresponding Lock Tines your goal remains the same.
Your Solution may differ.
The Key Tines are numbered according to the spot on the Key they are supposed to be.
The Key Tines are numbered 1 through 7.
Solution: Tine 1 = 2 Click, Tine 2 = 3 Clicks, Tine 3 = 2 Clicks, Tine 4 = 1 Click, Tine 5 = 4 Clicks, Tine 6 = 1 Clicks, and Tine 7 = 2 Click.
Move the Eye Patch from the Skeleton Head.
Gather the Glass Eye under the Patch.
Exit the Dungeon.
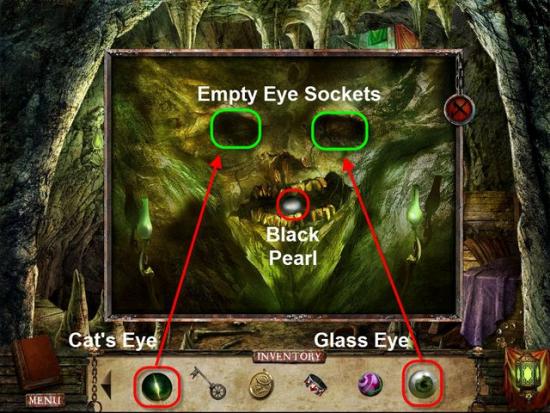
Examine the face in the Wall.
Place the Cat’s Eye and the Glass Eye into the Empty Eye Sockets.
The Mouth will open.
Gather the Black Pearl inside the Mouth.
Return to the Bar.
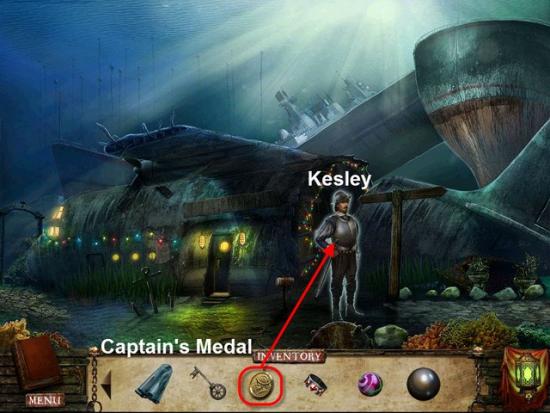
Talk to Kesley.
Give the Captain’s Medal, highlighted in Red, to Kesley.
Receive a Mini Sail.
Head Back to the Crashed Airplane.
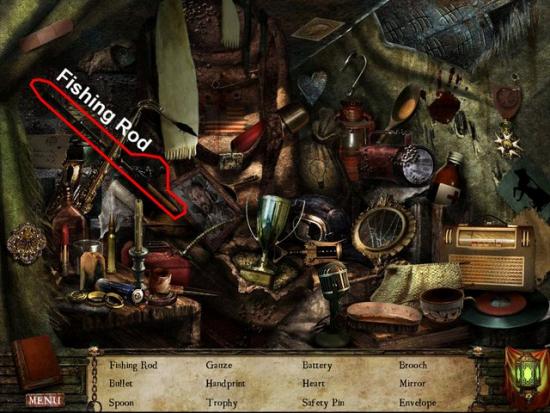
Examine the Cockpit Seat under the Wing.
Gather the Fishing Rod highlighted in Red.
Gather the remaining Hidden Objects.
Return to the Starting Area where your Ship Wrecked.
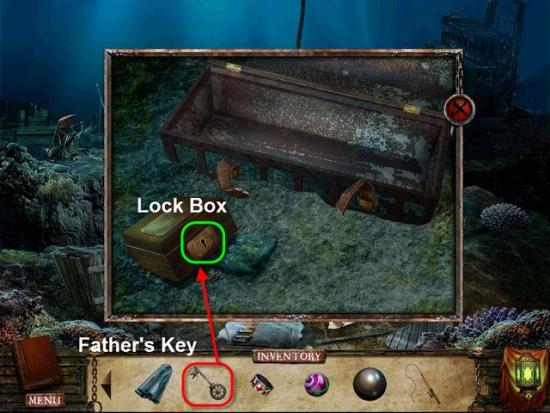
Examine the Chest & Lock Box.
Use the Father’s Key, highlighted in Red, to open the Lock Box, highlighted in Green.
Gather the Father’s Ring from inside the Lock Box.
Return to the City Gate.
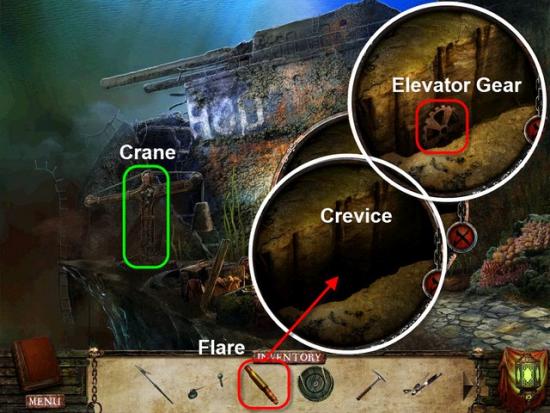
Head Left to the Cliff Edge.
Examine the Crevice.
Use the Flare, from Inventory to Light Up the Crevice.
Gather the fifth Elevator Gear.
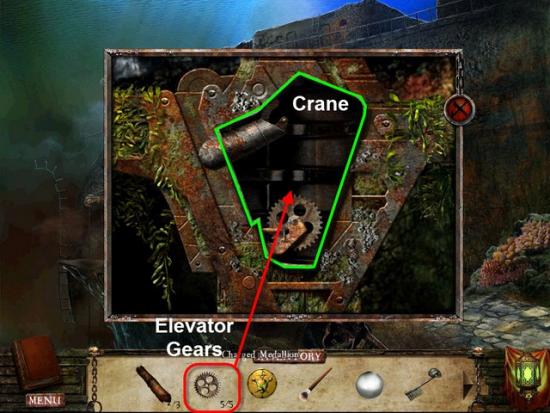
Examine the Crane.
Place the five Elevator Gears into the Crane.
Head Down the Cliff Edge.
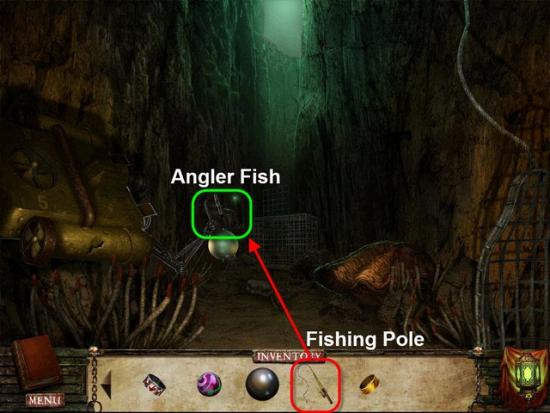
Use the Fishing Pole, highlighted in Red, to capture the Angler Fish, highlighted in Green.
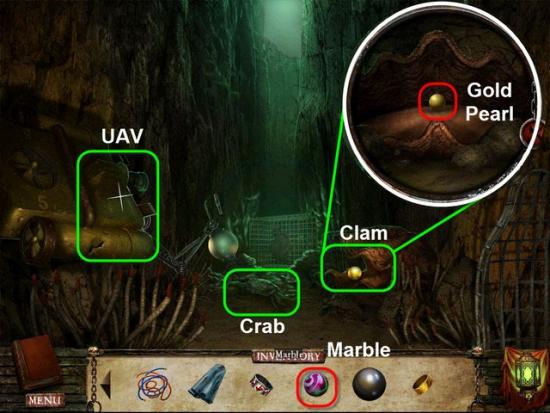
Examine the Clam.
Swap the Marble, from inventory, for the Gold Pearl in the mouth of the Clam.
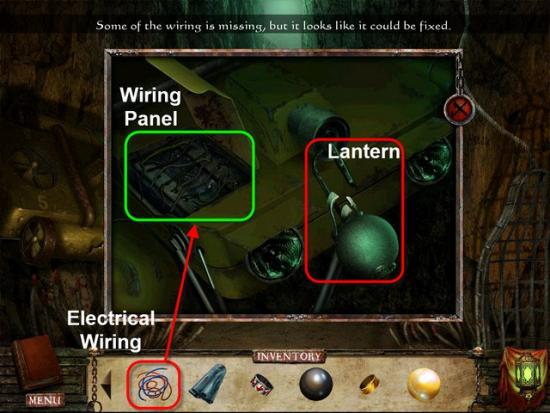
Examine the UAV.
Place the Electrical Wiring, from Inventory, into the Wiring Panel, highlighted in Green.
Next, gather the Lantern highlighted in Red.
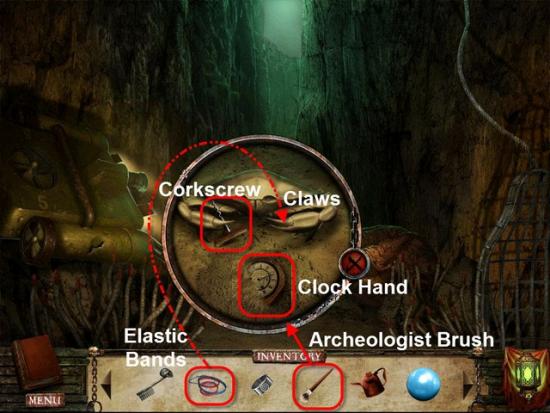
Examine the Crab.
Use the Elastic bands, from Inventory, on the Crabs Claws.
Gather the Corkscrew from the Crab.
Next, use the Archeologist Brush on the Dirt, just in front of the Crab.
Gather the Clock Hand that is revealed.
Head Back up the Cliff.
Return to Davy Jones Home.
Enter the Side Cavern.
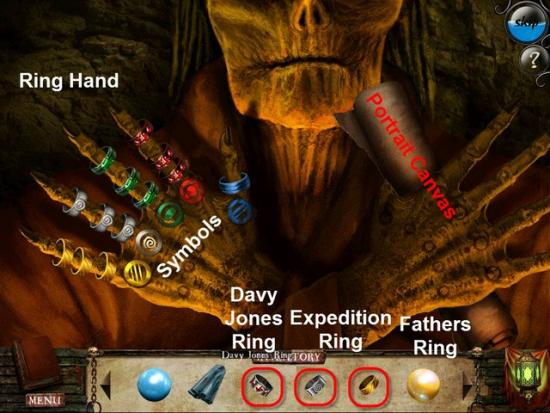
Examine the Pirate Statue.
Place the three Rings on the Ring Hand of the Pirate Statue.
For this Mini-Game the Goal is to rearrange all the Rings on the Hand, so that all the Rings on each Finger matches the Symbol on the Knuckles of the Ring Hand.
Click the Ring you wish to move and then the Finger you would like to put the Ring on.
You can only move the Top Ring of each Finger.
Each Finger can hold up to four Rings except the Thumb which can only hold two Rings.
Once you have all the Rings rearranged correctly the other Hand will open.
Gather the first Portrait Canvas in the second Hand.
Enter the Foyer.
Climb the Stairs.
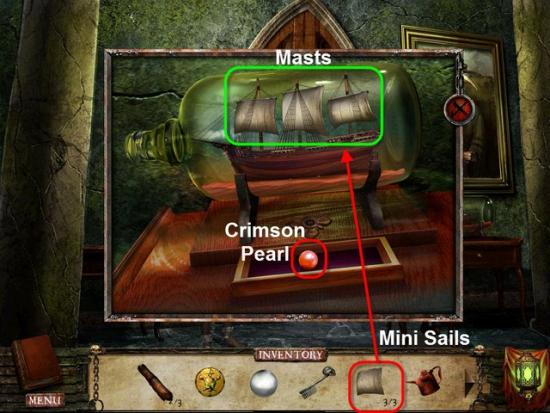
Examine the Ship in a Bottle.
Place the three Mini Sails, from Inventory, on the empty Masts of the Ship.
Panel will open in the Display Stand.
Gather the Crimson Pearl.
Head back Downstairs.
Examine the Foyer Door.
Place the five Pearls into the Door.
The Doors will open.
Enter the Bedroom.
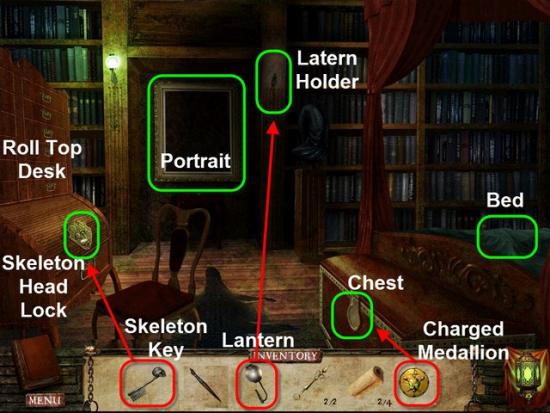
Place the Lantern on the Wall in the Lantern Holder next to the Portrait.
Use the Charged Medallion on the Chest.
Gather the second Portrait Canvas located inside.
Examine the Roll Top Desk.
Use the Old Handkerchief to clean off the Skeleton Head Lock.
Use the Skeleton Key on the Skeleton head Lock.
This Mini-Game is just like the previous Skeleton Key Mini-Game.
Move the Tines to their correct Position, Click and Drag the Tine you wish to move to the location in which it belongs.
Once all the Key Tines shapes are matched with the corresponding Lock Tines your goal remains the same.
Your Solution may differ.
The Key Tines are numbered according to the spot on the Key they are supposed to be.
The Key Tines are numbered 1 through 8.
Solution: Tine 1 = 3 Click, Tine 2 = 1 Clicks, Tine 3 = 2 Clicks, Tine 4 = 1 Click, Tine 5 = 3 Clicks, Tine 6 = 0 Clicks, Tine 7 = 2 Click, and Tine 8 = 1 Clicks.
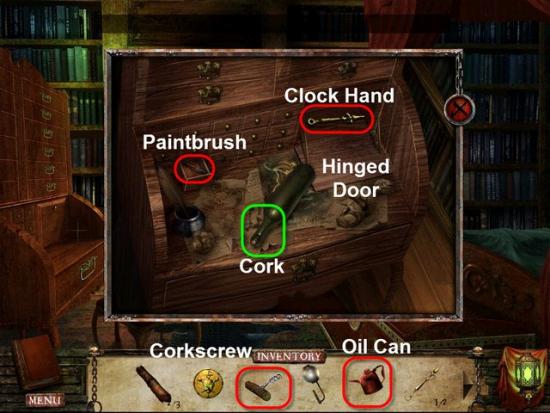
Use the Corkscrew, from Inventory, on the Cork in the Wine Bottle, to open the Wine Bottle.
Receive the third Portrait Canvas.
Use the Oil Can, from Inventory, on the Hinged Door.
Open the Hinged Door.
Retrieve the second Clock Hand.
Open the Small Drawer.
Gather the Paintbrush located inside.
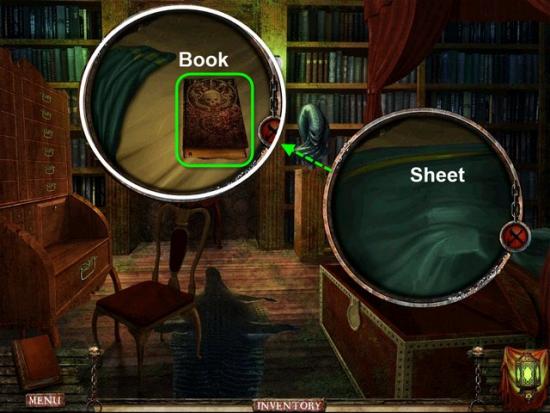
Examine the Bed.
Pull back the Sheet to reveal a Book.
Open the Book.
Note the Time noted inside, 9:04.
Head Back one screen.
Examine the Grandfather Clock.
Place the two Clock Hands on the Clock Face.
Click and Drag the Clock Hands to set the Time to 9:04.
The Clock Face will open up.
Gather the fourth Portrait Canvas located inside.
Reenter the Bedroom.
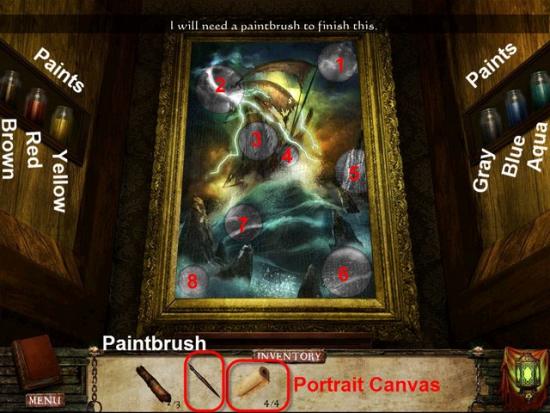
Examine the Portrait.
Place all four Portrait Canvas’s into the Portrait.
Next use the Paintbrush and the Paints to paint the Grayed Out Sections of the Portrait.
Use the Paintbrush on the Jar of desired Color and then the Grayed Out Section you wish to Color.
If you Paint a section the wrong Color it will not look natural.
Just choose another Color with your Paintbrush and repaint.
If you choose the correct Color, the Grayed Out Section will blend into the Painting.
That Section will no longer be affected.
Once you have completed the Portrait, you will receive the Decken Blood Scroll.
Solution:
Exit the Bedroom.
Head upstairs.
Give the Decken Blood Scroll to Jaleyah.
Receive the Translated Blood Scroll.
Finally, enter the Throne Room for the last time.
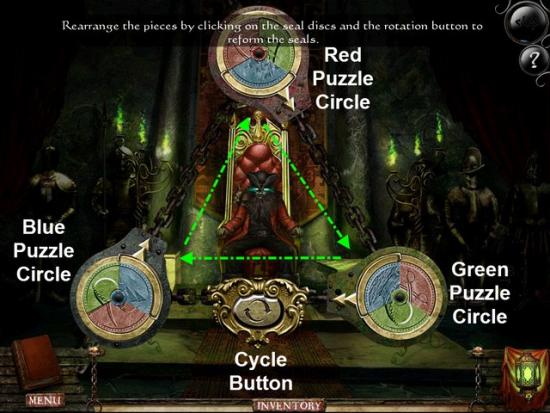
This is the final Mini-Game.
Place the three Blood Scrolls into the Blank Puzzle Circles.
For this final Mini-Game you must reassemble the three Images.
Each of the Images is split into three Sections.
Each of the three Images need to be reassembled and into their matching Puzzle Circle.
Clicking on an individual Puzzle Circle will rotate the Sections of the Image located in that Puzzle Circle.
Clicking on the Cycle Button will move the Puzzle Piece, adjacent to the Arrow, in a clockwise direction.
Each Image must be reassembled in the correct order to reform the Image and must be turned up-right.
Congratulations you have beat Davy Jones and saved all the Lost Souls. You have completed the Game.
