
Grow A Garden 2 Base Price List
What's the most valuable crop?![Evomon Best Starter [Leafbun, Blazpup, or Bubble?]](/wp-content/uploads/2026/06/evomon-best-starter.jpg "Evomon Best Starter [Leafbun, Blazpup, or Bubble?]")
Evomon Best Starter [Leafbun, Blazpup, or Bubble?]
Grass-type, Fire-type, or Water-type?![Evomon Tier List [META and BEST Evomon]](/wp-content/uploads/2026/06/evomon-tier-list.jpg "Evomon Tier List [META and BEST Evomon]")
Evomon Tier List [META and BEST Evomon]
The Evomon dream team.
![[Roblox] Evomon Shiny Hunting Guide – Including Prismatic and Pris Shinies!](/wp-content/uploads/2026/06/evomon-shiny-hunting-guide.jpg "[Roblox] Evomon Shiny Hunting Guide – Including Prismatic and Pris Shinies!")
World of Zellians: Kingdom Builder Walkthrough
Welcome to Gamezebo’s Strategy Guide for World of Zellians: Kingdom Builder.


- Prefer Gamezebo on Google

a:1:i:0;a:2:s:13:”section_title”;s:46:”World of Zellians: Kingdom Builder Walkthrough”;s:12:”section_body”;s:193590:”
Welcome to Gamezebo’s Strategy Guide for World of Zellians: Kingdom Builder.

TABLE OF CONTENTS
TOC o "2-2" n h z t "Heading 1,1" Overview
- NOTE: This Strategy Guide is for the PC version of the game. There is another similar game, World of Zellians (available for the Wii and other platforms), which shares some features but is not the same as Kingdom Builder.
- World of Zellians: Kingdom Builder shares some features with the Build-A-Lot or Wonderburg type of Real Estate game, but it’s not a really a Time Management game and there are many possible solutions to each level. It is more of a Strategy/Puzzle game and has some similarities to Sim City and Roller Coaster Tycoon, although it should never become so overwhelming that you feel like you’re juggling too many tasks at once or have to manage Too Much Information.
- This is a RELAXED game so you can take your time solving the puzzles of how to place all the required Buildings in the allotted space at your own pace (except for the optional Bonus Levels).
- There is no Timed Mode and no Score. You either Pass a level by completing all the Goals or not. But, be careful! If you decide to leave the game before finishing a level, you will LOSE all progress on that level and have to start it over.
- There is no "Expert" rating to try to reach. You must meet all the Goals for each City to finish the level and progress.
- Unlike the Build-A-Lot type of game, there is no concept of "Appeal" or "Happiness" so your citizens will be quite happy living in a House next to a Pig Ranch.
- As you complete cities, you can use the Free Mode (sort of like "Sandbox Mode" in other games), in which you can play with any game features in any Kingdom you have already unlocked without having to accomplish particular goals. You can use the Free Mode to try out strategies or just have fun.
- While there are many types of Buildings to place, they are introduced to you gradually, and you don’t have to memorize anything because the game provides all the information you need as you go along.
- The game becomes MUCH more challenging as you progress through the Kingdoms, as you must fit more and more required Buildings into available space.
- In later levels, you must deal with Emergencies that require timely responses (such needing a Fire Station to put out burning Buildings or Police Stations to catch Thieves) but the time pressure is nowhere near as frantic as you might find in many modern Time Management games.

- This game has nine Kingdoms, each containing five Cities to develop with stated Goals (plus an optional Bonus Level in each Kingdom). Each Kingdom has a different ruler (and they don’t necessarily get along with each other at the beginning of the game). Part of your mission is to rebuild the Kingdoms and get them working with each other as you progress.
- The current level is indicated on the Map by a blue star. Click on the blue star or the "Play" button to start a level.
- You may also "Visit" Cities that you have already completed (indicated by gold stars), but you cannot replay a level once it is completed.
- After you complete each Kingdom you will be presented with an optional Bonus Level that appears on the map as a rainbow-colored star until you complete it.
- There were a few optional Bonus Levels that we didn’t get through in time to complete this Strategy Guide. If you can provide a solution, please let us know how you did it and we will update the Guide and give you credit for the solution!
- Each Building in a City must be connected to a Spring by Roads in order to operate. In some Kingdoms, it might be called "Fountain" instead of Spring, but it works the same way.
- The Spring does not need to be built, but you may have to search to find it.
- The Spring/Spring provides 1 Gold and 1 Materials Income per turn.
- Sometimes the Spring is already connected, and in other levels you must build a Road to connect the Spring to the Road network so your City may thrive.
- If there are existing Roads leading to the outside world, you might need to connect them to your Road network, otherwise your Spring or Buildings may complain that they are unconnected.
- Are FREE to build.
- Click on the Road Icon and then drag your mouse to build roads.
- Roads will automatically create Bridges across water if the water is only one map unit wide.
- All roads must be connected to the Spring in order for Buildings to operate.
- Pre-existing Roads in a City must all be connected to the Spring by the Road network (or Demolished) for the Spring to supply your Buildings and let them operate. Exception: Roads leading to the outside world sometimes must be connected to the Road network and should not be Demolished.
- To cancel placing Roads (or any action), Right-Click the mouse.
- For purposes of this Guide, North is the upper left, East is upper right, South is lower left, and West is lower right.
- You may Demolish Buildings, Roads, Bridges, Boulders and other features, but you may not Demolish Trees (they are Sacred to the Zellians). This can become troublesome in the Forest Kingdom which, umm, has lots of Trees.
- You might need to Demolish Roads or Buildings to make room for other Roads or Buildings.
- You automatically recycle the Gold and Materials from demolished Boulders and Buildings, making the Resources available for other purposes.
- Some Boulders include Gold or Jewels, and provide lots of Gold and Materials when Demolished.
- Demolish all the Boulders you can find if you are short on Resources or need space to place Buildings.
- Gold, Materials, and Population are Resources.
- Gold and Materials Resources are renewed (rather quickly) based on the Gold and Materials Income from your Production and Shops Buildings.
- Population is increased by Social Buildings, specifically by Houses. Other Social Buildings provide Services but not Population (Fire Station, Police Station, School, etc.).
- Many of the Production and Shops Buildings require a Minimum Population, which is NOT cumulative, meaning that if two Buildings each require 8 Population, you only need 8 Population total, not 2×8 or 16.
- Buildings may only be created when you have enough Resources (Gold, Materials, Population), and meet all Requirements (see tables below).
- Each Building may only connect to Roads in a particular direction (you cannot rotate Buildings) indicated by light yellow Connection Arrows.
- Some Buildings have multiple Connection Arrows. You only have to connect ONE of them to a Road, but you may connect any or all of them to a Road
- To see the Requirements for a Building, click on a Building Tab and then hover your mouse cursor over the icon for the Building. If any of the requirements are RED then you don’t have the necessary Gold, Materials, Population or other pre-requisite Buildings.
- Unavailable Buildings are dimmed in the Building Tabs if you don’t meet the Requirements for that Building. You can still see the Requirements.
- In some levels, certain Buildings will simply be "unavailable" and have the universal red circle/bar "No" symbol on them. You cannot see the Requirements for them if they are unavailable.
- To place a building, select it from one of the Building Tabs and then find a clear spot on the City Map.
- Buildings cannot be placed where there are obstacles (Boulders, Trees, Roads, Water, etc.). They also cannot be placed too close to the edge of the City Map (shaded area).
- While placing a Building, if any part of the Building shadow is RED then you can’t place the Building there. Find another spot or remove obstacles (Roads, Boulders) with the Demolish tool first.
- To cancel placing a Building, right-click the mouse.
- You do not need to wait while a Building is being completed before you place another Building, as long as you have the required Resources and Requirements. Again, there is usually NO TIME PRESSURE, so you don’t need to rush (except during Bonus levels).
- If an existing Building doesn’t have one of its Requirements, a circle containing an icon representing the missing Requirement will appear above the Building. For example, if your Grain Farm is on fire, all Buildings requiring Grain will display a Grain Icon over them. The Alerts area will also list any Building that has stopped operating.
- If you have limited room, place larger Buildings FIRST (as long as you have the Resources and meet the Requirements). Connect Roads to these Buildings to get them operating.
- To identify a Building that is already placed, you can click on it on the Map to display its Name and Income (if any).
- Buildings fall into four categories: Social, Production, Shops, and Special:
- Social Buildings either provide housing for Population or provide other services. They provide no Income, but they don’t cost anything to maintain, either.
Cost
Houses
Min.
First
Social
Gold
Materials
Requirement
Residents
Pop.
Kingdom
Small House
30
30
Spring (required by all)
4
Valley
Family House
55
55
8
4
Prairie
Big House
90
90
12
8
Tundra
Fire Station
150
150
–
24
Forest
Police Station
110
110
School
–
16
Volcano
School
160
240
Grocery + Fire Station
–
16
Ruins
University
400
500
2 Schools + 2 Grocery Stores
–
24
Ruins
Hospital
600
800
University + 2 Herbal Pharmacies
–
32
Mountains
- Production Buildings produce both Gold Income and Materials Income.
Cost
Minimum
Income
First
Production
Gold
Materials
Population
Requirement
Gold
Materials
Kingdom
Fishery
50
10
4
Next to Water
6
3
Valley
Wood Mill
65
20
4
3
15
Valley
Orchard
60
30
4
10
4
Valley
Grain Farm
100
10
8
5
20
Valley
Pig Ranch
130
40
4
Grain Farm
6
18
Prairie
Sheep Ranch
175
80
8
Grain Farm
12
35
Prairie
Cow Ranch
350
120
16
Grain Farm
25
80
Prairie
Mine
400
400
16
Wood Mill
30
30
Volcano
- Shops produce only Gold income.
Cost
Minimum
Income
First
Shops
Gold
Materials
Population
Requirement
Gold
Kingdom
Juice Stand
14
6
–
Orchard
4
Valley
Grocery Store
70
15
4
Grain Farm + Orchard
10
Valley
Shoe Shop
75
50
8
Wood Mill + Sheep Ranch
12
Forest
Boutique
125
75
8
Sheep Ranch + Shoe Shop
30
Forest
Diner
190
65
24
Fishery + Pig Ranch
35
Tundra
Herbal Pharmacy
30
30
4
Grain Farm + Orchard
8
Ruins
Ice Cream Parlor
90
60
12
2 Orchards + Cow Ranch
16
Mountains
Party Shop
140
115
32
Boutique + Herbal Pharm.
24
Coast
- Note: Although the Boutique requires Sheep Ranch and Shoe Shop, the Shoe Shop requires Wood Mill and Sheep, so the Boutique really only requires a Shoe Shop (you already have Sheep).
- Special Buildings are only available in particular Kingdoms.
- Some of these Buildings also go through Upgrades, which are discussed at the appropriate level in the Walk-Through.
Cost
Minimum
Income
Special
Gold
Materials
Population
Requirement
Gold
Materials
Kingdom
Big Fishery
265
210
24
4 Fisheries + Shoe Shop,
Next to Water
35
35
Tundra
Fruit Market
340
435
20
4 Orchards + 4 Juice Stand
60
10
Tundra
Gourmet Cottage
610
370
42
Cow Ranch + University
90
15
Tundra
Old Cellar
320
180
36
Fruit Market + Grain Farm
42
8
Tundra
Zagor’s Delight
775
420
56
2 School + 2 Diner
55
–
Tundra
Great Oven
425
910
42
2 Wood Mill + 2 Grocery
130
20
Volcano
Goldsmith
320
520
30
2 Mines + School
54
16
Volcano
Jeweller
1,820
780
64
2 Mines + University
230
45
Volcano
Zagor’s Soothe Spa
3,800
1,860
52
Herbal Pharm + 3 Juice Stand
180
–
Volcano
Oil Refinery
440
220
38
Wood Mill + 3 Fire Station
*
*
Desert
Palm Bank
980
1,225
50
3 Oil + 3 Police Station
500
–
Desert
Dune Market
50
50
0
Spring connection
5
–
Desert
Essence of Al-Zagur
360
890
48
3 Herbal Pharm + 3 Dune Market
115
–
Desert
Palace West Wing
6,350
2,150
–
See Level 39-"The Royal Palace"
–
–
Desert
1001 Night Clothes
1,110
540
34
Boutique + Essence of Al-Zagur
68
–
Desert
Desert Rose Hair
3,040
960
44
University + Essence of Al-Zagur
55
–
Desert
Seaside Cafe
420
380
36
Grocery + Ice Cream Parlor
45
–
Coast(**)
Bench
10
–
Wood Mill
–
–
Coast
Tree
2
12
–
Orchard + Fire Station
–
–
Coast
Fountain
4
20
–
Water Plant
–
–
Coast
Surf Shop
320
535
28
Wood Mill
36
–
Coast(**)
Street Market
630
355
55
Herbal Pharmacy, Shoe Shop
135
–
Coast(**)
Beach Bazaar
930
1,450
68
Party Shop, Street Market
260
–
Coast(**)
Club Zapital
1,350
1,900
79
Police Station, Hospital
325
–
Coast(**)
- Note (*): Oil Refineries can generate positive or negative Income, depending on where they are drilled. They can also stop producing income after they run dry.
- Note (**): Special Buildings on the Coast need to be built next to water (in any direction). Landscaping features (Bench, Tree, and Fountain) do NOT need to be next to water.
- There are many ways to fulfill the Goals for each City and Bonus Level, so this Guide might differ in some ways from your choices. There is no one "Right Way" to play this game.
- While the stated Goals for each City in the game are included, some Goals need other Requirements to be fulfilled before the Goal can be achieved. For example, before you can build a Grocery Store, you need to have both a Grain Farm and an Orchard. Before you can build a School you need to have a both a Grocery Store and a Fire Station.
- In this Guide, we try to list all the things you really NEED to do on each level, even if they are not in the stated Goals for the level.
- We also try to advise you of things you might NOT need to do in order to reach your Goals.
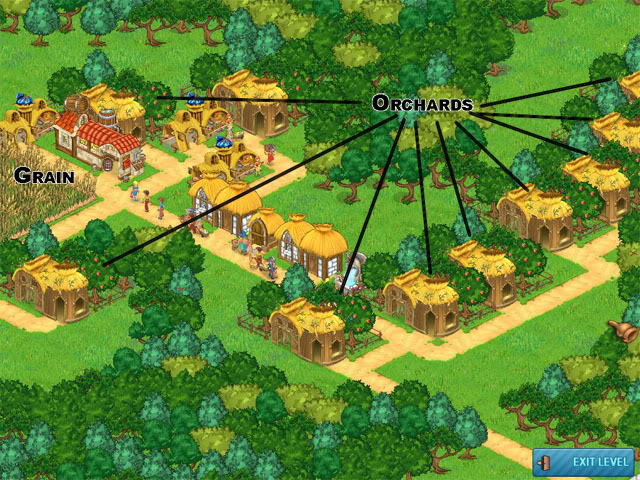
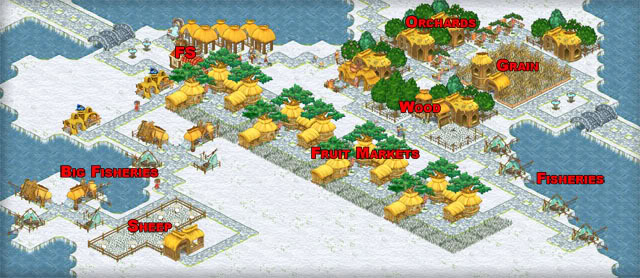
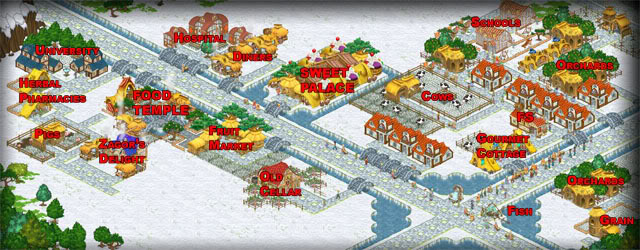
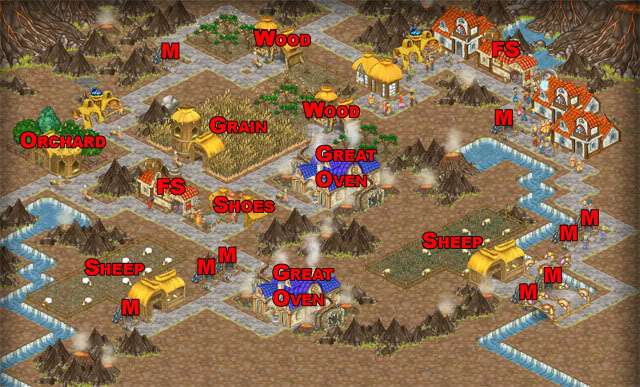
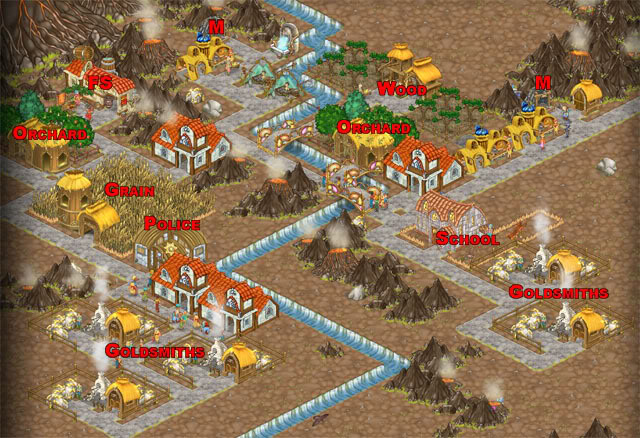
- A screen shot appears at the end of the entry for that level, showing you one possible solution.
- Many of the Buildings will be labeled in the screen shots, but as the Guide progresses, we will not put labels on the common buildings that you should already be familiar with.
- Remember that if you quit a level before completing it, you LOSE all your progress on that level and will need to start it again later. The game will warn you about this.
- Your solution to a level may be more elegant or more efficient, but as long as you meet the Goals of each level, you have succeeded.
- Most of this Kingdom is a Tutorial to help you understand the game’s mechanics. The Goals are relatively easy to achieve.
- Zorm, your Tutor, introduces the basic mechanics of the game.
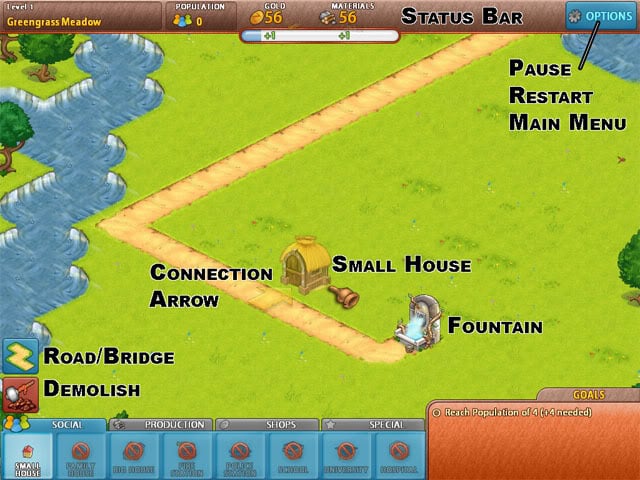
1. Greengrass Meadow (Tutorial)
- You need to build 1 Small House.
- Notice the light yellow Connection Arrow on the Small House.
- You cannot rotate buildings, so they must be built where they connect with a Road.
- The Connection Arrow goes ON the Road. You can place a Building with no Road, but you’ll have to connect it later.
- You can Zoom In/Out on any City Map by rolling your center Mouse Button (if you have one).
- You can also tap the [Up Arrow] key to Zoom In or the [Down Arrow] key to Zoom Out.
- It’s fun to Zoom In all the way so you can hear the residents and animals and see more of the activities going on.
- Zoom Out for an overview of the City Map.
- You can scroll to other parts of the City Map by placing your mouse cursor on the edge of the screen in any direction.
- Shaded areas at the edges of the level are not available for placing Buildings, but sometimes you may build Roads in them.
- To Pause the Game, press [Esc] key or click on the Options Button at the upper right.
Goal
Need
Small House
1
2. Village of Clearlake (Tutorial)
- New Production Building: Fishery, costs 50 Gold and 10 Materials. Income: 6 Gold and 3 Materials.
- New Production Building: Wood Mill, costs 65 Gold and 20 Materials. Income: 3 Gold and 15 Materials.
- You already have the Spring present and some roads.
- Fisheries must be built next to Water on the North, East, or South.
- To grow your Population to 24, you need to build three Small Houses (4 Pop each).
Goal
Need
Add
Fisheries
4
4
Wood Mills
1
1
Population
24
12
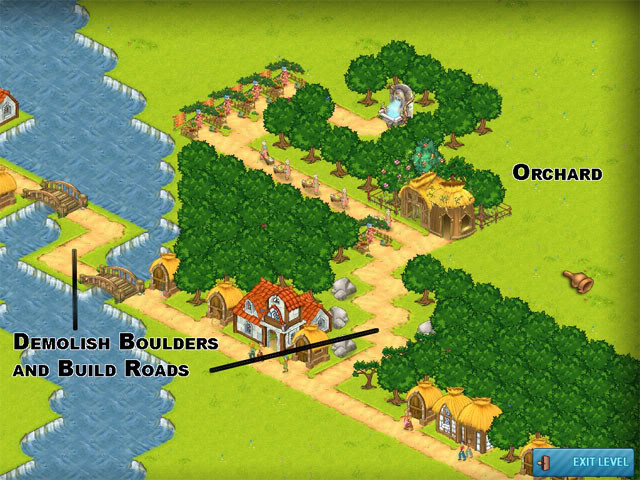
3. Village of Bluebird (Tutorial)
- New Production Building: Orchard, costs 60 Gold and 20 Materials, minimum 4 Population. Income: 10 Gold and 4 Materials.
- New Shop Building: Juice Stand, costs 14 Gold and 6 Materials, requires Orchard. Income: 4 Gold.
- There are already a two Small Houses and one Wood Mill present, but they are not connected to a Spring by Roads, so you need to take care of that, as well.
- Build a Road across the water (creating a Bridge) to the Spring.
- Build four Small Houses to raise the Population to 24 (4 in each Small House).
- Build an Orchard so you can then build the Juice Stands.
Goal
Need
Add
Orchard
1
1
Needed for Juice Stand
Juice Stand
3
3
Requires Orchard
Wood Mill
3
3
Population
24
16
4. Town of Stillwater (Tutorial)
- Introduces the Demolish Tool, which you need to use to remove the Boulders blocking access to the Bridges.
- Demolishing Boulders adds a small amount of Materials (varies). Some Boulders also contain Gold later in the game.
- You also need to Demolish a Small House and additional Boulders to connect the Roads to the Spring.
- Each time you Demolish a Building you get a full refund on Gold and Materials.
- You cannot Demolish Trees (they are sacred to the Zellians) so build the Road around the Trees and connect it to the spot where you demolished the Small House.
Goal
Need
Add
Orchard
1
1
Needed for Juice Stand
Juice Stands
5
5
Requires Orchard
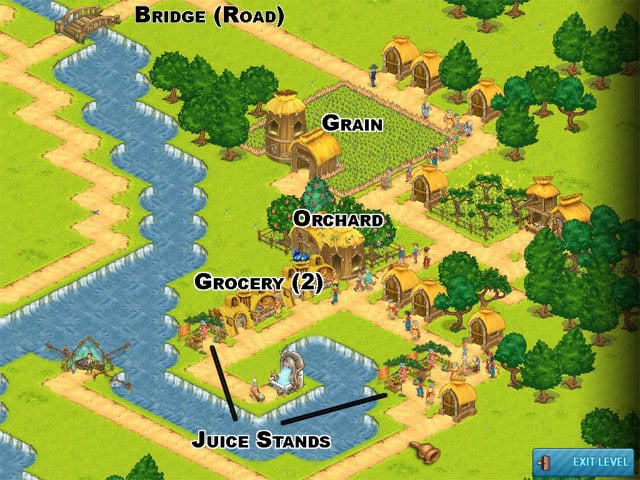
5. Village of Nobridge (Tutorial)
- This level introduces the concept of Alerts (red button in upper right). Click on the Alerts button to see what needs fixing in your City. Click on a particular Alert and the Camera will Pan to the building that needs attention. Click the Alerts button again to hide the Alerts. Once all Alerts have been attended to, the Alerts button disappears.
- New Production Building: Grain Farm, costs 100 Gold and 10 Materials, minimum 8 Population. Income: 5 Gold and 20 Materials.
- New Shop Building: Grocery Store, costs 70 Gold and 15 Materials, requires Grain Farm and Orchard, minimum 4 Population. Income: 10 Gold.
- This Village needs Roads to cross the River before the Buildings will thrive. Roads can only be built across a River of one unit at this point.
- Demolish the Boulder in the upper left and build a Bridge across the River, then connect it to the Road network that leads to the rest of the world.
- You also need to connect the existing Fishery to the Road network or else Demolish it.
- Build additional Small Houses to raise the Population to 32.
Goal
Need
Add
Grain Farm
1
1
Needed for Grocery Store
Orchard
1
1
Needed for Grocery Store
Grocery Store
2
2
Requires Orchard and Grain Farm
Juice Stand
3
3
Requires Orchard
Population
32
32
- After you complete all the Cities in a Kingdom, you are awarded a Trophy.
- The Queen of the Valley awards you the Gift of Plenty, which looks like a cornucopia.
- Trophies are also available to view from the Trophy button on the Main Menu.
- You can continue with the next Kingdom, or play the Bonus Level (Rainbow Star).
- If you skip the Bonus Level, you can return to it later if you wish.
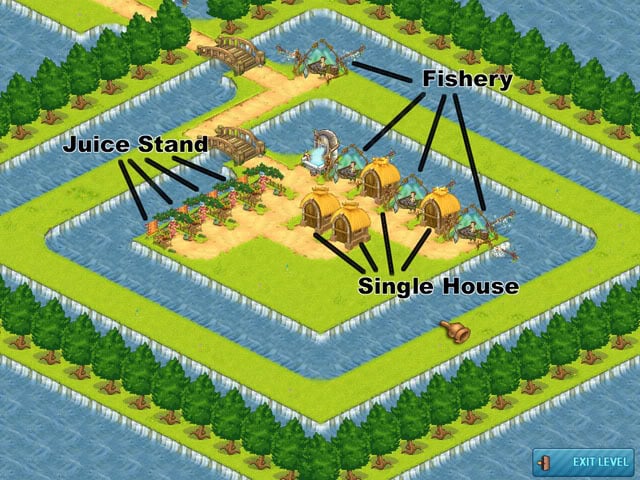
Valley Bonus Level: Isle of Tartour
- During Bonus Levels you have a time limit, but these levels are optional.
- Now you have a time limit (2:30 minutes) to place 4 Social Buildings, 4 Production Buildings and 4 Shops.
- If you don’t succeed within the time limit you can Restart as often as you like.
- There is always a solution to the Bonus Levels, but it may not be obvious at first.
- You can skip a Bonus Level and return to it at any time.
- Here is one possible solution:
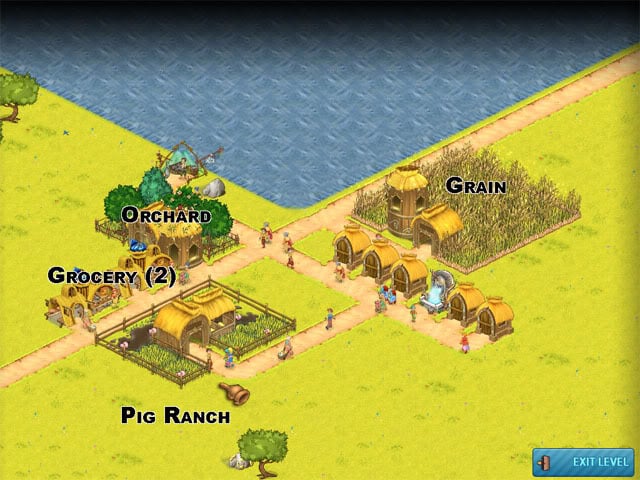
The Prairie 6. Village of Biglake
- New Production Building: Pig Ranch, costs 130 Gold and 40 Materials, with minimum Population 8. Income: 6 Gold and 18 Materials.
- Build a Road connecting the existing Fishery to the Spring.
- Build additional Small Houses to raise the Population to 20.
- Demolish Boulders to make room for larger Buildings. The materials are recycled.
- Build a Grain Farm as soon as possible, because it is required for both the Pig Ranch and the Grocery Store.
- Build an Orchard (required for Grocery Store).
- Build the Pig Ranch LAST, as you will need lots of Gold (130) to build it.
Goal
Need
Add
Population
20
20
Grain Farm
1
1
Needed for Grocery and Pig Ranch
Orchard
1
1
Needed for Grocery Store
Grocery Store
2
2
Requires Orchard and Grain Farm
Pig Ranch
1
1
Requires Grain Farm
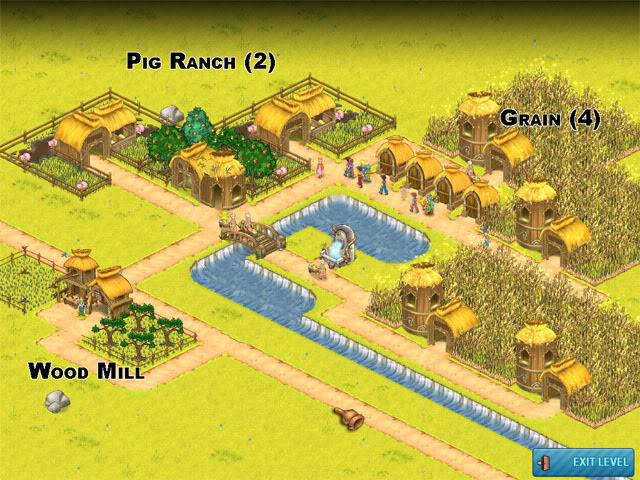
- Demolish the Boulder near the existing Orchard.
- Connect Roads to the Spring, existing Small Houses and existing Road.
- Build at least two Pig Ranches (requires Grain Farm)
- Materials Income of 125: Build multiple Grain Farms (20 materials income), Wood Mills (15 materials income)
Goal
Need
Add
Grain Farm
1
1
Needed for Pig Ranch
Pig Ranch
2
2
Requires Grain Farm
Materials Income
125
125
- New Social Building: Family House, provides shelter for 8 Residents, costs 55 Gold and 55 Materials, also requires minimum 4 Population (there must be at least one Small House).
- New Production Building: Sheep Ranch, costs 175 Gold and 80 Materials, minimum 8 Population, requires Grain Farm. Income: 12 Gold and 35 Materials.
- There is one existing Pig Ranch, but it needs to be connected to the Spring by Road and you need to build a Grain Farm before it can operate.
- Like the previous City, you need to build up your Materials Income quickly. Grain Farms (20) and Pig Ranches (18) provide the most Materials so far.
- You might also build an Orchard for Gold Income (10).
- Build the Sheep Ranch LAST, as you will need lots of Gold (175) to build it.
- Once you have one Sheep Ranch built, you might as well build a 2nd or 3rd one because each one provides 35 Materials Income.
Goal
Need
Add
Family House
2
2
Provides 8 Residents
Grain Farm
1
1
Needed for Pig Ranch and Sheep Ranch
Pig Ranch
4
3
Requires Grain Farm
Sheep Ranch
1
>1
Requires Grain Farm
Materials Income
190
190
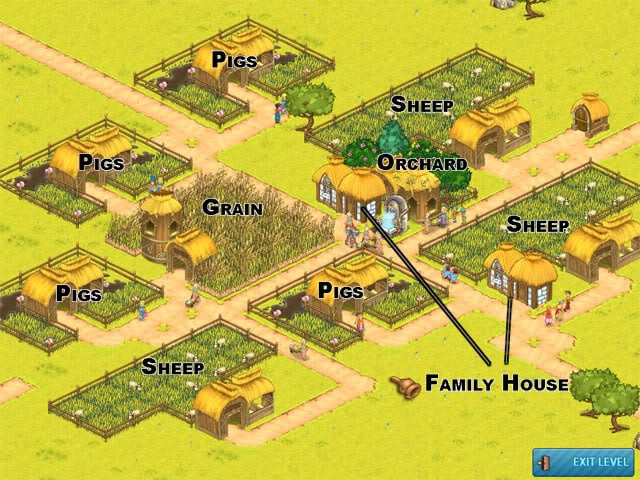
- New Production Building: Cow Ranch, costs 350 Gold and 120 Materials, requires a Grain Farm and Population of 16. Income: 25 Gold and 80 Materials.
- You already have a one Family Houses present. Build more Family Houses and Small Houses to bring your Population up to 50.
- Demolish the Bench next to the Family House to make room for a Road.
- Demolish the Boulder to the south to get some Gold and Materials.
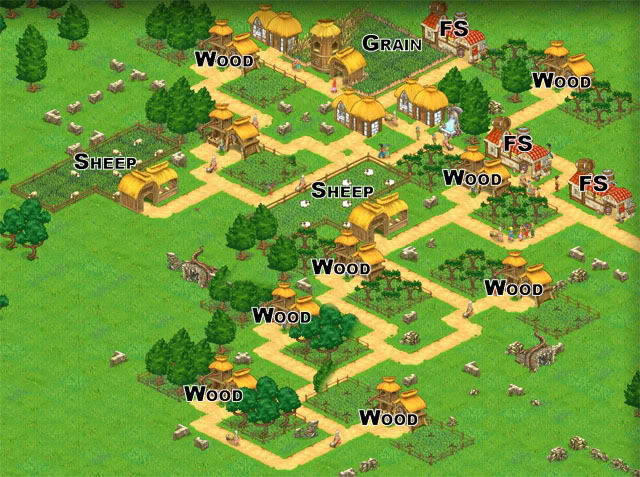
- Some Buildings that may not be listed in the Goals should be built in order to increase Gold Income and Materials Income so you have sufficient Resources. We built two Grain Farms behind the existing Family House, and added Sheep Ranch and a Wood Mill in order to gather Materials more quickly.
- Note that Grocery Stores fit nicely into the spaces near the entrance to a Sheep Ranch.
- The Cow Ranches should be built LAST. You need two of them. And they are HUGE, so make sure you save room for them.
- In the screen shot below, the Grocery Stores, Family Houses and Small Houses are not labeled. At this point in the game, you should be able to recognize them easily.
Goal
Need
Add
Grain Farm
1
1
Needed for Grocery Store and Cow Ranch
Orchard
1
1
Needed for Grocery Store
Grocery Stores
4
4
Requires Grain Farm and Orchard
Cow Ranch
2
2
Requires Grain Farm
Materials
220
220
This is not INCOME but Inventory
Population
50
42
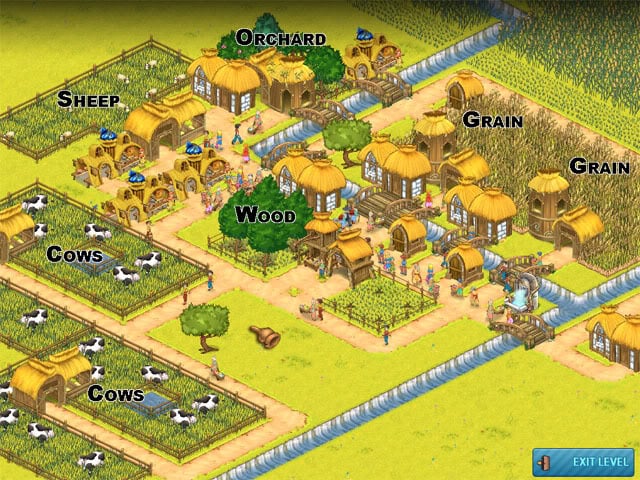
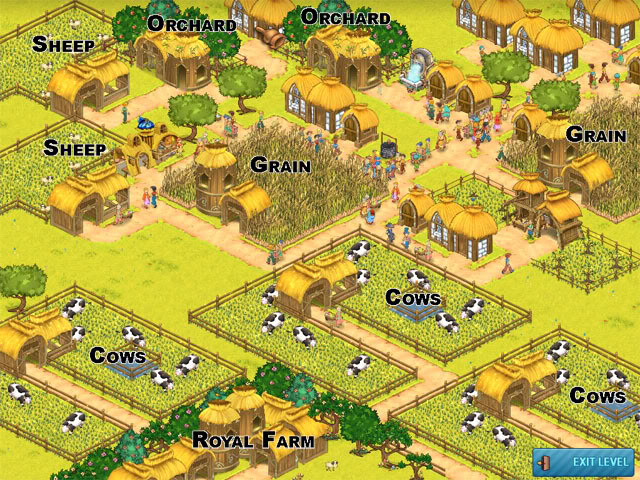
- This is the most difficult level you will have encountered so far. You need to place some very large Buildings, and there is not a lot of free room.
- A new concept of Great Building is introduced. The fifth City in each Kingdom will have one or more Great Buildings to Upgrade.
- Here, you need to Upgrade the Royal Farm to 1 Star. But it’s the final Goal you need to achieve.
Cost
Required
Income
Upgrade
Gold
Materials
Population
Requires
Gold
Materials
Kingdom
Royal Farm
750
1,200
46
Sheep, Cows
240
440
Prairie
- First connect all existing Buildings (Family Houses, Grain Farm and Fisheries) to the Spring by Roads so they start operating.
- You will have 16 Population from the exiting Family Houses, so you need to add 64, or 8 Family Houses. Fit Family Houses and Small Houses in where you can.
- Demolish all the Boulders you can find for additional Materials and to make room for the larger Buildings.
- You will need to Demolish some existing Roads in order to make room for the larger Buildings.
- Just demolish the existing Fisheries after you have some other Income-producing Buildings; the Fisheries provide very low Income. Build them back later if you really want to. At least they’ll stop yelling in the Alert box that they’re disconnected after you Demolish them.
- Next, build an additional Grain Farm and other buildings that produce lots of Materials Income. We also built two Orchards to get some Gold Income and to use up empty space.
- You need to build at least three Cow Ranches so you can to get your Materials Income up. Sheep Ranches help, too, if you can fit them in. Place the Ranches BEFORE Roads and then join the Roads to them.
- By the time you have built the third Cow Ranch, you should probably have the requirements to Upgrade the Royal Farm. Its Income alone (440 Materials) should push you past the requirements for the Level.
Goal
Need
Add
Grain Farm
0
1
Needed for Sheep and Cows
Sheep Ranch
1
2
Needed to Upgrade Royal Farm
Cow Ranch
1
3
Needed to Upgrade Royal Farm
Materials Income
800
800
Income on each Turn
Population
80
64
Prairie Trophy: Gift of Gratitude
- For completing all the Cities in the Prairie, the King of the Prairie awards you a Trophy of a Sheep (which he used to be afraid of).
Prairie Bonus Level: Land of Popcrop
- For this Bonus Level you need to build 4 Social Buildings, 6 Production Buildings and 4 Shops.
- Existing Wheat fields cannot be removed.
- You only have Family Houses available for Social Buildings. They take up two map units N/S.
- You have plenty of Resources and you don’t need to worry about Requirements.
- You have 5:00 minutes.
- Here is one solution:
- We accidentally added an extra Orchard (oops!), but the solution here requires only 3 Orchards, 3 Wood Mills, 4 Grocery Stores and 4 Family Houses.
The Forest 11. Village of Lotwood
- New Social Building: Fire Station, costs 150 Gold and 150 Materials, requires 24 Population.
- If a building is on Fire, an Alert will appear. Click on the Fire Alert to travel to the Building on Fire, and put out the Fire as quickly as possible.
- There is some time before a Building on Fire will burn down, so if you don’t have a Fire Station, build one as quickly as possible as close to the Fire as you can.
- Buildings on Fire produce no Income and will be Demolished if you don’t Extinguish the Fire in time.
- Any Buildings dependent on the burning Building will also produce no Income until the Fire is extinguished. For example, if a Grain Farm is on Fire, Ranches and Grocery Stores will stop operating.
- It takes some time for the Firepeople to travel along the Roads and extinguish the Fire, so try to build Fire Stations in central locations with easy access to the Road network.
- In later levels, you might need to build multiple Fire Stations.
- Use the Demolish tool to remove debris from Buildings that have already burnt down.
- If you have no Fire Stations in any of the Forest levels (and later), you must build one. Fortunately, in this level, you already have a Fire Station.
- You need a Minimum Population of 8 before you can build a Grain Farm, so build a few Family Houses.
- You already have one Orchard, but you need to build a Grain Farm before the Grocery Stores.
- You need to maximize Gold Income, so build as many Orchards if you can fit it in. There isn’t enough room for Cow Ranches here.
Goal
Need
Add
Extinguish a Fire
1
0
Other Fires will occur
Grain Farm
1
1
Needed for Grocery Stores
Orchard
>1
Needed for Grocery Stores and provides 10 Gold Income each
Grocery Store
3
3
Requires Grain Farm and Orchard
Gold Income
130
130
Per turn
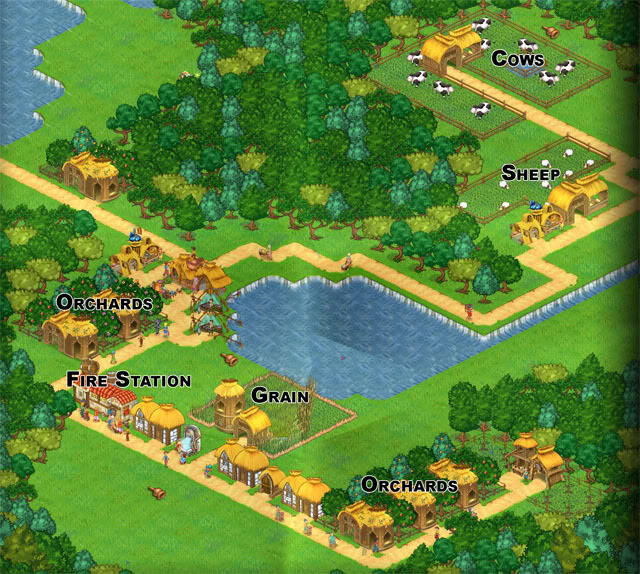
- New Shop Building: Shoe Shop, costs 75 Gold, 50 Materials, requires Wood Mill and Sheep Ranch and 8 Population. Income: 12 Gold.
- Don’t forget to build a Fire Station! You need 24 Population before it can be built, so build some two Family Homes along the Western Road ASAP. The Wood Mill will be on fire before you know it.
- Before you can build the Shoe Shop, you need to build a Sheep Ranch (you already have a Wood Mill).
- You need a Grain Farm before you can build the Sheep Ranch. We built one behind the row of Family Houses and the Fire Station. You could build two Grain Farms there.
- Connect the Roads to the East and find enough space for the Sheep Ranch and a Cow Ranch (for Income).
- Build Orchards (where you can fit them) to raise your Gold Income.
Goal
Need
Add
Fire Station
1
1
Requires 24 Population
Wood Mill
1
0
Needed for Shoe Shop
Grain Farm
1
1
Needed for Sheep Ranch
Sheep Ranch
1
1
Requires Grain Farm,
Needed for Shoe Shop
Shoe Shop
1
1
Requires Wood Mill and Sheep
Acquire Gold
640
640
Inventory
Gold Income
150
150
Per Turn
- You start with only two Family Houses and very little Gold or Materials.
- Build lots Fisheries near the central Island to start generating Gold Income quickly, even though it’s not much. The Income cycle is pretty fast.
- Once you start earning over 50 Gold per turn, switch to building Family Houses to get the Population up to 24, then build a Fire Station.
- Orchards provide 10 Gold and 4 Materials. Build at least one so you and also build a Grocery Store after you have a Grain Farm.
- You can build more than three Shoe Shops, but you might need to build an extra Sheep Ranch if you build too many.
- If you can find the space, build a Cow Ranch for 25 Gold Income.
- There are some gold-filled Boulders to the South and West, if you want to Demolish them for quick Gold and Materials Income.
- Don’t forget to build a Fire Station ASAP!
Goal
Need
Add
Fire Station
1
1
Requires 24 Population
Wood Mill
1
1
Needed for Shoe Shop
Grain Farm
1
1
Needed for Sheep Ranch
Sheep Ranch
1
1
Needed for Shoe Shop
Shoe Shop
3
3
Requires Wood Mill and Sheep
Population
56
36
Gold Income
195
195
Per Turn
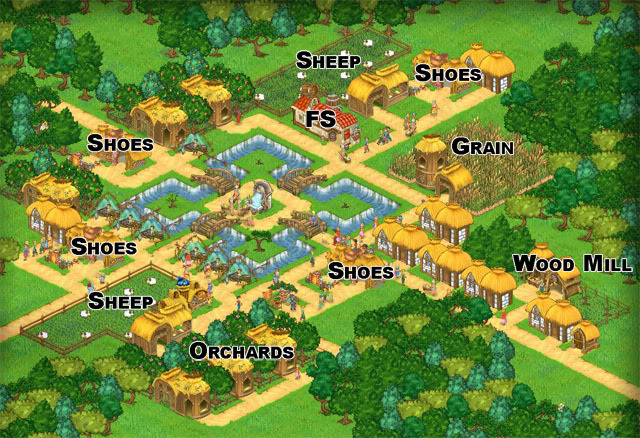
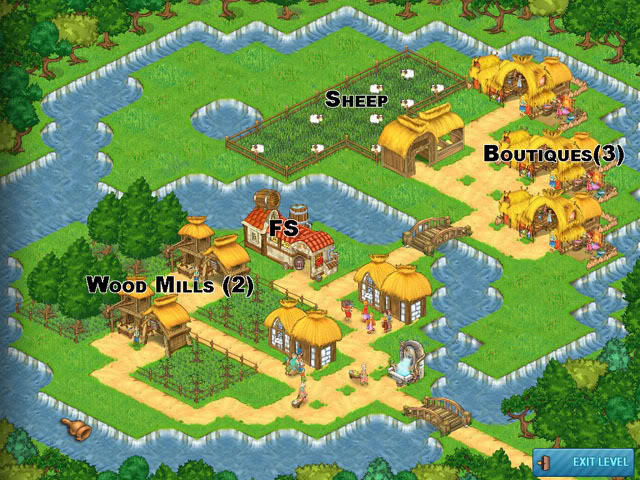
- New Shop Building: Boutique. Costs 125 Gold, 75 Materials. Needs a Sheep Ranch, a Shoe Shop, and 8 Population. Income: 30 Gold.
- You start the level with many Buildings in place, but there is no Road network connecting them to the Spring, so you need to start by building Roads. This includes the Roads running off the screen to the East and North.
- Build a Family House to raise your Population to 24 so you can build a Fire Station ASAP.
- Build a Cow Ranch (even though it’s not required) to start pumping up your Gold and Materials Income. It is somewhat difficult to find a spot to fit one in, so do this before placing other new Buildings.
- After you meet the Requirements for your Shoe Shops and Boutiques, build them. We chose to build the Boutiques and some Shoe Shops on the island.
- Build Orchards and Grocery Stores (where you can find room) in order to raise your Gold Income.
Goal
Need
Add
Fire Station
1
1
Requires 24 Population
Wood Mill
1
1
Needed for Shoe Shop
Grain Farm
1
1
Needed for Sheep Ranch
Sheep Ranch
1
1
Needed for Shoe Shop
Shoe Shop
4
4
Requires Wood Mill and Sheep
Needed for Boutique
Boutique
2
2
Requires Sheep and Shoe Shop
Acquire Gold
2,750
2,750
Inventory
Gold Income
280
280
Per Turn
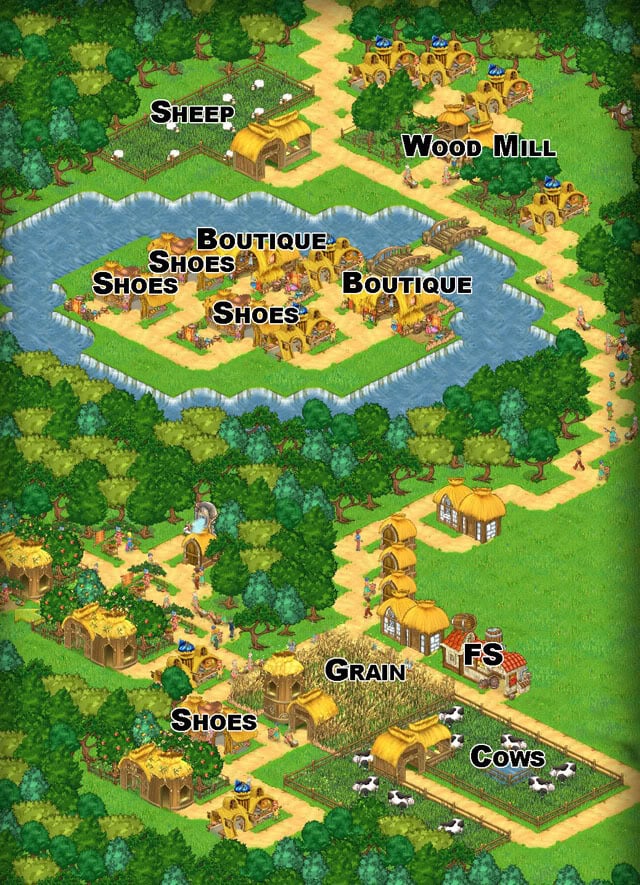
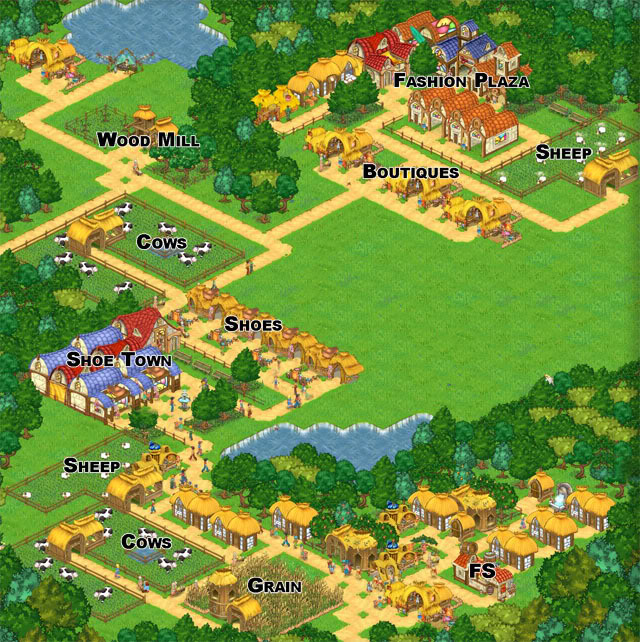
- In this level you have TWO Great Buildings to Upgrade:
Cost
Required
Income
Upgrade
Gold
Materials
Population
Requires
Gold
Materials
Kingdom
Shoe World
1,600
850
48
2 Sheep, 4 Shoe Stores
450
Forest
Fashion Plaza
3,200
2,450
64
1 Cow, 4 Boutiques
950
Forest
- Of course, you must build all the Required Buildings before you can develop Shoe Shops or Boutiques. They are listed in the table below.
- You start out with lots of missing Roads, so hook up your Road network to the Spring. Demolish Roads that you don’t need.
- There is a lonely Fishery off to the north that you need to connect to the Roads. Don’t Demolish it right away as it is providing some Income.
- You also start with 0 Population, so first build a Small House, then start placing Family Houses to get your Population up to 24 so you can build the Fire Station.
- Don’t forget to build a Fire Station ASAP!
- You can’t Demolish any part of the existing Shoe World or Fashion Plaza.
- After you Upgrade both Shoe World and Fashion Plaza, you should have no trouble reaching the Gold Income goal.
Goal
Need
Add
Fire Station
1
1
Requires 24 Population
Wood Mill
1
1
Needed for Shoe Shop
Grain Farm
1
1
Needed for Sheep Ranch
Sheep Ranch
2
2
Needed for Shoe Shop
Shoe Shop
4
4
Requires Wood Mill and Sheep
Needed for Boutique
Boutique
4
4
Requires Sheep and Shoe Shop
Gold Income
1,650
1,650
Per Turn
- For completing all the Cities in the Forest, the King and Queen of the Forest award you a Trophy of a Tree.
- Remember to wash your hands, since you don’t want to catch their sniffles.
Forest Bonus Level: Lonely Spring
- In this Bonus Level you need to build 3 Social Buildings, 3 Production Buildings, and 3 Shops.
- You can build all Buildings without worrying about Requirements.
- Build the Fire Station FIRST, because Buildings will start burning down right away.
- The Fire Station counts as a Social Building.
- Production Buildings available include only Wood Mills and Sheep Ranches. We built 2 Wood Mills and 1 Sheep Ranch.
- Shops available include only Boutiques.
- After you have placed the Productions Buildings and Shops, fit in two more Family Houses.
- You have 3:00 minutes to complete the level.
- Here is one possible solution:
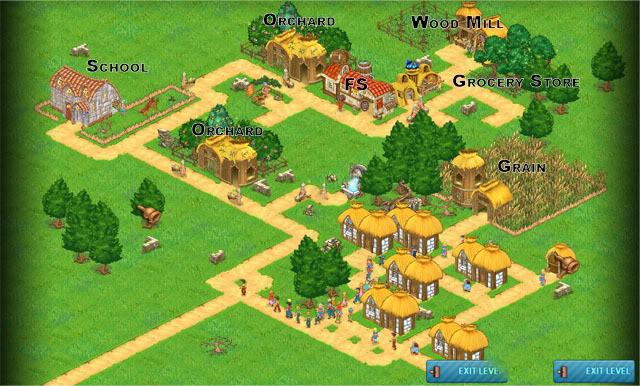
- New Social Building: School costs 160 Gold, 240 Materials and requires 16 Population. Also requires Grocery Store and Firehouse.
- New Shop Building: Herbal Pharmacy costs 30 Gold, 30 Materials and requires 4 Population. Also requires Grain Farm and Orchard. Income: 8 Gold.
- Existing Ruins may not be Demolished (they are Sacred, just like Trees) so you will need to build around them.
- The Spring is disconnected from the existing Road network, so get it connected fast.
- Demolish all the Boulders you can find to gather Materials and make room for larger Buildings.
- Your first objective should be the Fire Station, but you need a minimum of 24 Population and it costs 150 Gold and 150 Materials, which you don’t yet have.
- Build a Small House, then a few Family Houses.
- Build one or more Orchards (Income of 10 Gold, 4 Materials) and a Wood Mill (Income of 3 Gold, 15 Materials).
- Build more Family Houses to get your Population up to 24, then build the Fire Station ASAP!
- One or more Buildings may catch on fire before the Fire Station is built, but you have some time before they burn down. Place the Fire Station as centrally as you can, because the Firemen need to follow the Roads to get to the burning Building, and that takes precious time.
- Build a Grain Farm to meet the requirements for the School.
- You don’t have to build a Herbal Pharmacy to meet the Goals for this City. We don’t know why they included it in this Level, because it’s not needed until the next one.
- Once the School is built, continue adding Family Houses to bring total Population to 48.
Goal
Need
Add
Fire Station
1
1
Requires 24 Population,
Needed for School
Grain Farm
1
1
Needed for Grocery Store and Herbal Pharmacy
Orchard
1
>1
Needed for Grocery Store and Herbal Pharmacy
Grocery Store
1
1
Requires Grain Farm and Orchard,
Needed for School
Herbal Pharmacy
–
–
Requires Grain Farm and Orchard
School
1
1
Requires Grocery and Fire Station
Population
48
48
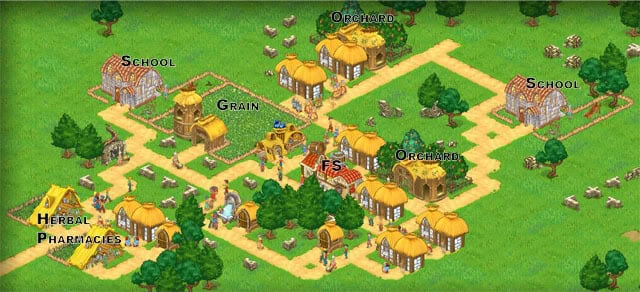
- You need to build 2 Schools, 2 Herbal Pharmacies and get your Population up to 60.
- The strategy here is similar to the previous level.
- You start with a Spring and three Small Houses, but the Road network is in shambles. You have to build around existing Ruins-you can’t Demolish them.
- NOTE: If you Demolish the Road that leads off the screen to the West, it will break the Road Network and your Spring won’t supply water to any Building.
- Demolish all the Boulders you can find to get Resources.
- Build Family Houses to get your Population up to 24.
- Build a Fire Station ASAP!
- Demolish Roads that serve no obvious purpose in order to make room for the Buildings you need.
- Build a couple of Orchards to start your Gold Income.
- Build a Grain Farm so that you can build the Grocery Store and Herbal Pharmacy.
- Place your Schools and Herbal Pharmacies.
- Build more Family Houses to get the Population up to 60.
Goal
Need
Add
Fire Station
1
1
Requires 24 Population,
Needed for School
Grain Farm
1
1
Needed for Grocery Store and Herbal Pharmacy
Orchard
1
>1
Needed for Grocery Store and Herbal Pharmacy
Grocery Store
1
1
Requires Grain Farm and Orchard,
Needed for School
Herbal Pharmacy
2
2
Requires Grain Farm and Orchard
School
2
2
Requires Grocery and Fire Station
Population
60
48
- Zorm doesn’t show up for this level (or the rest of the Forest Kingdom) because he is still angry at you for proving that you CAN fit in the required Buildings without Demolishing Ruins in the previous two levels.
- The Queen of the Ruins asks for 8 Wood Mills, 2 Sheep Ranches and 2,900 Materials.
- The challenge is to find room for all the required Buildings. Remember that you can’t Demolish Ruins.
- Don’t forget to build a Fire Station ASAP! You have already have 8 Population, so you need to add 16 more before you can build a Fire Station.
- You already have a Grain Farm, so you don’t need to build one for the Sheep Ranch.
- Demolish all the existing Roads that are unnecessary obstacles to placing your Buildings.
- You might need to build additional Fire Stations, because it seems that they can only handle one fire at a time (and you get multiple fires on this level). It also takes them time to traverse the Roads to the burning Building.
Goal
Need
Add
Fire Station
1
>1
Requires 24 Population
Wood Mill
8
8
Sheep Ranch
2
2
Materials
2,900
2,700
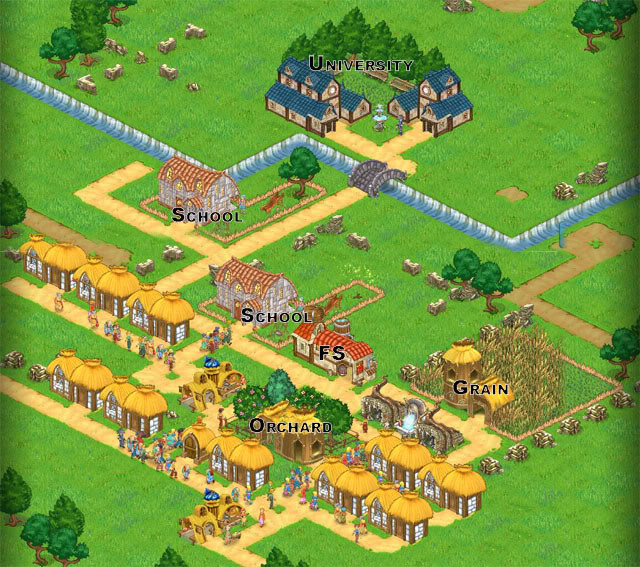
- New Social Building: University. Costs 400 Gold and 500 Materials. Requires TWO Schools, TWO Groceries, and Minimum Population of 24.
- Demolish any unnecessary existing Roads and Boulders to make room for the larger Buildings.
- Of course you need to build a Fire Station, but you already have a Population of 28, so build the Fire Station FIRST.
- You also already have a Grain Farm and an Orchard, so you can build the Grocery Store or Herbal Pharmacy.
- You can fit Grocery Stores in almost anywhere.
- Build 2 Schools and then build the University.
- Add additional Family Houses to bring the Population up to 80.
Goal
Need
Add
Fire Station
1
1
Requires 24 Population,
Needed for School
Grocery
2
2
1 Needed for School and
2 Needed for University
School
2
2
Requires Fire Station and Grocery,
2 Needed for University
University
1
1
Requires 2 Schools and 2 Grocery
Population
80
52
- Since the Queen of the Ruins wants to make her Kingdom the most advanced in knowledge of the Zellian History, you need to Upgrade the Heritage Center to TWO STARS! That means there are two levels of Upgrade to achieve:
Cost
Required
Income
Upgrade
Gold
Materials
Population
Requires
Gold
Materials
Kingdom
1 Star
1,800
1,850
48
3 Wood, 1 University
Ruins
2 Stars
2,500
2,900
84
2 Boutique, 2 Fire Station
350
Ruins
- Again, you need a Fire Station ASAP, so build some Family Houses to get your Population up to 24, and then build the Fire Station.
- It’s not noted by the game, but the Big House with the Red Roof already contains 12 Residents. You can’t build these yet, so we don’t know why they are introduced here.
- Connect the existing Heritage Center to the Roads.
- You need to build at least one Grain Farm and Orchard to build the Grocery Store and the School.
- Bulldoze Boulders and any unnecessary Roads.
- You need 2 Schools and 2 Grocery Stores to build the University.
- You could build a Cow Ranch (not required) to generate some Gold and Materials Income.
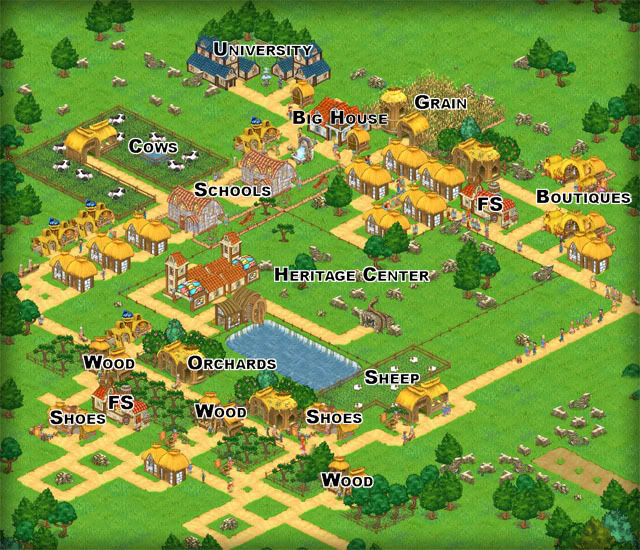
- As soon as you have the Requirements, perform the Upgrade 1 on the Heritage Center.
- You learn that you will also need to find or make room for a Sheep Ranch, which you need to build the Shoe Shop and eventually 2 Boutiques (required for Upgrade 2 to Heritage Center).
- Build more Family Houses to raise your Population to 84 for the Upgrade 2 and 96 to meet the level Goals.
- Perform Upgrade 2 on the Heritage Center.
- We built a couple of Juice Stands and an extra Shoe Shop for no other reason than it was fun to do.
Goal
Need
Add
Fire Station
1
1
Requires 24 Population,
Needed for School
Grain Farm
1
>1
Needed for Grocery Store and for Sheep Ranch
Orchard
1
>1
Needed for Grocery Store
Grocery Store
2
2
Needed for School, University
Wood Mill
3
3
Needed for Upgrade 1 to Heritage Center and for Shoe Shop
School
2
2
2 Needed for University
University
1
1
Needed for Upgrade 1 to Heritage Center
Sheep Ranch
1
1
Requires Grain Farm
Shoe Shop
1
1
Requires Wood Mill and Sheep
Boutique
2
2
Needed for Upgrade 2 to Heritage Center
Requires Sheep and Shoe Shop
Population
96
80
- The Queen of the Ruins awards you with a Gift of Wisdom (a Book about ancient Zellian).
Ruins Bonus Level: The Old City
- For this Bonus Level you must build 3 Social Buildings, 2 Production Buildings and 1 Shop.
- Unfortunately, the only Social Buildings you have available are School and University. The only Production Buildings available are Sheep Ranch and Cow Ranch, and the only Shop available is a Boutique.
- You don’t need to worry about a Fire Station (and you can’t build one, anyhow)!
- Forget about trying to place a Cow Ranch or University, you don’t have enough room.
- You don’t need to worry about Requirements, but Roads must be attached for the Buildings to Operate.
- You will have to Demolish some Roads to get your Buildings to fit. Don’t Demolish Roads leading to the outside world, or the Road network might fail.
- Build additional Roads to attach the new Buildings after they are placed.
- You cannot demolish existing Ruins.
- You have 6:00 minutes.
- Here is one possible solution with 3 Schools, 3 Sheep Ranches (only 2 Production Buildings are required-we got carried away!) and a 1 Boutique:
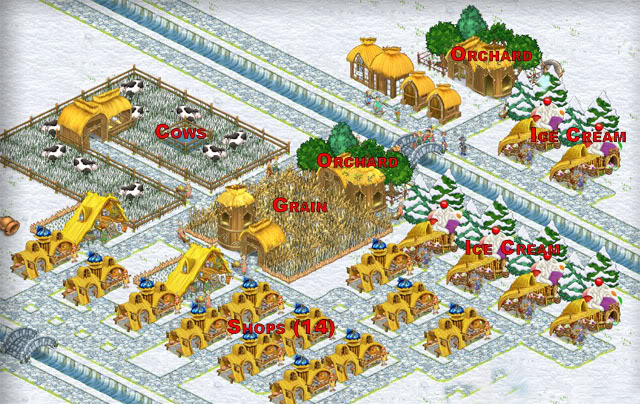
- New Shop Building: Ice Cream Parlor, costs 90 Gold and 60 Materials, requires TWO Orchards, a Cow Ranch and 12 Population. Provides 16 Gold Income.
- Now we’re in the cold Mountains and the goal is 6 Ice Cream Parlors and 20 total Shops.
- Connect the Road network to the Spring (Roads look different here in the snowy Mountains).
- Build a Grain Farm for the Cow Ranch.
- Keep the existing Cow Ranch, but Demolish the existing Pig Ranch and Sheep Ranch in order to gain Materials (and space).
- Build 2 Orchards, needed for Ice Cream Parlor.
- Build a Family House to raise the Population to 12 before you can build Ice Cream Parlor.
- Build 6 Ice Cream Parlors and then fill in the remaining 14 shops with Grocery Stores and Herbal Pharmacies, excepting Juice Stands (which are not available in this level).
Goal
Need
Add
Grain Farm
1
1
Required for Cow Ranch
Orchards
2
2
Required for Ice Cream Parlor
Ice Cream Parlor
6
6
Requires 2 Orchards and 1 Cows
Shops
20
14
Any type of shop, except Juice which freezes in the cold. Ice Cream Parlors count as Shops.
- Zorm is back, but he’s not happy with your success because he says it makes him look bad. Watch out for him, he might be up to no good! He might be MAD!
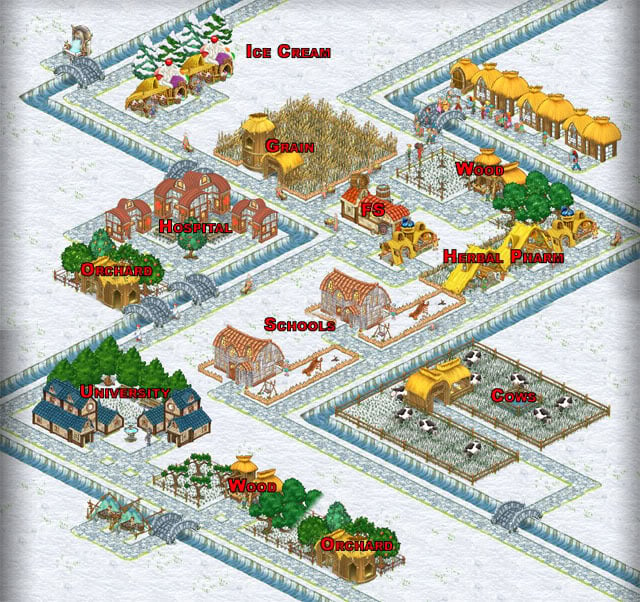
- New Social Building: Hospital: costs 600 Gold and 800 Materials, requires 2 Herbal Pharmacies and 1 University, minimum 32 Population.
- New Alert Hazard: Madmen, who run around destroying Roads and Buildings if they are not treated in Hospitals. Each Hospital can treat up to 3 Madmen at a time.
- The meter over the Madmen counts down (sort of like the meter on Buildings on Fire). Click on the meter before it runs down to have them treated by a Doctor at a Hospital.
- If Madmen destroy Roads, you might need to repair the Roads to connect your Buildings to the Road network.
- If Madmen destroy Buildings, you will need to place them again.
- Don’t forget to build a Fire Station (even though it’s cold here, it’s needed for School).
- You have an existing Hospital, but it needs 2 Herbal Pharmacies and 1 University before it will function. Since the Hospital is already here, you don’t need to get your population up to the 32 you would need if you were building a new Hospital.
- Remember to save room for a Cow Ranch, you need it for the Ice Cream Parlors.
- After you take care of the Madmen, build another Orchard, then a couple of Ice Cream Parlors and relax.
Goal
Need
Add
Fire Station
1
1
Requires 24 Population,
Needed for School
Grain Farm
1
1
Needed for Herbal Pharmacy and Grocery Store
Orchard
2
2
Needed for Herbal Pharmacy and Grocery Store, Ice Cream Parlor
Grocery Store
2
2
Needed for School and University
Herbal Pharmacy
2
2
Requires Grain Farm and Orchard,
Needed for Hospital
School
2
2
Needed for University,
Requires Grocery and Fire Station
University
1
1
Needed for Hospital,
Requires 2 Schools and 2 Groceries
Hospital
1
0
Requires 2 Herbal Pharmacies and
1 University
Cow Ranch
1
1
Needed for Ice Cream Parlor
Ice Cream Parlor
2
2
Requires 2 Orchards and
1 Cow Ranch
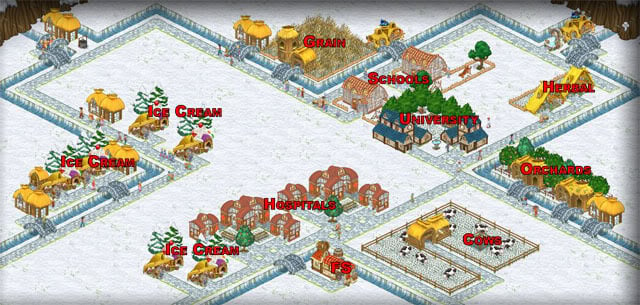
- The stated Goals are 2 Hospitals, 10 Shops and 48 Population
- You start with an existing Fire Station(!), 12 Population, a Grain Farm, an Orchard, and 2 Ice Cream Parlors (but they need an additional Orchard and a Cow Ranch before they operate).
- As the Madmen wander around before you build Hospitals, they will possibly destroy Roads and Buildings. Alerts will help you repair the damage. In the screen shot (below) notice the missing Road by the Herbal Pharmacies. We forgot to fix that, but it doesn’t matter since they’re still connected to the Road network.
- You have plenty of available space to work with in this level, but still be careful when you place larger Buildings.
- There are some Boulders at the North and East you can Demolish for Materials, if you like.
- Build a Family House to get your Population up to 16 so you can build the Cow Ranch.
- Build another Orchard and then a Cow Ranch to get the Ice Cream Parlors operational.
- Build 2 Grocery Stores and 2 Herbal Pharmacies.
- Build 2 Schools, then a University.
- Build 2 Hospitals and get those Madmen off the streets!
- Finally, build additional Shops (any type) and Family Houses to complete your goals.
Goal
Need
Add
Fire Station
1
0
Requires 24 Population,
Needed for School
Grain Farm
1
0
Needed for Herbal Pharmacy and Grocery Store
Orchard
2
1
Needed for Herbal Pharmacy and Grocery Store, Ice Cream Parlor
Grocery Store
2
2
Needed for School and University
Herbal Pharmacy
2
2
Requires Grain Farm and Orchard,
Needed for Hospital
School
2
2
Needed for University,
Requires Grocery and Fire Station
University
1
1
Needed for Hospital,
Requires 2 Schools and 2 Groceries
Hospital
2
2
Requires 2 Herbal Pharmacies and
1 University
Cow Ranch
1
1
Needed for Ice Cream Parlor
Ice Cream Parlor
2
0
Requires 2 Orchards and
1 Cow Ranch
Shops
10
8
Start with 2 Ice Cream Parlors
Population
48
26
Start with 12
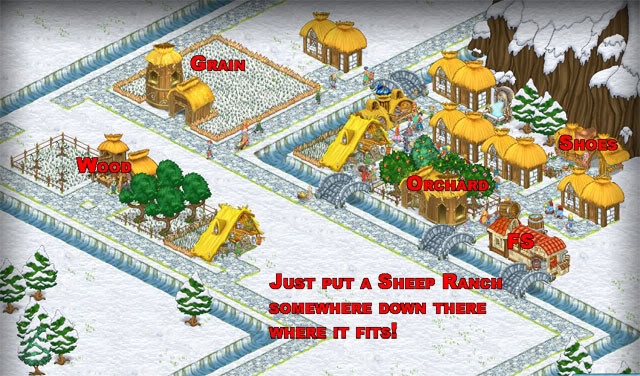
- Stated Goal: Gather 2,400 Materials
- The challenge here is the limited space.
- You start with 8 Population, so add 16 Pop to build the Fire Station ASAP! You might not need it, but it never hurts to have one!
- Demolish all the Boulders you can find to get Gold and/or Materials Resources.
- You already have 1 Herbal Pharmacy, 1 Grocery Store, and 1 Shoe Shop, but the Pharmacy and the Grocery need a Grain Farm and Orchard to operate, and the Shoe Shop needs a Wood Mill and a Sheep Ranch to operate.
- So, build a Grain Farm and an Orchard
- Also, build a Wood Mill and a Sheep Ranch (anywhere)!
- You have some Madmen running around, but as long as you reach 2,000 Materials, you don’t have to build a Hospital to treat them! Just fix any damage that they cause.
Goal
Need
Add
Fire Station
1
1
Requires 24 Population,
Needed for School
Grain Farm
1
1
Required for Sheep Ranch, Grocery and Herbal Pharmacy
Orchard
1
1
Needed for Grocery and Pharmacy
Wood Mill
1
1
Needed for Shoe Shop
Sheep Ranch
1
1
Requires Grain,
Needed for Shoe Shop
Shoe Shop
0
0
Requires Wood Mill and Sheep Ranch
Materials
2,400
1,875
- Zorm has pretty much abandoned you by now. Wonder what’s up with that?
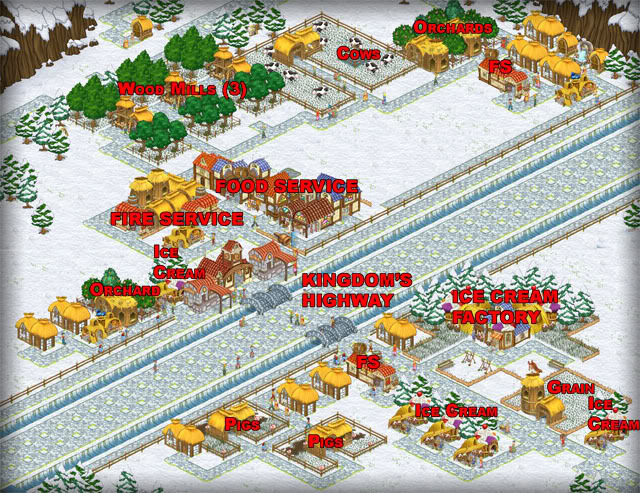
- In this level you need to Upgrade 4 Great Buildings, they are: Fire Service, Ice Cream Factory, Kingdom’s Highway, and Food Service.
- But do them in this order: Fire Service, Ice Cream Factory, Food Service then Kingdom’s Highway.
- Connect all the Roads to the Great Buildings where you see the light green Connection Arrows.
- We don’t have the detailed requirements for each Upgrade here. You need to build 2 Fire Stations, 3 Wood Mills, a Grain Farm, 2 Orchards, 2 Pig Ranches, a Cow Ranch, and 5 Ice Cream Parlors.
- Get your Population up to 24 and build 2 Fire Stations, you’ll need them.
- You can mostly ignore the Madmen running around, but fix any damage they cause.
Mountains Trophy: A Sweet, Sweet Gift
- The King of the Mountains awards you a Sweet, Sweet Gift, which is (of course) an Ice Cream Sundae.
Mountains Bonus Level: Snowstorm Peak
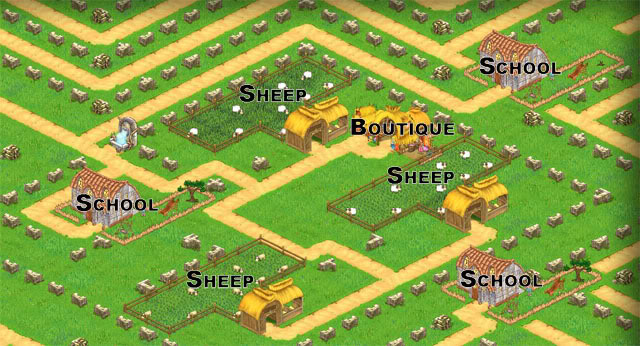
- You need to place 12 Social Buildings, but all you have available are Schools and Hospitals, and not a lot of room to place them.
- Of course, there are dozens of Madmen running around Demolishing Roads and Buildings!
- You have to Demolish the Roads left and right. Start with the upper part.
- Then you build schools (two in a row). Don’t worry about them being connected to Roads right away (the Madmen are destroying Roads anyhow).
- In the lower left corner, build a Hospital.
- Fill the rest of the space with Schools.
- Then build Bridges for the Schools and a new Road on the left side (over the river).
- Your time limit is 3:00 minutes.
- We don’t have a screen shot of the solution for this Bonus level. If you have one, please let us know and we’ll add it to the guide and give you a mention for it.
The Queen of the Tundra introduces herself and you learn that the residents here really like to eat!
- New Social Building: Big House, costs 90 Gold and 90 Materials, requires 8 Population and houses 12 Population.
- New Shop Building: Diner, costs 190 Gold and 65 Materials, requires 24 Population, Fishery and Pig Ranch.
- Of course, build a Fire Station ASAP! From this point on we won’t specifically mention Fire Stations again in this Guide unless they are a Requirement for another Building. You’ll remember quickly enough when Buildings start burning down!
- Note that the Kingdom’s Highway passes through the center of town, along with a Station and fences that can’t be Demolished (except by Madmen).
- You have some Madmen running around, but you can safely ignore them and focus on your other goals. Repair any damage they cause. If you really want to, you can perform all the steps you need to build a Hospital, but it’s not really needed for this level’s Goals.
- Demolish any Boulders you can find. Many have Gold.
- Build a Grain Farm to generate some Income.
- Build 2 Orchards and a few Fisheries to get additional Income.
- You might build some Grocery Stores for additional Income, but they are not Required.
- When you have enough Resources, build your Pig Ranch and Cow Ranch.
- Now you can build 2 Diners and 3 Ice Cream Parlors.
Goal
Need
Add
Fishery
1
1
Needed for Diner
Grain Farm
1
1
Needed for Pig Ranch and Cow Ranch
Orchard
2
2
Needed for Ice Cream Parlor
Pig Ranch
1
1
Requires Grain
Needed for Diner
Cow Ranch
1
1
Requires Grain
Needed for Ice Cream Parlor
Diner
2
2
Requires Fishery and Pig Ranch
Ice Cream Parlor
3
3
Requires 2 Orchards and Cow Ranch
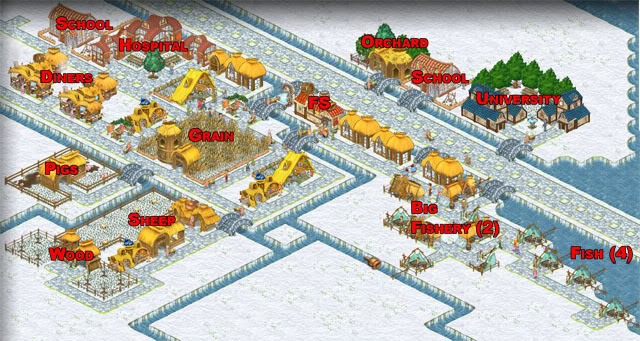
- New Special Building: Big Fishery, costs 265 Gold, 210 Materials. Requires 4 Fisheries and Shoe Shop, minimum Population 24. Income: 35 Gold and 35 Materials.
- Special Buildings are only available in certain Kingdoms/Kingdoms.
- Your stated goals are 2 Big Fisheries and 2 Diners.
- The Big Fishery has an X-shape with a Fishery at each end. At least one of these Fisheries has to be next to water. There are several Connection Arrows.
- You start with a Fire Station, a Grain Farm, a Herbal Pharmacy (need 1 more), a School (need 1 more), and a Hospital (needs 2 Herbal Pharmacies and a University to operate).
- Since you already have a Hospital, after you get it operating, treat the poor Madmen rather than letting them run around destroying Roads and Buildings. If you wish, you can skip the Hospital steps and concentrate only on the stated Goals.
- Generally, build the items in the order listed in the table below.
Goal
Need
Add
Fishery
4
4
Required for Big Fishery and Diner
Wood Mill
1
1
Needed for Shoe Shop
Orchard
1
1
Needed for Grocery Store and
Herbal Pharmacy
Grain Farm
1
0
Needed for Grocery Store, Herbal Pharmacy, and Ranches
Pig Ranch
1
1
Needed for Diner
Sheep Ranch
1
1
Needed for Shoe Shop
Grocery Store
2
2
Requires Grain Farm and Orchard,
Needed for School and University
Herbal Pharmacy
2
1
Requires Grain Farm and Orchard,
2 Needed for Hospital
School
2
1
Requires Grocery and Fire Station,
2 Needed for University
University
1
1
Requires 2 Schools and 2 Grocery
Hospital
1
0
Requires 2 Herbal Pharmacies and a University
Shoe Shop
1
1
Requires Wood Mill and Sheep, Needed for Big Fishery
Big Fishery
2
2
Requires 4 Fisheries and Shoe Shop
Diner
2
2
Requires Fishery and Pig Ranch
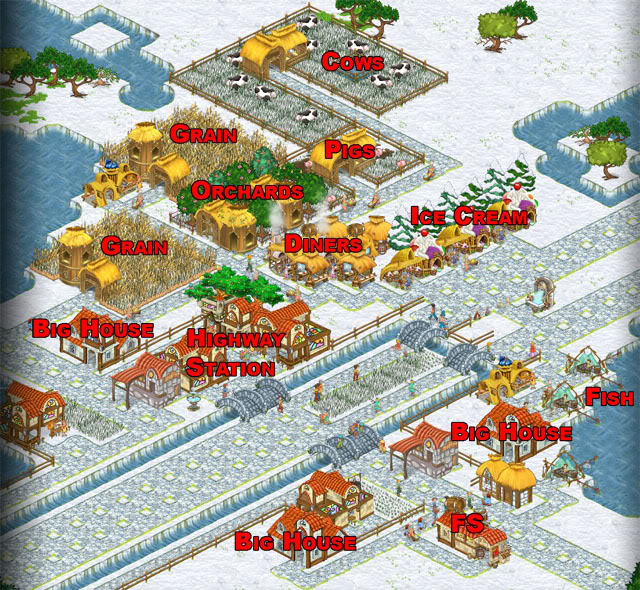
- New Special Building: Gourmet Cottage, costs 610 Gold and 370 Materials, requires 42 Population, Cow Ranch and University. Income: 90 Gold and 15 Materials.
- Stated Goals: 1 Gourmet Cottage and 4 Ice Cream Parlors
- You start this level out with NOTHING but a Spring and existing Roads.
- There are several Boulders with Gold you can Demolish to get some Resources.
- You need to connect your Spring to the Roads before you can do anything else.
- You will need to get your Population up to 24 for the Fire Station (ASAP!) and then 42 for the Gourmet Cottage. Start with two Small Houses, then build Big Houses (12 Pop) afterwards.
- You don’t really have to build a Hospital unless you want to treat the Madmen that appear. The Madmen will run around destroying Roads and Buildings (mostly Roads) but you can easily repair the damage. You will get Alerts when any buildings are cut off from the Road network. For this reason, build redundant Roads (make sure there is more than one connection to different areas of the Map).
- You can build additional Buildings that aren’t listed here in order to generate more Gold and Materials. For example, build a few Fisheries to start raising income. Then, generally follow the order listed in the table below.
Goal
Need
Add
Grain Farm
1
1
Needed for Grocery Store, and Cow Ranch
Orchard
2
2
Needed for Grocery Store and
Ice Cream Parlor
Grocery Store
2
2
Requires Grain Farm and Orchard,
Needed for School and University
Cow Ranch
1
1
Requires Grain Farm
Needed for Gourmet Cottage and Ice Cream Parlor
School
2
2
Requires Grocery and Fire Station,
2 Needed for University
University
1
1
Requires 2 Schools and 2 Grocery,
Needed for Gourmet Cottage
Ice Cream Parlor
4
4
Requires 2 Orchards and Cow Ranch
Gourmet Cottage
1
1
Requires Cow Ranch and University
- New Special Building: Fruit Market, costs 340 Gold and 435 Materials. Requires 20 Population, 4 Orchards and 4 Juice Stands. Income: 60 Gold, 10 Materials.
- Stated Goals: 3 Special Buildings (any type), 400 Gold Income, 130 Materials Income.
- You start with an existing Population of 24, so build your Fire Station right away!
- There are lots of Boulders you can Demolish for extra Income.
- You have an existing Grain Farm, connected to outside Roads, so you don’t really have to connect it to the Road network, and it provides Income.
- You have an existing Pig Ranch, but you don’t really need it for anything, so Demolish it unless you plan to build a Diner (35 Gold Income, but no Materials Income).
- As soon as you have Orchards, build a few Grocery Stores to increase your Gold Income.
- After you have the Shoe Shop, you could also build a Boutique (30 Gold Income).
- We decided to add 2 Big Fisheries (35 Gold, 35 Materials) and 4 Fruit Markets (60 Gold, 10 Materials), in order to meet the Gold and Materials Income goals. You might achieve your goals using a different strategy.
- Fruit Markets are the first Buildings that connects to Roads to the East (upper right).
- Or course, you have Madmen running around destroying Roads and Buildings, but you don’t need to build a Hospital if you can keep up with repairing the damage they cause. And they cause a lot on this level.
Goal
Need
Add
Fishery
4
4
Needed for Big Fishery
Orchard
4
4
Needed for Fruit Market
Juice Stand
4
4
Needed for Fruit Market
Wood Mill
1
1
Needed for Shoe Shop
Sheep Ranch
1
1
Requires Grain Farm,
Needed for Shoe Shop
Shoe Shop
1
1
Requires Wood Mill and Sheep Ranch
Needed for Big Fishery
Big Fishery
1
2
Requires 4 Fisheries and Shoe Shop
Fruit Market
1
4
Requires 4 Orchards and 4 Juice Stands
Gold Income
400
400
Per Turn
Materials Income
130
130
Per Turn
- You learn that Zorm has been sabotaging you by starting Fires and releasing Madmen. What is his problem? He threatens more trouble to come.
- New Special Building: Old Cellar, costs 320 Gold and 180 Materials. Requires 36 Population, Fruit Market and Grain Farm. Income: 42 Gold and 8 Materials.
- New Special Building: Zagor’s Delight, costs 775 Gold and 420 Materials. Requires 56 Population, 2 Schools and 2 Diners. Income: 55 Gold.
- You have two Great Buildings to Upgrade to 1 Star for the Queen of the Tundra.
Cost
Required
Income
Upgrade
Gold
Materials
Population
Requires
Gold
Materials
Kingdom
Food Temple
777
777
77
Old Cellar, Gourmet Cottage
77
77
Tundra
Sweet Palace
1,920
2,650
84
Food Palace, Zagor’s Delight
550
100
Tundra
- You start with 12 Population, a Cow Ranch, a Grain Farm, a Wood Mill and a School (needs Fire Station and Grocery Store).
- There are lots of lovely Boulders to Demolish.
- Of course, build a Fire Station after you get your Population to 24 (one more Big House).
- You will need to add Population as you go along to meet Goals. Ultimately you need 84 Pop for the final Upgrade to the Sweet Palace.
- You don’t really have to build a Hospital for the Madmen, but with all this going on, why not if you can fit it in? It only requires two more Herbal Pharmacies after you have the University and 32 Population. Actually, go ahead and build the Hospital and get the Madmen out of your hair.
Goal
Need
Add
Fire Station
1
>1?
Requires 24 Population
Fishery
1
1
Needed for Diner
Grocery Store
2
2
Requires Grain Farm and Orchard
Needed for School and University
Orchard
4
3
4 Needed for Juice Stands and Fruit Market
Juice Stand
4
4
Requires Orchard,
Needed for Fruit Market
School
2
1
Requires Grocery and Fire Station
Pig Ranch
1
1
Needed for Diner
Diner
2
2
Needed for Zagar’s Delight,
Requires Fishery and Pig Ranch
University
1
1
Needed for Gourmet Cottage,
Requires 2 Schools and 2 Grocery
Herbal Pharmacy
2
2
Needed for Hospital,
Requires Grain and Orchard
Hospital
1
1
Only needed to treat Madmen,
Requires University and 2 Herbal Pharmacies
Gourmet Cottage
1
1
Needed for Food Palace
Requires Cow Ranch and University
Fruit Market
1
1
Needed for Old Cellar,
Requires 4 Orchards and 4 Juice Stands
Old Cellar
1
1
Needed for Food Palace,
Requires Fruit Market and Grain Farm
Zagor’s Delight
1
1
Needed for Sweet Palace
Requires 2 Schools and 2 Diners
Food Palace
Needed for Sweet Palace,
Requires Old Cellar and Gourmet Cottage
Sweet Palace
Requires Food Palace and Zagor’s Delight
Tundra Trophy: Gift of Togetherness
- The Queen of the Tundra awards you a Trophy that looks like a Snowflake.
Tundra Bonus Level: The Icy Shallows.
- You need to place 12 Production Buildings and 1 Big Fishery.
- The only Production Buildings you have to work with are Fisheries.
- You can’t place the Big Fishery until you have 4 Fisheries placed.
- You have 3:30 minutes.
- Very tricky, but possible.
- We didn’t get a solution for this Bonus Level. Sorry, but let us know if you have a solution and we’ll update the Guide and give you credit for it.
- New Production Building: Mine, costs 400 Gold and 400 Materials. Requires 16 Population, 1 Wood Mill. Income: 30 Gold and 30 Materials
- New Special Building: Great Oven, costs 425 Gold and 910 Materials. Requires 42 Population, 2 Wood Mills and 2 Grocery Stores. Income: 130 Gold and 20 Materials.
- Stated Goals: 3,000 Gold and 300 Gold Income, 1,500 Materials and 400 Materials Income.
- You start with a Fire Station and 12 Population, but you need to hook up them all up to the Road network and link to the outside world. You might build an extra Fire Station, since fires seem to happen rather frequently here.
- There are lots of Boulders to Demolish and many of them have lots of Gold and Materials. Just by Demolishing Boulders, we reached 2 of the Goals (already having collected 4,619 Gold and 2,760 Materials) before we built anything.
- Get your Population up to at least 42 by building Big Houses and Family Houses where you can fit them in.
- We built a couple of Sheep Ranches (Pigs and Cows are not available) because they have 35 Materials Income.
- Since we already had the Sheep Ranch and Wood Mill, we built a Shoe Shop and could have also built a Boutique (30 Gold Income). They are not necessary..
- After you Build a Great Oven, build at least one more for the Gold Income (130 per turn).
- To get your Materials Income up, build Sheep Ranches (35 per turn).
- At this point you should have lots of Gold and Materials accumulated, so build Mines until you reach your Materials Income Goal. They’re tiny but expensive. "M" in the screen shot denotes a Mine.
Goal
Need
Add
Grain Farm
1
1
Needed for Grocery Store
Orchard
1
1
Needed for Grocery Store
Wood Mill
2
2
Needed for Mine and Great Oven
Grocery Store
2
2
Requires Grain Farm and Orchard,
Needed for Great Oven
Mine
1
>1
Requires Wood Mill
Great Oven
1
>1
Requires 2 Wood Mills and
2 Grocery Stores
Gold
3,000
3,000+
And 300 Gold Income
Materials
1,500
1,500+
And 400 Materials Income
- New Social Building: Police Station, costs 110 Gold and 110 Materials. Requires 16 Population and School. No Income, but catches Thieves (who steal Gold and Materials very quickly).
- New Special Building: Goldsmith, costs 320 Gold and 520 Materials. Requires 30 Population, School and 2 Mines. Income: 54 Gold and 16 Materials.
- Stated Goals: Gold Income of 400, Build 4 Goldsmiths and catch 2 Thieves.
- You start with 16 Population, 320 Gold, 420 Materials, a Fire Station, 2 Fisheries and 2 Mines (but they need a Wood Mill to Operate).
- Build a Police Station ASAP because Zorm has now unleashed Thieves!
- Thieves don’t waste any time breaking into buildings and stealing you blind. Click on the meter above the Thief and the Police will catch them, and return your Gold and Materials. If the Thief makes it off screen before they are caught, you lose whatever they stole.
- Demolish Boulders to get Gold and Materials and make free space for Buildings.
- Get your Population up to 30 so you can build Goldsmith.
- Fortunately, there don’t seem to be any Madmen in this level, and you couldn’t build a Hospital with the limited space, anyhow.
- You only need 4 Goldsmiths to meet the Goals, but build some more to generate Gold Income.
- Add other Gold Income Shops or Production Buildings where you can fit them.
Goal
Need
Add
Wood Mill
1
1
Needed for Mines
Grain Farm
1
1
Needed for Grocery
Orchard
1
1
Needed for Grocery
Grocery
1
1
Requires Grain Farm and Orchard
Needed for School
School
1
1
Requires Fire Station and Grocery,
Needed for Police Station
Police Station
1
1
Requires School,
Needed to Catch Thieves
Goldsmith
4
+4
Requires 2 Mines and School
Gold Income
400
400
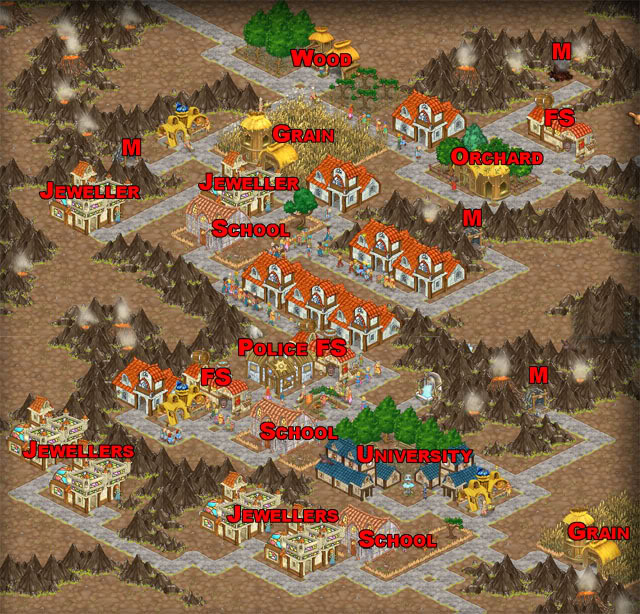
- New Special Building: Jeweller, costs 1,820 Gold and 780 Materials. Requires 64 Population, 2 Mines and University.
- Stated Goals: Gold Income of 1,500, Build 4 Jewellers, Acquire 12,000 Gold.
- You start with 520 Gold, 390 Materials. You have a Fire Station, a Big House, a Grocery (but it needs Grain Farm and Orchard), and 4 Mines (but they need a Wood Mill), and they aren’t operating because the Spring is disconnected from the Road network leading out of the Kingdom.
- You can Buildings connect to Roads that lead out of the Kingdom instead of to the Spring, but be sure everything is linked eventually so Fire Station(s) and Police Station can reach all the Buildings.
- Demolish Boulders to get their Gold and Materials, and also to open up other parts of the Map that are blocked by the Boulders. A few of the Mines are inaccessible until you remove Boulders.
- Build a Police Station ASAP because you will encounter Thieves. You need 16 Population and a School.
- TIP: You might want to place an extra Building of each type just in case one catches on fire, so the rest of the Buildings dependent on it don’t stop operation while the fire is extinguished.
- Build a few extra Fire Stations in different parts of the map. Fires happen frequently for some reason. Hmm…
- Get your Population up to 32 for the University and to 64 for the Jewellers.
- Once you can build Jewellers, build as many as you can fit in order to reach your Gold Income Goal.
- There is a Mine in the upper right corner that burned down just as we were finishing the level. Luckily, we had 3 other Mines still going.
Goal
Need
Add
Wood Mill
1
>1
Needed for Mines
Grain Farm
1
>1
Needed for Grocery
Orchard
1
>1
Needed for Grocery
Grocery
2
>1
Requires Grain Farm and Orchard
Needed for School and University
School
2
>2
Requires Fire Station and Grocery,
Needed for Police Station and University
Police Station
1
1
Requires School,
Needed to Catch Thieves
University
1
1
Requires 2 Schools and 2 Grocery,
Needed for Jeweler
Jeweller
4
>4
Requires 2 Mines and University
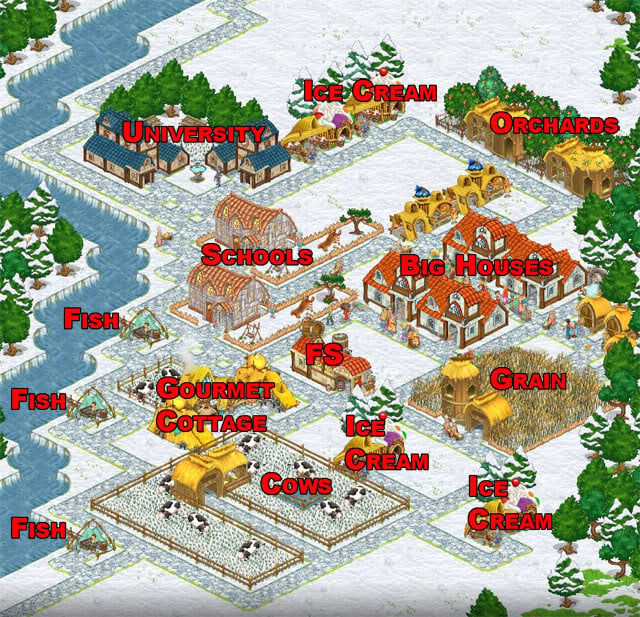
- New Special Building: Zogar’s Soothe Spa, costs 3,800 Gold and 1,860 Materials. Requires 52 Population, Herbal Pharmacy, and 3 Juice Stands. Income: 180 Gold.
- Stated Goals: Upgrade Spa to 1 Star, build 3 Special Buildings.
- After you have the Spa Built, you need to Upgrade it to 1 Star, which requires:
Cost
Required
Income
Upgrade
Gold
Materials
Population
Requires
Gold
Materials
Kingdom
Zogar’s Spa
7,200
2,650
72
Great Oven
290
–
Volcano
- Before doing anything else, Demolish all the Boulders (there are lots of them) to accumulate over 9,000 Gold and 5,000 Materials (your results may vary). Now you can start building quickly.
- You start with a Spring and 2 Family Houses, none of which are connected.
- Build up your Population to 24 so you can build a Fire Station. Fires are frequent here.
- Build a Police Station as soon as your Population reaches 16 and you have a School. Thieves are rampant.
- The Spa requires 52 Population and the Spa Upgrade requires 72 Population. Build Big Houses where you can fit them.
- The Spa is HUGE (11 x 8) so leave plenty of room for it. Build along the North (upper left) and East (upper right) of the island to start out until you can fit the Spa in.
- For the 3 Special Buildings we built 1 Goldsmith (needs 2 Mines) and 2 Great Ovens. The Spa should count as a Special Building, but don’t take chances.
- You will have Madmen about, but there isn’t enough time or room to build a Hospital to treat them, so just repair their damages.
- Note: After the Spa is Upgraded, DO NOT CLICK ON IT OR THE GAME MIGHT CRASH. That would be a shame after all your hard work on this level.
- In the screen shot, "J" is used for Juice Stands. Normally, we don’t label those at this point in the Guide, but you need 3 Juice Stands in this level to build the Spa. Fortunately, they are tiny so you can fit them in almost anywhere.
- There are other solutions, but here is the general order to follow for ours:
Goal
Need
Add
Grain Farm
1
1
Needed for Herbal Pharmacy and Grocery Store
Orchard
1
1
Needed for Juice Stand, Grocery Store, and Herbal Pharmacy
Juice Stand
3
3
Requires Orchard,
Needed for Spa
Herbal Pharmacy
2
2
Requires Grain Farm and Orchard,
Needed for Spa and Spa Upgrade
Grocery Store
2
2
Requires Grain Farm and Orchard, Needed for School and Great Oven
School
1
1
Requires Fire Station and Grocery,
Needed for Police Station
Police Station
1
1
Requires School
Zogar’s Spa
1
1
Requires Herbal Pharmacy and
3 Juice Stands
Wood Mill
2
2
Needed for Great Oven
Mine
2
2
Needed for Goldsmith
Great Oven
2
2
Requires 2 Wood Mill, 2 Grocery
Goldsmith
1
1
Requires 2 Mines
Spa Upgrade
1
1
Requires 2 Herbal Pharmacies and Great Oven

- Once again, you need to Upgrade a Great Building, the Blue Fire Mines, to 3 Stars.
Cost
Required
Income
Upgrade
Gold
Materials
Population
Requires
Gold
Materials
Kingdom
None
70
120
Volcano
1 Star
2,050
3,600
46
4 Mines, Goldsmith
250
360
Volcano
2 Stars
4,200
6,030
68
4 Goldsmiths, Great Oven
630
760
Volcano
3 Stars
7,350
7,590
82
3 Jewellers
1,600
2,350
Volcano
- Other stated Goals: 3,000 Gold Income, Accumulate 30,000 Gold.
- You start with a Fire Station, 12 Population, and a School.
- Connect all existing Buildings to the Road network, including the Blue Fire Mines, which already has Income of 70 Gold and 120 Materials.
- Get that Police Station built ASAP! Build a Grain Farm and Orchard, then Grocery Store. You already have a School. Extra Police Stations can help as you place more Buildings.
- Thieves tend to break into Houses and Schools most often.
- Again, Fires break out frequently, so build an extra Grain Farm, Orchard, and Grocery Store to keep the School from shutting down, which puts your Police Station out of business. You also might want to add a few extra Fire Stations as you go along. Having extra Buildings of each type is a good idea on this level, and you have the room.
- You will spend a lot of time fighting Fires and catching Thieves on this level, but (fortunately) there don’t seem to be any Madmen, so you don’t really need a Hospital.
- After you have the Police Station(s) stabilized, Demolish all the Boulders you can find for lots of Gold and Materials Income. We found well over 20,000 of each.
- Build at least 2 Wood Mills (again, because one might be on fire) and start placing at least 4 Mines and 4 Goldsmiths (you’ll need them for Upgrade 2).
- You need 3 Jewellers for Upgrade 3, so you’ll need a University.
- Build more Jewellers to raise your Gold Income over 3,000 (if you want to) but the final Upgrade 3 will add 1,600 Gold Income.
- It’s not that hard to reach the Goals for this level, but it takes a while as you keep fighting Fires and Thieves.
Goal
Need
Add
Grain Farm
1
2
Needed for Grocery Store
Orchard
1
2
Needed for Grocery Store
Grocery Store
2
>2
Requires Grain Farm and Orchard, Needed for School and Great Oven
School
2
>2
Requires Fire Station and Grocery,
1 Needed for Police Station and Goldsmith,
2 Needed for University
Police Station
1
1
Requires School
Wood Mill
2
>2
Needed for Mine and Great Oven
Mines
4
>4
Needed for Goldsmith
Goldsmith
1
4
Requires 2 Mines and School,
1 Needed for Upgrade 1,
4 Needed for Upgrade 2
University
1
1
Requires 2 Schools, 2 Grocery,
Needed for Jeweller
Great Oven
1
1
Requires 2 Wood Mill and School,
Needed for Upgrade 2
Jeweller
3
3
Requires 2 Mines and University ,
3 Needed for Upgrade 3
Gold
30,000
30,000
And 3,000 Gold Income per turn
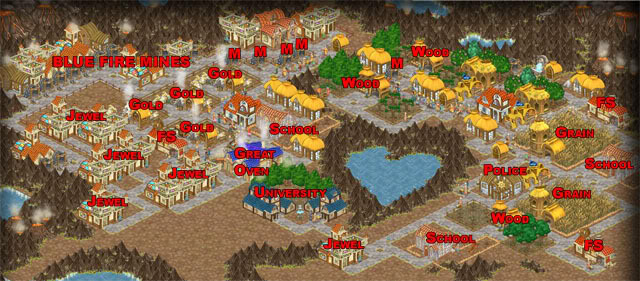
Volcano Trophy: Gift of Wealth
- The King of the Volcano awards you the Gift of Wealth, which looks like a goblet of precious jewels.
Volcano Bonus Level: The Forgotten Crater
- In a crater strewn with Boulders, you need to build 4 Social Buildings, 12 Production Buildings and gather 1,100 Gold.
- You have 3:40 Minutes.
- Normal Requirements don’t apply: Even though a Wood Mill is available, you don’t need it for the Mines. You still need enough Gold and Materials to construct your Buildings.
- Start by Demolishing Boulders with Jewels to get lots of Gold and Materials.
- Place 1 Police Station, and connect it to the Spring so it can catch the Thieves (lots).
- Then build 3 Big Houses and 12 Mines. We placed 4 Big Houses and 13 Mines, but we were rushing and didn’t keep track of the count.
- Place Roads to connect the Buildings, Demolishing Boulders (best with Gold) as you go along.
- Here is one solution:
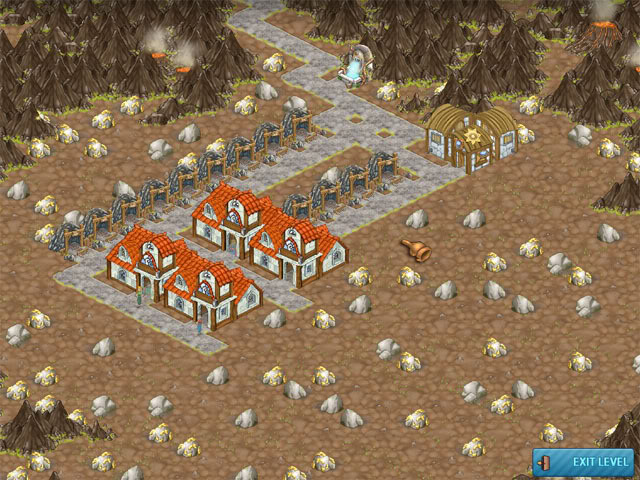
- New Special Building: Oil Refinery, costs 440 Gold and 220 Materials. Requires 38 Population, Wood Mill and 3 Fire Stations. Variable Income/Loss (see below).
- Stated Goals: Build 3 Oil Refineries, Gather 7,650 Materials.
- You start with a working Orchard, Grain Farm and Fishery, 4 Population, 580 Gold and 420 Materials.
- Increase Population to 24 so you can build Fire Stations, then to 38 so you can build Oil Refinery.
- Oil Refineries, as you will learn, can either give you LOTS of Gold and Materials or take them away. So, if you discover you have created an Oil Refinery in a bad place, DEMOLISH IT IMMEDIATELY and drill someplace else. Our solution may not have the same results as yours.
- From this point on the screen shots will only label Buildings that are new or may be hard to distinguish or a vital to meeting your Goals. You should be familiar with most of the Social, Production, and Shops buildings by now.
Goal
Need
Add
Fire Station
3
3
Needed for Oil Refinery
Wood Mill
1
1
Needed for Oil Refinery
Oil Refinery
3
3
Requires Wood Mill and 3 Fire Stations
Materials
7,650
7,650
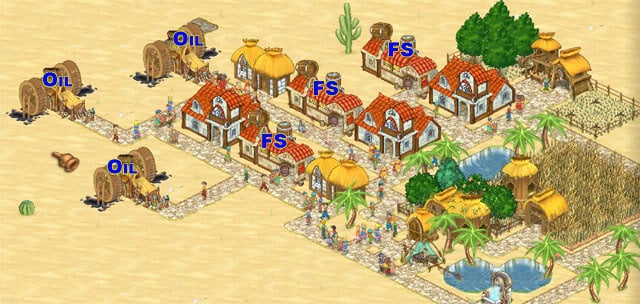
- New Special Building: Palm Bank, costs 980 Gold, 1,225 Materials. Requires 50 Population, 3 Oil Refineries, 3 Police Stations.
- Stated Goals: Build 1 Palm Bank, gather 5,230 Gold and reach Gold Income of 690.
- You start with 8 Population, Grain Farm, Pig Ranch and Orchard, so you can already build a Grocery Store. Why do you need the Pig Ranch?
- Get the Population up to 16 for Police Station, 24 for Fire Station and 50 for Palm Bank.
- Build a Grocery Store and School so you can build the Police Stations.
- We built 2 Palm Banks to achieve the Gold Income Goal. The Roads to a Palm Bank are kind of tricky, so leave room around them.
Goal
Need
Add
Fire Station
3
3
1 Needed for School
3 Needed for Oil Refinery
Wood Mill
1
1
Needed for Oil Refinery
Oil Refinery
3
3
Requires Wood Mill and 3 Fire Stations,
3 Needed for Palm Bank
Grain Farm
1
0
Needed for Grocery Store
Orchard
1
0
Needed for Grocery Store
Grocery Store
1
1
Requires Grain Farm and Orchard, Needed for School
School
1
1
Requires Fire Station and Grocery,
Needed for Police Station
Police Station
3
3
Requires School
Palm Bank
1
2
Requires 3 Police Stations and
3 Oil Refineries
Gold
5,230
5,230
And Gold Income 690
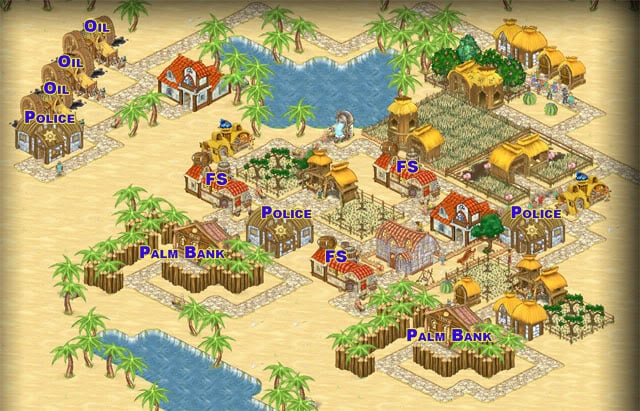
- New Special Building: Dune Market, costs 50 Gold and 50 Materials. Income 5 Gold.
- Stated Goals: 5 Dune Markets, gather 8,600 Gold and 7,950 Materials.
- You start with 380 Gold, 420 Materials, Population 8, School (needs Fire Station), Grain Farm, Wood Mill, Grocery Store, Fruit Stand, Fishery, Police Station (needs School Operating).
- You can only build Small Houses on this Level. Put them in the single spots available to the right/East of the Roads and Get your Population to 24 for Fire Station, which allows School (and Police Station) to Operate. Increase your Population to 38 for Oil Refinery.
- Thieves are rampant! Keep on top of the annoying pests.
- The only Production Building available to build is the Mine, which is strange, because you can’t build additional Wood Mills. You have one already Operating Wood Mill, though.
- Build Mines, where you can, to increase Gold and Materials.
- Build your 5 Dune Markets. They can connect at the North or South and require
- Build 2 more Fire Stations and then start building Oil Refineries to meet your Gold and Materials Goals. You may need to add several, depending on their Income.
Goal
Need
Add
Fire Station
1
3
Needed for School and Oil Refinery
Dune Market
5
5
Goal
Oil Refinery
?
?
Requires Wood Mill and 3 Fire Stations
Gold
8,600
8,220
Acquire
Materials
7,950
7,530
Acquire
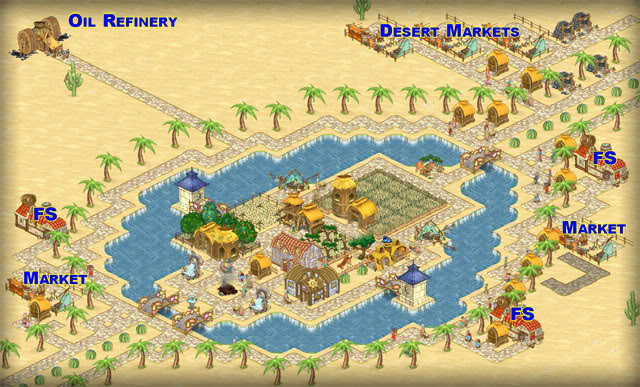
- This is a very tough level and you might have to try a few times to get it all right.
- New Special Building: Essence of Al-Zagur: Costs 360 Gold, 890 Materials. Requires 48 Population, 3 Herbal Pharmacy, 3 Dune Markets. Income: 115 Gold. This building is not required in this level, but it doesn’t hurt to learn how to build it.
- New Special Building: Palace West Wing, costs 6,350 Gold, 2,150 Materials. No Requirements. You need to Upgrade the West Wing to 2 Stars.
Cost
Required
Income
Upgrade
Gold
Materials
Population
Requires
Gold
Materials
Kingdom
None
6,350
2,150
–
–
Desert
1 Star
12,700
5,250
66
Palm Bank, 2 Dune Markets
–
–
Desert
2 Stars
26,200
12,300
82
5 Mines, 2 Diners
–
–
Desert
- Other Stated Goal: Population 100.
- You start with enough Gold and Materials to place the Palace West Wing and there’s only one place it will fit, and it is ENORMOUS. Line it up between the two blue towers to the North and South, with the 4 Connection Arrows (pointing West) just a bit East of the Springs. You’ll know when you have it right because all the RED will disappear.
- You also start with an Orchard and Grain Farm that are not hooked to the Road network. Connect them with Roads, leaving some room along the water to place other Buildings.
- Grow your Population steadily, up to 24 for Fire Stations, and 32 for University, then keep growing it so you can meet the Requirements as you go along. Small Houses and Family Houses might work better where you have limited space.
- You will have some Madmen running around, so you might want to build a University and then a Hospital to treat them. They get very annoying!
- Your Oil Refineries may stop producing Income after a while, and that’s OK in this level. You simply need 3 Oil Refineries to exist so you can build the Palm Bank.
- For Upgrade 2, you learn that you need Mines and Diners (requiring Fishery and Pig Farm). Hope that you left room!
Goal
Need
Add
Fire Station
3
3
1 Needed for School and
3 Needed for Oil Refinery
Dune Market
5
5
3 Needed for Essence (optional) and 2 Needed for Upgrade 1
Oil Refinery
3
3
Requires Wood Mill and 3 Fire Stations,
Needed for Palm Bank
Grain Farm
1
0
Needed for Grocery Store and Herbal Pharmacy
Orchard
1
0
Needed for Grocery Store and Herbal Pharmacy
Herbal Pharmacy
3
3
Requires Grain Farm and Orchard,
2 Needed for Hospital
3 Needed for Essence
Essence of Al-Zagur
1
1
(Optional) Requires 3 Herbal Pharmacy and 3 Dune Markets
Palm Bank
1
2
Requires 3 Police Stations and
3 Oil Refineries
Grocery Store
1
1
Requires Grain Farm and Orchard, 1 Needed for School
2 Needed for University (optional)
School
1
2
Requires Fire Station and Grocery,
1 Needed for Police Station
2 Needed for University (optional)
University
0
1
(Optional) Requires 2 School and 2 Grocery, Needed for Hospital
Hospital
0
1
(Optional) Requires 2 Herbal Pharmacy and University
Police Station
3
3
Requires School,
Needed for Palm Bank
Palm Bank
1
2
Requires 3 Police Stations and
3 Oil Refineries,
Needed for Upgrade 1
Mines
5
5
Requires Wood Mill,
Needed for Upgrade 2
Pig Farm
1
1
Requires Grain,
Needed for Diner
Diner
2
2
Requires Fishery and Pig Farm,
Needed for Upgrade 2
Population
100
100
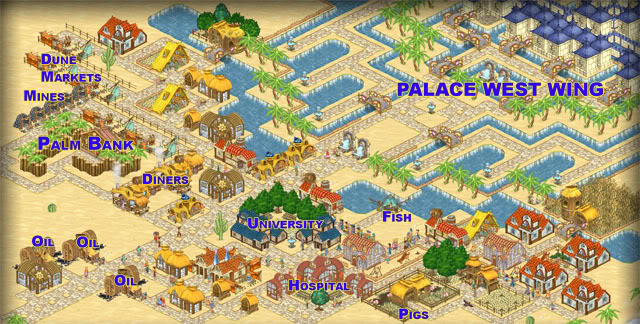
- The Queen of the Desert is making final plans for her Wedding. As you probably know, Weddings take a lot of planning and work!
- New Special Building: 1001 Night Clothes: Costs 1,110 Gold and 540 Materials. Requires 34 Population, Boutique and Essence of Al-Zagur. Income: 68 Gold.
- New Special Building: Desert Rose Hair: Costs 3,040 Gold and 960 Materials. Requires 44 Population, University and Essence of Al-Zagur. Income: 55 Gold.
- Stated Goal: Upgrade Zelia’s Bridal Dream to 2 Stars. The shop already exists in the North and provides 55 Gold Income.
Cost
Required
Income
Upgrade
Gold
Materials
Population
Requires
Gold
Materials
Kingdom
None
55
–
Desert
1 Star
9,300
2,650
66
1001 Night Clothes
130
–
Desert
2 Stars
19,600
6,900
77
1001 Night Clothes,
Desert Rose Hair (Upgraded)
185
Desert
- You start with 12 Population, 98 Gold Income and 111 Materials Income, along with Pigs, Cows, Grain, and Orchard built along the Kingdom’s Highway.
- The Food Service is complaining that it needs Grocery Store (2) so build those first.
- Add a Big House to get your Population up to 24, then add Fire Station, School and Police Station ASAP. You will have many Fires and Thieves to chase after. Fortunately, there are no Madmen, so you don’t really need a Hospital.
- There are a few Boulders with Gems and Gold hidden along the existing Kingdom Highway. Demolish them for Gold and Materials.
- Keep adding Production, Shops, and Social Buildings to meet the Requirements as you go along. The table below shows the general order.
- Add Population as you go along until you reach at least 77 or more (84 is good).
- After you Build Desert Rose Hair you will find you need to Upgrade IT to 1 Star (but the Game isn’t explicit about that). Costs 6,320 Gold and 1,340 Materials. Click on the blue button with the yellow arrow to upgrade it. You should have plenty of Resources by this point.
- You don’t really need Oil Refineries or Palm Bank to complete this level. If you wish, you can build them to speed up your Income.
Goal
Need
Add
Grocery Store
2
2
Requires Grain and Orchard
1 Needed for School
2 Needed for Food Service
Fire Station
1
>1
1 Needed for School
Build extra for safety
School
2
2
Requires Grocery and Fire Station,
1 Needed for Police Station
2 Needed for University
Police Station
1
1
Requires School
Wood Mill
1
1
Needed for Shoe Shop
Sheep Ranch
1
1
Requires Grain,
Needed for Shoe Shop and Boutique
Shoe Shop
1
1
Requires Wood Mill and Sheep
Needed for Boutique
Boutique
1
1
Requires Shoe Shop
Needed for 1001 Night Clothes
Herbal Pharmacy
3
3
Requires Grain and Orchard,
Needed for Essence of Al-Zagur
Dune Markets
3
3
Needed for Essence of Al-Zagur
Essence of Al-Zagur
1
1
Requires 3 Herbal Pharmacy and 3 Dune Markets.
Needed for 1001 Night Clothes and Desert Rose Hair
1001 Night Clothes
1
1
Requires Boutique and Essence,
Needed for Upgrade 1 to Zelia’s
University
1
1
Requires 2 School and 2 Grocery,
Needed for Desert Rose Hair
Desert Rose Hair
1
1
Requires University and Essence,
Needed for Upgrade 2 to Zelia’s

Desert Trophy: Gift of Prosperity
- The Queen of the Desert awards you the Gift of Prosperity, which looks like a cactus with a ring set with a precious jewel.
Desert Bonus Level: Fort Palmer
- The Queen of the Desert wants your help with the Thieves who are overrunning Fort Palmer!
- Goal: Gather 17,000 Gold from them.
- You have 2:10 minutes.
- You don’t have to place any Buildings at all!
- This plays more like an arcade game. All you need to do is click on all the Thieves as quickly as possible.
- If there are multiple Thieves overlapping, one click catches them all!
- This Bonus Level provides a nice break before the final Kingdom: The Coast.
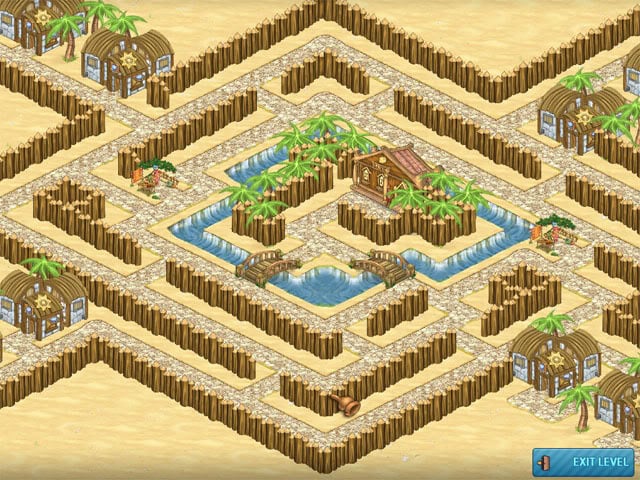
- All Special Buildings in the Coast Kingdom need to be built next to water (like Fisheries). That means water must be one map unit away in any direction (even diagonally).
- You can Demolish any landscaping features except for Trees (they are Sacred to the Zellians).
- New Shop: Party Shop, costs 140 Gold, 114 Materials. Requires 32 Population, Boutique and Herbal Pharmacy.
- New Special Building: Seaside Café , costs 420 Gold, 380 Materials. Requires 36 Population, Grocery and Ice Cream Parlor.
- Stated Goals: 2 Party Shops, 2 Seaside Cafes and Population 60.
- You start with existing 16 Population, 180 Gold, 120 Materials, Water Plant (needs 2 Wood Mills), 3 Herbal Pharmacies (need Grain Farm and Orchard), 2 Grocery Stores (need Grain Farm and Orchard), Hospital, University, 2 Schools, and a Fire Station.
- The Water Plant is a Building that you can’t create (in this version of the game) but it seems to require 2 Wood Mills. Make it happy by placing 2 Wood Mills.
- Build at least 1 Grain Farm and 2 Orchards.
- You can Demolish landscaping features such as Benches or Slides, but not Trees, to make room for Roads to get near the water.
- Build Population up to 36 as you can fit them in.
- Remember that the Seaside Café must be built next to the water.
- Police Stations are unavailable in this level, so we guess there are no Thieves to worry about.
Goal
Need
Add
Wood Mill
2
2
Needed for Water Plant and Shoe Shop
Orchard
2
2
Needed for Grocery Store, Herbal Pharmacy and Ice Cream Parlor
Grain Farm
1
>1
Needed for Grocery Store and Herbal Pharmacy, Ranches
Cow Ranch
1
1
Requires Grain Farm
Needed for Ice Cream Parlor
Ice Cream Parlor
1
1
Requires 2 Orchards and Cows
Needed for Seaside Cafe
Sheep Ranch
1
1
Requires Grain Farm
Needed for Shoe Shop
Shoe Shop
1
1
Requires Wood Mill and Sheep,
Needed for Boutique
Boutique
1
1
Requires Shoe Shop (and Sheep)
Needed for Party Shop
Seaside Café
2
2
Requires Grocery and Ice Cream
Party Shop
2
2
Requires Boutique and Herbal Pharmacy
Population
60
48
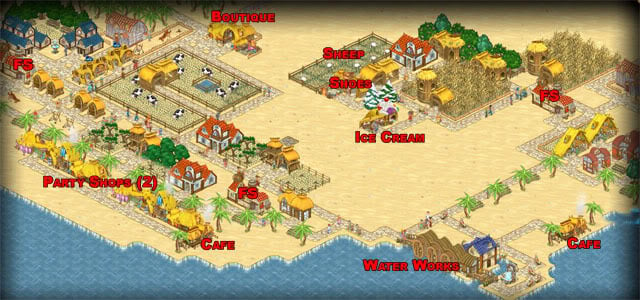
- New Special Buildings: Actually, these are really Landscaping Features (new in this Kingdom).
Cost
Required
Income
Special
Gold
Materials
Population
Requirement
Gold
Materials
Kingdom
Bench
–
10
–
Wood Mill
–
–
Coast
Tree
2
12
–
Orchard + Fire Station
–
–
Coast
Fountain
4
20
–
Water Plant
–
–
Coast
- Stated Goals: You need to place 8 Benches, 16 Trees and 4 Fountains.
- Add another Big House to get your Population up to 24 so you can build Fire Station.
- The existing Water Plant requires 2 Wood Mills and 2 Herbal Pharmacies. Water Plants are not available to build in this game, but they may exist when you start a level. They provide Gold Income of 140.
- These Landscaping items do NOT need to be placed next to water.
- You can Demolish Benches and Fountains, but not Trees. Once Trees are placed they are permanent.
- In the screen shot, the Trees we placed lean to the right. The Benches and Fountains are along the Road.
Goal
Need
Add
Fire Station
1
1
Requires 24 Population,
Needed for Trees
Grain Farm
1
1
Needed for Herbal Pharmacy and Trees
Orchard
1
1
Needed for Herbal Pharmacy and Trees
Wood Mill
2
2
Needed for Water Plant
Herbal Pharmacy
2
2
Requires Grain Farm and Orchard,
Needed for Water Plant
Bench
8
8
Wood Mill
Tree
16
16
Orchard + Fire Station
Fountain
4
4
Water Plant
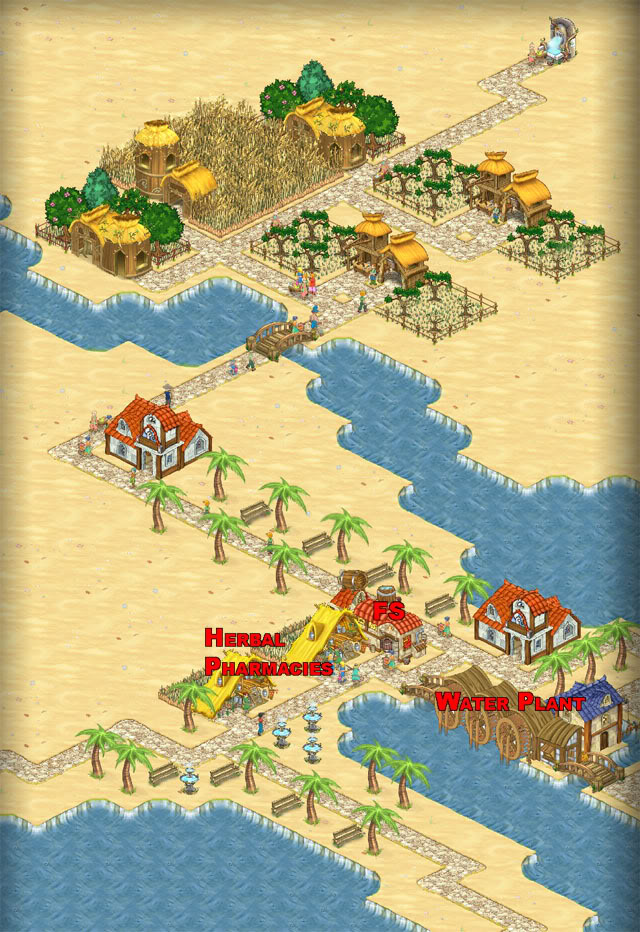
- New Special Building: Surf Shop, costs 320 Gold and 535 Materials. Requires 28 Population and Wood Mill. Income 36 Gold. Must be built next to water.
- Stated Goal: Upgrade Honeymoon Bungalow to 5 Stars
Cost
Bungalow Upgrade
Gold
Requirement
Kingdom
None
Juice Stand
Coast
Upgrade 1
500
Boutique
Coast
Upgrade 2
1,000
Diner
Coast
Upgrade 3
1,500
Surf Shop
Coast
Upgrade 4
2,000
Seaside Cafe
Coast
Upgrade 5
3,000
2 Herbal Pharmacy + 2 Party Shop
Coast
- You start with 8 Population, 265 Gold and 380 Materials.
- The existing Water Plant requires 2 Wood Mills and 2 Herbal Pharmacies. Water Plants are not available to build in this game, but they may exist when you start a level. They provide Gold Income of 140.
- Start building from the lower left (West).
- Expect lots of Fires and Thieves.
- Grow your Population to 24 so you can build a Fire Station.
- Get a Police Station built ASAP!
- There are several Boulders with Gold and Jewels you can Demolish for quick Gold and Materials Resources.
- Wait to Demolish the Boulders until after you have your Police Station, so the Thieves don’t steal your precious Resources. There is an especially tricky Boulder with Jewels hidden among the Palm Trees that we couldn’t get to.
- Build extras of important Buildings so that if they catch on Fire, dependent Buildings won’t stop operating. If you have multiple Fires burning, build more Fire Stations.
- Frequently check the Honeymoon Bungalow to see if you can perform an Upgrade (Blue button with yellow arrow). If the arrow is gray, then you can hover over it to learn the Requirements for the next Upgrade.
- Once you learn about Upgrade 5 (requiring 2 Party Shops) you may be dismayed (as we were) to learn that you will need to replace some of your Buildings and Demolish them to make room for the Party Shops. They do NOT need to be on the water as they are "Shops" not "Special" Buildings.
- We built some replacement Buildings (Houses and Shops) in the available area in the East and along the beach, then Demolished some Buildings to fit in one Party Shop in the far East (lower left) and we still had room for one in the far West (upper right).
Goal
Need
Add
Grain Farm
1
1
Needed for Herbal Pharmacy and Grocery Store
Orchard
2
2
1 Needed for Herbal Pharmacy, Grocery Store, and Juice Stand,
2 Needed for Ice Cream Parlor
Grocery Store
1
>1
Requires Grain Farm and Orchard,
Needed for School
Fire Station
1
>1
Requires 24 Population,
Needed for School
School
1
1
Requires Grocery Store and Fire Station,
Needed for Police Station
Police Station
1
1
Requires School
Wood Mill
2
2
Needed for Water Plant, Shoe Shop and Surf Shop
Juice Stand
1
1
Requires Orchard,
Needed for Honeymoon Bungalow
Sheep Ranch
1
1
Requires Grain Farm
Needed for Shoe Shop
Shoe Shop
1
1
Requires Wood Mill and Sheep,
Needed for Boutique
Boutique
1
1
Requires Shoe Shop (and Sheep),
Needed for Party Shop
Fishery
1
1
Needed for Diner
Pig Ranch
1
1
Requires Grain Farm,
Needed for Diner
Diner
1
1
Requires Fishery and Pig Ranch,
Needed for Upgrade 2
Surf Shop
1
1
Next to Water, Requires Wood Mill,
Needed for Upgrade 3
Cow Ranch
1
1
Requires Grain Farm,
Needed for Ice Cream Parlor
Ice Cream Parlor
1
1
Requires 2 Orchards and Cows
Seaside Café
1
1
Next to Water, Requires Grocery and Ice Cream
Needed for Upgrade 4
Herbal Pharmacy
2
2
Requires Grocery, Orchard and Party Shop,
Needed for Upgrade 5
Party Shop
2
2
Requires Boutique and Herbal Pharmacy,
Needed for Upgrade 5
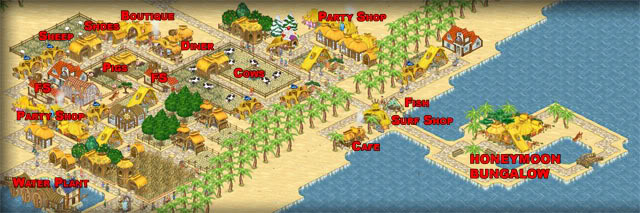
- 3 New Special Buildings:
Cost
Minimum
Income
Special
Gold
Materials
Population
Requirement
Gold
Materials
Kingdom
Street Market
630
355
55
Herbal Pharmacy, Shoe Shop
135
–
Coast(**)
Beach Bazaar
930
1,450
68
Party Shop, Street Market
260
–
Coast(**)
Club Zapital
1,350
1,900
79
Police Station, Hospital
325
–
Coast(**)
- Note (**): Must be placed next to water.
- Stated Goals: Build 1 Club Zapital, 2 Beach Bazaar, 3 Seaside Café and 4 Surf Shops.
- You start with 8 Population (after you connect the Spring), 330 Gold, 285 Materials, a Water Plant (needs 2 Wood Mills and 2 Herbal Pharmacies), and Police Station (needs School).
- The existing Water Plant requires 2 Wood Mills and 2 Herbal Pharmacies. Water Plants are not available to build in this game, but they may exist when you start a level. They provide Gold Income of 140.
- There are Madmen running around so you will definitely need a Hospital unless you want to repair their damages.
- Thieves need a Police Station ASAP.
- Of course, you need a Fire Station when you get your Population up to 24.
- Once you have Police and Hospital, try to place Club Zapital after you get your Population up to 79, it’s Huge and must be on the water.
- The main challenge here is that the Special Buildings need to be placed next to the water. So start placing other buildings centrally and leave the coastlines clear.
- You will probably need to Demolish some of the existing Roads along the line of Trees in the middle of the level to make room for Buildings.
- If you find that you cannot place the Special Buildings required for this level, relocate other Buildings by finding space for a new copy and then Demolishing the old Building.
- Surf Shops need a connection to the Road from the East (very unusual).
Goal
Need
Add
Grain Farm
1
1
Needed for Herbal Pharmacy and Grocery Store
Orchard
2
2
1 Needed for Herbal Pharmacy and Grocery Store
2 Needed for Ice Cream Parlor
Grocery Store
2
2
Requires Grain Farm and Orchard,
Needed for School
Herbal Pharmacy
2
2
Requires Grain Farm and Orchard,
Needed for Hospital, Water Plant University, and Street Market
Wood Mill
2
2
Needed for Water Plant and Shoe Shop
Fire Station
1
1
Requires 24 Population,
Needed for School
School
2
2
Requires Grocery Store and Fire Station,
1 Needed for Police Station and
2 Needed for University
Police Station
1
0
Requires School
Needed for Club Zapital
University
1
1
Requires 2 Schools and 2 Grocery,
Needed for Hospital
Hospital
1
1
Requires 2 Herbal Pharmacy and University,
Needed for Club Zapital
Club Zapital
1
1
Requires Police and Hospital
Sheep Ranch
1
1
Requires Grain Farm
Needed for Shoe Shop
Shoe Shop
1
1
Requires Wood Mill and Sheep,
Needed for Street Market
Cow Ranch
1
1
Requires Grain Farm,
Needed for Ice Cream Parlor
Ice Cream Parlor
1
1
Requires 2 Orchards and Cows,
Needed for Seaside Café
Seaside Café
3
3
Requires Grocery and Ice Cream Parlor,
Needed for Beach Bazaar
Street Market
1
1
Needed for Beach Bazaar
Requires Herbal Pharmacy and Shoe Shop
Party Shop
1
1
Requires Boutique and Herbal Pharmacy,
Needed for Beach Bazaar
Beach Bazaar
2
2
Requires Party Shop and Street Market
Surf Shop
4
4
Requires Wood Mill
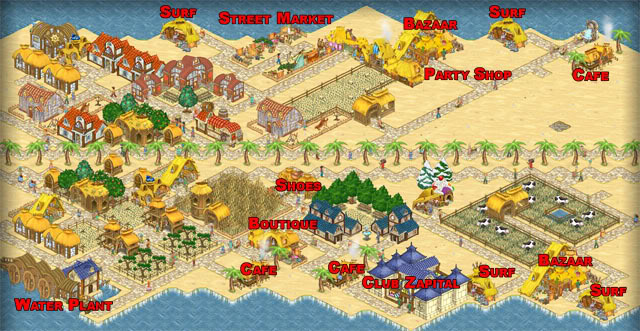
- This is the Final Level (except for a Bonus).
- Zorm shows up again and vows to ruin the Wedding Ceremony. Strangely, he doesn’t really send any Fires, Thieves or Madmen to ruin it. It’s a Wedding Day! You don’t need any Fire Stations, Police Stations, or Hospitals to deal with Emergencies, only to meet your Goals.
- Goal: Upgrade Wedding Ceremony to 3 Stars.
Cost
Required
Wedding Ceremony
Gold
Materials
Population
Requirement
Kingdom
-none-
Juice Stand and Diner
Coast
Upgrade 1
2,500
2,500
50
2 Schools and Seaside Café
Coast
Upgrade 2
5,000
5,000
75
2 Boutique and Beach Bazaar
Coast
Upgrade 3
10,000
10,000
100
3 Party Shops, 1 Club Zapital
Coast
- You start with the 1,000 Gold, 1,000 Materials, Wedding Ceremony (needs Juice Stand and Diner) and two non-functional Water Plants (need 2 Wood Mills and 2 Herbal Pharmacies).
- First thing to do is build a Small House. Then build more houses to bring your Population up to 24 so you can build Fire Station. Keep building the Population as you go along to meet the Goals.
- Remember that Special Buildings in the Coast need to be built by water.
- At this point, you should be very experienced in playing the game, but if you still need help, here is the general order to follow:
Goal
Need
Add
Grain Farm
1
1
Needed for Herbal Pharmacy and Grocery Store
Orchard
2
2
1 Needed for Herbal Pharmacy and Grocery Store
2 Needed for Ice Cream Parlor
Grocery Store
2
2
Requires Grain Farm and Orchard,
Needed for School
Herbal Pharmacy
2
2
Requires Grain Farm and Orchard,
Needed for Hospital, Water Plant and Street Market
Wood Mill
2
2
Needed for Water Plant and Shoe Shop
Fire Station
1
1
Requires 24 Population,
Needed for School
School
2
2
Requires Grocery Store and Fire Station,
Needed for Police Station
2 Needed for University
Sheep Ranch
1
1
Requires Grain Farm
Needed for Shoe Shop
Shoe Shop
1
1
Requires Wood Mill and Sheep,
Needed for Street Market
Police Station
1
1
Requires School
Needed for Club Zapital
Sheep Ranch
1
1
Requires Grain Farm
Needed for Shoe Shop
Shoe Shop
1
1
Requires Wood Mill and Sheep,
Needed for Street Market
Boutique
2
2
Requires Shoe Shop (and Sheep),
Needed for Upgrade 2
Cow Ranch
1
1
Requires Grain Farm,
Needed for Ice Cream Parlor
Ice Cream Parlor
1
1
Requires 2 Orchards and Cows,
Needed for Seaside Café
Seaside Café
3
3
Requires Grocery and Ice Cream Parlor,
Needed for Beach Bazaar
Street Market
1
1
Requires Herbal Pharmacy and Shoe Shop,
Needed for Beach Bazaar
Party Shop
3
3
Requires Boutique and Herbal Pharmacy,
Needed for Beach Bazaar and Upgrade 3
Beach Bazaar
1
1
Requires Party Shop and Street Market,
Needed for Upgrade 2
University
1
1
Requires 2 Schools and 2 Grocery,
Needed for Hospital
Hospital
1
1
Requires 2 Herbal Pharmacies and University
Needed for Club Zapital
Club Zapital
1
1
Requires Police and Hospital,
Needed for for Upgrade 3

- The Royal Wedding is a big success! Look amongst the guest for your favorite Madmen, Hospital Workers, Thieves and Police Officers.
- The King of the Coast presents you with a Trophy that looks like a Golden Palm Tree.
- The Royal Wedding finally happens and you are thanked for all your efforts.
- Of course, Zorm appears and threatens your the future (we guess there might be a sequel to this game).
Coast Bonus Level: Z Marks the Spot
- Stated Goals: Build 1 Club Zapitol, 1 Beach Bazaar, 1 Street Market and 20 Special Buildings
- You have 2:00 Minutes.
- We don’t have a screen shot for the solution to this level. If you have one to share, let us know and we’ll include it in the guide and give you a mention for your contribution.
Congratulations! You have completed World of Zellians: Kingdom Builder. We hope you enjoyed the game.
“;

More articles...
-
Grow A Garden 2 Base Price List
What's the most valuable crop? -
Evomon Best Starter [Leafbun, Blazpup, or Bubble?]
Grass-type, Fire-type, or Water-type? -
Evomon Tier List [META and BEST Evomon]
The Evomon dream team.