
Grow A Garden 2 Base Price List
What's the most valuable crop?![Evomon Best Starter [Leafbun, Blazpup, or Bubble?]](/wp-content/uploads/2026/06/evomon-best-starter.jpg "Evomon Best Starter [Leafbun, Blazpup, or Bubble?]")
Evomon Best Starter [Leafbun, Blazpup, or Bubble?]
Grass-type, Fire-type, or Water-type?![Evomon Tier List [META and BEST Evomon]](/wp-content/uploads/2026/06/evomon-tier-list.jpg "Evomon Tier List [META and BEST Evomon]")
Evomon Tier List [META and BEST Evomon]
The Evomon dream team.
![[Roblox] Evomon Shiny Hunting Guide – Including Prismatic and Pris Shinies!](/wp-content/uploads/2026/06/evomon-shiny-hunting-guide.jpg "[Roblox] Evomon Shiny Hunting Guide – Including Prismatic and Pris Shinies!")
Women’s Murder Club: Twice in a Blue Moon Walkthrough
Welcome to Gamezebo's strategy guide for Women's Murder Club: Twice in a Blue Moon. This is the 3rd title in the game series based on the popular novels by James Patterson. The game offers a combination of Hidden Object and puzzles in a contemporary detective mystery. This Strategy Guide is divided into two sections:General Tips (no spoilers)Detailed Walkthrough GENERAL TIPSThere is no timer.There are 9 investigations. Each one is a combination of Hidden Objec…


- Prefer Gamezebo on Google


a:1:i:0;a:2:s:13:”section_title”;s:53:”Women’s Murder Club: Twice in a Blue Moon Walkthrough”;s:12:”section_body”;s:63766:”
Welcome to Gamezebo’s strategy guide for Women’s Murder Club: Twice in a Blue Moon. This is the 3rd title in the game series based on the popular novels by James Patterson. The game offers a combination of Hidden Object and puzzles in a contemporary detective mystery.
This Strategy Guide is divided into two sections:
General Tips (no spoilers)
Detailed Walkthrough
- There is no timer.
- There are 9 investigations. Each one is a combination of Hidden Object scenes and puzzles.
- Over the course of the game you will play as any of 4 different characters: Lindsay Boxer (police detective), Claire Washburn (medical examiner), Cindy Thomas (reporter) or Jill Bernhardt (district attorney).

- The choice of character is automatic; it’s just for story purposes.
- You will receive 5 hints and only 5 hints for each investigation. The hints can only be used in the Hidden Object scenes, they don’t work for the puzzles
- When you need to use items from your inventory, you will only see 3 or 4 at a time. There is no way to scroll through inventory, but you won’t need to.
- There are only a few tools you can use in the game, and they only appear part of the time. If a tool is available, it will be in the inventory tray.
- To use a tool, click on it in inventory, then drag it across the scene.
- Both Lindsay and Claire may have the flashlight. This is for black-out scenes.
- Claire also has a cotton swab. Drag this to a stain at the crime scene to collect evidence. The swab will be automatically bagged and placed in your inventory.
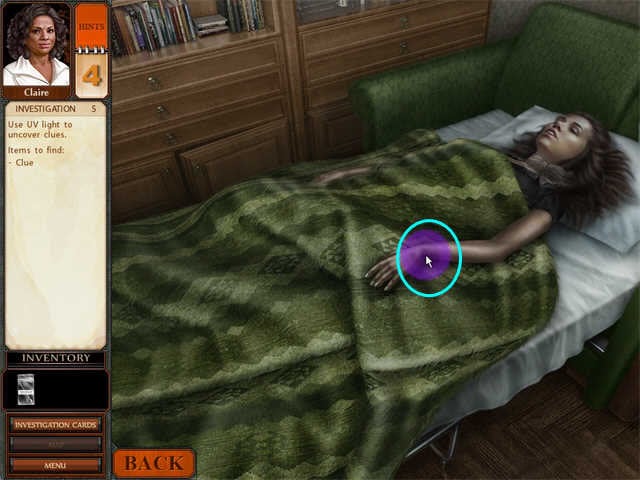
- Claire also has a "UV light." To use it, click on it in inventory and then drag it across the scene. You will get a purple circle that may show you something previously invisible.
- Sometimes the "UV light" acts like a UV light and sometimes it acts like an X-Ray. Drag it across every part of the scene, because it may reveal something underneath another layer, like an item in a victim’s pocket.
- You may skip any puzzle just by clicking on the SOLVE button in the top left. This will not cost you a hint, so feel free to use it if you get stuck.
- When you need to go to a new location, you will be automatically transferred to the map.
- For most of the game, there will be only one location available on the map.
- Although your character can fail in some of the puzzles, you will just restart automatically, so you don’t have to do any saves.
- There are two mini-games where you are in a maze, and you have to avoid contact with others who are also in the maze. You move more quickly than the others, so just stay alert and back up or turn down a side path and you shouldn’t have any trouble getting through.
- When a puzzle restarts you can either try again or use the SOLVE button to skip it.
- The game will automatically save every time you exit.
- Investigation One
- Investigation Two
- Investigation Three
- Investigation Four
- Investigation Five
- Investigation Six
- Investigation Seven
- Investigation Eight
- Investigation Nine
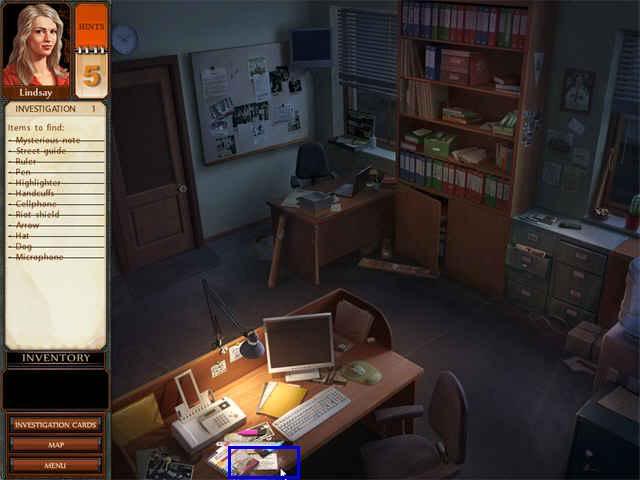
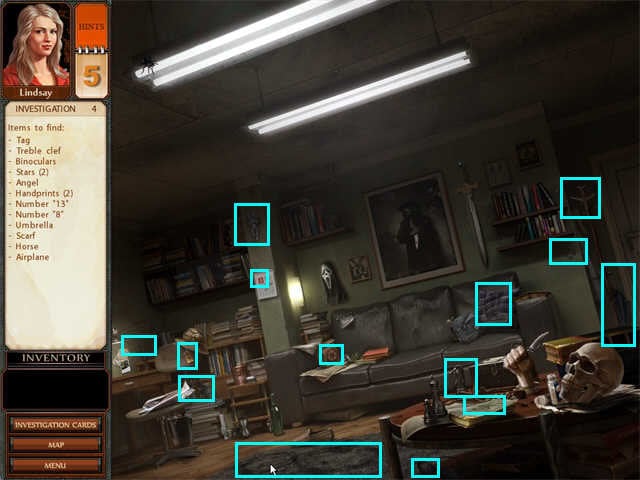
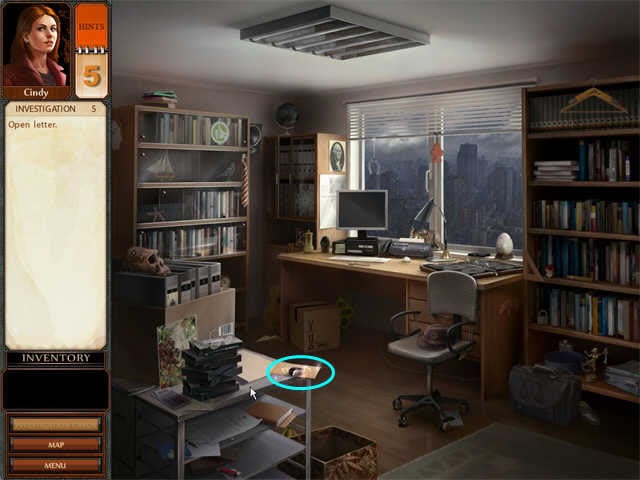
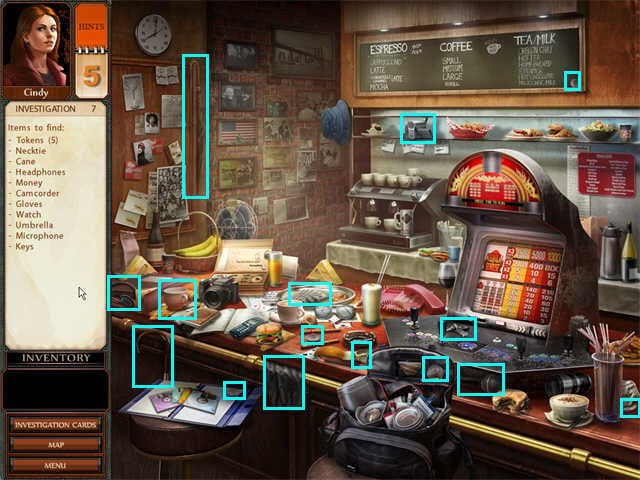
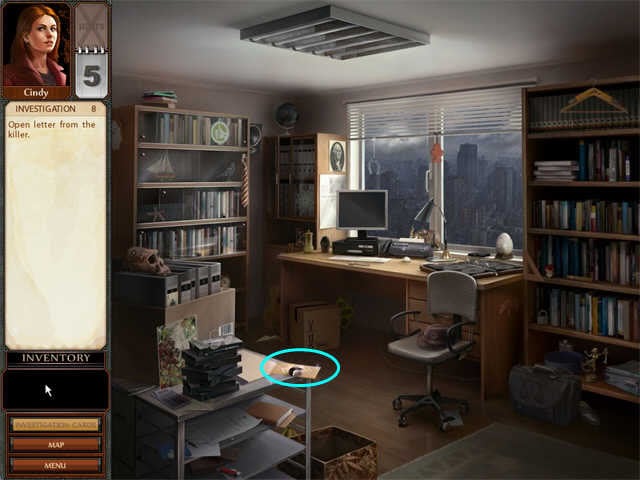
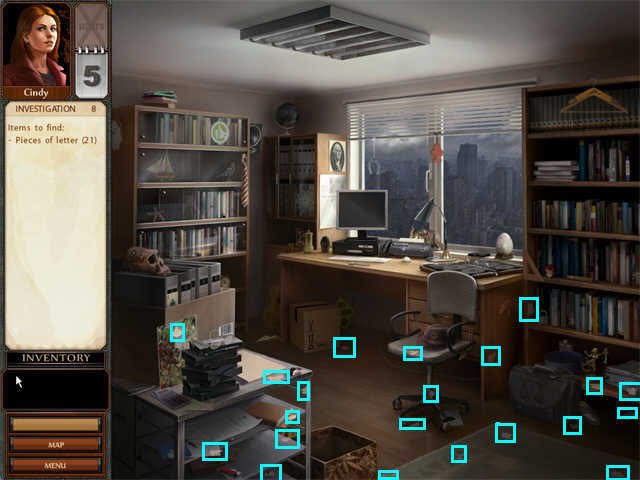
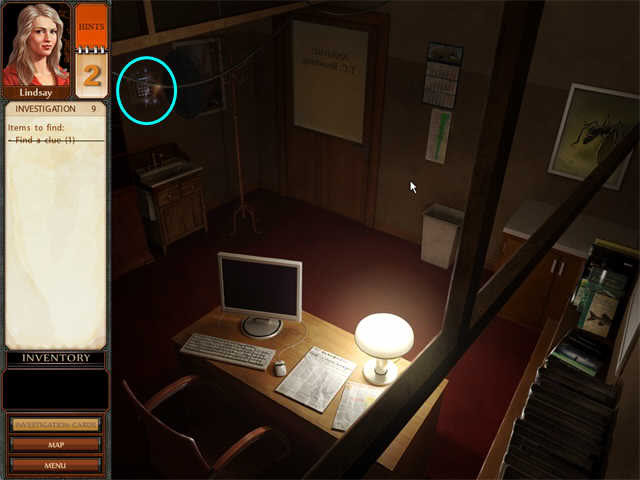
- Start with a Hidden Object Scene.
- Collect everything on the Find List.
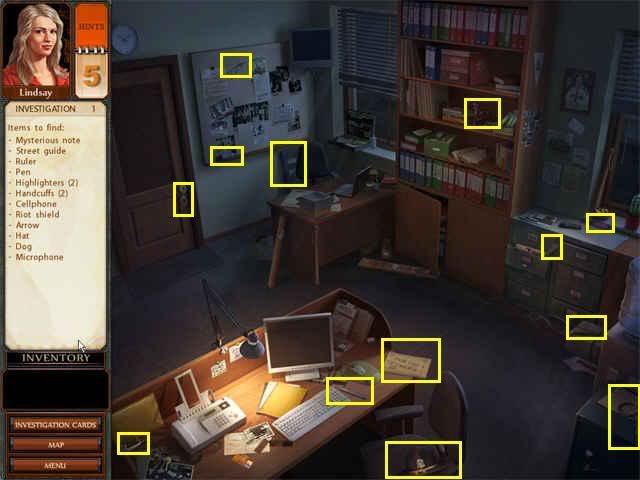
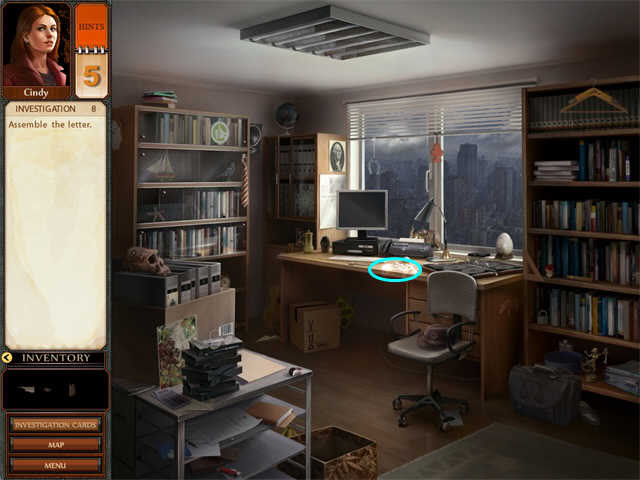
- The letter on the desk will sparkle. Click on it.
Map Puzzle
- Use the clues in the note to eliminate streets one by one.
- Click on the street you want to eliminate and it will have a highlight line drawn through it.
- For example, "clay" is a natural substance and "pacific" is a body of water.
- Eventually you will be left with just one street, Jack Kerouac Alley.
Solution:
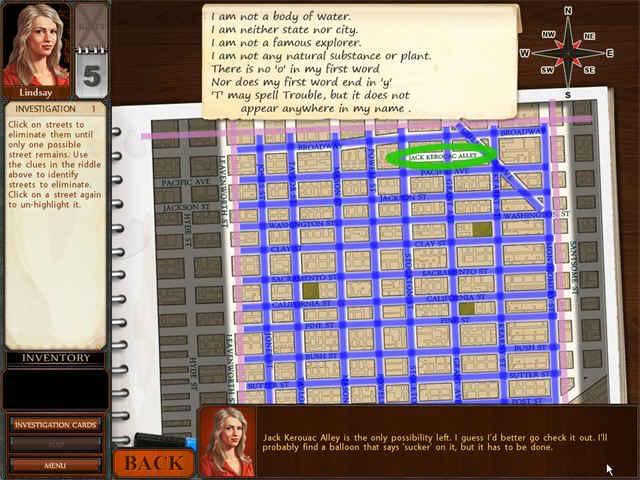
- You will return to the map.
- Click on Jack Kerouac Alley.
- A puzzle scene will start.
- The lamp post is flickering. You need to fix the light before you can go any further.
- There is no Find List for this puzzle-you just have to try different objects in the scene and see which ones will move.
Flickering Lamp Post Puzzle
- The ladder is not tall enough to reach, so you need to stack up a few things first.
Solution:
- Click and drag the following items to the lamp post, in this order:
- Bench, big box, medium box, ladder
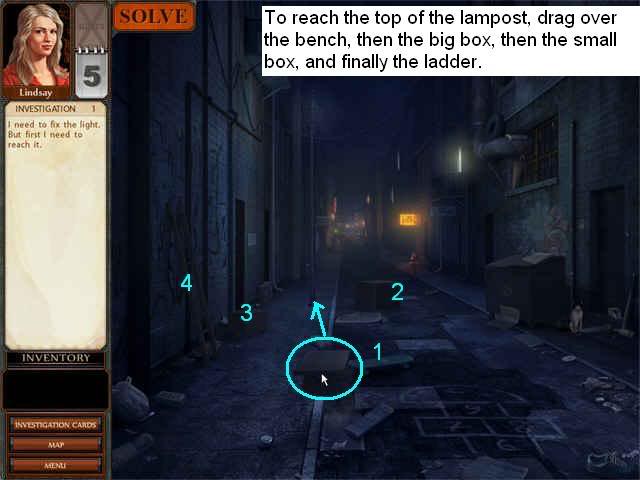
- Lindsay will say "Now I can reach the light."
- Click on the top of the lamp post twice to open it.
- Drag the light bulb to tighten it.

- Now you can see better.
- A new Hidden Object scene starts.
- Collect 13 newspapers.
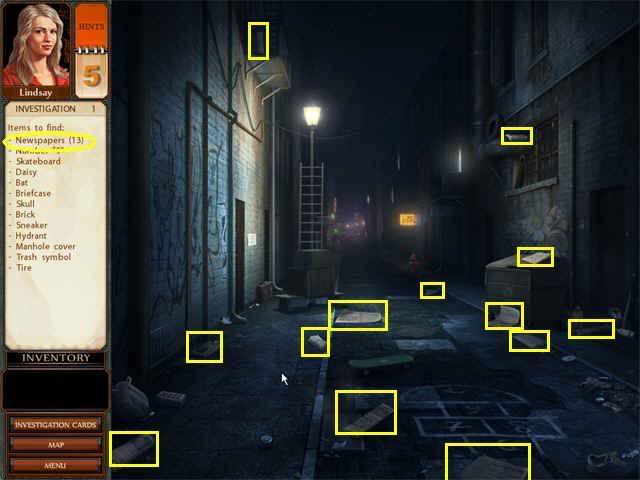
- Collect everything else on the Find List.
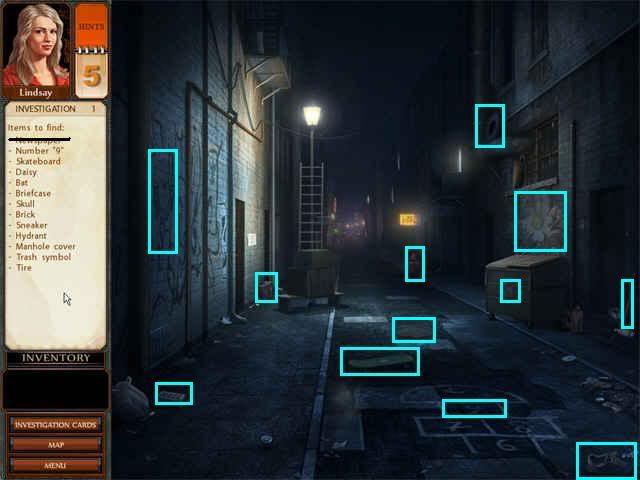
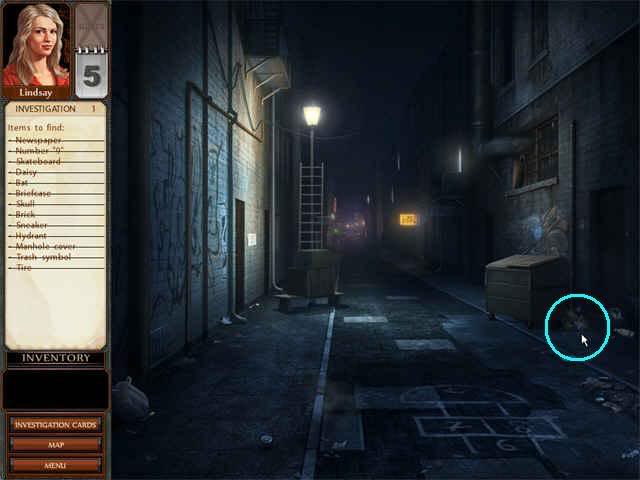
- The cat will move, revealing a body behind the dumpster. Click on it twice.
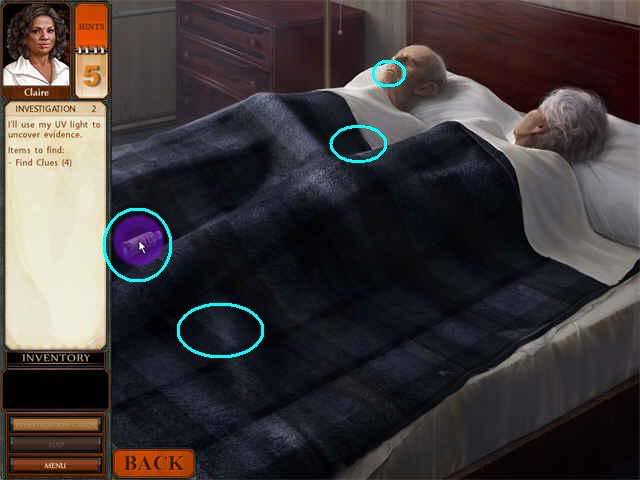
You are now playing as Claire Washburn, the Medical Examiner.
- Click on the body one more time.
- Click on the UV light in inventory, then hover it over the body and the crime scene.
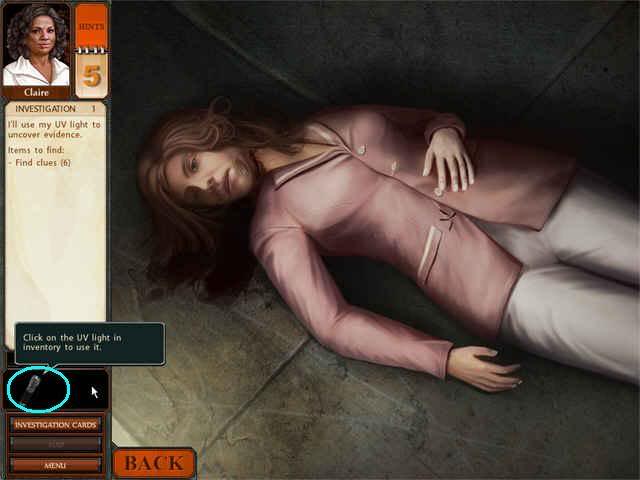
- Click anywhere it looks different in the UV light.
- You will find 2 clues in the first phase.
- There is a bruise on the chin.
- There is evidence on the neck (click at the lowest part of the wound).
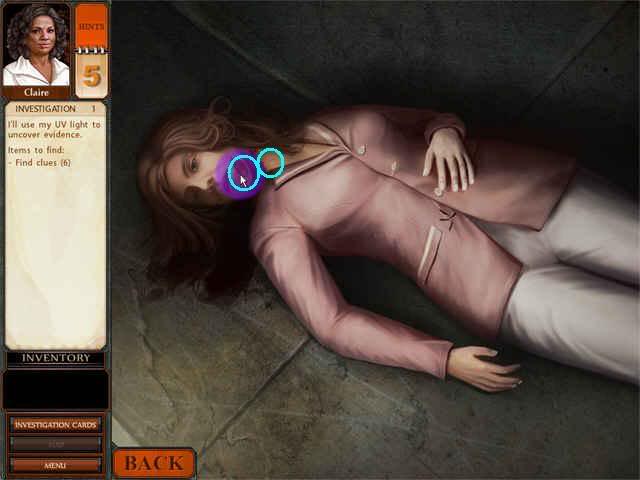
- Now click on the bloodstain near the belt line.
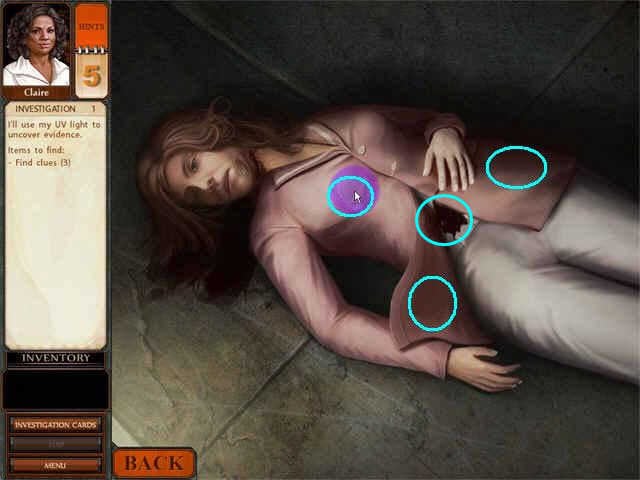
- The jacket will open. This is the second phase of Claire’s investigation.
- You can find four more clues.
- Click on the bloodstain on the shirt by the belt line.
- There is a pocket handkerchief, even though there’s no pocket!
- Click on the fancy comb inside the jacket.
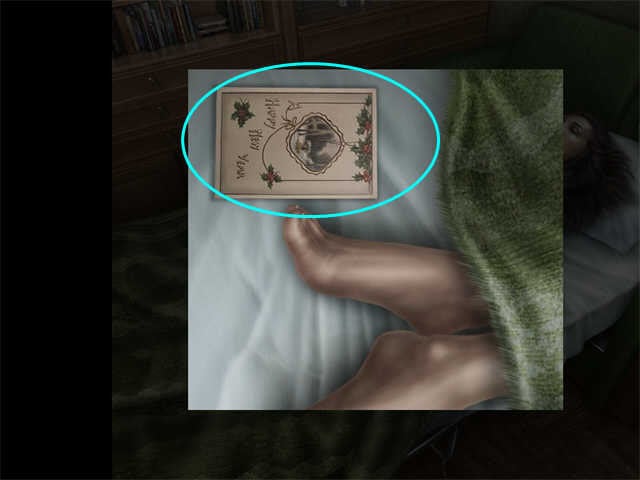
- Click on the mirror on the right side of the body (see screenshot).
- The artwork doesn’t really match the text descriptions, but just go with it.
- Once you have found all 6 clues, you will get a case file on the victim, and that will end the investigation.
Investigation 2: Don’t Fear the Ripper
- The 4 women are meeting at a diner, discussing the case.
- Cindy Thomas the reporter realizes the victim’s name, Mary Nichols, is a clue.
- She returns to the newspaper office to do some research.
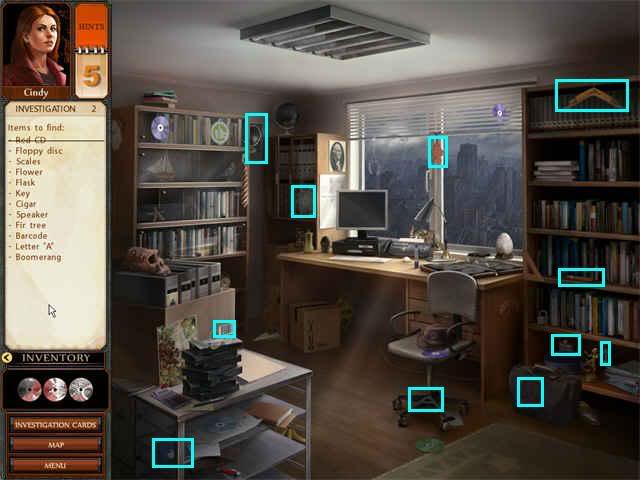
You are now playing as the reporter.
- Click on the map location for the San Francisco Register.
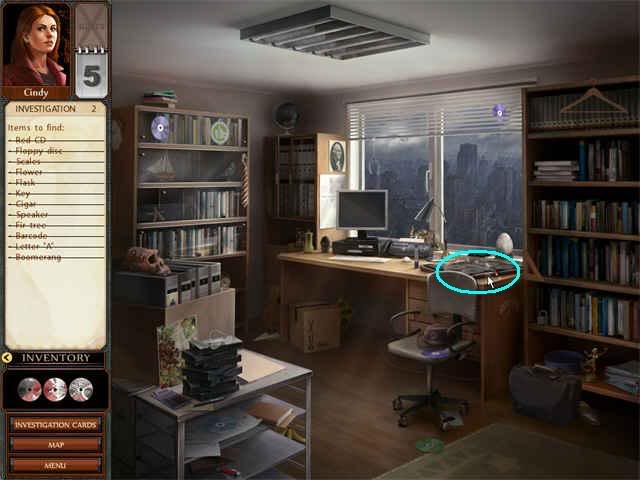
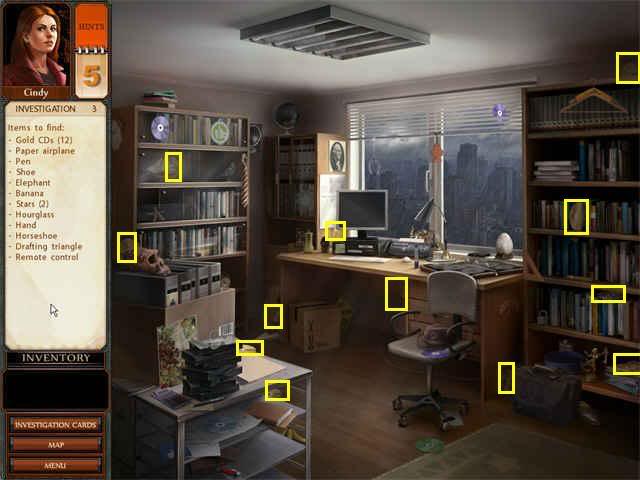
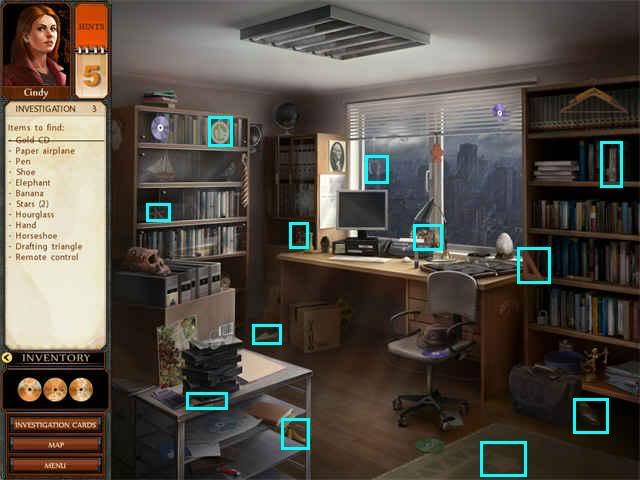
- Start with a Hidden Object Scene.
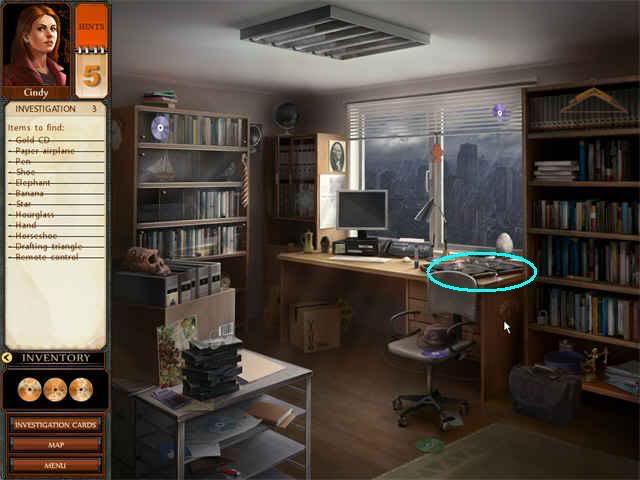
- Find 13 red CDs. Only the red ones will count.
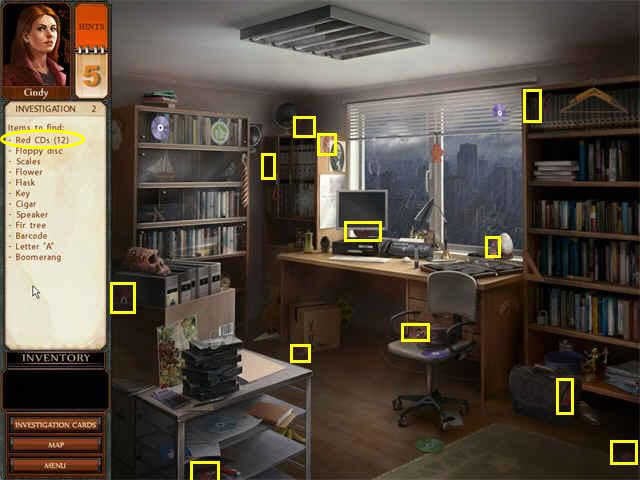
- Now collect the other items on the Find List.
- The letter "A" is on the base of the chair.
- Cindy will say "Let’s take a closer look." The CD folder on the desk is sparkling. Click on it.
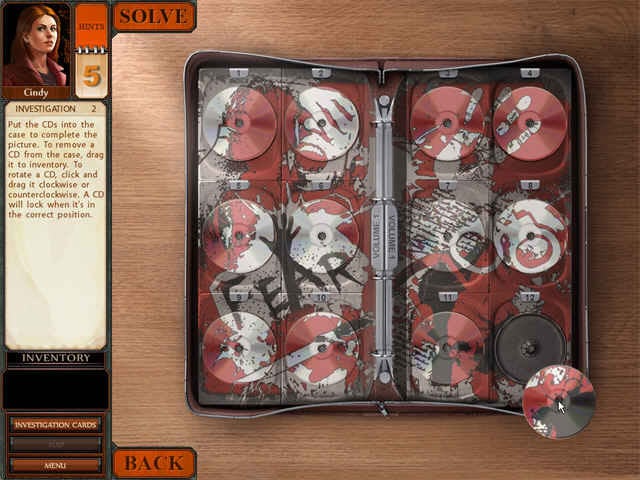
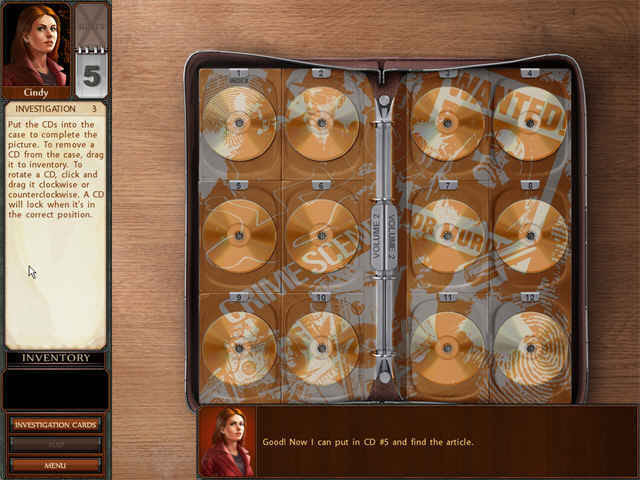
CD Folder Puzzle
- Drag a CD to a slot in the case, then drag it to spin it.
- If it’s in the right place, it will lock in place.
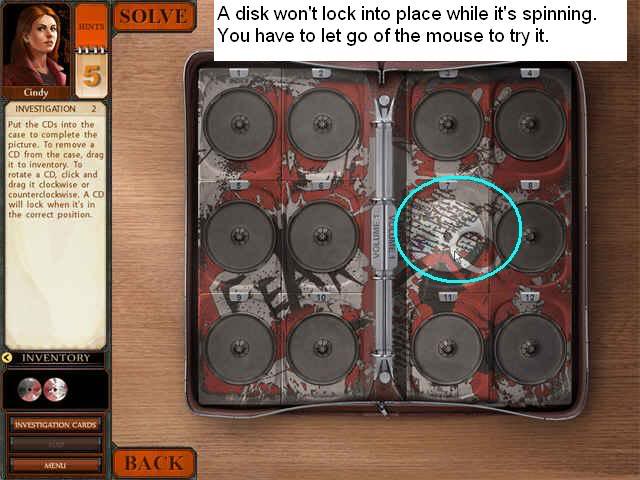
- If it’s not in the right place, just try it in a different slot.
- You can use the patterns as a guide or just do it by trial and error.
- However, the disk won’t lock into place if it’s spinning, so line it up about where you think it goes, then let go of the mouse to see if it clicks.
- You can leave a CD in the wrong slot while you try another one. This way you can look at several disks at once.
Solution:
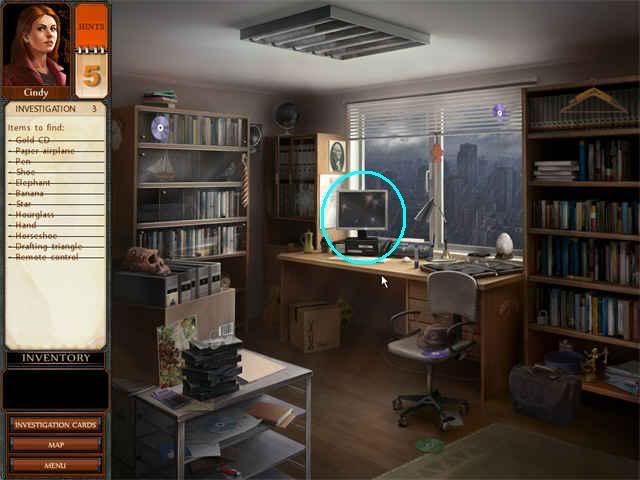
- Cindy will say "Now I can look at the index CD."
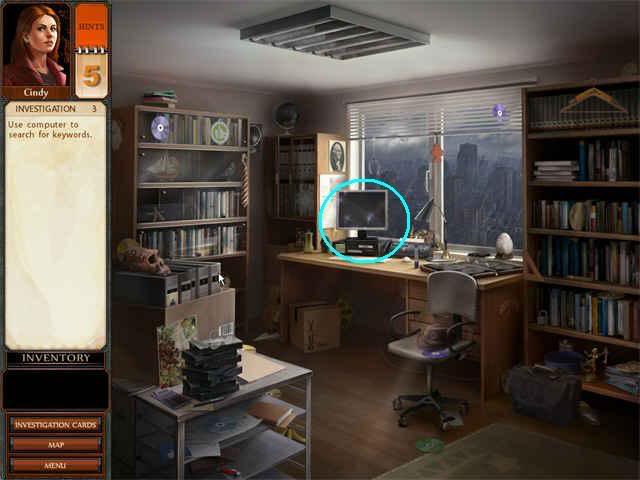
- Click on the computer monitor.
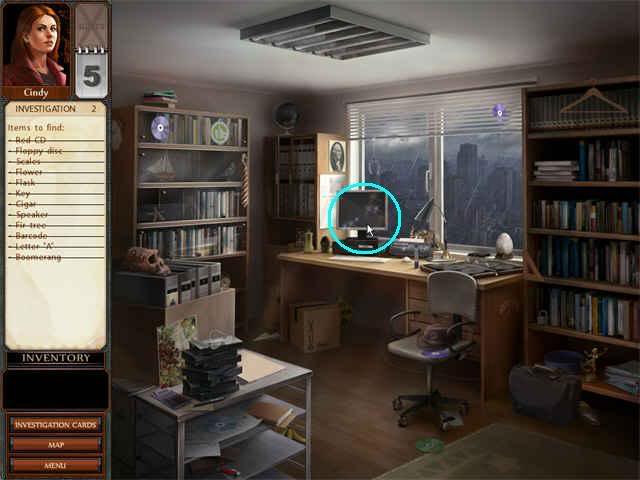
- You will get a zoom view of the computer. Click on the red CD to start it.
- You will get an entry screen. Enter Mary Nichols and click search.
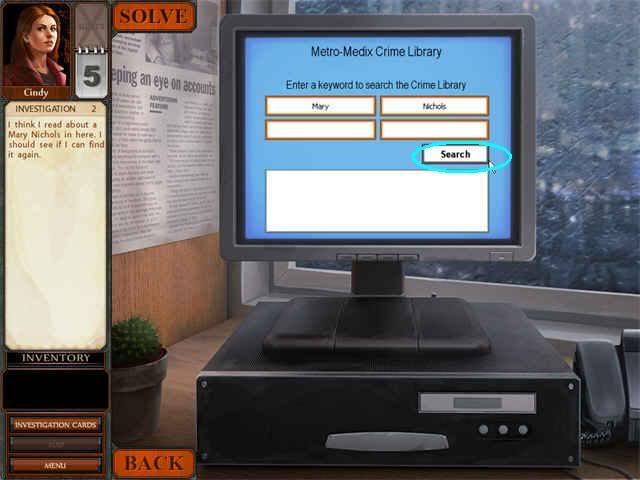
- Read the information. The killer is copying Jack the Ripper!
The scene shifts to the Police Office. You are playing as the police detective.
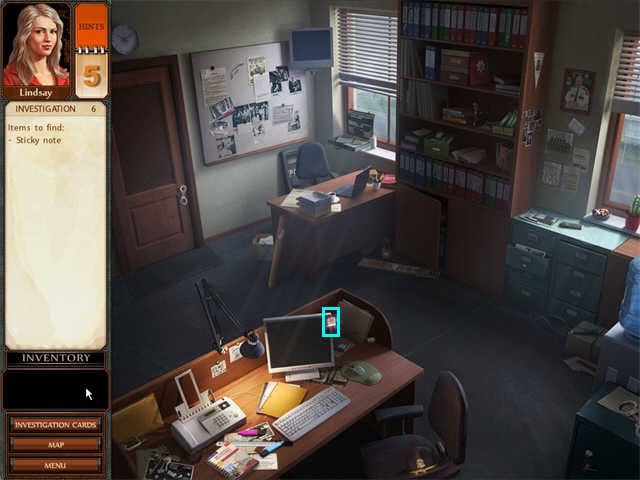
- Find the FAX and the sticky note.
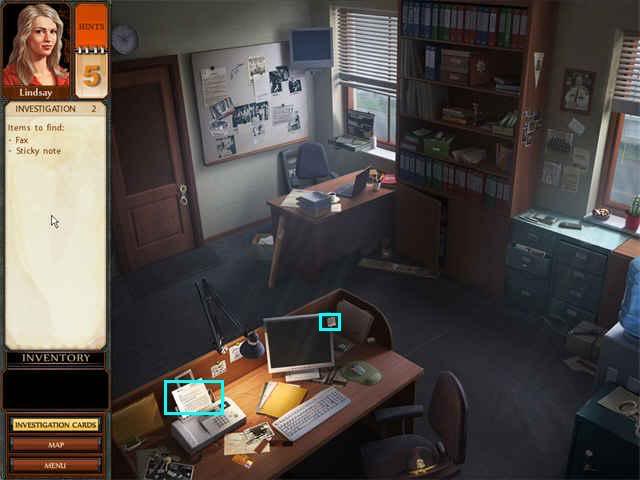
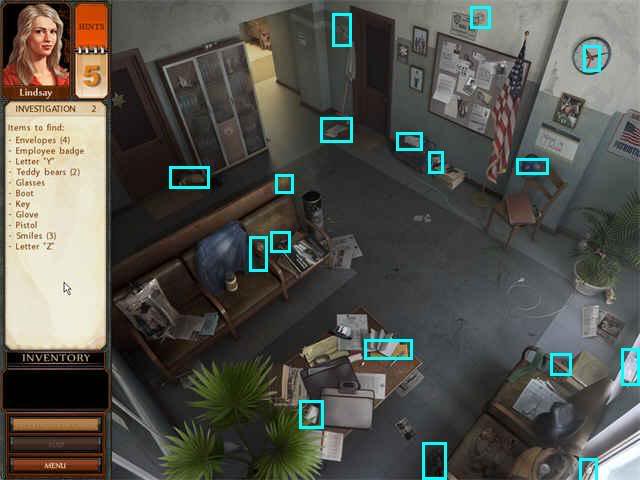
- The scene will shift to the Police Station Lobby.
- A Hidden Object scene starts.
- Collect the items on the Find List.
- You will return to Lindsay’s office.
- Click on the map materials on her desk.
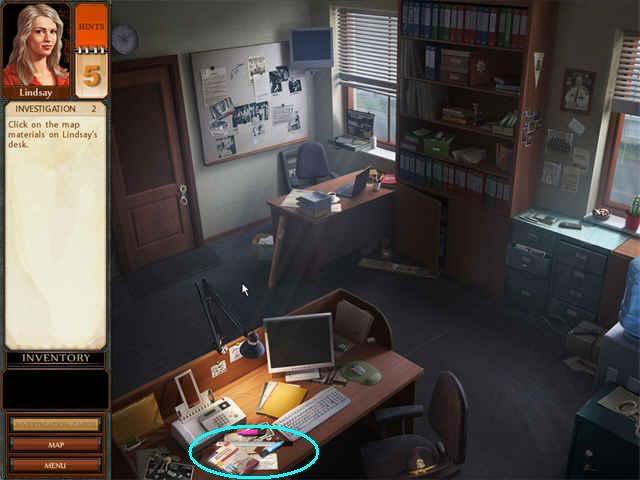
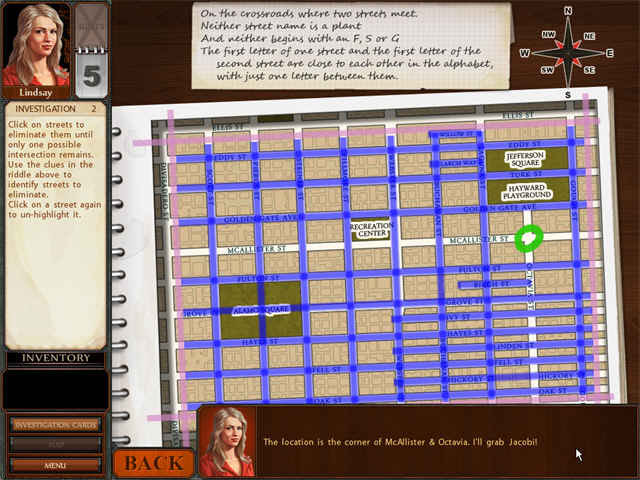
Map Puzzle
Solution:
- McAllister and Octavia
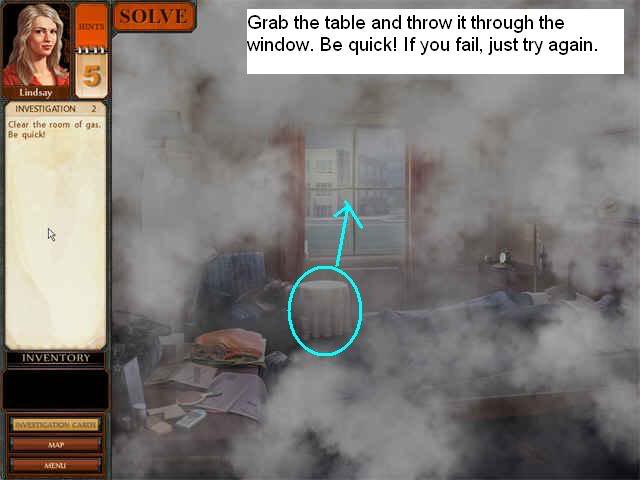
- In the motel room, there is a lot of gas. You have to quickly find something to break the window.
- Grab the round table that is by the left side of the window and throw it through the glass.
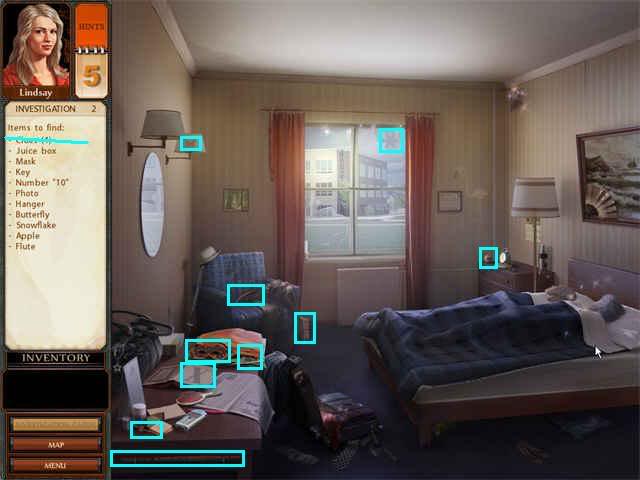
- A new Hidden Object scene will start.
- First find the 4 clues:
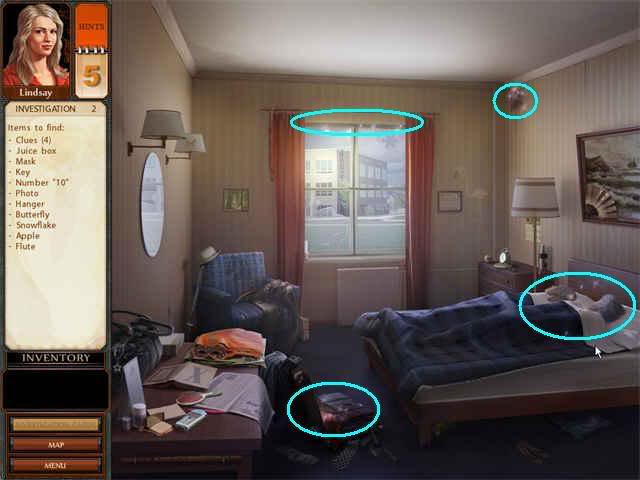
- When you click on the vent you will get a zoom scene. Click on the right side of the vent to open it and then click on the hose to get credit for the clue.
- Collect the other items on the Find List.
- The "number 10" is the Roman numeral X on the book.
- The juice box is about the size of a Wii.
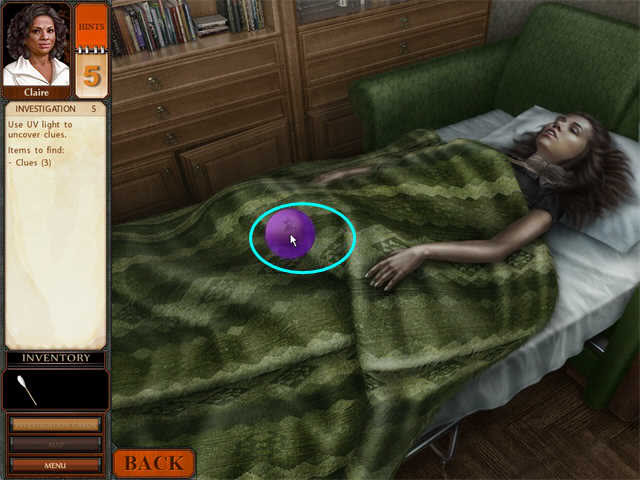
Claire will arrive. You are now playing as the Medical Examiner.
- Use the UV light on the bodies.
- Collect 4 clues:
- A bottle of acid by the man
- A hank of hair by the woman’s leg
- Foam from the man’s mouth
- A ticket near the man’s chest in between the two bodies
- The map will show the Forensics Lab. Click on it.
- Click on the computer to start the analysis.
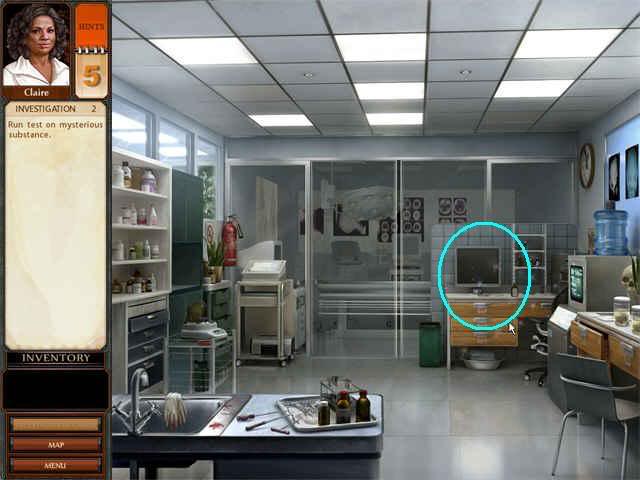
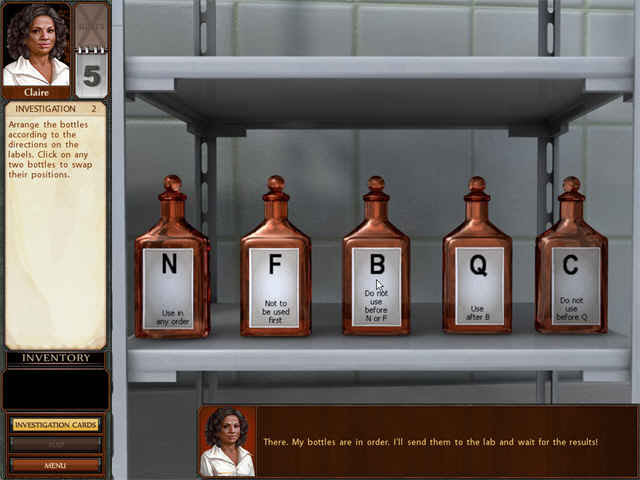
- Click on the bottles to start the puzzle.
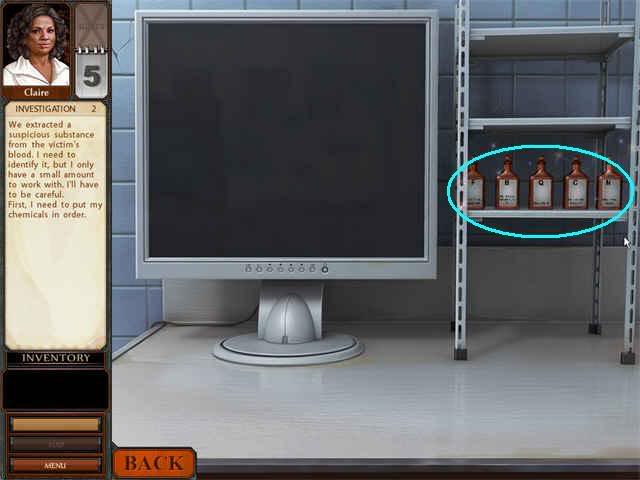
Lab Analysis Puzzle 1
- Click on any two bottles to swap the labels on them.
- Use logic to put them in the right order.
Solution:
NFBQC
- The computer will say "Lab Results In"
- Click on it to read the results.
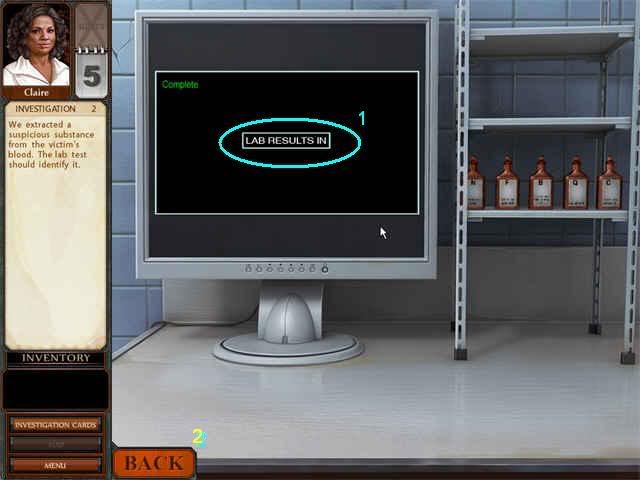
- Then click on BACK to return to the investigation.
You are playing as the reporter.
- Click on the computer to start your research.
- Search for Pitezel and Gas.
- Cindy will say she needs to search the gold CDs.
- Search for Gold CDs
- Collect the remaining items on the Find List.
- Click on the CD folder to start the puzzle.
Gold CD Puzzle
- I thought this was considerably easier than the red one because of all the small pictures like the $100 bill and the WANTED poster.
Solution:
- Click CONTINUE to return to the room view.
- Click on the Computer to get started with your research.
- Click on the CD tray.
- Read about the case.
Now you are playing as the police detective again.
- Click on Motel on the map.
- A Hidden Object scene will start.
- Start by collecting the tourist coupons.
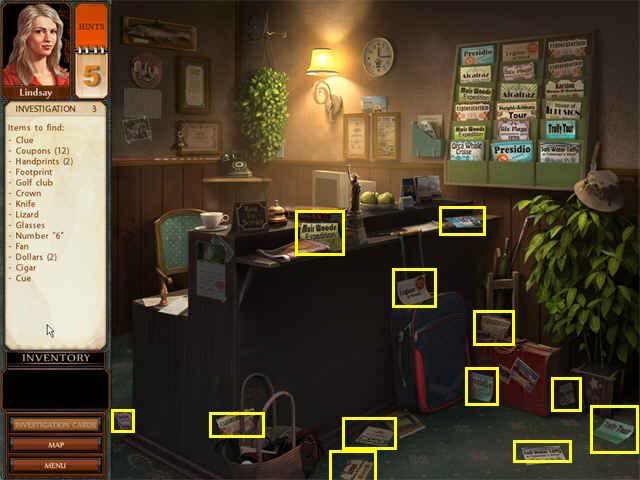
- The ledger on the desk is a clue. Click on it.
- Click on the name "Ned Edda."
- Collect the remaining items on the Find List.
- The 6 is on the lamp on the wall.
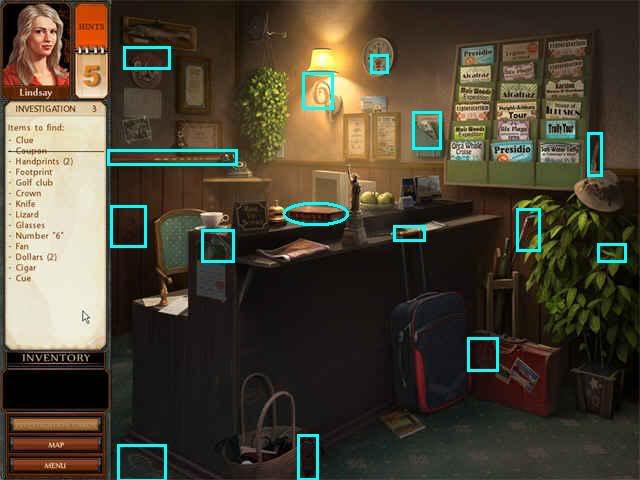
- The coupon case is another clue. Click on it.
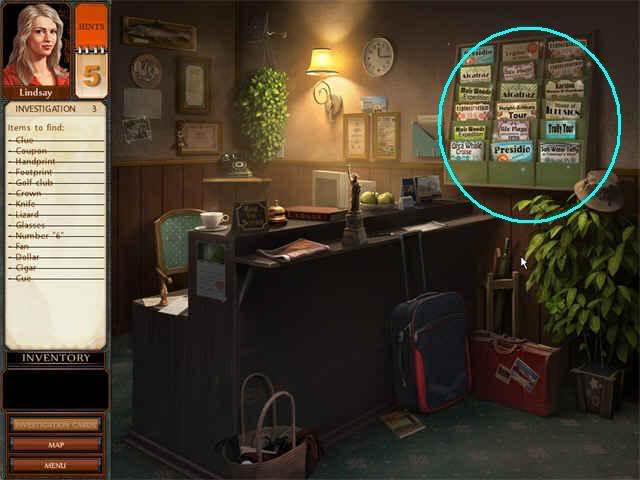
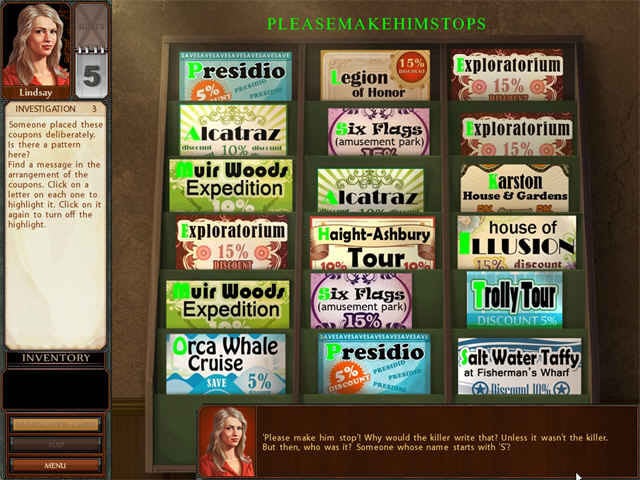
Coupon Case Puzzle
- You read across each shelf from left to right, then go down to the next.
- Pick one letter on each coupon and click on it to highlight it.
- The letters you pick will appear at the top of the screen.
- There are no spaces or punctuation.
Solution:
PLEASEMAKEHIMSTOPS
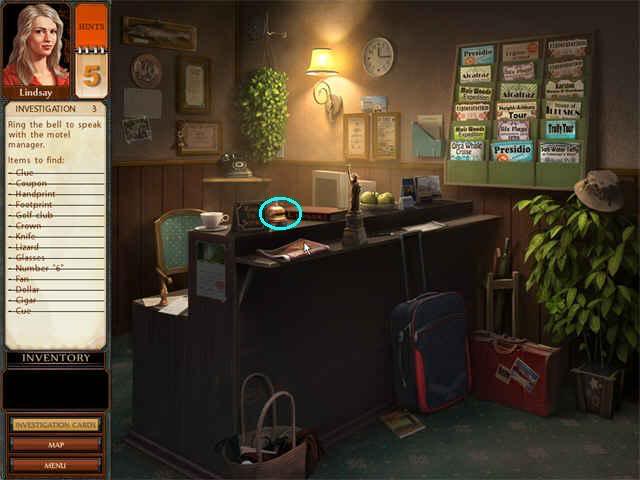
- Ring the bell and speak with the motel manager.
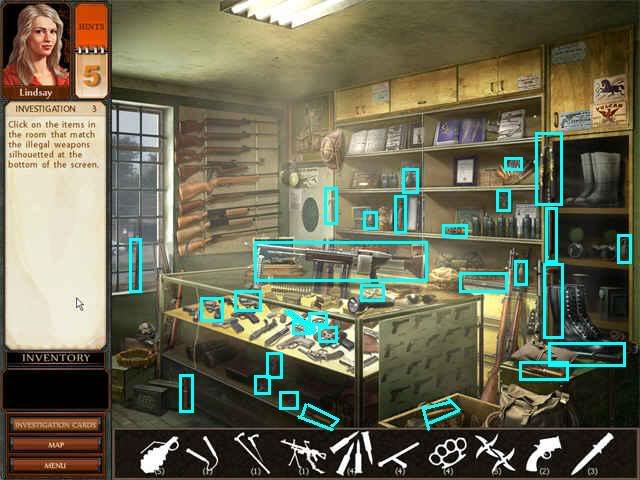
- You will return to the map. Choose the Home Turf Weapons Store.
- A Hidden Object scene will start.
- Collect everything listed.
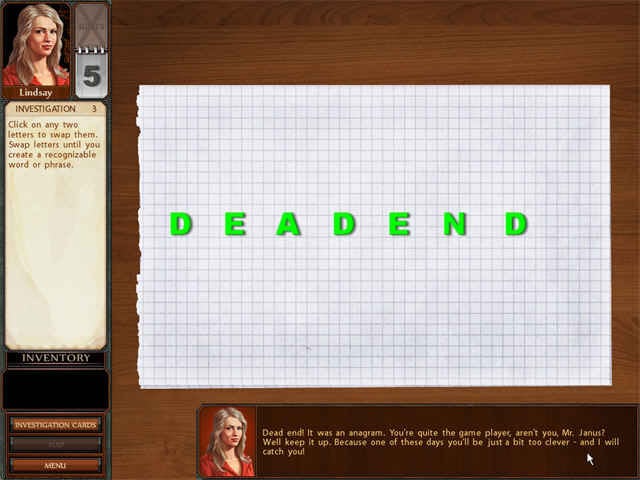
- Return to the Police Station and Lindsay’s office.
- Click on the Crime Computer to begin investigating names.
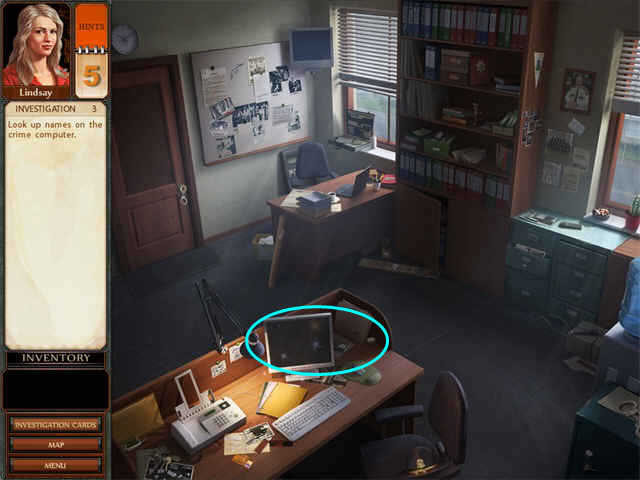
Name Puzzle
Solution:
Dead End
Investigation Four: Addicted to Murder
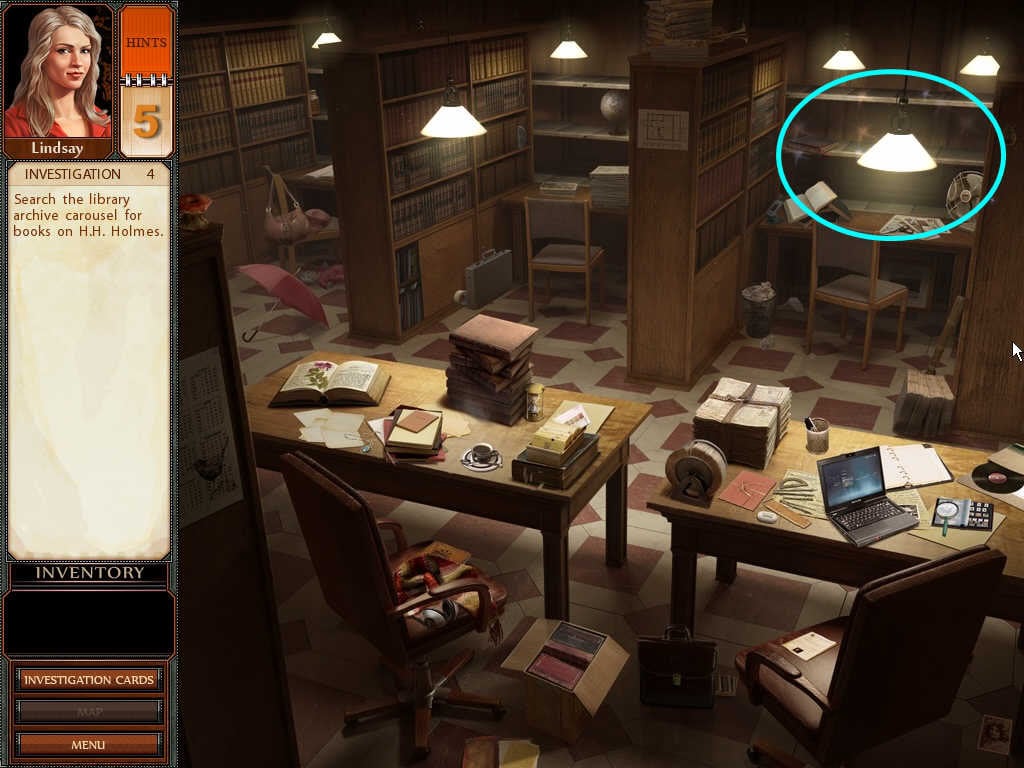
- Go to the library.
- Follow the archivist TC Browning down to the archives. He will go out a different door each time-you just have to click on the door he goes through.
- There are 10 stages to the puzzle.
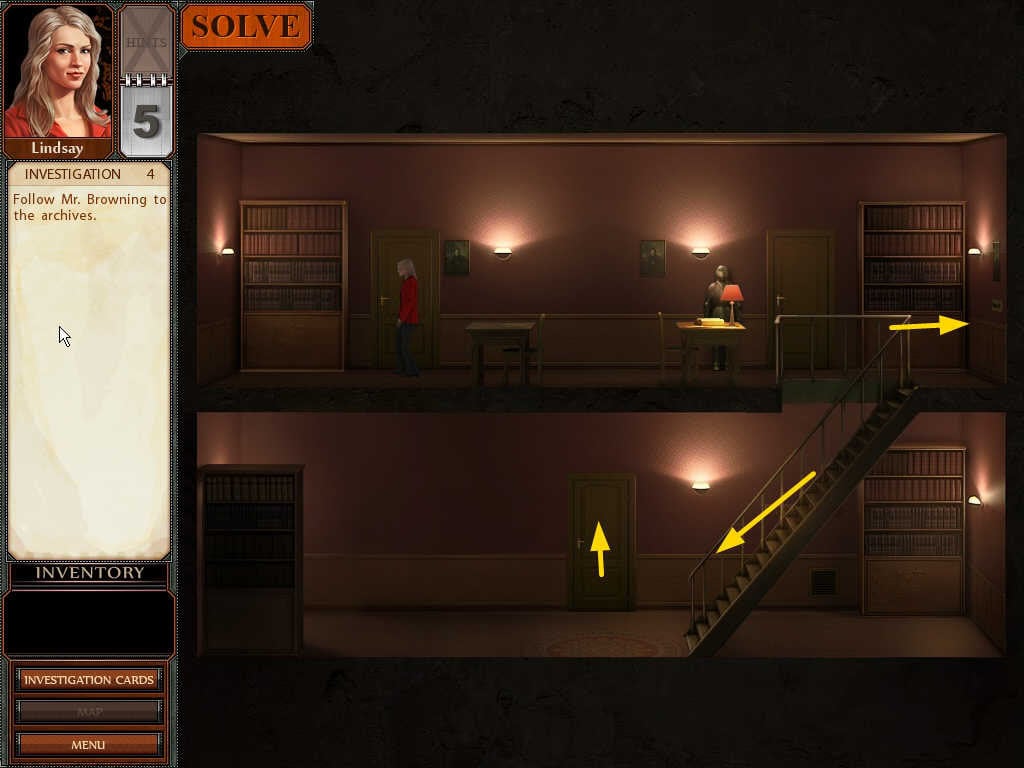
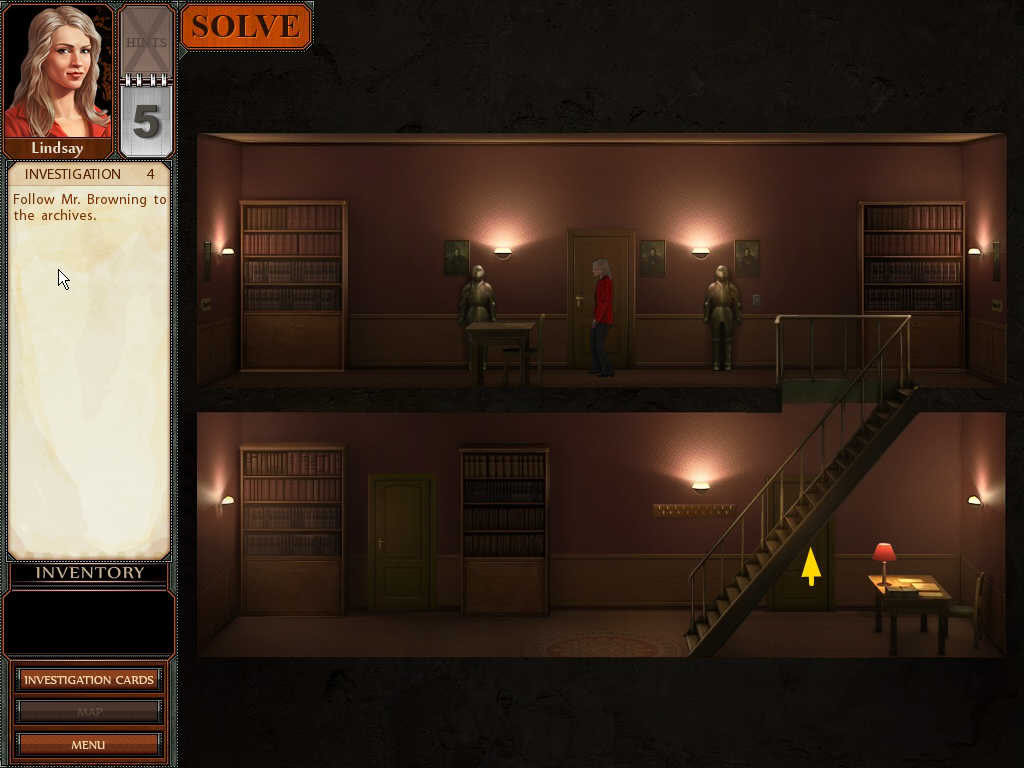
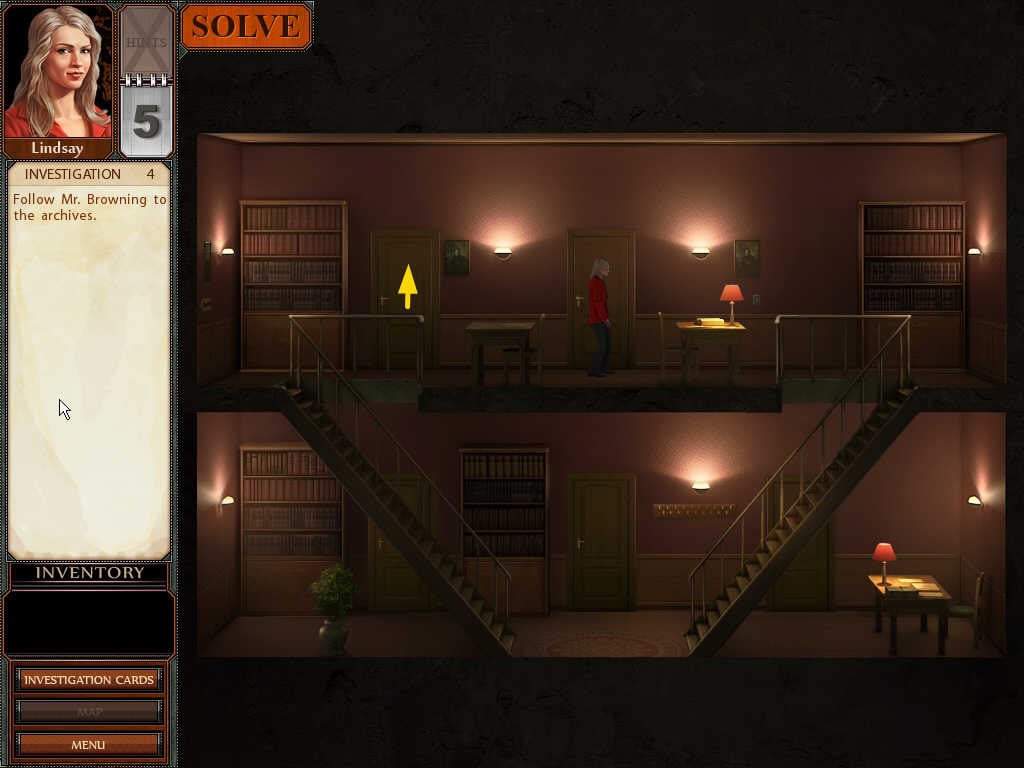
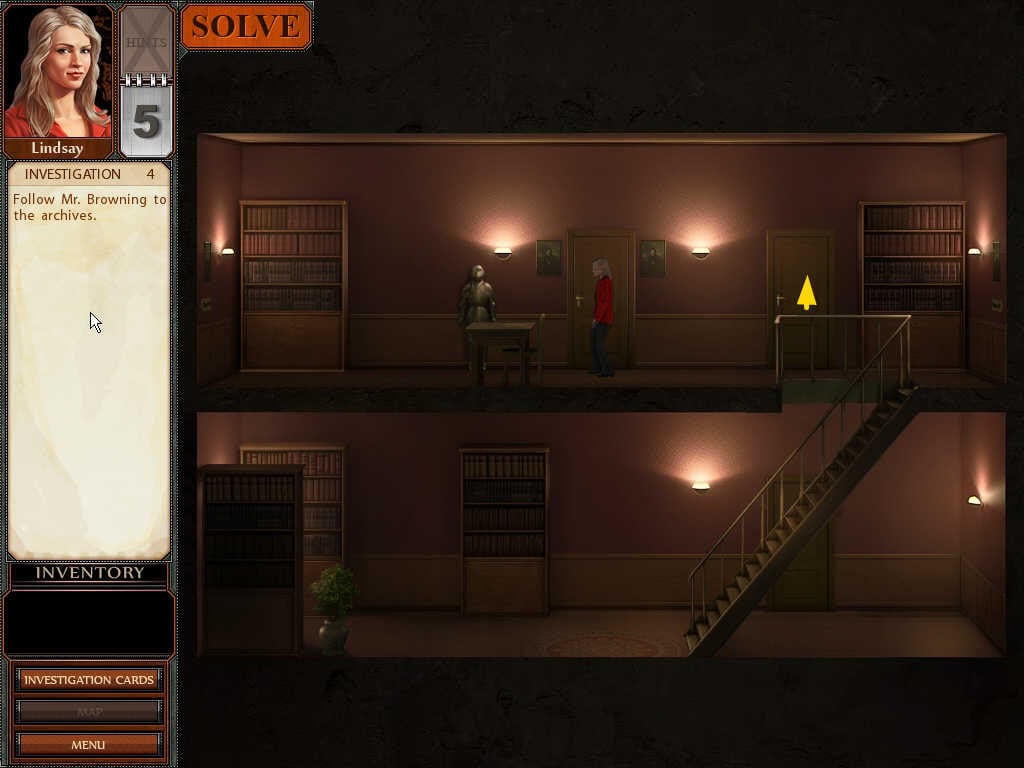

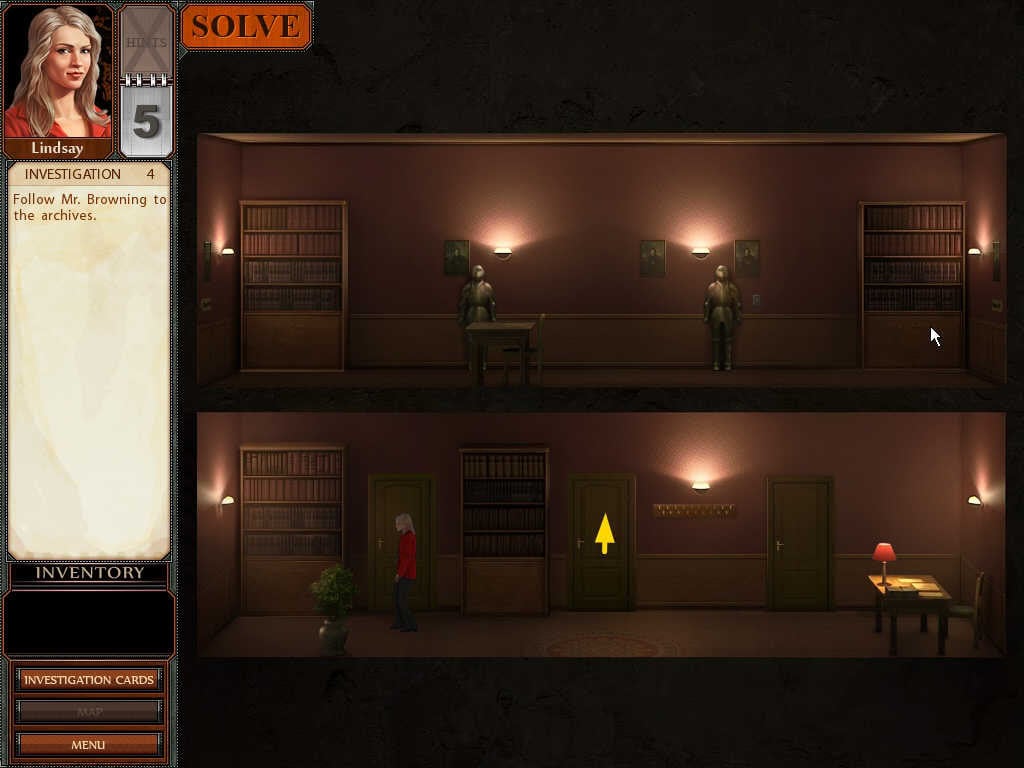
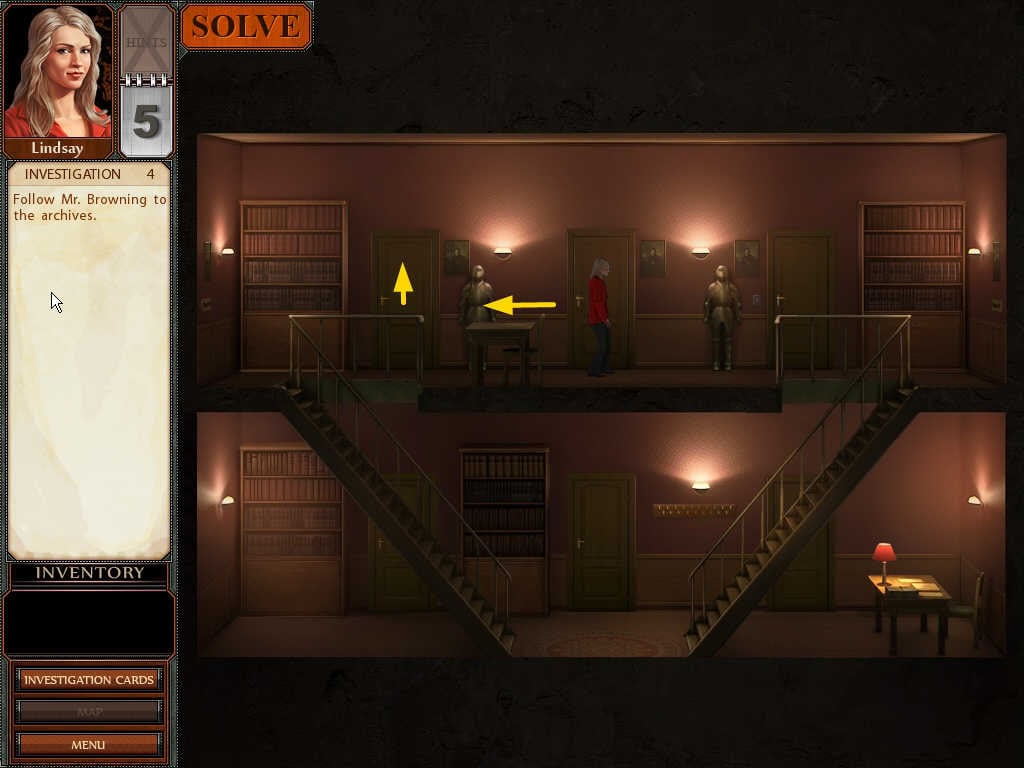
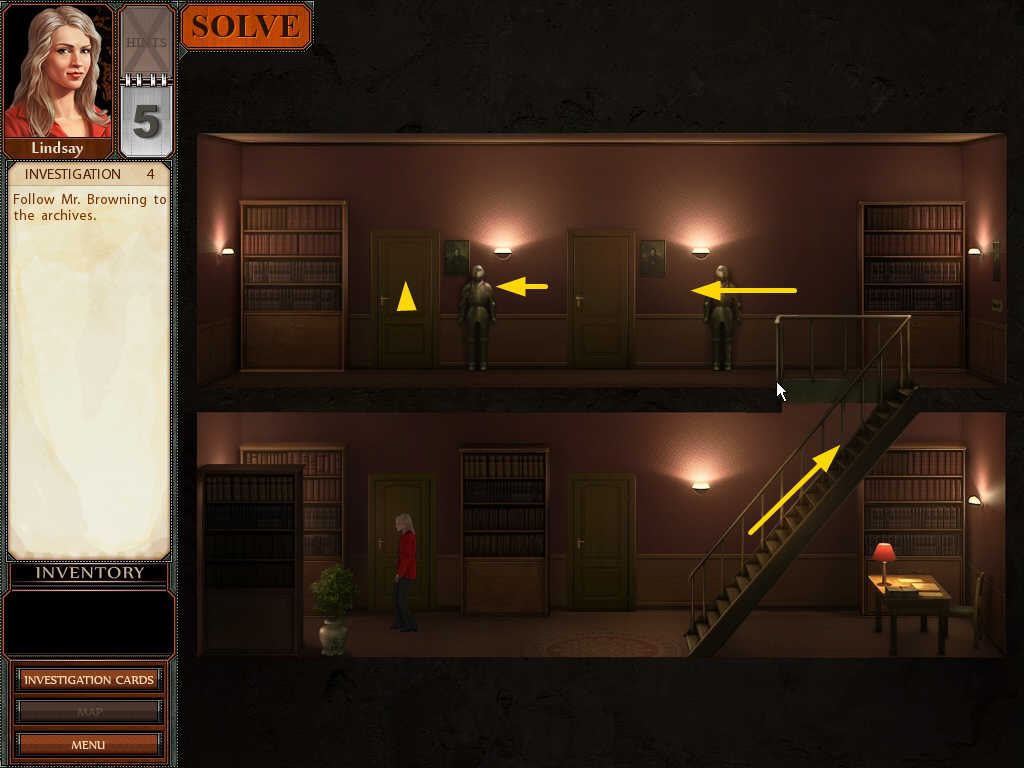
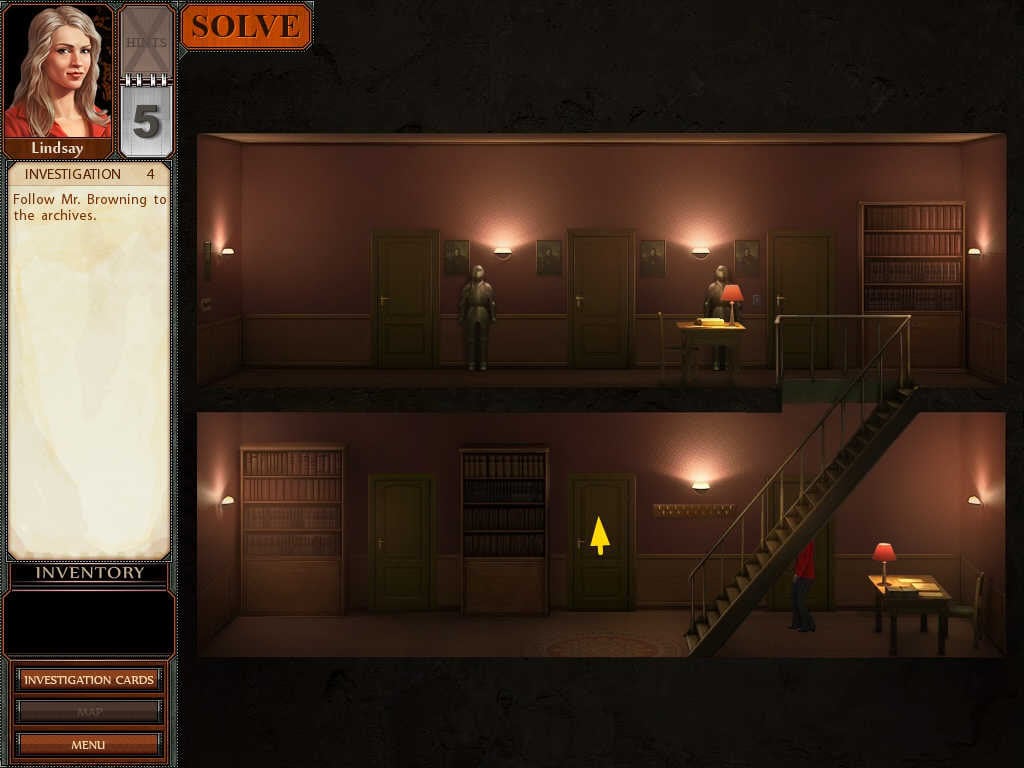
- Eventually you end up down in the archives.
- Click on the Active shelf which is sparkling.
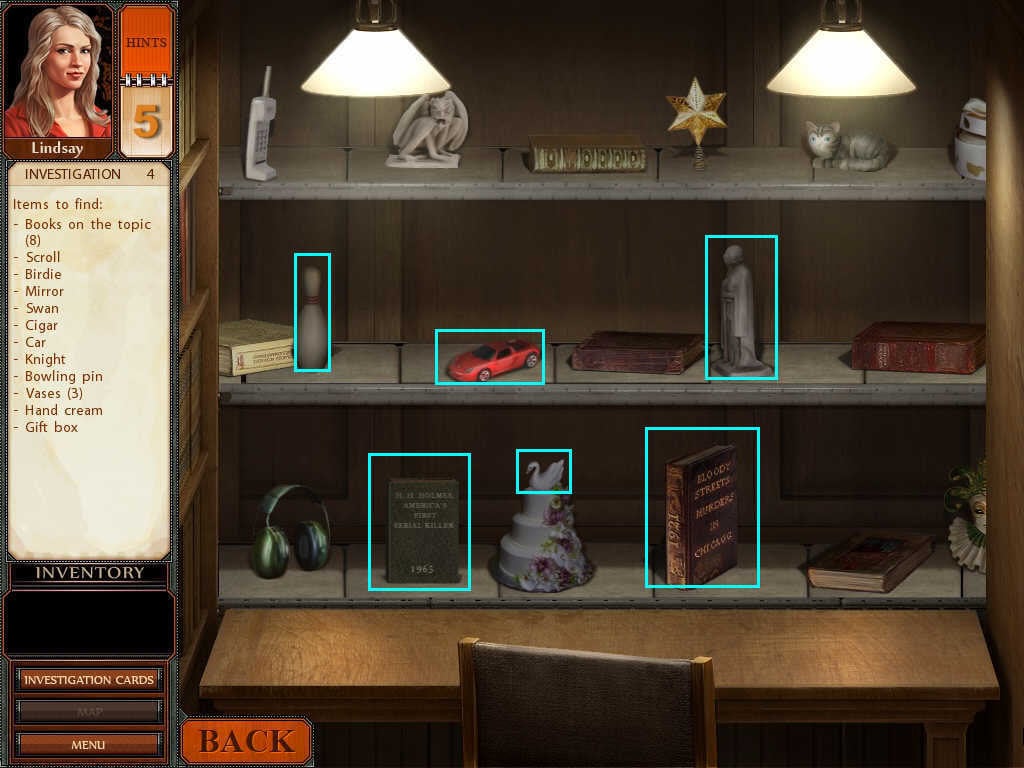
- A Hidden Object scene will start.
- The items are rolling past on conveyor belts.
- Each item will keep circling around, so if you don’t get it the first time you can get it later.
- Collect the materials on the Find List, plus any books that mention H.H. Holmes.
- The "birdie" is a badminton birdie.
- The swan is the swan on top of a wedding cake-you must click on the swan itself or it won’t count.
- You must click on the cigar itself, not the ashtray.
- The mirror is a small mirror inset into the top of a jewelry box.
- The books include "Serial Killers of the Victorian Age." "Chicago’s Criminal Past" "Victorian Master Criminals" "Bloody Streets: Murders in Chicago" and of course any book that mentions H H Holmes in the title.
- Lindsay will tell you if you pick an incorrect book.
- Go to the bookstore, Murder on Market.
- You have to solve a pipes puzzle.
Pipes Puzzle
- The goo will flow in the direction of the yellow dot on the wheels.
- The levers turn to green to open, red to close.
- Leave the first lever in the path until last, that way you can get the path set up correctly before the goo starts to flow.
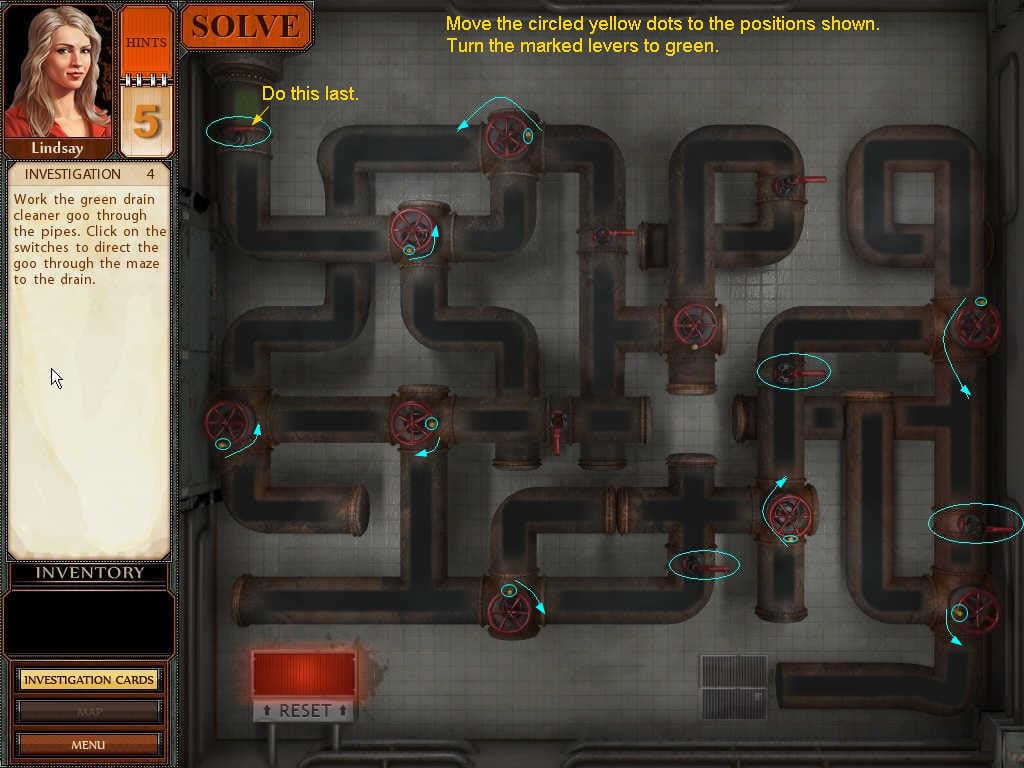
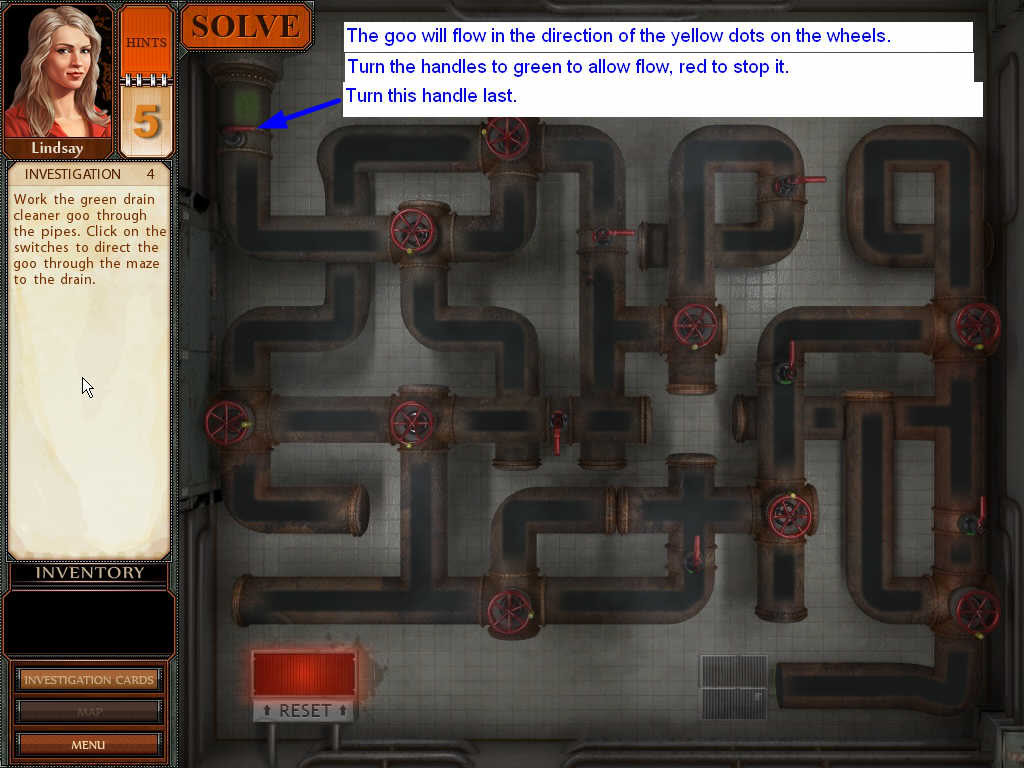
- Here is the path:
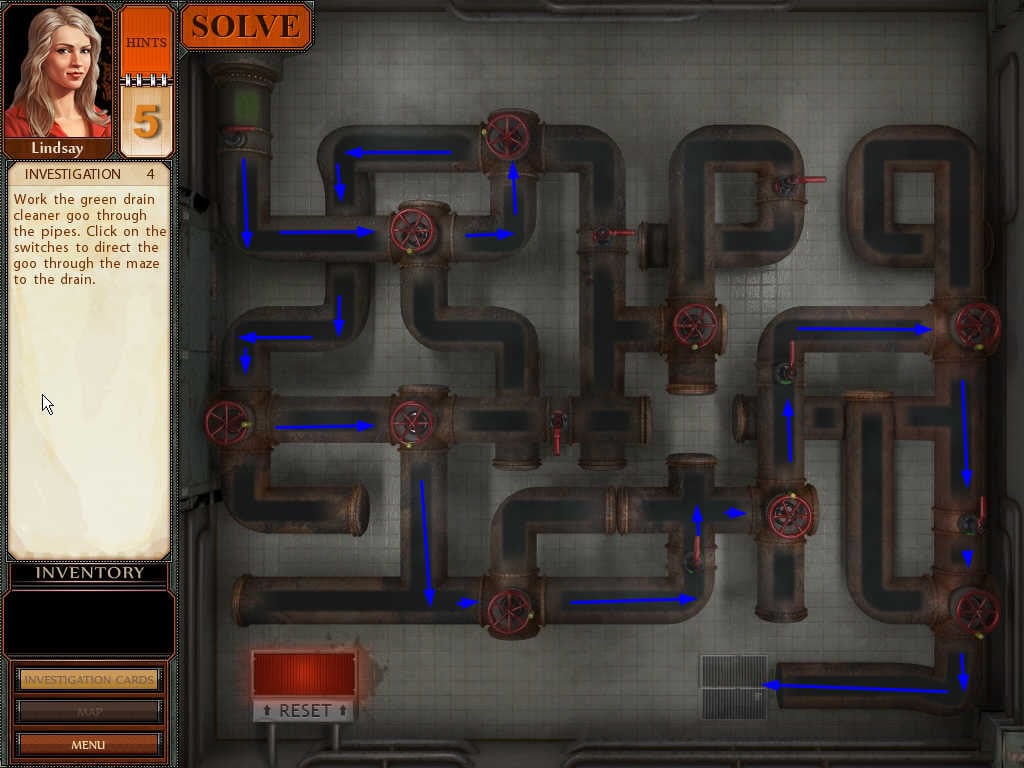
Solution:

- The bookstore owner will show you the receipts for two sales of the book.
- You will return to the map.
- Choose Lemond Boyd’s Victorian.
- A Hidden Object scene will start.
- Some of the items are on the street view and some are on the zoom scenes of the houses.
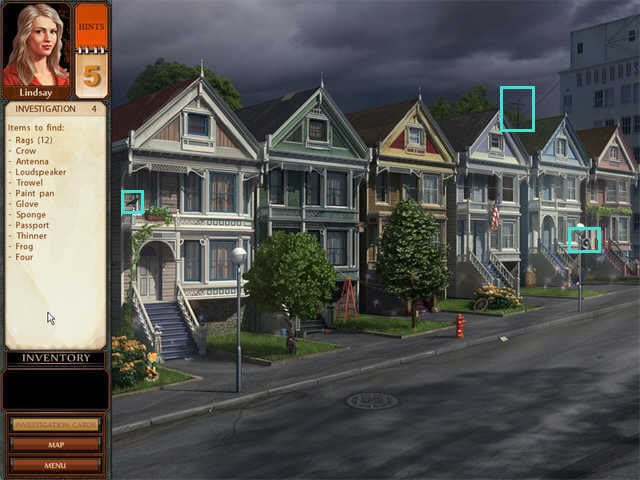
- Each of the 6 houses is a different color.
- You must click on each house and collect the 2 rags there.
- For most houses the hot spot is right at the base of the stairs, but you may have to click around a little to find it.
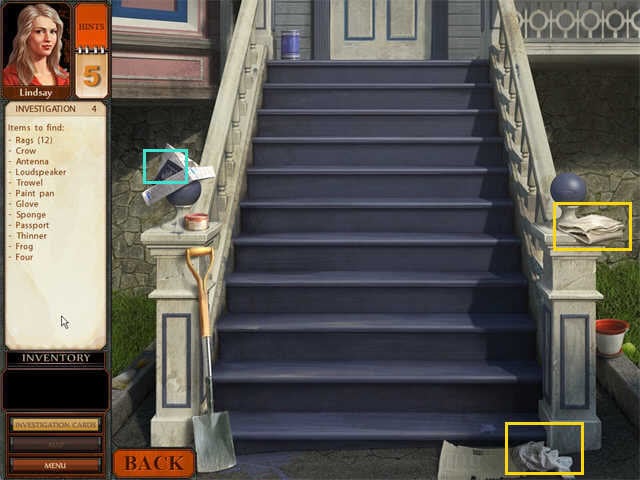
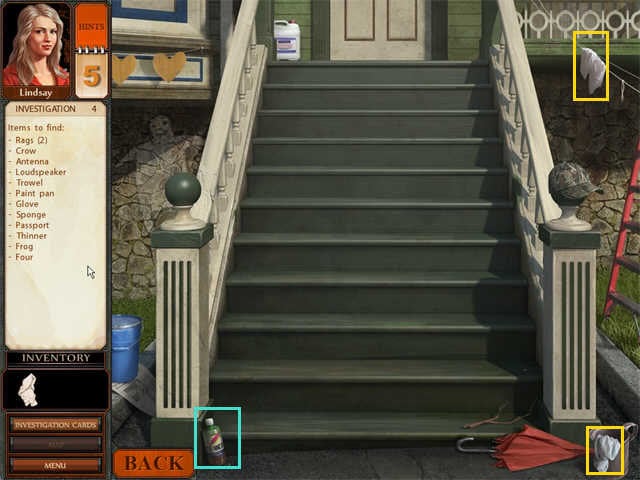
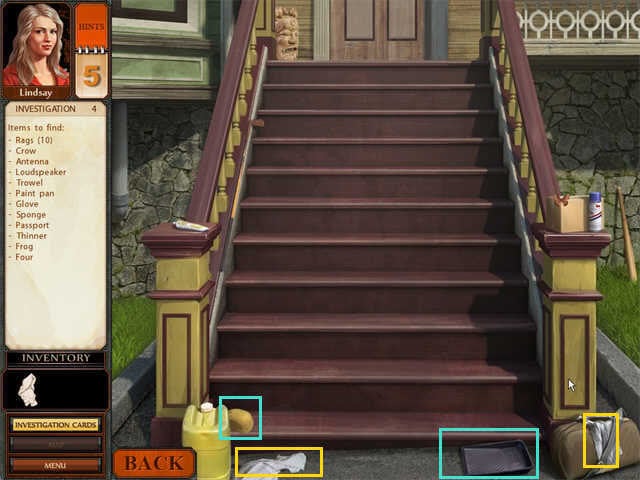
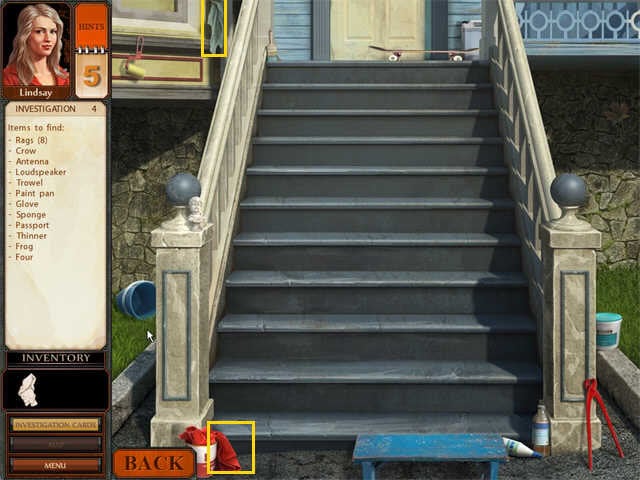
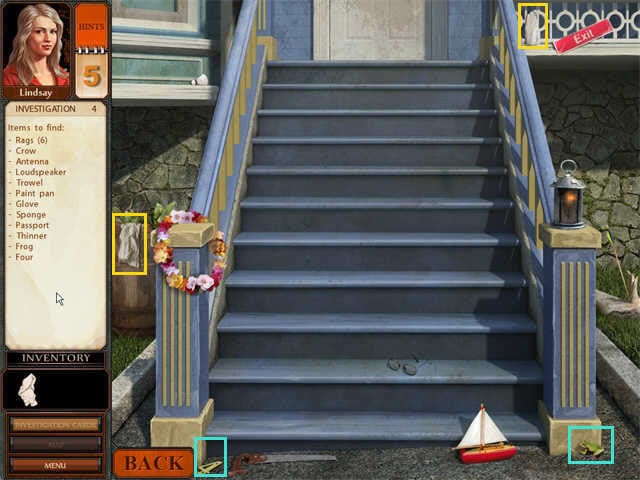
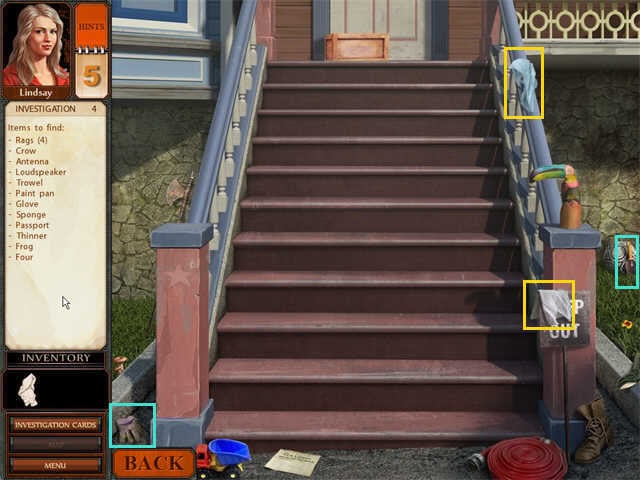
- Once you have all 12 rags and have collected all items, you can use the rags to reveal the house numbers.
House Number Puzzle
- Click on the rag in inventory so it attaches to your cursor.
- Now rub it along the top of the step to reveal the house number beneath it.
- The number is in different places on different houses.
- You are looking for 2761.
- You must completely uncover each number to get credit for it. Lindsay will either say "That’s not it" or "That’s the one" as you do.
- Before you can leave a zoom scene, you have to put the rags back into your inventory, then click on the BACK button.
Solution:

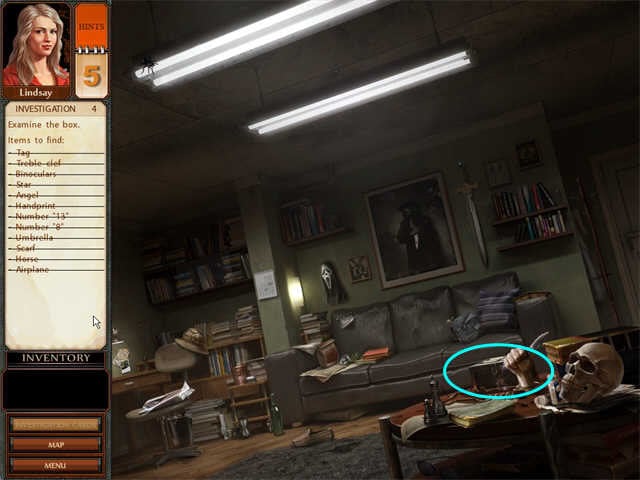
- Return to the map. Choose Herbert Smythe’s.
- After you talk to Herbert Smythe, a Hidden Object scene will start.
- Collect all the items.
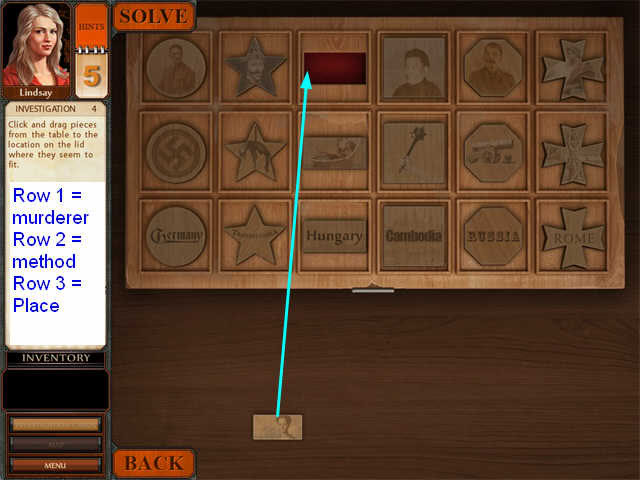
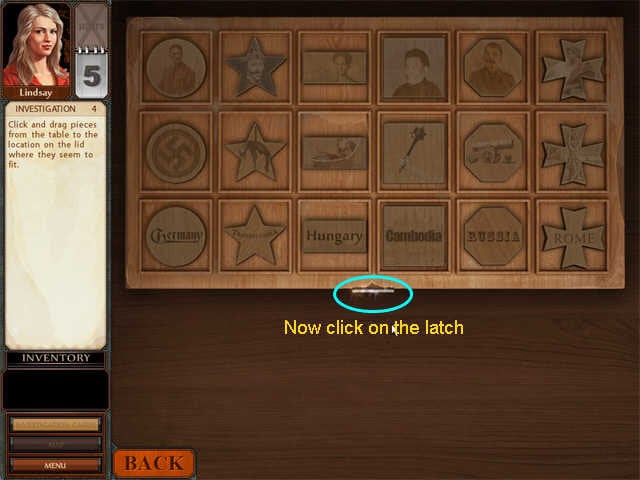
- Click on the puzzle box.
Puzzle Box Puzzle
- The row is the murderer.
- The middle row is the method.
- The third row is the place.
- Pieces will lock into place when set correctly.
Solution:
- Now click on the latch.
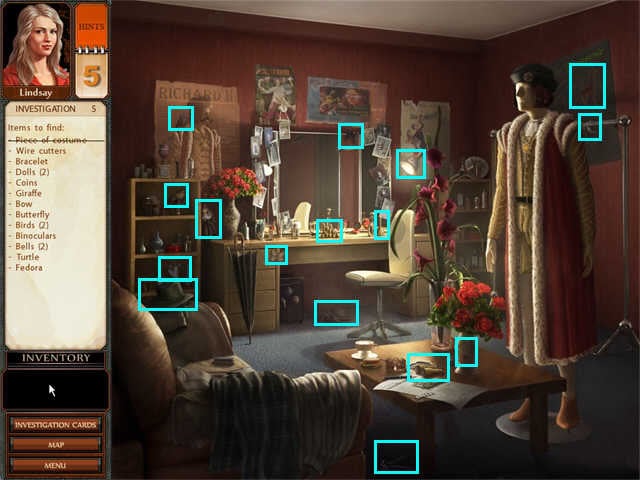
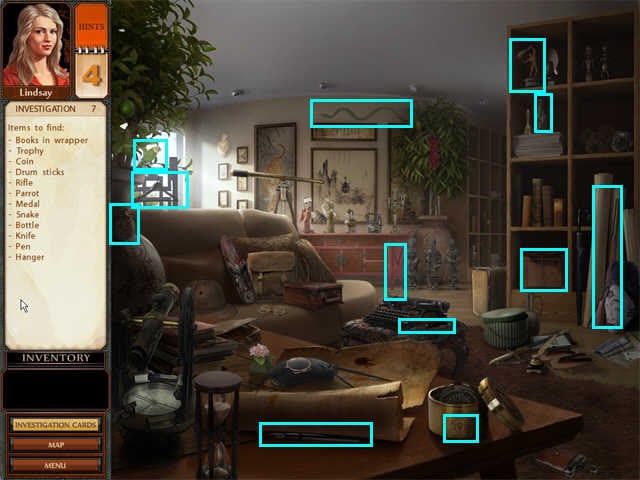
Investigation Five: Tied With A bow
- Click on the Orpheum Theatre.
- First you have to collect 12 "pieces of costume."
Costume Puzzle:
- You must drag each piece to the mannequin.
- They must be put on the mannequin in the right order, so you have to put on the shirt before the jacket.
- The pieces are:
- Wig, then Hat
- Shirt, then gold chain, then jacket, then belt, then sword
- Pants
- Leggings, then garter, then shoes
- Cape last.
Solution:
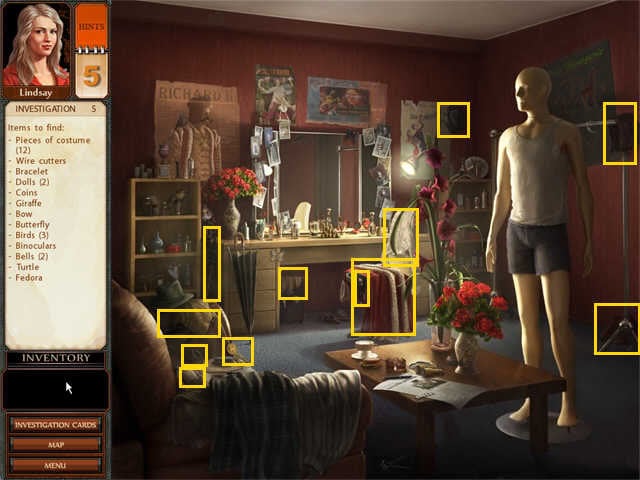
- Once all the items of the costume are placed, collect the remaining items on the Find List.
- One of the bells looks like it’s part of the lamp on the right.
- You will return to the map.
- Click on the SF Register office.
You are now playing as the reporter.
- A Hidden Object scene has started.
- Collect all the objects.
- Find 12 ribbons and 2 bows
- Click on the letter.
Letter Puzzle 2:
- It’s a code. Take the 7th letter each time.
Solution:
- Use the computer to enter
1964useasternseaboard.
- Now click on the CD to search the crime files.
- Enter 1964 eastern seaboard.
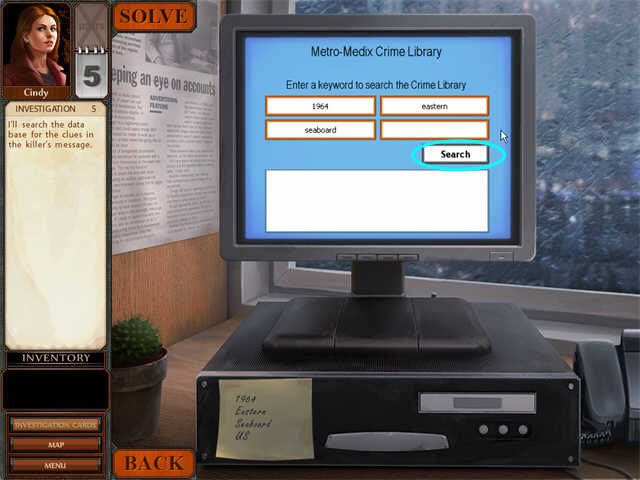
- Click on the CD again to read the crime file. The Boston Strangler!
You will now be playing as the police detective in her office.
- Click on the Crime Computer.
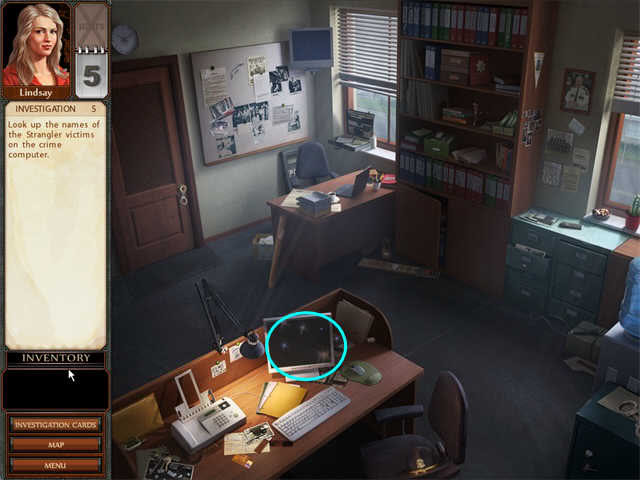
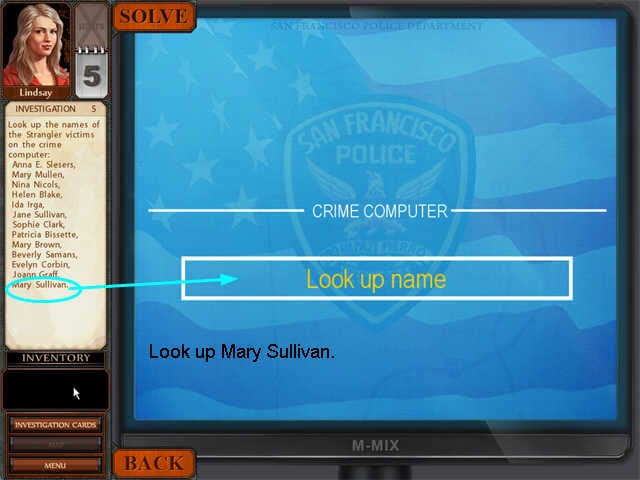
- You need to look up the names until you find a match.
Solution:
Mary Sullivan
- You will go to the map.
- Choose Mary’s Sullivan’s apartment.
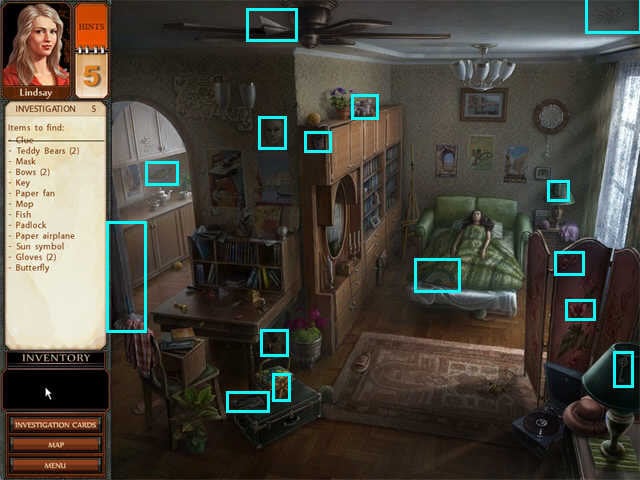
- A hidden object scene will start.
- First click on the 4 clues:
- The victim’s face
- The victim’s body
- The calendar on the desk
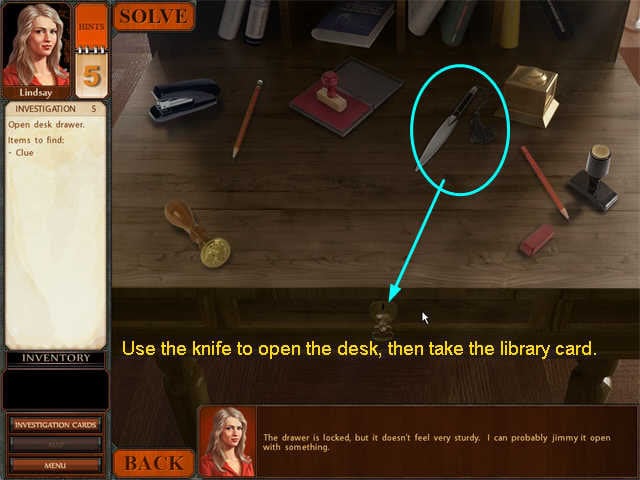
- The desk drawer.
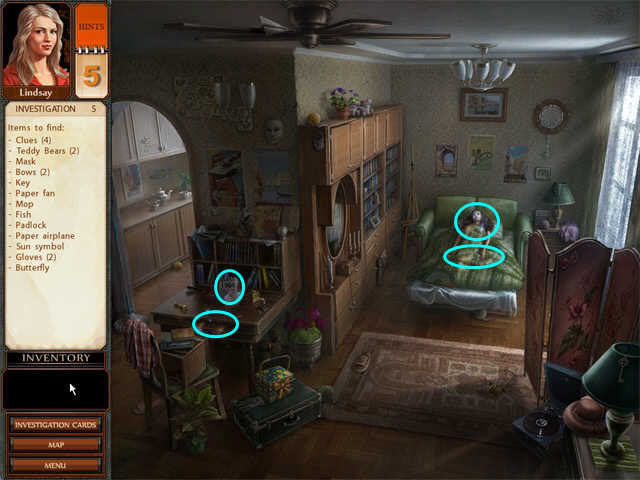
- The desk drawer is jammed. Use the letter opener to jimmy it open, then take the library card.
- Click on CONTINUE to return to the room view.
- Collect the remaining objects.
You will now play as the medical examiner.
- Click on the victim’s body to get a zoom scene.
- Pick up the UV light from inventory and use it to examine the body for clues.
- The first clue is a New Year’s card by her feet. Click once to open a zoom scene.
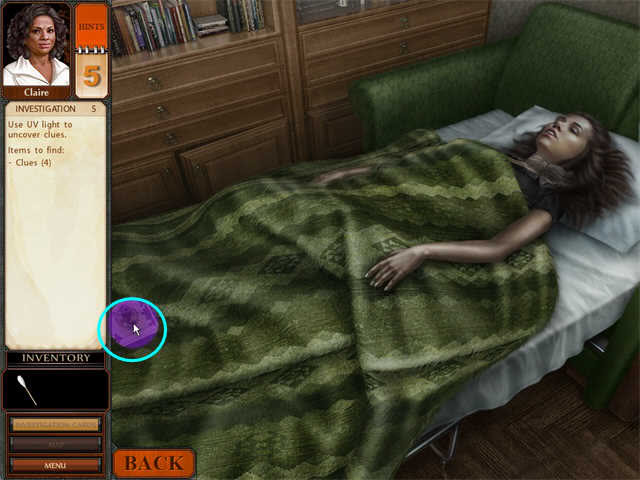
- Click on the card to read it.
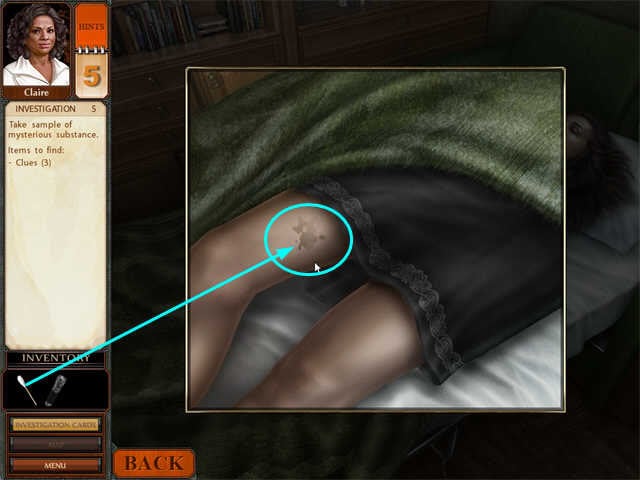
- The next clue is by the garter on her thigh. Click once to open a zoom scene.
- Use the swab from inventory to take a sample for later analysis.
- The next clue is the bruising on her neck.
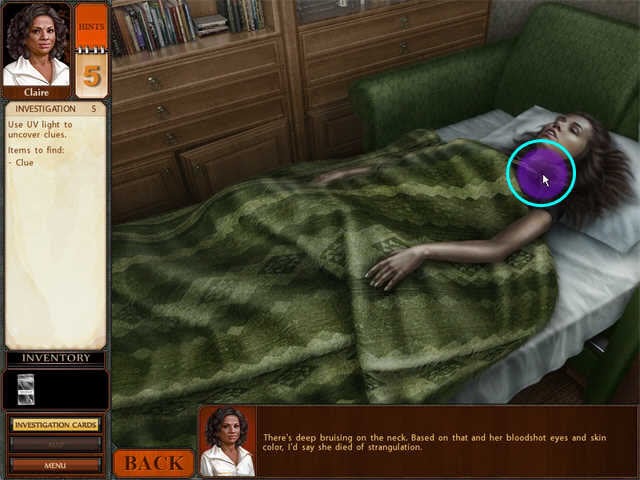
- The final clue is hard to see, but there is bruising on her wrist.
- Now return to the Forensics Lab to run tests.
- Click on the computer to start the analysis.
- Click on the bottles to start the puzzle.
Lab Analysis Puzzle 2
- Click on any two bottles to swap the labels on them.
- Use logic to put them in the right order.
Solution:
NFBQC
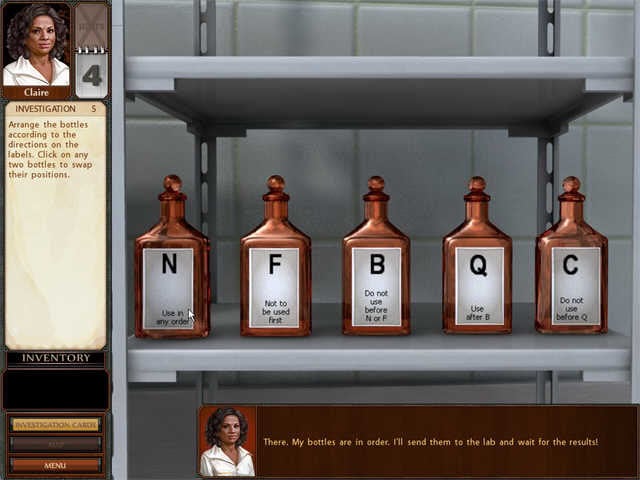
- Click on the words "Lab Results In" on the computer to read the results.
Investigation Six: Down in the Depths
You are now playing as the police detective in her office.
- A Hidden Object scene starts.
- Find the items.
- Click on the computer.
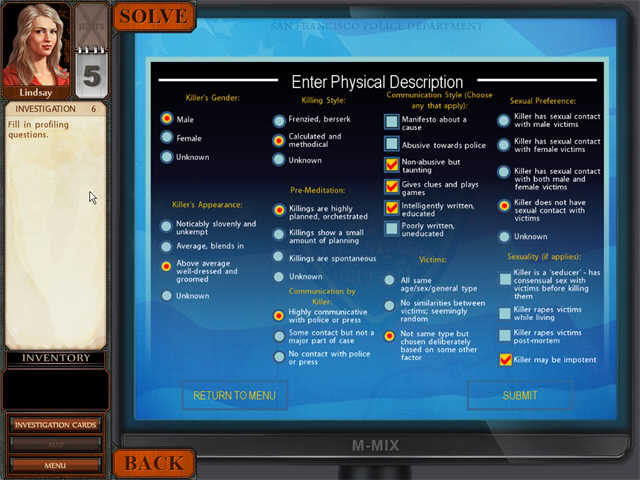
- A new Serial Killer Profile program has been installed. Click on that program choice.
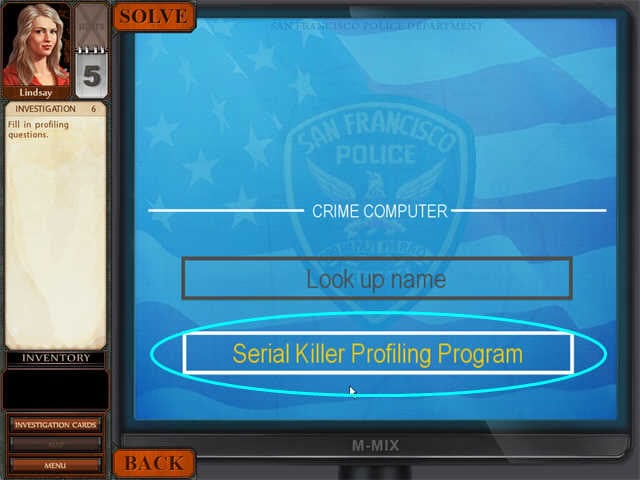
- Now enter what you know about the killer. I thought that his comments about wanting people to see the dark side of life counted as a "manifesto," but the game does not agree.
Solution:
- Go to Jack Kerouac Ally
- A hidden Object scene will start.
- Collect the items.
- Click on the credit cards to read the next clue.
- But, seriously-two people who live in a big city both having a library card "can’t be a coincidence"?
- Go to the library.
- Talk to the librarian. She tells you this is one of the busiest libraries in the world.
- Click on the computer to get a zoom view of the desk.
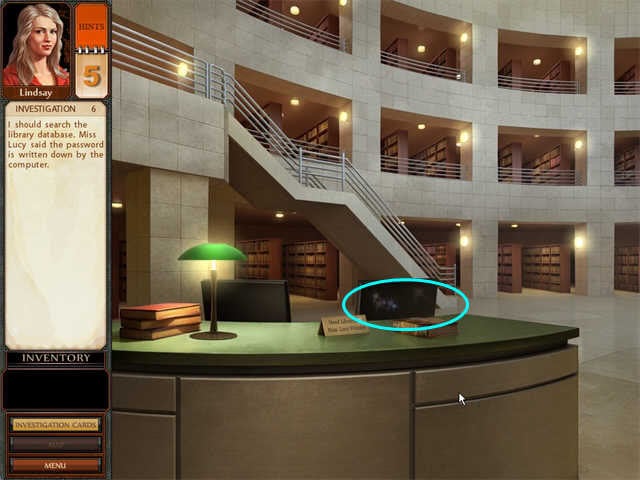
- A Hidden Object scene will start.
- Collect 12 things written down.
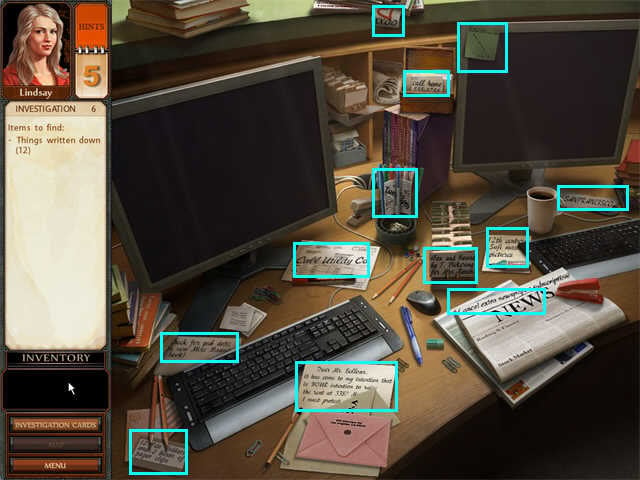
- Click on the computer to access the log-in screen.
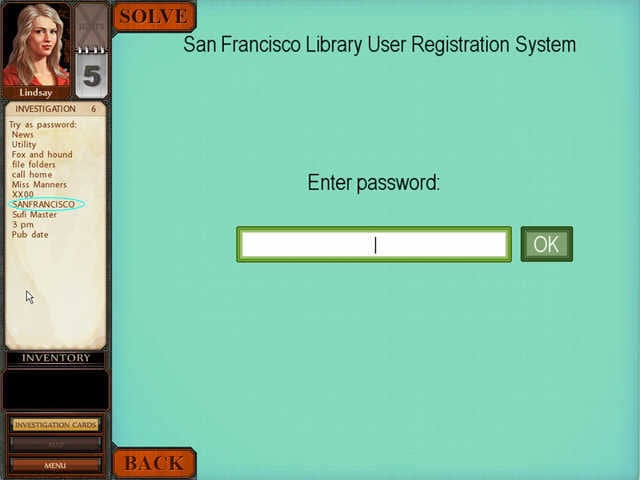
Solution:
SANFRANCISCO
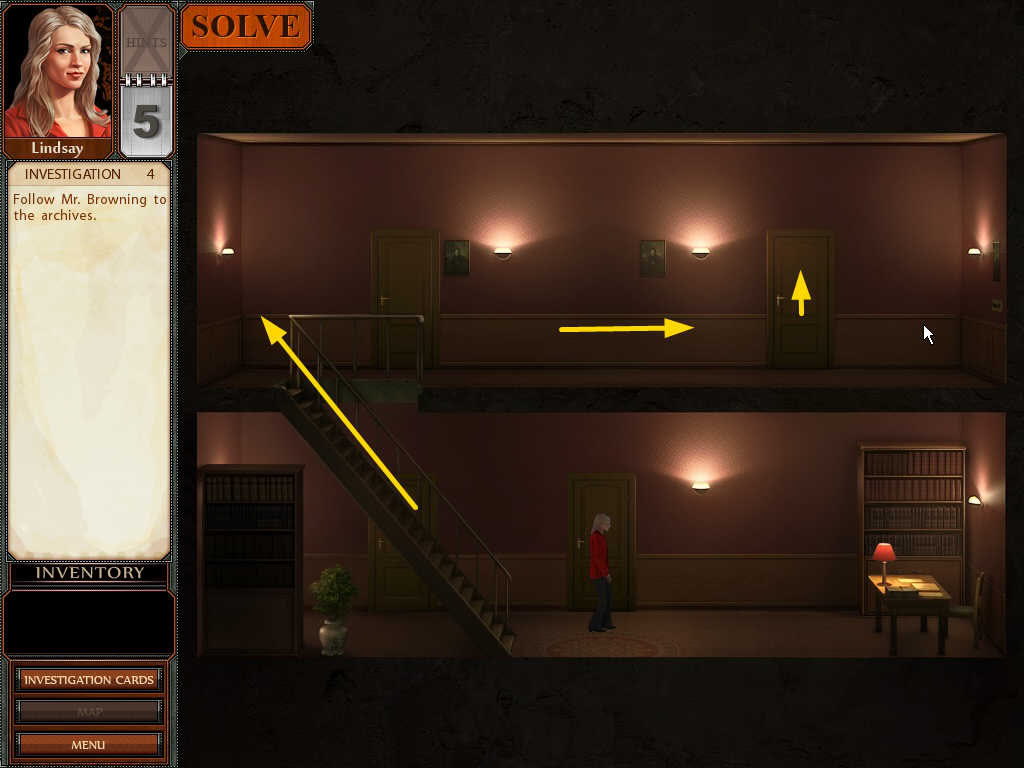
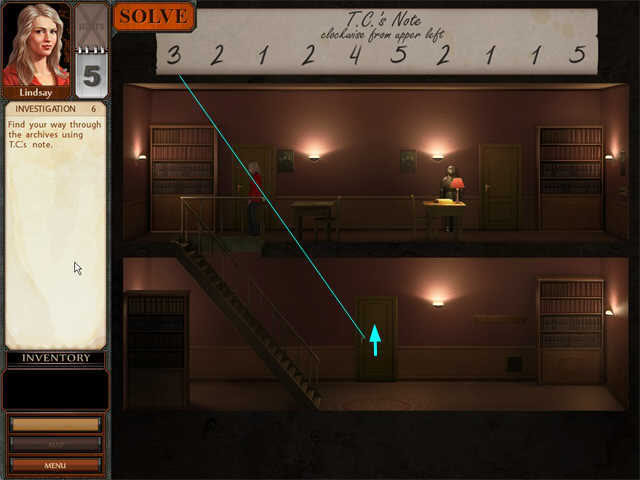
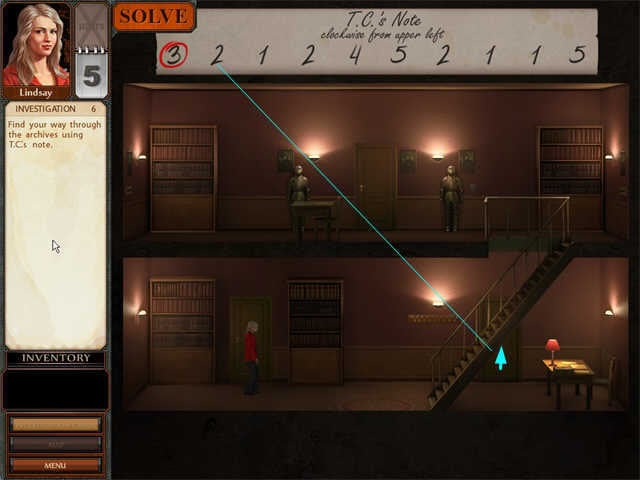
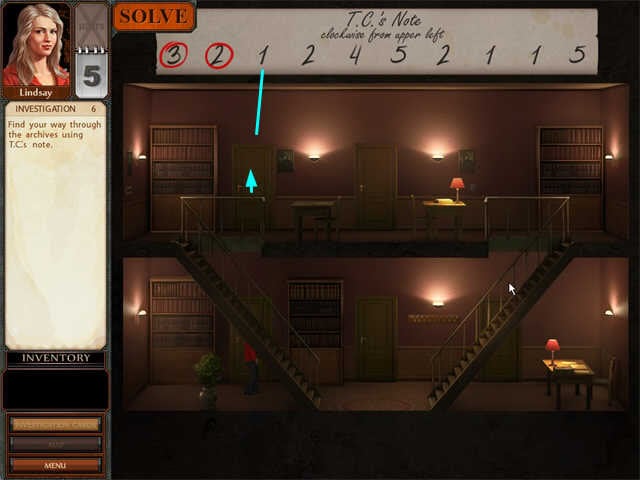
- Time to visit the archives. Just count the doors starting at the upper left each time and going clockwise. I’ve given you the first 3 steps as examples.
- Remember to always start counting from the upper left, not from wherever Lindsay happens to be.
- Also make sure you count the doors under the stairs, they can be a little hard to see.
Investigation Seven: What the Agent Knew
You are playing as the reporter.
- Go to the Deadlines Café.
- A Hidden Object scene will start.
- Collect the items.
- Click on the Cup O Joe machine to start it.
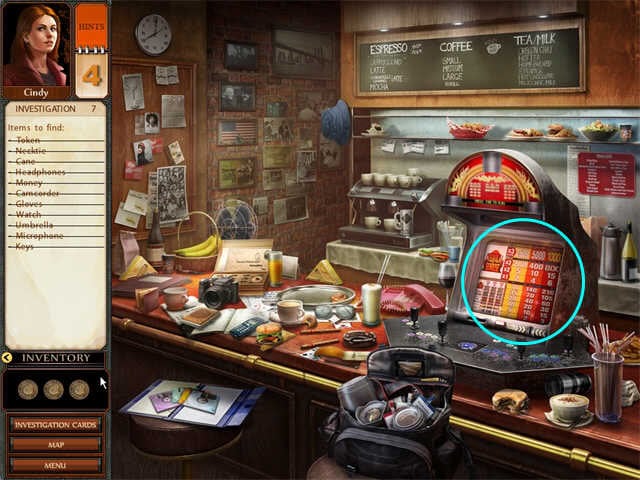
Cup of Joe Puzzle 1
- You are trying to pick letters that will fill in the words so that you can guess the common phrase.
- Drag a token from inventory to the slot on the right, then choose a letter.
- If you get a Token Bonus, there will be an extra token next to the coin slot that you can use.
- When you are ready to guess the common phrase, click on the GUESS button.
- I guessed B, R, F.
Solution:
Feeling Fruity
- Take the Coffee ticket from the Ticket slot on the left.
- Go to Americo Daley’s office.
- A Hidden Object scene will start.
- Collect the objects.
You are playing as the police detective.
- Go to Lemond Boyd’s house.
- A Hidden Object scene will start.
- Collect the objects.
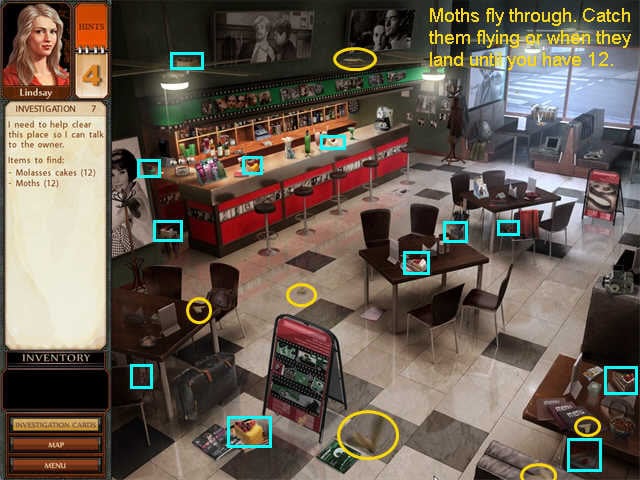
- Go to the Actors’ Café.
- A Hidden Object scene will start.
- Find the molasses cakes in the usual way. They are marked in blue on the screenshot.
- The moths will fly through the scene. Catch them when they are flying or when they land until you have 12. I have marked a few in yellow as examples.
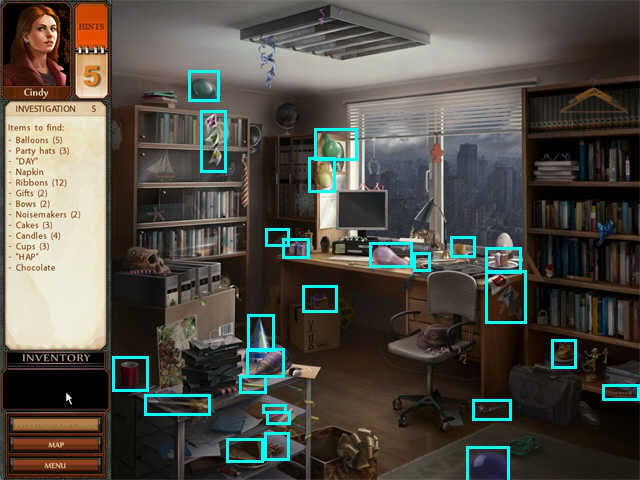
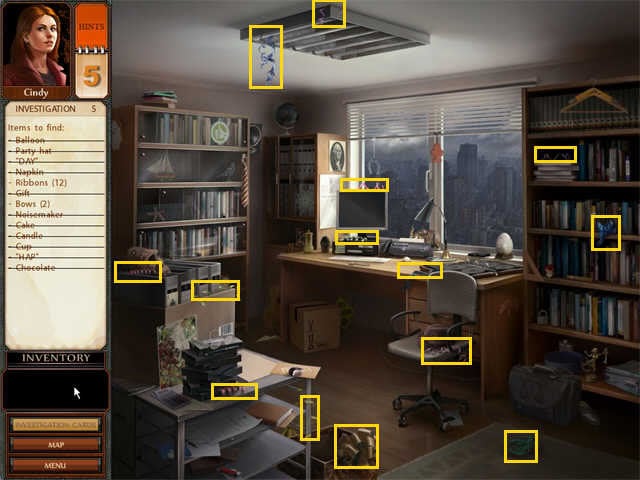
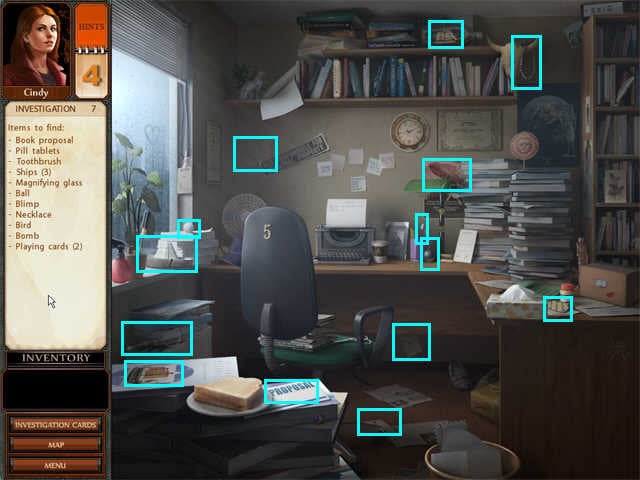
Investigation Eight: Secrets and Lies
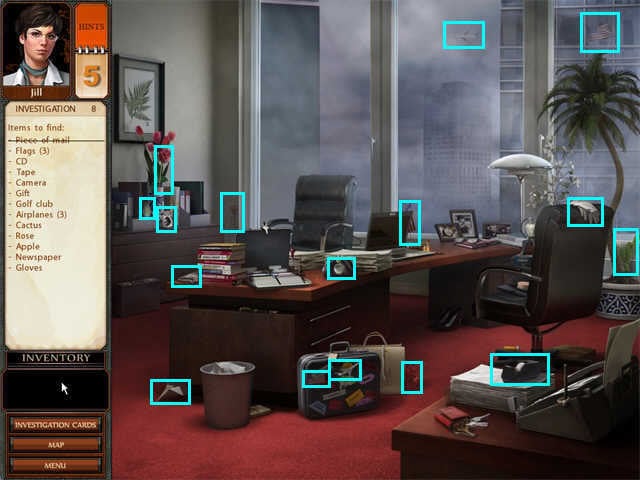
You are now playing as Jill Bernhardt, District Attorney.
- Start at Jill’s office.
- A Hidden Object scene will start.
- Collect 10 pieces of mail.
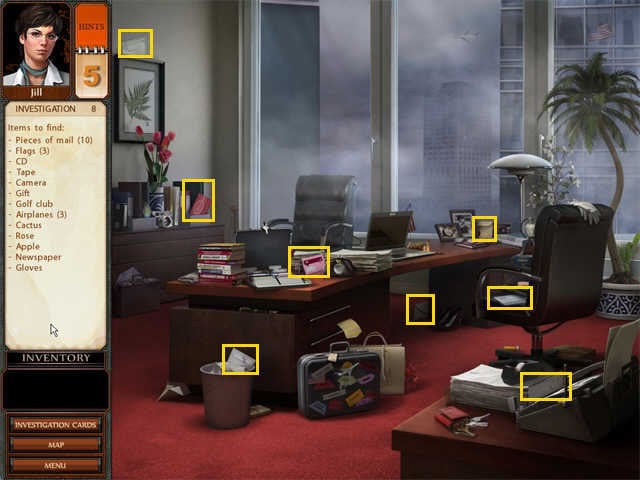
- Collect the remaining items on the Find List.
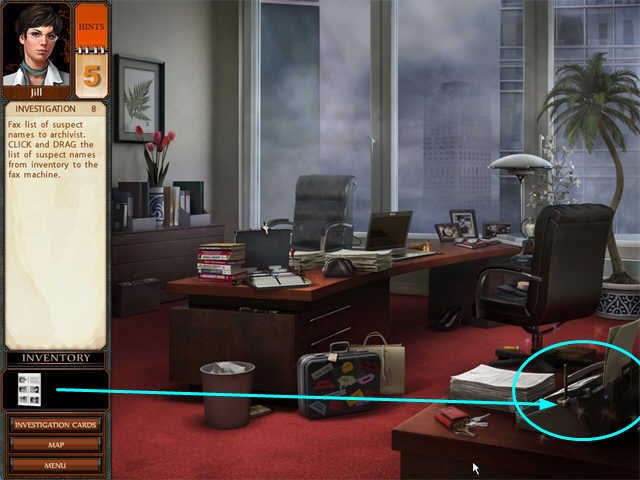
- Drag the suspect reports to the FAX machine to send them to the archives.
Law Archives Maze Puzzle
- This triggers a mini-game.
- You have to use the arrow keys to get Jill to the right year without physically running into any interns.
- The archives are organized by decade, with the 00’s in the front, then the 90’s, then the 80’s, then the 70’s.
- As you pass a shelf you can see its year.
- Once Jill stops in front of the correct year, she can read the documents.
- If you do run into an intern, you just have to try again.
You are now playing as the police detective in her office.
- Click on the FAX machine to read the note from Jill.
- Go to the library.
- Talk to both suspects. Both agree to take a lie detector test.
- Go back to the police station.
- A Hidden Object scene will start.
- The only letter A that counts is the one written on the floor on the right.
- The tower is a picture of the Eiffel Tower.
Lie Detector Puzzle
- You will get to ask all the questions, so you may pick a different order than I did.
- Read the suspect’s answer, then click on the True or Lie button.
Q. Is your name TC Browning? Yes. True.
Q. Please answer yes to this–Do you work at the Zoo? Yes. Lie.
Q. Do you know a man name Richard who frequents the library? No. True.
Q. Are you the Copycat Killer? No. True.
Q. Do you have a brother? No. True.
Q. Do you work at the SF Library? Yes. True.
Q. Do you know the Copycat Killer? No. True.
Q. Did you grow up in Kansas City? Yes. True.
Q. Are you a resident of SF? Yes. True.
Q. Do you work at the Zoo? No. True.
Q. Is your name Emmet Dakree? Yes. True.
Q. Please answer yes: Do you drive a Porsche? Yes. Lie.
Q. Have you ever killed a person? No. True.
Q. Were you ever in trouble with the law? No. Lie.
Q. Have you ever killed an animal? NO. Lie.
Q. Are you a resident of San Francisco? Yes. True.
Q. Do you know the Copycat Killer? No. True.
Q. Are you the Copycat Killer? No. True.
Q. Were you arrested as a teenager? No., Lie.
Q. Do you drive a Porsche? No. True.
You are now playing as the reporter.
- Go to SF Register office.
- Pick up the new letter.
- The pieces fall out. Collect them.
- Click on the pieces on the desk.
Letter Jigsaw Puzzle
- Put the jigsaw puzzle together.
- Take additional pieces from your inventory as you need them.
- Pieces will lock into place when they are placed correctly.
Solution:
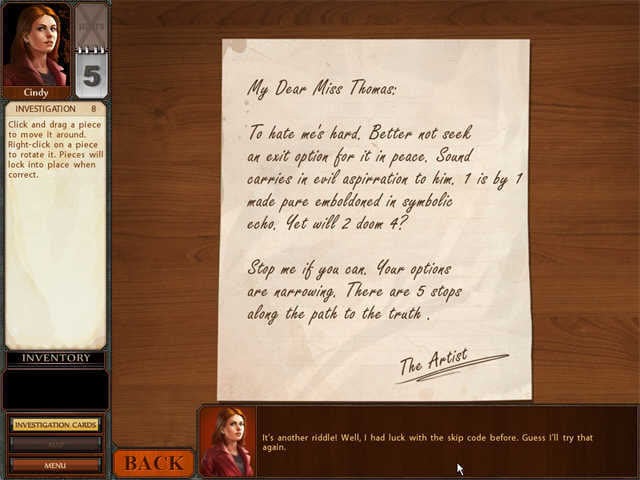
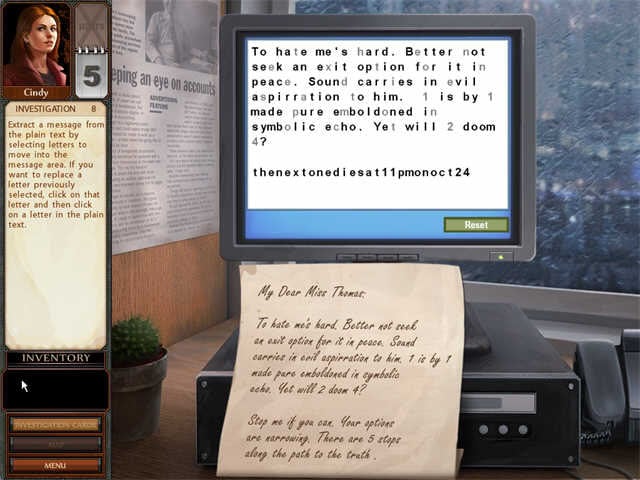
- Now break the code by entering every 5th letter.
Solution:
- Thenextonediesat11pmonoct 24
Investigation Nine: The Mirror Crack’d
You are playing as the police detective.
- Go to Dudley’s Day Care.
- There is an arrow on the ground. Click on it.
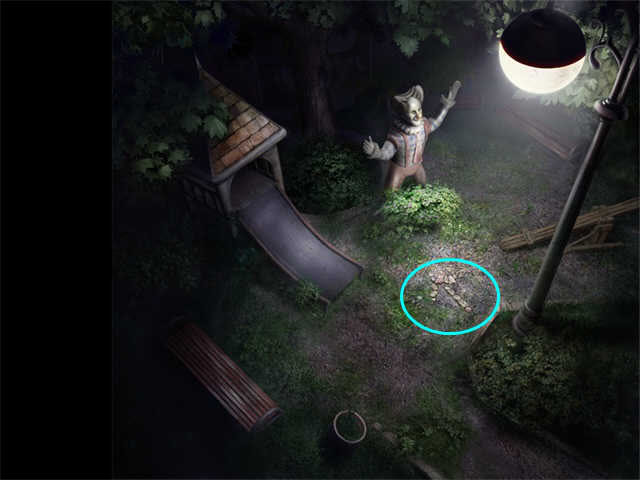
- Now the tree is sparkling. Click on it.
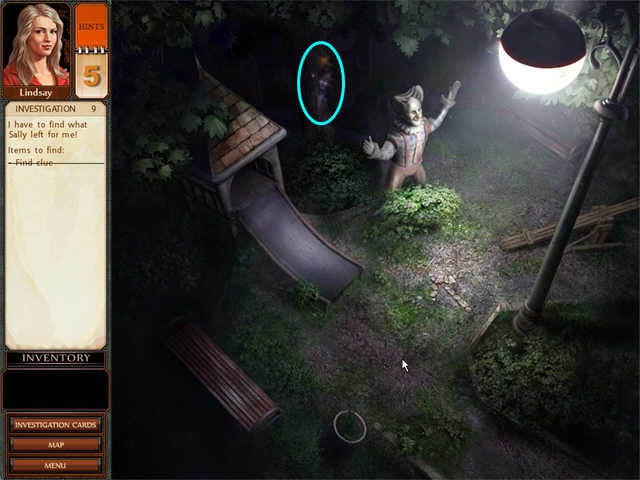
- A hidden object scene will start.
- Collect the items.
- Some of the feathers are green. Most are white or grey.
- All of the chewing gum pieces look similar.
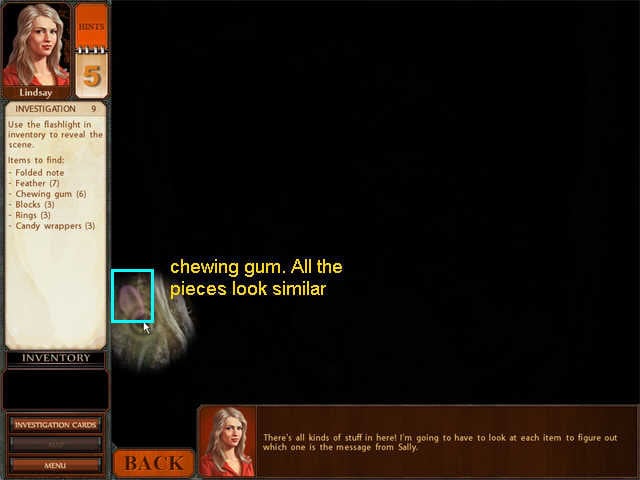
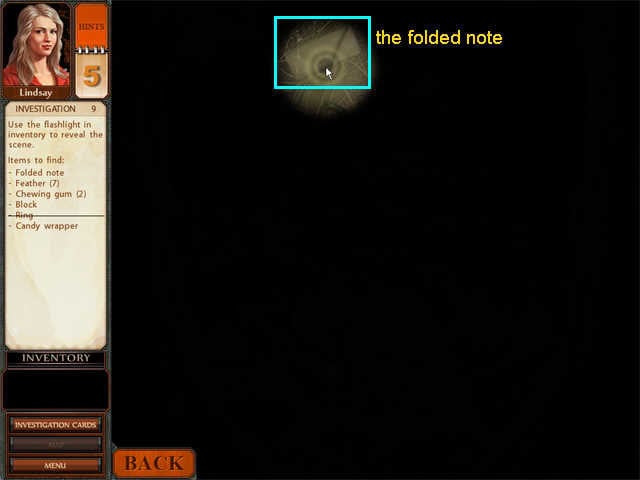
- The only paper you have to worry about is the folded note. You can’t see the writing until you open it.
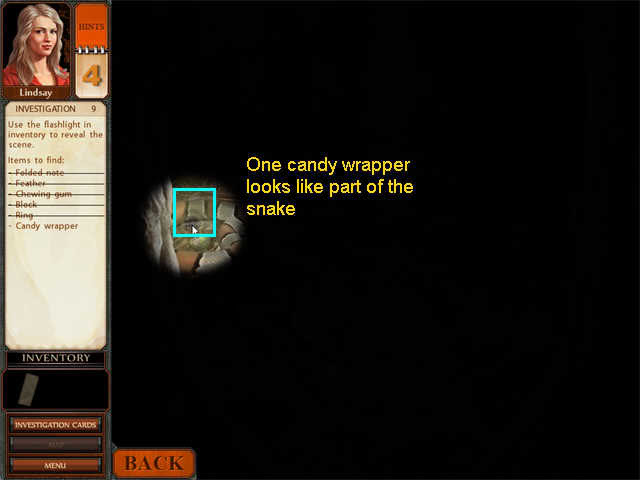
- One of the candy wrappers looks like part of the snake.
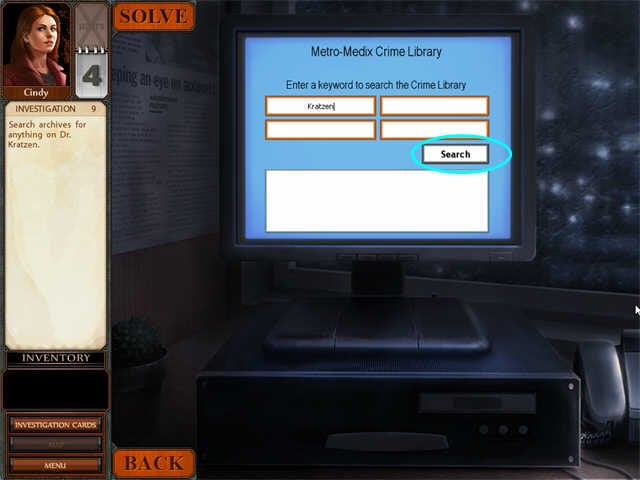
Now you are playing as the reporter.
- Go to the SF Register office.
- Click on the computer to start.
- Enter Kratzen and read the article.
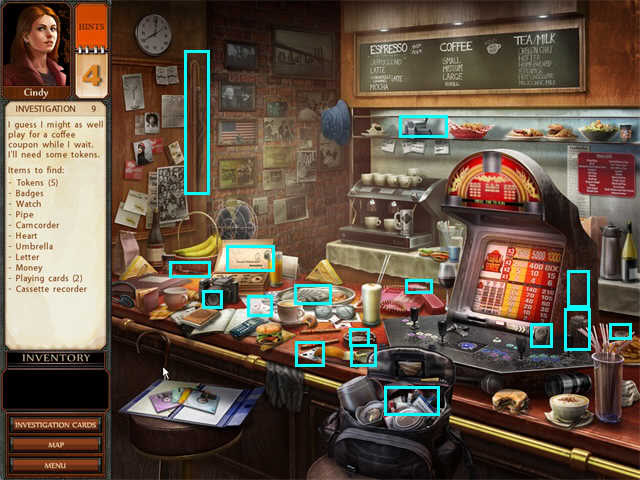
- Go to the Deadlines Cafe
- A Hidden Object scene will start.
- Collect the items.
Cup of Joe Machine Puzzle 2
- Click on the Cup O Joe machine to start a game.
Solution:
On The Map
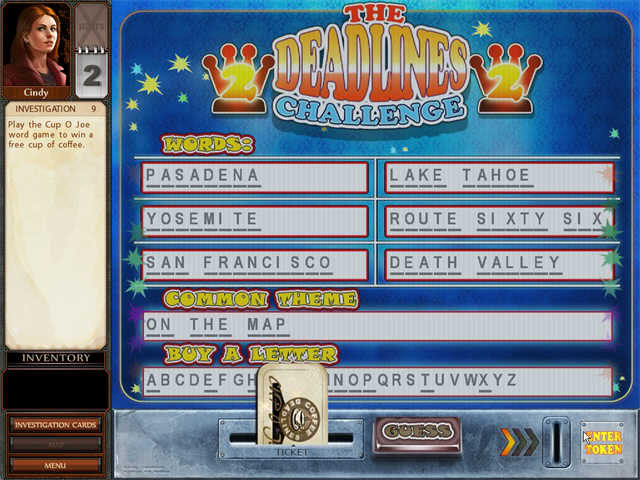
- Take the coffee coupon and talk to the reporter.
Now you are playing as the police detective.
- Go to Dr. Kratzen’s house.
- Click on 12 roses.
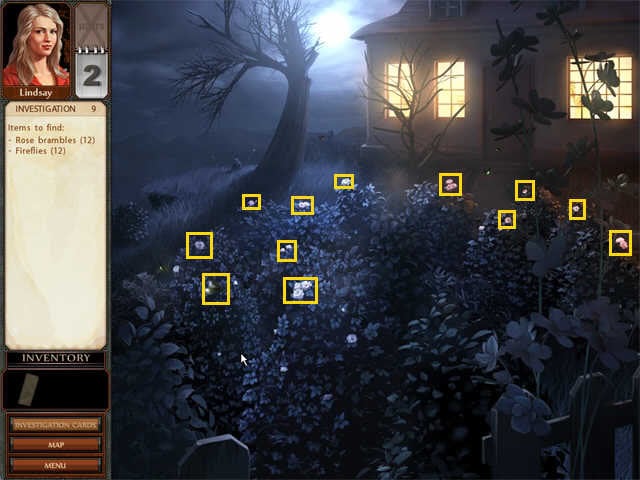
- Fireflies will fly through the scene. Click on them either flying or resting until you have 12.
- Now click on the door.
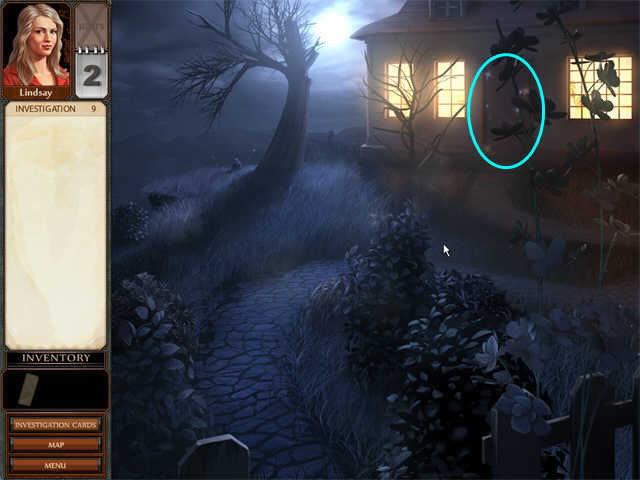
- Give the folded note to Dr. Kratzen.
- Go to the library.
Safe Puzzle
- Click on the cracked mirror.
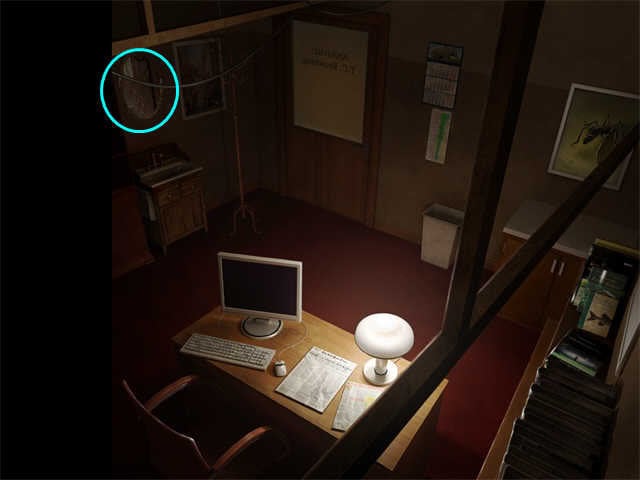
- You will find a safe behind it. Click on it to start a puzzle.
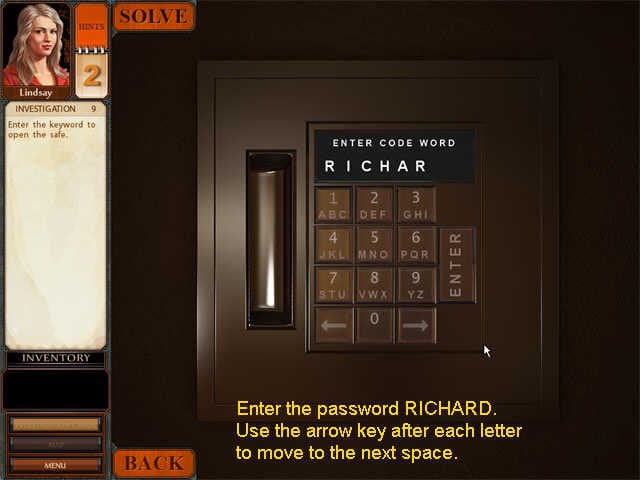
Library Safe Puzzle
Enter the password.
- Use the arrow key after each letter to move to the next space.
- Click on the ENTER key at the end.
Solution:
RICHARD
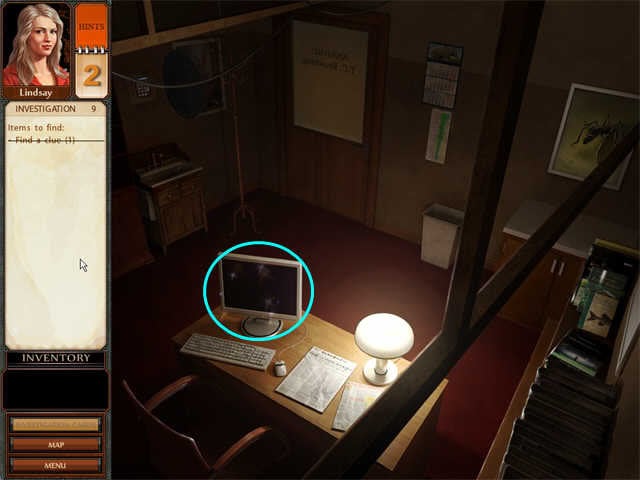
- Click on Browning’s computer.
- Enter Stephanie Thomas to get her address.

- The map will open.
- Go to Stephanie Thomas’ place.
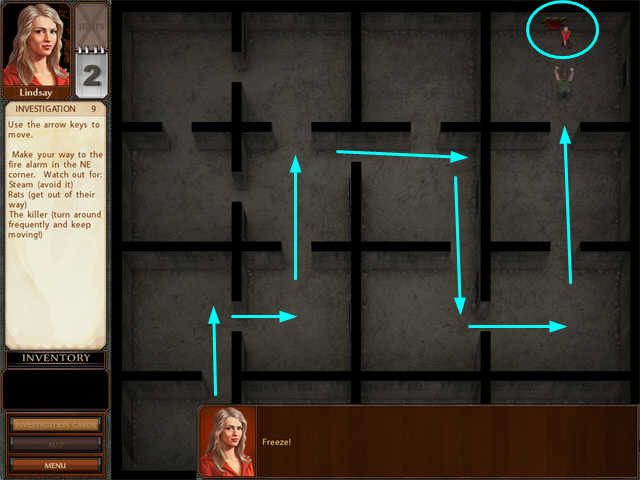
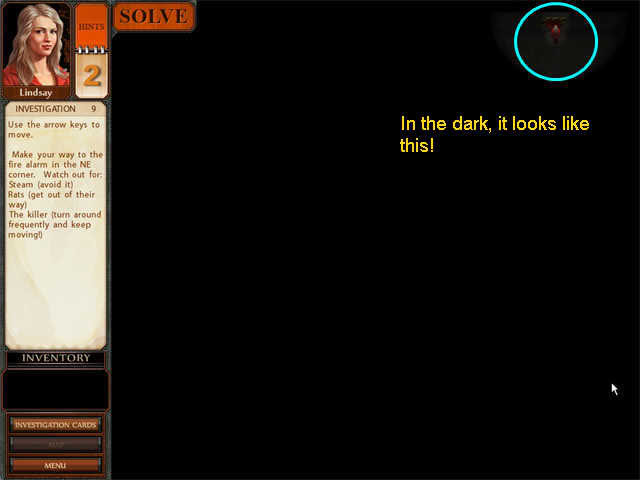
Cellar Maze
- After a cut scene, you will end up in a cellar maze.
- You have to try to get to a fire alarm in the upper right corner.
- The fire alarm is on the back wall.
- Use the arrow keys to control your character.
- If you see little red eyes, those are rats-just move around them. You move faster than they do.
- If you hear a clank, steam will come out of vents on the side walls in the middle of the rooms. Try to get near a doorway and wait.
- The killer is also in the dark, but if you keep moving and changing direction you probably won’t even see him.
- If you do run into any problems, you will just start over. Or you can click solve.
Solution:
- Here’s what the solution would look like if the lights were on.
- But here’s what it looks like in the dark!
- Watch the ending.
“;

More articles...
-
Grow A Garden 2 Base Price List
What's the most valuable crop? -
Evomon Best Starter [Leafbun, Blazpup, or Bubble?]
Grass-type, Fire-type, or Water-type? -
Evomon Tier List [META and BEST Evomon]
The Evomon dream team.