- Wondering how to get Monopoly GO! free rolls? Well, you’ve come to the right place. In this guide, we provide you with a bunch of tips and tricks to get some free rolls for the hit new mobile game. We’ll …
Best Roblox Horror Games to Play Right Now – Updated Weekly
By Adele Wilson
Our Best Roblox Horror Games guide features the scariest and most creative experiences to play right now on the platform!The BEST Roblox Games of The Week – Games You Need To Play!
By Sho Roberts
Our feature shares our pick for the Best Roblox Games of the week! With our feature, we guarantee you'll find something new to play!Type Soul Clan Rarity Guide – All Legendary And Common Clans Listed!
By Nathan Ball
Wondering what your odds of rolling a particular Clan are? Wonder no more, with my handy Type Soul Clan Rarity guide.
Wisegal Walkthrough
Welcome to Gamezebo's walkthrough for Wisegal. General Game Information Hidden Object game based on the Lifetime Channel's "Wisegal" the story of a former mob wife whose son Nino and his friend Angela have been kidnapped. Patti Montanari the main character is now working with the FBI to track down her son and bring the criminals to justice. The game's storyline is read between each screen change. This game is played with 4 modes. Hidden object, Ph…
a:1:i:0;a:2:s:13:”section_title”;s:19:”Wisegal Walkthrough”;s:12:”section_body”;s:55291:”
Welcome to Gamezebo’s walkthrough for Wisegal.

General Game Information
- Hidden Object game based on the Lifetime Channel’s "Wisegal" the story of a former mob wife whose son Nino and his friend Angela have been kidnapped. Patti Montanari the main character is now working with the FBI to track down her son and bring the criminals to justice.
- The game’s storyline is read between each screen change.
- This game is played with 4 modes. Hidden object, Photography, find the differences, and place the listening device.
- The game has no timer and is played in relaxed mode for story completion.
- There are no points awarded and the game is played only for story completion.
- There are unlimited hints available in the game and the hints have a period of regeneration before they can be used again.
- If you click on the screen too many times in quick succession you will be given a penalty cursor that will lock you out for a few moments.
- You can adjust the game’s volume of ambient sound and music by clicking on the options key in the main menu.
Game Elements
Hidden Object Sample Screen
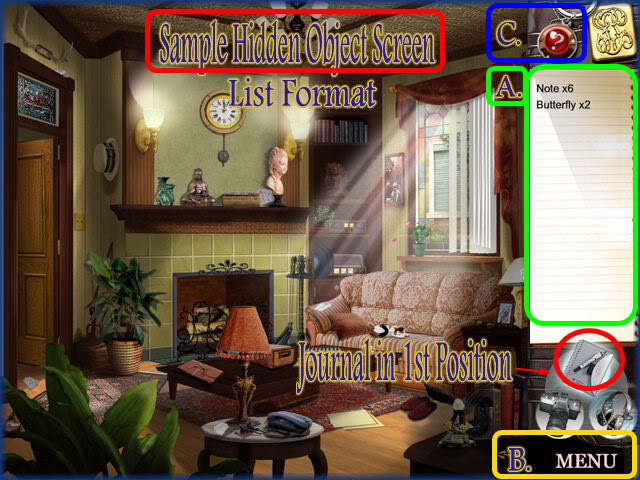
- This is a standard hidden object screen in list format.
- A. Here the items you are to search for are listed. There may be more than 1 of an item required.
- B. Menu Button – Click here if you need to pause the game, exit or change control settings.
- C. Hint Button – If you get stuck you can click on the hint button and it will take you to the item at the top of your list. Hints have a few moments of regeneration and are unlimited in number.
- NOTE – Hints do not last very long at all in this game so once you hit the button make sure you are paying attention to your screen.
- Note there are 3 images under the list area. Whichever mode you are in will be shown by which image is at the top. For the hidden object screen you will see the journal in the topmost position.
Sample Photography Screen
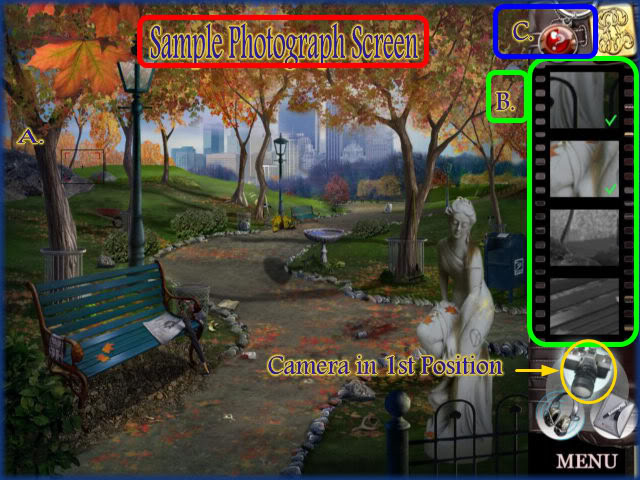
- This is the photography mode of the game.
- Your cursor will change to a view finder and you are to find the exact scene in the film cell to your right and take a picture in the screen area to the left.
- If you are correct you will see a flash on the screen and the film cell will turn from black and white to colorized and there will be a green check mark in each film cell. In this walkthrough they have all been color coded to help you find them easily.
- A. Lens Finder – This is what your cursor will look like in this mode. Simply place it where you wish to take a picture and click with your left mouse button.
- B. Film Cells – This is the area you need to study as you look for your picture to take.
- C. Hints – In this mode you do have hints and clicking on the button will cause several flashing blue rings to appear in the location you need to take your picture.
- Note at the bottom of the film cell area that the camera is in the topmost position. You will see this whenever you are in photography mode.
Sample Bug Placement Screen 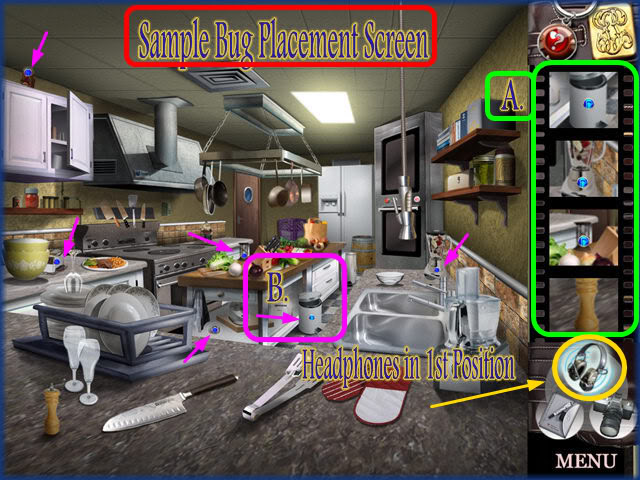
- In this game your character is working with the FBI and she will need to have bugs placed strategically throughout locations in the game.
- In this mode you will look at the colored pictures in the panel to the far right (A.) and locate those areas in the scene and click on them.
- Doing so will place a blue sparkling gem on the item.
- Once you have placed all of them you can proceed to the next screen.
- B. This is an example of an item that has a bug placed on it.
- Note that when you are in this mode the headphones will be in the topmost position of the three.
Find the Differences Sample Screen 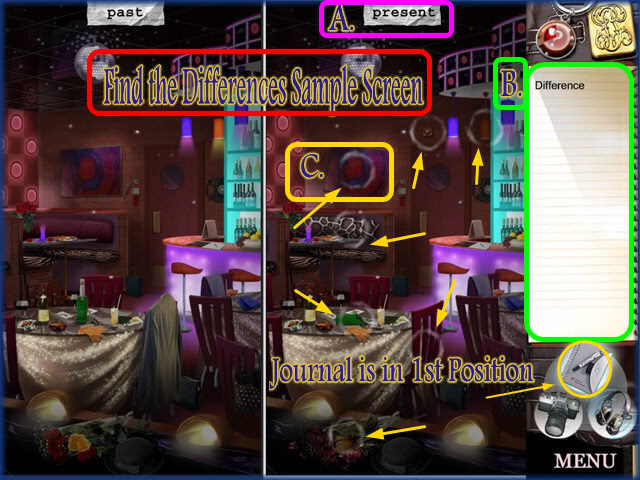
- Here is a sample of the find the difference screens you will see in the game.
- All games ask that you locate 8 differences between the two side by side scenes.
- You are asked to only click on the right side which is labeled "present" Figure A.
- Click on any area you see a difference and a smokey rotating ring will appear around that item if you are correct. Figure C.
- If you get stuck you can use a hint which will form a blue circle in the correct location. This circle shows for a very brief moment so be prepared to watch the screen carefully if you use a hint.
Hints 
- This is a hint button located in the upper right side of the game screen and you simply click on it and a blue ring will appear around the item at the top of your list.
- You are given unlimited hints in the game but must wait a few moments in between hints.
Regenerating Hint Button 
- This is what your hint button looks like while it is regenerating and you can not click on it when it looks like this.
Penalty Cursor 
- If you click the screen too many times in fast succession your cursor will change to this symbol and you will be locked out for a few moments.
- If this happens simply do nothing and wait a few moments and it will return to normal.
Walkthrough
- This game has the same answers each time you play it.
- The items have been circled for you and color coded where necessary.
- You also have to change locations frequently in this game and the areas you need to place your mouse are marked with arrows to help you find your way around.
Brooklyn 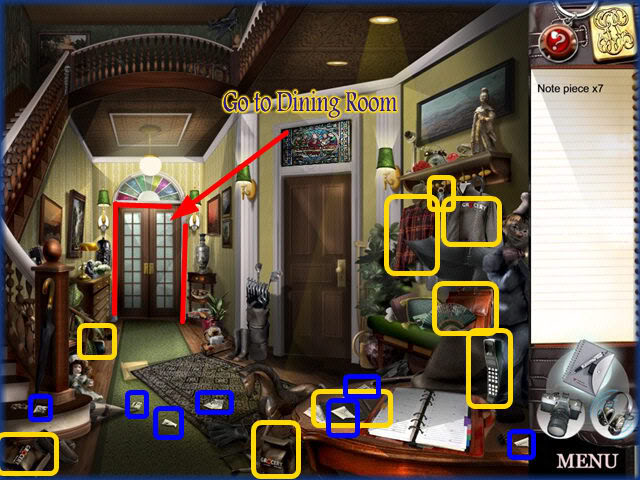
- Vito’s House
- Locate the note pieces x 7.
- Then you will be asked to find the following 9 items which are circled above.
- Woman’s Jacket
- Wallet
- Coin Purse
- Set of Keys
- Phone
- Briefcase
- Grocery bags x 2
- Man’s Jacket
- When you find all of these items click on the dining room door (door on the far left) to move into the Dining Room.
Dining Room 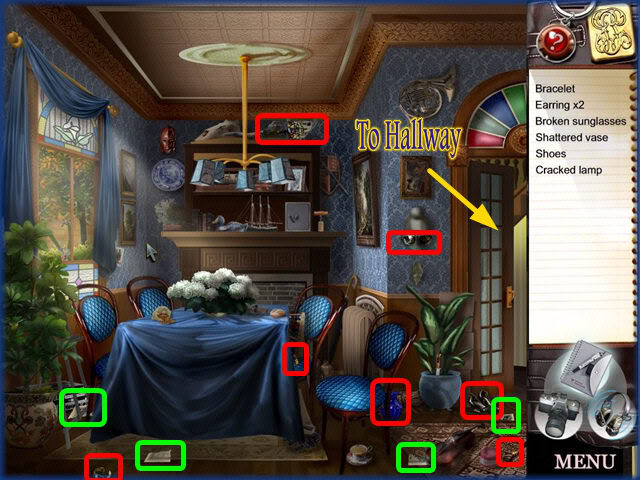
- Locate the 7 items listed above.
- Then you will be asked to find Ripped notes x 4 which are also circled above in green.
- When you are finished click on the door to the far right and go into the hallway.
Door to Living Room 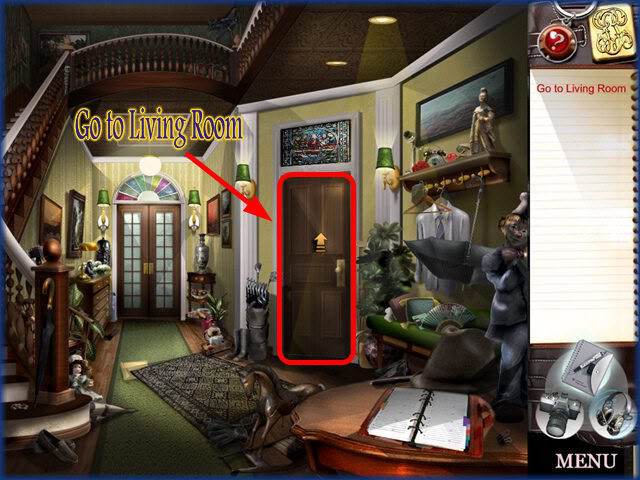
- Click on this door to enter the living room.
Living Room 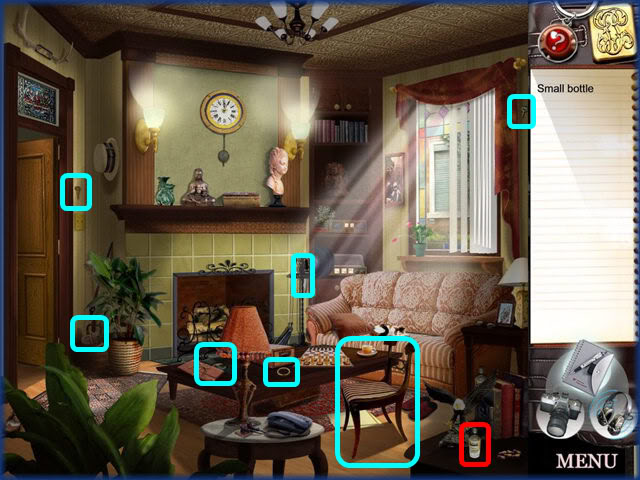
- Locate the small bottle.
- Next, you will be asked to find the following items:
- Key Ring
- Rope
- Broken Record
- Broken Chair
- Knife
- Keys x 2
Back to Dining Room 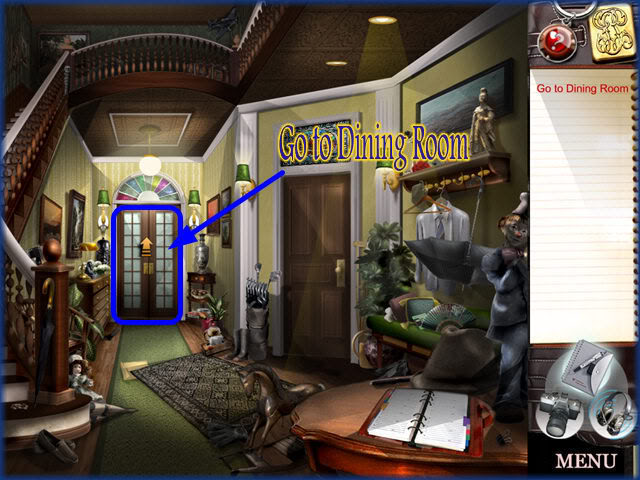
- Once you find these items go to the hallway and exit into the left door which is the dining room.
Safe 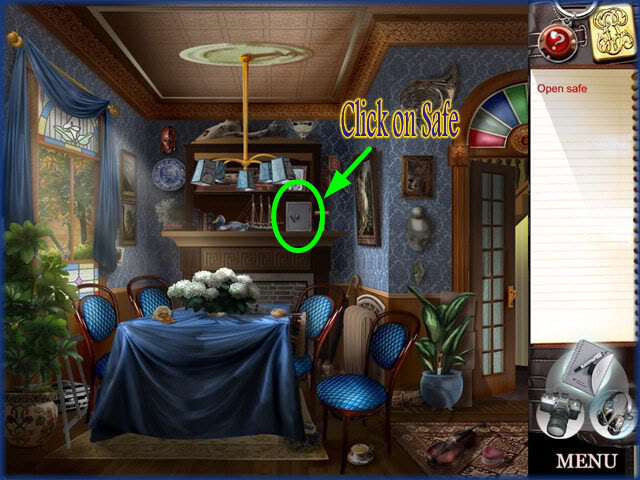
- Click on the safe seen circled above.
Inside Safe 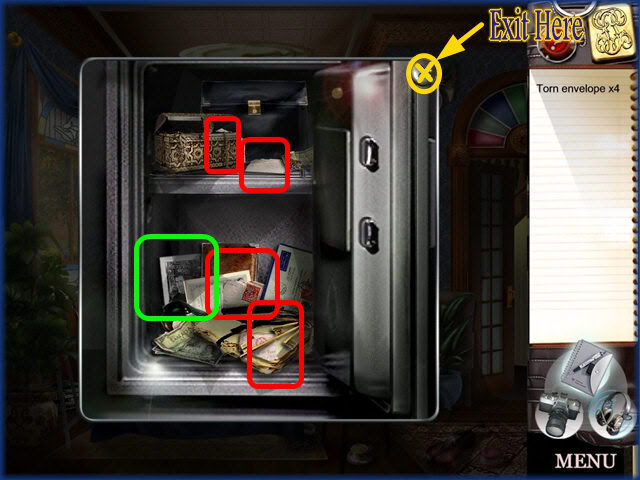
- Click on the 4 pieces of torn envelope.
- Click on the photograph inside the safe.
- Exit out by clicking on the "X" in the upper right hand corner.
Grocery Store 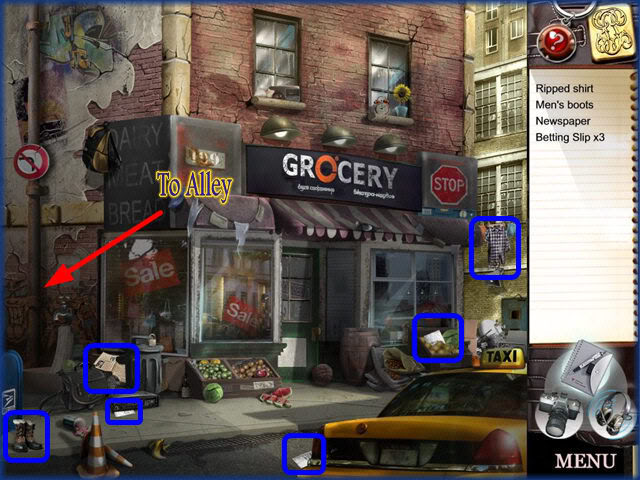
- Here your search is taken to the Grocery Store.
- Find the items on your list.
- Click on the red arrow to move into the Alley.
Alley 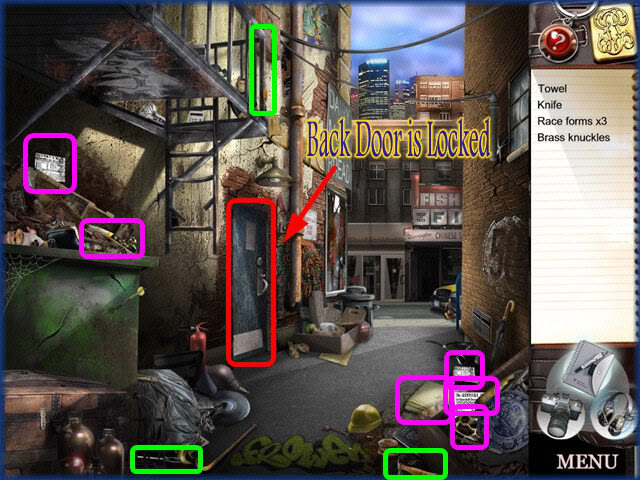
- Find the items on your list.
- Click on the door to check it. The door is locked. Continue to find items to help you open the door.
- After you find the items go back to the door and click on it and you will be able to go inside the grocery store.
Inside Grocery Store 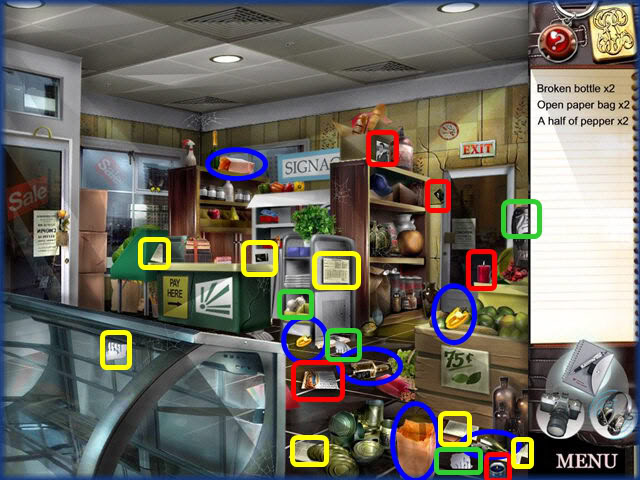
- Locate the items on the list.
- You will also be asked to find the following items:
- Photo
- Vase
- Candles x 2
- Prayer Card
- Dried Rose
- Memorial photo
- Invoice x 6
- Ripped Note x 4
- Business Cards x 2
Mama Mia’s Restaurant 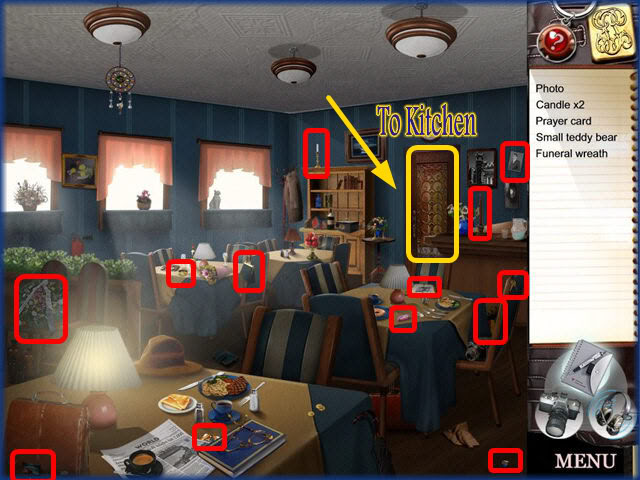
- Locate the items on your first list.
- You will also be asked to find the following items.
- Drivers license
- Wallet
- Credit Card
- Pack of Gum
- Keys
- Class Ring
- Wristwatch
- After you find these items click on the door to enter the Kitchen.
Kitchen
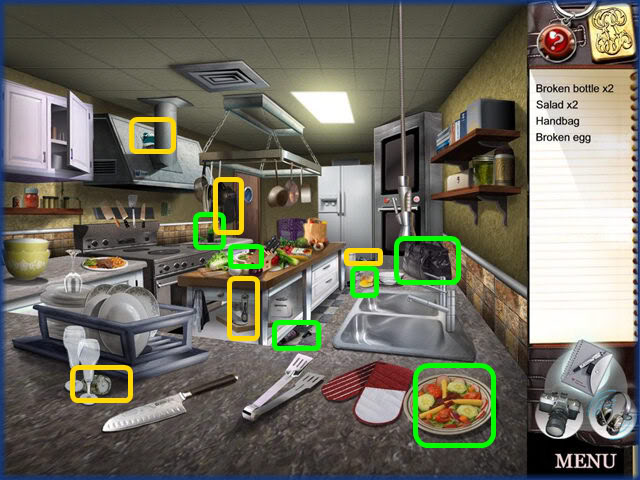
- Locate the items on your list circled in green.
- You will also be asked to find additional items circled in yellow. These items are:
- Jacket
- Sneakers x 2
- Watch
- Necklace
Park 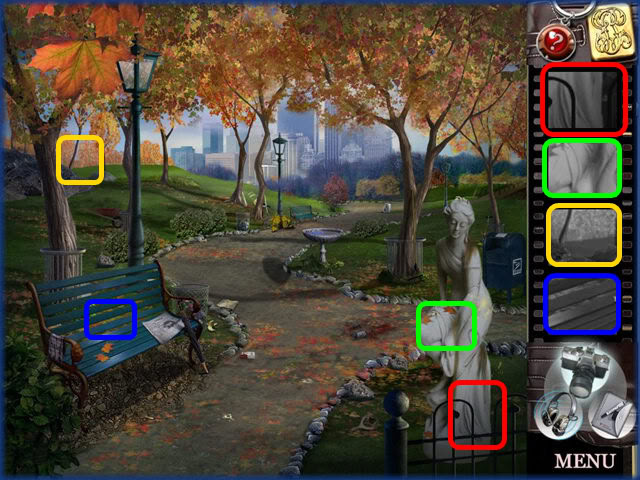
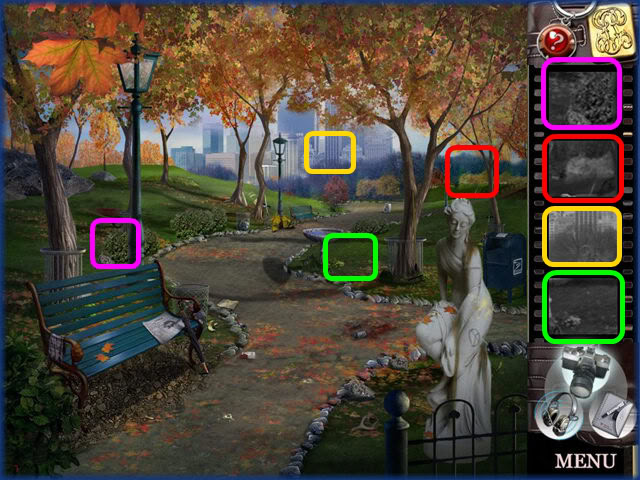
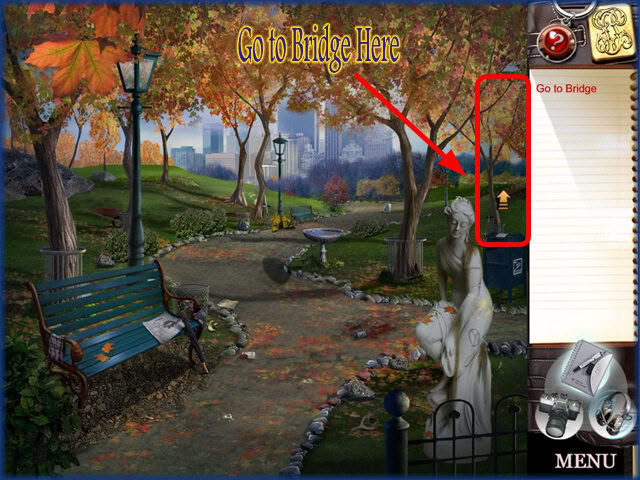
- Now you are at the park looking for clues.
- This is the first time for you to play the photography level. There will be a brief tutorial here or you can read the instructions above.
- The images are color coded to help you locate them.
- You will see a flash when you take a picture correctly.
- Simply click with your left mouse button after you line the viewfinder over the correct area.
- Next go to the bridge as indicated above.
Bridge 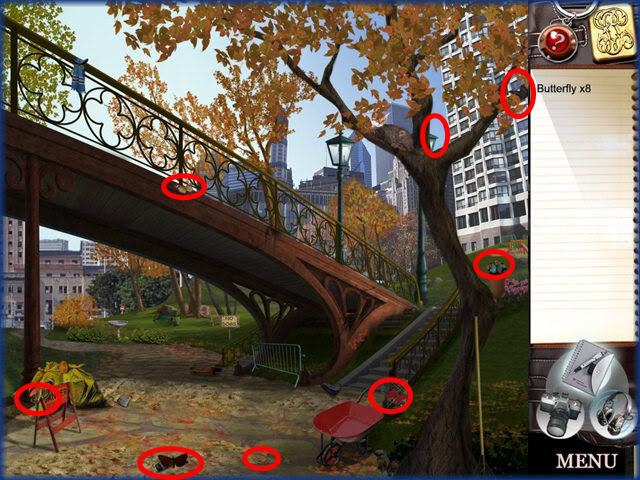
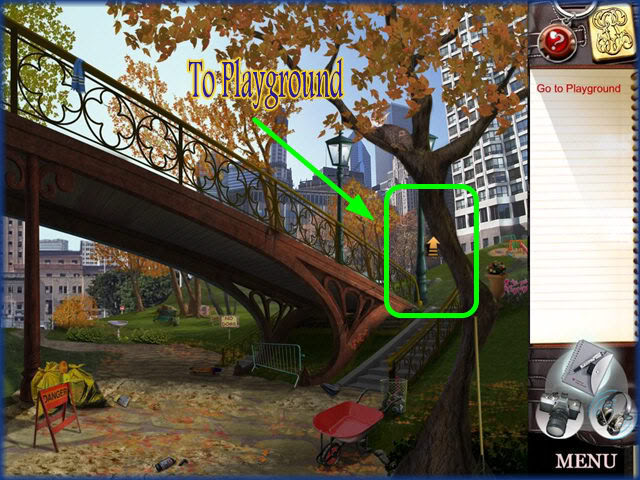
- Locate the butterflies as indicated above.
- Click where indicated to move to the Playground.
Playground – Find the Differences 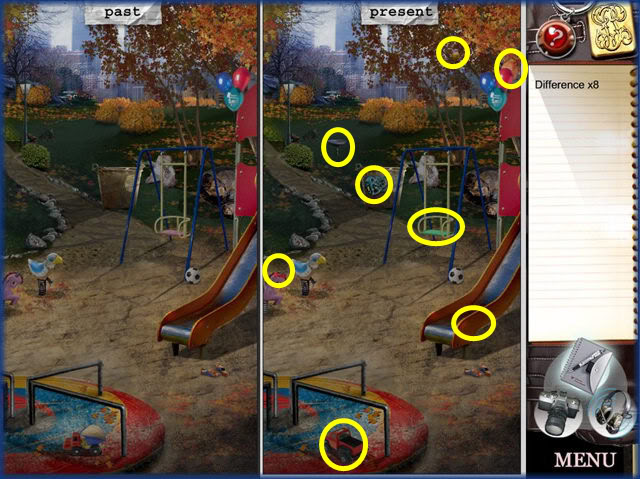
- Here is your first find the differences screen and there will be a brief tutorial or you can read the instructions above.
- Locate the 8 differences.
- Click on the right side marked "Present" only and you will see circles of swirled smoke around the areas.
Strongoli’s Funeral Home
Hallway 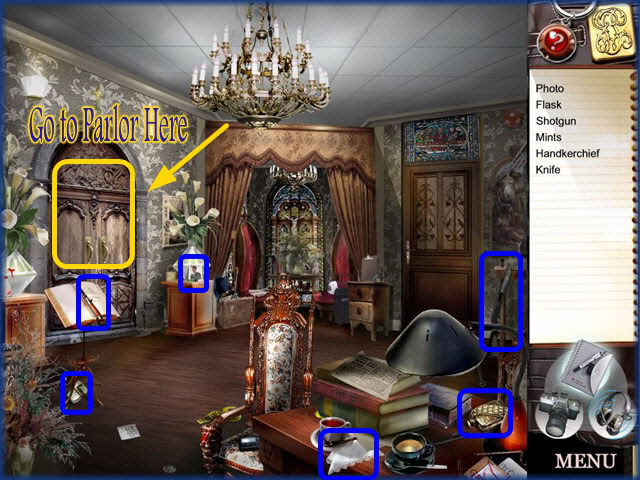
- Locate the items on the list.
- Take the left door to the Parlor area of the funeral home.
Parlor 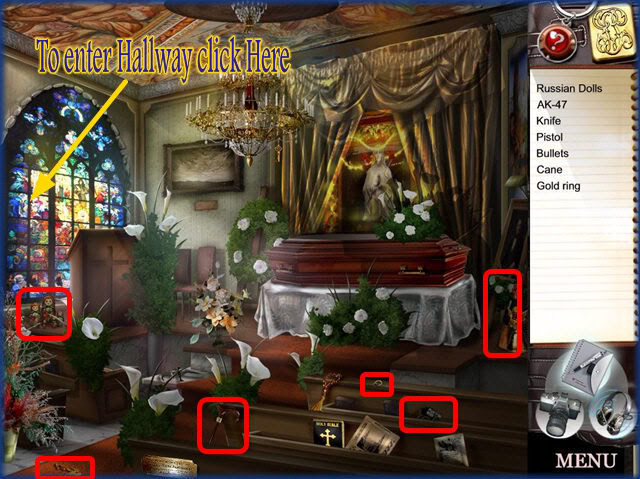
- Locate the items on the list.
- Click where indicated to return to the Hallway.
Hallway 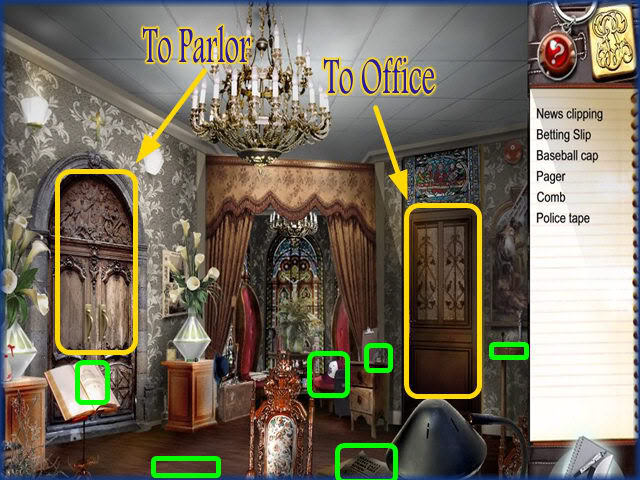
- Locate the items on the list.
- Attempt to go through the office door.
- It is locked you must find a key first.
- Exit back into the Parlor.
Parlor/Key 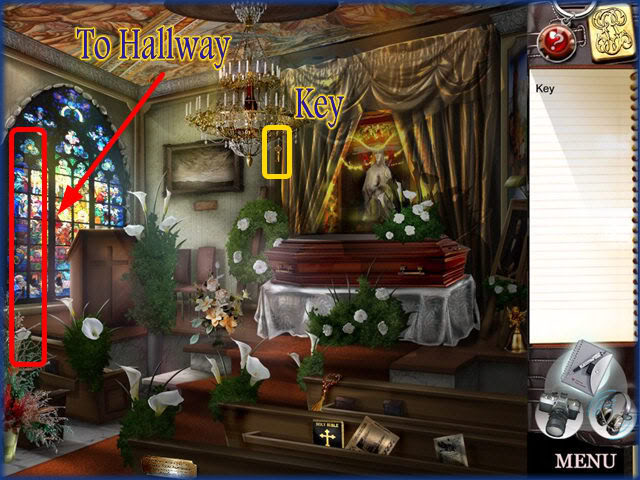
- Locate the key as shown.
- Exit as indicated to enter the Hallway again.
Hallway 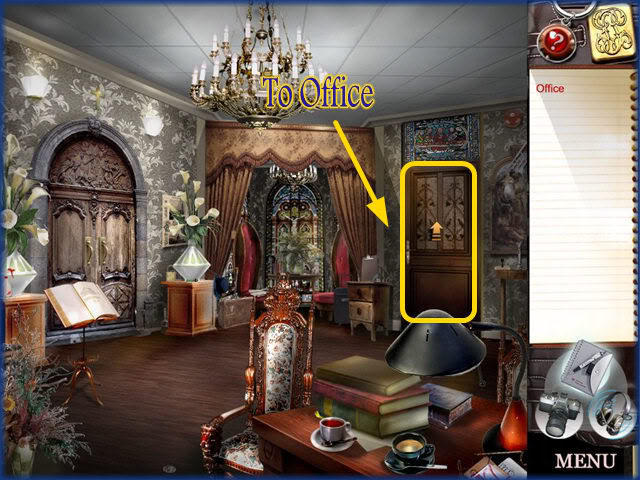
- Click on the Office door.
- Since you found the key you should be able to enter now.
Office 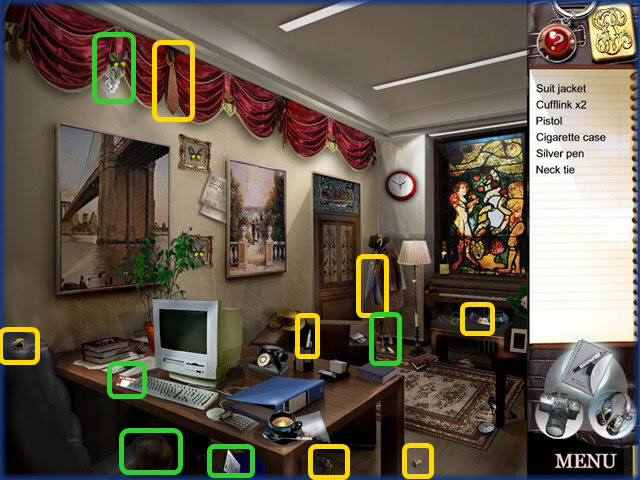
- Locate the items on your first list.
- You will also be asked to find the following items:
- 2 Fliers
- Tickets
- Garter
- Woman’s Wig
- High Heels x 2
Anastasia’s Palace 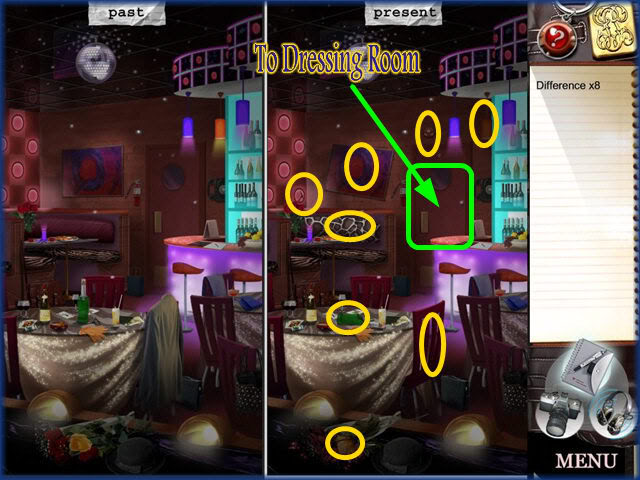
- Now you are taken to a new location Anastasia’s Palace.
- This is a find the difference screen.
- Locate the 8 Differences.
- Click on the back door as shown to enter dressing room.
Dressing Room 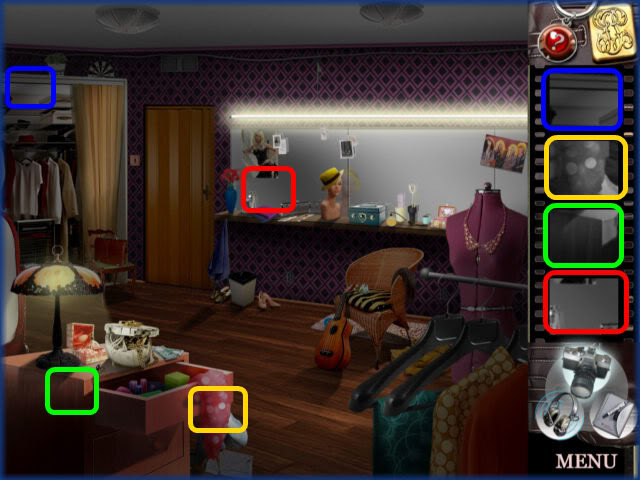
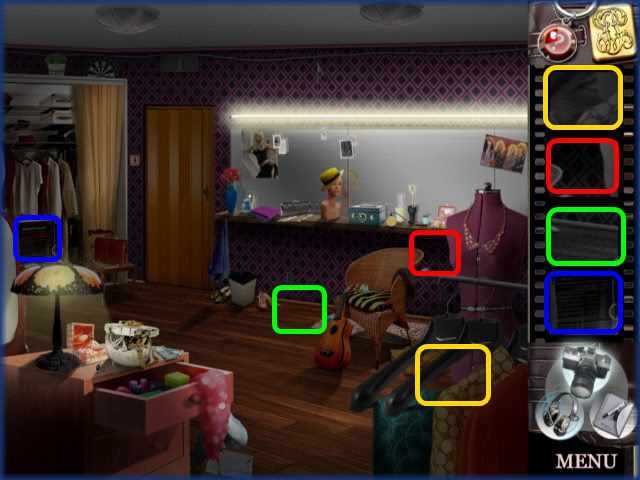
- This is a Photography level.
- The images have been color coded to help you locate them.
- Watch for the flash when you take pictures.
- You will be taken back to the Grocery Store.
Grocery Store 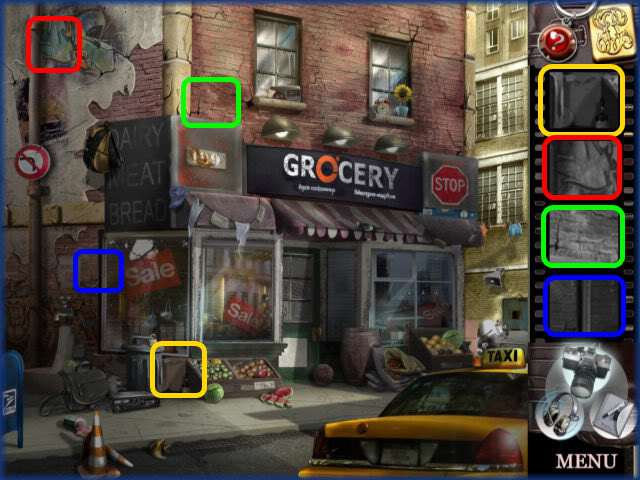
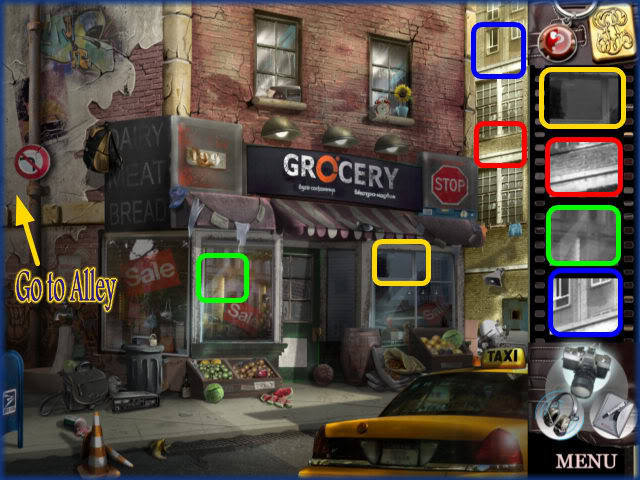
- Take the pictures as indicated.
- They have been color coded to help you find them.
- When finished click on the Alley as indicated above.
Alley 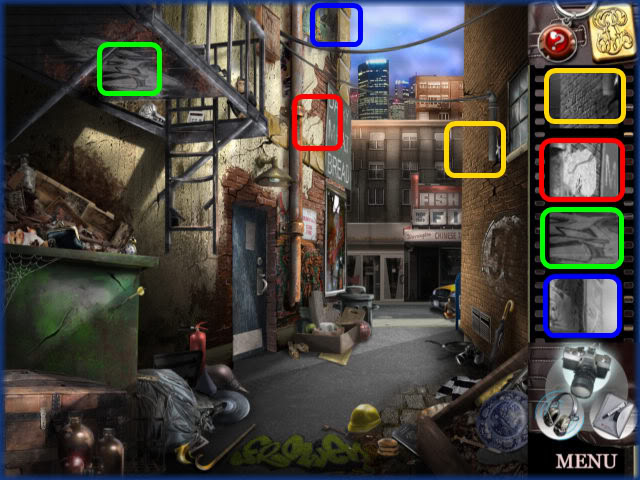
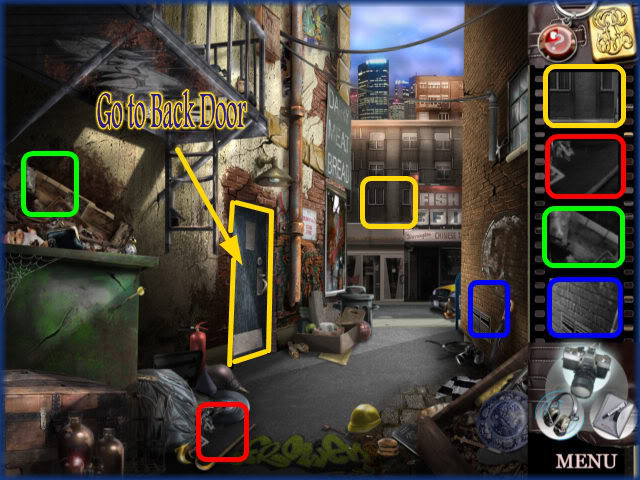
- Take the pictures as shown above.
- They have been color coded to help you find them.
- When finished click on the back door of the Grocery Store.
Grocery Store 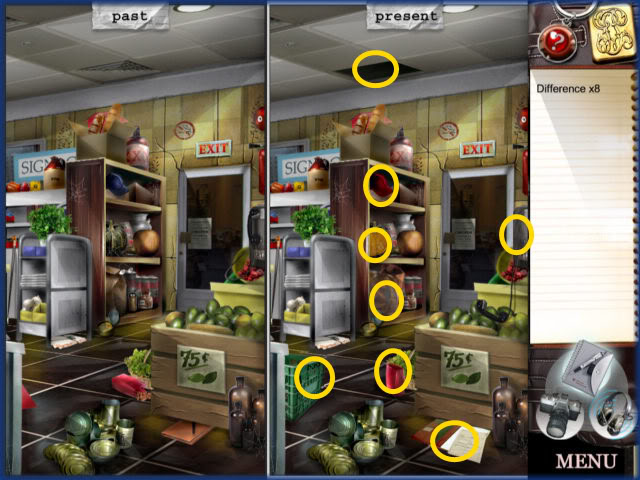
- Locate the 8 differences in this scene.
- You will be taken back to Vito’s house.
Vito’s Home 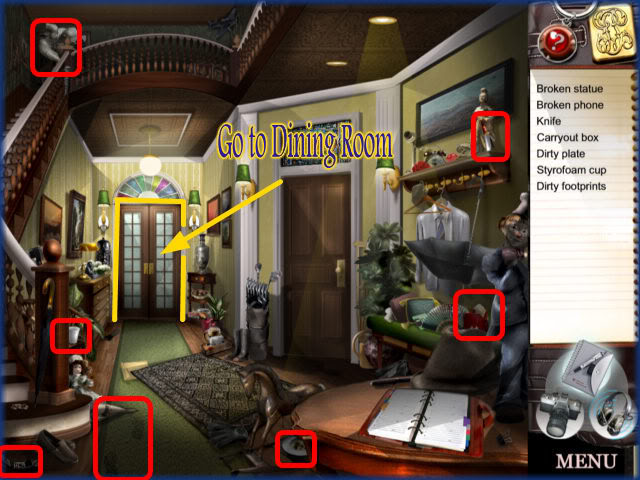
- Find the items listed above.
- Click on the Dining Room door when you are finished.
Dining Room 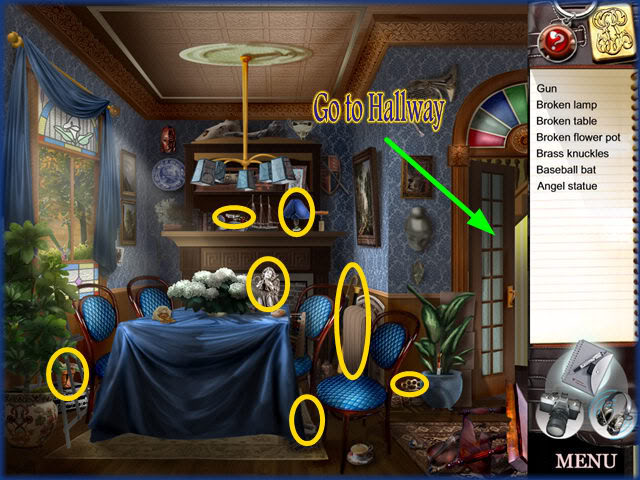
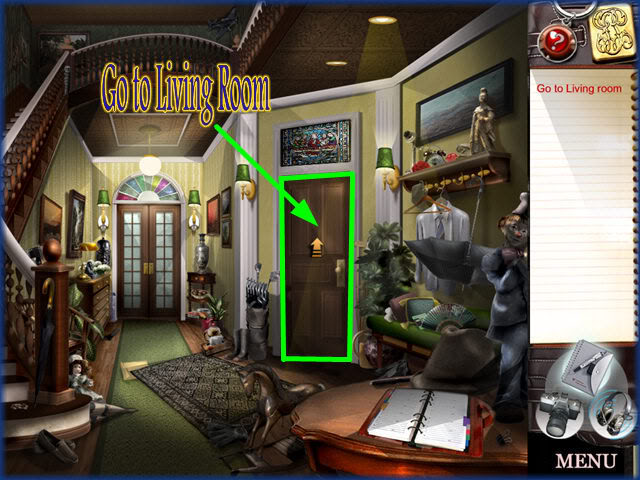
- Locate the items hidden in the Dining Room.
- When finished go back into the Hallway.
- Then click on the living room door as shown above.
Living Room 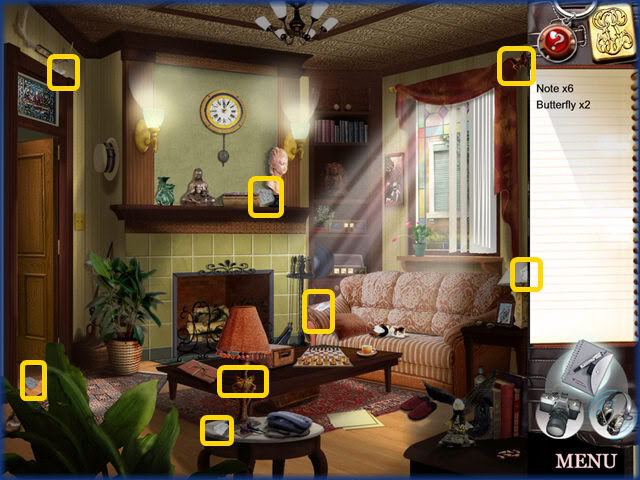
- Locate the items on the list as shown.
- You will be taken to the park.
Park 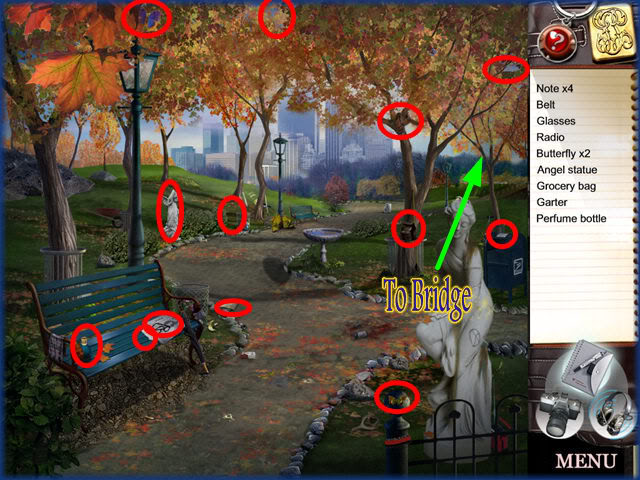
- Locate the items on the list.
- Click on the arrow indicated to move to the Bridge area.
Bridge 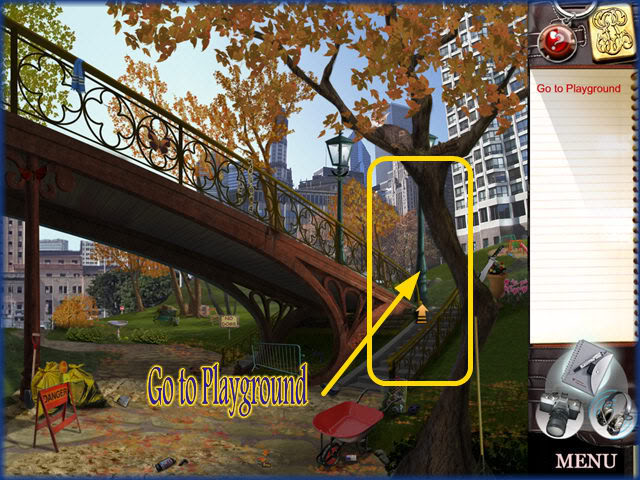
- Once here click on the arrow to move to the Playground area.
Playground 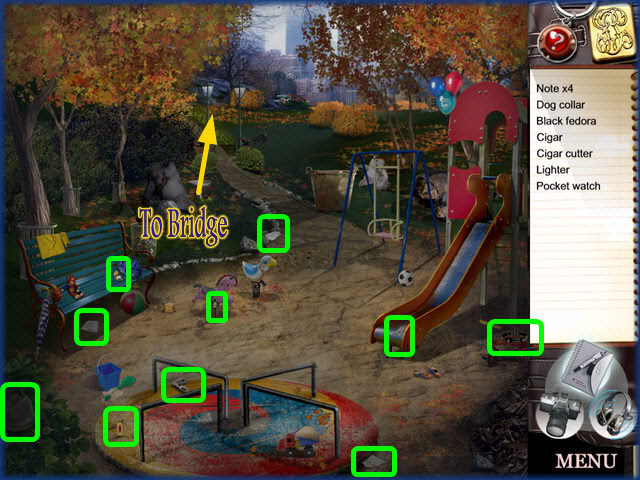
- Locate the hidden items in this scene.
- When finished click on the arrow to move back to the Bridge.
Bridge 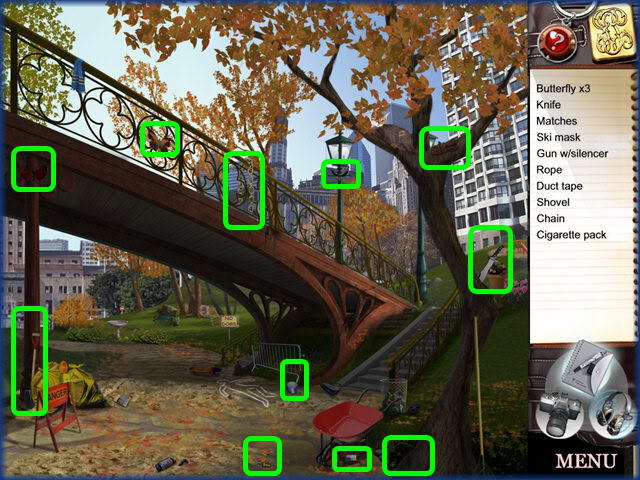
- Locate the hidden objects on the list.
- When you are finished you will be taken back to Anastasia’s Palace.
Anastasia’s Palace
Lounge 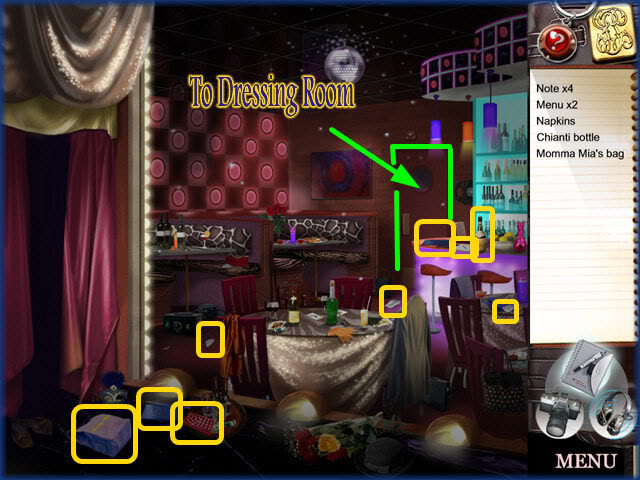
- Locate the items on the list.
- Click on the door to move to the dressing room.
Dressing Room 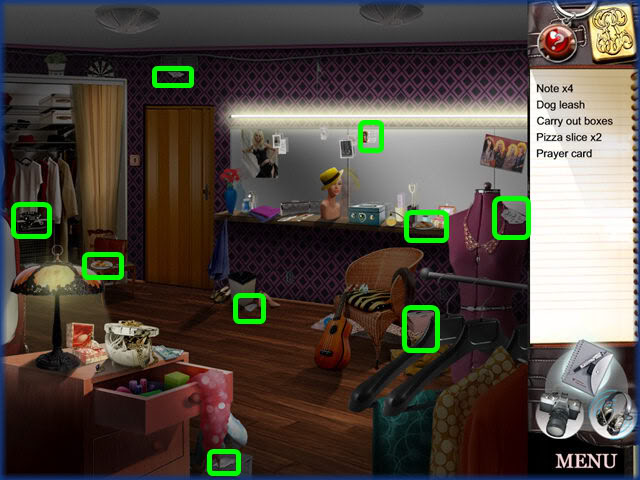
- Locate the items listed.
- You will then be taken back to Mama Mia’s Restaurant.
Mama Mia’s Restaurant 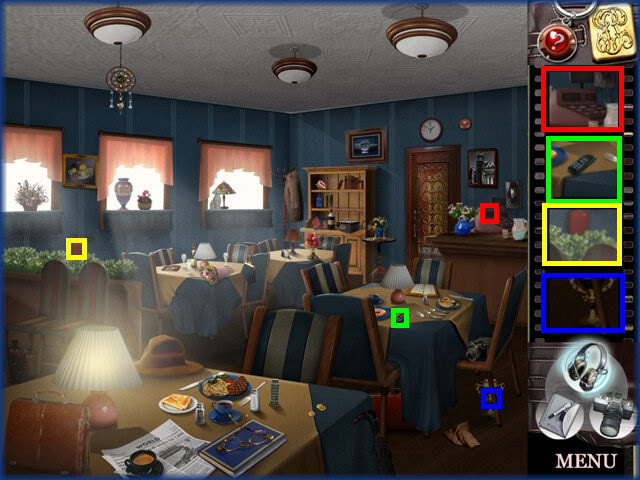
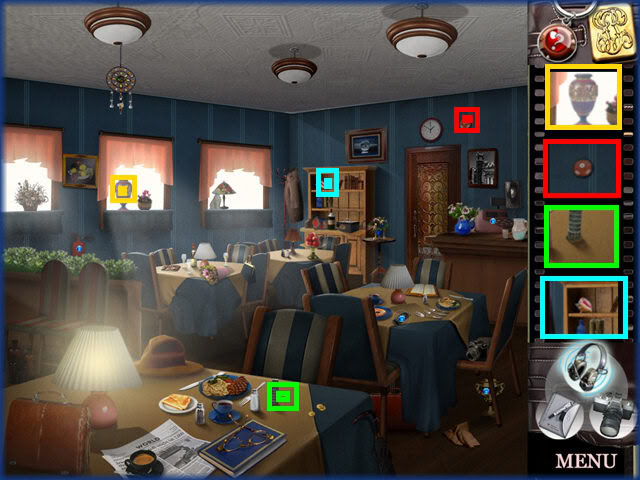
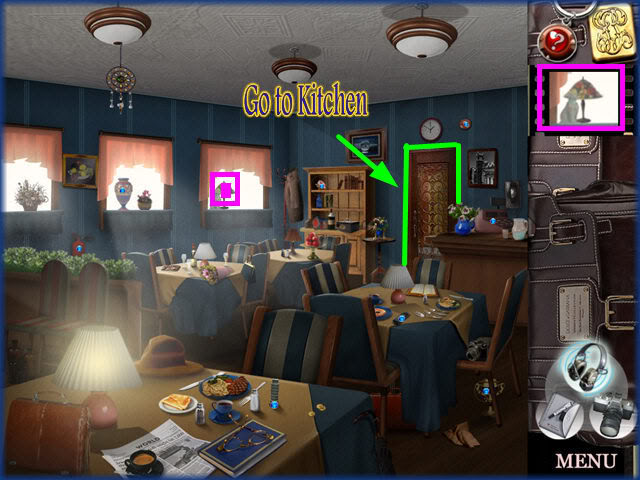
- This is the first level you will be asked to place the bugs.
- Look at the panel on the right and click on those areas on the left to place the bugs.
- You will see a blue gem if you are correct.
- There is a brief tutorial on this level or you may read the instructions above.
- Once complete click on the door to move to the Kitchen.
Kitchen 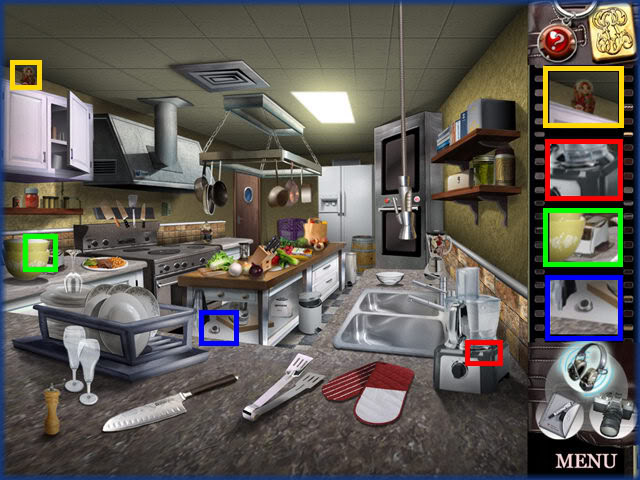
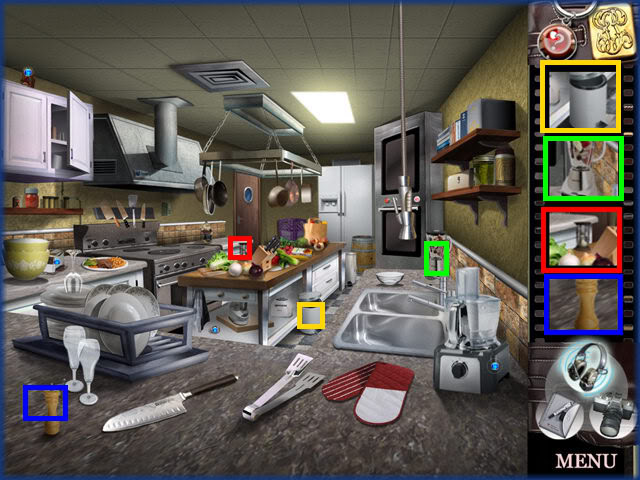
- Place the bugs in the correct locations.
- You will be taken back to Strangoli’s Funeral Home.
Strangoli’s Funeral Home
Hallway 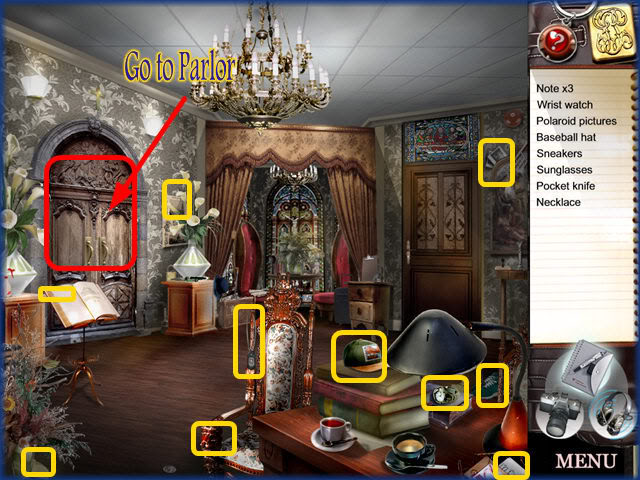
- Locate all of the hidden objects on the list above.
- Click on the door shown to move into the Parlor.
Parlor 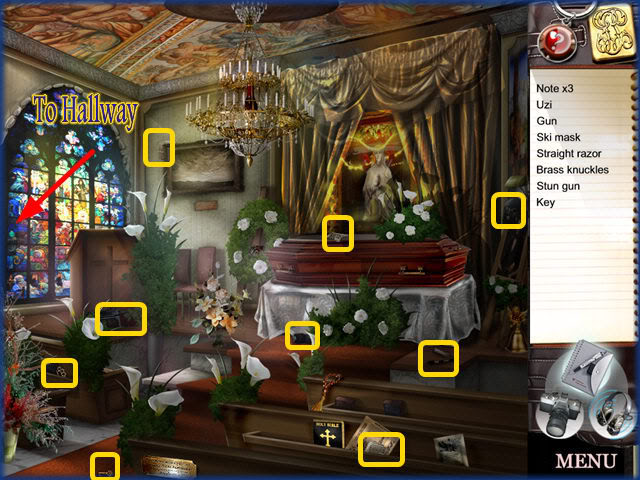
- Locate all of the hidden objects on the list above.
- Click on the arrow to return to the Hallway.
Hallway 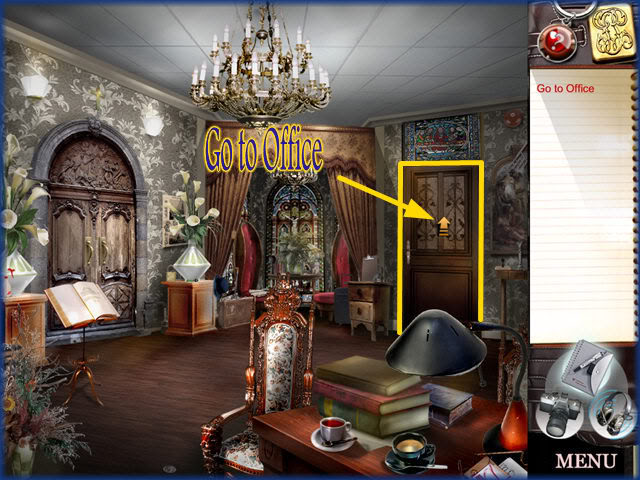
- Click on the right door to move into the Office.
Office 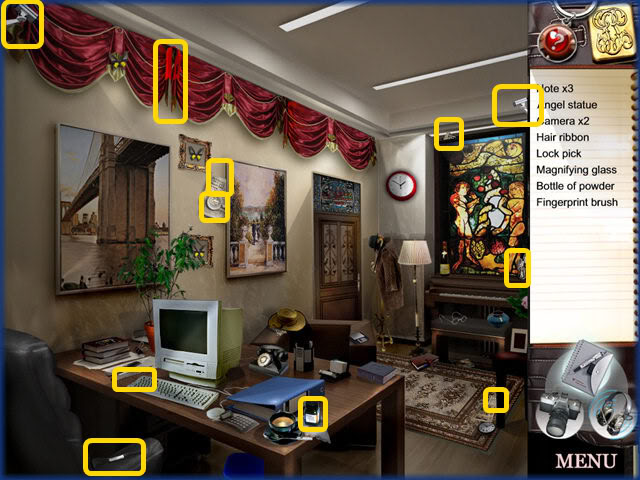
- Locate all of the hidden objects on the list above.
- When you are finished you will be taken back to Vito’s Home.
Vito’s House
Hallway 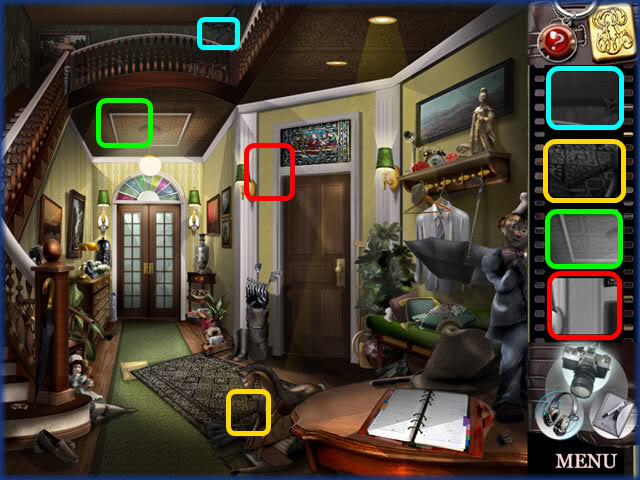
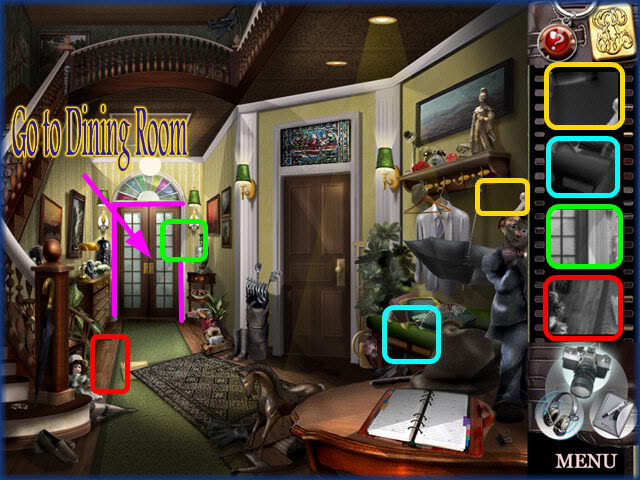
- In this level you are to take images.
- The answers have been color coded for you above.
- When you are finished click on the Dining Room door.
Dining Room 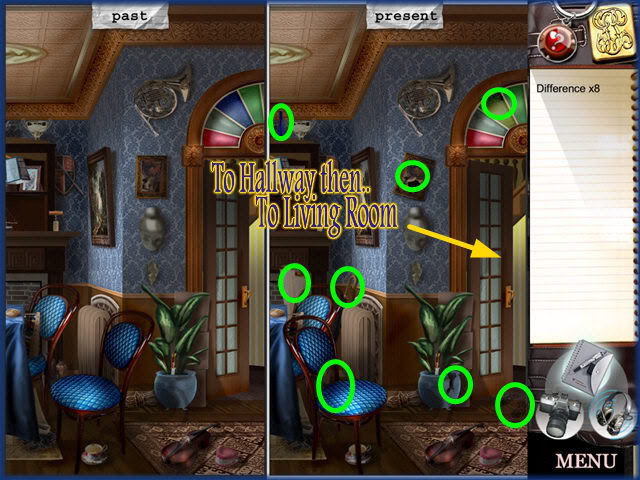
- Locate the 8 Differences in the scene above.
- When finished go back into the hallway and then proceed to the Living Room.
Living Room 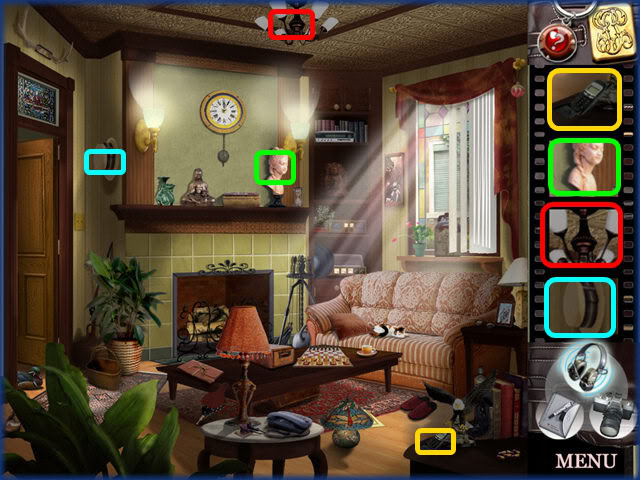
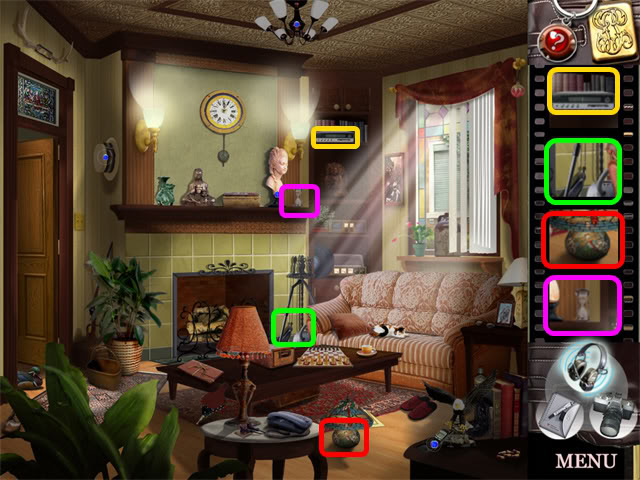
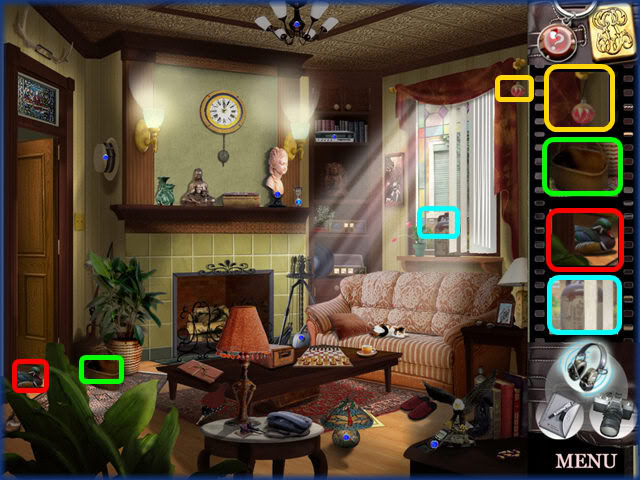
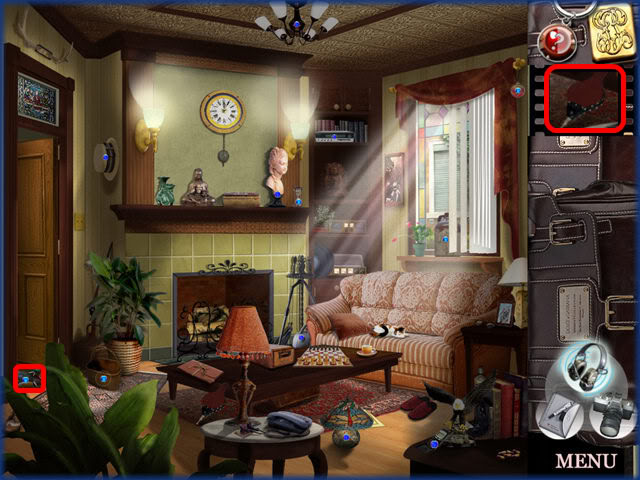
- Place the bugs in the correct locations.
- They have been color coded for ease.
- When you are done you will be taken back to the Grocery Store.
Grocery Store 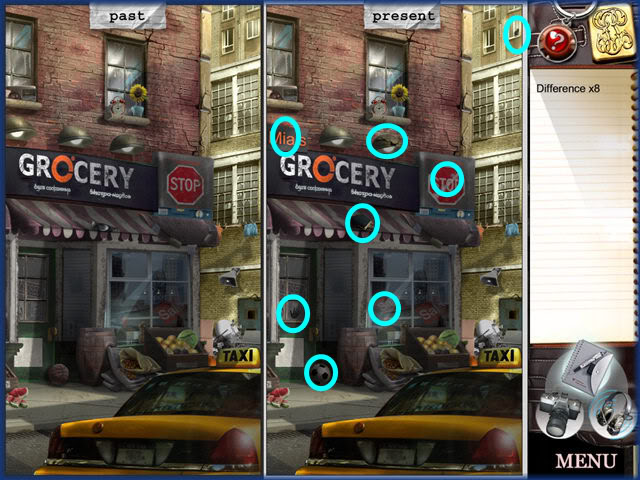
- Locate the 8 differences between the scenes.
- You will automatically be taken to the Alley when finished.
Alley 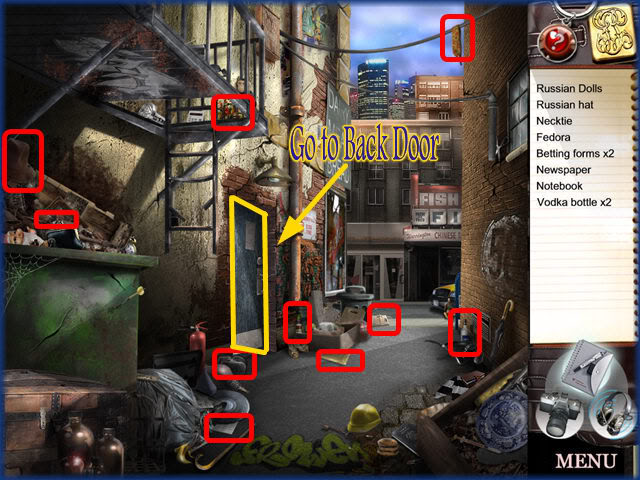
- Locate all of the items on the list above.
- Click on the back door when you are finished.
Inside Grocery Store 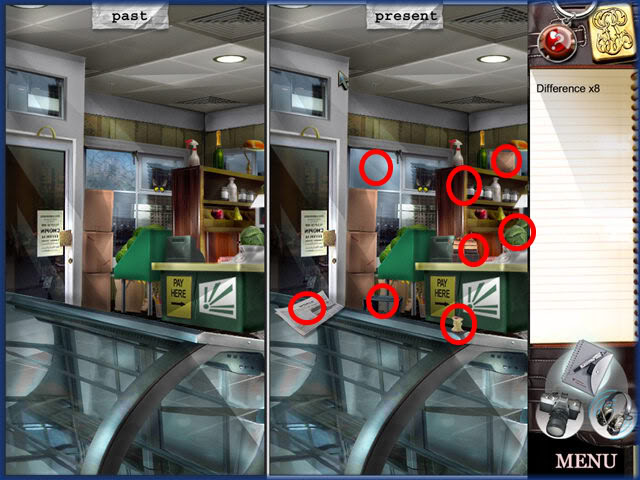
- Locate the 8 differences between the scenes as shown.
- You will be taken to Mama Mia’s Restaurant when finished.
Mama Mia’s Restaurant 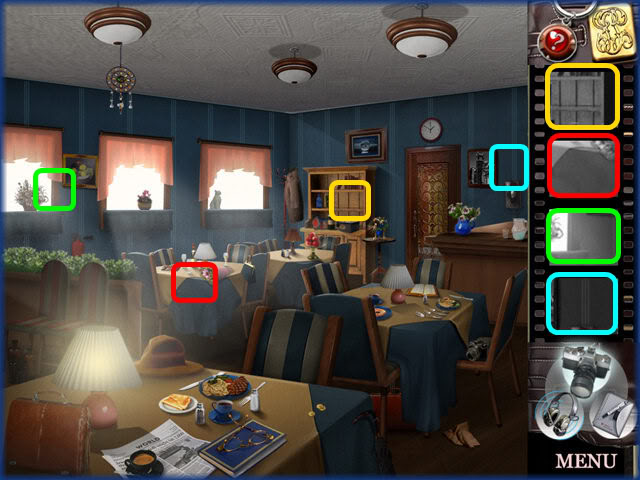
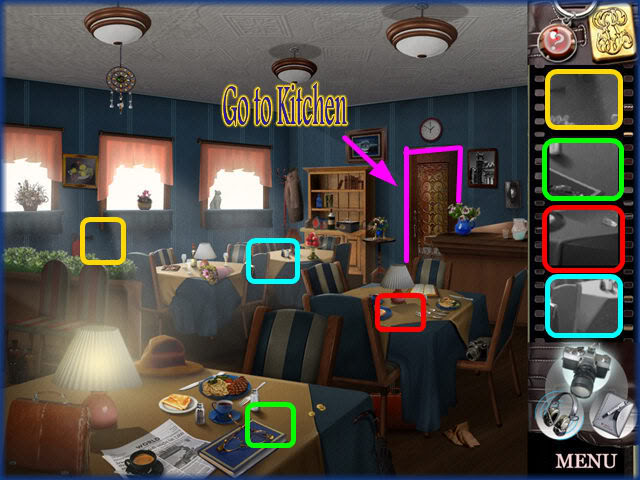
- Take the 8 pictures as shown above.
- The answers have been color coded for ease above.
- When finished click on the kitchen door as shown above.
Kitchen 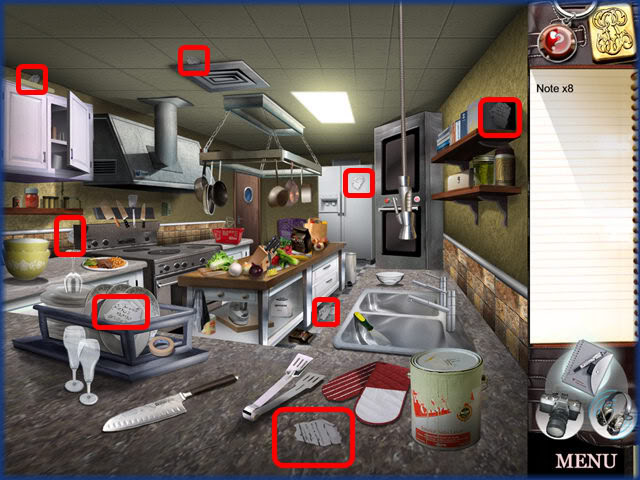
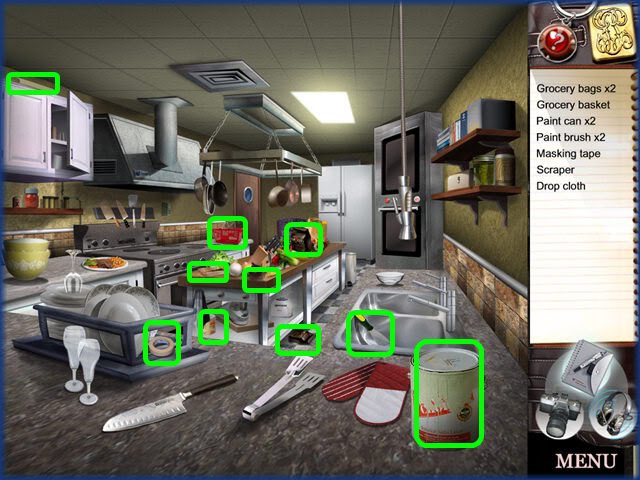
- Locate all of the hidden objects seen listed above.
- When finished you will be taken back to the Funeral home.
Strongoli’s Funeral Home
Hallway 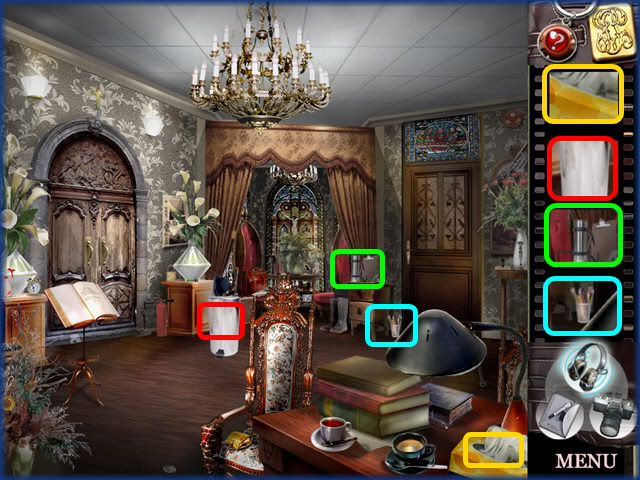
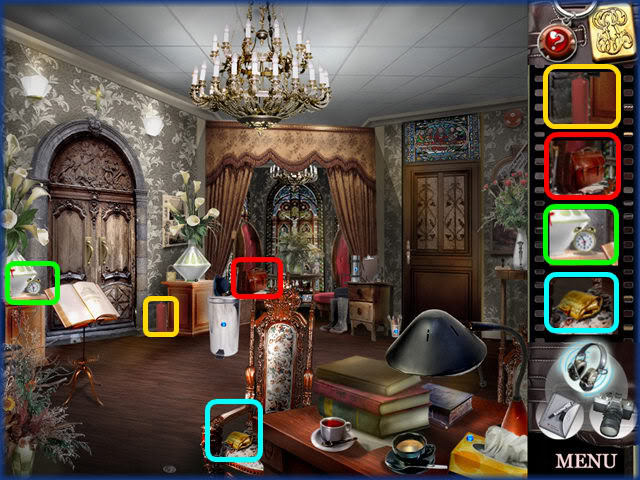
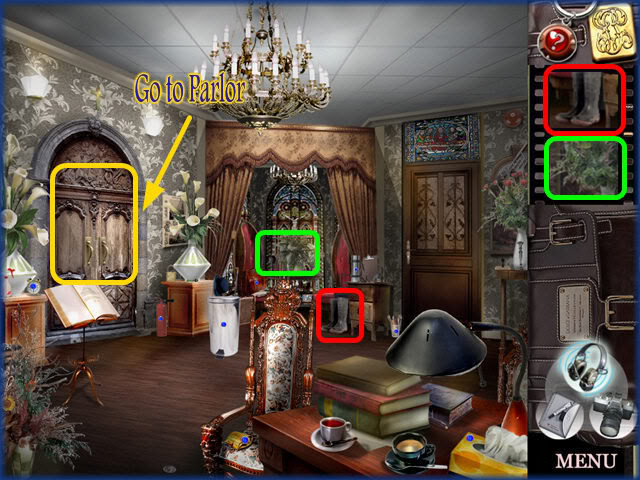
- Place all of the bugs as shown in the areas above.
- When finished click on the door to be taken to the Parlor.
Parlor 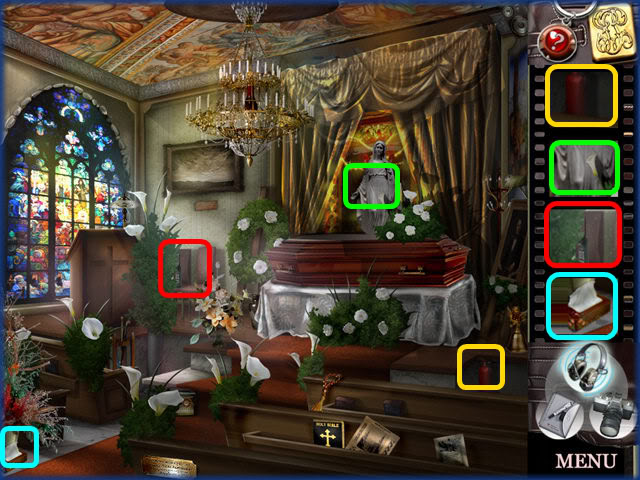
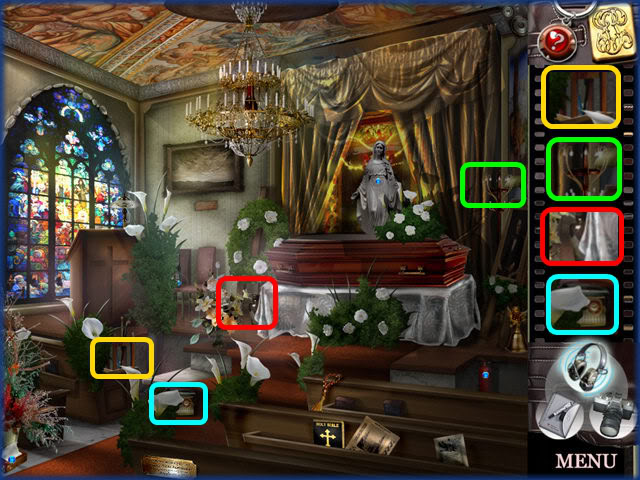
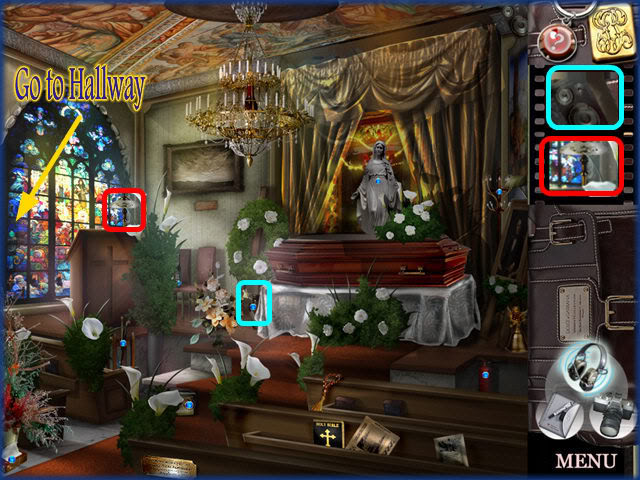
- Place all of the bugs in the Parlor as shown above.
- When finished click on the arrow to return to the Hallway.
Hallway 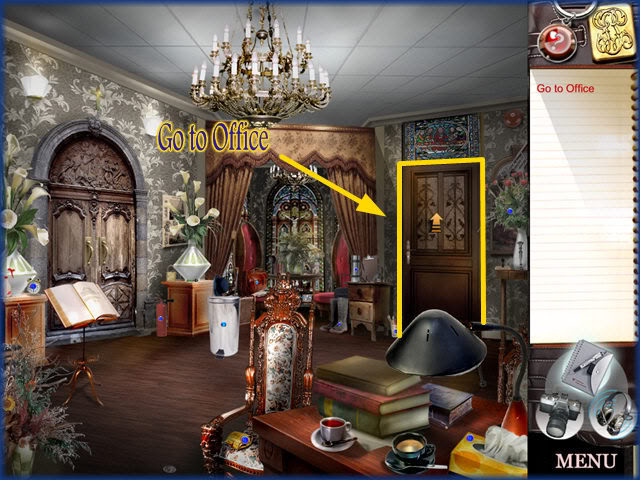
- Once here click on the right door to enter the office.
Office 
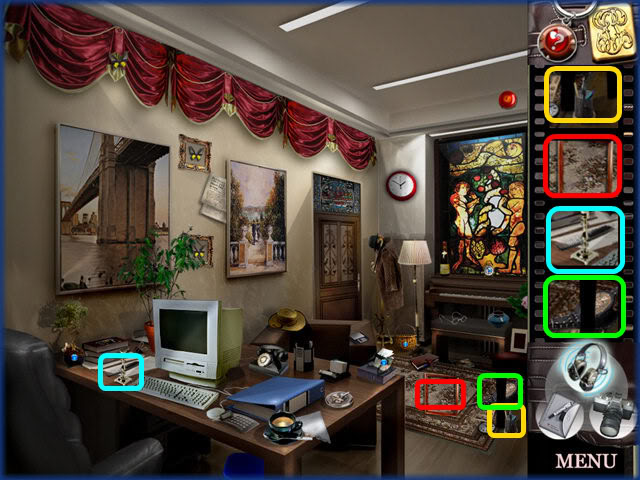
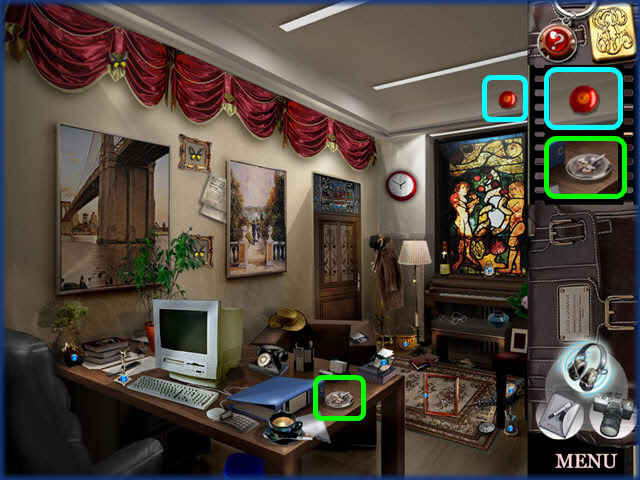
- Place all of the bugs in the areas indicated above.
- When finished you will be taken to the Playground.
Playground 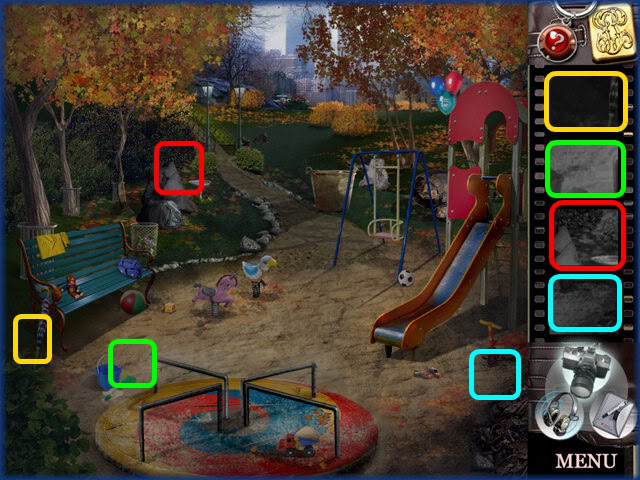
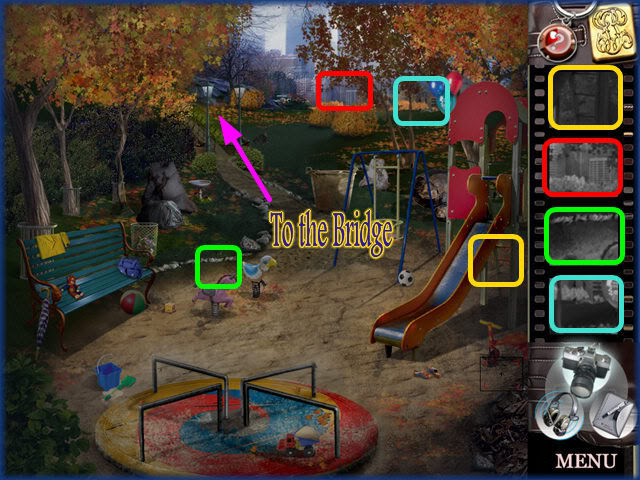
- Take the pictures as shown above.
- They are color coded for ease.
- When finished you will click on the arrow to move to the Bridge area.
Bridge 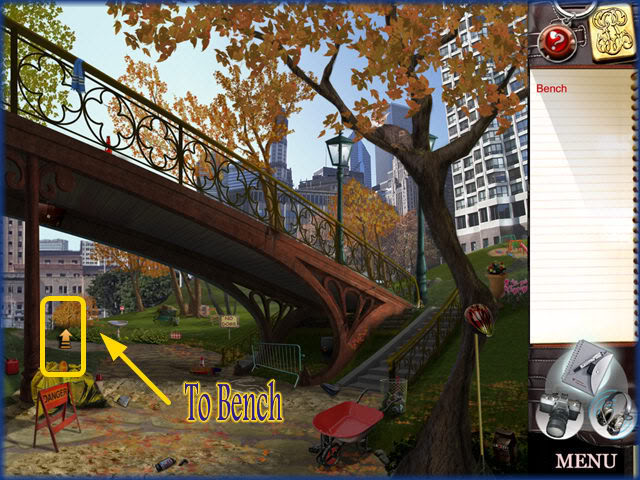
- Here you will be asked to move to the Bench area.
Bench 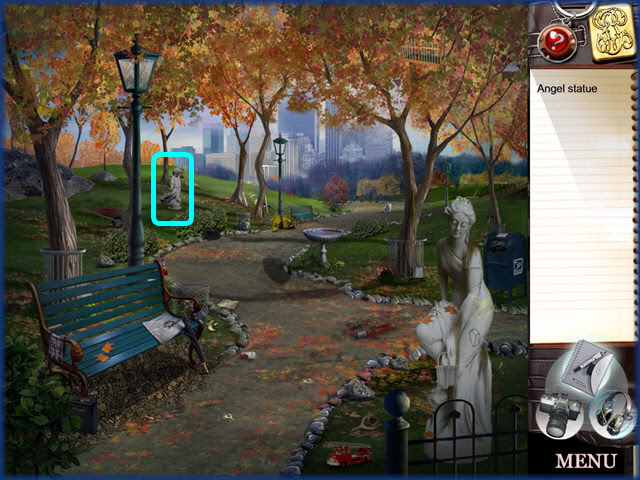
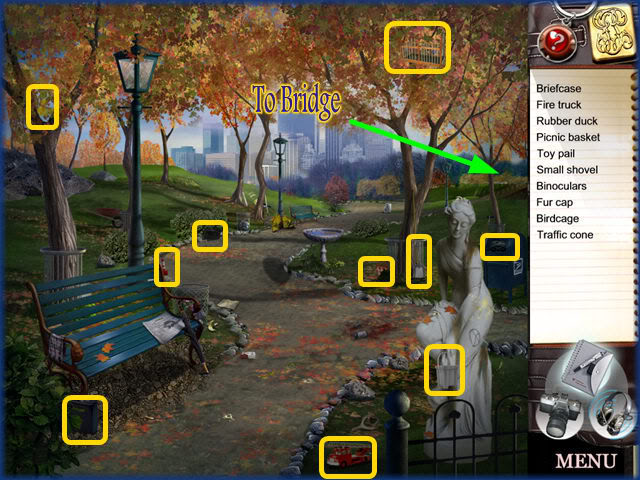
- Here find all of the items listed in both images above.
- When finished return to the Bridge.
Bridge 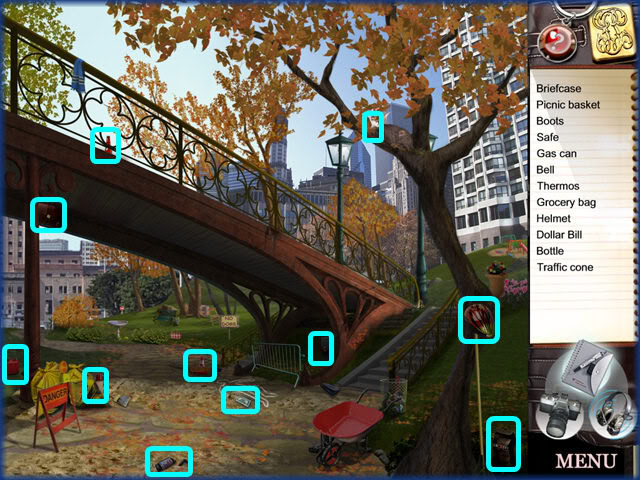
- Locate the items on the list above.
- Items are circled for you.
- You will be taken back to Anastasia’s Palace.
Anastasia’s Palace 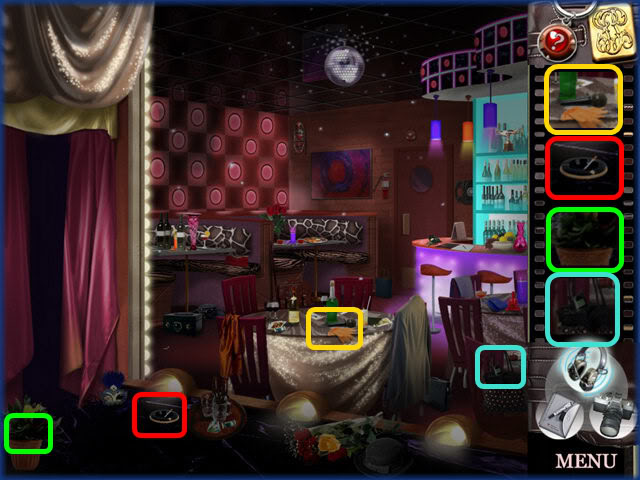
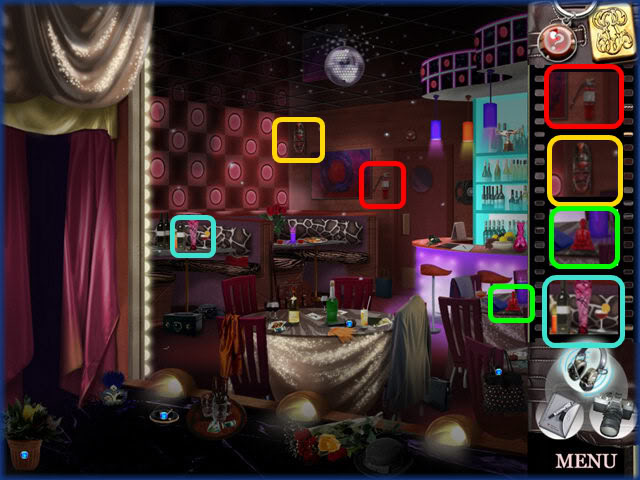
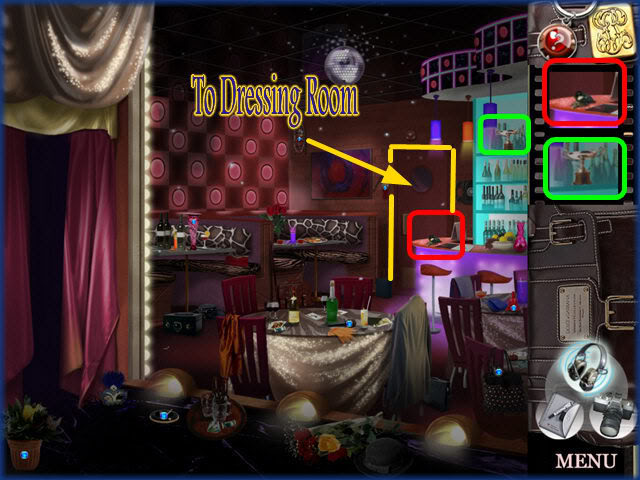
- Place bugs in all the areas indicated above.
- These areas are color coded for ease.
- When finished exit to the Dressing Room.
Dressing Room 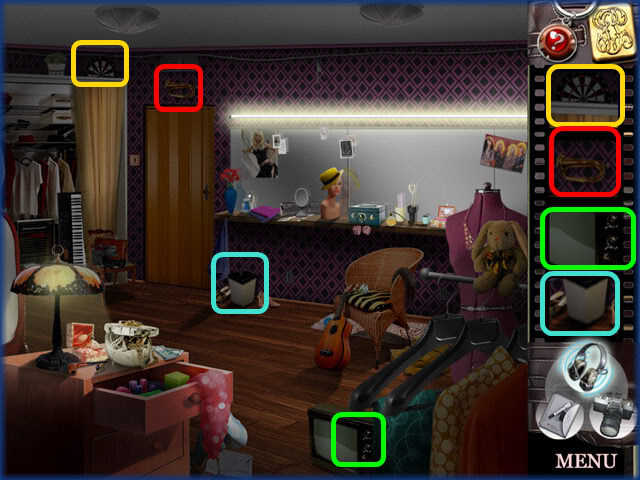
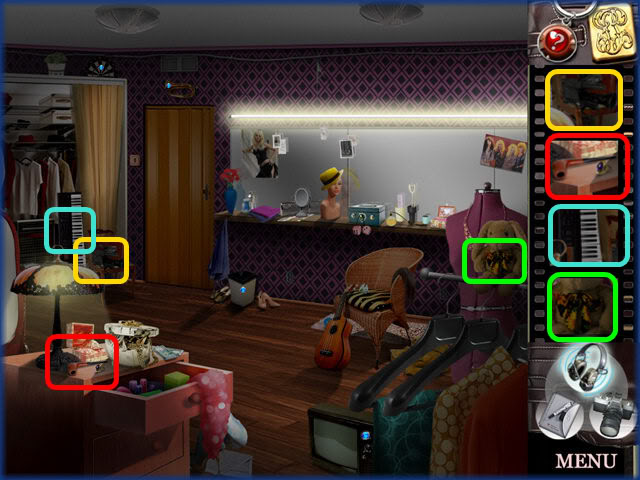
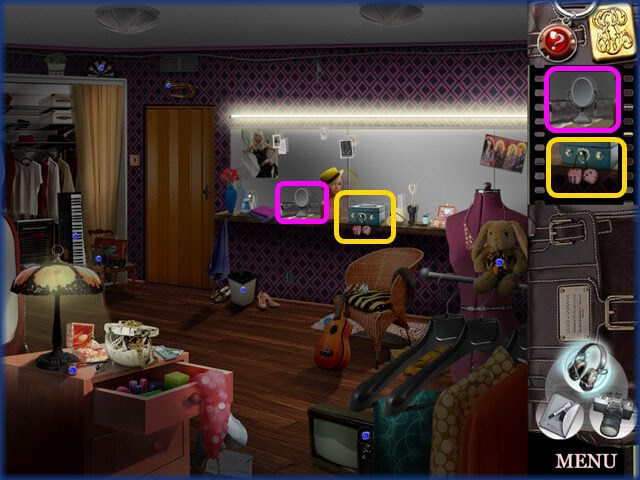
- Place bugs in all of the areas indicated above.
- The areas are color coded for ease.
- You will be taken back to the Funeral home when finished.
Strongoli’s Funeral Home
Hallway 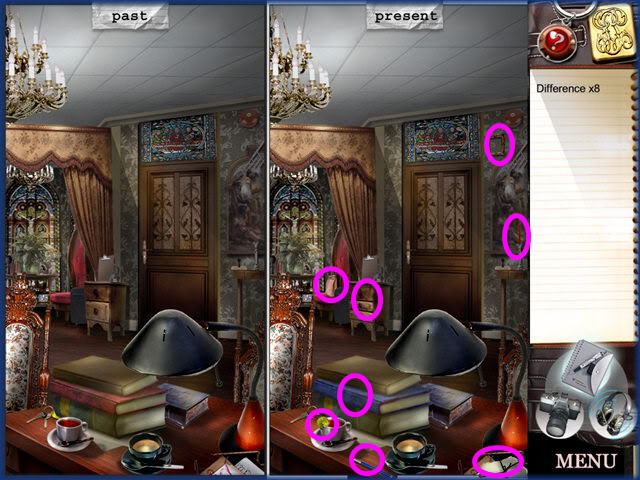
- Locate the 8 differences between the two scenes.
- You will be taken instantly to the Parlor.
Parlor 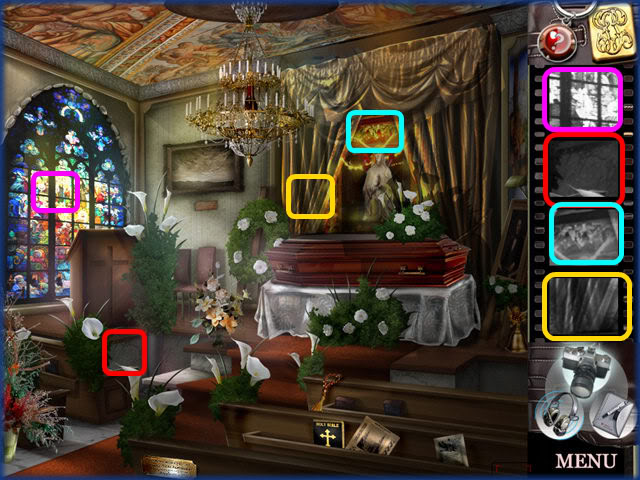
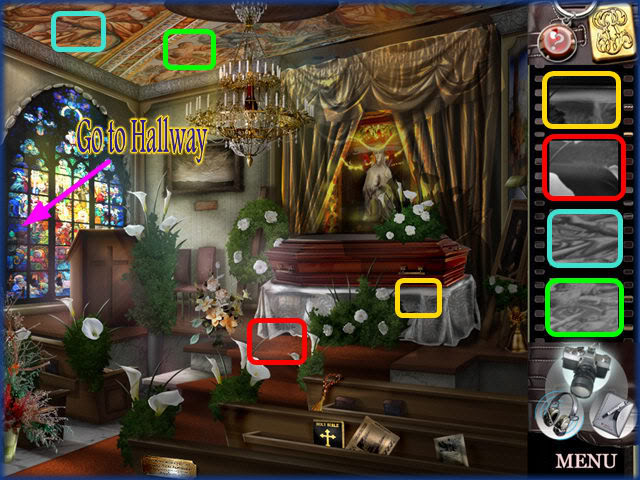
- Take photographs of the areas indicated above.
- The answers have been color coded for ease above.
- When finished you will go back to the Hallway.
Hallway 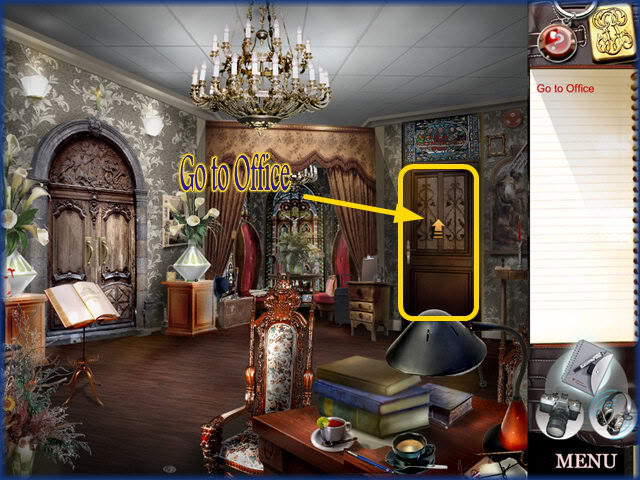
- Click on the Office door from this location.
Office
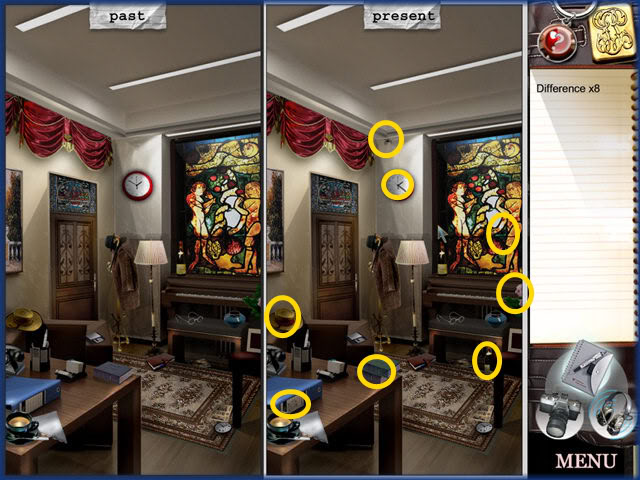
- Locate the 8 differences between the two scenes as shown above.
- You will be taken back to Anastasia’s Palace when you are finished.
Anastasia’s Palace 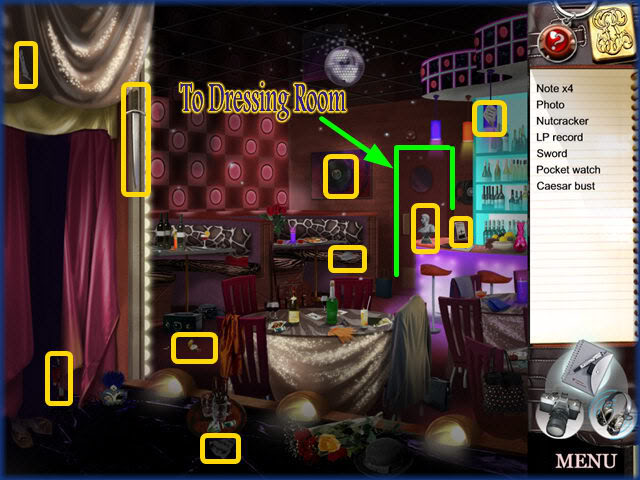
- Locate the items on the list above.
- When finished click on the Dressing room.
Dressing Room 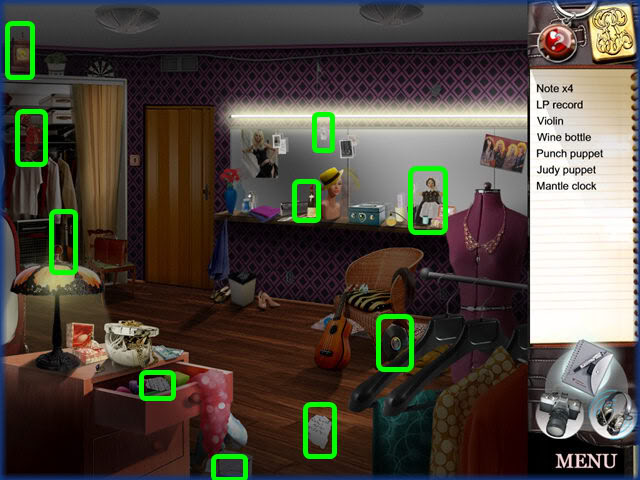
- Locate the hidden objects on the list above.
- When finished you will be taken back to Vito’s home.
Vito’s House
Hallway 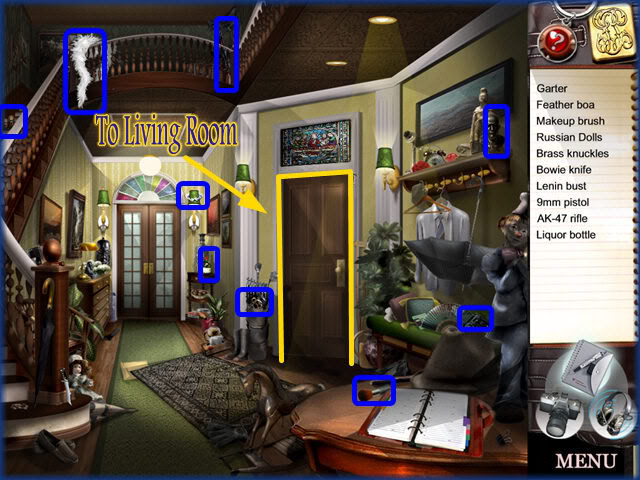
- Locate the hidden items on the list above.
- When finished click on the Living Room Door.
Living Room 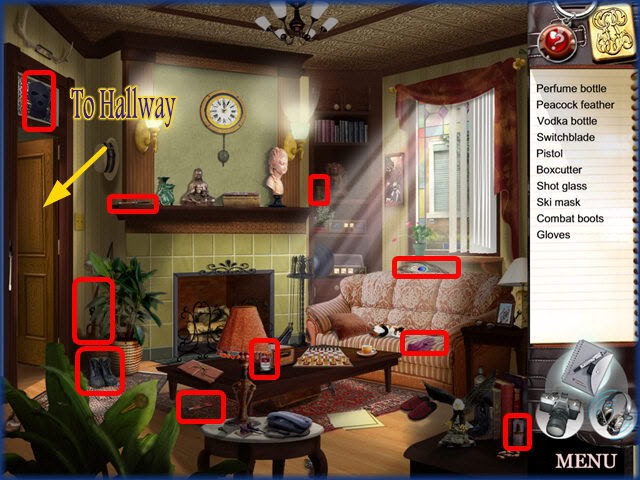
- Locate the hidden objects listed above.
- Go back into the Hallway when you are finished.
Hallway 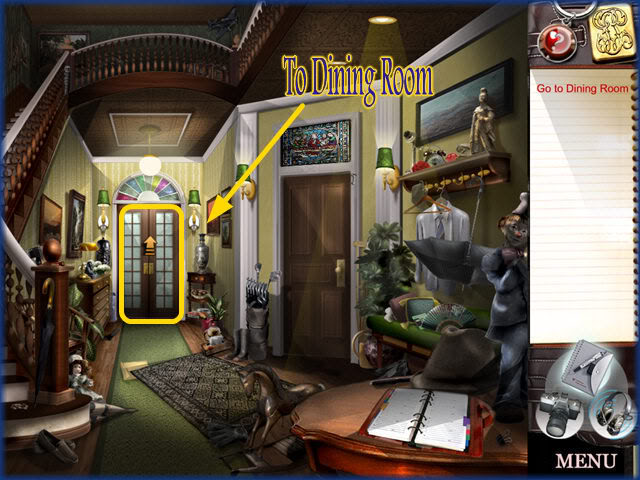
- From here move into the Dining Room.
Dining Room 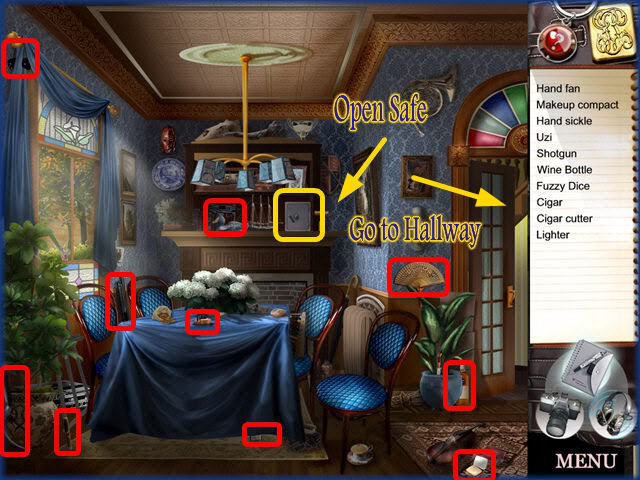
- Locate the items on the list.
- Try to open the safe. You realize you need a key.
- Exit to the Hallway to find the key.
Hallway
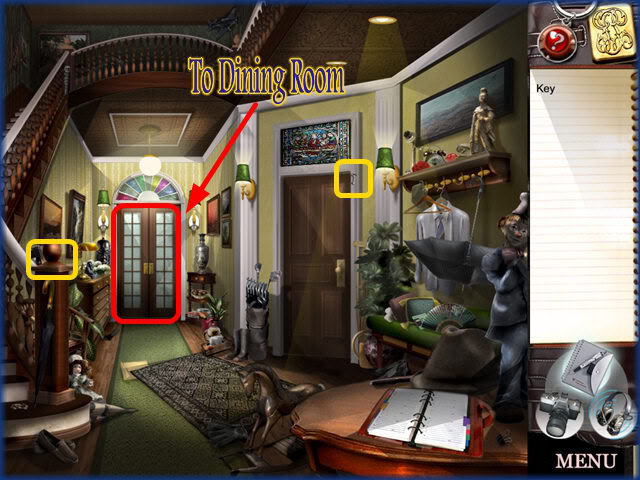
- Here you will locate 2 keys and then go back into the Dining room to open the safe.
Dining Room 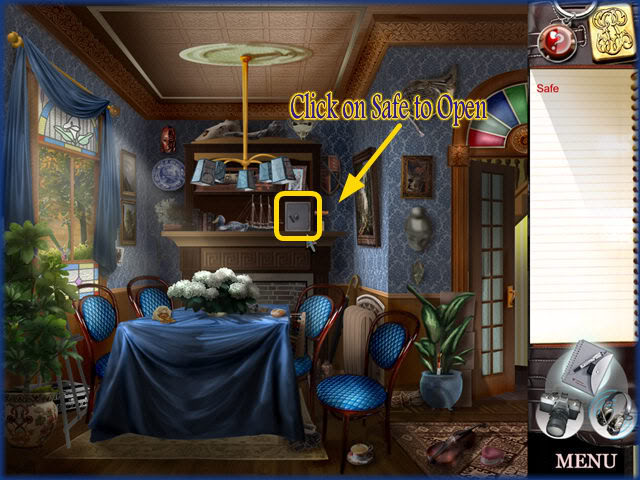
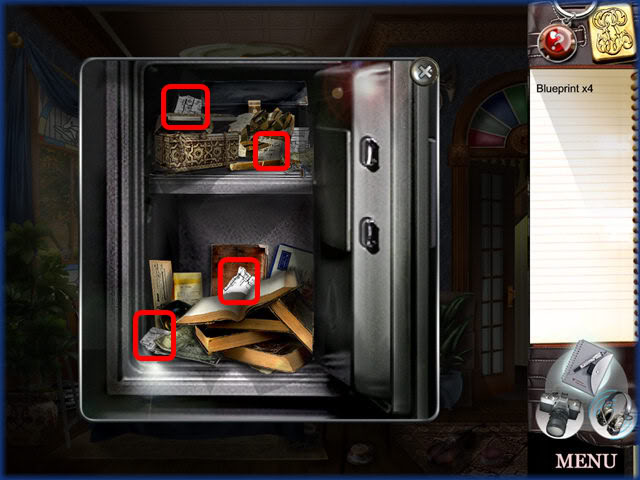
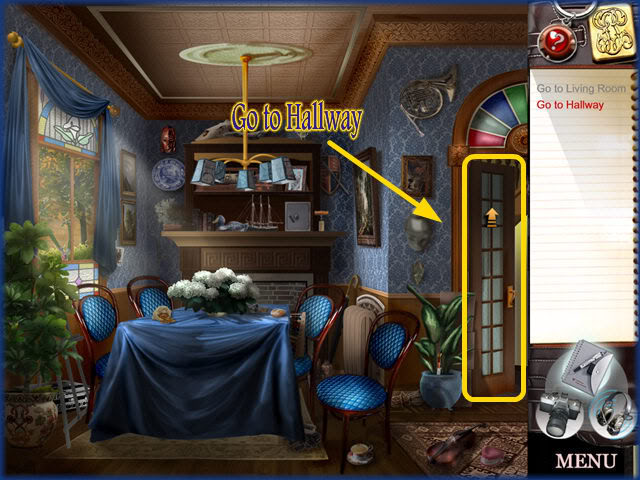
- Click on the safe to open.
- Click on the hidden objects inside the safe.
- Click on the "X" in the upper right hand corner to exit out of the safe.
- Exit back into the Hallway from here.
Hallway 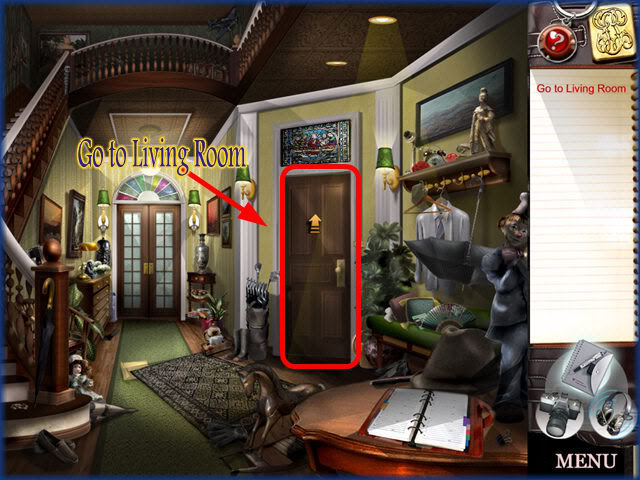
- Exit to the Living room from here.
Living Room 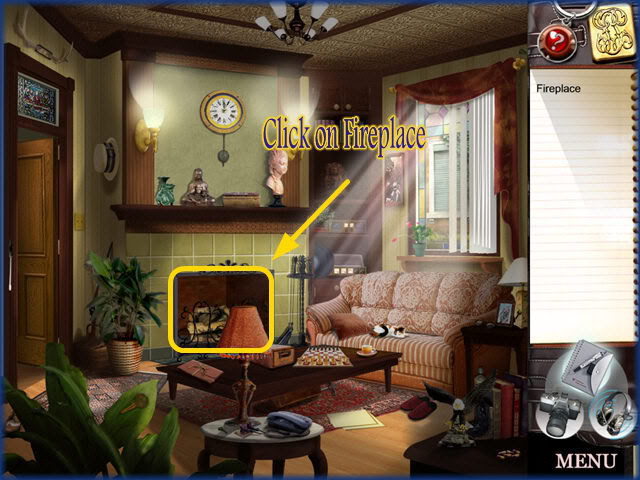
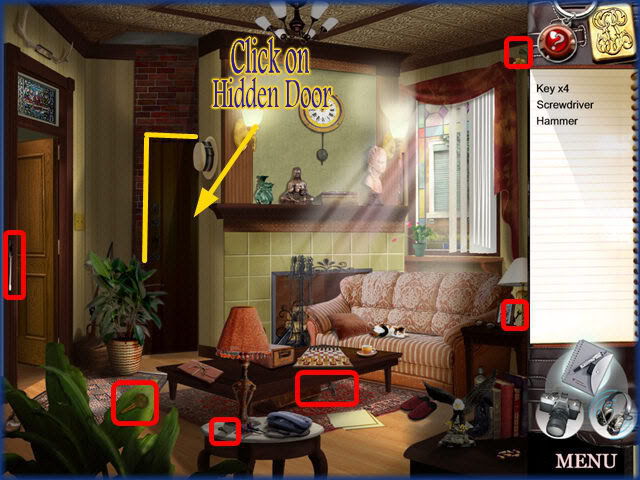
- Click on the fireplace as shown above.
- Locate the hidden objects on the list.
- Click on the hidden door as shown.
- You will be taken back to the Grocery store.
Grocery Store 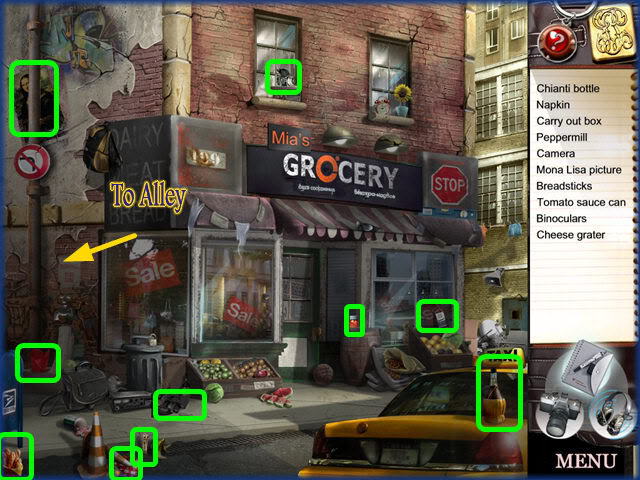
- Locate the hidden objects listed above.
- Click on the arrow to move into the Alley next.
Alley 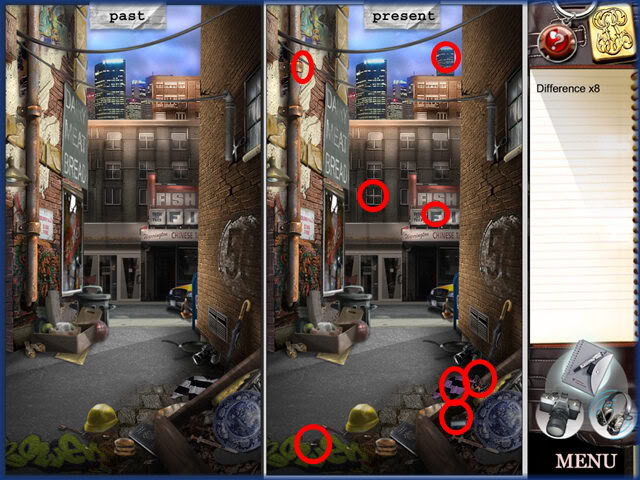
- Locate the 8 differences between the two scenes as shown above.
- You will be taken inside the grocery store right away when finished.
Inside Grocery Store 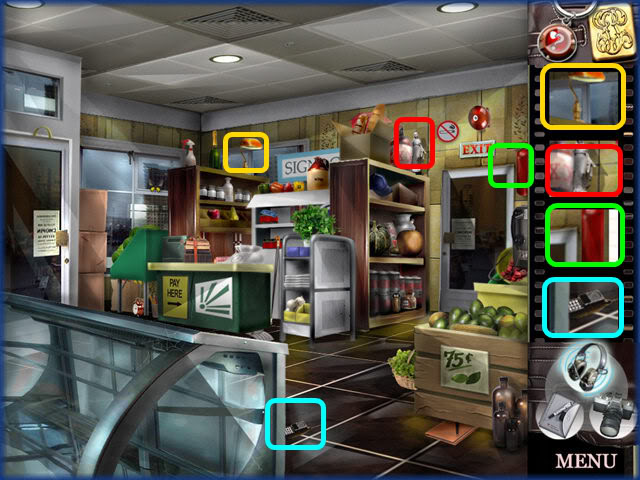
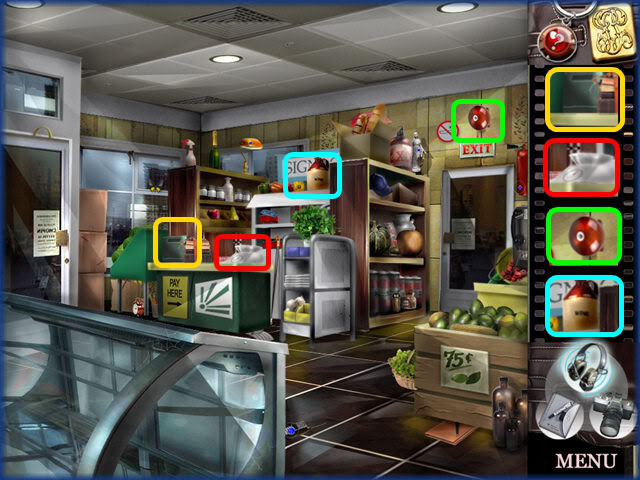
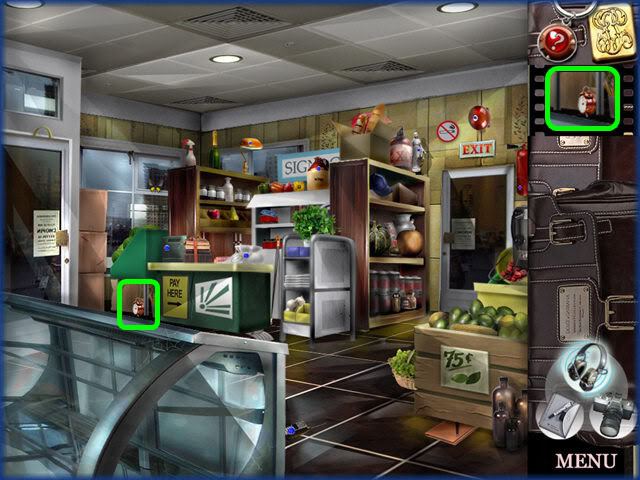
- Place the bugs in all of the locations indicated above.
- When finished you will be taken to the Park.
Park 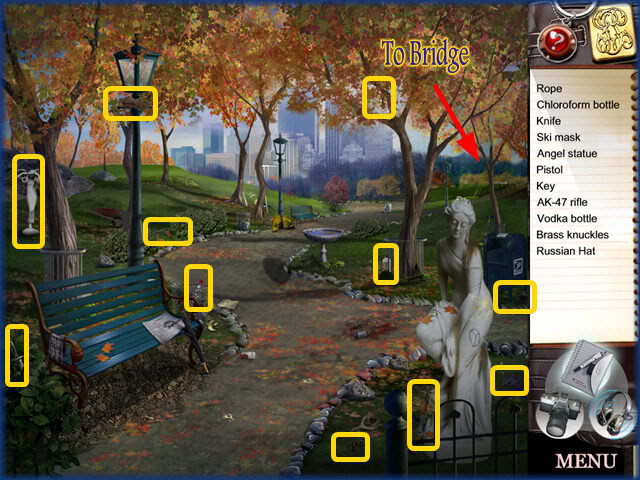
- Locate all of the hidden objects on the list above.
- Click on the arrow to move to the Bridge location.
Bridge 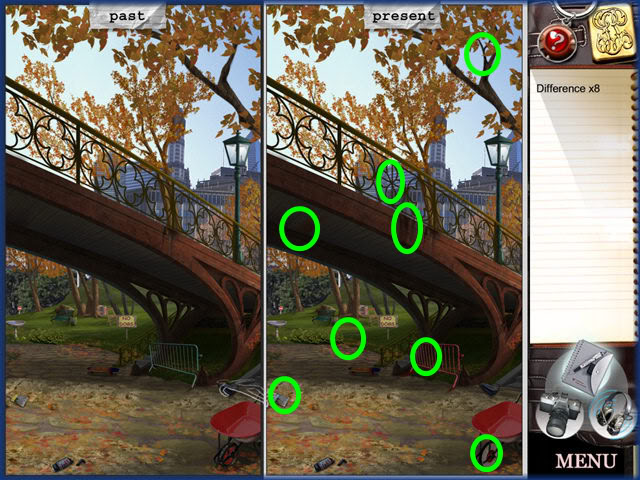
- Locate the 8 differences as shown above.
- You will be instantly taken to the playground area once finished.
Playground 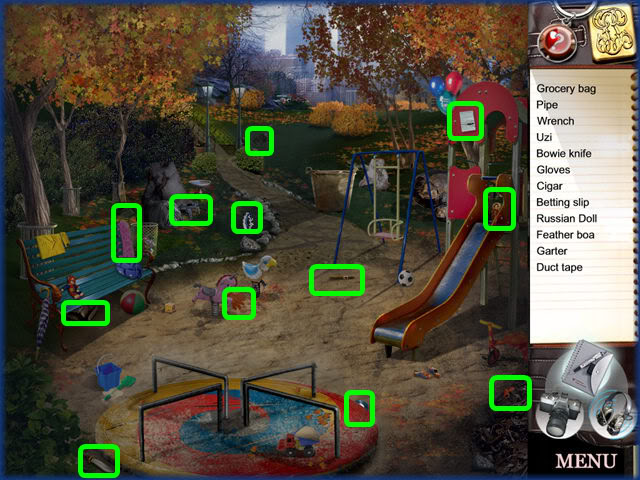
- Locate all of the hidden objects at this location.
- You will be instantly taken to Mama Mia’s Restaurant from this location.
Mama Mia’s Restaurant 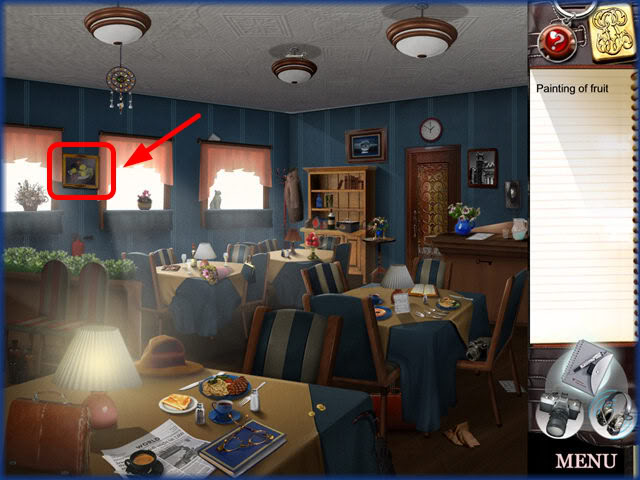
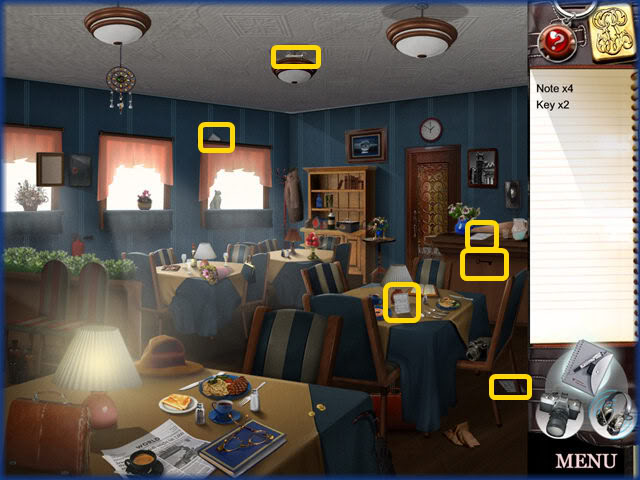
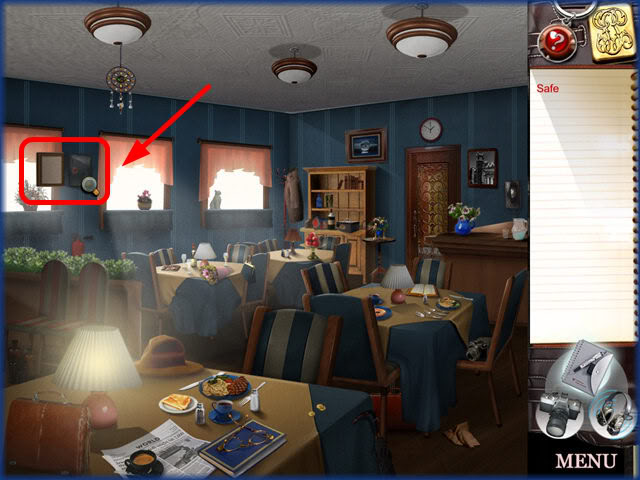
- Click on the painting of fruit.
- Locate all of the hidden objects in the scene above.
- Next, Click on the safe as shown.
Safe 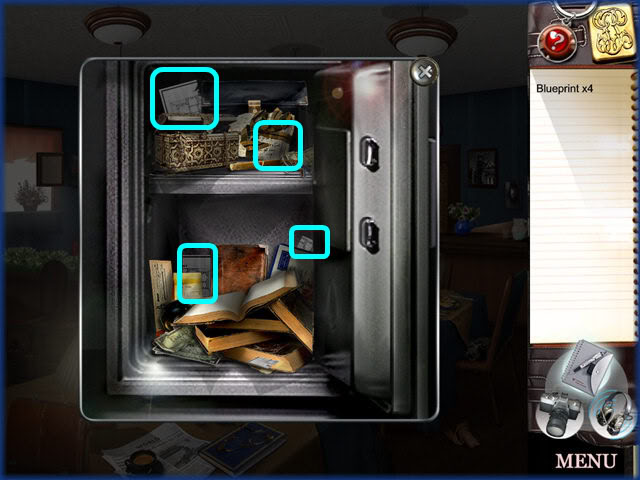
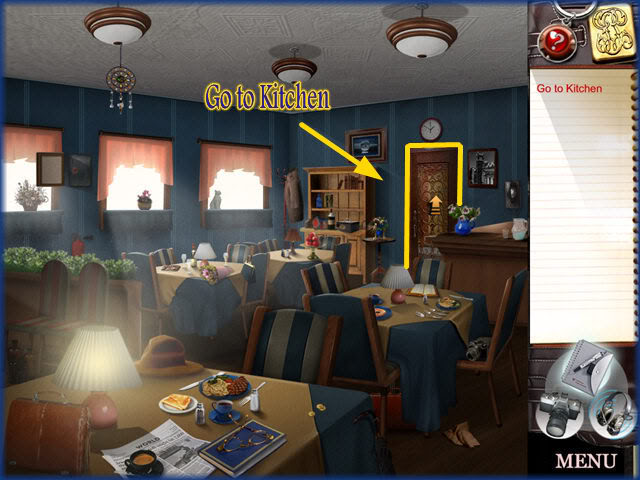
- Click on the hidden objects inside the safe.
- Next you will move into the Kitchen.
Kitchen 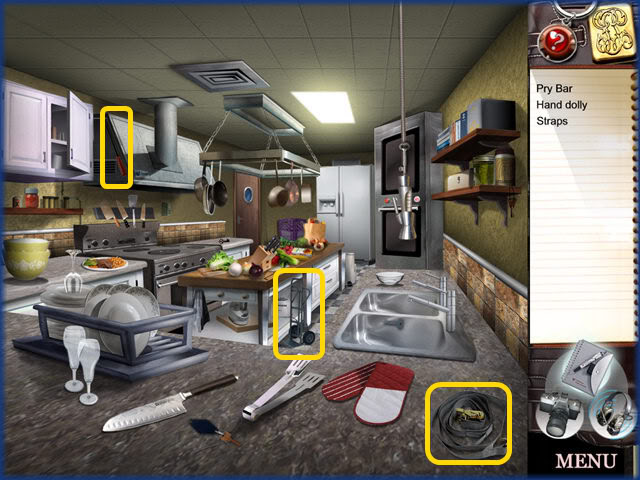
- Locate the 3 items on the list above
Refrigerator 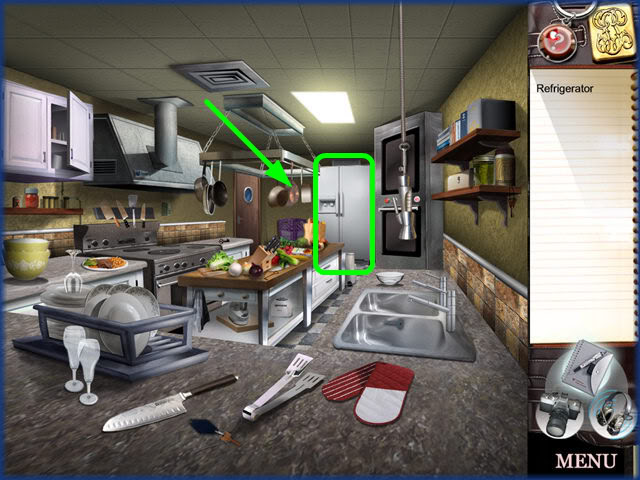
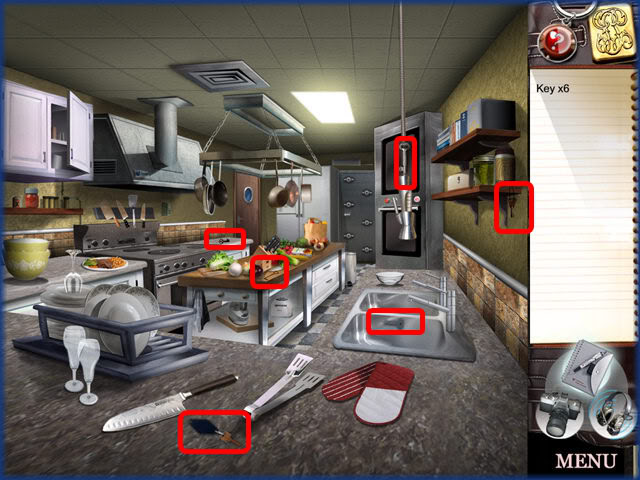
- Click on the white refrigerator at the back of the scene.
- It will open up.
- Next locate the 6 keys hidden in the scene.
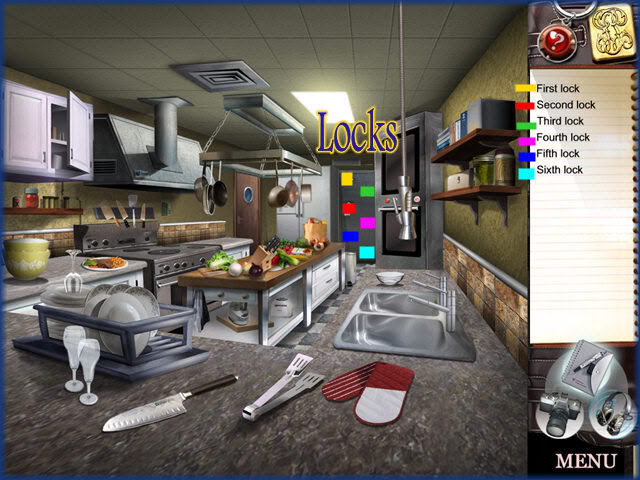
- Click on each lock in the correct order from 1 -6.
- The locks have been color coded for ease.
- Watch ending scenes play out to resolve storyline.
Congratulations! 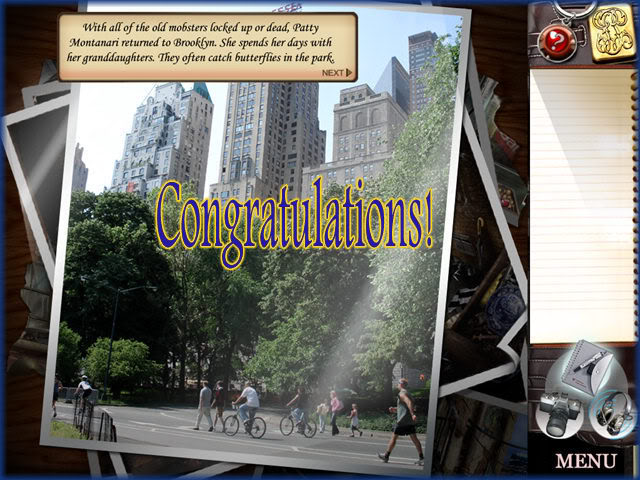
- Congratulations you have completed Wisegal!
“;
More articles...
Monopoly GO! Free Rolls – Links For Free Dice
By Glen Fox
Wondering how to get Monopoly GO! free rolls? Well, you’ve come to the right place. In this guide, we provide you with a bunch of tips and tricks to get some free rolls for the hit new mobile game. We’ll …Best Roblox Horror Games to Play Right Now – Updated Weekly
By Adele Wilson
Our Best Roblox Horror Games guide features the scariest and most creative experiences to play right now on the platform!The BEST Roblox Games of The Week – Games You Need To Play!
By Sho Roberts
Our feature shares our pick for the Best Roblox Games of the week! With our feature, we guarantee you'll find something new to play!Type Soul Clan Rarity Guide – All Legendary And Common Clans Listed!
By Nathan Ball
Wondering what your odds of rolling a particular Clan are? Wonder no more, with my handy Type Soul Clan Rarity guide.


