
Best Horror Games On Itch.io – July 2026
Across a bounty of subgenres.
Grow A Garden 2 Base Price List
What's the most valuable crop?![Evomon Types Guide [Strengths, Weaknesses, Resistance]](/wp-content/uploads/2026/06/evomon-types.jpg "Evomon Types Guide [Strengths, Weaknesses, Resistance]")
Evomon Types Guide [Strengths, Weaknesses, Resistance]
Your companion guide during battles.
![[Roblox] Evomon Shiny Hunting Guide – Including Prismatic and Pris Shinies!](/wp-content/uploads/2026/06/evomon-shiny-hunting-guide.jpg "[Roblox] Evomon Shiny Hunting Guide – Including Prismatic and Pris Shinies!")
Westward Kingdoms Walkthrough
Welcome to the Westward Kingdoms Strategy Guide on Gamezebo. Westward Kingdoms is a Real-Time Strategy/Adventure/Simulation game played on the PC, created by Sandlot Games. This Gamezebo Strategy Guide includes background information, tips and tricks, helpful hints, and strategies for completing Westward Kingdoms.


- Prefer Gamezebo on Google

Westward Kingdoms – Game introduction
Welcome to the Westward Kingdoms Strategy Guide on Gamezebo. Westward Kingdoms is a Real-Time Strategy/Adventure/Simulation game played on the PC, created by Sandlot Games. This Gamezebo Strategy Guide includes background information, tips and tricks, helpful hints, and strategies for completing Westward Kingdoms.
Introduction and Disclaimers
Introduction
If you have NOT played earlier games in the Westward series, this Guide will explain the game mechanics, Characters, Buildings, and Resources and guide you in the most efficient use of resources to complete your objectives of completing all the Required Quests and the Story.
If you HAVE played other games in the Westward series, you might already know most of the game mechanics, however there are some significant differences between this Westward Kingdoms and earlier games in the Westward series. These are discussed in Appendix 1: Differences from Other Westward Games.
The game is nothing like a Hidden Object Adventure. It’s more like a Role Playing Game (“RPG”) in which you have a Hero (a Prince or a Princess) who must complete various Quests in order to progress. It makes no difference which Hero you choose, the game play and Maps are identical (different from Westward IV).
Disclaimers
This Strategy Guide contains SPOILERS for the all the Required Quests and many of the Optional Quests. If you want to play the game without ruining your enjoyment of discovery (which is most of the fun), DO NOT read the detailed instructions for the Quests.
Each Kingdom has all Quests and Tasks listed in the order in which you will probably encounter them, but the order can vary depending on which triggers you activate and other events that occur as you play the game. Use [Ctrl+F] or the Edit/Find tool in your Browser to locate a particular Quest, Location, Building, Character, or Object.
All Optional Quests will be described, but there might not be step-by-step instructions.
If you encounter technical problems installing, loading, or playing the game, you should contact Sandlot Games Support if you purchased the game directly from Sandlot Games. If you purchased it elsewhere, contact Customer Support at the site where you purchased the game.
This Gamezebo Guide is based on Sandlot Games’ release of Westward Kingdoms version 1.000, published on December 15, 2010. Future versions of the game might change the accuracy of information described here or add new features.
Some of the ideas and techniques described in this Guide were shared by the many helpful and generous members of the Sandlot Games Forum for Westward Kingdoms. Thanks!
There are some parts of the Guide that need further work and read [more to come]. Gamezebo will update the Guide when those parts are completed.
Getting Started
- New Game starts a New Game using your current Player Profile (if you already have one). Otherwise, you will be prompted to create a new Player Profile. If you already have a Player Profile, you can start a New Game and choose to skip the Tutorial.
- Continue your last saved game using the current Player Profile.
- Load Game allows you to select a particular Saved Game (you have 10 Saved Game Slots) named by Location, Date and Time. This can be useful if you encountered a disaster or made a choice that you want to “undo” by returning to a different Saved Game Slot.
- Sandbox mode allows you to play special “Sandbox” levels that are not part of the main game, with additional Quests, goals and other surprises. Use the Sandbox to practice strategies and skills without affecting your main game. From time to time, Sandlot Games releases FREE Sandbox Levels for download. Sandbox Levels are NOT covered in this Guide.
- Profile lets you create additional player Profiles. You must choose whether to play as Prince or Princess, but your choice has no real effect on game play except for the appearance and voice of your Hero. Each new Player Profile will require you to complete the Tutorial before continuing to play the game.
- Options opens the Options screen where you can select sound levels, screen resolution, and graphics quality. The game tries to determine the best settings for your computer. At later stages of the game, when there are many more “things” being tracked by the simulation, some players report a “lagging” or slowdown in screen updates. Selecting 800×600 screen resolution (NOT in Windowed mode) and setting LOW graphics quality seems to help in the majority of cases. If you are continuing to experience problems with “lagging” or slow screen updates, try shutting down all other programs while running the game.
- Credits displays the Credits for those who developed the game.
- Help displays the Help Screens (there are only 4) which explain the basic game Characters, Buildings, Resources and various icons you will encounter. READ THEM.
General Gameplay Tips
Complete the Tutorial
Westward Kingdoms provides a very detailed Tutorial that you MUST complete in order to play your first game under a new Player Profile. The Tutorial teaches you the basic mechanics of the game.
This Guide does NOT include systematic instructions on how to complete the Tutorial.
On subsequent plays of the game (“New Game” rather than “Continue”) with the same Player Profile, you may choose to SKIP the Tutorial.
Read the Dialog Screens
Dialog screens pop-up frequently in the game with VITAL information about new Quests or requirements. Some of them are also very funny or surprising.
If you’re in the habit of automatically clicking on “More” or “Okay” because you don’t want to be bothered to READ these Dialog Screens, you will probably become frustrated later on, since you might not understand what is required of you.
Read the Help Screens
Help is available from the Title Screen, and there are only 4 Help Screens. They contain all the basic information you need to start playing the game.
The Help Screens are accurate, but not exactly complete. For example, they state that you may upgrade a Level 2 Peasant to a Craftsman, but they don’t mention that you can also upgrade a Level 3 Peasant to a Craftsman. This Guide discusses those issues in more detail.
Keep a Notebook Handy
You will often be working on multiple Quests at the same time. The game provides a Quest page that lists the tasks you have already completed for each current Quest and also lists the tasks you still need to complete. There are also Quest Tips displayed on the screen for each of your currently active Quests, listing the tasks you have yet to accomplish.
It’s still a Good Idea to take some pen-and-paper notes on what you are working on, what you can put off until later, and the things you don’t yet understand how to do.
If you discover something and don’t understand what it is, make a note of its location so you can find it easily later.
Save Your Game Early and Often
Many Bad Things can happen during the game that will cause frustration if you don’t SAVE YOUR GAME frequently. Enemy attacks, Earthquakes, and Fires can damage or destroy buildings. Army members can die in battle (unlike your Hero, they don’t magically come back to life). Buildings can run out of non-renewable resources.
The easiest way to reach the Menu while you’re playing is by pressing the [Esc] key, then choosing Save. You have 10 Game Save slots available under each Player Profile. Use them!
If something bad or unexpected happens, you can always return to the Menu and choose Load to select the Game Save Slot you want to return to.
Take Your Time
Don’t expect to complete the game in one sitting when you have a few hours on a rainy afternoon. This game will take an estimated bare minimum of 10-15 hours of game play to finish the main game, but most players probably average 20+ hours. Completing all the Optional Quests and earning all the Trophies might take you much longer.
There is no Trophy for completing the game in a limited amount of time. This game can be like a marathon (very long), but it’s NOT a race.
IMPORTANT: Don’t try to anticipate what the game wants by completing Tasks before you have a specific Quest that asks for it. For Example, collecting Bird Eggs before you actually have a Task that requires Bird Eggs will simply use them up as Food, and you’ll still have to go back and collect more Eggs later, when a Quest requires it.
You Can’t Always Get What You Want …
You will sometimes see items that you can’t access because they are on the other side of an obstacle, such as Deep Water, a locked Gate, a Pressure Plate, or in a place that’s too high to reach.
However, the game is generally fair: It won’t tempt you with objects that are impossible to reach. If you can’t access something YET, it means that you have a new puzzle to solve or a Quest to complete.
There are several Quests that you will not be able to complete without completing other Quests first or visiting other Kingdoms. Don’t get frustrated if, at first, you don’t succeed.
But If You Try Sometimes …
Most rivers can be crossed with Bridges. Deep Water can usually be drained (somehow). Locked Gates generally have Keys. Pressure Plates need something heavy dropped on them. Things in high places can sometimes be knocked down by growing a certain type of plant, or by getting help from a very tall character.
Certain Chests can only be unlocked by a Scholar. Certain plants can only be picked by a Scholar or Wizard.
Sometimes, your Hero (or a Citizen) CAN get to an area that you don’t yet know how to access. Try right-clicking to see if they can find a route that takes them in an unexpected direction (like walking in a river or around an obstacle).
You Just Might Find …
If you pick up an object you don’t recognize, you might trigger a Quest to find many more of these objects, example, the “Lost Marbles” Quest, the “Lost Tiara” Quest, and the “Lost Bottles” Quest (one in each Kingdom). These Quests are Optional and are not required to finish the game. They are usually impossible to complete without visiting further locations, completing other Quests, and returning to the originating Kingdom. They will test all your skills, requiring you to do things that are not intuitively obvious.
There are other objects generated by winning Battles or hunting certain kinds of animals, for example “Barbarian Helmets” or “Black Knight Helms” or “Boar Tusks”, that you might need later on to complete a Quest. It’s probably best to avoid picking them up until you actually need them to complete a Quest.
You Get What You Need!
Your Hero and Citizens will encounter loose Food, Gold, Stones and Wood. It’s usually a Good Idea to pick up these items (excepting Food, if your Food Storage is at capacity). Your Citizens (Villagers and Army) gain XPs by picking up most items. The Hero does not.
After Battles, have your Army pick up dropped Gold, Wood, Stone, Treasures, Knowledge Books (“Tomes”), and other items that will increase their Experience Points or add to your Kingdom Resources.
Dig up every Dirt Pile to discover what it conceals.
More Is Better
It is usually a Good Idea to build more than one some types of Buildings, if you can afford to do so. Farms are the most obvious example. You get more Food Production from two Farms with one Farmer working on each Farm than from one Farm with two Farmers working. The same applies to Lumber Camps, Stone Quarries, and Gold Mines.
Buildings can be damaged or destroyed by Earthquakes, Fires, or Enemy Attack. If a vital Building is destroyed, having an extra one will keep production running smoothly while you rebuild.
Some Optional Quests can only be triggered by having multiple Buildings of the same type.
Some Trophies can only be achieved by having a certain number of Buildings or Characters of the same type.
Fewer Is Better
Certain Buildings can only be staffed by particular Villagers. For example, Advanced Buildings (see below) require a Craftsman; Libraries and Apothecaries require a Scholar.
However, if a Building is not required to be in continuous operation, you can get away with having one Villager staff both Buildings by switching them back and forth.
One example: Build a Library and Alchemist near each other. Have the Scholar quit the Library and move to the Alchemist to build up an inventory of Health Potions. After you have purchased Health Potions, switch the Scholar back to the Library.
Another example: Build a Tavern and Market near each other. Have a Craftsman work at the Tavern and switch the Craftsman to the Market only when you desperately need to purchase Food, Wood, or Stone. Afterwards, switch the Craftsman back to the Tavern.
Some Quests Are Not Required
Required Quests are those that you MUST complete in order to trigger other Quests, progress to the next Kingdom, and to complete the game. From time to time, Quests appear that are Optional, or may be completed later, at any time. You still gain Experience Points (and perhaps Trophies) by completing the Optional Quests.
Some Quests cannot be completed until you visit a later portion of the game. For example, the “Lost Marbles” Quest in Kingdom 1 cannot be completed until you accomplish certain objectives in Kingdom 2. Fortunately, as you open up each new Kingdom, you may travel freely back to earlier Kingdoms to complete those Quests.
In Kingdoms 2 and 3, the Castle will offer 10 Optional “Defend the Village” Side Quests (players of Westward IV should recall the “Market Challenge” Side Quests). These Side Quests are provided as a method for you to practice your Westward Kingdom skills and gain Experience Points (and other Resources) if you desperately need them. Your entire current Army and Healing Potions will travel with your Hero and you get to keep whatever Gold you earn on the Side Quest. “Defend the Village” Side Quests are NOT covered in this Guide.
Hero
Your Hero is the main character, either the Prince or the Princess.
Your Hero can move anywhere on the Map, interact with other characters through Talk Bubbles, construct Basic Buildings (and apply Upgrades), repair Buildings, purchase Store items (Building Plans and Upgrades), dig holes, open chests, mine Gold and Stone, chop Wood logs and tree stumps, fight with Barbarians and other enemies, hunt most types of Animals, pick up items (loose Food, Gold, Stones, Treasures and other things), carry things to other places, purchase goods from Merchants, etc.
Your Hero CANNOT be employed at any particular Building. The Hero also can’t construct Advanced Stone Buildings; you will need a Craftsman for that (see below).
Your Hero has another unique feature: when injured in Battle, the Hero can be knocked out but never killed, and will recover after a time. Other Army Units, unfortunately, only have one life to give for their Kingdom.
Unlike previous games in the Westward series, your initial choice of Hero (Prince or Princess) is irrelevant: it has no effect on the game play, except for their appearance and voice.
Villagers
Villagers live and work in your Kingdom. They raise the Food, operate the Mines and Camps, and Staff the Shops. Villagers require Food, Housing and Employment in order to remain in the Kingdom.
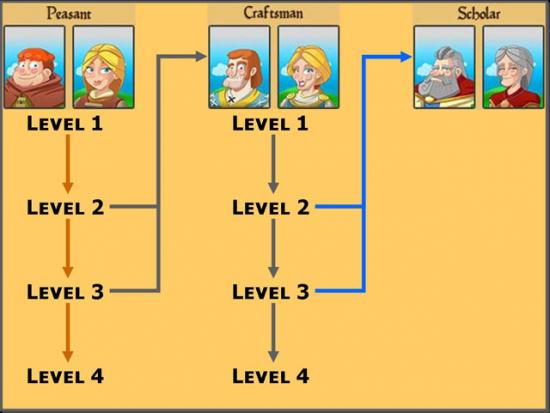
Peasants
Each Villager of your Kingdom starts out as a Level 1 Peasant.
Peasants gain Experience Points (“XPs”) by building or being Employed at Basic Buildings (usually Farms or Lumber Camps, but they can also work at Gold Mines or Stone Quarries), gathering Food (Berry Bushes, Fishing), chopping wood, mining gold, finding items, picking up and carrying items to other places, etc.
Peasants provide a bonus in Production at Buildings that produce Food or Wood, such as Farms or Lumber Camps.
As your Peasants gain Experience Points by doing all those things, they have the opportunity to upgrade or “Level Up” to the next type of Villager: the Craftsman.
Craftsmen
Level 2 or Level 3 Peasants (at maximum XPs) may be upgraded to Craftsman, who can build and work at Basic or Advanced Buildings (see more under Advanced Buildings). Craftsmen can do anything that Peasants can do, but have additional abilities.
When you upgrade a Peasant to a Craftsman, they immediately stop working at their current Building, but you can re-employ them there or you can transfer them to an Advanced Building that requires Craftsmen.
Craftsmen provide a bonus in Production at Buildings that produce Gold or Stone. So it’s best if they work at Gold Mines or Stone Quarries. Craftsmen are required to staff most of the Shops.
Craftsmen can work on Farms or Lumber Camps, but they lose the Food and Wood production bonus that Peasants provide.
Scholars
Level 2 or Level 3 Craftsmen (at maximum XPs) may be upgraded to Scholars (only if you have built a Library).
Scholars can still build Basic or Advanced Buildings, repair Buildings, and do just about anything else that Peasants or Craftsman can do, but Scholars can generally only be Employed at Libraries (employs up to 2 Scholars), Alchemists, or a Castle—Scholars lose the ability to work at any other type of Building. When you upgrade a Craftsman to a Scholar, you must quickly re-employ them at a suitable building, or they might LEAVE due to unemployment.
Peasant Upgrade Path

Villager Tip 1: You can “downgrade” a Villager, but it’s not recommended except in an emergency. You will LOSE all Experience Points that the Villager has gained and they will be returned to the lowest Level in the previous class.
Villager Tip 2: Villagers require both a Home and Employment, or they will eventually leave your Kingdom after protesting.
Villager Tip 3: Villagers require Food; they will eventually leave the Kingdom if adequate Food is not available.
Army
Your Army (also called “Combat Units” at various places in this Guide) defends against invasions and attacks enemies of the Kingdom.
Army may also hunt Animals, dig holes, pick up some items (Loose Food, Wood, Gold, Stone, Treasures, Knowledge Books (“Tomes”), etc.).
Army cannot be Employed at non-military buildings (see below), nor will they gather Food from Berry Bushes or Fishing, nor can Army Members Chop Wood, Mine Gold, nor can they carry items to other places. Some Army members have other special abilities (see below).
Army members are housed in Barracks. Each Barracks can accommodate up to 2 Army (3 with Barracks Upgrade). Homeless Army will not leave the Kingdom, but they fight with reduced force.
Hungry Army will eventually faint from hunger if food is not available. This becomes very important during the King’s Crown/Family Heirloom Quest.
Army members are often injured in Battle, but may be healed with Healing Potions.
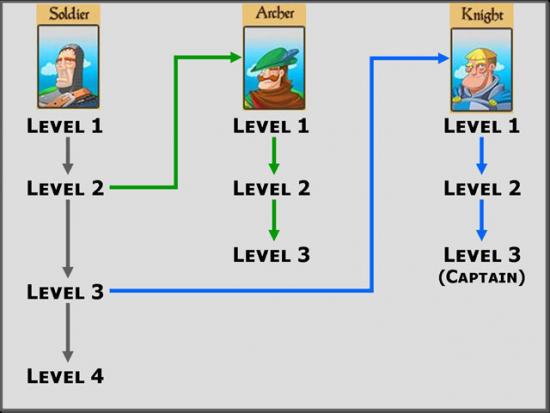
Soldiers
Soldiers can use their swords to Cut Vines/Weeds.
Higher-level Soldiers are stronger in attacks than lower-level Soldiers are and can sustain more damage in battle.
Employ Soldiers at guarding a Wood Tower (or Stone Tower) to gain XPs.
Soldiers can still perform various tasks for you, and will automatically return to their assigned Tower when their task is completed.
There are four Levels for Soldiers. Level 2 Soldiers (at Maximum XPs) can be upgraded to Archers. Level 3 Soldiers (at Maximum XPs) can be upgraded to Knights.
Archers
Level 2 Soldiers (at Maximum XPs) may be upgraded to Archers (if you have an Archery Camp).
Archers are generally weaker than Soldiers are, but Archers attack from a distance so they usually aren’t injured in battle as easily (unless they get too close to the enemy).
Employ Archers at an Archery Camp to gain XPs. Each Archery Camp can train up to 2 Archers at a time.
Archers can still perform various tasks for you, and will automatically return to their assigned Archery Camp when their task is completed.
There are three Levels for Archers. After Level 2 Archers become Level 3 Archers, they can receive no more training at an Archery Camp (making room for new Archers to train).
Archers can shoot an animal without destroying it, so they can gather both meat and other products. Birds: get Eggs, Meat, and Feathers (sometimes). Boars: get Boar Meat and Tusks. Deer: get Deer Meat and Deer Skins. Rabbits: get Rabbit Meat and Rabbit’s Foot. Frogs: get Frog Legs.
Archers are the only Combat Units that can shoot Giant Carnivorous Plants (“Audreys”).
Knights
Level 3 Soldiers (at Maximum XPs) can be upgraded to Knights (if you have an Armory). Knights are the strongest members of your Army (both offensively and defensively).
Knights can also cut vines.
Knights are the strongest Combat Units and can attack with more force as well as sustain more damage than any other Combat Unit.
Employ Knights at an Armory to gain XPs. Each Armory can train up to 2 Knights at a time.
Knights can still perform various tasks for you, and will automatically return to their Armory when their task is completed.
There are three Levels for Knights. Level 2 Knights can be upgraded to Level 3 Knights, called Knight Captains, mounted on horses. After Level 2 Knights become Knight Captains, they can receive no more training at an Armory (making room for new Knights to train).
Army Upgrade Path
Any items your Army gathers are added to the general inventory of your Hero because Army cannot pick up and carry items from place to place.
Army Tip 1: Injured Army members can be partially healed with Health Potions (found lying around, won in Battle, for purchase from an Alchemist or from a Traveling Merchant). However, when an Army member Levels Up, their entire Health is restored automatically, so don’t waste Health Potions on them if they are near maximum on their Experience Points.
Army Tip 2: After you build and upgrade a Blacksmith, you will be able to add Armor Upgrades (for Soldiers and Knights) and Weapon Upgrades for your Army (any type).
Wizards
Wizards can only be recruited if you have a Wizard Hut. Only one Wizard can be employed at each Wizard Hut (where they also live). You can create and staff many Wizard Huts in any Kingdom.
Wizards are considered part of your Army, and can cast Spells during Battles.
Wizards are VERY weak and may be easily killed by strong opponents in Battle.
Wizards sell Blight Scrolls at Wizard Huts (after you reach Kingdom 3 and complete the “Fight the Blight” Quest).
Wizards can destroy the Evil Blue Curse Stones found throughout the Kingdoms.
Wizard Tip 1: If a Wizard dies in Battle, you can hire a new Wizard at any existing Wizard Hut for 120 Gold.
Food
All Villagers (Peasants and Army) require Food. If your Food supplies run out, you will be warned by a Hunger Alert.
Hungry Peasants will not work and eventually will leave the Kingdom. Hungry Army members operate with a reduced fighting capacity and will eventually “faint” from Hunger. This becomes very important in one of the side Quests.
Food can be grown on Farm Fields, employing 1 or 2 Peasants or Craftsmen.
Different crops produce different amount of Food per cycle. You start with Lettuce, which produces 3 Food Units per cycle, feeding the Farmer and 2 other Villagers.
Higher-Level Peasants produce more Food per cycle. As you progress through the game, you will acquire up to 6 different types of Crops that may be produced on each Farm Field. There is a special Trophy for growing all 6 Crops in one Kingdom at the same time.
Food can also be gathered by your Hero or any Peasant from Berry Bushes, by Fishing, or picking up loose Food that appears inside Chests or after a Barbarian battle.
When the Hero or Army hunts animals, the animal will generally turn into Food that can be picked up by them. Army can also pick up loose Food, but they won’t pick Berries or go Fishing.
Unused Food is stored for later use, but your Food Storage capacity is limited to 20 Units at the beginning of the game. You can increase Food Storage capacity by building Wooden Towers (+8 Units) or Stone Towers (+10 Units).
Food Tip 1: Try to maintain a Food Storage total at least 3x to 4x your total population (Villagers plus Army) in order to prevent starvation.
Food Tip 2: Have Farm Fields growing enough Food per cycle to feed the entire population. Any extra Food goes into Food Storage.
Food Tip 3: If your Food Storage is filled to capacity, don’t bother picking up Loose Food: it is simply wasted.
Gold, Wood and Stone
Gold
Gold is required for purchasing Building Plans and Upgrades at the Store. Gold is also used for buying things from Merchants, Markets, Apothecaries, etc.
Any character can collect loose Gold lying around or find it inside Chests (as Gold or Treasure).
Your Hero and Villagers can also dig for Gold at glittering gold-veined rocks, until those rocks are exhausted.
Gold Mines provide the most effective way to generate Gold, employing up to 2 Peasants or Craftsmen. Craftsmen have a production bonus for Gold.
After a time, a Gold Mine will be exhausted, so balance your Gold production with your needs. Demolish exhausted Gold Mines and recycle their resources.
Gold is also generated by several of the Buildings (while they are employed), such as the Bakery (employs Craftsman, uses 3 Basic Food crops), the Tavern (employs Craftsmen, uses 3 Advanced Food crops) and the Library (employs Scholars, uses Wood).
Your Castle can also provide Gold by Taxing the Citizens, after you employ at least one Scholar at the Castle. Employ 1 Scholar at the Upgraded Castle to generate “Light Taxes” (1 Gold per Citizen) or 2 Scholars at the Grand Castle to generate “Heavy Taxes” (2 Gold per Citizen). Unlike previous Westward games, there is no concept of “Happiness” so Taxing has no bad effect.
Wood
Wood is required for purchasing Building Plans and Upgrades at the Store. Wood is also used in actual construction of Buildings.
Loose Woodpiles can be found around the Kingdom and may be picked up by anybody.
Tree Stumps and Logs can be chopped by your Hero or any Villager (not Army).
Lumber Camps provide the most effective way to harvest Wood, employing up to 2 Peasants or Craftsmen. Upgraded Lumber Camps can employ up to 3, and have a wider range. Peasants have a production bonus for Wood.
After a time, a Lumber Camp will have no more Wood to harvest, but your Villagers can still chop the Tree Stumps. Eventually, you will gain the ability to buy Tree Seeds and renew your Forests after you have completed the Green Giant Quest in Kingdom 2.
Stone
Stone is required for purchasing Building Plans and Upgrades at the Store. Stone is also used in actual construction of Buildings.
Loose Stone piles can be found around the Kingdom and may be picked up by anybody.
Stone Quarries provide the most effective way to harvest Stone, employing up to 2 Peasants or Craftsmen. Craftsmen have a production bonus for Stone.
After a time, a Stone Quarry will have no more Stone to mine, but don’t demolish it. A Stone Quarry is necessary for you to build a Masonry (even if the Stone Quarry is not employed at the time).
Experience Points (“XP”)
Experience Points (“XP”) should be a familiar concept for players of Role Playing Games. Each time any Character does something, they gain XP. Eventually their XP level will be great enough to “Level Up”, giving them additional capabilities or powers.
All Characters gain XP while being employed at a building. They can also gain additional XP by performing other side tasks such as picking up loose Food, Picking Berries, Chopping Wood, Fishing, etc.—while they are still employed at their main job (and they will return to their main job as soon as the side task is completed). Soldiers must be employed at a Wood (or Stone) Tower, Archers at an Archery Camp, and Knights at an Armory in order to gain employment XP.
Army can also gain XP for hunting animals, fighting in battles, picking up treasure, etc. Soldiers and Knights can gain XP by using Practice Dummies (+25 XP). More will be discussed about this at the point where Practice Dummies become available.
At various points around the Kingdom, you will find Blue Tomes (books) that give a +25 XP bonus to the Character who picks it up. It’s a waste of those XP to have the Hero pick up the Tome. Choose a Character who needs the XP.
The only exception to all the above is your Hero. Your Hero gains XP by completing Quests (the focus of the game). Your Hero’s XP are required to purchase Building Plans and Upgrades in the Store.
Your Hero also gains 1 XP each time you Upgrade a Character.
Buildings and Upgrades
Most Buildings are where your Villagers and Army live, work, and produce resources. Other Buildings provide additional abilities, such as Windmills (give a Food production boost to Farms), and Bridges (allows characters to travel across rivers).
Basic Buildings
Basic Buildings can be built by your Hero or any Villager, as long as they are unlocked in the Store and you have enough Gold, Wood and Stone available.
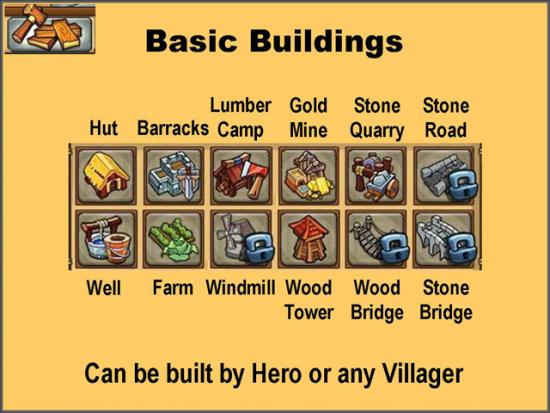
Buildings with a “Lock” icon on them are not yet available.
Discussion of each of the Basic Buildings is including in the following sections.
Advanced Buildings
Advanced Buildings can only be built by Craftsman or Scholars, as long as they are unlocked in the Store and you have enough Gold, Wood and Stone available. Some of these Advanced Buildings have other requirements or are unlocked during certain Quests.
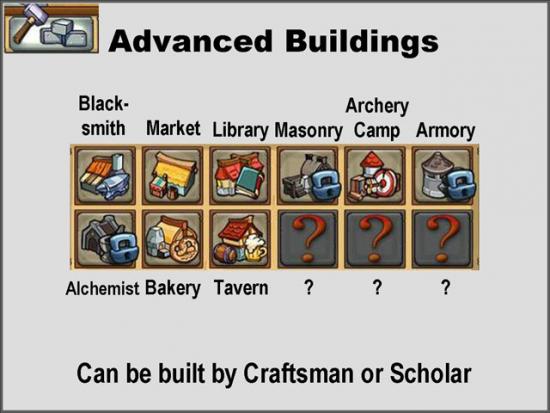
Buildings with a “Lock” icon on them are not yet available.
If a Building has a “?” as its icon, it is a “Mystery Building” and is not available until you complete certain Quests or unlock other items in the Store.
Discussion of each of the Advanced Buildings is included in the following sections.
Villager Homes
Villagers (Peasants, Craftsmen, and Scholars) require Homes or they will leave (after protesting being homeless for a few cycles). The basic home is a Hut (houses 1 Villager), but that can be upgraded to a Hut Upgrade (2 Villagers), or converted to a Cottage (3 Villagers).
Army Buildings
Army (Soldiers, Archers, and Knights) require Barracks. They will not leave if they are homeless, but they will fight at reduced capacity.
Barracks can house 2 Army. Upgraded Barracks can house 3 Army.
Archery Camps are necessary before you can upgrade Level 2 Soldiers to Archers. Employ Archers at an Archery Camp to give them basic training and XP.
Armories are necessary before you can upgrade Level 3 Soldiers to Knights. Employ Soldiers at an Armory to give them basic training and XP.
Wizard Huts are both the home and employment location of Wizards.
Food Production and Storage
Wells are necessary to provide water for Farms, and one Well can be sufficient for several nearby Farms. Wells are also necessary to fight Fires, so extra Wells should be built near groups of non-farming buildings. Unlike previous Westward series games, “water” is not a resource that you have to manage directly.
Farm Fields grow Food, and each can employ up to two Peasants or Craftsman. Peasants provide a production bonus on Farms. It is more effective to have TWO Farms, with one Farmer on each one, than to have two Farmers working on one Farm.
Crops: Each Farm can grow one Crop at a time. You start out only being able to grow Cabbage, but additional Advanced Crops will become available as the game progresses (6 Crops are available). A single Farmer growing Cabbage can provide enough food for 3 Citizens (including the Farmer). Advanced Crops provide more Food production, as do Level 2 (or higher) Peasants.
Wood Towers provide +8 Food Storage to your Kingdom. You will want to build at least one Wood Tower for each Farm, to store excess Food Production (otherwise the Food is wasted). Stone Towers (available starting in Kingdom 2) provide +10 Food Storage.
Windmills add a production boost to all “nearby” Farms, but it’s not clear exactly how this boost works.
Kingdom 1 Quest List (Spoilers)
General Kingdom 1 Info
In this Kingdom, you will practice the skills you learned in the Tutorial. As you progress, you will add new Villagers and Army. Remember that you must provide Homes and Employment for each Citizen.
Kingdom 1 Tip 1: As soon as you have a working Farm and enough Wood, build a Wood Tower in the East and employ a Soldier there.
Kingdom 1 Tip 2: Upgrade Level 2 Peasants to Craftsmen when it doesn’t interfere with Food production. You will need the Craftsmen to build Advanced Buildings.
Kings Request (K1, Required)
You need to build a Wood Tower to store enough Food to provide 25 Food to the King.
You can’t complete this until you have completed the next few Quests. As soon as you provide 25 Food to the King, he will try to enter the Castle. Be sure that you have enough Food for the rest of your Citizens.
Soldier Rescue (K1, Required)
A Soldier is trapped on top of a rock and needs 25 Wood to get down.
Wicked Weeds (K1, Required)
A Farmer has his Farm and Hut congested by Weeds. After you rescue the Soldier, have him chop the Weeds (+8 XP) to free the Farm. Only Soldiers can chop Weeds.
Trapped Damsel (K1, Required)
A Damsel is trapped at the top of a Tower. Buy a Magic Bean from the Merchant and drop it below the Tower to let her climb down. She thanks you and starts production on an existing Lumber Camp.
Ale Run (K1, Required)
Above the Farm you freed from the Weeds is an Ale Merchant who can’t move his cart until you mine the Stone piles blocking the road. He rewards you with some more Stone.
Key to the Kingdom (K1, Required)
The King informs you that he lost the Key to the gates of the Castle. The Key is in a dirt pile near the Lumber Camp.
You can’t attack the Castle and the Barbarians with only 1 Soldier, so you need to build a Barracks (that’s why you need the Stone) to attract a 2nd Soldier and attack the Barbarians.
Kingdom Repair (K1, Required)
After you have defeated the Barbarians, the King requests that you clean up things a bit.
First, build a Well near the fires in front of the Castle. Use your Soldiers to cut Weeds and put out the fires. Your Hero can also put out fires.
A new Peasant appears who can help you mine the 3 Stone Piles directly in front of the Castle. Of course, you will also need to build a Hut and a Farm to House and Employ the new Peasant.
Kingdom Restore (K1, Required)
Now the King is getting serious, he wants $4,000 Gold, 20 Villagers and 10 Army before the Kingdom is restored. This will take quite some time, so work on other Quests and come back to it to complete later on.
In any case, you must upgrade the Castle before you can have a total Population of over 25.
Caged Villagers (K1, Required)
You find a Barbarian Camp northeast of the Castle. After you defeat the Barbarians, you discover 3 Caged Prisoners. The Cages can only be opened by a Craftsman.
After you release all 3 Prisoners, you discover that one of them was a Potato Farmer who has 4 Bags of Potato Seeds scattered over the Kingdom (see “Pilfered Potatoes” Quest). The other two Villagers will need immediate Housing and Employment.
Tip: You might want to have one of the new Villagers build and staff a Gold Mine near the Gold Deposits south of the Barbarian Camp.
Pilfered Potatoes (K1, Optional)
This quest is Optional, but you should do it so you can unlock Potatoes as a Crop for your Farms.
One of the rescued Farmers from “Caged Villagers” tells you he needs his Potato Seeds.
There are 4 bags of Potato Seeds: they are (1) West of Rescued Damsel Tower, (2) South of Barbarian Camp with Cages, (3) in Barbarian Camp to the North, and (4) Near Stone Deposits in the Northwest.
After you recover all 4 bags of Potato Seeds, you can switch your Farms to grow Potatoes (more Food than Cabbages).
Bridge Rescue (K1, Required)
A stranded Citizen on an island asks you for help. You need to build a Bridge to reach her.
She will explain that you need to build a Blacksmith (requires a Craftsman) and an Upgraded Lumber Camp before you can build a Bridge.
After you have completed those objectives, talk to her again. This allows you to unlock Bridges in your Store.
Build a Bridge to the Island. You need to rotate the Bridge in order to build it across the River.
Tip: It’s easier to press the [R] key than to try to access the weird Rotate button on the screen.
It turns out that she is a Craftsman! Use her skills wisely to build and staff Advanced Buildings.
Tip: Have her build a Windmill and then a Bakery, to start generating more Gold and use up excess wasted Food.
Traveling Bard (K1, Required)
In each Kingdom, a Bard will turn up and present you with an annoying request so he can write a song about it.
This one wants to attract a Great Barbarian to the Castle, which will be triggered when you deposit $1,000 Gold as part of “Kingdom Restore” Quest.
You can wait to complete this until you have built up your Army a bit, because you WILL have a Barbarian Invasion attack the Castle as soon as you have deposited the Gold and talked to the Bard again.
Kings Feast (K1, Required)
The King wants a great Feast to celebrate his Birthday. He wants
1) 30 Food – general food is fine, but make sure that you have enough Food Storage to feed the rest of the Citizens
2) 8 Rabbits (hunt with Army or Hero)
3) 6 Deer (hunt with Army or Hero)
4) 5 Fish (Hero or Villagers can go Fishing by dragging them to a group of Fish in Pond or River. They are not always successful. If they catch a Fish, you must have them pick the Fish up for it to count.)
4) 3 Boars. They are only found in the Royal Forest in the Southeast. You must build a Bridge to cross a river in order to reach the Royal Forest.
The entrance to the Royal Forest is blocked by a Giant Carnivorous Plant (we’ll call those an “Audrey” as a tribute to “Little Shop of Horrors”). You need an Archer to shoot the Audrey before you can access the Royal Forest. You can either build an Archery Camp to train an Archer or use the one you pick up in the “King’s Crown” Quest.
Merchant Trade 1 (K1, Partially Required)
After you build the Bridge, you discover a Merchant. He will give you several goals. After you complete each goal, he will offer you a new item for sale.
1) 5 Wild Carrots. Anybody can pick these from the ground, and they are located all over the Kingdom. Merchant will offer Healing Potion for $75 Gold.
2) 6 Deer Meat. Hero or Army can hunt Deer. Merchant will offer Straw Bundles for $50 Gold. Straw Bundles are required to complete the “Boar Poachers” Quest.
3) 8 Fish. Merchant will offer Magic Beans for $100 Gold. A Magic Bean is required to complete the “Injured Giant” Quest.
4) 8 Bird Feathers. An Archer is required to shoot Birds in order to get Feathers, but they are not always successful. Sometimes they only get Bird Eggs or Bird Meat. Birds tend to regenerate in the same places, so keep an Archer (or 2) planted in the same place and keep trying. Merchant will offer Training Dummies for $200 Gold. Training Dummies can be used by Army to gain +25 XP, but it’s very expensive.
5) 3 Barbarian Helms. These are randomly dropped by Barbarians after you defeat them in Battle, and not often. Leave them lying on the ground until you need them for this goal. Merchant offers you a Treasure Chest, but you’ll need a Scholar to open it.
Boar Poachers (K1, Required)
You discover that the Boars in the Royal Forest are all dead.
Use an Archer to investigate the 3 dead Boars and learn that there are Boar Poachers using Traps.
There are 5 Traps located in and around the Royal Forest. You can only spring the traps by buying Straw Bundles from the Merchant and dropping them on the Traps.
After the Boars start re-spawning, you can hunt 3 of them to complete the King’s Feast Quest.
Tavern Travesty (K1, Optional)
Build a Bridge West across the river to the place where a Soldier is camped out. He complains about not having a Tavern.
Unlock and Build a Tavern (using a Craftsman) and the Soldier will join your Army.
Tip: If your Army is already large enough (6 Army members) to go on the “Family Heirloom” Quest and you don’t want to add the Soldier yet (another mouth to feed), you might want to wait a while before building the Tavern.
The Tavern (employ a Craftsman) generates Gold and uses Advanced Food Crops to brew and sell 3 different beverages.
Stone Mason (K1, Required)
A bit West of the Soldier you find a man is locked inside stocks. Send a Craftsman to unlock the stocks and free the man.
You discover that the man is a King’s Mason and has knowledge of how to Upgrade the Castle (necessary to grow your Population over 20).
The Mason tells you that you need to build a Stone Quarry to mine special stone in a specific location in the Southwest. Unfortunately, that location is guarded by a Giant behind a locked Gate. The Gate is controlled by a Pressure Plate.
To unlock the Gate, buy a Magic Bean from the Merchant. Plant the Magic Bean just below the tower that has a Stone Block on top of it. The Beanstalk knocks the Stone Block onto the Pressure Plate and opens the Gate.
Use your Army to attack and kill the Giant. Pick up any items dropped by the Giant before you build a Stone Quarry inside the Giant’s area. There is also a Chest that can be only opened by a Scholar.
As soon as the Stone Quarry is built (it doesn’t have to be Employed yet), the Castle Upgrade will unlocked in the Store.
You can send the Mason to work at the Stone Quarry, but that’s not necessary.
Kings Crown (K1, Required)
As soon as you have at least 6 Army, the King will ask you to recover his Family Heirloom (the King’s Crown) that has been stolen by the Barbarians. The first stage is to build a Trap (25 Wood) for Barbarians at the place indicated with a red arrow.
You must lure a Barbarian from a Barbarian camp into the Trap. Do this sending your Hero or a Army NEAR to a Barbarian, but not really engaging in battle. Continue retreating, but not too far, so the Barbarian will follow you to the Trap. Interrogate the trapped Barbarian to find out that he doesn’t know where the secret camp is located.
Lure, trap and interrogate a 2nd Barbarian to learn the location of the secret Barbarian Camp.
You have a choice of immediately starting the “Family Heirloom” Side Quest (“Travel to Camp”) or waiting until later.
Family Heirloom (K1, Required Side Quest)
Before you embark on the Family Heirloom Quest, make sure that all your Army are at maximum health by applying Health Potions (if available). There will be Health Potions to find during the Quest, but it’s better to be safe.
Important Tip: SAVE YOUR GAME before embarking on this Quest and SAVE YOUR GAME after every significant accomplishment during the Quest.
This is the first “Side Quest”, a concept that should be familiar to players of earlier Westward games. During a Side Quest, ALL of your Army automatically travel with you. If you don’t already have at least one Archer, you will eventually find one during the Quest (and he’s necessary to complete it).
The most difficult obstacle of the Family Heirloom Quest is that you must keep your Army from going hungry. You start with 40 Food and maximum 40 Food Storage; each Army Unit will consume 1 Food Unit per cycle. You will quickly discover that without Food, your starving Army will “Faint from Hunger” and disappear from the Quest, leaving your Hero alone. If this happens, you can Restart the Quest or Return to Kingdom.
Important Tip: It’s much easier to complete this quest with fewer Army members, because each one consumes Food.
You will probably require several attempts to complete this Side Quest successfully. Use the information you learn to make each subsequent attempt more efficient.
In order to combat Hunger, pick up any loose Food you might find (without exceeding your maximum Food Storage), have your Hero pick Berries, and/or send your Army to hunt animals (remember that Archers can shoot Birds). As you unlock various Gates, you will gain access to Wood Towers, which will increase your Food Storage total.
Dig up all the Dirt Piles you find. Pick up and use Healing Potions, when necessary (if a Soldier Falls in Battle here, he is gone from the game). Gold and Treasure you pick up will travel back to your main Kingdom with you. Experience Points for your Army will also travel back with you (as will damage they receive in battle with the Barbarians).
You need to find KEYS, each of which opens a Locked Gate. Most of the Gates have Barbarians behind them that you must defeat in Battle. You also must locate and open all Treasure Chests.
Each Locked Gate has a clue that tells you where the corresponding Key is located.
Gate with Dirt: Dig in dirt by Giant Beanstalk (central) to get RED KEY.
Gate with Hut: Destroy Barbarian Hut (north) to get YELLOW KEY.
Use Hero to carry Stone Block found in Northwest area to drop on Pressure Plate to open access to BLUE KEY (on a table). Use the BLUE KEY on the Blue Gate.
Gate with Boulder: The compound in the Southwest has a gate blocked with a giant boulder. Have Hero mine stone wall on the East side of the compound, then explore Food Crates to get GREEN KEY (to free trapped Archer).
Gate with Birds: Send an Archer to shoot birds (near Beanstalk) to get PURPLE KEY.
Gate with Vines: Use Soldier to cut vines (Southeast) to get access to SILVER KEY.
After Keys have been found, all Gates have been unlocked and all Treasure Chests have been opened, the final sequence starts in the Central Area. Travel there to defeat the Barbarians and recover the King’s Crown.
You can “Continue Playing” in order to gather more Gold and Treasures or “Complete” the Quest to return to your Kingdom.
Ancient Drawbridge (K1, Required)
This Quest is REQUIRED in order to reach Kingdom 2.
You find an Ancient Drawbridge in the Northwest part of the Map. Access to this area is blocked by an Audrey, so you need an Archer kill it. If there is a Blue Curse Stone in front of the Audrey, you need to use a Wizard to destroy the Curse Stone.
Talk to the King.
Cut the Vines surrounding the Drawbridge Ruins, then send a Scholar to examine the Ruins.
Bring 3 Wall Pieces to the Drawbridge and drop them near it. Wall Pieces look like white blocks with green moss on them. They are located (1) West of the Ancient Drawbridge; (2) in a Pond near the Castle; and (3) North of the Giant, past the River.
Now you need to find the Drawbridge Scrolls, located in the “Ancient Library Ruins south of the Castle”. Find a raised Hill with a paved area and Stone Ruins in the Southeast of the Map, blocked by Vines and an Audrey. Kill the Audrey with an Archer (you can leave the Vines alone for now). Mine the Stone Ruins on the Hill. Send a Scholar to open the Chest to discover the Drawbridge Scrolls.
Click on the Ancient Drawbridge and Upgrade it. Wait for the upgrade to finish. A Drawbridge Wheel should appear.
Now you need to find 4 Pegs for the Drawbridge Wheel. The Pegs are located: (1) just West of the Ancient Drawbridge; (2) in the Royal Forest, north of the entrance; (3) in the Giant’s Stone Quarry; and (4) on a High Ridge just outside the Royal Forest in the Southeast.
You won’t be able to retrieve the 4th Peg until you complete the “Injured Giant” Quest.
After all 4 Pegs have been retrieved, you need to turn the Drawbridge Wheel. Only a “strong” (higher-level) character has the strength to do so.
Injured Giant (K1, Required)
This Quest is REQUIRED in order to complete the “Ancient Drawbridge” Quest.
After you have retrieved one or more of the Drawbridge Pegs, you will hear an Earthquake, which really isn’t an Earthquake. It’s caused by an Injured Giant in the Southeast.
Send your Hero or an Army member to talk to the Giant. There is really no reason to attack him with your Army. The Giant’s foot is injured and you need a Blacksmith to pull out the thorn.
The Giant needs new shoes. For this, you’ll need to gather (1) 3 Straw Bundles (buy from Merchant); (2) 2 Ropes from Vines (use Soldiers to cut Vines); and (3) 4 Deer Hides (requires Archer to shoot Deer).
The now-happy Giant will help you to reach the 4th Peg for the Ancient Drawbridge.
Barbarian Invasion (K1, Required)
After the “Kings Crown” Quest is finished, your Kingdom will be attacked by Barbarians from five different areas at the edges of the Kingdom. The Barbarians are showering your Kingdom with boulders thrown by Catapults, causing tremendous damage to Buildings.
The Barbarian Catapults are located at approximately 2:00, 5:00, 7:00, 9:00 and 11:00 if you look at the Map as a clock.
Use your Army to Defeat the Barbarians and destroy the Catapults. You might want to deploy various “Platoons” of Army in order to do so.
Tower Defense (K1, Required)
This Quest is REQUIRED in order to reach Kingdom 2.
After the Barbarian Invasion, the King decides that you need to build defensive Towers at 3 Locations near the edges of the Kingdom.
These Towers must be built IN ORDER as the King directs you. After each Tower is completed, he will tell you about the location of the next Tower.
1) In the East, behind and above the Farm, near where the “Ale Rush” Quest started
2) In the West, in the paved area near the Drawbridge
3) In the Southeast, inside the Barbarian Camp (Barbarians will continue to spawn here, so it’s a good location for a Tower or 2 with strong Army, in any case)
Completing the Tower Defense Quest should trigger the “Royal Letter” Quest, which starts you on your way to Kingdom 2, as long as you have already completed the “Ancient Drawbridge” Quest.
Lost Marbles (K1, Optional)
When you pick up a Marble, the King asks to recover his 13 Lost Marbles.
This Quest is Optional. You don’t need to finish it to proceed to Kingdom 2 or to complete the Game.
As you come across the Marbles while completing other Quests, have your Hero or any Citizen pick them up.
Some of the Marbles are very hard to locate, and you might need to Zoom In to look beneath Trees. You might also have to overcome Obstacles to reach some of them.
1) North of Castle, in Pond
2) Royal Forest, just beyond Gate to the North
3) At end of Valley, Northwest of Royal Forest. Mine Stone Ruins to reach the area.
4) South, in Barbarian Camp
5) Southwest, inside Giant’s Stone Quarry
6) Southwest, near Wall
7) West, near paved area where you build one of the Towers for “Tower Defense” Quest
8,9) Central, near Barbarian Trap location
10) North of completed Drawbridge (after completing “Ancient Drawbridge” Quest)
11) West of Drawbridge, in area with 3 Purple Plants. Walk through River to reach the area.
12) End of River, just behind Merchant. Demolish Bridges to walk through River.
13) Near Statue Ruins in West (not accessible until after visiting Kingdom 2). Build a Stone Bridge to reach this area.
Royal Letter (K1, Required)
You MUST complete the “Tower Defense” Quest before this Quest is available.
Pick up the Royal Letter from the King and send your Hero across Drawbridge to area where George/Patsy is waiting for you. Your next Required Side Quest awaits in “River Crossing” before you can reach Kingdom 2.
In Kingdom 2, eventually, the Countess will send you back to Kingdom 1 with a Pie. Drop it in front of the King.
Wizard Help (K1, Required)
You won’t be able to complete this Quest until you have already visited Kingdom 2 and unlocked Stone Bridges.
Return to Kingdom 1 using the Travel Map.
Build a Stone Bridge to Western area to pick up the Wizard’s Hat by the river.
Statue Ruins (K1, Optional/Trophy)
This isn’t really listed as a Quest on your Quest List. You need a Wizard to destroy the Evil Blue Curse Stones in the far West.
You will acquire Wizard Huts as part of Kingdom 2. Return to Kingdom 1 (at any time). Build and Employ a Wizard Hut in Kingdom 1. Send the Wizard to destroy the Evil Blue Curse Stones.
The Wizard comments that the Vines cannot be destroyed by any ordinary swords. That is not entirely true. Send any Soldier or Knight to cut the Vines surrounding the Statue Ruins.
Send a Craftsman to repair the Statue Ruins. Higher-level Craftsman can probably repair them faster. After the Statue is repaired, the King thanks you.
This is one of the three Mystery buildings you need to complete in order to get a special Trophy.
Sword in Stone (K1, Optional/Trophy)
You discover a Sword in a Stone inside the Royal Forest. It’s not easy to remove. Your Hero cannot remove it because they are not “strong enough”.
Various players have reported success using higher-level Army (Soldiers or Knights), high-Level Craftsmen, Scholars, or by characters wearing a Crown.
River Crossing (K1 to K2, Required)
SAVE YOUR GAME!
Before you can reach Kingdom 2, you must figure out how to cross the River with a broken Bridge. This Side Quest also teaches you new skills that you will need in later stages of the game. Unlike other Side Quests, your Army from Kingdom 1 DOES NOT travel with you.
George/Patsy is totally useless during this Side Quest. He’s just there to clap the coconut shells together (Monty Python reference).
Several existing Villagers, Homes, and Shops help you get production started at Farms, Lumber Camps, Gold Mines, and Stone Quarries. You might need to eventually upgrade housing to get a few more Villagers. Upgrade at least one Peasant to Craftsman when available.
Build a Barracks to recruit 2 Soldiers. Build 2 Wood Towers to employ the Soldiers and increase Food Storage.
Eventually you will need at least 1 Archer to complete this Quest.
Alternative 1: Build an Archery Camp when you can afford it and have a Level 2 Soldier upgrade to an Archer.
Alternative 2: There is a trapped Archer in a Cage in a Barbarian Camp. Use a Craftsman to unlock Cage to free the Archer after you have defeated the Barbarians.
A Travelling Merchant tells you that you must build a dam with 9 Stone Blocks.
You get the 9 Stone Blocks from mining dark grey Stone deposits located:
1) Southeast of Merchant ( by Red Arrow)
2) On Ridge just to the East above George/Patsy
3) North of Village Bakery
4) South of Village Farms
5) North, beyond an “Audrey” (Giant Carnivorous Plant)
6-7) Clear Vines with Soldiers East of Gold Mine, and build a Stone Quarry (2 Block)
8-9) Build a Stone Quarry Northwest of Village (2 Blocks)
Carry the Stone Blocks to the narrow part of the River indicated by the Red Arrow and Drop them there.
The Travelling Merchant will sell you a Stone Bridge design if you give him 5 Bird Eggs and 2 Bird Feathers. Only Archers can hunt Birds for Feathers (and not always successfully).
Purchase the Stone Bridge Design from the Traveling Merchant.
Unlock and Build Stone Bridge across the River.
Move Hero and George/Patsy to Travel Point (Red Arrow) to enter Kingdom 2.
At this point you gain access to the Travel Map, which allows you to travel to other Kingdoms that you have already visited.
Kingdom 2 Quest List (Spoilers)
General Kingdom 2 Info
In Kingdom 2 you will meet the Countess at her Castle. When you start in a new Kingdom, you have no Villagers or Army, except for those that voluntarily join you (just as they did in the River Crossing Side Quest). Some Kingdom 2 Quests require you to travel back to Kingdom 1 in order to complete them.
Drawbridge Entrance (K2, Required)
Find 2 Drawbridge Pegs: (1) to the East of the Soldier and (2) mine the Stone Deposit to the West of the Soldier.
Turn wheel to open Drawbridge. Visit the Countess.
Royal Letter 2 (K2, Required)
For the Countess’ Recipe, gather 2 Fire Spice plants (red), 3 Bird Eggs, and 8 Pumpkins.
Travel back to Kingdom 1.
Sword and Arrows (K2, Required)
Build up your Army to include 6 Soldiers, 4 Archers and 3 Knights. This will take some time, so you should do it while you work on other Quests.
You will need Housing (Barracks) for the Army to attract new members.
As soon as this Quest is completed, you trigger the “Giant Attack” Quest.
Villager Rescue (K2, Required)
Various (10) Citizens are trapped in Cages located all over the Kingdom. These Cages can generally be opened only by Craftsmen. Some Cages must be reached by overcoming obstacles and/or completing other Quests, so you won’t be able to rescue all 10 Villagers at once.
After each Cages is opened, use a Soldier to chop down the Cage in order to recover Wood resources. Cages might also contain Soldiers and Archers.
1) South near existing Hut, on cliff
2) East near the Mega-Tree. Chop log to free Villager (you don’t need a Craftsman to unlock this Cage)
3) North, near Barbarian Camp
4) West, past Dragon. Must complete “Sleeping Dragon” Quest to reach this Cage.
5) West, in area North of Dragon, with Giant. Mine Stone Ruins to reach this area.
6) Southwest, near Merchant. Use Soldier to cut Vines. Build Bridge across River to reach Merchant area.
7) Southwest, to West of Merchant, blocked by Stone. Build a Stone Quarry to mine Stone.
8) Northwest of Castle, with Wheel on Ridge. Drop Magic Bean to turn Wheel.
9) North, next to a Pressure Plate. Drop a Stone Block on the Pressure Plate.
10) Far South, in area by River, guarded by a Giant Carnivorous Plant (“Audrey”). Destroy Bridge to Merchant Area in order walk through River.
Mason Key (K2, Required)
A compound with a Locked Gate is near the River in the East. Send anybody near this compound in order to trigger the Quest.
You must travel back to Kingdom 1 to complete this Quest. Retrieve the Mason Key from Kingdom 1. This can be done while completing the “Royal Letter 2” Quest.
Return to Kingdom 2.
Unlock Gate.
Retrieve Mason Scroll. Now you can (finally) unlock Masonry in Store. The Masonry Building is VERY important, and required for unlocking several other items in the Store.
Sleeping Dragon (K2, Required)
Move any character close to the Dragon in the West.
Locate an Alchemist and send the Scholar employed there to gather an Endormi Plant (purple).
If you don’t already have an Alchemist shop, you need to build one with a Craftsman and employ a Scholar there.
Locate a Bakery. Talk to the Baker. He gives you a recipe for a pie that requires 7 Boar Meat (can gather with Hero or any Army), and 8 Eggs (require an Archer to shoot Birds).
Return to the Bakery to pick up the Pie and Drop the Pie near the Dragon. The Dragon will go to sleep.
You can now access the items beyond the Sleeping Dragon and send a Craftsman to rescue one of the Trapped Villagers from the Cage.
Traveling Bard 2 (K2, Required)
This Quest is really Optional, but you should complete it in order to unlock Tree Seeds that can be purchased at Upgraded Lumber Camps. The Hero or any Villager may plant Tree Seeds to re-grow Forests that have been depleted.
You must have an Upgraded Lumber Camp along with the Axes Upgrade.
Chop down the Mega-Tree in the Far Eastern part of the map to attract the Green Giant. You will probably need a Level 2 Craftsman (or better).
Talk to the Bard again.
Attack the Green Giant to allow unlocking of Tree Seeds in Store.
Rival Princesses (K2, Optional)
The Countess wants to impress Princesses from neighboring Kingdoms.
1) Gather 60 Food (make sure you have enough Food Storage and Food Production so the rest of the Citizens don’t starve). Talk to the Countess when you have enough Food to give her.
2) Upgrade the Castle.
3) Have at least 2 Scholars. You can upgrade Level 2 or Level 3 Craftsmen to Scholars. Employ Scholars at a Library or Alchemist or AT THE CASTLE. You can start Taxing the Kingdom with 1 Scholar at the Castle.
4) Upgrade 4 Huts to Cottages (can house 3 Villagers). If you already have Hut Upgrades, there is only 1 step. From Huts there are two upgrade steps. Don’t rush to complete this task or you will quickly have a lot of unemployed and Hungry Villagers. Take your time.
Enjoy the conversation between the Countess and the Rival Princesses.
Magic Curse (K2, Required)
Locate an Alchemist shop then click on the Scholar working there.
You must return to Kingdom 1 to get a Wizard to follow you back here.
Return to Kingdom 2.
Unlock and Build a Wizard Hut. Employ Wizard at Wizard Hut.
Use Wizard to destroy at least 3 of the Evil Blue Curse Stones (there are more).
Love Potion (K2, Required)
Locate an Alchemist shop then click on the Scholar working there.
To create a Love Potion, collect (1) 4 Tree Sap (chop tree stumps); (2) 4 Boar Tusks (use Archer to shoot Boars); (3) 4 Carrots (located in various places); and (4) 4 “Toe of Frog” (use Archer to shoot Frogs).
Click on the Alchemist again to have them mix the Love Potion.
Carry the Love Potion to the Countess and drop it in front of her.
Matchmaker (K2, Required)
Send any Knight Captain (Level 3 Knight mounted on Horse) to the Countess.
Ancient Cathedral (K2, Optional)
Use a Wizard to destroy the Evil Blue Curse Stone in front of the Audrey (Giant Carnivorous Plant). Use an Archer to Kill the Audrey.
Combat the Barbarians and destroy their camp. Use Hero or Soldier to dig up the Fire Pit to find a Straw Bundle. Drop the Straw Bundle on the Trap.
Use an Archer to Kill the Audrey blocking access the Flooded Area. You can’t enter the Flooded Area because of Deep Water.
Send a Mason to inspect the Ruins.
Demolish the 3 Towers around the Flooded Area. You need to “control” the Towers before you can demolish them. Use a Soldier to Chop Vines at the Stone Tower in the West of the Flooded Area. East of the Flooded Area are two more Stone Towers. Chop the Log in front of the North Tower. Use a Magic Bean to knock down the key on top of the South Tower.
Do NOT bother to employ Soldiers at these towers. Just demolish the 3 Towers and the Flooded Area will be cleared of Deep Water.
After the Flooded Area is drained, you need to find 4 Keystones to the Cathedral. They are all in the Formerly Flooded Area and look like the “Wall Pieces” from the Drawbridge in Kingdom 1.
Various obstacles such as Vines and Stone Ruins block access to the Cathedral Keystones. Use Soldiers to cut the Vines, and use the Hero or Villagers to mine the Stone Ruins.
One Keystone is behind a Gate controlled by a Pressure Plate in the North. Bring the Stone Block used in the “Villager Rescue” Quest to drop on the Pressure Plate and open the Gate. Alternative: Drop a Magic Bean on the Pressure Plate.
Bring all 4 Keystones to the Ancient Cathedral Ruins and drop them near the Ancient Cathedral.
Send a Craftsman (preferably a Mason) to repair the Ancient Cathedral.
Giant Attack (K2, Required)
After you complete the Sword and Arrows Quest, your Kingdom will be attacked by several Giants near the edges of the Kingdom.
Locate and defeat the Giants.
Chop down the Beanstalks to stop them from regenerating.
Merchant Trade 2 (K2, Required)
As in Kingdom 1, the Merchant will request several mini-quests.
1) 7 Rabbit Fee (require Archer) to buy Healing Potion for $100 Gold
2) 6 Deer Skin (require Archer) to buy Mystery Seeds for $75 Gold. Mystery seeds can grow into almost any type of plant.
3) 8 Frog Legs (require Archer) to buy Magic Beans for $100 Gold
4) 3 Giant’s Clubs to buy Knowledge Books (“Tomes”) with +25 XP for $200 Gold.
5) 2 Dragon Scales (to buy Gold Ring for $500 Gold. Required by “Princely Proposal” Quest)
A Princely Proposal (K2, Required)
The Locked Gate in the North is now open. Pick up the Dragon Egg.
Get a Diamond after you defeat the Dragon.
Buy a Gold Ring from the Merchant for $500 Gold.
Talk to a Blacksmith to construct the Engagement Ring.
Take the Ring to the Countess.
You can now go to Kingdom 3. In order to reach the access point, you will probably need to build another Stone Bridge.
Lost Tiara (K2, Optional)
When you pick up a Tiara, the Countess asks to recover her 13 Lost Tiaras.
This Quest is Optional. You don’t need to finish it to proceed to Kingdom 3 or to complete the Game.
As you come across the Tiaras while completing other Quests, have your Hero or any Citizen pick them up.
Some of the Tiaras are very hard to locate, and you might need to Zoom In to look beneath Trees.
In no particular order, the Tiaras are found:
1) West of Castle, near Road Signs
2) Northwest of Castle, inside Barbarian Camp to the East of the Pressure Plate
3) Northwest of Castle, just below a small ridge and near a small Gold Deposit.
4) Southeast of the 2 Water Control Towers, just South of a Gold Deposit, in Forest
5) Past the Sleeping Dragon in the West (must complete “Sleeping Dragon” Quest first)
6) Northeast of the Ridge with a Wheel
7) West of Dragon Spawning Area in the Northeast
8) Directly West of Green Giant’s Mega-Tree, just North of Forest
9) South of Cage blocked by Stone (in area near Merchant in Southwest)
10) Through River in South, in walled area, just West of starting point for Kingdom 2. This is the same area with one of the Trapped Villagers. You need to destroy a Bridge if it blocks your access through the River.
11) Far West, in an area past the Barbarian Camp, just South of the Ancient Cathedral
The next 2 Tiaras can only be retrieved after you drain the Flooded Area as part of “Ancient Cathedral” Quest.
12) Formerly Flooded Area, in the Northwest corner
13) Formerly Flooded Area under Stone Tower. Demolish the Tower to reveal Tiara
Scrying Stone (K2, Required)
You should not complete this Quest until you have partially completed the “Ancient Tower” Quest in Kingdom 3 and learn that you NEED a Scrying Stone. Return from Kingdom 3 to Kingdom 2 using the Travel Map.
Move your Hero to the Countess at the Castle to learn that she threw away the Scrying Stone and doesn’t know where it is.
You will find the Scrying Stone in the North area blocked by a Tree.
If you don’t already have a Wizard Hut, build one using a Craftsman. Recruit a Wizard and Employ them at the Wizard Hut so you can buy Blight Spell Scrolls.
Send a Wizard or a Scholar to cast the Blight Spell to clear the area by the Tree. If you send a Wizard, have him destroy the Evil Blue Curse Stone while he’s there.
Build a Lumber Camp and Employ with at least 2 High-Level Peasants. DO NOT UPGRADE THE LUMBER CAMP (that will expand the Lumber Camp’s Range and make the harvesting take longer).
You can choose to apply the Axes Upgrade to your Lumber Camp to increase Wood Production and speed up the Quest, but that will automatically Upgrade the Lumber Camp, as well.
This will take some time because the Peasants chop trees in whatever order they choose. Eventually they will cut down the Tree blocking access to the Scrying Stone.
When the Tree has been cut, chop the stump to gain access to the Scrying Stone.
Send your Hero to pick up the Scrying Stone then return to Kingdom 3.
Garden Ruins (K2, Optional/Trophy)
This isn’t actually a Quest and isn’t listed on your Quest List. You only need to complete it if you want to earn one of the optional Trophies.
You need to have the Blight Scroll Spell (from Kingdom 3) before you can start this Quest.
The Garden Ruins are in the North, surrounded by Vines that can’t be removed by Soldiers or Knights. There is an old Stone Tower to the East.
Send a Wizard or Scholar to cast a Blight Spell on the paved area just West of the Ruins.
Build a Wood Tower on that spot, then upgrade it to a Stone Tower, removing the Vines from the Garden Ruins.
Send a Craftsman to repair the Ruins.
Cathedral’s Secret (K2, Optional/Trophy)
This isn’t really a Quest and it’s not listed in your Quest List. You will gain a Trophy by completing it.
Directly North of the Castle (just above the center of the Map) locate a raised Ridge with a solitary Tree and a single Stone Deposit just to the Northwest of the Tree.
Build a Lumber Camp to chop down the Tree. Staff the Lumber Camp with a Level 4 Peasant (or 2) for faster production. For even faster production, upgrade the Lumber Camp and employ 3 Peasants, and make sure you have the Axes Upgrade. Chop the tree stump and demolish the Lumber Camp to clear the area so you can build a Stone Quarry. Re-employ your Villagers after the Lumber Camp is demolished.
Staff the Stone Quarry with Craftsmen (three Level 4 Craftsmen will work the quickest) to mine the Stone Deposit. It’s also a Good Idea to have the Masonry Staffed (for the Masonry Boost to Stone Quarries) and apply the Pickaxes Upgrade at the Masonry (if you have not already done so) for a production bonus of Stone. As soon as the Stone Deposit is depleted, re-employ your Villagers at any suitable Advanced Building.
You discover a Rose Window. Take the Rose Window to the Cathedral and drop it in front of the Cathedral Door.
Dig in the Dirt Patch that appears in order to discover the Cathedral’s Secret Treasure.
You achieve the Magic Mirror Trophy.
Kingdom 3 Quest List (Spoilers)
General Kingdom 3 Info
Build Barracks to generate Soldiers. Generate Archers as soon as possible by building an Archery Camp.
Meet the Duke (K3, Required)
Seek the Duke’s Castle, to learn that he is hiding in a cave and the Villagers are frightened, so you must gain their trust. You can search caves for the Duke immediately, but it’s better to get Resource production started with the Villagers (see “Help the Villagers” Quest, below), then return to searching for the Duke.
You might find the Duke in the cave to the far South, blocked by a Stone Ruin. Mine the Stone to release the Duke. Some players have reported that the Duke will be found in a different cave blocked by a wooden crate. This could be a bit random. The Duke is definitely hiding in one of the southern Caves.
Send 2 Soldiers to Escort the Duke back to his Castle. If you don’t already have Soldiers, now would be a good time to build Barracks.
The Duke tells you about a terrible Blight that is covering his Kingdom, triggering the “Fight the Blight” Quest.
Help the Villagers (K3, Required)
Help 3 Villagers to gain their trust.
1) Farmer: wants his “Manifesto”, which can be found in dirt patch by Lumber Camp. Return it to the Farmer and he will start producing Food. Build a Wood Tower (or two) for Food Storage as soon you have an operating Lumber Camp. Employ your Soldiers at the Wood Towers when they are not otherwise occupied.
2) Lumberjack: has lost Key to Lumber Camp when a Boar ate it. Hunt several Boars, in area behind Gold Miner, until you recover the Key. Return the Key to the Lumberjack in order to start up Wood production at the Lumber Camp.
3) Gold Miner: has lost his “Gold Rocks”. Use Soldiers to cut the vines behind him to provide access to that area. Send someone to the “Gold Rocks”, hidden by foliage in the western portion of the area. The Gold Miner offers to work in a Gold Mine—if you build one for him. Do so.
Now you have Food, Wood, and Gold production started for Kingdom 3.
Fight the Blight (K3, Required)
Blight appears as dark grey cracked stone in many parts of the Kingdom. Nothing can be grown or built on Blight. There may be some animals found there, but most have died.
Fight the Blight Tip: You will require at least one Archer to complete this Quest. Two Archers are better.
Seek the Wizard’s Grove in the far North of the Kingdom (you will need build a Wooden Bridge to cross a river to reach it).
The Wizard will help you in return for :
1) 5 Frog Legs (require Archers)
2) 4 Bird Eggs (require Archers)
3) 2 Fire Herbs. These are red and can often be found near the Ruined Tower in the North. Access the area by killing an Audrey with an Archer.
Kill the Giants in the East to get the Blight Scroll.
Have a Scholar or Wizard use the Blight Scroll on a patch of Blight.
Merchant Trade 3 (K3, Optional)
This Merchant wants the following:
1) Pick 6 Berry Bushes (requires Hero or any Villager). Allows purchase of Mystery Seed for $75 Gold.
2) 5 Boar Tusks (requires Archer). Allows purchase of Magic Bean for $100 Gold.
3) 4 Black Knight Helms (with Red Feathers). Allows purchase of Meat Pies for $150 Gold. Black Knight Helms are sometimes dropped by defeated Black Knights after battle.
4) 2 Crowns. Allows purchase Training Dummies for $200 Gold. Crowns are randomly dropped by enemies in fights (usually Dragons) and often inside Locked Chests that require a Scholar to open.
5) 1 Dragon’s Horn. Allows purchase of Tome of Knowledge for $300. Defeated Dragons sometimes drop a Dragon’s Horn.
The Merchant Trade 3 Quest is not as important as the one in Kingdom 2, and you may safely wait to complete it unless you absolutely need one of the items the Merchant has for sale.
Forgotten Outpost (K3, Required)
After completing the “Fight the Blight” Quest, or on approaching the Fort, directly South of the Ancient Tower, you learn about the Forgotten Outpost.
Tip: To reach the Eastern part of the K3 Map, you need to build a Stone Bridge from North to South over the river. You should already have a Wood Bridge in place (that you built to reach the Wizard’s Grove).
The Forgotten Outpost is in the Southeast on the Map. It’s locked, and you need to find a Key, which is located in the Berry Bushes to the West. Harvest the Berries; pick up the Key, and approach the Outpost Gates.
Search the Outpost for Clues: Notice the Scroll at the top of the Tower. You need a Magic Bean in order to knock it down. You can buy the Magic Bean from the Merchant.
Pick up the Scroll and read it to discover that you need to find the Black Knights’ Lair. It’s in the East, North of where you are.
Approach the Black Knight at the Gate, and defeat him. Try opening the Gate. It’s blocked and you will need another way in. Fortunately, there is a pile of Stone Ruins at the South end of the Black Knight’s Lair. Mine it with your Hero or a Villager.
Summon your entire Army to fight the Black Knights and defeat them. They might drop Black Knight Helms (if you are at that stage of the “Merchant Trader 3” Quest, pick them up, otherwise, leave them until later). You will have further opportunities to fight Black Knights. They continue to spawn at the Black Knight Lair.
Inside the Lair, you find 3 Cages containing 1 Soldier and 2 Peasants. Send a Craftsman to open the Cages. After all 3 Cages are open, you need to send your Hero to talk to the Duke at the Castle.
You also need to House and Employ the new Peasants and find something for the new Soldier to do.
Herman the Rotten (K3, Optional)
Directly East of the Black Knight’s Lair is an enclosure containing Herman the Rotten.
Click on him, then click away, and click again on him. Eventually (after MANY clicks and many protests from Herman) he will get sufficiently annoyed to LEAVE his compound, which contains dozens of Tomes, Treasures, Healing Potions, etc.
Have your Army gather the Tomes to quickly add XP for them. It’s a good idea to get them Leveled Up before you attack some of the harder enemies.
This Quest is entirely Optional, but a good idea. You will probably be just as annoyed as Herman was by the time you finish it.
Traveling Bard 3 (K3, Optional)
This Bard wants you to attract and kill Ruby, the Red Dragon. He suggests that you build buildings that will attract the Dragon, with “movement”, that is, Windmills. Build 5 Windmills.
The Bard will provide a cage. Send an Army force near the Cage.
Buy a Meat Pie and deliver them to the Cage. You learn that a Rabbit (inside the Meat Pie) isn’t enough: you need a Boar. Birds or Rats might be attracted to the Cage, too, so use your Archers to shoot them. If other animals get trapped, the Bard will announce that they are unsuitable and release them.
Some players have reported success after trying 6 or 7 Meat Pies on the Cage before a Boar shows up.
Traveling Bard 3 Tip: A quicker way to lure a Boar to the Cage: find one with a Hero or Army, attack it, and then run a bit away back towards cage. The Boar will follow you and become trapped. Be careful not to kill the Boar in the process.
Ruby the Red Dragon will be attracted to the Boar in the trapped Cage. Your assembled Army must kill it. You might get a Dragon Egg (take it to the Dragon Hatchery) in the process.
Haunted Woods (K3, Optional)
Build a bridge to enter the Blighted area Northwest of the Castle. This area used to be a Forest, which started suffering from vines choking out all life.
You need to destroy the source of the vines, which turns out to be a Giant Carnivorous Plant (“Mega-Audrey”) to the West. Use 2 Archers to attack and destroy Mega-Audrey.
Use a Wizard or Scholar with Blight Scrolls to clear the Blight from several areas. Plant at least 4 Tree Seeds to re-grow the Forest.
Ancient Tower (K3, Required)
Talk to a Mason (a Craftsman working at a Masonry), who will advise that you need: 1000 Stone, 8 Tower Corner Stones and a population of 20 Villagers (not Army).
Tower Corner Stones are found in the same dark grey stones you needed to mine in order to get stone blocks in “River Crossing”. They are located: (1) just above the Forgotten Outpost; (2) on a hill west of Ancient Tower Ruins; (3) Southeast of the Black Knights’ Lair, in front of Herman’s compound; (4-8) build and employ Stone Quarry (preferably with 2 high-level Craftsmen) southwest of the Ancient Tower Ruins to generate 4 more Corner Stones and then mine remaining dark grey stone for final Corner Stone.
Take each of the 8 Tower Corner Stones and drop them near the Ancient Tower Ruins.
Tip: Hold off on increasing Villager population until you have completed “Forgotten Outpost” Quest (you will get some new Villagers there automatically) and gathered the Corner Stones. You do NOT need the 20 Villagers or the 1000 Stone until you are actually ready to rebuild the Ancient Tower.
Bring a Wizard to inspect the Ruins, and learn that you now need to gather 7 Old Tower Fragments and a Scrying Stone.
You must return to Kingdom 2 to get the Scrying Stone from the Countess. You don’t need to do this immediately if you have other Quests going on, but you still need to do it eventually.
Old Tower Fragments look like the “wall pieces” you collected for the Ancient Drawbridge Quest in Kingdom 1.
The 7 Old Tower Fragments are located: (1) In the Haunted Forest, near the Western edge; (2,3) West and East of the Good Wizard’s Grove; (4) Near the Ruined Fountain in the Northwest; (5) Near the Dragon’s Lair in the East; (6) West of the Black Knights’ Lair, by the River; and (7) in the South near one of the Caves.
As you find the Old Tower Fragments, bring them to the Ancient Tower ruins and drop them nearby on the paved area. Be careful not to drop anything on top of the Scrying Stone.
SAVE YOUR GAME!!! and watch while the Ancient Tower is rebuilt because after the Ancient Tower Quest is completed, your Kingdom will be invaded by Black Knights coming from many directions.
Ancient Ritual (K3, Required)
There are 5 hills surrounding the Ancient Tower. Clear them of any debris.
Build Wood Towers on each hill and upgrade them to Stone Towers.
Light Fires in each Stone Tower (costs 50 Wood).
A Cave is revealed in the North.
Lost Bottles (K3, Optional)
When you pick up a random Bottle containing a dark liquid (could be green or purple), the Duke asks to recover his 14 Lost Bottles of Wine.
This Quest is Optional. You don’t need to finish it to complete the Game.
As you come across the Bottles while completing other Quests, have your Hero or any Citizen pick them up.
Some of the Bottles are very hard to locate, and you might need to Zoom In to look beneath Trees.
1) Far South, Southwest of cave where Duke was hiding, next to a tree
2) Inside Castle grounds, Northeastern corner
3) Southeast inside Barbarian Camp
4) Western edge of Haunted Forest, past Mega-Audrey
5) North of the hidden Gold Mine
6) In the River, South of the Merchant (may need to destroy Bridge to reach)
7) Eastern end of the River (may need to destroy Bridge to reach)
8) Southeast, near Lost Outpost
9) North, directly East of Fountain Ruins. Mine Stone in flooded area to reach.
10) On Ridge behind Merchant, to the East
11) Next to Cave blocked with Gold in Center of Map
12) North of the Dragon Spawning Area
13) North in Good Wizard’s Grove, in Western part under a tree. Must Zoom In to see it.
14) Gated area West of the Fountain. The Gate is locked by a Pressure Plate inside the Gated Area. To open Gate, drop a Magic Bean next to the Eastern wall of the Gated Area, knocking the barrel down onto the Pressure Plate. You can only retrieve the Bottle in this area by walking through the River. See “Fountain Ruins” Quest for information on reaching this area.
Completing this Quest, along with the “Lost Marbles” and “Lost Tiara” Quests, will award you the “Lost Treasures” Trophy and unlock the final Mystery Building: “King’s Statue”.
Fountain Ruins (K3, Optional)
In the North, Kill the Audrey (with an Archer) blocking the Bridge in order to access this area.
Several Stone Piles surround the Fountain Ruins. Remove them with your Hero and Villagers. You find a Rusty Key. This will open the Locked Gate just South of the Fountain in a depressed area. Open the Locked Gate with the Rusty Key.
Send a Wizard to destroy the Evil Blue Curse Stone on the Pressure Plate just to the West of the Fountain, next to the River, opening the Flood Gates from the River.
Reaching this Pressure Plate is very tricky. First, build a Bridge to the small island just Southwest of the Castle, then build a Stone Bridge from the island to reach the far shore near the Crates by the Cave. This provides access to walk in the River to the place where the Evil Blue Curse Stone is located. You must destroy the Bridge to the Haunted Forest (but you should no longer need it).
Send a Skilled Craftsman to repair the Fountain Ruins.
Storming the Tower (K3, Required)
This Quest is triggered after you complete the “Ancient Ritual” Quest. You don’t have to do it immediately if you have other Quests active. You might want to wait and build up your Army before starting this Quest. It’s also a Side Quest, which means that your entire Army will travel with you (including Dragons and Wizards).
You can’t start this Quest with fewer than 6 Combat Units, but you probably have many more than that by now.
Before starting this Quest:
1) Use Healing Potions on any injured Combat Units to bring them all up to full strength. For this Quest, Healing Potions do NOT travel with the Hero, but you may find them to pick up.
2) Make sure that each member of your Army (and Hero) has upgraded Weapons and Shields (from Blacksmith). Archers can only have upgraded Weapons, since they don’t wear Shields.
3) SAVE YOUR GAME! If you fail to complete this Quest, you can “Restart Quest” or “Return to Kingdom”, but any casualties carry over to the Main Game. Be sure you have a good Saved Game from before you started the Quest. During the Quest, Save Your Game often.
Another strange quality of this Quest is that your Army will NOT require Food. You can pick up Food, but it won’t be consumed. You can still dig in dirt piles and open Chests to find Gold or Treasures. A Magic Bean will appear randomly, but don’t pick it up until you actually need it.
Now, here’s how to Storm the Tower:
Take your Hero to the Revealed Cave in the North, beyond the Good Wizard’s Grove (it only becomes visible after completing “Ancient Ritual” Quest). Click on the Cave’s Talk Bubble. You do not need to move your Army to the Cave, they will automatically come with you when the Quest starts.
Approach the Drawbridge to learn that you need to find 4 Drawbridge Pegs to turn the Wheel. They are located: (1) Southwest, in the Pond; (2) West in Barbarian Camp (destroy huts there to gain an extra Soldier); (3) Southwest in Giants’ Camp (smash Crates to find Peg); and (4) Southeast, on a Ridge East of the starting point.
Cross the Drawbridge and Kill the guards. Travel to the Barbarian Camp to the East (through the River) and Kill the Barbarians. Destroy the Barbarian Huts to gain an extra Archer.
Approach the Wall to the Central Castle, to find out that the Gate is blocked. Since you already control the Barbarian Catapult in the East, the Catapult will hurl a boulder and destroy part of the wall. Enter and defeat the Black Knights.
Before attacking the Central Castle, you need to remove the “Magic Barrier” by destroying 5 Stone Towers. Destroy the Towers by having your Army or Hero attack them, not by using the “Demolish” button.
Send your Army to the West to defeat the Guards around a Tower blocked by Beanstalks. Use Soldiers to cut the Vines.
You will find a BLUE key near one Tower that’s necessary to open a Locked Gate to access another Tower just North of it.
There is one Locked Gate with a Pressure Plate that you need to open by dropping a Magic Bean below the Crate on the wall.
After all 5 Stone Towers are destroyed, attack the Dark Wizard in the Central area to complete the Quest.
Congratulations! You have completed the Main Game for Westward Kingdoms. You may continue play in order to complete Optional Quests in any Kingdom and to earn Trophies. You may also play in “Sandbox” mode for additional challenges and fun.
Mystery Crops (Spoilers)
These Advanced Crops are not available at the start of the game, but only after triggering certain events or completing other tasks. They all provide much more Food than the Basic Crops.
Sunflower
Employ two Level 4 Peasants and/or Level 4 Craftsman at the same Farm.
Provides Sunflower Mead at the Tavern (+4 Gold while Sunflowers are grown at Farms).
Eggplant
Found in Chests that can only be opened by Scholars OR randomly produced by a Mystery Seed.
Unlock Eggplants at the Store before you can grow Eggplants on a Farm.
Provides Wizard’s Potion at the Tavern (+4 Gold while Eggplants are grown at Farms).
Dragon Fruit
Build a Dragon Hatchery (requires 4 staffed Libraries). Take a Dragon Egg to the Hatchery (staffed by a Scholar). After a Dragon Hatches, you can use it as a Combat Unit to destroy a Farm that is growing Eggplants. Dragon Fruit seeds appear. Pick them up.
Unlock Dragon Fruit in the Store before you can grow Dragon Fruit on a Farm.
Provides Dragon Ale at the Tavern (+5 Gold while Dragon Fruit are grown on Farms).
Appendices
Appendix 1: Differences from Other Westward Series Games
1) Multiple Character selection groups feature with Ctrl+# is still present (but undocumented). However, you LOSE the shortcuts after exiting the game and reloading or continuing. This is a real shame, because that feature saves lots of time when setting up combats. You will have to re-create your Groups each time you start a new game session or Load a Saved Game.
2) The City/Kingdom Overview/Stats screen is simply gone. There is no one place to find out how much you are producing various resources (now Gold, Wood, Stone, Food), which Buildings and Upgrades you have constructed, etc. Many players are NOT pleased with this change.
3) Also gone is the concept of “Happiness” (perhaps a good thing). It really doesn’t matter if you raise Taxes through the roof.
4) There are no livestock to raise. Some people might miss having chickens, turkeys, pigs, and other livestock, but there are plenty of other challenges.
5) Your Quests disappear from the current Kingdom Quest list after you have completed them. They move to the “Completed” tab on the Quests page.
6) It doesn’t matter which Hero you choose when you start a Player Profile. The MAPS for the Prince and Princess are identical. It is fun, however, to hear soldiers say “Yes, SIR!” to the Princess.
Appendix 2: Character and Group Control Tips
An often overlooked feature of the game is that you can create GROUPS of Villagers (including Peasants, Craftsmen, and/or Scholars) or Army (Soldiers, Archers, and/or Knights) in more than one way.
Group Tip 1: Drag the cursor in a “lasso” or “marquee” fashion, from upper-left to lower-right, around multiple characters to select them all and create a temporary Group. Then, right-clicking moves them as a Group to the desired destination.
Group Tip 2: SHIFT-CLICK on multiple characters to create a Group. Right-click to move them all at once. If you already have a Group selected, Shift-Click can add new characters to the Group selection.
Group Tip 3: After you have a Group of characters selected, you can create a keyboard shortcut for that Group by pressing [CTRL]+[0-9]; that is: press [CTRL]+[1] to create “Group 1”, press [CTRL]+[2] to create “Group 2”, etc. Later in the game, just by pressing [1] you select all those characters in “Group 1”, no matter where they may be located on the map, and WITHOUT SHIFTING THE “CAMERA” view to them. When you right-click on the main screen they will ALL move to the desired destination.
This is especially useful with your Combat Units (Soldiers, Archers, Knights, Wizards). If you are having an invasion by Barbarians, you can summon all the Combat units in a defined group to the battle by typing the shortcut #, then right-click to move them all to the battle location.
NOTA BENE (Note Well): This feature is still present in Westward Kingdoms, but is not documented anywhere. Also, you LOSE the CTRL groups shortcuts when you Exit the game or Load a saved game. You will have to re-establish them after starting a new session or Loading a Saved Game.
The maximum number of units you can include in a group is 14. That is the maximum that can display their icons/health on the screen at once. During later quests, you might want to have several groups of Combat Units (“platoons”) posted at different parts of the map.
You can also use this technique to select BUILDINGS. Select the building then press [Ctrl+#] to set a shortcut to that building. Later, press the [#] you set, then click on the Building Image at the lower right corner to move the camera to the building. This can be useful for buildings such as the Castle, a Market, or an Alchemist that you need to locate quickly.
You can also create a shortcut for group of only 1 character. For example, select your Hero (or any other Person) and press [Ctrl+1]. Now you can just press the [1] key on your keyboard to select him/her and, WITHOUT SHIFTING THE CAMERA, right-click anywhere on the current map to make them travel there to do something.
Finally, you can DOUBLE-CLICK on any character to select all “similar” characters that are visible on the screen. This means that if you double-click on a Peasant, you select all nearby Peasants VISIBLE ON THE SCREEN. Double-clicking on any Combat Unit (other than your Hero) selects all Combat Units visible on the screen (including Hero, Soldiers, Archers, Knights, Wizards). This feature can be very useful when fighting fires, or during combat.
Appendix 3: Undocumented Function Key Shortcuts
[F1] = Move Camera to Hero
[F2] = Move Camera to Next Combat Unit (Soldier, Archer, Knight, Wizard, etc.)
[F3] = Move Camera to Next Unemployed Villager
[F4] = Move Camera to Next Damaged Building (useful after Earthquakes and Fires)
[F5] = Toggle Quest Tips On/Off
There isn’t a Function Key for Next Upgradable Person (that I know of) but there should be.

More articles...
-
Best Horror Games On Itch.io – July 2026
Across a bounty of subgenres. -
Grow A Garden 2 Base Price List
What's the most valuable crop? -
Evomon Types Guide [Strengths, Weaknesses, Resistance]
Your companion guide during battles.