
Best Horror Games On Itch.io – July 2026
Across a bounty of subgenres.![Haze Seas Accessories Tier List [Best Accessories to Equip]](/wp-content/uploads/2026/07/haze-seas-accessories-tier-list.jpg "Haze Seas Accessories Tier List [Best Accessories to Equip]")
Haze Seas Accessories Tier List [Best Accessories to Equip]
The accessories with the best stat buffs in Haze Seas.
![[Roblox] Evomon Shiny Hunting Guide – Including Prismatic and Pris Shinies!](/wp-content/uploads/2026/06/evomon-shiny-hunting-guide.jpg "[Roblox] Evomon Shiny Hunting Guide – Including Prismatic and Pris Shinies!")

Weird Park: Broken Tune Walkthrough
Welcome to the Weird Park: Broken Tune walkthrough on Gamezebo. Weird Park: Broken Tune is a Hidden Object/Adventure game played on Mac or PC created by Alawar Games. This walkthrough includes tips and tricks, helpful hints, and a strategy guide on how to complete Weird Park: Broken Tune.


- Prefer Gamezebo on Google

Weird Park: Broken Tune – Game Introduction
Welcome to the Weird Park: Broken Tune walkthrough on Gamezebo. Weird Park: Broken Tune is a Hidden Object/Adventure game played on Mac or PC created by Alawar Games. This walkthrough includes tips and tricks, helpful hints, and a strategy guide on how to complete Weird Park: Broken Tune.
General Information
As with all hidden object adventure games, you need to explore various scenes to find objects and solve puzzles. You can scan the scene with your cursor, which will change shape when you’ve found an interactive area. The cursor is usually arrow-shaped but will change into the following icons when you can interact with something:
- Magnifying glass: inspect closer
- Pointing finger: grab an object
- Gears: use an inventory item
- Magnifying glass with puzzle piece: zoom in on a puzzle
Hidden object scenes (HOS) and exits to new scenes are indicated with a magnifying glass and white sparkles.
At the bottom of your screen is your inventory bar, in which all the items currently in your possession are kept.
To the right of the inventory is the hint button. Objectives that can be completed in the current scene will be circled with green sparkles when you click the hint button. The hint button can also be used to find items in the hidden object scenes. After you’ve used the hint button, it will need to recharge before you can use it again. If there is nothing left to do in the current scene, green sparkles will appear in the direction you need to go. In this case the hint button does not need to recharge.
To the left of the inventory is the journal, which keeps track of important information you find. Check the journal to find codes and hints to puzzle solutions you may have found. When a new journal entry is made, the journal will open while the new information is being written down. If there is any information in the journal that you haven’t looked at yet, the journal will glow slightly.
Occasionally you will need to solve puzzles. Click the question mark in the top left of a puzzle to get the instructions. Puzzles cannot be reset, unfortunately – even when you close a puzzle and come back to it later, it will remain unchanged.
About this Walkthrough
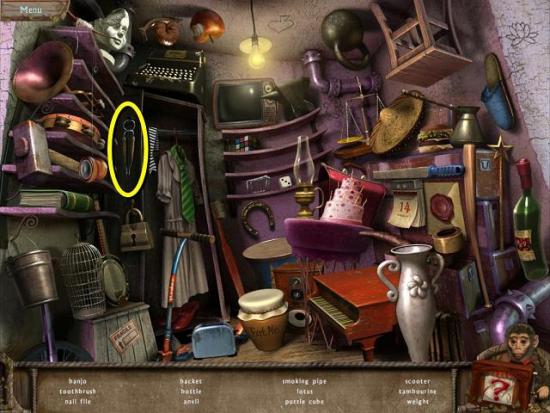
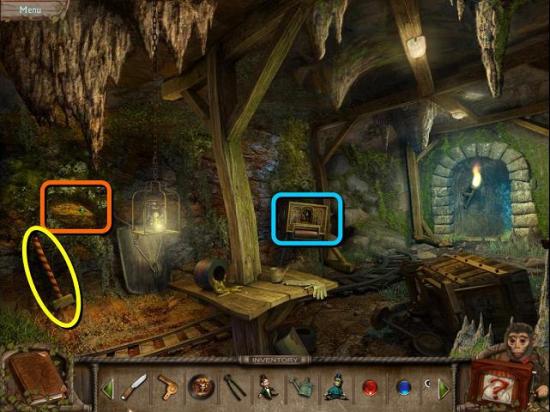
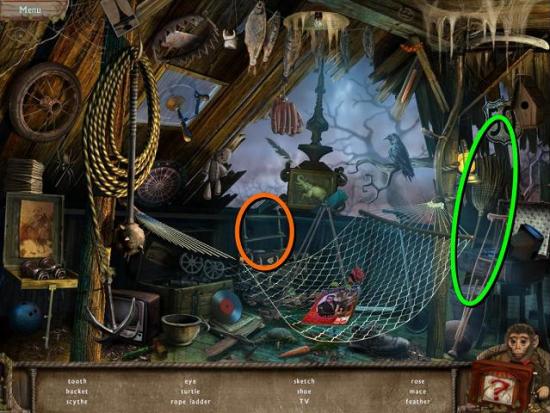
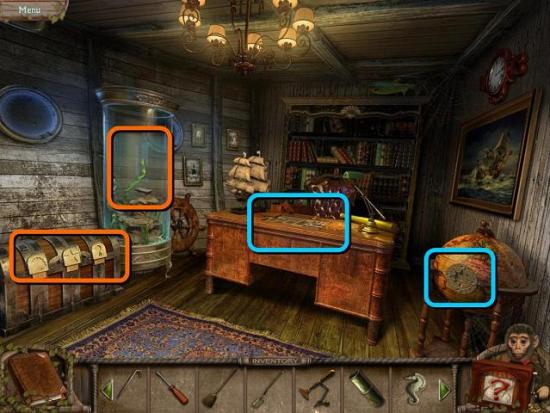
Screen shots will be provided for each new area you get to. Objects that can be picked up to go into your inventory will be circled in yellow. Areas that can be interacted with on the first visit to a new scene will be outlined in orange. Areas that can be interacted with later, once you have found new objects or information, will be
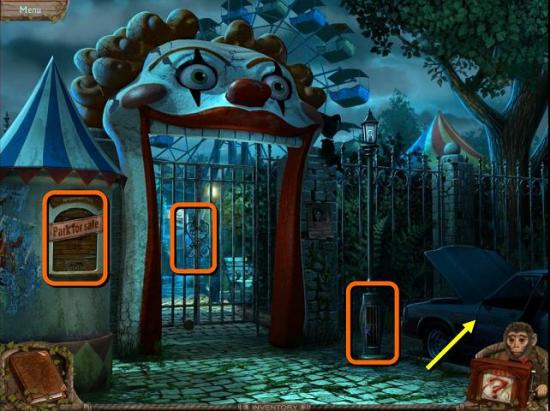
Walkthrough – Part 1

- Zoom in on the ticket booth
- Click on the ‘Park for Sale’ sign to tear it down
- Underneath is a KEY. Click on it to put it in your inventory, then take the KEY out of your inventory and use it on the lock
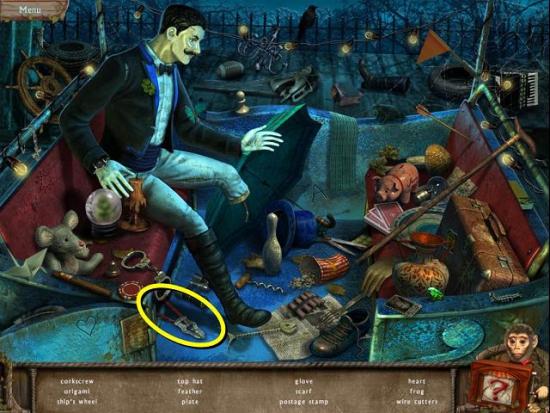
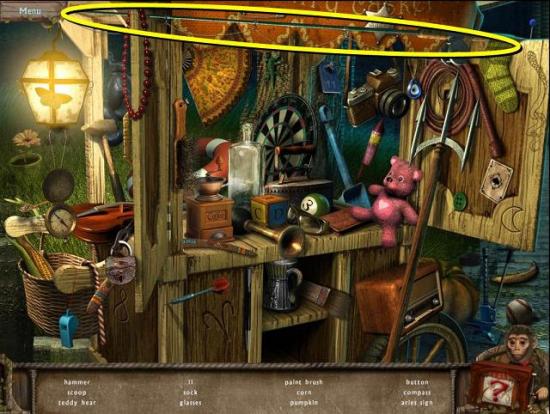
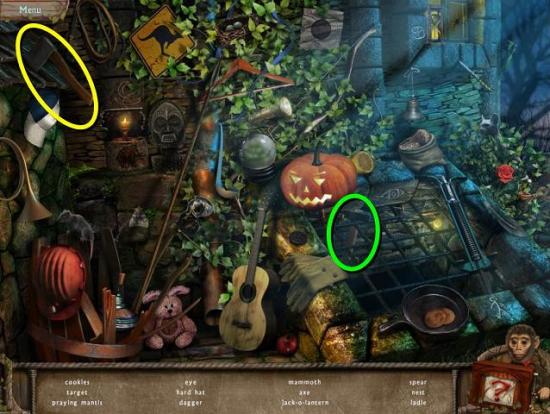
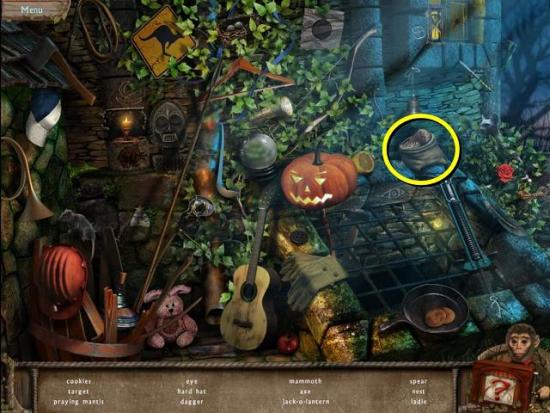
- Click on the now open ticket window for your first HOS. Find the TAPE
- Zoom in on the broken wires at the base of the lamp post and us the TAPE to fix them
- Zoom in on the car and first click on the front door
- Take the SLEGEHAMMER from the back seat
- Click the down arrow to go to the front seat
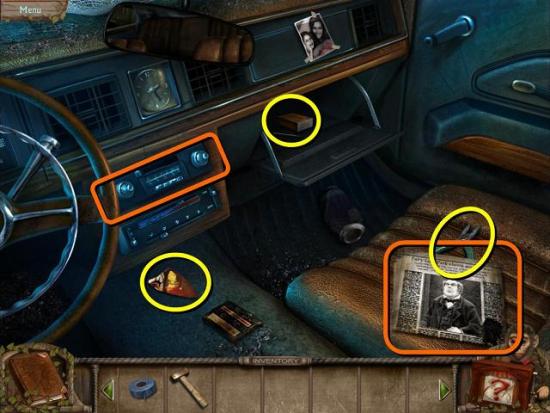
- Click on the newspaper and read it. Underneath it is a pair of PLIERS
- Open the glove compartment to find MATCHES
- Click on the radio. It will spew out a broken tape you can’t pick up and the first piece of the Broken Tune, which you can pick up
- Back out of the car and now zoom in on the trunk of the car
- Use the PLIERS on the broken key to open the trunk
- Light the torch inside the trunk with your MATCHES and then take out the TORCH
- You can also zoom in on the hood of the car, but you can’t take the battery and fan belt just yet
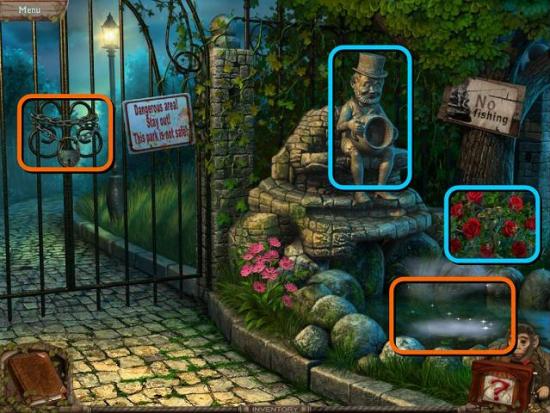
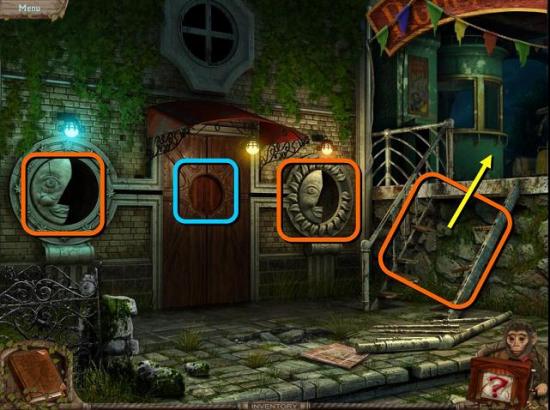
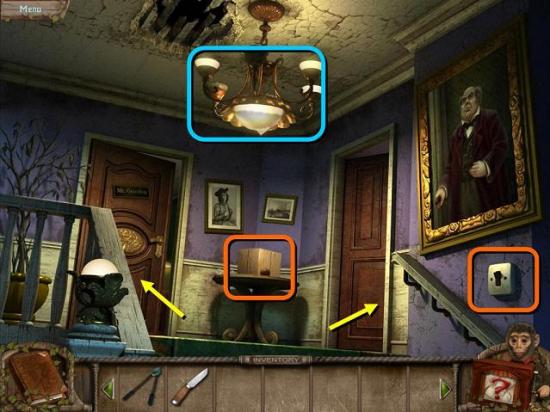
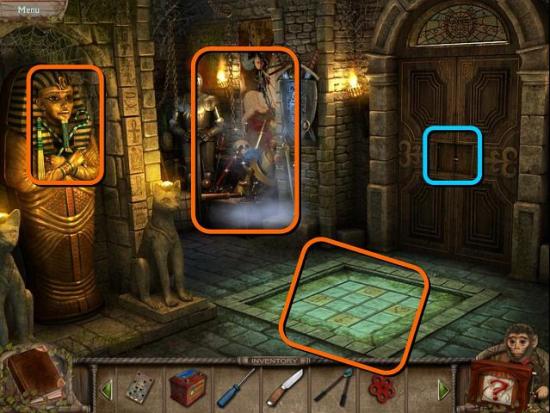
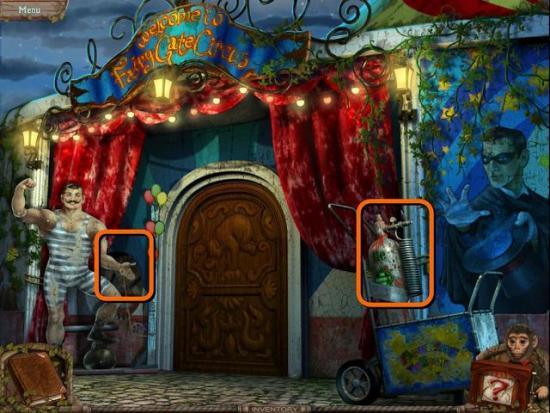
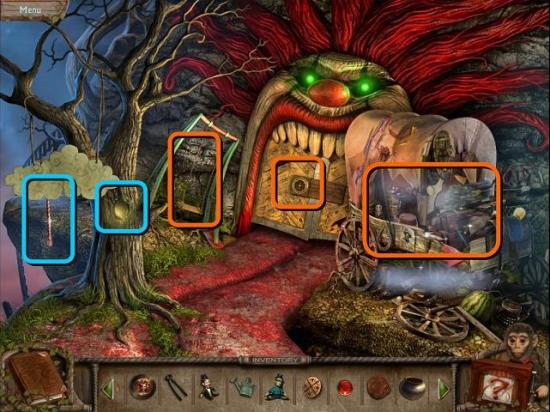
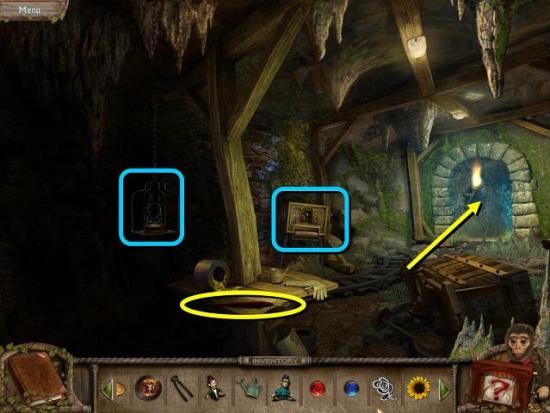
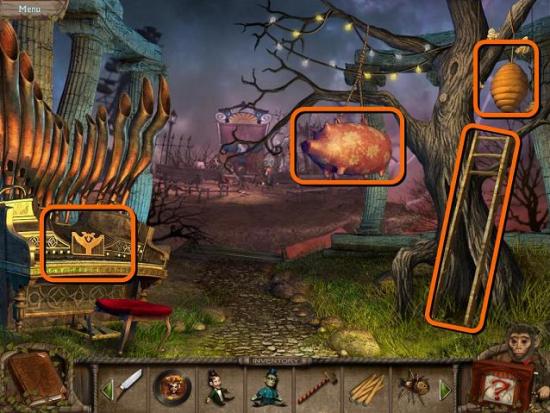
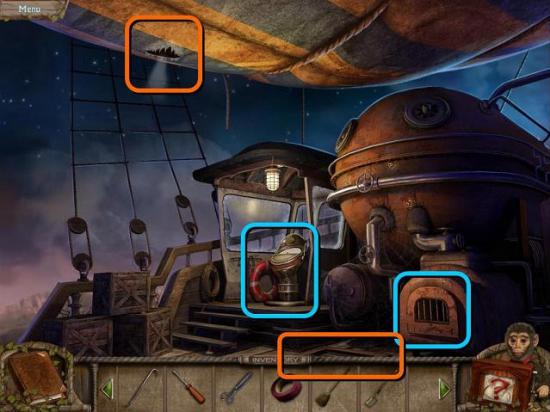
- Back out to the first scene and zoom in on the gate
- Use the TORCH to heat the chain on the gate, then break it with the SLEDGEHAMMER
- Go through the gate
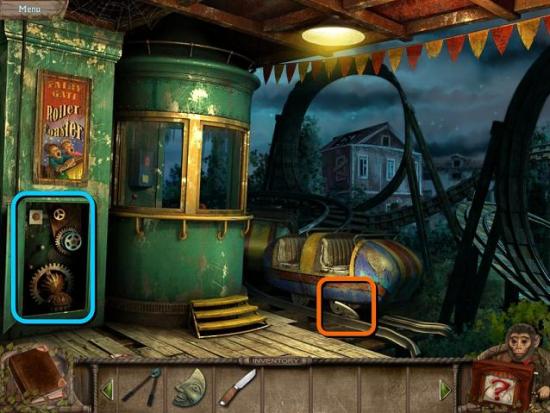
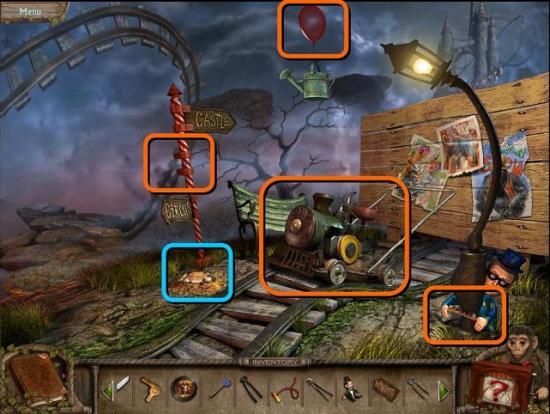
The Ferris Wheel
- There is nothing do on the main square right now, so first go right to the Ferris wheel
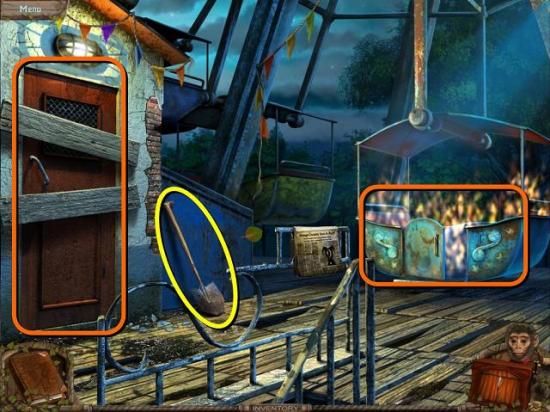
- At the base of the Ferris wheel, pick up the SHOVEL
- Back out to the main square and zoom in on the bench in the distance
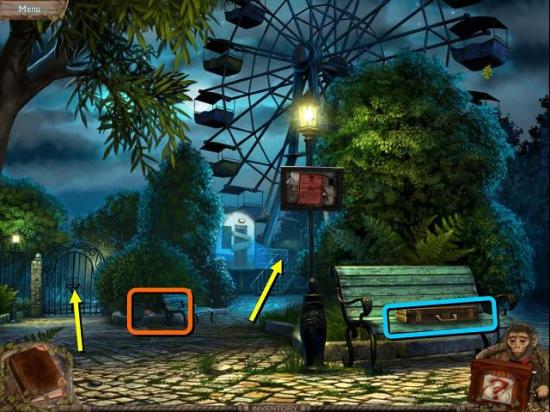
- Use the SHOVEL to dig up the case with the FIRE EXTINGUISHER
- Go back to the Ferris wheel and use the FIRE EXTINGUISHER on the burning car
- Zoom in on the car and pick up the CROWBAR
- Use the CROWBAR to remove the PLANKS from the door
- You can go inside and explore if you like, but there’s nothing to do there right now
- Back out to the main square and go through the gate on the left
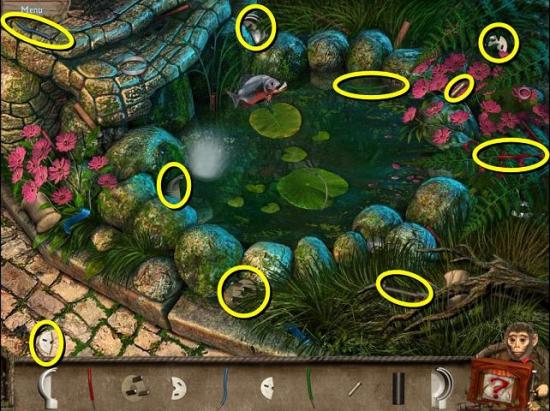
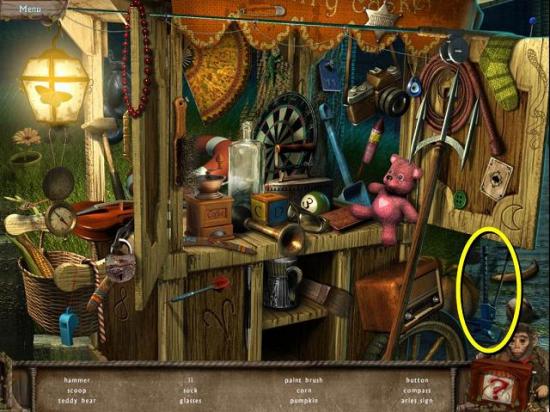
The Fishing Pond
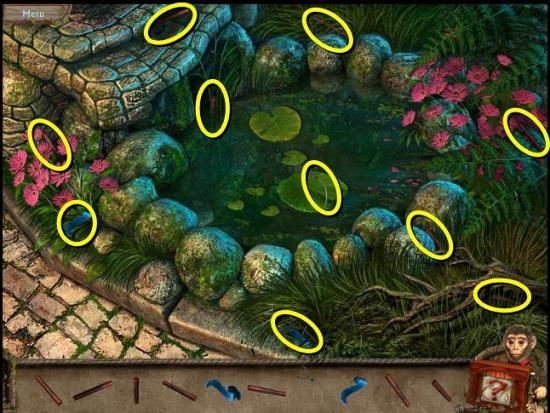
- Zoom in on the fishing pond for a different kind of HOS. You need to find the items shown at the bottom. Note that they can appear rotated from the example image at the bottom. When you’re done, you will get a PLUG
- Go back to the Ferris wheel and go into the cabin
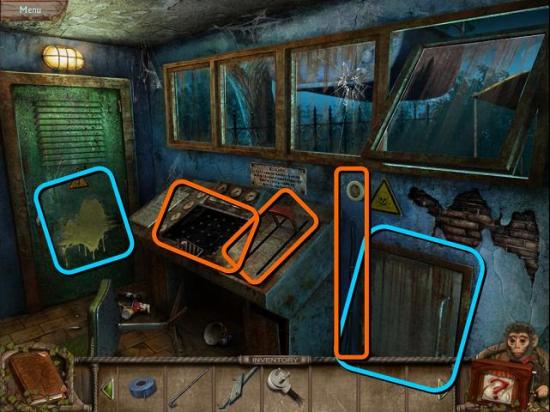
- Zoom in on the wall socket beside the control unit, place the PLUG in the socket and use the TAPE to connect the wires
- Now zoom in on the control panel. You need to light all the lamps in an unbroken sequence, starting at the bottom and ending with the green one in the top right

- Pull the lever and exit the cabin
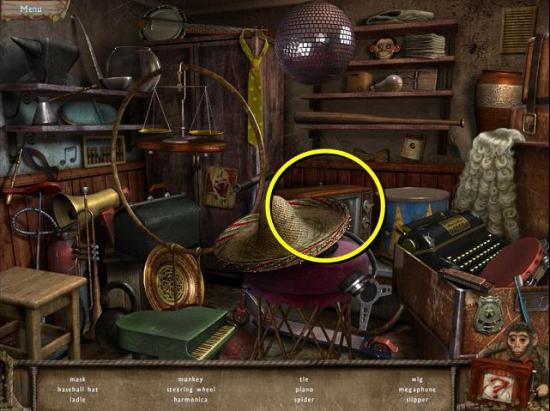
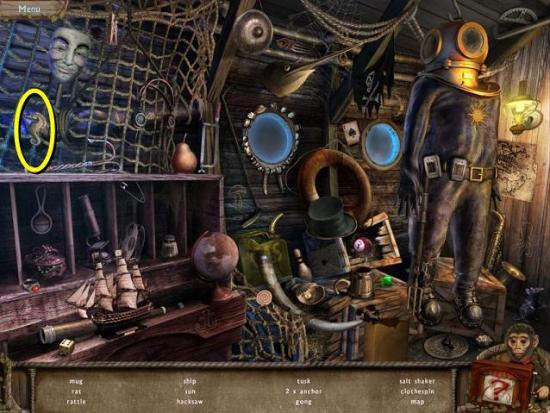
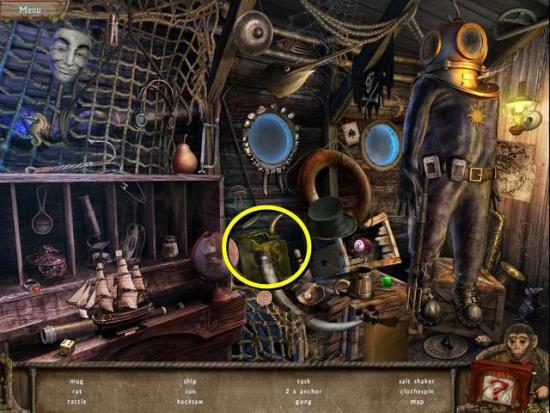
- Zoom in on the car with the mannequin for a new HOS. Find the WIRE CUTTERS
- Go back to the fishing pond and use the WIRE CUTTERS on the chains on the gate
- Go through the gate to the carousel
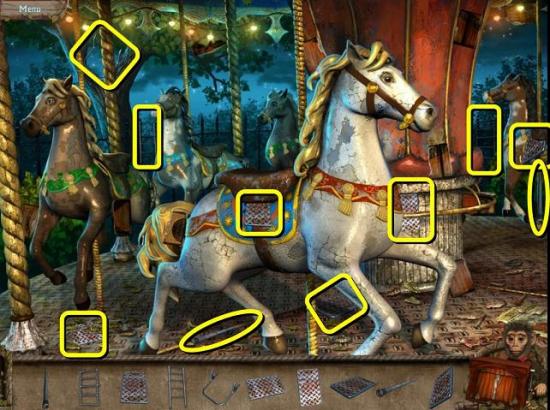
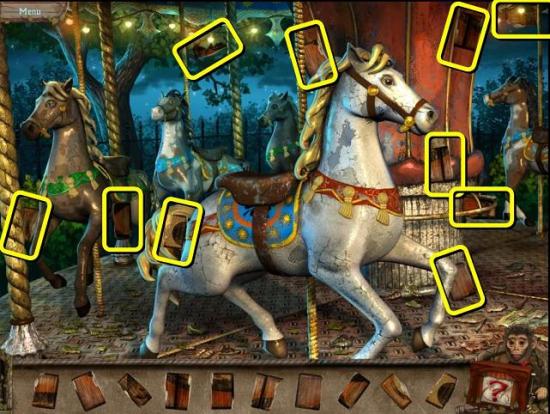
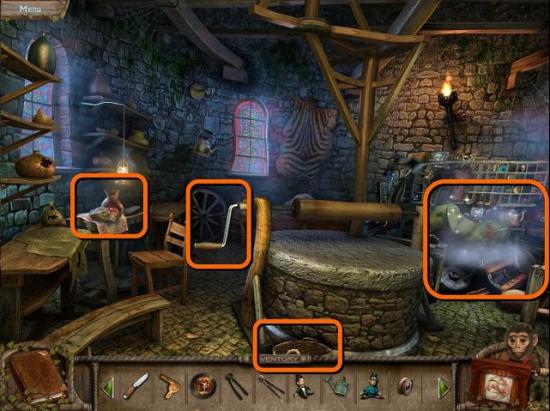
The Carousel
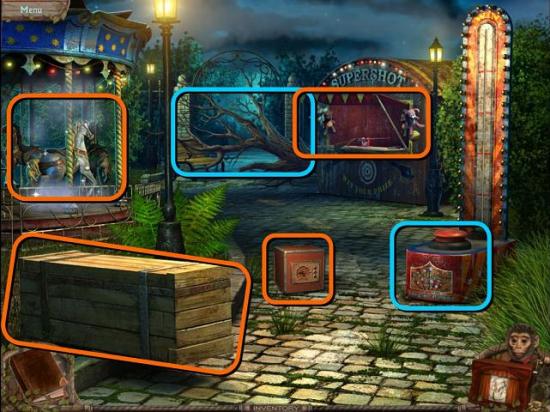
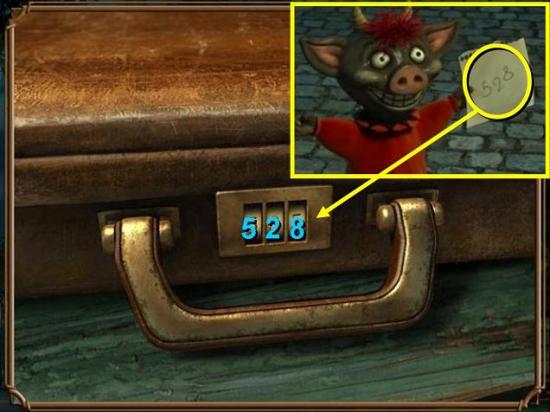
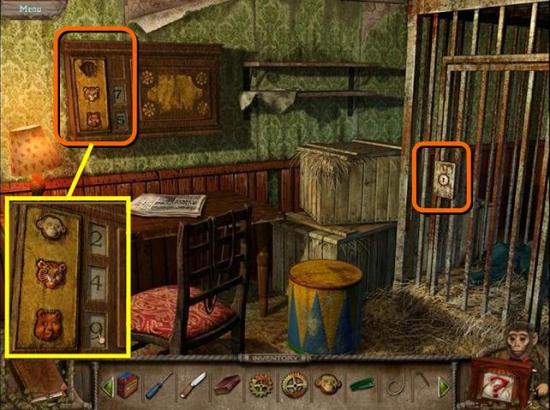
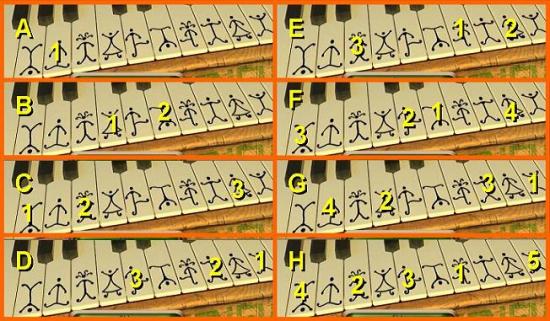
- Zoom in on the red Jack-in-the-box and play the puzzle to open. You need to click on the buttons on the right to rotate the three hands to their correct position. Each button moves a different pair of hands. The fastest solution is to click the III/I button 4 times, so the I hand is in the correct spot, and then clicking the II/III button once
- Inside the Jack-in-the-box is a puppet holding a note with a code saying 528
- Open the big crate at the front with the CROWBAR. Inside it is a chainsaw, but you need to put gas in it before you can use it
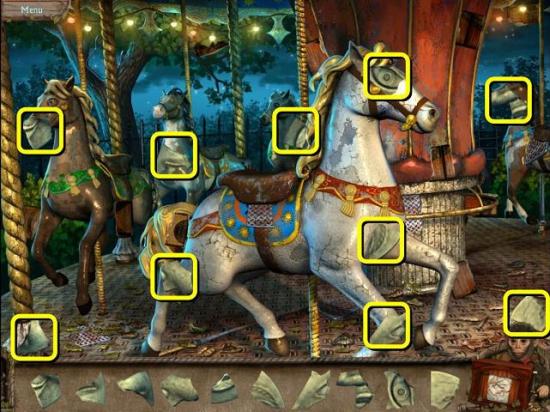
- Zoom in on the carousel to find the 10 pieces of the FACE FRAGMENT
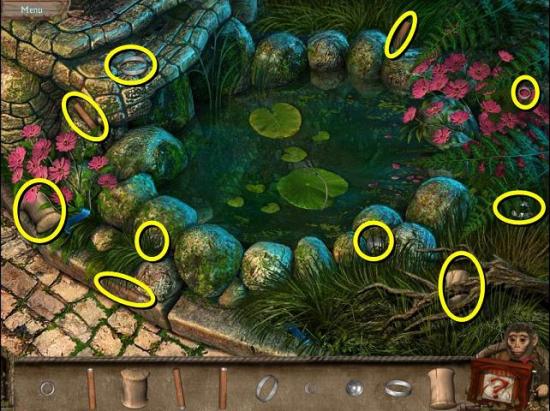
- Go back one screen to the fishing pond, zoom in on the pond and find the 10 pieces of a HAMMER
- Go back one screen to the main square and zoom in on the briefcase on the bench. Enter the code 528. Inside is a flashlight that needs batteries
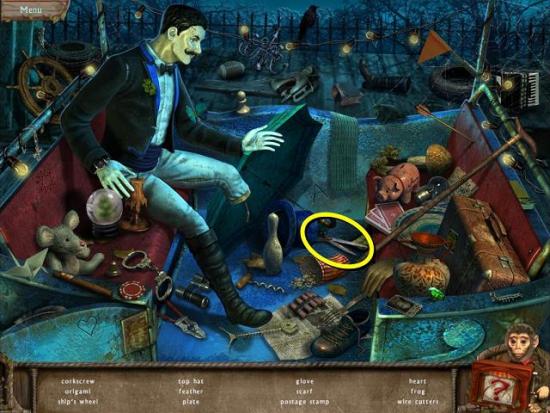
- Go back to the Ferris wheel and play the new HOS in the car with the mannequin. Find the BULLETS

- Go back to the carousel and zoom in on the Supershot in the back
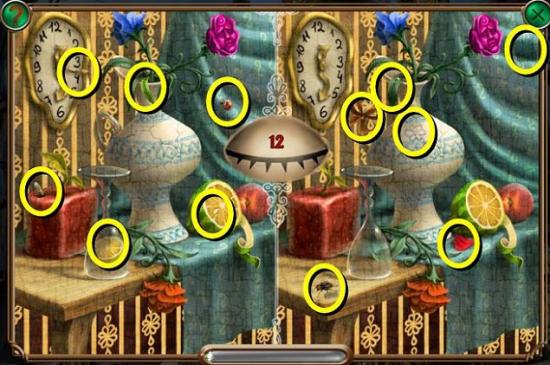
- Pick up the PARTY FAVOR
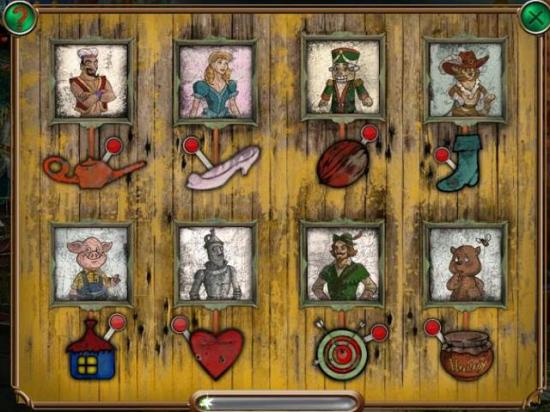
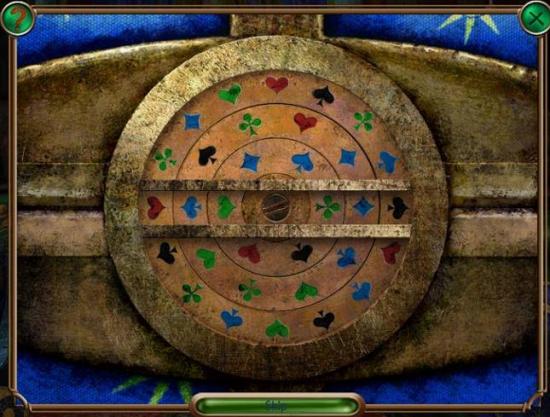
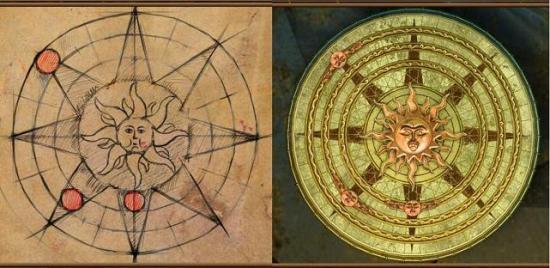
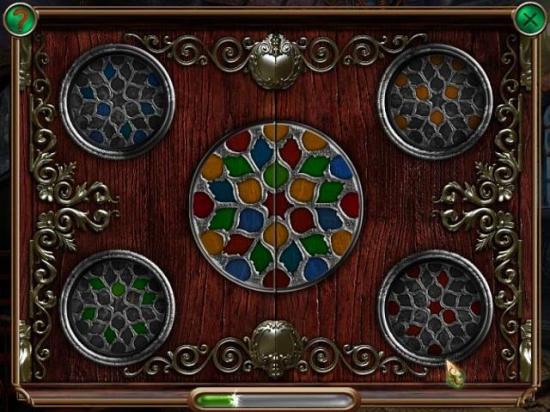
- Put the BULLETS in the gun and click on the gun again for a puzzle. You need to shoot the target that’s related to the picture above it. Each round there is only one target that matches. If you shoot the correct one, the picture you shot will be fixed in place and the remaining pictures will scramble and reveal one other correct pair. The pairs are shown in the image below. Please note that the image shows all the correct answers, but the answers will only appear one at a time
- Click on the toy monkey you get as a prize and take the BATTERY out of its back
- Use the HAMMER to hit the King of Power and take the OILER from the compartment that opens
- Go back to the briefcase on the bench in the main square and put the BATTERY in the flashlight and take the FLASHLIGHT
- Now go back to the Ferris wheel and into the cabin
- Use the OILER to oil the hinges of the rusty hatch next to the control panel
- Zoom in on the hatch and use the FLASHLIGHT to look inside
- Find the GAS CAN
- Go back to the carousel and zoom in on the big crate. If you haven’t opened it yet, open it with the CROWBAR. Use the GAS CAN to fill the chainsaw with gas, then take the CHAINSAW. Also take the second piece of the Broken Tune
- Zoom in on the fallen tree in the back and cut it up with the CHAINSAW
- Go through the arch to the circus square
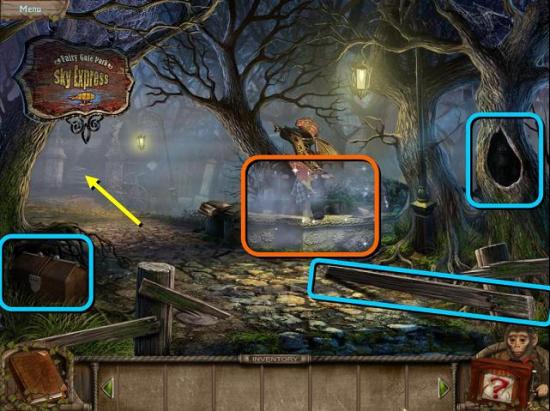
The Circus Square
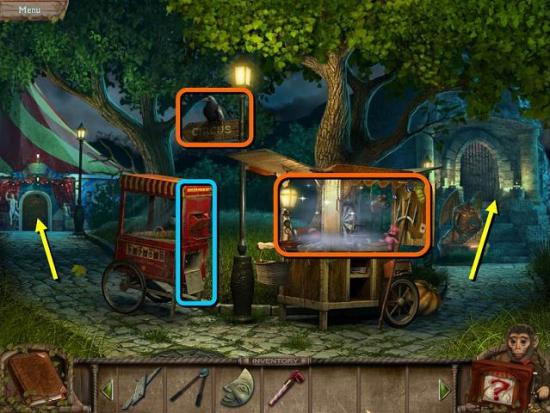
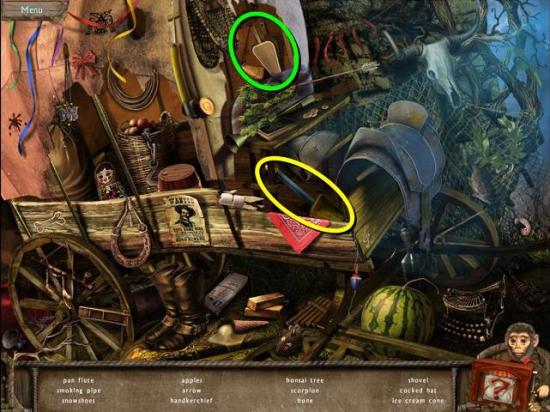
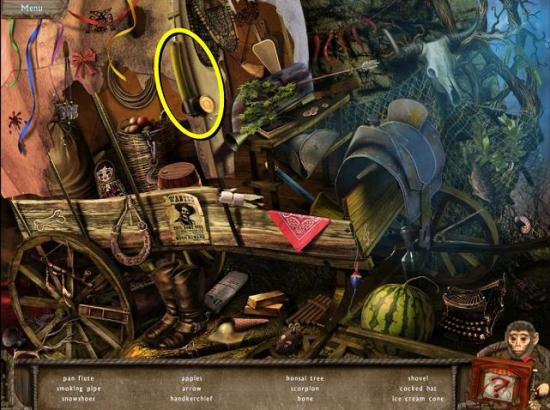
- Zoom in on the cart for a HOS. Find the HAMMER

- Zoom in on the crow and use the PARTY FAVOR to scare it away
- Zoom in on the signpost again to find a star map, which will go into your journal
- Go right to the fairy gate
The Fairy Gate
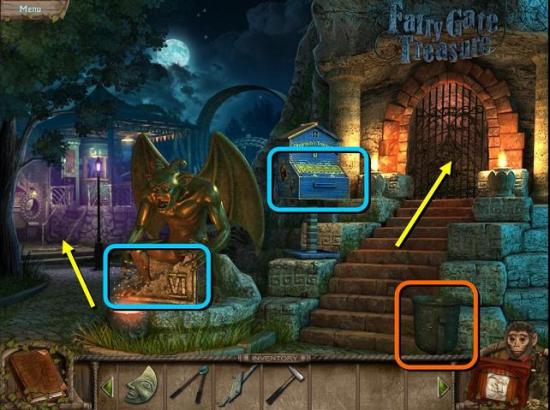
- All you can do here right now is tip over the trash can to find a KNIFE
- Go left to the rollercoaster
The Rollercoaster
- Put the FACE FRAGMENT on the half face on the right
- Zoom in on the broken ladder and fix it with the PLANKS
- Use the HAMMER to fix them in place
- Go up to the rollercoaster and click on the car. Something is stuck underneath it
- Go back to the circus square and play the HOS in the cart again to find the CAR JACK
- Go back to the rollercoaster, zoom in on the car and put the CAR JACK underneath it to find another FACE FRAGMENT
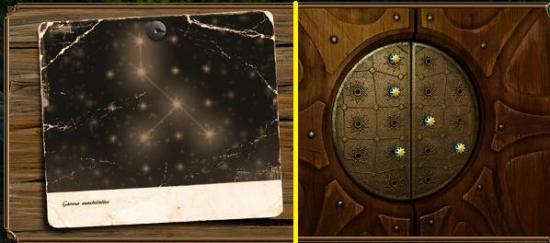
- Go back one screen and place the FACE FRAGMENT on the half face on the left
- Now zoom in on the door and move the blue stars to make the constellation you found on the star map the crow revealed
- Go through the door into the office building
The Office Building
- Switch on the light with the switch on the right and once again watch the Joker scuttle away
- Zoom in on the box on the table and open it with the KNIFE
- Inside is a bag of CORN and the third piece of the Broken Tune
- Go into the office on the left
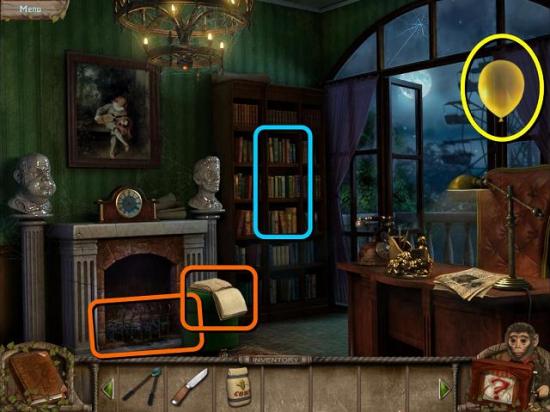
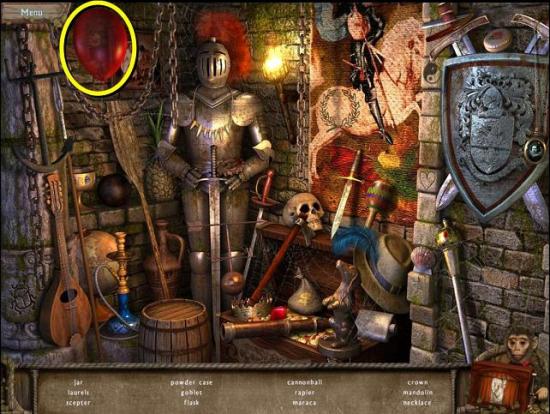
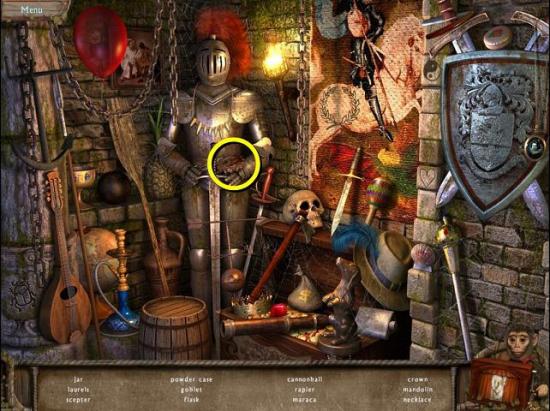
- Take the yellow BALLOON
- Zoom in on the book on the stool to find out that the Joker is really a demon named Loki
- Zoom in on the fireplace to find the fourth piece of the Broken Tune
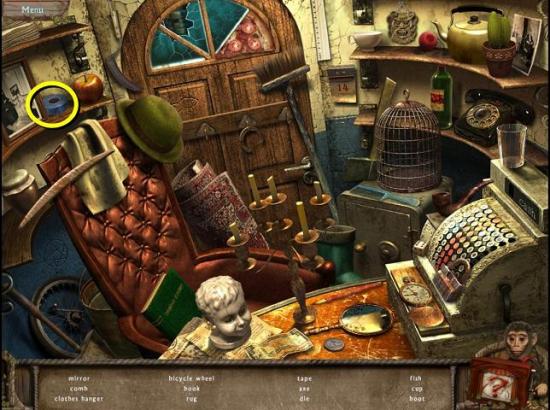
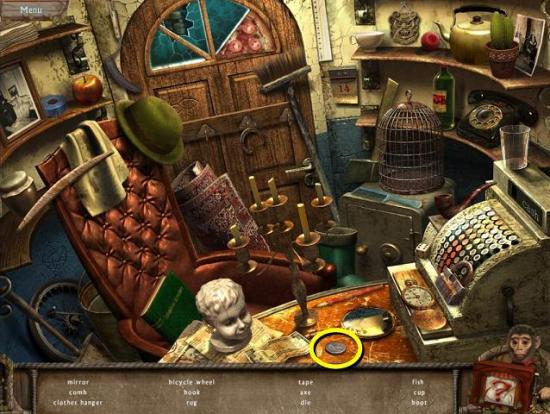
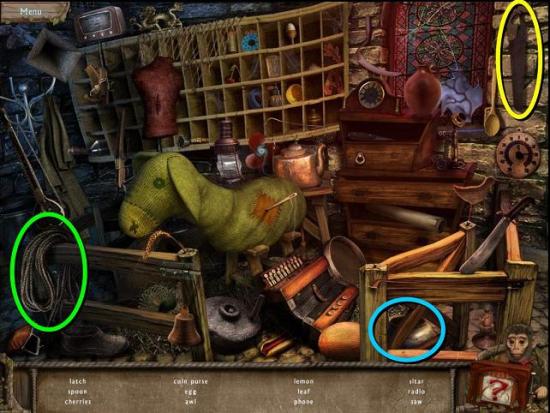
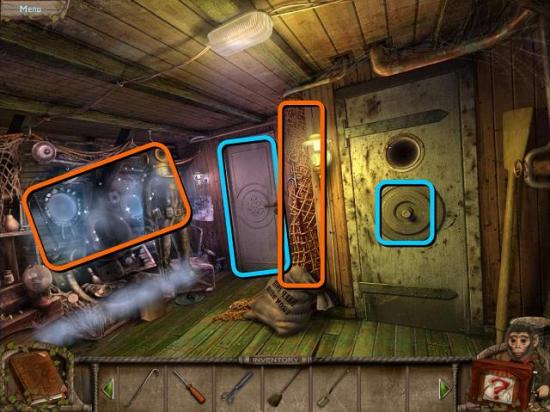
- Back out to the hallway and go into the store room on the right
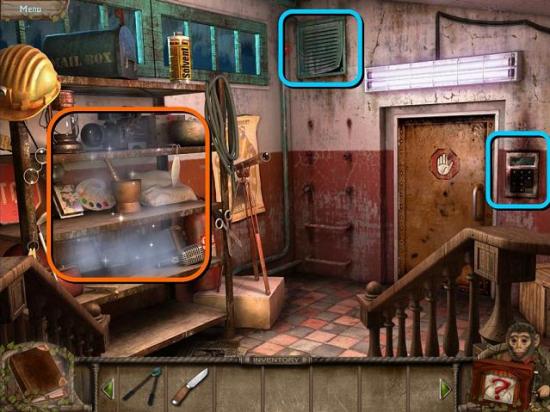
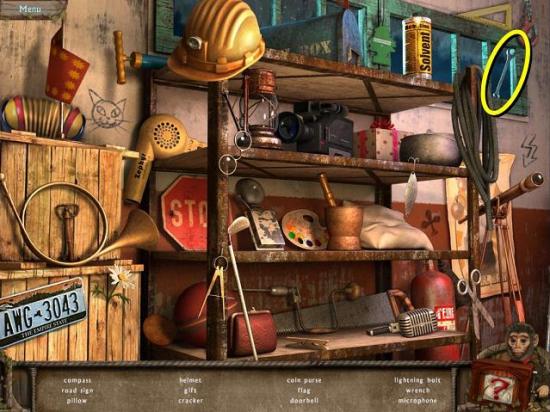
- Play the HOS on the shelves to find a WRENCH
- Back all the way out to the circus square and once again play the HOS in the cart, this time looking for a FISHING ROD
- Now zoom in on the popcorn cart. You can put the CORN in it now, if you like, but you need to find a battery. So back all the way out to the ticket booth and zoom in on the car
- Go to the hood of the car and take out the BATTERY with the WRENCH
- Play the HOS in the ticket booth and find the COIN
- Move on to the carousel and play the HOS to find the 10 pieces of the LADDER
- Go to the popcorn cart in the circus square, place the BATTERY, hit the blue button and watch the thing explode
- Zoom back in and pick up the MAGNET
- Make sure to pick up the BATTERY again
- Back out to the fishing pond, place the FISHING ROD in the gnome’s hand and put the MAGNET at the end of it
- Take the SCREWDRIVER the gnome fishes out for you
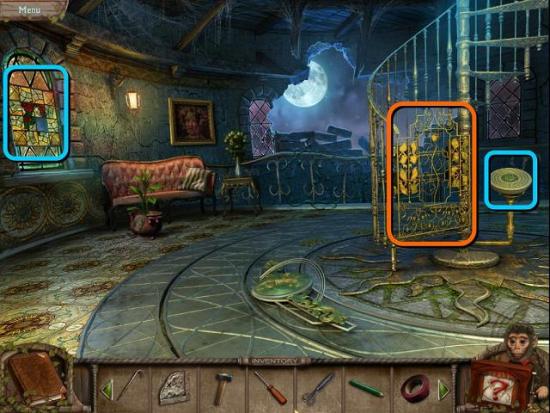
- Go forward to the Fairy Gate and zoom in on the blue Pharaoh’s Castle
- Put the COIN in the slot and click on the pictures that appear for a puzzle. You need to click the buttons at the bottom to move the picture fragments to their correct places. The quickest way to solve it is to click right, right, left, right, right
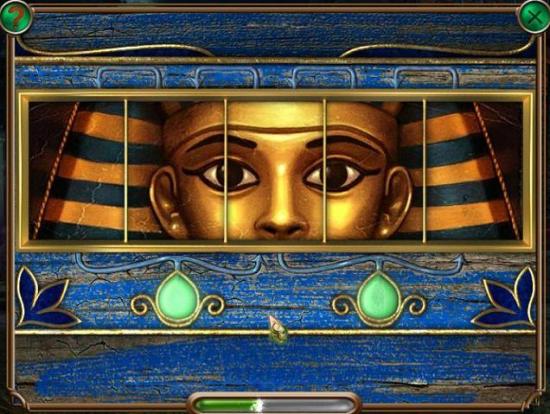
- You will get a PLASTIC CARD as a reward
- Go left towards the rollercoaster and enter the office building
- Go into the storage room on the right
- Put the LADDER under the vent in the wall and zoom in on the vent
- Use the SCREWDRIVER to undo the screws
- Take the GUN from the vent and use the WRENCH to take off the VALVE
- Back out to the hallway and shoot the lamp with the GUN
- Pick up the STONE FRAGMENT
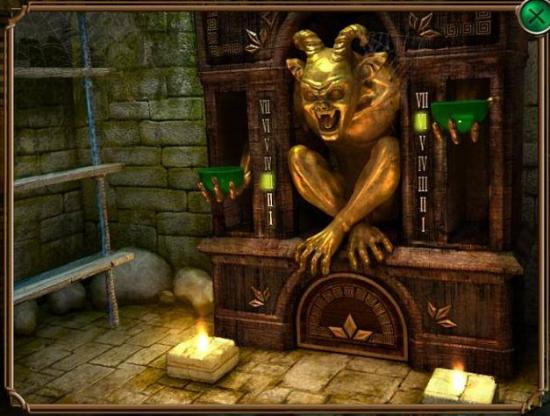
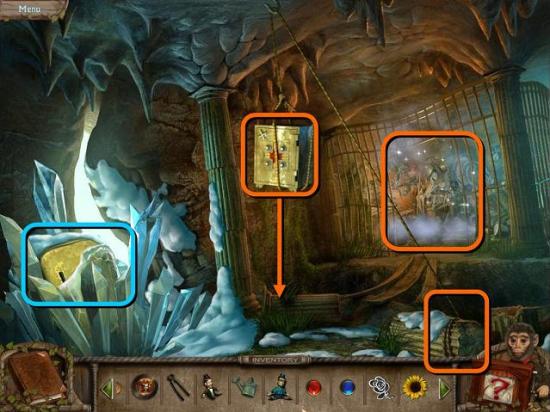
- Back out two screens to the Fairy Gate and place the STONE FRAGMENT on the broken plaque under the gargoyle. Note that the plaque says III/VI
- Enter the fairy gate treasure cave
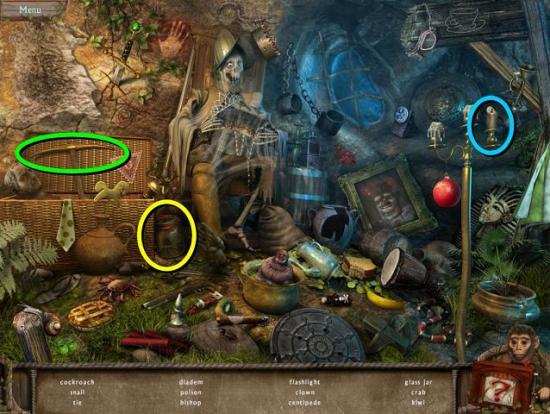
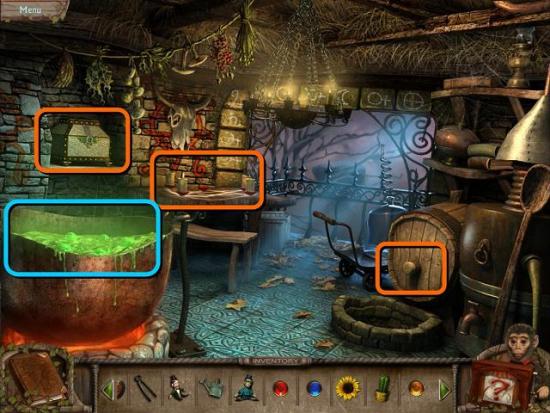
The Treasure Cave
- Play the HOS to find a FLASK

- Zoom in on the sarcophagus, click on its mouth to open it and enter the PLASTIC CARD
- Zoom in on the mummy and take the MAGIC STONE
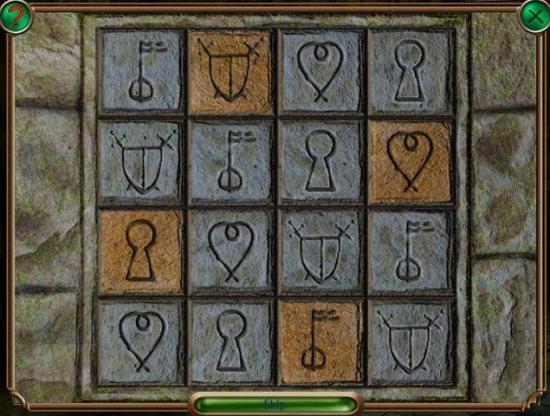
- Click on the floor panel to get a puzzle. You need to change the symbols so that all rows and columns only contain one of each symbol. The yellow symbols cannot be changed
- Go down the hole and take the DEFLATED BALLOON from the ladder on the left
- Back out to the carousel and play another HOS. This time you need to find the 10 pieces of the PLATE FRAGMENT
- Now go back to the Ferris wheel and play another HOS there. Find the PRUNING SHEARS
- Go back to the fishing pond and cut the roses with the PRUNING SHEARS
- Turn the valve behind the roses and fill up the FLASK under the waterfall to get a FLASK WITH WATER
- Go back to the treasure cave and down the hole in the ground
- Use the FLASK WITH WATER to fill the two green bowls. Keep clicking on the bowls until the one on the left stops at III and the one on the right stops at VI
- Take the other PLATE FRAGMENT from the compartment that opens
- Play the new HOS in the treasure cave to find the red BALLOON
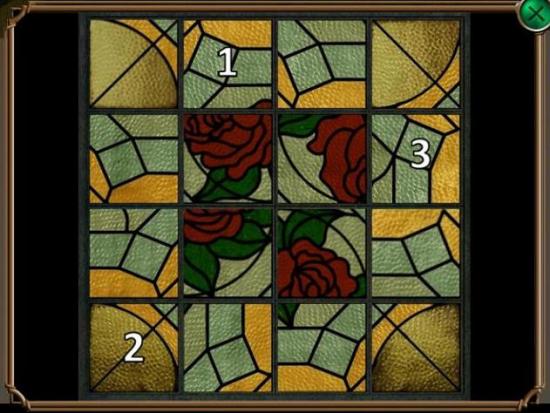
- Now zoom in on the doors and place the two PLATE FRAGMENTS
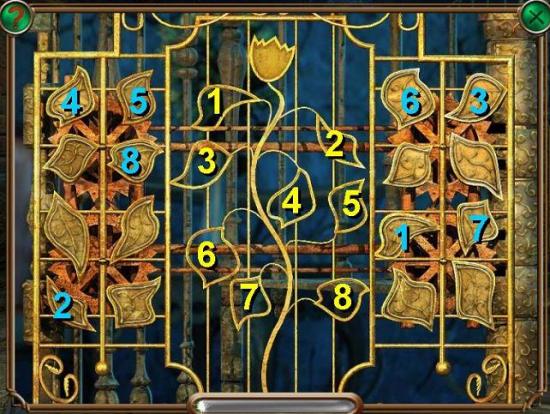
- Click on the door again for a puzzle. You need to turn all the pieces to reveal the image. Clicking on a piece will turn all the pieces around it, but not the piece itself. This is another puzzle I honestly have no idea how to play. If someone has a strategy, let me know!
- Go through the door to the fortune teller’s room
The Fortune Teller’s Room
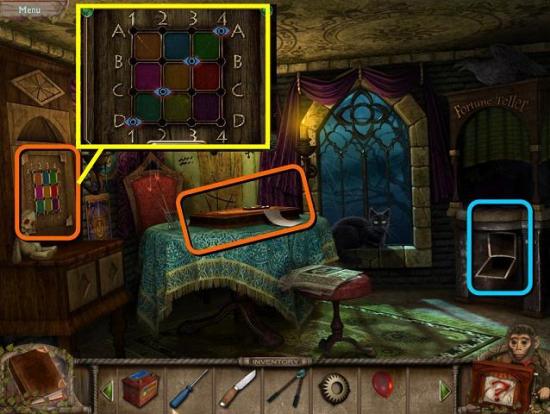
- Zoom in on the Ouija board on the table and place the MAGIC STONE
- The Ouija board will spell out a combination: B3, D1, A4, C2
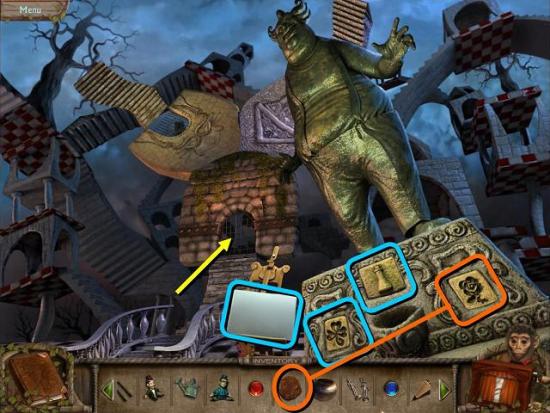
- Now click on the colored panel on the left wall. Move the blue eye pins by clicking on the arrows that appear on the sides to the combination spelled out by the Ouija board. No row or column can contain more than 1 pin at any time, so moving one pin may move others too. Just start at the top and work your way down
- Zoom in on the compartment that opens. Take the BOOK, the THREAD and the fifth piece of the Broken Tune
- Back out to the treasure room and play yet another HOS. This time, find the GEAR
- Back out to the circus square and go left to the circus tent
The Circus Tent
- Put the yellow and red BALLOONS on the strongman on the left
- Zoom in on the helium tank and place the VALVE
- Put the DEFLATED BALLOON on the nozzle and turn the valve to inflate it
- Use the THREAD to tie it off and take the green BALLOON
- Put the green balloon on the strongman and enter the circus tent
- Zoom in on the blue trunk for a puzzle. You need to turn the three discs until only one of each symbol is shown on the horizontal bar
- Inside is another GEAR
- Go through the curtains to the dressing rooms
- Play the HOS in the hallway to get a MONKEY

- Go into the first dressing room on the left
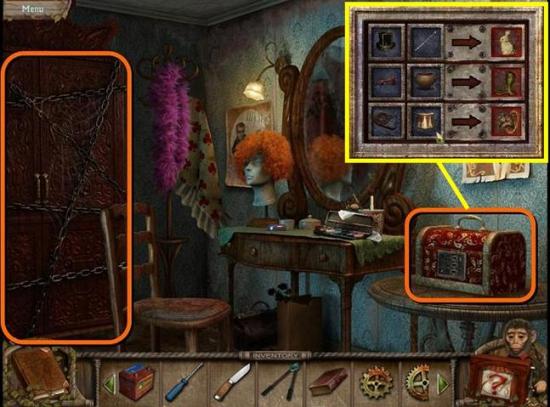
- Click on the red case and open the lock by changing the blue symbols on the left until they relate to the red symbols on the right
- Take the STAPLER from the case
- Take the WIRE CUTTERS you have been lugging around for ages to cut the chains around the cupboard
- Zoom in on the bottom of the cupboard and take out the sixth piece of the Broken Tune and the FIRE POKER
- Use your KNIFE to cut the fuse on the rocket
- Back out of the room. We can go to the back of the corridor later, now first back all the way out to the car at the start
- Zoom in on the hood and use the STAPLER on the ENGINE BELT and take it out
- You can put the BATTERY back under the hood now, if you like, as you will need to do that later
- Now go back into the park and make your way to the rollercoaster
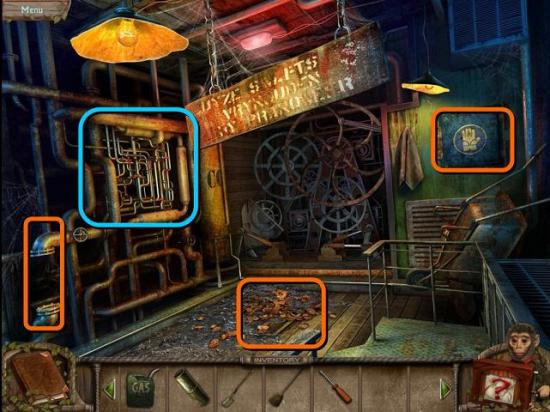
- Zoom in on the mechanism on the left and place the two GEARS and the ENGINE BELT, then hit the red button
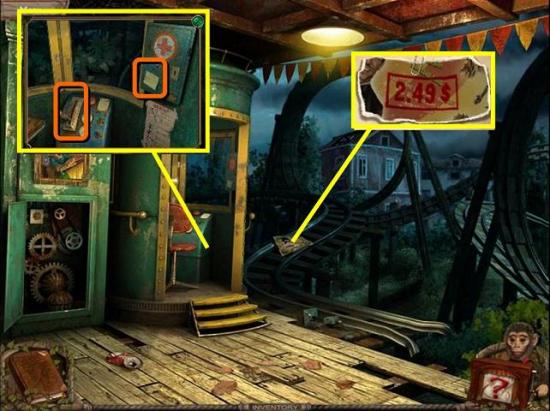
- Go into the control booth and check out the note on the medicine cabinet. It says the code to the safe is the same as the price of a ticket
- Pull the lever
- Zoom in on the poster on the rails and get the code 2.49. Also pick up the seventh piece of the Broken Tune
- Go back to the circus tent and go to the back of the corridor
- Zoom in on the safe on the wall and place the MONKEY
- Enter the code 249
- Inside the safe are a KEY, and AUDIO TAPE and the eight piece of the Broken Tune
- Back out to the fishing pond and play another HOS. Find the 10 pieces of the DYNAMITE (great idea to keep dynamite in water)
- Back further out to the car and go inside. Play the AUDIO TAPE. All it says is the word “greed”
- Go back to the circus square, go right to the fairy gate and on to the control booth of the rollercoaster
- Open the medicine cabinet with the KEY and take out the SMELLING SALTS and the ninth piece of the Broken Tune
- Go into the office building, enter the office on the left and zoom in on the fire grate
- Use the FIRE POKER to dig around in the ashes and find a STENCIL
- Zoom in on the book case and place the BOOK
- Behind the books is a safe that needs a code word to open, so enter “greed”
- Inside the safe are a LIGHTER and the tenth piece of the Broken Tune
- Back out and go right into the storage room
- Play the HOS for a HAIRDRYER

- Zoom in on the door, place the DYNAMITE behind the handle, dry it with the HAIRDRYER and then light it with the LIGHTER
- Zoom in on the room behind the door and pick up the eleventh piece of the Broken Tune
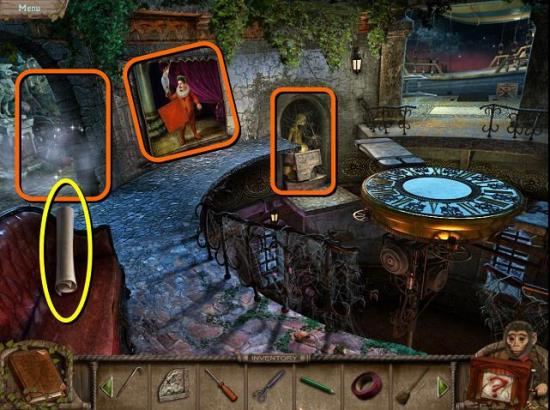
Rescue John
- Now go back to the circus tent and place the FUSE on the cannon, if you haven’t already done so
- Light the fuse with the LIGHTER
- Pick up the twelfth piece of the Broken Tune and another KEY
- Go into the corridor and to the room at the back
- Open the locked gate with the KEY you just found and pick up the thirteenth piece of the Broken Tune, the TICKET and the DOOR HANDLE
- Go back into the corridor and zoom in on the closed door in the middle, which is Louis Gauche’s dressing room
- Place the DOOR HANDLE on the door, open the door and go in
- You’ve found John!!
- Zoom in on the record player on the left and pick up the RAG
- Zoom in on the dresser and use the SCREWDRIVER to take off the bottom HANDLE
- Place the HANDLE on the top drawer and open the drawer
- Get the KEY, the GRAMMOPHONE NEEDLE and the fourteenth piece of the Broken Tune
- Revive John with the SMELLING SALTS
- Cut the ropes on his arms with the KNIFE, zoom in on the shackles on his legs and unlock them with the KEY you just found
- Take the VIDEOTAPE John left behind
- Back out to the corridor and play the HOS for a TV
- Go back to the office building and into the storage room
- Zoom in on the back door, replace the TV and play the VIDEOTAPE
- When you’re done, a new HOS will appear. Find the SOLVENT
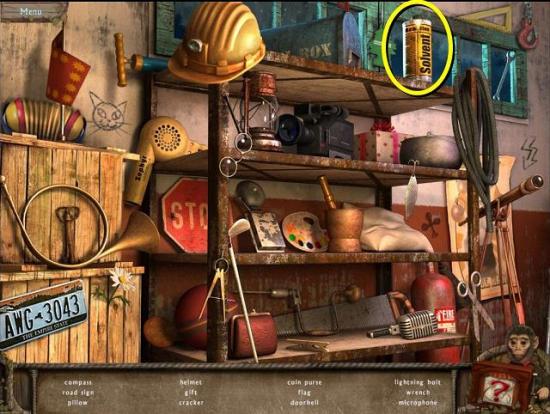
- Back all the way out to the main square and go back to the control cabin by the Ferris wheel
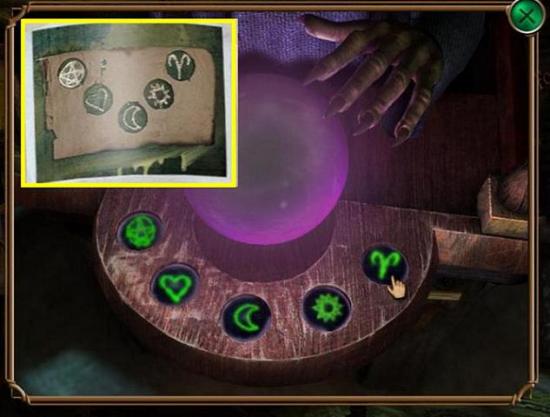
- Zoom in on the door in the back and use the SOLVENT and the RAG to reveal symbols
- Place the STENCIL on the symbols to get a specific sequence of five symbols: pentagram, heart, moon, sun, Aries
- Go to the fortune teller’s room at the back of the treasure cave
- Zoom in on the booth on the right and enter the TICKET
- Zoom in on the crystal ball. Enter the symbols you found on the door
- Take the fifteenth and final piece of the Broken Tune from the compartment that opens and get a RECORD
- Go back to Louis Gauche’s dressing room at the back of the circus tent
- Zoom in on the record player and place the GRAMMOPHONE NEEDLE
- Place the RECORD and turn the handle to play
- The RECORD will go back into your inventory and a portal will open
- Go through the portal
Through the Portal
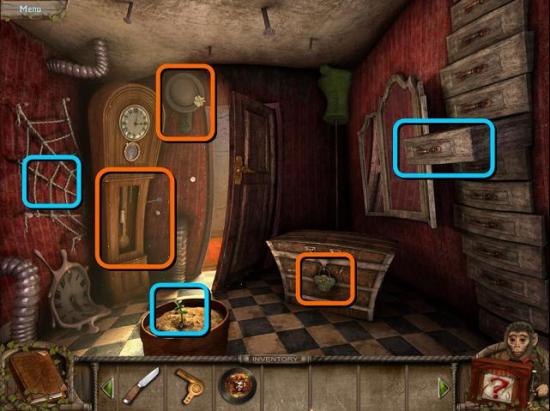
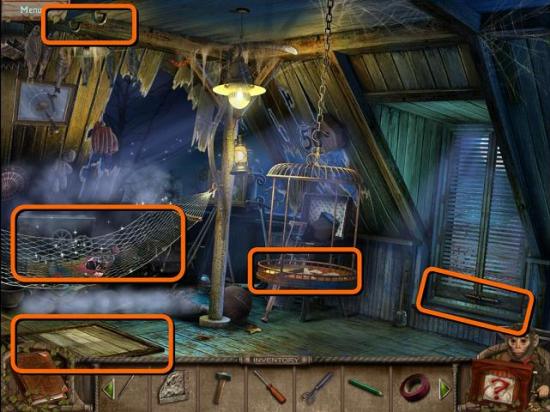
- Zoom in on the clock and take the DART
- Click on the hat hanging on the wall. It will fall off and reveal a SCRUB BRUSH
- Zoom in on the trunk and use the SCRUB BRUSH to clean the lock
- Go through the door

- Play the HOS to find a NAIL FILE

- Zoom in on the grate in the wall and use the NAIL FILE to saw through the bars
- Take the TONGS and the ROPE WITH HANDLE
- Zoom in on the oven mitt on the floor, use the TONGS to take out the nail pinning it down and take the OVEN MITT
- Go back to the grate and use the OVEN MITT to turn the valve
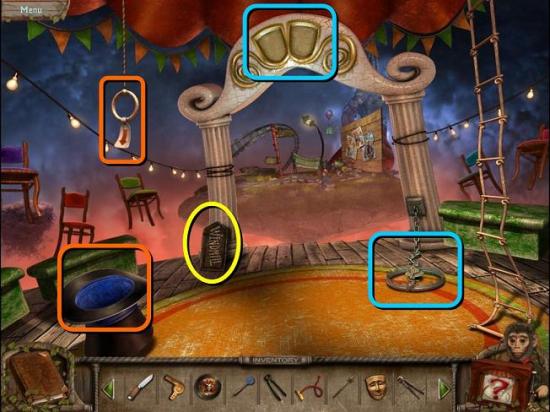
- Play the HOS again for the MAGIC WAND
- Use the KNIFE on the carpet to get the MASK
- Pick up the ADJUSTABLE WRENCH on the right
- Go through the door at the back
- Use the MAGIC WAND on the hat and a snake will come out
- Pull the handle with the arrow and take the SNAKE FLUTE
- Use the SNAKE FLUTE on the snake to get it to sleep
- Use the KNIFE on the snake’s belly and take out the green DOLL
- Pick up the SIGN
- Place the MASK on the archway
- Go back to the previous room and play the HOS to get the TWEEZERS
- Go back into the first room and keep clicking on the drawers until a CANE falls out
- Go to the room with the snake, zoom in on the trap and use the CANE to spring it so you can take the KEY
- Go back to the first room and use the KEY to open the chest
- Inside are another MASK and a WEIGHT for the grandfather clock
- Zoom in on the clock and place the WEIGHT. A spider will come out, but you can’t use it yet
- Go back to the room with the snake, place the second MASK on the arch and walk across the bridge to the railway
The Railway
- Use the DART to pop the red balloon. You will get a WATERING CAN
- Zoom in on the doll by the lamp post. You need to click on the buttons of the flute until they are all down

- When released, take the blue DOLL
- Zoom in on the lawnmower, put the ROPE WITH HANDLE on it and pull the handle to start it
- Then take the LAWNMOWER
- Put the SIGN on the signpost and go west to the windmill
The Windmill

- Mow the tall grass at the base of the scarecrow with the LAWNMOWER
- Pick up the HEART
- Zoom back in on the lawnmower and take of the WHEEL with the ADJUSTABLE WRENCH
- Zoom in on the scarecrow, place the HEART and pull the string
- A KEY will fall on the path, so pick it up
- Zoom in on the door and take the bits of wood out of the lock with the TWEEZERS
- Open the lock with the KEY
- Enter the windmill
- Move the basket on the floor to find a MEDALLION
- Zoom in on the winch handle of the well and use the ADJUSTABLE WRENCH to take off the WINCH HANDLE
- Zoom in on the little table by the window and use the WATERING CAN to moisten the clay
- Take the red GEM and the CLAY
- Play the HOS to get a SAW (yellow)
- Back out and use the SAW to cut through the chain blocking the mill
- Go back inside and play the HOS again for a ROPE (green in previous image)
- Put the ROPE down the well, which has now been opened and go down the well

- Put the WHEEL on the mine cart
- Zoom in on the winch in the back, place the WINCH HANDLE and turn the handle to raise the gate
- Pull the lever to move the cart
- Inspect the oven
- Back out to inside the windmill and play the HOS to find a POT (blue in image above)
- Go back to the railway and now go east to the castle
The Castle
- Zoom in on the HOS in the caravan to find a SHOVEL
- Back out to the railway and use the SHOVEL to dig underneath the signpost
- Open the box to find TIN SOLDIERS and a blue GEM
- Go back to the HOS outside the castle and find the BELLOWS (green in previous picture)
- Zoom in on the swing and use the TONGS to take out the nails and receive the LOGS
- Zoom in on the castle door and place the MEDALLION in the lock
- You now need to turn the black bars until they’re all horizontal. Clicking one bar means you rotate everything in its row and column
- Enter the castle
- Put the CLAY on the rose symbol on the right to make a COPY OF THE ROSE
- Now go all the way back to the windmill and down the well
- Zoom in on the top of the furnace, place the COPY OF THE ROSE on the left and the POT on the stove
- Put the TIN SOLDIERS in the pot
- Now use the BELLOWS on the oven door to fuel the fire
- Go back to the top of the furnace and pick up the pot with the MELTED TIN
- Use the MELTED TIN to fill both molds on the left and pick up the TIN ROSE and TIN CLOVER
- Go back to the area outside the castle and play the HOS to get an INSECT SPRAYER
- Enter the castle and place the TIN CLOVER in its matching indentation
- Go up the stairs
- Take the PAINT BRUSH from the table and go into the room at the back
- Use the KNIFE on the rope (you need to cut close to the ground) to drop the safe
- You need to turn the knobs to move the red pieces to the center. For me the actions were: 1x top left, 1x top right, 1x bottom right, 2x bottom left
- Take out the CACTUS and the yellow GEM
- Play the HOS to find the GLASS JAR
- Back out to the stairs, zoom in on the blank canvas and use the PAINTBRUSH on it
- Zoom in on the painting for a find the differences game
- When you’re done, you will get a green GEM
- Back out to the outside of the castle, zoom in on the hollow tree and use the GLASS JAR on the sleeping elf to get a JAR WITH ELF (poor creature)
- Go back inside and up the stairs revealed by the clover button and place the JAR WITH ELF on the broken lamp on the left
- Pick up the SLEDGEHAMMER
- Go back inside, to the room in the back and play the HOS to get a PICKAXE (green in image above)
- Use the PICKAXE on the ice blocking the fridge
- Open the fridge door and defrost with the HAIRDRYER to get a CORKSCREW
- Back out one room and zoom in on the emerald in the rock
- Use the PICKAXE to take out the EMERALD
- Go back to the back room again and play the HOS again for a CANDLE (blue in the image above)
The Alchemy Lab
- Go back to the stairs, put the TIN ROSE in the rose symbol and go up the new stairs
- Use the CORKSCREW on the barrel and pick up the FLASK
- Zoom in on the chest in the alcove on the left and open it with the EMERALD
- Take out the JOKER FIGURINE
- Zoom in on the table with the candles
- Light your CANDLE from the inventory with the one candle that’s lit, light all the other candles and place your candle at the top
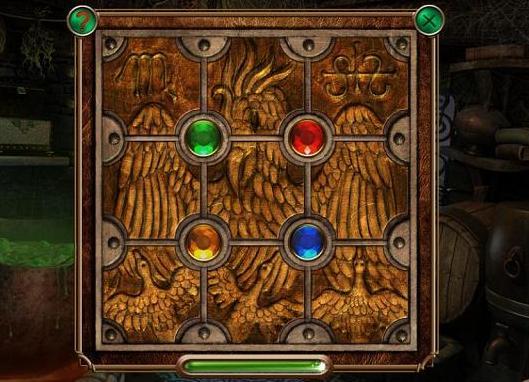
- Zoom in on the book that appears and place the four GEMS you have on the cover
- You now need to restore the image by clicking on the gems. Each gem moves the four blocks around it clockwise. To solve the puzzle quickly, click yellow, yellow, blue, red, green
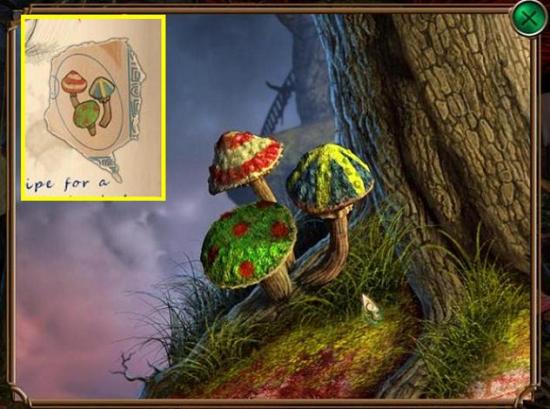
- In the book is a recipe for a potion. You need a rose, a sunflower, mushrooms and a cactus
- Go to the front of the castle, by the caravan, and pull the rope to make it rain
- Zoom in on the mushrooms and click on them to change the colors of their hoods to the colors seen in the recipe (which is in your journal) and take the MUSHROOMS
- Go back to the garden of the windmill, zoom in on the plants on the right and use the INSECT SPRAYER to get a SUNFLOWER
- Back all the way out to the very first room and use the WATERING CAN to grow the rose
- Take the WIND-UP KEY and the ROSE
- Zoom in on the spider on the left wall and use the WIND-UP KEY to get a SPIDER
- Go back to the castle and up the stairs activated by the rose
- Put the ROSE, MUSHROOMS, CACTUS and SUNFLOWER in the cauldron
- Take some of the POTION with your FLASK
- Back out to the stairs and put the POTION in the hole between the rose and the clover
- Go up the new stairs
The Puppet Theater
- Use the SLEDGEHAMMER to break the pig piñata and pick up the TREE FIGURINE
- Use the LOGS to repair the ladder
- Zoom in on the beehive and use the KNIFE to cut it open
- Take out the second JOKER FIGURINE
- Back out and go back up the stairs activated by the clover symbol
- Zoom in on the music box and place the two JOKER FIGURINES and the TREE FIGURINE
- Turn the handle to play the music box and take the MUSICAL NOTES
- Go back out, activate the middle stairs and go up
- Zoom in on the organ and place the MUSICAL NOTES
- Repeat the sequence of notes the organ plays. There are eight sequences. If you make a mistake, you have to start again. The good news is that the sequences are always the same
- Cross the bridge
- Put the SPIDER on the hoop to make a net
- Take the DOLL from the net (you should now have three dolls)
- Zoom in on the puppet theater
- Rotate the four small discs to make an image of a joker
- Zoom in on the theater again and place the three dolls on the hands with a matching color
- After the scene, throw the RECORD at Louis Gauche
- Go through the portal
Collector’s Edition Bonus Chapter
The Fountain
- Play the HOS to find a SICKLE
- Move on to the next scene
The Gate
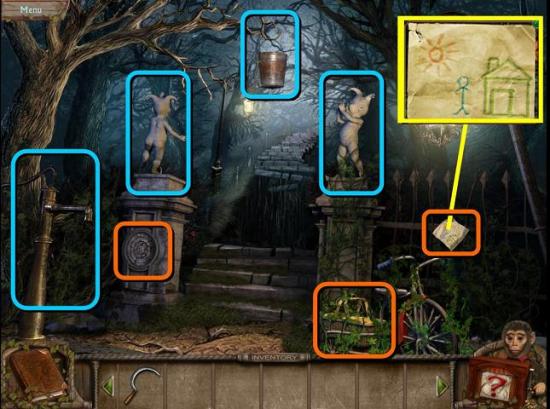
- Zoom in on the bike and use the SICKLE to move the vines
- Open the basket and get a STEAK
- Inspect the note on the fence. It shows a sun, a man and a house
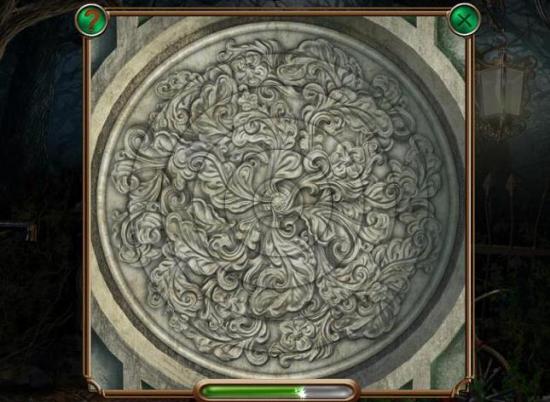
- Zoom in on the base of the statue on the left and do the puzzle
- Take the CAGE
- Go back to the previous scene, zoom in on the hollow tree and give the STEAK to the lynx
- Take the HORSE
- Zoom in on the doctor’s bag by the tree and enter a sun, a man and a house
- Take the HORN out of the opened bag
- Play the HOS in the fountain again and find a CROWBAR
- Use the CROWBAR to get a PLANK off the fence
- Go back to the gate and give the HORSE to the statue on the left and the HORN to the statue on the right
- Go up the steps
The Garden
- Put the PLANK across the gap
- Zoom in on the base of the tree and get the BOOMERANG
- Play the HOS to find an AXE
- Go back to the previous screen and use the BOOMERANG to get the BUCKET down
- Put the BUCKET on the pump and move the handle to get a BUCKET WITH WATER
- Go back to the fire and use the BUCKET WITH WATER to extinguish it
- Use the AXE to cut the fallen tree
- Zoom in on the door and knock three times
- Go into the lighthouse
The Lighthouse
- Zoom in on the window on the right, take the paper with the radio frequency on it
- Zoom in on the window again and use the CROWBAR to take the STONE FRAGMENT
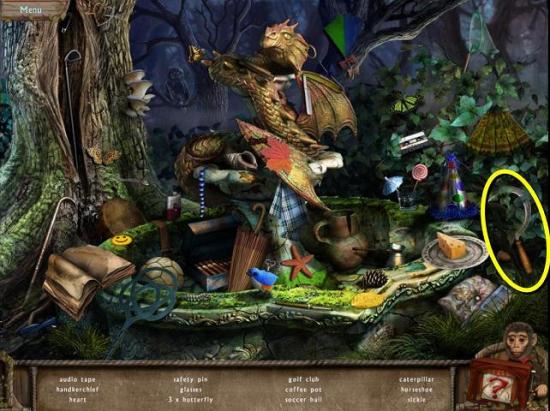
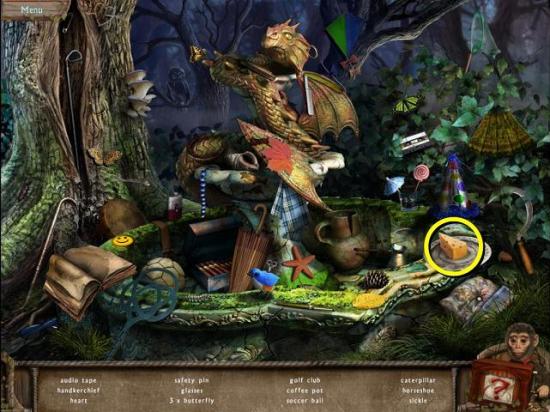
- Back out and play the HOS again. This time find a HAMMER (green in the image above)
- Go back to the fountain at the start and play the HOS again to find the CHEESE
- Go back to the garden outside the lighthouse
- Zoom in on the tree, place the CAGE and put the CHEESE in the cage
- Get a HAMSTER
- Go inside, zoom in on the engine in the back and put the HAMSTER in it
- Go back out and zoom in on the tree trunk with the zeppelin’s anchor and use the AXE to release the anchor
- Zoom in on the mechanism and pull the lever to release the zeppelin
- Zoom back in on the mechanism and pick up the SCREWDRIVER
- Go inside and up to the elevator
- Use the HAMMER to get the SCISSORS from the door
- Go into the elevator
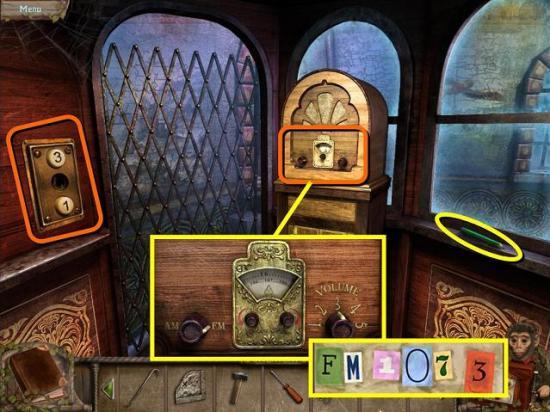
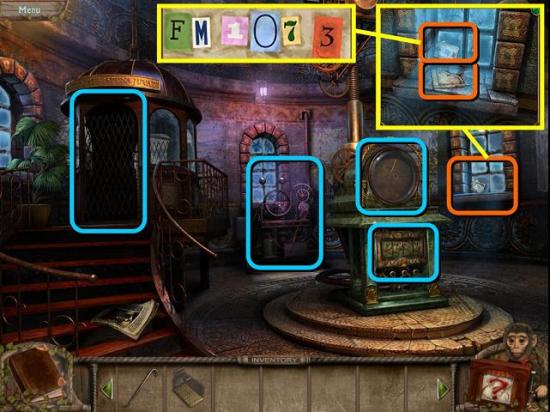
- Take the PENCIL
- Zoom in on the radio and set it to FM 107, volume 3
- Inside the clock is TAPE
- Use the SCREWDRIVER to open the panel inside the clock and take out the FUSE
- Now zoom in on the elevator buttons and use the SCREWDRIVER again to open the panel
- Replace the broken fuse behind the panel with the FUSE you just found
- Before you go up, go back outside and play the HOS to get the BIRDSEED
- Then go back to the elevator and push 3 to go upstairs
The Third Floor
- Zoom in on the gate by the stairs. You can open the gate by putting the rose leaves in the correct spots
- Go up the stairs
The Attic
- Play the HOS to find a ROPE LADDER (yellow)
- Use the CROWBAR to open the hatch
- Put the ROPE LADDER on the hooks above the opened hatch
- Play the HOS again and get a BROOM (green in the image above)
- Zoom in on the window, use the HAMMER to open the rusty latch and open the window
- Zoom in on the cage and put the BIRD SEED in the cage
- When the pigeon has arrived, zoom in on it and take the note from its leg
- Go one screen back and zoom in on the mechanism beside the stairs
- Enter the code from the pigeon’s note
- The floor will turn, a hole will appear and the rope ladder will drop down
- Go down the rope ladder
The Clock Bridge
- Take the PAPER SCROLL from the bench
- Play the HOS to get a SHOVEL

- Zoom in on the painting, cut the patch off the painting with your SCISSORS and flick the switch that’s behind it
- You can now go down the steps to the statue in the alcove
- Zoom in on the statue and clean it with your BROOM
- Take the CLOCK WINDER
- Put the STONE FRAGMENT on the base of the statue, then cover it with the PAPER SCROLL and make a print of the map with your PENCIL
- Take the MAP
- Back out until you’re on the ground floor
- Zoom in on the base of the clock and play the puzzle. Each of the buttons rotates two of the panels. To recreate the image, click the left button once and the middle one twice
- Zoom in on the top of the clock and put the CLOCK WINDER in the hole
- Turn the winder to 5 o’clock – you should see the doll that’s hanging from the ceiling just above the top left of the panel
- Go back up the elevator and down the rope ladder and then cross the bridge to the zeppelin
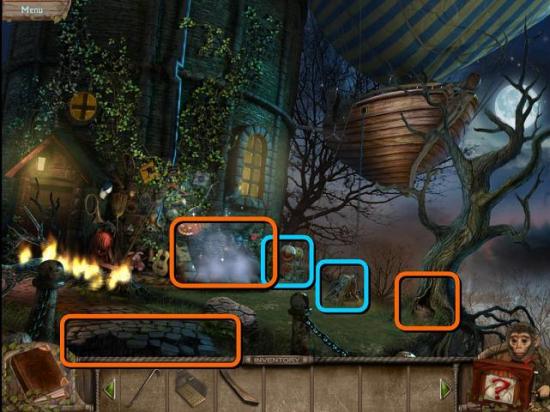
The Balcony
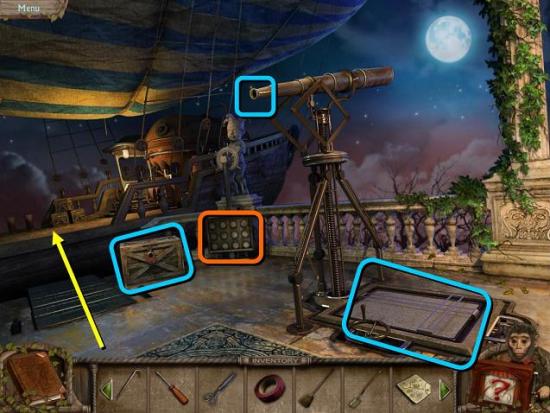
- Zoom in on the statue in the back and play the match two puzzle to raise the bridge to the zeppelin itself. As right now there is not much else to do here, go to the zeppelin
The Zeppelin’s Deck
- Fix the hole in the balloon with the TAPE
- Zoom in on the hatch in the floor and move the slides until only images of open locks are showing
- Go down the hatch
The Zeppelin
- Zoom in on the net in between the two doors
- Use the SCISSORS to cut the net and take the BOAT HOOK
- Play the HOS to get a HACKSAW
- Back out to the bridge to the zeppelin and cut the rope with your SCISSORS
- Back out to the level with the rope ladder and go up the stairs to the attic
- Play the HOS and get a GLASS CUTTER
- Zoom in the opened window in the attic and use the BOAT HOOK to get a KEY
- Zoom back in the window and use the HACKSAW to cut the PIPE
- Now back out to the ground floor of the lighthouse. When you cut the rope, the doll fell down from the ceiling. Zoom in on it and do the puzzle. You need to click on the circles on the outside so they match the pattern on the inner circle
- Get another (smaller) KEY from the safe
- Go up the elevator, down the rope ladder and across the clock bridge
- Open the crate with the smaller KEY
- Get the HANDLE from the crate
- Zoom in on the floor next to the telescope and place the HANDLE and the MAP on it
- Turn both handles until the X on the map is in the intersection
- Board the zeppelin, go down the hatch and play the HOS to find a SEAHORSE
The Machine Room
- Zoom in on the door on the right, put the CROWBAR on the handle and turn it
- Clear the leaves on the floor with your BROOM
- Open the hatch, zoom in on it and use your SHOVEL to fill the bucket with coal
- Take the BUCKET WITH COAL
- Zoom in on the panel in the back wall and undo the screws with the SCREWDRIVER
- Inside is a STAR FIGURE. Take it.
- Put the PIPE in the gap on the left
- Back out
The Captain’s Cabin
- Zoom in on the door on the left and open it with the other KEY
- Go through the door to the cabin
- Zoom in on the fish tank and cut it with the GLASS CUTTER
- Zoom in on it again and take the SEASHELL FIGURINE
- Zoom in on the chest and place the SEAHORSE, SEASHELL FIGURINE and STAR FIGURE on it
- Open the chest and take the CARDINAL DIRECTIONS FIGURINE and the COLORED GLASS
- Back out and play the new HOS to find a GAS CAN
- Back out until you’re in the scene with the bridge. Play the HOS to find MATCHES

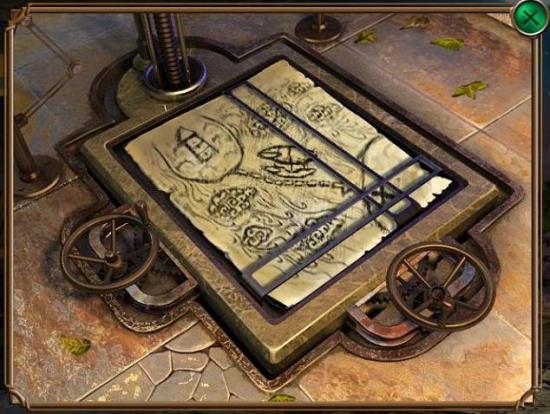
- Back out to the rope ladder and zoom in on the stained glass window
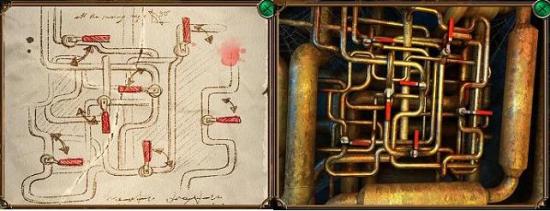
- Place the COLORED GLASS and click on the window for a puzzle. Each pane rotates the panes around it. The quickest way to do this is as in the figure (screen shot taken from the official in-game strategy guide)
- Zoom in on the floor where the light is shining and clean it with your BROOM
- Zoom in on it again to get the cardinal directions, which are (clockwise from top): W, N, E, S
- Go back to the deck of the zeppelin, open the furnace and use the BUCKET OF COAL and GAS CAN on it, then light it with the MATCHES
- Go down the hatch and into the room on the left
- Zoom in on the globe and place the CARDINAL DIRECTIONS FIGURINE
- Change the directions on the globe as in the image under the window (W, N, E, S)
- Take the SCHEMATIC FRAGMENT
- Zoom in on the desk for a slide puzzle

- Open the book, put the SCHEMATIC FRAGMENT on it and look at it
- Back out and go into the room on the right
- Zoom in on the pipes on the wall and turn the handles as in the scheme from the book
- Back all the way out to the clock bridge and play the HOS again to find the MONOCLE
- Go across the clock bridge to the telescope, zoom in on it and replace the broken lens with the MONOCLE
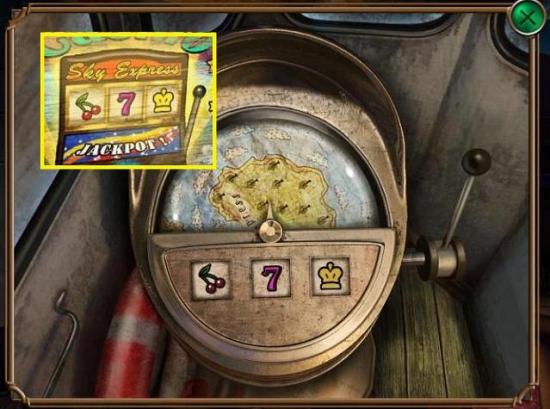
- Look through the telescope to find a fruit machine code (this only happens if you’ve placed the handles on the floor in the right spot as above)
- Go to the deck of the zeppelin and zoom in on the controls on the left
- Change the images to the ones you just saw through the telescope and pull the handle

More articles...
-
Best Horror Games On Itch.io – July 2026
Across a bounty of subgenres. -
Haze Seas Accessories Tier List [Best Accessories to Equip]
The accessories with the best stat buffs in Haze Seas.