
Best Horror Games On Itch.io – July 2026
Across a bounty of subgenres.![Haze Seas Accessories Tier List [Best Accessories to Equip]](/wp-content/uploads/2026/07/haze-seas-accessories-tier-list.jpg "Haze Seas Accessories Tier List [Best Accessories to Equip]")
Haze Seas Accessories Tier List [Best Accessories to Equip]
The accessories with the best stat buffs in Haze Seas.
![[Roblox] Evomon Shiny Hunting Guide – Including Prismatic and Pris Shinies!](/wp-content/uploads/2026/06/evomon-shiny-hunting-guide.jpg "[Roblox] Evomon Shiny Hunting Guide – Including Prismatic and Pris Shinies!")

Voodoo Chronicles: First Sign Walkthrough
Welcome to the Voodoo Chronicles: First Sign Collector’s Edition walkthrough on Gamezebo. Voodoo Chronicles: First Sign is a hidden object adventure game played on the PC created by Space Monkey Games. This walkthrough includes tips and tricks, helpful hints, and a strategy guide for how to complete Voodoo Chronicles: First Sign.


- Prefer Gamezebo on Google

Voodoo Chronicles: First Sign – Game Introduction
Welcome to theVoodoo Chronicles: First SignCollector’s Edition walkthrough on Gamezebo.Voodoo Chronicles: First Signis a hidden object adventure game played on the PC created by Space Monkey Games. This walkthrough includes tips and tricks, helpful hints, and a strategy guide for how to completeVoodoo Chronicles: First Sign.
General Tips
- At the beginning of a new game, you can choose from two difficulties: Hard or Casual.
- The Hint button is located in the bottom right corner of the screen, however hints can only be used within hidden object areas. Hints are limited, so use them wisely!
- To collect more hints, keep and eye out for Spies– small dark creatures with skull-like faces that will appear and disappear throughout various areas. You can also collect hints by finishing mini-games.
- Mini-games can be skipped after a certain amount of time has passed.
- The Diary is located in the bottom left corner of the screen. Click on it to view story progress, hints, and lists informing which tasks you’ve done and what’s yet to be done.
- For the Collector’s Edition, Bonus content can be unlocked as you progress through the main story and can be accessed via the main menu.
- In hidden object areas, items listed in red will require you to move, open, or interact with something in order to reveal that object. Such objects are shown outlined with a square in the guide below.
- Key Items are identified with CAPS and are circled in red in the guide below.
- The Bonus chapter for the Collector’s Edition can be found at the bottom of this guide.
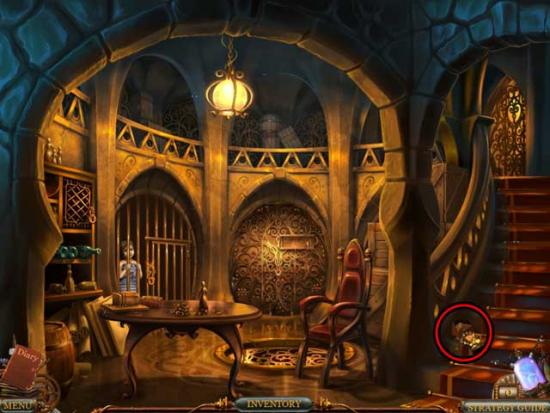
Walkthrough – Chapter 1: Murder
Office
- Click on the ringing phone on the desk.
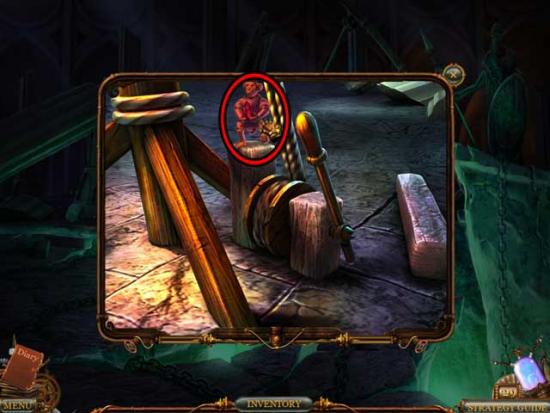
- Take a closer look at the creature sitting on the desk– it’s not about to let you have the scroll it’s perched on.
- Proceed into the kitchen on the right.
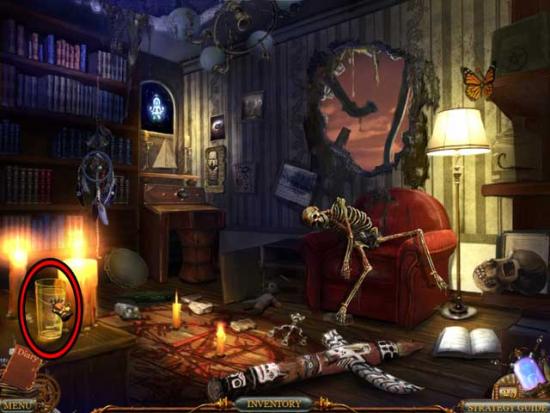
Kitchen
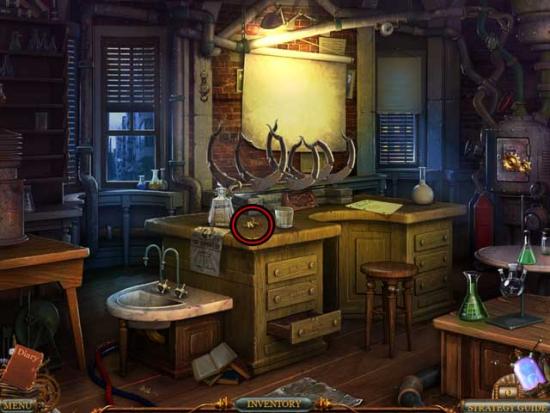
- Click on the SAFE KEY within the glass on the shelf on the left to add it to your inventory.
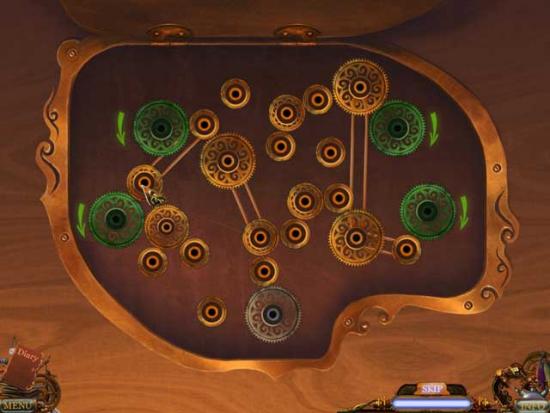
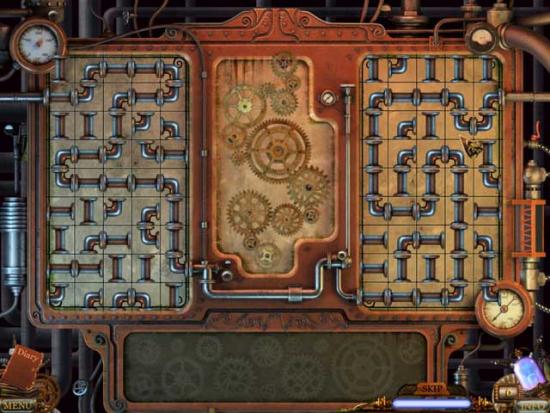
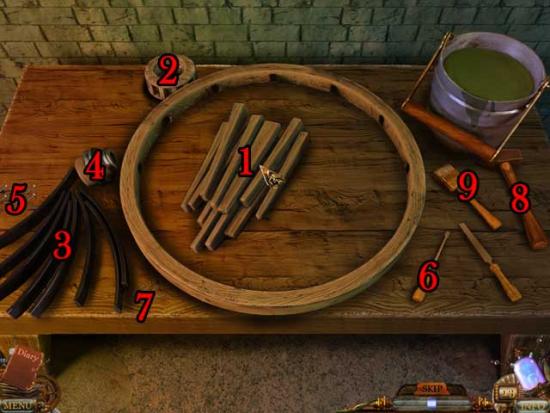
- Click on the device on the table to enter a mini-game.
- Connect the yellow wheels so that the green wheels rotate in the indicated directions. To connect the wheels: pick up a belt, then click the desired gears one at a time. To remove a belt, simply click it. A possible solution is shown below.

- Upon completing the puzzle, you’ll have activated the Hint Machine, which can be found in the lower right corner of the screen.
- Go back to the office.
Office
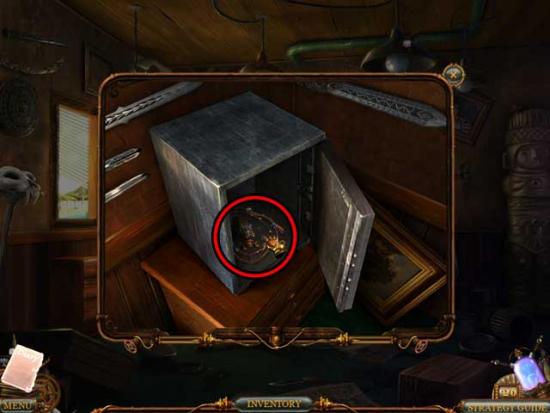
- Use the SAFE KEY on the Safe on the right near the doorway to open it, then look inside for a closer view. There’s a gun, but you can’t taken it until you find bullets.
- Take a closer look at the desk again. Click on the spy to turn it into a hint, then click on the MAGIC SCROLL to read it and add it to your inventory. You can also read the letter lying on the desk.
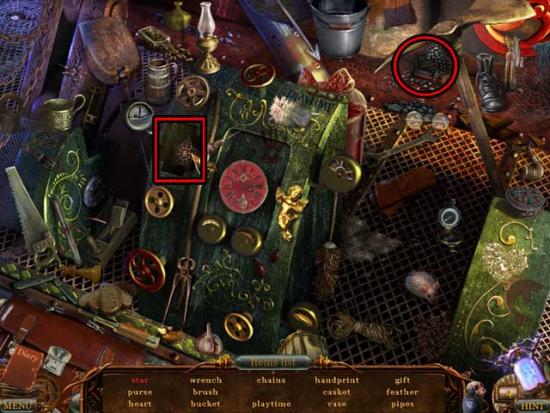
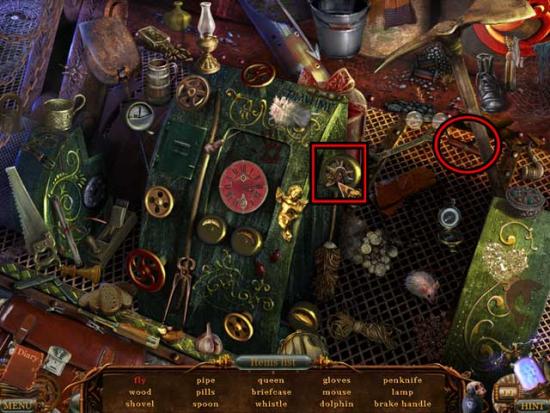
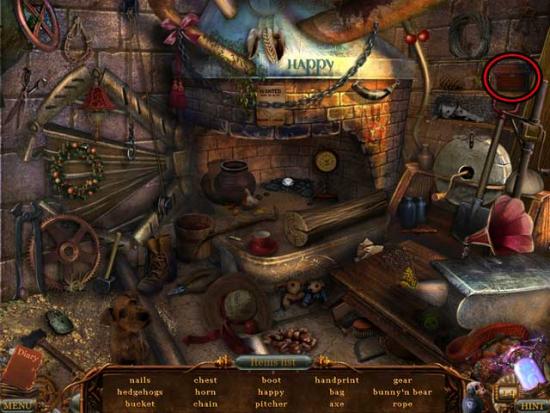
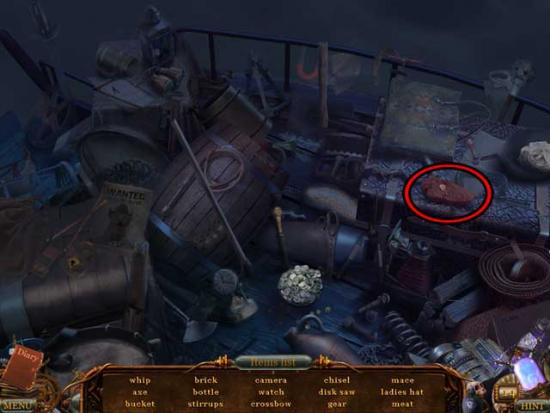
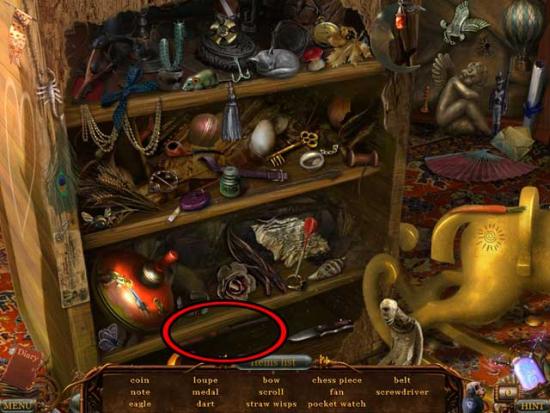
- Exit the close-up and click on the hidden object area that appears over the set of drawers behind the desk.
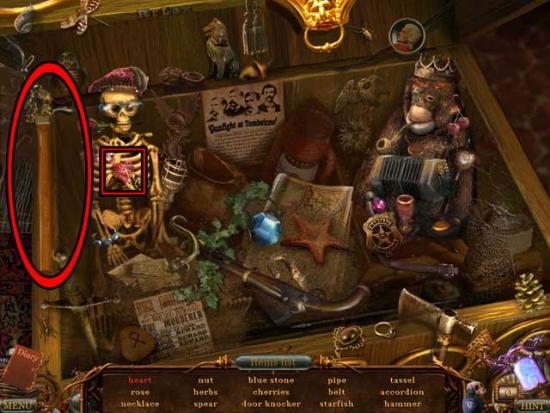
- Find the objects listed at the bottom of the screen. Items listed in red must be revealed first and are outlined with a square, while Key Items are circled. Other objects are randomized.

- Upon completing the area, the DETECTIVE BADGE will be added to your inventory.
- Take a closer look at the food dish at the foot of the desk: Kitty must be hungry.
- Enter the kitchen.
Kitchen
- Examine the fridge on the right: it’s missing a handle.
- Click on the BULLETS lying on the counter to add them to your inventory.
- Return to the office.
Office
- Examine the open safe. Use the BULLETS on the gun to obtain the REVOLVER.
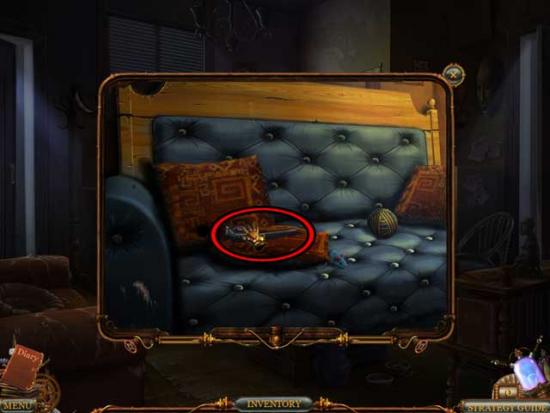
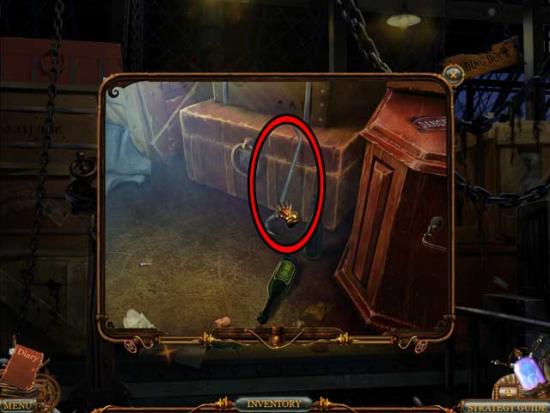
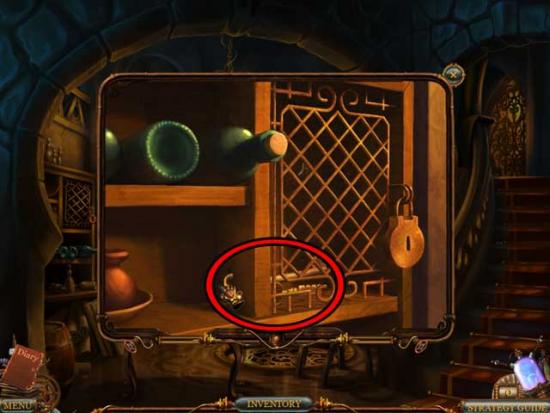
- Kitty is awake now. Take a closer look at where Kitty was sleeping, then click on the FRIDGE HANDLE to add it to your inventory.
- Return to the kitchen.
Kitchen
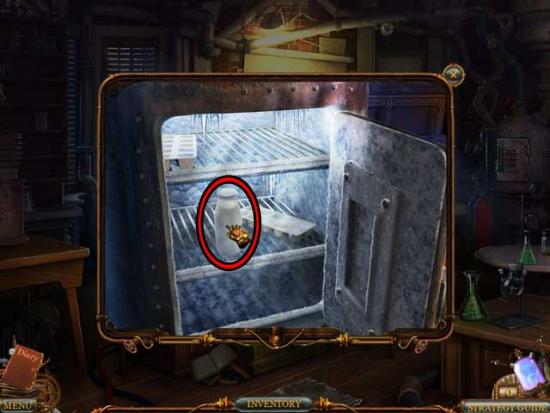
- Use the FRIDGE HANDLE on the fridge on the right to open it, then take a look inside. Click on the BOTTLE OF MILK to add it to your inventory.
- Return to the office.
Office
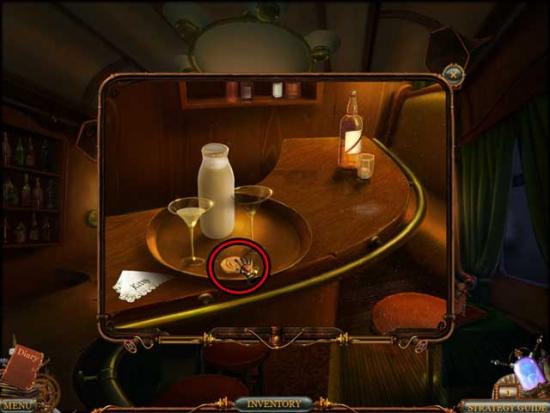
- Take a closer look at the dishes at the foot of the desk. Use the BOTTLE OF MILK on the empty bowl.
- Exit the office via the door on the left.
Street
- Go forward to the station.
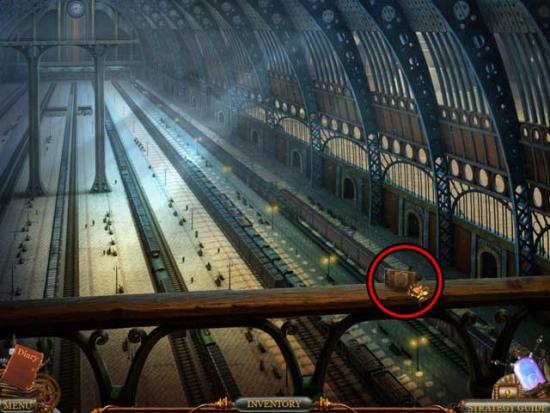
Station
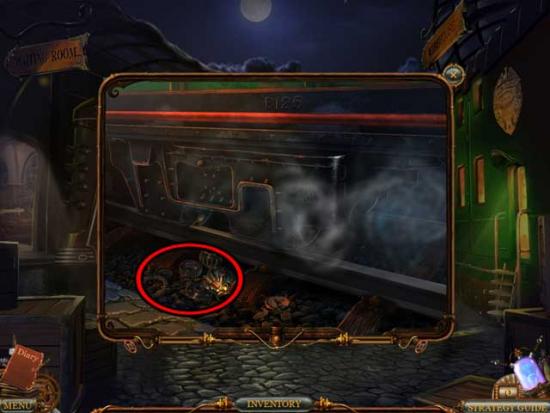
- Take a closer look at the foot of the green train on the right. Click on the GEARS to add them to your inventory.
- Enter the waiting room on the left.
Waiting Room
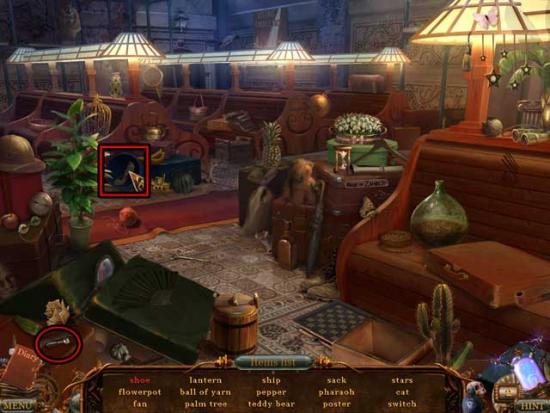
- Click on the hidden object area on the right.
- Find the objects listed at the bottom of the screen. Items listed in red must be revealed first and are outlined with a square, while Key Items are circled. Other objects are randomized.
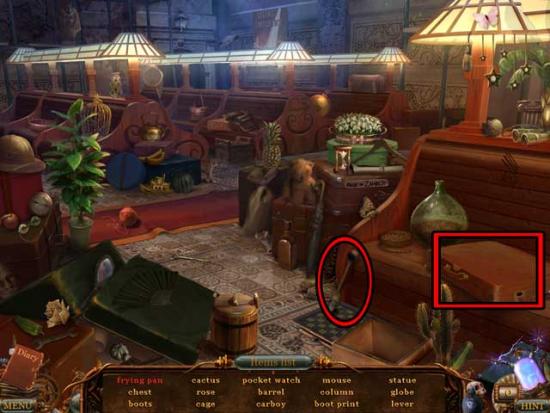
- Upon completing the area, the LEVER will be added to your inventory.
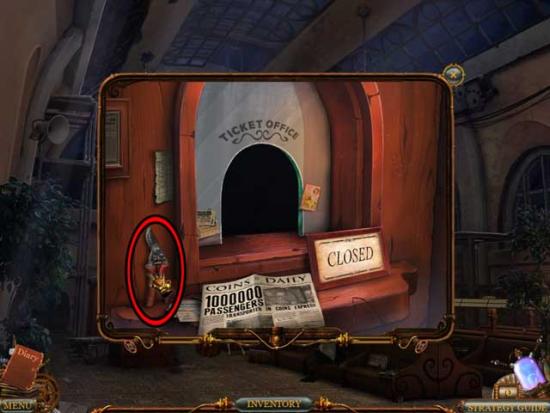
- Examine the ticket booth on the left. Click on the GARDEN SHEARS to add them to your inventory.
- Return to the street outside the station.
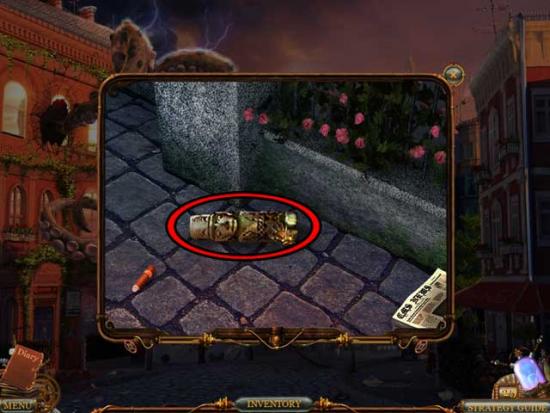
Street
- Take a closer look at the planter full of roses on the left. Use the GARDEN SHEARS on the roses to add the ROSE to your inventory.
- Return to the waiting room.
Waiting Room
- Give the ROSE to the woman in pink. She’ll inform you where the ticket agent went.
- Go outside to the station and up towards the warehouse.
Loading Dock
- Click on the panel on the left to open it, then use the GEARS on the panel to trigger a puzzle.
- Remove all the boxes from the field with a mechanical claw. Use the directional buttons to plan the claw’s movements, then click the Take Box button. If you plan correctly, the claw will take the box. You can reset your plan by clicking the Reset button. A possible solution is outlined below:
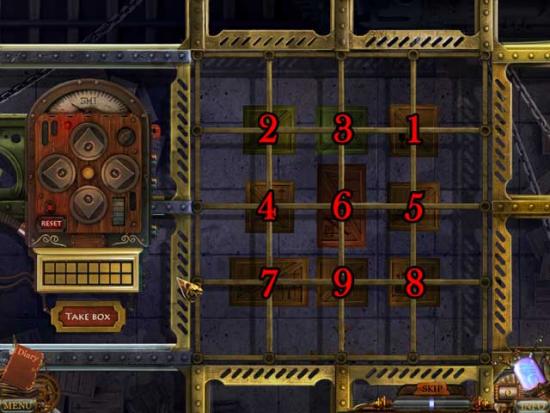
- 1) Up, Up, Up, Right
2) Up, Up, Up, Up, Left, Down
3) Up, Up, Up
4) Up, Up, Left
5) Up, Up, Right
6) Up, Up
7) Up, Left
8) Up, Right
9) Up
- Take a closer look at the foot of the boxes on the right. Click on the CROWBAR to add it to your inventory.
- Proceed forward to the warehouse.
Warehouse
- Talk to the woman on the left, then use the LEVER on the panel on the right to raise the gate.
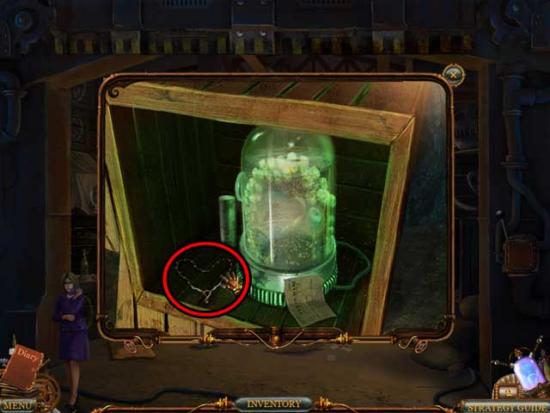
- Use the CROWBAR on the marked box on the right to open it, then take a closer look inside. Click on the NECKLACE to add it to your inventory.
- Give the NECKLACE to the woman on the left: she’ll inform you the diamond’s missing.
- Return to the waiting room.
Waiting Room
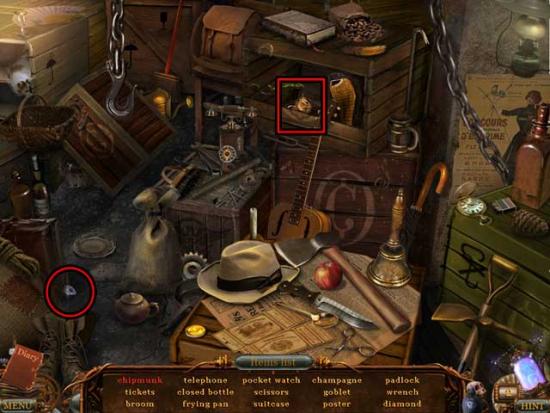
- Click on the hidden object area on the right.
- Find the objects listed at the bottom of the screen. Items listed in red must be revealed first and are outlined with a square, while Key Items are circled. Other objects are randomized.
- Upon completing the area, the SWITCH will be added to your inventory.
- Return to the warehouse.
Warehouse
- Use the SWITCH on the panel within the warehouse, then click on it for a closer view. Click on the panel to open it and reveal a puzzle.
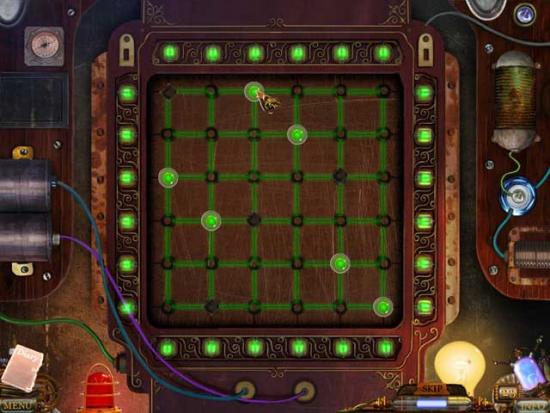
- Click on the various switches so that all of the switches are in the “On” position. Solutions are randomized. Upon completing the puzzle, the barrel will drop from the crane. Take a closer look at the barrel.
- Click on the man inside to talk to him, then click on the hidden object area that appears (outside of the close-up, on the left side of the warehouse).
- Find the objects listed at the bottom of the screen. Items listed in red must be revealed first and are outlined with a square, while Key Items are circled. Other objects are randomized.
- Upon completing the area, the DIAMOND will be added to your inventory.
- Give the DIAMOND to the woman on the left to acquire the TRAIN TICKET.
- Return to the station.
Station
- Give the TRAIN TICKET to the conductor, then enter the green train on the right.
Chapter 2: Coins Express
Corridor
- Go forward through the door at the far end of the corridor to the dining car.
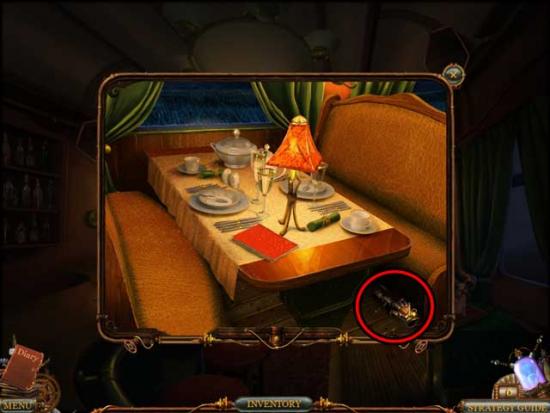
Dining Car
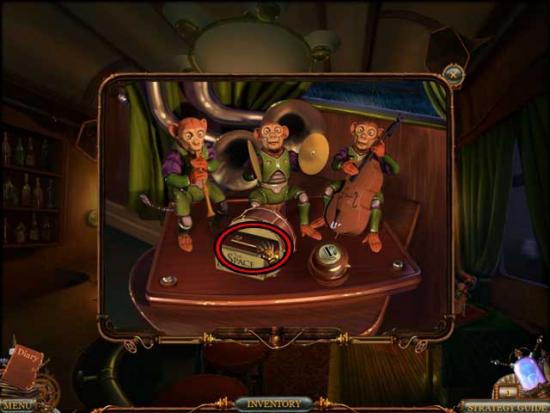
- Take a closer look at the monkeys on the right: they need a coin to operate.
- Take a closer look at the bar counter on the left. Click on the COIN to add it to your inventory.
- Take a closer look at the monkeys on the right again. Use the COIN on the slot to open a hidden compartment. Click on the COMPARTMENT KEY to add it to your inventory.
- Return to the corridor.
Corridor
- Use the COMPARTMENT KEY on the middle door to open it, then proceed inside.
Compartment #2
- Take a closer look at the note lying on the far right side of the compartment.
- Exit back to the corridor.
Corridor
- Click on the closest door on the left to open it and proceed inside.
Compartment #1
- Talk with both the women.
- Exit back to compartment #2.
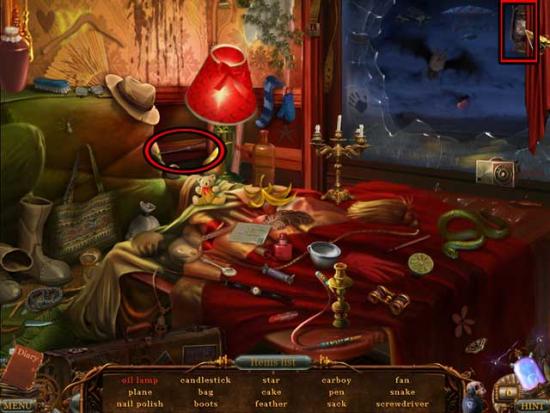
Compartment #2
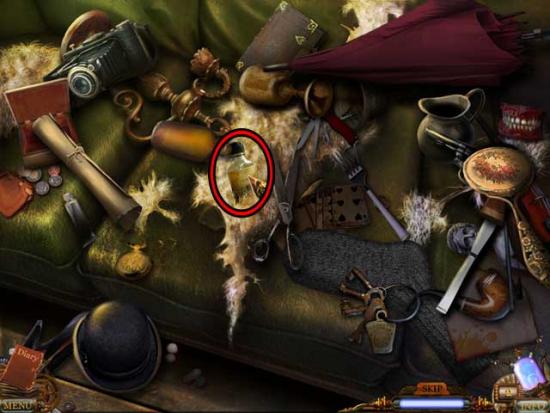
- Take a closer look at the ripped seat cushion on the right. Move the various objects out of the way until you reveal the location of the SMELLING SALTS. Click on it to add it to your inventory.
- Return to the first compartment.
Compartment #1
- Use the SMELLING SALTS on the woman on the right, then exit back to the dining car.
Dining Car
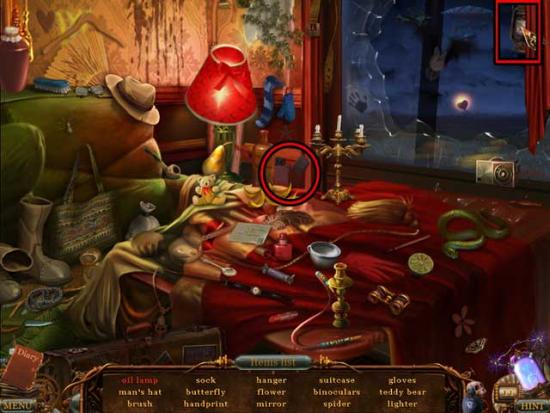
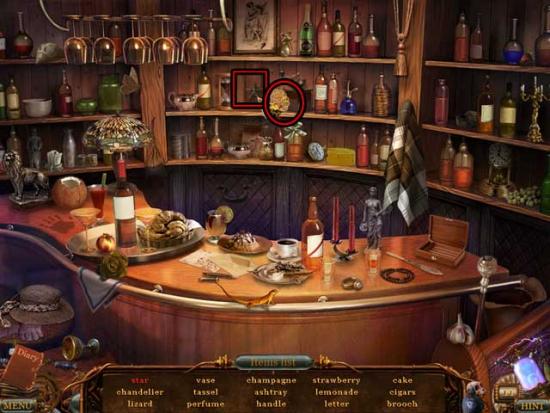
- Click on the hidden object area on the left.
- Find the objects listed at the bottom of the screen. Items listed in red must be revealed first and are outlined with a square, while Key Items are circled. Other objects are randomized.
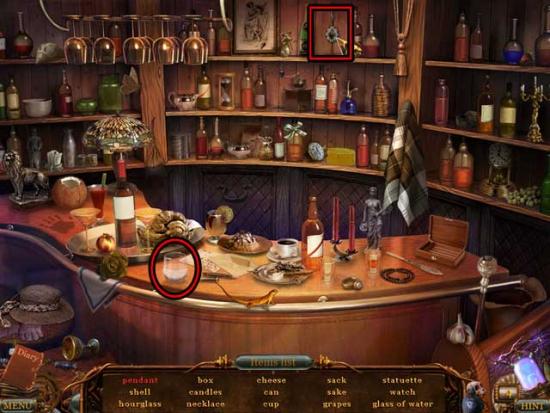
- Upon completing the area, the GLASS OF WATER will be added to your inventory.
- Return to compartment #1.
Compartment #1
- Use the GLASS OF WATER on the woman on the right.
- Return to the corridor.
Corridor
- Click on the furthest door on the left to enter compartment #3.
Compartment #3
- There’s a document lying on the table you can read. Once you’ve read it, return to the dining car.
Dining Car
- Enter through the doors at the far end of the car.
Engine Room
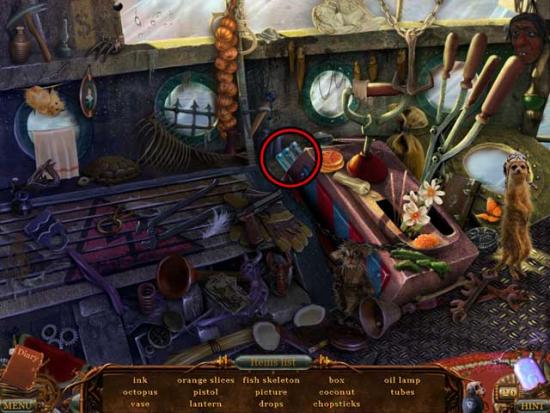
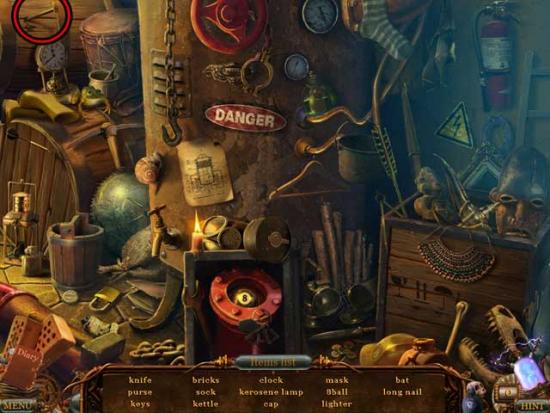
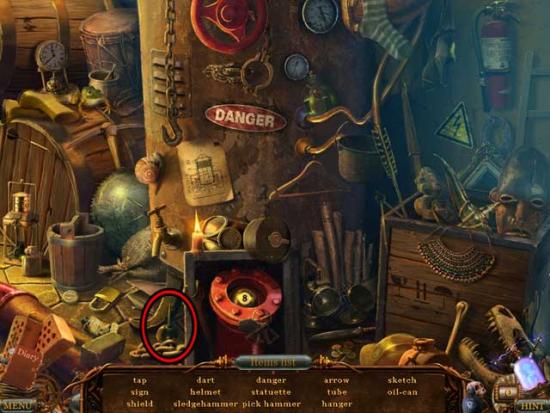
- Clicking on the hidden object area on the right.
- Find the objects listed at the bottom of the screen. Items listed in red must be revealed first and are outlined with a square, while Key Items are circled. Other objects are randomized.
- Upon completing the area, the PIPES will be added to your inventory.
- Proceed up the ladder on the left.
Roof
- Click on the BOLT to add it to your inventory.
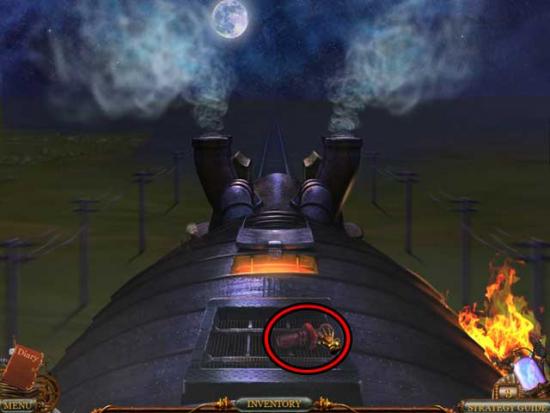
- Return to the engine room.
Engine Room
- Take a closer look at the ladder on the right. Use the BOLT on the train hitch.
- Return to compartment #2.
Compartment #2
- Click on the hidden object area on the left.
- Find the objects listed at the bottom of the screen. Items listed in red must be revealed first and are outlined with a square, while Key Items are circled. Other objects are randomized.
- Upon completing the area, the SCREWDRIVER will be added to your inventory.
- Return to the engine room.
Engine Room
- Use the SCREWDRIVER on the striped hatch at the top of the screen to remove it.
- Return to the dining car.
Dining Car
- Take a closer look at the tables on the far left of the car. Click on the VALVE to add it to your inventory.
- Return to the engine room.
Engine Room
- Use the VALVE on the stream of steam in the upper right corner of the screen. Next, use the PIPES on the area at the top of the screen previously covered by the hatch to trigger a puzzle.
- Turn the pipe pieces to direct the steam to the block with the gears. Drag the gears to their places to run the steam into the third block, then direct the steam to the exit. The solution is shown below.
Chapter 3: Richtown
Station
- Click on the MATCHES to add them to your inventory.
- Exit to the right.
Square
- Go forward to the bank.
Lobby
- Show the DETECTIVE BADGE to the officer in the lobby to gain access to the bank.
- Head forward to the far end of the lobby.
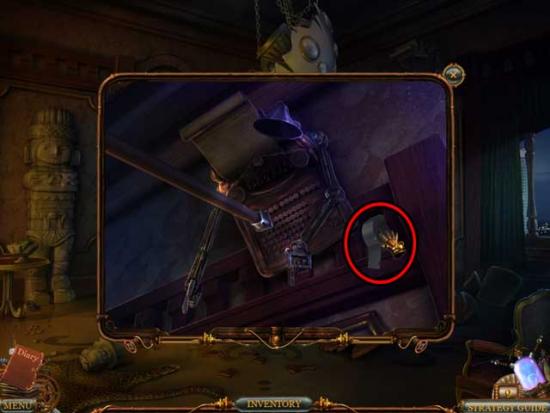
Headquarters
- Click on the spies to remove them from the body.
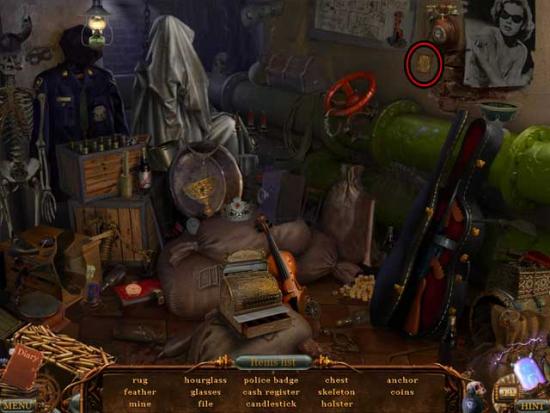
- Click on the hidden object area on the right.
- Find the objects listed at the bottom of the screen. Items listed in red must be revealed first and are outlined with a square, while Key Items are circled. Other objects are randomized.

- Upon completing the area, the COINS’ SIGN will be added to your inventory.
- Take a closer look at the upper right corner of the screen. Click on the INSULATING TAPE to add it to your inventory.
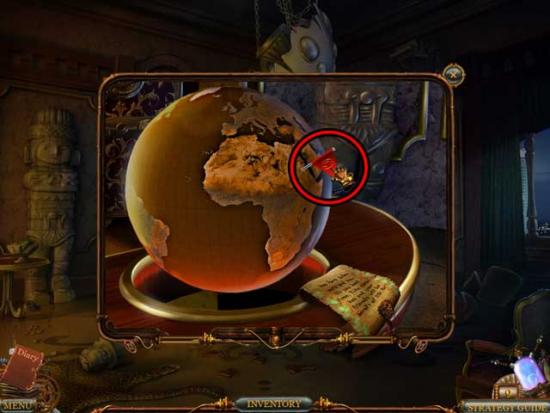
- Click on the golden globe on the desk, then examine it for a closer view. Click on the NAIL to add it to your inventory, then read the note left behind.
- Click on the section of wall behind the body to reveal a hidden alcove containing a safe.
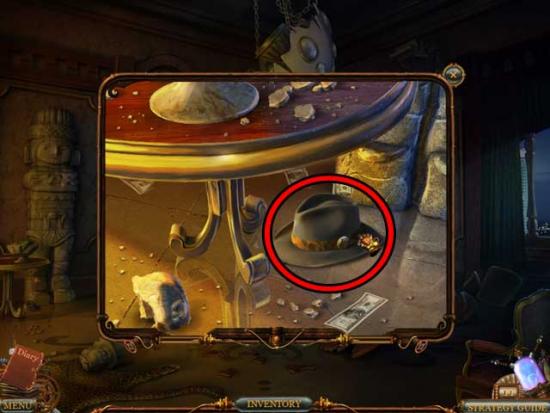
- Examine the table on the left. Click on FILLINI’S HAT to add it to your inventory.
- Return to the lobby.
Lobby
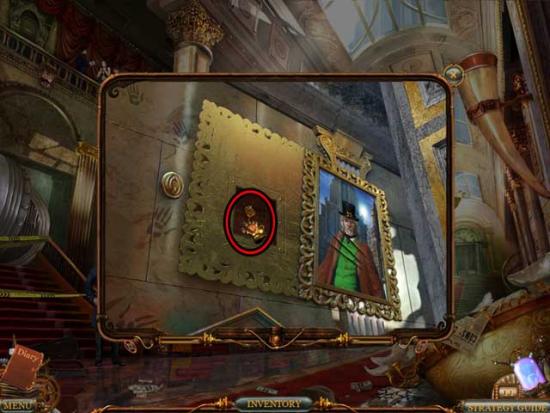
- Click on the painting behind the columns on the left. Use COINS’ SIGN on the insignia to the left of the painting, then click on COINS’ KEY to add it to your inventory.
- Return to the headquarters.
Headquarters
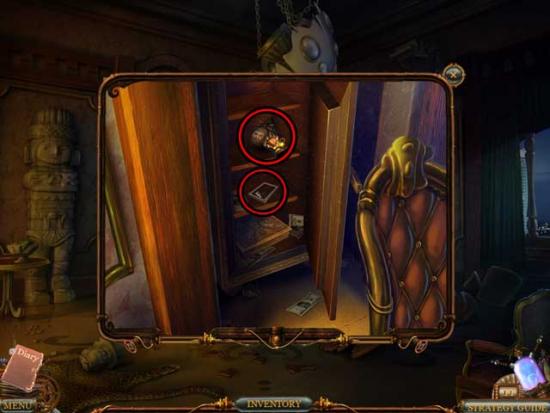
- Examine the safe behind the body. Use COINS’ KEY on the safe to open it.
- Click on the VOODOO BAG and FILLINI’S CARD to add them to your inventory. Take note of box on the bottom shelf.
- Exit back to the square.
Square
- Go forward (via the right).
Side Street
- Proceed to the left.
Alley
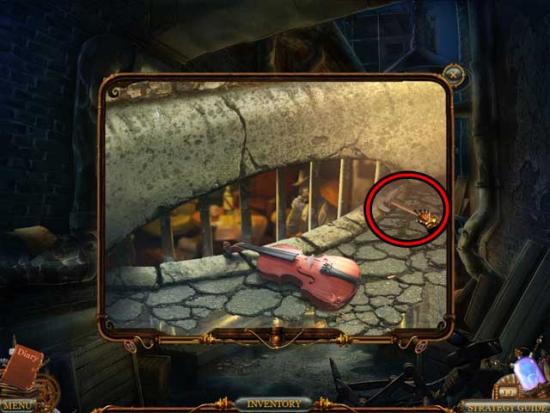
- Take a closer look at the sewer grate to the right of the door. Click on the HAMMER to add it to your inventory.
- Take a closer look at the switch next to the door. Use the INSULATING TAPE on the switch to trigger a puzzle.
- Click on the panel to open it. Connect the wires’ contact points. Each contact point must be connected to an adjacent point a specified number of times. To connect the contact points, first select one point and then another to connect it to. To remove a wire, simply click on it. To start over, click Reset. The solution is shown below.
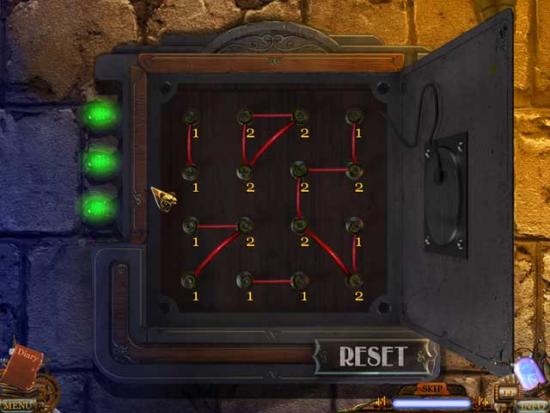
- Click on the fixed switch, and the viewing slot in the door will open. Click for a closer view.
- Use FILLINI’S CARD on the thug.
- Use the NAIL above the door, then use the HAMMER to secure it. Use the VOODOO BAG on the nail to hang it.
- Backtrack to the headquarters.
Headquarters
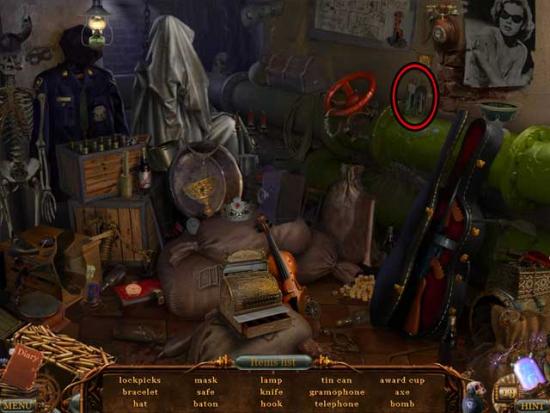
- Click on the hidden object area on the right.
- Find the objects listed at the bottom of the screen. Items listed in red must be revealed first and are outlined with a square, while Key Items are circled. Other objects are randomized.
- Upon completing the area, the WHISKEY will be added to your inventory.
- Return to the alley.
Alley
- Use the WHISKEY then the MATCHES on the trashcans on the right.
- Enter through the open door.
Hideout
- Examine the green chair on the right. Click on the EYE to add it to your inventory.
- Use FILLINI’S HAT on the gangsters to trigger a hidden object area.
- Find the objects listed at the bottom of the screen. Items listed in red must be revealed first and are outlined with a square, while Key Items are circled. Other objects are randomized.
- Upon completing the area, the LOCK PICKS will be added to your inventory.
- Return to the headquarters.
Headquarters
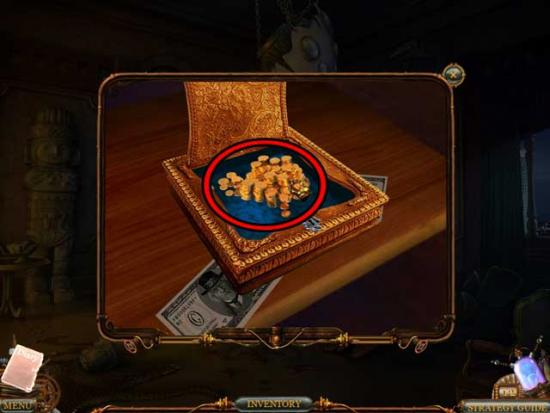
- Examine the safe behind the body, then click on the box on the bottom shelf for a closer view. Use the LOCK PICKS on the box to open it and obtain the GOLD COINS.
- Return to the hideout.
Hideout
- Use the GOLD COINS on the gangsters to trigger a hidden object area.
- Find the objects listed at the bottom of the screen. Items listed in red must be revealed first and are outlined with a square, while Key Items are circled. Other objects are randomized.
- Upon completing the area, the VOODOO CARD will be added to your inventory.
- Return to the station, reacquiring the VOODOO BAG along the way.
Corridor
- Back on the train, enter the middle compartment.
Compartment #2
- Click on the hidden object area on the left.
- Find the objects listed at the bottom of the screen. Items listed in red must be revealed first and are outlined with a square, while Key Items are circled. Other objects are randomized.
- Upon completing the area, the LIGHTER will be added to your inventory.
- Return to the corridor.
Corridor
- Use the LIGHTER on the lamp on the far left, then click on it to add the LIGHTED LANTERN to your inventory.
- Proceed through the door at the end of the corridor.
Dining Car
- Use the LIGHTED LANTERN to restore light to the area.
- Click on the hidden object area on the left.
- Find the objects listed at the bottom of the screen. Items listed in red must be revealed first and are outlined with a square, while Key Items are circled. Other objects are randomized.
- Upon completing the area, the BROOCH will be added to your inventory.
- Proceed through the door at the far end of the car.
Engine Room
- Click on the hidden object area on the right.
- Find the objects listed at the bottom of the screen. Items listed in red must be revealed first and are outlined with a square, while Key Items are circled. Other objects are randomized.
- Upon completing the area, the BRAKE HANDLE will be added to your inventory.
- Return to the corridor.
Corridor
- Use the BRAKE HANDLE on the Stop panel between compartments #2 and #3. Click on it to stop the train.
Chapter 4: Village
Raven Hill
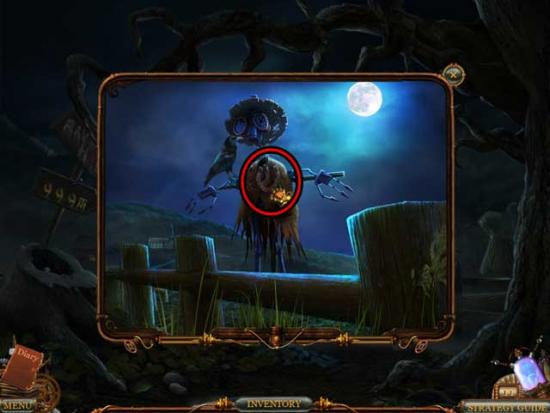
- Click on the BROKEN WHEEL on the right, to the left of the tree, to add it to your inventory.
- Take a closer look at the haystacks behind the fence. Click on the HORSESHOES around the scarecrow’s neck to add them to your inventory.
- Proceed forward to the village.
Village
- Take a closer look at the steps on the left. Click on the HAMMER to add it to your inventory.
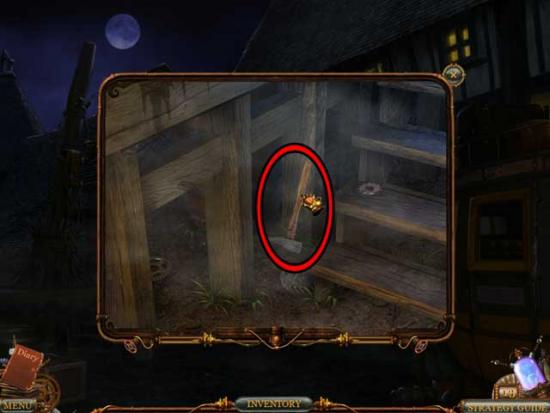
- Proceed forward.
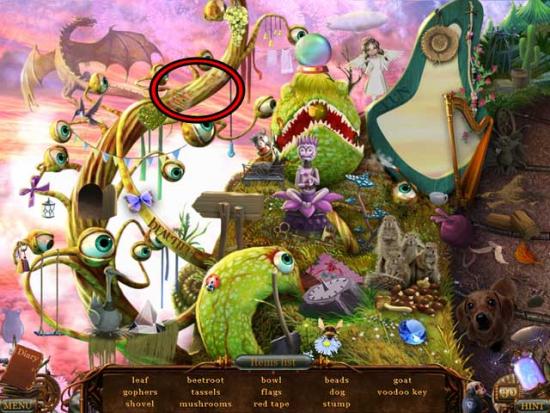
Blacksmith
- Click on the hidden object area on the left.
- Find the objects listed at the bottom of the screen. Items listed in red must be revealed first and are outlined with a square, while Key Items are circled. Other objects are randomized.
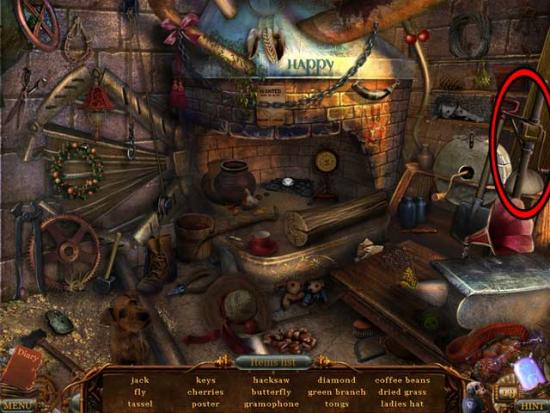
- Upon completing the area, the JACK will be added to your inventory.
- Take a closer look at the back of the smithy. Place the HAMMER and the BROKEN WHEEL on the workbench.
- Return to the village.
Village
- Talk to the man on the deck. Give the HORSESHOES to the man, then use the JACK on the carriage. Click on the jack until the carriage is fully lifted.
- Return to the blacksmith.
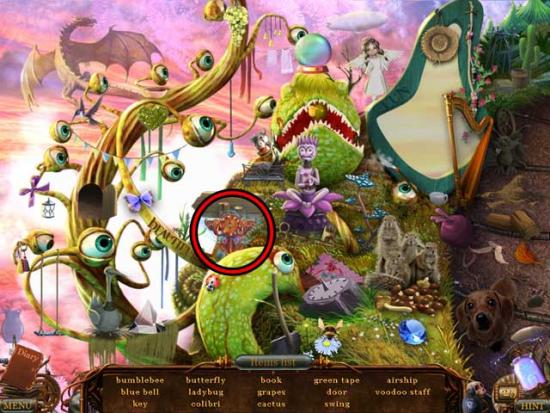
Blacksmith
- Click on the hidden object area on the left.
- Find the objects listed at the bottom of the screen. Items listed in red must be revealed first and are outlined with a square, while Key Items are circled. Other objects are randomized.
- Upon completing the area, the BOX OF NAILS will be added to your inventory.
- Examine the workbench at the back of the smithy. Use the BOX OF NAILS on the bench to trigger a puzzle.
- Assemble a wheel for the cart. Click and drag pieces to fix the wheel, for which you will also need tools. Assemble the wheel as follows:
- 1.Use the beams on the center of the wheel
2. Apply the wheel center
3. Place the metal brace around the outside of the wheel
4. Apply the second part of the wheel center
5. Add the screws to the center part of the wheel
6. Use the screwdriver to secure the screws
7. Apply the nails to the outside of the wheel
8. Use the hammer to secure the nails
9. Dip the brush in the bucket of paint, then apply it to the wheel
- Upon completing the puzzle, the CART WHEEL will be added to your inventory.
- Return to the village.
Village
- Use the CART WHEEL on the carriage on the right, then click on the jack to lower it.
- Give the BROOCH to the man on the porch.
- Enter the carriage.
Carriage Front
- Go to the back of the carriage.
Carriage Back
- Click on the hidden object area on the left.
- Find the objects listed at the bottom of the screen. Items listed in red must be revealed first and are outlined with a square, while Key Items are circled. Other objects are randomized.
- Upon completing the area, the MATCHES will be added to your inventory.
- Click on the TORCH, the LANTERN, and the POLES to add them to your inventory.
- Return to the front of the carriage.
Carriage Front
- Place the LANTERN on the hook on the right, then use the MATCHES to light it.
- Place the POLES in the slots on either side of the carriage.
- Return to the back of the carriage.
Carriage Back
- Click on the hidden object area on the left.
- Find the objects listed at the bottom of the screen. Items listed in red must be revealed first and are outlined with a square, while Key Items are circled. Other objects are randomized.
- Upon completing the area, the MEAT will be added to your inventory.
- Use the MEAT on the wolf on the right.
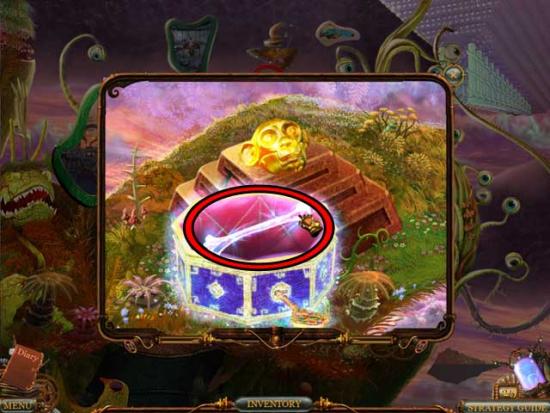
- Use the TORCH on the bracket on the left, then use the MATCHES to light it. Click on it to acquire the FLAMED TORCH.
- Take a closer look at the blue chest on the right. Click on the TRAP inside to add it to your inventory.
- Use the TRAP on the wolf on the left.
- Attempt to return to the front of the carriage, and the wolves will return. Use the FLAMED TORCH on the wolves as they appear until you’ve warded off 20 of them.
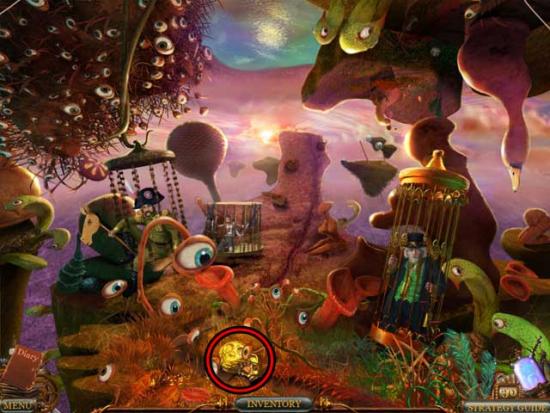
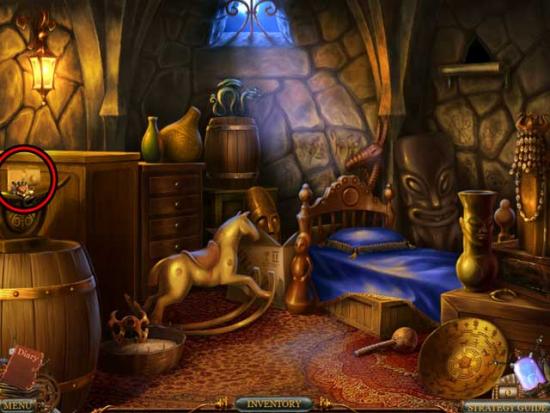
Chapter 5: Paul Seeker
Office
- Examine the couch on the back wall and read the letter left behind.
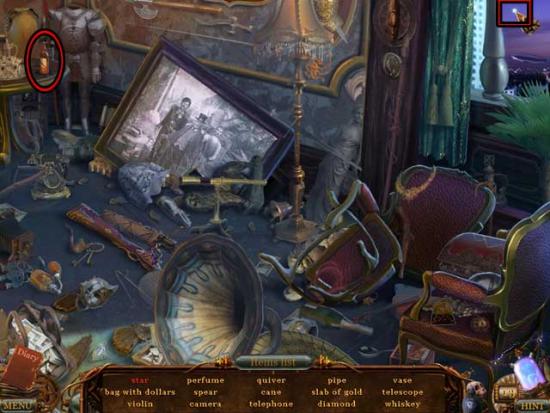
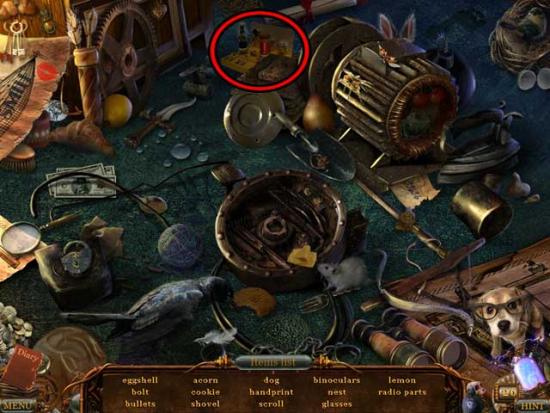
- Examine the desk and read the letter on the desk to trigger a hidden object area.
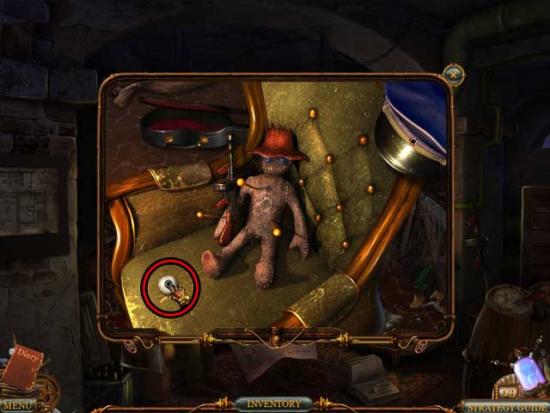
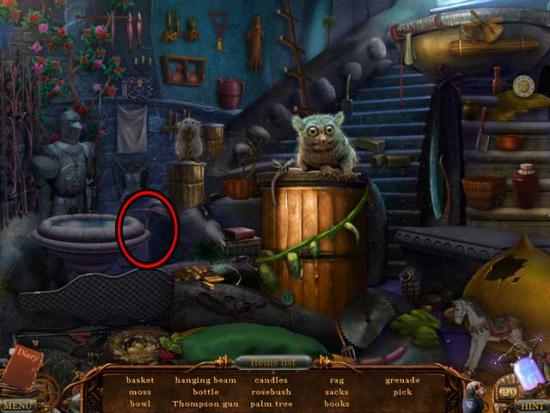
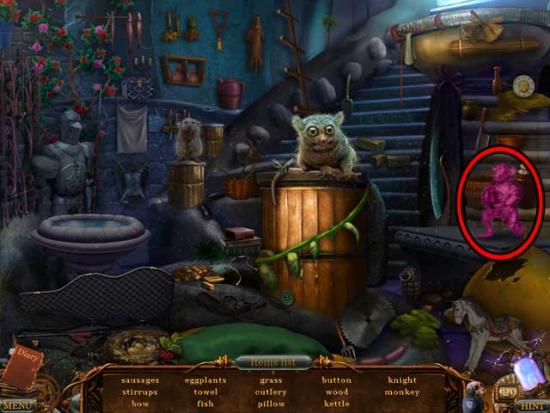
- Click on the hidden object area in the back corner of the room.
- Find the objects listed at the bottom of the screen. Items listed in red must be revealed first and are outlined with a square, while Key Items are circled. Other objects are randomized.
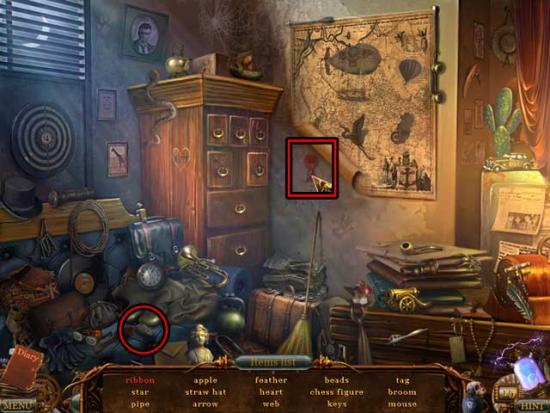
- Upon completing the area, the TOY MOUSE will be added to your inventory.
- Examine the foot of the desk. Use the TOY MOUSE next to the food bowl.
- Enter the kitchen.
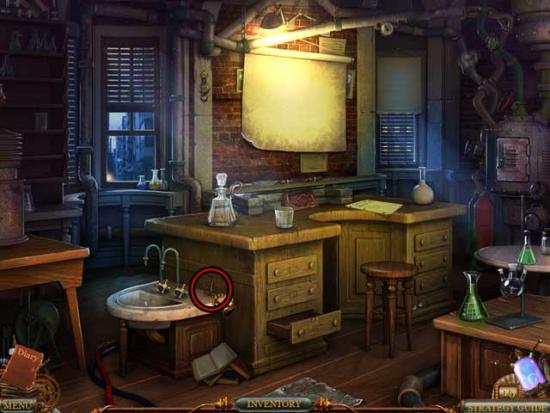
Kitchen
- Click on the CLOCKWORK KEY sitting on the sink to add it to your inventory.
- Return to the office.
Office
- Examine the foot of the desk. Use the CLOCKWORK KEY on the mouse toy, then click on it. Kitty should take off after the toy.
- Return to the kitchen.
Kitchen
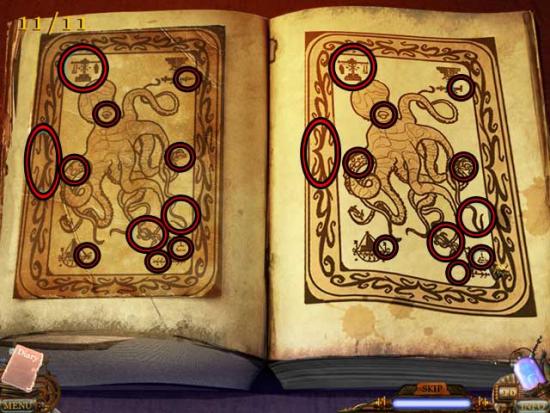
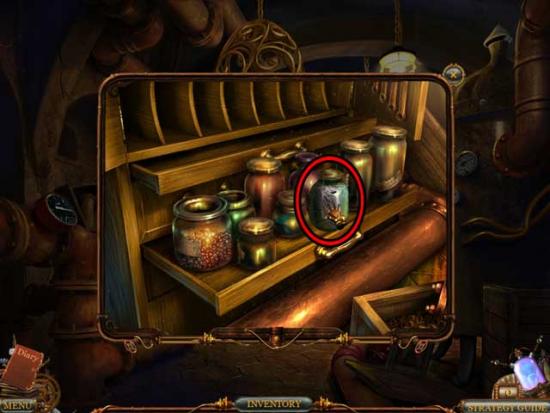
- Use the VOODOO CARD on the jar on the shelf on the left to trigger a puzzle.
- Spot 11 differences between the images. Every you find a difference, it will be highlighted. The solution is shown below.
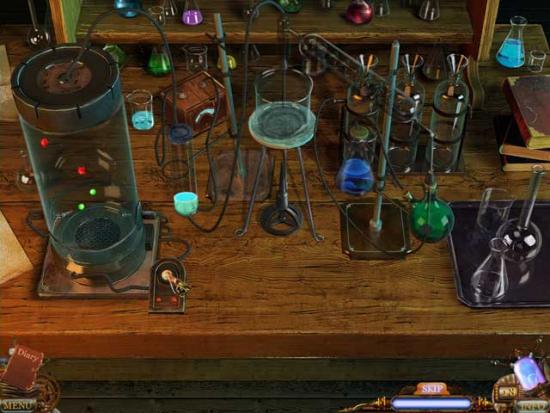
- Use the VOODOO BAG on the chemistry set on the right.
- First, assemble the chemical stand by dragging the components to their correct locations. Upon full assembly, filter the substance by clicking the button on the remote, which will activate an electrical current that can break down molecules. Destroy the red ones and let the green ones fall to the bottom until the flask is full. The solution of the setup is shown below.
- Return to the office.
Office
- Exit outside to the street.
Street
- Proceed down the street to the right.
City Hall
- Talk to the woman at counter 1, then talk to the woman at counter 3, followed by counter 5.
- Examine counter 3. You’ll receive FORM #2.
- Go back to counter 5. Give FORM #2 to the woman to acquire FORM #3.
- Go back to counter 1. Give FORM #3 to the woman to receive information about Paul Seeker.
- Exit back to the street.
Street
- Continue to the far left. You should notice ambulances in the upper corner of the screen.
Mental Clinic
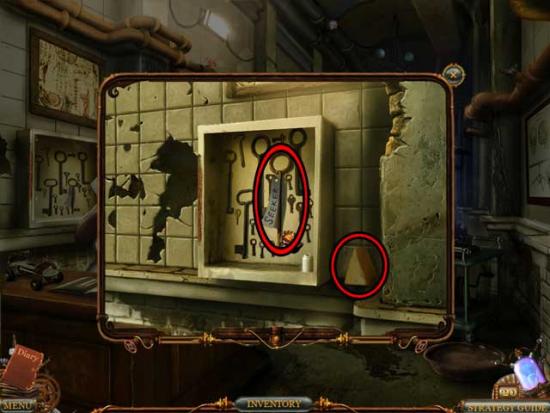
- Examine the cabinet to the left of the nurse. Click on the WARD KEY and the CHEESE to add them to your inventory.
- Click on the ROLLING SKATE and the BUCKET to add them to your inventory.
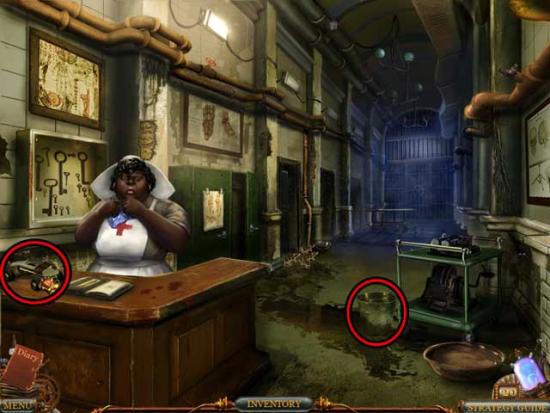
- Place the BUCKET near the brown pan in the lower right corner of the screen.
- Place the ROLLING SKATE on the floor near the water leak, then use the CHEESE on the skate. Click on it to get rid of the rats.
- Take a closer look at the doorway on the left. Use the WARD KEY on the lock, then enter the cell.
Cell
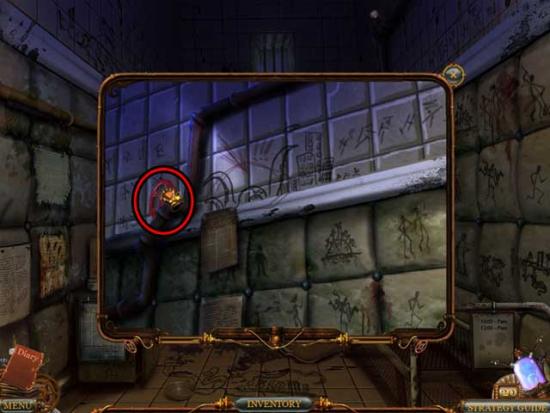
- Examine the upper part of the far right corner of the cell. Click on the VALVE to add it to your inventory.
- Return to the ward.
Mental Clinic
- Use the VALVE on the pipes in the upper right corner of the screen. Click on it to pour water into the bucket below, then click on the BUCKET OF WATER to add it to your inventory.
- Return to the cell.
Cell
- Use the BUCKET OF WATER on Paul Seeker. Talk to him, then open the glowing brown box on the right. Click on the head that appears.
- Exit the cell and head back to the office.
Office
- Examine the desk for a closer view. Use the EYE on the head, then click on the phone when it rings.
- Exit the office.
Chapter 6: Harbor & Iron Liberty
Harbor Entrance
- Continue forward to the harbor.
Harbor
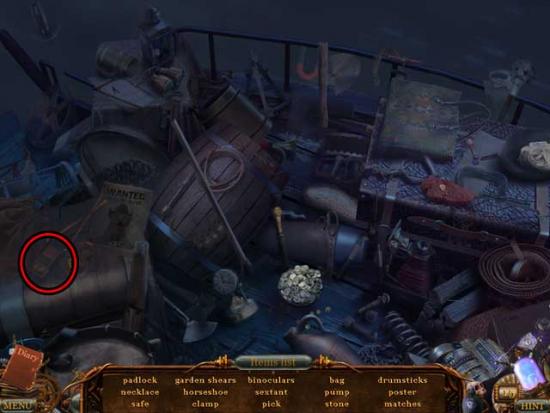
- Click on the PART FROM A LADDER on the boxes on the right to add it to your inventory.
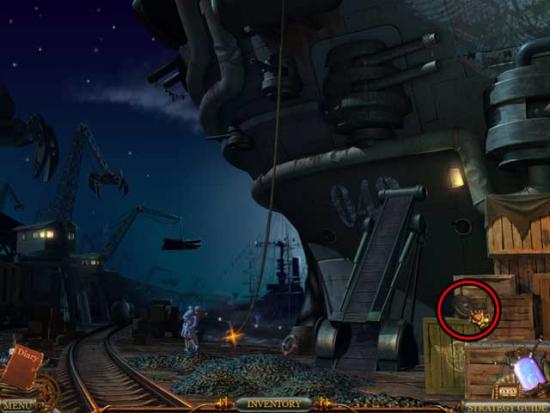
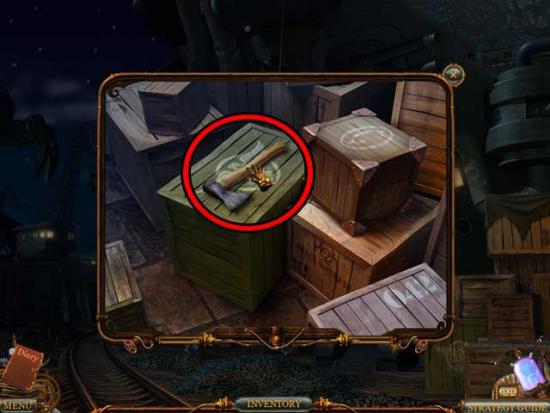
- Examine the boxes further to the right. Click on the AXE to add it to your inventory.
- Examine the rope tie next to the kissing couple. Use the AXE on the rope until it’s severed.
- Return to the harbor entrance.
Harbor Entrance
- Click on the METAL WHEEL to add it to your inventory.
- Return to the harbor.
Harbor
- Examine the base of the mechanical ladder. Use the PART FROM A LADDER and the METAL WHEEL in their correct locations to restore working order to the ladder.
- Enter the ship.
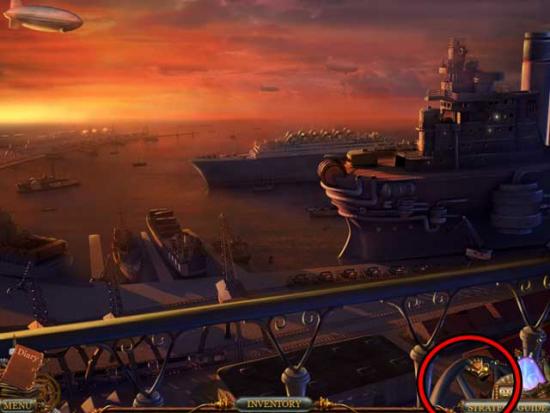
Deck
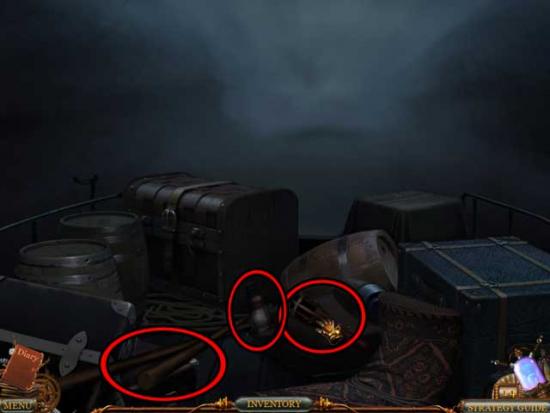
- Click on the SPEED LEVER to add it to your inventory.
- Take a closer look at the side of the ship via the upper left corner.
- Go “down” to the next area.
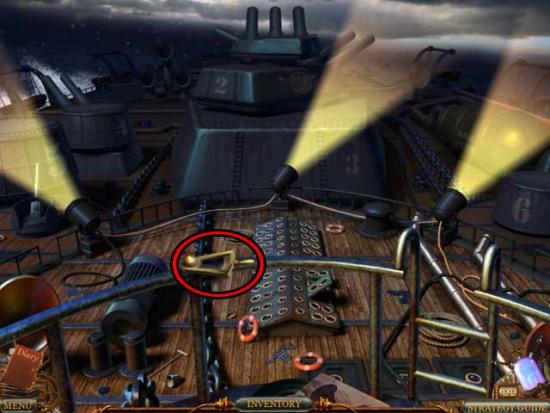
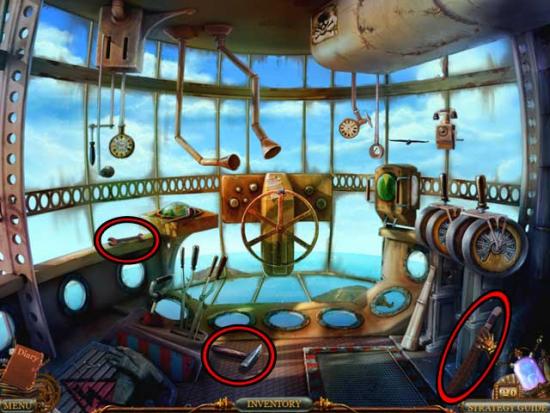
Wheelhouse
- Take a closer look at the large pipes in the lower right corner of the screen. Click on the SEARCHLIGHT LAMPS to add them to your inventory.
- Take a closer look at the paper in the lower left corner of the screen. Click on the FUSES FOR PUMP to add them to your inventory.
- Click on the FIRE EXTINGUISHER on the right wall to add it to your inventory.
- Return to the deck.
Deck
- Take a closer look at the searchlight beacons. Use the SEARCHLIGHT LAMPS on the beacons to fix them.
- Return to the wheelhouse, then go right back to the deck, which is now on fire.
- Use the FIRE EXTINGUISHER to put out all the flames.
- Take a closer look at the pump near the lower left corner of the screen. Use the FUSES FOR PUMP on the open panel to restore it to working order. A puzzle will be triggered.
- Place the safeties so that each one turns green. Safeties cannot share vertical or horizontal rows with other safeties. A possible solution is shown below.
- Return to the wheelhouse.
Wheelhouse
- Examine the wheel. Use the SPEED LEVER on the speed control on the right, then click on it to slow the ship down.
Chapter 7: Military Base
Beach
- Take a closer look at the debris above the deceased soldier. Click on the AXE to add it to your inventory.
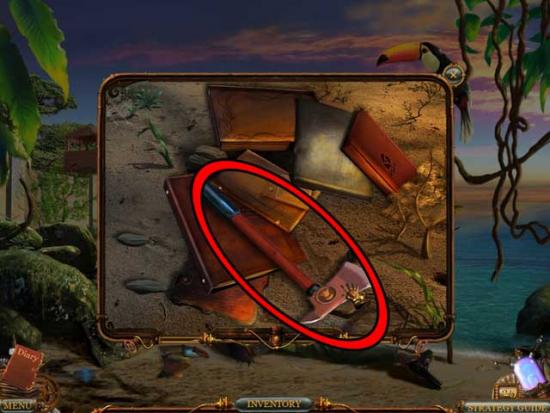
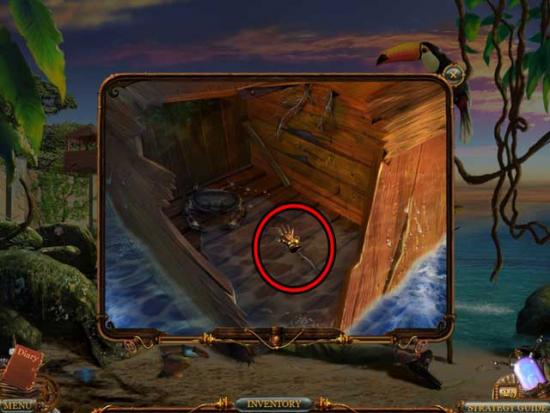
- Use the AXE on the crate in the water to break it open, then click for a closer view. Click on the SCREWDRIVER inside to add it to your inventory.
- Show the DETECTIVE BADGE to the soldier standing nearby, then enter the complex to the right via the open gate in the distance.
Military Base
- Continue forward to the general’s office.
General’s Office
- Click on the hidden object area on the right.
- Find the objects listed at the bottom of the screen. Items listed in red must be revealed first and are outlined with a square, while Key Items are circled. Other objects are randomized.

- Upon completing the area, the SAFE CODE will be added to your inventory.
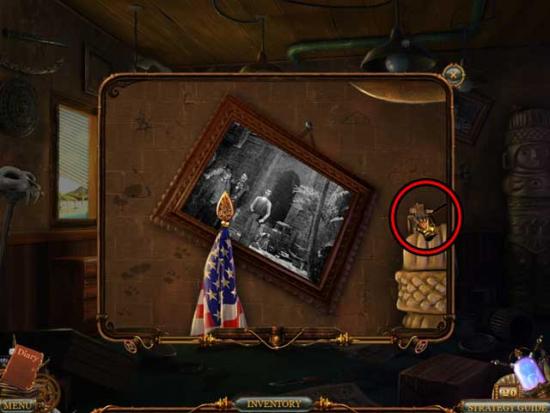
- Take a closer look at the tilted picture in the upper right corner. Click on the GENERAL’S LIGHTER to add it to your inventory.
- Read the letter lying on the floor on the left, then take a closer look at the safe. Use the SAFE CODE on the safe to open it, then click on the VOODOO AMULET inside to add it to your inventory.
- Examine the radio on the desk. Use the SCREWDRIVER to open it.
- Exit the office back to the beach, then return to the office to find a hidden object area.
- Find the objects listed at the bottom of the screen. Items listed in red must be revealed first and are outlined with a square, while Key Items are circled. Other objects are randomized.
- Upon completing the area, the RADIO PARTS will be added to your inventory.
- Examine the radio on the desk. Use the RADIO PARTS on it. You’ll find yourself whisked away to the city.
City
- Examine the phone booth on the right. Click on the CAR KEYS to add them to your inventory.
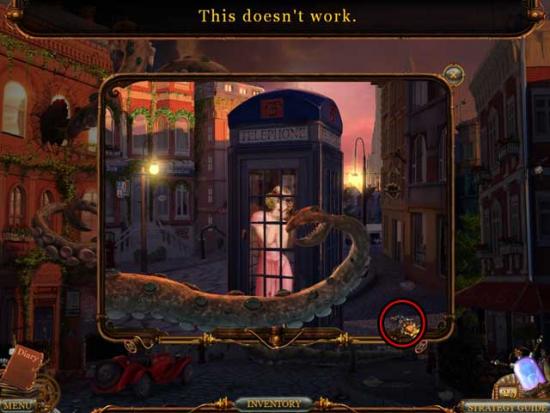
- Use the CAR KEYS on the red car on the left, then click on it for a closer view. Click on the gear shift to send the car rolling.
- Take a closer look at the phone booth again. Click on the GAS CAN inside to add it to your inventory.
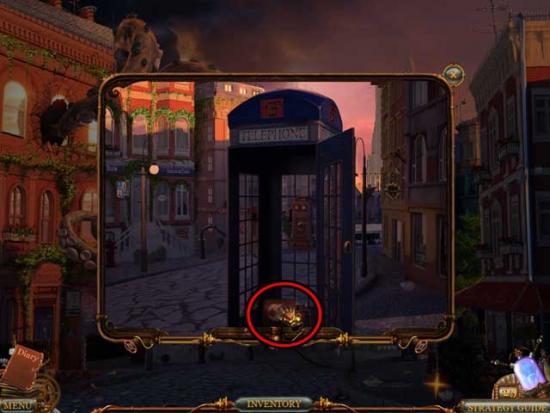
- Take a closer look at the cafe in the bottom right corner. Click on the IDOL to add it to your inventory.
- Use the GAS CAN on the large tentacle on the left to drench it, then use the GENERAL’S LIGHTER to set it ablaze.
- Enter the building on the left.
Apartment
- Use the AXE on the tentacles until all of them are gone.
- Use the IDOL on the slot in the back corner.
- Pick up the GLASS OF WATER to add it to your inventory.
- Examine the desk in the back corner. Use the GLASS OF WATER on the flames to put them out, salvaging the book. Flip through the pages to discover the location of the island.
- Return to the street.
City
- Click on the bomb near the bottom of the screen to send it rolling away.
- Climb up the ladder into the airship once the option appears.
Airship
- Click on the hidden object area on the left.
- Find the objects listed at the bottom of the screen. Items listed in red must be revealed first and are outlined with a square, while Key Items are circled. Other objects are randomized.
- Upon completing the area, the ELECTRIC TUBES will be added to your inventory.
- Click on the MACHETE, the HAMMER, and the WRENCH to add them to your inventory.
- Examine the radar on the right. Use the ELECTRIC TUBES on the radar to restore it to working order.
- Click on the HULL PART lying on the floor to add it to your inventory.
- Examine the upper right corner from where the smoke is coming. Use the HULL PART on the gap, then use the WRENCH to secure it.
Chapter 8: Temple
Cliff
- Click on the BRUSHWOOD (x6) to add it to your inventory.
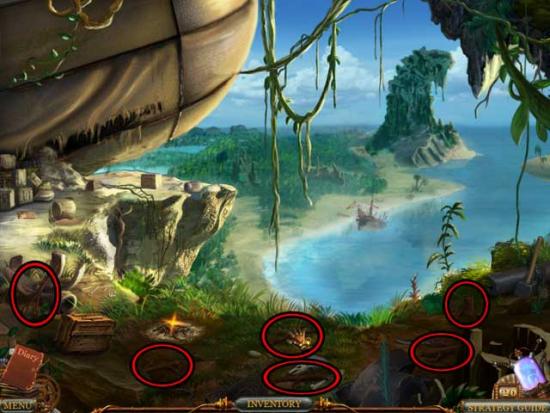
- Use the BRUSHWOOD on the fire pit.
- Take a closer look at the area in front of the airship. Click on the box to open it and collect the LADDER MACHINE from inside. Pick up the LANTERN lying nearby as well to add it to your inventory.
- Take a closer look at the edge of the cliff. Use the LADDER MACHINE on the edge.
- Back in the main area, click on the small box in the lower left corner to open it, then click on the CRAMPS inside to add them to your inventory.
- Examine the edge of the cliff again. Use the CRAMPS on the ladder, then use the HAMMER to secure them.
- Enter the ripped airship.
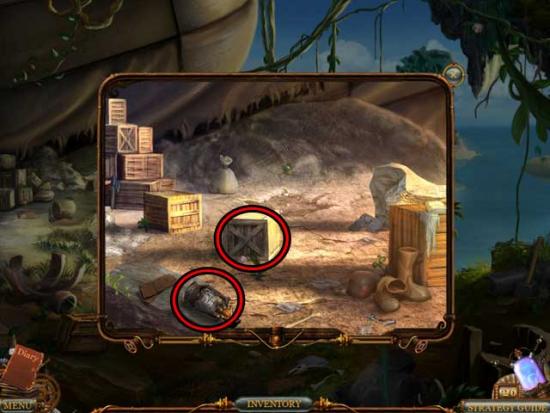
Airship
- Click on the hidden object area on the left.
- Find the objects listed at the bottom of the screen. Items listed in red must be revealed first and are outlined with a square, while Key Items are circled. Other objects are randomized.
- Upon completing the area, the LEVER will be added to your inventory.
- Return outside.
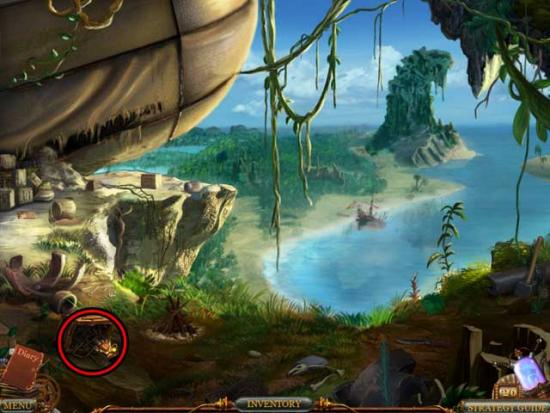
Cliff
- Use the LANTERN on the fire pit to light a fire, then take a closer look at the edge of the cliff.
- Use the LEVER on the ladder, then click on it to lower it.
- Take the ladder down into the jungle.
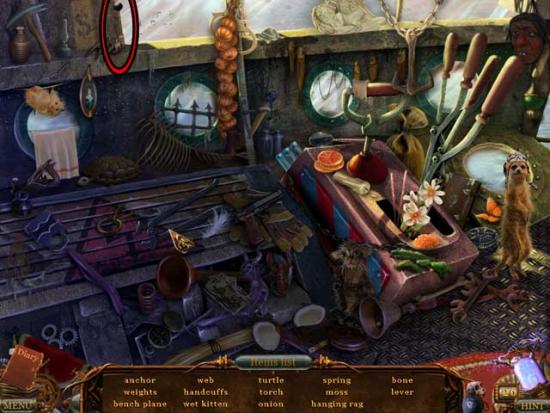
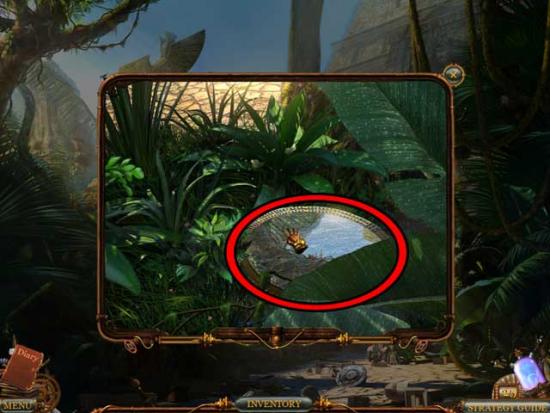
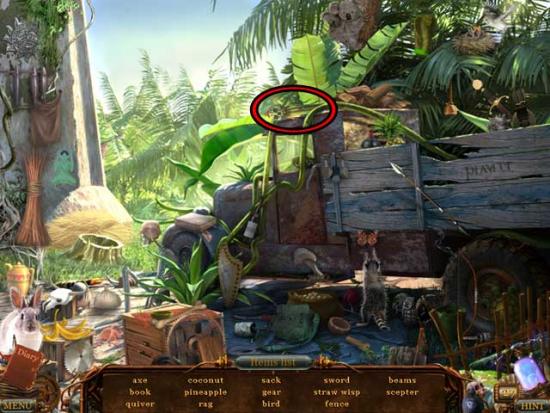
Jungle
- Click on the hidden object area on the right.
- Find the objects listed at the bottom of the screen. Items listed in red must be revealed first and are outlined with a square, while Key Items are circled. Other objects are randomized.
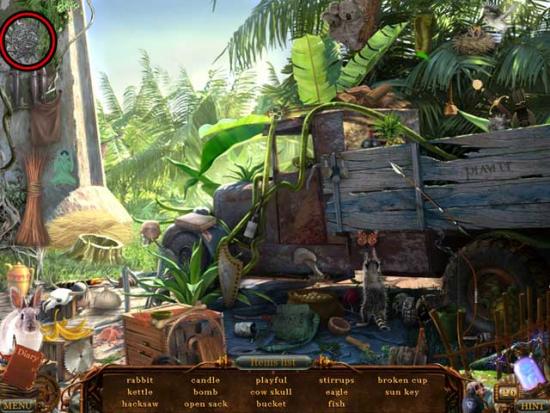
- Upon completing the area, the SUN KEY will be added to your inventory.
- Take a closer look at the brush on the far left. Click on the MIRROR to add it to your inventory.
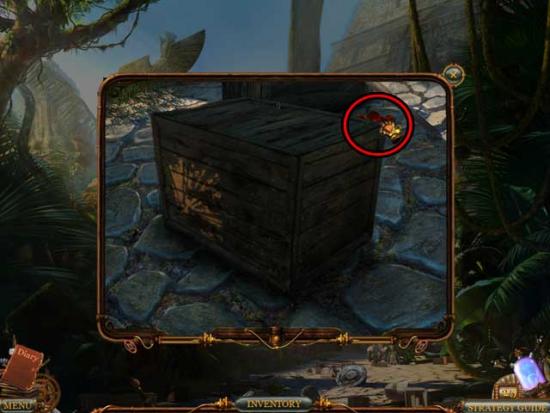
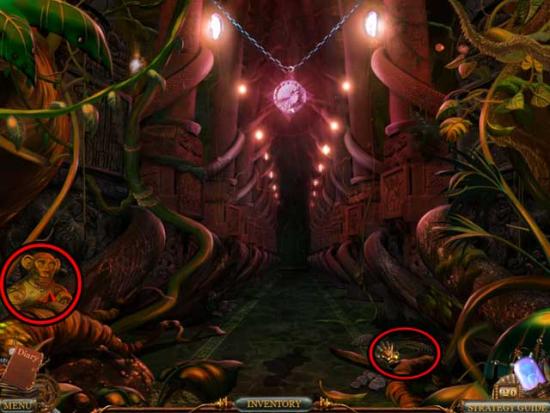
- Examine the brush to the left of the temple entrance. There’s a crate, but you can’t open it just yet. Click on the MONKEY STATUETTE (RED) to add it to your inventory.
- Click on the SHINY SHIELD and the SABER to add them to your inventory.
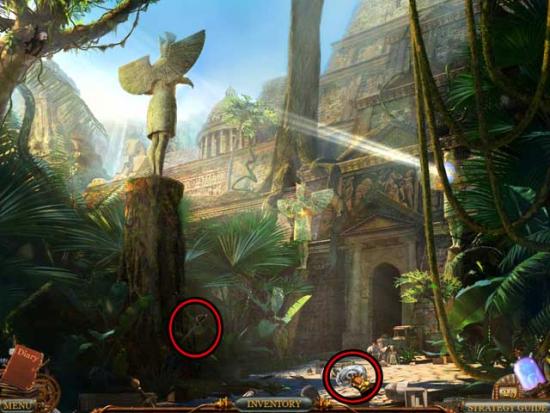
- Use the SHINY SHIELD on the statue on the left, and the MIRROR on the statue on the right.
- Go towards the temple entrance.
Temple Entrance
- Use the MACHETE to clear away the brush.
- Click on the ROPE and the MONKEY STATUETTE (YELLOW) to add them to your inventory.
- Take a closer look at the end of the corridor. The door will become blocked.
- Return to the jungle.
Jungle
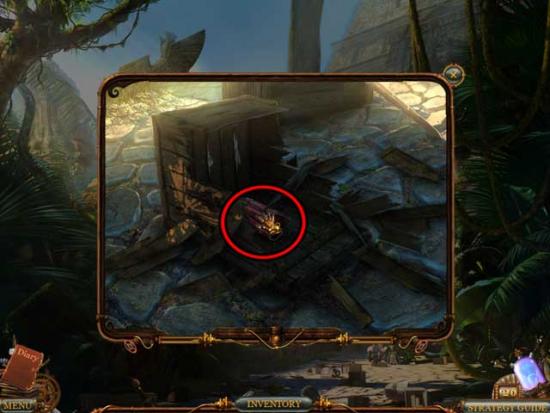
- Take a closer look at the brush in front of the entrance. Use the SABER on the box until it’s completely open, then click on the DYNAMITE to add it to your inventory.
- Go to the temple entrance.
Temple Entrance
- Take a closer look at the end of the corridor. Use the DYNAMITE on the stones to clear them aside.
- Use the SUN KEY on the door to open it, then proceed inside.
Lava Hall
- Click on the BAMBOO STICK to add it to your inventory.
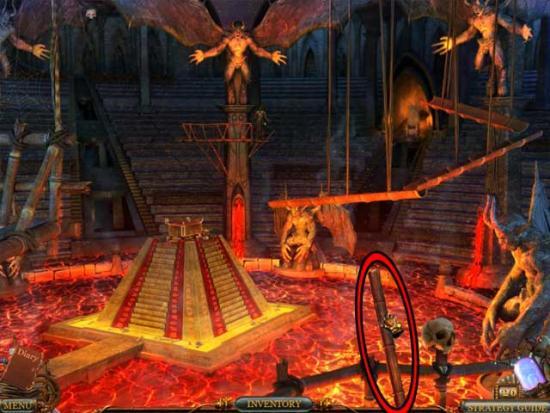
- Take a closer look at the figure in the distance. Use the REVOLVER on the figure, then take a closer look at who it reveals.
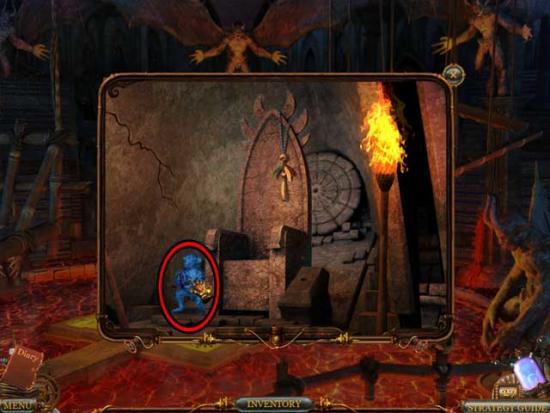
- Take a closer look at the doorway in the distance towards the right.
- Click on the MONKEY STATUETTE (BLUE) to add it to your inventory.
- Return to the jungle.
Jungle
- Click on the hidden object area on the right.
- Find the objects listed at the bottom of the screen. Items listed in red must be revealed first and are outlined with a square, while Key Items are circled. Other objects are randomized.
- Upon completing the area, the VOODOO SCEPTER will be added to your inventory.
- Return to the lava hall.
Lava Hall
- Take a closer look at the doorway on the far end of the room again. Use the VOODOO SCEPTER on the pedestal to the right of the throne, then use the BAMBOO STICK on the round door to open it.
- Proceed into the next area.
Hallway 1
- Click on the MONKEY STATUETTE (GREEN) to add it to your inventory.
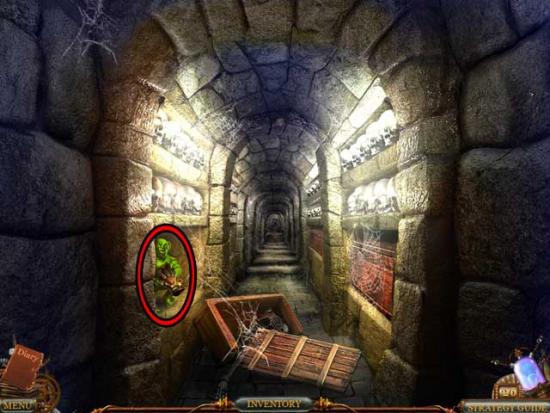
- Continue forward.
Hallway 2
- Continue forward.
Hallway 3
- Click on the WOODEN BOARD to the left to add it to your inventory.
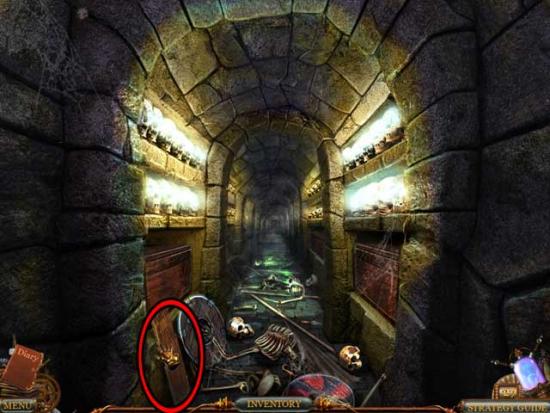
- Continue forward.
Chasm
- Click on the ARROW to add it to your inventory.
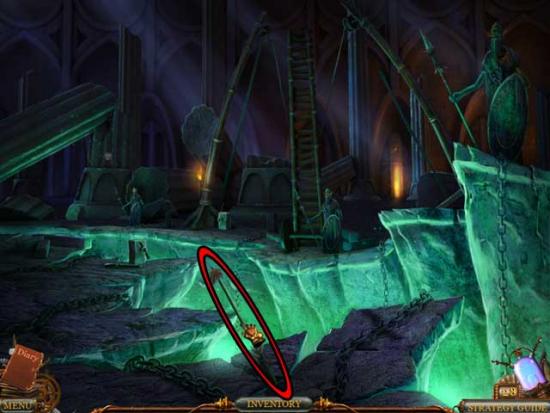
- On the chasm edge to the right, use the WOODEN BOARD, then the BAMBOO STICK, followed by the ARROW, and finally the ROPE. Click on it to fire.
- Examine the other end of the bridge. Click on the MONKEY STATUETTE (PINK) to add it to your inventory.
- Enter through the door at the far end of the room.
Portal Room
- Click on the hidden object area on the left.
- Find the objects listed at the bottom of the screen. Items listed in red must be revealed first and are outlined with a square, while Key Items are circled. Other objects are randomized.
- Upon completing the area, the PICK will be added to your inventory.
- Use the PICK on the yellow and pink pedestals to clear the crystals. This will trigger another hidden object area.
- Find the objects listed at the bottom of the screen. Items listed in red must be revealed first and are outlined with a square, while Key Items are circled. Other objects are randomized.
- Upon completing the area, the MONKEY STATUETTE (PURPLE) will be added to your inventory.
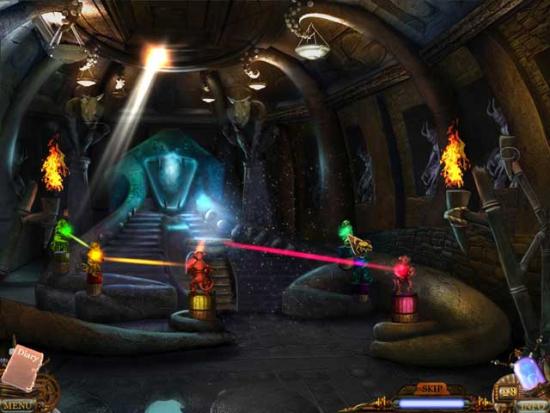
- Place all the MONKEY STATUETTES on their corresponding-colored pedestals.
- Take a closer look at the weak beam coming from the ceiling. Use the REVOLVER to clear the blockage.
- Click on the various statuettes until the crystals on each glow. The solution is shown below.
- Enter through the portal.
Chapter 9: Spirit World
Prisons
- Click on the MONKEY IDOL lying in the grass to add it to your inventory.
- Continue forward.
Bridge
- Click on the hidden object area on the left.
- Find the objects listed at the bottom of the screen. Items listed in red must be revealed first and are outlined with a square, while Key Items are circled. Other objects are randomized.
- Upon completing the area, the SPIRIT KEY will be added to your inventory.
- Use the MONKEY IDOL on the pink pedestal near the foot of the vine, then click for a closer view.
- Use the SPIRIT KEY on the glowing box, then click on the SPIRIT BONE inside to add it to your inventory.
- Give the SPIRIT BONE to the three-headed wolf to make it disappear, then continue along the path.
Throne
- Take a closer look at the top of the throne. Use the VOODOO AMULET on the tribesman.
- Return to the bridge.
Bridge
- Click on the hidden object area on the left.
- Find the objects listed at the bottom of the screen. Items listed in red must be revealed first and are outlined with a square, while Key Items are circled. Other objects are randomized.
- Upon completing the area, the SCEPTER will be added to your inventory.
- Return to the throne.
Throne
- Use the SCEPTER on the area to the left of the king to trigger a game.
- Move your cursor around to control the white entity. The goal is to collect all the white orbs before your competitor collects all the black ones. You can attempt to block your competitor from grabbing their orbs by reaching them first. The first to collect ten orbs wins.
- Upon completing the game, you’ll find yourself back in the office.
Office
- Pick up the phone.
Congratulations! You’ve completed Voodoo Chronicles: The First Sign!
Bonus Chapter: Kitty’s Story
To access this content in the Collector’s Edition of the game, you must first complete the main adventure. Once done, select Bonus, then select the first tab option and click “Play”.
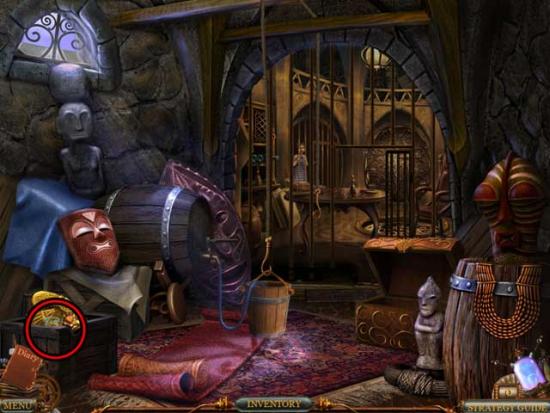
Cell
- Click on the HOSE, the PARCHMENT, the BOTTLE, the WOODEN BUCKET, and the SKELETON KEY to add them to your inventory.
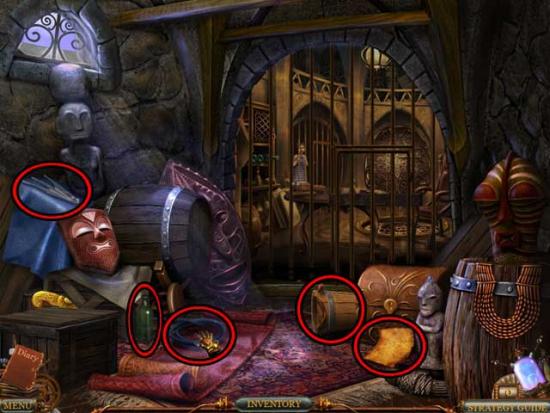
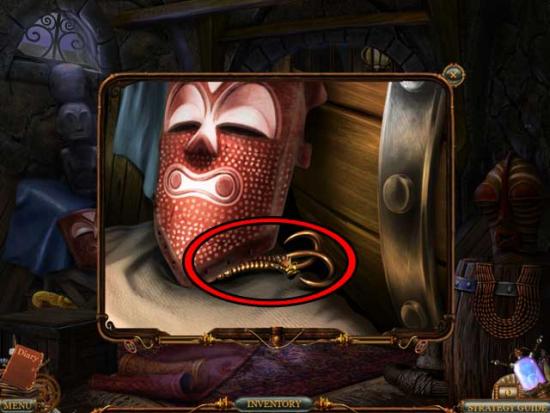
- Take a closer look at the red mask on the left. Click on the HOOKS to add them to your inventory.
- Use the SKELETON KEY on the brown chest on the right, then click on the hidden object area.
- Find the objects listed at the bottom of the screen. Items listed in red must be revealed first and are outlined with a square, while Key Items are circled. Other objects are randomized.

- Upon completing the area, the COILED ROPE will be added to your inventory.
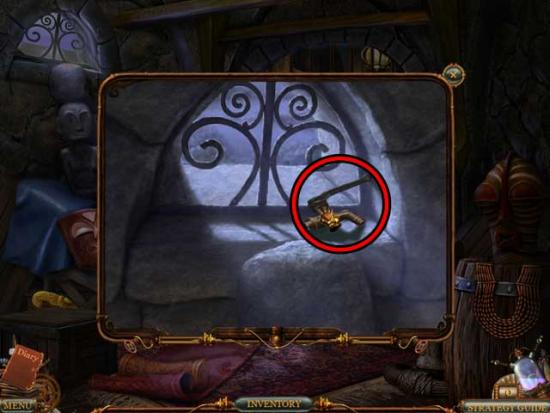
- Take a closer look at the window on the left. Click on the FAUCET to add it to your inventory.
- Use the FAUCET on the barrel on the left, then use the COILED ROPE on the beam at the top of the screen. Use the HOOKS on the rope ends, then use the WOODEN BUCKET on the hooks. Use the HOSE on the faucet, then click on it to release the water.
- Exit the cell.
Cellar
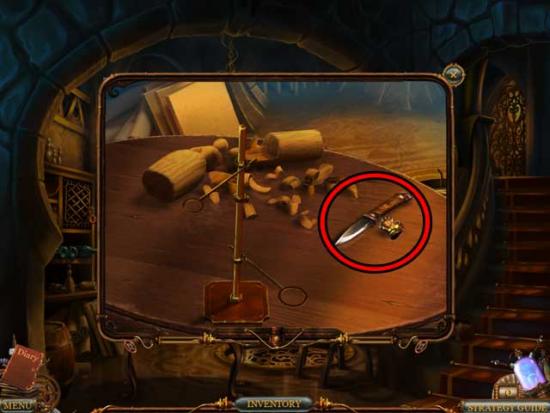
- Take a closer look at the table. Click on the KNIFE to add it to your inventory.
- Click on the CHEMICAL REAGENT on the stairs to add it to your inventory.
- Return to the cell.
Cell
- Use the KNIFE on the crate in the lower left corner to open it, then click on the FLASK inside to add it to your inventory.
- Return to the cellar.
Cellar
- Take a closer look at the table. Use the FLASK on the device, then use the CHEMICAL REAGENT on the flask to obtain the FLASK WITH ACID.
- Take a closer look at the door at the top of the stairs. Use the PARCHMENT on the foot of the door.
- Talk to the girl in the cell and use the FLASK WITH ACID on the door.
- Return to the cell.
Cell
- Click on the hidden object area on the right.
- Find the objects listed at the bottom of the screen. Items listed in red must be revealed first and are outlined with a square, while Key Items are circled. Other objects are randomized.
- Upon completing the area, the HAMMER will be added to your inventory.
- Return to the cellar.
Cellar
- Use the HAMMER on the girl’s cell to break it open and enter inside.
Child’s Cell
- Click on the CHEESE sitting on the left to add it to your inventory.
- Take a closer look at the opening in the upper right corner. Use the CHEESE on the ledge to lure out the MOUSE and add it to your inventory.
- Return to the cellar.
Cellar
- Take a closer look at the shelf on the left. Use the MOUSE on the shelf, then click to obtain the STORAGE KEY.
- Use the STORAGE KEY on the solid cell door to open it, then proceed inside.
Boiler Room
- Click on the LEVER to add it to your inventory.
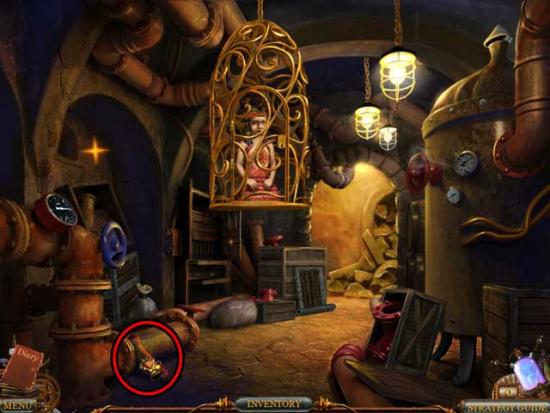
- Take a closer look at the area underneath the cage. Click on the JAR WITH TERMITES to add it to your inventory.
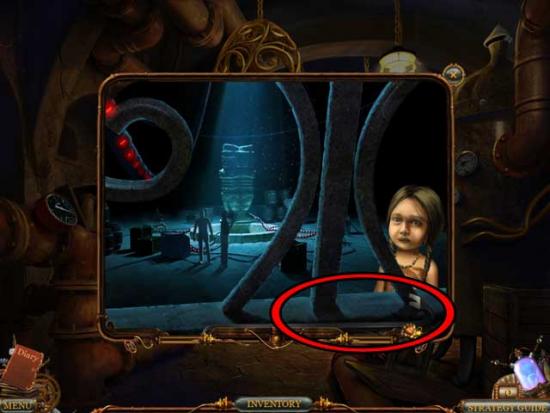
- Take a closer look at the small window on the left. Talk to the girl inside, then click on the CROWBAR to add it to your inventory.
- Use the LEVER on the switch panel to the left of the cage, then click on it to lower the girl.
- Return to the child’s cell.
Child’s Cell
- Use the JAR WITH TERMITES on the set of drawers on the left. Click on the hidden object area that appears.
- Find the objects listed at the bottom of the screen. Items listed in red must be revealed first and are outlined with a square, while Key Items are circled. Other objects are randomized.
- Upon completing the area, the SCREWDRIVER will be added to your inventory.
- Return to the boiler room.
Boiler Room
- Use the SCREWDRIVER on the cage to open it and free the girl inside.
- Click on the hidden object area that appears on the right.
- Find the objects listed at the bottom of the screen. Items listed in red must be revealed first and are outlined with a square, while Key Items are circled. Other objects are randomized.
- Upon completing the area, the LONG NAIL will be added to your inventory.
- Return to the cellar.
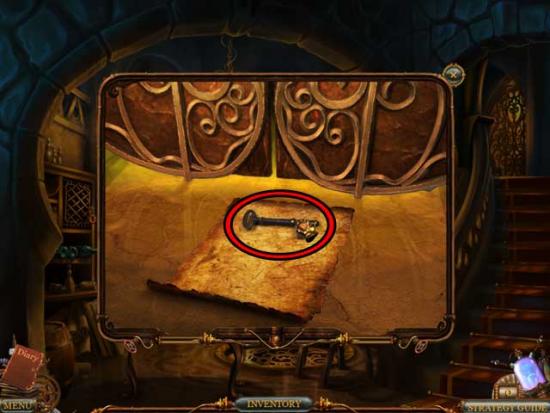
Cellar
- Take a closer look at the door at the top of the stairs. Use the LONG NAIL on the keyhole, then take a closer look at the foot of the door. Click on the parchment to pull it back, then click on the KEY TO EXIT to add it to your inventory.
- Take a closer look at the door again. Use the KEY TO EXIT on the keyhole to open the door, then proceed through.
Catacombs
- Take a closer look at the girl trapped in the cell in the floor on the right.
- Return to the child’s cell.
Child’s Cell
- Click on the hidden object area.
- Find the objects listed at the bottom of the screen. Items listed in red must be revealed first and are outlined with a square, while Key Items are circled. Other objects are randomized.

- Upon completing the area, the ROPE will be added to your inventory.
- Return to the catacombs.
Catacombs
- Use the ROPE on the cell grate on the right, then use the CROWBAR on the stack of barrels to knock them over and free the girl.
- Examine the door at the top left of the screen: the latch is stuck.
- Return to the boiler room.
Boiler Room
- Click on the hidden object area on the right.
- Find the objects listed at the bottom of the screen. Items listed in red must be revealed first and are outlined with a square, while Key Items are circled. Other objects are randomized.
- Upon completing the area, the OIL-CAN will be added to your inventory.
- Return to the catacombs.
Catacombs
- Examine the door again. Use the OIL-CAN on the latch, then click and slide it to unlock the door.
Congratulations! You’ve completed Voodoo Chronicles: The First Sign Collector’s Edition!

More articles...
-
Best Horror Games On Itch.io – July 2026
Across a bounty of subgenres. -
Haze Seas Accessories Tier List [Best Accessories to Equip]
The accessories with the best stat buffs in Haze Seas.