- Wondering how to get Monopoly GO! free rolls? Well, you’ve come to the right place. In this guide, we provide you with a bunch of tips and tricks to get some free rolls for the hit new mobile game. We’ll …
Best Roblox Horror Games to Play Right Now – Updated Weekly
By Adele Wilson
Our Best Roblox Horror Games guide features the scariest and most creative experiences to play right now on the platform!The BEST Roblox Games of The Week – Games You Need To Play!
By Sho Roberts
Our feature shares our pick for the Best Roblox Games of the week! With our feature, we guarantee you'll find something new to play!Type Soul Clan Rarity Guide – All Legendary And Common Clans Listed!
By Nathan Ball
Wondering what your odds of rolling a particular Clan are? Wonder no more, with my handy Type Soul Clan Rarity guide.
Victorian Mysteries: Woman in White Walkthrough
Welcome to the Victorian Mysteries: Woman in White walkthrough on Gamezebo. Victorian Mysteries: Woman in White is an interactive hidden object game played on PC, created by FreezeTag Games and available at BigFish Games. This walkthrough includes tips and tricks, helpful hints, and a strategy guide for how to complete Victorian Mysteries: Woman in White.
Victorian Mysteries: Woman in White – Game Introduction
Welcome to the Victorian Mysteries: Woman in White walkthrough on Gamezebo. Victorian Mysteries: Woman in White is an interactive hidden object game played on PC, created by FreezeTag Games and available at BigFish Games. This walkthrough includes tips and tricks, helpful hints, and a strategy guide for how to complete Victorian Mysteries: Woman in White.
General Information
- Enter your profile name with up to 31 characters (letters, numbers and symbols). Click on the “Click to change player” button (located at the bottom of the screen), to add or delete profiles. You may create a total of 6 profiles.
- When you create a profile, you’ll be asked if you want to play in Casual (the Hint and Skip buttons charge in 120 seconds and active areas are highlighted) or Expert (the Hint and Skip buttons charge in 135 seconds and active areas are not highlighted) mode.
- Click on Options to adjust the Music and Sound volumes. Note that adjusting the Music volume also adjusts the voiceover sound levels. If you set this fairly low, you won’t hear the voiceovers clearly. You can also click Mute to disable all sound and switch between Full Screen and Windowed modes. Windowed mode was tested on resolutions of 800×600, 1024×768 and 1152×865, and works for all of them. Click on Credits to view this information.
- Secrets is locked until you complete the game
- You’ll be given the opportunity to use a Tutorial when you first start a game.
- All object search areas will be highlighted in purple, in both Casual and Expert modes.
- You can back out of most puzzles by moving your cursor to the bottom of the screen, and you can exit object search scenes by clicking on the word list.
- Once you’ve started a game, you’ll see the Journal, Tasks and Maps and Menu buttons at the lower left side of the screen.
- The Journal contains the Fairlie Family Tree, Character information and Story Elements. It will begin empty and be added to as you progress in the game.
- The Tasks and Maps book contains your current list of objectives and a Map showing your current location (yellow highlight).
- Search scenes Inventory items are always the same and in the same location.
- During Puzzles and Minigames, click on the blue “?” (question mark) for information on how to complete them.
- During dialog scenes, click on each of the discussion points and then click anywhere to progress through the conversations. Click on Good Bye only AFTER you’ve exhausted the other choices. The outcome isn’t affected by which order you choose to ask the available questions, just don’t choose Good Bye or you’ll have to click on the character again and complete the other choices, first.
- The mis-click penalty is random. Sometimes it only happens if you click quickly, several times, other times it will be triggered no matter how long you pause between clicks. In all cases, the cursor will be disabled for approximately 4 seconds.
Gameplay and Guide Tips
- This guide assumes you’ve read the General Information, Gameplay and Guide Tips, used the Help, used the Tutorial and/or otherwise familiarized yourself with navigation and gameplay mechanics.
- The Hint button works in all game screens. During object searches, a random item in the list will be highlighted if you use the Hint button. In the regular game scenes, you’ll be shown an area of interest to explore.
- In object searches, items will be highlighted in yellow with Inventory items highlighted in blue. In landscape scenes, active locations will be highlighted in White, Inventory items in Blue and Journal items in Green. Note that the game will highlight all object search areas in Purple; they won’t be otherwise highlighted in the images in this guide.
- Collecting items related to entries in the Journal aren’t always necessary in order to progress in the game. If you miss an item, and can no longer return to collect it, you will still be able to progress. When you collect a Journal entry item, the Journal will glow. Click on it to read more.
- The game is somewhat non-linear and you may perform some tasks in any order you choose, however some areas won’t be available until you complete tasks or collect inventory items.
- If you’re confused about your location, be sure and look at the in-game map (click on Tasks and Maps, at the lower left) for help in navigating to where you want to go. Note that the maps are not interactive and you’ll have to navigate by moving your cursor around the scene, locating the entrances and exits and clicking to go in that direction. Navigation directions won’t be given in this guide.
- Hovering your cursor over Inventory items will show you a popup tag with a description. Names of all the entrances and exits to a scene will also have descriptive tags.
- Some of the “hotspots” for active areas, or items in object searches, may not be very precise. Move your cursor a little and you’ll be able to click on the area or item.
Walkthrough
Click on Play and watch the opening movie.
Chapter 1
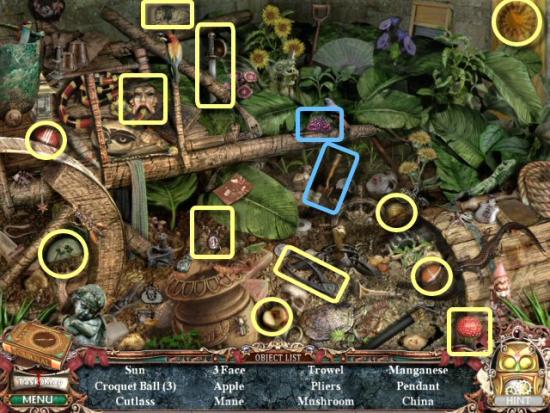
You arrive at the Limmeridge Entry. Click on the Bushes for an Object Search and collect all items in the list. Inventory Items: Manganese, Trowel

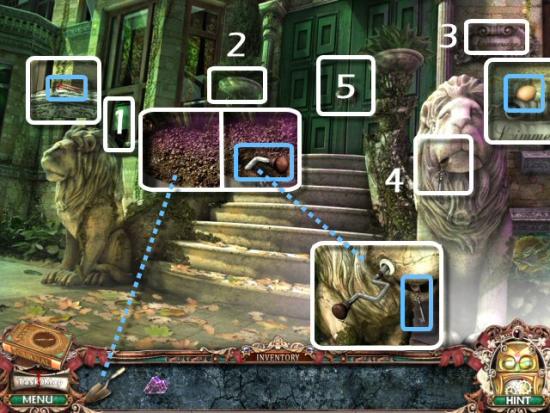
Click on the Window (1), collect the Matches, click on the Planter (2), use the Trowel and collect the Crank. Click on the Lion (3), use the Crank, click on it and then collect the Key. Click on the Plaque (4), collect the Egg and then click on the Door (5).
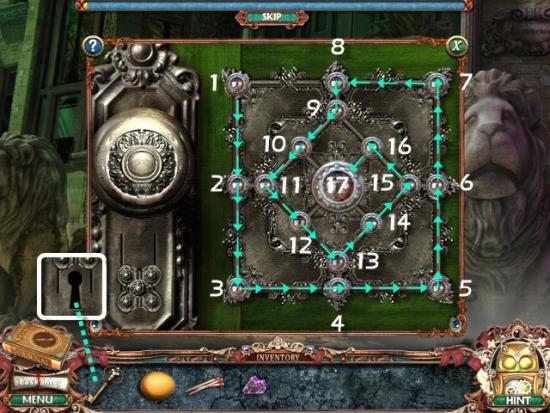
Door Puzzle: click on each pin, only once, to trace around them and open the Keyhole. If you run out of moves, the puzzle will reset, or you can close the puzzle and then click on the door again, to restart it. Click on the buttons, beginning with “1” and ending with “17.” When complete, use the Key in the Keyhole, click on the Key and then enter the house. Note: you don’t have to start with the button in the upper left corner. You can start with any corner and, once you complete the outer square, you can go in either direction in the center square.
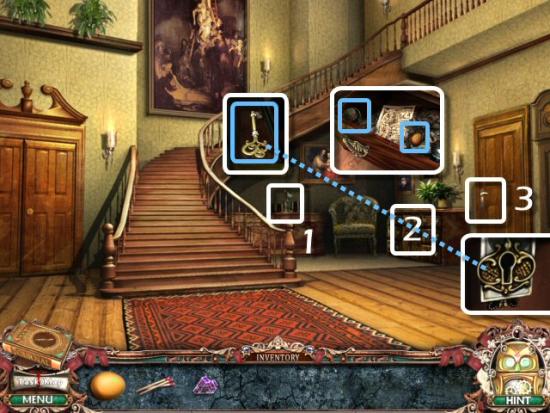
Speak to Marian and exhaust the list of discussion points. Click on the Horse (1) and collect the Key. Click on the Dresser (2), click on the top Drawer to open it, collect the Empty Paint Jar and the Egg and then click on the Door (3). Use the Key, click on it and then enter the Conservatory.
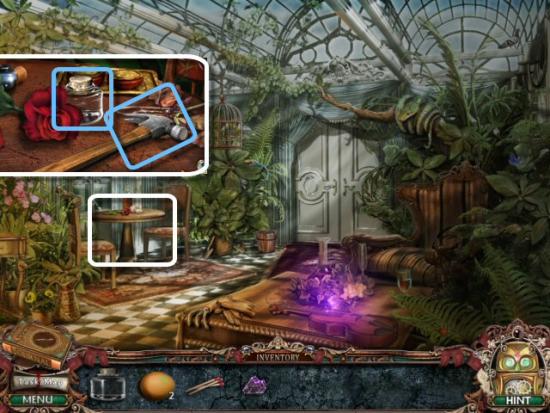
Click on the Table and Chairs, collect the Empty Paint Jar and the Hammer and then click on the Workbench for an Object Search.
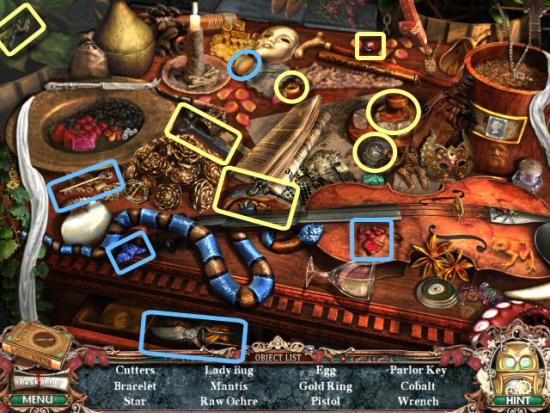
click on the Drawer to open it and collect all items in the list. Inventory Items: Cutters, Egg, Cobalt, Raw Ochre, Parlor Key
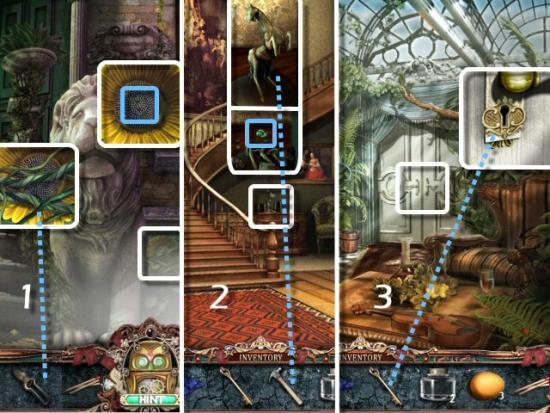
Return to the Limmeridge Entry, click on the Sunflower (1), use the Cutters on the Vines (it doesn’t matter in which order you click on the Vines – there are a total of 7 vines) and collect the Sunflower Seeds. Return to the Entry Hall, click on the Horse (2), use the Hammer and collect the Malachite. Return to the Conservatory, click on the Door (3), use the Parlor Key and then click on it.
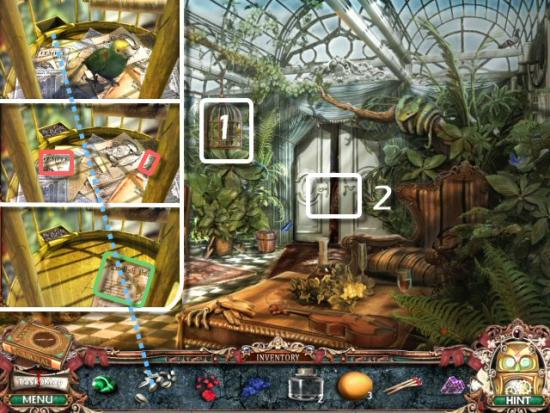
Click on the Cage (1), use the Seeds in the Feeder and then click on pairs (example shown – there are a total of 11 pairs) of papers until you uncover the Newspaper Article. Enter the Parlor (2).
Collect the Note, click on the Table and then collect the Paint Brush, Empty Paint Jar and the Sheet Music. Click on the Clock, use the Hammer on the Glass, collect the Silver Coins, click on the Pendulum, collect the Paint Key and then click on the Piano.
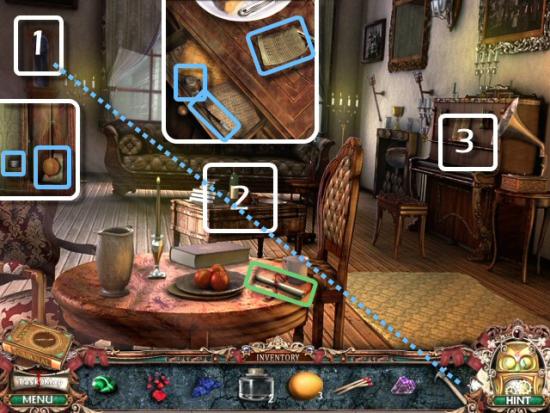
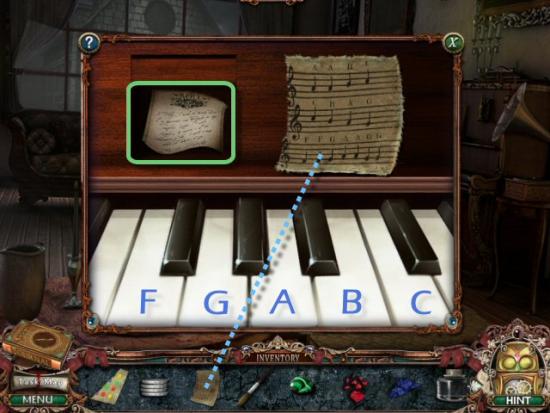
Use the Sheet Music on the Music Holder and play the 3 sequences of notes. Note that the Sheet Music shows you which notes you need to play, however it assumes you’re familiar with a music keyboard. The following screen shot shows which piano keys you need to click when you hear (or see, for the hearing disabled) the tune. When complete, collect the Fairlie Will and then head to the Art Studio (to the left). Note that the tune being played is Ludwig von Beethoven’s “Ode To Joy” (9th Symphony).
- A A B C
- C B A G
- F F G A A G G
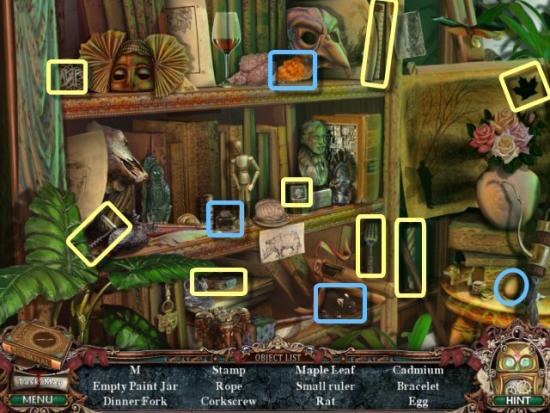
Click on the Shelves for an Object Search and collect all the items in the list. Inventory Items: Cadmium, Empty Paint Jar, Egg, Rat
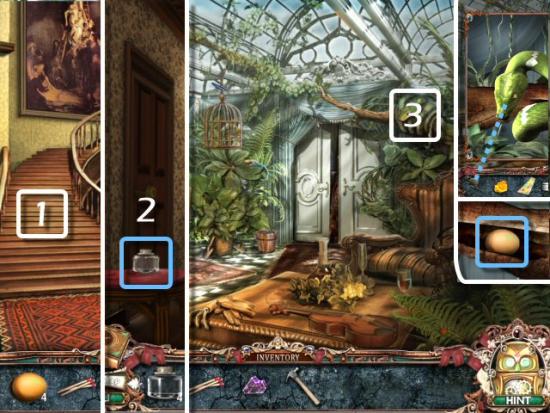
Return to the Entry Hall and go to the Upstairs Hallway (1). Collect the Empty Paint Jar (2) and return to the Conservatory. Click on the Snake (3), use the Rat on the Snake, collect the Egg and then return to the Art Studio.
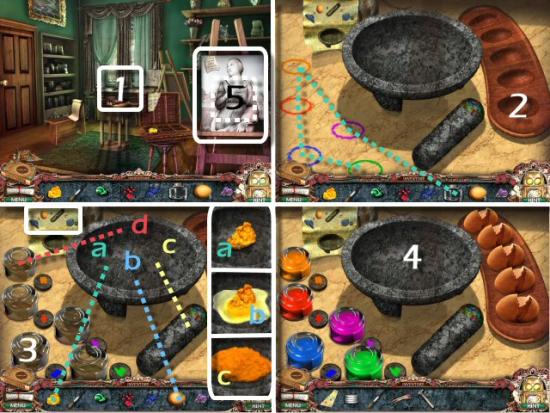
Click on the Desk (1) and use each of the 5 Empty Paint Jars in the Colored Circles (2). Create the Pigments by adding one of the Elements (a) to the Mortar, then one of the 5 Eggs (b), use the Pestle (c), click on the correctly colored Empty Paint Jar (d) and then click on the Pigment in the Mortar (3); repeat for each Element (Cadmium, Raw Ochre, Malachite, Cobalt and Manganese). When complete, collect all 5 Jars of Pigment (4) and then click on the Painting (5). Note that you can add either the element or the egg, first, to the mortar; it makes no difference.
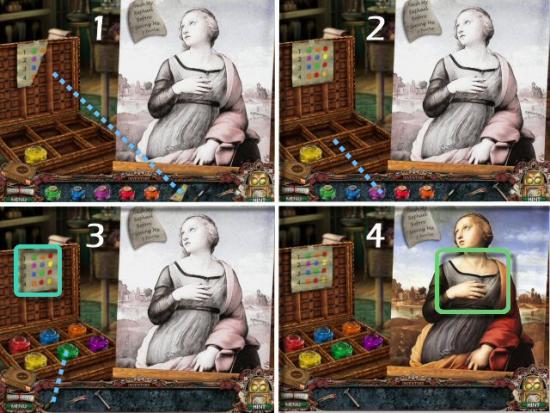
Use the Paint Key on the Torn Paper (1) and use each of the 5 Jars of Pigment in the Paint Box (2). You can click anywhere in the Paint Box; the Jars will automatically go to their assigned spots.
Using the Paint Key as your guide, use the Paintbrush in a Jar of Pigment and then click on the Painting (3). You can click anywhere on the Painting. Repeat this for each color listed in the Paint Key, starting with line 1, following the colors listed from left to right and then continuing with each line, from 2 to 4. When complete, click anywhere on the Painting (4) to add it to your Journal and then click left to enter the Study.
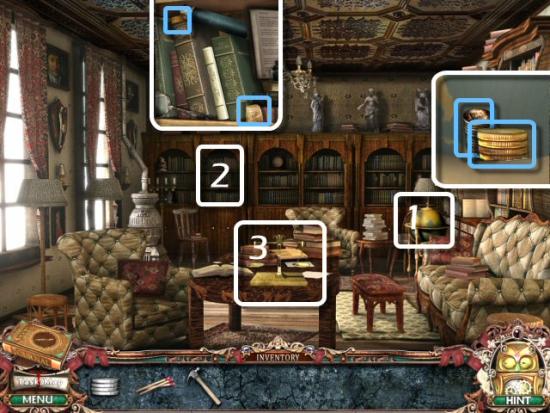
Speak to Lord Fairlie and exhaust the list of discussion points. Click on the Globe (1), click on it again and then collect the Gold and the Bronze Coins. Click on the Shelf (2) and collect the Gold Coins and Coins in Wax. Return to the Parlor; when you come back, click on the Table (3).
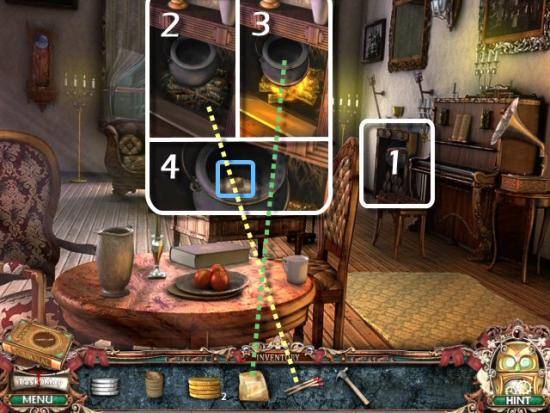
Click on the Fireplace, use the Matches on the Wood, use the Coins in Wax in the Pot and then collect the Bronze Coins. Return to the Study.
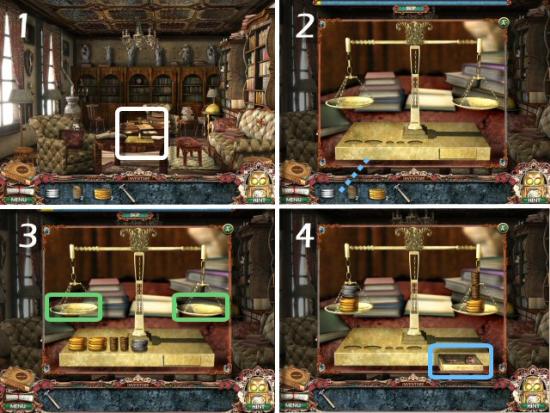
Click on the Table (1) and use all the Coins in the Slots in the Base of the Scale (2). The object is to balance the Scale and the logic is very simple…Gold weighs more than Silver, which weighs more than Bronze. The solution is to put 1 Gold and 1 Silver on one side of the Scale, and 1 Gold and 2 Bronze on the other (3). It doesn’t matter which side of the Scale you use for the Coin combinations (2). When complete, collect the Bedroom Key (4).
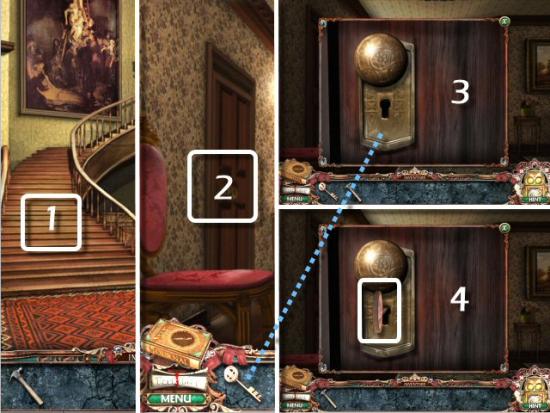
Return to the Upstairs Hallway (1). Speak to Marian and exhaust the list of discussion points. Click on the Bedroom Door (2), use the Bedroom Key in the Lock (3), click on it (4) and then enter the Bedroom.
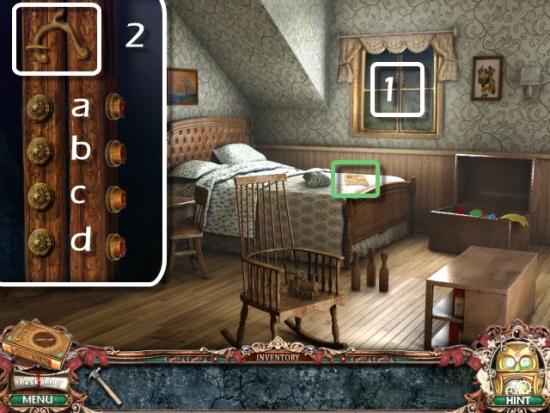
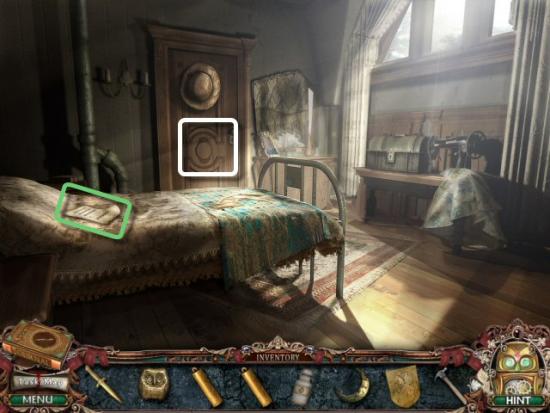
Collect the Note on the bed and then click on the Window (1). The object is to press the correct sequence of buttons so you can open the Latch. If you click a, locks b and c open. If you click b, locks a and c open. If you click c, locks b and d open. If you click d, locks a and d open (2). It’s a simple process of elimination…click any combination of the following: a and d, d and a, b and c or c and b. Any one of these will solve the puzzle. Click on the Latch to open the Window and enter the Gazebo.
Chapter 2
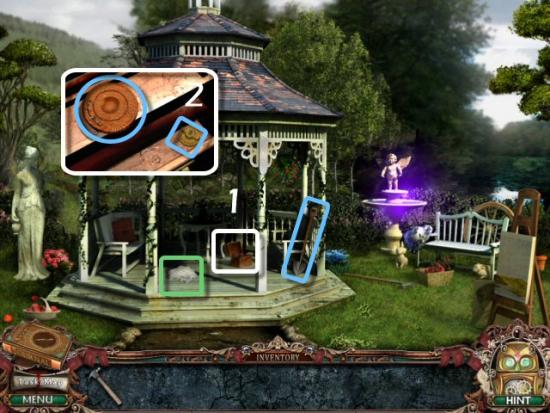
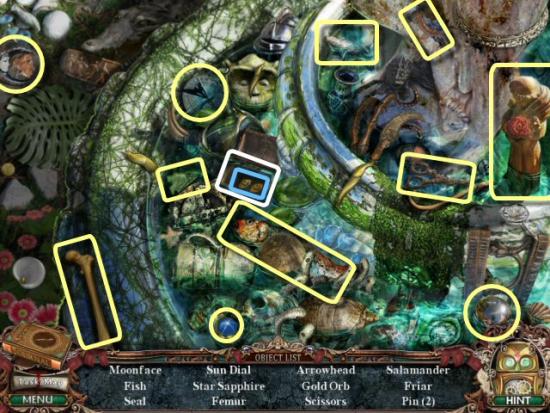
Collect the Shovel and White Shawl, click on the Chest (1), collect the Reel Top and Reel Top Screw (2) and then click on the Fountain for an Object Search. When complete, click left to the Lake.
Click on the Small Chest to open it and collect all items in the list. Inventory Items: 2 Reel Pins
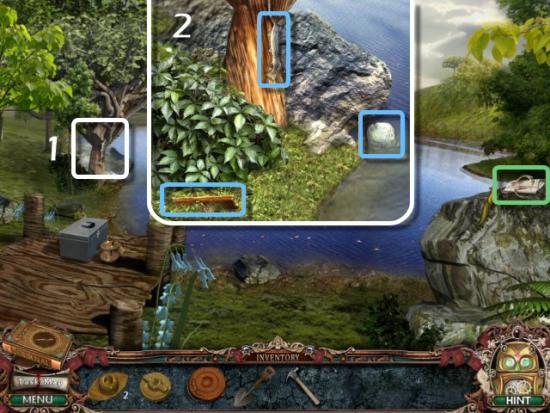
Speak to Professor Pesca and exhaust the list of discussion points. Collect the Apron and then click on the Tree (1). Collect the Fish, Rod Connector and Stone (2), return to the Gazebo and then click left to the Garden.
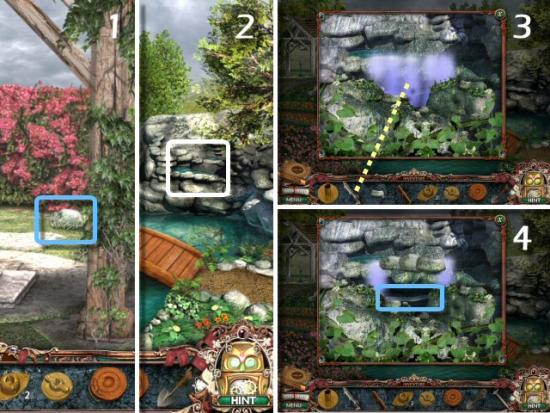
Click on the Flower Bed (1), collect the Reel Spindle, Telegram and Stone (2) and then click left to the Water Pump.

Collect the Stone (1) and then click right to return to the Garden. Click on the Water Feature (2), use the 3 Stones (3), collect the Pump Handle (4) and then return to the Water Pump.
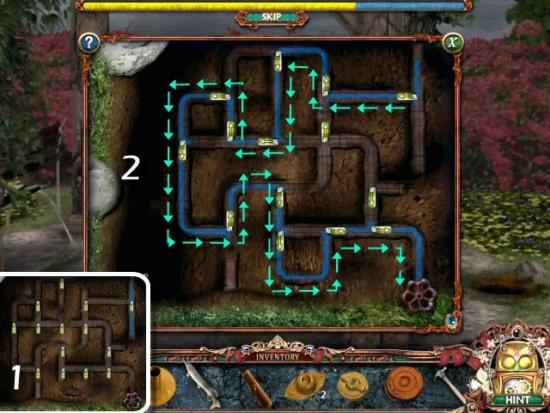
Use the Shovel on the Gravel and then click on the Hole.
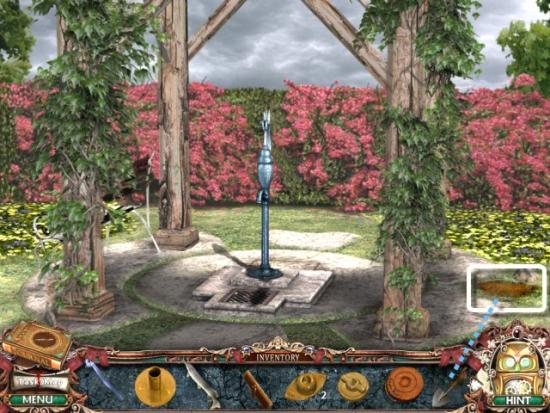
The object is to get the water flowing to the Pump. All arrows begin pointing down (1); click on an arrow to rotate it clockwise to a different direction (right clicking has no effect), until the water flows through to the Faucet Handle (2).
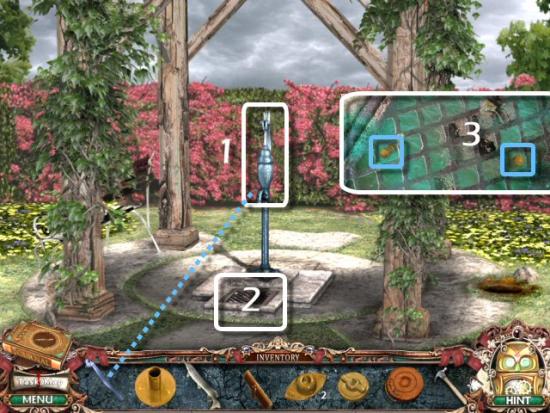
Use the Handle on the Pump (1), click on it and then click on the Grate (2). Collect the 2 Reel Knobs (3) and then return to the Lake.
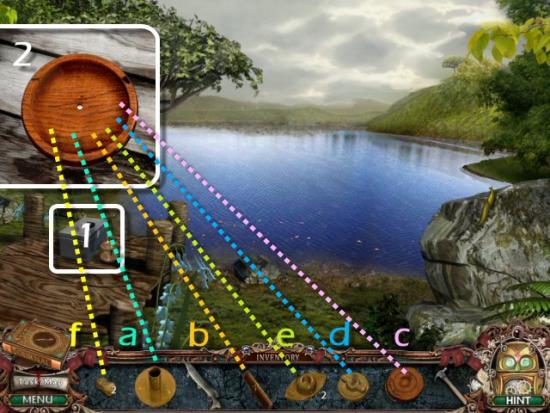
Click on the Tackle Box (1) and assemble the Reel as follows (2): Use the Reel Spindle (a), the Rod Connector (b), the Reel Top (c), the Reel Top Screw (d), the 2 Pins (e) and then the 2 Knobs (f) on the Reel Base. You must do it in this order to complete it.
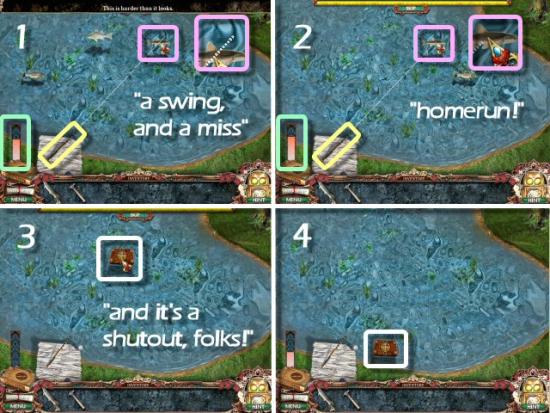
Aim your Rod (yellow) at a likely target (pink)…the one shown happens to be stationary…watch the Power Meter (green) and click. If at first you don’t succeed (1), try, try again (2). If you’ll notice, the Rod angle and Power Meter level are virtually identical…well; the meter is just a skosh different. Anyway, after you’ve caught all the little beasties (3), repeat with the Chest to reel it into shore (4) and click on it.
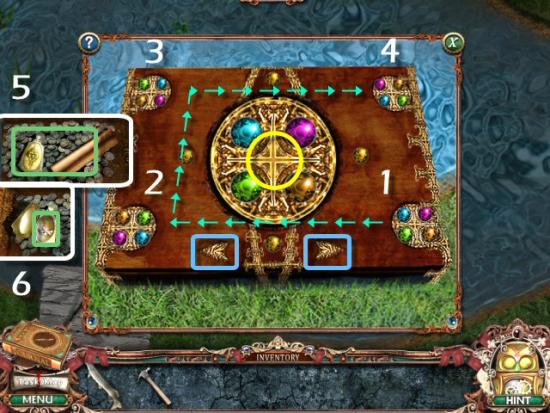
Unlock the Chest. Rotate the Disk, using the Left and Right Arrows below it, until it has the same configuration as one of the Hinges and then click on the center of the Disk. You can start with the initial configuration, or rotate the Disk to any one of the other 3 configurations. Once you open the first Hinge, you must unlock the rest by going clockwise.
Rotate the Disk so it has the same configuration as the subsequent Hinges and then click on the Disk until you reach the last one. If you start at the Bottom Right (1), you must continue clockwise to the Bottom Left (2), Top Left (3) and finally the Top Right (4). Once solved, click on both items in the Chest (5) and then collect the Lock of Hair (6).
Speak to Marian and Laura Fairlie until you exhaust all discussion points.
Chapter 3
Speak to Marian until you exhaust all discussion points and then return to the Entry Hall. Click on the left Door to enter the Dining Room. Click on the Shelf (1), collect the Screwdriver, use the Hammer on the Vase (2), collect the 2 Screws (3) and then click on the Painting (4) for an Object Search. When finished with the object search, click on the Side Table (5)
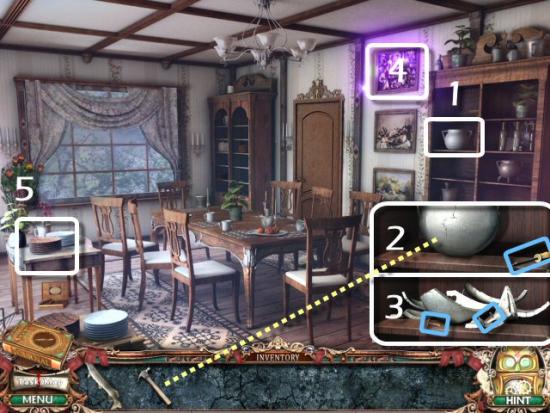
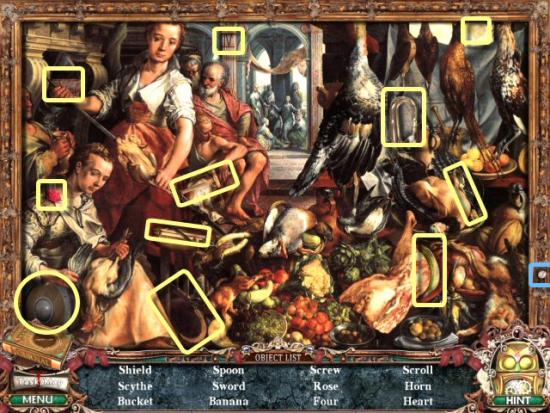
Collect all the items. Inventory Item: Screw
The object is to move all 4 of the Corner Blocks to the Center by sliding the blocks to clear paths. When complete, collect the Cupboard Key.
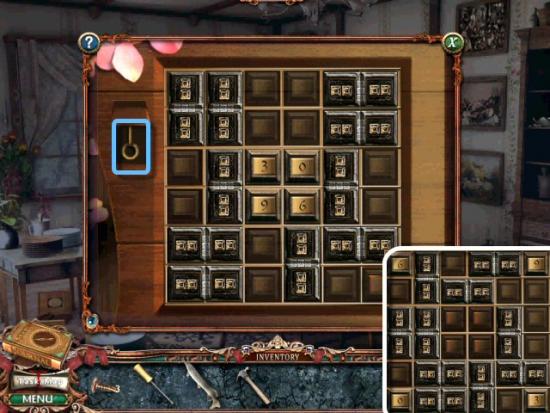
Click on the following for a video solution.
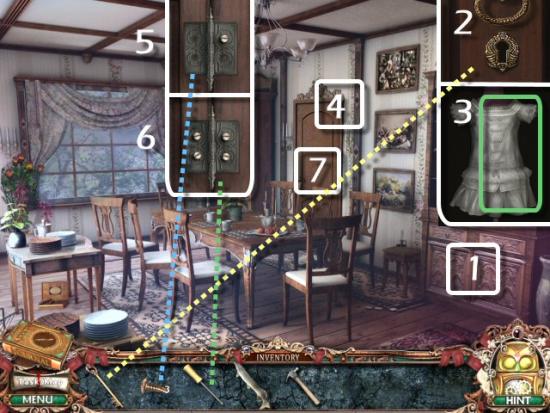
Click on the Cupboard Door (1), use the Cupboard Key (2), click on it and collect the Child’s Dress (3). Click on the corner of the Door (4), use the 3 Screws in the Holes (5), use the Screwdriver on each of the 4 Screws (6) and then enter the Kitchen.
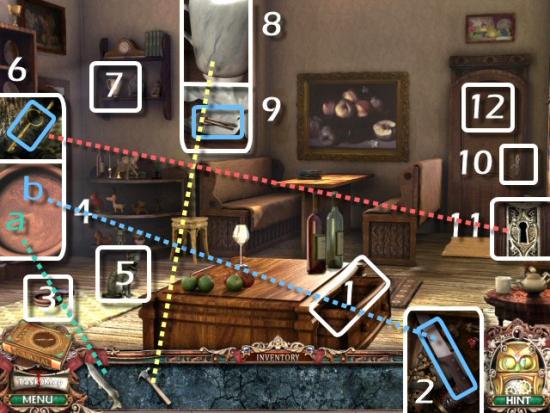
Click on the Drawer (1) and collect the Knife (2). Click on the Cat Bowl (3), use the Fish (a) on the Cat Bowl (4) and then use the Knife (b) on the Fish. Click on the Cat (5) and collect the Key (6). Click on the Shelf (7), use the Hammer on the Pitcher (8) and collect the Matches (9). Click on the Lock (10), use the Key in the Lock (11), click on the Key and then enter the Maid’s Room (12).
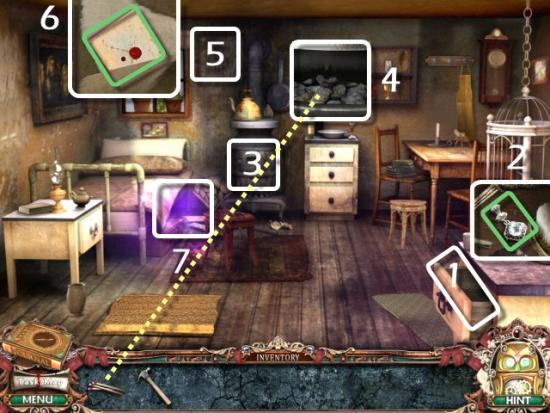
Click on the Drawer (1), collect the Piece of Jewelry (2), click on the Stove (3), click on the Door and then use the Matches (4). Click on the Wall above the Stove (5), collect the Envelope (6) and then click on the Bed (7) for an Object Search.
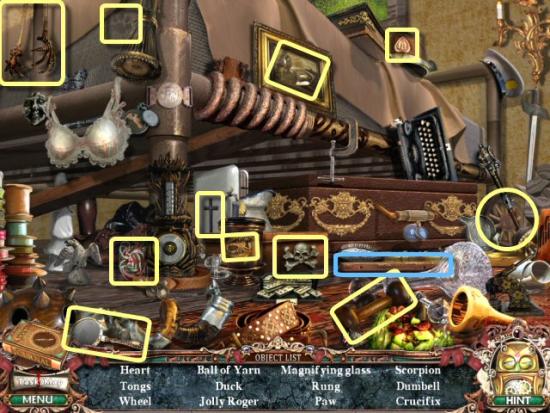
Collect all the items. Inventory Item: Rung
Speak to the Maid, exhaust all discussion points, return to the Parlor, speak to Laura and exhaust all discussion points.
Chapter 4
Collect the Rung and 2 Pieces of Letter and then click on the side of the Chapel for an Object Search.
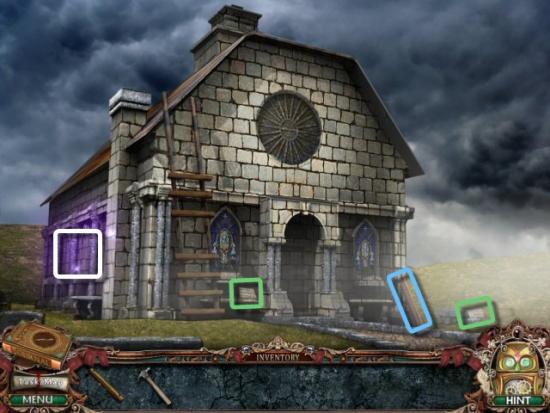
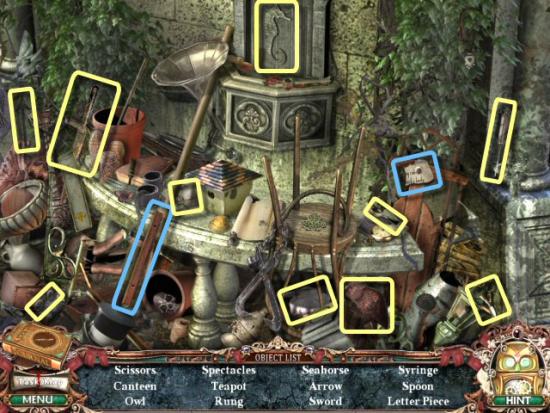
Collect all the items in the list. Inventory Items: Rung, Piece of Letter
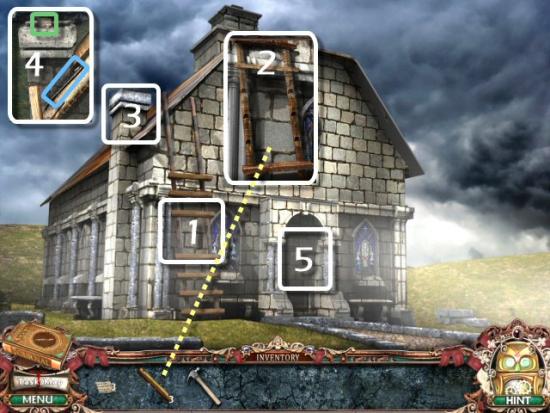
Click on the Ladder (1), use the 3 Rungs (2), click on the Chimney (3), collect the Piece of Letter and Crowbar (4) and then enter the Chapel (5).
Speak to Marian and exhaust all discussion points. Collect the 2 Pieces of Letter, click on the Table (1), use the 6 Pieces of Letter on the Table (2) and assemble them, jigsaw style (3). Click on the Door (1), use the Crowbar on the Boards (click on each of the 3 Boards) and then enter the Graveyard.
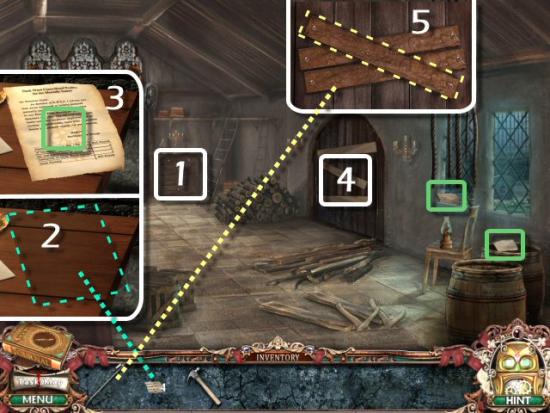
Click on the Grave (1), collect the Note (2) and then click on the Gate (3).
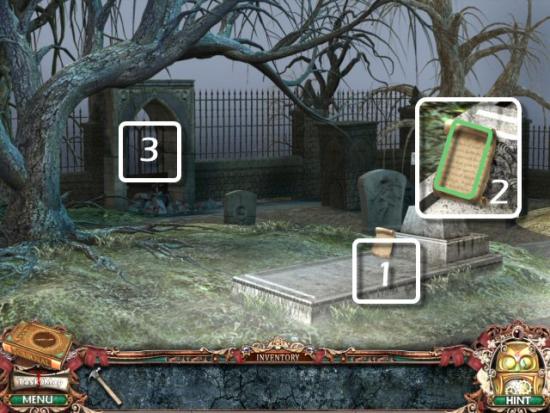
Chapter 5
Collect the Book and 3 Stars and then click on the Shelves (1). Use the Book in the empty space (2), click on one Book and then click on another to switch (3) their places until they form an image of a Sword (4) and then enter the Secret Room (5).
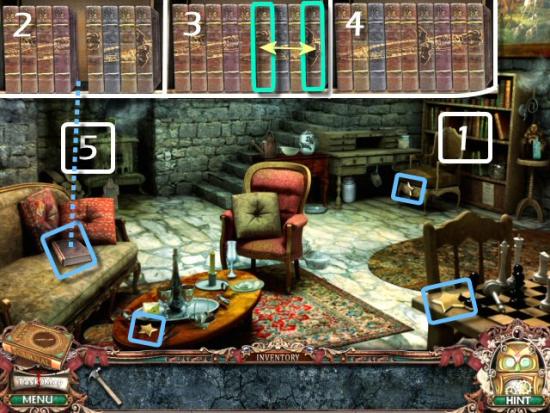
Click on the Shield (1), use the 3 Stars on the Shield (2), collect the Shield (3) and then return to the Cellar.
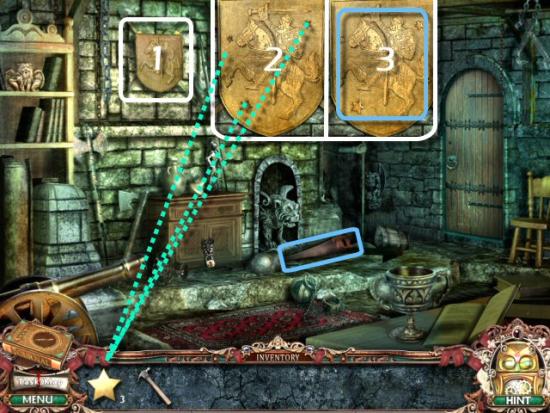
Click on the Door (1), use the Saw on the Board (2) and then enter the Kitchen.
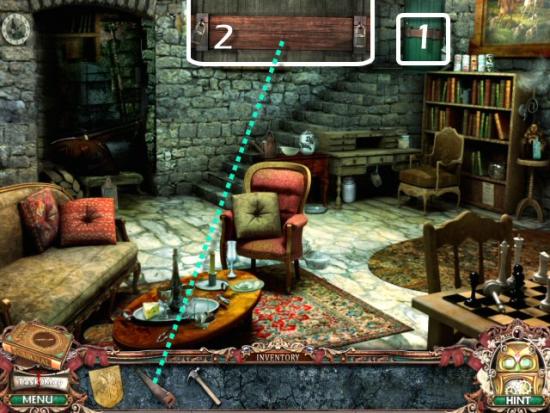
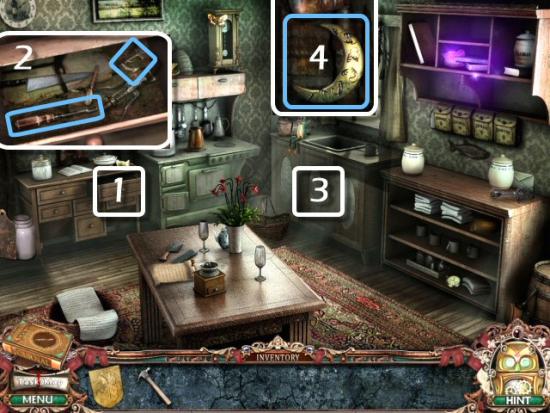
Click on the Drawer (1) and collect the Screwdriver and Anchor (2). Click on the Sink Doors (3), collect the Crescent Moon (4) and then click on the Shelves for an Object Search. When complete, click left to the Hall.
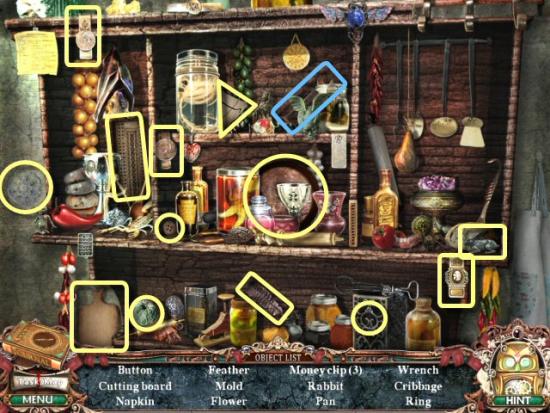
Collect all the items. Inventory Item: Wrench
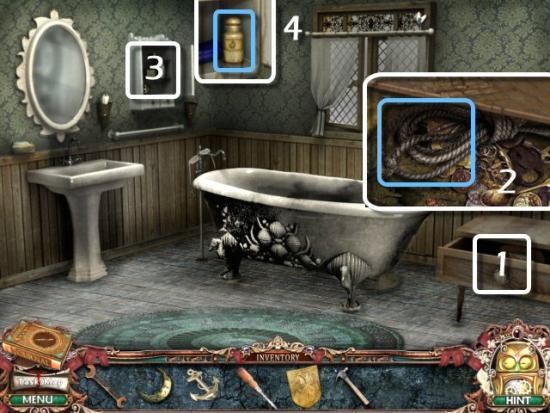
Speak to Marian and exhaust all discussion points and then click left into the Bathroom. Click on the Drawer (1), collect the Rope (2), click on the Cabinet (3), collect the Acid (4) and then return to the Hall and click left to the Study.
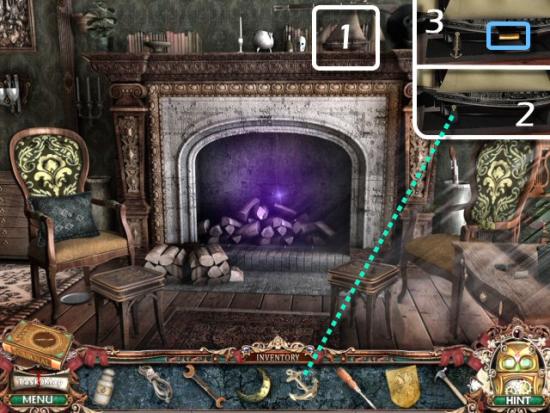
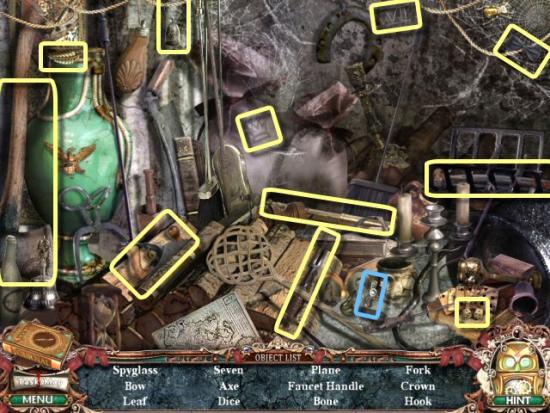
Click on the Boat (1), use the Anchor (2), collect the Small Weight (3) and then click on the Fireplace for an Object Search. When complete, return to the Bathroom.
Collect all the items in the list. Inventory Item: Faucet Handle
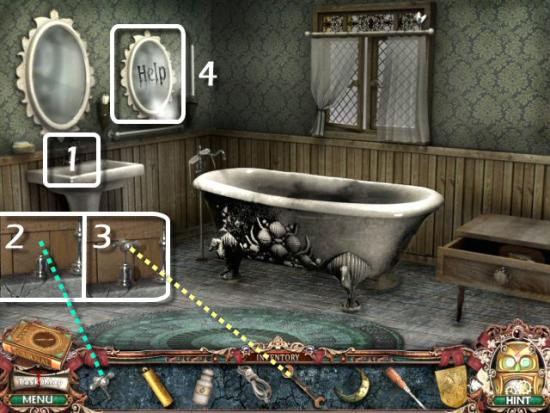
Click on the Sink (1), use the Faucet Handle on the Stem (2 – Note: you need to click approximately a quarter to an half of an inch above the Stem or it won’t work), use the Wrench on the Faucet Handle (3) and read the Message in the Mirror (4). Return to the Hall and click forward to the Entry.
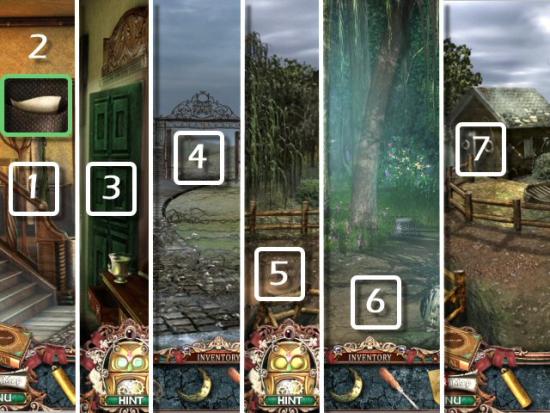
Click on the Coat (1) and collect the Debt Notice (2). Exit to the Courtyard (3), forward to the Road (4) and then right to the Forest (5). Speak to Laura and exhaust all discussion points. Return to the Road (6) and then left to the Boathouse (7).
Chapter 6
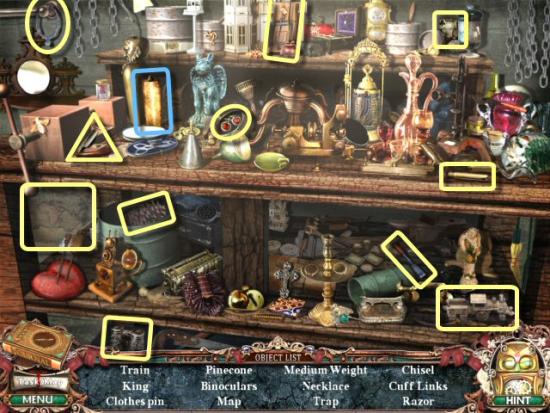
Click on the Rope (1), collect the Note (2) and then click on the Workbench for an Object Search.
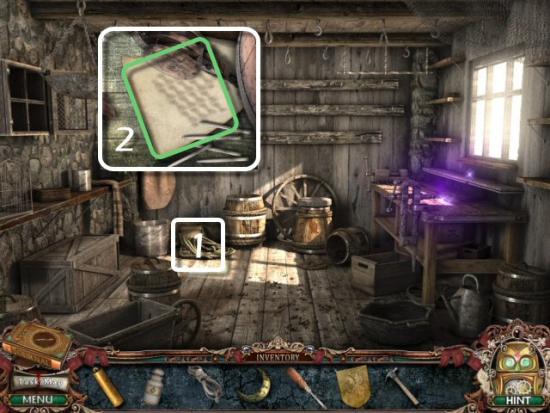
Collect all the items. Inventory Item: Medium Weight
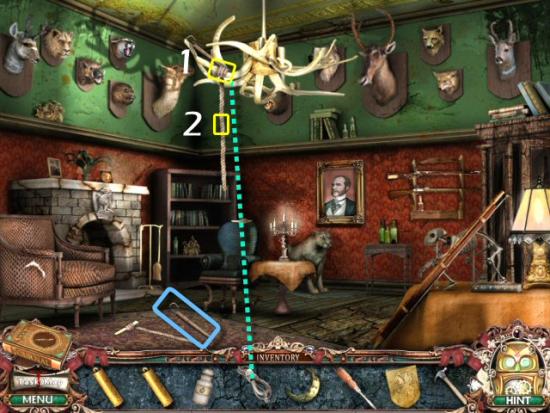
Return to the Entry and enter the Trophy Room. Use the Rope on the Antler (1 – you may need to click on a couple places for this to work), click on the Rope (2 – about 2/3 of the way up, approximately where indicated, or it won’t work), collect the Hook, exit to the Entry and then click left to the Upstairs Hall.
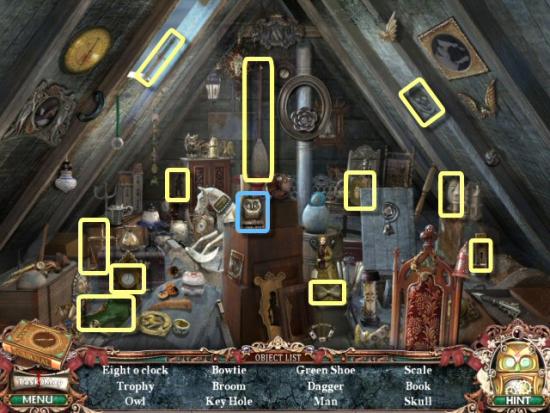
Use the Hook on the Attic Door and click on it for an Object Search. When complete, click right to go to the East Hallway.

Collect all the items. Inventory Item: Owl
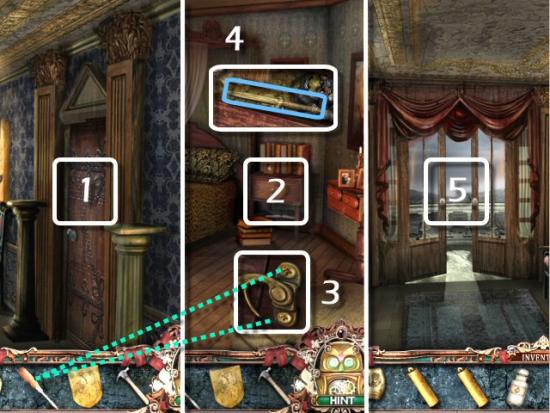
Enter the Master Bedroom (1), click on the Nightstand (2), use the Screwdriver on the Latch Screws (3) and collect the Dagger (4). Return to the East Hallway and click forward to the Balcony (5).
Chapter 7
Speak to Marian and exhaust all discussion points. Collect the Note and then exit to the Hall.
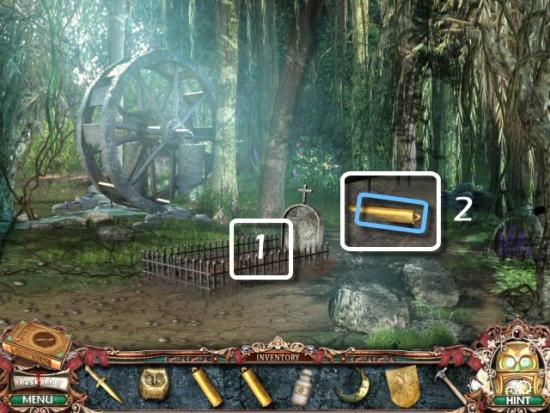
Return to the Forest, Speak to the Maid and Marian and exhaust all discussion points. Click on the Grave (1), collect the Large Weight (2) and then return to the Entry.
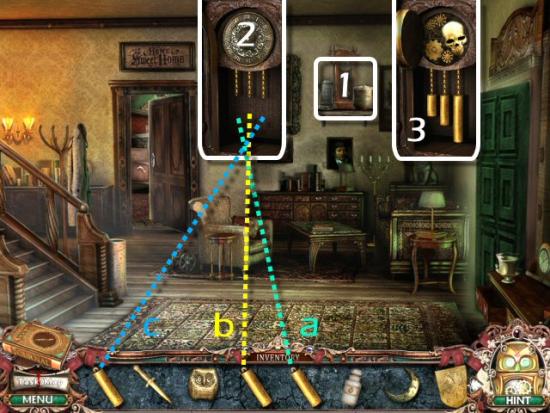
Click on the Clock (1), use the Small (a), Medium (b) and Large (c) Weights on the Chains (2 – click approximately a quarter inch below each chain or it won’t work. Be sure to place your cursor over the Weights in your Inventory so you know which one is which), collect the Skull (3) and then return to the Secret Room.
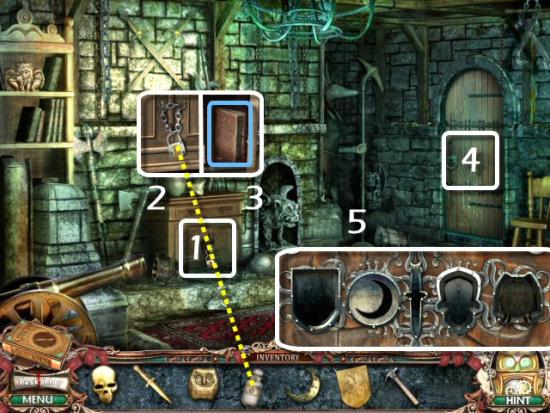
Click on the Cabinet (1), use the Acid (yellow) on the Lock (2) and collect the Book of Deaths (3). Click on the Door (4), use the Shield, Moon, Dagger, Skull and Owl in the Slots (5) and then enter the Secret Passage.
Chapter 8
Use the Hammer on the Panel (1), collect the Wing (2) and click forward twice, to continue.
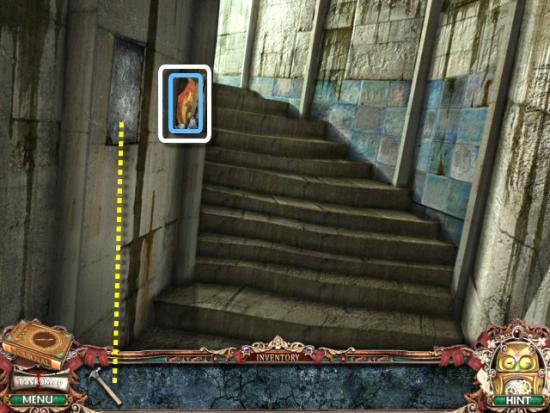
Speak to Dr. Gringe and exhaust all discussion points.
Now comes the unpleasant task of trying to find your way through the Asylum’s Labyrinth of Doors (artist M. C. Escher, or the architects of Warehouse 13, must have created this mess). There appears to be no particular logic for figuring out which doors lead to the next, correct step, and which lead you nowhere except back to your previous location.
After you choose a door, you’ll only be told that you’ve chosen the “right door” or the “wrong door.” If you’ve chosen the “wrong door,” you’ll go back to the last “right door” you chose and get to pick again. If you chose the “right door,” click on another to continue. Note that once you’ve gone through a door, it remains open and should tell you not to go through it again.
Which Door? Hmmm…how about the one on the Right?
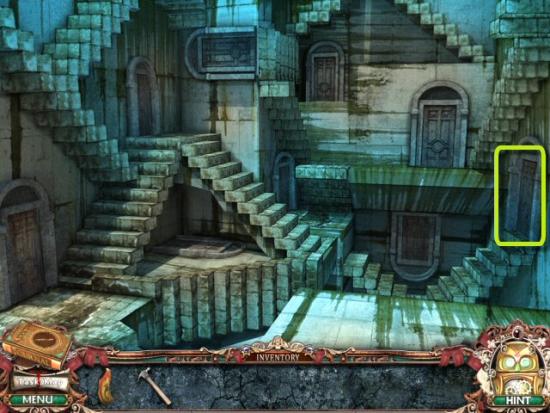
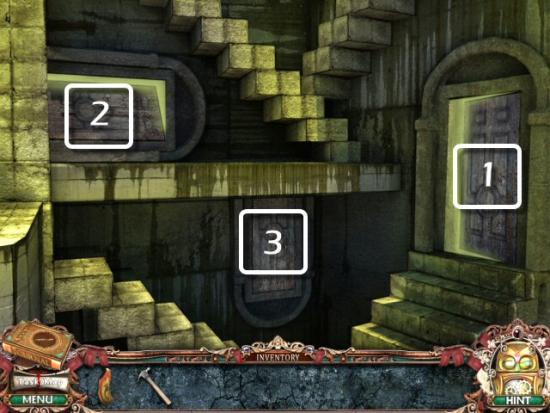
Now it’s a “dice roll” as to which door you should choose…however, you’ll eventually come to one scene with only 3 doors. Click on the Right Door (1), speak to a female patient, exhaust all discussion points and then click back. Next, click on the Left Door (2), speak to a male patient, exhaust all discussion points and then click back. Finally, click on the Middle Door (3) to leave this nightmare.
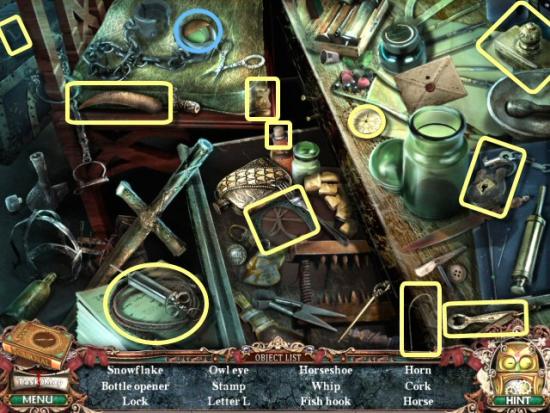
Use the Hammer on the Panel (1), collect the Gear (2), click left to enter the Director’s Office (3) and click on the Desk (4) for an Object Search. When complete, click on the Owl (5).
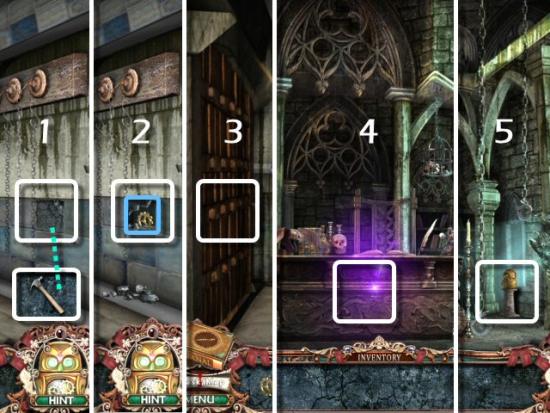
Collect all the items in the list. Inventory Item: Owl Eye
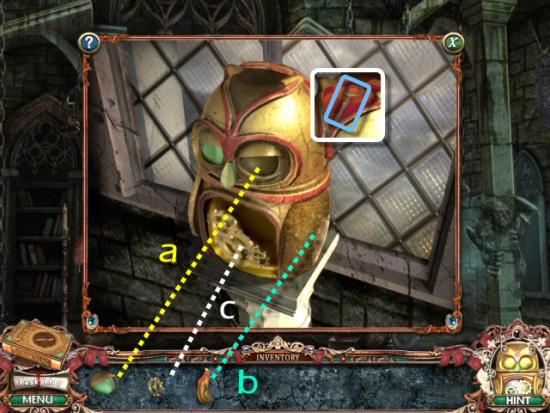
Use the Owl Eye (a), Wing (b) and Gear (c), collect the Cell Key and then return to the Hallway.
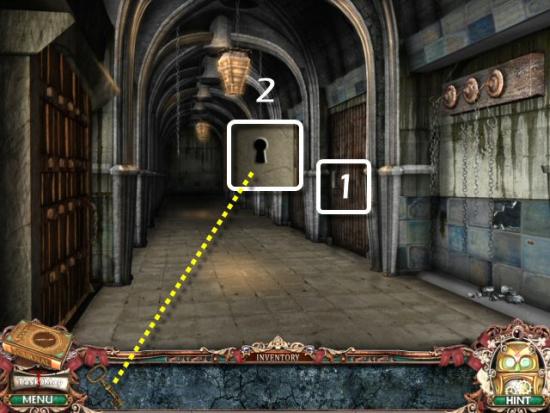
Click on the Cell Door (1), use the Key in the Lock (2), click on it and enter the Cell.
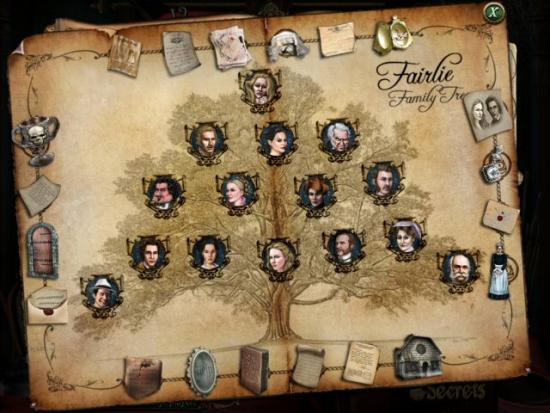
Click anywhere and find out what happened! You’ve now unlocked the Secrets, which are a recap of the Characters you met, Story elements and a filled in Family Tree. If you missed any Journal Items, you’ll see a Lock instead of the image of an Item.
Congratulations! You’ve completed Victorian Mysteries: Woman In White.
More articles...
Monopoly GO! Free Rolls – Links For Free Dice
By Glen Fox
Wondering how to get Monopoly GO! free rolls? Well, you’ve come to the right place. In this guide, we provide you with a bunch of tips and tricks to get some free rolls for the hit new mobile game. We’ll …Best Roblox Horror Games to Play Right Now – Updated Weekly
By Adele Wilson
Our Best Roblox Horror Games guide features the scariest and most creative experiences to play right now on the platform!The BEST Roblox Games of The Week – Games You Need To Play!
By Sho Roberts
Our feature shares our pick for the Best Roblox Games of the week! With our feature, we guarantee you'll find something new to play!Type Soul Clan Rarity Guide – All Legendary And Common Clans Listed!
By Nathan Ball
Wondering what your odds of rolling a particular Clan are? Wonder no more, with my handy Type Soul Clan Rarity guide.


