- Wondering how to get Monopoly GO! free rolls? Well, you’ve come to the right place. In this guide, we provide you with a bunch of tips and tricks to get some free rolls for the hit new mobile game. We’ll …
Best Roblox Horror Games to Play Right Now – Updated Weekly
By Adele Wilson
Our Best Roblox Horror Games guide features the scariest and most creative experiences to play right now on the platform!The BEST Roblox Games of The Week – Games You Need To Play!
By Sho Roberts
Our feature shares our pick for the Best Roblox Games of the week! With our feature, we guarantee you'll find something new to play!All Grades in Type Soul – Each Race Explained
By Adele Wilson
Our All Grades in Type Soul guide lists every grade in the game for all races, including how to increase your grade quickly!
Victorian Mysteries: The Yellow Room Walkthrough
Victorian Mysteries – The Yellow Room is a hidden object/adventure game based on the novel by Gaston LeRoux, which is about the adventures of two men investigating the murder of a woman in Paris which has baffled investigators, as the murderer escaped from the room where the deadbolt was locked from the inside. Locate hidden objects and solve challenging mini game puzzles in this mystery thriller that lets you help solve the mystery of the yellow room. Gamezebo’s Victorian Mysteries – The Yellow Room walkthrough will provide you with detailed images, tips, and latest information on how to play your best game.
Game Introduction – Victorian Mysteries – The Yellow Room
Victorian Mysteries – The Yellow Room is a hidden object/adventure game based on the novel by Gaston LeRoux, which is about the adventures of two men investigating the murder of a woman in Paris which has baffled investigators, as the murderer escaped from the room where the deadbolt was locked from the inside. Locate hidden objects and solve challenging mini game puzzles in this mystery thriller that lets you help solve the mystery of the yellow room. Gamezebo’s Victorian Mysteries – The Yellow Room walkthrough will provide you with detailed images, tips, and latest information on how to play your best game.
Getting Started
- Victorian Mysteries – The Yellow Room can be purchased by clicking on the “Buy Now” link at the top of this page.
- Once you load the game it will ask you to enter your user name. The game will save under this name and will save your progress at the point of your exit if you leave the game properly through the menu option at the bottom left of the screen. If you do not properly exit the game, it will restart you at the beginning of the chapter and you will lose any progress you may have made.
- You can play the game under several different user names.
- Be sure to check the Gamezebo forums for this game where you can share tips and hints with other players.

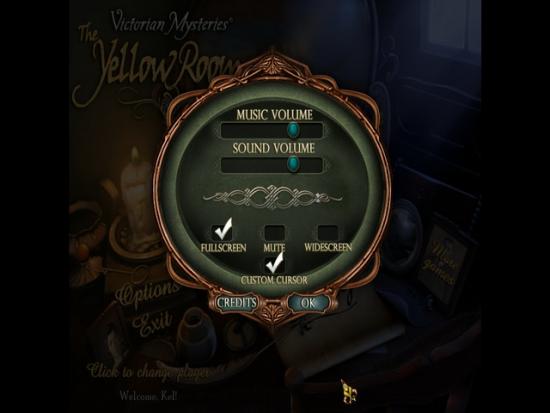
- Options – Click on the “Options” button at the bottom left of the main menu screen. Here you can adjust the volume of the game music and sound, mute them, and adjust custom cursors if you choose.
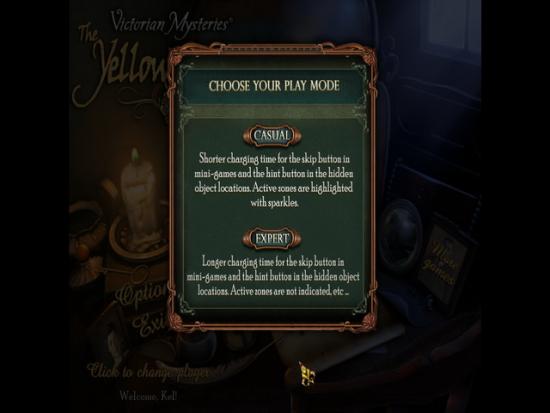
- Play Mode – When you start a new game this will be the first option you see after you enter your user name. You will have to decide between two play modes which determine difficulty level.
- Casual Mode – Shorter charging times for the skip and hint button in the hidden object scenes and mini games. Active zones are highlighted with sparkles.
- Expert Mode – Longer charging times for the skip and hint buttons in the hidden object scenes and mini games. There are no active zones shown highlighted in expert mode.
Game Tips/General Information
- The game has five chapters which consist of hidden object scenes and interactive scenes requiring you to have interactive dialogue with characters for information, and mini game puzzles that vary in difficulty. You will find items in one location that are needed in another location to activate a puzzle or complete something.
- Inventory – Your inventory is located along the bottom of the screen. You will be notified before anything is placed into your inventory area and will click on “Ok” to confirm. To use an item click on it and it will stick to your cursor. Click on the item you wish to use it on and affect change on it.
- Note the solutions to most puzzles are the same in either difficulty mode. Puzzles can vary from game to game meaning you may have different hidden objects to locate the second time you play the game but the general game play and finding items will be the same.
- Hidden object scenes are found by looking for the sparkling areas in a scene and clicking on it. (See hidden object scenes below)
- The items in the hidden object list may vary from game to game. They will be shown here circled as there will be many in common.
- If you get stuck in a scene, place your cursor around the edges of the screen and look for arrows and new rooms to explore. Also, click on the map at lower right corner to learn of all available locations in a chapter.
- The game will start out with an introductory story line shown as a mini film. You will see these films in between chapters to tie the story together as well as the dialogues you will have with characters. The dialogues will not be listed in this walkthrough as you are expected to click on each question from top to bottom to gather information. It will then be placed in your tasks book.
Cursors
- There are several types of cursors in the game and you will need to know what each type does.
- Arrow – This is the general pointing cursor. Click on items to choose them while in a hidden object scene or to locate items you need to move from scene to scene. When you place the cursor along the edge of a scene if there is a room an arrow will appear along with the name of the room. Click on it to enter.
- Hand – When a cursor changes to a hand the item under it can be picked up and placed into inventory.
- Magnifying Glass- When you see this cursor click on the item to take a closer look or a look behind something.
- Puzzle piece – When your cursor turns to a puzzle piece you need something else to complete the task. Look in your inventory for this item.
- Simply move your cursor around a scene looking for changes while you hunt for items.
- Camera – When you finally have the camera in your possession the cursor will begin to turn into a camera each time you collect evidence. When it does this click on the item to take a picture and the information and image will be placed in your journal under evidence.
- Ear – When your cursor turns into an ear it means you are listening to a private or secret conversation.
Dialogue Scenes
- Periodically you will have to have dialogues with various characters in the game. You will see a list of questions appear at the bottom of the screen and character text at the top.
- Click on the questions from top to bottom and read the dialogue at the top for valuable game information.
Using Hints
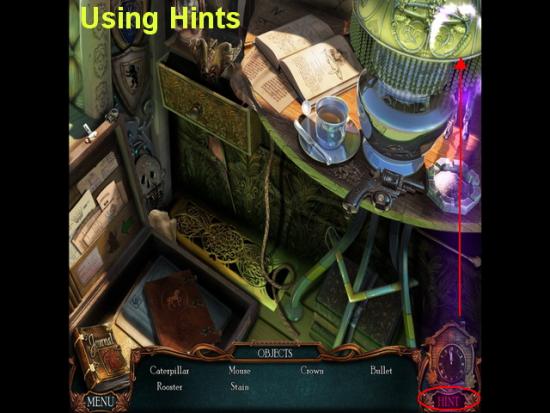
- Hints are unlimited and do not give you a penalty but you must wait for them to recharge in between uses. If you are in expert mode you will have to wait much longer for the hint to recharge than casual mode.
- While in a hidden object scene or a mini game puzzle the hint button will appear at the lower right corner of the game screen.
- When you are stuck click on the button and the word “Hint” will turn red and a ray of light will move to the object you are looking for. This item if in a hidden object scene will show the light moving from the item in the list to the location of the item in the list.
- Click on the item as usual to cross it off your list.
- If in a mini puzzle game click on hint and it will show you the next move or an item you need to solve it.
Journal
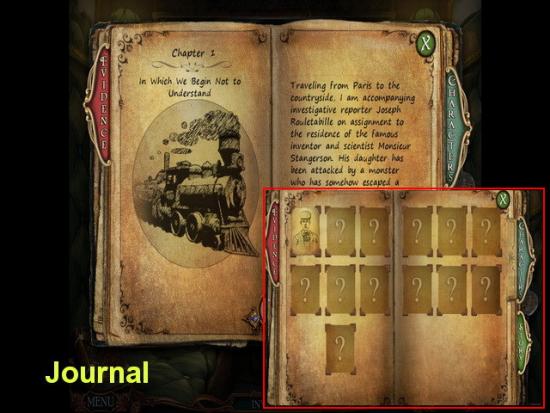
- The game journal is located at the lower left corner of the game scene.
- Click on the journal to open it.
- The journal is divided into chapters and they unlock one at a time.
- Here you will see tabs along the side of the journal consisting of “Characters” as people are added to the game their image will be added to this book.
- “Storyline” – At any time click on this section and you can read a summary of the story as it progresses in the game. There are also helpful hints found here at times.
- “Evidence” Here you will see a summary of all evidence located in the case.
Map
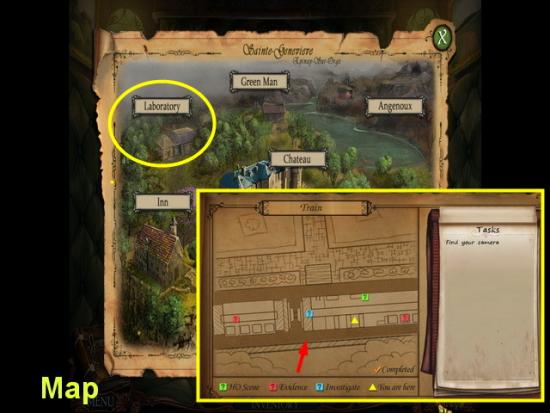
- The map is found under the hint button at the lower right corner of screen.
- When you need help navigating around a chapter click on the map area and it will show you several locations and a summary of tasks. You can also see a color coded section as to where hidden object scenes are located, and puzzle which can be very helpful.
- Yellow – Your current location
- Pink – Evidence
- Blue – Investigate
- Green – Hidden object scene.
Hidden Object Scenes
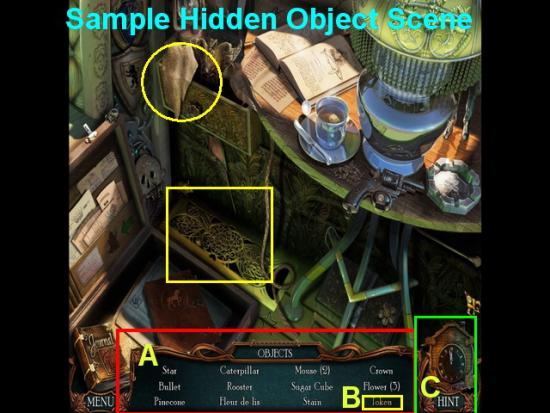
- When see a sparkling effect over it click on it as this is a hidden object scene. You can also use the map to find them.
- A. Once in a scene note the inventory list is along the bottom. You will need to find all the items in this list.
- B. Yellow items – These items will require an additional step to solve them. Look for unusual things in the scene as well as hand cursors as they provide hints.
- C. You can also use your hint button every few minutes as it recharges.
- Click on an object in the scene on the list and it will disappear.
- Once all items are found a special item will be added to your inventory for future game play.
- The items can be very small and difficult to find so be sure to look along edges and inside of drawers and cabinets when possible.
Walkthrough Information
- This walkthrough will take you through the five chapters of the game explaining in detail how to proceed in the game.
- Note that not all moves will be identical and there are many ways to solve the game and many orders of moves. This guide is one way to solve the puzzles of the game.
- The hidden object scenes will show the answers circled for you.
- Items will be marked with a letter or number then a description will be given of how to proceed when you click on that particular item shown.
- Dialogue will not be explained each time. When you see the instruction “Complete dialogue” it means answer each question from top to bottom in the list.
Chapter 1 – “In which we begin not to understand”
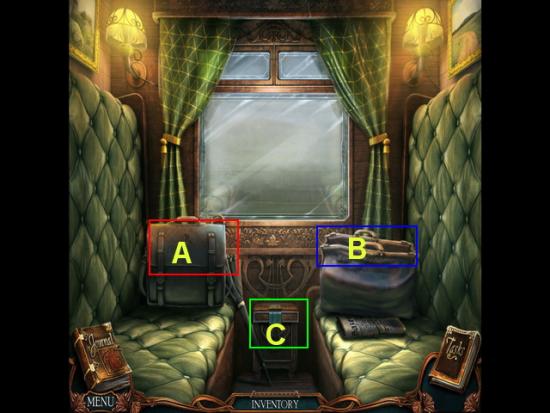
- Watch introduction video
- Complete the dialogue.
- A. Click on the briefcase with “JR” on it and remove the scroll. This is your map which is found under the hint button at the lower right corner of scene.
- B. Click on the briefcase and remove the journal. It will move into place at lower left side of scene.
- C. Click on the table for a closer view and then click on the button to open panel. Take the paper card into inventory.
- Exit right to the hallway and a man tries to shoot at you and runs away. Chase him to the back door straight ahead.
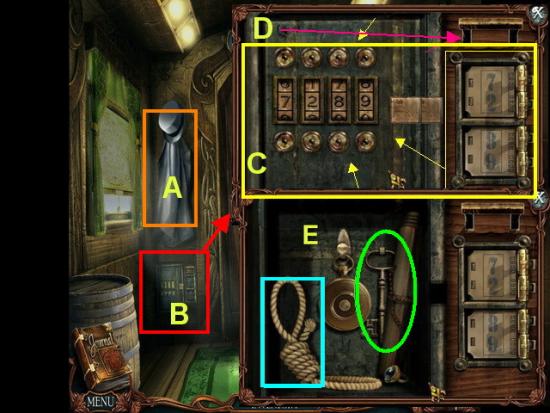
- A. Click on the jacket and take the second paper card into inventory.
- B. Click on the panel under the coat and hat. When it opens take the two paper tickets from inventory and place them in the puzzle.
- You will see the numbers “7289” along the right. Put these numbers in the machine by using the arrows along the top. Click on them until you reach the desired number.
- C. The panel will now open. Take the rope and the key into your inventory.
- Exit the scene and go into the hallway. Click on the purple sparkling area for a hidden object scene.
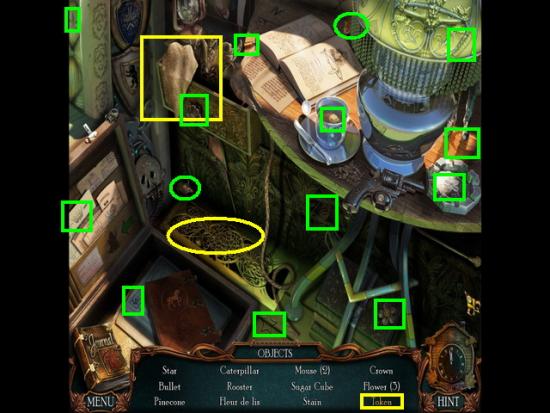
- Locate the items listed along the bottom of the screen shown circled above.
- Yellow item – Click on the handkerchief at top left which exposes a magnet. Run magnet over grate to expose token.
- Take the token and place in inventory.
- Exit scene walk forward until you are at the front door area.
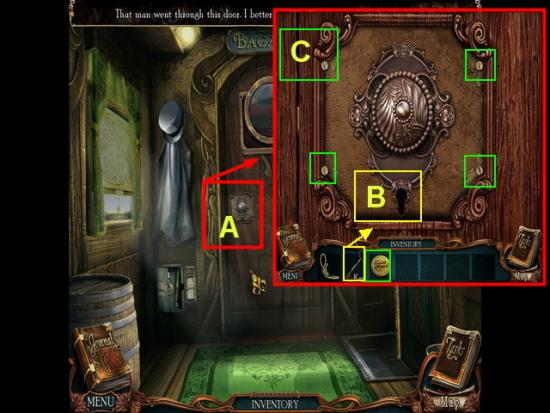
- A. Once at the door click on the doorknob area and a panel will open.
- B. Use the key from inventory on the lock. It breaks off.
- C. Use the token from your inventory on all four screws around the lock. The plate will then open.
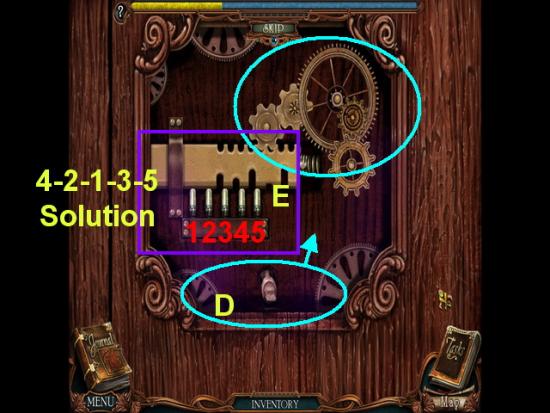
- D. Take all of the gears along the bottom and place them at top right until they lock in.
- E. The gears must be pressed in the correct sequence to force the tumbler to move.
- Each tumbler is labeled with a number. Press in this order to solve the puzzle – 4,2,1,3, and 5.
- When the tumbler reaches the end the luggage car door will open.
- Step forward through the door you will see a man running off. Go inside the room.
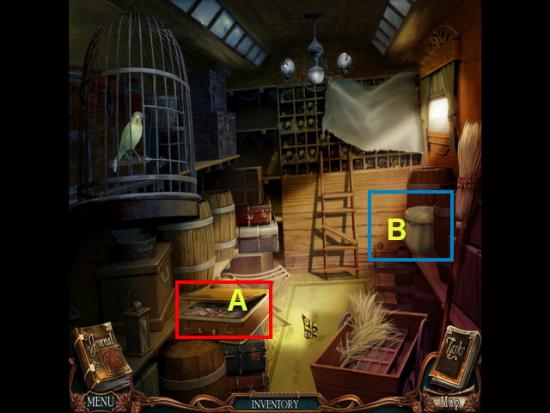
- A. Click on the suitcase in center of scene. Take the tool and place in your inventory.
- B. Click on the hatbox to the far right of the scene. Take the tool from inventory and use it on the lock to open it. Once opened. You will find your camera inside! Now you can take pictures at various steps in the game. These pictures are important and will be added to your journal as evidence. The areas where evidence is shown on the map is where you take pictures.
- Exit the luggage room and click downward four times until you see a man in front of you.
- Once you see the man in front of you place your cursor on him and note it turns into a camera now. Take picture by clicking and read through the dialogue. Click on the door panel to the right of the man. Now you will see your cursor turn to an ear. This means you can hear conversations that are secret.
- Listen to the Magistrate’s conversation and make note of it.
- Exit the train go to the train station.
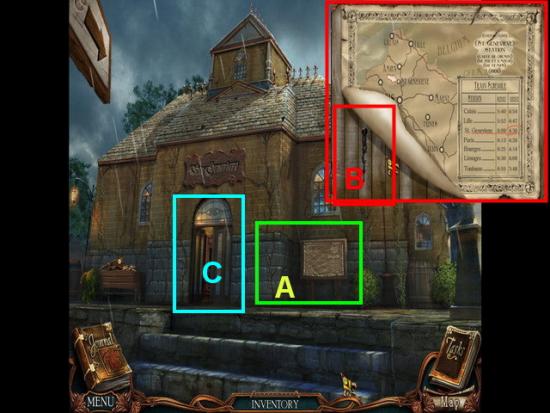
- A. Click on the sign outside of the station.
- B. Click on the lower left corner of the paper and lift it up to reveal a clock hand. Take it into inventory.
- C. Go inside the building.
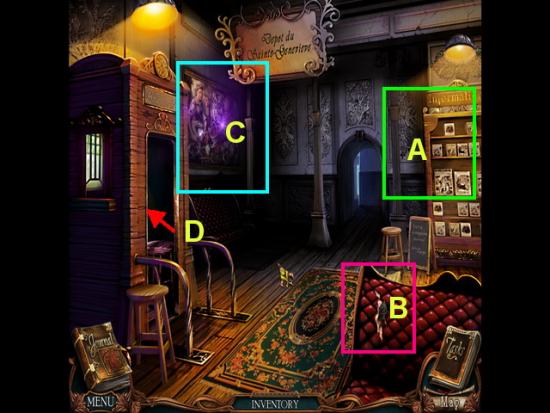
- A. Click on the bookcase at far left and take a picture of the newspaper for evidence.
- B. Click on the sofa and remove the piece of box embedded there into inventory.
- C. Click on the sparkly scene to complete a hidden object scene.
- D. Go into the ticket booth.
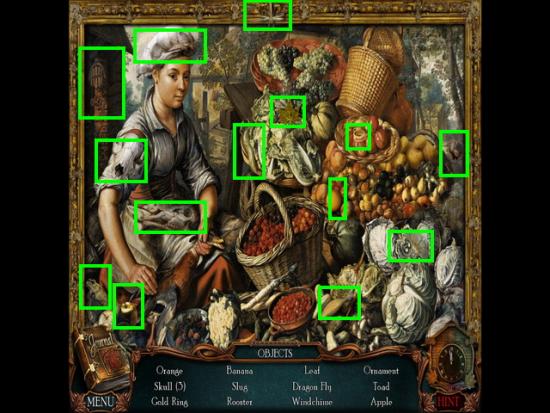
- Locate the 14 hidden objects in the scene shown circled in green above.
- Yellow item – None for this puzzle.
- Once you complete this scene a golden apple is added to your inventory.
- Exit the scene and return to the ticket room.
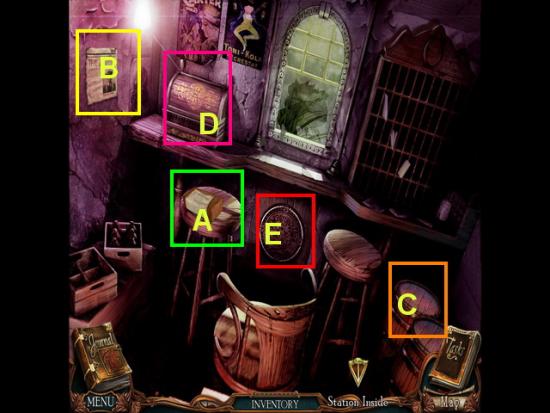
- A. As you walk into the ticket booth a brick with a note on it will crash through the window. Take your camera and take a picture of it for your evidence. Be sure to collect the golden apple on the side of the image for your inventory.
- B. Click on the wall calendar and take a picture of it also for your evidence files. Note – Be sure to take the spark plug to the left of the scene into inventory.
- C. Click on the barrel. You do not have the tool needed yet so come back to this later.
- D. Click on the wall ornament to trigger a mini game.
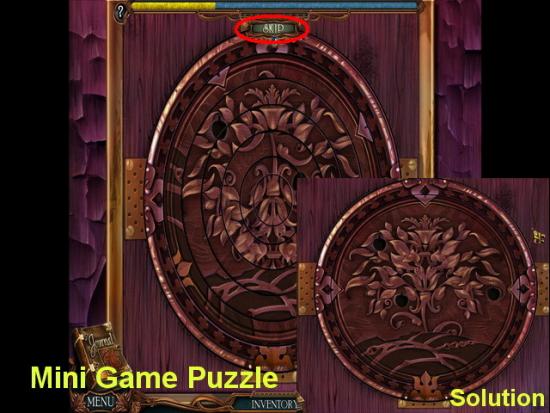
- Use your mouse and click on the rings to rotate them. Start with the center ring and work your way out. Note the apple shaped holes. You will need to line up the shapes and puzzle so you can place golden apples here which you will find in you inventory from other scenes.
- The solution is shown above.
- Now you will take any golden apples you have in inventory (Should be 2 if following this guide) and place in the empty spots.
- You will have to go to another scene to locate the third and return later.
- Exit the scene and click on the register .
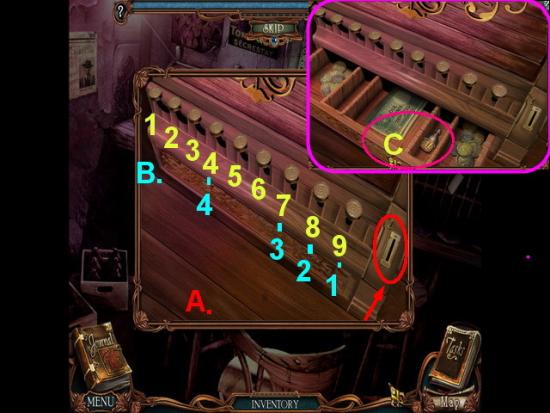
- A. Take the token from your inventory and place in the slot to activate the mini game. Now the buttons will raise and you will need to press them all down in the correct sequence to open the drawer. Some keys will affect other keys as pressing one may cause more than one other to go down with it.
- B. All the keys are labeled from 1 to 9 in yellow above. Press on keys 9-8-7-4 and the drawer should open.
- C. Click on the spark plug in the drawer and add to your inventory.
- Exit the ticket booth and go through the door at back of room.
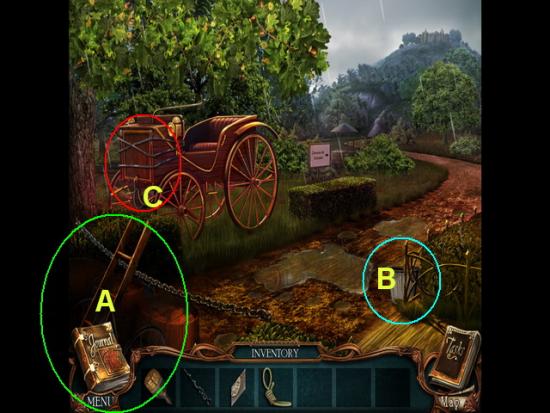
- Now you are behind the station and you have spotted a car but it needs to be repaired.
- A. Click on the ladder to the left and take into your inventory.
- B. Click on the bucket of rainwater and take into your inventory.
- C. Click on the car for a closer look. You have nothing to help at this time. The ropes need to be cut in order to get inside.
- Exit the scene go through building out to the front of station.
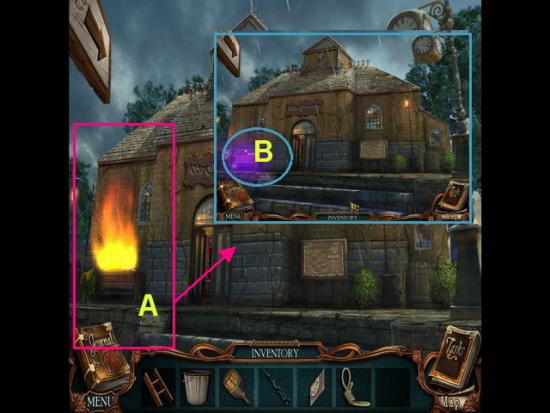
- Once you are at the front of the station a man comes from the left of the scene and throws an explosive on the bench which catches on fire.
- A. Take the bucket of rainwater from inventory and put out the fire.
- B. The scene now glows purple and has become a hidden object scene. Click on it to proceed.
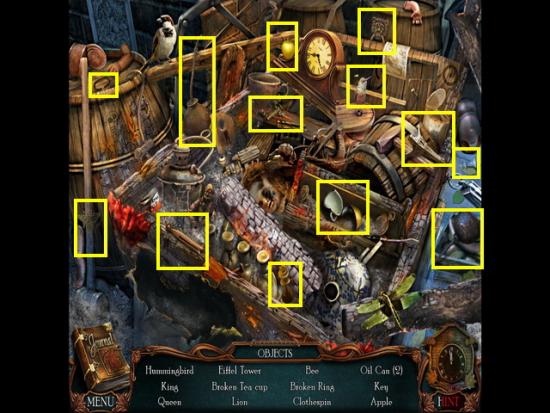
- Locate the 13 hidden objects in the scene.
- Yellow Object – None
- Once completed collect the golden apple into your inventory.
- Return to the ticket booth and click on the round area in center of scene to bring the mini game screen back up.
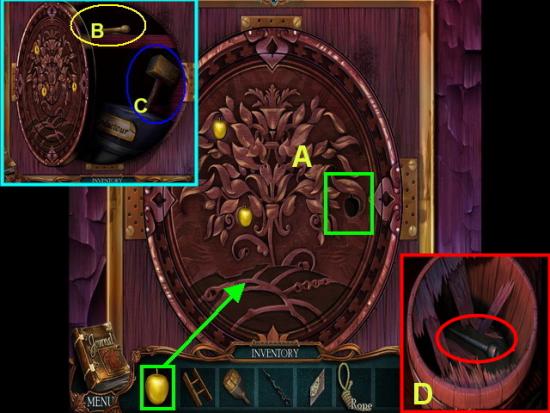
- A. Place the final golden apple from inventory into the spot and the panel will open
- B. Click on the crank and place into your inventory.
- C. Click on the mallet and place into inventory.
- Click on the barrel to lower left and take the mallet from your inventory and click on the barrel four times to expose what is inside.
- D. Click on the piston and take into inventory.
- Return to the front of the train station.
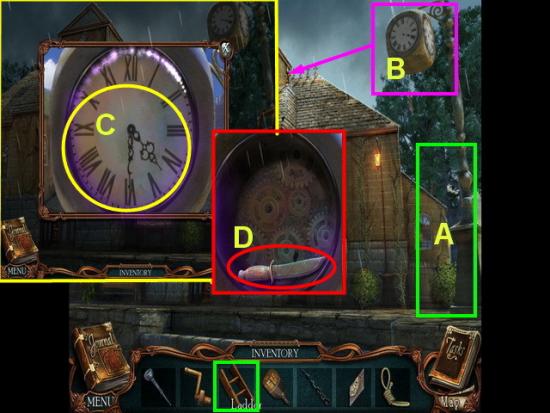
- A. Take the ladder from your inventory and place against the clock pole at right of scene.
- B. Click on the clock to activate it.
- C. Click on the hands of the clock and move them so the clock says 4:30
- D. The panel will open. Take the knife into inventory.
- Go back into station building and out back door to the scene with the car.
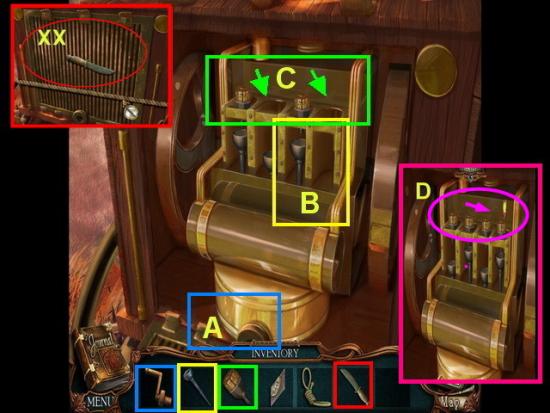
- Zoom into the front of car panel.
- XX. Use your knife from inventory and cut on the ropes. You will need to do this a few times.
- A. Once panel is exposed take the crank from inventory and place in the hole at front center.
- B. Take the piston from inventory and place it in the empty slot.
- C. Take the two spark plugs and place them in the empty spots.
- Click on the crank to start the car.
- D. As you see each spark plug fire the lightning bolt will fill up with red. As it completely fills up instantly click on it. If you miss you will have to start all over again as car will die.
- Once you have all four fired correctly the car will start.
- Watch the video clip.
- You have now completed chapter one.
Chapter 2 – “We shall have to eat red meat now!”
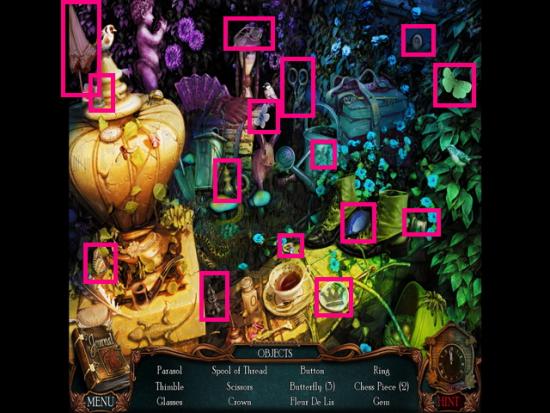
- Once the dialogue with the man is over the area to his right will glow purple click on it for a hidden object scene.
- Locate the hidden objects in the scene.
- Yellow item – None
- Collect the gem and add to your inventory.
- Talk to the man again then follow the trail to the left.
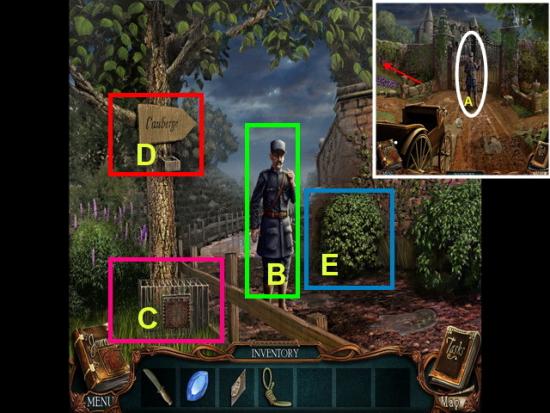
- A. Talk to the man standing in the path and follow it down trail to the left of scene.
- B. Click on the man in the center and talk to him.
- C. Click on the rabbit trap and take a picture for evidence files.
- D. Click on the tree and take the clippers into your inventory.
- E. Click on the bush and take the rake into your inventory.
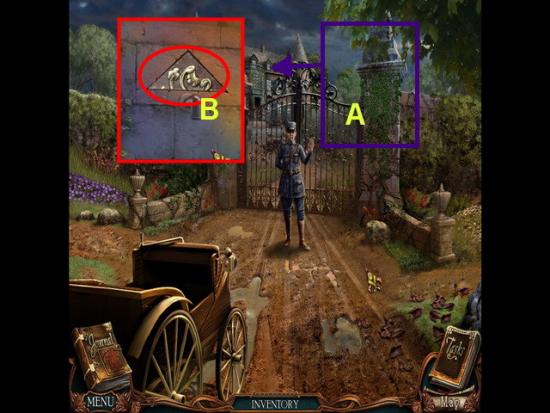
- A. Click on the area to the right of the man’s head shown marked in image above. When the panel opens take your clippers from inventory and click several times until all the greenery is cut away.
- B. Take the box piece shown and place in inventory.
- Head off to the right of the man.
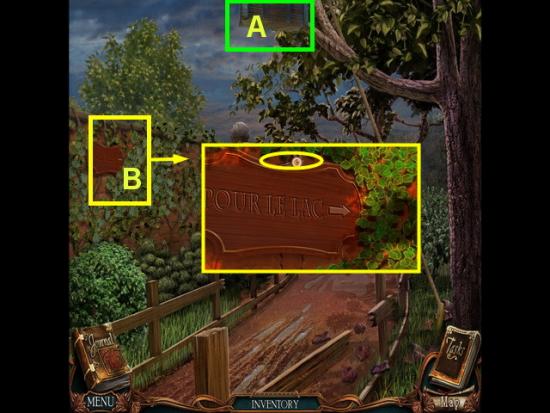
- A. Click on the trunk overhead and read the message. You will need to figure out how to cut this down later.
- B. Click on the panel. Take the latch pin and place in your inventory.
- Continue straight ahead along the lake trail.
- When you reach the next scene take the shovel in the center of the scene.
- Click on the bottom right and you will see a mini game puzzle you will return to later.
- Click on the top left you will see you don’t have anything long enough to reach this and will need to return later.
- Proceed forward to the lake.
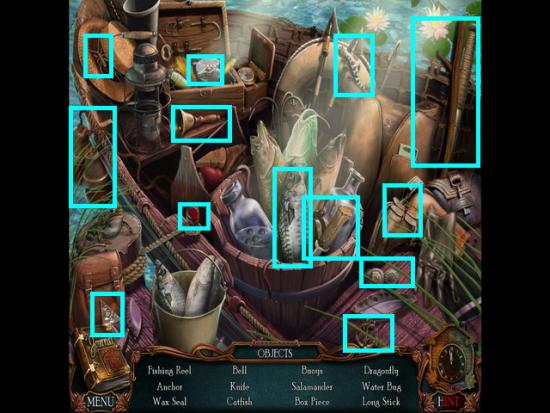
- Click on the purple glowing area in the boat.
- Locate the hidden objects
- Yellow Item – None
- Collect the box piece and long stick once you complete the puzzle into your inventory.
- Go back to scene.
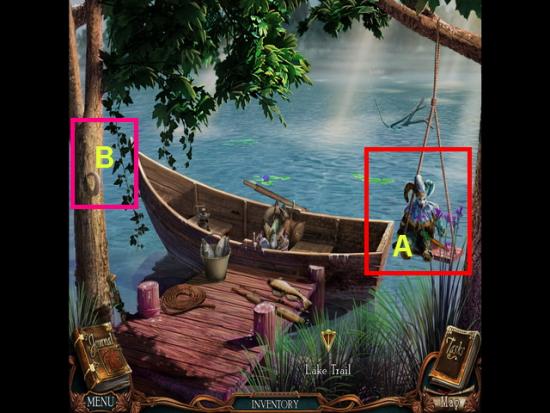
- A. Click on the clown doll to the right. Take the carrot into inventory.
- B. Click on the tree to the left of scene. Take a picture of the horn for evidence.
- Back out of the scene to lake trail and click on the puzzle box at bottom right for a mini game puzzle.
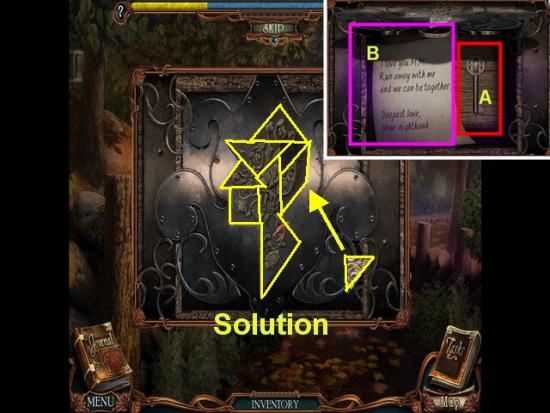
- Click on the puzzle to open it up and place the three box piece inside to start it.
- You will need to click on each piece to rotate it then hold the left mouse button down to hold on to and place the pieces.
- The pieces will lock into place when placed correctly.
- The solution is shown above.
- A. You will be given a mail key when you complete the puzzle for your inventory.
- B. Take a picture of the letter for your evidence file.
- Exit back twice until you get to the car scene.
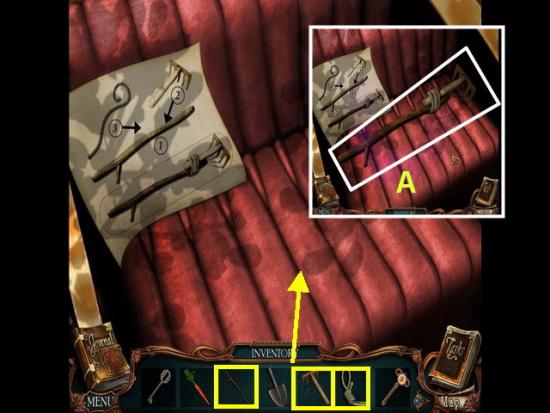
- Click on the car to open the panel.
- A. Take the rake, long stick, and rope from your inventory and place on the seat.
- Click on the items in this order to assemble.
- Bring rake to stick.
- Click on rope to tie together.
- Once you have the long rake assembled click on it and add to your inventory.
- Return to the right until you get to the lake trail.
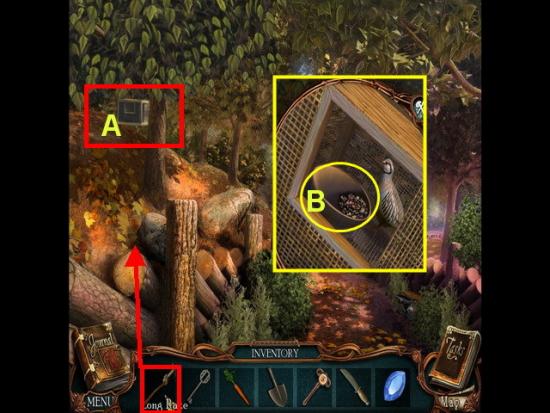
- A. Take your long rake from inventory and place on the bird cage to reach it.
- B. Take the bird seed into inventory.
- Go back to the main scene with the car then veer to the left.
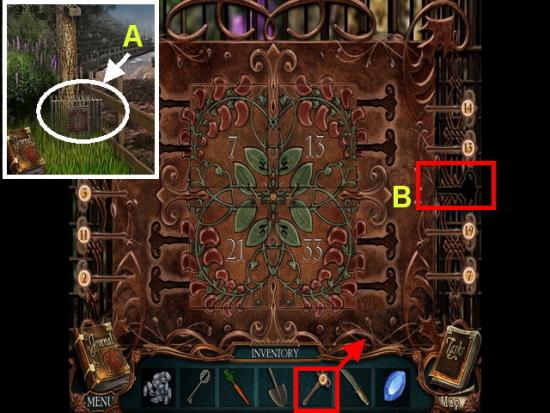
- A. Click on the rabbit cage at lower left to open the panel of a mini game.
- B. Place the latch pin from your inventory into the missing spot as shown.
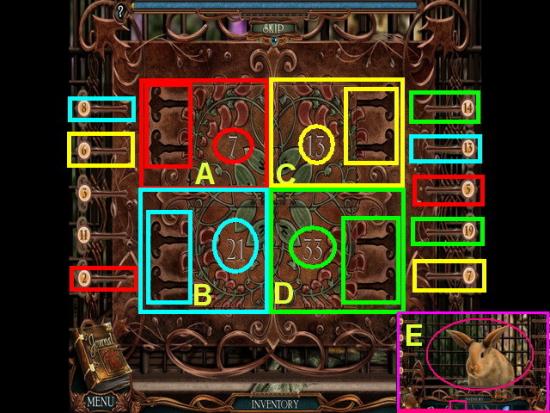
- The objective to this puzzle is to open each panel by placing keys that added together total the number in the panel. Hold down left mouse button over a key to carry it to its location.
- A. In the upper left panel place keys 2 and 5 for a total of 7
- B. In the lower left panel place keys 8 and 13 for a total of 21
- C. In the upper right panel place keys 7 and 6 for a total of 13
- D. In the lower right panel place keys 19 and 14 for a total of 33.
- Each time you correctly place keys a panel will open with a picture behind.
- E. Once you expose the bunny take your carrot from inventory and give it to him and he will disappear. Take the scarf left there and add to your inventory.
- When you exit out of the scene go forward to the Inn.
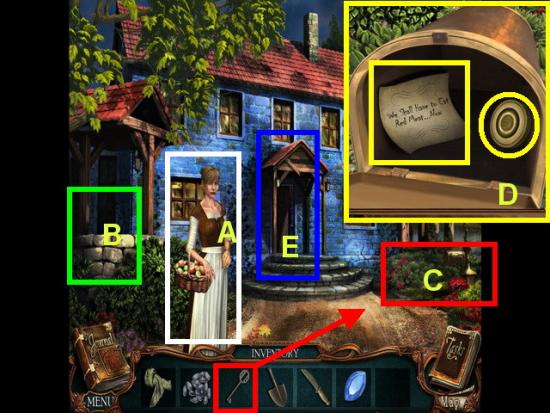
- A. Click on the woman and watch the brief video.
- B. Click on the well. You need something to open it which you don’t have so you will come back later.
- C. Click on the mailbox. Use the key in your inventory to open it.
- D. Once open take the safe dial into inventory then take a picture of the document for evidence.
- E. Once finished go inside the inn through this door. Click on the man inside and watch the video.
- Exit the scenes all the way back to the front of the train station. Click on the sparkling area for a hidden object scene.
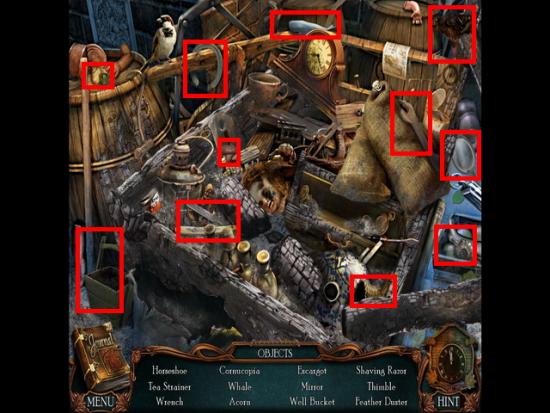
- Locate the hidden objects in this scene.
- Yellow item – None
- When finished collect the well bucket and feather duster into your inventory.
- Return to the Inn.
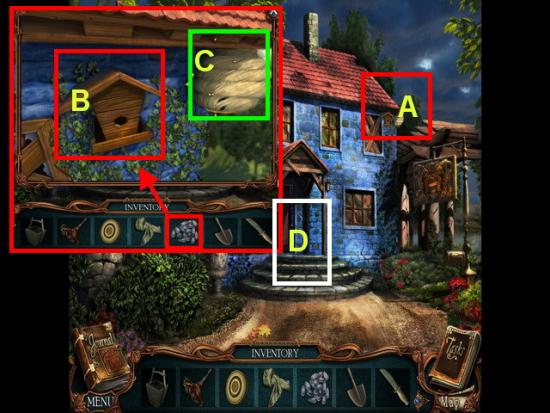
- A. Look for the tiny birdhouse at upper right corner of scene.
- B. Take birdseed from your inventory and add it to the birdhouse. This will cause the bird to fly up and scare away the bees.
- C. Click on the hive and honey will be added to your inventory.
- D. Go back inside the Inn. Give the innkeeper some honey from inventory and watch the short video. Now the area he was standing in is glowing. Click on it for a hidden object scene.
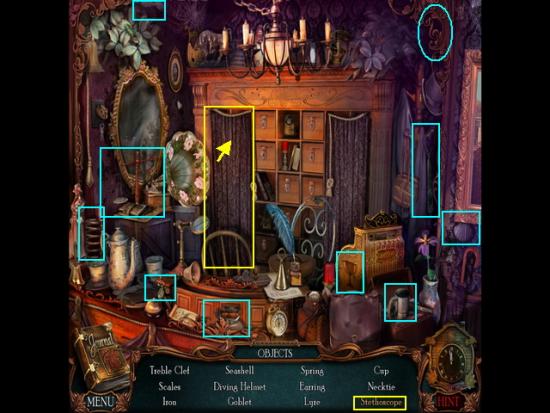
- Locate the hidden objects in the scene shown circled above.
- Yellow item – Stethoscope – Click on the left side panel of cabinet to remove the curtain. Click on the stethoscope on top shelf.
- When finished add the stethoscope to your inventory.
- Return to inside the inn.
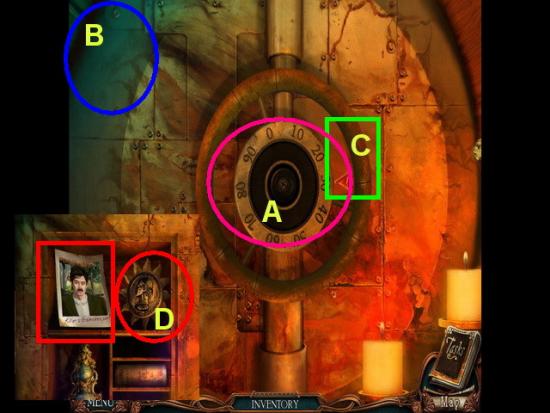
- Click on the safe area over the fireplace to open it then click again to expose the safe.
- A. Add the safe dial from inventory to the safe center.
- B. Add the stethoscope from inventory to the upper left of the scene.
- C. Grab dial while holding left mouse button down then move the dial until the arrow at right turns green. Completely release the left mouse button and then do this two more times until the panel opens.
- D. Take a picture of the photograph and place the medallion in inventory.
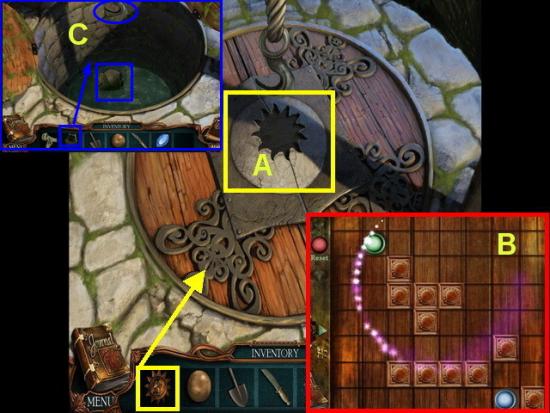
- A. Return to the outside of the Inn and focus in on the well again. Use the medallion from your inventory in the center opening.
- Once the panel opens you will start a mini game.
- B. Focus on the arrows on the right. It controls both balls at the same time. Your objective is to get both balls in the holes at the same time. There are several ways to solve this puzzle. Work the arrows until you find a solution. One possible solution – RA down x 2, LA down x 2, LA, UA x 5 and DA x 1, You can reset the puzzle at any time if you get lost.
- C. Once the well panel opens you won’t be able to reach what is inside. Take the well bucket from your inventory and place it on the hook at the top. Then it will retrieve the welding mask which is placed in your inventory.
- Exit out of the scene to right in front of the Chateau gate and then go to the right until you see two men. Watch the video of them speaking.
- Exit back once and go into the Chateau gate to start chapter three.
Chapter 3 – “In which Frederic Larsan explains how the murderer was able to get out of the Yellow room”
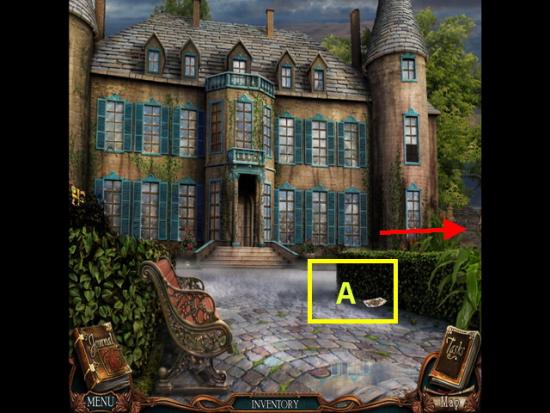
- A. Click on the playing card and take it into your inventory.
- Exit to the right side of the scene as shown above.
- When you reach the side of the chateau you will see an angel statue glowing purple. Click on it for a hidden object scene.
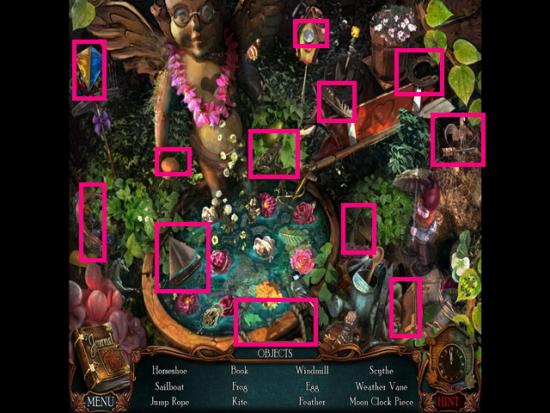
- Locate all the hidden objects in the scene which are shown circled in dark pink above.
- Yellow item – None
- Collect the moon clock piece and place in your inventory when finished.
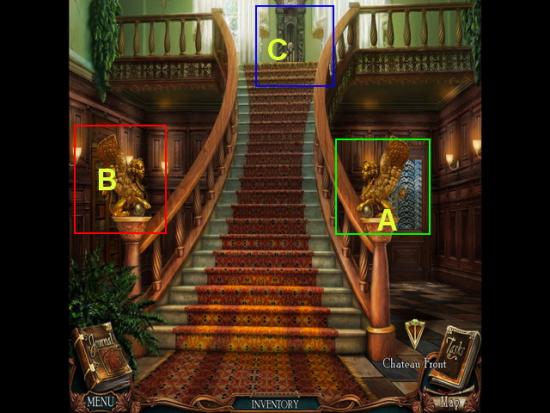
- A. Click on the right lion statue at end of stairs. When panel opens take the gem from inventory and place on eye. Take the lead ball under the lion into your inventory.
- B. Click on the left lion you will see you need an item you will find later on.
- C. Click on the clock at the top of the stairs and play the mini game puzzle.
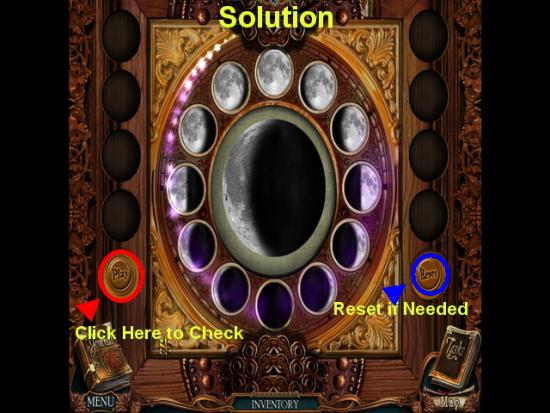
- Take the moon pieces along the sides and place them in order around the perimeter so you will have a perfect playback of the cycles of the moon.
- Once you have all pieces placed hit the “Play” button and you will see it play as you placed it. If correct, a panel with a key hole will appear in the center.
- You do not have the key for this yet. Leave this scene and come back later.
- Once you exit the puzzle go to the left side of the stairs.
- Take a picture of the caretaker and constable by clicking on them and watch the short video about them.
- Enter the door behind them.
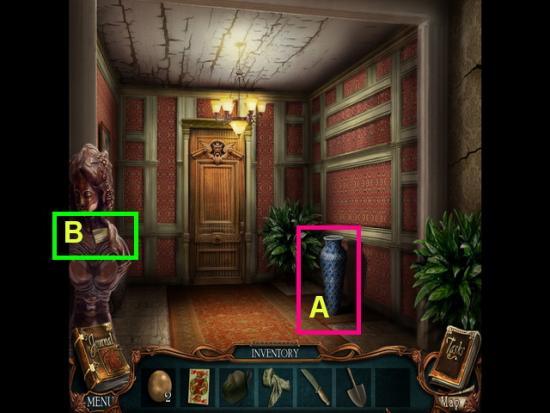
- A. Click on the vase to the right and collect the card into inventory.
- B. Take the letter piece off of the statue and place in inventory.
- Take the door and when you see “Daddy Jacques” click on him and watch the short video.
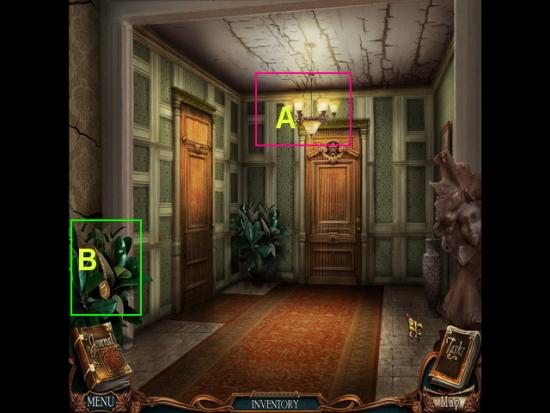
- After the video “Daddy Jacques” is gone.
- A. Click on the light fixture and collect the playing card into inventory.
- B. Click on the plant to the left and collect the necklace into inventory.
- Exit to the left into Larstan’s room.
- Exit the room to the left and you will see a glowing area over the fireplace. Click on it for a hidden object scene.
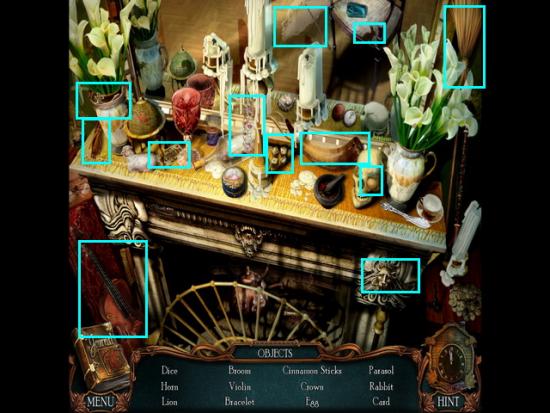
- Locate the hidden objects in the scene shown circled in light blue.
- Yellow Item – None
- Once finished collect the playing card into inventory.
- Once you exit the scene click to the left side of desk to trigger a mini game.
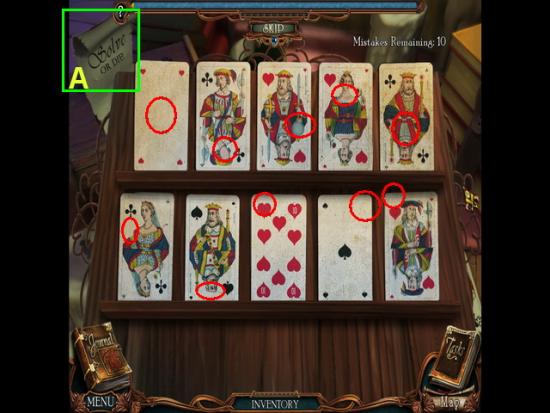
- A. Click on the little note at upper left corner to take a picture of it and add it to evidence.
- Take the four playing cards and place them in the puzzle by clicking four times in the empty spaces.
- Once all the cards are placed you have ten chances to click on each card and identify the area where there are differences. Each card should be a mirror image of itself.
- Click on the difference and it will repair. If you make a mistake the counter to the upper right will go down. If it goes to zero, you will have to start the puzzle all over.
- The solution is shown circled in red on each card.
- Once you find all difference in the cards, the scene will change. Take the clock key from the upper left hand side of the scene.
- Once you exit the scene go back to the main foyer at bottom of stairs.
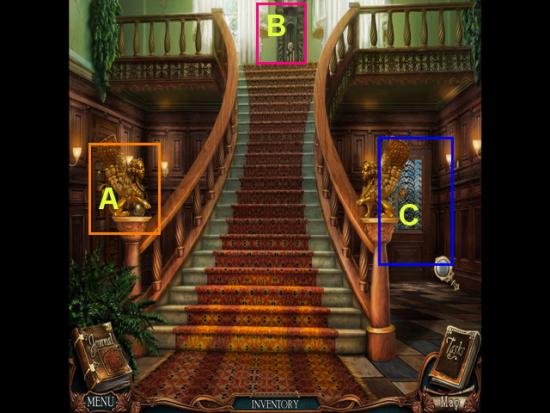
- A. Click on the lion at the left side of the stair case. Take the necklace from your inventory and place around its neck. Now you can collect the lead ball at his feet into your inventory.
- B. Go back to the clock at the top of the stairs. Take your clock key out of inventory and open it. Once the panel opens take the back door key and place in inventory.
- C. Go downstairs and click on the door to the right. When the panel opens place the door key from inventory into the keyhole and click on the handle to turn it. You can now go outside of this door to a new location. Follow out the door.
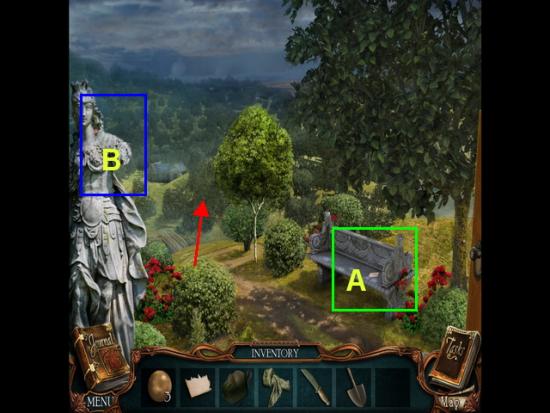
- A. Click on the bench at lower right and remove the letter piece and place in inventory.
- B. Click on the statue at the left and remove the checker into inventory.
- Exit straight back to the laboratory.
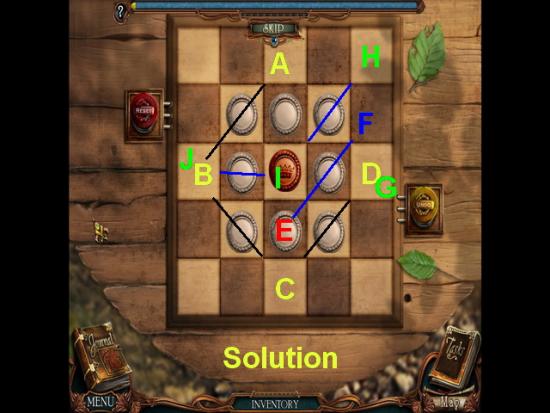
- You will now see the laboratory building. Click on the outside on the small table at center and this will trigger a mini game.
- Take your red checker from inventory and place it on the board.
- Rules – The objective is to jump all white checkers until they are all gone and only red is left standing. You may use the red checker or another white checker but you may not jump over the red checker
- The solution is shown in images above. Follow the letters and this explanation.
- Follow letters starting by bringing the red checker to letter, A, B, C, then D.
- Next click on white checker E and bring it to space F.
- Click on the red checker again and bring it to space G.
- Skip over the last two white checkers until only the red one is left (I and J)
- When the puzzle is completed take a mallet into your inventory.
- Return to the outside of the laboratory. Click on the chest at far right.
- When the lock appears take the mallet out of inventory and use it on the lock.
- Once open the chest will glow purple. Click on it for a hidden object scene.
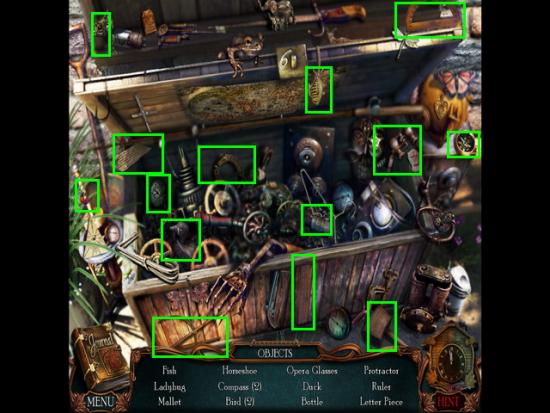
- Locate the hidden objects in the scene shown circled in green.
- Yellow Item – None
- Once you complete the scene take the letter piece into inventory.
- Go inside the laboratory.
- Click on the bright gold contraption on the table toward center of room to trigger a mini game.
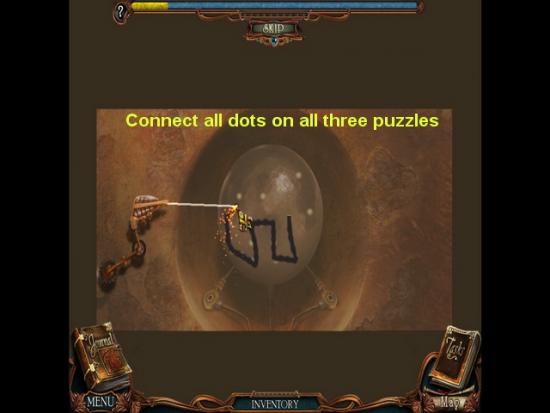
- Click on the welder’s helmet in your inventory and place it. You will see the scene turn a little blurrier.
- Take the one of the three lead balls and place it on the center of the scene.
- You will now see a globe appear with several white dots. You will need to connect the dots with the machine to make a picture. The first one is a pig, the second is a rooster and the third is a horse.
- You will put a lead ball up on the machine each time you do a new picture.
- You must connect all dots for this to work.
- You will collect a pig, horse and rooster into inventory when you complete this puzzle.
- Go into the yellow room.
- Watch the short video.
- Now the area above the bed will glow purple. Click on this and enter a new hidden object scene.
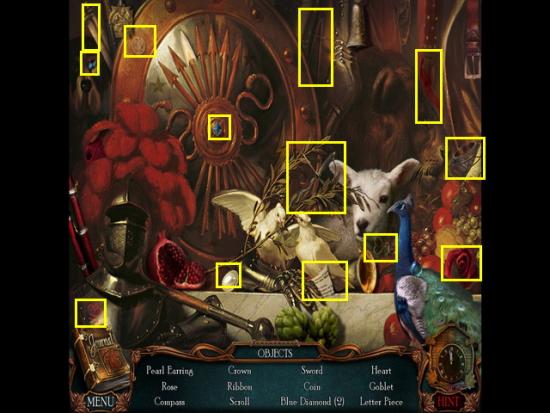
- Locate all hidden objects in the scene shown circled in yellow above.
- Yellow Item – None
- When finished place letter piece in inventory.
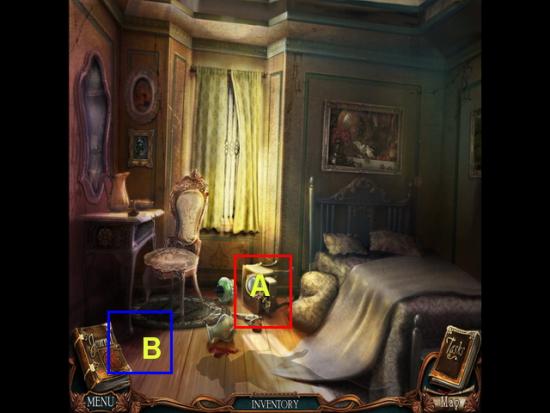
- A. Click on the table in the middle of the scene. Take the letter piece and take a picture of the gun to go into evidence.
- B. Click on the floorboard. Take the hammer from inventory and use it to remove the board. Take the letter piece once it is exposed into your inventory.
- Exit the room back into main lab.
- Click on the clock on far wall to trigger mini game puzzle.
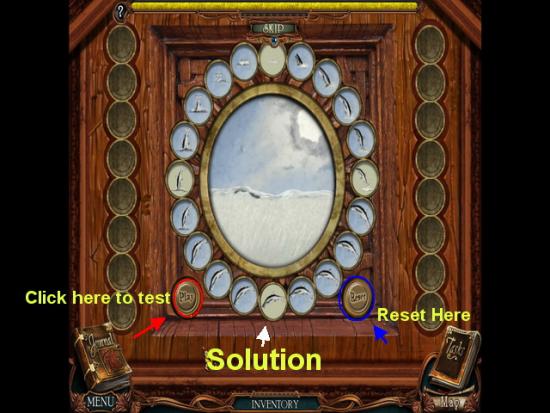
- Place all the images along the sides in the correct circles to show the fish diving correctly.
- Once you place all discs. Click on the “Play” button to confirm you are correct. If you are, you will see the fish dive in the center area.
- Once finished collect the letter piece and place in inventory.
- Exit the scene until you are in front of the Chateau gate.
- Take a right and follow the path.
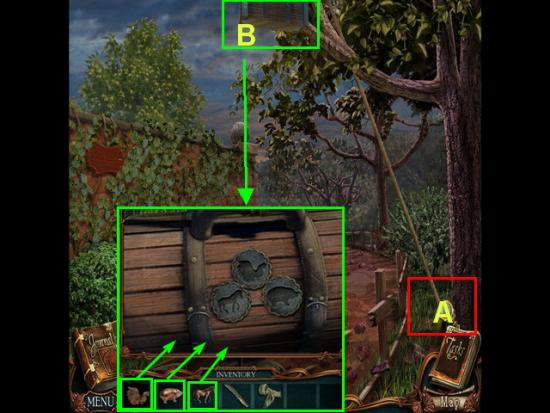
- A. Click on the area at bottom right at base of rope. Take the shovel from inventory and dig up the stake in the ground. The chest above will fall to the ground.
- B. When chest falls to the ground, click on it and panel will open. Take the rooster, pig, and horse and place in empty spots.
- When panel opens take the final letter piece, and the fur sample into inventory.
- Go back into the yellow room at the laboratory.
- Click on the dresser to far right to trigger a mini game puzzle.
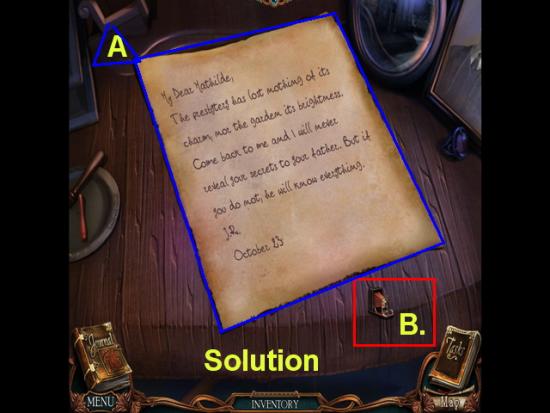
- A. Take the letter pieces from inventory and click on the empty area ten times to unlock all of them.
- Now you will click on the pieces and reassemble the letter. If you place it correctly it will lock into place on the scene.
- B. Once the letter is assembled you must click on it to take a picture into evidence.
- Watch the video
- You have now completed Chapter 3.
Chapter 4 – “I Expect the Assassin later this Evening!”
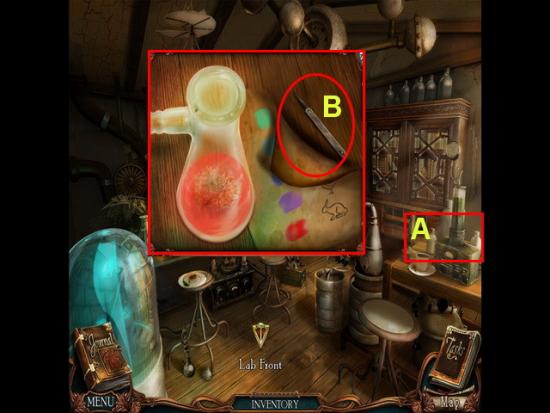
- Return to the lab and click on the machine to the far right. Here you can test the animal fur you found near the garden bench.
- A. Click on the animal fur in your inventory and place it in the flask of liquid. In a few seconds the liquid will turn red which indicates rabbit fur according to the key.
- B. Click on the upper right corner of the key and the page will fold revealing a lock pick underneath. Click on it and place in your inventory for later use.
- Exit until you reach the Chateau entrance take a right to the garden.
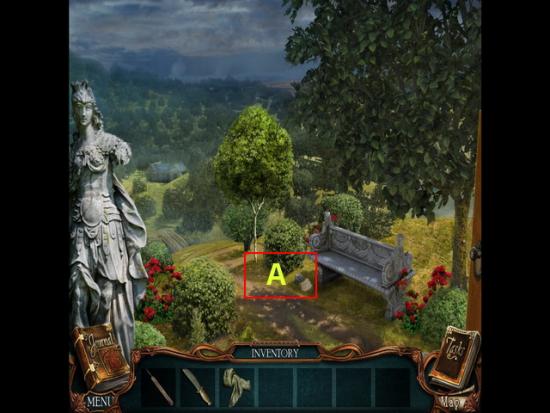
- A. Click on the paper under the bench. It is a note from Larsen. Take a photograph of the note.
- B. Take the slider at the left into your inventory.
- Go into the Chateau up to the left side of staircase. Once in the hallway click on the light fixture and remove the light bulb and place into inventory.
- Next, go into Rouletabille’s room which is the door to the left.
- Place the ear cursor over the two men talking and listen to their conversation. (Watch short video clip)
- After the conversation the area over the fireplace mantle will glow for a hidden object scene. Click on it to activate it.
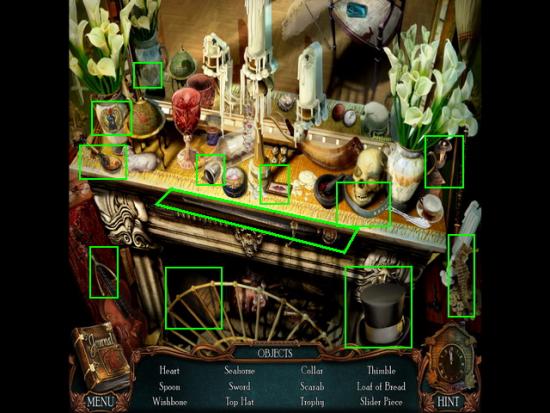
- Locate the hidden objects in the scene. Solutions are shown above circled in green.
- Yellow items – None
- Once you locate all of the items, a slider piece will be added to your inventory for later use.
- Leave the room and go into the room next door.
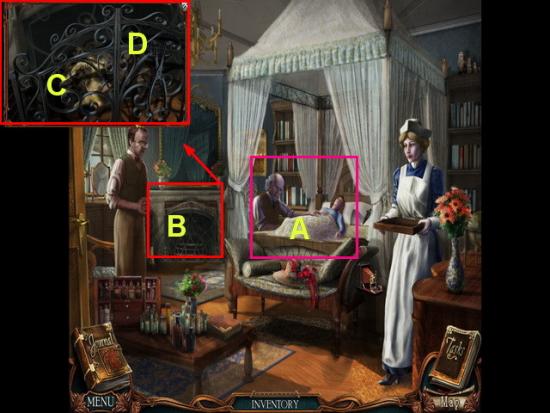
- A. When you walk into the room use your camera to take a picture of the woman in bed. This is for evidence.
- B. Click on the fireplace. Note the paper inside and click on it to take a photograph.
- C. Click on the tongs and add to your inventory for later use.
- Exit to the Garden.
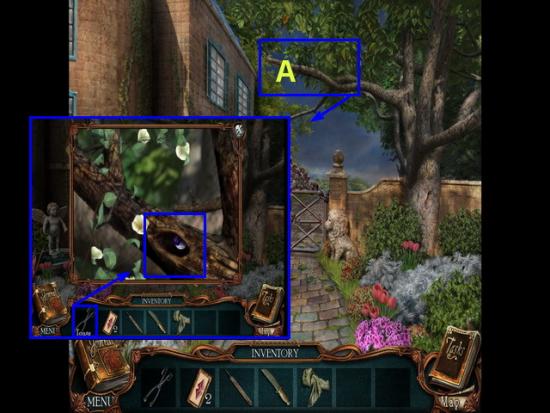
- A. Click on the limb to the upper right.
- Take the tongs from inventory and use them to remove the marble from the tree limb.
- Take marble into inventory.
- Return to the laboratory and go inside.
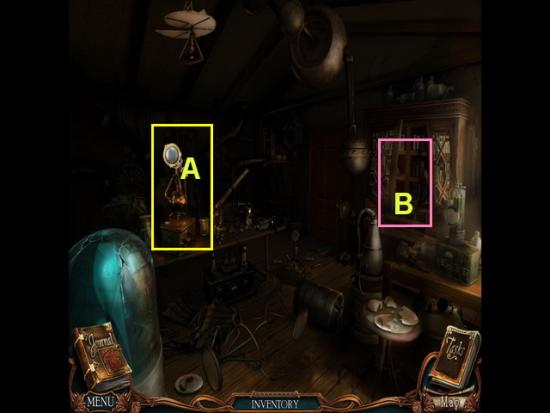
- The laboratory has been ransacked and there is no light.
- A. Click on the device on the far left table. Take the light bulb from inventory and place it in the device.
- Take a picture of the room for evidence.
- B. Click on the cabinet and take the tarot card into inventory.
- Exit into the yellow room and click on the glowing portrait over the bed for a hidden object scene.
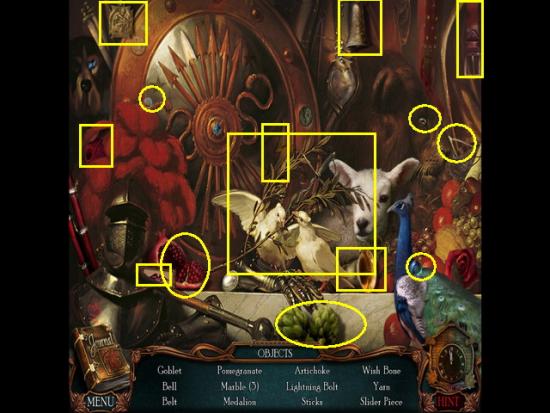
- Locate all the hidden objects in the scene shown circled in yellow above.
- Yellow item – None
- Once you collect all of the items a slider piece will be added to your inventory.
- Go back to the Chateau up the stairs to the left and to the door of Detective Larsen.
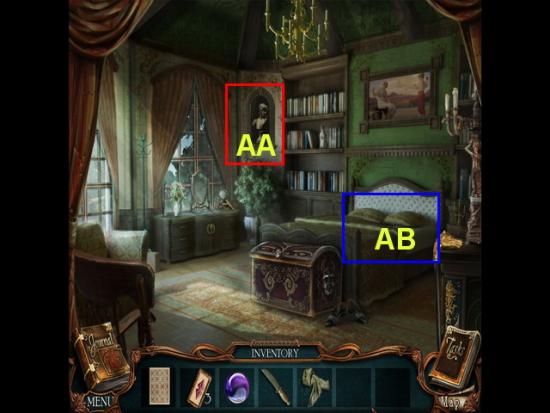
- Click on the door to detective Larsen’s room. When the panel opens use the lock pick from your inventory to open the door then go inside.
- AA. Click on the bust over the fireplace and when the panel opens take a marble from inventory and place in the hole of the statue. A slider piece will fall out. Take it and place in inventory.
- BA. Click on the bed for a mini game puzzle. Take the tarot card from inventory and add it to the panel to trigger the game. You will now need to click on the cards and make pairs to remove them. Once all are removed take the final slider key into inventory. Click on the chest at the end of the bed.
- CA. You now have a second mini game where you will slide tiles and the goal is to get the four patterned tiles on the corners into the center. You can skip this puzzle if you choose once the meter at the top of the screen fills up. If you wish to complete it simply work the tiles out of position and weave the patterned tiles through until they are centered.
- Once you complete the puzzle a keyhole will appear. Take the slider key from inventory and use on the lock. When the panel opens you will see a knife and a piece of paper with a three digit code which is 152. Take a picture of the code and take the knife into inventory.
- Exit the lab and walk forward twice.
- Watch a brief video.
- Return to the outside of the Inn.
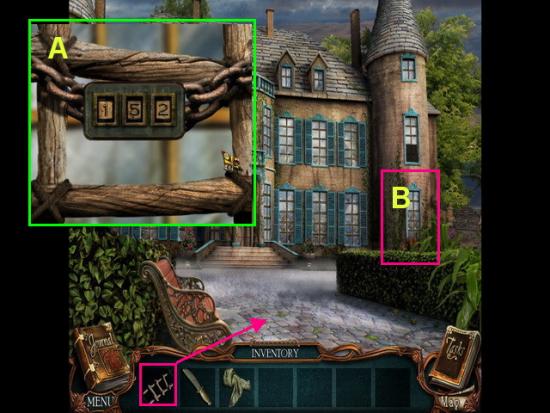
- A. Click on the lock on the ladder and when the panel opens enter the code “152”. The chains will remove and the ladder will be placed into your inventory.
- Go to the Chateau.
- B. Take the ladder from inventory and place it over the window at the far right of chateau.
- When you look into the window you will see a brief video.
- When you exit the scene head to the right one click.
- You will hear a gun shot.
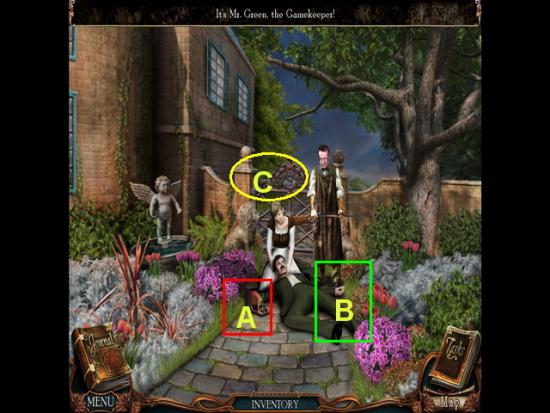
- A. Take a picture of the scene for evidence.
- B. Click on the man for a close up of his hand. Take the piece of paper from his hand and place into inventory.
- Exit back into the Chateau go up to the right and enter Mr. Rouletabille’s room.
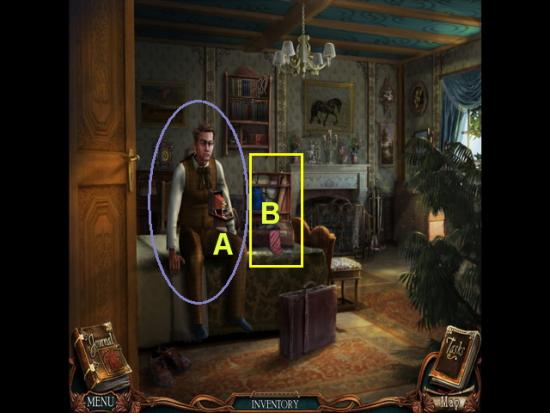
- A. Take a picture of Rouletabille and he will disappear from scene.
- B. Click on the briefcase for a close up scene. You will see two pieces of paper. One is a threatening letter which you will need to take a photo of to enter into evidence. The other is a note piece which you will take into inventory.
- Return to the outside of the train station and talk to him again.
- This is the end of Chapter 4.
Chapter 5 – “In Which Rouletabille appears in all his Glory”
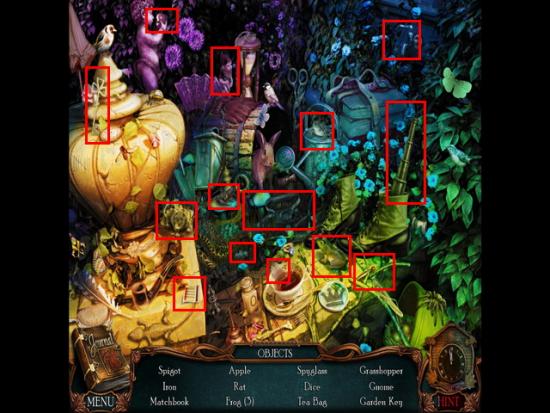
- Go to the area outside the Chateau gate and click on the glowing area for a hidden object scene.
- Locate the hidden objects in the scene shown circled in red above.
- Yellow item – None
- Collect the garden key when you complete the scene and place in inventory.
- Return to the garden gate at the right of the Chateau. Use the garden key from inventory on the gate and walk through once opened.
- You are heading to Mr. Green’s house.
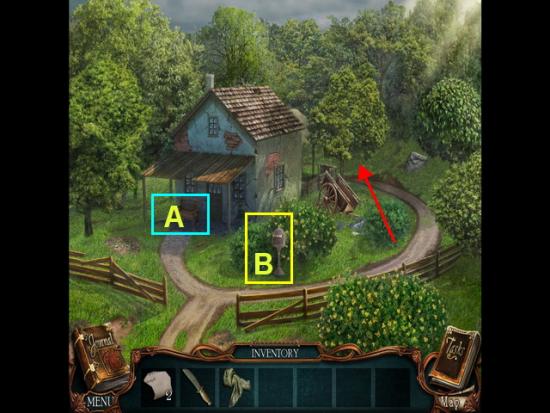
- A. Click on the bench on the front porch and take the note piece into inventory.
- B. Click on the mailbox and take the note piece into inventory.
- Head to the back porch area.
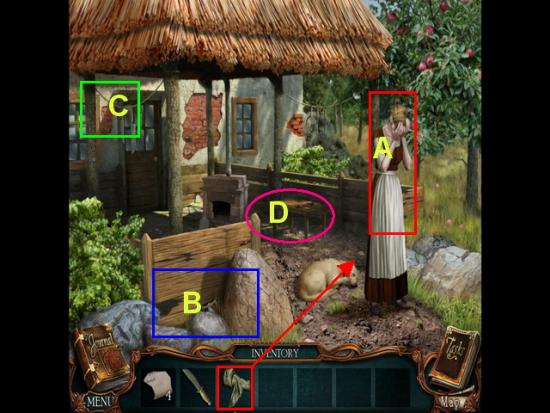
- A. Click on the woman and give her the scarf from your inventory. She will stop crying and start to talk to you. Watch the brief video.
- B. Click on the area by the large rock. Take the shield into inventory.
- C. Click on the wall by the door and take the note piece into your inventory.
- D. Note there is a mini game here that you will need to collect eight note pieces for.
- Head back to the Chateau and go to Larsen’s room again.
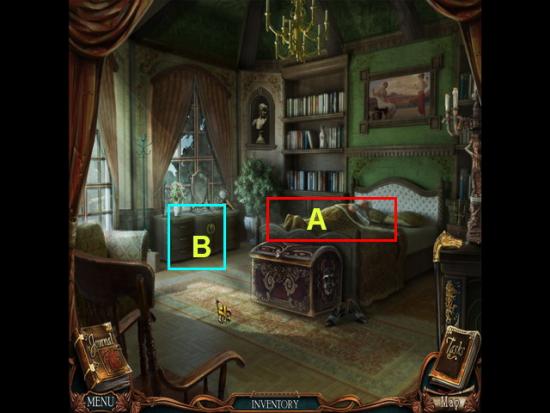
- A. Click on Larsen for a close up look of his hand. Take the note piece and place in your inventory.
- B. Click on the dresser. Place the seal from inventory into lion’s mouth. Once the panel opens take the note piece into inventory. You should now have eight pieces.
- Return to the back porch of Mr. Green’s house and click on the mini game area.
- Place all eight pieces of note from inventory on to the empty platform. Reassemble the note here. The pieces will lock into place as you put them in the correct location.
- Once the entire note is finished take a picture of it for evidence.
- Go back to the garden and click on the fountain that is now glowing purple for a hidden object scene.
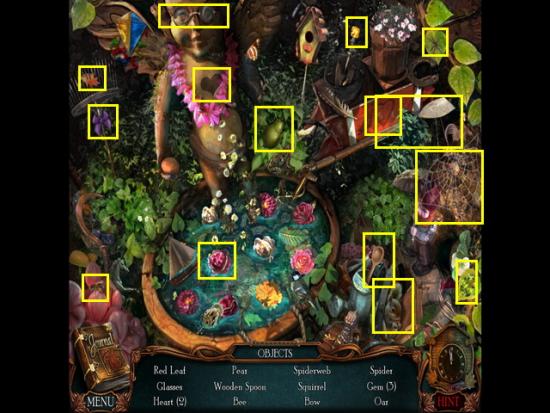
- Locate all hidden objects in the scene shown circled in yellow above.
- Yellow item – None
- Once you locate all items an oar will be placed in your inventory.
- Exit the scene and speak to Daddy Jacques and Larsan.
- Return to the lake and find the boat dock.
- Take the oar from inventory and place it on the boat.
- Click at the very top of the boat farthest out near water and head forward taking you across the lake.
- Once you reach the next scene you will see you can’t do anything at this time so locate the top center and head for the cave path.
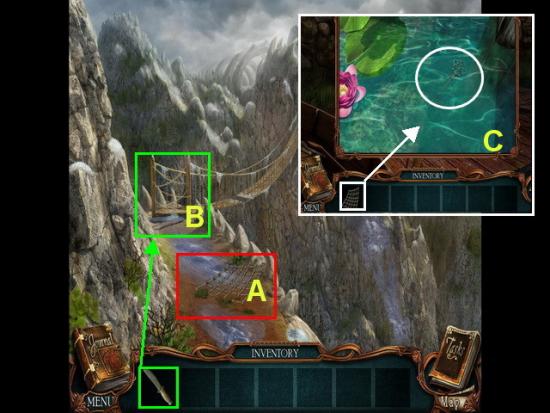
- A. Click on the fishing net and take into your inventory.
- B. Go up to the bridge and take the knife from inventory and use to cut the ropes twice.
- Head back down to the previous location.
- C. Take the net from inventory and use it on gypsy key in the water. Add the key to your inventory.
- Move to the upper left corner to the Gypsy hut.
- When you reach the gypsy hut click on the woman and watch a brief video.
- Click on the door of the hut and when the panel opens click on the key in inventory and use it to open the door.
- When the area starts to glow purple, click on it to start a hidden object scene.
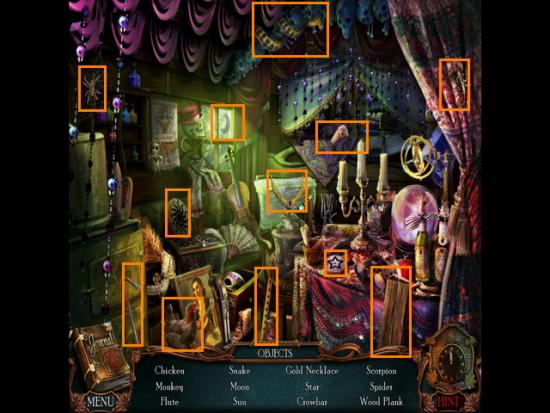
- Locate the hidden objects in the scene circled in orange above.
- Yellow item – None
- Once you find all of the items you will earn a crow bar and a wood plank to place in your inventory.
- Return to the dock. Use the crowbar from inventory on loose board and take the second wooden plank into inventory.
- Return to the bridge.
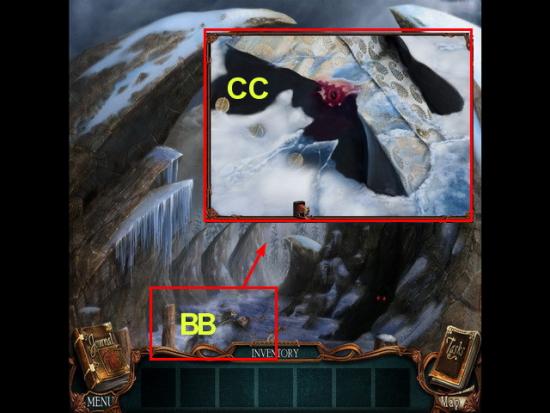
- BB. Click on the body and when you see the close up panel (CC.) take a picture of it for evidence.
- Head back to the Chateau.
- Talk to Daddy Jacques by watching short video.
- Head to Rouletabille’s room.
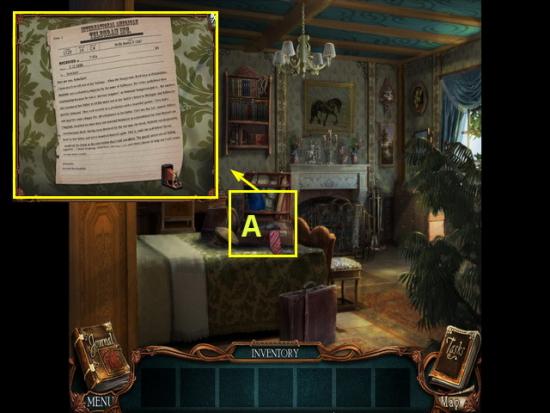
- A. Click on the briefcase and when the telegram is shown take a picture of it as evidence.
- Return to the station and speak to Rouletabille in a short video clip.
- Return to the laboratory and watch the final scenes and the mystery is uncovered.
This is the end of Chapter 5!
Congratulations!
You have completed Gamezebo’s walkthrough for Victorian Mysteries: The Yellow Room by Freeze Tag Games. Be sure to check back often for game updates, Staff and user reviews, user tips, forum comments and much more here at Gamezebo!
More articles...
Monopoly GO! Free Rolls – Links For Free Dice
By Glen Fox
Wondering how to get Monopoly GO! free rolls? Well, you’ve come to the right place. In this guide, we provide you with a bunch of tips and tricks to get some free rolls for the hit new mobile game. We’ll …Best Roblox Horror Games to Play Right Now – Updated Weekly
By Adele Wilson
Our Best Roblox Horror Games guide features the scariest and most creative experiences to play right now on the platform!The BEST Roblox Games of The Week – Games You Need To Play!
By Sho Roberts
Our feature shares our pick for the Best Roblox Games of the week! With our feature, we guarantee you'll find something new to play!All Grades in Type Soul – Each Race Explained
By Adele Wilson
Our All Grades in Type Soul guide lists every grade in the game for all races, including how to increase your grade quickly!


