![Digimon UP Tier List [Supports, Buddies, and Partners]](/wp-content/uploads/2026/07/digimon-up-tier-list.jpg "Digimon UP Tier List [Supports, Buddies, and Partners]")
Digimon UP Tier List [Supports, Buddies, and Partners]
These Digimon will get you UP the leaderboard.


![Haze Seas Boss Drops [Chances, Locations, and How to Spawn]](/wp-content/uploads/2026/07/haze-seas-boss-drops.jpg "Haze Seas Boss Drops [Chances, Locations, and How to Spawn]")

Welcome to the walkthrough for VaultCracker: The Last Safe on Gamezebo. VaultCracker: The Last Safe is a hidden object game for the PC by Gogii Games. This walkthrough includes tips and tricks, helpful hints, and a strategy guide to complete VaultCracker: The Last Safe.

Welcome to the walkthrough for VaultCracker: The Last Safe on Gamezebo. VaultCracker: The Last Safe is a hidden object game for the PC by Gogii Games. This walkthrough includes tips and tricks, helpful hints, and a strategy guide to complete VaultCracker: The Last Safe.
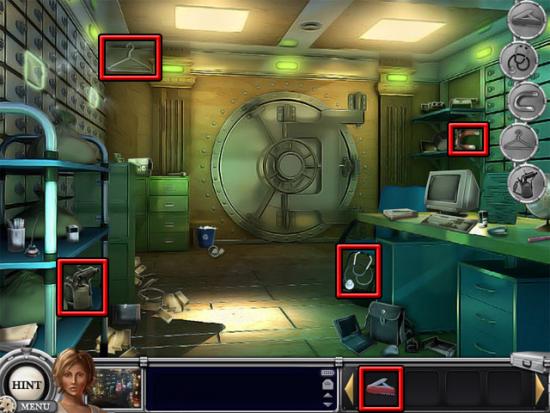
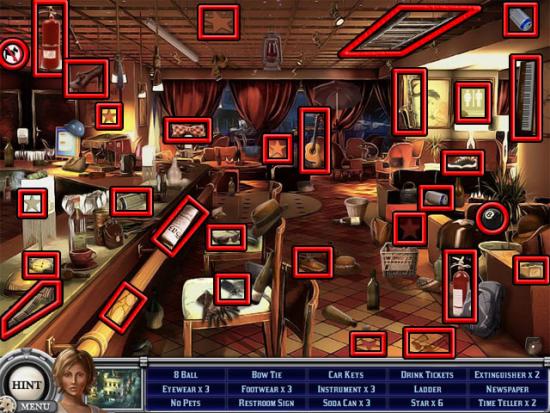
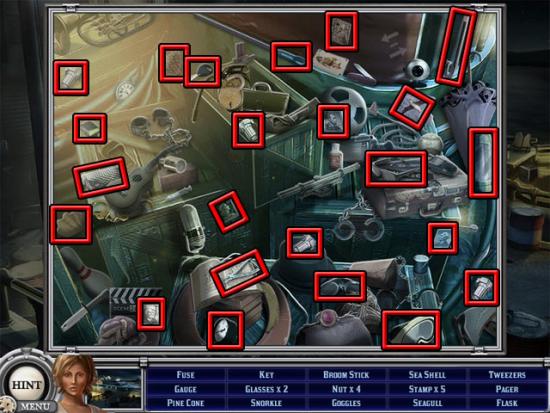
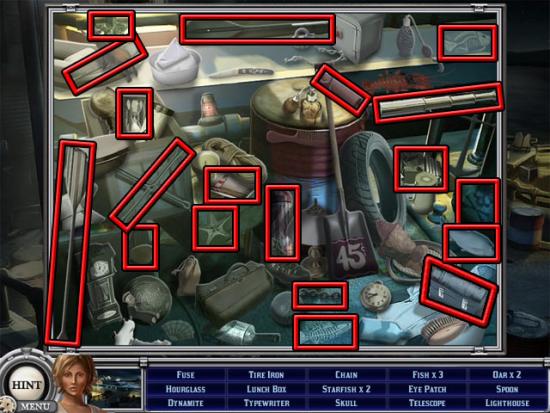
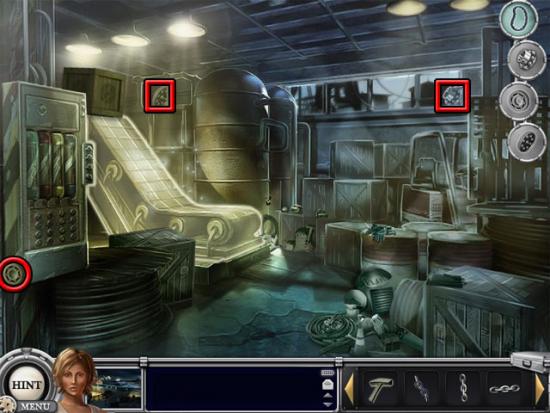
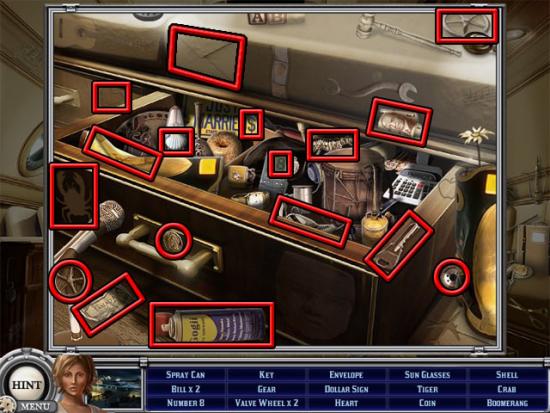
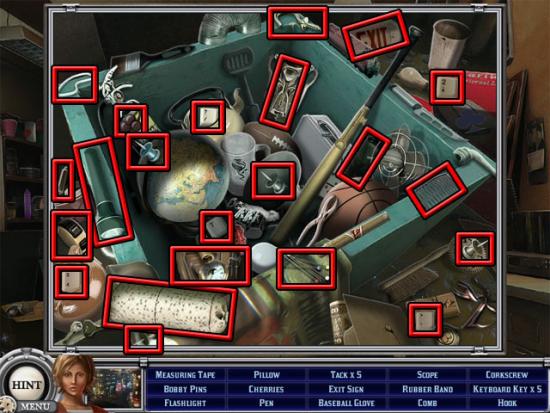
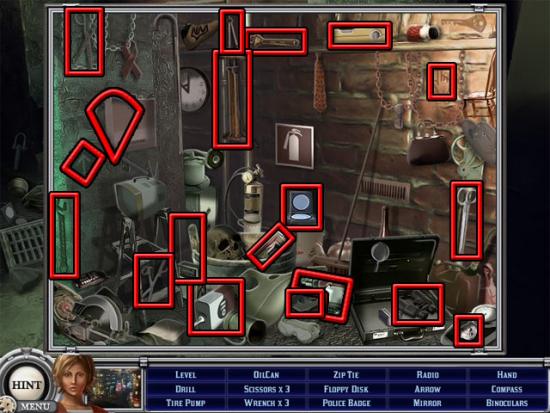
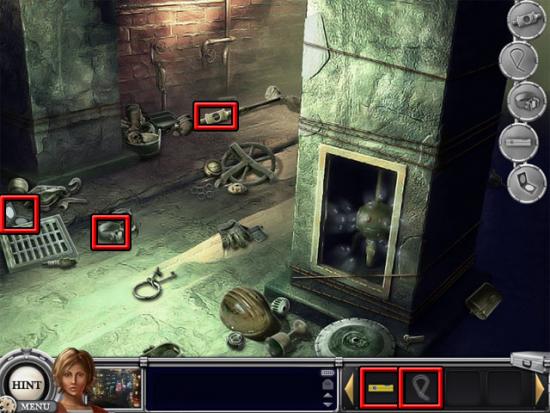
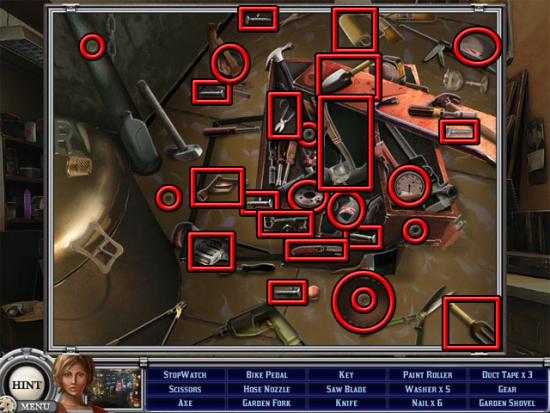
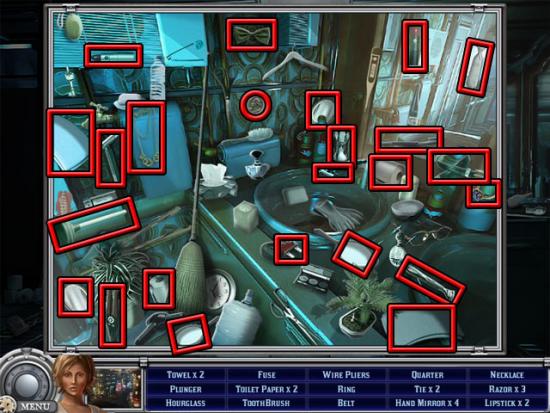
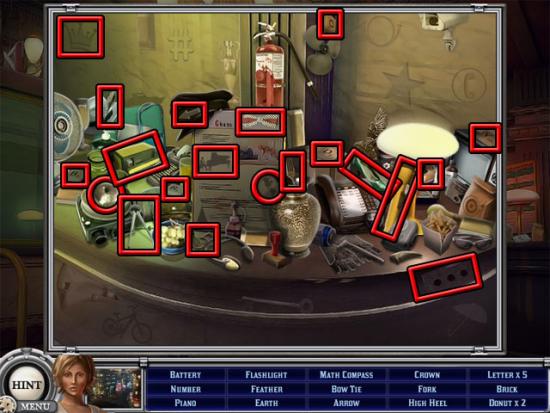
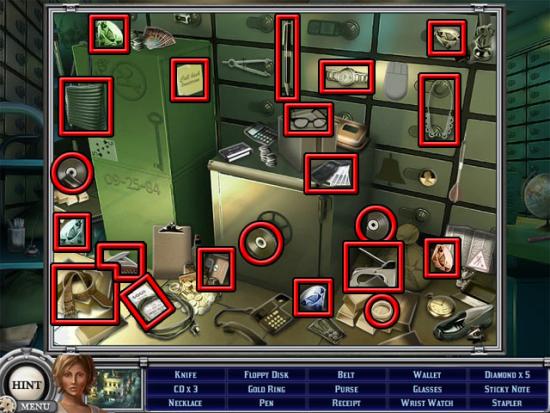
The first section of the game acts as a tutorial to learn the basic controls and commands that will be seen throughout the rest of the game. This section can be skipped by returning to the main menu and then selecting the Play button. Follow the on-screen instructions to select the safety deposit boxes, find the stethoscope and place the stethoscope on the circle indicated by the arrow. Examine the green cabinet to enter a hidden object scene. Find all of the objects on the list:

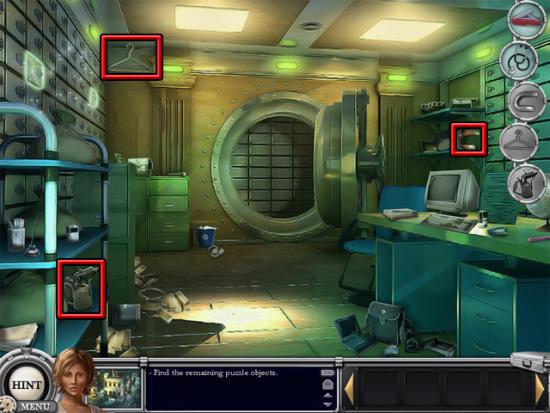
Continue following the on-screen instructions by selecting the penknife from the inventory and using it on the indicated circle. Find the remaining puzzle objects in the room, placing each one on its appropriate circle:
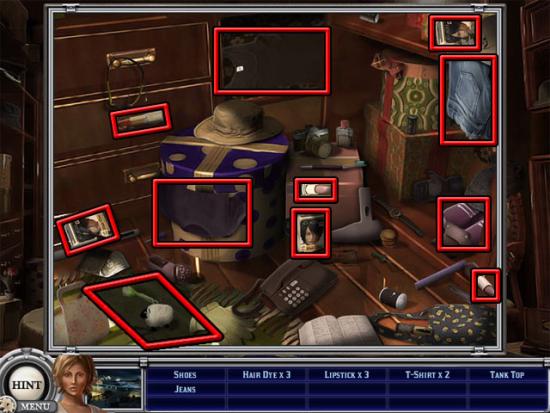
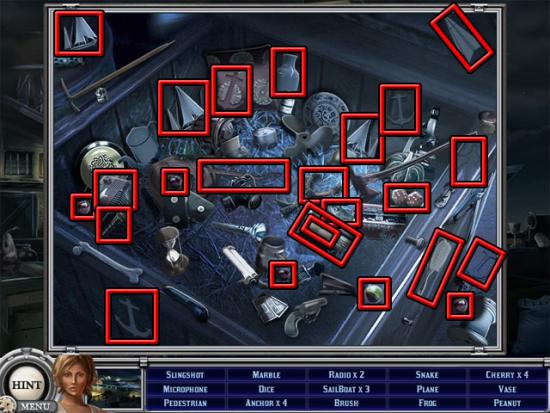
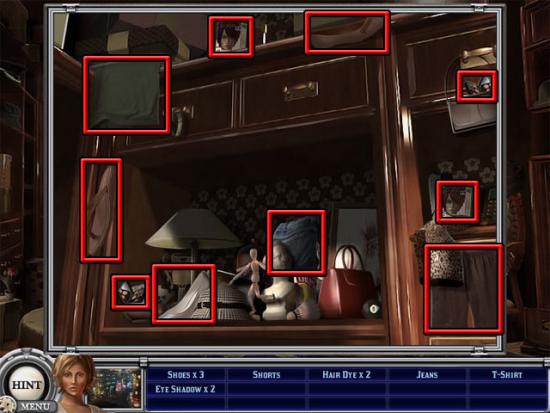
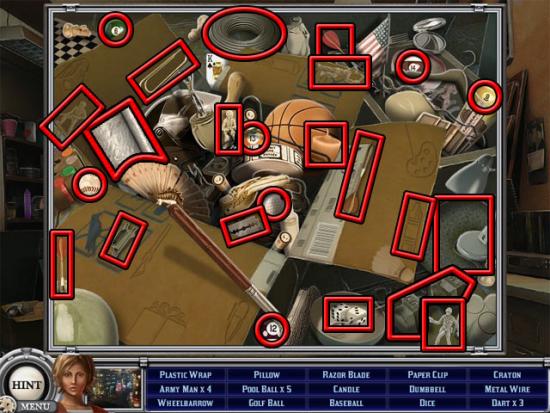
Melissa travels to Sara’s room. Find all of the objects on the list:
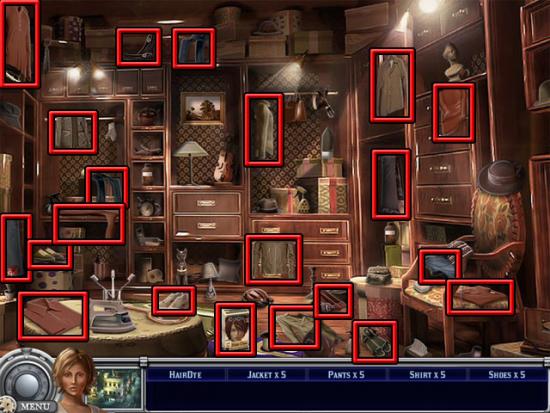
Select the hair and makeup, tops, pants and shoes for Melissa to wear. Click the Done button when you are ready to continue.
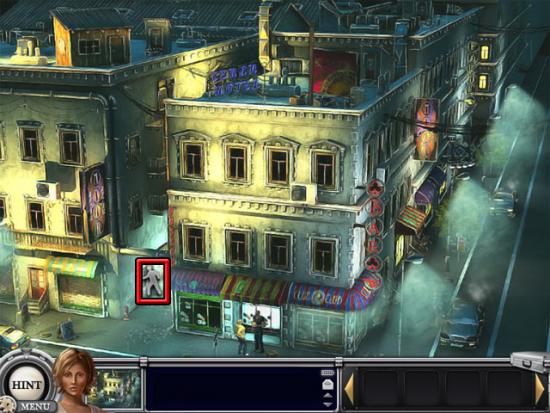
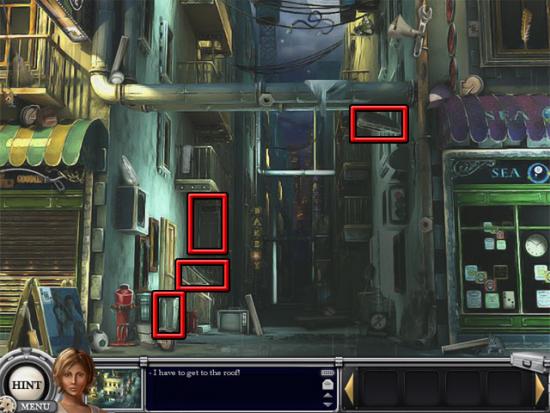
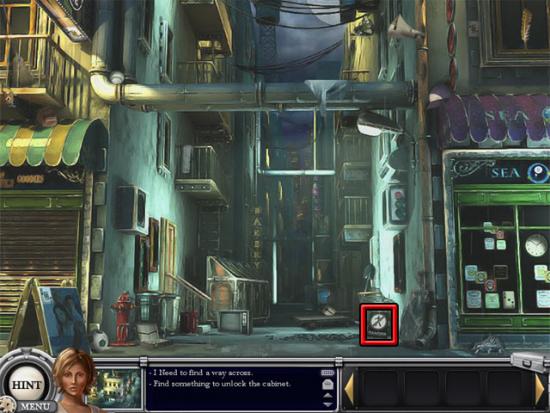
Select the alley:
The hotspots in the area that open hidden object and circle item scenes are shown below:
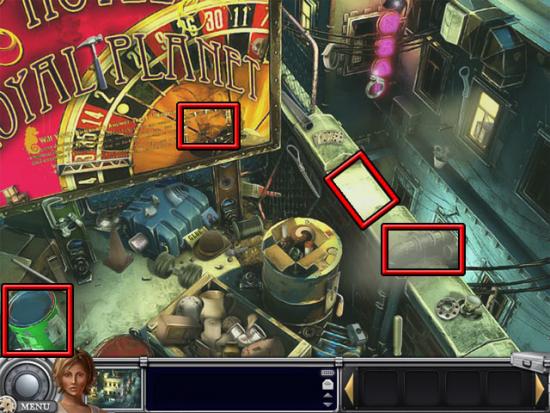
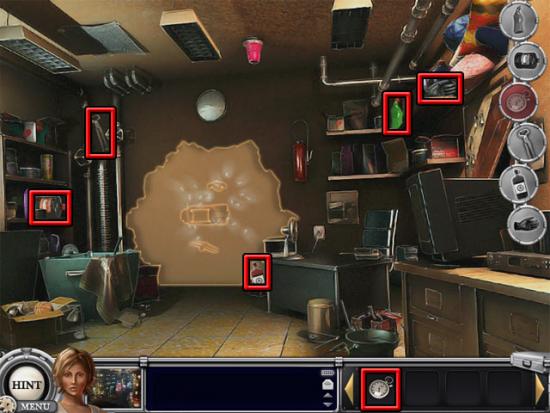
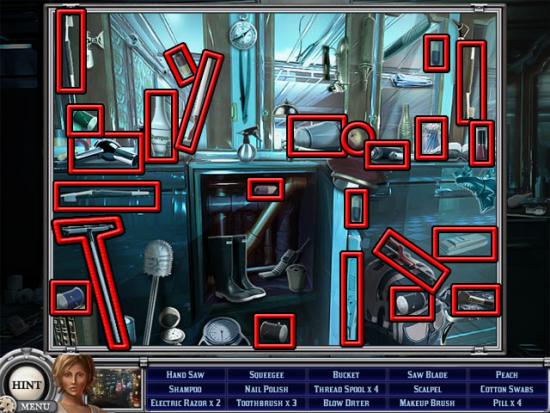
Examine the bin and find all of the objects on the list:
Select the dumpster, ladder and lamp to reveal the parts that need to be found. Find all of the parts shown below:
As before, place each part on the correct circle at the right side of the screen. Remember to place the three items from the inventory as well. After placing all of the parts, Melissa will say that there is nothing as she can do here. Select the button at the right side of the Melissa’s portrait to exit the alley. Select the glowing shed at the top-left corner of the area:
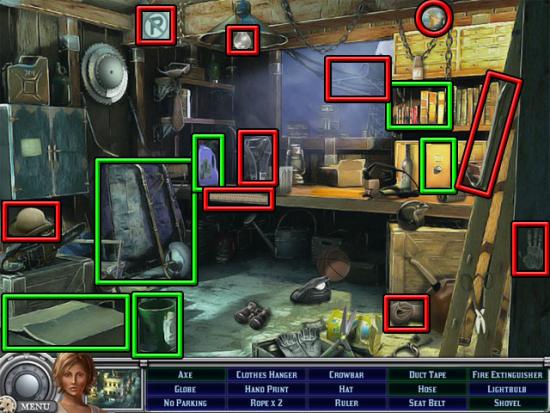
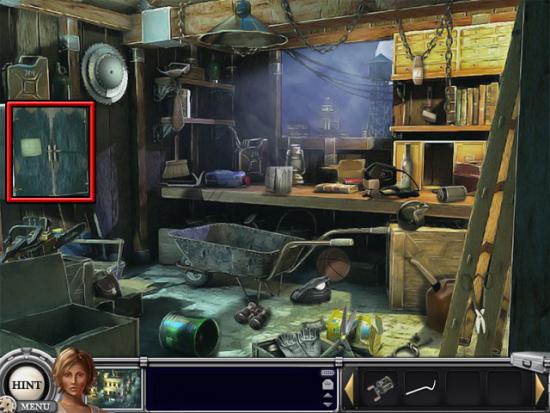
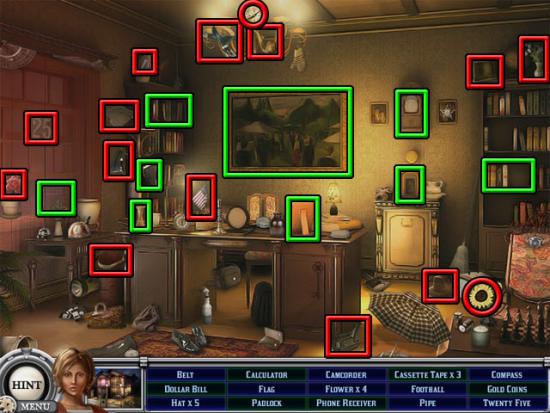
Some objects in this scene are hidden inside or behind other objects. These objects are identified in the image with a green outline. Find all of the objects on the list:
Return to the alley. Select the light bulb from the inventory and use it on the remaining circle. Examine the danger sign:
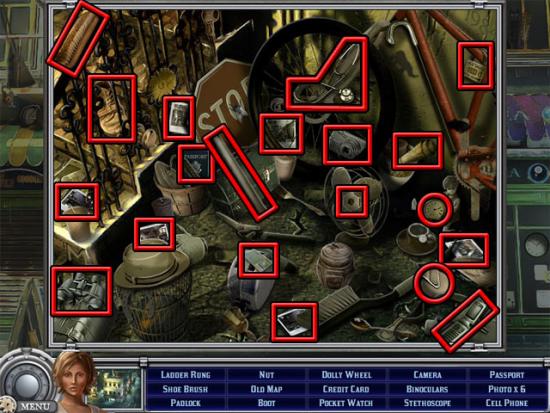
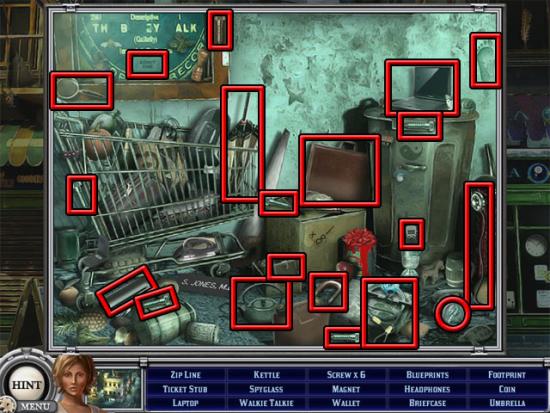
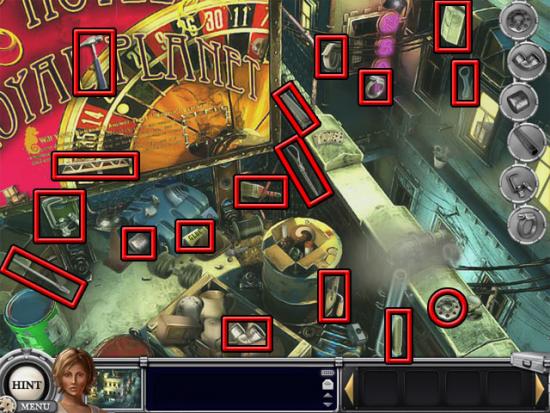
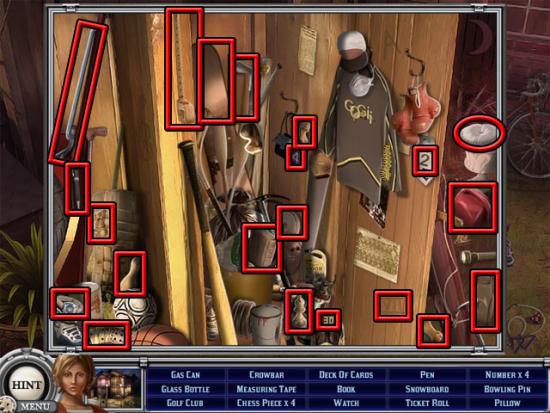
Find all of the objects on the list:
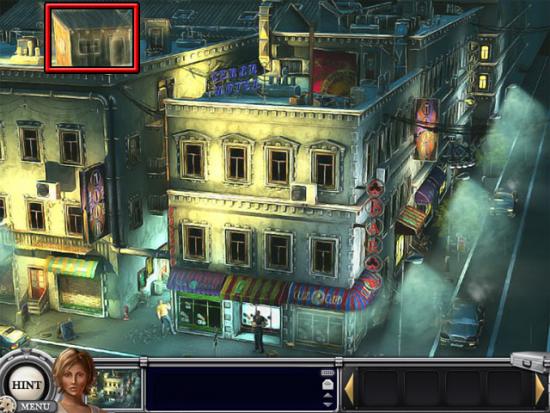
Back out of the alley and select the new glowing area on the roof:

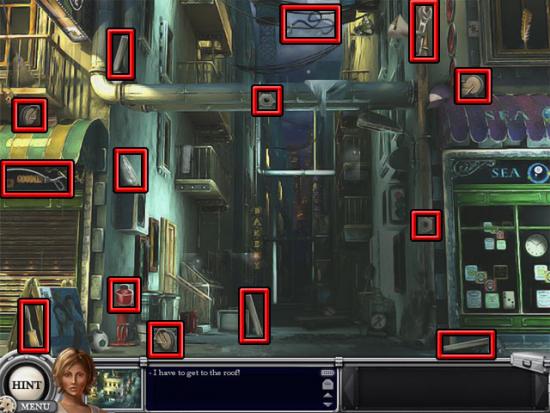
Select the following hotspots to see some of the objects that need to be found in the area:
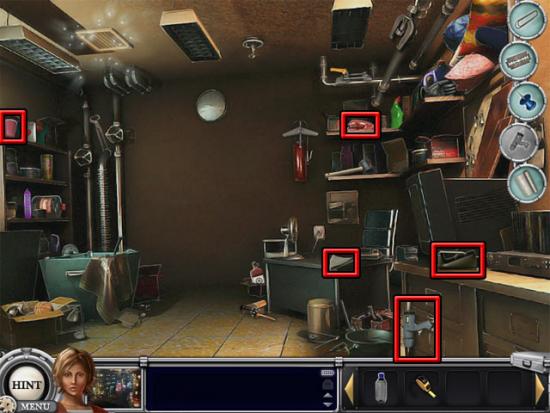
Note that the wall hotspot can only be selected after all the item circles for the pipe object have been completed, so you will need to find those items last. Find the objects shown below:
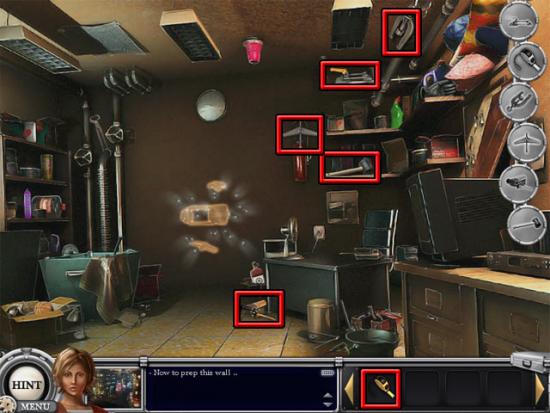
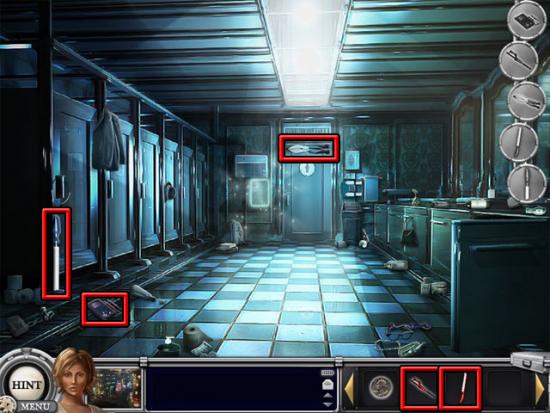
One of the objects on the bulletin board cannot be found at the moment. After all the objects have been found, take the device from the spilled paint and the lock pick from the pipe. Back away from the roof and return to the shed. Use the lock pick on the locked cabinet:
Select the Pick button when the white circle is in the green area:

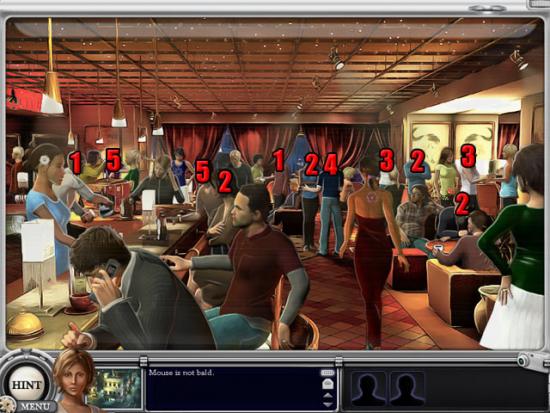
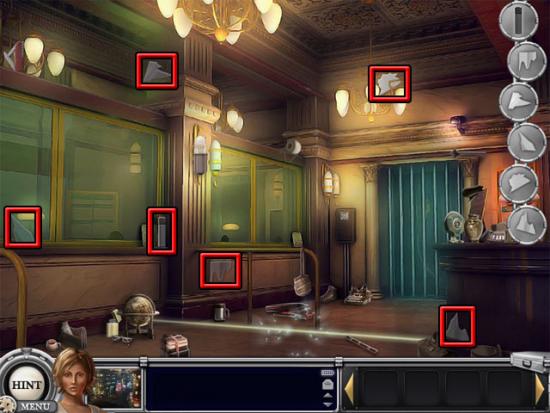
Do this four more times to unlock the cabinet. If a mistake is made you will need to restart the mini-game. Take the knife from the opened cabinet. Exit the shed and return to the bulletin board on the roof. Select the knife from the inventory and add it to the circle. Take the hook from the bulletin board. Select people in the room to remove them from the area. The first five sets of people to select are shown below:
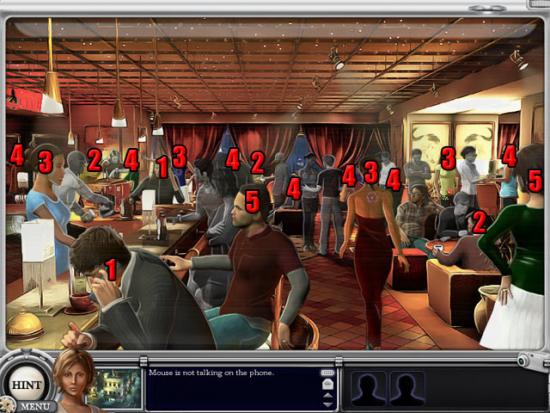
The remaining five sets of people to select are shown below:
Find all of the objects on the list:
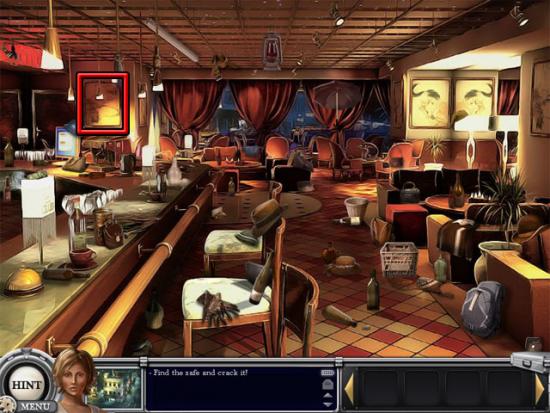
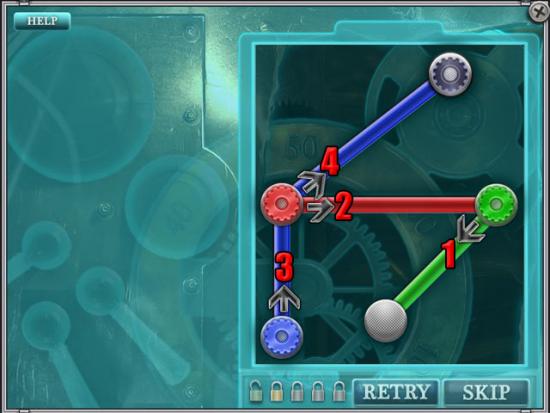
Select the safe:
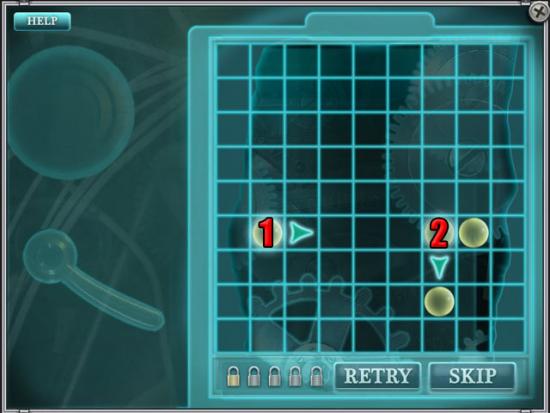
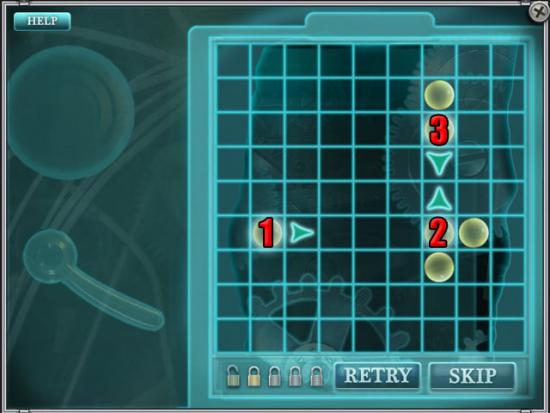
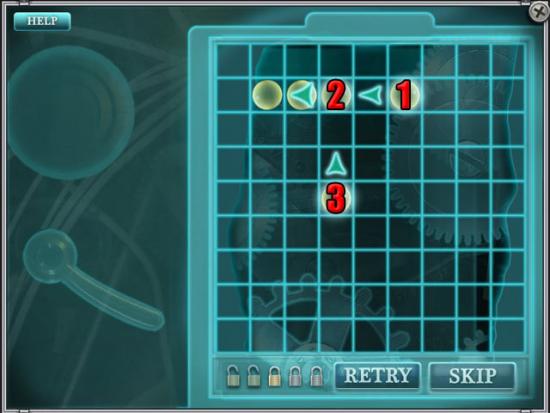
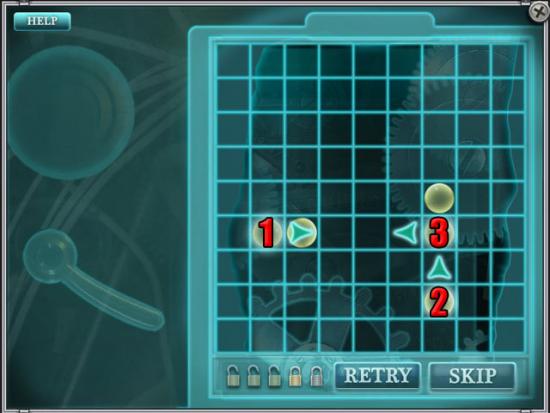
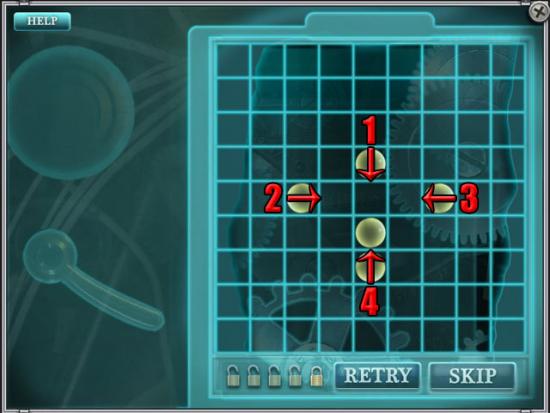
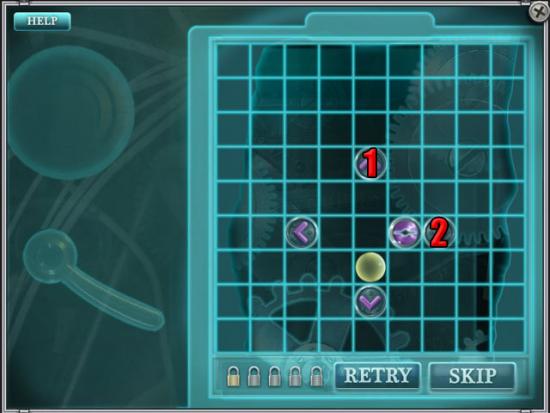
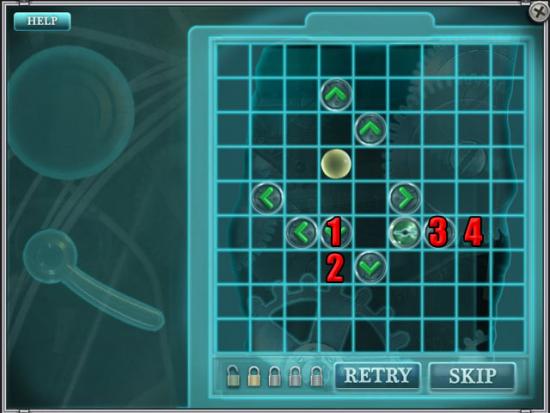
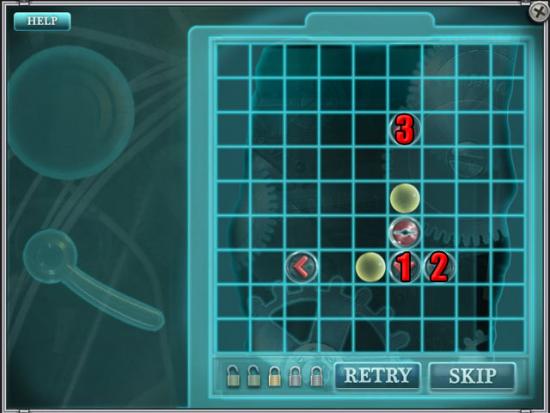
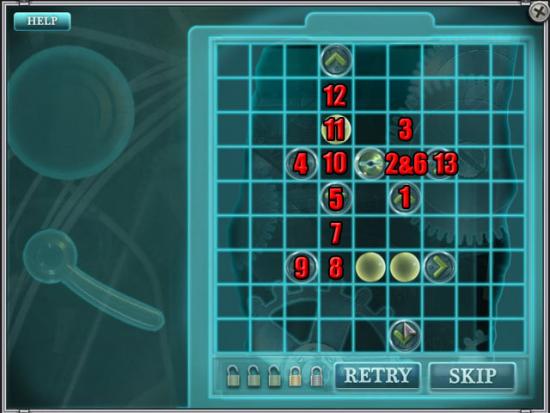
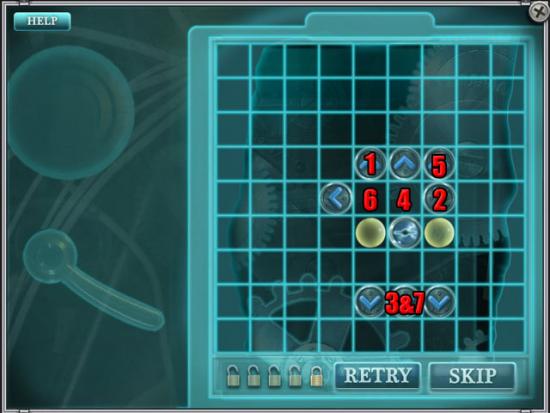
The aim in this mini-game is to remove all but one of the balls from the grid. Click a ball to select it and then click the arrow to move the ball. There are five rounds of the mini-game to complete.
Round 1:
Round 2:
Round 3:
Round 4:
Round 5:
Select the file in the safe. Melissa travels to Sara’s room. Examine the sparkling area at the left side of the room to enter a hidden object scene. Find all of the objects on the list:
Select the hair and makeup, tops, pants and shoes for Melissa to wear. Click the Done button when you are ready to continue.
Select the glowing area at the right side of the screen. Select the following hotspots to see some of the objects that need to be found in the area:
Find the objects shown below and add them to the circles:
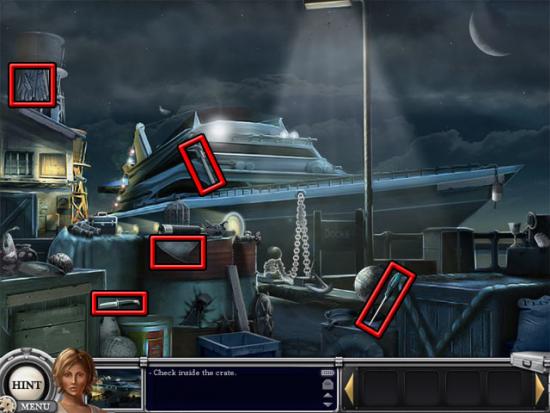
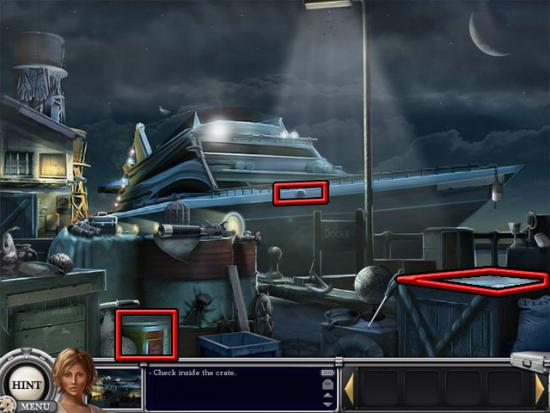
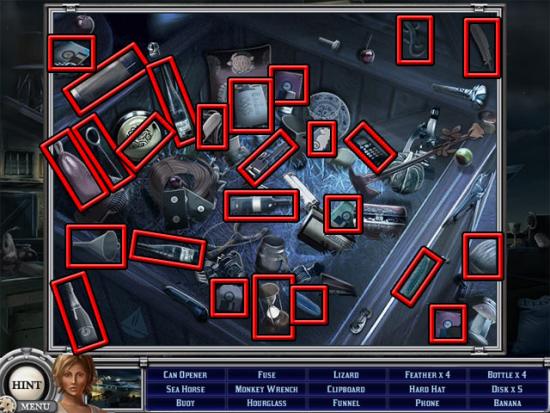
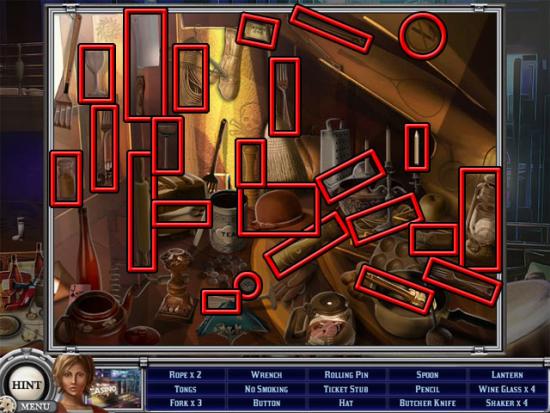
Examine the crate and find all of the objects on the list:
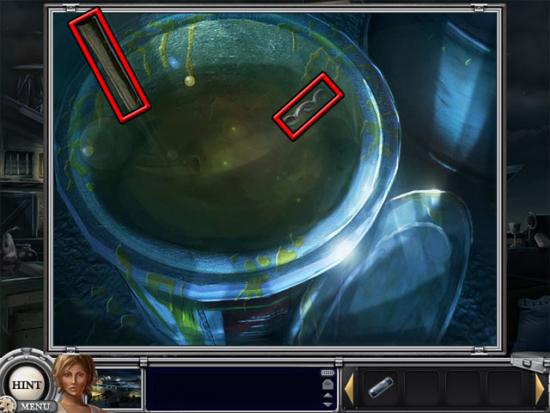
Add the can opener from the inventory to the circle. Examine the can of paint and take the chain and hammer:
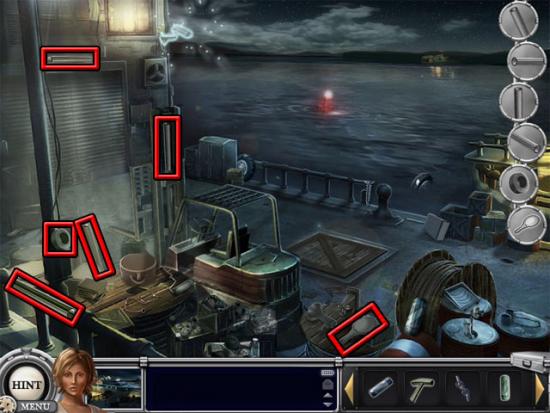
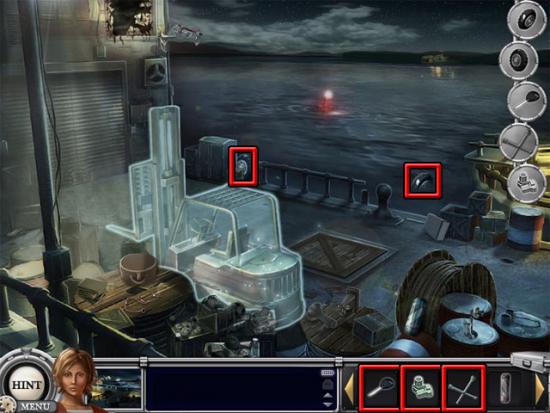
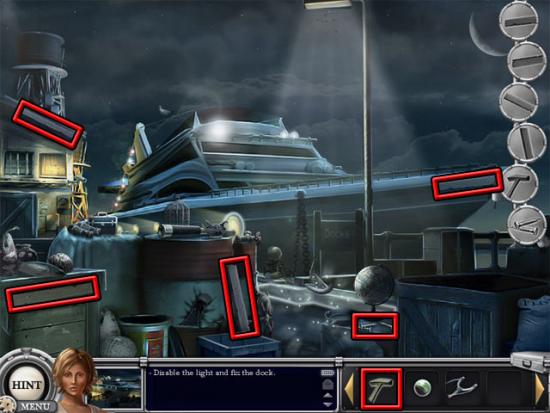
Move back to the dock. Select the glowing area at the left side of the screen. The following hotspots are available:

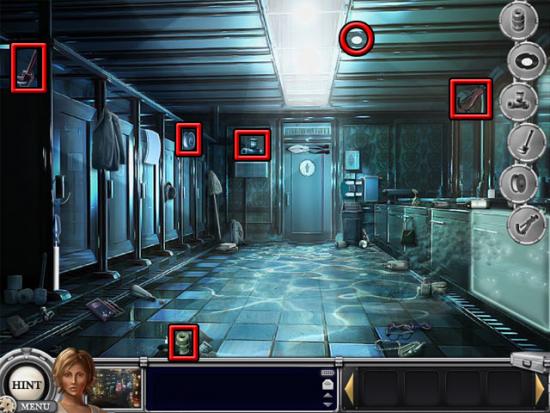
Examine the lower hotspot to enter a hidden object scene. Find all of the objects on the list:
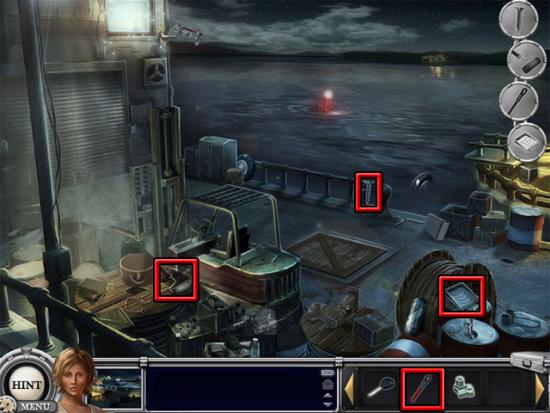
Select the camera find the objects for the circles:
Select the wall at the left side of the camera. Find the objects and add them to the circles:
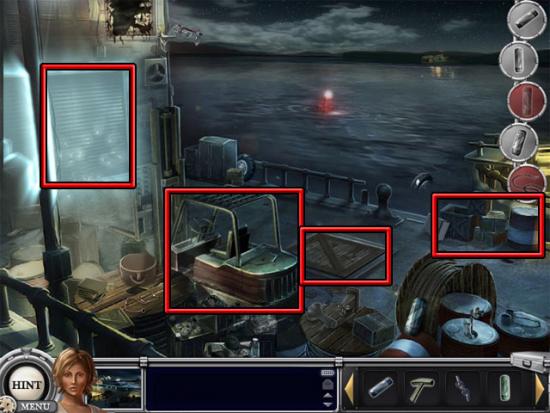
Select the warehouse door and the following hotspots can now be selected:
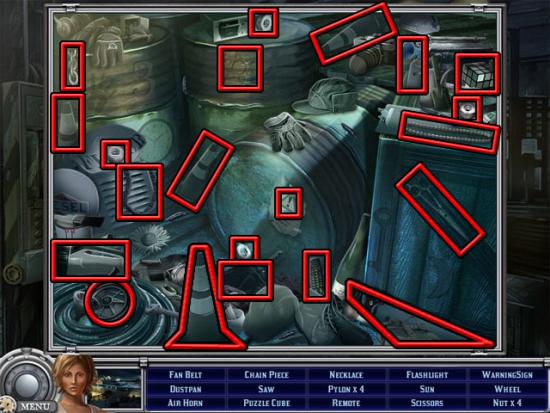
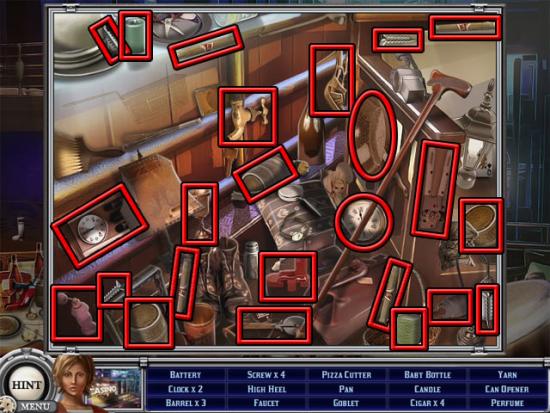
Examine the barrels to enter a hidden object scene. Find the following objects:
Add all of the objects to the forklift circles:
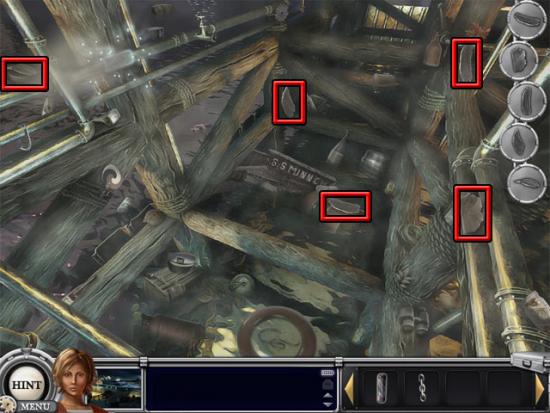
Select the hatch to show the item circle. Take the handle and add it to the hatch circle. Go down the hatch. Select the pipe and find all of the objects:
Select the wire in the ring near the bottom of the screen. Take the hook and add it to the wire circle to receive the wire. Move back to the warehouse. Select the wire from the inventory and add it to the warehouse door circle. Take the fuse near the right side of the hatch and then add the four fuses to the warehouse door circles to open the door. Enter the warehouse. Examine the crate at the bottom-right corner of the room and find all of the objects on the list:
Examine the conveyor belt and add the fan belt to the object circle. Find the remaining three objects and add them to the circles:
Take the chain piece that falls out of the crate. Move back and return to the right side of the boat. Add all of the chain parts to the circles. Select the crate at the bottom-right corner of the area and find all of the objects on the list:
Select the section of the dock at the left side of the globe and find the objects for the circles:
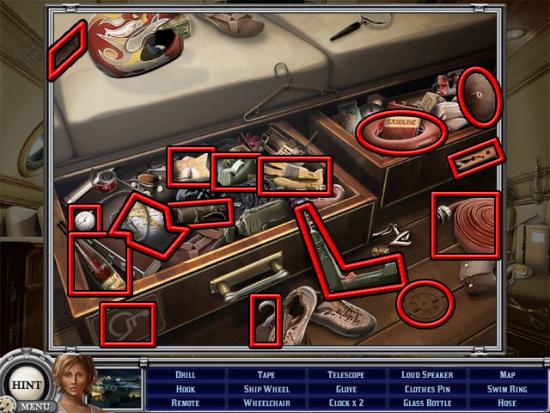
Select the light and add the two inventory items to the circles. Move back and select the glowing window on the boat. Examine the drawer below the white sofa at the left side of the room to enter a hidden object scene. Find all of the objects on the list:
Examine the drawer at the right side of the room and find all of the objects on the list:
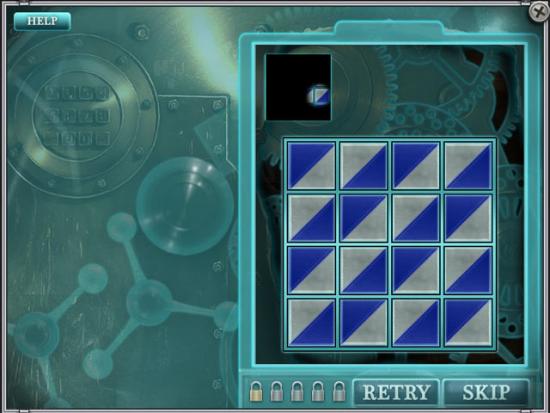
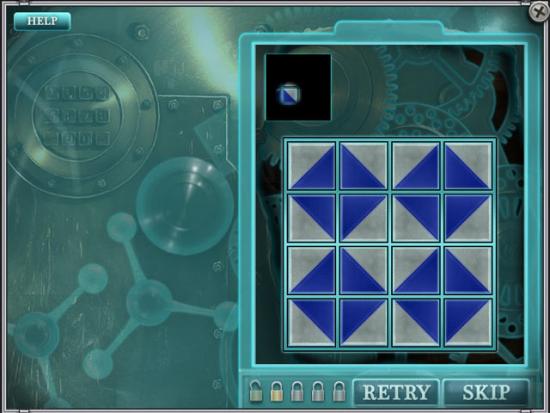
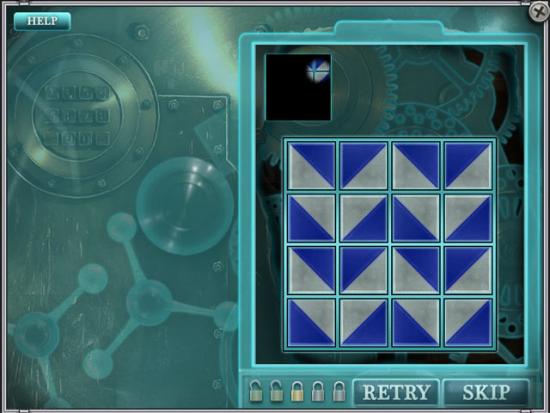
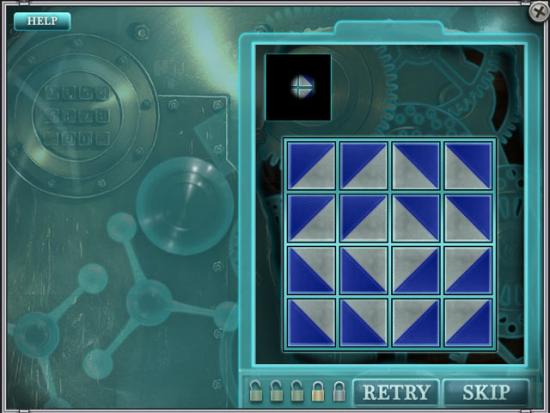
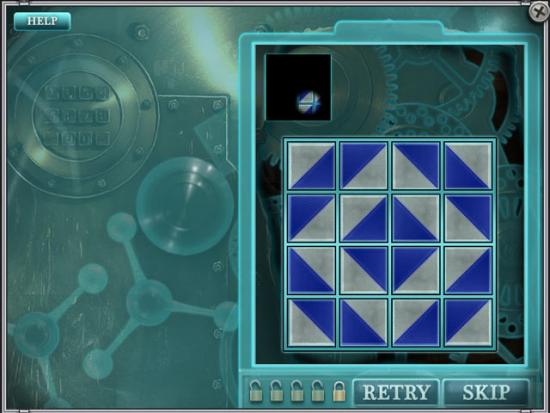
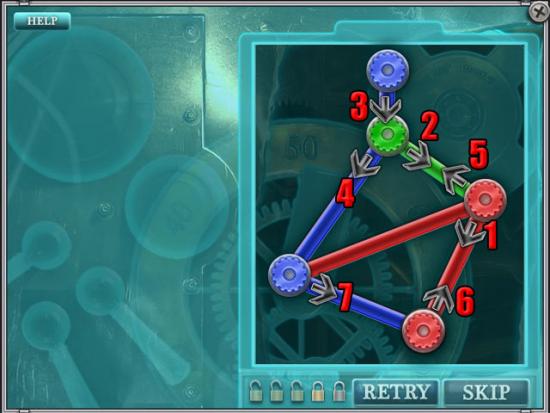
Select the painting on the wall to reveal a lock pick. Take the lock pick and add it and the two inventory items to the circles. Select the drawer at the bottom-left corner of the room and pick the lock as before by pressing the Pick button when the white circle is within the green section. After the drawer has been unlocked, click above the drawer to see the safe puzzle. The aim in this mini-game is to change the tiles so that they match the pattern shown at the top of the screen.
Round 1:
Round 2:
Round 3:
Round 4:
Round 5:
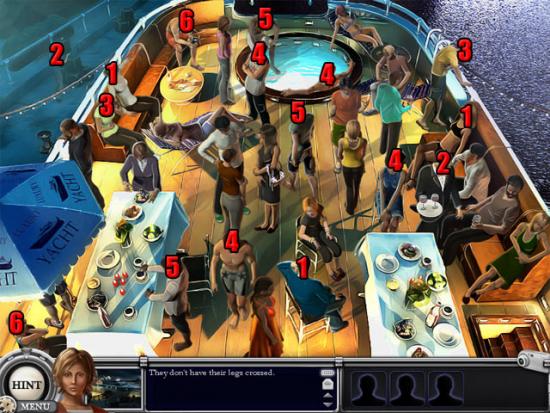
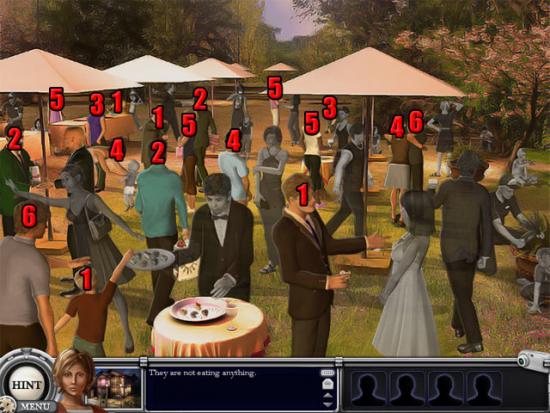
Go through the doorway to the deck of the boat. Select people on the deck to remove them from the area. The first six sets of people to select are shown below:
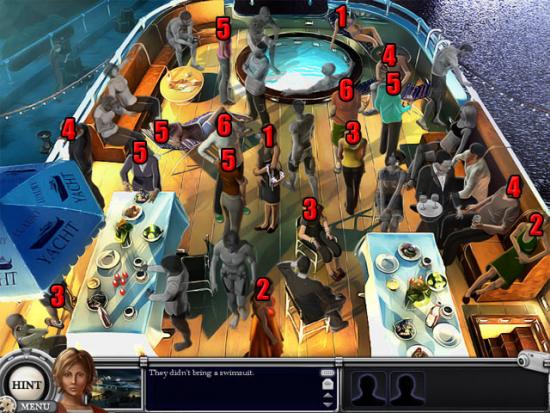
The remaining six sets of people to select are shown below:
Melissa travels to Sara’s room. Examine the sparkling area at the right side of the room to enter a hidden object scene. Find all of the objects on the list:
Select the hair and makeup, tops, pants and shoes for Melissa to wear. Click the Done button when you are ready to continue.
Select the doghouse at the bottom-left corner of the area. The following hidden object and circle scenes are available:
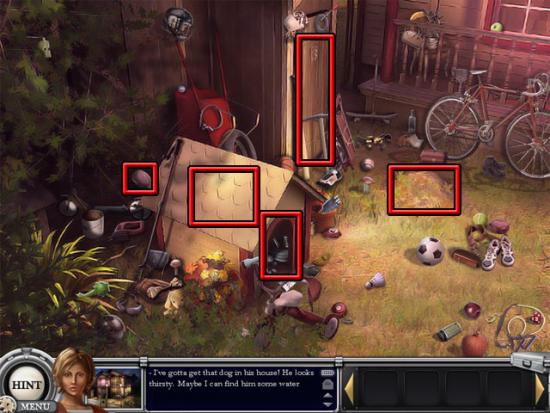
selecting the light, the doghouse roof and the mound to reveal the objects that need to be found. Select the doghouse door to enter a hidden object scene. Find the objects shown below:
Find the objects shown below and add them to the circles:
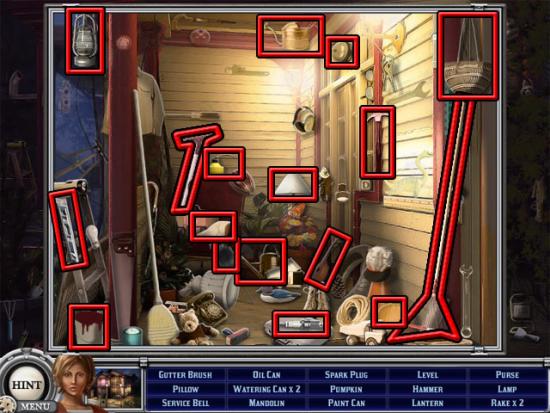
Examine the porch and find all of the objects on the list:
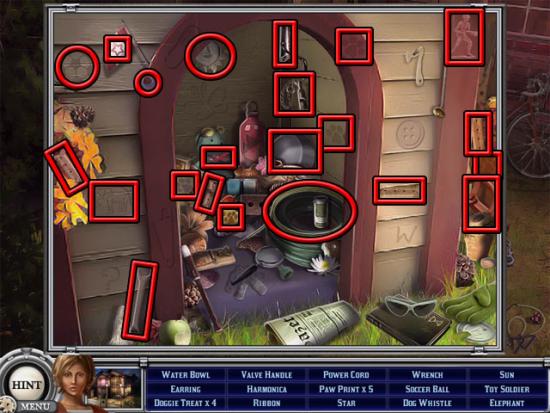
Add the inventory items to the circles as well. Take the light from where the mound used to be. Add all of the inventory items to the circles. Select the leaking pipe to reveal the object circles. Take the pipe on the far left doghouse and add it to the leaking pipe. Move back and select the front gate. As before, select the Pick button when the white circle is in the green section. Move to the right side of the house. Examine the sparkling area at the top of the steps to enter a hidden object scene. Find all of the objects on the list:
Select the hotspots shown below:
Find all of the objects for the hotspot circles:
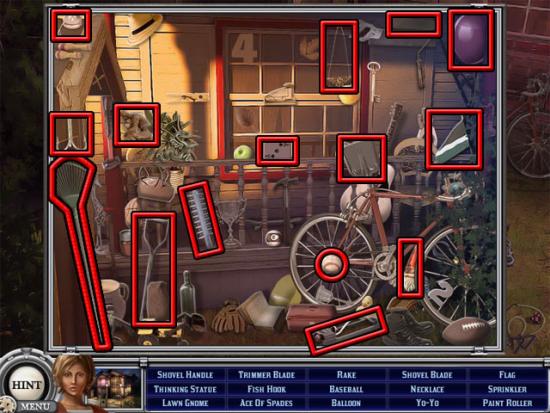
Select the lawnmower and the flowerbed to reveal more item circles. Find the items shown below:
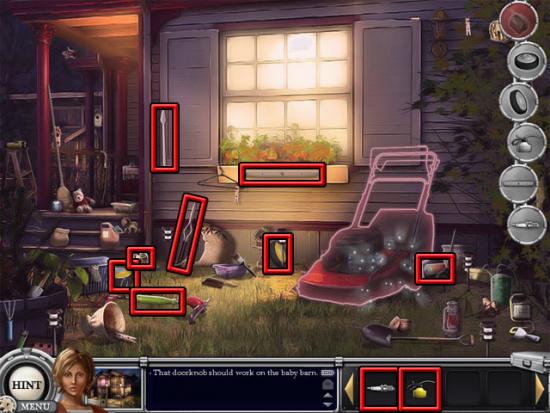
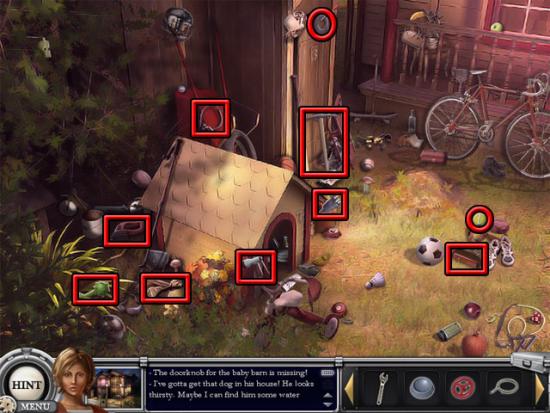
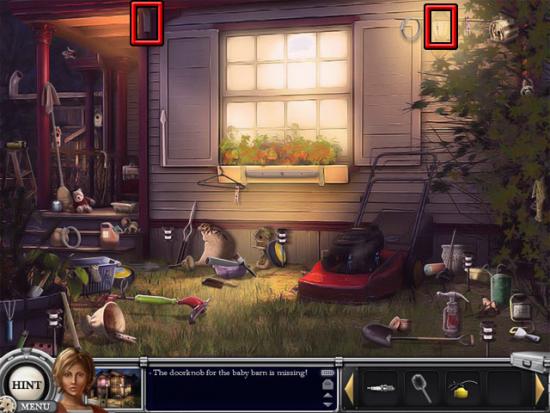
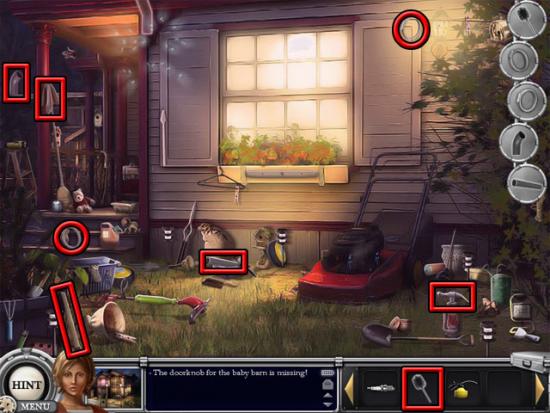
Back away from the side of the house and return to the doghouse. Use the door knob on the baby barn and find all of the objects on the list:
Back away and return to the side of the house. Add the inventory items to the lawnmower circles. Take the mirror and use it on the flowerbed circle. Go through the window to enter the house. Find all of the objects on the list:
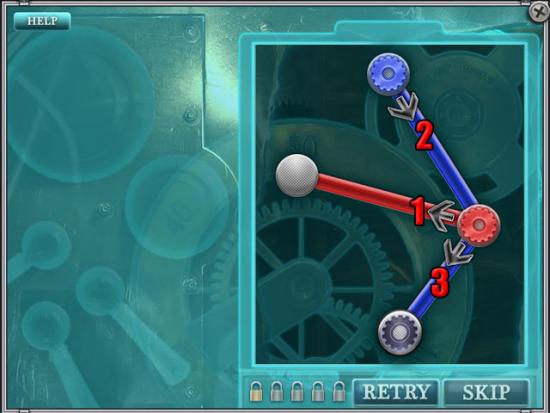
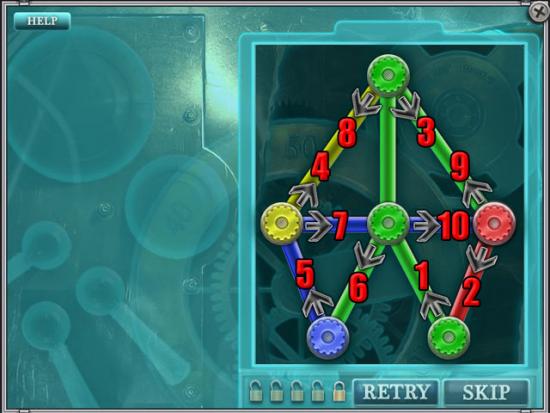
Select the safe and complete the five rounds of the mini-game by moving the blue gear back to the proper place.
Round 1:
Round 2:
Round 3:

Round 4:
Round 5:
Select the photograph in the vault. Select people in the garden to remove them from the area. The first six sets of people to select are shown below:
The remaining six sets of people to select are shown below:
Melissa travels to Sara’s room. Examine the sparkling area at the top-left corner of the room to enter a hidden object scene. Find all of the objects on the list:

Select the hair and makeup, tops, pants and shoes for Melissa to wear. Click the Done button when you are ready to continue.
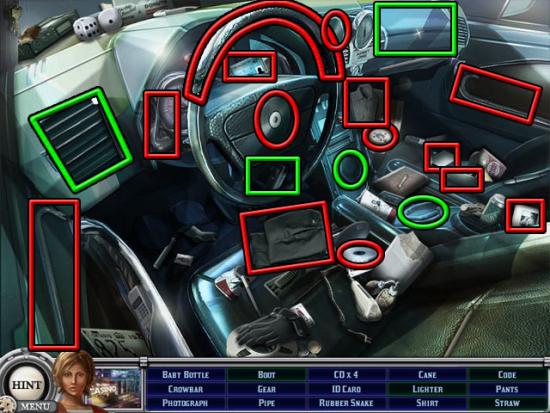
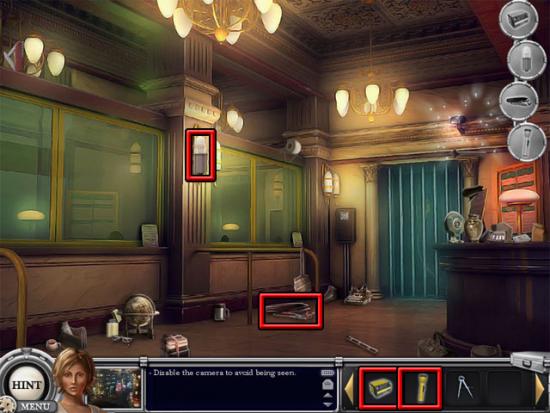
Select the purple car at the bottom-right corner of the screen and complete the five rounds of the lock picking mini-game again by selecting the Pick button when the white circle moves into the green section. Find all of the objects on the list:
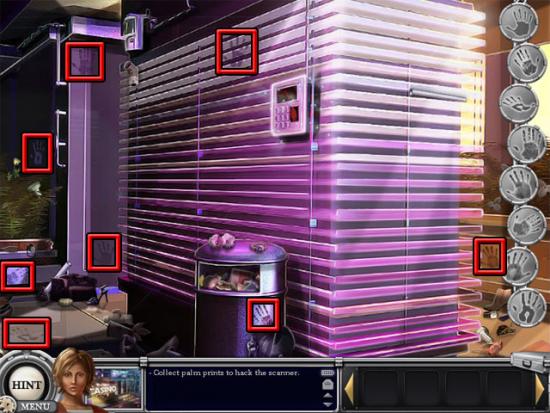
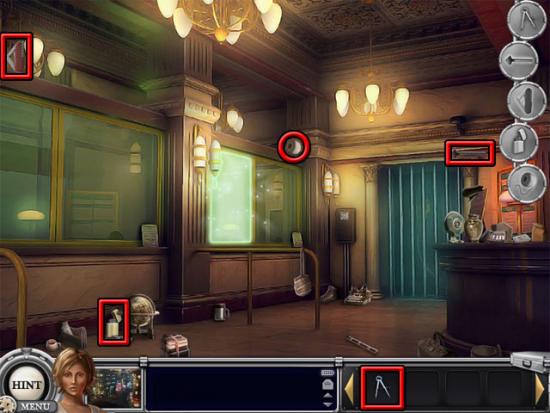
Select the casino entrance. Select the scanner and add the eight hand prints to the circles:
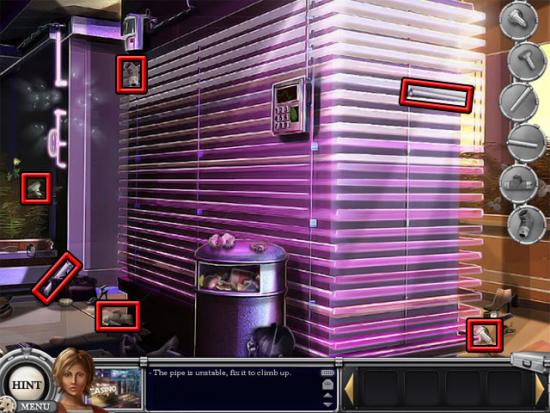
Select the pipe and find the objects:
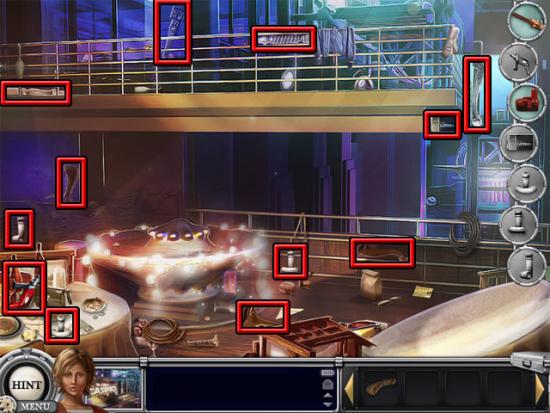
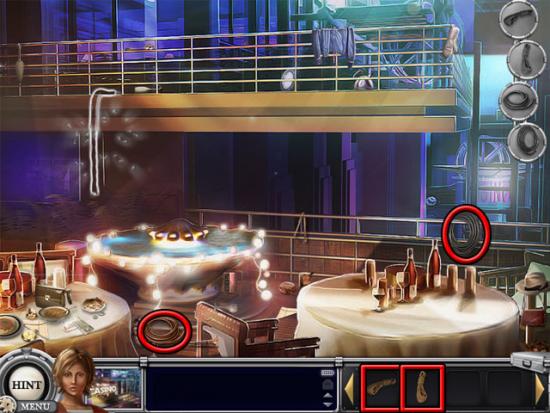
Move back and climb up to the balcony. The available hotspots are shown below:
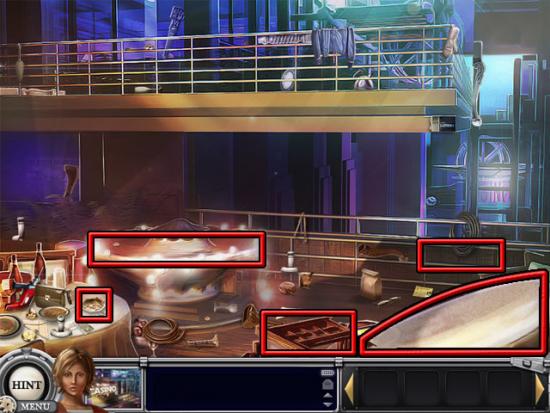
Examine the left table and find all of the objects on the list:
Examine the rope at the right side of the room and find all of the objects on the list:
Add all of the inventory items except the rope to the circles. Find the objects:
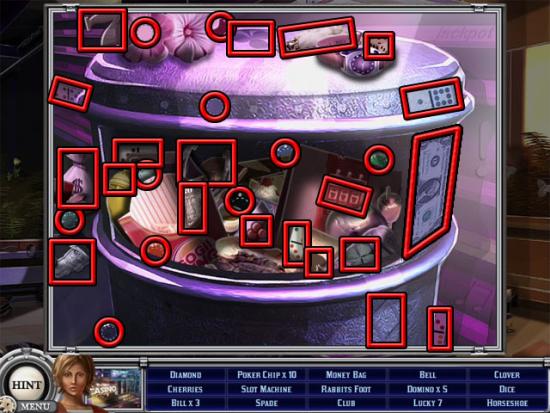
Move back and the janitor will say that he lost all of his poker chips. Examine the bin and find all of the objects on the list:
Move back to give the poker chips to the janitor. Select the sparkling area and add the objects to the circles:
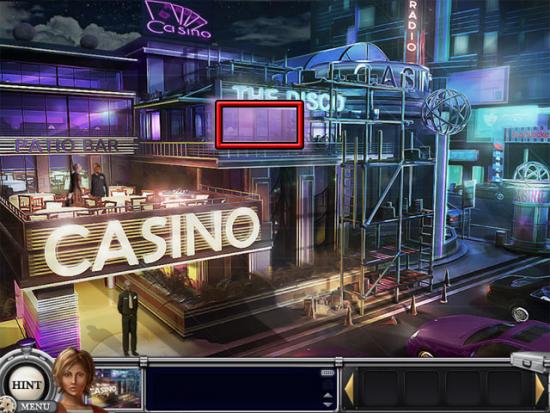
Move back and select the glowing purple area:
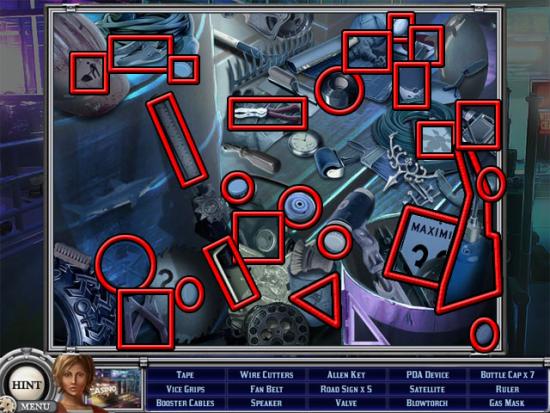
Examine the barrel on the scaffolding and find all of the objects on the list:
Select the left grate and find the objects for the circles:
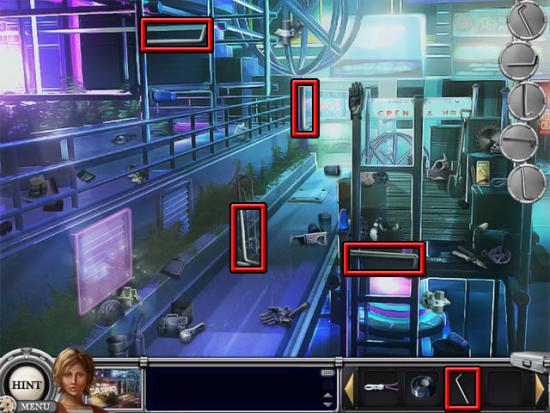
Select the access panel and find the objects for the circles:
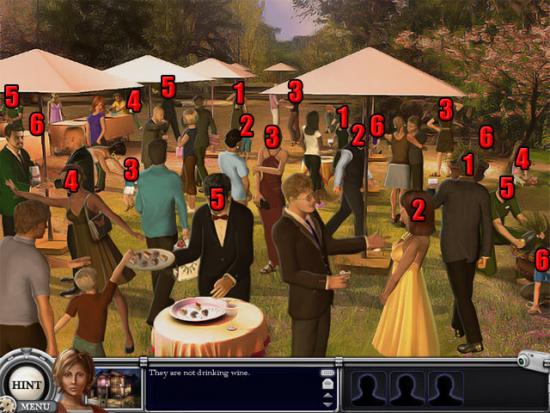
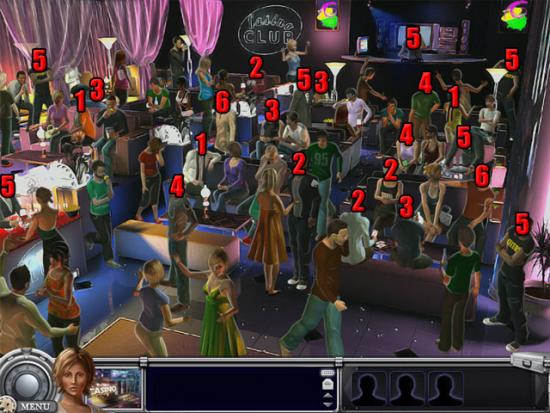
Move back and climb up to the roof of the casino. Select people in the room to remove them from the area. The first six sets of people to select are shown below:
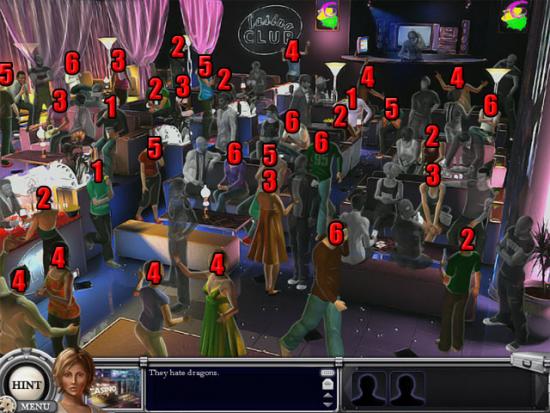
The remaining six sets of people to select are shown below:
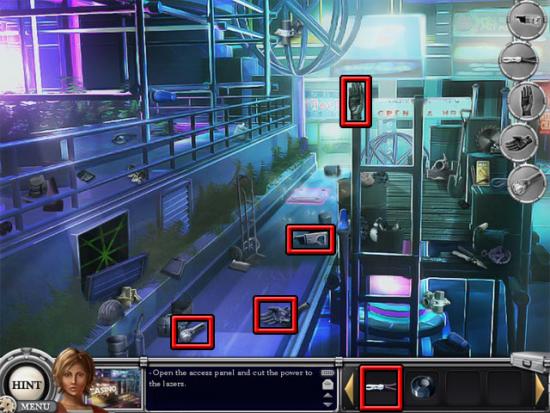
Select the panel and find the items shown below:
Select the scaffolding and find the items shown below:
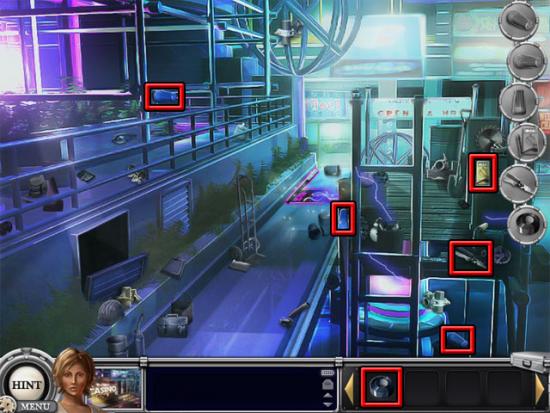
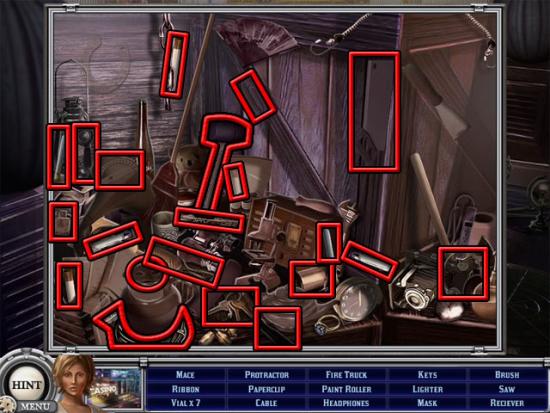
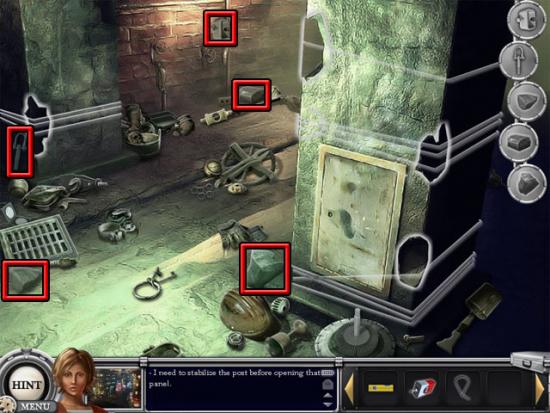
Move back and select the roof at the top-left corner of the screen. Examine the barrels near the top-left corner of the scene and find all of the objects on the list:
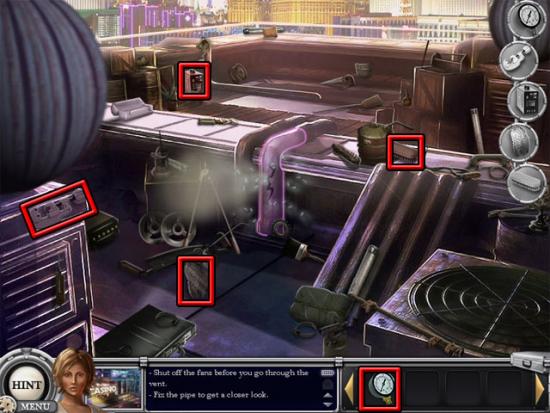
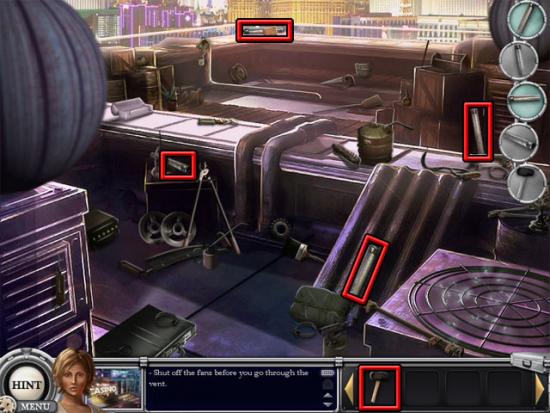
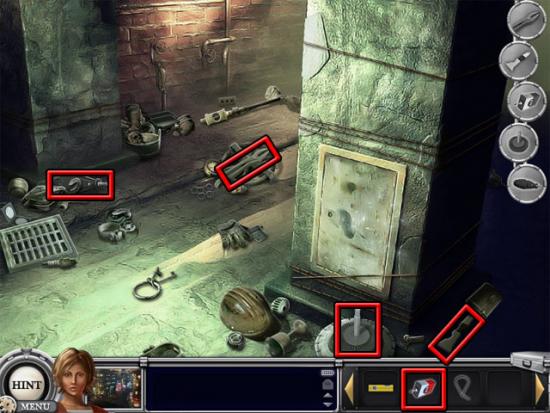
Select the broken pipe in the middle of the area. Find the objects shown below:
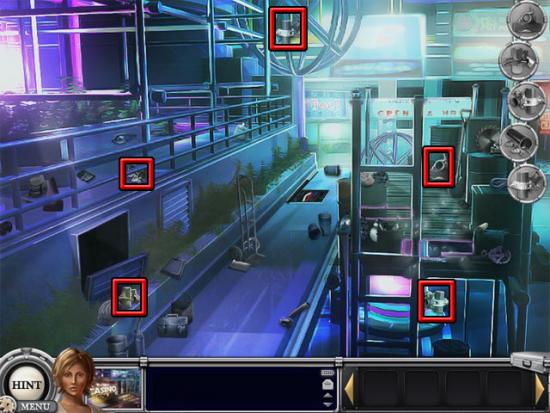
Now that the pipe is fixed, examine the table and find all of the objects on the list:
Select the fan and add the objects shown below to the circles:
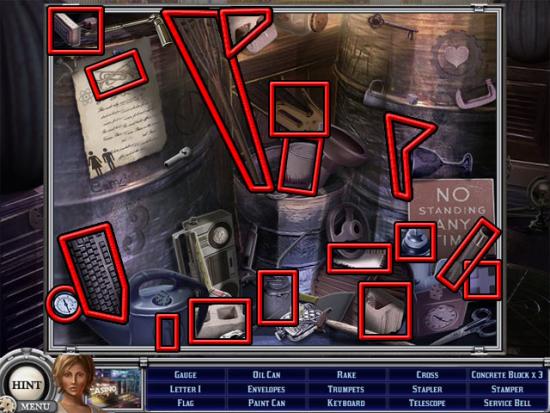
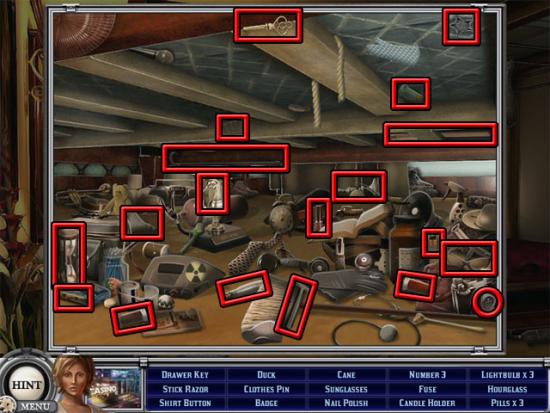
Go through the vent to enter the bedroom. Examine the objects below the bed to enter a hidden object scene. Find all of the objects on the list:
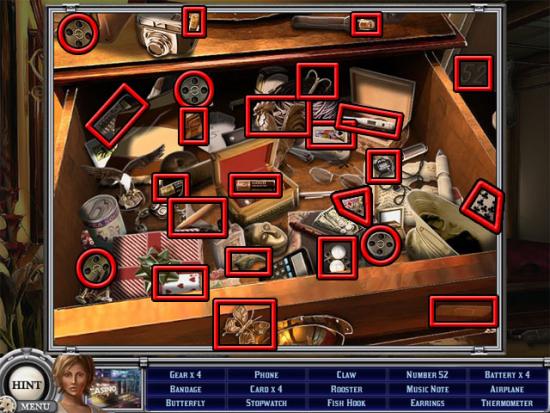
Use the key from the inventory on the small drawer. Find all of the objects on the list:
Select the painting above the bed and add the four gears to the circles. Select the painting. The aim in this mini-game is to rotate a plate so that it contains four balls of the same color. Click a ball when it is facing a tube to send it toward a different plate. Select the blueprint from the safe. Melissa travels to Sara’s room. Examine the sparkling area near the right side of the room to enter a hidden object scene. Find all of the objects on the list:
Select the hair and makeup, tops, pants and shoes for Melissa to wear. Click the Done button when you are ready to continue.
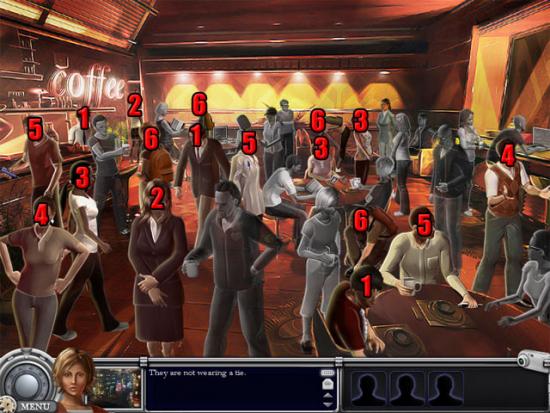
Enter the coffee shop and select people in the room to remove them from the area. The first six sets of people to select are shown below:
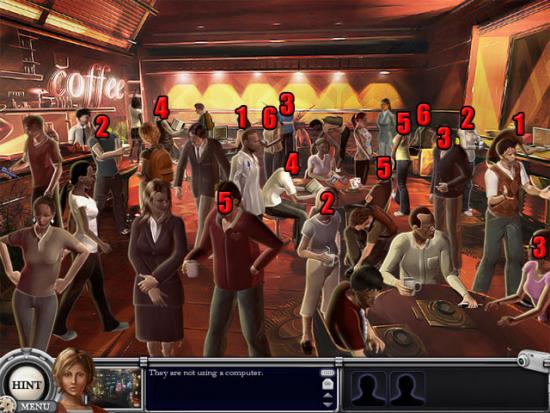
The remaining six sets of people to select are shown below:
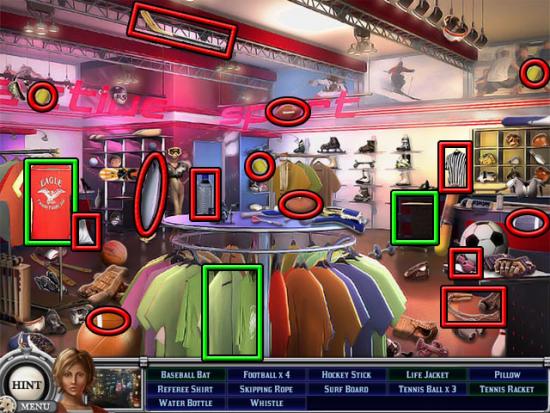
Select the sports shop door and unlock it by selecting the Pick button when the white circle is in the green section. Find the objects on the list:
Move back and select the glowing area at the left side of the sports shop. Examine the green bin and find all of the objects on the list:
Examine the box at the bottom-left corner of the room and find all of the objects on the list:
Select the vent and the sprinkler on the ceiling and the vent on the right wall. Add the items from the inventory to the circles. Find the items shown below:
Select the wall and add the items to the circles:
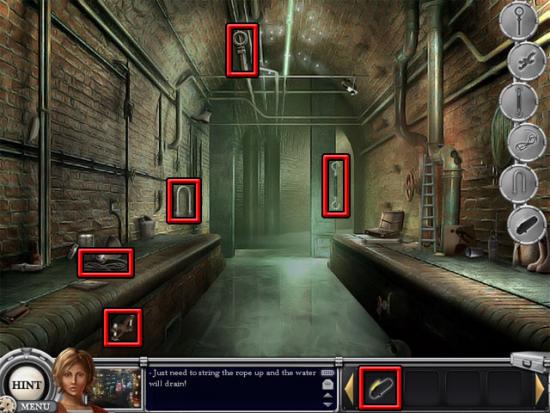
Move back and select the sewer entrance. Select the right side of the water and find all of the items for the circles:
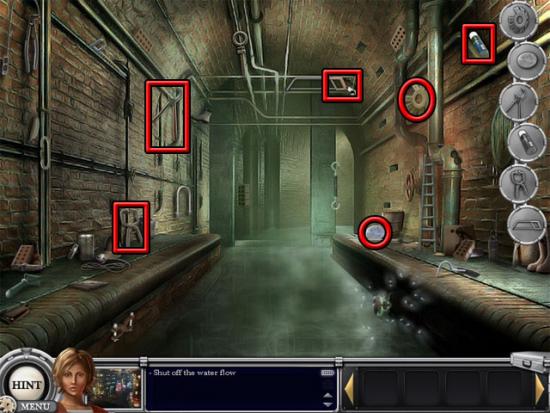
Examine the ladder at the right side of the room and find all of the objects:
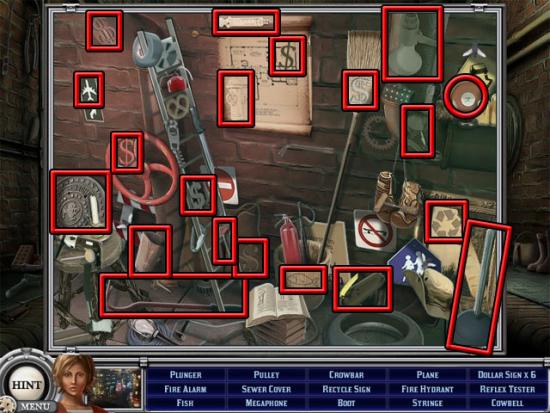
Select the grate and find the objects for the circles:
Select the bricks and find the objects for the circles:
Select the pipe on the ceiling and find the objects for the circles:
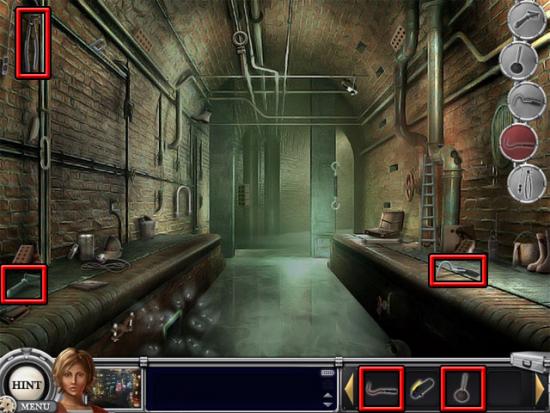
Move forward and select the panel. Examine the wall and find all of the objects on the list:
Select the panel and find the objects for the circles:
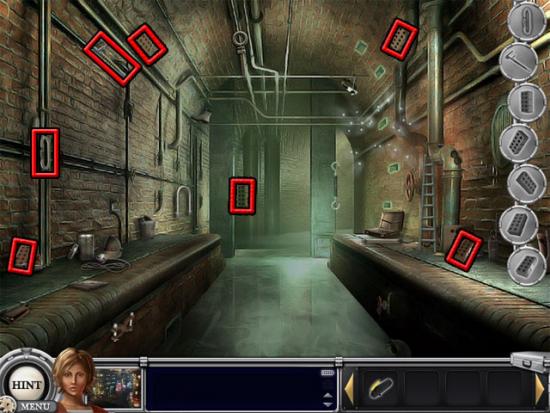
Select the panel again and find the objects for the circles:
Select the open panel and find the objects for the circles:
Move back and return to the left side of the sports shop. Examine the area below the desk and find all of the objects on the list:
Select the wall and find all of the objects for the circles:
Select the cupboard and find objects for the circles:
Examine the desk and find all of the objects on the list:
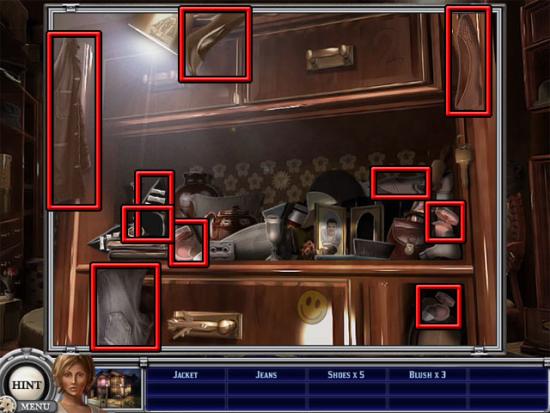
Examine the cabinet at the bottom-right corner of the room and find all of the objects on the list:
Examine the puddle and use the inventory items on four of the circles. Find the remaining two items in the room:

Select the panel at the left side of the door and find the items for the circles:
Select the panel again and find the items for the circles:

Go through the doorway. Select the line on the floor and find the items for the circles:
Examine the desk at the right side of the room and find all of the objects on the list:
Select the camera and add the objects to the circles:
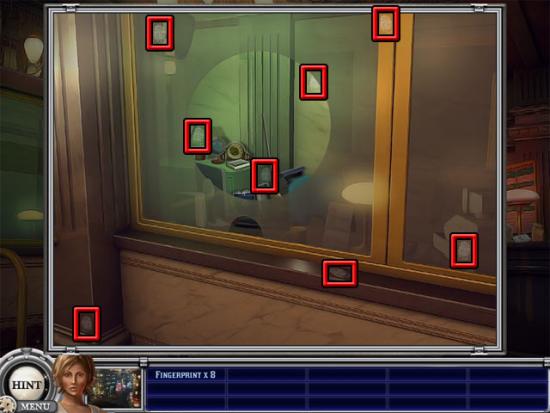
Select the window and add the objects to the circles:
Examine the hole in the window and find the eight fingerprints:
Select the bars and add the fingerprint from the inventory to the circle. Go through the doorway to enter the bank vault. Examine the green cabinet and find all of the objects on the list:
Select the safe door and complete the five rounds of the mini-game.
Round 1:
Round 2:
Round 3:
Round 4:
Round 5:
Take the diamond from the safe. Select the safety deposit boxes and find the objects for the circles: