- Wondering how to get Monopoly GO! free rolls? Well, you’ve come to the right place. In this guide, we provide you with a bunch of tips and tricks to get some free rolls for the hit new mobile game. We’ll …
Best Roblox Horror Games to Play Right Now – Updated Weekly
By Adele Wilson
Our Best Roblox Horror Games guide features the scariest and most creative experiences to play right now on the platform!The BEST Roblox Games of The Week – Games You Need To Play!
By Sho Roberts
Our feature shares our pick for the Best Roblox Games of the week! With our feature, we guarantee you'll find something new to play!All Grades in Type Soul – Each Race Explained
By Adele Wilson
Our All Grades in Type Soul guide lists every grade in the game for all races, including how to increase your grade quickly!
Unsolved Mystery Club: Ancient Astronauts Walkthrough
Welcome to the Unsolved Mystery Club: Ancient Astronauts Collector’s Edition walkthrough on Gamezebo Unsolved Mystery Club: Ancient Astronauts Collector’s Edition is a Hidden Object Game played on the PC created by Freeze Tag Games. This walkthrough includes tips and tricks, helpful hints and a strategy guide on how to complete Unsolved Mystery Club: Ancient Astronauts Collector’s Edition.
Unsolved Mystery Club: Ancient Astronauts – Game Introduction
Welcome to the Unsolved Mystery Club: Ancient Astronauts Collector’s Edition walkthrough on Gamezebo Unsolved Mystery Club: Ancient Astronauts Collector’s Edition is a Hidden Object Game played on the PC created by Freeze Tag Games. This walkthrough includes tips and tricks, helpful hints and a strategy guide on how to complete Unsolved Mystery Club: Ancient Astronauts Collector’s Edition.
General Tips
This hidden object game requires visiting several locations and using inventory items to advance play.
- Play is linear and task oriented.
- Not all items collected are added to the active inventory. Some items are added to the interactive journal with no indication that is where they are stored.
- Check the interactive journal before going to the next chapter to make sure you have collected all the necessary items. Uncollected items are indicated by a lock.
- Always move the cursor around a scene. Watch the cursor to see if it changes into a hand or an eye.
Main Menu:
- Play – Begin or resume a game. The first time you play you must select a profile name and a difficulty level:
- Casual – Hint and Skip buttons recharge faster.
- Expert – Hint and Skip buttons take longer to recharge.
- Options – Change music and sound effects volume. You may select different screen sizes and a custom cursor.
- Exit – Quit the game.
- Extras – Music, concept art and characters sketches.
- Bonus Level – Available after completing the game.
- Profiles – Follow the “Click to Change” link to create, delete or switch player profiles.
Screen Navigation:
- Menu – Change your options, resume the game or return to the main menu.
- Hint/Skip Bar – Clicking will show a random item from an itemized list. Hints are not limited and the bar refills quickly. The bar turns into a Skip bar for puzzles.
- Interactive journal – Clicking an object can add clues or information.
- Inventory/Item List – A scrollable list of icons showing available items or a list of hidden items to be collected.
Symbol Meanings:
- Eye – Zoom in on interactive area.
- Hand – Interact with an object.
- Sparkles – Hidden object areas.
Walkthrough
A short clip explains the background and introduces the story line for play.
If you are not familiar with hidden object games, click “Yes” when asked if you would like a tutorial. This will show you how to interact with objects and characters.
The objects for hidden object scenes are randomly generated. That is why only inventory items are shown. They are highlighted in white with a blue border. Objects in blue indicate interaction is needed to get the item.
With the exception of a hidden object area, most inventory items are not collected from a scene until they are needed.
Assumptions:
- You know to click through the conversations with characters.
- After you have gone back and forth between locations more than once, you don’t need to be told how many times to go up or down.
- Just as in the movies, you will always enter a darkened door or broken window.
Chapter 1: Sarah – Mali, Africa

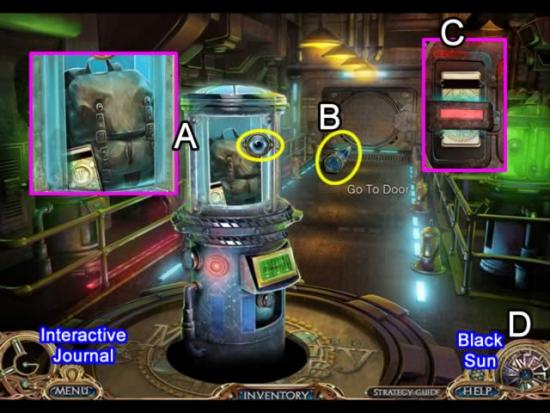
- Place your cursor of the storage area. It turns into an eyeball. Click to zoom in on the area.
- Pick up the KEYCARD and BACKPACK (A).
- Click the globe arrow showing the way to the door (B).
- Zoom in on the access pad.
- Place the KEYCARD in the slot (C) to gain entrance to the vault.
- Receive the Black Sun to store the 12 gems collected along the way (D).
- Entries to the Interactive Journal are added later.
- Read Sarah’s profile. Click “Investigate” to begin play.
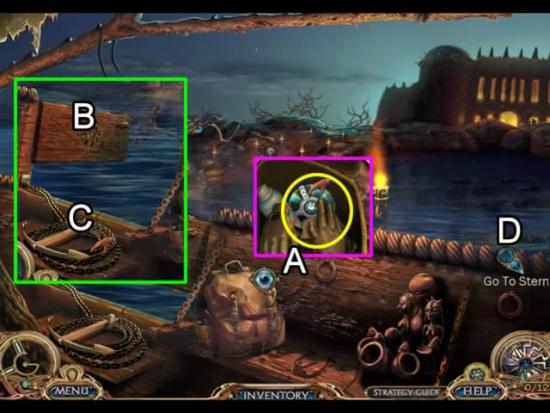
- Inspect the contents of the backpack (A). Pick up the disk to start the interactive journal.
- Click the side of the boat (B). Throw the anchor overboard (C).
- Go to the Stern.
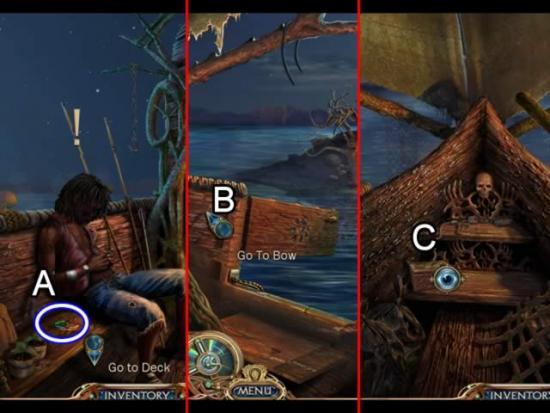
- Take the CENTER LOCK next to the ferryman (A).
- Go back to the center of the boat and then forward to the bow (B).
- Look at the box (C) to open a puzzle.
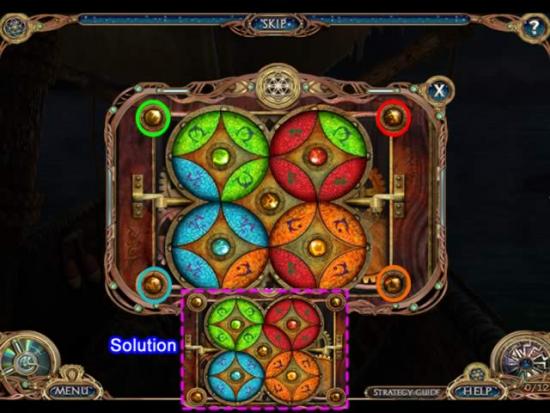
- Place the CENTER LOCK in the empty slot. The goal is to form complete circles of the same color and symbol. The outside circles show the symbol for that area.
- The best way to solve this puzzle is to first rotate the red and blue colors so the majority of their colors are away from the center circle. Click the colored spheres in the center of each circle to rotate them.
- Rotate the colors into the center circle in the correct color sequence.
- The solution is shown above.
- Take the TRANSLATOR, FOLDED PAPER and LIGHTER from the compartment.
- Return to the ferryman.
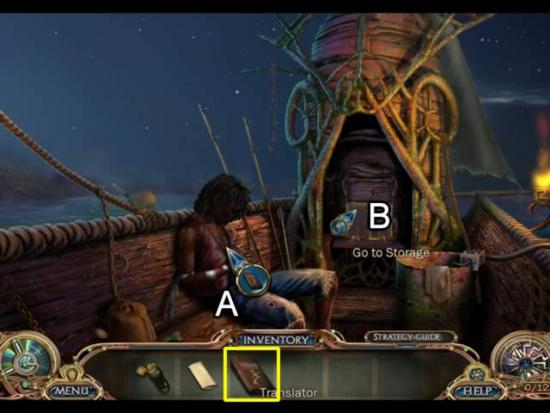
- Drag the TRANSLATOR from inventory to the ferryman (A). Sarah’s note is stored in the journal.
- Enter the storage area (B).
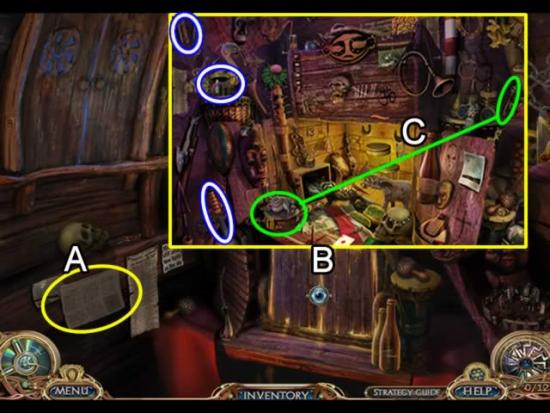
- Read the article on the wall (A) for more story information.
- Open the double doors of the cabinet (B) to play a hidden object scene.
- Click and drag the key to the frog (C) to get the Jumping Frog. Get the HANDLE, KNIFE and GREEN FIREFLIES for inventory.
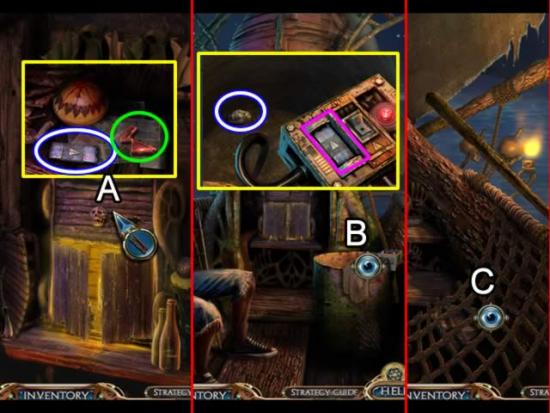
- Place the HANDLE in the drawer slot (A). Inspect the contents of the drawer. Take the BATTERY and the Garnet Gem. The gem is automatically inserted into the black sun.
- Exit the storage room.
- Zoom in on the barrel just outside of the storage room door (B).
- Place the BATTERY in the space on the control panel (pink). Click the switch next to it to drain the liquid. Pick up the ORE.
- Go to the bow.
- Use the KNIFE to cut the netting (C). Take the BUCKET.
- Return to the stern and reenter the storage room.
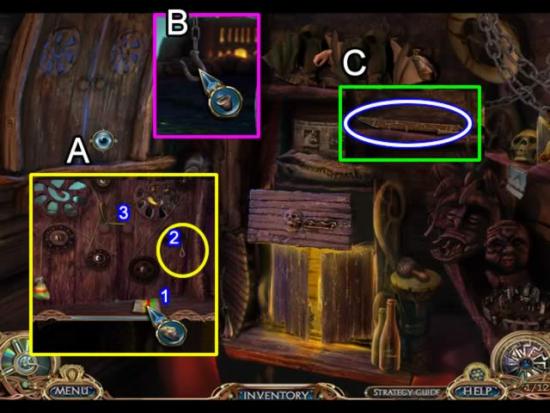
- Access the shutters (A).
- Place the ORE on the striped sack (A). Hang it on the loop (2). Click the knob (3) to open the shutters.
- Place the BUCKET on the hook (B).
- Shoo away the bats (C) and get the SHAFT.
- Exit the storage room.
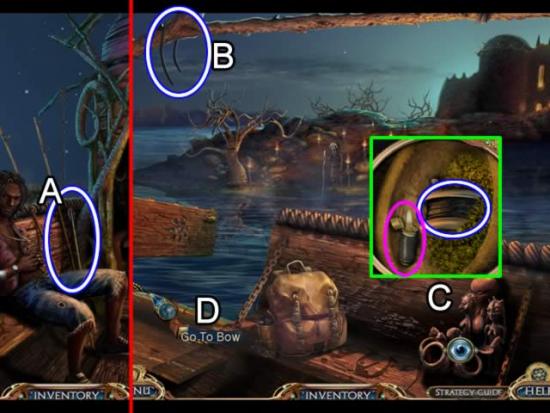
- Pick up the GRAPPLING HOOK in the corner (A).
- Go forward to the middle of the boat.
- Take the RUBBER BAND hanging from the limb (B).
- Inspect the statue (C). Use the LIGHTER to illuminate the dark recess. Take the REEL.
- Go to the bow (D).
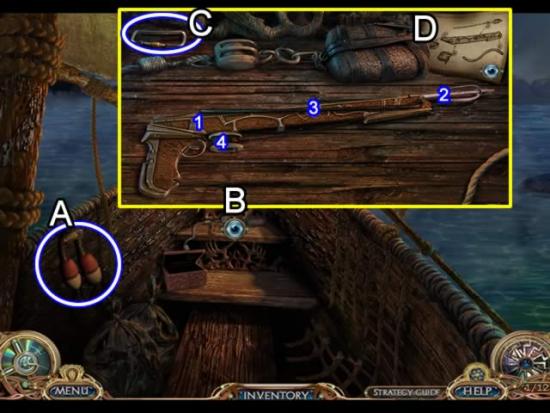
- Pick up the BUOY on the left (A).
- Zoom in the rear shelf (B).
- Take the CARABINEER (C).
- Place the GRAPPLING HOOK, SHAFT, REEL and RUBBER BAND on the work surface. Follow the instructions (D) to assemble the GRAPPLING GUN:
- Attach the shaft to the handle (1).
- Place the grappling hook on top of the shaft (2).
- Secure the grappling hook to the shaft with the rubber band (D).
- Put the reel in the slot by the trigger (4).
- Return to the middle of the boat.
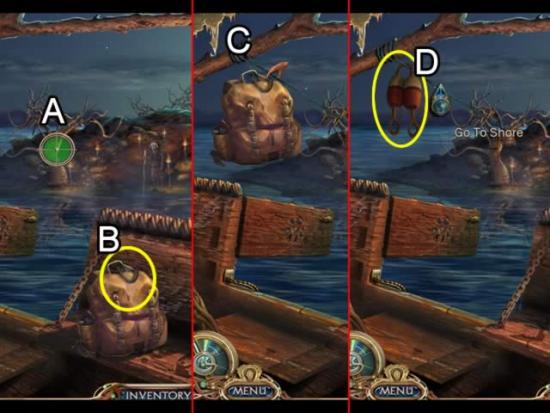
- Sight the GRAPPLING GUN on the tree (A). It is in the correct position when the cross hairs turn green.
- Attach the CARABINEER to the top of the pack (B).
- Place the pack on the rope (C) to send it to shore.
- Put the BUOY on the rope (D) and click the direction arrow to go to shore.
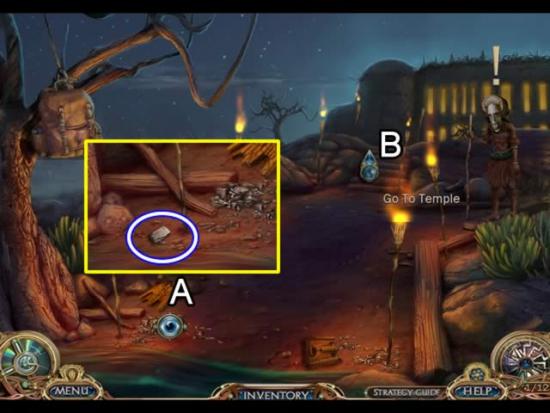
- Inspect the rocks on the shore (A). Pick up the ore (COAL).
- Go to the temple (B).
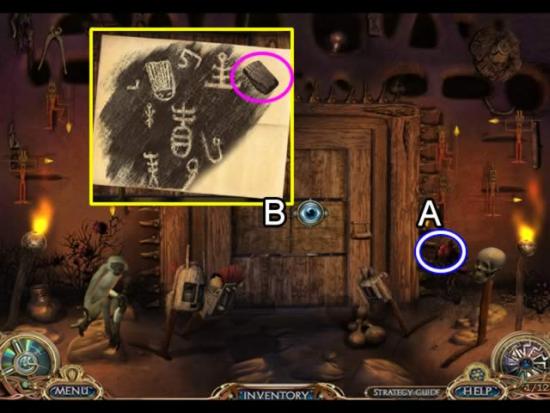
- Pick up the BERRIES on the right (A).
- Check out the door (B). Place the FOLDED PAPER over the characters on the door. Rub the COAL over the paper to create the DOGON RUBBING.
- Return to the shore. Take the trail to the right to the fire pit.
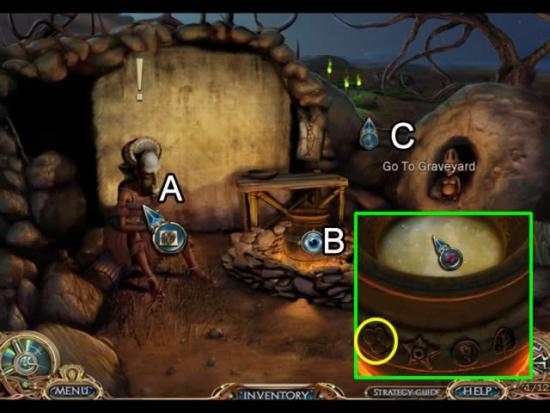
- Use the DOGON RUBBING as a translation document (A).
- Place the BERRIES in the pot as instructed (B). Note there are three remaining ingredients.
- Go forward to the graveyard (C).
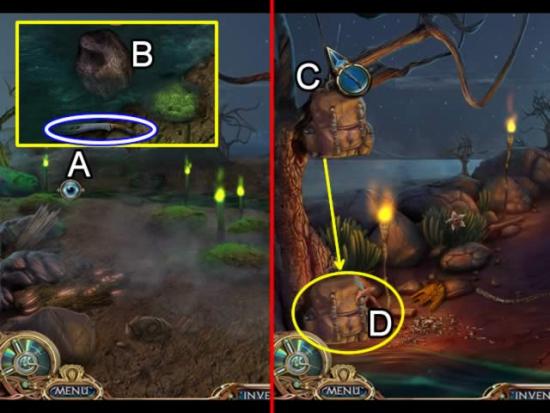
- Approach the river in the back (A).
- Pick up a MACHETE. Knock over the rock (B) to uncover some interesting looking algae.
- Return to the fire pit.
- Go back to the shore.
- Use the MACHETE to cut down the pack (C).
- Rifle through the pack and get GLOVES, BRUSH and PETRI DISH.
- Retrace your steps to the graveyard.
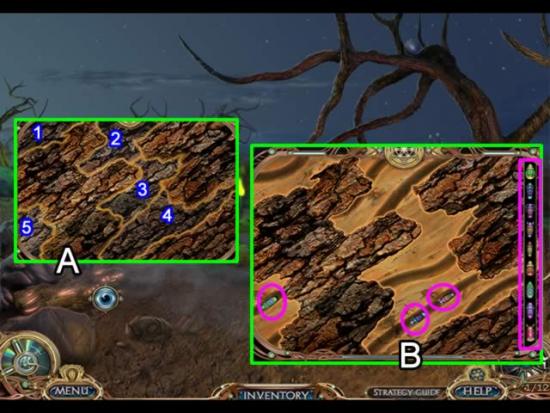
- Zoom in on the log (A).
- Use the GLOVES to remove the five pieces of bark and open a puzzle.
- The goal is to catch grubs matching the patterns on the right as they go through the grooves. Receive a GRUB as a reward.
- Go back to the river.
- Place the PETRI DISH on the ALGAE to collect a sample.
- Return to the shore.
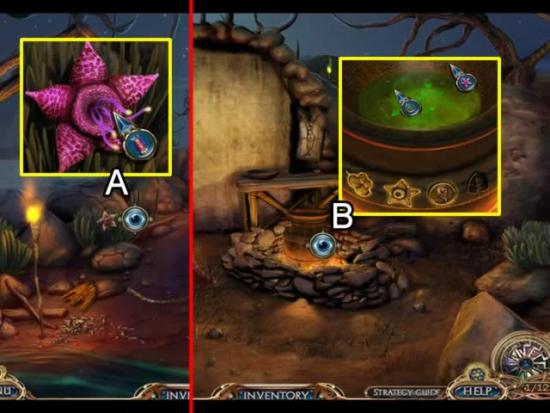
- Click the flower (A). Feed it the GRUB. Pick the satisfied STAR FLOWER.
- Return to the fire pit.
- Access the cauldron (B).
- Add the STAR FLOWER and ALGAE to the mixture. Note there is one missing ingredient.
- Exit the cauldron area.
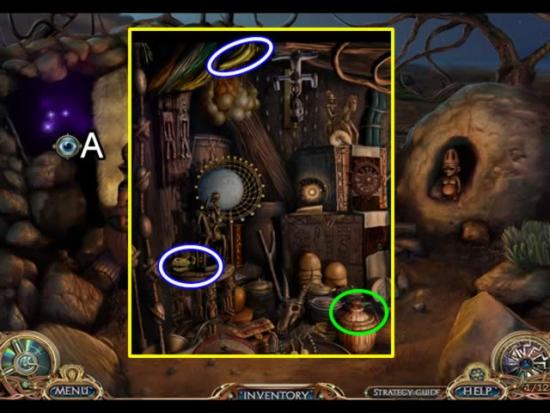
- Play the hidden object scene on the left (A).
- Take the lid off of the jar (green) to find the Ashes. Get the BANANA and GOLD SNAKE HEAD.
- Return to the graveyard.
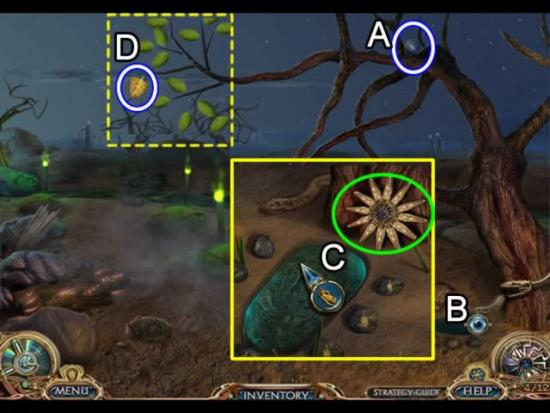
- Get STAR B from the branches of the tree (A).
- Zoom in on the base of the tree (B).
- Take the Black Sun brooch (green). The information about it is added to the journal. Place the GOLD SNAKE HEAD in the pool of water (C).
- Pluck the GOLD LEAF from the now leafy tree.
- Return to the fire pit.
- Add the GOLD LEAF to the cauldron to complete the potion. Receive an INK VIAL.
- Zoom in on the canvas area in the back to begin a mini-game.
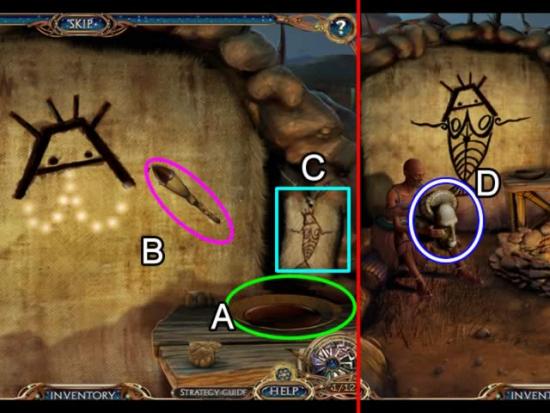
- Empty the contents of the INK VIAL into the bowl (A). Take the BRUSH and dip it in the ink (B). Dots show up on the canvas.
- The goal of the game is to recreate the image on the right (C). Use the inked brush to connect the dots as they appear on the canvas. Dip the brush into the ink as it dries up.
- Receive the DOGON MASK (D) when the game is complete.
- Go back to the shore and then up to the temple.
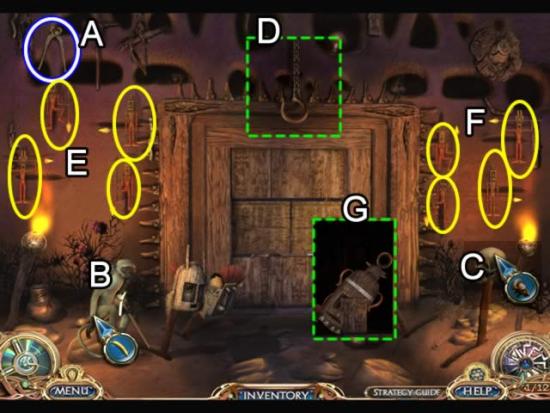
- Take the PLIERS from the wall (A).
- Click the monkey (B). It scurries up the wall and retrieves a pick. Bribe the monkey with the BANANA to get the PICK.
- Place the DOGON MASK on the skull (C). A hook drops down (D) to begin a mini-game.
- Click each figure (yellow) on the left (E) and right (F) sides of the door. Each figure will slide open a panel in the door. It does not matter in which order they are clicked. Once all the panels are open, take the mask (G) and place it on the hook to open the temple door.
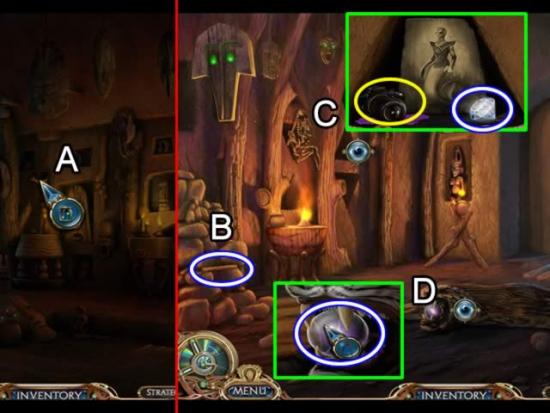
- Place the GREEN FIREFLIES on the back wall (A) to light the temple.
- Go right to the idol room.
- Pick up the LEVER (B).
- Look at the triangle shelf (C). Take the camera for the journal and the DIAMOND.
- Zoom in on the tiger’s mouth (D). Use the PLIERS to extract the top right tooth. Take STAR A.
- Return to the entrance hall.
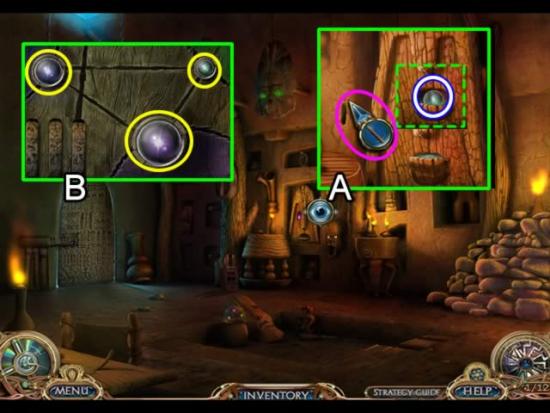
- Access the head on the back wall (A). Place the LEVER in the slot (pink). Click the lever to open the mouth. Take STAR C.
- Inspect the door lock for the observatory (B). Place STAR A, STAR B and STAR C in the round impressions according to size.
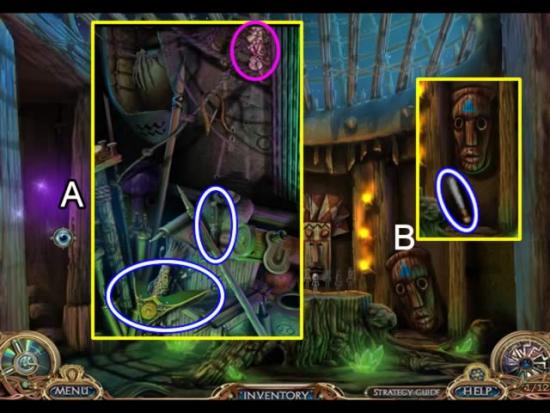
- Play the hidden object scene on the left (A). Click the curtains on the back wall to reveal the Flowers (pink). Collect the CHEST PIECE and SWITCHBLADE.
- Pick up the mask on the right (B) and hang it on the wall. Take the BLUDGEON that was hidden behind it.
- Return to the entrance hall.
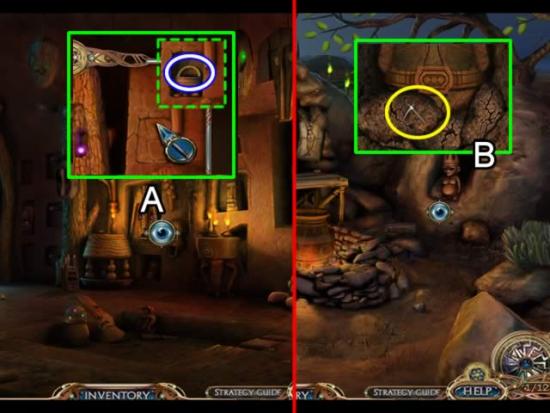
- Access the head (A). Use the BLUDGEON to open the compartment. Take the RING.
- Exit the temple and return to the fire pit.
- Zoom in on the idol in the rock on the right (B). Use the PICK to break the rocks and free the IDOL.
- Return to the temple. Go to the idol room.
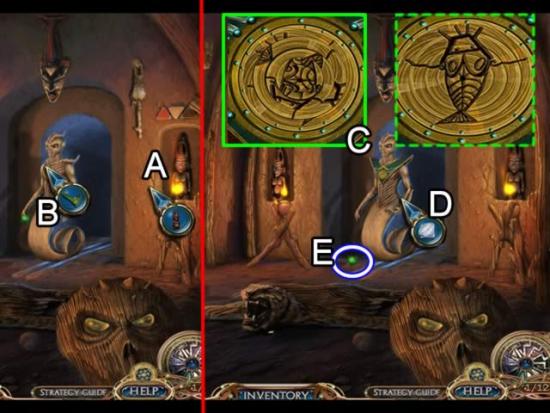
- Place the IDOL in the niche on the right (A). The idol rolls out (B).
- Place the CHEST PIECE on the idol.
- Access the chest piece to play a puzzle (C). Place the RING in the empty slot. Rotate each ring so the lines form the same pattern painted on the canvas (dashed green).
- Place the DIAMOND in the hand (D). Pick up the UNFINISHED EMERALD from the ground (E).
- Return to the observatory.
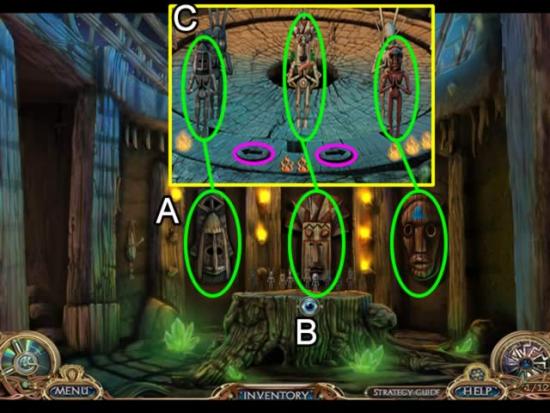
- Note the pattern and position of the masks on the wall (A).
- Access the board game on the log (B). Place the UNFINISHED EMERALD in the middle of the circle to begin the mini-game (C).
- Use the arrows (pink) to rotate the figures on the board until they are in the same position as the masks. Click the figure to move it into the slot.
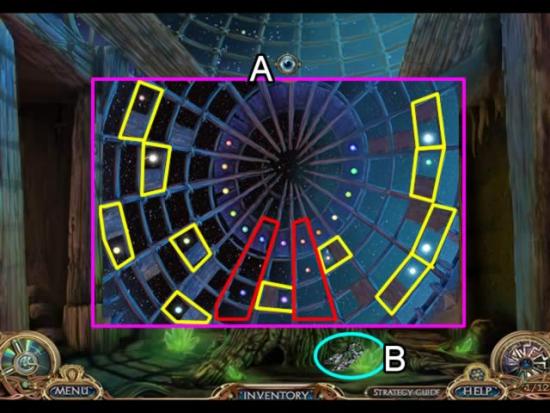
- Zoom in on the ceiling to open a mini-game (A).
- Slide the doors to find a flashing star in each section. If a section has more than one door, make sure only the flashing star is showing. Note that there are two sections (red) where nothing needs to be done. The solution is shown above.
- Pick up Sarah’s scarf for journal information (B).
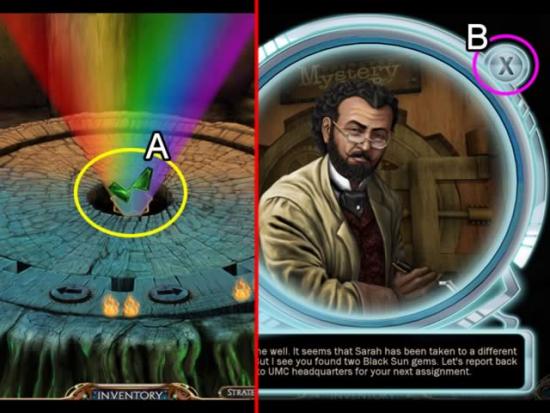
- Access the center of the stump again. Pick up the Emerald Gem for the Black Sun (A).
- Click the “X” on the dialogue box to return to headquarters (B).
- Click Ben’s picture. Click the “Investigate” tab to continue.
Chapter 2: Ben – Giza, Egypt
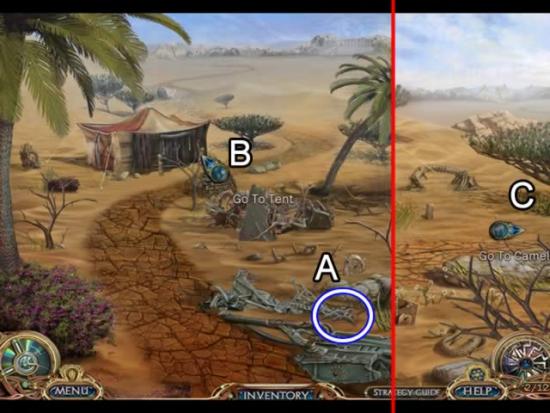
- Pick up the GLYPH (A).
- Go toward the tent (B).
- Go right to the camel (C).
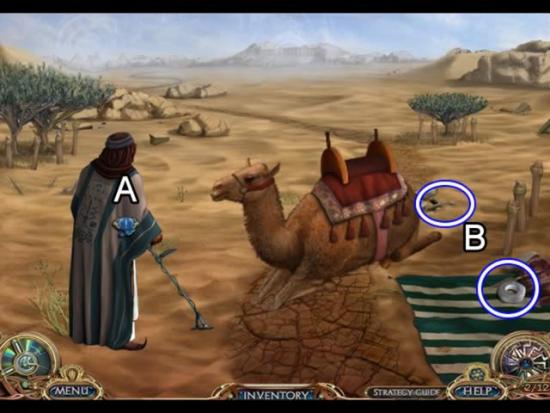
- Speak to the man to get the first goal for this chapter (A).
- Pick up the ELECTRICAL TAPE and GLYPH (B).
- Return to the tent and enter it.
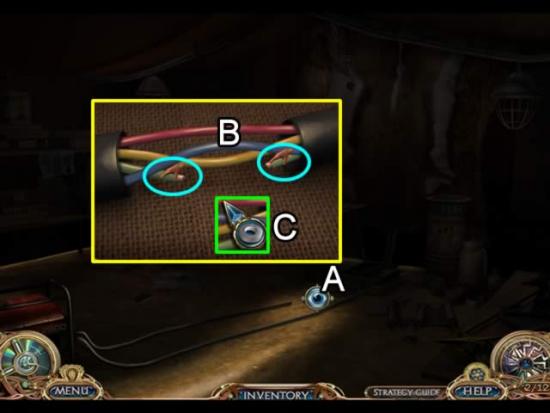
- Zoom in on the frayed wires (A).
- Click one end of a wire (B) and then its same colored end to connect them. When all are connected, wrap them with the ELECTRICAL TAPE (C).
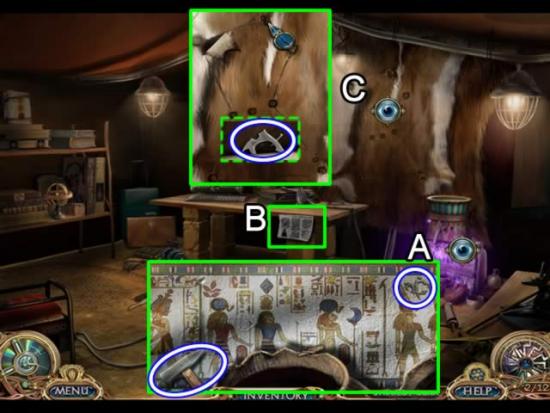
- Play the hidden object scene (A). Collect the HAMMER and GLYPH.
- Read the article on the side of the desk (B).
- Zoom in on the hide on the wall (C). Place the SWITCH BLADE on one of the holes. The hide falls away revealing a GLYPH (dashed green).
- Exit the tent. Go down to the desert.
- Examine the pharaoh’s head.
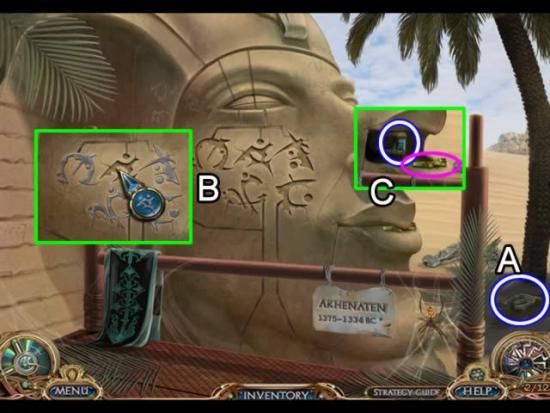
- Pick up the last GLYPH at the base of the palm tree (A).
- Match each glyph from inventory with its corresponding shape on the pharaoh’s cheek (B). The mouth opens (C) when each is correctly placed.
- Take the Tiger’s Eye gem (pink) for the Black Sun emblem and the DIGITAL CODE.
- Return to the tent.
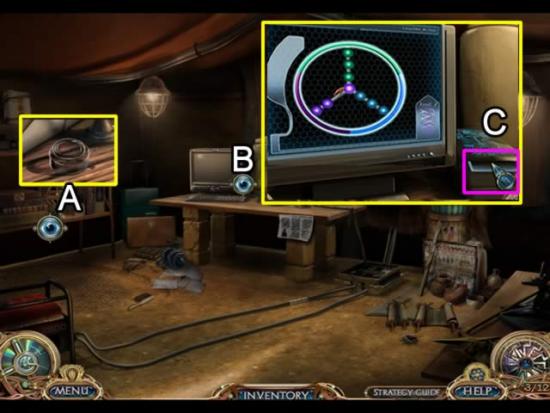
- Take the JAR from the shelf on the left (A).
- Access the computer (B). Insert the DIGITAL CODE in the reader (C) to begin a mini-game.
- The goal is to place the blue, green and purple balls in the slot matching that color on the outside of the ring. Click any two balls to swap them. Repeat this game three times with an increasing number of balls. Receive a BINARY STRIP.
- Exit the tent. Go right to the camel.
- Give the BINARY STRIP to the man. Receive a METAL DETECTOR in exchange.
- Return to the outside of the tent.
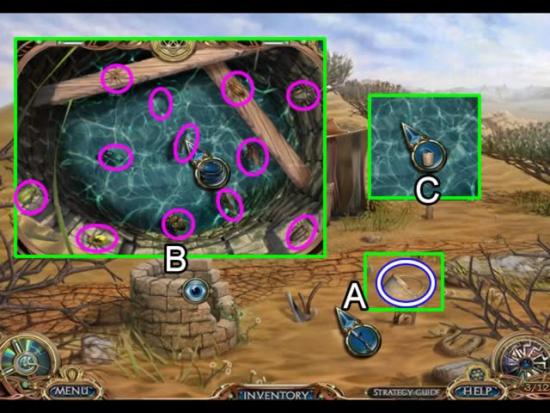
- Use the METAL DETECTOR to find the BUCKET (A).
- Take a close look at the well (B). Take the JAR from inventory. Click it on all 12 bugs (pink).
- Dip the BUCKET into the clean water (C) to fill it with water.
- Go to the camel.
- Give the BUCKET OF WATER to the thirsty camel.
- Go forward to the temple grounds.
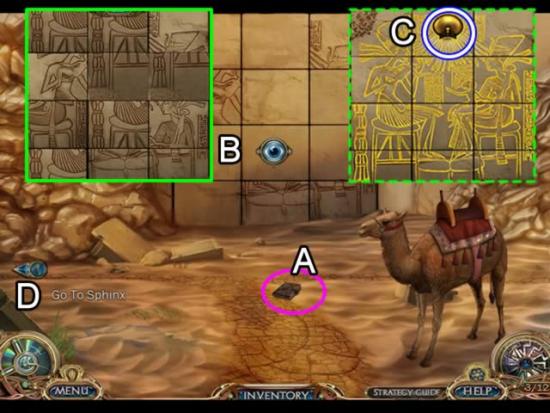
- Pick up Ben’s travel book (A) for the interactive journal.
- Zoom in on the wall to open a mini-game (B).
- Click each stone to rotate it until the correct shape appears. A pattern quickly emerges. Continue rotating the stones until the complete picture appears (C). Take ATEN’S DISC.
- Go left to the sphinx (D).
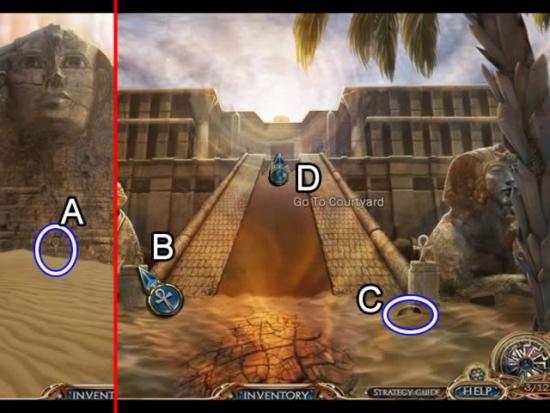
- Pick up the ANKH at the base of the sphinx (A).
- Return to Aten’s wall. Go right to the temple entrance.
- Place the ANKH on the pedestal (B).
- Pick up the BATTERY CASE (C).
- Go up the steps to the courtyard (D).
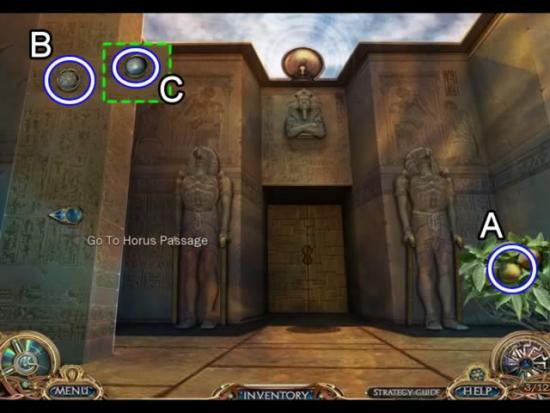
- Pick up the GRAPEFRUIT (A) and FLOWER OF LIFE (B). Underneath the Flower of Life is a SKY MARBLE (C).
- Go left to Horus passage.
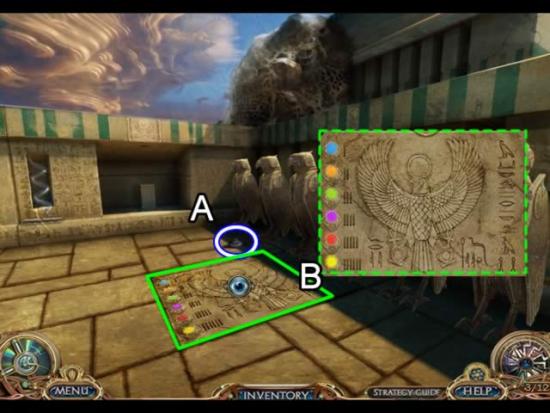
- Pick up the CAP (A).
- Zoom in on the stone in front of the bird statues (B). Note the color and number combination.
- Return to the courtyard. Go right to Isis passage.
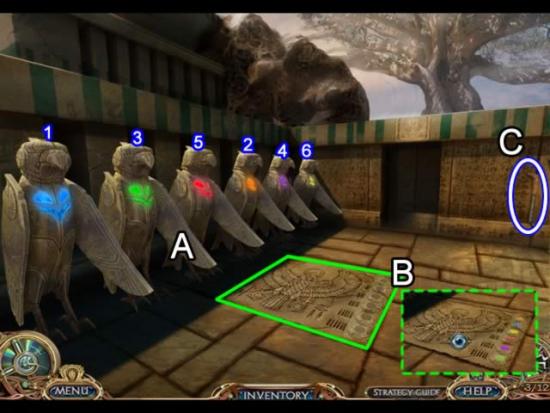
- Click the colored chests of the bird statues (A) in the order indicated from the stone in the Horus passage. A correct click will turn the chest color white. Clicking a bird out of order will reset the colors. The correctly numbered sequence is shown above.
- Correctly clicking all the birds causes the stone at their feet to change to one with a colored sequence (B). Examine it.
- Pick up the PROD in the corner (C).
- Retrace your steps to the Horus passage.
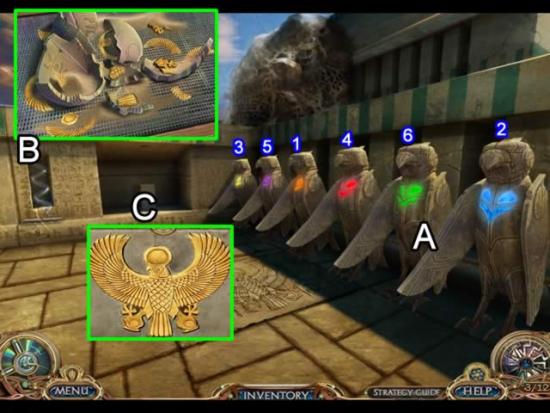
- Play the same game with the birds as in the Isis passage (A). The correct sequence number is shown above.
- Correctly clicking all the birds gives access to the alcove on the far left (B). Use the HAMMER to break the ball. Collect the 13 MEDALLION PIECES.
- Zoom in on the right alcove (C). Place the MEDALLION PIECES on the imprint to begin a puzzle.
- Correctly place each piece to solve the puzzle. Right or left click a piece to rotate it. It is easiest to spread the pieces out and then place the most recognizable first: the wings and head. Place the remaining pieces according to the established pattern.
- Return to the Isis passage and enter the sanctuary.
- Pick up the second SKY MARBLE.
- Return to the courtyard.
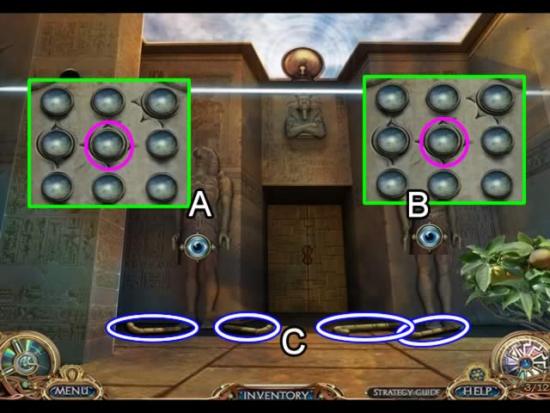
- Zoom in on the left statue (A). Place a SKY MARBLE in the empty slot to begin a mini-game.
- The goal is to find the right combination to flip all the marbles up. The arrows on the side of a marble indicate which other marbles it affects. Unfortunately there is no re-set button, so giving a numbered solution is no help if you have already started. The best strategy is to see the reaction flipping each marble has and then work around the board.
- Repeat the puzzle with the second statue (B).
- Pick up the four CANES and return to the sanctuary in the Isis passage.
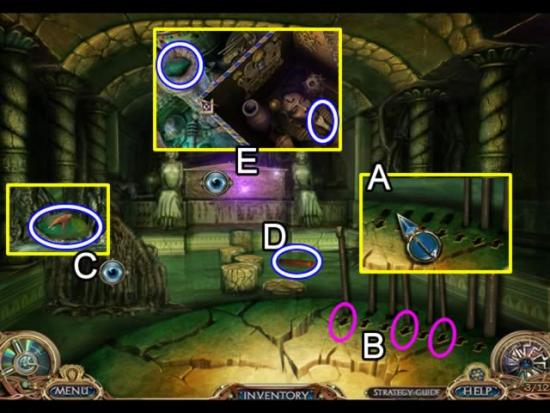
- Place the four CANES in the empty slots (A).
- Lower the water by clicking the three canes with a down arrow (B).
- Get the LEVITATION ORE (1/3) from the roots (C).
- Pick up the COPPER TUBE floating in the water (D).
- Play the hidden object scene (E). Collect the LEVITATION ORE (2/3) and URAEUS COBRA.
- Return to the courtyard. Click down twice to return to the camel.
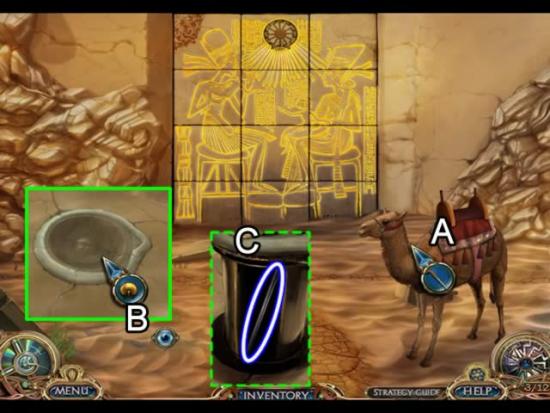
- Use the PROD on the camel (A) to make it spit three times.
- Zoom in on the area the spit cleared away (B). Place ATEN’S DISC in the impression.
- Take the PIPE (C).
- Return to the courtyard and approach the door.
- Place the URAEUS COBRA in the impression.
- Enter the hall of mirrors.
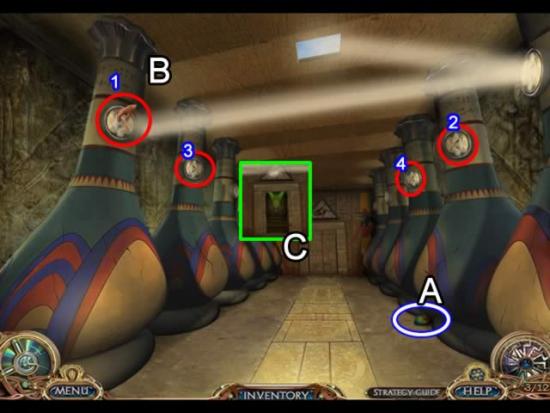
- Pick up the LEVITATION ORE (3/3) on the floor (A).
- Click each of the four mirrors (B) to redirect their beams and open the door at the end of the hall (C).
- Enter the dendera room.
- Zoom in on the work area on the left.
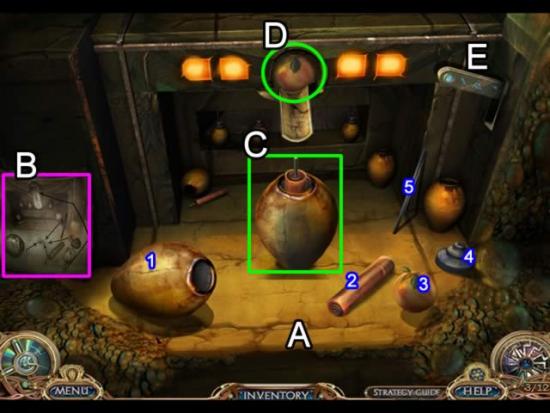
- Place the BATTERY CASE (1), COPPER TUBE (2), GRAPEFRUIT (3), CAP (4) and PIPE (5) on the work surface.
- Inspect the instructions (B).
- Place the battery case in the center of the table. Insert the copper tube in the case. Put the pipe inside the copper tube (C).
- Put the grapefruit in the slot (D). Pull the lever (E) to squeeze the juice into the contraption. Put the lid on top. Take the BATTERY.
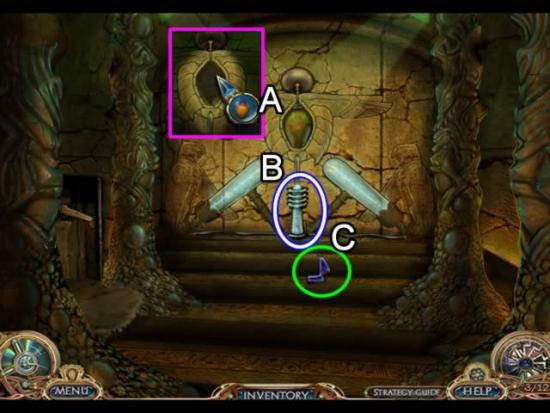
- Place the BATTERY in the slot (A) to light the chamber.
- Pick up the DJED PILLAR (B) and the Lapis Lazuli gem for the Black Sun emblem.
- Go to the Sphinx (click down four times to reach the camel. Click left once).
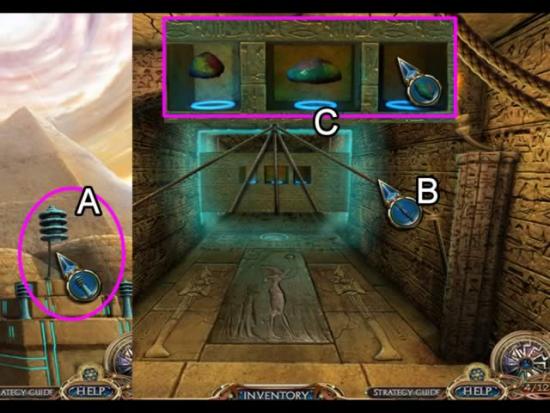
- Place the DJED PILLAR on the pedestal (A). Enter the tunnel.
- Use the SWITCHBLADE to cut the ropes (B).
- Approach the far wall (C). Place the pieces of LEVITATION ORE in the three compartments.
- Enter the treasury.
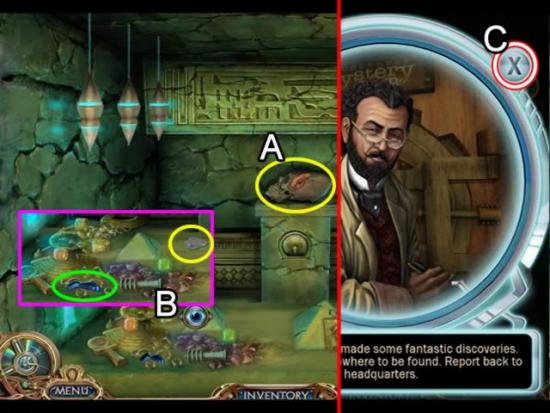
- Pick up the skull (A) for the journal.
- Inspect the treasure heap on the floor (B). Take Ben’s tags (yellow) for the journal. Collect the Sapphire gem for the Black Sun emblem.
- Close the dialogue box (C) to return to headquarters.
- Click Alex’s picture. Click the “Investigate” tab to continue.
Chapter 3: Alex – Chiapas, Mexico
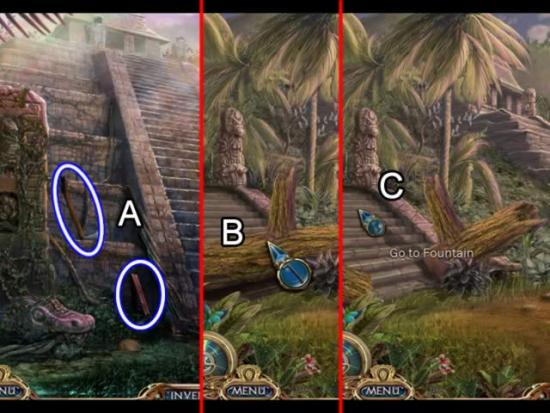
- Go forward to the temple grounds.
- Pick up the WOOD PLANK (1/3) and AXE (A).
- Return to the path.
- Use the AXE to cut the log (B). Head up the steps to the fountain (C).
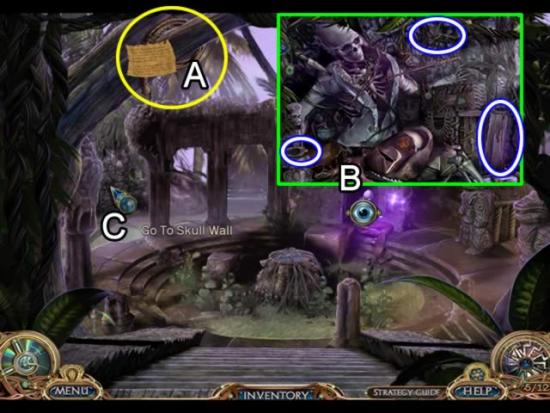
- Alex’s whip and journal entry are added to the interactive journal (A).
- Play the hidden object scene by the skeleton (B). Get the SPIGOT, CRANK and WOOD PLANK (2/3).
- Go to the skull wall (C).
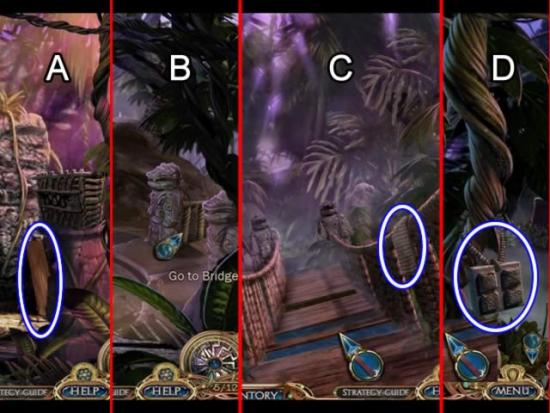
- At the skull wall(A), take the PLANK (3/3).
- Return to the fountain (B). Take the right path to the bridge.
- Pick up the CLOTH hanging on the bridge. Place the PLANKS in the empty slots.
- Cross the bridge to the temple top (D). Take the QUECHUAN TABLET.
- Retrace your steps to the skull wall.
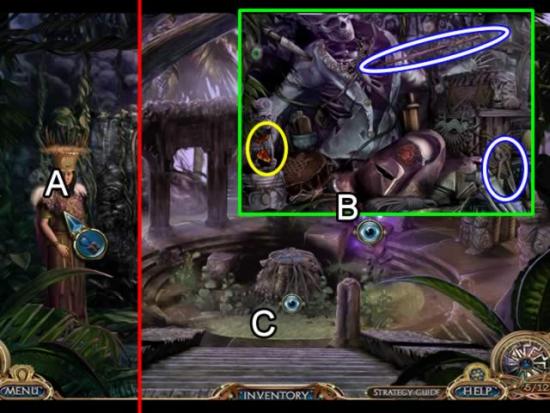
- Place the QUECHUAN TABLET on the priestess to translate the language (A).
- Return to the fountain.
- Play the hidden object scene on the skeleton (B). Get the Citrine Gem for the Black Sun emblem. Pick up the SHAFT and CUTTERS.
- Inspect the tree trunk (C).
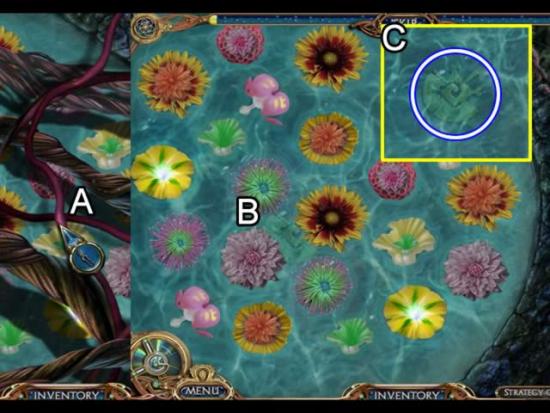
- Use the CUTTERS to remove all of the vines (A).
- Click the matching flowers to remove them all from the water (B).
- Get the TZOLK’IN MEDALLION from the water.
- Return to the skull wall.
- Give the TZOLK’IN MEDALLION to the priestess in exchange for a CHISEL.
- Go back to the temple grounds (click down twice and then forward once).
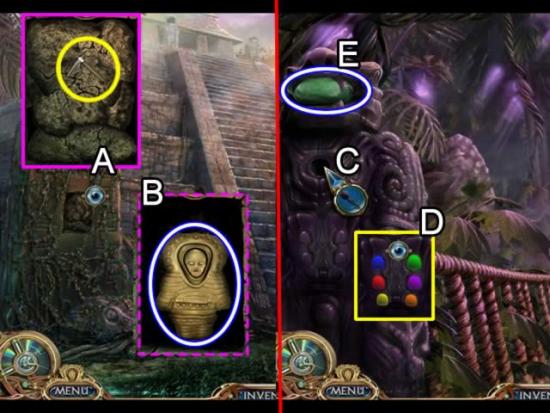
- Examine the covered area (A).
- Use the CHISEL to remove all of the rocks. Take the ASTRONAUT from the recess (B).
- Return to the skull wall.
- Give the ASTRONAUT to the priestess in exchange for the JAGUAR KEY.
- Return to the fountain and go right to the bridge.
- Place the JAGUAR KEY in the slot (C) to unseal the area below it.
- Access the area to play a repeat-the-sequence game (D). An incorrect click will not generate a new pattern; the current sequence will be repeated.
- Completing the puzzle opens the mouth (E). Take the JADE EYE.
- Return to the skull wall.
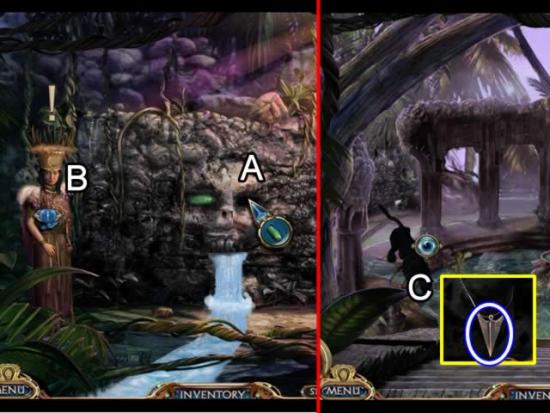
- Insert the JADE EYE in the opening (A). The water begins flowing.
- Speak to the priestess (B) to receive the SUN STONE.
- Return to the fountain.
- Wait for the jaguar to appear (C). Zoom in and take the ARROWHEAD.
- Return to the path.
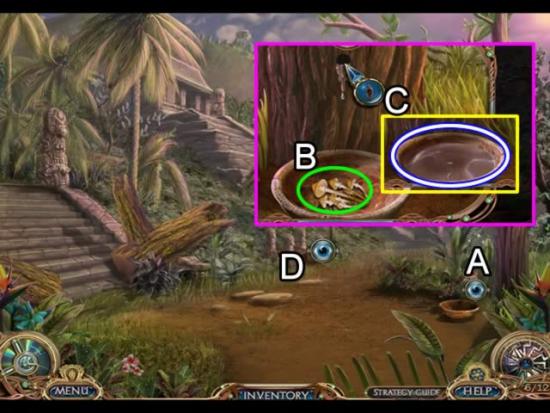
- Look closely at the base of the tree (A).
- Pick up the Psilocybin Mushrooms for the journal (B).
- Place the SPIGOT in the hole in the tree (C). Take the FULL BOWL OF SAP.
- Continue up the path to the work area (D).
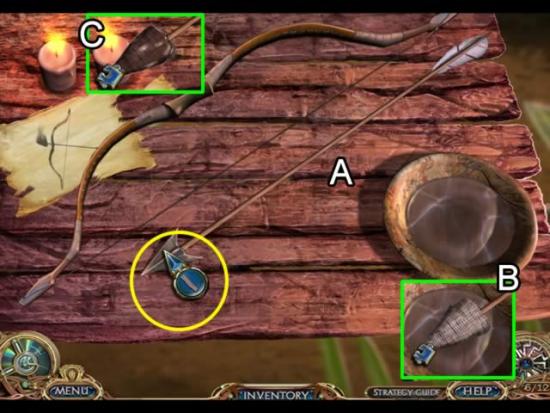
- Place the FULL BOWL OF SAP and SHAFT on the table (A). Attach the ARROWHEAD to the shaft. Wrap the arrowhead with the CLOTH.
- Dip the cloth covered arrowhead in the bowl of sap (B).
- Light the arrowhead with the candle. Take the BOW AND ARROW.
- Return to the fountain; go right to the bridge and up to the temple top.
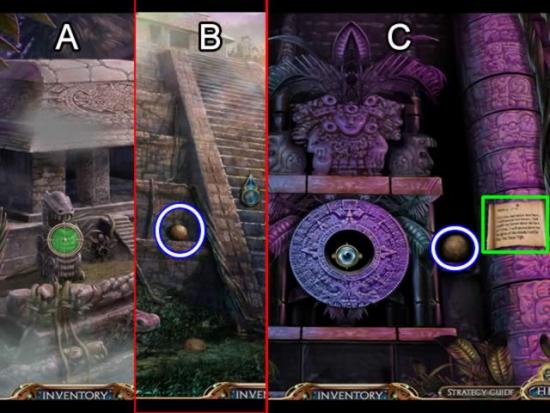
- Take the BOW AND ARROW and move it until the crosshairs turn green and are aligned on the statue. Click to shoot and destroy the statue.
- Return to the temple grounds
- Pick up the CANNONBALL by the side of the steps (B).
- Climb the steps to the temple entrance (C). Pick up the Bible verse pinned to the tree. Get the second CANNONBALL.
- Zoom in on the hanging stone disk.
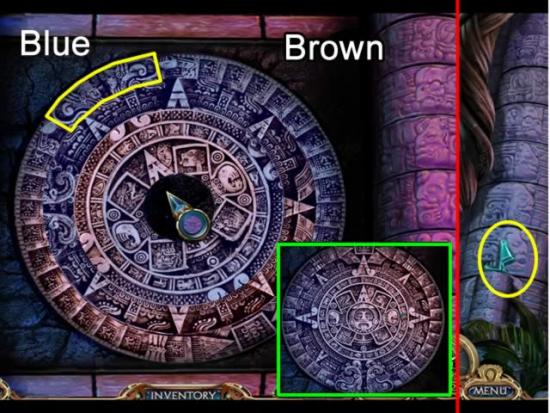
- Place the SUN DISC in the center to begin a mini-game.
- The goal is to rotate the disks into the correct position. To determine this, note the color shadings on the columns the disk is attached to. The left side is blue and the right is brown. Rotate the outer most ring so it matches the surrounding colors. The pattern outlined in yellow should be at the bottom. Now match each ring based on color and the existing pattern. The solution is shown above (green).
- The disk rises to allow entrance to the temple. Pick up the Turquise Gem for the Black Sun emblem and enter the temple.
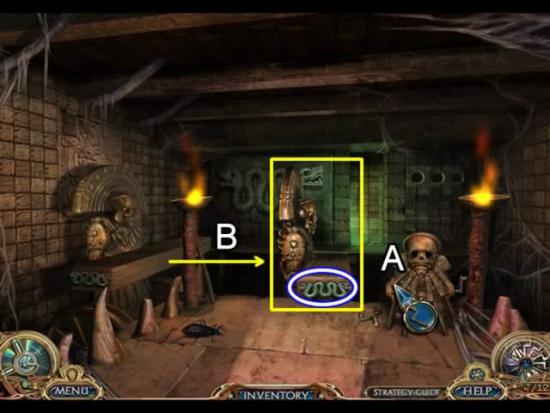
- Place the CRANK into the side of the mechanism (A). Click until the bridge moves from the wall to the middle of the temple. Take the JADE SERPENT.
- Exit the temple and return to the skull wall.
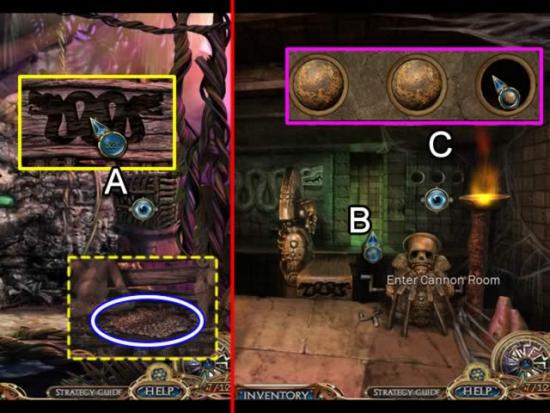
- Zoom in on the reed basket (A). Place the JADE SERPENT in the impression. Take the EXPLODING SEEDS.
- Return to the temple.
- Enter the cannon room (B) and get the third CANNONBALL from the floor.
- Zoom in on the three holes in the temple wall (C). Place the three CANNONBALLS in the slots.
- Return to the cannon room.
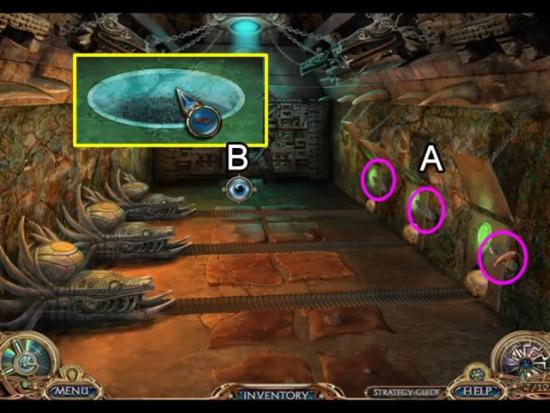
- Click the three levers (A) to send the cannonballs across the room and into the mouths of the creatures.
- Inspect the base of the door (B). Place the EXPLODING SEEDS in the basin to blow open the door.
- Enter Voltan’s tomb.
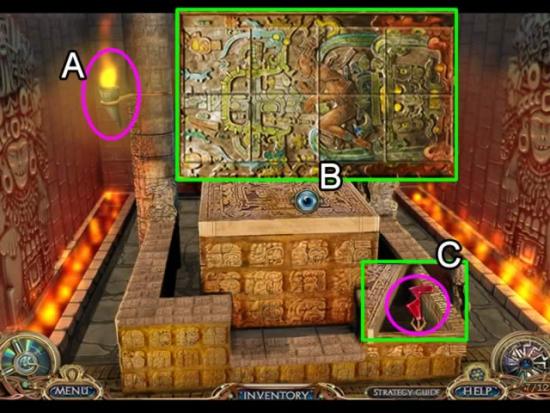
- Use the torch (A) to light the fuel troughs on both sides of the tomb.
- Click the sarcophagus (B) to open a puzzle.
- Use the patterns on the outside of the tiles to figure out the initial placement. Click a tile to select it. Click another to swap two tiles (this isn’t a slider puzzle). Double click to rotate a tile. The solution is shown above.
- Take the Ruby Gem.
- Close the dialogue box to return to headquarters.
- Click Shawn’s picture. Click the “Investigate” tab to continue.
Chapter 4: Shawn – Palpa, Peru
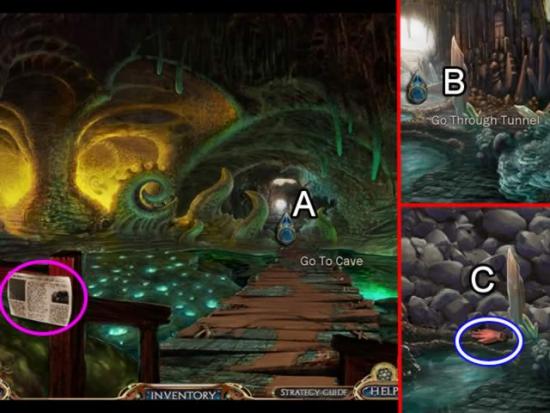
- Examine the article on the post to add the information to the journal.
- Go forward to the cave (A).
- Click to go through the tunnel (B).
- Pick up the GLOVES at the base of the rock slide (C).
- Return to the cave entrance.
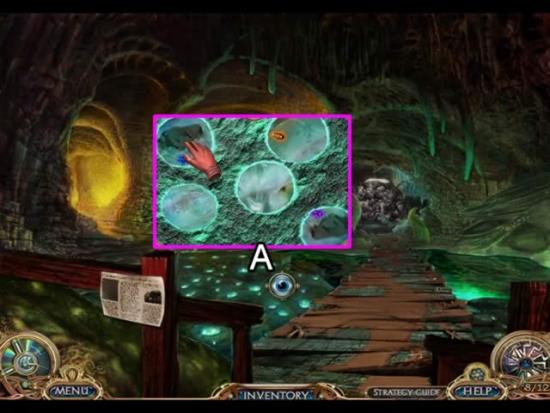
- Zoom in on the area to the left of the bridge (A).
- Use the GLOVES to catch the eight flourescent GRUBS.
- Return to the cave.
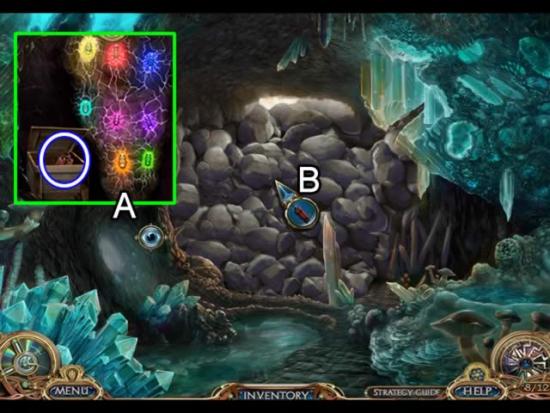
- Examine the area on the left (A). Place the colored GRUBS in their correspondingly colored hole to illuminate the room.
- Open the box and take the DYNAMITE.
- Place the DYNAMITE on the rocks.
- Retreat to the entrance to be safe from the explosion.
- Return to the now cleared cave.
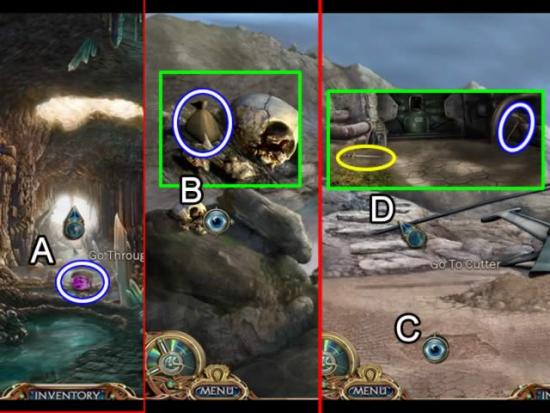
- Pick up the UNCUT AMETHYST and continue through the tunnel (A).
- Inspect the skull (B). Move it aside and pick up the BAG OF SAND.
- Go toward the jet.
- Inspect the sand (C) for information for the journal.
- Go to the cutter (D). Pick up the PICKAXE and the dagger for the journal.
- Return to the cave.
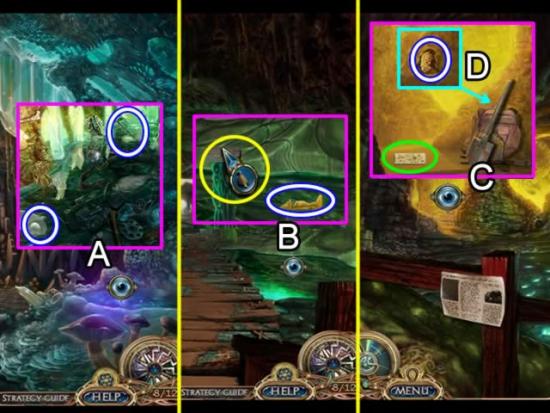
- Play the hidden object scene in the water on the right side of the cave (A). Get a CROWBAR and UNCUT PEARL for inventory.
- Return to the cave entrance.
- Examine the pool on the right (B). Place the BAG OF SAND on the counterweight to take the AIRPLANE.
- Go to the alcove on the far left (C). Pick up the chart (green) for the journal. Click the equipment to move it. Use the PICKAXE to remove the UNCUT TOURMALINE that was hidden behind the gear.
- Go back through the tunnel to the jet.
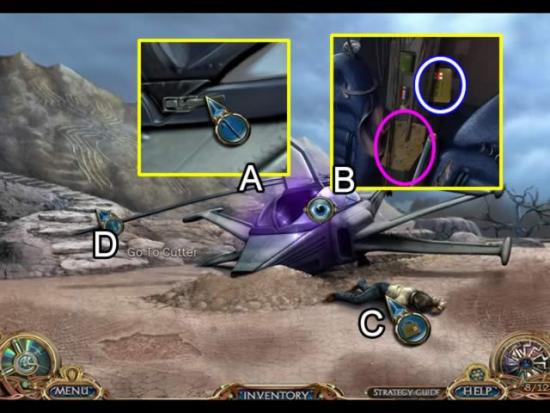
- Use the CROWBAR to remove the damaged latch (A).
- Play the hidden object scene (B). The Piri Reis Map information is added to the journal. Open the cabinet door in the rear of the cockpit to retrieve the FIRST AID KIT.
- Use the FIRST AID KIT to revive Shawn. He gives you a PLASMA BATTERY.
- Go up the steps to the cutter.
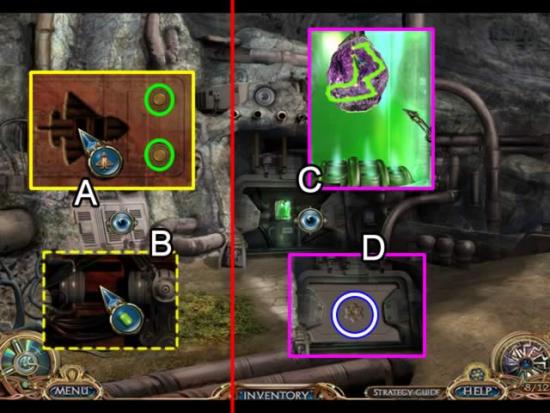
- Zoom in on the power supply (A). Place the AIRPLANE in the outline. Press the two buttons (green) to open the panel.
- Insert the PLASMA BATTERY (B) to generate power to the cutter.
- Access the cutter (C). Place one of the uncut gems in the cutter. Click and hold down the left mouse button to connect the dots. The cut gem is added to the Black Sun emblem. Do this for the UNCUT PEARL, AMETHYST and TOURMALINE.
- The door to cover the cutter comes down when all of the gems have been cut (D). Take the STAR OF DAVID from the front of the door.
- Return to the jet.
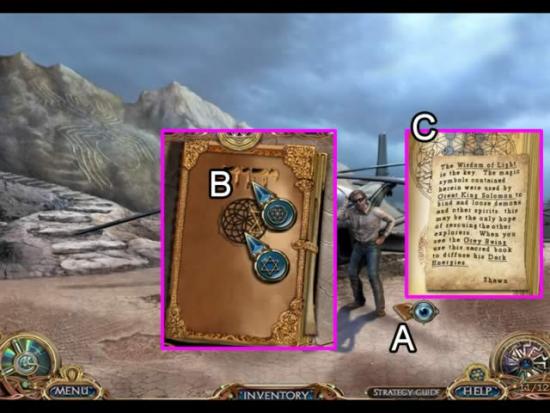
- Pick up the book at Shawn’s feet (A).
- Place the FLOWER OF LIFE and the STAR OF DAVID in the design on the cover (B). Open the book. Take Shawn’s note (C) for the journal. The BOOK is added to inventory.
- Close the dialogue box to return to headquarters.
- Click Sunny’s picture. Click the “Investigate” tab to continue.
Chapter 5: Sunny – New Swabia, Antartica
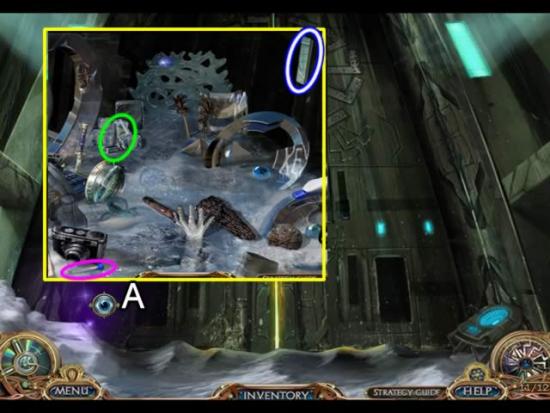
- Play the hidden object scene in the snowbank on the left (A). The Test Tube (pink) is added to the journal as an Organic Tracking Device. The Diamond Gem completes the BLACK SUN MEDALLION for inventory. The BLUE BAR is added to inventory.
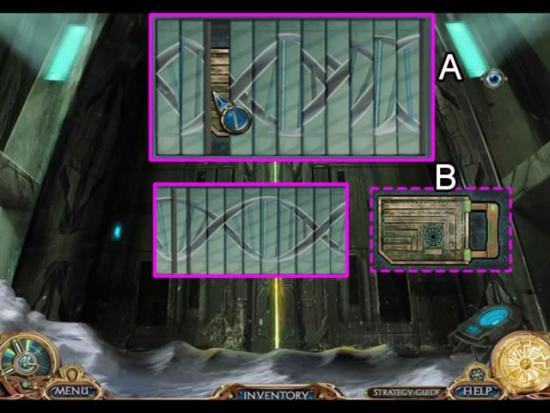
- Zoom in on the blue light in the upper right corner (A). Insert the BLUE BAR in the empty slot to begin a puzzle.
- The goal is to swap the strips to come up with the correct design. Match colors and line patterns to get the design. The solution is shown above.
- Take the KEY (B).
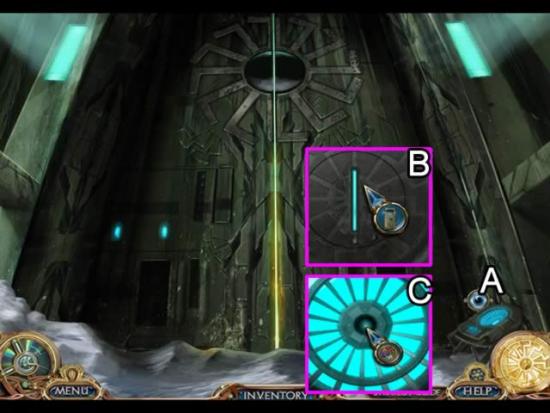
- Access the lock mechanism (A).
- Insert the KEY in the slot (B) to open the panel. Place the BLACK SUN MEDALLION in the center opening.
- Enter the base.
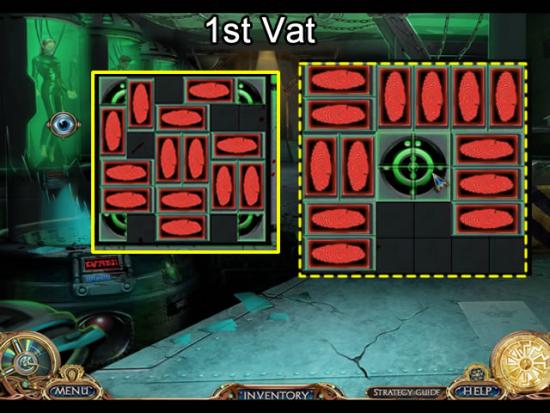
- Each of the three vats on the left require solving a slider puzzle to get a key. These are not easy sliders. Including long video solutions or multiple screen prints showing the many steps involved didn’t seem practical to include with this guide. Each screen shot shows the initial puzzle configuration and the final placement of the puzzle pieces to assist you. Each puzzle is different.
- Get KEY ONE.
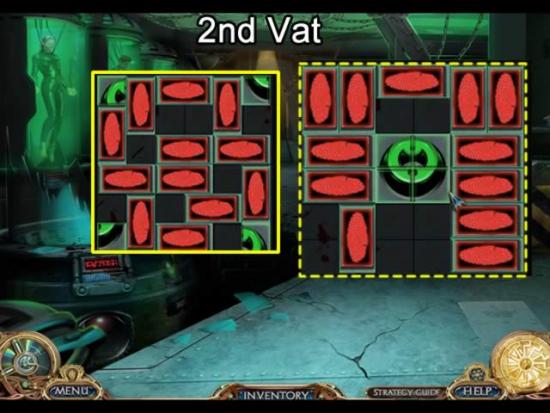
- Get KEY TWO.
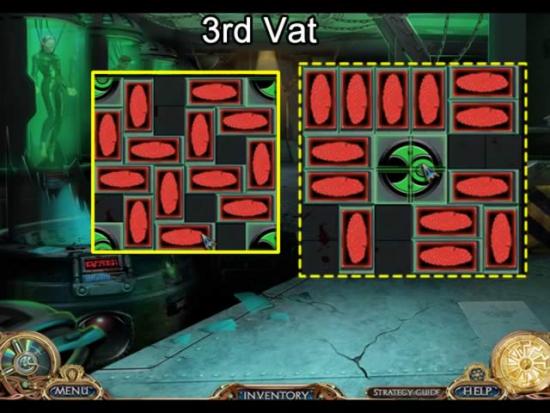
- Get KEY THREE.
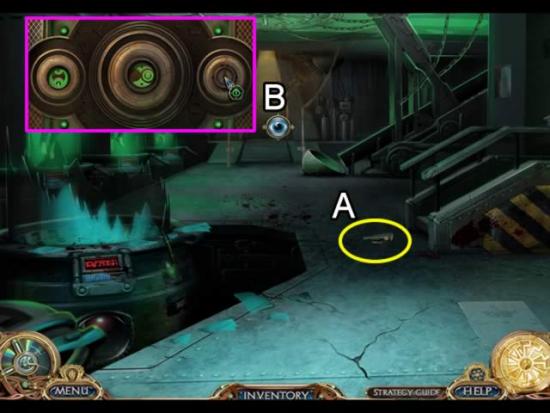
- Pick up Sunny’s sunglasses for the journal (A).
- Access the lock mechanism on the rear door (B). Match the patterns on KEY ONE, KEY TWO and KEY THREE to the door patterns.
- Enter the hall.
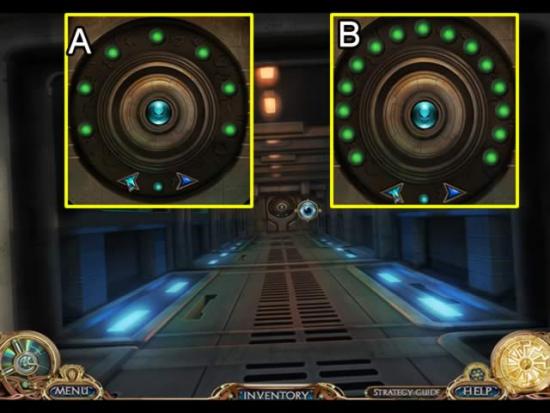
- Examine the lock mechanism at the end of the hall (A).
- The goal is to use the left and right arrows in a sequence to turn all the lights green.
- My solution for the first door (A): Left arrow seven times.
- Repeat the game for the next door (B).
- My solution: L(x2) – R – L(x5) – R(x2) – L – R(x2) – L(x2).
- Enter the test chamber.
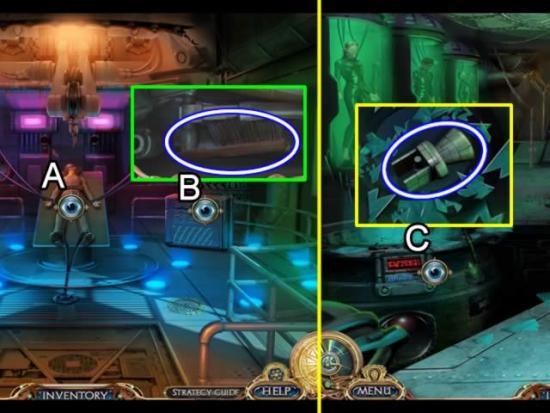
- Zoom in on Sunny (A). Remove the oxygen mask to speak to her. Receive the KEYCARD.
- Inspect the cabinet on the right (B). Take the BRUSH.
- Return to the vat room.
- Look at the cabinet with the broken glass (C). Use the BRUSH to sweep away the glass shards. Take the KEY.
- Return to the test chamber.
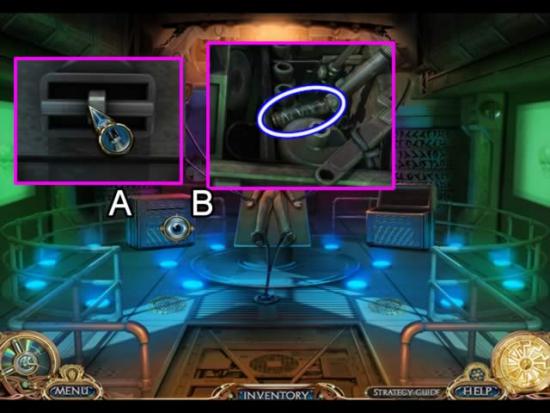
- Use the KEY to open the lock on the box on the left (A).
- Play the hidden object scene when the lid pops up (B). Take the COIL CAPSULE.
- Return to the vat room.
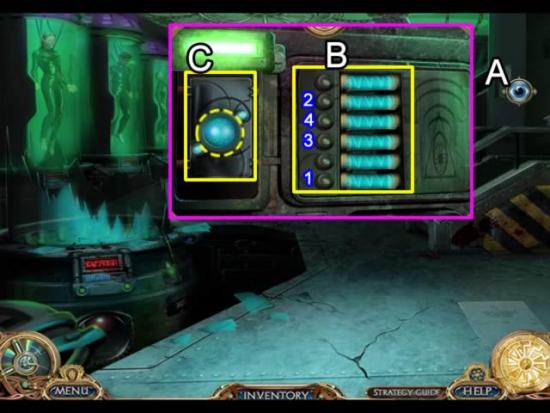
- Access the lock panel to the control room (A).
- Insert the COIL CAPSULE in the empty slot to start a mini-game (B).
- The goal is to press the correct button sequence to light all the coils at once. The sequence is indicated above.
- Insert the KEYCARD in the reader (C). The light turns green. Click the center blue button (dashed yellow) to open the door to the control room.
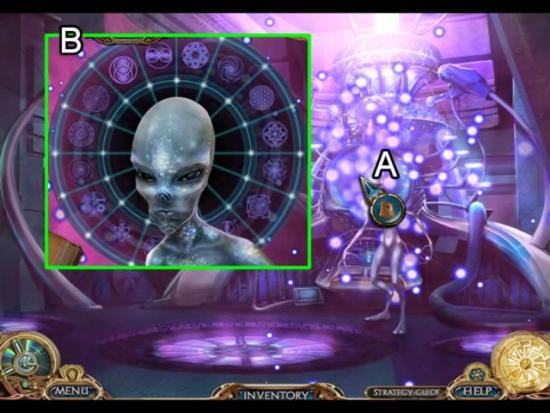
- Place the BOOK on the alien to begin a mini-game (A).
- This is a match-the-sequence game using the symbols along the outside of the ring. Each correctly followed sequence removes those symbols. Continue until all symbols are removed.
Congratulations! You have completed playing Unsolved Mystery Club: Ancient Astronauts
The bonus chapter is now unlocked. Click the “Bonus Level” tab on the main menu to continue playing.
Collector’s Edition Bonus Chapter
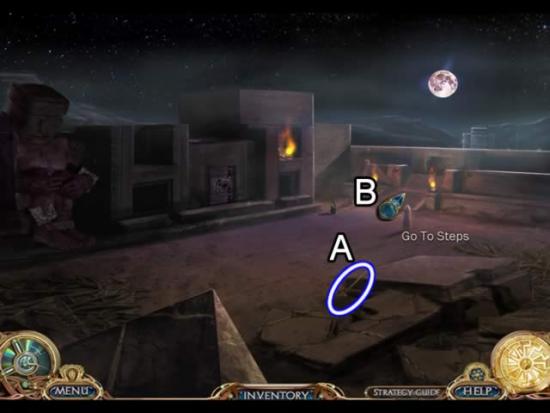
- Pick up the SHOVEL (A) and go toward the steps (B).
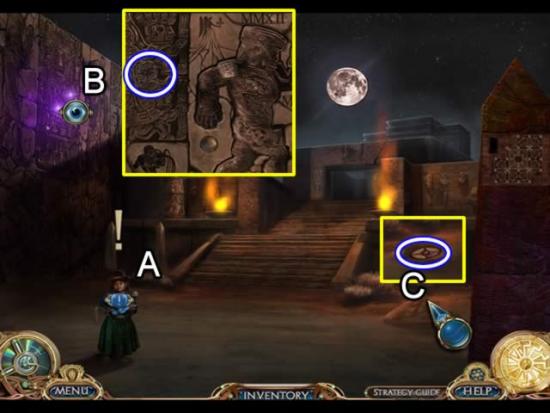
- Talk to the girl (A).
- Play the hidden object scene on the wall (B). A lion ZOCIAC SIGN is added to inventory.
- Use the SHOVEL to dig up the dirt pile (C). Take the DISC (1/4).
- Return to the stone giant.
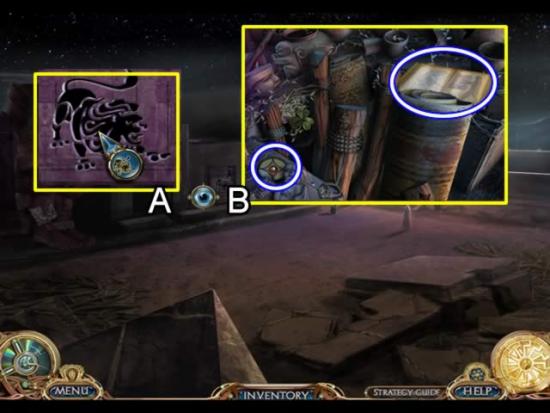
- Insert the lion ZODIAC SIGN in the outline on the wall (A).
- Play the hidden object scene that appears (B). Collect a DISC (2/4) and the BOOK OF DRAWINGS.
- Return to the girl.
- Give the BOOK OF DRAWINGS to the girl. She gives you a KEY.
- Go to the spear gate.
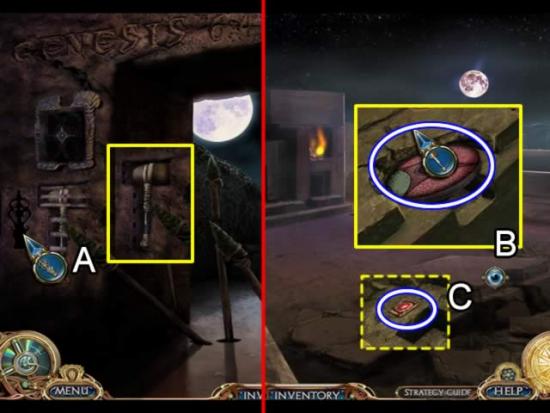
- Place the KEY in the slot to unlock the HAMMER (A).
- Return to the stone giant.
- Zoom in on the rocks (B).
- Use the HAMMER to free the DISC (3/4). Collect the PEG hidden under the disc (C).
- Return to the steps.
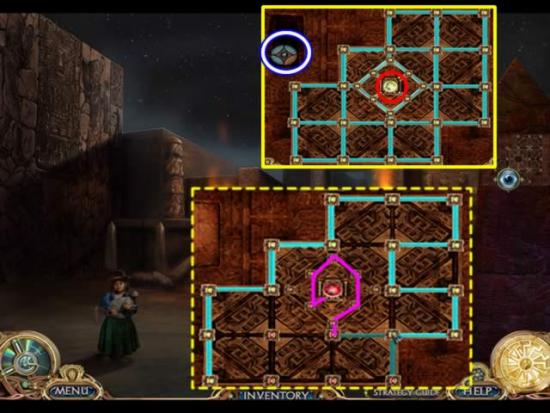
- Zoom in on the obelisk on the right. Insert the PEG in the center to start a mini-game.
- The goal is to find a path to turn all the lights on (see top inset). This is a strange puzzle. One would think it necessary to close all the boxes without recrossing a path. That doesn’t appear to be necessary. The dashed box shows my solution (the pink lines represent moves I didn’t get screen shots for). I started at the lower left and worked my way around. There may be a shorter, simpler way to solve this puzzle.
- Take the DISC (4/4).
- Return to the spear gate.
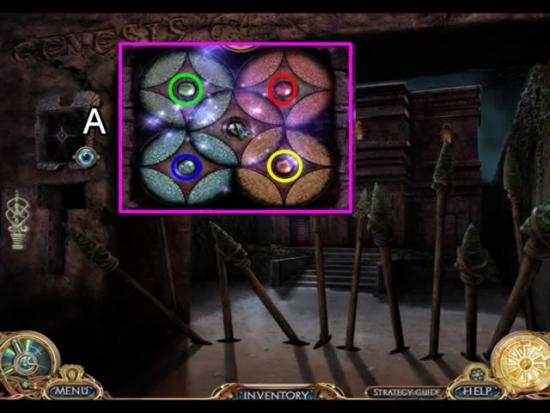
- Place the four DISCS in the nook in the wall to start a mini-game (A).
- Use the dics to rotate the colored sections to their same colored button as indicated above.
- Enter the temple grounds.
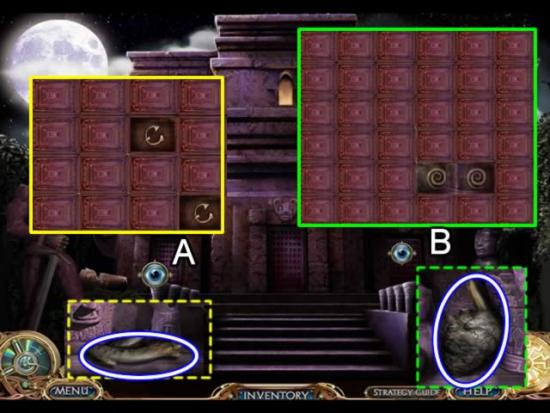
- Zoom in on the door on the left (A).
- Play a symbol match game. Receive an AORTA.
- Zoom in on the right door (B).
- Play a larger version of the symbol match game. Receive the ANTERIOR HEART.
- Enter the middle door.
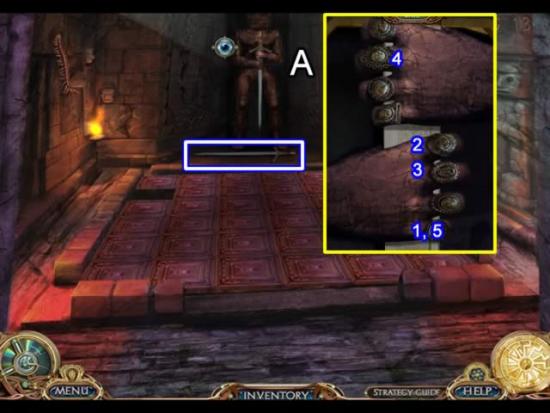
- Zoom in on the statue in the back (A).
- Click his fingers in the order indicated.
- Pick up the sword.
- Exit the temple.
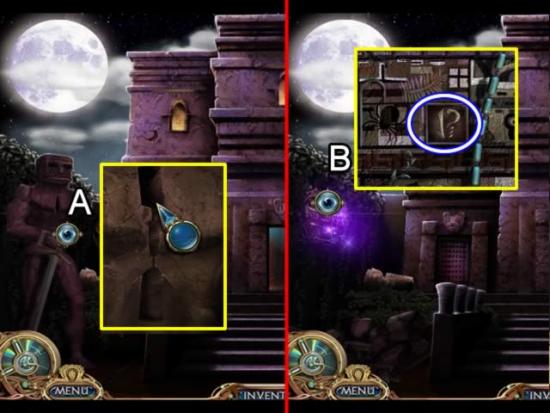
- Click the statue in front (A). Insert the SWORD in the slot. The statue recedes.
- Play the hidden object scene on the wall (B). Get the HIEROGLYPH TILE.
- Enter the temple.
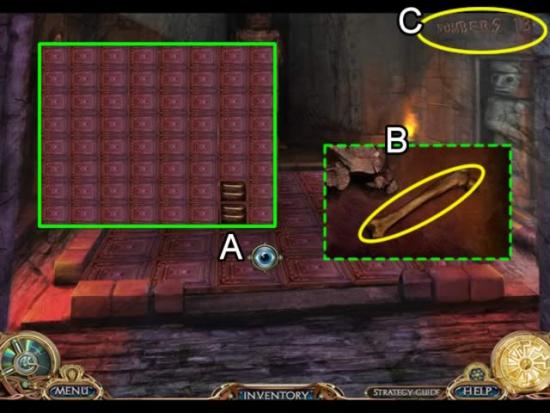
- Insert the HIEROGLYPH TILE in the empty slot on the floor (A).
- Play another symbol match game.
- Collect the bone for the journal (B).
- Click the text on the wall (C) for another journal entry.
- Return to the stone giant.
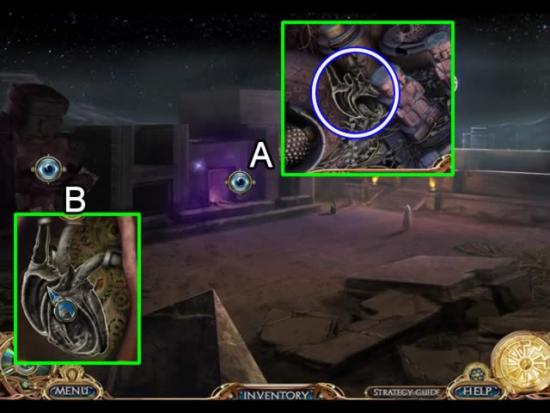
- Play the hidden object scene on the wall (A). Collect the POSTERIOR HEART.
- Inspect the giant (B).
- Insert the heart parts in this order: POSTERIOR HEART, AORTA, ANTERIOR HEART.
- The giant leaves.
- Go to the ruins and down the steps.
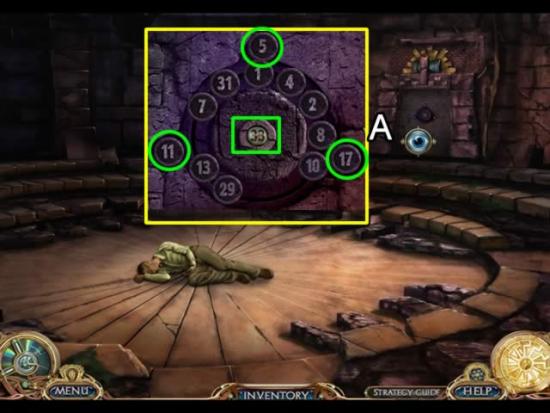
- Access the door lock (A).
- The goal is to place the three numbers that sum to 33 in the outside slots. Click the center button to rotate the numbers. As they come close to the slots (they won’t align exactly), click them to slide them in. The solution is shown above.
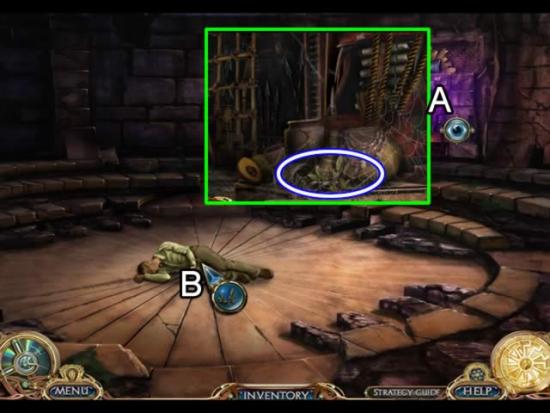
- Play the hidden object scene in the open door (A). Collect an OLIVE BRANCH.
- Use the OLIVE BRANCH to revive Dr. Brightside.
Congratulations! You have completed playing the bonus level of Unsolved Mystery Club: Ancient Astronauts Collector’s Edition.
More articles...
Monopoly GO! Free Rolls – Links For Free Dice
By Glen Fox
Wondering how to get Monopoly GO! free rolls? Well, you’ve come to the right place. In this guide, we provide you with a bunch of tips and tricks to get some free rolls for the hit new mobile game. We’ll …Best Roblox Horror Games to Play Right Now – Updated Weekly
By Adele Wilson
Our Best Roblox Horror Games guide features the scariest and most creative experiences to play right now on the platform!The BEST Roblox Games of The Week – Games You Need To Play!
By Sho Roberts
Our feature shares our pick for the Best Roblox Games of the week! With our feature, we guarantee you'll find something new to play!All Grades in Type Soul – Each Race Explained
By Adele Wilson
Our All Grades in Type Soul guide lists every grade in the game for all races, including how to increase your grade quickly!


