
Best Horror Games On Itch.io – July 2026
Across a bounty of subgenres.![Haze Seas Accessories Tier List [Best Accessories to Equip]](/wp-content/uploads/2026/07/haze-seas-accessories-tier-list.jpg "Haze Seas Accessories Tier List [Best Accessories to Equip]")
Haze Seas Accessories Tier List [Best Accessories to Equip]
The accessories with the best stat buffs in Haze Seas.
![[Roblox] Evomon Shiny Hunting Guide – Including Prismatic and Pris Shinies!](/wp-content/uploads/2026/06/evomon-shiny-hunting-guide.jpg "[Roblox] Evomon Shiny Hunting Guide – Including Prismatic and Pris Shinies!")

Twisted Lands: Shadow Town Walkthrough
Welcome to the walkthrough for Twisted Lands: Shadow Town on Gamezebo. Twisted Lands: Shadow Town is a hidden object game for the PC created by Alawar Entertainment. This walkthrough includes tips and tricks, helpful hints, and a strategy guide to complete Twisted Lands: Shadow Town.


- Prefer Gamezebo on Google

Twisted Lands: Shadow Town – Game Introduction
Welcome to the walkthrough for Twisted Lands: Shadow Town on Gamezebo. Twisted Lands: Shadow Town is a hidden object game for the PC created by Alawar Entertainment. This walkthrough includes tips and tricks, helpful hints, and a strategy guide to complete Twisted Lands: Shadow Town.
General Information
Main Scenes
- The default mouse cursor in the game is the blue arrow. Move the mouse cursor around the screen and it will change to a different icon when it moves over interactive areas. Left click to perform an action with the current icon. The magnifying glass icon examines an object for a description or a close-up view. The hand icon collects an object that is then added the inventory slots at the bottom of the screen. The gears icon shows that an inventory object should be used in this area. The large arrow icon shows that there is an exit to the current location.
- Hidden object scenes are indicated by white sparkling areas. You will sometimes need to complete a series of steps or examine a specific object before the hidden object scene becomes available.
- Any items that are picked up in the game window will be added to the inventory slots at the bottom of the screen. Items can be selected from the slots and used on hotspots where the gears icon is shown. There is no need to combine inventory items in this game.
- Although many inventory items are displayed as soon as you enter a room, you will occasionally need to click and drag other objects out of the way to reveal them.
- The notepad at the bottom-left corner of the screen shows all of the notes and images that have been recorded so far. Keep checking back on the journal as it is updated frequently as you progress through the game.
- The mirror at the bottom-right corner of the screen can be selected for hints. There are two types of mirror hints: Direction and action. The direction hints can be used to point the way to an area where an action needs to be taken, and these can be used as many times as you want. Action hints show you the current object that needs to be interacted with. Once an action hint has been used, 90 seconds must pass before the mirror can be used again.
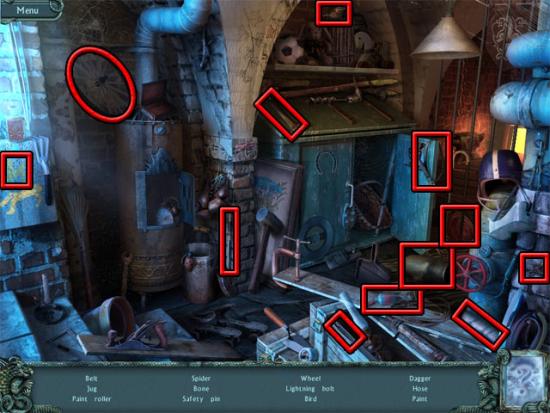
Hidden Object Scenes and Mini-Games
- The aim in each hidden object scene is to find all twelve of the objects that are displayed on the list. One object will always be added to the inventory after the scene has been completed. The objects are always in the same place in every game that is played, so the locations of every object has been identified in the walkthrough images.
- In every hidden object scene except the first one on the boat, clicking too quickly without finding an object causes mist to appear at the edges of the game window and the cursor to become invisible for four seconds.
- The mirror can be selected at the bottom-right corner of the screen to reveal the location of one of the objects on the list. After a hint has been used, 90 seconds must pass before the mirror can be used again.
- Mini-games are frequently encountered as you play through the game. It is not possible to give an exact solution to every mini-game as many of them vary from one game to the next. The skip button will become available three minutes after the mini-game begins, and once available it can be selected to automatically complete the mini-game.
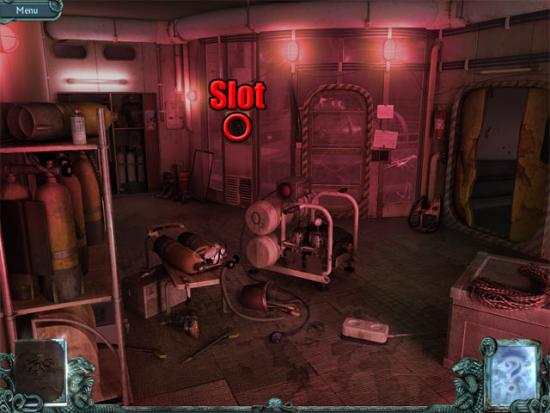
Walkthrough – Repair the Circuit
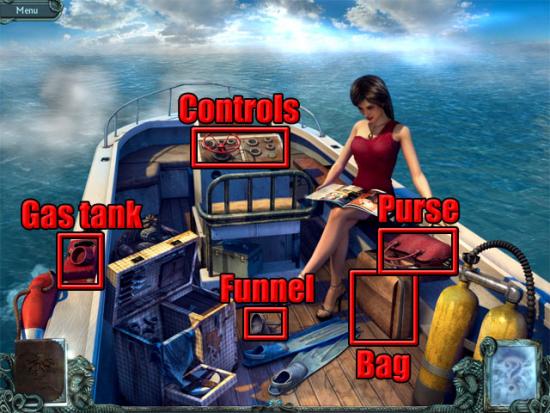
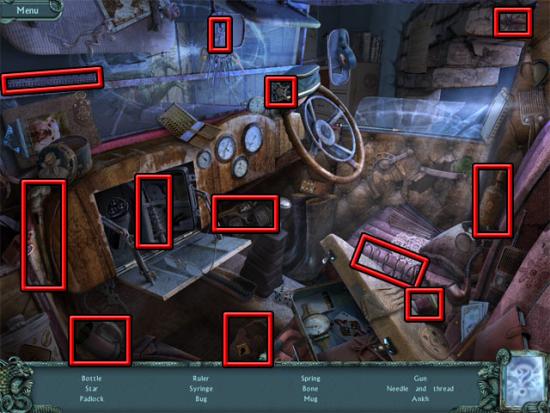
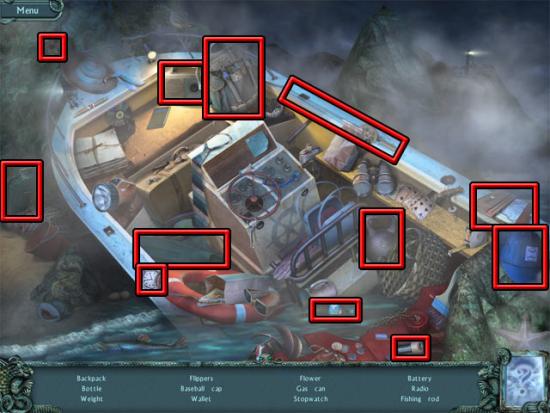
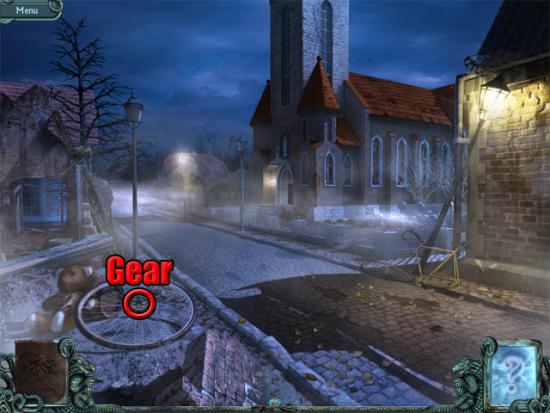
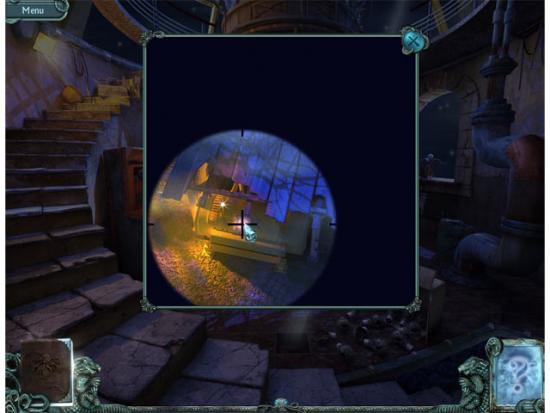
The game starts on the boat. Take the funnel and use it on the gas tank. Select the bag on the deck and move it to the right to reveal the gas can. Use the gas can on the gas tank. Examine the controls to see that a key is needed. Open the red purse and take the key from inside. Examine the controls again and use the start key on the slot to break the key in half:

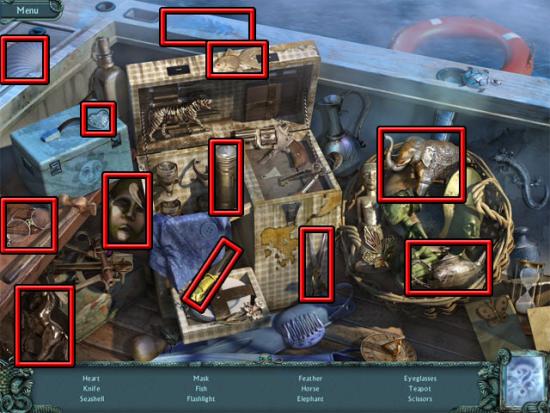
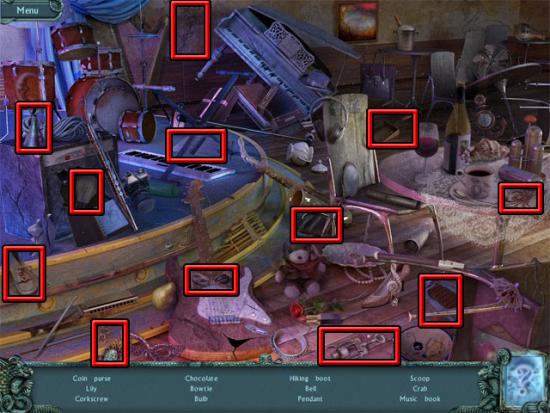
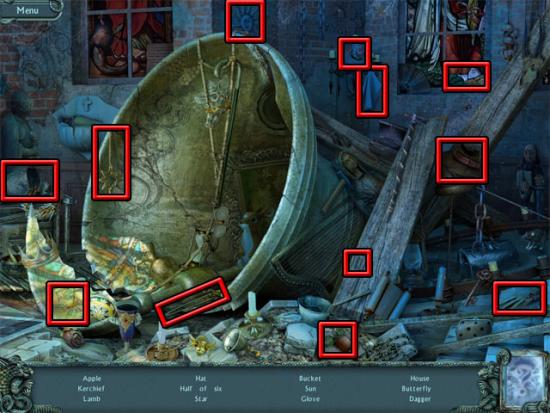
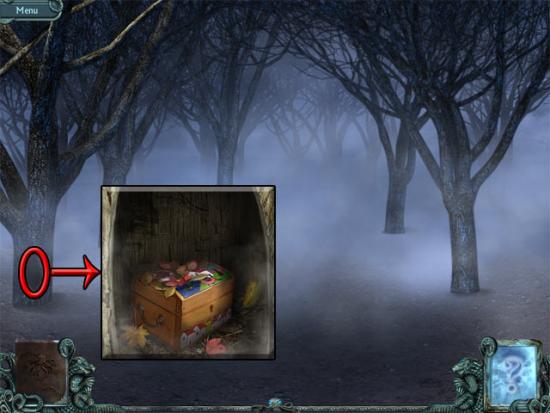
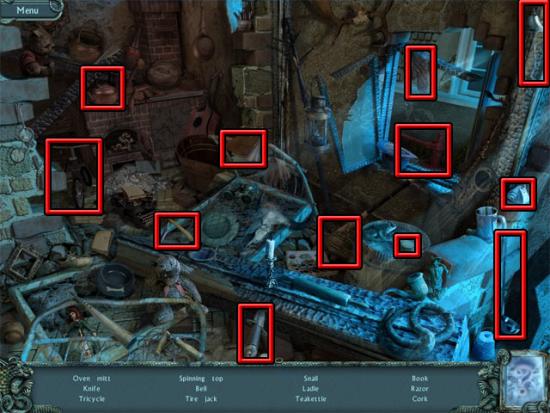
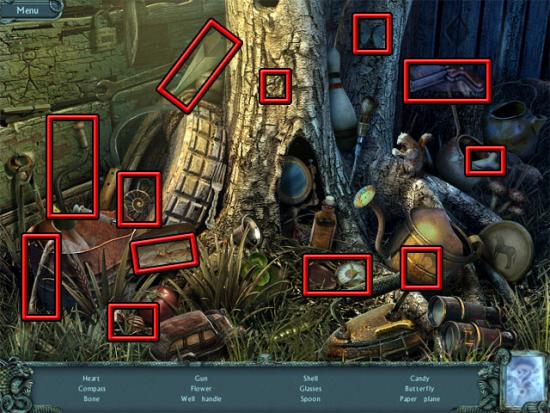
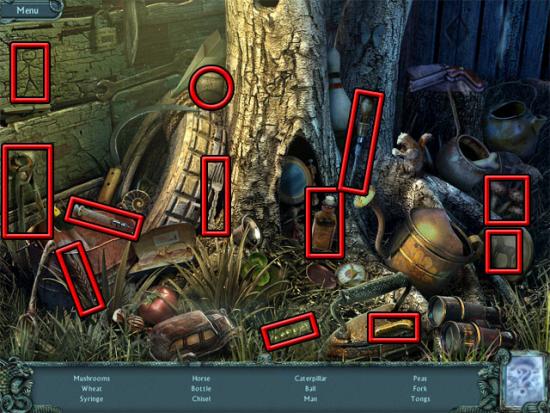
Examine the sparkling area on the chest to enter a hidden object scene. Find all of the objects on the list and the knife will be added to the inventory:
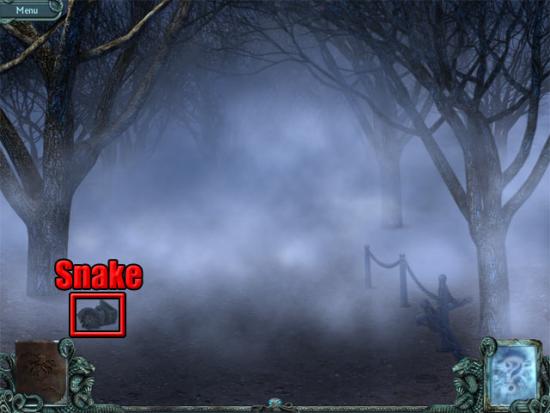
Examine the controls again and use the knife on the slot to reveal the circuit. Select the circuit to repair it. Take the snake statue to travel to the beach.
Open the Suitcase
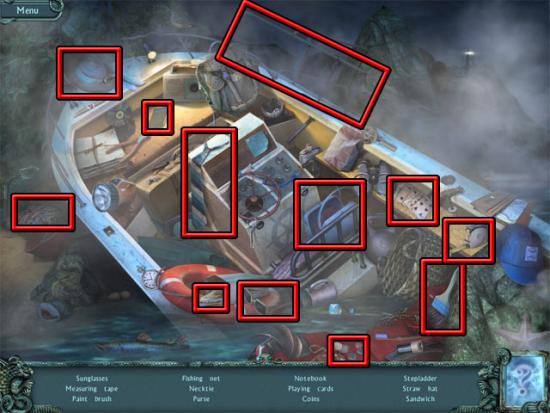
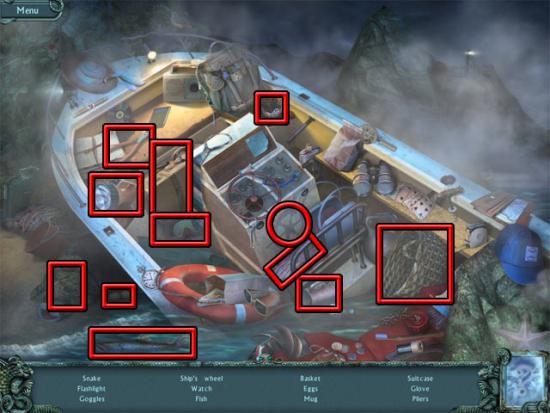
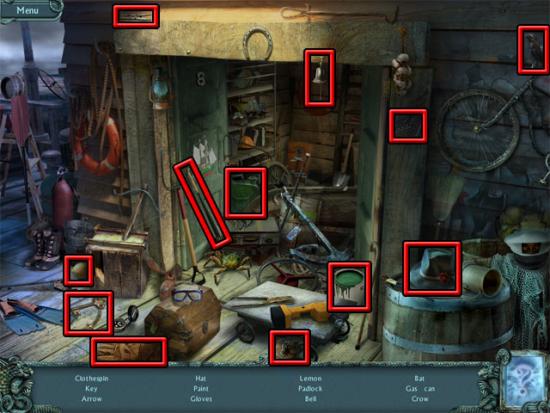
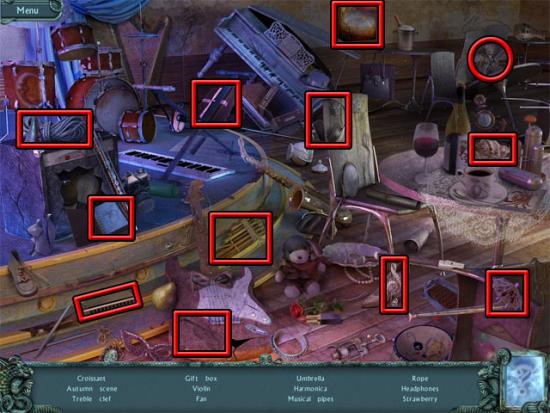
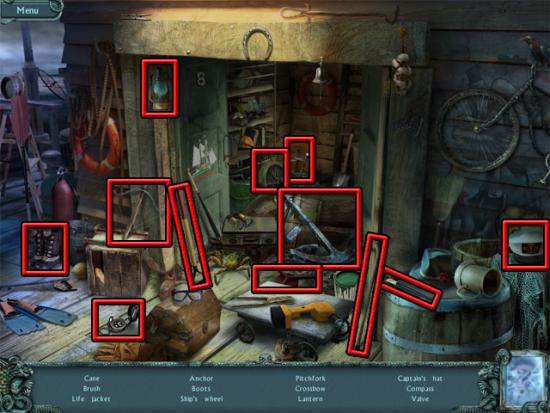
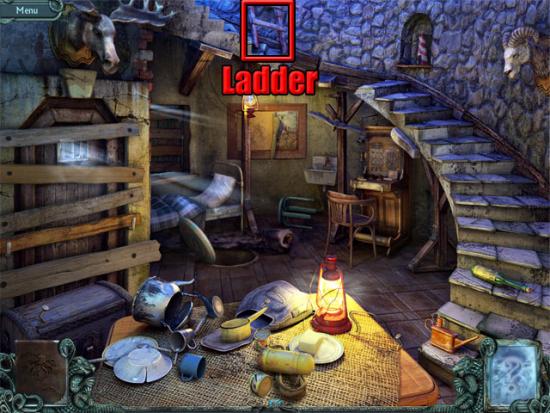
Examine the sparkling area of the boat to enter a hidden object scene. Find all of the objects on the list and the stepladder will be added to the inventory:
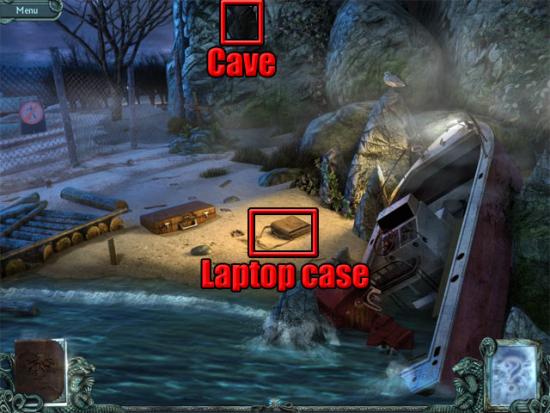
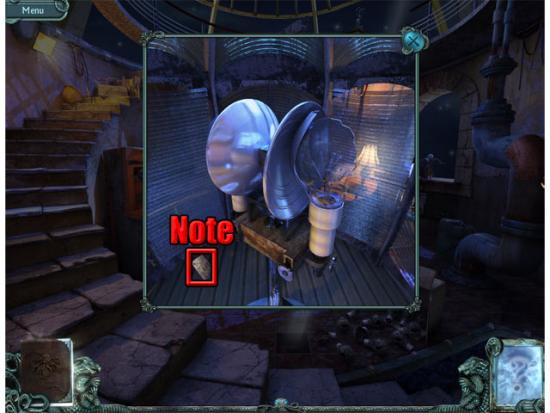
Examine the laptop case. Take the flashlight in the close-up view and then select the laptop to see the panel on the back. Exit the view of the laptop case and use the stepladder and the flashlight on the cave entrance:
Take the key and use the flashlight on the well:
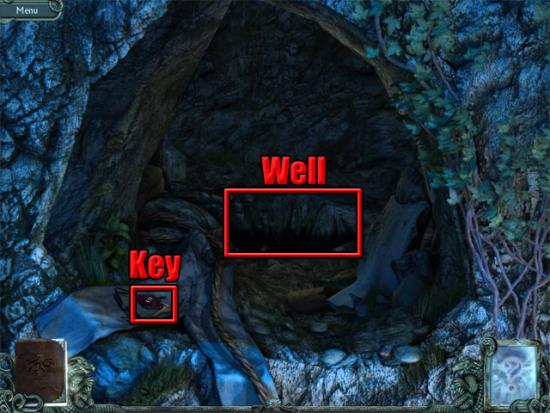
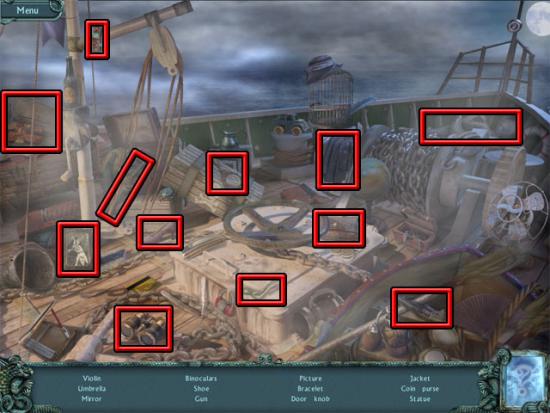
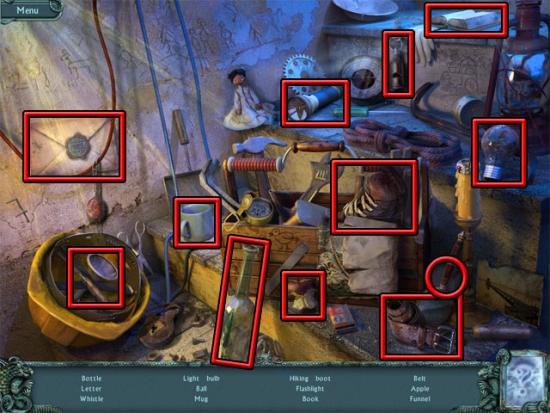
Go down the well to see a large door with fifteen notches around the outside. Return to the beach and examine the boat again to enter a hidden object scene. Find all of the objects on the list and the pliers will be added to the inventory:
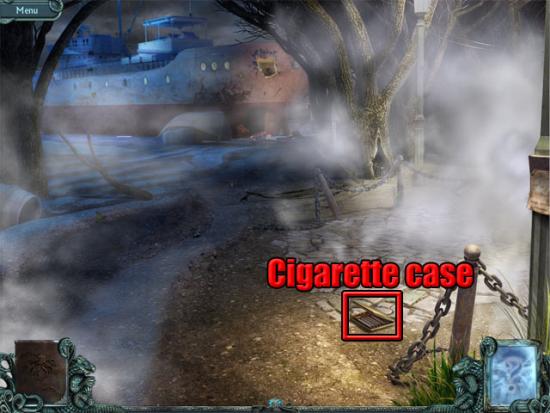
Use the pliers on the fence and go through the gap. Take the cigarette case:
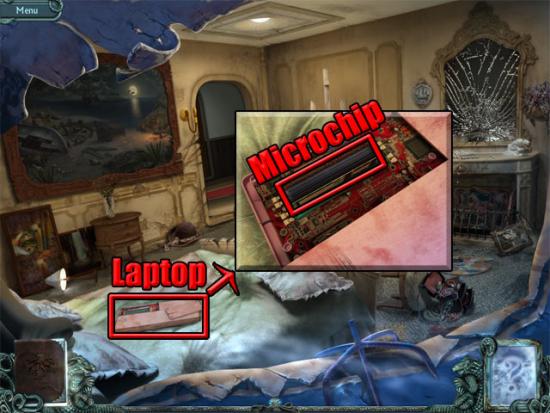
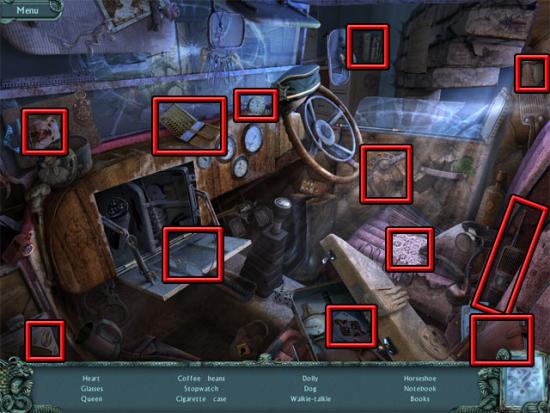
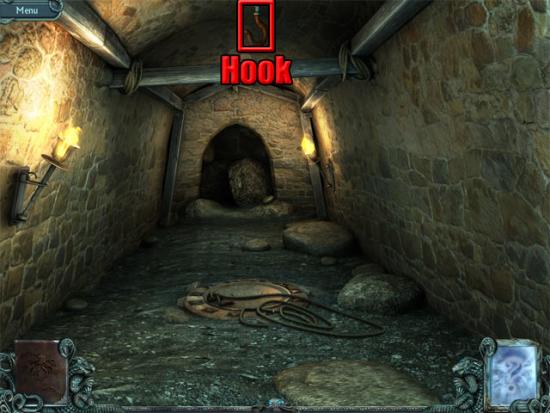
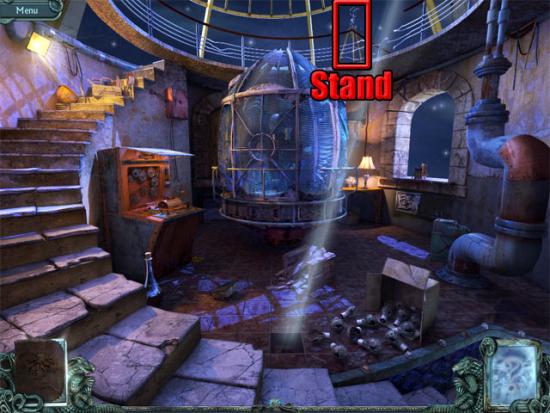
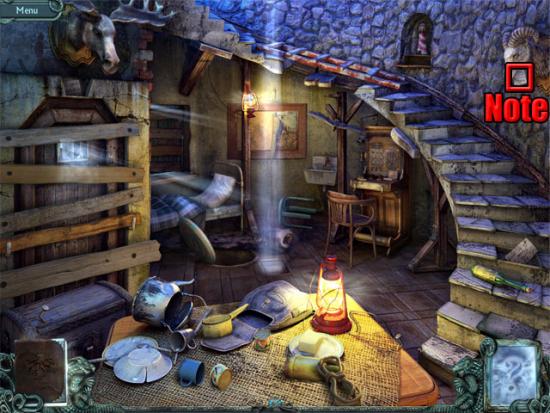
After the cutscene, move forward to the ship and examine the fire. Take the grappling hook in the close-up view and use it on the hole in the ship. Climb into the ship. Select the laptop on the bed to turn it. Examine the laptop and take the microchip in the close-up view:
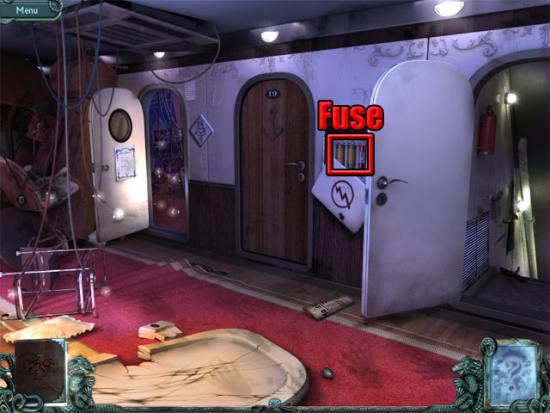
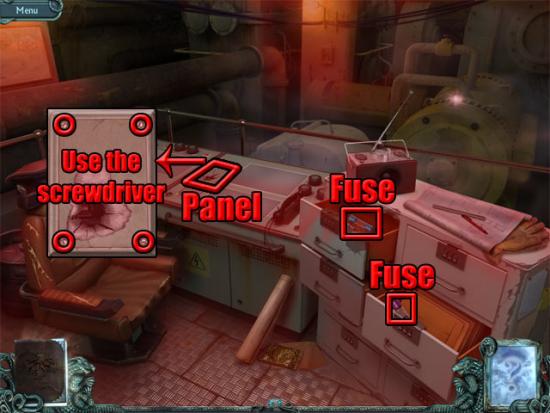
Go through the doorway to the hall and take the fuse from the fusebox:
Go through the left doorway to enter the restaurant. Select the right handle on the bar to open the curtain:
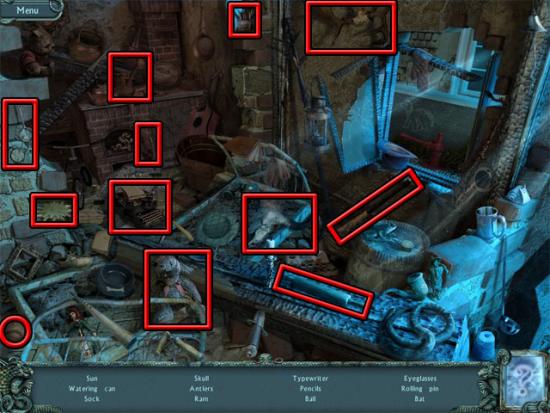
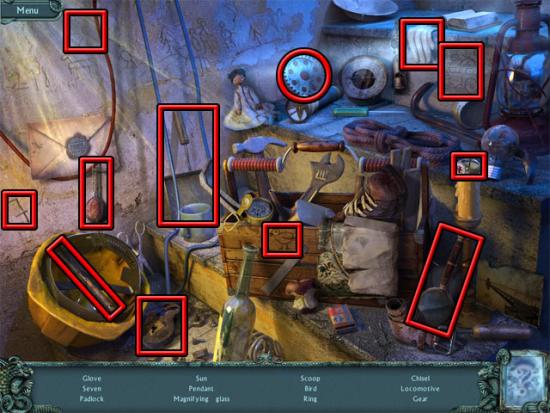
Examine the sparkling area to enter a hidden object scene. Find all of the objects on the list and the scoop will be added to the inventory:
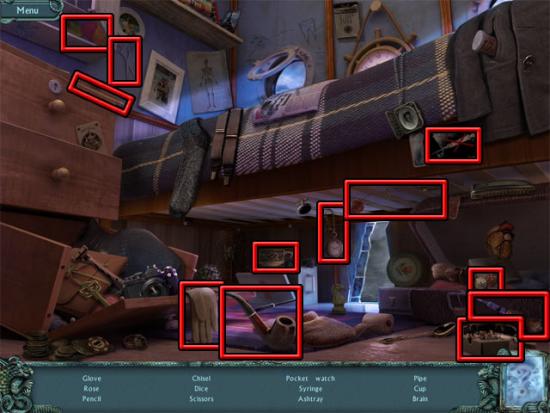
Return to the hall and use the middle door to open it. Go through the middle doorway to enter the cabin. Examine the sparkling area on the floor to enter a hidden object scene. Find all of the objects on the list and the chisel will be added to the inventory:
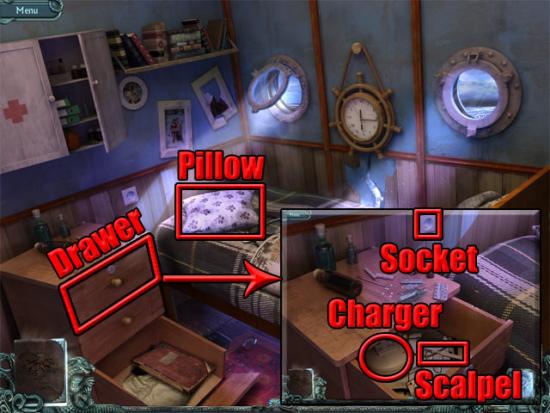
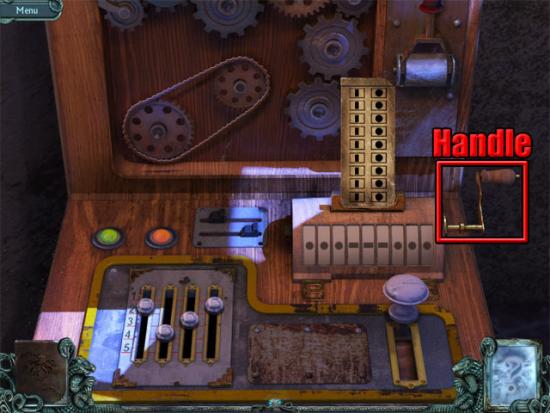
Move the pillow on the bed and take the cell phone. Use the chisel on the top drawer and take the cell phone charger and the scalpel. Use the cell phone charger on the socket:
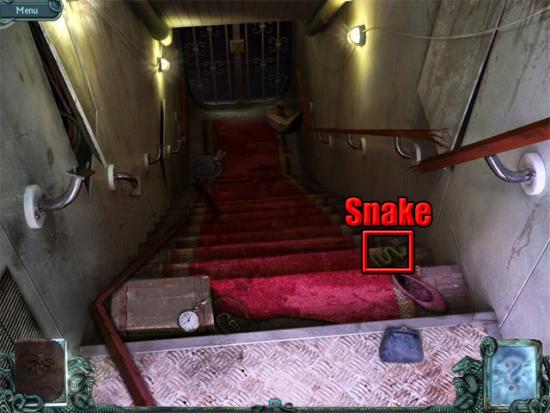
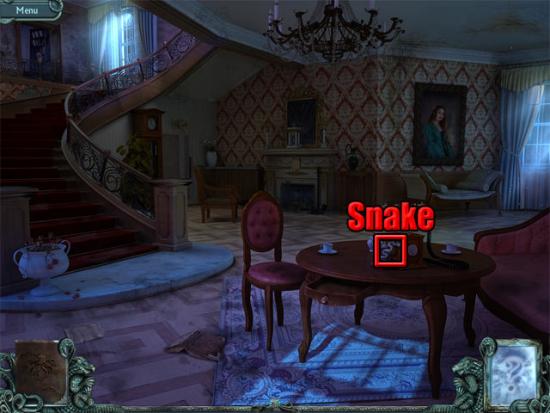
Use the dead cell phone on the charger. Examine the cell phone and press the right arrow six times to reveal the combination to the suitcase on the beach. The combination that is shown will vary from one game to the next. Return to the hall and go through the right doorway. Take the snake figurine on the stairs:
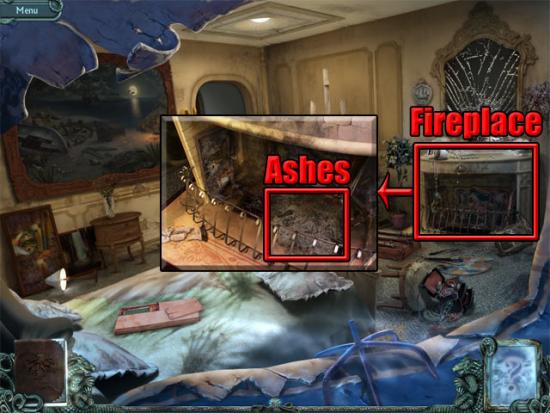
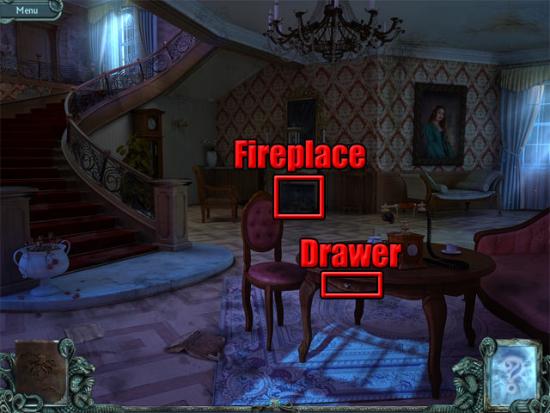
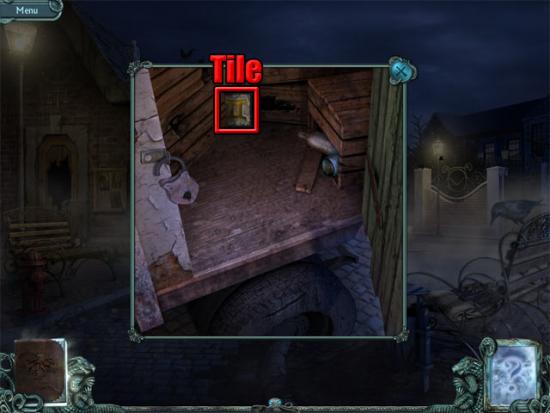
Move back twice to the artist’s room. Examine the fireplace and use the scoop on the ashes to reveal the flash drive:
Take the flash drive. Return to the beach and examine the suitcase. Enter the combination that was shown on the cell phone in the ship to open the suitcase.
Reveal the Hatch
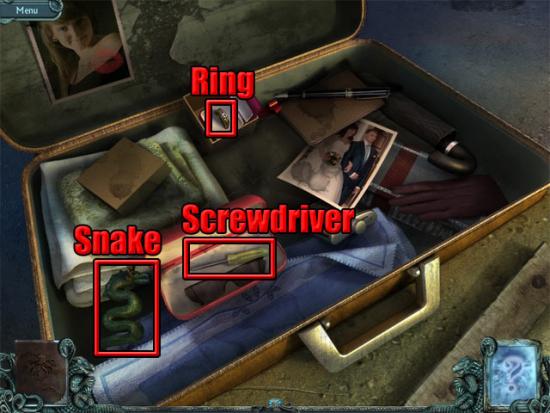
Take the snake figurine. Open the present and take the diamond ring from the box. Open the glasses case and take the screwdriver:
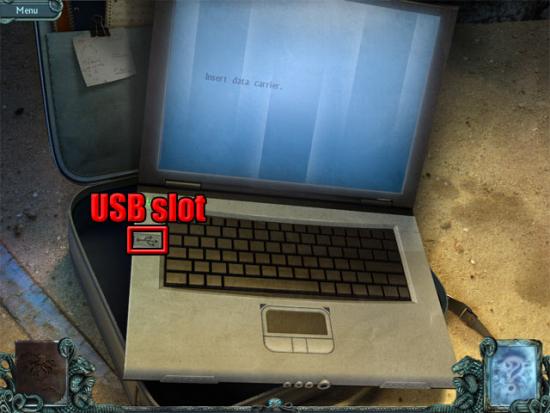
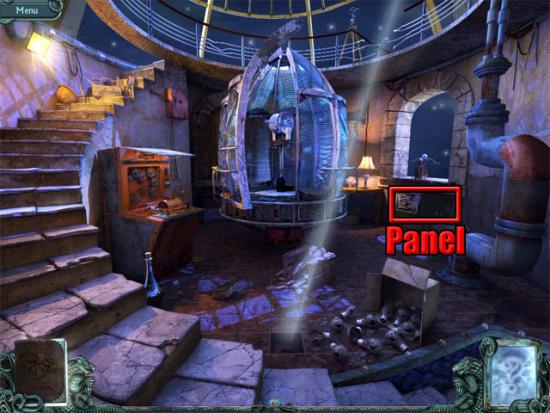
Exit the view of the suitcase and examine the laptop. Examine the panel and use the screwdriver on the four screws in the close-up view:

Take the old microchip from the panel and replace it with the microchip from the inventory. Use the flash drive on the USB slot:
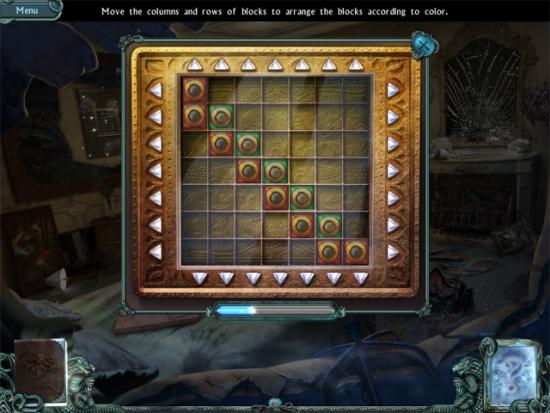
Use the right arrow on the laptop screen four times to read about a safe behind a painting in the cabin. Return to the artist’s room in the ship and examine the large painting on the left wall. Use the scalpel on the painting to reveal the safe. Examine the safe to play a mini-game where the aim is to arrange the blocks according to color by using the arrows to move horizontally and vertically. The completed mini-game is shown below:
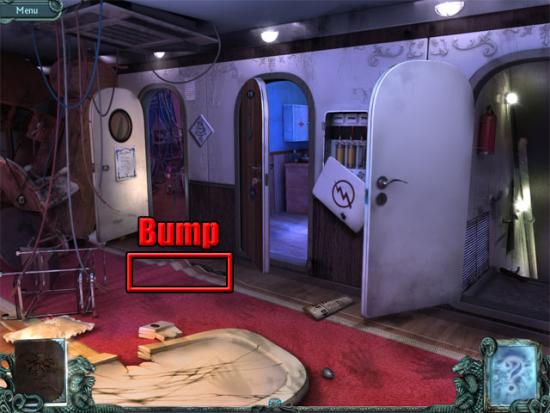
After completing the mini-game, take the snake figurine and the body oil. Exit the view of the safe. Move forward to the hall and examine the bump in the carpet. Use the scalpel on the bump in the close-up view to reveal the hatch:
Enter the Mansion
Go through the middle doorway to the cabin. Examine the sparkling area to enter a hidden object scene. Find all of the objects on the list and the key will be added to the inventory:

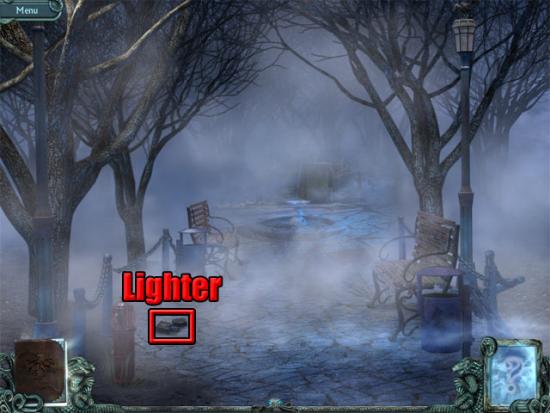
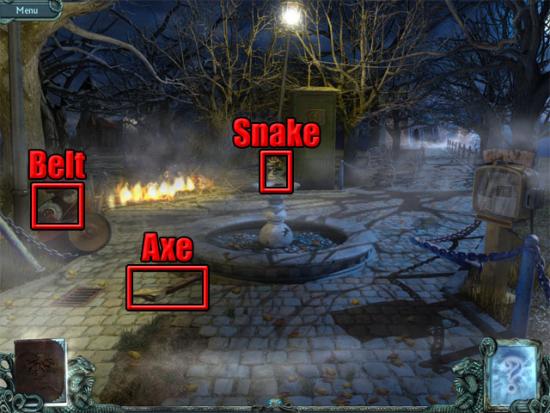
Return to the hall and examine the hatch. Use the first key on the right lock on the hatch in the close-up view. Exit the view of the hatch and then move back three times and right to the path leading to the fountain. Take the lighter:
After the cutscene, move forward to the fountain and take the belt, axe and snake figurine:
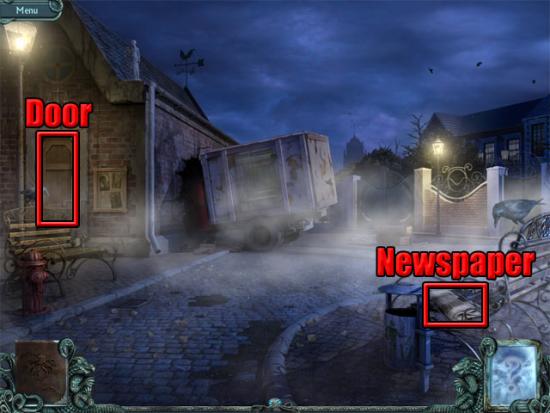
Move forward-right to the police station entrance. Examine the newspaper on the bench to read about an earlier mysterious disappearance. Exit the view of the newspaper and use the axe on the police station door:
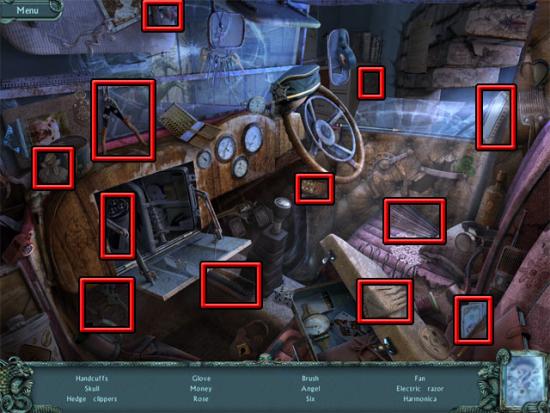
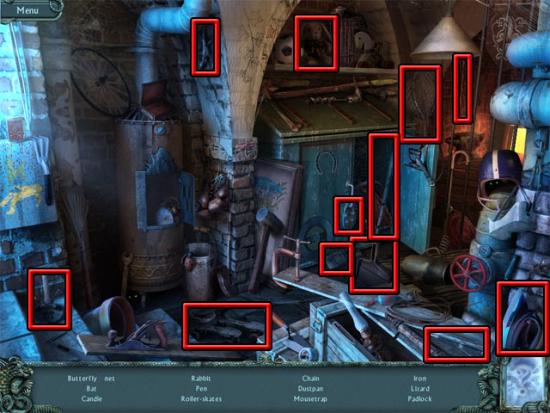
Enter the police station and examine the sparkling area to enter a hidden object scene. Find all of the objects on the list and the hedge clippers will be added to the inventory:
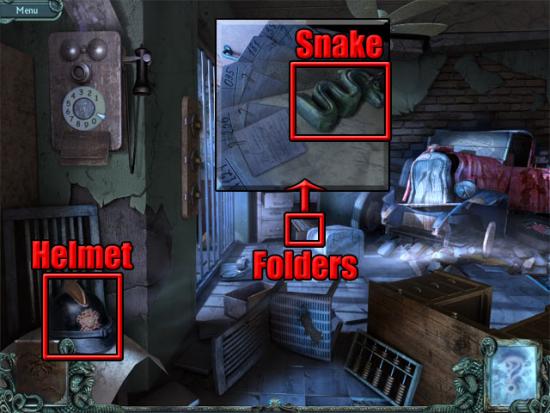
Move the helmet at the bottom-left corner of the room and take the zodiac tile. Examine the folders and take the snake figurine:
Exit the police station. Open the gate and enter the mansion courtyard. Use the hedge clippers on the rose bush:
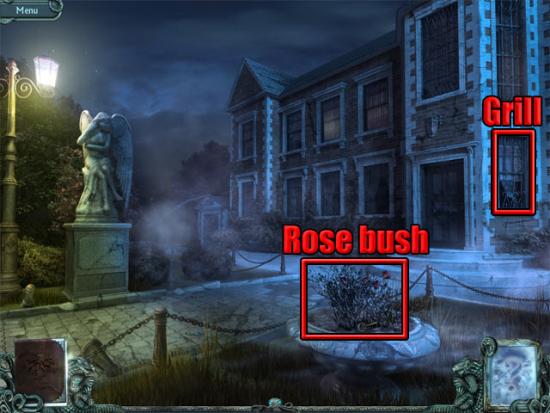
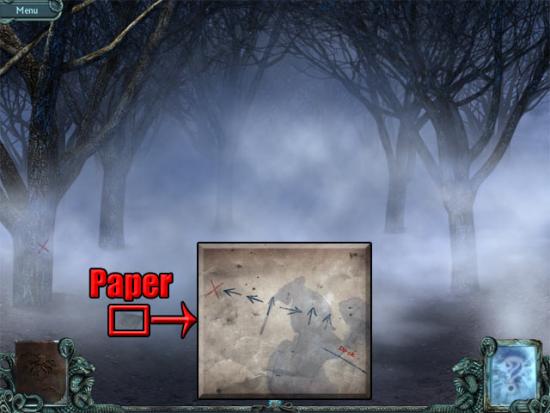
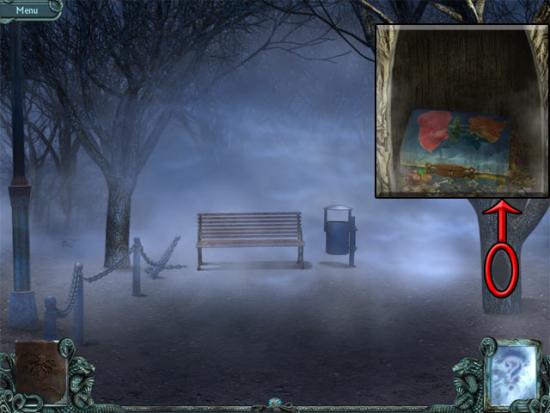
Take the dried up roses and the key. Move to the left side of the mansion and examine the piece of paper on the path:
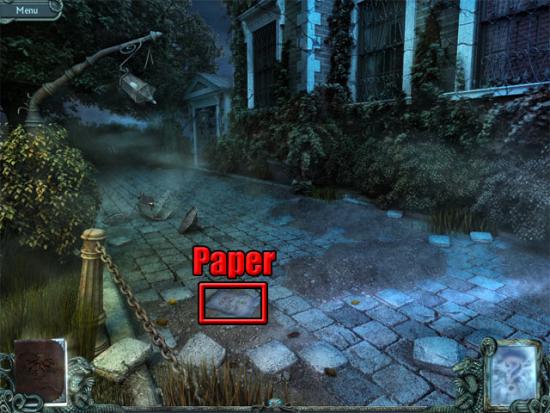
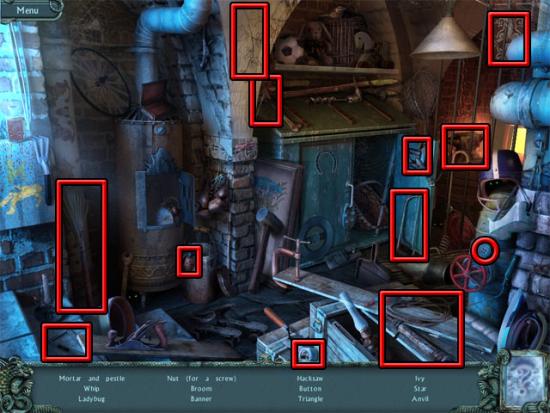
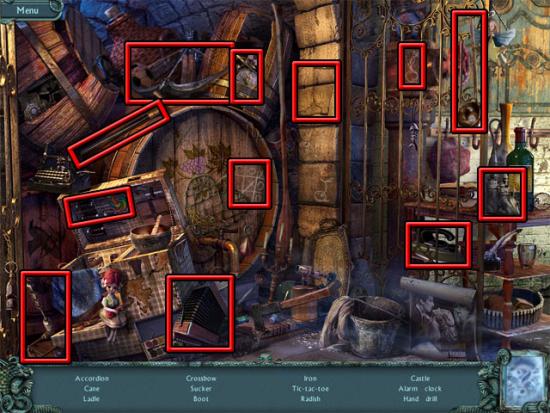
The map of the woods will be recorded in the journal. Approach the door and use the axe on the branch twice. Use the key on the lock to unlock the door and then examine the door to enter a hidden object scene. Find all of the objects on the list and the hacksaw will be added to the inventory:
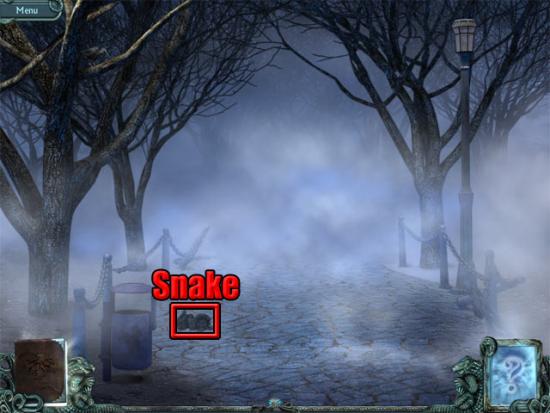
Back away from the door and then move forward twice on the path. Take the snake figurine:
Move back three times and examine the grill on the window at the right side of the door. Use the hacksaw on the grill in the close-up view and then select the grill to remove it. Exit the close-up view and go through the window to enter the mansion.
Extinguish the Fire
Open the drawer and take the revolver. Examine the fireplace:
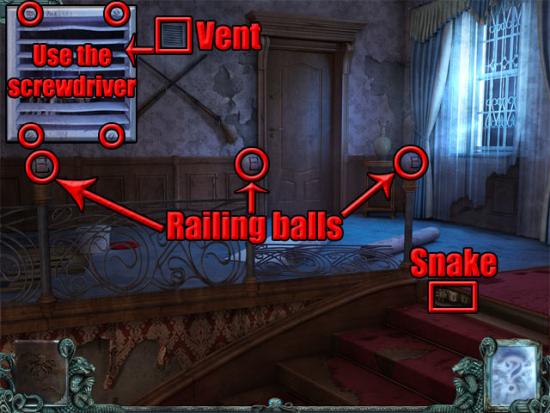
Use the dried up roses, the lighter and the kindling on the fireplace in the close-up view. Exit the close-up view to see the smoke drifting over to the left wall. Move left to the clock. Use the scalpel on the wall and then select the wall to reveal a hidden door. Use the first zodiac tile on the panel at the right side of the door. Move back and go upstairs. Move back and go upstairs. Examine the vent and use the screwdriver on the four screws. Take the zodiac tile. Use the body oils on the two left railing balls and then turn all three balls one time to open the top step. Take the snake figurine from the top step:
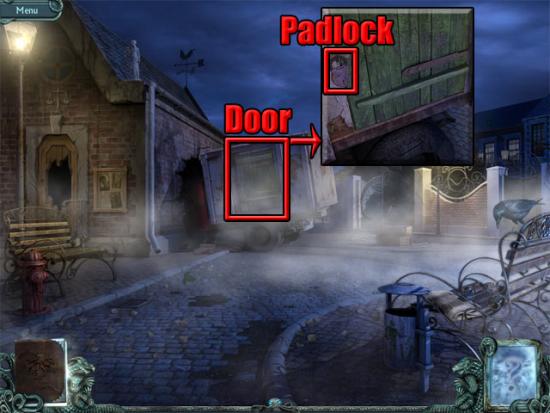
Open the door to reveal a snake. Go downstairs and approach the clock again to add the second zodiac tile to the panel. Exit the mansion and return to the police station entrance. Examine the door to the truck and then use the revolver on the padlock in the close-up view to break it:
Enter the police station and examine the sparkling area to enter a hidden object scene. Find all of the objects on the list and the needle and thread will be added to the inventory:
Exit the police station and examine the truck. Use the needle and thread on the sack and then select the sack to take it. Take the zodiac tile that is revealed:
Return to the left side of the mansion and approach the door. Examine the door to enter a hidden object scene. Find all of the objects on the list and the butterfly net will be added to the inventory:
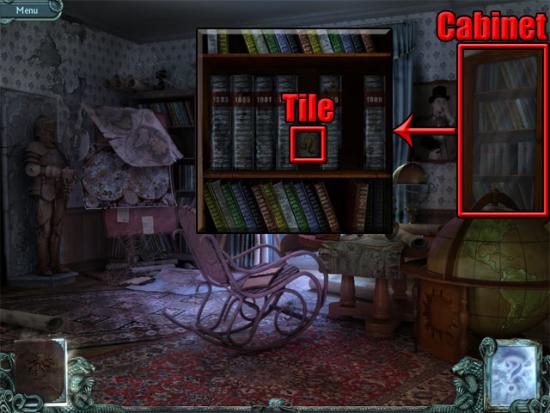
Return to the mansion and go upstairs. Open the door to reveal the snake if this has not already been done. Use the butterfly net and the burlap sack on the snake to catch it. Go through the doorway to enter the reading room. Examine the cabinet and take the zodiac tile in the close-up view:
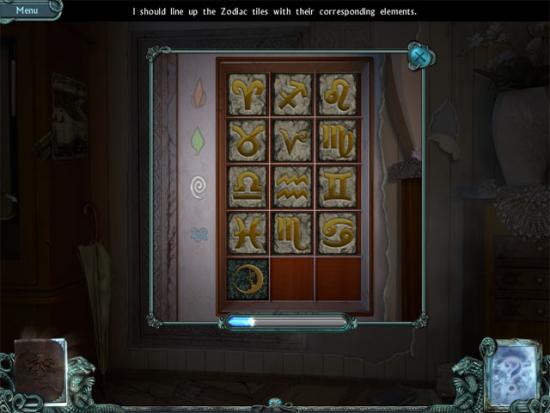
Go downstairs and approach the secret door near the clock. Use the remaining zodiac tiles from the inventory on the slots and the panel will then move to reveal more zodiac tiles. Examine the panel to play a mini-game where the aim is to line up the zodiac tiles with their corresponding elements:
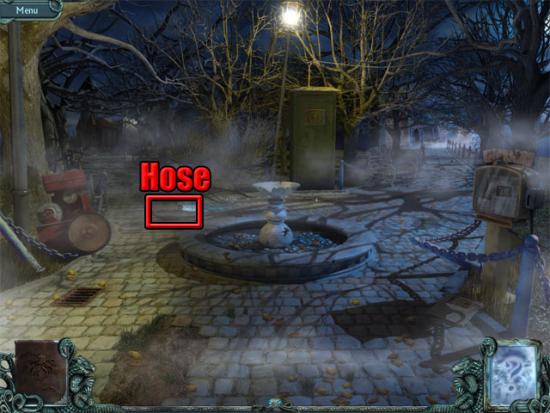
Examine the door and take the monkey wrench and the snake figurine. Return to the door at the left side of the mansion and examine the door to enter a hidden object scene. Find all of the objects on the list and the hose will be added to the inventory:
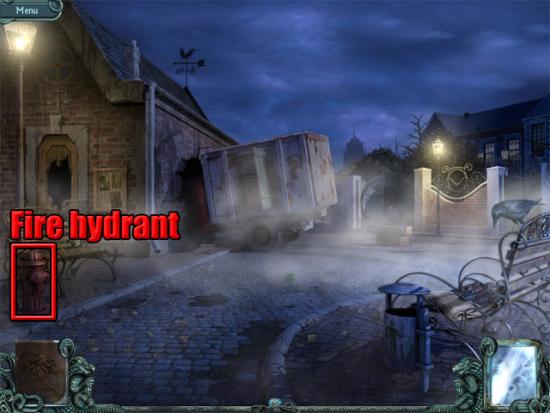
Return to the police station entrance and use the hose and the monkey wrench on the fire hydrant:
Move back the fountain and select the hose:
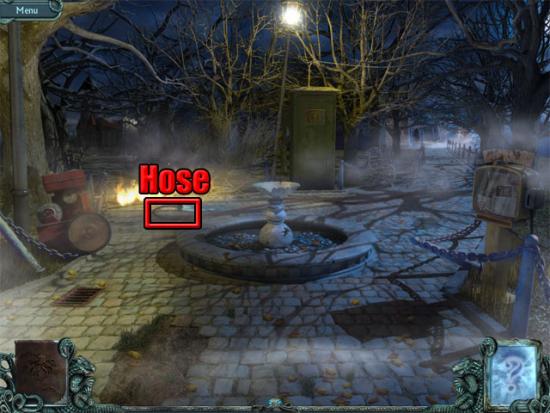
Use the hose on the fire to extinguish it.
Unlock the Diary
Move forward-left to enter the woods. Move forward-left and examine the piece of paper on the ground to see directions to the dock:
Move left twice, forward and right. Take the snake figurine on the path:
Move forward twice and then left to the dock. Examine the sparkling area in the doorway enter a hidden object scene. Find all of the objects on the list and the key will be added to the inventory:
Move back five times and forward-right to the church lane. Examine the sparkling area to enter a hidden object scene. Find all of the objects on the list and the sun will be added to the inventory:
Use the scalpel on the teddy bear:
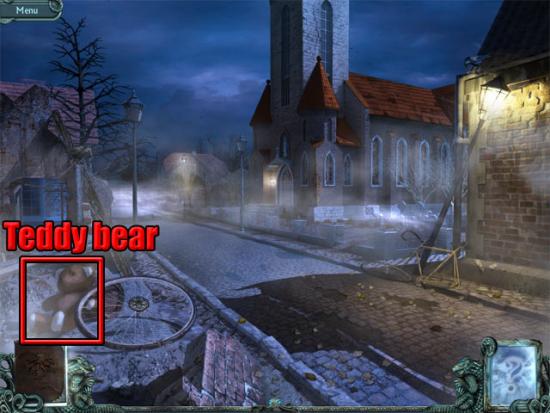
Take the key from the teddy bear. Approach the church and examine the door. Use the gold key from the dock on the keyhole in the close-up view. Enter the church and examine the sparkling area to enter a hidden object scene. Find all of the objects on the list and the handkerchief will be added to the inventory:
Use the handkerchief in the basin of water. Use the wet handkerchief on the right window to clean it:

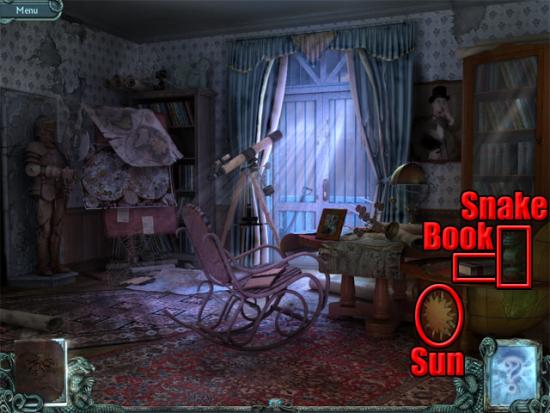
Return to the mansion and examine the fireplace. Take a piece of coal from the fireplace in the close-up view. Go upstairs and enter the reading room. Use the sun on the slot to open the globe. Take the book and the snake figurine:
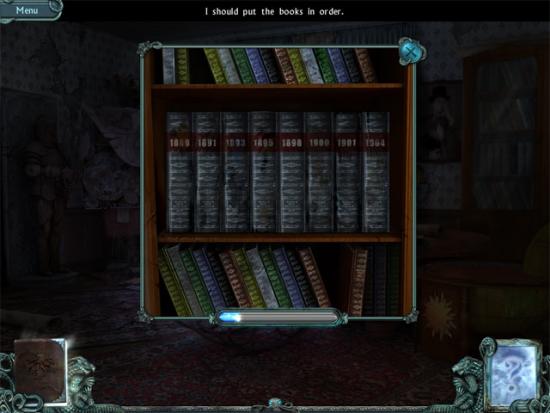
Examine the book cabinet and use the two books on the gaps. Arrange the books in order from earliest year to latest year:
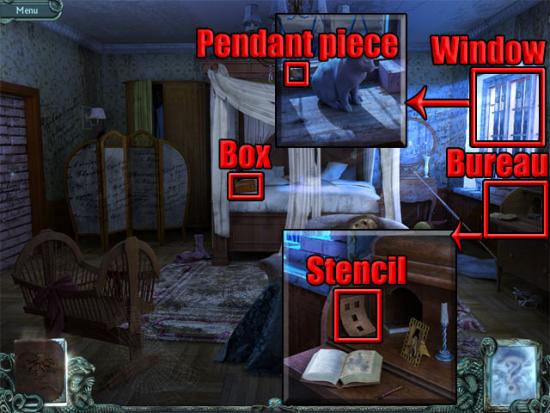
Go through the left doorway to enter the bedroom. Examine the bureau and take the stencil in the close-up view. Examine the window and take the pendant piece in the close-up view. Move the curtain and examine the box on the bed:
Examine the top of the box in the close-up view to play a mini-game where the aim is to turn the parts of the box to assemble the ornament. Turn pieces 1 to 4 three times each and then turn piece 5 twice to unlock the box:
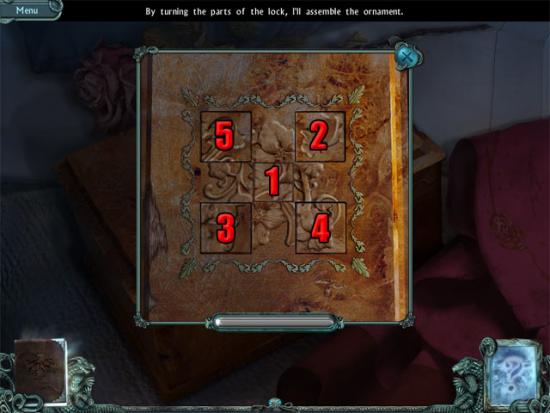
Take the notepad page from the box. Use the first pendant piece in the heart-shaped slot on the front of the diary. Return to the police station and examine the sparkling area to enter a hidden object scene. Find all of the objects on the list and the broken pendant will be added to the inventory:
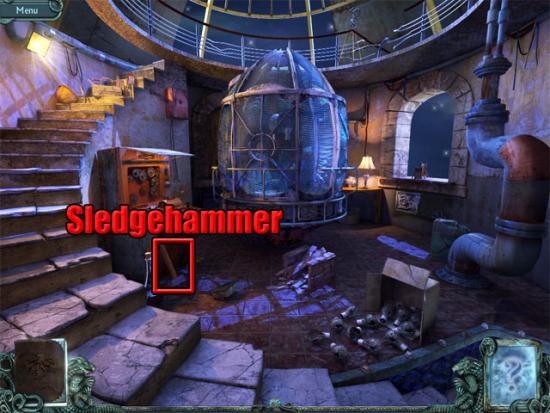
Return to the door at the left side of the mansion and examine the door in the close-up view to enter a hidden object scene. Find all of the objects on the list and the sledgehammer will be added to the inventory:
Back away from the door and move forward to the bench to the woods. Move forward, left and forward. Examine the hole in the tree and use the key on the box:
Take the green dart from the box. Move back twice, right, forward and right. Examine the hole in the tree and use the key on the box:
Take the snake figurine and the blue dart from the box. Move back and then forward. Examine the hole in the tree and use the key on the box:

Take the red dart from the box. Return to the bedroom in the mansion and examine the box. Use the other part of the broken pendant on the heart-shaped slot in the diary and then examine the diary to see a picture of the stained glass window from the church.
Open the Snake Door
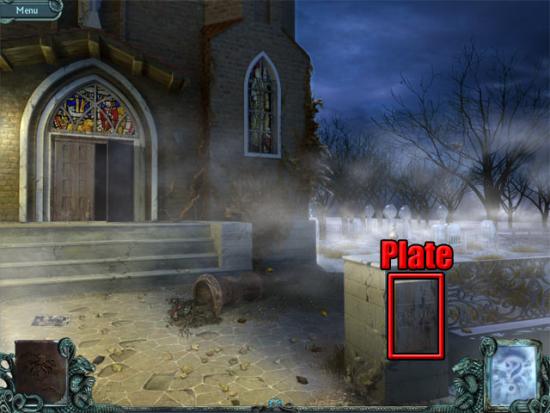
Use the sledgehammer on the brick wall at the left side of the bedroom and take the strange disc in the close-up view. Return to the church entrance and use the notepad page and the coal on the plate to record the symbols in the journal:
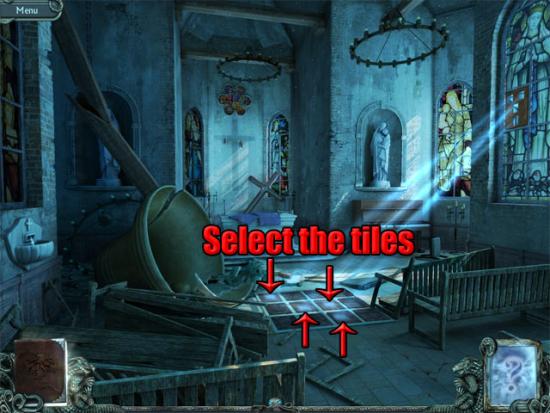
Enter the church and examine the window at the right side of the room. Use the stencil on the window and then use the diamond ring on the stencil. Turn over the tiles that the illuminated by the rays of light:
Move forward and examine the tile on the floor. Use the strange disc on the lock and then complete the mini-game by moving the tiles to the order shown below:
Take the snake figurine after completing the mini-game. Move back and examine the sparkling area to enter a hidden object scene. Find all of the objects on the list and the hammer will be added to the inventory:

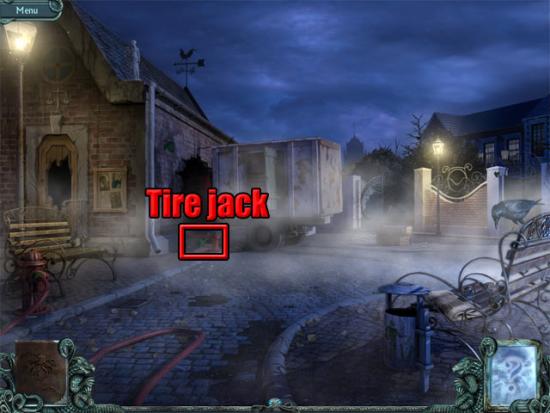
Exit the church and move back to the church lane. Examine the sparkling area to enter a hidden object scene. Find all of the objects on the list and the tire jack will be added to the inventory:
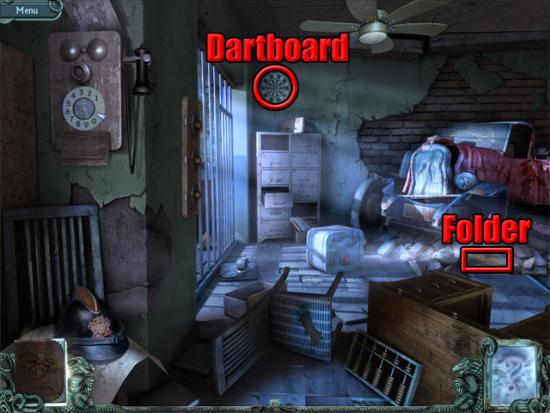
Return to the police station entrance and use the tire jack on the truck. Enter the police station and select the folder below the truck to move it. Open the folder in the close-up view and take the phone number. Use the three darts on the dartboard:
Return to the mansion and take the snake figurine from the phone:
Return to the bedroom in the mansion and examine the window at the right side of the room. Use the hammer on the cat statue and take the coins. Exit the mansion and examine the base of the statue. Use the hammer on the panel:

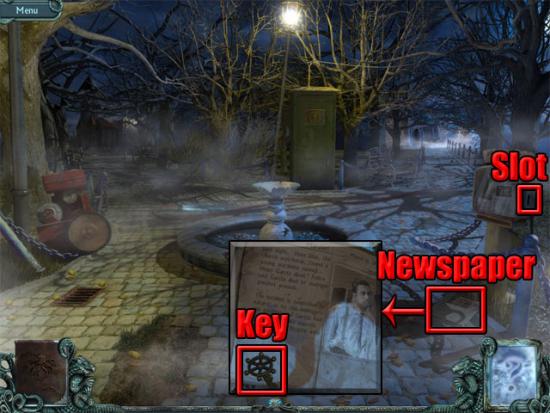
Take the key. Return to the fountain and use the coins on the newspaper box coin slot. Select the newspaper that falls to the floor and take the key in the close-up view:
Return to the hall in the ship. If you didn’t do so earlier on, use the scalpel on the bump in the carpet to reveal the hatch. Examine the hatch and use the remaining keys from the inventory on the keyholes. Take the snake figurine from the hatch. Return to the beach and go through the cave to the snake door. Use the fifteen snake figurines on the notches around the door to open it.
Rescue Angel
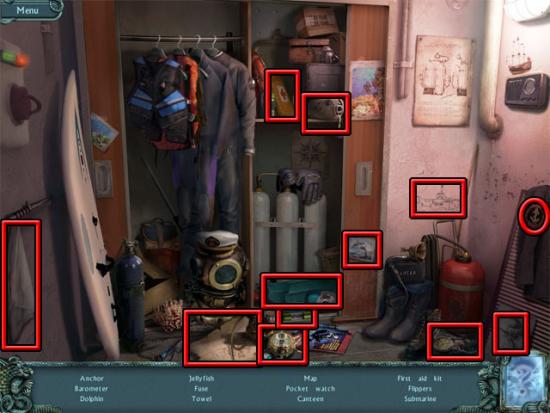
Go through the doorway and try to open the hatch to find out that the lid is too heavy. Return to the beach and examine the sparkling area on the boat to enter a hidden object scene. Find all of the objects on the list and the weight will be added to the inventory:
Return to the restaurant in the ship and examine the sparkling area to enter a hidden object scene. Find all of the objects on the list and the rope will be added to the inventory:
Return to the snake door hall and use the rope on the hatch. Select the rope and then select the hook on the ceiling:
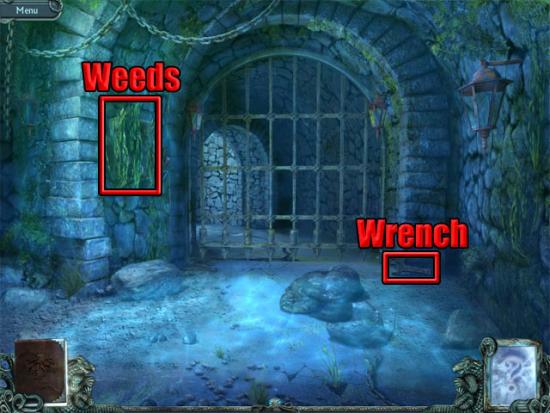
Use the weight on the rope to open the hatch. Select the hatch to enter the flooded room. Examine the weeds at the left side of the room and remove the three weeds to reveal a mechanism. Exit the close-up view of the mechanism. Move the stones at the right side of the arch and take the wrench:
Return to the church lane and use the wrench on the gear of the bicycle wheel to remove the gear:
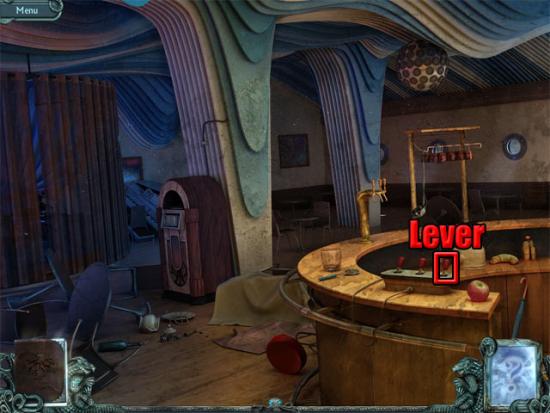
Return to the flooded room and examine the mechanism. Use the gear and the belt on the mechanism and then pull the lever to see the gate rise slightly. Return to the police station entrance and take the tire jack:
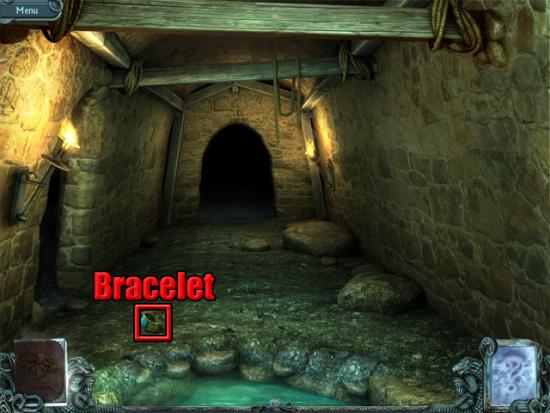
Return to the flooded room and use the tire jack on the gate to make a hole in the floor. Dive through the hole and move forward to the other side of the gate. Take the bracelet:
Move forward, forward-left, forward, right and forward to the temple. Examine the platform:
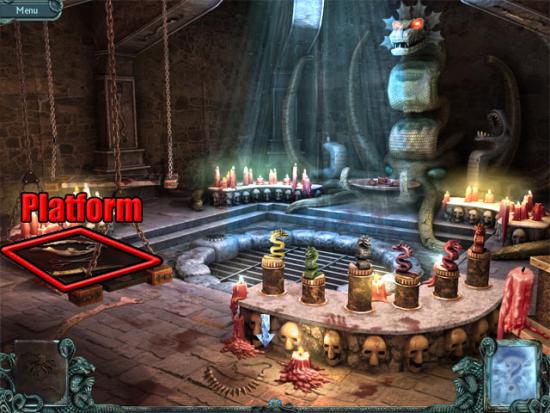
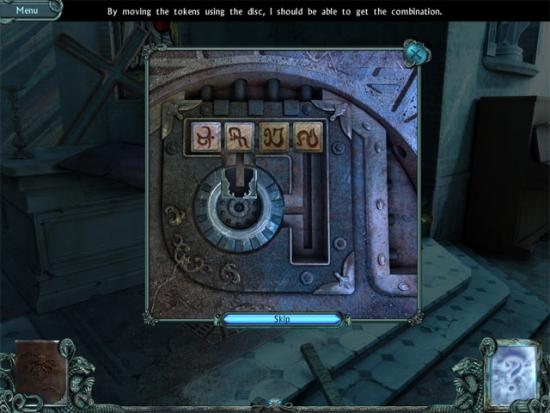
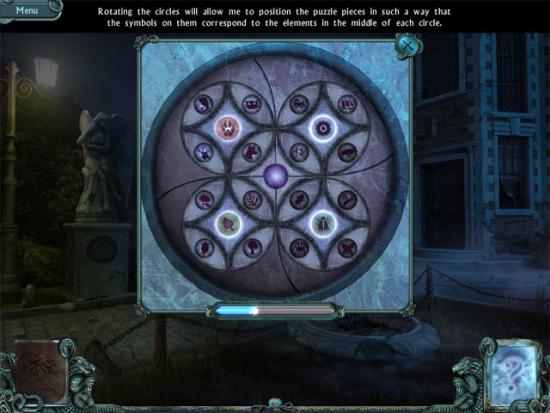
The five symbols on the knife will be recorded in the journal. Return to the mansion entrance and examine the panel below the statue. Press the symbols in the order that was shown on the knife in the temple. The symbols will vary from one game to the next. Examine the disc that is revealed to reveal a mini-game where the aim is to position the pieces so that they correspond to the objects shown in the middle of the discs:
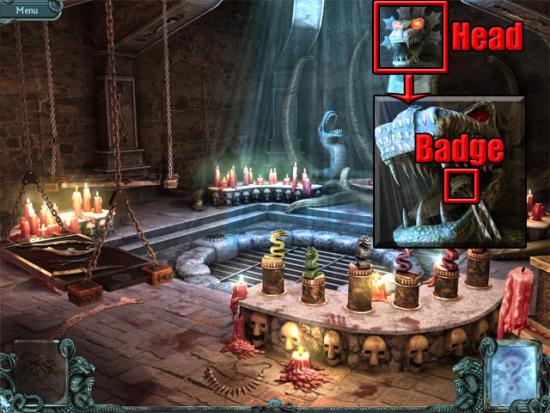
Take the stone head from the hole. Return to the temple and use the stone head on the left snake statue. Examine the head of the middle snake and take the policeman’s badge:
Return to the police station and use the policeman’s badge on the slot below the dials in the cell:
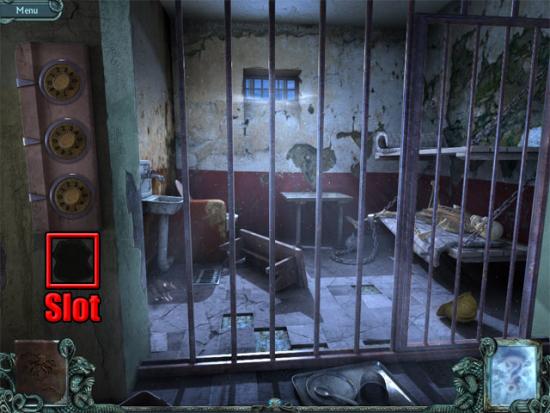
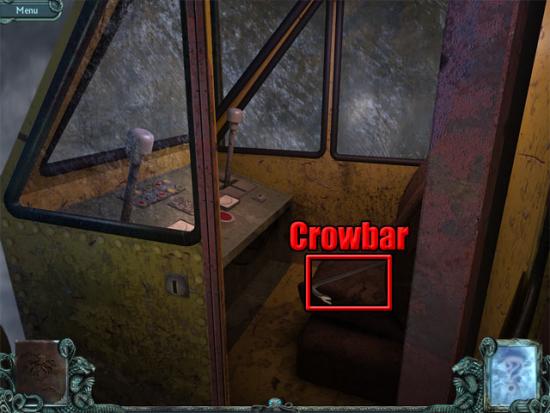
Numbers will appear on the badge which vary from one game to the next. Move the dials to the numbers shown on the badge. After moving the dials to the correct numbers, select the skeleton in the cell and take the start key that is dropped. Return to the dock by walking back through the woods near the church and approach the crane. Use the start key on the keyhole and take the crowbar:
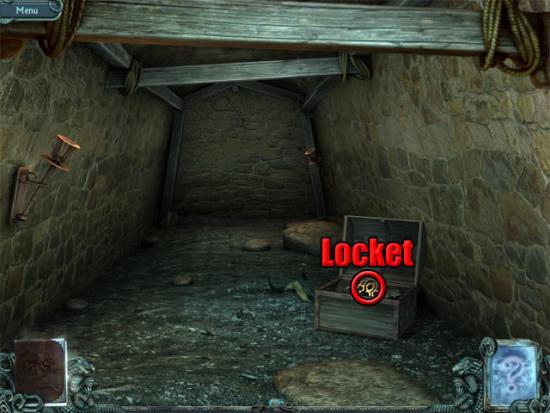
Return to the temple maze on the other side of the flooded room and move left, right, forward twice and left to the room with the chest. Use the crowbar on the chest and take the locket:
Move back, right and forward to return to the temple. Examine the well in the middle of the room. Use the locket on the slot and then select Angel to carry her back to the ship.
Escape the Island
Return to the crane at the dock and examine the control panel. Use the start key on the keyhole. Turn the key and then press the yellow button to clear the windshield. Move the right lever right and the left lever down, then press the red button to pick up the ramp. Move the right lever left twice and up and then press the red button to place the ramp. Examine the sparkling area to enter a hidden object scene. Find all of the objects on the list and the valve will be added to the inventory:
Board the ship and examine the sparkling area to enter a hidden object scene. Find all of the objects on the list and the door knob will be added to the inventory:
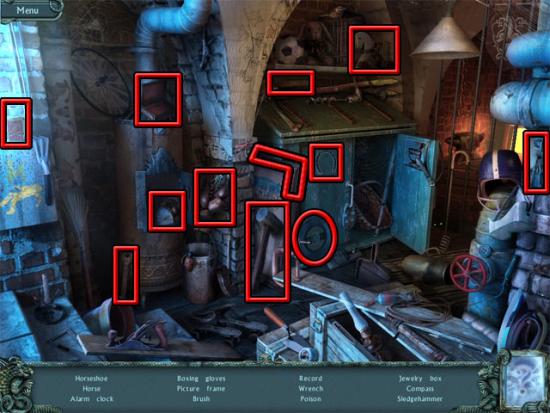
Use the valve on the door and then select the valve to open the door. Use the crowbar on the window at the left side of the door and take the part of the round key. Go through the door and move downstairs. Examine the sparkling area to enter a hidden object scene. Find all of the objects on the list and the fuse will be added to the inventory:
Go through the right doorway to the control room and use the crowbar on the top-left drawer. Take the fuse. Open the second drawer from the top on the right side and take the fuse. Take the iron bar from the panel. Examine the panel and use the screwdriver on the four screws:
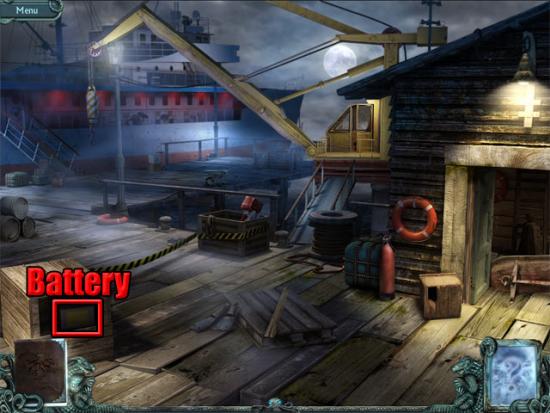
Return to the dock and use the crowbar on the crate three times. Take the battery:
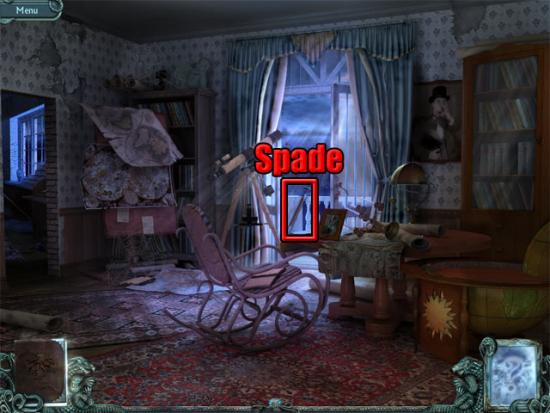
Return to the reading room in the mansion and examine the door. Use the door knob on the door and then select it to open the door. Take the spade:
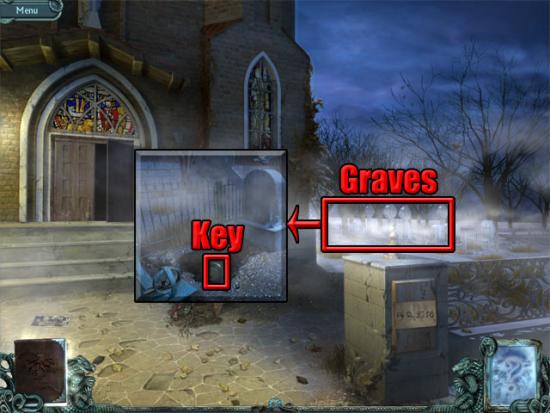
Return to the church entrance and examine the graves. Use the spades on the grave and take the part of the round key:
Return to the hold in the ship near the dock and examine the slot:
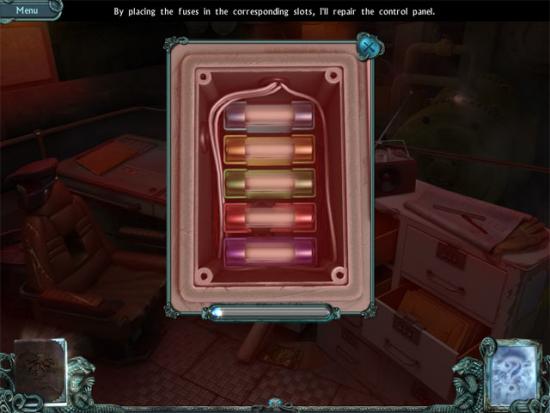
Use the two parts of the round key on the slot to open the cupboard. Take the fuse from the cupboard. Enter the control room and examine the panel. Select the old fuses to remove them. Put the five fuses in the correct slots:
Return to the deck and examine the sparkling area to enter a hidden object scene. Find all of the objects on the list and the access card will be added to the inventory:
Return to the control room and examine the control display. Use the access card on the slot, select the power supply button and select the emergency power button to turn the emergency power off. Return to the hold and examine the keypad:
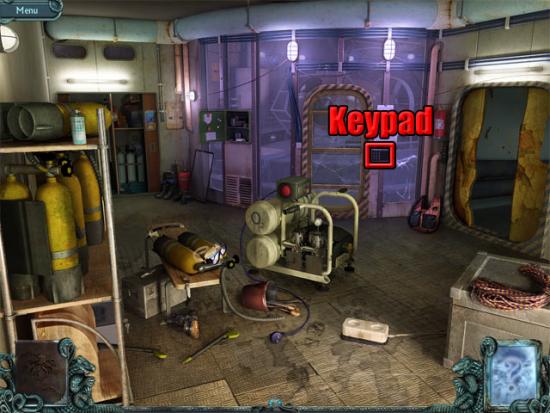
The aim on the keypad puzzle is to guess the correct sequence of numbers. Try pressing 1 to start with. If it is displayed as red, press the < button on the keypad and try other numbers until it is displayed as green. Once the first digit has been entered correctly, repeat the same method with the other three numbers to open the door. Return to the fountain and take the hose:
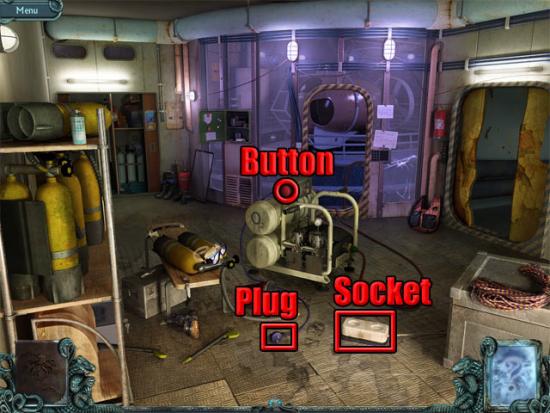
Return to the ship’s hold and use the hose on the air pump in the middle of the room. Take the plug and use it on the socket. Press the button on the air pump:
Take the hose and select the submersible room door. Enter the submersible room. Open the small door on the side of the submarine. Take the hose and use it on the small door. Select the switch to open the hatch:
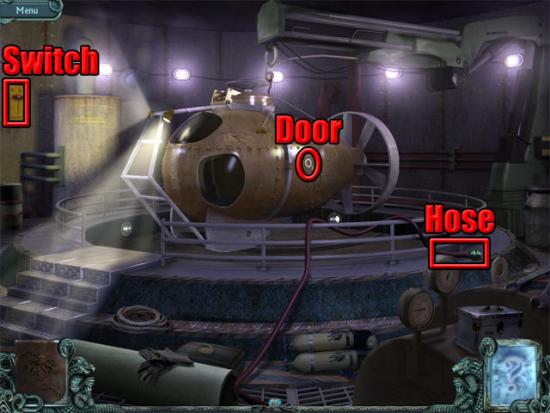
Remove the hose and then close the small door. Return to the hold and press the button on the air pump to turn it off. Return to the control room and examine the display. Select the floodgate control button and lower the submersible. Enter the submersible and open the battery box:
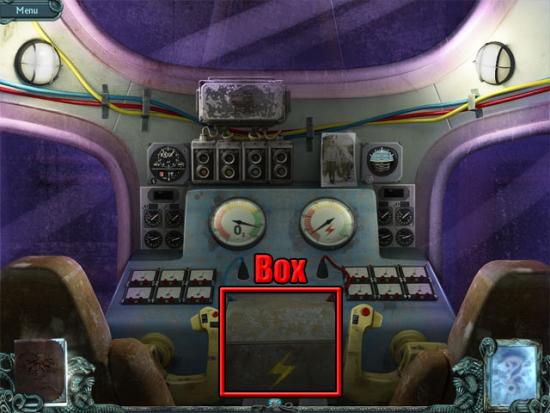
Remove the old battery and replace it with the battery from the inventory to complete the main game.
Bonus Chapter
The bonus chapter starts outside the shack. Examine the sparkling area to enter a hidden object scene. Find all of the objects on the list and the well handle will be added to the inventory:
Use the well handle on the top of the well and then select it to raise the bucket. Take the bucket of water. Take the crowbar from the bucket and use it on the door to remove the boards. Take the two boards and use them on the ladder to repair it. Examine the bottom of the drain pipe and take the toy soldier in the close-up view. Examine the top of the drain pipe take the toy soldier in the close-up view:
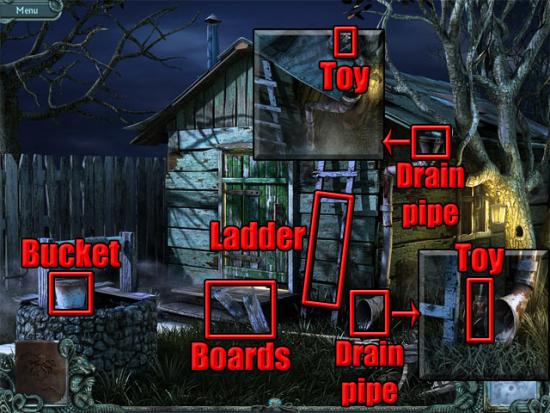
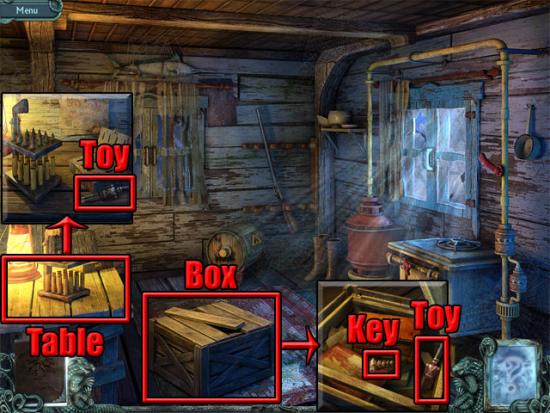
Use the bucket of water on the drain pipe. Examine the bottom of the drain pipe and take the hairpin. Examine the door and use the hairpin on the keyhole. Enter the shack. Examine the table and take the toy soldier in the close-up view. Examine the instructions on the piece of paper. Use the crowbar on the box. Examine the box and take the shaped key and the toy soldier in the close-up view:
Move the top-right corner of the carpet and examine the hatch that is revealed. Exit the shack and examine the sparkling area to enter a hidden object scene. Find all of the objects on the list and the well handle will be added to the inventory:
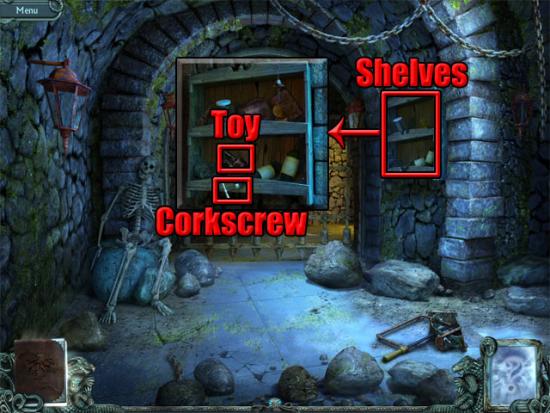
Enter the shack and examine the hatch. Use the chisel on the hatch in the close-up view. Go down the hatch to enter the dungeon. Examine the shelves on the wall and take the toy soldier and the corkscrew in the close-up view:
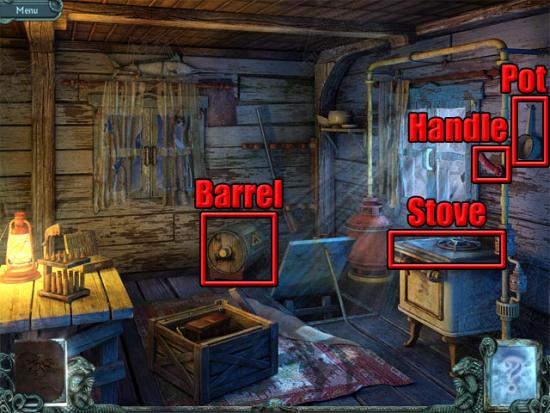
Use the corkscrew on the barrel and take the gunpowder that drops out. Take the pot and use it on the stove. Use the toy soldiers on the pot and then select the handle to turn on the gas.
If you are not able to put the toy soldiers in the pot, examine the instructions on the table at the left side of the room and then try again. Move back to exit the shack and use the bucket on the well. Take the bucket of water. Return to the shack and examine the table. Use the pot with melted metal on the box in the close-up view and then close the box. Use the bucket of water on the box. Open the box and take the bullets. Use the gunpowder and the bullets on the shells. Select the clamp and then take the cartridges. Exit the view of the table and examine the gun on the wall:
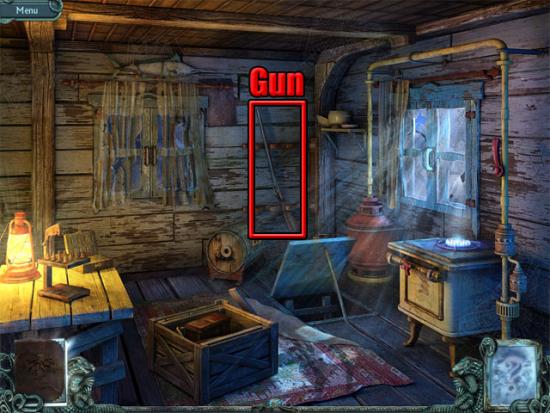
Use the cartridges on the gun and the shotgun will be added to the inventory. Move back and use the shotgun on the fence. Examine the monster and take the key in the close-up view. Return to the shack and examine the crate. Use the key on the box in the crate and take the rust remover from it. Go down the hatch to the dungeon and use the rust remover on the trap:
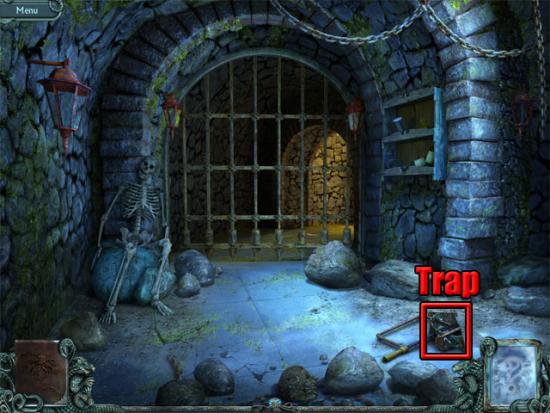
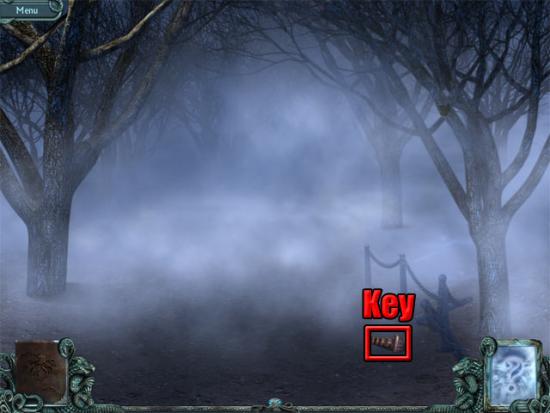
Open the trap and take the hacksaw. Use the hacksaw on the gate and move forward twice to the lighthouse. Examine the doormat. Select the doormat in the close-up view and take the shaped key:

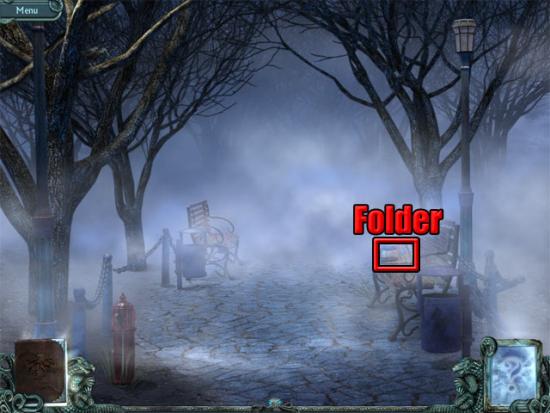
Move right and forward to the bench. Examine the folder on the bench:
Move forward from the bench and take the shaped key:
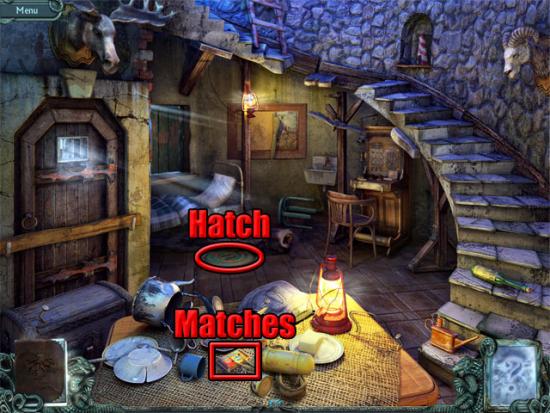
Move back three times and examine the door. Use the three shaped keys on the lock to open the door. Enter the lighthouse. Open the bag. Move the yellow flask and take the box of matches. Move the bearskin and open the hatch:
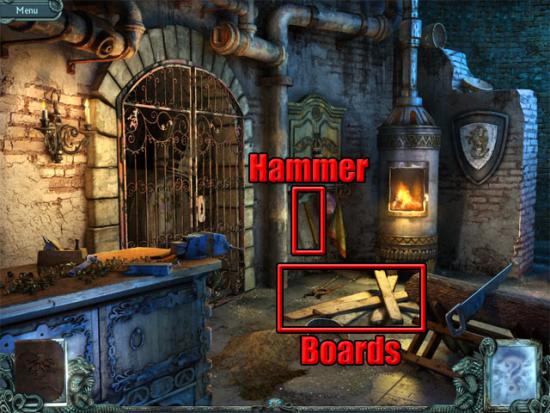
Go down the hatch and use the matches on the candles at the left side of the room. Take the hammer and the boards:
Go upstairs and examine the window. Use the boards and the hammer on the window. Use the boards and the hammer on the door. Take the key on top of the chest:
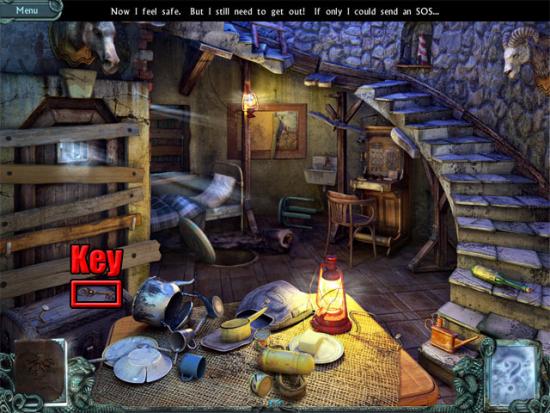
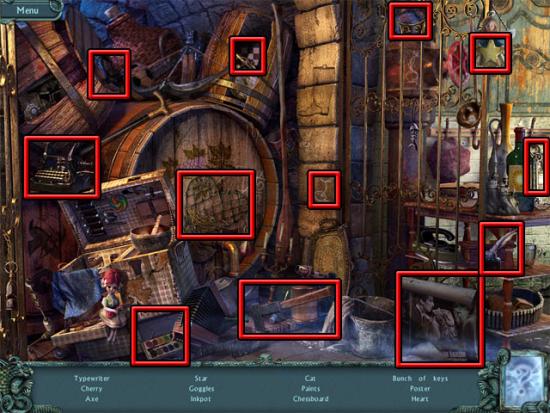
Return to the basement and use the key on the keyhole. Examine the sparkling area to enter a hidden object scene. Find all of the objects on the list and the bunch of keys will be added to the inventory:
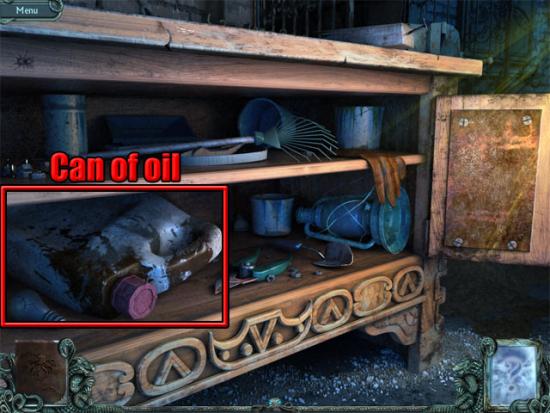
Use the bunch of keys on the dresser and the cabinet. Examine the dresser and take the can of oil in the close-up view:
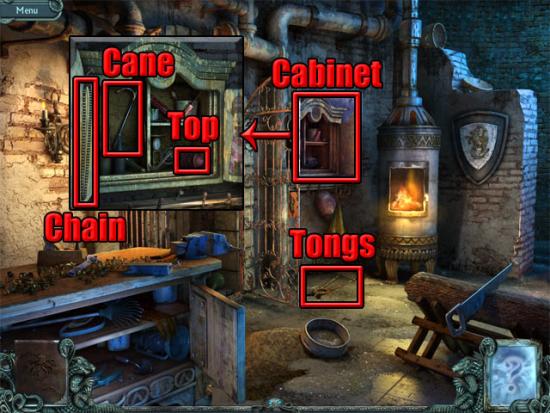
Examine the cabinet and take the chain, cane and toy lighthouse top in the close-up view. Exit the close-up view and take the tongs:
Go upstairs and use the cane on the ladder to pull it down:
Climb upstairs to the main hall of the lighthouse. Examine the sparkling area on the steps to enter a hidden object scene. Find all of the objects on the list and the funnel will be added to the inventory:
Take the sledgehammer:
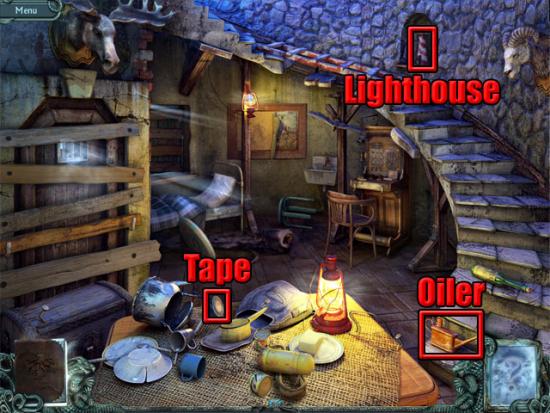
Go downstairs and use the funnel on the oiler. Take the duct tape on the table. Examine the small lighthouse. Use the toy lighthouse top on the lighthouse in the close-up view and then take the lens. Use the can of oil on the oiler and then take the oiler:
Go upstairs and examine the controls. Use the chain and the oiler on the gears. Select the handle at the right side of the gears to open the dome. Use the crowbar on the tile:
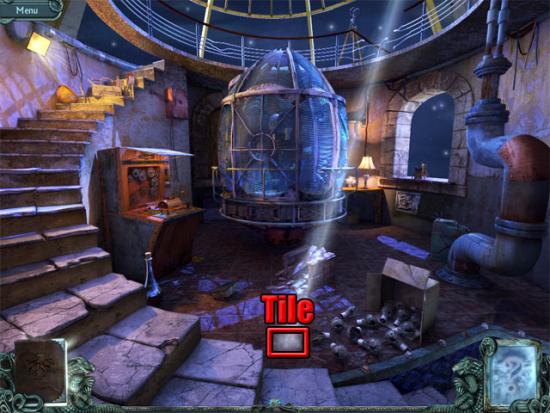
Go downstairs and use the crowbar on the tile:
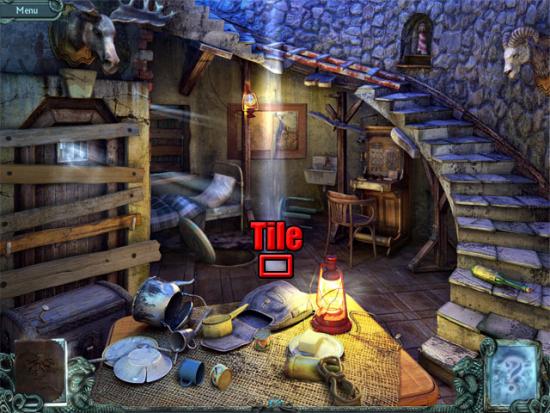
Examine the tile. Move the straw and examine the note about the large stone above the door. Move the stone below the moose head and examine the note. Use the sledgehammer on the fourth step and examine the note:

Go downstairs to the basement. Move the candle holder and examine the note. Move the shield:
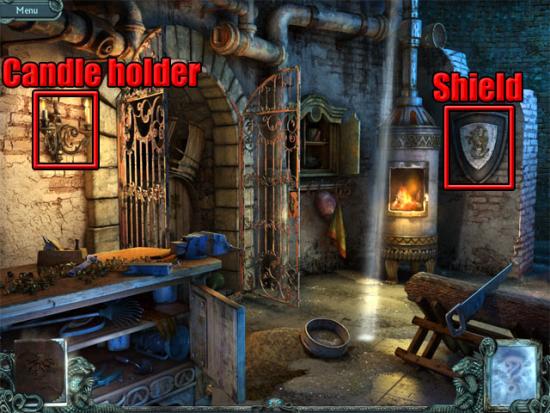
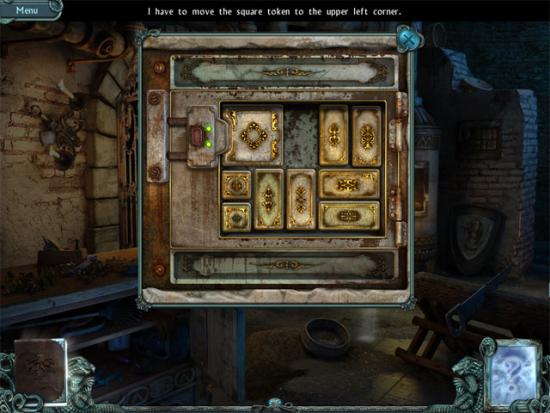
Use the sledgehammer on the wall above the shield to reveal a safe. Examine the safe to play a mini-game where the aim is to move the square token to the top-left corner:
Take the spyglass from the safe. Use the crowbar on the tile:

Examine the tile and examine the equations on the paper in the close-up view. Take the punch card and the telegraph part. Go upstairs to the top floor and examine the spyglass stand:
Use the spyglass on the stand and then use the lens on the spyglass to see the flag of the ship. Exit the close-up view and examine the controls. Use the punch card on the punch card reader. Set the shapes on the punch card reader to the ones shown in the Morse code note from the basement and then turn the handle:
The punched card will be added to the inventory. Go downstairs and examine the control panel. Put the plugs in the correct slots:
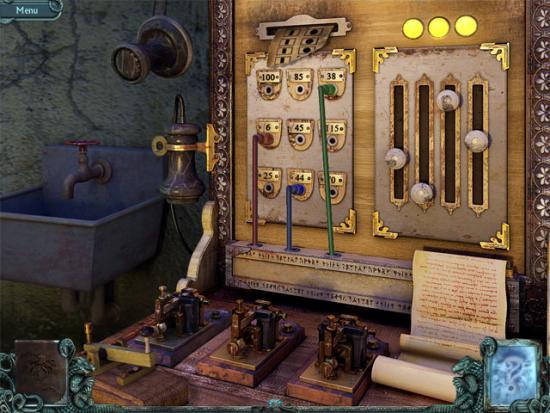
Use the telegraph part in the left slot and then use the punched card on the torn card in the slot to send the telegram. After talking to a person on the ship, exit the view of the panel and go upstairs. Examine the control panel and move the sliders to the numbers that were mentioned by the person on the ship. The numbers that are mentioned will vary from one game to the next. Select the white handle to raise the lamp. Return to the basement and examine the sparkling area to enter a hidden object scene. Find all of the objects on the list and the crossbow will be added to the inventory:
Return to the top floor and take the spyglass from the stand. Examine the window and use the crossbow, spyglass and duct tape on the crossbow stand. Select the spyglass and shoot an arrow at the button on the generator:
Examine the control panel and move the white handle to raise the lamp. Open the lamp and then examine it. Select the note in the close-up view:
Go downstairs and select the goat head on the wall. Select the note:
Go upstairs and examine the panel:
Move back and examine the sparkling area to enter a hidden object scene. Find all of the objects on the list and the scoop will be added to the inventory:
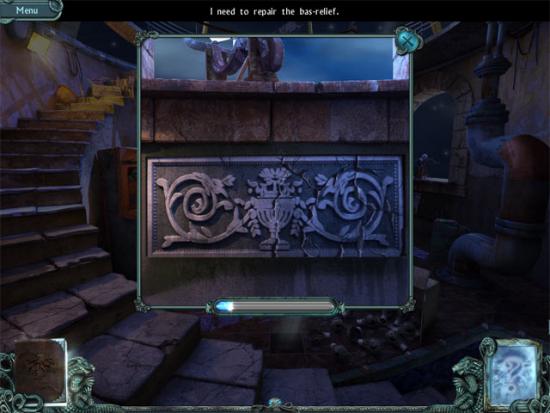
Return to the basement and use the scoop on the dirt on the floor. Take the bas-relief fragments from the sieve and then select the scoop to find more fragments. After five fragments have been found, go upstairs and examine the panel below the window. Use the bas-relief fragments on the panel and move them to the correct positions to complete the panel:
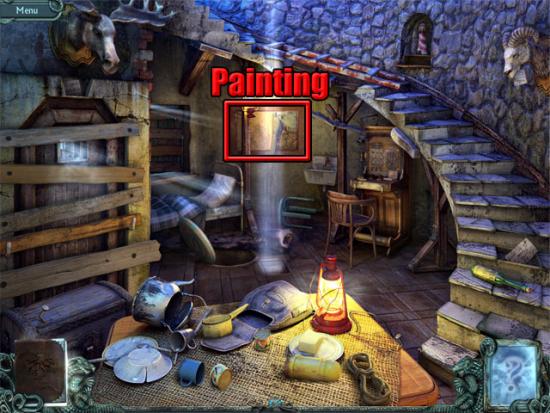
Read the note to see the code to the safe. Go downstairs and select the painting on the wall:
Examine the safe and enter the numbers that were shown on the note from the panel. Select the lever to open the safe and take the bulb. Go upstairs and examine the lamp. Use the tongs on the old bulb to remove it. Use the new bulb on the bulb holder. Examine the control panel and select the white handle to complete the bonus chapter.

More articles...
-
Best Horror Games On Itch.io – July 2026
Across a bounty of subgenres. -
Haze Seas Accessories Tier List [Best Accessories to Equip]
The accessories with the best stat buffs in Haze Seas.