
Best Horror Games On Itch.io – July 2026
Across a bounty of subgenres.![Haze Seas Accessories Tier List [Best Accessories to Equip]](/wp-content/uploads/2026/07/haze-seas-accessories-tier-list.jpg "Haze Seas Accessories Tier List [Best Accessories to Equip]")
Haze Seas Accessories Tier List [Best Accessories to Equip]
The accessories with the best stat buffs in Haze Seas.
![[Roblox] Evomon Shiny Hunting Guide – Including Prismatic and Pris Shinies!](/wp-content/uploads/2026/06/evomon-shiny-hunting-guide.jpg "[Roblox] Evomon Shiny Hunting Guide – Including Prismatic and Pris Shinies!")

Twisted Lands: Origin Walkthrough
Welcome to the Twisted Lands: Origin walkthrough on Gamezebo. Twisted Lands: Origin is a hidden object game created by Alawar Games. Discover the chilling origins of the terror that has been holding the island of Tormente in its grip. Gamezebo’s quick start strategy guide will provide you with detailed images, tips, information, and hints on how to play your best game.


- Prefer Gamezebo on Google

Game Introduction – Twisted Lands: Origin
Welcome to the Twisted Lands: Origin walkthrough on Gamezebo. Twisted Lands: Origin is a hidden object game created by Alawar Games. Discover the chilling origins of the terror that has been holding the island of Tormente in its grip. Gamezebo’s quick start strategy guide will provide you with detailed images, tips, information, and hints on how to play your best game.
General Information
Difficulty Modes
- You can play the game in Regular or Expert mode.
- In Regular Mode the hint and skip buttons recharge faster and interactive scenes are indicated with sparkles.
- In Expert Mode hint and skip buttons recharge more slowly and interactive scenes are not highlighted.
Cursors
- The default cursor is a little crystal arrow on a silver rose.
- The crystal turns red during cut scenes, meaning you can’t interact with anything until the scene has ended.
- The crystal turns green in areas that require an item from your inventory. Clicking on an area with a green crystal will give you a black bar hint at the top of your screen.
- A magnifying glass indicates areas you can zoom in on to inspect them more closely.
- A hand cursor indicates objects you can pick up to go into your inventory or areas that you can directly interact with (such as opening a suitcase).
- If you move your cursor to the edge of the window swirly arrows will appear to indicate directions you can go in.
Journal and Map
- Your game journal is located in the bottom left of your screen.
- The journal has three areas: notes, tasks and map.
- The notes section is your main journal, which keeps track of all the information you’ve gathered, including clues for puzzle solutions.
- The tasks section of the journal shows a list of the tasks you need to complete. When a task is completed it will be struck through.
- The map section of the journal shows all locations you’ve accessed. The map isn’t interactive, meaning you can’t use it to move from location to location. Your current location is highlighted in yellow and shows a yellow exclamation mark. Red arrows pointing away from a location mean that you can access new areas from that location. Locations shown in red indicate places you have previously been to but that you can’t go back to right now.
- A red question mark indicates areas that contain actions you can complete. As you have to do a lot of running around in this game, the red question marks are very useful in telling you where to go next. I even found the question marks more helpful than the hint button.
Hidden Object Scenes
- Hidden Object Scenes (HOS) are of the old-fashioned kind, meaning that they simply show a list of items for you to find without any funny business.
- Occasionally an item will be listed in orange, meaning you need to complete an extra action before you can find it, like removing a curtain or opening a box. Sometimes your cursor will change into a hand when it’s over the object that requires the extra action, but this isn’t consistently done.
Hint and Skip Buttons
- The hint button is located in the bottom right of the screen.
- Clicking on the hint button will create a circle of mirror fragments around the area that requires an action in the current scene.
- After you used a hint you need to wait some time before the mirror has repaired itself and you can use it again.
- If there are no actions to complete in the current scene, the hint button will show you in which direction you need to go for your next action. This doesn’t break the mirror and the hint won’t need to recharge. So you can use this function as many times as you like to navigate towards your next action.
- Occasionally you get a mini game or puzzle you need to complete before you can move on. All puzzles have a skip button at the top of the screen that slowly charges. When the skip button is fully charged you can use it to skip the puzzle and move on, should you want to.
Chapter 1: The Island
- During the opening sequence, either jump over or crawl under the wall.

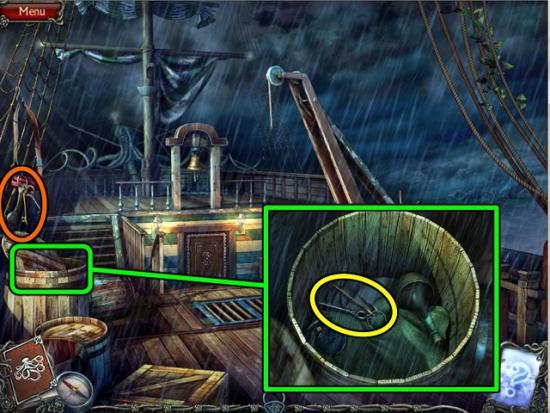
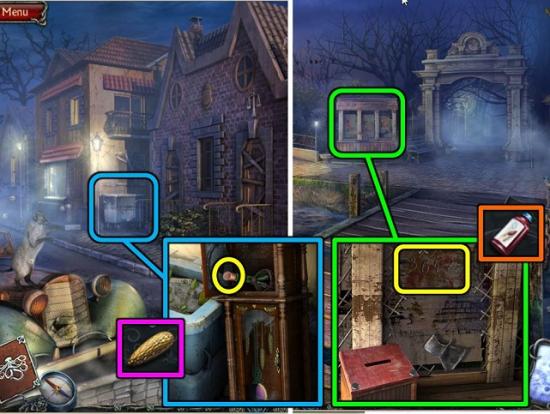
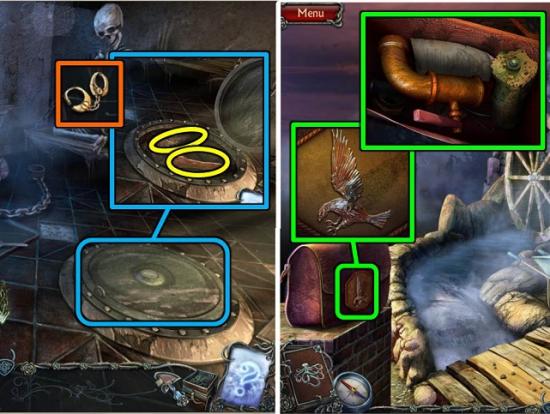
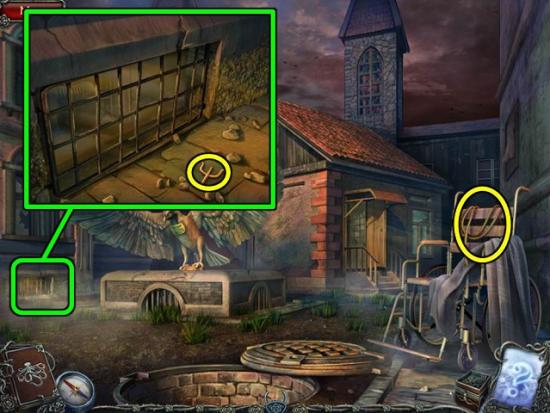
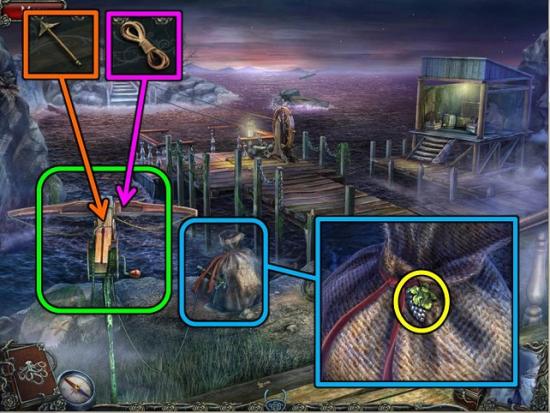
- Click on the keys hanging on the left.
- Inspect the barrel the keys fall into and remove the lid.
- Take the HOLD KEYS.
- You get a short cut scene when you close the barrel window.
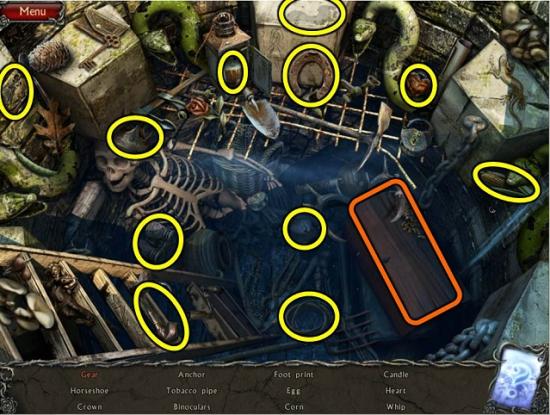
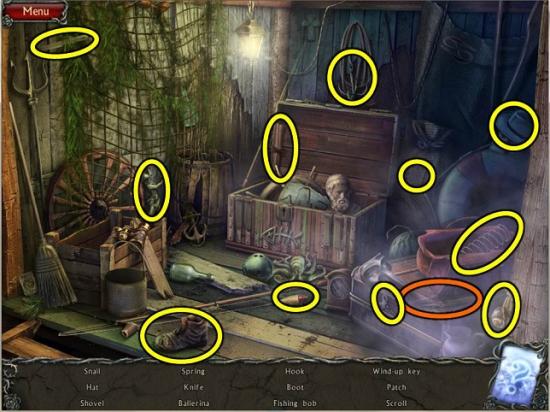
- Play the HOS in the ship’s cabin.
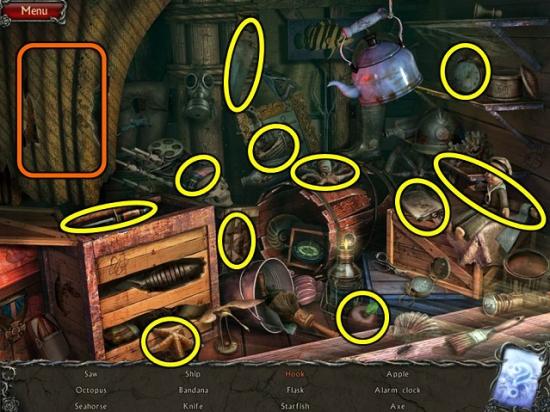
- Remove the curtain on the left (orange) to find the hook.
- You get a HOOK and a SHIP.
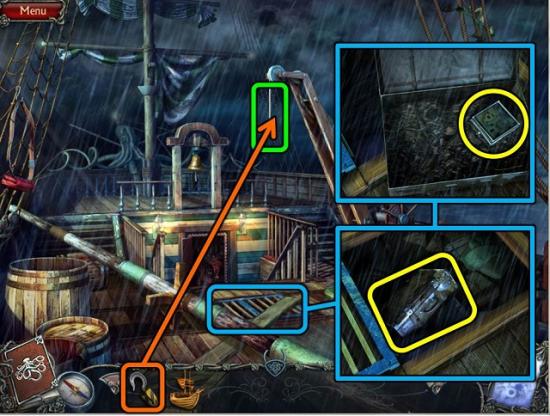
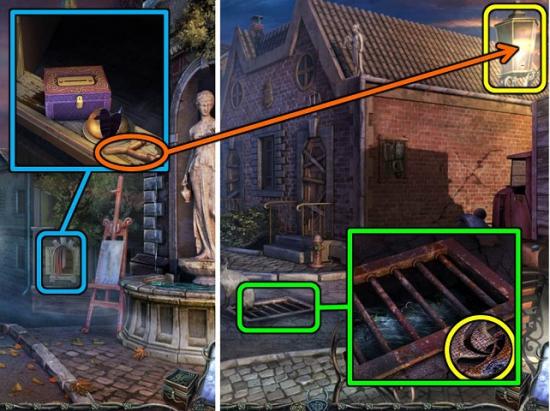
- Hang the HOOK from the crane and click on it to remove the broken mast.
- Click to remove the plank.
- Click to open the grate to the hold.
- Click on the suitcase inside the hold for another short scene.
- Take the funny little box from the suitcase. It will appear to the right of your inventory at the bottom of the screen.
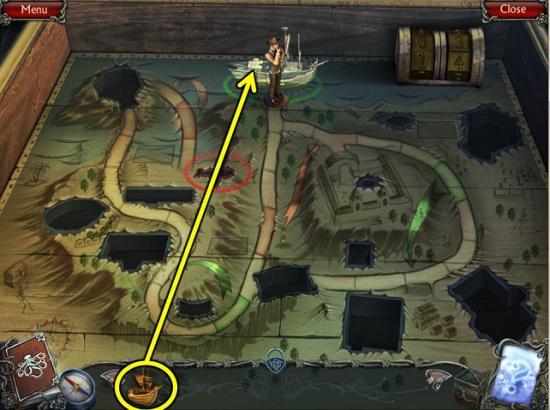
- Inside the box is an unusual sort of board game with lots of missing pieces. You need to find all the pieces over the course of the game and place them in the box. The counter in the top right shows how many pieces you still need to find.
- Put the SHIP behind the figurine.
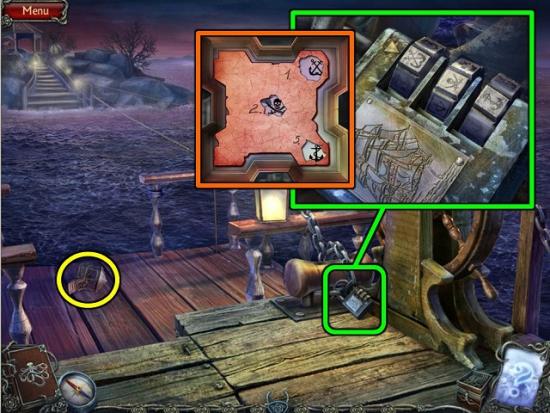
- Exit the ship to the dock.
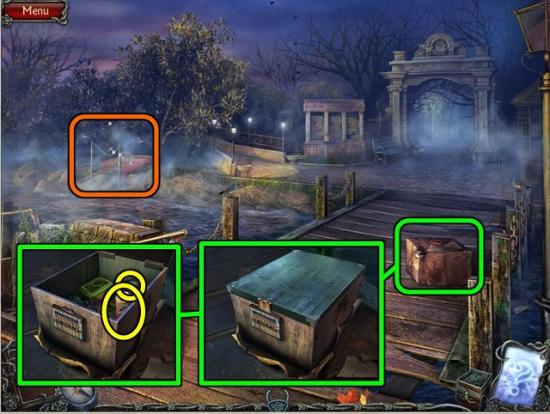
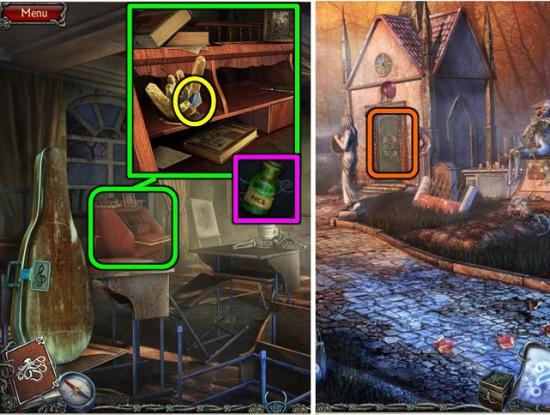
- Zoom in on the parcel on the pier and click to open it.
- Click on the box inside the parcel for a puzzle.
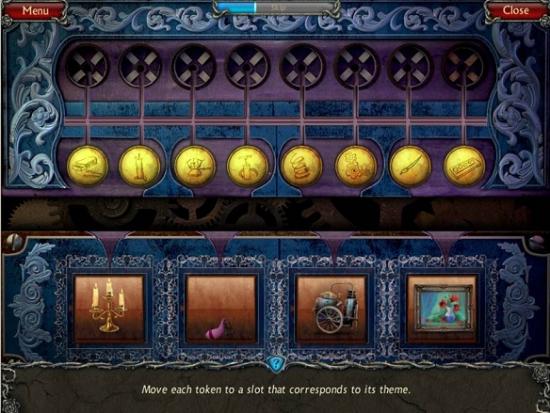
- Move the coins in the slots at the top to the slots below so the images on the slots match the images at the bottom. Simply click on a coin to select it and then click on where it needs to go.
- Inside the box are BUG SPRAY and a COIN (1/3).
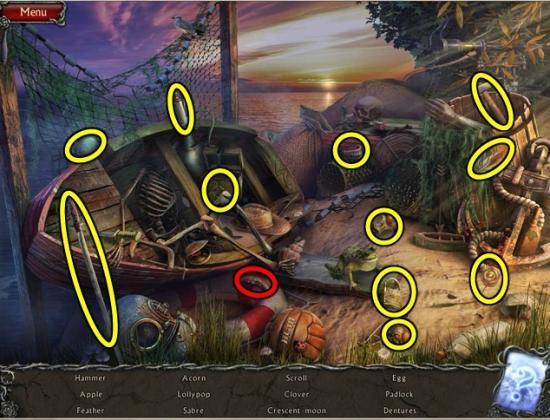
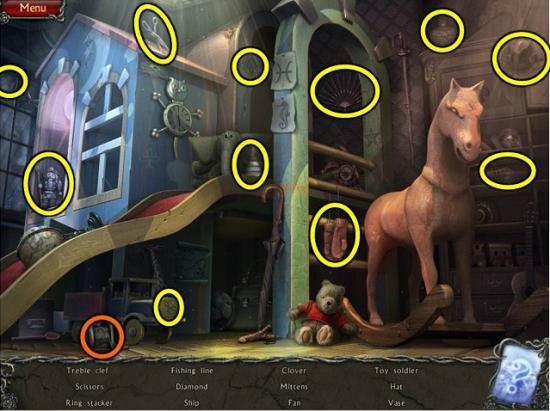
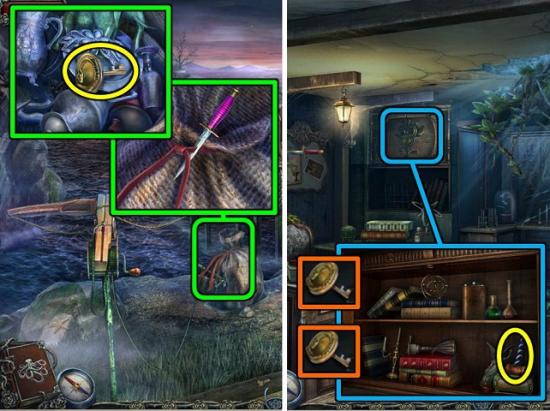
- Play the HOS by the dinghy on the left.
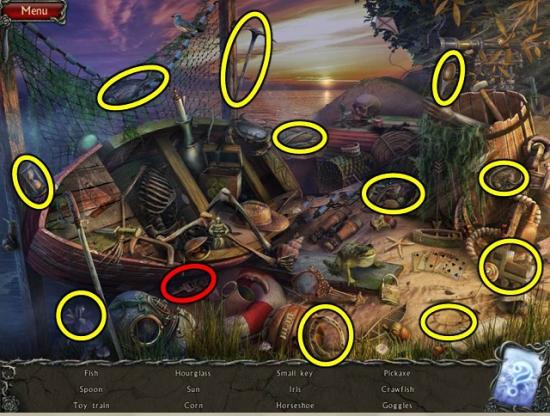
- Get a SMALL KEY.
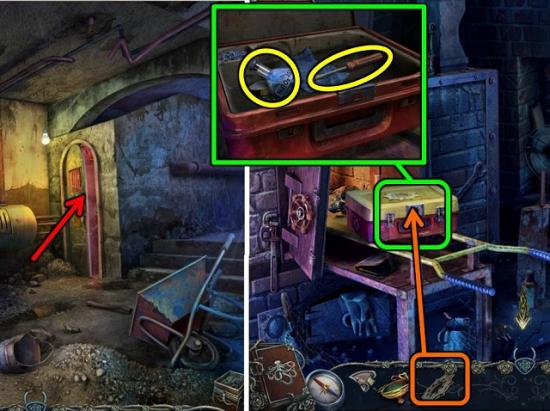
- Cross the bridge on the left to the hospital gate.
- Pick up the HAND RAKE.
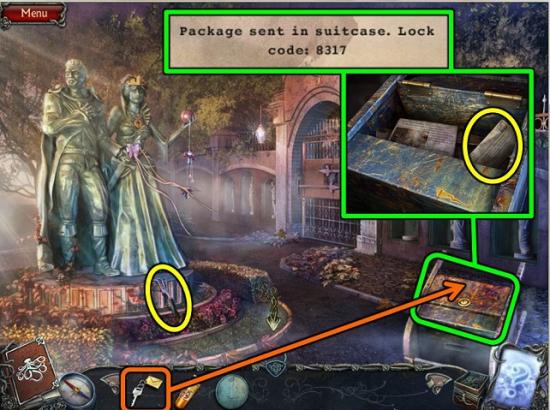
- Open the cabinet with the SMALL KEY and look inside.
- Look at the papers inside. One has a suitcase code on it: 8317.
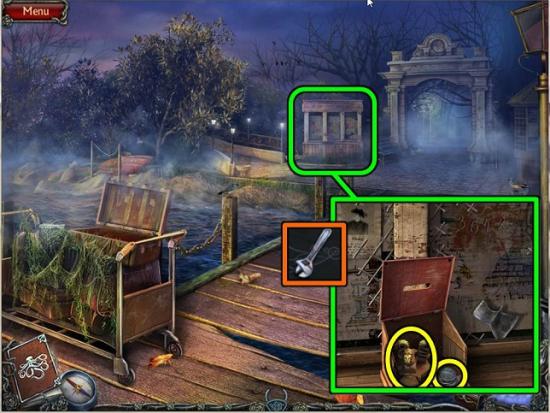
- Back out to the dock and inspect the suitcase on the trolley.
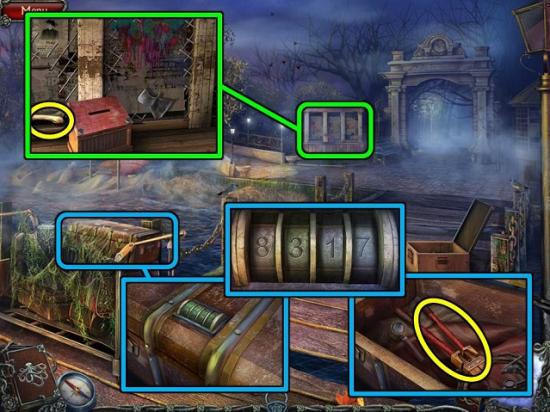
- Click on the lock and enter the code you just found: 8317.
- Take the WIRE CUTTERS.
- Zoom in on the information board in the back.
- Remove the grate with the WIRE CUTTERS.
- Take the BONE.
- Go through the gate to the foggy park.
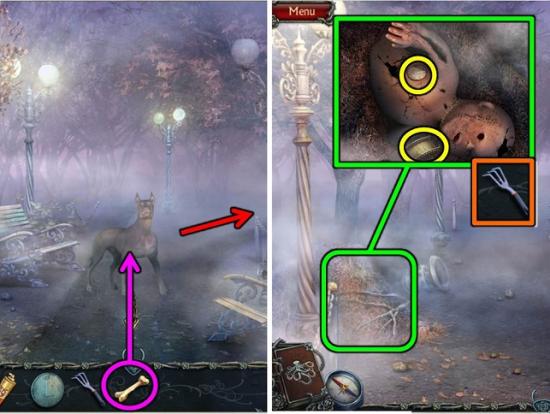
- Give the BONE to the dog.
- Go to the right.
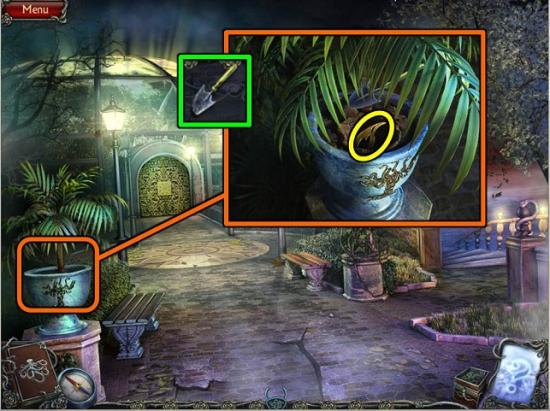
- Zoom in on the pile of pine needles and remove them with the HAND RAKE.
- Pick up the COIN (2/3) and the BRIDGE.
- The board game will open so you can place the BRIDGE in its correct spot.
- You won’t need to come back to this part of the foggy park again.
- Back out to where you found the dog and go straight on to another part of the park where there is nothing to do.
- Go on to the fork in the road.
- Talk to the old woman.
- Go up the rocky road and on to the elevator.
- In the wheelbarrow you will find another COIN (3/3).
- Enter the elevator.
- When you’re in the alley at the top of the elevator, walk further up the hill to the mansion entrance.

- Inspect the fountain and take the TOKEN.
- Go back to the alley.
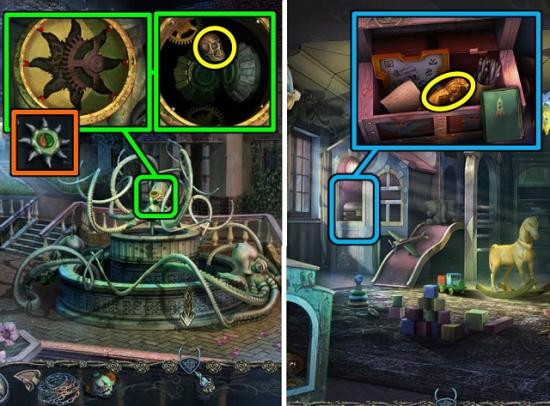
- Zoom in on the telescope and use the TOKEN.
- Click on the telescope to use it.
- You will find a series of symbols that will go into your journal.
- Inspect the round gate. The symbols you just found through the telescope should be shown on the left.
- Click to move the symbols in the lock until they match the ones you found.
- Go through the gate to the catacombs
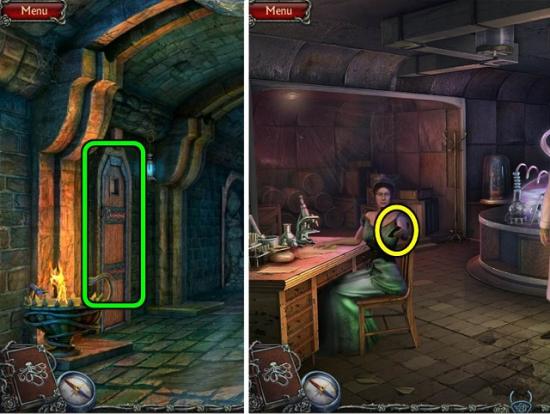
- Inspect the door on the left and knock on it.
- Talk to Theresa.
- After the conversation, take the LETTER from Theresa’s hand.
- Click on “smash the door down” twice to break through.
- Back at the fork in the road, talk to the old woman again.
- Buy her HAMMER for 3 coins.
- Go back up the road to the elevator.
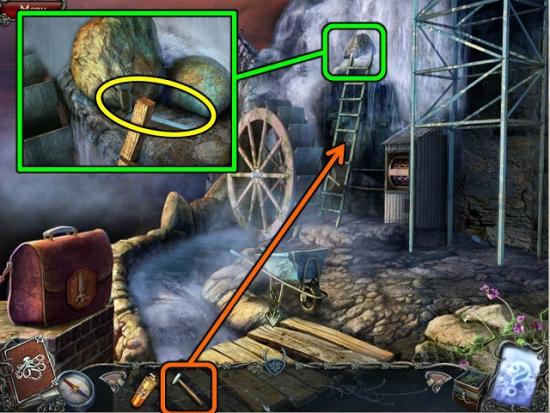
- Use the HAMMER on the ladder to fix it.
- Look at the top of the ladder to find the LEVER.
- Back out two screens to the fork in the road.
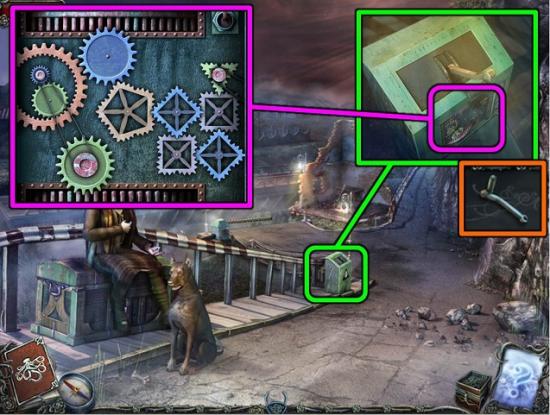
- Zoom in on the bridge mechanism.
- Use the LEVER on the mechanism and pull it.
- Click on it again for a gears puzzle.
- Place the gears on the right on the mechanism and flick the switch at the top to make them rotate.
- Cross the bridge to the city of Tormente.
Chapter 2: Tormente City
- Continue on to the square outside the police station.
- Play the HOS in the shop window.
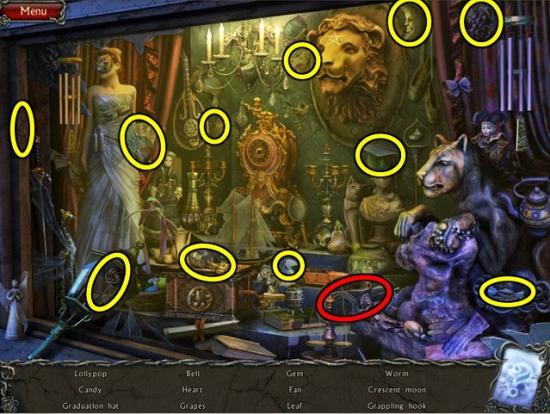
- Click on the window to break it and release all the HOS items.
- Get a GRAPPLING HOOK.
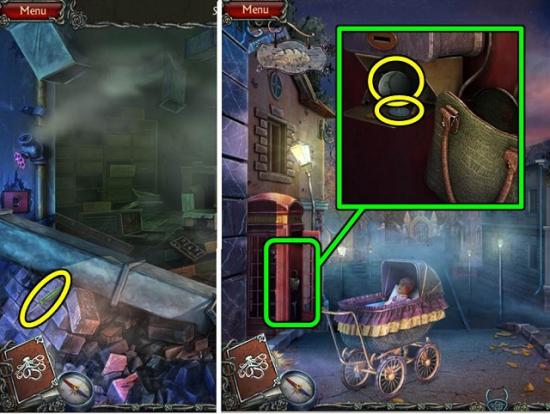
- Exit to the main street on the left.
- Zoom in on the window in the back and take the SLINGSHOT.
- Return to the street by the police station.
- Use the SLINGSHOT on the lamp post.
- After the cat has moved, inspect the drain it was sitting on.
- Take the SMALL SHIP.
- Go back to the main street and on to the street by the church.
- Talk to the monk.
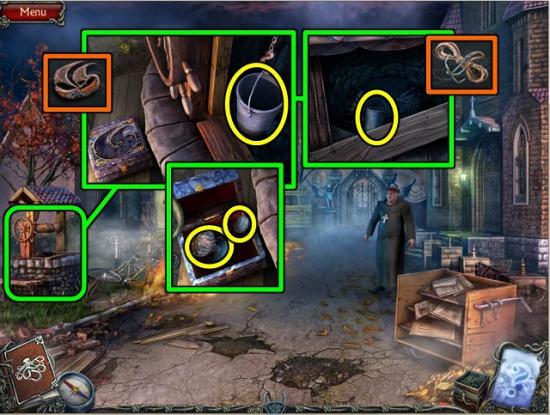
- Zoom in on the well.
- Put the SMALL SHIP on the locked box.
- Take the DRAWER KNOB and a COIN (1/5).
- Click on the bucket.
- Zoom in on the well and use the GRAPPLING HOOK to take the BUCKET.
- Go all the way back to the old woman by the bridge.
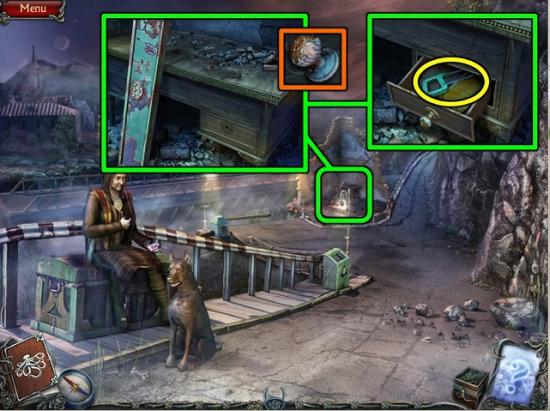
- Zoom in on the old desk in the ruins in the back.
- Zoom in on the drawer and place the DRAWER KNOB.
- Click on it again to tighten the screws.
- Open the drawer, take the HACKSAW and read the journal.
- Go back to the main street.
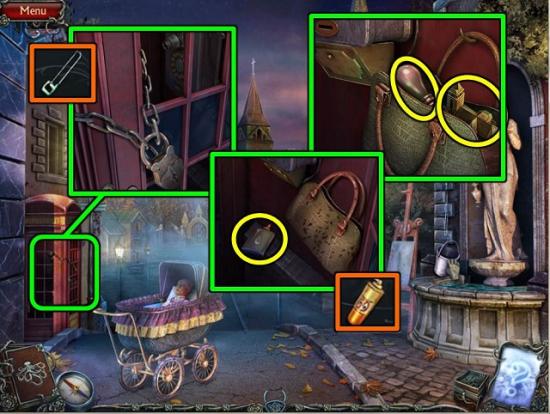
- Zoom in on the phone booth.
- Remove the chain with the HACKSAW.
- Take the GLUE.
- Zoom in on the bag and remove the ants with the BUG SPRAY.
- Take the LIGHT BULB and the CHURCH.
- Place the CHURCH on the board game.
- Fill the BUCKET in the fountain to get a BUCKET OF WATER.
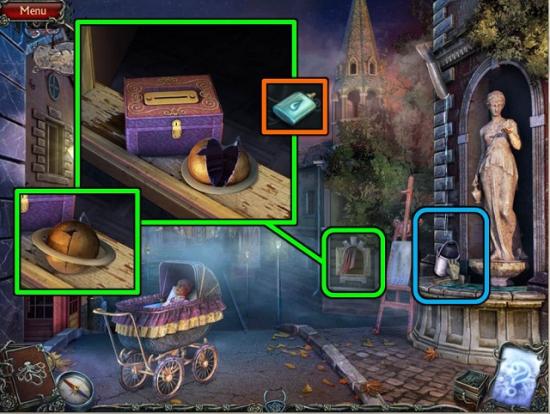
- Go back to the window where you found the slingshot.
- Use the GLUE to repair the PLANET.
- Go down the street to the monk by the church.
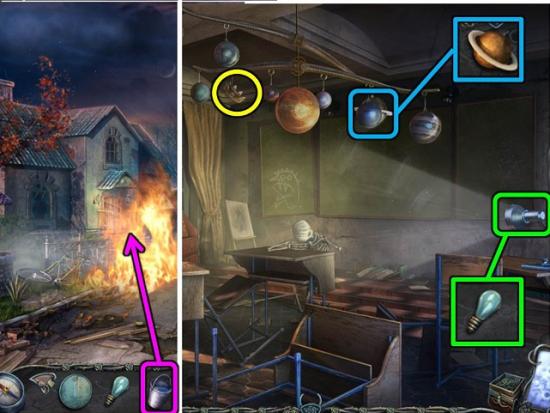
- Use the BUCKET OF WATER to extinguish the flames.
- Go left to the school and climb through the window.
- Put the LIGHT BULB in the lamp.
- Hang the PLANET from the solar system on the ceiling and take the CROWN.
- Back out all the way to the dock (you will have to talk to the monk on your way).
- Play the new HOS by the dinghy.
- You get a MONK.
- Go left to the hospital gate.
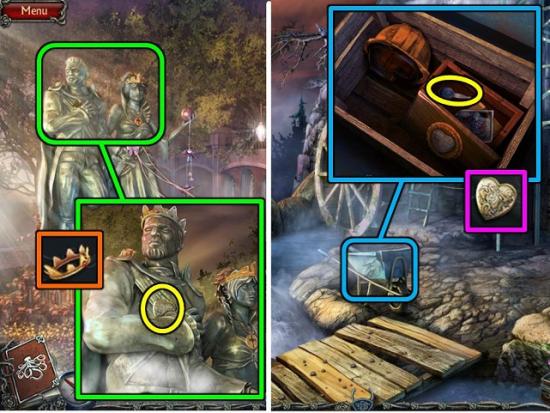
- Zoom in on the statue.
- Put the CROWN on the King’s head and take the HEART.
- Go back to the dock, on to the old woman by the bridge and up the road to the elevator.
- Zoom in on the wheelbarrow and place the HEART on the wooden box.
- Inside the box is the TRUCK KEY.
- Back out to the bridge, cross it and go on to the street outside the police station.
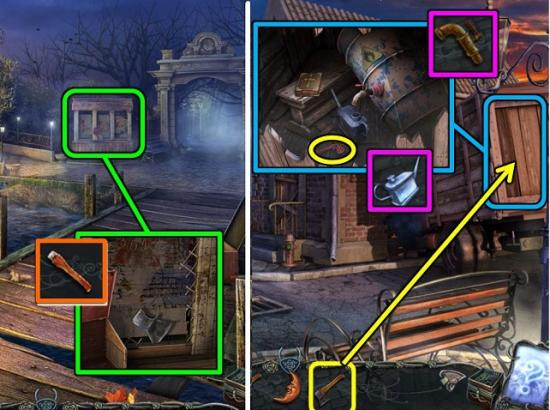
- Zoom in on the truck and open the door with the TRUCK KEY.
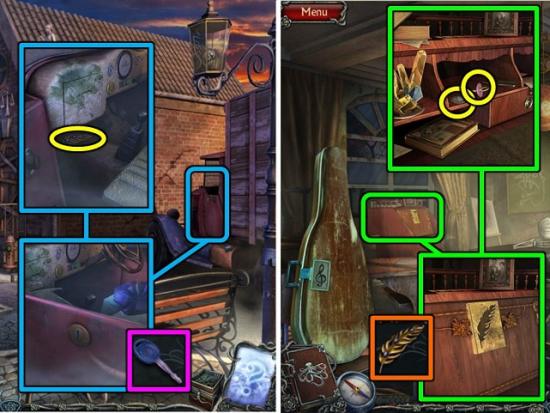
- Take the FEATHER and put the TRUCK KEY in the ignition.
- Go down the road and into the school house.
- Zoom in on the desk and open it with the FEATHER.
- Take the PACIFIER and the COIN (2/5) and read all the documents and books.
- Back out to the main street.
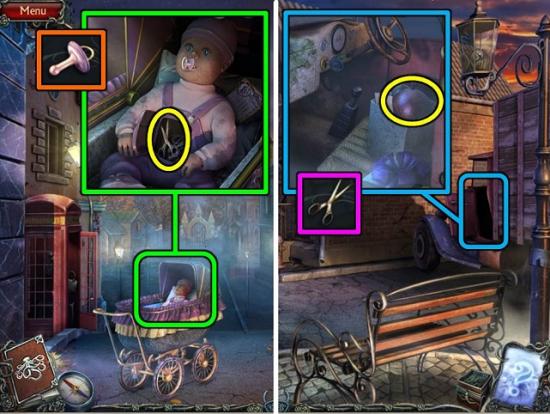
- Zoom in on the pram.
- Give the doll the PACIFIER.
- Take the SCISSORS.
- Back out to the truck by the police station.
- Zoom in on the truck’s cabin and cut the ribbon on the parcel with the SCISSORS.
- Take the PLANET and two more COINS (4/5) from the box.
- Go back to the school house.
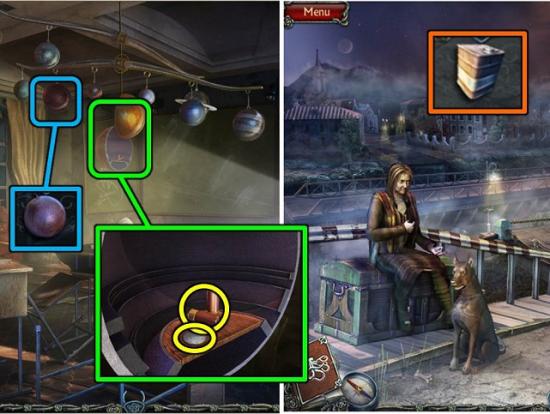
- Hang the PLANET from the solar system.
- Take the CARTRIDGES and the COIN (5/5).
- Go to the woman by the bridge and buy the GASOLINE.
- Go back to the truck by the police station.
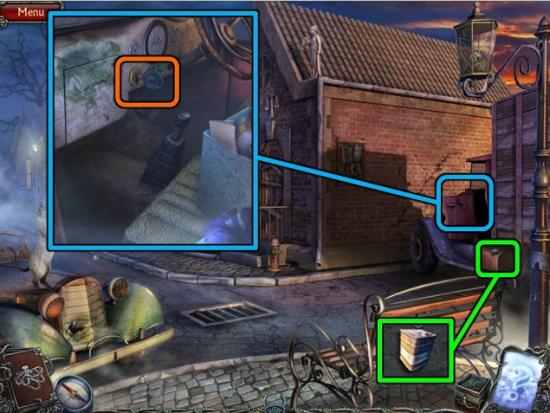
- Pour the GASOLINE into the fuel tank.
- Go back into the truck’s cabin and turn the key.
Chapter 3: The Police Station and the Cemetery
- Go into the police station
- Take the SCREWDRIVER.
- Back out, go left to the main street and zoom in on the phone booth.
- Zoom in on the phone and remove the panel with the SCREWDRIVER.
- Inside are a COIN (1/10) and a CRESCENT MOON.
- Go to the monk by the church
- Zoom in on the gate.
- Put the MONK and the CRESCENT MOON on the gate.
- Go through the gate to the cemetery.
- Play the HOS by the dragon statue.
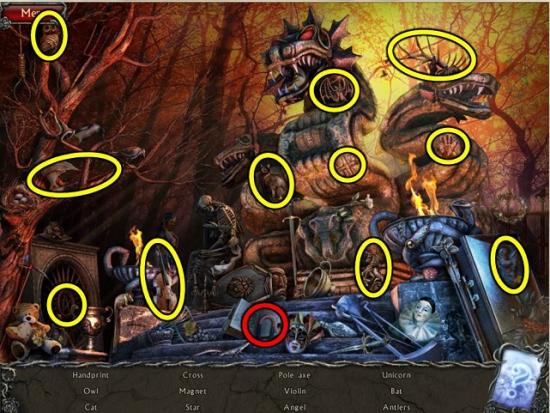
- You receive a MAGNET.
- Go to the street outside the police station.
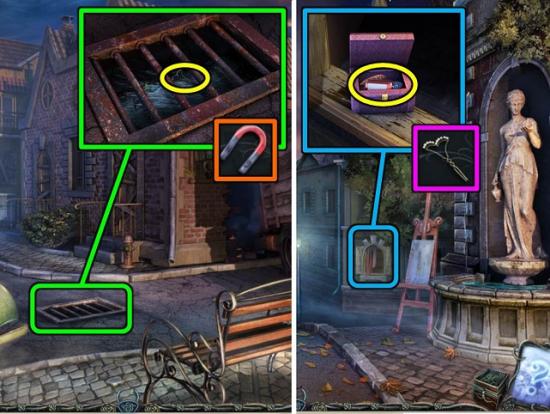
- Zoom in on the drain and use the MAGNET to find the PIN.
- Go to the main street.
- Zoom in on the window and pick the lock on the box with the PIN.
- Inside are two COINS (3/10), SOLVENT and a CLOCK WEIGHT.
- Back out to the street outside the police station.
- Inspect the dumpster.
- Put the CLOCK WEIGHT on the grandfather clock.
- Take the CORK from the bottle.
- Back out all the way to the dock.
- Zoom in on the information board.
- Remove the paint with the SOLVENT.
- You find the code 3642.
- Go to the old woman by the bridge
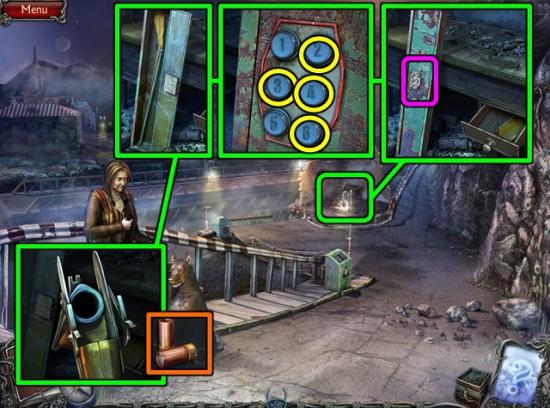
- Zoom in on the desk by the ruins.
- Click on the locker and enter 3642.
- Click on the SHOTGUN and put the CARTRIDGES in it.
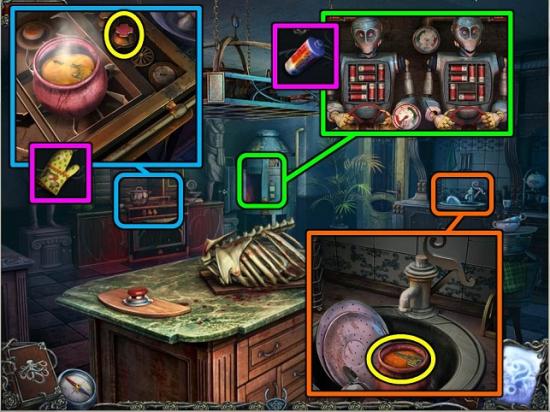
- Go to the police station and go in.
- Put the CORK in the steaming pipe and flick the switch to turn on the fan.
- Inspect the safe and shoot it with the SHOTGUN.
- Inside the safe are a COIN (4/10), ACID and a lot of documents you can read.
- Go into the cell.
- Pick up the MILL WHEEL and put it on the board puzzle.
- Back out to the street and play the new HOS in the shop window.
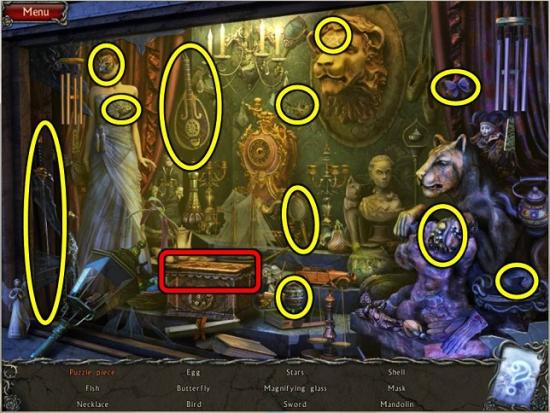
- The PUZZLE PIECE is inside the Jack-in-the-box.
- Go to the school house
- Zoom in on the desk.
- Use the ACID on the crystals to get another PUZZLE PIECE.
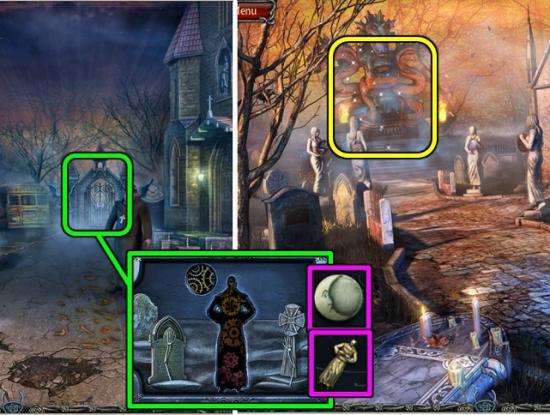
- Back out to the monk and go through the gate to the cemetery.
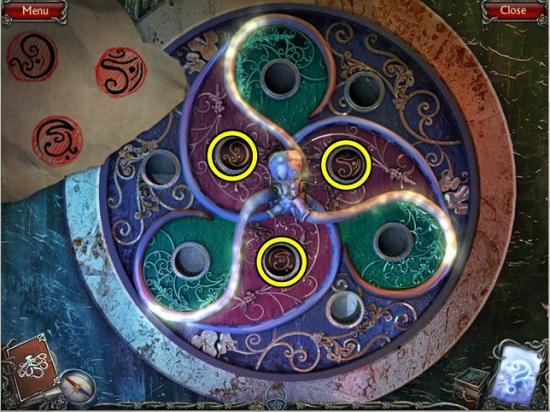
- Zoom in on the door of the crypt and place both PUZZLE PIECES.
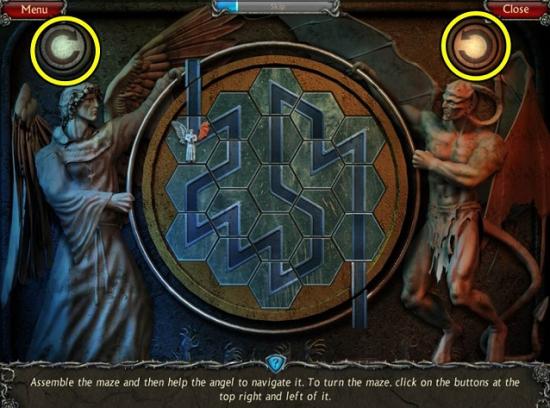
- This puzzle is in two parts: first you must rotate all the puzzle pieces to create a path from the top to the bottom of the lock.
- Once you have the path, you need to rotate the lock using the arrows on either side to guide the angel figurine from the top to the bottom.
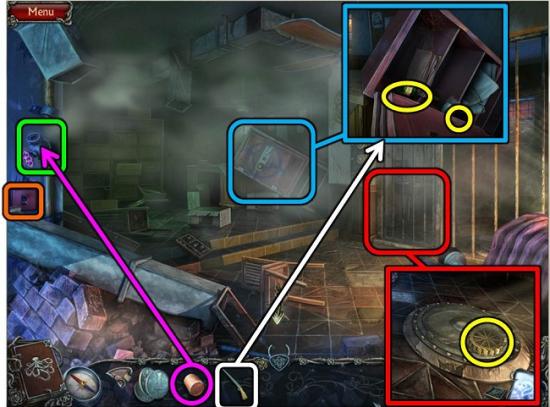
- Go into the crypt.
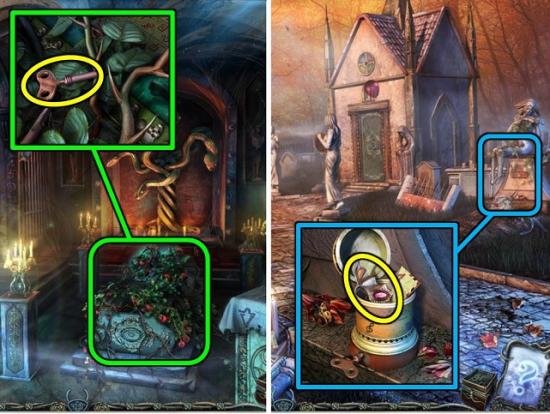
- Zoom in on the coffin and take the WIND-UP-KEY.
- Back out to the cemetery and zoom in on the gravestone on the right.
- Use the WIND-UP-KEY on the music box.
- Take the BAT and read the letter.
- Go back into the crypt.
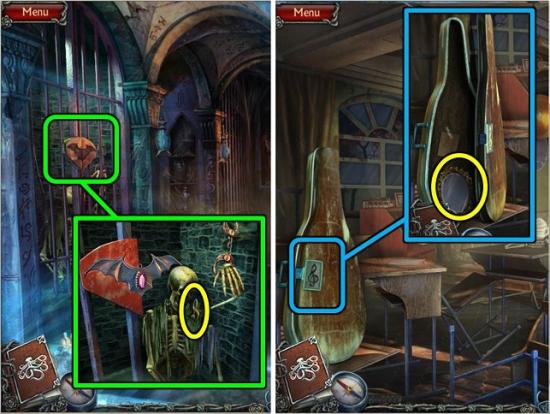
- Zoom in on the locked cell and open the lock with the BAT.
- Take the TREBLE CLEF.
- Go back to the school house.
- Use the TREBLE CLEF to open the cello case.
- Take the MIRROR.
- Go to the cemetery.
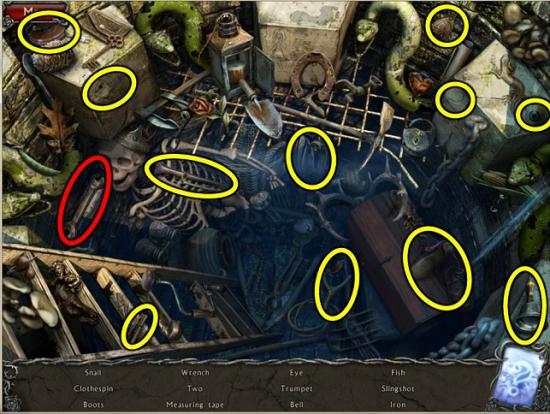
- Play the new HOS.
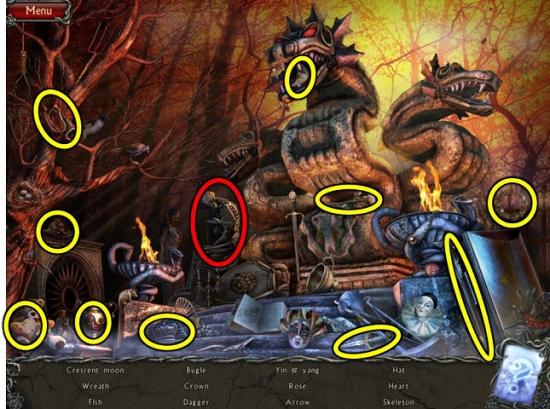
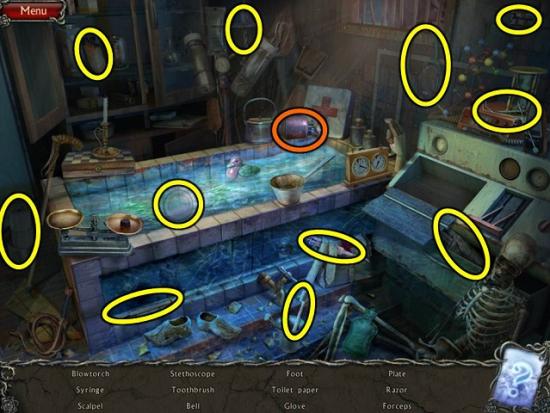
- Get a SKELETON. The fish is behind the skeleton.
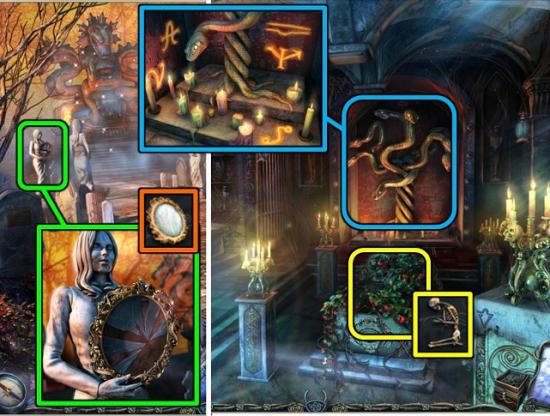
- Zoom in on the statue to the left of the HOS.
- Replace the broken mirror with your own MIRROR.
- Go into the crypt.
- Zoom in on the snake statue in the back. After you placed the mirror, there should now be some glowing symbols on the wall, which will go into your inventory.
- Zoom in on the coffin and remove the shrubs with the SKELETON.
- Click on the puzzle lock.
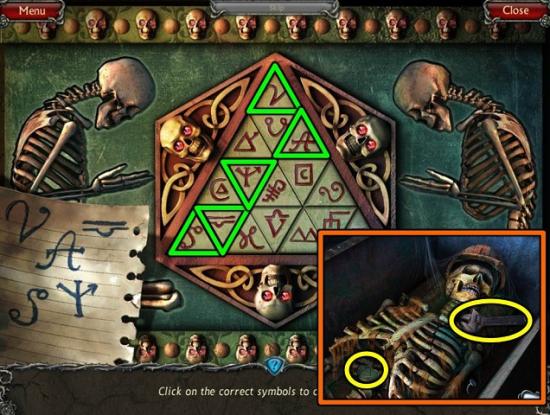
- The correct symbols will appear on the left. Note that you have to look at the snake statue to have the symbols entered into your journal.
- Click on the correct symbols to open the coffin.
- Inside the coffin are a WRENCH and more COINS (6/10).
- Go all the way back to the dock.
- Zoom in on the notice board and remove the bolts on the money box with the WRENCH.
- Find three more COINS (9/10) and a SNAKE STATUE.
- Place the SNAKE STATUE on the board puzzle.
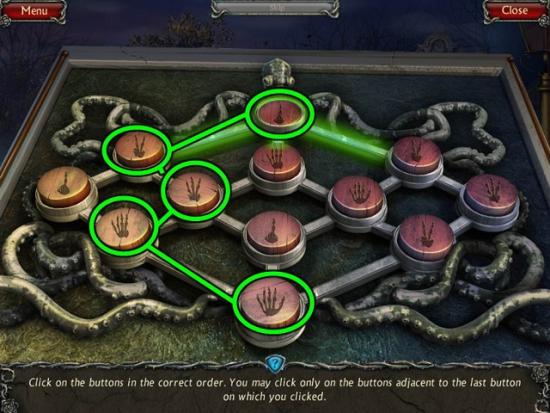
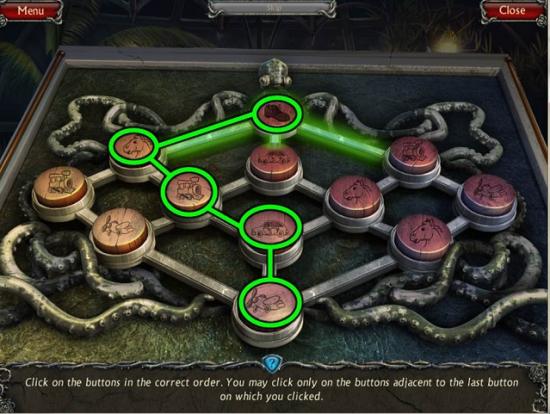
- You will get a new puzzle in which you have to click the symbols in a logical order. You can only click on symbols directly next to the last one you clicked.
- Inside is the last COIN (10/10).
Chapter 4: Getting into the Hospital
- Go back to the old woman by the bridge and buy her DYNAMITE.
- Go into the city and make your way through to the crypt in the cemetery.
- Zoom in on the snake statue and place the DYNAMITE beside it.
- Well, that didn’t help, did it.
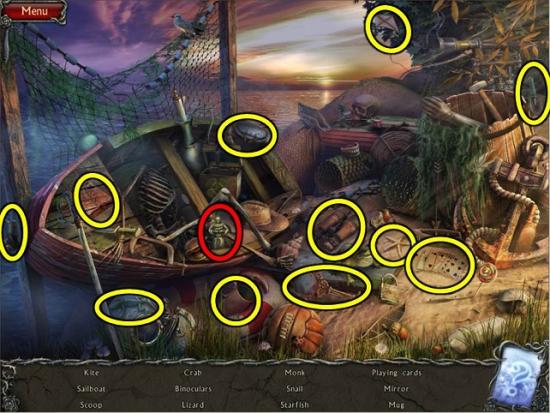
- Back out to the cemetery and play the new HOS.
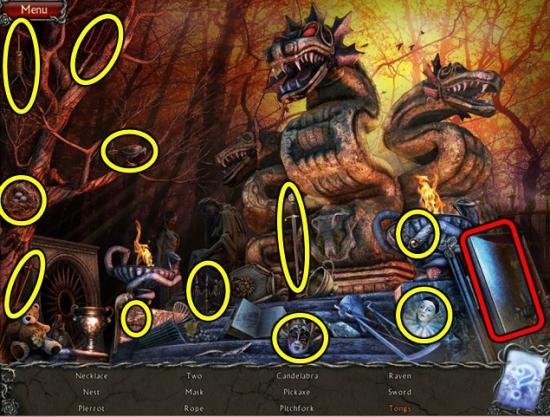
- The TONGS are in the coffin.
- Go back into the crypt
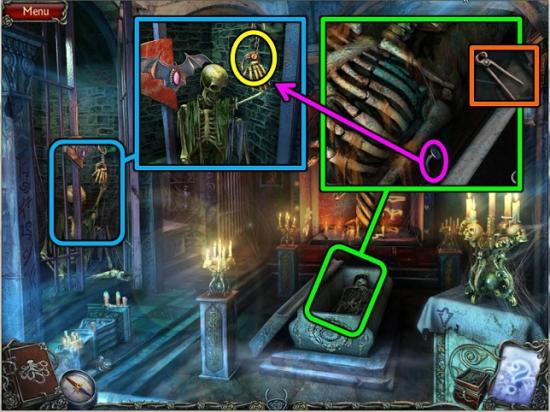
- Zoom in on the coffin.
- Take out the BENT NAIL with the TONGS.
- Then go to the skeleton in the cell and undo his HANDCUFFS with the TONGS.
- Go to the street by the police station and play the new HOS in the shop window.
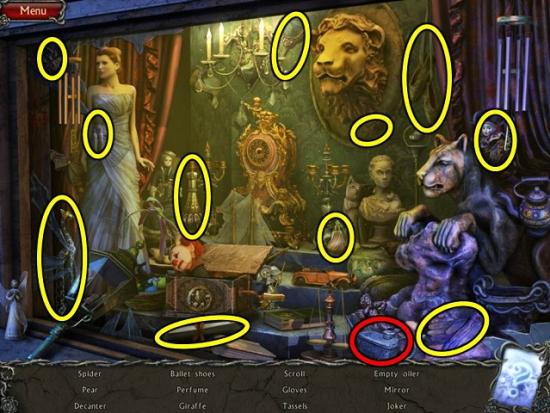
- You get an EMPTY OILER.
- Go into the police station and into the cell.
- Use the HANDCUFFS to move the trapdoor.
- Take the WING and the AXE HANDLE.
- Go to the bridge where the old woman used to be and go up the hill to the elevator.
- Inspect the bag and put the WING on the eagle.
- Take the TAP from the bag.
- Back out all the way to the dock.
- Play the new HOS by the dinghy.
- Get a CRESCENT MOON.
- Zoom in on the notice board and put the AXE HANDLE on the axe head.
- You get the AXE.
- Go to the street outside the police station.
- Use the AXE on the back of the truck.
- Zoom in on the back of the truck.
- Take the CROSS.
- Put the TAP in the barrel and put the EMPTY OILER under it.
- Click on the tap to fill the oiler.
- You get a FULL OILER.
- Go back to the bridge
- Zoom in on the old woman’s chest.
- Remove the pin from the lock.
- Use the FULL OILER to undo the latch.
- Take the ROYAL FAMILY from the chest and put it on the board game.
- Go back to the chest.
- Pick up the MATCHES and use them to light the LANTERN.
- Cross the bridge and make your way to the cemetery.
- Zoom in on the dark grave and use the LANTERN to look inside.
- Take the CHISEL.
- Back out one screen and go into the school house.
- Zoom in on the desk and use the CHISEL to open the drawer.
- Take the STARS from the drawer.
- Go back to the dock and cross the bridge to the hospital gate.
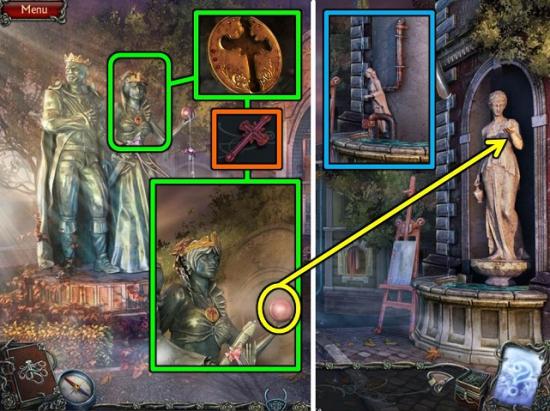
- Zoom in on the statue, and again on the Queen’s necklace.
- Put the CROSS on the necklace.
- Take the STONE SPHERE from her hand.
- Go back to the dock, through the foggy park, across the bridge and to the main street.
- Put the STONE SPHERE on the hand of the statue by the fountain.
- Take the STATUE.
- Go back to the dock and the hospital gate.
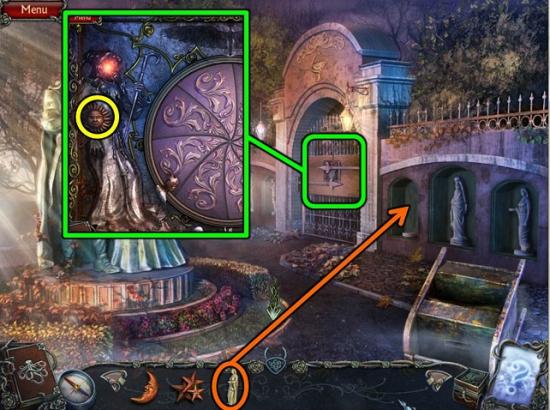
- Place the STATUE in the empty alcove.
- Access the lock on the gate and take the SUN.
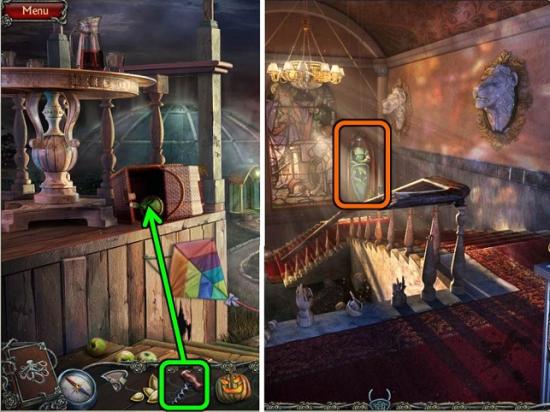
- Back out to the dock.
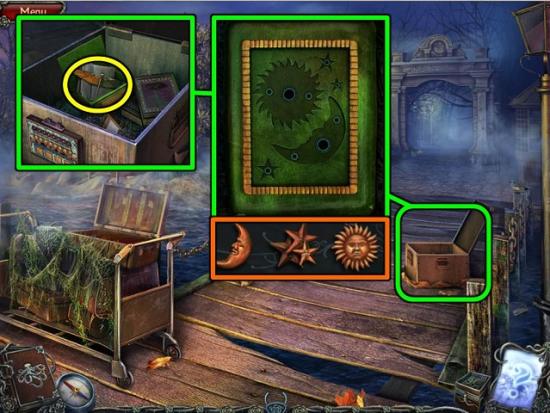
- Zoom in on the box on the pier and put the SUN, STARS and CRESCENT MOON on the smaller box inside.
- Take the CADUCEUS from the box.
- Go to the hospital gate and zoom in on the lock.
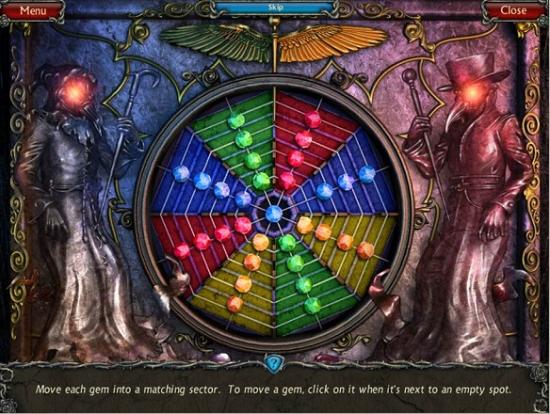
- Place the CADUCEUS at the top of the lock to activate a mini game.
- For this game you need to move the colored gems into areas of the same color. Gems can move in all directions but only if there is an empty spot next to them. I have no strategy for this, just keep moving them around until you’ve got it.
- Go through the gate to the hospital.
Chapter 5: The Hospital
- Click “Need to hurry”.
- Open the statue’s first aid kit and take the SCISSORS.
- Inspect the torn carpet and cut it with the SCISSORS.
- Take the CLOSET KEY.
- Go to the closet door and open the padlock with the CLOSET KEY.
- Move the curtain and take the MEDICAL CROSS and the GLASS EYE.
- Zoom in on the desk.
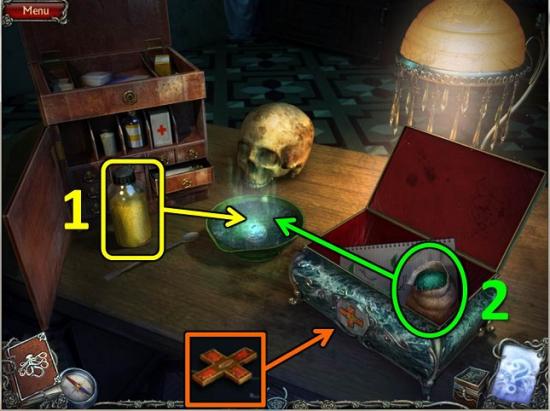
- Open the box with the MEDICAL CROSS and take the GREEN POWDER inside.
- Also read the instructions in the box.
- Take the YELLOW POWDER from the desk.
- First put the YELLOW POWDER in the bowl, followed by the GREEN POWDER.
- Take the second GLASS EYE from the bowl.
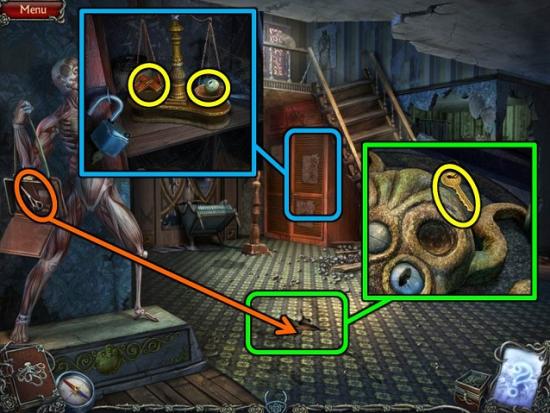
- Go back to the octopus that was under the carpet.
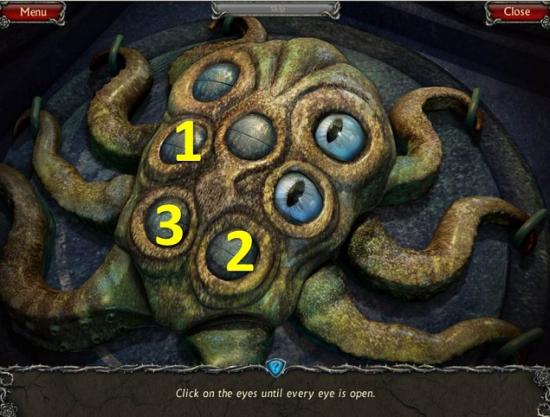
- Give him back his two GLASS EYES.
- You need to click on the eyes until they are all open. From the default setting, click the eyes in the order shown in the image.
- Go down the shaft to the catacombs.
- Go down the left path and on to the Colonnade.
- Inspect the fallen columns on the right and take the KNOB.
- Play the HOS in the center of the room.
- Get a WRENCH.
- Back out to the junction and take the right path.

- Zoom in on the hatch in the ceiling and place the KNOB on the puzzle.
- Turn the knobs on the puzzle until all the lights are on. Knobs may affect other knobs. From the default position click the following knobs: 1, 5, 7, 2, 5, 3, 6, 4, 10, 12, 11.
- Go through the hatch.
- Pick up the ROPE.
- Zoom in on the grate covering the basement window and pick up the GREEK LETTER.
- Go through the door into the procedure room.
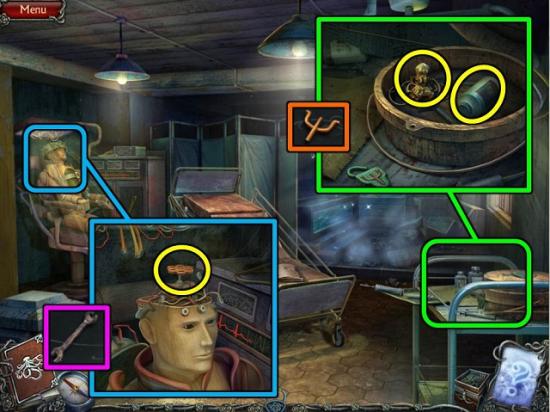
- Inspect the trolley on the right.
- Put the GREEK LETTER on the box.
- Take the OCTOPUS and put it on the board game.
- Also take the SULFURIC ACID.
- Zoom in on the dummy in the chair and use the WRENCH to remove the helmet.
- Take the VALVE HANDLE.
- Play the HOS in the back of the room.
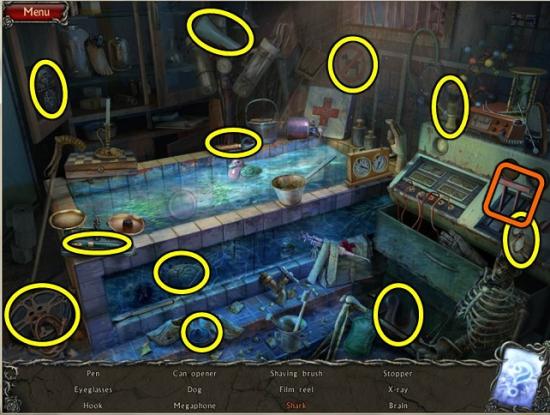
- Pull the handle on the right to find the SHARK.
- Go back to the hospital yard
- Zoom in on the basement window.
- Remove the grate with the SULFURIC ACID.
- Go through the window into the basement.
- First go right to the rose door (look familiar?) and watch the scene.
- Take the note from Teresa’s hand.
- Inspect the tank on the table and take the CADUCEUS and put it on the board game.
- Now go back to the catacombs and take the left path to the colonnade.
- Zoom in on the mechanism in the wall and put the SHARK on it.
- Pull the lever.
- When the pillars are turning, put the ROPE on the right one.
- Go down the new path.
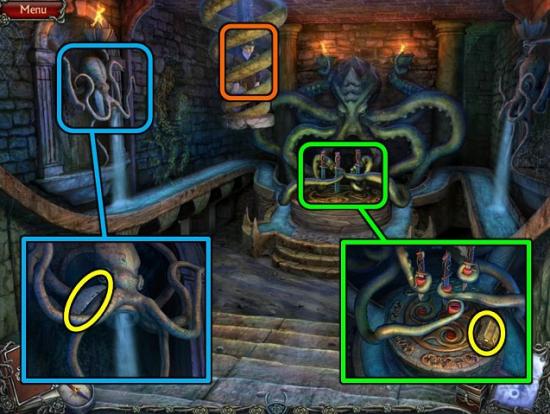
- Talk to Ernesto.
- Inspect the octopus fountain and take the METAL PLATE.
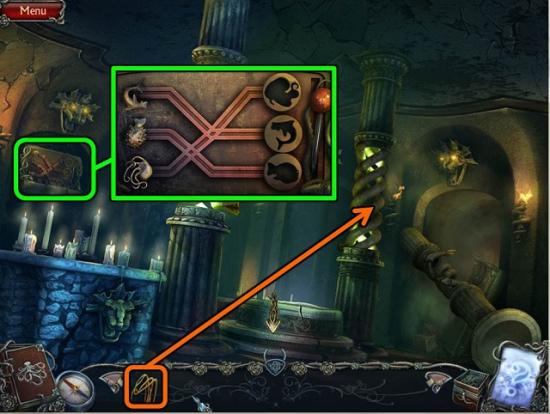
- Inspect the daggers in the middle of the room.
- Take the POLICE STATION and put it on the board game.
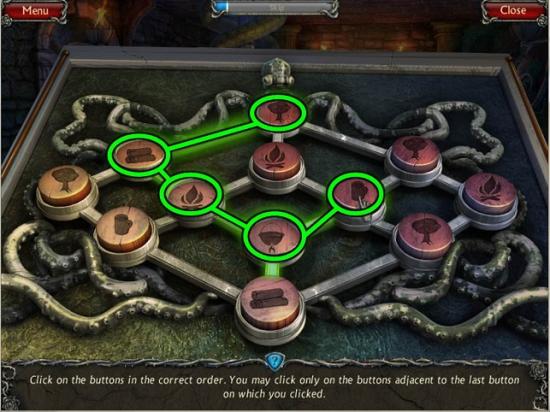
- You get another “find the order” puzzle. This time you need to click the symbols in the right order for making a cup of tea: tree, logs, fire, cauldron, mug.
- Take the DAGGER.
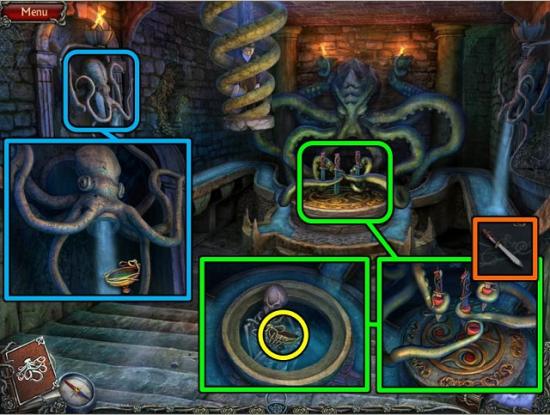
- Zoom in on the daggers in the floor again and put the DAGGER you just found with the others.
- Take the DIRTY BOWL.
- Go back to the octopus fountain and clean the DIRTY BOWL under the stream.
- You get a CLEAN BOWL, obviously.
- Go back one room and play the new HOS.
- The GEAR is inside the chest.
- Go to the basement by the hospital courtyard.
- Zoom in on the door beside the back boiler.
- Put the GEAR on the tool box.
- Take the REAGENT and the SCREWDRIVER.
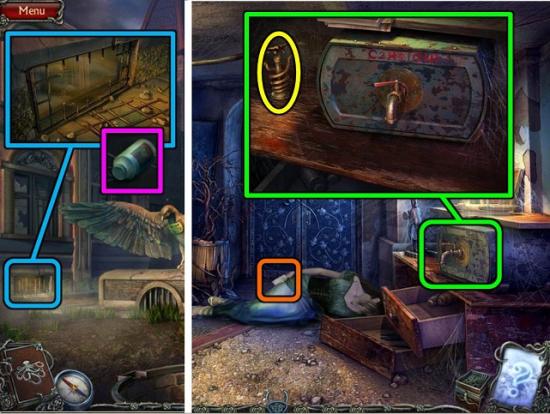
- Go to the rose room.
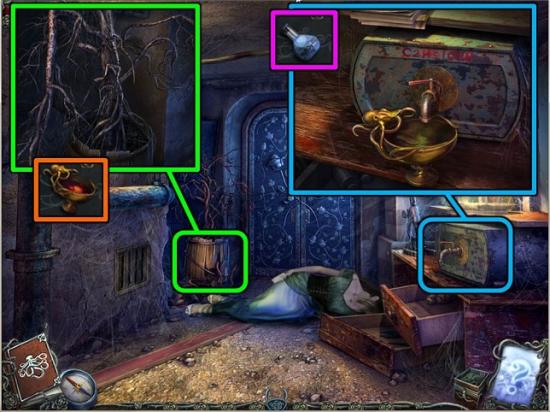
- Zoom in on the container on the bench.
- Put the CLEAN BOWL under the tap and turn the handle.
- Put the REAGENT in the bowl.
- Take the BOWL OF LIQUID.
- Zoom in on the dried shrub in the corner.
- Put the BOWL OF LIQUID on the soil.
- Back out to the yard and go into the procedure room again.
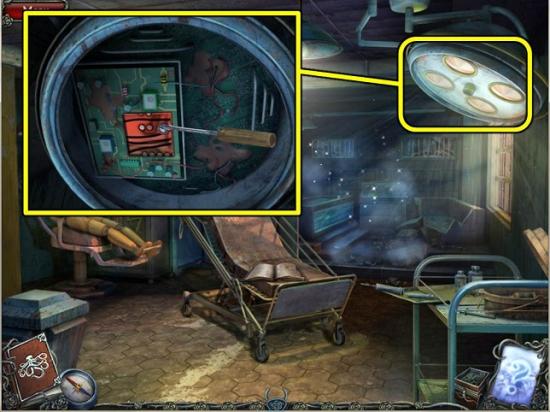
- Inspect the surgical lamp.
- Click to remove the cover plate and then use the SCREWDRIVER to remove the MICROCHIP.
- Play the new HOS in the back.
- You get a BLOWTORCH.
- Go back to the basement.
- Zoom in on the boiler in the front and put the METAL PLATE behind the hooks.
- Use the BLOWTORCH to fix it in place.
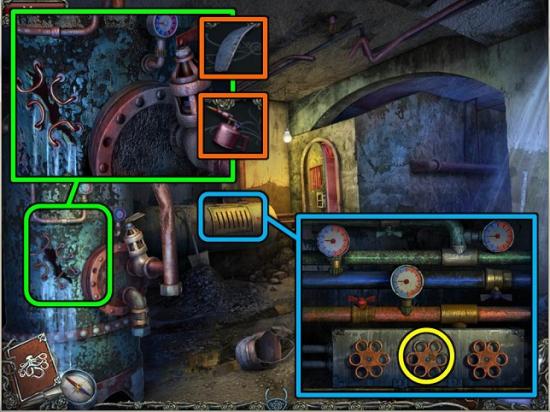
- Inspect the boiler in the back.
- Remove the grate and put the VALVE HANDLE in between the other two.
- Click on one of the valves to increase the pressure.
- Go into the rose room.

- Take the BIRD KEY from Teresa.
- Go back to the hospital yard.
- Zoom in on the bird statue and open the compartment with the BIRD KEY.
- Click on the mechanism and replace the missing MICROCHIP.
Chapter 6: The Mansion
- Click “Need to hurry”.
- Go to the rose room and through the door.
- Pick up the SUN-SHAPED KEY.
- Exit right (straight on is a dead end).
- Go to the top of the ladder and put the SUN-SHAPED KEY on the hatch.
- Exit through the hatch.
- You’re back in the foggy park!
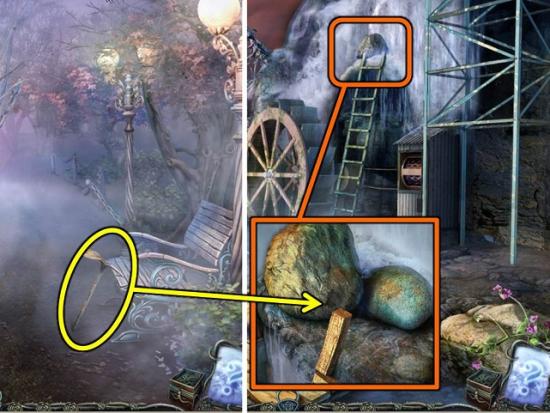
- Pick up the PICKAXE.
- Go forward twice and up the hill to the elevator.
- Climb to the top of the ladder and remove the rocks with the PICKAXE.
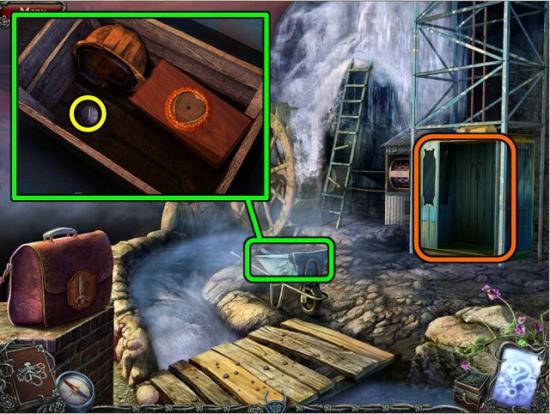
- Enter the elevator.
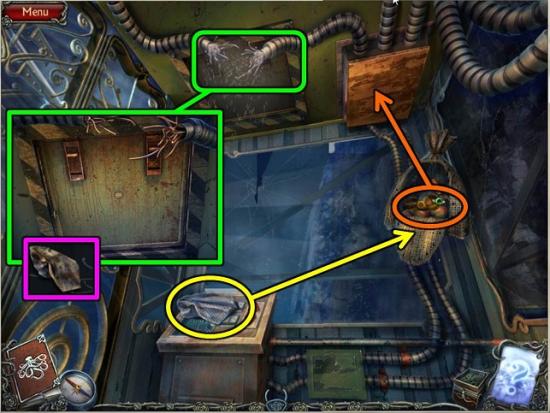
- Inside the elevator, pick up the RAG.
- Click to open the sack and take the CAN OPENER.
- Put the RAG on the dripping oil to get an OILY RAG.
- Use the CAN OPENER on the fuse box above the sack.
- Zoom in for a puzzle.
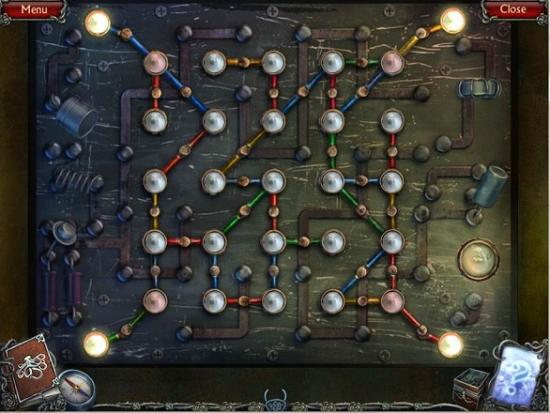
- You need to move the lights to make a full circuit and turn on all the lights. Wires need to connect to wires with a matching color. The light will come on if all its wires are correctly connected. However, this doesn’t necessarily mean it is in the correct place. Some lights can’t be moved.
- After the puzzle, zoom in on the ceiling hatch.
- Loosen the hinges with the OILY RAG.
- Climb out and climb up.
- Keep climbing until you’re safe.
- Go through the circular door to the catacombs.
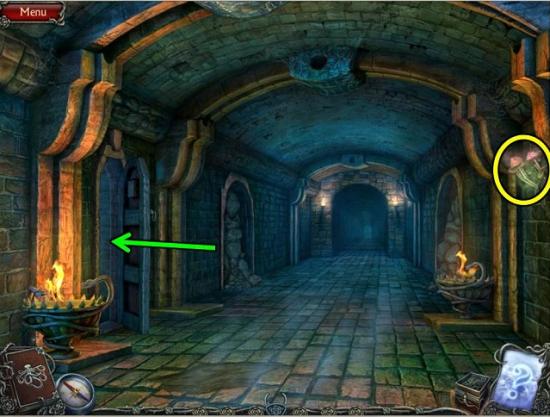
- Pick the LUMINESCENT MUSHROOMS.
- Go left into the shelter.
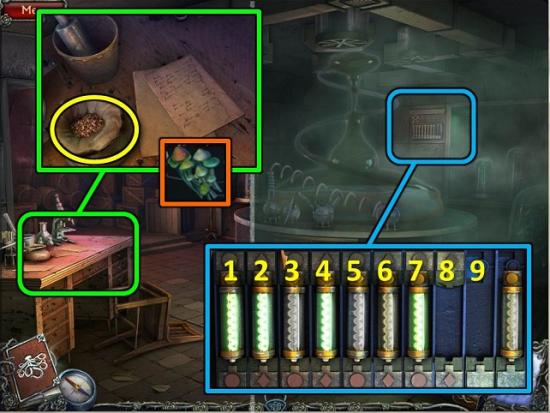
- Click on the fuse box in the back wall for a puzzle. You need to move the fuses so they match the symbols at the top and bottom. However, fuses can only move in pairs. To move, click on the left fuse of the pair you want to move and then on the left slot of the place you want to move them to. This is seriously tricky. I found the quickest solution from the default setting, but if you came to this walkthrough after having tried for yourself first, you’re on your own, sorry!
- From the default, click the fuses in the following order (I’m only listing the fuses you need to pick up, as for each move there will only be one place you can move to): 3, 7, 9, 6, 4, 7, 9.
- Inspect the desk and take the SACK OF SEEDS.
- Read the note for instructions.
- Put the SACK OF SEEDS in the mortar and pestle, followed by the LUMINESCENT MUSHROOMS.
- Grind to a powder.
- Take the SNAKE POWDER.
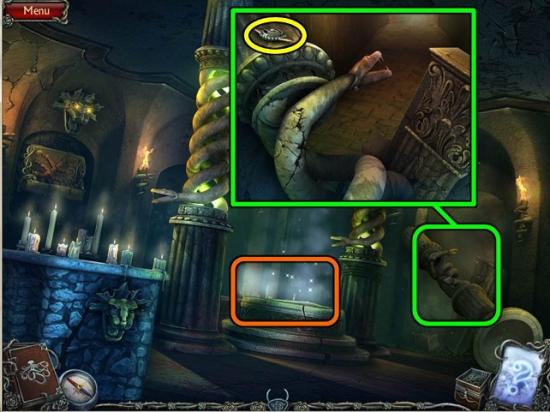
- Back out to the catacombs and go on to the back section.
- Put the SNAKE POWDER on the flame at the front left.
- When the snake is asleep, take the CHAIN.
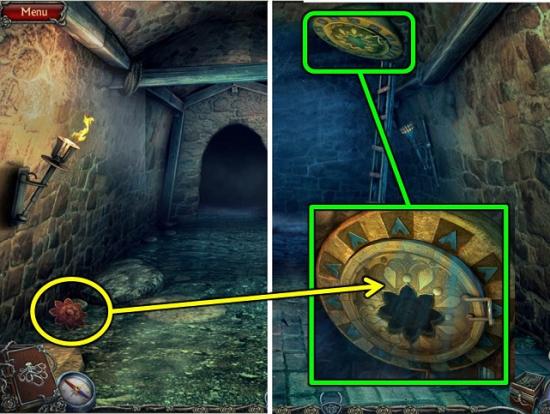
- Go through the right door and take the AMULET.
- Back out to where the snake was and this time go straight on.

- Put the AMULET on the snake statue.
- Take the CLOWN’S HEAD.
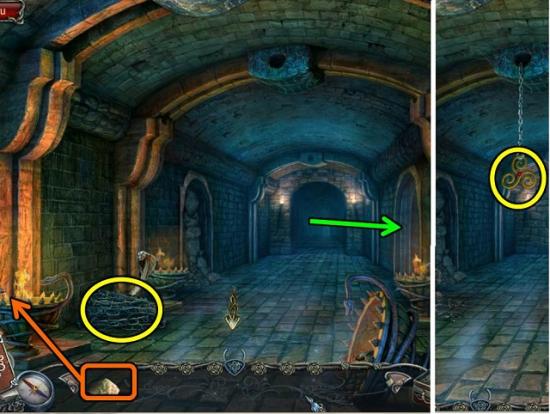
- Back out three screens to the alley with the telescope.
- Go up the stairs to the mansion entrance.
- Use the CHAIN on the balcony and enter the mansion.
- Pull the tasselled cord hanging from the ceiling.
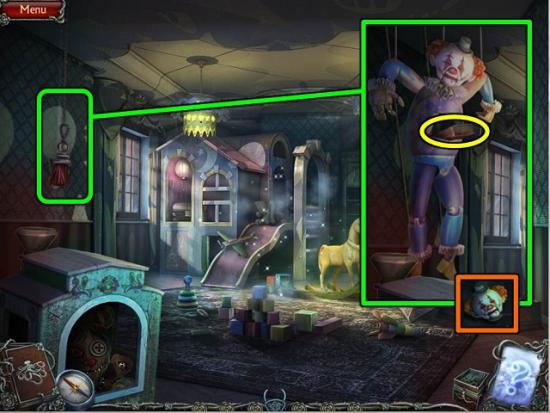
- Put the CLOWN’S HEAD on the puppet.
- Take the book from the compartment that opens.
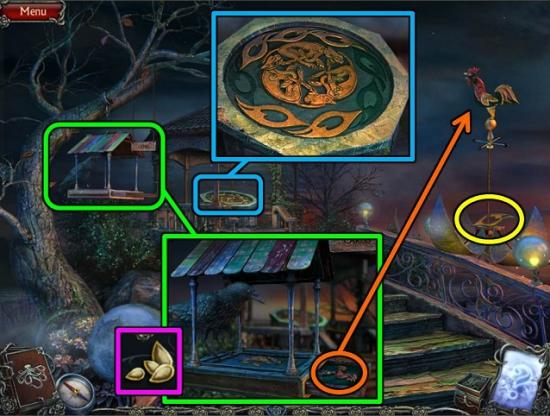
- Play the HOS in the playhouse.
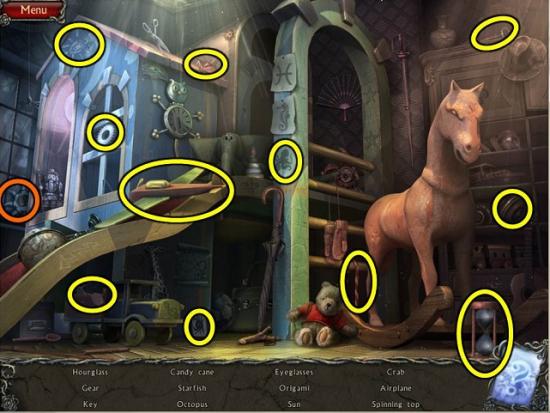
- You get a STARFISH.
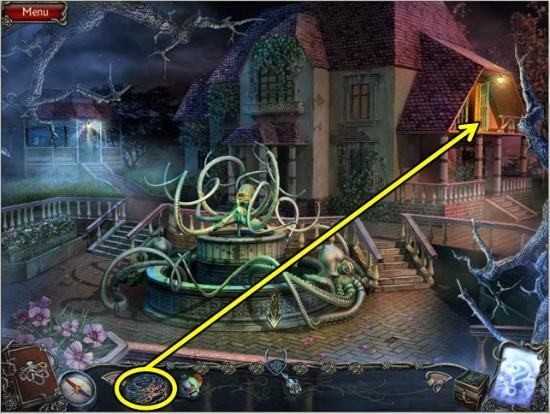
- Go back to the Mansion entrance.
- Zoom in on the fountain and put the STARFISH on it.
- Take the SKULL.
- Go through the window to the nursery.
- Inspect the playhouse in the back.
- Put the SKULL on the chest.
- Take the LION.
- Go through the door on the right to the stairs.
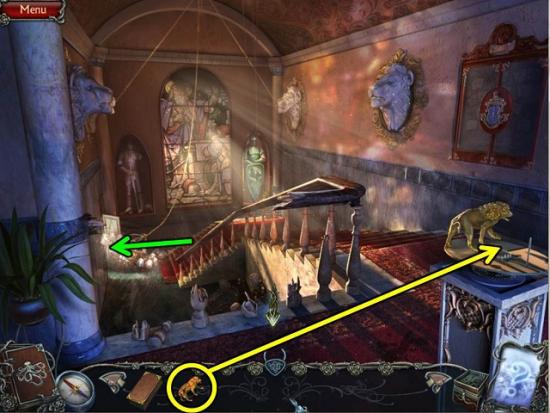
- Put the LION with the other lion on the right.
- Exit through the door at the bottom of the stairs.
- Inspect the sink and take the SOLIDIFIED HONEY.
- Push the button on the bench top.
- Inspect the basket that drops down and take the OVEN MITT, TRAIN and SHED.
- Put the SHED on the puzzle board.
- Go back two screens to the nursery.
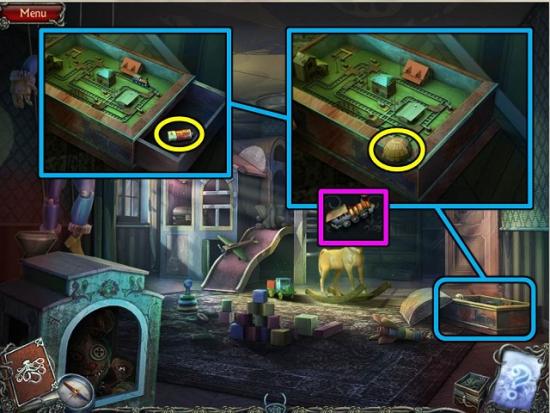
- Inspect the toy train set.
- Take the GREENHOUSE and put it on the puzzle board.
- Put the TRAIN on the set. Strangely enough, all you need to do is watch it go around the track.
- Take the BATTERY from the drawer.
- This triggers a new HOS by the playhouse.
- You get FISHING LINE.
- Go back to the stairs and down to the kitchen.
- If the basket is still down, push the button again to make it go up.
- Zoom in on the boiler in the back.
- Put the BATTERY on the boiler.
- Again, no puzzle. Odd.
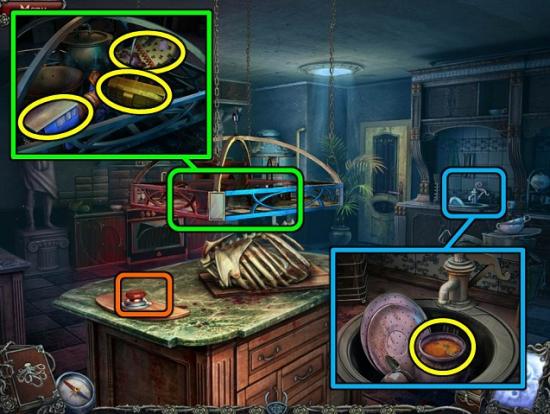
- Zoom in on the stove.
- Put the SOLIDIFIED HONEY on it.
- Turn the red knob.
- Once the honey is hot, use the OVEN MITT to take the HONEY POT.
- Go back to the sink and put the HONEY POT in the sink.
- Run the tap and take the KEY.
- Zoom in on the back door and open it with the KEY.
Chapter 7: The Greenhouse
- Go through the door to the porch.
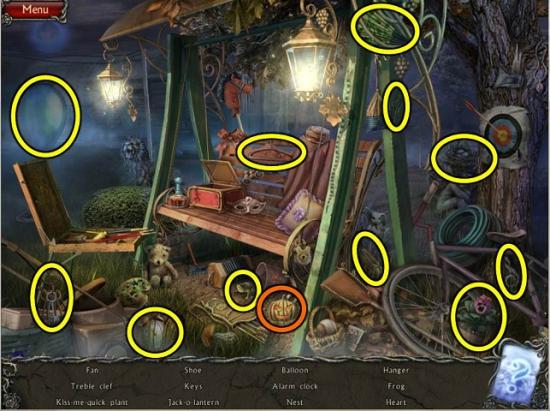
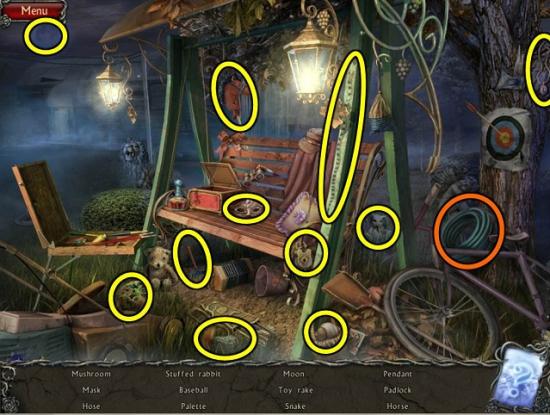
- Play the HOS by the swing.
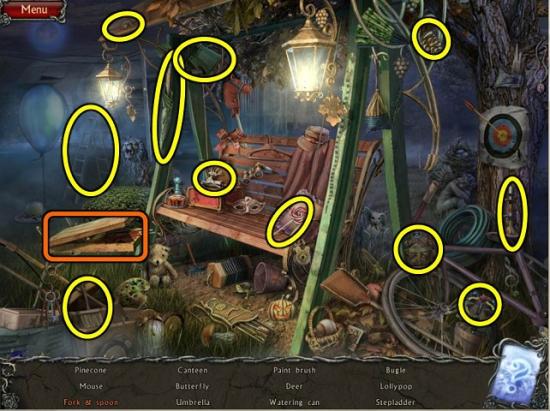
- The FORK AND SPOON are in the paint box on the left, which you need to click to open.
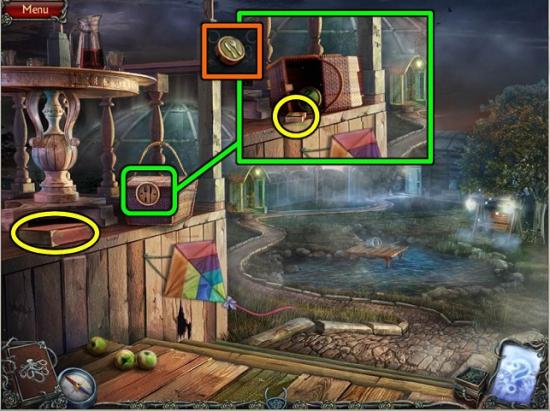
- Take the second BOOK from the ledge.
- Put the FORK AND SPOON on the picnic basket on the ledge.
- Take the MATCHES.
- Go on to the area outside the hangar.
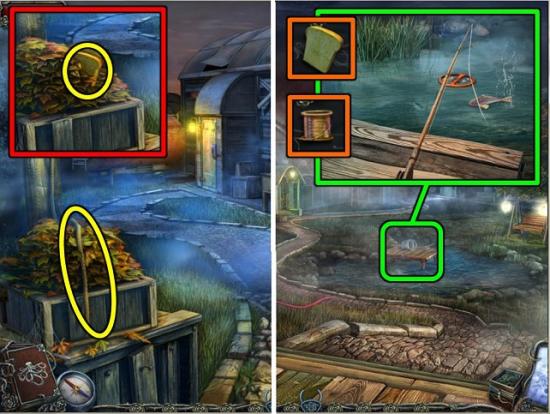
- Click on the pile of leaves to take the ROPE.
- Click again to move the LEAVES.
- Take the PIECE OF BREAD.
- Go back to the porch.
- Have a closer look at the water.
- Put the FISHING LINE on the rod and take the FISHING ROD.
- Put the PIECE OF BREAD in the water.
- Use the FISHING ROD on the water.
- You get a FISH.
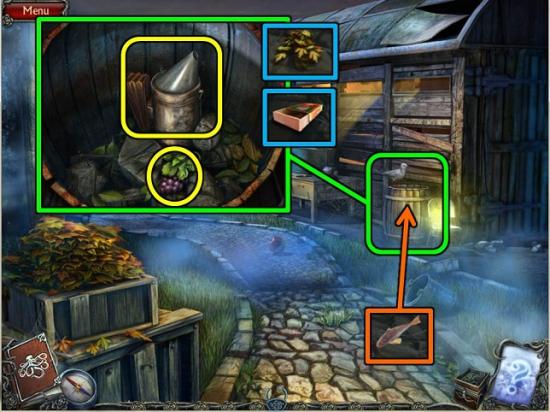
- Go back to the hangar.
- Give the FISH to the gull.
- Once the gull is gone, have a look inside the barrel.
- Take the GRAPES.
- Put the LEAVES inside the smoker and light it with the MATCHES.
- You get a SMOKER.
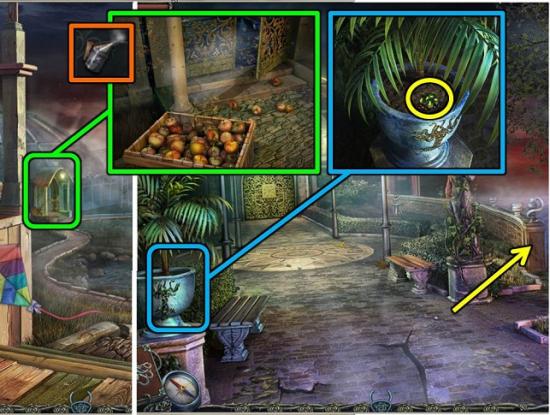
- Go back to the porch and zoom in on the greenhouse.
- Use the SMOKER on the bees.
- Go through to the terrace outside the greenhouse.
- Inspect the planter and take the second lot of GRAPES.
- Go down the stairs to the ferry.
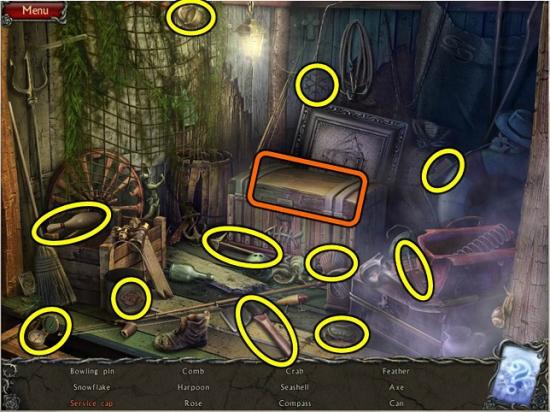
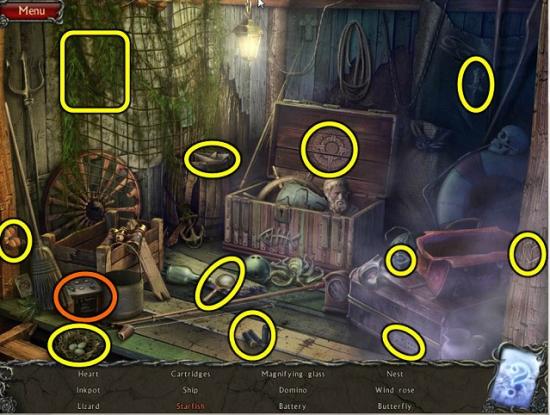
- Play the HOS inside the little shed by the pier.
- The service cap is inside the chest. You get a HARPOON.
- Put the HARPOON on the crossbow and tie the ROPE to it.
- Click to fire.
- Inspect the bag and take more grapes.
- Back out to the outside of the greenhouse.
- Zoom in on the door.
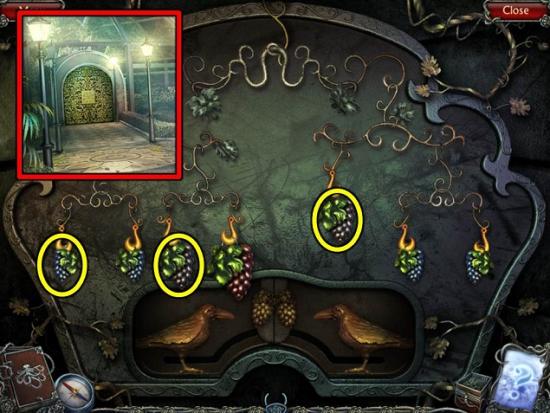
- Put your three lots of GRAPES on the door.
- Go into the greenhouse.
- Zoom in on the shelves and take the FLOWER.
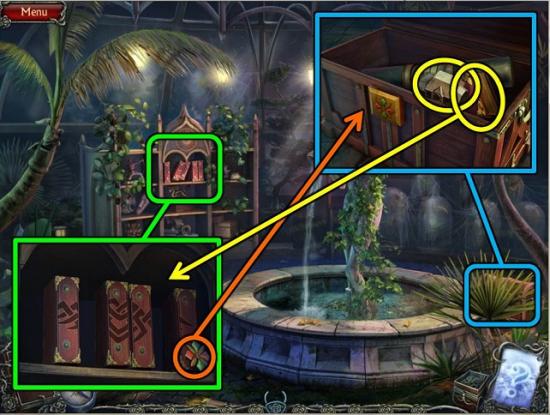
- You can put your two BOOKS on the shelf now if you like. But you need to find a third.
- Remove the big leaf on the right and inspect the chest.
- Put the FLOWER on the chest.
- Take the third BOOK (that was easy!) and the HOUSE.
- Put the HOUSE on the puzzle board.
- Go back to the shelves and put the third BOOK on it.
- Go down the hatch.
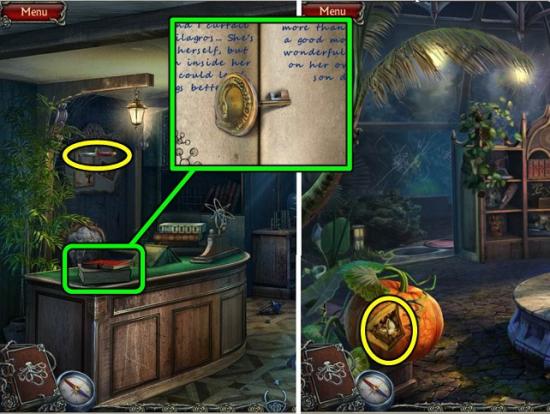
- Pick up the book on the desk and turn the pages until you find the SNAKE KEY.
- Take the KNIFE from the pin board.
- Back out to the greenhouse.
- Carve the pumpkin with the KNIFE and take the PUMPKIN SEEDS.
- Go to the ferry.
- Zoom in on the bag and cut it with the KNIFE.
- Take the second SNAKE KEY.
- Go back to the study below the greenhouse.
- Open the locked safe in the wall with the two SNAKE KEYS.
- Take the CORKSCREW.
- Back out three screens and play the new HOS by the swing.
- You get a JACK-O-LANTERN (which you could have made yourself in the greenhouse just now…).
- Use the CORKSCREW on the bottle in the picnic basket.
- Read the note inside the bottle.
- Back out two screens to the stairs.
- Zoom in on the suit of armour on the right and put the JACK-O-LANTERN on it (oh, maybe it was a “special” Jack-o-lantern).
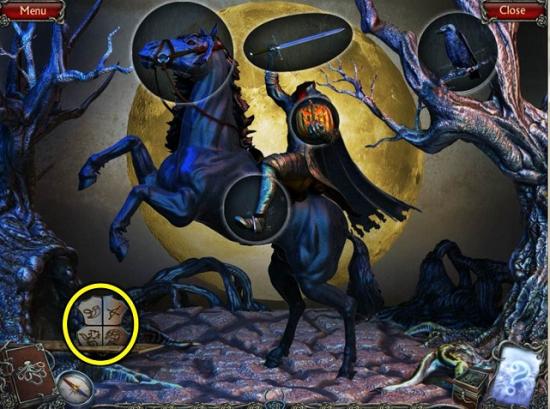
- Click on all the circled symbols until you’ve found the correct ones to make the image of the Grim Reaper (though I didn’t find any example to follow – you?).
- When done, take the COAT OF ARMS.
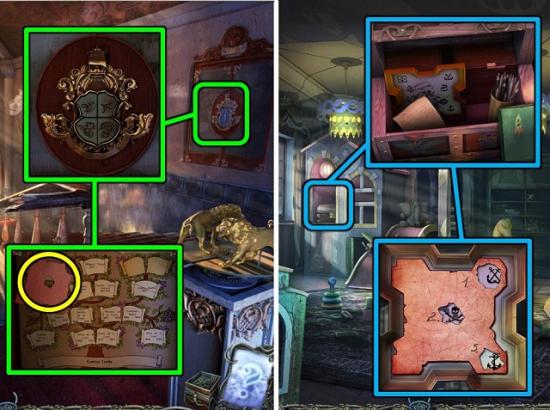
- Zoom in on the shield on the wall and put the COAT OF ARMS on it.
- Behind it is a STENCIL.
- Go back to the nursery.
- Inspect the playhouse and take the funny shaped picture from the chest.
- Put the STENCIL on the picture. Take note of the three symbols.
Chapter 8: Escaping the Island
- Go back to the greenhouse and down to the ferry.
- Play the new HOS (which is triggered by reading the note inside the corked bottle).
- You get the SHOVEL.
- Go back one screen.
- Zoom in on the planter and use the SHOVEL.
- Take the BAS-RELIEF PIECE.
- Go to the ferry and on to the end of the pier.
- Zoom in on the lock.
- Remind yourself of the correct symbols in your journal and enter them into the lock.
- Pick up the SUMMER HOUSE and put it on the puzzle board.
- This time, click the symbols in order of increasing sophistication of transport: foot, horse, train, car, plane (you may have done this earlier).
- Take the second BAS-RELIEF fragment.
- Turn the ship’s wheel to go to the pavilion across the water.
- Inspect the bird house and put the PUMPKIN SEEDS on it.
- After the bird has arrived, take the WEATHER VANE.
- Put the WEATHER VANE on the globe on the right.
- Take the third BAS-RELIEF PIECE.
- Inspect the pillar in the gazebo.
- Put the three BAS-RELIEF PIECES on the pillar.
- Take the BIRD FIGURINE.
- Back out to the ferry for another HOS.
- The starfish is behind the net on the wall. You get a BATTERY.
- Back out two screens for a HOS by the swing.
- You get a HOSE.
- Go to the hangar.
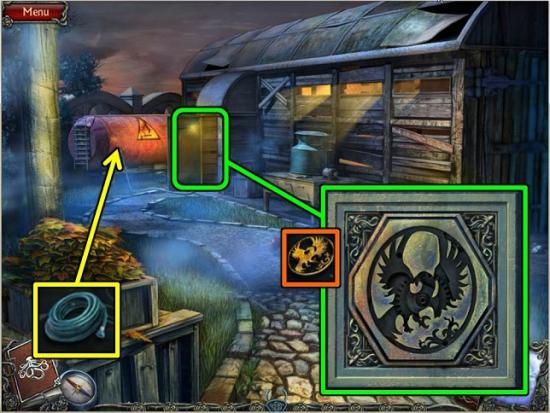
- Zoom in on the door.
- Put the BIRD FIGURINE on the lock.
- Before you go in, put the HOSE on the fuel tank by the door.
- Go into the hangar.
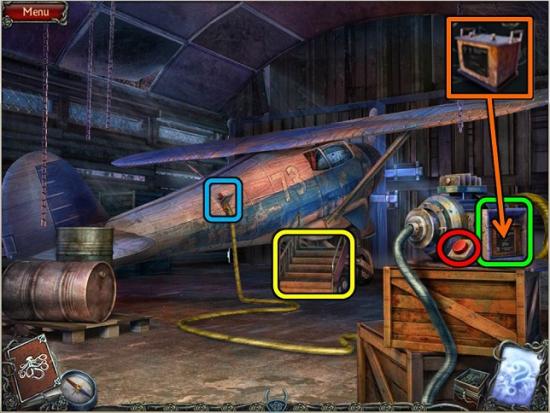
- Remove the panel on the side of the pump and put the BATTERY behind it.
- Click to roll the stairs to the plane.
- Click on the fuel tank to connect the hose.
- Hit the red button to fill the tank.
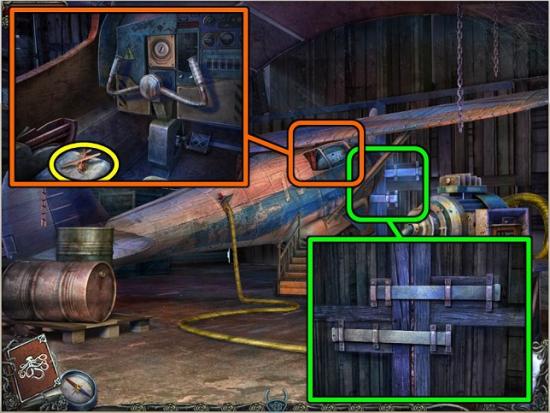
- Zoom in on the hangar doors and remove the latches.
- Look inside the plane.
- Take the PLANE MODEL and put it on the puzzle board.
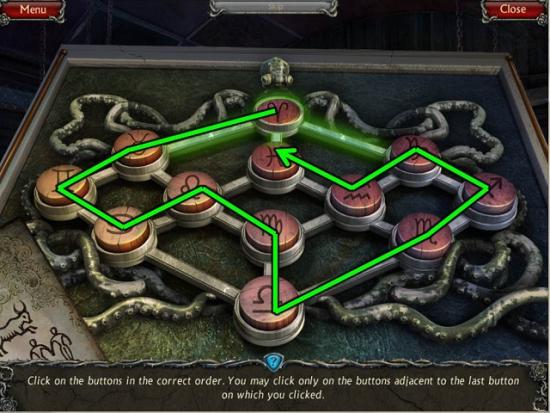
- This time, click the symbols of the zodiac in the correct order.
- Take the PLANE KEY.
- Go back to the plane.
- Put the PLANE KEY in the ignition and turn it.
Congratulations!
You have completed Gamezebo’s walkthrough for Twisted Land: Origin. Be sure to check back often for game updates, staff and user reviews, user tips, forums comments and much more here at Gamezebo!

More articles...
-
Best Horror Games On Itch.io – July 2026
Across a bounty of subgenres. -
Haze Seas Accessories Tier List [Best Accessories to Equip]
The accessories with the best stat buffs in Haze Seas.