
Best Horror Games On Itch.io – July 2026
Across a bounty of subgenres.![Haze Seas Accessories Tier List [Best Accessories to Equip]](/wp-content/uploads/2026/07/haze-seas-accessories-tier-list.jpg "Haze Seas Accessories Tier List [Best Accessories to Equip]")
Haze Seas Accessories Tier List [Best Accessories to Equip]
The accessories with the best stat buffs in Haze Seas.
![[Roblox] Evomon Shiny Hunting Guide – Including Prismatic and Pris Shinies!](/wp-content/uploads/2026/06/evomon-shiny-hunting-guide.jpg "[Roblox] Evomon Shiny Hunting Guide – Including Prismatic and Pris Shinies!")

Twisted Lands: Insomniac Walkthrough
Welcome the Twisted Lands: Insomniac walkthrough on Gamezebo. Twisted Lands: Insomniac is an adventure/hidden object game played on PC created by Alawar Games. This walkthrough includes tips and tricks, helpful hints, and a strategy guide to how to complete Twisted Lands: Insomniac.


- Prefer Gamezebo on Google

Twisted Lands: Insomniac – Game Introduction
Welcome the Twisted Lands: Insomniac walkthrough on Gamezebo. Twisted Lands: Insomniac is an adventure/hidden object game played on PC created by Alawar Games. This walkthrough includes tips and tricks, helpful hints, and a strategy guide to how to complete Twisted Lands: Insomniac.
General Information
Moving Around
This game is played out in two separate areas: the hospital and the Twisted Lands. You will automatically be taken from one place to the other at specific points in the game. Don’t worry if you didn’t complete all the objectives in one part of the game when you’re transported to the other, as you will be able to pick up where you left off the next time you’re back.
You can navigate through the various scenes by clicking on the swirly white arrows that appear when you move your cursor around. Except in the main compartment of the bus, clicking on the downward arrow will always get you back to the previous screen. So, if you are lost you can always return to a familiar place by backing out using the downward arrow.
When you’re really lost and don’t know where to go next, you can click the hint button in the bottom right of the screen. If there are no actions to perform in the scene you’re currently in, the hint button will direct you to the place you need to go. There is no limit to how often you can use the hint button to find your way around. It will only shatter when it shows you the next action you have to perform. After this it will need some time to reload before you can use it again.
The cursor changes when you can interact with something or someone. The various cursors are:
- Magnifying glass: zoom in on an object
- Magnifying glass with jigsaw piece: zoom in on a puzzle
- Hand: pick up an object
- Arrow with gears: use an inventory item on the object. When you’re holding an inventory item, the item will be shown in a circle next to the cursor. To open your inventory, simply move your cursor to the lower edge of the screen and the inventory will open.
In addition, interactive areas such as hidden object scenes are indicated with white sparkles when you’re playing in regular mode.
Journal
In the bottom left corner of the screen is your journal. The journal has two main compartments.
1: Clicking on the notepad sticking out of the top of the journal takes you to a list of objectives.
2: The leather-bound journal itself contains all the information you have gathered. So any codes, diagrams etc. you need to solve the various puzzles are recorded in your journal for quick reference. There are three tabs in the journal: one containing the information you gathered in the hospital, one containing the information from the Twisted Lands and a third with a photo album and the pictures you have found.
IMPORTANT: Pretty much all the codes and sequences in this game are randomized. Therefore, in this walkthrough I will give you information on where to find the codes and show examples of what they will look like, but the codes themselves will likely be different than in your game. If you can’t remember a code you found, check your journal.
Walkthrough – The Bus and Tree House
Tutorial
Click on the doctor to talk to him. Click on the journal. You will see that your first task is to remove your leg straps.
Pick up the pitcher, then take the pitcher out of your inventory and smash the glass with it.
Pick up a glass shard from the bedside table, take it out of your inventory and click on your foot to get a close up of the leg straps. Use the glass on one of the leg straps to cut yourself free.
Leave the Room
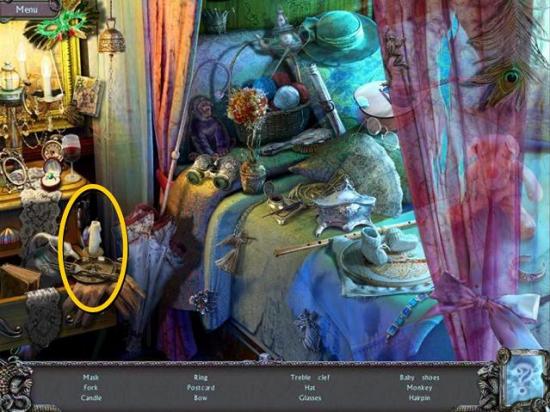
Click on the bed to get your first hidden object scene. Find the nail file.

Click on the newspapers in the wheelchair and under the bed to get more information. You can also look through the bars in the door.
Click on the grate above the bed and use the nail file on the screws to remove the grate. Enter the ventilation shaft.
Pick up the crowbar, look down through the grate if you like and move forward around the corner. Use the crowbar on the next grate – you have to click twice. Go down through the grate.
Exit through the Bathroom
Click on the scrunched up newspaper on the right and pick up the key inside.
Click on the cabinet on the left wall – it is locked. Take the faucet handle from the shelf under the cabinet and use the key to open the padlock. Open the cabinet and take out the stopper.
Click to open the curtains and the shower curtain. Click on the bath. Plug the drain with the stopper and put the faucet handle on the knob beside the tap. Click on the handle to fill the bath and leave through the floor.
Leave the Bus
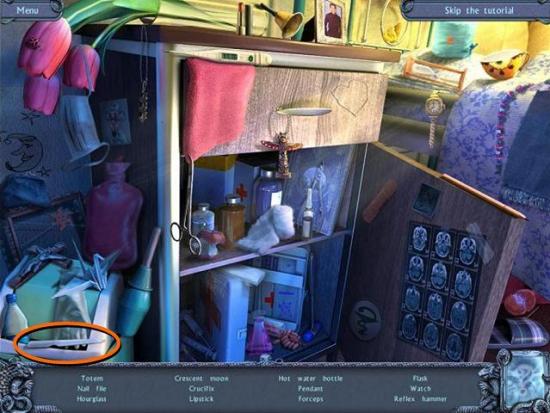
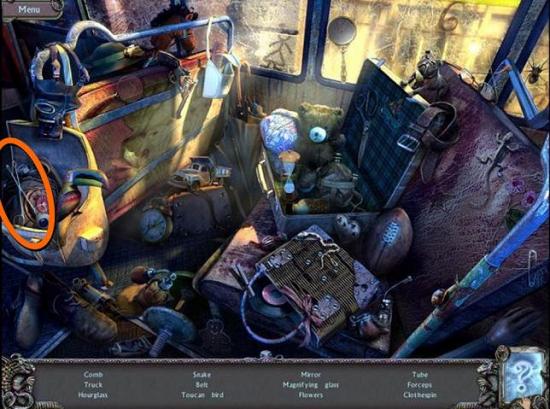
Click on the bench on the right for another hidden object scene. Find the flashlight.

Go to the front of the bus and look at the note on the window. Click on the compartment under the door controls and enter the code you found taped to the window. Note that the code is random and will likely be different in your game.
Take the photo album and the roll of tape from the compartment. You need to find the 15 missing photos from the album. At the end of the walkthrough is a list where you can find all photos.
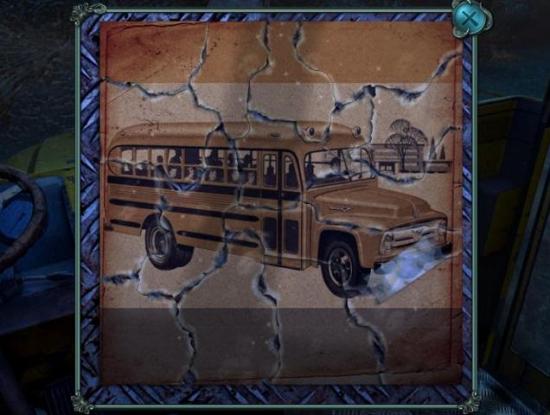
Click on the shredded photograph on the floor and complete the jigsaw – the bottom right piece is already fixed in place.
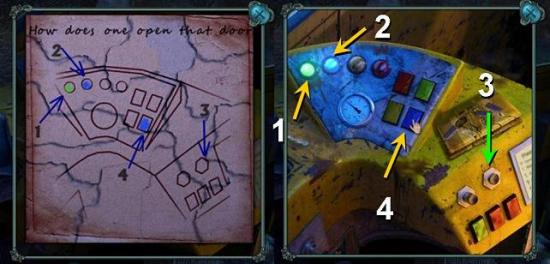
Tape the pieces together with the tape you found in the glove compartment. Instructions on how to open the door appear on the back. Click on the door controls and click on the colored buttons according to the instructions. Again, this is a randomly generated code.
Exit the bus.
Click on the archway underneath the window next to the hospital sign. Use your flashlight to see and then click on the fuses to take them out and cut the power to the cable blocking your way.
Click on the wooden shack next to the bus and take the scissors from the windowsill.
Click on the bus and inspect the two books left on the seat. The book with the cross on the cover contains the first picture for the photo album.
The Tree House and Gardens
Walk up the road past the bus.
Click on the ribbon at the base of the ladder to the tree house. The ladder needs to be repaired, but there is a note hidden inside the tree trunk at the base of the ladder telling you where to look for the toolbox.
Go up the path to the right to the gardens. Click on the rusty old toolbox on the left and take out the hammer and the file.
The lion statue in the center has a puzzle you can’t solve yet. Click on the swing and read the newspaper on the swing.
Enter the gazebo, take the empty bottle and the bracelet and read the card by the present. Note the water in the basin for later. Click on the present and open it with your scissors
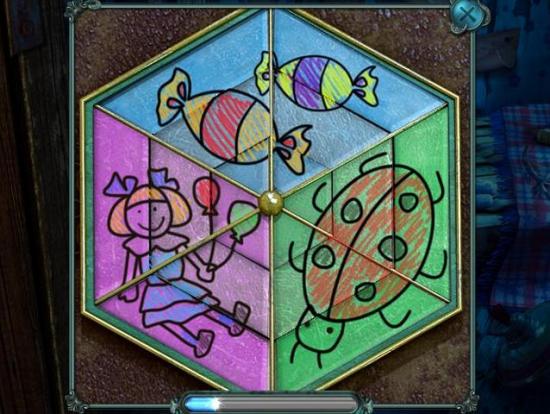
Inside the present is a puzzle box. You need to arrange the gems so the three visible sides of the cube each contain only one color gem. You can move gems by clicking on a gem next to the hole. The trick is to move the gems you want to keep on a side to the outside edges and the ones you want to move to a different side to the inside edges. Keep swapping them around until they’re all moved. It doesn’t matter which color goes on which side.
Inside the box is the second photo and a handle.
Leave the gazebo and the garden to go back to the tree house. Fix the ladder with the hammer. You can go up the ladder, but you need a key to get into the tree house.
Go back to the scene with the bus and click on the wooden cabin. Use the handle from the puzzle box on the Jack-In-The-Box in the window.
Enter the cabin through the door. The cabinet on the wall needs a special key. Click on the clamp on the table and use the file from the toolbox on the metal in the clamp to turn it into a key. This awakens the ghost from the skeleton, and he won’t let you past.
Go back to the tree house, go up the ladder and unlock the door with the key you just made. Click on the rope ladder to take it. Click on the diary on the bed. The third photo for the album is on the diary. To open the diary, you need to find 3 missing lock fragments.
Inside the Hospital
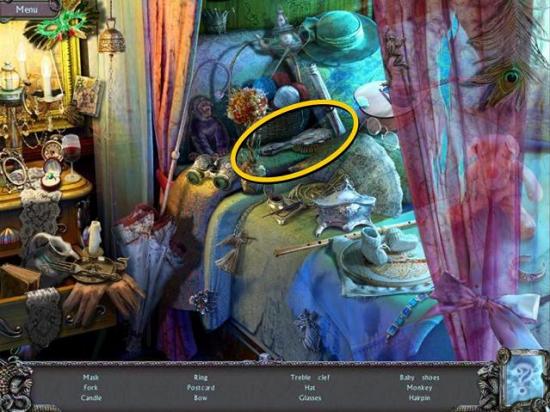
Now keep clicking the back arrow until you’re back in the main compartment of the bus. There is a new hidden object scene on the benches. Find the forceps.
Use the rope ladder to get through the roof of the bus. The suitcase on the roof has a combination lock you don’t have the code for.
Pick up the ladder and move it to the window. Enter the mortuary.
Open the Mortuary Door
Click on the jar on the shelves on the far wall. Take off the lid and use the forceps to take out the ring.
Use the ring on the funny shaped lock of the fridge on the right. Click twice on the body inside the fridge to zoom in and take the mortuary door key from his hand. Inspect the locket and the funny symbols on the inside of the door.
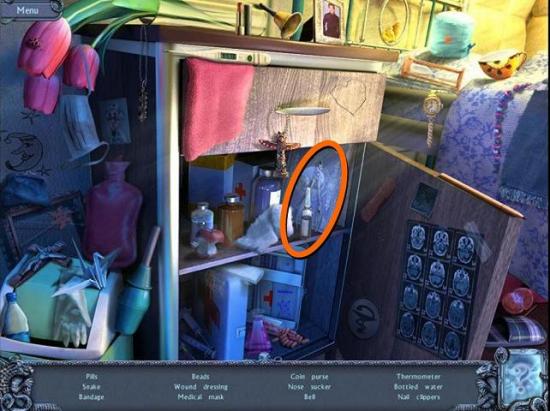
Open the mortuary door with the key and exit the mortuary. Click on the flowering shrub on the medicine cabinet.
Second Escape from the Ward
Leave the Room
Click on the bed for another hidden object scene. Find the nail clippers.
Click on the wheelchair and take off one of the spokes with the nail clippers. Click on the bedside table on the far side of the bed and take the reflex hammer. Use the hammer to hit the nails into the board, then put the spoke on the nails to make a lock pick. Take the lock pick.
Before you go, note the locked makeup box on the windowsill and click on the slippers by the bed to find a broken pencil.
Use the lock pick on the door lock and exit the room
Open the Gate
Click on the doctor in the room on the left to steal his ID card.
Go to the station at the back of the corridor. Sharpen the broken pencil with the sharpener on the desk.
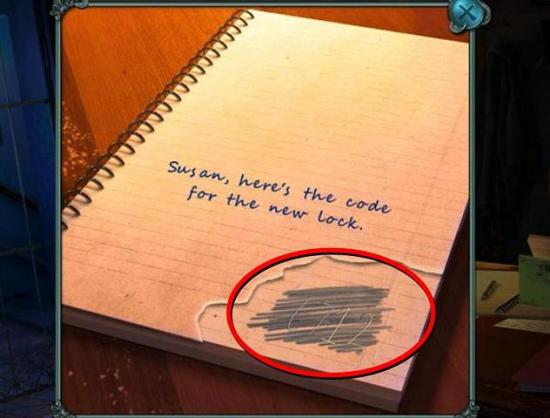
Click on the notepad and take the tape. Use the pencil on the bottom right corner of the notepad to highlight the code for the security lock. The code will be stored in your journal.
Take a bottle of powder from the cabinet on the far wall.
Click on the phone and take the flower key.
Now go back to your room and unlock the makeup box on the windowsill with the flower key. Take out the brush.
Go back to the end of the corridor and click on the cup in the water cooler. Use the powder from the cabinet on the cup and wipe off the excess powder with the makeup brush. Lift off the fingerprint with the tape.
Do the same with two fingerprints on the receiver of the phone.
Go to the security lock on the gate and enter the ID card. Use all three fingerprints on the fingerprint pad of the security lock – the key pad will open at the third try, regardless of which print you try first.
Enter the code from the note pad to open the gate and leave.
Return to Twisted Lands Hospital
You find yourself back in the nurses’ station outside the mortuary.
Read the newspaper on top of the medicine cabinet and take the matches out of the bottom drawer.
Click on the phone on the back wall to find the first diary lock fragment and the fourth photo for the album.
Go down the stairs and look at the picture on the dental chair. Inspect the box on the dental chair – it is locked.
Go further down the stairs. Use the matches on the torch that’s sitting on the stairs. Use the lit torch on the chains on the door and exit.
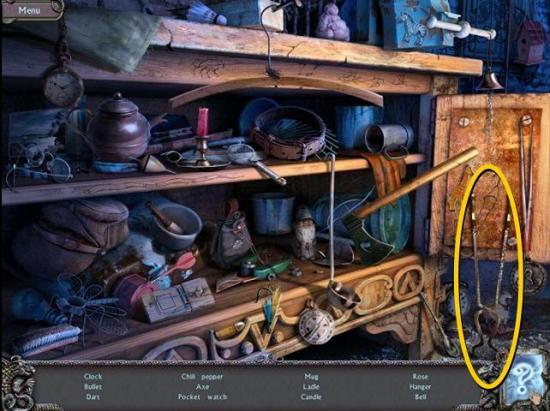
Hospital Nurse’s Station and Cellar
There is a chainsaw on the floor that needs gas. There appears to be a ghost behind a door with an intricate lock you can’t open yet. On the left is a yellow boiler with 3 valves – you can’t do anything with this yet either.
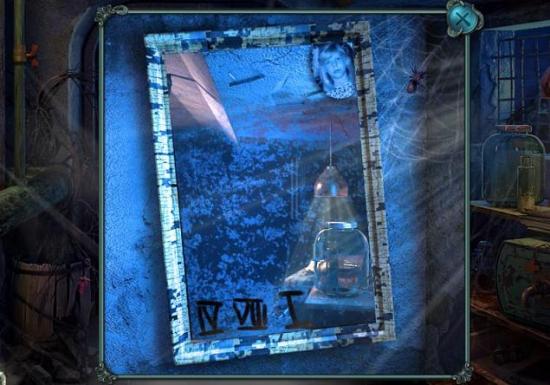
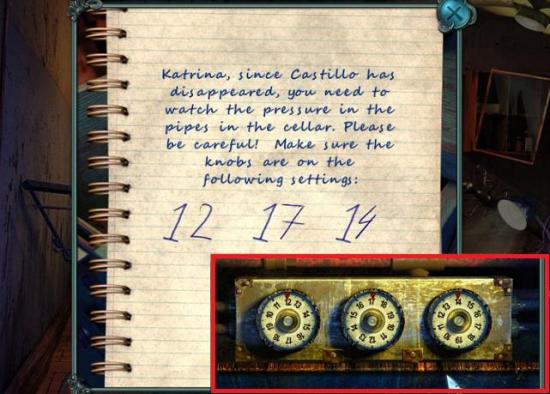
Go up the steps at the far end of the room. Click on the mirror to find the fifth photo and a code in roman numerals.
On the right is an old water tank with a tap. You need to find a tool to take off the tap. On top of the water tank is a key with a Red Cross key chain. Take the key.
Go back out until you’re back at the nurses’ station. Unlock the medicine cabinet with the key with the Red Cross key chain and take the hammer and chisel from the cabinet.
Inspect the notepad inside the cabinet. It has a 3 number code on it. Go back to the boiler room and turn the three valves using the code you just found.
Click on the barred window on the right to find the second diary lock fragment. Use the hammer and chisel on the loose plaster on the left hand side of the window. The hammer will go back into your inventory.
Get Rid of the Ghost in the Cabin
From the cellar, keep backing out until you’re back on top of the bus. Use the code you found on the mirror to unlock the suitcase. Take out the silver cross.
Now go down into the bus, exit the bus, go to the tree house and turn right to the garden. Enter the gazebo.
Use the silver cross on the water in the basin and then fill your glass bottle with the holy water.
Go back to the bus and enter the cabin. Use the bottle of holy water on the ghost. The ghost will drop a key – use it on the cabinet on the wall.
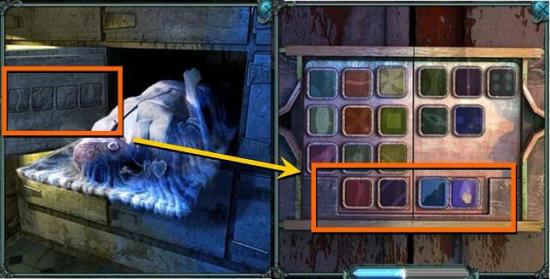
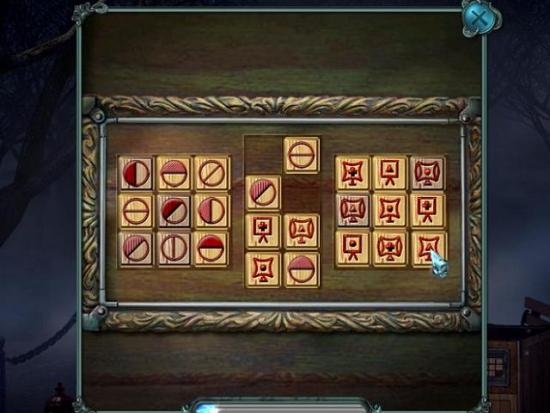
Inside the cabinet is a symbol puzzle. You will have seen the correct symbols on the inside of the fridge door in the mortuary. To open, you need to drag the symbols around until the 4 symbols you want are in the right order at the bottom of the lock.
Inside the cabinet are a wrench and the third diary lock fragment. Before you go, inspect the broken frame on the far wall, to the right of the cabinet.
Fill the Chainsaw with Gas
Go back to the tree house and enter. Put the missing pieces on the lock of the diary and solve the puzzle. Note that the center pieces are fixed in place, so you have to move the other pieces around those.
Inside the diary is another code.
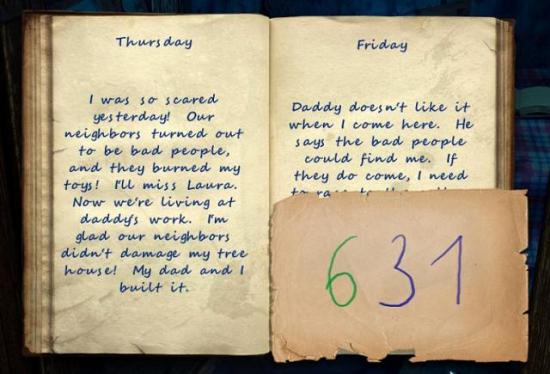
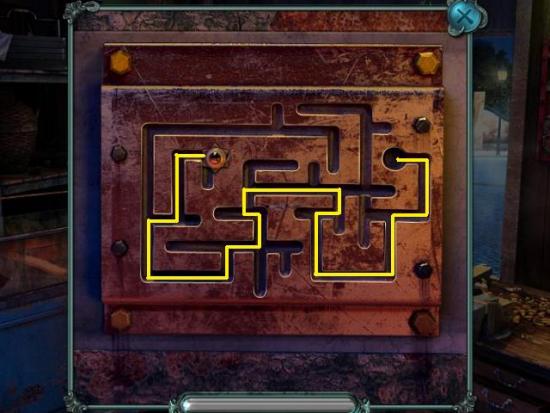
Exit the tree house, go back to the bus and through the roof. Enter the hospital and keep going forward until you’re back in the boiler room. Click on the door with the ghost behind it and slide the numbered marbles down into the 3 slots below according to the code from the diary.
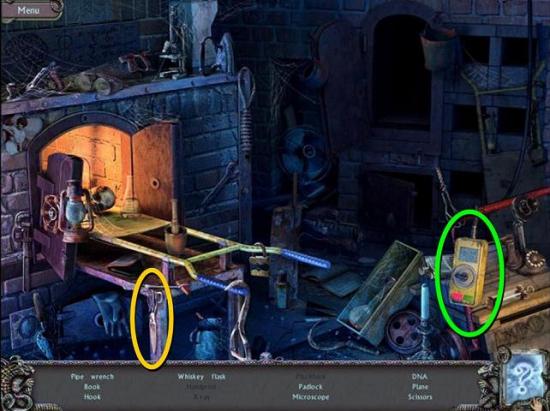
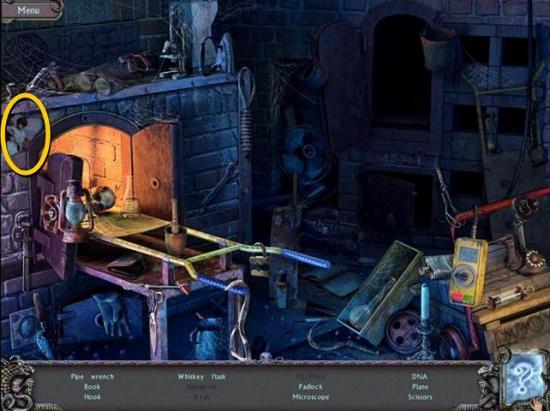
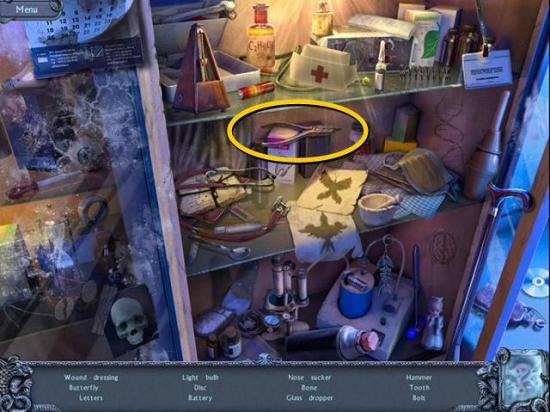
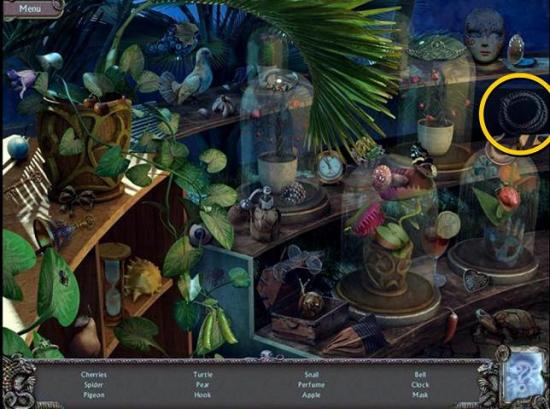
After the ghost disappears, click on the open door for a hidden object scene. This one is a bit different: some of the items are blacked out, you need to find a way to uncover these items. In this case you need to click on the yellow power switch (circled green) to light the oven and give you more vision. Find the scissors (circled yellow).
Go back to the room in the back cellar with the door needing two roses. Use the wrench on the tap of the water tank to take the tap. Use the scissors on the hose on the left wall to take a piece of hose.
Go back to the boiler room and to the window on the right. Put the tap and the hose on the gas container outside the window. Take the filled chainsaw.
The Lion Statue and Crossing the Gap
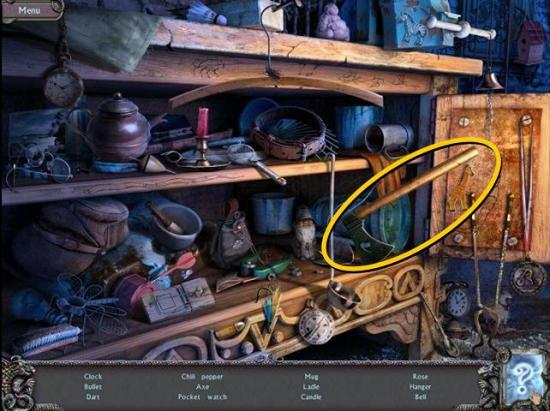
Click on the room where the ghost was locked again for another hidden object scene. Find the photo.
Go all the way back to the mortuary and put the photo you found in the body’s locket. The body will disintegrate and you will find a metal disc.
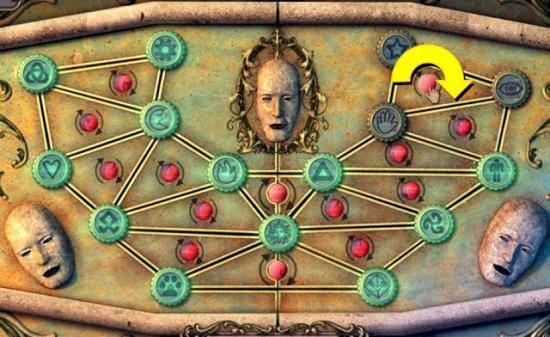
Go back out the window to the bus, and move forward to the gardens to the right of the tree house where the lion statue is. Put the metal disc on the statue puzzle.
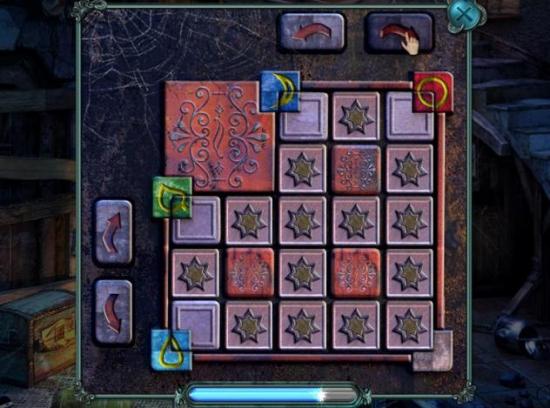
To solve the puzzle, the colored balls need to be moved to the holes on the outside with the same color. You can find out which hole has which color by clicking on the metal disc. You can move the balls by clicking on them to select them, and then clicking on the place you want the ball to move to. You can temporarily move balls into the holes on the outside to clear the way.
Inside the statue is a lens.
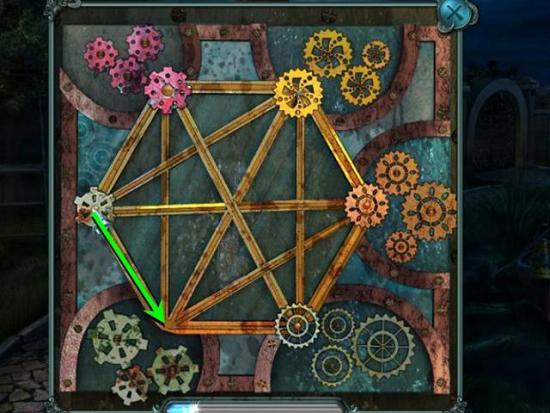
Go back to the tree house and move forward to the gap. Use the chainsaw on the tree beside the gap and cross the gap.
The Lighthouse
You find yourself in a rather misty forest. Go one screen forward and then go left. Take the pickaxe from the tree.
Go one screen back and go right. Go one screen forward. Use the pickaxe on the bricked up window and enter the lighthouse.
On the table on the left is another puzzle box. To solve the puzzle, the blocks with the colored corners need to be moved to the colored symbols around the edges to complete the symbols. You can move the blocks by clicking the arrows on the left and top. The two sets of arrows control two loops – one horizontal loop (left arrows) and one vertical loop (right arrows). This is a tricky puzzle as you need to figure out where the blocks need to be in relation to each other so they will move into their respective target locations at the same time.
Inside the puzzle box is a note with a set of coordinates.
In the back of the room is a bed with a purple pillow. Click on the pillow and tear the ripped corner to find a feather and a gun.
On the far wall of the room is a safe tat needs a code.
Lighthouse Cellar
Go down the hole in the middle of the room to get to the cellar. Click on the cabinet for another hidden object scene. Find the axe.
There is something in the furnace but you can’t take it out while the furnace is on. In the cabinet on the wall is a lighter and a box with part of the lid missing.
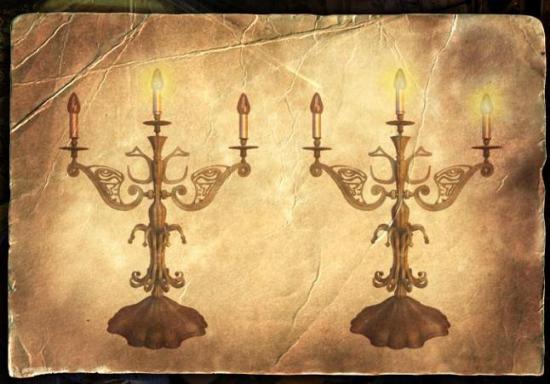
Go into the room on the left and break the barrel with the axe. There’s a note on the door with two candelabras on it with some candles lit and some candles off. The door itself needs a key.
Upper Lighthouse Floors and Telescope
Go back out to the main room and up the stairs. Go to the door on the right and smash the glass with your hammer. Turn the key on the outside to open the door.
On either side of the door is an alcove with a candelabra. Light the candles in the left alcove according to the first candelabra on the note and the candles in the alcove on the right according to the second candelabra on the note.
A tile slides away from the balcony outside the door to reveal another puzzle.
Go up the stairs and click on the alcove under the window to find a knife and a piece of paper with the code for the safe.
Click on the desk in the back of the room and click on the lamp to light it. Inside the lamp is the sixth photo for the album.
Light the candle with the lighter to reveal a ‘cache key’ in the same shape as the image on the tile on the balcony. Take the key.
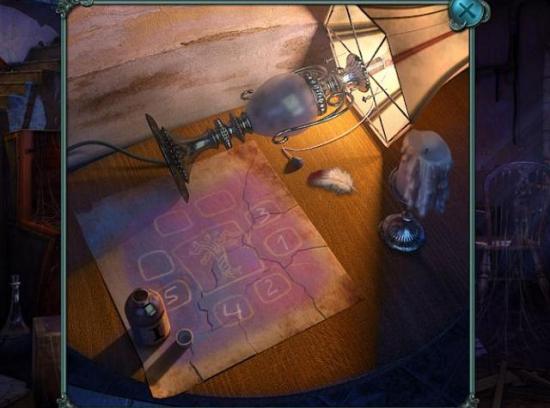
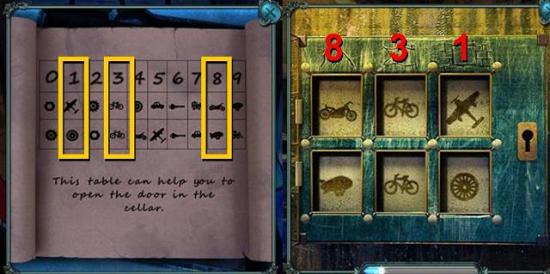
Complete the jigsaw puzzle on the desk. Click on the bottle to take off the cap and dip the feather in the iodine. Use the feather to spread the iodine over the paper to reveal more clues. Make sure to reveal the whole image of a tree surrounded by 8 squares, 5 of which are numbered.
Go to the top level of the lighthouse and put the lens you found in the lion statue on the telescope. Find the coordinates from the puzzle box – there are 3 sets. Each set of coordinates reveals a picture with a number on it.
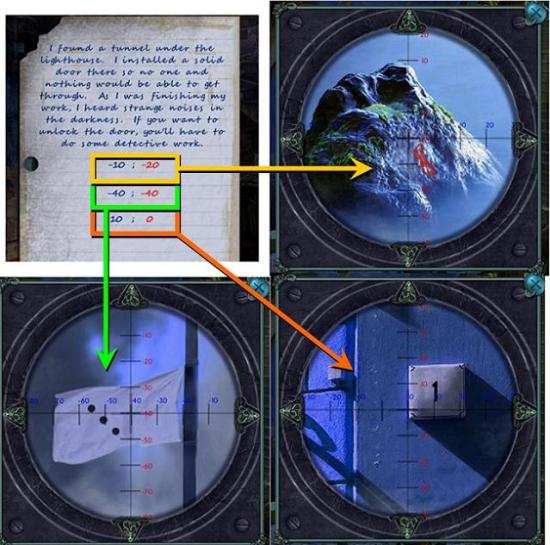
Remember these numbers in the order from the top coordinates to the bottom. In this example they are 8, 3 and 1. Note that you HAVE to find all coordinates to be able to unlock the cellar door.
Before you leave, read the journal lying on the floor by the telescope.
Lighthouse Balcony and Cellar Door
Go down two flights of stairs and out the door to the balcony. Put the cache key you found inside the candle on the puzzle and then click the buttons in the order according to the clue from the iodine jigsaw. Note that you have to visualise the whole picture with the iodine for this to work.
Take the angel. Open the parcel with the knife. Take the spider key and look at the scroll with symbols to open the cellar door.
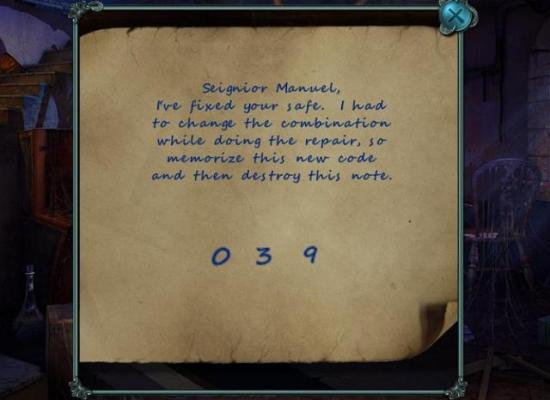
Go back downstairs and click on the safe on the back wall of the ground floor. Enter the code from the note you found in the alcove where the knife was. Move the plastic slide to the first number and enter the first digit, then move to the second number and enter the second digit etc. Pull the lever. Inside the safe is a note and an ignition key.
Go downstairs to the cellar. The cabinet holds another hidden object scene. Find the tongs.
Use the tongs to take the jewellery box cover from the furnace. Use the jewellery box cover to open the box in the cabinet on the wall. Inside is photo seven.
Go through the gates and put the spider key in the lock on the door. Now find the numbers you saw through the telescope on the scroll from the balcony. Note that you need to enter the numbers in the order in which you found the coordinates.
So, in this example the numbers on the telescope pictures were 8, 3, and 1. Click on the pictures on the door to match them with the pictures on the scroll for the numbers 8, 3 and 1.
The Mansion
The Tunnels
Go through the cellar door and go right. Inside the chest is a saw blade, another newspaper clipping and photo eight.
The path to the left is a dead end so go straight on. Pick up the chain from the floor.
Shoot the lock on the door on the right with your gun and go right.
The Garage
Click on the work bench in the garage to find photo nine.
Put the saw blade from the chest on the saw. Click on the red box on the far wall – it’s the door mechanism. Put the chain on the mechanism to open the garage door. On the floor just outside the door is a steering wheel.
Click on the car door and enter. Click on the glove compartment and drag the metal pin to the hole on the right. Inside the compartment is a metal dragon (don’t worry, you can still do this even after you’ve driven the car into the gate).
Put the steering wheel on the metal rod on the left and put the key in the ignition. Turn the key to jump the car forward and crash the gate on the other side of the street.
Pick up the cloth that was underneath the car
Go through the gate to the mansion. Click on the door and put the metal dragon on the lock to open it. Enter the mansion.
Clear the Stairs
When you try to follow the woman up the stairs, the chandelier falls down, blocking your way. Use the hacksaw from the garage on the chain of the chandelier. There is plenty to do on the ground floor, but first let’s go upstairs.
Go into the room on the right. Click on the crystal ball on the table, and smash it with the hammer. Inside is a diagram and some pins.
Other things to find here are a safe behind the poster on the wall and another telescope, showing a statue of a lion in the park.
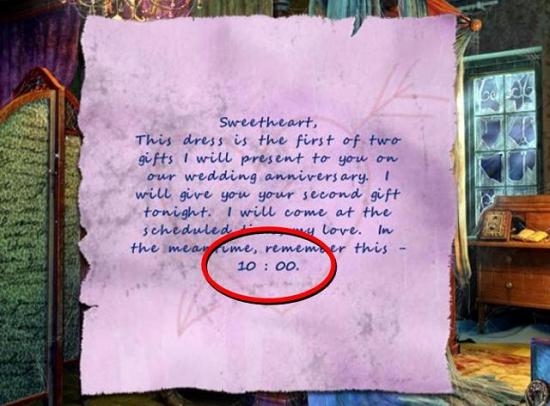
Go back to the landing and through the hole in the wall to a bedroom. The dress on the mannequin hides a note reminding someone of a certain time.
On the desk on the right is a picture frame you can inspect. Also read the diary and take the hairpin
The bed hides another hidden object scene. Find the candle.
Go back to the landing and into the corridor at the end. Smell the flowers on the shrub and…
Escape the Operating Room
Click on the wall cabinet to get a hidden object scene. Find the battery.
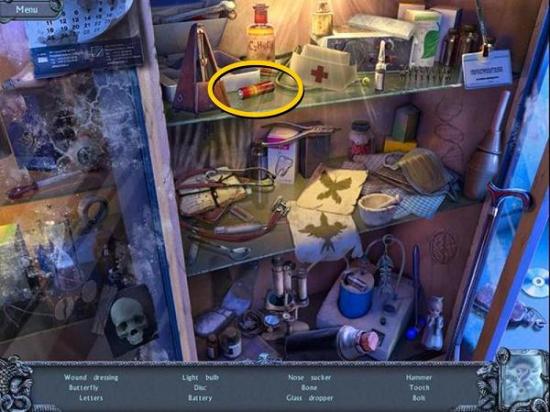
Click twice on the window and pick up the ID card. There is a code on the back. Take the second battery.
Click on the locked box in the back of the room and enter the code from the ID card. There is a third battery inside the box. Put all three in the charger. Take the charged batteries out and put them in the bone saw that’s inside the box.
Pick up the iron that’s to the left of the door. Go back to the window and break the glass with the iron. You need to do this twice.
Then cut the bars with the bone saw.
Take the blue blanket from the operating table and the yellow one from the room divider. Click on the window and click twice on the blankets. Exit through the window
Back in the Mansion
Find yourself back in the room where you smelled the rose bush.
There is a shovel inside the rolled up rug. Take it.
Click on Medusa’s head on the far left wall and clean it with the cloth from the garage. She needs two eyes.
Take the oil lantern from the shelves on the right. Click on the ladder and pour the oil from the lantern on the ladder to loosen the wheels.
Take the wire cutters from the shelf behind the ladder and climb out.
The Treasure Chest
Time to check the ground floor, so go back downstairs. Click on the music box. Yup, you guessed it. You need a key.
Open the drawer under the music box and find a wooden leaf, another newspaper clipping and a paperclip.
Go through the door on the right side of the hallway. Click on the chair to find the back can unzip – unfortunately the zipper is broken. Use the paperclip on the zipper and find a connect-the-dots drawing. You need a pen to complete the drawing.
Click on the clock to find it’s missing one of its hands.
The door on the right reveals several pictures. One of them says “The gargoyle keeps my secret. Fire will make her talk”.
Back out until you’re outside of the mansion. Click on the gargoyle to the right of the front door and place the candle from the bedroom in its mouth. Light with the lighter.
Click on the patch of ground that the gargoyle’s eyes point to and dig with the shovel to find a treasure chest.
There is a stack of notes on the treasure chest. You need to read through them all to find clues on where each of the three keys to open the chest can be found. It is important to click through all the notes or some later events will not be triggered!
The Blue Key
Go back to the landing and through the hole in the wall. The bed now has a new hidden object scene. Find the brush.
Go back inside and click on the door on the left to open it. Enter the dining room. On the basin is a ruby and a row of flowers – take the ruby.
Inspect the painting on the wall and brush it with the brush from the bedroom. The picture underneath shows a girl holding three flowers. Remember the flowers and go back to the basin. Select the three flowers from the painting from the row of flowers on the back of the basin.
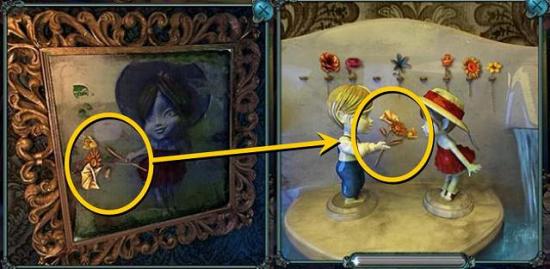
Take the blue key from the compartment that opens.
The Green Key
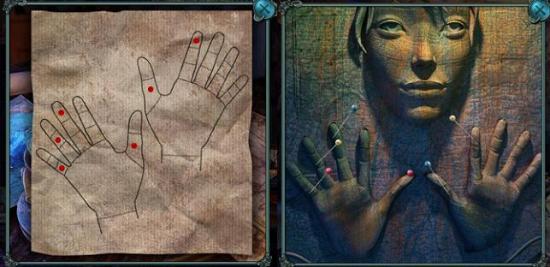
Pull the sheet from the wardrobe and find a rather spooky looking sculpture with two hands. Put the pins on the sculpture. Open your journal to check the diagram of the hands you found inside the crystal ball and put the pins in the hands according to the diagram. The statue will cry and the wardrobe will open.
Inside the wardrobe is another wooden leaf and a minute hand for a clock.
Go out and into the door to the right of the stairs. Put the minute hand on the clock and set the time to the time mentioned in the note found on the mannequin. Inside the clock is a wind-up key.
Use the wind-up key on the music box by the stairs. Inside the music box is a pen and photo number ten.
Go back to the room on the right with the grandfather clock and use the paperclip on the zipper of the chair, if you haven’t done so already. Use the pen to complete the connect-the-dots drawing.

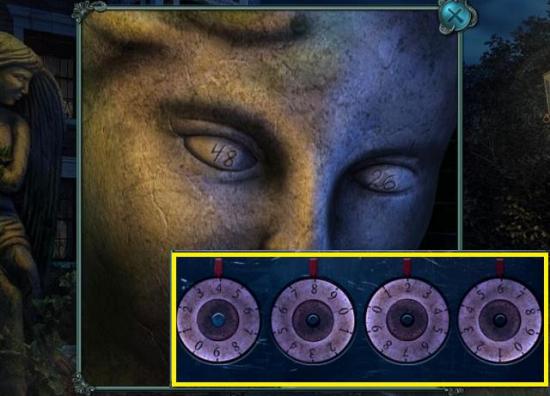
Back out a few times and click on the statue at the front of the mansion. Click on her eyes to find two numbers.
Go up the stairs to first room on the right. Enter the numbers into the safe and turn the handle.
Inside the safe are a bullet and a locked box. Pick the lock with the hair pin from the desk in the bedroom. Inside the box is another ruby and photo number eleven.
Go back to the landing and down the hole. Wipe Medusa’s head with the cloth from the garage, if you haven’t already done so, and put the two rubies on Medusa’s head.
You need to click the six snake heads in a specific order so they all stay down. If you click the wrong one, they will all pop up again and you have to start again. Keep trying combinations until you have the correct order.
Behind the head are photo number twelve and the green key.
The Red Key
Go back to the upstairs landing and click on the rifle on the wall. Click on it again to open it and enter the bullet you found in the safe.
One of the notes by the chest said to shoot the lion from the window, so go back into the room on the right and click on the telescope. Use the loaded rifle to shoot the lion statue and get a color code. NB: If you can’t shoot the statue, go back to the treasure chest and make sure you go through all the notes!
Go back to the landing and to the bedroom behind the hole in the wall. Click on the desk and on the picture frame on the desk. Click on the colored gems on the picture frame in the order suggested by the color code from the lion.
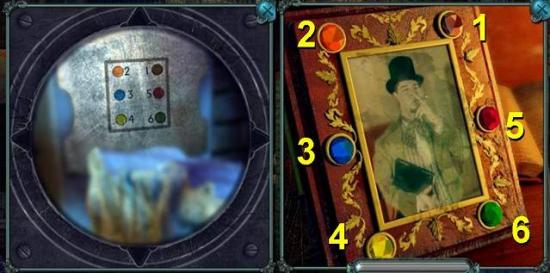
Inside is the red key.
Go back to the treasure chest outside. Put the keys on the locks of the same color. Inside the chest is a silver rose, a third wooden leaf and another diary for you to read.
Go up the stairs to the room at the end of the hallway. Burn the cobwebs with the lighter.
Click on the bird cage on the table and cut the wires on the door with the wire cutter. Take out the fourth wooden leaf.
Click on the painting on the wall on the left and place the 4 wooden leaves on the frame. Behind the painting is a human figurine.
The Medical Records
Now go out, out, out all the way through the mansion, tunnels, lighthouse, forest until you’re back at the cabin by the bus. Enter the cabin and place the human figurine on the broken frame on the wall. Behind the frame you will find photo number thirteen.
Leave the cabin, back out to the bus, go through the roof and make your way through the hospital all the way to the cellar with the silver doors. Put the silver rose on the door.
You should know better by now than to smell those flowers, but as it’s the only thing you can do right now… go ahead and smell them
Back inside your room, inspect your makeup kit on the windowsill and take out a hairpin.
Leave your room and enter the surgery on the right. Click on the wall cabinet for another hidden object scene. Find the pliers.
Leave the surgery and check the next door. Try to turn the key, but it breaks. Fortunately, you just found the pliers. Use them to turn the key.
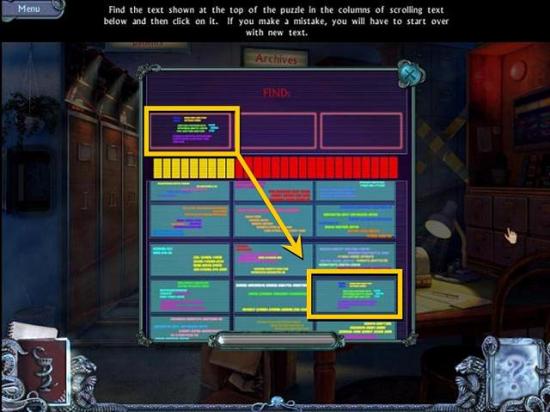
Inside the next room you need to switch off the alarm system. Click on the alarm system on the right wall. You need to find the text box matching the text at the top. This can be tricky to see as the background color is different, so you need to look at the pattern and color of the lines. Do this three times.
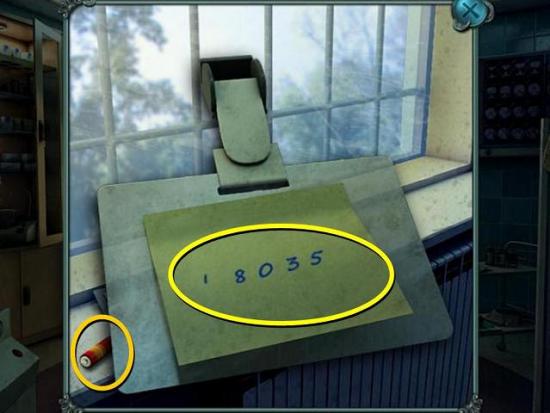
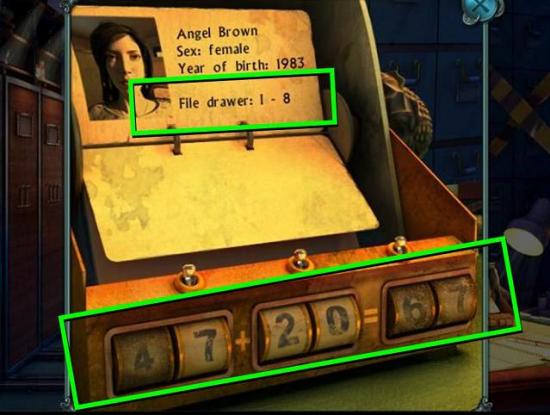
Click on the rolodex on the desk. Some of the numbers are fixed in place, and you need to click on the other numbers to complete the equation. Inside the rolodex is a care with your name on it, indicating where your patient files are located. In this example they’re in drawer I, box 8.
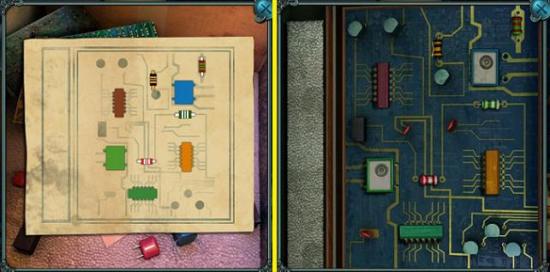
In the back of the room is a box with circuit parts and a circuit diagram. Click on the circuit board below the plant on the wall and use the parts on the board. Place the parts according to the diagram.
To find your patient files, click on the slide of the circuit board to open the correct drawer (in this example, slide 1 for drawer 1). Then click on the box with the correct number (in this example, box 8).
Use the hairpin on the box to open it. Inside the box are your files and a cross.
Opening the Silver Door
Click through the medical files until you reach a paper with mysterious symbols on it. Take note of these symbols as you will need them later and it won’t be stored in your journal.
Clicking the symbols will take you back to the room with the door with the silver roses. Note that the symbols from your medical files can also be seen on the left wall.
Back out repeatedly until you’re at the dental chair on the stairs. Click on the box and place the cross in the slot. Recreate the symbol with the symbols on the box. You can use the arrows around the edges to move the shape indicated on the arrow.
Inside the box is the second silver rose and photo fourteen.
Go back to the silver door and place the other rose on it. Go through the door.
The End
Straight on is a dead end, so go left. Go left again and a third time until you get to another door.
Click on the door to find photo fifteen. If you don’t have all photos, this is where you can find them:
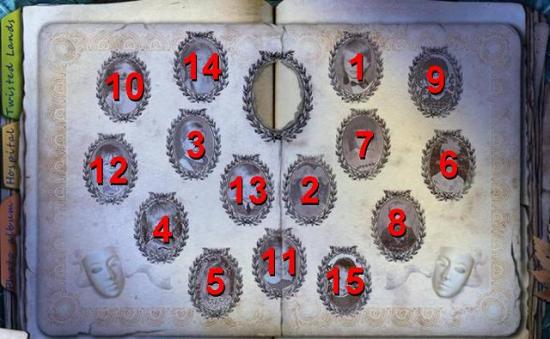
1 – In book on front seat of the school bus
2 – Puzzle box in gazebo
3 – On top of the diary in the tree house
4 – On the wall phone in the nurses’ station
5 – On mirror in hospital cellar
6 – Inside lamp, second floor lighthouse
7 – Jewellery box in lighthouse cellar wall cabinet
8 – Chest in lighthouse tunnels
9 – Workbench in garage
10 – Inside music box in mansion
11 – Inside safe in upstairs office in mansion
12 – Behind Medusa’s head
13 – Behind picture frame in the cabin
14 – Inside box on dental chair
15 – On the door in hospital tunnels
When you have all fifteen photos, symbols will appear behind them in the photo album.
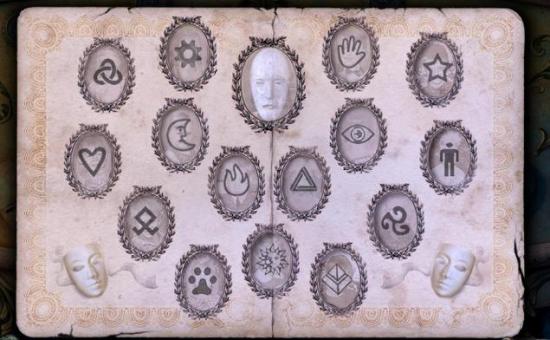
Hit the red buttons on the door to move the symbols around until they are in the position as on the photo album.
Go through the door. Click on Mark and place the angel from your inventory on the lock.
Leave your room and go to the end of the corridor. Inspect the patient files and find a lighter.
Go back to the corridor and into the first room on the right. Pick up the oxygen tank and place it on the windowsill. Turn the red knob on the oxygen tank.
Check the cabinet on the wall for a hidden object scene. Find the chemical compound.

Pour the chemical compound on the floor and light with the lighter.
Collector’s Edition Bonus Chapter
The Workshop and Stables
In the opening scene is a boat you can’t get to, an apple tree that’s too high, a locked garden door needing more gears and a locked power box. The only thing you can do is unlock the door to the left of the windmill.
Complete the lock on the door by rotating the discs until all black symbols surround the colored symbols they match with. This can be a bit tricky as some of the black symbols could fit in several groups. There is only one solution, however. Unfortunately the game went too fast for me to take a screen shot.
Go through the door and take the stepladder. If you can’t select the stepladder straight away, go back out and click on the tree, which should give you a message that you need a ladder. Then return to the horse and get the ladder.
Go back out and put the stepladder under the tree. Pick the apple from the branch. There are items in the nest, but it’s too dark for you to see. Go back through the door and give the apple to the horse.
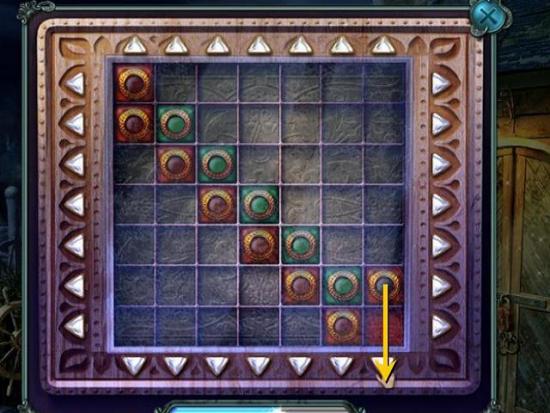
Go past the horse and click on the workshop in the back. Click on the arrows until each colored token sits on top of a tile with a matching color
Enter the workshop. If you click on the grindstone, the stone will break. There is also a toolbox that’s rushed shut and some gears on the work bench that you can’t pick up yet.
Take the tongs from the wall and click on the fire. Use the tongs to take the heated chain from the fire. Dip the heated chain in the bucket of water to get a cooled chain.
Go back out and use the chain on the well. Turn the wheel on the well to break open the door to the stables. Enter the stables.
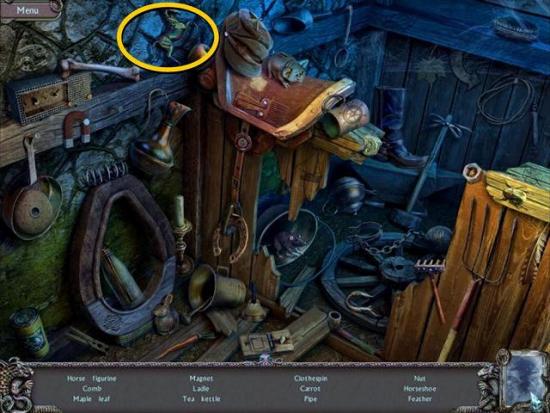
Click on the box on the left for a hidden object scene. Find the horse figurine.
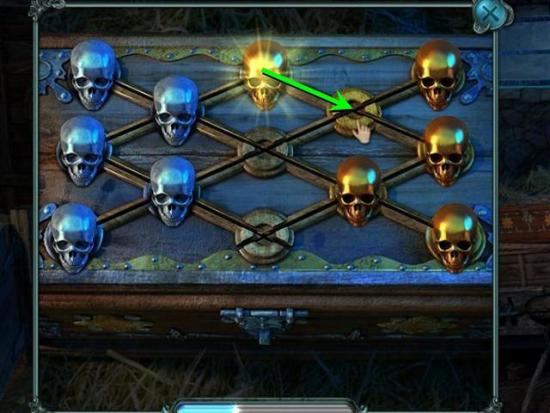
Click on the wall cabinet and place the horse figurine on the mechanism. Inside the cabinet are a skull and an oiler.
Click on the hay cart and place the skull on the puzzle. Move all gold skulls to the right and the silver ones to the left.
Take the hammer from the chest.
Go back to the workshop and use the oiler on the rusted toolbox. Take out the dull pruning shears, wrench and screwdriver.
Use the hammer on the broken clock next to the toolbox and take the gears.
The Garden and Greenhouse
Go out twice until you’re back at the start and click on the garden doors. Place the gears on the lock. The gears can only slide in a straight line and can only move to empty spaces around the edge. Slide them around until they’re all in the correct corner.
Enter the garden and take the fuse box key from the sundial and the wheel from the bench
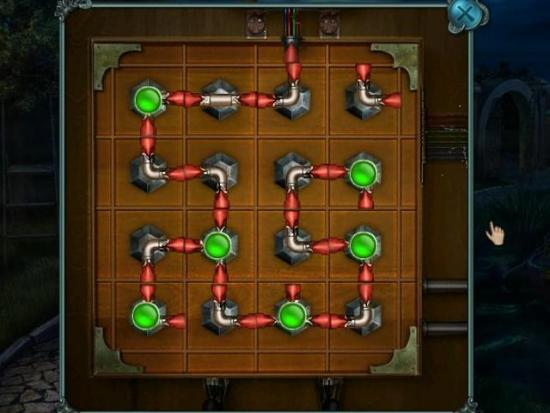
Go back out and click on the windmill. Open the fuse box with the key. Turn the blocks until all four lights are lit. Note that this game is slightly different than the traditional water pipes games in that the wires don’t need to make a closed circuit. They only have to connect with all the lights.
Go back into the garden and click on the door to the greenhouse in the back. Put the wheel on the wheelbarrow and use the wrench to tighten the bolts.
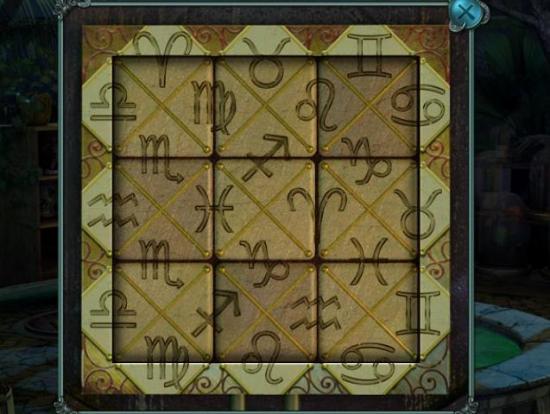
Enter the greenhouse. To go through the hatch, you need to find 4 tokens with zodiac signs.
Click on the hidden object scene at the right. Find the hook.

Take the flare gun from the tree on the right.
Click on the dragon on the shelves in the back. The teeth will light up in a specific sequence. You need to repeat the sequence by clicking on the teeth. Do this four times.
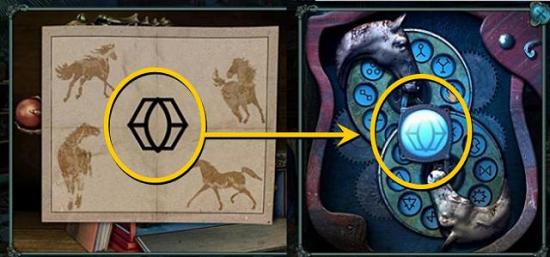
Inside you will find matches, a token with zodiac signs and a piece of paper with horses on it. Take note of the symbol in the center. Also read the diary.
There is a very thorny bush to the left of the door, but you need to sharpen the pruning sheers before you can cut it.
Go back to where the horse was. There is a flock of crows blocking your way. Use the flare gun to scare them away.
Go back into the stables and do another hidden object scene. Find the grindstone.

Click on the locked door in the back. There are two discs with symbols on them. You need to rotate the discs until you find two symbols that together make up the symbol you found on the paper inside the dragon statue.
Behind the door are a crowbar and a boat hook.
Go back to the workshop and replace the broken grindstone. Sharpen the pruning shears.
Put the hook on the crane. Click on the crane to open the trapdoor. Break open the box with the crowbar. Take out a bottle of kerosene.
Go out twice until you’re back at the start. Get the boat with the boat hook. Put the kerosene in the lantern and light it with the matches.
Climb the stepladder to the apple tree and light the nest with the lantern. Find a hand drawn map of the area, with a red X marking a specific location. Also find a second token with zodiac signs.
Go back into the garden and the greenhouse. Cut the thorny shrub by the door with the sharpened shears. Get the scoop.
Back out to the garden and click on the rabbit-shaped bush. Use the scoop to dig under the bush and find a chest.
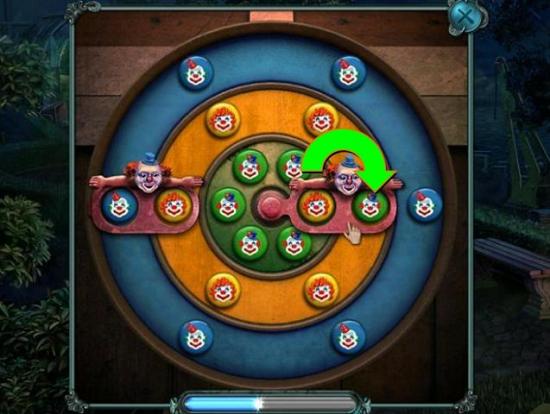
To open the chest, move the tokens to the ring of their matching color. Click on the rings to rotate them, then click on the clowns to swap the two tokens inside the clown.
Inside the chest find a third token with zodiac signs and a letter.
Go back into the greenhouse and put the zodiac tokens on the lock to the hatch. Move them around until the picture is complete.
There is a new hidden object scene in the greenhouse. Find the rope.
Down the Hatch
Go down the hatch and straight on.
To open the next lock, the tokens at the top need to be put in a sequence from egg to butterfly – note that they also need to be the right way up. They can be rotated with the disc in the middle.
The way I did it was to get the egg in place in the top left. Then I kept rotating the butterfly, pupa and caterpillar until all three had the opening on the right. Move the caterpillar with the opening on the right to the bottom right corner. Rotate the butterfly in place, then the pupa, then the caterpillar.
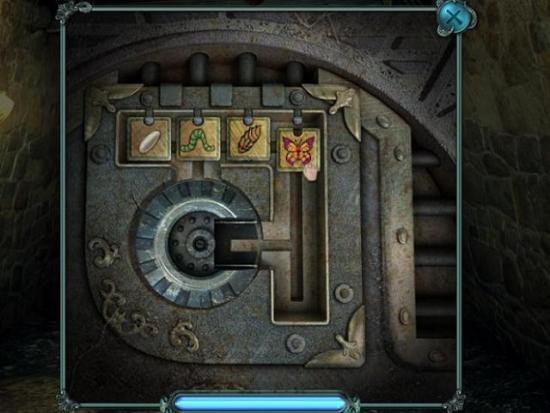
Attach the rope to the hatch and go down the hole.
Undo the crews from the plaque on the wall with your screwdriver. Find a fish and a bottle you can’t open.
Go left, right and left again. The box on the wall contains a crescent moon, a corkscrew and a jar with some kind of acid you don’t want to put your hand in. Take the moon and the corkscrew.
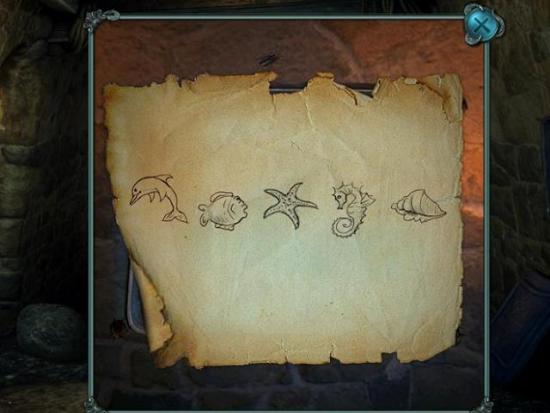
Go back three times and open the bottle with the corkscrew. Inside it are a pair of tweezers and a piece of paper with symbols of various forms of sea life.
Go left, right and left again and use the tweezers on the jar to get the dolphin.
Go straight on and exit up the stairs. You’re in the misty forest again.
On the left is a panel with red buttons. All the buttons need to be pushed down. Each time you push a button, all the buttons around it will change too. This is just trial and error – keep hitting buttons until they’re all pushed down. When you’re done, the lights go on.
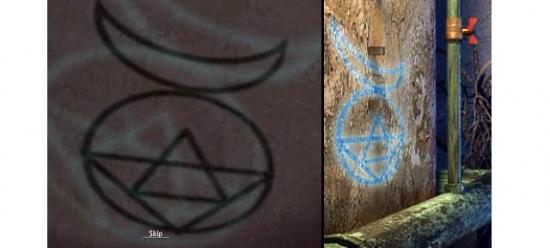
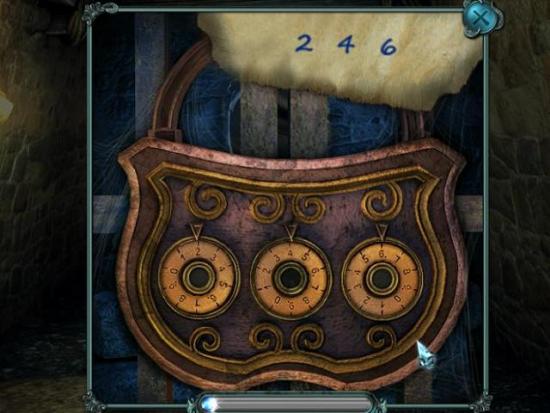
Go forward, right and forward again. Click on the tree trunk and place the crescent moon on the symbol. Inside are a sea shell and a note with two x’s and a number, for example xx6.
Off to the right is a dead end, so back out to where you switched on the lights.
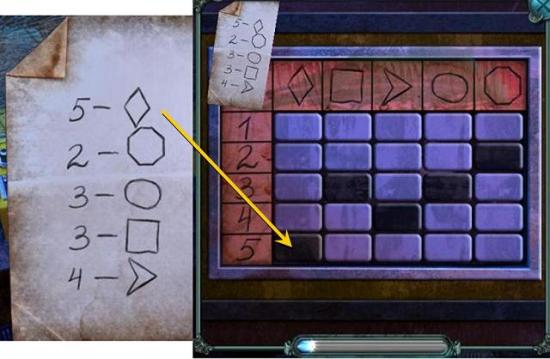
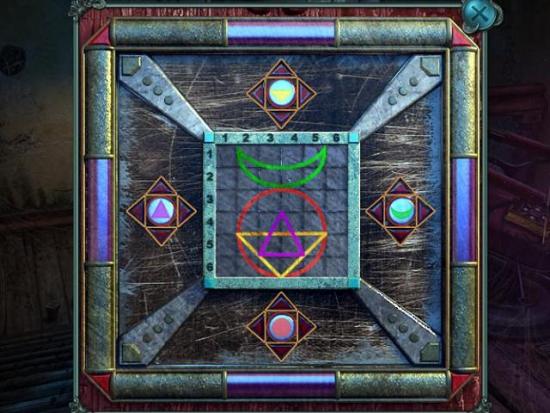
This time go forward, left, forward and left. Complete the puzzle in the box as below. (This puzzle was the same each time I played it so I am assuming it is not randomized.)
Inside the box are a starfish and another note with x’s and a number, for example x4x.
Go back one screen and go right. Click on the hollow tree trunk and the suitcase inside it. Place all symbols in their respective slots. Click on the symbols in the sequence on the note from the bottle.
Inside the suitcase is a third piece of paper with a code, for example 2xx. Once you’ve found all three notes with codes, the complete code in the correct order will appear in your journal.
Back out until you’re back in the tunnels and find the locked gate (if you can’t find it, back out to the hatch, then go down the hatch and go right, left, right, straight). Enter the code into the lock.
Go through the gate and click on the tree.

More articles...
-
Best Horror Games On Itch.io – July 2026
Across a bounty of subgenres. -
Haze Seas Accessories Tier List [Best Accessories to Equip]
The accessories with the best stat buffs in Haze Seas.