- Wondering how to get Monopoly GO! free rolls? Well, you’ve come to the right place. In this guide, we provide you with a bunch of tips and tricks to get some free rolls for the hit new mobile game. We’ll …
Best Roblox Horror Games to Play Right Now – Updated Weekly
By Adele Wilson
Our Best Roblox Horror Games guide features the scariest and most creative experiences to play right now on the platform!The BEST Roblox Games of The Week – Games You Need To Play!
By Sho Roberts
Our feature shares our pick for the Best Roblox Games of the week! With our feature, we guarantee you'll find something new to play!Type Soul Clan Rarity Guide – All Legendary And Common Clans Listed!
By Nathan Ball
Wondering what your odds of rolling a particular Clan are? Wonder no more, with my handy Type Soul Clan Rarity guide.
Tulula: Legend of a Volcano Walkthrough
Welcome to the Tulula: Legend of a Volcano walkthrough on Gamezebo. Tulula: Legend of a Volcano is a Fragmented Puzzle Hidden Object Adventure game played on PC, created by Alt.A Games and available at Screenseven. This walkthrough includes tips and tricks, helpful hints, and a strategy guide for how to complete Tulula: Legend of a Volcano.
Tulula: Legend of a Volcano – Game Introduction
Welcome to the Tulula: Legend of a Volcano walkthrough on Gamezebo. Tulula: Legend of a Volcano is a Fragmented Puzzle Hidden Object Adventure game played on PC, created by Alt.A Games and available at Screenseven. This walkthrough includes tips and tricks, helpful hints, and a strategy guide for how to complete Tulula: Legend of a Volcano.
General Information
- Click on Options to adjust the dials for Sound, Music and All Volume levels. You may also choose Fewer Dialogs and Windowed mode (screen resolution must be at least 1024×768). Note that the Option settings are global for all profiles you create. If you opt for Fewer Dialogs, it will affect all profiles.
- Click Play and then enter your profile name. Your profile name may contain up to 21 characters (letters, numbers and symbols) and you must choose one of four profile icons (2 male, 2 female).
- To add additional profiles, you need to complete the initial Tutorial steps (through collecting the Notebook) and then click on the Menu button to access the Main Menu. From the Main Menu, click on your profile name, at the lower right, to add or delete a profile. Each time you want to add a profile, you must go through these same steps. You may create up to 5 profiles.
- You begin play with a mandatory Tutorial that activates your Hint button, Notebook/Help and Inventory.
- The Menu button is located at the lower right, with the Notebook just above the Task List.
- The Hint button is located to the left of the Notebook, Task List and Menu button. The Hint button recharges in 30 seconds.
- During Minigames, the Skip button will be available after 90 seconds. Click on the Green “?” to repeat the instructions.
- The Notebook contains the following information, from left to right:
- Totem Stones (Blue button – Stones you need to collect in the current level/location)
- Tasks (Orange button – objectives you need to complete/have just completed)
- Shaman’s Cave (Purple button – information about your progress)
- Blueprints (Yellow button – Blueprints of buildings to repair in the Village)
- Dialogs (Green button – all dialogs encountered throughout the game, most recent to oldest)
- The Inventory is located at the bottom (after you activate it). Click on an item and then use it on an object or location.
- To change locations, move your cursor until you see a Red arrow and a “Footprints” icon and then click on that area. If you see the “Gears” icon, then you need to complete another task before you can progress.
- You earn Talents (money) and find Blueprints in every level after you complete the Chief’s Castle. You can access the Village from the Totem Suite (button at the upper right) and use the Talents to repair the Village as you play, wait until the end of the game or ignore this feature (you’ll miss two of the Awards) completely.
- There are 15 Awards to earn. Some you’ll receive automatically, in the course of progressing through the game, others you’ll receive for not skipping minigames, not using hints, earning certain amounts of Talents, etc.
- Each level consists of finding fragments of objects, various inventory items, one object search and a number of tasks and minigames.
- At the end of every level, you’ll receive your score, including the points you earned for completions and minigames, Talents earned to use to repair the Village, the Achievement Flag for the previous level and any Awards you’ve collected. Continue to the Map (bottom) and then click on an area in the center to continue to the next level, return to the Totem Suite (button at upper right) or enter the Village (button at upper left, after Level 2, the Chief’s Castle) to begin repairs.
Gameplay and Guide Tips
- This guide assumes you’ve read the General Information, used the in-game Tutorial and/or Help features or otherwise familiarized yourself with the gameplay.
- The first level is a Tutorial, which you can’t skip. This game has features that other games don’t so it’s worth your while to read and understand the information to know how the game functions. I highly recommend you click on the Notebook, as soon as it’s available, and use the Notebook Tutorial to familiarize yourself with each function. You can opt out and just click on each icon, across the top, to look at the current information.
- The game is mostly non-linear and you’ll often have to activate/complete tasks, or trigger game progression, in a specific order. The tasks and objectives listed in this guide are presented in the order they become available. The only free movement is between the limited locations in each section, and only if they’ve been activated/are incomplete.
- In the Totem Suite, click on the Flags and Awards for a popup description.
- Click anywhere on the screen to close the dialogs.
- When you first access the Village, you’ll be given an option to use the Tutorial that explains how to repair everything. Choose “No” if you don’t want/need this information.
- Check the Notebook to see how many Totem Pieces (first pieces start in Level 2) and Blueprints (first ones start in Level 3), if any, are in each level.
- During each level, you can gauge your progress by looking at the blue bar, just above your Inventory.
- Object searches (the first object search will be in Level 3) are always the same, but your list may be in a different order than the images shown in this guide. In addition, more items will be added to the list as you find others. When complete, there will be an interactive scene.
Walkthrough
Click on Play, create your profile and then choose your icon to begin.
Tutorial Level
The Shaman’s Cave
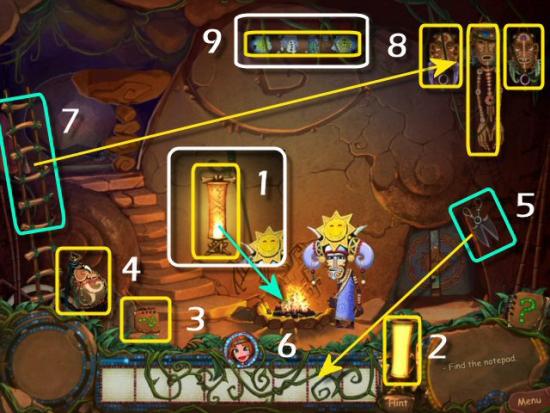
Click on the Shaman’s Lamp and then use it on the Fire (1). This will illuminate the cave and activate the Hint feature. Click on the Hint button (2) to progress, collect the Notebook and Backpack (3 and 4), collect the Scissors (5) and then use the Scissors on the Vines (6), covering your Inventory. Collect the Ladder (7), use it on the Masks (8) and then click on each one to remove them. Click on the Ancestor’s Souls (9) to progress and view a cutscene about the current state of affairs. You may skip it (Skip button is located at the upper right), if you like.

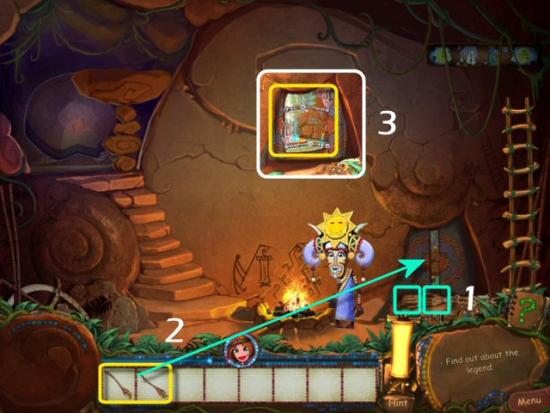
Collect 2 Skeleton Arms (1), use both Skeleton Arms to prop it open (2) and then click on the Door (3) to enter the Totem Suite.
The Totem Suite
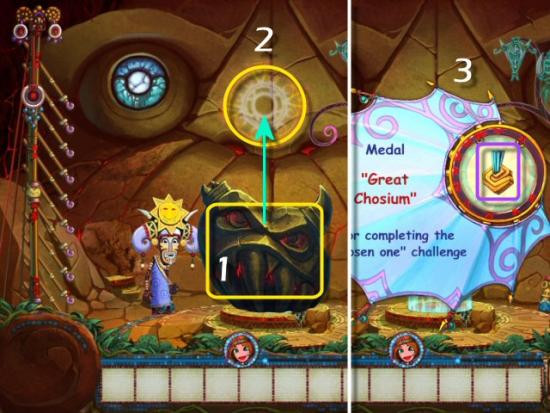
You need to raise the Black Stone (1) off the altar. To do so, click on it until it disappears into the Vortex (2). Click on it, wait until it rises, click again and keep doing this until it disappears (5 clicks). You don’t need to click very quickly but you need to click just after it rises or it will fall back down. When complete, you’ll receive your first Trophy (3). Click to close it and add it to the Sacred Tree.
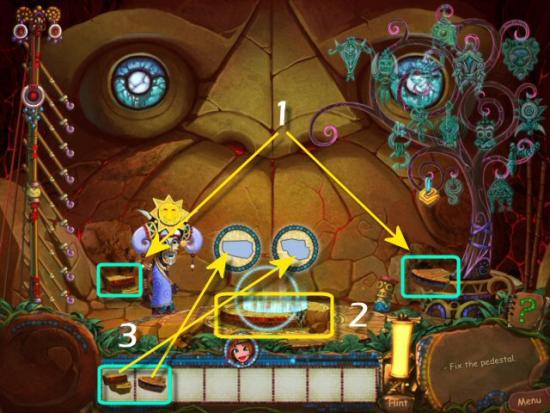
Collect the Stones (1), click on the Altar (2) and then use the Stones the Toolwheel (3).
The Shaman’s Cave
Click on Ivan (1), click on the Stairs (2) and then click and place each Stone, to repair the Stairs (3). Take a Stone from Ivan’s hands, place it on the Stairs and then continue until complete (4).
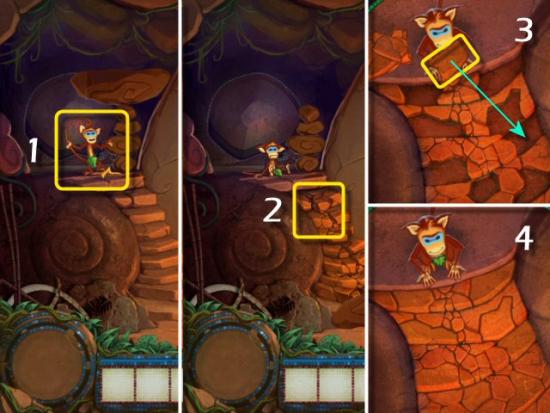
The Totem Suite
Click on the Flag (1) to raise it, receive your first Flag and then click on the Map (2).
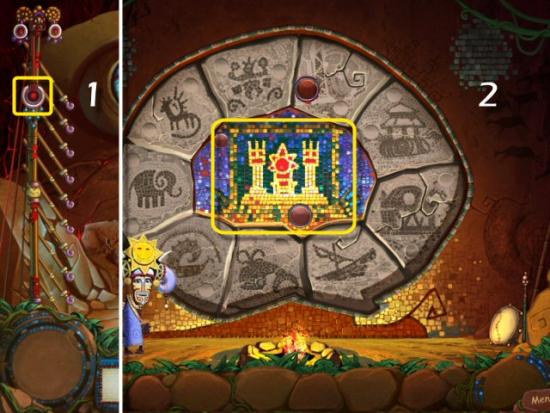
Level 1 – Chief’s Castle
The Throne Hall
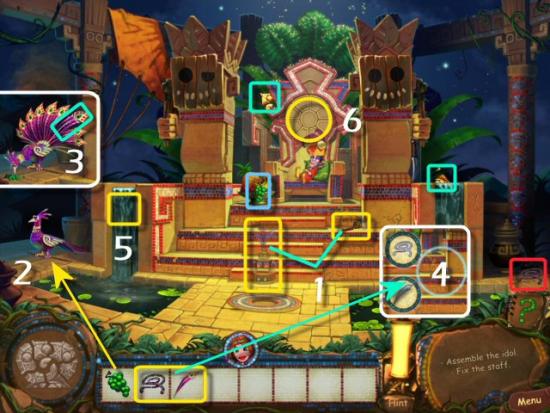
Click on the Idol and Staff (1) to activate those tasks (you can click again to close the Toolwheel). Collect the 2 pieces of the Totem (green), the Grapes (blue) and the Rope (red). Use the Grapes on the Peacock (2) and collect the Magic Feather (3). Use the Magic Feather and Rope on the Staff (4 – click on the Staff to open the Toolwheel). Click on one of the Waterfalls (5 – left or right; you only need to click on one) and then Click on the Disk (6 – over the Throne.
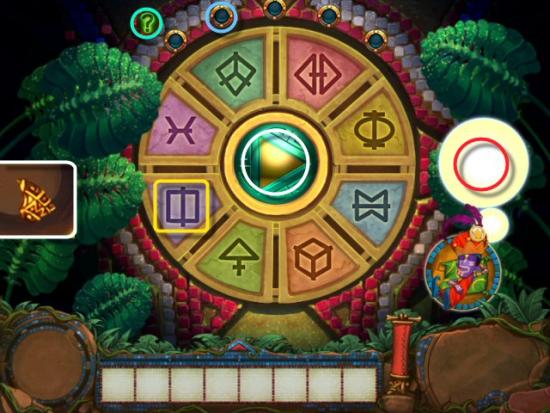
Click on the “?” (green) to repeat the instructions and then click on the Middle Button (white) to start. Click on the symbols (yellow) in the order they appear over the Chief’s head (red). You’ll begin with one symbol and progress to five. The sequence will stay the same through each round, but one more symbol will be added to subsequent rounds until you reach five. A correct round will result in one of the Circles (blue) being lit, above the wheel. If you click incorrectly, you’ll have to start over with a new sequence. The sequence is different for each player and each time you restart. I recommend writing down the order of the symbols (number them on the wheel) as they appear. When complete, collect the Totem Piece (inset)
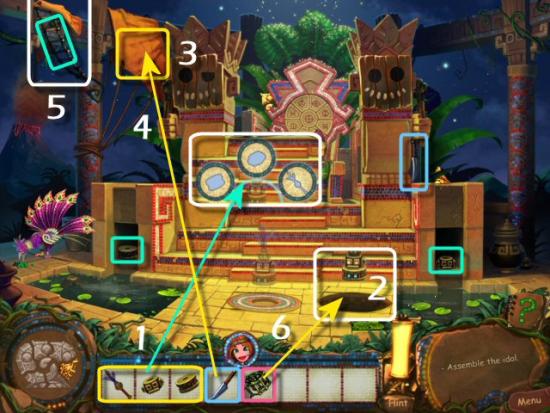
Collect the 2 Idol Fragments (green), use the Idol Fragments and Magic Wand on the Idol (1) and then click on the Hole (2). Click on the Canvas (3), collect the Knife (blue), use it on the Canvas (4) and then collect the Rope Ladder (5). Use the Rope Ladder on the Hole (6) and then click on the Hole to enter the Treasury.
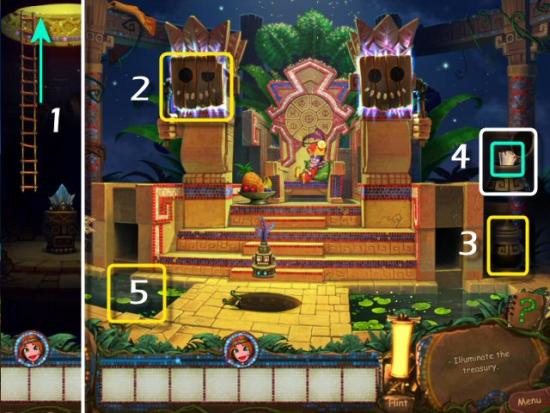
Return to the Throne Hall (1), click on one of the Statues (2 – left or right; it doesn’t matter), click on the Urn (3), collect the Pearl Diagram (4), and then click on left Pool (5).
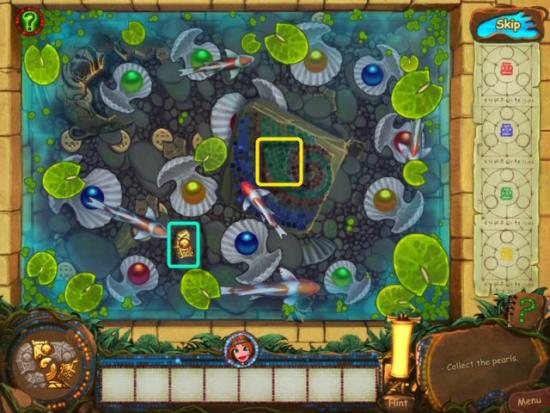
Find 12 colored pearls (3 each of red, blue, green and yellow) and collect the Totem Piece (green). Click on the stones to move them and reveal the Clams. Once a Clam is partially uncovered, keep clicking until all the stones are moved away and the shell opens. Make sure to move your cursor and click in different spots and you’ll need to click on the Tile (yellow) to reveal 2 of the clams. You can either open the Clams and collect the Pearls as you go, or open all of them and then collect the Pearls.
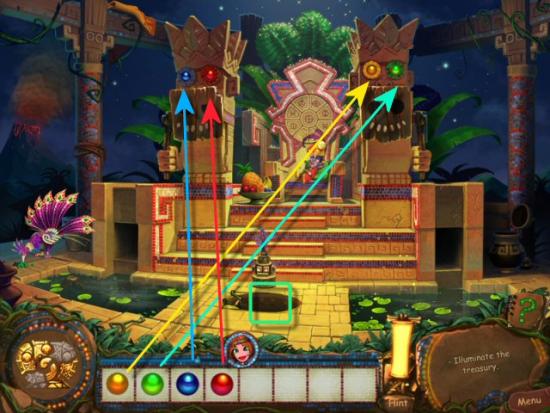
Use the Pearls in the Statues’ Eyes and then click on the Hole to enter the Treasury.
The Treasury
Click on the Crystal (1), click on the Ceiling Tile (2), collect the Crystal Fragments (green) and then use them on the Crystal (3). Click on Bush-Bush (4), collect the Weight on the Swing and then collect the other 2 Weights (blue – you must collect the weight on the swing, first). Use the Weights on top of swing fulcrum (5 – Heavy, Medium and Small, in that order) and then click on Fan (6 – click 3 times).
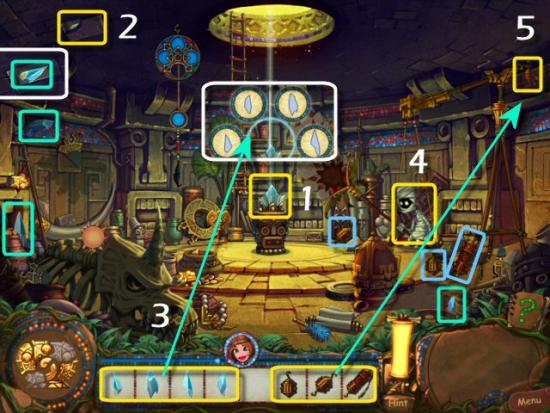
Collect the 2 Totem Pieces (red), collect the Medal Fragment (green) and then use it on the Broken Medal (1). Click on the Fan (2 – click 3 times), collect Sun Disc (blue) and then use the Sun Disc on the Fan (3).
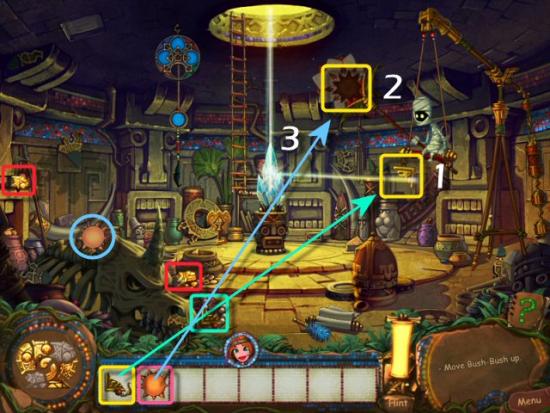
Collect the Duster (green) and use it on the Rhino Horn (1). Collect the Key (blue), use it on the Casket (2), click on the Casket and then click on the Dream Wheel (3 – click 4 times).
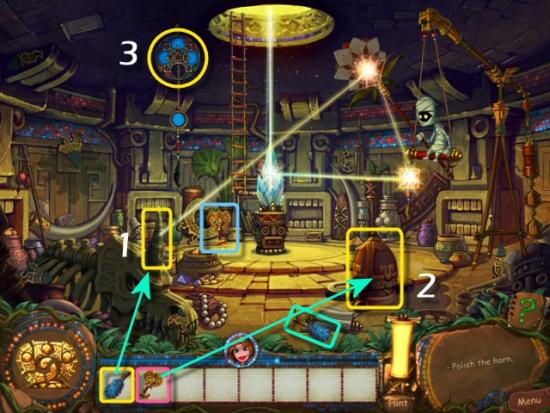
Collect the Mirror Fragments (green), click on the Mirror (1) use them on the Toolwheel (2) and then click on the Portal (3).
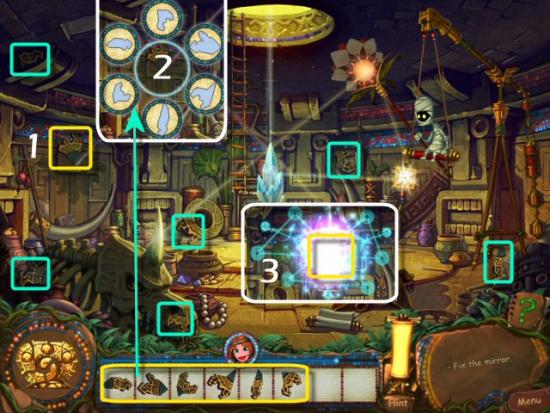
Enter the Map (1) and then click on the next area (2).
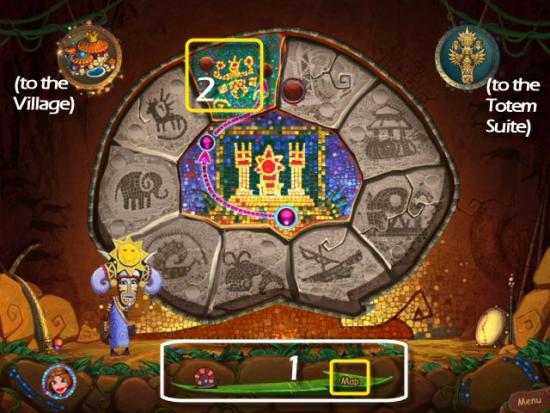
Level 2 – Ruins of Kalamuna
The Gates of the Temple
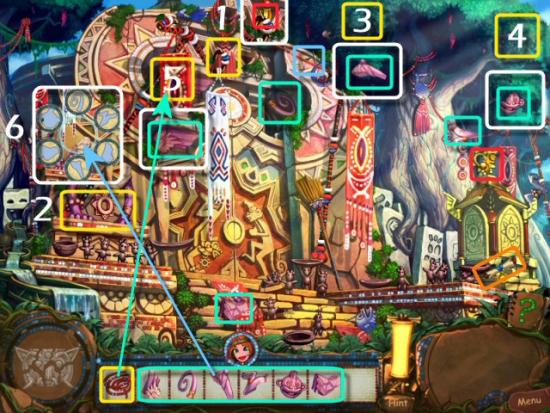
Click on the Tassel (1), collect 2 Totem Pieces (red) and the Bridge Blueprint (orange) and then click on the Left Statue (2). Click on the 2 Tree Branches (3 and 4), collect the Rope (blue) and then use the Rope on the Banner (5). Collect the Statue Fragments (green), click on the Statue and then use the Fragments in the Toolwheel (6).
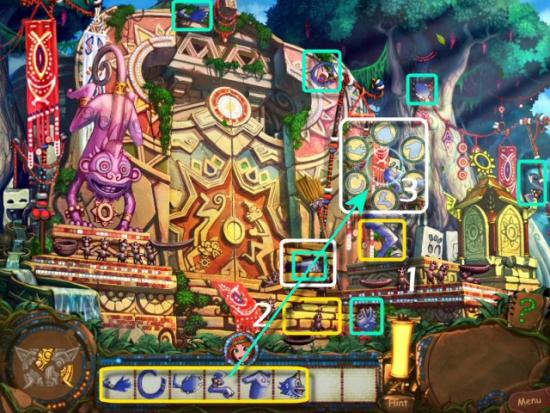
Click on the Right Statue (1), click on the Steps (2), collect the Statue Fragments (green), click on the Statue and then use the Fragments in the Toolwheel (3).
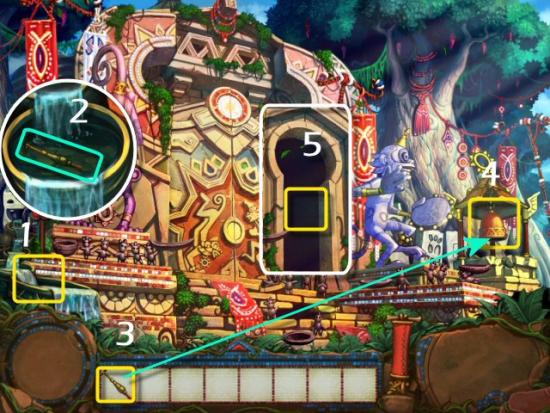
Click on the Waterfall (1), collect the Bell Clapper (2), use it on the Bell (3), click on the Bell (4) and then enter the Temple (5).
The Deserted Sanctuary
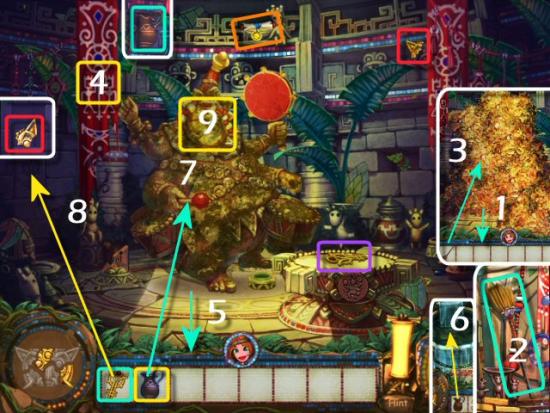
Exit the Temple (1), collect the Broom (2), return to the Temple and then use the Broom on the Leaves (3 – click on any 3 active areas). Click on the Banner (4), collect the Totem Piece (red), Barn Blueprint (orange) Jug (green) and Symbol (purple). Exit the Temple (5), click on the Waterfall, use the Jug on the Waterfall (6), return to the Temple and then use the Jug on the Statue (7). Use the Key on the Wall (8 – click on the Banner again to move it out of the way), collect the Totem Piece (red) and then click on the Statue (9).
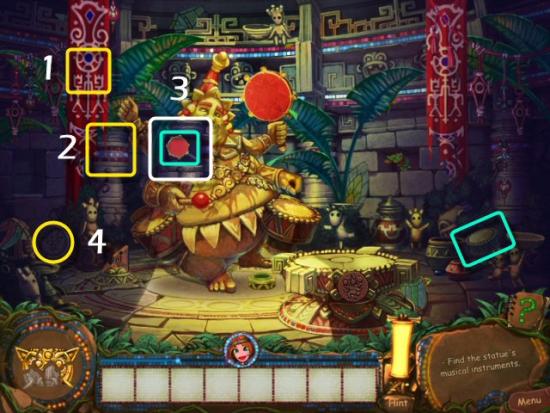
Click on the Banner (1 – only if it’s covering the Column), click on the Column (2), collect the Tambourine (2), collect the Drum (green) and then click on the Medallion (3).
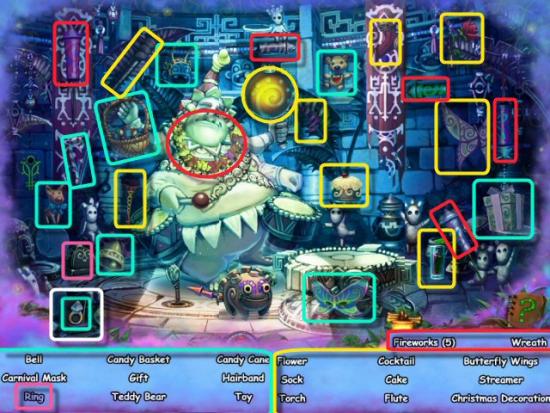
Find all the objects in the list. Note that more items will be added as you find the ones first shown. Open the Box (pink) to find the Ring. Items from the first list will be green, items from the second list will be yellow and the final 2 items will be red.
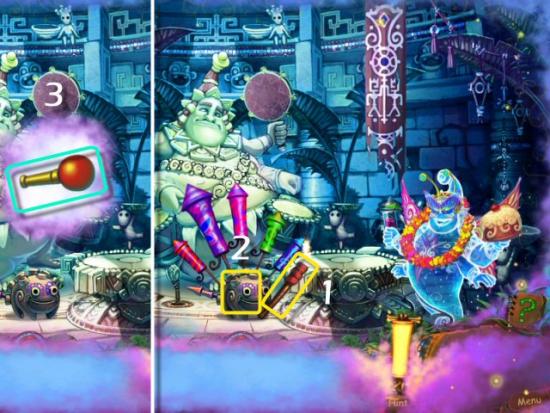
Click on the Torch (1), use it on the Fireworks (2) and then collect the Drumstick (3).
Use the Instruments in the Toolwheel (1), exit the Temple, collect the Oil (2 – just to the right of the Door) and then return to the Temple. Use the Oil on the Statue (3), click on the Statue’s Arm (4), collect the Remote Control Part (5) and then use it on the Broken Remote Control (6). Click on the Remote Control (7), collect the Remote Control Button (8), use the Oil on the Rust (9 – click on all 5 areas of Rust) and then use the Remote Control Button (10).
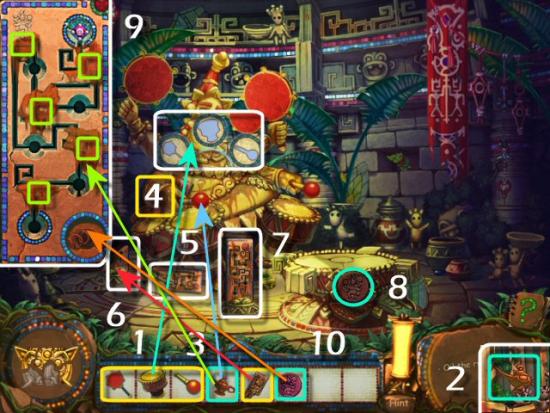
Click on the Remote Control Button (1) 5 times, to raise the Stairs, and then enter the Temple Dome.
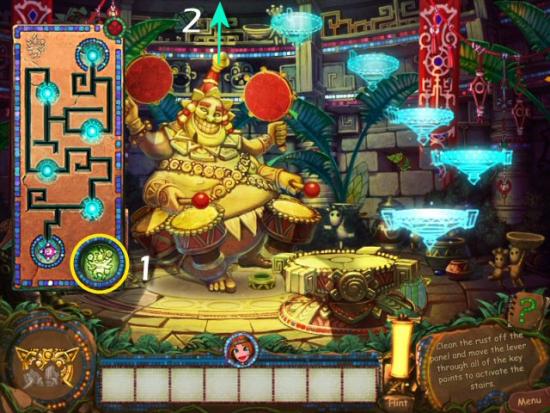
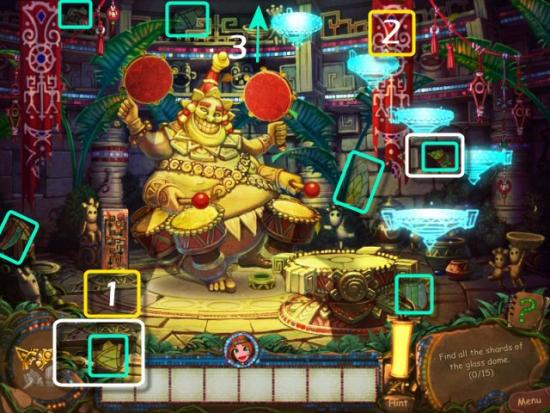
Return to the Temple (exit is at the upper left), click on the Tile (1), click on the Banner (2 – only if it’s covering the Wall), collect 7 Pieces of Glass and then return to the Temple Dome (3).
The Sanctuary Vault
Collect the 2 Totem Pieces (red), the Farmer’s Guild Blueprint (orange) and the remaining 8 Pieces of Glass (green).
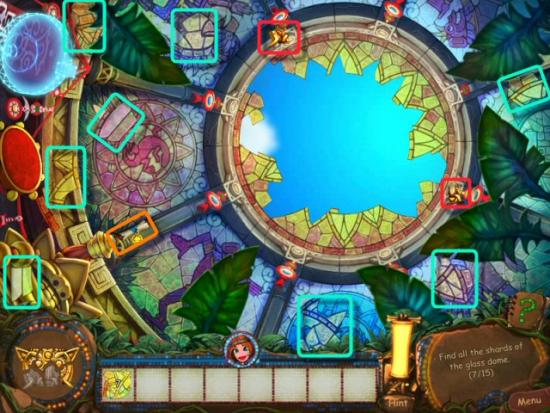
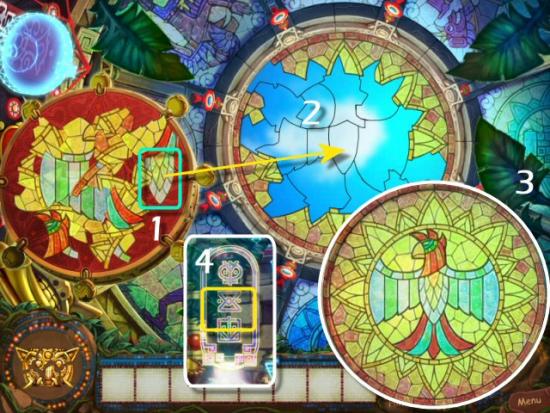
Repair the Temple Dome. Click on a Piece of Glass (1) and then place it in the correct space (2). Continue placing the Pieces of Glass until the Temple Dome is restored (3) and then click on the Portal (4).
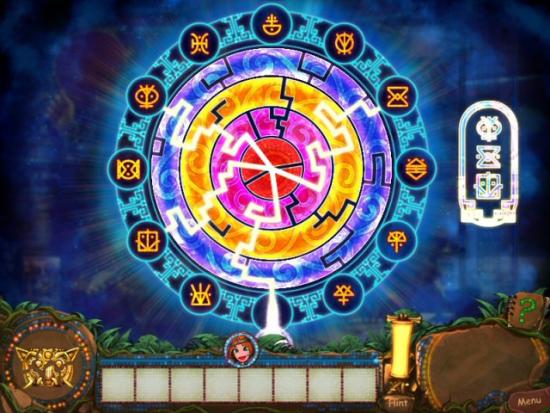
Rotate the 4 Rings so that all 3 Symbols are connected. Click and drag a Ring, clockwise or counter-clockwise, to move it into place. I recommend beginning with the outermost Ring, then work your way to the Center. When complete, click on the Portal in the Center.
Enter the Map and the click on the next area. If you like, you can click on the Village to do additional repairs, first.
Level 3 – Village in the Trees
The Village in the Trees
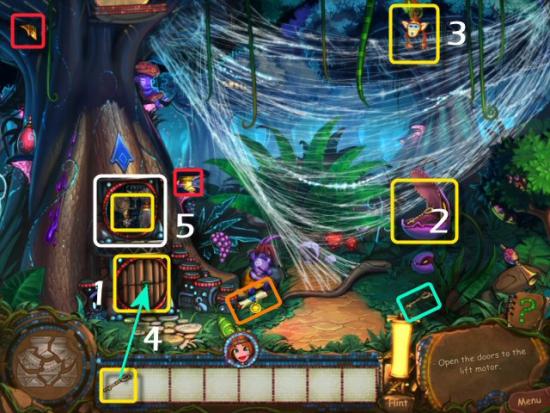
Click on the Doors to the Lift Motor (1), click on the Carnivorous Plant (2) and then click on Ivan (3 – click on him 3 times, wait for the Carnivorous Plant to open, then click again. If you miss the Key, you’ll start over with Ivan at the top). Collect the Key (green), the Totem Pieces (red) and the Cattle Breeder’s Blueprint (orange). Use the Key on the Lift Motor Doors (4), click on the Key and then click on the open Doors (5).
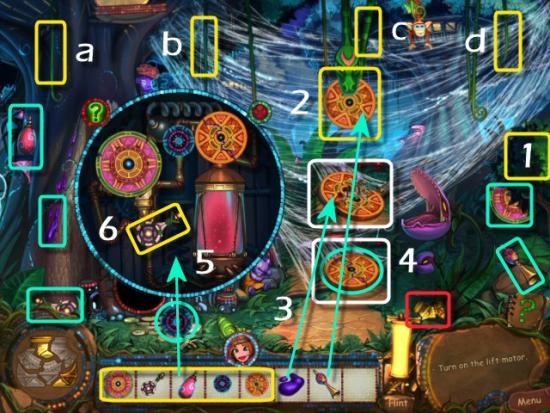
Click on the Tree Branch (1), click on the Vines (a, b, c and d), collect the Big Gear, Fuel, Sticky Wax, Small Gear, Lever, Flute (green) and Totem Piece (red). Use the Flute on the Snake (2), use the Sticky Wax on the Broken Gear (3) and then collect the Gear (4). Use the Parts on the Lift Motor (5) and then click the Lever (6).
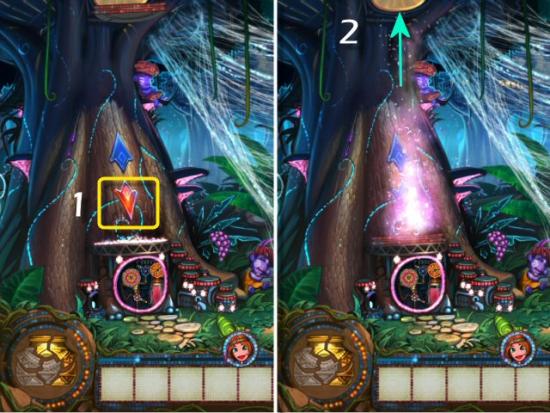
Click the Down Arrow (1) and then enter the Doctor’s Hut (2).
The Doctor’s Hut
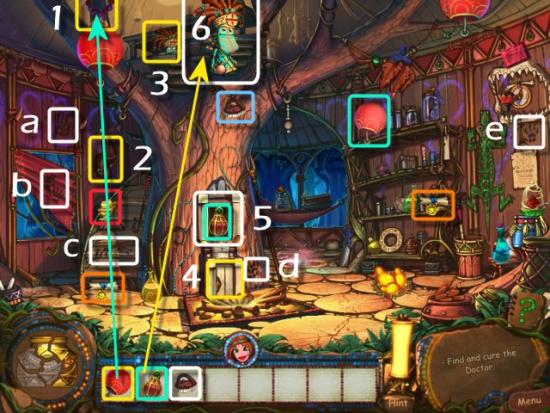
Collect the Lantern (green), use it on the Fixture (1), click on the Meat (2), collect the Totem Piece (red), the Market and Main Square Blueprints (orange) and then click on Doctor Kouse (3). Click on the Base of the Chair (4), collect the Potion of Strength (5) and then use it on the Doctor (6). Collect the Brush (blue) and use it on the Dirt (white – a, b, c, d and e).
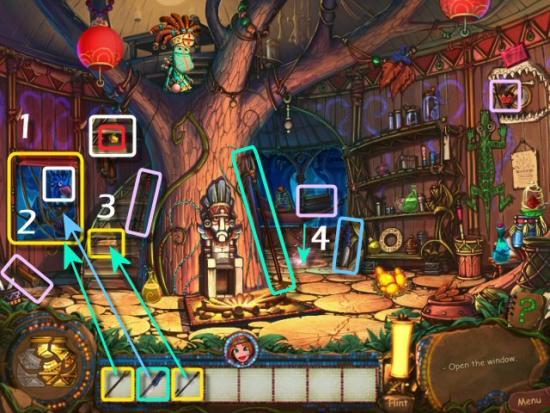
Collect the Forked Stick (green), use it on the Window (1 – click twice), click on the Bluebird (white), collect the Knife (blue) and then use it on the Vines (2). Collect the Poker, Brushwood, Fire Powder and Cauldron (light purple), use the Poker on the Stairs (3), collect the Totem Piece (red) and then return outside (4).
The Village in the Trees
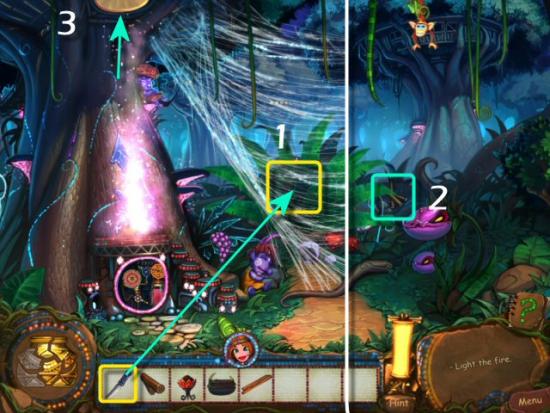
Use the Knife on the Spider Web (1), collect the Brushwood (2) and then return to the Doctor’s Hut (3).
The Doctor’s Hut
Click on the Fire Pit, use the items in the Toolwheel (1), click on the Recipe (2) and then collect the Empty Bottle, Red Spice, Red Leaves and Bark of the Red Tree (green). Return outside (3) and then click on the Symbol (4 – Doctor’s Hut on the right).
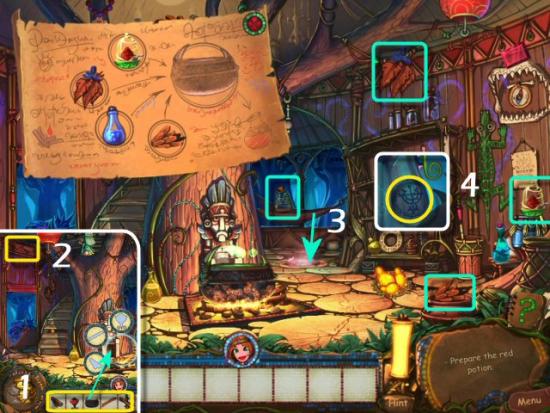
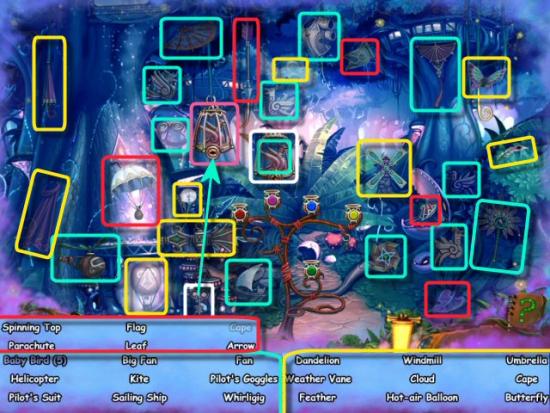
The Village in the Trees
Find all the objects in the list. Note that more items will be added as you find the ones first shown. Click on the Key (white), use it on the Cage (pink), click on the Key and then collect the Baby Bird. Items from the first list will be green, items from the second list will be yellow and the final 5 items will be red.
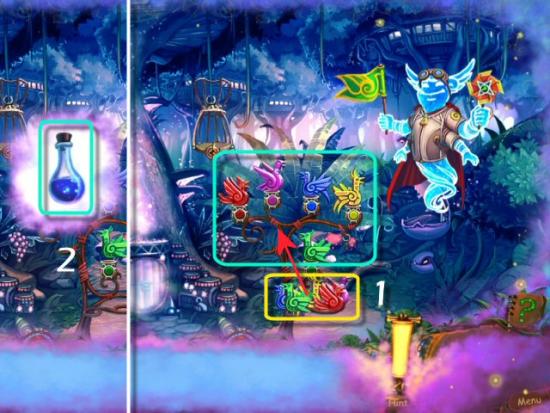
Place all the Baby Birds on their matching Pedestals (1) and collect the Aqua Vita (2).
The Doctor’s Hut
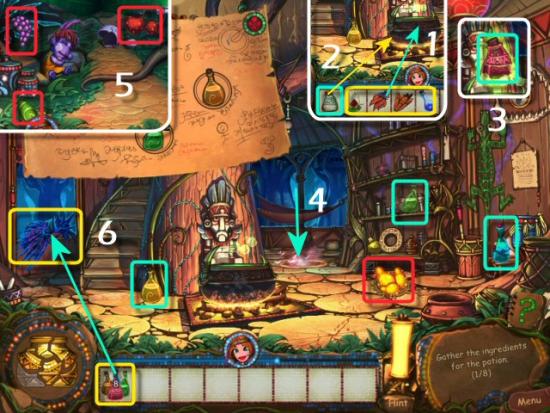
Return to the Doctor’s Hut, use the Ingredients on the Cauldron (1), use the Empty Bottle on the Cauldron (2) and then collect the Red Potion (3). Collect the Blue, Green and Yellow Potions (green), collect the Yellow Fruit and then exit to the outside (4). Collect the Red, Green and Purple Fruit (5), return inside and then use everything on the Bluebird (6).
Watch for the Ingredients that appear next to the Bluebird (purple), click on the item (yellow) and then add it to the Pill Maker (green) in the exact order they appeared. You’ll play 5 rounds, beginning with one ingredient for the round 1. Subsequent rounds will have one more ingredient until the final round, which will have 5. They appear in quick succession, so you may want to write them down quickly, in some sort of shorthand. If you make a mistake, you’ll go back one round and repeat the previous sequence. For example, if you make a mistake during round 3, you’ll have to repeat round 2 before progressing to round 3 again. This minigame is completely random; each sequence, and each game, will be different. When complete, collect the Totem Piece (red).
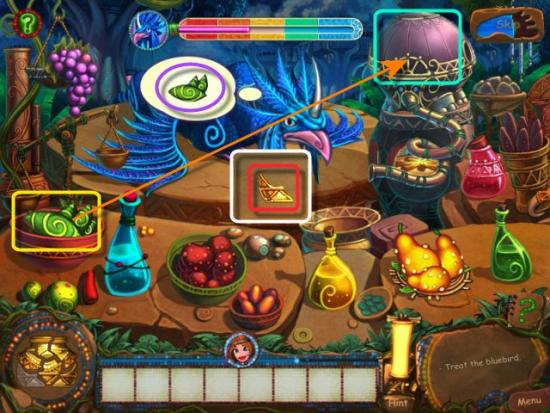
Collect the Magic Crystal (green), click on it (yellow) and move it over the entire scene. Click when you find one of the Bluebird’s Babies (red), continue searching until you’ve found 3 and then exit to the outside.
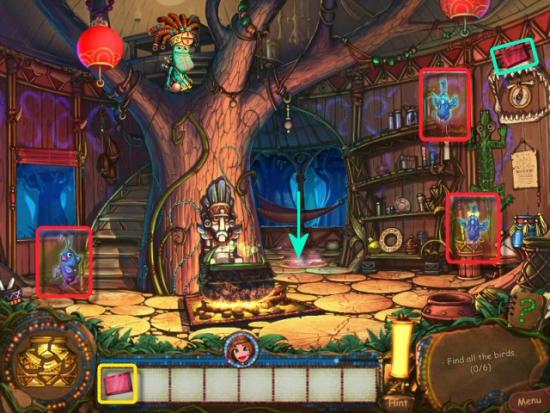
The Village in the Trees
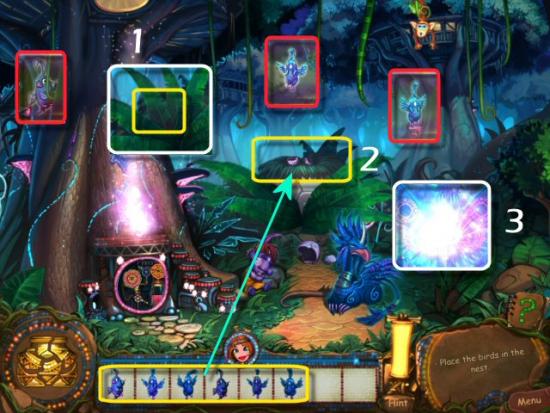
Continue searching until you’ve found the final 3 Babies (red), click on the Leaves (1 – click twice) and then put all the Bluebird’s Babies in the Nest (2). Click on the Bluebird Family and then click on the Portal (3).
Enter the Map and the click on the next area. If you like, you can click on the Village to do additional repairs, first.
Level 4 – Jungle
The Old Trail
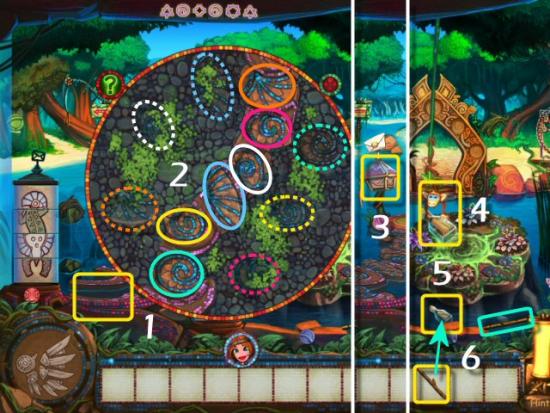
Click on the Water Gate (1), click on the Algae (2), click on the missing part of the Code (3) and then click on the Symbols in the Gate (4), according to the Code (5). Note that the Code is always the same.
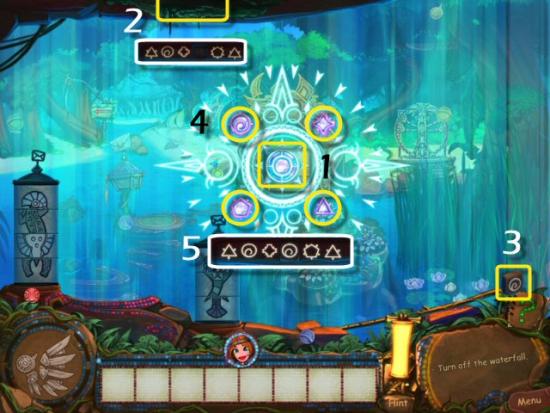
Click on the first part of the Bridge (1 – click twice), place the Stones in the correct spots (2), click on the Mailbox (3) and then click on Ivan (4). Click on the Bottle (5), collect the Long Stick (green) and then use the Long Stick on the Bottle (6).
Click on the Code (1), click on the Cylinders (yellow – top, middle and bottom) to match the images on the Code (2) and then collect the Stone Ship (green). Click on the second part of the Bridge (3) and then place the Stones in the correct spots (4).
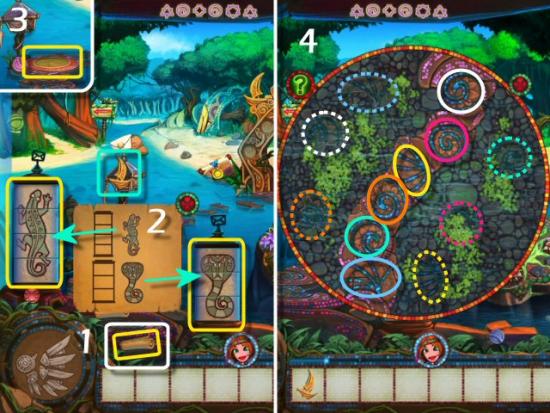
Collect the Totem Piece (red), Craftsmen’s Guild Blueprint (orange), use the Stone Ship on the Gate and then collect the Gate Stones (green).
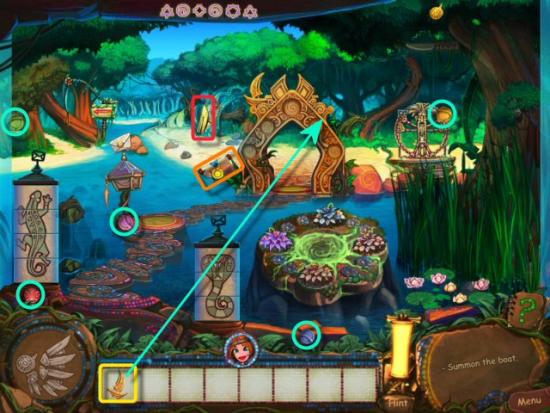
Use the Gate Stones in the matching color spaces (1) and then rotate them into position to match the pattern on the Gate (2). Click to rotate clockwise and right click to rotate counter-clockwise.
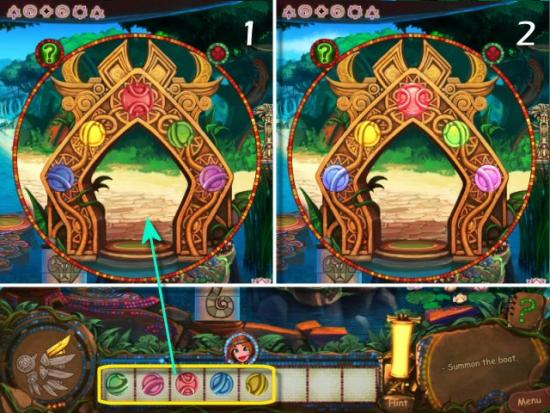
Collect the Sickle (green), use it on the Reeds (1), click on the Crocodile (2), collect the Branches (blue) and use them on the Crocodile (3). Collect the Axe (light purple), use it on the Fallen Tree (4) and then enter the Meadow of Animals (5).
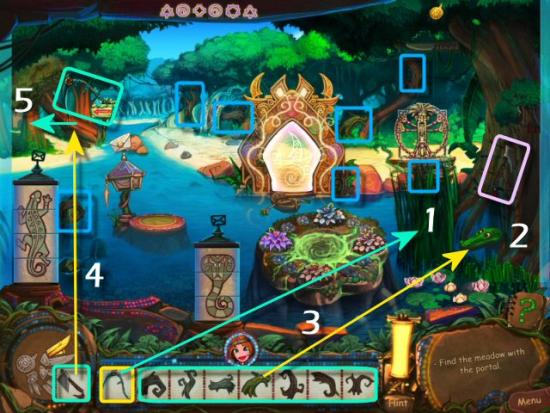
The Meadow of Animals
Click the Pods (1 – click twice), collect the 2 Totem Pieces (red) and then collect the Worker’s Guild and Post Office Blueprints (orange). Click the Portal Stone (2), click the Elephant (3), click on Ivan (4), collect the Code (blue) and then exit to the Old Trail (5).
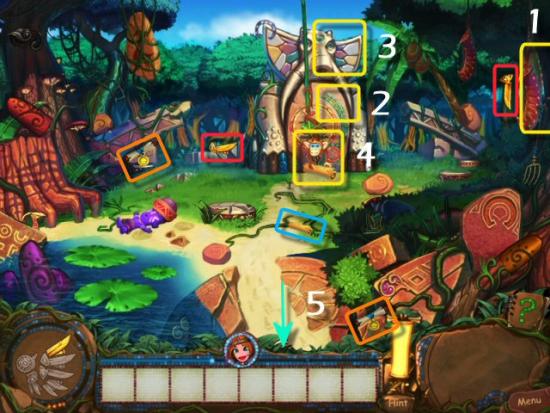
The Old Trail
Click on the Code (1), click on the Cylinders (yellow – top, middle and bottom) to match the images on the Code (2), collect the Magic Crystal (green) and then return to the Meadow of Animals (3).
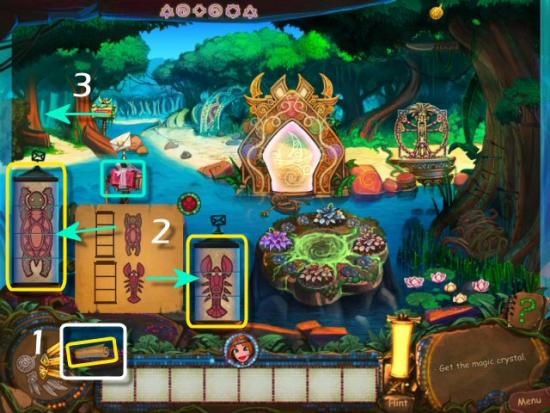
The Meadow of Animals
Click on the Magic Crystal (yellow), move it over the entire scene, click when you find one of the Animals (red) and continue searching until you’ve found 6. Find the Ostrich’s Secret Stash (green), click on the Ostrich (1), use them in the Toolwheel (2) and then click on the Ostrich (3).
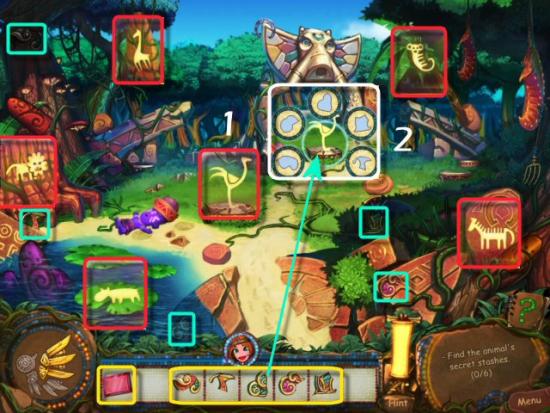
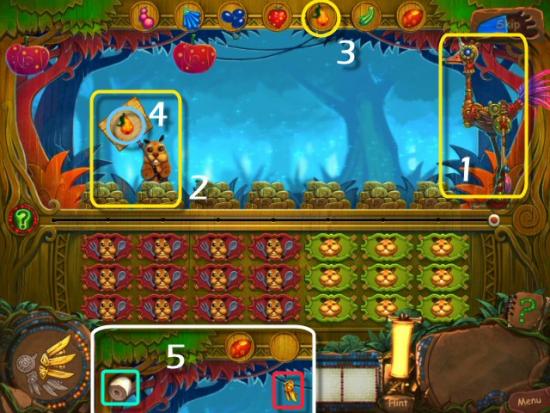
Feed the Hungry Gophers before the Ostrich gets to the Fruit, and eats it all. Click on the Ostrich (1) to begin. As a Gopher pops up (2), click on the Fruit (3 – at the top), that matches the one on its Sign, and then click on the Sign (4) before the Gopher disappears.
Occasionally, 2 Gophers will pop up and you need to try to feed both of them. As the Gophers are fed, the boxes on the bottom will turn green. If you miss one, you’ll have more chances and should finish well before the Ostrich moves all the way to the Left. When complete (5), collect the Totem Piece (red) and Piece of Trunk (green – 1 of 6).
The Old Trail
Click on the Giraffe (1), collect the Rope Ladder (green) and then exit to the Old Trail. Use the Rope Ladder on the Branch (2), collect the Totem Piece (red) and Knife (green), return to the Meadow of Animals (3) and then use the Knife on the Vines (4 – on the Giraffe).
The Meadow of Animals
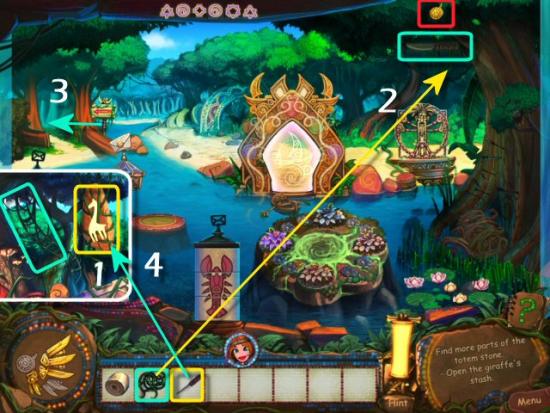
Collect the Piece of Trunk (green – 2 of 6) click on the Silver Horseshoe (1) and then click on Ivan’s Diagram (2). Collect the Rock (light purple), use the Rock on the Catapult (3) and then close the Diagram (4). Collect the Silver Horseshoe (red), use it on the Zebra (5) and then collect the Piece of Trunk (6 – 3 of 6).
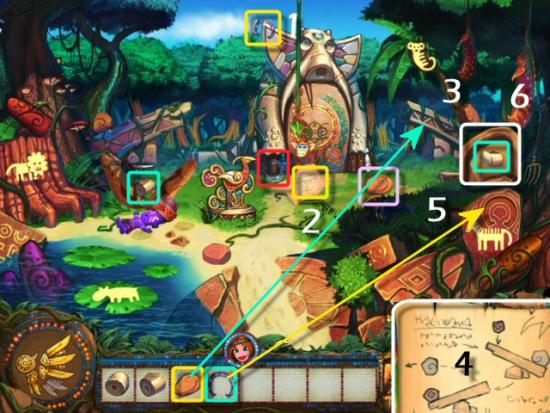
Collect the Pitchfork (1), use it on the Lion (2) and then collect the Piece of Trunk (3 – 4 of 6). Collect the Rock (4), use it on the Catapult (5), collect the Piece of Trunk (6 – 5 of 6) and then exit to the Old Trail (7).
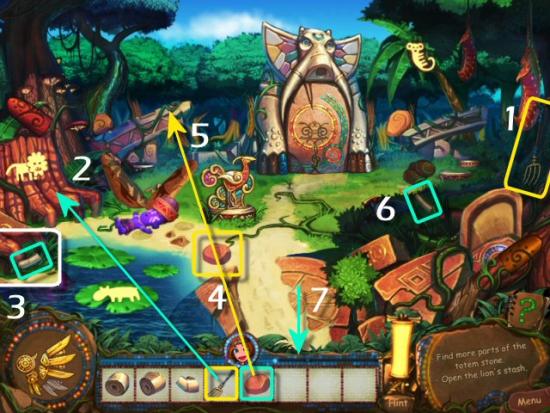
Collect the 3 Lotus Flowers (1 – lower right), return to the Meadow of Animals, use the Lotus Flowers on the Hippo (2) and then collect the Piece of Trunk (3 – 6 of 6). Click on the Elephant (4), use the Pieces of Trunk in the Toolwheel (5) and then click on the Portal Stone (6).
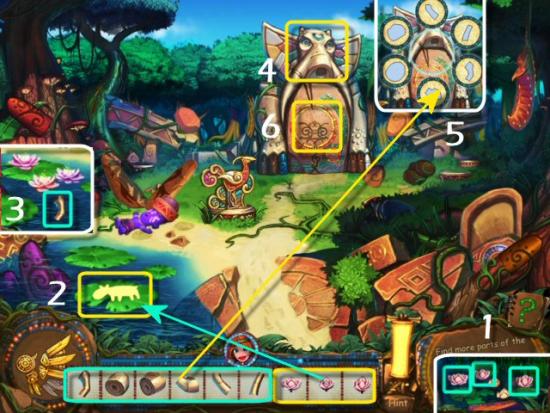
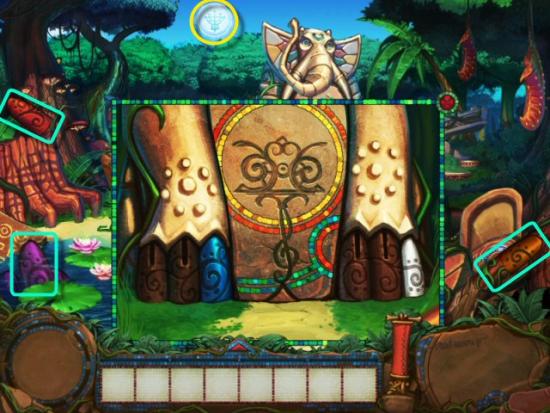
Collect the Keys (green – 3 of 4) and then click on the Magic Emblem (yellow).
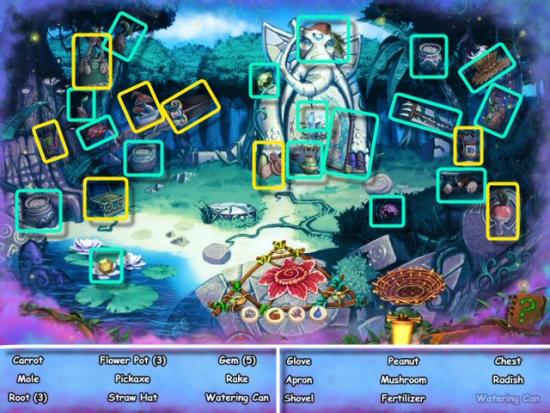
Find all the objects in the list. Note that more items will be added as you find the ones first shown. Items from the first list will be green and items from the second list will be yellow.
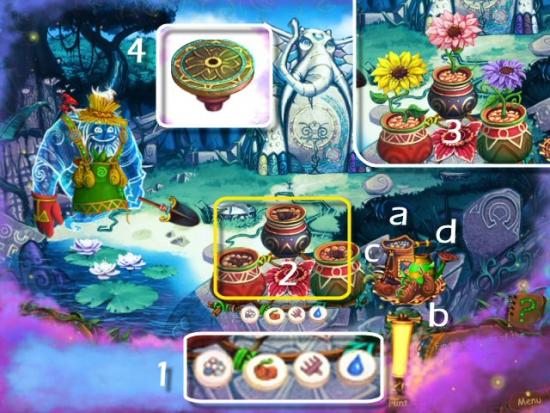
Grow the Plants performing the steps shown, just below the Flower Pots (1). Use the Fertilizer, the Roots, the Rake and then the Watering Can (a, b, c and d), in that order. Click on one of the items and then click on each of the Flower Pots (2). When complete (3), collect the Special Filter (4).
The Old Trail
Exit the Meadow of Animals, use the Special Filter on the Poison (1), click on the Branch (2) and then collect the Notes (3). Collect the Clock Hand (4), use it on the Clock Face (5), click on the Purple Flower (6), collect the Totem Piece (7 – red) and the Key (green) and the return to the Meadow of Animals (8).
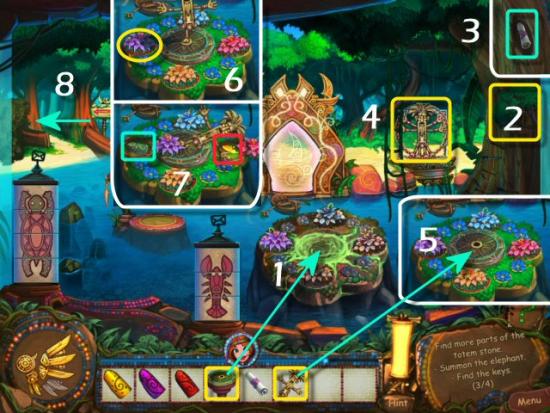
The Meadow of Animals
Click on the Portal Stone, use the Keys in the Empty Spaces (match the designs on the Keys and Empty Spaces) and then use the Notes on the Music Stand (1). Click the Keys in the order shown on the Music Score (2). Collect the Portal Symbol (3 – on the right), use it on the Portal (4) and then click to enter.
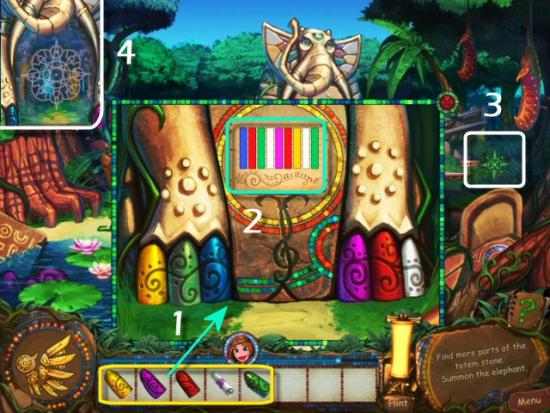
Enter the Map and the click on the next area. If you like, you can click on the Village to do additional repairs, first.
Level 5 – Village on the Water
The Shore
Close all the Umbrellas. Click on one Umbrella then click on another with a matching pattern.
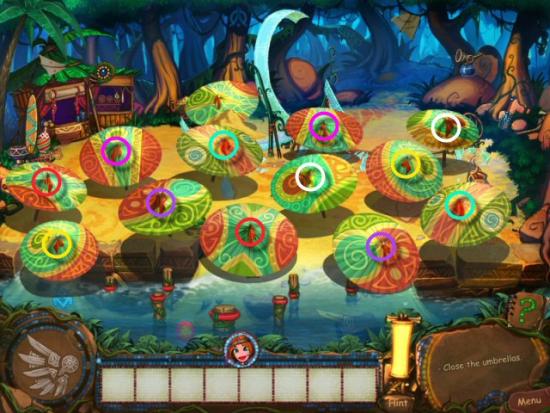
Collect the Shovel (green), use it on the pile of Sand (1), click on the Umbrella (2) and then click on the Stone (3). Collect the 3 Totem Pieces (red), the Lighthouse Blueprint (orange), the Sand Cart (blue) and the Sprayer (purple) and then click on the Pyramid Design (4). You’ll repeat the next steps with the Fish Design (5) and Hands Design (6).
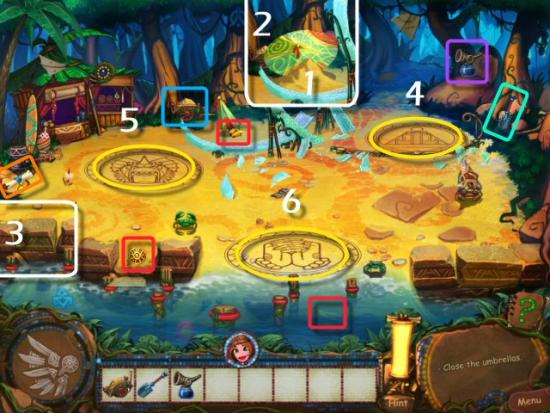
Click on the Design, use the Sand Cart (1), the Shovel (2) and the Sprayer (3), in that order, to create the Sand Sculptures.
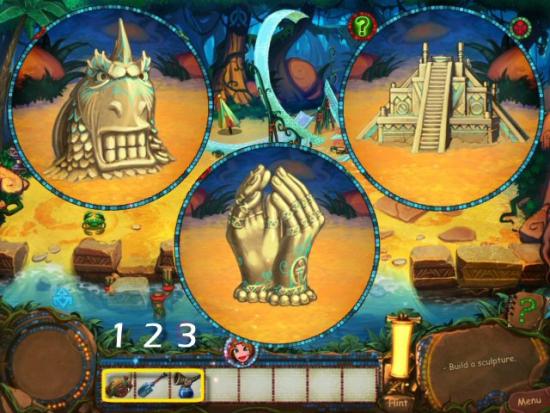
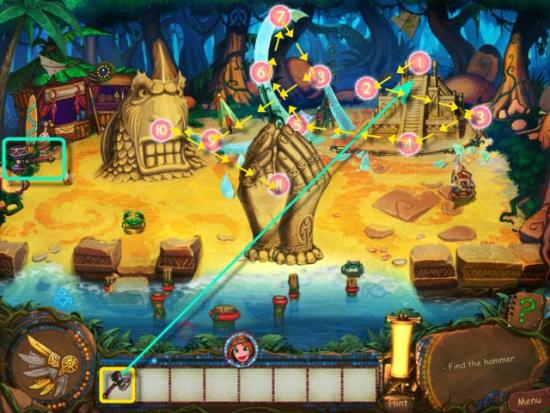
Collect the Hammer (green) and then use it on the Circles, in the correct order, to create the Waterslide.
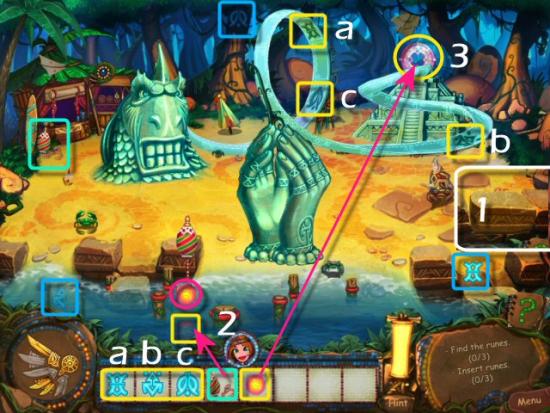
Click on the Stone (1), collect the Runes (blue) and then use them on the Waterslide (a, b and c). Collect the Hook (green), use it on the Runic Ball (2) collect the Runic Ball (pink) and then use it on the Pyramid (3).
Click on the Code (1), click on the Lights (2), in the order shown on the Diagram (3).
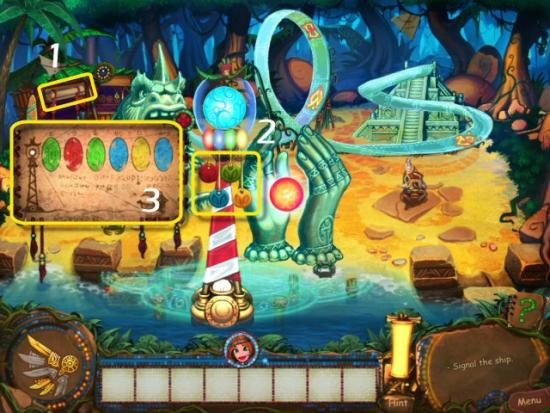
Collect the Ship Parts (green), click on the Ship (1) and then use the Parts in the Toolwheel (2).
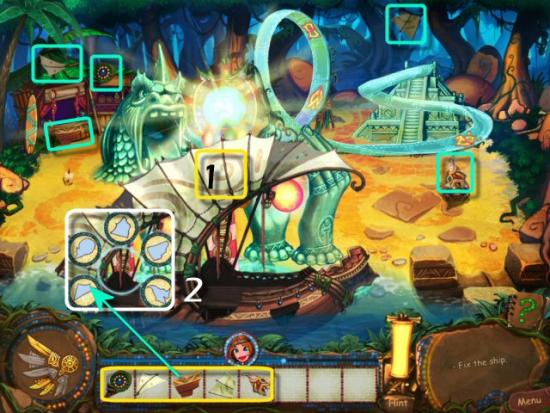
The Main Square
Click the Lantern (1), collect the 3 Totem Pieces (red), the Pharmacy Blueprint (orange) and the Torn Details of the Underwater Hatch (green). Click on the Hatch (2) and use the Pieces (3).
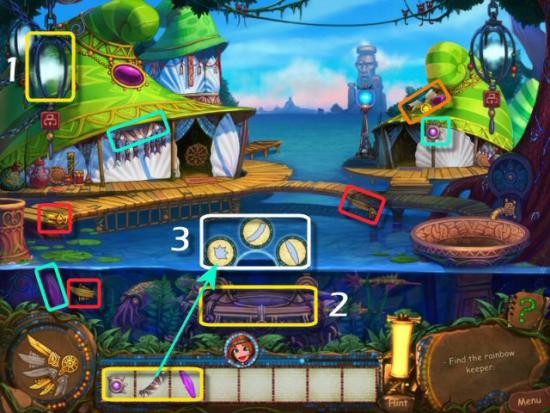
Collect the Ladder (green), use it on the Kite (1), click on the Clamshell (2) and then click on the Stash (3). Collect the Pattern Pieces (red), use the Pattern Pieces on the Stash (4) and then collect the Kite Pieces (blue). Click on the Kite, use the Pieces in the Toolwheel (5), collect the Kite (6), try to use it on the Rainbow Keeper and then click on the Symbol (7).
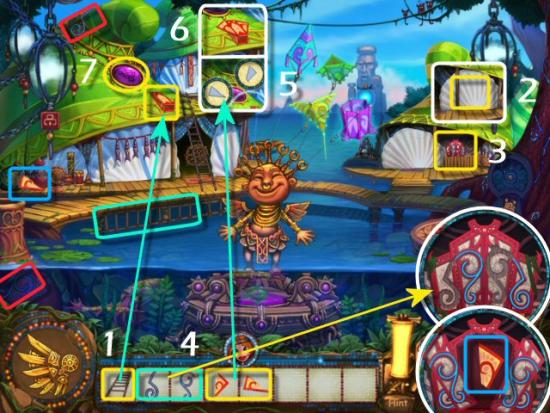
Find all the objects in the list. Note that more items will be added as you find the ones first shown. Open the 2 Clams (pink) to find the 2 Pearls. Items from the first list will be green, items from the second list will be yellow and the final 7 items will be red.
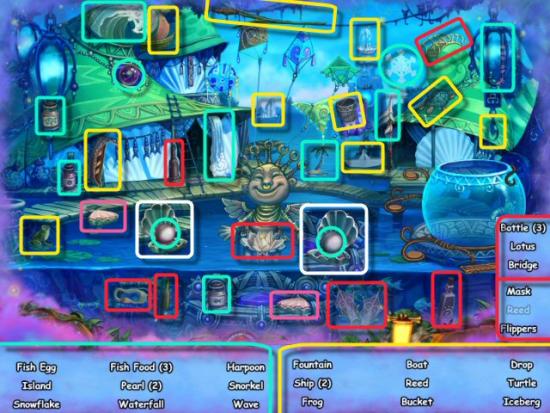
Create a New Sea Creature. Use the 3 Bottles (any order), the Fish Egg and then the Small, Medium and Large Fish Food (a, b, c, d and e), in that order, on the Fishbowl (1). Collect the Rope (2).
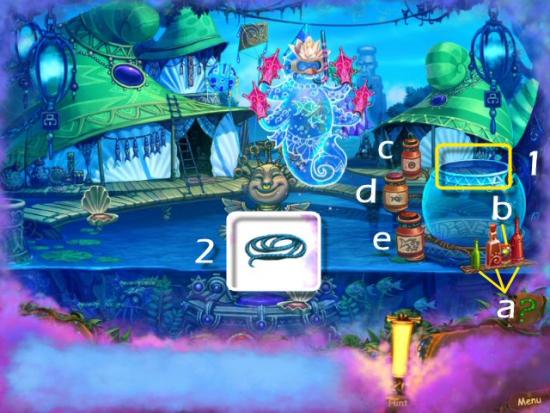
Use the Rope and then the Kite (1), in that order, on the Rainbow Keeper. Collect the Ladder (green), use it on the Cage (2) and then collect the Cage with Cloud (pink). Collect the Tap (blue), use it on the Faucet (3), click the Tap (4) and then collect the Squid (red). Use the Squid and then the Cage with Cloud (5), in that order, on the Water. Enter the Portal.
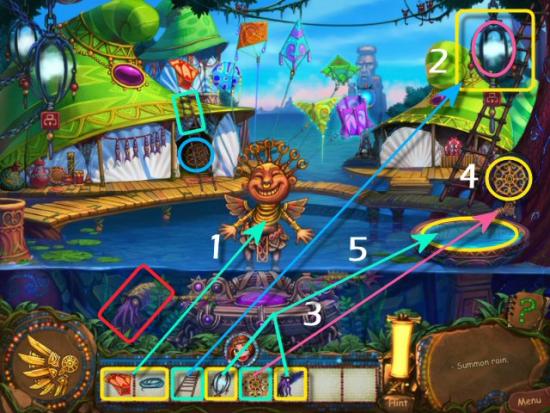
Enter the Map and the click on the next area. If you like, you can click on the Village to do additional repairs, first.
Level 6 – Maya’s Fish House
Fish House
Click on Maya (1), collect the Dock and Magic Fountain Blueprints (orange), collect the 6 House Parts (green), click on the House (2) and then use the Parts in the Toolwheel (3).
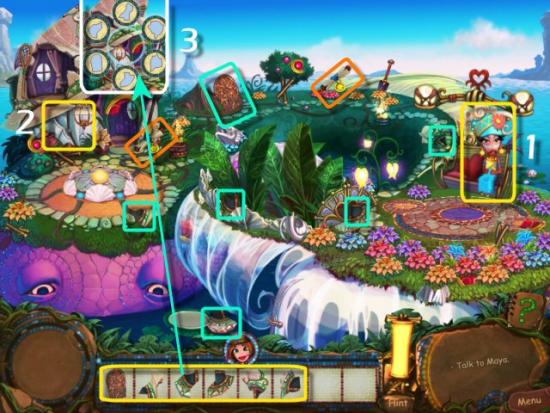
Collect the Shovel (green), use it on the Stump (1), click on the Window (2), collect the Seed (blue) and use it on the Soil (3). Collect the Fountain Parts (red), click on the Fountain (3) and use the Fountain Parts in the Toolwheel (4).
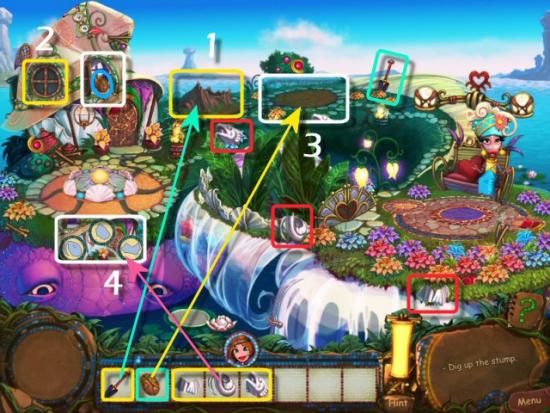
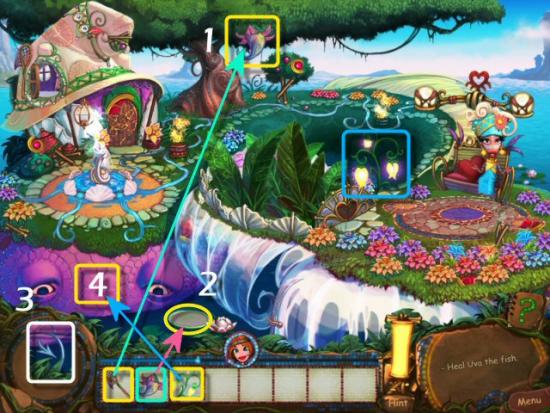
Collect the Net (green), use it on the Tuna Fruit (1), use the Tuna Fruit on the Plate (2) and then click on the Hook (3) in Uva’s mouth. Click on Uva, collect the Light Plant (blue), use the Light Plant on Uva (4) and then click on her mouth.
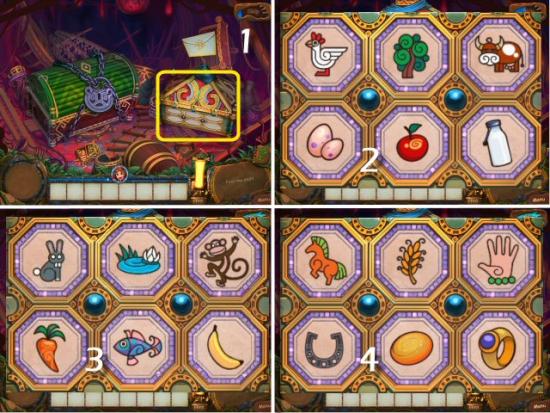
Click on the Mailbox (1). Switch the items, in the bottom row, so that those that belong together are opposite each other. Click on one then click on another to switch places. You’ll play 3 rounds (2, 3 and 4) with 3 pairs in each round. Note that the order of items may be different when you play.
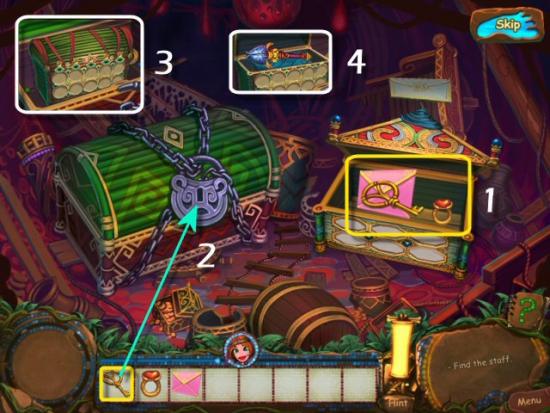
Collect the Ring, Key and Letter (1), use the Key on the Lock (2), click on the Key, click on the Lid and then click on the Small Chest (3). You’ll play the same Pairs Game as with the Mailbox, only there will 5 rounds with 5 pairs in each. When complete, collect the Magic Staff (4). The Pairs are (the order of your pairs may be different):
Round 1 | Round 2 | Round 3 | Round 4 | Round 5 |
Canoe/Oar | Sun/Beach Umbrella | Flowers/Vase | Bee/Honey | Sheep/Sweater |
Cloud/Rain | Snowman/Snowflake | Arrow/Target | Bird/Track | Telescope/Planet |
House/Bricks | Windmill/Flour | Cheese/Mousetrap | Dog/Bone | Fox/Paw Print |
Squirrel/Acorns | Eye/Glasses | Book/Letter | Trees/Leaf | Palette/Paint Brush |
Foot/Shoe | Teddy Bear/Doll | Fire/Match | Wine/Glasses | Table/Chair |
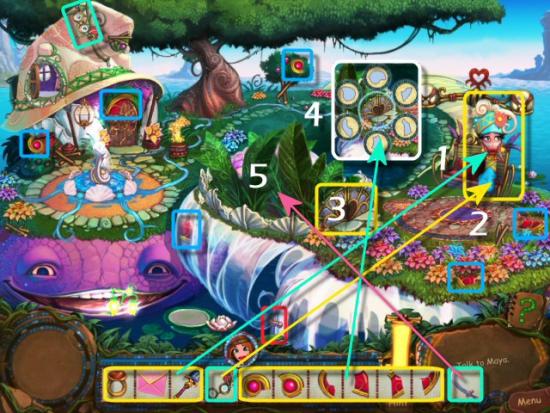
Use the Magic Staff, Ring and Letter on Maya (1 – give her the Magic Staff first), collect the Glasses (green) and then use them on Maya (2). Collect the Gate Parts (blue), click on the Portal Gate (3) and then use them in the Toolwheel (4). Click on the Gate again, collect the Machete (red), and then use it on the Weeds (5 – click 3 times).
Collect the Brushwood (green), click on the Fire Pot (1) and use them in the Toolwheel (2). Collect the Lamp (blue), use it on the Fire (3) and then use it on the Wood (4). Enter the Portal.
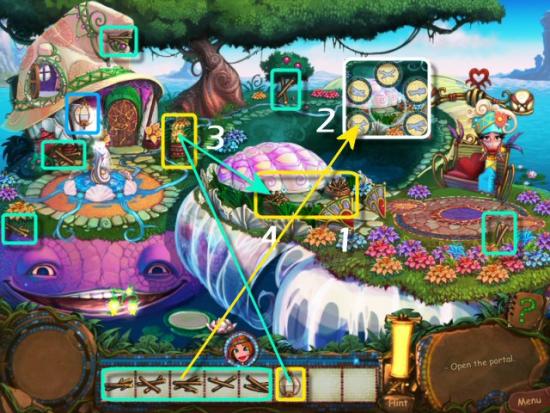
Enter the Map and the click on the next area. If you like, you can click on the Village to do additional repairs, first.
Level 7 – The Island of Loss
The Shore of Sunken Ships
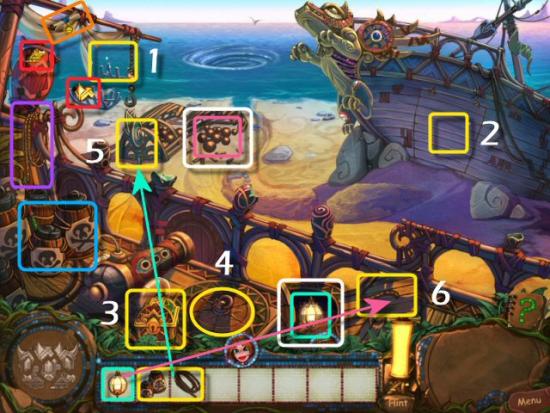
Click on the Wreck in the Water (1), collect the 2 Totem Pieces (red) and the Magic Laboratory Blueprint (orange), click on the Side of the Ship (2) and then click on the Green Chest (3 – click twice). Click on the Hatch (4), collect the Lamp (green), Gun Powder (blue) and Wick (purple). Use the Gun Powder and Wick on the Wreck (5), use the Lamp on the End of the Wick (6) and then collect the Cannonballs (pink).
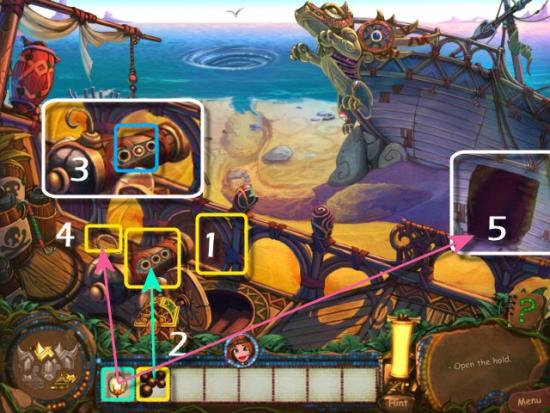
Click on the Cannon Hatch (1), use the Cannonballs on the Cannon (2) and then click the Cannon until it moves forward. Click the Cannon until the Cannonball shows in the Center Hole (3), use the Lamp on the Wick (4) and then use the Lamp on the Open Hatch (5).
Collect the Crowbar (green), use it on the Boards (1), collect the Totem Piece (red) and Bathyscaphe Parts (blue), click on the Bathyscaphe (2) and use them in the Toolwheel (3). Collect the Shovel (purple), use it on the Sand (a, b and c), click on the Bathyscaphe and enter the Whirlpool (4).
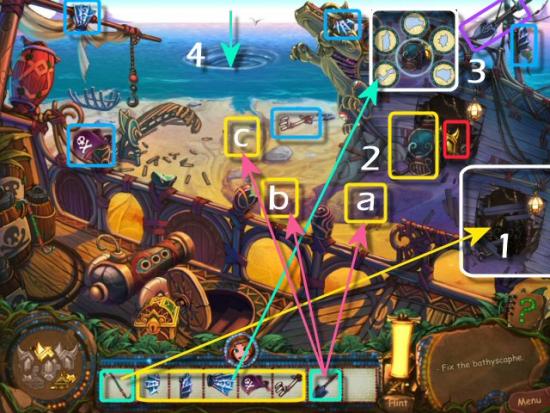
Return to the Surface (1 – upper right), use the Crowbar on the Chupacabra (2), re-enter the Whirlpool (3) and then use the Chupacabra (4 – click anywhere in the scene).
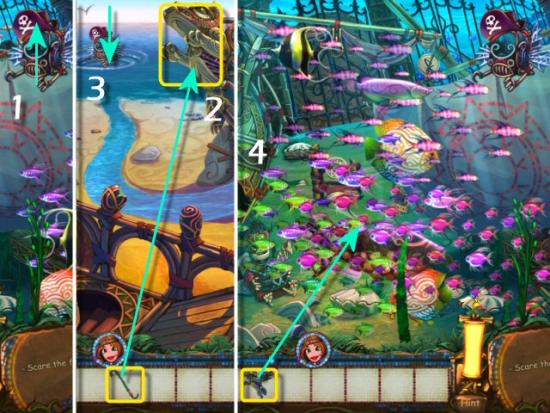
The Underwater Treasures
Click on the Lock (1), the Sail (2) and the Tile (3), collect the Rope (4) and use it on the Sail (5). Collect the 2 Totem Pieces (red), the Tavern Blueprint (orange), the Anchor (green), use the Anchor on the Lock (6) and then click on the Symbol (7).
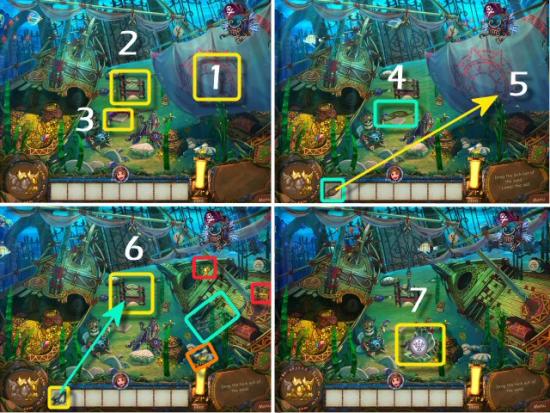
Find all the objects in the list. Note that more items will be added as you find the ones first shown. Items from the first list will be green and items from the second list will be yellow.
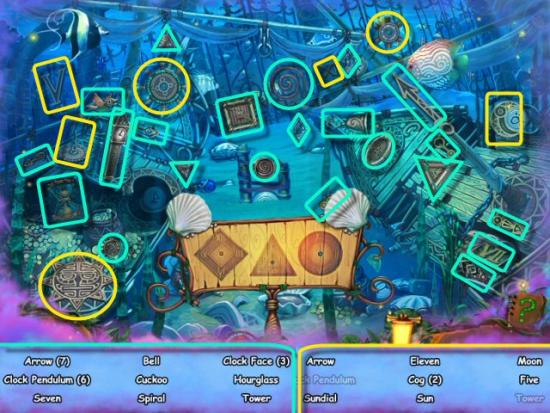
Assemble the Clock. Use the Diamond, Triangle and Circle Clock Faces on the Board (1); use the Diamond, Triangle and Circle Pendulums below the match Clock Faces (2); and then use the Diamond, Triangle and Circle Clock Hands on the Clock Faces (3). Click on the Fish (4) and then collect the Key (5).
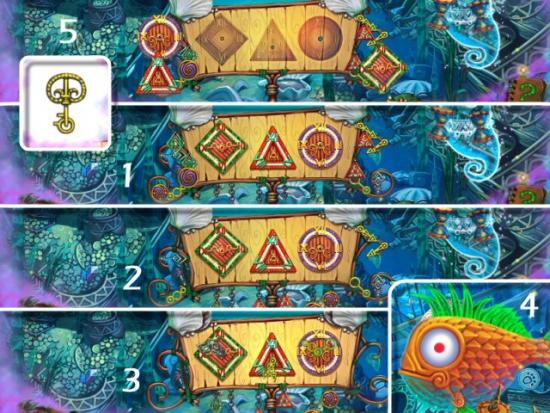
Return to the Surface (1), use the Key on the Small Chest (2) and collect the Large Key (3). Re-enter the Whirlpool, Click the Hatch (4 – click twice), click the Octopus (5), use the Large Key on the Skeleton Chest (6) and then click the Open Chest (7). Collect the Wheel Parts (green), click on the Wheel Mechanism (8), use the Wheel Parts in the Toolwheel (9) and then click on the Wheel.
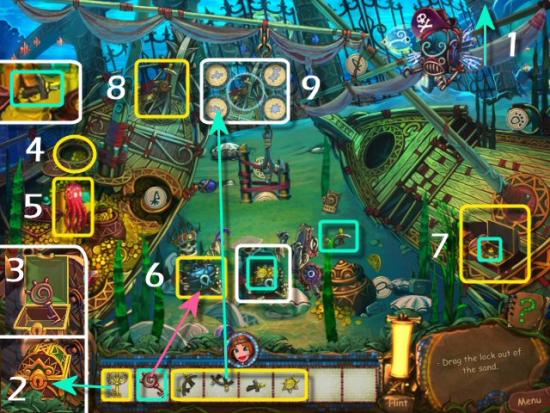
Collect the Buttons (green) and use them in the Lock (1). Place the buttons according to the order already shown…either low to high or high to low…and then click on the Chupacabra (2).
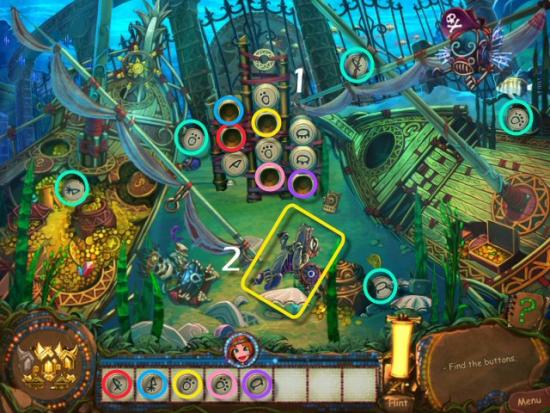
Click on the Buttons in the order the Fish arrive (1 through 7). When the Gates open, click on the Disc (8).
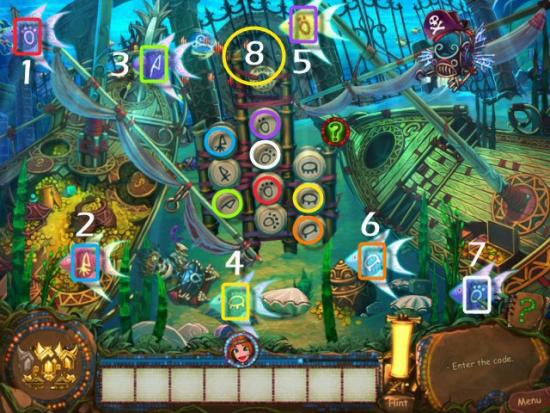
Click anywhere on the Altar (center) to rotate it clockwise; right click to rotate it counter-clockwise. Line up the Green Arrow, with the Green Sphere, to open the Chest on the Left (1). Line up the Blue Arrow, with the Blue Sphere, to open the Chest on the Right (2). Line up the Cyan Arrow, with the Cyan Sphere, to open the Chest at the Bottom (3).
Click on the coins and jewels to move them out of the way and uncover the Parts. Click on a Part and place it on the Altar. When complete, collect the Totem Piece (4 – red) and then enter the Portal (click in the center).
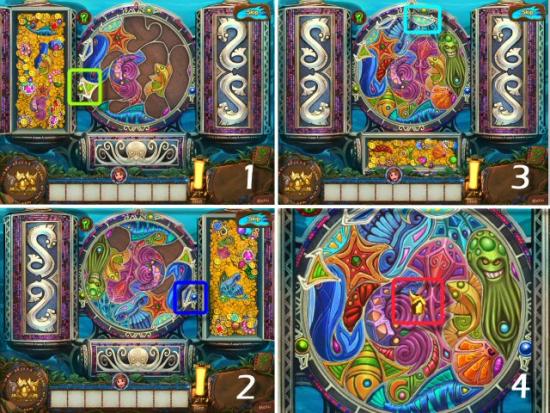
Enter the Map and the click on the next area. If you like, you can click on the Village to do additional repairs, first.
Level 8 – Ice Desert
The Entrance to the Observatory
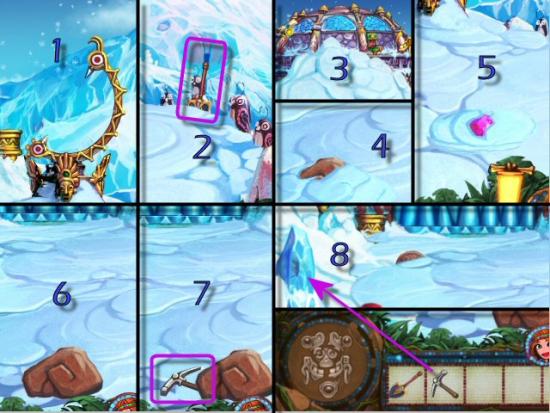
Click on the Plinth (1), collect the Shovel (2) and use it on the Pink Crystal (3), the Rock (4) and the Structure (5). Click on the Rock (6 – click 3 times), collect the Ice Pick (7) and use it on the Ice (8 – click twice).
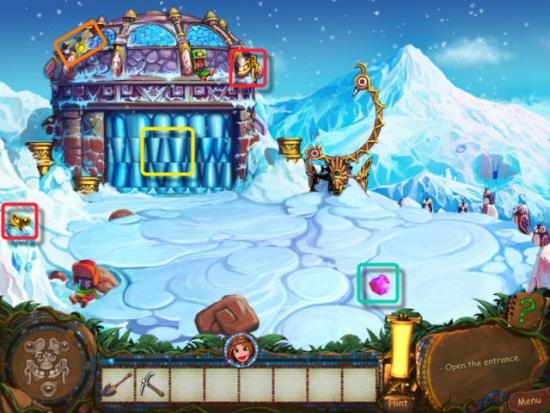
Collect the Pink Crystal (green), Diamond Mine Blueprint (orange) and 2 Totem Pieces (red) and then click on the Ice Rocks (yellow).
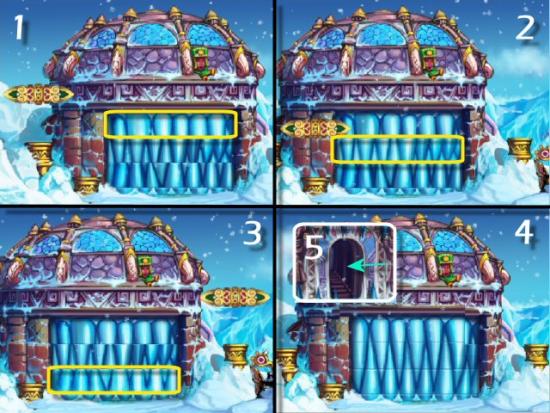
Click on each Row (1, 2 and 3) to bring up the Arrow for that row. Click on the left or right side of the Arrow, to shift the row left or right. Line up all 3 images (4) and then enter the Structure (5).
The Observatory
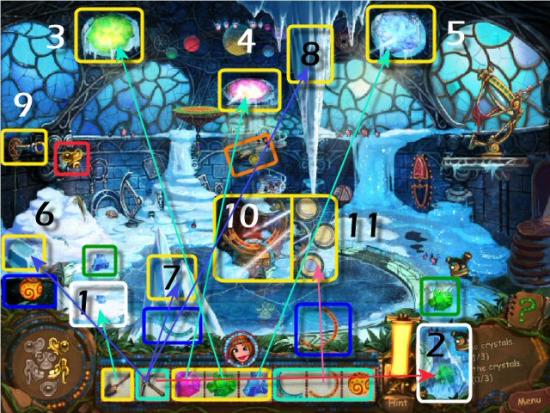
Use the Shovel on the Snow (1), use the Ice Pick on the Ice (2 – click twice), collect the Library Blueprint (orange), the Totem Piece (red) and the Blue and Green Crystals (green). Use the Crystals in the Openings (3, 4 and 5), use the Ice Pick on the Ice (6, 7 and 8 – click twice on each) and click the Lever (9). Collect the Generator Parts (blue), click on the Generator (10), use the Generator Parts in the Toolwheel (11) and then click the Lever, again.
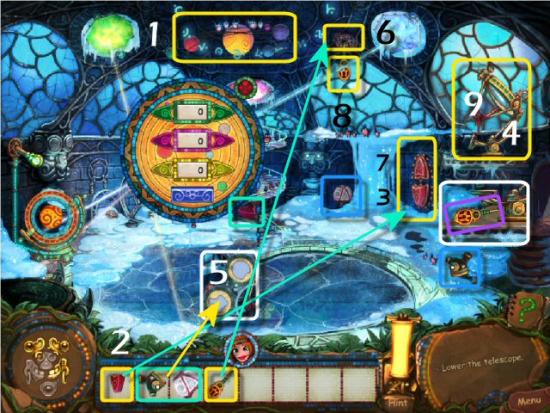
Click on the Planets (1), collect the Button (green), use it on the Lift Controls (2), click the Down Button (3), collect the Telescope Parts (blue), click on the Telescope (4) and use them in the Toolwheel (5). Collect the Switch (purple – the Telescope must be in the Down position to see it), use it on the Switch Control (6), click the Up Button (7), click on the Window Switch (8) and then click on the Telescope (9).
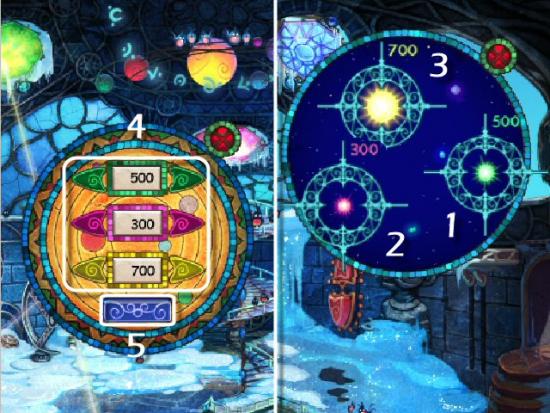
Click on each of the Stars (1, 2 and 3) to get the Coordinates, enter them in the Portal Device (4 – click the left and right arrows) and then click the Blue Button (5).
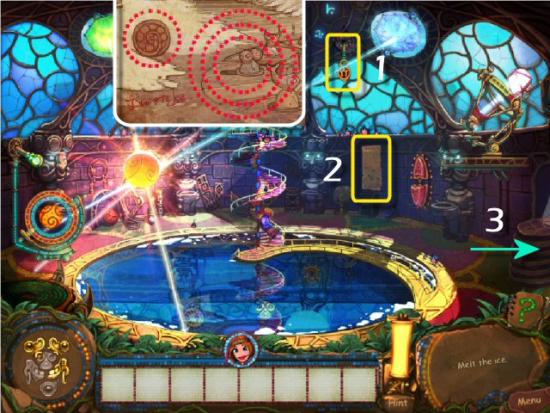
Click the Switch (1), click the Diagram (2) and the exit to the outside (3).
Click the Figure (1), collect the Totem Piece (red), return inside (2), collect the Totem Piece (red), click on the Lock (3) and then click on the Symbol (4).
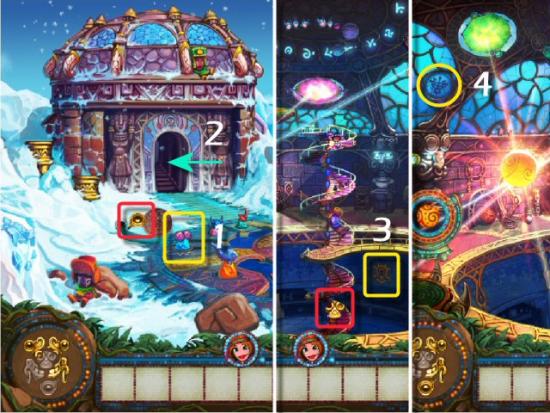
Find all the objects in the list. Note that more items will be added as you find the ones first shown. Open the Chest (pink) to find the Beads. Items from the first list will be green, items from the second list will be yellow, items from the third list will be red and the final items will be blue.
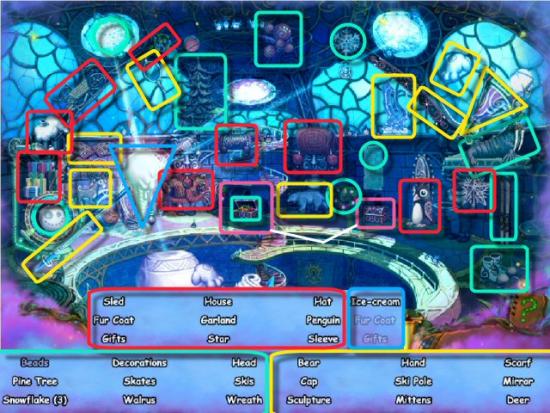
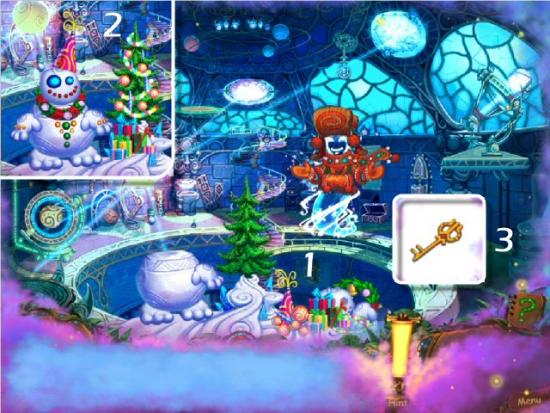
Decorate the Tree and build the Snowman (1 – the Hat and the Garland go on the Snowman; everything else goes on the Tree. Note that it doesn’t matter which order you use things, although you do need to use the Snowman Head and Hand, before you decorate him). When complete (2), collect the Key (3).
The Entrance to the Observatory
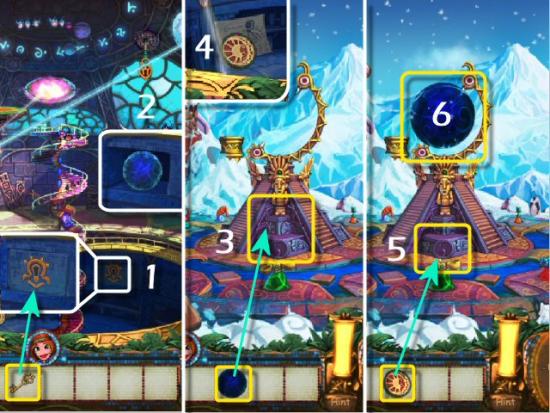
Use the Key in the Lock (1), click on the Key, collect the Dark Matter (2) and then exit to the outside. Use the Dark Matter on the Pyramid (3), return inside, collect the Zodiac Symbol (4), return outside, use the Zodiac Symbol on the Pyramid (5) and then click on the Dark Matter (6).
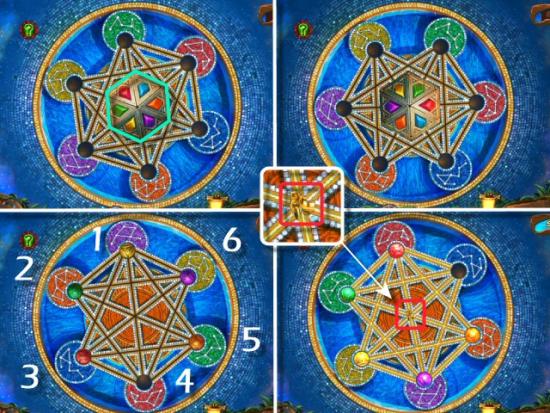
Click on the Center (1) until the Diamonds point to the matching colored circles (2). Switch the places of the Spheres (3) so they end up in the matching colored Slots (4). When complete, collect the Totem Piece (red). Click on a Sphere to move it along an open path to the Empty Slot. The solution is (colors in “lower case” are the Spheres and colors in “Upper Case” are the Slots):
- red to Red (3 to 4)
- purple to Blue (6 to 3)
- yellow to Yellow (1 to 6)
- green to Purple (2 to 1)
- orange to Orange (5 to 2)
- green to Green (1 to 5)
- purple to Purple (3 to 1)
Enter the Portal.
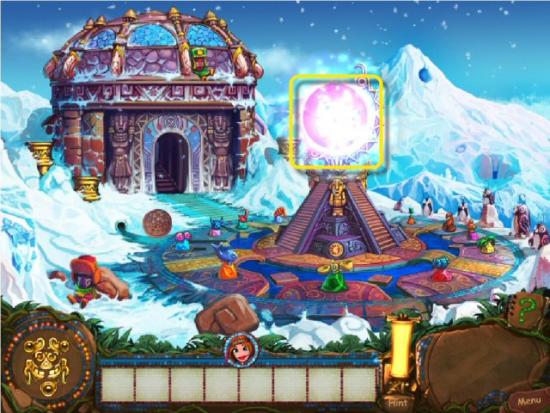
Enter the Map and the click on the next area. If you like, you can click on the Village to do additional repairs, first.
Level 9 – Watch Towers
The Watch Tower
Click on the Shell Gate (1) and the Keymaster (2), collect the 2 Totem Pieces (red) and the Sacred Fire and Temple Blueprints (orange). Click on the Log (3), collect the Guard House Parts (green), click on the Guard House (4) and use them in the Toolwheel (5). Collect the Medallion (blue), use it on the Keymaster and then click on the Shell Gate.
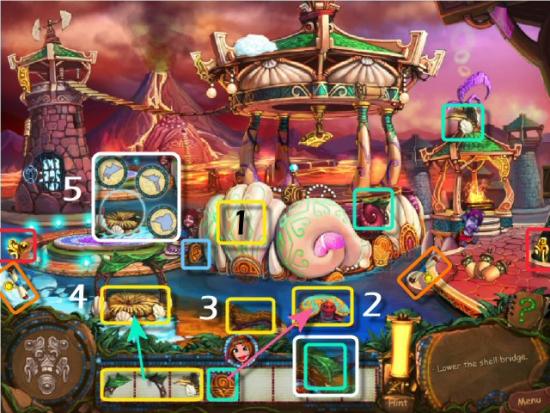
Click on the Lever (1), collect the Pearls (green) and use them on the Pearl Tower (a and b). Click on the Lever, again, collect the Balloon Basket (blue), use it on the Launch Pad (2), click on the Rope Ladder (3) and then click on the Hatch (4).
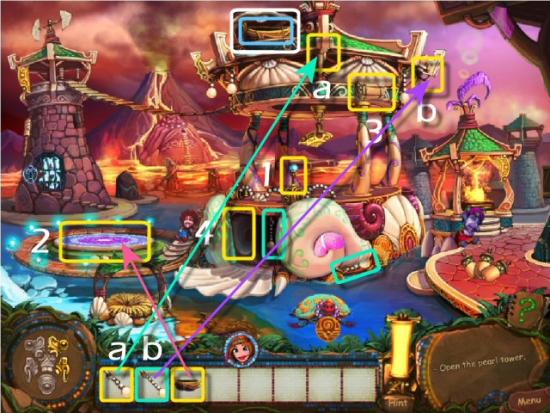
Rotate the Tiles to restore the image. Click to rotate clockwise and right click to rotate counter-clockwise. When complete, collect the Balloon Part.
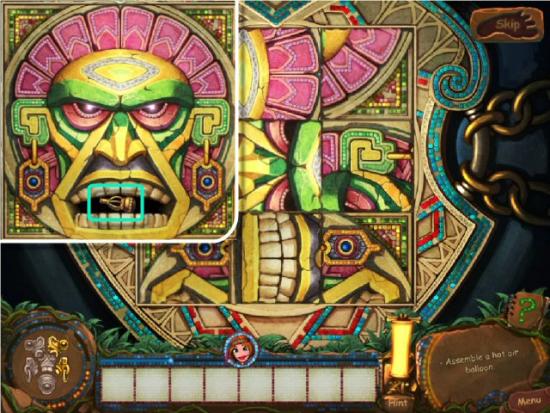
Collect the Balloon Parts (green), click on the Balloon Basket (1) and use them in the Toolwheel (2). Collect the Empty Vessels (purple), the Gong Parts (blue), click on the Gong (3) and use the Gong Parts in the Toolwheel (4). Click on the Paving Stones (5).
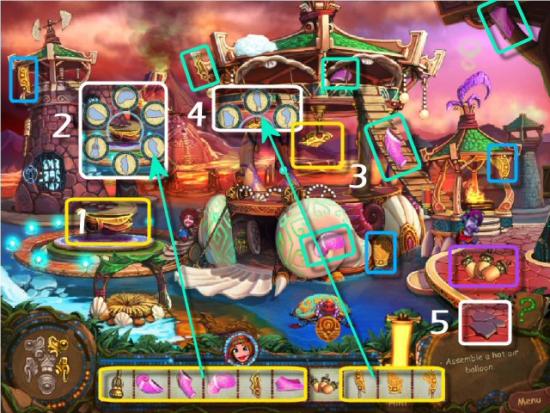
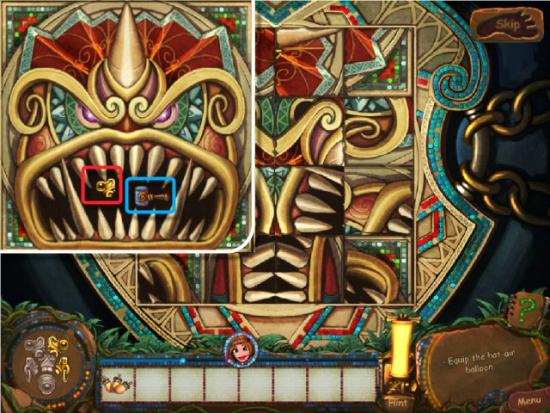
Rotate the Tiles to restore the image. Click to rotate clockwise and right click to rotate counter-clockwise. When complete, collect the Totem Piece (red) and Mallet (blue).
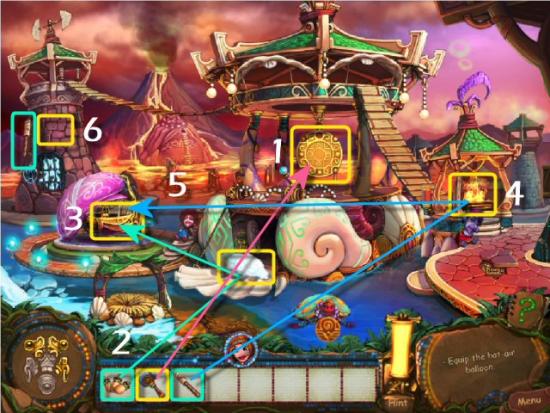
Use the Mallet on the Gong (1), use the Empty Vessels on the Snow (2) and then use the Snow Projectiles on the Balloon (3). Collect the Torch (green), use it on the Fire (4), use it on the Balloon (5) and then click on the top of the Dungeon (6).
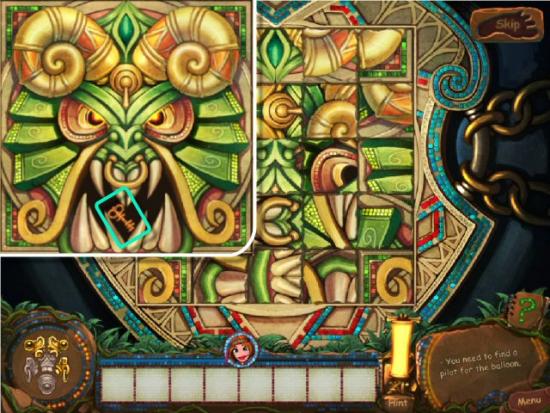
Rotate the Tiles to restore the image. Click to rotate clockwise and right click to rotate counter-clockwise. When complete, collect the Key (green).
Use the Key in the Lock (1), click on the Key, click on the Balloon Pilot (2) and then enter the Gates (3)
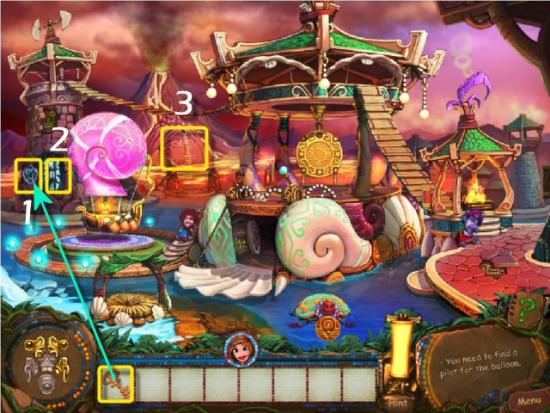
The Giant
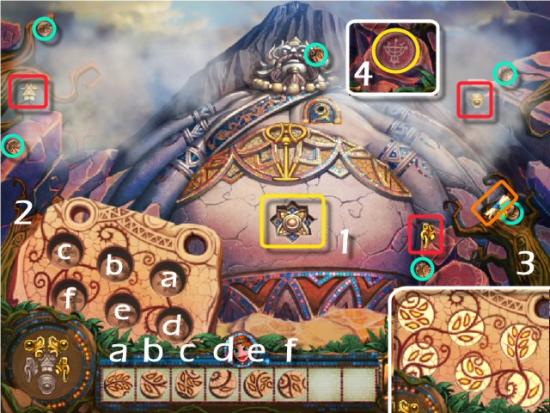
Click on the Emblem (1), collect the 3 Totem Pieces (red), the Jeweler’s Blueprint (orange), the Buttons (green), use the Buttons in the Mechanism (a, b, c, d, e and f) and then rotate them into position to match the pattern on the Mechanism (2). Click to rotate counter-clockwise and right click to rotate clockwise. Click on the Buttons (3), in the correct order, to lower the Arms. The correct order is from lowest to highest (fewest number of leaves to most number of leaves). Click on the Symbol (4 – lower right).
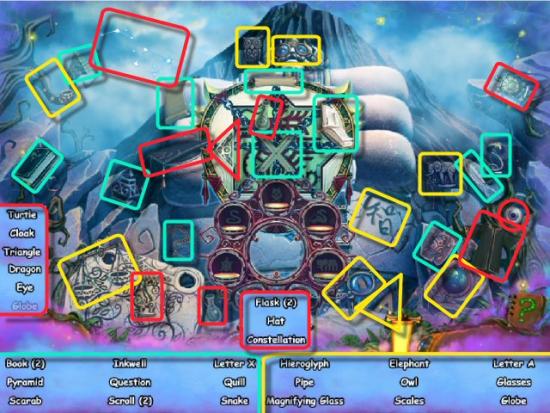
Find all the objects in the list. Note that more items will be added as you find the ones first shown. Items from the first list will be green, items from the second list will be yellow and the final items will be red.
Place the Statues (1) in the correct Niches (2) and then collect the Hammer (3).
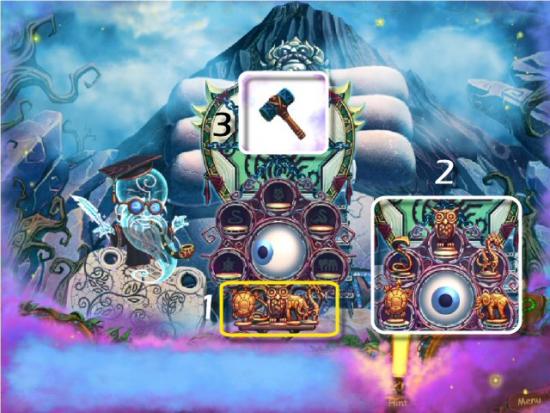
Use the Hammer (yellow) on the Weak Links (green) on the Chains (1). Click on one of the 4 Rings (a, b, c, or d) and use the Ropes to rotate them into position. The Left Rope (2) rotates a Ring counter-clockwise and the Right Rope (3) rotates a Ring clockwise. The outermost ring is stationary, so the best strategy would be to align the rings, beginning with the outside one (a). When complete (4), the Arms will rise out of the way.
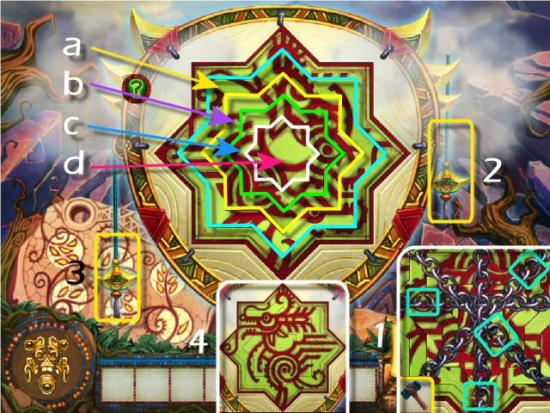
Collect the Key (green), use it in the Lock (1) and then enter the Portal (2).
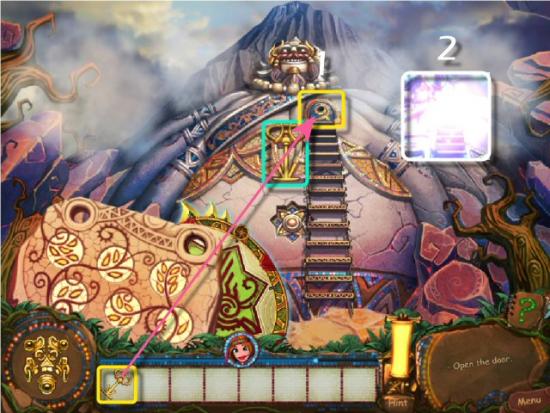
Enter the Map and the click on the next area. If you like, you can click on the Village to do additional repairs, first.
Level 10 – Volcano
The Blazing Caves
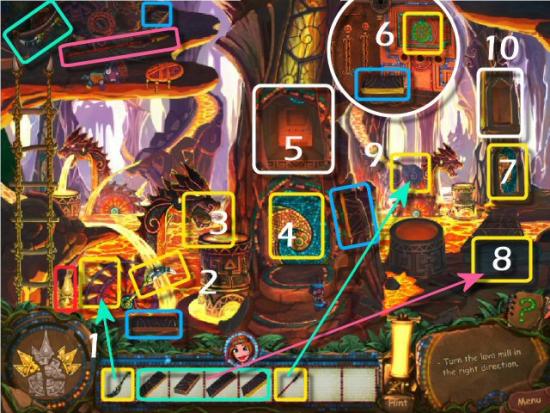
Click on the Mill (1), click on the Rope Ladder (2), click on the Large Stone (3), collect the Rungs (blue) and then use the Rungs on the Rope Ladder (4). Click on the Medium Stone (5), collect the Totem Pieces (red) and the Oracle Blueprint (orange). Click on the Lava Well (6), click on the Small Stone (7), collect the Mill Parts (green), click on the Mill (if you closed the Toolwheel), use the Mill Parts in the Toolwheel (8) and then click on the Lava Waterfall (9).
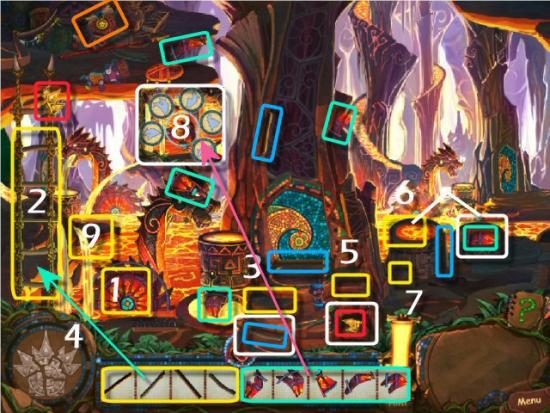
Switch the Tiles and restore the image (1). Click on a Tile and click on another to switch their places (2). Click on the Stones (a, b, c) and move them (3) so the Lava flows onto the Mill (4).
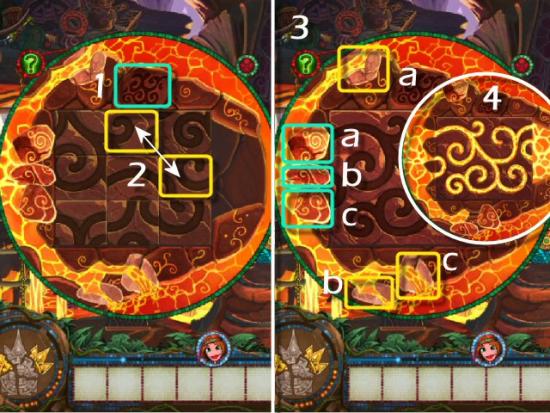
Collect the Totem Piece (red), the Lever (green), use it on the Mill (1), click on the Lever (2) and then click on the Dragon’s Mouth (3). Click on the Lift Doors (4), click on the inside (5), click on the Controls (6) and then click on the Second Lift (7). Collect the Passage Stones (blue), use them on the Large Tile (8), click on the Second Lift and then click on the Boulder (9). Collect the Spear (pink), use it on the Boulder and then click on the Second Lift’s open Doors (10).
Collect all the Parts from the Second Lift (1), click on the First Lift and use all the Parts to repair it. Place the Handle first (2) and then click on it to open the Panel. Refer to the settings of all the Levers from the Second Lift (3 and 4), adjust the ones in the First Lift so they’re in the same positions and then click on the Cord (pink Tassel). Enter the Lift
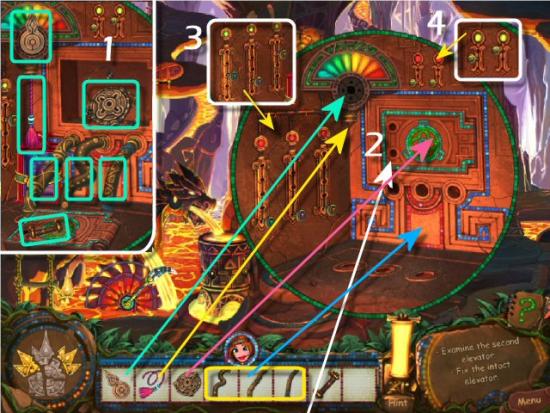
The Cliff of the Dancing Fire
Click on the Controls (1), collect the Totem Pieces (red), the Blueprint (orange) and the Key (green) and then return to the [gate?] (2). Click on the Second Lift, use the Key in the Box (3), click the Key, collect the Fire Extinguisher (blue) and then return to the Portal Room. Use the Fire Extinguisher on the Salamander (4), collect the Button (purple), use it on the Controls (5) and then click on it. Click on any of the 4 Claws (6), click on the Dragon Gate (7) and then click on the Symbol (8 – behind the inset with the Button).
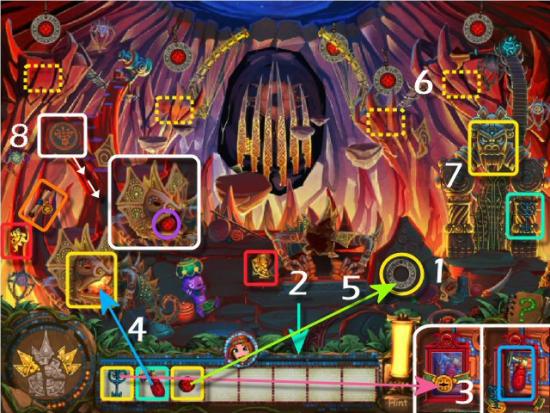
Find all the objects in the list. Note that more items will be added as you find the ones first shown. Items from the first list will be green, items from the second list will be yellow, items from the third list will be red and the final item will be pink.
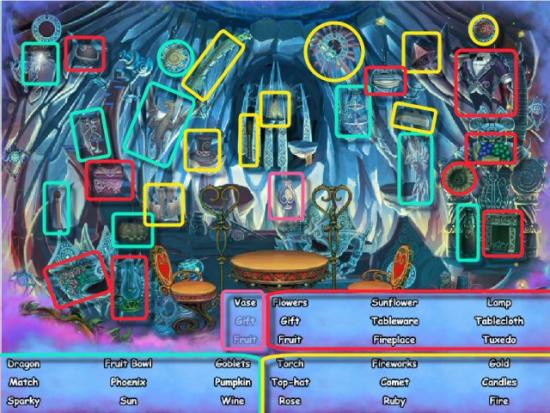
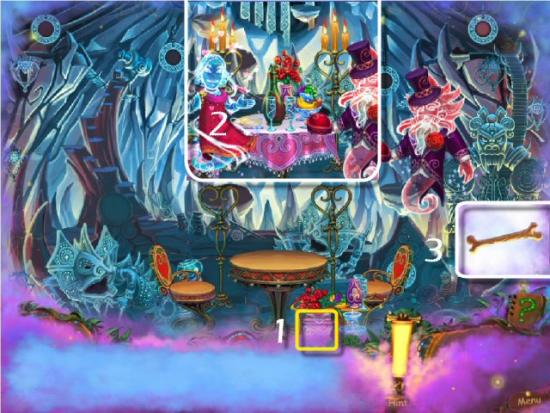
Set the Table, beginning with the Tablecloth (1). Use the Vase before the Flowers and the Fruit Bowl before the Fruit…otherwise, the remaining items can be used in any order you like (2). Collect the Bone (3).
Use the Bone on the Dragon (1), click on the Gate (2) and then click on the remaining Buttons (a, b, c, d and e – in any order you like). Collect the Salamander Parts (green), click on the Salamander (3) and then use the Parts in the Toolwheel (4). Click on the Salamander again, collect the Mace (blue), click on the Telescope (5).
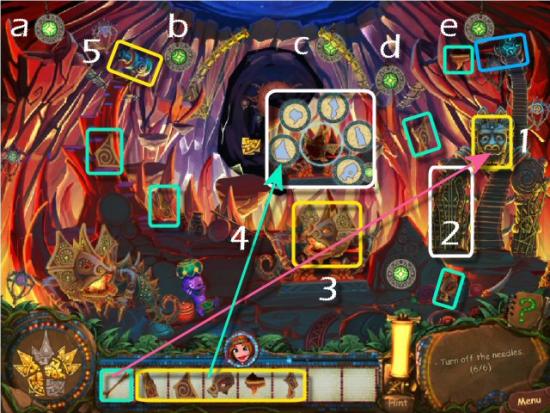
Use the Mace on the Rocks (1 – click on them in any order you like), collect the Totem Piece (red) and then click on the Portal (2).
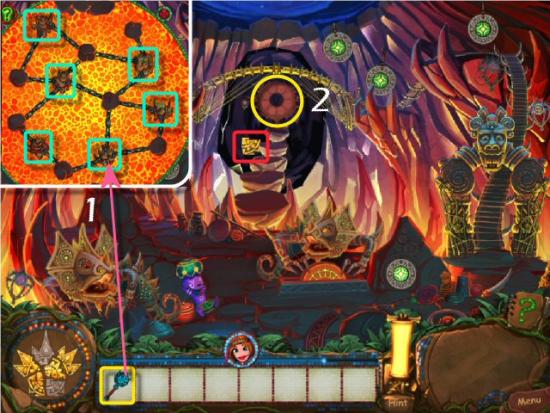
Collect the Cages (green – you’ll have to close the Portal to collect the Cage at the upper left) and then use them on the Portal – it doesn’t matter which Cage you place on which Empty Space.
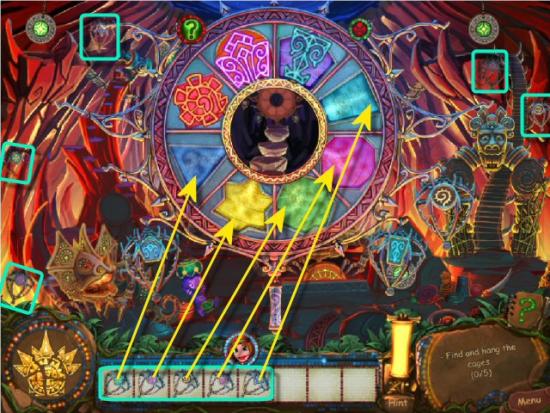
Switch the Cages so the color of the Design matches the background color. Click on a Cage and then click on its matching background to switch places (1). When complete (2), enter the Portal (3).
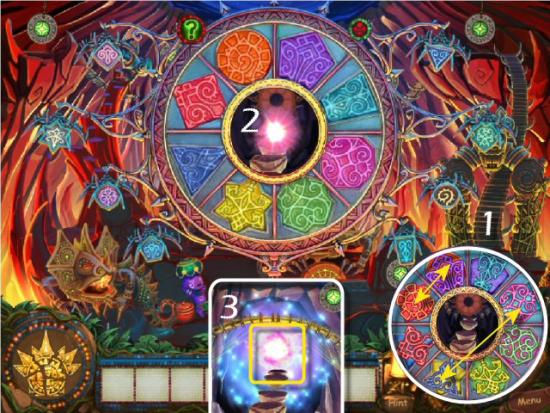
Enter the Map and the click on the next area. If you like, you can click on the Village to do additional repairs, first.
Level 11 – Cave of the Warlock
Cave
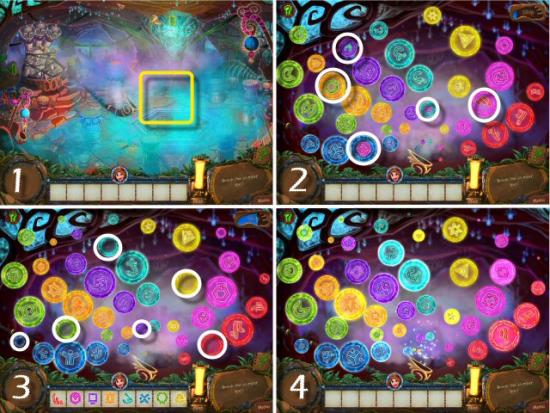
Click anywhere in the center of the scene (1). Click on the Runes that are on different colored backgrounds (2 – there are 8 different colors) and then use the Runes on the correct colored backgrounds (3 – the blank discs). The Discs move around, appear and disappear. If you miss any, just wait for them to appear again and continue until complete (4).
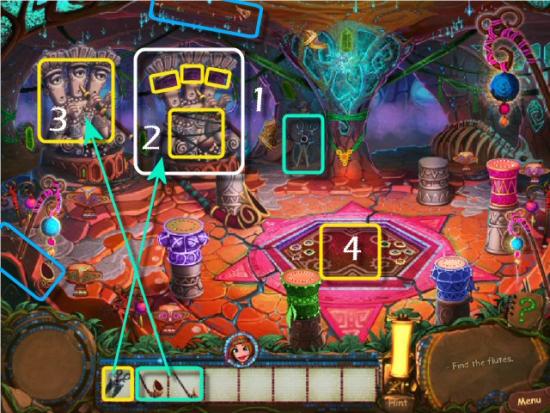
Click on the Spellmaster (1), collect the Scissors (green), use them on the Vines and each Blindfold (2). Collect the Flutes (blue), use them on the Spellmaster (3) and then click on the Lock (4).
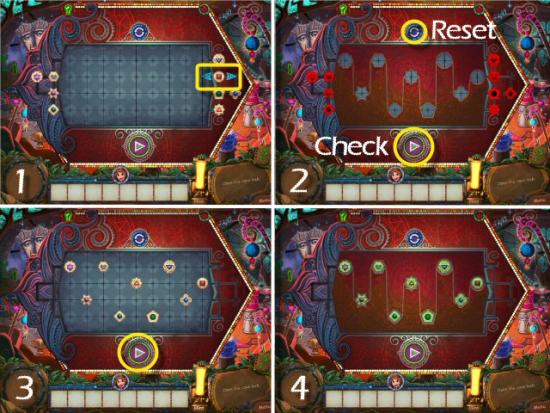
Move the Symbols to the correct spots to unlock the Cave. Click on a Symbol and then click on one of the directional arrows to move the Symbol one space (1). Click on the “Check” Button to see where the Symbols belong and which ones are in the correct (green) or incorrect (red) spots. Click on the “Reset” Button to start over (2). When you think they’re all placed correctly, click on the “Check” Button (3) to unlock the Cave (4).
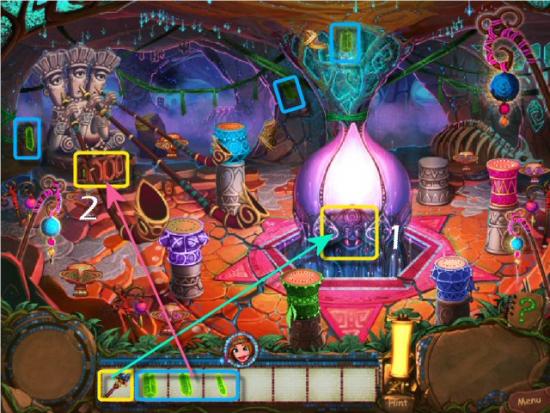
Use the Magic Staff on Flowerchild (1), collect the Magic Crystals (blue) and use them on the Base of the Spellmaster’s Pedestal (2).
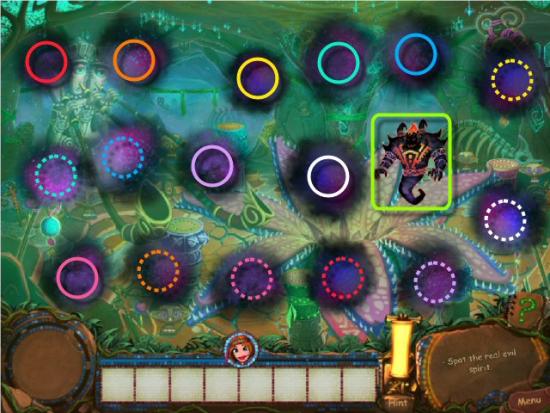
Match pairs to eliminate all of Volco’s Clones, until all that remains is Volco. Imprison Volco. Click on him 5 times to move him into Flowerchild’s petals.
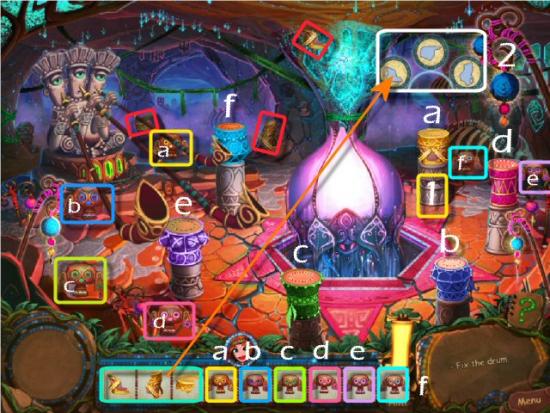
Collect the Drum Parts (red), click on the Drum (1) and then use the Parts in the Toolwheel (2). Collect the Assistants and place them on their matching colored Drums (a, b, c, d, e and f).
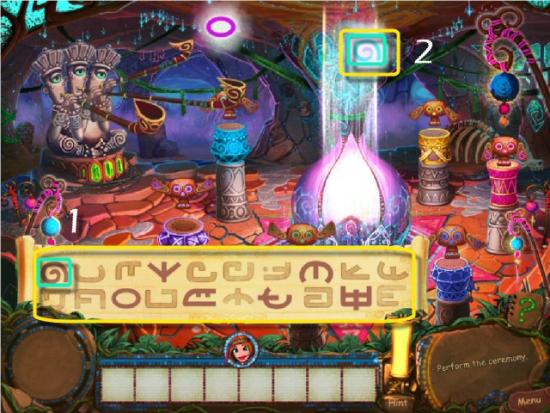
Click on the matching Notes (green), on the Parchment (1), as they enter the Beam (2). If you click on the Parchment before or after the Note reaches the Beam, you’ll have to start again.
Watch the ending movie. Congratulations! You’ve completed Tulula: Legend of a Volcano.
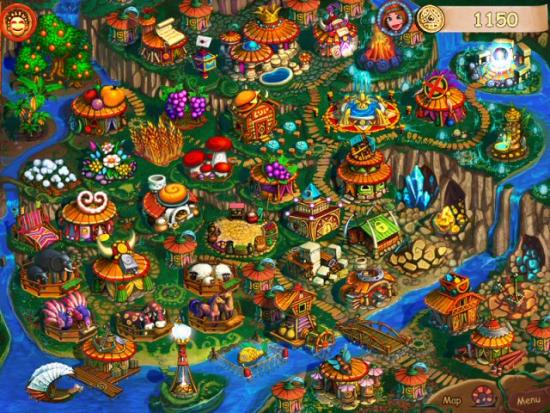
If you haven’t been repairing the Village, as you played the game, you can click on Play, on the Main Menu screen, then click on the Village Button (upper left) and do so now. You can also access the Village directly (lower left) from the Main Menu screen.
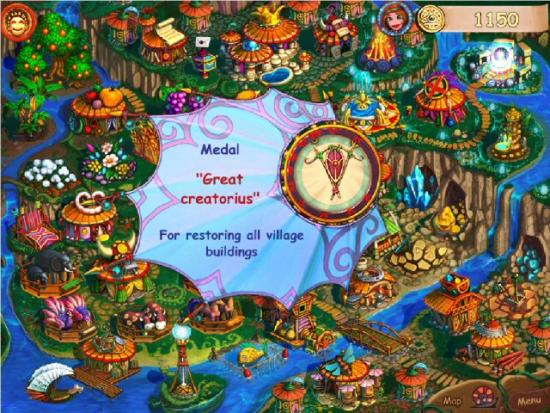
You can also view your awards by click on the Totem Suite Button (upper right). I played the game several times and was unable to get the Lazious, Twitchyus and Great Twitchyus Awards and I have no idea how you’d get them. It’s possible that they’re negative Awards (too many mis-clicks, using the Hint button too often or Skipping all the minigames).
More articles...
Monopoly GO! Free Rolls – Links For Free Dice
By Glen Fox
Wondering how to get Monopoly GO! free rolls? Well, you’ve come to the right place. In this guide, we provide you with a bunch of tips and tricks to get some free rolls for the hit new mobile game. We’ll …Best Roblox Horror Games to Play Right Now – Updated Weekly
By Adele Wilson
Our Best Roblox Horror Games guide features the scariest and most creative experiences to play right now on the platform!The BEST Roblox Games of The Week – Games You Need To Play!
By Sho Roberts
Our feature shares our pick for the Best Roblox Games of the week! With our feature, we guarantee you'll find something new to play!Type Soul Clan Rarity Guide – All Legendary And Common Clans Listed!
By Nathan Ball
Wondering what your odds of rolling a particular Clan are? Wonder no more, with my handy Type Soul Clan Rarity guide.


