Tropical Dream: Underwater Odyssey Tips Walkthrough

Check out our tips and tricks for Tropical Dream: Underwater Odyssey. GAMEPLAY SUMMARY The goal of the gameĀ  is to help Megan realize her dream of becoming a successful deep sea diving photographer and in order to do this you will be taking the pictures. You will complete 75 dives which will each require a very specific set of goals. Before each level you will be given a "goal summary screen" (see "Image A" below) listing your requirements and once you are actually in th…

By
Share this
  • Share this on Facebook
  • Share this on Twitter

a:1:i:0;a:2:s:13:”section_title”;s:39:”Tropical Dream: Underwater Odyssey Tips”;s:12:”section_body”;s:11857:”Check out our tips and tricks for Tropical Dream: Underwater Odyssey.

GAMEPLAY SUMMARY

  • The goal of the gameĀ  is to help Megan realize her dream of becoming a successful deep sea diving photographer and in order to do this you will be taking the pictures.
  • You will complete 75 dives which will each require a very specific set of goals. Before each level you will be given a "goal summary screen" (see "Image A" below) listing your requirements and once you are actually in the dive, these requirements will appear on the game screen in the top left hand corner.
  • Goals (see "Image B" below) will consist of taking pictures of specific fish in assigned groupings of 1 or more per picture and you will be required to take from 3 to 8 pictures per dive.
  • You will be timed and given a limited oxygen supply which varies per level and you must complete all listed goals before the tank runs out of oxygen. Other goals are taking a picture worth a specific point value and taking pictures to obtain a cumulative score set in advance.
  • There are also 2 mini game modes that are critical to meeting level goals. If you are unsuccessful you will be redirected to replay the level and any points earned in previous attempts are lost.

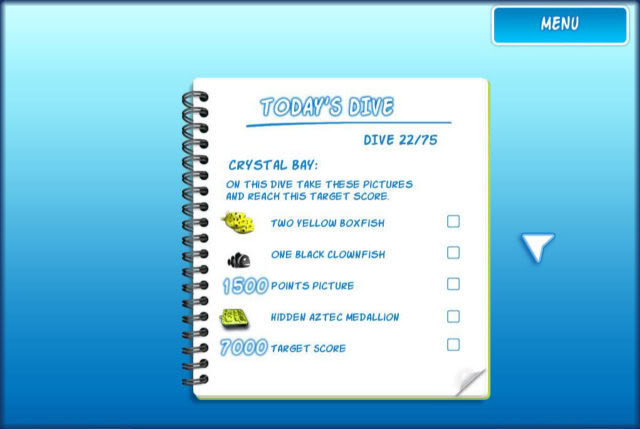
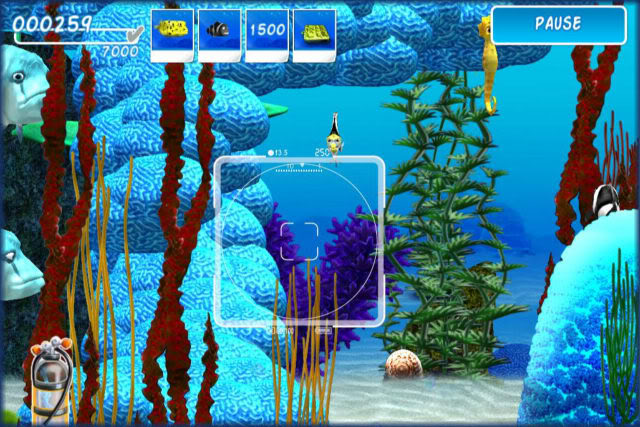
Image A. This is the "goal summary screen" shown before each level.

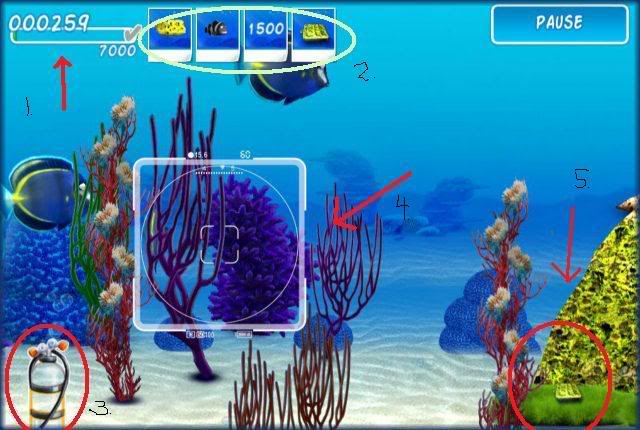
Image B. 1. Score indicator 2. Goal panel 3. Oxygen tank/timer 4. Camera view finder 5. Hidden object from level 22. "Crystal Bay"

GAME MAP INDICATORS

Note that each "dot" on the map represents a different kind of gameplay.

"Treasure Chest" – In these levels, you will be searching for one hidden antique object. This object once found is to be photographed and will lead immediately into the games match 3 mini game. On the game board you will match 3 or more of any matching symbol which will cause it to disappear and a tiny treasure chest is on the game board.Ā  As pieces are removed from the board the treasure chest drops down and you will keep matching until the chest falls out of the grid and onto the ocean floor where the item will be released to you.

"Star" – Expert challenges that have a high point score to achieve. Once this is done, it will trigger the game’s other mini game a "Memory" style "match the pair" game that varies in the amount of items on the game board. Once these items are paired it releases the fish into the ocean so they can be photographed. It is usually best to meet your point score as soon as possible in these levels because you may need the released fish in order to make your picture goal.

"?" – In these levels, you will take a picture of any type or number of fish, but you must achieve the points listed on the photograph to meet the goal. This will require the highest quality pictures with the most fish inside each frame.

"Fish" – Any fish "dot" on the game map means a new sea creature will be added to the game.

"100" – This level consists of all goals that require a picture with a point value be taken. You can photograph any combination of fish for big point combos.

TAKING HIGH QUALITY PICTURES

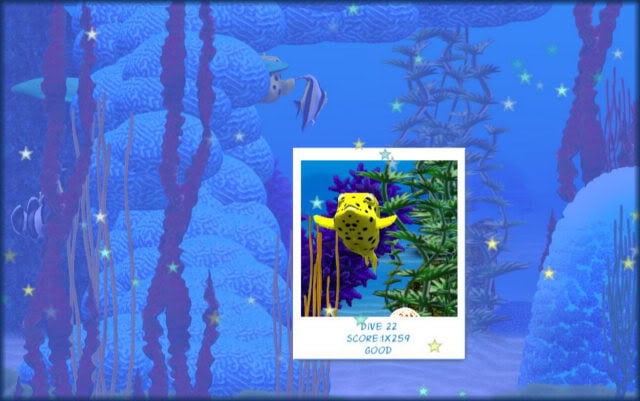
"A picture taken with advanced camera. (Note the score is at the bottom multiplied by number of fish in the image.)

  • Cameras require a recovery time of 3 to 5 seconds after taking a picture, and the less expensive the camera, the longer the recovery time will be.
  • Use the view finder guide to center images when possible as you will earn higher point values for centered images.
  • Centered face shots give the highest scores.
  • It may be better to take pictures quickly focusing on quantity versus quality in the more advanced levels.
  • Each picture shows a rating of 0 to 1000 pts and this score is multiplied by the number of fish in the picture.
  • Each picture will be rated as "Poor", "Good", "Nice","Outstanding" and "Gorgeous" and this is seen at the bottom of the picture under the awarded points. (Image D.)
  • Pay attention to the behaviors of the fish as they are introduced, it will help you anticipate where they will be and help you prioritize the order you should take your pictures.

SEA CREATURES

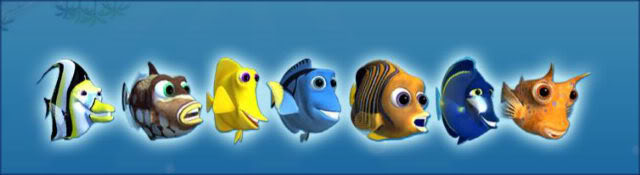
"A few of the beautiful fish in the game."

  • In the game you will encounter over 25 different sea creatures with very realistic behaviors which just like in the real Ocean make deep sea photography a challenge.
  • The key to taking a great picture is knowing how your subject behaves and anticipating behaviors.Ā  Watch and take note of behaviors that will give you an advantage in the level. For example, Seahorses are in almost every level and they are very camera shy and skittish.Ā  Very fast and tricky, they also cycle between hovering in a few spots to moving fast back and forth through the water. Watch for the hovering but don’t forget to try and photograph something else while waiting as time is critical in this game.
  • When a fish is required to be photographed and you get a shot of its face, the fish will give you a big toothy smile and you will see a green check in the bottom right corner of the picture.
  • The "Eels" are tricky as they swim straight through in one direction at all times, so watch for the eel to cycle back around as the scene is in a big loop.
  • Many of the fish hide behind coral, sea cucumbers and anemones making it impossible to take their picture. If any item is in front of the fish’s face, the score will be zero avoid pictures with obstructions and wait until the fish swim into a cleared area.
  • The photographs at the top of the screen are very small and it is very easy to mistake the fish identity and not even realize that there are two kinds of fish in the picture. Carefully study the photographs before you begin, as it will save you a lot of time.
  • Some fish swim in groups that stay close together such as the "Firefish" (Iintroduced in level 27, elongated white fish with black and red markings on the tail.) Take advantage of this behavior to gain large point scores. The closer to the center of the lens you can photograph them, the higher the score per fish. You may be able to photograph 4 to 6 Firefish in one photograph if you are fast.
  • Some fish swim in groups very quickly and it is best not to chase them all over the screen. It is better to find one area and wait for them to swim into your trap. Watch for swimming patterns.

MINI-GAME TIPS

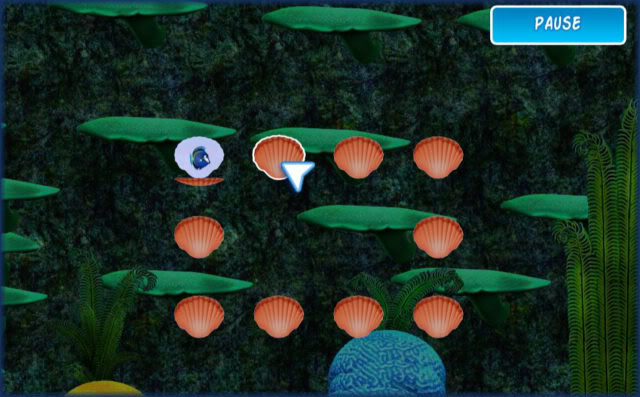
Image C. "Memory" match mini-game. (Matched pairs release fish into water to be photographed.)

Image D. Match 3 Mini-Game. (Matches release the trunk to free hidden treasure)

  • In the "Memory" match mini game (Image C.) the fish you pair up are released into the sea for you to photograph. As you progress to the more difficult levels you will need to play the mini game as soon as possible to have access to the locked away fish. If this is the case, fulfill the overall point goal first, play the mini game (timers are halted for mini games and do not effect diving time) then take the required pictures. This is the strategy that helped complete levels 40 and 65 which are especially difficult.
  • The "Match 3" Mini Game (Image D.) has a few different modes. 1. You match items to clear the way for the treasure chest to fall out of the grid and release treasure into the water. 2. You must clear the background first then clear the grid to let the treasure chest fall. This mini game is best saved until the end when all other goals are met.
  • The oxygen timer used during the dives are inactive during mini games so you can take your time. Once finished, the dive will continue where it left off.

ADDITIONAL TIPS TO REMEMBER

"Scene from level 22, "Crystal Bay" with advanced camera lens.

  • Upgrades are automatic with completion of levels and are not purchased. In the beginning of the game you have a poor quality camera that is hard to control at first. With practice it gets easier to manipulate, but you will notice a huge difference every time equipment is upgraded.
  • The night levels where the flash light is used can be frustrating due to the narrow field of vision. You can take pictures and the flash will light up the water temporarily allowing you to see where the fish are swimming. Use this to your advantage as much as possible.
  • Some fish have higher base scores than others so you may want to go after those fish first to meet the point requirements for a level. A good example would be the more elusive fish such as the "Copperbands" and "Napoleon Wrasse" which are fast and high point earners.
  • Many of the fish hide behind coral, sea cucumbers and anemones making it impossible to take their picture. If any item is in front of the fish’s face, the score will be zero.
  • Keep an eye on your goals at the top of the screen and check for multiple items in a picture as some are very hard to see.
  • Many fish go through phases of facing forward and then moving then facing backwards. When you see fish facing forward, take a few quick pictures for fast points as you should be able to center these easily.
  • Levels can be replayed at any time for an improved score.
  • To see your total score after you complete the game, click on "Scores" in the games menu as the total score is not shown anywhere else in the game only the level scores are shown.
  • Be sure to visit Megan’s shop after you finish the game by clicking on it at the bottom left of the level map. Once inside, you can see all your upgraded equipment, all discovered ancient treasures and there is a wall with the highest scoring picture you took from each level.

“;