
Best Horror Games On Itch.io – July 2026
Across a bounty of subgenres.
Grow A Garden 2 Base Price List
What's the most valuable crop?![Evomon Types Guide [Strengths, Weaknesses, Resistance]](/wp-content/uploads/2026/06/evomon-types.jpg "Evomon Types Guide [Strengths, Weaknesses, Resistance]")
Evomon Types Guide [Strengths, Weaknesses, Resistance]
Your companion guide during battles.
![[Roblox] Evomon Shiny Hunting Guide – Including Prismatic and Pris Shinies!](/wp-content/uploads/2026/06/evomon-shiny-hunting-guide.jpg "[Roblox] Evomon Shiny Hunting Guide – Including Prismatic and Pris Shinies!")
Treasure Seekers: The Time Has Come Walkthrough
Welcome to the Treasure Seekers: The Time Has Come walkthrough on Gamezebo, written by Lynne Basinet. Treasure Seekers: The Time Has Come is an Interactive, Adventure, Hidden Object game played on PC, created by Artogon Games. This walkthrough includes tips and tricks, helpful hints, and a strategy guide for how to complete Treasure Seekers: The Time Has Come.


- Prefer Gamezebo on Google


Treasure Seekers: The Time Has Come – Game Introduction
Welcome to the Treasure Seekers: The Time Has Come walkthrough on Gamezebo, written by Lynne Basinet. Treasure Seekers: The Time Has Come is an Interactive, Adventure, Hidden Object game played on PC, created by Artogon Games. This walkthrough includes tips and tricks, helpful hints, and a strategy guide for how to complete Treasure Seekers: The Time Has Come.
Copyright Information
This walkthrough was created by Lynne Basinet, for Gamezebo.com, and is protected under US and International Copyright laws. Any unauthorized use, including re-publication, in whole or in part, without permission, is strictly prohibited.
General Information
- Main Menu
- Options: Adjust the Music and Sound levels, turn Full Screen and Aspect Ratio (for Widescreen Monitors) on and off, change Difficulty Levels (Casual or Advanced) and view the Credits.
- Extras: Concept Art, Walkthrough and Wallpapers.
- Change Player: Located at the top, you may create up to 9 profiles of 18 characters each (letters only).
- Game Screens
- Menu Button: Located at the upper right, click on it to access Continue, the Main Menu, Options and Restart Level. Note that the Esc key, on your keyboard won’t work for this function.
- X-Glass: Located at the lower right, click on it and move it around the scene to reveal invisible items. If there are no items to find, it will be inactive (inside its case).
- The Ring: Located to the left of the X-Glass, once it’s available. Click on it to travel to a different time, in the current area.
- Hint Button: Located at the lower left, you can use it in general areas, to find items and receive general information, and in search scenes, to reveal a random item in the list.
- Skip Button: Located at the lower right of the Minigame/Puzzle window. Click on the “?” (Question Mark), located at the upper left corner, for the Instructions.
- Task List: Located at the bottom, between the Hint Button and the Inventory. This will show the current list of objectives you need to complete.
- Inventory: Located at the bottom of the screen, to the right of the Task List.
- Strategy Guide: Located at the upper left. You can also access it from the Main Menu, in Extras.
- There are 2 modes of play. In Casual Mode, the Hint and Skip buttons charge faster and there is a shorter amount of time before the next area/item is illuminated. In Advanced Mode, the Hint and Skip buttons charge more slowly and there are few area/item indicators during gameplay. You are free to change the Difficulty Level at any time during gameplay.
- When you start your first game, the Bonus Chapter is locked. You can access it as soon as you’ve completed the main game.
- Gameplay consists of Object Searches, finding Inventory Items, Interactive Tasks and Puzzles/Minigames. Game progression is mostly linear, although there may be an area or two that you can travel back and forth between, in addition to travelling to different times, in order to complete tasks.
- Interactive Tasks require you find the objects shown and place them in Tool Wheels.
- Cursors
- Eye Cursor: Click on the area to zoom in for a closer look.
- Hand Cursor: Click on an item to pick it up.
- Gear Cursor: Use an item from Inventory, or in a Search Scene, to activate it.
- Arrow Cursor: Click on it to change locations.
- Cube Cursor: Click on it to access a Puzzle.
- Active areas will generally highlight in blue, and the cursor will change to an Eye, a Gear, a Cube or an Arrow Cursor.
- Search List areas and some Interactive Items will be indicated by sparkles.
Gameplay and Guide Tips
- This guide assumes you’ve read the General Information, used the in-game Tutorial and/or Help features or otherwise familiarized yourself with the gameplay.
- If you choose to use Restart Level, from the Menu, you will restart at the beginning of the chapter.
- The total number of tasks, and how many remain, will be shown at the top of the Task List, for each chapter.
- Object searches are random and generally contain 2 or more interactive tasks. Only the Inventory Item will be indicated in this walkthrough; interactive items are also random, unless they net an Inventory Item. Item Lists initially contain 12 items; 6 more will be added as you find the first few items. Search Scenes contain at least 18 items, some of which are in multiples. The item list will indicate how many total items you need to find.
- To remove an Interactive Item from the Search List, click on an object to open it or find an item, click and drag it to the Interactive Area and then click again. See the following examples.

- Click on Interactive Items to open the Tool Wheel and then place the items on their corresponding circles. You may also just place the items in the center of the Tool Wheel.
- Click on the “Red X,” at the top right, of any open window (close-up or interactive area) to close it. You may also click anywhere outside the window to close it and return to the main scene. In this walkthrough, it is assumed you understand to close the open window before clicking on another area, if the window doesn’t automatically close.
- When using the X-Glass, click on the item to activate the task. Click again, if necessary, to open the Tool Wheel or to collect the item.
- When instructed to “return to the future/past/present,” click on The Ring.
- The Inventory only holds 4 items and all will be used in the current or adjacent area. [If you don’t see an item in the Inventory, use the left and right arrows to scroll through your items.]
- Make sure to scrutinize the current scene if you find there’s nothing else you can do. Often, a new area will have opened up. Move your cursor around the scene to locate it.
- The Hint Button recharges in 60 seconds in Casual Mode and 120 seconds in Advanced Mode. The Skip Button charges in 120 seconds in Casual Mode and 240 seconds in Advanced Mode.
- In this walkthrough, Inventory and Tool Wheel Items will be indicated in green, Interactive Items in yellow and Active Areas will be highlighted in blue. Additional/Alternate colors, Numbers and/or Letters will be used where necessary and for clarification.
Walkthrough
Create your profile, adjust the Settings if you like, click on Start Adventure and watch the opening movie. Note that if you didn’t change your Difficulty Level under Settings, you’ll be given an opportunity to choose one after you begin the game.
Chapter 1 – Paris, France
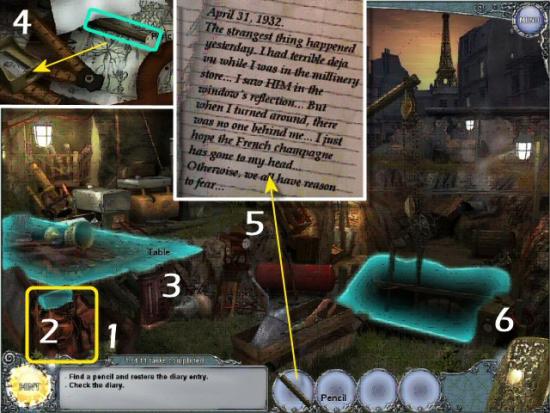
Click on Nelly’s Backpack (1) and then click on the Diary (2). Click on the Table (3), click on the Pencil and then click on the Sharpener (4). Click on the Diary, use the Pencil on the Page (5 – move your cursor over the page; there is no need to click and drag) and then enter the Excavation (6).
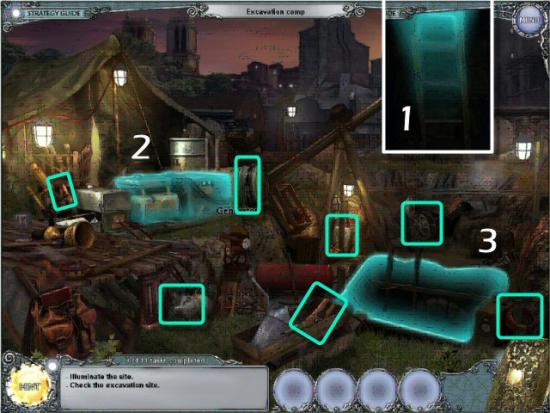
Return to the Camp (1), click on the Generator (2), find all the items, return to the Excavation (3) and then return to the Camp.
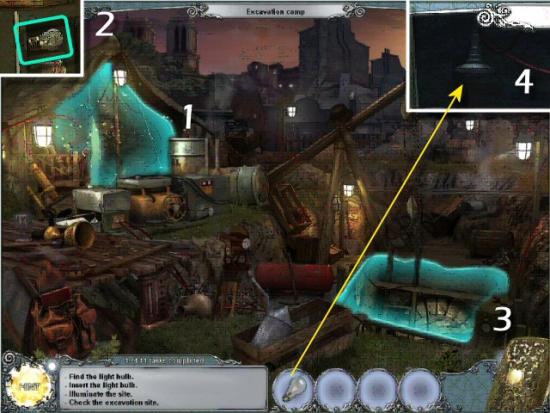
Click on the Tent (1), find all the items in the list – Inventory Item: Light Bulb (2 – located inside the safe, on the left) – return to the Excavation (3) and then use the Light Bulb in the Empty Fixture (4).
Click on the Broken Plate (1), click on the Shield (2), click on the Plastic Sheeting (3) and use the X-Glass on the Pile of Dirt (4). Find 7 of the 8 Tiles and then return to the Camp (5).
Click on the Tent, find all the items in the list – Inventory Item: Shovel (6 – located near the bottom, in the center) – and then return to the Excavation. Use the Shovel on the Pile of Dirt (click 3 times), collect the final Tile and then click on the Broken Plate, again.
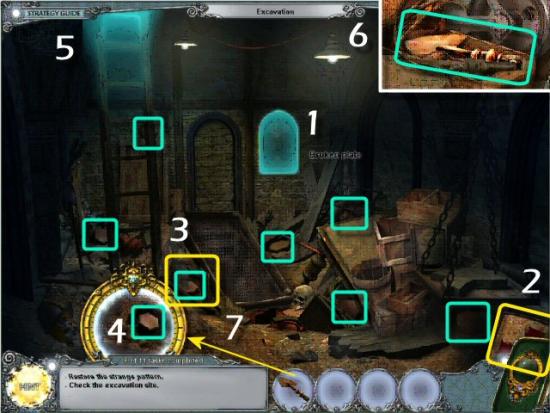
Restore the Strange Pattern: Click on a Tile and then click on another to switch their places. Note the registration markings for the Tiles that go in the 4 corners (1). Match those, first, switch the remaining 4 Tiles to solve the Puzzle (2) and collect the Ring (3).
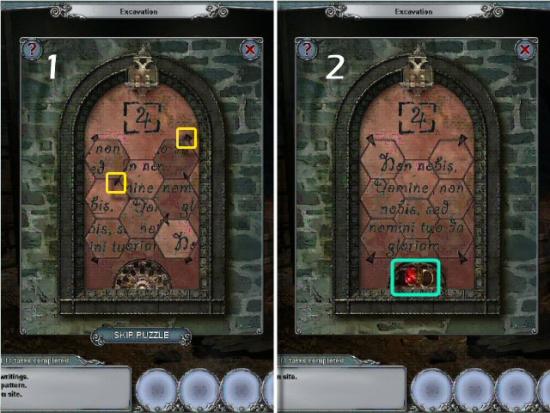
Collect the Ring (click twice) and Eyeball, click on the Drawer (1 – click twice) and collect the second Eyeball (2). Use the X-Glass to locate and collect the 2 Torn Pages (3) and then click on the Mask (4).
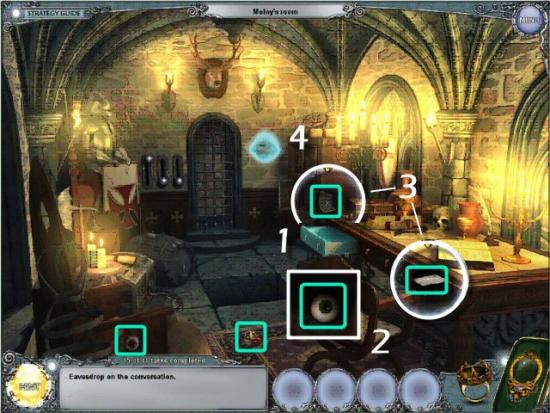
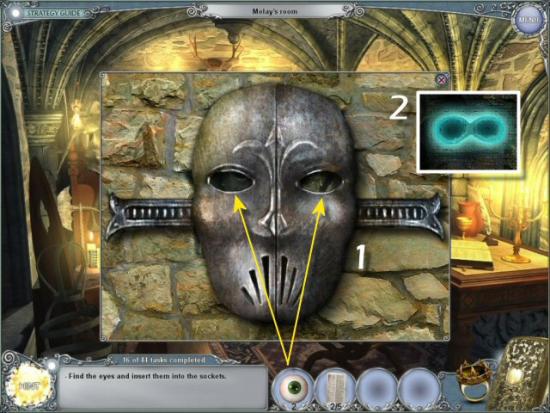
Use the Eyeballs in the Sockets (1) and then click on the Peephole (2).
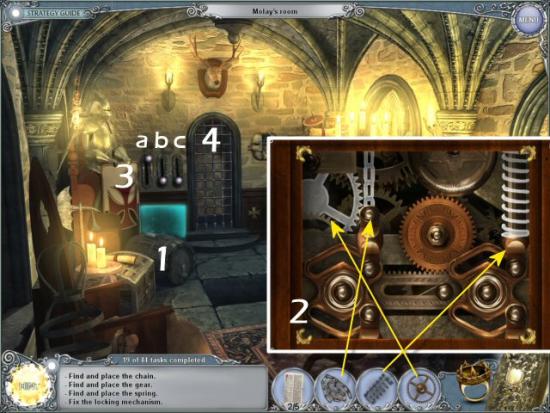
Click on the Door (1), use the X-Glass to find the Panel (2) and then click on the Panel to open it (click twice). Click on the Nut and move it into position (3). Click on the Gear (4), use the Knife to cut the Cords (5) and then collect the Gear, the Chain and the Spring.
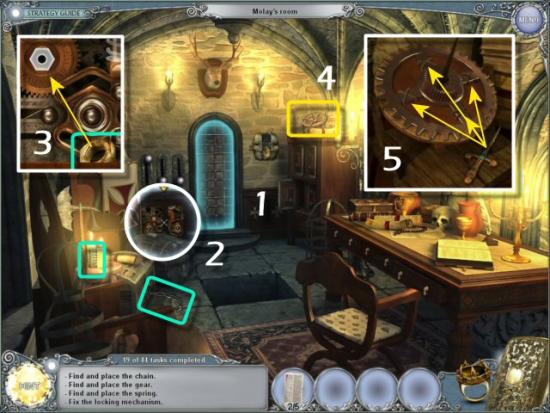
Click on the Panel (1) and use the Chain, Spring and Gear (2). Click on the Levers (3) to open the Door (4). The solution is to click on the Levers in order: a, b and c. Go through the Door.
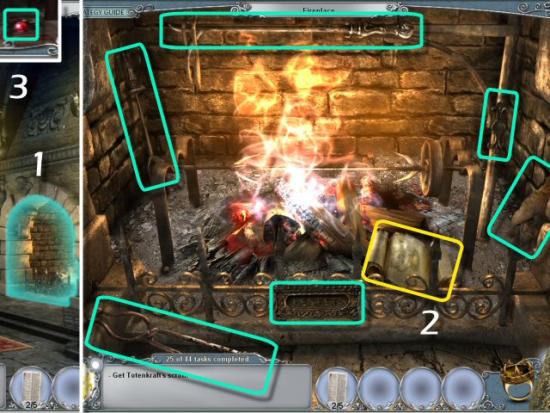
Click on the Fireplace (1), click on the Scroll (2), find all the items and then collect the Gem (3 – located on the floor, at the lower left. Click twice).
Click on the Winch (1) and find all the items. Click on the Plastic (2) and Fountain (3) for two of the items.

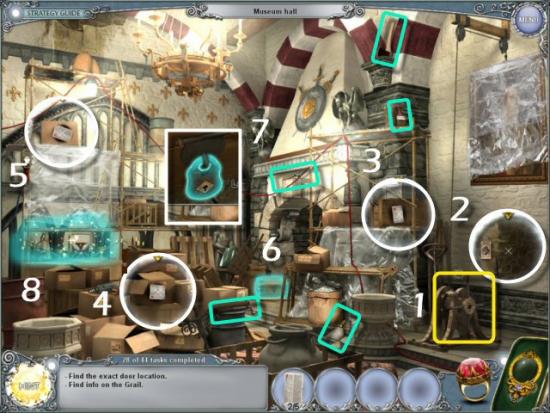
Click on the Winch Handle (1), use the X-Glass to find the Door (2), click on the Secret Door and find all the items. Use the X-Glass and find the remaining Torn Pages (3, 4 and 5). Don’t bother clicking on all the boxes; they’re all empty. Click on the Chest (6), click on the Lock (7) and then click on Niche (8).
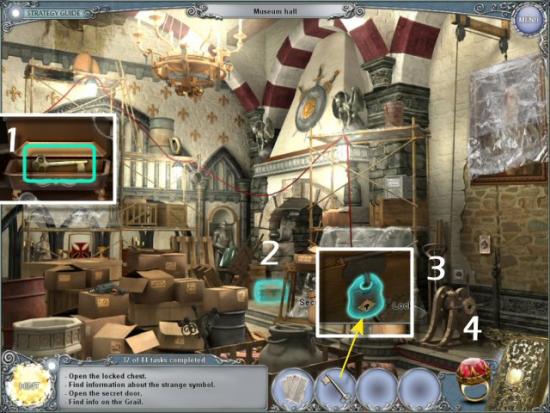
Find all the items in the list – Inventory Item: Key (1 – located in the center of the table; click on the box to open it) – click on the Chest (2), use the Key in the Lock (3) and then click on The Ring (4).
Click on the Shield Display (1) and rearrange the order to match the images etched on the left and right (2). Click on one Shield and then another to switch their places. The shape of the Shield, and the design on it, must match the images etched into the wall. Click on the Box (3) and then return to the [Past].
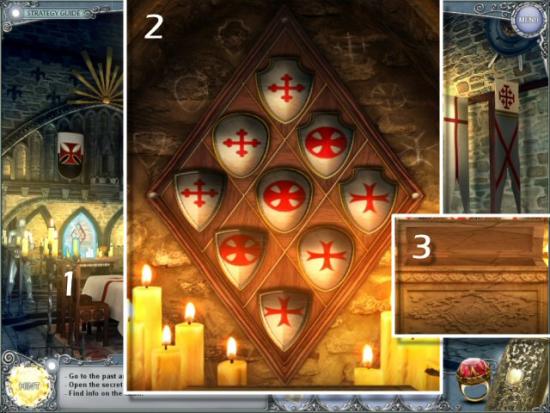
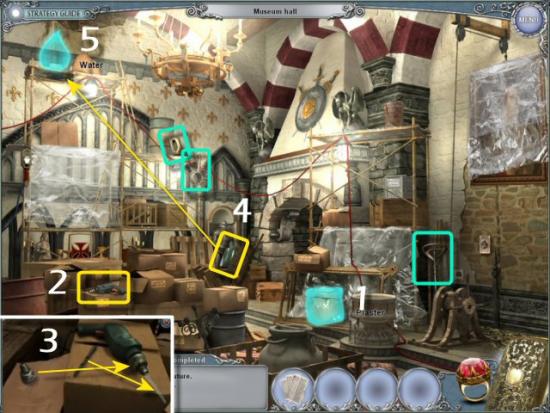
Click on the Plaster (1) and find 3 of the 5 items. Click on the Drill (2), place the parts in the correct locations (3) and then add it to the Tool Wheel. Click on the Jug (4), use it on the Water (5), add it to the Tool Wheel and then return to the Future.
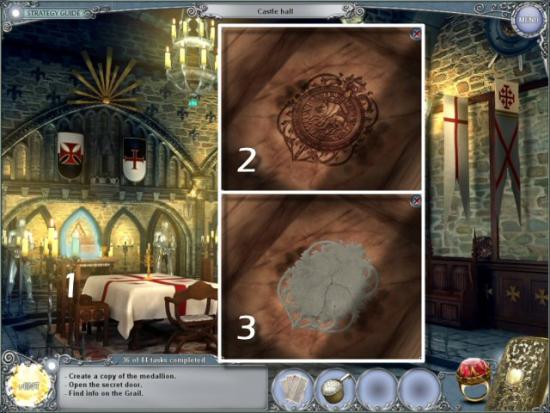
Click on the Box (1), use the Plaster in the Mold (2), collect the Medallion (3) and then return to the [Past].
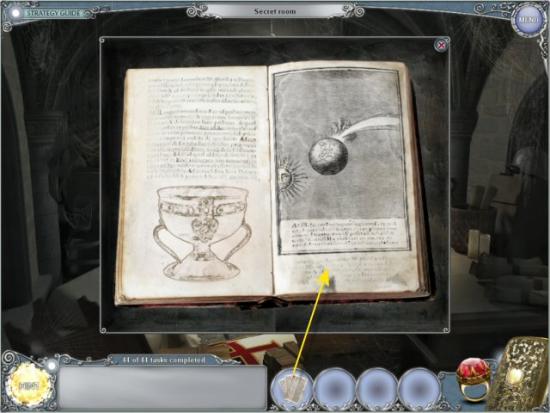
Click on the Strange Glyph (1), use the Medallion (2) and then enter the Secret Room (3). Return to the Museum Hall (4), collect the Lamp (5), return to the Secret Room and then use the Lamp on the Hook (6).
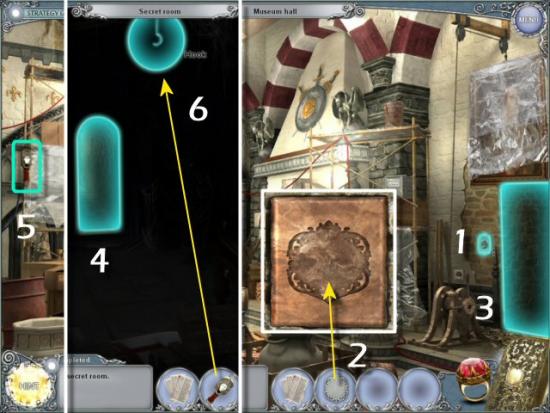
Return to the Museum Hall (1), click on the Plug (2) and use it on the Wall Socket (3). Return to the Secret Room (4) and then return to the Museum Hall, again (5). Click on the Niche (6), find all the items in the list – Inventory Item: Broom (7 – located on the left side of the table) – and then return to the Secret Room.
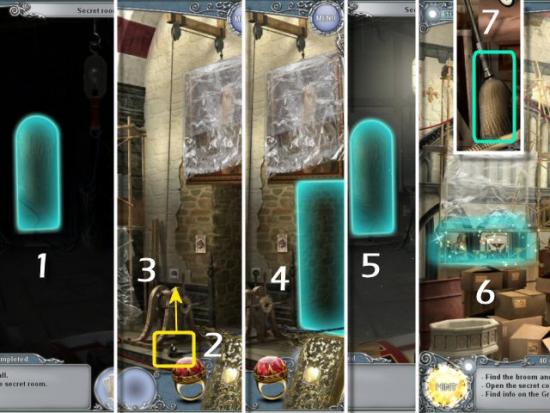
Use the Broom to clear the Dust (1 – click on the Broom and move your cursor around until the Broom disappears), return to the Past and click on the Drawer (2 – click twice). Collect the Knife (3), click on the Open Compartment (4), use the Knife to collect 3 Buttons (5) and then return to the Future.
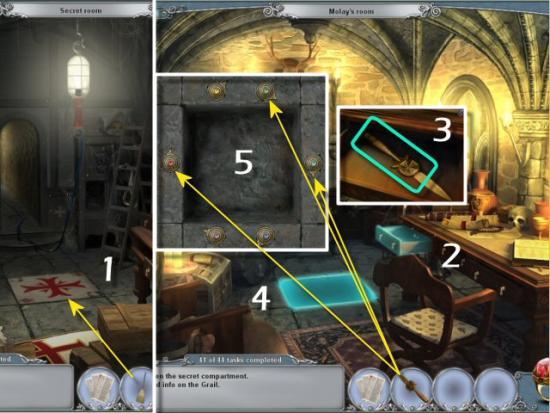
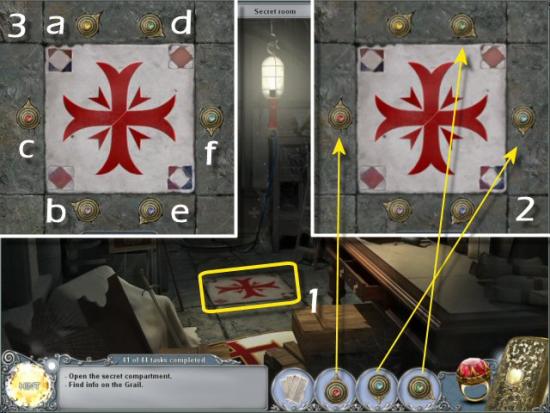
Click on the Compartment (1) and use the Buttons in the Empty Spaces (2). Press the Buttons in the correct sequence to open the Compartment. If you press a Button out of sequence, it will reset and you’ll have to start over. Keep track of the Buttons you’ve pressed, that were correct, to make it easier to complete. The solution (3) is to click as shown in the image – a, b, c, d, e and f. Note that the solution is the same, each time you play.
Click on the Panel (1) and find all the items.
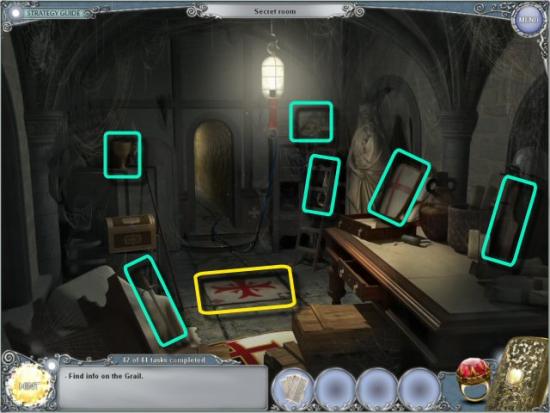
Click on the Panel again and use the Torn Pages in the Book.
Chapter 2 – Jerusalem
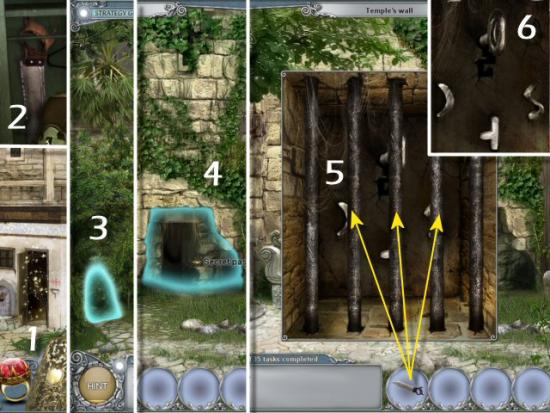
Collect the Rake and the Broom, click on the Plaque (1) and use the Broom to clear away the dust (2 – click on the Broom and move your cursor around until the Broom disappears). Click on the Door (3) and enter the Date from the Plaque (4). Click on the Door again, find all the items in the list – Inventory Item: Glue (5 – located at the left, on the desk) – and then continue to the Temple Wall (6).
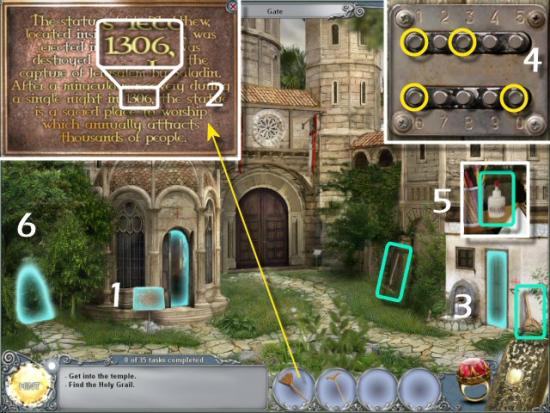
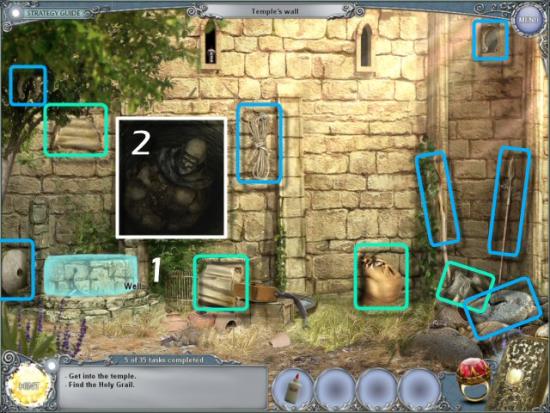
Use the Rake on the Leaves (1 – click 5 times), click on the Spear (2) and use the Spear on the Stones (3 – click 10 times; 2 times on each of the 5 Stones). Click on the Secret Passage (4) and then return to the Past.

Collect the Bag of Straw, and 3 of 4 Statue Parts, click on the Well (1) and click on the last Statue Part (2). Click on the Well a second time, find all the items (blue), click on the Well a third time and collect the last Statue Part.
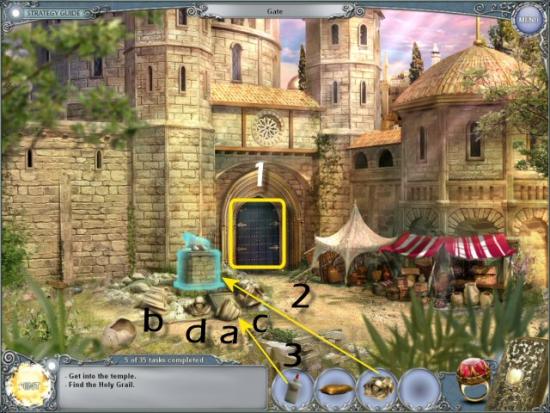
Return to the Gate (click back), click on the Gate (1), use the Statue Parts on the Statue Base (2), and then use the Glue on any one of the 4 Statue Parts (3). Reassemble the Statue. Click on a Statue Part and then click on the Statue Base. You must assemble the Statue in the correct order: a, b, c and then d. When complete, return to the Future.
Enter the Chapel (1), click on the Book (2 – click 3 times), use the Bag of Straw on the Floor (3), click on the Book again, collect it from the Bag of Straw and then return to the Past. Use the Book on the Statue (4) and return to the Wall (5). Click on the Secret Passage (6) and then return to the Future.
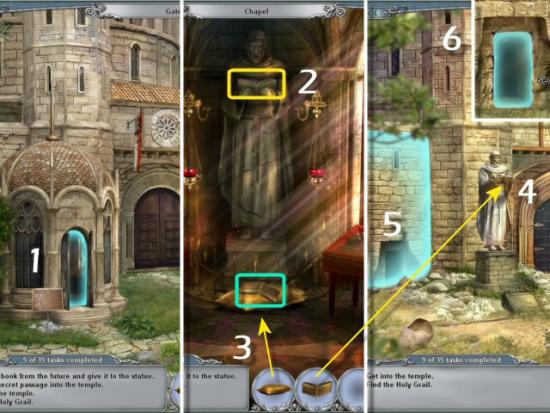
Return to the Gate (click back), click on the Door (1) and find all the items in the list – Inventory Item: Saw (2 – located on the left, inside the locker). Return to the Wall (3) and click on the Secret Passage (4). Use the Saw in the center of the 3 middle Bars (5 – click on each Bar), collect the 4 Strange Keys (6) and then return to the Past.
Click on the Secret Passage (1), use the Keys in the Locks (2) and enter the Temple (3).

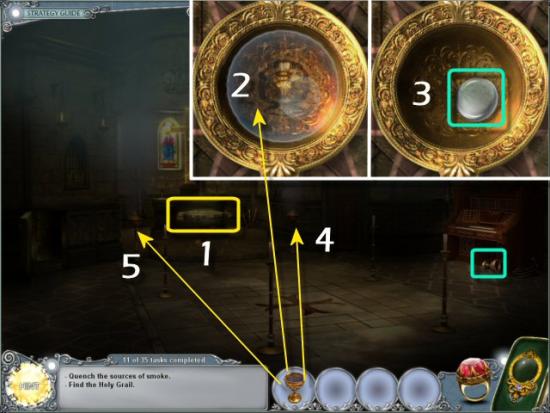
Collect the Goblet and click on the Brazen Bowl (1). Use the Goblet in the Water (2), collect the Lens (3) and then use the Goblet of Water on the 2 Censers (4 and 5).
Click on the Door (1) and use the X-Glass to find the Key (2) and collect the Eye of Omniscience (3). Return to the Future, use the X-Glass to collect 2 more Eyes of Omniscience and locate the Key again (4). Return to the Past and then return to the Wall (5).
Return to the Gate (click back), click on the Tent (1) and find all the items in the list – Inventory Item: Lion Head (2 – located inside the basket on the right). Return to the Temple (3 and 4) and then return to the Future.
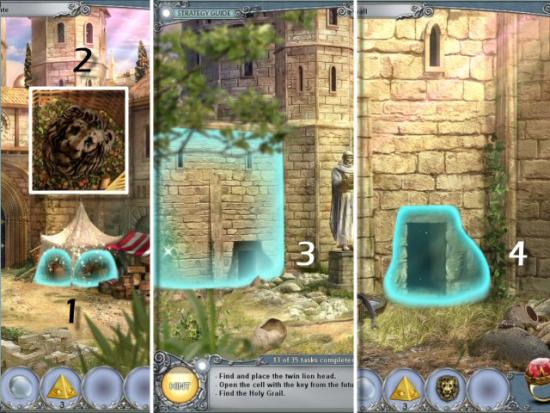
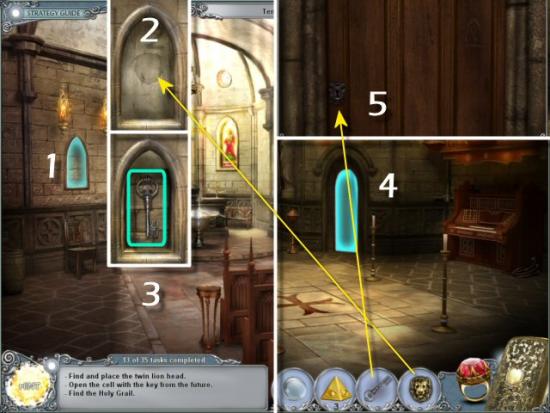
Click on the Niche (1), use the Lion Head on the Wall (2), collect the Key (3) and then return to the Past. Click on the Door (4), use the Key in the Lock (5) and then enter the Cell.
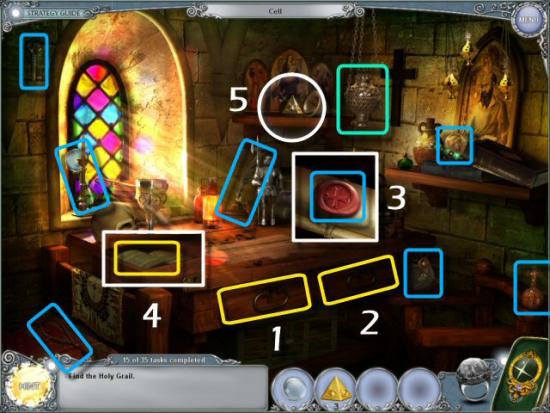
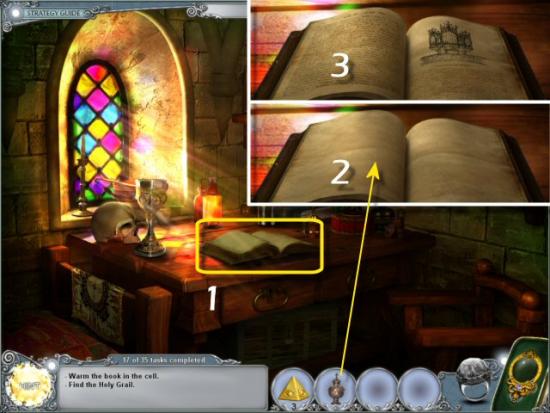
Collect the Censer, click on the Left Drawer (1) and find 7 of the 8 items (blue), click on the Right Drawer (2 – click twice) and collect the final item (3). Click on the Left Drawer again, click on the Book (4 – click twice; click the second time, after it opens on the Desk), use the X-Glass to collect the Eye of Omniscience and then return to the Temple Wall (click back and then left).
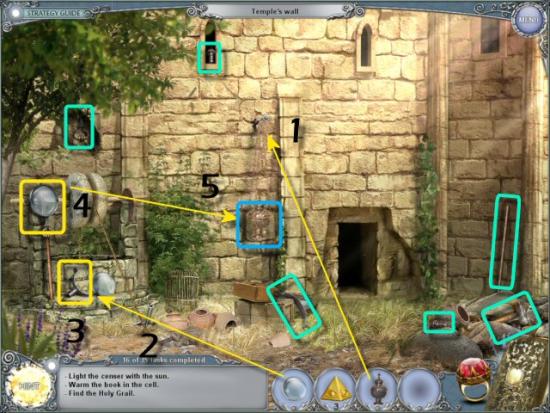
Use the Censer on the Hook (1), use the Lens on the Lens Frame (2), click on it (3) and then find all the items. Click on the Lens (4), hold it over the Censer (5) until it lights and then collect the Burning Censer (blue). Return to the Cell (click forward and then right).
Click on the Book (1), use the Censer on the Book (2) to reveal the Pages (3) and then return to the Gate (click back, left and then back).
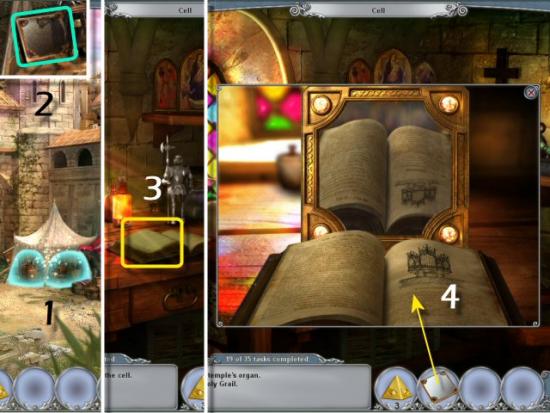
Click on the Tent (1), find all the items in the list – Inventory Item: Mirror (2 – located on the top, left shelf; click to open the cover) – and then return to the Cell (click left, forward and then right). Click on the Book (3) and use the Mirror on the Page (4).
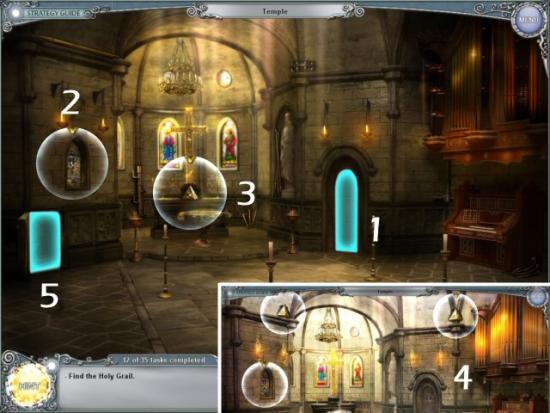
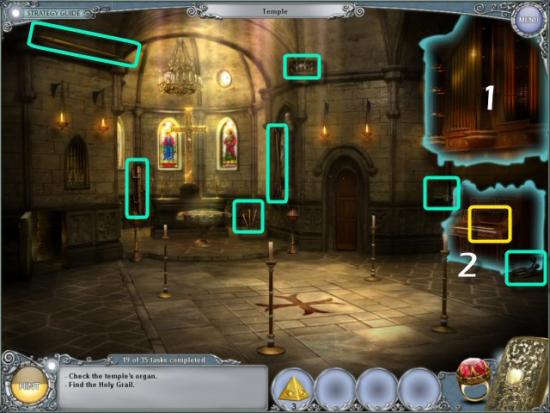
Return to the Temple (click back once), click on the Organ (1), find all the items, click on the Keyboard (2) and then return to the Future.
Click on the Console Table (1), find all the items, collect the Pipe Set (2) and then return to the Past.
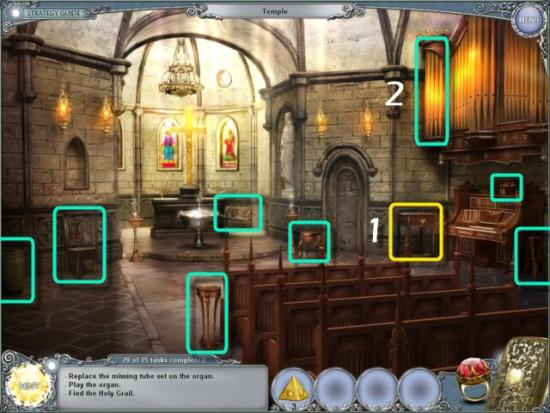
Use the Pipe Set on the Organ (1), click on the Keyboard (2), return to the Gate (click left and then back) and then return to the Future. Enter the Chapel (3) and click on the Glass Case (4).
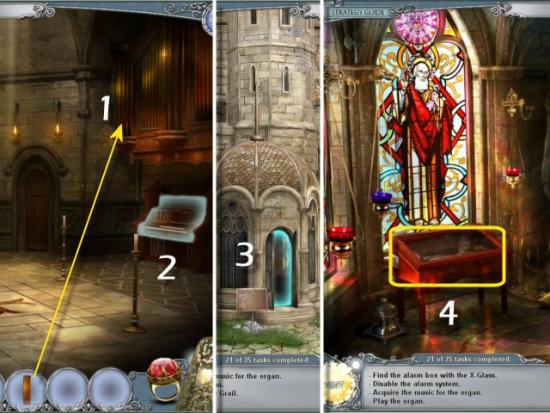
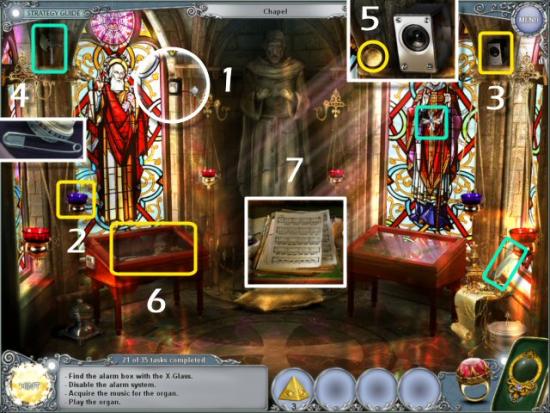
Use the X-Glass and trace the Alarm Path to the Control Box (1). Click on the Brick (the Brick will highlight after you remove the X-Glass), find 3 of the 5 items, click on the Lamp (2) and the Speaker (3) for the remaining 2 items (4 and 5 – click on the Coin and use it on the 4 Screws, click on the Front Panel and then collect the Speaker). Click on the Open Case (6), collect the Sheet Music (7).
Return to the Wall (click left), return to the Past, enter the Temple (click forward) and click on the Keyboard. Use the Sheet Music on the Music Stand (1). There are 2 sets of Organ Stops: alpha (1) on the Left and beta (2) on the Right. Each set has 6 Stops, numbered I through VI. Each line on the Music Sheet references which set of Stops (alpha or beta) to use, and which Stop to pull. To solve, click on the correct Stop and then play the Keys shown on the line of Music.
If you play an incorrect note, only that line of music will reset. Note that the solution is always the same. The solution is:
Line | Stop Set | Stop | Keys |
a | alpha (1) | V | 11, 8 |
b | beta (2) | II | 3, 18, 15 |
c | alpha (1) | I | 11, 5, 20, 13, 19 |
d | alpha (1) | VI | 3, 11, 20, 15, 16 |

Enter the Secret Room, place the Columns on the Empty Spaces (1 and 2), use the Eyes of Omniscience on the Pedestals (3). Click on the Skull (4), collect the Gem (5), collect the Bottle and Sugar Cubes and then click on the Casket (6).
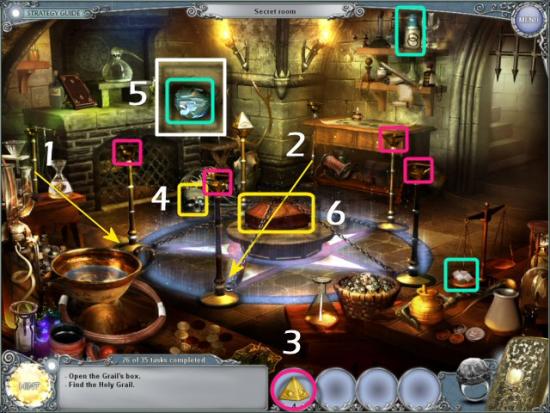
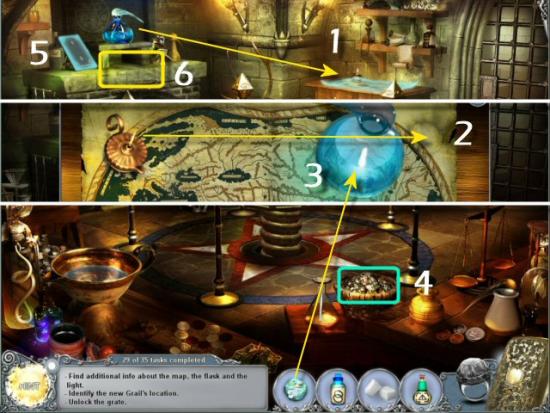
Click on the Open Casket (1), click on the Flask (2), find all the items and then collect the Bottle (3 – hidden behind the Spool).
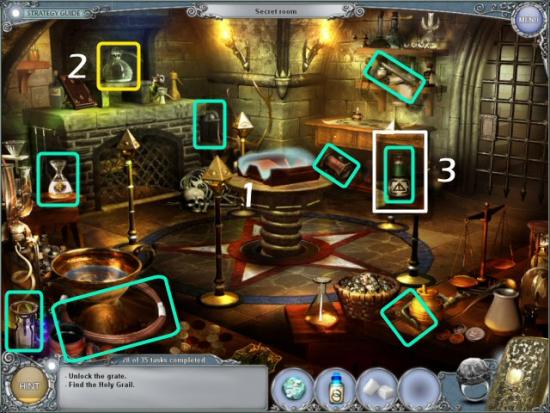
Click and drag the Blue Flask to the Map (1), click and drag the Candle to the Right Side of the Map (2) and use the Gem in the Flask (3). Collect the Coal (4), click on the Book (5) and then click on the Workbench (6).
Mouseover the Book (1) for a closer look at the Directions. Use the Crucible on the Stand (2), use the Sugar in the Crucible (3), use the Coal under the Stand (4) and collect the Candle (5). Click back, use the Candle on one of the Torches (6) and then click on the Workbench again. Use the Lit Candle on the Coal (7), click on the Bellows and then use it on the Flames (8).
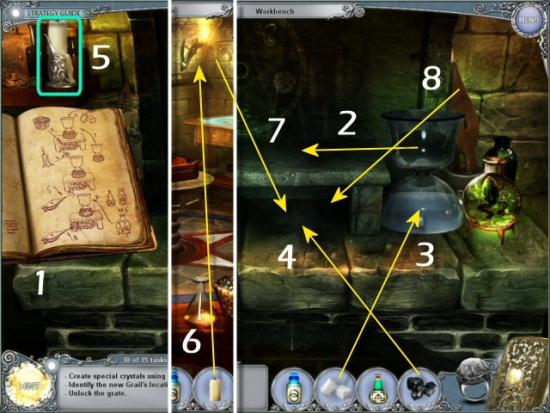
Use the Bottles on the Flask (1), use the Flask on the Crucible (2) and use the Bellows on the Flames (3). Collect the Crystals (4 – they’ll turn green), exit Workbench (click back) and then click on the Map (5).

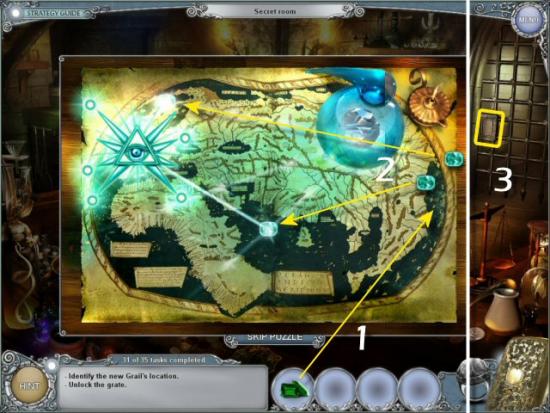
Use the Crystals on the Map (1), click on each Crystal and then place them so the light beams meet (2) and then click on the Door Lock (3).
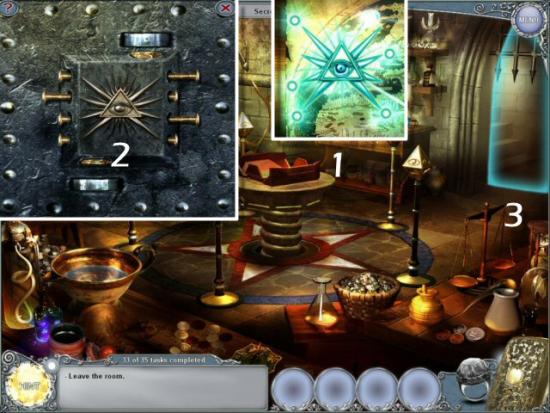
Using the Image revealed on the Map (1), click on the Buttons to open the Gate (2) and then exit (3).
Chapter 3 – Scotland
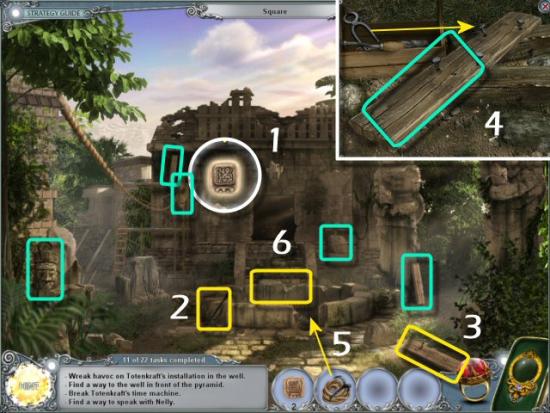
Click on the Monk (1), enter the Graveyard (2), collect the Sickle and use it on the Branches (3 – click 6 times).

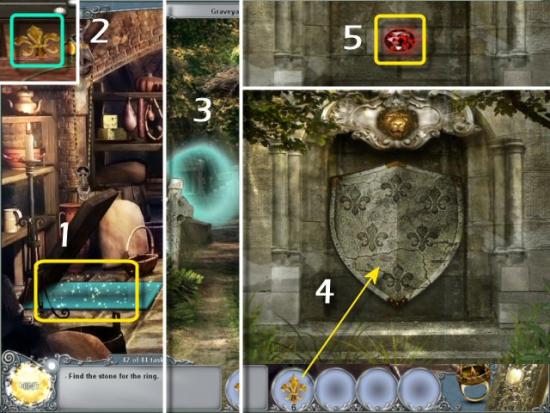
Use the X-Glass to collect the 2 Fleur de Lis (1 and 2) and find the Parchment (3). Click on the Base (after you remove the X-Glass), click on the Stone, use it on the Base (4 – click 4 times) and then click on the Panel (5).
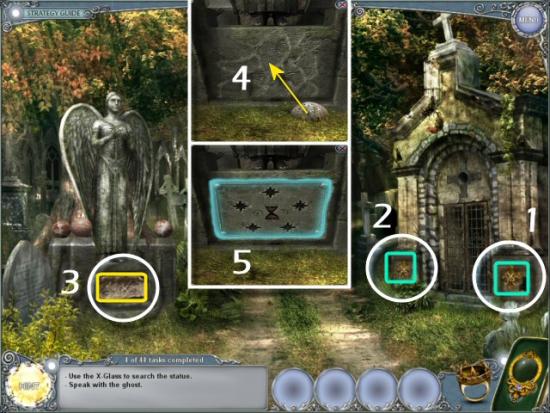
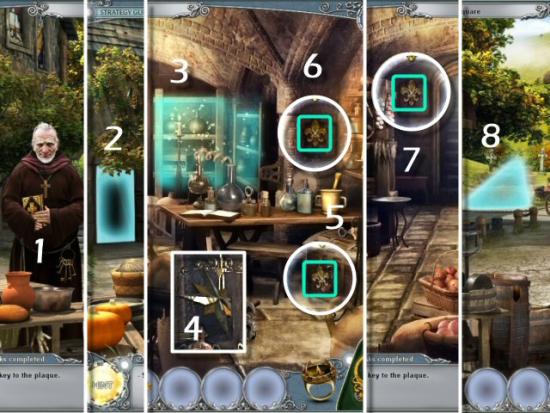
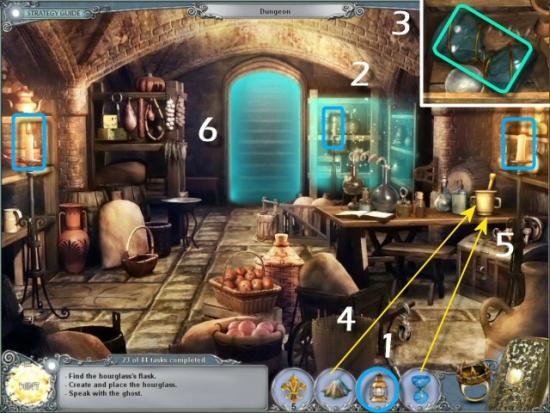
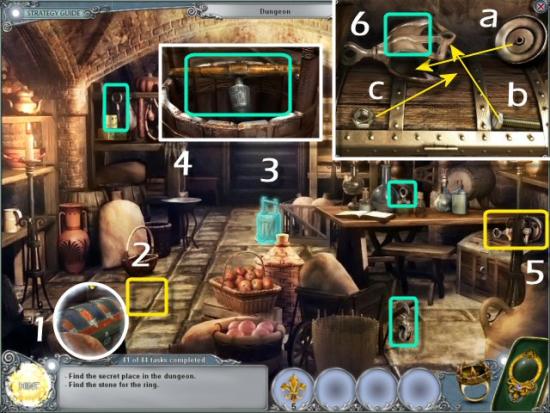
Return to the Square (click back once), click on the Monk (1) and then enter the Dungeon (2). Click on the Shelves (3) and find all the items in the list – Inventory Item: Wind Rose (4 – located at left). Use the X-Glass to collect the 3 Fleur De Lis (5, 6 and 7), return to the Square (click forward) and then return to the Graveyard (8).
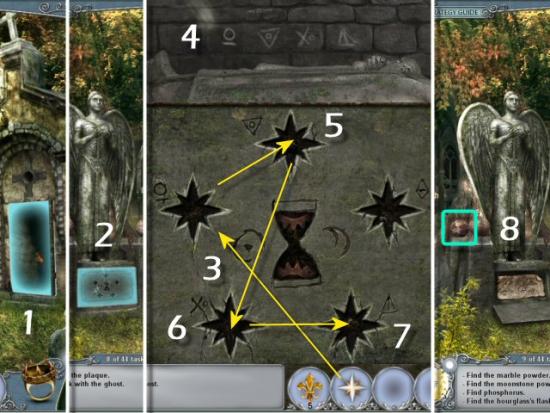
Click on the Crypt (1) and then click on the Base of the Statue (2). Use the Wind Rose, placing it first in Slot 1 (3), according to the Symbols in the Crypt (4). Click on the Wind Rose and move it to the other 3 Slots (5, 6 and 7) in the order shown in the Symbols. Collect the Marble Globe (8) and then return to the Square (click back).
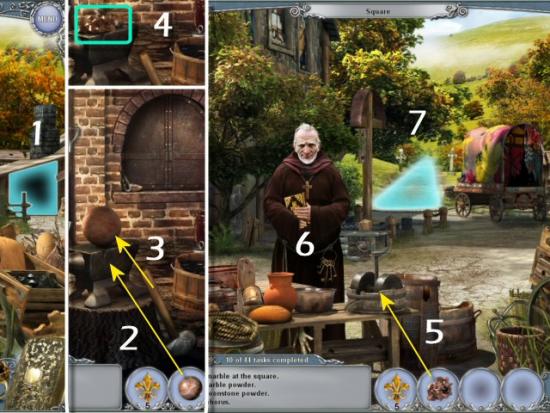
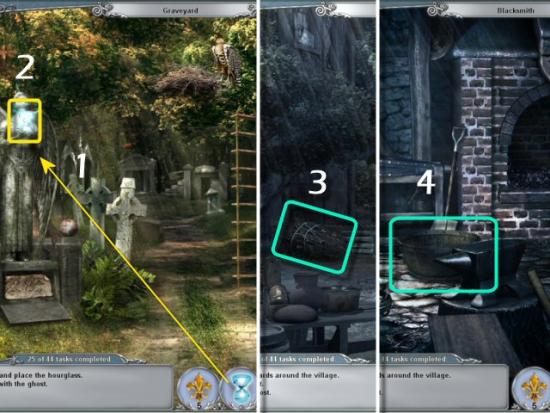
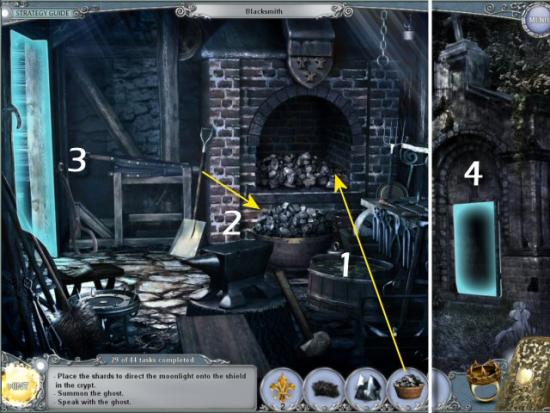
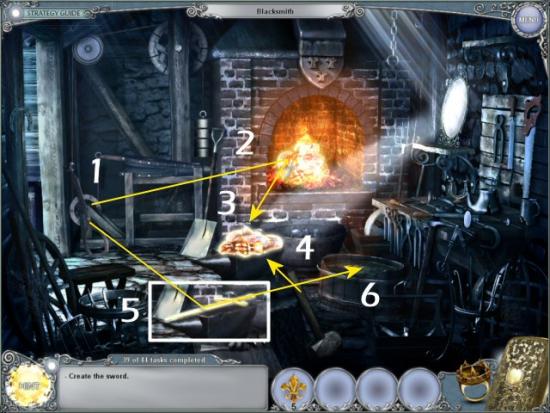
Enter the Blacksmith’s (1), use the Marble Globe on the Anvil (2), use the Hammer on the Globe (3 – click 3 times), collect the Marble Fragments (4) and then return to the Square (click left). Use the Marble Fragments in the Handmill (5), click on the Monk (6) and then return to the Graveyard (7).
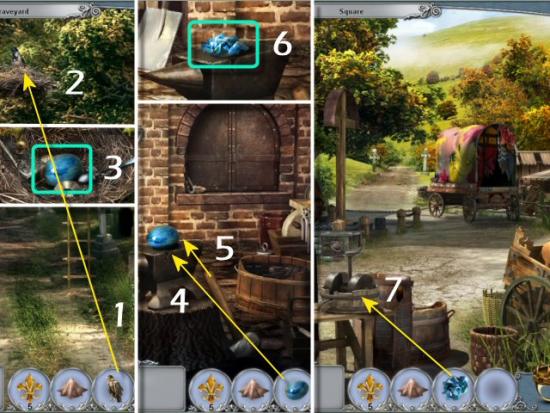
Click on the Nest (1), return to the Square (click back), click on the Rope (2) and find 6 of the 7 items. Click on the Tree (3), use the Nail Puller on the 3 Nails and collect the last item (4). Collect the Rope Ladder (5) and return to the Graveyard (6).
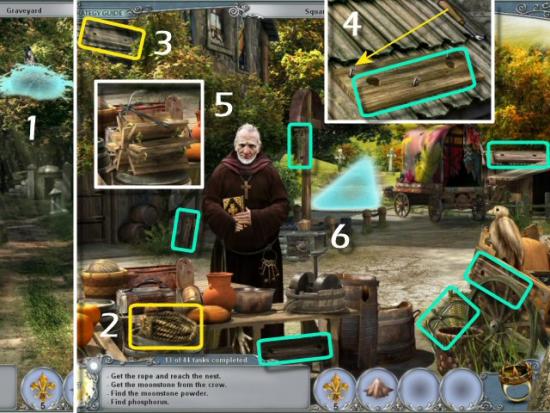
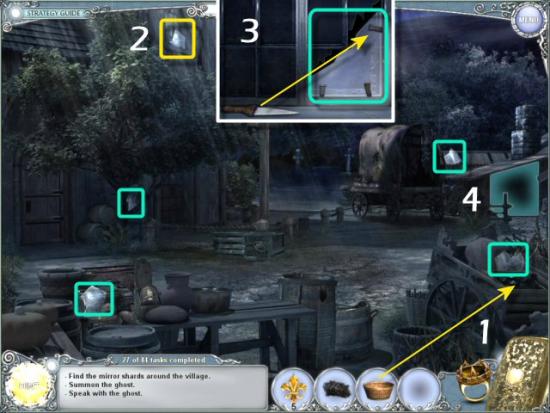
Use the Rope Ladder on the Nest, click on the Nest and then return to the Square (click back). Click on the Wooden Hawk (1) and find 4 of the 5 items. Click on the Tree (2), use the 3 Feathers and collect the Feather (3). Click on the Wagon (4), find all the items in the list – Inventory Item: Hunter’s Whistle (5 – located on the left, inside the upper cabinet) – use it on the Stuffed Hawk (6) and then return to the Graveyard (7).
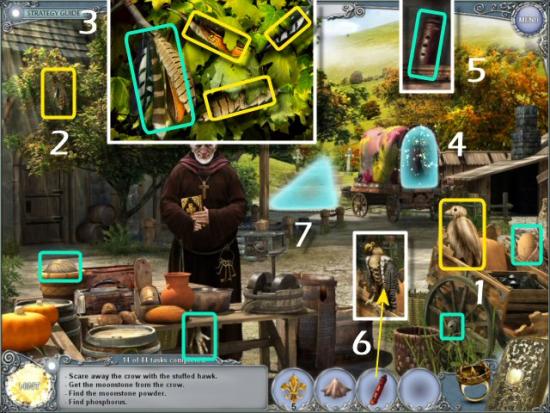
Use the Stuffed Hawk on the Crow (1), click on the Nest (2), collect the Moonstone (3) and then return to the Blacksmith’s (click back and then right). Use the Moonstone on the Anvil (4), use the Hammer on the Moonstone (5 – click 3 times), collect the Moonstone Fragments (6) and return to the Square (click back). Use the Moonstone Fragments on the Handmill (7) and then return to the Dungeon (click left).
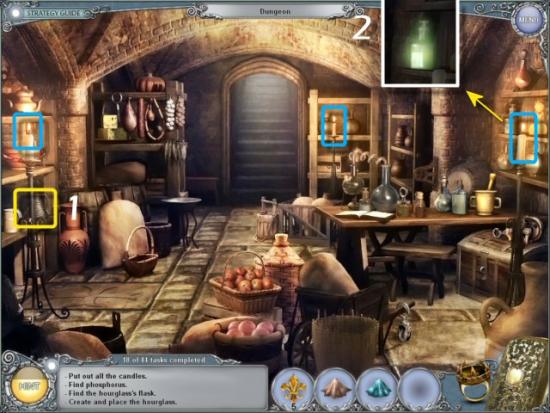
Click on the Candle Snuffer (1) and use it on the 3 Candles (blue – click on each Candle). Collect the Phosphorus (2), return to the Square (click forward), click on the Monk and then return to the Blacksmith’s (click right).
Click on the Lamp (1), find 4 of the 5 items, click on the Toolbox (2), collect the last item (3), collect the Lamp and return to the Square (4).
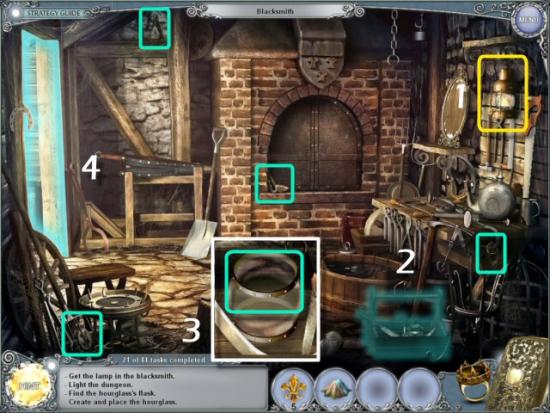
Return to the Dungeon (click right), use the Lamp (1) on the 3 Candles (blue – click on each one), click on the Shelves (2) and find all the items in the list – Inventory Item: Flask (3 – located at the lower left, inside the crate). Use the Powder Mix on the Mortar and Pestle (4), use the Flask on the Mortar and Pestle (5) and then return to the Square (6).
Return to the Graveyard (click forward), use the Hourglass on the Statue (1), click on the Hourglass and return to the Square (click back). Collect the Brushwood (2), enter the Blacksmith’s (click right), collect the Coal Basket (3) and return to the Square (click left).
Use the Coal Basket on the Coal (1), click on the Window (2), use the Knife on the 3 Clips and collect the Mirror Shard (3), collect the remaining 4 Mirror Shards and return to the Blacksmith’s (4).
Use the Basket of Coal on the Floor (1), click on the Shovel and use it on the Basket (2 – click 3 times). Return to the Square (3), continue to the Graveyard (click forward) and then click on the Crypt (4).
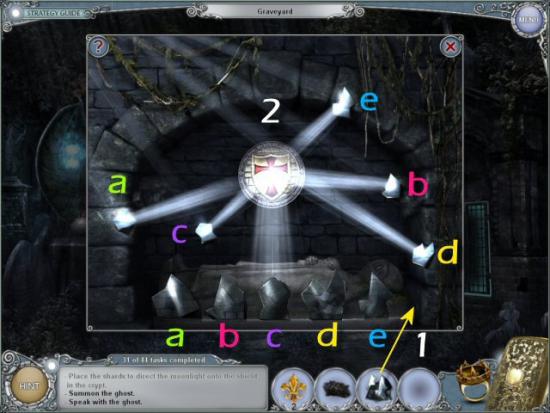
Use the Mirror Shards on the Tomb (1) and then place the Shards so that the Moonlight is reflected onto the Shield (2). Place the Shards (a, b, c, d and e) according to the screenshot.
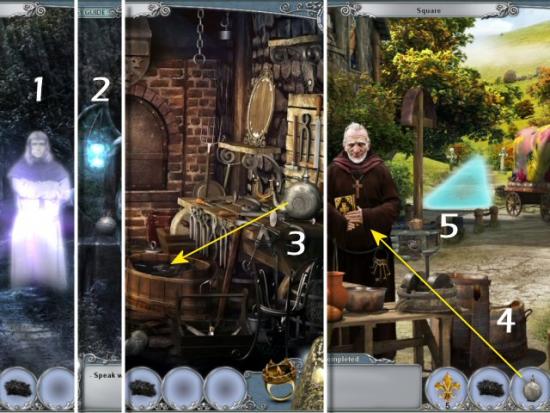
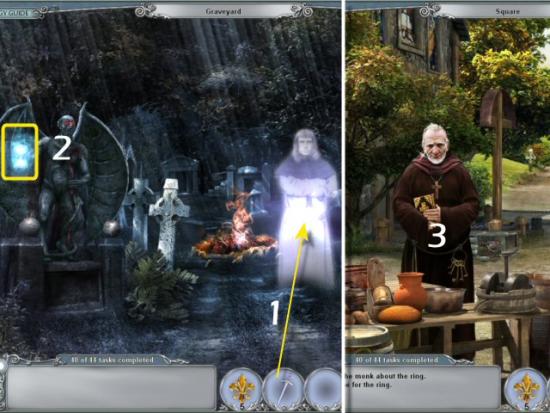
Click on the Ghost (1), click on the Hourglass (2) and return to the Blacksmith’s (click back and then right). Use the Flask on the Barrel (3), return to the Square (click left), use the Flask of Water on the Monk (4) and then return to the Graveyard (5).
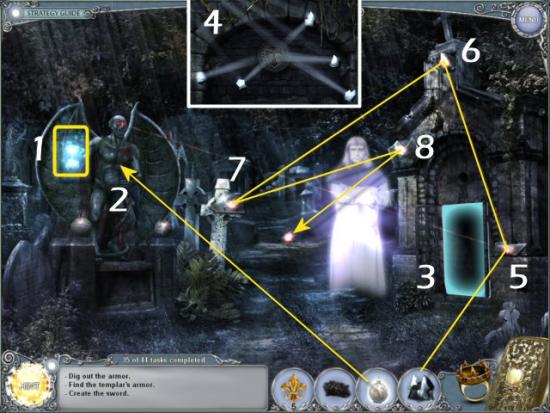
Click on the Hourglass (1), use the Holy Water on the Devil Statue (2), click on the Crypt (3) and collect the 5 Mirror Shards (4). Place the Mirror Shards, beginning with the Spot revealed by the Devil Statue’s Eyes (5). As you place a Mirror Shard, the next Spot will illuminate 6, 7 and 8). Click on the Hourglass, again, and then return to the Square (click back).
Click on the Wagon (1), find all the items in the list – Inventory Item: Mattock (2 – located at the bottom, to the right of the lower cabinet) – return to the Graveyard (click forward) and click on the Hourglass (3). Use the Mattock on the Dirt (4), click on the Hole (5) and collect the Armor (6). Use the Brushwood on the Hole (7) and then return to the Blacksmith’s (click back and then right).
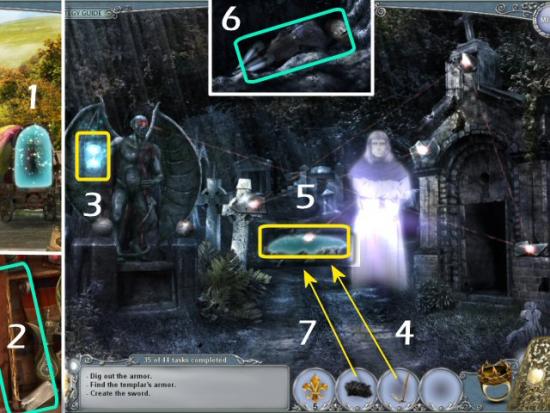
Use the Burning Branch in the Forge (1), use the X-Glass to find the Blockage (2), collect the Brush and then return to the Square (click left). Click on the Chimney (3), use the Brush (4) and then return to the Blacksmith’s (5).
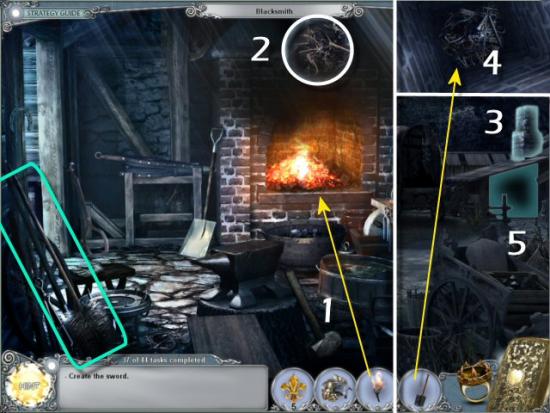
Use the Armor in the Forge (1), click on the Bellows (2) and find 6 of 7 items. Click on the Wheel (3), use the Scissors on the Ropes (click on each Rope) and collect the last item (4). Click on the Anvil (5) and find 3 of 4 items (blue). Click on the Toolbox (6), collect the last item (7) and then return to the Graveyard (click left and then forward).
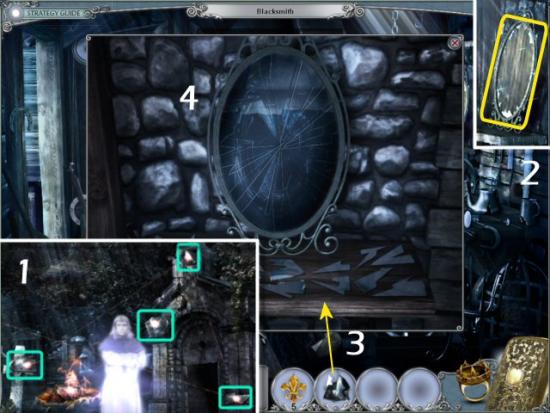
Collect 4 Mirror Shards (1), return to the Blacksmith’s (click back and then right), click on the Broken Mirror (2) and use the Mirror Shards (3). Reassemble the Broken Mirror. Click on a piece, drag it to the Frame and click to place it. You don’t need to rotate any pieces and the solution is always the same.
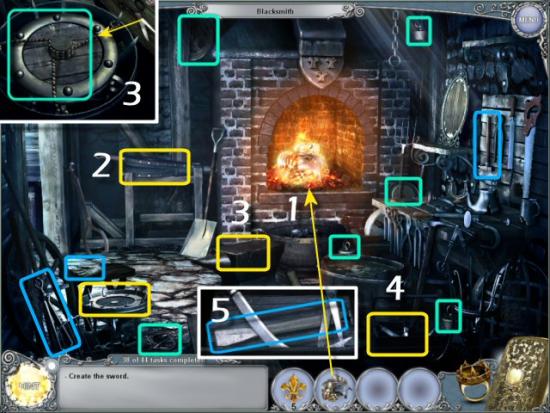
Click on the Tongs (1), use them in the Forge (2) and then on the Anvil (3). Use the Hammer on the Molten Armor (4 – click twice), use the Tongs on the Molten Sword (5) and then on the Barrel of Water (6). Return to the Graveyard (click left and then forward).
Use the Sword on the Ghost (1), click on the Hourglass (2), and return to the Square (click back). Click on the Monk (3) and return to the Dungeon (click left).
Use the X-Glass to locate the Secret Compartment (1), click on the Panel (2) and find 3 of the 5 items. Click on the Bucket (3) and collect the fourth item (4). Click on the Chest (5), assemble (in the order shown) and collect the last item (6).
Click on the Open Compartment (1) and find all the items in the list – Inventory Item: Fleur De Lis (2 – “Lily” located at the bottom right, in the right drawer ). Return to the Graveyard (click forward twice) and continue to the Mausoleum (3). Use the Fleur De Lis (4 – click 6 times) and collect the Gem (5).
Chapter 4 – Yucatan, Mexico
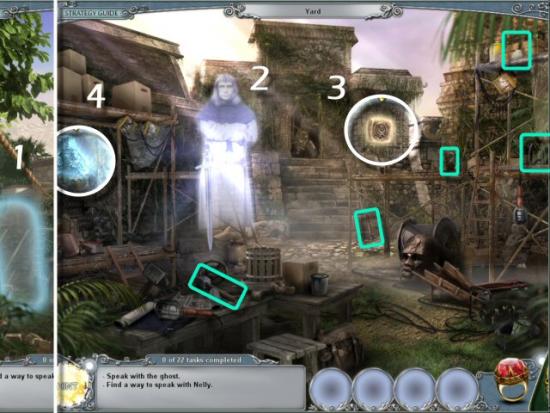
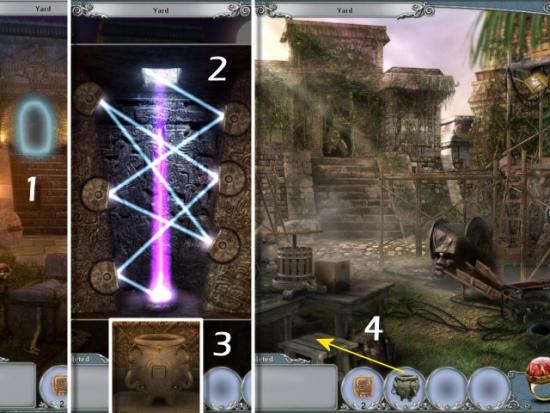
Enter the Yard (1 – on the left), click on the Ghost (2), use the X-Glass to collect the Tile (3) and locate the Idol (4). Click on the Bricks (after you remove the X-Glass), find all the items, click on the Door (the Door will be revealed once you find all the items) and then return to the Past.
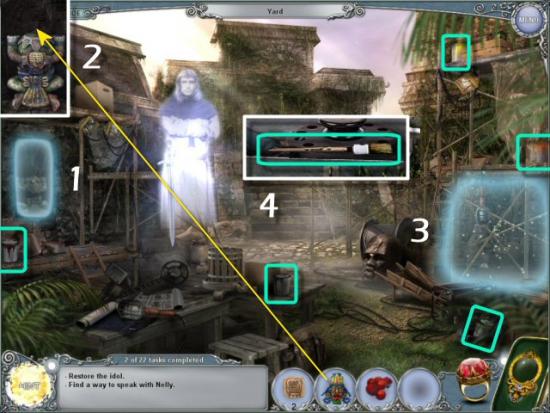
Use the X-Glass to collect the Stone Tile (1), click on the Fallen Idol (2), find 7 of the 8 items, click on the Wheel (3), use the Knife on the 4 Ropes and collect the last item (4). Collect the Idol’s Head (5), return to the Square (click back), collect the Tomatoes (6 – on the right) and then return to the Future.
Return to the Yard (click left), click on the Idol (1), use the Idol’s Head (2) and find all the Paints. Click on Scaffolding (3), find all the items in the list – Inventory Item: Brush (4 – located at the bottom, inside the toolbox) – and then click on the Idol again.
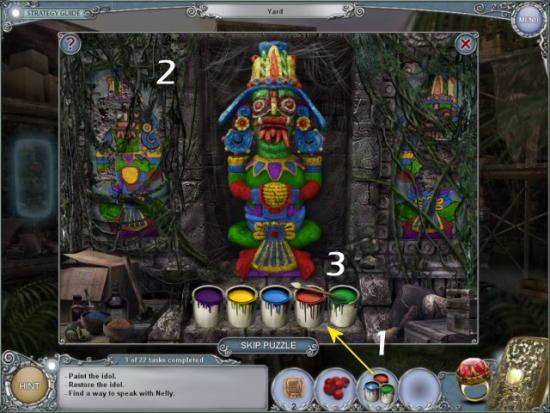
Use the Paints on the Steps (1) and paint the Idol according to the Diagram (2) at the left. Click on the Brush (3), click on one of the Paints and the click on the appropriate section of the Idol. If you make a mistake, simply click on another color of Paint and redo the section. Note that you won’t need to click on every section; some of the section will automatically fill in.
Use the Tomatoes in the Juicer (1), click on the Ladder (2), use the Wire Cutters on the 2 Wires, collect the Juicer Handle (3) and use the Handle on the Juicer (4). Collect Juice and return to the Past.

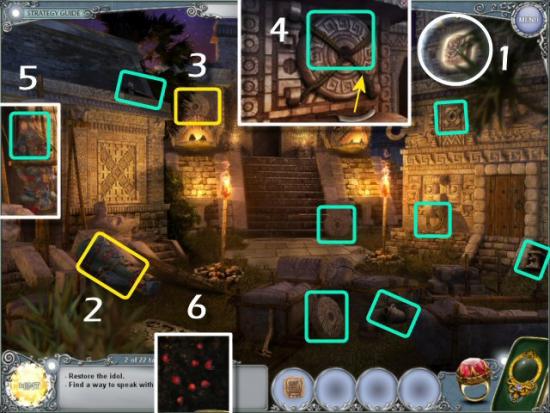
Click on the Door (1) and rotate the Disks to direct the light onto the Crystal at the Bottom (2). Each Disk only moves between 2 positions and the solution is always the same. Click on the Door again, collect the Pot (3) and return to the Future. Use the Pot on the Stool (4) and then return to the Past.
Use the Tomato Juice on the Idols (1), collect the Corn Cob, click on the Door (2) and collect the Stone Slab (3). Return to the Future, enter the Yard (click left), click on the Scaffolding (4) and find all the items in the list. Note that you will not find the Inventory Item in the Search Scene; you’ll receive a Stone Slab when you complete it. Return to the Past, use the X-Glass to locate the Corn Cob (5) and then click on the Door.
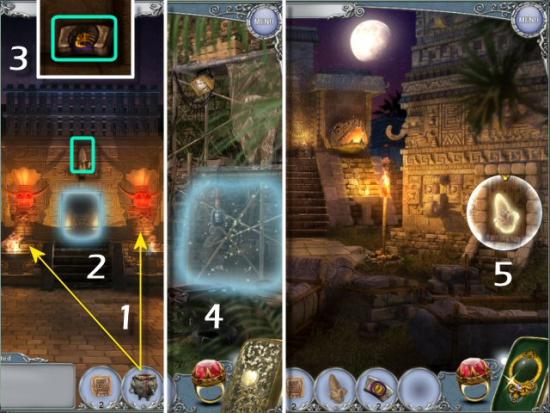
Use the Stone Slabs in the Spaces (1) and then rotate the inside and outside Rings (blue – click on the left or right arrows) until the Symbols in the Frames match (2). Collect the Corn Cob (3) and then return to the Square (click back).
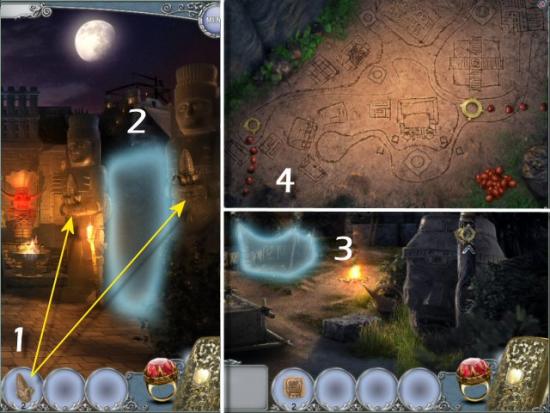
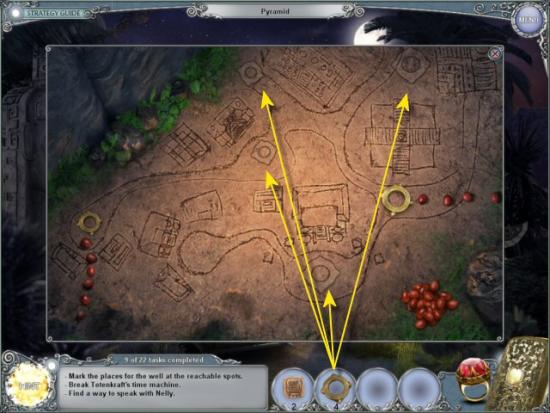
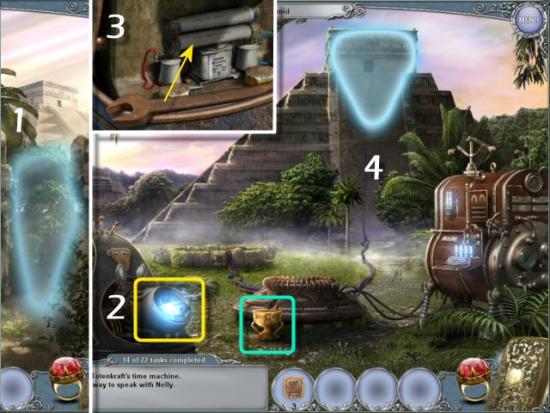
Use the Corn Cobs on the Idols (1), enter the Pyramid (2) and click on the Tent (3) to view the Map (4).
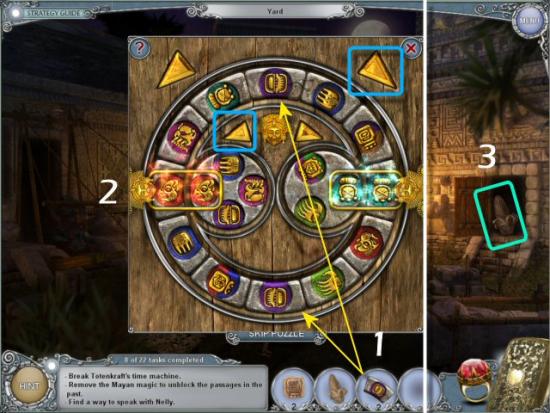
Click on the Totem (1) and find 5 of 6 items. Click on the Mask (2), use Knife on the 3 Ropes, collect the last item (3) and then click on the Crate (4).
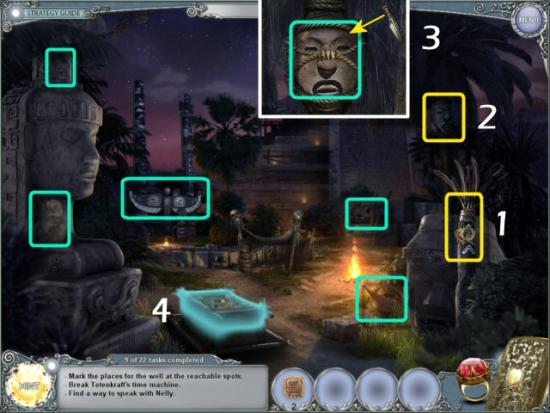
Rotate the Rings until there’s a continuous line from the Center to both Skulls. Note that the Rings only rotate in one direction when you click on them.
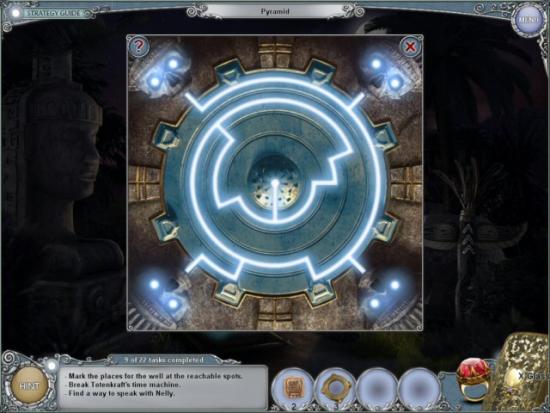
Click on the Tent, again, use the Rings in the Empty Spaces, return to the Square (click back) and then return to the Future.
Use the X-Glass to collect the Stone Tile (1), click on the Grappling Hook (2) and find 5 of 6 items. Click on the Plank (3), use the Pincers to remove the 4 Nails and collect the final item (4). Use the Hook on the Well (5) and then enter the Well (6).
Click on the Grate (1) and find 6 of 8 items. Click on the Gear (2), use the Wrench to remove the 3 Bolts and collect the fifth item (3). Click on the Hole in the Wall (4), assemble and collect the last item, in the order shown (5), and then enter the Grate.
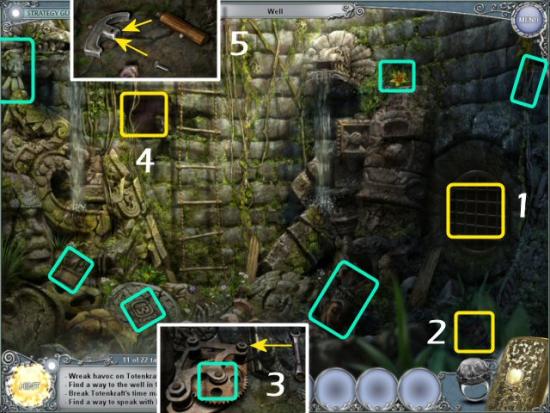
Click on the Broken Cart (1), find 7 of 8 items, click on the Toolbox (2) and find the final item (3). Collect the Hamster and the Jar (blue) and then return to the left.
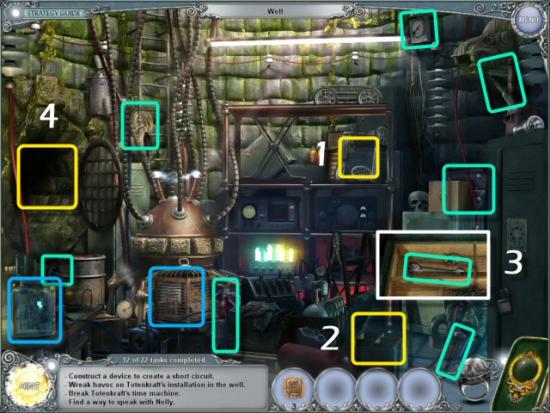
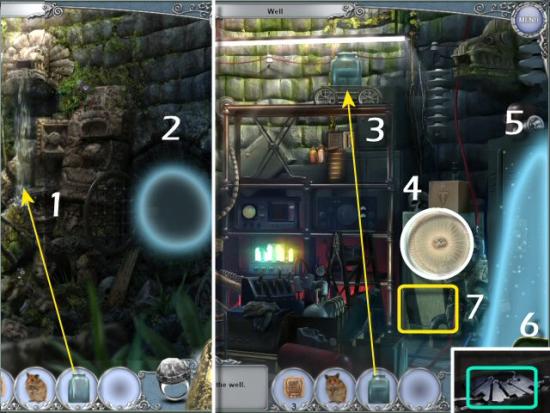
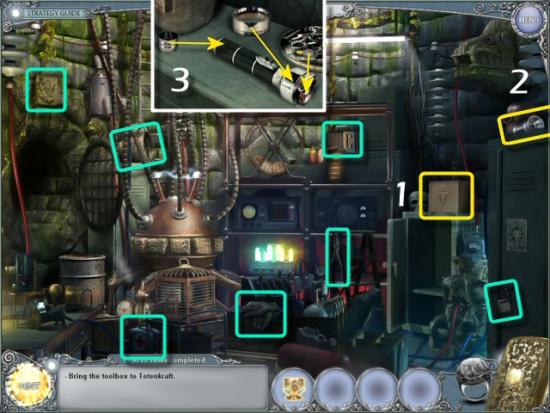
Use the Jar on either Waterfall (1), return to the right (2) and then use the Jar of Water on the Cart (3). Use the X-Glass to located the Hamster Wheel (4), click on the Locker (5), find all the items in the list – Inventory Item: Lockpicks (6 – located at the lower left, inside the toolbox) – and then click on the Safe (7).
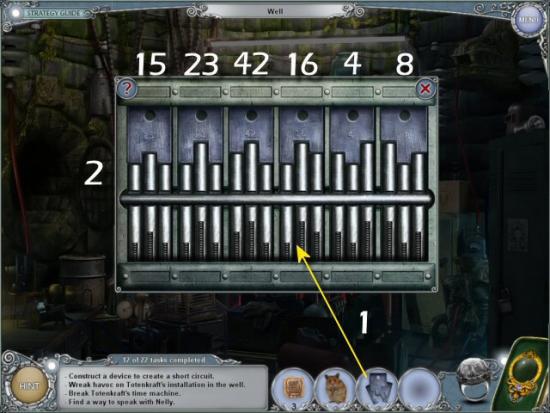
Use the Lockpicks (1), and then rearrange the Locks so they’re in the correct order the Bar runs straight down the center (2). Click on one (click on the top part), then another, in order to switch their places. The correct order is 15, 23, 42, 16, 4 and 8.
Click on the Hamster Wheel (1), use it on Frame (2), use the Hamster on the Wheel (3) and then return to the Square (4).

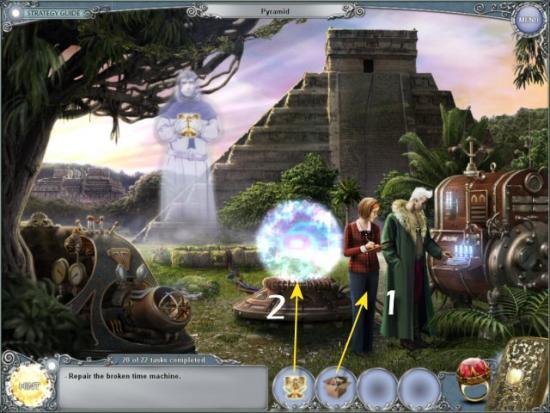
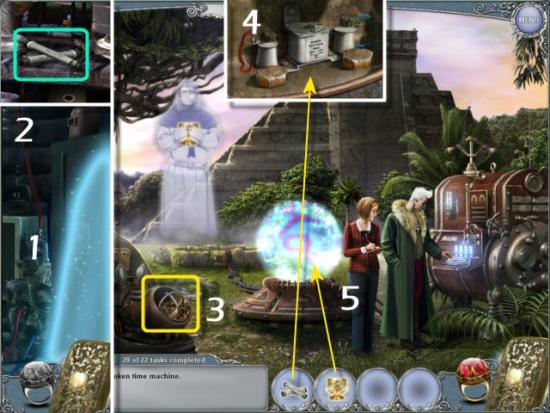
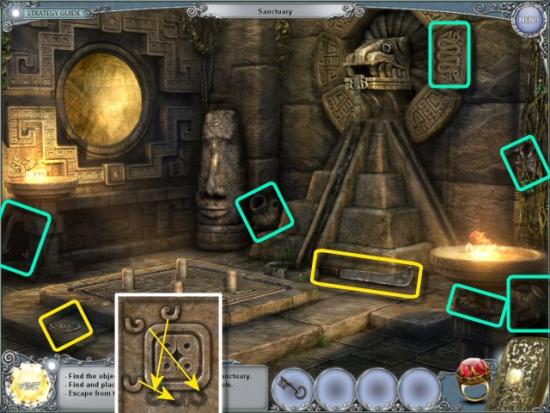
Enter the Sanctuary (1), click on the Controls (2), click on the Wrench and then use it on the Fuses (3). Collect the Grail (4) and continue to the Top of the Pyramid (5).
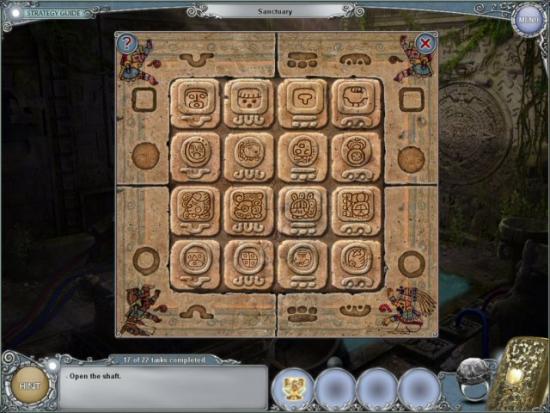
Use the X-Glass and collect the Stone Tile (1), click on the Floor (2) and use the 4 Stone Tiles (3).
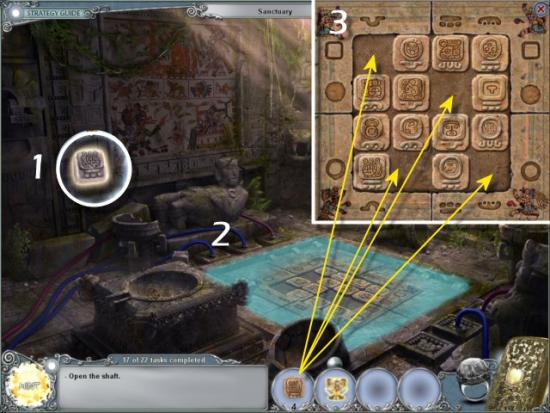
Arrange the Tiles according to the clues at the top and sides of the Board. Click on a Tile and then click on another to switch them.
Return to the Pyramid (click back), click on Nelly, return to the Well (click back, down and right), click on the Box (1) and find 7 of 8 items. Click on the Flashlight (2), assemble it in the order shown, collect the final item (3) and then return to the Pyramid (click left, up and then right).
Use the Box on Nelly (1), use the Grail on the Force Field (2), and then return to the Well (click back, down and right).
Click on the Locker (1), find all the items in the list – Inventory Item: Fuses (2 – located on the right shelf, in the center) – and then return to the Pyramid (click left, up and then right). Click on the Controls (3), use the Fuses (4) and then use the Grail in the Force Field (5).
Watch the ending movie. Congratulations! You’ve completed Treasure Seekers: The Time Has Come.
Bonus Chapter
Click on Start Adventure and click on Extra Play.
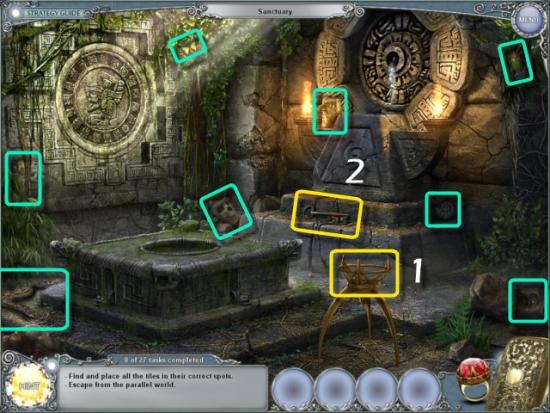
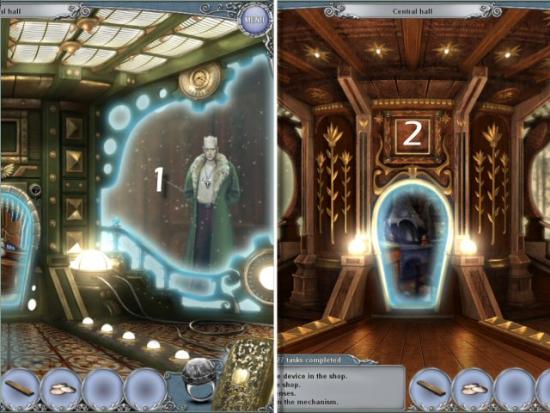
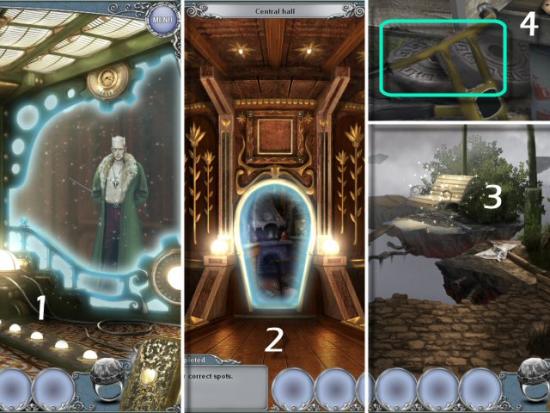
Collect the Seal (1), click on Nelly (2), use the Seal above the Door (3) and then enter the Sanctuary (4).
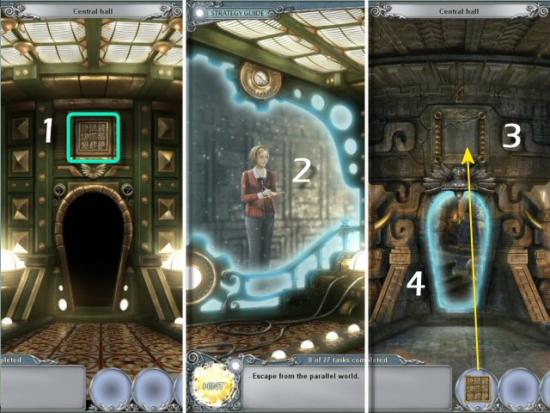
Click on the Pedestal (1), click on the Key (2), find all the items and then return to the Past.
Click on the Machete (1), find 6 of 7 items, click on the Tile (2), assemble the Tile as shown and collect the final item (3). Return to the Future and return to the Central Hall (click back).
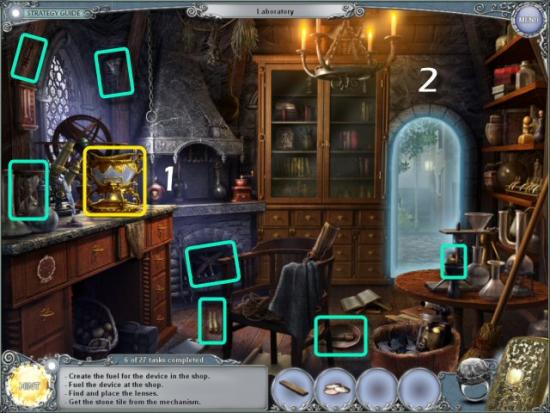
Click on Totenkraft (1), enter the Laboratory (2) and use the X-Glass to find the Door (3).
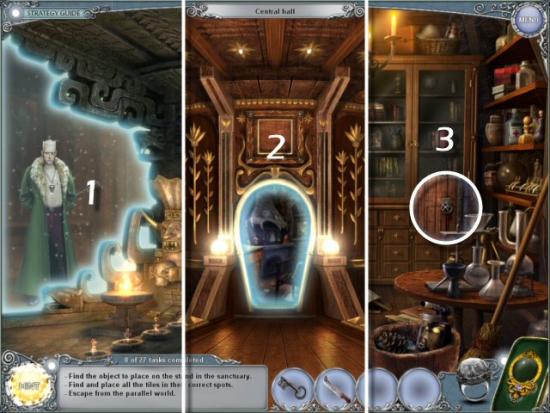
Click on the Hutch (1), find 7 of 8 items, click on the Plate (2), reassemble the pieces and collect the final item (3).
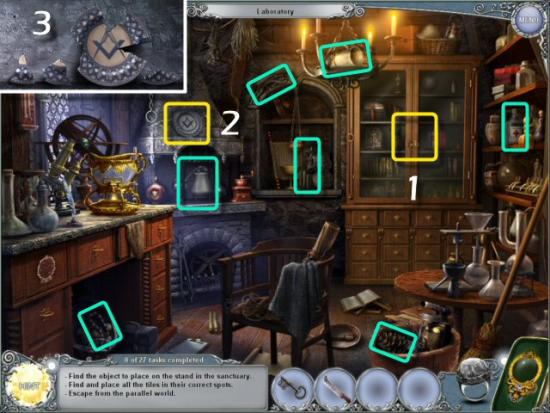
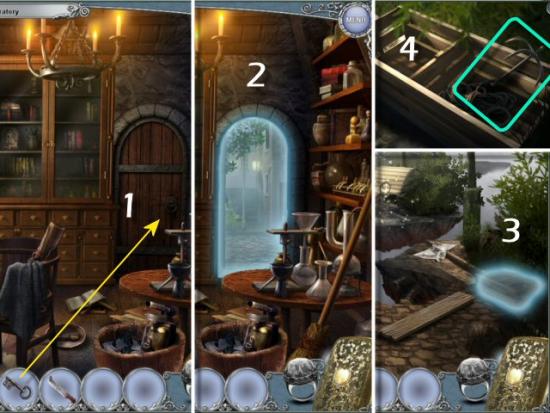
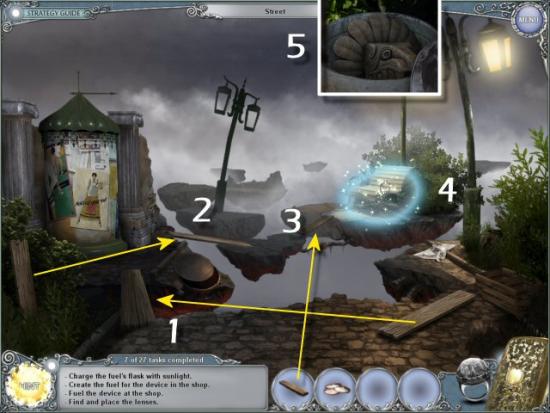
Use the Key on the Door (1) and enter the Street (2), click on the Crate (3) and collect the Grappling Hook (4). Return to the Central Hall (click back twice).
Click on Tom (1), enter the Shop (2) and use the X-Glass to locate the Seal (3).
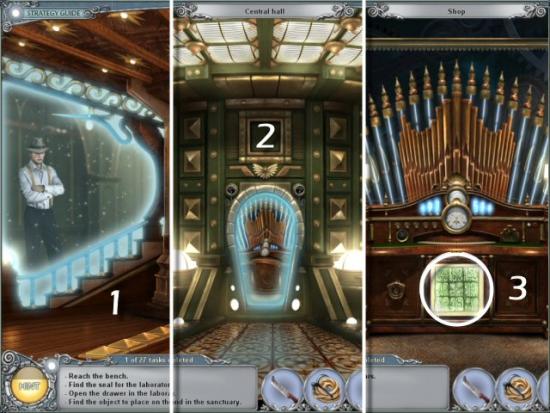
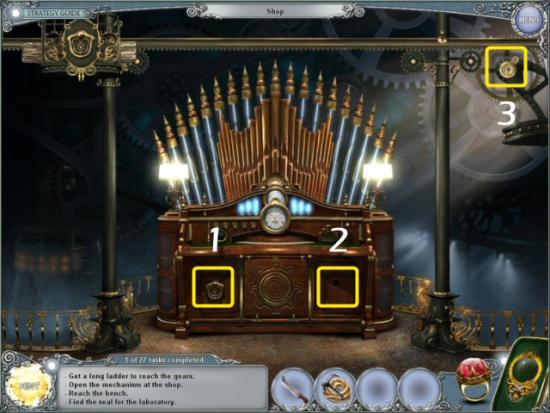
Click on the Doors at the Base of the Organ (1 and 2), click on the Gears (3) and then return to the Past.
Use the Machete on the Rope (1), click on the Pavilion (2), find all the items in the list – Inventory Item: Gear (3 – located in the Cabinet on the left) – and then return to the Future.
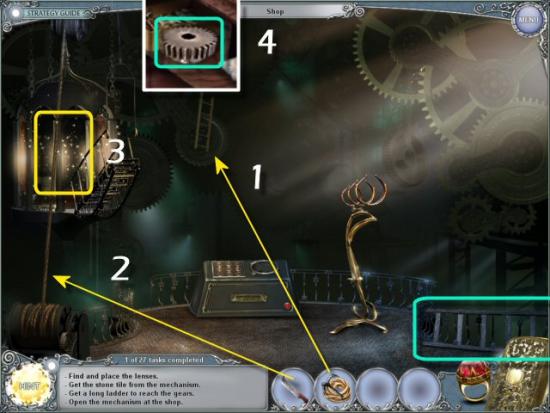
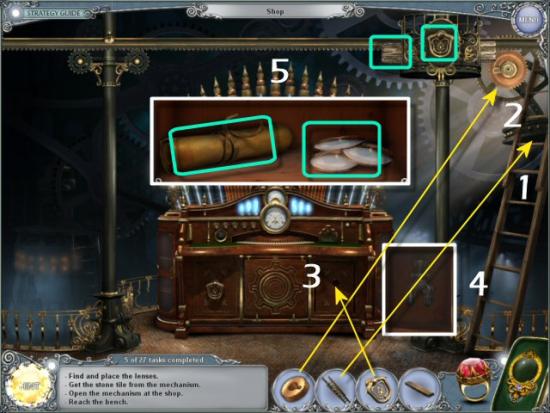
Use the Ladder on the Side (1), use the Gear (2) and then collect the Handle and Plank. Use the Handle on the Door at the Base of the Organ (3), click on the open Door (4), collect the Lenses and Scroll (5) and then return to the Central Hall (click back).
Click on Totenkraft (1) and enter the Laboratory (2).
Click on the Flask (1), find all the items, click on it again and then return to the Street (2).
Click on the Planks and place them to cover 2 of the Gaps (1 and 2), and use the remaining Plank to cover the last Gap (3). Click on the Park Bench (4), find all the items in the list – Inventory Item: Lion Head (5 – located on the right, inside the trashcan) – and then return to the Central Hall (click back twice).
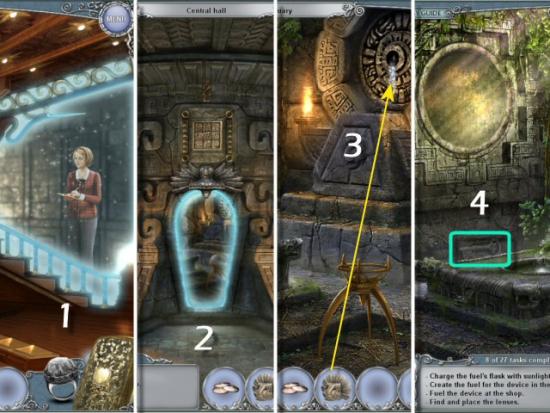
Click on Nelly (1), enter the Sanctuary (2), use the Lion Head (3), collect the Key (4) and then return to the Central Hall (click back).
Click on Tom (1), enter the Shop (2), use the Key on the Cabinet Door (3), click on the Open Door (4), collect the Blade and then return to the Past.
Use the Lenses on the Holder (1), click on the Red Button (2), click on the Lenses (3) and then click on the Console (4). Click on the Red Buttons to match the Display viewed through the Lenses (5), collect the Medal (6), return to the Future and return to the Central Hall.
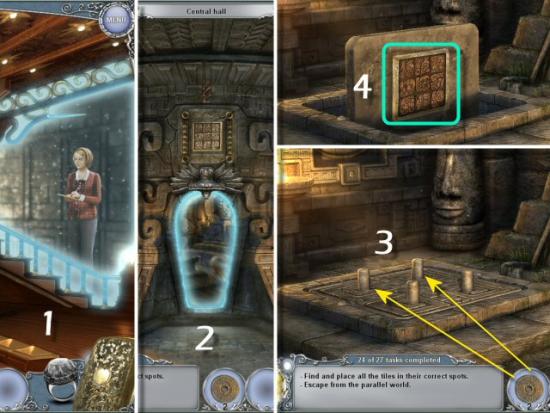
Click on Totenkraft (1), enter the Lab (2) and click on the Left Drawer (3).
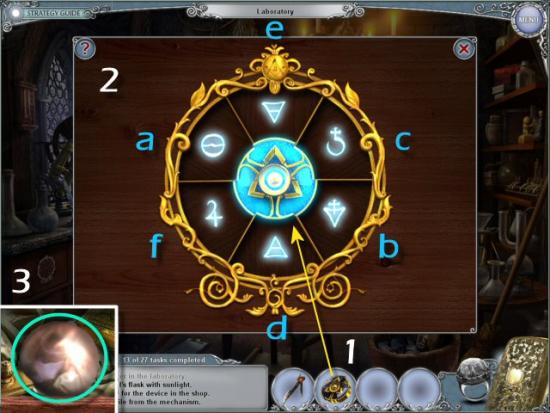
Use the Medal in the Center (1) and illuminate the Symbols (2). Click on the Symbols in the correct order (a, b, c, d, e, and f), if you miss one, you’ll have to begin again. When complete, click on the Drawer again, collect the Sphere (3) and return to the Central Hall (click back).
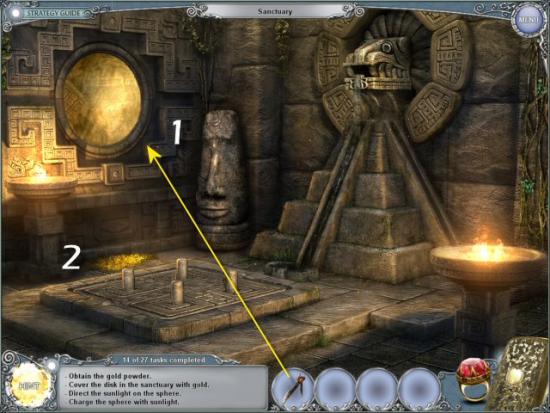
Click on Nelly (1), enter the Sanctuary (2), use the Sphere on the Pedestal (3), click on the Sphere and the Gold Dome on the Wall (4) and then return to the Past.

Use the Blade on the Gold Dome (1), click on the Gold Dust (2 – click twice), return to the Future and then return to the Central Hall (click back).
Click on Tom (1), enter the Shop (2), return to the Past, click on the Pavilion (3) and find all the items in the list – Inventory Item: Weather Vane (4 – located at the lower right, in the floor compartment). Return to the Future and then return to the Central Hall (click back).
Click on Totenkraft (1), enter the Laboratory (2), continue to the Street (click forward), use the Weather Vane on the Kiosk (3), collect the Magnet (4) and then return to the Central Hall (click back twice).
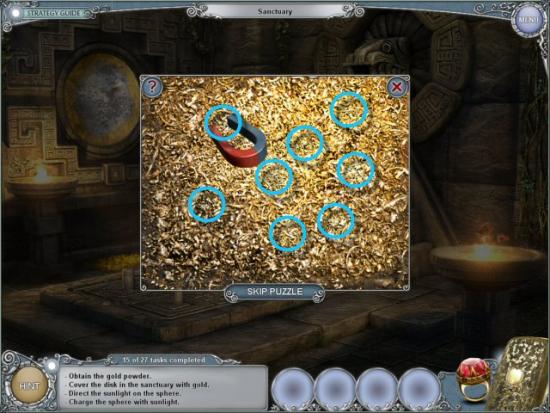
Click on Nellie (1), enter the Sanctuary (2) and return to the Past. Click on the Gold Dust (3) and use the Magnet on the Gold Dust (3 – click on the Magnet to pick it up and then click anywhere to begin) to collect it (4).
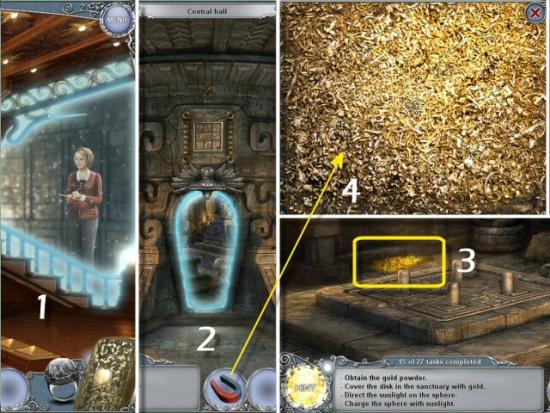
You’ll need to move the Magnet around until you see the Gold begin to shake. Click to pick up a piece of the Gold Dust. You’ll repeat this 7 more times. Note that the Gold Dust locations are the same, each time you play.
Return to the Future, use the Gold Dust on the Dome and then return to the Central Hall (click back).
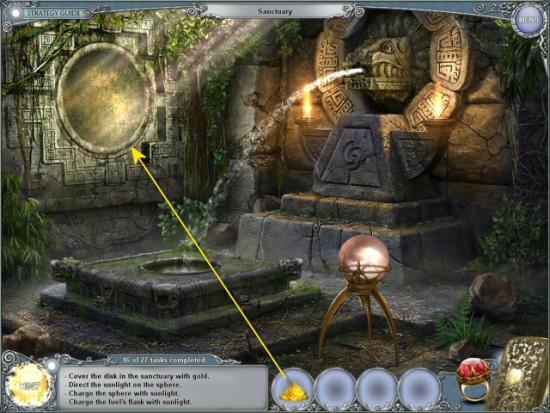
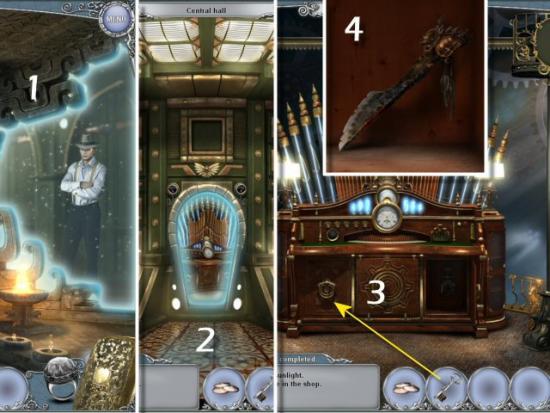
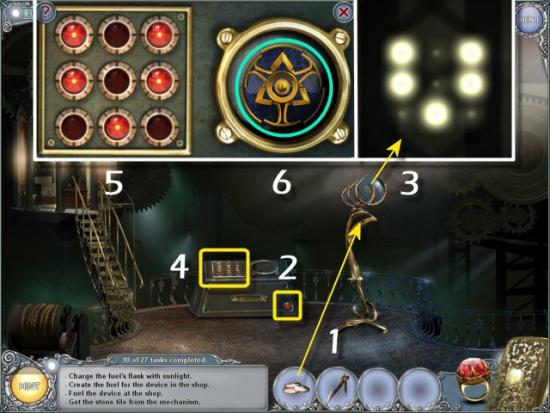
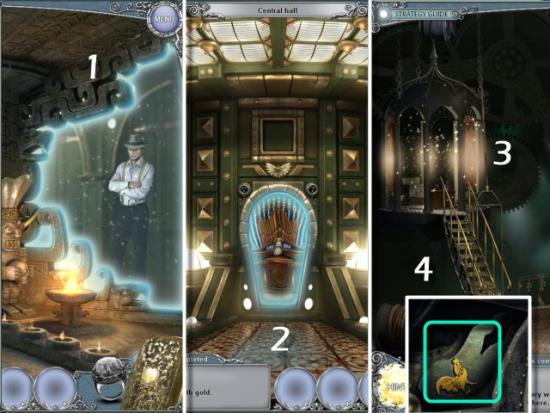
Click on Totenkraft (1), enter the Laboratory (2), use the Charged Sphere on the Flask (3) and then return to the Center Hall (click back).
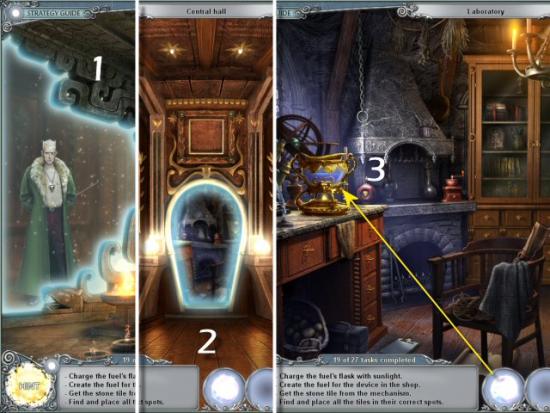
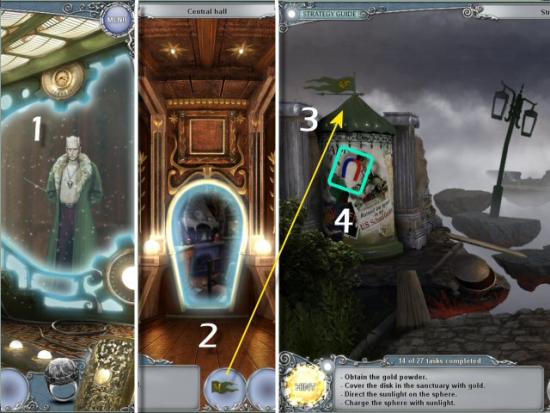
Click on Tom (1), enter the Shop (2), click on the Right Cabinet (3), use the Fuel (4) and collect the Seal (5). Return to the Center Hall and use the Seal above the Door (6).
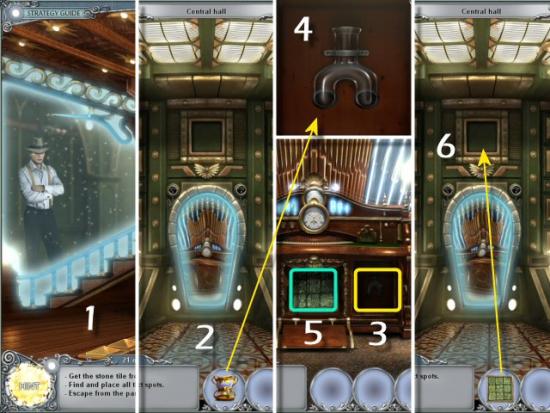
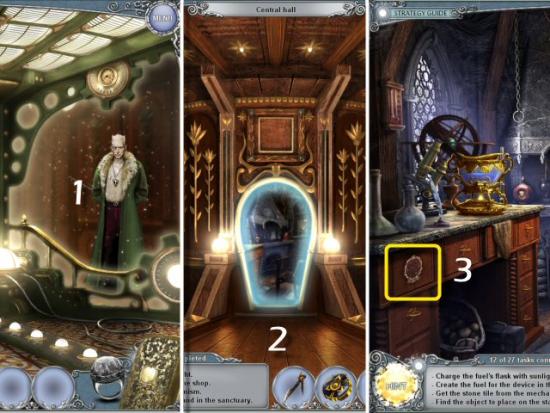
Click on Totenkraft (1), enter the Laboratory (2) and continue to the Street (click forward). Click on the Park Bench (3), find all the items in the list – Inventory Item: 2 Stone Disks (4 – located under the bench, just to the left of center) – and then return to the Center Hall (click back twice).
Click on Nelly (1), enter the Sanctuary (2) and return to the Past. Use the Stone Disks on the Board (3), collect the Seal (4), return to the Future and then return to the Center Hall (click back).
Click on Totenkraft (1) and use the Seal over the Door (2).
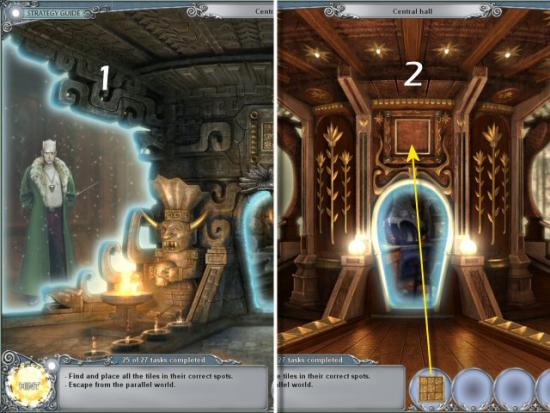
Watch the ending movie. Congratulations! You’ve completed the Bonus Chapter of Treasure Seekers: The Time Has Come.

More articles...
-
Best Horror Games On Itch.io – July 2026
Across a bounty of subgenres. -
Grow A Garden 2 Base Price List
What's the most valuable crop? -
Evomon Types Guide [Strengths, Weaknesses, Resistance]
Your companion guide during battles.