- Wondering how to get Monopoly GO! free rolls? Well, you’ve come to the right place. In this guide, we provide you with a bunch of tips and tricks to get some free rolls for the hit new mobile game. We’ll …
Best Roblox Horror Games to Play Right Now – Updated Weekly
By Adele Wilson
Our Best Roblox Horror Games guide features the scariest and most creative experiences to play right now on the platform!The BEST Roblox Games of The Week – Games You Need To Play!
By Sho Roberts
Our feature shares our pick for the Best Roblox Games of the week! With our feature, we guarantee you'll find something new to play!Type Soul Clan Rarity Guide – All Legendary And Common Clans Listed!
By Nathan Ball
Wondering what your odds of rolling a particular Clan are? Wonder no more, with my handy Type Soul Clan Rarity guide.
Treasure Isle Walkthrough
Welcome to the the Treasure Isle walkthrough on Gamezebo! Treasure Isle is a real time treasure hunting Simulation game created by Zynga and played on Facebook.This walkthrough includes tips and tricks, helpful hints, and a strategy guide to get your best score on Treasure Isle.This guide will be updated as the game changes in addition to weekly updates located at the lower right side of the screen so be sure to check back frequently.
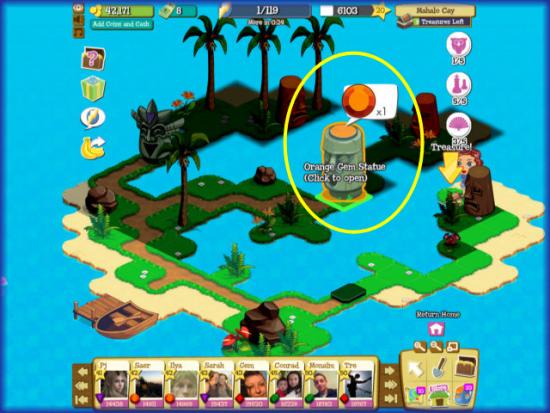
How to open the Tiki Statue Gates

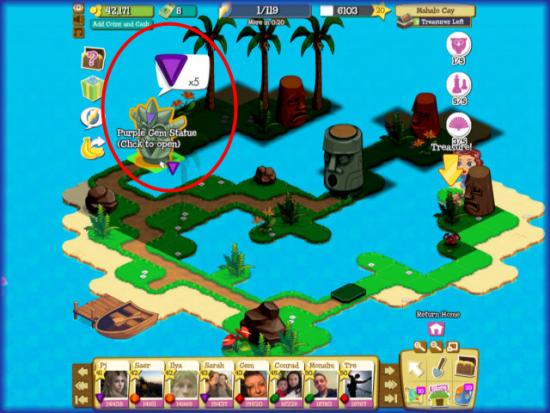
- Tiki Statue Gates are Stone Tiki Statues that block your passage until you give them gems.
- Once you feed them gems they will allow you to pass from that point on as many times as you need.
- Some Statues may ask for 1 Gem and some may ask for up to 5 at the most.
- Note – No energy is required to feed the Tiki Statues Gems and you will earn 5 XP for feeding them.
- How to feed them – Simply click on the statue and when the message prompt asks you if you want to spend the gems tell it “Yes” and the statue will become flat in the shape of the gem.
- It may appear again but will disappear when you try to walk past it.
Treasure Chests
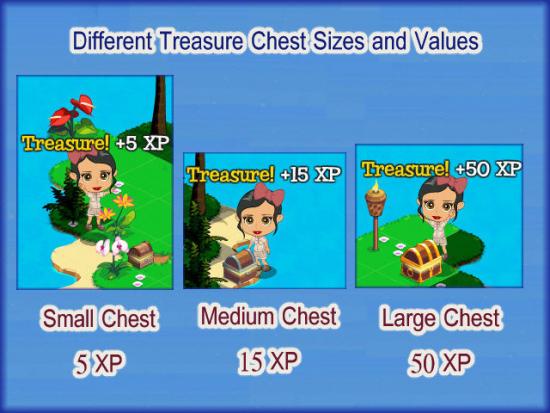
- As you dig for Treasure you will find Treasure chests at certain spots in the Island.
- TIP – Look at the upper right of the game screen and you will see how many treasure chests are buried in the Island you are currently digging at.
- There are 3 sizes and values of Treasure Chests:
- Small Treasure Chest – 5 XP
- Medium Treasure Chest – 15 XP
- Large Treasure Chest – 50 XP
- Click on a Chest to open in. The item inside will be part of a collection and you will see it in the lower right hand corner of the game screen.
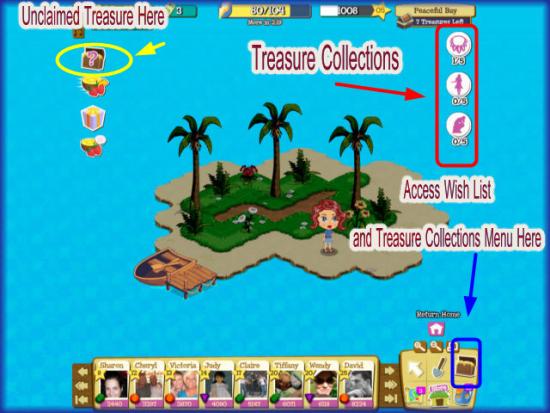
- NOTE – If you forget to click on a treasure chest or leave an island before you opened a chest it will move into the chest at the top right with the “?” on it. Click on it to claim all treasure.
Collections/Trading Collections for Reward
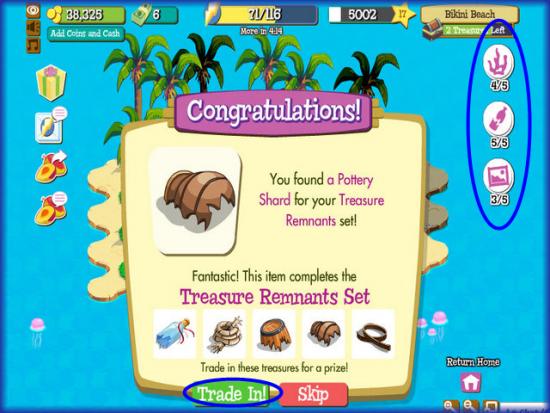
- As you dig for treasure you will find treasure chests that have collectible items in them. Each Island has 1 to 3 collections for you to complete.
- Once you find the 5 items in a collection you can trade it in for a large cash and XP bonus by clicking on “Trade in” when prompted.
- Be sure to click on any chests you uncover so you get credit for the item in it.
- If you miss a chest click on the gift icon in the upper left of the screen that has a “?” on it. This is where all unclaimed treasure goes.
- There are currently 22 Collections but this will increase as the game will have 100 levels soon.
- Be sure to see the collections listed above for details about it and check back for updates soon.
Gems/Gem Trees/Gems from Live Feeds
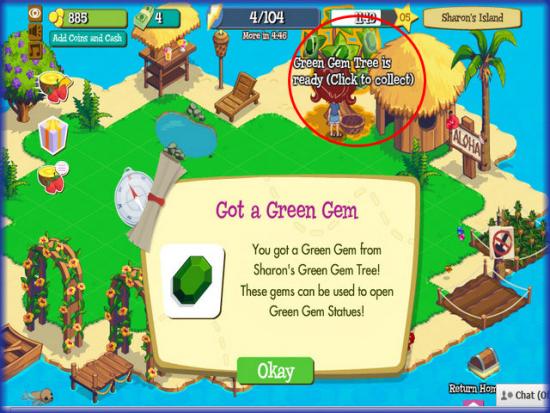
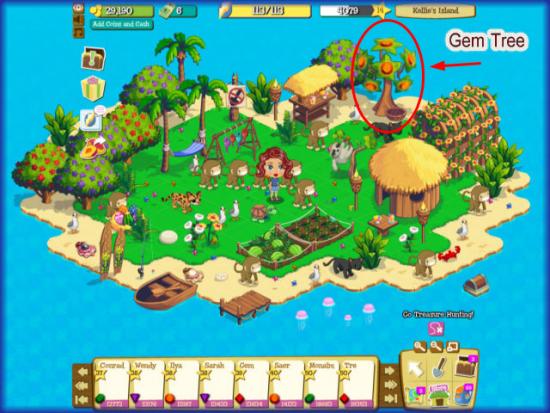
- Each Player in Treasure Isle is given one Gem Tree on their Home Island. It will either have Orange, Red, Green, Blue, or Purple Gems on it.
- The tree yields one Gem every 24 hours for you and your Neighbors can collect from it once a day as well.
- You will need the Gems in all different colors to get past certain Tiki Statues in the game.
- The Tiki Statue will require 1 to 5 gems for you to pass.
- You may find Gems while you are digging and they will move into your inventory in your backpack.
- If you see a live feed post offering a free gem be sure to click on it. The more gems you can save up the easier you will progress through the game.
- TIP – Look at the bottom of your screen and you can see your neighbors and what kind of gem tree they have on their island. If you need a specific gem color you can make sure to visit those neighbors first.
- You can also request gems if you are running low. You will be prompted if your Neighbor’s or your gem tree is empty.
- Keep an eye on the live feeds for free gems.
Tools Needed for Digging in different environments
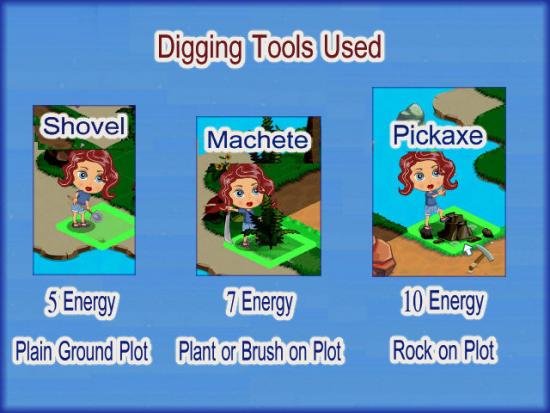
- There are currently 4 items used for digging for Treasure in Treasure Isle but this could change as new levels are added.
- Shovel – Used on plain areas of land with nothing on it. Cost – Free
- Machete – Used on Plots of land with brush, plants or bushes on it. Cost – 250 Coins
- Pick-axe – Used on Plots of land with rocks on it. Cost – 500 Coins
- Dynamite – Used on large rocks that are blocking passage. Cost 250 Coins for 1 Dynamite Stick.
- Bug Spray – Used on Swarms of Mosquitoes blocking your path in the upper levels of the game. Cost 300 Coins for 1 application of Bug Spray.
How to Dig for Treasure
- Once you are on the Island you can begin to dig provided you have enough energy.
- The island is broken up into a grid with several squares which highlight when your mouse touches it.
- Place your cursor over a square and when it lights up green click on it and your Avatar will walk to it and begin to dig.
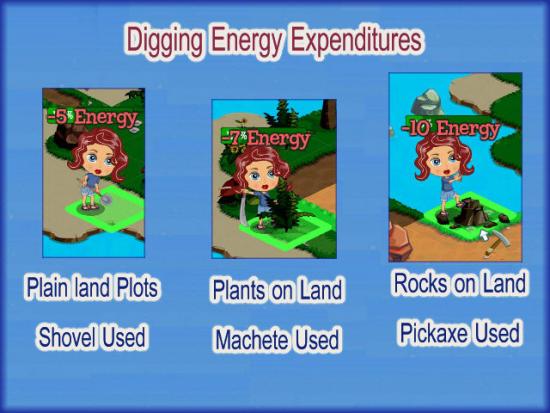
- Each time your avatar digs on a plot of land either 5, 7, or 10 energy points will be spent. In the higher levels you will have items called “Multi Dig Items (Multi Dig Plants, Multi Dig Rocks) and they must be attacked 3 times each before the area is clear. If the area uses 7 energy points, it will use 7 points per strike which means it will cost 21 points to dig under that Multi Dig item.
- Multi Digs will cost 15, 21, or 30 energy points depending on what they are.
- Start digging when your meter is full. Once it is empty click on your backpack and use whatever fruit you have so you can keep digging.
- 5 Energy Points – Plain land Plots nothing on them using a shovel.
- 7 Energy Points – Plant life on Plot Machete Used.
- 10 Energy Points – Rocks on Land Plot – Pick-axe Used.
- NOTE – Whenever you find a treasure chest be sure to click on it to open it.
- Keep an eye on your energy meter and supplies at all times.
Multi-Dig Items
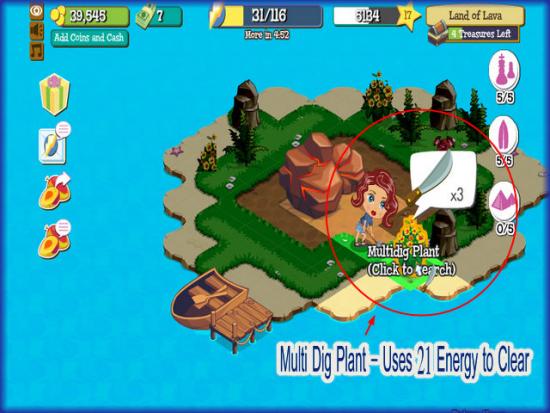
- Multi Dig items are introduced once you reach the Island called, “Land of Lava”
- Multi Dig areas can be Plants or Rocks and cost three times the normal value to clear the area.
- Multi Dig Plants – 7 x 3 = 21 Energy Points
- Multi Dig Rocks – 10 x 3 = 30 Energy Points
How to update your Wishlist
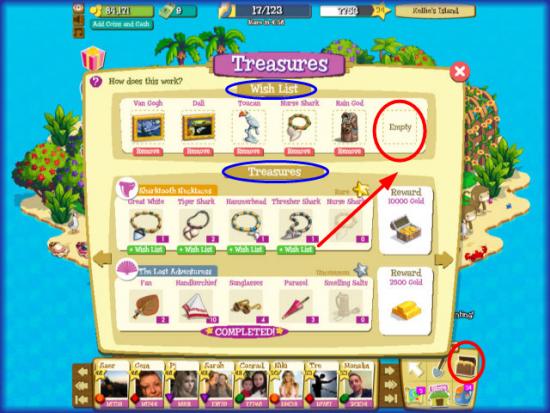
- You can put a wish list out into the live Feeds at Facebook asking your Neighbors to gift you items that are missing from your Collections.
- The game has a nice feature that keeps track of how many of each collectible you have and notifies you of the ones you need by leaving them faded.
- If you are missing and item you can click on it and it will move into your Wish List.
- You may place 6 items in your Wish list and when you close the menu you will be prompted to post the message on your live feed so others can see it.
- NOTE – Once you have completed and traded in a collection for a reward you can not put the item in the Wish List ever again.
- If you collect the set again you can trade it in for another reward each time.
Collecting Missed Treasure
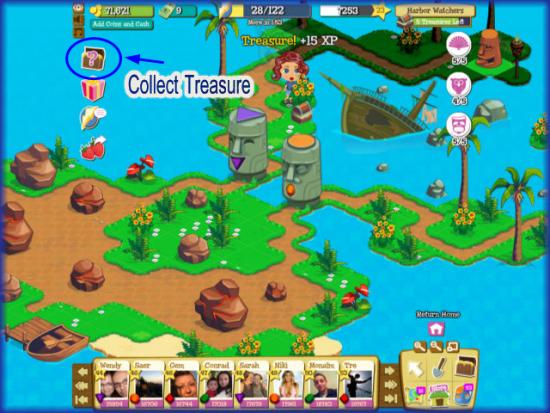
- If you forget to click on a treasure chest you have dug up or quit the game before you open the treasure chest you can find the items by clicking on the icon of the Treasure chest with the “?” on it located at the upper right side of the game screen.
Live Feed/Free items
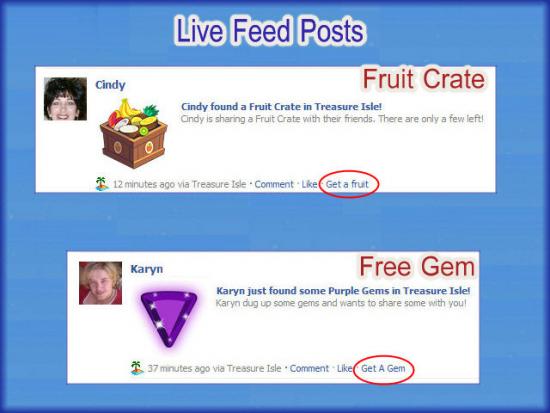
- There are multiple opportunities to post to Facebook’s live feeds.
- Be sure to watch the feeds for free gems, fruit, cash bonuses, and free animals to put on your Home island.
- If you see one of these be sure to click on them to claim your prize.
- Also be sure to post on the live feeds so your Neighbors will return the favor.
Adopting Lost Baby Animals
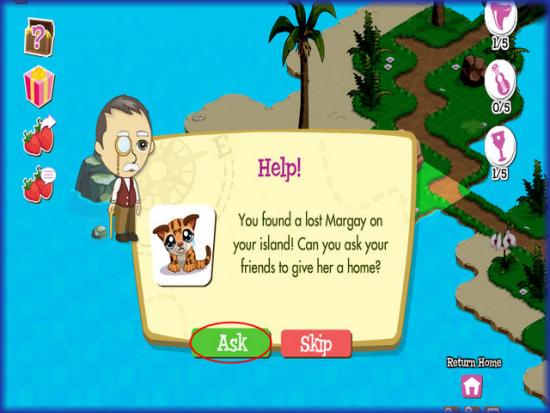
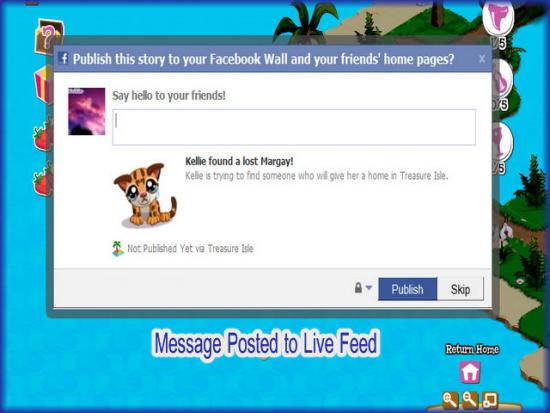
- Occasionally you will see a message pop up in your game asking you to rescue a baby Panther, Dolphin, or Margay.
- If you see this message and click on “Ask” your neighbor will adopt this animal and can place it on their Home Island.
Treasure Isle Helpful Links
- Facebook – You must have an active Facebook account to play Treasure Isle – http://www.facebook.com
- Treasure Isle – http://apps.facebook.com/treasureisle/
- Zynga Forums Treasure Isle – http://forums.zynga.com/forumdisplay.php?f=312
- Thanks for visiting Gamezebo! Be sure to check back here frequently for Updates to Zynga’s Treasure Isle at Facebook!
Receiving Gifts from your Neighbors
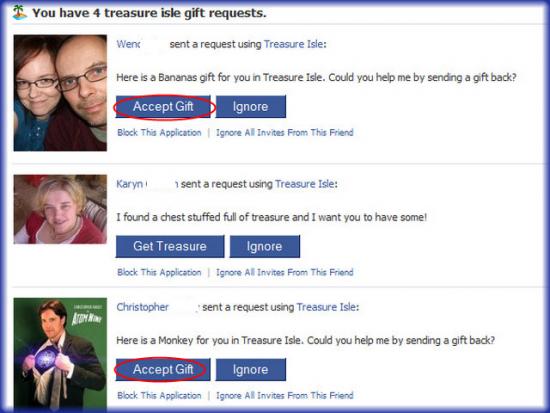
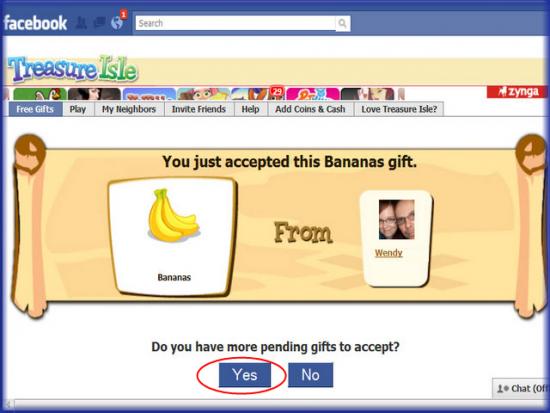
- To accept gifts sent to you by Neighbors go to the Request page at Facebook by clicking on “Home.” You may see requests in the upper right hand corner. Click on those and you will be taken to the page where the requests are listed.
- Click on “Accept” for any gift you wish to keep.
- The items automatically move into your inventory and can be found in your backpack the next time you play the game.
Sending Gifts/Energy to your neighbors
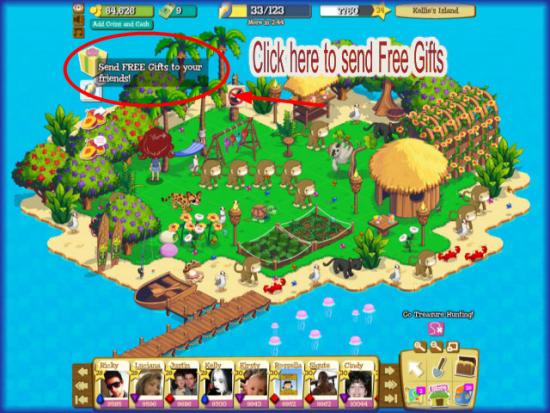
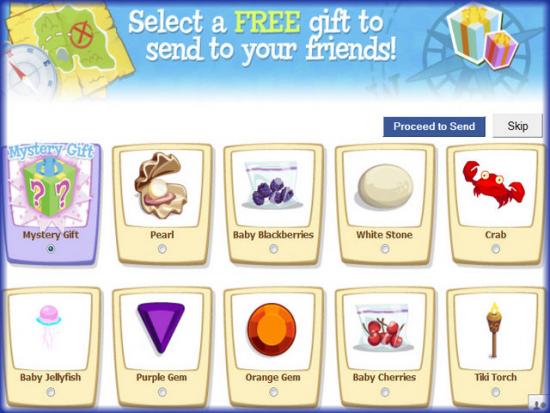
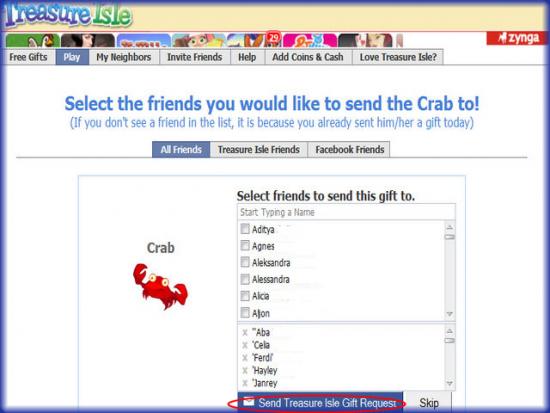
- To send free gifts to your neighbors you can either click on their individual avatar at the bottom of the screen and then click on “Send Gift” or you can click on the Gift Icon at the top left of the screen shown in image above.
- This will take you to a screen where you will pick out one gift to send to up to 30 people at once depending on how many friends you have. It begins with letting you send gifts to 8 Neighbors and as you increase your Neighbors this number will increase to a maximum of 30 per day.
- Choose the gift you wish to send. (Some of these gifts will only be available when you reach a certain level to unlock them.
- Choose the friends you wish to send to and hit send.
- You will have to wait 24 hours before you can send again.
- NOTE – Treasure Isle updates the free gifts you can send to your Neighbors several times per month.
How to Invite Facebook Friends to become your Neighbors in Treasure Isle
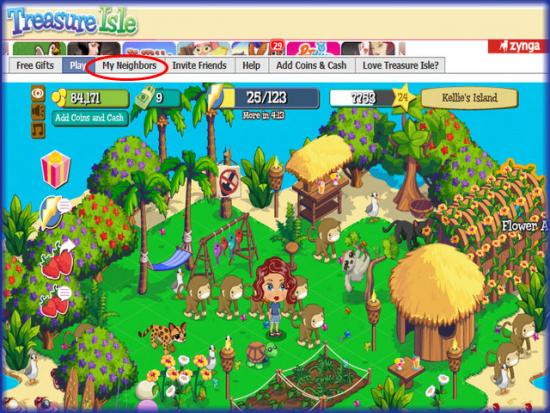
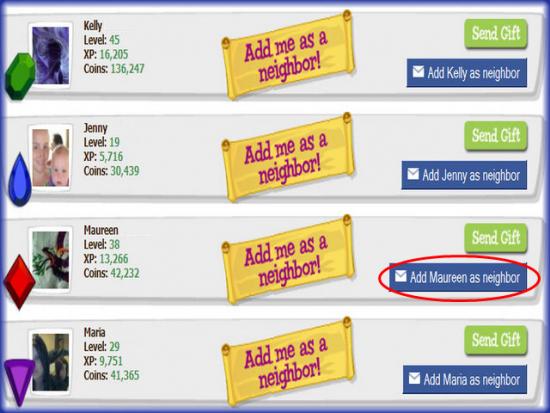
- To invite your Facebook friends to play Treasure Isle click on the ” My Neighbors” tab at the top of the game screen shown in image above.
- You can see which ones of your friends are already playing the game and what level they are on and if they have a wish list.
- Simply click on the “Send Invitation” link to anyone you wish to invite.
- Your neighbor must accept the invitation to show on your friend list. If they decline you will not be notified.
How to Visit neighbors/Collecting Daily Items from Neighbors

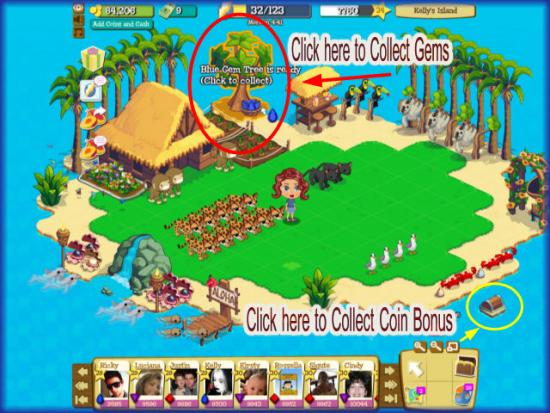
- At the bottom of your game screen you will see your neighbors listed in order from lowest to highest score.
- Click on their avatar and you will see a pull up menu ask if you want to visit or send a gift. Click on visit and you will be taken to their Home island.
- Each Player has a Treasure chest floating in the water near their Island. You can click on this once every 24 hours and collect 10 to 100 coins.
- Also you can click on your neighbors gem tree and if they have any left you can collect one.
- You will receive 20 Coins and 5 XP for the first 10 Neighbors you visit in a 24 hour period. After ten you will receive 5 Coins and 1 XP per neighbor that you visit.
General Game Information
Welcome to the the Treasure Isle walkthrough on Gamezebo! Treasure Isle is a real time treasure hunting Simulation game created by Zynga and played on Facebook.This walkthrough includes tips and tricks, helpful hints, and a strategy guide to get your best score on Treasure Isle.This guide will be updated as the game changes in addition to weekly updates located at the lower right side of the screen so be sure to check back frequently.
- In Treasure Isle you have 150 levels to dig for currency, XP, and exotic treasures that are parts of collections you can trade in for large amounts of money at various Island locations.
- You can design your own Avatar and buy its clothing and decor for the “Home Island” your Avatar lives on.
- Zynga Introduced Treasure Isle on April 1st of 2010 at Facebook.
- You must be registered at Facebook to play Treasure Isle.
- You start out on your own Island which you can decorate with items gifted to you by Neighbors and where you can grow fruits to use for digging energy as well as grow colored gems you will need to feed to various Island statues to allow passage to various parts of the Island you are digging at.
- Each person is given a random gem tree on their Island. This tree can yield either Orange, Blue, Purple, Green, or Red gems in various shapes. These gems are needed to gain passage at large statues that can block your path while digging on different Islands. You will need various colors while you dig and will have to rely on your neighbors gifting you certain color gems in the game. You can take gems from your Neighbors trees once per day. The more gems you can save up by visiting Neighbors and responding to offers from your neighbors to share on the live feeds each day.
- As you dig at various Islands you will find either XP (experience points), Gems, Gold, or fruit which energizes your player to dig. You will also find various treasures that are part of collections. Once you complete a collection you can trade it in for a large cash bonus and XP. This will trigger a live feed message which allows you to share this bonus with your Neighbors and you can also click on your neighbors live feed request and earn extra coins from their successes.
- Neighbors are an important part of the game as you will need gems and fruit which they can provide to you as a gift. Gems allow you passage on various Islands and fruit gives your character energy to continue digging.
- You start out with a level energy of 100 and each time you level up this amount increases by 1.
- Every 5 minutes you earn back 1 energy point. Based on your level it could take a little over 8 hours to earn all of your energy back to its full level just by waiting.
- There are currently 8 maps in the game (More coming soon) each containing Islands you can travel to in order to dig for treasure.Some Islands will need to be unlocked using Island Coins or Cash before you can dig.
How to Travel to an Island to Dig/Island Maps
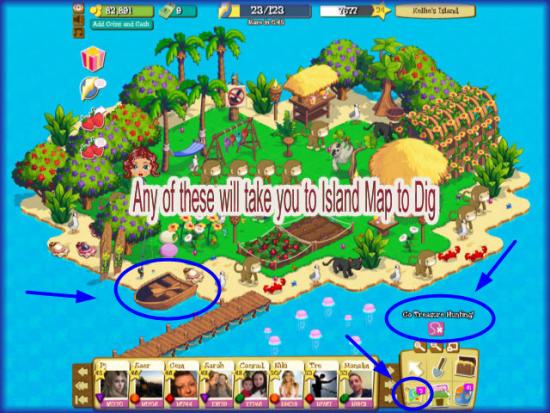
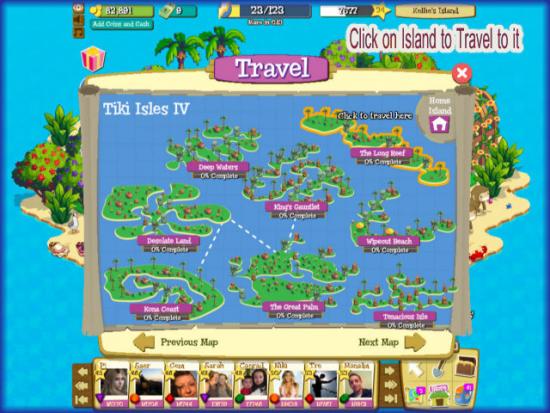
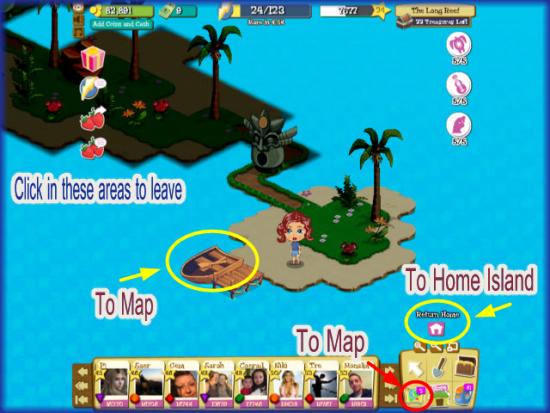
- From your Home Island you can either click on the “Go Treasure Hunting” button at the top of the menu. (Pink Map Icon), the Map icon at the bottom left of the Menu, or the boat next to your pier on your Home Island. Clicking on any of these will bring up the Map menu. Scroll until you reach the Island you wish to explore and click on it.
- You will be taken to the Island and you can begin to dig on any dark area as long as you have enough energy.
- NOTE – You must unlock all of the Islands on a Map before you will be able to see the next map with Islands to travel to.
Collections
- Here you will find a list of each collection, what you need to find to complete it, and how much of a reward you will earn if you trade it in.
Crown Jewel Set
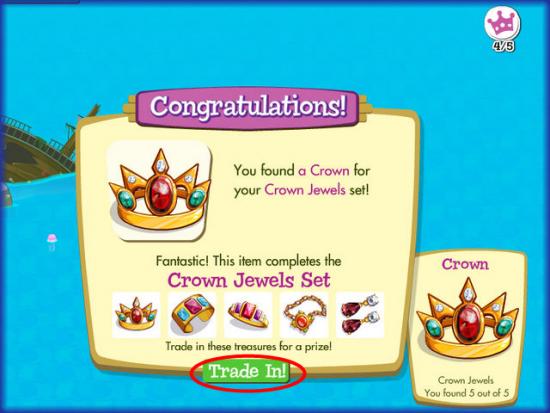
- Reward – 300 Gold and 35 XP
- Crown
- Bracelet
- Ring
- Necklace
- Earrings
Tiki Statues
- Reward – 2,500 Gold Bars and 60 XP.
- Wind God
- Rain God
- Mountain God
- Sea God
- Forest God
Coral Jewelry Collection
- Reward – 2,500 Gold Bars and 60 XP
- Coral Crown
- Coral Bracelet
- Coral Ring
- Coral Necklace
- Coral Earrings
Koa Wood Statues
- Reward – 1,000 Gold Coins and 30 XP
- Marlin
- Shark
- Turtle
- Whale
- Mahi Mahi
Hula Outfit
- Reward – 2,500 Gold Bars and 60 XP
- Skirt
- Lei
- Anklet
- Wristlet
- Headdress
Puka Shells
- Reward – 1,000 Gold Coins and 30 XP
- Anklet
- Necklace
- Ring
- Earrings
- Bracelet
Treasure Remnants Set
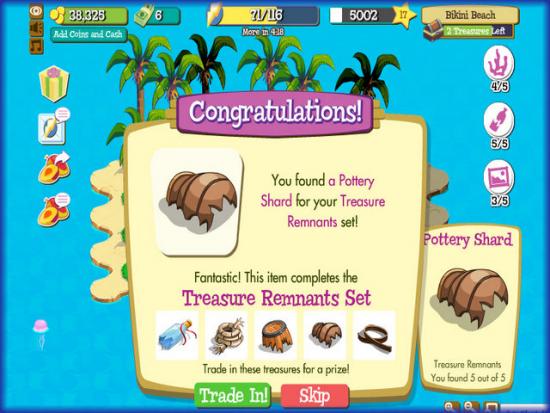
- Reward – 1,000 Gold Coins and 30 XP
- Broken Bottle
- Frayed Rope
- Old Barrel
- Pottery Shard
- Worn Strap
Historical Sculptures
- Reward -10,000 Gold Coins and 100 XP
- David
- The Thinker
- Justice
- The Discus
- Venus
Royal Garb
- Reward – 2,500 Gold Bars and 60 XP
- Cap
- Cloak
- Staff
- Loincloth
- Necklace
Sharktooth Necklaces
- Reward – 10,000 Gold Coins and 100 XP
- Great White
- Tiger Shark
- Hammerhead
- Thresher Shark
- Nurse Shark
Sailing Instruments
- Reward – 1,000 Gold Coins and 30 XP
- Spyglass
- Hourglass
- Sextant
- Compass
- Globe
Alepoi’s Beach Gear
- Reward – 2,500 Gold Bars and 60 XP
- Surfboard
- Paddle
- Outrigger
- Surf Amulet
- Beach Mat
Tiki Masks
- Reward – 2,500 Gold Bars and 60 XP
- Happy Tiki
- Sad Tiki
- Crazy Tiki
- Angry Tiki
- Sleepy Tiki
Lucky Loot
- Reward – 10,000 Gold Coins and 100 XP
- Broken Mirror
- Four Leaf Clover
- Four of Clubs
- Horseshoe
- Rabbit’s Foot
Royal Tableware
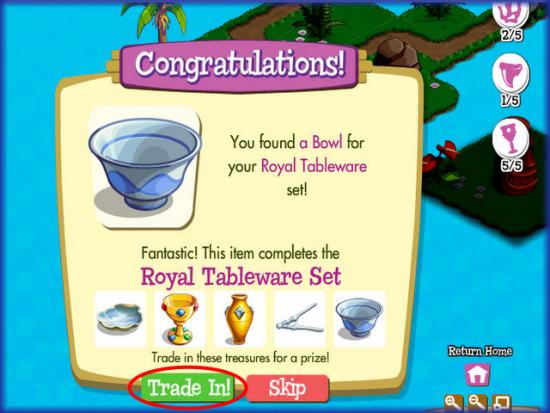
- Reward – 1,000 Gold Coins and 30 XP
- Nutcracker
- Bowl
- Chalice
- Vase
- Serving Platter
The Lost Adventurer/Adventuress
- Reward – 2,500 Gold Bars and 60 XP
- Fan
- Handkerchief
- Sunglasses
- Parasol
- Smelling Salts
Treasures of Egypt
- Reward – 10,000 Coins and 100 XP
- Ankh
- Pyramid
- Sphinx
- King Tut
- The Eye
Famous Diamonds
- Reward – 10,000 Coins and 100 XP
- Blue Heart
- Golden Jubilee
- Hope Diamond
- Hortensia
- Star of Africa
Lost Fine Art
- Reward – 10,000 Gold Coins and 100 XP
- Da Vinci
- Magritte
- Monet
- Dali
- Van Gogh
Jeweled Birds
- Reward – 10,000 Gold Coins and 100 XP
- Peacock
- Hummingbird
- Owl
- Swan
- Toucan
Chess Pieces
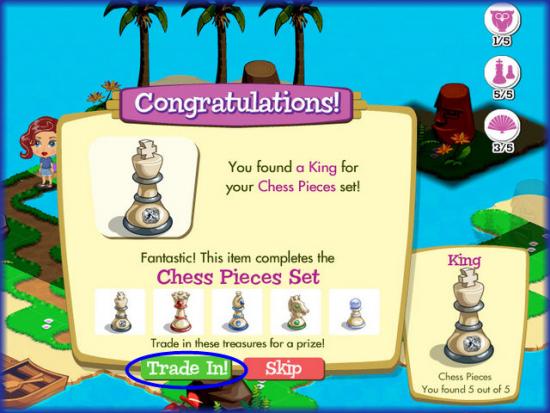
- Reward – 1,000 Gold Bars and 30 XP
- King
- Queen
- Pawn
- Knight
- Bishop
Luau Artifacts
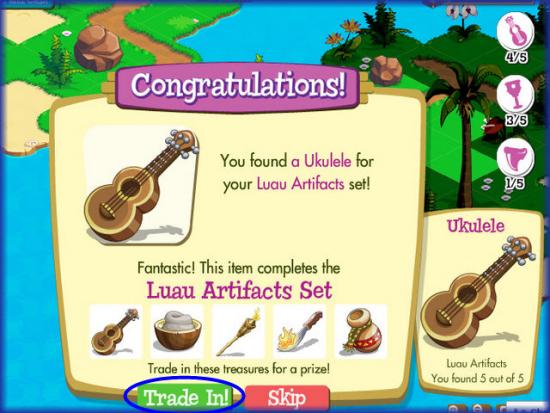
- Reward – 2,500 Gold Bars and 60 XP
- Ukulele
- Poi Dish
- Ipu Drum
- Fire Knife
- Tiki Torch
Kingly Treasure
TI_204.jpg
- Emerald Brooch
- Diamonds
- Pearl Necklace
- Sapphire Gem
- Scepter
Grand Feast
- Cooking Pot
- Grinding Stone
- Basket
- Gourd
- Stirring Spoon
Mayan Jewelry
- Necklace
- Bracelet
- Earrings
- Ring
- Headdress
Royal Furniture
- Table
- Stool
- Armoire
- Rug
- Throne
Kingly Treasure
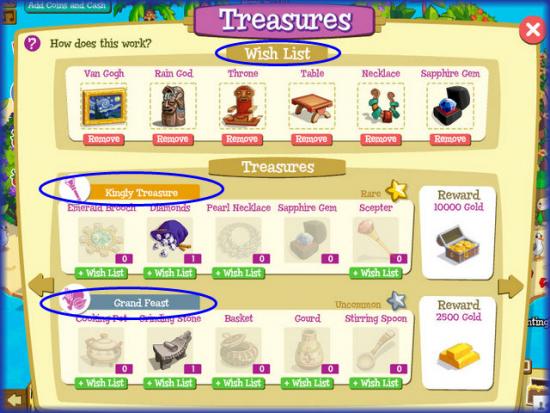
- Emerald Brooch
- Diamonds
- Pearl Necklace
- Sapphire Gem
- Scepter
Grand Feast
- Cooking Pot
- Grinding Stone
- Basket
- Gourd
- Stirring Spoon
Mayan Jewelry
- Necklace
- Bracelet
- Earrings
- Ring
- Headdress
Royal Furniture
- Table
- Stool
- Armoire
- Rug
- Throne
NOTE – More Collections will be added soon so be sure to check back here at Gamezebo!
Islands/Tiki Isle Maps
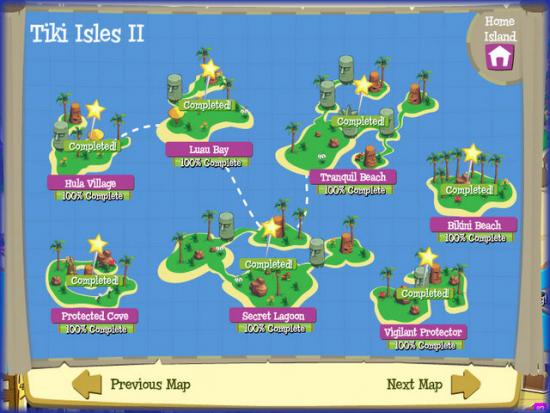
- There are 4 Tiki Island Maps which contain the Islands you can sail to and dig for treasure. You must follow them in order as each Island unlocks when you reach a certain level.
- NOTE – You will not be able to see the additional 3 maps until they unlock.
Aloha Island
- Map – Tiki Isle I
- Level Unlocked – 1
- Collections – Crown Jewel Set
- Reward for Completion – 25 XP
- Gems Needed – None
Sunny Shores
- Map – Tiki Isle I
- Level Unlocked – 2
- Collections – Tiki Statues
- Reward for Completion – 25 XP
- Gems Needed – None
Palm Paradise
- Map – Tiki Isle I
- Level Unlocked – 3
- Collections – Treasure Remnants, Royal Garb, and Famous Diamonds.
- Reward for Completion – 30 XP
- Gems Needed – 1 Orange Gem
Tiki Atoll
- Map – Tiki Isle I
- Level Unlocked – 3
- Collections – Puka Shells, Royal Garb, Famous Diamonds
- Reward for Completion – 30 XP
- Gems Needed – 1 Orange Gem
Gem Gate Isle
- Map – Tiki Isle I
- Level Unlocked – 3
- Collections – Royal Garb, Koa Wood Statues, and Famous Diamonds
- Reward for Completion – 40 XP
- Gems Needed – 1 Purple Gem
Peaceful Bay
- Map – Tiki Isle I
- Level Unlocked – 4
- Collections – Puka Shells, Hula Outfit, and Historical Sculptures.
- Reward for Completion – 20 XP
- Gems Needed – None
Guarded Shores
- Map – Tiki Isle I
- Level Unlocked 5
- Collections – Hula Outfit, Koa Wood, and Historical Sculptures
- Reward for Completion
Glimmering Shoals
- Map – Tiki Isles I
- Level Unlocked – 6
- Collections – Sailing Instruments, Hula Outfit and Historical Sculptures.
- Reward for Completion – 55 XP
- Gems Needed – 1 Orange Gem.
Hula Village
- Map – Tiki Isle II
- Level Unlocked –
- Collections – Treasure Remnants, Sharktooth Necklaces, and Royal Garb.
- Reward for Completion –
- Gems Needed –
Mahalo Cay
- Map – Tiki Isle III
- Level Unlocked -20
- Collections –
- Reward for Completion – 45 XP
Harbor Watchers
- Map Tiki Isle III
- Level Unlocked – 23
- Collections – The lost adventurers, Tiki Masks, and Jeweled Birds.
- Reward for Completion – 95 XP
Protected Cove
- Map – Tiki Isle II
- Level Unlocked –
- Collections – Alepoi’s Beach Gear, Chess Pieces, and Famous Diamonds.
- Reward for Completion –
Vigilant Protector
- Map – Tiki Isle II
- Level Unlocked – 14
- Collections – Coral Jewelry, Royal Tableware, and Lost Fine Art.
- Reward for Completion – 30 XP
Tranquil Beach
- Map – Tiki Isle II
- Level Unlocked –
- Collections – Coral Jewelry, Sharktooth Necklaces, and Royal Tableware.
- Reward for Completion – 45 XP
Bikini Beach
- Map – Tiki Isle II
- Level Unlocked –
- Collections – Coral Jewelry, Treasure Remnants, and Lost Fine Art.
- Reward for Completion – 25 XP
Secret Lagoon
- Map – Tiki Isle II
- Level Unlocked – 20
- Collections –
- Reward for Completion – N/A
Luau Bay
- Map – Tiki Isle II
- Level Unlocked -21
- Collections –
- Reward for Completion – N/A
Little Kahuna
- Map – Tiki Isle III
- Level Unlocked -22
- Collections – The lost adventures, Chess Pieces, and Treasures of Egypt.
- Reward for Completion –
- NOTE – You will need to purchase Dynamite to blow through rocks in this level. Be sure you have at least 250 coins saved up for this purchase.
Land of Lava
- Map – Tiki Isle III
- Level Unlocked -22
- Collections – Alepoi’s Beach Gear, Chess Pieces, and Treasures of Egypt.
- Reward for Completion – 25 XP
- NOTE – Magma Rocks introduced to game.
- NOTE – Multi Dig Items (Rocks and Plants) introduced into the game.
Big Kahuna
- Map – Tiki Isle IV
- Level Unlocked – 23
- Collections – Treasure Remnants, Hula Outfit, and Egyptian Treasures.
- Reward for Completion – N/A
Isle of Trials
- Map – Tiki Isle IV
- Level Unlocked – 23
- Collections – Alepoi’s Beach Gear, Tiki Masks, and Jeweled Birds.
- Reward for Completion – N/A
Isle of Smiles
- Map – Tiki Isle IV
- Level Unlocked – 40
- Collections – N/A
- Reward for Completion -N/A
Desolate Land
- Map – Tiki Isle IV
- Level Unlocked -19
- Collections – The lost Adventures, Chess Pieces, and Famous Diamonds.
- Reward for Completion -N/A
King’s Gauntlet
- Map – Tiki Isle IV
- Level Unlocked -20
- Collections – Sharktooth Necklaces, Sailing Instruments and Royal Garb.
- Reward for Completion -N/A
Deep Waters
- Map – Tiki Isle IV
- Level Unlocked – 23
- Collections – Puka Shells, Coral Jewelry, and Sharktooth Necklaces.
- Reward for Completion -N/A.
The Long Reef
- Map – Tiki Isle IV
- Level Unlocked – 23
- Collections – Luau Artifacts, Koa Wood Statues, Historical Sculptures.
- Reward for Completion -N/A
Wipeout Beach
- Map – Tiki Isle IV
- Level Unlocked -24
- Collections – Alepoi’s Beach Gear, Treasure Remnants, and Jeweled Birds.
- Reward for Completion -N/A
Tenacious Isle
- Map – Tiki Isle IV
- Level Unlocked – 21
- Collections – Luau Artifacts, Chess Pieces, and Famous Diamonds.
- Reward for Completion -N/A
The Great Palm
- Map – Tiki Isle IV
- Level Unlocked -20
- Collections – Coral Jewelry, Tiki Masks, and Treasures of Egypt.
- Reward for Completion -N/A.
Kona Coast
- Map – Tiki Isle IV
- Level Unlocked – 24
- Collections – Royal Tableware, Hula Outfit, and Lost Fine Art.
- Reward for Completion -N/A
Features Coming Soon to Treasure Isle
- Watch for additional levels to be added to the game.
- More Islands and Collections will be added soon.
- Check the Store for themed items to decorate your home Island with.
Treasures/Putting Together and Redeeming Collections
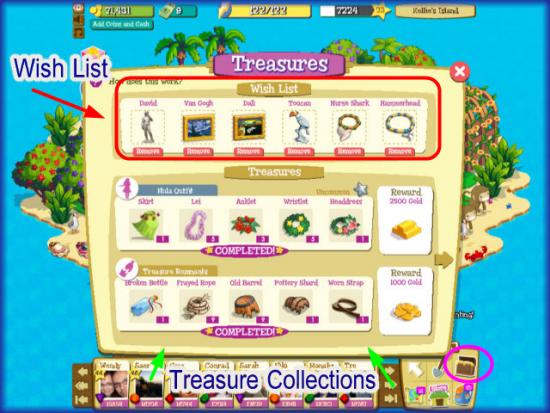
- As you dig at each Island you will be searching for treasures in collections. There are 3 Collections per Island (excluding the first two Island’s which only have one collection) and some you will find all at one Island and others you must dig at several Islands to complete a collection. There are 5 Items in each collection. When you finish a collection you may trade it in for a reward of Gold Bars, Coins and XP. If you need items for your collection you can add the items to your Wishlist and your Neighbors can gift these items to you. NOTE – Once you complete a collection you can collect the items again many times and trade in for more cash and XP but you will not be able to put missing items in the Wishlist after you have completed and traded in a collection once.
- Below you will see the name of each collection, the items in it and the reward collected for completing and trading it in.
- TIP – Completing collections is one of the fastest ways to level up in the game.
- NOTE – There are currently 22 Collections in the game and since more levels will be added soon additional collections will be added as well. This guide will be updated when new collections are added.
Treasure Isle Levels
1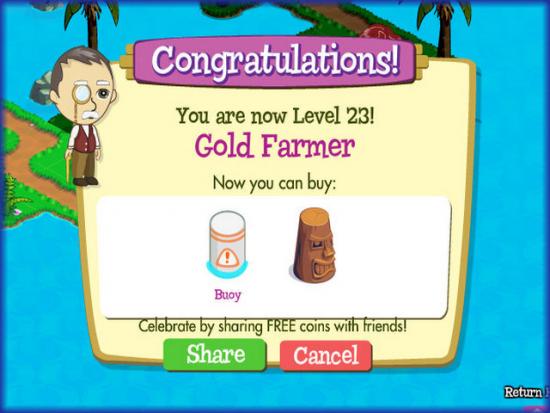
- There are currently 150 levels in Treasure Isle. NOTE – Not all level names are known at this time but all XP levels are listed below. As we learn new level names we will update the information in this section.
- Once you reach level 150 you can continue to play and earn XP so if future levels are added you will get credit for your work.
- Be sure to watch the Island maps as additional Islands and Collections will be added periodically.
Level 1
- Level Name -“Aloha Island Tutorial”aka “Treasure Hunter”
- Energy Maximum – 100
- XP – 0
- Unlocked Items -Master Hunter Badge, Kiwis
Level 2
- Level Name -“Beach Comber”
- Energy Maximum – 101
- XP – 297
- Unlocked Items – Gifts – Baby Cherries, Tiki Bar Stool, and Tiki Torch. Items to purchase – Machete, Fish Rack, Tiki Table, Tiki Juice Bar.
- NOTE – You will need to purchase the Machete in this level to proceed. Make sure you have 500 Coins set aside to purchase it when the time comes.
Level 3
- Level Name -“Gold Gatherer”
- Energy Maximum – 102
- XP – 438
- Unlocked Items -Purchase – Gloxina and Pond. Gift – Kiwis, Raspberries, and Hibiscus.
Level 4
- Level Name – “Freelance Explorer”
- Energy Maximum – 103
- XP -638
- Unlocked Items -Purchase – Moon Flower. Gifts – Tiki Aloha Sign, Reed Pagoda and Pick-axe.
- NOTE – You will need to purchase the pick-axe in this level to proceed. Be sure you have 500 coins set aside to purchase it.
Level 5
- Level Name – “Hula Hopeful”
- Energy Maximum – 104
- XP -898
- Unlocked Items -Purchase – Fishing Pole. Gifts – Tiki Surfboard, Flower Arbor, Raspberries, and baby Blueberries.
Level 6
- Level Name – “Skilled Explorer”
- Energy Maximum – 105
- XP – 1,218
- Unlocked Items – Purchase – Philodendron, Dynamite, Wooden Chair, and Wooden Lounger.
Level 7
- Level Name – “Young Adventurer”
- Energy Maximum – 106
- XP – 1,541
- Unlocked Items -Purchase – Tiki Parasol and Tent. Gifts – Butterflies and Fan Palm.
Level 8
- Level Name – “Accomplished Explorer”
- Energy Maximum – 107
- XP – 1,867
- Unlocked Items -Purchase – Bug Spray, Chinese Fern, No Dig Sign, and Orange Canopy. Gifts – Footprints.
Level 9
- Level Name – “Islander”
- Energy Maximum – 108
- XP – 2,196
- Unlocked Items – Purchase – Beach Chair and Beach Lounger. Gifts – Baby Grapes.
Level 10
- Level Name – ” Tiki Tactician”
- Energy Maximum – 109
- XP – 2,528
- Unlocked Items -Purchase – Blue Surfboard. Gifts – Faberge Egg Nest.
Level 11
- Level Name – “Shovel Sergent”
- Energy Maximum – 110
- XP 2,863
- Unlocked Items -Purchase – Flamingo Lily
Level 12
- Level Name – “Treasure Sailor”
- Energy Maximum – 111
- XP -3,201
- Unlocked Items -None
Level 13
- Level Name -“Astute Adventurer”
- Energy Maximum – 112
- XP – 3,542
- Unlocked Items -None
Level 14
- Level Name -“Hardy Adventurer”
- Energy Maximum – 113
- XP -3,886
- Unlocked Items -None
Level 15
- Level Name – ” Savvy Adventurer”
- Energy Maximum – 114
- XP – 4,233
- Unlocked Items -Purchase – Orchid, Orange Towel, Pink Towel, and Blue Towel. Gifts – Mangoes, Small Tiki Head, and Baby Kumquats.
Level 16
- Level Name -“Executive Adventurer”
- Energy Maximum – 115
- XP – 4,583
- Unlocked Items -Purchase – Stilted Hut
Level 17
- Level Name -“Renown Adventurer”
- Energy Maximum – 116
- XP – 4,936
- Unlocked Items -Purchase – Pink Cone Shell and Blue Cone Shell. Gifts – Royal Butterflies.
Level 18
- Level Name – “Treasure Trawler”
- Energy Maximum – 117
- XP -5,292
- Unlocked Items -None
Level 19
- Level Name -“Gravy Boat”
- Energy Maximum – 118
- XP – 5,651
- Unlocked Items -Purchase – Flame Tree and “No Dig” Fan Palm Tree.
Level 20
- Level Name – “Midas Touch”
- Energy Maximum – 119
- XP -6,013
- Unlocked Items – Pink Stone and Monkey
Level 21
- Level Name -“Seeker of Coin”
- Energy Maximum – 120
- XP -6,378
- Unlocked Items -Tiki Head
Level 22
- Level Name -“Coin Collector”
- Energy Maximum – 121
- XP -6,745
- Unlocked Items -Purchase – Tiki Lodge
Level 23
- Level Name – “Gold Farmer”
- Energy Maximum – 122
- XP – 7,117
- Unlocked Items -Purchase – Buoy and Tiki Statue.
Level 24
- Level Name – “Doctor Jones”
- Energy Maximum – 123
- XP – 7,491
- Unlocked Items – Rubber Tree, Blue Fan Shell, and Pink Fan Shell.
Level 25
- Level Name – “Gold Finger”
- Energy Maximum – 124
- XP – 7,868
- Unlocked Items -Large Tiki Head and Large Magma Rock.
Level 26
- Level Name -“Tiki Titan”
- Energy Maximum – 125
- XP -8,248
- Unlocked Items -None
Level 27
- Level Name – “Dynamighty ”
- Energy Maximum – 126
- XP -8,631
- Unlocked Items – Mangrove
Level 28
- Level Name – “Aztec Archaeologist”
- Energy Maximum – 127
- XP – 9,017
- Unlocked Items -None
Level 29
- Level Name – “Globe Trotter”
- Energy Maximum – 128
- XP -9,406
- Unlocked Items – Lifeguard Tower.
Level 30
- Level Name – “Grand Poo-bah”
- Energy Maximum – 129
- XP -9,798
- Unlocked Items -Reclining Statue and Dino Inner-tube.
Level 31
- Level Name – “Gold Digger”
- Energy Maximum – 130
- XP – 10,193
- Unlocked Items -None
Level 32
- Level Name – “Relic Hunter”
- Energy Maximum – 131
- XP -10,591
- Unlocked Items -None
Level 33
- Level Name – “Great Explorer”
- Energy Maximum – 132
- XP -10,992
- Unlocked Items – Mayan Calendar.
Level 34
- Level Name -“Renown Explorer”
- Energy Maximum – 133
- XP – 11,396
- Unlocked Items -None
Level 35
- Level Name -“Gem Grabber”
- Energy Maximum – 134
- XP – 11,803
- Unlocked Items -None
Level 36
- Level Name – “Desert Isle Diva”
- Energy Maximum – 135
- XP – 12,213
- Unlocked Items -Mayan Rare Artifact
Level 37
- Level Name -“Expert Explorer”
- Energy Maximum – 136
- XP -12,626
- Unlocked Items -None
Level 38
- Level Name -“Map Maker”
- Energy Maximum – 137
- XP – 13,042
- Unlocked Items -None
Level 39
- Level Name -“Pick Axe Harry”
- Energy Maximum – 138
- XP – 13,461
- Unlocked Items – Mayan Pyramid.
Level 40
- Level Name -“Long John Silver”
- Energy Maximum – 139
- XP – 13,883
- Unlocked Items -“Isle of Smiles”
Level 41
- Level Name – “Island Crooner”
- Energy Maximum – 140
- XP – 14,308
- Unlocked Items – Large head statue.
Level 42
- Level Name -“Treasurer Agent”
- Energy Maximum – 141
- XP -14,736
- Unlocked Items -None
Level 43
- Level Name -“Captain Collector”
- Energy Maximum – 142
- XP -15,167
- Unlocked Items -None
Level 44
- Level Name -“Pretty Pirate”
- Energy Maximum – 143
- XP – 15,601
- Unlocked Items – Lion Statue
Level 45
- Level Name -“Smug Smuggler”
- Energy Maximum – 144
- XP -16,038
- Unlocked Items -None
Level 46
- Level Name – “Island Hopper”
- Energy Maximum – 145
- XP -16,483
- Unlocked Items -None
Level 47
- Level Name – “Island Leaper”
- Energy Maximum – 146
- XP -16,932
- Unlocked Items -None
Level 48
- Level Name – “Island Wrangler”
- Energy Maximum – 147
- XP – 17,385
- Unlocked Items -Sunken Ship
Level 49
- Level Name -“Island Master”
- Energy Maximum – 148
- XP -17,842
- Unlocked Items -None
Level 50
- Level Name -“Native Son/Daughter”
- Energy Maximum – 149
- XP -18,303
- Unlocked Items -None
Level 51
- Level Name – ” Island Ruler”
- Energy Maximum -150
- XP -18,763
- Unlocked Items – None
Level 52
- Level Name – “Candid Cartographer”
- Energy Maximum -151
- XP -19,226
- Unlocked Items –
Level 53
- Level Name – “Creative Cartographer”
- Energy Maximum -152
- XP -19,692
- Unlocked Items – None
Level 54
- Level Name – “Brilliant Cartographer”
- Energy Maximum -153
- XP -20,161
- Unlocked Items – None
Level 55
- Level Name – “Gold Guru”
- Energy Maximum -154
- XP -20,633
- Unlocked Items – None
Level 56
- Level Name – “Maldives Master”
- Energy Maximum -155
- XP -21,108
- Unlocked Items – None
Level 57
- Level Name – “Polynesian Professional”
- Energy Maximum -156
- XP -21,586
- Unlocked Items – None
Level 58
- Level Name – “Maori Matron”
- Energy Maximum -157
- XP -22,067
- Unlocked Items – None
Level 59
- Level Name – “Kamehameha Chameleon”
- Energy Maximum -158
- XP -22,551
- Unlocked Items – None
Level 60
- Level Name – “Mayan Master”
- Energy Maximum -159
- XP -23,038
- Unlocked Items – None
Level 61
- Level Name – “Junior Curator”
- Energy Maximum -160
- XP -23,528
- Unlocked Items – None
Level 62
- Level Name – “Astute Curator”
- Energy Maximum -161
- XP -24,028
- Unlocked Items – None
Level 63
- Level Name – “Handy Curator”
- Energy Maximum -162
- XP -24,517
- Unlocked Items – None
Level 64
- Level Name – “Savvy Curator”
- Energy Maximum -163
- XP -25,016
- Unlocked Items – None
Level 65
- Level Name – “Executive Curator”
- Energy Maximum -164
- XP – 25,518
- Unlocked Items – None
Level 66
- Level Name – “Museum Master”
- Energy Maximum -165
- XP – 26,023
- Unlocked Items – None
Level 67
- Level Name – “Seeker of Gold”
- Energy Maximum -166
- XP – 26,531
- Unlocked Items – None
Level 68
- Level Name – “Artifact Artisan”
- Energy Maximum -167
- XP -27,042
- Unlocked Items – None
Level 69
- Level Name – “Chest Inspector”
- Energy Maximum -168
- XP -27,556
- Unlocked Items – None
Level 70
- Level Name – “Fantastic Adventurer”
- Energy Maximum -169
- XP -28,073
- Unlocked Items – None
Level 71
- Level Name – “Amazing Adventurer”
- Energy Maximum -170
- XP -28,593
- Unlocked Items – None
Level 72
- Level Name – “Incredible Adventurer”
- Energy Maximum -171
- XP – 29,116
- Unlocked Items – None
Level 73
- Level Name – “Marvelous Adventurer”
- Energy Maximum -172
- XP -29,642
- Unlocked Items – None
Level 74
- Level Name – “Unequaled Adventurer”
- Energy Maximum -173
- XP -30,171
- Unlocked Items – None
Level 75
- Level Name – “Doctor Savage”
- Energy Maximum -174
- XP – 30,703
- Unlocked Items – None
Level 76
- Level Name – “Considerate Conquistador”
- Energy Maximum -175
- XP – 31,238
- Unlocked Items – None
Level 77
- Level Name – “Seven Sea Sailor ”
- Energy Maximum -176
- XP – 31,776
- Unlocked Items – None
Level 78
- Level Name – “Treasure Trapper ”
- Energy Maximum -177
- XP – 32,317
- Unlocked Items – None
Level 79
- Level Name – “Timber Shiverer ”
- Energy Maximum -178
- XP -32,861
- Unlocked Items – None
Level 80
- Level Name – “Goldman and Sacks ”
- Energy Maximum -179
- XP – 33,408
- Unlocked Items – None
Level 81
- Level Name – “Dirt Delver”
- Energy Maximum -180
- XP – 33,958
- Unlocked Items – None
Level 82
- Level Name – “Hardy Explorer”
- Energy Maximum -181
- XP – 34,511
- Unlocked Items – None
Level 83
- Level Name – “Presidential Procurer”
- Energy Maximum -182
- XP – 35,067
- Unlocked Items – None
Level 84
- Level Name – “Coconut Technician”
- Energy Maximum -183
- XP -35,626
- Unlocked Items – None
Level 85
- Level Name – “Jolly Roger”
- Energy Maximum -184
- XP –
- Unlocked Items –
Level 86
- Level Name – “Jungle Bookkeeper”
- Energy Maximum -185
- XP – 36,753
- Unlocked Items – None
Level 87
- Level Name – ” ”
- Energy Maximum -186
- XP – 37,321
- Unlocked Items – None
Level 88
- Level Name – ” ”
- Energy Maximum -187
- XP – 37,892
- Unlocked Items – None
Level 89
- Level Name – ” ”
- Energy Maximum -188
- XP – 38,466
- Unlocked Items – None
Level 90
- Level Name – ” ”
- Energy Maximum -189
- XP -39,043
- Unlocked Items – None
Level 91
- Level Name – ” ”
- Energy Maximum -190
- XP -39,623
- Unlocked Items – None
Level 92
- Level Name – ” ”
- Energy Maximum -191
- XP – 40,206
- Unlocked Items – None
Level 93
- Level Name – ” ”
- Energy Maximum -192
- XP – 40,792
- Unlocked Items – None
Level 94
- Level Name – ” ”
- Energy Maximum -193
- XP – 41,381
- Unlocked Items – None
Level 95
- Level Name – ” ”
- Energy Maximum -194
- XP – 41,973
- Unlocked Items – None
Level 96
- Level Name – ” ”
- Energy Maximum -195
- XP – 42,568
- Unlocked Items – None
Level 97
- Level Name – ” ”
- Energy Maximum -196
- XP – 43,166
- Unlocked Items – None
Level 98
- Level Name – ” ”
- Energy Maximum -197
- XP – 43,767
- Unlocked Items – None
Level 99
- Level Name – ” ”
- Energy Maximum -198
- XP – 44,371
- Unlocked Items – None
Level 100
- Level Name – ” ”
- Energy Maximum -199
- XP – 44,978
- Unlocked Items -None
Level 101
- Level Name – ” ”
- Energy Maximum -200
- XP – 45,588
- Unlocked Items – None
Level 102
- Level Name – ” ”
- Energy Maximum -201
- XP – 46,201
- Unlocked Items – None
Level 103
- Level Name – ” ”
- Energy Maximum -202
- XP – 46,817
- Unlocked Items – None
Level 104
- Level Name – ” ”
- Energy Maximum -203
- XP – 47,436
- Unlocked Items – None
Level 105
- Level Name – ” ”
- Energy Maximum -204
- XP – 48,058
- Unlocked Items – None
Level 106
- Level Name – ” ”
- Energy Maximum -205
- XP – 48,683
- Unlocked Items – None
Level 107
- Level Name – ” ”
- Energy Maximum -206
- XP – 49,311
- Unlocked Items – None
Level 108
- Level Name – ” ”
- Energy Maximum -207
- XP – 49,942
- Unlocked Items – None
Level 109
- Level Name – ” ”
- Energy Maximum -208
- XP – 50,576
- Unlocked Items – None
Level 110
- Level Name – ” ”
- Energy Maximum -209
- XP – 51,213
- Unlocked Items – None
Level 111
- Level Name – ” ”
- Energy Maximum -210
- XP – 51,853
- Unlocked Items – None
Level 112
- Level Name – ” ”
- Energy Maximum -211
- XP – 52,496
- Unlocked Items – None
Level 113
- Level Name – ” ”
- Energy Maximum -212
- XP – 53,142
- Unlocked Items – None
Level 114
- Level Name – ” ”
- Energy Maximum -213
- XP – 53,791
- Unlocked Items – None
Level 115
- Level Name – ” ”
- Energy Maximum -214
- XP – 54,443
- Unlocked Items – None
Level 116
- Level Name – ” ”
- Energy Maximum -215
- XP – 55,098
- Unlocked Items – None
Level 117
- Level Name – ” ”
- Energy Maximum -216
- XP – 55,756
- Unlocked Items – None
Level 118
- Level Name – ” ”
- Energy Maximum -217
- XP – 56,417
- Unlocked Items – None
Level 119
- Level Name – ” ”
- Energy Maximum -218
- XP – 57,081
- Unlocked Items – None
Level 120
- Level Name – ” ”
- Energy Maximum -219″
- XP – 57,748
- Unlocked Items – None
Level 121
- Level Name – ” ”
- Energy Maximum -220
- XP – 58,418
- Unlocked Items – None
Level 122
- Level Name – ” ”
- Energy Maximum -221
- XP – 59,091
- Unlocked Items – None
Level 123
- Level Name – ” ”
- Energy Maximum -222
- XP – 59,767
- Unlocked Items – None
Level 124
- Level Name – ” ”
- Energy Maximum -223
- XP – 60,446
- Unlocked Items – None
Level 125
- Level Name – ” ”
- Energy Maximum -224
- XP – 61,128
- Unlocked Items – None
Level 126
- Level Name – ” ”
- Energy Maximum -225
- XP – 61,813
- Unlocked Items – None
Level 127
- Level Name – ” ”
- Energy Maximum -226
- XP – 62,501
- Unlocked Items – None
Level 128
- Level Name – ” ”
- Energy Maximum -227
- XP – 63,192
- Unlocked Items – None
Level 129
- Level Name – ” ”
- Energy Maximum -228
- XP – 63,886
- Unlocked Items – None
Level 130
- Level Name – ” ”
- Energy Maximum -229
- XP – 64,583
- Unlocked Items – None
Level 131
- Level Name – ” ”
- Energy Maximum -230
- XP – 65,283
- Unlocked Items – None
Level 132
- Level Name – ” ”
- Energy Maximum -231
- XP – 65,986
- Unlocked Items – None
Level 133
- Level Name – ” ”
- Energy Maximum -232
- XP – 66,692
- Unlocked Items – None
Level 134
- Level Name – ” ”
- Energy Maximum -233
- XP – 67,401
- Unlocked Items – None
Level 135
- Level Name – ” ”
- Energy Maximum -234
- XP – 68,113
- Unlocked Items – None
Level 136
- Level Name – ” ”
- Energy Maximum -235
- XP – 68,828
- Unlocked Items – None
Level 137
- Level Name – ” ”
- Energy Maximum -236
- XP – 69,546
- Unlocked Items – None
Level 138
- Level Name – ” ”
- Energy Maximum -237
- XP – 70,267
- Unlocked Items – None
Level 139
- Level Name – ” ”
- Energy Maximum -238
- XP – 70,991
- Unlocked Items – None
Level 140
- Level Name – ” ”
- Energy Maximum – 239
- XP – 71,718
- Unlocked Items – None
Level 141
- Level Name – ” ”
- Energy Maximum -240
- XP – 72,448
- Unlocked Items – None
Level 142
- Level Name – ” ”
- Energy Maximum -241
- XP – 73,182
- Unlocked Items – None
Level 143
- Level Name – ” ”
- Energy Maximum -242
- XP – 73,920
- Unlocked Items – None
Level 144
- Level Name – ” ”
- Energy Maximum -243
- XP – 74,662
- Unlocked Items – None
Level 145
- Level Name – ” ”
- Energy Maximum -244
- XP – 75,408
- Unlocked Items – None
Level 146
- Level Name – ” ”
- Energy Maximum -245
- XP – 76,158
- Unlocked Items – None
Level 147
- Level Name – ” ”
- Energy Maximum -246
- XP – 76,911
- Unlocked Items – None
Level 148
- Level Name – ” ”
- Energy Maximum -247
- XP – 77,667
- Unlocked Items – None
Level 149
- Level Name – ” ”
- Energy Maximum -248
- XP – 78,426
- Unlocked Items – None
Level 150
- Level Name – ” ”
- Energy Maximum -249
- XP – 79,188
- Unlocked Items – None
Game Elements
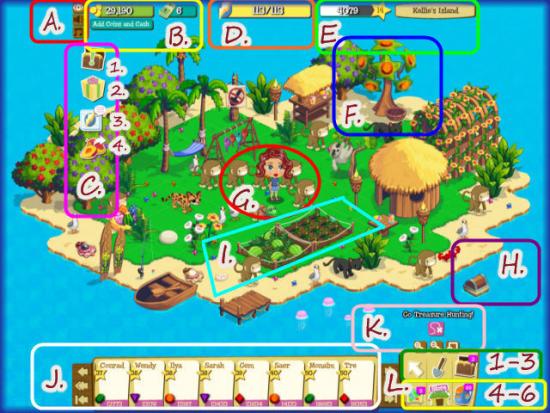
Home Island Screen
- In the image above you see the “Home” screen. This is your Avatar at home and the items placed around the scene are items gifted from neighbors in the game and purchased in the game’s shop.
- A. Game Controls – (Top to Bottom) These are basic game controls. Toggle the following on and off. Top button – Game screen quality. If your computer runs slow you may want to use this setting. Game Sounds – Click here to toggle the game’s sounds on and off. Game Music – Click here to toggle the games music on and off.
- B.Game Currency/Add More Currency – Here you will see the amount of Island Coins and Island Cash you have on hand. There is also a link to purchase additional currency if you wish. (See Game Currency Below)
- C1. Treasure Chest with “!” – This means that you have treasure you haven’t claimed yet that was given to you by a Neighbor.
- C2.Treasure Chest with “?” – This means you have treasure that you have dug up but you haven’t clicked on the chest to open it. A few moments after you dig if you do not open the chest the item will revert here.
- C3. Send Gifts – Click here to send gifts to your Neighbors.
- C4. – Send Energy packs – Click here to send an energy pack to your Neighbors. (See Energy Packs below)
- D. Energy Level – This is your current energy level. The number on the left tells you how much you currently have and the number on the right tells you the maximum you can have at a time. (See Energy for more information.)
- E. XP/Level/Island Name – Here you will find your current XP amount, Level, and the name of your Island.
- F. Gem Tree – Each player has 1 gem tree on their Home Island. It could be an Orange, Blue, Green, Purple or Red gem tree. You can click on this gem tree once per day to collect a gem for yourself and share with your Neighbors. Your Neighbors will also be able to click on your tree when they visit you as long as it is not empty.(See Gems Below for more information.)
- G. Avatar – This is your game player Avatar which can be male or female and you can design the Avatar’s appearance at any time by clicking on it and a menu will appear allowing you to edit appearance, gender, and clothing for your avatar.
- H. Daily Treasure Chest – Each player has a chest floating alongside their Island. You can click on your own chest once per day for a coin bonus which ranges from 10 to 50 coins or more per day. When you visit your Neighbors you can click on their chest once per day for a coin bonus as well. (See visiting Neighbors below)
- I. Garden Plots – Each Player has 2 garden plots in which they can purchase seeds and plant them. After a while they will mature and you can use them in your digging for energy. NOTE – If you do not claim them in time they will rot and you will lose your investment. (See Garden Plots below for more information.)
- J. Neighbor Menu – Along the bottom of your screen you will see your Neighbors. Click on the Neighbor you wish to visit and a menu will appear asking you if you wish to send them a gift or visit. Note the gems at the bottom of each Neighbors Icon. This is helpful when you need a certain color gem while you are digging and allows you to visit only the neighbors that have the color gem you need.
- K. Begin Treasure Hunting – Click the pink icon at the top to return to the Island maps and continue digging where you last left off. Below this you will see icons that allow you to zoom in or out and toggle to a full screen mode.
- L. 1-3 (Left to Right) This is the 6 square menu at the bottom right of your game screen and what each item does.
- L1. Multi Point Tool – Click here when you need to clear your cursor.
- L2. Dig Tool – Click here when you are ready to start digging or need to change your digging tool.
- L3. Collections Chest/Menu – Click here to see your collections and to access your Wish List. NOTE – If you see a number on the image as shown above you have completed collections you can trade in for cash.
- L4. Map – Click here to access the Island Maps if you wish to move to a new location to dig.
- L5. Store – Click here to purchase items for your Home Island. (See purchasing Items from the shop below)
- L6. Backpack – This is where all of your gifts are stored when you accept them as well as all fruit, energy packs, tools or anything you need to dig. Click on it to access the menu.
Digging for Treasure Menu
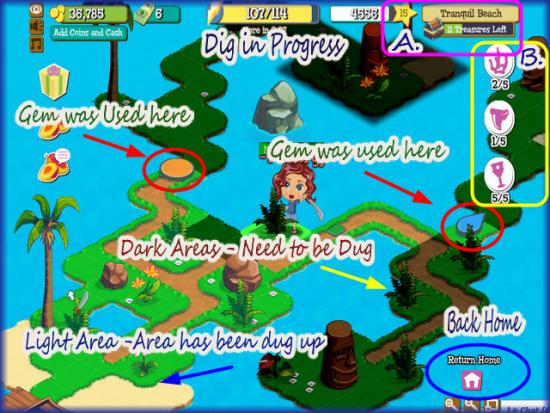
- Here is a screen of a dig taking place. Note the land is dark until it has been dug up then it will turn the light color as shown in image above.
- After a gem is used to gain entrance past a statue it will turn into a flat icon of the gem as shown above. You only have to pay the gem once and you will always be able to move back and forth after.
- A. Island Name/Treasure Left to Dig up – Here you will see the name of the Island you are digging at as well as how much treasure is on it. This number will count down as you find treasure.
- B. Collectibles found – Here you will see 3 icons representing a collection. You will see at the bottom how many you have found out of the five items you must locate to complete a collection.
Game Tips and Strategies
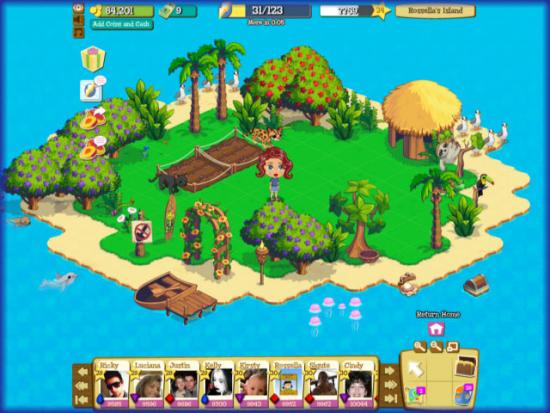
- Be a great Neighbor – It is imperative that you have as many Neighbors as possible from your Facebook friend list. Friends can gift you with food items which allow you to dig. Once you are out of energy you can’t play the game until it replenishes. If you have a large number of friends gifting you then you will level up much faster. Neighbors also gift items to you that you can use to decorate your island or which you can sell back for extra coins. Be sure to send out fruit and gift neighbors daily so they will return the favor.
- Use the gifts your Neighbors send to you to decorate your Island at first. Do not invest all of your money in decorating your Island as you will need it to purchase tools for digging. There are different tools for different digging obstacles. You can also sell the gifts to afford the digging tools if you choose.
- Keep an eye on your energy meter when digging. When you are running low on energy dig only in areas of land with no rocks, trees or plants as they cost the least amount of energy to dig at.
- Keep an eye on the live feeds. Treasure Isle offers a lot of bonuses and the ability to share them with others. Each time you click on a live feed you will receive 100 coins. You will also be able to ask for items you need to complete collections, gems and power packs via the live feeds.
- Purchase dynamite one stick at a time to save money as you won’t need it until you are past level 10 and toward the higher levels.
- Visit your Neighbors daily to collect coins and gems. If you are limited on time try to visit neighbors from each gem color so you have a supply of all colors.
- Keep fruit planted in your Garden plots at all times. Be sure you can harvest it before the crop withers and dies or you will lose the money you invested. (See Garden Plots below for more information)
- TIP – When you start to dig at a new Island go to the Tiki Statue Gates first and give it a Gem to open passage. There is no energy expended for this and you gain 5 XP points for each one you give a gem to. If you are close to leveling up this could get you to the next level faster.
- TIP – Keep an eye on the game’s energy meter as you are using fruit from your backpack to fill it up. If you have a total capacity for 110 energy and you are at 108 and need 2 more energy points to fill the meter back up to 110 use fruit that has 1 or 2 points. Do not use a Mango which is 15 points as you will forfeit the 13 points. Basically anything over your maximum limit will be lost.
- Each time you use a gem to gain access to a portion of an Island you will gain 5 XP. Keep this in mind when you are trying to level up.
- TIP – If you find you are short on Gems and you need say for example, Blue gems look at the bottom of your screen and visit your Neighbors that have blue gems next to their names. Eventually you will find a Neighbor that has a blue gem available for you. This is faster than searching the live feeds but you can also search the live feeds for gems in this situation if you choose.
- TIP – Be sure to visit at least ten of your neighbors each day. The first 10 Neighbors you visit will earn you 20 Coins and 5 XP each which is 200 coins and 50 XP. Any Neighbor you visit after 10 will earn you 5 Coins and 1 XP.
- TIP – If you are past level 6 and out of energy and you have a comfortable amount of gold coins you may want to consider looking for other Islands you can dig at that have rocks that need to be blasted with Dynamite. Once you reach level 6 you will unlock dynamite for purchase) It does not expend any energy to blow up rocks and you will earn 5 XP for each time you do it. The dynamite costs 250 coins each so be sure you can afford this without hurting your future game moves.
- TIP – Each Tiki Statue has a treasure chest under it which guarantees you will get at least 5, 15, or 50 XP from it depending on the size of the chest you find. (It costs 5 energy to dig) If you can, start digging at these Tiki Statues as this will help you to level up faster.
- Keep an eye on the messages that show up after each dig. You will see hints such as “Treasure Very Close” If you are short on energy these messages can help you decide how best to use your last bit of energy.
- TIP – When you are digging and running low on energy keep in mind that you could dig up fruit and earn a few more digs. Play until you use up every bit of possible energy. The clock will give you 1 energy point every 5 minutes so you will have a long wait before you can dig at full energy again. The best thing to do is ask your Neighbors to send you energy and work aggressively to get as much energy as possible throughout the day.
How to Plant seeds for Energy/Seed Values
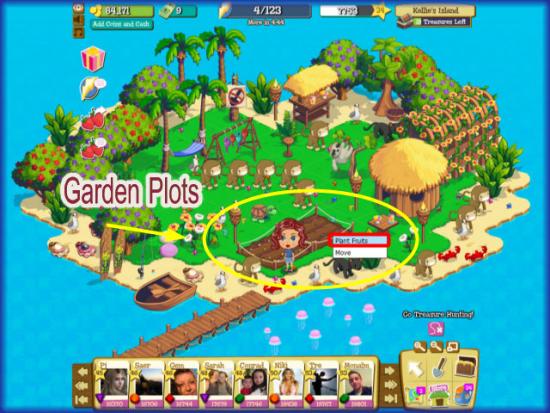
- To plant seeds in the two Garden plots click on each plot and then when the pull down menu appears click on “Plant Seeds”
- When the store menu appears choose the seeds you wish to plant.
- NOTE – You must be sure to harvest the fruit before it withers and dies. You have exactly the amount of time it took for the item to mature for it to spoil. For example if an item takes 4 hours to mature then from the moment it is ripe you have 4 hours to harvest it before it spoils.
- Spoiled fruit can not be recovered and you will lose your investment so only choose times you can be sure to make it back for harvesting.
Seed Values
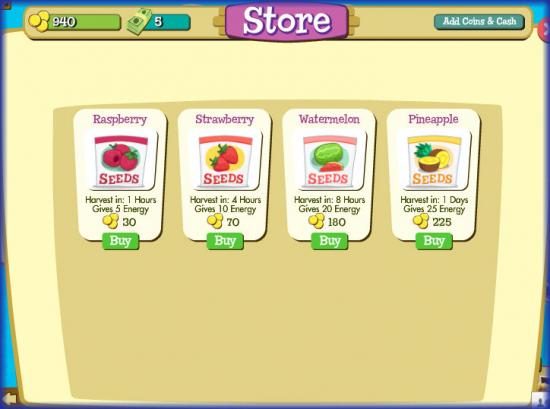
- Raspberries
- Cost – 30 Coins
- Energy – 5
- Time Until Mature – 1 Hour
- Strawberries
- Cost – 70 Coins
- Energy – 10
- Time Until Mature – 4 Hours
- Watermelon
- Cost – 180 Coins
- Energy – 20
- Time Until Mature – 8 Hours
- Pineapples
- Cost – 225 Coins
- Energy – 25
- Time Until Mature – 1 Day
Getting Started
- You will need to have an active Facebook account to play Treasure Isle. You can register here – http://www.facebook.com
- You can locate the game application here – http://apps.facebook.com/treasureisle/
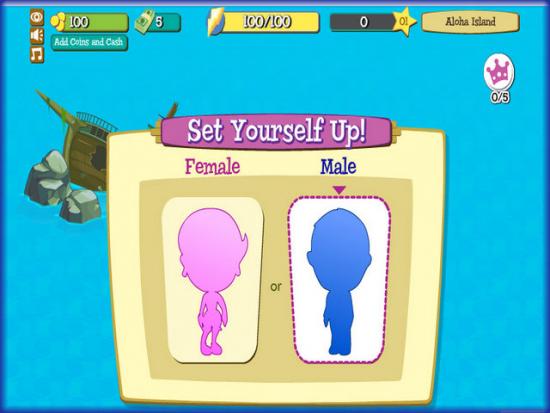
- When you begin you are given 100 Island Coins and 5 Island Cash.
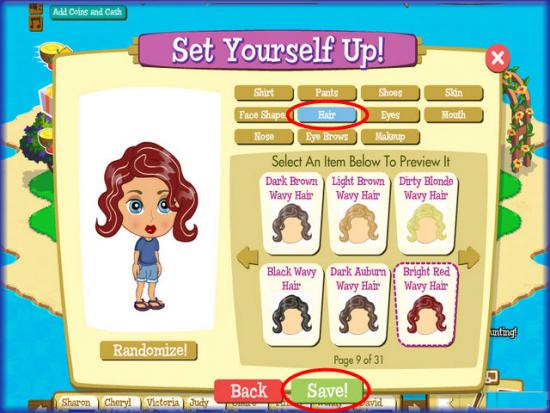
- Choose the gender of you avatar and then click on it to change the appearance. Choose the features you want and hit save when finished. You can edit this anytime you want by clicking on the avatar.
- Next you will be taken through a very brief tutorial showing you basically that you mouse over a plot of land and it will highlight a neon green color. Click on it to begin digging. Watch closely and you will see what you have dug up scroll by your avatar.
- You will quickly find the first treasure which is the crown Jewels and by the time you finish the tutorial will almost be at level 3.
- Be sure to share all achievements on the live feeds so you can attract new Neighbors to play the game with you.
- Once you have finished the game to this level be sure to click on “Add Neighbors” and invite your friends to play the game with you. (See adding Neighbors below)
- Click on the Map at the bottom left of the menu and you will be taken to the Island Maps. Click on an available Island to dig and explore.
Currency Costs
Island Cash
- 25 Island Cash – $5.00 USD
- 55 Island Cash – $10.00 USD
- 115 Island Cash – $20.00 USD
- 240 Island Cash – $40.00 USD
- 310 Island Cash -$50.00 USD
Island Coins
- 7,500 Coins – $5.00 USD
- 16,000 Coins – $10.00 USD
- 33,000 Coins -$20.00 USD
- 72,000 Coins – $40.00 USD
Energy/Energy Countdown Clock/Energy Meter
Energy Clock/Energy Meter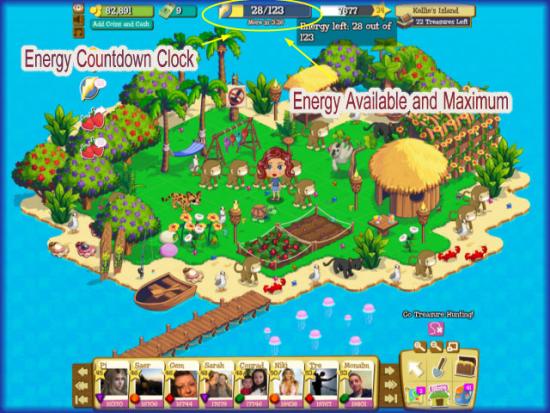
- There is an energy countdown clock at the top center of the game screen under your energy meter. It counts down in 5 minute increments.
- Every 5 minutes you will regain an energy point. This clock counts while you are out of the game as well.
- Above the clock is the meter which tells you in the first number how many energy points you have to use and the second number is the maximum amount of energy you can have.
- NOTE – You begin with 100 energy points as your Maximum energy and this increases by 1 point each time you level up in the game.
- In Treasure Isle your energy is in the form of food. The fruit your Avatar eats keeps him or her digging for you.
- There are a few activities you can do that do not cost energy such as feeding gems to Tiki Gate Statues or blowing up rocks with dynamite.
- Start digging when your meter is full. Once it is empty click on your backpack and use whatever fruit you have so you can keep digging.
- TIP – Be sure not to go over your maximum number when adding fruit as you will lose anything over your Maximum. For example if your Maximum is 120 and you have 118 energy only add 1 or 2 more energy not 15 or you will lose the difference that you go over your maximum.
Ways to earn Energy
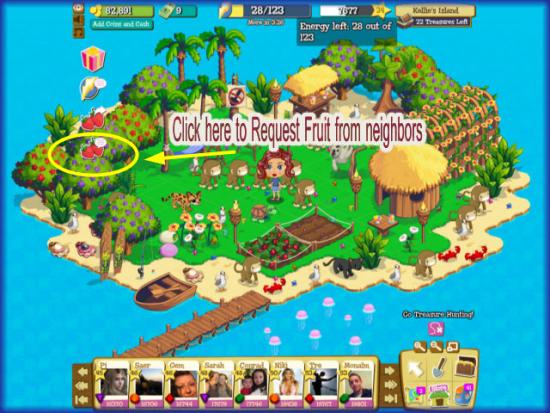
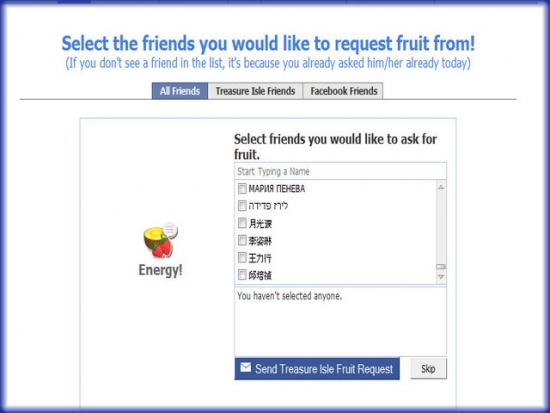
- Have your Neighbors gift it to you by requesting it.
- Keep your Neighbor numbers high to increase the odds you will receive gifts daily.
- Grow fruit in your Garden Plots.
- Wait until the energy meter replenishes itself.
Your Home Island
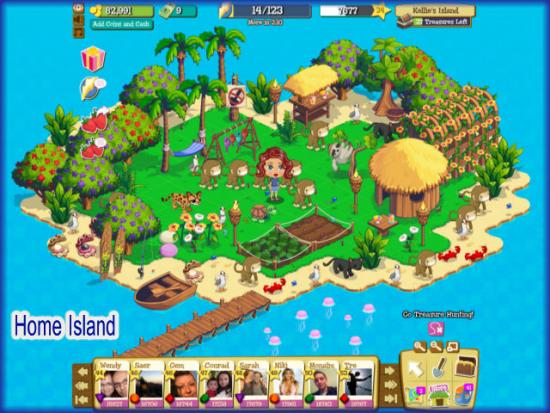
- Your Home Island is available for you to decorate with gifts that are sent by your Neighbors or items you purchase from the Island Store.
- Each person is given 2 Garden Plots to grow energy fruit. (See Planting Items)
- Each Players is given one Gym Tree that they can harvest one gem per day from and their Neighbors can harvest from daily as well.
- When you are finished digging at the other Islands click on the “Home” button at the lower right of the game screen to return to your home Island.
Game Currencies/How to Purchase Additional Currency
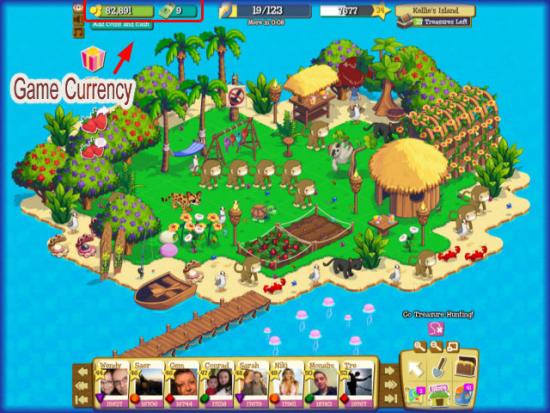
- There are two types of Currency in Treasure Isle. The game gives you 100 Island Coins and 5 Island Cash to start the game.
- Island Coins – This is the game’s primary currency and what you receive when you sell items to the store.
- Island Cash – These are Island Bills that are used to purchase higher end virtual items from the store or to unlock in the game at higher levels.
Purchasing Additional Currency
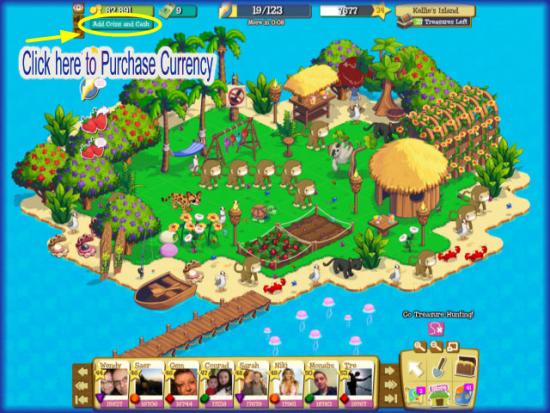
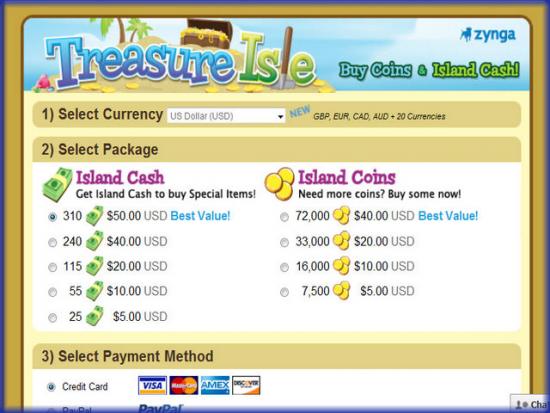
- Click on the “Add More Coins or Cash” button seen under the cash totals at the top of the screen.
- You will be taken to a screen that will allow you to purchase additional currency using either a major credit card or your Paypal Account.
- You can also earn currency by purchasing merchandise or taking surveys shown at the bottom of the page.
Backpack/Inventory
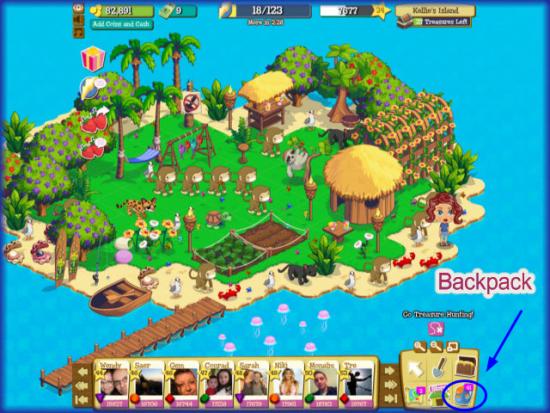
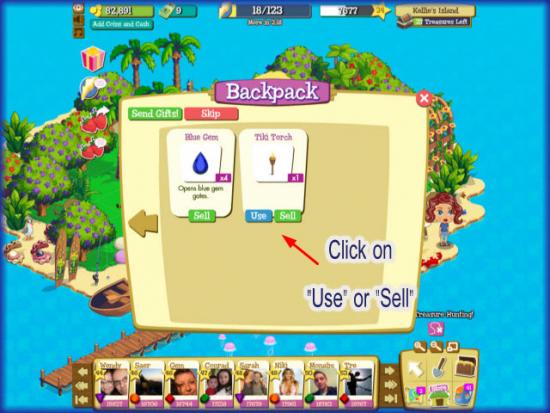
- Your backpack is your Inventory for items you find when you dig or items gifted to you by your Neighbors.
- Click on the backpack icon at the lower right side of the game screen menu.
- Once you are here simply click on “Use” or “Sell”
- You will need to use your backpack frequently when digging to see your energy inventory.
How to purchase items from the Store/Placing items on your Land
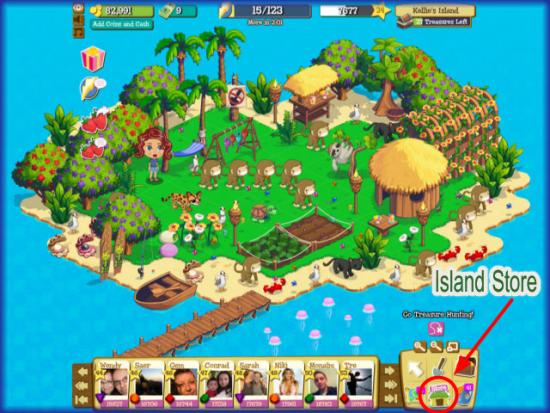
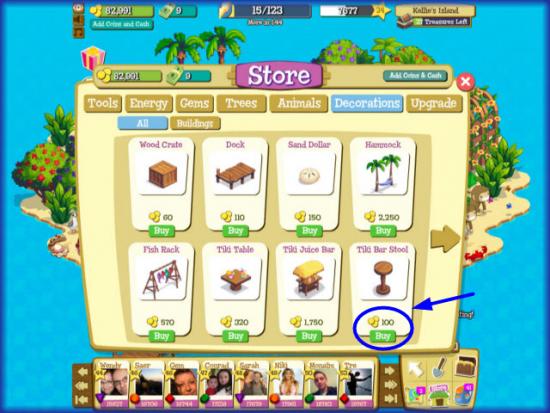
- To Purchase Items from the store click on the “Store Icon” shown in the image above.
- A store menu will appear. Click on one of the categories along the top to find the items you need.
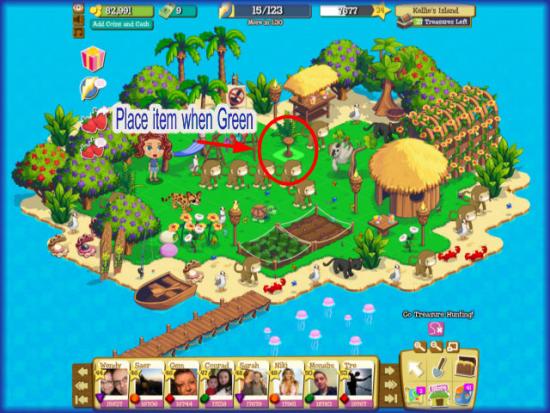
- Once you find an item click on “Buy” and the item will stick to your cursor.
- Move the item around your Island where you want to place it until you see a green outline around it. This means it is ok to place the item. If you can’t place the item in that location you will see a red square.
- The item is not deducted from your total until you click somewhere on the land to lock in the purchase.
- If you change your mind before you click on the land simply exit the game or click on the white arrow in the menu to undo the action.
How to sell items back to the Store
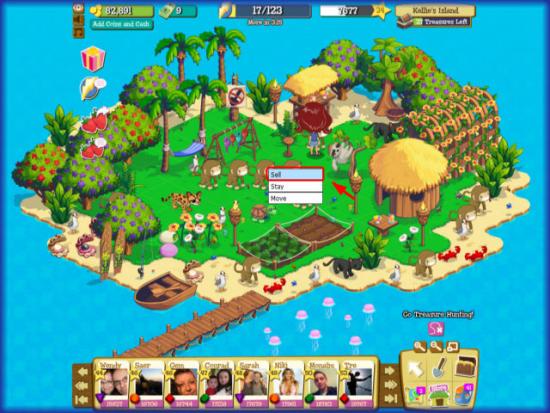
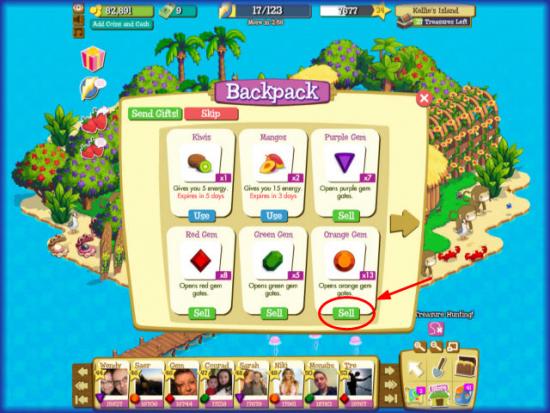
- At anytime you can click on an item that is placed on your Home Island and a pull down menu will appear with the option to sell an item.
- If the item is in your Backpack simply click on “Sell” and the coins will be credited to your balance.
Mayan Islands
- May 2010 the Mayan Islands were added to Treasure Isle’s list of Maps you can travel to in order to dig for treasure.
- This means more collections have been added as well.
- Watch this guide for additional updates as new Islands will continue to be added to the game.
Mayan Isle (I)
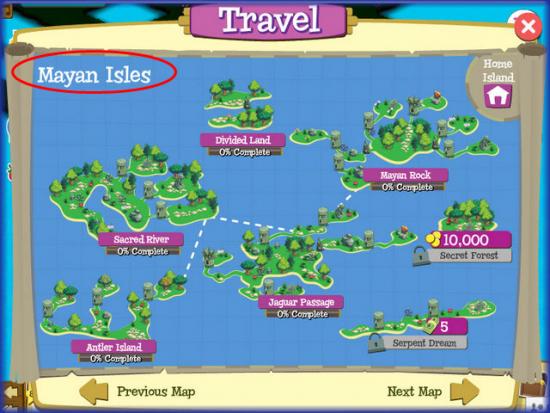
- Note that some of the Islands will require you to pay either coins or Cash to unlock them.
Divided Land
- Map – Mayan Isle
- Level Unlocked – 25
- Collections – Royal Collection, Grand Feast Preparation, and Kingly Treasures.
- Cost – None
Sacred River
- Map – Mayan Isle
- Level Unlocked – 26
- Collections – Fine Weapons, Cave Explorer, and Mayan Jewelry.
- Cost – None
Antler Island
- Map – Mayan Isle
- Level Unlocked – 20
- Collections – Ancient Containers, Cave Explorer, and Mayan Jewelry.
- Cost – None
Mayan Rock
- Map – Mayan Isle
- Level Unlocked – 20
- Collections – Royal Furniture, Grand Feast Preparation and Shipwreck Loot.
- Cost – None
Jaguar Passage
- Map – Mayan Isle
- Level Unlocked – 20
- Collections – Ancient Containers, God Statues, and Mayan Jewelry.
- Cost – None
Secret Forest
- Map – Mayan Isle
- Level Unlocked – 20
- Collections – Unknown
- Cost – 10,000 Coins
Serpent Dream
- Map – Mayan Isle
- Level Unlocked – 20
- Collections – Unknown
Cost – 5 Island Cash
Mayan Isles II
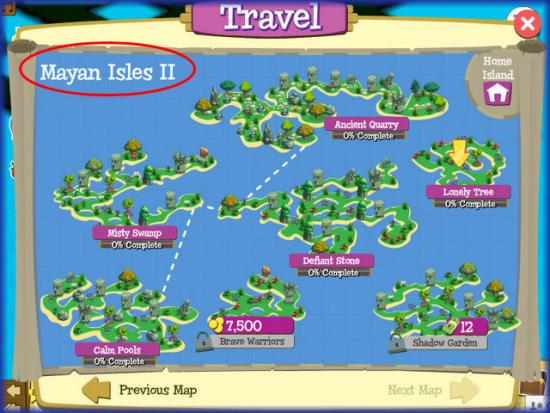
- Note that you will have to pay to unlock some of the Islands on this map.
Ancient Quarry
- Map – Mayan Isles II
- Collections – Fishing Gear, Royal Medallions, and Queen’s Dowry.
- Cost – None
Brave Warriors
- Map – Mayan Isles II
- Collections – Unknown
- Cost – 7,500 Coins
Calm Pools
- Map – Mayan Isle II
- Collections – The Lost Hunter, Ceremonial Items, and Kingly Treasure.
- Cost – None
Defiant Stone
- Map – Mayan Isle II
- Collections – Musical Instruments, Royal Medallions and Faberge Eggs.
- Cost – None
Lonely Tree
- Map – Mayan Isle II
- Collections – Musical Instruments, Ceremonial Items, and Faberge Eggs.
- Cost – None
Misty Swamp
- Map – Mayan Isle II
- Collections – The lost Hunter, Ceremonial Items and Faberge Eggs.
- Cost – None
Shadow Garden
- Map – Mayan Isle II
- Collections – Unknown
- Cost – 12 Island Cash
Mayan Isles III
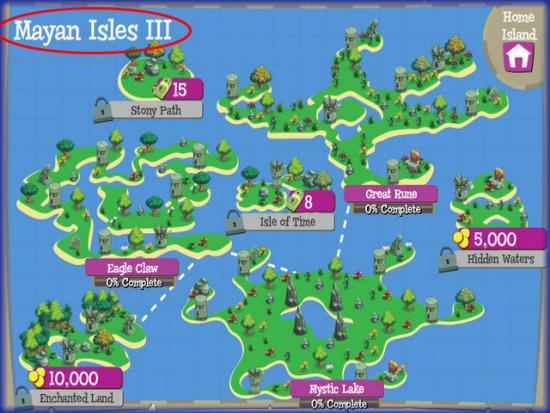
- Note – You must Unlock all of the items on Mayan Isle II before you will be able to see the map for Mayan Isles III.
Eagle Claw
- Map – Mayan Isles III
- Collections –
- Cost – None
Enchanted Land
- Map – Mayan Isles III
- Collections –
- Cost – 10,000 Coins
Great Rune
- Map – Mayan Isles III
- Collections – Unknown
- Cost – None
Hidden Waters
- Map – Mayan Isles III
- Collections – Unknown
- Cost – 5,000 Coins
Isle of Time
- Map – Mayan Isles III
- Collections – Unknown
- Cost – 8 Island Cash
Mystic Lake
- Map – Mayan Isles III
- Collections – Unknown
- Cost – None
Stony Path
- Map – Mayan Isles III
- Collections – Unknown
- Cost – 15 Island Cash
Mayan Isles IV
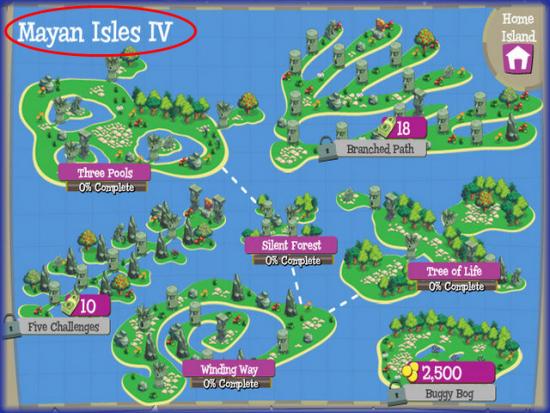
- NOTE – You must unlock all of the Islands on Mayan Isles III before you will be able to see the Map for Mayan Isle IV.
- Watch for additional maps to be added to the game.
Branched Path
- Map – Mayan Isles IV
- Collections – Unknown
- Cost – 18 Island Cash
Buggy Bog
- Map – Mayan Isles IV
- Collections – Unknown
- Cost – 2,500 Coins
Five Challenges
- Map – Mayan Isles IV
- Collections – Unknown
- Cost – 10 Island Cash
Silent Forest
- Map – Mayan Isles IV
- Collections – Unknown
- Cost – None
Three Pools
- Map – Mayan Isles IV
- Collections – Unknown
- Cost – None
Tree of Life
- Map – Mayan Isles IV
- Collections – Unknown
- Cost – None
Winding Way
- Map – Mayan Isles IV
- Collections – Unknown
Cost – None
More articles...
Monopoly GO! Free Rolls – Links For Free Dice
By Glen Fox
Wondering how to get Monopoly GO! free rolls? Well, you’ve come to the right place. In this guide, we provide you with a bunch of tips and tricks to get some free rolls for the hit new mobile game. We’ll …Best Roblox Horror Games to Play Right Now – Updated Weekly
By Adele Wilson
Our Best Roblox Horror Games guide features the scariest and most creative experiences to play right now on the platform!The BEST Roblox Games of The Week – Games You Need To Play!
By Sho Roberts
Our feature shares our pick for the Best Roblox Games of the week! With our feature, we guarantee you'll find something new to play!Type Soul Clan Rarity Guide – All Legendary And Common Clans Listed!
By Nathan Ball
Wondering what your odds of rolling a particular Clan are? Wonder no more, with my handy Type Soul Clan Rarity guide.


