
Best Horror Games On Itch.io – July 2026
Across a bounty of subgenres.![Haze Seas Accessories Tier List [Best Accessories to Equip]](/wp-content/uploads/2026/07/haze-seas-accessories-tier-list.jpg "Haze Seas Accessories Tier List [Best Accessories to Equip]")
Haze Seas Accessories Tier List [Best Accessories to Equip]
The accessories with the best stat buffs in Haze Seas.
![[Roblox] Evomon Shiny Hunting Guide – Including Prismatic and Pris Shinies!](/wp-content/uploads/2026/06/evomon-shiny-hunting-guide.jpg "[Roblox] Evomon Shiny Hunting Guide – Including Prismatic and Pris Shinies!")

The Trail Tips, Cheats and Strategies
The Trail is an exploration and expansion simulator from 22cans. In this game, players will travel across a rugged, undeveloped country in search of a place to call home that they can help build and then use as a base …


- Prefer Gamezebo on Google

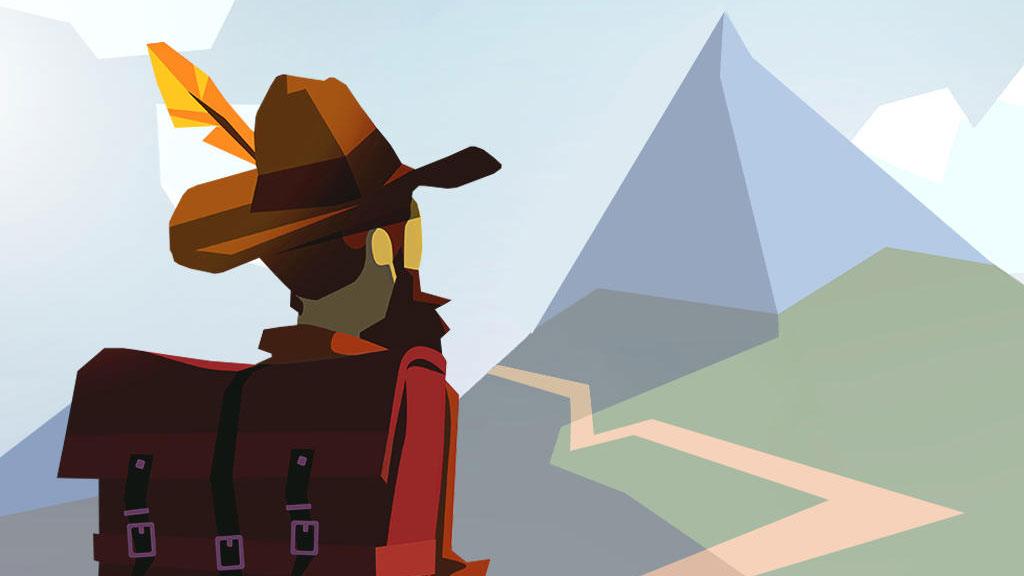
The Trail is an exploration and expansion simulator from 22cans. In this game, players will travel across a rugged, undeveloped country in search of a place to call home that they can help build and then use as a base of operations to continue their ongoing journey. Gamezebo’s The Trail Tips, Cheats and Strategies will help you thrive throughout your travels.

- Enjoy the journey, but also strive for money. The Trail is somewhat open-ended and grandiose in its goals: it gives you a giant list upon first starting which includes distant goals like settling in a town and having a family. For the beginning and much of the game, however, you can boil most goals down to making money. You’ll need money to cross rivers along your path—with ticket prices increasing as you progress from $200 up to $5,000 before you ever reach a settlement—and to purchase items from other players when you stop at camps.
- How to make money: To earn the currency in the game, chits, you’ll need to pick up items along the trail, craft them into better objects when at a camp, and then sell them during the trading mini-game. Crafted objects always sell for more than their base ingredients, and the more you craft an object, the higher its sale value. Unless you’re specifically saving an item for a future craft project—like a hat you don’t have enough ingredients for just yet—you should always craft and sell every ingredient in your bag. If you have extra ingredients that can’t be applied to a craft project, sell them outright for a few more chits and to free up space in your bag.

Tips on the trading mini-game: When you stop at a camp to rest, you’ll see a box at the top of the screen that says “Trading Time.” Hitting “Go!” before the timer runs out will enter the trading mini-game, where you’ll see a conveyor belt and some other campers listed. This game allows you to offload items from your pack to free up space, make money off those items, and purchase items from other players that they are similarly putting out on the conveyor.
- Place your items on the far-left side of the conveyor. This assigns them the highest purchase price possible and gives players more time to buy them. You want the other players to buy your items, since unpurchased items go into the wood chipper and award less money.
- If you accidentally place something on the conveyor you don’t want to sell, just drag it back into your rucksack. You won’t have to pay its cost, you’ll just take it back.
- The trading timer will stop counting down when you’re in a menu, so you can spend all the time you need crafting or equipping items before trading. Even if you craft something that will take multiple minutes to finish, as long as you stay in a menu, you can wait until it’s ready and then exit and select “Go!” Your bag menu does not count since it just pops up on-screen; if you’re organizing your bag, the timer will still count down.

- But if you do miss out on trading before the timer runs out, you can use your map to jump to another campground and trade there. The trading timer will reset every time you enter a campground, even via fast travel from the map, so you can jump around and trade at different camps multiple times in a row. If you really need a specific item and aren’t finding it, this can be a good way to seek it out.
- The trading game doesn’t last very long. It’s sometimes easier to decide if you want to focus on selling items or buying and then do just that. Since, as we mentioned above, you can always jump to another camp to trade some more, you’ll always have a chance to sell off your items before hitting the trail again.
- Know what you need, and what it looks like, before entering the trading game. We forgot, for instance, what skirts looked like but we desperately needed to buy one. Item names are not visible during trading and there’s rarely enough time to tap and hold on items to pull up their info box before they are purchased or hit the wood chipper. You want to be able to recognize and grab an item as soon as it’s on the conveyor.
- Don’t worry if you aren’t winning the trading game by earning the most money. You’ll naturally earn more money as you learn to craft higher-value items. And the gift you receive for first place isn’t always a huge deal—it’s often just a higher-level ingredient or an item for the quest you’re currently on.

Always craft equipment if you can. You don’t want to be out on the trail and have your hat or pants break. When you stop at a camp, craft any equipment you need first—e.g., my hat is about to break—and then craft equipment even if you don’t need it. Equip the highest durability version (biggest number) of every item you have and then sell off the rest in the trading game. Equipment is generally high value, will earn you good money, and is often purchased by other players (so it will be worth more than something no one wants), so there’s never any harm in having extras lying around.
- To see how close your equipment is to breaking, enter your clothing equipment menu. Each item will have a colored bar and number on it. The number indicates how many km the item has left—so, if it has a “1.2” on it, you can walk about 1.2 km until it breaks completely. (However, some items are more durable and on those, this number will decrease slower.) The colored bar indicates what percentage of the item’s max health is left. So, if you crafted an item and it came out at 1.2 durability, it will be green at 1.2, turn orange at about 75% (0.9), then red as you drop below 50% (0.6). This means that high durability items will turn red at higher numbers, but it doesn’t mean they are closer to breaking. Thus, the number is generally a better indicator of how close something is to breaking than the color, and a red 2.5 item is still better than a green 1.5. The more times you craft an item and the higher its crafting level, the higher its durability will be.
- If your equipment is very close to breaking, you’ll receive a warning under your stamina/heart meter that highlights which piece of equipment is worn down. If you tap this icon, you’ll be given the option to repair your equipment by paying favors. However, we recommend simply making new equipment and equipping that instead: don’t waste favors on repairing your current equipment.
And if you can only have one item, make it a hat. Hats, even the earliest hats you can craft, give you additional hearts of stamina. These hearts are essential for making it along the trail without passing out. Although you can eat to regain stamina, a hat can often mean the difference between making it safely between camps or having to eat all of your ingredients just to survive.

You can become over-encumbered. If you ever notice your hearts turning orange or red instead of green, this is an indication that you’re carrying too much stuff. Your character’s weight is a total of your equipped clothing and anything in your bag / pockets / tool hooks. You can see any item’s weight by holding down on it and waiting for its info box to pop up: weight is the leftmost icon, indicated by a gray weight symbol. Larger numbers on darker weights are heavier, and stacks of items will show their total weight (so a stack of three raw meat, which weigh 2 lbs each, will show a 6).
If you become over-encumbered and your hearts turn orange or red (your bag also usually flashes the same warning color, as will your walking speed meter), your stamina will drain at a much faster rate on the trail. It’s generally better to drop some items than to continue on in this state, or else you’ll have to continually eat to maintain your stamina—or risk collapsing from exhaustion.
Try to carry at least one back-up food item with you. As the game progresses, the trail between camps gets longer and longer. You should have improved equipment as the game goes on that will make these longer treks possible, but you’ll also want to keep some extra snacks on hand just in case you run low on stamina. There are usually food items on the trail, like apples, berries, or raw meat, but you’re never guaranteed to find these (or find them before someone else does). We like to start off from camp with at least one item in our pack for emergencies, or a few if we have the space. Remember, you can always eat or drop something if you don’t want it anymore, but you can’t magically make food appear from thin air.

- To eat an item from your bag, open your inventory and tap and hold on the item you want to eat. When its info box pops up, tap the fork-and-knife icon to eat it. You’ll see some hearts appear and float up to be added to your total stamina. Edible items will always have a white outline around them. If you want to know how much stamina a certain item awards before eating it, tap and hold on the item and then view its detailed info via the “i” button instead. Fun fact: if a food item is sticking up out of the top of your overly-full bag, you can tap-hold on it while walking and without opening your inventory first.

What happens when you run out of hearts? If you run out of stamina/hearts, your character will collapse from exhaustion. You’ll be given the option to revive and travel to the next camp immediately by paying 2 favors, or you can wait and “hope no other players steal your stuff.” Your items will slowly trickle out of your bag, so they don’t all fall out at the same time–and some items may not fall out before you revive. It takes less than 10 seconds to revive, but in that time anyone who walks by can steal the items that have fallen out of your bag. Once your hearts refill, you’ll stand back up and can pick up anything lying on the ground that remains, then continue walking to the next camp. Your equipped items do not fall off of you; only items in your bag.
The outlines on items you find on the trail have different meanings. White outlines mean an item is edible. Keep an eye out for these if you are running low on stamina.
- Blue outlines mean the item is used in a crafting recipe that you know. (Note: some white outlined items, like apples, are also used in crafting recipes, but they will always be white even if you know their recipe).
- Red outlines mean the item is part of your current quest; any red outlined items that you pick up will go to Koko the bird instead of into your bag.
- Items with no outline have no special benefit to you at this time—they are likely part of a crafting recipe that you do not yet know.
- All items, however, can always be sold, so even if you pick up an item without an outline, you can sell it during trading. But generally you’ll want to focus on outlined items since they will be worth more to you in the long run.

Think about item availability before you choose your next quest. The quests that Beatrice offers usually require items in the order you come across them—easy, early-game items in the first few quests, and branching out to later-trail items as you progress. However, you’ll sometimes come across a quest with items that are not available to you yet—such as feathers that are only found beyond Eden Falls, even if you’re nowhere near Eden Falls. Although you can get these items in other ways, through trading with players or watching ads, it’s usually easier to select a quest with items that you can find while walking the trail.
- Also remember that any quest items you pick up will go to Koko directly and you won’t have access to them in your bag. So, if you select a quest that requires rabbit hides, you will not have access to rabbit hides until the quest is complete. That means you won’t be able to craft equipment that requires rabbit hides, either.
- You can quit a quest by tapping and holding on Koko the bird and then hitting the red “X” in his info box. He will fly away, leaving you all the quest items you collected in your bag. This is useful to know if you’re desperate to craft something that needs the items he’s holding. You can then select a new quest (or re-select your old quest) at the next campsite (or if you quit your quest at a camp, you can select one right away—Beatrice will appear as soon as you quit the quest). The problem with quitting a quest is that all items Koko was holding will be level 1 instead of whatever level you actually picked up, resulting in worse versions of crafted items.
Managing bag space: A large part of your journey through The Trail will be managing storage and deciding what items are worth hanging on to.
- When collecting items, remember that anything you need for your current quest—items with a red outline—will go to Koko and will not take up space in your bag.

- Later bags that you craft, like the military bag, will offer you the ability to stack items. So, instead of having five twigs taking up tons of space, you can merge those twigs into a single twig with the number five on it. To stack items, simply place two same items next to one another so they are touching an no other items are between them. They will automatically merge together. (If this does not happen, try moving the items slightly. If it still does not work, your bag may be too low level to stack items.) Stacked items still weigh the total of all the items in a stack, so a single stack of 5 raw meats will still weigh 10 lbs (2 lb x 5 = 10).
- One other benefit of item stacks is that they will arrange your items in order of star rating, from highest to lowest. So if you’re crafting a recipe and drag a stack onto the blueprint, the highest star rating version of that item will be assigned to the recipe. If you need more than one of the item and drag again, the next highest star rating will be assigned, etc. This makes it easier to craft high quality items without checking what every ingredients’ star rating is individually.

- If you want to unstack items, there are a few things you can do. First, using an item in a crafting recipe or selling it will unstack one item and put it in the assigned location. So if you’re trying to trade an entire stack, you’ll have to drag the stack onto the conveyor belt numerous times to sell each item. If you just want to separate a stack, in order to, say, store something in a chest, you can choose “freeform” from the crafting recipe list and drag your stack onto this blueprint. Then drag the items from the blueprint back into your bag—but be careful not to put it on top of its like item, or they will merely re-stack.
- You don’ t have to drag items all the way into your bag when collecting them along the trail. If you drag over to the bag and let go, gravity will drop the item into your bag. This can save time when you’re trying to collect multiple items at once.
- But if you need more space, try dragging items all the way to your bag and “shoving” them down as you put them in to squish things together. Often items will fall into your bag and leave empty space between them. If you drag down while dropping an item in, it will shove into these empty spaces and open up more room.
- When taking items out of your inventory, you can pull things through the bottom or side walls of the bag—you don’t have to take it out of the top. This is useful for preventing items from being knocked off the top as you pull things out.
Item collection tips: The other big part of the game is simply collecting items on the trail. Our main suggestion is to grab things quickly, especially if you see something you really need. Other travelers can and will grab things before you get to them, including wood you’ve just chopped or animal fur you’ve just slingshotted.
- Try to collect from trees and animals that are in front of you. The game re-positions your viewpoint after you exit the wood-chopping and slingshotting mini-games so you are facing forward. If you go after a tree behind you, you’ll have to turn back around in order to collect your resources. This gives other travelers lots of time to swipe the items out from under you. If you collect from trees in front of you, you’ll still be facing them when you exit the mini-game and can put the items in your bag immediately.

- You can grab items from pretty far away. There’s no “must be within arms’ reach” rule; your character can grab things that are way, way out of realistic physical reach. If you see an outline or item in the distance, try grabbing it. Sometimes holding for a second and then dragging helps. We’ve been able to pick up very small, very distant objects by dragging them repeatedly, snagging them away from travelers that were farther ahead of us and much closer to the item.
- You won’t always be alerted to the raccoon. Sometimes the game shows a mini-scene where he runs up and grabs your quest item. Oftentimes, however, you’ll just come across a raccoon tail in the wild. If he’s present, he’s always hiding behind a rock, so keep an eye out for his tail behind the rocks you pass.

The “complete for 2 favors” option is powerful, but expensive. When crafting an item, you’ll often see a pop-up near the bottom of the screen: “complete for 2 favors.” If you tap this button, you’ll automatically receive every item you still need for the recipe, and all items will be 5 stars. This can allow you to craft a very high quality version of an item, but the cost is high—favors are purely premium currency and you will only receive 10 for free in the game (there is, so far, no other way to earn favors except by paying real money). If you choose to use this option, do so only on a recipe where you have none of the items, in order to get the most value from it. Also, be careful not to tap the button by accident—there is no confirmation pop-up, you’ll just lose 2 favors and get the items immediately.
The craft menu has two shortcuts to show what can be crafted. On the left-hand side of the menu will be a list of items; these are all available to be crafted with the items you currently have on hand. Tapping one of these will open its blueprint without entering the recipe list. And in the recipe list, any recipes under “Available” that are blue can currently be crafted with what you have.
To talk to other travelers / your neighbors: Tap and hold on your character until a wheel of conversation options appears. These are things like “Hello,” “Sorry,” “Taunt,” etc. Tap on one of these and your character will say a random phrase from that category.
Don’t stress too much over the type of house you build. When you make it to a settlement and purchase a home, you’ll have to select your “job.” This only determines what type of item mill you have in your house and what items are required to upgrade it. For instance, we chose “tanner” and we have a tannery in our house that turns beaver fur into tanned leather. And our house requires that tanned leather to upgrade.

- However, you can use the mills in anyone’s home in your settlement to make upgraded items—woven cloth from the weaver, molding from the carpenter, etc.—so you are not stuck with just your profession’s goods. If you hate killing animals then you may want to avoid the tanner profession, but otherwise, your job does not have a huge impact on what you can do in the game.
You won’t get to live in Eden Falls. It might be a little confusing when you arrive at “Eden Falls” and it has a totally different name, but from what we’ve gathered: it seems like each settlement has a maximum number of 20 citizens that can live there. Once a settlement fills up, the next person to arrive at the Eden Falls map point will get to found a new town. Then that town fills up, and another one is formed. So you will get to live in whatever town was formed just before you arrived. If you are lucky, you might get to be the founder! All the towns “exist” at that spot on the map but they will be different for each person playing.
Try to save up $5,500 before you get to a settlement. It will cost $1,000 to purchase your home. The remaining $4,500 we recommend spending on a “private chest.” This will allow you to store items in your home without other people having access to them. If you purchase the much-cheaper “shared shelving” (tempting at only $300), anyone can walk into your home and take any items you place on your shelf. The private chest will be locked and inaccessible to your neighbors and will allow you to stock up on items you need for future quests, equipment crafting, etc.

If you’re thinking about buying the $7.99 premium package, wait until you make it to Eden Falls. You’ll be given a new package called the “New Settler Offer,” which gives you $15,000 instead of $5,000, and some great equipment—a jacket with 5 pockets and no durability, trousers with four hooks and no durability. You’ll only get 33 favors instead of 88, but that’s still enough to buy a nice hat from the trader to complete your outfit. If you prefer more favors, the initial offer is probably preferable.
You can go home anytime. After you settle in a town and have a home, the settlement menu will be added to the upper-right side of your screen. Tapping this button and then selecting the single home option will send you to your house. You can also see what your town is currently working on collecting from this menu and tap on it to go directly to the trade box. To leave the town and return to traveling, either tap on the trail button at the bottom of the settlement menu or drag to the far right of your town and an option to exit will appear.
Congratulations!
You have completed Gamezebo’s guide for The Trail. Be sure to check back often for game updates, staff and user reviews, user tips and much more here at Gamezebo!

More articles...
-
Best Horror Games On Itch.io – July 2026
Across a bounty of subgenres. -
Haze Seas Accessories Tier List [Best Accessories to Equip]
The accessories with the best stat buffs in Haze Seas.