
Grow A Garden 2 Base Price List
What's the most valuable crop?![Evomon Best Starter [Leafbun, Blazpup, or Bubble?]](/wp-content/uploads/2026/06/evomon-best-starter.jpg "Evomon Best Starter [Leafbun, Blazpup, or Bubble?]")
Evomon Best Starter [Leafbun, Blazpup, or Bubble?]
Grass-type, Fire-type, or Water-type?![Evomon Tier List [META and BEST Evomon]](/wp-content/uploads/2026/06/evomon-tier-list.jpg "Evomon Tier List [META and BEST Evomon]")
Evomon Tier List [META and BEST Evomon]
The Evomon dream team.
![[Roblox] Evomon Shiny Hunting Guide – Including Prismatic and Pris Shinies!](/wp-content/uploads/2026/06/evomon-shiny-hunting-guide.jpg "[Roblox] Evomon Shiny Hunting Guide – Including Prismatic and Pris Shinies!")
Tradewinds Caravans Tips Walkthrough
In Tradewind Caravans you will travel along the Silk Road from Damascus to the Eastern edge of China, finding adventure, glory, and maybe fortune along the way. The series retains its trademark humor and plot depth, but this time the game experience varies tremendously from character to character, making it six complete games in one. STRUCTURE OF THE GUIDE This guide is divided into the following sections: 1. Getting Started: Choosing a Character. 2. General Gameplay Tips for All Character…


- Prefer Gamezebo on Google

a:1:i:0;a:2:s:13:”section_title”;s:24:”Tradewinds Caravans Tips”;s:12:”section_body”;s:84417:”
In Tradewind Caravans you will travel along the Silk Road from Damascus to the Eastern edge of China, finding adventure, glory, and maybe fortune along the way. The series retains its trademark humor and plot depth, but this time the game experience varies tremendously from character to character, making it six complete games in one.
STRUCTURE OF THE GUIDE
This guide is divided into the following sections:
1. Getting Started: Choosing a Character.
2. General Gameplay Tips for All Characters
3. General Exploring and Land Travel Tips for All Characters
4. General Battle Tips for All Characters
5. General Trading Tips for All Characters
6. City Guide.
SPOILER SECTION:
7. Character Guide: A detailed section for each character with specific Battle, Trading, and Exploring tips for their major quest.
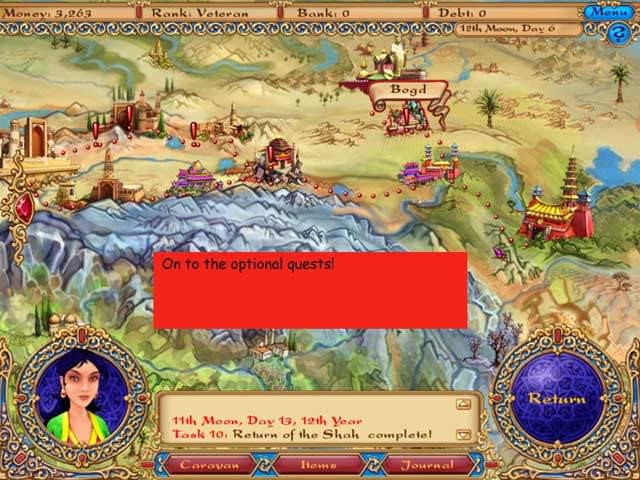
8. Optional Quest Tips. You may play the optional quests during a Main Quest or save them for the end. This section will tell you whether an optional quest requires primarily battle or trading skills.
Have fun!
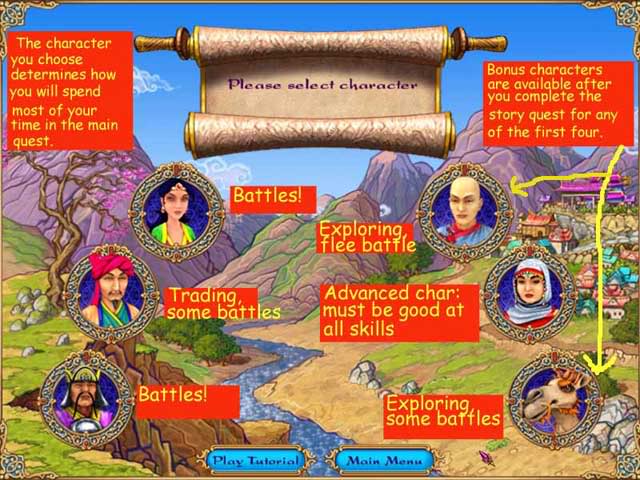
1. GETTING STARTED: CHOOSING A CHARACTER
TRADE OR BATTLE? CHOOSE YOUR CHARACTER WISELY!
Players in Tradewinds Caravans can choose to concentrate on battles, trading, or exploring. That’s a big difference from earlier games in the series that required players to balance trading and battle skills. It all depends on which of the major characters you choose.
Each character has its own required Main Quest. This is a complex series of tasks that can take you several “years” of gameplay to complete.
We recommend choosing a character that will play the kind of Main Quest you’re interested in, completing that Main Quest, and then playing through the various optional quests. That way you’ll have built up lots of resources before you get to optional quests that may require skills you find less interesting. And you can always start a new story with a different character if you want to experience different aspects of the game.
CHARACTER INTRODUCTION
The character you choose will determine whether you spend most of your time fighting, trading, or a mix of both. Each character has a mandatory Main Quest to complete. Finishing the Main Quest doesn’t end the game, though—it unlocks the Open Road mode where you can spend your time exploring and completing optional quests.
Characters are listed in the order they appear on the selection screen, listing first the left column and then the right.

Delaram al Din
Female, heir to the throne
Special ability: Greek Fire (battle weapon)
Main Quest: Recapture the throne after her father’s assassination
Gameplay: Battles! You can get through the entire Main Quest without doing any trading, since you will earn more than enough money on the battlefield and with random treasure to complete the quest.
Sakeem
Male, high ranking servant in the Milioni household
Special ability: Silver Tongue (makes enemies run away)
Main Quest: Help your spoiled rich kid master survive his various political assignments—and do your own trading on the side to build your personal wealth.
Gameplay: Want to travel to exotic locations? Live by your wits? Are good at multitasking? Prefer trading to fighting? Then Sakeem is the character for you! Lots of cities, lots of trading, and you can avoid almost all battles until you’re rich enough to hire a nearly invincible army.
Chabudei Kiyat
Male, member of the royal Mongol family
Special ability: Berserker (increase battle ability of all troops)
Main Quest: Help determine the true heir after the murder of your cousin.
Gameplay: Want to ride to the rescue of innocents, always keep your word, battle your way across a Kingdom and stray true to the warrior code? And do it all against frantic time deadlines that could be a matter of life and death? The Chabudei Kiyat character gives you all of that. You can do the entire Main Quest without ever making a single trade except to sell some of the spoils of war. One of the faster paced quests; this one includes intrigue, suspense, and a sophisticated storyline.
Yu Qian (bonus character)
Male, monk in training
Special ability: Heal allies on the battlefield
Main Quest: Recover missing spiritual relics and return them to your monastery.
Gameplay: This bonus character unlocks after you complete the Main Quest for one of the first four characters. Are you pure of heart and fleet of foot? Enjoy exploring and helping people, but not really interested in battle or trade? Join this monk on a journey to recover spiritual relics. You will mostly run from battle, and trade only enough to buy necessities. Meet interesting people and travel the length of the silk road.
Jinpa Jasaret (Advanced character)
Female, wife of a merchant
Special ability: Toxic payload (battle weapon)
Main Quest: Find a cure for your children’s illness after your husband goes missing.
Gameplay: A working mom’s life is all about balance, and Jinpa’s is no exception. She must balance being a merchant, a warrior, and an explorer as she travels from West to East and back again in search of a cure for her 3 children’s mysterious (and magical) illness—and tries to earn a living at the same time. One of the longest and most challenging Main Quests, you’ll have to be good at all 3 aspects of the game to succeed. We recommend not starting Jinpa’s story until you’ve completed at least one of the others and gotten familiar with the game mechanics and the various cities and services.
Prince Ao (bonus character)
Male, Dragon Prince (transformed into a camel)
Special ability: Dragon Storm (battle weapon)
Main Quest: Find a way to break the spell and turn back into a dragon.
Gameplay: This bonus character unlocks after you complete the Main Quest for one of the first four characters. The adventure is decidedly surreal. You can play this quest without any trading whatsoever. Some battle will be necessary, but very little long term strategy is needed. The quest is most like a scavenger hunt, with a lot of time-based challenges that send you hurrying back and forth around the countryside with very little time to do anything but get on to the next objective. Lots of humor, good characters.
CHOOSING YOUR FIRST CHARACTER
- If you prefer trading to battle, choose Sakeem the merchant. This gameplay will be most like previous Tradewinds.
- If you enjoy battles, choose either Delaram al Din (female) or Chabudei Kiyat (male). Chabudei’s Main Quest has more time pressure, but otherwise both are similar. Each is dealing with royal politics and has to fight a lot of battles, as well as use long-term strategy to gradually build up the strength of their armies.
- Jinpa Jasaret is an advanced character. You will have to be good at all three aspects of the game, trading, battles, and exploring to complete her Main Quest. We recommend completing one of the other characters first to get used to the gameplay.
2. GENERAL GAMEPLAY TIPS FOR ALL CHARACTERS
GENERAL TIPS ON WINNING THE GAME
- Initial Setup. When the game first came out, the battle sequences were too hard for most players. Starting with version 1.001, the game automatically starts in “Easy” mode (which is really standard mode, with the other mode being the advanced battle mode). We recommend playing the game in Easy mode.
- Different characters, different strategies for success. Because each character has a different special ability and a different Main Quest, different strategies will work for them. In general, the more true you are to your character, the easier it will be to complete his/her required Main Quest. See our Character guide below for specific tips for each character.
- Ranks. As you progress through the game, your character earns new ranks, like Veteran, Master, etc. These are sort of like earning medals, since the total amount of your money will go up and down throughout the game.
- Multitasking. You may accept more than one Task at a time, but you will start out with one—your character’s required Main Quest. Tasks may be broken up into multiple Objectives.
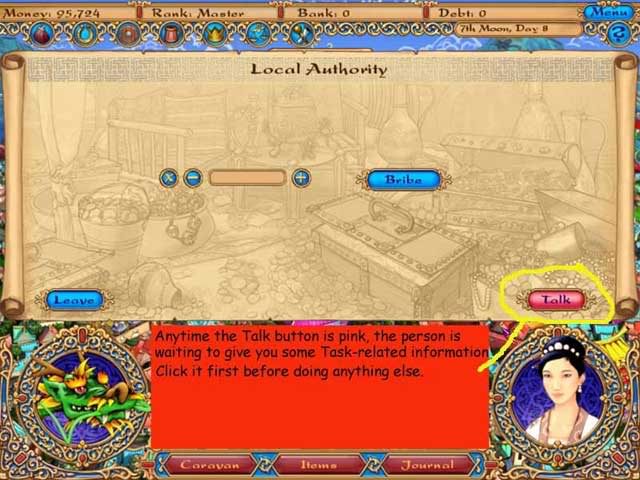
- Don’t Buy What You Can Get For Free. When you enter a building, first look at the TALK button on the righthand side. If the button is pink, the person there has something to say to you. Talk to them before you do anything—they may give you what you’re looking for for free or at a discount. If the button is blue, you can talk to them, but it’s probably just regular conversation.
- Follow the Instructions Exactly. The Quest will give you an instruction like, “Go work for my brother Hakeem in Turfan. When you are done, he will give you 1,000 taels. Bring it back to me, and I will give you the Medallion of Many Mysteries.” If you get one like that, it won’t matter if you have 1,000 taels of your own—the character will only accept the ones that come from Hakeem. This can be true with tradegoods, too. If the character will accept something you already have in inventory, they’ll let you know.
- Decline optional tasks until you’ve completed your Main Quest. There is one exception. Sakeem the merchant will have to accept optional tasks that offer him extra money, or he won’t be able to complete his Main Quest. But for the others, follow the Main Quest straight through, then use the resources you’ve earned to complete the additional optional quests.
- The optional quests are the same for all characters, but they may start and end in different cities. In a few cases, particularly the horse race, some of the combinations are simply impossible to complete in the required time. If you get one that seems impossible, just abandon it. None of the optional quests are required to win the game.
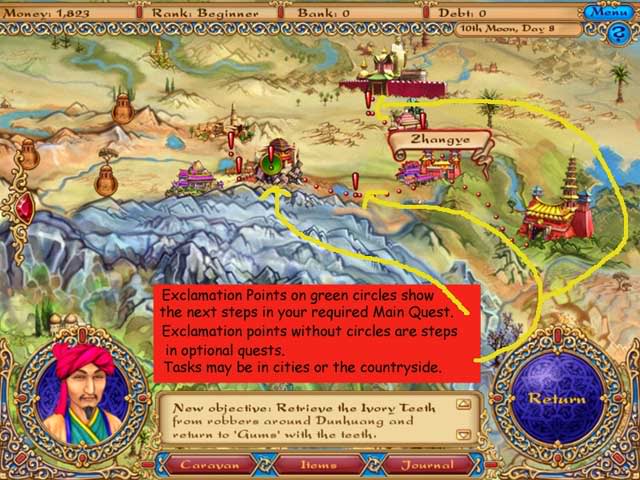
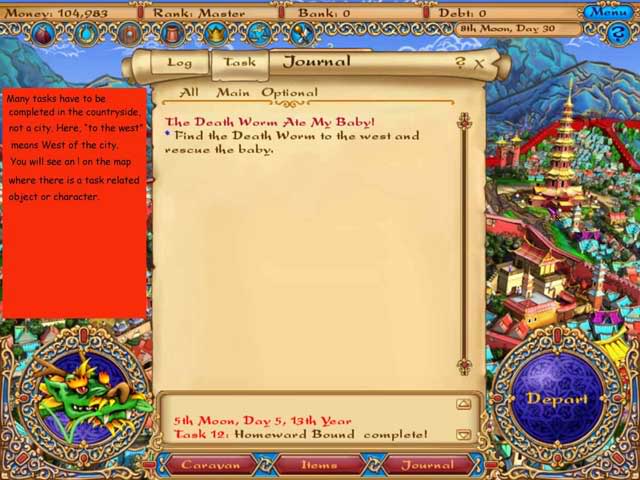
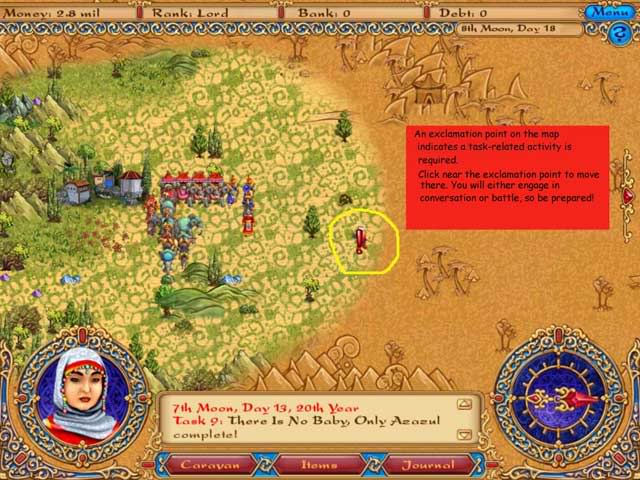
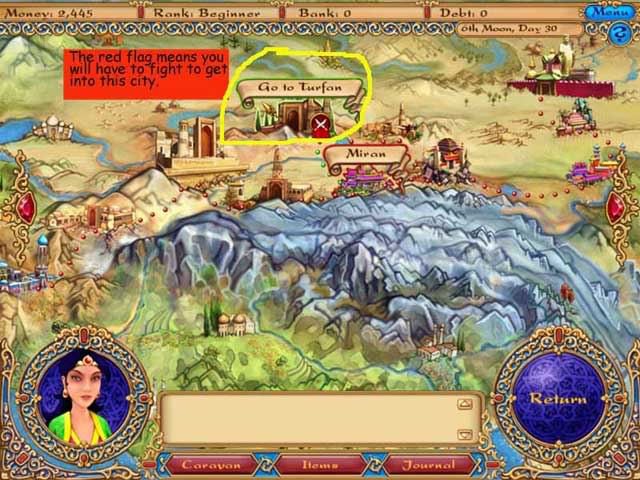
- Watch those exclamation points! When you enter a city, some buildings may be marked with an exclamation point. If it is a just a red exclamation point, there is something associated with an optional task there. If it is a red exclamation point on a green circle, there is something associated with your Main Quest there. You will also see the exclamation points on the map as you travel between cities.
- The Two Quests Glitch. There is one known glitch in the game. If a character is going to offer you an optional quest at the same time and in the same building as that character will also give you information about your Main Quest, you may have to accept the optional quest in order to get the character to tell you about the Main Quest. If you can tell from the map that there is a required task in a building but you keep getting offered an optional task there, just go ahead and accept it. Then leave the building and re-enter, and you should be able to continue with the required task.
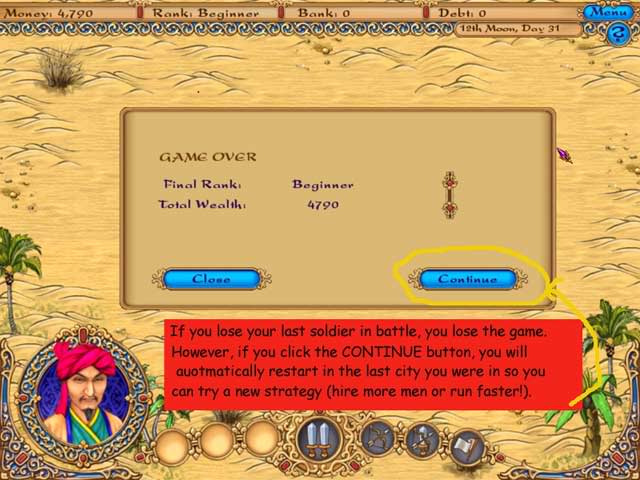
- “Last Man Standing” is you plus one soldier. If you lose all the soldiers from your army, you will technically lose the game. However, you will be offered the option to “continue,” which will take you back to the last city you were in and restart you from there.
- Loading a saved game. You can also restart yourself by loading a saved game from the main menu. Some players like to save the game at various important stages so they can go back and replay with a different strategy if desired. Many play straight through without ever saving except at the end of a playing session.
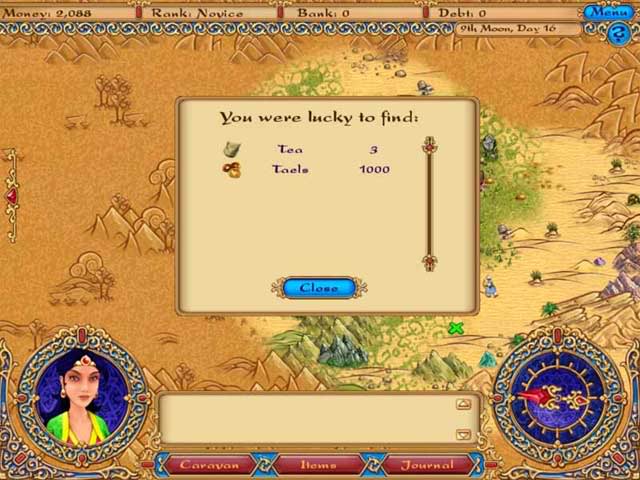
- Earning money. You earn money in four different ways. First, when you are just exploring the countryside traveling between cities, you may see twinkling coins, brown bags, or treasure chests. These may hold money, trading goods, or junk, but they’re usually worth checking out. Second, as you complete various tasks you may be given money as a fee or a reward. Third, when you win in battle, you will usually seize some money and trading goods. And finally, there’s normal trading, where you buy goods in the market and sell them later. (See picture.) See our sections on General Trading tips for tips on which goods to buy where, and the Character Guides for specific money strategies for each character.
- Playing on after the main quest is completed. You win the game by completing your character’s required Main Quest, but you can still keep playing if you have more optional quests
GENERAL TIPS ON USING YOUR JOURNAL
- Any place where you have a task to complete will be marked with an exclamation point. However, you should still read your journal before leaving each city to make sure you understand your current tasks.
- The journal is available at any time, either while you’re in a city or exploring the countryside.
- The journal will automatically delete old log entries to make room for new ones. The current objectives will still be listed on the Tasks page. You can look at all tasks, just the ones for the Main Quest, or just the optional ones.
3. GENERAL EXPLORING TIPS FOR ALL CHARACTERS:
- The Silk Road was a trading route that traveled through many different empires. The game map is divided roughly into 3 sections, West, the Central Region and East. Unlike previous Tradewinds games, Caravans is landbased.
- Time passes while you travel. While you are in a city, time stands still (that is, it’s all one day). So take as much time as you need to trade, get healing services, read your journal, etc. Once you press the DEPART button and you are travelling the silk road, time passes as you move across the map.
- Different cities have different services (healer, market, temple, etc). See our Cities Guide for specifics.
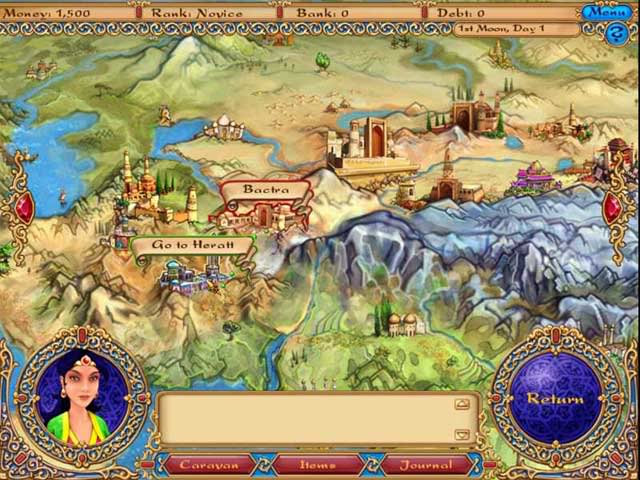
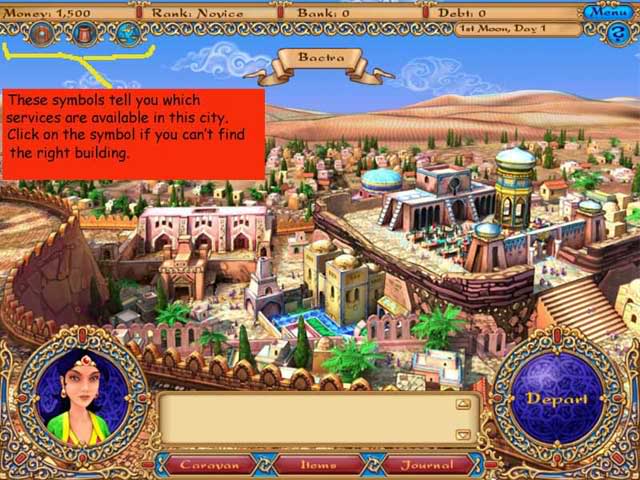
- Choose a destination. Each city will have trade routes to only one or two other cities. Each city has a name tile that will pop up when you hover your cursor over it. The city where you are has a name tile outlined in red on the map. Cities that you can travel directly to have name tiles outlined in green. In many cases you will have to enter a city, then exit it again in order to access its routes further east or west. Click on a green city to start travelling towards it. (See picture.)
- Exclamation points on the map. When you look at the map, a red exclamation point on a green circle shows you a location where you must complete an objective for your required Main Quest. A red exclamation point with no background is an objective for one of the optional quests. There can be many exclamation points on the map at one time, and they may appear in both the city and the detail views. (See picture.)
- If a city is marked with a red flag over the door, it is controlled by your enemies, and you will have to fight a battle to enter that city.
- Moving through the countryside. Once you choose a destination, you will see a more detailed map and be able to see your caravan’s position. To travel, click anywhere on the map and your main character will head towards that point. The rest of your caravan will follow him/her. You can change direction at any time just by clicking a new spot.
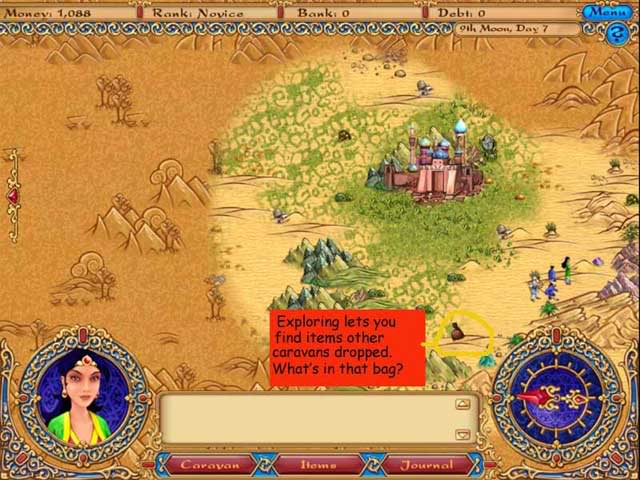
- Finders keepers. While you are exploring the detail map, you may find items that other caravans dropped. These are yours to keep. They may include money or trade items. You may also meet people who are important in the quests.
- Seeing details. As you travel across the detailed map, only one part of it is “lit up” in high detail. As your character moves, you will see more details in new areas. (See pictures.)
- The route between cities is not precisely fixed, because you have some room to wander around in. However, you will see more time pass if you don’t take the most direct route.
- You can also reenter the city you just left by returning to it. This is especially useful if you got in an early battle and need to visit a healer before setting out again.
- All cities are entered from the Southern (lower) side. Sometimes you may want to go North and circle around the city to avoid an enemy.
- Keep an eye out for shadowy figures in the area just outside the high detail. These are usually enemies waiting to fight you.
- Enemy armies that include magical creatures are usually the strongest. There are dragons in the East, Karakorum (a kind of buffalo/unicorn) in the central region, and Garuda (giant birds) in some parts of the West. If the enemy has such a creature, you will see it on the map. Later in the game you will also fight Death Worms. Before the battle you will see the ground rippling as they move.
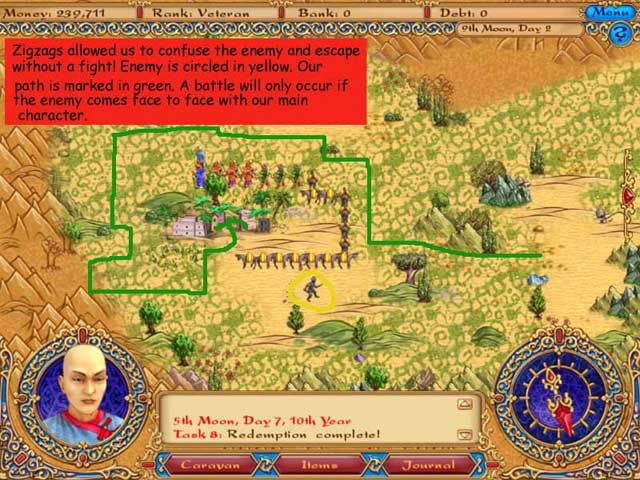
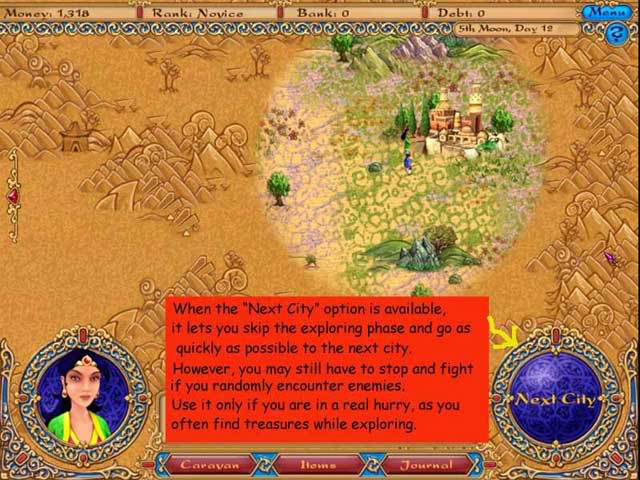
- Making battles happen when you want them. You will only be forced into battle if your enemies can come head to head with the leader of your caravan. If they just come next to the middle of your caravan, the fight won’t start. So if you do want to fight, click right next to them, and that will bring your leader face to face with theirs. If you don’t want to fight, click as quickly as you can towards the city you are headed for. You may also be able to confuse a following enemy with a zig zag pattern.
- Next City. When it is available, you can use the Next City button to go directly to the next city by the fastest route. You may still have to fight a battle on the way. However, it’s almost always better to do your own exploring until you’ve completed your character’s Main Quest. First, you can outrun a lot of enemies if you don’t want to fight. Second, you may find valuable items or more characters. The Next City button is most useful once you’re in the Open Road mode at the very end of the game. (See picture.)
4. GENERAL BATTLE TIPS FOR ALL CHARACTERS
- Initial Setup. When version 1 of the game was released, many people found the battles too difficult. So starting with version 1.001, the standard mode for the game is “Easy Mode,” which makes magical creatures just slightly easier to defeat. We recommend that everyone use this default, even if you like battle games.
- “I hate the idea of hand to hand combat.” If you liked earlier versions of Tradewinds, but don’t like the hand to hand fighting in Caravans, it may help to think of the soldiers as magical spirits rather than human soldiers. This fits with the game because when a warrior’s health goes to zero, he doesn’t actually die—he literally disappears from the battlefield in a puff of smoke. If you prefer to think of him as teleporting back to homebase, go ahead and do so. Although there is a lot of detail in the battle scenes, there are no images of injury or mortality.
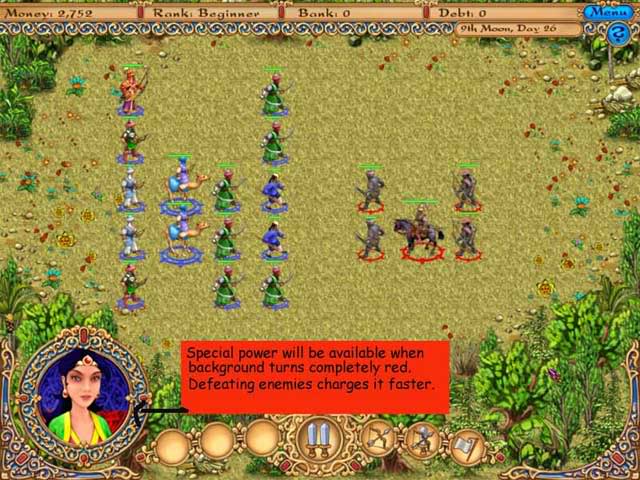
- Types of Soldiers. There are four different types of soldiers: infantry (hand to hand fighters, including swordsmen on foot), cavalry (any mounted warrior, including camel archers, siege elephants, and horse warriors), archers on foot (from simple bowmen to Elite Archers) and magical specialists (healers and summoners, who call down lightning bolts). These always form three basic lines in your battle formation: infantry in front, then cavalry behind them, and then foot archers and magical specialists behind the cavalry. (See picture.)
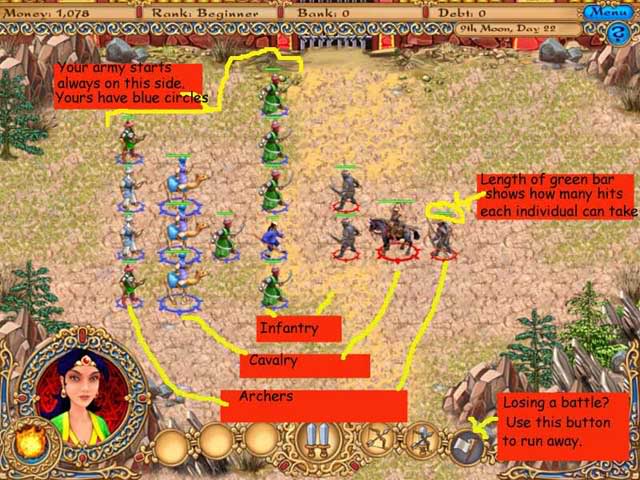
- The battle screen. Your army will always start on the left side of the screen. Your soldiers will have blue circles around their feet. The enemy soldiers will have red circles around their feet. So the starting battle screen will always show, from left to right, your archers, your cavalry, your infantry, the enemy’s infantry, the enemy’s cavalry, and the enemy’s archers. (See previous picture.)
- Your Army. You can hire a maximum of 15 soldiers for your army. If you want to “trade up,” you can go to the Guild and release one of your current soldiers so you can hire one of a different type. Two soldiers of the same type have the same capability even if they cost a different amount. (See picture.)
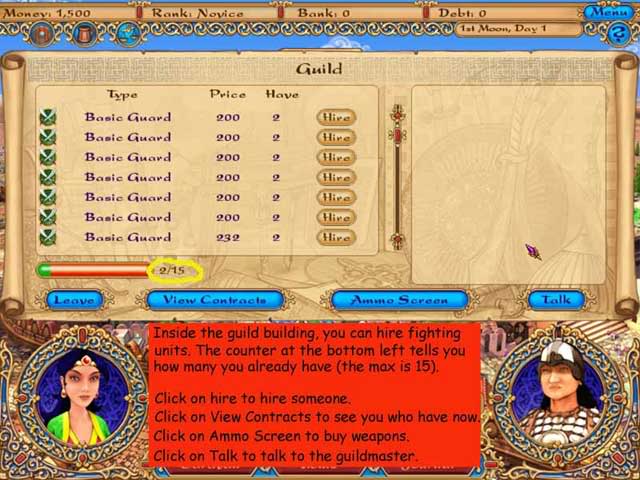
- Soldier ranks. On the Guild screen and in the Journal, soldiers are ranked as Green (weakest), Yellow, or Red (strongest). They will have a logo showing their type: Infantry (two crossed swords), Cavalry (sword crossed with a bow), or Archers (bow only).
- “Assemble a caravan.” If you are required to “assemble a caravan,” you will need 8 to 10 soldiers. You can just keep hiring them until the objective is met.
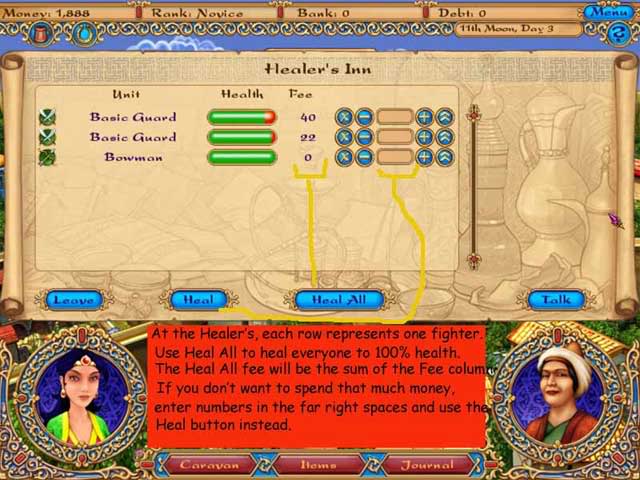
- Healing after battle. Once you hire a soldier, sooner or later you will have to find a healer. As on the Guild screen, each row represents one fighter. Use Heal All to heal everyone to 100% health (the sum total of the Fee column). If you don’t want to spend that much money, you can specify how much you want to spend on each soldier, then use the Heal button instead of Heal All (see picture.)
GEARING UP: TIPS ON AMMO, SPECIAL BATTLE ITEMS, AND SPECIAL ABILITIES
- Special Items: there are various special battle items available for sale in the temples. In the beginning, you’re better off using your money on ammo. However, do buy the cushy cushion, which causes healing services to cost less, as soon as you can spare the money. There will also be some character specific tips on magical items in the Character Tips section. You can check which special items you own on the Sell Screen in a Temple or in your journal.
- Using Ammo: If you purchased special weapons on the Ammo Screen at the Guild in a city, they are available through the buttons on the left side of the battle screen. These usually come into play about half way through the Main Quest when you start having enough money to buy them. These special weapons are available for sale on the Ammo Screen of the Guild building. (See the City Guide for Cities that have Guilds.) They cost from 5,000 to 15,000 each and you can only use them for one battle, so they’re quite expensive in the early part of the game.
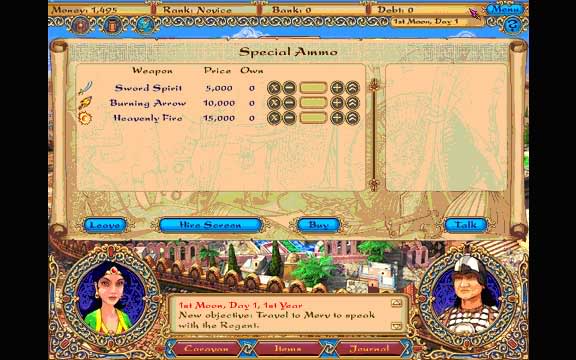
- 4 Heavenly Fire will win almost any battle. Once you have a lot of money, keep an inventory of 8-12 on hand.
- Using your character’s Special Ability during battle: Each character has a “special ability” which is useful in battle. This ability will be available when the background behind the character’s image in the lower left has turned completely red. To use the ability, click on the small button to the character’s lower left that will appear when the ability is fully charged. Once the ability has been used, it will have to be recharged before it can be used again. The more enemies you defeat, the faster it will recharge.
FIGHTING THE BATTLE: STEP BY STEP
- When a battle first starts, time is frozen. You will see the lineup of the enemy’s army, but no fighting will start until you click on the central button. Start by looking at both the number and strength of your enemy’s forces compared to your own. (A magical beast is roughly the equivalent of 3 strong warriors.)
- You can win a battle with fewer soldiers on your side if yours are stronger, or if you have special battle weapons to help out.
- If you decide the opposing army is just too strong, you can choose to flee the battlefield. You can do this at any time once the battle is started by clicking on the White Flag button at bottom right of the screen.
- If you are going to use special weapons during the battle, you may want to use one right away, especially if you have any of the weaker fighters in your infantry line.
- The simplest battle strategy is:
- a. Assess the enemy. If you want to run, click the battle button, then the white flag.
- b. If you want to fight, click the battle button, then your special ability if you’re using it, then an ammo button if you’re using it.
- c. Use additional ammo (or flee) if the battle isn’t going your way.
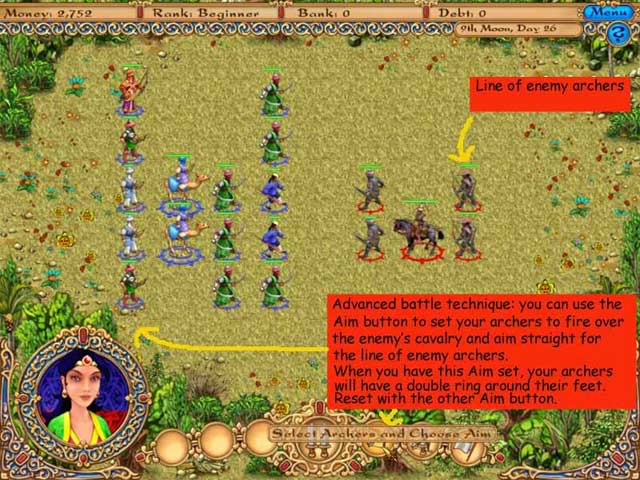
- Advanced battle tip: Aiming your arrows. During battle, you can cause your row of archers to target on a specific individual enemy. The targeting system is simpler than it seems at first. Your only choice is whether you want your archers to fire all over the battlefield, or just at the enemy’s rear line. You switch back by clicking the targeting button again. (See picture.) However, the targeting system really isn’t needed in the standard (“Easy”) mode.
DECIDING WHICH SOLDIERS TO HIRE: FORMATION TIPS
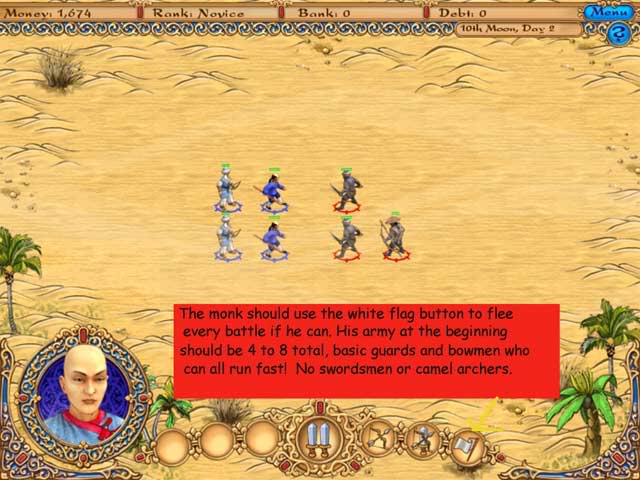
- The ideal fighting formation will vary depending on your character. For example, since the monk should try to run away from every fight, it’s best for him to have a minimum of soldiers and to choose ones that are fast runners! No swordsmen for his armies. On the other hand, if your character is the Mongol prince who does a lot of fighting, you will want a strong army.
- Different types of fighting units will be available at different times and in different cities. In some cases it will cost more to hire a 2nd or 3rd soldier of the same type.
- Who’s in your Army? You can see which fighters your army currently has by going to the Guild and clicking on the Contracts screen. Each row represents one soldier in your army. Note that the Have total is the total of that type.
The following are general army formation tips that apply to most characters. See the specific character tips for more specific tips.
- You will face stronger enemies as the game goes on. In the beginning a small force of 4 to 8 soldiers will be enough to win battles, but by the middle of your quest most characters will need a full caravan of 15 fighters.
- Keep a balanced formation. Do not hire archers unless you have cavalry or infantry in front of them to protect them. So build your army by first hiring infantry, then archers, then stronger infantry and cavalry, then stronger archers and finally magical fighters. Eventually you can trade in infantry and just use cavalry.
- Early Stage formation. When you start out and you don’t have much money, try to keep a balance between archers and infantry. You won’t be able to afford any cavalry for awhile. 4 basic guards and 4 bowmen is a good beginning. You will lose a lot of fighters, but that’s just how it is. You don’t need Ammo at this stage.
- Middle Stage formation. Once you can keep a reserve of 3,000 to 5,000 taels all the time, and you’ve upgraded most of your basic green guards to yellow warriors or red swordsmen, it’s reasonable to start adding in red Elite Archers to your army. They cost 3,000 each. Just add one in as you can afford them. Once you have at least 3 Elite Archers you can start adding in cavalry like red Horse Soldiers (6,000 taels each). If you end up with an extra 15,000 tael at any point, you may want to invest in Heavenly Fire Ammo. This will be used up in one battle, but it can make a big difference.
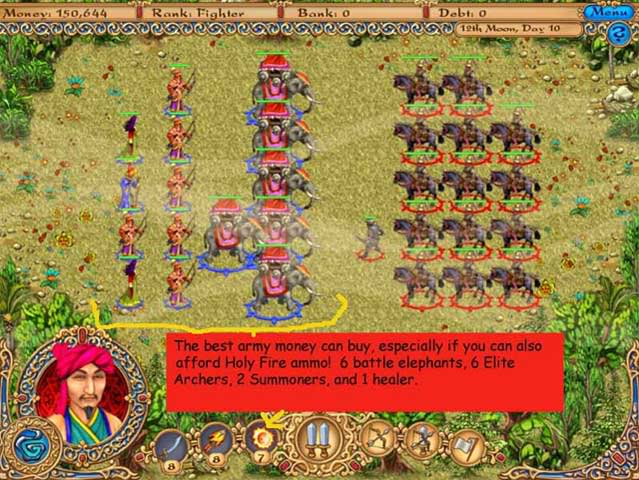
- Late Stage Formation. If you were just going to buy the ultimate army to begin with, you would want 6 warrior elephants (not carrier elephants, which you buy at the Stables, but warrior elephants, which must be bought at the Guild), 6 Elite Archers (who stand behind the elephants), 2 Healers, and a Summoner. Add in Ammo purchases of 4 Heavenly Fire (15,000 taels each) per fight, and you’ll probably win every battle. However, you probably won’t be able to afford that until fairly late in the game.
- Magical Fighters. There are two magical fighters that you will want to add to your army in the late stages of the game when you have a lot of money. Because these are so expensive, you should wait to buy them until you have a full line of Siege elephants (at least 5) to protect them. They are The Healer (helps your troops heal faster) at 30,000 taels and The Summoner (calls down lightning strikes on the enemy army) at 50,000 taels.
- Fights become more difficult the longer the game goes on. As the game goes on you will start to see more and more magical creatures, which are difficult to defeat without several doses of Heavenly Fire ammo.
5. GENERAL TRADING TRIPS FOR ALL CHARACTERS
- Traders and Merchants. You can sell and purchase items in two different locations: Traders Shops in a temple building and the Marketplace. Traders sell magical items. Marketplace merchants sell tradegoods. You probably won’t sell magical items unless you don’t need them any more or you need the cash.
- Cargo Units are pack animals You carry your items using Cargo Units: donkeys, horses, camels, and elephants that you buy at the Stable. You can also sell pack animals you don’t need anymore.
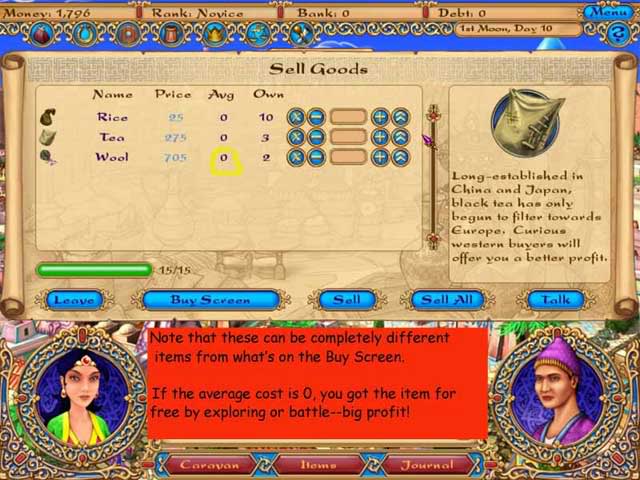
- Sell anything anywhere there’s a marketplace. Unlike some other trading games, you will be able to sell anything you have in any market in the game. This is useful. However, an item will not show on the Buy screen unless it is available for purchase in that location. So to see what you can sell goods for, you do need to look at the Sell screen also. There you’ll see the prices for any tradegoods that you have in inventory.
- Your tradegoods counter. The counter on the lower left of the screen shows you how many trade items you can carry with your current caravan. If your caravan is full, you have two choices: buy another pack animal at the Stables, or sell some of your current goods.
- The buy screen scrolls. The buy screen will scroll if there are more items than will fit. Make sure you check to see what else is available. (See picture.)
- Moneylenders. In previous Tradewinds games, moneylenders were a big part of the game. However, because of the limitations on where you can travel when and how much you can carry, it is best in the early stages of the game to borrow money only if you intend to pay it back within 4 cities worth of travel. In our case we completed all 6 main quests without borrowing any money at all. Once you get to the Open Road part of the game and you don’t face any time constraints from your main quest, it will make more business sense to borrow money.
- Tea trading. If you are stuck in the East for awhile, there is some good variation in tea, and you can make some money just trading it. Buy when it is less than 50; sell when it’s at 100 or more.
- Rice: Small Price, Big Profit. Rice is also a good commodity for the East, but there’s not as much variation as tea. Still, if you can buy it at 10 and sell it at 20, you made a good profit. Even buying at 20 and selling at 25 helps.
- Silk earns the most money. To earn the maximum cash (not the maximum percentage), buy silk in the East at 5,500 or less, and sell it in the West for 17,000 or more.
- Dried fruit. If you are stuck in the West, you have a harder time finding local goods to trade in. There is some variation in dried fruit and nuts, both of which tend to be cheapest in the far West, but it it’s not quite as consistent as tea and rice in the East. Dried fruit is good to buy in the West and sell in the East.
- Gold: Buy in the West, sell in the East. Gold is worth much less in the West than in the East. If you have the money and can buy gold for less than 5,000 in the West, you can probably sell it for 12,000 in the East. Gold won’t show up until the middle stages of the game.
- Horses: Buy in the Central Region. Horses to use as cargo units can be purchased just about anywhere. Horses to use as tradegoods, though, can only be purchased on the market Buy screen in the central region. These horses were historically valued by both the East and West, and you can usually make a profit going in either direction.
- Magical Items: You have to take the bad with the good. There are many magical items that have opposite effects on Traders (those selling magical items in the Temples) and Merchants (those selling tradegoods in the Market). This can be important for strategy in the Open Road phase, but doesn’t have much impact during the Main Quest. In general it’s better to save your money for ammo in the early stages. However, if your character is primarily a Merchant, do buy the Goldie the Goldfish magical item in a temple once you can afford it, as it will help you be successful in bribes and lower taxes. Also, the “cushy cushion” which lowers the price of healing services is useful for all characters.
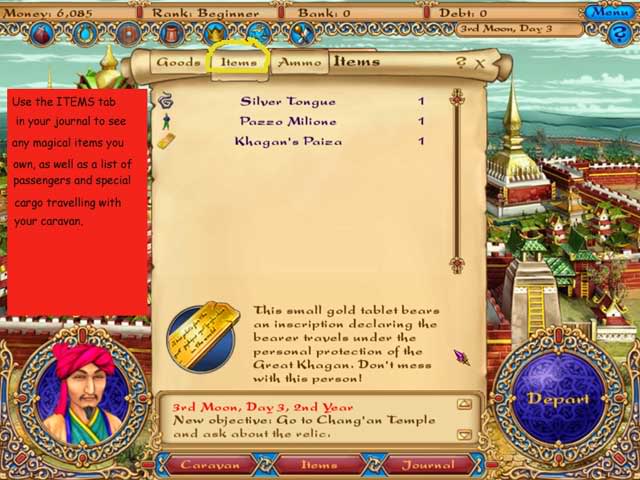
- Magical Item Inventory. In most cases you only need one of each magical item. So if you have one Goldie the Goldfish or Silly Silkworm, you don’t need another. You can always see which magic items you have by checking the Items tab in your Journal.
- Bribes to avoid sales tax. Bribes are pretty inconsistent in the game. The idea is to bribe someone in the tax office in the local palace so you won’t be charged taxes when you go to sell goods. Tax is usually in the 5% range, which isn’t horrible. If you are going to sell a whole caravan of expensive goods, say 100 silk carpets, it’s definitely worth it to try a palace bribe first. If you have the Goldie the Goldfish magical item, you can usually succeed with a bribe of 1,500 to 3,000 taels.
- Trade Early and Often. Some trading sims are all about timing: arrive in City X in October when you can unload bananas at a high price, then zip over to City Y by November to pick up apples at their cheapest. You can’t do that easily in Caravans because the travel is so uncertain and it can easily take you a year or more to get from one end of the silk road to another. So it’s often a good idea to keep two kinds of trade goods in stock. One are “investment items,” particularly silk or gold, which have a high enough price that they’re worth keeping in stock all the way from East to West. But you’ll also want to have “turnover inventory,” items that you will sell every 3 or 4 cities to make a quick profit. All the items under 1,000 taels except ginger are good for this. Buy rice at 10 in Changuan and sell it for 25 in Turfan and you made a nice profit quickly. Pick up some wool in Turfan for 500 and sell it for 750 as soon as you hit Baghdad and you’re ready to look at local goods.
- Color coding on the buy and sell screens. If a price is shown in red on the buy screen, it is being offered for less than what you paid for it. If it is shown in light blue, you can sell it for more than you paid.
- See a great bargain? Add a kiang! If your character is a merchant, it’s a good idea to check the marketplace in every city to look for bargains. If you see something at a particularly great price and your caravan is full, it may well be worth it spend 200 taels on one more kiang (pack mule) just to pick up some stuff to sell.
- What to buy, when. The following list shows a typical range of prices for each tradegood, as well as notes on where to buy or sell it. Goods are listed alphabetically. Remember that you can sell tradegoods in any city, even if they aren’t offered for sale there, so always check the Sell screen for the current sell price.
- For many goods, the very lowest and very highest prices are extremely rare, so we also list good buy and sell prices that you will see frequently if you’re in the right region. If you can sell dried fruit at 120, that’s a good sell price. About every 4 or 5 “years” you might see a higher price, but it’s not worth keeping in inventory that long.
Dried Fruit: 20-180. Buy West, sell Central or East. 30 is a good buy price, Sell at 120+.
Dyes: 400-1500. Buy West, sell East.
Ginger: 180-600. Buy East, sell West or when you need money.
Gold: 4000-14,000. Buy West, sell East. 5,500 is a good buy price. Sell at 12,000+.
Horses (market, not guild). 7000-9000. Buy Central, sell East or West.
Lapis: 1700-2100
Nuts. 100-500
Perfume: 1000-2000. Buy West, sell East.
Porcelain. 3350-4500. Buy East, sell West.
Raw Jade: 2,950-4,400. Buy Central, sell East. 3,800 is a typical sell price.
Rice: 10 – 30. High profit item if you buy at 10 in the East and sell at 20.
Tea: 25 – 275. Buy in the East, sell in the West or when you need money. Best profit.
Silk: 4,500 – 22,500. Buy East, sell West. Highest $ item. Under 6,000 is a good buy price. Sell at 16,000+.
Wool: 450-750. Buy Central, sell West.
- Which pack animals to buy. Every character, even the Dragon Prince and the Monk, should have at least two kiangs (pack mules), just to carry stuff you’ll find while exploring. They’re cheap (around 200 taels) and well worth the investment.
- Selling pack animals. If you’re desperate for money, you can sell one of your pack animals, but you’ll have to sell all the goods it’s carrying first.
- Getting more cargo capacity. You can also “trade up” if you have a full caravan by selling a small pack animal, like a kiang, and then buying a larger one like a packhorse or a camel. Again, you have to sell the trade goods it’s carrying first.
- Merchants need bigger pack animals. Most characters can get by with just kiangs until they’ve completed the main quest. The exception are the two merchants, Sakeem and Jinpa, who will probably start investing in larger pack animals midway through the quest.
- Which pack animals do you already have? In the stables, there is one row for each animal, but the HAVE column shows you your total of that type. (See picture.)
- Horses, Horses…and Horses. You can acquire horses in three different ways in the game, but each category is kept separate. Battlehorses come with cavalry in the Guild. When you hire a “Horse Warrior,” he has his own horse. Packhorses can be used to carry trade goods. You can buy and sell them at the Stables. Trade horses are horses that have not yet been broken to saddle and are sold as tradegoods. You buy and sell them in the Market. Trade horses cannot be sold in the Stables and packhorses cannot be sold in the Market. Make sure you know which kind you want before you buy! The same is true of elephants. Battle elephants are hired in the Guild. Pack elephants are bought at the Stables.
- Late stage investment trading. If you have achieved your Main Quest and you don’t have a lot of money but you do have a strong army and you have a lot of optional quests to play, you can now do some investment trading to make sure you will have enough money to buy Heavenly Fire ammo. Start in the East. If you have at least 95,000 taels and the price of silk is below 6,000, go to the moneylender and borrow the maximum possible. With the money, buy a pack elephant at the stables and as much silk as you can afford. Increase your ammo to 12 to 20 Heavenly Fire ammo. You can now make the long trip to the West. Sell the silk as soon as it gets above 16,000 taels and pay off the moneylender in full. You will still have 150,000 or more taels left over. Stay in the West, going from city to city, until you find gold under 5,500. Again, go to the Moneylender, borrow the maximum. Buy 50 gold bars, restock on Heavenly Fire ammo, and head back to the East. Sell the gold when it is at least 14,000 taels and pay off the Moneylender. Doing this roundtrip once or twice will get you more than enough money to keep your ammo restocked.
- The amount you can borrow is based on the amount you currently have. Borrow money before you do anything else, even healing your army. That way you’ll increase the amount you can borrow.
6. CITY GUIDE
- No matter which character you’re playing as or which quest you’re on, it’s helpful to know which services are available in each city. That way you’ll know where to go to find a healer or sell your tradegoods. This is especially important since travel is linear and you have to plan your routes in advance.
- A city may have any or all of the following types of buildings:
- Regent/Palace. Pay a bribe there to avoid future taxes, and complete various quest assignments.
- Market. Buy and sell goods, and talk to merchants who often have the most accurate news. You will also get quest assignments here. Note that horses sold here are for trade only—pack animals (which increase the amount of goods you can carry) are bought at the Stables.
- Guild. Hire or End the Contract of various fighting units. This is also where you buy ammo.
- Healer. Heal your army. Some Healers are in Inns, but the service is the same.
- Stables. Buy or sell pack animals. Note that the elephants sold here are pack animals only—warrior elephants are sold at the Guild.
- Moneylender. Borrow or repay loans here.
- Temple. If you pay a tithe at a temple (a few taels), you may get useful information to help in trading. Or not. Temples also have a Trader who sells a variety of Magical Objects. Most aren’t worth the money in the beginning.
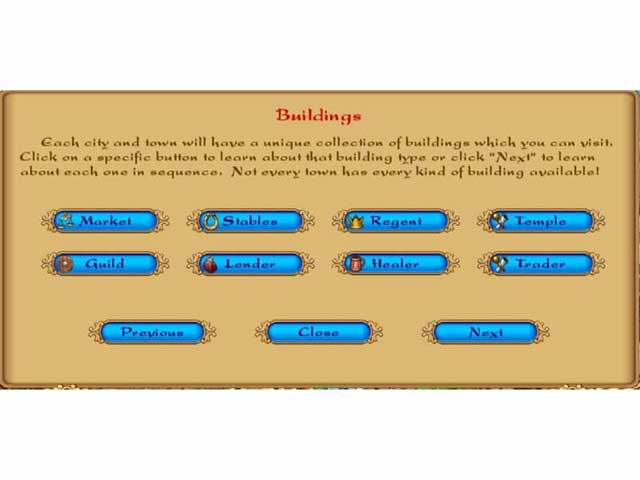
- Where’s the Healer? When you enter a city, there will be a row of symbols in the top left of the screen that will show you what services are offered there. If you are having trouble finding a specific service, like the guild, just click on its symbol button.
Our City Guide lists cities alphabetically.
The Region is in parentheses after the City name.
Abu Kamal (Central): Healer, Stables
Bactra (Central): Guild, Healer, Market
Baghdad (West): Guild, Healer, Market, Moneylender, Palace, Stables, Temple
Bogd (East): Healer, Temple
Chang’an (East, Chinese capitol): Guild, Healer, Market, Moneylender, Palace, Stables, Temple
Constantinople (West): Guild, Healer, Market, Moneylender, Palace, Stables, Temple
Dunhuang (East): Guild, Healer, Market, Moneylender, Palace, Stables, Temple
Heratt (Central): Guild, Healer, Market, Moneylender, Stables, Temple
Karakorum (East, Mongol capitol): Guild, Healer, Market, Moneylender, Palace, Stables, Temple
Kashgar (Central): Guild, Healer, Market, Moneylender, Palace, Stables, Temple
Khotan (Central): Guild, Healer, Market, Stables, Temple
Konya (Central): Market
Kumul (Central): Guild, Healer, Stables
Merv (Central): Healer, Market, Palace, Stables, Temple
Miran (Westmost Eastern city): Healer, Market
Sabzevar (Central): Healer, Market
Turfan (Central): Guild, Healer, Market, Moneylender, Palace, Stables, Temple
Zhongye (East): Guild, Market
7. INDIVIDUAL CHARACTER QUESTS (SPOILER SECTION)
Delaram al Din, the Princess

Female, heir to the throne
Special ability: Greek Fire (battle weapon, esp. good against magical creatures)
Main Quest: Recapture the throne after her father’s assassination
Gameplay: Battles! You can get through the entire Main Quest without doing any trading, since you will earn more than enough money on the battlefield and with random treasure to complete the quest.
General Tips for the Princess:
- Talk to everyone before spending any money. Because yours is a political quest, some people will give you items at a discount.
- Skip all optional quests until you have completed your Main Quest.
- If you get a Task requirement to donate money to a temple, do so only by pressing the Donate button in the Task conversation. Don’t use the regular Tithe button or it won’t count.
Exploring Tips for the Princess:
- Check out any bags, treasure chests, or twinkly gold coins, as you will need the money.
- Buy two kiangs at the stable to carry items found while exploring.
Battle/Main Quest Tips for the Princess (includes spoilers):
- Her special ability, Greek Fire, reduces the health of several enemies by about 30%. Especially good against magical creatures. You can use it more once during one battle if it recharges fast enough.
- Using Heavenly Fire ammo will help recharge her special ability.
- This character is allowed to lose some battles as part of her Main Quest and keep playing. Always do your best, but in some cases you will lose and then be captured or told to go to a city to continue.
- When you learn the Mongols are coming to attack, hire the minimum number of soldiers to keep you alive to get to the main battle, (probably 4 bowmen and 4 cheap infantry fighters) to fulfill the task requirement. Don’t hire more, because you are going to lose the fight to the Mongols regardless.
- When you are told you need to have a Caravan, that means you need to have 8 to 10 fighters. Keep hiring them until the task is complete.
- Once you receive the magical drum, keep your army at at least 10 men until further notice.
- If you get a task objective to find the Death Worm, make sure your special ability Greek Fire is charged up before fighting the worm. You will need it to defeat the creature. If it’s not charged up, you need to fight a couple of minor battles with bandits first.
- Once you have the last ingredients for Greek Fire, you want to build your army up to 15 before you start attacking towns, and you want to have Elite Archers and some Battle Elephants. So you may need to do some exploring to fight smaller battles and find treasures to build up your army before attacking any of the red flag cities.
- When you are ready to “attack 3 Mongol towns,” start with Heratt because it has a guild and a healer and you will be able to replenish your army before moving on. If Heratt is not under Mongol control, choose another city with a healer and a guild (see our City Guide for a list of which services are in which cities).
- Once you have unlocked the Mongol towns and gone back to the rebel leaders, you will plan to take an Army to attack the Mongol Army at Merv (the westernmost town of the East). You can try and do this in the ordinary way with a very strong army. However, the game has a trick coming up. Every soldier you have in your Army when you get to Merv is going to be used to fight against you! So take a small Army instead, just enough to keep you alive. If you have too many fighters, you can release them from their contracts at any Guild building. Make sure you have no elephants. However, you can go ahead and buy Heavenly Fire ammo—8 should be enough.
- You will be captured by the Mongol army at Merv. Now your army is their army. Continue to Karakorum. Near Karakorum, a group of Persian rebels (your father’s supporters) will begin attacking you. Do not use your ammo or your special weapons against them! Remember that your own army is now under control of the Mongols and you are a prisoner.
- Halfway through the battle at Karakorum, the battlescreen will change, and the armies will have switched places! This means that the rebels have freed you, and now you are fighting on their side, with your old army still under the control of the Mongols. Now is the time to use your special ability and your ammo. As long as you kept your army small enough, you should win.
Trading Tips for the Princess:
- Don’t waste time trying to buy and sell trade goods like a merchant. You will make enough money from battles and exploring. If you have some items that are spoils of war, sell them when you need the money.
- Once you have completed your Main Quest, review the late stage investment trading strategy at the end of the General Trading Tips section if you need to raise money to buy enough Heavenly Fire ammo to get through the optional quests. The optional quests are the same for all characters, though, so you may prefer to play them as one of the merchant characters like Sameer or Jinpa, where the trading comes more naturally to the character.
Sakeem, the assistant Merchant
Male, high ranking servant in the Miloni household
Special ability: Silver Tongue (makes enemies run away)
Main Quest: Help your spoiled rich kid master survive his various political assignments—and do your own trading on the side to build your personal wealth.
Gameplay: Want to travel to exotic locations? Live by your wits? Are good at multitasking? Prefer trading to fighting? Then Sakeem is the character for you! Lots of cities, lots of trading, and you can avoid almost all battles until you’re rich enough to hire a nearly invincible army.
General Tips for Sakeem:
- Take all the time you need for your own trading. Your master won’t care if he spends a few extra months in an Inn or even a dungeon while you’re off on your own. (He’ll probably be too drunk to notice.)
- Accept any optional quests that offer money. You need lots of money to win your Main Quest.
- Accept any of the following optional tasks, which involve mostly trade and travel (not fighting)
- The family that needs help to get to the emperor’s palace
- The merchant who gets seasick on a camel
- The villagers who are having trouble with a ghost
- The young woman who lost her dowry
- The horse race
- Finding the Heir
- Decline the following tasks if possible, which involve mostly fighting:
- 30 ponies
- If at any time you need money to buy something for your Master, you can take time to do trading to make that money.
- Avoid the temptation to borrow from the Moneylenders to finance silkbuying. It’s such a long trip from east to west that the interest rates can kill you. It’s better for this character to accept a few side quests to make extra money, or to buy silk cheaply in Changuan or Karakorum and sell it at a 25% profit in Miran than it is to try to finance a big trip with borrowed money.
Battle Tips for Sakeem:
- Avoid battles if you can by the zigzag technique or just clicking fast to outrun your enemies.
- However, because you carry a lot of expensive tradegoods, it is usually better to fight than to run away once battle has been engaged. Only flee an active battlefield if you think you’re going to lose your last soldier.
- Work your way up to an army of 6 to 8 units in the first stages, evenly divided between Infantry and Archers. But it’s more important to invest your money in trading goods than to get to an army of 15 right away.
- You will need a reserve of around 3,500 tael to pay for healing your troops, as you’re not very good at battle.
- Your special ability is Silver Tongue. This will cause 1 to 3 enemies to run off the field of battle. There’s no point in wasting ammunition on enemies who are running away anyway, so your battle plan should be to use Silver Tongue immediately, then pause the battle again by hitting the central button. After the enemies have left the battlefield, restart the battle. Use ammo if you intend to.
- Once you have lots of money you will buy a better army. But it will take a long time to work up to this. (See picture.)
- If you have battle elephants, keep an eye on their health. They cost 15,000 taels each, the same as one round of Holy Ammo, so it’s worth using the ammo to protect the investment in the elephants.
- Infantry, however, are cheap. Don’t waste ammo to save infantry if you still have a strong line of cavalry and archers.
Trading/Main Quest Tips for Sameer the Merchant:
- Make all decisions based on your personal profit.
- In the beginning you are stuck in the East. You can still trade in tea and rice and make a nice profit. You need to raise 30,000 taels to pay for things your boss will want at the beginning.
- Review the general trading tips for what sells best where.
- Anytime you can buy silk under 6,000, do so. You can usually sell it in Miran (the westmost Eastern city) for about a 25% profit.
- You will need to buy 2 or 3 kiang at the Stables to carry your trade goods, eventually building up to about 8 kiang and a couple of pack horses.
- When you get to Constantinople, sell rice, ginger, and silk. Buy nuts, perfume, and dyes.
- In the middle of the game you will spend several years travelling back and forth between Karakorum (the capitol city in the East) and Constantinople (the capitol city in the West). This is a great opportunity for you to amass personal wealth, particularly by acquiring silk in the East and selling it west of Baghdad. (Sometimes the price is better in Constantinople, sometimes in Damascus—since you will be making lots of trips, you don’t have to be too fussy, any price over 16,000 should be good enough.)
- Gold will normally sell for about 12,000 taels once you get to the East, so if you can afford to buy some in the West for under 7,000, do so.
- Be patient. Trade in anything that looks good to you. (Tea bought at 50 can almost always be sold eventually at 140 or higher.)
- If you are going to make a sale of 100,000 tael or more, invest in a 3,000 tael bribe at the local Palace first.
- Buy the goldy the goldfish charm at the temple when you can afford it. After that, you can drop your bribe offers to1,500 tael.
- Once you have bought the Cushy Cushions and the Goldy the Goldfish magical items, you can buy any magical items that will get you better deals in the marketplace at your own discretion. Once you’ve achieved your Main Quest and have a lot of money, you may want to temporarily sell some of the charms that cause Trader prices to go up (you can buy them back later) and then buy some of the big ticket charms.
Chabudei Kiyat, Mongol Chieftain
Male, member of the royal Mongol family
Special ability: Berserker (increase battle ability of all troops)
Main Quest: Help determine the true heir after the murder of your cousin.
Gameplay: Holding out for a hero? Want to ride to the rescue of innocents, always keep your word, battle your way across a Kingdom and stray true to the warrior code? And do it all against frantic time deadlines that could be a matter of life and death? The Chabudei Kiyat character gives you all of that. You can do the entire Main Quest without ever making a single trade except to sell some of the spoils of war. One of the faster paced quests; this one includes intrigue, suspense, and a sophisticated storyline.
General tips for Chabudei:
- To succeed at this Quest, you must think like a Mongol leader. Be brave, impatient, focused, and true to the warrior code. After the first few turns, always have a full caravan of 15 fighting units, but hire the best fighters you can afford. You won’t need ammo until task 4 or 5.
- When you get to a city:
- Heal all units.
- Visit the guild. Replace any missing fighters with the best you can afford.
- Once you get to task 4, buy 2 to 4 charges of Heavenly Fire.
- Visit the market, and sell anything that’s at a good price. But if you need the money to max out your fighting units, go ahead and sell more, even if it’s only at a modest profit. Remember, you’re not a merchant—you’re a warrior! The military objective comes first, you’re not trying to become personally rich.
- While traveling between towns, move as quickly as possible to your next objective. Time is of the essence!
- Decline all optional tasks until your main Main Quest is completed.
- It’s fine to avoid a battle if you’re in a hurry to get to the next town, but of course once a battle engages, never run!
- Don’t waste time! You should get enough money just from battle spoils to keep your troops healthy and get to the next objective, and that’s all you have to worry about.
- Purchase magical items that help your troops fight better as long as they don’t add to the cost of healing or hiring troops. Buy the Cushy Cushions as soon as you can afford them.
Battle tips for Chabudei:
- Battle sequence:
- Use Berserker special power if available.
- Fight!
- Keep an eye on the health of your elephants. If they get down to about 2/3, use Heavenly Fire if available.
- (Don’t worry about the infantry—if they die nobly, sobeit.)
- If you are heavily outnumbered, use 1 Heavenly Fire first.
- You will need Heavenly Fire ammo against magical beasts.
- You should always have some infantry, preferably red level swordsmen, in your Army, because your berserker power will make them very effective.
- Your berserker power will last for an entire battle. Even if it recharges, you don’t need to use it a second time. Save it for the next battle.
- Once your army consists of 5 elephants, 5 Elite archers, and 5 infantry fighters, try to save up 30,000 taels to hire a healer (trading up one of the archers) as soon as one becomes available. This is usually in Dunhuang, but may be elsewhere. The healer’s abilities are also enhanced by your berserker special power.
- Late quest tip: you can buy a charm in the temple for about 2,000 taels which will lower the cost of healing, but increase the cost of hiring new fighters. Since you won’t be losing many fighters at this stage, this is always worth it.
Trading Tips for Chabudei:
- Mongol Chieftains don’t engage in trade. You can sell spoils of war, but that’s it.
- Buy two kiang (pack mules) at the stables to carry spoils of war. You probably won’t ever need more.
- Once you have completed your Main Quest, review the late stage investment trading strategy at the end of the General Trading Tips section if you need to raise money to buy enough Heavenly Fire ammo to get through the optional quests. The optional quests are the same for all characters, though, so you may prefer to play them as one of the merchant characters like Sameer or Jinpa, where the trading comes more naturally to the character.
Yu Qian, monk

Male, monk in training
Special ability: Heal allies on the battlefield
Main Quest: Recover missing spiritual relics and return them to your monastery.
Gameplay: This bonus character unlocks after you complete the Main Quest for one of the first four characters. Are you pure of heart and fleet of foot? Enjoy exploring and helping people, but not really interested in battle or trade? Join this monk on a journey to recover spiritual relics. You will mostly run from battle, and trade only enough to buy necessities. Meet interesting people and travel the length of the silk road.
General Tips for Yu Qian:
- Many people complain that they have a hard time winning battles with Yu Qian. We have a better strategy. Stay true to your character, and flee every battle you’re allowed to! You’ll be most successful in completing the main quest if you follow this strategy.
- Never borrow money.
- Help those who truly need it, but don’t enter into business dealings.
- Don’t have your fortune told.
- Ignore the person who says, “If you want to avoid a nasty smiting”—that’s not your belief set.
- Sometime during the quest you will get a helper who has a battle weapon ability. Don’t worry about it—it’s just to help keep you alive.
- There’s really no way to play the optional quests and stay in character, since many involve personal gain. The optional quests are the same for all characters, so we recommend just skipping them for Yu Qian.
Exploring/Main Quest Tips for Yu Qian:
- Learn the zigzag technique when crossing the countryside. You’ll need it.
- Keep your eyes open for found items as you’re crossing the countryside. This money will help pay for healing. That includes brown bags, twinkly coins, and treasure chests.
- Whenever the Talk button is pink, click it before doing anything else. Even if your assignment is to “buy a kiang,” you will find that you will often be given one without having to spend any money as long as you Talk to the person first.
Battle Tips for Yu Qian:
- Avoid fighting whenever possible. That includes fleeing battles in progress.
- Buy the Silly Silkworm charm that improves your chances in retreat.
- Buy the Cushy Cushion magical item that lowers the cost of healing.
- Only hire soldiers who can run fast. That includes Basic guards, archers, and camel archers. No elephants or swordsmen.
- If you happen to have a lot of money, it’s OK to hire a healer/magical fighter.
- Your special ability, heal allies, only works on the battlefield (while the battle screen is showing). So make sure you use it while your troops are running away.
- Start with a couple of basic guards. Eventually you can work up to an army of 10, 5 infantry and 5 archers. As long as they’re fast runners.
- If you have to, retreat back to the city you just came from.
- It’s OK to invest in some Heavenly Fire ammo, as it’s the only way to deal with magical creatures. But don’t use it if you’re just running away.
- You will run into some battles that you will not be allowed to flee late in the game. This is why you should invest in some ammo. Note that your healing ability will recharge itself, so you may be able to use it twice in one battle. Don’t use it too early or it will be wasted—wait at least until some of your troops are down about 1/3 in health.
Trading Tips for Yu Qian:
- You will need to do a little trading to pay for healing. Trade in tea, rice if below 25, dried fruit. Sell stuff you find while exploring.
- Buy two kiang (pack mules) to carry your trade items.
- Don’t invest in expensive trade goods like gold or silk even if they’re available at a fantastic price. Because you are going to run from every battle, you will tend to lose a lot of goods on the battlefield. Lose a 20 tael bag of rice, no problem. Lose a 5,000 tael bar of gold, not good.
Jinpa Jasaret (Advanced character)
Female, wife of a merchant
Special ability: Toxic payload (battle weapon)
Main Quest: Find a cure for your children’s illness after your husband goes missing.
Gameplay: A working mom’s life is all about balance, and Jinpa’s is no exception. She must balance being a merchant, a warrior, and an explorer as she travels from West to East and back again in search of a cure for her 3 children’s mysterious (and magical) illness—and tries to earn a living at the same time.
General Tips for Jinpa:
- One of the longest and most challenging Main Quests, you’ll have to be good at all 3 aspects of the game to succeed. We recommend not starting Jinpa’s story until you’ve completed at least one of the others and gotten familiar with the game mechanics and the various cities and services.
- Follow all instructions exactly! If a task tells you to go get 1,000 taels from someone in another city, you will have to do just that.
- Always click the TALK button if it is pink before doing anything else. You will often find out something important.
- Don’t worry too much about your kids—they can take care of themselves. Just follow the Quest instructions exactly anytime you are apart from them.
- Because you are in a hurry to find the cure for your kids, you will decline most optional quests until you’ve completed the Main Quest. However, you can accept the Quest for the family that needs help to get to the emperor’s palace.
Exploring Tips for Jinpa:
- Because Jinpa will travel the full length of the Silk Road several times, she can make particularly good profits from “found items.” You may want to take the time to explore some of the area around a city before actually entering it, just in case there are treasure chests there.
Battle Tips for Jinpa:
- Your special ability will make all of your fighters a little more effective for an entire battle, so if you’re going to use it, use it early. If you recharge, you don’t need to use it again for the same battle.
- Jinpa needs to build a strong army both to protect her while she’s exploring the countryside for tasks related to curing her children and to protect her trade goods. Follow the formation tips in the General Battle Tips section at the beginning of this guide.
- Don’t run away from battles unless you’re seriously outnumbered or you will lose too many goods.
- You will need to have some Heavenly Fire ammo in stock to win the battles towards the end of the Main Quest.
Trading Tips for Jinpa:
- You will need to be a master trader to raise all the money Jinpa will need. Study the General Trading tips section at the beginning of this guide.
- Start by buying 2 kiang (pack mules), and keep adding more pack animals as you can find goods you want to buy. After the first few rounds, keep 1 kiang for “investment” goods like silk, porcelain, and gold, and 2 more for “fast turnover” goods like rice and tea. Jinpa does a lot of travelling back and forth to meet various quest objectives, so she needs to make a good profit for short 3 or 4 city trips.
Prince Ao, Camel/Dragon
Male, Dragon Prince (transformed into a camel)
Special ability: Dragon Storm (battle weapon)
Main Quest: Find a way to break the spell and turn back into a dragon.
Gameplay: The adventure is decidedly surreal. You can play this quest without any trading whatsoever. Some battle will be necessary, but very little longterm strategy is needed. The quest is most like a scavenger hunt, with a lot of time-based challenges that send you hurrying back and forth around the countryside with very little time to do anything but get on to the next objective.
General Tips for Ao the Dragon:
- You’re a dragon. You don’t know anything about trading. Or human battle strategy. Accept all battles. Sell anything you win on the battlefield or find while exploring in the very next city.
- Decline all optional quests until you complete the Main Quest. Some of them seem like they will help your Main Quest, but they aren’t counted the same way, so just wait.
- Spend all your money on soldiers and quest-required items. You can also buy Heavenly Fire ammo once you have an army of at least 10 strong fighters.
- Once Ao completes his main quest and turns back into a dragon, you may want to switch to a different character to do the optional tasks. Otherwise you have to start doing a lot of trading and things out of character, and since the optional quests are the same for all characters, there’s no real reason to do them with Ao.
Battle Tips for Ao the Dragon:
- Your special ability, dragon storm, will help you win a lot of battles, so don’t run away unless you’re down to your last two soldiers. Winning battles will also be your main source of money in the game.
- Using Heavenly Ammo will help recharge your Dragon Storm ability, so it’s almost like two for one in the later stages. In the late stages of the game, a good battle strategy is: Start the battle. Use one Heavenly Fire ammo. Use your Dragon Storm. Use one more Heavenly Fire ammo. This will defeat most armies that don’t include magical creatures.
- As you get the money, invest in Horse Warriors in front and Elite Archers in back of your army formation. You won’t really need infantry after you have enough money to afford better. Don’t buy camel archers, though—they don’t suit your fighting style. Eventually you can upgrade the Horse Warriors to battle elephants.
- A summoner magical fighter will be of more use to you than a healer magical fighter because, again, it will help recharge your own special ability.
- After you complete the Main Quest, you may want to upgrade two Elite Archers to summoners so you have total of 3. This will recharge your Dragon Storm ability very quickly when you are fighting magical creatures.
Trading Tips for Ao the Dragon:
- Buy one or two kiang (pack mules) to help carry the stuff you find.
- You don’t need to do any trading during your Main Quest. Sell anything you find in between cities or win in battle as soon as you get to the next city.
- Once you have completed your Main Quest, review the late stage investment trading strategy at the end of the General Trading Tips section if you need to raise money to buy enough Heavenly Fire ammo to get through the optional quests. The optional quests are the same for all characters, though, so you may prefer to play them as one of the merchant characters like Sameer or Jinpa, where the trading comes more naturally to the character.
8. Optional Quests (spoilers)
- The optional quests are all self-explanatory as long as you follow the instructions exactly and use the pink TALK button when it is available.
- You can accept or decline any optional quest and it won’t affect the Main Quest unless you have a time requirement for the Main Quest. If an optional quest is taking too long, just ignore it and go back to working on the Main Quest.
- Unless an optional task has a specific time requirement, you can take as long as you want. Yes, even if the Death Worm has the baby.
- There is some randomness in the optional quests. You may get different amounts of money as a reward or they may start and end in different cities.
- The optional quests are the same for all characters.
- It’s easiest to stay in character and be successful with the merchant characters, Jinpa and Sameer, as it takes a lot of money to keep buying Heavenly Fire ammo to defeat all the magical creatures.
- If you are playing as one of the other characters, review the late stage investment trading strategy at the end of the General Trading Tips section.
- Cashing in your rewards. You may get a reward of cash, tradegoods, magical items, or specialty objects. Tradegoods can be sold in the market. Magical items (including things like black pearls) can be sold at the Temple in the trader’s shop.
- You can tell what items you have by checking your journal.
- Traders will buy some of the items you get during optional quests. You can tell what items a trader will buy by going to the Sell screen in the trader’s shop in the temple.
- If you need a quick payoff with no required fighting, look for the family in the East who needs help to get to the emperor’s palace. The horse race is also good if the starting and ending cities are close enough together.
This section includes spoilers on the type of gameplay in some of the optional quests.
Quests involving travel:
- The man who wants to know if you speak Chinese (minimal payoff)
- The family that needs help to get to the emperor’s palace (large payoff)
- The merchant who gets seasick on a camel (medium payoff)
- The villagers who are having trouble with a ghost (medium payoff)
- The young woman who lost her dowry (medium payoff)
- The horse race (large payoff)
- Finding the Heir (medium payoff)
- “Hello, is anyone there?” (blind pilgrim) (low payoff)
Quests involving mandatory fighting:
- “You look like you could hold your own in a fight” (heavy fighting, large payoff)
- “I thought the Pax Mongolia…” (some fighting, small payoff)
- Having your fortune told (medium amount of fighting, medium payoff)
- The woman whose child was taken by a Death Worm (heavy fighting, minimal payoff)
- “This is so embarrassing!” (distraught father) (medium fighting, low to medium payoff)
- “If you want to avoid a nasty smiting…” (heavy fighting, very long set of tasks, medium payoff)
- “You can’t trust those mountain folk” (medium fighting, medium payoff)
- “You look like someone who enjoys the finer things in life” (heavy fighting, medium payoff)
- “Oh, no, not another one…” (medium fighting, small to medium payoff)
- “I need a hero…” (heavy fighting, medium payoff)
- “If you’re one of those Hashashin fellows…” (many small battles, medium payoff)
“;

More articles...
-
Grow A Garden 2 Base Price List
What's the most valuable crop? -
Evomon Best Starter [Leafbun, Blazpup, or Bubble?]
Grass-type, Fire-type, or Water-type? -
Evomon Tier List [META and BEST Evomon]
The Evomon dream team.