- Wondering how to get Monopoly GO! free rolls? Well, you’ve come to the right place. In this guide, we provide you with a bunch of tips and tricks to get some free rolls for the hit new mobile game. We’ll …
Best Roblox Horror Games to Play Right Now – Updated Weekly
By Adele Wilson
Our Best Roblox Horror Games guide features the scariest and most creative experiences to play right now on the platform!The BEST Roblox Games of The Week – Games You Need To Play!
By Sho Roberts
Our feature shares our pick for the Best Roblox Games of the week! With our feature, we guarantee you'll find something new to play!All Grades in Type Soul – Each Race Explained
By Adele Wilson
Our All Grades in Type Soul guide lists every grade in the game for all races, including how to increase your grade quickly!
Time Mysteries: The Final Enigma Walkthrough
Time Mysteries: The Final Enigma is an interactive hidden object puzzle game created by Artifex Mundi. You will move from location to location solving hidden object hunts and mini-puzzles, and picking up items to use in order to proceed in the game. Gamezebo’s strategy guide will provide you with detailed images, tips, information, and hints on how to play your best game.
Game Introduction – Time Mysteries: The Final Enigma
Time Mysteries: The Final Enigma is an interactive hidden object puzzle game created by Artifex Mundi. You will move from location to location solving hidden object hunts and mini-puzzles, and picking up items to use in order to proceed in the game. Gamezebo’s strategy guide will provide you with detailed images, tips, information, and hints on how to play your best game.
General Tips
- This walkthrough is meant to be used as a guide to assist in solving mini-puzzles and acquiring all items in order to complete the game. You may explore locations in the order you wish, this walkthrough is written to take the most direct route to the game’s finish.
- Inventory objects will be written in CAPITALS and highlighted in yellow in the screenshots. The walkthrough will state, “Use the inventory item on the blah blah,” because it assumes you have the item. If you don’t have the item, on your keyboard, press CTRL+F (at the same time). In the text box, type the name of the item you are looking for and press ENTER. This will scan this page for the appearance of that word.
- Play the tutorial! It will explain gameplay elements. If you don’t play the tutorial, from the Options menu, click on Help and read the instructions on gameplay.
- Often you need to perform an action (i.e., place or collect an inventory item) in order for the game to progress. Before assuming the game has a glitch, go through your inventory and see if you can place any of your items anywhere or look for an item to pick up, switch to flip, etc.
- The Menu button at the bottom right of the screen gives access to the options screen and can bring you back to the main menu.
- From the Menu button, click Options and click Help for information on gameplay.
- Items collected throughout the game go into your inventory, located at the bottom of your screen.
- Closing a window – To close the zoom-in windows, click anywhere outside the window. Tip: If you can zoom in on the area again, you likely haven’t found everything you needed to find.
Difficulty Modes
- There are two difficulty modes.
- Casual mode has faster filling Hint and Skip meters and sparkles indicate all active areas.
- Expert mode has slower filling Hint and Skip meters and there are no sparkles to indicate active areas.
- You can change the difficulty setting during the game from the Options menu by either selecting or deselecting Expert mode.
Cursors
- The default cursor looks like an arrow.
- A magnifying glass indicates you can inspect the area more closely.
- A hand indicates you can pick up an item to add to your inventory.
- A pointing hand indicate you can perform an action with an inventory item.
- A large arrow indicates you can move in that direction.
- Move your cursor over every aspect of a scene and watch for it to change, it’s the only way to find everything, especially if playing in Extreme mode.
Hidden Objects scenes (HOS) or Match 3 game
- Hidden object scenes provide a list of items to find. These items are different each game so only the inventory item will be indicated by a yellow highlight in the screenshots. Interactive items will be indicated by a white highlight.
- Items written in white are available immediately.
- Items written in orange require an extra action to be found. When these items are found/reassembled, their name turns white in the list. These items will be indicated by white highlights in the screenshots.
- Hover your cursor over an item in the list and the Sonar view (bottom right-hand corner) will show a silhouette of the item.
- There is no misclick penalty in either difficulty mode.
- Click on the Toggle Mini Game icon in the bottom left-hand corner to play a Match 3 game instead.
- Click on groups of three or more identical marbles to fill the meter on the left. Click on groups of three or more touching the barrier around the golden gear to remove the barrier, then click on groups of three or more touching the golden gear to remove it. Removing a golden gear crosses an item off the list of items to find. Filling the meter on the left adds another golden gear to the board.
Journal and Map (otherwise known as the PTD)
- Your journal is located at the bottom left of the screen.
- The Notes tab in the journal records your progress and contains clues to solve puzzles. The journal will open when new information is added.
- The Objectives tab in the journal lists your current and completed objectives.
- Items collected that are added to your journal will be highlighted in white in the screenshots.
- The Portable Time Device (PTD) is the game’s map.
- The PTD is located at the bottom right-hand corner of the screen.
- The PTD is how you jump from time period to time period and from location to location. Areas with something to do are indicated by an exclamation point.
- This walkthrough will use the name of the locations as found on the map.
- You can use the PTD to jump from location to location.
Hint and Skip
- The Hint and Skips options are available in both difficulty modes.
- The Hint button is located at the bottom left of the screen. After using a hint, the meter will recharge.
- Hints used in hidden object scenes will point out an item to find.
- Hints used during the adventure mode will point out what to focus on in the scene or it will point to the PTD. Click on the PTD and look for an exclamation point. If you don’t see one, click on another time period button.
- Skip allows you to skip mini-puzzles.
Year 1796 – Meet Uncle Sean
- To start the game, from the main menu screen, press Play, then enter your name. Select a difficulty.
- Watch the cutscene.

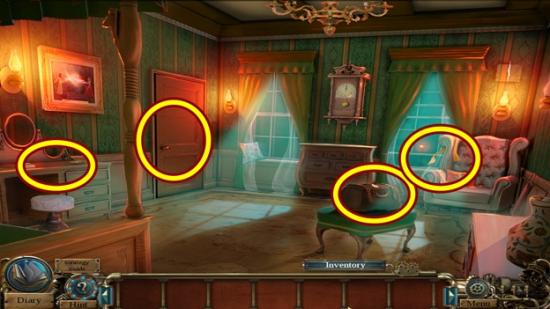
- Click on the bag.
- Open the latch and take the WOODEN PUZZLE (1/4). Click anywhere outside the window to close it.
- Click on the dresser at the far left.
- Take the MEDALLION. Click anywhere outside the window to close it.
- Click on the right windowsill.
- Watch the cutscene.
- Take the ROOM KEY.
- Click on the door.
- Insert the ROOM KEY and turn the handle.
- Talk to the messenger that appears.
- Take the message he gives you.
- After reading the message, click anywhere outside the window to close it.
- Go out to the street.
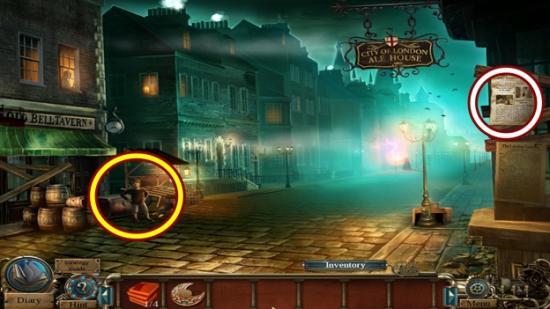
- Read the news article on the post.
- Click on the boy to learn he needs help opening his chest.
- Move down and move forward to Uncle Sean’s house.
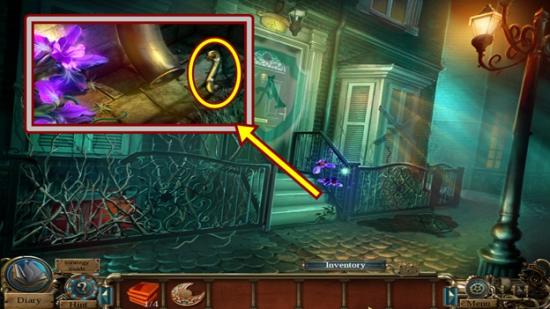
- Talk to the mysterious man.
- Watch the cutscene.
- Click on the steps.
- Take the DOOR HANDLE. Click anywhere outside the window to close it.
- Move past the house to the alley.
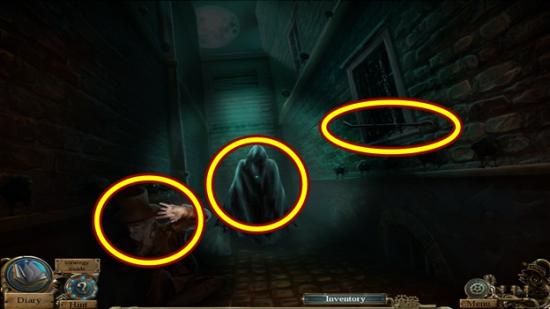
- Try to talk to the mysterious man.
- Once he disappears, talk to the old man. Watch the cutscene.
- Take the CROWBAR.
- Move down two scenes to the street and click on the boy.
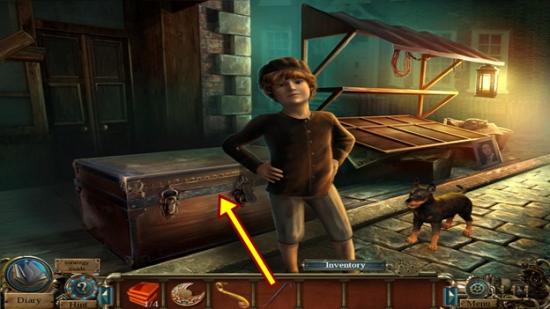
- Use the CROWBAR to pry open the chest.
- Watch the cutscene.
- Click on the stall to start a hidden object hunt.
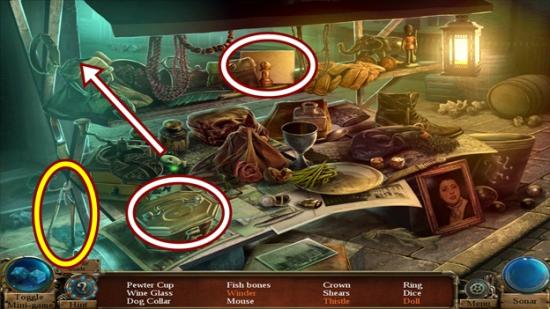
- Find all the objects or click Toggle Mini Game to play a match 3 game. Put the doll head back on the doll’s body, then take the doll. Open the casket and take the winder. Open the letter and take the thistle. SHEARS are added to your inventory.
- Return to Uncle Sean’s house.
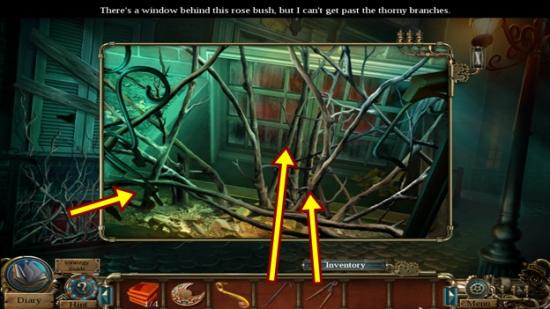
- Click on the thorny branches.
- Use the SHEARS to remove the thorny branches, then use the CROWBAR to pry open the window.
- Enter the basement.
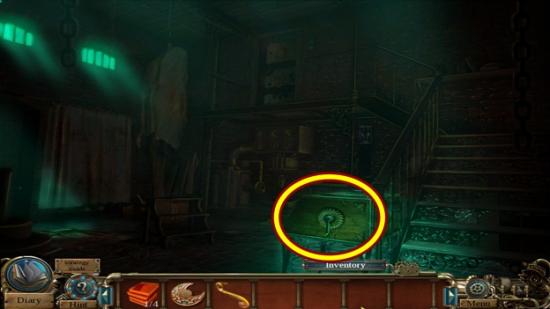
- Click on the electrical panel.
- A mini-puzzle starts.
- Rotate the rings to create a continuous flow of electricity from the bottom wires to the top wires.
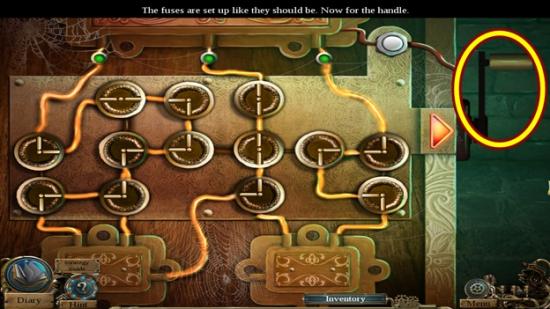
- When all the fuses are lit, pull the handle.
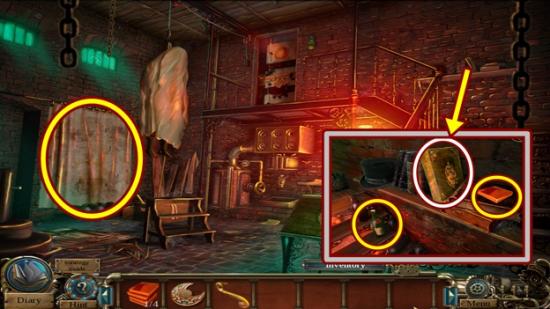
- Click on the shelf above the stairs.
- Take the WOODEN PUZZLE (2/4).
- Click on the bottle and take the CORK.
- Open the plant spell book and read the entry. Click anywhere outside the window to close it.
- Remove the curtain from the wall.
- Click on the underwater suit to start a hidden object hunt.
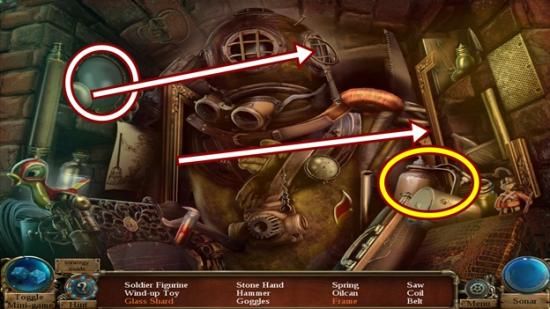
- Find all the objects or click Toggle Mini Game to play a match 3 game. Put the frame back together (piece on left goes to piece on right). Break the large glass lens to take the glass shard. Put the lens back in the magnifying glass. An OILCAN is added to your inventory.
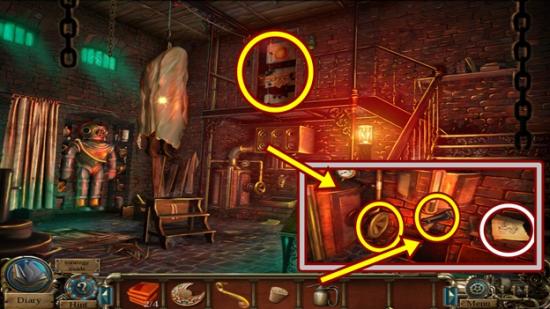
- Click on the panel on the wall.
- Add the OILCAN to the spout. Turn the large valve handle, then turn the small lever to get the FULL OILCAN.
- Click on the door above the stairs.
- Pour the FULL OILCAN on the gears, then add the DOOR HANDLE, then turn it.
- Go upstairs.
- Watch the cutscene.
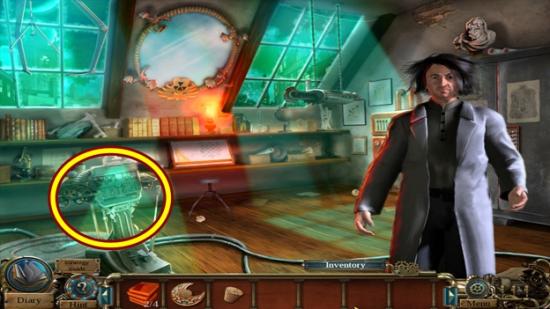
- Talk to Uncle Sean.
- Watch the cutscene.
- Click on the time machine.
- A mini-puzzle starts.
- Reassemble the time machine. Pieces can only be placed in their proper position. Place the gears (A and B) in their correct positions, the bulbs (C and D) in their correct positions, and the clock faces (E and F) in their correct positions.
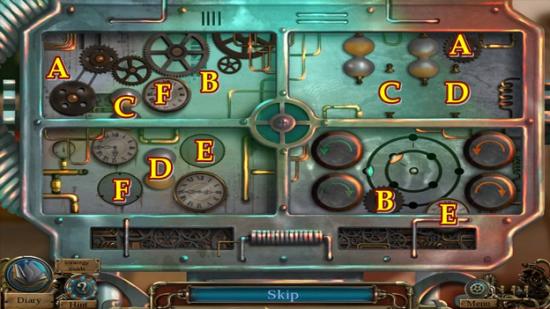
- When you are finished, adjust the light beams to read:
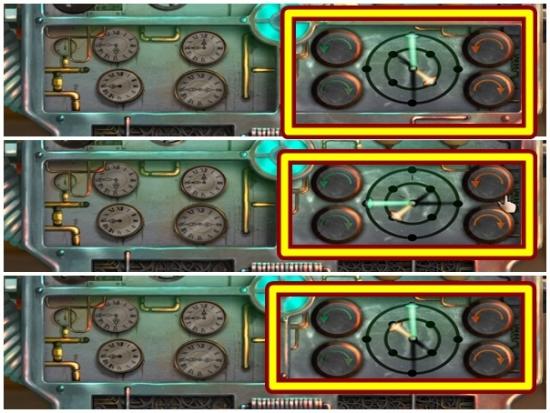
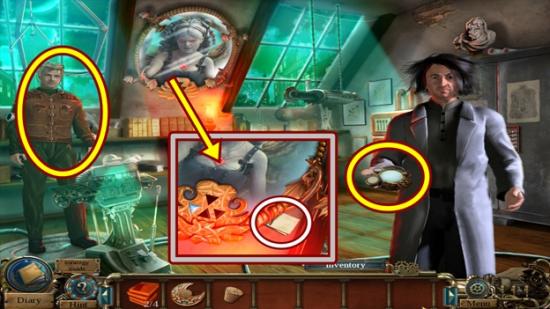
- Talk to the man that appears.
- Watch the cutscene.
- Click on the magic mirror.
- Click on the paper and note the times (added to journal). Click anywhere outside the window to close it.
- Talk to Uncle Sean.
- Watch the cutscene.
- Take the Portable Time Device (PTD), then click on the on it (bottom right corner of the screen).
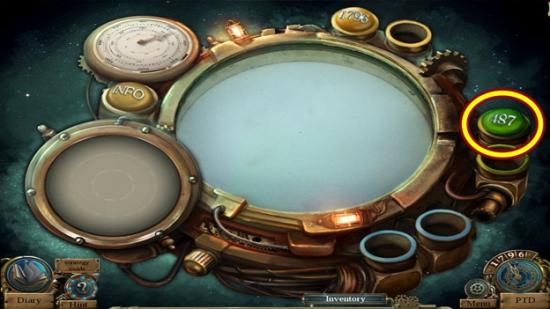
- Press Info to gain more information about the PTD.
- Click on the 487 button, then click on the map piece that appears. Click on the viewer on the left to travel to that area.
Year 487 – Merlin
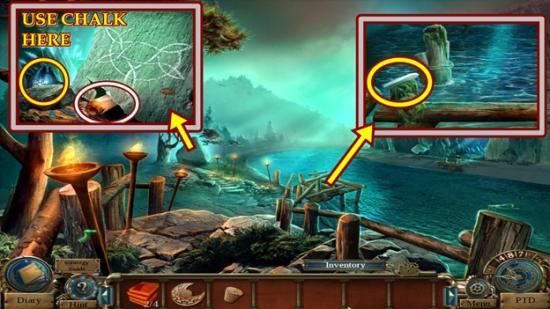
- Click on the broken dock.
- Take the CHALK. Click anywhere outside the window to close it.
- Click on the rock.
- Move the rock and take the FROST POWDER.
- Look at the scroll and learn how to cast a spell.
- Use the CHALK on the drawing. Click anywhere outside the window to close it.
- Click on the broken dock again.
- Use the FROST POWDER on the water.
- Watch the cutscene.
- Cross the water and go into the cave.
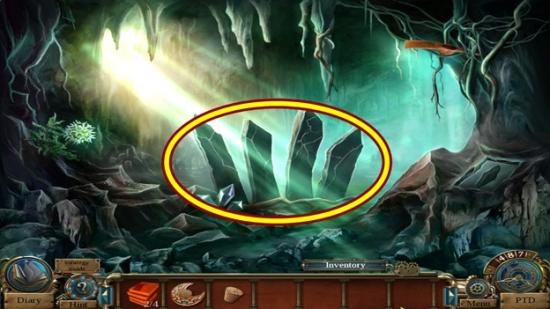
- Click on the four jutting out rocks.
- A mini-puzzle starts.
- Click on the rocks in a specific order. Click on each rock until one remains blue. Click on another rock. If they turn red, click on the first rock that turned blue, then select another rock. Continue until all the rocks turn blue.
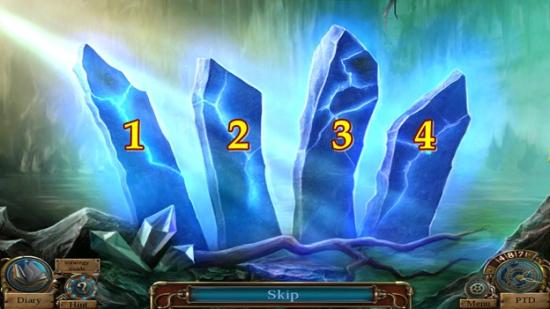
- Assuming the rocks are labelled 1-4 from left to right, solve the puzzle by clicking the rocks in the following order:
- Round one – 2, 3, 1, 4.
- Round two – 4, 2, 1, 3.
- Round three – 1, 4, 3, 2.
- Take the bridge to the cliff.
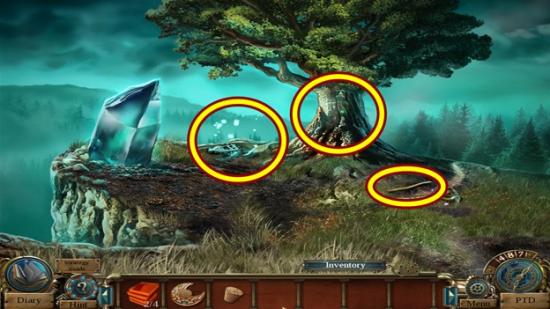
- Watch the cutscene.
- Click on the staff on the ground.
- Take the TOUGH BRANCH. Click anywhere outside the window to close it.
- Click on Merlin the tree. Talk to him.
- Click on the area to the left of the tree to start a hidden object hunt.
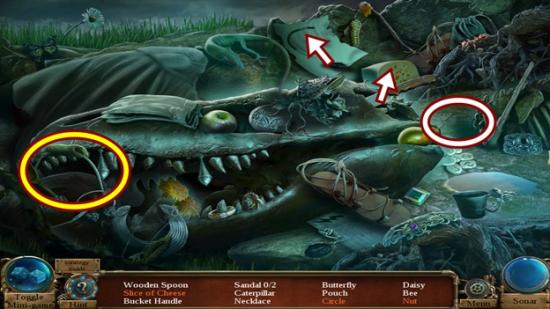
- Find all the objects or click Toggle Mini Game to play a match 3 game. Use the knife on the cheese to take the slice of cheese. Use the charcoal on the paper to complete the circle. Brush away the ground to take the nut. A BUCKET HANDLE is added to your inventory.
- Move down to the cave.
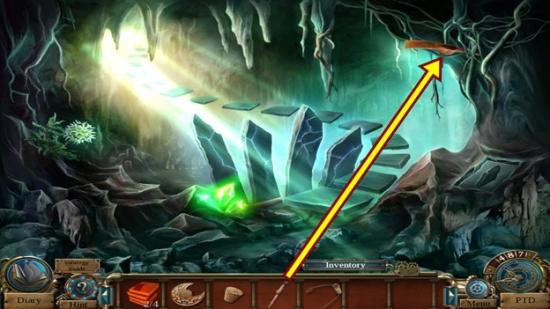
- Use the TOUGH BRANCH on the axe blade, then take the PICKAXE.
- Click on the PTD (bottom right hand corner of the screen).
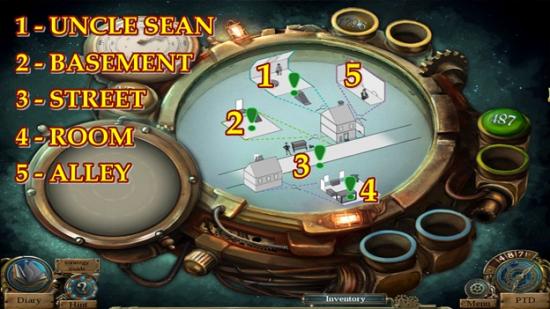
- Click on the 1796 button. Note the areas of 1796 appear in the centre of the PTD.
- Go to the street.
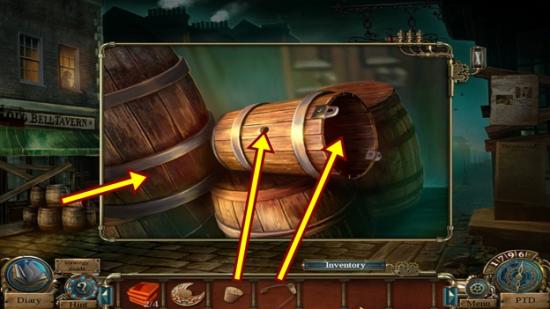
- Click on the barrels beside the boy.
- Put the CORK in the hole and add the BUCKET HANDLE.
- Take the BUCKET.
- Click on the PTD.
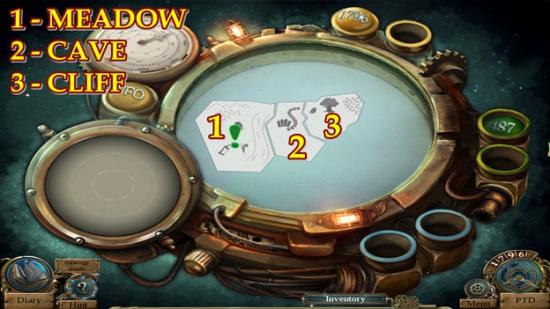
- Click on 487 and return to the meadow.
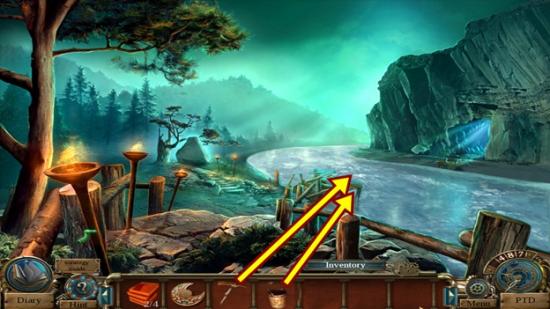
- Click on the broken dock.
- Use the PICKAXE on the ice (three clicks).
- Dip the BUCKET in the water to get the BUCKET OF WATER.
- Go into the cave and go to the cliff.
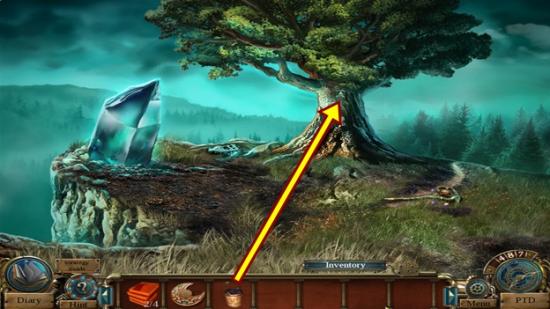
- Click on the Merlin the tree.
- Pour the BUCKET OF WATER on Merlin.
- Watch the cutscene.
- Move forward to Merlin’s hut.
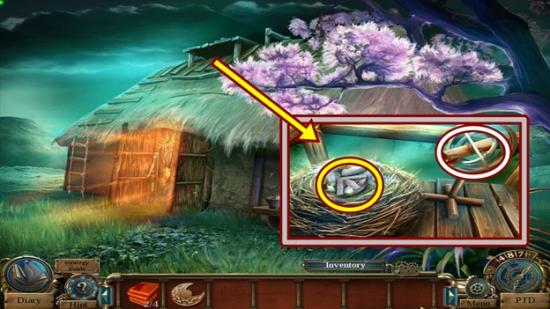
- Click on the top of the hut.
- Take the DRAGON CARVING.
- Read the scroll. Click anywhere outside the window to close it.
- Go inside the hut.
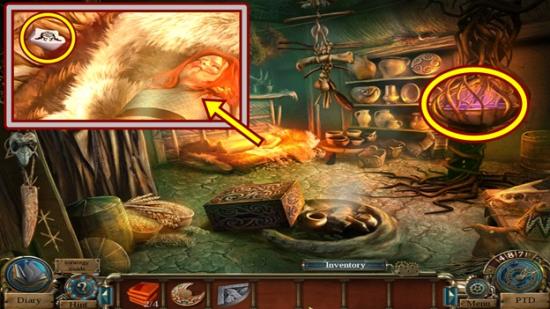
- Click on Nimue.
- Take the VINES STONE.
- Click on the glowing purple basin.
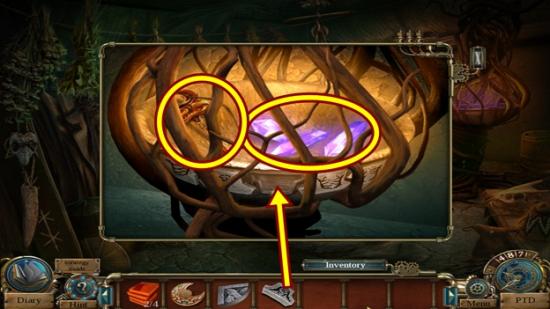
- Add the VINES STONE.
- Take the MAGIC CRYSTALS and the DRAGON KEY.
- Remove the curtain to start a hidden object hunt.
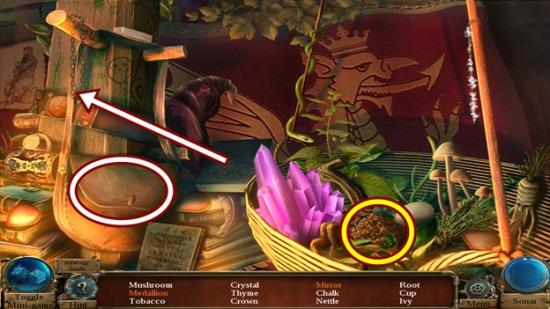
- Find all the objects or click Toggle Mini Game to play a match 3 game. Open the book, take the medallion and add it to the chain, then take the medallion. Open the bag and take the mirror. TOBACCO is added to your inventory.
- Move down two scenes to the cliff.
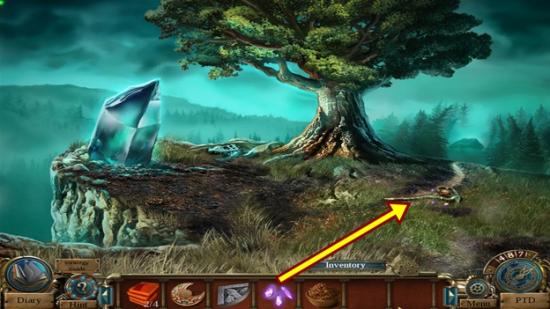
- Click on the staff.
- Add the MAGIC CRYSTALS, then take the MAGIC STAFF.
- Return to the inside of Merlin’s hut.
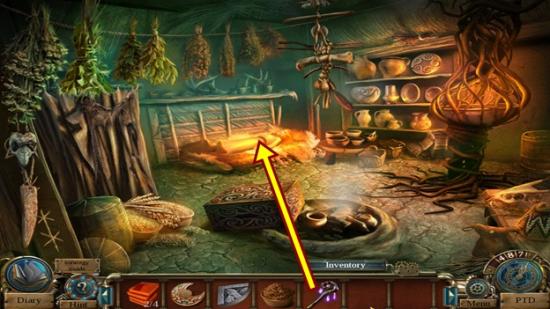
- Click on Nimue.
- Use the MAGIC STAFF to break the aura.
- Watch the cutscene.
- Click on the PTD.
- Click on 1796 and go the alley.
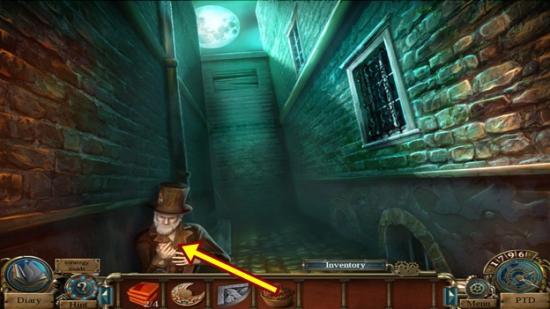
- Give the TOBACCO to the old man.
- Watch the cutscene.
- Take the DRAGON CARVING he offers.
- Click on the PTD.
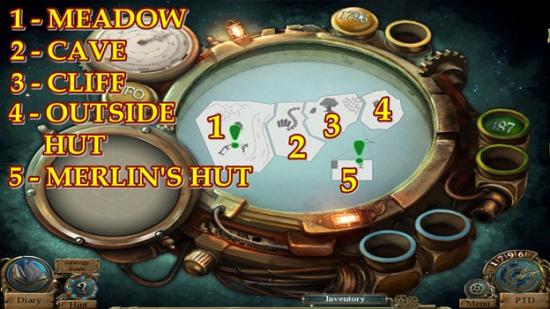
- Click on 487 and go to Merlin’s hut.
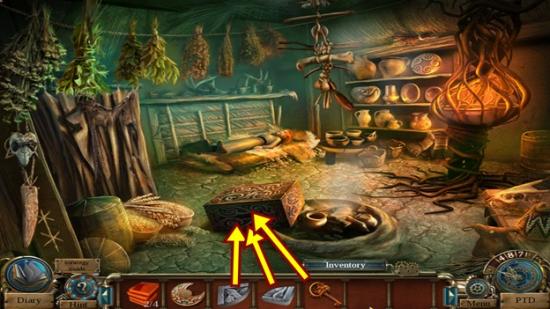
- Click on the chest.
- Insert the DRAGON KEY, then turn it.
- Add the two DRAGON CARVINGS to the two corners of the chest.
- A mini-puzzle starts.
- Swap adjacent tiles to recreate the image. Use the locked inner tiles to match up with the outer tiles. Start from one side (top, bottom, left or right) and work your way out.
- Solution:
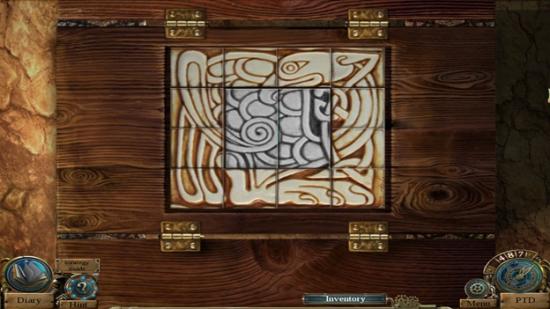
- Take the 502 TIME CRYSTAL.
Year 502 – Merlin
- Click on the PTD.
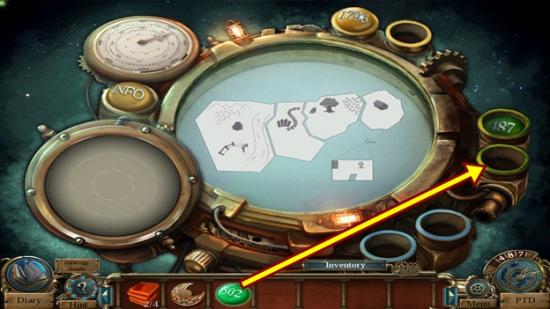
- Put the 502 TIME CRYSTAL in the empty slot (match the colours).
- Press 502, click on the new map area and enter the area.
- Click on the large crystal.
- Take the CRYSTAL SHARD.
- Move forward to Merlin’s hut.
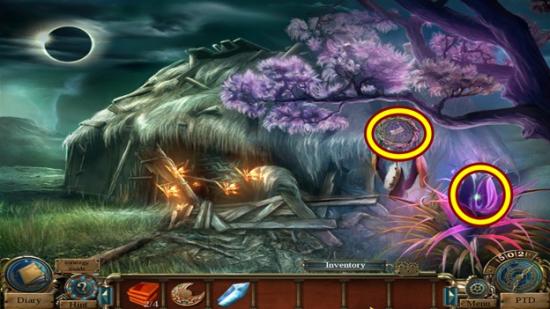
- Click on the dream catcher.
- Take the ENGRAVED BROOCH.
- Open the flower and take the MAGIC FRUIT.
- Click on the PTD.
- Click on 1796 and go to Uncle Sean.
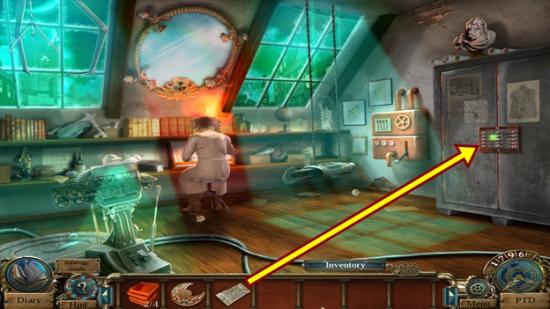
- Talk to Uncle Sean.
- Click on the cabinet.
- Add the ENGRAVED BROOCH.
- A mini-puzzle starts.
- Click on the latches until they are all open. Each latch controls itself and its adjacent latches. As there is no reset button, a step-by-step solution cannot be provided as you may have already moved some pieces.
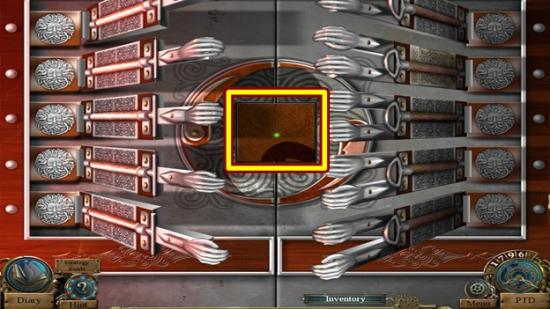
- When the puzzle is solved, take the WOODEN PUZZLE (3/4).
- Open the latch.
- Click on the cabinet to start a hidden object hunt.
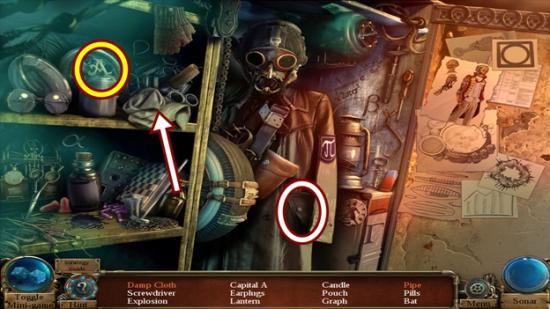
- Find all the objects or click Toggle Mini Game to play a match 3 game. Pour the bottle’s contents onto the cloth, then take the damp cloth. Look in the jacket pocket and take the pipe.
- The LETTER A is added to your inventory.
- Return to the hotel room.
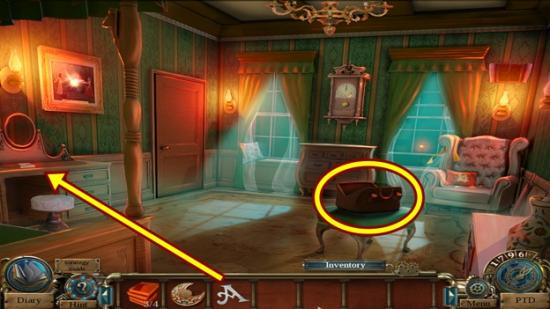
- Click on the dresser on the left.
- Add the LETTER A, then open the book.
- Read the entry, then turn the page and take the DRAGON SHAPE. Click anywhere outside the window to close it.
- Click on the bag.
- Add the DRAGON SHAPE.
- Open the chest and take the BUTTERFLY CATCHER.
- Read the note. Click anywhere outside the window to close it.
- Click on the PTD.
- Click on 502 and return to Merlin’s hut.
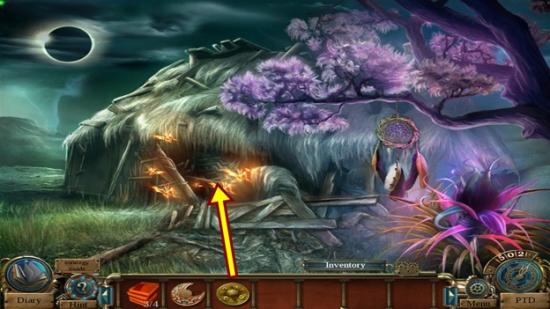
- Use the BUTTERFLY CATCHER on the butterflies.
- Click on the doorway.
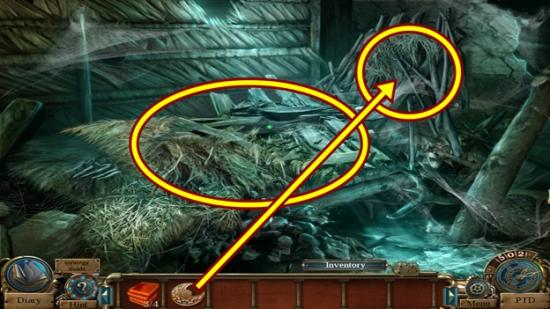
- Brush away the straw.
- Move the branches that are against the wall.
- Add the MEDALLION.
- Take the RUNE STONE.
- Click on the PTD.
- Click on 487 and go to the cave.
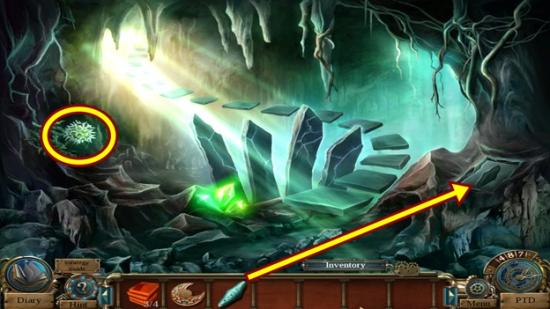
- Click on the inset on the right.
- Add the RUNE STONE, then take the SILVER SICKLE.
- Use the SILVER SICKLE to cut the flower, then pick up the CAVE FLOWER.
- Click on the PTD.
- Click on 1796 and go to the outside of Uncle Sean’s house.
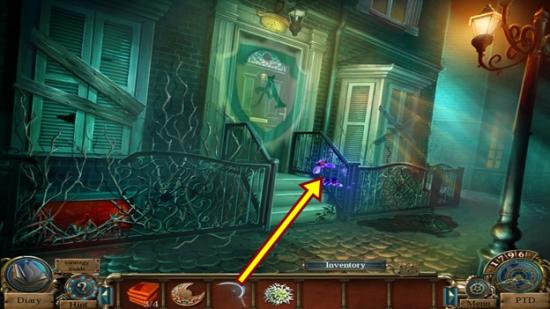
- Click on the steps.
- Use the SILVER SICKLE to cut the flower, then take the MAGIC FLOWER.
- Click on the PTD.
- Click on 487 and go to the outside of Merlin’s hut.
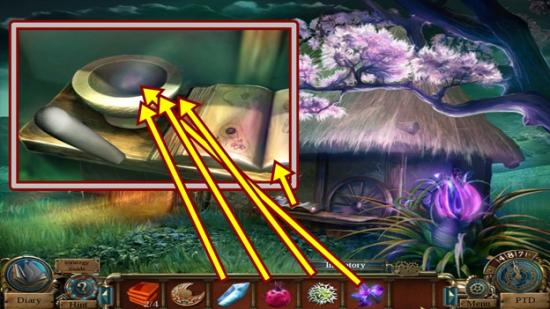
- Click on the table.
- Add the CRYSTAL SHARD, MAGIC FLOWER, CAVE FLOWER and MAGIC FRUIT to the mortar, then pick up the pestle and grind it into a paste (three clicks).
- Take the HEALING SALVE.
- Enter Merlin’s hut.
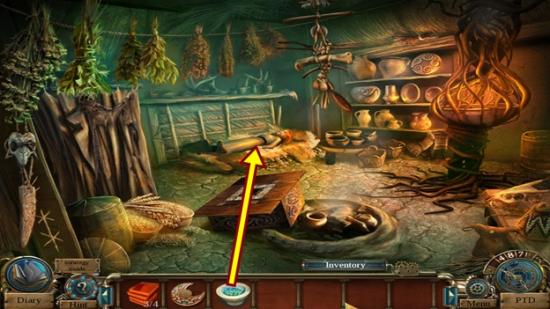
- Click on Nimue.
- Use the HEALING SALVE on her.
- Watch the cutscene.
- Take the VISION CRYSTAL she offers.
- Click on the PTD.
- Click on 1796 and return to Uncle Sean.
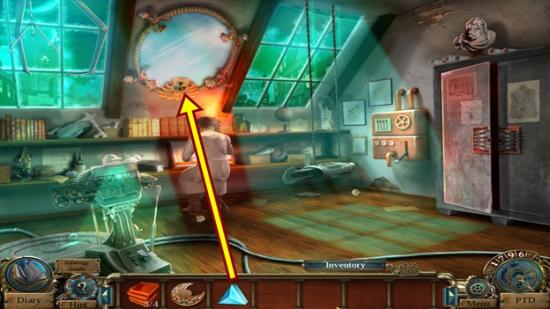
- Click on the magic mirror.
- Add the VISION CRYSTAL.
- Watch the cutscene.
- Click on the PTD.
- Click on 502 and go to the cliff (area with a question mark). If you can’t go to the cliff, go to Merlin’s hut and move down.
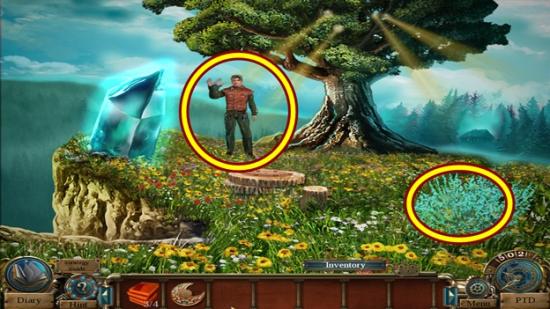
- Talk to Michael.
- Watch the cutscene.
- Click on the blue flowers and take the FUTURE TIME CRYSTAL.
- Click on the PTD.
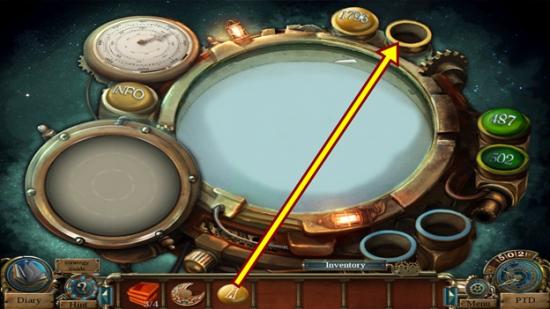
- Add the FUTURE TIME CRYSTAL, then click on it. Click on the new area of the map and enter it.
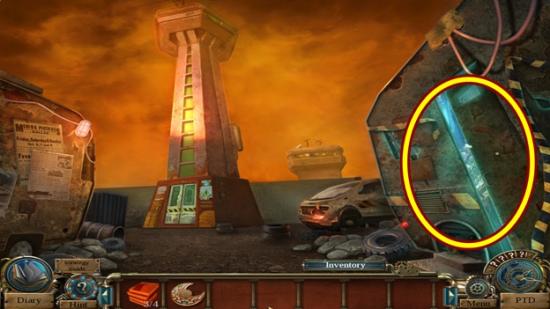
- Click on the trailer to start a hidden object hunt.
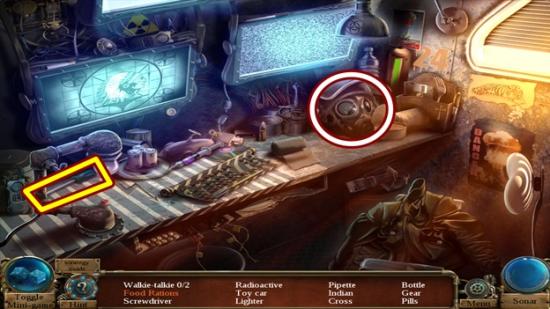
- Find all the objects or click Toggle Mini Game to play a match 3 game. Move the gas mask and take the food rations. A SCREWDRIVER is added to your inventory.
- Move towards the tower door.
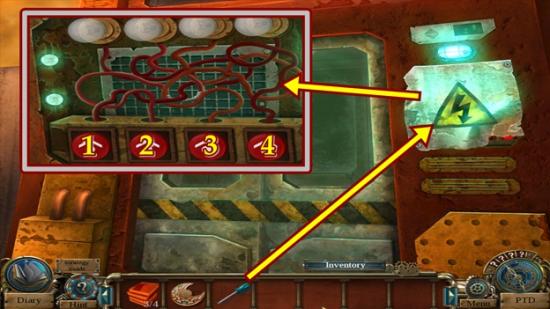
- Click on the hazard sign.
- Use the SCREWDRIVER to remove the sign.
- A mini-puzzle starts.
- Turn on all the lights by flipping the switches in the correct sequence. Flip on the switches until one remains lit. Flip another switch. If the lights turn off, flip the first switch that remained on, then flip another switch. Continue until all the lights remain on. Assuming the switches are labelled 1-4 from left to right, click on the switches in the following order: 3, 2, 4, 1.
- Take the lift (elevator) up.
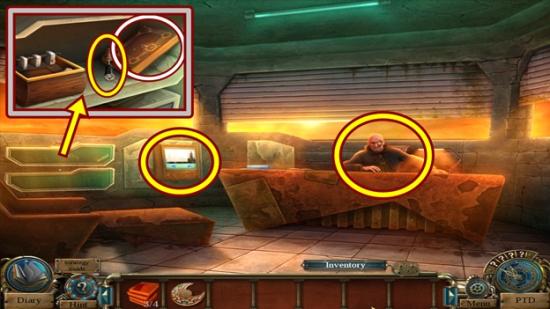
- Talk to Professor Liam.
- Click on the computer.
- Read the entries. Click on the arrow to scroll through the entries. When you get to the Moscow entry, click on the padlock to open the bookcase. Click anywhere outside the window to close it.
- Click on the bookshelf on the left.
- Take the NUT DRIVER.
- Open the book and read the entry. Click anywhere outside the window to close it.
- Click on the PTD.
- Click on 1796 and return to the basement.
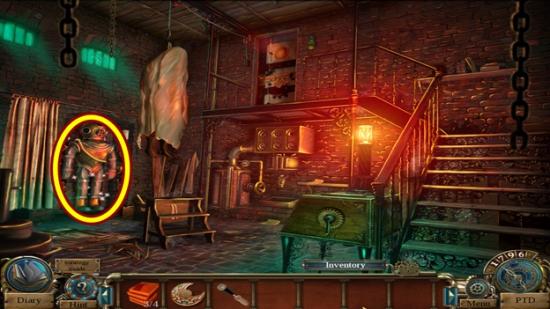
- Click on the underwater suit to start a hidden object hunt.
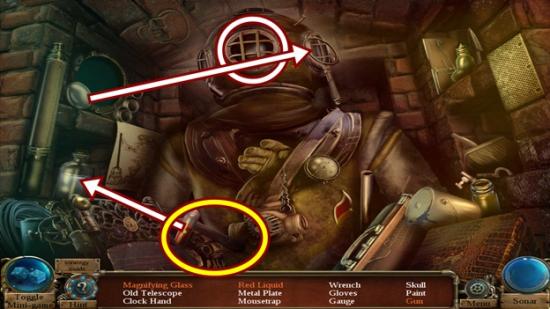
- Find all the objects or click Toggle Mini Game to play a match 3 game. Put the lens on the magnifying glass. Open the helmet’s face plate and take the gun. Pour the red liquid into the larger bottle, then take the red liquid. A WRENCH is added to your inventory.
- Return to the street.
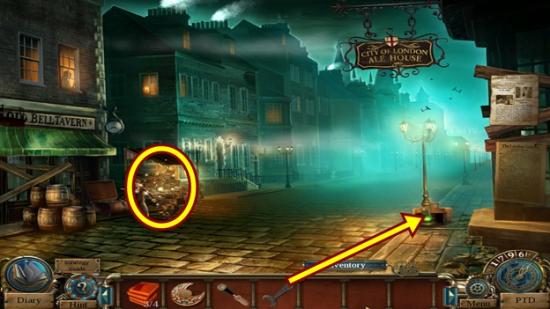
- Click on the base of the lamppost.
- Use the WRENCH to remove the panel.
- Take the MUSIC BOX PLATE.
- Click on the stall to start a hidden object hunt.
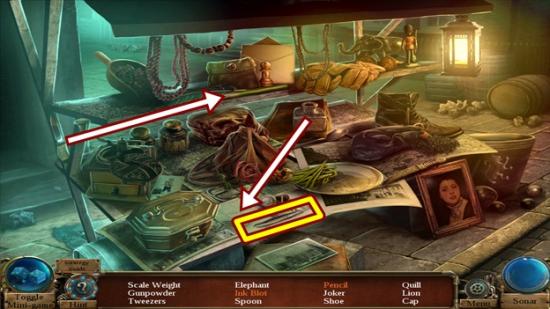
- Find all the objects or click Toggle Mini Game to play a match 3 game. Use the knife on the left to sharpen the pencil (click on the tip of the pencil). Pour ink on the paper, then take the ink blot. TWEEZERS are added to your inventory.
- Return to the basement.
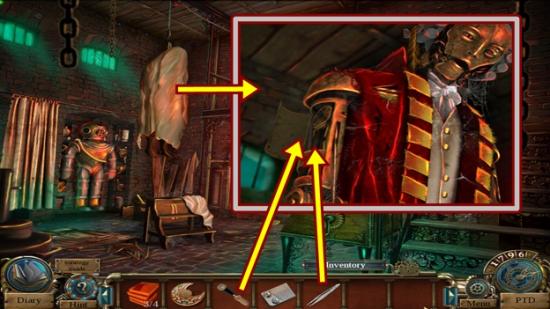
- Click on the body hanging and remove the sheet.
- Click on the arm.
- Use the NUT DRIVER to open the panel.
- Click on the panel and use the TWEEZERS to take the CLOCK DIAL.
- Return to the hotel room.
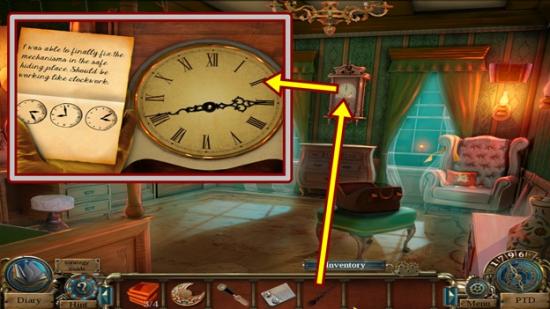
- Click on the wall clock.
- Add the CLOCK DIAL.
- A mini-puzzle starts.
- If a mini-puzzle doesn’t start, return to Uncle Sean’s room and click on the magic mirror. The paper with the clock times is tucked behind the mirror on the right side.
- Adjust the clock hands to the times shown on the paper. Start from the time shown on the very left and work your way right. When you correctly set the time, the clock hands will move automatically and then you can set the next time.
- After you have correctly set all the times, a panel opens.
- Take the CYLINDER.
- Click on the PTD.
- Click on the future and return to the top of the tower.
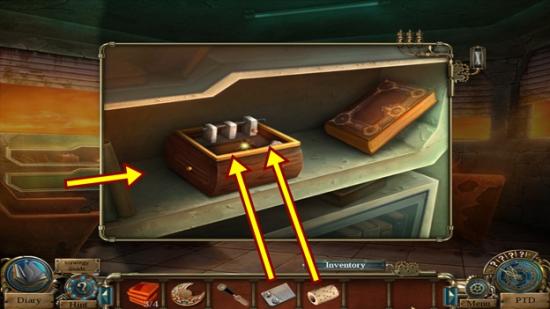
- Talk to Professor Liam.
- Click on the bookshelf.
- Add the CYLINDER and MUSIC BOX PLATE to the music box.
- Take the MOSCOW 1812 TIME CRYSTAL. Click anywhere outside the window to close it.
Year 1812 – Moscow
- Click on the PTD.
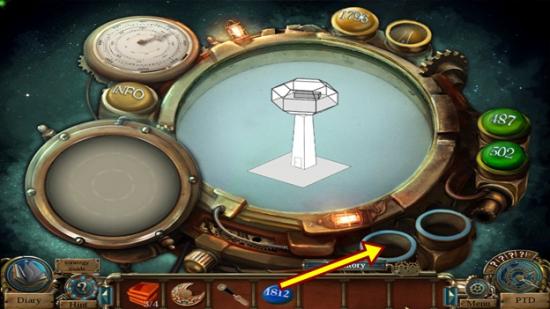
- Add the MOSCOW 1812 TIME CRYSTAL in the slot, then click on it. Click on the new map entry and enter the area.
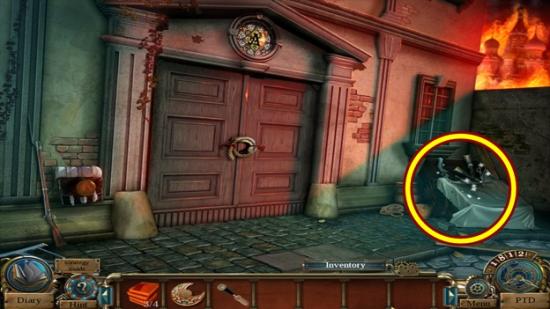
- Click on the overturned cart to start a hidden object hunt.
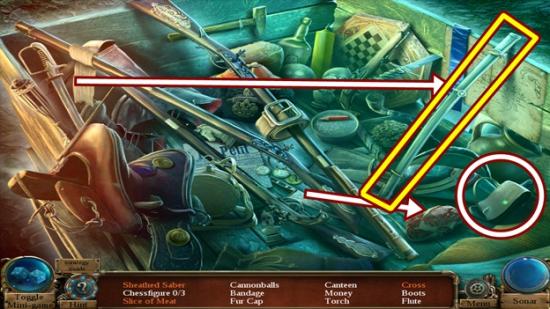
- Find all the objects or click Toggle Mini Game to play a match 3 game. Pull away the blanket to reveal more items. Put the sabre in the sheath and take the sheathed sabre. Use the chef’s knife on the meat, then take the slice of meat. Open the bag and take the cross. A SABRE is added to your inventory.
- Click on the door.
- Use the SABRE to cut the rope.
- Enter the house.
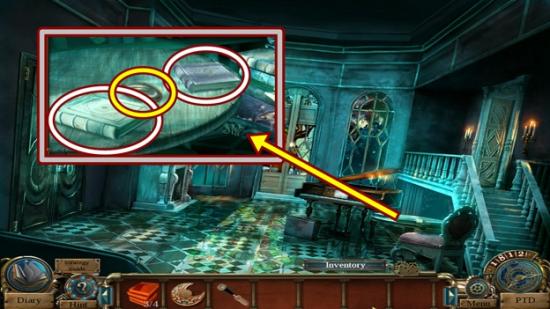
- Click on the table.
- Take the SMALL MIRROR (1/3).
- Read the two books. Click anywhere outside the window to close it.
- Go up the stairs into the bedroom.
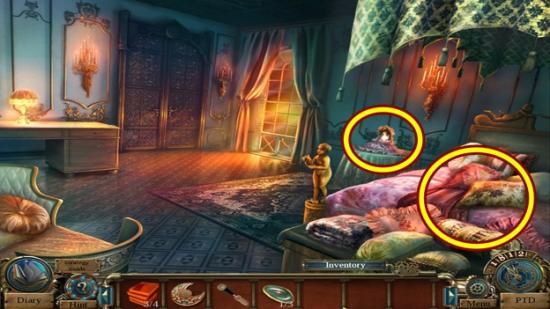
- Click on the doll on the table.
- Click on the doll, then take the TREE SHAPE.
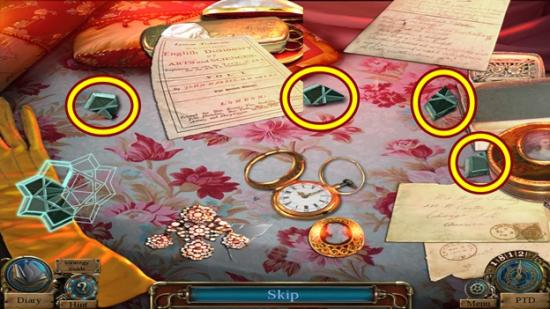
- Click on the bed.
- A mini-puzzle starts.
- Move the items out of the way to reveal the four mechanism pieces.
- The MECHANISM PIECE (1/2) is added to your inventory.
- Solution:
- Move down to the dining room.
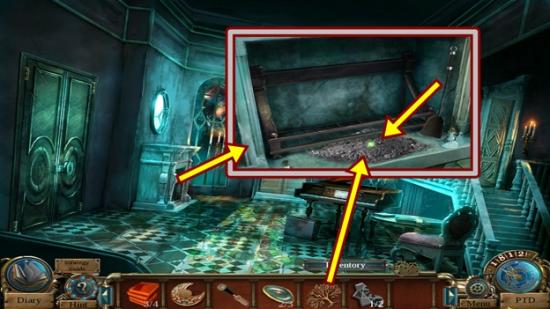
- Click on the fireplace.
- Use the small shovel to clear away the ashes.
- Put the TREE SHAPE in the newly revealed slot.
- Take the WARDROBE KEY.
- Return to the bedroom.
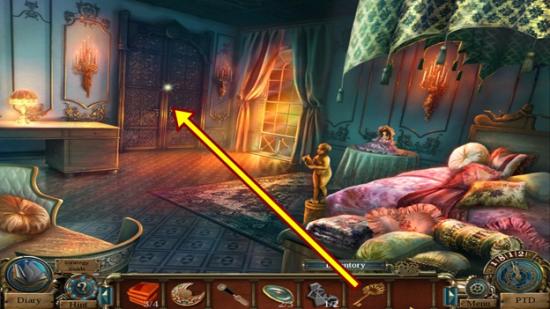
- Use the WARDROBE KEY on the wardrobe.
- Click on the wardrobe to start a hidden object hunt.
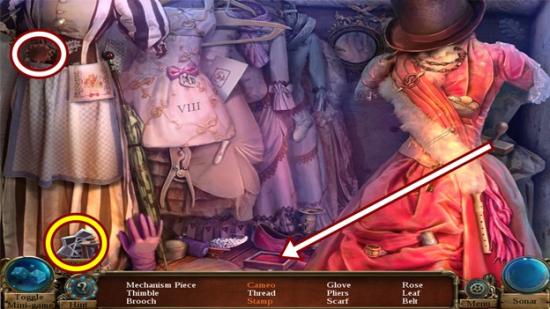
- Find all the objects or click Toggle Mini Game to play a match 3 game. Click on the brooch to reveal the cameo. Put the stamp on the ink pad, then take it. A MECHANISM PIECE (2/2) is added to your inventory.
- Move down to the dining room.
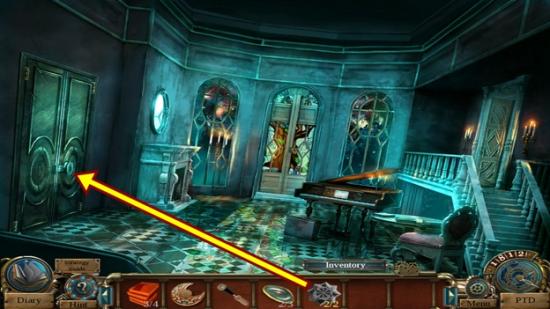
- Click on the door on the left.
- Add the two MECHANISM PIECES.
- Enter the workshop.
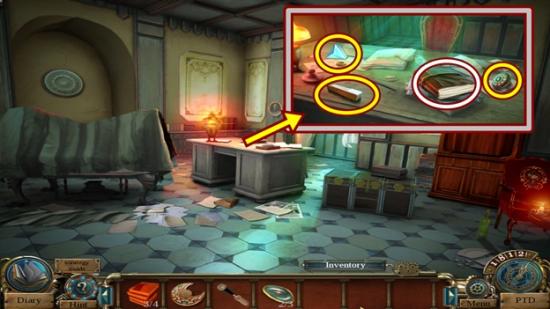
- Click on the desk.
- Take the DRAWER KNOB, VISION CRYSTAL and PIANO KEYS (1/3).
- Read the diary. Click anywhere outside the window to close it.
- Return to the bedroom.
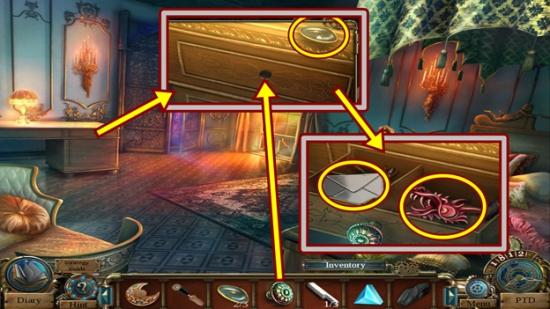
- Click on the dresser.
- Take the SMALL MIRROR (2/3).
- Put the DRAWER KNOB in the slot, then open the drawer.
- Take the DRAGON HEAD.
- Open the envelope and take the METAL PLATE (1/3).
- Click on the PTD.
- Click on 1796 and return to Uncle Sean.
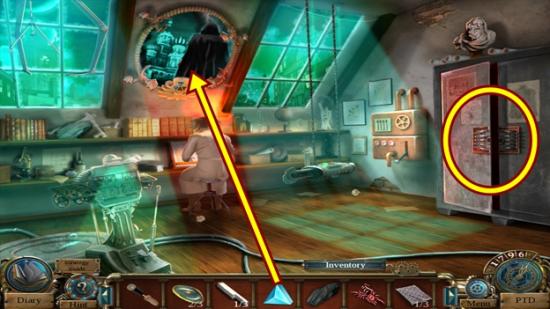
- Click on the magic mirror.
- Add the VISION CRYSTAL.
- Watch the cutscene.
- Click on the cabinet to start a hidden object hunt.
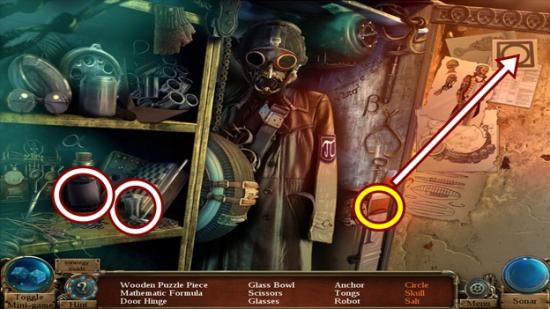
- Find all the objects or click Toggle Mini Game to play a match 3 game. Click on the salt shaker to pour some salt on the shelf. Use the eraser on the circle drawing. Remove the bottle’s label to reveal the skull. A WOODEN PUZZLE (4/4) is added to your inventory.
- Return to the hotel room.
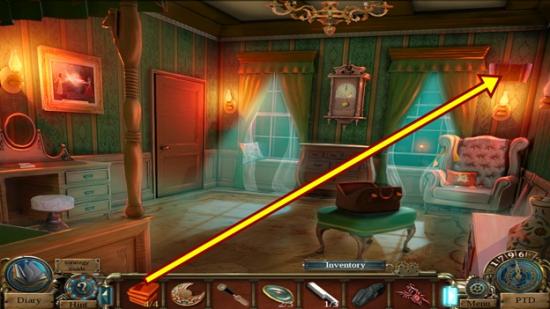
- Click on the upper part of the wall by the right window.
- Tear away the wallpaper.
- Add the four WOODEN PUZZLES.
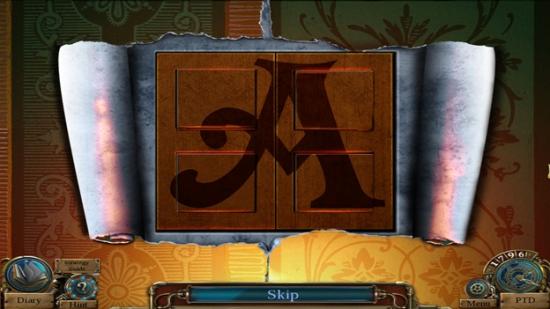
- A mini-puzzle starts.
- Swap adjacent tiles to create the letter A used on all the Ambrose items.
- Solution:
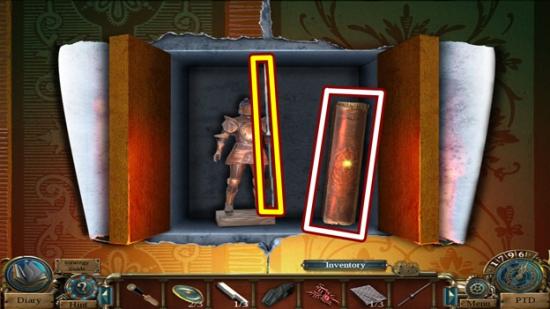
- Take the LANCE.
- Read the book. Click anywhere outside the window to close it.
- Click on the PTD.
- Click on 1812 and return to the workshop.
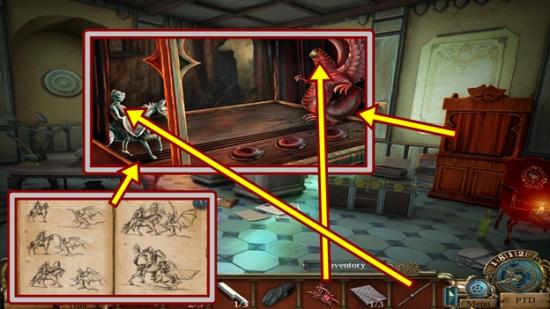
- Click on the wooden theatre.
- Open the curtains.
- Add the DRAGON HEAD to the dragon and give the LANCE to the knight.
- A mini-puzzle starts.
- Recreate the battle between the knight and the dragon according to the book found on the table in the dining room. Use the buttons to recreate the battle. In order from left to right, the buttons represent the shield, lance and dragon. In the following order, press the buttons: dragon, shield, dragon, and lance.
- When you have solved the puzzle, take the MOSCOW 1913 TIME CRYSTAL.
Year 1913 – Moscow
- Click on the PTD.
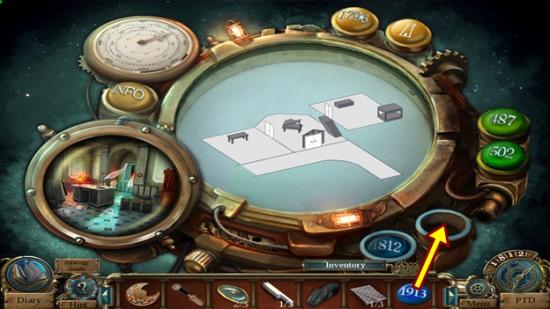
- Add the MOSCOW 1913 TIME CRYSTAL to the slot. Click on it, then select the map piece that appears, then enter the area.
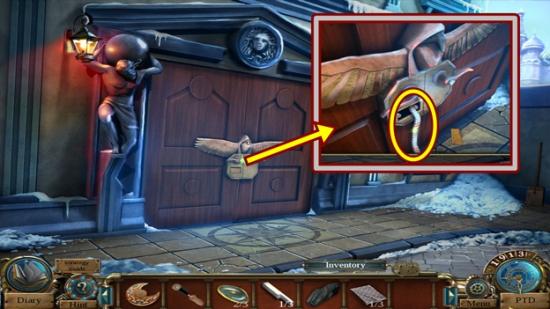
- Click on the door.
- Turn the handle.
- When the panel pops off, take the CHAIN. Click anywhere outside the window to close it.
- Click on the PTD.
- Click on the future and go to the base of the tower.
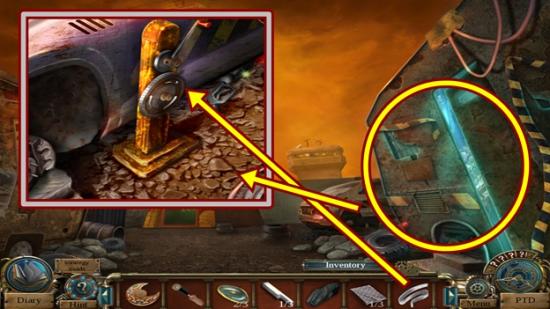
- Click on the car.
- Add the CHAIN to the jack. Click anywhere outside the window to close it.
- Click on the trailer to start a hidden object hunt.
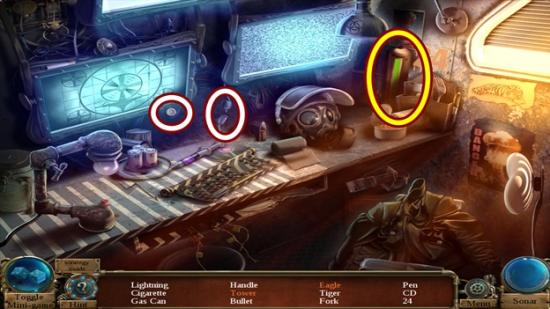
- Find all the objects or click Toggle Mini Game to play a match 3 game. Press the power button on the left monitor and take the eagle. Plug in the right monitor and take the tower. A GAS CAN is added to your inventory.
- Click on the car.
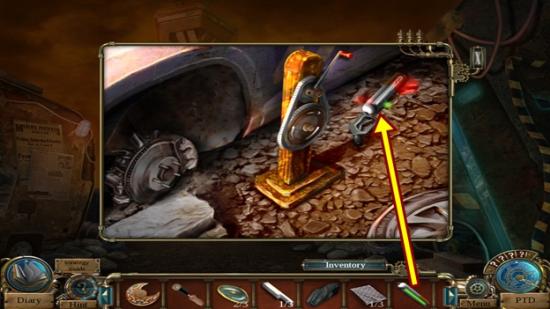
- Add the GAS CAN to the torch, then take the INDUSTRIAL TORCH.
- Click on the PTD.
- Click on 1913 and go to the area.
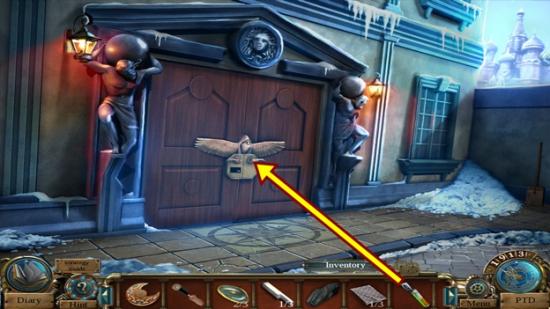
- Click on the door.
- Use the INDUSTRIAL TORCH on the handle.
- Open the door and go inside to the dining room.
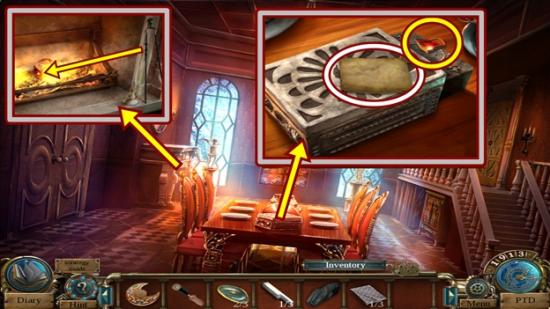
- Click on the table.
- Take the RUSSIAN DOLL LOCK (1/3).
- Read the note. Click anywhere outside the window to close it.
- Click on the fireplace.
- Use the tongs on the fire to get the HOT STONE LOCK.
- Go into the showroom (left door).
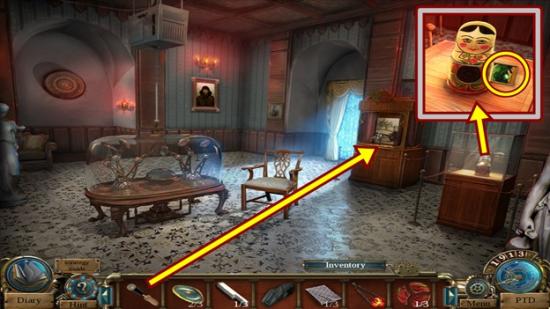
- Remove the glass from the display case at the far right.
- Click on the display.
- Take the PUZZLE LOCK PIECE. Click anywhere outside the window to close it.
- Click on the wooden theatre.
- Use the NUT DRIVER, remove the screw, then the plate and take the GEARS.
- Return to the dining room.
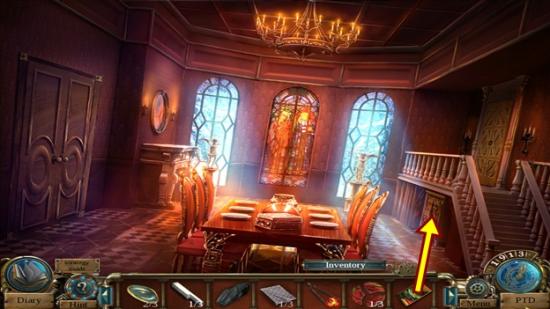
- Click on the chest below the stairs.
- Add the PUZZLE LOCK PIECE.
- A mini-puzzle starts.
- Slide the tiles to recreate the image. A tile can only slide into an empty slot. As there is no reset button, a step-by-step solution cannot be provided as you may have already moved some pieces.
- Solution:
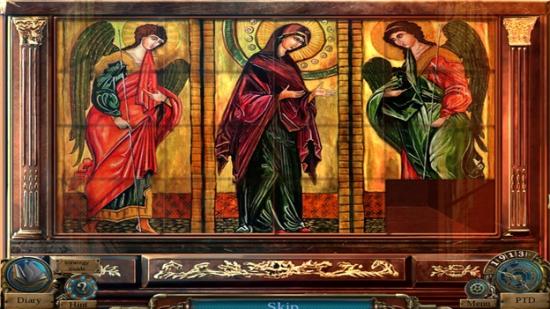
- As the bottom right slot is empty, start by properly arranging the tiles in the upper left corner, then work your way down and right.
- Take the LOCK PART.
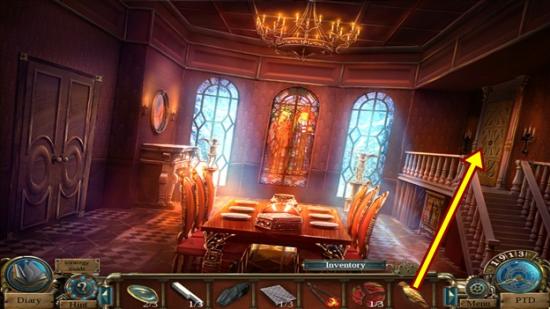
- Click on the bedroom door.
- Add the LOCK PART and turn the handle, then enter the bedroom.
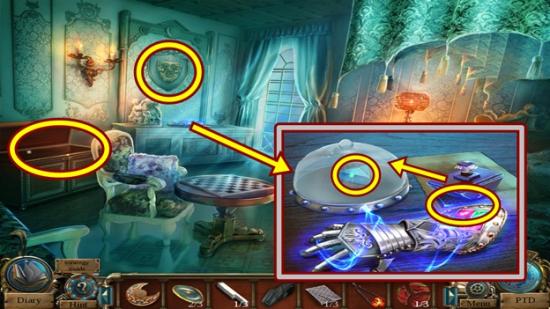
- Take the SHIELD.
- Click on the table below where the shield was.
- Use the stamp to break the glass (two clicks), then take the VISION CRYSTAL and the METAL PLATE (2/3). Click anywhere outside the window to close it.
- Click on the chest to start a hidden object hunt.
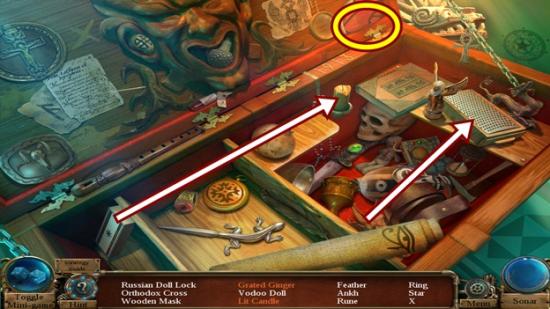
- Find all the objects or click Toggle Mini Game to play a match 3 game. Use ginger on the grate, then take the grated ginger. Use the matches on the candle, then take the lit candle. A RUSSIAN DOLL LOCK (2/3) is added to your inventory.
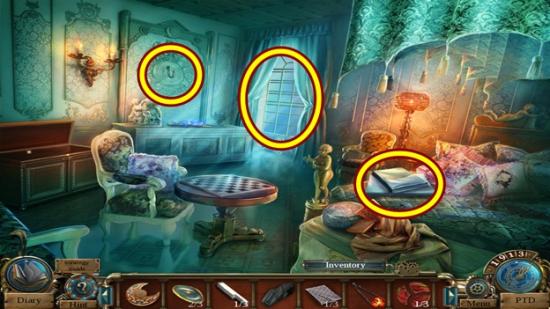
- Open the window.
- Click on the blanket on the bed to make a rope, then put the rope on the hook where the shield was.
- Go out the window to the garden.
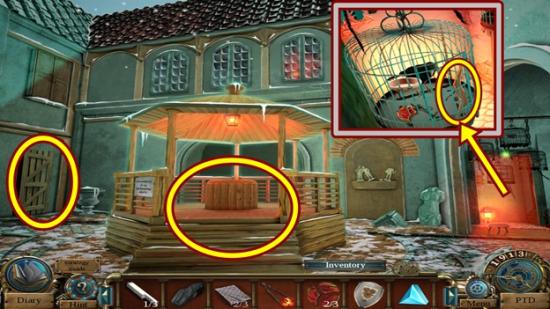
- Click on the birdcages.
- Open the cage and take the GAZEBO LOCK.
- Click on the gazebo.
- Add the GAZEBO LOCK.
- Lift the loose board and take the GARDEN KEY.
- Read the note on the side of the gazebo.
- Click on the door to start a hidden object hunt.
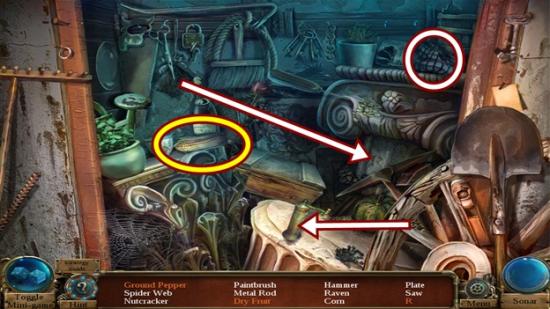
- Find all the objects or click Toggle Mini Game to play a match 3 game. Put the pepper in the grinder, then take the ground pepper. Move the cloth and take the dried fruit. Use the feather duster on the stone to remove the dust and get the R. CORN is added to your inventory.
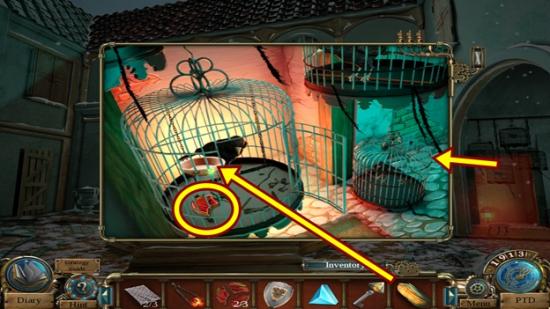
- Click on the birdcages.
- Put the CORN in the bird’s dish, then take the RUSSIAN DOLL LOCK (3/3).
- Go to the outside of the house (down three scenes).
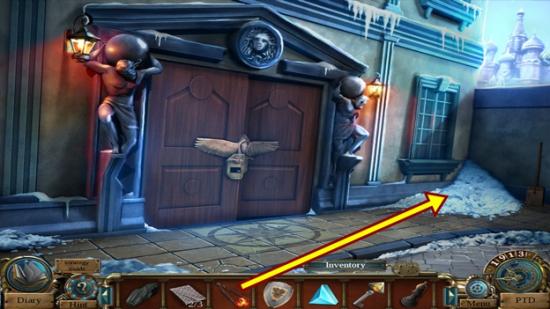
- Put the HOT STONE LOCK in the snow.
- Click on the snow and take the STONE LOCK.
- Go inside the house.
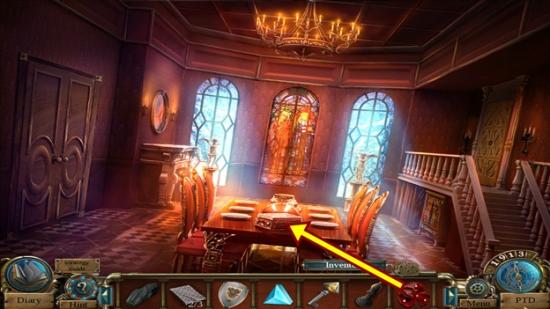
- Click on the table.
- Insert the STONE LOCK in the slot, then open the chest.
- Take the WHITE MASK and BLUE MASK.
- Enter the showroom.
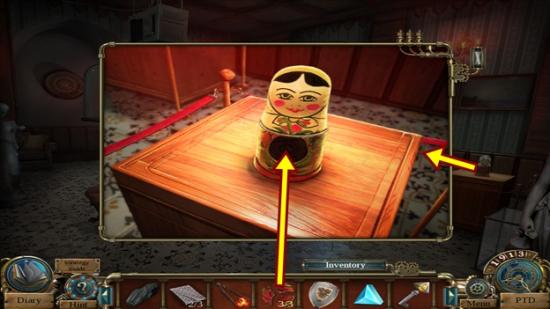
- Click on the display on the right.
- Add the three RUSSIAN DOLL LOCK pieces.
- Unstack the Matroyshka doll, then take the BLACK BISHOP.
- Click on the PTD.
- Click on 1796 and return to Uncle Sean.
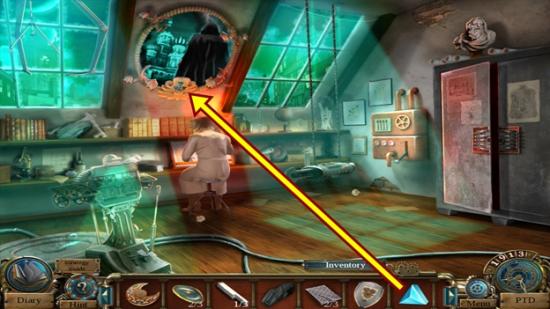
- Click on the magic mirror.
- Add the VISION CRYSTAL.
- Watch the cutscene.
- Click on the PTD.
- Click on 1812 and return to the dining room.
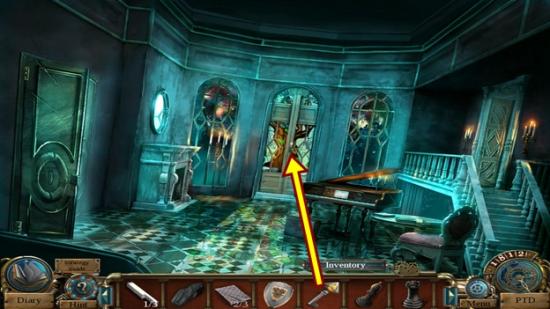
- Click on the door at the back of the room.
- Insert the GARDEN KEY and turn the handle.
- Go into the garden.
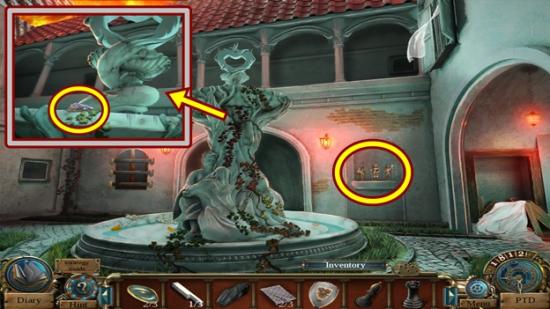
- Click on the top of the fountain.
- Take the GUARD PLATE. Click anywhere outside the window to close it.
- Click on the soldier statuettes.
- A mini-puzzle starts.
- Recreate the soldiers using their silhouettes as a guide.
- Solution:
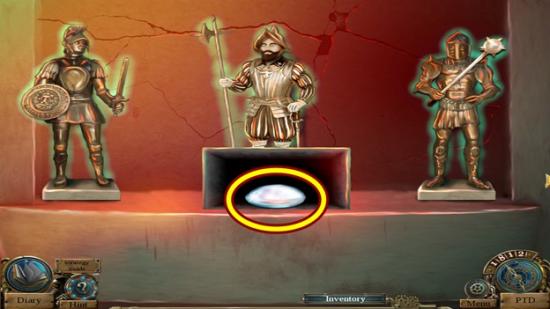
- When the panel opens, take the LENS.
- Move down two scenes to the front of the house.
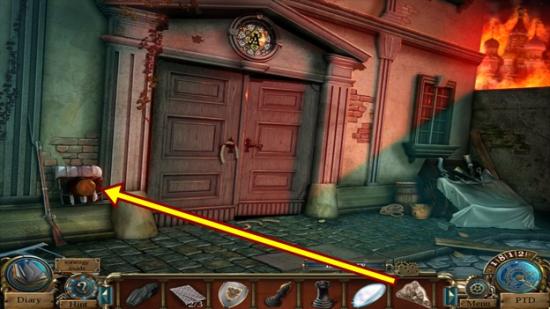
- Click on the equipment to the left of the door.
- Remove the pot and add the GUARD PLATE to the inset.
- Open the bag and take the WINDER.
- Return to the garden.
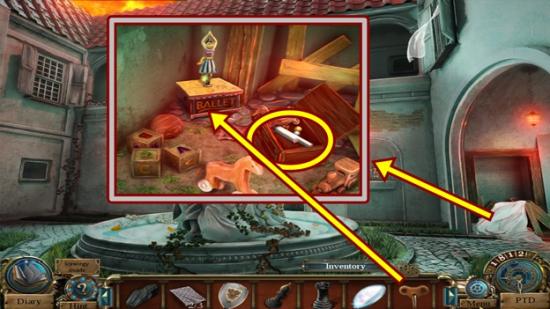
- Click on the debris on the far right.
- Remove the tarp and board.
- Take the PIANO KEY (2/3).
- Put the WINDER on the music box.
- When the music box opens, take the SMALL MIRROR (3/3) and the PIANO KEY (3/3).
- Move down to the dining room.
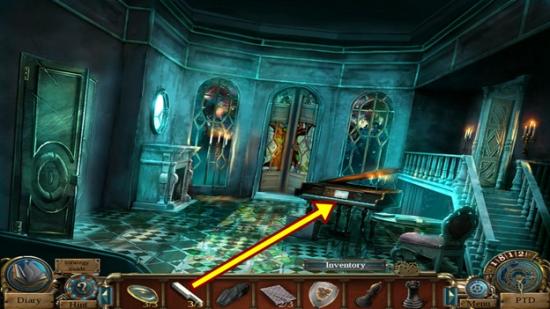
- Click on the piano.
- Add the three PIANO KEYS.
- A mini-puzzle starts.
- Watch the tune that plays, then press the piano keys in the same order. Assuming the piano keys are labelled 1-5 from left to right, press 5-3-4-1-2.
- Take the GEM PIECE.
- Click on the PTD.
- Click on 487 and go to the cliff.
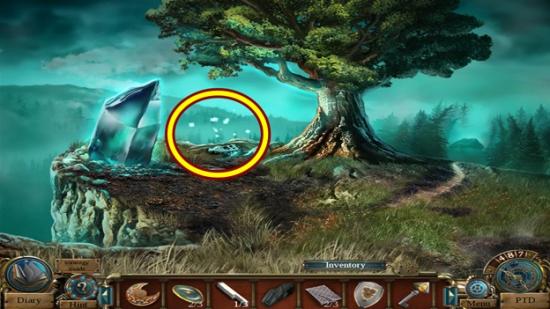
- Click on the area to the left of the tree to start a hidden object hunt.
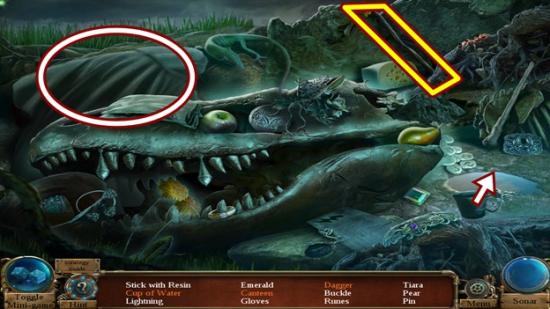
- Find all the objects or click Toggle Mini Game to play a match 3 game. Move the coat to reveal items. Use the cup on the puddle to get the cup of water. A STICK WITH RESIN is added to your inventory.
- Click on the PTD.
- Click on 1913 and go to the outside of the house.
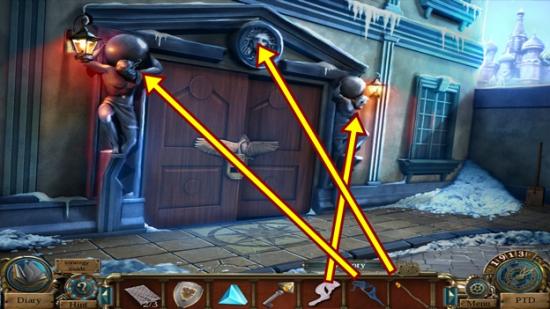
- Click on the left statue and add the BLUE MASK.
- Click on the white statue and add the WHITE MASK.
- Click on the shield above the door.
- Use the STICK WITH RESIN on the mouth to get the BLACK ROOK.
- Go inside the house and go left into the showroom.
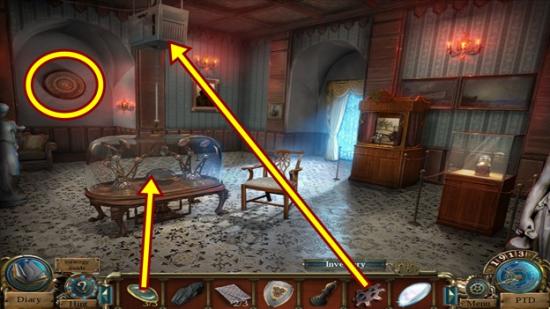
- Click on the mechanism hanging from the ceiling.
- Remove the panel and add the GEARS, then pull the lever to lift the glass off the table.
- Click on the table.
- Add the three SMALL MIRRORS.
- A mini-puzzle starts.
- Adjust the mirrors so the light beam is directed onto the relief on the wall. Click on a mirror to move it.
- Solution:
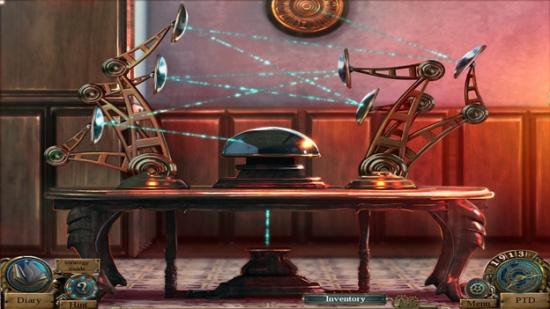
- Click on the relief on the wall.
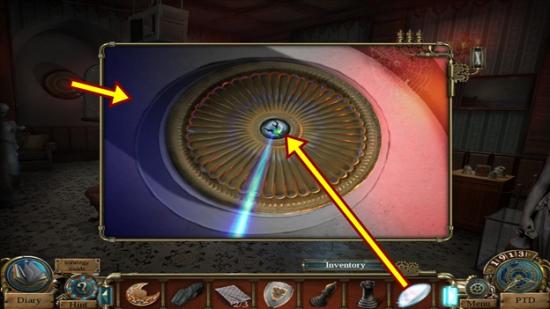
- Add the LENS to the centre, then take the FOUNTAIN HEART.
- Click on the PTD.
- Click on 1812 and return to the garden.
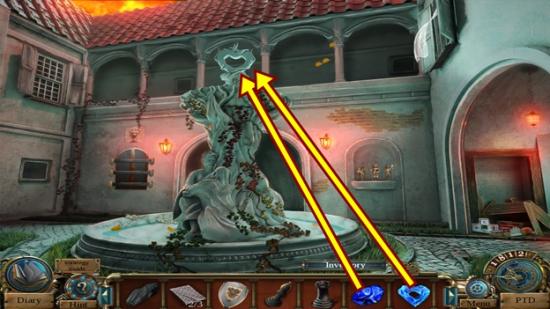
- Click on the top of the fountain.
- Add the FOUNTAIN HEART and the GEM PIECE.
- Time has been changed.
- Click on the PTD.
- Click on 1913 and return to the garden.
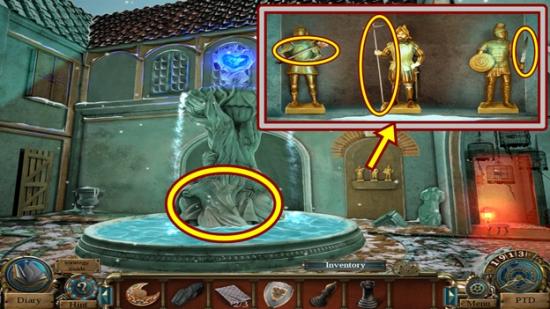
- Click on the statuettes.
- Take the SWORD, SPEAR and the MACE.
- Click on the base of the fountain.
- Add the appropriate weapon to the appropriate slot.
- From left to right, add the SWORD, SPEAR and MACE.
- When the panel opens, take the WHITE KING.
- Move down to the bedroom.
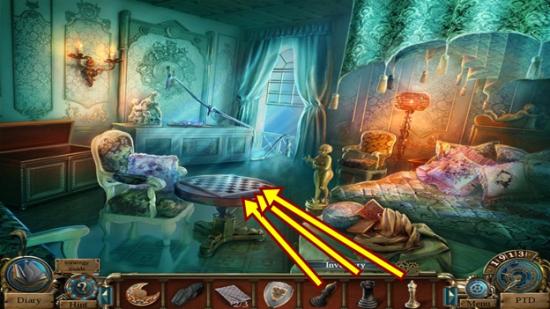
- Click on the chessboard.
- Add the BLACK BISHOP, BLACK ROOK and the WHITE KING to the spaces with an X carved on them (you can only put a piece on its correct spot).
- Take the DEMON SEAL.
- Return to the showroom.
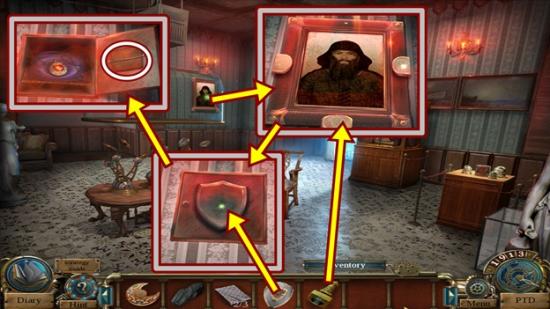
- Click on the Rasputin painting.
- Put the DEMON SEAL on the three seals attached to the painting.
- When the painting disappears, add the SHIELD, then click on it.
- Try to take the medallion.
- Read the note on the back panel to see how to get the medallion. Click anywhere outside the window to close it.
- Return to the garden.
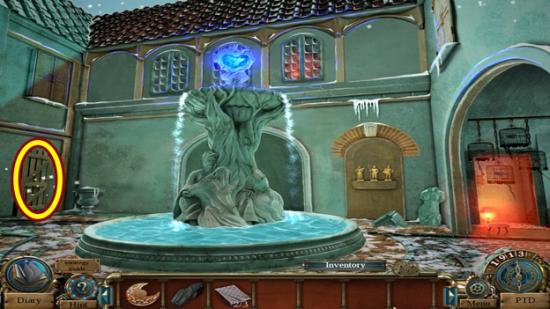
- Click on the door to start a hidden object hunt.
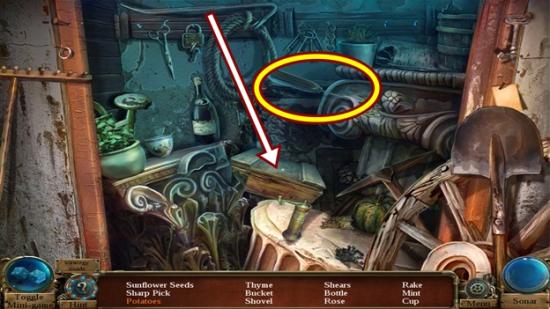
- Find all the objects or click Toggle Mini Game to play a match 3 game. Use the crowbar on the crate (click where your cursor is, not the tip of the crowbar) to get the potatoes. A SHARP PICK is added to your inventory.
- Click on the PTD.
- Click on 502 and go to the area outside the house.
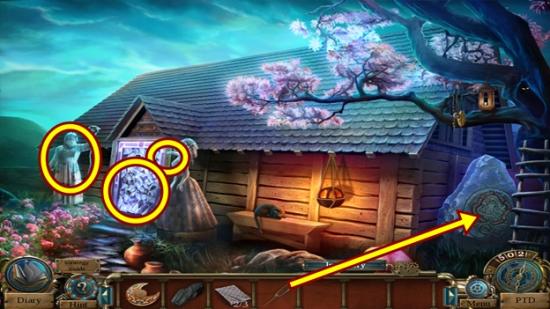
- Click on the large rock.
- Use the SHARP PICK on the inset.
- A mini-puzzle starts.
- Press all the elements so they all light up. Pressing an element affects it and its adjacent elements.
- When you are finished, take the TRISKELE SYMBOL.
- Click on the Merlin statue.
- Add the TRISKELE SYMBOL to the inset, then take the RING.
- Click on Viviana’s outstretched hand.
- Put the RING on the statue’s finger.
- Click on the door and turn the handle.
- Enter the house.
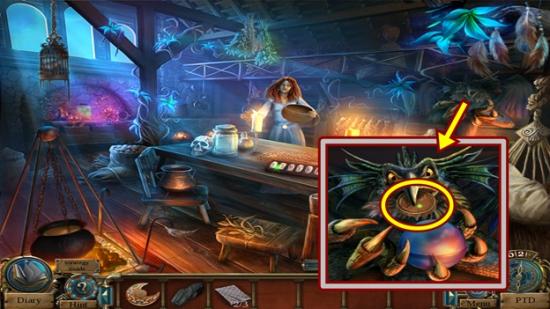
- Watch the cutscene.
- Talk to Nimue.
- Click on the bird on the wall.
- Take the MAGIC SEAL.
- Click on the PTD.
- Click on 1812 and go to the are outside the house.
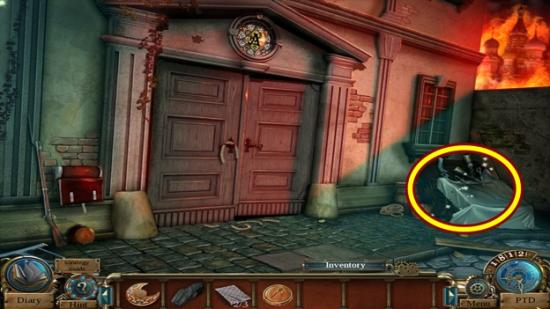
- Click on the overturned card to start a hidden object hunt.
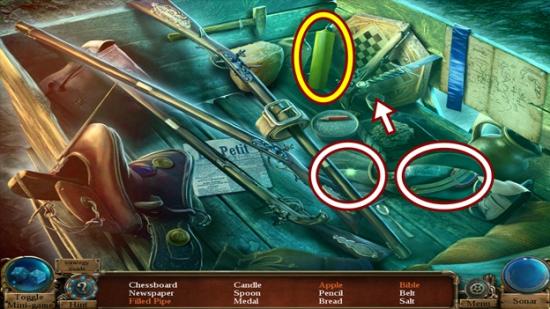
- Find all the objects or click Toggle Mini Game to play a match 3 game. Put the tobacco in the pipe, then take the filled pipe. Move the hat and take the bible. Move the cloth and take the apples. A CANDLE is added to your inventory.
- Go to the bedroom.
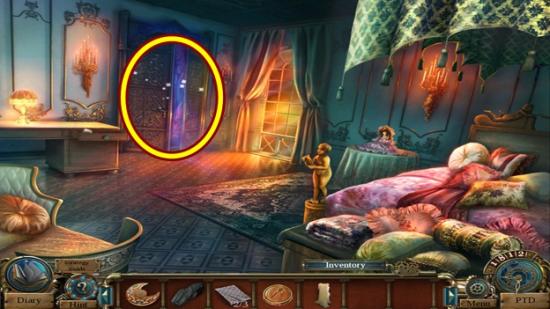
- Click on the wardrobe to start a hidden object hunt.
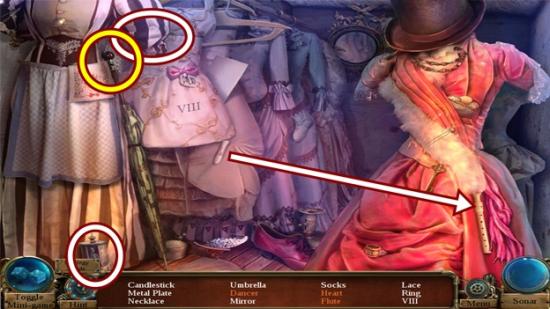
- Find all the objects or click Toggle Mini Game to play a match 3 game. Reassemble the flute. Move the dress sleeve and take the heart. Click on the jewelry box and take the dancer. A METAL PLATE (3/3) is added to your inventory.
- Go to the workspace.
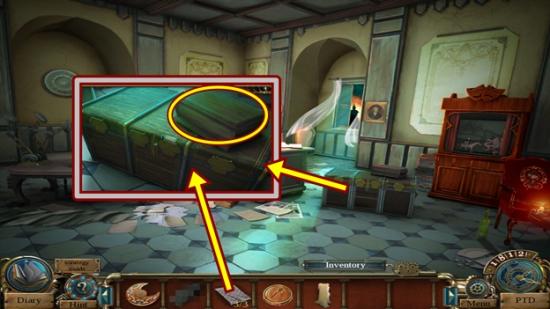
- Click on the chest.
- Open the small chest and take the COAL.
- Put the three METAL PLATES on the large chest.
- Open the large chest and take the CIRCULAR SAW.
- Click on the PTD.
- Click on 1796 and go to Uncle Sean.
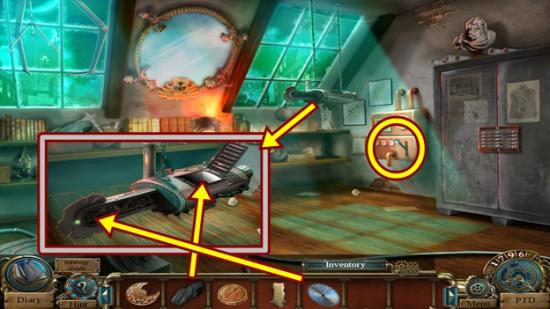
- Pull the lever on the wall contraption.
- Click on the lowered saw.
- Remove the panel and add the COAL.
- Add the CIRCULAR SAW and take the SAW PROTOTYPE.
- Click on the PTD.
- Click on 487 and go to the meadow.
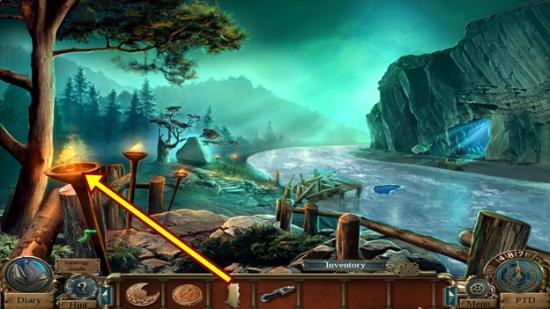
- Use the CANDLE on the fire to get the BURNING CANDLE.
- Click on the PTD.
- Click on 1812 and go to the garden.
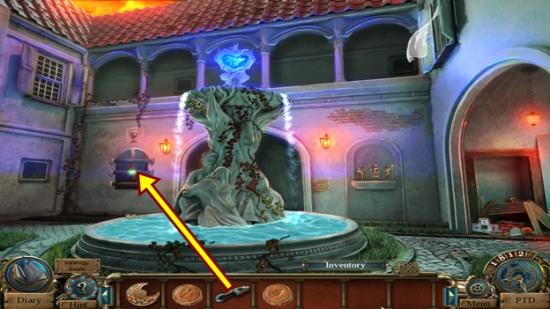
- Click on the left window and use the SAW PROTOTYPE to remove the three beams.
- Open the shutters and take the CRYSTAL BALL.
- Click on the PTD.
- Click on the PTD.
- Click on 502 and go to the area outside the house.
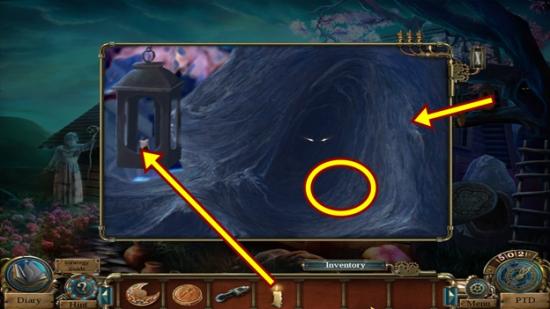
- Take the ladder and put it against the tree.
- Use the BURNING CANDLE to light the lantern, then take the EARTH SEAL.
- Move down to the cliff.
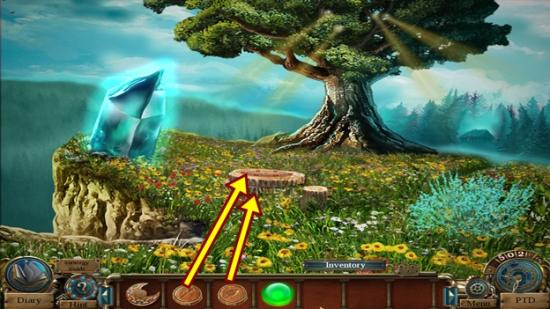
- Click on the tree stump.
- Add the MAGIC SEAL and the EARTH SEAL.
- A mini-puzzle starts.
- Rearrange the seals so each seal’s symbol is adjacent to the symbol etched in the wood. Slide the seals along the rails to move them. A seal can only move into an empty slot.
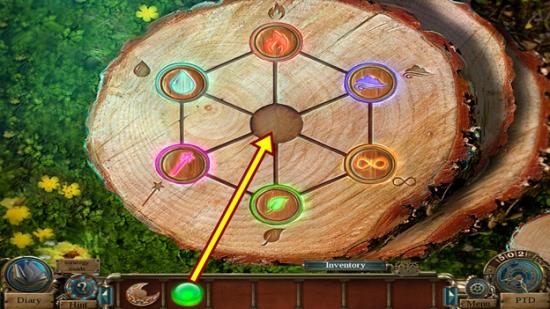
- When you are finished, add the CRYSTAL BALL to the centre.
- Watch the cutscene.
- You receive the MERLIN IN A CRYSTAL BALL.
- Move forward and go into the house.
- Talk to Nimue.
- Watch the cutscene.
- Click on the PTD.
- Click on 1913 and go to the bedroom.
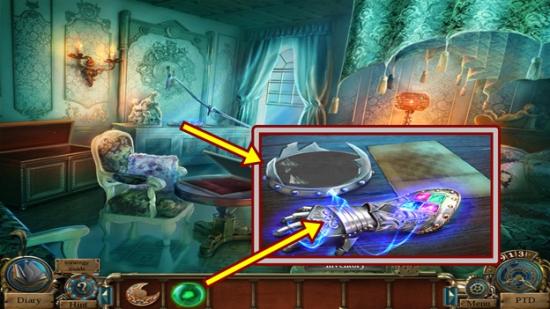
- Click on the table against the wall.
- Put the MERLIN IN A CRYSTAL BALL on the gauntlet.
- Watch the cutscene.
Time Museum
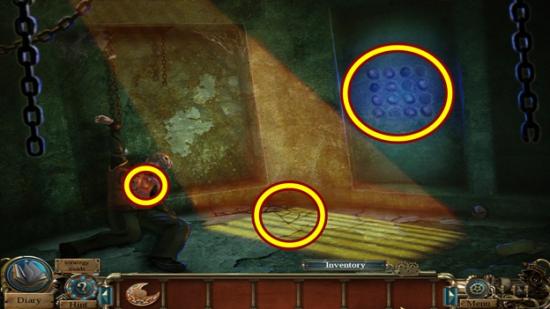
- Click on Michael.
- Open the jacket pocket and take MICHAEL’S KNIFE.
- Click on the broken rocks in the corner.
- Use MICHAEL’S KNIFE on the rocks, then move them and take the LODESTONE.
- Click on the wall.
- Add the LODESTONE.
- A mini-puzzle starts.
- Press the stones so they all light up. Pressing one stone affects it and its surrounding stones. Pressing an inactive stone activates it and pressing an active stone inactivates it.
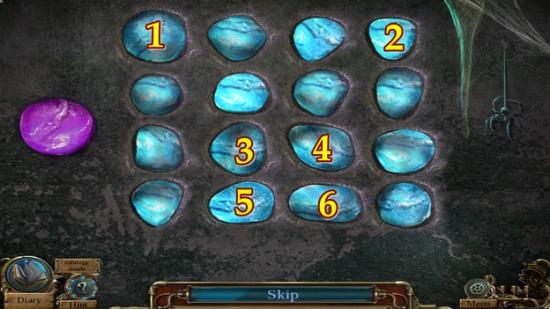
- Using the screenshot above as a guide, press the buttons in the order shown. Press the purple button to reset, if necessary.
- Move towards the exit.
- Watch the cutscene.
- Move right to the time museum chamber.
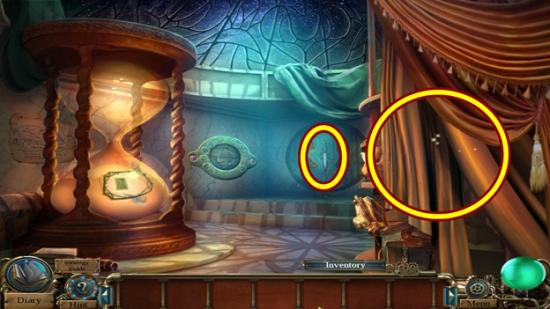
- Click on the knife on the wall.
- Take the CELTIC DAGGER. Click anywhere outside the window to close it.
- Click on the curtains to start a hidden object hunt.
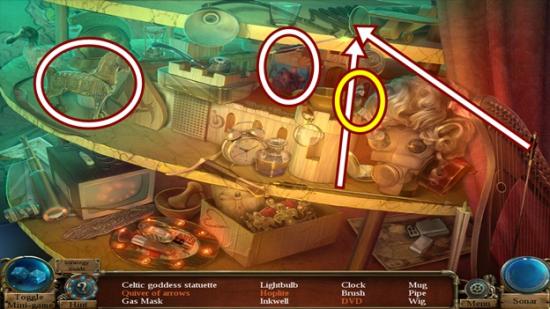
- Find all the objects or click Toggle Mini Game to play a match 3 game. Put the two arrows back in the quiver, then take the quiver or arrows. Open the DVD box and take the DVD. Click on the wooden horse and take the hoplite. A CELTIC GODDESS STATUE is added to your inventory.
- Move down to the time museum hall.
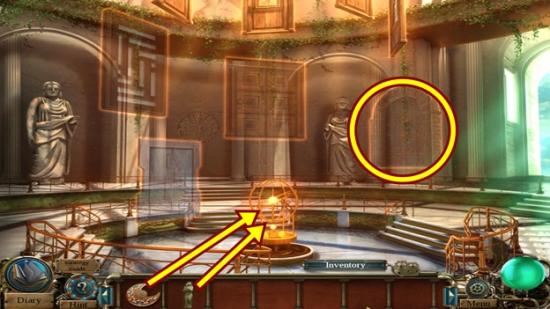
- Click on the contraption in the centre of the room.
- Add the MEDALLION, then the CELTIC GODDESS STATUE.
- Enter the floating door at the right to Celtic times.
- Go inside the house.
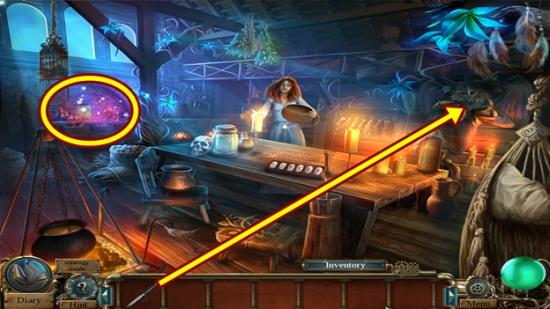
- Click on the bird on the wall.
- Use the CELTIC DAGGER on the sphere, then take the CHEST TOKEN.
- Click on the drawers on the left to start a hidden object hunt.
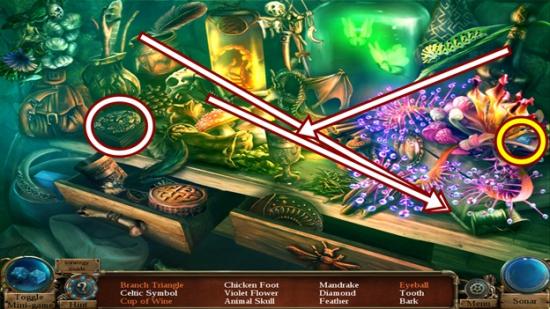
- Find all the objects or click Toggle Mini Game to play a match 3 game. Open the small box and take the eyeball. Pick up the bottle of wine and pour it into the cup. Move the branches to the far right branch to make the branch triangle. A DIAMOND is added to your inventory.
- Go to the time museum (sphere at the bottom right of the screen where the PTD was) and go right to the time museum chamber.
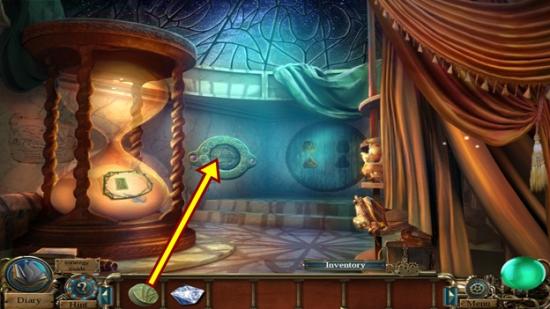
- Click on the panel on the wall.
- Add the CHEST TOKEN.
- A mini-puzzle starts.
- There are three separate puzzles to solve.
- First puzzle – Rearrange the tokens on the left to recreate the pattern. Click on two adjacent tiles to swap their positions.
- Second puzzle – Light up the tokens by pressing the tokens in a specific order. Assuming the tokens are labelled 1-5 from top to bottom, press 4, 2, 1, 5 and 3.
- Third puzzle – Rotate the rings to recreate the image of the tree. The two inner rings rotate each other and the outer ring only rotates itself. Rotate the innermost ring so the tree trunk appears sideways, then rotate the middle ring to line up the tree trunk properly. The last step is to align the outer ring.
- Solution:
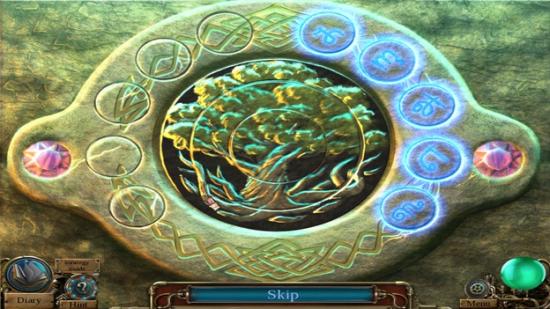
- Take the OMEGA.
- Click on the curtain to start a hidden object hunt.
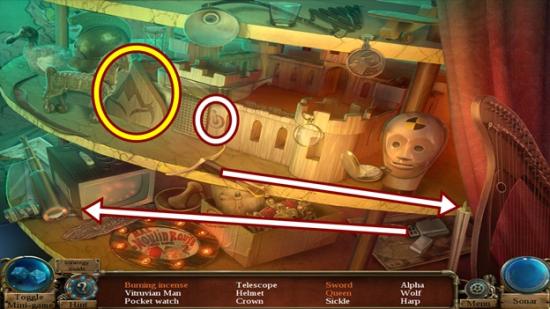
- Find all the objects or click Toggle Mini Game to play a match 3 game. Put the sword handle on the blade, then take the sword. Light the incense with the lighter. Lower the drawbridge and take the queen. An ALPHA is added to your inventory.
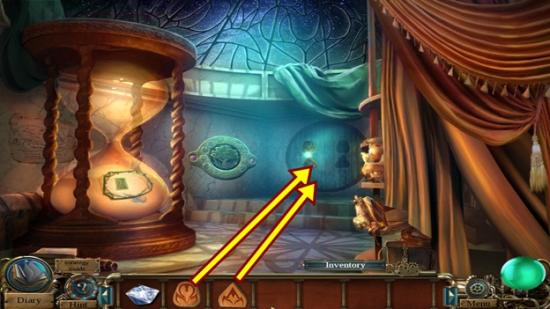
- Click on the circular inset on the wall.
- Add the ALPHA and OMEGA.
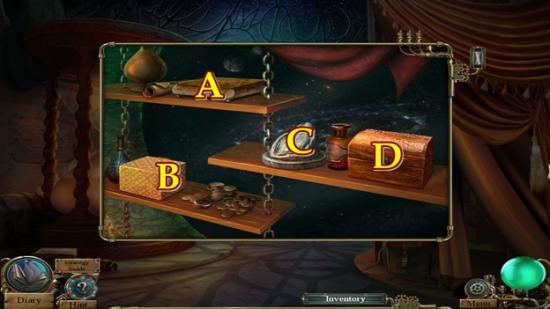
- Open the casket (A) and take the winder. Put the winder on the box (B). Turn the winder and when the clown pops out, take the sword. Put the sword in the rock (C) and take the key. Use the key on the chest (D) and take the HOURGLASS TOKEN.
- Click on the large hourglass.
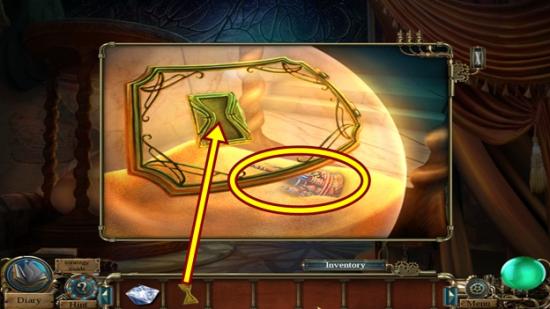
- Put the HOURGLASS TOKEN in the inset.
- Move the glass panel and take the MOSCOW CHURCH FIGURINE.
- Move down to the time museum hall.
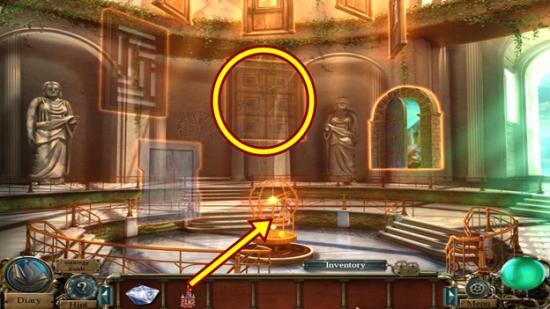
- Click on the contraption in the centre of the room.
- Add the MOSCOW CHURCH FIGURINE.
- Go through the centre door to Moscow 1913.
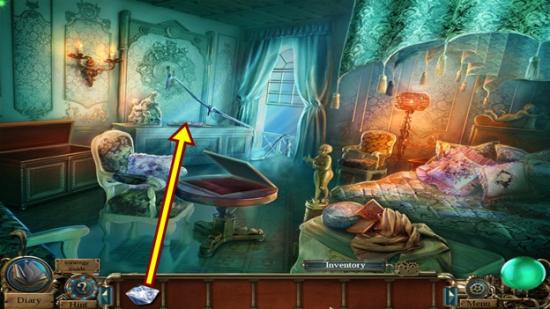
- Click on the table against the wall.
- Put the DIAMOND in the gauntlet, then take the MAGIC GLOVE.
- Return to the showroom (move down, then go left).
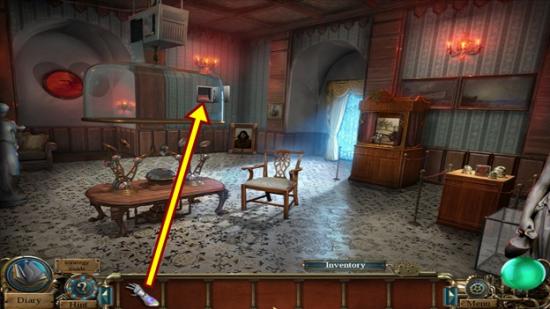
- Click on the inset where the Rasputin painting hung.
- Use the MAGIC GLOVE to take the CURSED MEDALLION.
- Return to the time museum, go through the door to the Celtic times and go inside the house.
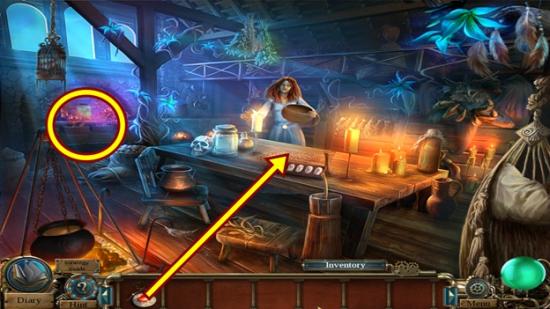
- Click on the table.
- Put the CURSED MEDALLION on the pattern. Move down.
- Click on the drawers to start a hidden object hunt.
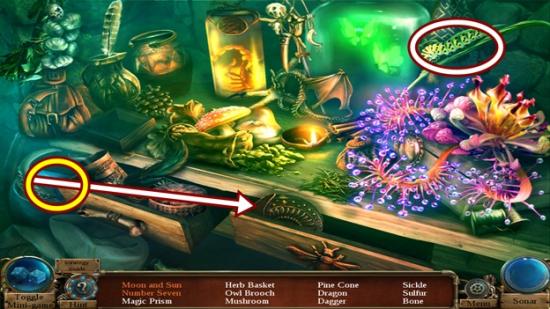
- Find all the objects or click Toggle Mini Game to play a match 3 game. Put the moon in the inset and take the moon and sun. Move the caterpillar and take the number 7. A PRISM is added to your inventory.
- Click on the table.
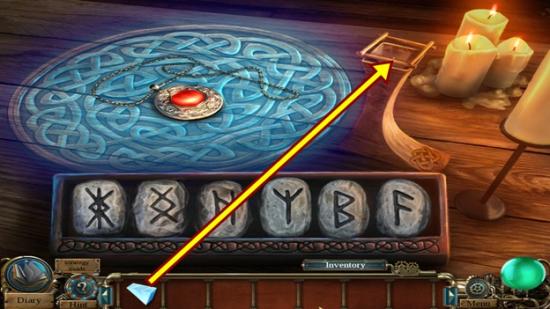
- Add the PRISM to the holder.
- A mini-puzzle starts.
- Click on the runes in a specific order (similar to several puzzles you’ve already solved). Assuming the runes are labelled 1-6 from left to right, click on runes 2, 5, 1, 4, 3 and 6.
- Watch the cutscene.
- Talk to Nimue.
- Return to the time museum hall and go to Moscow 1913.
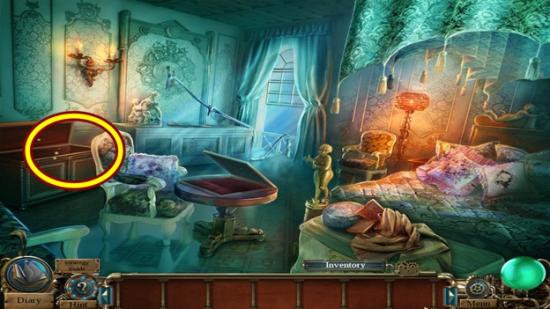
- Click on the chest to start a hidden object hunt.
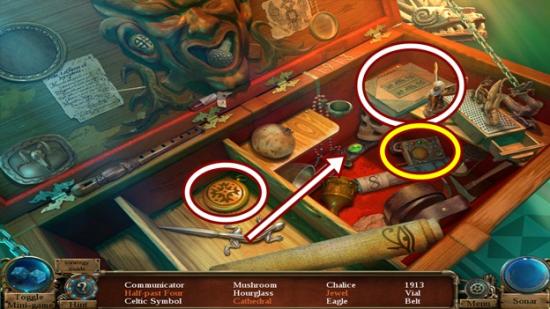
- Find all the objects or click Toggle Mini Game to play a match 3 game. Open the pocketwatch and take the half past four. Open the book and take the cathedral. Use the lizard letter opener to pop out the jewel from the dagger. A COMMUNICATOR is added to your inventory.
- Return to the time museum hall.
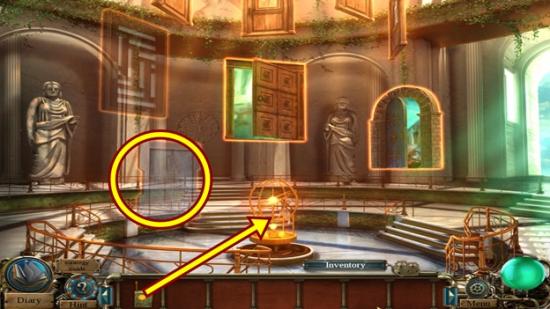
- Click on the contraption in the centre of the room and add the COMMUNICATOR.
- Go through the lower left door to the future.
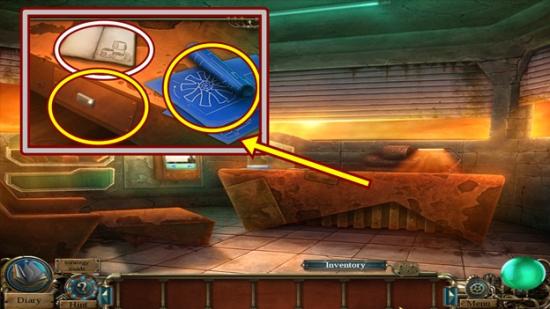
- Click on the desk.
- Take the BLUEPRINTS.
- Open the drawer and take the OLD BOOK.
- Read the book on the desk. Click anywhere outside the window to close it.
- Return to the time mu
- Return to the time museum hall.
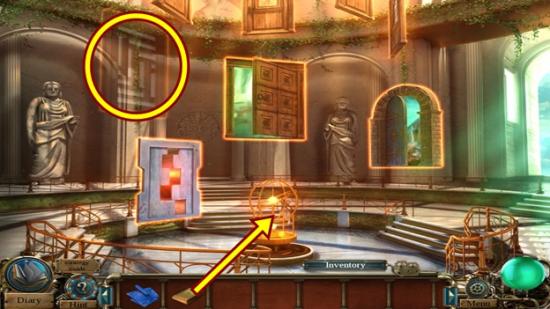
- Click on the contraption in the centre of the room and add the OLD BOOK.
- Go through the upper left door to unknown times.
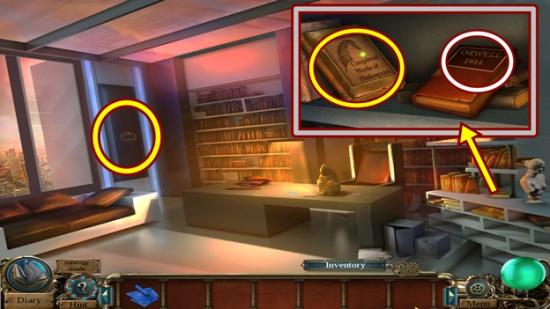
- Click on the shelves at right.
- Open the Shakespearean book and take the GARGOYLE HEAD.
- Take note of Orwell’s 1984. click anywhere outside the window to close it.
- Click on the door.
- Adjust the dials to read 1984.
- Click on the door to start a hidden object hunt.
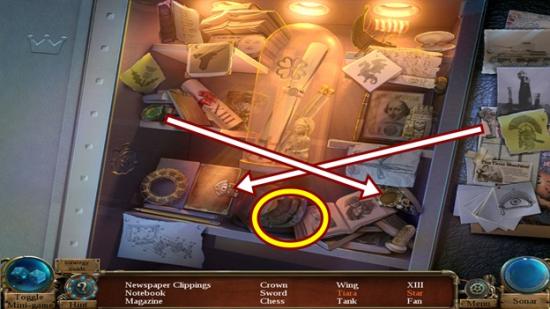
- Find all the objects or click Toggle Mini Game to play a match 3 game. Use the key on the diary, then turn the key and take the star. Put the jewel in the tiara. A GARGOYLE WING is added to your inventory.
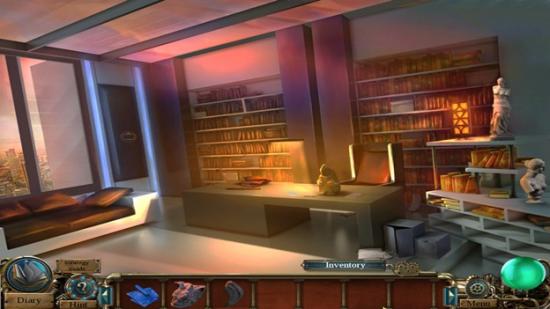
- Click on the table.
- Put the GARGOYLE HEAD and GARGOYLE WING on the statue.
- When the panel opens, take the STORY PUZZLE.
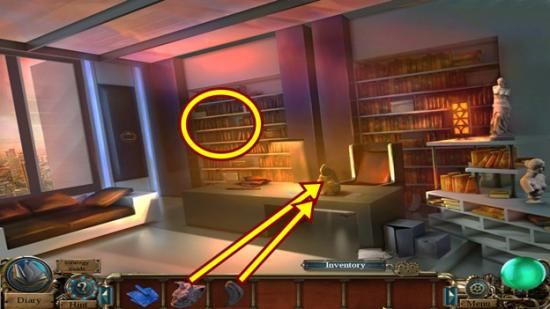
- Click on the back bookshelf on the left.
- A mini-puzzle starts.
- Pull out the books in a specific sequence. This is the same puzzle you’ve played many times already. Assuming the books are labelled 1-4, pull out books 2, 4, 1 and 3.
- Click on the panel that now appears.
- Add the STORY PUZZLE.
- A mini-puzzle starts.
- Adjust each row so it tells a story from start to finish. Click on a block to flip it.
- Solution:
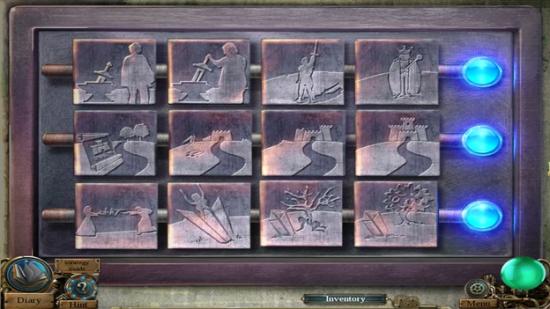
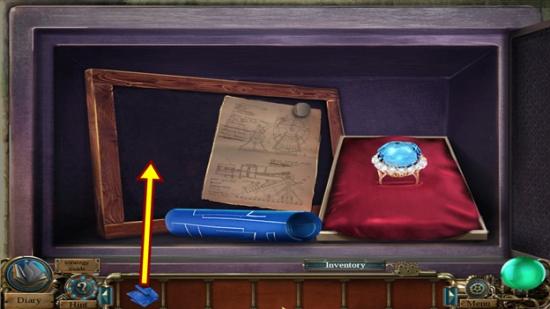
- Add the BLUEPRINTS.
- Watch the cutscene.
- The end!
If you are playing the Collector’s Edition, you can now play the Bonus Chapter:
- From the main menu, click Extras.
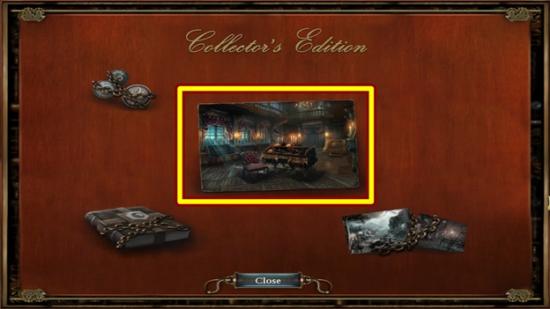
- Click on the center picture.
Bonus Chapter
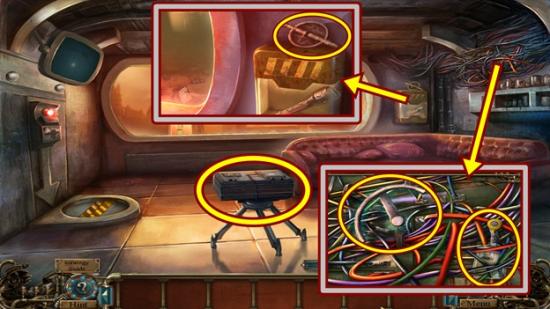
- Watch the cutscene.
- Click on the window.
- Watch the cutscene.
- Take the STAR BADGE.
- Move down.
- Click on the wires.
- Take the VALVE HANDLE PIECE and the ID CARD.
- Click on the case in the middle of the room.
- Use the ID CARD to open the case.
- Click on the case to start a hidden object hunt.
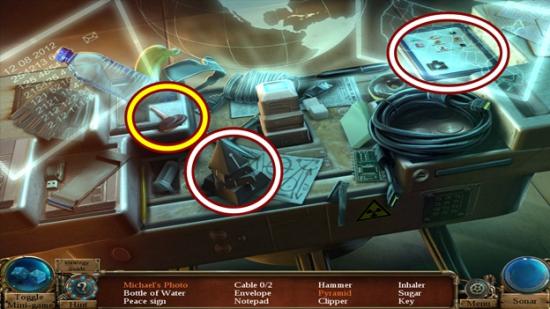
- Find all the objects or click Toggle Mini Game to play a match 3 game. Click on the tablet, then take Michael’s picture. Click on the pyramid pieces to line them up, then take the pyramid. A STAIRS KEY is added to your inventory.
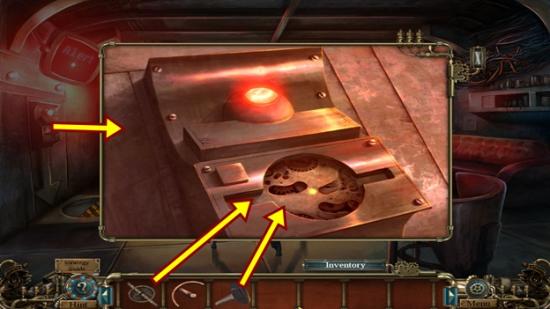
- Click on the panel on the left.
- Insert the STAR BADGE, then insert the STAIRS KEY.
- Go down the ladder to the quarter.
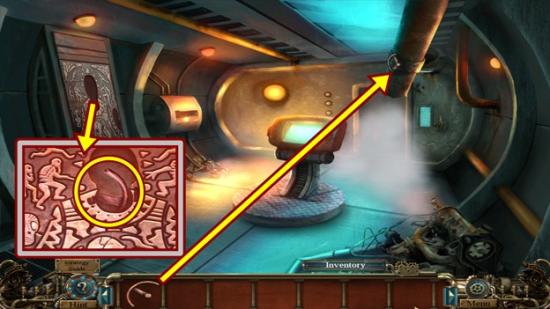
- Click on the relief on the left.
- Take the VALVE HANDLE PIECE.
- Click on the broken pipe.
- Add the two VALVE HANDLE PIECES.
- Turn the valve handle to turn off the steam.
- Open the door and go out to the tower base, then move forward to the master chamber.
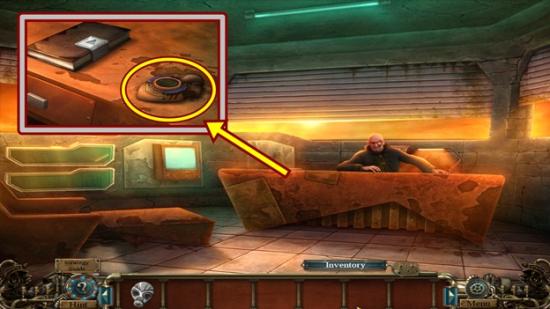
- Talk to Professor Liam.
- Click on the desk.
- Take the PORTABLE TIME DEVICE.
- Click on the PTD.
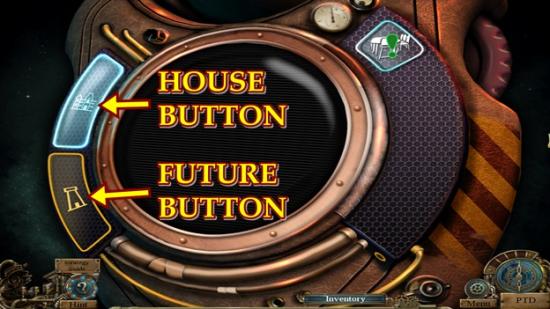
- Click on the house button, then click on the dining room icon and go through the viewer.
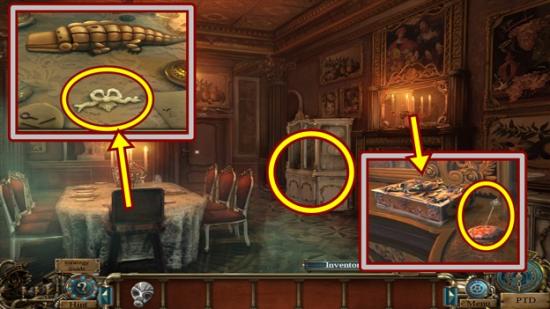
- Click on the mantle.
- Take the PIN. Click anywhere outside the window to close it.
- Click on the table.
- Move the clutter and take the CUPBOARD TOKEN. Click anywhere outside the window to close it.
- Click on the china cabinet.
- Insert the CUPBOARD TOKEN.
- Click on the china cabinet to start a hidden object hunt.
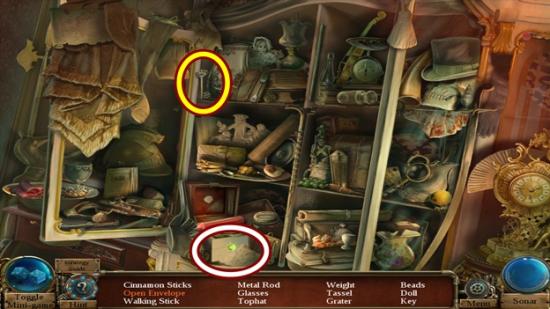
- Find all the objects or click Toggle Mini Game to play a match 3 game. Click on the envelope to open it. A CORRIDOR KEY is added to your inventory.
- Click on the door.
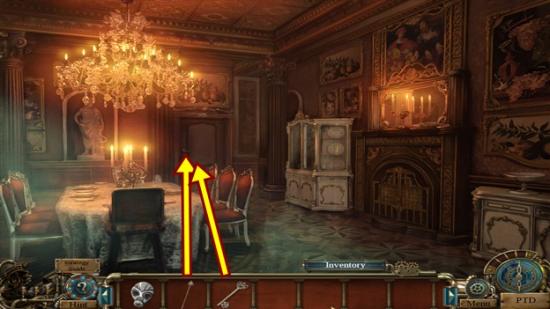
- Insert the PIN into the keyhole, then add the CORRIDOR KEY.
- Turn the handle and go through the door to the corridor.
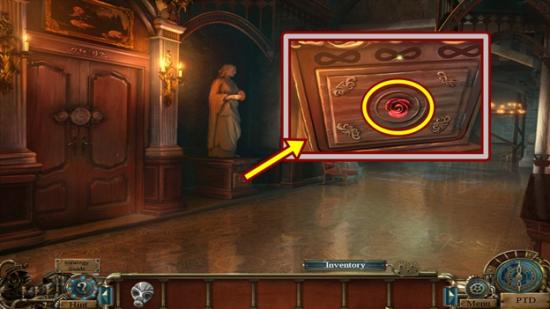
- Click on the base of the statue.
- Take the SMALL ROSE TOKEN. Click anywhere outside the window to close it.
- Move forward to the main hall.
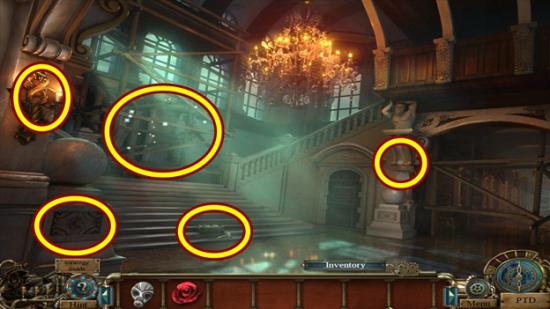
- Click on the stairs.
- Take the HAMMER. Click anywhere outside the window to close it.
- Click on the statue.
- Take the LARGE ROSE TOKEN.
- Click on the wall sconce.
- Take the INFINITY SYMBOL, then click on the candle.
- Click on the newly opened panel.
- Remove the cover and take the PUZZLE PIECE.
- Click on the scaffolding to start a hidden object hunt.
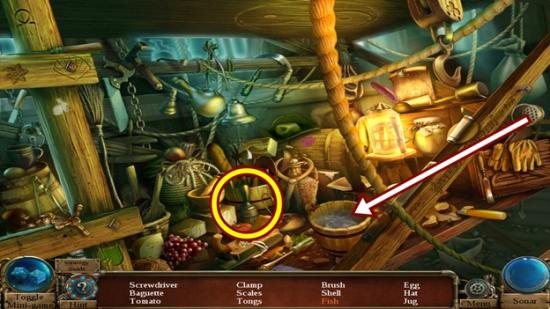
- Find all the objects or click Toggle Mini Game to play a match 3 game. Use the drainer in the bucket of water to get the fish. A BRUSH is added to your inventory.
- Move down two scenes to the dining room.
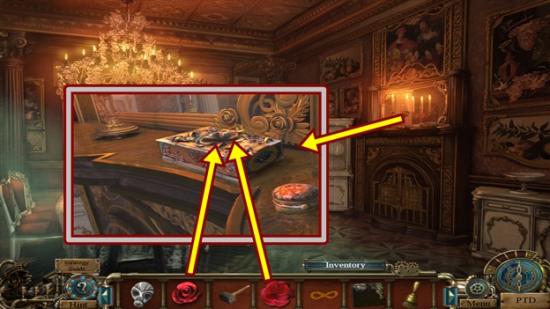
- Click on the mantle.
- Add the LARGE ROSE TOKEN and the SMALL ROSE TOKEN to the small casket.
- Open the casket and take the TRIANGLE KEY.
- Click on the PTD.
- Click on the future button and go to the master chamber.
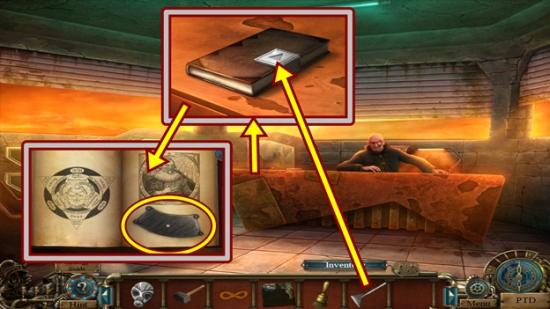
- Click on the desk.
- Use the TRIANGLE KEY on the book, then turn the key.
- Open the book and take the NECKLACE (1/3). Click anywhere outside the window to close it.
- Move down to the tower base.
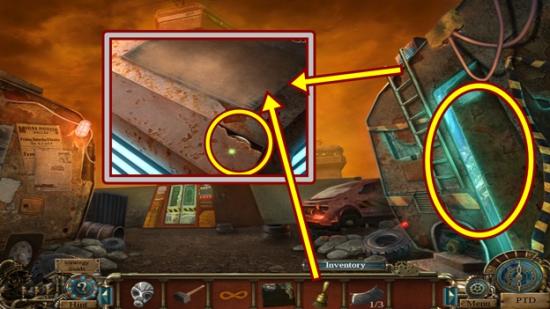
- Click on the trailer ladder.
- Lift the metal piece and take the MASK.
- Use the BRUSH to clean off the solar panel.
- Click on the trailer to start a hidden object hunt.
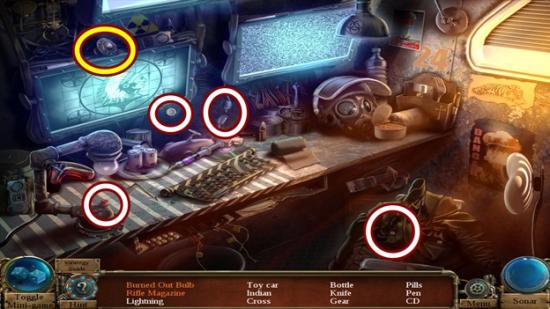
- Find all the objects or click Toggle Mini Game to play a match 3 game. Turn on the lamp, wait a couple of seconds, then take the burned out bulb. Click on the left monitor’s power button (if necessary) and take the Indian. Open the jacket pocket and take the rifle magazine. A HANDLE is added to your inventory.
- Move down two scenes to Michael’s room.
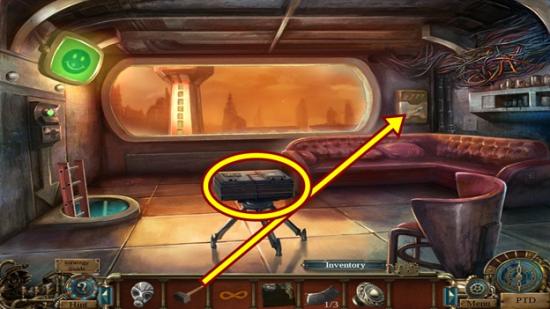
- Click on the window.
- Use the HAMMER to break the glass and take the EMPTY FLASHLIGHT.
- Click on the case to start a hidden object hunt.
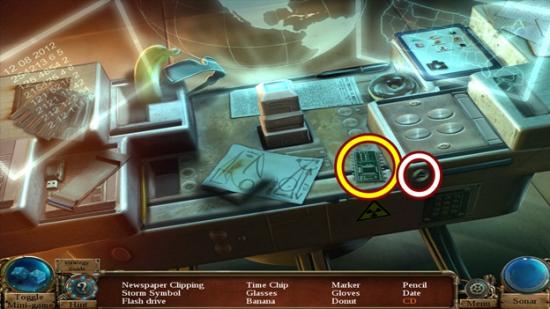
- Find all the objects or click Toggle Mini Game to play a match 3 game. Press the eject button and take the CD. A TIME CHIP is added to your inventory.
- Move down to the quarter.
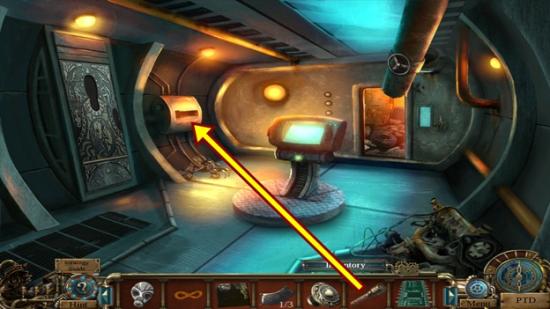
- Click on the panel on the left.
- Insert the EMPTY FLASHLIGHT and wait for it to charge, then take the CHARGED FLASHLIGHT.
- Click on the PTD.
- Click on the house button and go to the main hall.
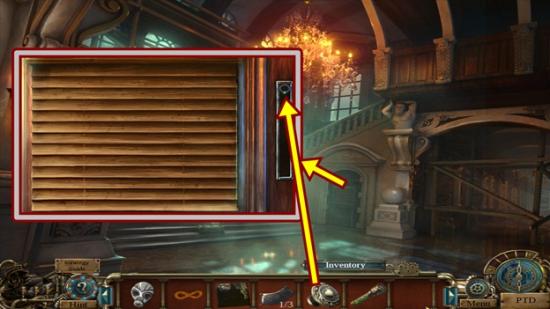
- Click on the door.
- Add the HANDLE to the slot on the right, then pull it down.
- When the panel opens, add the PUZZLE PIECE.
- A mini-puzzle starts.
- Slide the tiles to recreate the image. The empty slot is the bottom right.
- Once you have solved the puzzle, enter the storeroom.
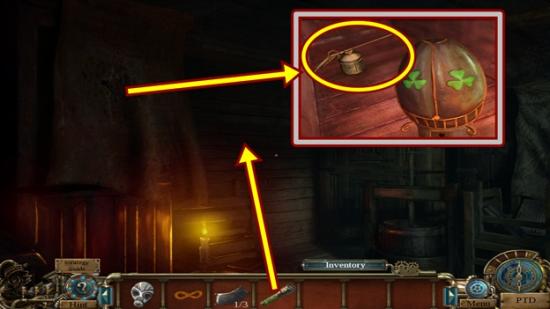
- Use the CHARGED FLASHLIGHT on the room.
- Move the carpet and click on the cabinet.
- Take the FULL OILCAN. Click anywhere outside the window to close it.
- Move down to the main hall.
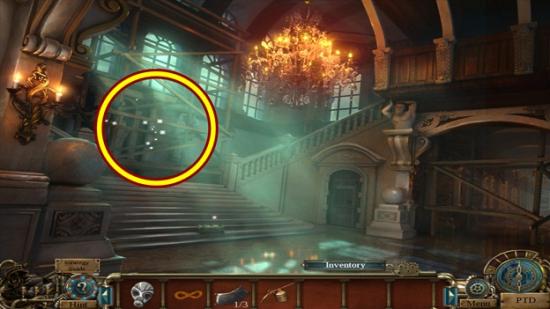
- Click on the scaffolding to start a hidden object hunt.
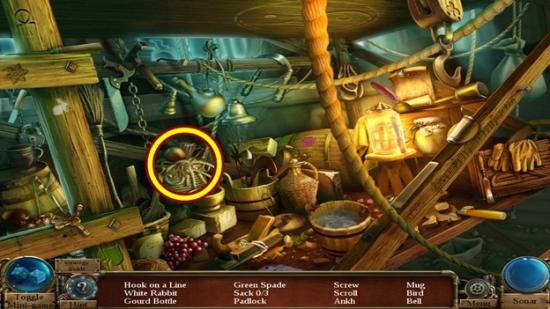
- Find all the objects or click Toggle Mini Game to play a match 3 game. A HOOK AND LINE is added to your inventory.
- Move down two scenes to the dining room.
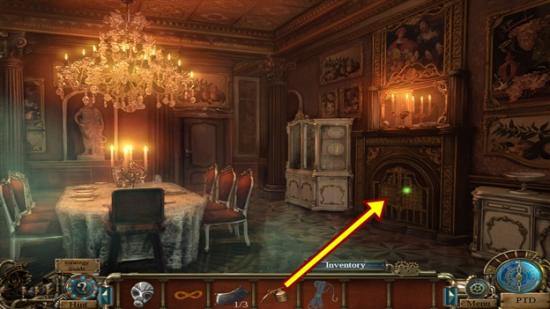
- Click on the fireplace.
- Use the FULL OILCAN to remove the rust.
- A mini-puzzle starts.
- Slide the blocks so the block with the key on it can slide into the top position. A block can only move in the direction of its arrows.
- Solution:
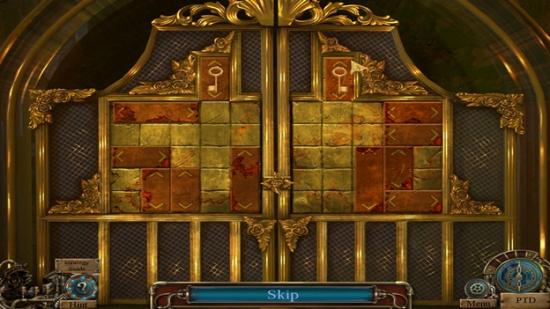
- Click anywhere outside the window to close it.
- Click on the china cabinet to start a hidden object hunt.
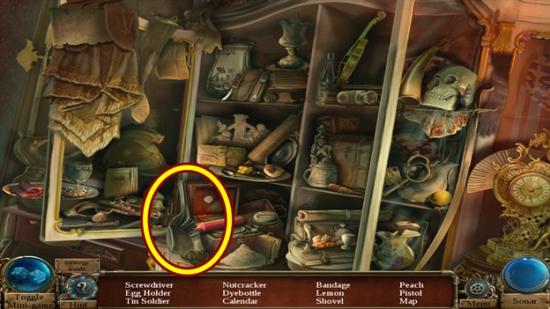
- Find all the objects or click Toggle Mini Game to play a match 3 game. A SHOVEL is added to your inventory.
- Click on the fireplace.
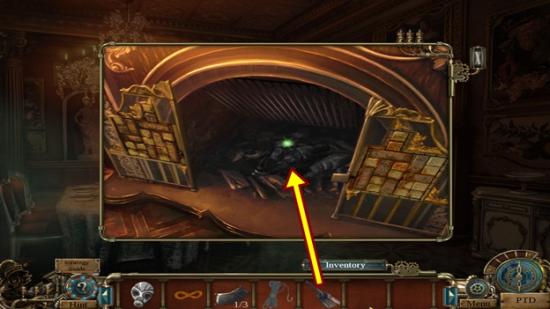
- Lift the grate and use the SHOVEL on the ashes.
- Take the NECKLACE (2/3).
- Click on the PTD.
- Click on the future button and go to the tower base.
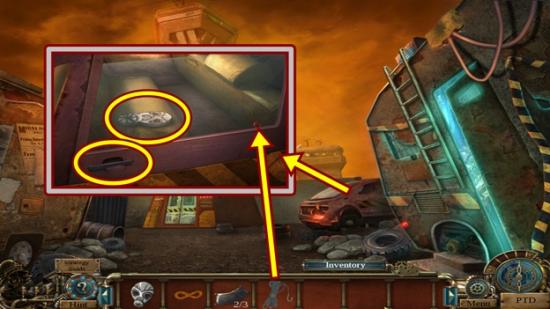
- Click on the car.
- Use the HOOK AND LINE on the door lock.
- Pull the handle to open the door, then take the MASK.
- Move down to the quarter.
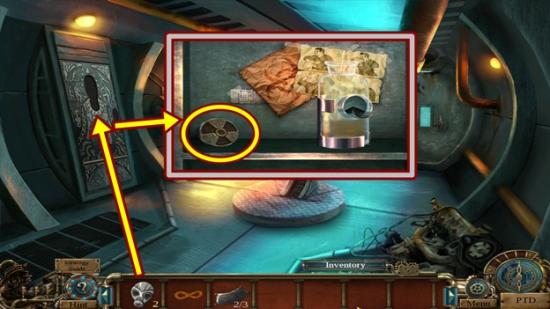
- Click on the relief.
- Add the two MASKS.
- Open the relief.
- Take the BIOHAZARD TOKEN. Click anywhere outside the window to close it.
- Move forward to the tower base.
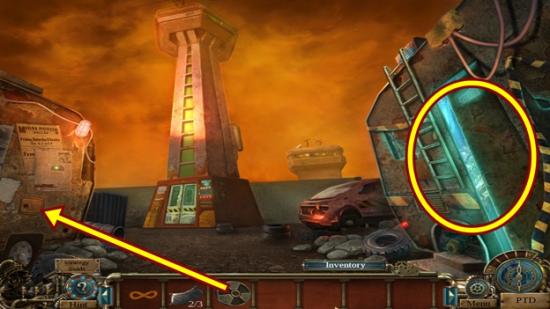
- Click on the left trailer.
- Remove the poster, then insert the BIOHAZARD TOKEN into the inset.
- Open the panel and take the FILTER.
- Click on the trailer to start a hidden object hunt.
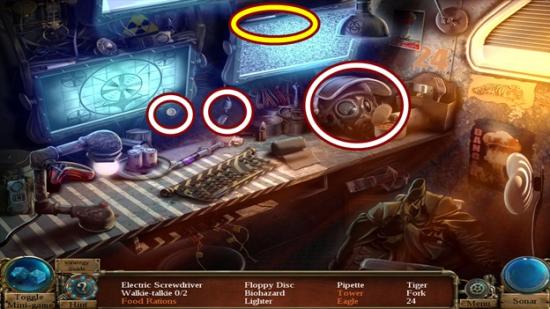
- Find all the objects or click Toggle Mini Game to play a match 3 game. Move the mask and take the food rations. Plug in the right monitor and take the tower. Push the left monitor’s power button (if necessary) and take the eagle. A PIPETTE is added to your inventory.
- Move down to the quarter.
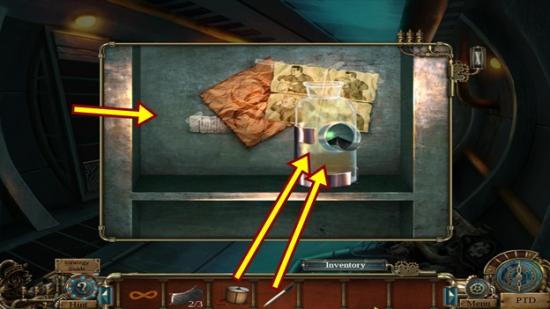
- Click on the panel where the relief was.
- Add the FILTER to the jar of acid.
- Use the PIPETTE on the jar to get ACID.
- Click on the PTD.
- Click on the house button and go to the storeroom.
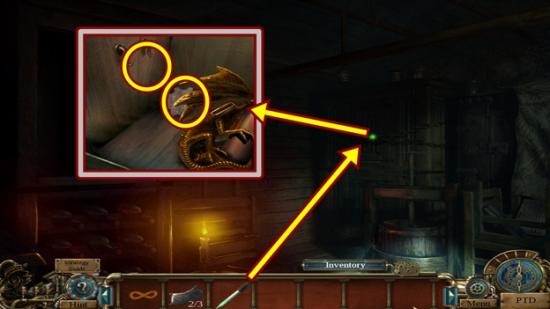
- Click on the wardrobe.
- Use the ACID to break the chain.
- Open the cabinet and take the SMALL KEY and the GEAR SYMBOL. Click anywhere outside the window to close it.
- Move down to the main hall.
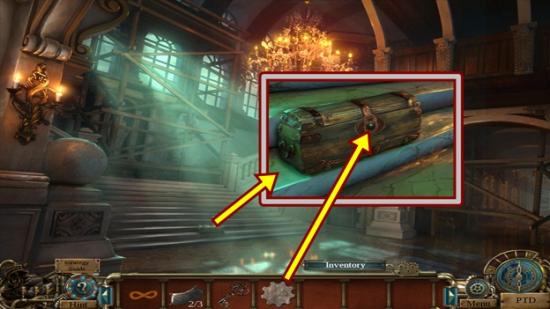
- Click on the stairs.
- Click on the small chest and add the GEAR SYMBOL.
- Open the chest and take the SCREWDRIVER.
- Move down to the corridor.
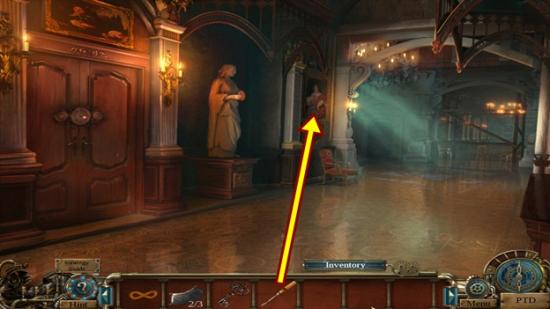
- Click on the painting.
- Remove the painting with the SCREWDRIVER.
- Take the DRAGON WING. Click anywhere outside the window to close it.
- Return to the storeroom.
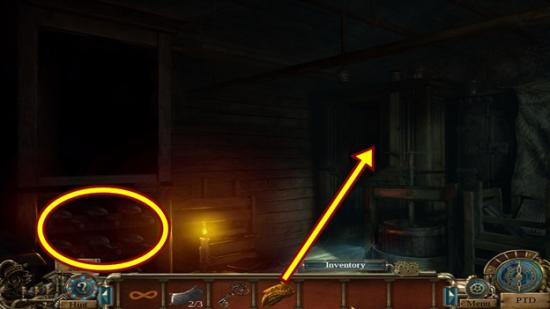
- Click on the wardrobe.
- Add the DRAGON WING to the statuette and take the WINE BOTTLE.
- Open the bottom cabinet on the left.
- Add the WINE BOTTLE.
- A mini-puzzle starts.
- Each bottle represents a number. Rearrange the bottles so each row, column and diagonal line equals 15. When you start the puzzle, three bottles are locked in place so use those to start. The top rows numbers are 2-7-6. The middle row is 9-5-1 and the bottom row is 4-3-8.
- Solution:
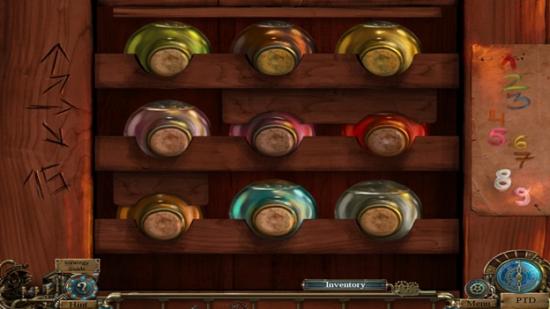
- Take the MERLIN AND VIVIANA TOKEN.
- Move down two scenes to the corridor.
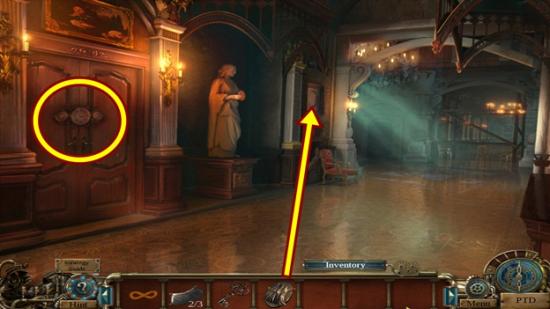
- Click on the inset where the painting was and insert the MERLIN AND VIVIANA TOKEN.
- Open the panel and take the ROTATE BUTTON.
- Click on the door.
- Insert the ROTATE BUTTON.
- A mini-puzzle starts.
- Use the rotate buttons to turn the centre dial so all the pie pieces turn green. When a red pie piece lands under the pointer, it will turn green and vice versa. As there is no reset button, a step-by-step solution cannot be provided as you may have already moved some pieces.
- Solution:
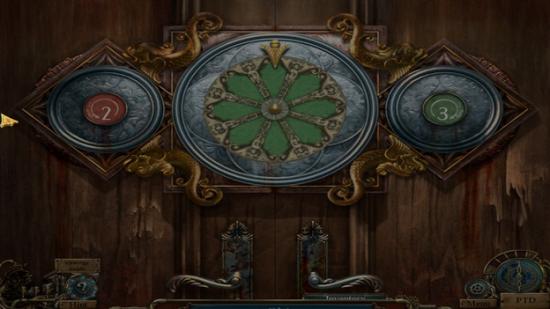
- Enter the study.
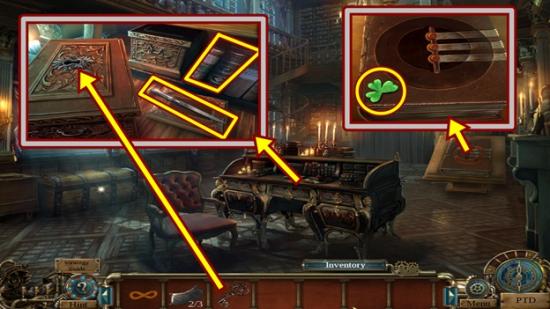
- Click on the desk.
- Take the LETTER OPENER.
- Use the SMALL KEY on the chest.
- Turn the key to open the chest and take the NECKLACE (3/3).
- Open the book and take the WINDER.
- Click on the large book on the podium.
- Take the CLOVER TOKEN.
- Return to the dining room.
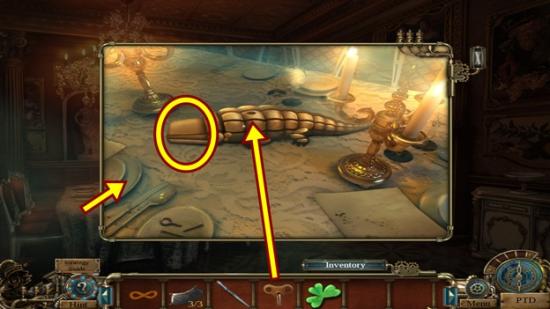
- Click on the table.
- Insert the WINDER in the toy.
- Click on the toy’s mouth and take the INFINITY SYMBOL.
- Return to the storeroom.
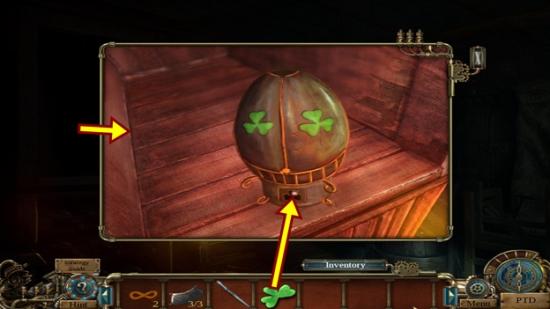
- Click on the cabinet.
- Insert the CLOVER TOKEN to the lamp, then take the INFINITY SYMBOL.
- Move down two scenes to the corridor.
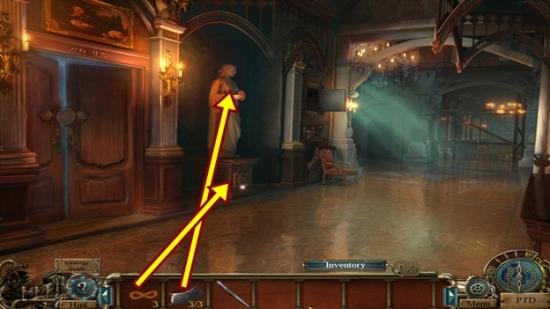
- Click on the top of the statue.
- Add the three NECKLACE pieces.
- Take the SEAL CENTRE.
- Click on the base of the statue.
- Add the three INFINITY SYMBOLS.
- Open the panel and take the SEAL GEM.
- Click on the PTD.
- Click on the future button and return to the master chamber.
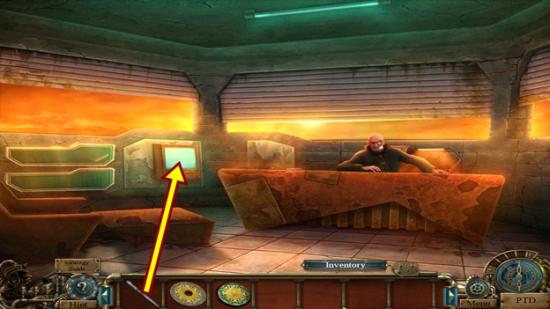
- Click on the computer.
- Use the LETTER OPENER on the reset button.
- A mini-puzzle starts.
- Each token has a value which appear on the right. Tokens must equal the sum that appears between the tokens. The reset button does not work. Start with the lowest values.
- Solution:
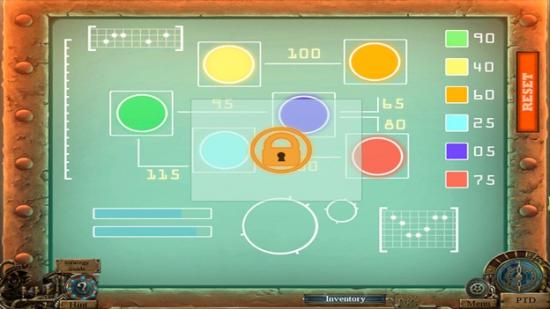
- Click on the lock symbol.
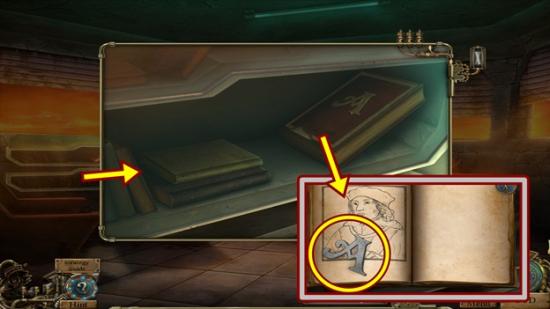
- Click on the bookshelf.
- Open the book and take the AMBROSE TOKEN.
- Click on the PTD.
- Click on the house button and return to the study.
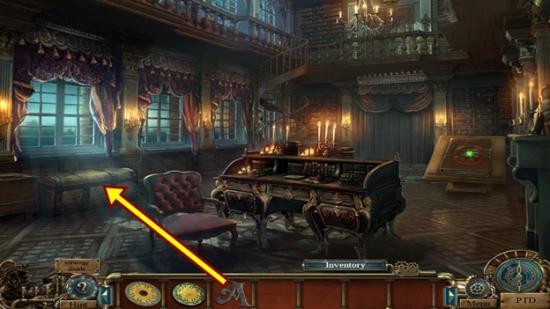
- Click on the chest.
- Add the AMBROSE TOKEN, then open the chest.
- A mini-puzzle starts.
- Move the items to reveal the four pieces of the seal ring.
- Solution:
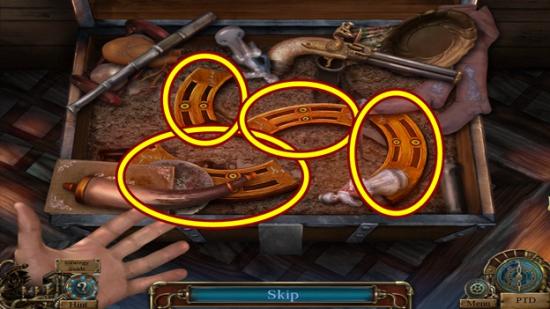
- Take the four pieces to get the SEAL RING.
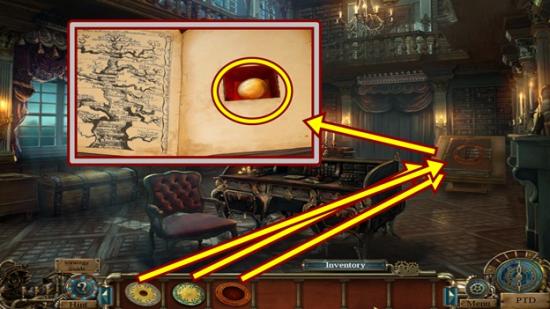
- Click on the large book on the podium.
- Add the SEAL RING, SEAL GEM and SEAL CENTRE.
- Open the book and take the BLANK TIME CRYSTAL.
- Click on the PTD.
- Click on the future button and return to the master chamber.
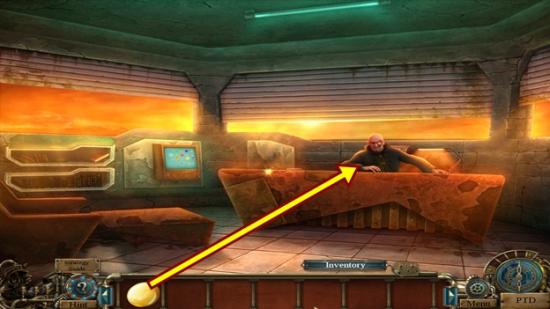
- Give the BLANK TIME CRYSTAL to Professor Liam.
- Watch the cutscene.
- Move down two scenes to the quarter.
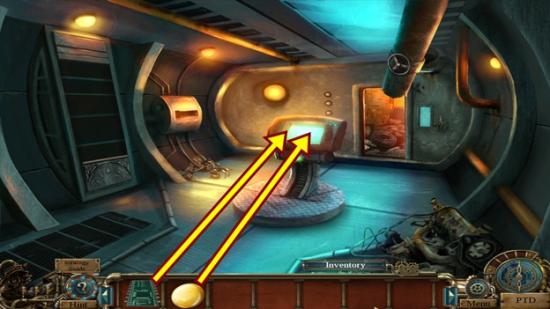
- Click on the central monitor.
- Add the TIME CHIP, then add the BLANK TIME CRYSTAL to the inset that appears.
- A mini-puzzle starts.
- Click on the tiles to create a complete image.
- Solution:
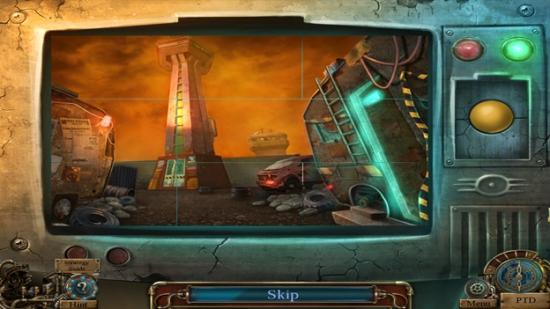
- Take the TIME CRYSTAL.
- Return to the master chamber.
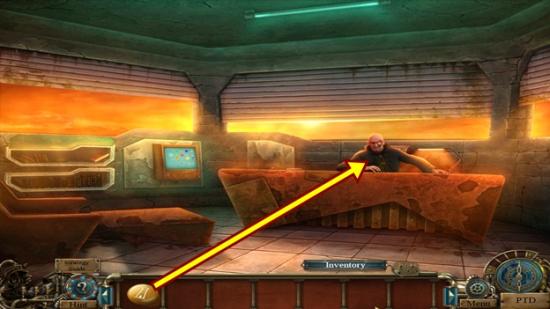
- Give the TIME CRYSTAL to Professor Liam.
- Watch the cutscene.
- The end!
Congratulations!
You have completed Gamezebo’s walkthrough for Time Mysteries: The Final Enigma. Be sure to check back often for game updates, staff and user reviews, user tips, forums comments and much more here at Gamezebo!
More articles...
Monopoly GO! Free Rolls – Links For Free Dice
By Glen Fox
Wondering how to get Monopoly GO! free rolls? Well, you’ve come to the right place. In this guide, we provide you with a bunch of tips and tricks to get some free rolls for the hit new mobile game. We’ll …Best Roblox Horror Games to Play Right Now – Updated Weekly
By Adele Wilson
Our Best Roblox Horror Games guide features the scariest and most creative experiences to play right now on the platform!The BEST Roblox Games of The Week – Games You Need To Play!
By Sho Roberts
Our feature shares our pick for the Best Roblox Games of the week! With our feature, we guarantee you'll find something new to play!All Grades in Type Soul – Each Race Explained
By Adele Wilson
Our All Grades in Type Soul guide lists every grade in the game for all races, including how to increase your grade quickly!


