- Wondering how to get Monopoly GO! free rolls? Well, you’ve come to the right place. In this guide, we provide you with a bunch of tips and tricks to get some free rolls for the hit new mobile game. We’ll …
Best Roblox Horror Games to Play Right Now – Updated Weekly
By Adele Wilson
Our Best Roblox Horror Games guide features the scariest and most creative experiences to play right now on the platform!The BEST Roblox Games of The Week – Games You Need To Play!
By Sho Roberts
Our feature shares our pick for the Best Roblox Games of the week! With our feature, we guarantee you'll find something new to play!All Grades in Type Soul – Each Race Explained
By Adele Wilson
Our All Grades in Type Soul guide lists every grade in the game for all races, including how to increase your grade quickly!
Time Dreamer Walkthrough
Welcome to the walkthrough for Time Dreamer on Gamezebo. Time Dreamer is a hidden object game for the PC by Tiki’s Lab. This walkthrough includes tips and tricks, helpful hints, and a strategy guide to complete Time Dreamer.
Time Dreamer – Game Introduction
Welcome to the walkthrough for Time Dreamer on Gamezebo. Time Dreamer is a hidden object game for the PC by Tiki’s Lab. This walkthrough includes tips and tricks, helpful hints, and a strategy guide to complete Time Dreamer.
General Information
Main Menu
- Profiles can be created, selected or deleted by selecting the “That’s not me!” text at the top-right corner of the screen.
- The Play button displays the difficulty selection window, where you can choose between casual or expert mode.
- On casual mode, the hint hourglass takes 90 seconds to recharge, sparkles show active areas, silhouette hints are available in hidden object scenes, hidden objects are easier to find and the puzzles are easier to complete. This walkthrough is based on the casual mode; you may notice that there are different puzzle solutions and object locations while playing on advanced mode.
- On expert mode, the hint hourglass takes 4 minutes to recharge, there are no sparkles over active areas, no silhouette hints are available in the hidden object scenes, hidden objects are more difficult to find and the puzzles are harder to complete.
- The Options button displays a window where there are slider bars to adjust effects and music volume. There are also check boxes to toggle a custom mouse cursor icon and full screen or windowed mode.
- The Credits are displayed by moving the mouse over the text at the bottom-left corner of the screen.
- The Exit button closes the game if the tick is selected or returns to the main menu if the cross is selected.
Main Scenes
- The main scenes provide a means of travel and a link between the various hidden object scenes and mini-games in the main game.
- The default mouse cursor in the game is the arrow with the green circle. Move the mouse cursor around until it changes and then left click to perform an action. A magnifying glass icon will zoom in to closer view. A hand icon interacts with an object. A blinking eye icon gives a line of information about an object. A pointing arrow means that you can move in that direction.
- Any collectable objects that are found will be added to the inventory, which can be opened and closed by clicking the grey toolbox near the bottom-left corner of the screen. Objects that are selected from the inventory can be used on other objects in the main scene.
- White sparkling areas indicate a hidden object scene on casual mode, while on expert mode there are no sparkles so you will need to find the scenes by yourself. Sometimes you will need to solve puzzles or use an inventory item on an object before a new sparkling area becomes available.
- The diary that can be selected at the bottom-left corner of the screen is an excellent way of keeping track of notes and current tasks that need to be completed. Check the diary regularly as it is frequently updated as you progress through the game.
Hidden Object Scenes
- The aim in the hidden object scenes is to find all of the objects that are displayed in the list window. The list of objects to find is not random each time the game is played, so it is possible to give the exact locations for all hidden objects.
- You will frequently need to open or move other objects in order to reveal the objects that are on the list. The objects that need to be opened or moved will be highlighted in the images with a blue outline, while the objects that need to be found on the list will be shown in red.
- After all of the listed objects have been found, one of the objects that has been found in the scene will be added to the inventory.
- Clicking too quickly in the wrong area causes the mouse cursor to move in a circular motion for three seconds. No objects can be selected while the mouse cursor is in this state.
- The hint hourglass can be selected at the bottom-right corner of the screen to highlight a hidden object. After using a hint, it takes 90 seconds on casual mode and four minutes on expert mode before the hourglass fills and another hint can be used.
- On casual mode, the mouse cursor can be moved over the name of the hidden object to reveal a silhouette of the object. This feature is not available in expert mode.
- To back out of a hidden object scene, move the mouse cursor away from the right side of the object list window and click when the cursor points down.
Mini-Games
- There are various mini-games that appear throughout the main adventure. The aim in each mini-game is to solve a puzzle or series of puzzles; for example, putting gears in the correct order so that all of them rotate at the same time to make a clock mechanism work.
- Instructions for each mini-game can be seen by clicking the black button at the top-left corner of the screen.
- Mini-games can be skipped after 90 seconds on casual mode or after 4 minutes on expert mode.
Walkthrough – Chapter 1: Welcome Home
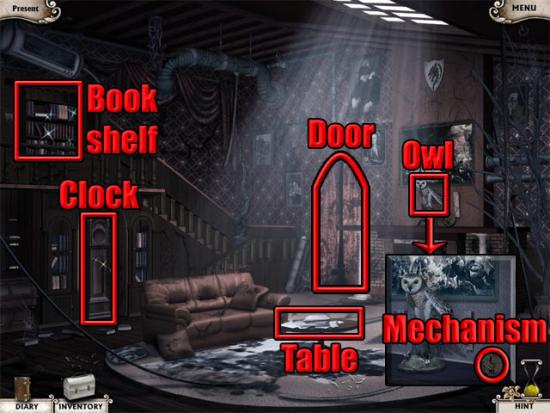
The game starts in the living room. Examine the owl and take the clock mechanism in the close-up view:
Select the bookshelf to enter a hidden object scene. Open the areas outlined in blue and then find all of the hidden objects: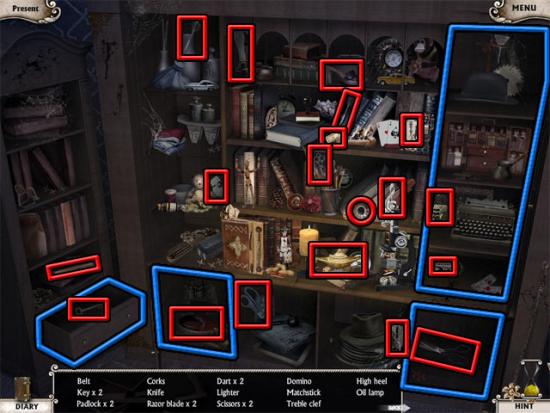
Remember that if you get stuck as to what a certain object looks like, on casual mode you can move the mouse cursor over the name of the object and it will show a silhouette. The scissors will be added to the inventory after all of the objects on the list have been found. Select the door to enter the hall. Select the latch at the bottom of the left door to unlock it. Examine the bureau and take the small hammer in the close-up view: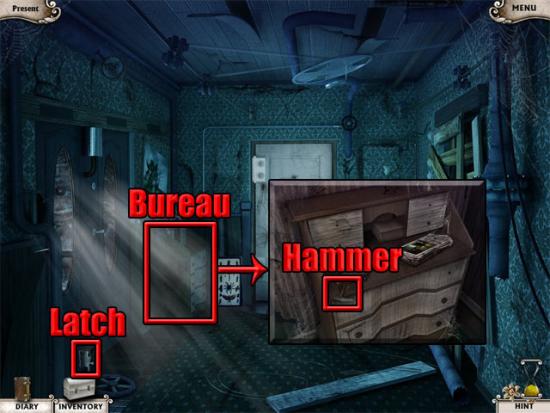
Exit the close-up view by clicking the X at the top-right corner of the close-up window. Go out the left door to arrive on the terrace. The important hotspots are shown below: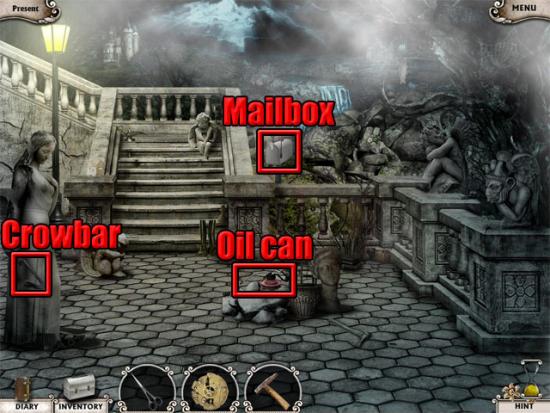
Take the oil can in the middle of the area. Use the small hammer on the crowbar and it will drop from the hand of the statue. Take the crowbar. Examine the mailbox and select the letter in the close-up view. Exit the view of the letter to see a package in the mailbox. Use the scissors on the package to open it and then take the key. Move back to the hall. Examine the padlock on the middle door. Use the key on the lock and then select the key to remove the chain. Use the crowbar on the door handle to open the door. Go through the middle door to enter a hidden object scene. Find all of the objects on the list: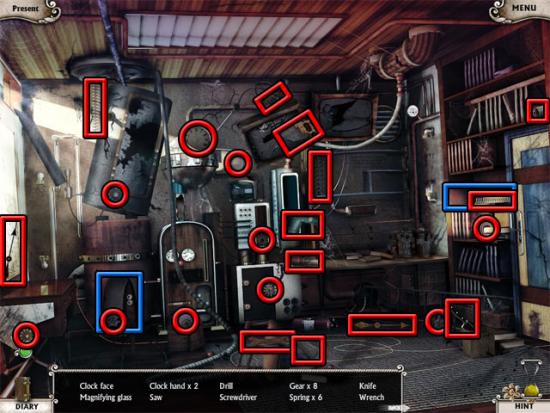
The clock parts will be added to the inventory. Move back to the living room. Examine the clock and use the clock mechanism and the clock parts on the top of the clock. Place the gears on the pegs in the correct order so that all of the gears can rotate: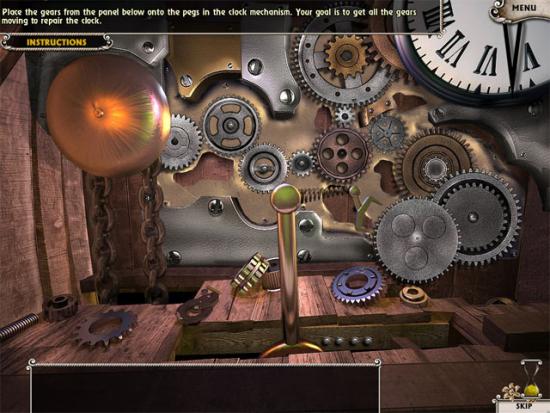
Use the oil can on the stuck second hand on the clock face. Select the sofa to go back in time by 15 years. Go through the door to the hall. Examine the bureau, open the middle drawer and take the bandage. Examine the cabinet and take the antiseptic: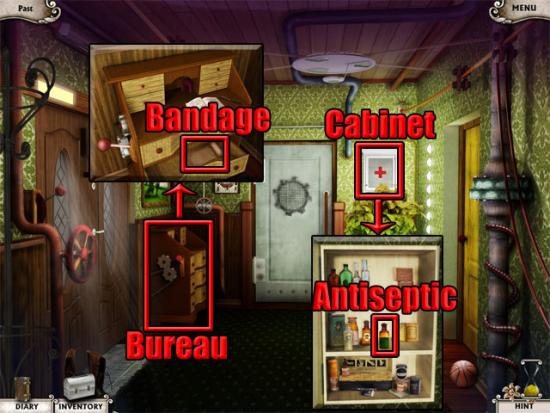
Move back to the living room and examine the owl on top of the fireplace. Use the antiseptic and the bandage on the owl to return to the present. Go through the door to the hall and open the left door to complete the chapter.
Chapter 2: The Intruder
The following hotspots are available: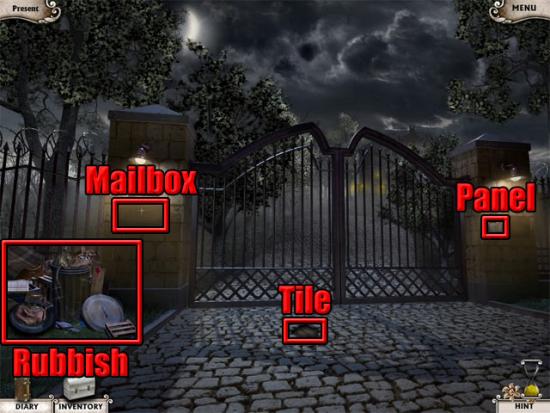
Examine the rubbish to enter a hidden object scene. Find all of the objects on the list: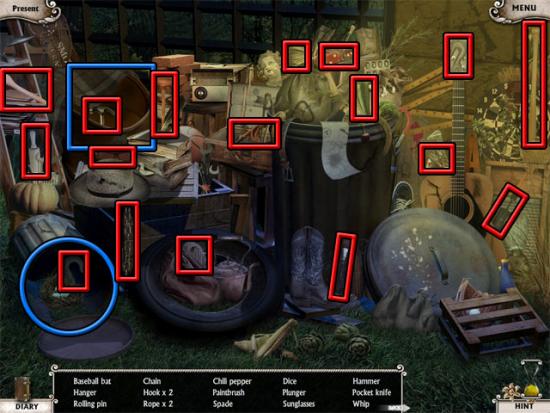
The rope ladder is added to the inventory. Examine the mailbox and take the piece of paper from the slot to reveal the code. Exit the view of the mailbox. Examine the panel and then select it to deactivate the electricity. Use the rope ladder on the gate. Select the gate to climb over. The important hotspots in this area are shown below: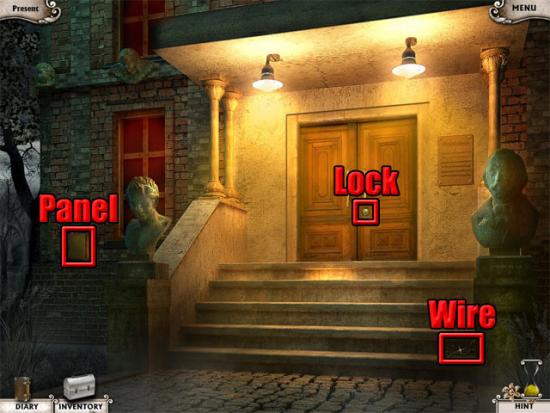
Take the wire on the steps. Move back to the gate and examine the mailbox. Use the wire on the slot and then take the paperclip that is revealed. Move forward to the steps and examine the lock on the door. Use the paperclip on the lock to play a mini-game. The aim in the mini-game is to move the wire to the correct position on the lock and then hold down the left mouse button to turn the screwdriver until the lock clicks. This needs to be done three times in order to pick the lock. The solution to the mini-game is random each time the game is played. After the lock has been picked, move forward through the door and examine the desk at the right side of the room to enter a hidden object scene. Find all of the objects on the list: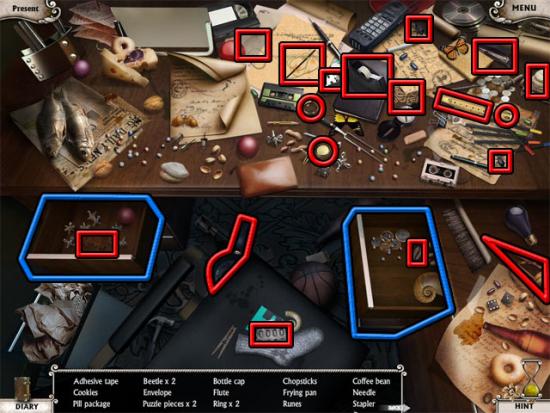
The bottle cap will be added to the inventory. Examine the elevator and use the bottle cap on the switch. Select the bottle cap and the elevator door will open. Enter the elevator to travel to a dark room. Examine the board and take the small key. Examine the plant and take the bubble gum: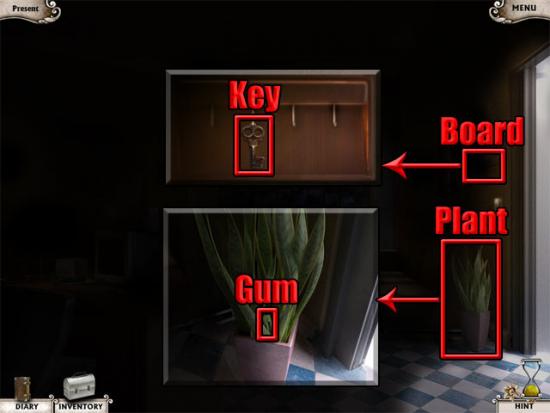
Move right to return to the lobby and then move back to go outside. Examine the panel. In the close-up view, unlock the panel with the small key and use the bubble gum on the right lever. Return to the building and enter the elevator to travel to the room again, which is now lit. The following hotspots are available: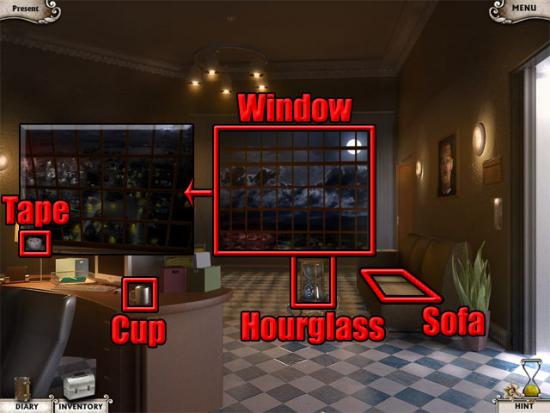
Take the empty cup on the desk. Examine the window and take the roll of adhesive tape in the close-up view. Examine the hourglass and use the adhesive tape on the hole in the close-up view. Exit the view of the hourglass and go all the way back to the gates where this chapter began. Examine the tile on the ground and use the empty cup on it in the close-up view to collect sand. Take the cup of sand and once again return to the second floor in the building. Examine the hourglass and then use the cup of sand on the hourglass in the close-up view. Select the sofa to complete the chapter.
Chapter 3: Better Tomorrow
Examine the desk at the left side of the room to enter a hidden object scene. Find all of the objects on the list: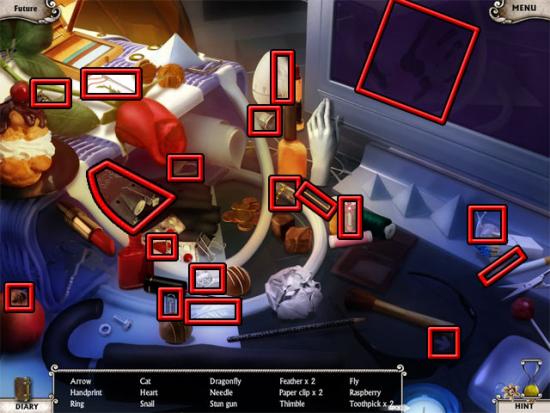
The stun gun will be added to the inventory. Enter the closet at the right side of the room to enter another hidden object scene. Find all of the objects on the list: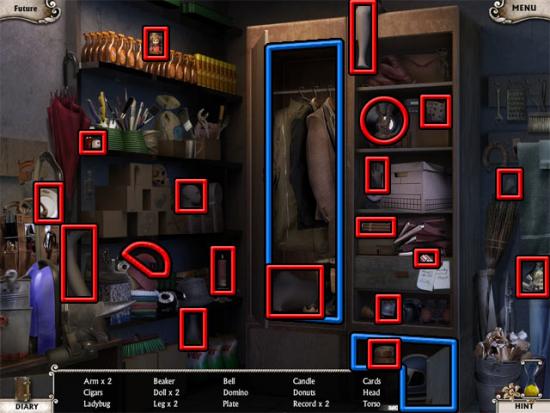
The mannequin is added to the inventory. Examine the window and take the glass cutter in the close-up view: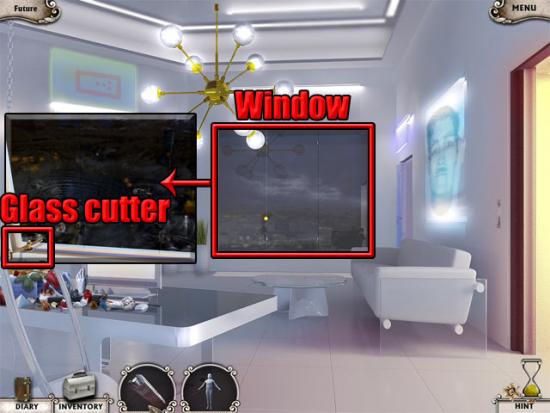
Exit the view of the window and go through the left doorway to enter the scanner room. Examine the sign and take the battery in the close-up view: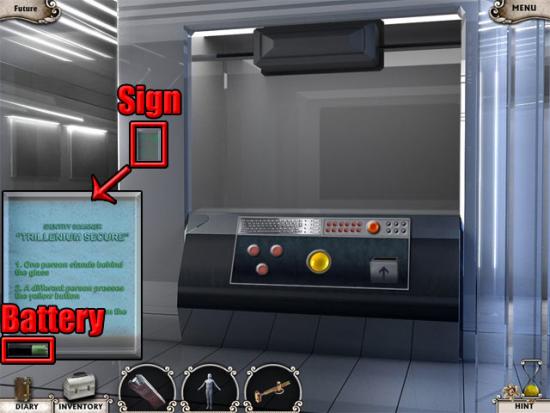
Move back and go through the right doorway to see a robot guarding the entrance to the archives. The following hotspots are available: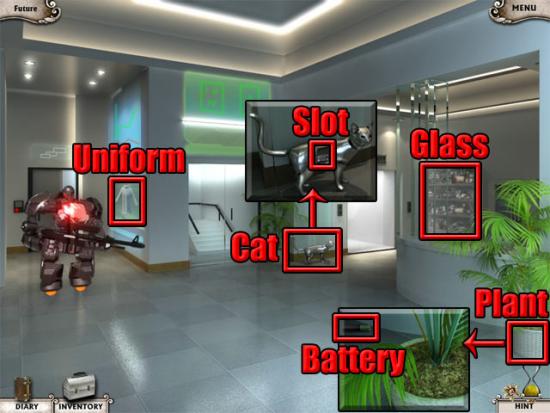
Examine the base of the plant and take the battery. Examine the cat and select it to open the battery slot. Use the two batteries on the slot. Select the cat and it will be added to the inventory. Use the cat on the robot guard and it will turn around. Use the stun gun on the robot guard to deactivate it. Take the uniform from the window near the left door. Use the glass cutter on the glass at the right side of the room and then examine the glass to enter a hidden object scene. Find all of the objects on the list: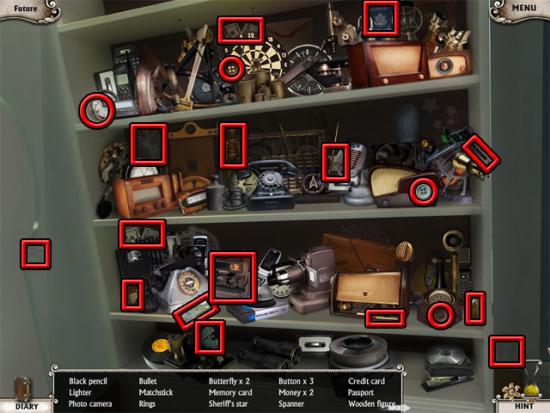
The camera will be added to the inventory. Enter the elevator to return to the hologram room. Examine the hologram and then use the camera on it to take a photo. Move left to the scanner room. Use the mannequin, the uniform and the photo on the scanner. Select the yellow button on the panel and then take the key card: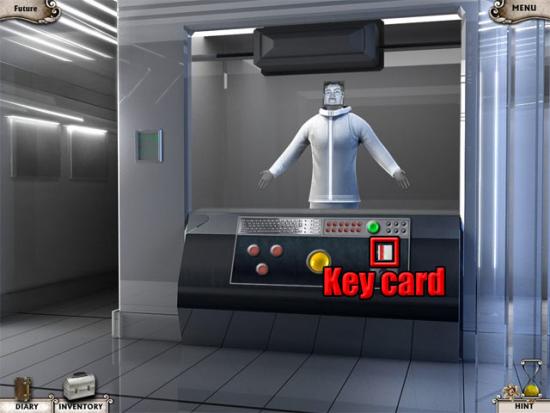
Exit the scanner room and enter the elevator to return to the lobby. Examine the next to the door at the left side of the room and then use the key card on the slot in the close-up view to open the door. Enter the archives and click the green arrow button to play a mini-game. The aim in this mini-game is to keep clicking the correct screen in the grid that matches the single screen shown above the grid. Move the mouse cursor to scroll through the various screens on the grid. Moving the cursor over red screens causes the time to count down more quickly, and clicking any of the red screens will restart the mini-game. Click eight correct screens to complete the mini-game. An example of finding a correct screen is shown below: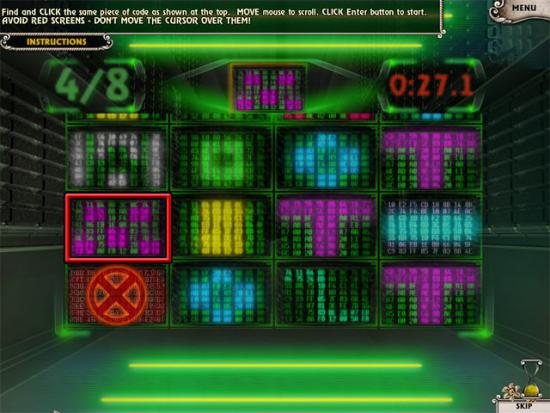
Chapter 4: Past Endeavours
Go through the right doorway to walk downstairs. Examine the coat and take the soporific pills from the pocket in the close-up view. Examine the table, select the paper and then take the key from the box in the close-up view: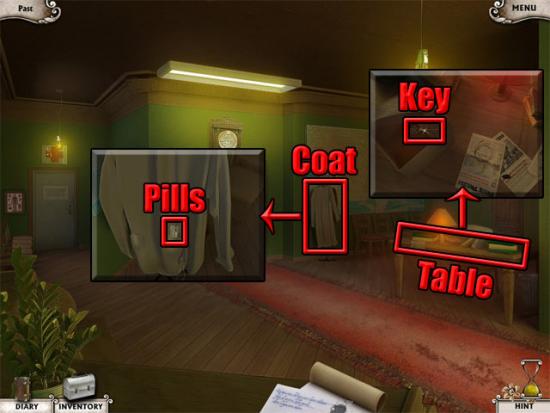
Go upstairs and examine the door at the right side of the window. Use the key on the door to open it. Go through the doorway to enter a hidden object scene. Find all of the objects on the list: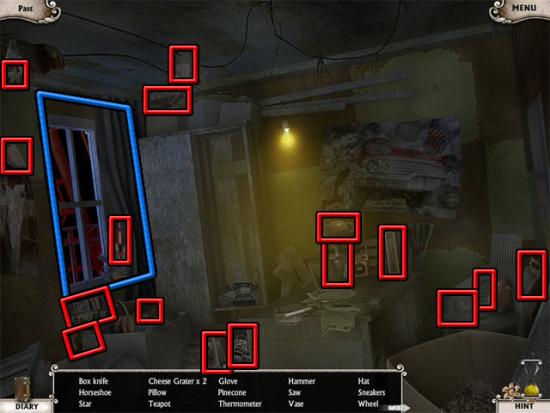
The box cutter will be added to the inventory. The following hotspots are available: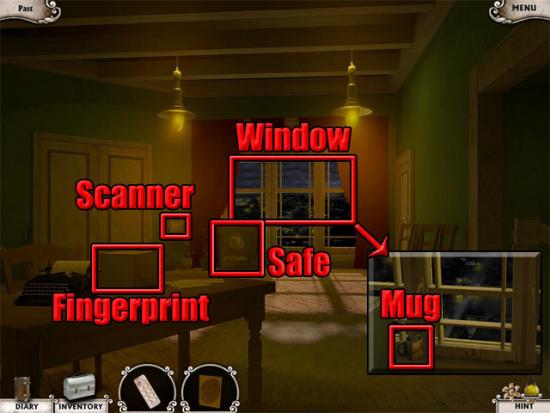
Examine the box on the table next to the typewriter and use the box cutter on the tape to take the fingerprint. Examine the window and use the soporific pills on the cup in the close-up view. Exit the close-up view of the window. Examine the scanner and use the fingerprint on it to open the door. Move left through the doorway to enter the boardroom. Examine the shelves at the right side of the room to enter a hidden object scene. Find all of the objects on the list: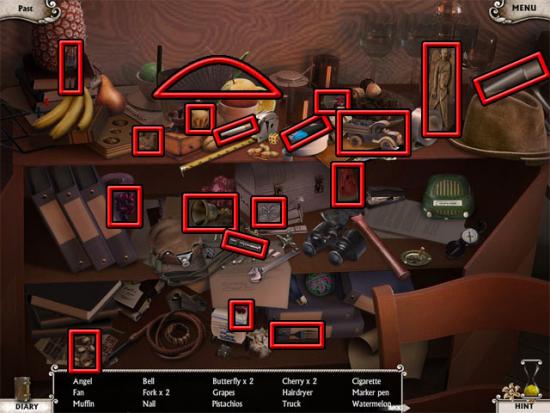
The marker pens will be added to the inventory. Examine the map and take the small key in the close-up view: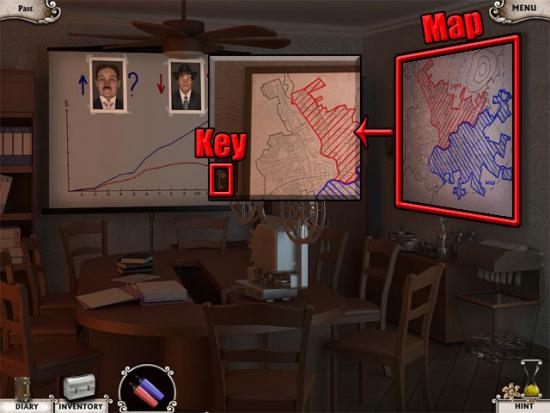
Exit the close-up view. Move back and then right to go downstairs. Examine the cabinet at the left side of the room and use the small key on the lock. Select the cabinet to enter a hidden object scene. Find all of the objects on the list: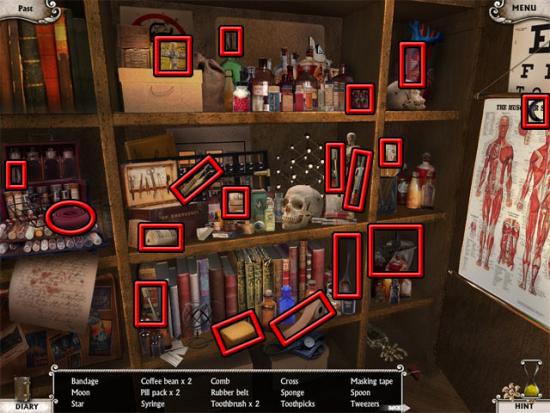
The rubber belt, tape and sponge will be added to the inventory. Go upstairs and move left to the boardroom. The following hotspots are available: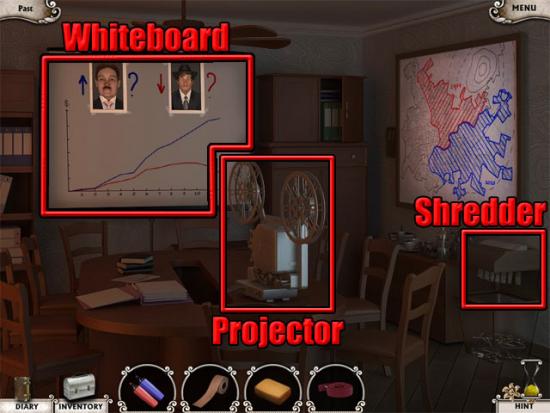
Examine the whiteboard. In the close-up view, use the sponge and the marker pens on the whiteboard. Exit the view of the board and examine the projector on the table. In the close-up view, use the rubber belt on the projector. Exit the view of the projector and examine the shredder at the right side of the room. In the close-up view, use the masking tape on the shredded document. Take the document to add the safe code to the inventory. Exit the boardroom and examine the safe by the window. Use the safe code on the safe to play a mini-game. The aim is to rotate the dial in the correct directions to the numbers displayed on the note so that all five of the lights become green. The directions are shown below: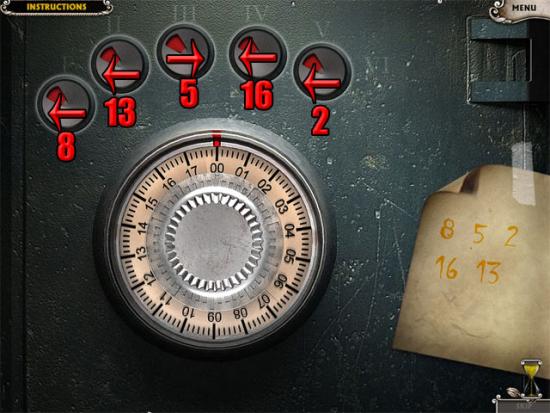
Take the presentation film and Stimmer’s report from the safe. Exit the view of the safe and move left to the boardroom. Examine the shredder and then use Stimmer’s report on the shredder in the close-up view. Examine the projector and then use the presentation film on the projector in the close-up view to complete the chapter.
Chapter 5: Guest
Go through the door at the left side of the house to talk to Giovanni. Move forward through the door to the hall and then forward again to the laboratory. Examine the desk and take the nails in the close-up view: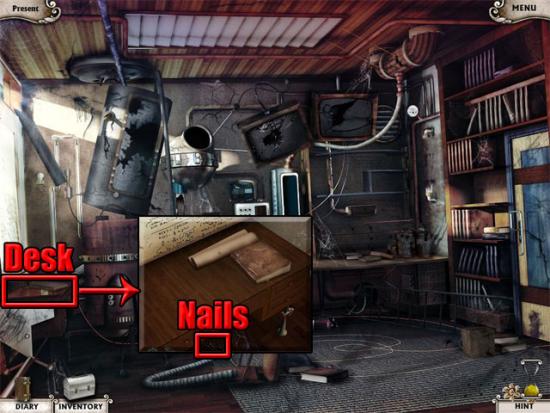
Move back to the hall and left to the terrace. Take the hammer and the rusted axe: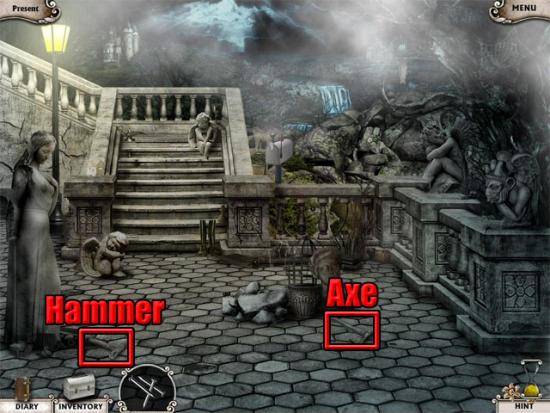
Move back three times to return to the front of the house. Examine the tree and take the board in the close-up view: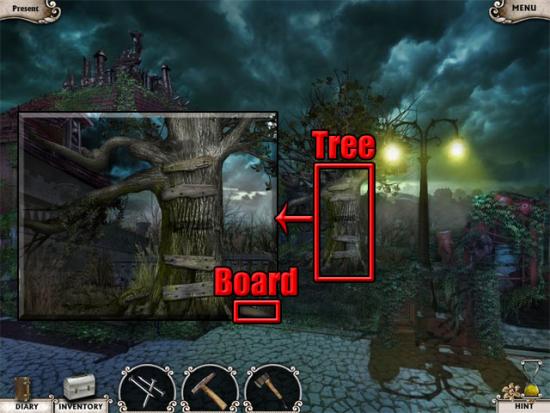
Use the board on the tree. Use the nails and the hammer on the board to complete the ladder. Climb up the ladder and use the rusted axe on the boards in the window. Move forward to enter the attic. The following hotspots are available: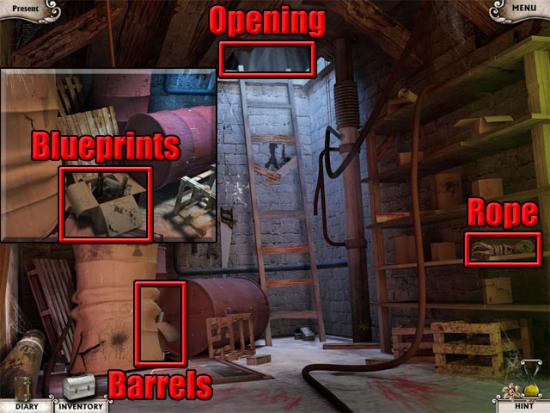
Examine the barrel and take the box of blueprints in the close-up view. Try to climb up the ladder and it will break. Take the rope on the shelf and use it on the opening. Climb up the rope to exit the attic. Enter the house. Give the blueprints to Giovanni and he will say that have been damaged. Select the sofa to travel to the past. Move forward to the hall. Examine the bureau and find the dumbbell, then examine the medicine cabinet and find the magnetic card: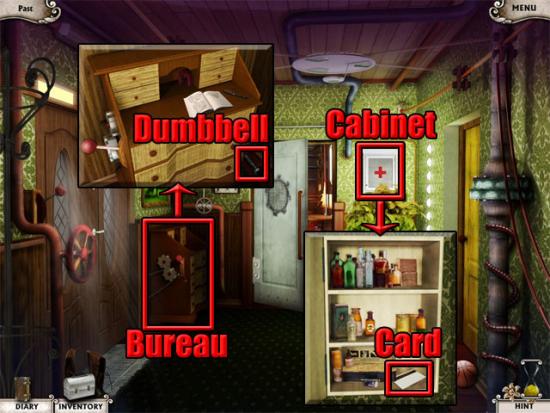
Move forward to the laboratory. Examine the blue door at the right side of the room and use the magnetic card on the card reader. Open the door and move forward to enter the storeroom. The following hotspots are available: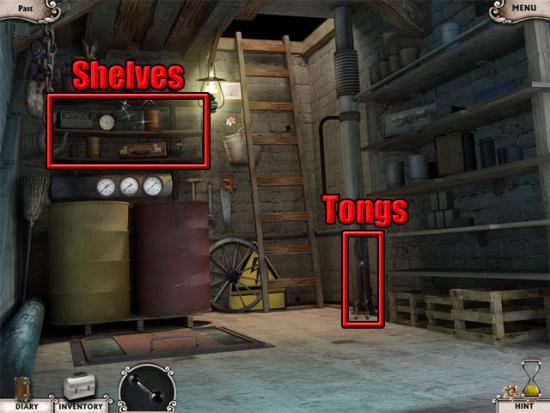
Take the fire tongs and then examine the shelves to enter a hidden object scene. Find all of the objects on the list: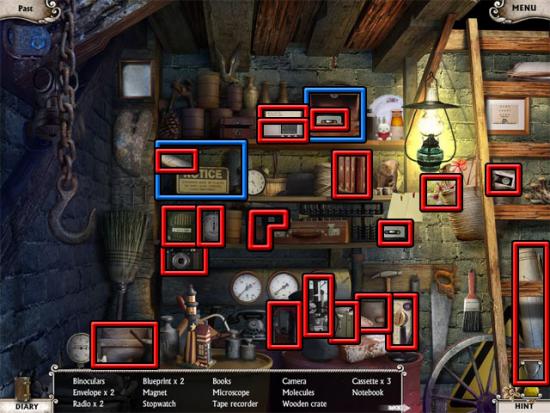
The blueprints will be added to the inventory. Move back three times to return to the living room. Select the painting above the fireplace to reveal a crack in the wall. Examine the crack and in the close-up view use the dumbbell on the crack twice to reveal the bricks. Use the fire tongs on the bricks and then use the blueprints on the hole to travel to the present. Select the painting above the fireplace to reveal the hole in the wall. Examine the hole and take the box of blueprints. Give the blueprints to Giovanni and then after the cutscene select the sofa to return to the past again. Move forward to the hall. Examine the bureau: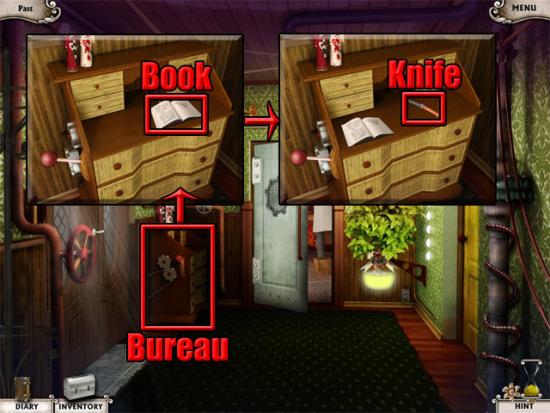
Examine the book on the bureau to read it. Exit the view of the book and then take the knife. Move back to the living room and examine the wire at the left side of the round table: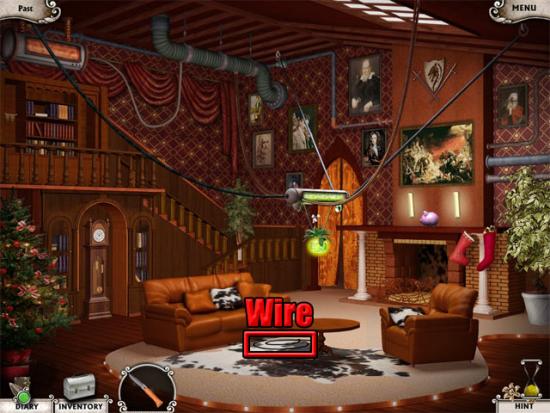
Use the knife on the wire in the close-up view and it will be added to the inventory. Move back to go outside. Take the hat from the statue. Examine the phone box and take the dumbbell in the close-up view: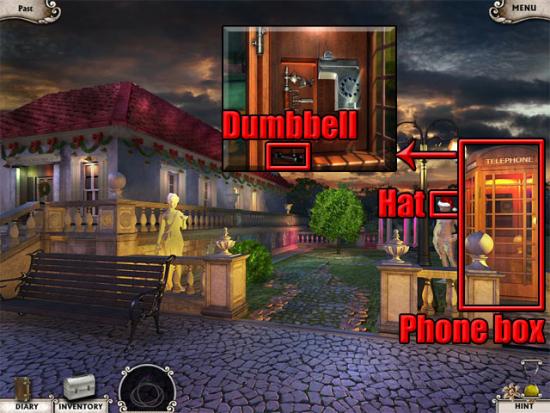
Still in the close-up view, use the wire on the cable to connect the phone. Exit the close-up view of the phone and return to the house. Examine the piggy bank on the shelf above the fireplace. Use the hat on the piggy bank and then use the dumbbell on the covered piggy bank. Select the hat and take the coins that drop out. Exit the house and examine the phone box. In the close-up view, use the coins on the phone. After the cutscene, enter the house, move forward to the hall and then move forward again to enter the laboratory. Examine the desk and take the hairdryer in the close-up view: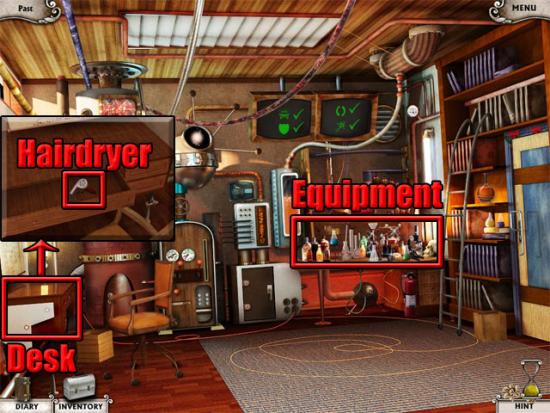
Examine the equipment to enter a hidden object scene. Find all of the objects on the list: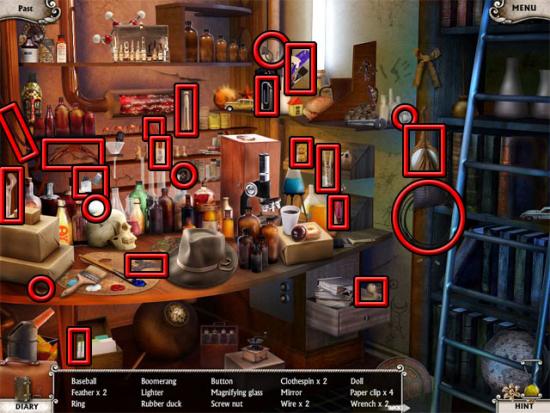
The lighter and the stuff will be added to the inventory. Go through the right door to enter the storeroom. Take the vacuum cleaner and the golf club: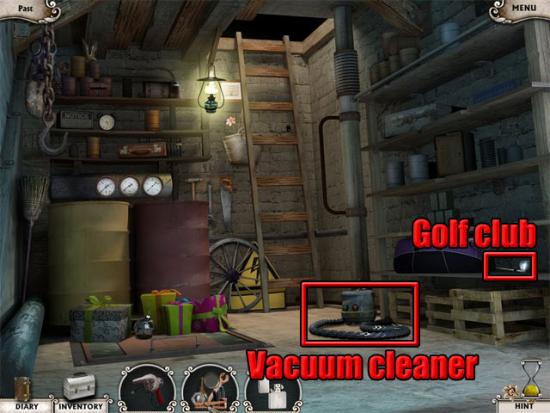
Move back four times to the front door. Use the golf club on the glass at the side of the door to overload the burglar alarm: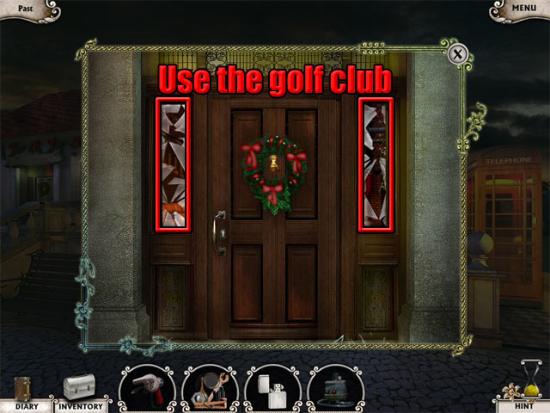
Enter the house and use the hairdryer on the plant to overload the watering system: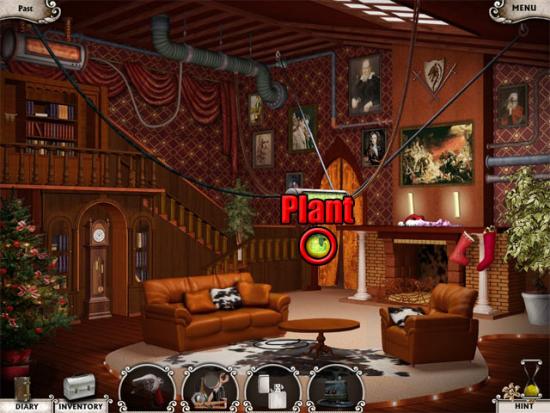
Move forward to the hall. Use the vacuum cleaner on the valve and then select the vacuum cleaner to overload the air conditioning system. Examine the cabinet and use the lighter on the sensor in the close-up view to overload the fire alarm system: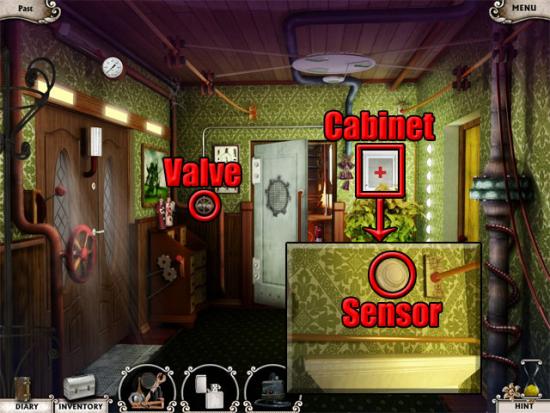
Move forward to enter the laboratory. Use the stuff on the generator: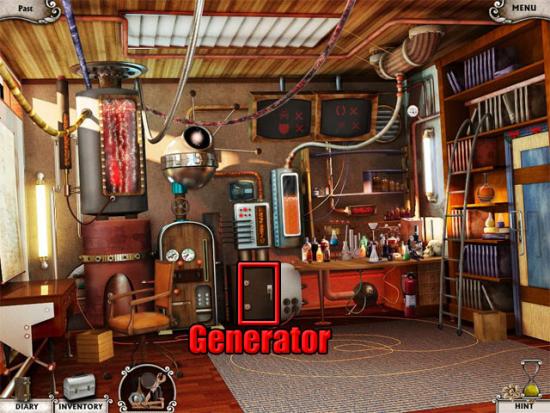
The aim in this mini-game is to use the connectors from the inventory to complete all of the connections on the circuit board. The completed circuit board is shown below: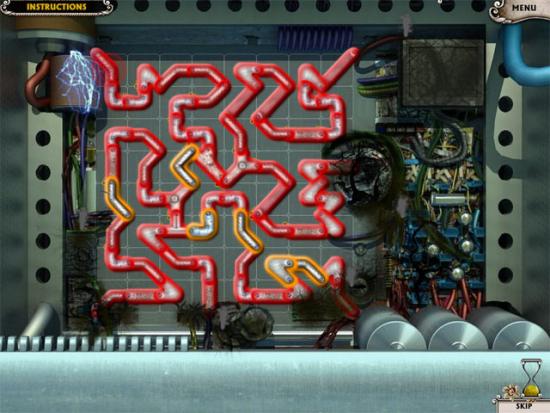
Chapter 6: How to Have Fun in Jail
Examine the objects at the top-left corner of the room to enter a hidden object scene. Find all of the objects on the list:
[time_48]
The stick will be added to the inventory. The following hotspots are available:
[time_49]
Examine the table and take the chalk in the close-up view. Examine the barrel and take some of the crackers in the close-up view. An owl will fly to the window after a few seconds. Examine the hole at the right side of the room and a rat will appear. Give the crackers to the rat three times and the owl will catch it. Examine the hole again and take the spoon in the close-up view. Examine the floor and then use the chalk on the floor in the close-up view to draw a dial. Use the spoon and the stick in the middle of the dial to make a sundial: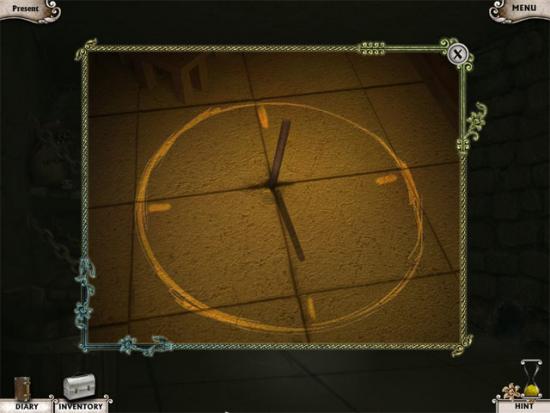
Exit the view of the sundial to travel to the past. The following hotspots are available: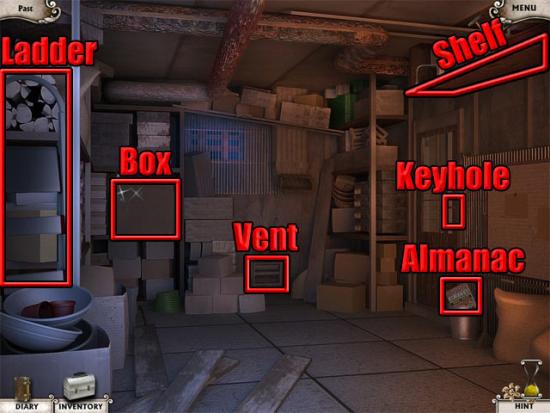
Examine the box to enter a hidden object scene. Find all of the objects on the list: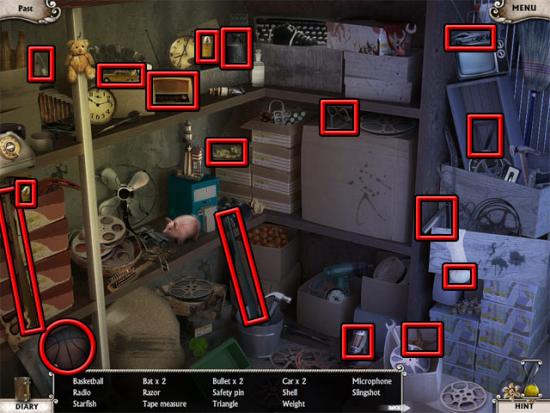
The antenna will be added to the inventory. Take the ladder and the almanac. Use the ladder on the right shelf. Examine the shelf and take the screwdriver in the close-up view. Examine the keyhole and use the almanac on the bottom of the door in the close-up view. Use the antenna on the keyhole to pull the key through to the other side of the door. Take the key from the almanac. Examine the vent below the sink and use the screwdriver on the vent in the close-up view to remove the cover. Use the key on the vent to return to the present. Take the spoon on the floor: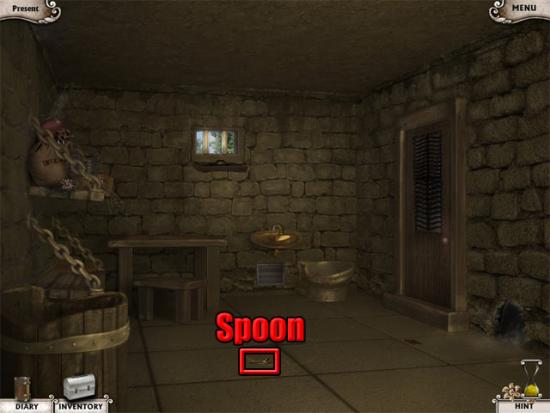
Examine the vent below the sink and then use the spoon on the vent in the close-up view to remove the cover. Take the key from the vent and use it on the door to open it. Go through the door and use the spoon on the grate at the left side of the hall: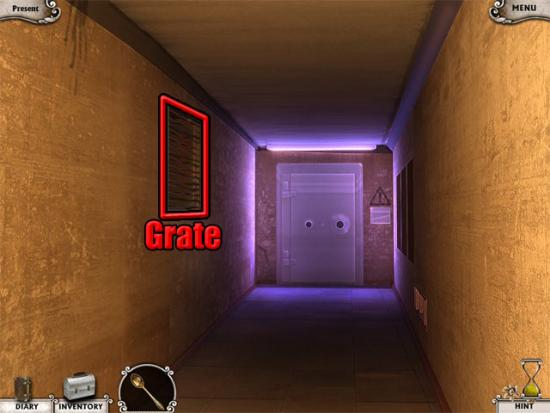
Move left through the vent to enter the server room. Examine the desk at the left side of the room to enter a hidden object scene. Find all of the objects on the list: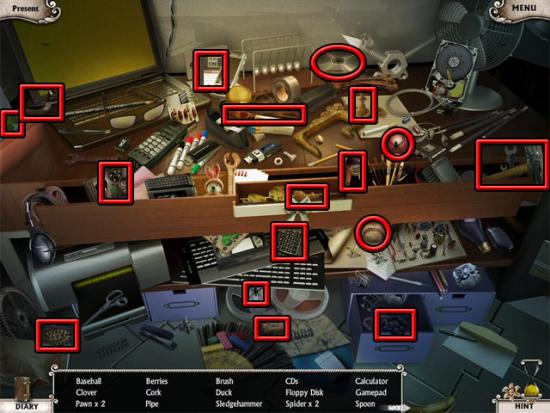
The sledgehammer will be added to the inventory. Use the sledgehammer on the eight servers: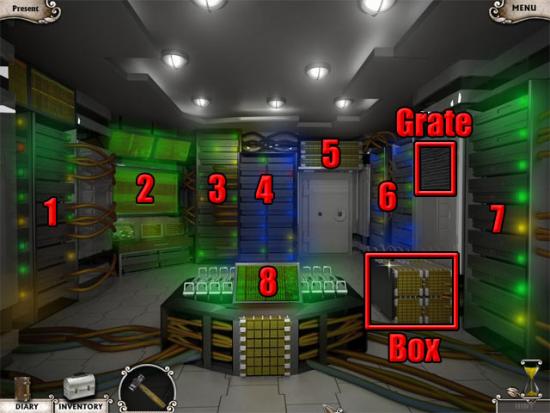
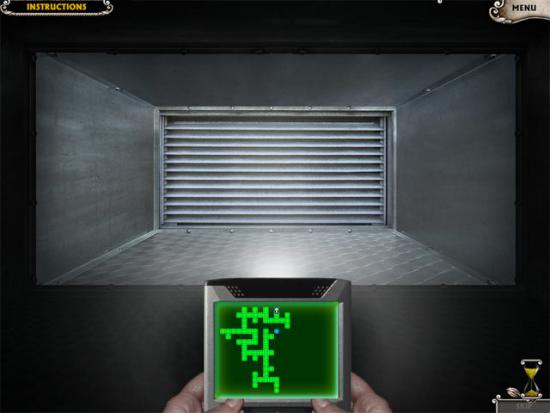
Examine the box below the grate and take the player in the close-up view. Select the grate to play the ventilation maze mini-game. The aim in this mini-game is to travel through the vents to reach the red dot on the map. Finding the blue map is optional and will display all possible vents on the map. Follow the directions shown below from the start of the maze:
- Forward 2
- Turn left
- Forward 2
- Turn right
- Forward 5
- Turn left
- Forward 4
- Turn right
- Forward 2
- Turn right
- Forward 2
- Turn left
- Forward 2
- Turn left
- Forward 2
- Turn right
- Forward 3
- Turn right
- Forward 4
- Turn right
- Forward 1
- Turn left
- Forward 2
- Turn left
- Forward 2
- The route through the maze is shown below:
Chapter 7: The Consequences
Examine the shelves in the middle of the room to enter a hidden object scene. Find all of the objects on the list: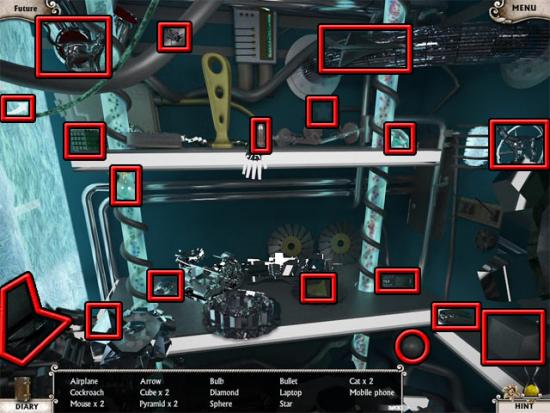
The stabilizer will be added to the inventory. The following hotspots are available: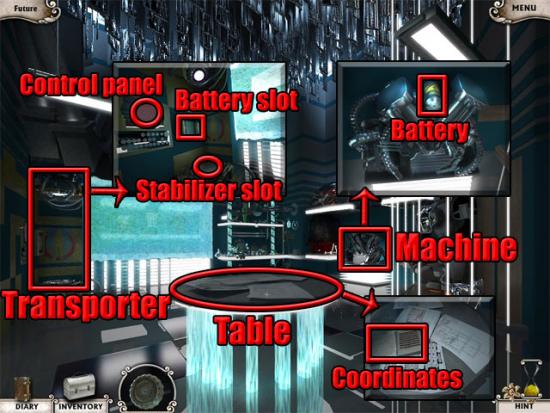
Examine the table and take the coordinates. Examine the perpetual motion machine and take the battery. Examine the transporter and use the battery in the battery slot and the stabilizer on the stabilizer slot. Use the coordinates on the panel and then move forward through the blue area to travel to the future. Examine any object and a cutscene with Giovanni will be shown. After the cutscene, examine the objects at the left side of the throne to enter a hidden object scene. Find all of the objects on the list: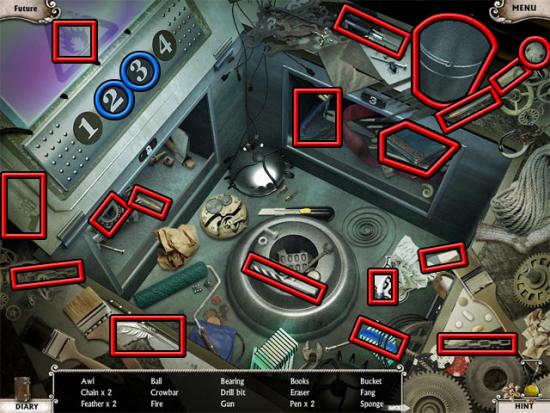
The bucket will be added to the inventory. The following hotspots are available: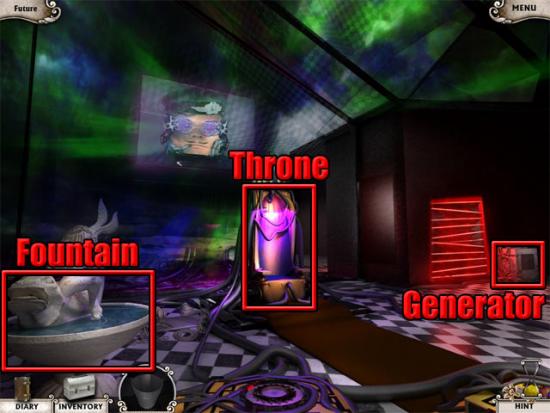
Examine the fountain and use the bucket on the water in the close-up view. Take the bucket of water. Examine the generator and then use the bucket of water on the generator in the close-up view. Exit the view of the generator. Examine the throne and select the pink box in the close-up view. Take the key from the box and then press the green button to open a panel. Examine the panel to enter a hidden object scene. Find all of the objects on the list: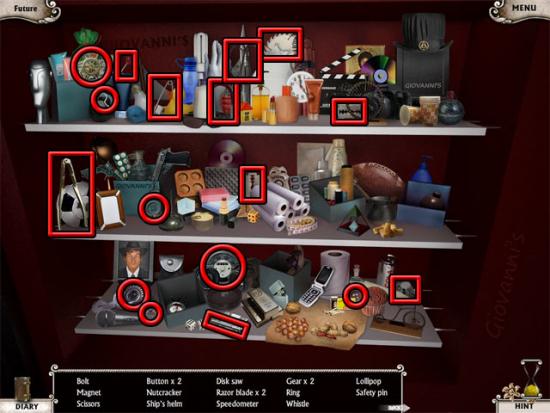
The nutcracker will be added to the inventory. Move back to the previous room and use the key on the blue energy shield. Examine the display case and take the comb in the close-up view: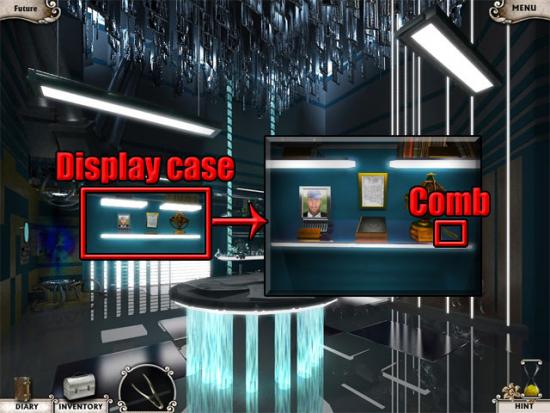
Exit the view of the display case. Move forward at the left side of the display case to return to the fountain room. Go through the doorway at the left side of the generator to enter the crystal room. Try to take the crystal and bars will fall down. Select the raised tile: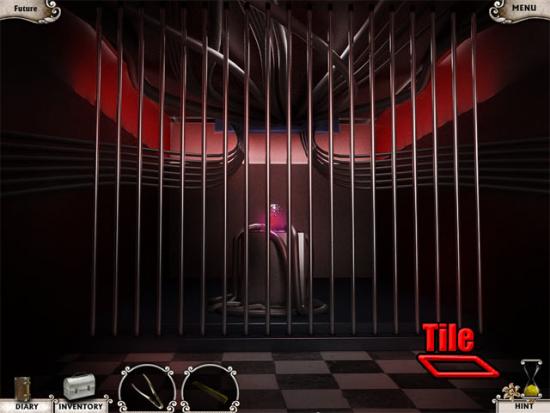
Examine the DNA receiver and use the comb on the receiver in the close-up view to raise the bars. Examine the crystal on the pedestal and then use the nutcracker on the crystal in the close-up view to complete the chapter.
Chapter 8: Happy Beginning
Examine the drawer at the left side of the bed to enter a hidden object scene. Find all of the objects on the list: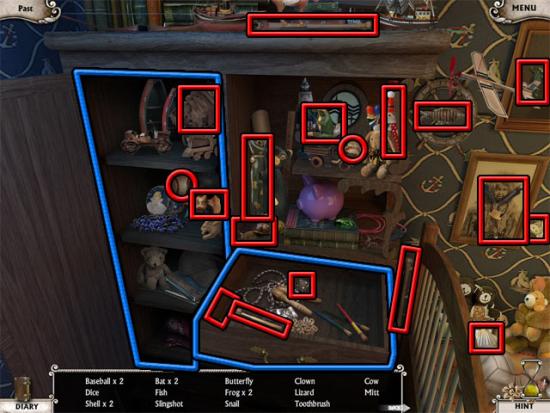
Note that one of the shells can only be found when the drawer is closed. The baseball kit will be added to the inventory after the scene has been completed. Select the curtains. Unlock and open the window and then move forward to exit the house. Take the present at the top of the steps. Enter the shed: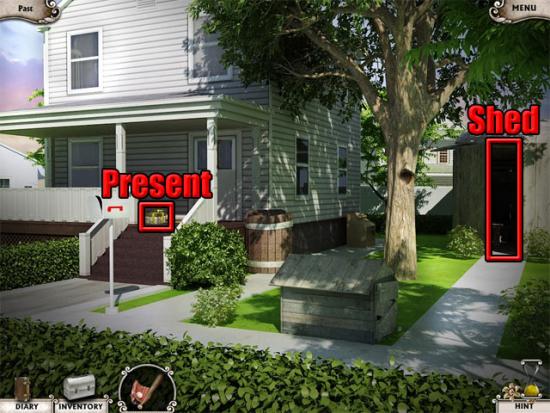
Examine the shelf at the right side of the tools to enter a hidden object scene. Find all of the objects on the list: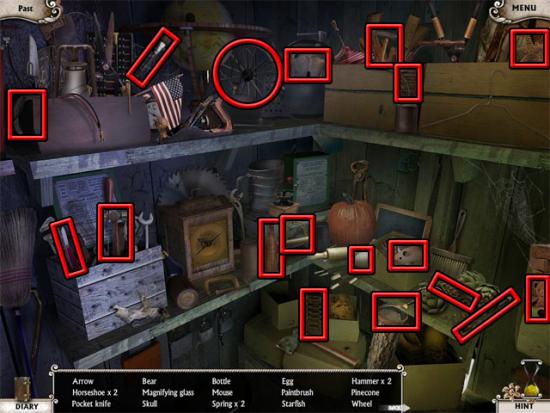
The knife will be added to the inventory. Examine the workbench at the left side of the shed and use the present on the workbench in the close-up view. Use the knife on the present and examine the present to see a drawing. Exit the view of the drawing and move back to exit the shed. Examine the hole in the key and take the key in the close-up view. Enter the shed. Examine the chest: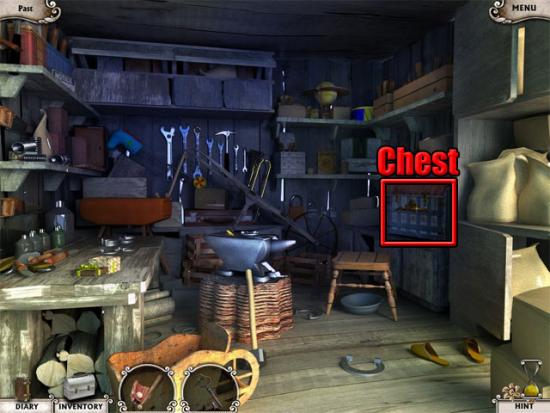
Use the key on the chest in the close-up view and then take the fishing rod from the chest. Move back to exit the shed. Examine the barrel: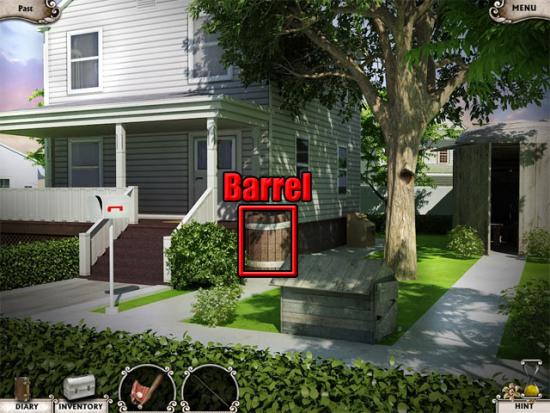
Use the fishing rod on the barrel and a bottle will rise to the surface. Examine the bottle to see a drawing of the doormat. Exit the view of the drawing and the barrel. Examine the doormat at the top of the steps. Select the doormat in the close-up view and take the key: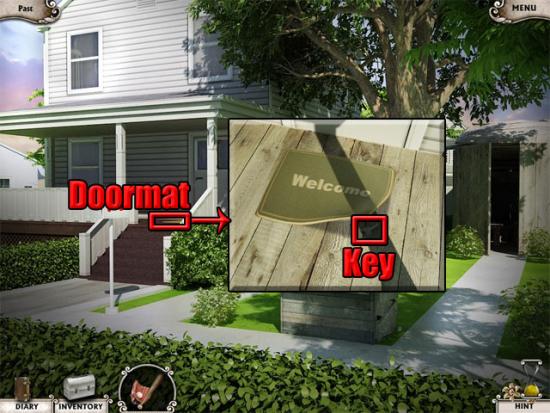
Examine the box at the side of the house and use the key on the lock. Take the crowbar from the box in the close-up view. Examine the doghouse door and use the crowbar on the boards to remove them. Use the baseball kit on the books to complete the game.
More articles...
Monopoly GO! Free Rolls – Links For Free Dice
By Glen Fox
Wondering how to get Monopoly GO! free rolls? Well, you’ve come to the right place. In this guide, we provide you with a bunch of tips and tricks to get some free rolls for the hit new mobile game. We’ll …Best Roblox Horror Games to Play Right Now – Updated Weekly
By Adele Wilson
Our Best Roblox Horror Games guide features the scariest and most creative experiences to play right now on the platform!The BEST Roblox Games of The Week – Games You Need To Play!
By Sho Roberts
Our feature shares our pick for the Best Roblox Games of the week! With our feature, we guarantee you'll find something new to play!All Grades in Type Soul – Each Race Explained
By Adele Wilson
Our All Grades in Type Soul guide lists every grade in the game for all races, including how to increase your grade quickly!


