
Best Horror Games On Itch.io – July 2026
Across a bounty of subgenres.![Haze Seas Accessories Tier List [Best Accessories to Equip]](/wp-content/uploads/2026/07/haze-seas-accessories-tier-list.jpg "Haze Seas Accessories Tier List [Best Accessories to Equip]")
Haze Seas Accessories Tier List [Best Accessories to Equip]
The accessories with the best stat buffs in Haze Seas.
![[Roblox] Evomon Shiny Hunting Guide – Including Prismatic and Pris Shinies!](/wp-content/uploads/2026/06/evomon-shiny-hunting-guide.jpg "[Roblox] Evomon Shiny Hunting Guide – Including Prismatic and Pris Shinies!")

Tiger Eye: The Sacrifice Walkthrough
Welcome the Tiger Eye: The Sacrifice walkthrough on Gamezebo. Tiger Eye: The Sacrifice is a hidden object adventure game created by Passionfruit Games. This walkthrough includes tips and tricks, helpful hints, and a strategy guide to how to complete Tiger Eye: The Sacrifice.


- Prefer Gamezebo on Google

Game Introduction – Tiger Eye: The Sacrifice
Welcome the Tiger Eye: The Sacrifice walkthrough on Gamezebo. Tiger Eye: The Sacrifice is a hidden object adventure game created by Passionfruit Games. This walkthrough includes tips and tricks, helpful hints, and a strategy guide to how to complete Tiger Eye: The Sacrifice.
General Tips
- When starting the game for the first time, you can choose between one of two difficulties: Casual or Advanced. Casual difficulty features sparkles visible over areas of interest, and the option to turn the tutorial on. Advanced difficulty features no sparkles over areas of interest, and no tutorial.
- During cutscenes, you will have the ability to pause or skip forward.
- In the lower left corner of the screen is the Journal: this will keep track of the story and any important clues you uncover and you progress in the game.
- Also located in the lower left corner of the screen is the Menu button. From here you can pause or quit the game, access options, etc.
- Toward the lower right corner of the screen, you will see the Compass. This will allow arrows leading to other areas to be actively displayed, or only to appear when you toggle the cursor over them.
- The Hint button is located in the lower right corner of the screen. Hints are limited, but more will appear if you don’t use the button for a long period of time. Using a Hint will cause the number of hints to decrease, and the “Hint charge” to reset to 0. You can use Hints back-to-back and do not have to wait for them to charge.
- During puzzles, you will be able to view Instructions on what you should do. From there, you can freely use up to two free Hints. These do not subtract from your Hint button total. In order to skip a puzzle, you will need to use the two Hints first. Skipping a puzzle afterward will deduct from your Hint button total, though.
Chapter 1: The Roadside
Car
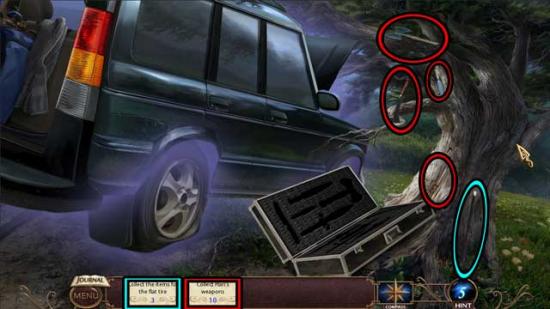
- Take a closer look at the rear right tire. Note it’s flat and will require 3 items before it can be fixed.
- Take a closer look at the open case at the base of the tree. Note the 10 missing weapons.
- Click on the WEAPONS and the TIRE ITEM in the area (shown below).

- Proceed to the left.
Roadside
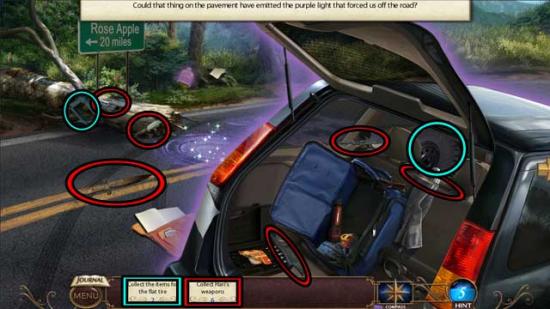
- Collect the remaining items in this area. Their locations are shown below.
- Return to the Car.
Car
- Take a closer look at the case at the base of the tree. Place HARI’S WEAPONS back into the case. This will cause the ENGINE WIRE 1/2 to appear on the ground behind the front tire. Click on it to add it to your inventory.
- Next, examine the flat rear tire. Use the ITEMS FOR A FLAT TIRE on it to replace it.
- Return to the Roadside.
Roadside
- Click on the purple portal in the road to trigger a puzzle.
- Click on or drag the various rings to rotate them and complete the picture on the right. The correct positions and solution are shown below.
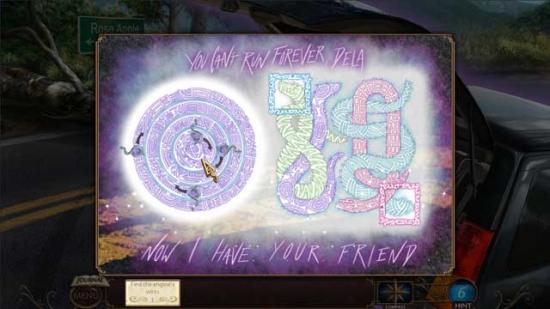
- Upon completing the puzzle, click on the LOCK PART 1/2 in the hole in the road to add it to your inventory.
- Examine the orange bag lying in the road and note the torn up journal. Back in the main area, click on the JOURNAL PAGES to add them to your inventory.
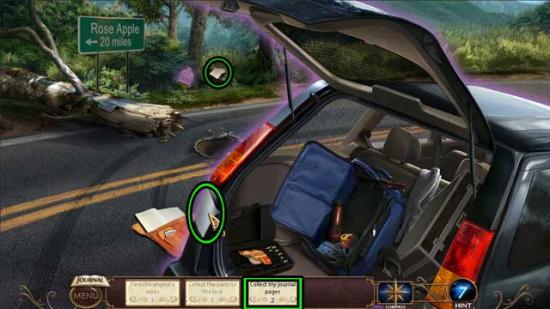
- Examine the orange bag containing the journal again. Use the JOURNAL PAGES on the journal to restore it. Then, once back in the main area/view again, click on the blue ENGINE WIRE 2/2 that appears where the bag was previously to add it to your inventory.
- Return to the Car.
Car
- Take a closer look at the open front hood. Use the ENGINE WIRE on it to trigger a puzzle.
- Drag the colored wires from the top to the corresponding images on the bottom. The key to this puzzle is numbers. The solution is shown below.
- Upon completing the puzzle, click on the LOCK PART 2/2 in the tree above the hood of the vehicle to add it to your inventory.
- Return to the Roadside.
Roadside
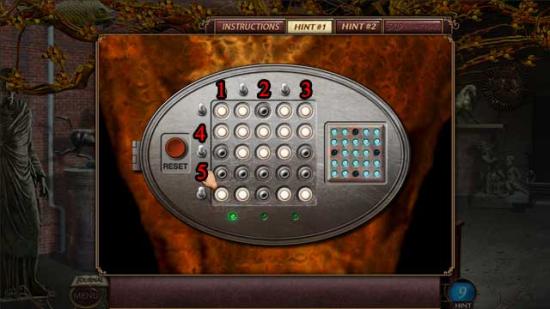
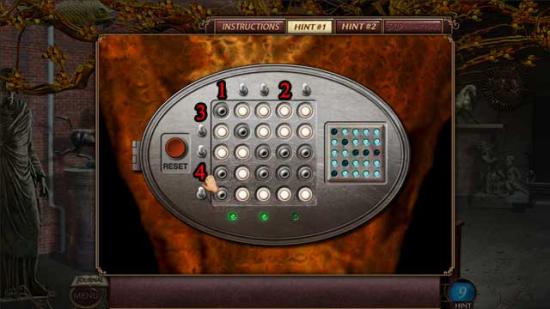
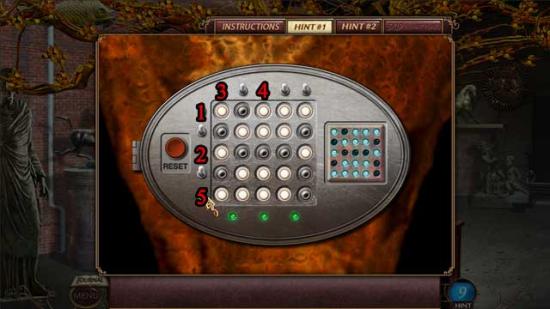
- Take a closer look at the bird cage on the other side of the road, near the bushes. Use SOME KIND OF LOCK on the indentation to trigger a puzzle.
- Click on the buttons in the correct order to open the lock. The order is randomized. Upon completing the puzzle, click on the Silver Violin to trigger another puzzle.
- Click and drag to connect chains of 3 or more symbols of the same color to clear the area behind them and fill the jar on the left. Fill the jar to reveal a psychic vision! You may shuffle the symbols twice. An example is shown below.
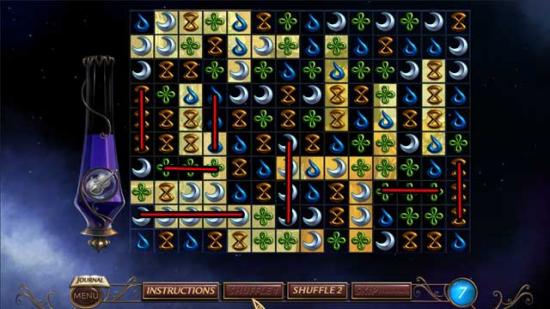
- Upon filling the jar enough, click the “Done!” button on the left.
Chapter 2: The Kosmo Klub
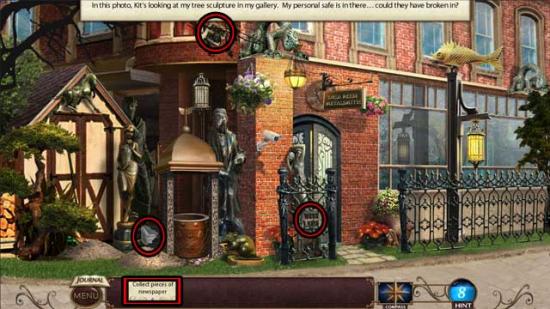
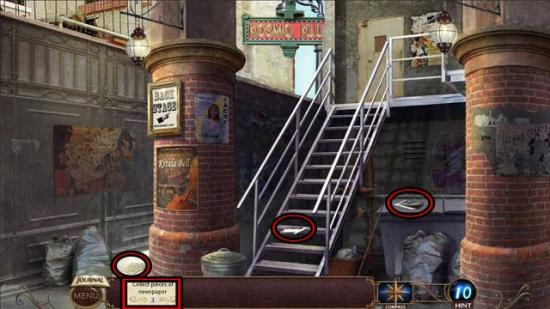
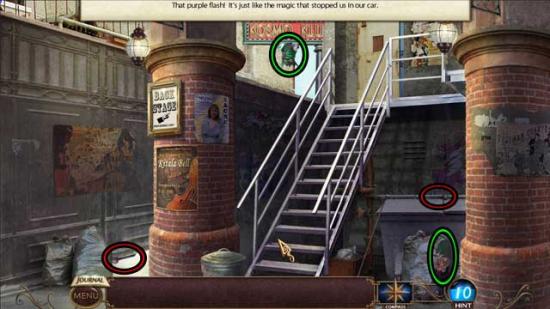
Square
- Click on the PIECES OF NEWSPAPER in the area to add them to your inventory.
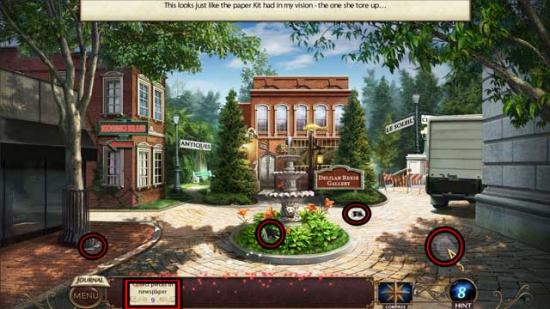
- Proceed forward to the Gallery Entrance.
Gallery Entrance
- Click on the box on the front doorstep to trigger a puzzle.
- Click on the cover of the box to remove it, revealing a sort of chess board beneath. The knight can move only in the shape an “L” that goes 2 spaces across a row and 1 space in the column or 1 space across a row and 2 spaces in a column. Valid spaces will be highlighted in blue. Click the desired blue spaces to move the knight and get the knight to the flag! The solution is shown below.
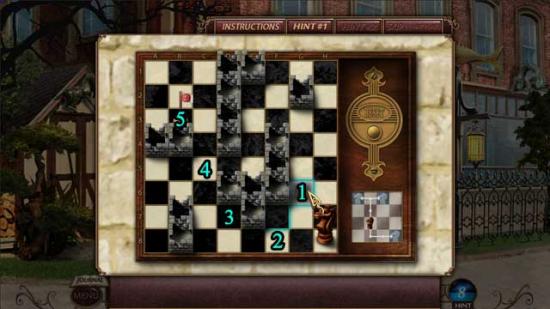
- Once you’ve completed the puzzle, click on the photo beneath.
- Back in the main area, click on the PIECES OF NEWSPAPER before proceeding through the door and into the Gallery.
Gallery
- Take a closer look at the branch near the horse statue on the column on the left. Note the missing winged creatures.
- Click on the WINGED CREATURES in the area to add them to your inventory.
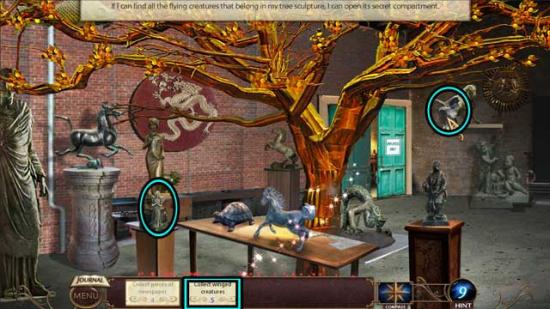
- Enter through the blue door at the back of the room.
Workshop
- Click on the WINGED CREATURES in the area to add them to your inventory.
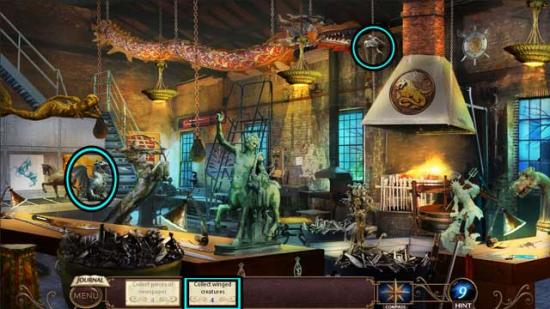
- Return to the Gallery Entrance.
Gallery Entrance
- Click on the remaining WINGED CREATURES to add them to your inventory.
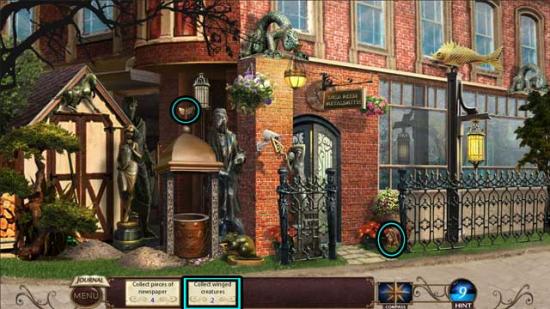
- Return to the Gallery.
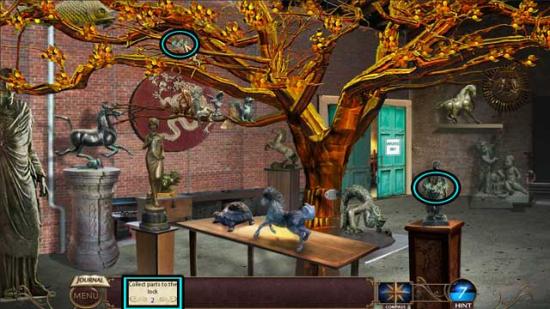
Gallery
- Examine the branch on the left near the horse on the column again. Use the WINGED CREATURES on the branch, revealing a secret lock at the base of the gold tree. Click on it for a closer view.
- Flip the switches in the rows and columns to get the black and white pattern on the large board to match the pattern shown on the small square on the right. There are three levels to this puzzle. Refer to the screenshots below for the solutions.
- Upon completing the puzzle, click on the poster inside.
- Return to the Square.
Square
- Proceed left towards the Kosmo Klub.
Kosmo Klub Entrance
- Click on the remaining PIECES OF NEWSPAPER to add them to your inventory.
- Make your way back to the Gallery.
Gallery
- Take a closer look at the newspaper on the table. Use the PIECES OF NEWSPAPER on it to trigger a puzzle.
- Complete the newspaper article by placing the torn pieces together. The solution is shown below.
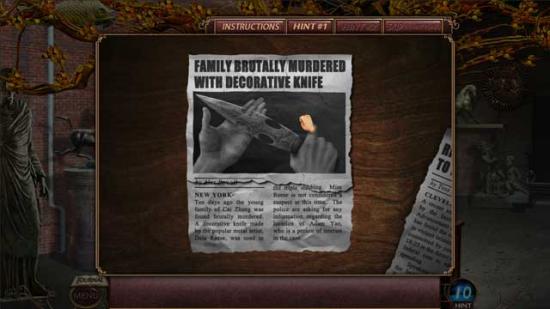
- Upon completing the puzzle, click on the article, then watch the cutscene that follows.
- Click on the photo lying on the floor at the base of the column on the left to examine it.
- Make your way back to the Kosmo Klub entrance.
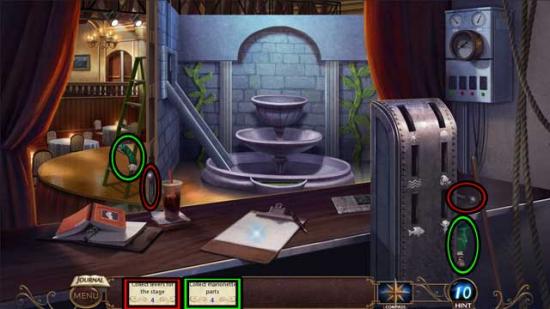
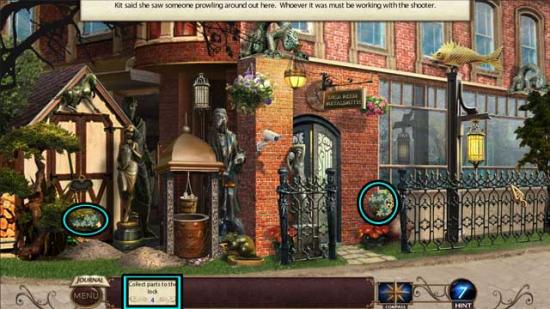
Kosmo Klub Entrance
- Click on the LEVERS and MARIONETTE PARTS in the area to add them to your inventory.
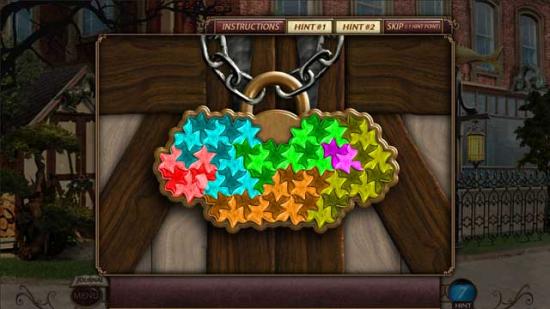
- Examine the door at the top of the steps, then click on the chains to trigger a puzzle.
- Click on any colored piece adjacent to the silver one to absorb all pieces of the same color that are touching the silver piece! You goal is to turn the entire board silver within the given number of clicks. The solution is as follows: Orange, Blue, Purple, Blue, Orange, Green.
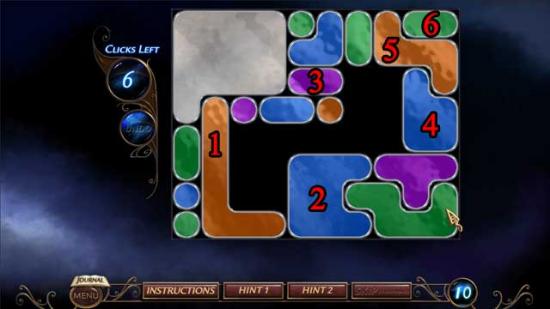
- Upon completing the puzzle, enter the Kosmo Klub.
Kosmo Klub
- Examine the clipboard and the newspaper on the counter, then collect the LEVERS and MARIONETTE PARTS in the area.
- Proceed forward to the door at the far end of the area, on the left.
Backstage
- Examine the door to the Dressing Room and note you’ll need to collect 2 Key Parts.
- Click on the remaining LEVERS and MARIONETTE PARTS to add them to your inventory.
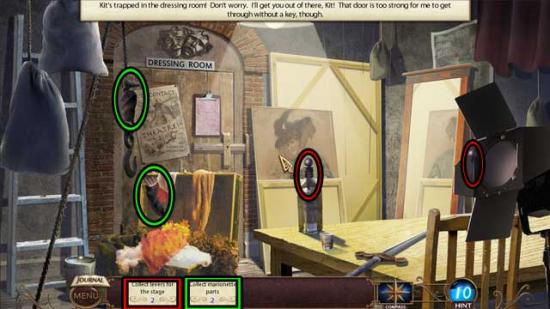
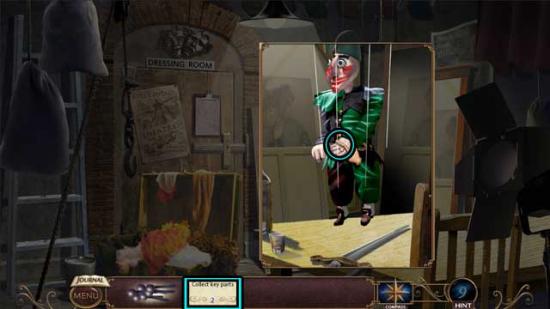
- Examine the strings hanging over the table. Use the (completed) MARIONETTE PARTS on the strings, then click on the KEY PART 1/2 in the marionette’s hand to add it to your inventory.
- Go back to the main club area.
Kosmo Klub
- Examine the control panel on the right for a closer view. Use the LEVERS on the control panel to trigger a puzzle.
- Pull the levers in the correct order so that the fairy can get the key from the fish. Pulling an incorrect lever will cause all of the levers to pop back up and the curtain will fall, resetting the stage. The solution is shown below and the order is as follows: Water, Fish, Sun, Vines, Cloud, Fairy.
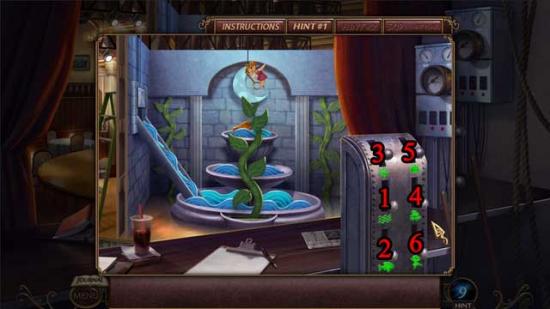
- Upon completing the puzzle, click on the KEY PART 2/2 the fairy is holding to add it to your inventory.
- Return to the Workshop.
Workshop
- Click on the forge on the right to trigger a puzzle.
- Put the valves onto the pipes in the correct order (from left to right). The telling order has to do with alphabetical order, and the solution is as follows: Apple, Bee, Coffee, Dinosaur, Egg, Foot, Grapes.
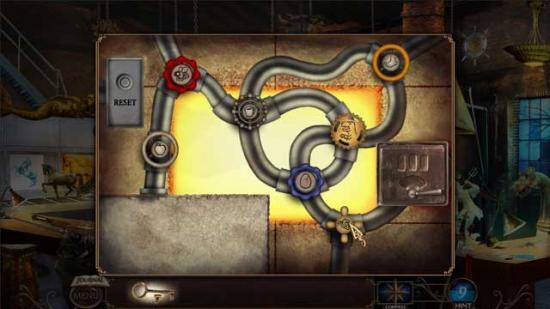
- Once the puzzle is complete, the furnace will open. Use the BROKEN KEY on the furnace to replace it, then open the door and click on the FIXED KEY to add it to your inventory.
- Return to the Backstage of the Kosmo Klub.
Backstage
- Take a closer look at the lock on the door. Use the FIXED KEY on the lock to open it, then proceed forward into the Dressing Room.
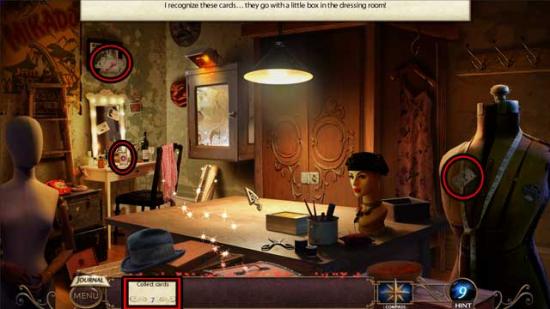
Dressing Room
- Click on the CARDS in the area to add them to your inventory.
- Go back out to the Backstage.
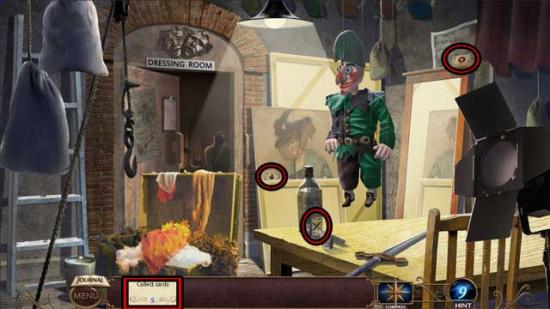
Backstage
- Click on the CARDS in the area to add them to your inventory.
- Go out to the main area of the Kosmo Klub.
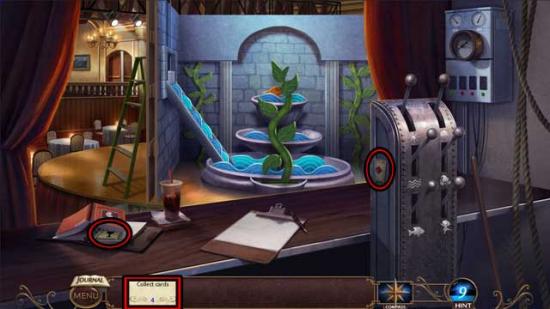
Kosmo Klub
- Click on the remaining CARDS to add them to your inventory.
- Return to the Dressing Room.
Dressing Room
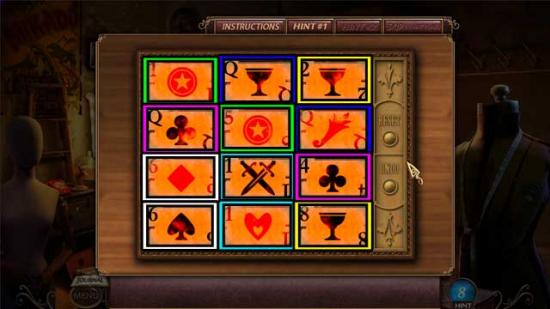
- Take a closer look at the box on the table. Use the CARDS on the box to trigger a puzzle.
- Match the cards in pairs by suit or number in order to turn them over. The goal is to turn all the cards over. The solution is shown below.
- Upon completing the puzzle, click on the Note and the MORGUE KEY to collect them.
- Exit to the Square.
Chapter 3: Poisoned
Square
- Now that the truck is gone, proceed right towards the City Morgue.
Morgue Entrance
- Take a closer look at the front door knob. Use the MORGUE KEY on the lock to open it, then proceed inside.
Morgue
- Take a closer look at the refrigerator doors. Note the missing charts.
- Click on the MORGUE CHARTS in the area.
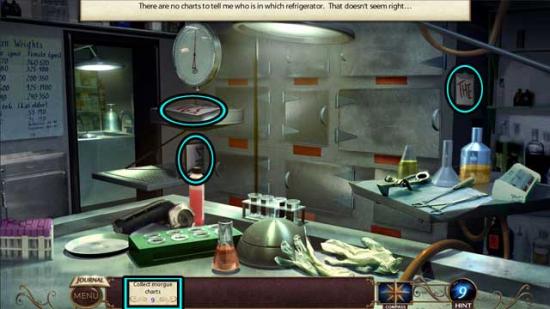
- Go through the doorway to the next room.
Autopsy Room
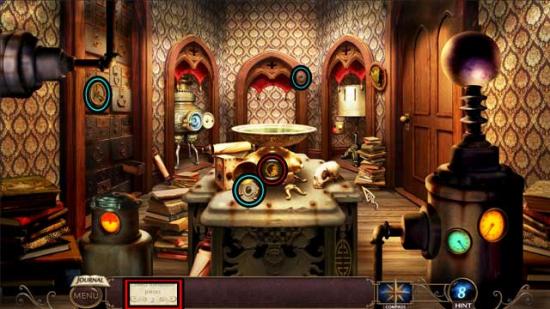
- Collect the MORGUE CHARTS in the area.
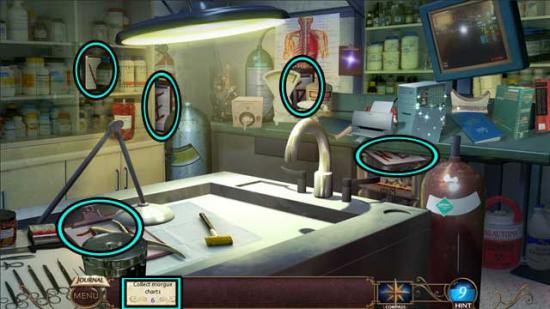
- Click on the computer beneath the hanging monitor on the right to enter a puzzle.
- Each number indicates how many connections a particular post has. Click between posts to add up to 2 connections. Click again to remove them. When a post is correctly fulfilled, it will light up blue. The solution is shown below.
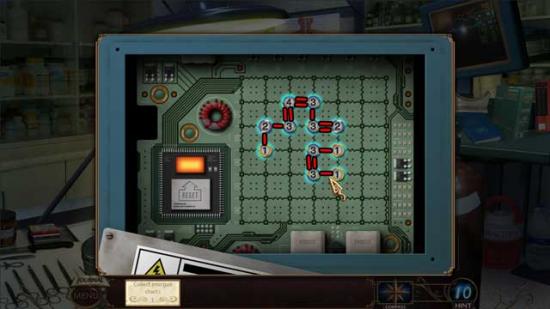
- Upon completing the puzzle, click on the PIECE OF PAPER and combine it with the clipboard to obtain the final MORGUE CHART.
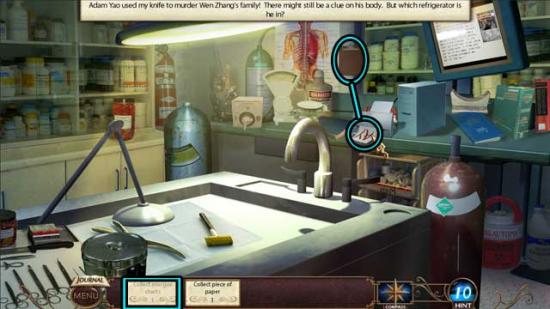
- Return to the Morgue.
Morgue
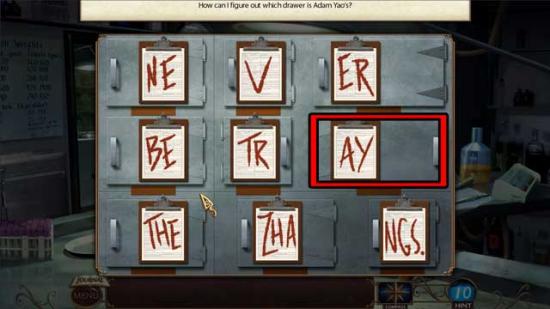
- Take a closer look at the refrigerator doors again. Use the MORGUE CHARTS on the doors to trigger a puzzle.
- Place the charts onto the refrigerator doors so that they create a phrase to figure out who is in which refrigerator. Then click on the door that belongs to Adam Yao. The solution is shown below.
- Once the correct door is open, click on the urn next to the body to trigger another puzzle.
- Place the correct pictures into the correct slots according to the hint inscription. The solution is shown below.
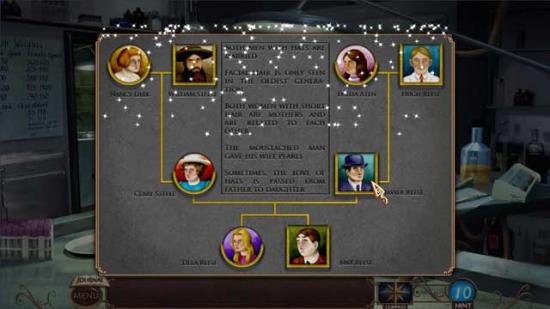
- Upon completing the puzzle, click on the invitation half that is revealed.
- Exit to the Gallery Entrance.
Gallery Entrance
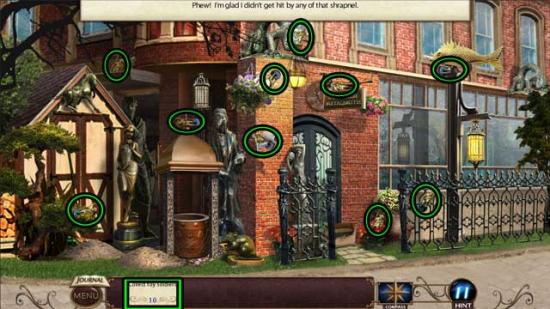
- Take a closer look at the package on the front step. Click on it, and it will burst.
- Collect the TOY SOLDIERS in the area to add them to your inventory. Their locations are shown below.
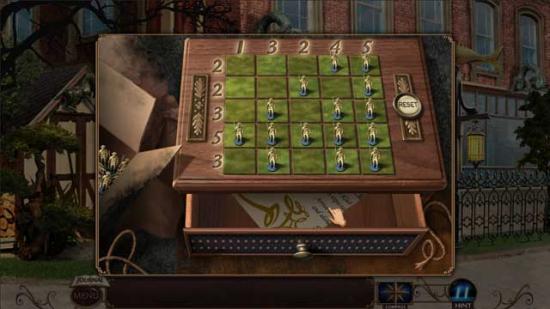
- Examine the package for a closer view again. Use the TOY SOLDIERS on the box to trigger a puzzle.
- The numbers indicate how many soldiers are in each row or column. Click the squares to place soldiers on the battlefield in such a way that all the numbers are fulfilled. The solution is shown below.
- Upon completing the puzzle, click on the invitation half to collect it. A puzzle will be triggered.
- Click and drag to connect chains of 3 or more symbols of the same color to clear the area behind them and fill the jar on the left. Fill the jar to reveal a psychic vision! You may shuffle the symbols twice. Upon completing the puzzle, a cutscene will be triggered.
Bedroom
- Click on the chest at the foot of the bed to trigger a puzzle.
- Place the pieces to the puzzle in the grid so that each row across, column down, and 3×2 box contains every number from 1-6. There will be no repeating numbers in any row, column, or 3×2 box. The solution is shown below.
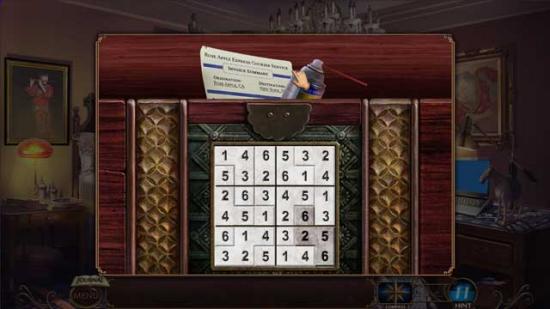
- Upon completing the puzzle, click on the MECHANICAL LUBRICANT to add it to your inventory.
- Click on the open window to trigger another puzzle. Click on the hatch to remove it, revealing the puzzle beneath. The goal is to move the gears into the correct positions, marked by the faint “ghost” gears. To move the gears, hover over a gold gear and click on an arrow to slide the gear across the board; it will keep moving until it hits an obstacle. The solution is shown below.

- Upon completing the puzzle, examine the window again. Note 5 Chains are missing.
- Collect the 5 CHAINS scattered throughout the room. Their locations are shown below.
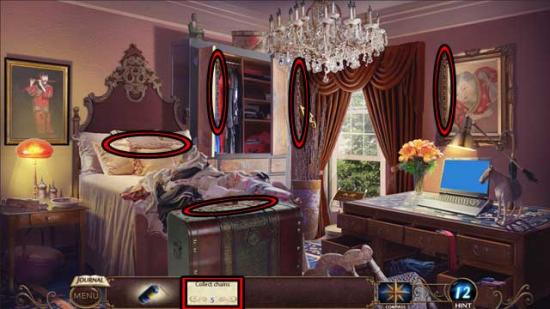
- Examine the open window again. Use the CHAINS, followed by the MECHANICAL LUBRICANT on the gears, then proceed out the window.
Gallery Entrance
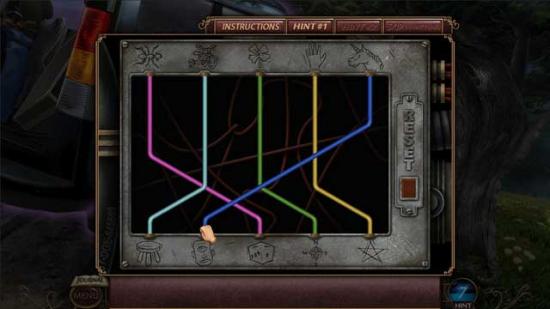
- Click on the security camera for a closer view, then remove the cover to trigger a puzzle.
- Reroute the security camera by connecting the two end points of the wire. The entire red wire must be used. Move the pieces of the wire by swapping any two pieces. The solution is shown below.
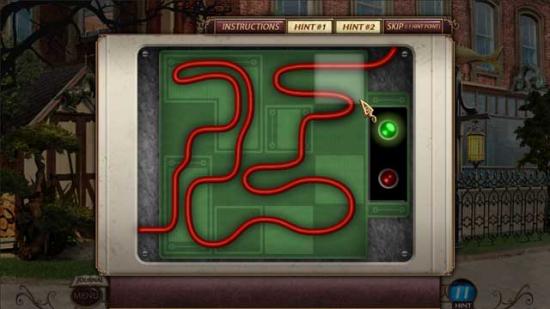
- Upon completing the puzzle, the security camera will be disabled, and you can leave the area.
Square
- Proceed left towards the Kosmo Klub.
Kosmo Klub Entrance
- Take a closer look at the wires dangling in front of the door, then click on them to trigger a puzzle.
- Click on any colored piece adjacent to the silver one to absorb all the pieces of the same color that are touching the silver piece. Your goal is to turn the entire board silver within the given number of clicks. The solution is shown below and is as follows: Green, Blue, Purple, Green, Blue, Purple, Orange.
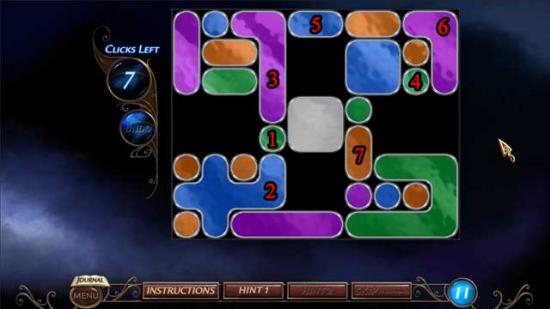
- Enter the Kosmo Klub.
Kosmo Klub
- Proceed towards the Backstage, then watch the cutscene that follows.
Backstage
- Click on the open chest to trigger a puzzle.
- Figure out which combination of character outfits the girl wants to wear by dragging different costume pieces to the girl. Click “Submit” to guess. “Correct Character” means that an item is from the right outfit but it’s not the right piece (for example, she wanted a chef Hat but is wearing chef Pants). “Correct Piece” means an item is from the right outfit and is also the right piece. The solution is as follows and is shown below: Chef Hat, Fireman Coat, Pirate Pants.
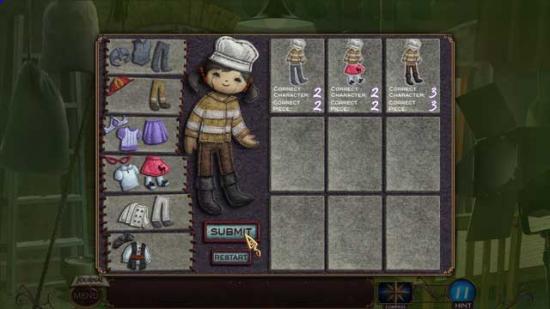
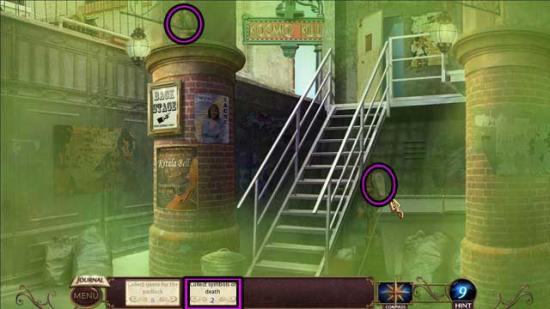
- Upon completing the puzzle, click on the GEMS FOR PADLOCK to collect them.
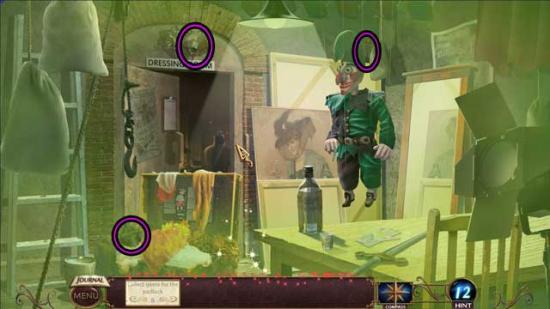
- Click on the SYMBOLS OF DEATH around the area to add them to your inventory.
- Enter the Dressing Room.
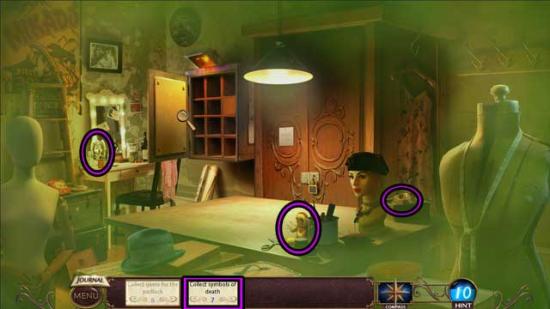
Dressing Room
- Click on the SYMBOLS OF DEATH in the room to add them to your inventory.
- Make your way back to the main area of the Kosmo Klub.
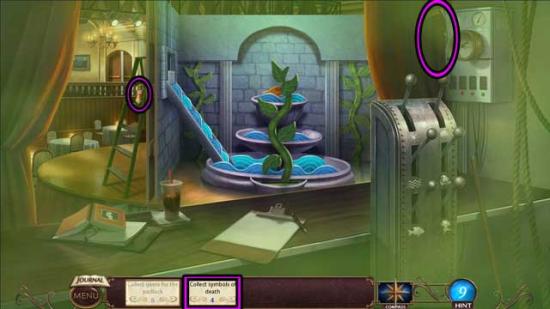
Kosmo Klub
- Click on the SYMBOLS OF DEATH in the room to add them to your inventory.
- Go outside to the Kosmo Klub Entrance.
Kosmo Klub Entrance
- Click on the remaining SYMBOLS OF DEATH to add them to your inventory.
- Make your way back to the Dressing Room.
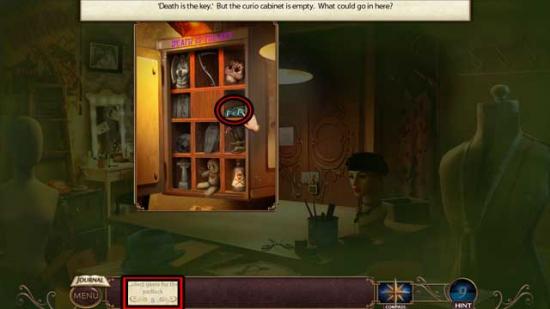
Dressing Room
- Take a closer look at the box compartment shelf on the far wall. Use the FIGURINES OF DEATH on the shelf, then click on the GEMS FOR PADLOCK to add them to your inventory.
- Return to the Gallery Entrance.
Gallery Entrance
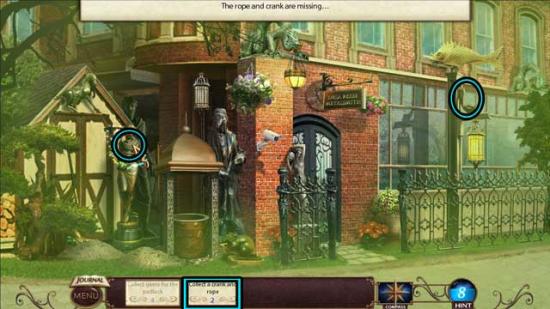
- Examine the well for a closer view and note the missing items. Click on the CRANK AND ROPE in the main area to collect them.
- Take a closer look at the well again. Use the CRANK AND ROPE on the well to pull up the bucket, then click on it to trigger a puzzle.
- To remove the lid, move the figurine around the board and turn over all the tiles so their red sides are face-up. Every space the figurine steps on will turn to the opposite color (red will turn to white and vice versa). The path you should take is starting at the lower right, going up to the upper right, down the middle, down to the lower left, up to the upper left, and back to the middle (then up from there). If a space is white when you leave it, move back to it to turn it red, then click on the next space and work forward from there.
- Upon completing the puzzle, click on the remaining GEMS FOR PADLOCK to add them to your inventory.
- Make your way back to the Dressing Room.
Dressing Room
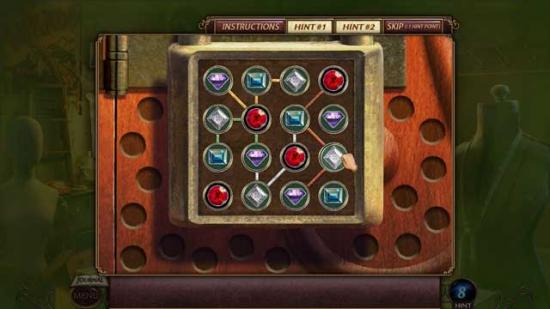
- Examine the padlock on the wardrobe. Use the GEMS on it to trigger a puzzle.
- Place the gems in the slots so that each row across, column down, and connected set of 4 slots has one of each type of gem. There cannot be repeat gem types in any row, column, or connected slots. The solution is shown below.
- Upon completing the puzzle, click on the Antidote to take it, then note the restaurant menu clue.
- Return to the Square.
Chapter 4: Rescue Kit
Square
- Proceed forward toward Le Soleil.
Le Soleil
- Enter the restaurant.
Dining Room
- Click on the box on the edge of the table to trigger a puzzle.
- Unscramble the word by sliding the pins on the music box’s barrel to hit certain notes of the music box’s comb teeth (each comb tooth will be used once). The colors of the pins correspond to the like-colored wheels that display the word at the bottom of the box. Use the crank to play the music box. The solution, “Revolution”, is shown below.
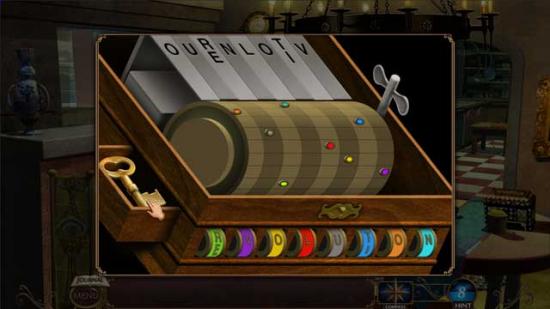
- Upon completing the puzzle, click on the KEY to add it to your inventory.
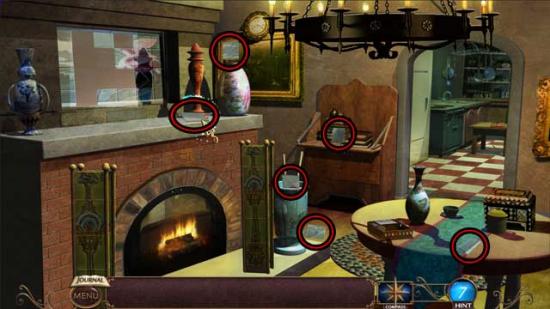
- Back in the main area, examine the fireplace screen on the left, specifically the section with the glowing orange keyhole. Use the KEY on the keyhole to open the screen.
- Click on the FIREPLACE TILES to add them to your inventory.
- Proceed right into the Kitchen.
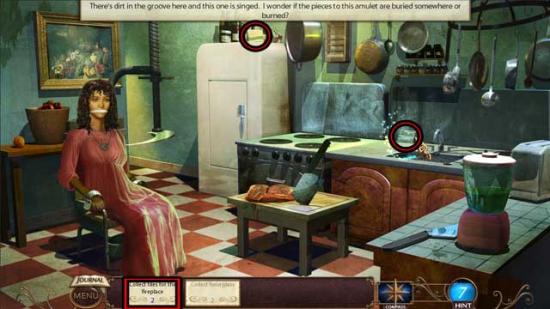
Kitchen
- Click on the chair cuff holding Kit in place to trigger a puzzle.
- The numbers on each button indicate how many adjacent buttons (including diagonals) should be pressed down. For example- if a button says “2”, then 2 of the buttons directly adjacent to it will be pressed down. Press down the correct buttons to unlock Kit from the guillotine chair. The solution is shown below.
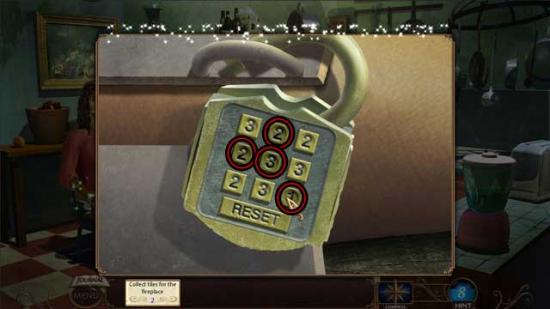
- Click on the remaining FIREPLACE TILES in the area to add them to your inventory.
- Return to the Dining Room.
Dining Room
- Examine the picture missing tiles on the left wall for a closer view. Use the FIREPLACE TILES on the mosaic to restore it. A secret compartment will open beneath the mosaic. Click on the button to turn off the fireplace.
- Examine the fireplace for a closer view. Click on the HOURGLASS 1/2 to add it to your inventory.
- Make your way back to the Gallery Entrance.
Gallery Entrance
- Examine the pile of dirt on the left, next to the well. Note you will need a shovel.
- Go back to the Square.
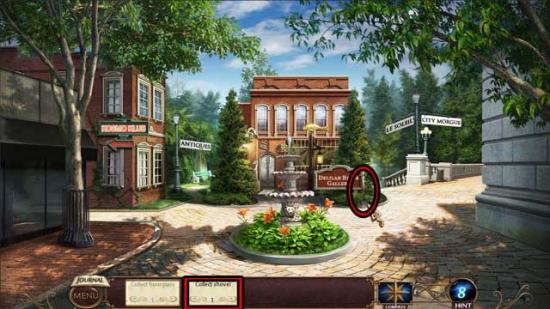
Square
- Click on the SHOVEL to add it to your inventory.
- Return to the Gallery Entrance.
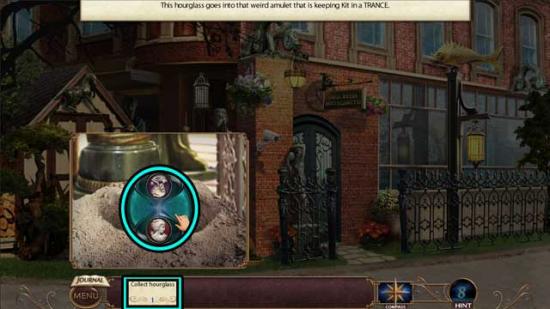
Gallery Entrance
- Take a closer look at the pile of dirt to the left of the well again. Use the SHOVEL on the dirt to dig it up, then click on the HOURGLASS 2/2 to add it to your inventory.
- Make your way back to the Kitchen.
Kitchen
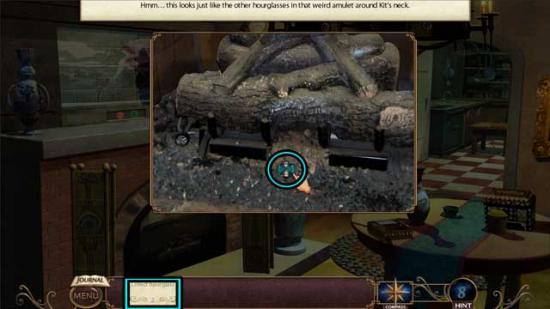
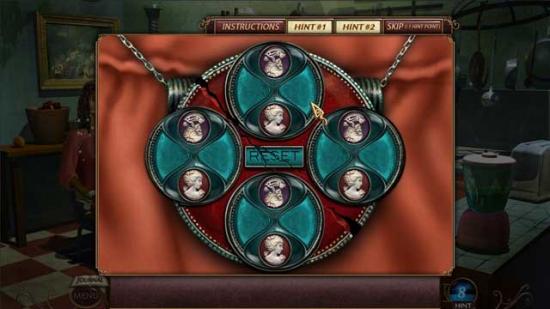
- Take a closer look at the necklace Kit is wearing. Use the 2 HOURGLASS(ES) on the pendant to trigger a puzzle.
- Turn all the hourglasses into the upright position (where the skeletons are upside down) to break Kit’s trance. The catch is that you can’t turn one hourglass at a time- you have to turn 3 at a time. Start with the hourglass in the 9 o’clock position and flip three hourglasses moving clockwise. Next, starting from the 12 o’clock position, flip three more hourglasses moving clockwise again. Then, start from the 3 o’clock position and flip three more hourglasses moving clockwise. Continue this pattern to complete the puzzle. The solution is shown below.
- Upon completing the puzzle, click on the Ring to trigger another puzzle.
- Click and drag to connect chains of 3 or more symbols of the same color to clear the area behind them and fill the jar. Fill the jar to reveal a psychic vision. Press the “Done!” button once finished.
- Upon completing the puzzle, the ANTIQUE RING will be added to your inventory.
- Make your way back to the Square.
Chapter 5: Restoring the Tiger
Square
- Proceed forward towards the path with the sign “Antiques”.
Antique Shop Entrance
- Take a closer look at the front door towards the left. Use the ANTIQUE RING on the lock to open it, then proceed inside.
Antique Shop
- After a cutscene, you will receive a list of items to find.
- Click on the large chest on the right to trigger a puzzle. Click on the top panel to remove it. To open the chest, move the man in the boat across the lake to the tiger icon. You have only two controls: row forward (arrow button) or wait (square button). After each command you give, the river’s currents will flow. If the boat is on top of a current when this happens, the boat will be affected. To rotate the boat multiple times, land in a whirlpool and click on the “wait” button. The solution is as follows:
1) Go forward to the first whirlpool and wait 3 turns until you’re facing forward again.
2) Move up into the single arrow right current. This should carry you into the top right whirlpool.
3) Wait in the top whirlpool until you’re facing left, then proceed left to the next whirlpool.
4) Wait in the whirlpool until you’re facing up, then go up to the space next to the dock with the tiger to complete the puzzle.
- Upon completing the puzzle, click on the ANTIQUE CAULDRON, the MOSAIC TILES, and the LUCKY ITEMS in the area to add them to your inventory.
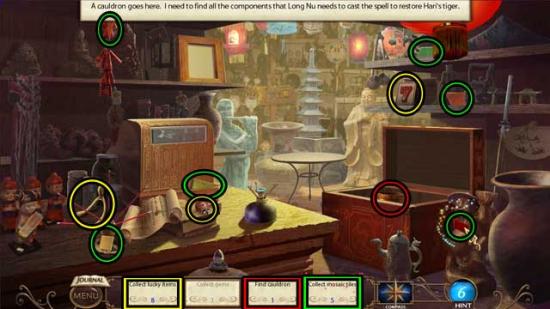
- Take a closer look at the burner on the edge of the counter. Use the ANTIQUE CAULDRON on the burner, then exit for now.
- Examine the picture frame on the shelf above the register. Use the MOSAIC TILES on the frame to trigger a puzzle.
- Reassemble the mosaic so that all the pieces fit snugly within the picture frame. Click and drag to move a piece. Once all the pieces are in the frame, the secret compartment will be accessible. The solution is shown below.
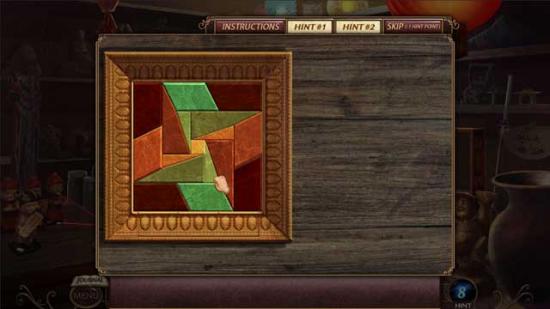
- Upon completing the puzzle, click on the GEMS that appear to add them to your inventory.
- Back in the main area, take a closer look at the cauldron. Use the GEMS on the cauldron, then exit for now.
- Exit to the shop entrance.
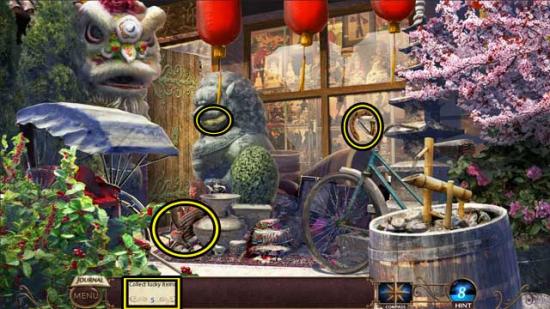
Antique Shop Entrance
- Click on the LUCKY ITEMS in the area to add them to your inventory.
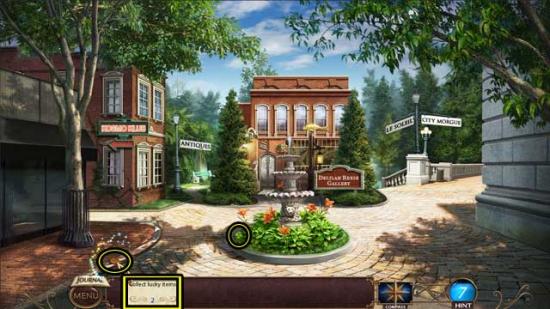
- Return to the Square.
Square
- Click on the remaining LUCKY ITEMS in the area to add them to your inventory. Once they’ve all been acquired, they will be renamed the SPELL INGREDIENTS.
- Return to the Antique Shop.
Antique Shop
- Take a closer look at the cauldron. Use the SPELL INGREDIENTS inside the cauldron to trigger a puzzle.
- Hover over a gem and press an arrow to slide it along the tracks. Get all the gems to locations on the board with matching colors. Doing this will activate the magical cauldron. Below are a series of screenshots that will show you a possible way to achieve the solution.

- Upon completing the puzzle, watch the cutscene that ensues.
Chapter 6: The Magi
Bedroom
- After a cutscene, you will find yourself in another puzzle. Click on any colored piece adjacent to the silver one to absorb all pieces of the same color that are touching the silver piece. Your goal is to turn the entire board silver within the given number of clicks. The solution is shown below and is as follows: Blue, Green, Blue, Purple, Green, Blue, Orange, Blue, Purple, Green.
- Upon completing the puzzle, the cutscene will come to a close.
- Proceed outside to the Gallery Entrance.
Gallery Entrance
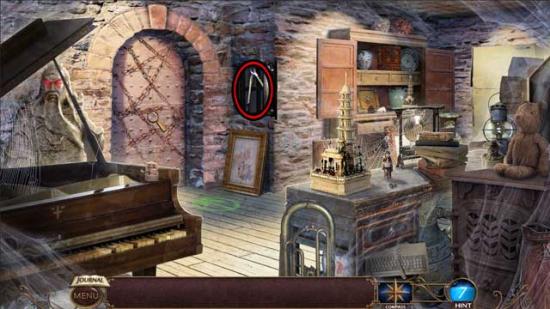
- Take a closer look at the door of the shed on the left. Note the missing lock parts.
- Click on the LOCK PARTS in the area to add them to your inventory.
- Enter the Gallery.
Gallery
- Click on the remaining LOCK PARTS to add them to your inventory.
- Return to the Gallery Entrance.
Gallery Entrance
- Take a closer look at the door of the shed again. Use the LOCK PARTS on the lock to trigger a puzzle.
- Click to rotate the pieces, click and drag to move the pieces. Place the pieces so that they fit snugly in the lock to get it open. The solution is shown below.
- Upon completing the puzzle, take a closer look at the document that falls to the ground between the dirt piles.
- Enter the Workshop.
Workshop
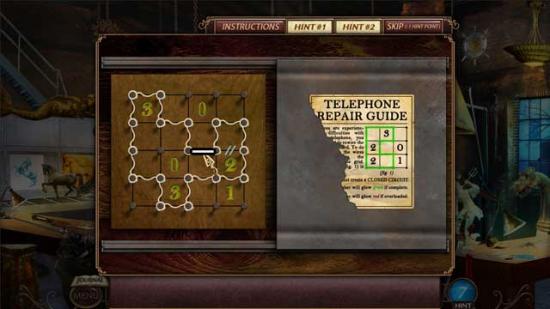
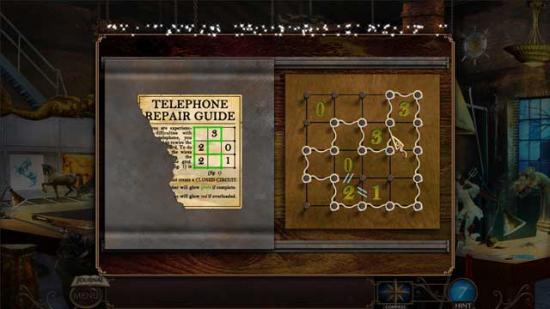
- Click on the phone behind the centaur statue to trigger a puzzle.
- Click in between posts to add wires to the board. Each number indicates how many wires need to border the square with the number in it (each has 4 border slots). Your goal is to make it so that all the numbers have the correct number of wires surrounding them and the wires create a circuit. See the repair guide for an example of a circuit. The solutions are shown below.
- Go upstairs to the Bedroom.
Bedroom
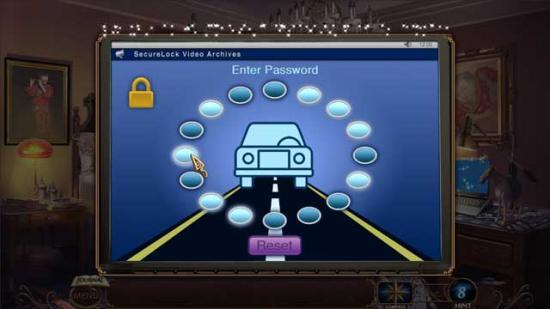
- Click on the computer to trigger a puzzle.
- Click on the “SecureLock Video Archives”. Depress the correct combination of buttons in order to get into Dela’s security system. Each button brings up a geometric shape on the screen; when the correct combination is pressed, the geometric shapes will create an image of an everyday item… (a car). The solution is shown below.
- Return to the Workshop.
Workshop
- After a brief cutscene, return to the Morgue.
Morgue Entrance
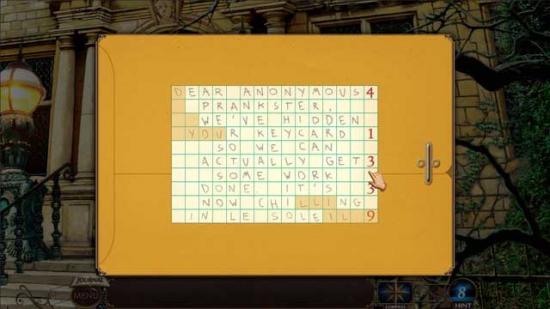
- Click on the gold puzzle at the foot of the door to trigger a puzzle.
- Place the pieces to the puzzle in the grid so that the message left behind can be read. The solution is shown below.
- Upon completing the puzzle, you will acquire the NUMBER COMBINATION.
- Backtrack to the Kitchen of Le Soleil.
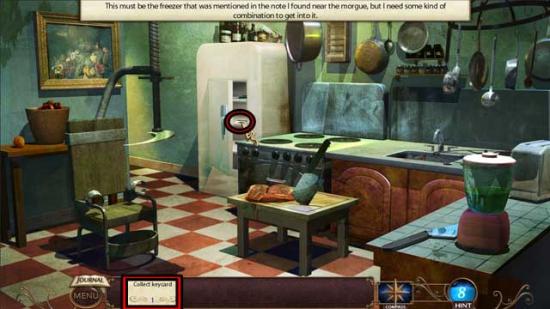
Kitchen
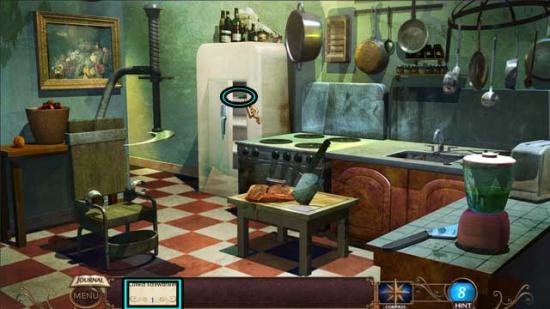
- Examine the fridge door. Use the NUMBER COMBINATION on the door to open it, then click on the KEYCARD inside to add it to your inventory.
- Return to the Morgue Entrance.
Morgue Entrance
- Take a closer look at the Keycard slide to the left of the door. Use the KEYCARD on the lock to open it.
- Next, take a closer look at the panel beneath the card slide. Note you’ll need a screwdriver to open it.
- Backtrack to the Kitchen.
Kitchen
- Click on the SCREWDRIVER to add it to your inventory.
- Return to the Morgue Entrance.
Morgue Entrance
- Take a closer look at the panel on the left again. Use the SCREWDRIVER to open the panel, triggering a puzzle.
- Move the thumbprint to the scanner by sliding the blocks and the thumbprint itself around the board. A possible step-by-step solution is shown below.

- Upon completing the puzzle, enter the Morgue.
Morgue
- Take a closer look at the fridge door and note the missing valves.
- Click on the VALVES in the area to add them to your inventory.
- Enter the Autopsy Room.
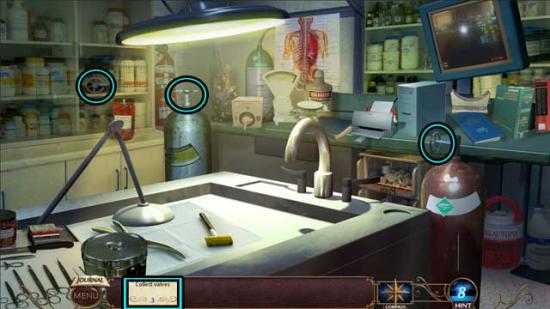
Autopsy Room
- Click on the remaining VALVES to add them to your inventory.
- Return to the Morgue.
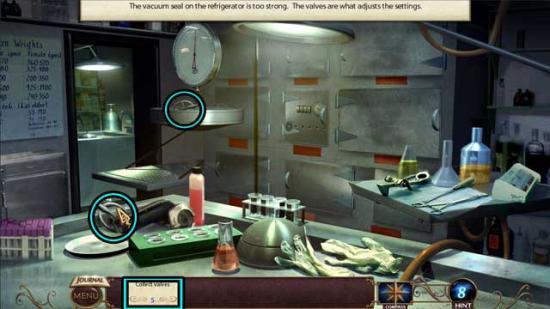
Morgue
- Take a closer look at the fridge door. Use the VALVES on the door to trigger a puzzle.
- Turn the vacuum seal on the refrigerators to zero by turning on only a specific combination of the valves. The solution is shown below.
- Upon completing the puzzle, click on the remains to trigger another puzzle.
- Click and drag to connect chains of 3 or more symbols of the same color to clear the area behind them and fill the jar. Fill the jar to reveal a psychic vision. When finished, click the “Done!” button on the left.
- Upon completing the puzzle, watch the cutscene and exit the Morgue.
Chapter 7: The Finale
Storage Room
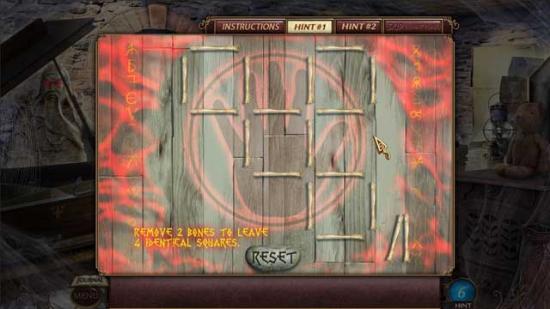
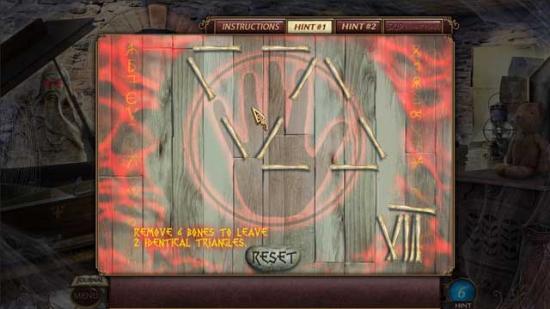
- Click on the small bones over the red portion of floor in front of the doorway to trigger a puzzle.
- Click the bones to remove them. Fulfill the requirements in order to deactivate this part of the alarm. No bones can be left “dangling”. The solutions are shown below.
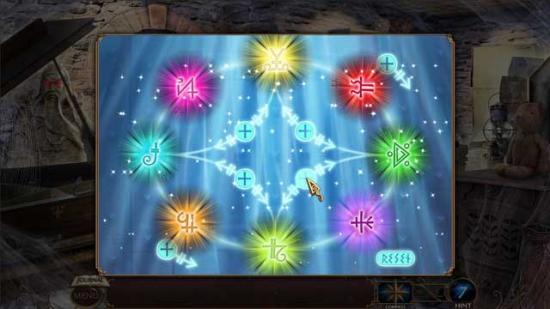
- Upon completing the puzzle, click on the blue aura over the doorway to trigger another puzzle.
- Break the Magi’s seal by getting the correct stars to the matching colored space on the board. Use the switches to swap the location of two stars or twist the entire board clockwise or counterclockwise by clicking the edges of the board. To get to the solution, follow these directions: Swap the pink symbol (in the 3 o’clock position) to the 12 o’clock, then to the 9 o’clock position. Next, swap the orange symbol (in the 3 o’clock position) to the 6 o’clock, then twist the entire board clockwise. From there, swap the yellow symbol (in the 6 o’clock position) to the 3 o’clock, then to the 12 o’clock. Lastly, swap the light green symbol (in the 3 o’clock) to the 6 o’clock to complete the puzzle. The solution is shown below.
- Examine the picture frame hanging to the right of the door. Note it needs a crowbar.
- Click on the CROWBAR to add it to your inventory.
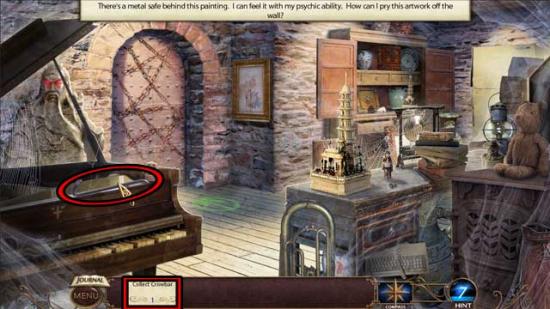
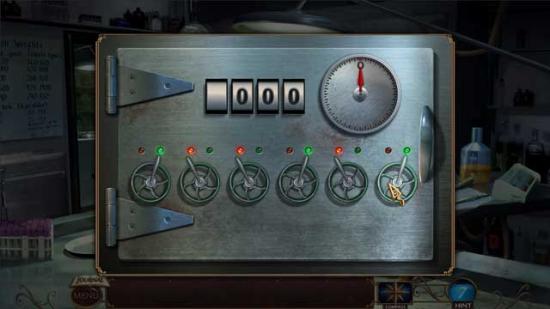
- Take a closer look at the frame again. Use the CROWBAR on it to pry it aside, revealing a puzzle.
- Your goal is to get the key to the lock to open the safe. Move the key by using the buttons to rotate the board. CW stands for clockwise and CCW stands for counterclockwise. The solution is as follows: CCW, CW, CW, CW, CCW, CCW, CCW, CW, CW, CCW, CCW, CW, CCW, CW, CCW, CCW.
- Upon completing the puzzle, click on the BOLT CUTTERS to add them to your inventory.
- Take a closer look at the door. Use the BOLT CUTTERS on the chains to remove them, then proceed through the door to the next area.
Laboratory
- Click on the gold basin to trigger a puzzle.
- Your goal is to unscramble the image. Click the gears to rotate the 4 tiles connected to the gear or click on the arrows along the edge to move tiles into the spaces along the sides. A good strategy is to rotate and move the edge pieces into their correct spaces, then store them along the sides. Rotate the middle piece into position, then re-insert the outer pieces to complete the puzzle. The solution is shown below.

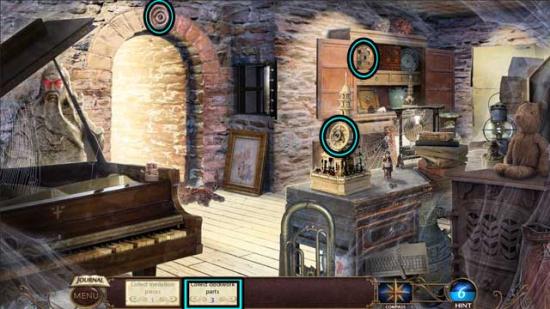
- Upon completing the puzzle, click on the MEDALLION PIECE 1/2 to add it to your inventory. Pick up the CLOCKWORK PARTS in the area as well.
- Return to the Storage Room.
Storage Room
- Click on the remaining CLOCKWORK PARTS to add them to your inventory.
- Return to the Laboratory.
Laboratory
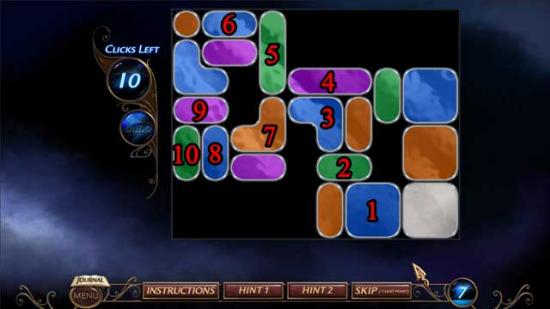
- Take a closer look at the device in the leftmost arch. Use the CLOCKWORK PARTS on it to trigger a puzzle.
- Your goal is to complete the constellations by shooting the stars into them. To shoot the stars, move the angle of the “shooter” until it’s in a satisfactory position, then click the mouse button to shoot the star. The light blue line is the “shooter”, and it will hit balls into the opposite side/direction it’s on. You have unlimited tries. Repeat this process, bouncing off walls etc, until you complete the puzzle.
- Upon completing the puzzle, click on the remaining MEDALLION PIECE 2/2 to add it to your inventory.
- Take a closer look at the door on the right. Use the MEDALLION PIECES on the lock to open it, then proceed through to the next area.
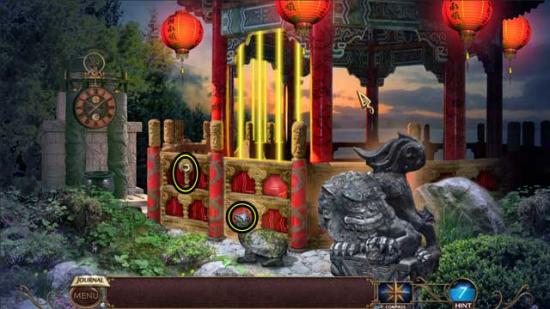
Trap
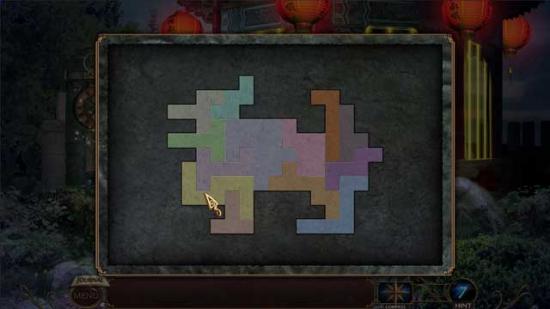
- Click on the stone Chinese lion statue on the right to enter a puzzle.
- Disable the mechanism in this statue by placing all the pieces into the outline. Click to rotate and click and drag to place the pieces. No pieces can overlap each other or go outside the outline of the dog. The solution is shown below.
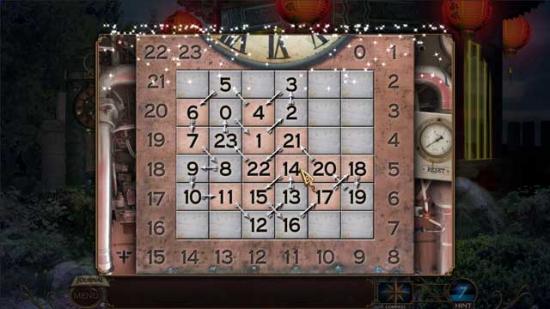
- Next, back in the main area, click on the device with the clock face on the left to enter another puzzle.
- Get the water clock moving again by placing numbers into the grid so that the numbers create a circuit of adjacent consecutive numbers (0-23). Horizontal, vertical, and diagonal all count as adjacent. The solution is shown below.
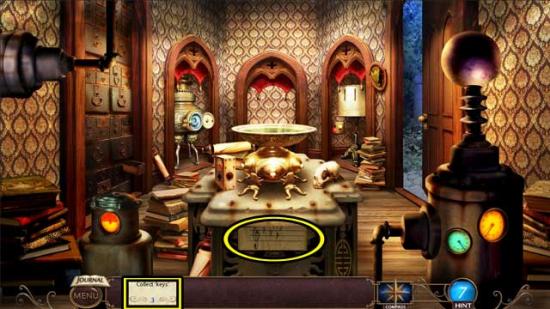
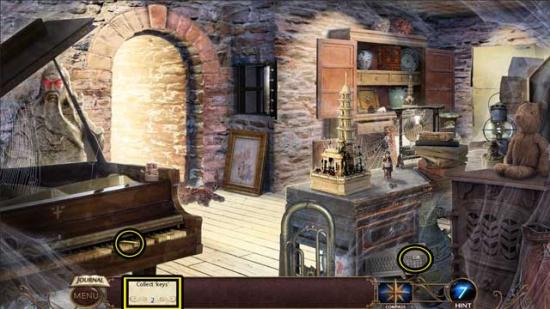
- Back in the main area, click on the KEYS in the area to add them to your inventory.
- Return to the Laboratory.
Laboratory
- Click on the KEYS in the area to add them (only 1 though) to your inventory.
- Go back to the Storage Room.
Storage Room
- Click on the remaining KEYS to add them to your inventory.
- Return to the Trap outside.
Trap
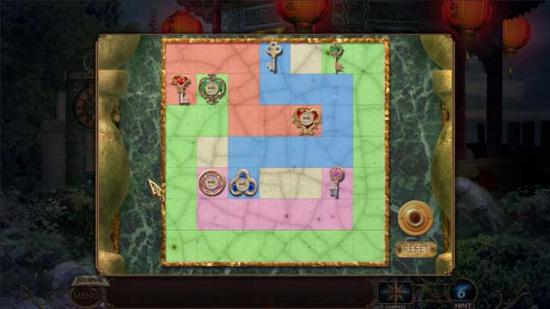
- Take a closer look at the red panel on the trap, above the stone turtle statue. Use the VARIOUS KEYS on the slots, triggering a puzzle.
- Unlock the gazebo trap by connecting the keys to their respective locks. Click on a lock or key to begin creating paths of that color by dragging your mouse over the grid. The paths that connect the keys and locks cannot cross paths of other colors. The solution is shown below.
- After a series of cutscenes, a puzzle will be triggered.
- Click on any colored piece adjacent to the silver one to absorb all pieces of the same color that area touching the silver piece. Your goal is to turn the entire board silver within the given number of clicks. The solution is as follows and is shown below: Green, Purple, Orange, Blue, Green, Orange, Blue, Purple.
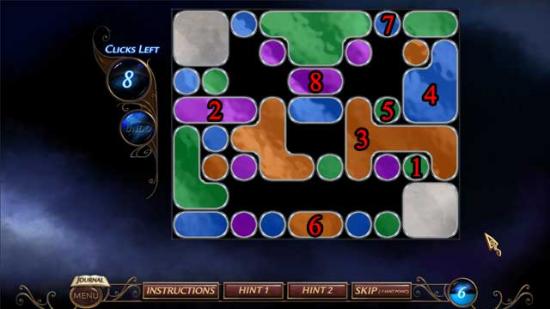
- Upon completing the puzzle, watch the cutscene that follows.
Epilogue
Bedroom
- Take a closer look at the pillows on the bed. Read the clue and click on the ROSE to add it to your inventory.
- Proceed to the Gallery Entrance.
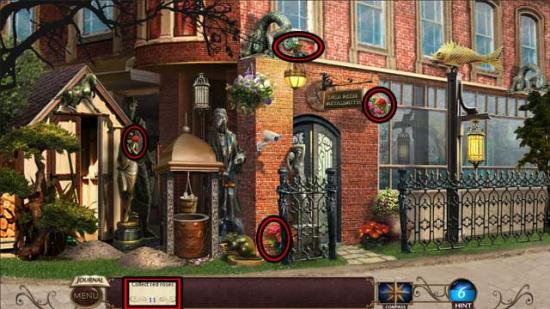
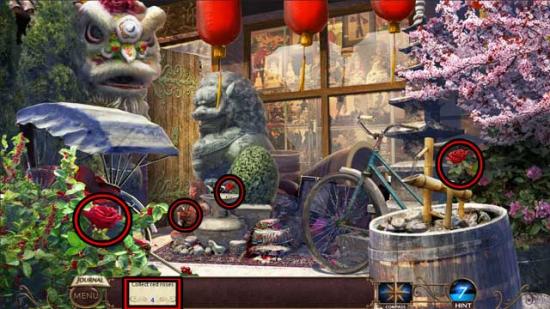
Gallery Entrance
- Click on the ROSES in the area to add them to your inventory.
- Proceed to the Square.
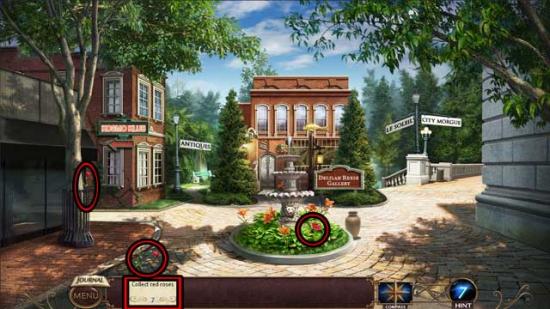
Square
- Click on the ROSES in the area to add them to your inventory.
- Go to the Antique Shop Entrance.
Antique Shop Entrance
- Click on the remaining ROSES to add them to your inventory.
- Return to the Square.
Square
- Examine the vase to the right of the fountain. Place the ROSES in the vase to reveal a compartment containing another clue and a tiny LANTERN.
- Proceed to Le Soleil.
Le Soleil
- Examine the box sitting on the bench, and note it’s missing 9 dominoes.
- Collect the DOMINOES in the area to add them to your inventory.
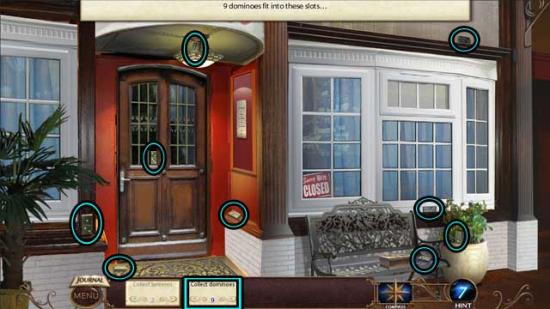
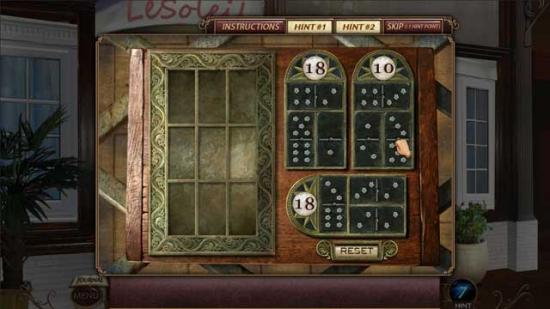
- Take a closer look at the box on the bench again. Use the DOMINOES on the box to trigger a puzzle.
- Place the dominoes so that each grouping of 3 adds up to the same number. The dominoes can go into any slot and will automatically change position (sideways or right side up) to fit into the slot you drag them into. The solution is shown below.
- Upon completing the puzzle, click on the tiny LANTERN and read the next clue.
- Go to the Antique Shop.
Antique Shop
- Click on the small box on the round table towards the back of the shop to trigger a puzzle.
- Press on the tiger’s arrows to use him to push the little Hari and little Dela icons together- they need to be in two adjacent spaces to open the chest. The solution is shown below.

- Upon completing the puzzle, click on the tiny LANTERN and read the next clue.
- Return to the Bedroom.
Bedroom
- Take a closer look at the round box on the bed. Use the LANTERNS on the box to trigger a puzzle.
- Open the riddle box by placing the miniature lanterns in the maze so that the entire maze is lit. Each of the lanterns will light up the 2 squares away from it, but the light will be deflected by walls. The solution is shown below.
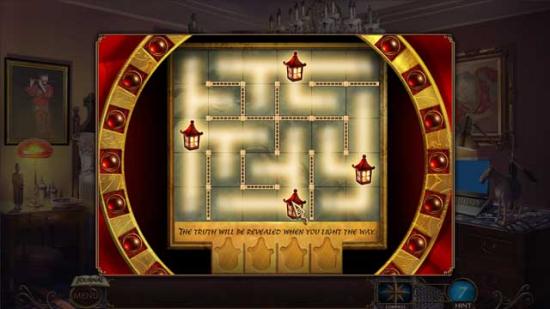
- Upon completing the puzzle, read the final note.
Congratulations! You’ve completed Tiger Eye: The Sacrifice!

More articles...
-
Best Horror Games On Itch.io – July 2026
Across a bounty of subgenres. -
Haze Seas Accessories Tier List [Best Accessories to Equip]
The accessories with the best stat buffs in Haze Seas.