- Dusk of Dragons: Survivors has been making waves since it splashed down on mobile at the beginning of September. Developed by Core Games, Dusk of Dragons: Survivors is a huge sandbox survival title with more than 100,000 organic downloads to …
Monopoly GO! Free Rolls – Links For Free Dice
By Glen Fox
Wondering how to get Monopoly GO! free rolls? Well, you’ve come to the right place. In this guide, we provide you with a bunch of tips and tricks to get some free rolls for the hit new mobile game. We’ll …Clover Retribution Magic Guide – All Magic Types
By Adele Wilson
...a Clover Retribution tier list that ranks the game’s magical abilities, a Clover Retribution Trait tier list, as well as a Clover Retribution Race tier list. Clover Retribution Magic Guide...Switch Review Round-Up – Rise of the Triad: Ludicrous Edition, Frog Detective, and More
By Simon Reed
A frog, some balls, Shrek, and much more
Tiger Eye: Curse of the Riddle Box Walkthrough
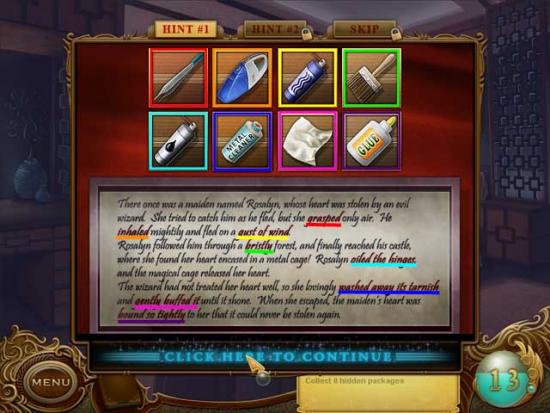
Welcome the Tiger Eye Part I: Curse of the Riddle Box walkthrough on Gamezebo. Tiger Eye Part I: Curse of the Riddle Box is a hidden object adventure game played created by PassionFruit Games. This walkthrough includes tips and tricks, helpful hints, and a strategy guide to how to complete Tiger Eye Part I: Curse of the Riddle Box.
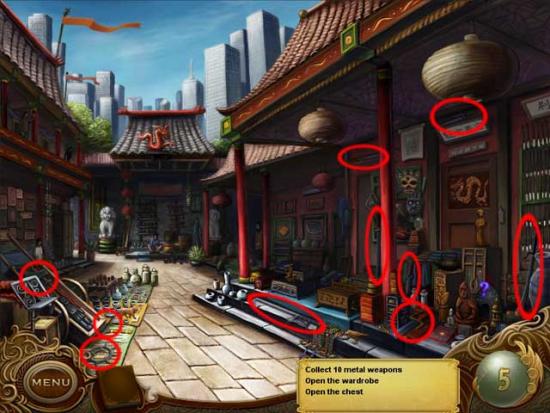
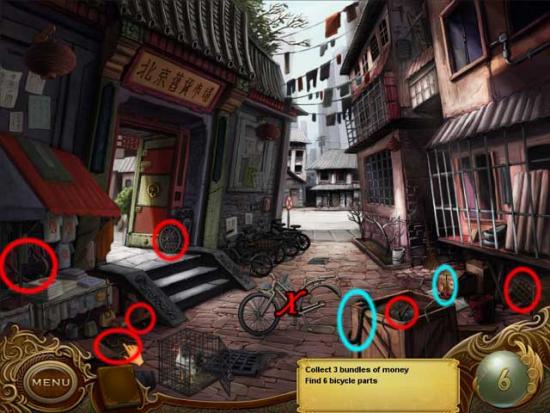
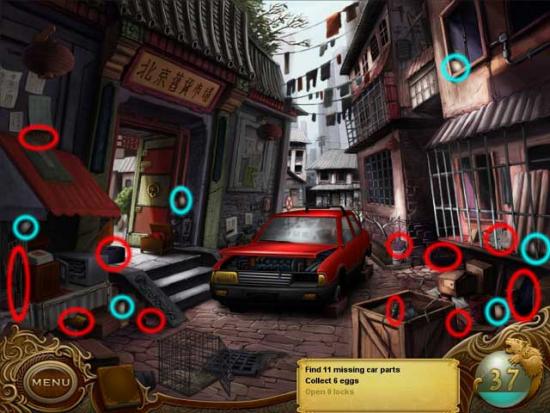
General Tips
- When a purple “?” appears in a scene, click on it to view a short storyline-related description or dialogue.
- Mini-game or puzzle areas that you can interact with will sparkle. You may then click on it and select “Play”.
- Complete puzzles and mini-games, as well as bonus rounds, to earn more Psi points. Psi points can be used as hints throughout the game.
- For certain puzzles, you can buy hints. After buying 2 hints, you may then skip the puzzle completely.
- For every 10 Psi points you earn, you will “increase a level”. Earn 50 Psi points to unlock a special feature.
- Unlock the Extras feature by gathering 50 Psi points. From there you can play “Hari’s Wardrobe”- the dress-up game from within the game, or view conceptual artwork.
Chapter 1: The Riddle Box
Dirt Market
- Find the 10 metal weapons scattered throughout the area. Their locations are shown below:

- Once you’ve found all the metal weapons, open the wardrobe by locating the key and using it on the area marked with an “X”. Their locations are shown below:

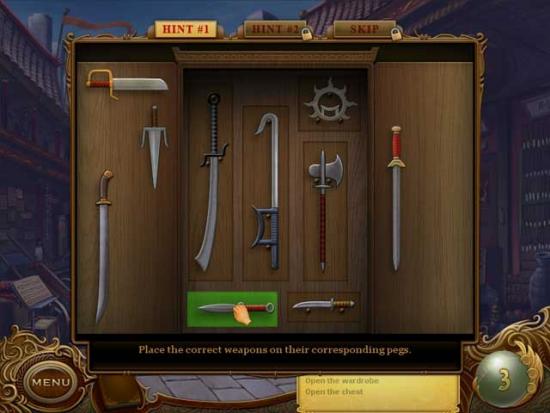
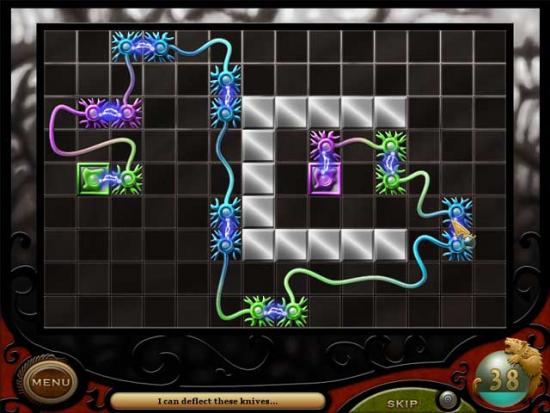
? A Cabinet full of weapons- Place the correct weapons on their corresponding pegs. You will obtain the stone flute as a reward. The solution is shown below:

- Now it’s time to open the chest. Obtain the 5 golden figurines and place them on the box marked with an “X” below to open it and retrieve the sheet music.

- Use the sheet music on the music stand on the left. Once you’ve obtained the stone flute, the stand will glow. Click on it to enter another mini-game.
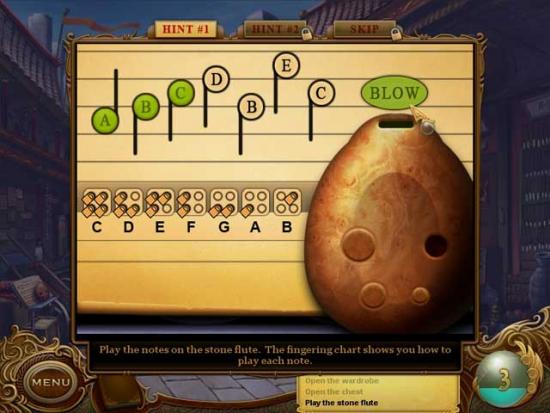
? The Flute from my dream- Play the notes on the stone flute. The fingering chart shows you how to play each note. Click on the holes so they match up with the notes you need to play. Clicking will cover or uncover a hole. Click “blow” once the holes are covered correctly according to the chart. A note will turn green when played correctly. An example is shown below:

- After talking with the old woman, collect the 15 puzzle pieces scattered throughout the area. Their locations are shown below:

- Once you’ve found all the puzzle pieces, click on the sparkling jewelry box near the door to enter another mini-game.
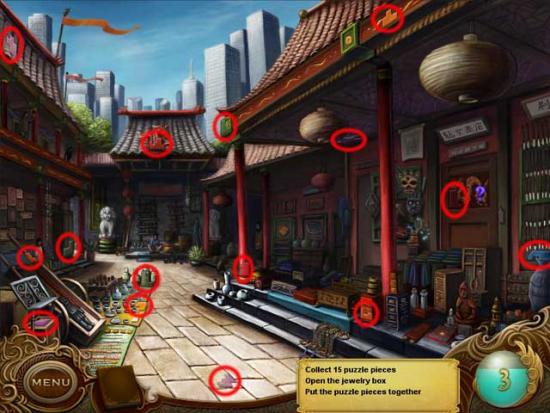
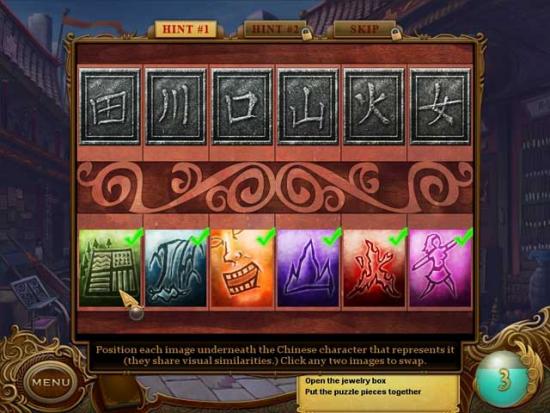
? A jewelry box- Position each image under the Chinese character that represents it (they share visual similarities). Click any two images to swap. Five more puzzle pieces lay within. The solution is shown below:

- Once you’ve collected the 15 puzzle pieces and completed the jewelry box puzzle, click the new sparkling area that appears to enter another mini-game.
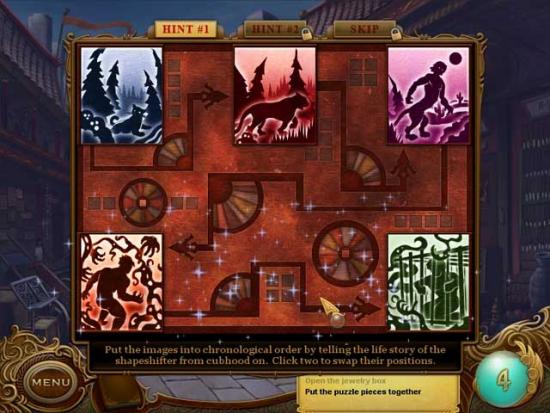
? Box left by old woman- Put the puzzle pieces together to create 5 different images, one for each picture frame, then put the images in chronological order by telling the life story of the shapeshifter from cubhood on. Click any two to swap their positions. Completeing the puzzle successfully will reward you with the Riddle Box. The final solution is shown below:
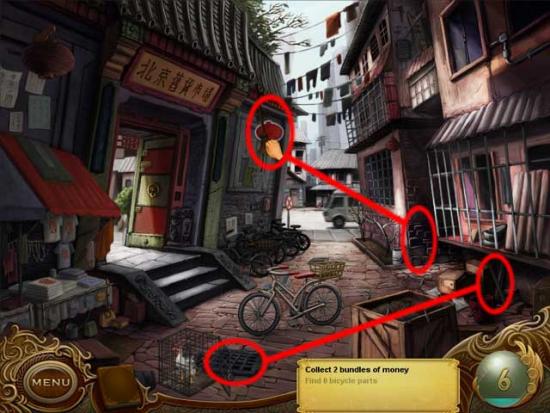
- Upon obtaining the Riddle Box, Dela will try to get a vision from it. Make chains of 3 or more connecting symbols of the same color to zap them away. Click and drag the cursor over the symbols to make a chain, then release. Trembling symbols act as “bombs”, and multi-colored diamond symbols can be matched with anything. Your goal is to clear away black tiles by making matches until the meter at the bottom of the screen is filled. Click “shuffle” if you haven’t got any possible matches left. Using shuffle costs Psi.

Dirt Market Alley
- Collect 5 bundles of money, starting with the chicken coop.
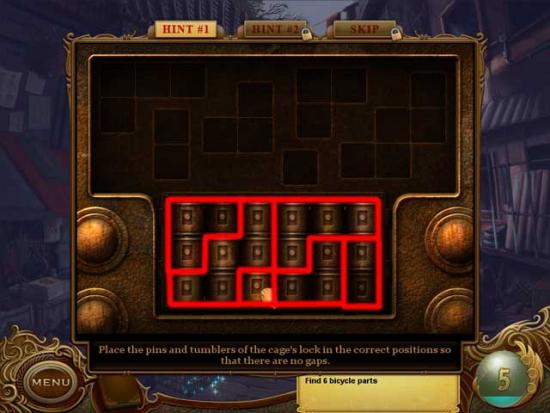
? There’s money in this- Place the pins and tumblers of the cage’s lock in the correct positions so that there are no gaps. The solution is shown below:

- Collect the 2 bundles of money earned from the chicken coop mini-game, as well as the extra lying in the street. Their locations are shown below:

- Time to click on the other sparkling area and enter another mini-game.
? A broken bike chain- Reconstruct the bike chain so that it is a continuous loop and all pieces are used. Click any two pieces to swap them. The solution is shown below:
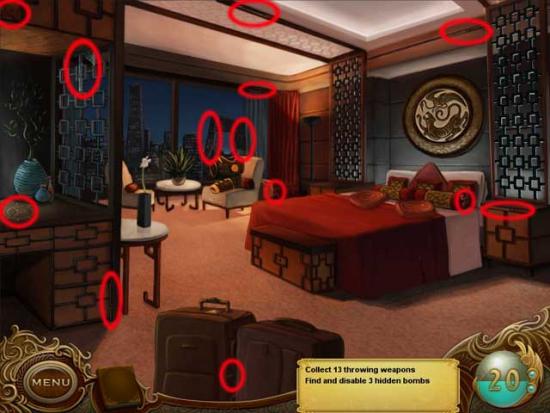
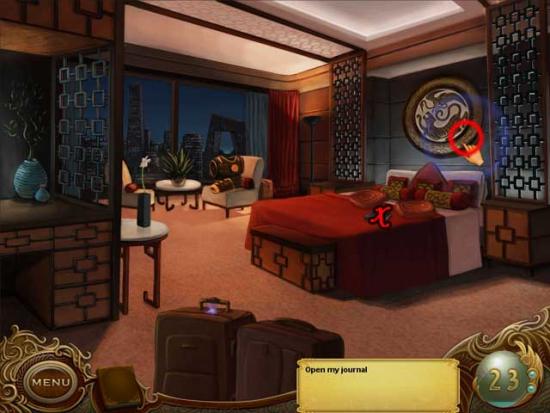
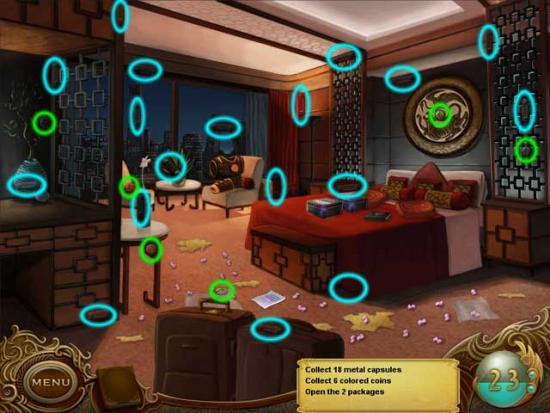
- Now it’s time to reassemble the bike. Find the 6 missing bike parts, then add them to the bike (marked with an “X”). Their locations are shown below. (Note! The bike tire tread must be added to the tire, then inflated before it can be added to the bike. The tire tread and bike pump are circled in blue).

- The remaining two buncles of money are hidden. First, use the broom on the hanging lantern to knock down one bundle. Next, use the crowbar on the grate to pry it open and collect the other. Their locations are shown below:

- Once you’ve completed the area, Dela will encounter a stranger. Connect a chain of neurons to fend them off. Two neurons can be linked up as long as their ends are the same color. Place the ends of the neurons in the adjacent grid spaces to link them. The solution is shown below:

- Bonus Round! Match the number of identical objects requested to earn bonuses such as extra hints and extra time. Beat the final round to earn even more hints.

Chapter 2: Meet Hari
Hotel Room
- Click on the box sparkling on the bed to open it and enter a mini-game. Inside is an important note you can read upon completing the following puzzle:
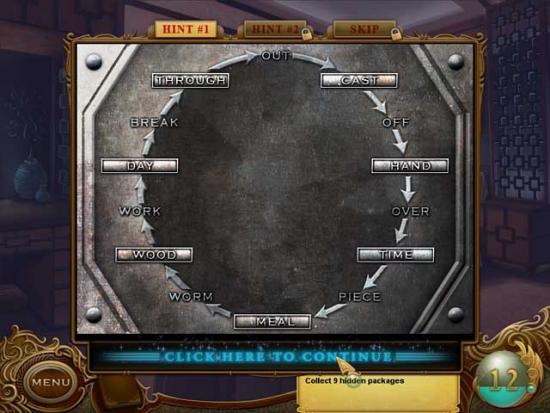
? A locked box- Put the available words into spaces that create compound words with those that come before and after. For example: Butter-Cup and Cup-Cake. The solution is shown below:

- Once you’ve opened the box, collect the 9 hidden packages throughout the room. Their locations are shown below:

- Upon finding all the packages, the letter you found in the box earlier will begin to sparkle. Click on it to enter a mini-game.
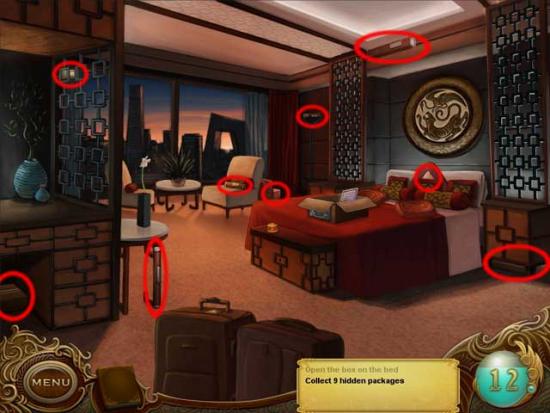
? Letter from Grandma- Place items in the correct order to clean up the riddle box. Your grandmother’s note will help you figure out the right order. The solution is shown below:
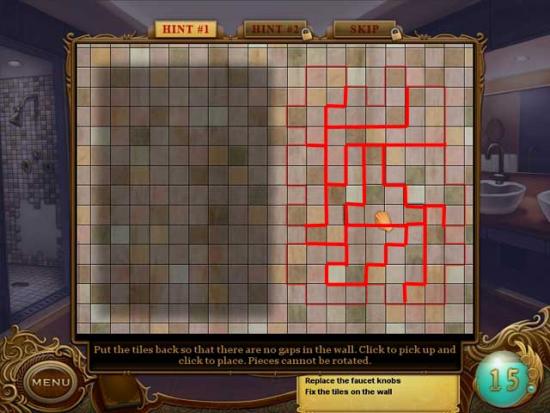
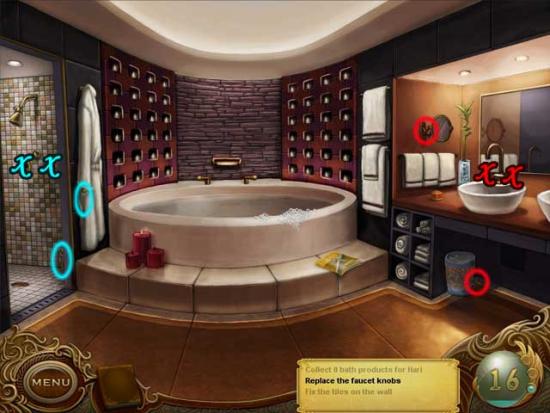
- Complete the pattern on the riddle box by rotating the discs. Left click to rotate clockwise, right click to rotate counterclockwise. There are three parts to this puzzle. All solutions are shown below:
- You’re about to meet someone new! Time to see what else you can learn about them via a match-3 puzzle. Make chains of 3 or more connecting symbols of the same color to zap them away. Click and drag the cursor over the symbols to make a chain, then release. Trembling symbols act as “bombs”, and multi-colored diamond symbols can be matched with anything. Your goal is to clear away black tiles by making matches until the meter at the bottom of the screen is filled. Click “shuffle” if you haven’t got any possible matches left. Using shuffle costs Psi.

Hotel Bathroom
- Collect 6 bath products for Hari (circled in blue below) and 9 pipes (circled in red).

- Once you’ve gathered all the pipes, click on the broken wall area on the left to enter a mini-game.
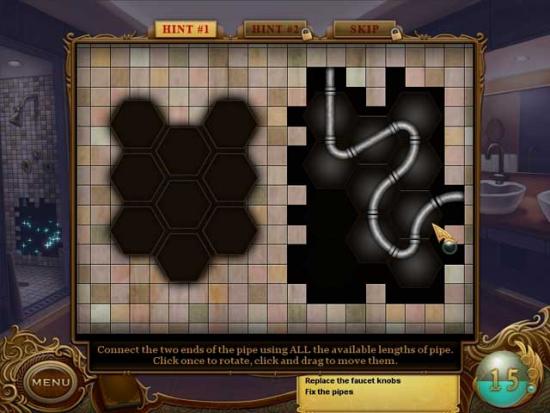
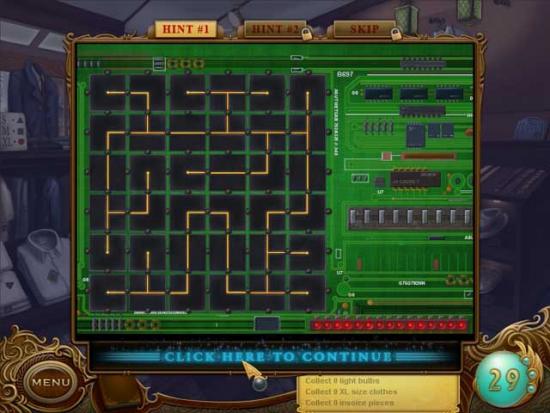
? Missing pipes- Connect the two ends of the pipe using all the available lengths of pipe. Click once to rotate, and click and drag to move them. The solution is shown below:

? Next, place the pieces of drywall over the pipes. The solution is shown below:

- Replace the faucet knobs for both the sink and the shower. The sink knobs are circled red with red X’s where they should be placed, and the shower knobs are circled in blue with blue X’s where they should be placed.

- Now the riddle box will start glowing again. Click on it to enter a mini-game.
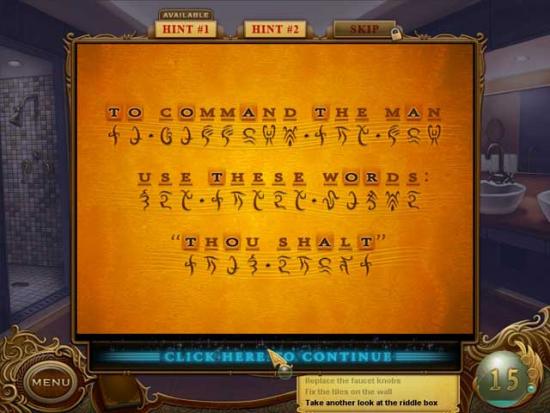
? Ancient script on the box- Decode the musial script. Click any two letters to swap them. Note: the A’s, O’s, R’s, and T’s are positioned correctly and are not moveable. The solution is “To command the man use these words: ‘Thou shalt’.”

- Bonus round! Match the number of identical objects requested to earn bonuses such as extra hints and extra time. Beat the final round to earn even more hints.
Chapter 3: Love, Roland
Hotel Room
- You will immediately encounter a problem at the start of this chapter. Connect a chain of neurons to fend it off. Two neurons can be linked up as long as their ends are the same color. Place the ends of the neurons in the adjacent grid spaces to link them. The solution is shown below:

- Collect 13 throwing weapons scattered throughout the room. Their locations are shown below:

- Find and disable 3 bombs. Each requires an item to reveal its location. Bomb locations and the items needed to reveal them are numbered and shown below:

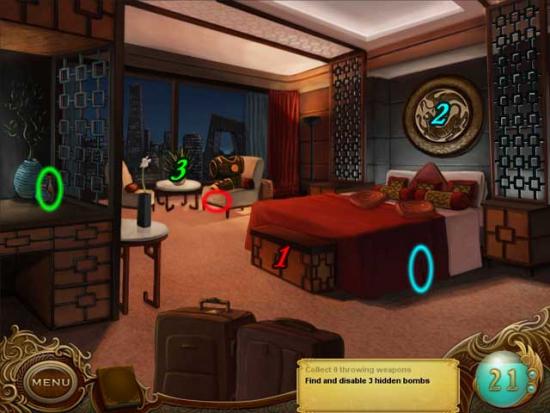
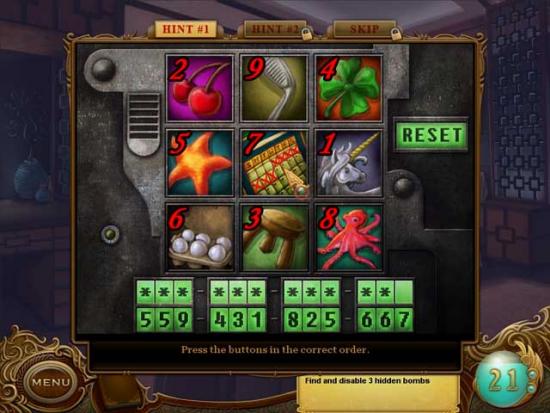
? 1.Bomb with coded lock!- Press the buttons in the correct order to input the code. The buttons have been clearly numbered for you below:

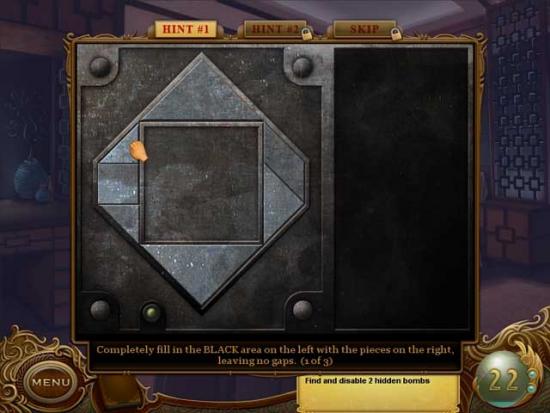
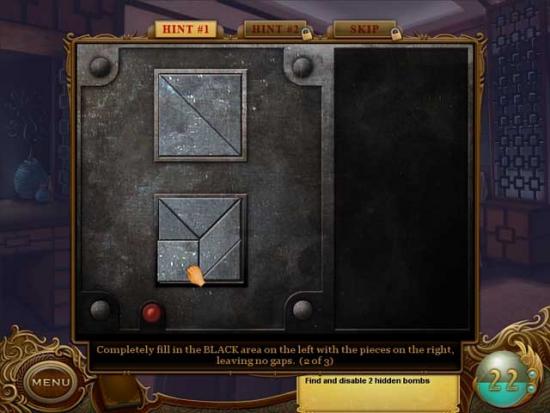
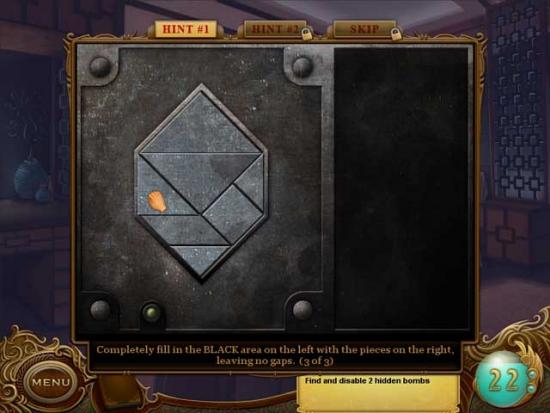
? 2.A bomb to disarm!- Completely fill in the black area on the left with the pieces on the right, leaving no gaps. There are 3 different puzzles here. All solutions are shown below:

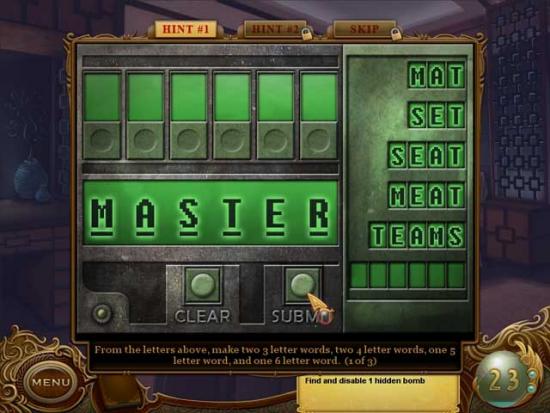
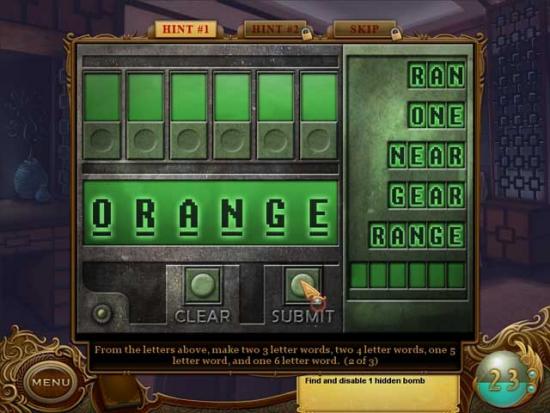
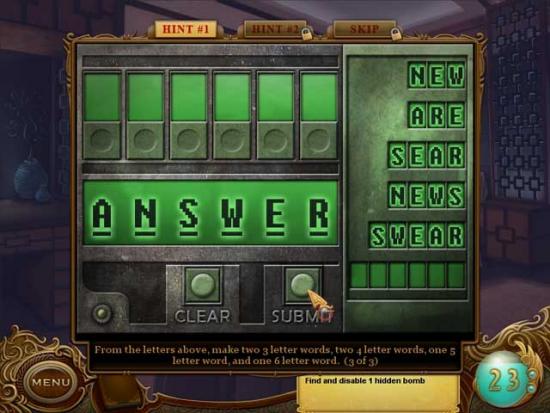
? 3.Bomb with coded lock!- From the letters above, make two 3 letter words, two 4 letter words, one 5 letter word, and one 6 letter word. There are 3 parts to this puzzle. The solutions are shown below:
- Now it’s time to try and read the assassin’s blade. Make chains of 3 or more connecting symbols of the same color to zap them away. Click and drag the cursor over the symbols to make a chain, then release. Trembling symbols act as “bombs”, and multi-colored diamond symbols can be matched with anything. Your goal is to clear away black tiles by making matches until the meter at the bottom of the screen is filled. Click “shuffle” if you haven’t got any possible matches left. Using shuffle costs Psi.

- New goal. Pick up the key hidden in the room (circled in red) and use it on the journal (marked with an “X”). Pick up the red decoder inside, then click on the lock on the luggage that begins to sparkle to enter a mini-game.

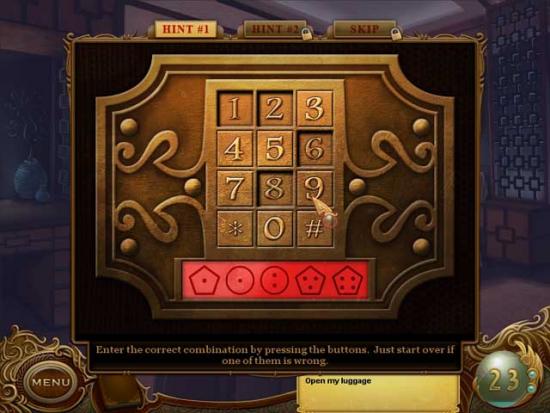
? A lock on the luggage- Enter the correct combination by pressing the buttons. Just start over if one of them is wrong. The combination is 6-1-2-8-9.

- Click on the package inside the suitcase for a closer look. Click it again and it will explode all over the room. Collect 18 metal capsules (circled in blue) and 6 colored coins (circled in green).

- Open the two packages and collect the contents inside.
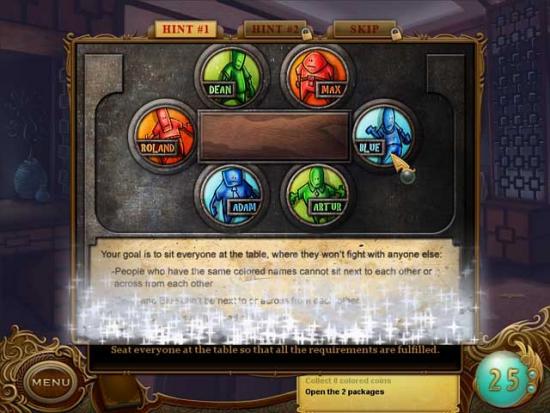
? 1.A sealed package- Your goal is to sit everyone at the table, where they won’t fight with anyone else: People who have the same colored names cannot sit next to each other or across from each other. Dean and Blue can’t be next to or across from each other. Roland is always at the head of the table. The solution is as follows:

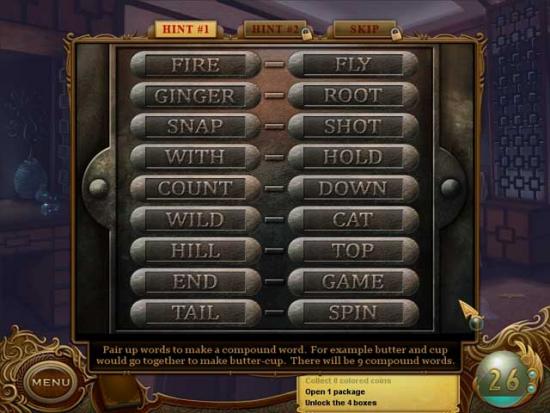
? 2.A sealed package- Pair up words to make a compound word. For example, butter and cup would go together to make butter-cup. There will be 9 compound words. The solution is shown below:

- Four more boxes will appear. Open them and collect the contents inside.
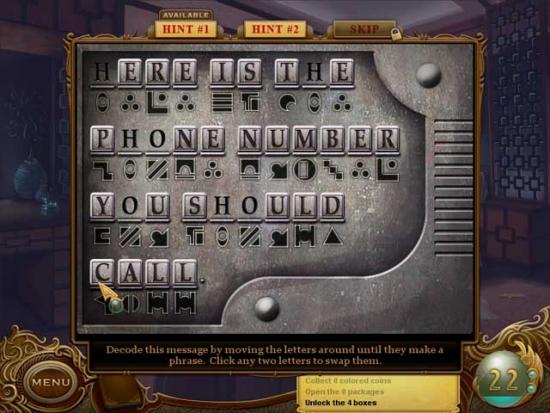
? 1.A sealed package- Decode the message by moving the letters around until they make a phrase. Click any two letters to swap them. The solution is “Here is the phone number you should call”.

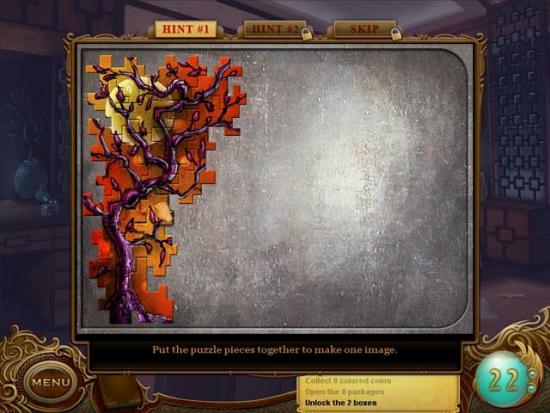
? 2.A sealed package- Put the puzzle pieces together to make one image. The solution is shown below:

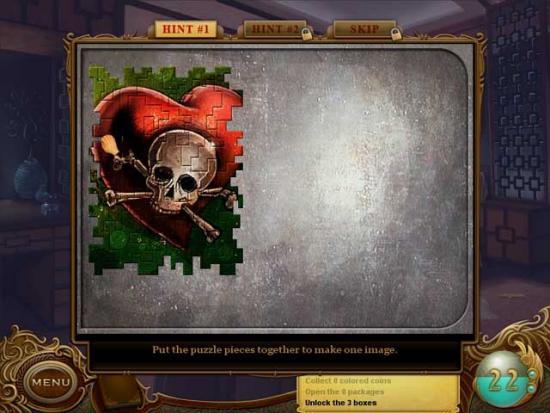
? 3.A sealed package- Put the puzzle pieces together to make one image. The solution is shown below:

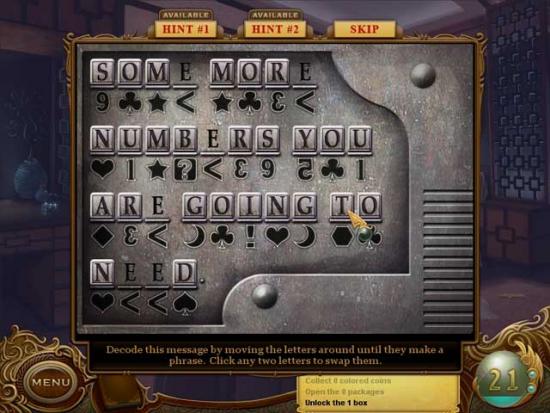
? 4.A sealed package- Decode the message by moving the letters around until they make a phrase. Click any two letters to swap them. The solution is “Some more numbers you are going to need”.
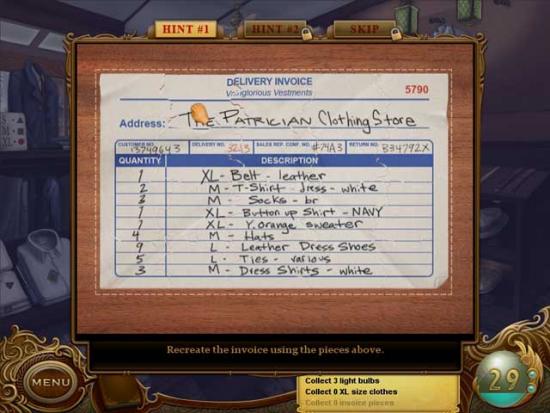
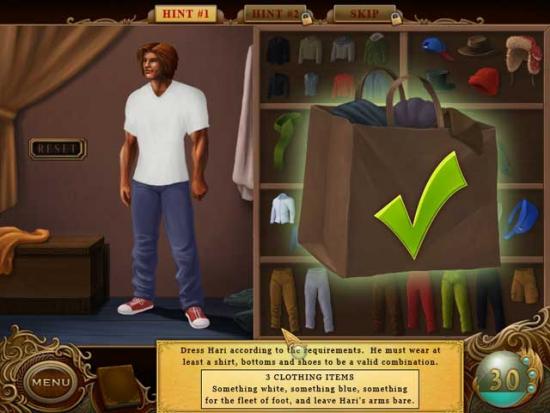
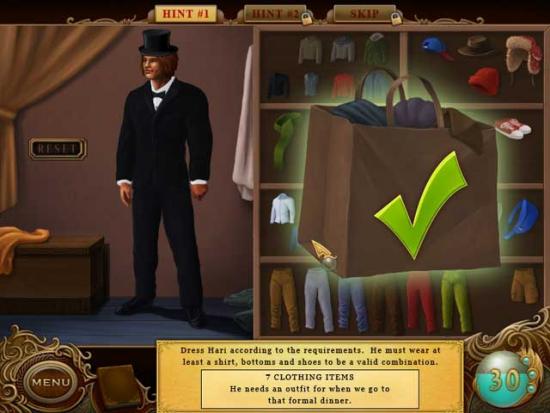
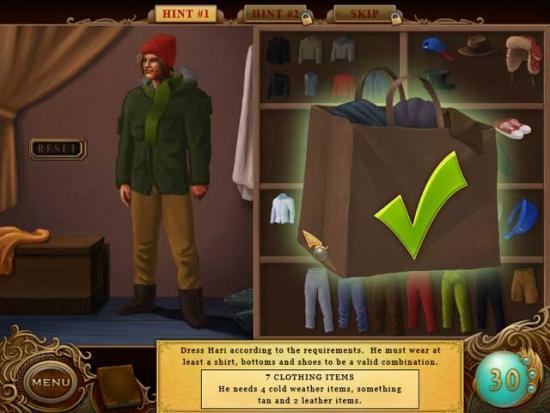
- Examine Hari’s armor to try and decipher more visions. Make chains of 3 or more connecting symbols of the same color to zap them away. Click and drag the cursor over the symbols to make a chain, then release. Trembling symbols act as “bombs”, and multi-colored diamond symbols can be matched with anything. Your goal is to clear away black tiles by making matches until the meter at the bottom of the screen is filled. Click “shuffle” if you haven’t got any possible matches left. Using shuffle costs Psi.
- Bonus round! Match the number of identical objects requested to earn bonuses such as extra hints and extra time. Beat the final round to earn even more hints.
Chapter 4: Blending in
Clothing Store
- Collect the 5 light bulbs (circled in green), the 8 XL size clothes (circled in red- note there are actually 9), and the 16 invoice pieces (circled in blue) scattered throughout the area. Their locations are shown below:

- Once you’ve collected all the invoice pieces, reassemble it so that it looks like this:

- Move the price tags around so that each row and column does not have repeating colors or prices. The solution is shown below:

- 7 more XL-sized clothes will appear once you reassemble the invoice. Their locations are shown below:

- Now it’s time to fix the register. Use the two items circled below on the register (marked with an “X”) to unlock a mini-game.

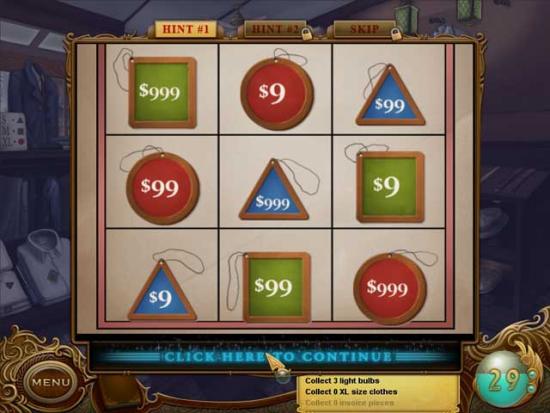
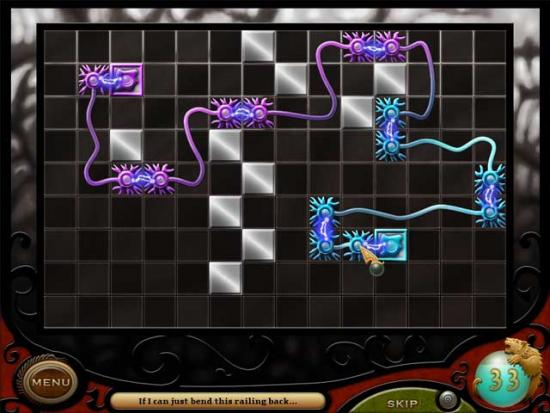
? The register is broken- Rotate the pieces so that they are all lit and connected to all the other wires. The solution is shown below:

- Dress Hari according to the requirements. He must wear at least a shirt, bottoms, and shoes to be a valid combination:
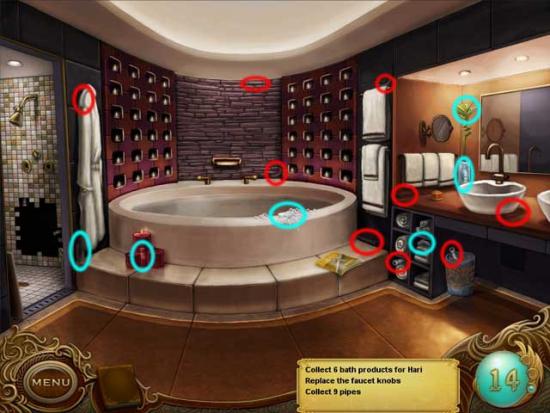
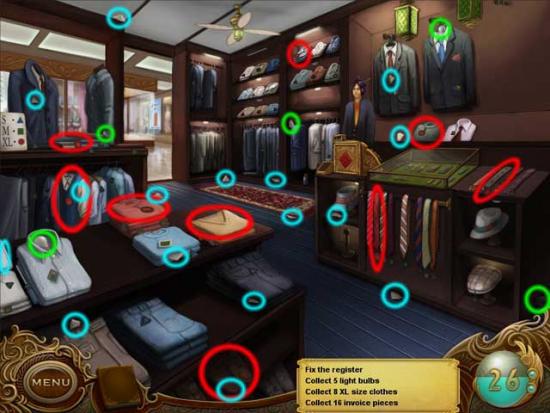
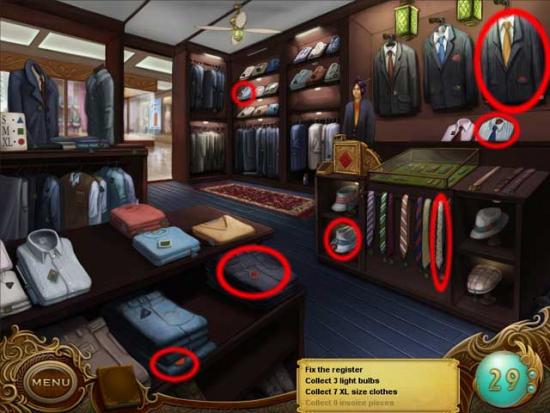
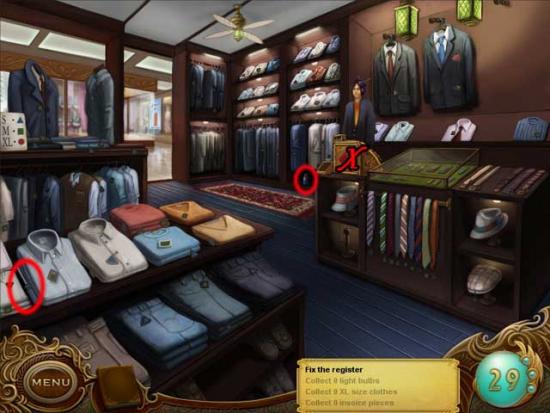
? 3 Clothing Items- Something white, something blue, something for the fleet of foot, and leave Hari’s arms bare.

? 7 Clothing Items- He needs an outfit for when we go to that formal dinner.

? 7 Clothing Items- He needs 4 cold weather items, something tan and 2 leather items.
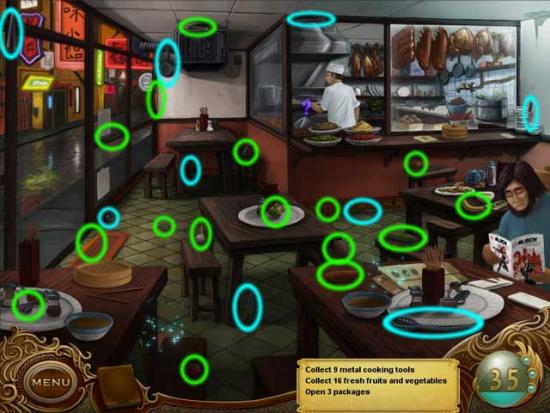
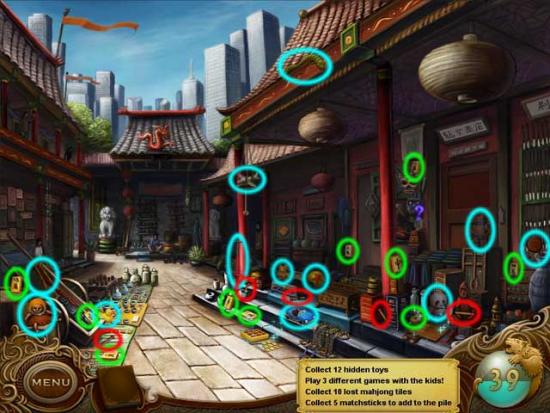
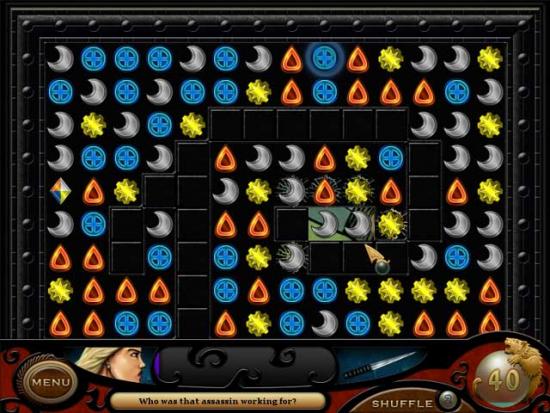
- A cutscene later, you’ve got to keep someone out of your head! Connect a chain of neurons to fend it off. Two neurons can be linked up as long as their ends are the same color. Place the ends of the neurons in the adjacent grid spaces to link them. The solution is shown below:

- Bonus round! Match the number of identical objects requested to earn bonuses such as extra hints and extra time. Beat the final round to earn even more hints.
Chapter 5: The old woman
Dumpling Restaurant
- Collect 9 metal cooking tools (circled in blue) and 16 fresh fruits and vegetables (circled in green). Their locations are shown below:

- Open 3 packages (they’re sparkling) and collect the items inside. Once you’ve opened the first two, the third will appear.
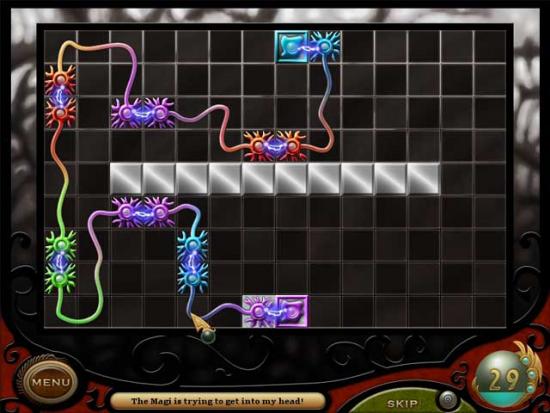
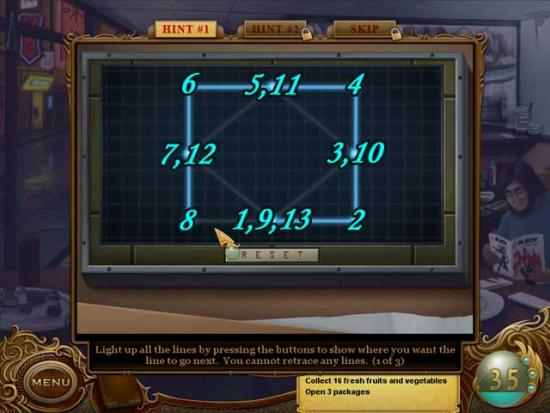
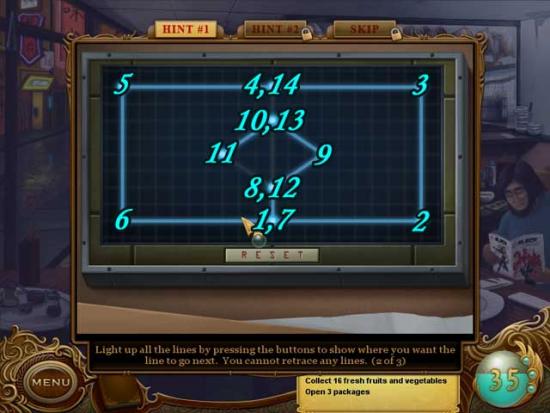
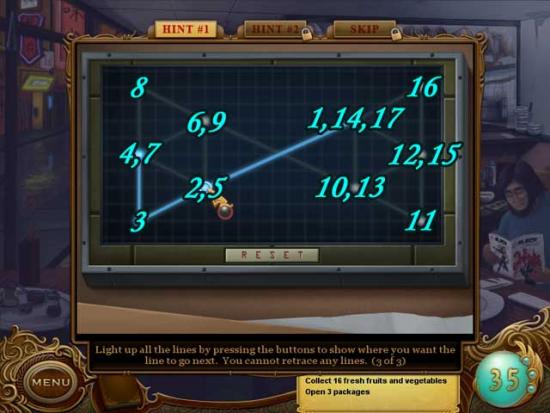
? 1.Locked package- Light up all the lines my pressing the buttons to show where you want the line to go next. You cannot retrace any lines. Buttons are numbered in the order of which they should be pressed. All 3 solutions are shown below:
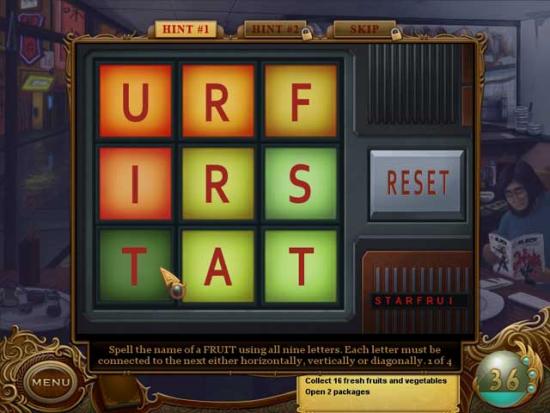
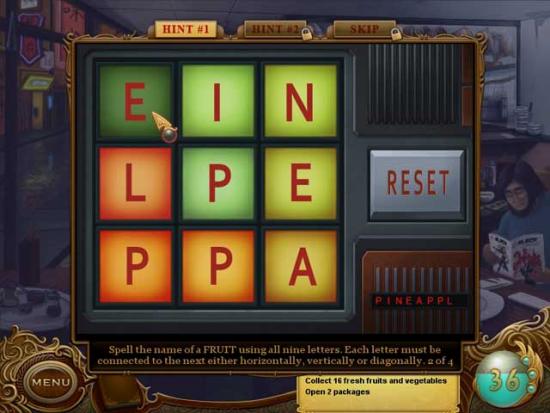
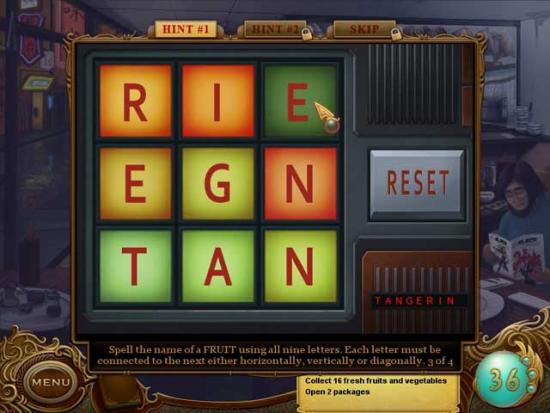
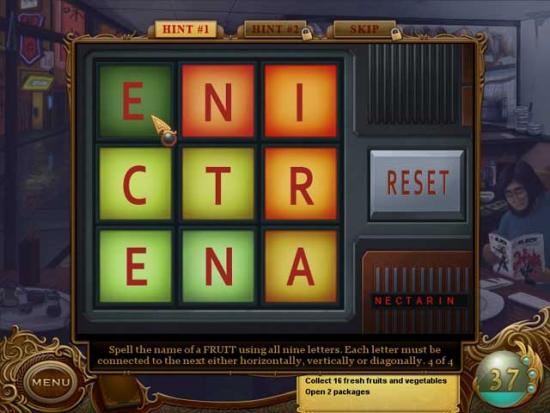
? 2.A locked box- Spell the name of a fruit using all 9 letters. Each letter must be connected to the next either horizontally, vertically, or diagonally. The solutions are Starfruit, Pineapple, Tangerine, and Nectarine respectively. The solutions are shown below:
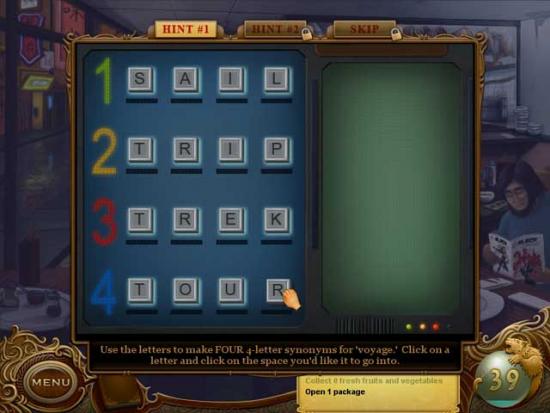
? 3.A secured box- Use the letters to make four 4-letter synonyms for “voyage”. Click on a letter and click on the space you’d like it to go into. The solutions are Sail, Trip, Trek and Tour, and are shown below:

Dirt Market
- Collect 12 hidden toys (circled in blue), 10 lost mahjong tiles (circled in green), and 5 matchsticks (circled in red). Their locations are shown below:

- Now it’s time to play 3 different games with the kids (look at the sparkling locations to enter these mini-games).
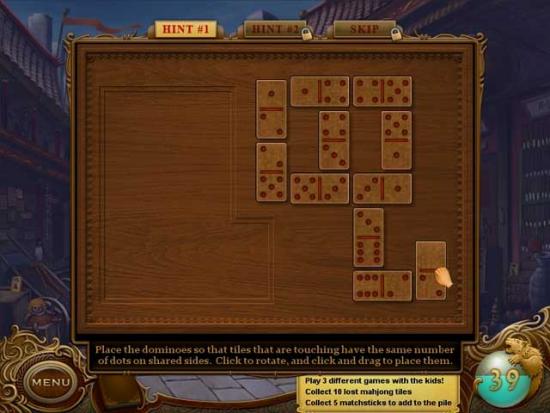
? Children’s dominoes- Place the dominoes so that the tiles that are touching have the same number of dots on shared sides. Click to rotate, and click and drag to place them. The solution is shown below:

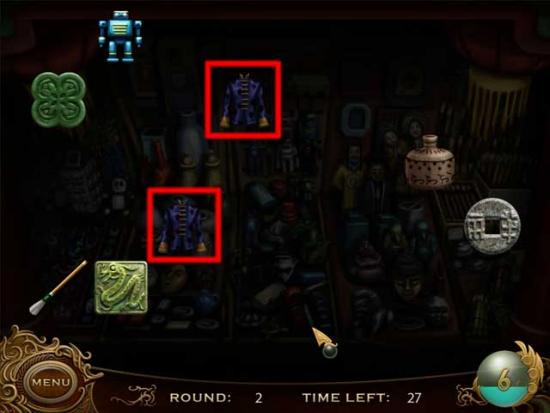
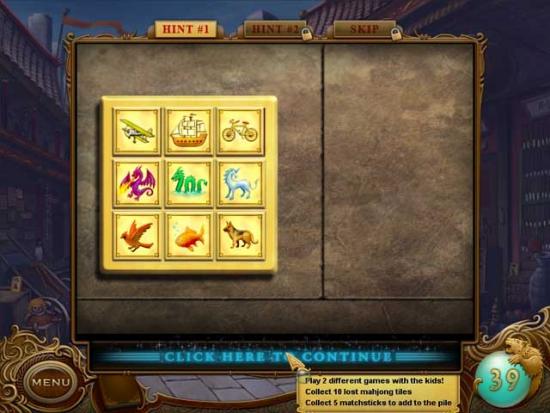
? Children’s puzzle- Organize the items by category (column and row). Each item fits two categories and should match other items that share its column and row. The solution is shown below:

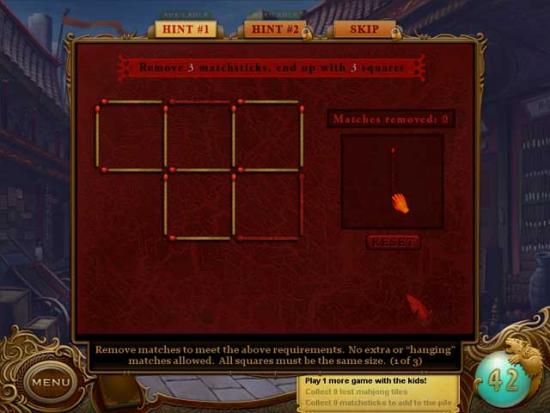
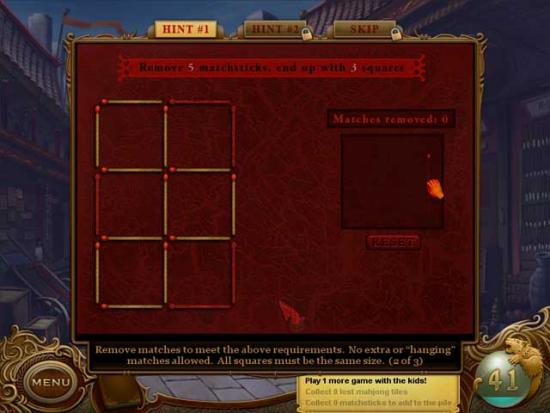
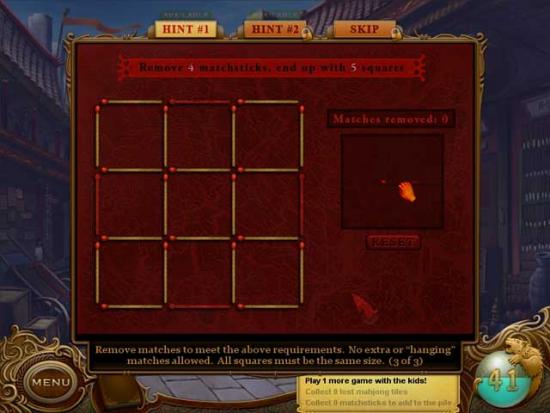
? Matchstick game- Remove matches to meet the above requirements. No extra or “hanging” matches allowed. All squares must be the same size. The solutions are shown below:
- Now you’ve got a new set of tasks. First, repair the cabinet glass.
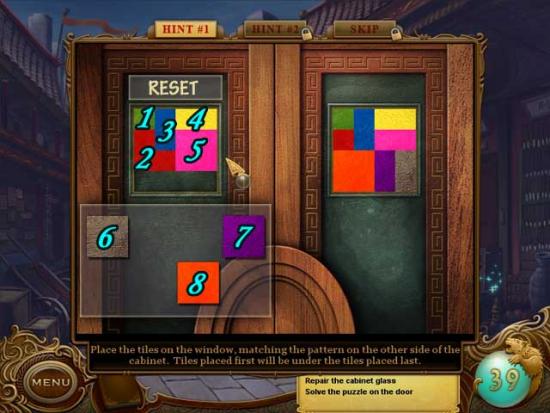
? A broken cupboard- Place the tiles on the window, matching the pattern on the other side of the cabinet. Tiles placed first will be under the tiles placed last. Below shows the proper order to lay down the tiles:

- Collect 12 faces scattered throughout the area. Their locations are shown below:

- Pick up the puzzle pieces on the ground and use them on the door to active another mini-game.
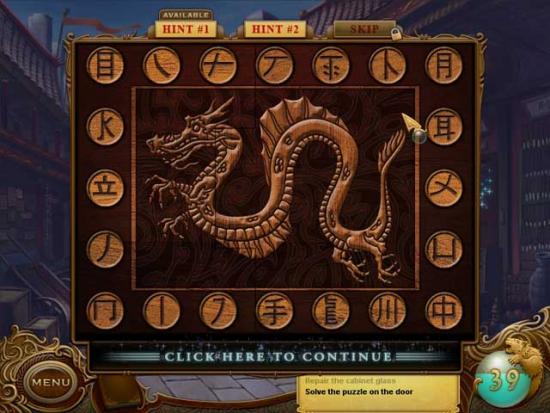
? Image on door- Recreate the image that is carved into the door. Click two tiles to swap them. The solution is shown below:

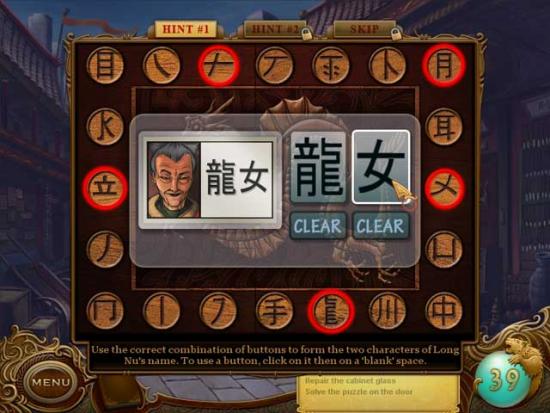
? Use the correct combination of buttons to form the two characters of Long Nu’s name. To use a button, click on it then click on a “blank” space. The solution is shown below and the buttons in need of pressing have been circled.

- Another confrontation! Connect a chain of neurons to fend it off. Two neurons can be linked up as long as their ends are the same color. Place the ends of the neurons in the adjacent grid spaces to link them. The solution is shown below:

Dirt Market Alley
- Open the 3 locks first and collect the items discovered.
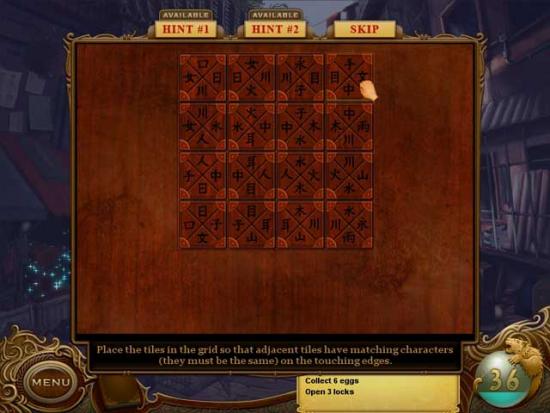
? A puzzling lock- Place the tiles in the grid so that adjacent tiles have matching characters (they must be the same) on touching edges. The solution is shown below:

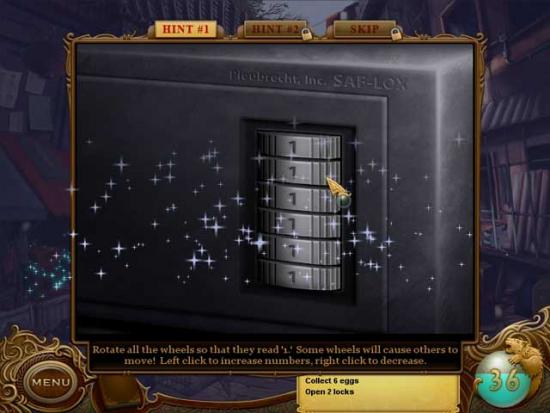
? A locked safe- Rotate all the wheels so that they read “1”. Some wheels will cause others to move. Left click to increase numbers and right click to decrease.

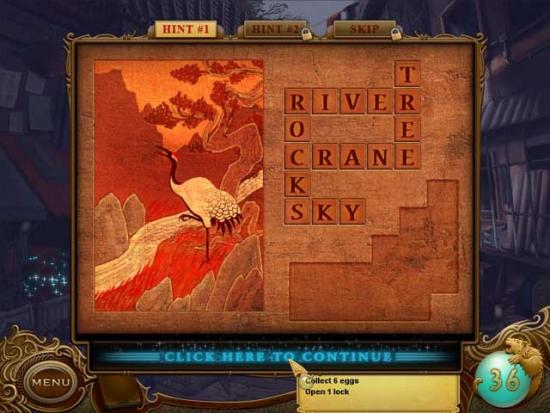
? A sealed cabinet- Fill the words in the empty crossword puzzle with the available letters. The painting should give you a hint as to what the words are. The solution is shown below:

- Collect 6 eggs (circled in blue) and 11 missing car parts (circled in red). Their locations are shown below:

- Bonus round! Match the number of identical objects requested to earn bonuses such as extra hints and extra time. Beat the final round to earn even more hints.
Chapter 6: Escape Beijing
Hotel Room
- First off, disable the wiretap device.
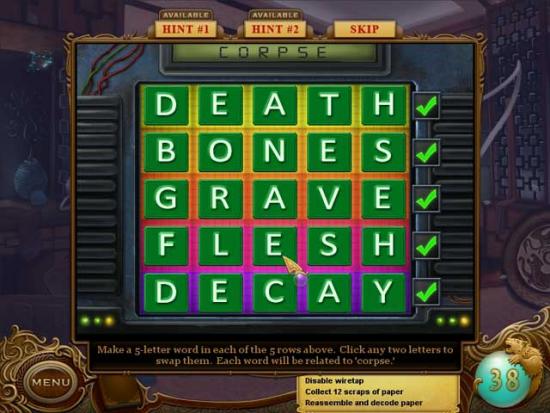
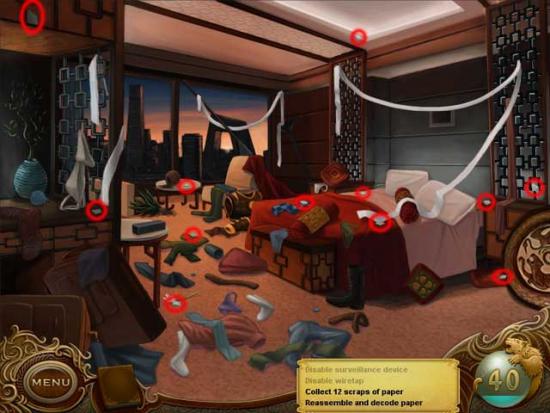
? A wiretapping device!- Make a 5-letter word in each of the 5 rows. Click any two letters to swap them. Each word is related to “corpse”. The solutions are Death, Bones, Grave, Flesh, and Decay, and are shown below:

- Next, disable the surveillance device.
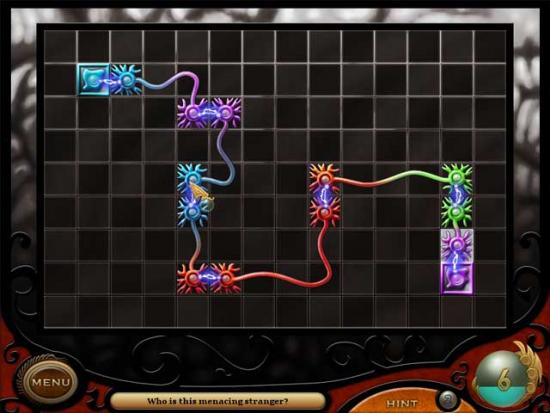
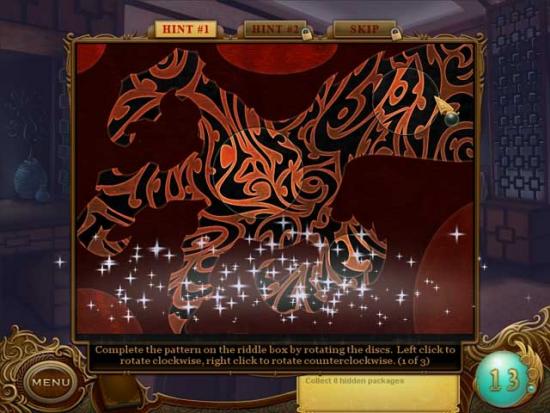
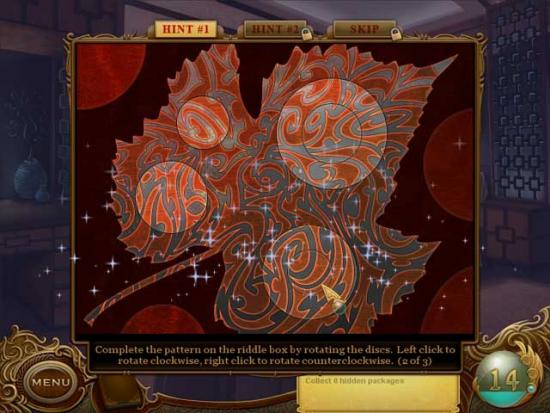
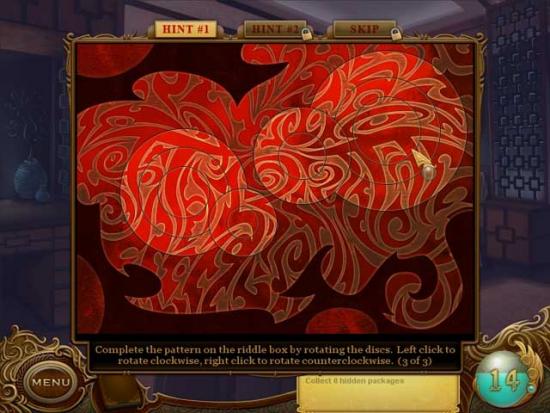
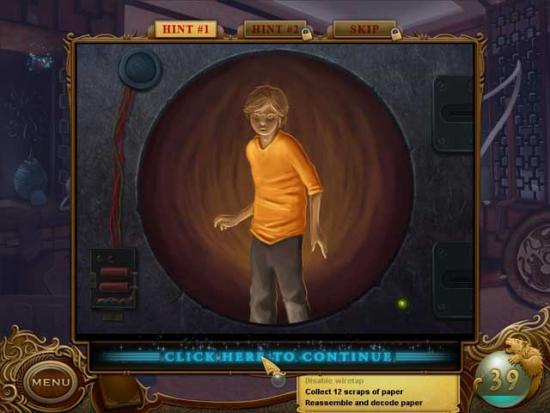
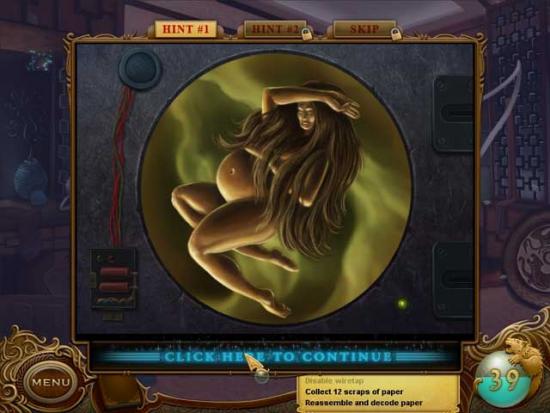
? A surveillance device!- Rotate the rings around until they make an image. Left click to rotate clockwise and right click to rotate counterclockwise. All 3 solutions are shown below:
- Collect 12 scraps of paper. Their locations are shown below. Once you’ve found all the pieces, click on the pile on the floor to enter a mini-game.

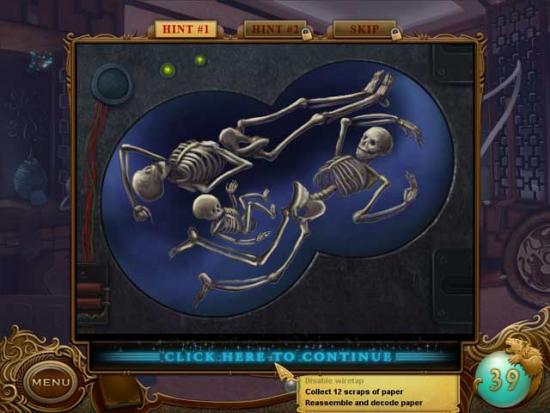
? I found all the pieces- Put the puzzle pieces together to make the instructions the ransacker left behind. The solution is shown below:

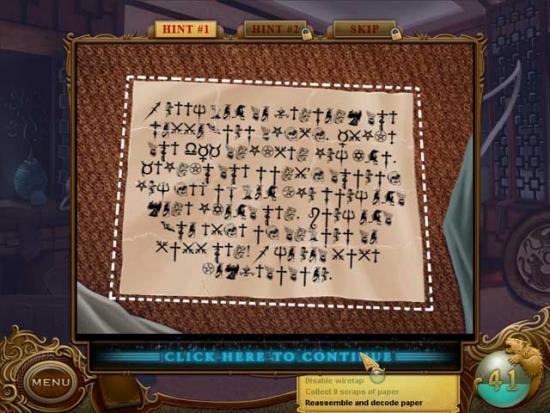
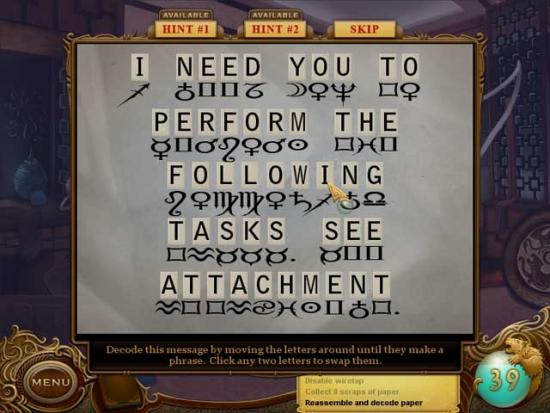
? Decode this message by moving the letters around until they make a phrase. Click any two letters to swap them. The solution is shown below:
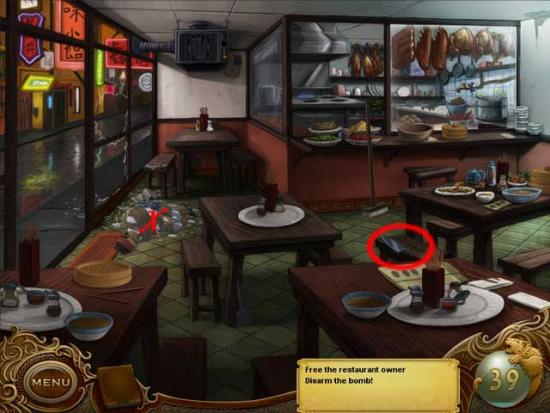
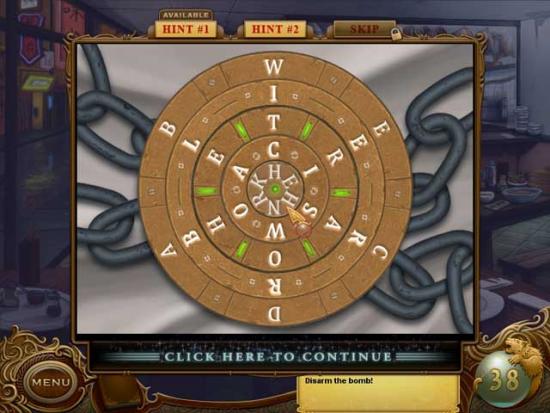
- Time to uncover more truth. Make chains of 3 or more connecting symbols of the same color to zap them away. Click and drag the cursor over the symbols to make a chain, then release. Trembling symbols act as “bombs”, and multi-colored diamond symbols can be matched with anything. Your goal is to clear away black tiles by making matches until the meter at the bottom of the screen is filled. This time, you will have to make a match twice over a black tile to break it. Click “shuffle” if you haven’t got any possible matches left. Using shuffle costs Psi.

Dumpling Restaurant
- Free the restaurant owner by using the knife on his ropes, then click on him to enter a mini-game.

? A lock for his chains- Figure out the lock’s password by rotating the rings until six 5-letter words are created from the outermost ring to the innermost ring. The solution is shown below:

- Disarm the bomb by using the items circled below on the area marked with an “X” to reveal another mini-game.

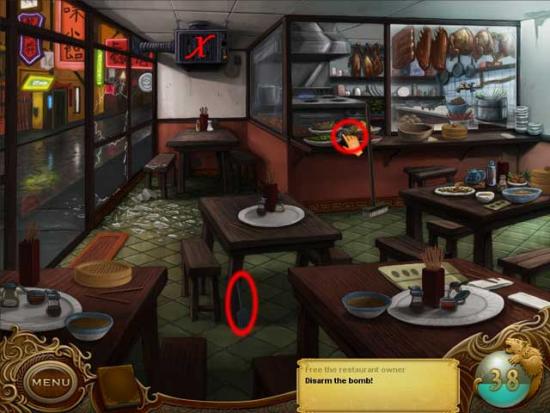
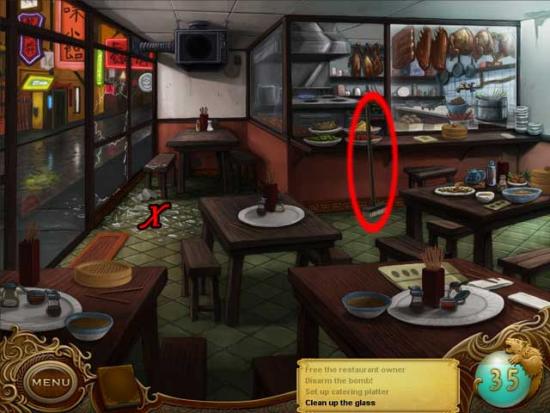
? A bomb to disarm!- To disarm the bomb, recreate the image by pressing the arrows to move columns or rows. The solution is shown below:

- Set up the catering platter by clicking on the sparkling dish on the counter.
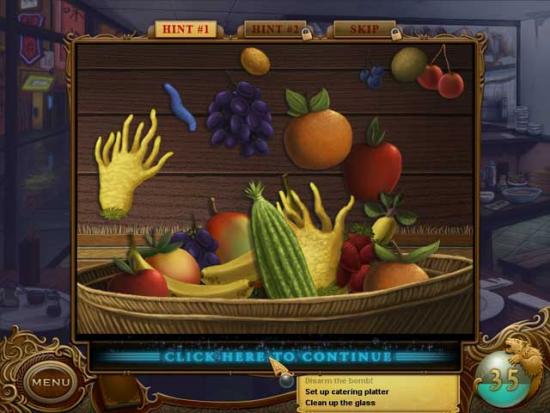
? A catering dish- Fill in the fruit basket’s silhouette by clicking and dragging on the various ingredients. Note- not all fruits need to go into the basket. The solution is shown below:

- Clean up the glass by using the broom on the pile of glass.

- Repair the railing! Connect a chain of neurons to repair it. Two neurons can be linked up as long as their ends are the same color. Place the ends of the neurons in the adjacent grid spaces to link them. The solution is shown below:

Congratulations! You’ve completed Tiger Eye Part I: Curse of the Riddle Box. Stay tuned for Part II!
More articles...
Major Update for Dusk of Dragons: Survivors – A Survival Sandbox Beyond Imagination!
Dusk of Dragons: Survivors has been making waves since it splashed down on mobile at the beginning of September. Developed by Core Games, Dusk of Dragons: Survivors is a huge sandbox survival title with more than 100,000 organic downloads to …Monopoly GO! Free Rolls – Links For Free Dice
By Glen Fox
Wondering how to get Monopoly GO! free rolls? Well, you’ve come to the right place. In this guide, we provide you with a bunch of tips and tricks to get some free rolls for the hit new mobile game. We’ll …Clover Retribution Magic Guide – All Magic Types
By Adele Wilson
...a Clover Retribution tier list that ranks the game’s magical abilities, a Clover Retribution Trait tier list, as well as a Clover Retribution Race tier list. Clover Retribution Magic Guide...Switch Review Round-Up – Rise of the Triad: Ludicrous Edition, Frog Detective, and More
By Simon Reed
A frog, some balls, Shrek, and much more