- Wondering how to get Monopoly GO! free rolls? Well, you’ve come to the right place. In this guide, we provide you with a bunch of tips and tricks to get some free rolls for the hit new mobile game. We’ll …
Best Roblox Horror Games to Play Right Now – Updated Weekly
By Adele Wilson
Our Best Roblox Horror Games guide features the scariest and most creative experiences to play right now on the platform!The BEST Roblox Games of The Week – Games You Need To Play!
By Sho Roberts
Our feature shares our pick for the Best Roblox Games of the week! With our feature, we guarantee you'll find something new to play!Type Soul Clan Rarity Guide – All Legendary And Common Clans Listed!
By Nathan Ball
Wondering what your odds of rolling a particular Clan are? Wonder no more, with my handy Type Soul Clan Rarity guide.
Theatre of the Absurd Walkthrough
Welcome to the Theatre of the Absurd walkthrough on Gamezebo. Theatre of the Absurd is a Hidden Object/Adventure Game played on the PC created by Silverback Productions and Gogii Games. This walkthrough includes tips and tricks, helpful hints and a strategy guide on how to complete Theatre of the Absurd.
Game Introduction – Theatre of the Absurd
Welcome to the Theatre of the Absurd walkthrough on Gamezebo. Theatre of the Absurd is a Hidden Object/Adventure Game played on the PC created by Silverback Productions and Gogii Games. This walkthrough includes tips and tricks, helpful hints and a strategy guide on how to complete Theatre of the Absurd.
General Tips
This hidden object game requires visiting several locations and using inventory items to advance play.
- Play is mostly linear although there are some options for the order in which to explore locations.
- Select Options to adjust the Music, Voice and Effects Volume. You may also toggle the Full Screen selection and change the Difficulty playing mode.
- Begin play by selecting a playing mode that suits your style of play: Casual or Expert. The mode may be changed during game play by selecting Menu, Options and selecting Casual or Expert.
- A Journal is kept to record story information, tips for solving puzzles and game objectives. Click the green checkmark next to a journal listing to review it.
- Use the Back arrow button on the navigation panel to exit a scene.
- Hints may be used to direct play or reveal the location of an item in a hidden object scene. The “hand” icon contains special abilities and glows when a special ability or game direction is needed.
Walkthrough Tips
- This guide is based on the Collector’s Edition of the game. Some scenes and content are not available in the standard edition.
- The main purpose of playing a hidden object game is to find the objects in a scene. For this reason, only inventory items are highlighted.
- CAPITALIZED inventory items are meant to make it easier to find where this guide may differ from your own play. Inventory items are highlighted in blue with a white border in the screenshots.
- If you don’t have an item referenced in this guide, click and hold the “Ctrl” key and then press the “F” key. This opens a Find area in your web browser. Type in the name of the object as it appears in this guide to find where else it’s referenced.
- To minimize back and forth moves, most available inventory items in a scene are picked up when first encountered.
Chapter 1: Escaping the Bell Tower

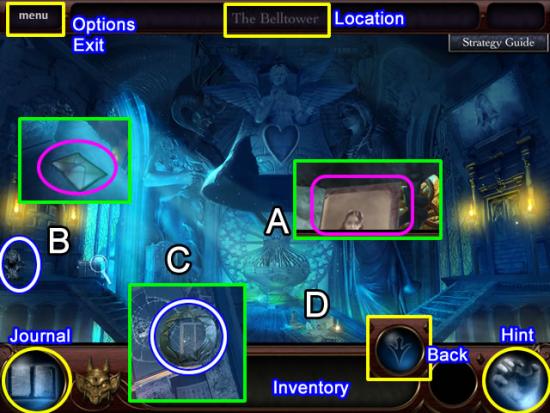
Bell Tower
- View the opening cutscene to obtain the background story, information about the journal and the use of your arm during game play.
- Approach the cage (A); take the picture for the journal.
- Pick up the HEAR NO EVIL statuette by the left door (B) and then examine the trunk. Read the document (pink) for more journal information. Click the “Back” arrow to exit a scene.
- Open the doors to the broken mirror (C); take the JADE RING (1/3).
- Play the hidden object scene on the floor (D).
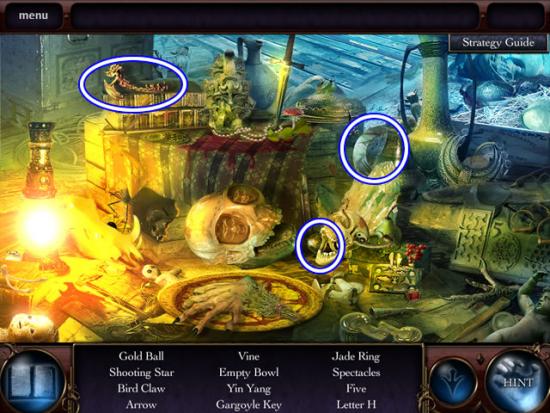
- Find the listed objects.
- Receive a GOLDEN EYE (1/8), GARGOYLE KEY and JADE RING (2/3) for inventory.
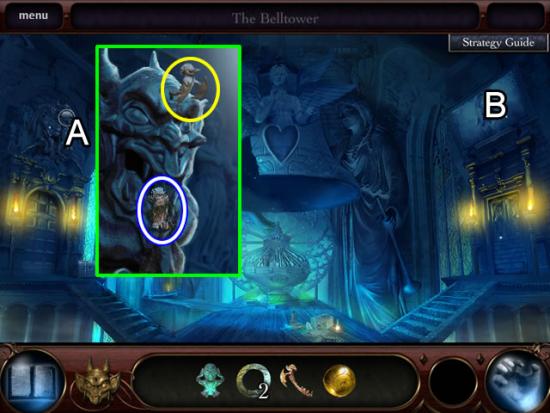
- Zoom in on the gargoyle above the left door (A).
- Insert the GARGOYLE KEY in the slot in its head (yellow); take the SPEAK NO EVIL statuette.
- Examine the area above the right door (B) to open a puzzle.
- The goal is to place the image circles on their corresponding location in the scene.
- The best strategy is to search for matching colors and pattern. Select a circle and drag it around the scene to find the match.
- Solution:
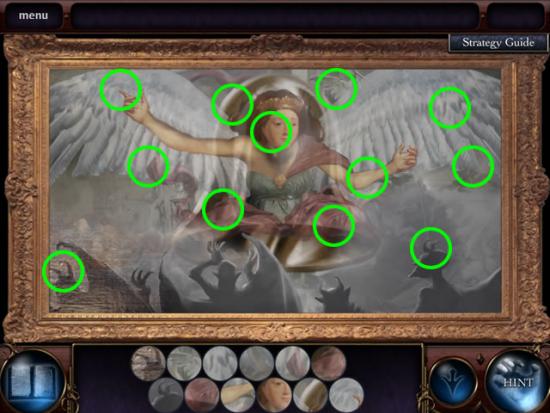
- Receive a JADE RING (3/3) for completing the puzzle.
- Return to the chest by the left door.
- Place the three JADE RINGS on the chest to open a puzzle.
- The goal is to rotate the rings to find a face in the pattern.
- The outside ring and first ring from the center both affect the center ring.
- The best strategy is to find matching colors and patterns between rings. Rotate the others to match the pattern.
- Solution:
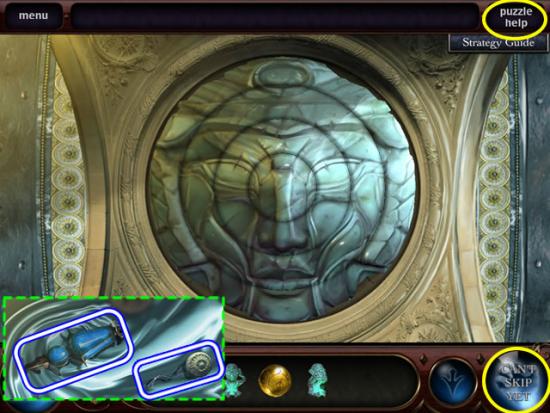
- Completing the puzzle opens a compartment.
- Take the WATER OF HORUS vial and a PUSHBUTTON.
- Inspect the door on the right.
- Insert the PUSHBUTTON in the empty slot. Click to open the door and a hidden object scene.
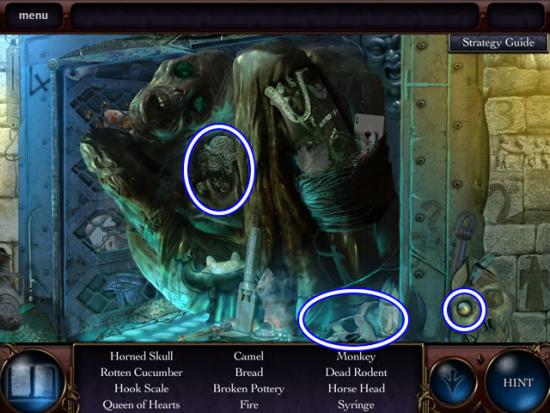
- Find the listed objects.
- Receive the SEE NO EVIL statuette, DEMON SKULL and FIRE ICON.
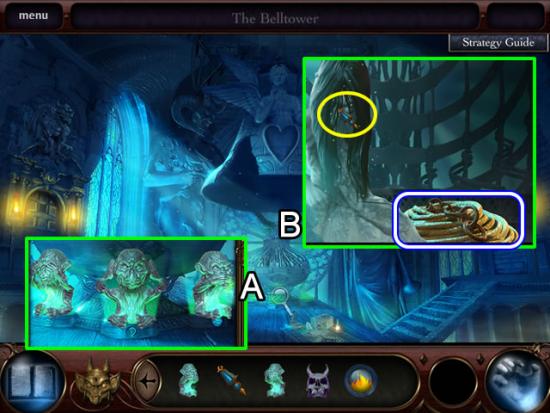
- Zoom in on the base of the cage (A).
- Place the statuettes in the slots based on the icon on each base: SEE NO EVIL, HEAR NO EVIL, SPEAK NO EVIL.
- Give the girl (B) the WATER OF HORUS vial. Receive the MAGIC ROPE.
- Follow the instructions to attach the MAGIC ROPE to the bell. Receive the Ability to Clear Demon Smoke.
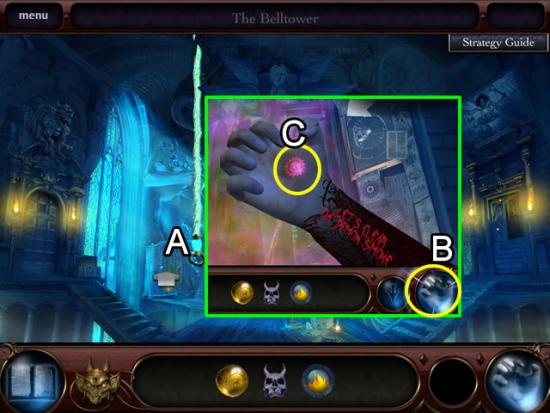
- Approach the broken mirror (A).
- The hand icon glows (B) indicating it should be selected. Click the symbol in the palm of the hand (C) to use the Clear Demon Smoke ability.
- Play the hidden object scene.
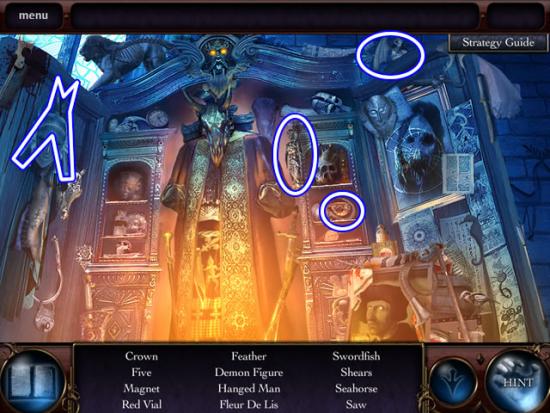
- Find the listed objects.
- Receive SHARP SHEARS, HANGED MAN FIGURE (1/2), DEMON FIGURINE and a MAGNET for inventory.
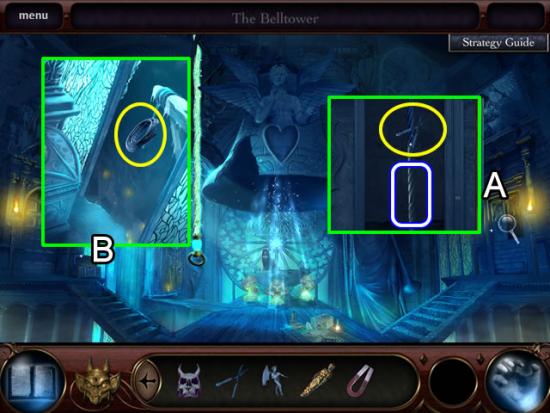
- Examine the elevator shaft (A).
- Use the SHARP SHEARS to cut a length of CABLE.
- Look at the area behind the trunk (B). Attach the CABLE to the support to escape the bell tower.
- View the cutscene and new instructions.
Chapter 2: Exploring the Main Hall and Library
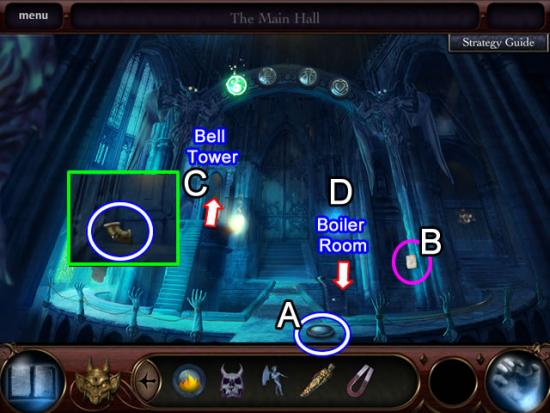
Main Hall
- Pick up the WATER ICON (A) and take the note (B) for the journal.
- Go through the arch to the bell tower (C) and up to the top of the stairs; pick up the ELBOW PIPE (1/3).
- Approach the ladder to the boiler room entrance (D).
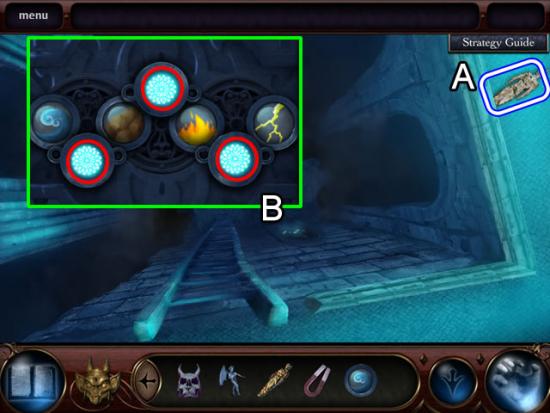
- Pick up the HANGED MAN FIGURE (2/2) on the right (A).
- Look at the glowing area on the side of the wall (B).
- Insert the WATER ICON and FIRE ICON to open a puzzle.
- Rotate the four elemental icons into position using the flower (red) icons to swap positions. The order should be the same as shown on the note in the main hall. See the above inset for the solution.
Boiler Room
- Pick up the note attached to the pipe on the left.
- Approach the furnace area on the left to play a hidden object scene.
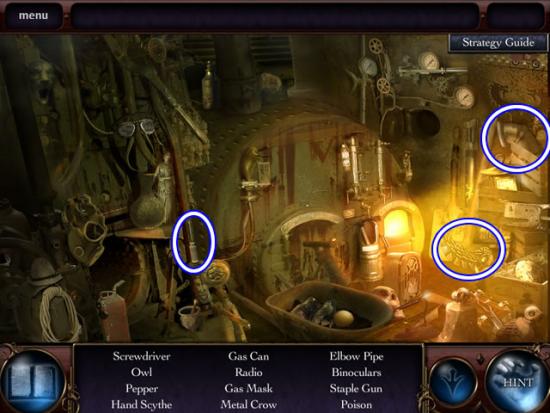
- Find the listed objects.
- Receive a SCREWDRIVER, CROW EMBLEM and ELBOW PIPE (2/3) for inventory.
- Return to the main hall.
Main Hall
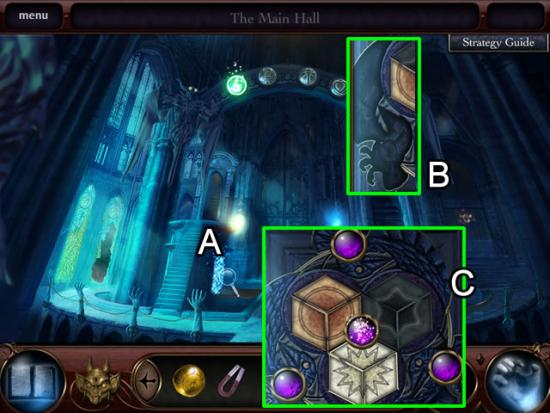
- Collector’s Edition. Examine the glowing door on the left (A). Enter the elevator to find information about bonus content.
- Examine the door on the right (B). Insert the CROW EMBLEM in the slot to open a puzzle.
- The goal is to use the purple circles to rotate the hexagons so that they form three patterns.
- The note from the boiler room showed the correct position for each figure. It is also shown in the above inset (C).
Library
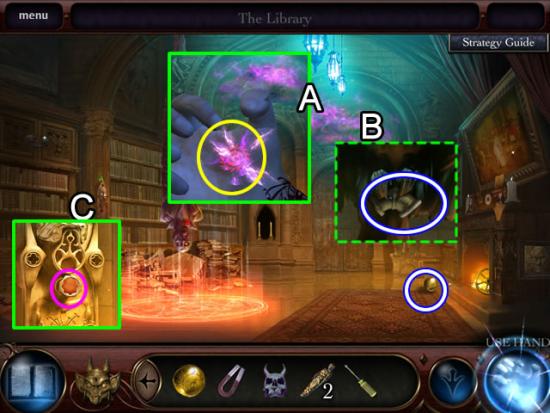
- Use the Clear Demon Smoke ability (A) to uncover the crows.
- Take the ELBOW PIPE (3/3) from the claws of the center crow (B).
- Pick up the GOLDEN EYE (2/8) from the carpet in front of the fire.
- Examine the speaker (C); press the red button to hear a clue about a “crimson spine”.
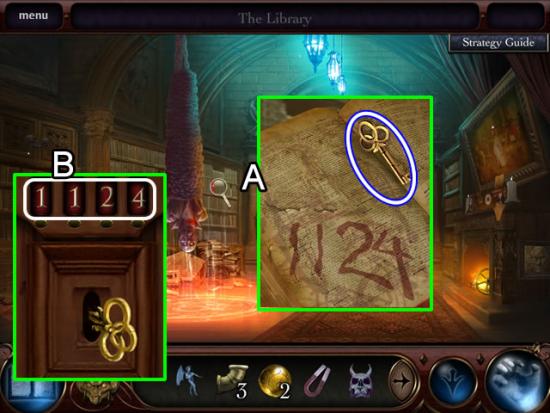
- Examine the book with the red spine on the shelf (A). Take the CABINET KEY and note the numbers.
- Look at the high cabinet (B).
- Insert the CABINET KEY. Click the tumblers until they match the numbers in the book. Turn the key to open a hidden object scene.
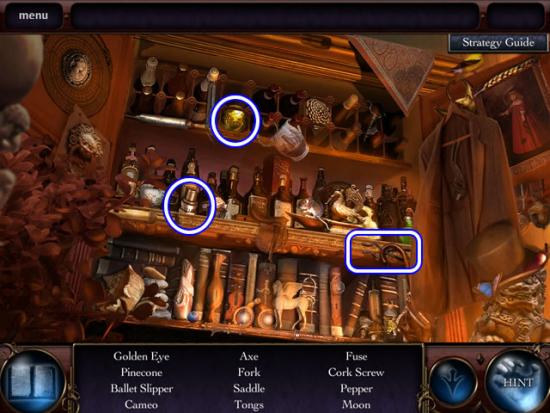
- Find the listed objects.
- Receive the GOLDEN EYE (3/8), FUSE and FIREPLACE TONGS for inventory.
- Use the FIREPLACE TONGS to retrieve the STEAM VALVE from the fireplace.
- Return to the main hall; go down the ladder to the boiler room.
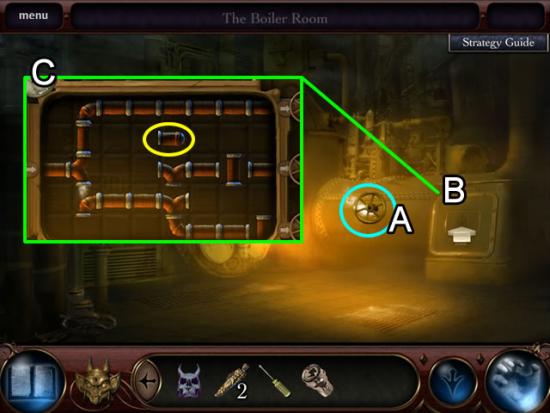
Boiler Room
- Attach the STEAM VALVE to the boiler (A) to stop the escaping steam.
- Remove the four screws on the panel (B) with the SCREWDRIVER.
- Add the three ELBOW PIPES to the board to open a puzzle (C).
- The goal is to direct the steam from the entrance pipe to the three exit pipes. There are three rounds with an increasing number of pipes to connect.
- Not all pipes need to be used but there can be no leaks. Use the terminal pieces (yellow) to stem a leak or vent into a sidewall.
- The best strategy in the later rounds is to work from the exit points backwards. Also solve the four-opening pipes first.
- Solutions:
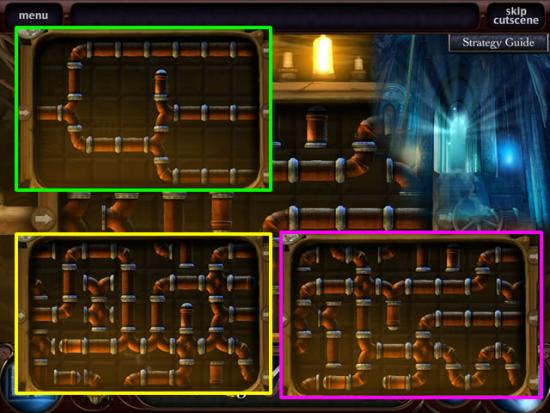
- The three insets above show possible solutions for round one (green), round two (yellow) and round three (pink).
- Completing the puzzle opens the center door in the main hall.
- Return to the main hall; exit the center door to the annex.
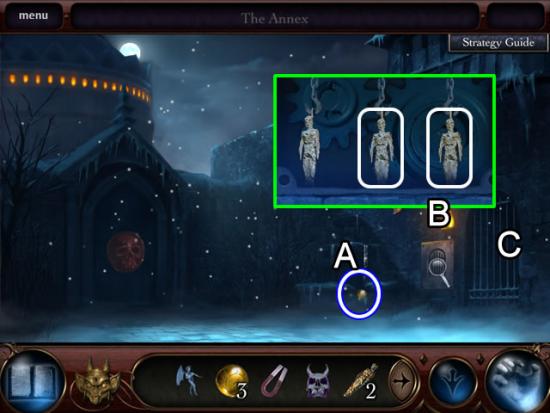
Annex
- Pick up the GOLDEN EYE (4/8) from the wishing well (A).
- Unscrew the panel (B) with the SCREWDRIVER. Place the two HANGING MAN FIGURES on the two empty hooks to raise the gate (C).
- Enter the gate to play a hidden object scene.
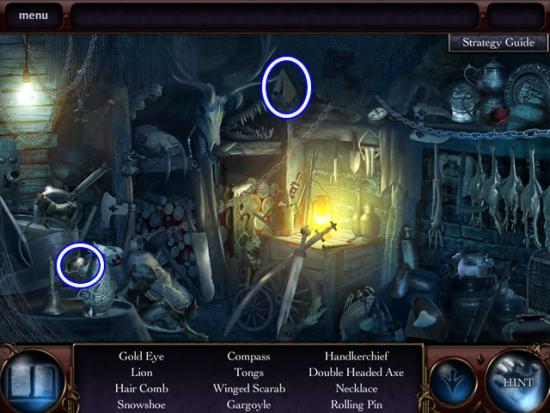
- Find the listed objects.
- The GOLDEN EYE (5/8) and CLOTH are added to inventory.
- Return to the main hall. Go up the stairs to the bell tower to see what is going on; receive a new goal.
- Go to the library.
Library
- Examine the painting over the fireplace to open a hidden object scene.
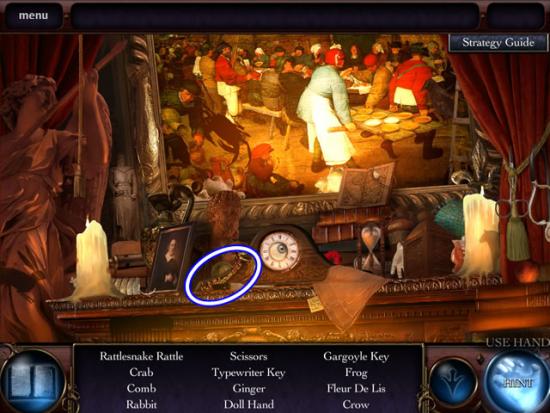
- Find the listed objects.
- The GARGOYLE KEY goes to inventory.
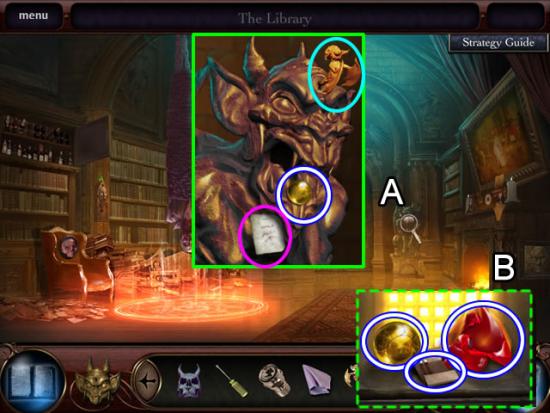
- Zoom in on the gargoyle (A).
- Insert the GARGOYLE KEY in the slot; take the GOLDEN EYE (6/8) from its mouth. Take the note (pink) for a journal goal.
- Inspect the etching on the side of the fireplace (B); use the CLOTH to remove the grime and open a compartment.
- Take the GOLDEN EYE (7/8), RED FRAGMENT and matchbook with SOME MATCHES (2).
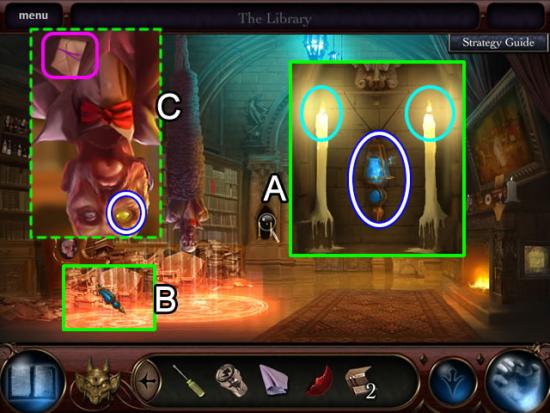
- Zoom in on the alcove to the left of the door (A). Use the two MATCHES to light both candles; take the WATER OF HORUS.
- Pour the vial of the WATER OF HORUS on the magic circle (B).
- Examine Dr. Corvus (C). Take the last words document (pink) and the GOLDEN EYE (8/8).
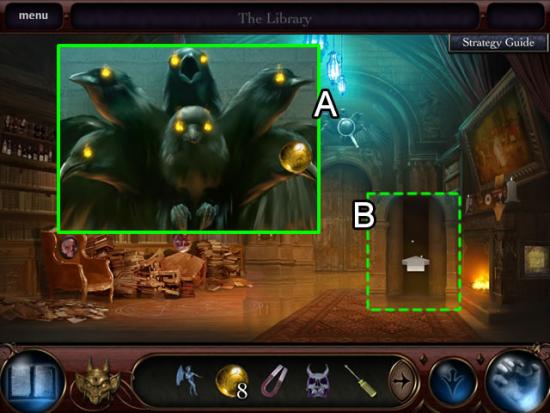
- Look again at the crows above the door (A).
- Insert the eight GOLDEN EYES in each of the eye sockets.
- Attempt to enter the study (B).
- View the cutscene to open a puzzle.
- Solve the jigsaw puzzle by matching the pieces. Use the numbers as a guide to placement.
- Correctly placed pieces snap together. Keep moving the pieces around so no piece gets covered up by the connected pieces.
- Solution:
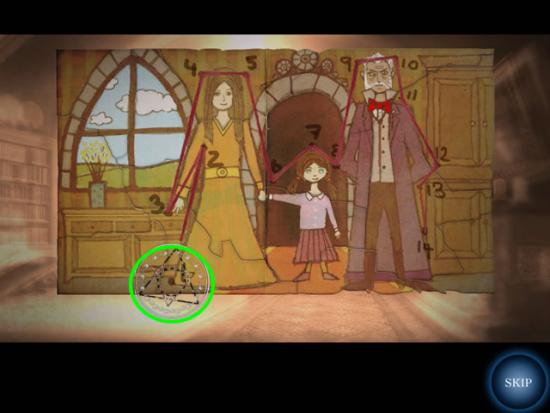
- Solving the jigsaw puzzles opens a connect-the-dots puzzle.
- Click the circle icon (green) to start the puzzle. Click the dot beside the number to continue connecting all of the dots in numerical order.
Chapter 3: Finding the Secret Passage
Study
- Approach the hidden object scene in front of the window.
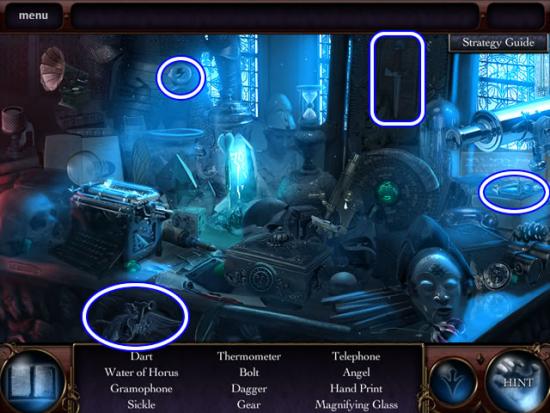
- Find the listed objects.
- Receive a FUSE (2/3), ANGEL FIGURINE, DAGGER and a vial of the WATER OF HORUS for inventory.
- Return to the main hall; go up the stairs to the bell tower door.
Bell Tower
- Insert the DEMON and ANGEL FIGURINES in the slots in the door.
- Enter the tower to view a cutscene.
- Speak to the girl about the passageway and give her the vial of WATER OF HORUS.
- Play the hidden object scene.
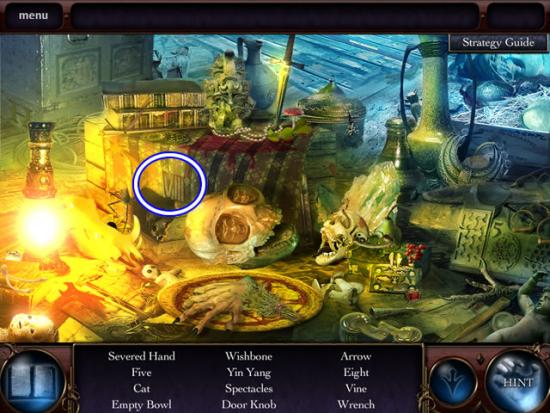
- Find the listed objects.
- Receive the roman number XIII for inventory.
- Exit through the door on the left and return to the study.
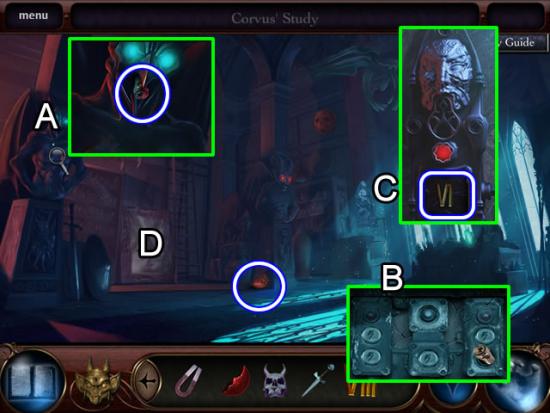
Study
- Pick up the RED FRAGMENT (2/3) on the floor.
- Examine the blue demon (A); take the FUSE (3/3) from its mouth.
- Zoom in on the bottom panel of the intercom (B); insert the three FUSES.
- Press the red button on the intercom (C) to hear a message; take the VI from the compartment.
- Look at the portrait sitting against the wall (D) to open a place-the-disk puzzle.
- Solution:
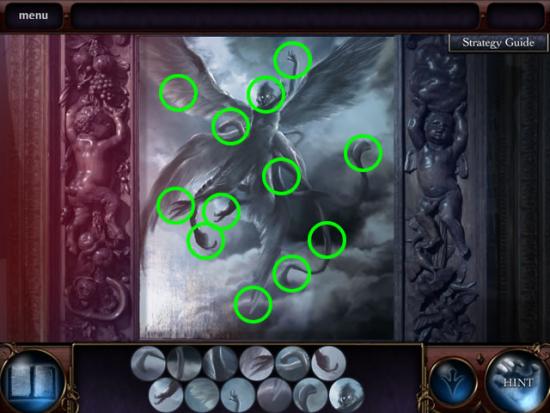
- Receive VII for inventory.
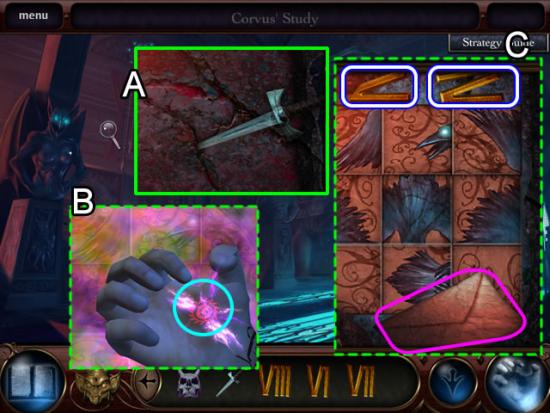
- Move the curtain aside and examine the stone behind it (A).
- Use the DAGGER to pry out the loose stones.
- Clear the Demon Smoke with the special ability (B).
- Take the V and IV for inventory; open the envelope for journal information (C).
- Play the tile rotation puzzle.
- The goal is to rotate the tiles to form a pattern. Rotating some tiles affect others.
- Solution:
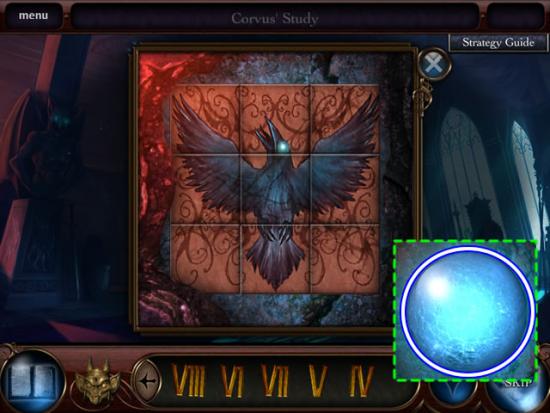
- Take the BLUE CRYSTAL SPHERE from the compartment.
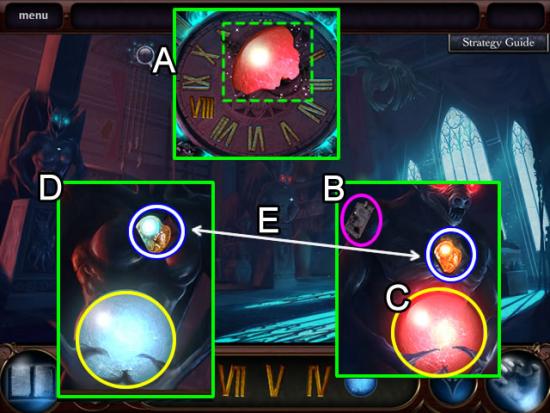
- Zoom in on the clock (A). Insert IV, V, VI, VII and VIII in the slots. Receive a RED FRAGMENT (3/3) in inventory.
- Look at the red demon (B). Take the note (pink) for the journal.
- Put the three RED FRAGMENTS in its claws (C) to assemble a sphere. Take the DEMON’S HEART (RED) from the chest cavity.
- Look at the blue demon (D). Place the BLUE CRYSTAL SPHERE in its claws to open its chest cavity. Replace the DEMON’S HEART (BLUE) with the DEMON’S HEART (RED). Place the DEMON’S HEART (BLUE) in the chest of the red demon (E).
- Enter the newly opened secret passageway that replaced the clock.
Chapter 4: Investigating the Secret Rooms
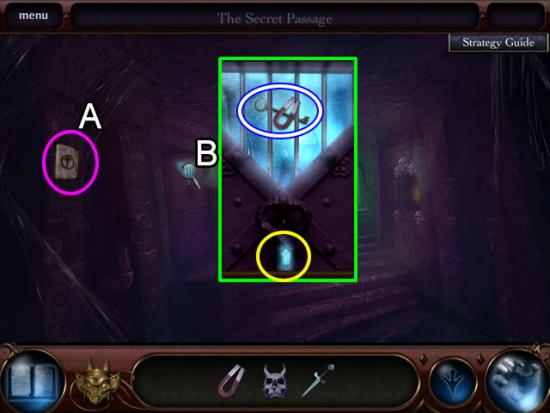
Secret Passage
- Read the note (A)
- Use the MAGNET to retrieve the CELL KEY (B). Insert the CELL KEY in the keyhole.
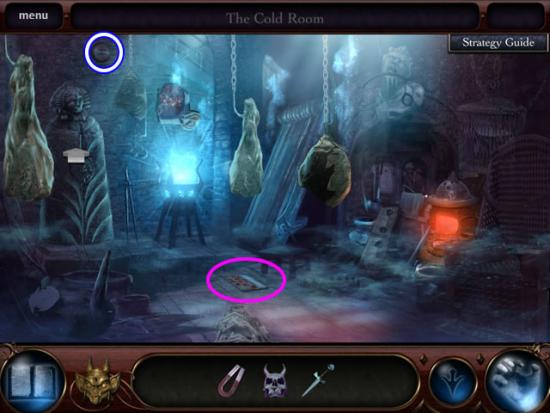
Cold Room
- Pick up the journal page on the floor (pink).
- Pluck the ZODIAC BUTTON (1/7) from the wall.
- Zoom in on the container on the left to open a place-the-disk puzzle.
- Solution:
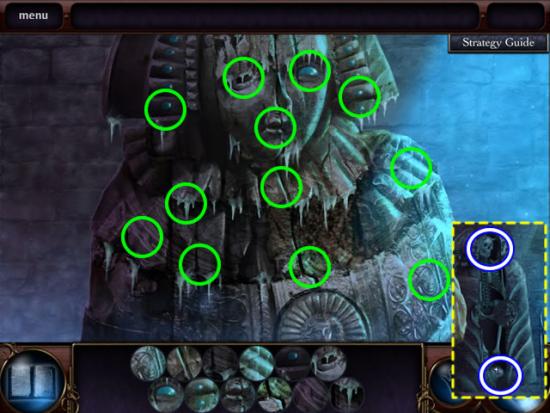
- Take the DEMON SKULL (2/4) and the ZODIAC BUTTON (2/7) from the open container.
- Play the hidden object scene by the stove.
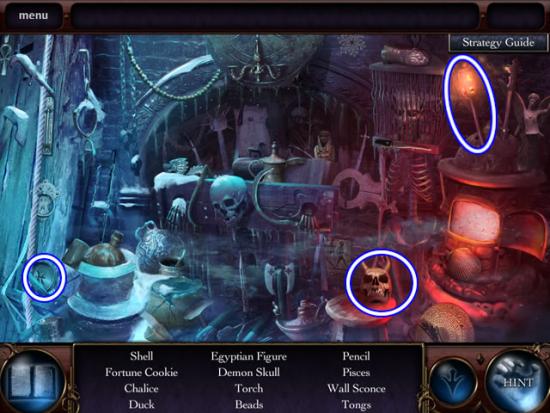
- Find the listed objects.
- Receive a DEMON SKULL (3/4), TORCH and ZODIAC BUTTON (3/7) for inventory.
- Exit the room.
Secret Passage
- Use the TORCH to light the two torches at the end of the hall to open the gate.
Astrology Lab
- Play the hidden object scene on the desk in the back right.
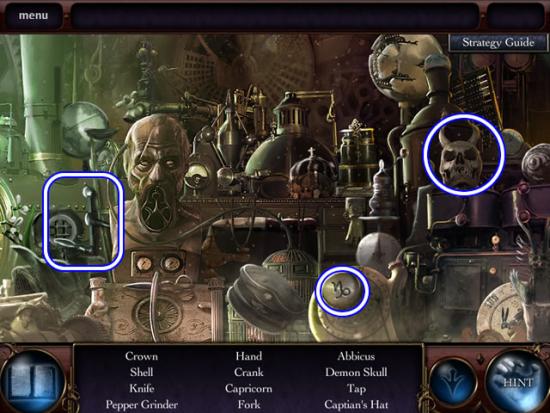
- Find the listed objects.
- Receive a DEMON SKULL (4/4), ZODIAC BUTTON (4/7) and CRANK for inventory.
- Exit the lab.
Secret Passage
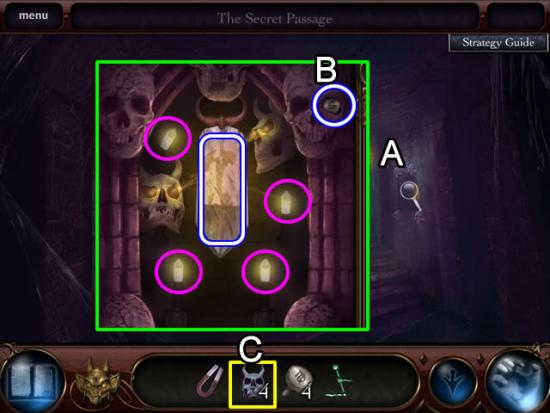
- Peer into the nook on the wall (A).
- Pluck the ZODIAC BUTTON (5/7) from the skull (B).
- Place the four DEMON SKULLS on the four crystals (pink) to direct a beam on the central crystal. Receive a GARGOYLE KEY for inventory.
Astrology Lab
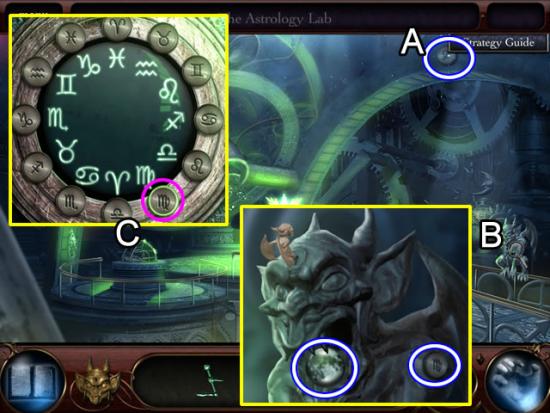
- Get the ZODIAC BUTTON (6/7) on the wall (A).
- Inspect the gargoyle (B). Insert the GARGOYLE KEY; take the EYE OF THE MOON from its mouth. Take the ZODIAC BUTTON (7/7) from its shoulder.
- Zoom in on the platform (C).
- Insert the seven ZODIAC BUTTONS in the empty slots to open a puzzle.
- The goal is to swap the inner symbols so they match the outer symbols. Correctly aligning the two symbols causes the outer button to light up (pink).
- Click a button on the outer ring to swap the inner symbol with its neighbor. Rotate the symbols around until all of the buttons are lit.
- Solution:
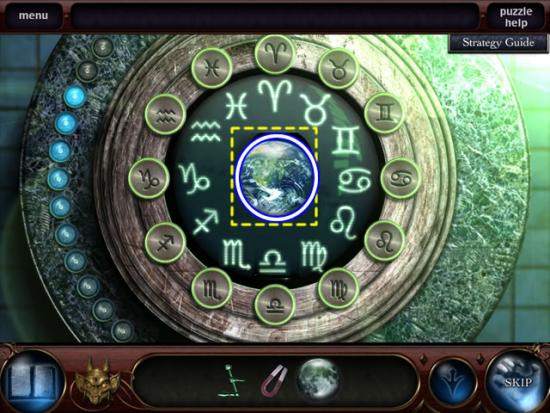
- Receive the EYE OF THE EARTH for inventory.
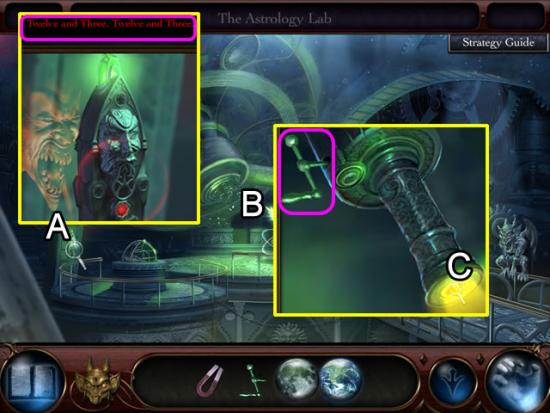
- Listen to the demon on the intercom (A); note the two numbers (pink).
- Zoom in on the telescope (B); attach the CRANK to the side (pink).
- Look into the eyepiece (C) to open a puzzle.
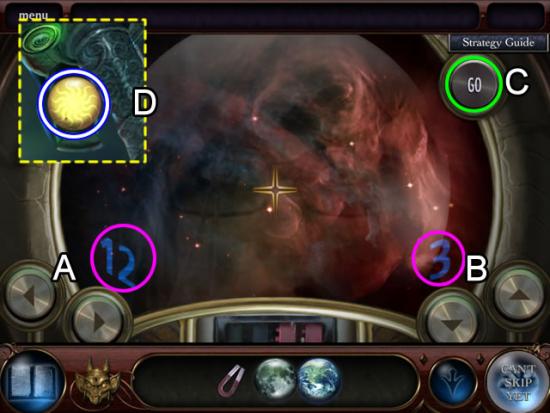
- Use the arrow buttons on the left (A) to set the coordinate to 12.
- Use the arrow buttons on the right (B) to set the coordinate to 3.
- Press the GO button (C) to rotate the telescope to the coordinates.
- Receive the EYE OF THE SUN (D).
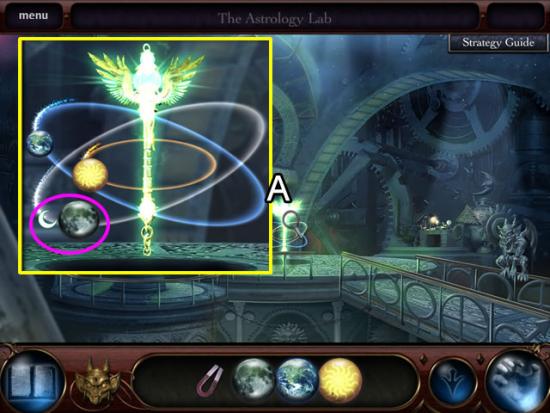
- Zoom in on the glowing celestial mace (A).
- Place the EYE OF SUN, EARTH and MOON on their symbols.
- Receive the CELESTIAL MACE.
- Head back toward the bell tower.
Study
- Play the hidden object scene.
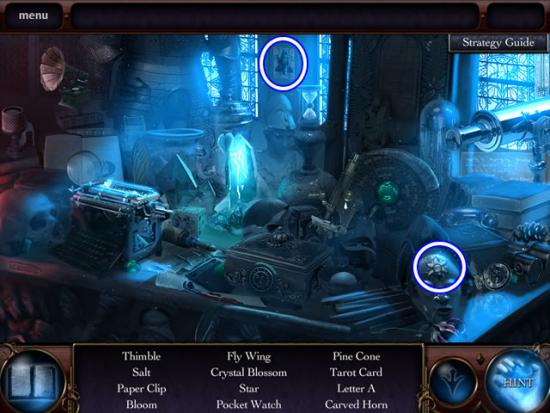
- Find the listed objects.
- Receive the CRYSTAL BLOSSOM and TAROT CARD for inventory.
Library
- Play the hidden object scene.
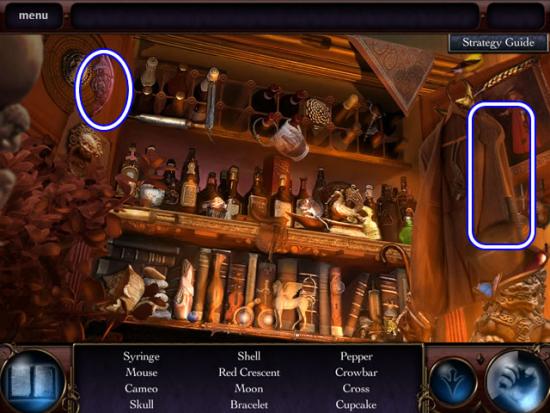
- Find the listed objects.
- Receive the EMBLEM PIECE (1/6) and CROWBAR for inventory.
Bell Tower
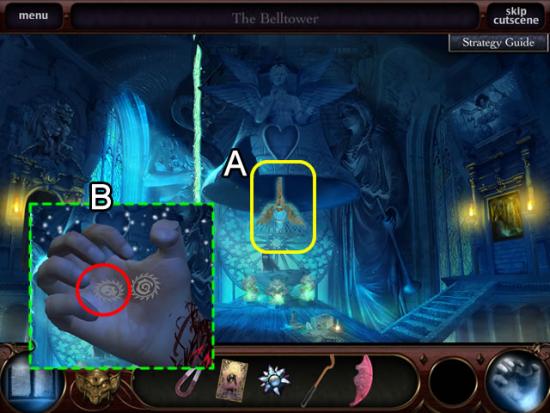
- Attach the CELESTIAL MACE to the bell (A).
- Receive the Ability to Break Skull Seals (B).
Chapter 5: Getting into the Theatre
Library
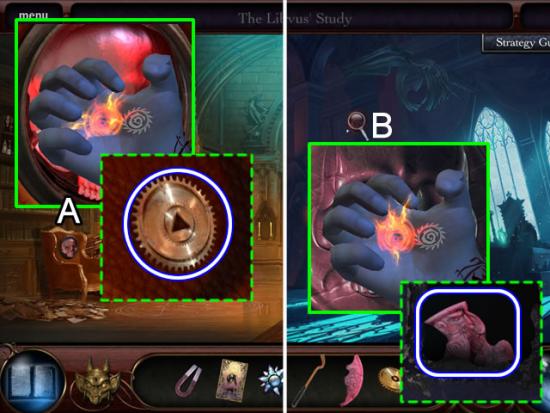
- Use the new ability on the skull seal on the chair (A); take the GEAR (1/6).
Study
- Look at the skull seal on the wall (B); break it with the seal breaking ability.
- Retrieve an EMBLEM PIECE (2/6).
- Return to the main hall. Exit through the center door to the annex.
Annex
- Apply the skull breaking ability to the seal on the gates.
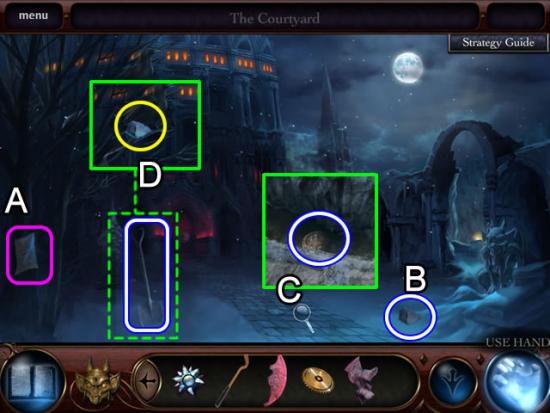
Courtyard
- Read the note attached to the tree (A).
- Pick up the ROCK (B).
- Pry up the loose cobblestone (C) with the CROWBAR; take the GOLD COIN.
- Throw the ROCK at the bird (D); it drops a SHOVEL.
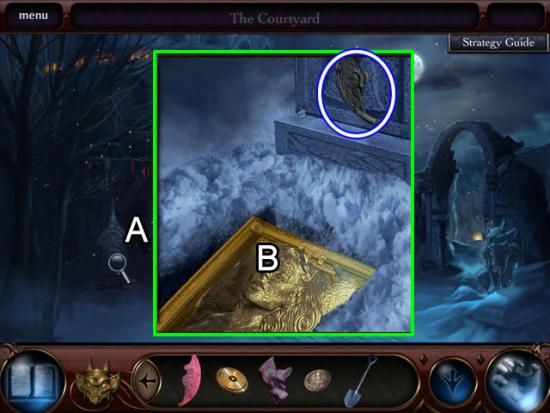
- Examine the monument (A); take the EMBLEM PIECE (3/6).
- Use the SHOVEL to uncover the gold etching (B); zoom in to open a place-the-disk puzzle.
- Solution:
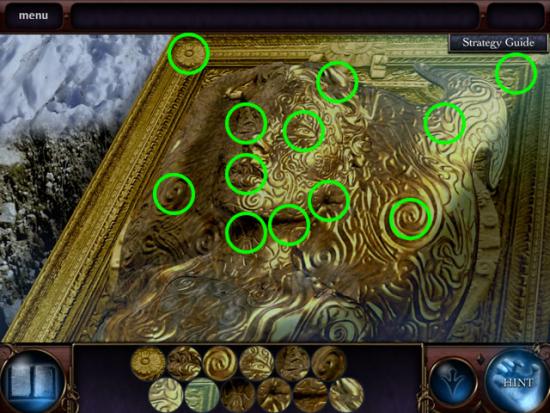
- Receive an EMBLEM PIECE (4/6).
Annex
- Throw the GOLD COIN into the wishing fountain; take the EMBLEM PIECE (5/6).
Courtyard
- Go through the arch on the right to the bridge to the crypt.
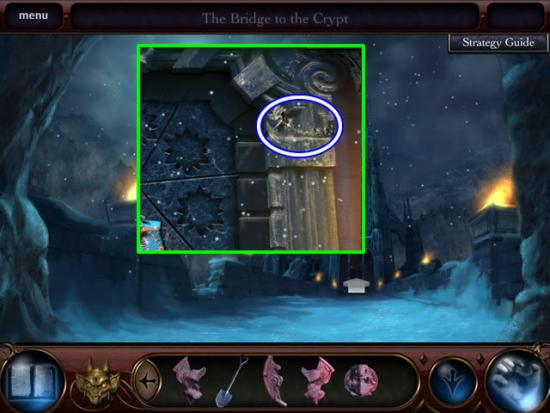
Bridge to the Crypt
- Go forward to the crypt door.
- Take the GARGOYLE KEY from the upper right portion of the door.
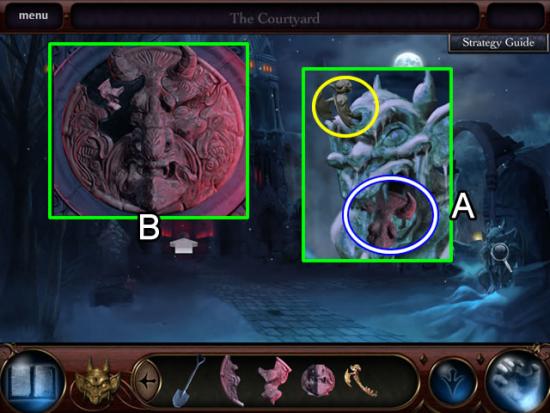
Courtyard
- Zoom in on the gargoyle (A); insert the GARGOYLE KEY. Take the EMBLEM PIECE (6/6) from its mouth.
- Approach the theatre door (B); insert the six EMBLEM PIECES in the door lock.
Chapter 6: Inside the Theatre
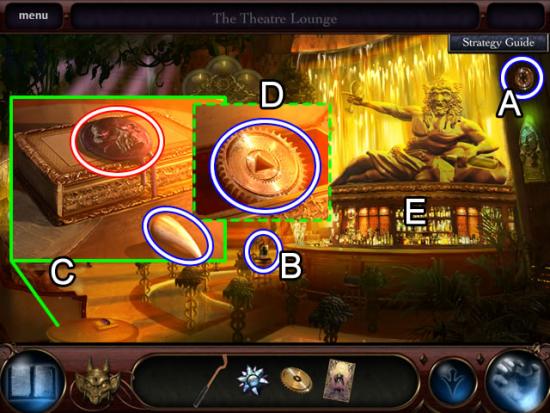
Lounge
- Take the GEAR (2/6) on the wall (A).
- Pick up the VACUUM TUBE (1/3) from the table (B).
- Look closer at the side table (C); take the TOOTH (1/7).
- Use the Ability to Break Skull Seals on the box; take the GEAR (3/6) from the box (D).
- Play the hidden object scene on the bar (E).
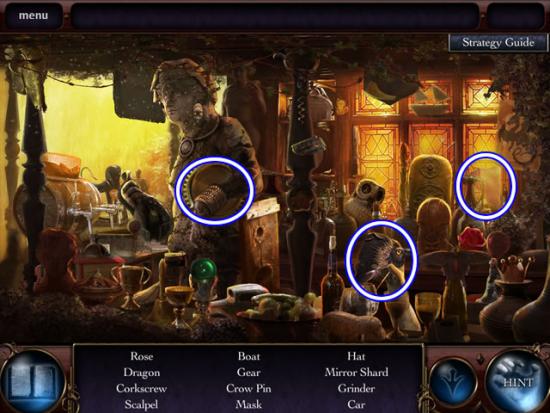
- Find the listed objects.
- Receive a GEAR (4/6), SMALL CROW PIN and SHARD OF MIRROR (1/5) for inventory.
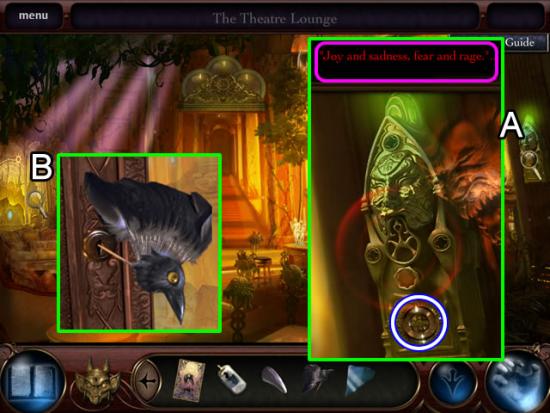
- Zoom in on the intercom (A); press the button for a message (pink) needed later. Take the GEAR (5/6).
- Use the SMALL CROW PIN to pick the lock (B); play the hidden object scene.
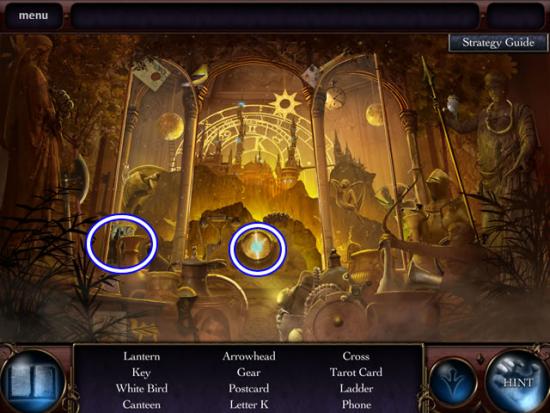
- Find the listed objects.
- Receive the GEAR (6/6) and a TAROT CARD (2/6) in inventory.
- Inspect the golden statue above the bar to open a place-the-disk puzzle.
- Solution:
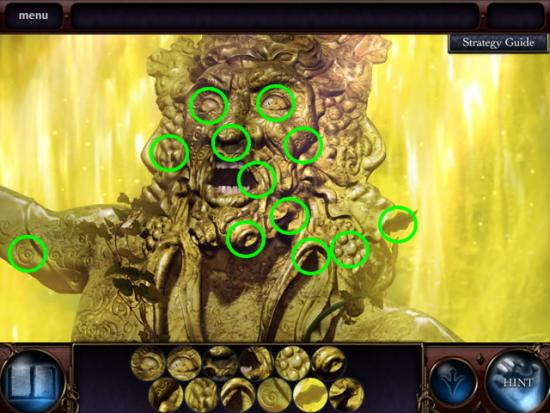
- Solving the puzzle unlocks the mechanism over the door.
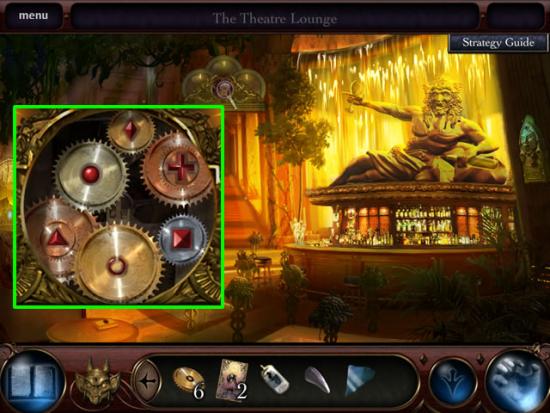
- Examine the counter mechanism.
- Place the six GEARS in the mechanism, matching the gear to the pattern.
- The counters reset to zero and open the doors.
Theatre
- Play the hidden object scene in the orchestra pit.
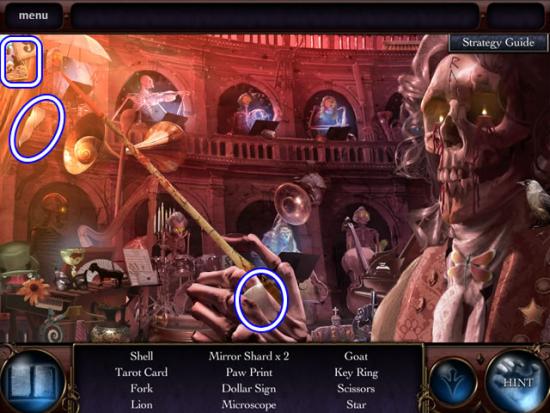
- Find the listed objects.
- Receive a TAROT CARD (3/6) and SHARDS OF MIRROR (2/5) and (3/5).
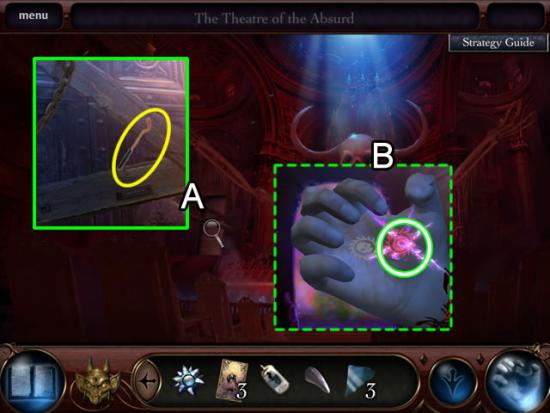
- Remove the boards and chains on the door (A) with the CROWBAR.
- Clear the Demon Smoke (B) in the entrance.
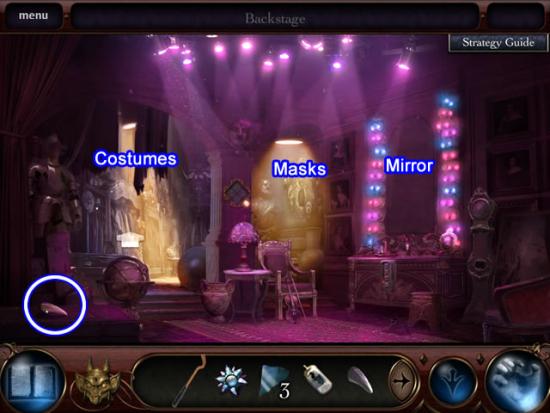
Backstage
- Look around the room.
- Pick up the TOOTH (2/7)
- Enter the costume area to play a hidden object scene.
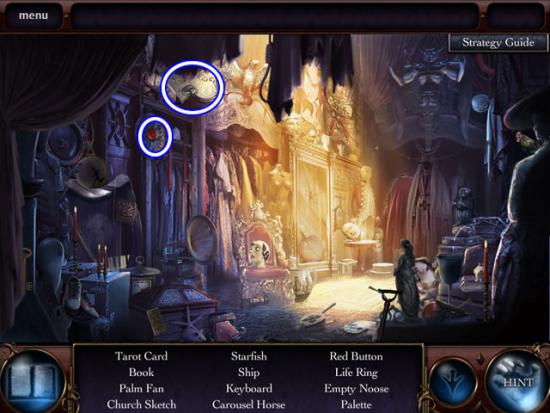
- Find the listed objects.
- Receive a TAROT CARD (4/6) and POWER BUTTON in inventory.
- Look at the masks to play a place-the-disk puzzle.
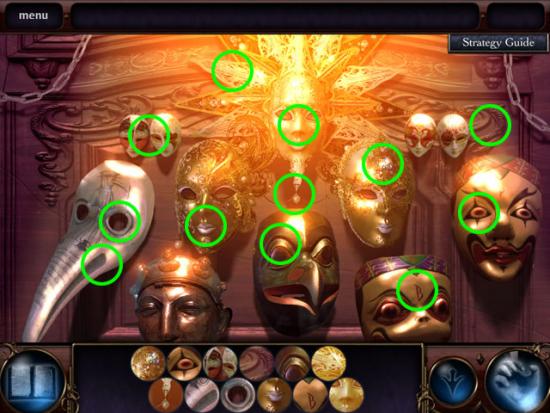
- Receive a SPOTLIGHT LAMP.
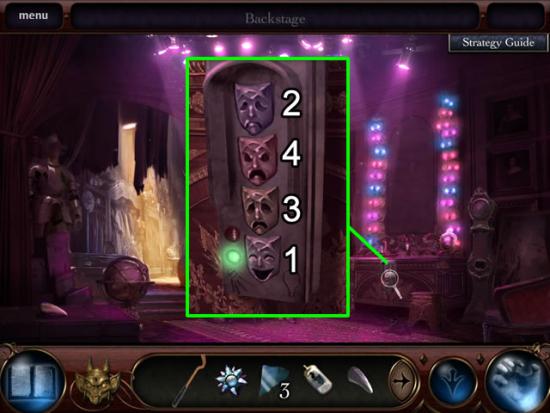
- Look at the panel on the mirror table.
- Click the masks in the order mentioned in the message from the lounge intercom: Joy, Sadness, Fear and Rage.
- The order is shown above.
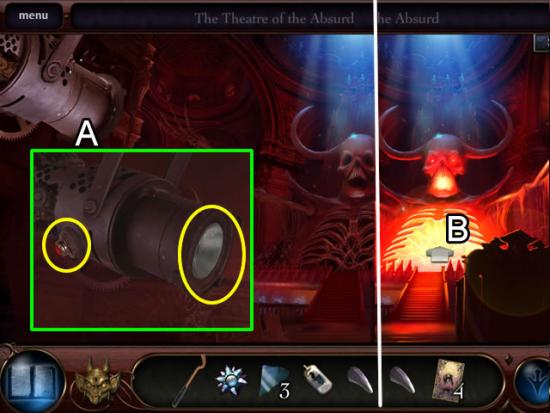
Theatre
- Examine the spotlight (A); attach the POWER BUTTON and insert the SPOTLIGHT LAMP. Click the power button to focus on the stage area.
- Approach the stage (A) for a hidden object scene.
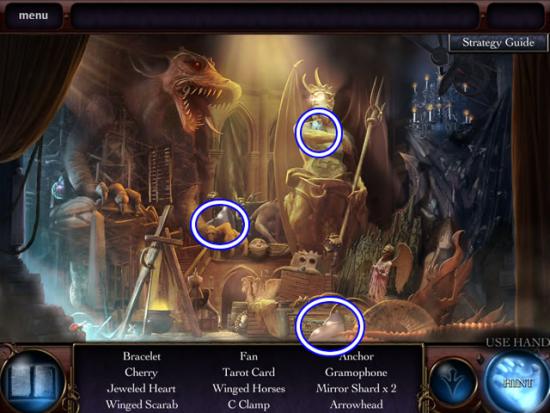
- Find the listed objects.
- Receive a TAROT CARD (5/6) and SHARDS OF MIRROR (4/5) and (5/5).
Backstage
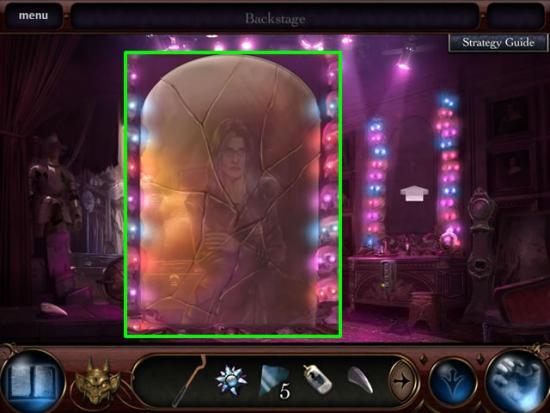
- Approach the mirror.
- Place the five SHARDS OF MIRROR on the mirror fame to open a puzzle.
- Arrange the pieces according to shape. Please see the above inset for the solution.
- Receive a TAROT CARD (6/6) for inventory.
- Return to the lounge.
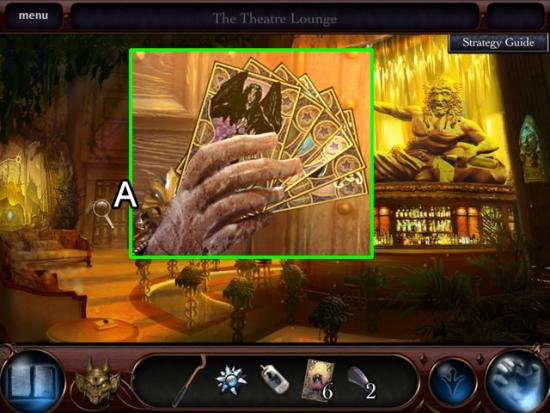
Lounge
- Place the six TAROT CARDS in the hand by the door (A).
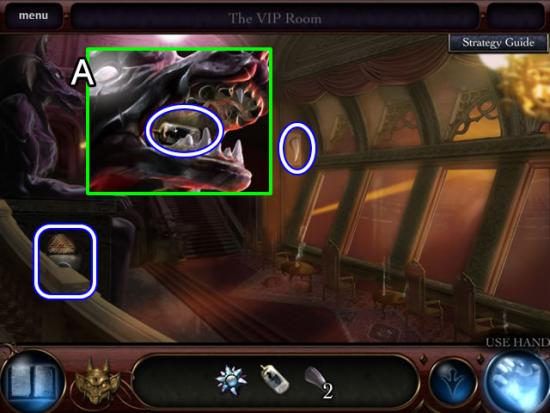
VIP Room
- Pick up the CANOPIC JAR (KIDNEY) and the TOOTH (3/7).
- Look inside Anubis’ mouth (A). Take the VACUUM TUBE (2/3).
Lounge
- Play the hidden object scene.
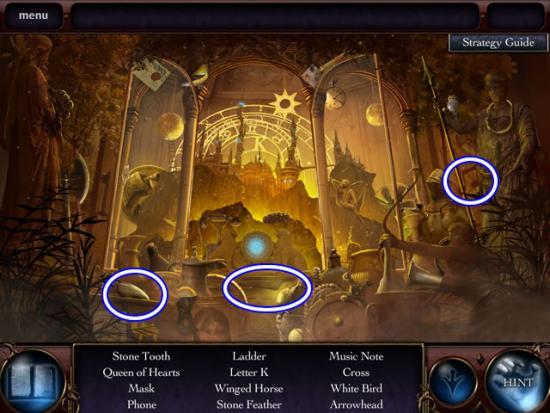
- Find the listed objects.
- Receive a TOOTH (4/7), MUSIC NOTE (1/6) and STONE FEATHER (1/3) for inventory.
Theatre
- Play the hidden object scene in the orchestra pit.
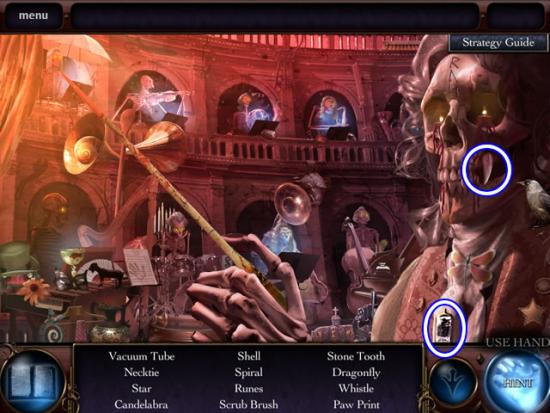
- Find the listed objects.
- Receive a VACUUM TUBE (3/3) and TOOTH (5/7) in inventory.
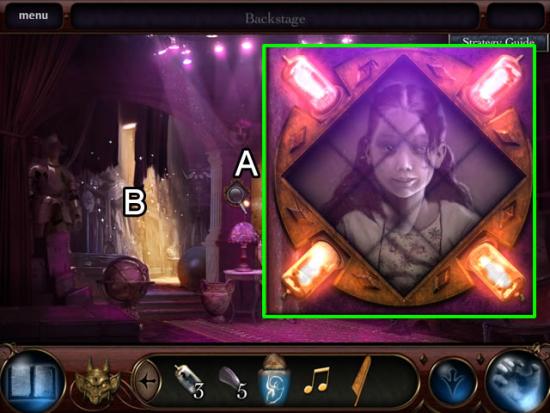
Backstage
- Examine the wall plaque (A).
- Insert the three VACUUM TUBES in the empty slots to retract the tiles and open a puzzle.
- Rotate the tiles to find the picture (please see above inset for the solution).
- Receive a TOOTH (6/7).
- Play the hidden object scene in the costume area (B).
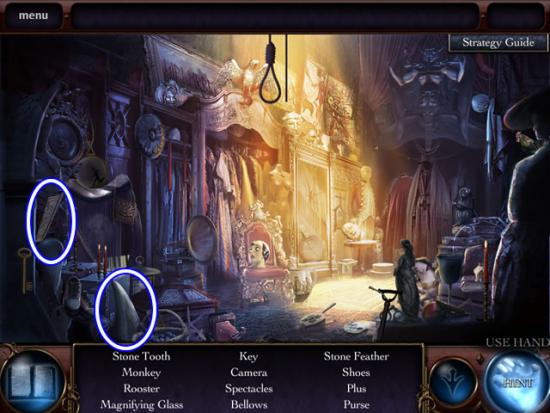
- Find the listed objects.
- Receive a TOOTH (7/7) and STONE FEATHER (2/3).
- Return to the lounge; enter the VIP Room.
Chapter 7: Under the Theatre
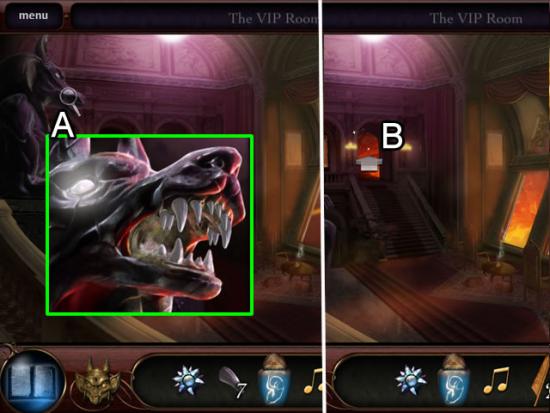
VIP Room
- Insert each TOOTH (7/7) in Anubis’ mouth (A).
- Exit via the door (B) after the elevator stops.
- Cross the bridge and enter the opening.
Under the Theatre
- Pick up the STONE FEATHER (3/3) from the pedestal on the left statue.
- Enter the left archway for a hidden object scene.
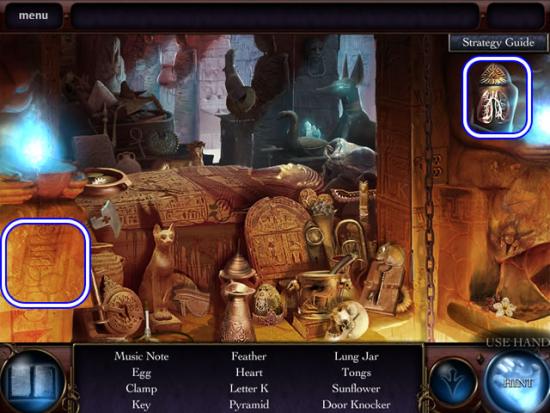
- Find the listed objects.
- Receive a MUSIC NOTE (2/6), CANOPIC JAR (LUNGS) and an EYE OF HORUS PIECE in inventory.
- Go through the arch on the right.
- Take the paper in the middle of the stone frame; play the place-the-disk puzzle.
- Solution:
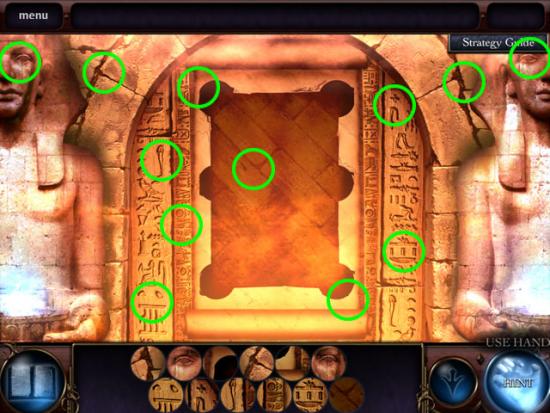
- Receive an EYE OF HORUS PIECE.
- Examine the back wall; place both pieces of the EYE OF HORUS in the outline to find a secret room.
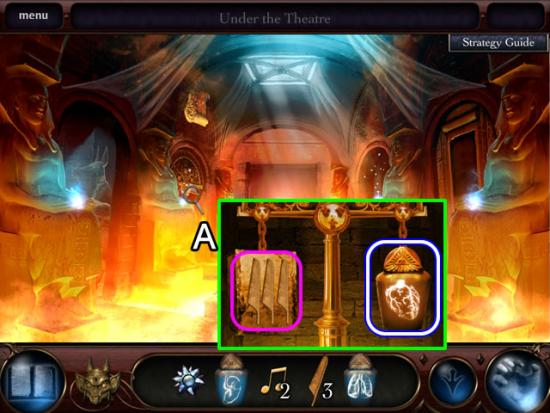
- Examine the new statue on the left (A).
- Place the three STONE FEATHERS on the scale; take the CANOPIC JAR (HEART).
- Go forward and enter the chamber in the rear wall.
- Reassemble the Hapsburg Cube.
- The best strategy is to spread out the pieces. Place them based on shape and color.
- Solution:
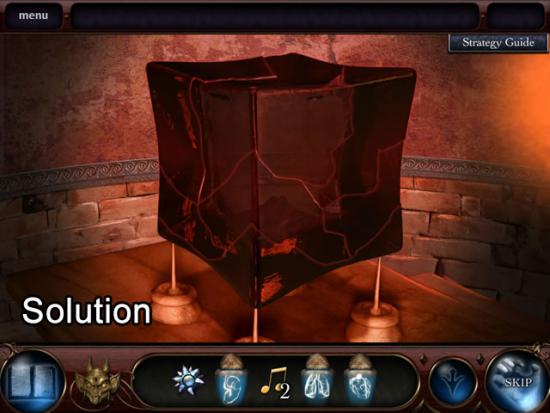
- Receive a CANOPIC JAR (BRAIN) and the HAPSBURG CUBE (FRACTURED) in inventory.
- Go through the arch on the right.
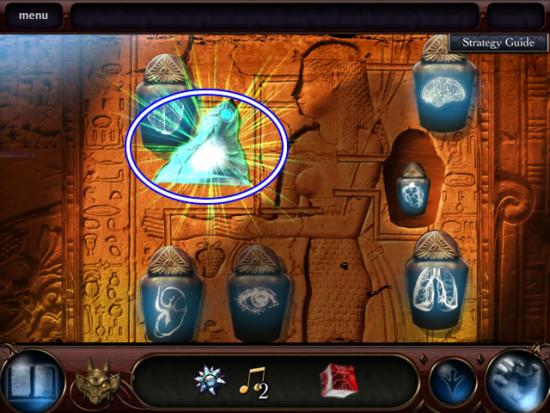
- Place the four CANOPIC JARS in the empty slots as shown above.
- Receive the BELL FRAGMENT.
- Exit the theatre and return to the bell tower.
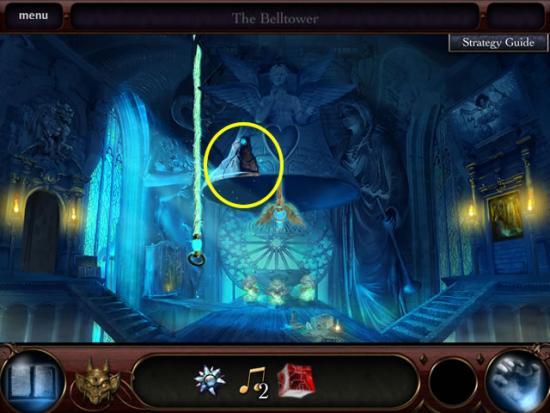
Bell Tower
- Insert the BELL FRAGMENT in the bell.
- Receive instructions to go to the crypt at the end of the bridge.
- Return to the annex, enter the courtyard and go through the arch to the bridge to the crypt.
Chapter 8: Putting the Pieces Together
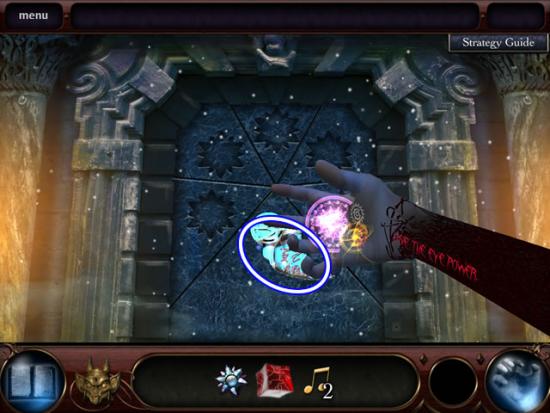
Crypt Entrance
- Receive the Power of the Eye; use it to collect the first JEWELED TABLET.
- Return to the annex.
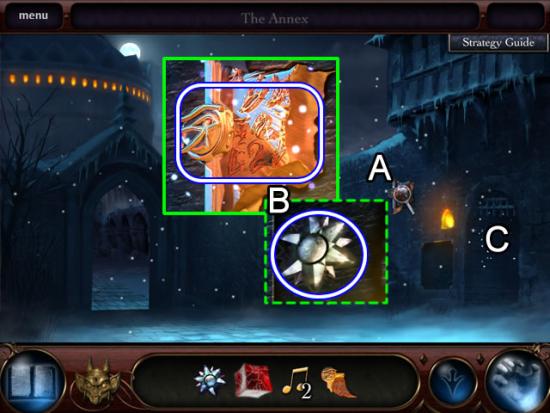
Annex
- Use the Power of the Eye on the glyph tablet (A).
- Take the JEWELED TABLET; pick up the CRYSTAL BLOSSOM (2/5) it hid (B).
- Play the hidden object scene in the gate (C).
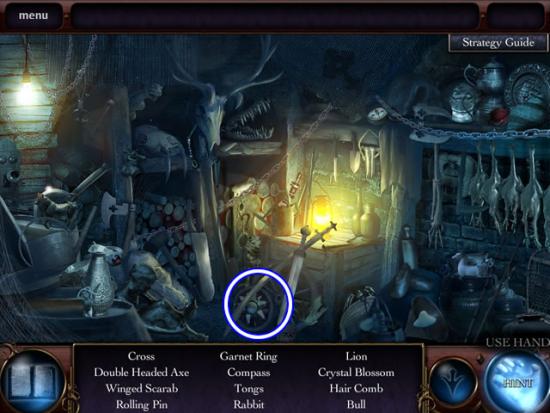
- Find the listed objects.
- Receive a CRYSTAL BLOSSOM (3/5) for inventory.
- Return to the library; proceed to the cold room off the secret passage.
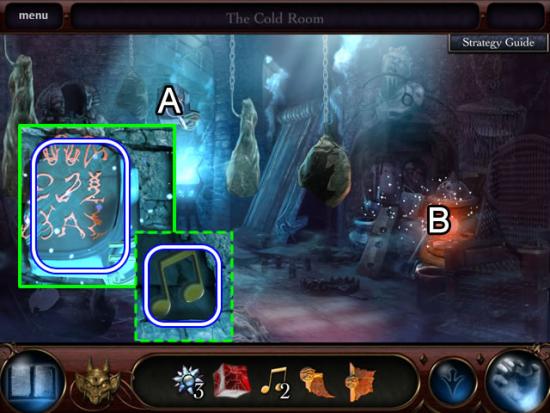
Cold Room
- Read the tablet (A); receive the JEWELED TABLET.
- Take the MUSIC NOTE (3/6).
- Play the hidden object scene on the stove (B).
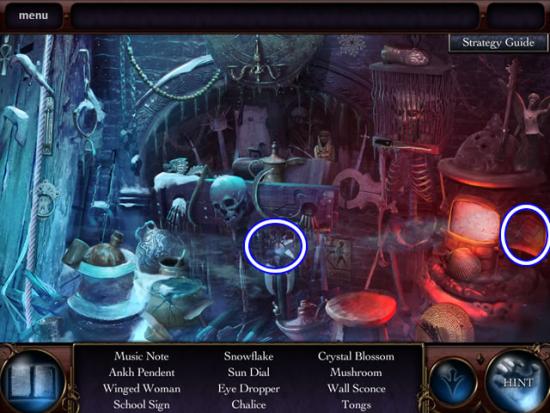
- Find the listed objects.
- Receive a MUSIC NOTE (4/7) and CRYSTAL BLOSSOM (4/5) in inventory.
- Return to the theatre; enter the VIP room.
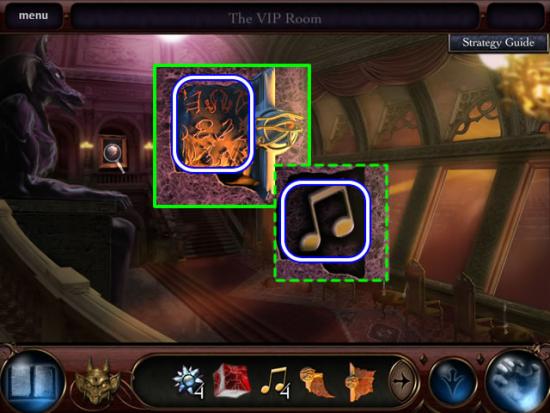
VIP Room
- Read the JEWELED TABLET on the back wall; take the MUSIC NOTE (5/6).
- Click the door on the right to engage the elevator.
- Enter the area under the theatre.
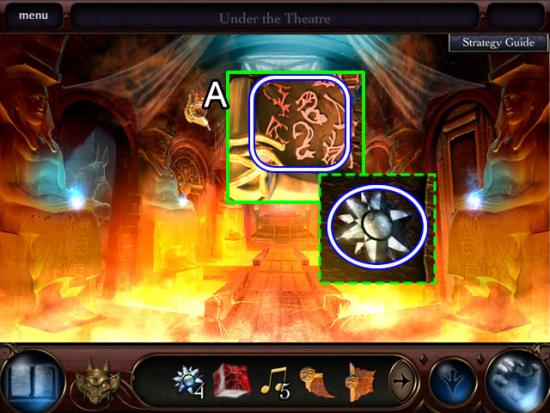
Under the Theatre
- Read the JEWELED TABLET (A); pick up the last CRYSTAL BLOSSOM (5/5).
- Exit the theatre.
- Return to the door of the crypt.
Crypt Entrance
- Put each of the CRYSTAL BLOSSOMS in the slots on the door.
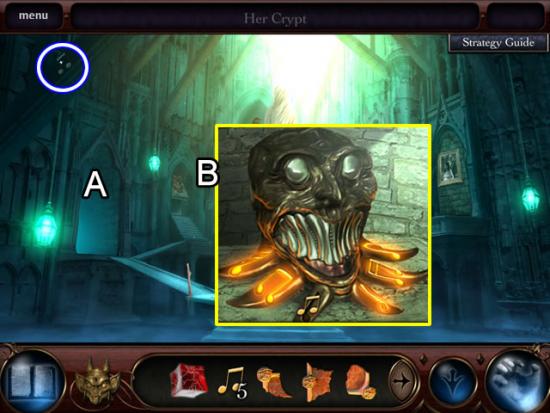
Her Crypt
- Pick up the last MUSIC NOTE (6/6).
- Enter the door on the left (A). Play a hidden object scene to light the first candle.
- Look into the nook (B). Insert the six MUSIC NOTES in the slots to light the second candle.
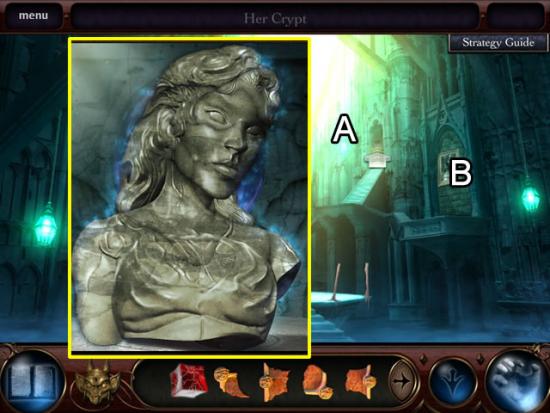
- Enter the work area (A).
- Assemble the bust to light the third candle.
- Examine the portrait (B) to open a place-the-disk puzzle.
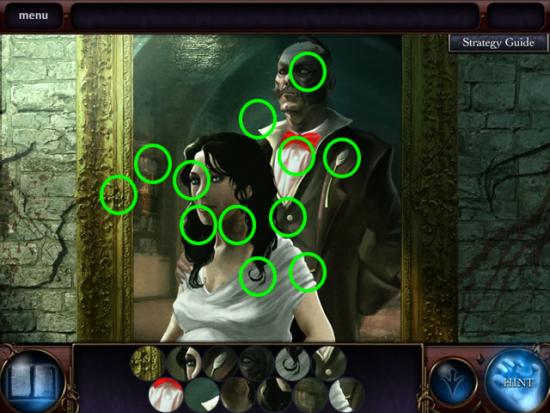
- Completing the puzzle lights the last candle.
- Receive the last JEWELED TABLET.
- Return to the theatre, enter the VIP room and return to the area under the theatre
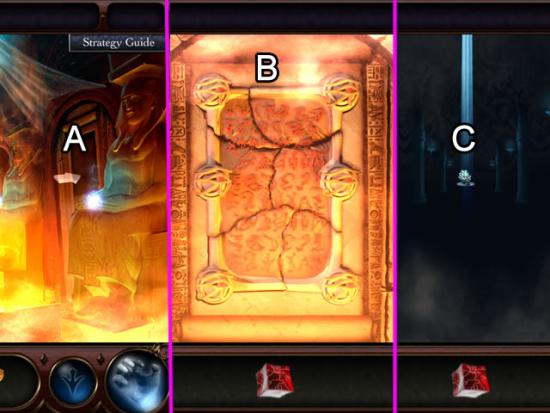
Under the Theatre
- Enter the first door on the right (A).
- Place each JEWELED TABLE piece in the frame (B) to open the true crypt.
- Approach the tomb (C) to receive the crystal bell HEART.
- Return to the bell tower.
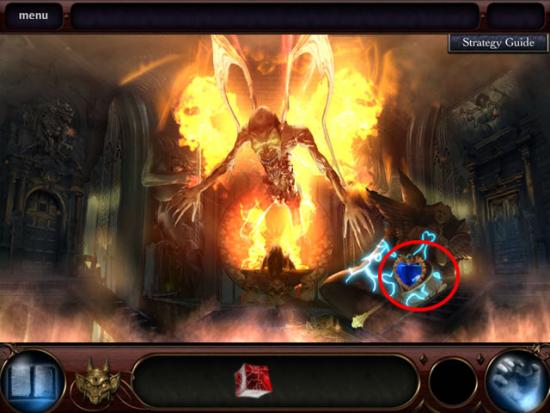
Bell Tower
- Place the HEART in the figure.
- Watch the final cutscene.
Congratulations! You have completed playing Theatre of the Absurd. Bonus game play is now available from the Bonus Content tab on the main menu.
Collector’s Edition Bonus Play
Main Hall
- Pick up the glowing paper.
- Go in search of the golden angels.
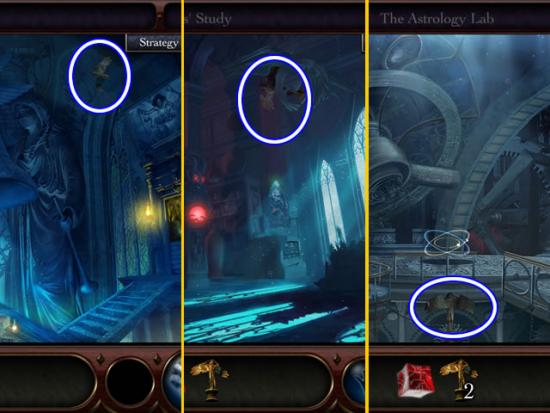
- Find three of the GOLDEN ANGELS in the castle in the Bell Tower, Study and Astrology Lab.
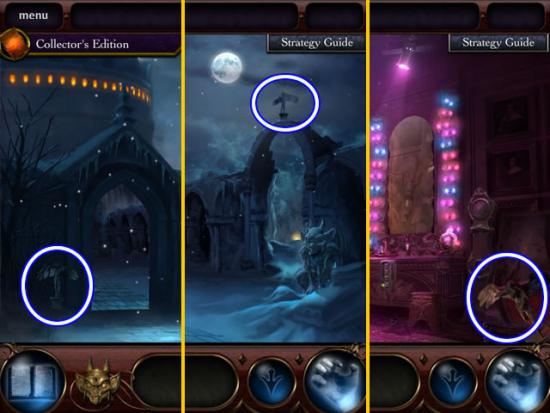
- Find three of the GOLDEN ANGELS in the Annex, Courtyard and Theatre Backstage.
- Return to the main hall.
Main Hall
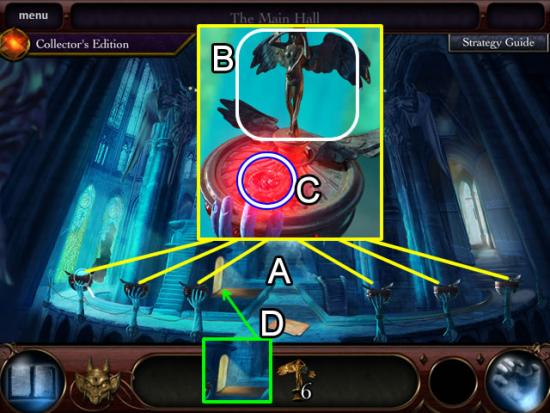
- For each of the six hands (A), insert a GOLDEN ANGEL (B) and take the RUBY GLYPH (C).
- If you haven’t previously done so, remove the glowing door and enter the elevator (D).
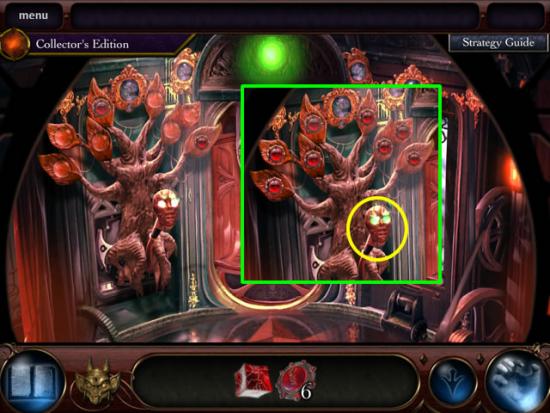
- Insert each of the RUBY GLYPHS in the slots on the tree (see inset).
- Pull the lever (yellow).
Cave
- Zoom in on the stained glass window; find the listed items.
- Solution:
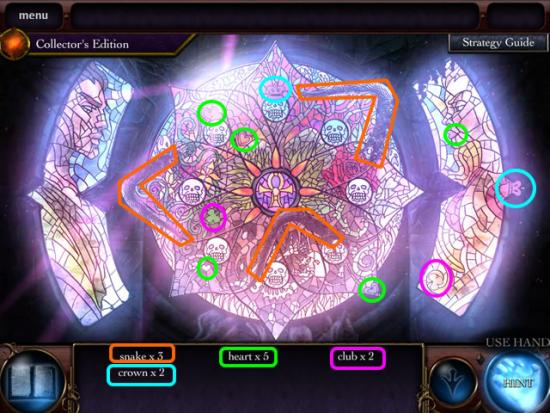
- Receive the GOLDEN SERPENT TRIFECTA for finding all of the items.
- Enter the elevator to return to the main hall; proceed to the study and the secret passage.
Secret Passage
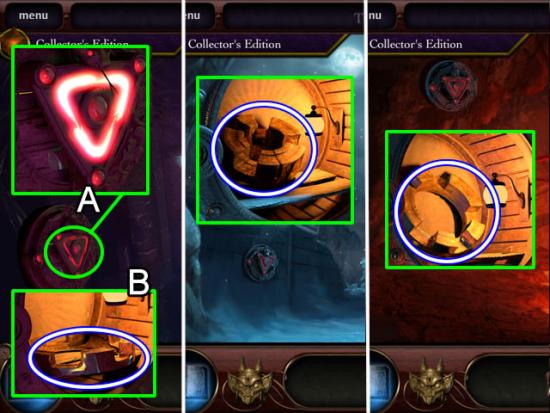
- Insert the GOLDEN SERPENT TRIFECTA in the outline on the safe (A); take the LOCK RING (1/3) from the open safe (B).
Bridge to Crypt
- Repeat the process to obtain LOCK RING (2/3).
Under the Theatre
- Repeat the process to obtain LOCK RING (3/3).
- Return to the main hall; enter the elevator and pull the lever
Cave
- Zoom in on the door.
- Insert the three LOCK RINGS to open a puzzle.
- The goal is to rotate the rings until all are in alignment and the three lights are lit.
- The best strategy is to work from the outside in. Light the bulbs using the outer ring. Match the pattern inward.
- Hint: All three of the bulb patterns from the outer ring to the inner ring are brown.
- Solution:
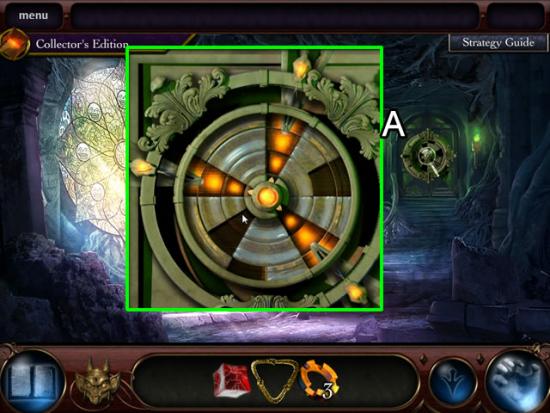
- Solving the puzzle opens the door.
Atrium of Souls
- Zoom in on the area above the ladder on the left to play a hidden object scene.
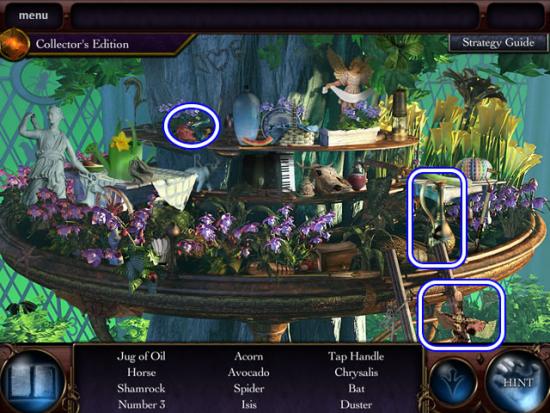
- Find the listed objects.
- Receive the FAUCET TAP, SACRED OIL and ISIS STATUETTE in inventory.
- Approach the worktable on the right.
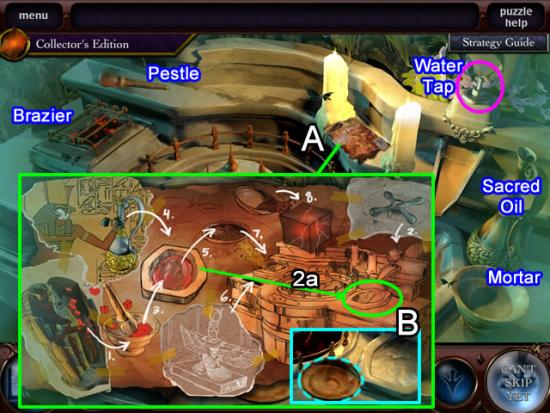
- Pick up the directions (A) and follow the instructions:
- Open the sarcophagus; add the cubes to the mortar; use the pestle to grind the cubes.
- Attach the FAUCET TAP to the water tap (pink); turn to pour water into the basin (2a) at the base of the spout.
- Add the crushed cubes to the water in the basin.
- Pour in the SACRED OIL.
- Use the bowl (dashed aqua) to scoop the mixture out of the basin (B).
- Put the ISIS STATUETTE in the slot below the brazier.
- Place the bowl containing the mixture on the brazier.
7a. Put the HAPSBURG CUBE (FRACTURED) on the pegs in the center of the work surface.
- Pour the heated mixture over the cube; take the HAPSBURG CUBE (SEALED).
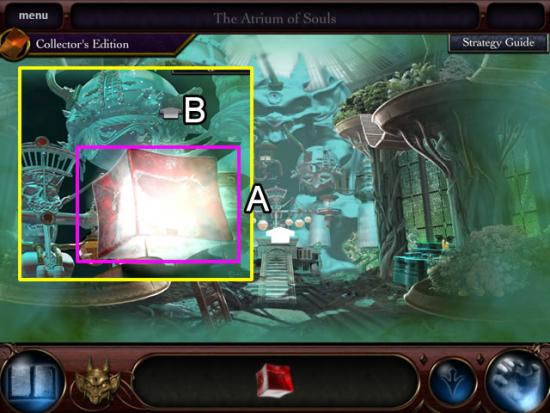
- Approach the scale (A).
- Place the repaired HAPSBURG CUBE on the scale pan.
- Zoom in on the tank on the right (B) to open a puzzle.
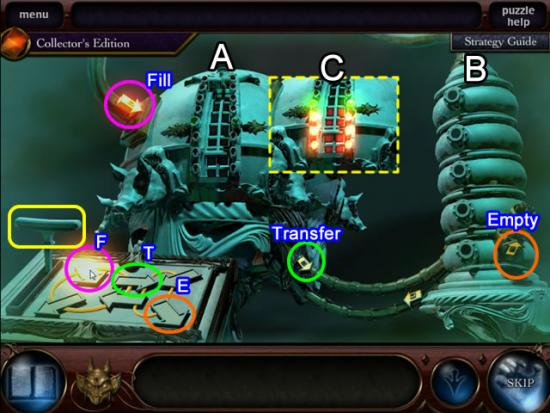
- The goal is to fill the large tank (A) to the level of the green lights (C).
- Use the lever and arrows on the control panel to fill the large tank, transfer from the large tank to the smaller tank (B) and empty the smaller tank.
- Click the arrow on the panel and then the lever to execute the movement.
- Tank (A) needs four units. Tank (B) holds five units. The best strategy is to transfer to and empty tank (B) until the volume in tank (A) is four units.
- Solution. F = Fill; T = Transfer; E = Empty. Always pull the lever to execute the movement. Here is one way to do it: F – T- E; T – F – T; E – T – E; T – F – T.
- The scale is now heavily tilted to the right.
- Exit the scale and zoom in on the left control panel.
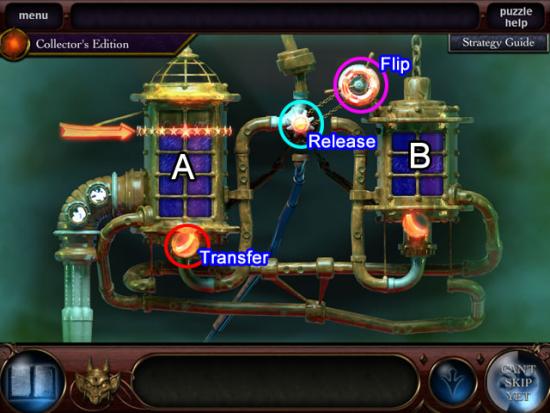
- The goal for this puzzle is the same as the other: fill tank (A) to the level of the red stars.
- Use the top wheel to flip the center pipe 45 degrees. The gear releases the liquid to either fill or empty a tank. The lower dial transfers the liquid from (A) to (B).
- Solution: F = Flip; R = Release; T = Transfer. Here is one solution: Fx2 – R – T; Fx2 – R -T; Fx2 – R -T.
- The goal of the last puzzle is to arrange the weights to balance the scale.
- Click a weight to swap it with another.
- Solution:
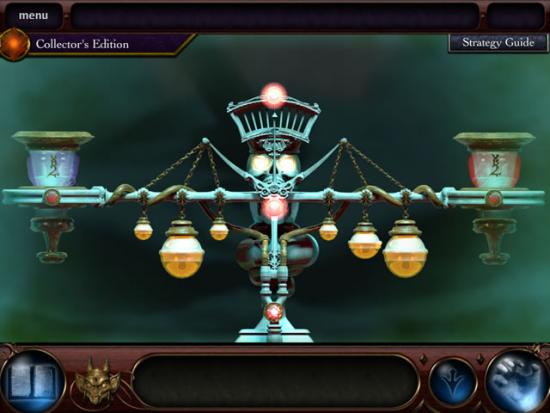
- View the final cutscene.
Her Crypt
- Go forward to enter the concept art gallery.
Congratulations! You have finished the bonus play for Theatre of the Absurd.
More articles...
Monopoly GO! Free Rolls – Links For Free Dice
By Glen Fox
Wondering how to get Monopoly GO! free rolls? Well, you’ve come to the right place. In this guide, we provide you with a bunch of tips and tricks to get some free rolls for the hit new mobile game. We’ll …Best Roblox Horror Games to Play Right Now – Updated Weekly
By Adele Wilson
Our Best Roblox Horror Games guide features the scariest and most creative experiences to play right now on the platform!The BEST Roblox Games of The Week – Games You Need To Play!
By Sho Roberts
Our feature shares our pick for the Best Roblox Games of the week! With our feature, we guarantee you'll find something new to play!Type Soul Clan Rarity Guide – All Legendary And Common Clans Listed!
By Nathan Ball
Wondering what your odds of rolling a particular Clan are? Wonder no more, with my handy Type Soul Clan Rarity guide.


