![All VV Ultimatum Titles [How to Get]](/wp-content/uploads/2026/06/vv-ultimatum-titles.jpg "All VV Ultimatum Titles [How to Get]")
All VV Ultimatum Titles [How to Get]
Do titles provide buffs?


Welcome to the The Treasures of Mystery Island: The Gates of Fate walkthrough on Gamezebo. The Treasures of Mystery Island: The Gates of Fate is an Interactive, Hidden Object game played on PC, created by Alawar Five-BN and available at Alawar. This walkthrough includes tips and tricks, helpful hints, and a strategy guide for how to complete Treasures of Mystery Island: The Gates of Fate.
Welcome to the The Treasures of Mystery Island: The Gates of Fate walkthrough on Gamezebo. The Treasures of Mystery Island: The Gates of Fate is an Interactive, Hidden Object game played on PC, created by Alawar Five-BN and available at Alawar. This walkthrough includes tips and tricks, helpful hints, and a strategy guide for how to complete Treasures of Mystery Island: The Gates of Fate.
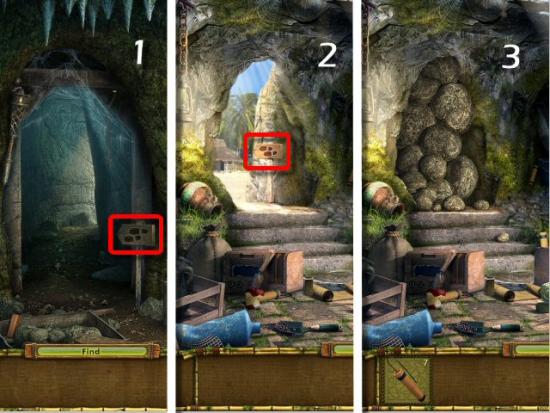
Click on Play to start your adventure and watch the Introduction.
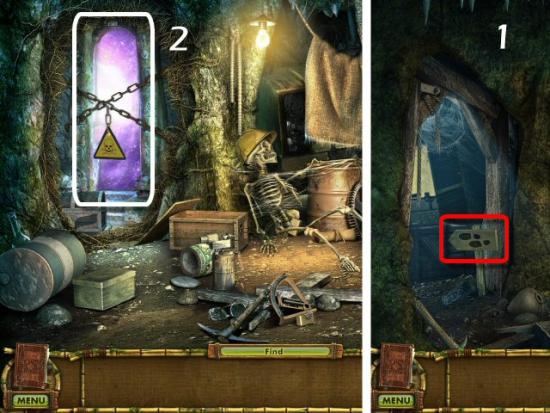
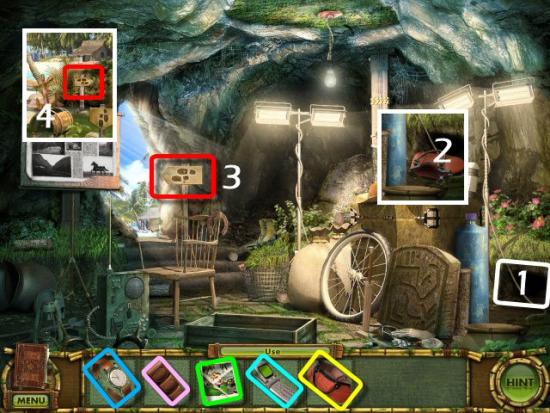
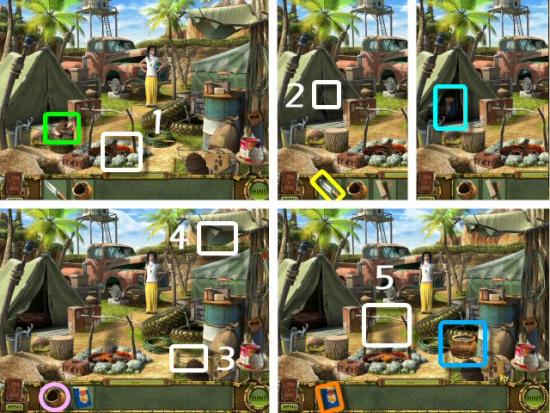
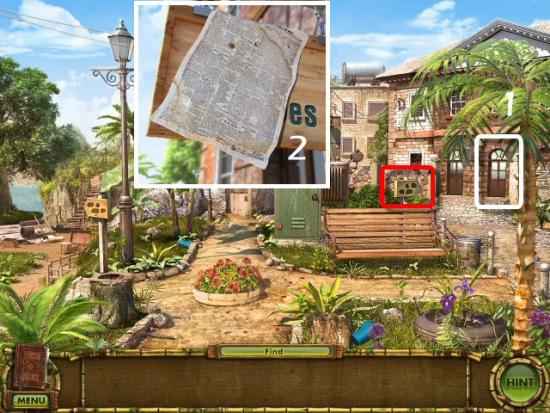
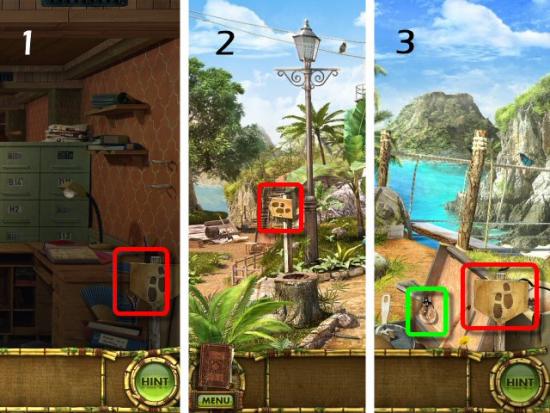
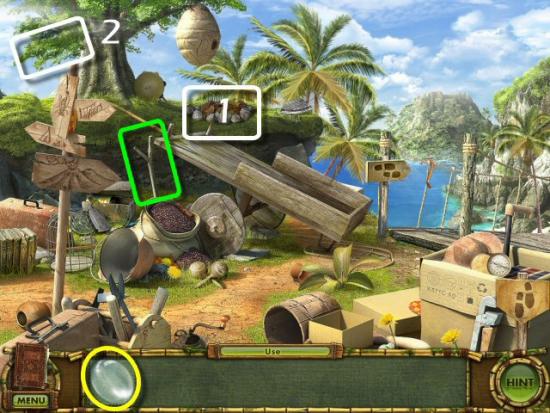
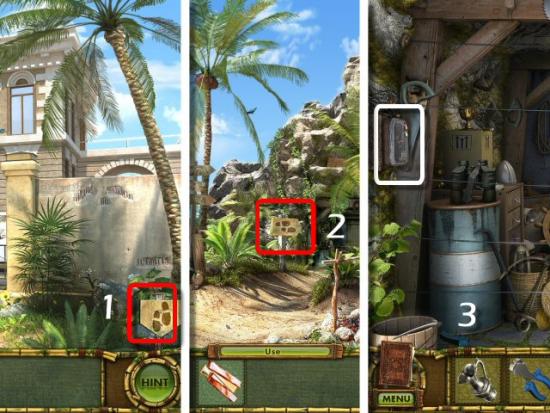
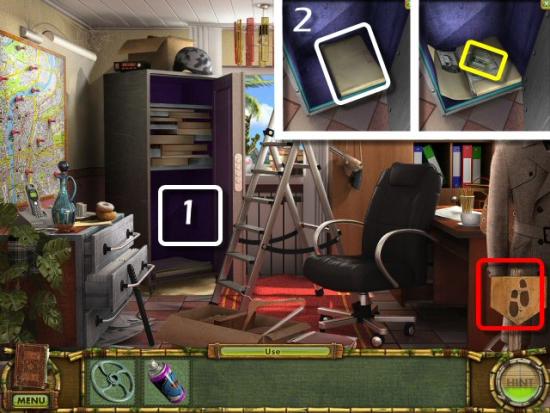
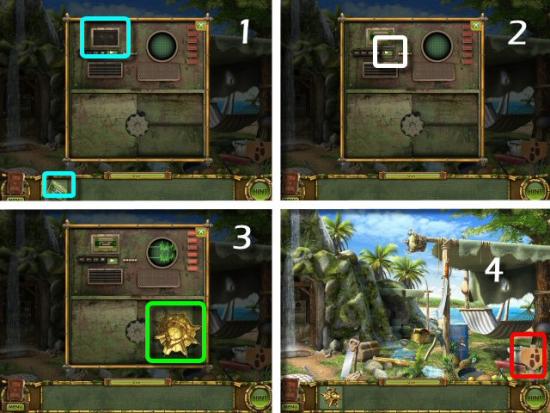
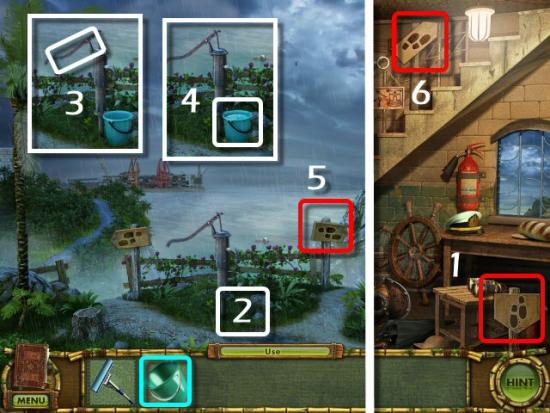
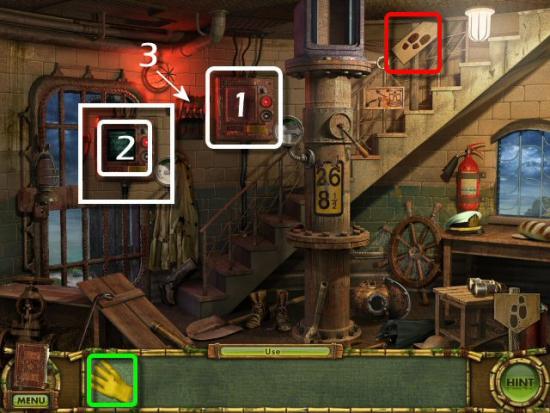
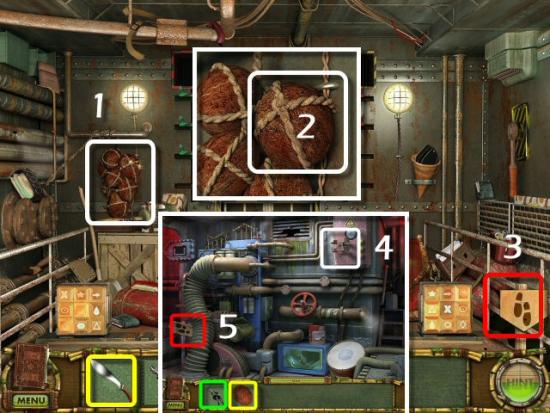
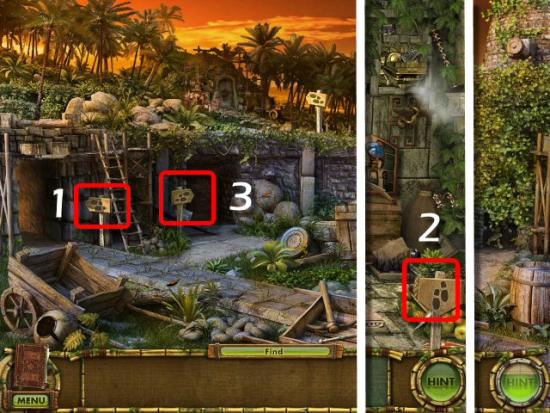
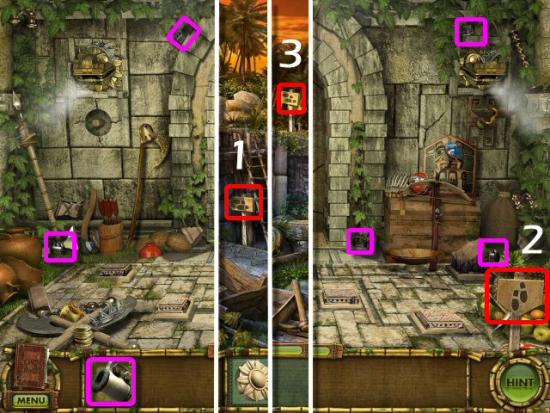
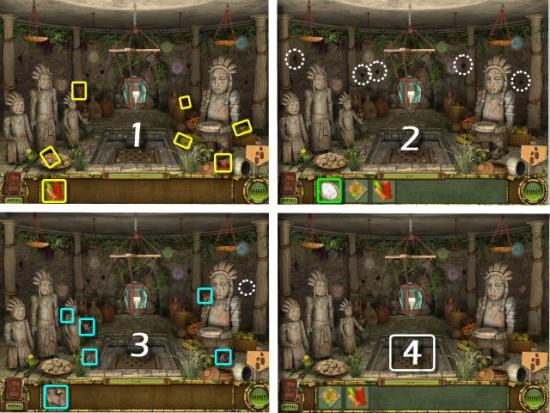
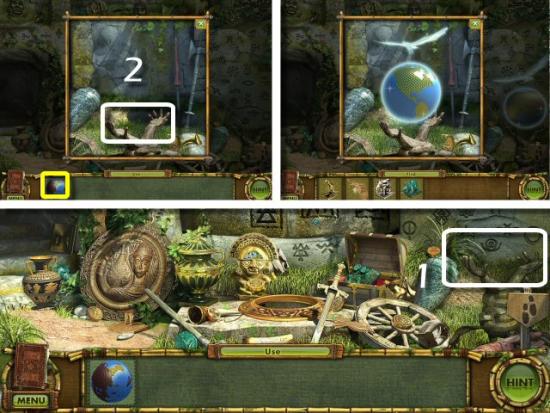
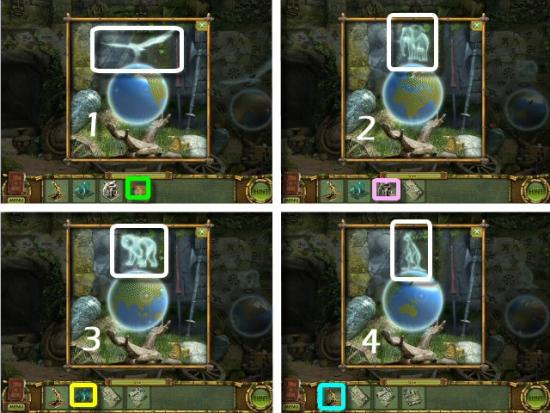
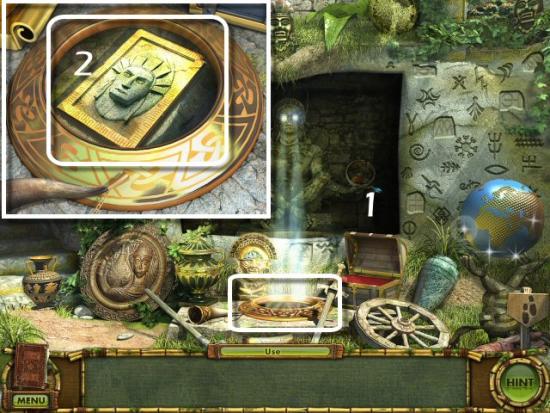
Click on the Signboard (1), make your way to the Entrance, click on the Signboard (2) to go outside and wait for the Rockslide to subside (3).

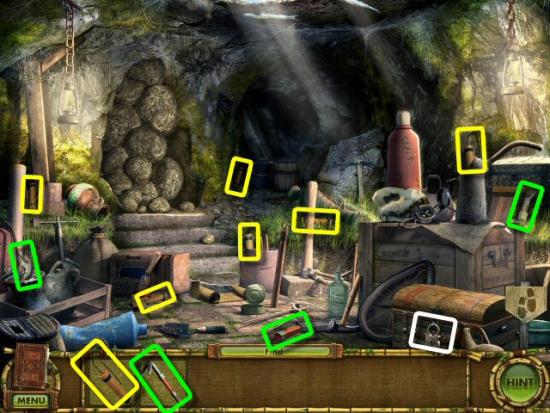
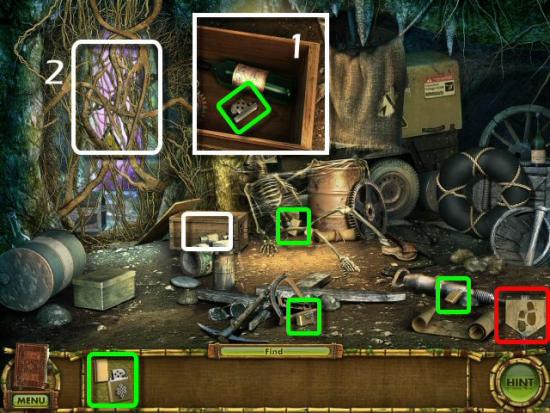
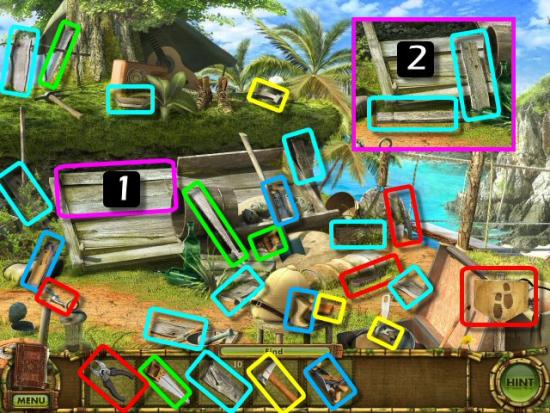
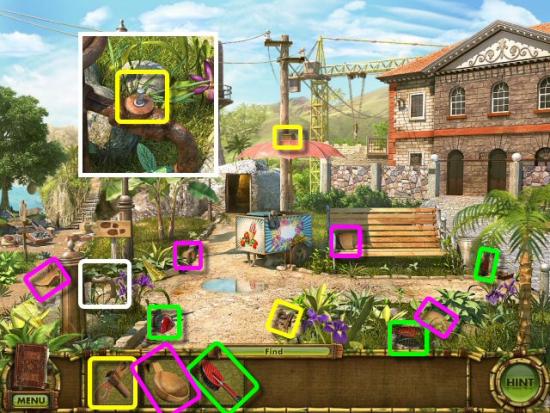
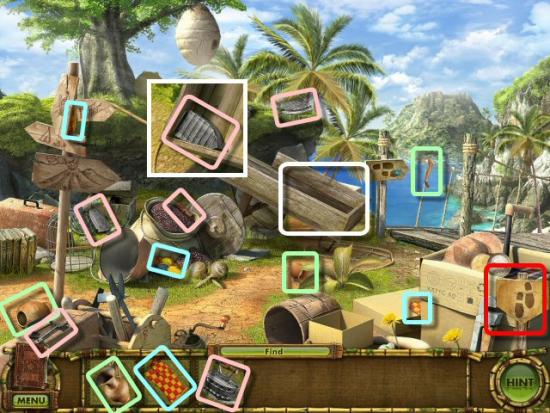
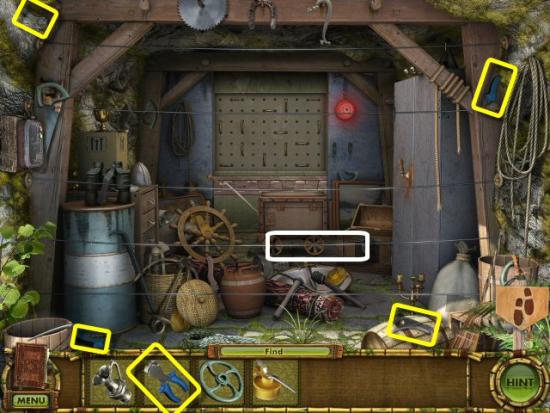
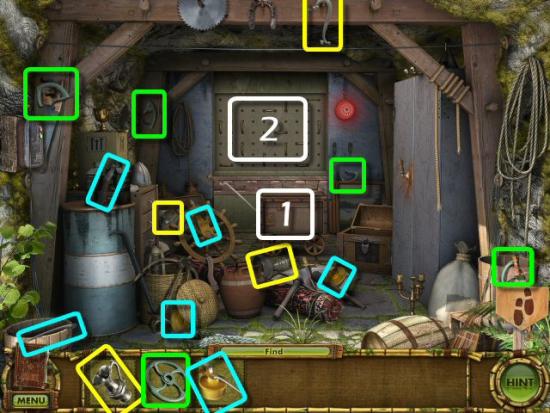
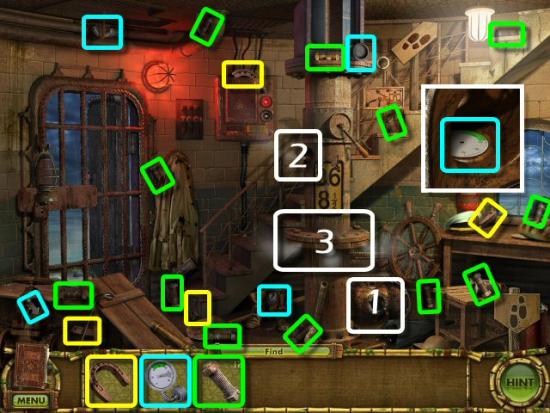
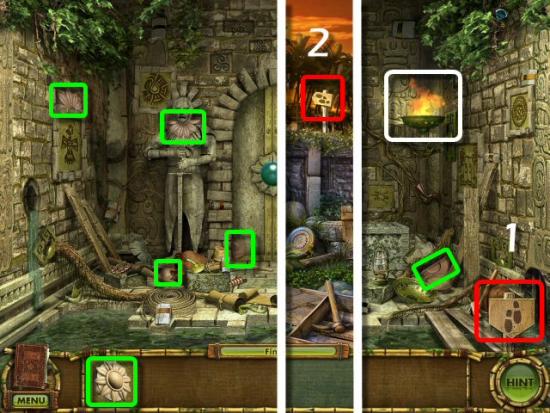
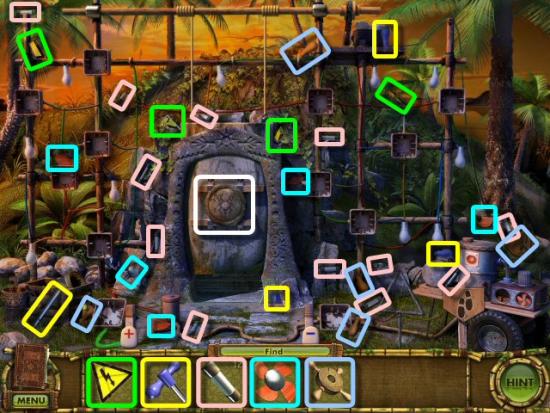
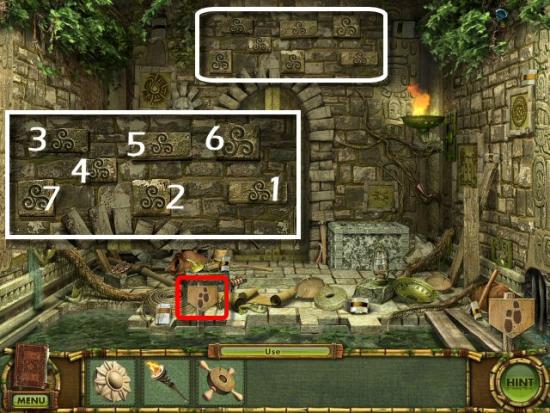
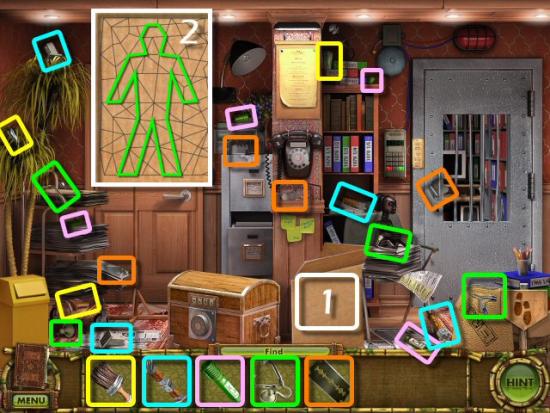
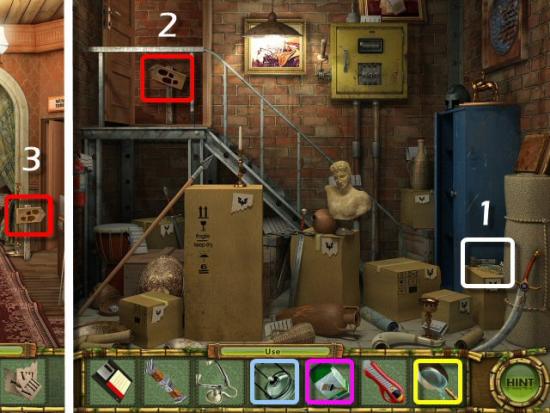
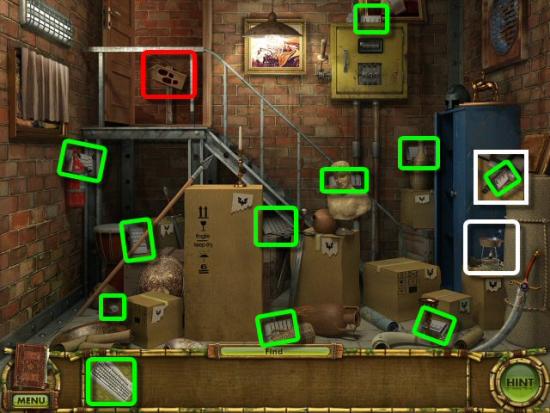
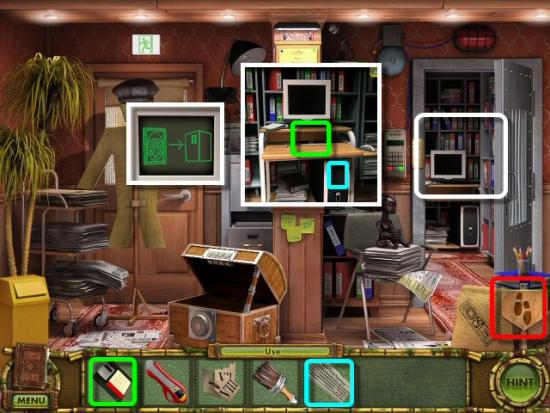
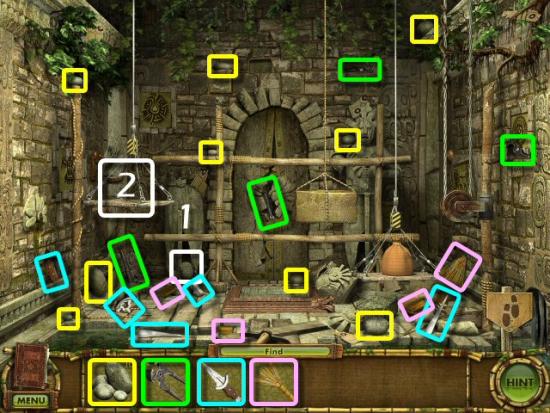
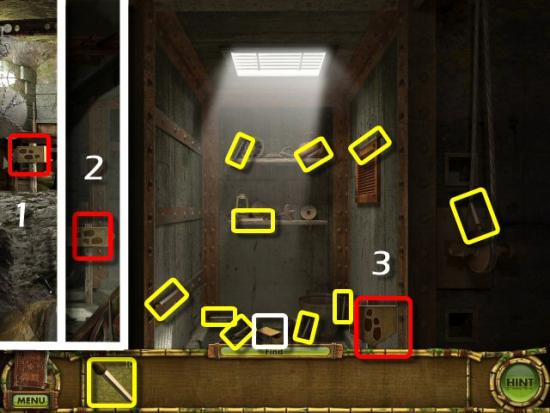
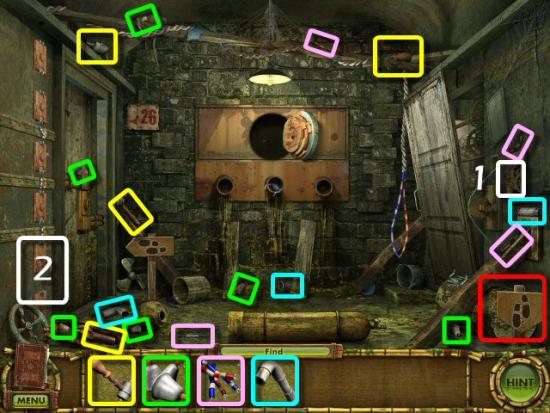
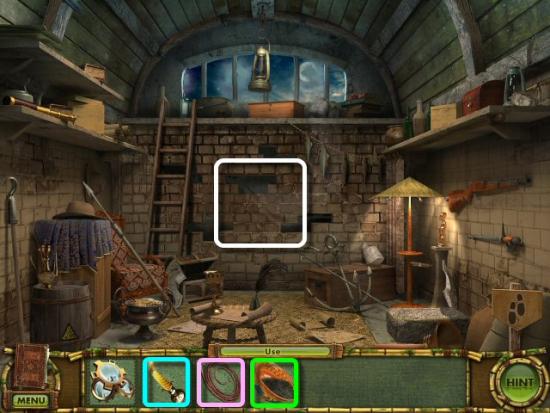
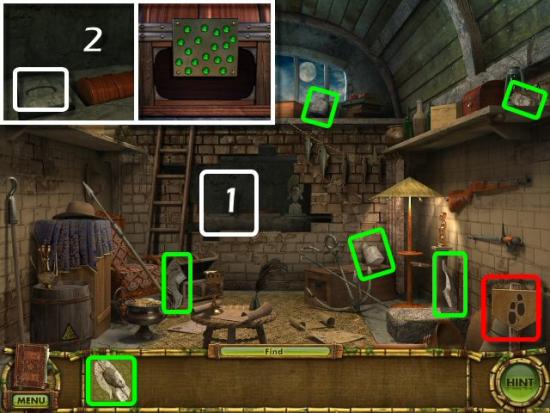
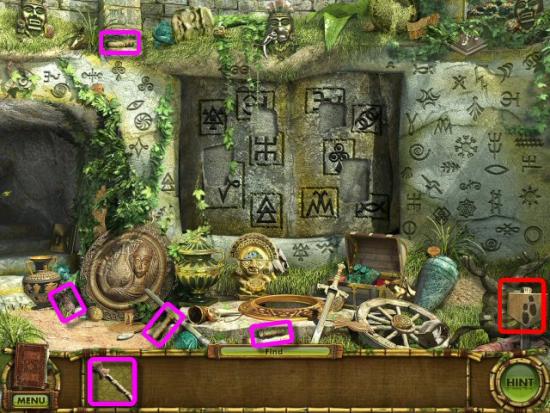
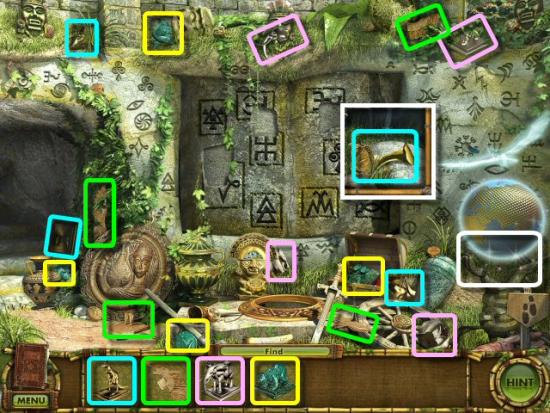
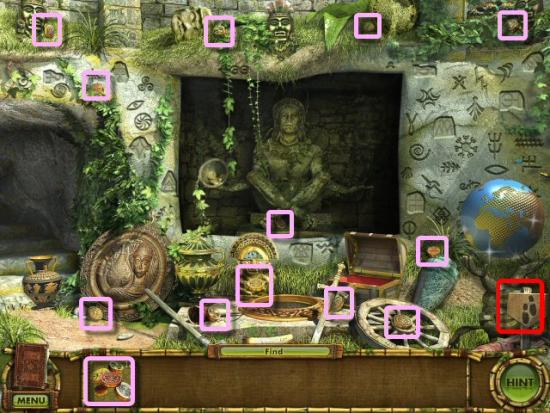
Find 6 of the 7 Sticks of Dynamite (yellow), click on the Chest (white) and find the 3 pieces of the Crowbar (green).
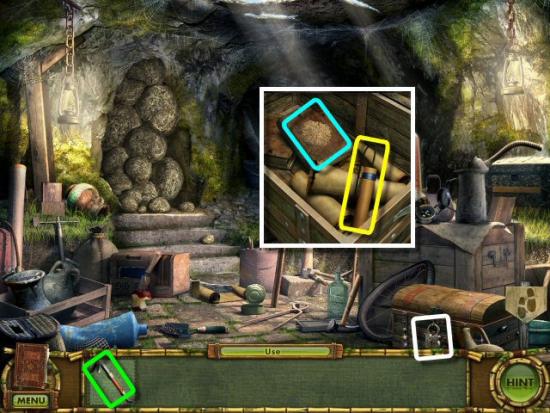
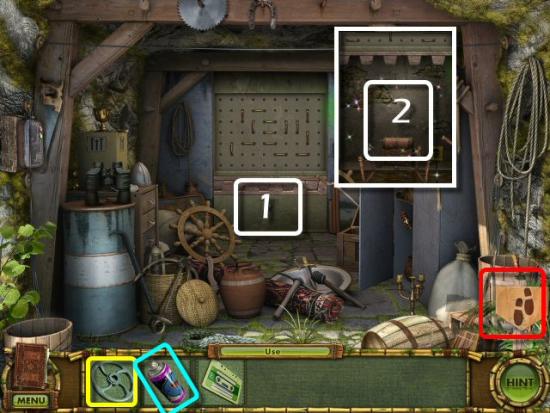
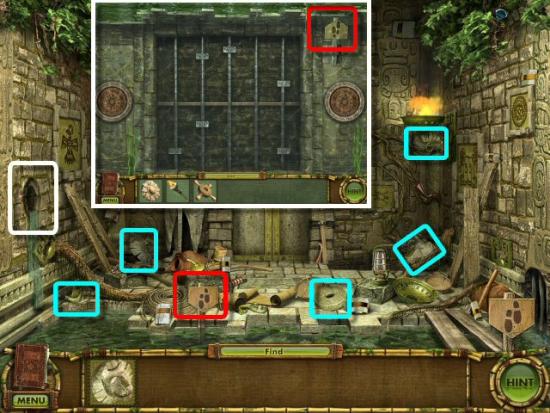
Click on the Chest (white), use the Crowbar (green), read the Journal (cyan), collect the final Piece of Dynamite (yellow).
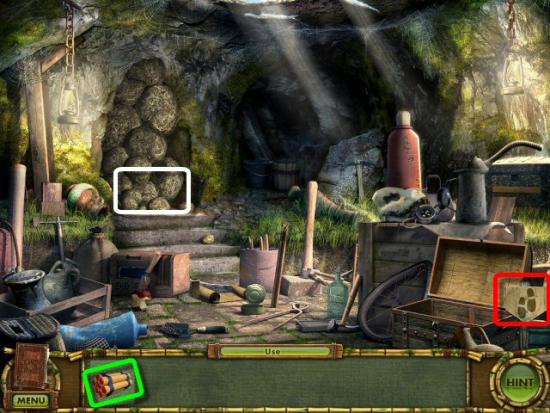
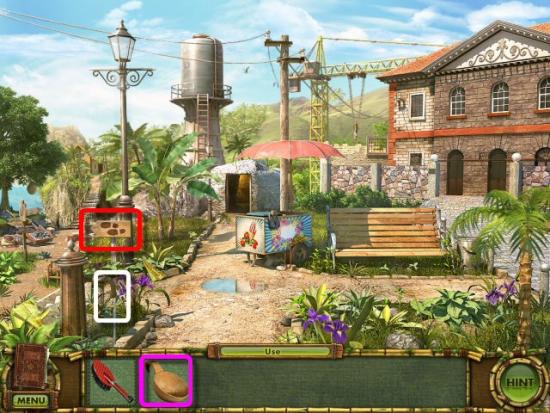
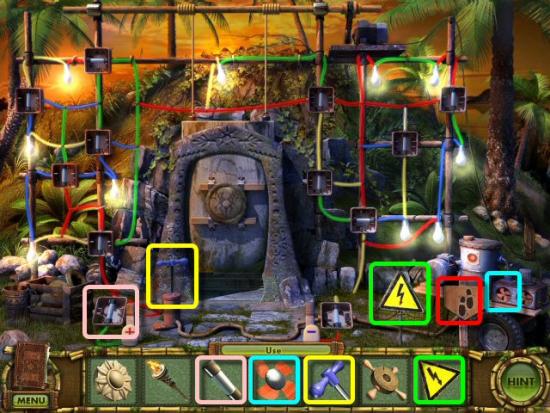
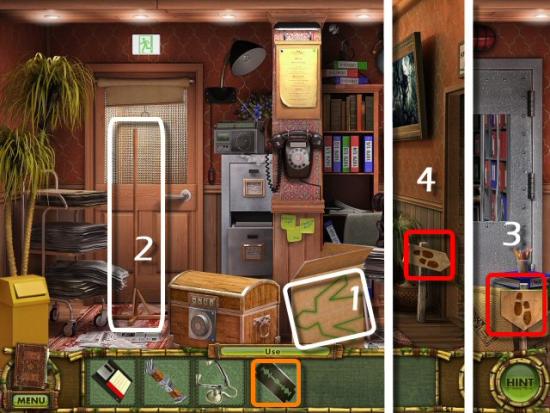
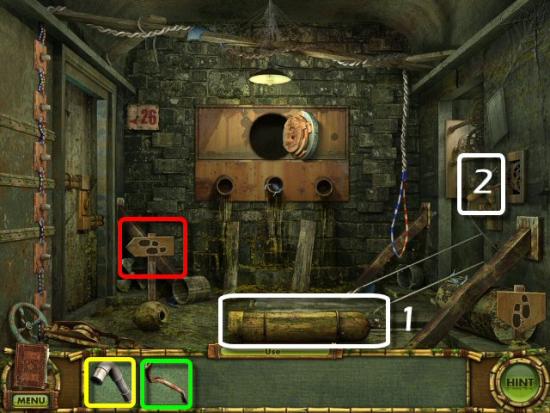
Use the Dynamite (green) on the Rockslide (white) and click on the Signboard (red) to return to the previous area.
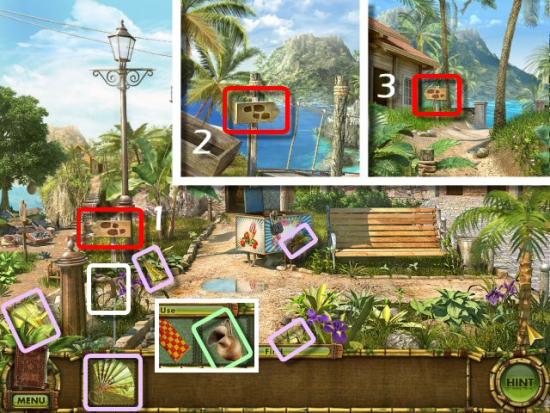
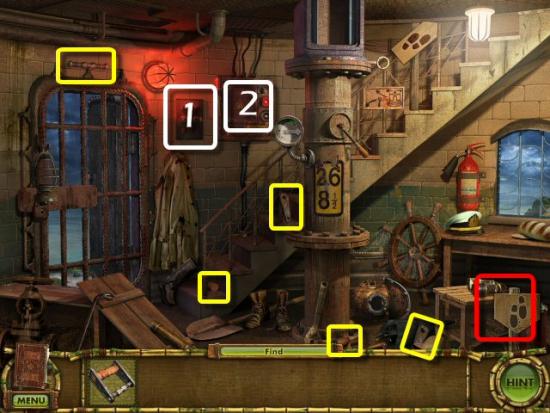
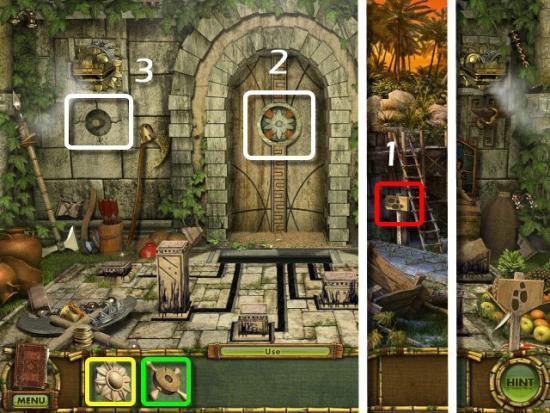
Click on the Left Signboard (1) to enter the next area and then click on the Gateway (2).
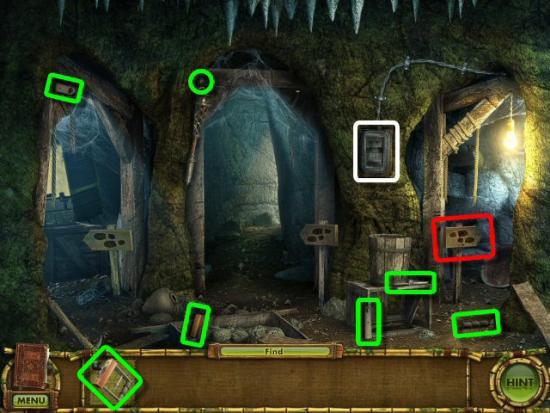
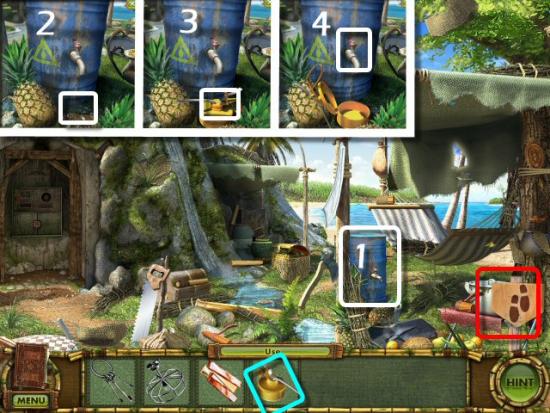
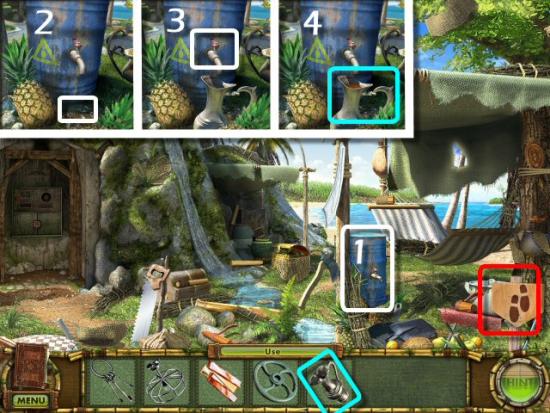
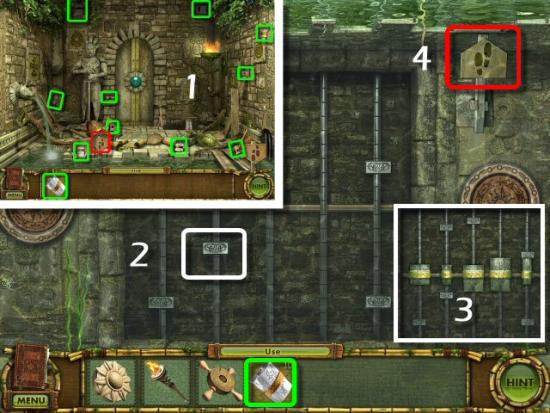
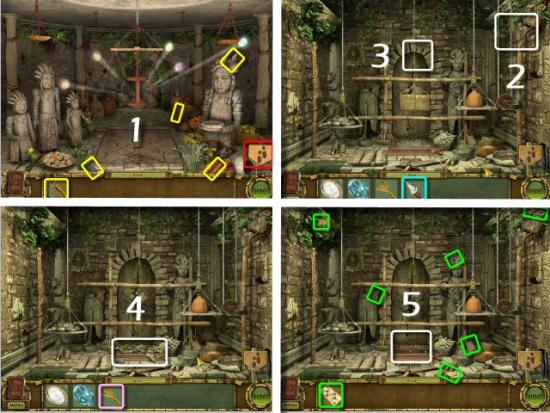
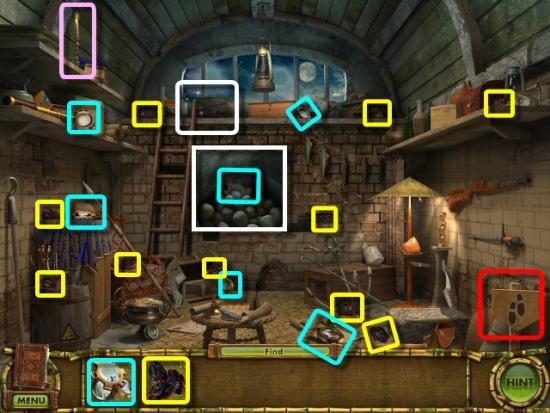
Collect the 4 pieces of the Lighter (green), including one in the Crate (1), and use it on the Vines (2). Click on the Signboard (red) to return to the previous area.
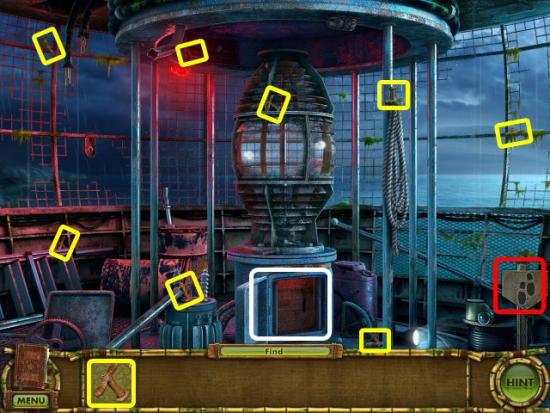
Find the 6 pieces of the Handle (green), click on the Switch (white), use the Handle on the Switch and click on the Switch Handle. Click on the Right Signboard (red) to enter the next area.
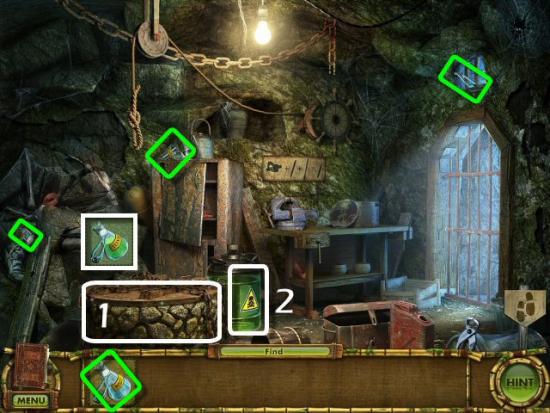
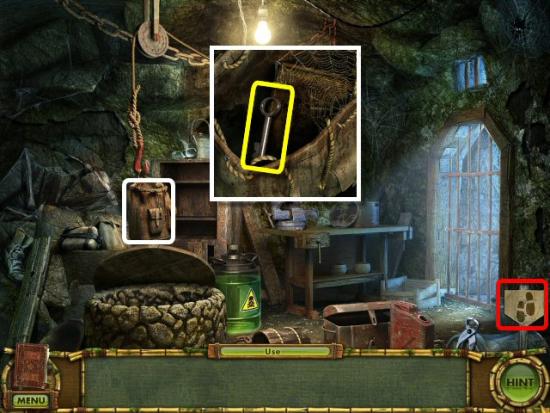
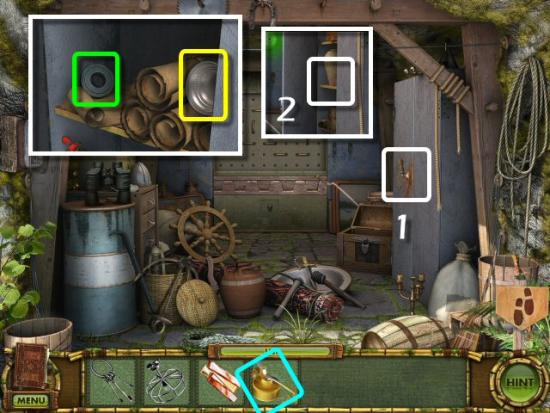
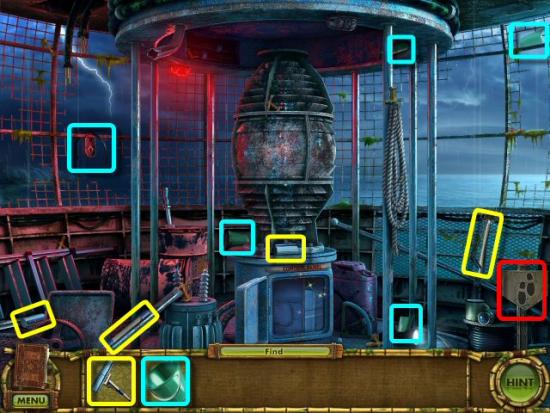
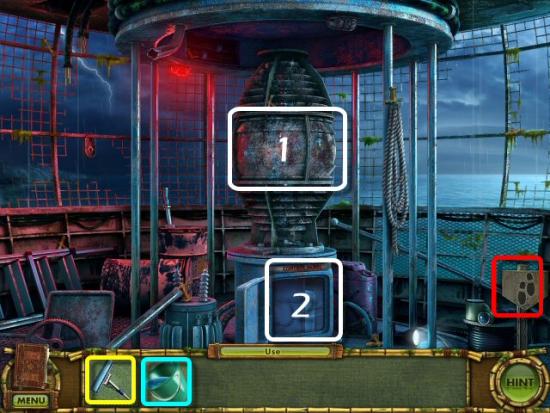
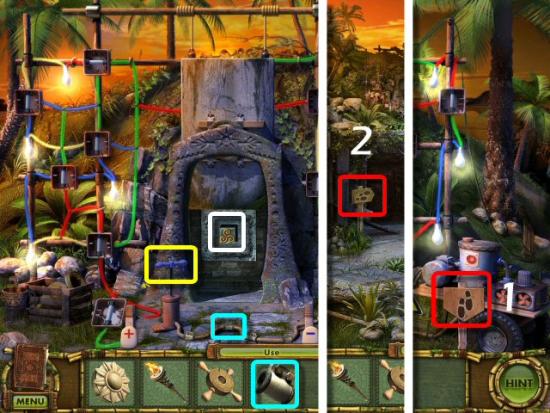
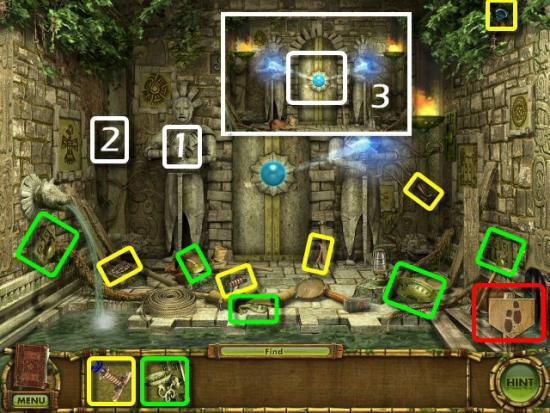
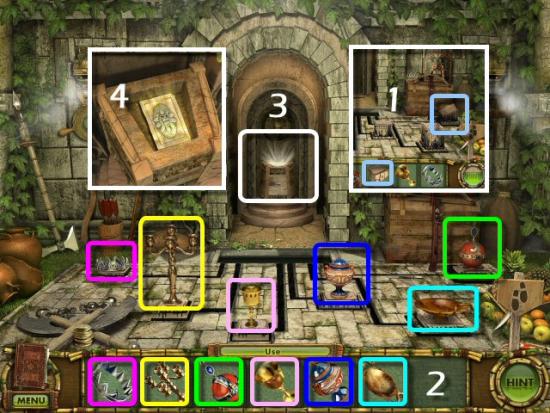
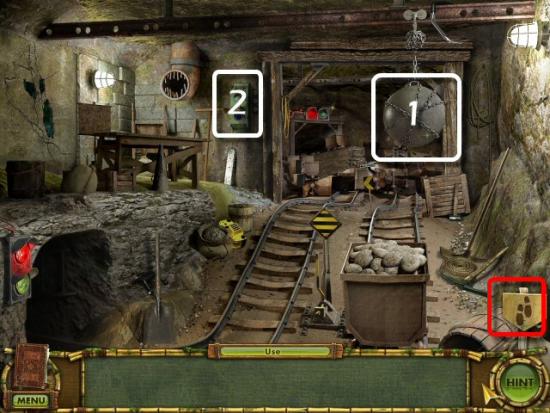
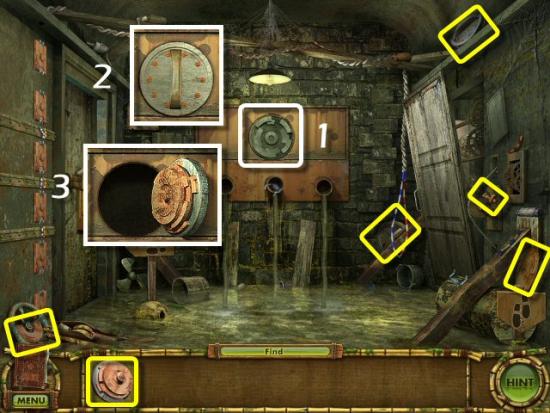
Click on the Chains (1), find the 3 pieces of the Flask (green), use it on the Vat of Acid (2), click on the Chains and use the Flask of Acid. Click on the Lid, 3 times, and then look inside.
Find the 3 pieces of the Hook (green), including one in the Cabinet (1), use the Hook on the Rope (2) and click on the Winch (3).

Click on the Backpack, click on the Key (yellow) and then return to the Gateway (click on the Signboard, then the Left Signboard in the previous area).
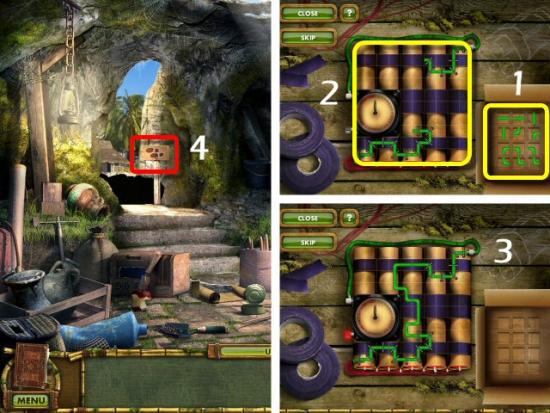
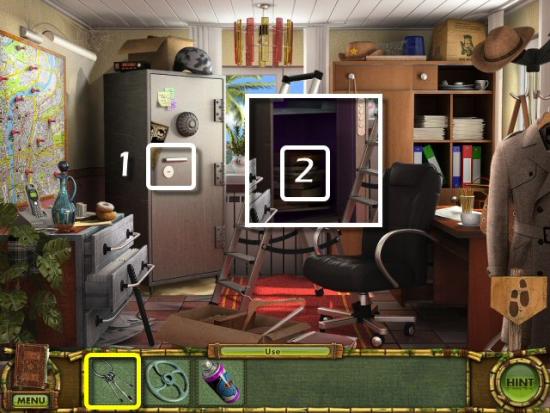
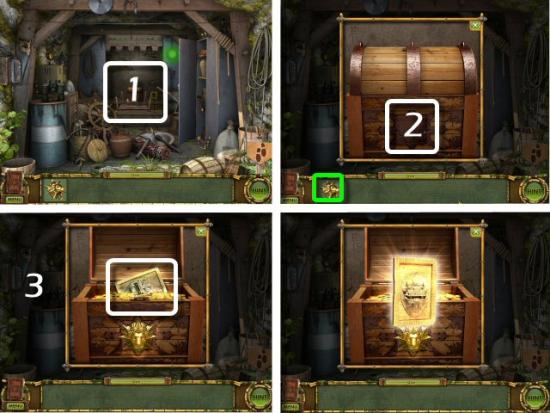
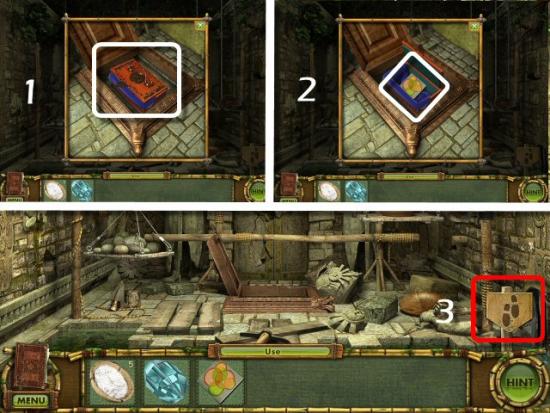
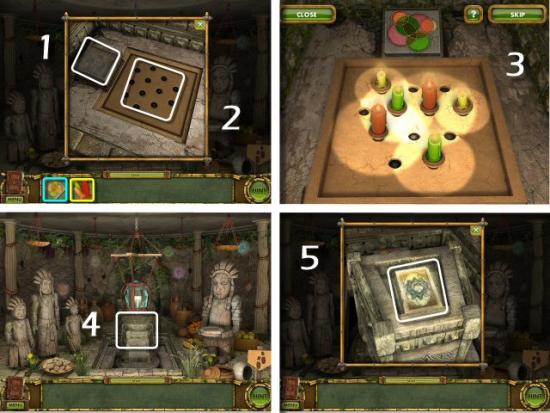
Click on the Chest (1), use the Key (2) on the Chest, click on the Lid, collect the Detonator (3) and then return to the Entrance (click on the Signboard, then the Middle Signboard in the previous area).
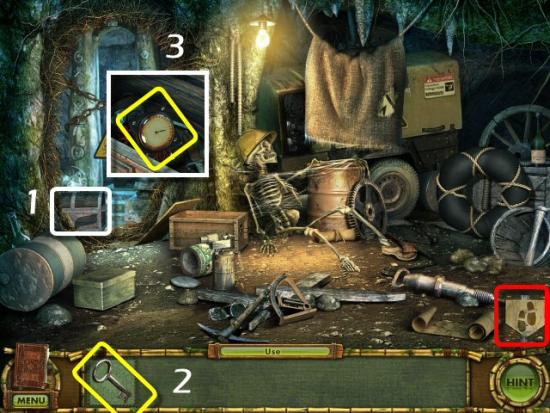
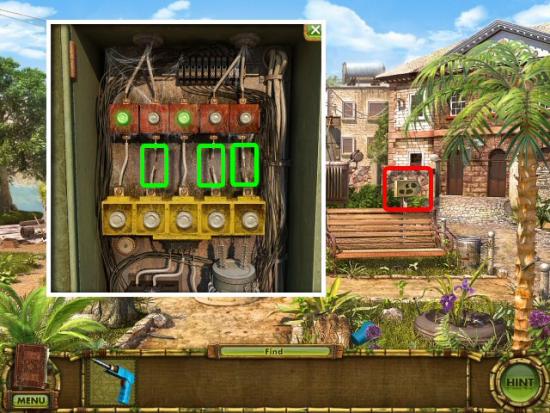
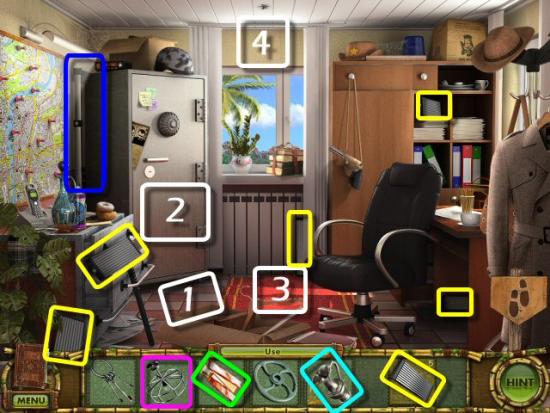
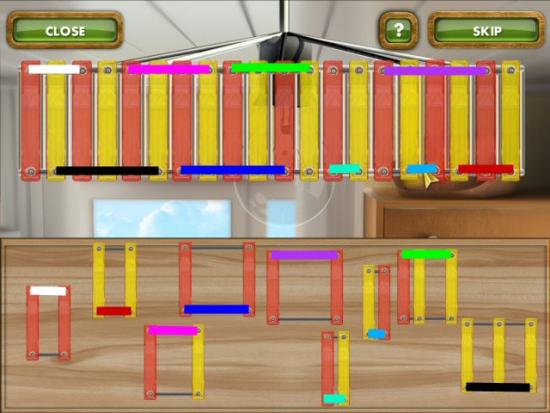
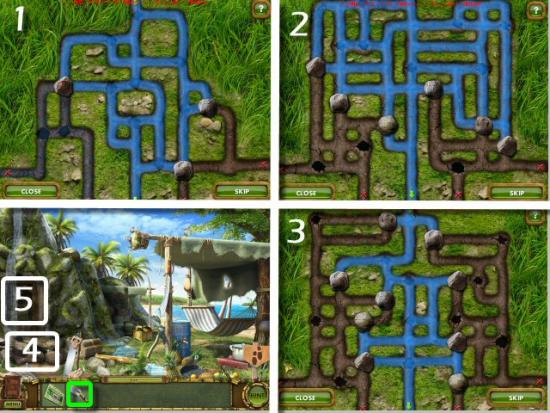
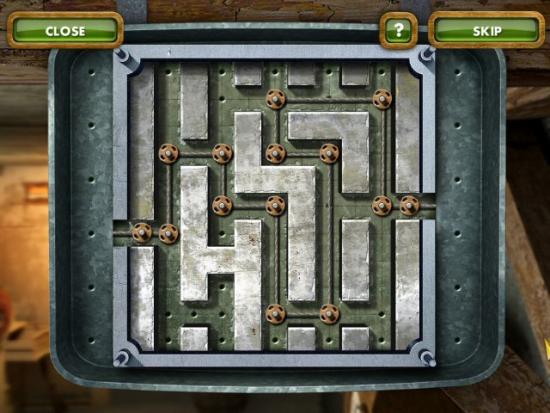
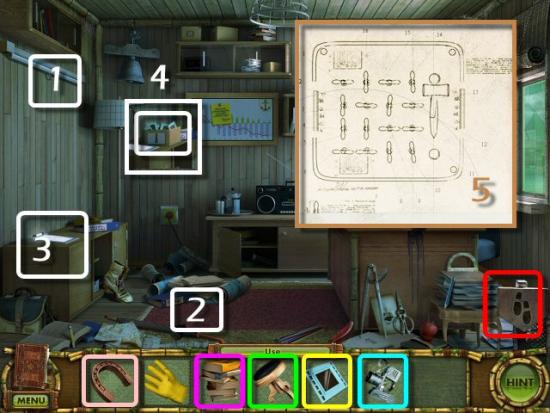
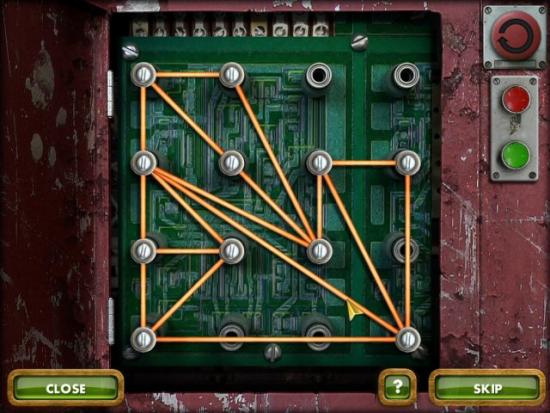
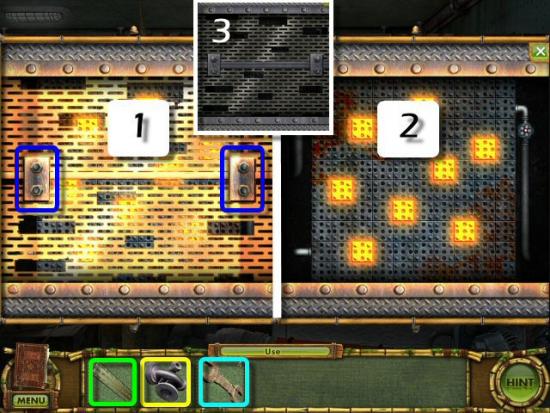
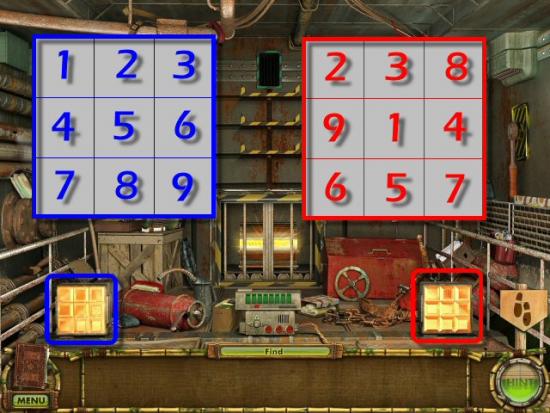
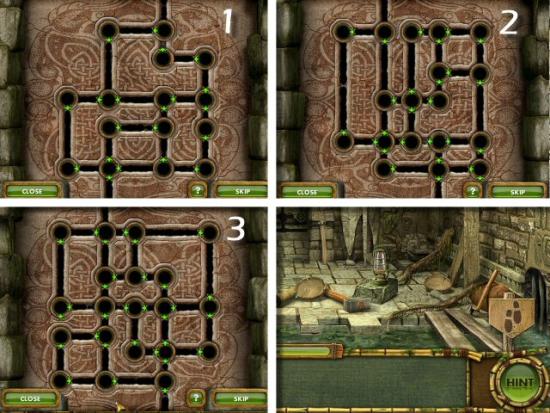
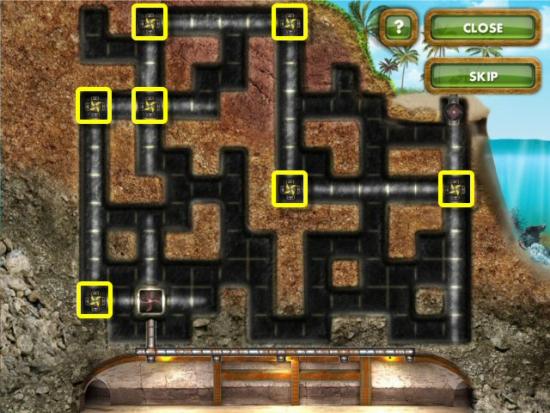
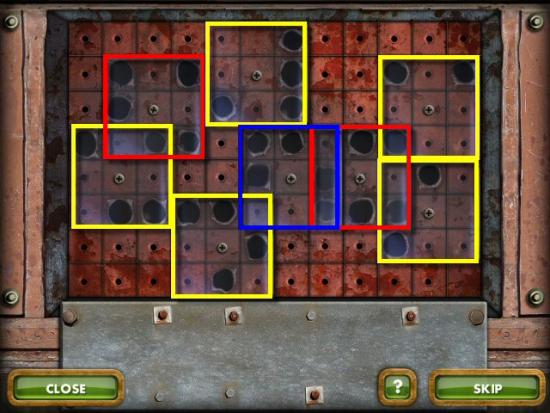
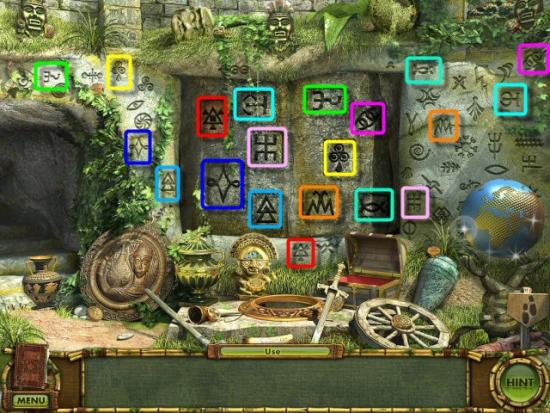
Use the Detonator on the Dynamite and then assemble the Wiring. Click on each piece of Wire (1) and place it in the Grid (2). You need to use all the pieces, in the correct location, because you will not need to rotate any of them. See the following for a solution (3); there may be other correct solutions. Click on the Signboard (4) to exit the Cave.
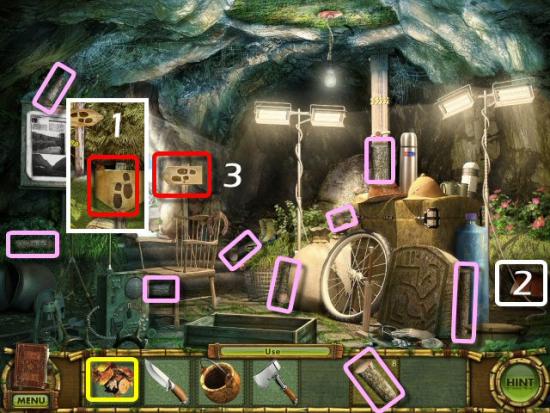
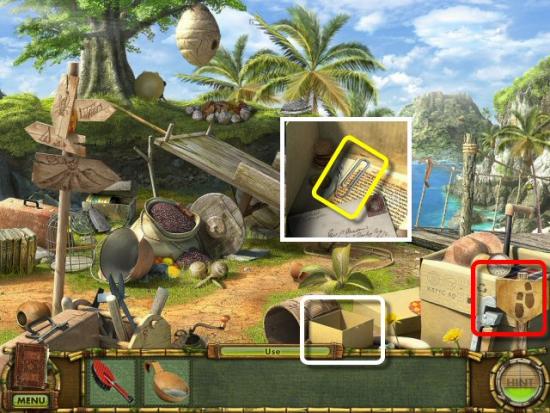
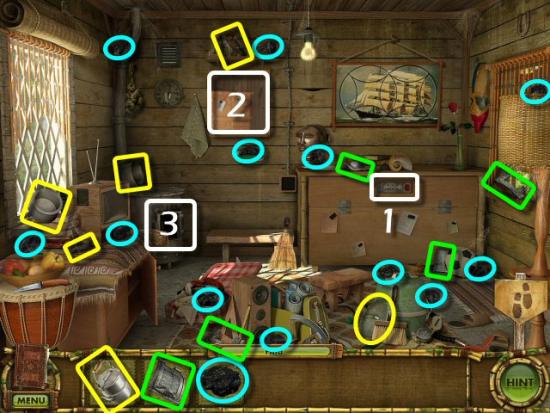
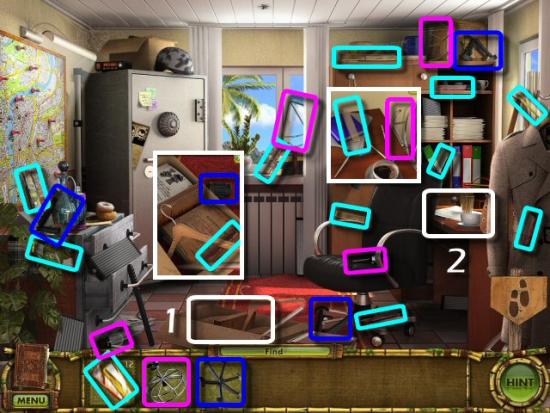
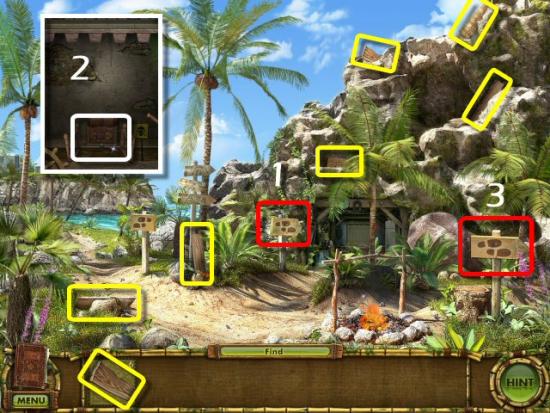
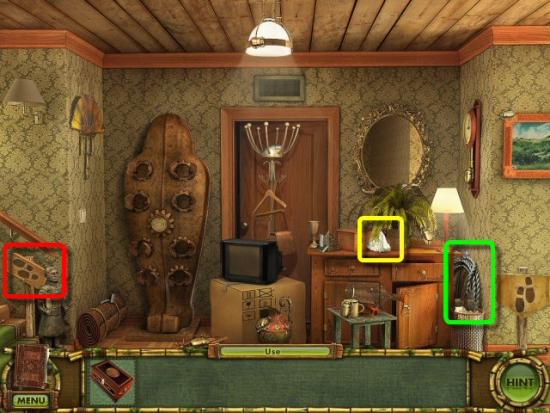
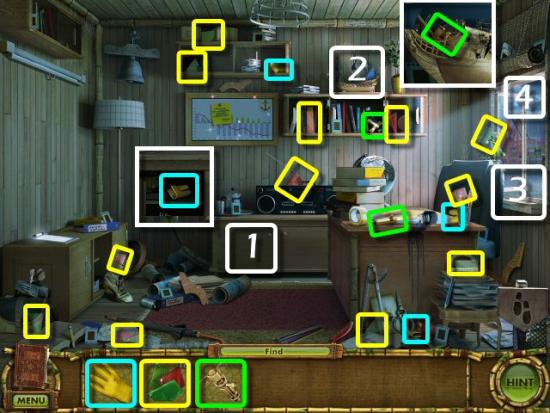
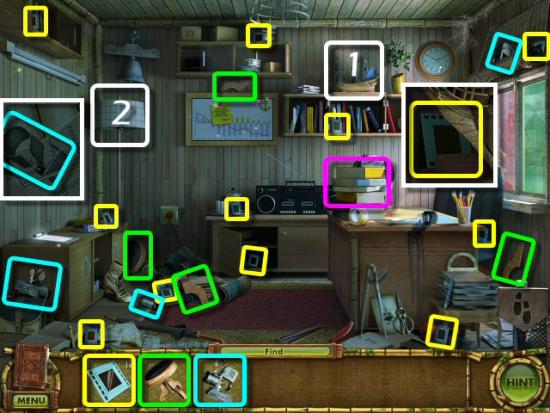
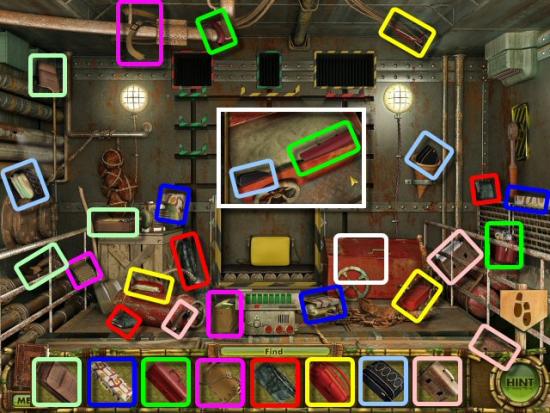
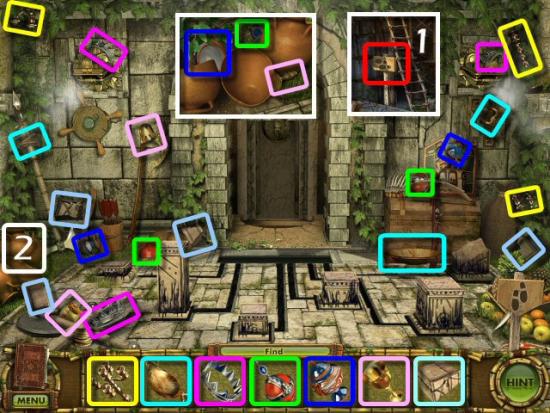
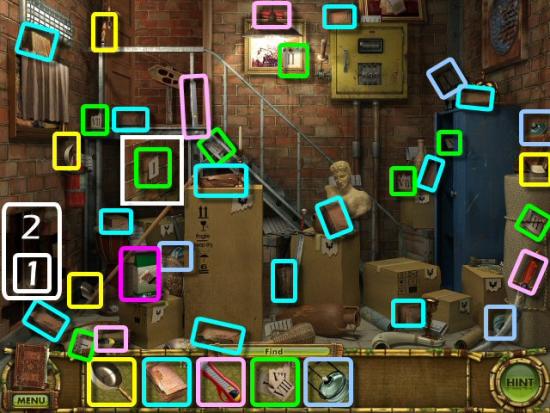
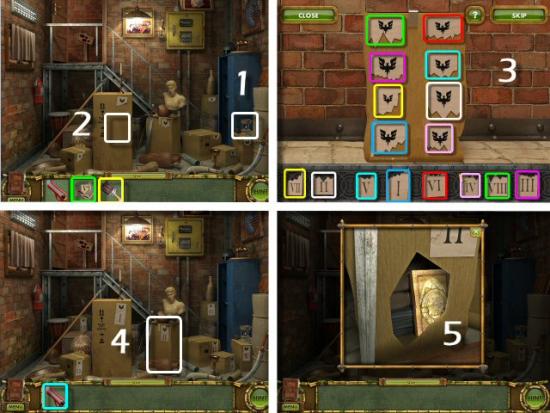
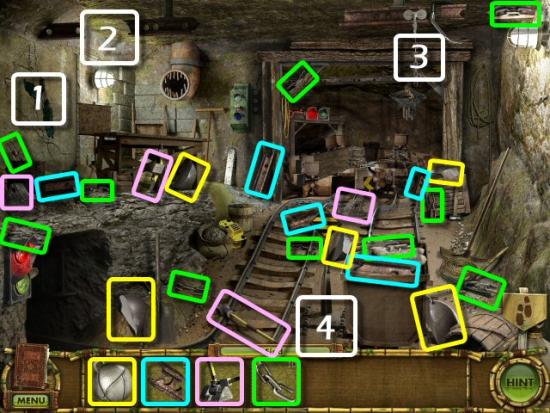
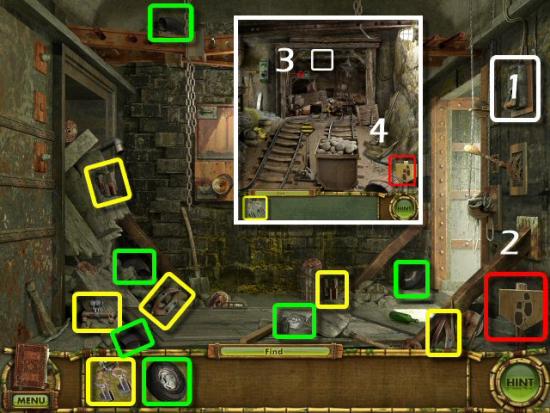
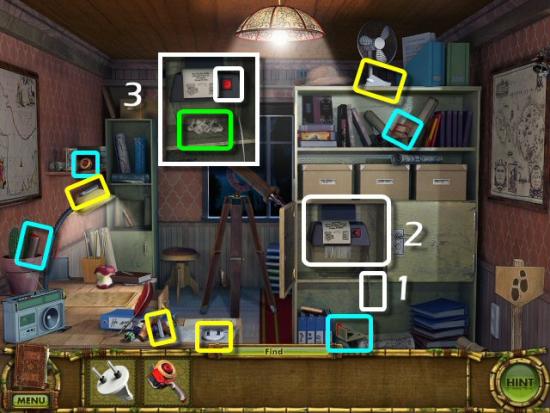
Find the 3 pieces of the Cell Phone (cyan), 3 pieces of the Photo (green), 8 pieces of the Newspaper (yellow), 3 pieces of the Chocolate (light magenta) and 3 pieces of the Watch (sky blue), including one piece of the Newspaper and the Cell Phone, inside the Crate (1). Use the Newspaper on the Board (2).

Newspaper Jigsaw Puzzle: Click and drag each piece of Newspaper to the Board (1), and click again, to place it. Placing the corner and edge pieces, first, will make quick work of solving this Jigsaw Puzzle. See the following for the solution (2). Click on the Signboard (3) to exit the Cave.

Find the 5 pieces of Lisa’s Purse (green) and click on the Signboard (red) to return to the Cave.
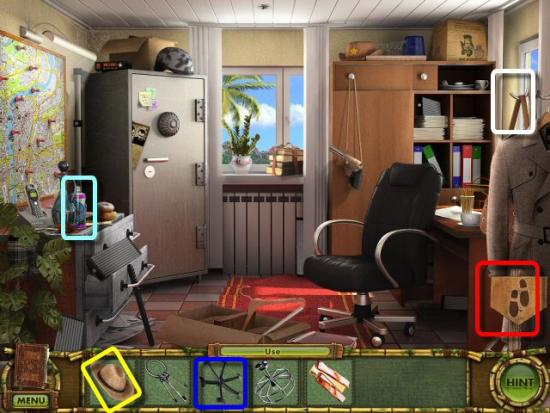
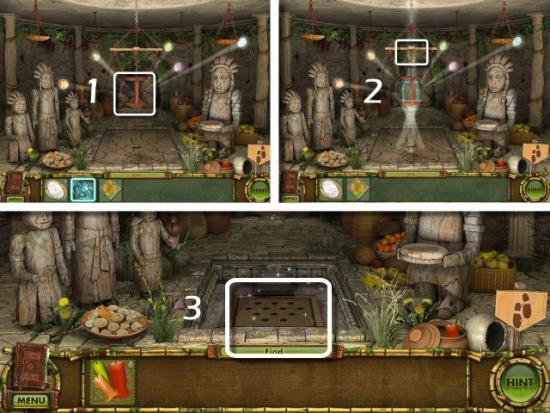
Use the Purse (yellow) on the Hole (1), use the Watch (sky blue), Chocolate (light magenta), Photo (green) and Cell phone (cyan) on the Purse (2) and then click on the Signboard (3) to return outside. Click on the Signboard (4) to continue to the Tents.
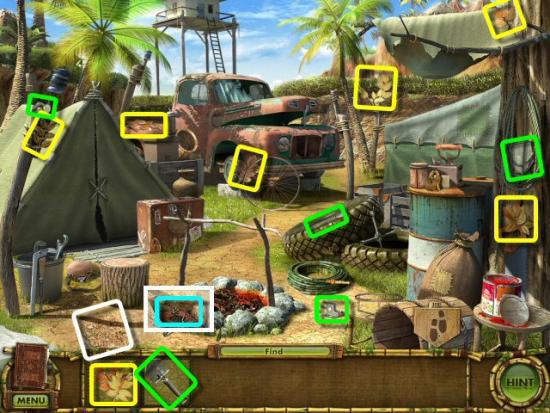
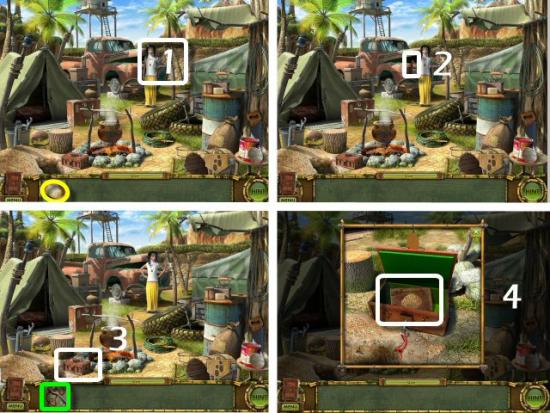
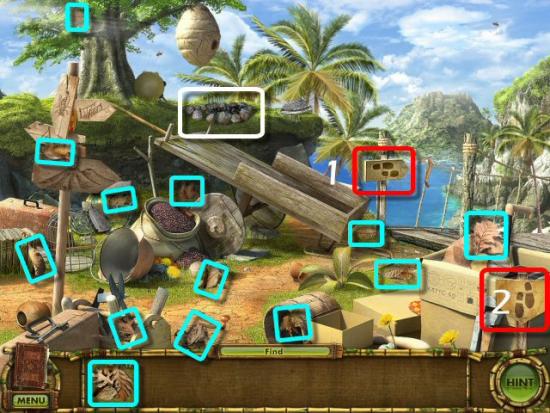
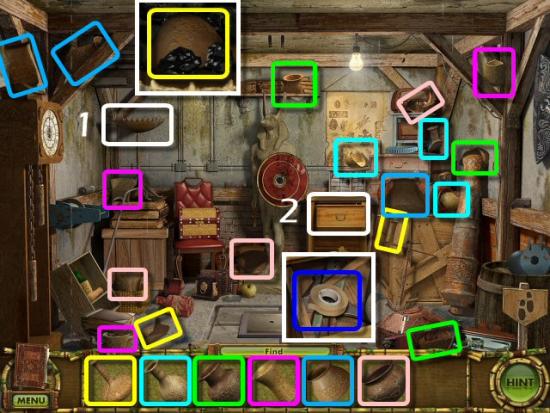
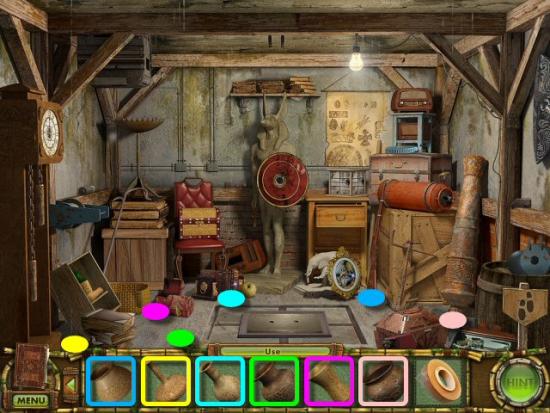
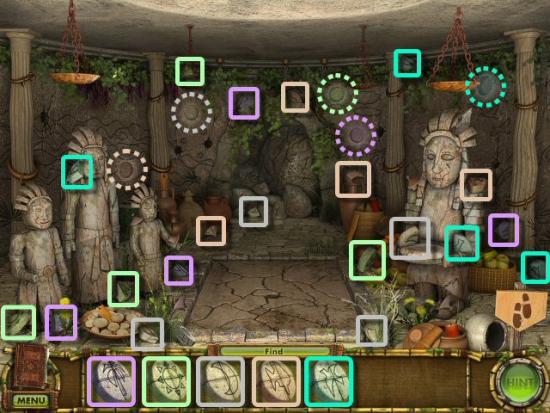
Find all 6 Leaves (yellow), 4 pieces of the Shovel (green), use the Shovel on the Ground (white), click on the Small Chest (cyan), then click on it again.
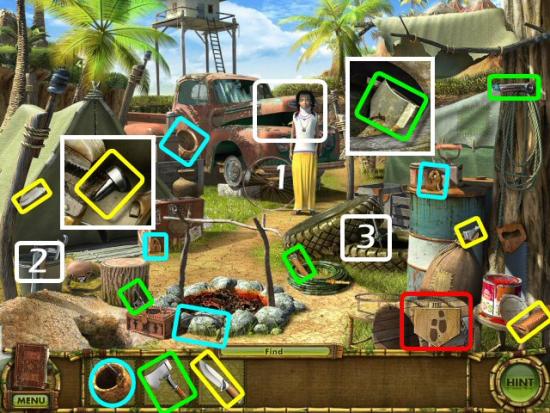
Click on Nicky (1), find the 4 pieces of the Pot (cyan), 4 pieces of the Axe (green) and 4 pieces of the Knife (yellow), including one piece of the Knife in the Bucket (2) and one piece of the Axe in the Tires (3). Click on the Signboard (red) to exit the area.
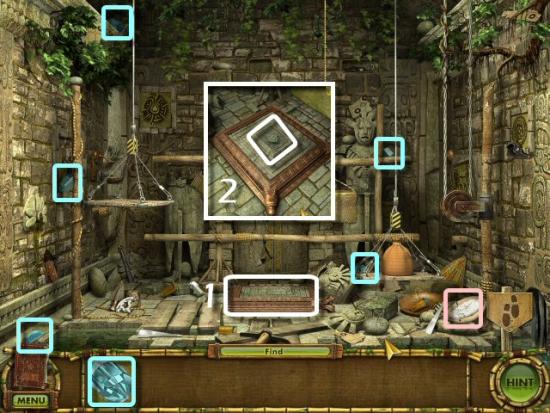
Click on the Signboard (1) to enter the Cave and click on Find to access the Inventory. Use the Leaves (yellow) on the Hole (2), click on Use to access the List, find 8 Logs (light magenta) and click the Signboard (3) to exit the Cave.
Click on the Signboard (1) to return to the Tents, use the Logs (light magenta) on the Stump (2) and use the Axe (green) on the Logs (3).

Chopping Logs Minigame: This is a skill game, where you need to click on the Axe when it’s over the chip in the Log. The easiest way to accomplish this is to position your cursor directly above the chip and click on the Axe as it passes by. It’s not difficult, and you may miss a couple times, but you should be able to complete chopping all 8 Logs, in a very short time. Click on the following for a video example, where I miss, several times, LOL If you’d rather not play this game, just click on the Skip button.
Collect the Firewood (green) and use it on the Fire (1). Use the Knife (yellow) on the Tent (2) and collect the Pasta (cyan). Use the Pot (light magenta) on the Stand (3) and click on the Tarp (4). Collect the Pot of Water (sky blue) and use it on the Fire (5), use the Pasta (orange) on the Pot of Water and collect the Cooked Pasta.
Use the Cooked Pasta (yellow) on Nicky (1), collect the Key (2), click on the Box (3), use the Key (green) on the Box, click on the Journal (4) and click on the Signboard to return to the previous area.
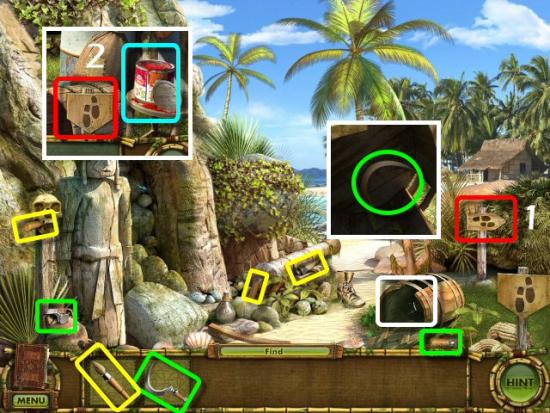
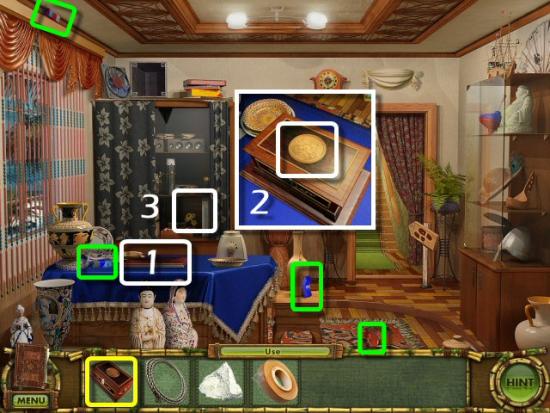
Find the 3 pieces of the Paintbrush (yellow) and the 3 pieces of the Sickle (green), including one piece of the Sickle inside the Barrel (white), and then click on the Signboard (1) to return to the Tents. Use the Paintbrush on the can of Red Paint (cyan) and click on the Signboard to return to the Cave entrance (2).
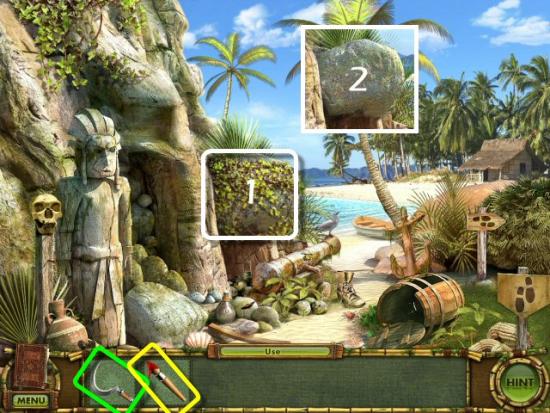
Use the Sickle (green) on the Vines (1), click on the Rock (2) and then use the Paintbrush (yellow).
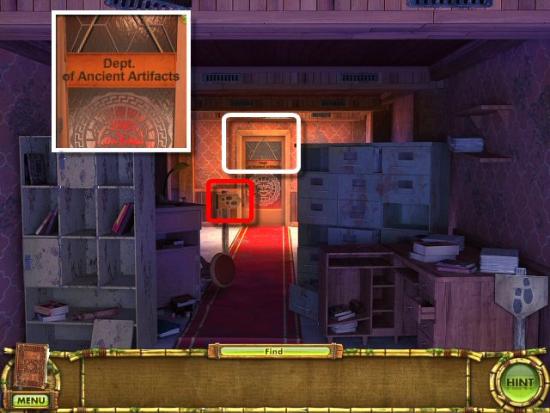
Click on the Door (1), click on the Newspaper (2) and then click on the Signboard (red).
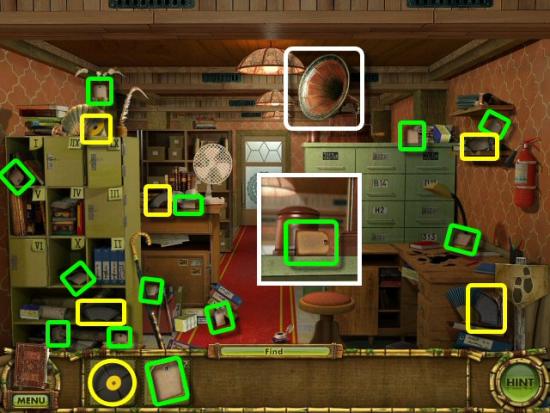
Click on the Archivist, find the 5 pieces of the Record (yellow), 11 of the 12 Labels (green), click on the Gramophone (white), use the Record on the Gramophone, click on the Handle and collect the last Label.
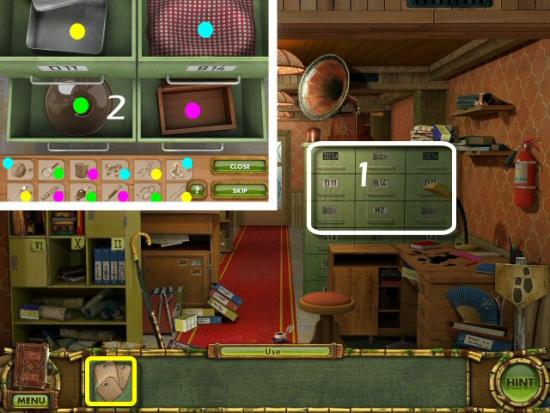
Use the Labels on the Filing Cabinets (1) and sort them according to their characteristics: Metal (yellow), Cloth (cyan), Glass (green) or Wood (magenta). Click on each Label and then click on the correct container (2).
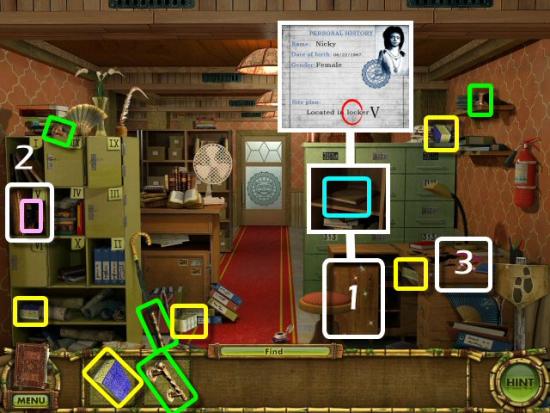
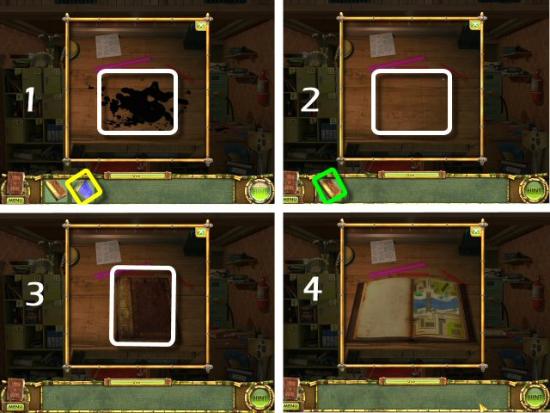
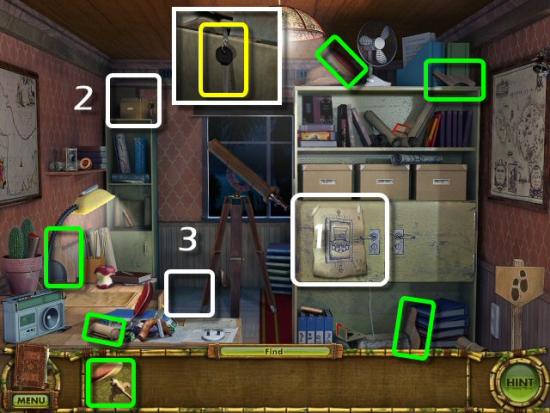
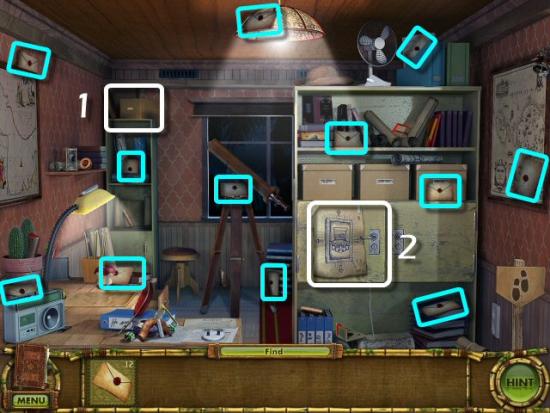
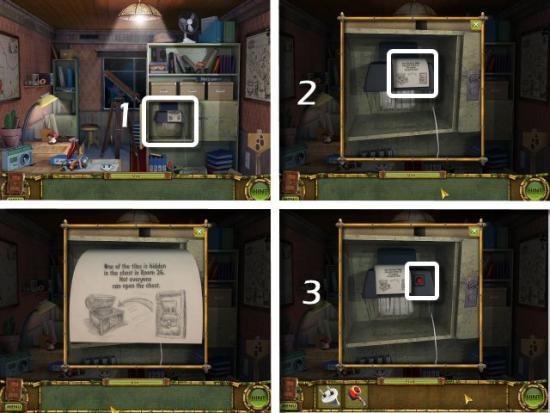
Find the 4 pieces of the Sponge (yellow), 3 pieces of the Handle (green), click on the Cabinet (1), use the Handle, click to open the Cabinet and click on the Portfolio (cyan). Click on Locker V, collect the Map Book (2) and then click on the Desk (3).
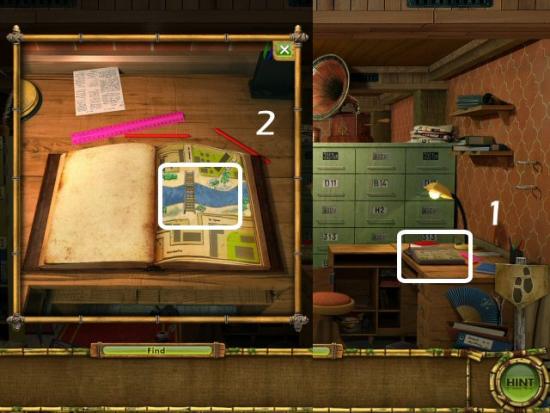
Use the Sponge (hold down your mouse button and move the cursor until the Ink Stain is gone) on the Desk (1), use the Map Book on the Desk (2) and click on the Map Book (3) to open it (4).
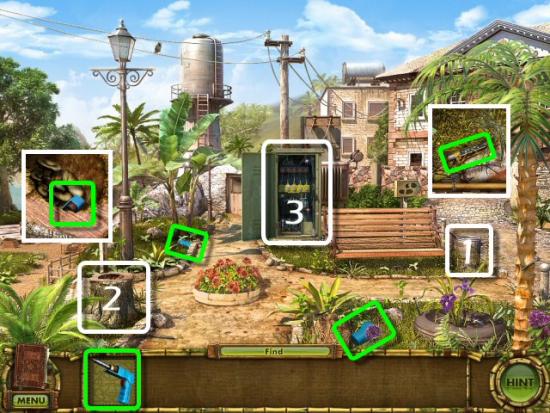
Click the Signboard (1) to go outside, click the Left Signboard (2), collect the Light Bulb (green), click the Signboard (3) to return and continue back into the Library.
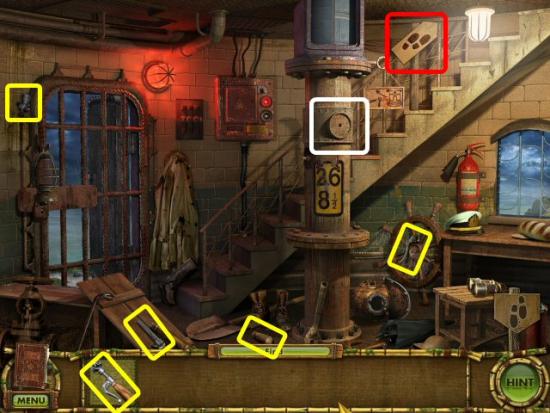
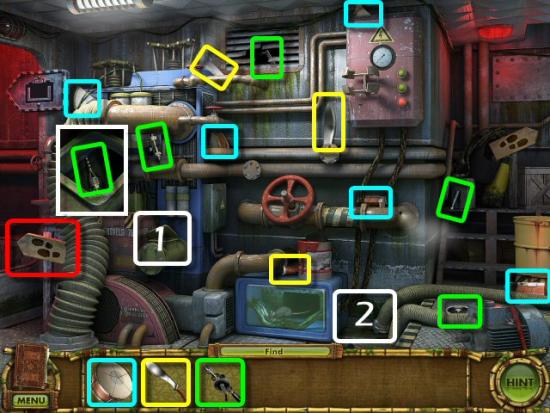
Use the Light Bulb on the Lamp, click on the Signboard (1), click on the Transformer, click on the Signboard (2), click on the Fire Extinguisher, click on the Signboard (3), click on the Transformer, use the Fire Extinguisher (hold down your mouse button and move the cursor until the Smoke stops) and click on the Transformer again (4).
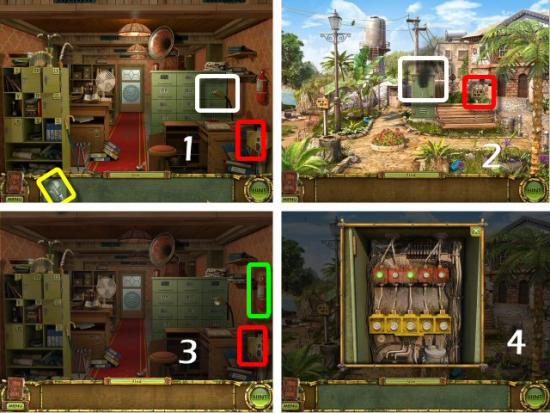
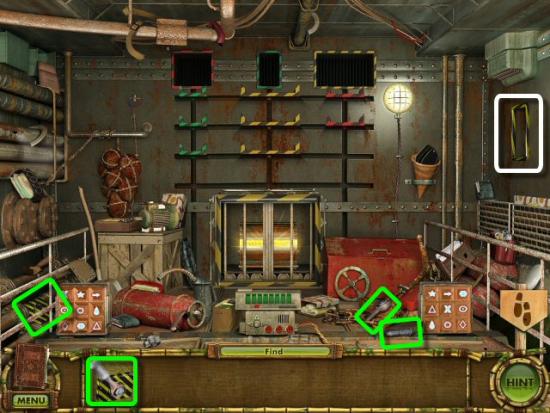
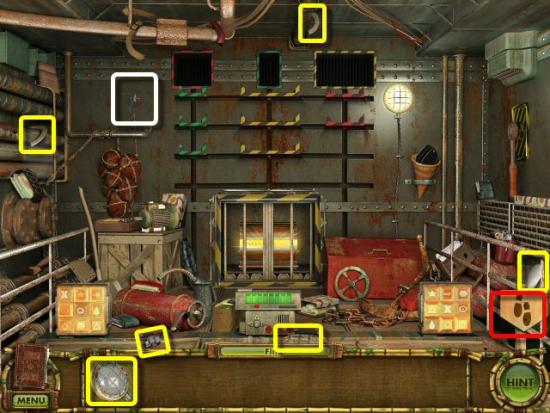
Find the 4 pieces of the Soldering Iron (green), including one next to the Trash Can (1), and one inside the Tree Stump (2) and then click on the Transformer (3).
Use the Soldering Iron on each of the 3 Broken Wires (green) and then click on the Signboard (red).
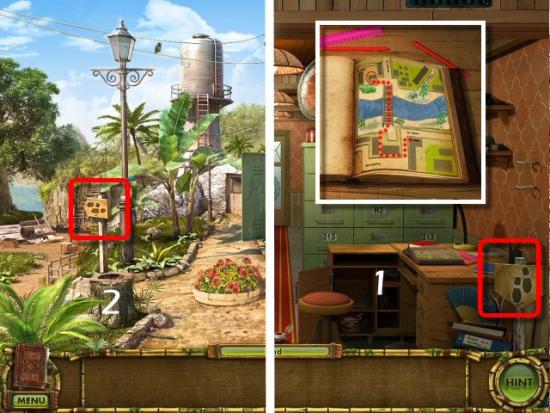
Click on the Desk (1) and click on the Map (2).
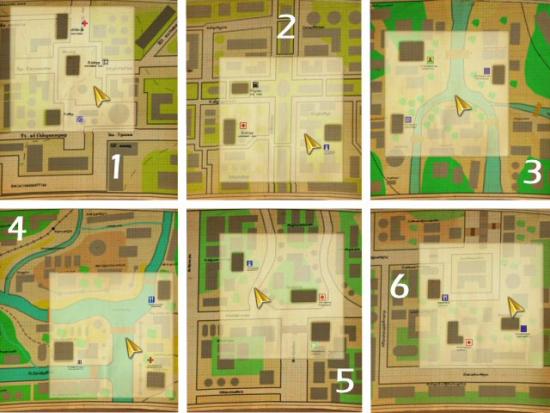
Map Puzzle: Click on one of the 6 Overlays, drag it to the Map and match it to the buildings on the Map. Once you place an Overlay correctly, the page will turn to the next Map. Continue placing them until you see the path to Nicky’s House.
Click on the Signboard to go outside (1) and then click on the Signboard at the left (2).
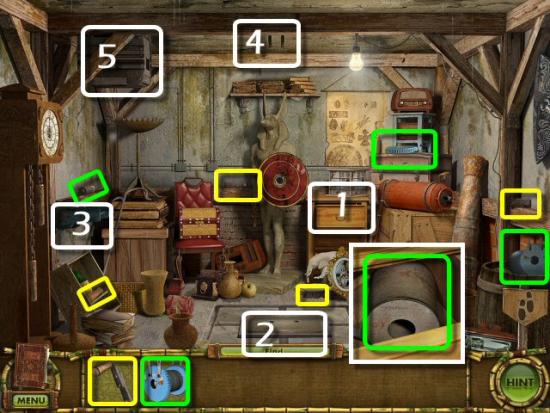
Find the 3 pieces of the Wire Cutters (red), the 3 pieces of the Saw (green), 3 pieces of the Hammer (yellow) and 3 pieces of the Plane (sky blue), collect 8 of 10 Boards (light magenta), use the Saw on the Wheelbarrow (1), collect the last 2 Boards (2) and click on the Signboard (red).
Find 5 Nails (green), including one inside the Trash Can (1) and one next to the Tree Stump (2) and click on the Signboard (red).
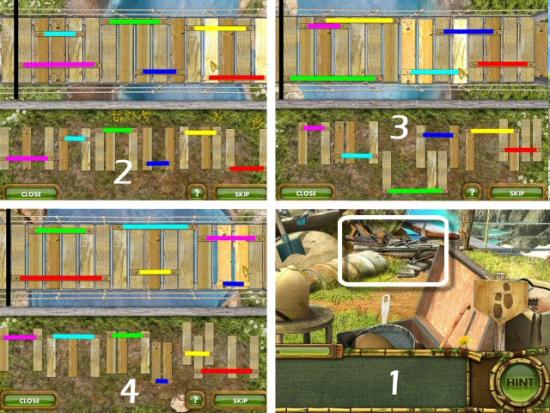
Use the Boards on the Ground, use each of the remaining items on the Boards and then click on the Supplies (1). Bridge Puzzle: Click and drag each section of the Bridge and then click to place it, jigsaw style. All the pieces must fit together, with the horizontal slats connecting other sections, but none of the Boards can overlap. You’ll complete this 3 times. See the following for the solutions (2, 3 and 4, in that order). Place boards to the right of the black line, matching the colors shown in the screenshot. Click on the Signboard (not shown) to cross the Bridge.
Click on the Signboard (1) to try to cross the Bridge, find all 12 Leaves (green), use them on the Fire Pit (white) and then click on the Signboard (2) back into town.
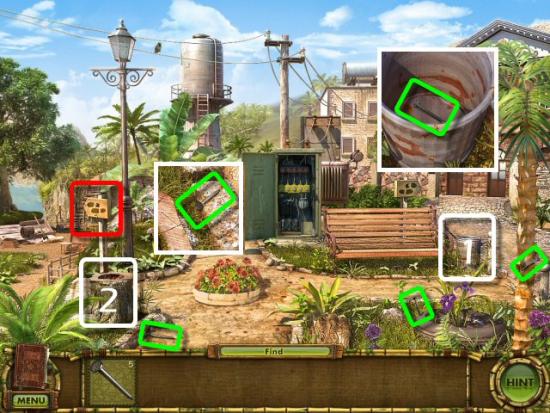
Find the 2 pieces of the Water Tap Handle (yellow), 4 pieces of the Bowl (magenta), 3 pieces of the Hairbrush (green), click on the Water Tap (white) and use the Handle.
Use the Bowl (magenta) on the Water (white), collect the Bowl of Water and then click on the Signboard (red).
Click on the Box (white), collect the Paper Clip (yellow) and then click on the Signboard (red).
Click on the Vendor Cart (1), use the Paper Clip (yellow) on the Lock (2), use the Bowl of Water (magenta) on the Freezer Shelf (3), use the Hairbrush (green) on the Ice (4), collect the Ice Lens (5) and then click on the Signboard (red).
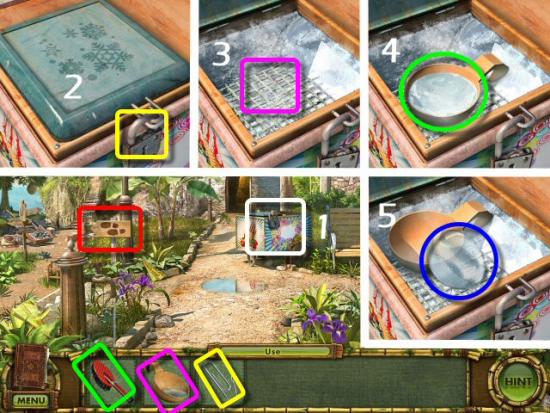
Try to use the Ice Lens (yellow) on the Leaves (1), collect the Forked Stick (green), use the Forked Stick on the Branches (2) and then use the Ice Lens on the Leaves.
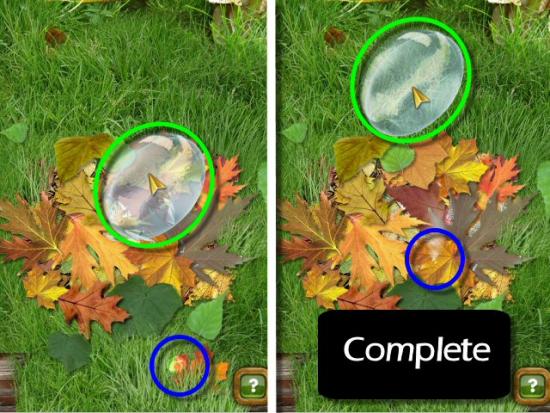
Starting the Fire Minigame: Click and drag the Ice Lens (blue) to focus the Sunlight (yellow) onto the leaves so they’ll catch fire. The key is to focus the sunlight into a very small, beam, as shown in the screenshot. When complete, click on the Signboard to cross the Bridge.
Click on the Signboard (1) to cross the Bridge, click on the Signboard (2) to enter the House and then click on the Cloth (3).

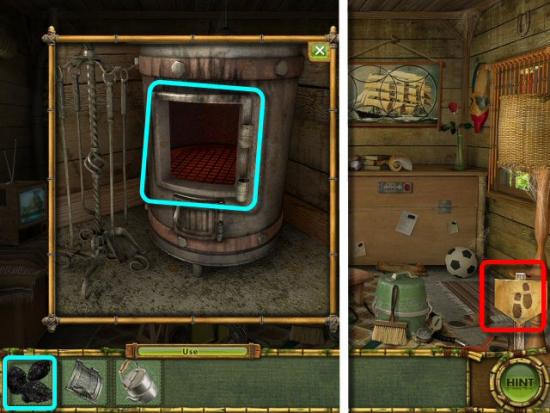
Click on the Lock (1), click on the Mirror (2), find the 5 pieces of the Empty Kettle (yellow), the 4 pieces of the Oven Door (green), the 12 Coals (cyan) and click on the Stove (3).
Use the Coals (cyan) on the Stove and then click on the Signboard (red) to exit the House.
Find the 4 pieces of the Wash Basin (cyan) and then click on the Signboard (red) to go back across the Bridge.

Find the 3 pieces of the Jug (light green), the 3 pieces of the Oven Mitt (light cyan), the 5 pieces of the Iron (light red), including one piece of the Iron inside the Cart (white) and then click on the Signboard (red) to return to Town.
Find the 4 pieces of the Fan (light purple), use the Jug (light green) on the Water (white) and return to the House by clicking on the Signboards (1, 2 and 3).
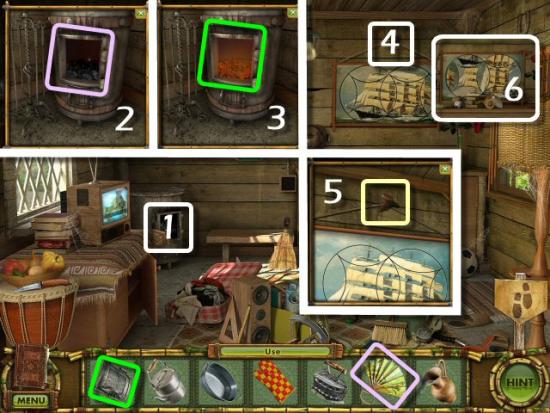
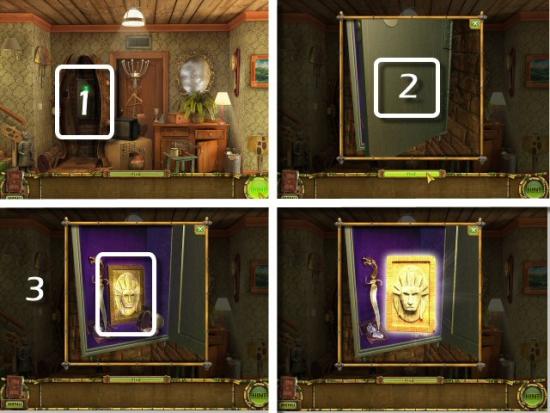
Click on the Stove (1), use the Fan (light purple) on the Coals (2), use the Oven Door (green) on the Oven (3), click on the Wall above the painting (4), collect the Nail (light yellow – 5) and then click on the Painting (6) after it falls on the Dresser.
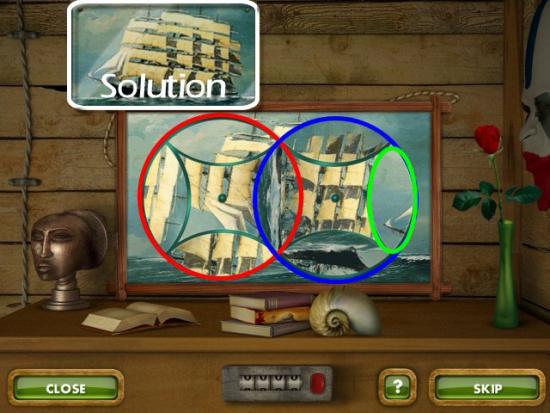
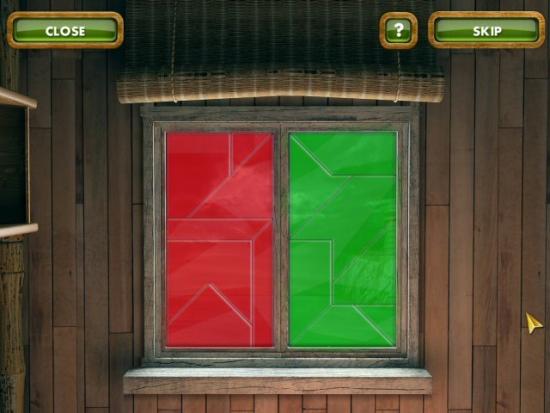
Ship Painting Puzzle: Click and rotate each of the 2 circles (red and blue) in order to move each of the picture elements (green) into their correct positions and restore the painting. You will need to work back and forth, between the two circles, in order to accomplish this. If you get confused, click the Close button and restart the puzzle. If you would prefer not to solve this challenging puzzle, simply click the Skip button. It IS challenging and took me quite awhile to solve it.
Click on the Stove and use the Nail (green) on the Hinge (1). Use the Empty Kettle (cyan) on top of the Stove (2) and use the Jug of Water (yellow) on the Empty Kettle (3). Use the Oven Mitt (white) on the Kettle of Hot Water (4). Use the Wash Basin (magenta) on the Bench (5), use the Kettle of Hot Water (medium purple) on the Wash Basin (6) and then read the Code (red) that appears on the Mirror (7).
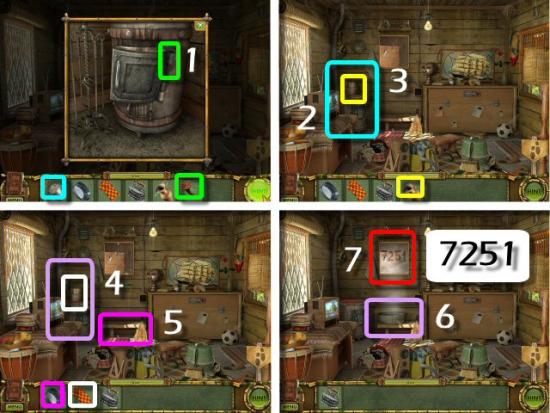
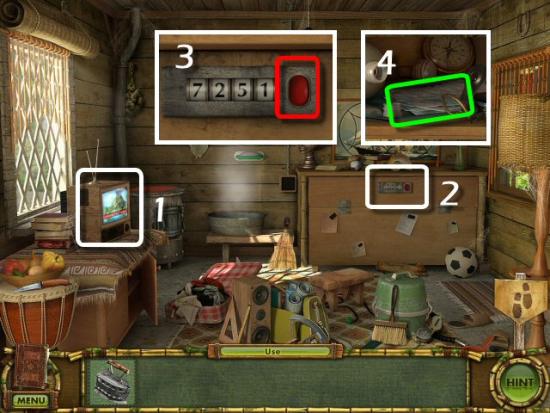
Click on the Television (1) to read about the imminent eruption of a volcano, click on the Lock (2), enter the Code (7251) by clicking on each number until you have them all set, click on the Red Button (3) and then collect the Wet Papers (4).
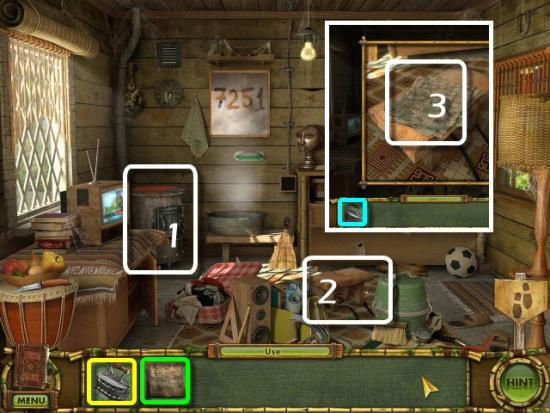
Use the Iron (yellow) on the Stove (1), collect the Hot Iron, click on the Bench (2), use the Wet Papers (green) on the Bench and use the Hot Iron (cyan) on the Papers (3).
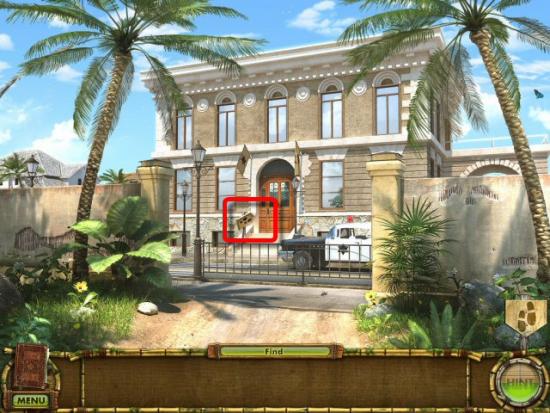
Click on the Signboard (1) to enter the Police Station.
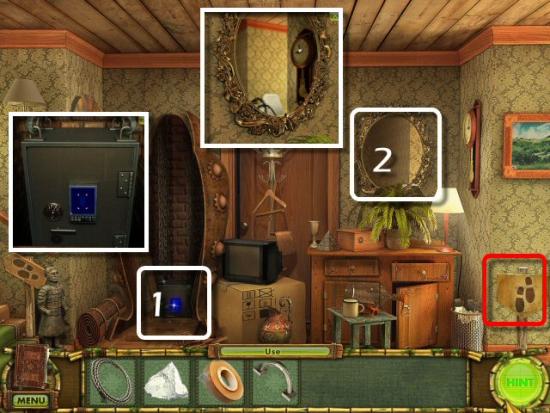
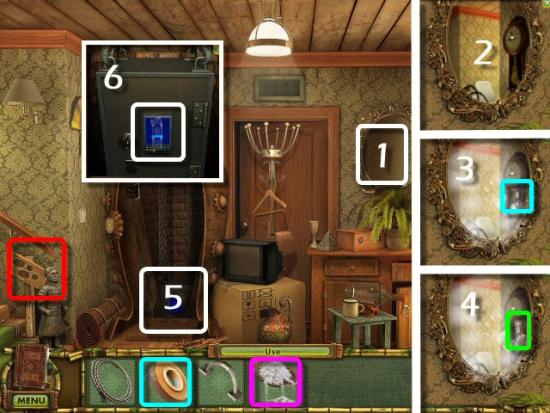
Click on the Safe (1), click on the Photo (2), collect the Hat (yellow) and then collect the Keys (green).

Find 12 pieces of Ceiling Lamp Glass (cyan), 5 pieces of the Ceiling Lamp (magenta) and 4 pieces of the Hanger (blue), including one piece of Glass and one piece of the Hanger in the Box (1) and one piece of Glass and one piece of the Ceiling Lamp on the Desk (2)
Use the Hanger (blue) on the Coat Rack (white), use the Hat (yellow) on the Hanger , collect the Bug Spray (light cyan) and click on the Signboard (red) to go outside.
Click on the Signboard (1) to exit the area, click on the Signboard (2) to enter the Cave and click on the Control Panel (3).
Wiring Puzzle: You’ll play 3 rounds of increasingly longer and more complex puzzles (16, 27 and 37 steps, respectively). Starting at the first Yellow Node, just below the Blue Spark, click on each Node, in succession, to burn the Wire. Once you’ve burned a Wire, you can’t retrace that path. While the second and third puzzles are more complex, they weren’t that difficult to figure out. Click on each of the following for a video solution for each puzzle. If you don’t care to try them, you can always click on the Skip button.
Find the 4 pieces of the Wire Cutters (yellow) and use them on the Fencing (white).
Find 3 of the 4 pieces of the Jug (yellow), 4 of the 5 pieces of the Valve (green), 5 pieces of the Oiler (cyan), click on the Cart (1) and then click on the Peg Board (2).
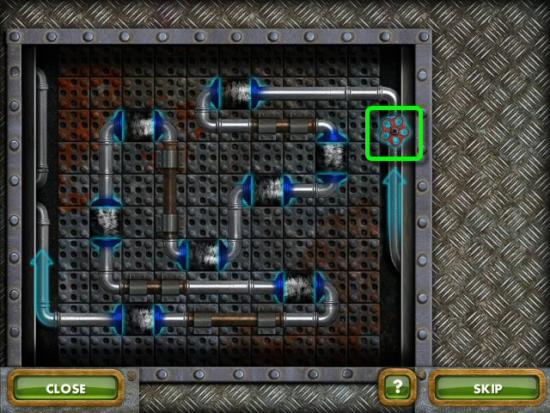
Pipe Puzzle: Move the Pipes to match the Schematic and follow the Path shown (the Dotted Line). Click on a Pipe, and then click on an adjacent Hole to move the Pipe to that location. When you click on a Pipe, you will see the Holes that you can use. You may have to move a Pipe several times to get it into position. This puzzle isn’t difficult but it does have too many steps to show in screenshots. Click on the following for a video solution.
Click on the Signboard (1) to exit the Cave and click on the Signboard (2) to continue to the Campsite.

Click on the Oil Drum (1), use the Oiler (cyan) below the Spigot (2), click on the top of the Oiler (3), click on the Spigot (4), collect the Filled Oiler and then click on the Signboard (red) to exit the Campsite. Return to the Cave.
Use the Oiler on the Locker (1), click on the Door (2), collect the last pieces of the Valve and the Jug and then click on the Signboard (red) to exit the Cave. Return to the Campsite.
Click on the Oil Drum (1), use the Jug (cyan) below the Spigot (2), click on the Spigot (3), collect the Filled Jug (4) and then click on the Signboard (red) to exit the Campsite. Return to the Police Station.
Use the Jug of Oil (cyan) and the Floor (1), click on the Safe (2), collect the Step Ladder (blue), use it on the Carpet (3). Find the 5 Steps (yellow), use them on the Step Ladder, use the Ceiling Lamp (magenta) on the Ceiling (4) and use the Ceiling Lamp Glass (green) on the Ceiling Lamp.
Lamp Puzzle: Click and drag each section of Glass and then click to place it, jigsaw style. All the pieces must fit together, with the colors alternating between red and yellow. See the following for the solution Place glass sections, matching the colors shown in the screenshot.
Use the Keys (yellow) on the Safe (1) and click on the Books (2) on the lower shelves.
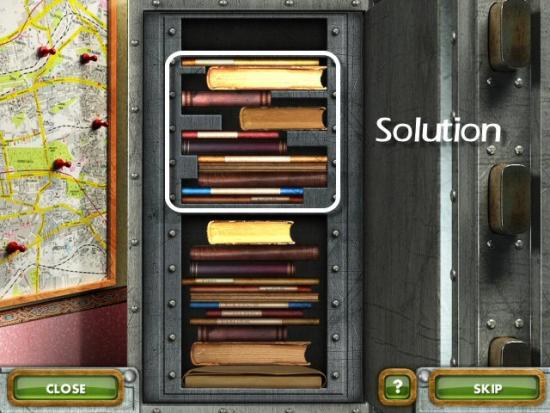
Book Puzzle: Place all the Books, except for the one on the bottom, one the second shelf. You must place the books, from the one on the top of the stack, to the bottom of the stack. Leave the top shelf empty. See the following for the solution.
Click on the Safe (1), click on the Book (2), collect the Audio Tape (yellow) and then click on the Signboard (red) to exit the Police Station. Return to the Cave.
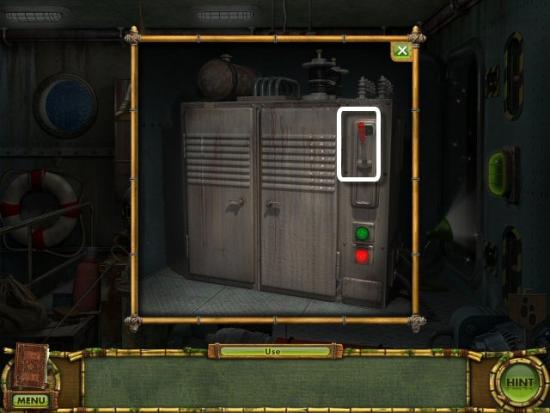
Use the Valve Handle (yellow) on the Work Bench (1) and click on the Handle. Click on the Doorway (2), use the Bug Spay (cyan) on the Mosquitoes (click and drag your cursor around in the highlighted area) and then click on the Signboard (red) to return outside.
Find the 6 Boards, click on the Signboard (1), use the Boards on the Gap (2), return outside and then click on the Signboard (3) to go to the Campsite.
Click on the right, the lasers activate and a Boulder (white) crashes down to block it. Find 12 pieces of Brushwood (yellow), 4 pieces of the Torch (cyan), 7 pieces of the Sack (magenta), 4 pieces of the Shovel (green) and click on the Signboard to exit the Campsite.

Use the Torch (cyan) on the Campfire (white), collect the Burning Torch and click on the Signboard (1) to return to the Campsite. Use the Brushwood (yellow) on the Ground (2) below the Boulder and use the Burning Torch (green) on the Brushwood. Use the Sack (magenta) on the Right Waterfall (3) and then click on the Left Waterfall (4)

Water Flow Puzzle: Use the Rocks to block the all the tributaries (red “X”), except for the middle one (green arrow). You’ll play 3 rounds of this puzzle. See the following for the solutions. Use the Shovel (green) on the Rubble (4) and then click on the Cache (5).
Use the Cassette (cyan) on the Player (1), click on the Play Button (2), collect the Locket (3) and then click on the Signboard (4) to exit the Campsite. Return to the Cave.
Click on the Chest (1), use the Locket (green) on the front (2) and collect the Tile (3).
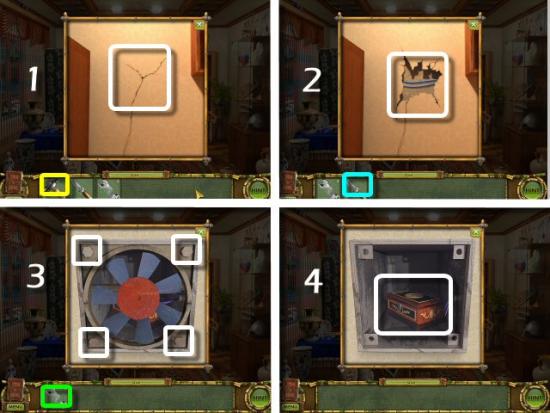
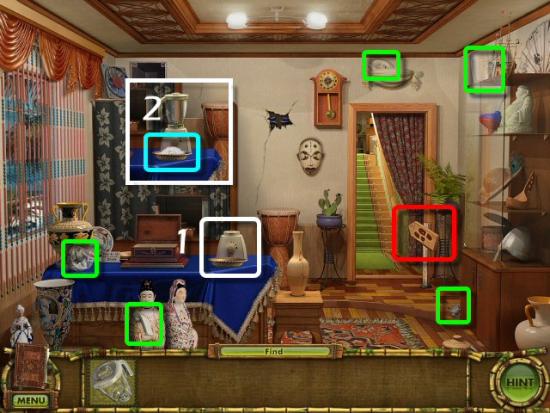
Click on the Fan (1), find 4 pieces of the Hammer (yellow), 4 pieces of the Dagger (cyan), 4 pieces of the Wrench (green), including one piece of the Hammer in the Plant (2) and then click on the Wall (3).
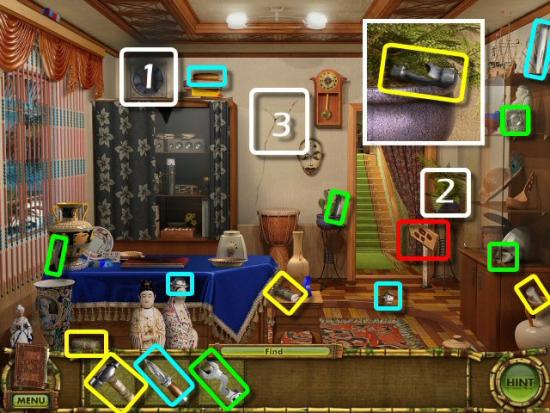
Use the Hammer (yellow) on the Crack (1), use the Dagger (cyan) on the Wires (2), click on the Fan and use the Wrench (green) on each of the 4 Bolts (3), collect the Jewelry Box (4) and then click the Signboard to go upstairs.
Collect the Rope (green), the Chalk (yellow) and then click on the Signboard (red) to head up to the Attic.
Find all the pieces of each of the 6 Pots, including one piece inside the Stand (1), click on the Drawer (2) and collect the Sticky Tape (blue).
Place the Pots in each location showing a Wet Spot. The mouth of the Pot needs to match the size of the Water Leak. See the following for the solution. Click on the Signboard (red) and continue down to the front room.
Use the Jewelry Box (yellow) on the Table (1), click on it, click on the Lid (2), find the 4 pieces of the Magnet (green) and use the Magnet on the Cabinet (3).
Key Puzzle: Move the Magnet so it picks up the Key and then move your cursor through the paths (exactly like a maze). If you bump into obstacles, you’ll drop the Key. Just pick it up and continue. See the following for the solution.
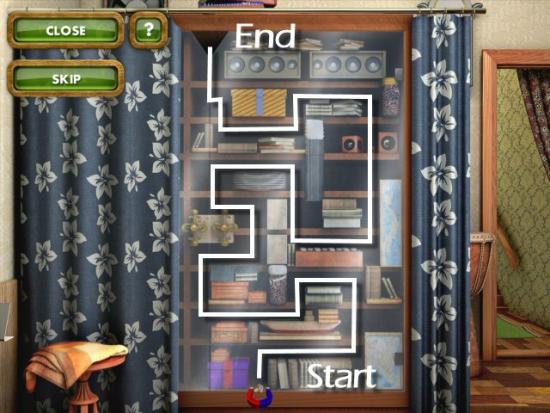
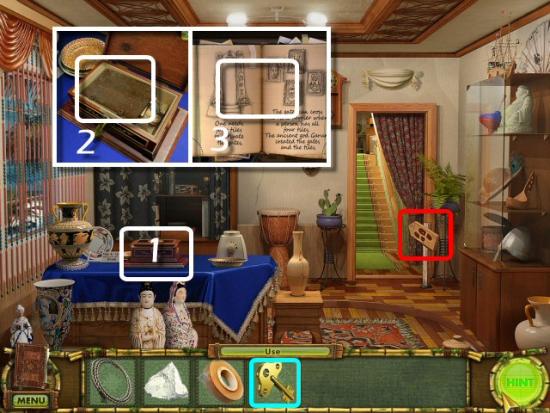
Use the Key (cyan) on the Jewelry Box (1), click on the Journal (2), read the information for clues (3) to the locations of the tiles (click on the pages for more information) and click on the Signboard (red) to go upstairs.
Find the 8 Bugs (cyan), 3 pieces of the Door Handle (green), use the Bugs on the Sarcophagus (1) and click on the Center Button (2).
Sarcophagus Lock Puzzle: Rotate the Rings so that all the Buttons line up with the Holes. Note the Stops (green). You can only rotate the Center Ring (with the Red Arrows); Click and drag the Center Ring around to each stop in order to move the other Rings. The key is to work from the outside to the inside. Rotate the Center Ring, counter-clockwise, until the First Ring is in position (1). Rotate the Center Ring, clockwise, until the Second Ring is in position (2). Rotate the Center Ring, counter-clockwise, until the Third Ring is in position (3) and then Rotate the Center Ring, clockwise, until it’s in position (4).
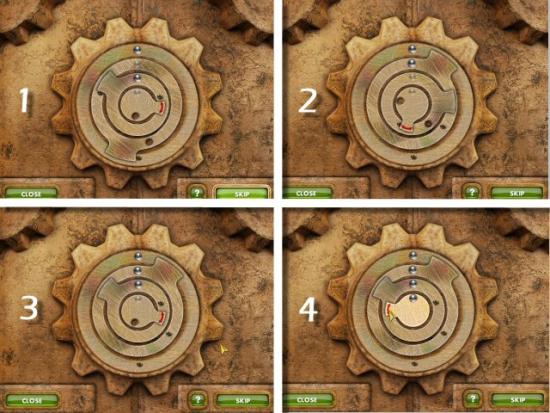
Click on the following for a video solution.
Click on the Safe (1) inside the Sarcophagus, click on the Mirror (2) and then click on the Signboard (red) to go back downstairs.
Find the 5 pieces of the Blender Container (green), use the Blender Container on the Blender Base (1), use the Chalk on the Blender, collect the Powdered Chalk (2) and then click on the Signboard (red) to go back upstairs.
Click on the Mirror(1), use the Powdered Chalk (magenta) on the Mirror (2), use the Sticky Tape (cyan) on the Chalk (3), collect the Fingerprint (green) from the Mirror (4), click on the Safe (5), use the Finger print on the Panel (6) and then click on the Signboard (red) to go up to the Attic.
Find the 4 pieces of the Winch Handle (yellow), the 4 pieces of the Pulley (green), including one inside the Drawer (1), use the Handle on the Trap Door (2), use the Winch Handle on the Winding Mechanism (3), use the Pulley on the Ceiling (4) and use the Rope on the Motor (5)
Winch Puzzle: Click and drag each piece to connect the Rope to the Trap Door. You must use all the pieces. See the following for a solution.
Click on the Winch Handle to raise the Safe and return downstairs. Click on the Safe (1), click on the Door (2) and collect the Tile (3).
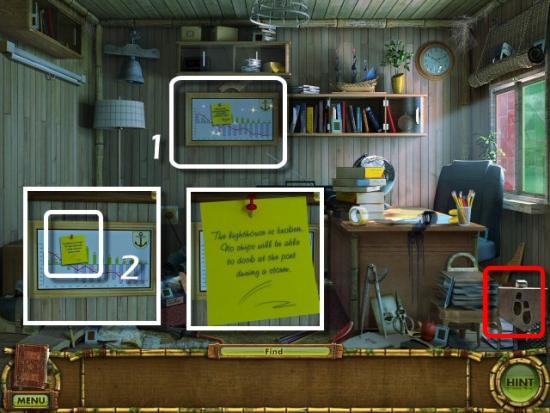
Click on the Board (1), click on the Note (2) and then click on the Signboard (red) to exit the Port Office.
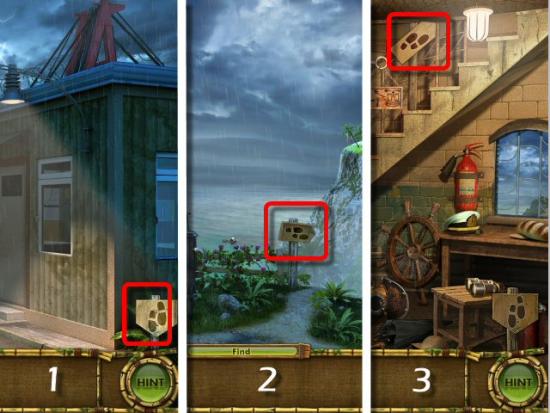
Click on the Signboard (1) to leave the Docks, click on the Right Signboard (2) to the Lighthouse and then click on the Signboard (3) to go upstairs.
Find the 4 pieces of the Mop (yellow), the 5 pieces of the Bucket (cyan) and then click on the Signboard (red) to return downstairs.
Click on the Signboard (1) to return to the Path, use the Bucket (cyan) on the Pump (2), click the Handle (3), collect the Bucket of Water (4), click on the Signboard (5) to return to the Lighthouse and then click on the Signboard (6) to return upstairs.
Use the Bucket of Water (cyan) and then the Mop (yellow) on the Lighthouse Lantern (1), click on the Control Panel (2) and then click on the Signboard (red) to return downstairs.
Find the 4 pieces of the Lever (yellow), use the Lever on the Control (white), click the Handle and then click the Signboard (red) to return upstairs. Click on the Control Panel again, then return back downstairs.
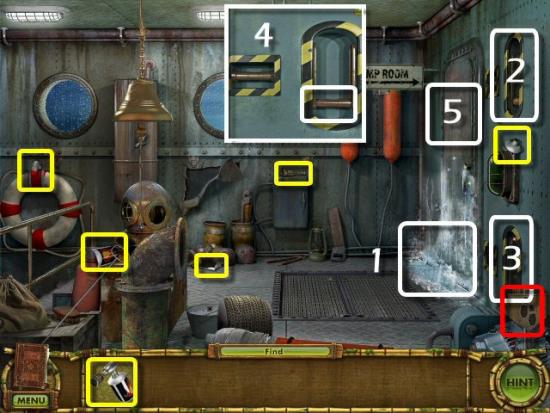
Find the 4 pieces of the Horseshoe (yellow), the 5 pieces of the Gauge (cyan) , the 12 Bolts (green), including one piece of the Gauge inside the Diving Helmet (1), use the Gauge on the Pipe (2) and click on the Coupling (3),
Use the Bolts (green) on the Coupling (white).

Bolt Puzzle: Place the Bolts according to size. There is no screenshot or solution as there is a glitch in the game, or I have an issue with my graphics card. The puzzle would not display properly (very dark screen…almost black) and I was forced to skip it.
Return upstairs and find 8 Control Switches (yellow), click on the Control Panel (white), use the Control Switches and then click on the Signboard (red) to return downstairs.
Find the 5 pieces of the Switch (yellow), use the Switch on the Control Panel (1), click the Handle, click on the Fuse Box (2) and then click on the Signboard (red) to exit the Lighthouse. Return to the Port Office.
Find 4 pieces of the Rubber Glove (cyan), 12 pieces of Colored Glass (yellow), 3 pieces of the Window Lock (green), including one piece of the Rubber Glove inside the Cabinet (1) and one piece of the Window Lock on the Shelf (2) and then use the Colored Glass on the Window (3). Complete the puzzle and then use the Window Lock on the Window (4).
Colored Glass Puzzle: Place the Red pieces on the left and the Green pieces on the right. Click one to pick it up, drag it to the window and then click to place it. Note that the pieces of glass will slide to the bottom if there’s nothing to support it. See the following for the solution.
Find the 12 Slides (yellow), the 4 pieces of the Stool (green), the 4 pieces of the Slide Projector (cyan), including one Slide on the Shelf (1) and one piece of the Slide Projector inside the Lamp (2) and then collect the Books (magenta).
Use the Horseshoe (light red) on the Projector Screen (1), use the Stool (green) on the Floor (2), use the Books (magenta) on the Stool, use the Slide Projector (cyan) on the Books and then use the Slides (yellow) on the Slide Viewer (3). Complete the Slide Puzzle, collect the Box of Slides (4), use them on the Projector and then click on the Signboard (red) to exit. Return to the Lighthouse.
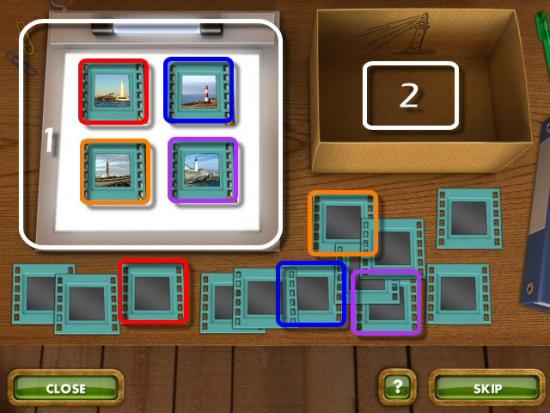
Slide Puzzle: Pick up each Slide and move it to the Viewer. If it has a Lighthouse in the picture, move it to the Box. See the following for the solution.
Use the Rubber Gloves (green) on the Electrical Box (1) and then click on the Wires (2). Complete the Wiring Puzzle, click on the Switch (3) to turn on the electricity and then click on the Signboard (red) to go upstairs.
Wiring Puzzle: Click on a Bolt and move it to another hole. Continue moving the Bolts until all the Wires are untangled. See the following for a solution.
Click on the Control Panel, click on the Control Switches to match the diagram shown and then click on the Lever to turn on the Lighthouse Lantern.

Click on the Left Signboard (1) and then click on the Right Signboard (2).
Click on the Door (1), find the 12 Pipes, the 5 pieces of the Wrench, the 6 Grates, including one piece of Pipe and one piece of the Wrench in the Vent (2) and then click on the Grid (3).
Use the Wrench (cyan) on all 4 Bolts (1 – blue), use the Pipes (yellow) on the Grid (2), complete the Pipes Puzzle and then use the Grates (green) on the Grid (3).
Pipes Puzzle: Place the Pipes so that there is a continuous cooling jet from the top right Inlet to the bottom right Outlet and passing over each hot tile. The game instructions are incorrect. Follow these instructions: The cooling jets (wide, blue end of the pipe) can be on the top and bottom, or on the left and right, of each hot tile. You will not place any pipes directly over any hot tile. Be sure to click on the Red Valve (green) to get the cooling jets to flow. You can do this before or after you start placing the Pipes; I recommend before, so you can see the progress. See the following for a solution.
Find the 5 pieces of the Gas Torch (yellow), click on the Ice (1) and use the Gas Torch (click and hold your mouse button and move your cursor around) until the Ice melts (click on the Door to trigger the locking mechanism). Click on each of the Locks (2 and 3), click on the Handles to move them to the center position (4), click on the Door (5) and then click on the Signboard (red).
Find the 5 pieces of the Lamp (yellow) and then click on the Signboard (red).
Click on the Door, use the Lamp on the Transformer (1), click on the Handle and then return to the previous area. Click on the Left Signboard, this time.
Find the 3 pieces of the Lever (green), use the Lever on the Control (white) and click on the Handle.
Find the 5 pieces of the Light (yellow), use it on the Wall (white) and then click on the Signboard (red).
Find the 5 pieces of the Drum (cyan), the 3 pieces of the Machete (yellow), the 5 pieces of the Hand Drill (green), including one piece of the Hand Drill inside the Pipe (1), use the Drum on the Floor (2), click on it and then click on the Left Signboard (red).
Click on the Coconuts (1), use the Machete (yellow) on the Rope (2), collect the Coconut and then click on the Signboard (3). Use the Coconut (yellow) on the Holder, (4), use the Hand Drill (green) on the Coconut and then click on the Left Signboard (red)
Pair Matching Minigame: Click on a square on the Left (blue), then click on a square on the Right (red) to make a matching pair. Complete all 9 matches. See the following for the solution.
Find all the pieces of the 8 Luggage items, including 2 pieces inside the Red Container (white). Each piece of Luggage consists of 3 separate fragments, for a total of 24.
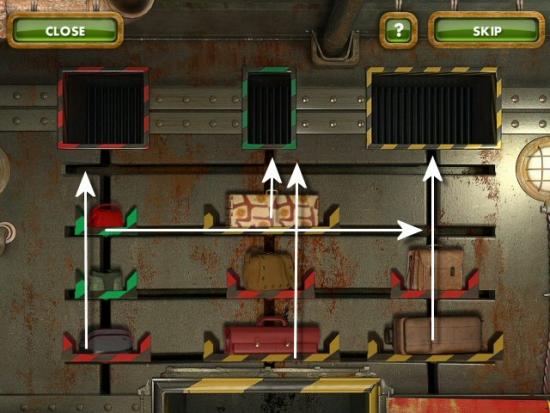
Place the 8 Luggage items onto the Conveyer, in any order you choose, and then click anywhere on the Racks (white).
Luggage Puzzle: Click and slide the Luggage Racks to position the bag at the opening of the correct conveyer. Columns and rows move at a unit, so be sure to leave spaces to move empty racks out of the way. There are many solutions to this puzzle, so this is only a screenshot of the starting scene. The arrows are only examples of some of the first moves you can make.
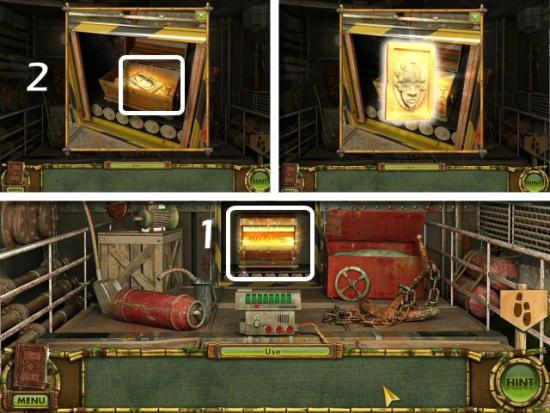
When the Chest comes by again, click on it (1) and collect the Tile (2).
Collect the Torch (green) and then click on the Left Signboard (1), click on the Signboard to return outside (2) and then click on the Middle Signboard (3).
Find the 5 pieces of the Lock (green), light the Torch in the Lamp (white), click the Signboard (1) to go back outside and then click the Upper Signboard (2).
Click the Center Button (white), find the 4 pieces of the Warning Sign (green), the 4 pieces of the Pump Handle (yellow), the 12 Fuses (light red), the 5 pieces of the Fan (cyan) and the 5 pieces of the Wheel (light blue).
Use the Warning Sign (yellow), Fan (cyan), Pump Handle (yellow) and Fuses (light red) where indicated. Click on the Fuses, to position them vertically or horizontally, until all the Bulbs are lit and the Fans are running and then click on the Signboard (red) to exit the area.
Click on the Left Signboard (1), collect 5 Clamps (magenta), click on the Signboard (2) and click on the Upper Signboard (3).
Use the Clamps (cyan) on the Hose, click on the Pump Handle (yellow) 3 times, click on the Stone Button (white), click on the Signboard (1) and then click in the Middle Signboard (2).
Click the Buttons above the Arch to lower the Stone Bench and then click on the Signboard to enter the Pool.
Find the 5 pieces of the Jaguar Head (cyan), use it on the Wall (white) click on the Signboard (red) to enter the Pool and then come back up.
Collect the 10 Weights (green) and then click on the Signboard (1). Use the Weights on the Shelves (2), click and drag each one, up and down, until they line up across the center (3) and then click on the Signboard (4) to leave the Pool.
Find the 5 pieces of the Sword Handle (yellow) and the 5 pieces of the Lamp (green), use the Sword Handle on the Statue (1) use the Lamp on the Wall (2), use the Torch on the Lamp, click on the Door (3) and then click to enter. Complete the Oil Puzzle and then click on the Signboard (red) to return outside.
Oil Puzzle: Click on each Bowl so that the flow of oil fills travels to all the paths to reach all the Bowls. The arrows indicate the holes through which the oil will flow. You will play 3 puzzles. See the following for the solutions.
Click on the Left Signboard (1), use the Lock (yellow) on the Door (2), use the Wheel (green) on the Spindle (3), click on the Lock and then click on the Wheel.
Find the 3 pieces of the Candelabra (yellow), the 3 pieces of the Plate (cyan) and the 3 pieces of the Crown (magenta). Find the 3 pieces of the Orb (green), the 3 pieces of the Vase (blue), the 3 pieces of the Goblet (light magenta) and the 4 pieces of the Pedestal Fragment (light cyan), including one piece of the Vase, one piece of the Orb and one piece of the Goblet among the Pots (2).
Use the Pedestal Fragment on the Broken Pedestal (1), place the Artifacts on the Pedestals indicated (2), click on the Stand (3) and collect the Tile (4).
Click on the Display Case (1), click on the Note (2) and then click on the Signboard (red) into the Museum Director’s Office.
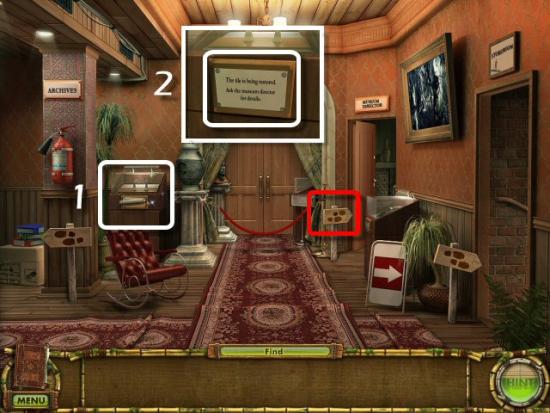
Click on the Floor (1), click on the Rug (2), click on the Case (3), find the 4 pieces of the Door Handle (green), the 8 Boxes (magenta), including one Box behind the Plant, use the Door Handle on the Door, click on the Handle and then use the Boxes on the Shelves.
Sorting Puzzle: Click on the right-hand door to open it. Sort the items according to their culture. You can put any item in any box, but you’ll need the rest of the items in that box to match the culture. See the following for a solution.

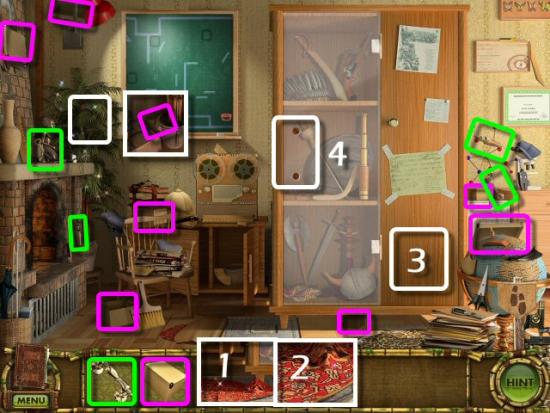
Click on the Note (1), find the 4 pieces of the Compass (yellow), the 3 pieces of the Protractor (light magenta), the 2 pieces of the Eraser (green), the 4 pieces of the Triangle (sky blue), the 2 pieces of the Pencil (cyan), including one piece of the Compass in the Plant (2). Use all the Tools on the Chalkboard (3) and then click on it. Basketball Puzzle: This is a physics puzzle. Place the fans and magnets, in the Black Boxes to guide the Ball (light green) into the Basket (red). Click the Start button after you’ve placed the objects (4). Once complete, you’ll have the code to the Safe.
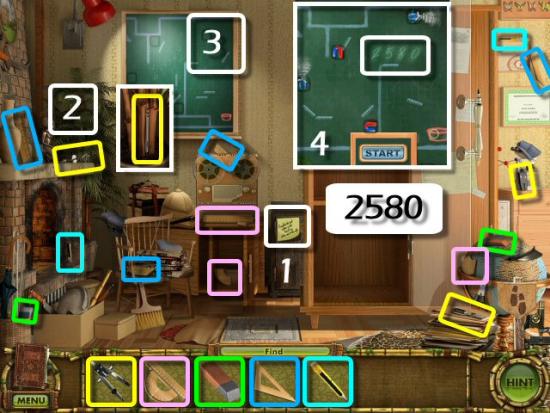
Click on the Safe, enter the Code (1), collect the Floppy Disk (2), click on the Signboard (3) to exit and click on the Left Signboard (4) to go to the Archives.
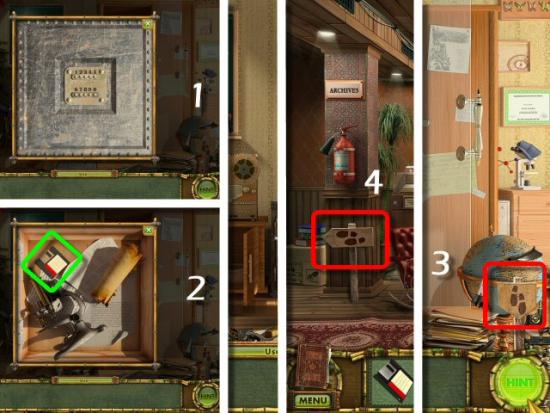
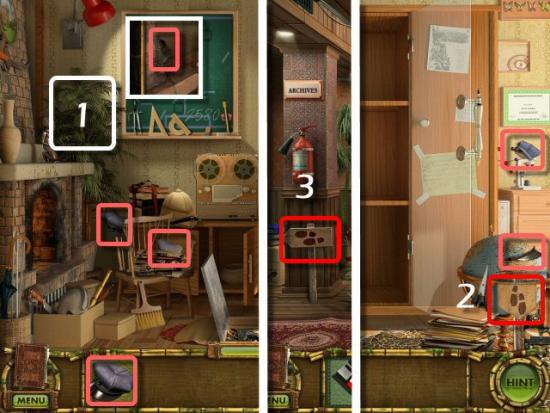
find 3 of the 4 pieces of the Paintbrush (yellow), the 4 pieces of the Girder (cyan), the 4 pieces of the Marker (light magenta), the 4 pieces of the Stethoscope (green), the 4 pieces of the Razor Blade (orange) and then use the Marker on the Cardboard (1).
Stick Figure Puzzle: Draw the outline by clicking on an intersection, then clicking on the next intersection. If you’re starting in an incorrect place, the marks will be red. When correct, all the marks will be green. Click on the Eraser at the right to start over. You do not need to click on every intersection in a straight line; you can click on the first and then click on the last one in that line however, you must start at one spot and finish at that same spot (2)
Use the Razor Blade (orange) on the Cardboard (1), place the Cutout at the Door (2), click on the Signboard (3) and then click on the Right Signboard (4) to enter the Storeroom.
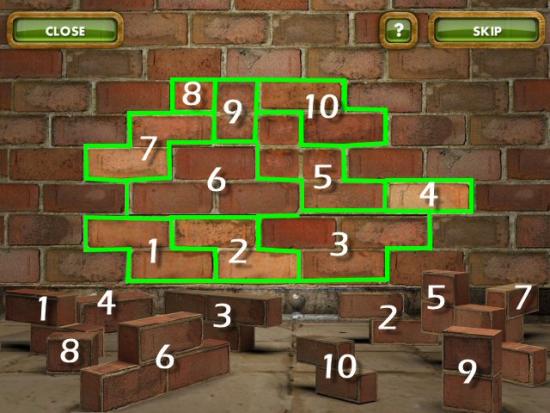
Find the 4 pieces of the Pan (yellow), the 12 Bricks (cyan), the 4 pieces of the Box Cutter (light magenta), 7 of the 8 Stickers (green), the 4 pieces of the Spirit Lamp (light blue) and the Glue (magenta). Use the Pan on the Water (1) and use the Bricks on the Wall (2). Complete the Brick Puzzle and collect the last Sticker from the Brick Wall.
Brick Puzzle: Click and drag each piece into the opening and click to place it. You need to fit all the pieces together, sort of like Tetris. See the following for a solution.
Use the Spirit Lamp (light blue) on the Rack (1), use the Pan of Water (yellow) on the Spirit Lamp, click on the Pan and use the Glue (magenta) on the Pan. Click on the Signboard (2) to exit and click on the Signboard (3) to enter the Museum Director’s Office.
Find the 5 pieces of the Guard Hat (medium red), including one next to the Plant (1), click on the Signboard (2) to exit and then click on the Signboard (3) to enter the Archives.
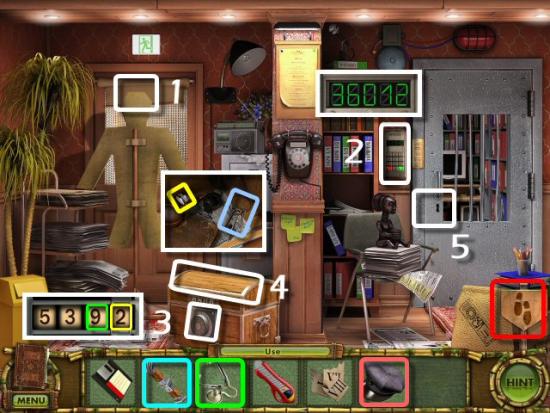
Use the Guard Hat (medium red) on the Cutout (1) and click on the Key Pad (2). Rebus Puzzle: You need to figure out what the pictures have in common, that’s in a different amount in each one…it’s windows. There are 3, 6, 0, 1 and 2 windows in each picture, so the code is 36012. Enter those numbers on the Keypad and press the green key.
Use the Stethoscope (green) on the Lock (3). Lock Puzzle: Click and hold your mouse button and rotate the dial, in either direction, until you hear an audible “click” and/or see the visual cue. Click on the first number (all the numbers will be “0” at the beginning of the minigame), at the top (green), until it reaches the correct number, then click the next number so the indicator moves to the right (yellow). Repeat for the remaining numbers. It doesn’t matter which direction you rotate the dial. The code is 5392.
Use the Girder (cyan) on the Lid (4), click on the Chest and collect the Keys (light Blue) and the last piece of the Paintbrush (yellow). Use the Keys on the Door (5) and then click on the Signboard (red) to exit. Return to the Storeroom.
Find the 10 pieces of the Keyboard (green), including one piece next to the Pot (white), and click on the Signboard (red) to exit. Return to the Archives.
Click on the Doorway (white), use the Keyboard (green) on the Desk, use the Floppy Disk (cyan) on the Drive and then click on the Signboard (red) to exit. Return to the Storeroom.
Click on the Pot (1), use the Brush (yellow) on the Pot, use the Glue Brush on the Boxes (2), use the Stickers (green) on the Boxes. Sticker Puzzle: Match the sticker with the correct number, based on the shape of the bottom edge (3). Use the Box Cutter (cyan) on Box II (4) and collect the Tile (5).
Click on the Right Signboard, find the 4 pieces for each of the Palm, Sun, Crescent Moon, Fish and Bird Symbols, use them in the Round holes and then click on the Signboard (red) to exit. Click on the Left Signboard.
Collect the Bowl of Flour (light red), find the 5 pieces of the Gem (light cyan), click on the Stone Slab (1) and click on the Lion Carving (2).
Find 9 of the 10 Stones (yellow), the 4 pieces of the Tongs (green), the 5 pieces of the Dagger (cyan), the 4 pieces of the Broom (light magenta), use the tongs on the last Stone (1), use the Stones on the Scale (2) and then click on the Signboard (red) to exit. Click on the Right Signboard.
Find the 4 pieces of the Axe (yellow), click on the Signboard (1) and return to the Left Cave. Use the Axe on the Vine (2), use the Dagger (cyan) on the Rope (3), click on the Rubble (4), use the Broom (light magenta) on the Rubble, find the 6 pieces of the Schematic (green), click on Lock (5) and use the Schematic.
Schematic Puzzle: Rearrange the Stones so they match the Schematic. Click in the center of any set of 4 stones and click to rotate the Stones in a clockwise direction. You will play 3 rounds of this puzzle. Click on the following for a video solution for all 3 puzzles.
Click on the Chest (1), collect the Candle Layout (2) and click on the Signboard (3) and return to the Right Cave.
Use the Gem (light cyan) in the Frame (1), click on the Frame (2) 5 times and click on the Grating (3).
Find 6 Candles (1 – yellow), use the Flour (green) on each of the 5 Holes (2), find the 5 pieces of the Lid (cyan), use the Lid on the Hole (3) and click on the Grating (4).
Use the Candle Layout (cyan) on the Pedestal (1), use the Candles (yellow) on the Grating (2), place the Candles according to the Diagram (3), click on the Pedestal (4) and collect the Tile (5).
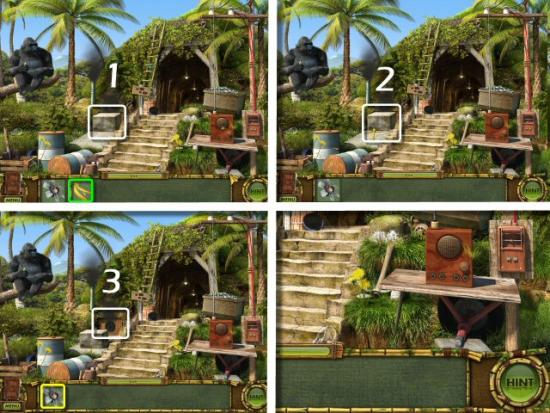
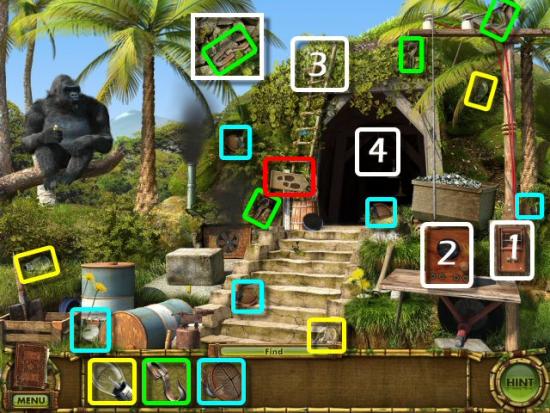
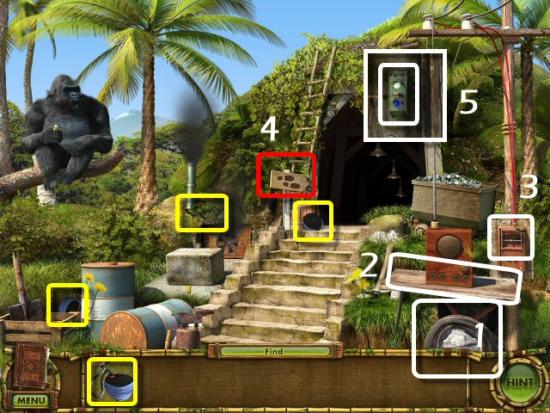
Click on the Signboard (1) to enter the Mine and click on the Signboard (2) to exit back outside. Find the 7 Fan Blades (yellow), the 4 pieces of the Pipe Cover, the 4 pieces of Grapefruit (cyan), including one Fan Blade at the top of the Ladder (3), use the Pipe Cover on top of the Smoke Stack (4), use the Grapefruit on the Gorilla (5).
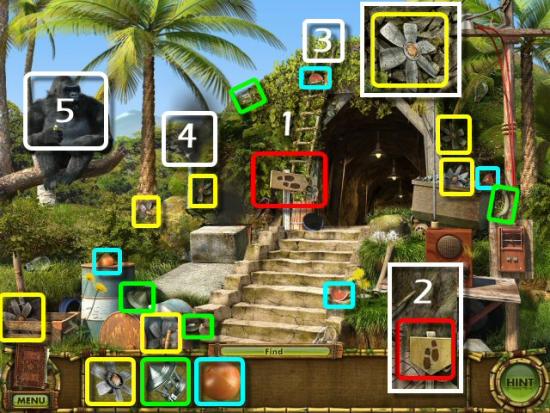
Use the Banana Peel (green) on the Large Stone (1), click on the Large Stone (2) and use the Fan Blades (yellow) on the Air Handler (3). Complete the Fan Puzzle and then enter the Mine.
Fan Puzzle: Click on the Fans to move them so all the dust blows out of the mine, at the upper right. See the following for a solution.
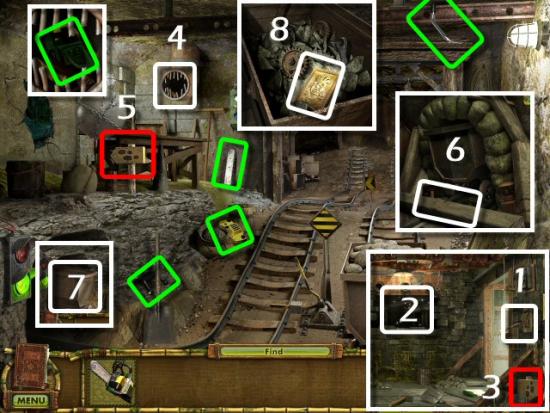
Click on the Wall (1), find the 5 pieces of the Wrecking Ball (yellow), the 5 Overhead Rails (cyan), the 4 pieces of the Lever (light magenta) and the 10 Chain Links (green). Use the Overhead Rails on the Ceiling (2), use the Wrecking Ball on the Chain (3), use the Chain Links on the Chain, collect the Wrecking Ball and use it on the Chain and use the Lever on the Rail Control (4).
Click on the Wrecking Ball (1), click on the Crane Control (2) and then click on the Signboard (red) to return outside.
Click on the Switch (1), find 3 Light Bulbs (yellow), 4 Hooks (green), including one at the top of the Ladder (2) and the 5 pieces of the Speaker (cyan). Use the Speaker on the Radio (3), use the Light Bulbs in the Fixtures (4) and click on the Signboard (red) to enter the Mine.
Click on the Left Signboard (1) to enter the Hole in the Wall, click on the Signboard (2) to enter the Utility Room, find 10 Matches (yellow), use the Matches on the Matchbox (white), collect the Box of Matches and then click on the Signboard (3) to exit.
Use the Matches, move your cursor until the Light Switch (1) is revealed and click on it. Find the 5 pieces of the Rail Clamp (yellow), the 5 pieces of the Tire (green) and click on the Signboard (2) to return to the Mine. Use the Rail Clamp on the Rail (3) and click on the Signboard (4) to go outside.
Use the Tire on the Wheel (1), find the 3 pieces of the Pump (yellow), use it on the Wheel, click on the Table (2), click on the Switch (3) and click on the Signboard (4) and then click on the Crane Control (5).
Mining Cart Puzzle: Move the Mining Carts onto the Conveyer. Click and drag each column or row to move the mining carts. You can only drag as far as there are empty spaces and you must add them so they order matches what is shown on the Diagram. There are many solutions to this puzzle, so these are only the moves I chose. You’ll play 3 rounds. Click on the following for video solutions to the puzzles. Note: I had some display issues, which resulted in the white flashes.
Click on the Lever (1) and click on the Signboard (2) to the Hidden Room. Find the 10 Gears (green), use the Hooks on the Chains (2), use the Gears on the Mechanism (3) and click on the Rope (4).

Rope Puzzle: Untangle the Ropes and arrange them according to the Diagram. Click on a Bolt and move it to the Empty Hole. Continue this until you’ve positioned all the Ropes correctly. There are a number of steps involved, and any number of ways to solve this puzzle. Click on the following for my solution.
Click on the Lever (1), click on the Wall (2) and click on the Signboard (3). Find the 5 pieces of the Chainsaw (yellow), including one in the Vent (4), click on the Signboard (5), click on the Wall and use the Chainsaw on the Rail Tie (6), return to the Mine, click on the Mining Cart (7) and collect the Tile (8).
Click on the Door then click on the Signboard.
Click on the Cabinet (1), click on the Box (2), find the 5 pieces of the Stool (green), use the Stool on the Floor (3), click on the Box and collect the Key (yellow).
Find the 12 Envelopes (cyan), click on the Box, use the Envelopes on the Box and use the Key on the Cabinet.
Click on the Shredder (1), click on the Note (2) and click on the Button (3).
Find the 4 pieces of the Plug (yellow), the 4 pieces of the Packing Tape (cyan), use the Plug on the Shredder Cord (1), click on the Shredder (2), click on the Red Button (3) and collect the Shredded Note (green).
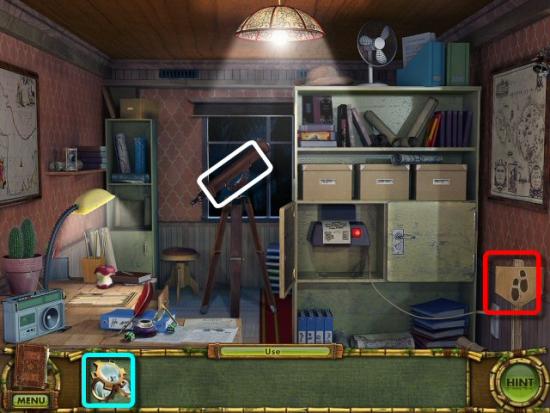
Use the Shredded Paper (green) on the Desk (1) and reassemble the Note. Click on a strip then click on another to exchange places. Continue until you’ve put it back together. Use the Packing Tape (yellow) on the Desk, click on the Telescope (2) and click on the Signboard (3) to return to the Hall. Click on the next 2 Signboards (4 and 5).
Find the 5 pieces of the Lock Handle (yellow), use the Lock Handle on the Lock and click on it twice.
Hole Puzzle: Cover the Holes with the Glass Plates. You only have 8 Glass Plates, but each one will cover a 3×3 grid (9 squares). Place them so all the Holes are covered. You need to make sure the screw, in the center, goes into a screw hole; you can’t place the screw over a large hole. You can (you’ll need to) overlap the Glass Plates. See the following for a solution. The colors are only to show which ones overlap.
Find the 4 pieces of the Lever (yellow), the 6 Fuses (green), the 4 Wires (light magenta) and the 3 pieces of the Pipe (cyan). Use the Lever on the Gears (1), click the Lever 3 times and use the Wires and Fuses on the Wall (2). Click on the Signboard (red) to exit and return to the Office.
Find the 4 pieces of the Crowbar (green) and click on the Signboard (red) to exit. Return to the previous area.
Use the Crowbar (green) on the Tank (1), click the Lever (2) twice, use the Pipe (yellow) on the Tank and click on the Signboard (red) to enter Room 26.
Find the 6 Lenses (cyan), including one on the Upper Ledge (white), the 10 Coals (yellow), collect the Candle (light magenta) and then click on the Signboard (red) to exit.
Find the 5 pieces of the Roasting Pan (green) and click the Signboard (red) to return to Room 26.
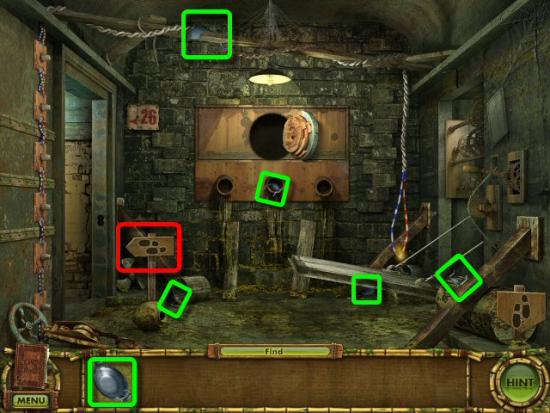
Use the Roasting Pan (green) on the Stone (1), use the Coals (yellow) on the Roasting Pan, use the Candle (light magenta) on the Coals, collect the Roasting Pan and use it on the Wall (2).
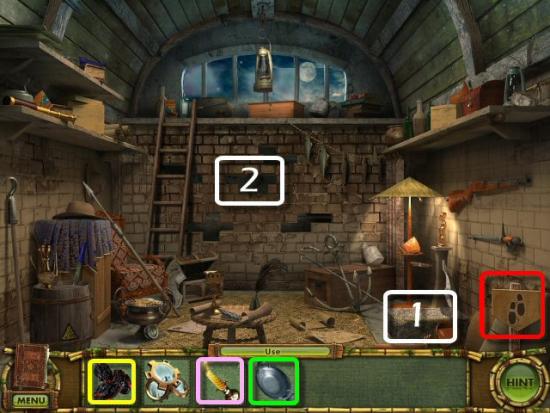
Click on the Floor (1), find the 5 pieces of the Tongs (yellow), including one on the Upper Ledge (2), the 5 pieces of the Bowl (green) and collect the Fuse (light magenta), also on the Upper Ledge.
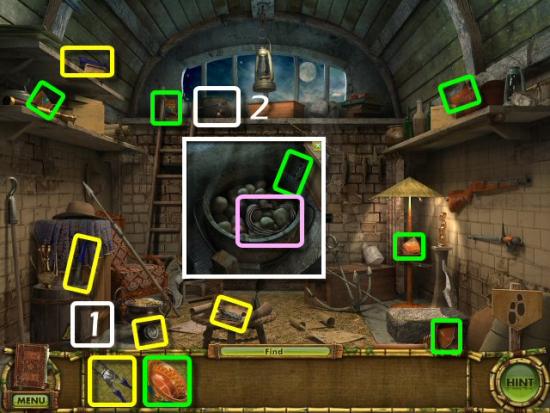
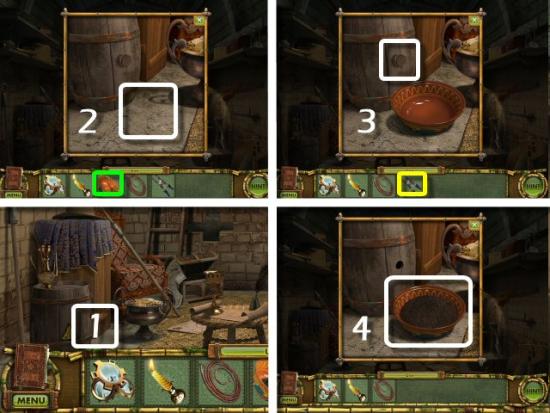
Click on the Floor (1), use the Bowl (green) on the Floor (2), use the Tongs (yellow) on the Barrel (3) and collect the Bowl of Gunpowder (4).
Use the Bowl of Gunpowder (green) on the Wall (1), use the Fuse (light magenta) on the Bowl and use the Candle (cyan) on the Fuse.
Find the 5 pieces of the Stone Head (green), click on the Wall (1), use the Stone Head on the Base (2) and then click on the Signboard (red). Return to the Office.
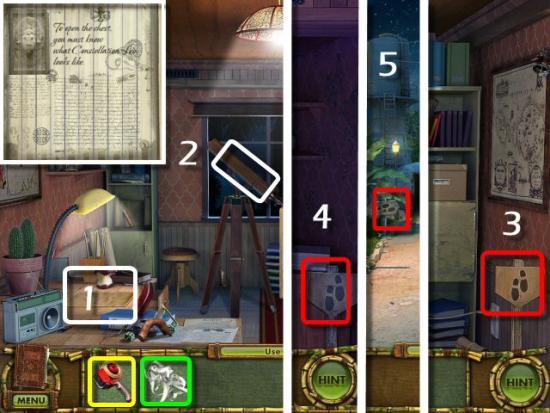
Use the Lenses (cyan) on the Telescope. Telescope Puzzle: Click on each Lens to position them in the correct position so the Constellation Leo appears. Click on the Signboard (red) to return to the previous area. Note: There isn’t a screenshot of the correct Lens positions, as I didn’t get my screenshot quick enough. It’s a very easy puzzle, and you can always skip it.
Click on the Chest (1), click on the Green Gems to form the pattern for the Constellation Leo (2) and collect the Tile (3)

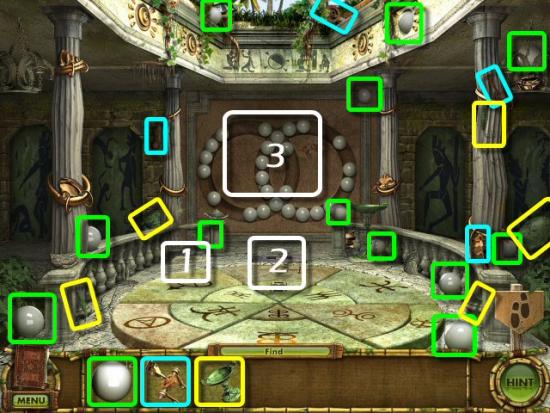
Click on the Upper Signboard (at the left). Find 12 Balls (green), the 5 pieces of the Lever (cyan), the 4 pieces of the Incense Burner (yellow), use the Incense Burner on the Base (1), use the Lever in the Floor (2), use the Balls in the Mechanism (3) and click on them.
Ball Puzzle: Arrange the Balls according to color. Click and drag any ball in either circle and rotate in either direction. Match one color at a time, or it will be nigh impossible to solve. As soon as you’ve matched one color, those balls disappear. Continue until all the Balls are gone. Click on the following for a video solution. Your puzzle will start differently.
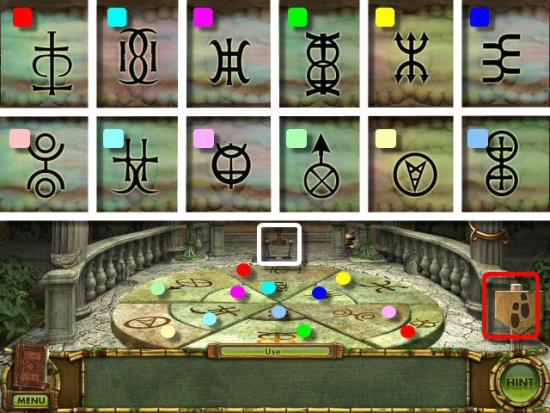
12 Symbols will appear. Click on the corresponding Tile Section in the floor. When complete, click on the Lever (white) and then click on the Signboard (red).
Click on the Lower Signboard (at the right). Find the 4 pieces of the Drumstick (cyan) and click on the Signboard (red). Return to the Upper Temple.
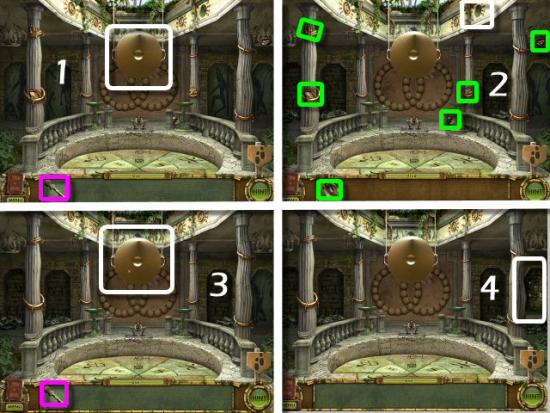
Use the Drumstick (magenta) on the Gong (1), drop the Drumstick (right click, anywhere), find the 5 pieces of the Disk (green), use the Disk in the Hole (2), use the Drumstick on the Gong, again (3), and click on the Doorway (4).
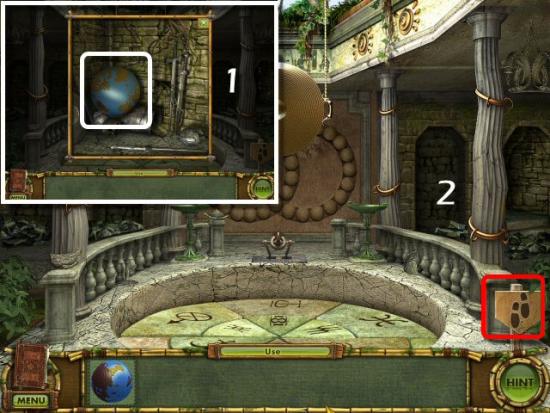
Collect the Magic Globe (1) and then click on the Signboard (2) to exit the Temple. Return to the Lower Temple.
Click on the Hands (1) and use the Magic Globe (yellow) on the Hands (2).
Find the 4 pieces of the Kangaroo (cyan), including one next to the Hands (white), the 4 pieces of the Bird (green), the 4 pieces of the Elephant (light magenta), the 4 pieces of the Bear (yellow) and then click on the Hands.
Use each of the Animal Figures above the Magic Globe and collect the Artifact Fragment after you place it.
Place each of the Artifact Fragments in the Stone Gate. A Symbol will begin to glow and you need to click on the corresponding Symbol carved into the walls around the Stone Gate.
Find the 12 Coins (light magenta) and click on the Signboard (red) to exit. Return to the Upper Temple.
Find the 4 pieces of the Bowl (cyan) and click on the Signboard (red) to exit. Return to the Lower Temple.
Use the Bowl (cyan) on the Statue’s Hand and use the Coins (light magenta) on the Bowl.
Balance Puzzle: Balance the Scales by placing an equal weight of Coins on each side. Normally you could assign values to the Coins and just divide them in two, but one side of the Scale is lower, so you have to compensate for that. By trying different Coins in the Right Bowl, you can figure out which single Coin will balance the scale. If you assign values to the Coins (5, 10, 15 and 20, or 25, 50, 75 and 100…or whatever you like), you should be able to figure out which Coins go in which Bowl. See the following for a solution.
Click on the Golden Bowl (1) and collect your final Tile (2). Watch the end of the story.
Congratulations! You’ve completed Treasures of Mystery Island 2: The Gates of Fate.
