
Best Horror Games On Itch.io – July 2026
Across a bounty of subgenres.
Grow A Garden 2 Base Price List
What's the most valuable crop?![Evomon Types Guide [Strengths, Weaknesses, Resistance]](/wp-content/uploads/2026/06/evomon-types.jpg "Evomon Types Guide [Strengths, Weaknesses, Resistance]")
Evomon Types Guide [Strengths, Weaknesses, Resistance]
Your companion guide during battles.
![[Roblox] Evomon Shiny Hunting Guide – Including Prismatic and Pris Shinies!](/wp-content/uploads/2026/06/evomon-shiny-hunting-guide.jpg "[Roblox] Evomon Shiny Hunting Guide – Including Prismatic and Pris Shinies!")
The Sultan’s Labyrinth: A Royal Sacrifice Walkthrough
Welcome to Gamezebo’s strategy guide for The Sultan’s Labyrinth: A Royal Sacrifice.


- Prefer Gamezebo on Google

General Tips
Persia’s beloved Sultan Bahar has died so his son-in-law Tallis will ascend the throne after the royal burial but a genie appears to say he has come to claim Bahar’s soul. Tallis begs the genie to save Bahar’s soul so the genie tells Tallis he will have to find his way out of a maze to atone for Bahar’s sins and there is only one way out that will not lead to madness or death.
Your task is to help Tallis on his journey to defeat the genie and save Bahar’s soul.
General Comments

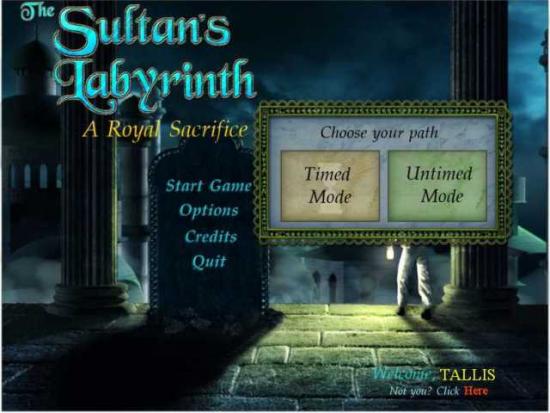
- From the Main Menu you select your player name, choose what options you wish and decide if you wish your path to be timed or untimed.
- This is also where you start the game or quit.
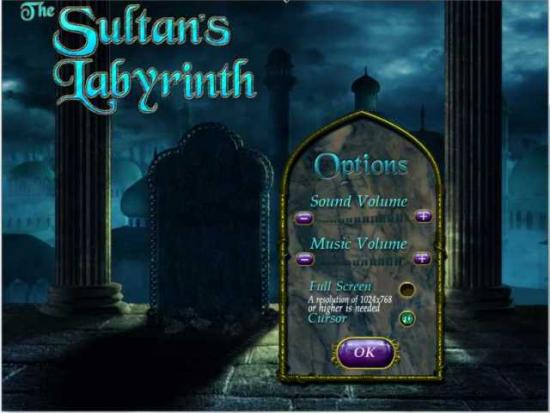
- Options include your choice of Sound and Music volume, Custom Cursor or not, and Full Screen or Windowed. If you choose Full Screen, your resolution will need to be 1024 x 768 or higher.
- There are 20 Realms with 3 Scenes in each Realm.
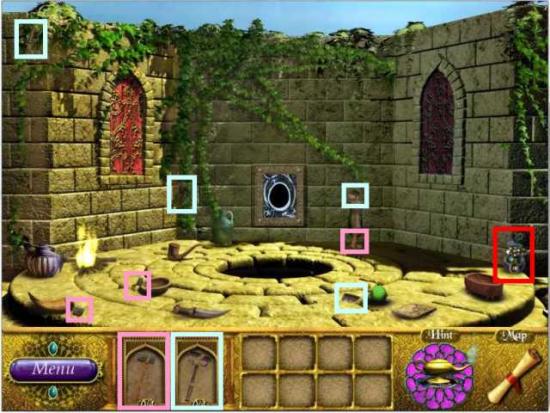
Specific Tips and Hints
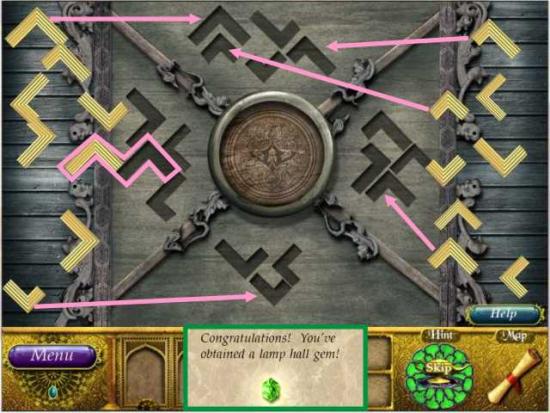
- Your first choice as you start the game will be to decide if you wish to follow the tutorial or begin on your own.
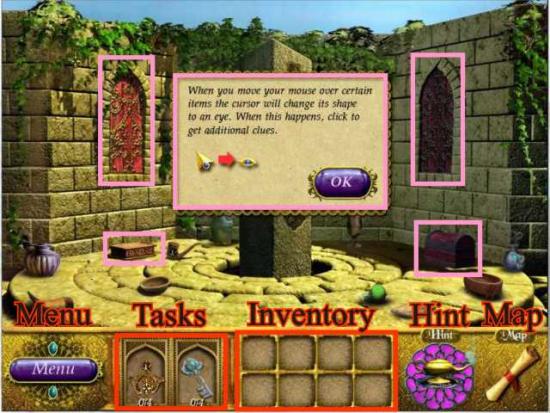
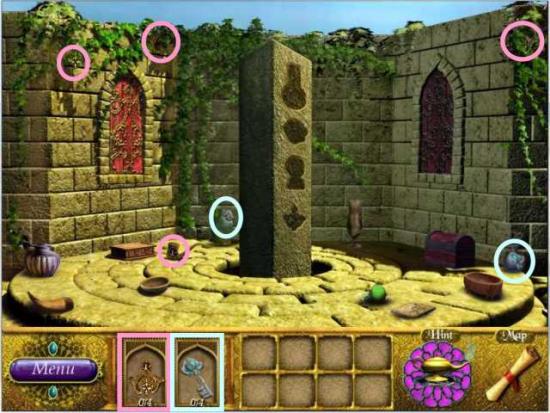
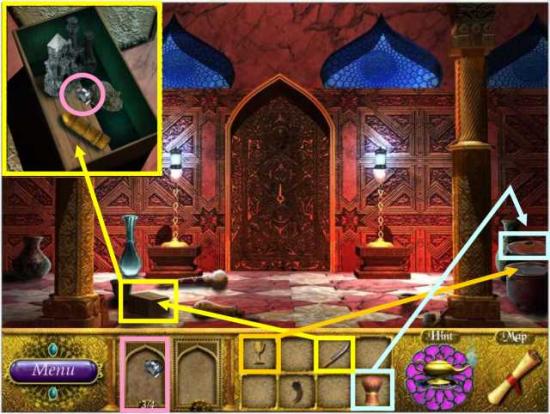
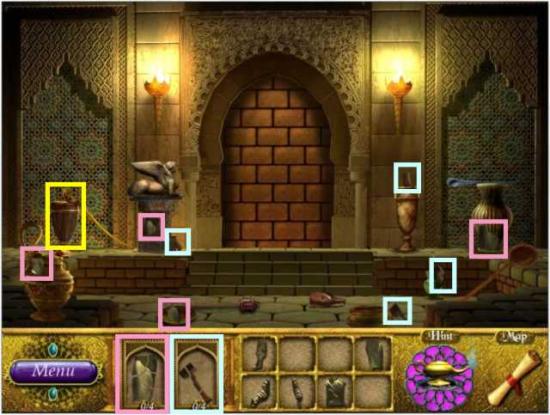
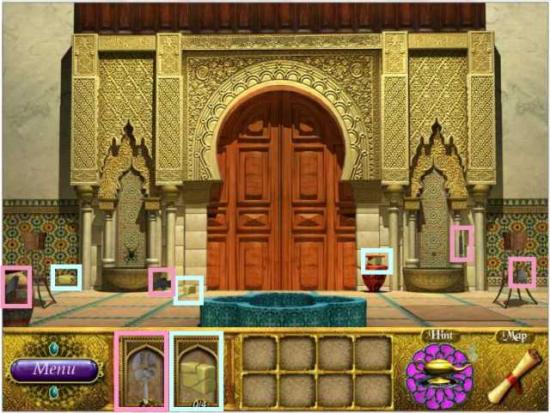
- The cursor will sometimes change its shape to an eye when you place it over certain items. The items will get a sparkle to tell you to look.
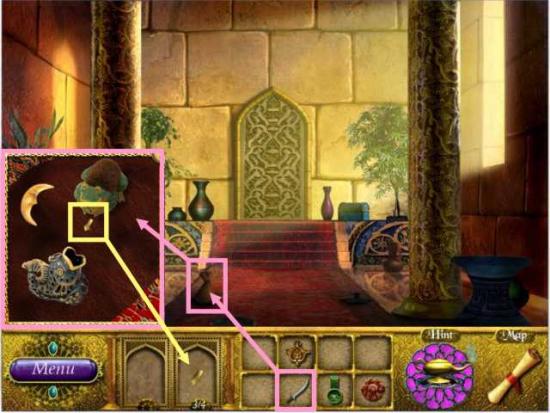
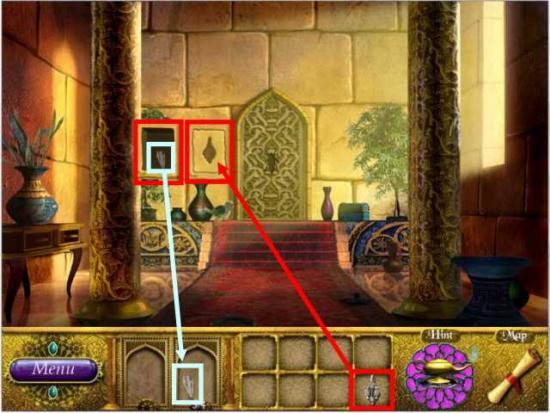
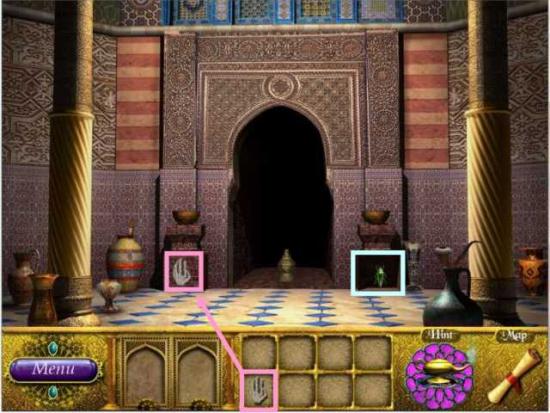
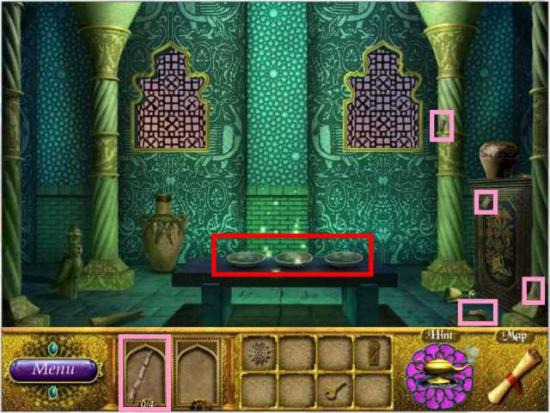
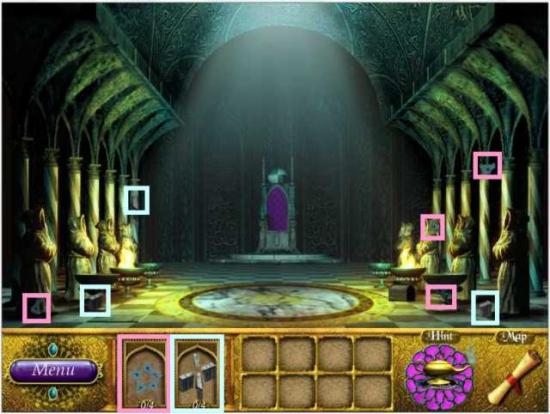
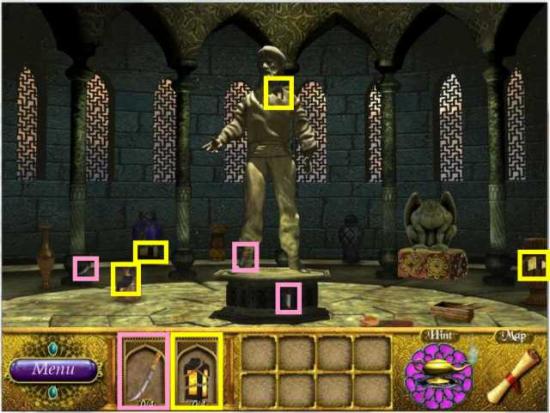
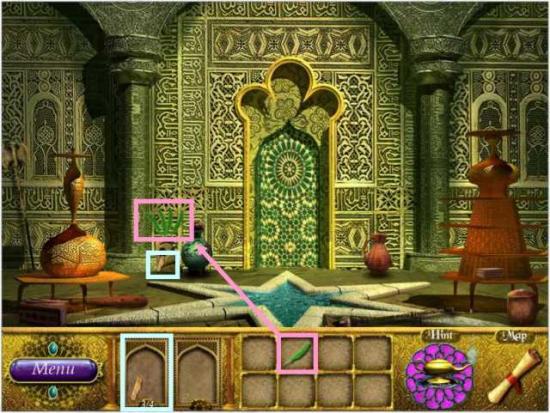
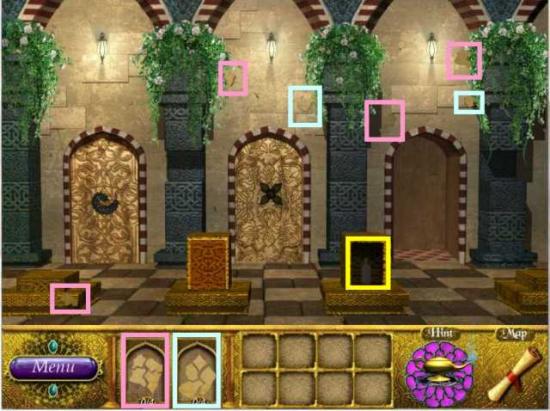
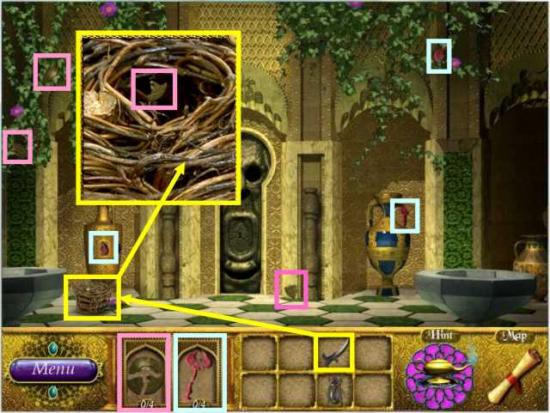
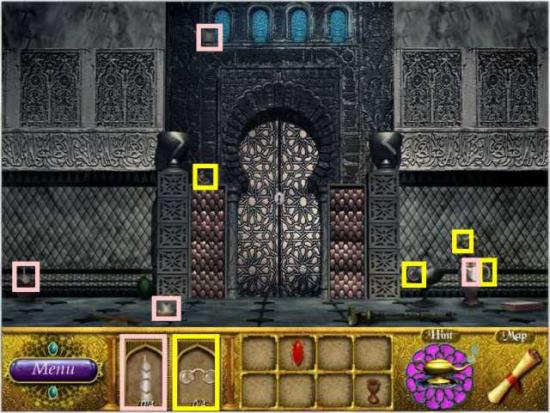
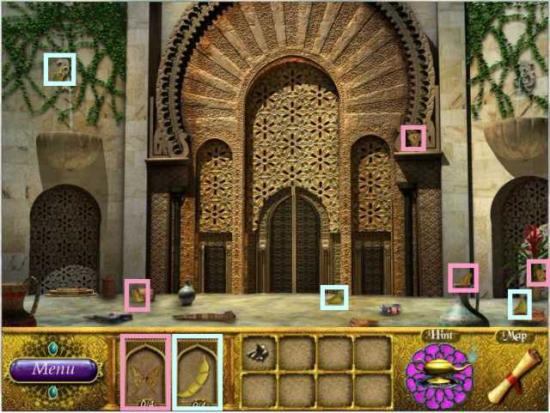
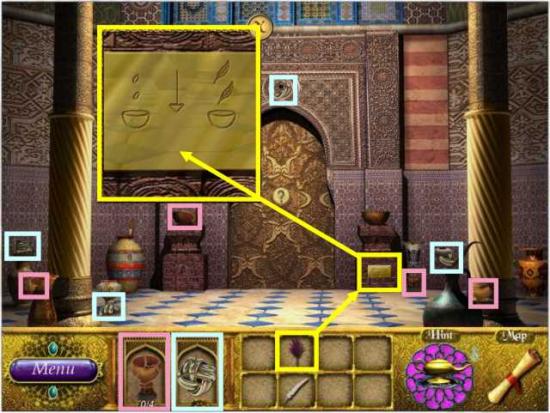
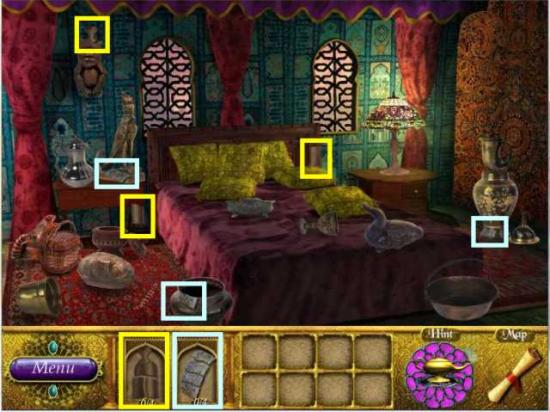
- In the scene above the items marked in pink, as well as the monolith, will get an eye to tell you to have a look at them for additional clues or to collect the items found within.
- Examine the two windows and the box on the left to find out they are locked – examine the chest on the right and the monolith to find out there are pieces missing.
- Most of the items you will be asked to find are fragmented…..see section marked “Tasks” above.
- You may not find all the parts in the one location so you will need to go back and forth between locations in order to find all the fragmented parts of the items.
- Once you find all the fragments the item will go into you Inventory.
- If you get frustrated and start clicking everywhere, your cursor will go crazy on you for a while.
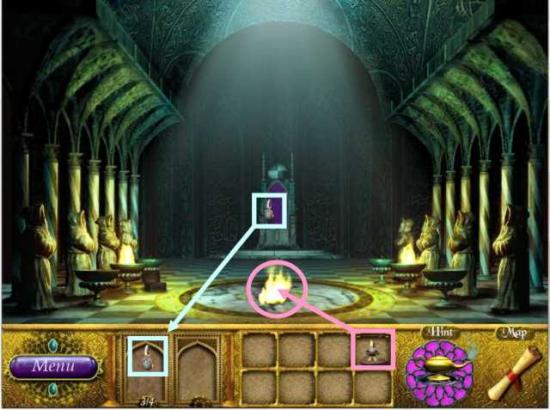
- For a Hint help click on the Genie Lamp which will need to refuel once it is used. There is a circlet surrounding it that will let you know how far it is in refueling and when it is ready to be used again.
- The Hints will only help you find fragments and will not tell you where to place completed items – they may also start over to refuel when you have changed scenes and placed items.
There is a Map in the lower right corner that will let you switch between locations.
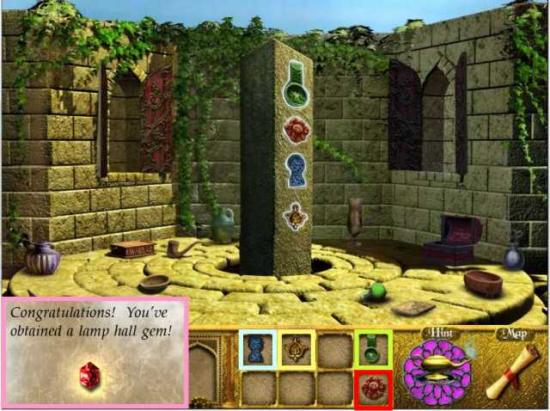
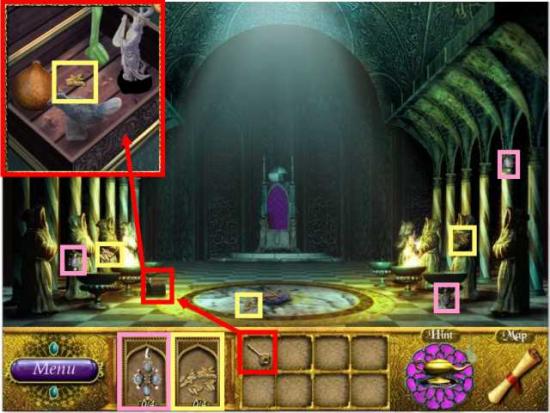
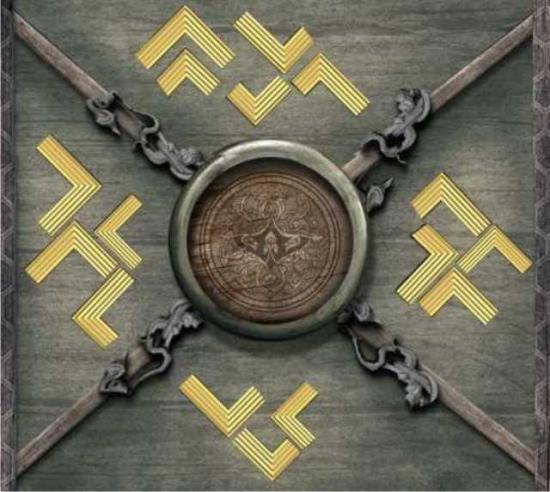
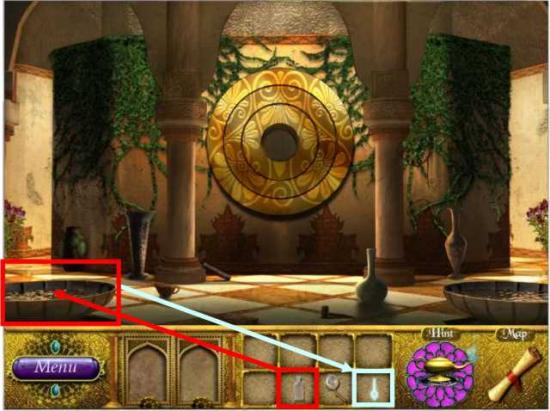
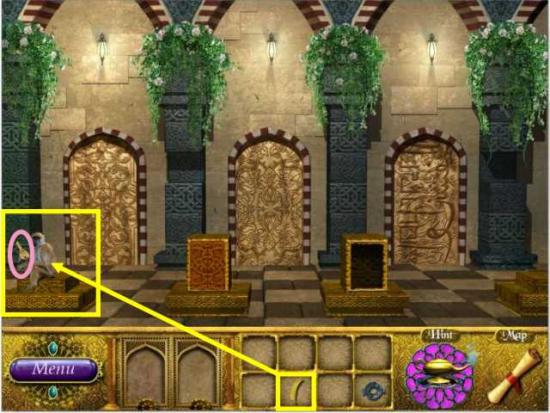
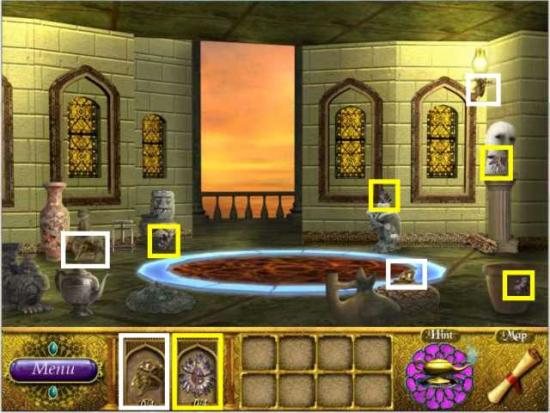
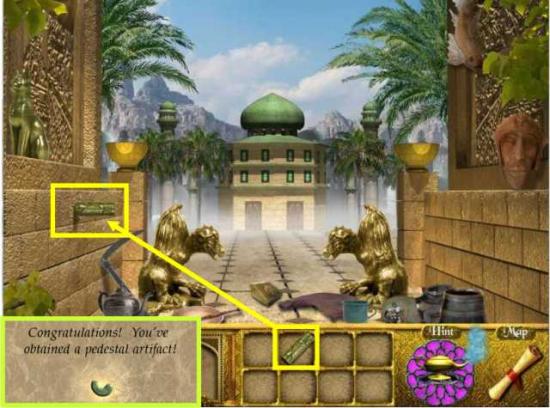
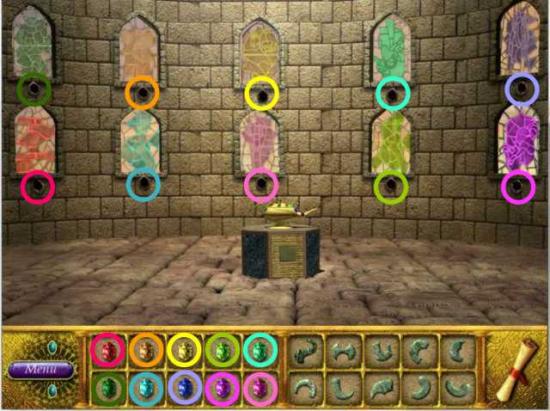
Lamp Hall
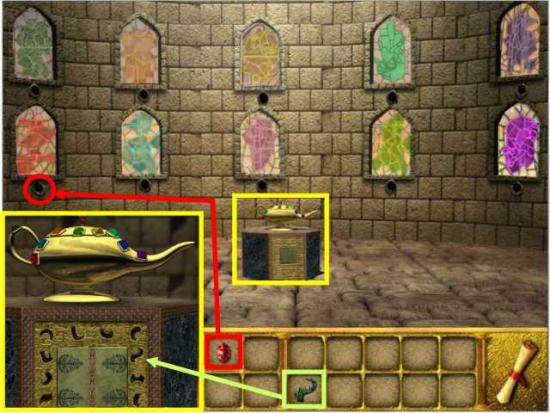
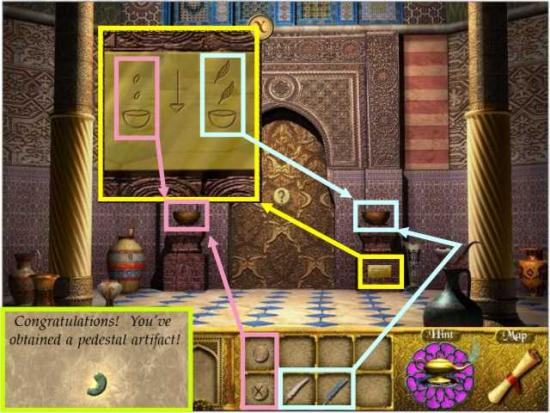
- The Lamp Hall is where Bahar’s lamp is kept. The Lamp has 10 colored jewels and 10 missing pieces on its pedestal which is shown in the insert at the left.
- At the completion of each Realm you will receive either a jewel or pedestal piece.
- You can choose to place the jewels and pedestal pieces as you collect them or you can wait until you have all of them, except in the case of one profile I played where they installed themselves for the first several Realms.
- I will be showing all of them all at the end but the above scene will show you how to place them as you go.
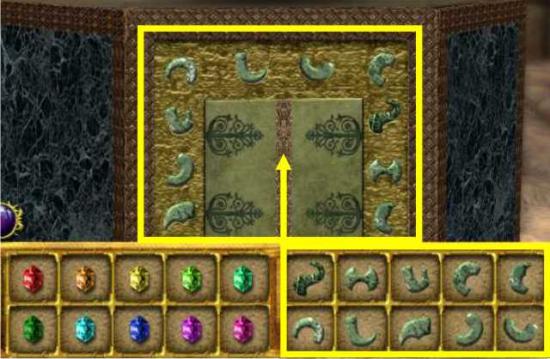
- The Jewel Inventory is on the left and the Pedestal Piece Inventory is on the right.
- Place the gems in the holes under their corresponding color. If you are unsure about the placement of the jewels, click on the lamp to see if the gem lights up on the lamp.
- Click on the pedestal to bring up a larger view – place the piece you have in the corresponding cut out shape.
- If you start to place them and then change your mind, you can go to the Lamp Hall and click on the piece to pick it up and then place it back in your Inventory by right clicking on it.
You will notice that when you click on the Map you will be given your choice as to whether you wish to go to the Menu or the Lamp Hall so you can visit there at any time.
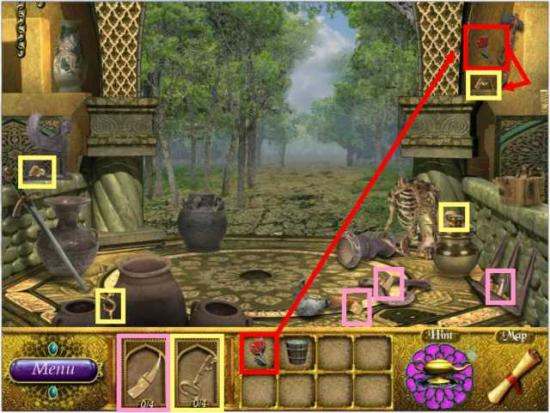
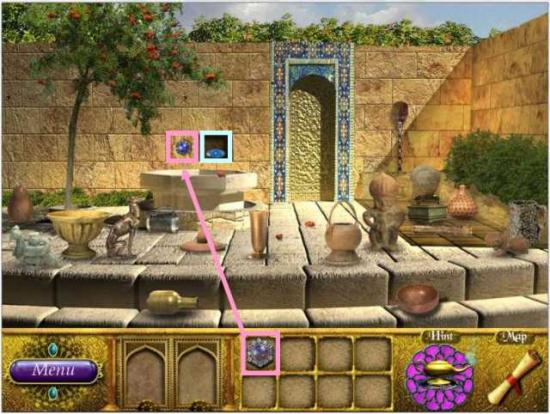
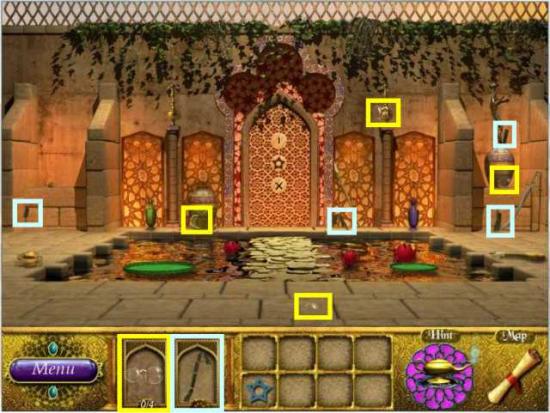
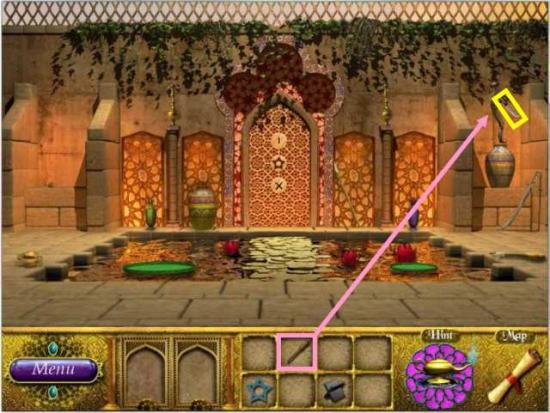
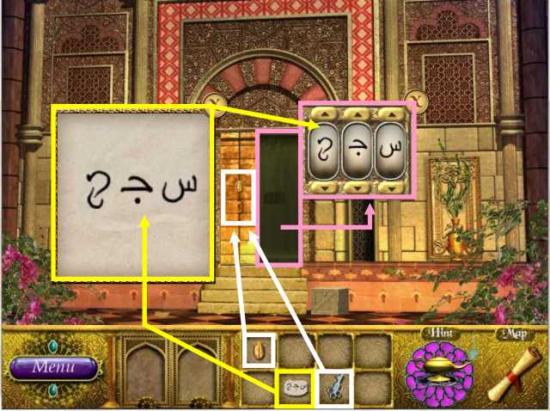
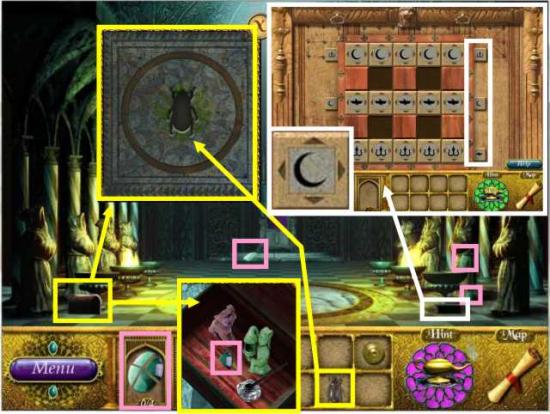
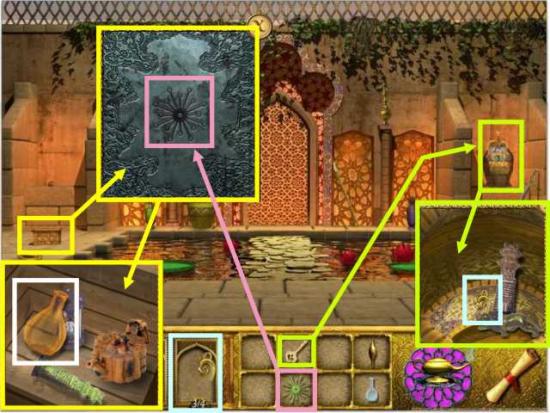
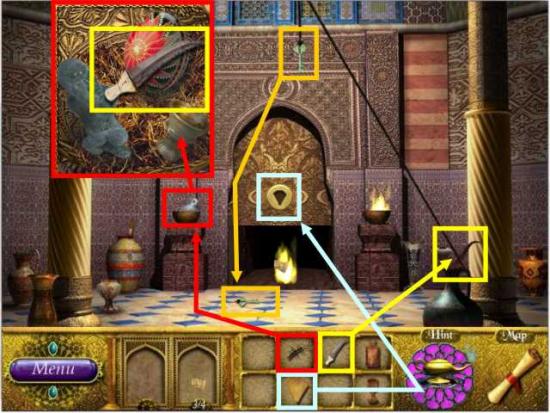
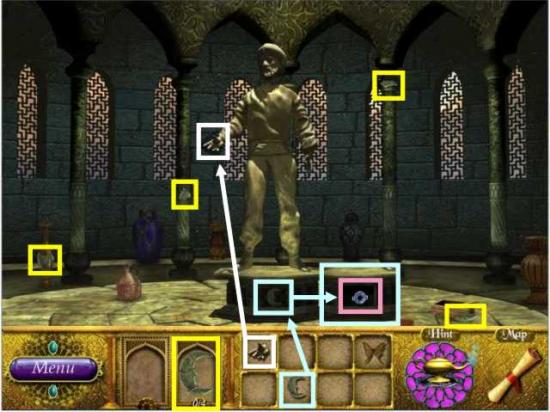
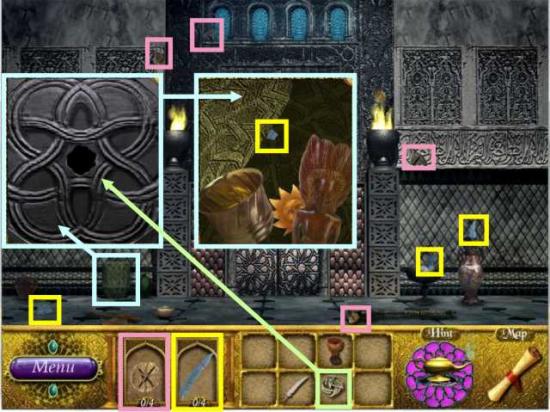
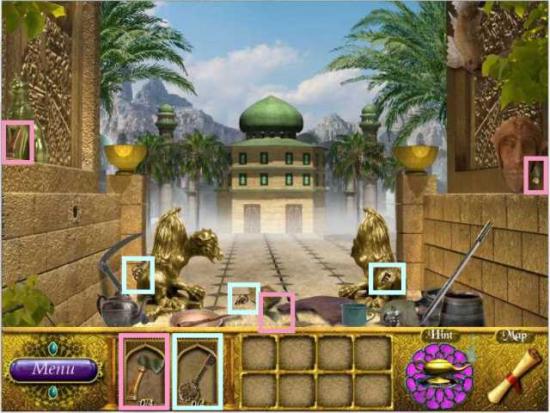
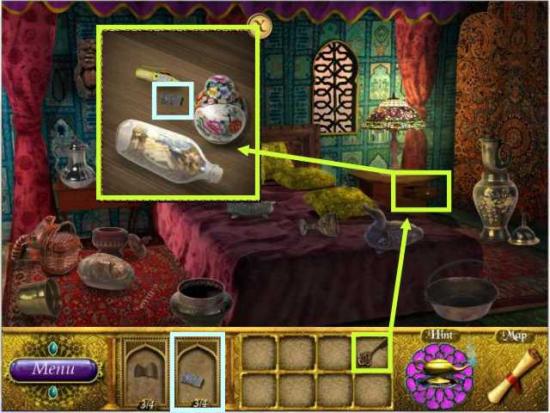
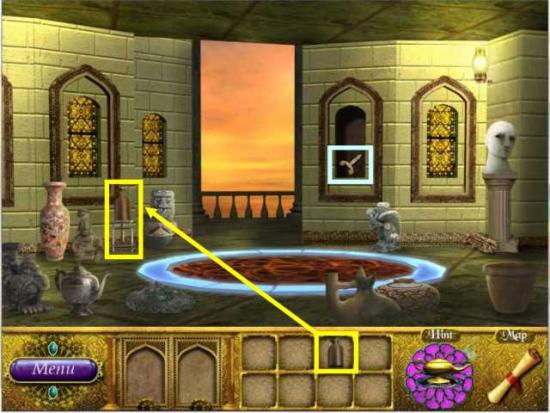
1st Realm
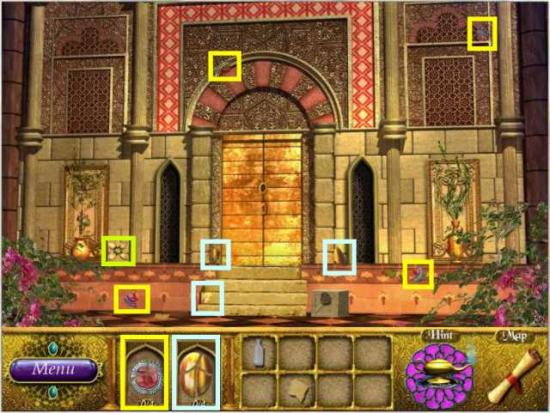
- For this first location you will be first be presented with Scene 2 according to the Map.
- Locate as many of the fragmented pieces as marked and then go to the Map to find another location to search for the missing piece of the key.
Map
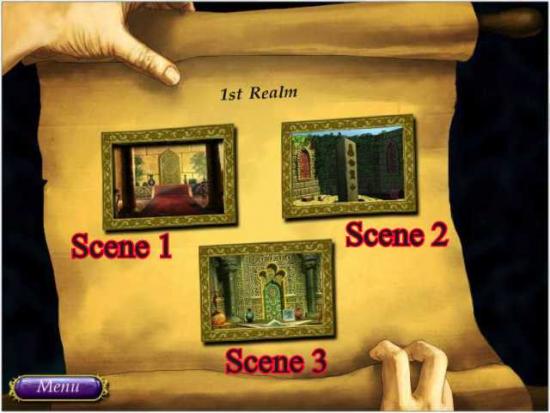
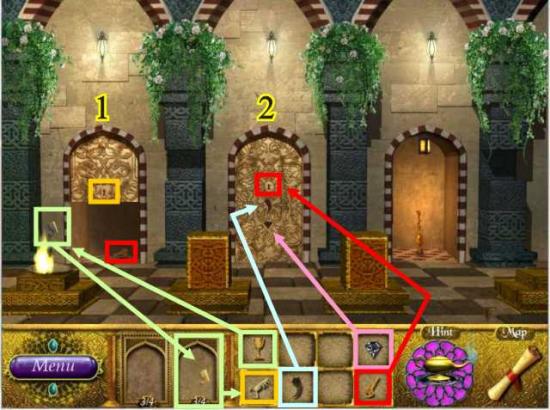
- The 3 locations for this Realm are marked on the map – I will refer to these numbers as we go back and forth between scenes – Select Scene 1.
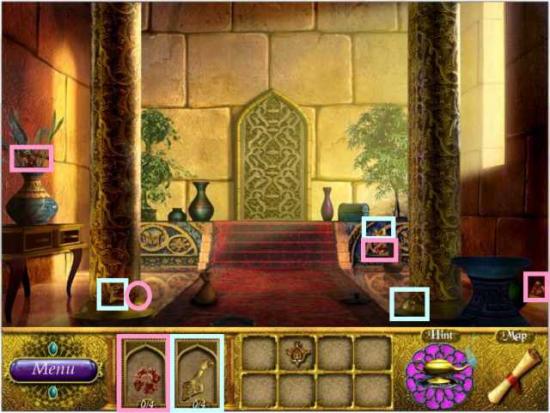
- Collect as many fragments as are marked and then go back to the Map and select Scene 3.

- Collect the marked fragments and then go to the Map and back to Scene 2.
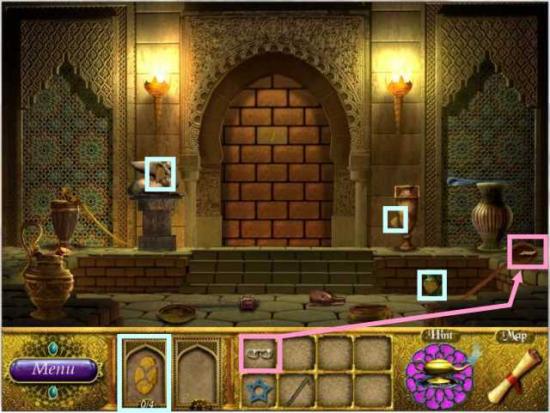
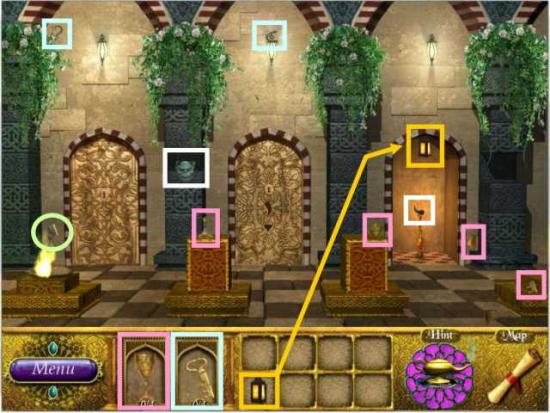
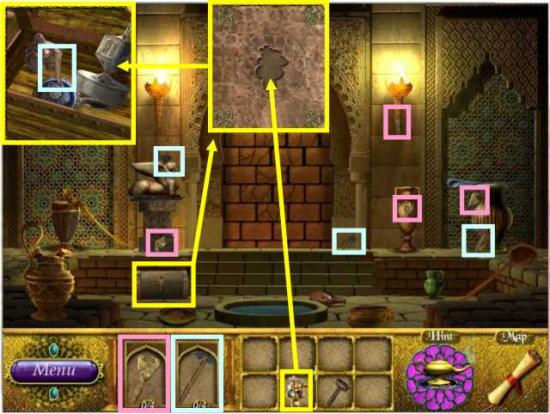
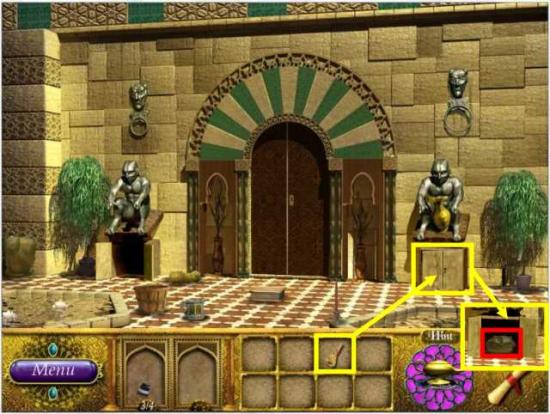
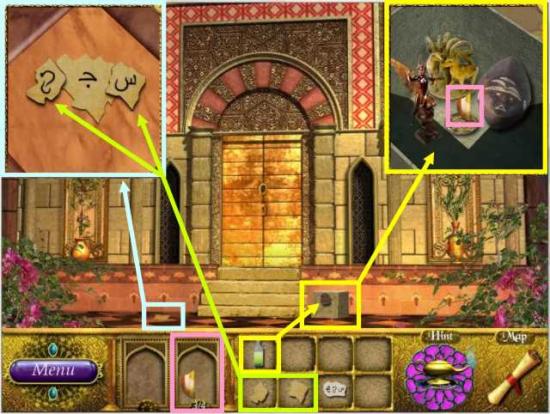
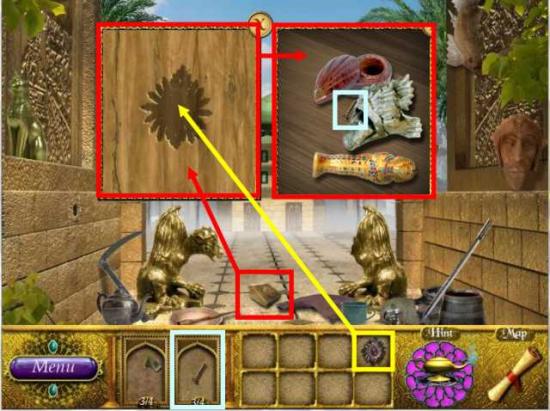
- Click on the chest to the right and place the missing piece on the plaque as shown in the insert.
- Click on it again to bring up the contents of the chest and collect the monolith piece.
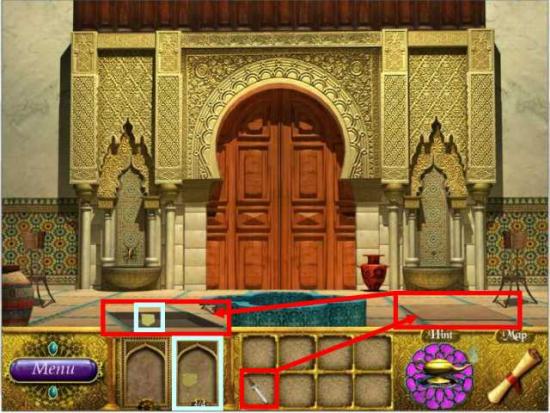
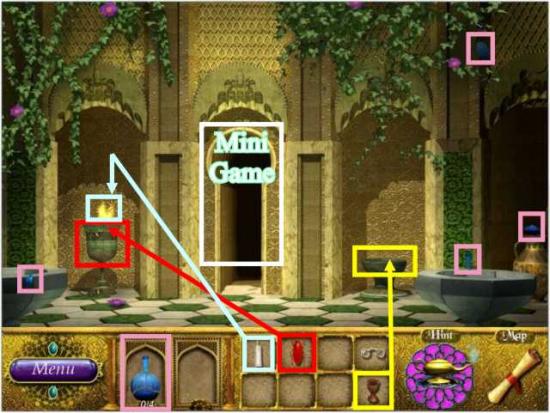
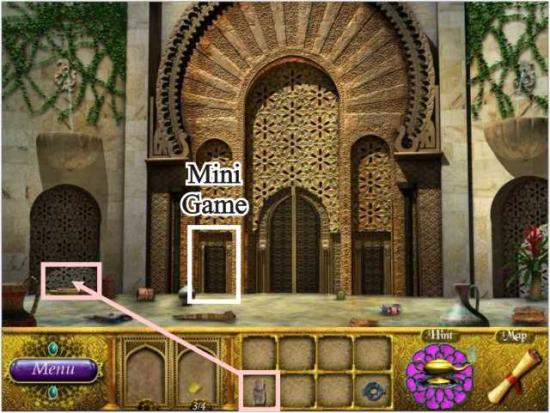
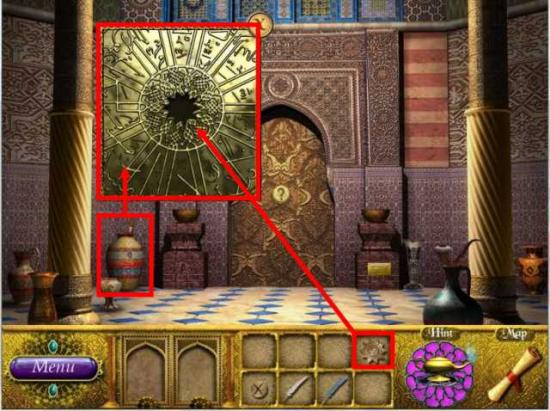
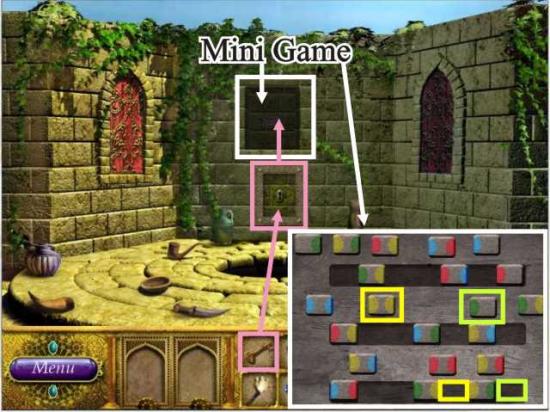
- You now have a crank to open the box on the left. Place it on the box to bring up a mini game.
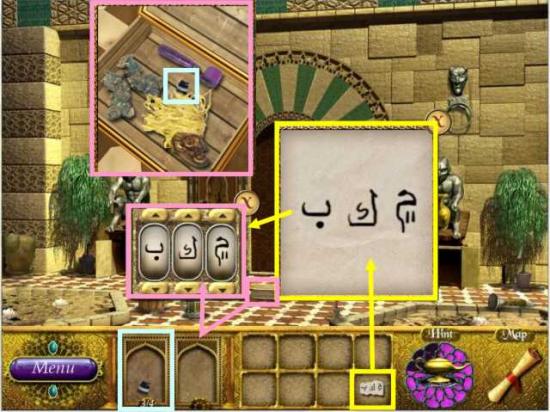
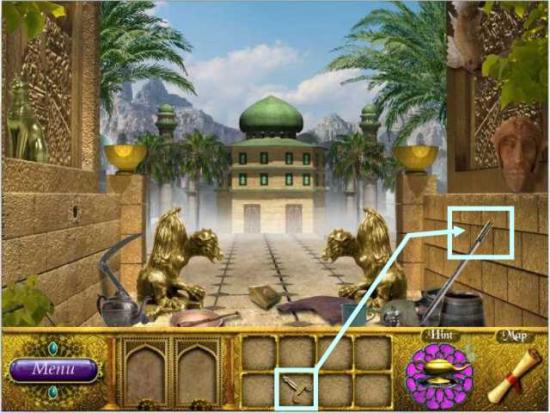
- Once you have the key use it on the left window and collect the dagger.
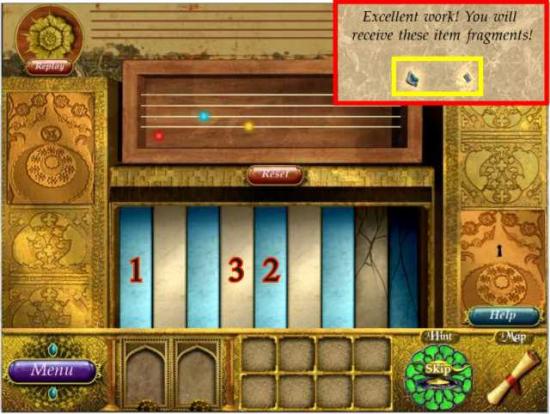
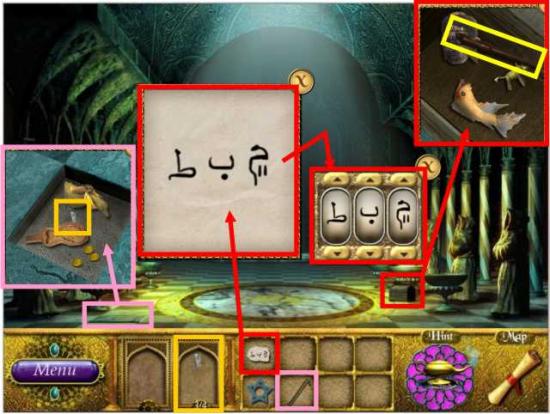
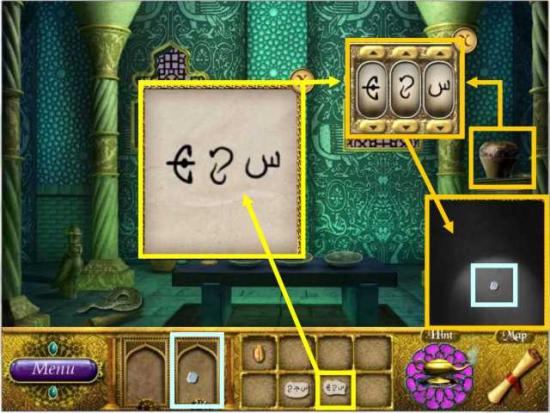
- Listen and watch the musical notes as they appear on the bar above. Click on the keys on the keyboard in the order marked.
- Note that the “Hint” button has turned green and the lamp says “Skip” so you can use it to skip the puzzle when it is full.
- You will receive the last fragments of the key which will go into your Inventory.
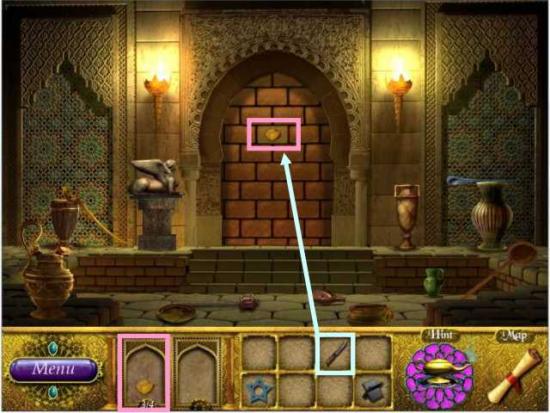
- See Scene 2 above for how to use it. Once you have the dagger go to the Map and select Scene 1.
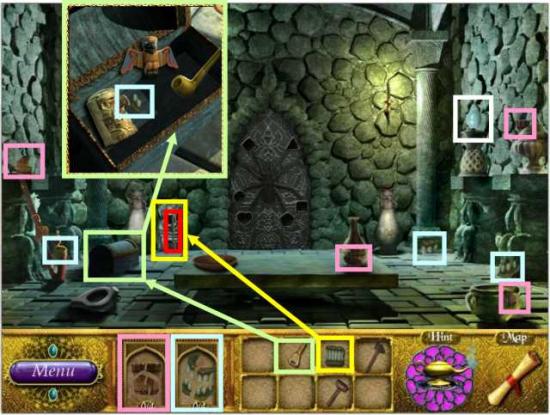
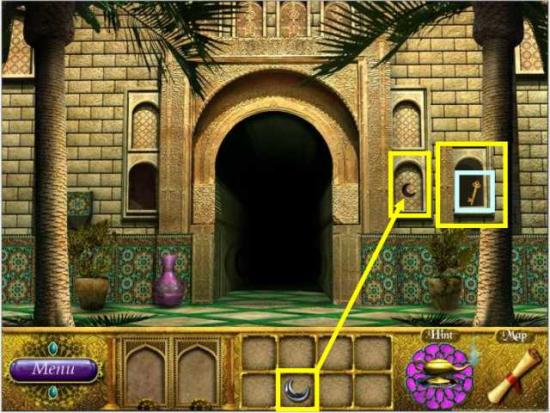
- Use the dagger on the leather bag and then click on it to bring up the insert – collect the fragment of the key.
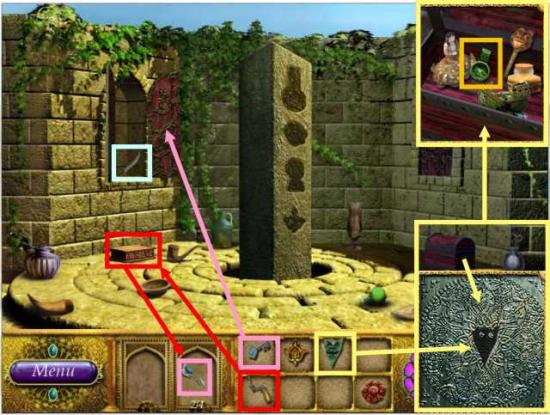
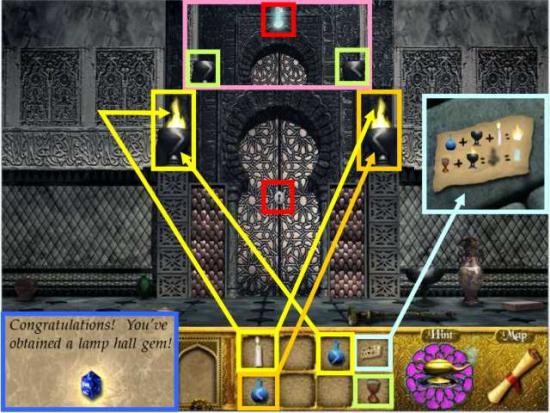
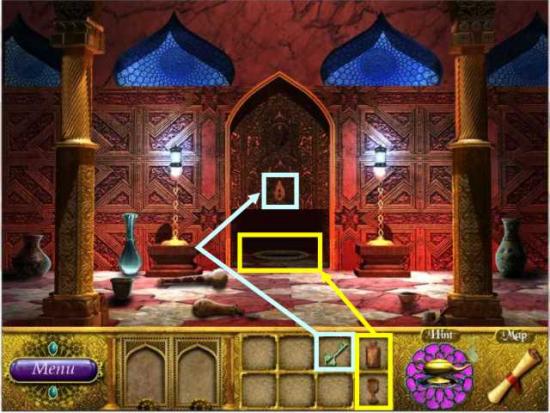
- You have completed this Scene so click on the Map and go back to monolith Scene 2.
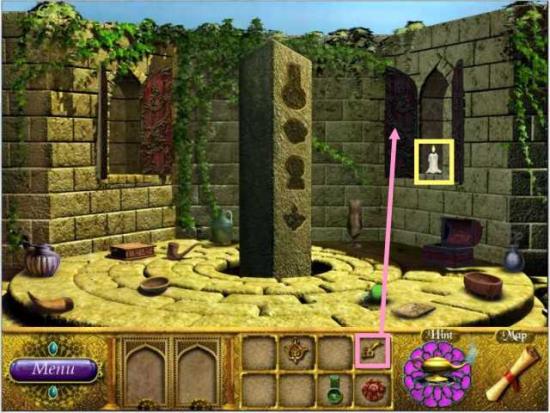
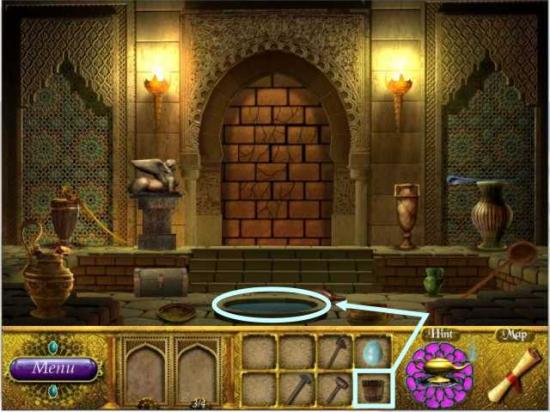
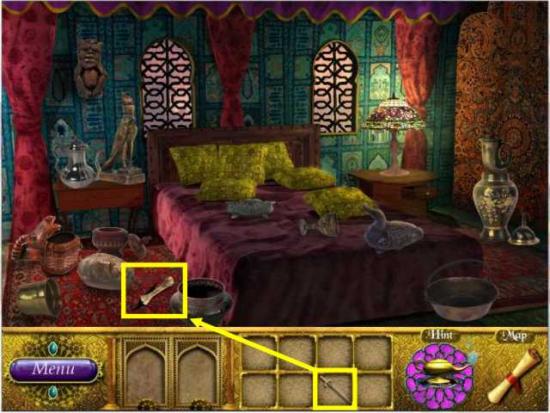
- Use the key on the right window and collect the candle.
- Go to the Map and select Scene 3.
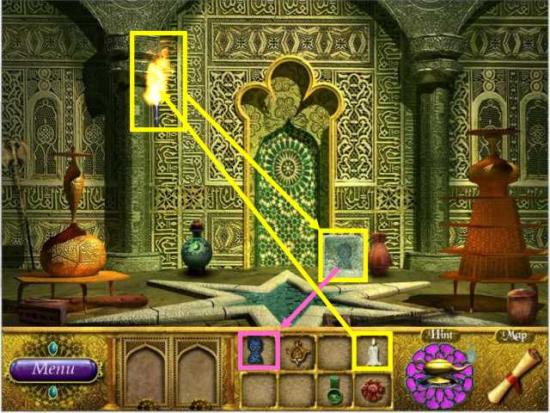
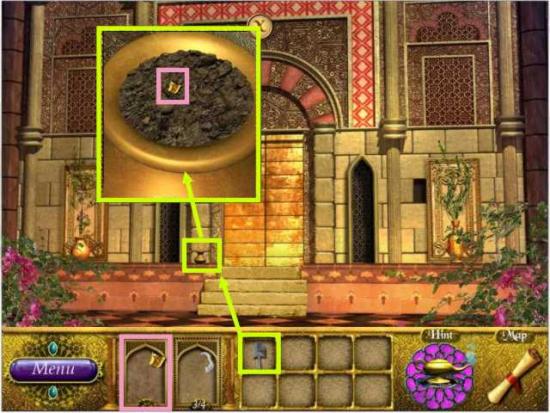
- Use the candle to light the torch.
- Place the torch on the block marked in red and it will melt it producing a monolith piece that will go into your Inventory.
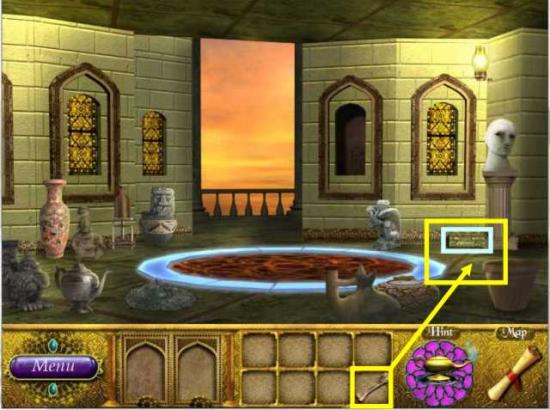
- You have completed this location so go to the Map and return to the monolith in Scene 2.
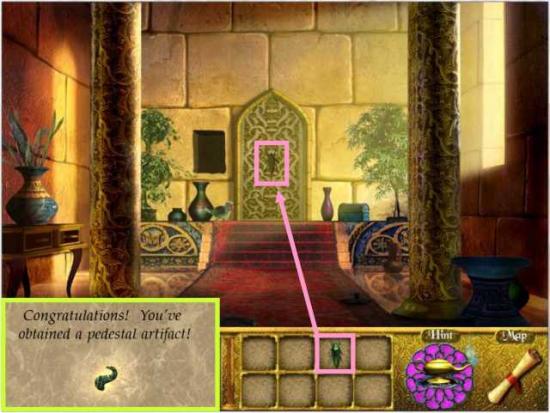
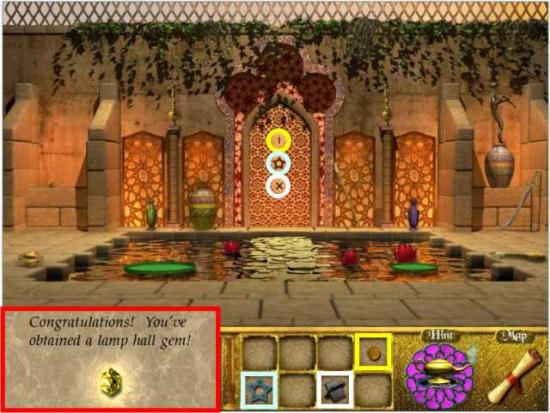
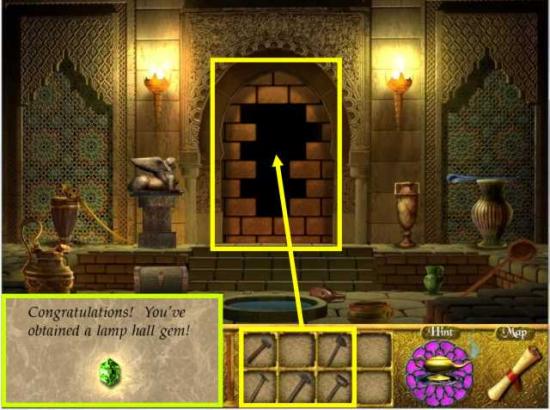
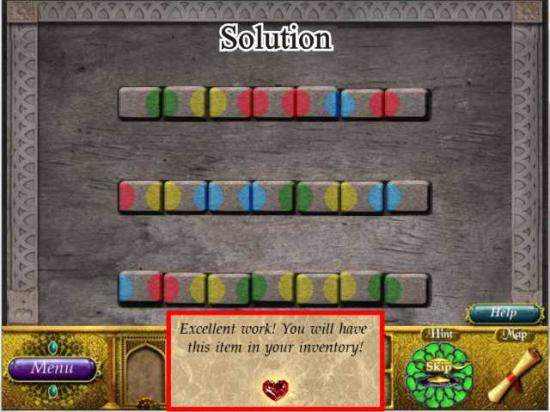
- The monolith pieces are marked according to their color as shown on the monolith – place them where they belong.
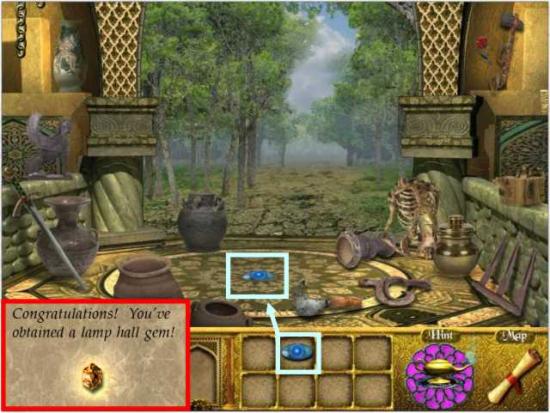
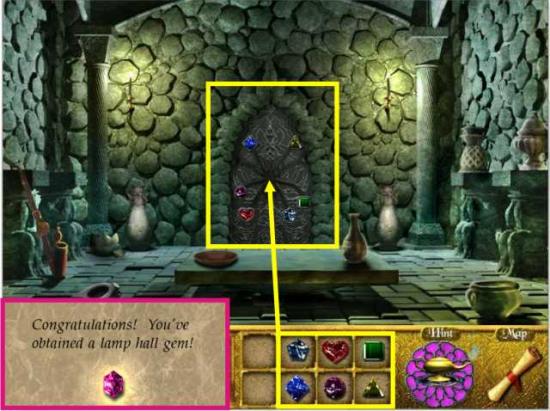
- You have completed the First Realm and have been give a lamp hall gem.
You will be taken to the Lamp Hall and can choose to place your gem or save it and click on the map to go to the next Realm.
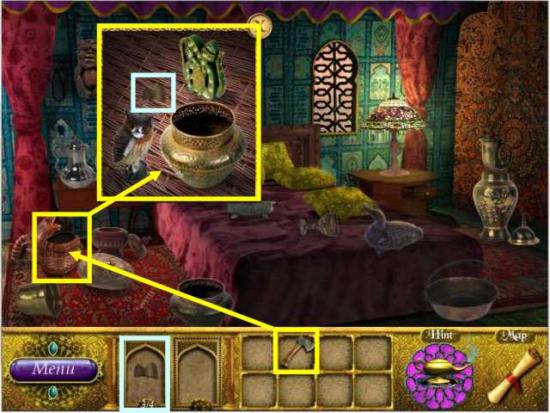
2nd Realm
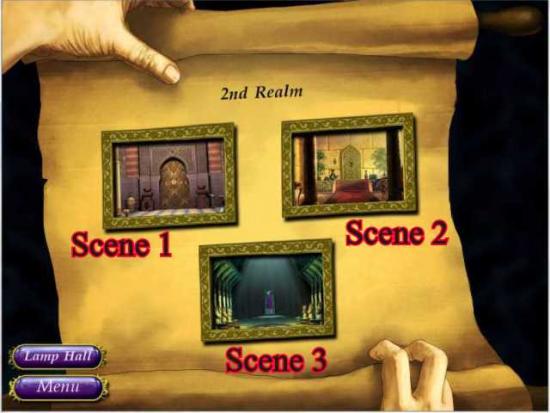
- Go to the Map and choose Scene 1.
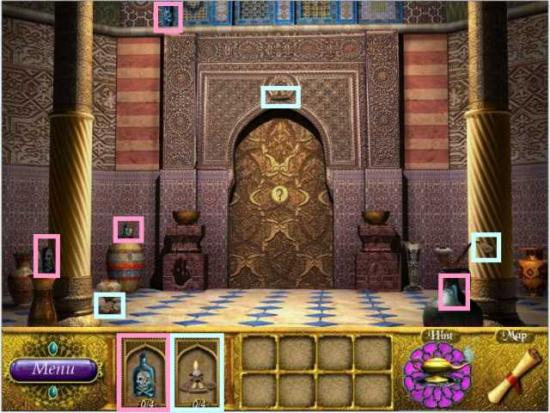
- Collect all the available fragments – one piece of the candle will be missing.
- Click on the map and go to Scene 2.
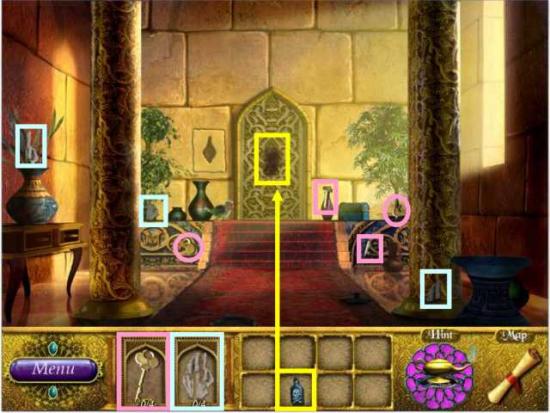
- Collect all the available fragments of the key and hand and then go to Scene 3.
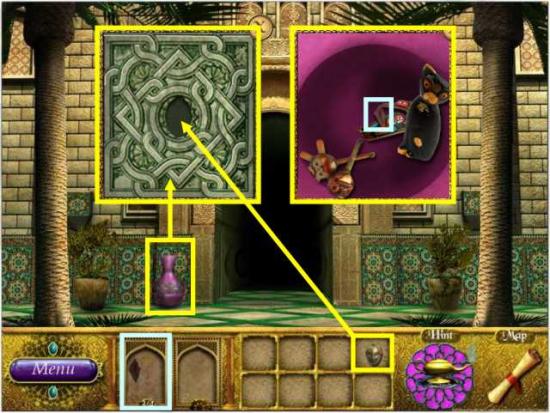
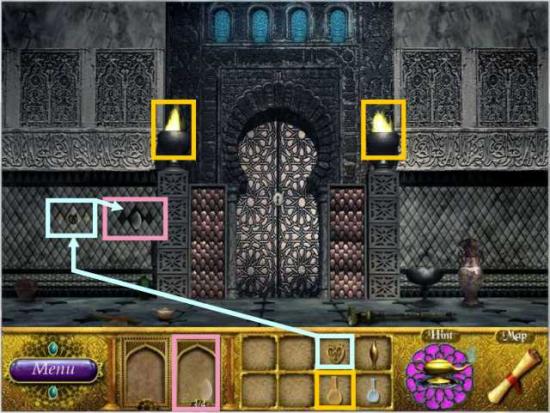
- Use the acid bottle on the hole in the door which will take on the shape of a cricket.
- Collects all the fragments and then use the key on the chest to get the insert and collect the last piece of the seeds.
- Click on the Map and go to Scene 2.
- Use the acid on the door which will produce the shape of a cricket.
- Give the seed to the parrot who will tell you the combination shown.
- Click on the Map and go to Scene 1.
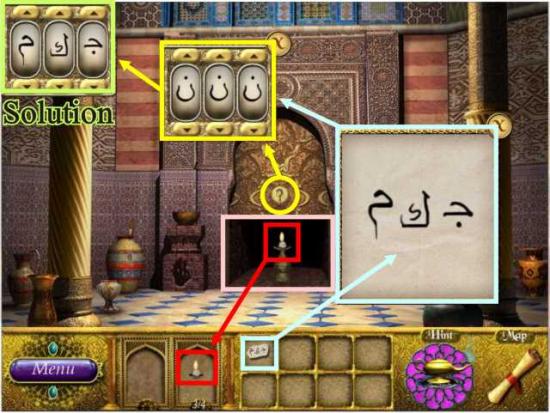
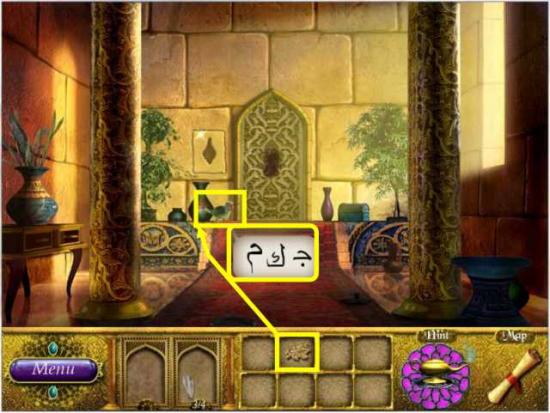
- Click on the “?” on the door and the combination will pop up in an insert.
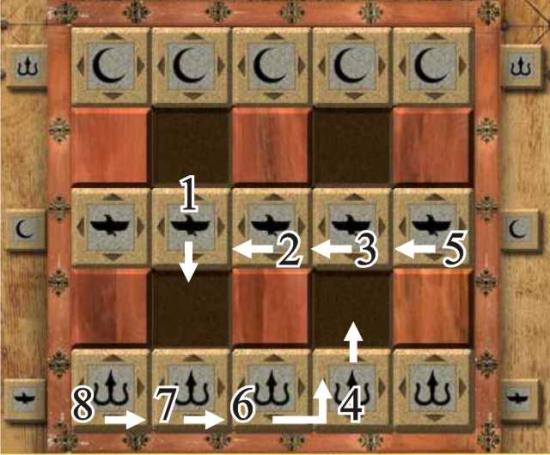
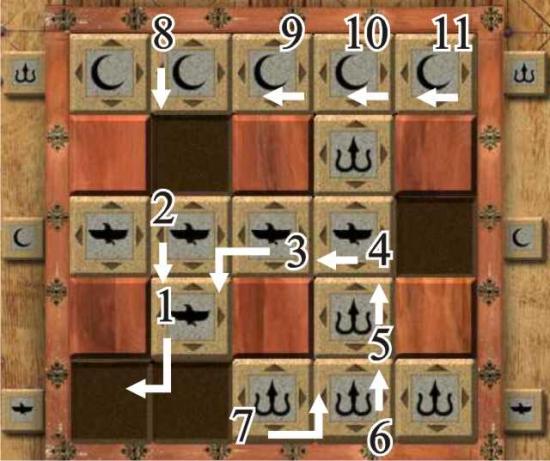
- Click on the combination in your Inventory and use the upper or lower arrows in the mini game insert so that it matches the correct figures as shown in the solution box in the upper left corner.
- The door will fully open and the remainder of the candle will appear as shown in the insert – collect it and go to Scene 3.
- Place the candle on the sticks in the middle of the circle to light the fire.
- The remaining piece of the medallion will appear on the altar – pick it up.
- You are finished here so go to Scene 2.
- Place the medallion in the spot carved in the wall marked in red – it will open the compartment as shown in the insert to the left of it.
- Take the piece of the hand and go to Scene 1.
- Place the hand where shown and collect the cricket marked in blue.
- You have completed this location so go back to Scene 2.
- Place the cricket on the door.
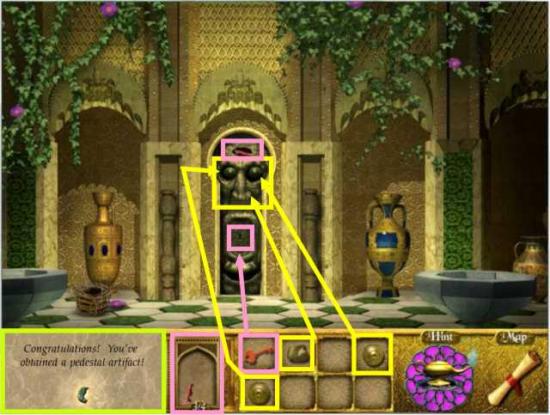
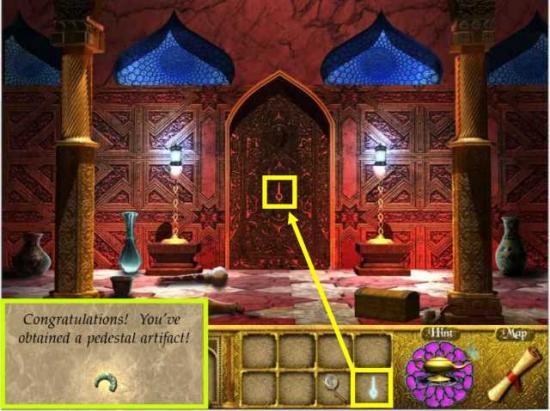
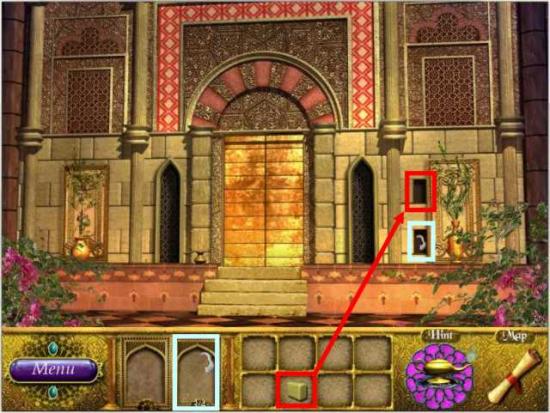
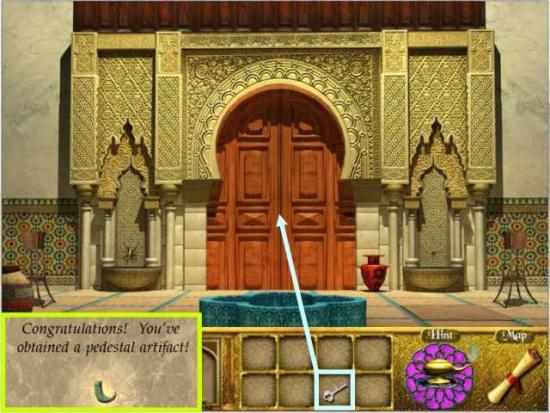
- You have completed the Second Realm and will receive an artifact for the pedestal under the Genie’s Lamp.
- You will be taken to the Lamp Hall and can choose to place the pedestal piece or save it and click on the map to go to the next Realm.
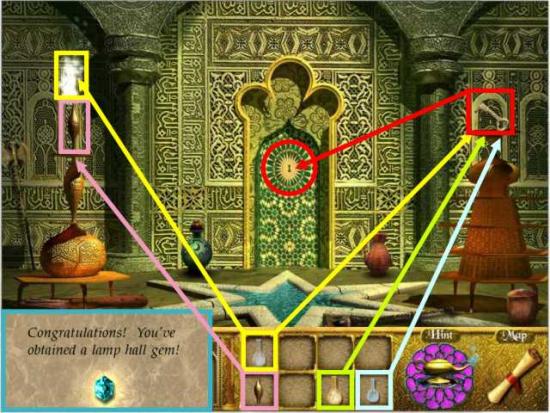
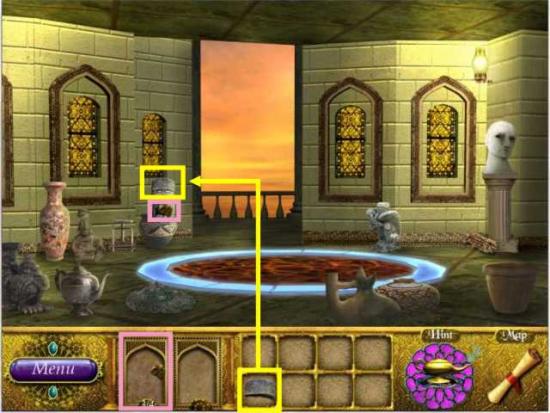
3rd Realm
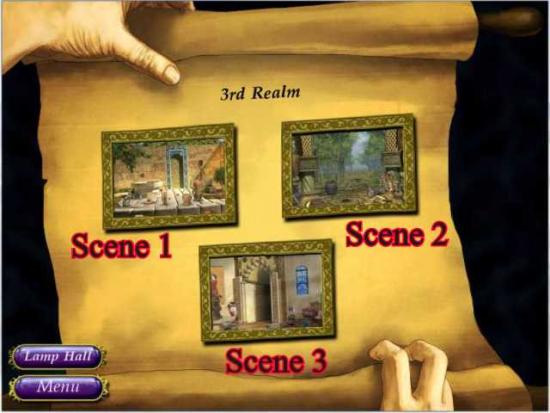
- Here is your location reference Map for this Realm – select Scene 1.

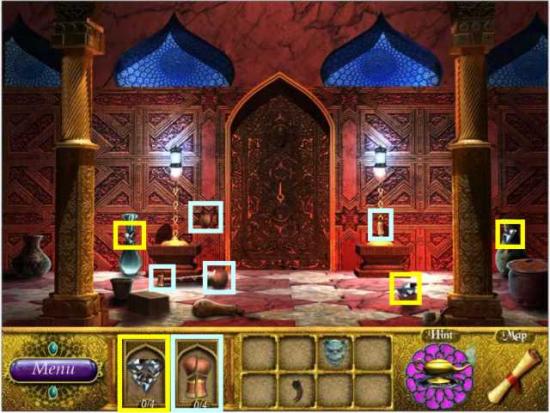
- Pick up the fragments of the metal ring and bucket.
- Place the completed ring on the red square to receive the last piece of the bucket.
- Place the empty bucket in the fountain and it will be returned to you filled.
- Go to the Map and select Scene 2.
- Collect as many fragments as you can and then go to Scene 3 to get the rose so you can get the last piece of the key.
- When you have completed the key go to Scene 1.

- Collect 3 each of the rose and hook pieces.
- Place the bucket on the fountain to fill it – the painting at the far left with open to reveal the last piece of the rose as shown in the red insert.
- Go back to Scene 2 to place the rose and finish the key before returning to Scene 1.
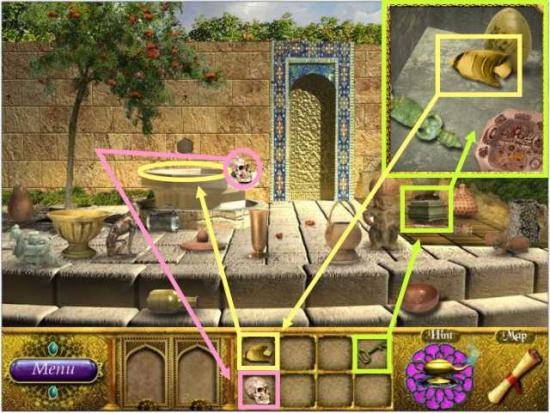
- Use the key on the box marked in green and pick up the goldfish shown in the insert.
- Place the goldfish in the fountain and a skull with pop out.
- Collect the skull and go to Scene 2.

- Place the skull on the skeleton and grab the last piece of the Dragon Horn – go to Scene 3.
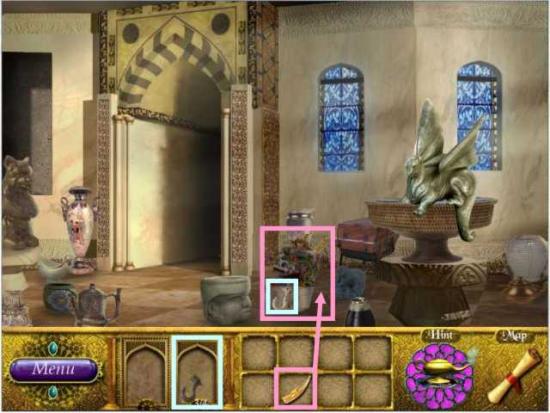
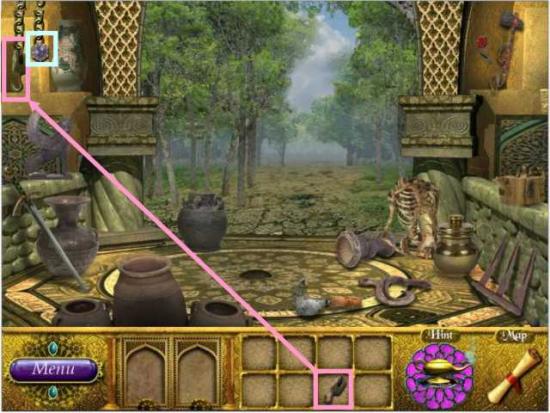
- Place the horn where indicated and grab the hook that appears.
- You have completed this location so go to Scene 2.
- Place the hook on the chain as shown and collect the medallion – take it to Scene 1.
- Place the medallion on the hole in the wall as indicated – grab the eye that appears in a hole next to it and you are done here and ready to go back to Scene 2 because you are done here.
- Place the eye in the hole in the center of the circle.
- You have finished Realm 3 and collected a jewel for the lamp.
You will be taken to the Lamp Hall and can choose to place your jewel or save it and click on the map to go to the next Realm.
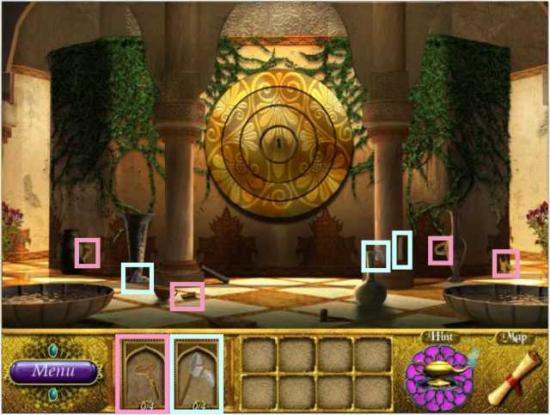
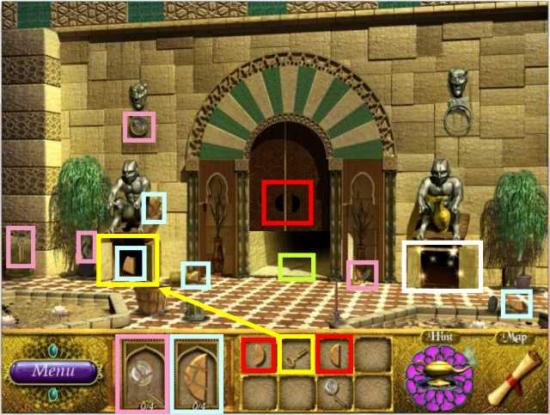
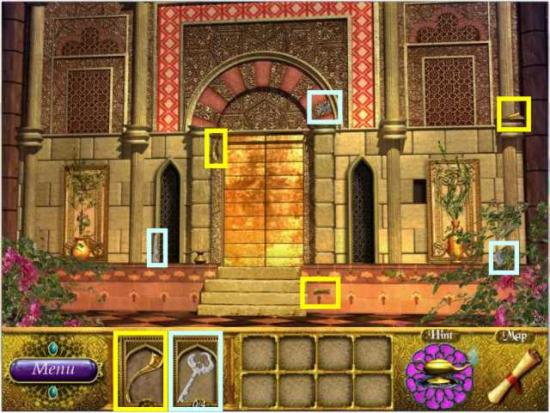
4th Realm
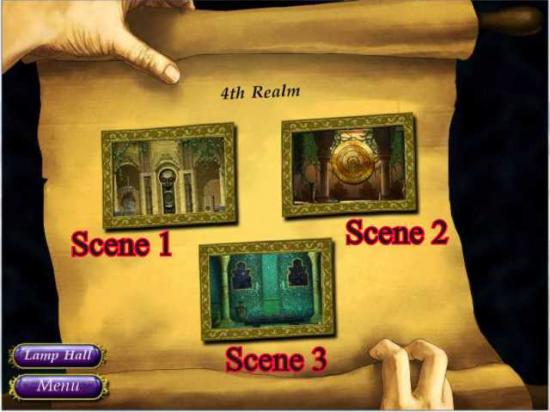
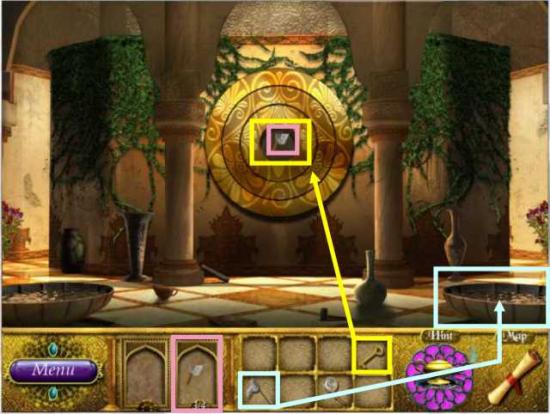
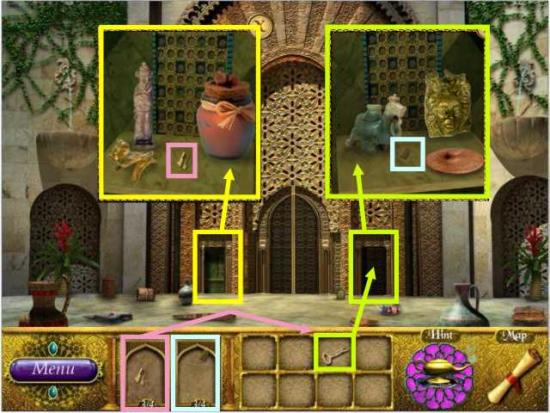
- Go to the Map and select Scene 1.
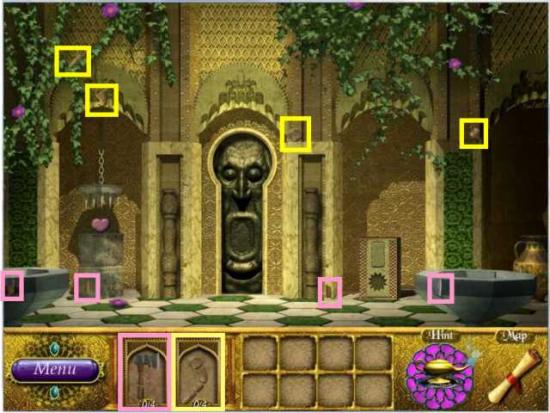
- You will be able to collect all pieces of the axe and crank so now go to Scene 2.

- Collect all the pieces of the idol and key plus a medallion.
- Use the crank on the box at the right to get the last piece of the key as shown in the blue insert.
- Use the axe to break the chains on the chest as shown in the green insert and take the medallion.
- Collect the pieces of the wooden stick.
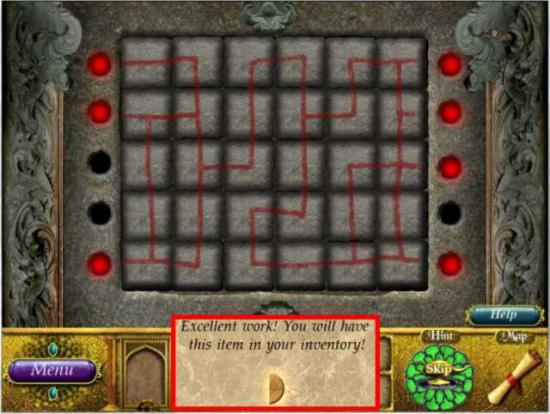
- Click on the 3 plates marked in red to be taken to a mini game.
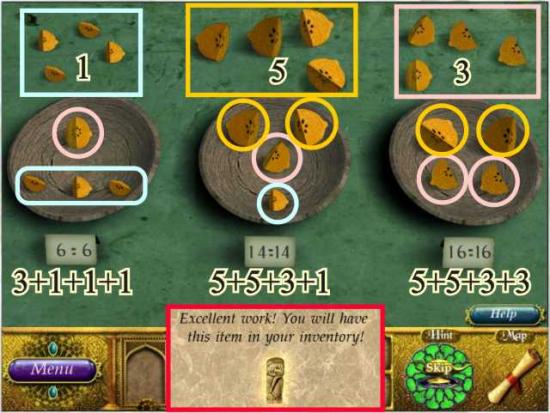
- The pieces of fruit each weigh a certain amount as shown on the top row. Your job is to place the pieces so that they match the total weight shown in the plaques under the plates.
- If the Hint button is fully green, you do have the option to skip the mini game.
- The pieces shown on the plates are the solution as added up in the numbers shown below the plaques.
- The pieces are arranged for you to be able to tell the sizes but you can place them anywhere on the plates.
- #1 = blue – #3 = pink – # 5 = orange
- Plate 1 = 3 blue pieces and one pink piece.
- Plate 2 = 2 orange pieces, one pink and one blue.
- Plate 3 = 2 orange pieces and 2 pink pieces.
- Your reward is another idol to add to your Inventory – go to Scene 1.
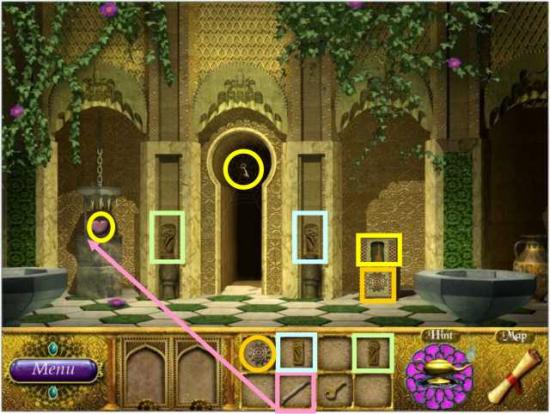
- Place the wood stick marked in pink on the trap and collect the heart.
- Place the sun marked in orange on the carved out sun marked in orange and collect the key when the niche opens up.
- Place the idols exactly as they are color coded – they need to face outward toward the edge of the scene. The door will open for you to collect another key.
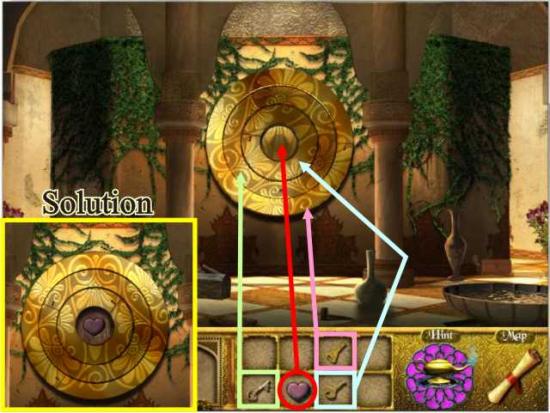
- The 3 keys you have collected unlock the rings in the puzzle – they are color coded to show you which key activates which circle.
- Once you have the solution as shown in the insert, place the heart in the indentation in the center.
You have completed this Realm and will receive a pedestal piece which you can place or continue to the next Realm.
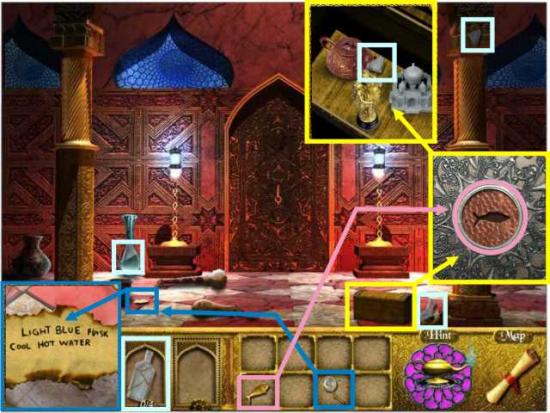
5th Realm

- Choose Scene 1
- Collect all the available pieces of the two artifacts – the star will be completed but the other will be missing a piece.
- Go to Scene 2
- Collect the fragments of the glasses and crowbar and then go to Scene 3.
- Collect the 3 fragments and place the glasses on the combination to be able to read it.
- The combination will go into your Inventory so go back to Scene 1.
- Place the crowbar marked in pink on the color coded loose tile to get the insert and collect the last piece of the artifact.
- For the red grouping click on the chest to the right of the circle – click on the combination in your Inventory.
- Match the chest combination to the paper as shown to get the insert and collect the flute – go back to Scene 2.
- Give the flute to the statue on the right and get a knife in return – go to Scene 3.
- Use the knife on the light color brick to get the last piece of the artifact and take it to Scene 2.
- Place the 3 artifacts where they are color coded on the door.
You have completed the Realm and have received another gem for the lamp.
6th Realm
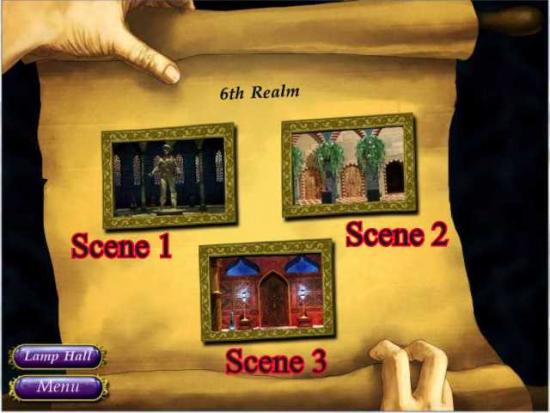
- Once you click on the Map choose Scene 1.
Collect the fragmented pieced available and go to Scene 2.
- Place the lantern in its corresponding orange marking and you will receive a claw artifact when the door opens – take it.
- Click on the gargoyle head to collect it.
- Pick up the available fragments as marked.
- Note the piece circled in green – somehow it got stick in suspended animation and now it is too hot to collect – go to Scene 3 while we wait for it to cool off.
- Collect all the marked fragments and go back to Scene 1.
- Place the gargoyle head on the gargoyle and take the last piece of the knife.
- You are finished with this location so go back to Scene 3.
- Put the blue handle on the blue pot lid which I’ve elevated to show the water.
- Dip the goblet marked in orange into the water.
- For the yellow sequence use the knife on the box at the left which will open up as shown in the insert.
- Take the remaining part of the gem to complete this location and go to Scene 2.
- In the green sequence use the water goblet to put out the fire and receive the remaining fragment of the key.
- The completed key is marked in orange – use it on Door #1 which I have partially opened so you can see the orange keyhole.
- Inside Door #1 is another key for you to collect – use this red key on Door #2
- Place the gem and claw on Door #2 as indicated and you will get a mini game.
- The object of this game is to wipe out all the outer symbols by aiming the weapon in the center at the symbol shown.
- Just move your cursor to the outer symbol and click on it – it will then go away.
- The first one is marked in the screen shot so keep aiming and shooting until all the outer symbols are gone at which point you will get a second round.
When you have successfully completed the two rounds or hit the “Skip” button, you will have completed the Realm and be rewarded with another pedestal piece.
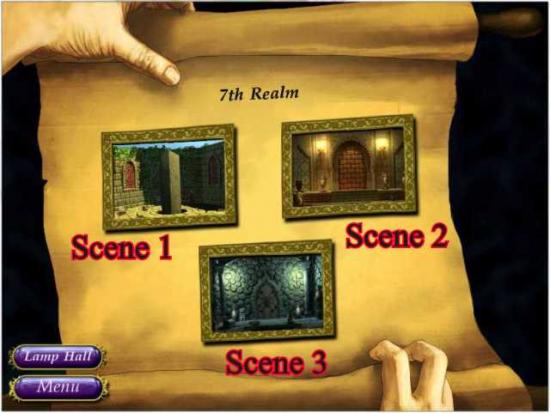
7th Realm
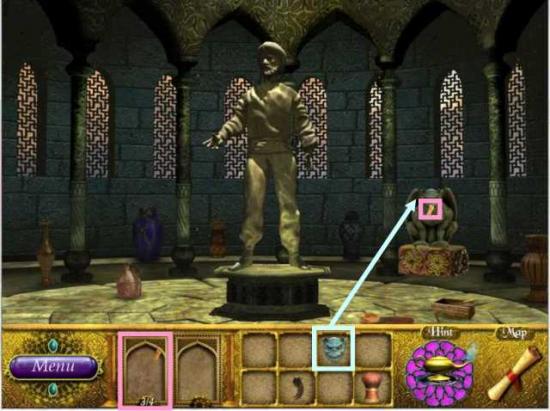
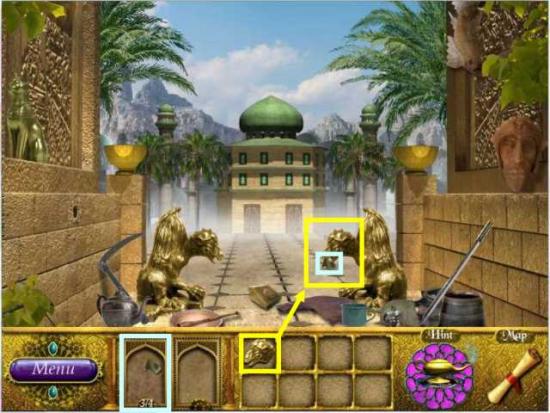
- The Map still shows the monolith as being there but when you choose Scene 1 you will only find a hole where it use to be because we all know it sunk in Realm 1 so we could get the Ruby gem.
- Collect all of the available fragments as well as the artifact marked in red and go to Scene 2.
- Click on the chest marked in yellow to get the insert – place the artifact in the indentation.
- Collect all the fragments available including the one from the pop up of the chest.
- Collect all the pink and blue fragments.
- Use the green key on the chest and as the insert shows you will find the last set of teeth parts.
- Place the completed set of teeth on the statue marked in yellow and it will give you another hammer which is marked in red.
- When you’ve finished all of those tasks don’t forget to click on the egg marked in white.
- You are done here so stop at Scene 2 to fill up the bucket you collected and then go to Scene 1.
- Once you’ve filled up the bucket go to Scene 1.

- Place the egg where indicated and get the final part of the third hammer as shown in the pink insert above.
- Douse the fire with the bucket of water to get another hammer from the sequence shown in red – go back to Scene 2.
- Use all of the hammers on the cracked bricks – pound with your cursor rather than the hammer.
When the bricks are broken as shown above you will have finished the Realm and receive a green gem for the lamp.
8th Realm
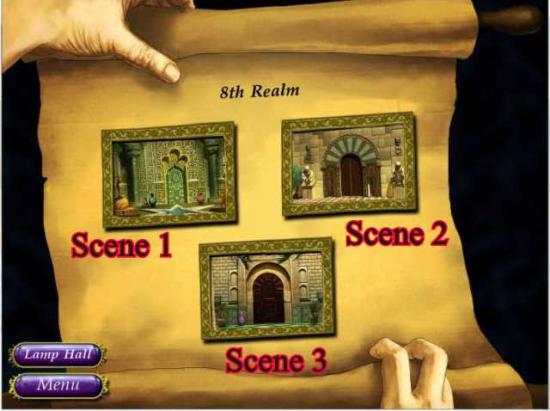
- When you’ve clicked the Map choose Scene 1.
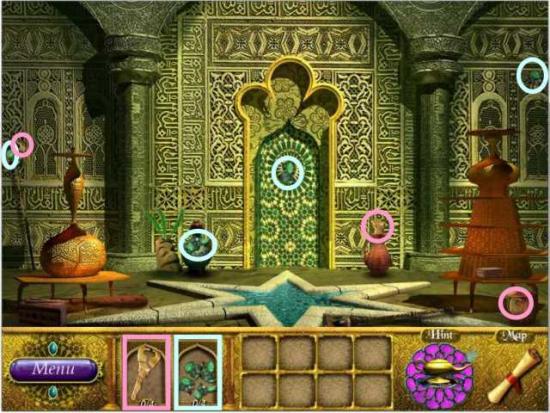
- Collect all the marked fragments and go to Scene 2.
- Collect all the fragments and then follow the yellow sequence.
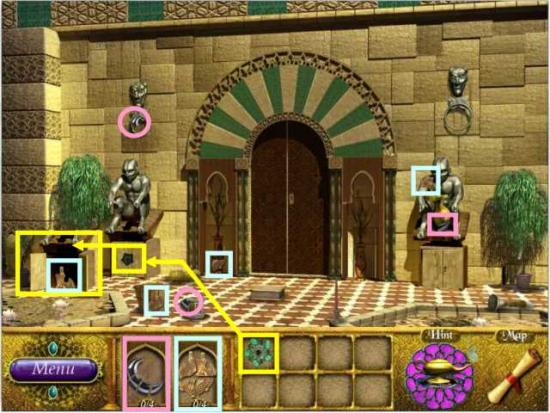
- Place the artifact in the indentation and collect the last fragment of the blue artifact shown in the insert – go to Scene 3.

- Place the artifact in its cutout and collect the last piece of feather shown in the insert – go back to Scene 1.
- Place the feather with the other feathers to receive the last fragment of the key – collect it and go to Scene 2.
- Use the key on the cabinet and collect the mask shown in the insert – go to Scene 3.
- Click on the vase to bring up the insert where you need to place the mask.
- The vase will open up to show the right insert with the last piece of the book – collect it and go to Scene 1.
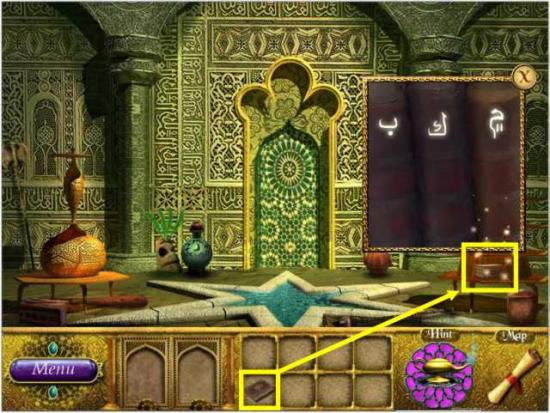
- Place the book on top of the stack of books and receive a combination – go to Scene 2.
- Click on the box in the middle of the floor to bring up its combination.
- Click on the combination in your Inventory and use the arrows to match the box combination to the paper.
- The box will open so you can collect the last piece of the crescent – go to Scene 3.
- Place the crescent in the cutout on the wall which will open up as shown in the insert next to it.
- Take the key and go back to Scene 2.

- Use the key on the locked door which will open up all the way – I just showed a part of it so you can see the lock.
- Click on the opening to get the mini game shown in the insert.
- The puzzle is sort of like playing dominos because you need to place the next tile so that the end matches the portion of the tile you are placing it against.
- The orange tiles are up and down so need to go vertically.
- The pink are corners so you need to place them in their proper corner to match both directions.
- The yellow tiles have 3 markings so go for all 3 directions so you have a 50/50 chance.
- The rest of the tiles that are unmarked are horizontal so keep matching them to the vertical tiles to complete the rows.
- The tiles do not become unmovable when you place them so if you pick one up, you will have to place it again or put it on the side if you want to choose another tile.
- You can skip the game if the Hint button is fully green but you can also just check the solution below and finish the puzzle.
SL77
This is the solution – there are a couple sets of tiles that are almost identical but the shapes need to line up exactly so you can get your pedestal piece which is shown in the insert.
9th Realm
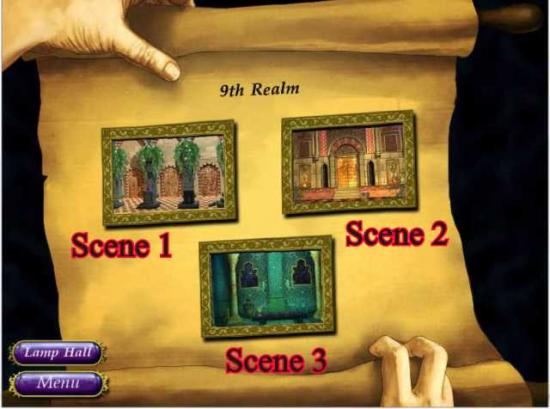
- When you choose Map also choose Scene 1.
- Collect all the available fragments and go to Scene 2.
- Collect all the available fragments plus the artifact marked in green – go to Scene 3.

- Collect the available fragments plus the artifact marked in red.
- Place the empty bottle on the snake marked in yellow in order to collect his venom and then go to Scene 1.

- Place the green and pink artifacts on their doors as color coded.
- The doors will completely open revealing the paper pieces marked in blue but I’ve only shown them part way so you can see where the artifacts go – collect the papers.
- Follow the yellow sequence by first clicking on the box to bring up the insert at the top right.
- Insert the 2 orange artifacts in their proper places and the box will open up as shown in the insert above the box and give you a piece of paper to examine.
- Click on the paper marked in red to see the combination in the upper left insert. I will show up in your Inventory so go to Scene 2.
- For the yellow sequence use the acid bottle to melt the padlock on the box which will then open as shown in the upper right insert – take the last piece of the jewel.
- Click on the paper marked in blue and you will see it in the insert with two plain pieces.
- Place the two green marked pieces of paper from your Inventory in the insert as shown in the upper left and go to Scene 3.
- Click on the vase to bring up the combination insert.
- Click on the combination in your Inventory that is shown in the insert and match the vase combination to it to get the remaining fragment of the key and go to Scene 2.
- Place the jewel and the key in the door and it will open all the way – I’m showing part of the door so you can see the key and jewel.
- Click on the open door to bring up the combination lock insert for the inner door.
- Click on your combination paper in Inventory and match the lock to the paper as shown to bring up a mini game.
- Place the gold tile shapes in the lock. I’ve shown where some of them go.
- When you have completed the puzzle or used your Skip button you will receive another gem.
This is the solution to the puzzle to complete the Realm.
10th Realm
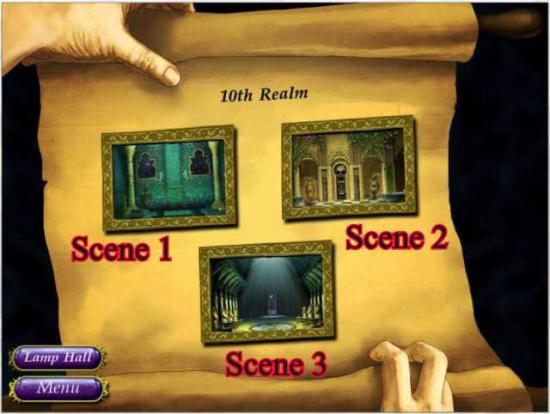
- Start with Scene 1.

- Collect all the marked fragments and go to Scene 2.
- Follow the yellow sequence and use the knife on the basket to get the insert with the eye fragment.
- Collect all the rest of the available fragments and go to Scene 3.
- Follow the yellow sequence and click on the chest in the lower left to bring up the lock insert.
- Place the bug in the indentation to open the chest – see arrow leading from chest for the insert.
- Collect all the pink marked fragments and click on the box marked in white to bring up a mini game shown in the insert at the top right.
- This is a variation of a slider game – there are 3 rows of tiles each with matching designs.
- There are 4 open spaces and your goal is to move all the tiles around so that the designs match the outside tabs that are marked.
- What this means is the top row will be the middle row, the middle row will be the bottom row and the bottom row will become the top row.
- In order to move the tiles you will need to click on the 4 directional arrows as shown in the blow up in the insert.
- There is a step-by-step below but there are alternative ways to come to the same conclusion and you also have the option of using the Skip button.
- In order to keep this simple I’m going to break it up in sections but there are some tiles you can keep moving if you are on a roll.
- The next screen shot in the sequence is how your screen will look after you make the moves in the shot above.
- To move a tile more than one space you will need to click on it the required number of times to get it to its destination.
- Move #1 – 3 one space in the direction indicated.
- Move #4 as far up as you can – move #6 over and up – move #5 one space left – and move #7 & 8 over a space to the right.
- Move all tiles in the order and direction indicated as far as they will go, except for #12 which should only move one space to the left.
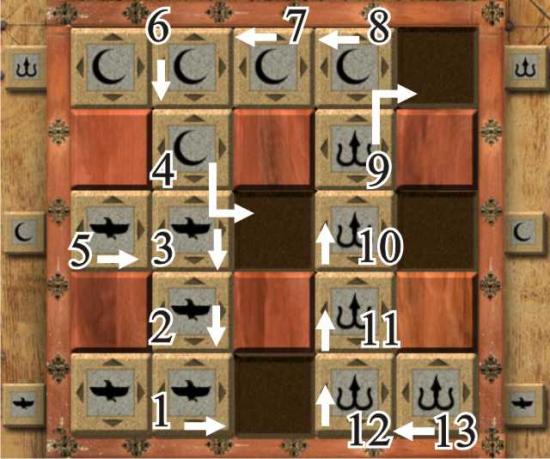
- Move all of the tiles in sequence as far as they can go.
- Move all of the tiles in sequence as far as they can go.

- Move all of the tiles in sequence as far as they can go.
- This is the solution – you will be rewarded with an artifact and need to go back to Scene 1 to continue.
- Click on the chest at the left that is marked in yellow to bring up the lock shown in the left insert.
- Place the jewel in the lock and the chest will open up as shown in the right insert.
- Collect the nose and go to Scene 3.
- Place the 2 eyes and the nose on the door and collect the last piece of the key.
Open the door with the key and you have finished the Realm and will receive the pedestal piece shown in the insert.
11th Realm
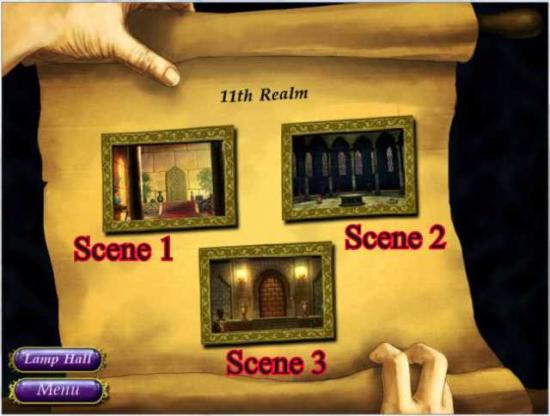
- Go to the Map and choose Scene 1.
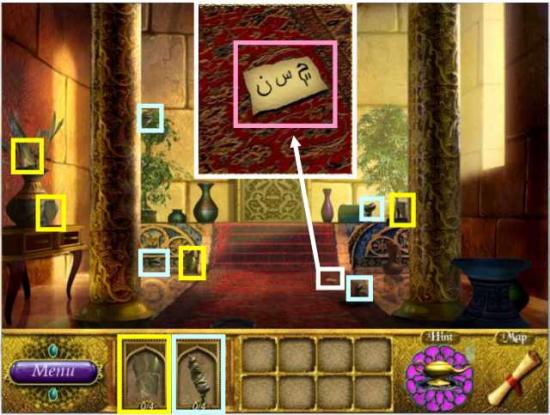
- Collect the fragments and click on the paper marked in white to get the combination shown in the insert – go to Scene 2.
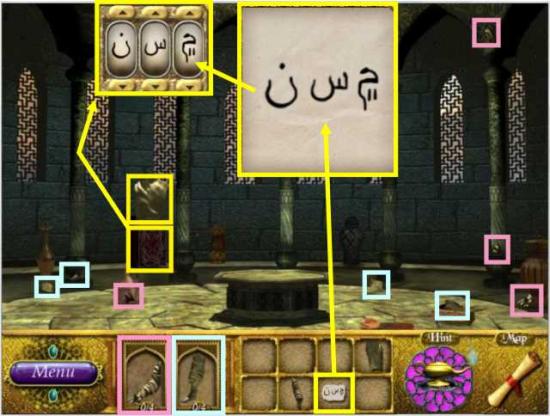
- Collect the fragments and follow the yellow sequence to get the torso.
- Click on the cabinet to bring up the combination – click on the combination paper and match the combination to it.
- Collect the torso and go to Scene 3.
- Collect all the fragments and click on the vase to bring up a mini game.
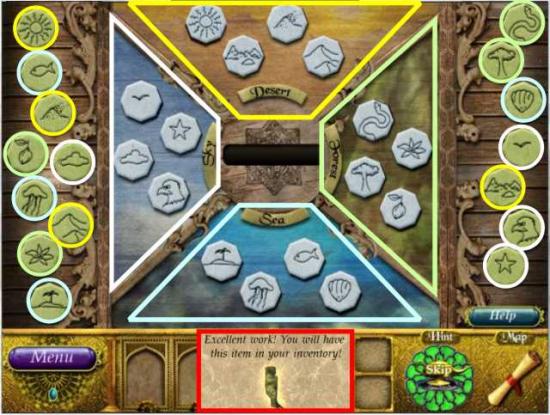
- There are four categories: Desert – Sky – Forest – Sea.
- Your job is to place the 4 appropriate tiles in each category so that you can get the item shown at the bottom of the scene for your Inventory.
- It doesn’t matter where you place the tiles within the category so I have color coded them to show what they are.
- The solution is shown in the middle of the scene so you can finish the puzzle or opt for the fully green “Skip” button – when it is completed go to Scene 1.
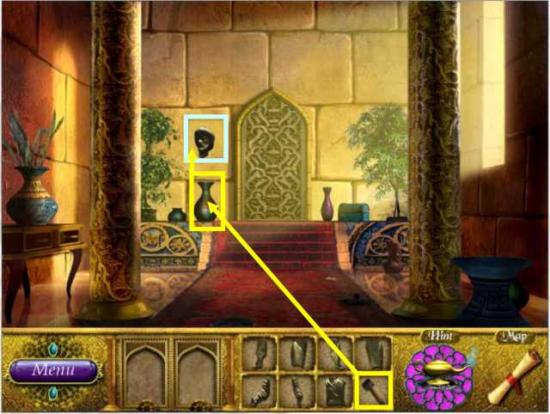
- Use the hammer to break the vase and collect the head that is shown in the insert above the vase – go to Scene 2.
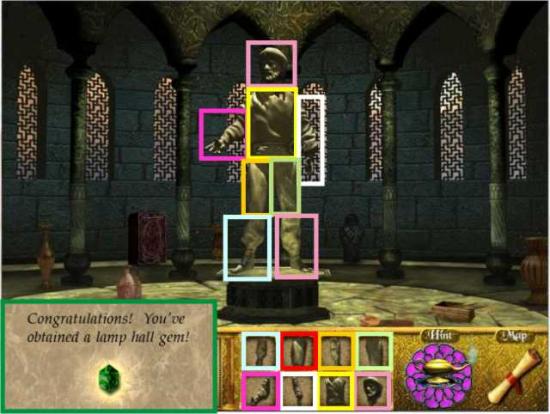
- Put Bahar’s statue back together – all the parts are color coded.
- It has to be put together by the parts – start with both feet and then both legs.
- Place the torso on and both arms before attaching the head.
- When you have finished you will have completed the Realm and received another lamp gem.
12th Realm
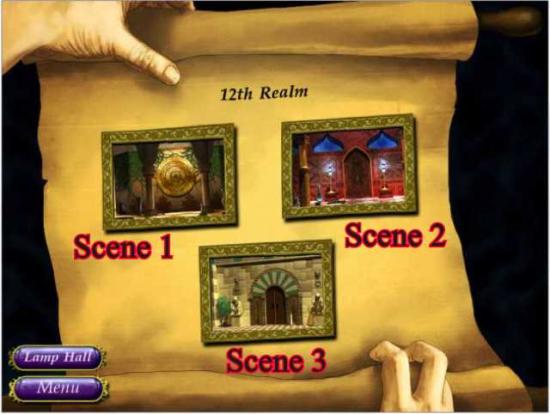
- Choose Scene 1 from the Map.
- Collect the marked fragments and go to Scene 3.
- Use the key you picked up in Scene 1 on the left cabinet which is marked in yellow and collect the fragment inside of it.
- Collect the rest of the fragments which will go into your Inventory.
- Click on the right cabinet to bring up a mini game which will give you the other half of the door key.
- Place both halves of the door key in their proper places on the door – the door will open wide but I have only shown the bottom portion so you can see where to collect a new key.
- After you have finished the scene go to Scene 2.
- This is the puzzle from the right cabinet above and the half of the door lock you will collect when you finish it or click on the “Skip” button.
- The puzzle is like a pipe game – the solution is shown above.
- Go back and finish the scene as shown in the previous screen shot and then go to Scene 1.
- Place the key in the wheel and it will produce the last piece of the fishnet.
- Dip the fishnet in the right water bowl to get a fish to take to Scene 2.
- For the yellow sequence click on the chest to bring up the lock.
- Place the fish on the lock and the chest will open for you to collect a bottle fragment.
- Collect the rest of the bottle fragments.
- Use the magnifying glass on the paper fragment on the floor to the left to see that you need fill the bottle so go back to Scene 1.
- Dip the bottle in the left bowl of water to get the blue key shown in your Inventory – go back to Scene 2.
- Place the key on the door which will open to give you another pedestal piece – you have now completed this Realm.
13th Realm
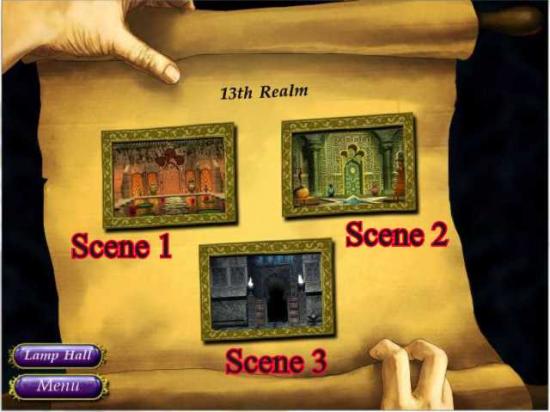
- Choose Scene 1 from the Map.
- Collect all the available fragments and go to Scene 2.
- Collect all the fragments.
- Dip the empty flask in the water and then place it back in your Inventory – go to Scene 3.
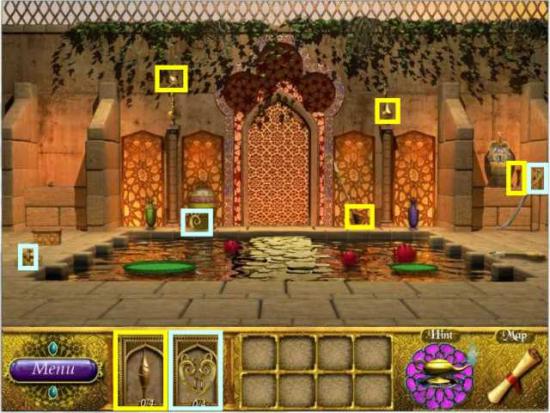
- Collect all fragments and go back to Scene 1.
- Click on the box marked in yellow to start the sequence.
- Place the pink key on the lock shown in the insert – take the flask from the opened box.
- Use the green key on the vase to open it up and take the last heart artifact fragment and go to Scene 3.
- Place the fire flask marked in orange on one of the two flames to fill it with fire.
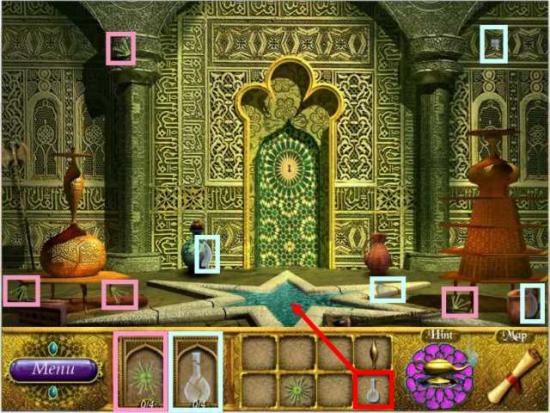
- Use the heart artifact on the wall where indicated and pick up the last piece of smoke flask shown in the insert next to it – go to Scene 2.
- Place the pipe as marked in pink.
- Fill the smoke flask from the smoke on top of the pipe and place all of the flasks where indicated to forge the key marked in red.
- Click on the key which will go into your Inventory – place the key in the door which will open and present you with a new gem for the lamp – see insert.
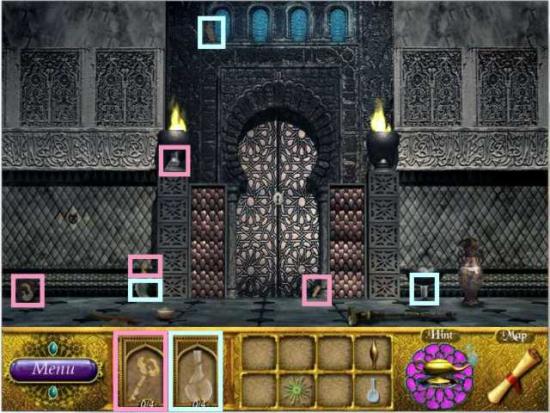
14th Realm

- Select Scene 1 from the Map.
- Collect all the available fragments and go to Scene 2.
- Collect all the available fragments and go to Scene 3.

- Collect all the available fragments and go back to Scene 1.
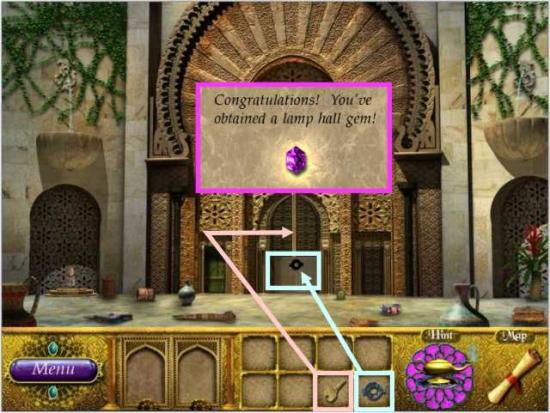
- Use the shovel on the vase and collect the last piece of the lever – go to Scene 2.

- Place the lever as indicated and go to Scene 3.
- The lever you just placed in Scene 2 activated the left door.
- Click on the yellow marked door to bring up the insert and collect the last piece of the key which will go into your Inventory.
- Use the key on the right door which will open giving you the right insert so you can collect the last fragment of the knife – go to Scene 2.
- Use the knife on the loose tile marked in red and collect the last fragment of the brick as shown in the insert to the left – go to Scene 1.
- Place the brick in the hole as shown – another brick will open up below so you can collect the last piece of the key and take it back to Scene 2.
- Place the key on the doors and they will open and present you with a pedestal artifact for having completed the Realm.
15th Realm
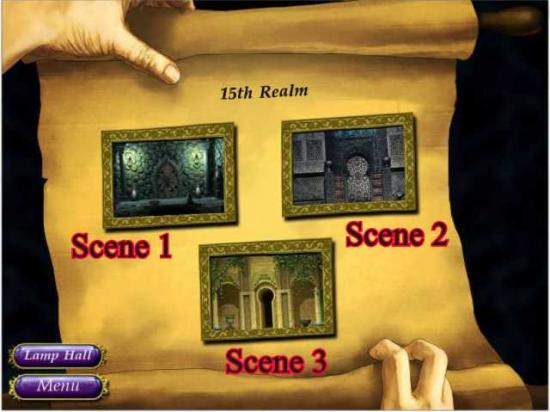
- Choose Scene 1 from the Map.
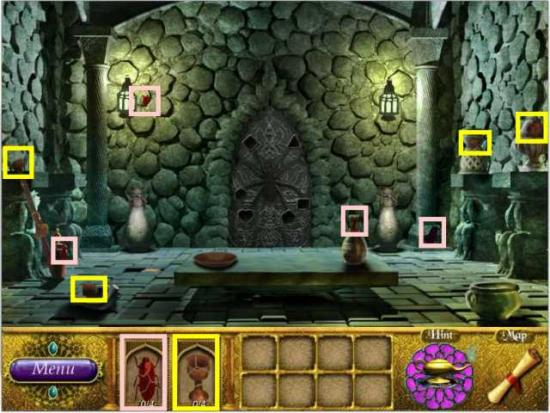
- Collect all the fragments and go to Scene 2.
- Collect all the fragments and go to Scene 3.
- Collect the pink fragments.
- Dip the goblet in the water to fill it.
- Place the red firebug in the urn marked in red.
- Light the candle with the fire.
- Click on the door to bring up a mini game.
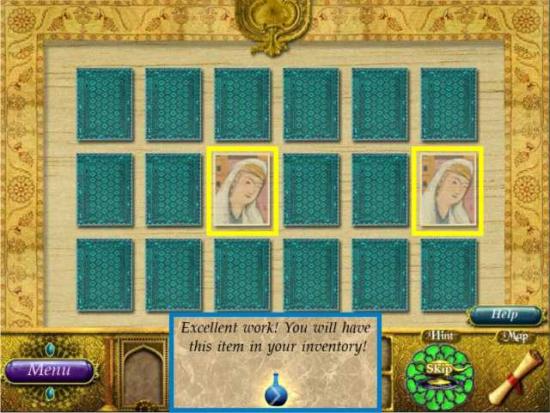
- The placement of the picture is random so click on the cards until you match 2 and then keep matching pairs until you have cleared the board and won the Inventory item.
- Go to Scene 1.
- Use the glasses on the pink-marked piece of paper to view the insert.
- The paper will to into your Inventory so go to Scene 2 to find out what to do with it.
- Click on the paper in your Inventory – it is a formula to tell you what needs to be done.
- Place the flammable bottle with the same marking as the urns into the matching urns.
- Light the urns with the candle – you have now completed the first row of the formula.
- Use the water goblet to put out the flames on both urns.
- Once the flames are out you will receive a key as shown in the insert at the top of the page – it will go into your Inventory.
- Use the key on the door and you will have completed the Realm and will receive a new gem for the lamp as shown in the lower left insert.
16th Realm
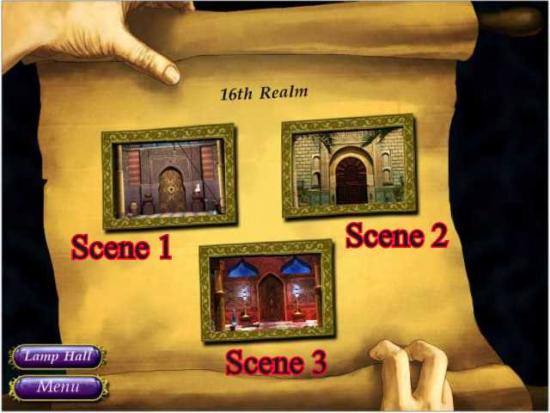
- When you choose the Map click on Scene 1.
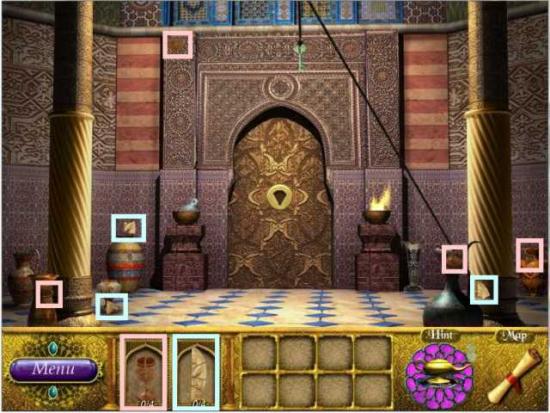
- Collect all available fragments and go to Scene 2.
- Collect all the available fragments.
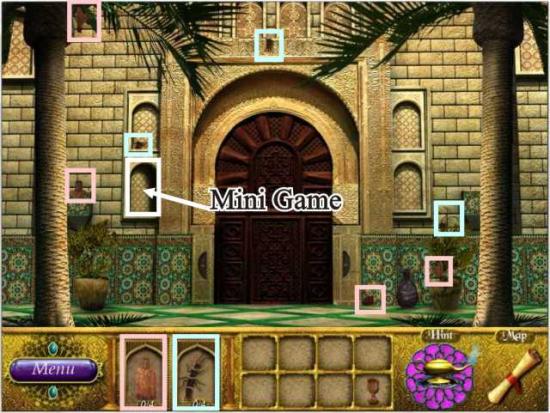
- Click on the alcove marked in white to bring up the mini game shown below.
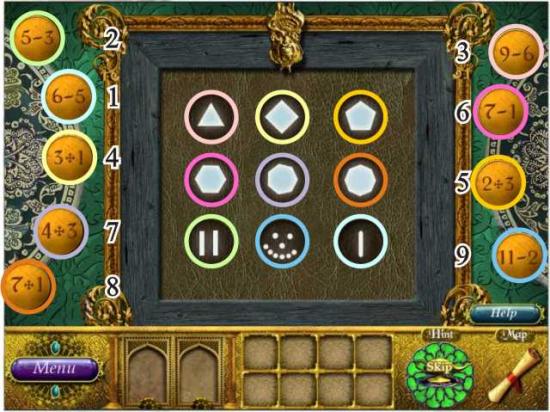
- The balls all have numbers on them that make a mathematical total as shown next to each ball.
- Each of the circles in the center has a total sum that must be matched – a triangle has 3 sides so 9 – 6 equals 3 and goes there.
- If you place the ball in the wrong place, it will automatically go back to the sidelines.
- They are all color coded in the shot above to show where they belong.
- You can choose to complete the game or skip it.
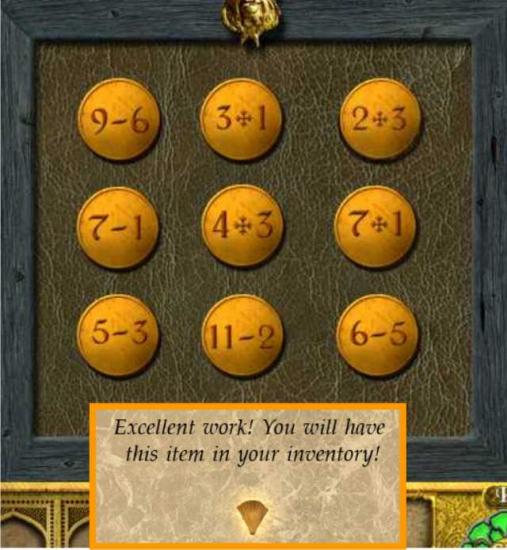
- This is the solution for which you will be rewarded with an item for your Inventory – go to Scene 3.
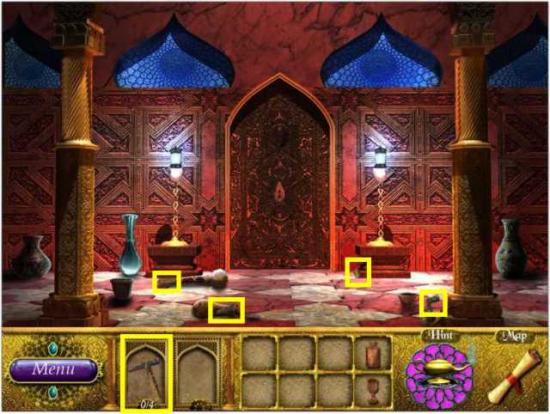
- Collect the pickaxe fragments and go to Scene 2.
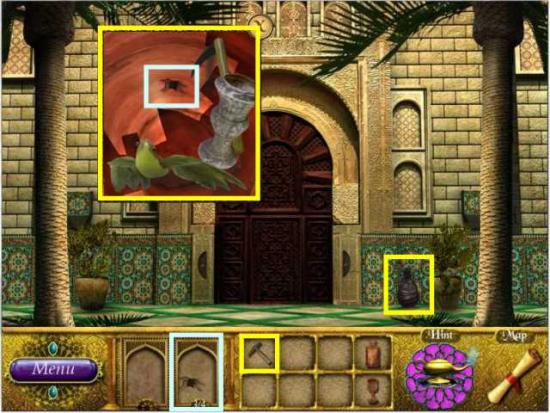
- Use the pickaxe on the vase and pick up the last part of the bug – go to Scene 1.
- Give the bug to the bird that will leave the nest so you can pick up the knife.
- The knife will go into your Inventory so pick it up and use it on the rope as indicated in yellow.
- The key marked in orange will fall to the floor for you to pick up.
- Place the shell on the door which will completely open but the bottom part is shown so you can see the fragment in the fire which is too hot to collect so go to Scene 3.
- Use the key on the door which will open all the way revealing a well in the floor – I only showed the open part at the bottom so you can see the lock.
- Fill the bottle and goblet with water from the well and go to Scene 1.
- Use the goblet to douse the fire so you can take the last fragment of the half mask.
- Use the flask on the urn and when the fire is out it will sparkle.
- Click on the urn to bring up the insert – take that half of the mask and go to Scene 2.

- Match the color coded mask halves to the panels in the doorway and the door will open and you will receive another pedestal piece for having completed the Realm.
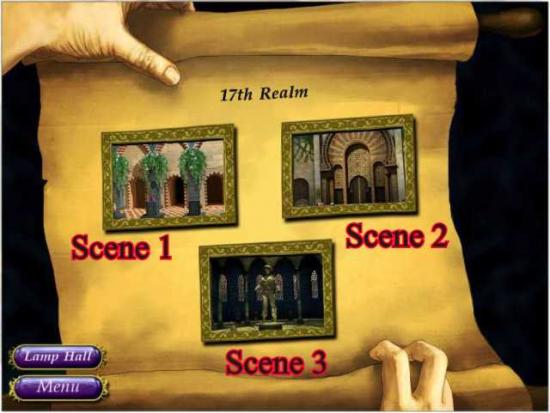
17th Realm
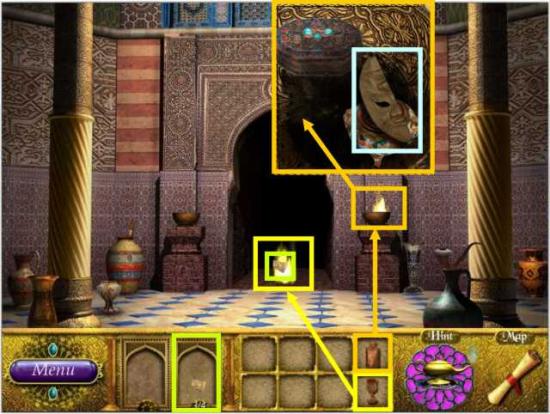
- Start with Scene 1.

- Collect all the available fragments that are marked and go to Scene 2.
- Collect all the available fragments that are marked and go to Scene 3.
- Collect all the fragments of the crescent which will go into your Inventory.
- Place the crescent on the pedestal of the statue and collect the artifact shown in the insert to the right.
- Place the hand on the statue and go back to Scene 1.
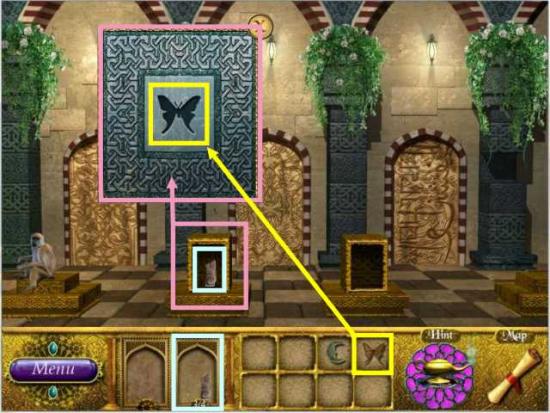
- Click on the left box and the insert will appear for you to place the butterfly.
- The cabinet will open so collect the idol and go to Scene 2.
- Place the idol on its pedestal and click on the small left door to bring up a mini game.

- The green pieces are numbered and need to be placed in the indentations so that they add up to the numbers indicated.
- These are the numbers need to equal the totals – place them where they belong to come up with the solution shown below.
- This solution or click in the “Skip” button will get you the item in the insert for your Inventory – go to Scene 1.
- Give the banana to the monkey and take the key he gives you – go to Scene 2.
- Place the key on the door which will open showing an indentation for the artifact in your Inventory.
- Place the artifact and receive the lamp gem to complete this Realm.
18th Realm

- Start out by choosing Scene 1.
- Collect all the fragments and go to Scene 2.
- Collect all the fragments.
- Follow the yellow sequence and use the feather duster on the plaque to see what is says – go to Scene 3.
- Click on the vase marked in blue to see the lock in the left insert.
- Place the green artifact on it to open it up as shown in the right insert and collect the fragment.
- Collect all of the other fragments and go to Scene 1.
- Fill the goblet with water and go to Scene 3.
- Pour the goblet of water on the burning urn so you can collect the artifact – go to Scene 2.
- Click on the vase and place the artifact on the lock to bring up a mini game.
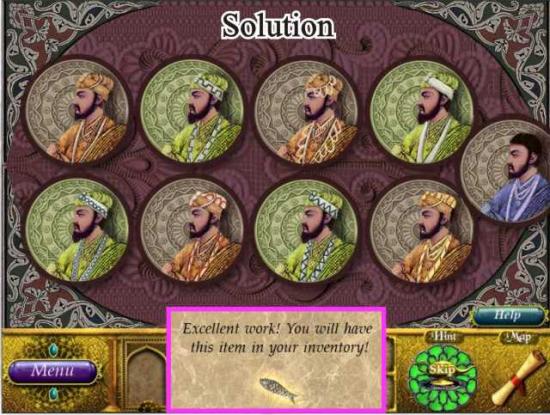
- None of the sultans’ turbans match their robes so your job is to straighten it all out and put them in the correct place.
- Use the sultan without a turban as a place to help swap out the turbans because you cannot do a click and swap between two pictures.
- The above screen shot is the solution so you can make it match or choose to skip – either way you will receive the item shown in the insert for your Inventory so go to Scene 1.
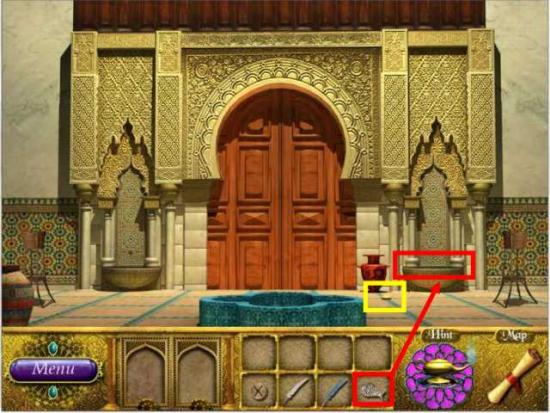
- Toss the fish in the water and pick up that is tossed back at you – go to Scene 2.
- Time to have another look at that formula we saw earlier so click on the plaque to bring up the insert.
- Place the 2 coins in the left vessel and place the 2 feathers in the right vessel.
- The door will open and you will have completed the Realm and received a pedestal artifact.
19th Realm
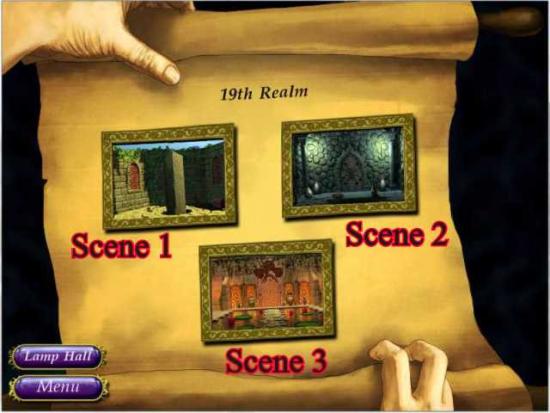
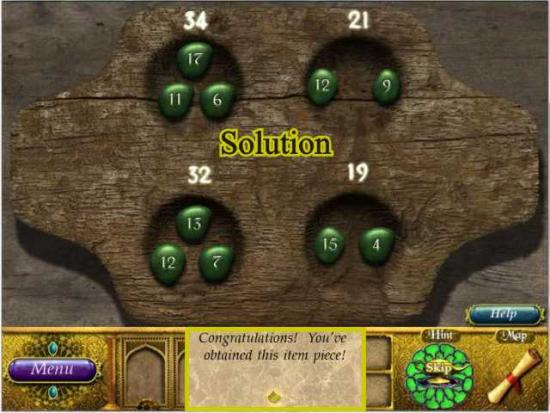
- Start with Scene 1 from the Map.
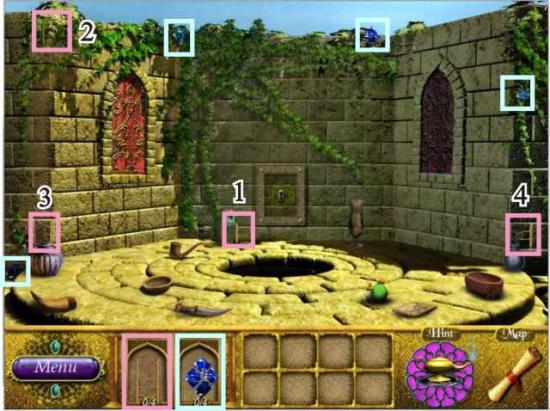
- The ladder apparently needs to be collect in order so I have numbered the pieces.
- Collect all of the fragments and then go to Scene 2.
- Collect the pink and yellow marked fragments.
- Use the hammer you collected on the vase marked in red – hit it twice to get the jewel in the insert and collect it for your Inventory.
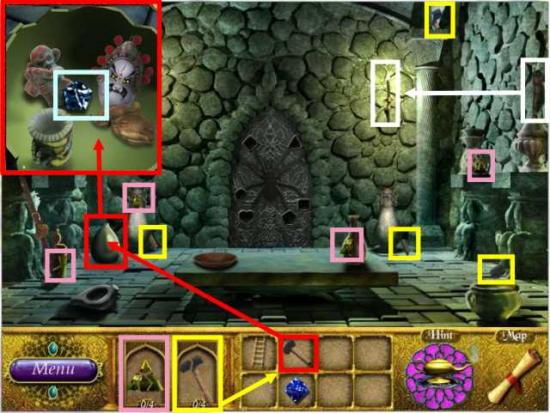
- Pick up the torch at the far right and light it – it will go into your Inventory – go to Scene 3.
- Place the torch on the vase marked in green and take the gem that appears.
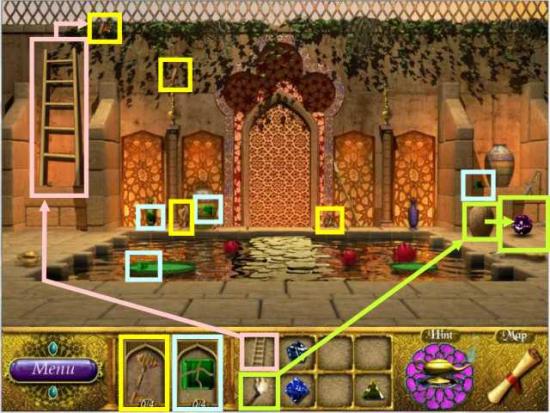
- The fragment at the left top of the screen is too high for you to get so place the ladder as shown.
- Collect all the remaining fragments and go back to Scene 1.
- Open the niche with the key and click on the vacant wall shown above it in order to bring up a mini game.
- Place the blocks so that both ends match the semicircles next to them – a couple samples are marked in the insert.
- You can choose to complete the puzzle as shown in the above solution or use the “Skip” button. You will receive a heart jewel for your inventory – go to Scene 3.
- Place all of the jewels on the door as shown above.
- You have completed the Realm and obtained another lamp gem.
20th Realm
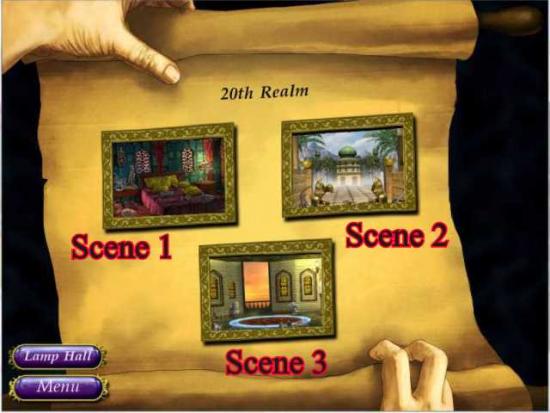
- Begin the final Realm with Scene 1.
- Collect the available fragments and go to Scene 2.
- Collect the available fragments and go to Scene 3.
- Collect the marked fragments and return to Scene 2.
- Click on the book and place the artifact on it as shown in the left insert.
- The right insert shows the last piece of key to collect – pick it up and go to Scene 1.
- Open the drawer with the key and pick up the hat fragment – go to Scene 3.
- Place the statue’s hat on his head and pick up the fragment of head – go to Scene 2.
- Place the head on the statue and gather the axe fragment – go back to Scene 1.
- Use the axe on the basket and pick up the weight fragment that is inside – go to Scene 3.
- Place the weight on the scale and the niche will open to give you the sword handle.
- Pick up the handle and go to Scene 2.
- Place the handle on the sword which will go into your Inventory – go to Scene 1.
- Use the sword on the stitches in the carpet and collect the bone – go to Scene 3.
- Place the bone on the skeleton piece and collect the pipe – go to Scene 2.
- Place the pipe in the wall and you will have finished all of the Realms and get your final pedestal piece.
- Time to go to the Lamp Hall.
Lamp Hall
- The lamp jewels are color coded to show where they should be placed.
- Click on the pedestal to make sure all of the lamp jewels are lighted and to place the pedestal artifacts.
- Place the pedestal artifacts in their proper places as shown.
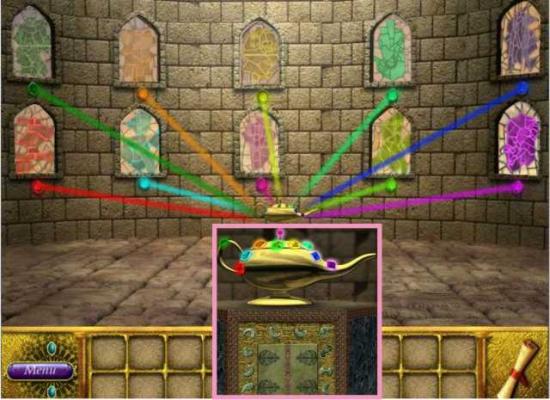
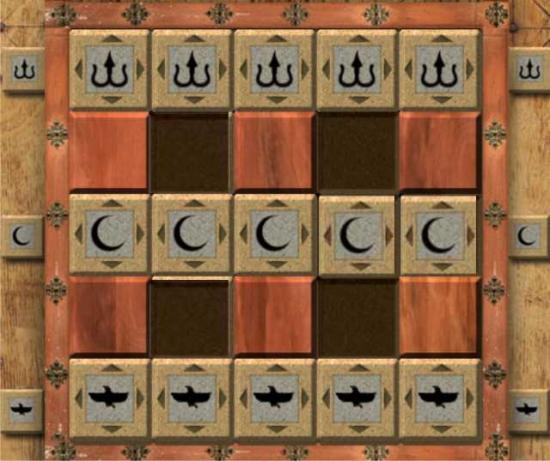
- The jewels are glowing and the artifacts are in their place – time for the final puzzle.
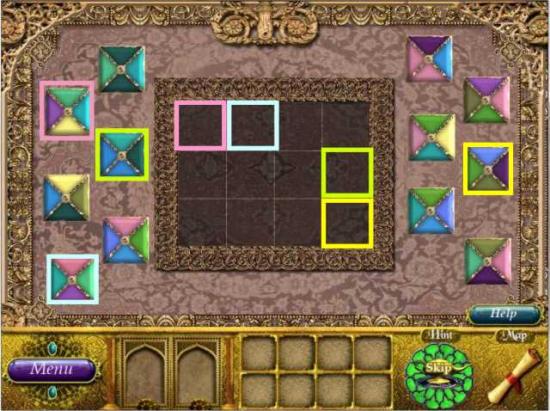
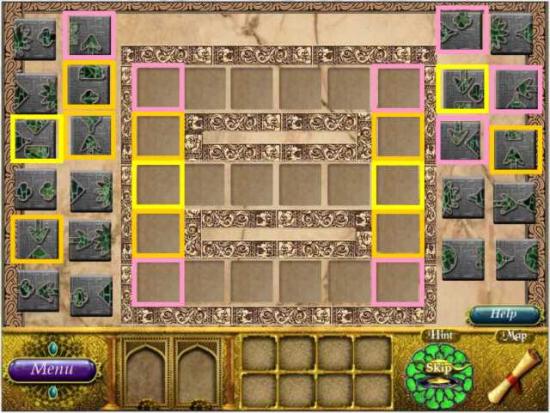
- Place the tiles so that the colors match in all directions necessary.
- Several samples are marked to get you started or you can choose to skip the puzzle.
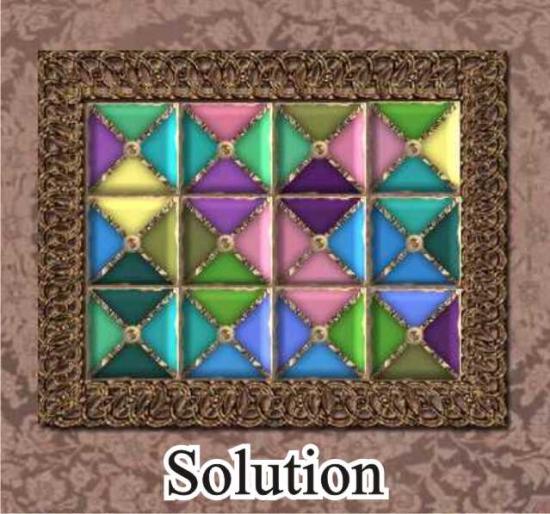
- This is the solution to the final puzzle.
CONGRATULATIONS! YOU HAVE CONQUERED THE LABYRINTH AND COMPLETED THE GAME.

More articles...
-
Best Horror Games On Itch.io – July 2026
Across a bounty of subgenres. -
Grow A Garden 2 Base Price List
What's the most valuable crop? -
Evomon Types Guide [Strengths, Weaknesses, Resistance]
Your companion guide during battles.