
Best Horror Games On Itch.io – July 2026
Across a bounty of subgenres.![Haze Seas Accessories Tier List [Best Accessories to Equip]](/wp-content/uploads/2026/07/haze-seas-accessories-tier-list.jpg "Haze Seas Accessories Tier List [Best Accessories to Equip]")
Haze Seas Accessories Tier List [Best Accessories to Equip]
The accessories with the best stat buffs in Haze Seas.
![[Roblox] Evomon Shiny Hunting Guide – Including Prismatic and Pris Shinies!](/wp-content/uploads/2026/06/evomon-shiny-hunting-guide.jpg "[Roblox] Evomon Shiny Hunting Guide – Including Prismatic and Pris Shinies!")

The Serpent of Isis: Your Journey Continues Walkthrough
Welcome to The Serpent of Isis 2: Your Journey Continues walkthrough on Gamezebo. The Serpent of Isis 2: Your Journey Continues is a Hidden Object game played on the PC and created by Gamgo Games. This walkthrough includes tips and tricks, helpful hints, and a strategy guide on how to complete The Serpent of Isis 2: Your Journey Continues.


- Prefer Gamezebo on Google

The Serpent of Isis 2: Your Journey Continues – Game Introduction
Welcome to The Serpent of Isis 2: Your Journey Continues walkthrough on Gamezebo. The Serpent of Isis 2: Your Journey Continues is a Hidden Object game played on the PC and created by Gamgo Games. This walkthrough includes tips and tricks, helpful hints, and a strategy guide on how to complete The Serpent of Isis 2: Your Journey Continues.
General Tips
- Hint Button takes approximately two minutes to refill on Easy.
- The Skip Puzzle Button takes approximately two and a half minutes to activate.
- Gathering all Special Items in each Chapter will earn you two extra Hints.
- Click on an Item Name in the List inside Hidden Object Scenes to use a Hint to find the related Item.
- In Inventory, click on the Magnifying Glass next to Items to review Items gathered.
- Blue Word Items in Hidden Objects will require an extra step to locate.
- Back Button can be found in Hidden Object scenes, Mini-Games, and Journal/Map.
- Use the Back Button to return to previous scene.
- Gear Mouse Icon represents areas that can be interacted with an Item.
- Magnifying Glass Mouse Icon represents areas that you can interact with.
- There are two Game Modes available, Casual Mode and Advanced Mode.
- Casual Mode features a faster Hint Recharge, faster Skip Puzzle Button, and Sparkles over key areas.
- Advanced Mode features a slower Hint Recharge, slower Skip Puzzle Button, and fewer Sparkles over key areas.
- Hidden Objects scenes will be different each time played.
Guide Tips
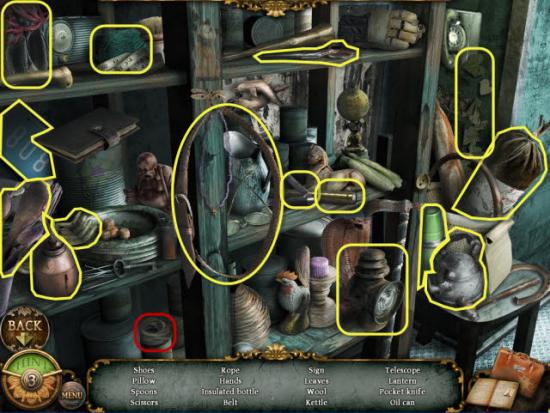
- Hidden Objects are highlighted in Yellow.
- Items are highlighted in Red.
- Special Items are highlighted in Orange
- Locations are highlighted in Blue
- Interactive Areas are highlighted in Green.
Interface
Menu – The Menu allows you access to main functions.
Hint – The number in the center of the Hint Meter represents the number of Hints available. When Meter is Red and no number is shown you must wait for the Hint Meter to recharge.
Journal – The Journal shows current progress and the Map. The Map can be used to move from location to location. The Journal also shows your progress and details on Special Items found.
Briefcase – The Briefcase shows your current inventory.
Skip Puzzle – The Skip Puzzle Button is used to skip any Mini-Game.
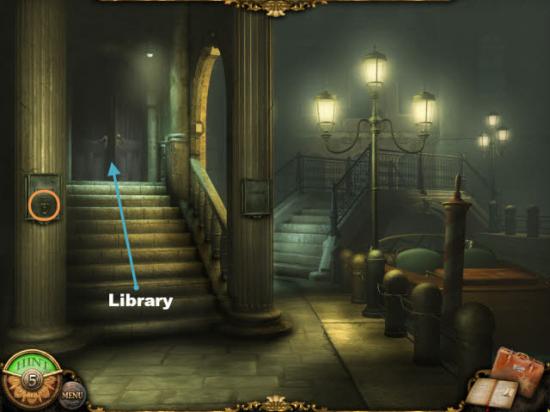
Walkthrough – Penroy’s Office

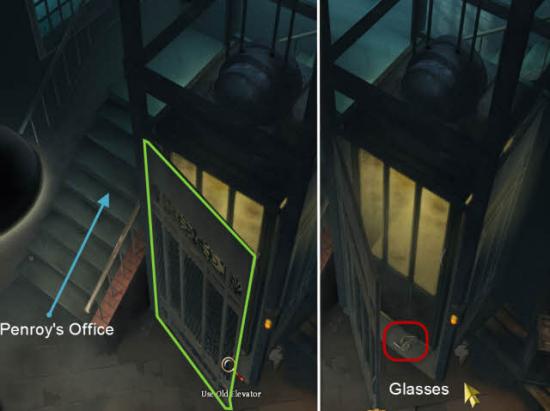
First open the Elevator Door highlighted in Green.
Next gather the Glasses highlighted in Red.
Finally, head upstairs to Penroy’s Office.
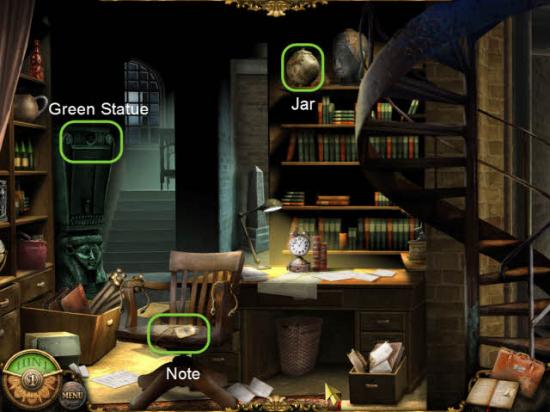
Examine the Note on the Office Chair highlighted in Green.

Gather the Button, Special Item #1(of 3), highlighted in Orange.
Examine the Jar highlighted in Green.
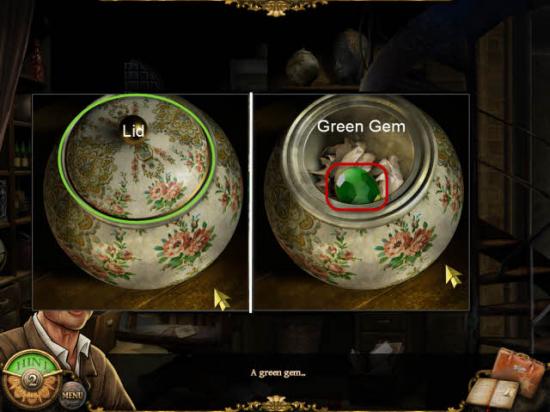
Remove the Lid highlighted in Green,
Gather the Green Gem highlighted in Red.
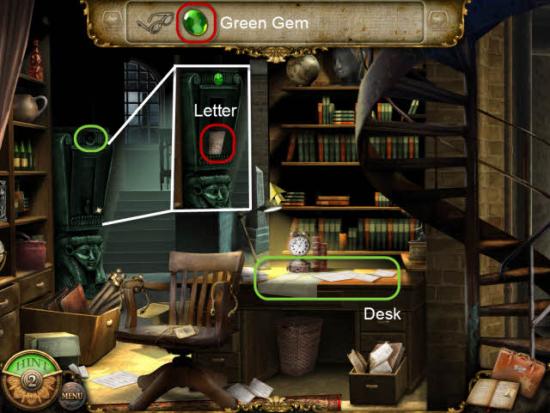
Use the Green Gem, highlighted in Red, on the Green Statue, highlighted in Green.
Gather the Letter highlighted in Red.
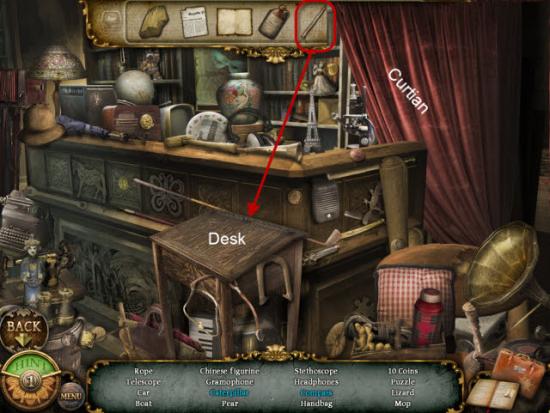
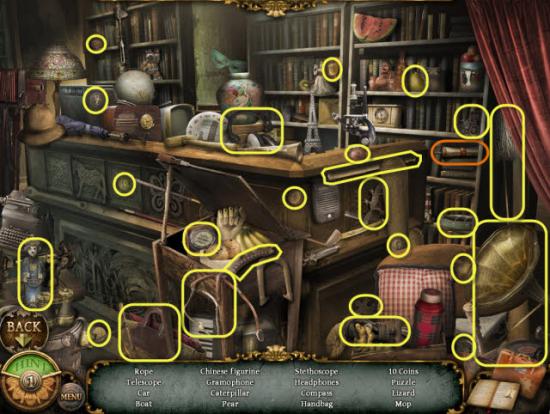
Examine the Desk highlighted in Green.
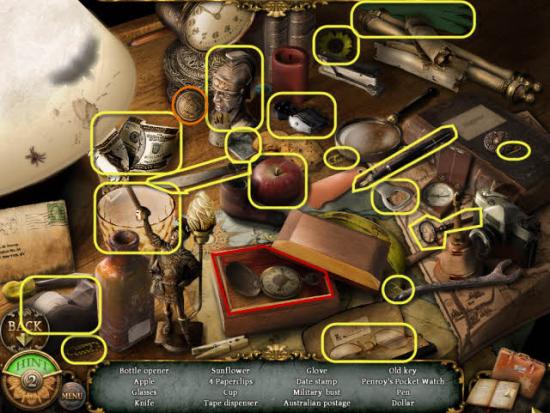
Gather Special Item #2(of 3) highlighted in Orange
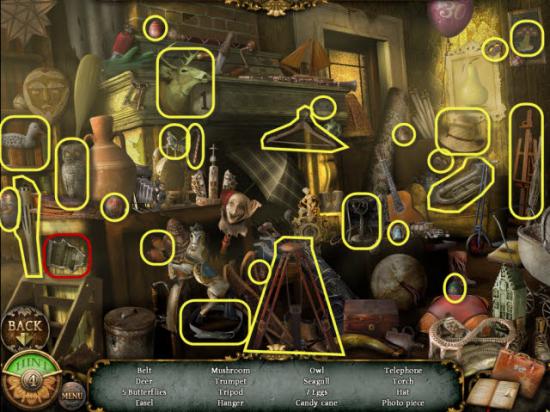
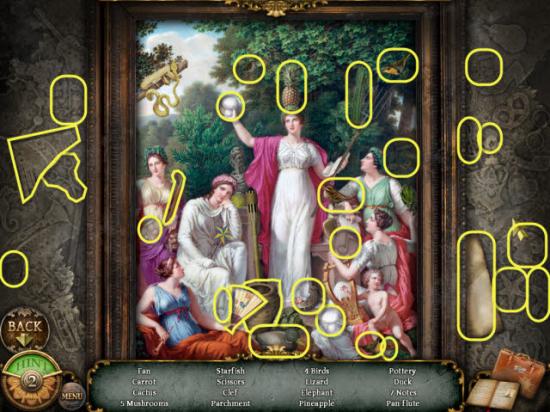
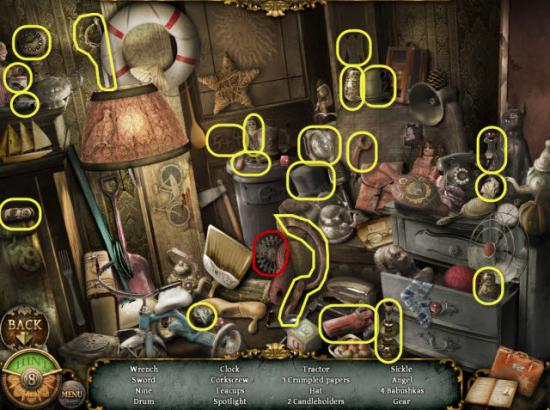
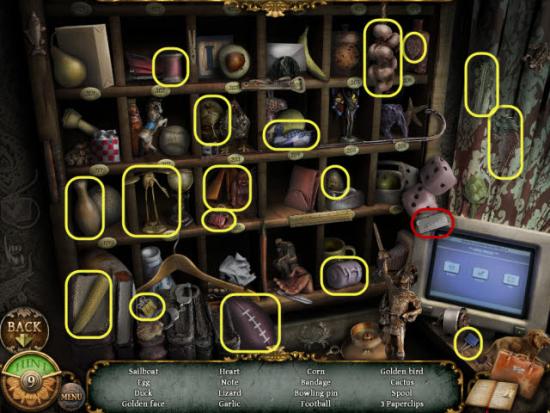
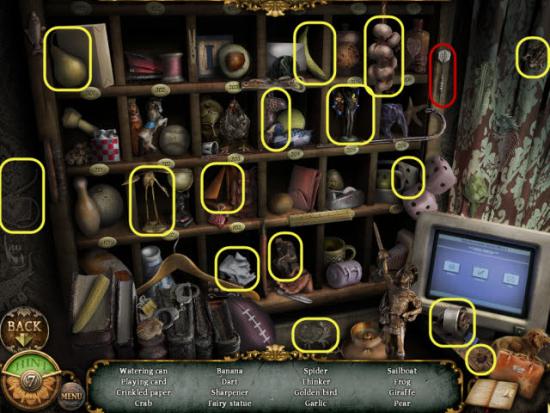
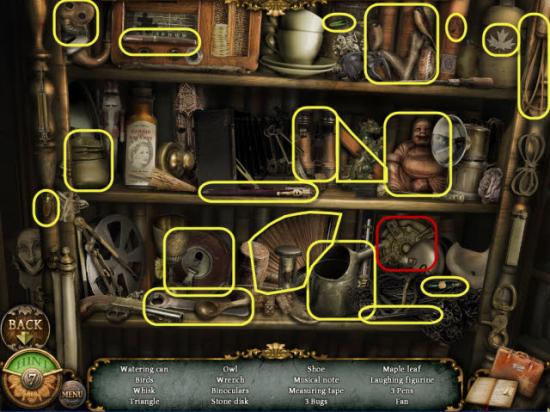
Find the Hidden Objects highlighted in Yellow and Pocket Watch highlighted in Red.
Receive the Pocket Watch.
Central Park
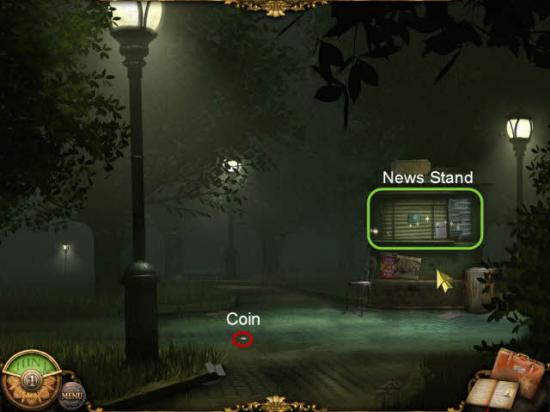
Gather the Coin highlighted in Red.
Examine the News Stand highlighted in Green.
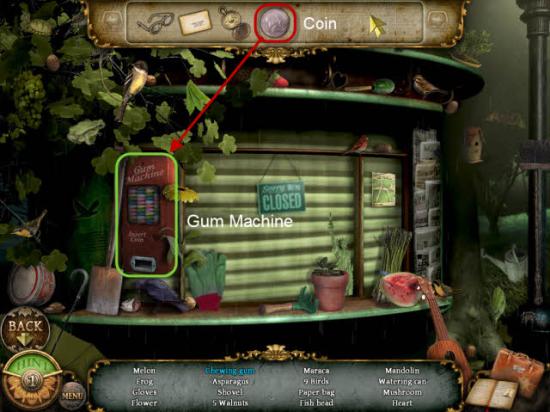
Use the Coin, highlighted in Red, on the Gum Machine, highlighted in Green.
Gather Special Item #3(of 3) highlighted in Orange.
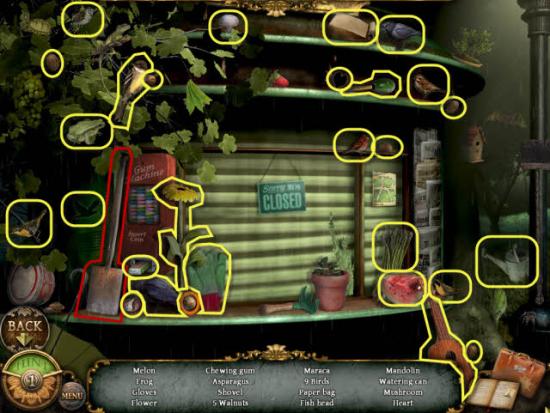
Gather the Hidden Object highlighted in Yellow.
Gather the Shovel highlighted in Red.
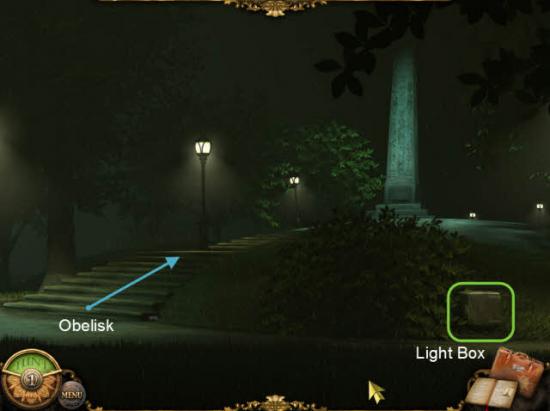
Move to the Obelisk.
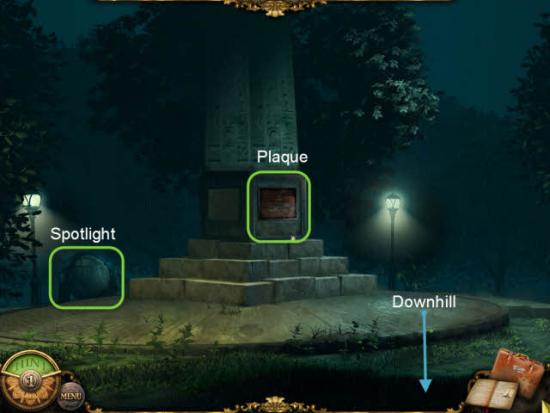
Examine the Plaque highlighted in Green.
Examine the Spotlight highlighted in Green.
Return Downhill.
Examine the Lightbox highlighted in Green.
Flip the Switch to turn on the Spotlight.
Return to the Obelisk.
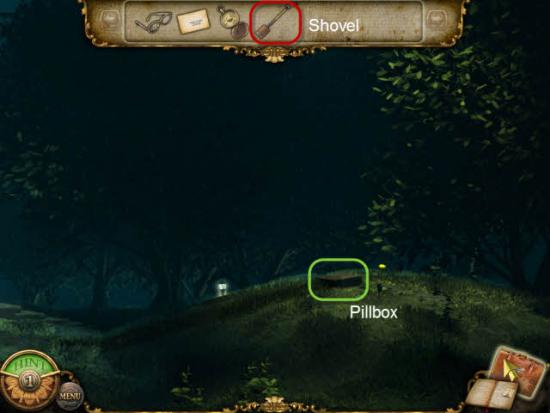
Use the Shovel, highlighted in Red, on the Pillbox, highlighted in Green.
Receive the Wooden Sword.
Grandfather’s House: Paris – France
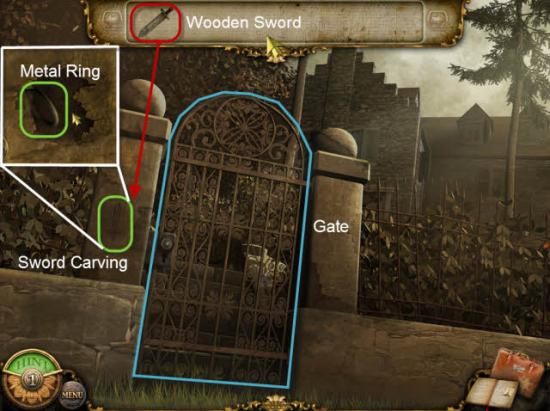
Use the Wooden Sword, highlighted in Red, on the Sword Carving, highlighted in Green.
Pull the Metal Ring, highlighted in Green, to Unlock Gate.
Open Gate highlighted in Blue.
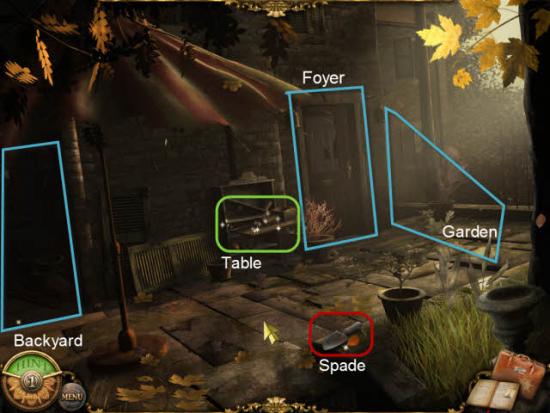
Gather the Spade highlighted in Red.
Examine the Table highlighted in Green.
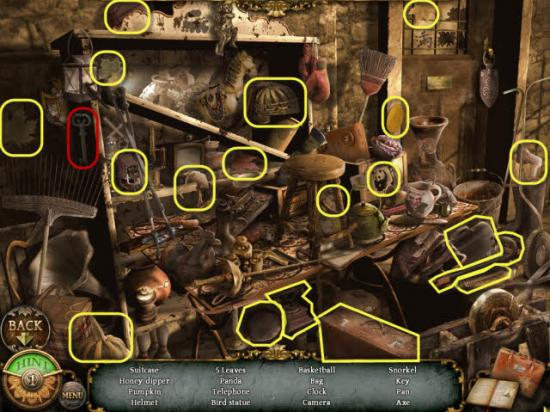
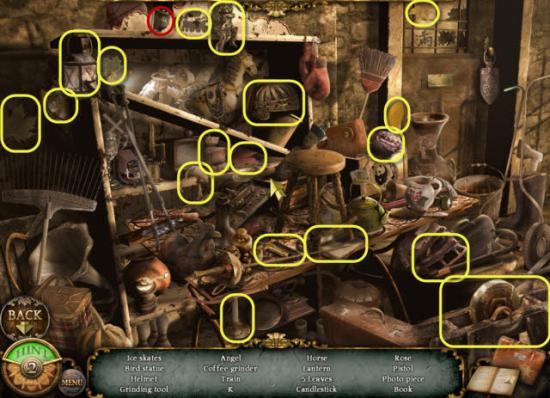
Find the Hidden Objects highlighted in Yellow and the Large Key highlighted in Red.
Head to the Garden.

Examine the Fountain highlighted in Green.
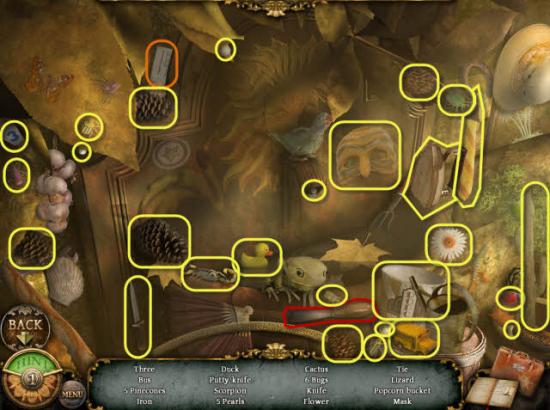
Gather Special Item #1(of 4) highlighted in Orange.
Gather the Putty Knife highlighted in Red.
Gather the remaining Hidden Objects highlighted in Yellow.
Return to the Terrace.
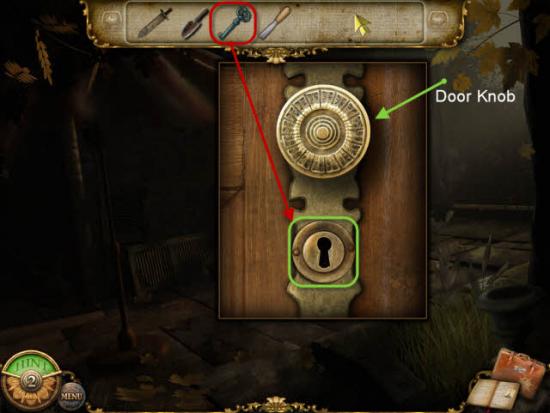
Examine the Foyer Door.
Use the Large Key, highlighted in Red, on the Door Lock, highlighted in Green.
Turn the Door Knob to gain access to the Foyer.
Enter the Foyer.

Gather Special Item #2(of 4) highlighted in Orange.
Examine the Light Switch highlighted in Green.
Click the Switch to turn on Lights.
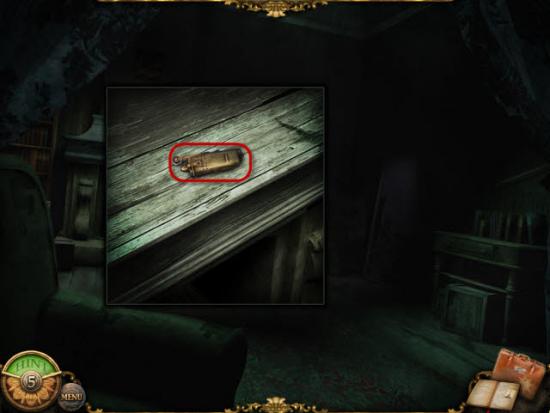
Examine the Floor Panel.
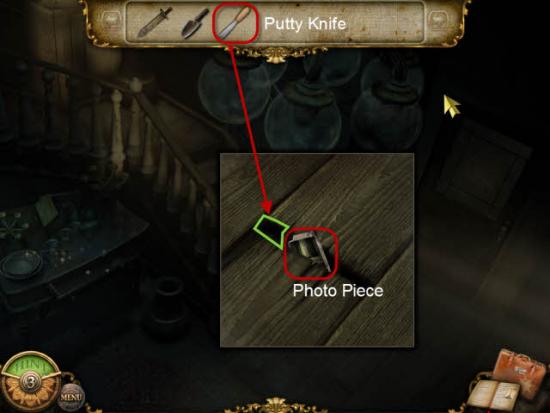
Use the Putty Knife, highlighted in Red, to widen the gap in the Floor.
Gather the Photo Piece highlighted in Red.
Examine the Desk.
Open Desk Drawer.
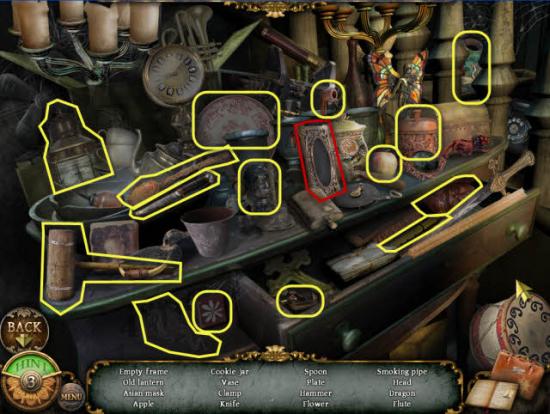
Gather the Photo Frame highlighted in Red.
Gather the Hidden Objects highlighted in Yellow.
Return to the Terrace.
Examine the Backyard.
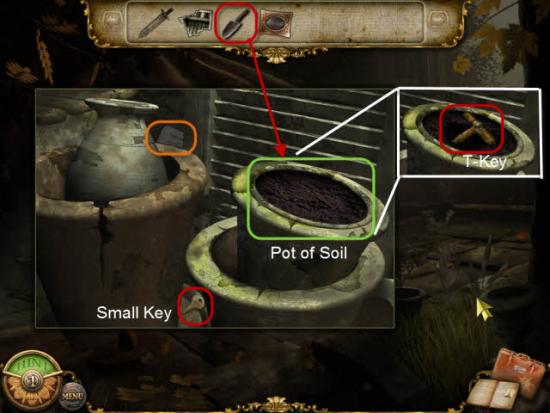
Gather Special Item #3(of 4) highlighted in Orange.
Use the Spade, highlighted in Red, on the Pot of Soil, highlighted in Green.
Gather the T-Key highlighted in Red.
Gather the Small Key highlighted in Red.
Return to the Foyer and enter the Living Room.
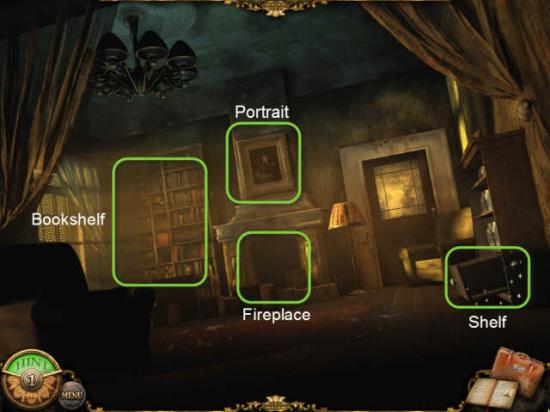
Examine the Shelf.
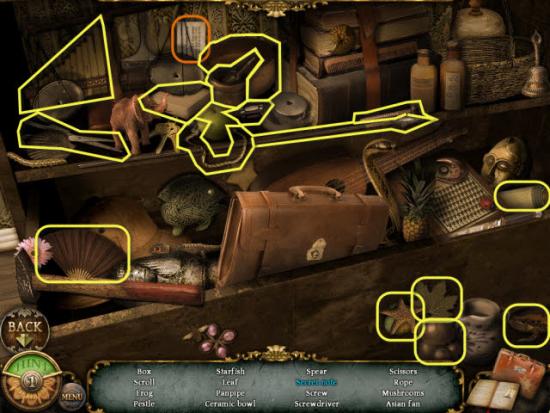
Gather Special Item #4(of 4)highlighted in Orange.
Gather the Hidden Objects highlighted in Yellow.
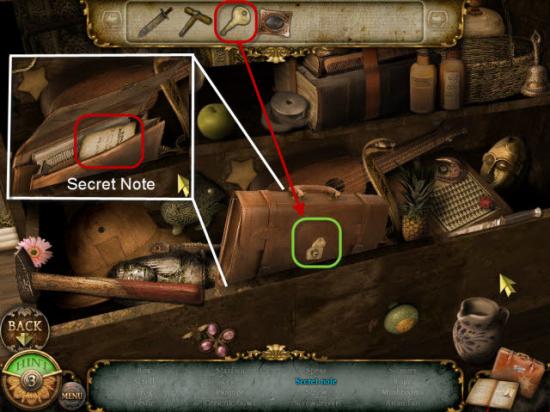
Use the Small Key, highlighted in Red, on the Briefcase, highlighted in Green.
Retrieve the Secret Note inside, highlighted in Red.
Examine the Portrait.
Examine the Safe behind the Portrait.
Gather the Note highlighted in Red.
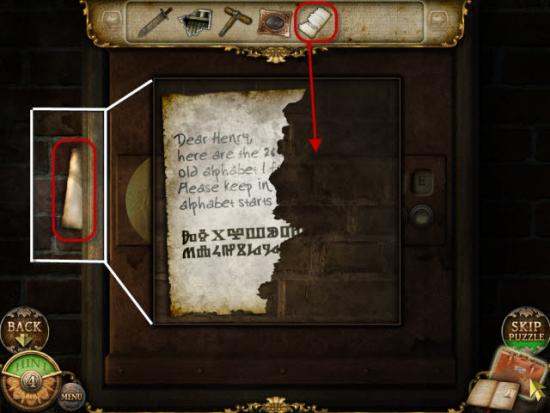
Open Inventory.
Add the Secret Note highlighted in Red to the other half of the Note.
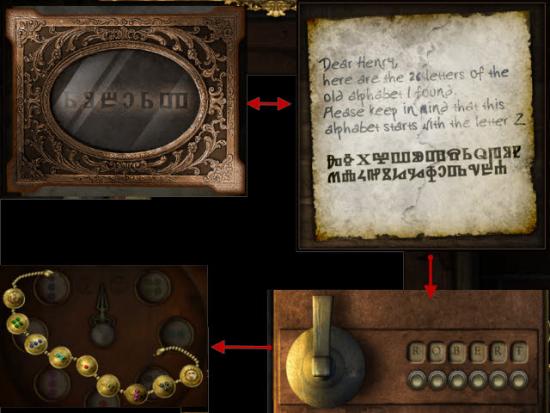
Compare the Note with the code from the Picture Frame.
This is a simple substitution code.
The Note contains the key. The Code is in the Picture Frame.
Use the Key to decipher the Code.
Click on each button under the letters on the safe to spell out the Code word.
Enter the Code, “Robert” into the safe.
Turn the Handle to open the Safe.
Gather the Necklace.
Examine the Chimney
Gather the Photo Piece highlighted in Red.
Gather the remaining Hidden Objects highlighted in Yellow.
Return to the Terrace.
Examine the Table again.
Gather the Photo Piece highlighted in Red.
Gather the remaining Hidden Objects highlighted in Yellow.
Return to the Garden.
Examine the Metal Case.
Add the three Photo Pieces from Inventory to the Puzzle.
Rearrange the Puzzle pieces to form a complete image.
Return to the Living Room.
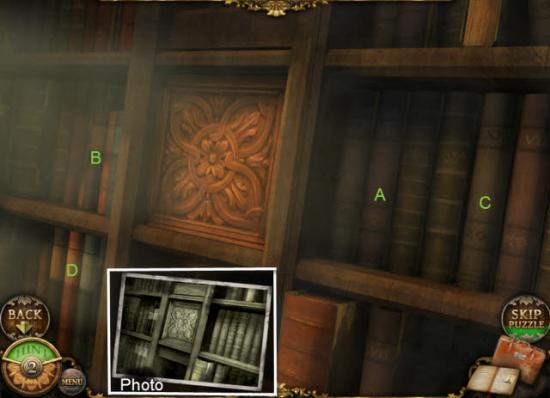
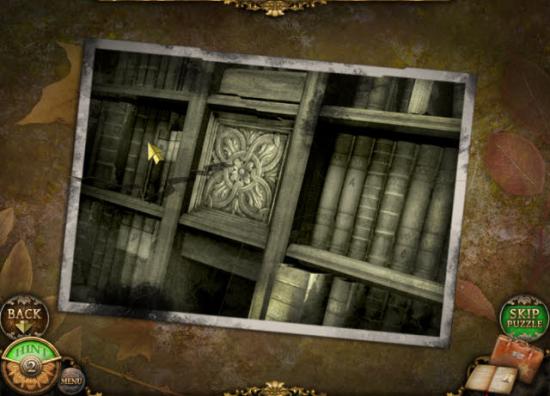
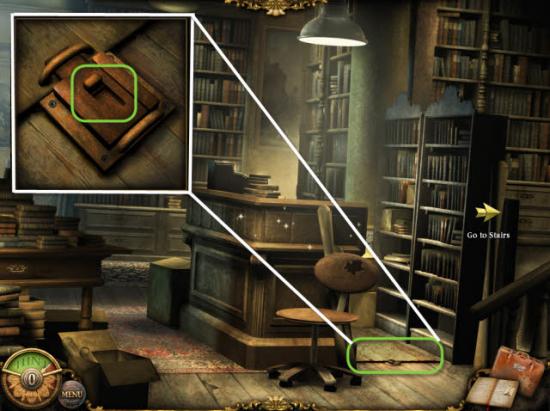
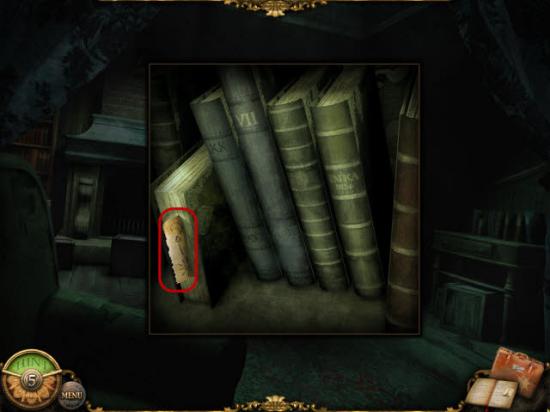
Examine the Bookshelf.
See the Photo to find the key to the Bookcase.
Click on the corresponding Books in alphabetical order.
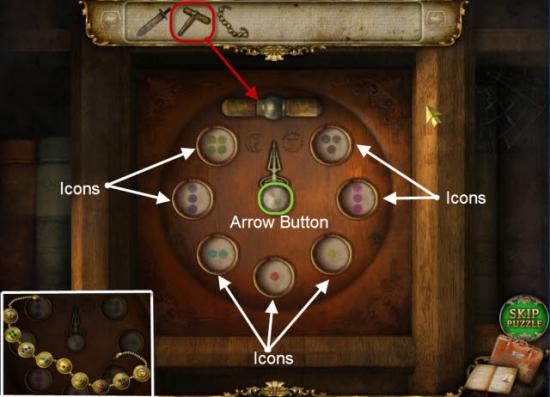
To solve this Puzzle, examine the Necklace in your Inventory from the Safe.
Click on the Arrow Button in the center to access each icon on the Clock Face.
Click on each Icon, as the Arrow is facing the Icon, to change the Icon to match the corresponding Icon on the Necklace.
Add the T-Key, highlighted in Red, to the Key Hole on top of the Clock Face.
Turn the T-Key to unlock the Bookcase.
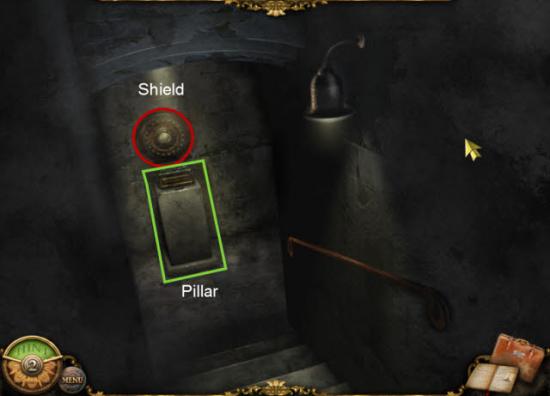
Gather the Shield highlighted in Red.
Examine the Pillar highlighted in Green.
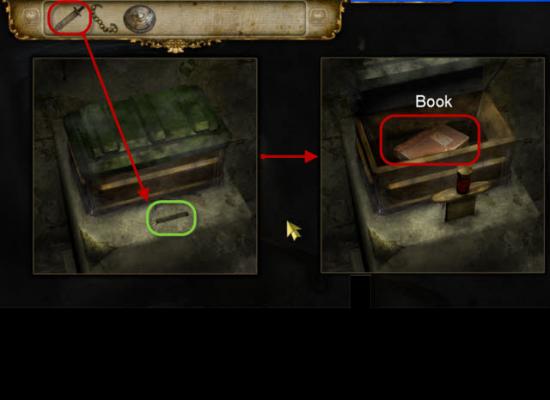
Insert the Sword, highlighted in Red, into the Slot, highlighted in Green, in the Pedestal.
Gather the Book highlighted in Red.

Examine the Ticket.
Read the Letter.
Examine the Book.
Pitigliano – Tuscany, Italy
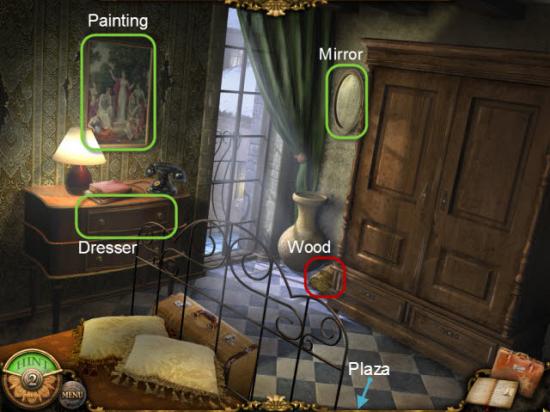
Gather the Wood highlighted in Red.
Examine the Dresser.
Examine the Mirror.
Examine the Painting.
Gather the Hidden Objects highlighted in Yellow.
Move to the Plaza.
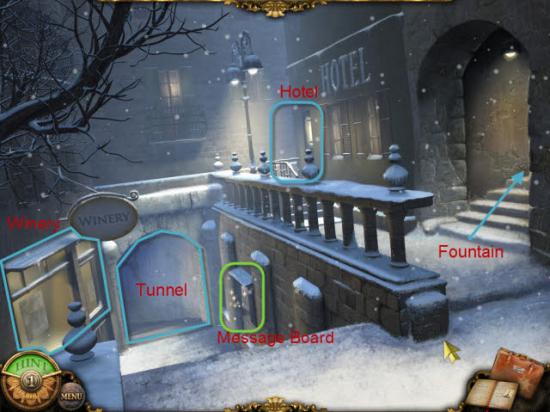
Examine the Message Board highlighted in Green.
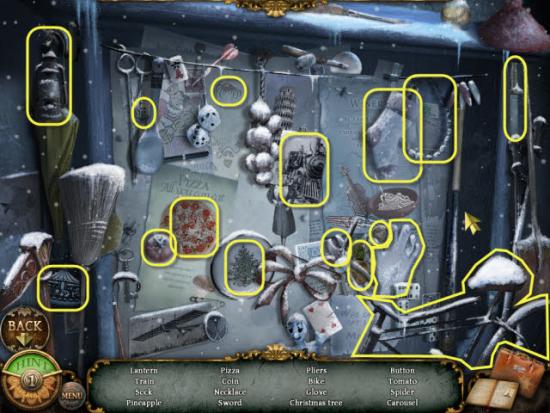
Gather the Hidden Objects highlighted in Yellow.
Receive a Wine Coupon.
Enter Winery
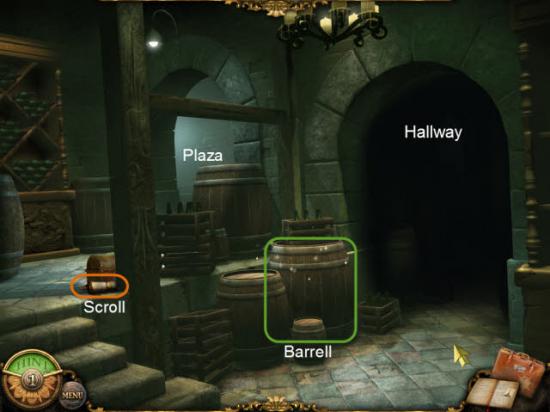
Gather Special Item #1(of 5) highlighted in Orange.
Examine the Barrel highlighted in Green.

Gather the Hidden Objects highlighted in Yellow.
Receive Bottle of Wine.
Return to Plaza.
Go to Fountain.
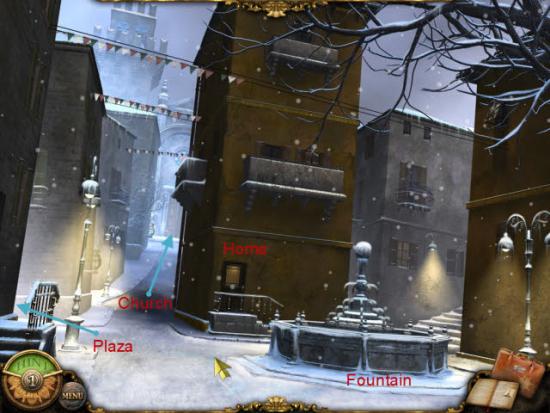
Examine the Home.
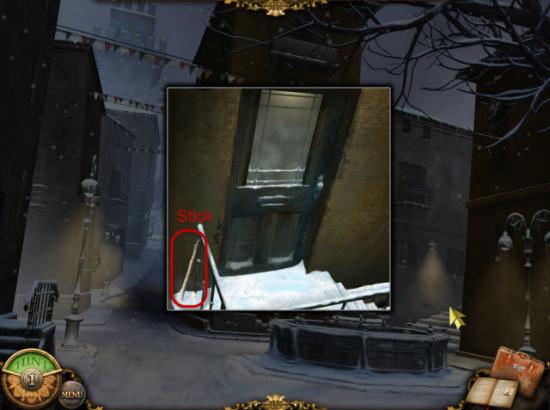
Gather the Stick highlighted in Red.
Move to the Church.
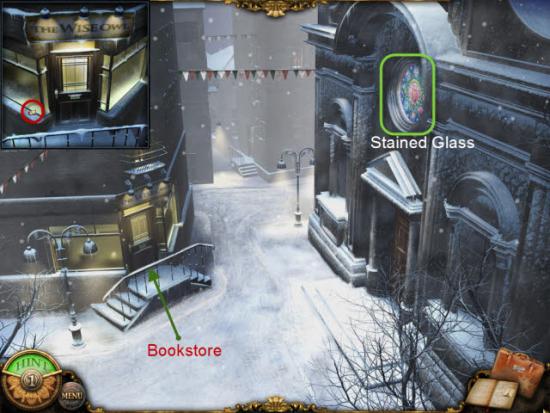
Examine Stain Glass on Church, highlighted in Green.
Examine the Bookstore.
Gather the Matches highlighted in Red.
Enter the Bookstore.
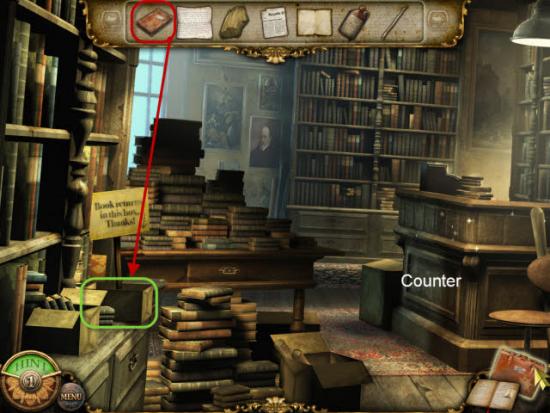
Return the Old Book highlighted in Red.
Examine the Counter.
Move the Red Curtain.
Use the Stick, highlighted in Red, on the Desk.
Gather Secret Item #2 (of 5) highlighted in Orange.
Gather the remaining Hidden Objects highlighted in Yellow.
Receive Key.
Examine the Secret Door behind the Counter.
Unlock the Secret Door.
Examine the Stairs to the right of the Counter.
Book Store Owner will stop you.
Return to the Fountain.
Use the Key on the Home Door.
Enter the Home.
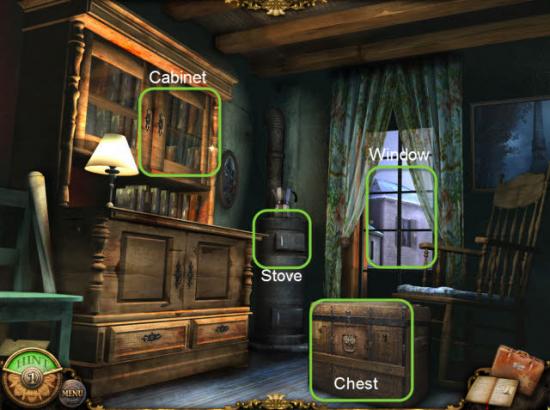
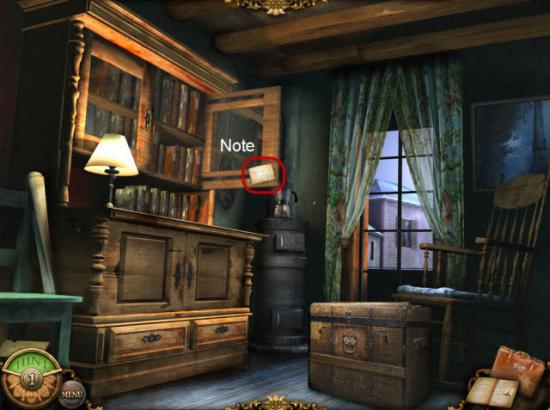
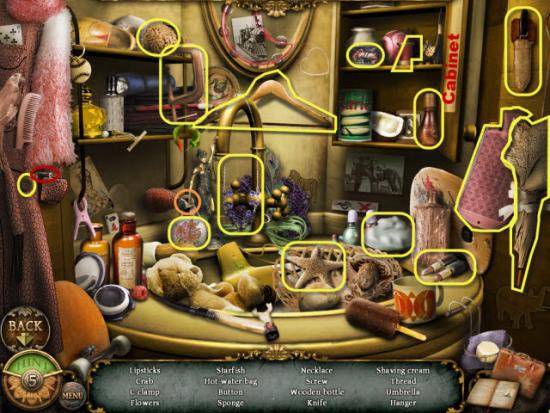
Examine the Cabinet.
Take the Note highlighted in Red.
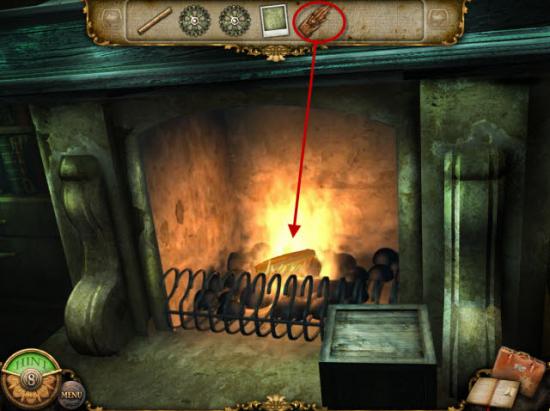
Examine the Fireplace.

Place Firewood in the Stove.
Use the Matches, highlighted in red, on the Stove.
Next use the Parchment, highlighted in Green, on top of the Stove.
Examine the Window.
Receive Photo.
Examine the Chest.
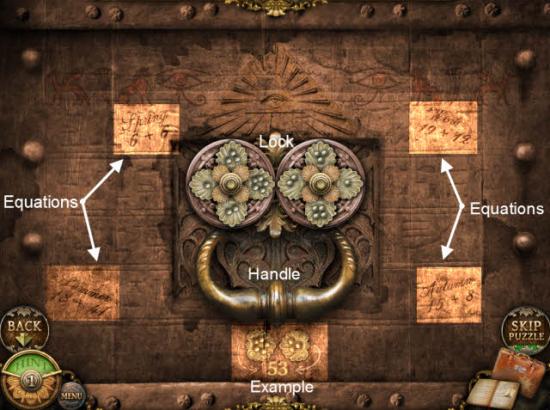
To solve this Puzzle will need to enter the codes using the four equations surrounding the Lock.
Use the Example for key to entering combinations.
Enter the codes from the four equations in order from Spring to Winter.
Add the two numbers of the equation to find the Lock code.
Click on the two separate sides of the lock to rotate the pieces.
Example in Image would be the code – 52.
After rotating the lock pieces to the corresponding code, pull the Handle to enter the code.
The four codes for solving the puzzle are:
- Spring = (6+6 = 12) 1 Pearl on left, 2 Pearls on right.
- Summer = (13+41 = 54) 5 Pearls on left, 4 Pearls on right.
- Autumn = (15+8 = 23) 2 Pearls on left, 3 Pearls on right.
- Winter = (19+12 = 31) 3 Pearls on left, 1 Pearl on right.
Enter the correct code sequence will reveal a key hole.
You do not have the needed item yet.
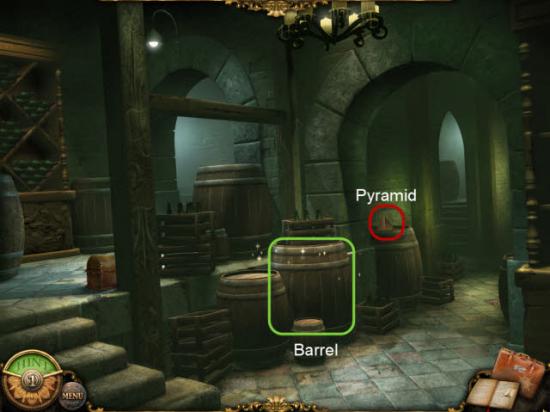
Return to the Winery.
Gather the Pyramid highlighted in Red.
Examine the Barrel highlighted in Green.
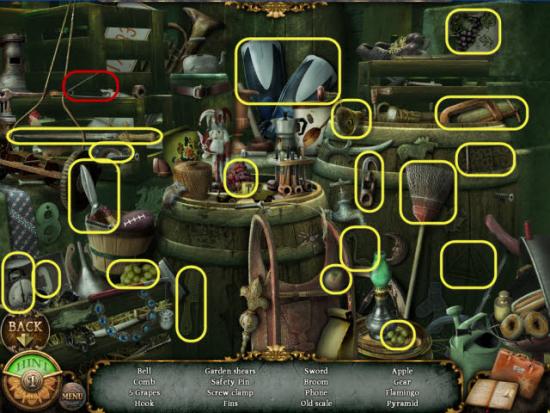
Gather the Safety Pin highlighted in Red.
Gather the remaining Hidden Objects highlighted in Yellow.
Return to the Home.
Use the Safety Pin, highlighted in Red, on the Chest Key Hole, highlighted in Green.
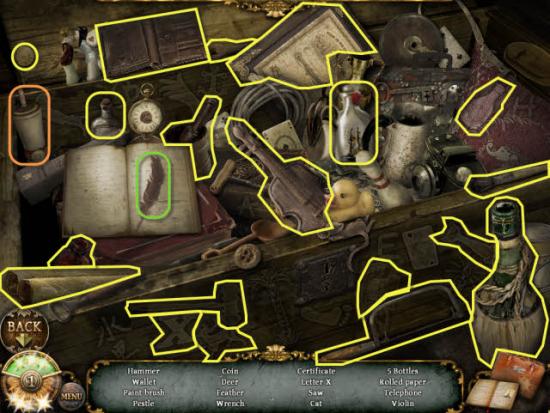
Examine the Book and gather the Feather highlighted in Green.
Gather Special Item #3(of 5) highlighted in Orange.
Gather the remaining Hidden Objects highlighted in Yellow.
Receive Book.
Return to the Bookstore.
Bookstore owner will close shop.
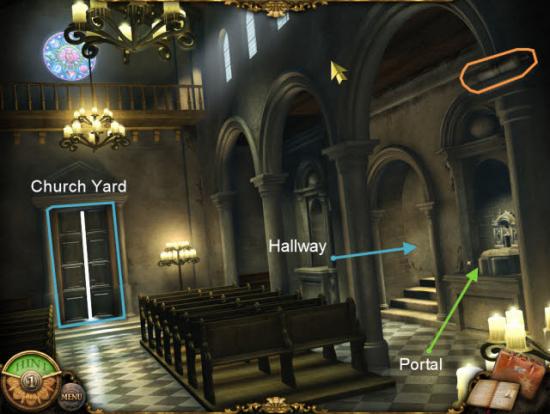
Return to the Church.
Enter the Church.
Gather Special Item #4(of 5) highlighted in Orange.
Examine the Portal.
Receive Photograph.
Move to Hallway.
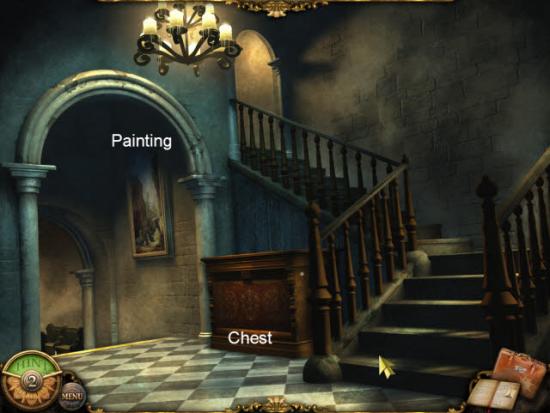
Examine the Painting.
Receive Photo.
Examine the Chest.
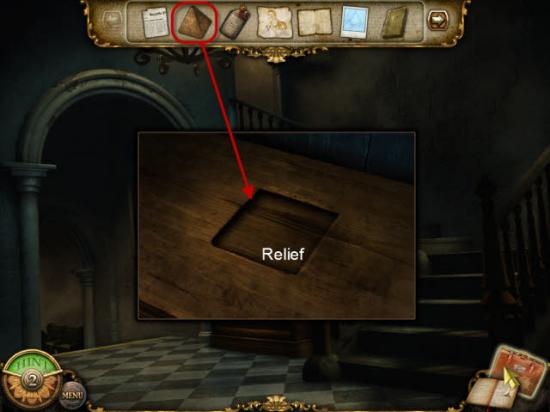
Place the Pyramid, highlighted in Red, into the square Relief on top of the Chest.
This will reveal a Secret Staircase.
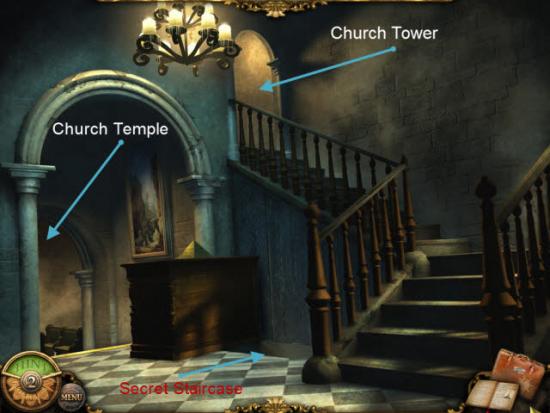
Enter the Secret Staircase.
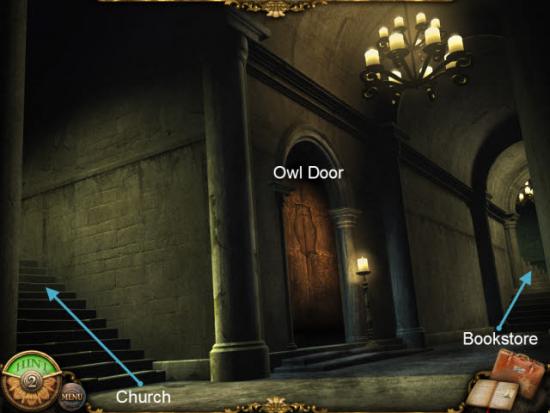
Take the Right hand Staircase to the Bookstore.
SI64
Gather Special Item #5(of 5) highlighted in Orange.
Examine the Small Cabinet highlighted in Green.
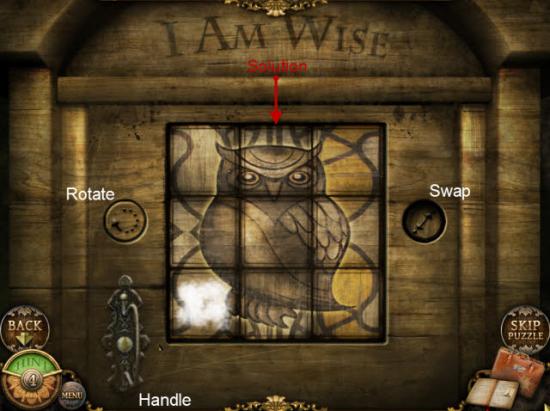
The right hand Button will allow you to rotate any piece when you click on the piece.
The left hand Button will allow you to switch any two pieces positions.
To solve this Puzzle rearrange the tiles to form the image of an Owl.
Pull the Handle to open the Small Cabinet.
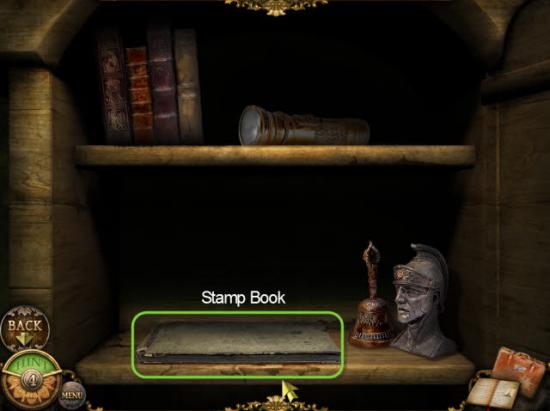
Examine the Book of Stamps highlighted in Green.
Receive to Stamps.
Return to Secret Passage.
Take Left Staircase to return to the Church.
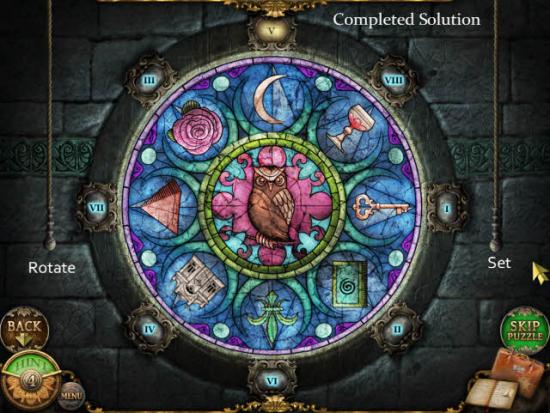
Move to the Church Tower.
The left hand Rope rotates the Images.
The right hand Rope sets the Image.
To solve this puzzle you will need to examine all your clues in inventory.
Rotate the Images to line up the corresponding Images with the corresponding Roman Numeral shown on the outer ring of the Stained Glass Window.
Starting with the top section with Roman Numeral “V”.
Rotate the Images, using the left hand Rope, till the correct Image is aligned with the current Roman Numeral.
Next pull the right hand Rope to set the Image.
Work clockwise around the Stained Glass Window till all eight Images have been set.
After solving the Puzzle you will be returned to the Secret Staircase.
Examine the Owl Door.
Grandfather’s House (Part 2) – Paris, France
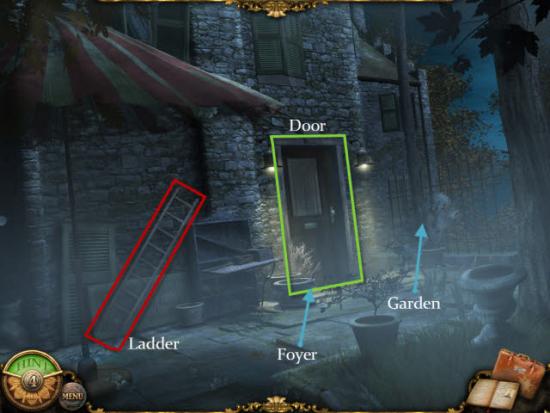
Gather the Ladder highlighted in Red.
Move to the Garden.
Gather the Crowbar highlighted in Red.
Examine the Garden Pots.
Examine the Gate Lock.
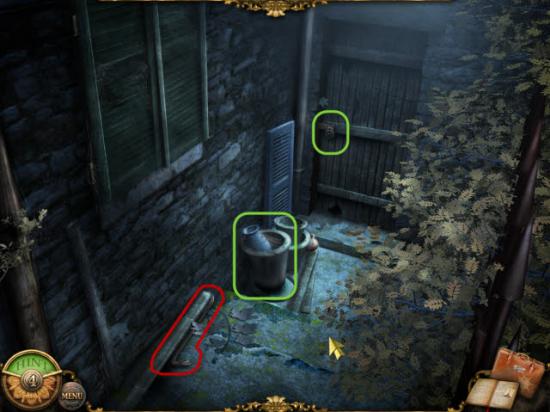
Return to the Terrace.
Examine the Door.
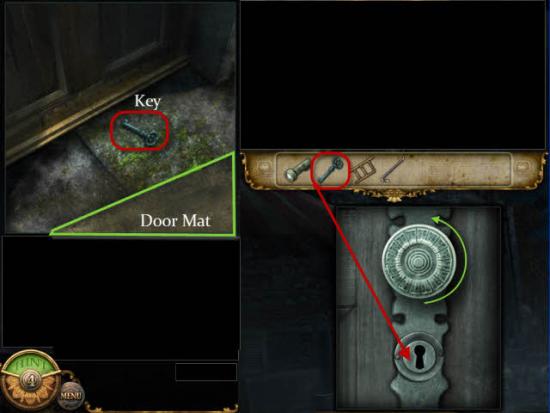
Examine the Door Mat.
Gather the Key under the Mat.
Use the Key, highlighted in Red, on the Door.
Turn the Door Knob.
Enter the Foyer.
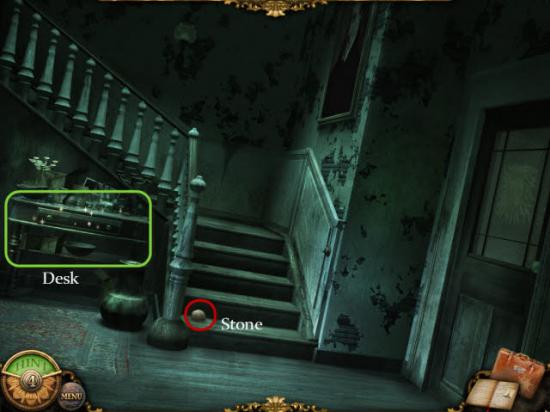
Gather the Stone highlighted in Red.
Examine the Desk.
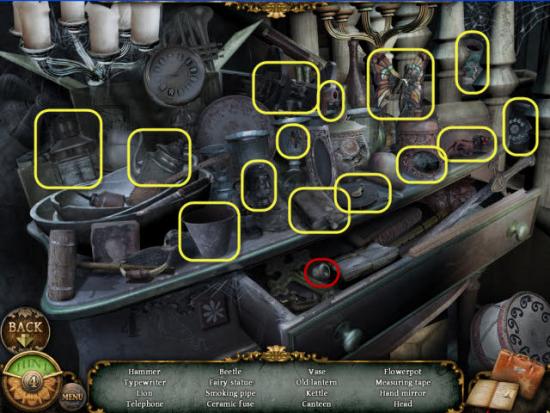
Open the Drawer.
Gather the Old Fuse highlighted in Red.
Gather the remaining the Hidden Objects highlighted in Yellow.
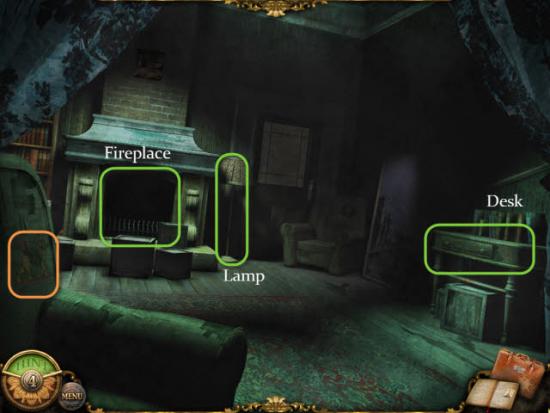
Enter the Living Room
Gather Special Item #1(of 6) highlighted in Orange.
Examine the Desk.
Take the Note highlighted in Red.
Examine the Lamp.
Examine the Fireplace.
Gather the Lighter highlighted in Red.
Return to the Garden.
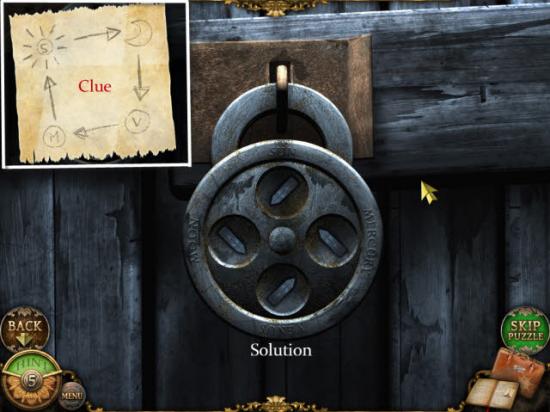
To solve this Puzzle will need to rotate the four arrow pieces into the correct combination.
Examine the Clue you found on the Desk in the Living Room.
Click on each Arrow to rotate the Arrow.
See the Clue for Combination to the Lock.
Solution:
- Sun points toward Moon.
- Moon points toward Venus.
- Venus points toward Mercury.
- Mercury points toward Sun.
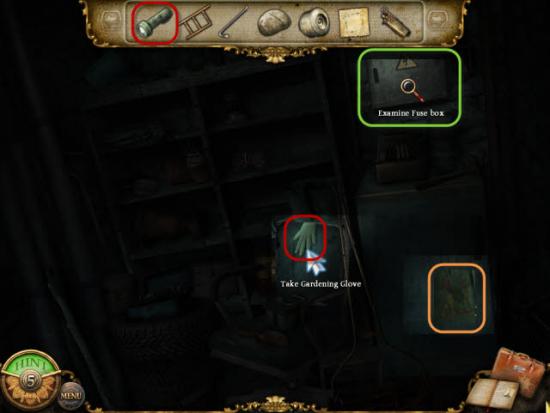
Use the Flashlight, highlighted in Red, to examine the dark Shed.
Gather Special Item #2(of 6) highlighted in Orange.
Gather the Gloves.
Examine the Fuse Box.
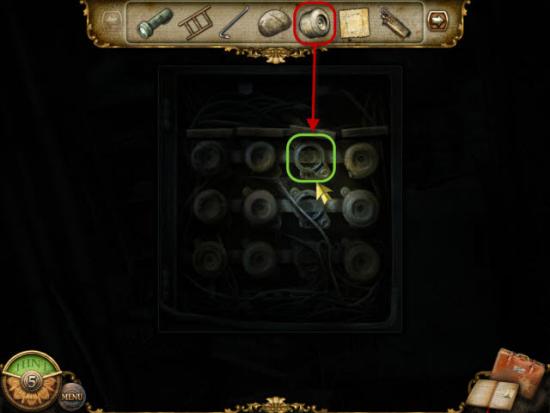
Use the Fuse, highlighted in Red, on the Fuse Box, highlighted in Green.
Return to the Garden
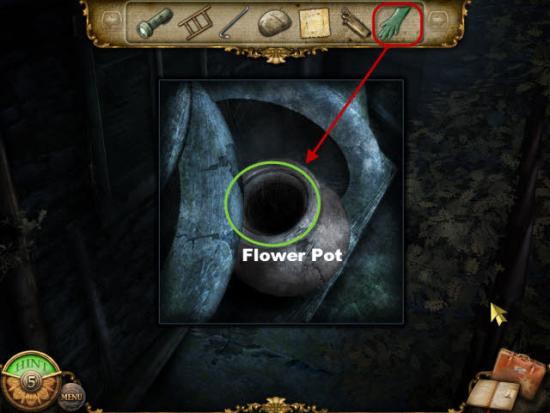
Use the Gloves, highlighted in Red, to examine the Flower Pot, highlighted in green.
Receive Rusty Key
Return to Foyer.
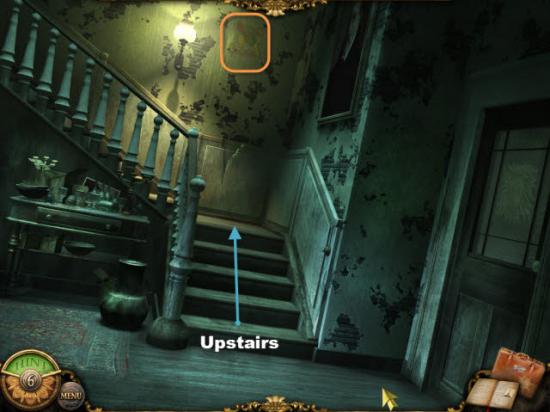
Gather Special Item #3(of 6) highlighted in Orange.
Go Upstairs.
Gather Special Item #4(of 6) highlighted in Orange.
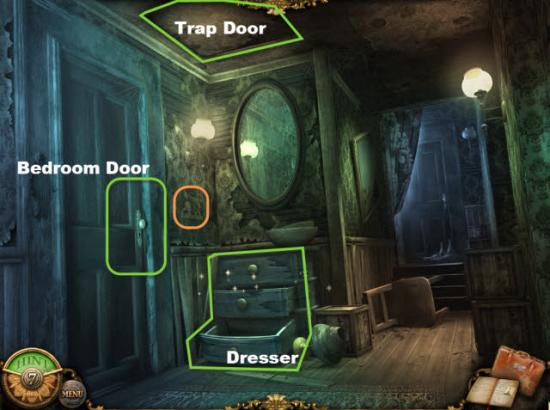
Examine the Dresser.
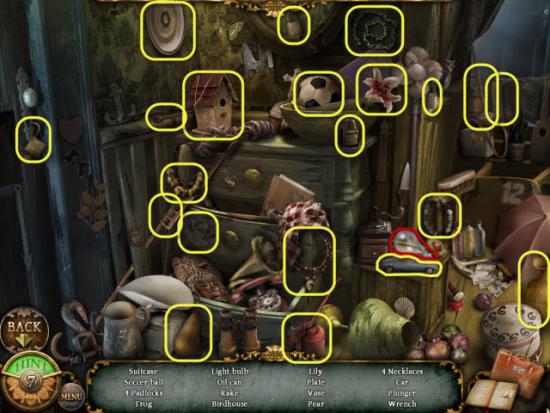
Gather the Light Bulb highlighted in Red.
Gather the remaining Hidden Objects highlighted in Yellow.
Examine the Trap Door.
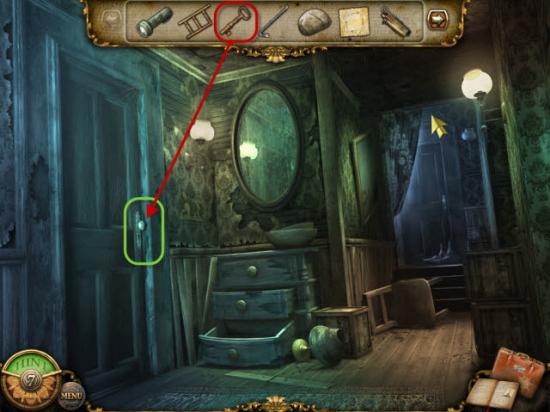
Examine Bedroom Door.
Use Rusty Key, highlighted in Red, on Bedroom Door.
Enter Bedroom.
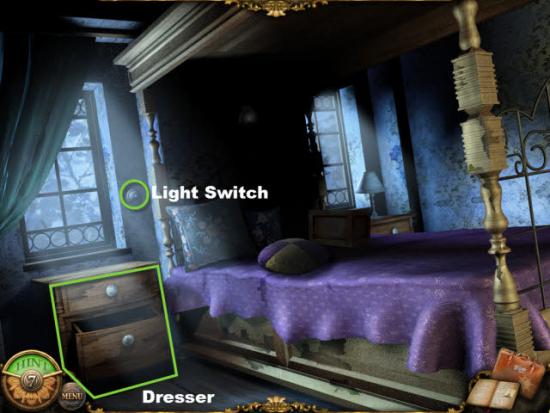
Examine the Light Switch, twice, until Cut Scene is triggered.
Examine the Dresser.
Examine the Drawer.
Gather the Oil Lamp Wick highlighted in Red.
Return to the Living Room

Use the Light Bulb, highlighted in Red, on the Lamp.
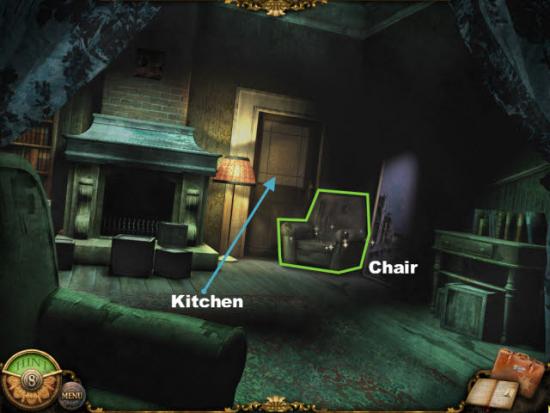
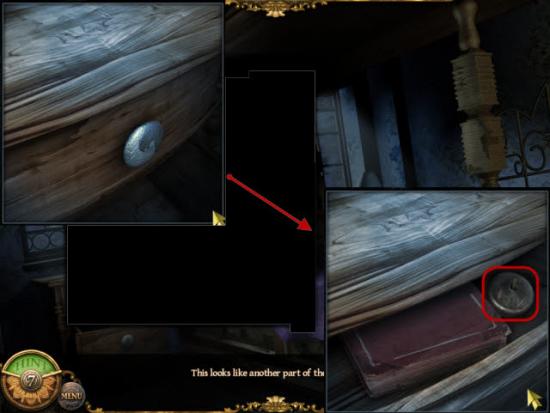
Examine the Chair highlighted in Green.
Gather the Oil Lamp Reservoir highlighted in Red.
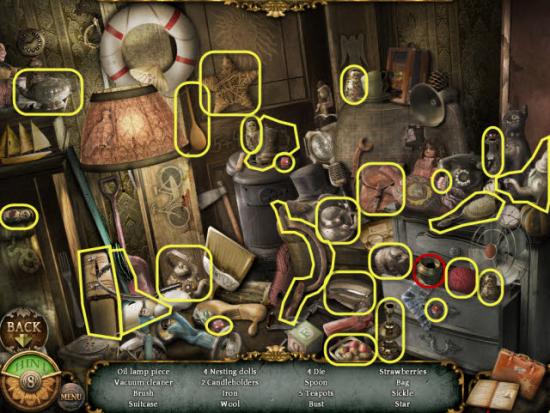
Gather the remaining Hidden Objects highlighted in Yellow.
Enter the Kitchen.
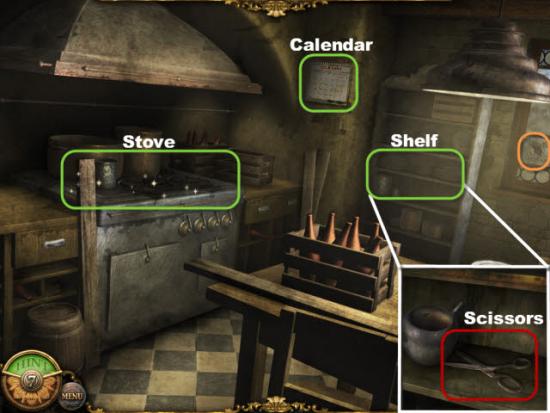
Gather Special Item #5(of 6) highlighted in Orange.
Examine the Shelf.
Gather the Scissors.
Examine the Calendar.
Examine the Stove.
Gather the Duct Tape highlighted in Red.
Gather the remaining Hidden Objects highlighted in Yellow.
Return to the Bedroom.
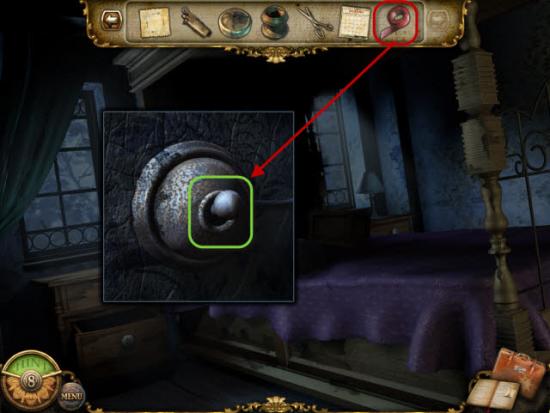
Examine the Light Switch.
Use the Duct Tape, highlighted in Red, on the Light Switch, highlighted in Green.
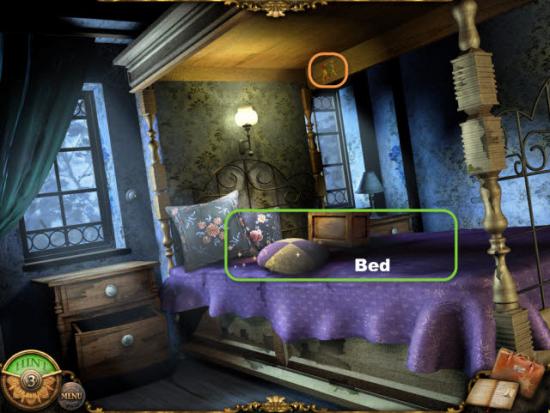
Gather Special Item #6(of 6) highlighted in Orange.
Examine the Bed.
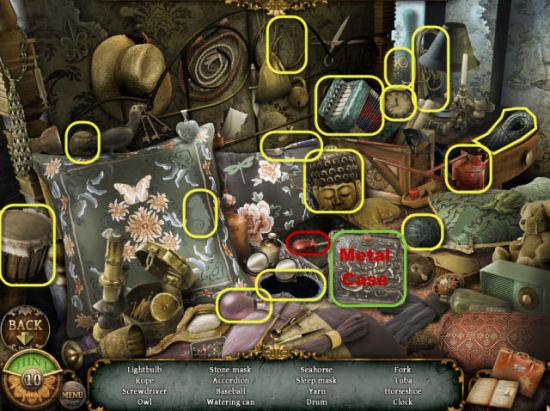
Examine the Metal Case.
Examine Dresser Drawer.
Gather the Screwdriver highlighted in Red.
Gather the remaining Hidden Objects highlighted in Yellow.
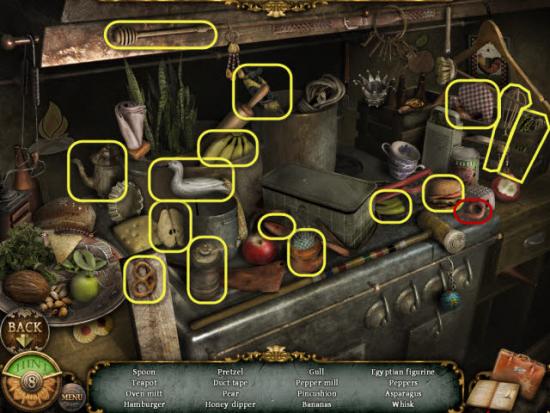
Return to the Kitchen.
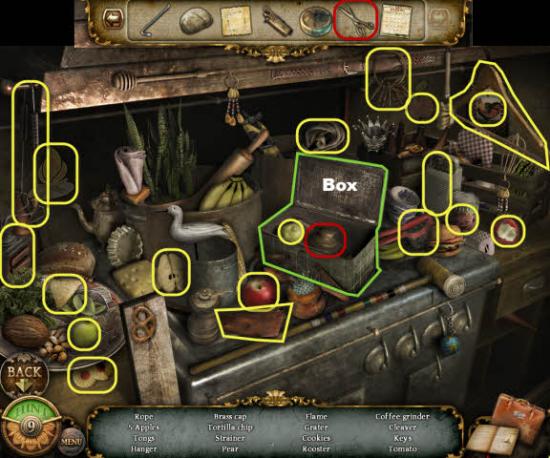
Examine the Stove.
Examine the Box.
Use the Scissors highlighted in Red to open the Box.
Gather the Oil Lamp Top highlighted in Red.
Gather the remaining Hidden Objects highlighted in Yellow.
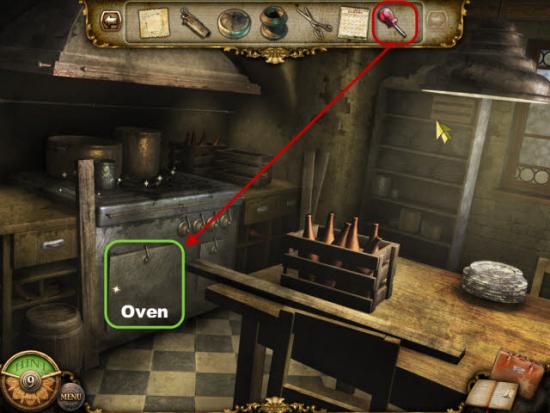
Examine the Oven.
Use the Screwdriver highlighted in Red, on the Oven, highlighted n Green.
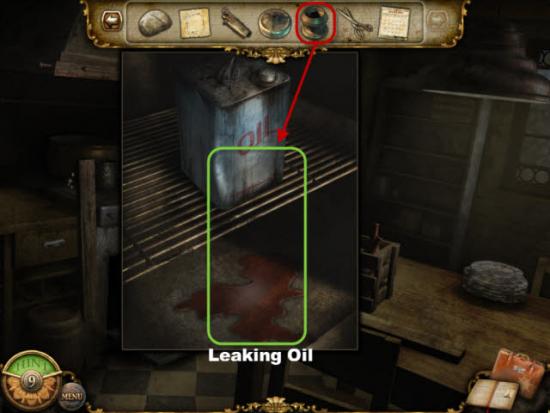
Examine the Oil Can.
Use the Oil Lamp Bottom, highlighted in Red, on the Oil, highlighted in Green.
Return Upstairs.
Examine the Dresser
Gather the Oil Lamp Glass Cover highlighted in Red.
Gather the remaining Hidden Objects highlighted in Yellow.
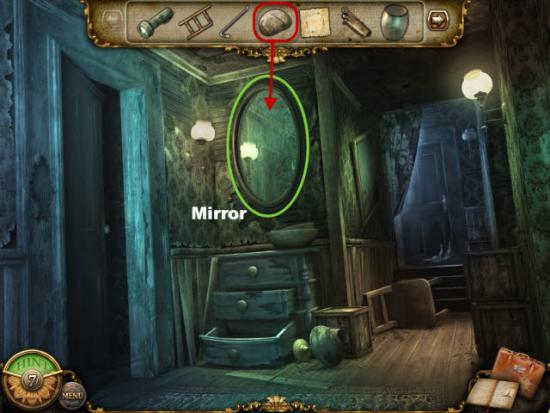
Examine the Mirror.
Use the Stone, highlighted in Red, on the Mirror, highlighted in Green.
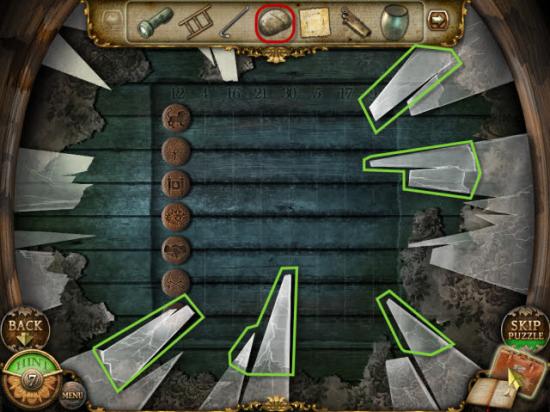
Use the Stone, highlighted in Red, to remove the remaining Mirror Shards.
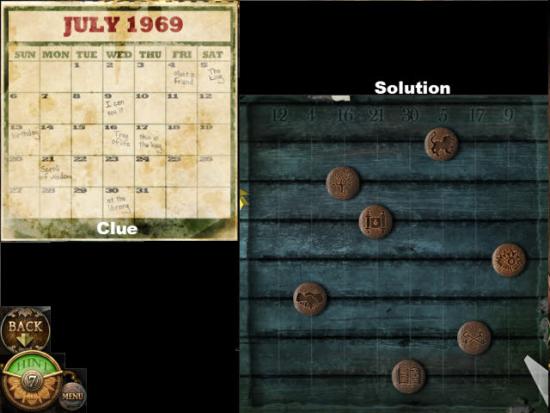
To solve this Puzzle align the Pieces with the correct Numbers.
Use the Calendar from the Kitchen as clue to find the solution.
Click on each Button to move them across to the corresponding Numbers.
Solution:
- Lion Button to Number 5.
- Tree Button to Number 16.
- Scroll Button to Number 21.
- Eye Button to Number 9.
- Handshake Button to Number 4.
- Crossed Keys to Number 17.
- Open Book to Number 30.
The Trap Door opens.
Return to the Kitchen.
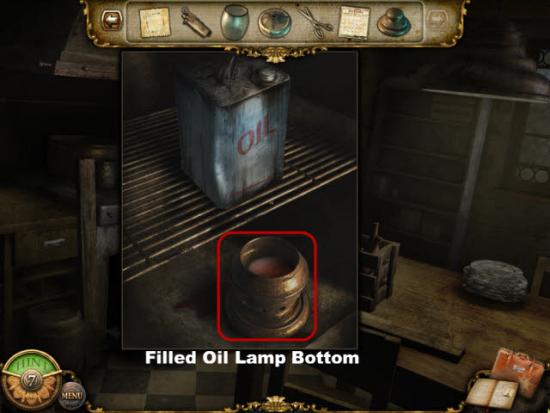
Examine the Oven.
Gather the Oil Lamp Bottom, now filled with Oil.
Return Upstairs.
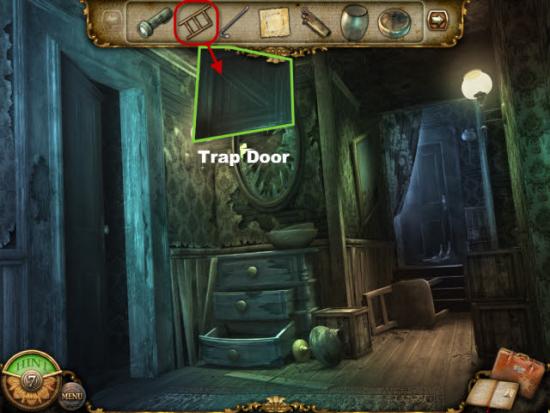
Use the Ladder, highlighted in Red, on the Trap Door.
Enter the Attic.
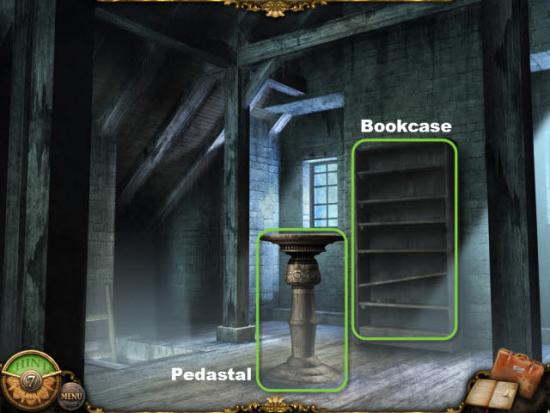
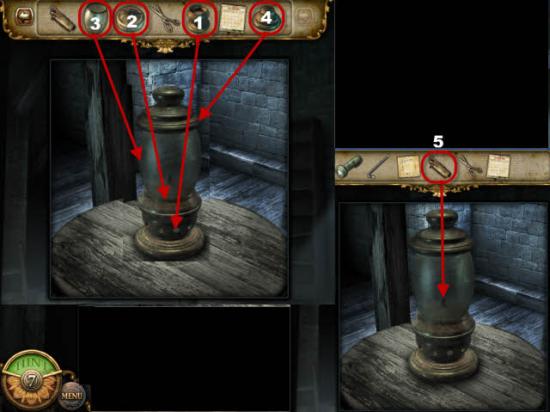
Examine the Pedestal.
Place the Filled Oil Lamp Bottom, in the indentation on the Pedestal, first.
Place the Wick on the Oil Lamp Bottom, second.
Place the Glass Cover on the Wick, third.
Place the Oil Lamp Top on the Glass Cover, fourth.
Now, use the Lighter, highlighted in Red, to light the Oil Lamp, fifth.
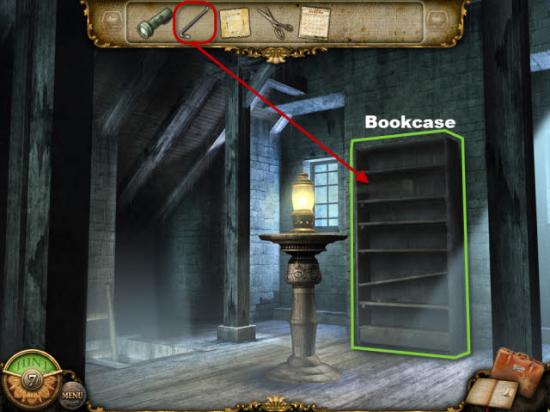
Use Crowbar, highlighted in Red, on the Bookcase, highlighted in Green, four times, to reveal Painting.
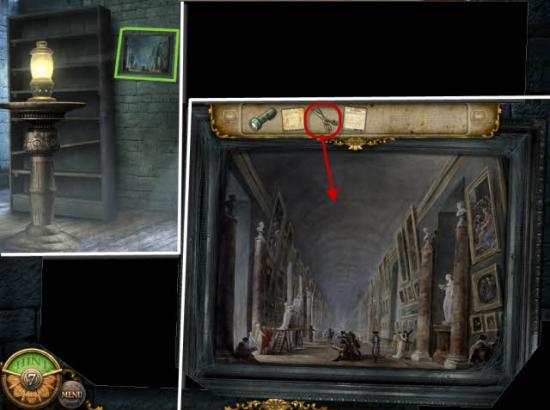
Examine the Painting highlighted in Green.
Use the Scissors, highlighted in Red, to cut out the Painting.
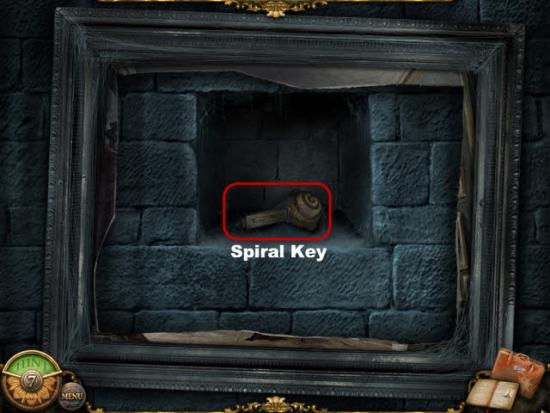
Gather the Spiral Key highlighted in Red.
Mont Palu Express to Venice
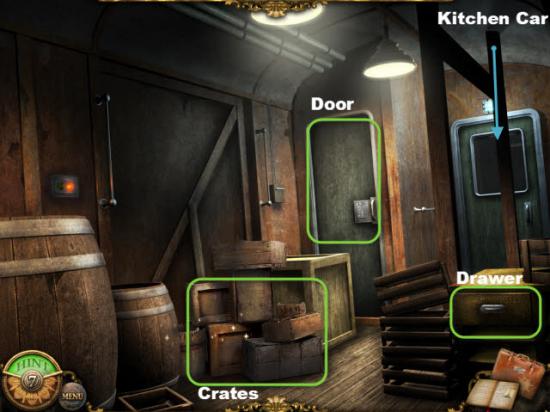
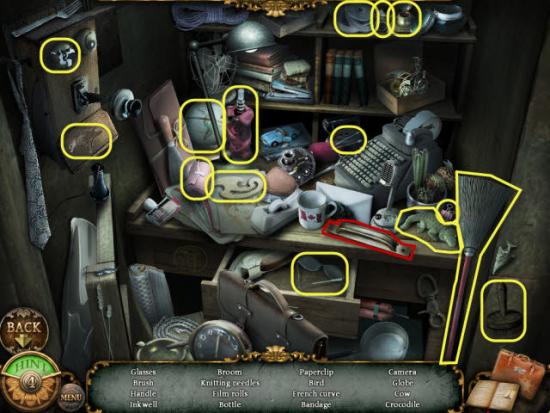
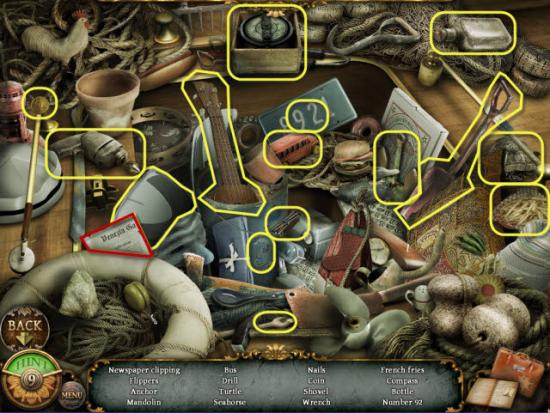
Examine the Crates.

Gather the Pliers highlighted in Red.
Gather the remaining Hidden Objects highlighted in Yellow.
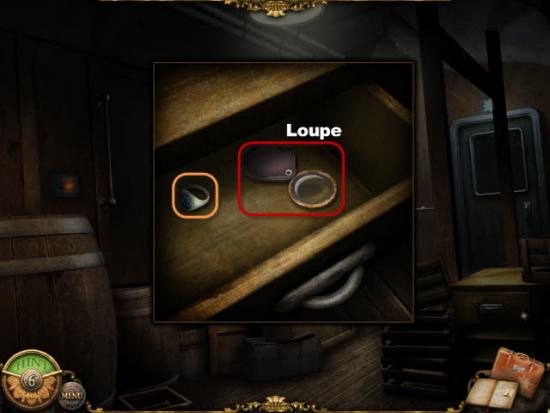
Examine the Drawer.
Gather Special Item #1(of 7) highlighted in Orange.
Gather the Loupe highlighted in Red.
Examine the Door.
Move to the Kitchen Car.
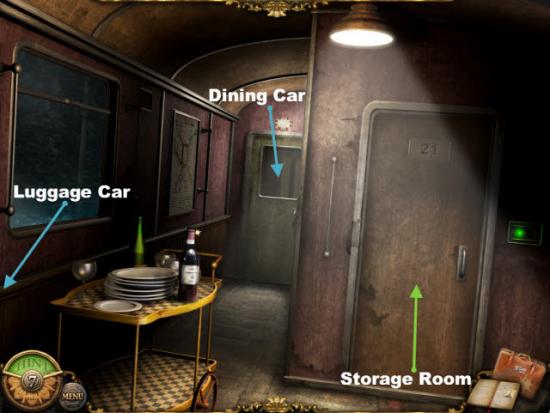
Enter the Storage Room.
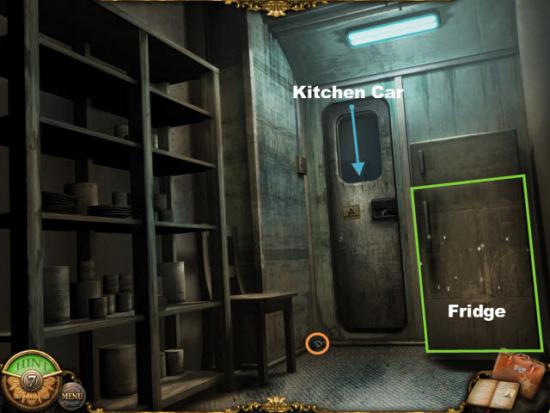
Gather Special Item #2(of 7) highlighted in Orange.
Examine the Fridge highlighted in Green.

Gather the Corkscrew highlighted in Red.
Gather the remaining Hidden Objects highlighted in Yellow.
Return to the Kitchen Car.
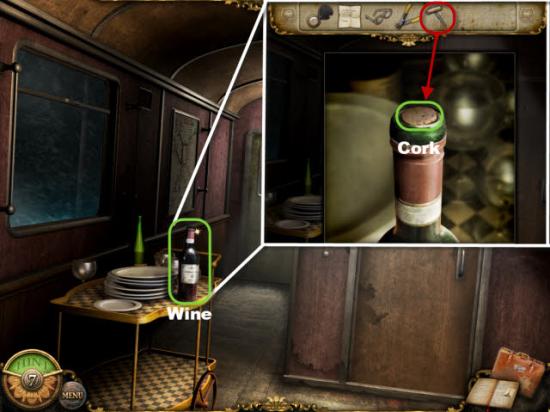
Examine the Bottle of Wine on the Food Cart, highlighted in Green.
Use the Corkscrew, highlighted in Red, on the Cork, highlighted in Green.
Receive the Wine Cork.
Enter the Dining Car.
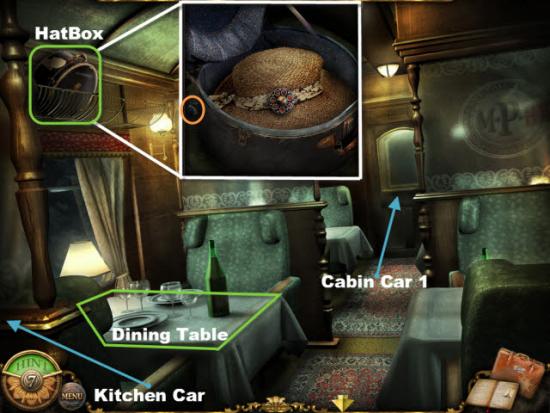
Examine the Hatbox.
Examine the Brooch.
Gather Special Item #3(of 7) highlighted in Orange.
Go to Cabin Car 1.
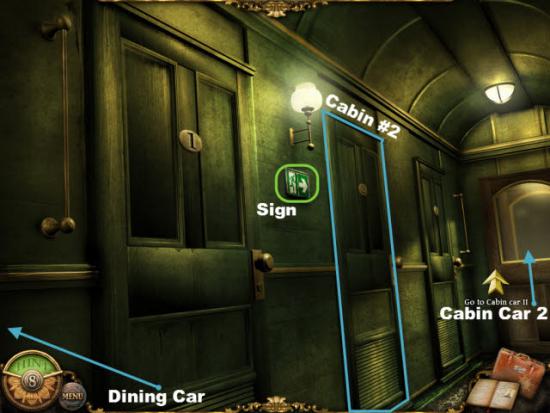
Examine the Sign highlighted in Green.
Enter Cabin #2.
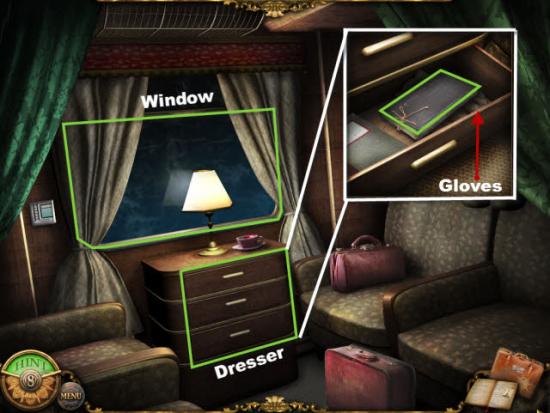
Examine the Window.
Examine the Dresser.
Examine the Book.
Gather the Gloves.
Return to the Dining Car.
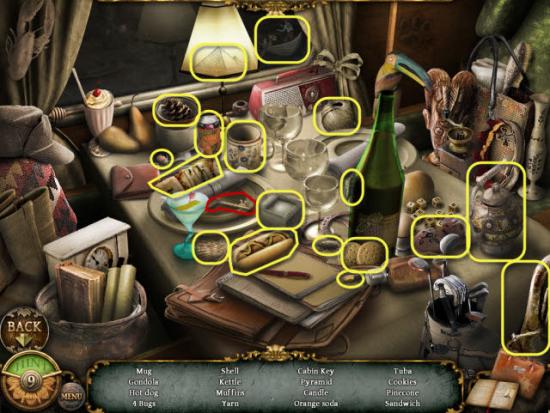
Examine the Dining Table.
Gather the Cabin Key highlighted in Red.
Gather the remaining Hidden Objects highlighted in Yellow.
Move to Cabin Car 2.
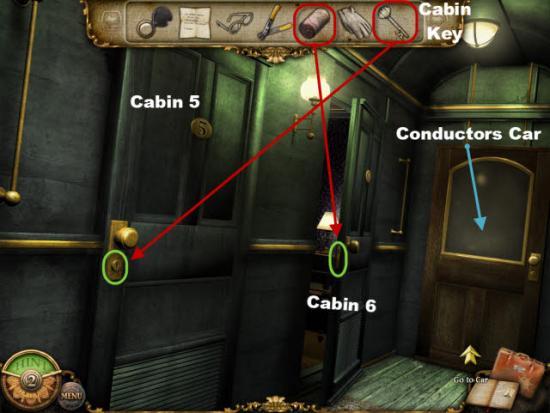
Examine the Door to Cabin 6.
Use the Cork, highlighted in Red, on the Door Jamb, highlighted in Green.
Use the Cabin Key, highlighted in Red, to open Cabin 5.
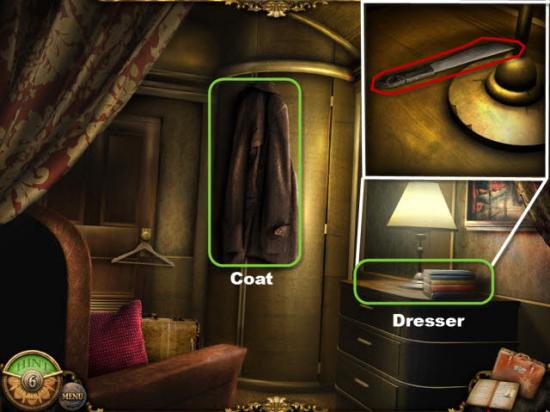
Examine the Dresser highlighted in Green.
Gather the Knife highlighted in Red.
Examine the Coat.
Exit the Cabin.
Move to the Conductors Car.
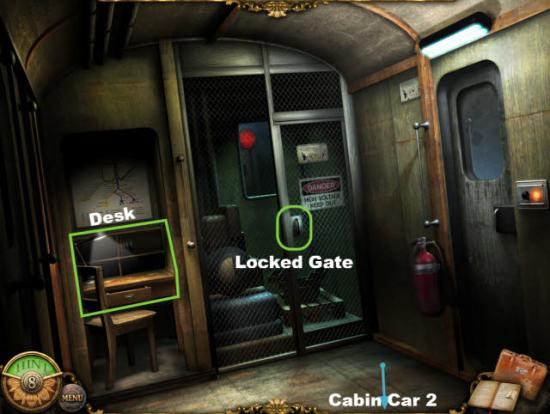
Examine the Desk highlighted in Green.
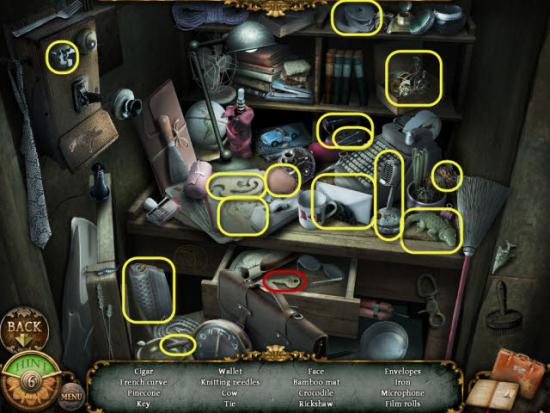
Gather the Key highlighted in Red.
Gather the remaining Hidden Objects highlighted in Yellow.
Examine the Locked Gate.
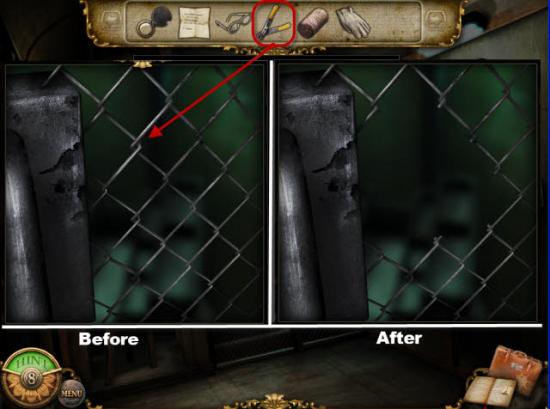
Use the Pliers, highlighted in Red, to clip the Fence, four to five times, until have clipped out a hole.
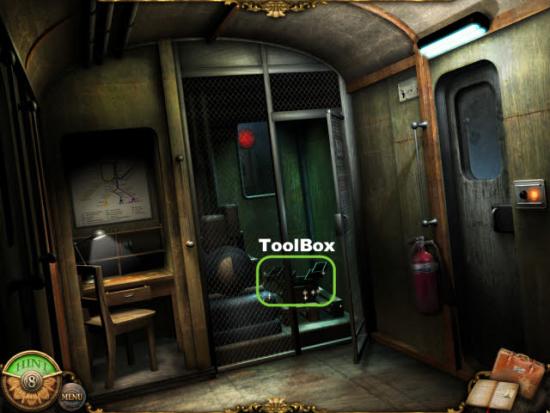
Examine the Tool Box.
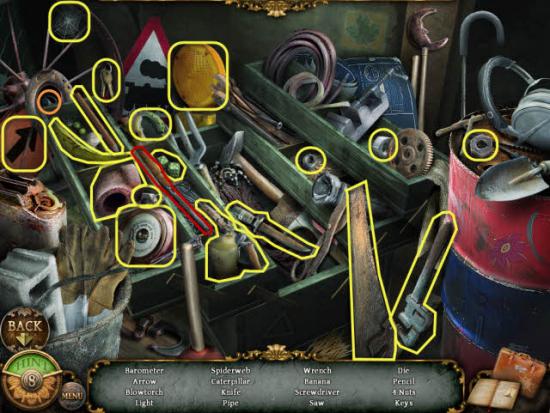
Get Special Item #4(of 7) highlighted in Orange.
Gather the Screwdriver highlighted in Red.
Gather the remaining Hidden Objects highlighted in Yellow.
Return to the Cabin 5.
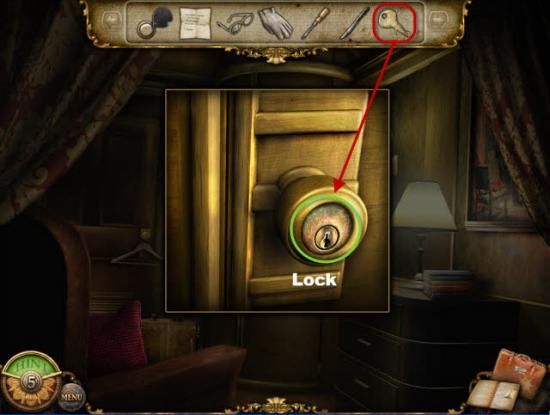
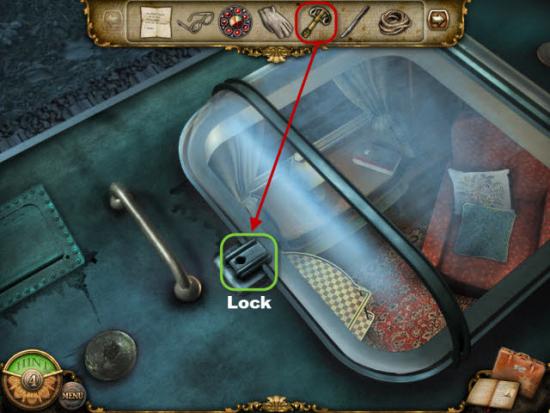
Examine the Lock.
Use the Key, highlighted in Red, on the Lock, highlighted in Green.
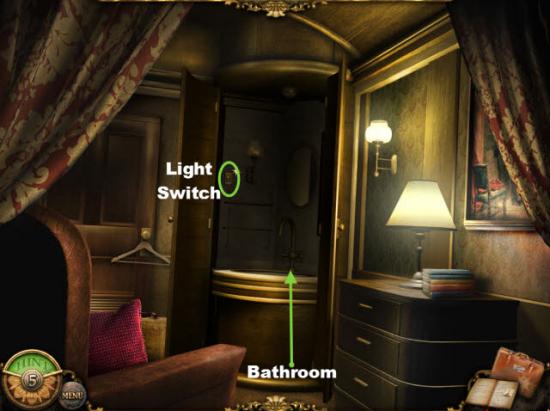
Turn on the Lights, highlighted in Green.
Examine the Bathroom.
Examine the Cabinet.
Gather Special Item #5(of 7) highlighted in Orange.
Gather the Screw highlighted in Red.
Gather the remaining Hidden Objects highlighted in Yellow.
Return to Coach Car 1.
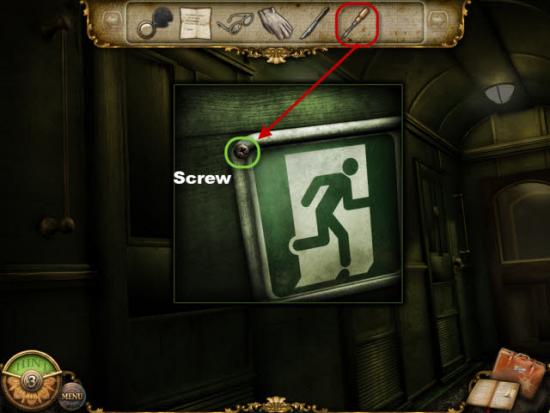
Examine the Sign.
Use the Screwdriver, highlighted in Red, on the Screw, highlighted in Green.
Receive a second screw.
Enter Cabin 2.
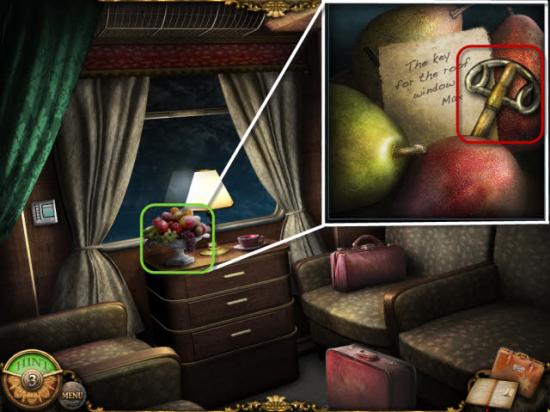
Examine the Fruit Bowl highlighted in Green.
Gather the Key highlighted in Red.
Return to the Kitchen Car.
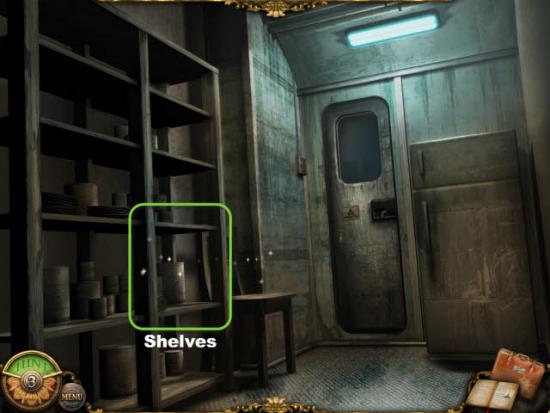
Enter the Storage area.
Examine the Shelving on the left.
Gather the Rope highlighted in red.
Gather the remaining Hidden Objects highlighted in Yellow.
Return to the Dining Car.

Examine the Hatbox.
Use the Knife, highlighted in Red, on the Brooch, highlighted in Green.
Receive the Brooch.
Return to Coach Car 2.
Enter Cabin 6.
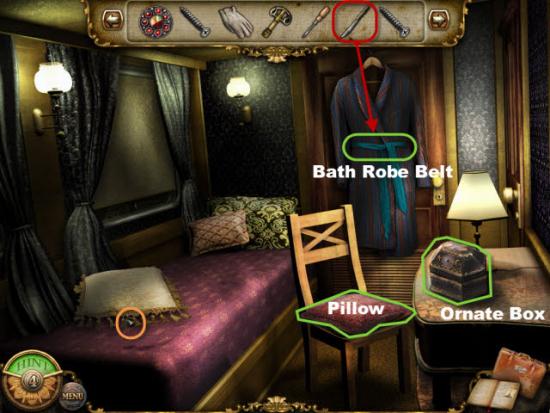
Gather Special Item #6(of 7) highlighted in Orange.
Use the Knife, highlighted in Red, on the Bath Robe Belt, highlighted in Green.
Receive Bath Robe Belt.
Examine the Pillow.
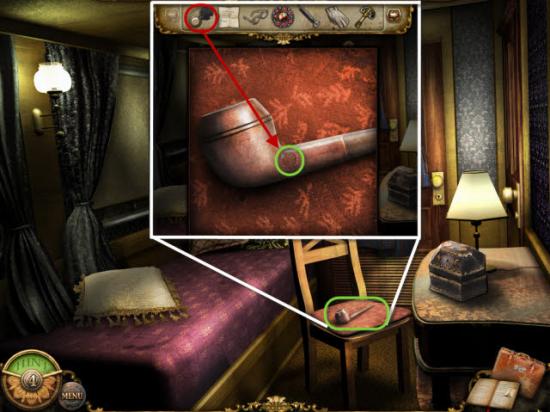
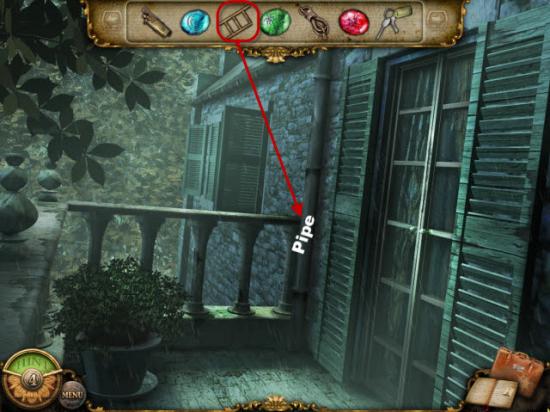
Examine the Pipe.
Use the Loupe, highlighted in Red, on the Pipe, highlighted in Green.
Receive Clue.
Return to the Conductors Car.
Examine the Desk.
Gather the Handle highlighted in Red.
Gather the remaining Hidden Objects highlighted n Yellow.
Return to Coach Car 1.
Enter Cabin 2.

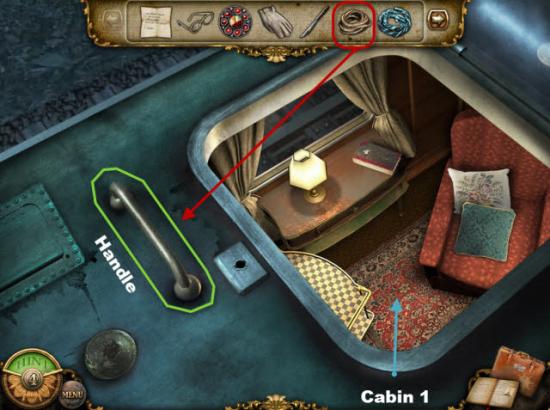
Examine the Window.
Place the Handle, highlighted in Red, on the Window.
Attach the two Screws, highlighted in Red, to both ends of the Handle.

Use the Screwdriver, highlighted in Red, to tighten both Screws, highlighted in Green.
Now open the Window.
After the Cut Scene, open Window once again.
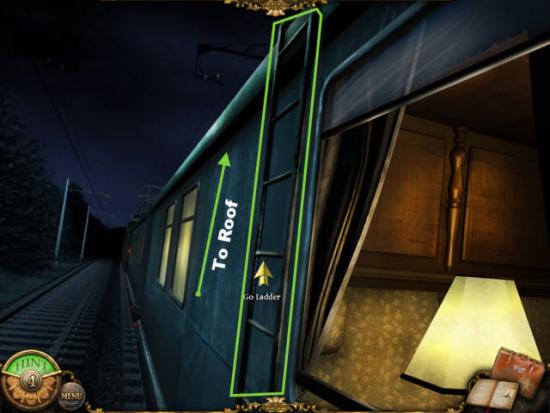
Climb the Ladder, highlighted in Green, to reach the Roof of the Train.
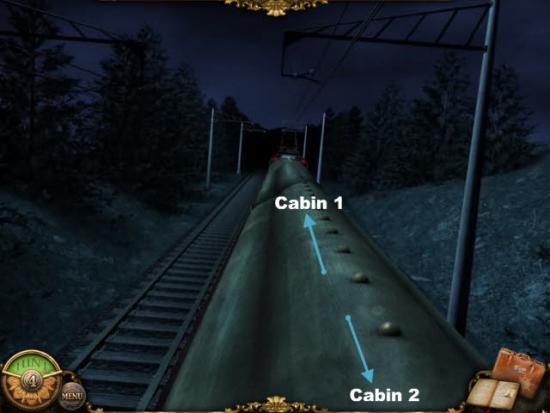
Move Forward to Cabin 1.
Use the Key, highlighted in Red, on the Window, highlighted in Green.
Use the Rope, highlighted in Red, on the Handle, highlighted in Green.
Enter Cabin 1 through the Roof.

Gather Special Item #7(of 7) highlighted in Orange.
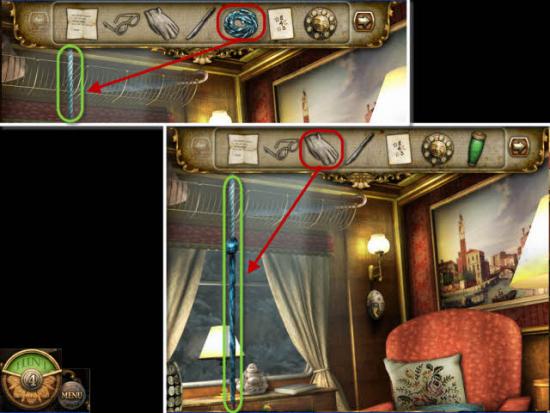
Examine the Painting highlighted in Green.
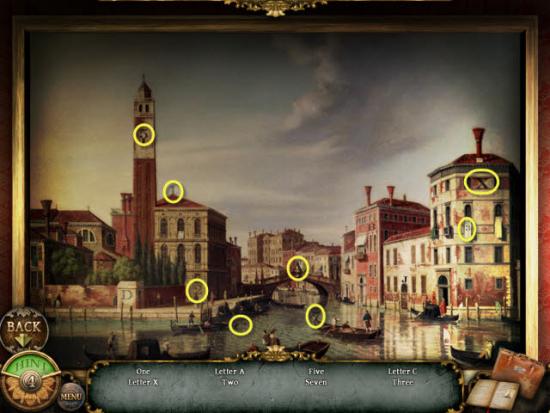
Gather the Hidden Objects highlighted in Yellow.
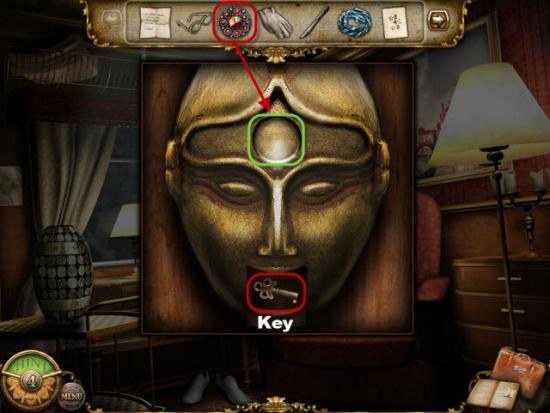
Examine the Mask.
Place the Brooch, highlighted in Red, on the Mask, highlighted in Green.
Gather the Key.
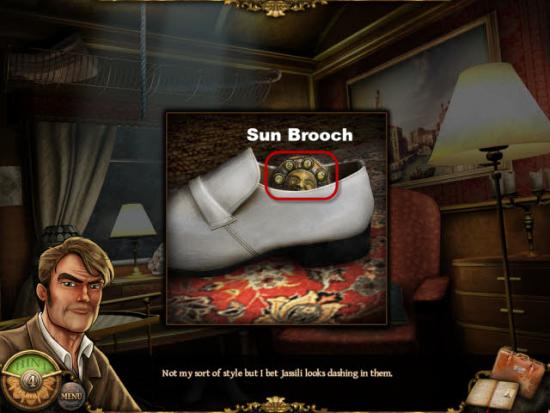
Examine the Shoes.
Gather the Sun Brooch highlighted in Red.
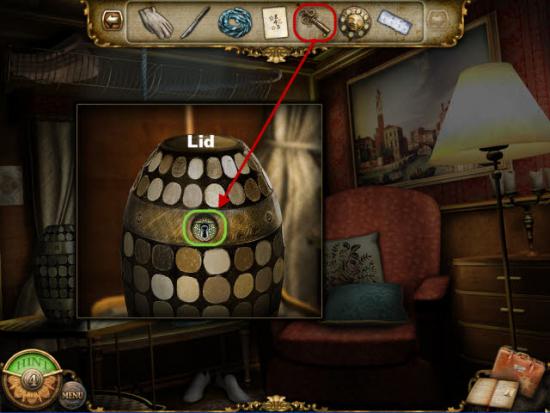
Examine the Vase.
Use the Key, highlighted in Red, on the Vase, highlighted in Green.
Examine the Lid of the Vase.
Gather the Capsule.
Use the Bath Robe Belt, highlighted in Red, on the Rope, highlighted in Green.
Next use the Gloves on the Rope, to reach the Roof.
Return to Cabin 2.
Return to Coach Car 2.
Enter Cabin 6.

Examine the Ornate Box.
Place the Sun Brooch, highlighted in Red, on the Ornate Box, highlighted in Green.
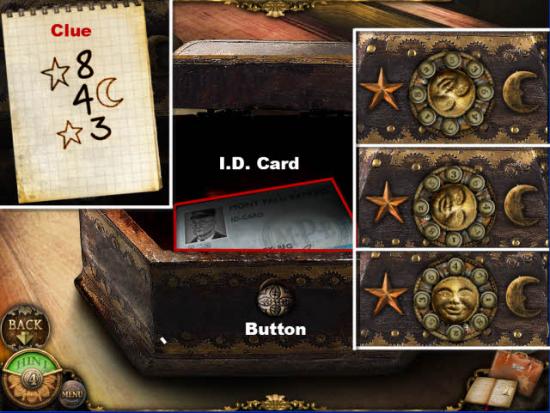
Use the Clue to solve the Lock.
Click the Sun Brooch to rotate it.
Push the Button to set Combo.
Solution:
- Turn the Dial so the number 8 is next to the Star.
- Push the Button.
- Turn the Dial until the number 4 is next to the Moon.
- Push the Button again.
- Turn the Dial until the number 3 is next to the Star.
- Push the Button once more, to open the Box.
Gather the ID card highlighted in Red.
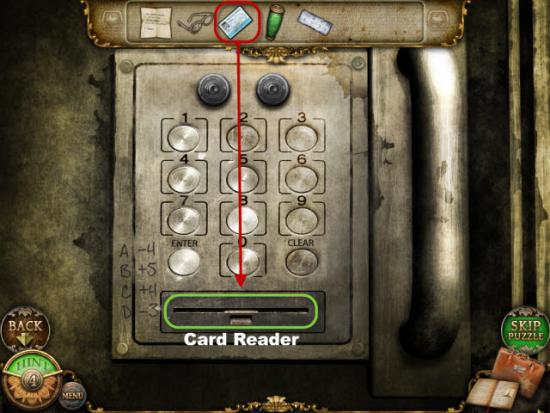
Return to the Luggage Car.
Examine the Door.
Use the I.D. Card. Highlighted in Red, on the Card Reader, highlighted in Green.
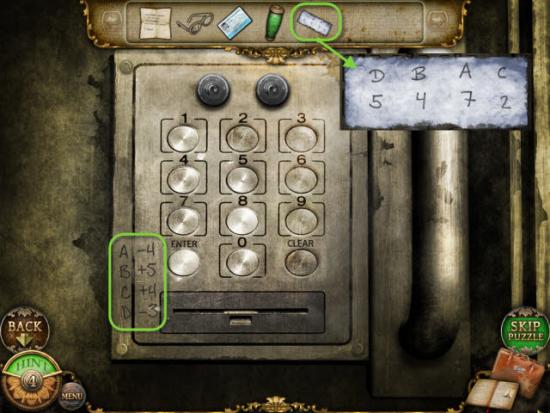
Use the Clue to solve the Key Code to the Lock.
Enter the Code in alphabetical order.
Take the Number, associated with each Letter.
Next, add or subtract, using the writing on the Lock.
Example: On Clue – [A = 7], On Lock – [A = -4], [7 – 4 = 3]. 3 is the first Code to unlock the Lock.
Solution: 3 9 6 2.
Press each Number on the Key Pad, then press the ENTER Key.
Grandfather’s House (Part 3) – Paris, France

Gather Special Item #1(of 8) highlighted in Orange.
Enter House.
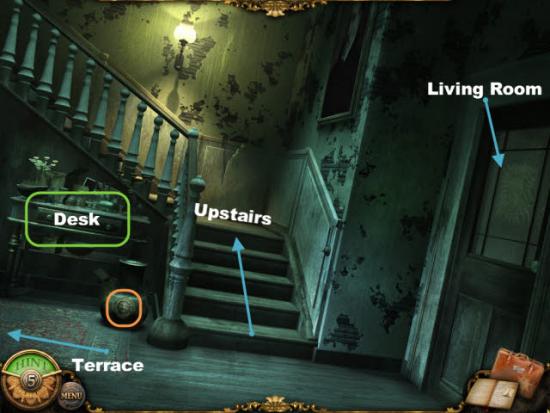
Gather Special Item #2(of 8) highlighted in Orange.
Examine the Desk.
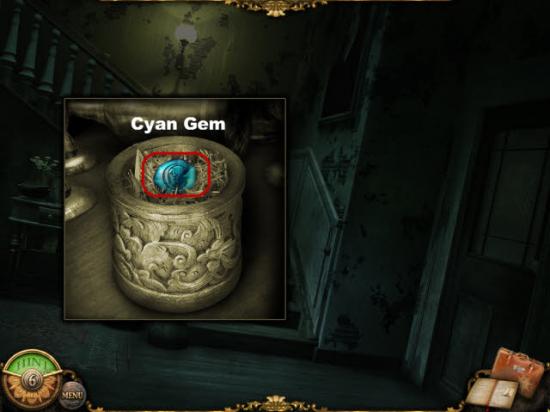
Examine Lid.
Gather the Cyan Gem highlighted in Red.
Enter the Living Room.
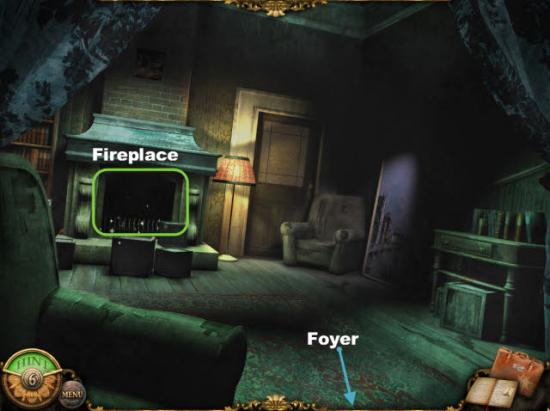
Examine the Fireplace.
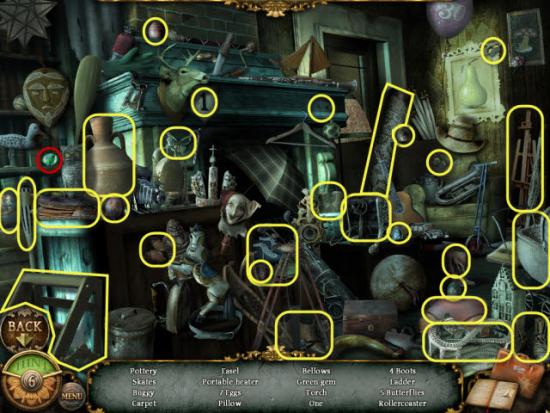
Gather the Green Gem highlighted in Red.
Gather the remaining Hidden Objects highlighted in Yellow.
Go Upstairs.
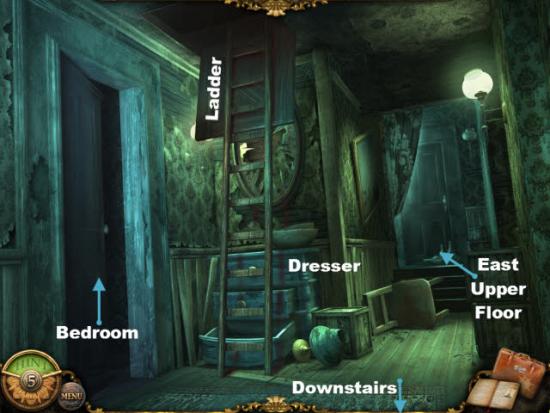
Take the Ladder.
Examine the Dresser.
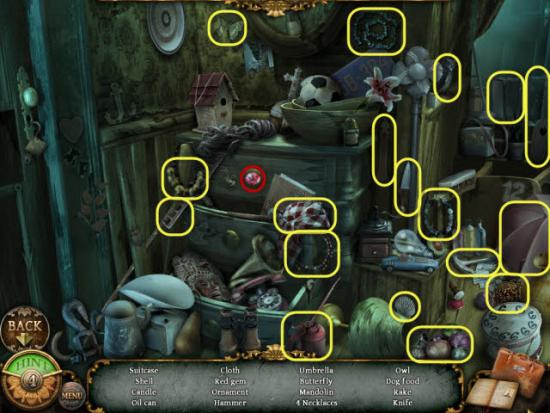
Gather the Red Gem highlighted in Red.
Gather the remaining Hidden Objects highlighted in Yellow.
Enter the Bedroom.
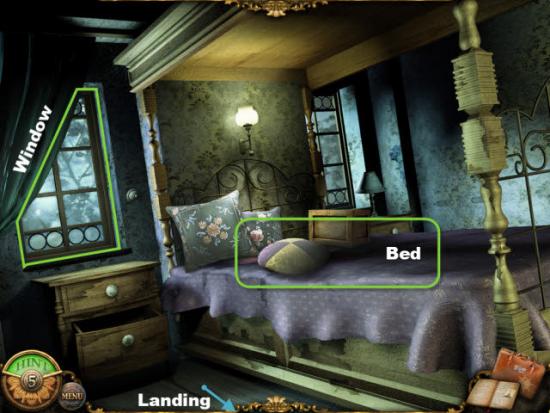
Examine the Window, twice.
Return to Bedroom.
Examine the Bed.
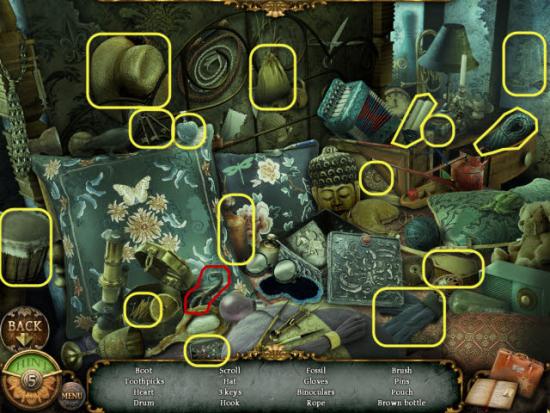
Gather the Hook highlighted in Red.
Gather the remaining Hidden Objects highlighted in Yellow.
Return to the Landing.
Head to East Upper Floor.
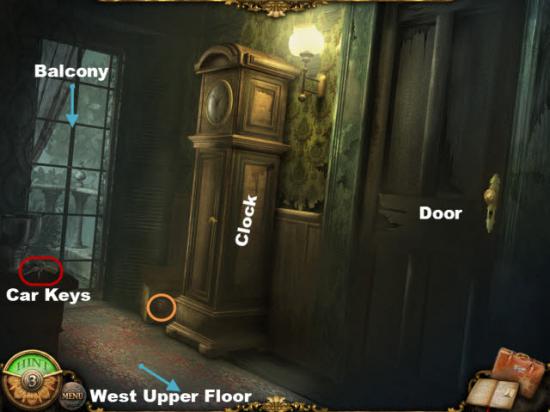
Gather Special Item #3(of 8) highlighted in Orange.
Take the Car Keys highlighted in Red.
Examine the Clock highlighted in Green.
Return to Hallway.
Examine the Door.
Enter the Balcony.
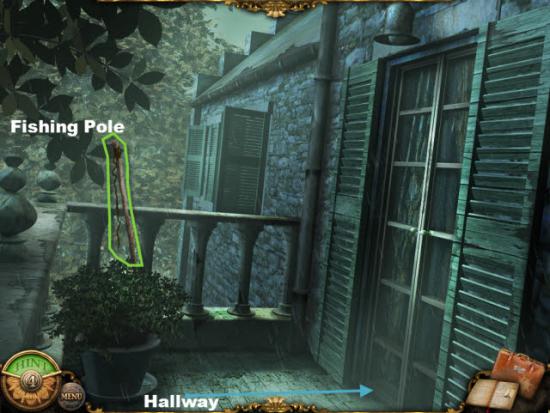
Examine the Fishing Pole highlighted in Green.
Use the Hook, highlighted in Red, on the Fishing Pole.
Receive Pole.
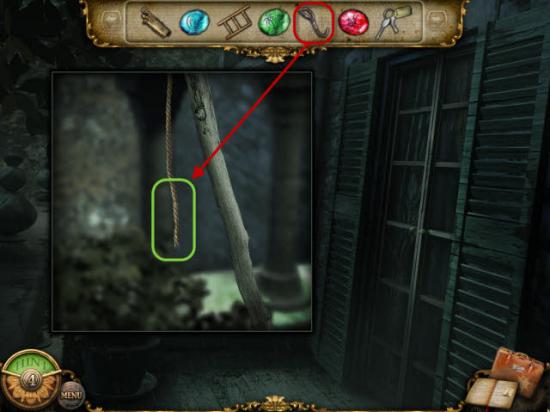
Return to the Bedroom.
Examine Window.
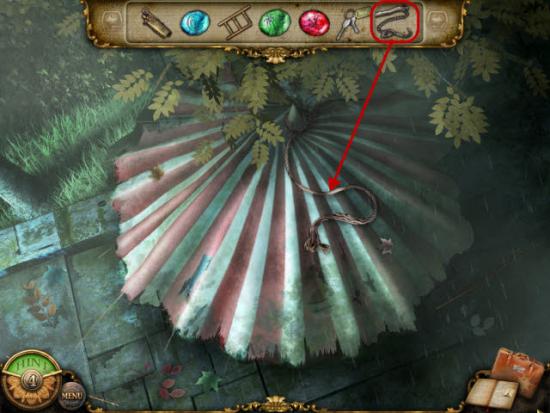
Use the Pole, highlighted in Red, to gather the Rope.
Return to the Balcony.
Use the Ladder, highlighted in Red, on the Pipe, highlighted in Green.
Climb the Ladder to the Chimney.
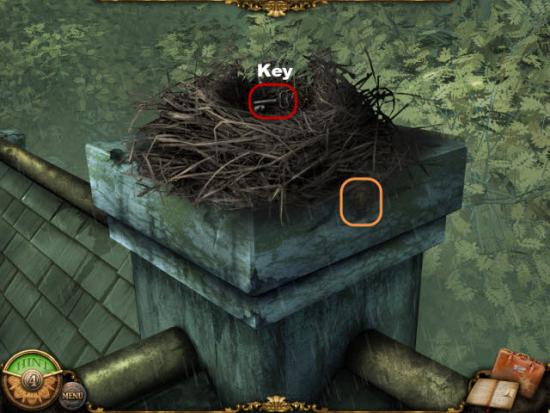
Gather Special Item #4(of 8) highlighted in Orange.
Gather the Key highlighted in Red.
Return to the Balcony.
Return to the Hallway.
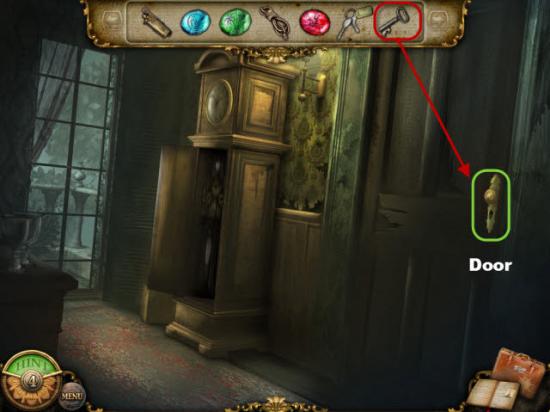
Examine the Door.
Use the Key, highlighted in Red, on the Door, highlighted in Green.
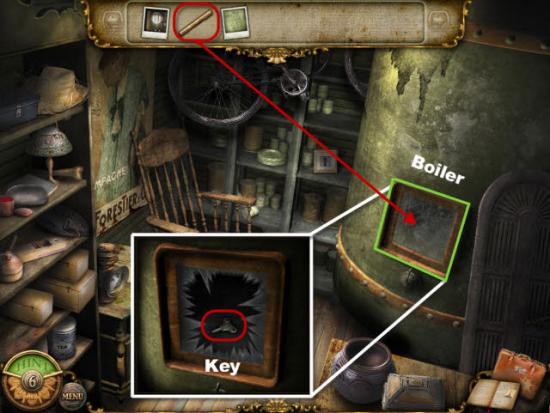
Enter Boiler Room.

Gather the Special Item # 5(of 8) highlighted in Orange.
Examine the Boiler Window highlighted in Green.
Examine the Rocking Chair.
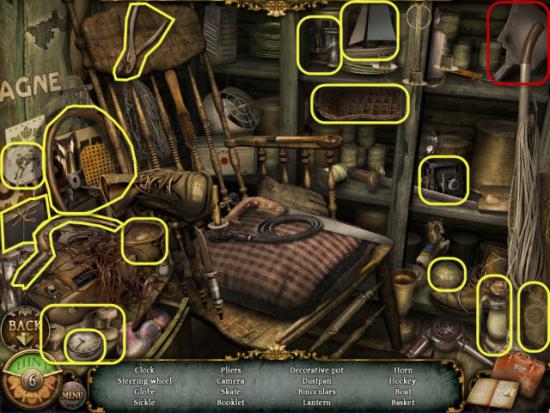
Gather the Dustpan highlighted in Red.
Gather the remaining Hidden Objects highlighted in Yellow.
Return to the Terrace.
Go to the Backyard.
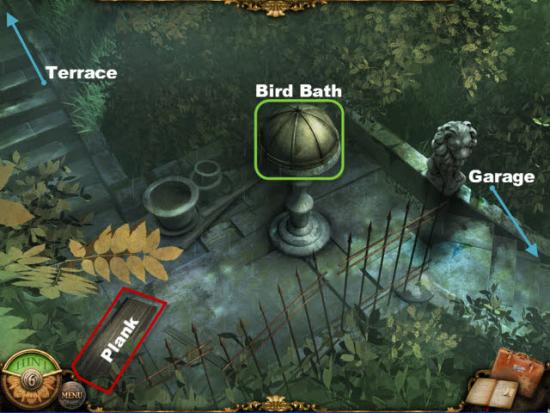
Gather the Plank highlighted in Red.
Examine the Domed Bird Bath highlighted in Green.
Head to the Garage.
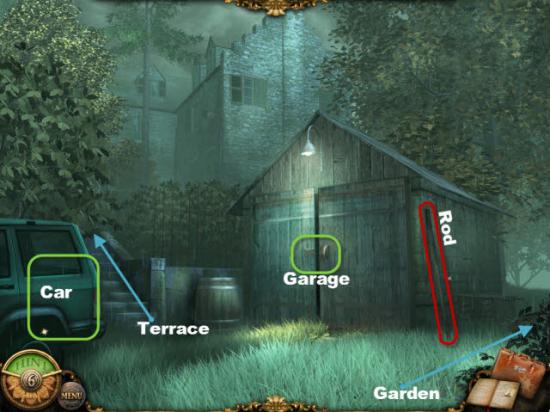
Gather the Rod highlighted in Red.
Examine the Garage Door.
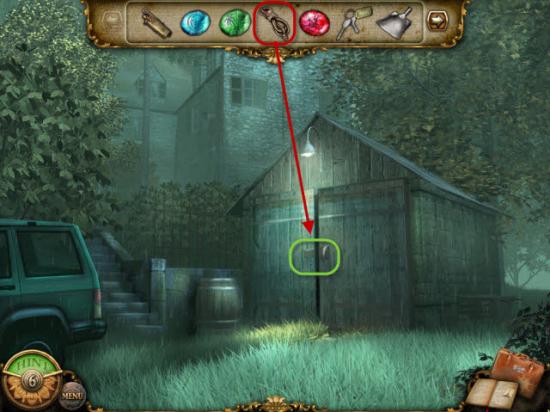
Examine the Garage Door.
Attach the Rope, highlighted in Red, on the Garage Door, highlighted in Green.
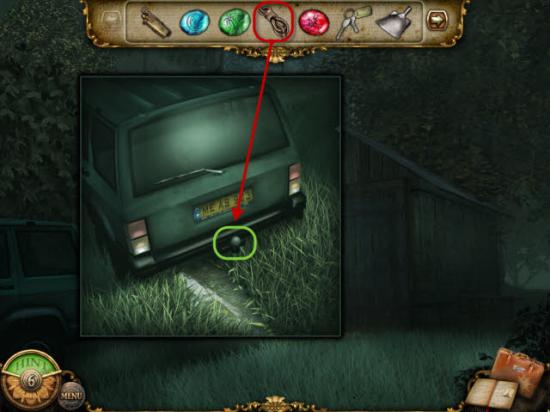
Examine the Car.
Attach the Rope, highlighted in Red, on the Trailer Hitch, highlighted in Green.
Gather Special Item #6(of 8) highlighted in Orange.
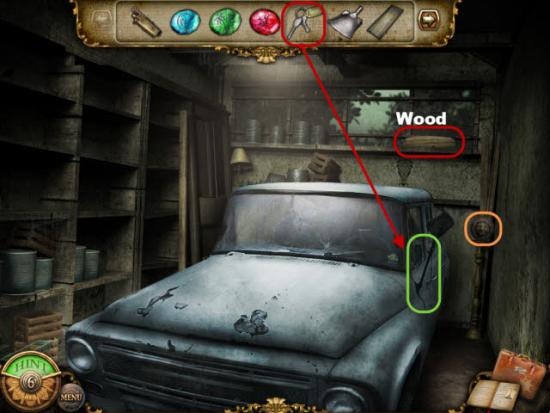
Gather the Wood highlighted in Red.
Use the Car Keys, highlighted in Red, on the Old Car, highlighted in Green.
Examine the Old Car.
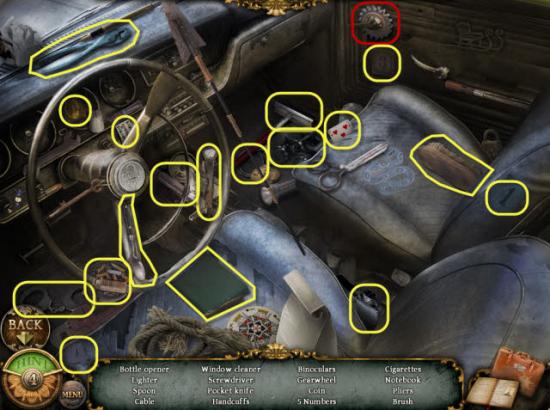
Gather the Gear highlighted in Red.
Gather the remaining Hidden Objects highlighted in Yellow.
Leave Garage.
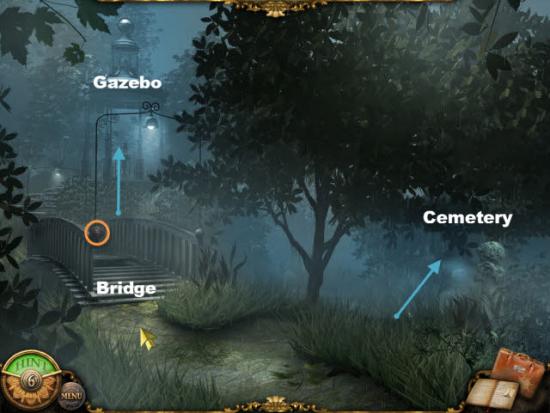
Head to the Garden.
Gather Special Item #7(of 8) highlighted in Orange.
Examine the Bridge.
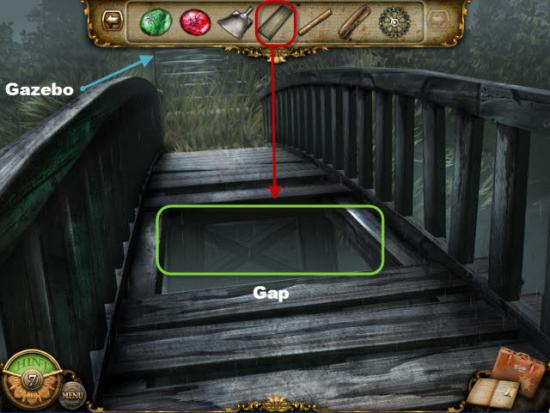
Place the Plank, highlighted in Red, across the Gap, highlighted in Green.
Cross the Bridge.
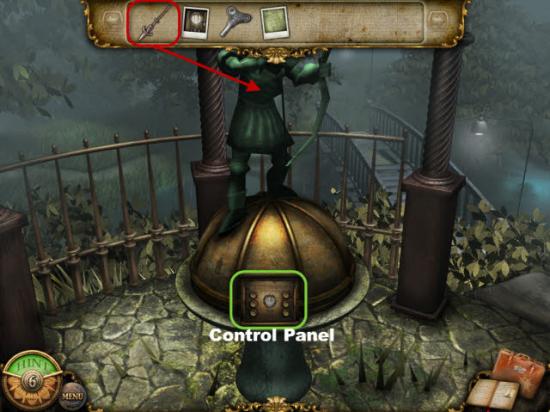
Head to the Gazebo.
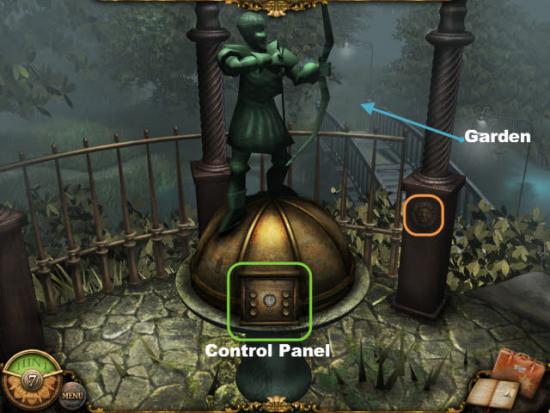
Gather Special Item #8(of 8) highlighted in Orange.
Examine the Control Panel.
Note the three Bolded Words related to Colors.
Return across the Bridge.
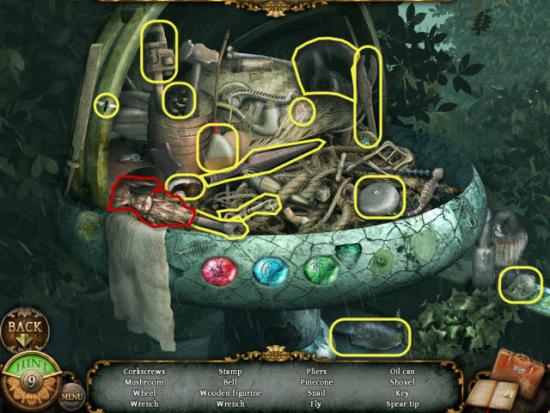
Head to the Cemetery.
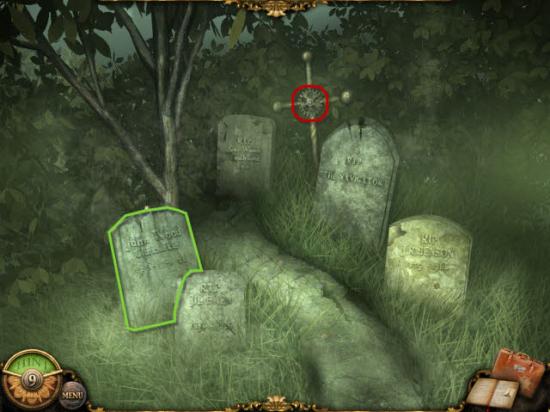
Gather the Gear highlighted in Red.
Examine the two Head Stones on the left.
Receive Photo of Head Stone.
Return to the Backyard.

Examine the Domed Bird Bath.
Place the Red Gem in the first Indentation.
Place the Blue Gem in the second Indentation.
Place the Green Gem in the third and final Indentation.
Gather the Figurine highlighted in Red.
Gather the remaining Hidden Objects highlighted in Yellow.
Return to the Living Room.
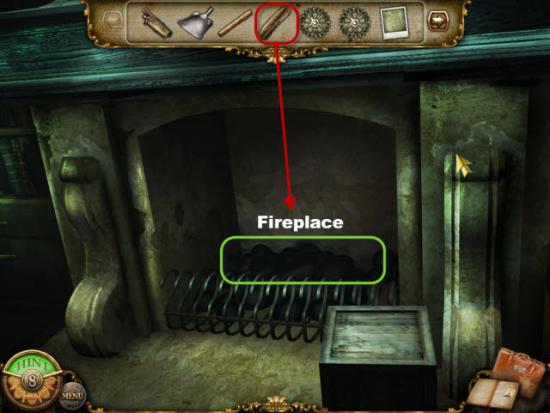
Examine the Fireplace.
Place the Wood, highlighted in Red, in the Fireplace, highlighted in Green.
Use the Lighter to try and light the fire.
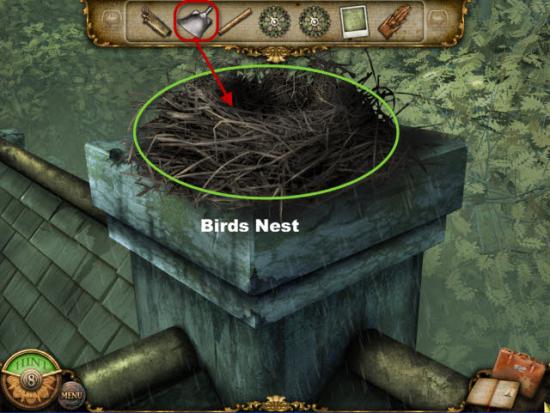
Return Upstairs to the Balcony.
Climb the Ladder to the Chimney.
Use the Dust Pan, highlighted in Red, to remove the Birds Nest, highlighted in Green.
Return to the Living Room.
Use the Lighter, once again, to light the Fire.
Place the Figurine, highlighted in red, on the Fire.

Examine the Chair highlighted in Green.
Gather the Gear highlighted in Red.
Gather the remaining Hidden Objects highlighted in Yellow.
Return Upstairs to the Hallway.

Examine the Clock.
Place the Large Gear on the center Dial.
Place the two smaller Gears, highlighted in Red, on either side of the Large Gear.
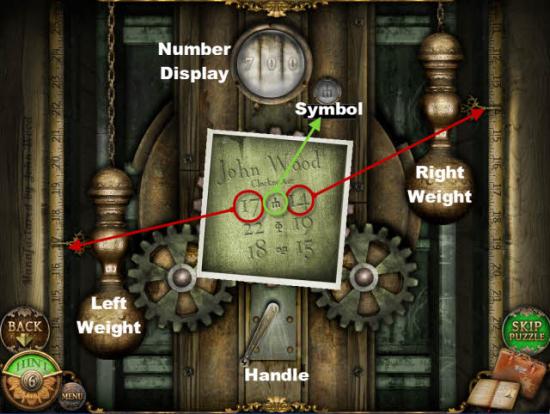
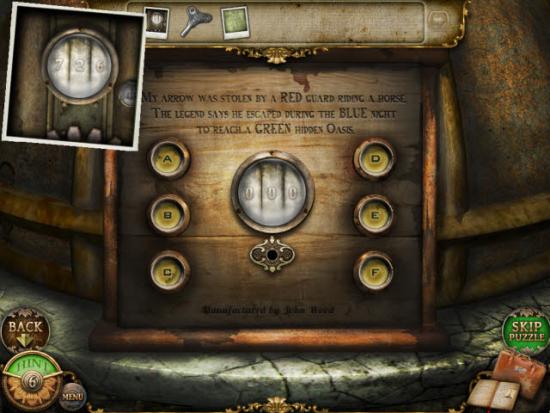
Use the Photo Clue, from the Graveyard, to help solve this Puzzle.
Click on the Left Weight to lower the Left Weight and raises the Right Weight.
Click on the Right Weight to lower the Right Weight and raise the Left Weight.
Notice the small Symbol next to the Number Display for current Code.
Raise or lower Weights till the Dials are aligned with the corresponding Numbers associated with the Symbol from the Photo Clue.
See Image for the correct positioning of the Weights for the first Symbol Code.
Once the Weights are aligned correctly, click the Handle between the Gears to set the Code.
Repeat for each symbol.
If done correctly the Number Display Code should read, 7-2-6.
Enter the Boiler Room.
Use the Rod, highlighted in Red, on the Boiler Window, highlighted in Green.
Gather the Key.
Return to the Living Room.

Examine the Fireplace.
Examine the Burned Out Fire.
Gather the Arrow highlighted in Red.
Return to the Garden.
Cross the Bridge and move over to the Gazebo.
Use the Arrow, highlighted in Red, on the Archer Statue.
Examine the Control Panel.
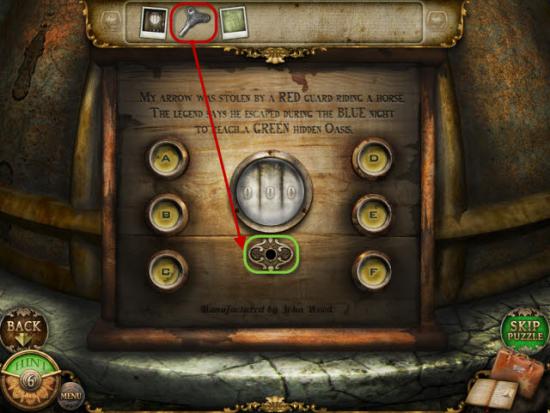
Insert the Key, highlighted in Red, into the Key Hole.
Use the Clue Code from the Clock to solve this Puzzle.
Need to enter the Code 7-2-6 into the Control Panel.
The Alphabetic Buttons are used to increase the total number in the Display Window.
- A = +1
- B = +2
- C = +4
- D = +5
- E = +22
- F = +43
If enter incorrect Code, turn the Key, to reset the Puzzle.
After entering the correct Code, turn the Key to trigger a Cut Scene.
One possible solution is:
- Press F Button – 16 Times.
- Press E Button – 1 Time.
- Press D Button – 3 Times.
- Press A Button – 1 Time.
- Turn the Key.
Return to the Garden.
Move over to the Cemetery.
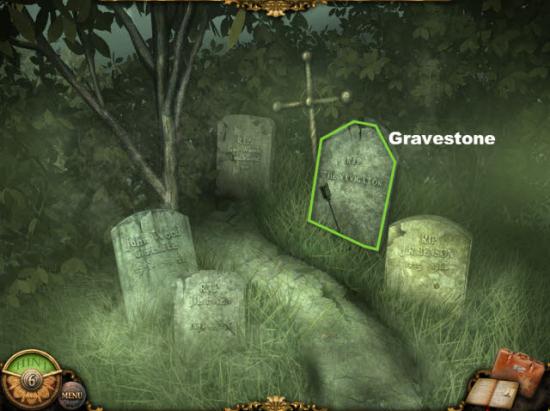
Examine the Grave Stone that was hit by the Arrow, highlighted in Green.
Venice, Italy
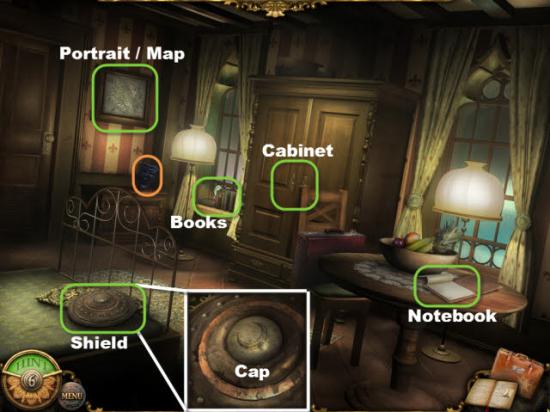
Get Special Item #1(of 9) highlighted in Orange.
Examine the Shield.
Examine the Cap of the Shield.
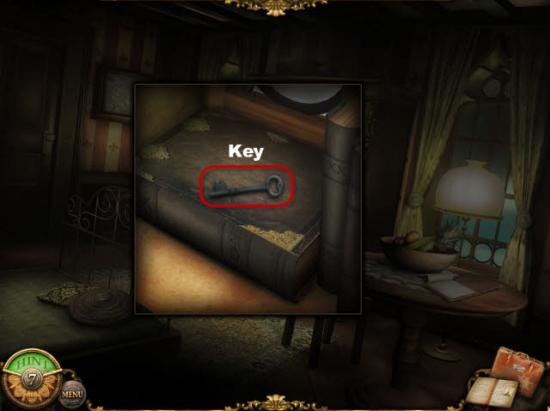
Examine the Books.
Gather the Key highlighted in Red.
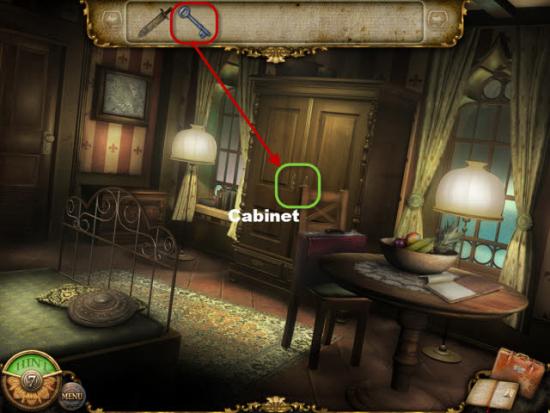
Use the Key, highlighted in Red, on the Cabinet, highlighted in Green.
Examine the Cabinet.
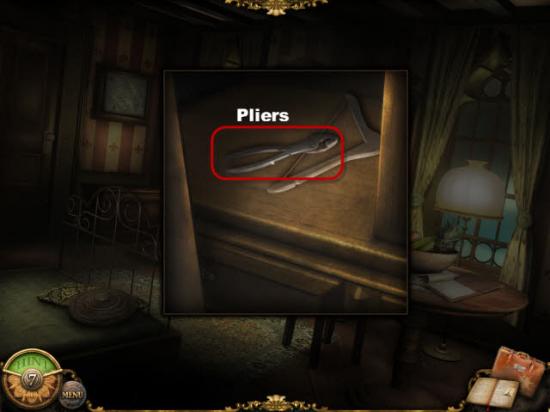
Gather the Pliers highlighted in Red.
Exit the Room.
Gather Special Item #2(of 9) highlighted in Orange.
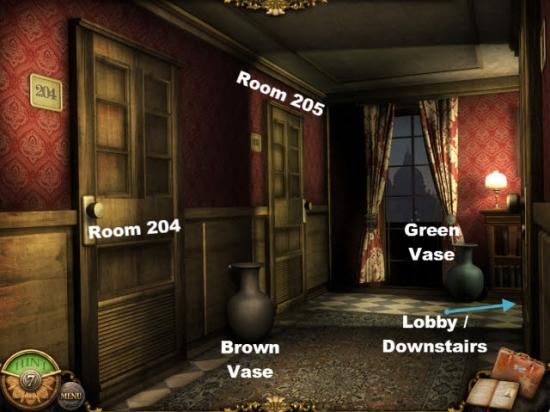
Examine the Green Vase, twice.
Receive a Rusty Allen Wrench.
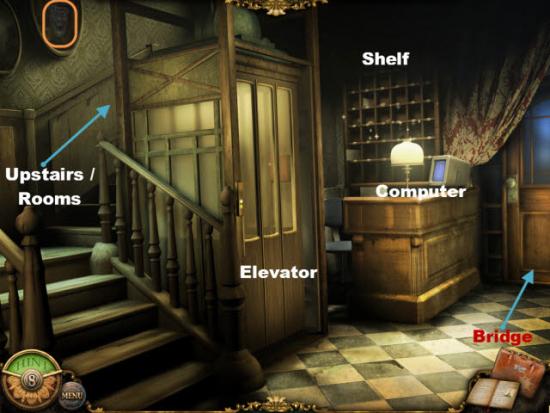
Head down the Stairs.
Gather Special Item #3(of 9) highlighted in Orange.
Open the Elevator Door.
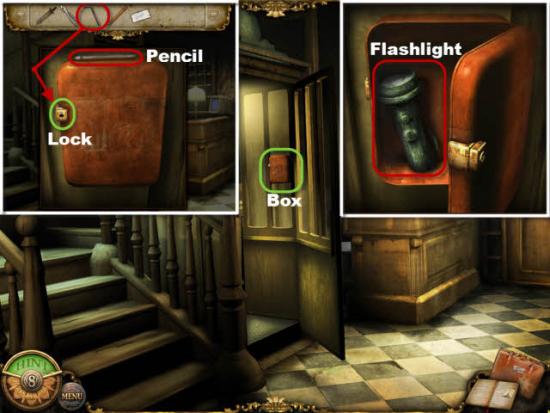
Examine the Box.
Gather the Pencil.
Use the Allen Wrench, highlighted in Red, on the Box Lock, highlighted in Green.
Gather the Flashlight.
Examine the Shelf.
Gather the Note highlighted in Red.
Gather the remaining Hidden Objects highlighted in Yellow.
Exit the Hotel.
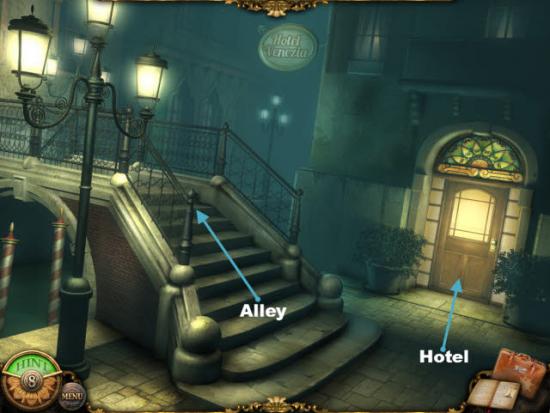
Cross the Bridge to the Alley.
Gather Special Item #4(of 9) highlighted in Orange.
Examine the Water Level.
Examine the Boat.
Gather the Newspaper Clipping highlighted in red.
Gather the remaining Hidden Objects highlighted in Yellow.
Return to the Hotel.
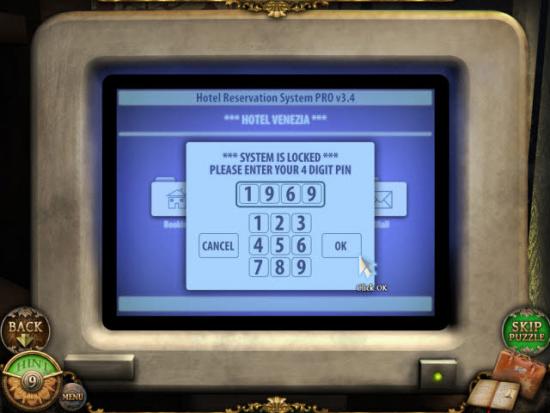
Examine the Computer.
Choose Booking on the Computer Screen.
Use the two Clues to solve the pass code.
The Note, hints that the Pass Code is the Year of the Hotel Owners birthday.
Reading the Newspaper Clipping tells you the Hotel Owners Birthdate.
Enter the Year of the Hotel Owners birth into the Computer Screen.
Then, press “OK” to see the Bookings.
Examine each of the Bookings.
Return Upstairs to Room 205.
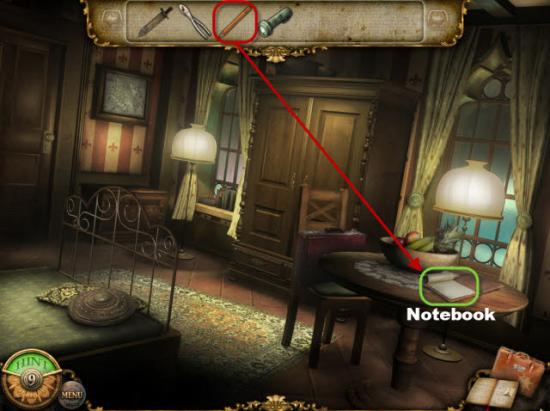
Use the Pencil, highlighted in Red, on the Notebook, highlighted in Green.
Receive the Note.
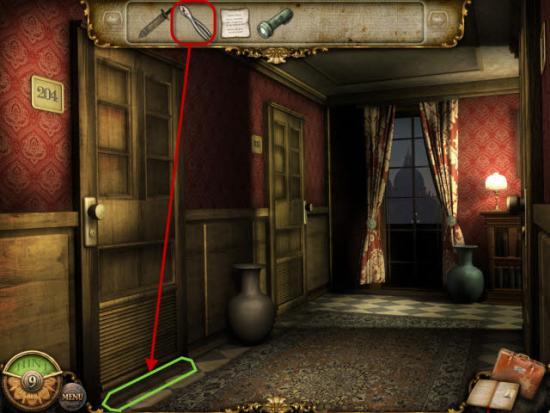
Exit to Hallway.
Slip the Note, highlighted in Red, under the Door to Room 204.
Go back downstairs to Lobby.
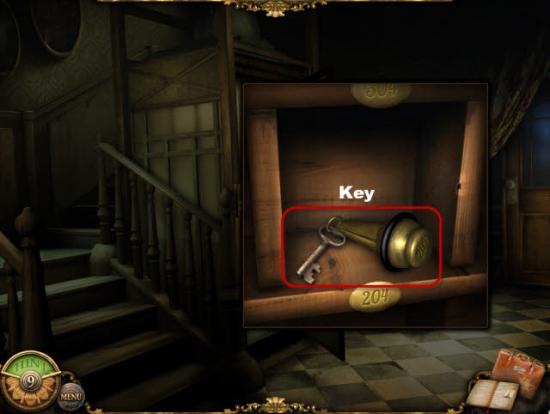
Examine the Shelf.
Gather the Key to Room 204.
Return to Upstairs.
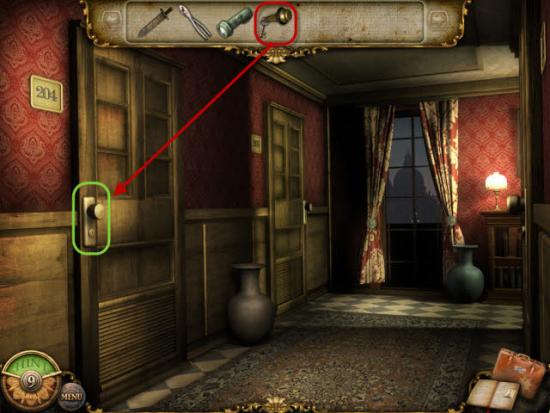
Use the Key, highlighted in Red, on the Door to Room 204.
Enter Room 204.
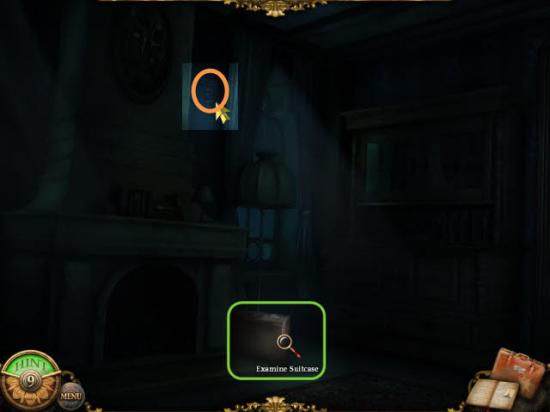
Gather Special Item #5(of 9) highlighted in Orange.
Examine the Suitcase highlighted in Green.
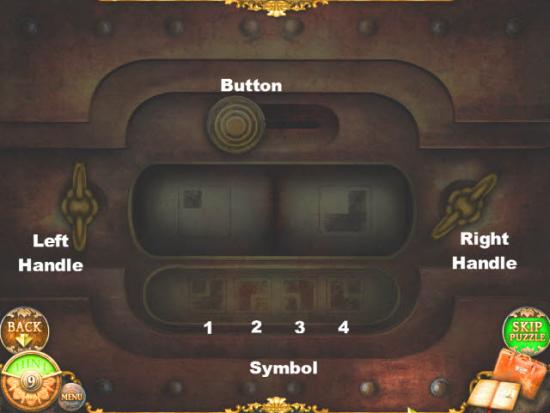
Click the Left Handle to rotate the Left Image.
Click on the Right Handle to rotate the Right Image.
Rotate the Images to match the lower Symbols.
Click the Button to set the Code.
Repeat with all four Symbols.
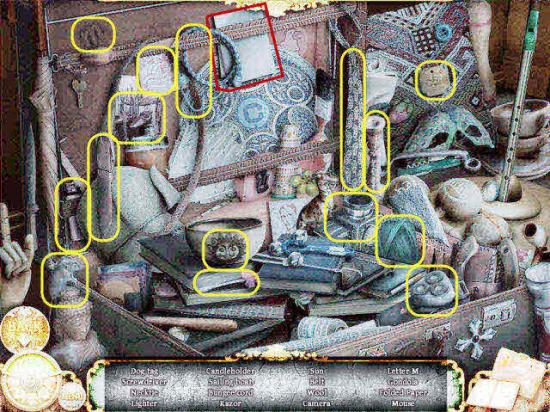
Gather the Folded Paper highlighted in Red.
Gather the remaining Hidden Objects highlighted in Yellow.
Receive the Fax.
Return to Room 205.
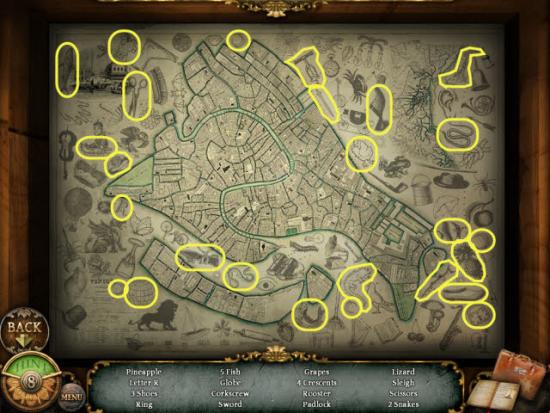
Examine the Portrait / Map.
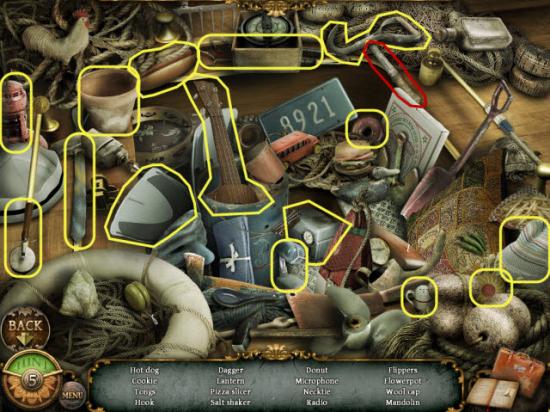
Find the Hidden Objects highlighted in Yellow.
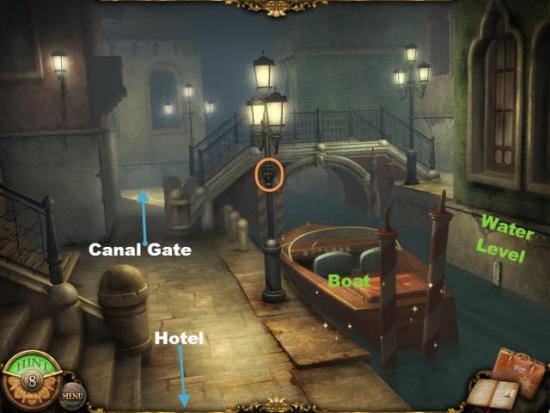
Return to the Alley.
Examine the Boat.
Examine the Water Level.
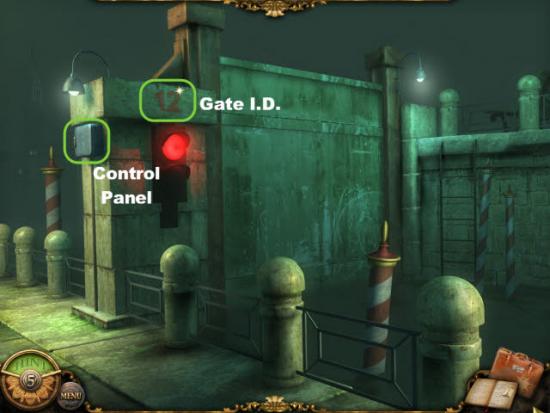
Go to the Flood Gate.
Examine the Gate I.D. Number.
Examine the Control Panel.
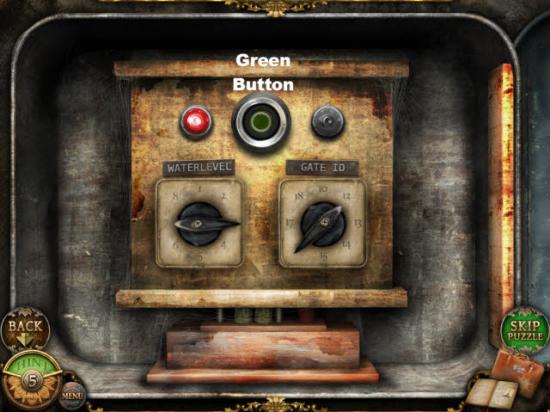
Turn the Water Level Dial, the left dial, to 7.
Turn the Gate I.D. Dial, the right dial, to 12.
Push the Green Button to open the Flood Gate.
Return to the Boat.
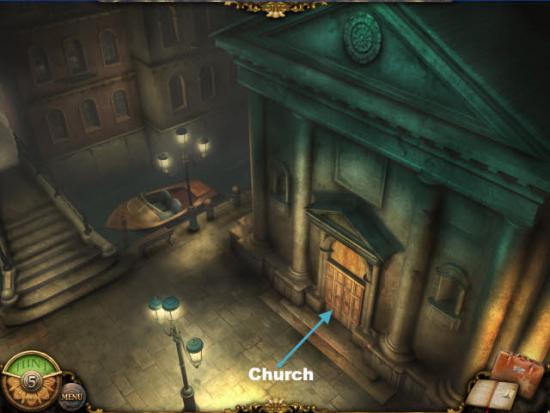
Enter the Church.
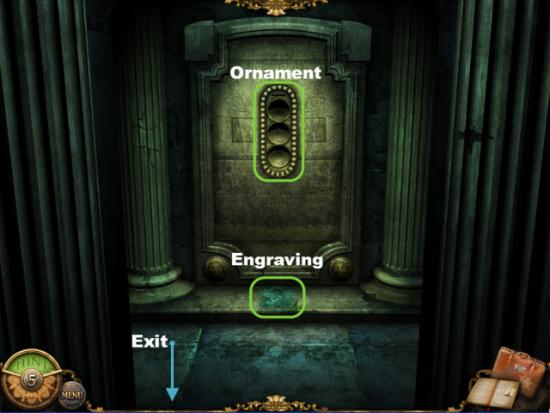
Examine the Ornament highlighted in Green.
Leave the Church.
Use the Boat to return to the Alley.
Examine the Boat.
Gather the Dagger highlighted in Red.
Gather the remaining Hidden Objects highlighted in Yellow.
Return to the Hotel; Upstairs to Room 205.
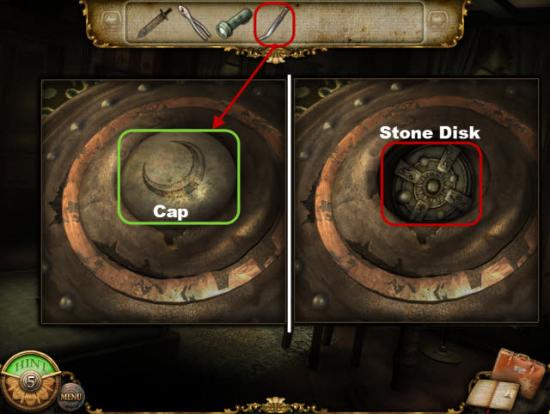
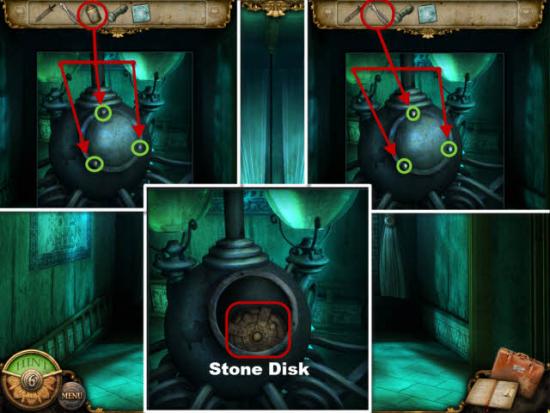
Examine the Shield.
Use the Dagger, highlighted in Red, on the Cap, highlighted in Green.
Receive the Stone Disk.
Return to the Church.
Examine the Ornament.
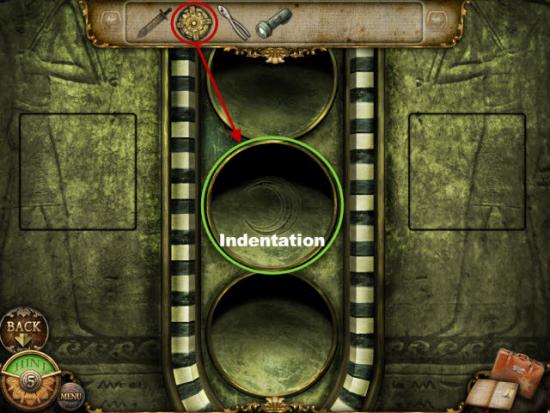
Use the Stone Disk on the Center Indentation, labeled with the Moon Symbol.
Gather Special Item #6(of 9) highlighted in Orange.
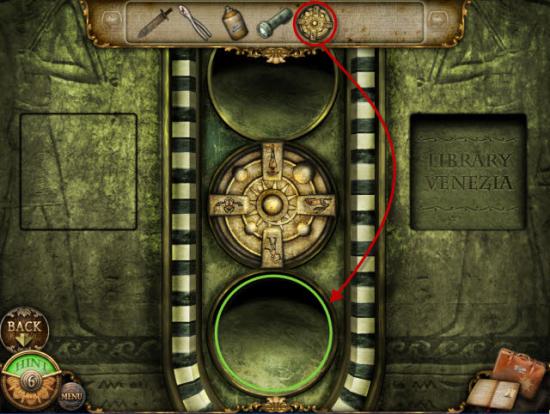
Enter the Library.
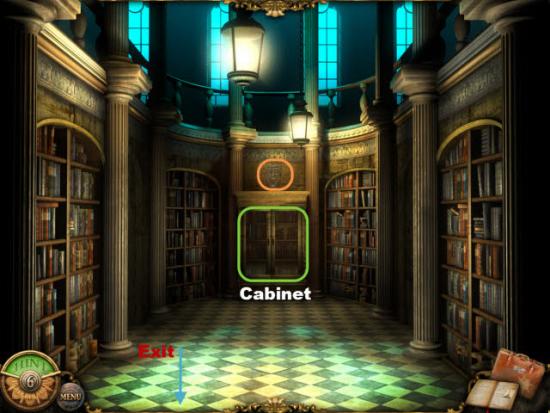
Examine the Cabinet.
Return to the Hotel Lobby.
Examine the Check In Shelf.
Gather the Dart highlighted in Red.
Gather the remaining Hidden Objects highlighted in Yellow.
Go Upstairs to Hallway.

Examine the Hotel Cart.
Gather the Rust Remover highlighted in Red.
Return to the Library.
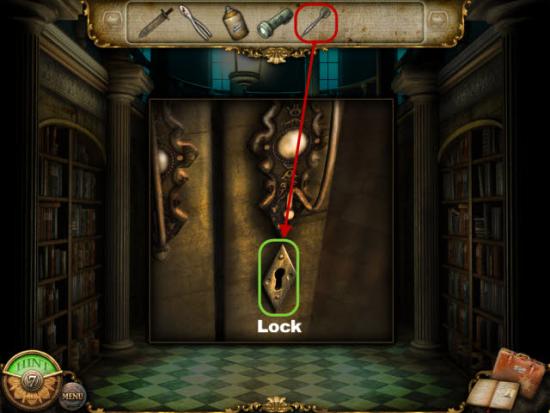
Examine the Cabinet.
Use the Dart, highlighted in Red, on the Lock, highlighted in Green.
Gather the Stone Disk highlighted in Red.
Gather the remaining Hidden Objects highlighted in Yellow.
Return to the Church.
Examine the Ornament.
Place the Stone Disk in the Bottom Indentation.

Gather Special Item #8(of 9) highlighted in Orange.
Enter the Palazzo.
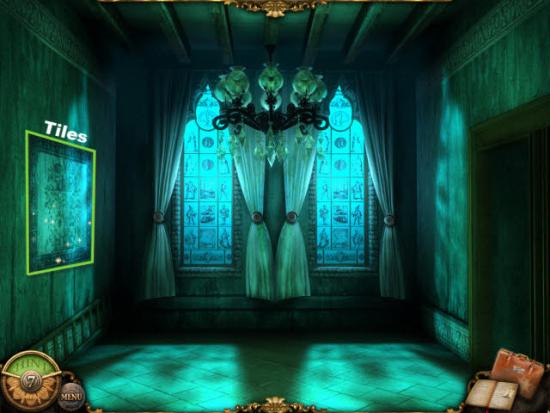
Examine the Tiles, highlighted in Green, on the Left Wall.
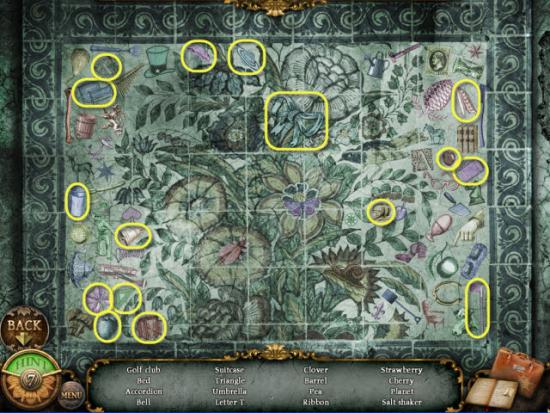
Gather the Hidden Objects highlighted in Yellow.
Receive a Lighthouse Tile.
Examine the Lamp.
Use the Rust Remover, highlighted in Red, on the three Bolts, highlighted in Green.
Next use the Pliers to remove the three Bolts.
Finally, gather the Stone Disk highlighted in Red.
Return to the Church.
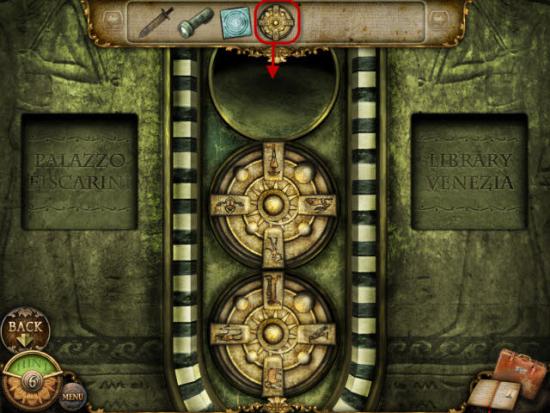
Insert the Stone Disk, highlighted in Red, into the last Indentation.
Now Rotate each Disk so all Hieroglyphics are right-side up.
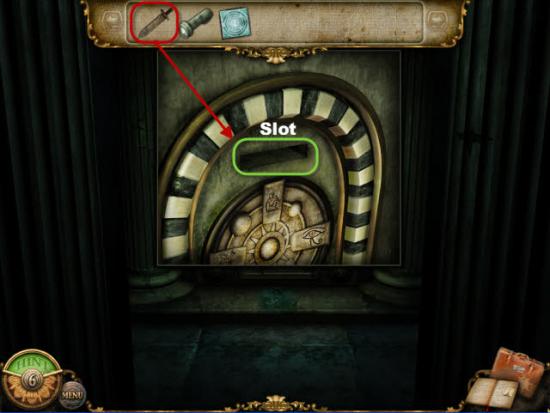
Examine the Ornament once again.
Use the Sword, highlighted in Red, on the Slot, highlighted in Green, on top of the Ornament.
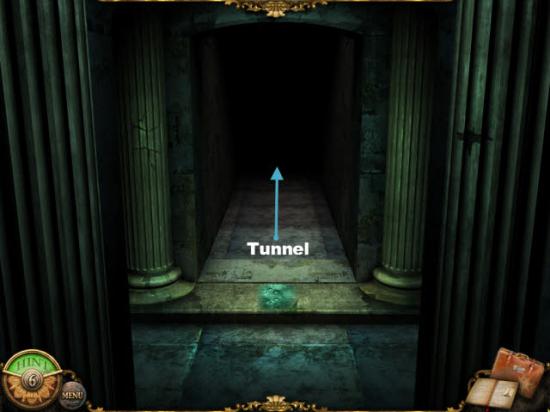
Enter the Tunnel.
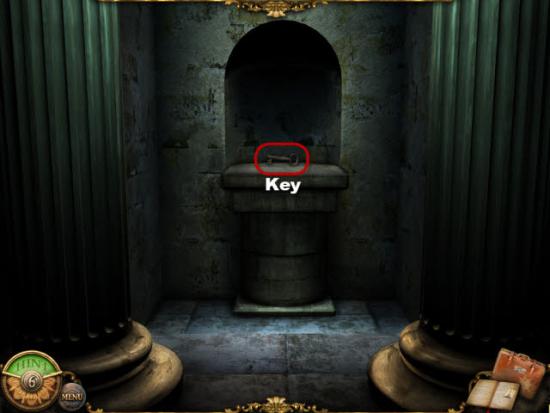
Gather the Key highlighted in Red.
Gather Special Item #9(of 9) highlighted in Orange.
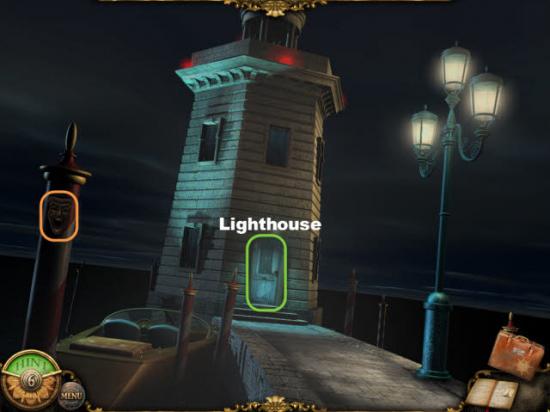
Examine the Lighthouse.
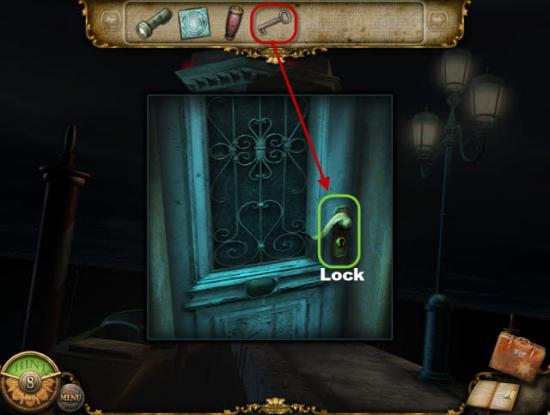
Use the Key, highlighted in Red, on the Lock, highlighted in Green.
Enter the Lighthouse.
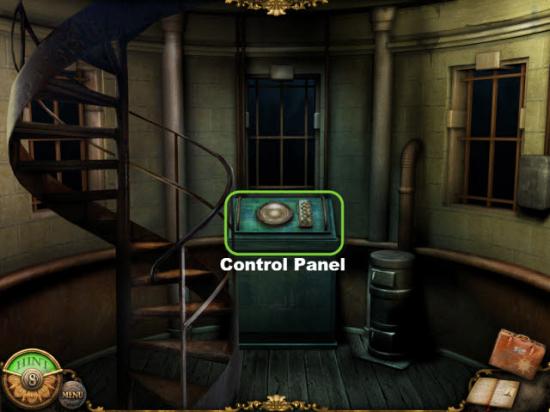
Examine the Control Panel highlighted in Green.
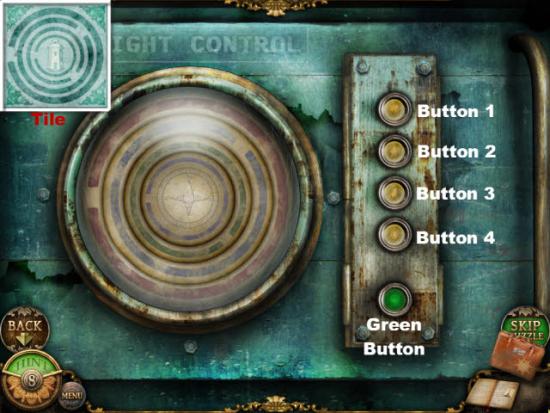
Use the Lighthouse Tile for key to solving this Puzzle.
The four Yellow Buttons rotate the four different Colored Rings.
- Button 1 controls the Purple Ring.
- Button 2 controls the Green Ring.
- Button 3 controls the Blue Ring.
- Button 4 controls the Red Ring.
Rotate the rings to match those of the Lighthouse Tile.
The Green Button enters final Solution.
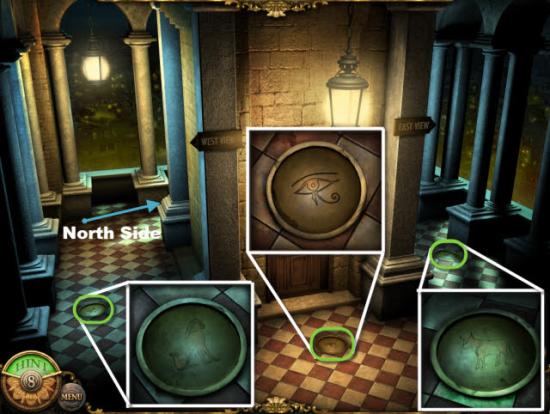
Examine all three Floor Images highlighted in Green.
Head to the North Side.
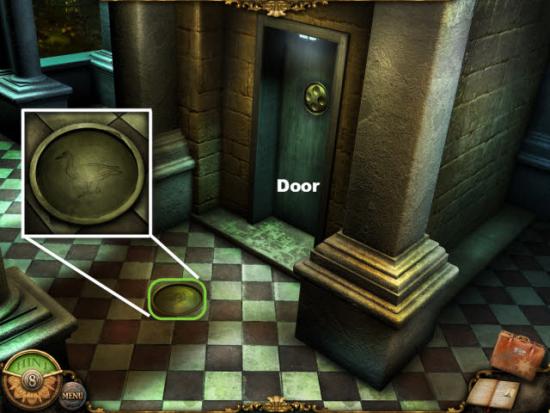
Examine the Floor Image highlighted in Green.
Examine the Door.
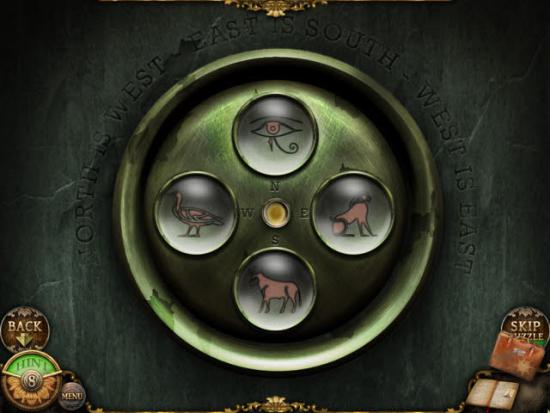
To solve this Puzzle need to set the correct Image to each of the Cardinal Directions.
Click on one of the Cardinal Directions and then click on the Yellow Button, in the center, to change the Image till the correct Image is showing.
Next click on another Cardinal Direction and repeat.
The Image will close when you choose another Cardinal Direction if the incorrect Image is showing.
Use the Clue Images you saw on the Floor and the Clue written around the Puzzle to solve this Puzzle.
The four Clue Images are:
- South = Eye
- East = Bull
- West = Lion
- North = Duck
Using the Clue written around the Puzzle; North becomes West, East becomes South, and West becomes East.
The Solution then becomes:
- North – Eye
- East – Lion
- West – Duck
- South – Bull
See Image for the Solution.
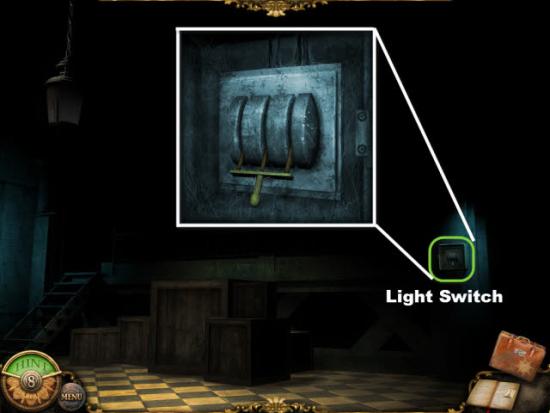
Go up the Stairs.
Examine the Light Switch highlighted in Green.
Click the Switch to turn on the Lights.
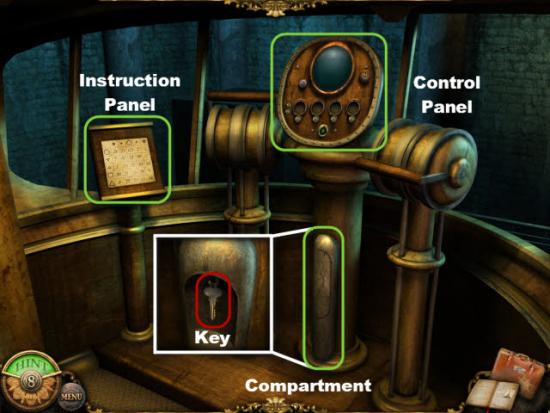
Enter the Airship.
Examine the Compartment under the Control Panel.
Take the Key highlighted in Red.
Examine the Instructions Panel
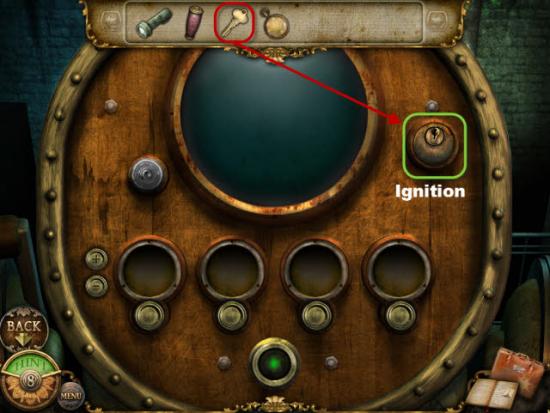
Examine the Control Panel.
Insert the Key, highlighted in Red, into the Ignition, highlighted in Green.
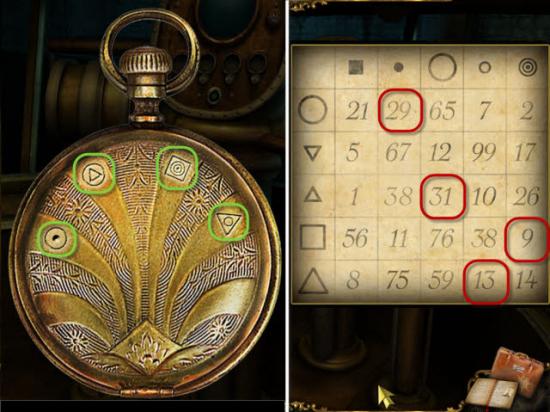
To solve this Puzzle you will need the Pocket Watch and the Instruction Panel.
Each of the four Images on the Pocket Watch consists of two separate Symbols.
Use the Instruction Panel to find each of the Symbols and note where the two points cross on the chart.
This Number will be the Number to enter in for the Coordination’s for the Airship.
Do this for all four Symbols.
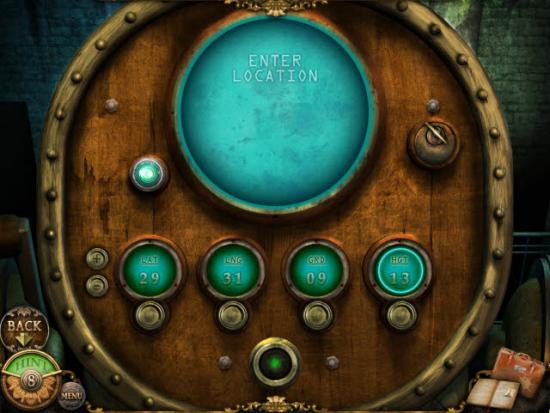
Click the Button underneath each Coordinate.
Now use the “+” and “-” Keys to set the Coordinates for each Symbol.
Repeat this for all four Symbol Coordinates.
Click the Green Button to set the Coordinates.
If correct the Airship will take off.
The correct coordination’s are: 29 – 31 – 9 – 13.
The Temple of Isis
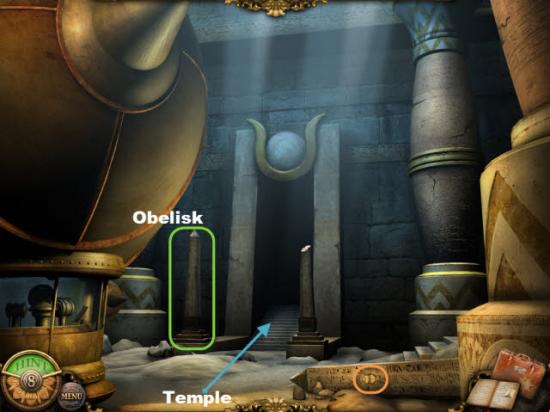
Gather Special Item #1(of 10) highlighted in Orange.
Examine the Obelisk highlighted in Green.
Enter the Temple.
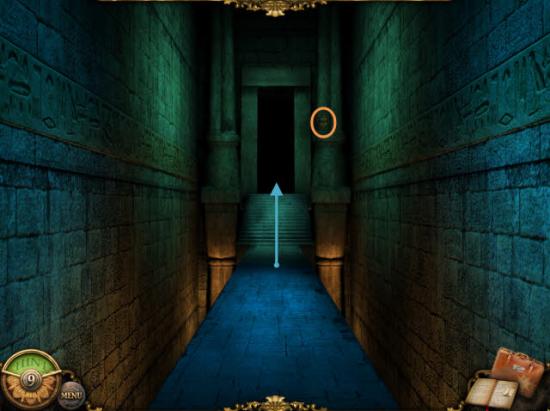
Gather Special Item #2(of 10) highlighted in Orange.
Head forward across the Walkway.
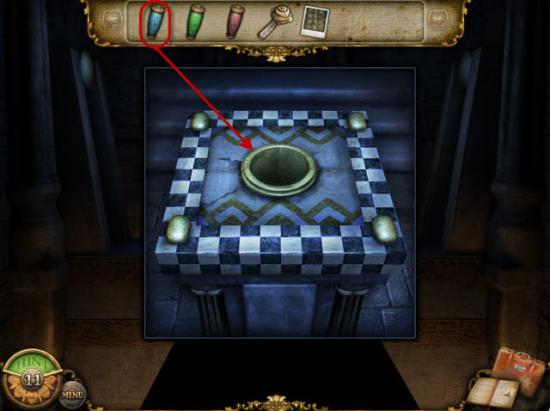
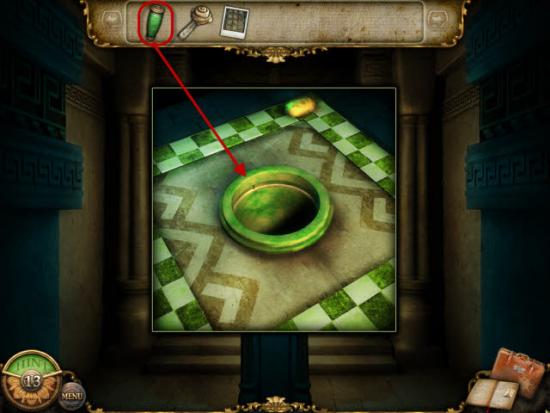
Examine the Blue Pedestal highlighted in Green.
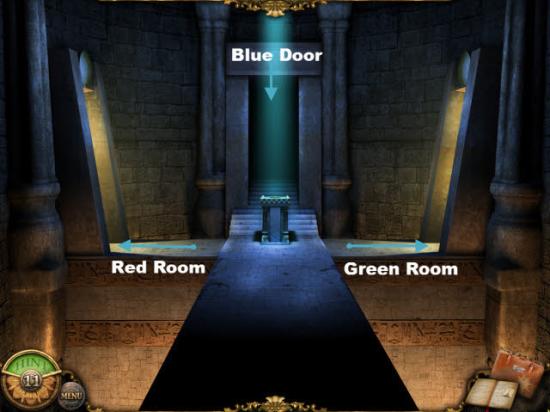
Place the Blue Capsule, highlighted in Red, in the Blue Pedestal.
Two Rooms open; Red Room to the left and Green Room to the right.
Enter the Red Room to the left.
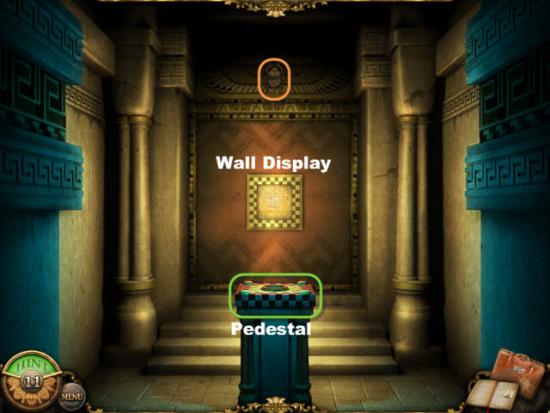
Gather Special Item # 4(of 10) highlighted in Orange.
Examine the Red Pedestal highlighted in Green.
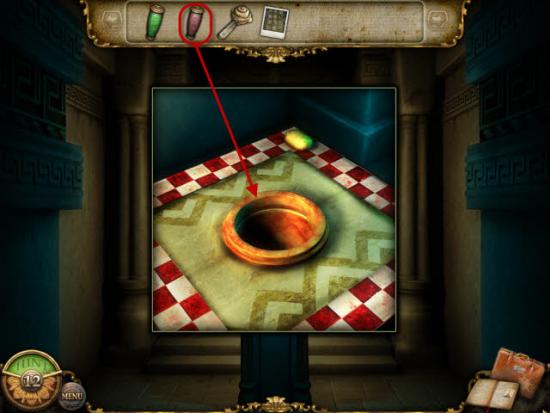
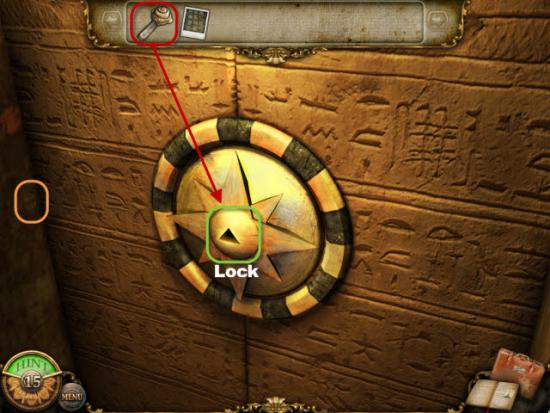
Use the Red Capsule, highlighted in Red, on the Red Pedestal.
Notice the Ankh Symbol.
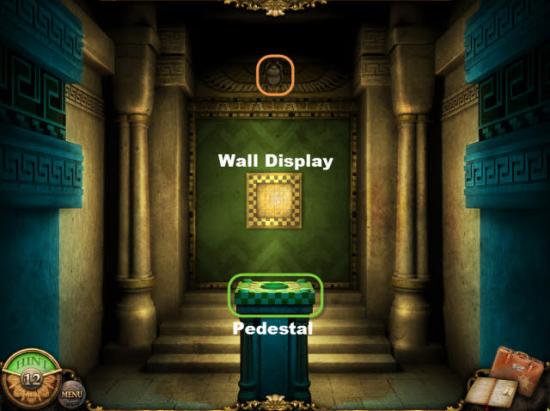
Examine the Wall Display behind the Pedestal.
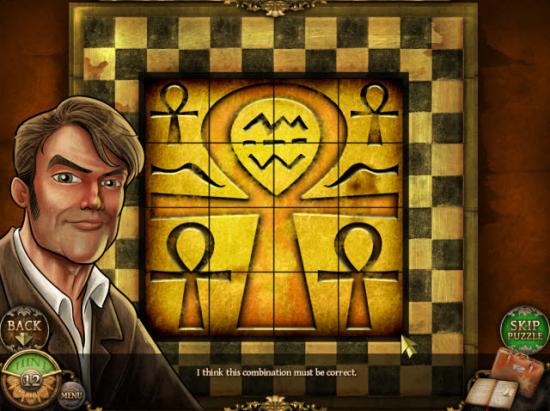
To solve the Puzzle need to recreate the Ankh Symbol.
Click on each Square to cycle through several different pieces until you have the correct piece.
Continue until have completed the Larger Symbol.
Exit the Red Room.
Enter the Green Room to the right.
Gather the Special Item #5(of 10) highlighted in Orange.
Examine the Green Pedestal highlighted in Green.
Place the Green Capsule, highlighted in Red, in the Pedestal.
Notice the Eye of Ra Symbol.
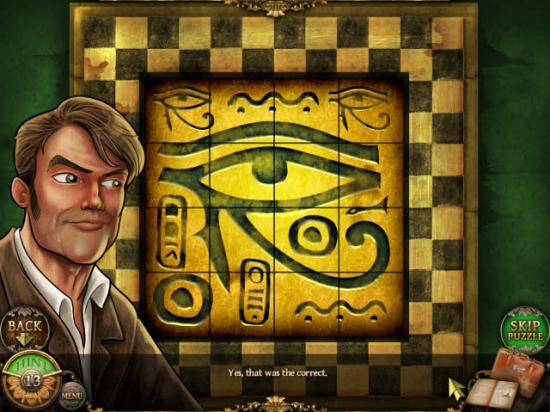
Examine the Wall Display behind the Pedestal.
To solve the Puzzle need to recreate the Eye of Ra Symbol.
Click on each Square to cycle through several different pieces until you have the correct piece.
Continue until have completed the Larger Symbol.
Exit the Green Room.
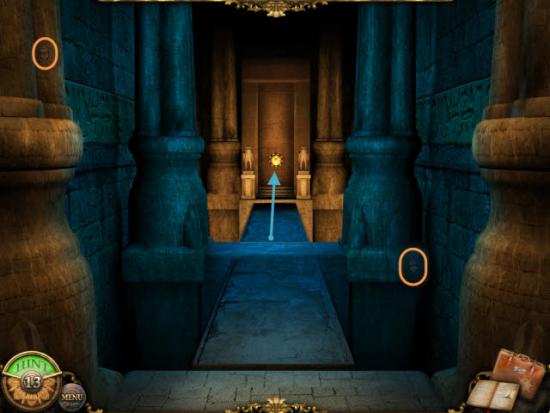
Head forward through the Blue Door.
Gather Special Item #6(of 10) and Special Item #7(of 10) highlighted in Orange.
Cross the Bridge.
Gather Special Item #8(of 10) highlighted in Orange.
Use the Spiral Key, highlighted in Red, on the Lock, highlighted in Green.
Gather Special Item #9(of 10) highlighted in Orange.
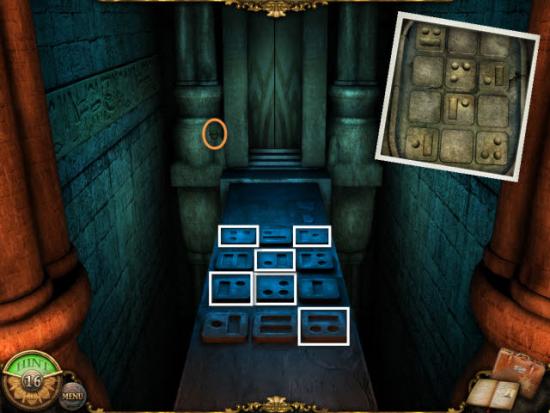
To cross the final Bridge need to press the correct Key Stones.
Use the Photo for Clue to solving the Puzzle.
The Photo Image is backwards and mirrored.
Press the Key Stones highlighted in White to Solve the Puzzle and cross the final bridge.
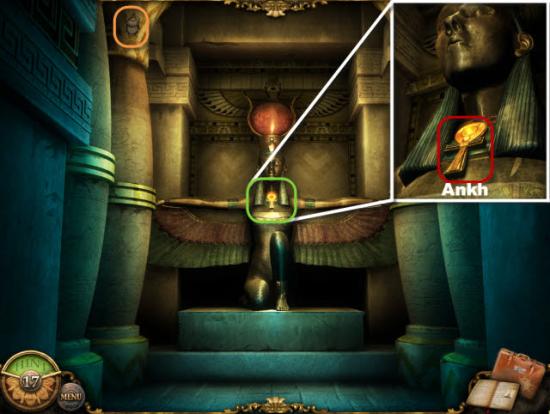
Gather Special Item #10(of 10) highlighted in Orange.
Examine the Isis Statue.
Gather the Ankh around Isis’s neck.
Congratulations you have completed The Temple of Isis 2: The Journey Continues.

More articles...
-
Best Horror Games On Itch.io – July 2026
Across a bounty of subgenres. -
Haze Seas Accessories Tier List [Best Accessories to Equip]
The accessories with the best stat buffs in Haze Seas.