
Best Horror Games On Itch.io – July 2026
Across a bounty of subgenres.
Grow A Garden 2 Base Price List
What's the most valuable crop?![Evomon Best Starter [Leafbun, Blazpup, or Bubble?]](/wp-content/uploads/2026/06/evomon-best-starter.jpg "Evomon Best Starter [Leafbun, Blazpup, or Bubble?]")
Evomon Best Starter [Leafbun, Blazpup, or Bubble?]
Grass-type, Fire-type, or Water-type?
![[Roblox] Evomon Shiny Hunting Guide – Including Prismatic and Pris Shinies!](/wp-content/uploads/2026/06/evomon-shiny-hunting-guide.jpg "[Roblox] Evomon Shiny Hunting Guide – Including Prismatic and Pris Shinies!")
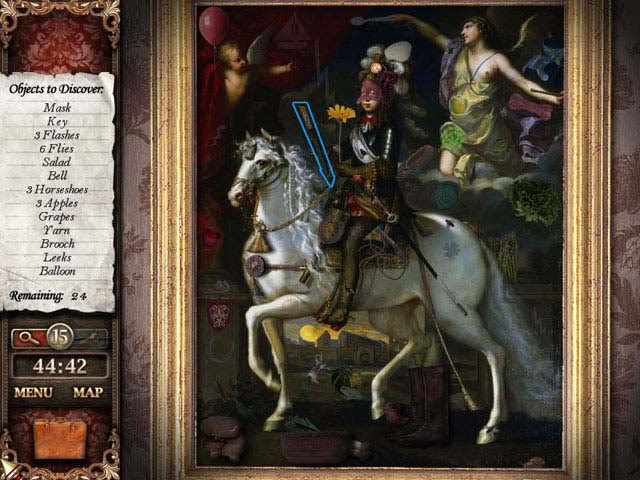
The Serpent of Isis Tips Walkthrough
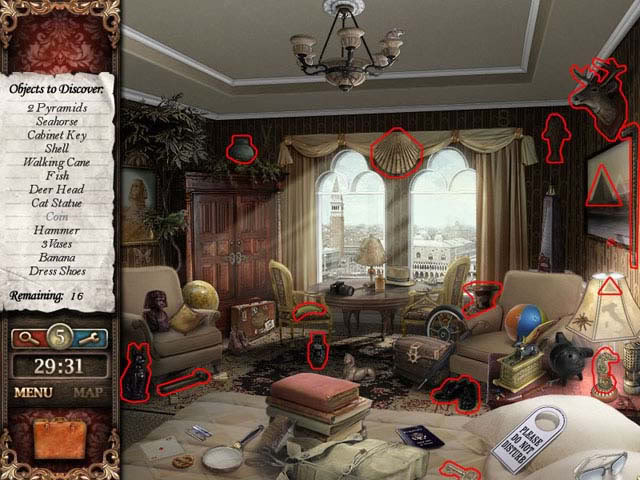
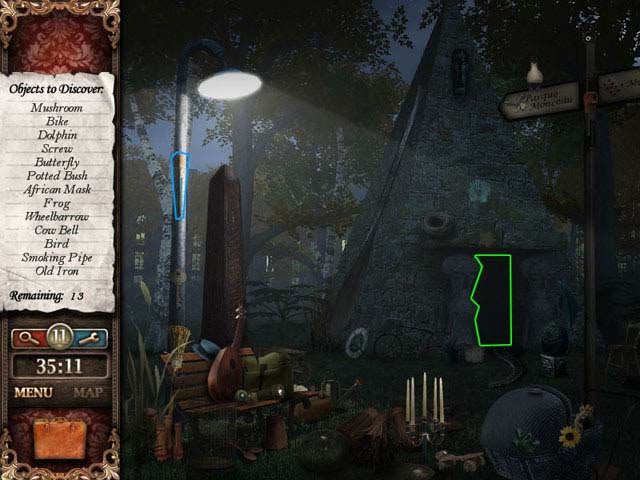
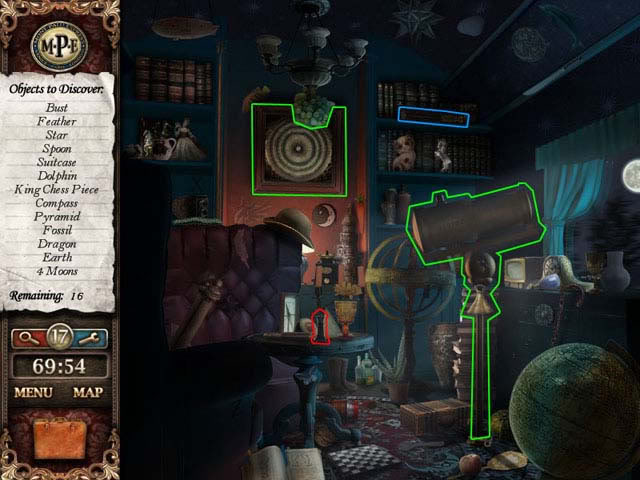
Check out our walkthrough for The Serpent of Isis. TABLE OF CONTENTS 1. Game Overview 2. General Tips 3. Walkthrough -Prologue: Venice, Italy -Chapter 1 – Heading to Budapest -Chapter 2 – Budapest -Chapter 3 – Heading for Vienna -Chapter 4 – Vienna -Chapter 5 – Heading to Prague -Chapter 6 – Prague -Chapter 7 – Heading to Paris -Chapter 8 – Paris -Chapter 9 – Heading to London -Chapter 10 – London GAME OVERVIEW There are 10 chapters in the game, and you will be spending 5 of those chapters …


- Prefer Gamezebo on Google

a:1:i:0;a:2:s:13:”section_title”;s:24:”The Serpent of Isis Tips”;s:12:”section_body”;s:65034:”Check out our walkthrough for The Serpent of Isis.
TABLE OF CONTENTS
1. Game Overview
2. General Tips
3. Walkthrough
–Prologue: Venice, Italy
–Chapter 1 – Heading to Budapest
–Chapter 2 – Budapest
–Chapter 3 – Heading for Vienna
–Chapter 4 – Vienna
–Chapter 5 – Heading to Prague
–Chapter 6 – Prague
–Chapter 7 – Heading to Paris
–Chapter 8 – Paris
–Chapter 9 – Heading to London
–Chapter 10 – London
- There are 10 chapters in the game, and you will be spending 5 of those chapters in the Mont Palu Express. When you are choosing the name for your character you can choose whether or not to play in unlimited mode.
- In unlimited mode there is no time limit, so feel free to take your time and play the game. You are awarded 5 extra hints for every chapter cleared, and for every bonus clue collected. However, if you click the wrong items 20 times in a row you lose a hint; keep that in mind.
- If unlimited mode is not selected each chapter will have a specific time limit, and if you run out of time you have to restart the chapter or quit the game, so be careful. Clicking the wrong items too many times will result in you losing 30 seconds, so watch out.
- Finding the bonus clues in this game will definitely help out a lot, so be on the lookout for them.
- Each suspect has a special suspect item that allows you to gain an extra hint when found; there is a list of the suspect’s items in your inventory, so be sure to check it out. Also try to remember that the suspect items will change about every 2 chapters or less.
- Note that suspect items will not show up on the list of hidden objects.
- Using the red hint button highlights one of the hidden objects from the item list for a short while.
- Using the blue hint button gives you a helpful hint on an unsolved quest object or puzzle.
- Items listed in grey letters usually require an extra step to be found. Be mindful of doors that can be opened and of objects that can be tampered with.
- To access your inventory click on the small bag that is located below the hint buttons. Items in your inventory can be picked up and used, simple click on the item once to attach it to your mouse, then click again to detach the item from your mouse.
- Combining items will be needed sometimes; to combine an item click on one to attach it to the mouse, and then click on the other item to combine the two.
- Puzzle can be skipped whenever you press the skip puzzle button; however you will end up with 20 minutes added to your overall game time.
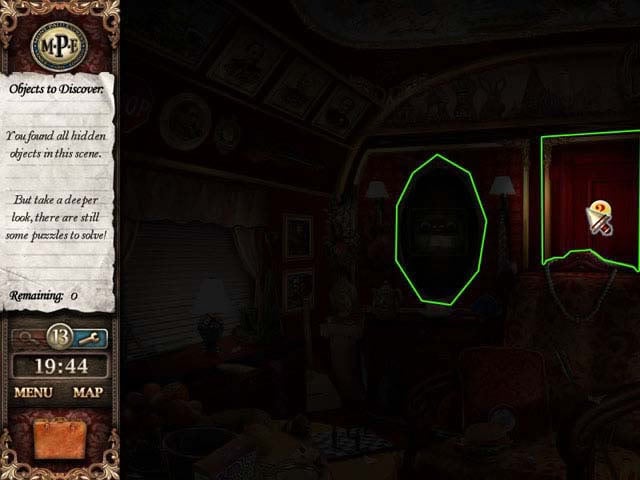
WALKTHROUGH
Notes About Screenshots
- Items highlighted with a light-blue color are the suspect items which award you with a bonus hint when collected.
- For Part A-Items highlighted in red are the items which must be collected.
- For Part B-Items highlighted in red are items that will be added to your inventory.
- Items with a green highlight are special quest objects.

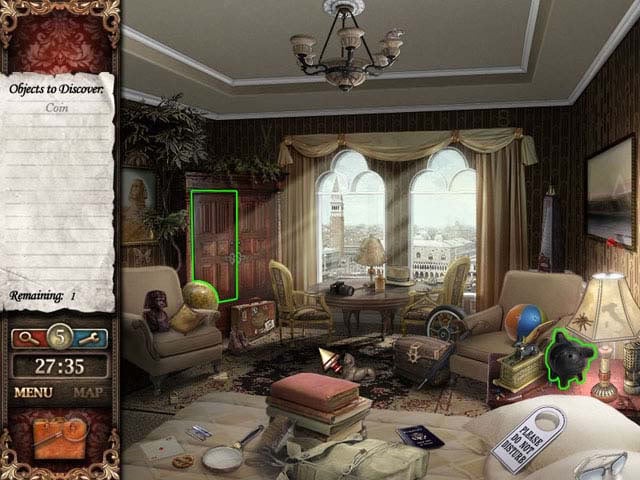
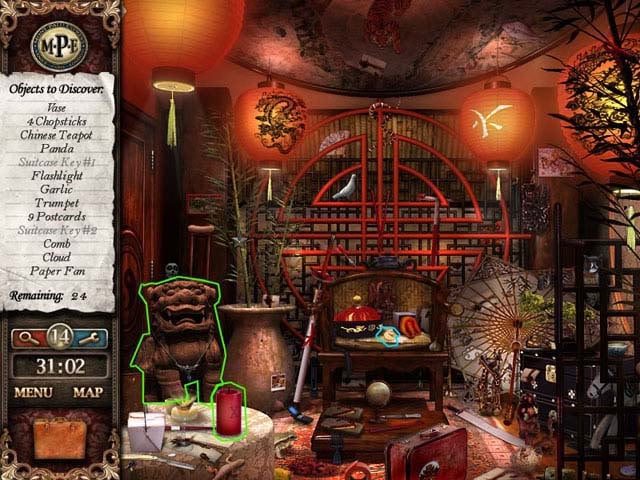
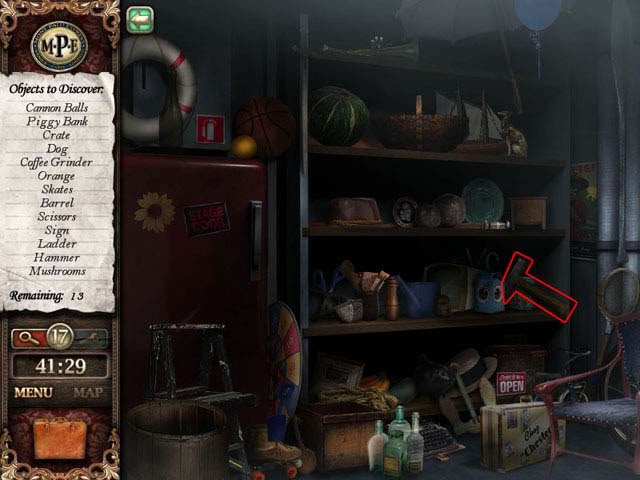
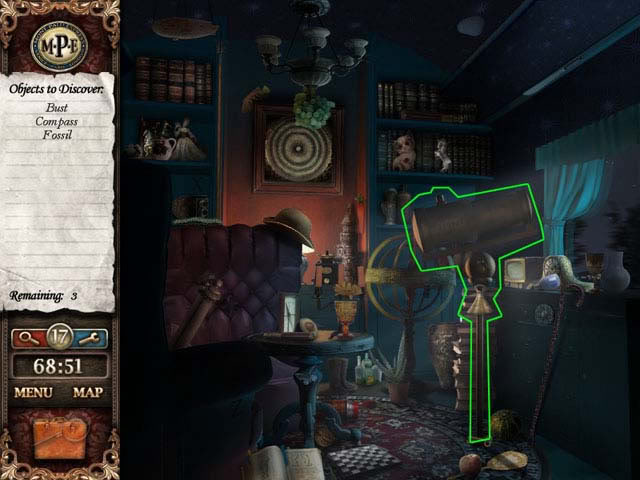
- Use the Hammer to break the Piggybank in order to get the Coin.
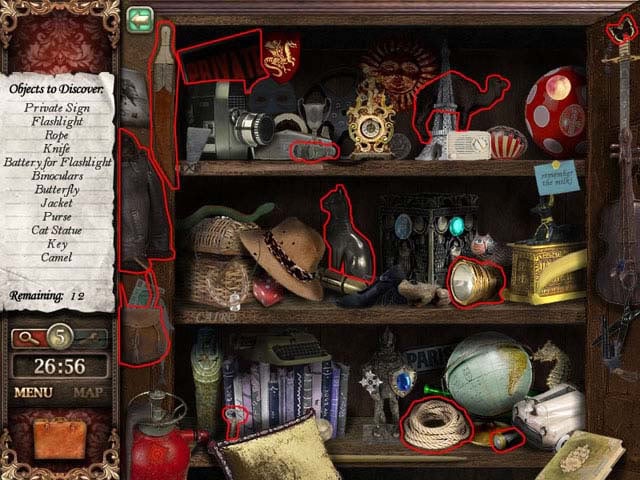
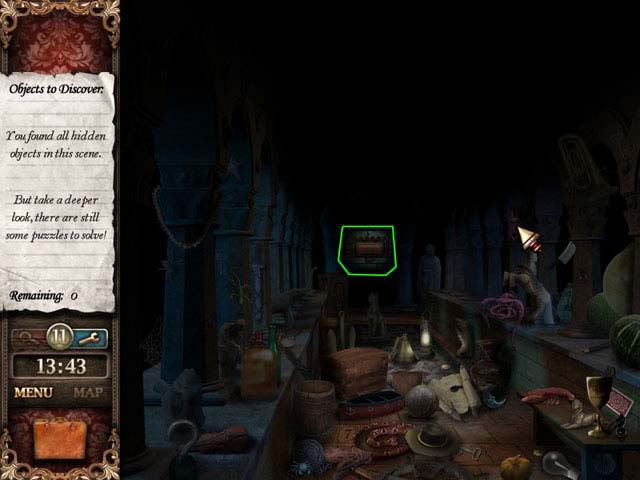
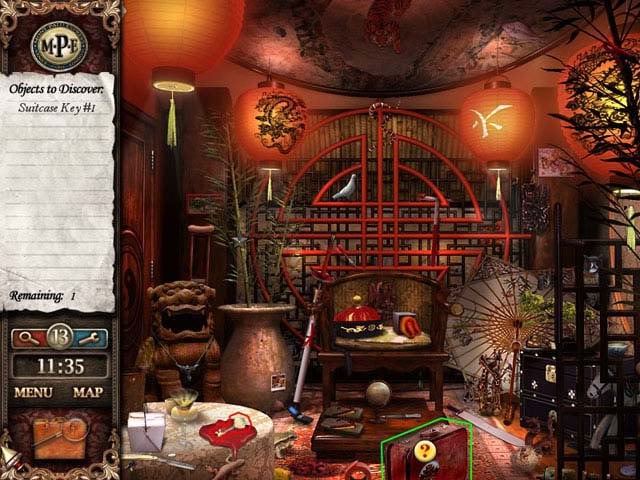
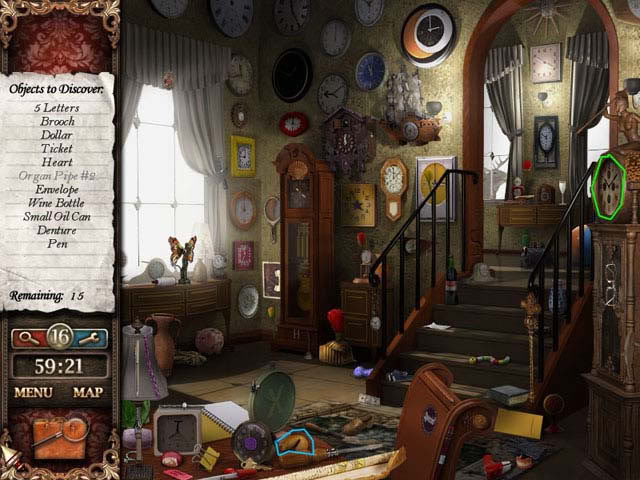
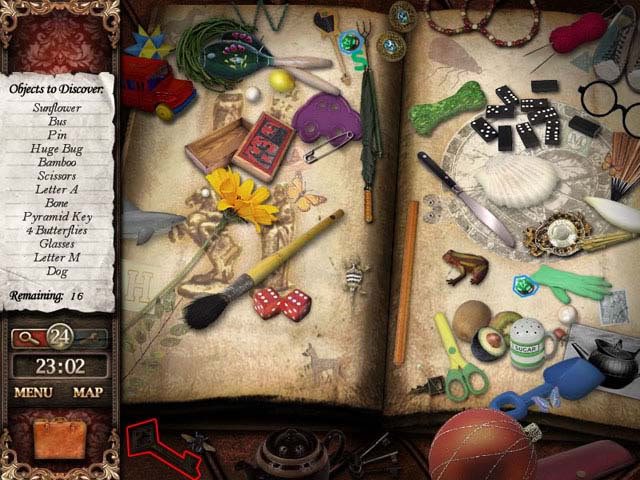
- Use the Cabinet Key to open up the Left Cabinet Door. You will have 12 more items to discover in this cabinet if you want to move on to the next scene.
- Objects to Discover in cabinet: 12
- Use the battery for flashlight on the Flashlight to make the flashlight work.
- There is a safe hiding behind the Flower Painting.
- Place the Small train on the newspaper in order to obtain the Sticky Paper.
- Use the Sticky note you get from the newspaper to open the black safe that was behind the Flower painting.
- You will find a ticket for the Mont. Palu Express in the safe, now you can board the train.
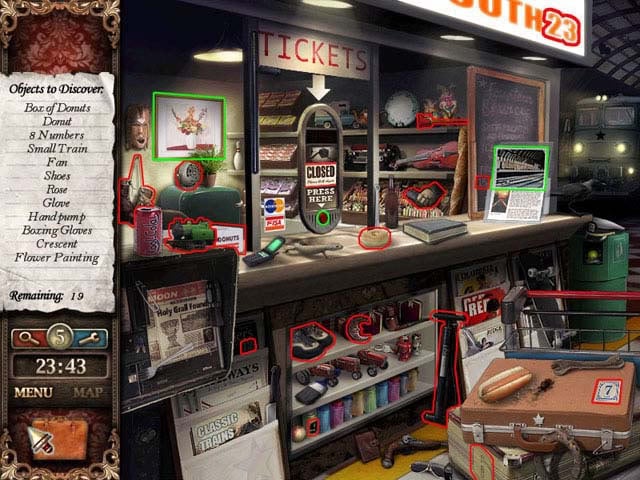
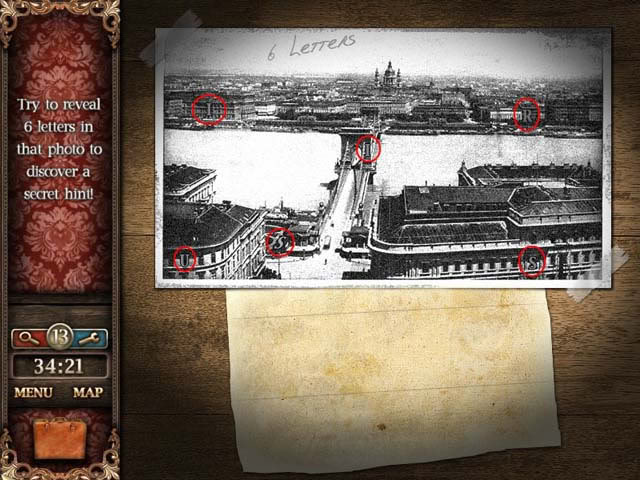
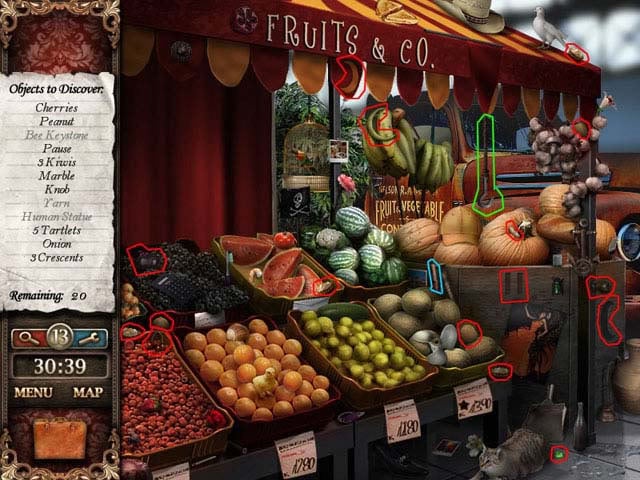
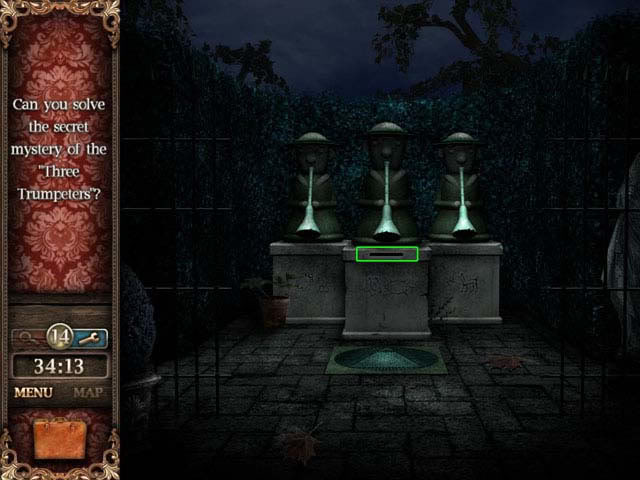
- Please look at the next screenshot for the location of all the numbers.
LOCATION OF THE 8 NUMBERS
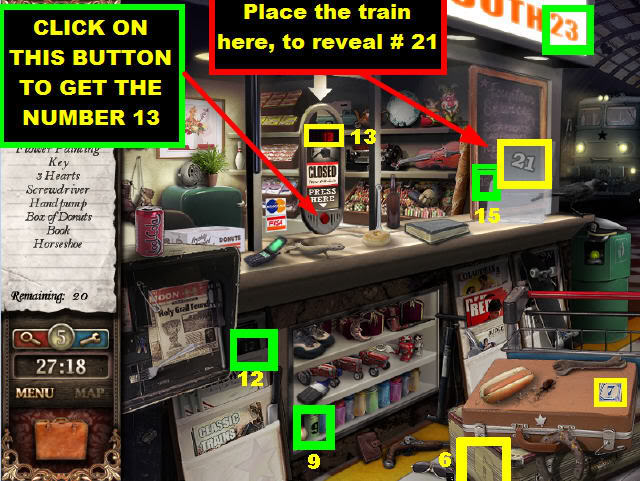
- In this screenshot, we’ve only highlighted the location of all the 8 numbers.
- In order to obtain the number 21, please grab the train that is on the top left side of the page (not shown in screenshot).
- Place the train in the location that is marked on the screenshot and the number 21 will be revealed.
- To obtain the number 13, please click on the red button that is underneath of the "closed" sign. The number 13 will appear above the "closed" sign.
- The rest of the numbers are in plain view and are highlighted in the screenshot.
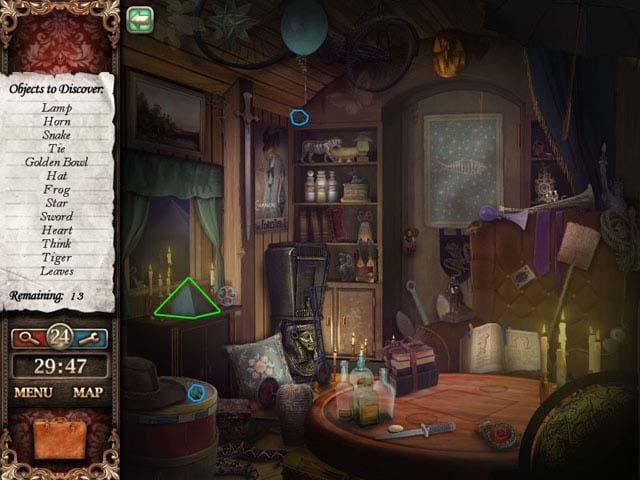
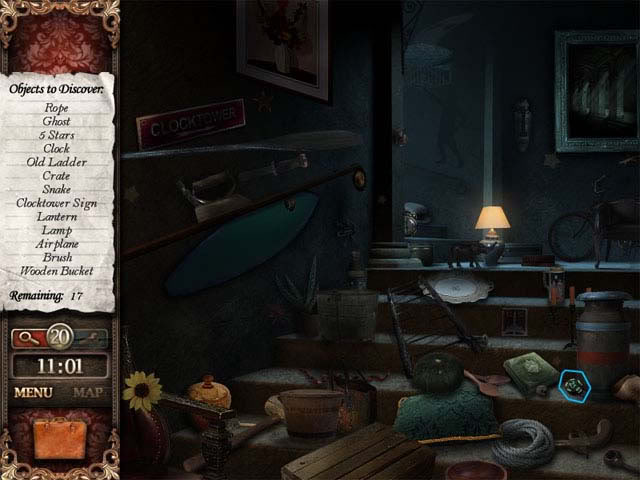
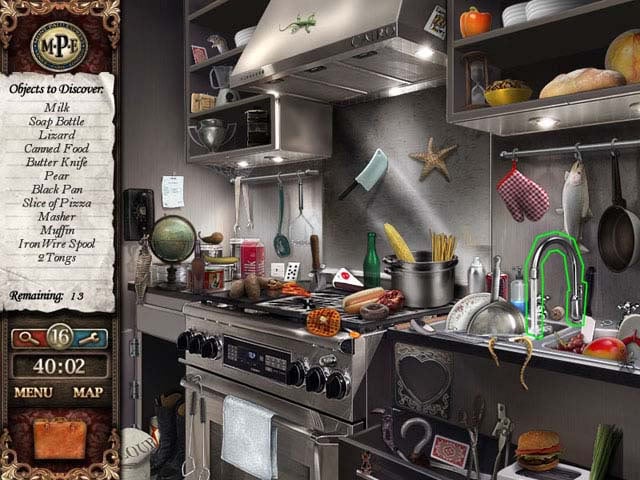
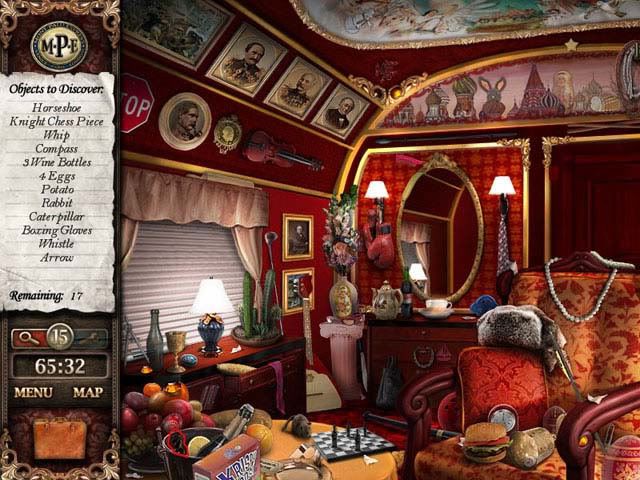
CHAPTER ONE – Heading for Budapest
Dining Cart
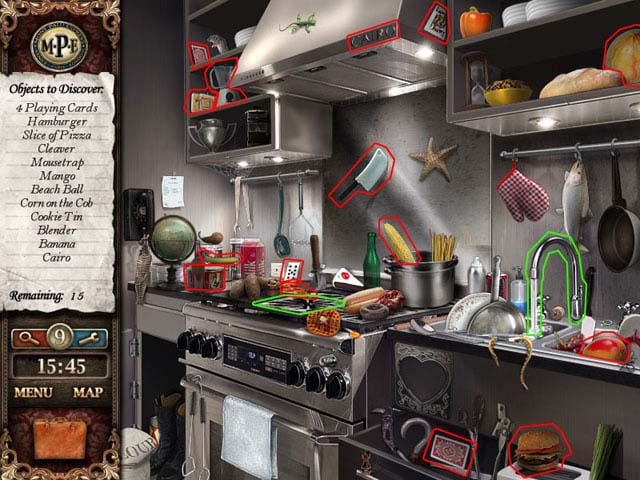
Cabinet 7
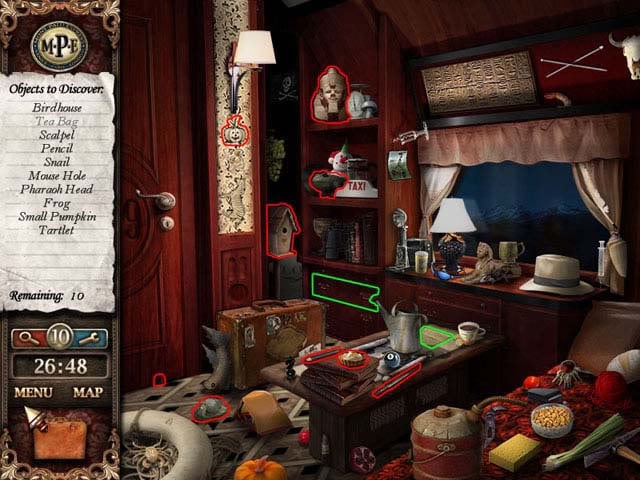
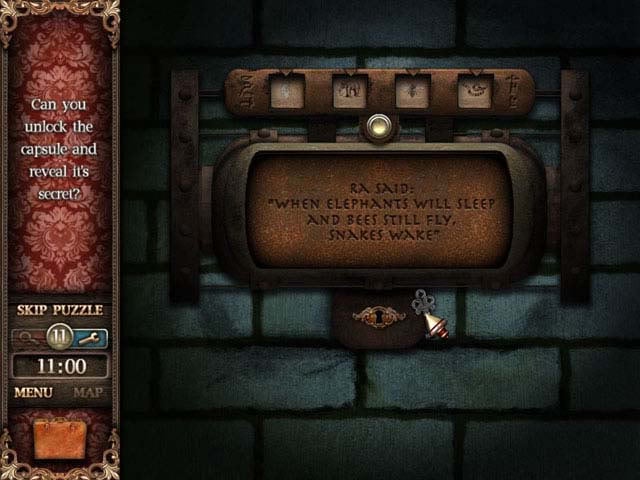
- Use the Screwdriver on the highlighted drawer in Cabinet 7 to find the Teabag.
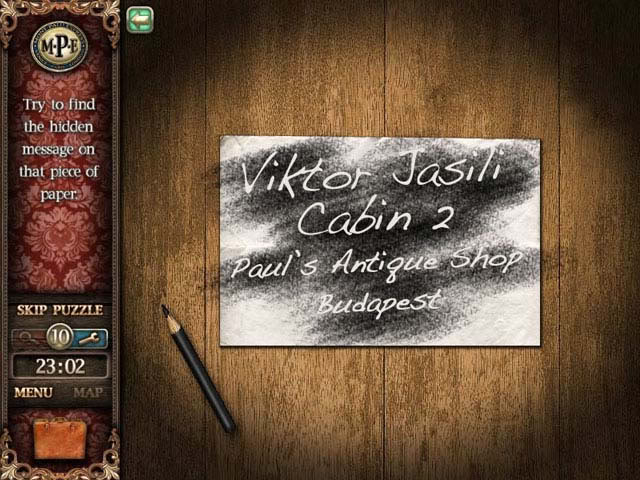
- Then use the Pencil on the highlighted note paper to read what is on the note paper. The finished puzzle should look like what is on the screen shot.
Cabinet 2
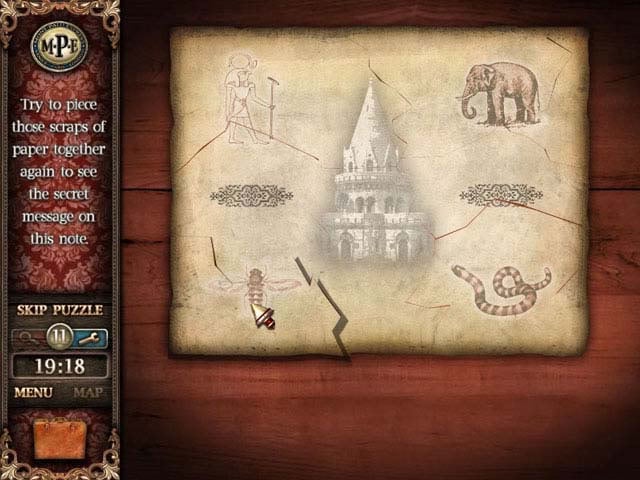
- After collecting the 9 scraps of paper you will have to put the scraps together. This is what the finished puzzle should look like:

- To get the Ra Keystone, you will need a Teabag, and Hot water from the Kitchen Cabinet, so be sure to head to the Kitchen Cabinet next.
Kitchen Cart
- Use the Teakettle on the water pipe in the sink to fill the Teakettle with water.
- Then take the Teakettle and place it onto the stove top to heat the water up.

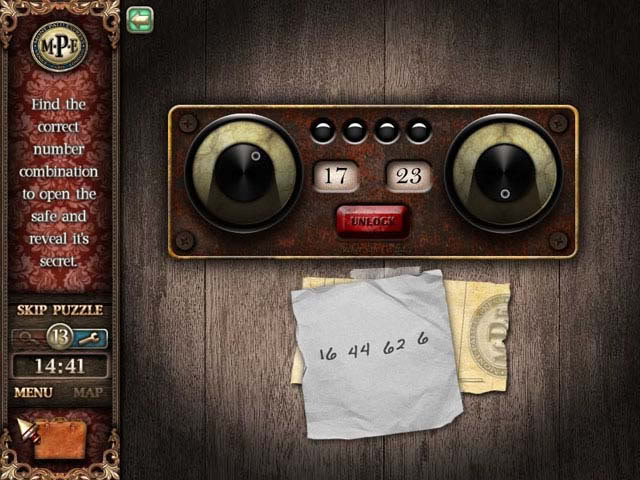
- Afterwards you can use the hot water from the Teakettle to make tea by placing the Teakettle on top of the Teacup in Cabinet 2. After the tea is made a secret safe behind the mirror will be revealed, and you will have to enter a secret combination to open it.
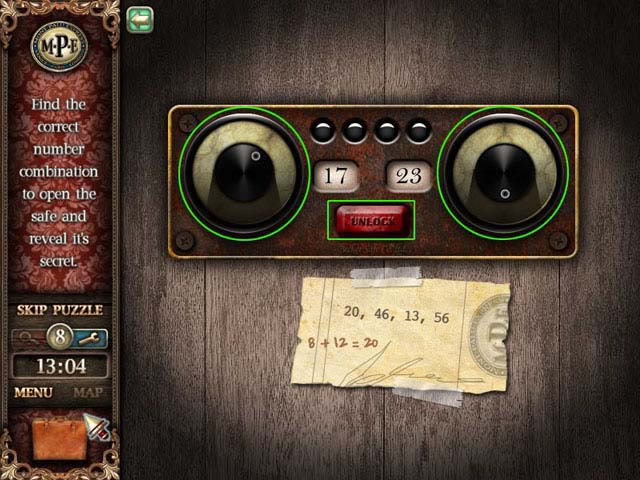
- The combination is 20, 46, 13, 56, but to get those numbers you will have to add the two numbers on the safe’s dials. To change the numbers on the left and the right, you will have to click on the dials. To add the numbers up, you will need to press the unlock button. Here are the correct combinations, 8 + 12, 39 + 7, 5+ 8, and 36 + 20. In the safe you will find the Ra Keystone.
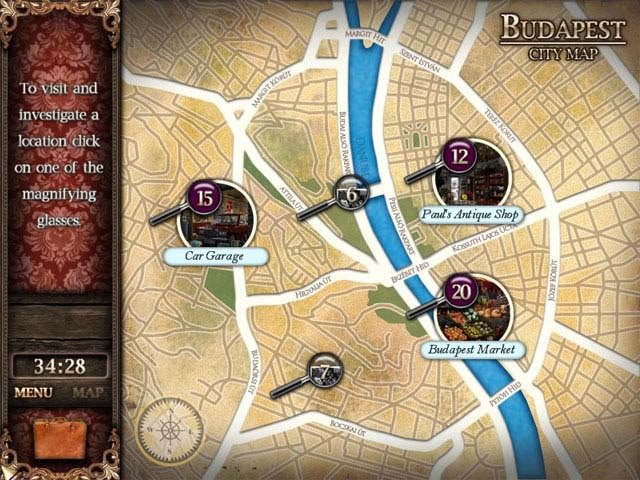
Budapest Map
- First Magnifying Glass (upper magnifying glass on map)
- The letters will spell out SIRIUS.
- Second Magnifying Glass (lower magnifying glass on map)
- The letters will spell out CANOPUS.
Car Garage
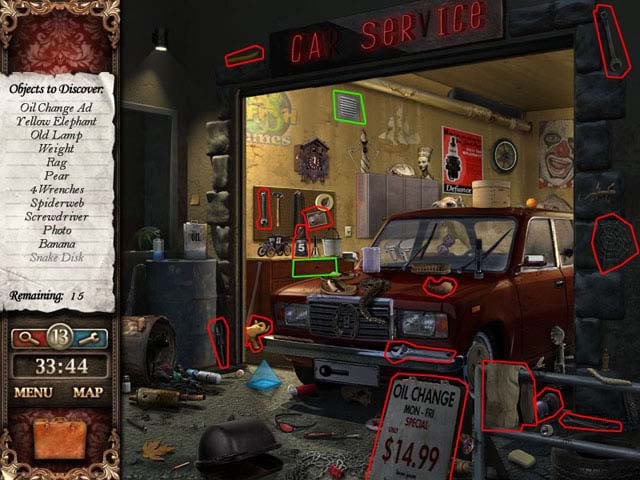
- We have to leave the snake disk here for now.
Paul’s Antique Shop
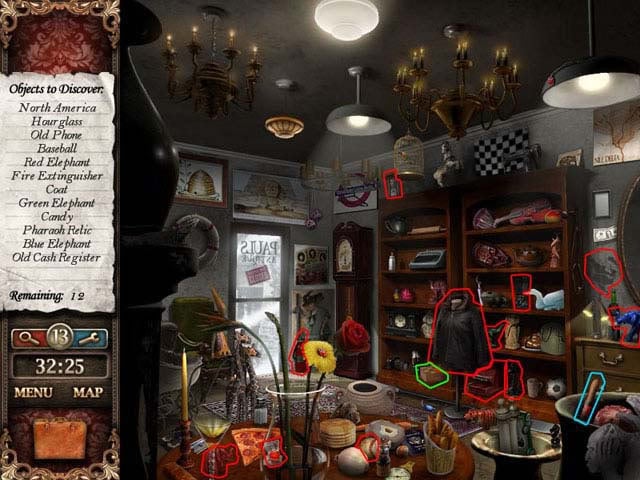
- Just collect the items here, then move on to the Budapest Market for now.
Budapest Market
- After you find all of the items – excluding the items spelled with grey letters – go back to the Car Garage.

- Use the Screwdriver on the Highlighted air vent to find the Snake Disk. Afterwards use the Knob on the highlighted drawer to reveal a puzzle. To complete this puzzle you will need to place your Snake Disk onto the puzzle.
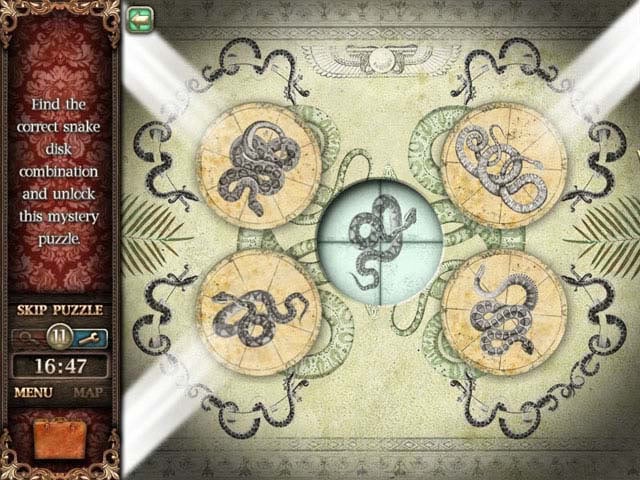
- In this puzzle they want you to use the four snake disks to make a complete snake image on the center disk. To do this, click on any of the four snake disks and a piece of the center puzzle will change, each Snake Disk controls a piece of the center disk.
- You must keep changing the center disk until it looks like one of the snakes on the four disks, once you match the center snake with one of the four disks a light will shine on the Snake Disk that matches with the center Snake Disk.
- Continue matching the center with the rest of the Snake Disks’ until there are four lights shining down on all four disks.
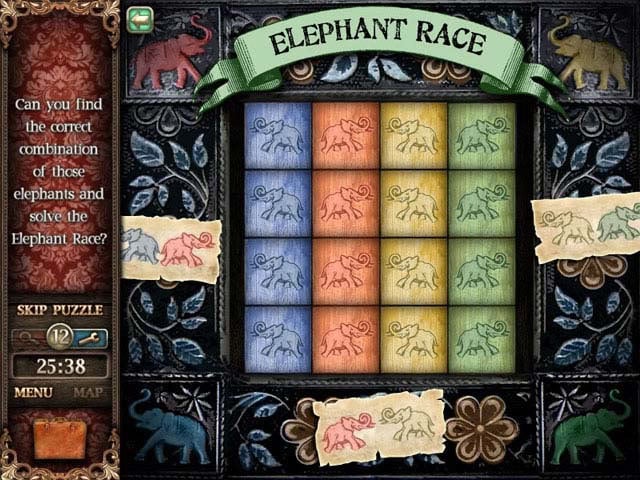
- Go back to Paul’s Antique Shop and click on the highlighted Chess Board. After that is done a puzzle will appear, and you will need to use the Colored Elephants you found to complete it. Place all of the Elephants in your inventory onto the board to begin the puzzle.
- Follow the screenshot’s pattern to complete the puzzle, keep in mind that you can switch any piece on the board with another piece just by clicking one then clicking another, and they will switch automatically.
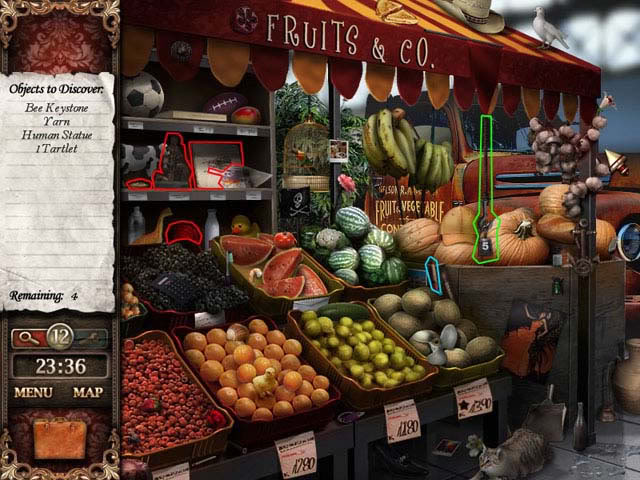
- Now you are ready to go back to the Budapest Market; go into your inventory and place the weight you have onto the highlighted hook open the Market’s curtain. When the curtain opens up you with be able to see the grey items on the list that you could not find before.
Time Capsule Tomb
- After finding all the items here a time capsule safe will be revealed towards the back of the room, there you will find your last puzzle of chapter 2.
- To complete this puzzle use all of the capsules that you collected to so far and insert them into the puzzle in this order: Ra Keystone, Elephant Keystone, Bee Keystone, and the Snake Keystone. Then use the Key from your inventory to unlock the time capsule.
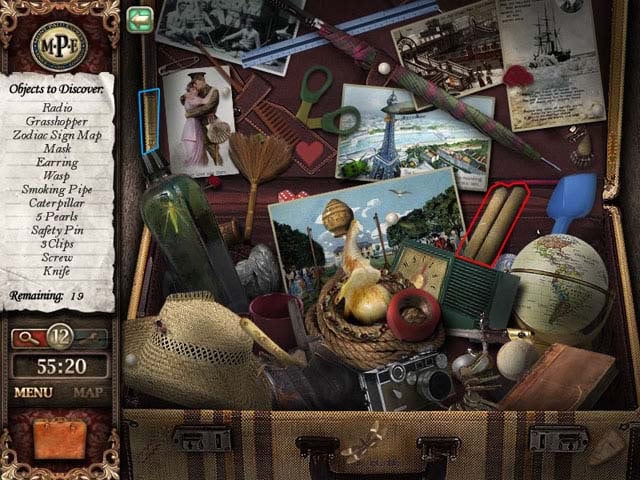
CHAPTER THREE – Heading for Vienna
Dining Cart
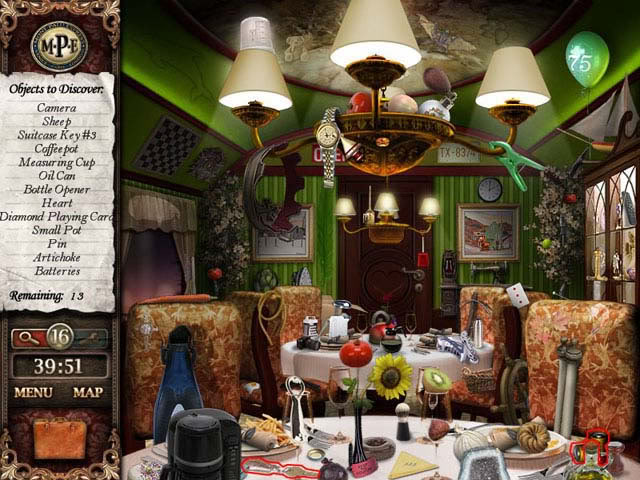
- Here we have 2 items that belong in the inventory- the batteries, and the Suitcase key #3.
- They have been highlighted so be sure not to forget them.
Bar Cart
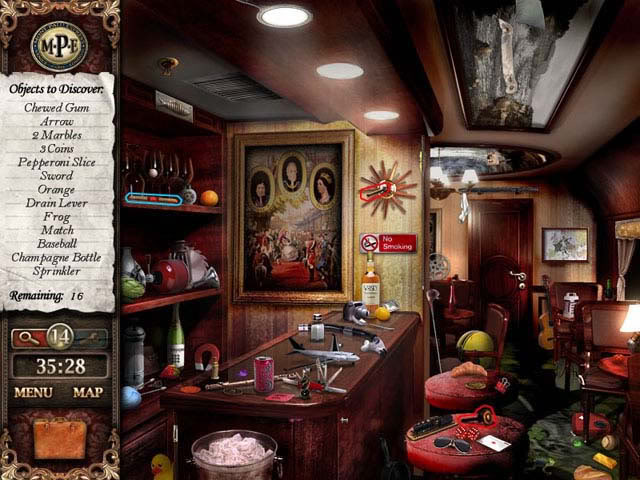
- Here you will need to collect 2 crucial items as well- the Match, and the Drain Lever.
Cabinet 3
- Use the Match on the highlighted candle, nothing will happen for now.
- Use the batteries you have on the tiger statue, the mouth will open up and you will find the Suitcase key #2 item.
- Because you cannot complete the candle puzzle yet you will have to go to Cabinet 2 to look for more clues.
Cabinet 2
- When you get back into this cabinet it will be dark and you will need to use your flashlight to find anything here. After you find all of the items in this room, click on the Bathroom door to get into the Bathroom.
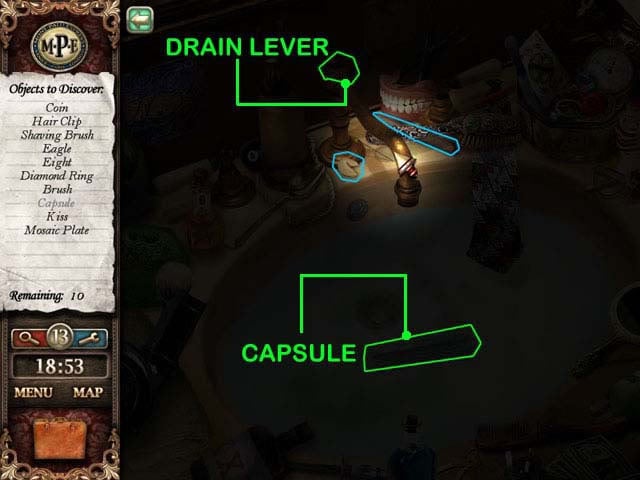
- Once you are there you need to use the Drain Lever on the top of the pipe, and then press the attached Drain Lever to drain out the poison sink water. After you drain out the water grab the Capsule at the bottom containing the safe’s combination.
- Once you get to the safe insert these pairs of numbers just like the first time: 8 + 8, 36 + 8, 39 + 23, and 2 + 4. Now you have the piece of the treasure again.
Cabinet 3
- You will need to return here again to find out what is up with the red candle. Now that you have returned at a later time you find that the candle has completely melted and there is a key inside. It’s the Suitcase key #1; now you can use all 3 keys to open up that Suitcase.
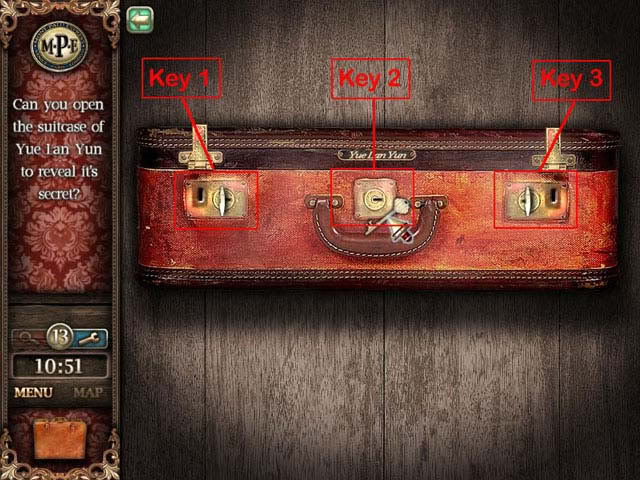
- This is how the keys fit into the suitcase.
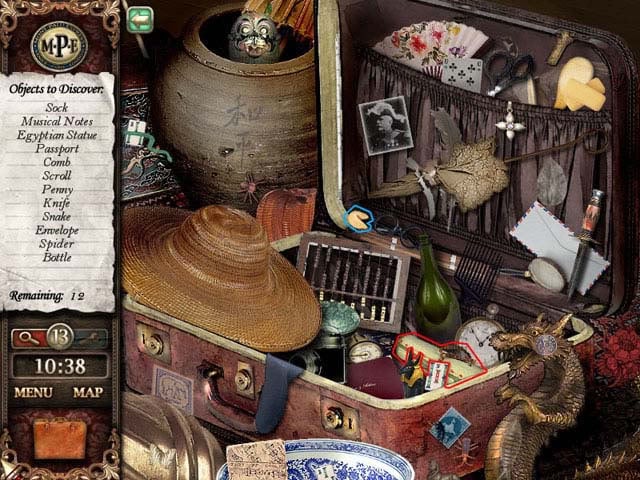
- The scroll is a special item that you will need later on, other than that there is also a fortune cookie that should be picked up.

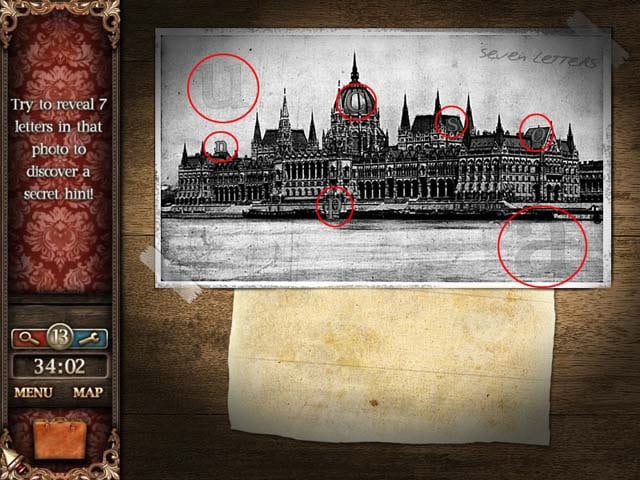
- First Magnifying Glass (higher magnifying glass on map)
- Use the screen shot to find the 4 zodiac signs in the picture.
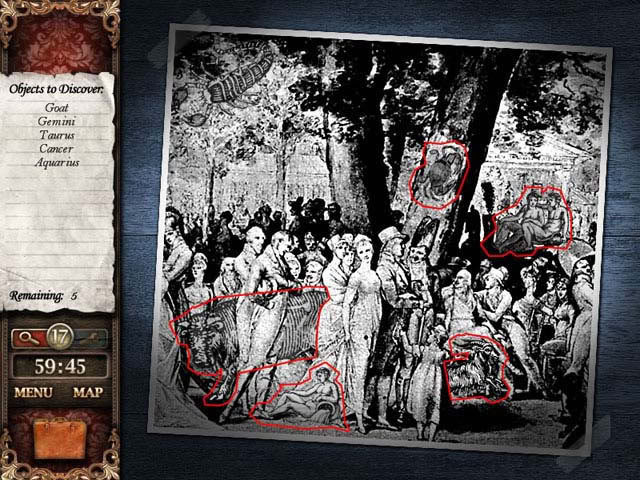
- Second Magnifying Glass (lower magnifying glass on map)
- Use the screen shot to find the 5 zodiac signs in the picture.
Clock Store
- There is a puzzle in the Clock Store when you click on the Highlighted clock face.
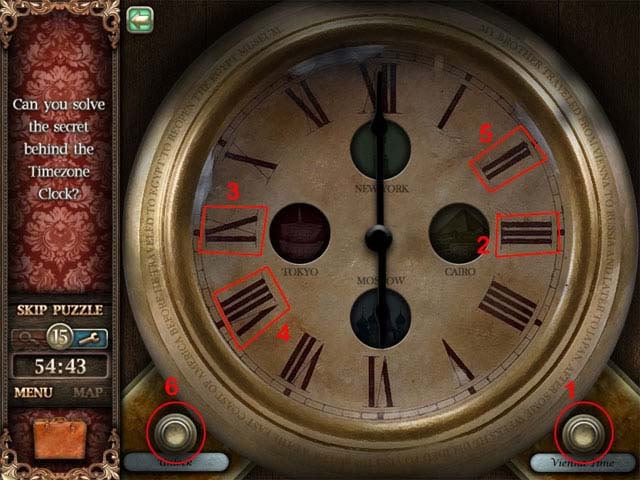
- After you complete the puzzle you will find the Organ Pipe #2, to complete the puzzle just click on what is selected in the screen shot and be sure to click everything in that exact order. The Organ pipe will be at the bottom of the clock when you have completed the puzzle.
Old Music Store
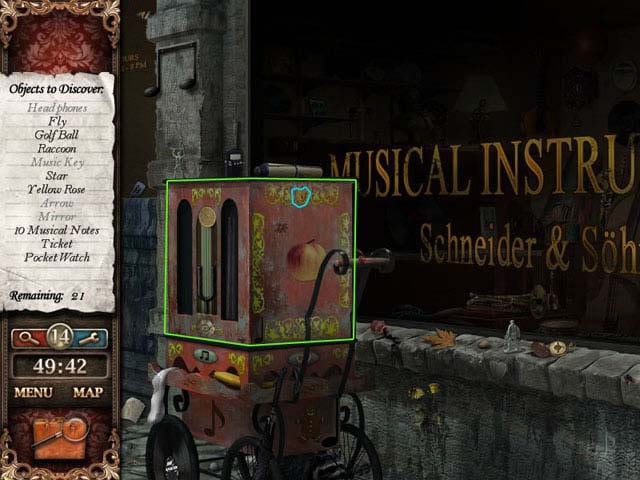
- There is a puzzle here, but you need 2 Organ pipes in order to try it out, so after you are finished collecting items here head for The Prater.
The Prater
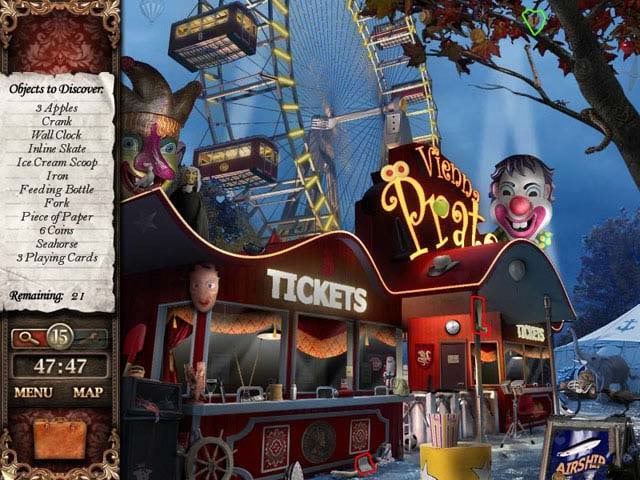
- Here there are no puzzles and no hidden items, just be sure get the fortune cookie, and the other two important items for your inventory.
Cafe

- Here you will be able to find the second Organ pipe of the 2. Now that we have both Organ Pipes we can go back to the music store and finish the puzzle.
Old Music Store
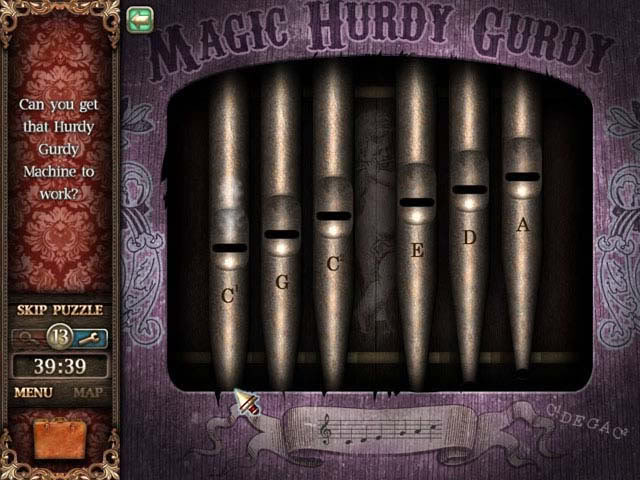
- Click on the music box again then take the 2 pipes and place them in with the other pipes. There is a small code of musical notes at the bottom right of the puzzle, you have to put the pipes in the correct order to complete this puzzle.
- Click on a pipe, then click on another pipe to switch the places of the pipes. Once the pipes form this code- C1 D E G A C2- the puzzle will be complete.
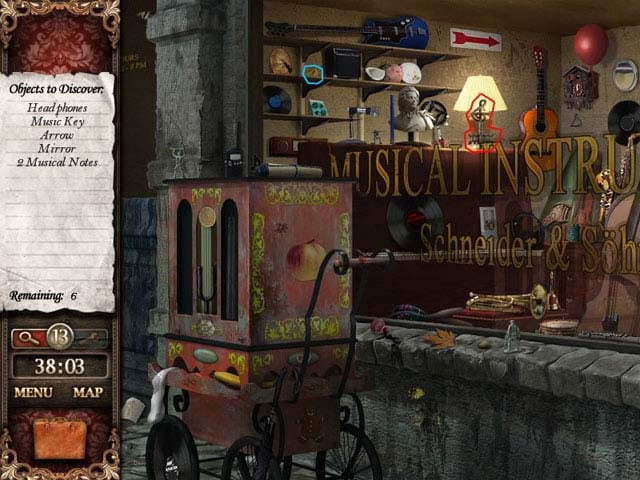
- Afterwards you will need to take the Crank that you found earlier and use it on the music box for the Old Music Store to open.
- Once the music store is open you will easily be able to collect the rest of the items.
Belverdere Garden Maze
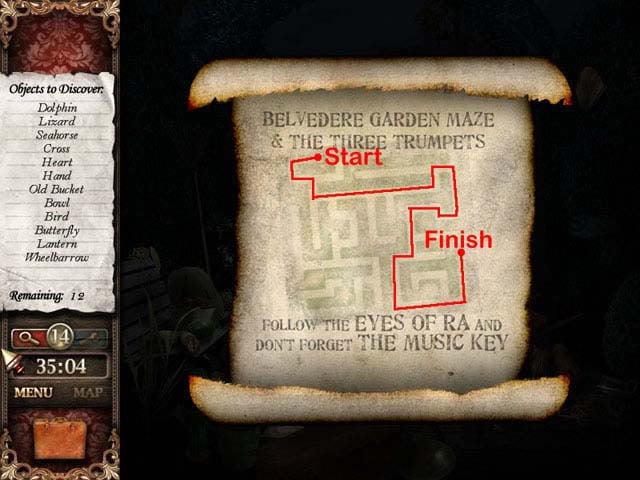
- This maze will be really painless, just follow the scroll that you have in your inventory or my screenshot.

- Clicking the white arrow will make your character go that in that direction. Keep going until you reach the end of the maze. Once you have reached the end of the Belverdere Maze you will end up in another part of the Belverdere Garden.
Belverdere Garden
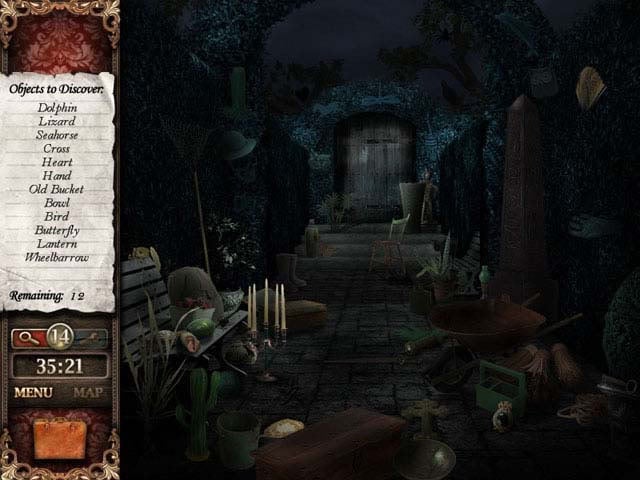
- Just collect the items on the list to open the next area of this Garden, and you will be fine.
Belverdere Garden puzzle
- At first it looks like a puzzle, but all you have to do is place the Music Key into the highlighted slot in order to get the next piece of the amulet.
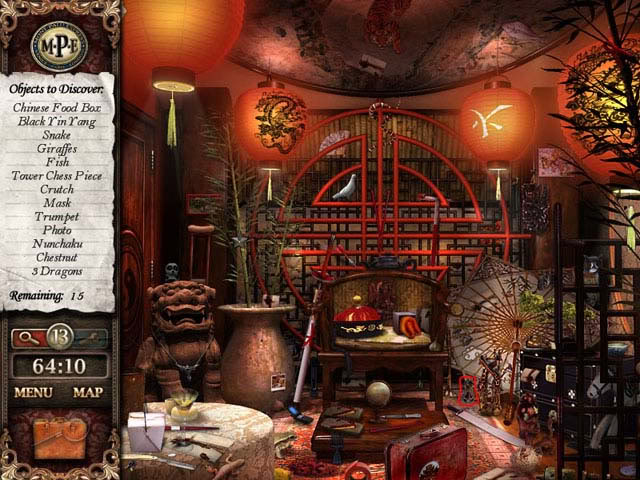
CHAPTER FIVE- Heading to Prague
Cabin 7
- In this Scene there is something that needs to be done with the door knob, but we can’t do it now so we must move on to the Kitchen Cart.
Kitchen Cart
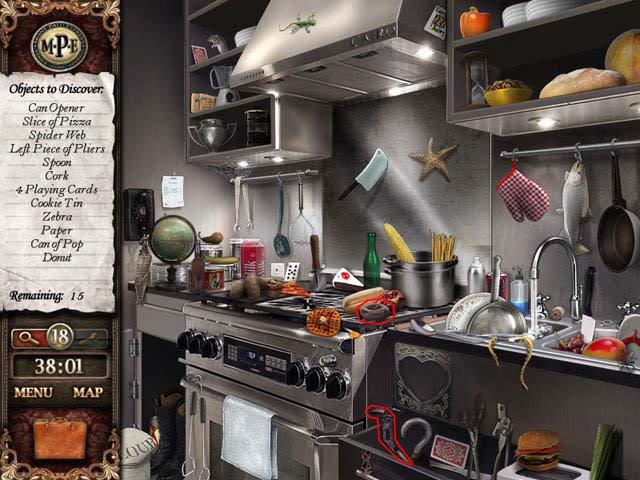
- This scene does not have anything special in it we just need the Left Piece of Pliers and the donut from here for later on.
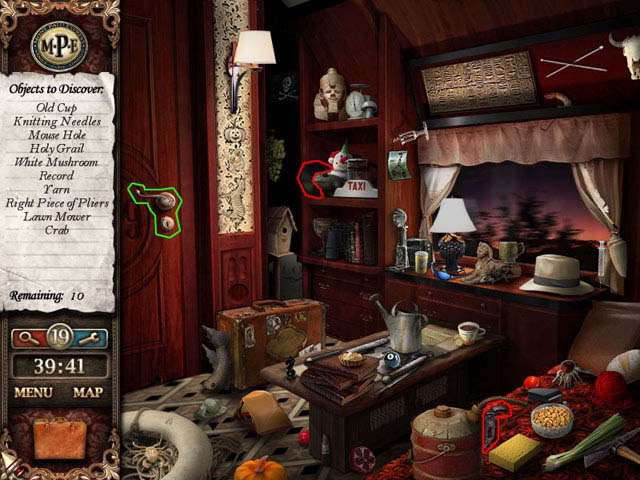
Luggage Cart

- Once you are here you will need to place your record onto the Gramophone, afterwards you will be able to collect all of the Items spelt with grey words.
- Go into your inventory and combine the left and right pieces of the Pliers, then use the pliers on the wires above the fuse box to collect those wires. Next we go back to Cabinet 7.
Cabin 7

- Now that we have the wire from the Luggage Cart we can use it to open the door here, so use the wire on the door knob to get into Cabin 8.
Cabin 8
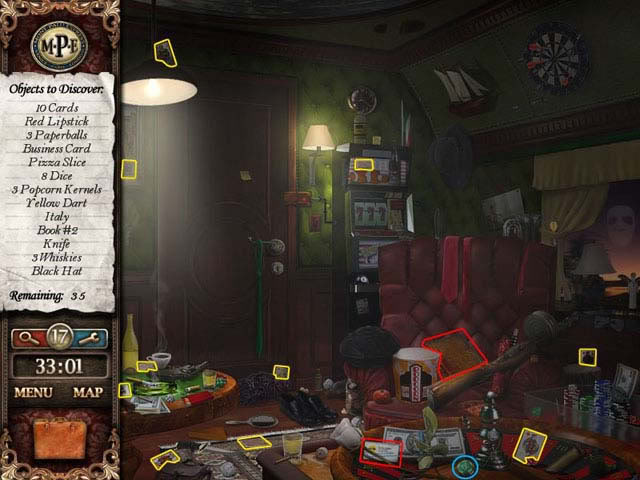
- Besides the regular items that go into your inventory, you will need to collect 10 cards in order solve a puzzle.

- To solve this puzzle just place the cards in the same order as seen in the screen shot.
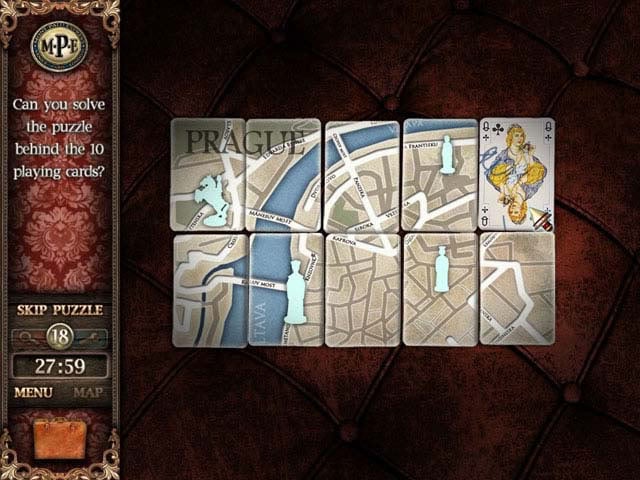
- Then click on each card to reveal the map on the back of the cards.
- After you have completed the puzzle click on the slot machine; you will get knocked out and put back into the luggage cart, and you will gain a new clue for your inventory. You will need to come back to Cabinet 8 and click on the same slot machine that had you knocked out, however this time you will be challenged with a puzzle.
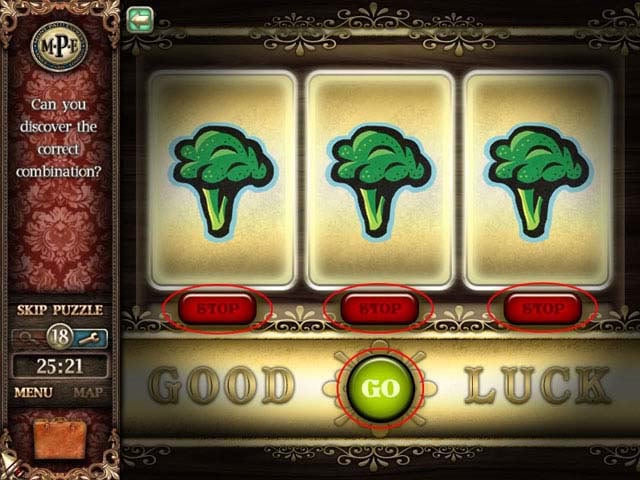
- You will need to get the correct combination of fruits and vegetables in order to clear this puzzle. This is the correct order from left to right CARROT, CHERRY, and BROCCOLI. Click the GO button to start the slot machine, then you will have to press the STOP buttons at the right time to get the correct symbols.
- Look for a pattern if you can, this will help you stop the symbols at the right time instead of depending on luck.
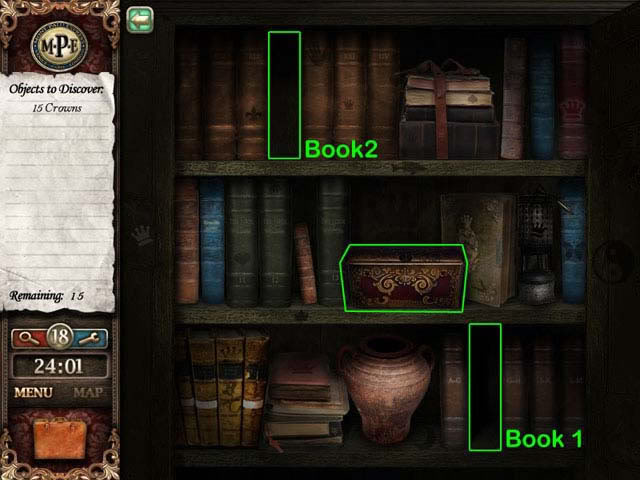
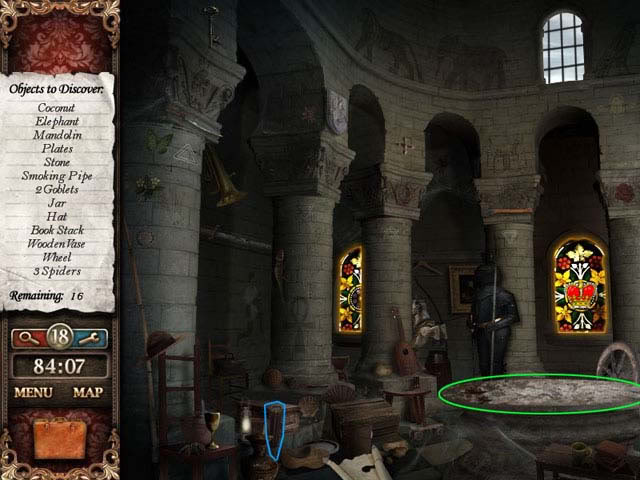
- After the puzzle is completed the locked door in the room will be unlocked, and you will be able to enter the Library. After collecting all of the items in the library room place the books in your inventory into the highlighted areas according to the screen shot. Afterwards the treasure chest on the shelf will open up and you will find a statue.
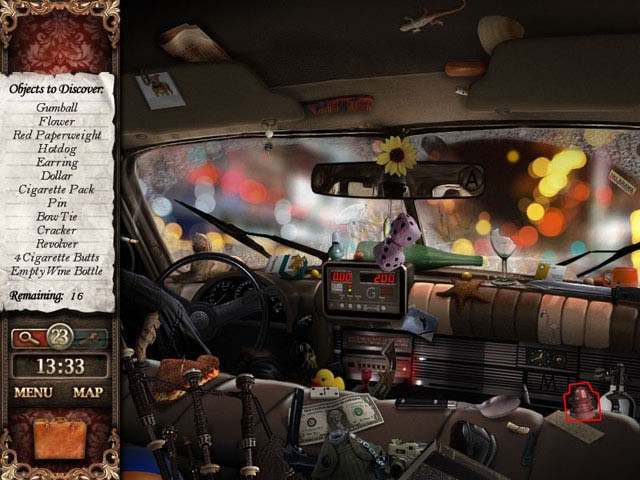
Taxi Cab
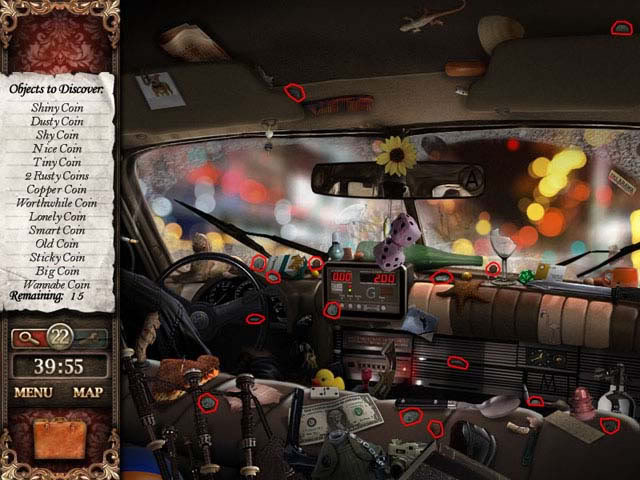
- Collect the 15 coins that have been highlighted in the screen shot to move on to the next scene.
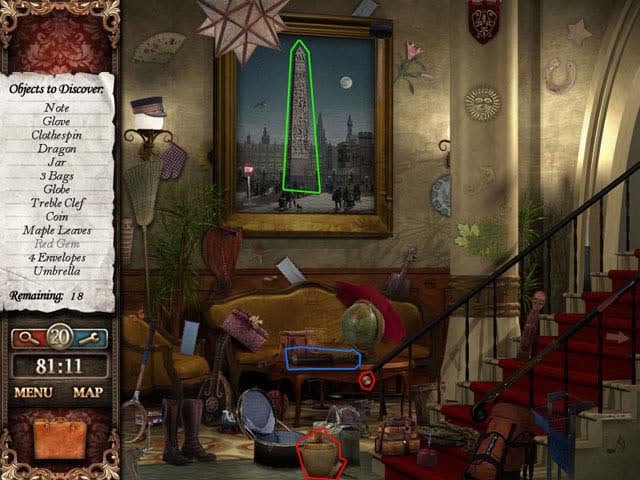
Museum
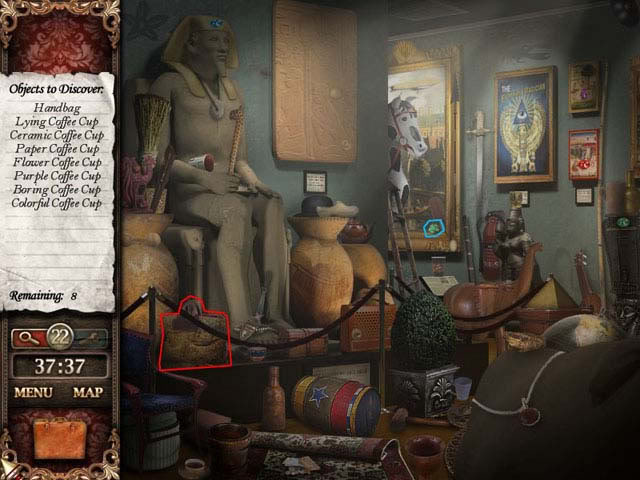
- The most important thing here is the Handbag that belongs to the driver’s Mother. After collecting the items you will report back to the Taxi cab.
Taxi Cab
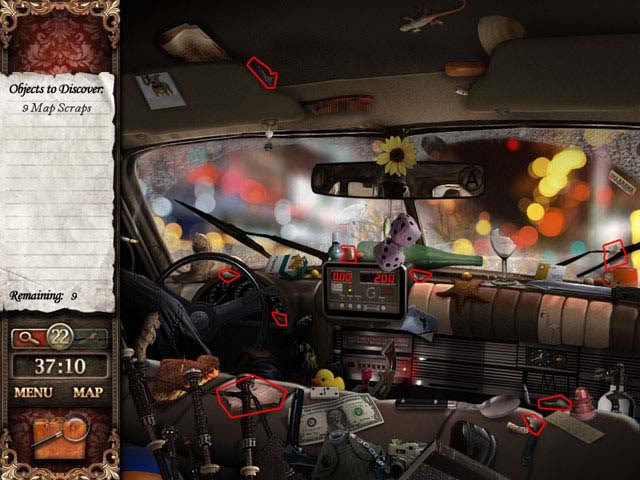
- Look at the screen shot to find the 9 map pieces.
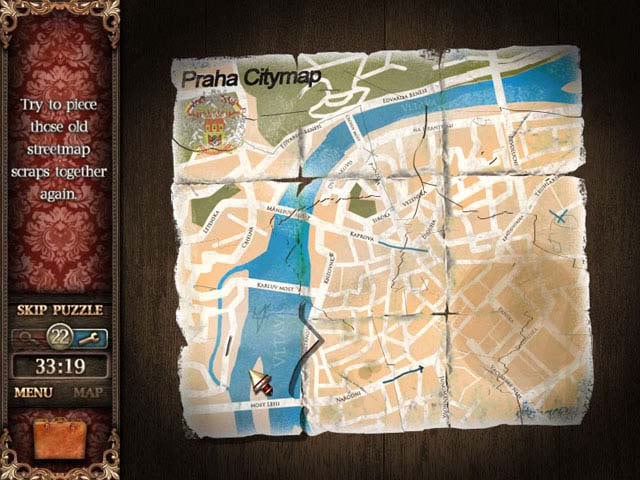
- After you find the map pieces you will have to put a map together like a puzzle. See the screen shot to see how the map is supposed to look.
- After the map is put together go to The Magician on the map.
The Magician
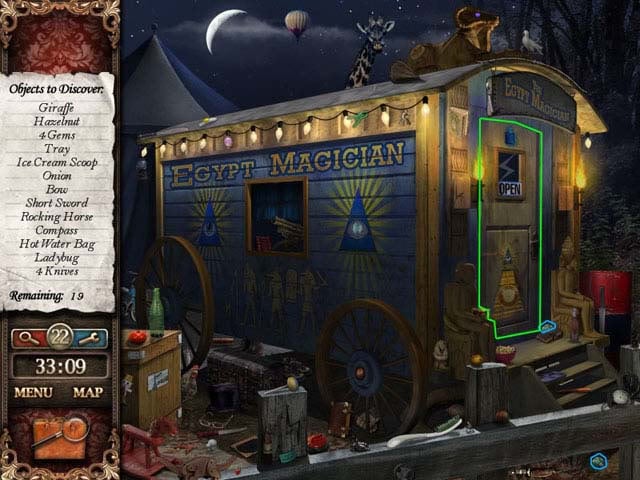
- After collecting all of the items in this scene be sure to go through the door highlighted in the screen shot, and continue collecting items there.
The Magician room
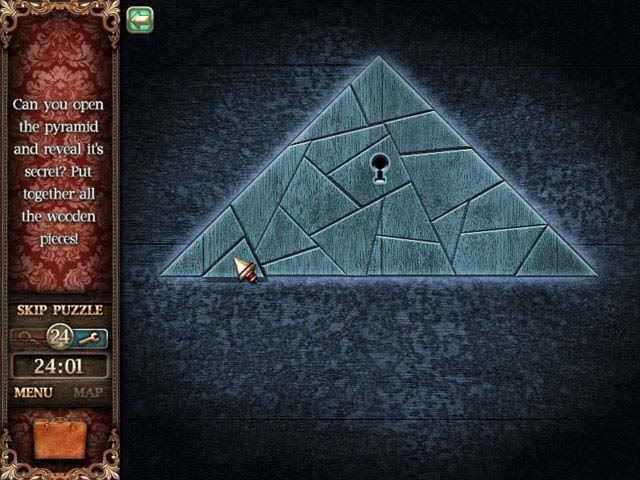
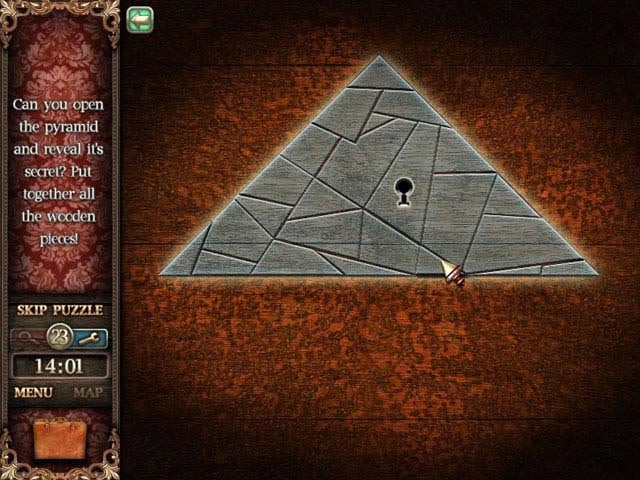
- After collecting the items in this room click on the pyramid that has been highlighted in the screen shot to begin the pyramid puzzle.
The Magician puzzle

- See the screen shot to check how the completed puzzle should look. To move the pieces around click on a piece to pick it up, and click again to drop the piece where you would like to.
- We do not have the key to open the finished puzzle just yet so head over to the Bookstore.
Bookstore
- This is where we get the Pyramid Key; after collecting all of the listed items head back over to The Magician pyramid puzzle.
The Magician Puzzle
- Insert the Pyramid Key into the pyramid puzzle to complete the puzzle and collect half of a Golden Ring. There is nothing else we can do here for now, so head over to the Ancient Museum.
Ancient Museum
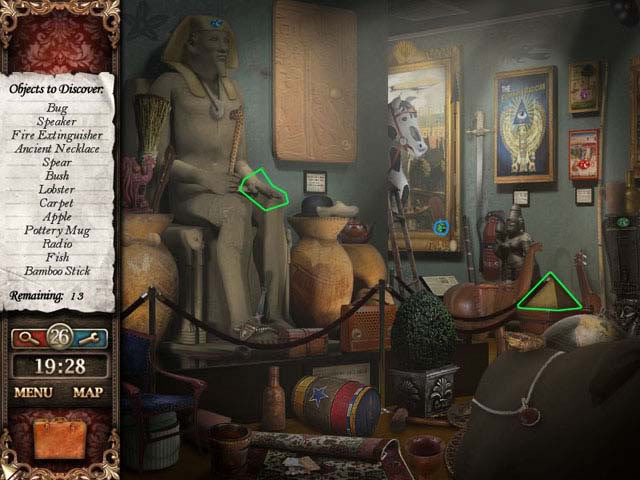
- After collecting the objects in the room click on the pyramid, and complete this pyramid puzzle.
Ancient Museum Pyramid Puzzle
- This puzzle is the same as the last one just complete it then insert the key into the center when you are finished to get the second half of the Golden Ring. Check the screen shot for help on completing this puzzle.
Ancient Museum

- Combine the 2 halves of the Golden Ring in your inventory, and then place it onto the statue’s hand.
- After placing the ring onto the statue’s hand you will receive a golden statue for your inventory. Now it’s time to go back to the taxi to pick something up.
Karell’s Taxi
- The Red Paperweight that we need has been highlighted in the screen shot. When everything has been collected here move on to the Tattoo Shop.
Tattoo Shop
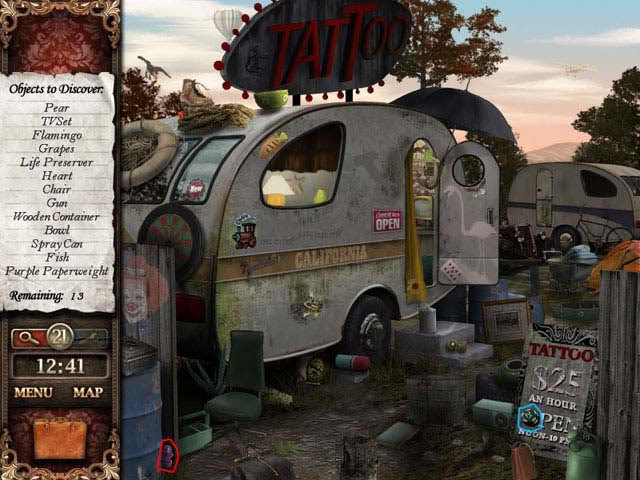
- Be sure to check the screen shot to locate the Purple Paperweight. After finding all of the items on your list go back to The Magician’s room where you saw the first pyramid puzzle.
The Magician’s room
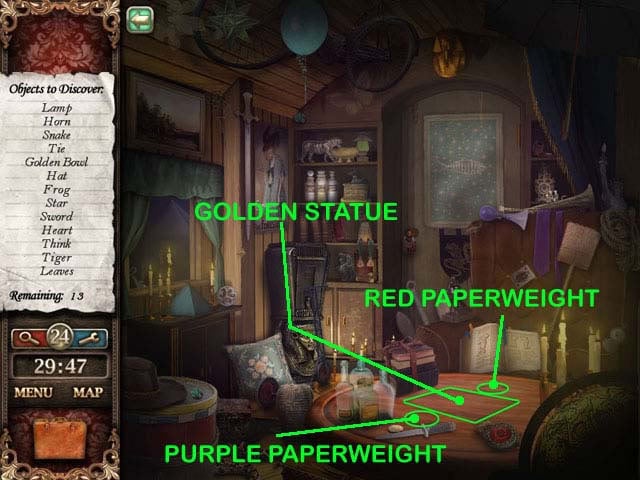
- We need to use both the paperweights here, check the screen shot to check where to place the paperweights, and where to get the golden statue. After you grab the statue, head for the Clocktower.
Clocktower
- After clearing all the items on the first floor, you will have to solve a puzzle at the top floor.
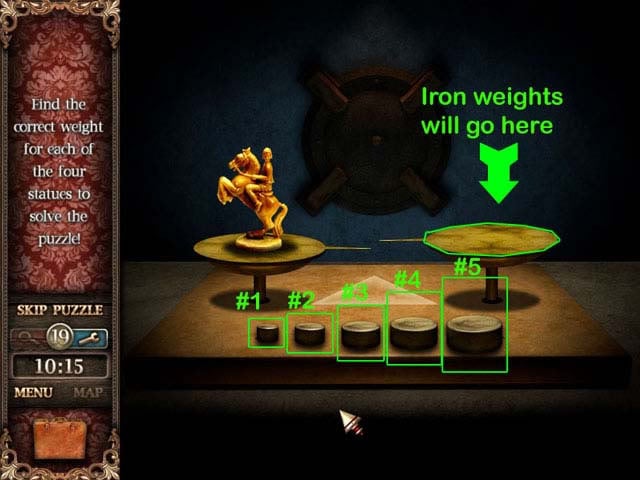
- For this puzzle you will have to match the weight of the statue on the left side of the scale with the iron weights on the right side of the scale. The first statue matches the weight of the 3rd iron weight, so click on the 3 iron weight to balance the scale.
- Here are the iron calculations for each of the weights: 1st statue = 3rd weight, 2nd statue = 2nd + 3rd weight, 3rd statue = 1st + 5th weight, and 4th statue = 1st + 3rd + 5th weight.
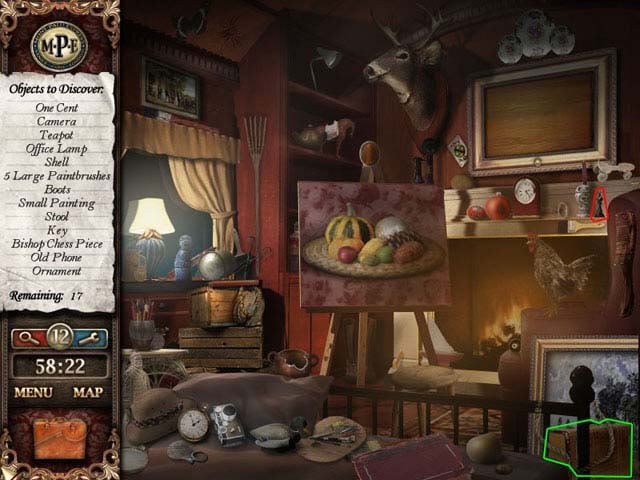
Chapter SEVEN- Heading to Paris
- First we should start at the Dining Cart
Dining Cart
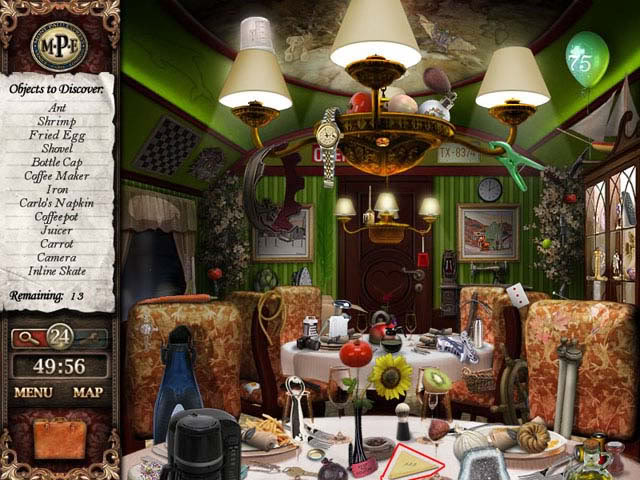
- In the screen shot Carlo’s Napkin has been highlighted, be sure to pick it and find the rest of the items on your list. After everything has been found in this room, head over to Cabin 8.
Cabin 8
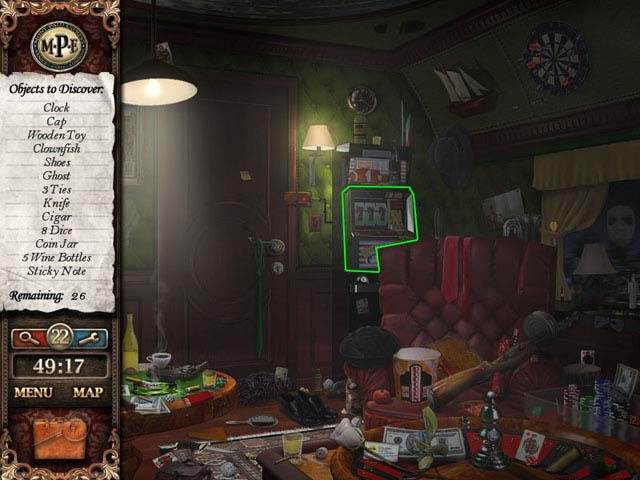
- After finding all of the items on your list, head over to the slot machine for another puzzle.
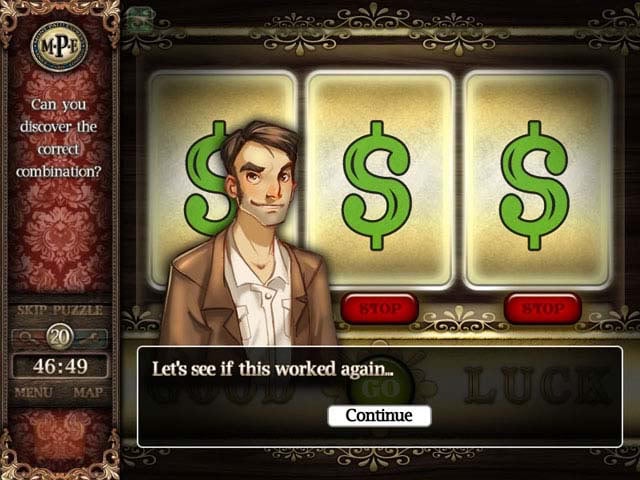
- This puzzle is the same as last time, just be sure that this time the slots have the "$" sign on them. After you complete the slot machine puzzle the closet door will open again.
Cabin 8 Book room
- Once you are here be sure to clear everything on the list, other than that we will have to skip the puzzle here and go to the Bar Cart.
Bar Cart
- See the screen shot for the location of the small key, the puzzle location in the painting, and for the room you must enter after the painting puzzle is complete.
Bar Cart Painting Puzzle
- For this puzzle you will have to click on certain parts of the puzzle that match the 8 circles to the left and right of the main painting. The spots that must be clicked have been highlighted in the screen shot. Once you are finished with this puzzle enter the room through the door to the right of the puzzle.
Bar Cart Back room
- The Hammer that we need for a puzzle has been highlighted in the screen shot. When you are finished here go back to the Cabin 8 Book room to use the Hammer.
Cabin 8 Book room
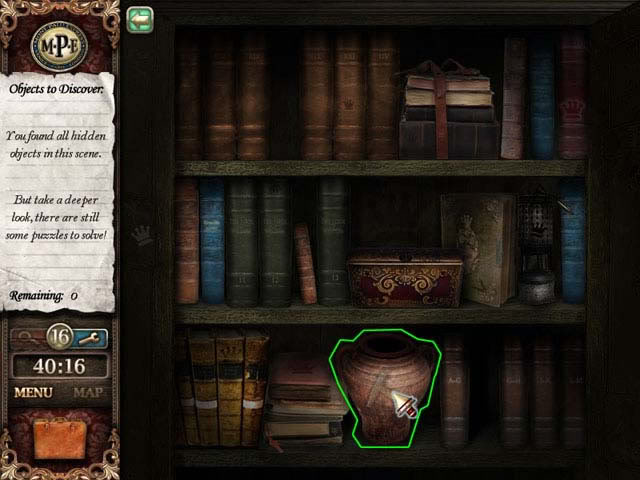
- There is a vase at the bottom of this scene, use the hammer on it to uncover the 3rd piece of the amulet. From here head over to the Kitchen Cart.
Kitchen Cart
- Collect all of the items here then go to the luggage cart.
Luggage Cart
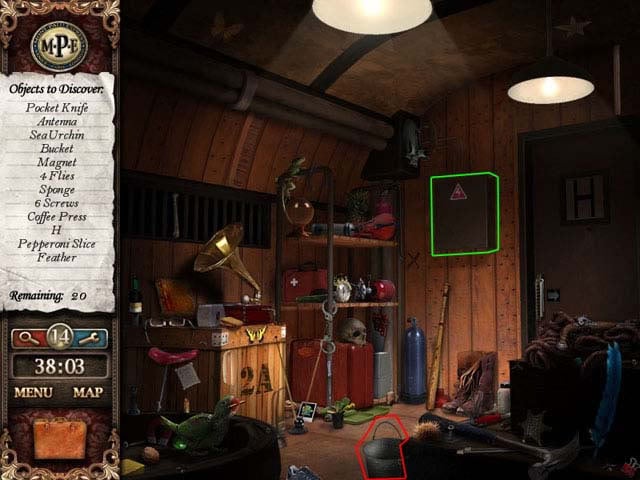
- The bucket has been highlighted in the screen shot; we will need this bucket to help us out later.
- After the rest of the items are collected, head back over to the Kitchen Cart and fill the bucket with water by using the kitchen pipe, then come back to the luggage cart for a puzzle.

- Use the Small Key that you have to open the fuse box, and start the puzzle off.
Luggage Cart Puzzle
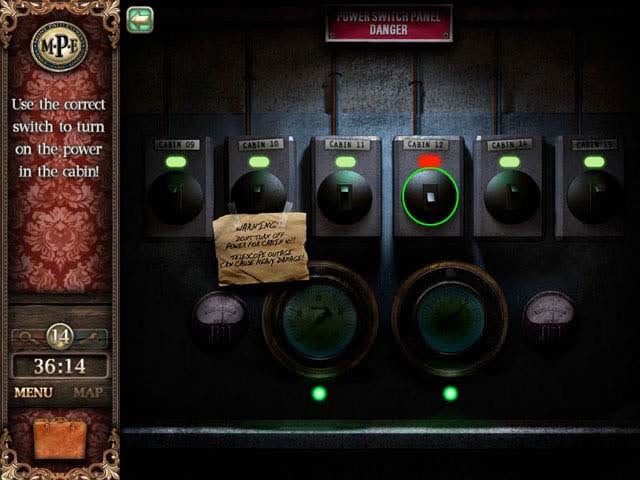
- Turn on Cabin 12’s power so that we can check inside Cabin 12.
Cabin 12
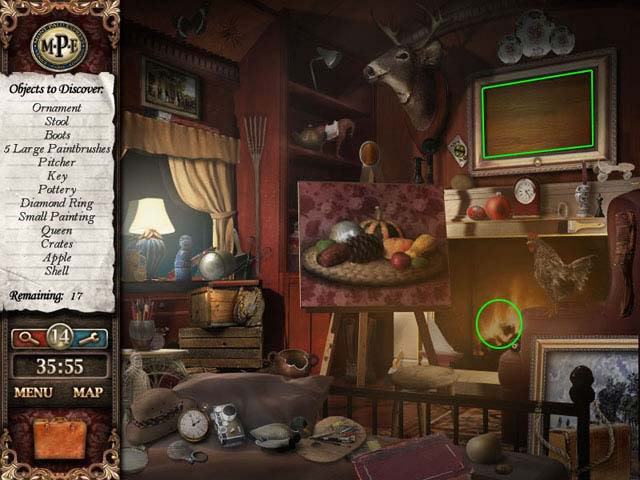
- After clearing the entire item list get ready for a puzzle.
- First you need to get that bucket of water that you have, and then use it to put out the fire in the fire place. The fire will come back so you will need to click on the empty picture frame.
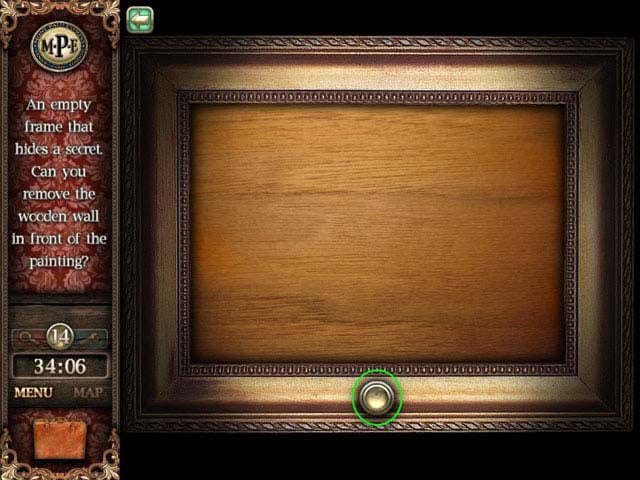
- Click the button you see right below the picture frame as seen in the screenshot to uncover the hidden painting in the empty frame.
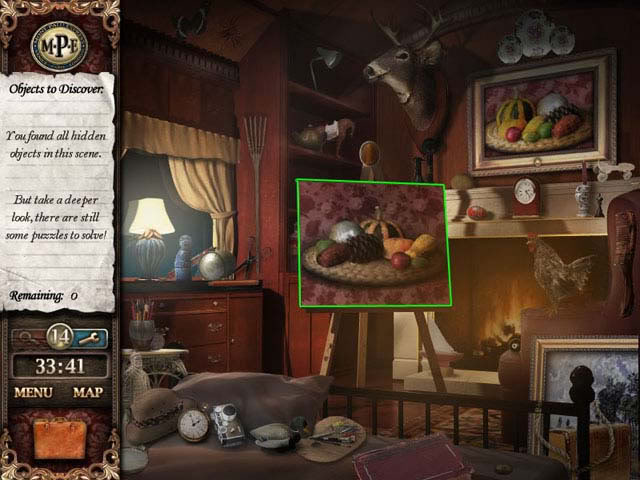
- Both the paintings in this room are similar, but not exactly the same. In this puzzle it is our job to make sure both paintings look identical. Begin by clicking the puzzle that is highlighted in the screen shot. Rearrange this painting until it looks like the other painting.
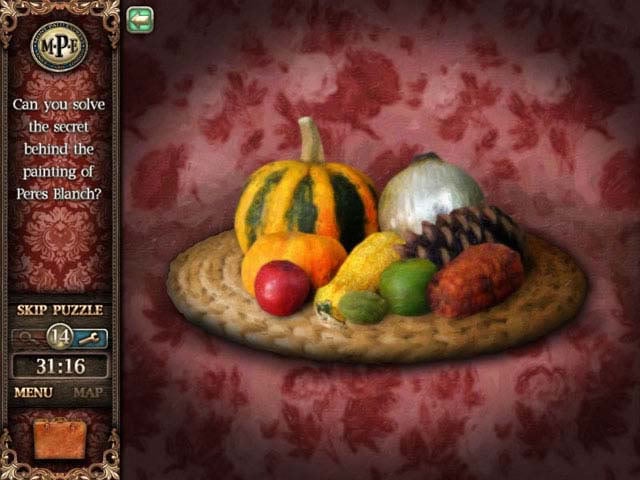
- The items in the painting will snap down when you put them into their proper places.
Eiffel Tower
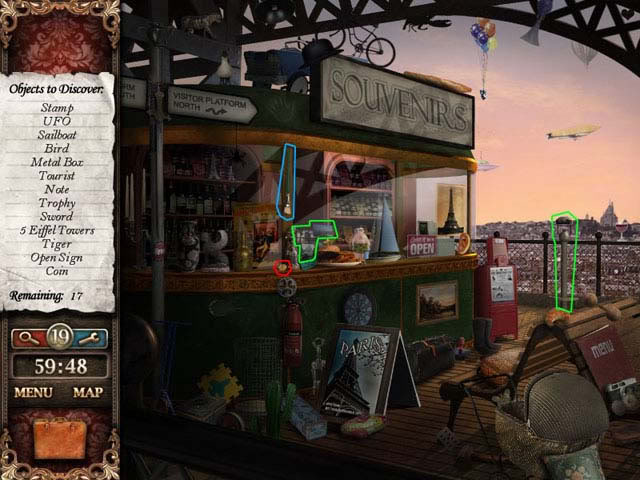
- After collecting the coin along with the other objects click on the post cards before checking out the telescope. You will need to insert the coin that you found into the telescope to use the telescope.
- Look at the diary in your inventory; there will be 3 names near the top of the right page.
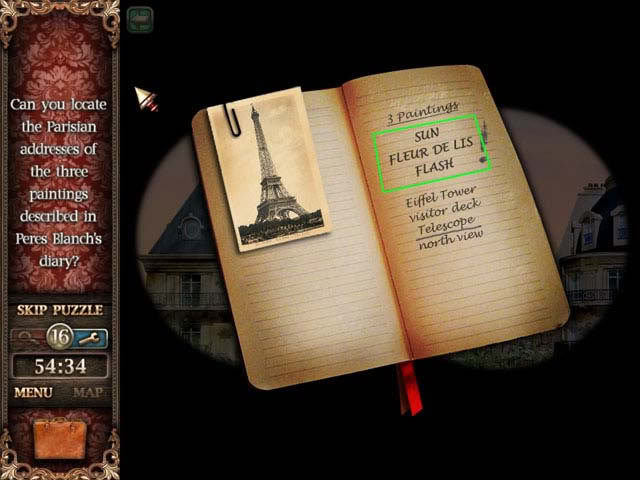
- (For example) My 3 names are Sun, Feur De Lis, and Flash. (See screen shot for details)
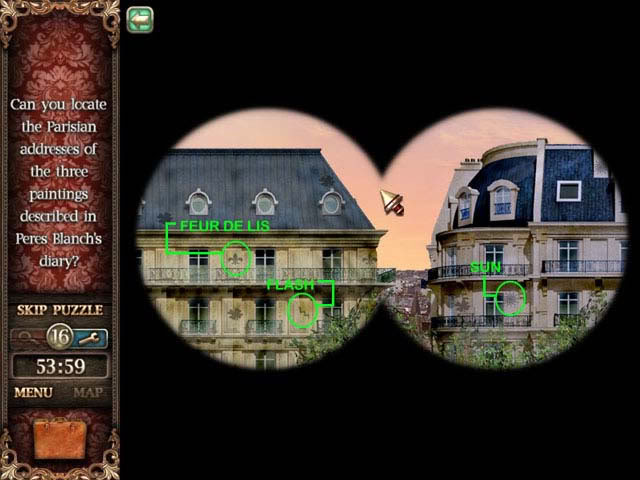
- So I have use the telescope to look for these 3 symbols on the buildings (see screen shot), and click on the symbols to collect them. Be sure to check the buildings on the right and left edges of the screen for symbols. There is more than 1 of each type of symbol on these buildings; keep collecting your 3 symbols until the puzzle ends.
- After the puzzle is complete go to the Rue Vineuse.
Rue Vineuse
- There is nothing really special about this scene; next go to the Souvenirs scene.
Souvenirs
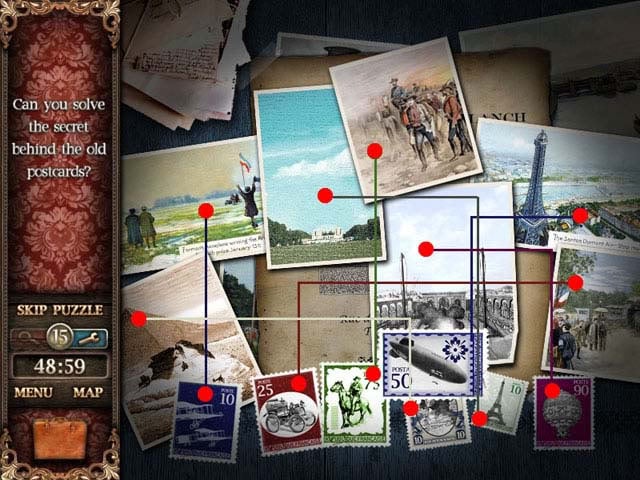
- In this puzzle you need to place the stamps onto the matching postcards. Use the screen shot to check which postcard each stamp belongs to. Next go to Champ Elysees.
Champ Elysees
- There are no puzzles here to solve; you just have to collect the objects listed in the scene. Afterwards head over to the Rue de Bourgogne.
Rue de Bourgogne
- There is nothing special here, but there is a bonus item located in the screen shot. Be sure to head over to the Winery Blanch next.
Winery Blanch
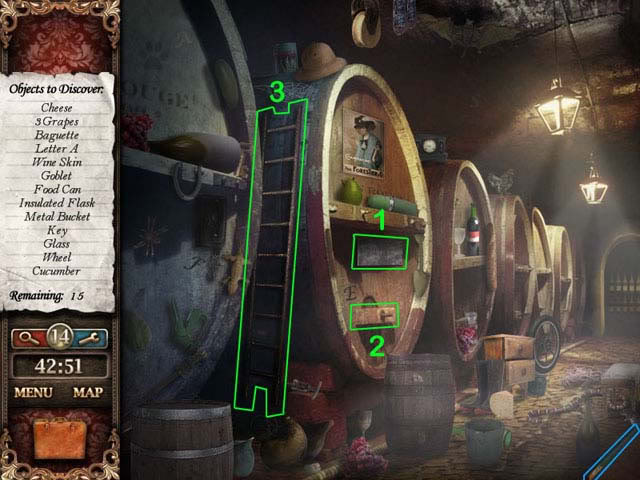
- After collecting the listed items in the room follow the steps in the screen shot to get into the next scene.
- Step 1: click on the metal sign to take it down.
- Step 2: use your faucet where the box labeled 2 is in the screen shot. Then click on the faucet to release the wine from the barrel
- Step 3: Climb up the ladder to get into the wine barrel.
Inside the Wine Barrel
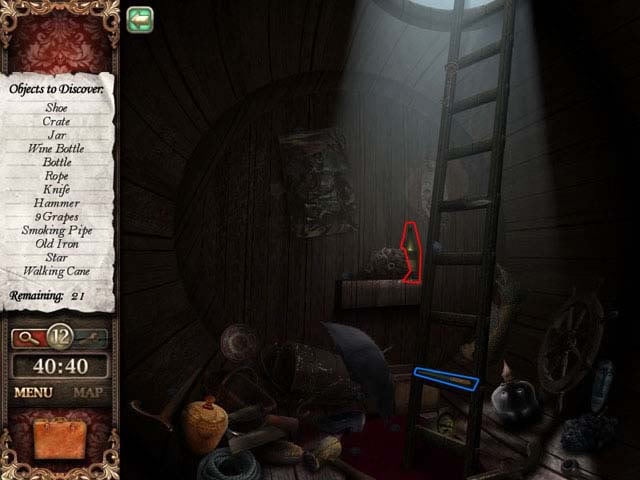
- You must collect the Wine Bottle here; we will be using it for a puzzle very soon. After you are finished collecting the items inside of the Wine barrel do not leave the Winery Blanch just yet.
Winery Blanch
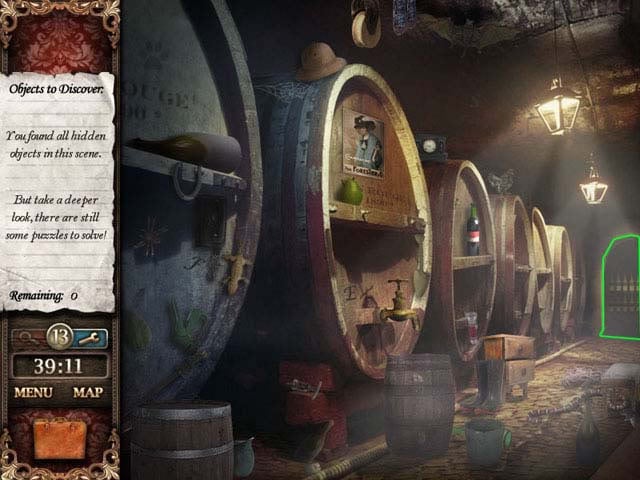
- There is a door all the way in the back with a puzzle behind it. Open the door to see the puzzle.
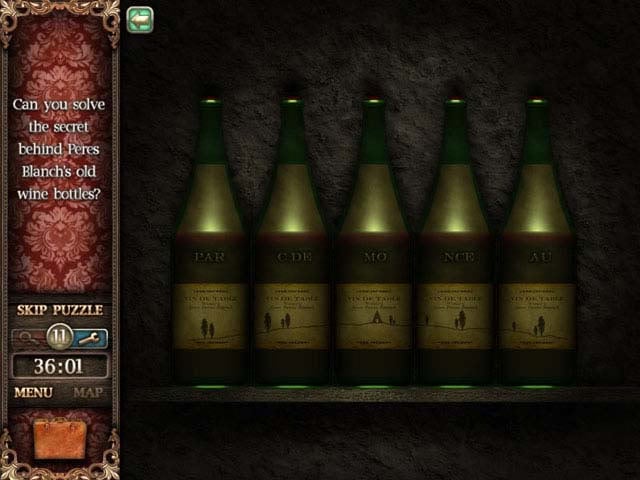
- The goal of the puzzle is to switch the positions of the bottles around until it spells Parc de Monceau. See the screen shot for more details on this puzzle.
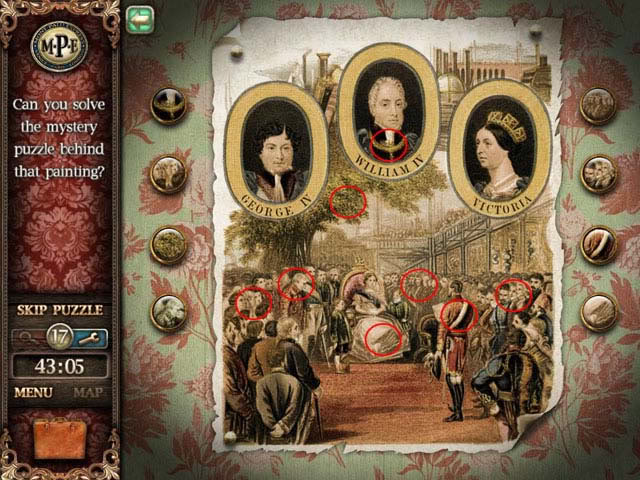
Eiffel Tower
- Go back to the Eiffel Tower and click on the newspaper by the telescope to meet one of the 5 criminals. After you are finished talking head to Parc de Monceau.
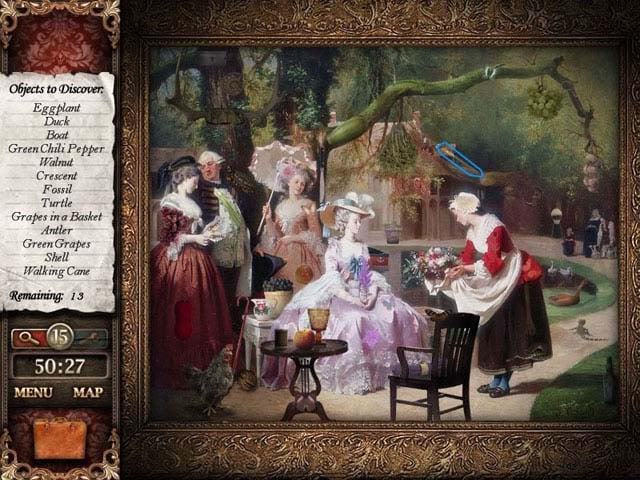
Parc de Monceau
- Collect all of the items to move on to the second part of this park.
Parc de Monceau part B
- After collect all of the items here go through the pyramid door to see the puzzle.
Parc de Monceau Puzzle
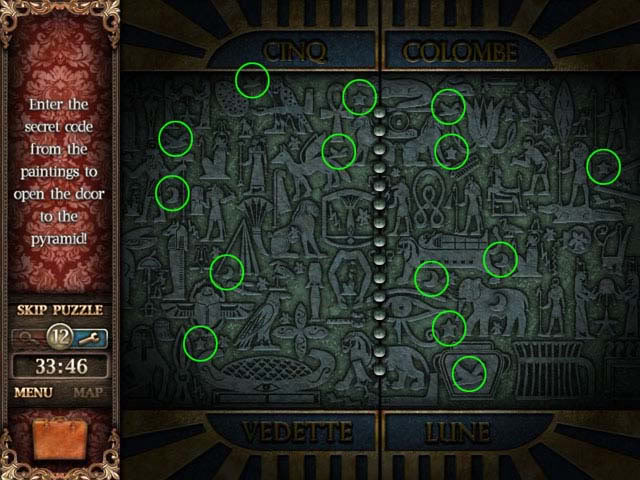
- In this puzzle you have to locate all of the Doves, Stars, and Moons in the scene. Everything has been highlighted in the screen shot.
- Upon completion you will get another piece of the treasure, and chapter 9 will begin.
CHAPTER NINE – Heading to London
Cabin 10
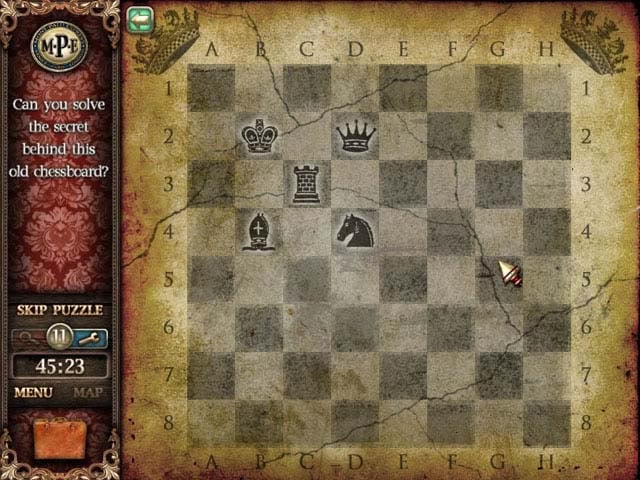
- After everything is collected here click on the telescope to talk to Lord Penroy, then when you two are finished talking click on the weird picture on the wall until he tells you to leave. Afterwards come back in and he will be gone; click the weird picture one more time to see the astrology puzzle, and click on the puzzle to make your character talk.
- Then Click the chess board on the floor to see the Chess board puzzle. Once you have a close up of the board on your screen be sure to click it to make your character talk. After taking a look at both puzzles exit the room and multiple Cabin doors will open up. We will start with Cabin 2.
Cabin 2
- The Knight Chess piece has been highlighted in the screenshot. Next go to Cabin 3.
Cabin 3
- The Tower Chess piece is highlighted in the screen shot. Next is Cabin 8.
Cabin 8

- The Queen Chess piece is highlighted in this screen shot. The next place is Cabin 12.
Cabin 12
- The Bishop Chess can be found here, and you will need to open up the suitcase highlighted in the screen shot to collect all of the items in this room.
Cabin 12 Suitcase
- Check the screen shot to see where the Zodiac Sign Map is that needs to be added to your inventory. Next we go back to Cabin 10 where we started.
Cabin 10 puzzles
- First you need to click on the Telescope that looks out of the window to get the names of 4 important zodiacs.
- Next go over to the zodiac puzzle on the wall and keep pressing the highlighted buttons from the screenshot below until your board looks exactly like the one in the shot. Each of the buttons controls a ball in the middle as you will find out.
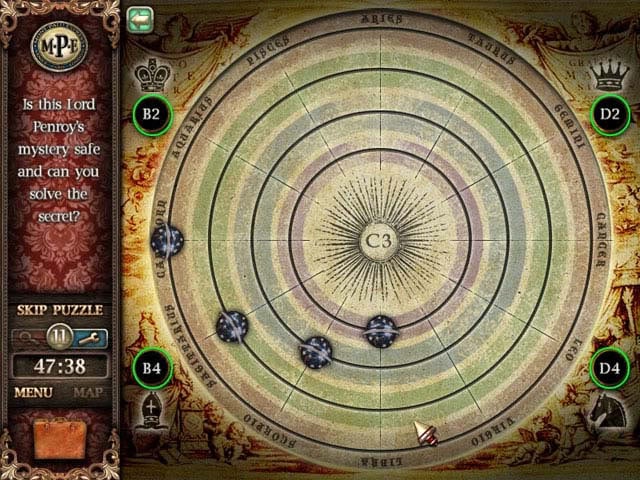
- After that go over to the Chess puzzle on the floor and place the Chess pieces from your inventory on the board identical to how the pieces are placed in the screen shot.
- After you complete this puzzle you will find another clue ending this chapter right here.
- Let us begin in Hyde Park…
Hyde Park
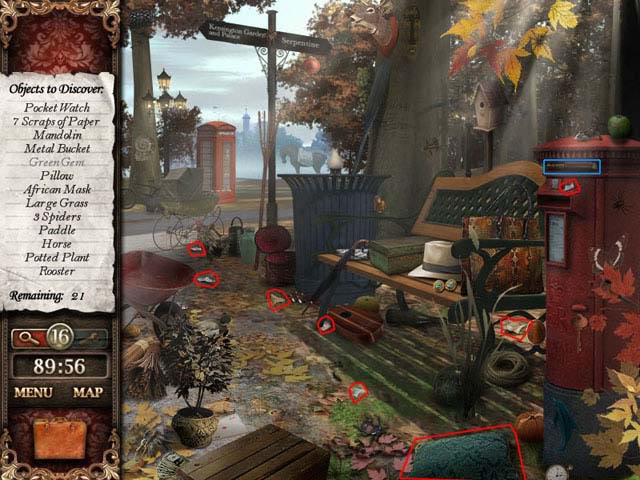
- You will need to pick up 9 scraps of paper that will later on form a puzzle, so be sure to check out the screen shot to locate the scraps.
- There is a Green Gem that is in green letters on the list; to find this gem pick up the pillow at the bottom of the screen. The gem will be hiding under the pillow.
Hyde Park Scrap puzzle
- Use the screen shot to see how the finished puzzle should look. Next go to the Phone booth.
Phone Booth

- There is a Cyan Gem hidden here but we will not be able to get it just yet, so head over to the Tower of London when you are finished here.
Tower of London
- There is a suspicious look table in this room, but there is nothing we can do here for now. Go over to the Junkyard to continue on.
Junkyard

- In the junkyard we will need to pick up a Blue Gem; it is hiding underneath the wooden box. There is also a Pyramid here that we will need later on. After this place, head over to the Hotel.
Hotel
- There is a Red Gem hidden behind the Jar, and a coin that needs to be collected; check the screen shot for the Jar’s, and the coin’s location.
- There is also something else that needs picking up; click on the object in the painting that is highlighted in the screen shot. Afterwards head over to the Phone booth again.
Phone Booth
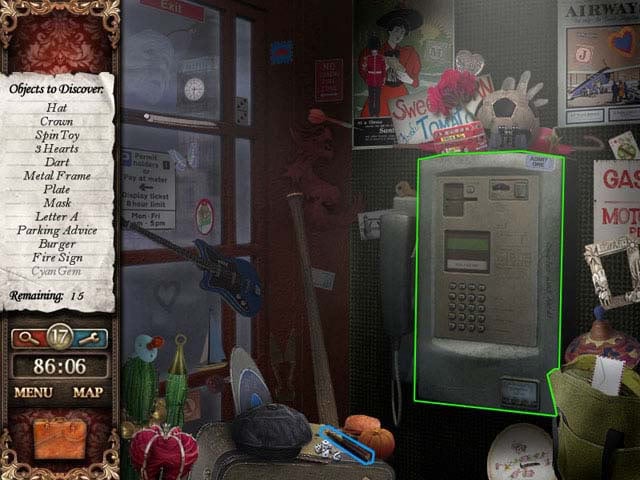
- Place a Coin into the Phone to get a Cyan Gem. Next we will have to go to the Tower of London again.
Tower of London
- Place the pyramid that you have in your inventory onto the round table and a beam of light will enter the roof of the tower and shine into the pyramid. All you have to do now is take each of the different colored gems from your inventory, and place them one by one into the pyramid on the table.
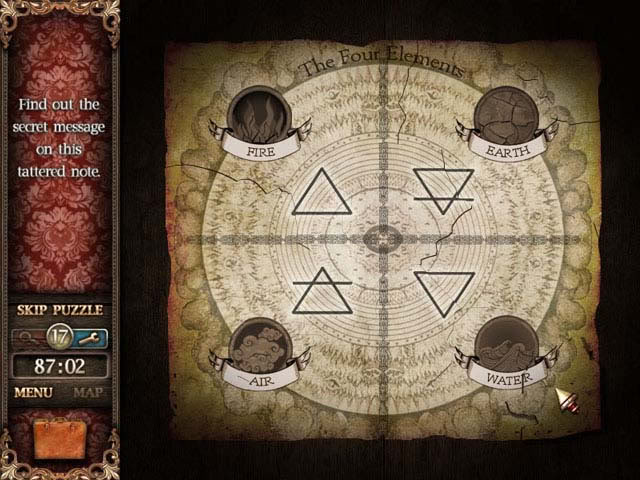
- After you have used all of the gems you will receive an extra clue for your element chart. From here move on to Cleopatra’s Needle.
Cleopatra’s Needle
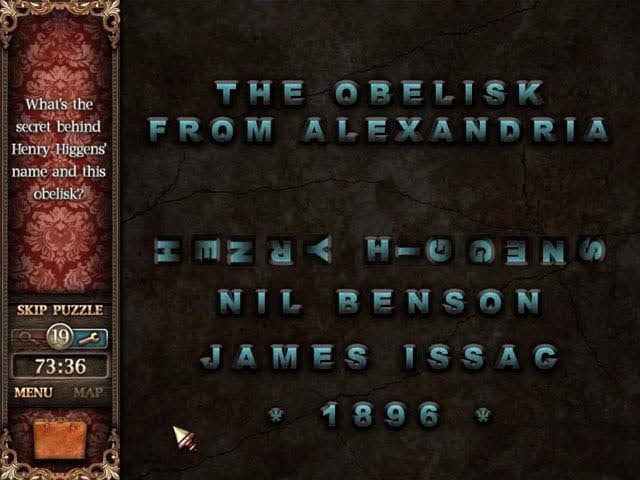
- The first thing that you will be faced with is a puzzle. The letters in the name Henry Higgens will need to be rotated to the correct angles in order for this puzzle to be completed. See the screen shot for a view of what the letters should look like.
- If it looks like you are finished and nothing happens flip the "S", and the "I" a couple of more times; they look the same even when they are facing the wrong way. After the puzzle is finished you will be heading down into a tomb.
Cleopatra’s Needle Tomb

- Click the box labeled as #1 in the screen shot on your screen to start the first puzzle.
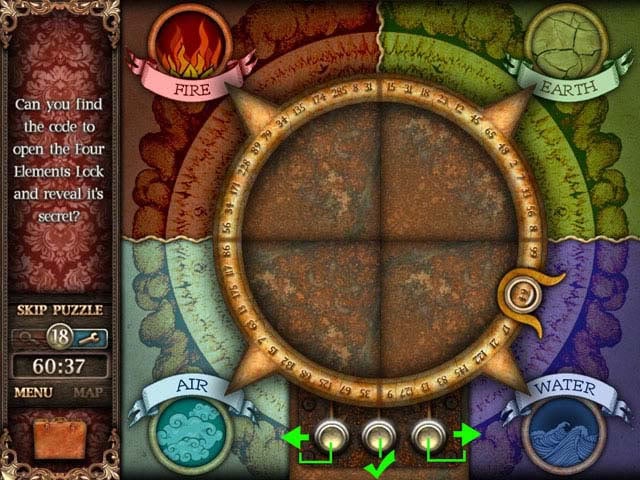
- This puzzle is split into 4 parts, because the represent the 4 elements. There are 3 buttons down at the bottom of this puzzle; the buttons to the left, and right of the middle button move the number selector to the left, and the right. The middle button selects the number that the number selector is currently on.
- You will have to enter 2 numbers for each of the 4 pieces of this puzzle. Here are the numbers for each element:
- Fire = 171 + 174
- Earth= 15 + 56
- Water= 86 + 132
- Wind= 32 + 122
- For each combination that you enter correctly a part of the puzzle will open up until the key is revealed.
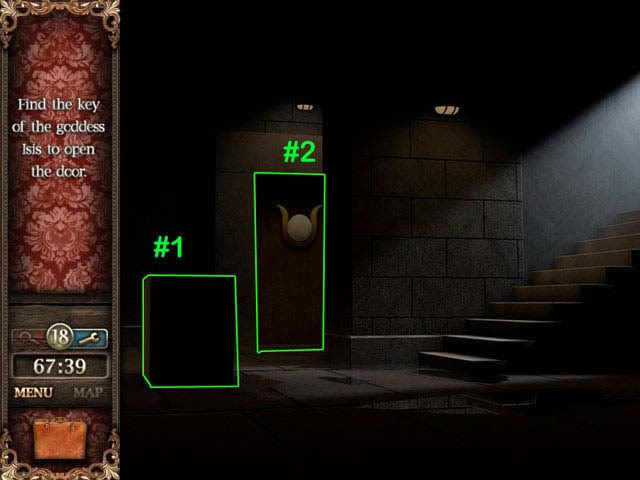
- Use the key you just found to go through the final door (labeled #2 in screen shot).
“;

More articles...
-
Best Horror Games On Itch.io – July 2026
Across a bounty of subgenres. -
Grow A Garden 2 Base Price List
What's the most valuable crop? -
Evomon Best Starter [Leafbun, Blazpup, or Bubble?]
Grass-type, Fire-type, or Water-type?