![Hololive Dreams Tier List [Best Cards]](/wp-content/uploads/2026/07/hololive-dreams-tier-list.jpg "Hololive Dreams Tier List [Best Cards]")
Hololive Dreams Tier List [Best Cards]
The best cards for the best performances.


![Iron Soul Dungeon Weapon Tier List [Best Weapons]](/wp-content/uploads/2026/07/iron-soul-dungeon-weapon-tier-list.jpg "Iron Soul Dungeon Weapon Tier List [Best Weapons]")

The Secret of Chateau de Moreau is a murder mystery that places you in the role of accused, as you try to solve the murder of your foster father and prove your innocence. Gamezebo’s walkthrough will provide you with all of the guidance you’ll need to solve the crime and clear your name.
The Secret of Chateau de Moreau is a murder mystery that places you in the role of accused, as you try to solve the murder of your foster father and prove your innocence. Gamezebo’s walkthrough will provide you with all of the guidance you’ll need to solve the crime and clear your name.
Go to Antoine’s Room, obtain the yearbook, and enter the passcode 3432 to open the safe. Graduation date.
Use either of the two pieces on the box. The two pieces will appear on the bottom. Match the piece to the appropriate blank, which displays a red-lined shape. Press all of the red-lined pieces to open the box and obtain the will.
The answer at the dinner should be ‘I was at school… that day.’ ‘Please give me time!’
Choose any question and move to the Living Room (3F). ‘Search’ – Statue of the angel and the bottom of the statue. To obtain the key, pass through the 1F Right Corridor to the Garden Entrance, and click the fountain using ‘Search.’ Move to the Living Room and click ‘Present’ – ‘Use’ the rusty key – ‘Search’ bottom of the statue – ‘Search’ statue – ‘Use’ the sword on the statue – ‘Search’ bottom of the statue.
Move to the Garden Entrance, and ‘Use’ the pipe handle. Move to Tower, 1F and Tower, 2F. Go back outside and click ‘Search’ to retrieve the pipe handle. Click the center of Tower, 2F. Turn the pipe handle clockwise as far as it can go, and then counterclockwise all the way. Obtain Punch Cards A & B. Return to the mansion to talk to Ervan, and then move to Ulic’s Room. Click ‘Search’ to obtain the pocket watch on the floor. Move to Catherine’s Room. ‘Present’ the pocket watch. ‘Search’ the bedside pillow to obtain the red die.
Move to the Banquet Hall (1F). Move to the Boiler Room (B1). ‘Talk’ – ‘Have you ever seen this pocket watch?’ Move to the Banquet Hall. Move to the Kitchen. ‘Search’ – Obtain the wooden horse on the floor. ‘Search’ – Click the cabinet. ‘Talk’ – ‘Has Ulic ever been here?’ Move to the Maid’s Room (B1). ‘Present’ the wooden horse. Obtain the music box. Move to the Kitchen. ‘Search’ the cabinet. Enter the password ‘SOUP’ (1s 2o 3u 4p) inside the Kitchen. ‘Search’ the cabinet. Obtain the recipe and the poison. Move to the Boiler Room (B1). ‘Present’ the recipe. Move to the Right Corridor (1F). Meet Marie. Move to the Kitchen. Move to the Maid’s Room. ‘Present’ the recipe. Bump into Sandra after leaving the room. Move to Ulic’s Room. ‘Search’ the deer to obtain the black die.
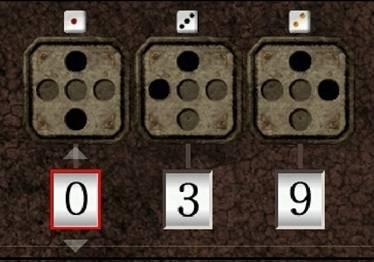
Move to the Garden Entrance. Move to Giz’s Room. ‘Talk’ – ‘Does Giz have a die?’ Obtain the yellow die. Move to the Count’s Study. Fit the dice to solve the puzzle that resembles the hands of a clock. The top is always colored black, and the center is always empty. If only the top circle is colored, enter 0. If the left circle and the top circle are both colored, enter 9. If the right circle and the top circle are both colored, enter 3. If the top circle and the bottom circle are both colored, enter 6.

‘Use’ the splendid key on the box on the table. Have the first punch card show only the numbers and the red dot at the bottom. Have the second punch card overlap the first punch card and turn it to show the password, which is 8620.
‘Use’ one of the punch cards on the diary (on top of the desk). The diary screen displays 2 blue check signs and 1 red check sign. Select each punch card, and while facing the appropriate colors, move the punch card sideways to reveal only the identical colors that form a word. The butler will answer, so answer in the following order: 1, 3, 2. Move to Giz’s Room. ‘Talk’ ‘Has Ulic ever gotten into an argument?’
To move to Chapter 3, answer in the order of ‘Ulic’s Quarrel,’ ‘Secret Meeting in the Kitchen,’ ‘1. He heard them talking about Ulic’s lover,’ ‘Pocket Watch,’ ‘Ulic is not the Count’s murderer,’ ‘Count’s Diary,’ ‘Music Box.’
Exit the room. ‘Move’ to the Piano Room (in front, 2F). ‘Search’ the left-side wall. ‘Search’ the metal box. ‘Search’ the unusual sheet music. ‘Search‘ the notepad beside the vase. ‘Use’ the unusual sheet music for Do, La, Fa, and Mi. According to the notepad, the notepad changes into ‘café.’ Using the password for the box, obtain the crystal. Exit the room and move left to meet Felix. Move to the Count’s Room (3F). ‘Search’ the table next to the sofa. ‘Use’ the crystal on the table. ‘Search’ the ceiling by using different combinations of windows (open or closed) to obtain 7 hieroglyphic notes. ‘Move’ to the Piano Room. ‘Search’ the left-side wall. Press according to the shapes on the notes.
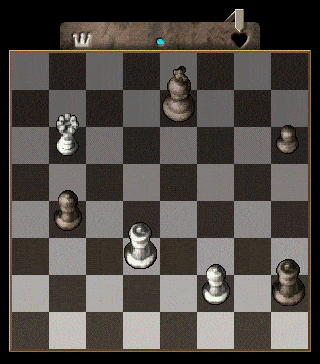
Exit the room and bump into Nolben. Move to the Chess Room at the 2F Left Corridor. ‘Search’ the chessboard. ‘Search’ the coat on the chair to obtain the silver ring. Move to Ulic’s Room. Move to 1F Right Corridor. Move to the Chess Room. ‘Search’ the chessboard. ‘Search’ the chess pieces (captured pieces to the right of the chessboard). Move to the Banquet Hall (1F). Move to the Kitchen (choice does not matter). ‘Search’ the kitchen scale. ‘Use’ the chess pieces on the scale. ‘Move‘ to Room 108. Obtain the mysterious ring. ‘Search‘ the bed to obtain the King piece. Move to the Chess Room. ‘Use’ the King piece on the chessboard. Place the ‘King, Queen, Rook, and Pawn’ on the black section, and ‘King, Queen, Bishop, and Bishop’ on the white section. 109:109 (The color does not matter. The single piece is the pawn, the castle-like piece is the rook, the small piece is the bishop, and the remaining pieces are the Queen and King).
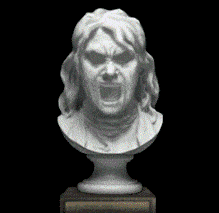
Move to the Boiler Room. Move to the Banquet Hall (1F). Move to the Memorial Hall (move through the Living Room on 3F). Match the description of each pedestal to the bust. The bald man is the ‘old man,’ the one with his mouth open is ‘anger,’ the thinking person is the ‘wise one,’ the person looking at the sky literally looks up, the one with a sad expression is the ‘saddened one,’ and the smiling one is the ‘one who laughs last.’
Move to the Garden Entrance. Move to the Tower, 1F. Observe the square tile in the center of the tower. Move to the Boiler Room. ‘Question’ ‘How many floors does the tower have?’ ‘Search’ the toolbox. ‘Move’ to Tower, 1F. Observe the square tile in the center of the room. Written on the left wall of Tower, B1 is r5v5rs5. 5=e. reverse. Enter it into the right wall. Move to Tower, 2F and, this time press all other signs except for the original 7 signs. Move to the Garden Entrance and leave the tower.
Move to Sandra’s Bar. ‘Question’ ‘Has Mr. Nolben ever been here?’ Exit the room and talk to Leah to the left. Move to the Banquet Hall (1F). Avoiding the chandelier – An arrow will shine up or down within a few seconds. Press the shining arrow button. Automatically move to the 2F Study. ‘Search’ the crossbow. ‘Present’ the yearbook. ‘Move’ to Catherine’s Room. ‘Present’ the teddy bear. Exit the room and talk to Alberto. Obtain the Count’s book list. Move to the Count’s Study (3F). ‘Search’ the painting in the study to reveal a safe. Find the books listed in the book list. The number of the book is the combination for the safe in the prescribed sequence. (Ex: 1st Shelf – #6 We Were Not There -> First combination to the safe is 6) Safe password is 6740. After opening the safe, obtain the study drawer key and IOU. ‘Use’ the key to open the drawer below the box and obtain the old piece of paper. Nolben suddenly comes and disappears. ‘Search‘ the painting which has changed. The new safe password is as written on the piece of paper. Roman numerals refer to the shelf number, and numbers at the bottom refer to the book number. (Ex: III, 4 -> 4th book on the 3rd Shelf -> ‘The War of the Gods’ -> The safe password is 25362. Obtain the old letter.
To move to Chapter 4, answer in the order of ‘IOU’, ‘Mr. Nolben’, ‘Old Photo’, ‘Drunken Guest’, ‘Suspicious Ring’, ‘Mr. Nolben, what was it that you saw?’, and ‘Old Letter.’
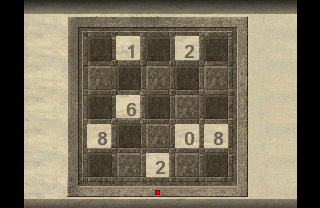
‘Search’ the wall. ‘Move’ to the Boiler Room. Obtain the blueprint. ‘Move’ to the Living Room (3F).
‘Search’ the wall. Press the corresponding tile on the wall according to the blueprint (regardless of order). For example, (7, 3) refers to the tile 7th from the left and 3rd from the top. R refers to right wall and L refers to left wall.

Move to the 3F Right Corridor. Move to Room 108. ‘Question’ ‘Charlotte was there?’ Move to Room 101. Move to Catherine’s Room (2F). ‘Question’ ‘Was she arranged to be married against her will?’ Move to 2F Study. ‘Question’ ‘The story about her marriage… Is it true?’ ‘Where do you think I can find her?’ Move to the Maid’s Room. ‘Question’ ‘I have something to ask you about Charlotte.’ ‘Where were you that night?’
‘Move’ to Ervan’s Room. ‘Move’ to the Banquet Hall (1F). ‘Move’ to Sandra’s Bar. ‘Question’ ‘Where do you think Michaela has gone? Michaela…’ Move to Room 101. Obtain the square wrench. Move to Tower, B3. Click all circles on the left wall. Move to the Boiler Room. Obtain the pipe parts. Move to Tower, B3 and fit in all pipe parts.
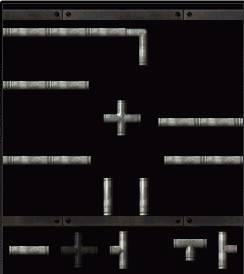
Pull down the lever to open the door to B4. After you turn the central wheel, click on a door to move. Turning the wheel changes where the left and right doors will lead to each time. For the bottom-right passageway, keep pressing the four levers to remove the walls. Obtain the items.
For the upper-right and lower-left passageways, each lever opens the other passageway’s door. (The two open the other passageway’s door.) Except for the bottom-right passageway, which contains 4, other rooms contain 2 stone plates each. There are 4 each of A, B, C stone plates. Insert them in the walls where the cat is resting. Matching the grooves creates a new passageway. Enter the central passageway. ‘Search’ the central wheel. Move to the Boiler Room. Obtain the mouse model. ‘Question’ ‘Is there anything else?’ Move to Room 105. ‘Question’ ‘Where do you think I can get some fishing line?’ Move to the Boiler Room. ‘Question’ ‘Where’s the key?’ Move to the Maid’s Room. ‘Question’ ‘Can you think of any place where a wind-up key might be?’ Move to Ulic’s Room (2F). ‘Search’ the music box to obtain the wind-up key. Move back to the basement (where the gap is). ‘Search’ and ‘Use’ the mouse model on the hole.
Turn the wind-up key by consecutively pressing right and left. When fishing, turn the sound on and turn the key at a constant speed. Turning the key too quickly will make the cat run away and turning it too slowly will make her lose interest. Turn the wheel twice to catch the cat.
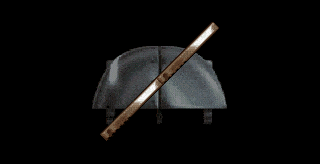
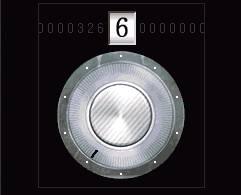
After talking to Charlotte, move to Charlotte’s Room (right below). The off-limits area leads to the tower and Charlotte’s Room. After Charlotte leaves the room, ‘Search’ the closet door. Move to the Boiler Room. ‘Question’ ‘I saw something like… a strange safe.’ Move to Ervin’s Room. Obtain the stethoscope. Move to Charlotte’s Room. ‘Search’ and ‘Use’ the stethoscope on the closet. Open the safe by listening to the sound. The number that makes a clicking sound when you spin the lock is the combination. The combination for my play-through was 523140. Obtain the toe shoes and storybook.
To move to Chapter 5, answer in the order of ‘Political Marriage’, ‘Vial’, ‘So, it was you that drugged the tea,’ ‘Toe Shoes,’ and ‘What Charlotte Did.’
Move to Ulic’s Room. Move to Catherine’s Room. Talk to the shadows in the hallway. Move to the Banquet Hall (1F). Move to the Kitchen. Move to in front of the Boiler Room. Talk to the shadows. Move to the Boiler Room. Move to the 1F Right Corridor. Talk to the shadows.
Move to Room 110 and ‘Search’ below the bed to obtain the spare handle.
Move to the Boiler Room. ‘Use’ the spare handle on the central machine and turn it.

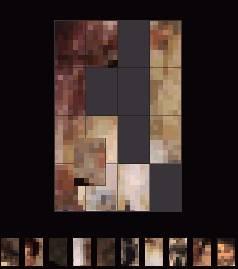
Talk to the shadows in front of Sandra’s Bar. Move inside Sandra’s Bar. ‘Question’ ‘Who do you think the murderer is?’ Move to Room 101. ‘Search’ the frame and obtain the piece of painting. Move to Room 103. Move further to the right to talk to Alberto. Choose ‘I’d like to look around the guest rooms…’ to obtain the key ring. Move to Room 105 to obtain the piece of painting. Move to Room 109 to obtain the piece of painting. Move to Room 106 to obtain the piece of painting. The living room (3F) shield also hides a piece of painting. Move to Sandra’s Bar. ‘Question’ ‘Where could the missing pieces be?’
Move to Ulic’s Room to obtain the piece of painting. Move to 2F Study to obtain the piece of painting. Move to Ervan’s Room to obtain the piece of painting. Move to the Piano Room. ‘Search’ the piano to open and obtain the piece of painting. Move to Charlotte’s Room. ‘Search’ the dressing table to obtain the piece of painting. ‘Present’ the golden key. Solving the puzzle of the man’s portrait drops the silver key, and the woman’s portrait drops the golden key.
Move to 3F Left Corridor. Check the wall that Ervan was looking at. Move to the Count’s Study. ‘Question’ ‘Can you give me a detailed account?’ ‘Use’ the golden key on the drawer below the box and painting. Obtain the picture sign set and storybook. Look at the wall that Ervan was looking at again. The answer to the puzzle is: 1. House 2. 3 people 3. Talisman 4. 6 people 5. Hero looking at the sun 6. Star shot into the sky 7. People surrounding a kneeling person 8. 4 people 9. Star dust (‘Present’ the storybook to Sandra, who will translate the books’ title (1~9).
Move to 1F Left Corridor. Talk to the shadows. Move to the Banquet Hall. ‘Search’ the clock. Set the clock to 12 o’clock to open the wall and pull the lever up. ‘Use’ the silver key on the wall of the Chess Room. Obtain the cross pendant where the wall opens up. Ride the elevator back down to the Banquet Hall (1F) (pull down the lever). Do it once more to move to the basement. ‘Use’ the cross pendant on the central wheel. Now the wheel will turn as its similar twin moved in Chapter 4.
[The room with beds] Pull down all levers from the top room to open other rooms. Activate the levers in the new rooms and continue to do so until the final two open in the center. Check the wall marks in both rooms. To solve the puzzle, move to the Chess Room and make the arrow point towards the Heart. Return to the basement and check the Heart mark. Then return to the Chess Room to make the arrow point towards the King mark, and return to the basement and check the King mark. After both statues appear, check them and make the blue light emit. Then you can obtain the gold coin in the left room.
[The room with spiky floors] Check the square tile mark on the left to make the spikes disappear. Keep on doing so until you reach the lever, which you pull down in order to obtain the lantern.
[The room with many square tiles] Move to the other side without touching the red tiles to obtain the gold coin.
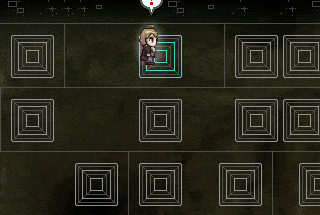
[The room with sculptures in a maze] Activate all of the bald sculptures to obtain the gold coin. Do not activate the sculptures with horns on their heads.
[The room with turning clockwork] Turn the levers on all four corners and pull up the lever appearing in the center to obtain the gold coin.
[The room where the square tiles are divided by the wall] Press OK to teleport to the opposite side of the wall.
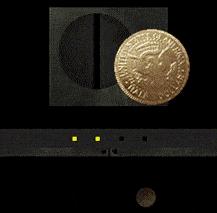
You should now have 5 coins and 1 lantern. One room has a mechanism for inserting coins. Turn 4 coins sideways to insert them, and fit the last coin as it is.
Enter the wall. Light the torch on the wall using the lantern and meet the bushy man that you met in Chapter 3. Talk to the man. After talking, return to the room and the dinner banquet starts.
‘I entrusted Alberto with it.’ -> ‘There is a suspicious person in here!’ -> Catherine is the culprit -> ‘Stop being a fool! It wasn’t because of you!!’ -> Changed to Alfredo is the culprit [Happy ending for the culprit]
‘In fact, the murderer is outside the door!’ -> Alfredo is the culprit [Bad ending for the culprit]
