
Best Horror Games On Itch.io – July 2026
Across a bounty of subgenres.![Haze Seas Accessories Tier List [Best Accessories to Equip]](/wp-content/uploads/2026/07/haze-seas-accessories-tier-list.jpg "Haze Seas Accessories Tier List [Best Accessories to Equip]")
Haze Seas Accessories Tier List [Best Accessories to Equip]
The accessories with the best stat buffs in Haze Seas.
![[Roblox] Evomon Shiny Hunting Guide – Including Prismatic and Pris Shinies!](/wp-content/uploads/2026/06/evomon-shiny-hunting-guide.jpg "[Roblox] Evomon Shiny Hunting Guide – Including Prismatic and Pris Shinies!")

The Seawise Chronicles: Untamed Legacy Walkthrough
Welcome to the walkthrough for The Seawise Chronicles: Untamed Legacy on Gamezebo. The Seawise Chronicles: Untamed Legacy is a hidden object game for the PC created by Maximize Games. This walkthrough includes tips and tricks, helpful hints, and a strategy guide to complete The Seawise Chronicles: Untamed Legacy.


- Prefer Gamezebo on Google

The Seawise Chronicles – Game Introduction
Welcome to the walkthrough for The Seawise Chronicles: Untamed Legacy on Gamezebo. The Seawise Chronicles: Untamed Legacy is a hidden object game for the PC created by Maximize Games. This walkthrough includes tips and tricks, helpful hints, and a strategy guide to complete The Seawise Chronicles: Untamed Legacy.
General Introduction
Main Scenes
- The default mouse cursor in the game is the yellow arrow. Move the cursor around and it will change when it moves over certain hotspots. The magnifying glass icon shows areas that can be examined for a close-up view, the gears icon shows that a mini-game can be started and a pointing arrow shows that you can leave the room in that direction. Interactive areas will glow white when the cursor moves over them.
- Many of the main scenes in the game consist of horizontally scrolling locations where a number of objects from the clues window need to be found. Move the mouse cursor to the edges of the screen to scroll left or right. Occasionally you will encounter main scenes that scroll vertically and other scenes that cannot be scrolled at all.
- The bag (displayed near the bottom-right corner of the screen) can initially be selected to switch between the clues and inventory window. Near the end of the first chapter, two additional pockets will be added to the bag. The left pocket opens the tools window, and the right pocket opens the ruby window.
- The clues window shows all of the objects that need to be found. Some of the objects are fragmented, so a number of parts of the objects will need to be found before it is complete. Once a clue has been found, it will be added to the inventory section of the bag.
- Objects are added to the inventory window once all parts of a clue have been found. Select an inventory object and use it on an interactive area in the game window. Some inventory objects can be combined with another object in the inventory to create a new item.
- The tools window shows all special items that have been found so far. These include tools like the ancient hammer, which can be used to remove ruby pieces from rocks in certain areas of the game. Later on you will receive the world map tool so that you can travel back to previously visited locations in the game. Other items include the illumination crystal for lighting small sections of a dark room, and a lion that can be used to dig hard soil to find parts of the ruby.
- The ruby window shows how many parts of the five rubies have been found. While viewing the world map, hover the mouse cursor over locations to see how many ruby pieces have been found. Some ruby parts can be found just by clicking them, while others will require the ancient hammer or the lion to be used from the tools section of the bag. Ruby pieces are identified in the walkthrough with a green outline.
- The journal above the hint jar at the bottom-left corner of the screen shows all of the notes and images on Tom’s travels so far. Keep checking back on the journal as it is updated frequently as you progress through the game.
- The hint jar at the bottom-left corner of the screen can be selected to reveal the location of one of the objects that needs to be found. Once a hint has been used, it takes 13 seconds before the hint jar refills and another hint can be used.
- The blue options button at the bottom-right corner of the screen displays a menu where music and sound volumes can be changed. There is an option to switch between full screen and windowed mode. Press the menu button to return to the main menu or the close button to return to the game.
Hidden Object Scenes and Mini-Games
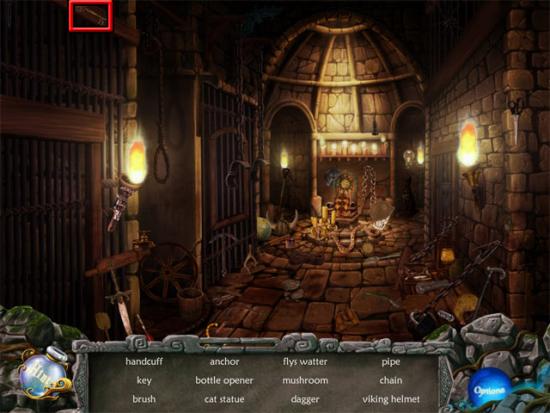
- There are four hidden object scenes in the game. The aim in each scene is to find all of the objects on the list. You may need to scroll the screen up or down in order to find some of the objects.
- One or more of the objects will be added to the inventory after the scene has been completed, and these will be identified in the walkthrough images. The rest of the objects that appear on the list vary from one game to the next, so it is not possible to identify the locations of these objects.
- Clicking seven times in a row without finding an object causes the cursor to become invisible for five seconds.
- As with the main scenes, the hint jar at the bottom-left corner of the screen can be selected to reveal the location of one of the objects that needs to be found. Once a hint has been used, it takes 13 seconds before the hint jar refills and another hint can be used.
- Mini-games will frequently be encountered as you play through the game, with tasks that range from rotating tiles into the correct positions to avoiding rocks while guiding a leviathan down a river. The time taken for the skip button to fill varies from one mini-game to the next, but once full it can be selected to automatically complete the mini-game.
Walkthrough – Chapter 1
Find the objects:

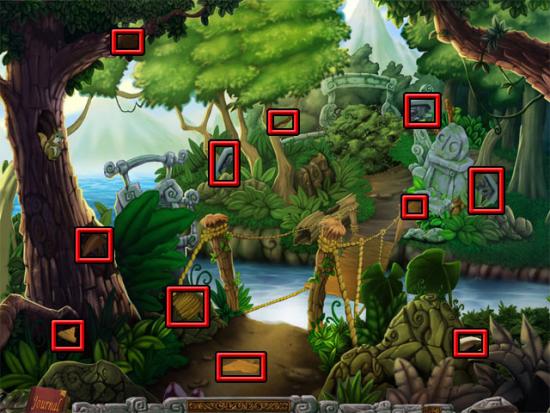
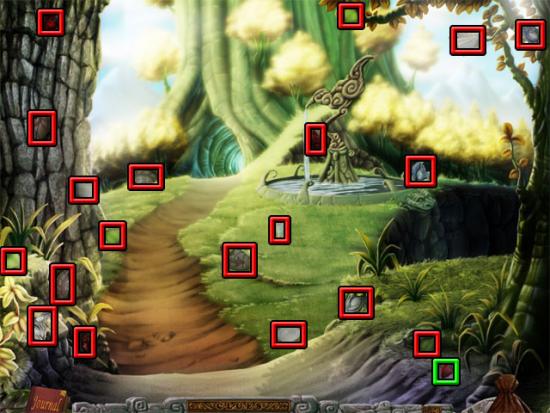
Move the cursor to the right side of the screen to scroll as far right as possible. Find the objects:
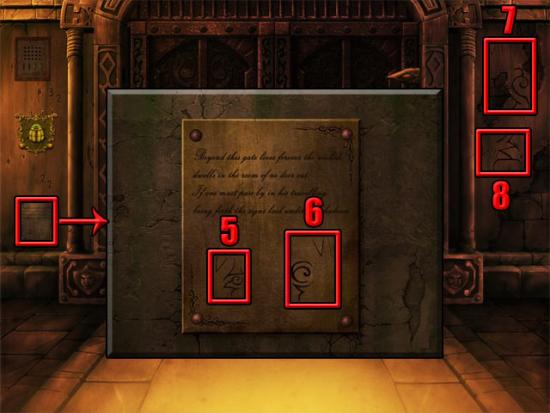
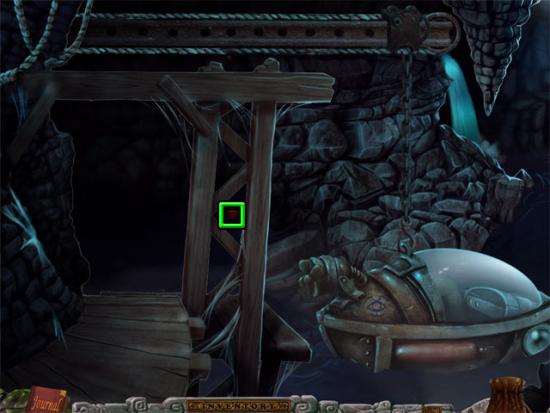
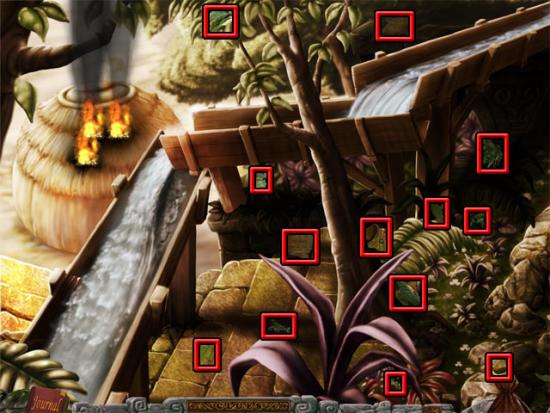
Scroll back to the left. Select the bag at the bottom-right corner of the screen to open the inventory window. Give the acorn to the squirrel in the tree and then take the final machete piece from the hole. Use the machete on the leaves at the right side of the tree. Use the carved rock on the stone device that is revealed to see three symbols. Combine the rope with the boards in the inventory to make the complete bridge piece. Use the complete bridge piece on the gap in the bridge to repair the bridge. Examine the statue on the other side of the bridge and press the symbols that were shown on the stone device. The symbols vary from game to game so it is not possible to show which ones should be pressed. After pressing the correct symbols, move forward through the gateway to the woods. Find the objects:
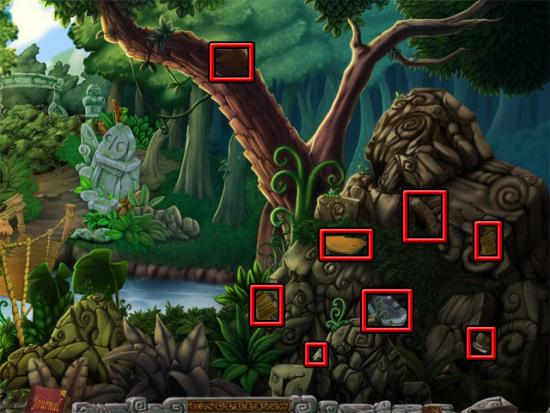
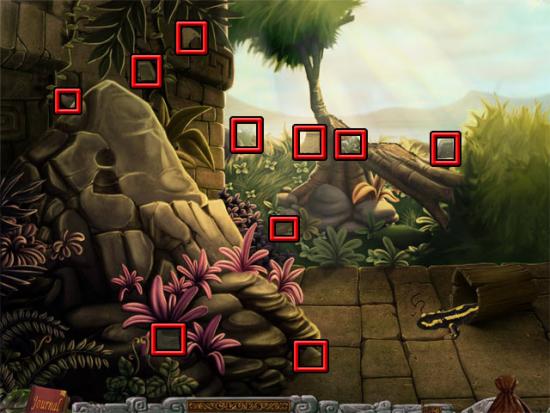
Scroll right and find the objects:

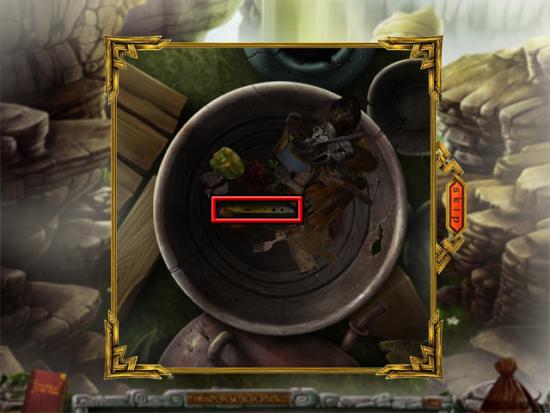
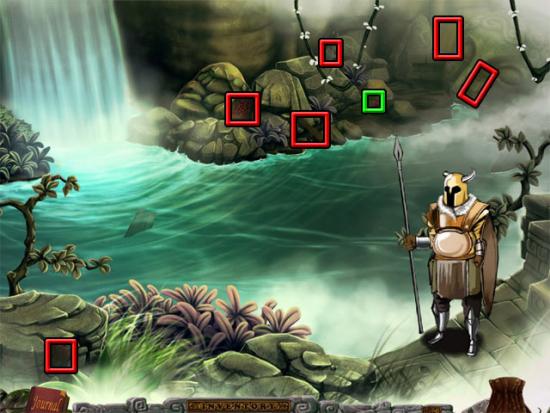
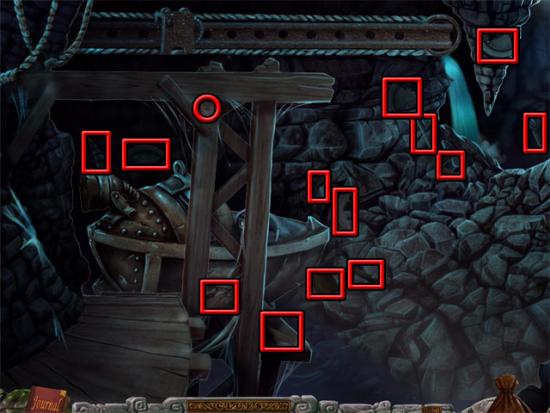
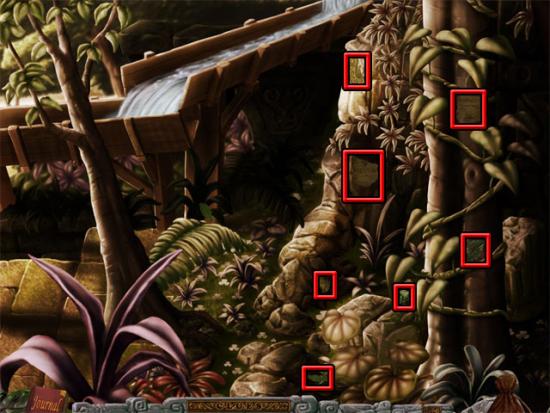
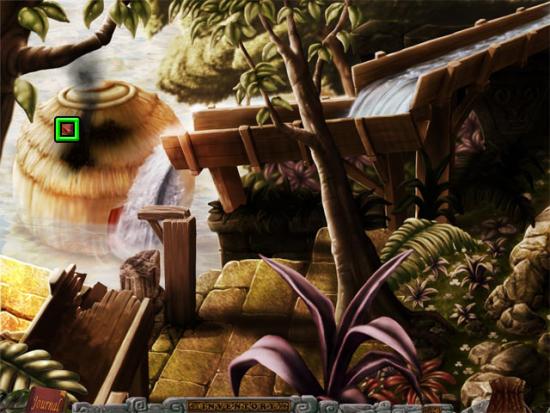
Note that the ruby (outlined in green) cannot be collected at the moment. You will need to return here once the world map has become available and use the ancient hammer on the ruby to collect it. Use the stick on the rope in the quicksand. Combine the hook with the rope in the inventory to make the grappling hook. Use the grappling hook on the tree branch and then move forward to see Pan. Use the shovel on the soil at the bottom-left corner of area to drain water. Find the objects:
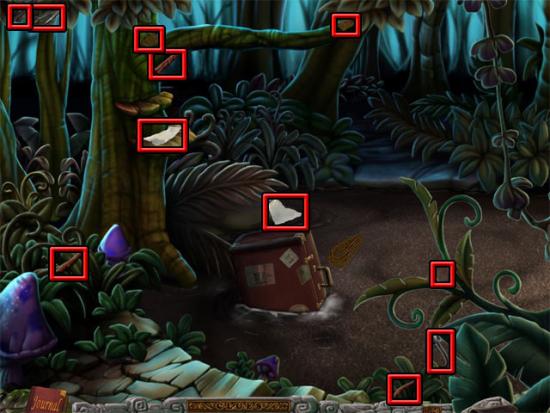
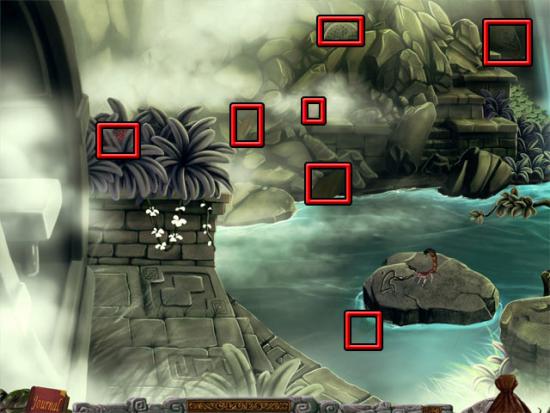
Scroll right and find the objects:
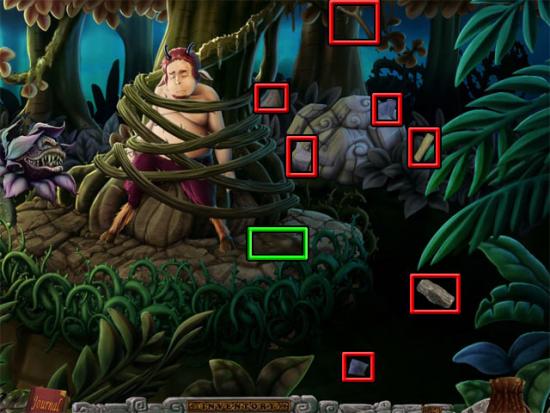
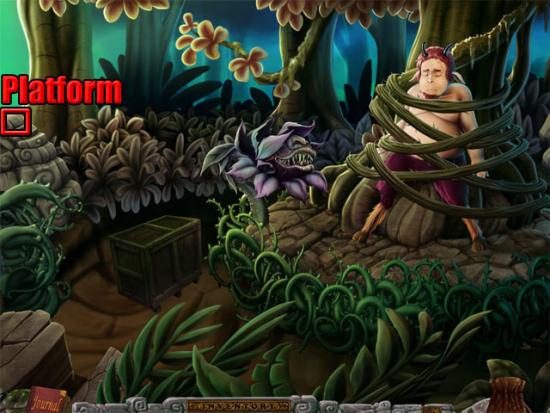
Note that the mound outlined in green contains a ruby piece that can’t be found until the lion becomes available later on in the game. Scroll left and use the statue on the platform at the left side of the area:
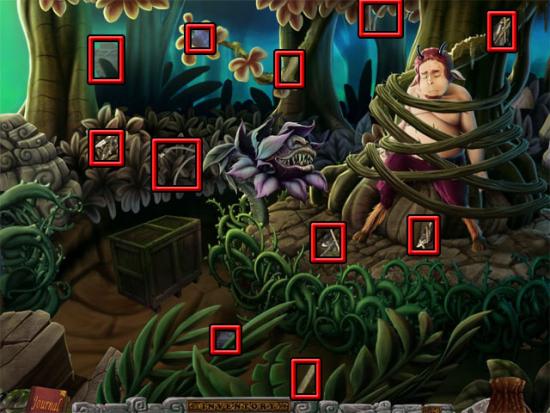
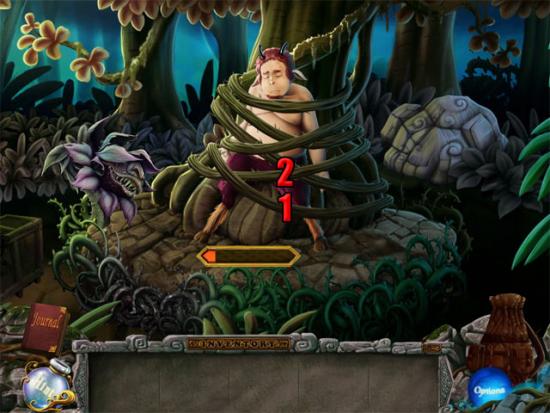
The sling will be added to the inventory. Use the hammer on the box and take the final piece of cloth that is revealed. Combine the wood with the piece of cloth in the inventory to make the dry materials. Use the dry materials on the thorns and then use the flint with the thorns to burn some of them. Use the sling on the plant and it will fall asleep. Select the vines in the following order to complete the mini-game:
Select Pan to complete the chapter.
Chapter 2
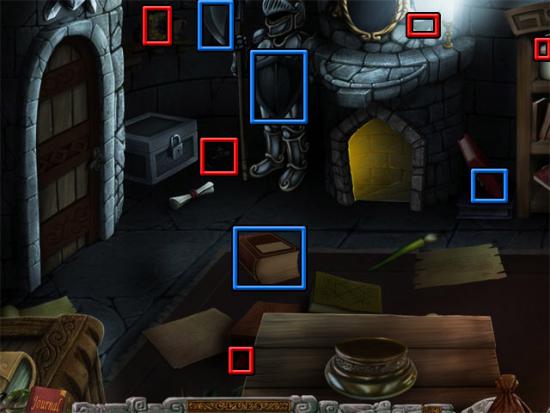
Some hotspots in this room need to be selected before the object on the list can be found. These objects are identified with a blue outline in the images. Find the objects:
Scroll right and find the objects:
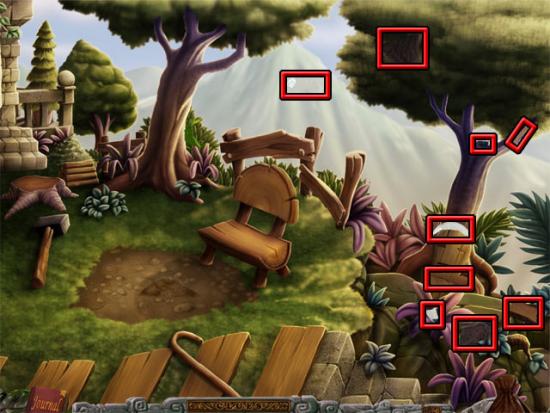
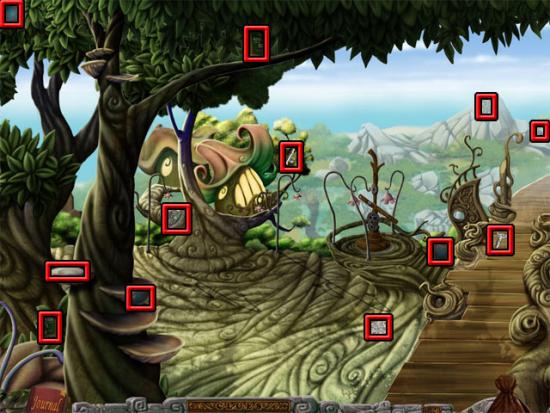
Scroll left and go through the big door to enter the garden. Find the objects:
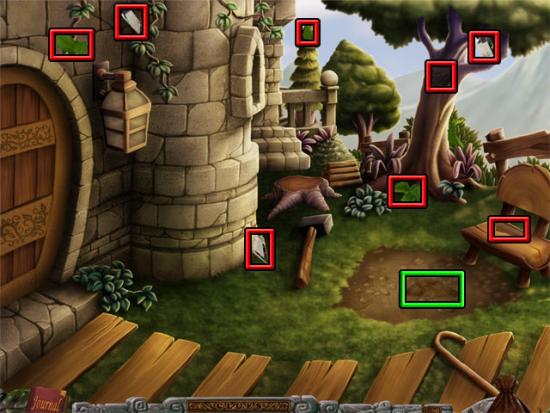
Note that the mound outlined in green contains a ruby piece that can’t be found until the lion becomes available later on in the game. Scroll right and find the objects:
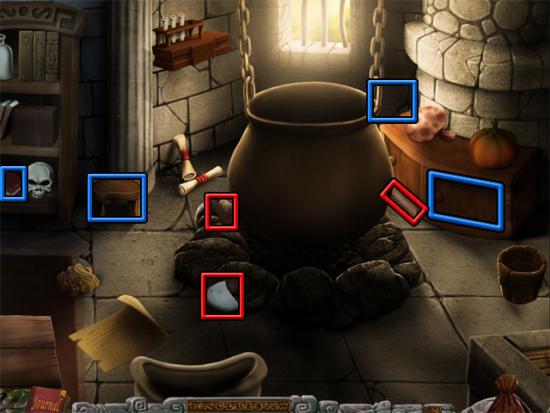
Enter the house and go through the fireplace to enter the basement. Find the objects:
Use the air horn on the lizard and take the lizard’s tail that drops to the floor. Use the brush on the spider web and take the spoon piece. Go upstairs and open the left door to return to the garden. Use the axe on the stump:
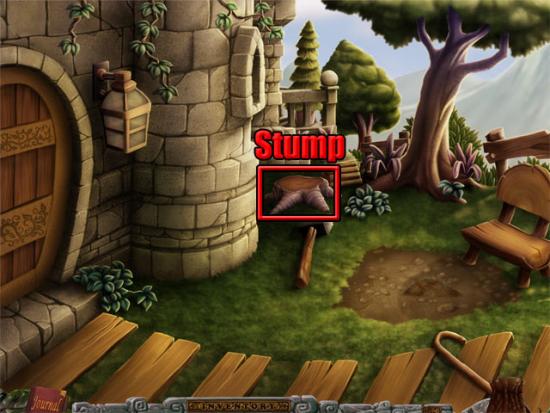
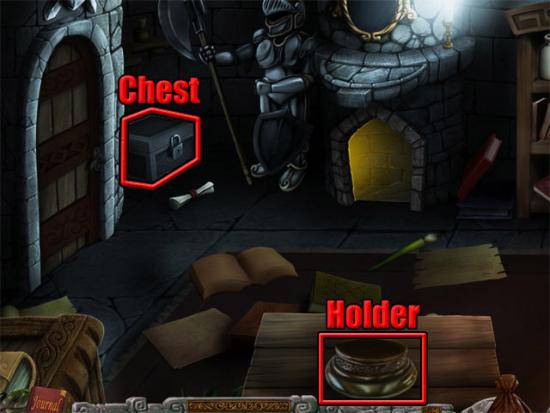
Take the final piece of the log. Return to the house. Use the key on the chest and take the piece of salt. Use the crystal ball on the holder and take the piece of salt:
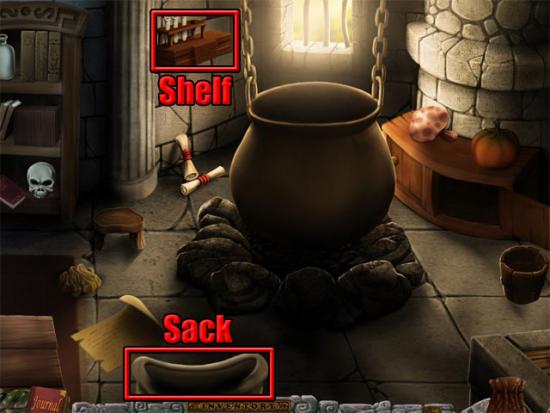
Scroll right. Use the test tube on the shelf and take the piece of salt. Use the black pepper, mint herbs and crystallized salt on the sack:
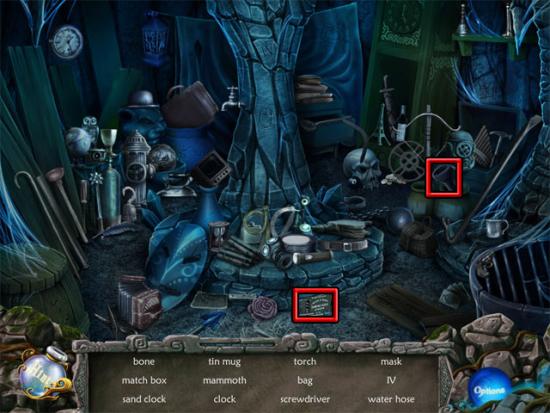
Use the mortar on the ingredients in the sack to make the smelly paste. Use the logs and the flints on the rocks below the cauldron. Use the lizard’s tail, the smelly paste and the wooden spoon on the cauldron. Select the cauldron to travel to the village. Use the ancient hammer from the tool pocket of the bag on the ruby and then take the ruby. Find the objects:
Scroll right and find the objects:
Go through the door to enter a hidden object scene. Find the watering can:
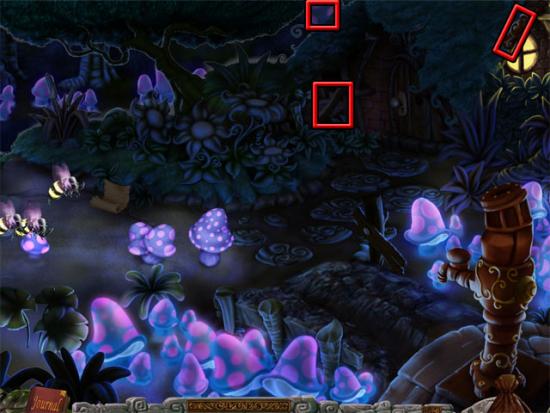
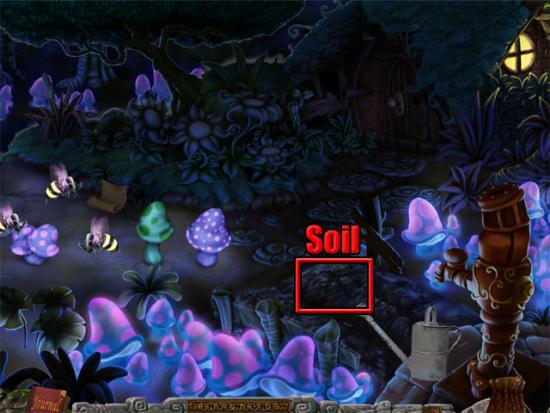
Find the remaining objects on the list and the watering can will be placed below the pump. Use the trowel on the soil near the watering can to dig a hole:
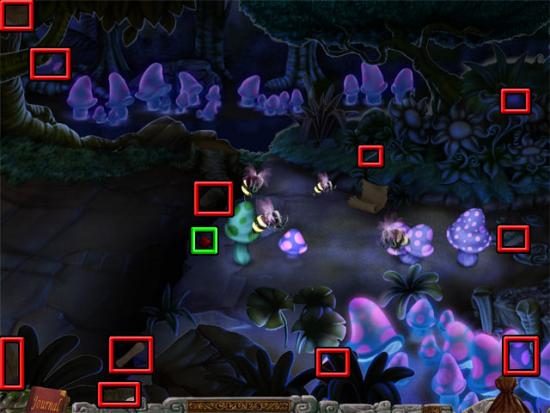
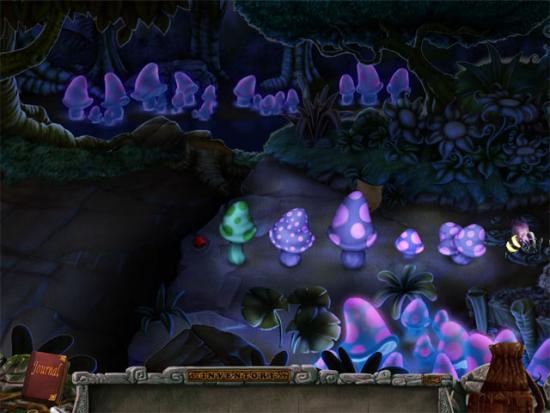
Use the bag full of flower seeds on the soil. Use the water handle on the pump and then use the handle to fill the watering can. Use the watering can on the hole to attract the bees. Put the light emitting mushroom next to the other mushrooms. Arrange the mushrooms in the following order:
The world map will now be added to the tools pocket of the bag. This can be used to travel to previously visited locations in the game.
Chapter 3
Use the ancient hammer from the tools pocket of the bag on the ruby and then take the ruby. Find the objects:
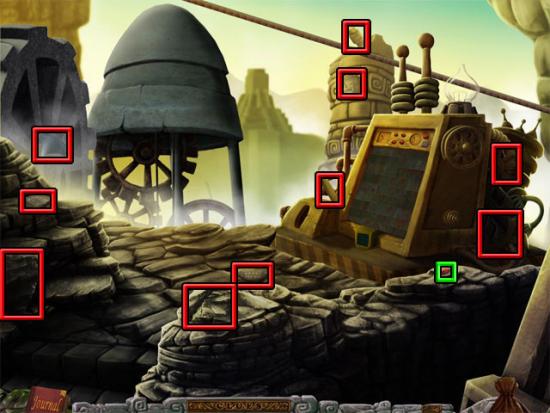
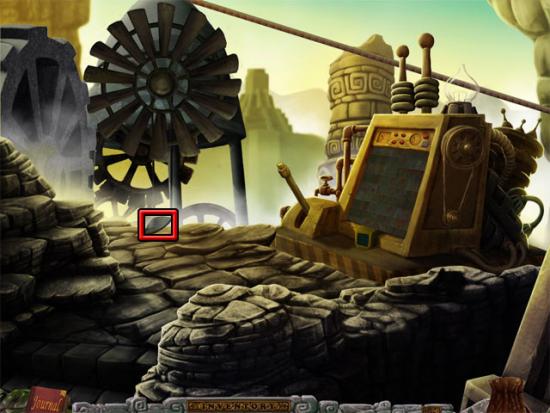
Examine the machine cover and rotate the tiles to make the picture shown below:
Scroll right and find the objects:
Scroll left and go down the stairs to the next area. Find the objects:
Examine the barrel to play a mini-game. Keep removing objects from the barrel until the whistle is found. Take the whistle:
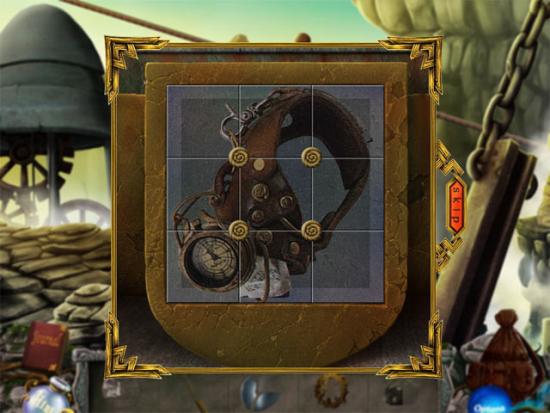
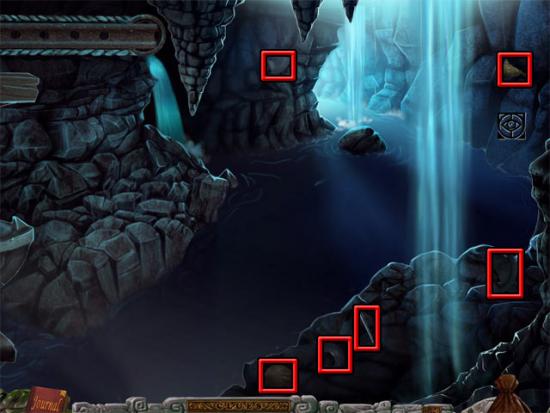
Go up the stairs at the bottom-left corner of the area. Use the lever on the lever slot and the two gears on the machine. Use the rubber band on the wheels on the side of the lift. Select the lever and the cable car will start running. Enter the cable car to descend to the river. Find the objects:
Scroll right and use the ancient hammer from the tools pocket of the bag on the ruby. Find the objects:
Use the net on the piece of wood in the river to complete the plank item. Use the plank on the rock with the scorpion on it. Take the scorpion. Move right past the guard to play a mini-game. Use the arrow keys to guide Tom through the maze to the exit within 200 steps. In certain places of the maze, you will need to push crates onto the water in order to cross them. After completing the mini-game, find the objects:
Scroll right and find the objects:

Scroll left and use the head and the body of the odd statuette in the holes in the rock. Use the heavy boulder on the right side of the log and the salamander will hide. Use the snail on the left side of the log and then take the salamander when it appears. Move back to the lake and give the whistle, mushroom, scorpion and the salamander to the guard to make the giant turtle appear. Go through the waterfall to complete the chapter.
Chapter 4
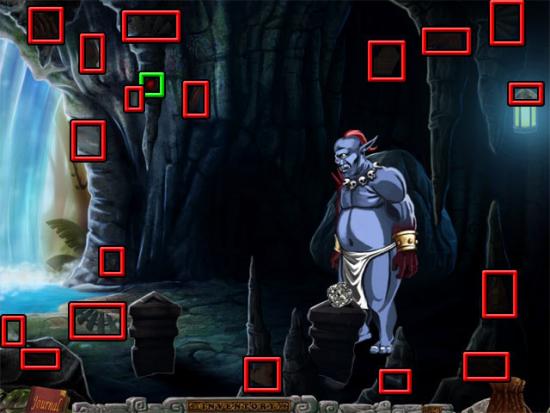
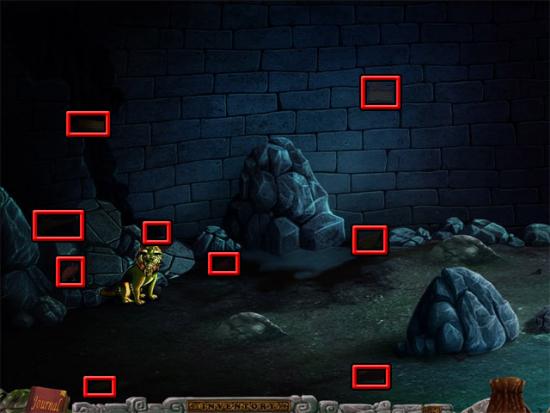
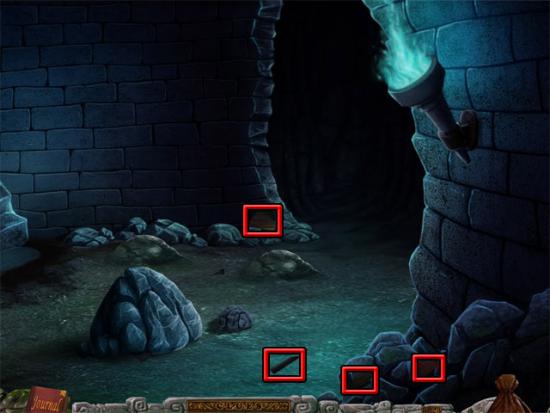
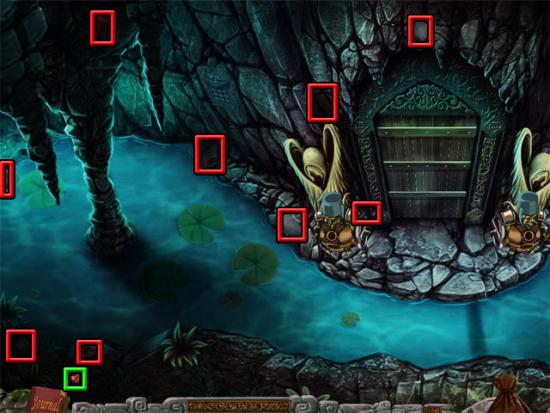
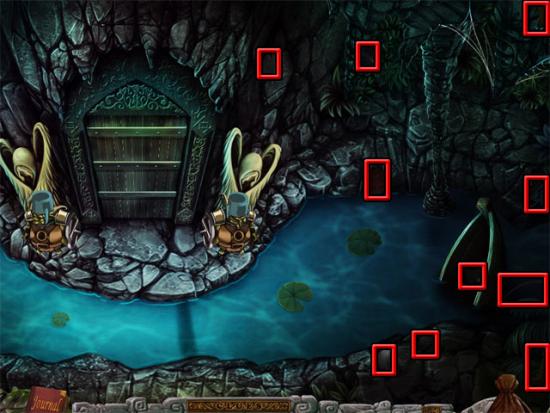
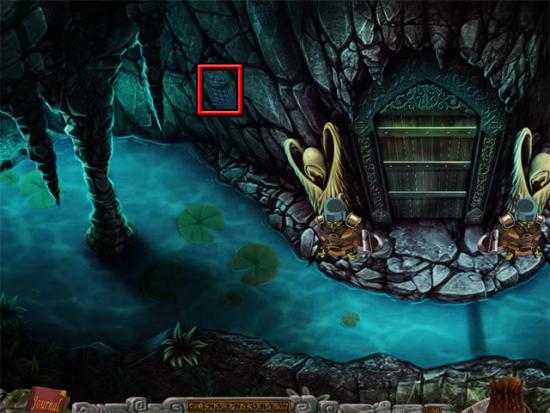
Use the ancient hammer on the ruby and then take the ruby. Use the lantern in the gap at the right side of the cave. Find the objects:
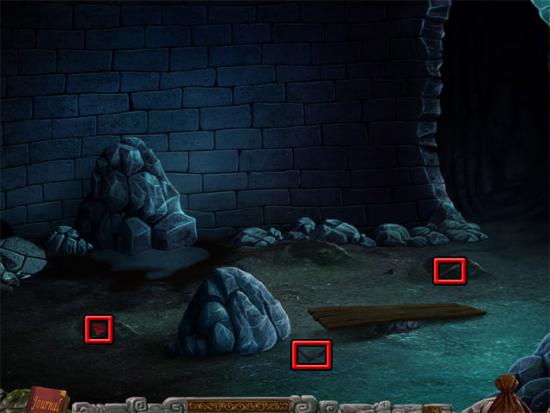
Return to the cable car station and use the propeller on the machine. Take the final piece of the submarine hatch:
Return to the Death Valley lake and go right past the guard to the next area. Use the shovel on the soil:
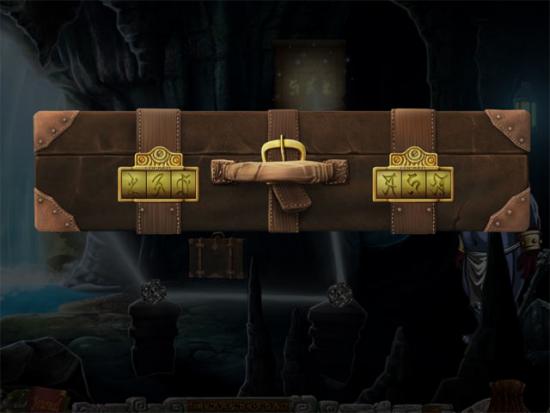
Take the final piece of the prism. Return to the waterfall cave and use the prism on the left platform. Give the club, helmet and gloves to the cyclops to put the suitcase on the floor. The suitcase is unlocked by entering the six symbols that are found in previous areas of the game. Each symbol has a number nearby to it which refers to the position it appears in the lock. Symbol 1 is found on the cable car after pulling the lever at the cable car station. Symbol 2 is found on the far wall at the far right side of the cable car station. Symbol 3 is found on the rock in the area reached by walking down the stairs from the cable car station. Symbol 4 is found on the rock in the waterfall area. Symbol 5 is found next to the salamander log. Symbol 6 is found in the waterfall cave. Enter the symbols on the suitcase in the correct order to unlock the suitcase:
Take the last piece of the mantra script in front of the suitcase. Combine the two halves of the mantra script in the inventory and then use them on the wall above the rock. Note the three illuminated symbols that are displayed on the script. Examine the large rock next to the cyclops and select the same symbols that were displayed on the script. The symbols vary from one game to the next so it is not possible to show which buttons need to be pressed here. The rock will move once the correct buttons have been pressed. Move forward into the dark room and use the small crystal from the tools section of the bag to illuminate part of the room. Scroll to the right side of the room and then move forward through the doorway to enter a hidden object scene. Find the torch and the matchbox:
Find the remaining objects on the list and the torch and match box will be added to the inventory. Combine the match box with the torch in the inventory to light it. Select the small crystal from the tools section of the bag again to illuminate part of the cave. Scroll to the far right side of the cave and use the torch on the torch holder to light the room. Scroll to the left side of the cave and find the objects:
Scroll to the right side of the room and find the objects:
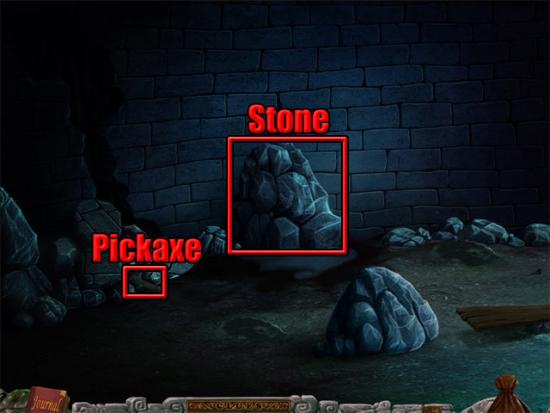
Use the plank on the small rock at the right side of the boulder. Select the plank to reveal a piece of the pickaxe. Take the pickaxe piece. Give the meat to the lion and then take the lion. The lion will now become selectable as a tool to dig out items under hard soil. Use the lion on the three mounds in the area and then take the ruby piece and the pickaxe piece. The items are randomly placed in the mounds so your items may look different from those shown below:
Scroll back to the left side of the area and take the final pickaxe piece from where the lion used to be sitting. Use the pickaxe on the stone:
Chapter 5
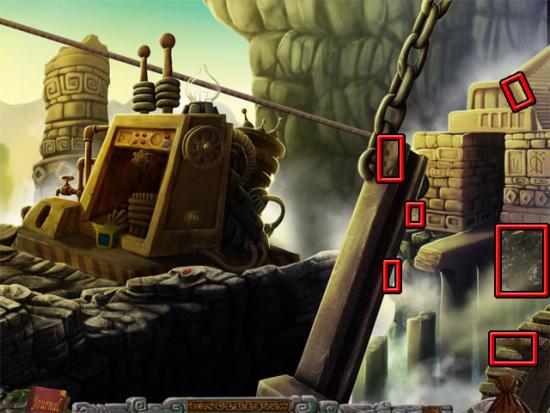
Find the objects:
Scroll right and find the objects:
Combine the rock with the sling in the inventory. Use the rat on the left guard and then use the sling on the left guard to knock both guards down. Use the rope on the guards to tie them up. Scroll left and examine the device on the wall:
Switch the tiles so that they match the image shown below:

Examine the symbols on the wall. The order of these symbols is important later on so make a note of them. Exit the view of the symbols and the gate will open part of the way. Use the oil can on the gate and it will open. Go through the gate to enter the temple. Select the lion and place it in front of the right box. After the guard walks over to the lion, pull the lever on the wall to knock out the first guard:
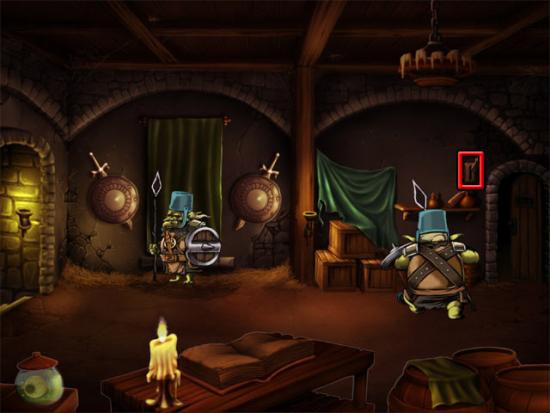
Take the spear from the right guard and use it on the curtain above the left guard:
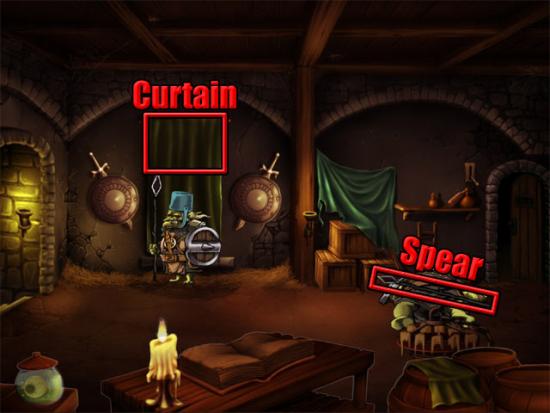
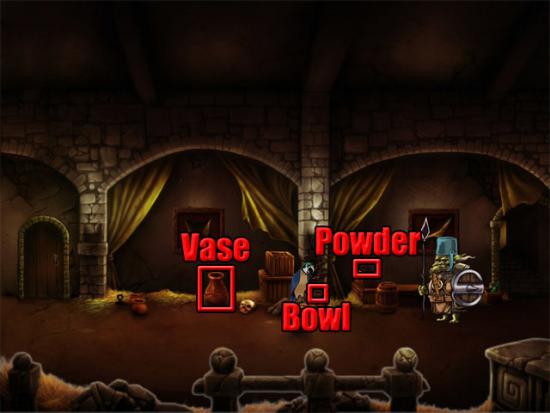
Go through the left doorway to enter the hall. Select the vase to distract the guard. Take the ammo powder and use it on the parrot’s bowl:
Wait until the guard carries the parrot over to the right side of the room. Select the right frame to knock out the guard. Select the door three times and the text at the top of the screen will mention checking the guard. It is important that this text is displayed or the guard will not move when you click him. Now just keep clicking the guard and gradually he will move until the key is revealed. Take the key and use it on the door. Note the sets of numbers on the wall and floor in this room. Examine the panel at the top-left corner of the room to play a mini-game. The aim is to place the pegs into the correct slots shown by the sets of numbers in the room. My numbers were 3&2, 2&2, 1&2 and 1&1; an example of how to solve this mini-game with those sets of numbers is shown below:
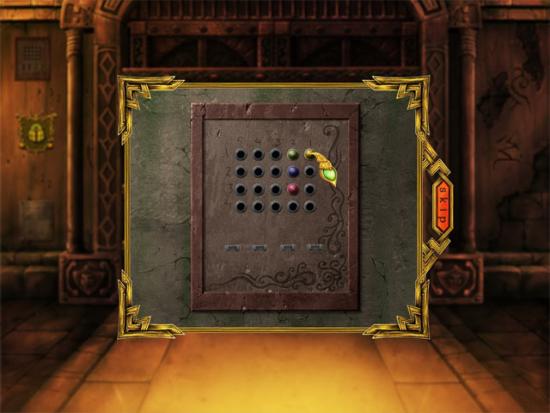
Your numbers will likely be different so the pegs will need to be placed in different slots. Examine the plaque on the wall to see two symbols with numbers next to them. Two other numbers can be seen on the wall at the right side of the room:
You now know the last four numbers for the upcoming mini-game. The first four numbers were found by examining the wall at the temple entrance after the tile swapping mini-game was completed. Examine the beetle on the wall and press the symbols in the correct order. Move forward through the doorway to enter a hidden object scene. Scroll up and find the key:
Find the remaining objects on the list and the key will be added to the inventory.
Chapter 6
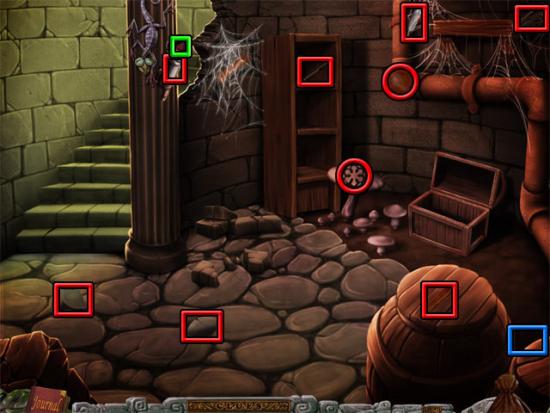
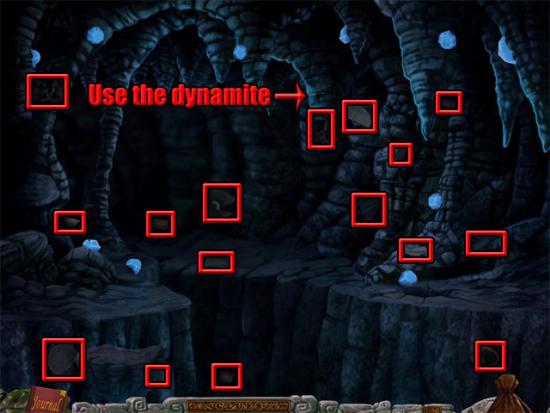
Find the objects. Use the dynamite on the stalactite and take the last piece of the climbing tool:
Use the ancient hammer from the tools pocket of the bag on the crystals until the ruby piece is found. Take the ruby piece. Scroll down and find the objects:
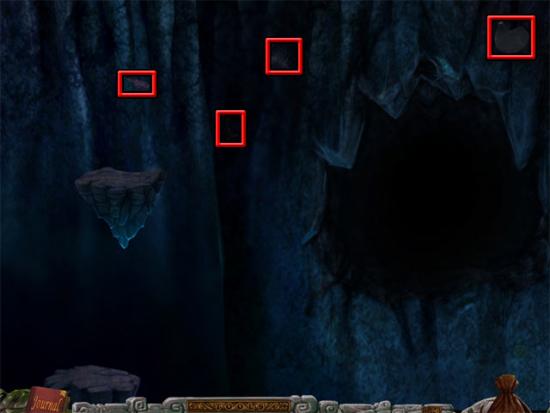
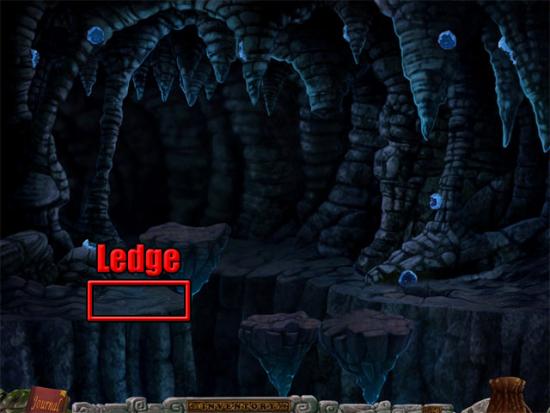
Scroll up and combine the climbing tools with the rope in the inventory to make the climbing set. Move the floating rocks to the positions shown below and then use the climbing set on the ledge:
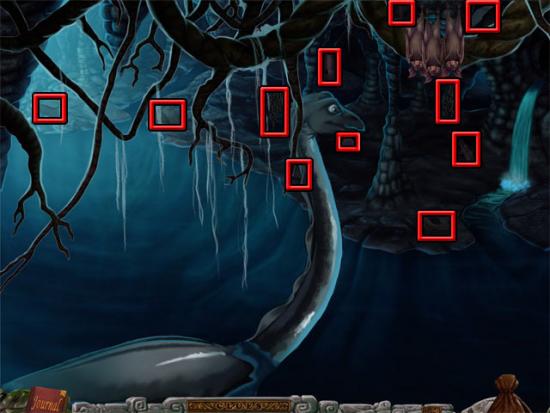
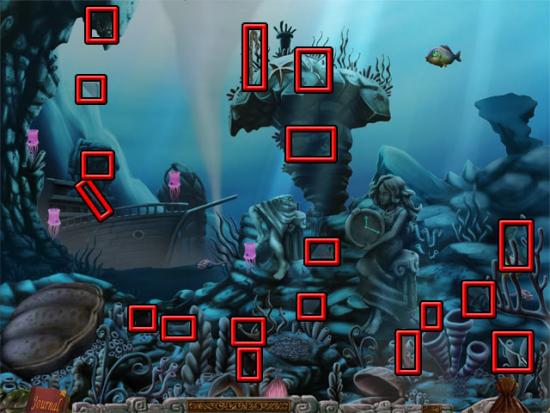
Move right to the next area to see the leviathan. Find the objects:
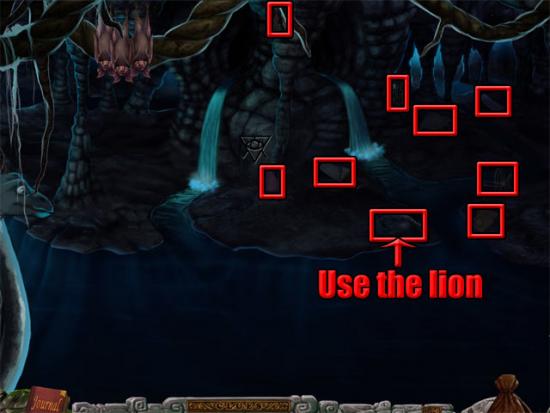
Scroll right and use the lion on the mound to find the ruby piece. Take the ruby piece and then find the objects:
Use the saddle and the leather strap on the leviathan’s back. Scroll right and note the symbol on the wall. Exit at the right side of the area to play the river mini-game:
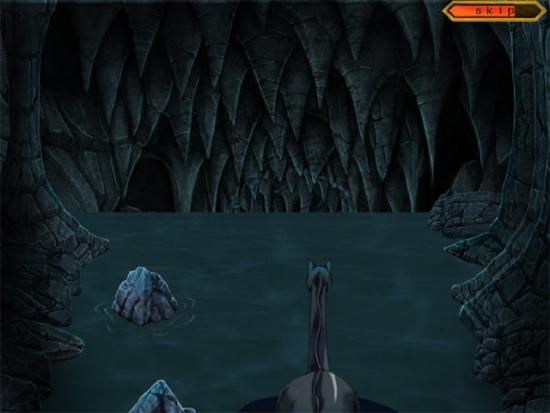
Avoid the rocks by using the arrow keys to move left and right. After completing the mini-game, find the objects:
Use the pickaxe on the pile of stones. Scroll right and note the symbol on the wall. Find the objects:
Scroll left and use the submarine hatch, propeller, oxygen tank and lamp on the submarine. Use the rusty chain on the pulley system above the submarine and note the symbol on the submarine. Take the ruby piece that was revealed when the submarine moved:
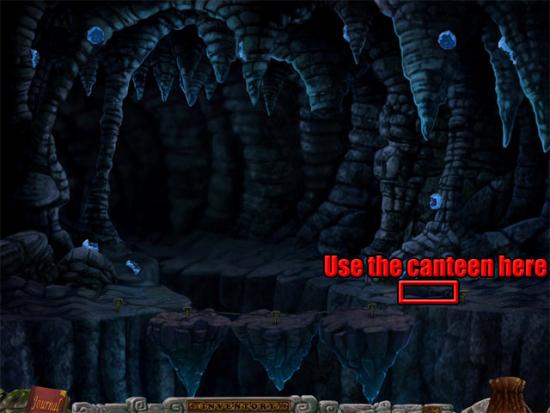
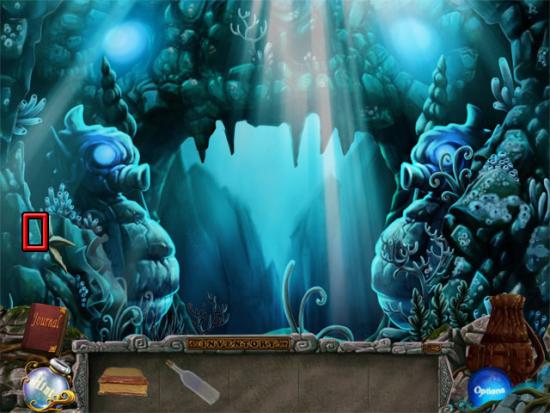
Return to the cave and use the conch shell on the bats to reveal a root. Use the knife on the root and then use the canteen on the green liquid. Move left to the next area and use the canteen on the hole:
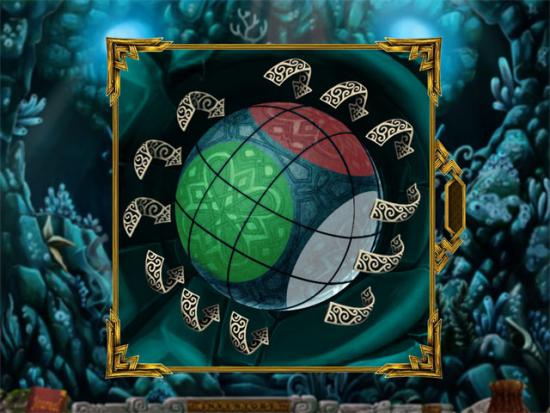
Scroll down and note the symbol that is shown on the wall. Return to the submarine and enter it to travel underwater. Use the javelin on the left statue to reveal the gate. Press the symbols in the correct order. The symbols vary from one game to the next so it is not possible to give an exact solution. The correct order is the illuminated symbol in the floating rock room, the symbol in the leviathan room, the symbol on the submarine and the symbol at the right side of the submarine room. After pressing the correct symbols, select the sphere and rotate the sections of the sphere to make the following pattern:
Move forward through the doorway. Find the objects:
Move left to the previous area and note the number on the rock:
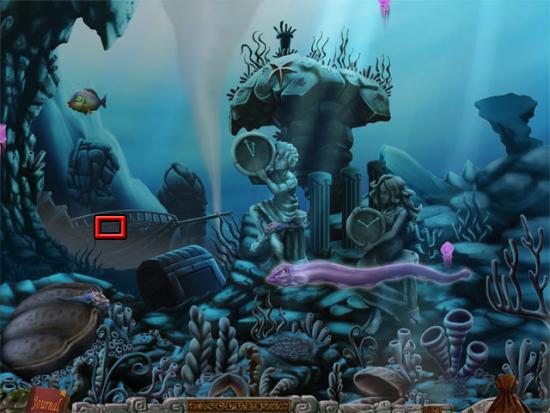
Remember this number, which will likely be different to the one shown in the image when you play through the game. Return to the ship area. Use the upper body on the incomplete statue and then use the clock on the statue. Use the anchor on the ship and a number will be revealed on the deck:
Again, your number will likely be different to the one shown here. The aim now is to examine the clocks held by the statues and set the left clock to the time shown in the previous area, and the right clock to the time shown on the deck of the ship. Note that the clocks are angled slightly so that 12 will not be at the top of the clock; you will need to look at the Roman Numerals to see the way the clocks are positioned. The clocks cannot be examined once they have been set to the correct time. After setting the clocks to the correct time, a castle will appear at the top-right corner of the area.
Chapter 7
Find the objects:
Use the candle on the chandelier to find the last part of the key. Move right to exit the castle. Select the squid and then use the bottle on the ink that appears. Use the rubber gloves from the inventory and then select the eel:

After selecting the eel with the rubber gloves, you will then be able to move it around the area. Move the eel over to the clam shell and then select the clam shell to open it. Take the last part of the rare black pearl from the clam shell. Use the key on the chest and take the last part of the trident. Enter the castle. Use the conch on the hole and the goblet on the table:
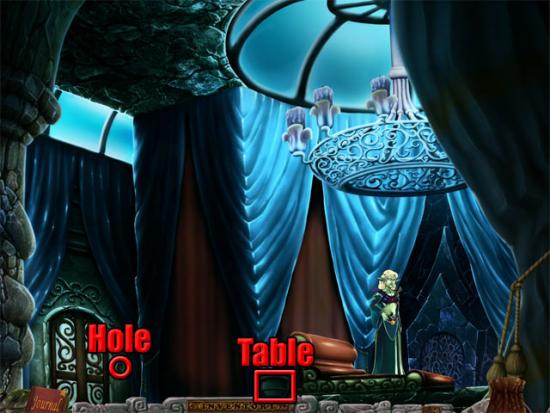
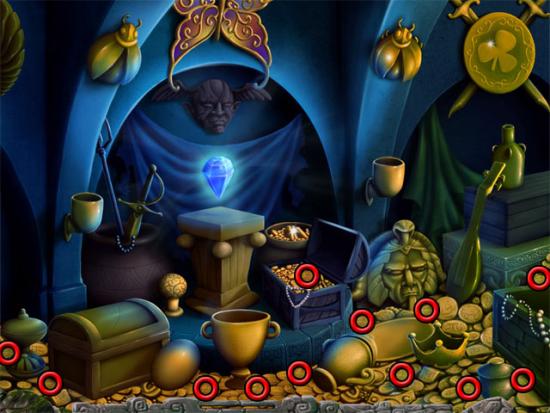
If you are having problems using the goblet on the table, move the cursor slightly higher than the table before placing the goblet. After the goblet has been placed, go through the doorway to enter the treasure room. Find the twelve gold elf coins:
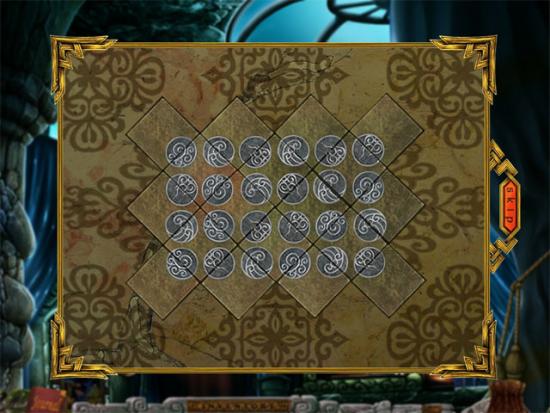
Use the elf coins on the door at the right side of the sea elf. Select the door and complete the mini-game by rotating the tiles to the following positions:
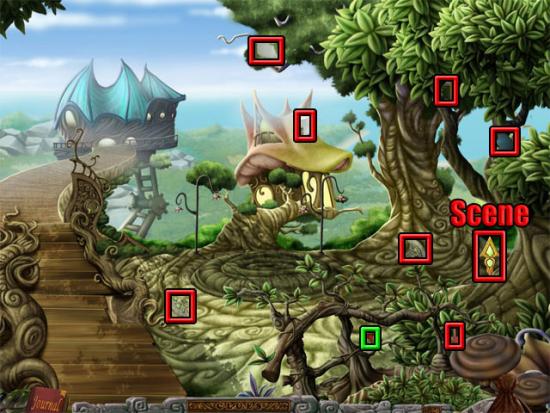
Give the bottle of ink, pearl and trident to the sea elf to receive the souvenir. The cyclone has now disappeared, so move up to travel to the beach. Use the lion on the mound to find the ruby piece. Take the ruby piece and then find the objects:
Move left to the next area to see the griffin. Use the lion the mound and take the ruby piece that is revealed. Find the objects:

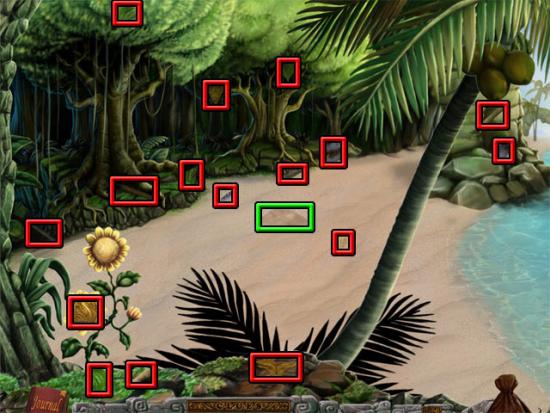
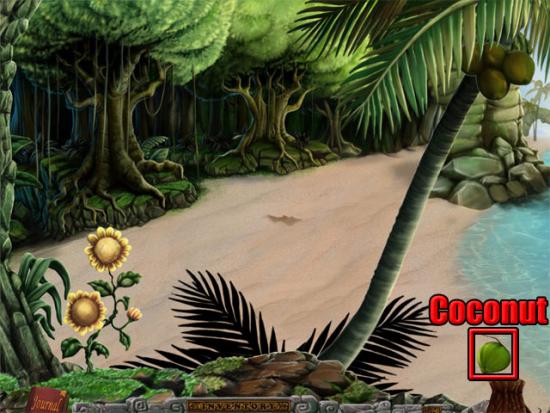
Move left to the beach. Keep selecting the coconuts in the tree until one falls down. Use the machete on the coconut:
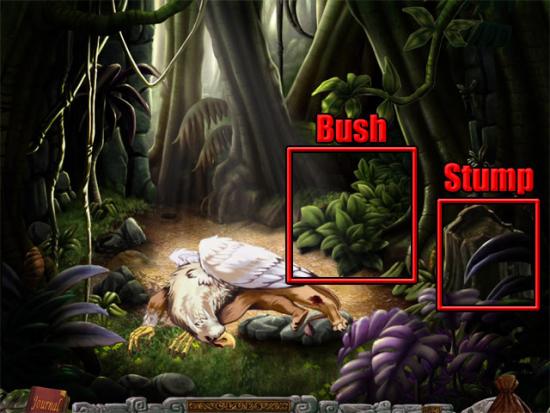
Take the coconut half. Move left to the griffin. Use the axe on the stump and take the leaves. Use the hedge cutters on the bush at the right side of the griffin:
Move right to the pond area. Use the ancient hammer on the stone and take the ruby piece. Find the objects. Dig the mound with the shovel and use the plant seeds on the hole to reveal the path to the village of the Centaurs:
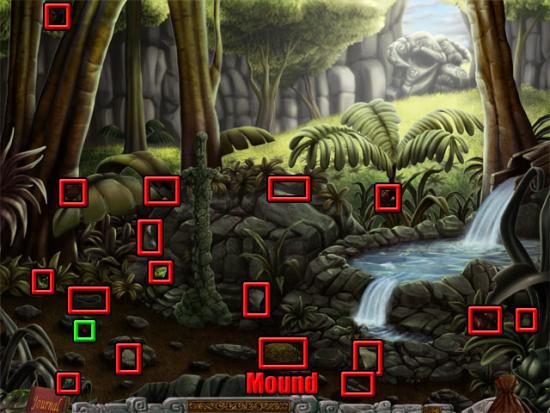
Move forward to the village and find the objects:
Scroll right and find the objects:
Use the hammer on the pole at the left side of the area to pour water onto the burning hut. Take the ruby piece:
Move left to the grand elf gate.
Chapter 8
Select the pieces around the gate and place them in the slots in the middle of the gate:
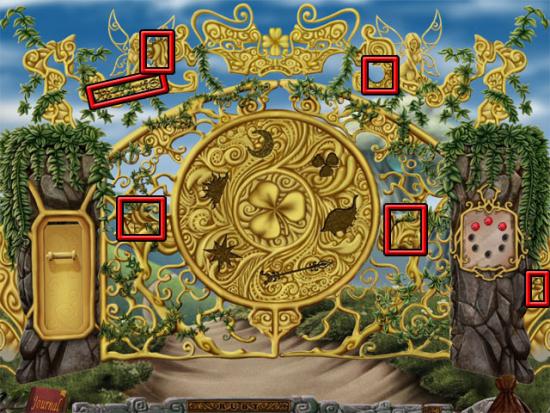
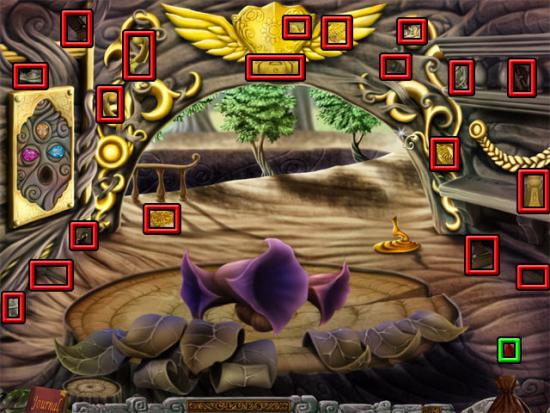
Use the elf souvenir on the lock in the middle of the gate. Select the panel at the left side of the gate to play the ball mini-game. The aim is to select and drag the platforms to tilt them so that 30 balls roll into the cup. Complete the mini-game and the gate will open. Move forward and find the objects:
Move forward to the next area and find the objects:
Scroll right and find the objects. Go through the exit to the hidden object scene:
Find the mirror:
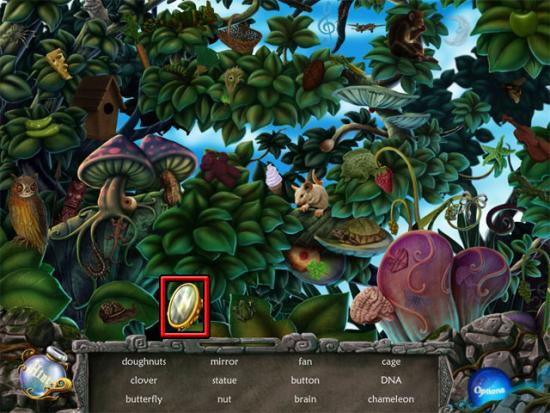
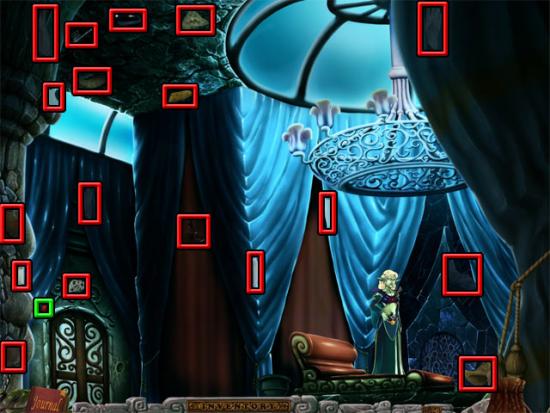
Find the remaining objects on the list and the mirror will be added to the inventory. Move across the bridge to the house with the blue roof to see a cutscene. You will not be able to use the world map to travel for the next few sections of the game. Find the objects in the house:
Exit the house and move back to the fountain. Examine the fountain and use the wrench on the nut in the close-up view. Use the two green gems on the dragon. Examine the drawer and then use the key on the drawer to unlock it:
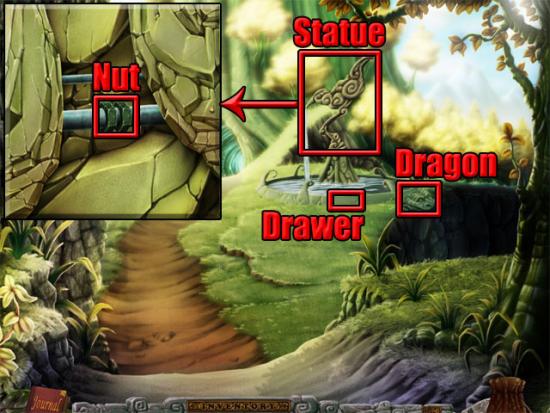
Take the last part of the ruby from the drawer. Move forward to the next area and return to the house with the blue roof. Examine the symbols on the table at the right side of the room and make a note of the order that they appear in. Use the bell on the hook and take the last piece of the book that drops out. Use the ruby on the slot, the mirror on the mirror stand and the leaves from the inventory in the gap below the right set of leaves in the room:
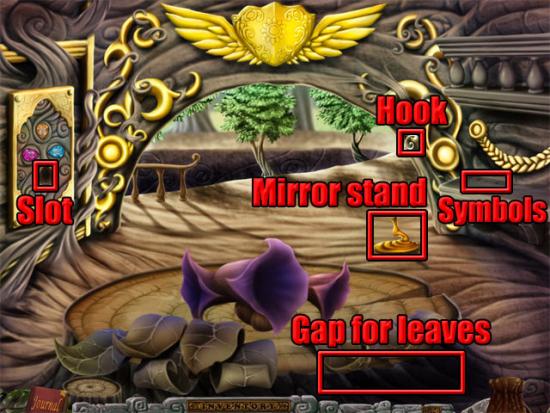
A mini-game will start after the leaves have been placed. Press the leaves in the order that they are highlighted. You will first need to remember three leaves, then five leaves and finally seven leaves to complete the mini-game. Exit the house to see that the light elf palace has now appeared. Return to the grand elf gate and give the two golden emblems and the clover to the fairy to stop the battle. You will now be able to use the world map to travel again. Use the world map to travel to the centaurs village. Move right to the pond and use the three medical herbs from the inventory on the rock:
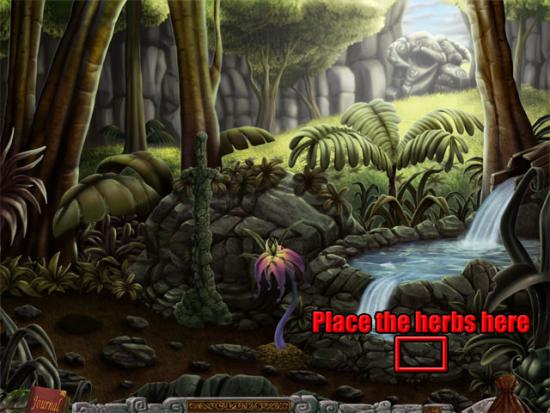
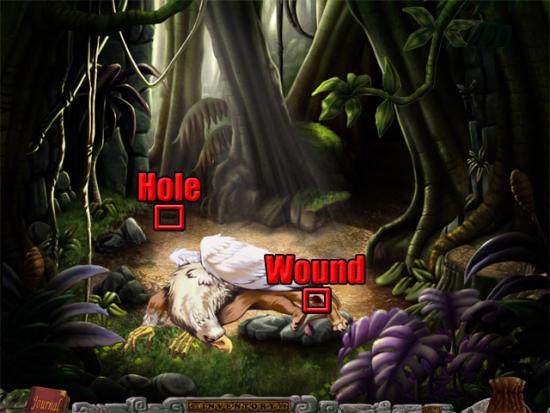
Use the stones from the inventory on the rock to make the herbal medicine paste. Examine the sword-shaped rock to see a close-up view of some symbols. The symbols must be rotated into the same order that was shown on the table in the house with the blue roof near the tree of life. Rotate the symbols into this order and then take the sword that is revealed. Move left to the griffin. Use the coconut half, medicine paste and the plaster on the wound. Combine the black ball with the rope in the inventory and then use the ball on the hole:
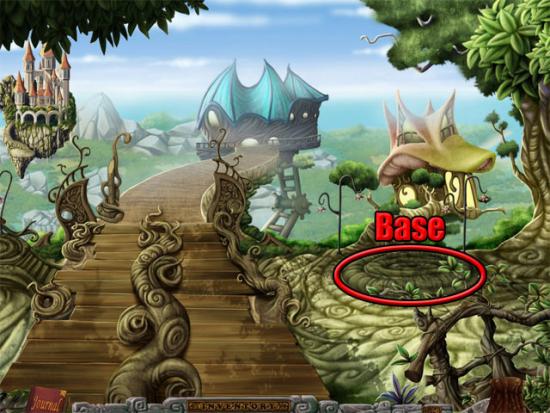
In the mini-game, use the arrow keys to guide the ball through the tunnel without touching the sides to reach the gold ball. After completing the mini-game, take the gold ball from the left side of the hole. Use the map to return to the tree of life. Use the trumpet stand and the trumpet on the base:
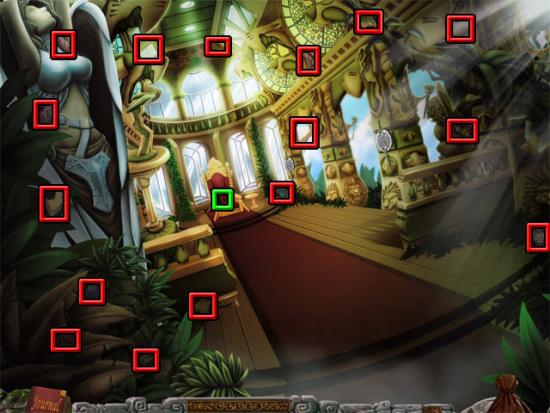
Select the trumpet and the griffin will appear (this only happens after the griffin’s wound has been healed). Select the griffin to travel to the grand palace. Find the objects:
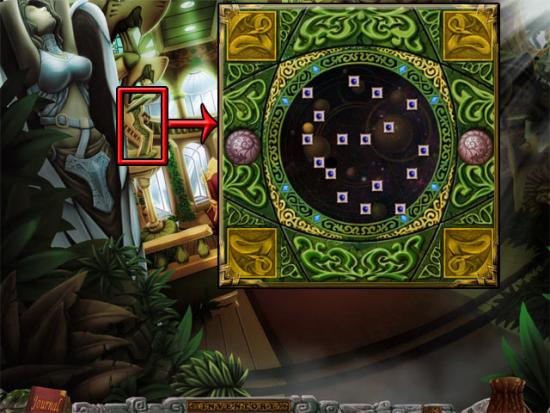
Use the elvish star on the small table at the right side of the throne to play a mini-game where the aim is to remove ten blocks without allowing the star to fall onto the table. Complete the mini-game and then take the flower lantern from the throne. Examine the green device near the left side of the room to see a close-up view. Use the oil on the middle of the puzzle, the two buttons in the holes at the edges of the puzzle and the iron ball on the middle of the puzzle:
Use the buttons to rotate the maze until the ball falls into the hole. One way of completing the puzzle with the layout shown is to press the right button once and the left button six times. The layout may vary from one game to the next. After completing the mini-game, take the medicine that appears. Return to the grand elf gate and select the right pocket of the bag to see how many ruby pieces have currently been found. You need to have collected all of the ruby pieces before you can continue any further, so you may need to use the world map to travel back to previous locations. When viewing the world map, move the mouse cursor over one of the locations and wait to see how many rubies have been found. Some rubies may be in the open, others will be hidden in rocks which the ancient hammer can be used on, and other rubies will be hidden under mounds which the lion can be used on. After all of the ruby pieces have been found, return to the grand elf gate and use the ruby pieces on the right panel. The eight rubies will then glow green in a certain order. Make a note of this order as you will need to use it again shortly. Return to the floating castle and use the sword and the shield on the middle pillar:
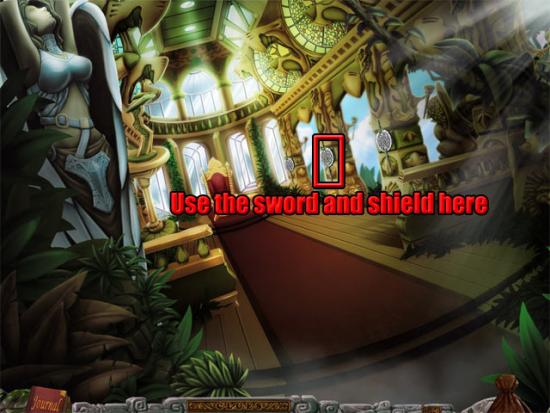
Select the middle pillar and press the buttons around the outside of the shield in the same order that was shown on the rubies at the grand elf gate. Take the last part of the telescope that is revealed after the correct order has been entered. Return to the tree of life and use the lantern and the telescope on the hook. Use the square mirror on the holder at the left side of the bridge:
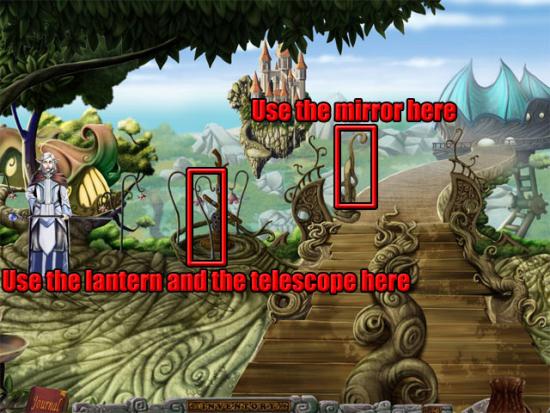
Examine the telescope to see two symbols on the rock. Exit the view of the telescope and examine the locked book in the inventory. Enter the same symbols on the book that were shown on the rock and the scroll will be added to the inventory. Enter the house with the blue roof and examine the red ruby on the left wall to see a short video of the broken underground root. Use the world map to travel to the cave of hidden rocks. Move right to the leviathan cave. Combine the medicine with the bandage in the inventory and then use the bandage on the root:

Use the world map to return to the tree of life. Give the scroll to the elf king to complete the game.

More articles...
-
Best Horror Games On Itch.io – July 2026
Across a bounty of subgenres. -
Haze Seas Accessories Tier List [Best Accessories to Equip]
The accessories with the best stat buffs in Haze Seas.