- Wondering how to get Monopoly GO! free rolls? Well, you’ve come to the right place. In this guide, we provide you with a bunch of tips and tricks to get some free rolls for the hit new mobile game. We’ll …
Best Roblox Horror Games to Play Right Now – Updated Weekly
By Adele Wilson
Our Best Roblox Horror Games guide features the scariest and most creative experiences to play right now on the platform!The BEST Roblox Games of The Week – Games You Need To Play!
By Sho Roberts
Our feature shares our pick for the Best Roblox Games of the week! With our feature, we guarantee you'll find something new to play!Type Soul Clan Rarity Guide – All Legendary And Common Clans Listed!
By Nathan Ball
Wondering what your odds of rolling a particular Clan are? Wonder no more, with my handy Type Soul Clan Rarity guide.
The Search for Amelia Earhart Walkthrough
Welcome to Gamezebo's walkthrough for The Search for Amelia Earhart. General Game Information Hidden object game released in January 2010. The game has 8 Chapters with 15 Mini games and can be played in timed or relaxed mode. The game has 16 trophies trophies available that you can earn for completing various tasks. Mini games are played for extra hints. The better your score on the mini game the higher number of hints you are awarded. Hints are given by timer and by the completi…

a:1:i:0;a:2:s:13:”section_title”;s:41:”The Search for Amelia Earhart Walkthrough”;s:12:”section_body”;s:87612:”
Welcome to Gamezebo’s walkthrough for The Search for Amelia Earhart.

General Game Information
- Hidden object game released in January 2010.
- The game has 8 Chapters with 15 Mini games and can be played in timed or relaxed mode.
- The game has 16 trophies trophies available that you can earn for completing various tasks.
- Mini games are played for extra hints. The better your score on the mini game the higher number of hints you are awarded.
- Hints are given by timer and by the completion of mini games. There is a timer that awards one hint every time the meter refills.
- The game has many historic facts about Amelia Earhart and has a disclaimer at the beginning stating that it has taken some creative liberties with the story since it is unknown how Amelia Earhart actually disappeared.
- Items in the game sometime move into an inventory bag and these items must be used on other items in the scene to do things such as open doors or look behind other items.
- There is a tutorial and a help section that explains all mini games and puzzles.
Game Elements
Sample Game Scene
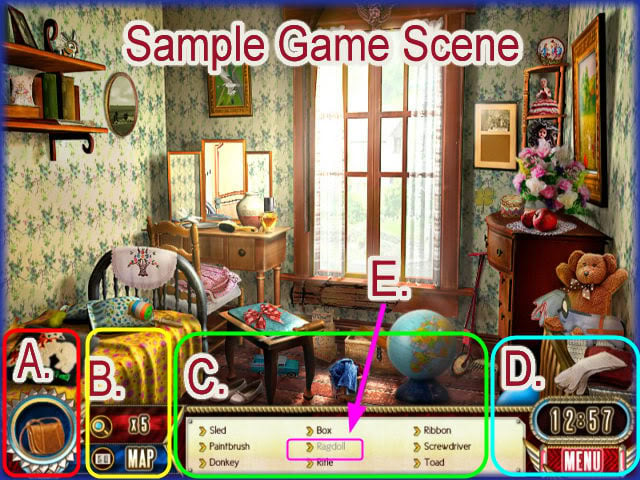
- A. Inventory Bag – Items here are your inventory items that can be used on other items in the inventory or items in the scene. Click on the bag and the inventory menu will appear.
- B. Hint Area/Map – If you choose to use a hint click on the magnifying glass next to the word "Hint" If you wish to go to the game map click on the map icon at the bottom.
- C. Search List – Here you will find the items you are to search for. As you find an item another may appear in its place.
- D. Timer/Menu – If you are playing the game in timed mode this is where you timer is located. You can also access your menu here if you need to pause, adjust settings, or quit the game.
- E. Faded Text – When you see faded text in the search list it means that you will not be able to find that object until something is done such as a door or drawer opened or something moved out of the way. As soon as the obstacle is moved the text will turn back to the normal color.
Hints
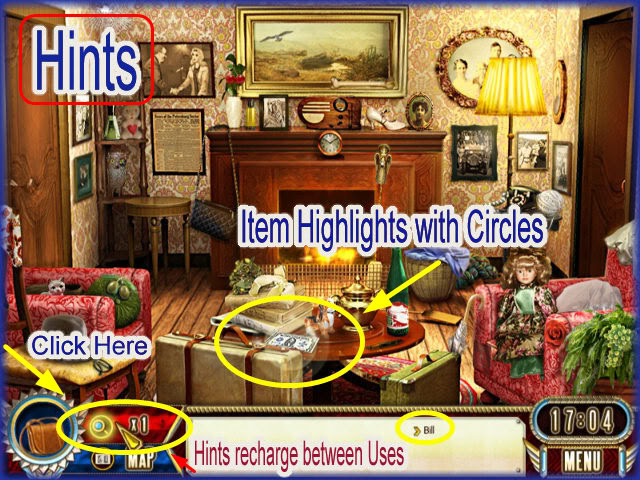
- To use a hint click on the small magnifying glass in the hint area at the bottom mid left side of the screen if you have at least 1 hint available to use.
- A random item from the search list is chosen and will highlight with bright circles.
- If you use a hint and there is only a gray text item left to find you will see a sparkly circle form around that item showing that something still needs to be done to find that particular item such as a door needs to open or something needs to be moved out of the way.
- Hints regenerate between uses and as long as you do not click too many times or too rapidly you will earn a hint after a few minutes.
- Hints are also earned by playing several various mini games. The better you score at these mini games, the more hints you can earn to a maximum of 5.
Inventory Bag/Using Inventory Items/Zones of Interest
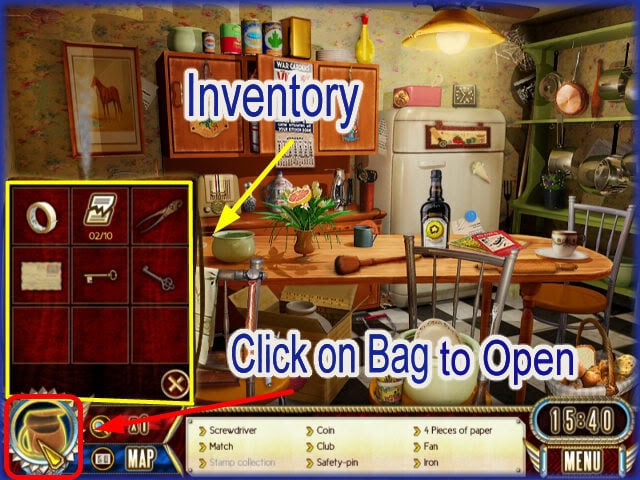
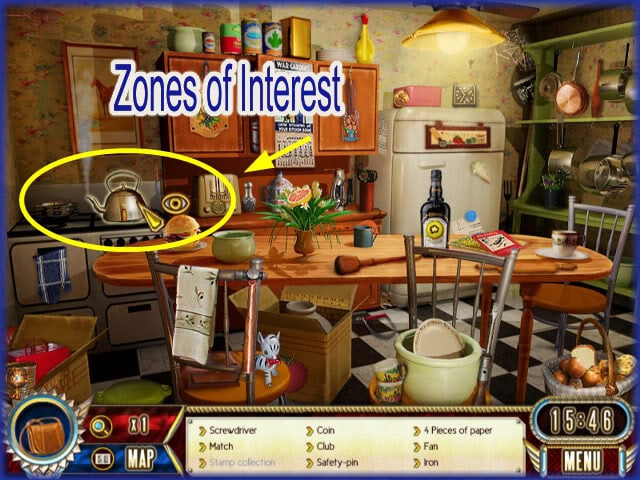
- The inventory bag located at the bottom left of the screen holds all items that are needed to act upon other items in the game.
- The inventory bag also holds items such as pieces of paper until you have enough to trigger a mini game puzzle. You may have to search for 20 pieces of paper of 3 game scenes and you can click on the bag at any time and see how many you have found.
- When in a search scene you will run across items by mousing over the scene. You will see an eye icon next to the area that an inventory item will act upon. These eyes are called, "Zones of Interest"
- Zones of Interest – Any area with the eye icon is an area you will need to drag an inventory item to in order to proceed in the game.
- Once you have a zone of interest the game character will also give you a hint. Once you have decided which item is to be used open the bad by clicking on it and drag the item to the zone of interest. If you are correct a change will immediately occur in that area and you should be able to click on the item in your list . (Gray text item)
- Sometimes you will need to drag an item or two from inventory to a third item in your inventory bag. When this happens you will be given plenty of help and clues from the game’s main character.
Moving from Scene to Scene
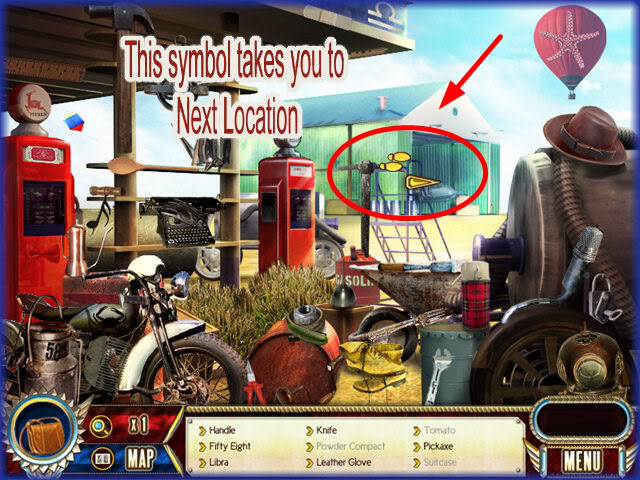
- Whenever you see the arrow with the footprints this is an area you can click on to move to the next location in a chapter.
- Use your mouse and move it all over the scene to find these areas.
- Some scenes have more than one and you can move back and forth between areas without penalty.
Locate the Coordinates Mini Game

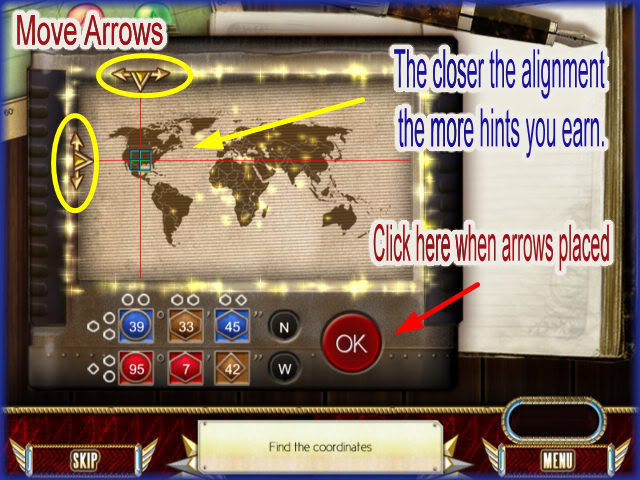
- Each chapter will require you to complete this mini game.
- If you are playing in timed mode you will need to move quickly as you don’t get much time.
- Your success will award you with 1 to 5 extra hints to use in your next search screen.
- You will have to find numbers in each search scene. Once you have found all 6 numbers you will be prompted to play the "Locate the Coordinate" game.
- The six numbers are printed on a colored shape.
- There are 6 empty colored panels at the bottom of the screen.
- Drag the number to the correct color and shape and if you are correct the number will stay in place.
- You always match color to color and shape to shape.
- Once you have all the numbers placed below 2 arrows will appear at the top of the map representing the horizontal and vertical point of intersection of the coordinates.
- You are to move the arrows by clicking on them and holding down your left mouse button.
- Place the arrows so that they intersect perfectly. Sometimes it is very hard to align these arrows.
- When you feel you have it in the best position click on the "OK" button. (If you are in timed mode you will have to be fast)
- A screen will appear telling you how close you were to the location.
- The better you do the higher the number of hints you will be awarded.
- If you run out of time in timed mode you can start over and try again until you succeed.
- Once you succeed you can not do the game again for a better score.
- After a few moments a "Skip" button will highlight at the lower left side of the screen. If you wish to skip this puzzle you can but there will be a penalty. You will lose hints and in timed mode you could lose some time.
- Skipping this puzzle will prevent you from winning a trophy.
Trophies
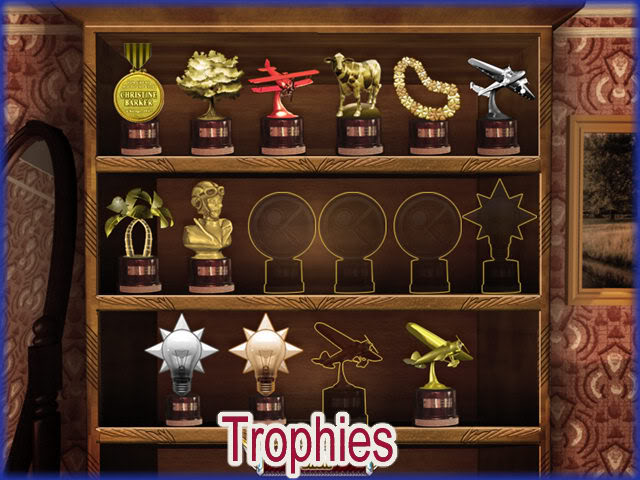
- There are 16 Trophies you can earn in the game.
- You can earn a trophy by doing the following:
- Trophy 1 – Complete Chapter 1
- Trophy 2 – Complete Chapter 2
- Trophy 3 – Complete Chapter 3
- Trophy 4 – Complete Chapter 4
- Trophy 5 – Complete Chapter 5
- Trophy 6 – Complete Chapter 6
- Trophy 7 – Complete Chapter 7
- Trophy 8 – Complete Chapter 8
- Trophy 9 – Do not use hints on 4 Chapters.
- Trophy 10 – Do not use hints for the entire game.
- Trophy 11 – Do not use hints for one chapter to win this trophy.
- Trophy 12 – Do not skip any mini games to earn this trophy.
- Trophy 13 – Do not skip nine mini games to earn this trophy.
- Trophy 14 – Do not skip any activities to earn this trophy.
- Trophy 15 – Complete the game in "Timed" mode to earn this trophy.
- Trophy 16 – Complete the game in "Relaxed" mode to earn this trophy.
Walkthrough
- Note that items shown in the search screen may vary from those in your screen but the key elements such as inventory items will always be the same.
Chapter 1 – Chicago, Illinois 1937
Living Room
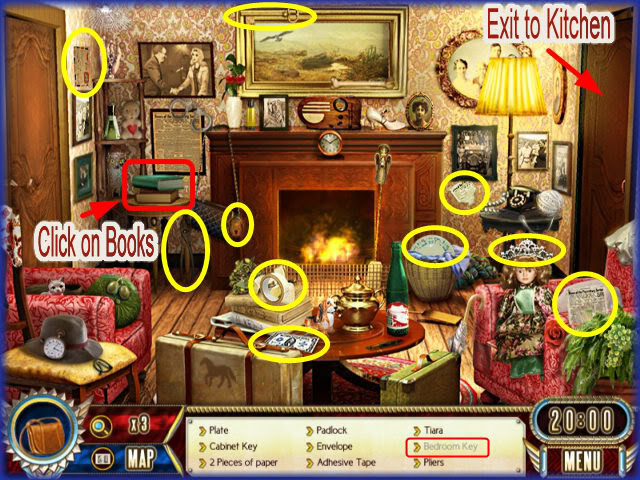
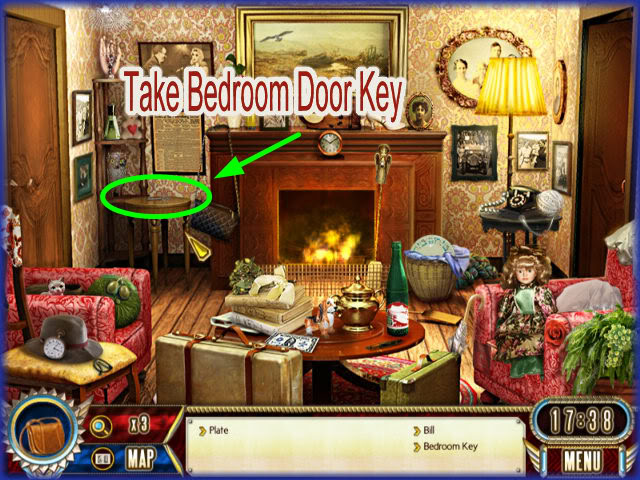
- Storyline – Here you meet "Christine" a beautiful and successful Clairvoyant that has won many awards for her ability to help law enforcement. She discusses Amelia Earhart and explains how she is her hero for paving the way for many women to do things traditionally thought exclusive for men.
- Christine needs to clean her apartment.
- Locate the 9 Hidden Items
- Items to find:
- Plate
- 2 Pieces of Paper
- Padlock
- Cabinet Key
- Adhesive Tape
- Tiara
- Pliers
- Gray Text – Bedroom Key – Click on the books and they will disappear. The bedroom key will be on the table.
- You can either click on the door to the right and enter the kitchen or take the key and enter the bedroom.
- For walkthrough purposes click on the kitchen door at the far right first.
Kitchen
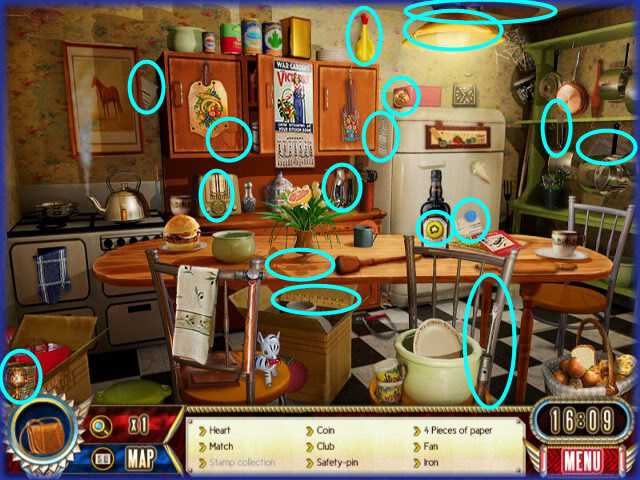
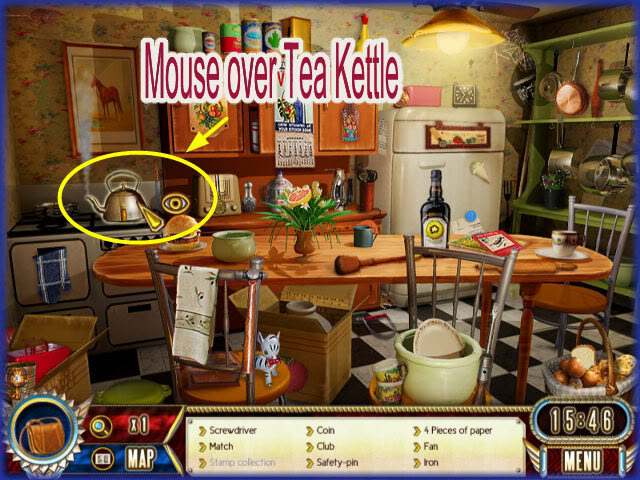
- Locate the 18 Hidden Items
- Heart
- Match
- Coin
- Club
- Safety Pin
- 4 Pieces of Paper
- Fan
- Iron
- Screwdriver
- Spoon
- Ruler
- Banana
- Goblet
- Kiwi
- Medal
Open Stamp Collection
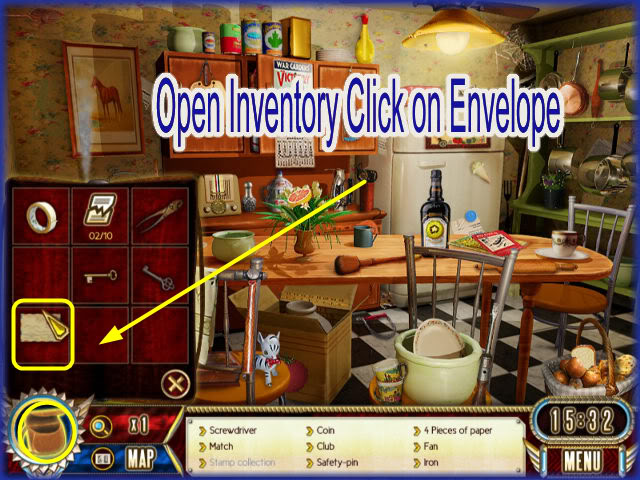
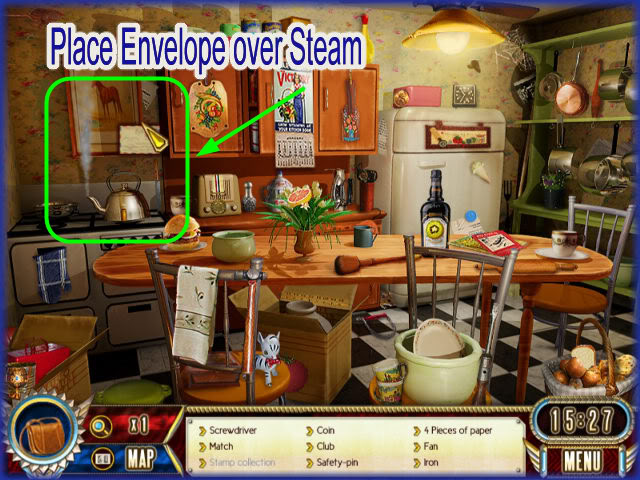
- Open the inventory bag and drag the envelope you found in the living room over the steam from the tea kettle and click your left mouse button.
- This will open the envelope.
- Go back to the living room and get ready to open the bedroom door at the far left.
Open Bedroom Door
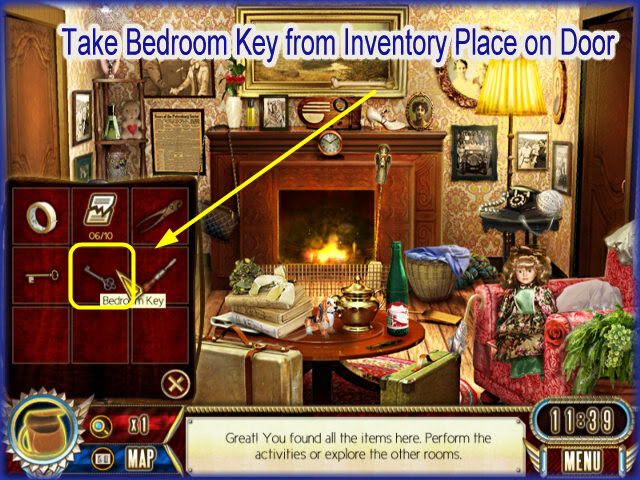
- Open inventory bag and drag silver bedroom door key to the door and click you left mouse button.
- You will be taken inside the bedroom.
Bedroom
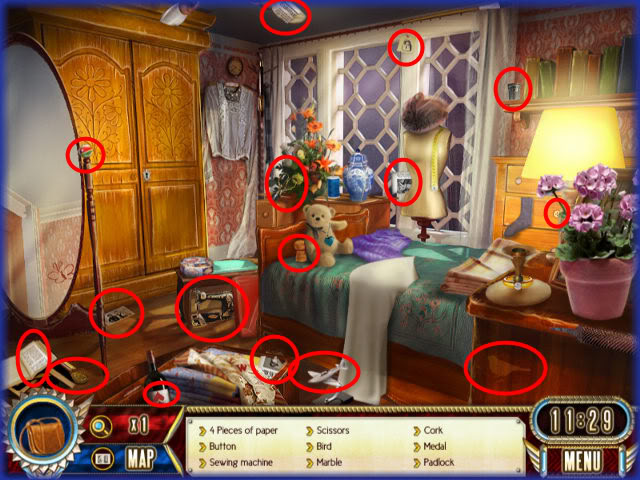
- Locate the 17 Hidden items
- 4 Pieces of Paper (Triggers Mini Game when all 4 Pieces are found)
- Sewing Machine
- Thimble
- Cork
- Padlock
- Photograph
- Airplane
- Marble
- Bird
- Scissors
- Medal
- Button
- Spade
- Gray Text – Gadget
Mini Game – Jigsaw Puzzle
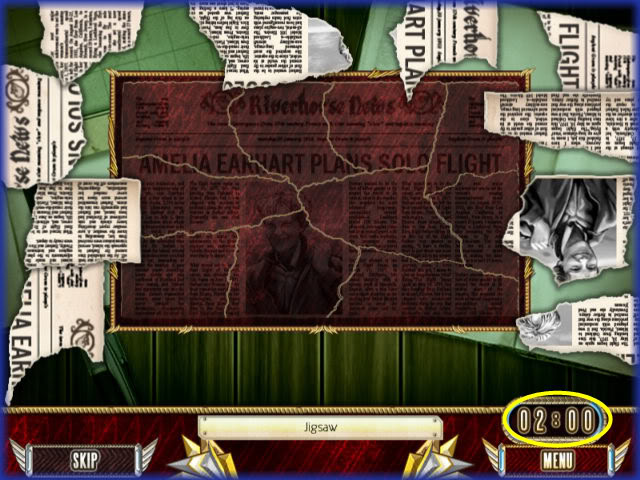
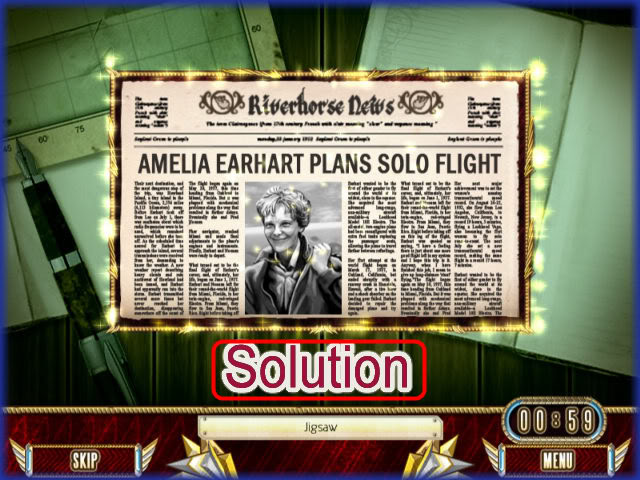
- After you collect all 4 pieces of paper you will trigger this mini game.
- Assemble all pieces of paper to complete the image.
- Use your left mouse button and hold it down to drag pieces where you wish to place them.
- Use your right mouse button to rotate the pieces.
- Once you place the piece correctly it will lock into place.
- If doing this in timed mode you only have 2 minutes so you will have to work fast.
- Start with the outer edge pieces first and work your way in using text on the paper to help you.
- Based on the amount of time you have left over once you finish you will be awarded extra hints for completion of this puzzle.
- You can skip this puzzle by hitting the "skip" button at the lower left of screen once it highlights.
- Solution is shown above.
Open Closet Door
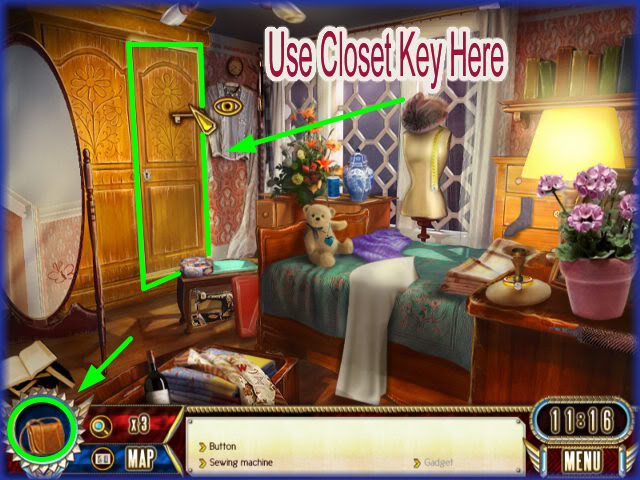
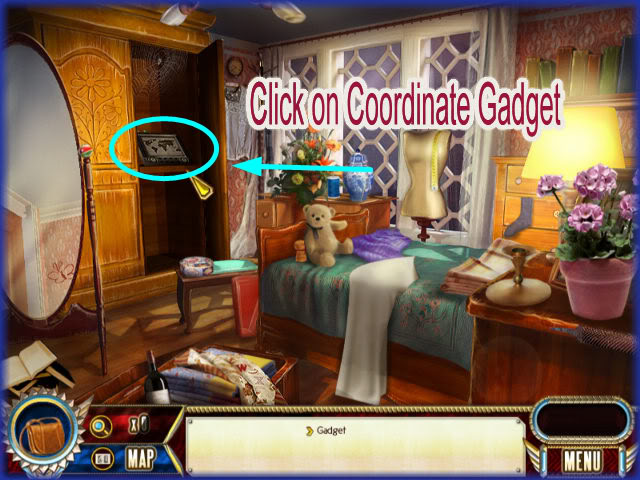
- Place your mouse over the closet door and you will see the door highlight with the eye icon.
- Click on inventory bag and drag the gold closet key to the closet door.
- Inside you will find the gadget.
- Click on gadget and it will enter your inventory.
Combining Objects to repair Coordinate Gadget.
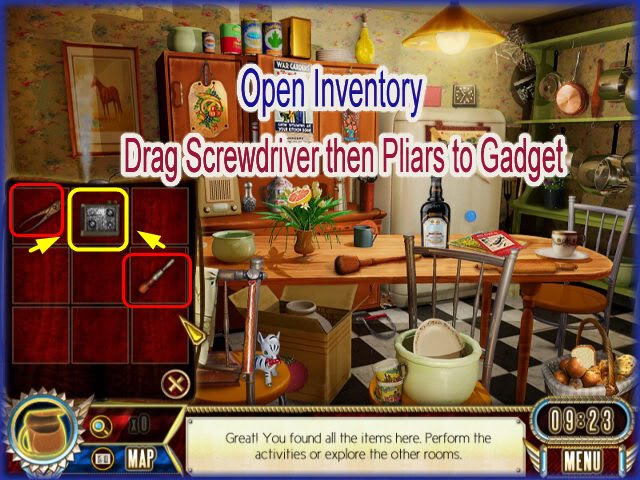
- The final task is to repair the gadget.
- You should have a screwdriver and a pair of pliers in your inventory bag.
- Click on the bag and open the menu.
- Drag the screwdriver to the gadget and then drag the pliers to the gadget.
- This will trigger your first coordinates mini game.
Mini Game – Find the Coordinates
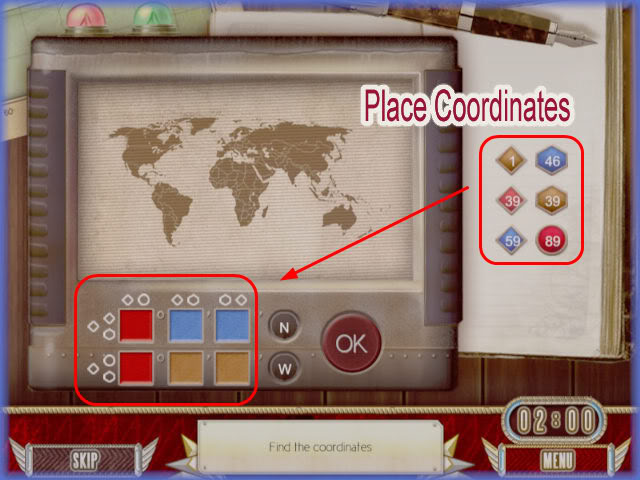
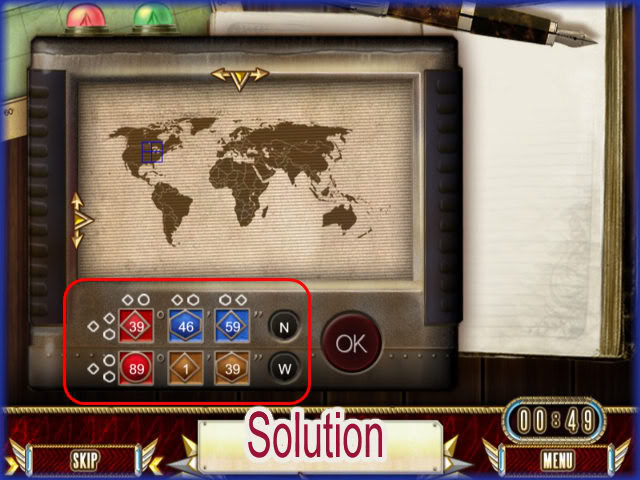
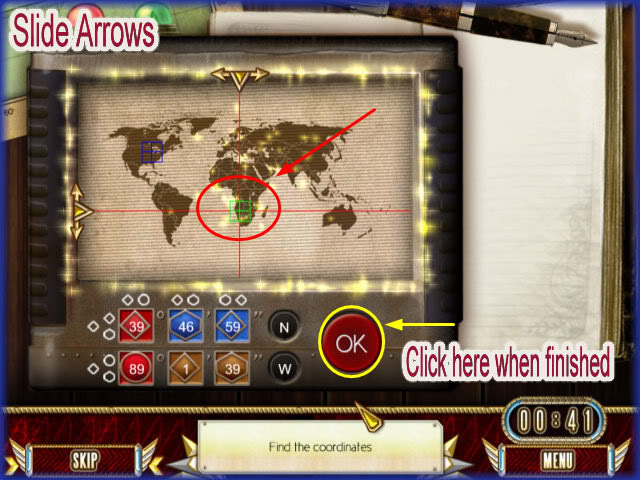
- Drag the number to the correct color and shape and if you are correct the number will stay in place.
- You always match color to color and shape to shape.
- Once you have all the numbers placed below 2 arrows will appear one at the top, and one at the side of the map representing the horizontal and vertical point of intersection of the coordinates.
- You are to move the arrows by clicking on them and holding down your left mouse button.
- Place the arrows so that they intersect perfectly. Sometimes it is very hard to align these arrows.
- When you feel you have it in the best position click on the "OK" button. (If you are in timed mode you will have to be fast)
- A screen will appear telling you how close you were to the location.
- The better you do the higher the number of hints you will be awarded.
- If you run out of time in timed mode you can start over and try again until you succeed.
- Once you succeed you can not do the game again for a better score.
- After a few moments a "Skip" button will highlight at the lower left side of the screen. If you wish to skip this puzzle you can but there will be a penalty. You will lose hints and in timed mode you could lose some time.
- SOLUTION – Top Row Left to Right – "39" Red Diamond, "46" Blue Hexagon, and "59" Blue Diamond.
- Bottom Row, Left to Right – "89" Red Circle, "1" Brown Diamond, and "39" Brown Hexagon"
Chapter 2 – Atchinson, Kansas 1897
Spot the Differences
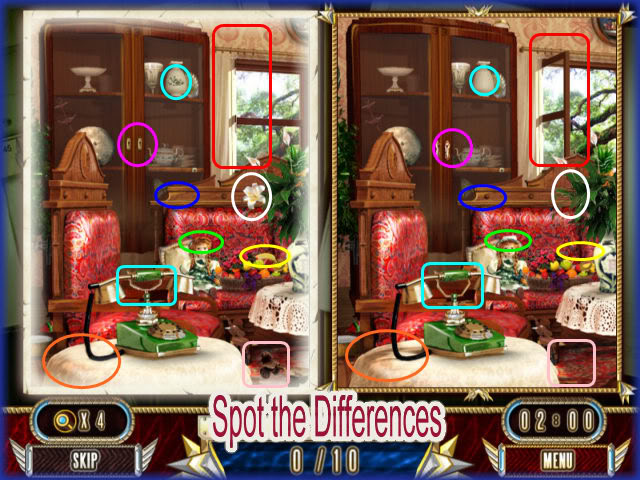
- Locate the 10 Differences between the two sides.
- If you are in "Timed" mode you have 2 minutes to complete this puzzle.
- You may skip this puzzle if you wish when the sign highlights.
- Based on the amount of time left over when you complete this puzzle you will earn 1 to 5 hints.
- Differences are color coded in image above.
Amelia’s Living Room
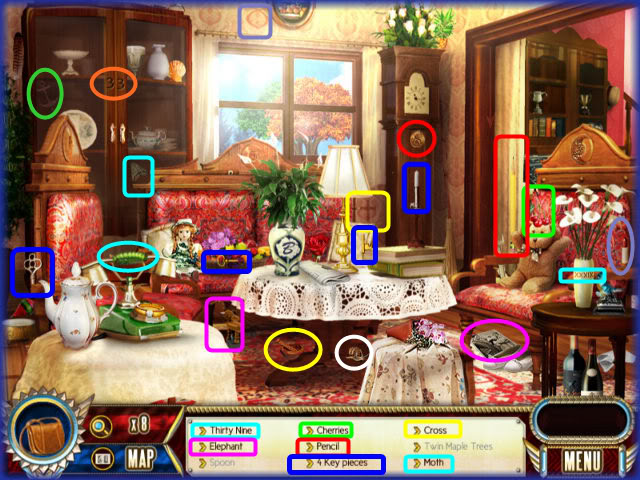
- Locate the 21 Hidden Items.
- Cherries
- Pencil
- Cross
- Moth
- 4 Key Pieces
- Elephant
- "Spoon" – Gray Text
- "Twin Maple Trees" – Gray Text
- Thirty-Nine
- Anchor
- Thirty-Three
- Photograph
- Coin
- Fish
- Caterpillar
- Lipstick
- Mortar
- Snail
Zones of Interest
Window
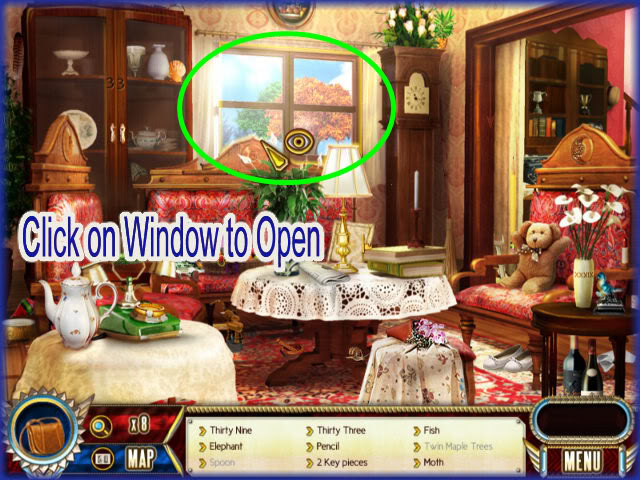
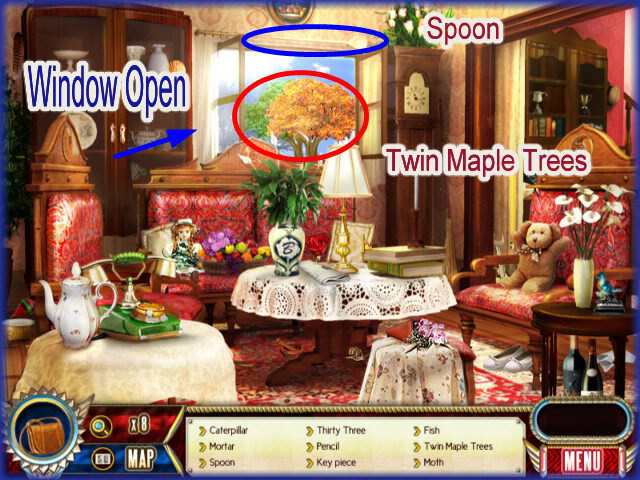
- Click on the window at back of scene.
- Once the window is open you can click on the spoon along the top and the twin maple trees outside.
- Once all items are found exit to the right into the dining room area.
Dining Room
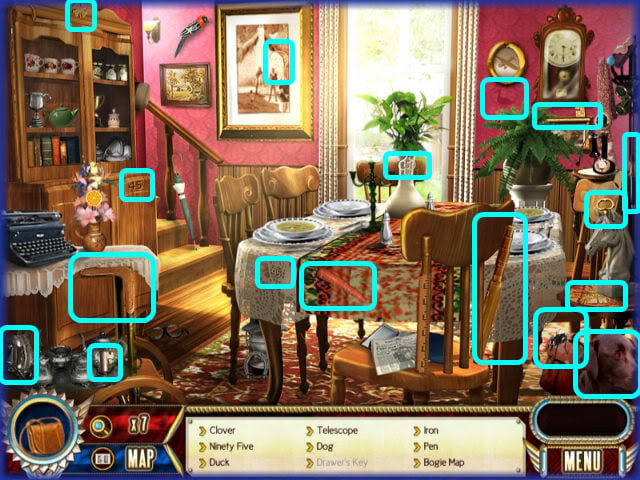
- Locate the 18 hidden items in the scene.
- Clover
- "95"
- Duck
- Telescope
- Dog
- Iron
- Pen
- Bogie Map
- Drawer Key – Gray Text
- Fly
- Carrot
- "45"
- 4 Key Pieces
- Boomerang
- Bread Slice
Zone of Interest
Clock
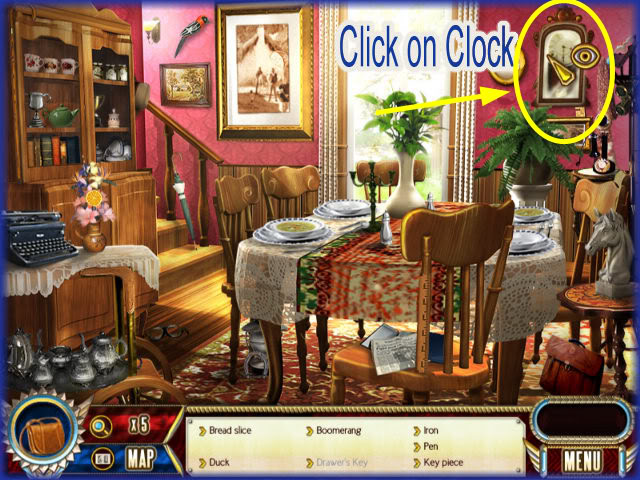
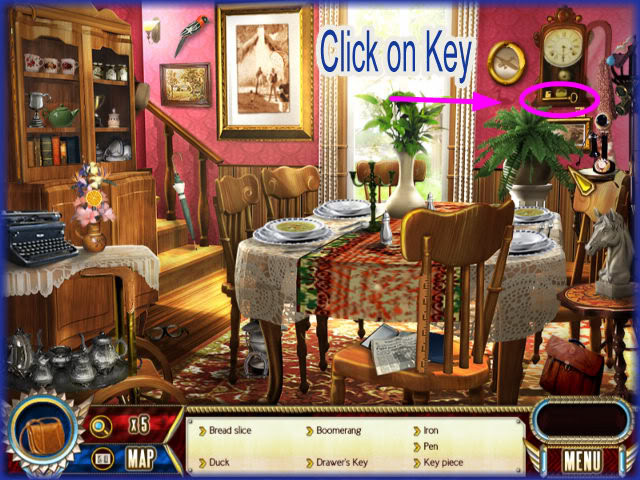
- Click on the clock and the glass door will open.
- Here you will find the drawer key which will go into your inventory for later use.
- Finding the key triggers the next mini game provided you have found all the key pieces. If you have not found them yet do so to trigger the puzzle.
Mini Game – Key Jigsaw Puzzle
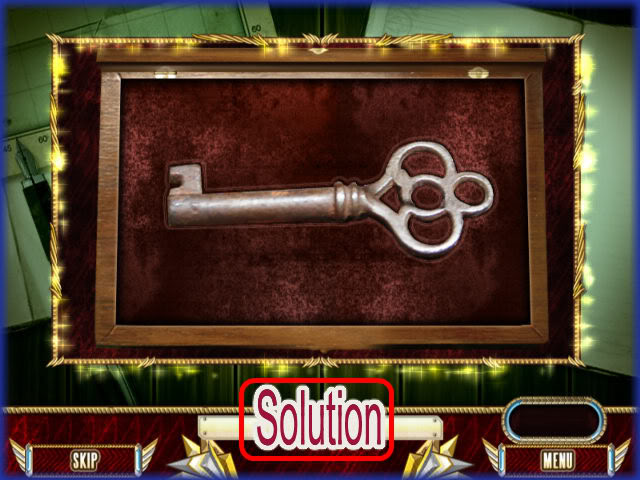
- Here you are to put all the pieces of the key together until image is complete.
- Click on a piece while holding down your left mouse button and drag to the location you wish to place it.
- Right clicking on a piece of key will cause it to rotate.
- TIP – Place the curved pieces at the top of the key first. If you rotate the pieces in that area it may lock it into place for you.
- If a piece is correctly placed it will lock into place.
- If you are playing in timed mode you will have 2 minutes to complete the puzzle.
- If you run out of time you can do the puzzle again until you are successful.
- You have the option to skip the puzzle once the button highlights but will lose your chance at extra hints.
- Based upon the amount of time left over when you are finished you will be awarded 1 to 5 hints to use in your next scene.
- A picture of the finished puzzle is shown above.
- Next you will find yourself inside the bedroom.
Amelia’s Bedroom
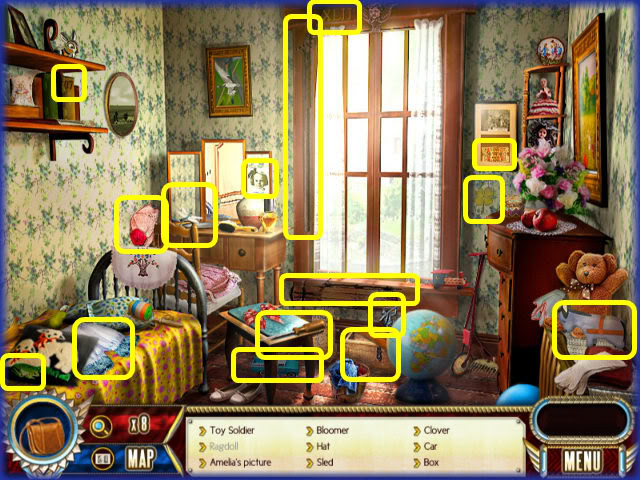
- Locate the 17 hidden items in the scene.
- Toy Solider
- Amelia’s Picture
- Rag doll – Gray Text Item
- Bloomer
- Hat
- Sled
- Clover
- Car
- Box
- "42"
- Fair Ticket
- Screwdriver
- Dragonfly
- Rifle
- Toad
- Donkey
- "7"
Mini Game – Place the Coordinates
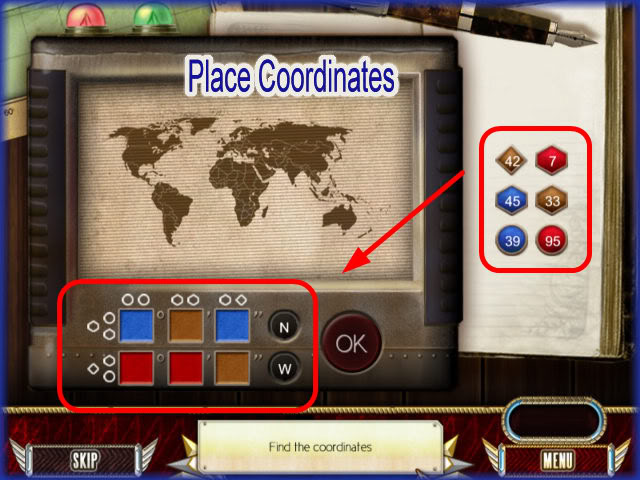
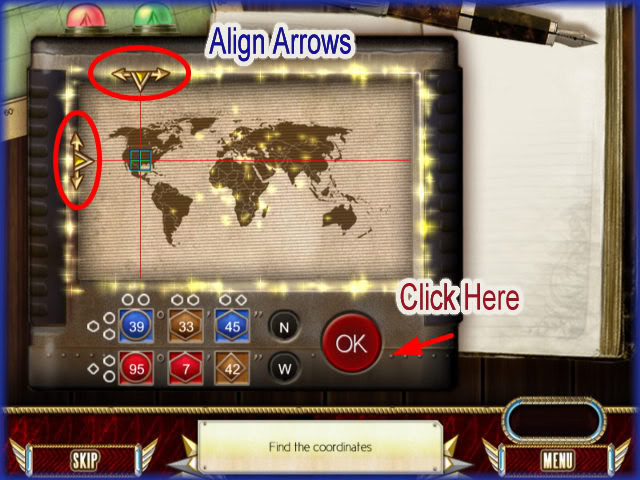
- Once you find all of the numbers you will need to help Christine use her gadget. (All six numbers are found in the bedroom and dining room)
- Drag the number to the correct color and shape and if you are correct the number will stay in place.
- You always match color to color and shape to shape.
- Once you have all the numbers placed below 2 arrows will appear one at the top, and one at the side of the map representing the horizontal and vertical point of intersection of the coordinates.
- You are to move the arrows by clicking on them and holding down your left mouse button.
- Place the arrows so that they intersect perfectly. Sometimes it is very hard to align these arrows.
- When you feel you have it in the best position click on the "OK" button. (If you are in timed mode you will have to be fast)
- A screen will appear telling you how close you were to the location.
- The better you do the higher the number of hints you will be awarded.
- If you run out of time in timed mode you can start over and try again until you succeed.
- Once you succeed you can not do the game again for a better score.
- After a few moments a "Skip" button will highlight at the lower left side of the screen. If you wish to skip this puzzle you can but there will be a penalty. You will lose hints and in timed mode you could lose some time.
- SOLUTION – Top Row Left to Right – "39" Blue Circle, "33" Brown Hexagon, and "45" Blue Hexagon.
- Bottom Row, Left to Right – "95" Red Circle, "7" Red Diamond, and "42" Brown Diamond.
Zone of Interest
Desk Drawer
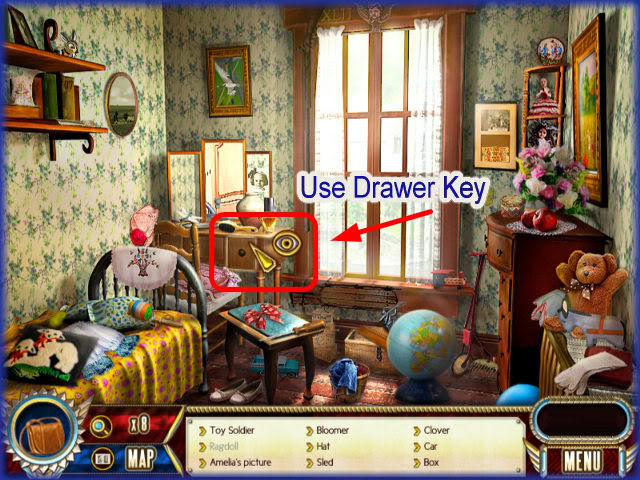
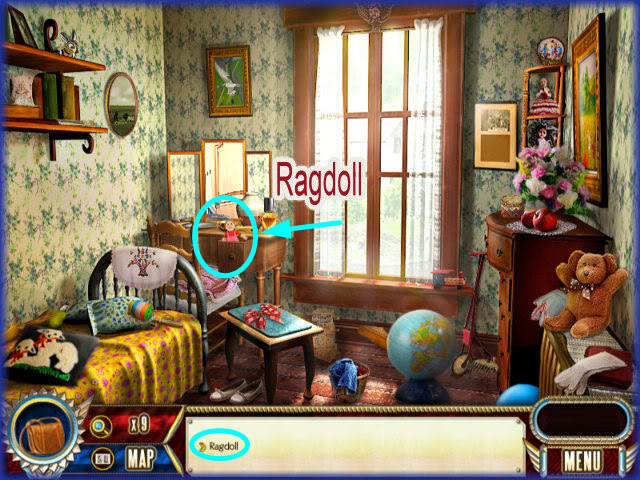
- Click on inventory bag and drag "Drawer Key" to the drawer.
- Once it is open click on the Rag doll.
- If you have found all the items this is the end of Chapter 2.
Chapter 3 – Canadian National Exposition – Toronto, Canada 1918
Unscramble the Image
Canadian Exhibition
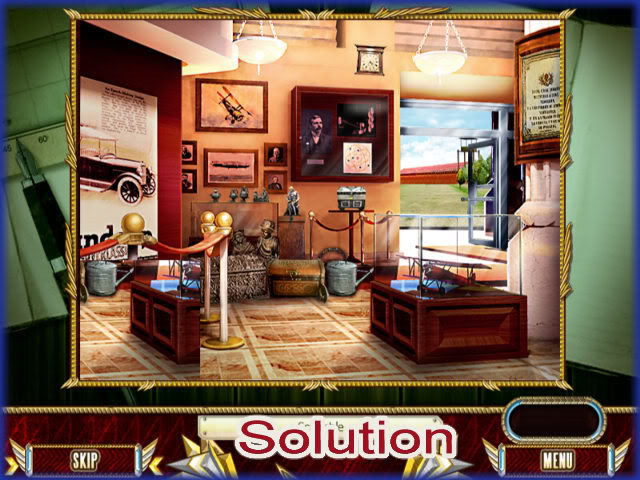
- After Christine opens the package of photographs you will be asked to reassemble the image by clicking on each tile until it flips to the correct location.
- TIP – Mouse over each tile carefully so that you do not touch any others. If you look carefully while the tile is moving you can see the correct image behind the moving tile.
- When you have the tile correctly placed be sure not to touch it with your mouse.
- It is easier to work from top right to left, then down left to right, then down right to left.
- TIP – When you get to the last two tiles place the mouse underneath the image after you flip it so you do not touch any of the fixed tiles. If you accidentally click on it you will have to start over and could lose a lot of time.
- This puzzle is easy at a relaxed mode but very difficult in timed mode.
- You can elect to skip the puzzle after the skip key highlights.
- You will earn hints based on how fast you can complete the puzzle.
Canadian Exhibit
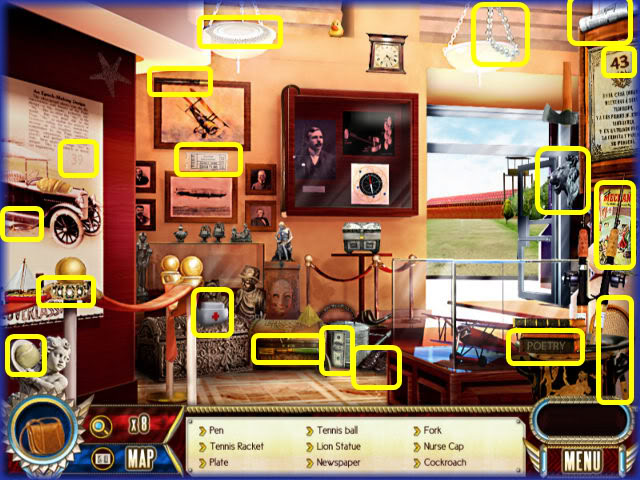
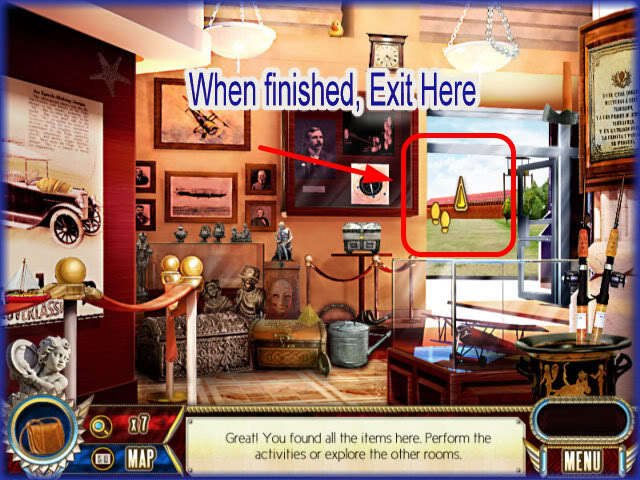
- Locate the 16 Hidden items in the scene.
- Pen
- Tennis Racket
- Plate
- Tennis Ball
- Lion Statue
- Newspaper
- Fork
- Nurse Cap
- Cockroach
- Bracelet
- Ticket
- "39"
- Poetry Book
- Magazine
- Shoes
- Bill
- When all items are located exit through back opening as shown in image above.
Outside Stadium
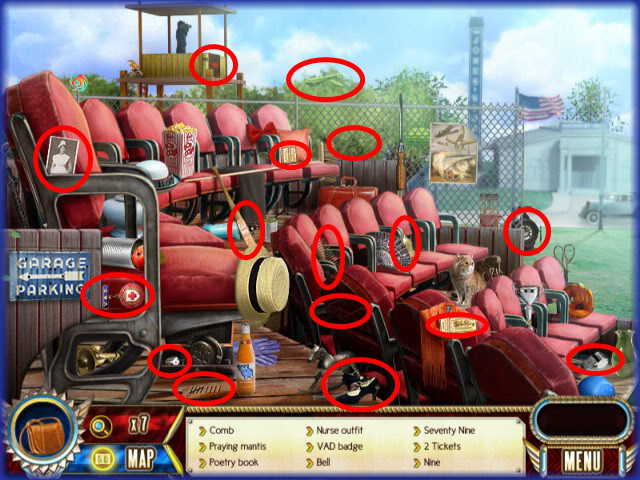
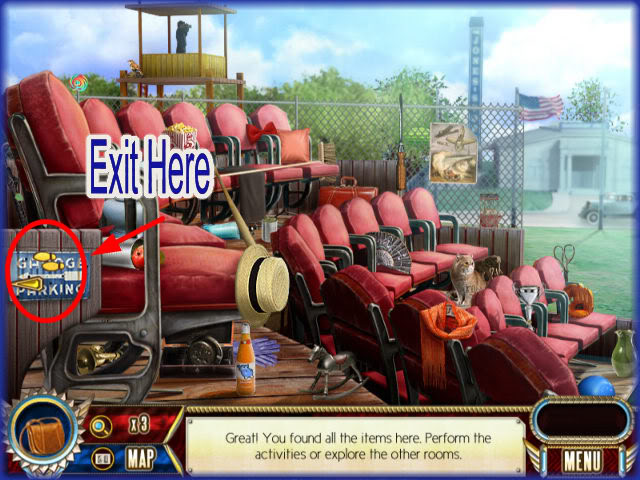
- Locate the 16 hidden items in the scene.
- Praying Mantis
- Comb
- Poetry Book
- Nurse Outfit
- VAD Badge
- Bell
- "79"
- Two Tickets
- "9"
- Bandage
- Whistle
- Shoes
- Glasses
- Pocket Watch
- Dice
- When all items are located exit by clicking on the left side of scene near blue sign as shown in second image above.
Garage Parking
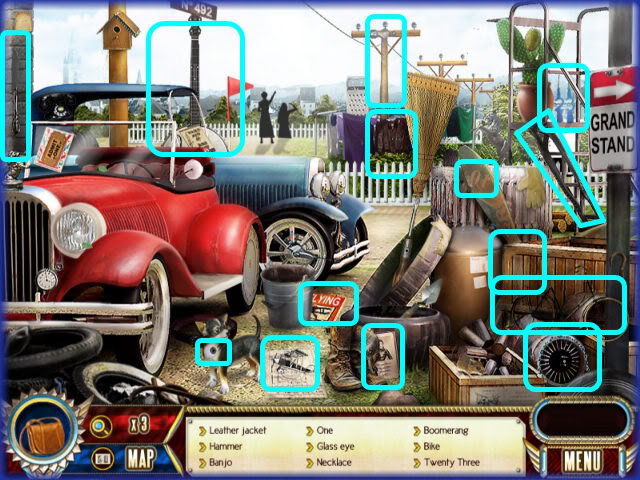
- Locate the 14 hidden items in the scene.
- Leather Jacket
- Banjo
- "1"
- Glass Eye
- Necklace
- Boomerang
- Bike
- "23"
- Licensed Aviator
- Ticket
- Biplane
- Knife
- Magazine
- Pliers
- Once you find all of the numbers you will trigger the coordinates mini game.
Mini Game – Locate the Coordinates
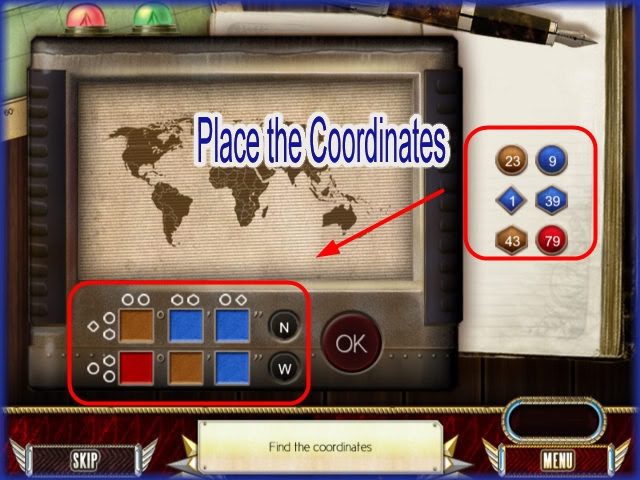
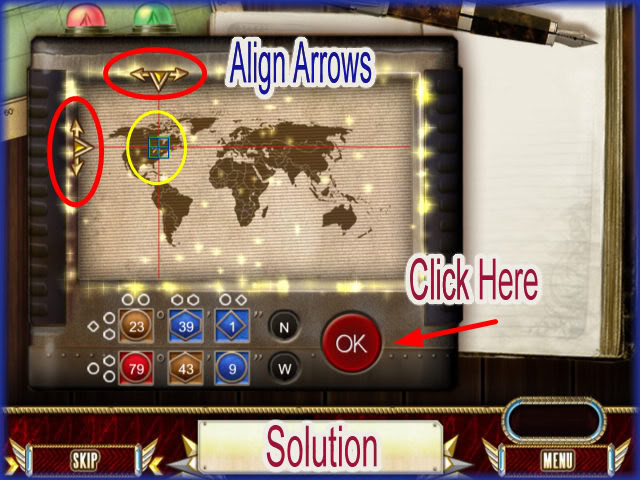
- Drag the number to the correct color and shape and if you are correct the number will stay in place.
- You always match color to color and shape to shape.
- Once you have all the numbers placed below 2 arrows will appear one at the top, and one at the side of the map representing the horizontal and vertical point of intersection of the coordinates.
- You are to move the arrows by clicking on them and holding down your left mouse button.
- Place the arrows so that they intersect perfectly. Sometimes it is very hard to align these arrows.
- When you feel you have it in the best position click on the "OK" button. (If you are in timed mode you will have to be fast)
- A screen will appear telling you how close you were to the location.
- The better you do the higher the number of hints you will be awarded.
- If you run out of time in timed mode you can start over and try again until you succeed.
- Once you succeed you can not do the game again for a better score.
- After a few moments a "Skip" button will highlight at the lower left side of the screen. If you wish to skip this puzzle you can but there will be a penalty. You will lose hints and in timed mode you could lose some time.
- SOLUTION – Top Row Left to Right – "23" Brown Circle,"39" Blue Hexagon, and "1" Blue Diamond.
- Bottom Row, Left to Right – "79" Red Circle, "43" Brown Hexagon, and "9" Blue Circle.
Chapter 4 – "Derry" Northern Ireland, 1932
Mini Game – Map Jigsaw Puzzle
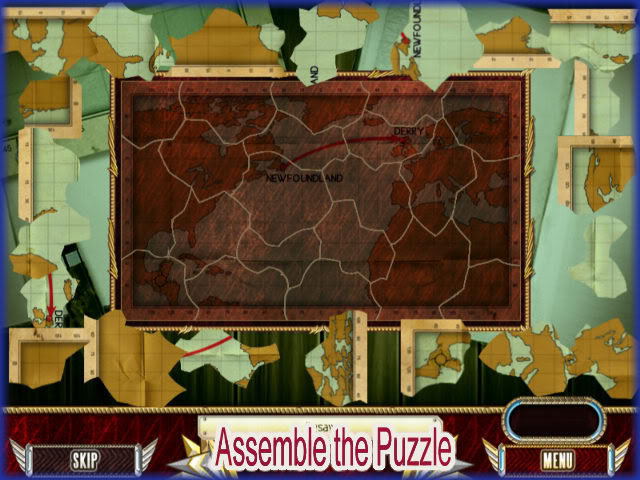
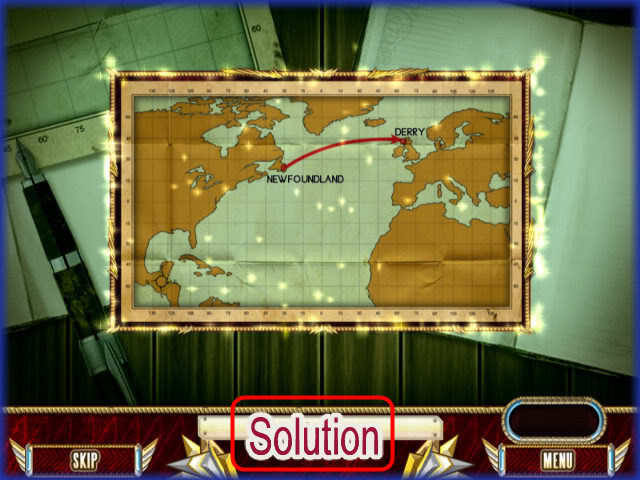
- Assemble the jigsaw puzzle.
- Click on each piece and while holding down the left mouse button drag it to the correct location.
- Right click your mouse to rotate the piece in different directions.
- Once you place the piece correctly it will lock into place.
- TIP – Place the outer edges first and work your way to the center of the puzzle.
- If playing in timed mode you will have 2 minutes to complete the puzzle
- You may skip the puzzle if you wish when the button becomes active.
- Once you complete the puzzle you will earn 1 to 5 hints based on your timing.
Field
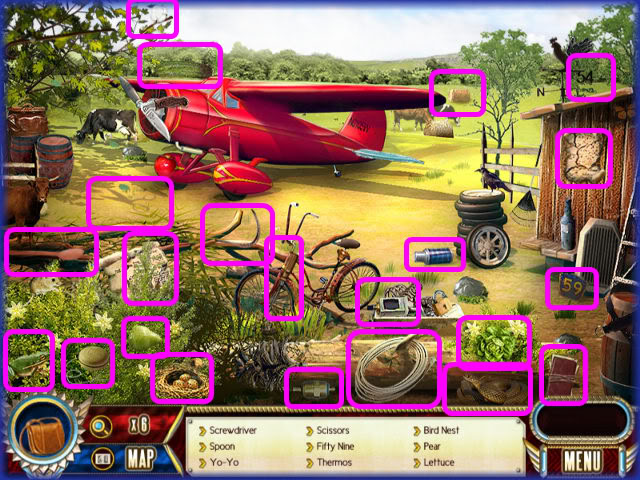
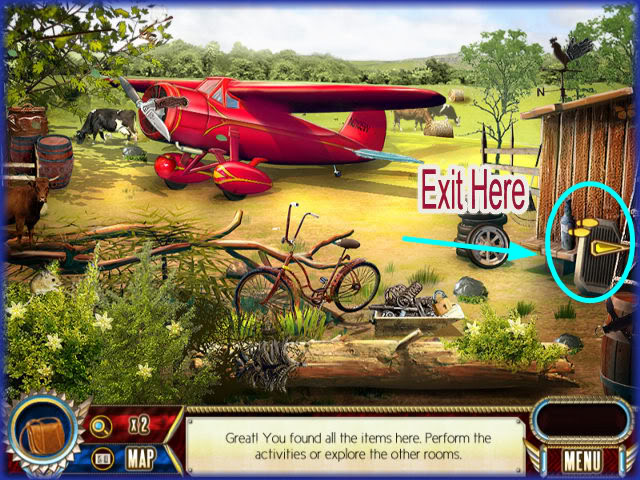
- Locate the 23 hidden items in the scene.
- Screwdriver
- Yo-Yo
- Spoon
- Scissors
- "59"
- Thermos
- Bird Nest
- Pear
- Lettuce
- Scythe
- "54"
- Cork
- Frog
- Cucumber
- 2 Map Pieces
- Cotton
- Rope
- 2 Motor Pieces
- Snake
- Bell
- Diary
- When all items are located exit to the right of the scene as shown in second image above.
Outside Cabin
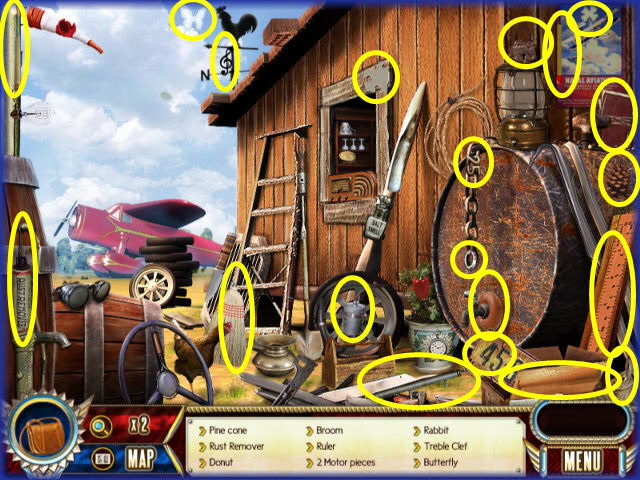
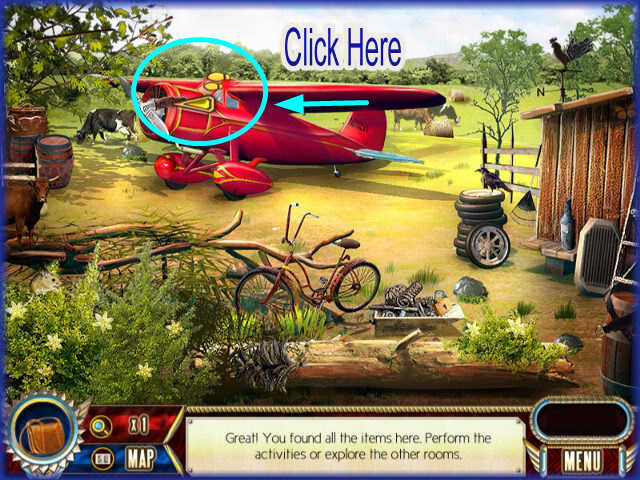
- Locate the 20 hidden items in the scene.
- Pine Cone
- Rust Remover
- Donut
- Broom
- Ruler
- 2 Motor Pieces
- Rabbit
- Treble Clef
- Butterfly
- Toothbrush
- Match
- Jigsaw Piece
- Padlock
- Clover
- "45"
- Platinum Ring
- Baseball Bat
- Diary
- "25"
- When finished finding items click on the front of the red plane as shown in second image above.
Repair the Plane
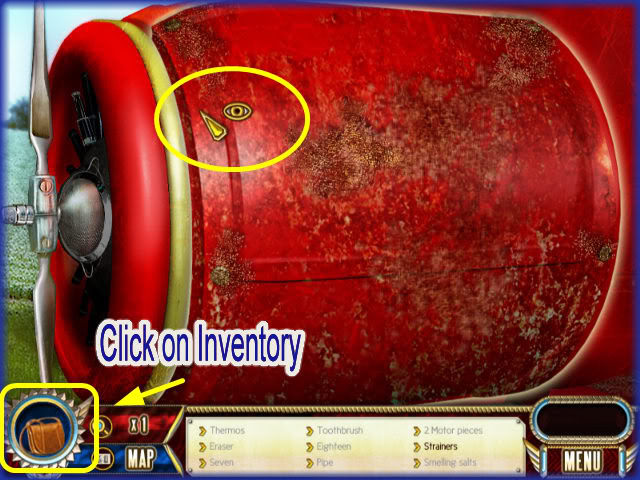
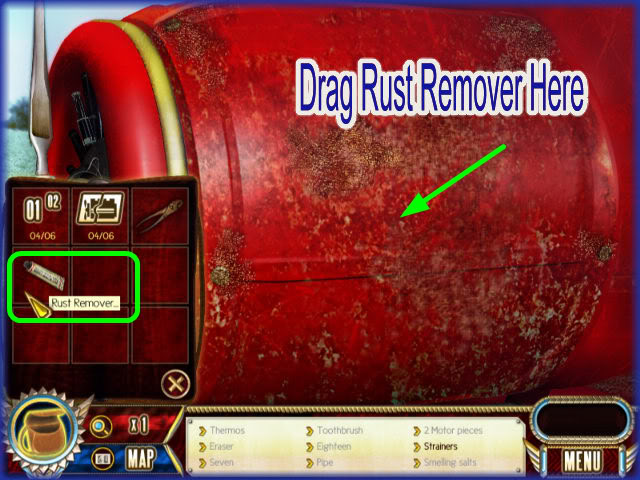
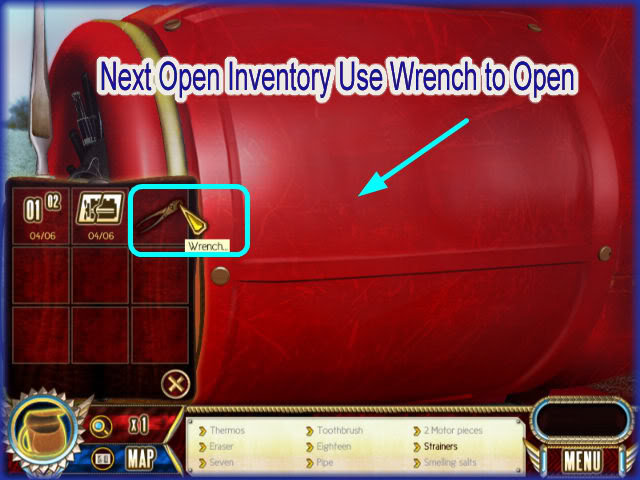
- Click on the inventory bag and drag the rust remover tube to the rusted area.
- Click on the inventory bag again and use the wrench to open.
Examine the Motor
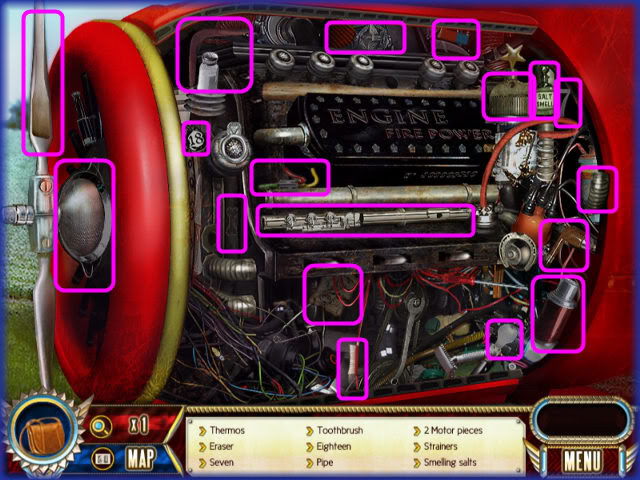
- Locate the 18 hidden items in the scene.
- Thermos
- Eraser
- "7"
- Toothbrush
- "18"
- Pipe
- 2 Motor Pieces
- Strainers
- Smelling Salts
- Boomerang
- Flute
- Comb
- Light Bulb
- Spatula
- Map Piece
- Medal
- Bone
Place the Motor Parts
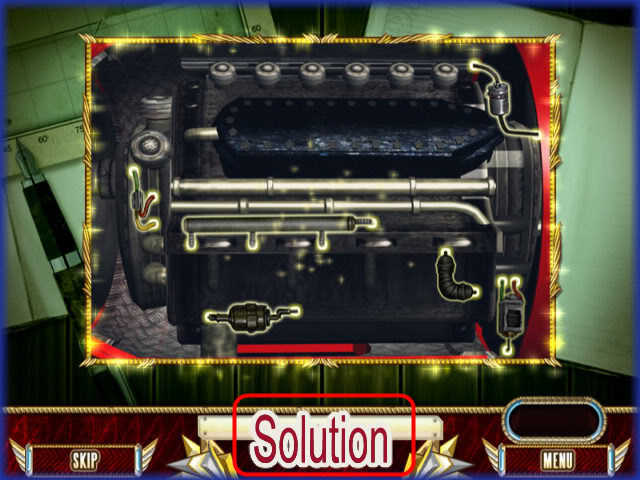
- Place the 6 motor parts in the correct locations.
- Click on the part and with your left mouse button down drag it to the area you wish to place it.
- Use your right mouse button to rotate the part.
- Place the ends of the pieces in the lighted circles.
- If part is correctly placed it will lock into place.
- You can skip this puzzle if you choose.
- You will earn 1-5 hints for your next scene based on your timing.
Mini Game -Locate the Coordinates
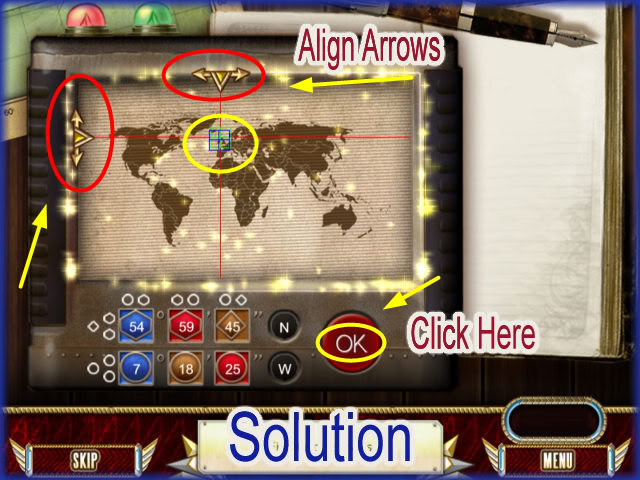
- Drag the number to the correct color and shape and if you are correct the number will stay in place.
- You always match color to color and shape to shape.
- Once you have all the numbers placed below 2 arrows will appear one at the top, and one at the side of the map representing the horizontal and vertical point of intersection of the coordinates.
- You are to move the arrows by clicking on them and holding down your left mouse button.
- Place the arrows so that they intersect perfectly. Sometimes it is very hard to align these arrows.
- When you feel you have it in the best position click on the "OK" button. (If you are in timed mode you will have to be fast)
- A screen will appear telling you how close you were to the location.
- The better you do the higher the number of hints you will be awarded.
- If you run out of time in timed mode you can start over and try again until you succeed.
- Once you succeed you can not do the game again for a better score.
- After a few moments a "Skip" button will highlight at the lower left side of the screen. If you wish to skip this puzzle you can but there will be a penalty. You will lose hints and in timed mode you could lose some time.
- SOLUTION – Top Row Left to Right – "54" Blue Hexagon, "59" Red Hexagon, and "45" Brown Diamond.
- Bottom Row, Left to Right – "7" Blue Circle, "18" Brown Circle, and "25" Red Circle.
Chapter 5 – Honolulu, Hawaii – 1935
Mini Game – Unscramble Image
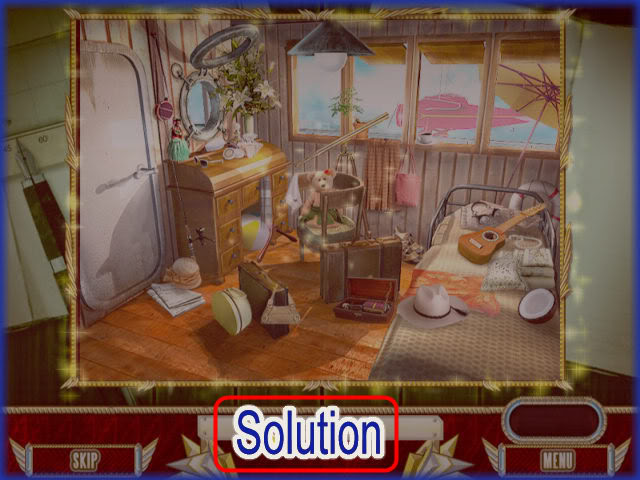
- Click on the tiles to flip them until you have unscrambled the image.
- TIP – Mouse over each tile carefully so that you do not touch any others. If you look carefully while the tile is moving you can see the correct image behind the moving tile.
- When you have the tile correctly placed be sure not to touch it with your mouse.
- It is easier to work from top right to left, then down left to right, then down right to left.
- TIP – When you get to the last two tiles place the mouse underneath the image after you flip it so you do not touch any of the fixed tiles. If you accidentally click on it you will have to start over and could lose a lot of time.
- This puzzle is easy at a relaxed mode but very difficult in timed mode.
- You can elect to skip the puzzle after the skip key highlights.
- You will earn hints based on how fast you can complete the puzzle.
Hawaiian Hut
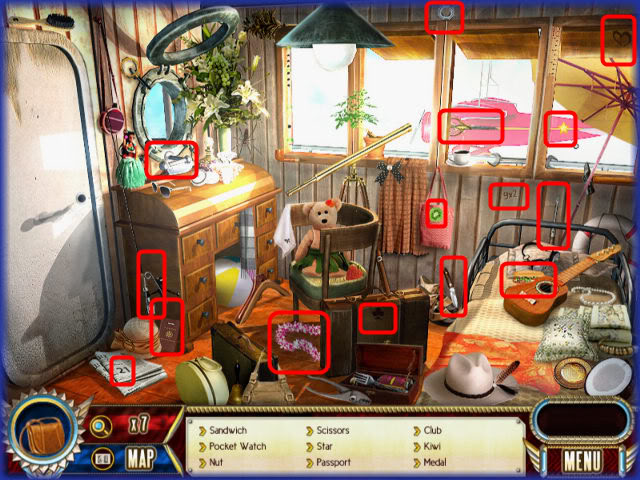
- Locate the 18 Hidden items in the scene.
- Sandwich
- Pocket Watch
- Nut
- Scissors
- Star
- Passport
- Club
- Kiwi
- Medal
- Map – "gray Text"
- Lei
- "21"
- Heart
- "18"
- Screwdriver
- Safety Pin
- Door Knob
- Knife
Zones of Interest
Repair Door
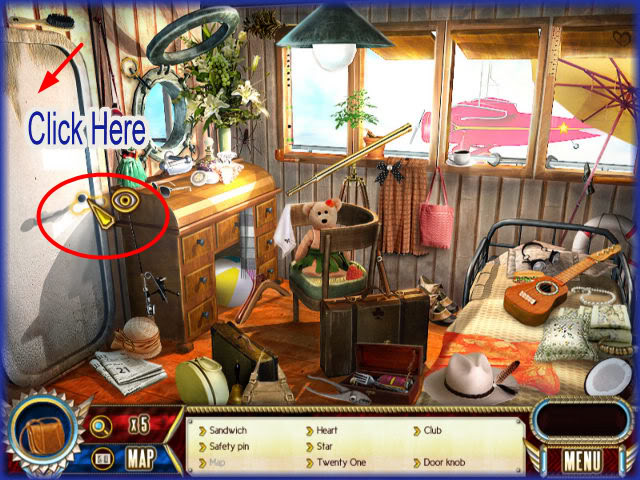
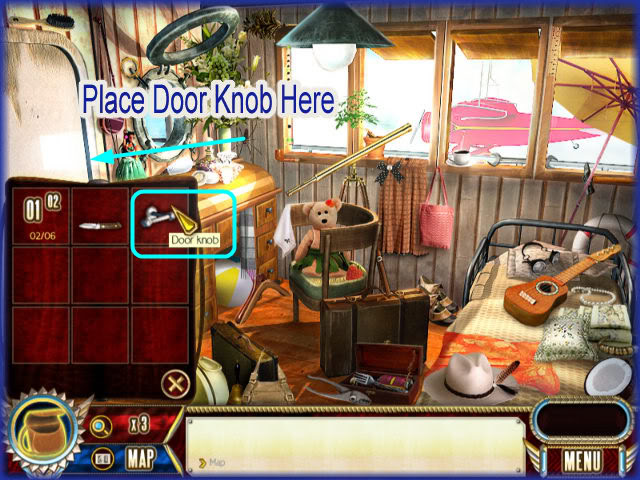
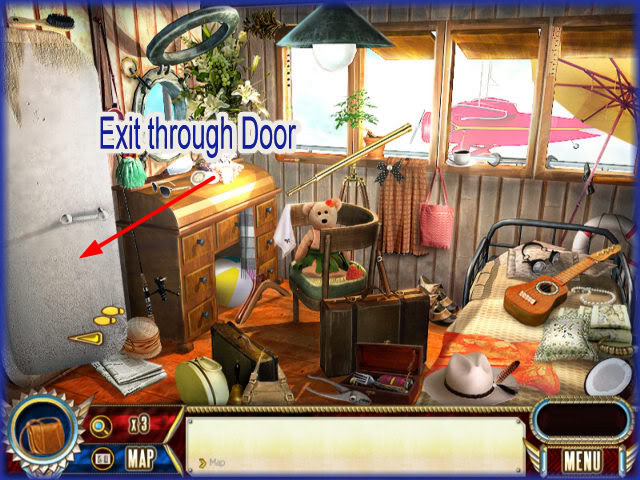
- Click on the inventory bag.
- Place the door handle on door to repair it.
- Exit out the door to next scene.
- You will need to return here later.
Deck
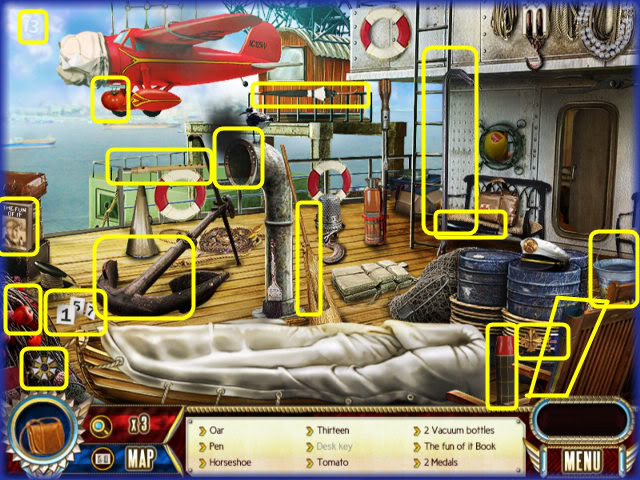
- Locate the 19 hidden items in the scene.
- Oar
- Pen
- Horseshoe
- "13"
- Desk Key – "Gray Text"
- Tomato
- 2 Vacuum Bottles (1 Bottle gray text)
- "The Fun of it" Book
- 2 Medals
- Bucket
- "157"
- Crowbar
- Flute
- Umbrella
- Apple
- Pick axe
- Telescope
Zone of Interest
Tarp over Life Boat
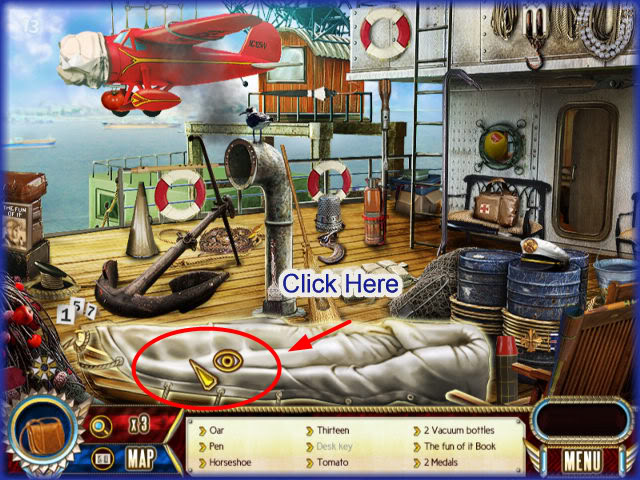
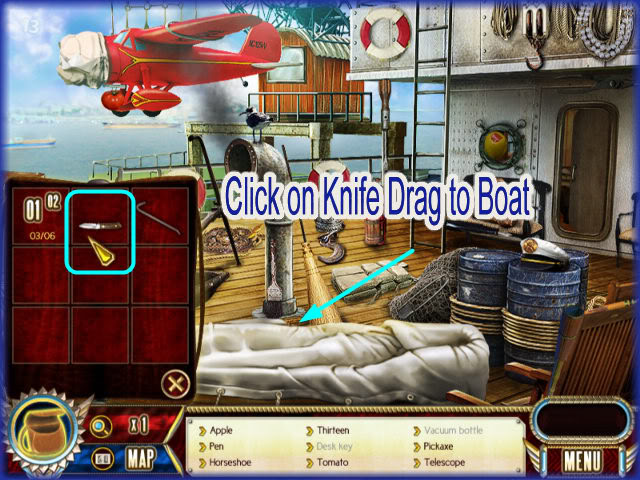
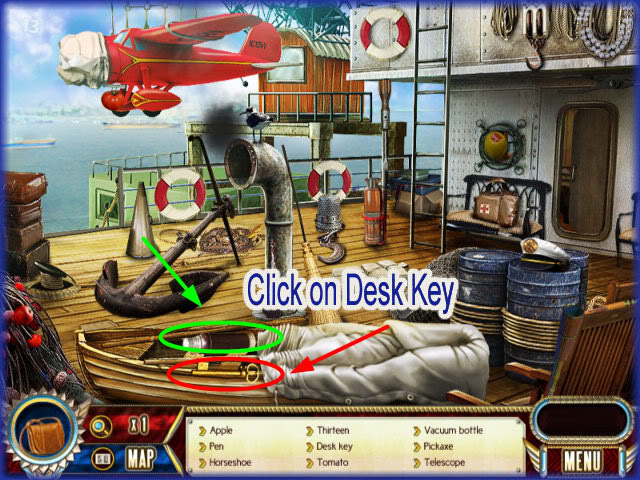
- Click on the inventory bag and drag knife to the tarp over the life boat.
- Click on the desk key inside boat and it will move into your inventory for later use.
- Click on the second vacuum bottle on the list if it is there for you.
- After you find all the items go back into the Hut.
Back to Hawaiian Hut
Zones of Interest
Open Drawer
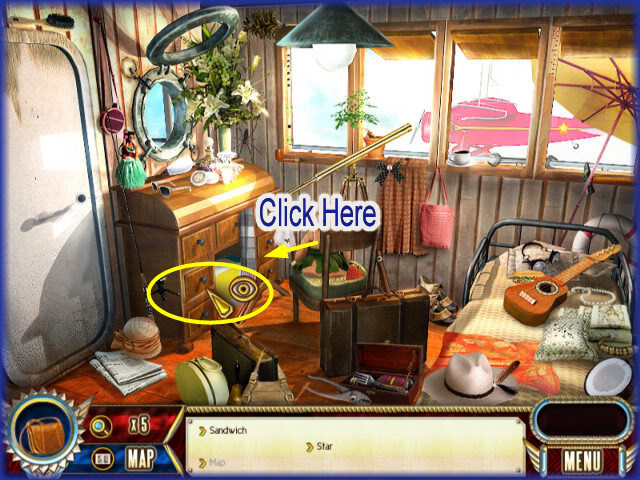
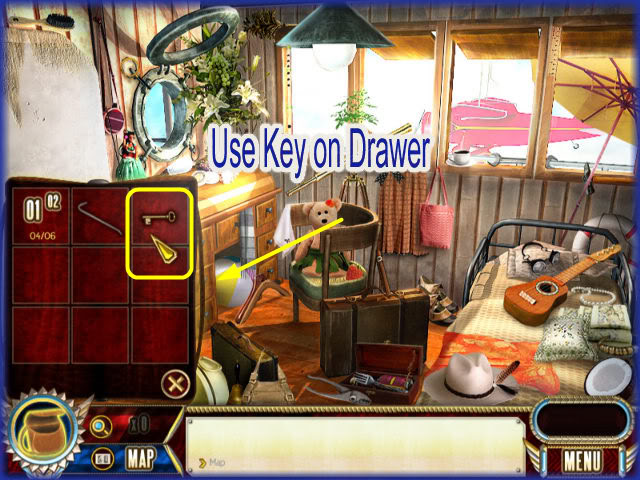
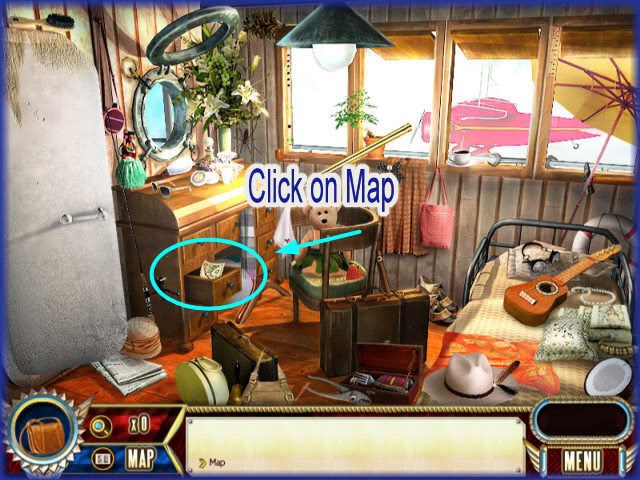
- Click on inventory bag and drag the desk drawer key to the closed drawer.
- Once open click on the map inside.
- Exit until you reach the outside of the boat.
Outside Boat
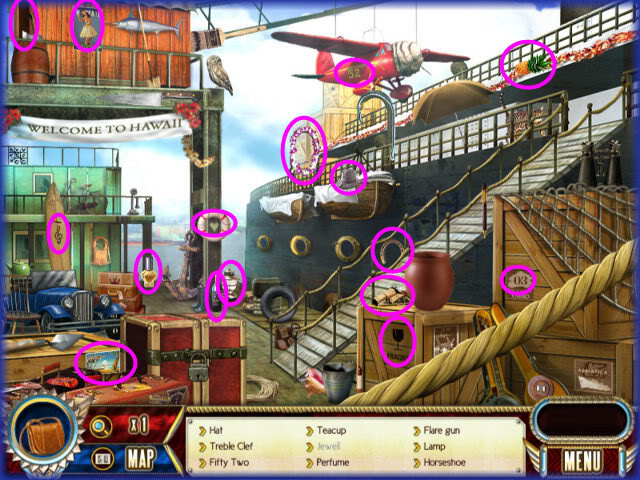
- Locate the 18 hidden items in the scene.
- Treble Clef
- Hat
- "52"
- Teacup
- Jewel – (Gray Text)
- Perfume
- Flare gun
- Lamp
- Horseshoe
- Pineapple
- Glass
- Hula Dancer
- Bottle
- Hawaiian Postcard
- "3"
- Hatchet
- Heart
- Lei
Zone of Interest
Locked Trunk
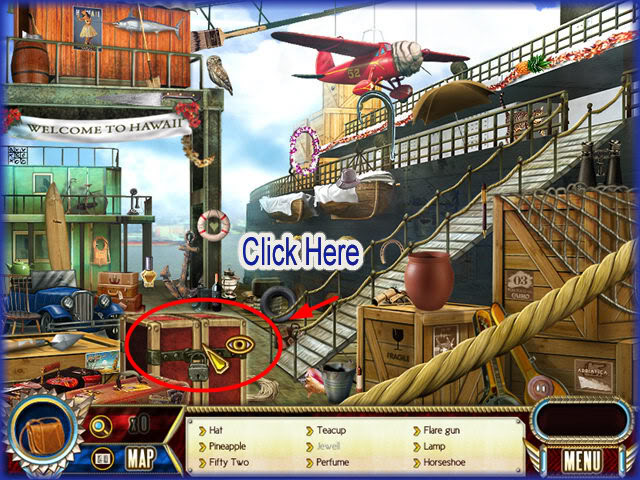
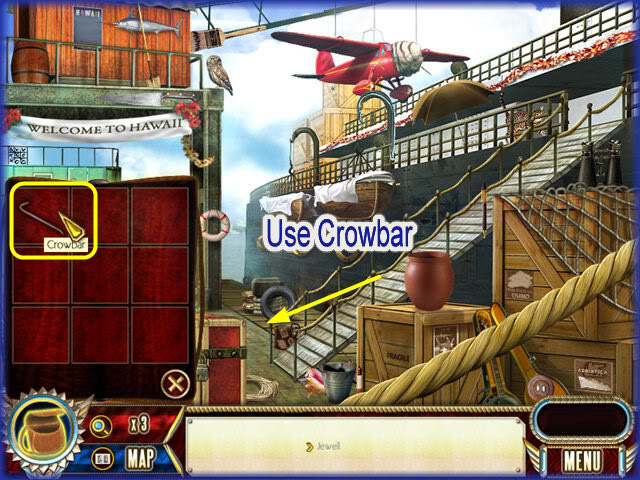
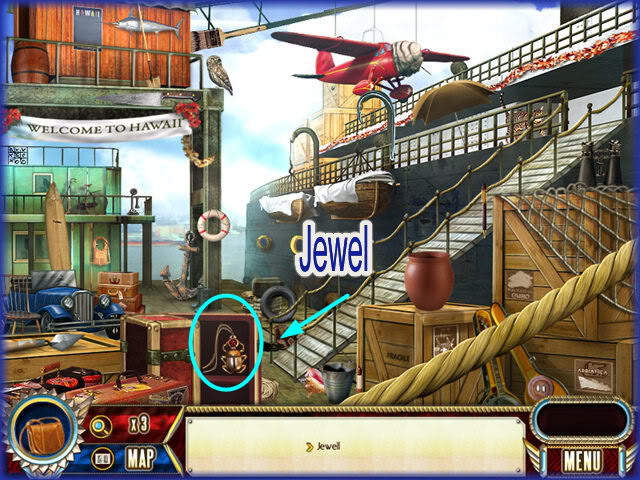
- Click on the inventory bag and drag the crowbar to the locked trunk.
- Once it is open click on the Jewel inside.
- Go back and find the remaining items on your list.
- Finding all the numbers will trigger the coordinates mini game.
Mini Game -Locate the Coordinates
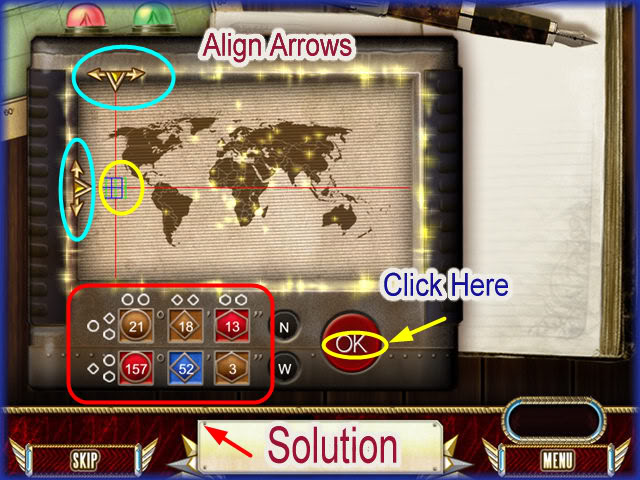
- Drag the number to the correct color and shape and if you are correct the number will stay in place.
- You always match color to color and shape to shape.
- Once you have all the numbers placed below 2 arrows will appear one at the top, and one at the side of the map representing the horizontal and vertical point of intersection of the coordinates.
- You are to move the arrows by clicking on them and holding down your left mouse button.
- Place the arrows so that they intersect perfectly. Sometimes it is very hard to align these arrows.
- When you feel you have it in the best position click on the "OK" button. (If you are in timed mode you will have to be fast)
- A screen will appear telling you how close you were to the location.
- The better you do the higher the number of hints you will be awarded.
- If you run out of time in timed mode you can start over and try again until you succeed.
- Once you succeed you can not do the game again for a better score.
- After a few moments a "Skip" button will highlight at the lower left side of the screen. If you wish to skip this puzzle you can but there will be a penalty. You will lose hints and in timed mode you could lose some time.
- SOLUTION – Top Row Left to Right – "21" Brown Circle,"18" Brown Diamond, and "13" Red Hexagon.
- Bottom Row, Left to Right – "157" Red Circle, "52" Blue Diamond, and "3" Brown Hexagon.
Chapter 6 – Lae, New Guinea – July 1937
Mini Game – Unscramble Image
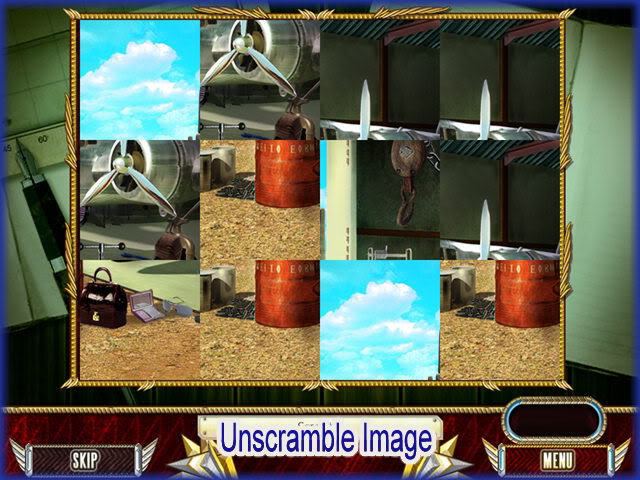
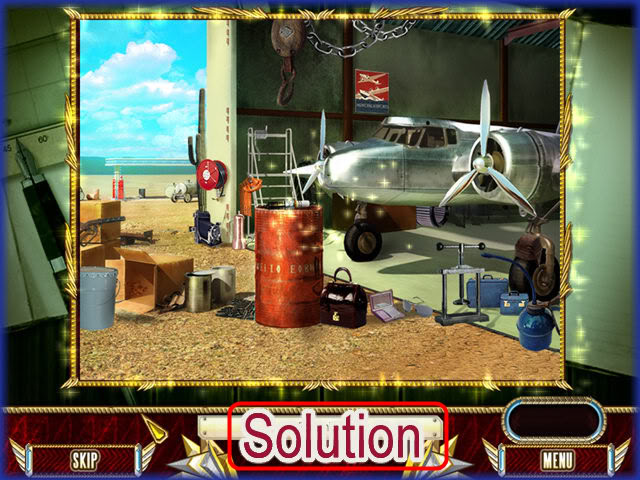
- Click on the tiles to flip them until you have unscrambled the image.
- TIP – Mouse over each tile carefully so that you do not touch any others. If you look carefully while the tile is moving you can see the correct image behind the moving tile.
- When you have the tile correctly placed be sure not to touch it with your mouse.
- It is easier to work from top right to left, then down left to right, then down right to left.
- TIP – When you get to the last two tiles place the mouse underneath the image after you flip it so you do not touch any of the fixed tiles. If you accidentally click on it you will have to start over and could lose a lot of time.
- This puzzle is easy at a relaxed mode but very difficult in timed mode.
- You can elect to skip the puzzle after the skip key highlights.
- You will earn hints based on how fast you can complete the puzzle.
"The Electra"
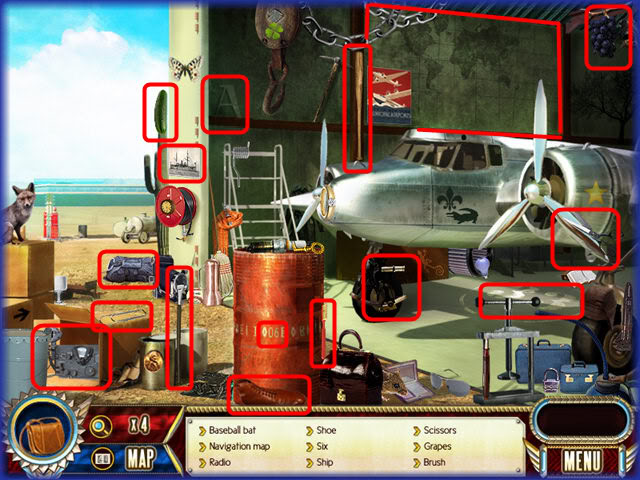
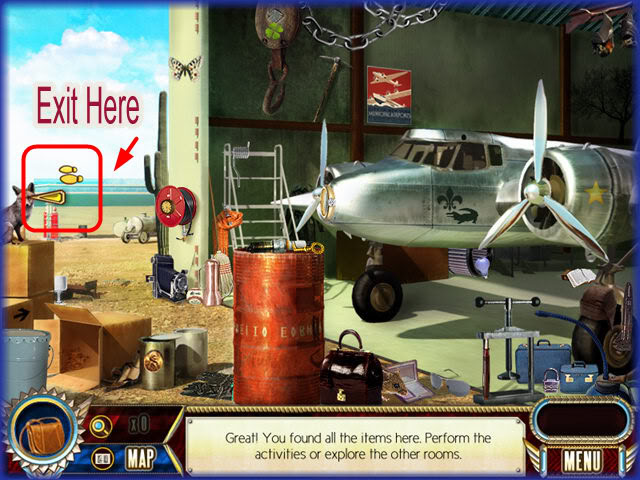
- Locate the 16 hidden objects in the scene.
- Baseball Bat
- Navigation Map
- Radio
- Shoe
- "6"
- Ship
- Scissors
- Grapes
- Brush
- Letter A
- Cucumber
- Sextant
- Parachute
- "33"
- Toothbrush
- Clip
- When all items are found exit at the upper left side of screen as shown in second image above.
Inside the Hangar
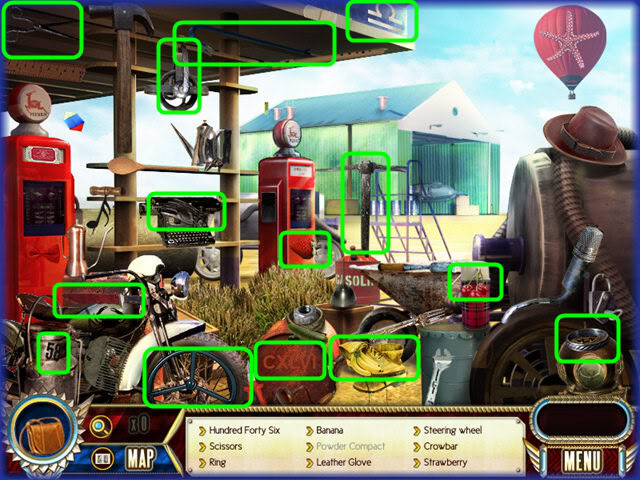
- Locate the 17 hidden items in the scene.
- "146"
- Scissors
- Ring
- Banana
- Powder Compact – (Gray Text)
- Leather Gloves
- Steering Wheel
- Crowbar
- Strawberry
- Tomato – (Gray Text)
- Knife
- Cherries
- Suitcase (Gray Text)
- "58"
- Handle
- Pick axe
- Libra
Zone of Interest
Grassy Area
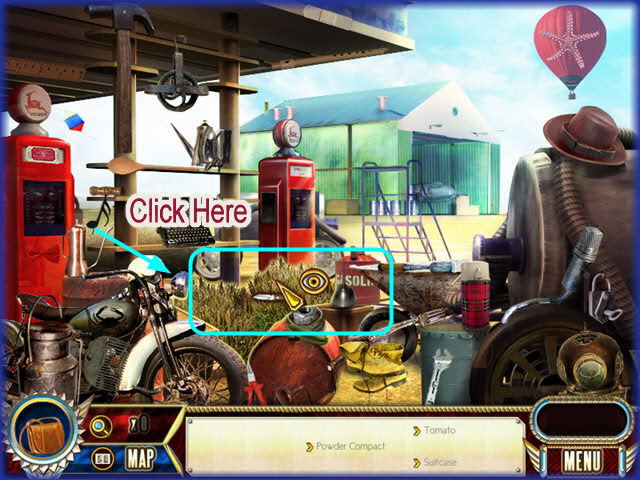
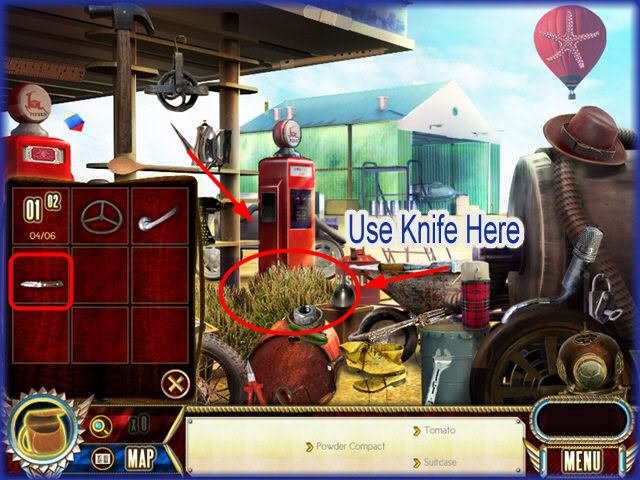
- Click on the inventory bag and drag the knife to the grassy area to cut it away.
- Click on the Suitcase
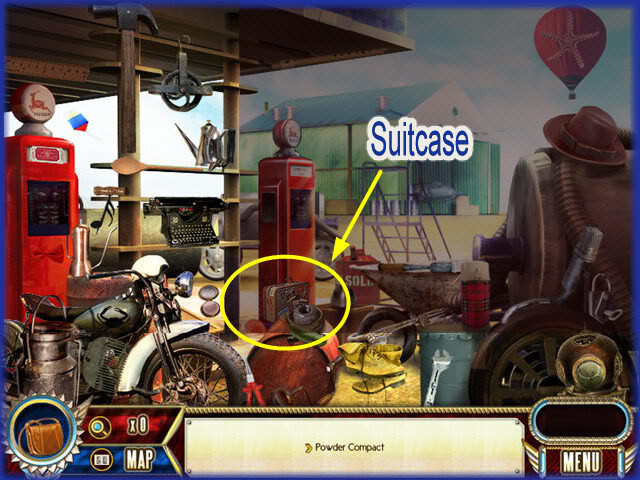
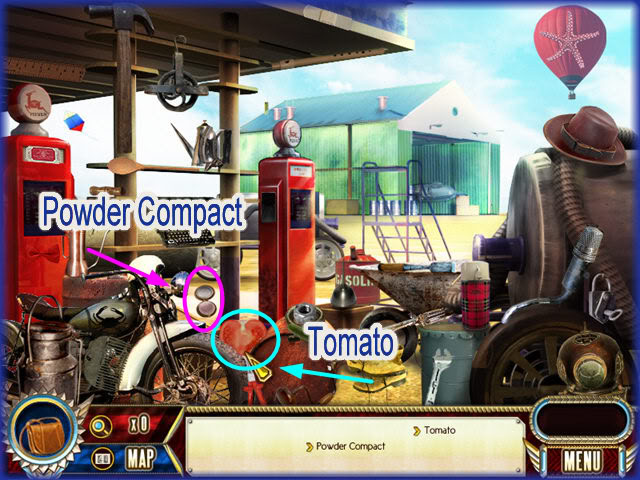
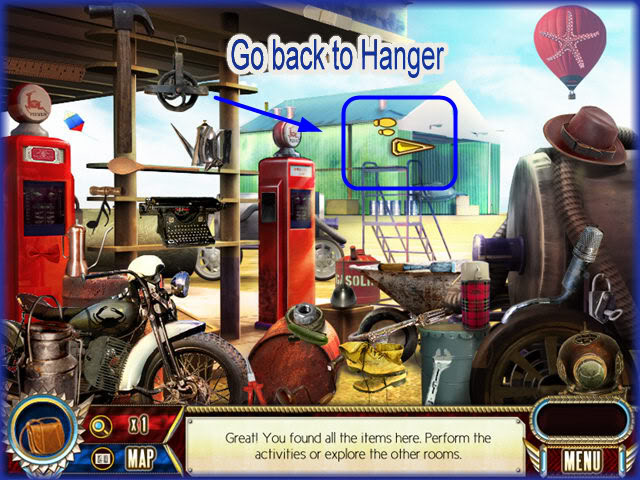
- Next click on the tomato and the powder compact as shown in image above.
- Click on the upper right side to return to Hanger.
Zone of Interest
Open the Hatch
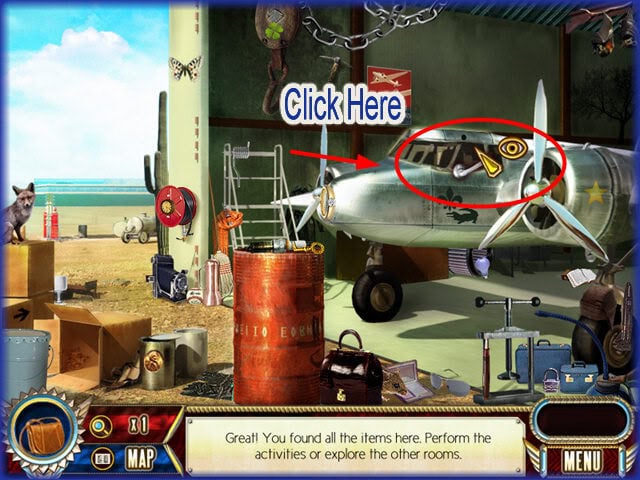
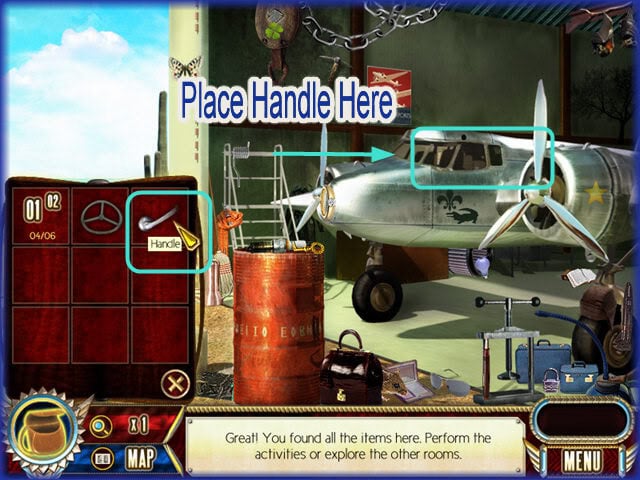
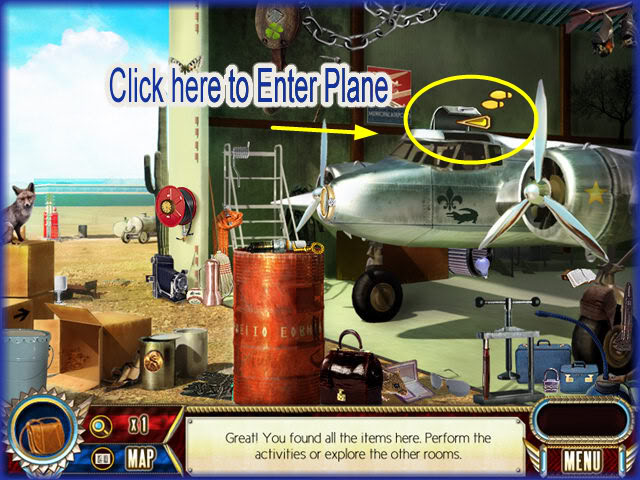
- Click on the area at the top of the plane.
- Click on the inventory bag and drag the handle to the area at the top of the plane.
- Now you can click on the top of the plane and enter it.
Inside the Airplane
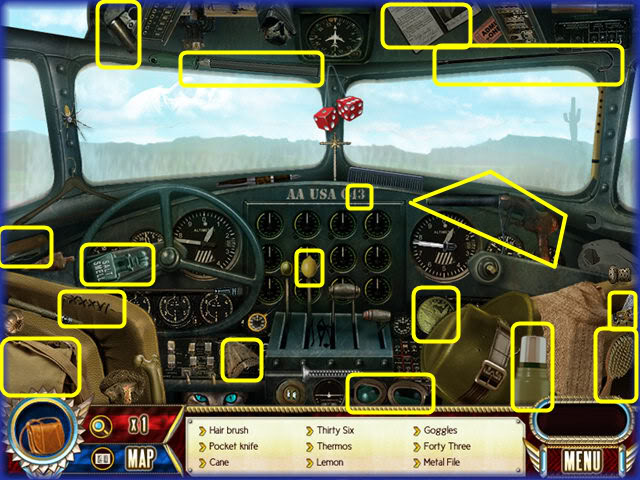
- Locate the 17 hidden items inside the scene.
- Hair Brush
- Pocket Knife
- Cane
- "36"
- Thermos
- Lemon
- Goggles
- "43"
- Metal File
- Canvas Flight Bag
- Flare Gun
- Pilot’s License
- Gas Nozzle
- Smelling Salts
- Moth
- Bee
- Coin
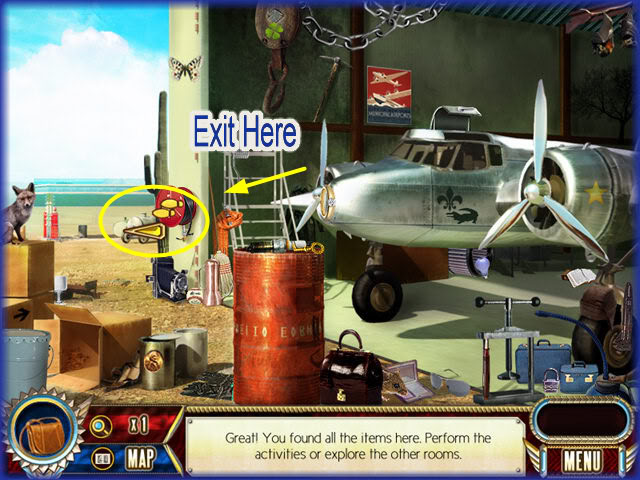
- After you find the items inside the plane exit back to the area with the gas pumps.
Mini Game – Locate the Coordinates
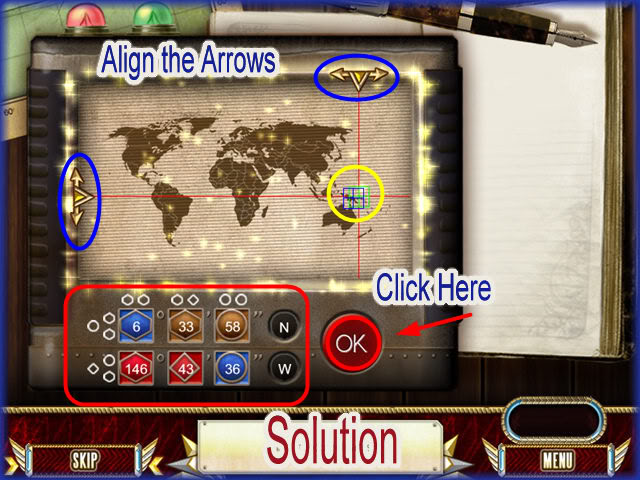
- Drag the number to the correct color and shape and if you are correct the number will stay in place.
- You always match color to color and shape to shape.
- Once you have all the numbers placed below 2 arrows will appear one at the top, and one at the side of the map representing the horizontal and vertical point of intersection of the coordinates.
- You are to move the arrows by clicking on them and holding down your left mouse button.
- Place the arrows so that they intersect perfectly. Sometimes it is very hard to align these arrows.
- When you feel you have it in the best position click on the "OK" button. (If you are in timed mode you will have to be fast)
- A screen will appear telling you how close you were to the location.
- The better you do the higher the number of hints you will be awarded.
- If you run out of time in timed mode you can start over and try again until you succeed.
- Once you succeed you can not do the game again for a better score.
- After a few moments a "Skip" button will highlight at the lower left side of the screen. If you wish to skip this puzzle you can but there will be a penalty. You will lose hints and in timed mode you could lose some time.
- SOLUTION – Top Row Left to Right – "6" Blue Hexagon,"33" Brown Hexagon, and "58" Brown Circle.
- Bottom Row, Left to Right – "146" Red Hexagon, "43" Red Diamond, and "36" Blue Circle.
Zone of Interest
Gas Pump
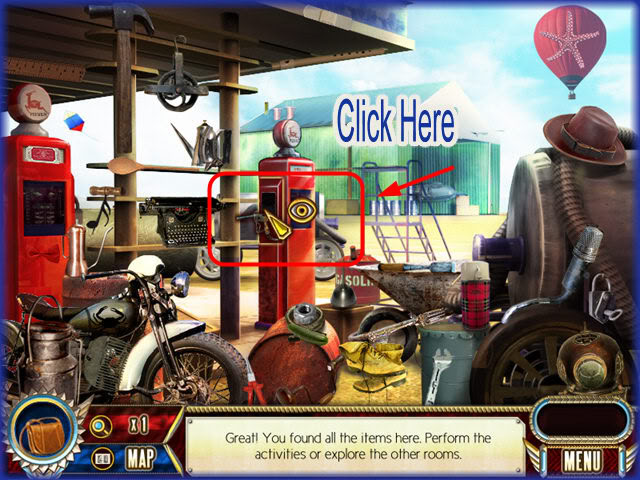
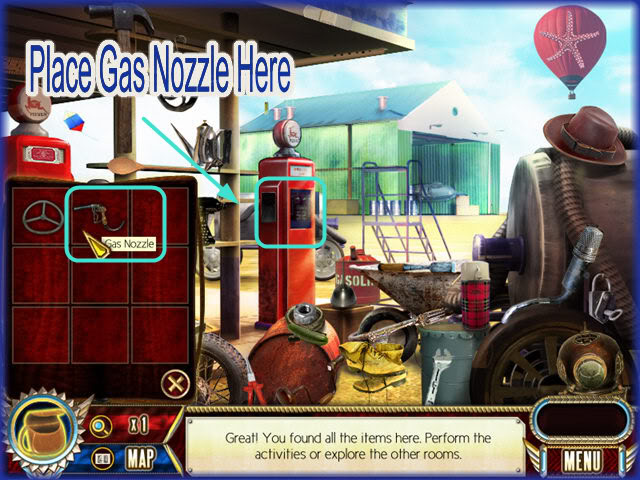
- Click on the center gas pump.
- Click on inventory bag and drag the gas nozzle to to pump.
- Now the plane will be refueled.
- Go back to the inside of the plane.
Zone of interest
Inside Plane – Steering Wheel
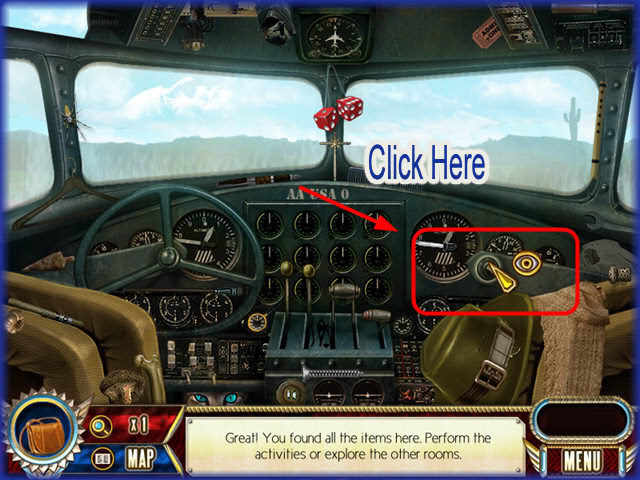
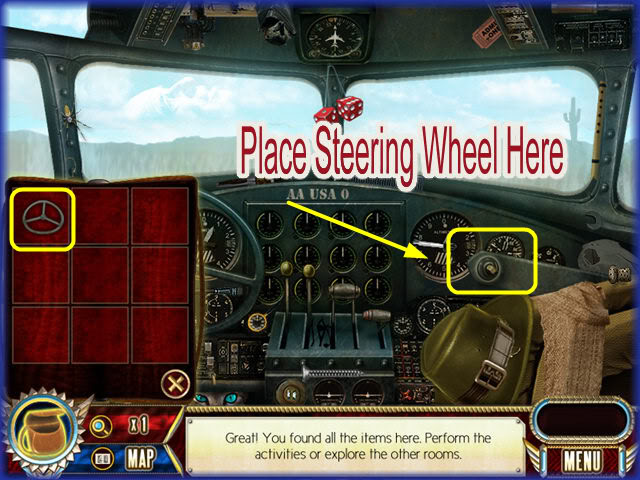
- Click on the inventory bag
- Drag the steering wheel to the location marked at the left.
- Now the plane is ready to fly.
Chapter 7 – Nikumororo Island – 1990 (Formerly known as "Gardner Island")
Christine’s House
- Storyline – Over 60 years have passed and Christine is an elderly lady. Her Niece Mary is now a Pilot and shares her Aunt’s enthusiasm of finding out what happened to Amelia Earhart. They discuss the current theories of what happened to Amelia and decide to fly to the Island they think she may have landed on during her last flight.
- Christine and Mary land on Nikumororo Island and begin to explore.
Mini Game – Unscramble the Map Image
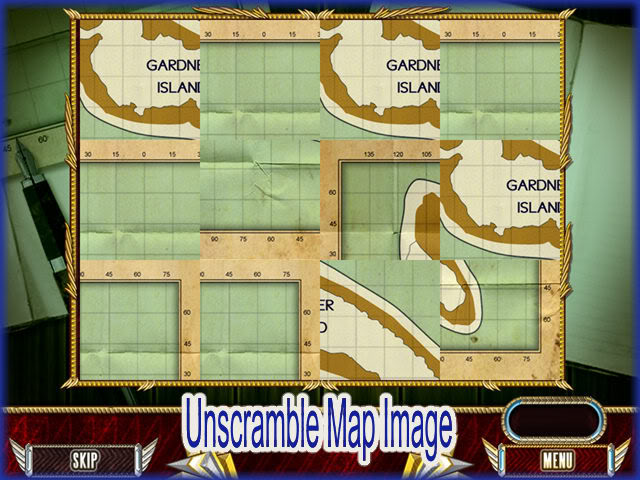
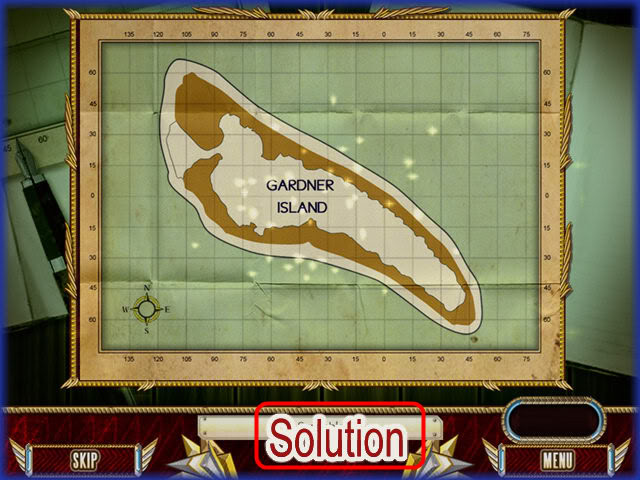
- Click on the tiles to flip them until you have unscrambled the image.
- TIP – Mouse over each tile carefully so that you do not touch any others. If you look carefully while the tile is moving you can see the correct image behind the moving tile.
- When you have the tile correctly placed be sure not to touch it with your mouse.
- It is easier to work from top right to left, then down left to right, then down right to left.
- TIP – When you get to the last two tiles place the mouse underneath the image after you flip it so you do not touch any of the fixed tiles. If you accidentally click on it you will have to start over and could lose a lot of time.
- This puzzle is easy at a relaxed mode but very difficult in timed mode.
- You can elect to skip the puzzle after the skip key highlights.
- You will earn hints based on how fast you can complete the puzzle.
Nikumaroro Island
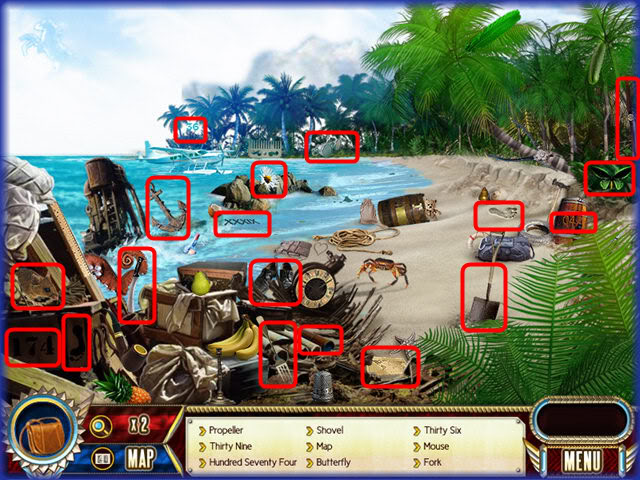
- Locate the 18 items hidden in the scene.
- Propeller
- "39"
- "174"
- Shovel
- Map
- Butterfly
- "36"
- Mouse
- Fork
- Goggles
- Machete
- 2 Footprints
- "4"
- Telescope
- Anchor
- Flower
- Shoes
Zone of Interest
Brush
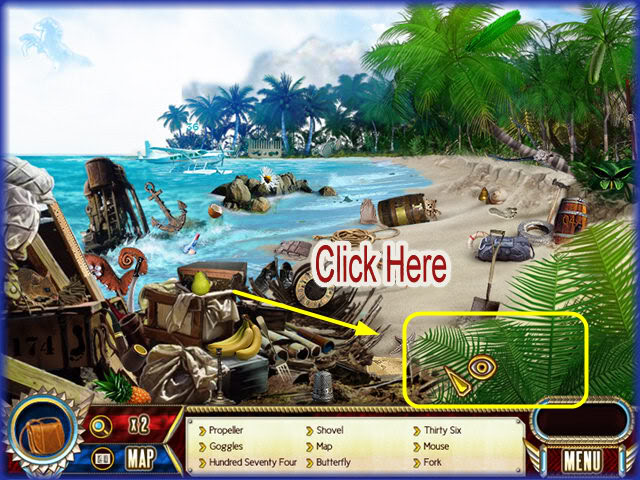
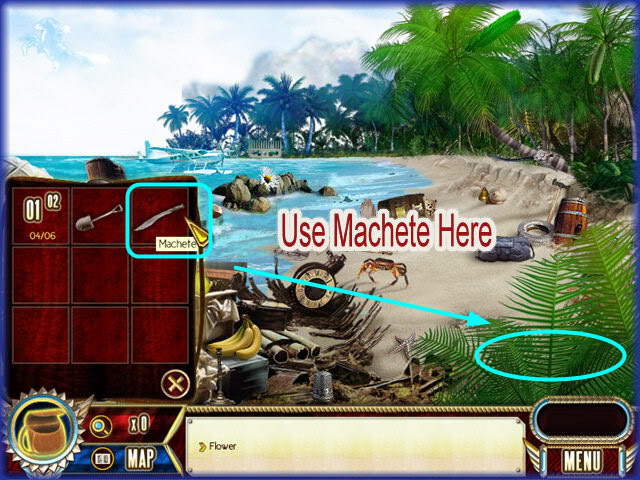
- Click on the brush to highlight.
- Click on the inventory bag and drag the machete to the brush to clear it away.
- Exit at the lower right side where the brush has been cleared away.
Abandoned Village
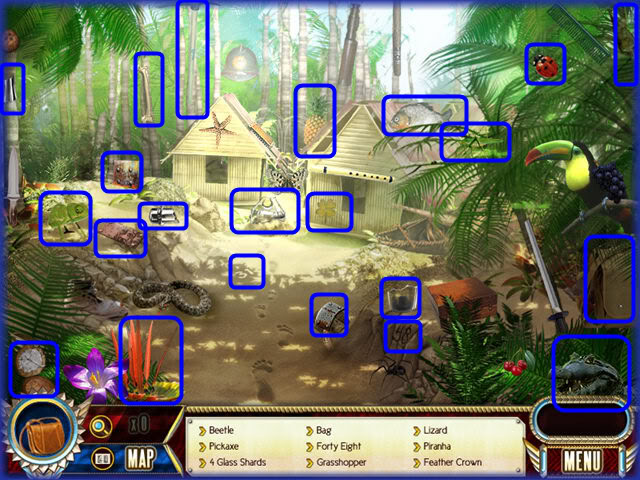
- Locate the 22 hidden items in the scene.
- Beetle (Ladybug)
- Pick axe
- 4 Shards of glass
- Bag
- "48"
- Grasshopper
- Lizard -Alligator
- Piranha
- Feather Crown
- Bone
- Powder Compact
- Sextant Box
- 3 Pieces of Metal
- Pineapple
- Club (Clover)
- Arrow Head
- "31"
Mini Game – Locate the Coordinates
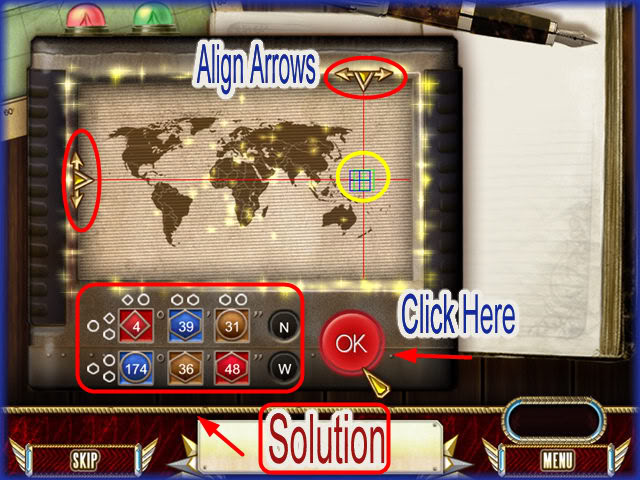
- Drag the number to the correct color and shape and if you are correct the number will stay in place.
- You always match color to color and shape to shape.
- Once you have all the numbers placed below 2 arrows will appear one at the top, and one at the side of the map representing the horizontal and vertical point of intersection of the coordinates.
- You are to move the arrows by clicking on them and holding down your left mouse button.
- Place the arrows so that they intersect perfectly. Sometimes it is very hard to align these arrows.
- When you feel you have it in the best position click on the "OK" button. (If you are in timed mode you will have to be fast)
- A screen will appear telling you how close you were to the location.
- The better you do the higher the number of hints you will be awarded.
- If you run out of time in timed mode you can start over and try again until you succeed.
- Once you succeed you can not do the game again for a better score.
- After a few moments a "Skip" button will highlight at the lower left side of the screen. If you wish to skip this puzzle you can but there will be a penalty. You will lose hints and in timed mode you could lose some time.
- SOLUTION – Top Row Left to Right – "4" Red Diamond,"39" Blue Hexagon, and "31" Brown Circle.
- Bottom Row, Left to Right – "174" Blue Circle, "36" Brown Hexagon, and "48" Red Hexagon.
Zones of Interest
Brush
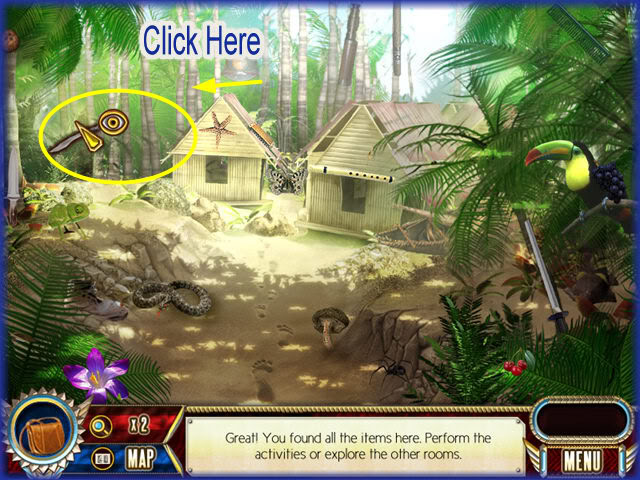
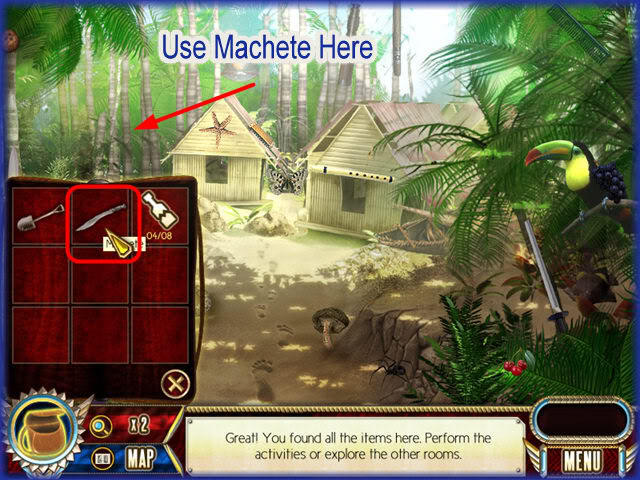
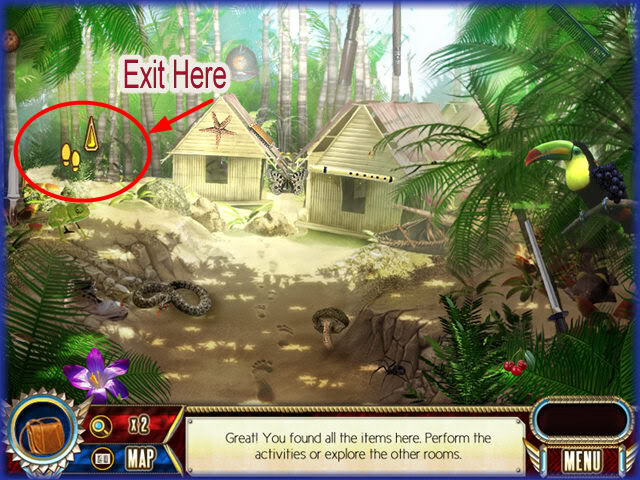
- Click on the back left area of the scene.
- Click on the inventory bag and drag the machete to the area to clear brush.
- Now the way is clear.
- Click on the area to move to the next scene.
Island Front
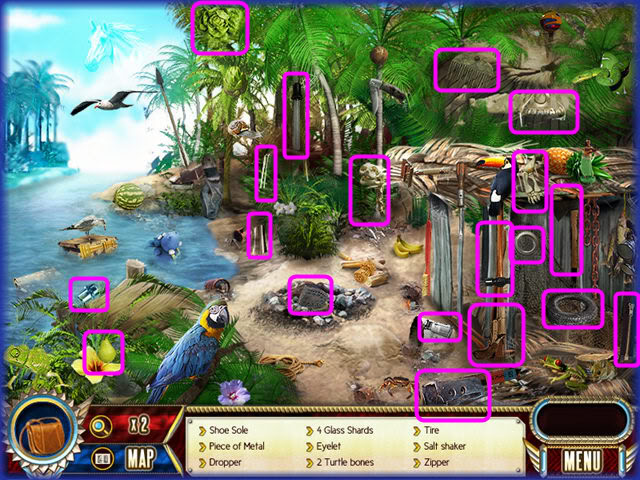
- Locate the 20 hidden items in the scene.
- Shoe Sole
- Piece of Metal
- Dropper
- 4 Glass Shards
- Eyelet
- 2 Turtle Bones
- Tire
- Salt Shaker
- Zipper
- Lettuce
- Flare Gun
- Pear
- Hammer
- Comb
- Shoe Heel
- Hatchet
Mini Game – Bottle Jigsaw Puzzle
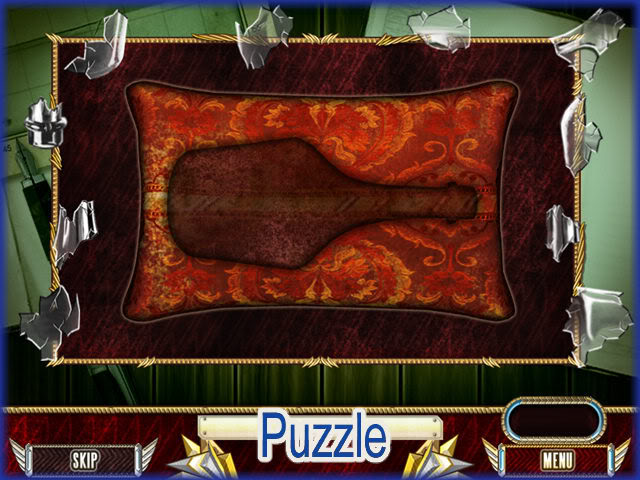
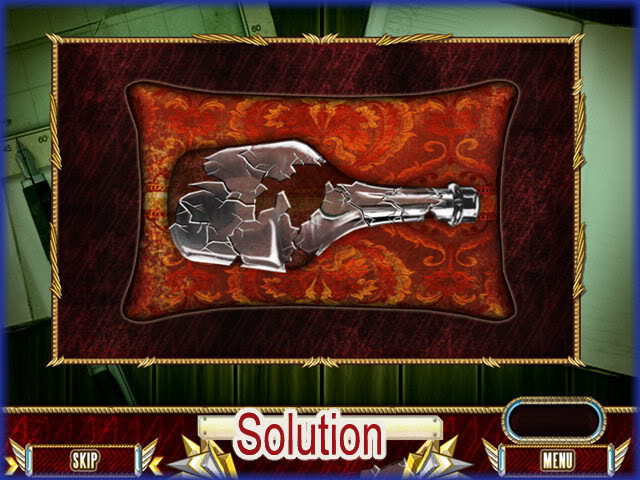
- Click on the glass shards and place them to assemble the bottle.
- Drag the piece with your left mouse button held down to the area you wish to place the item.
- Right click on your mouse to rotate the direction of the piece.
- If you have placed it correctly it will lock into place.
- TIP – Place the shard over the top and rotate and it will grab the piece and lock it into place for you.
- Work from the outer edges first and then the center pieces.
- Timed Mode gives you 2 minutes to complete the game.
- You can skip the puzzle if you wish.
- You will earn 1-5 hints for your next scene depending on how well you do with time.
Chapter 8 – Museum 1990
- Storyline – Christine and Mary decide to donate all of their findings and research to a Museum so others can continue in the study of Amelia’s last days.
Museum
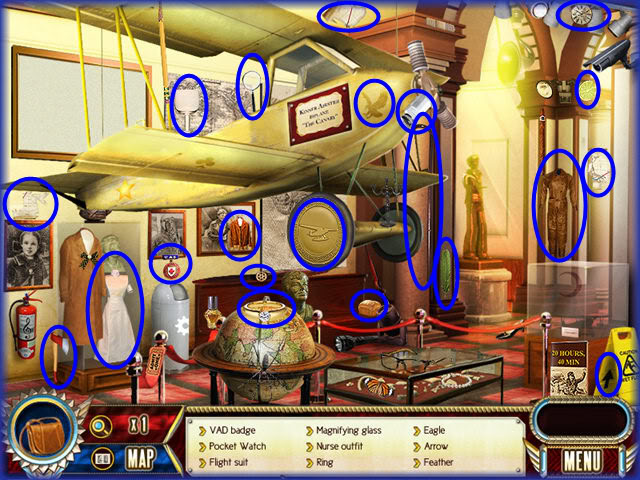
- Locate the 22 items hidden in the scene.
- VAD Badge
- Nurse Outfit
- Flight Suit
- Pocket Watch
- Magnifying Glass
- Ring
- Eagle
- Arrow
- Feather
- Lemon
- Salt Shaker
- Propeller
- Jacket
- Cane
- Bread Slice
- 3 Pieces of Map
- Hatchet
- Glass
- Cane
- Medal
- Once you find all the items exit toward the back right side of screen.
Display Room
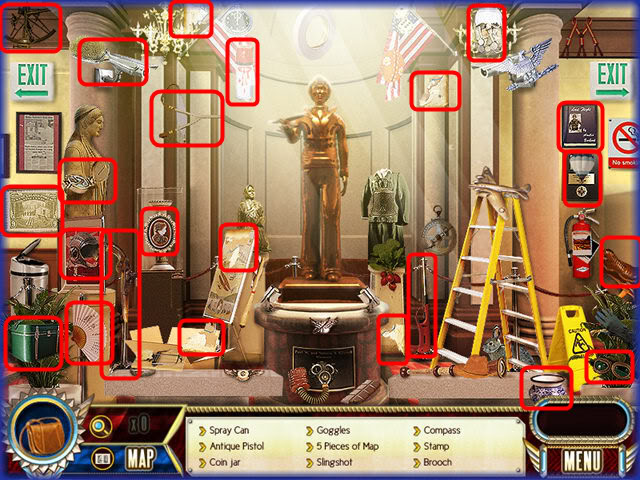
- Locate the 21 hidden items in the scene.
- Fan
- Balloon
- Shoes
- Helmet
- Vase
- Lighter
- Book
- Luggage
- Spray Can
- Antique Pistol
- Coin Jar
- Goggles
- 5 Pieces of Map
- Slingshot
- Compass
- Stamp
- Brooch
- When finished exit at the lower right hand side of the screen.
Display Room 2
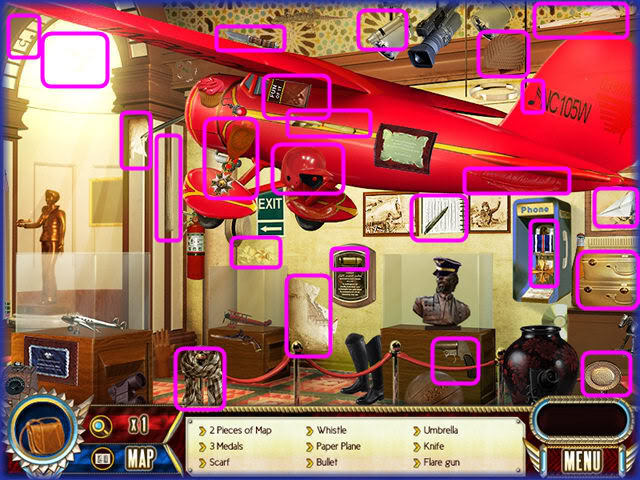
- Locate the 23 hidden items in the scene.
- 2 Pieces of Map
- 3 Medals
- Scarf
- Whistle
- Paper Plane
- Bullet
- Umbrella
- Knife
- Flare Gun
- "The Fun of It" Book
- Notebook
- Jigsaw Piece
- Feather
- Chili Pepper
- Wool Hat
- Treble Clef
- Dove
- Dart
- Luggage
- Baseball Helmet
Congratulations!

- Congratulations you have completed "The search for Amelia Earhart"
“;
More articles...
Monopoly GO! Free Rolls – Links For Free Dice
By Glen Fox
Wondering how to get Monopoly GO! free rolls? Well, you’ve come to the right place. In this guide, we provide you with a bunch of tips and tricks to get some free rolls for the hit new mobile game. We’ll …Best Roblox Horror Games to Play Right Now – Updated Weekly
By Adele Wilson
Our Best Roblox Horror Games guide features the scariest and most creative experiences to play right now on the platform!The BEST Roblox Games of The Week – Games You Need To Play!
By Sho Roberts
Our feature shares our pick for the Best Roblox Games of the week! With our feature, we guarantee you'll find something new to play!Type Soul Clan Rarity Guide – All Legendary And Common Clans Listed!
By Nathan Ball
Wondering what your odds of rolling a particular Clan are? Wonder no more, with my handy Type Soul Clan Rarity guide.


