- Wondering how to get Monopoly GO! free rolls? Well, you’ve come to the right place. In this guide, we provide you with a bunch of tips and tricks to get some free rolls for the hit new mobile game. We’ll …
Best Roblox Horror Games to Play Right Now – Updated Weekly
By Adele Wilson
Our Best Roblox Horror Games guide features the scariest and most creative experiences to play right now on the platform!The BEST Roblox Games of The Week – Games You Need To Play!
By Sho Roberts
Our feature shares our pick for the Best Roblox Games of the week! With our feature, we guarantee you'll find something new to play!All Grades in Type Soul – Each Race Explained
By Adele Wilson
Our All Grades in Type Soul guide lists every grade in the game for all races, including how to increase your grade quickly!
The Otherside: Realm of Eons Walkthrough
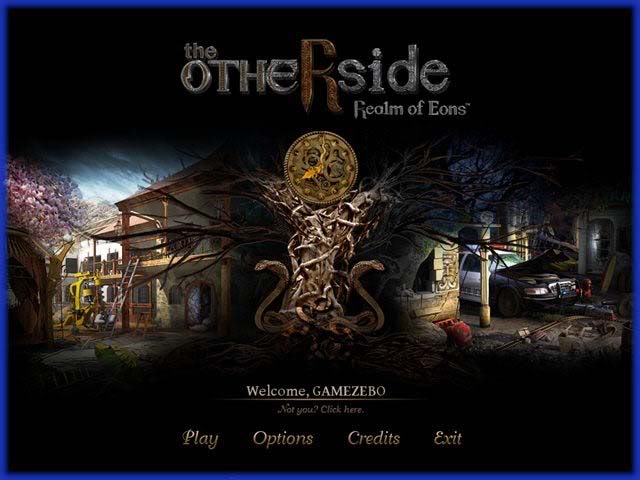
Welcome to Gamezebo's walkthrough for The Otherside – Realms of Eons.General Game Information Hidden Object Adventure game where we find Miranda caught between the real world and a world of dreams. She must help Michael find his sister Louise and save her from the mysterious order where the Evil Nord has captured her. Louise has special powers the order needs to fulfill its quest. The game has eighteen chapters and over 20 mini games. The game is played for story completion only there are n…
a:1:i:0;a:2:s:13:”section_title”;s:40:”The Otherside: Realm of Eons Walkthrough”;s:12:”section_body”;s:135610:”
Welcome to Gamezebo’s walkthrough for The Otherside – Realms of Eons.

General Game Information
- Hidden Object Adventure game where we find Miranda caught between the real world and a world of dreams. She must help Michael find his sister Louise and save her from the mysterious order where the Evil Nord has captured her. Louise has special powers the order needs to fulfill its quest.
- The game has eighteen chapters and over 20 mini games.
- The game is played for story completion only there are no timed modes or points offered in the game.
- You may change the game volume and screen settings by clicking on the "Options" button on the main menu of the game.
- The game gives you an unlimited number of hints that recharge between uses.
- Most mini games can be skipped if you find them too difficult. There is a "Skip" button at the lower right side of the screen but it must activate first. Wait until the button is fully activated if you decide to use it.
- If you exit the game it will return you to the point at which you left the game.
- The hidden object screens are the same each time you play the game.
Game Elements
Settings Menu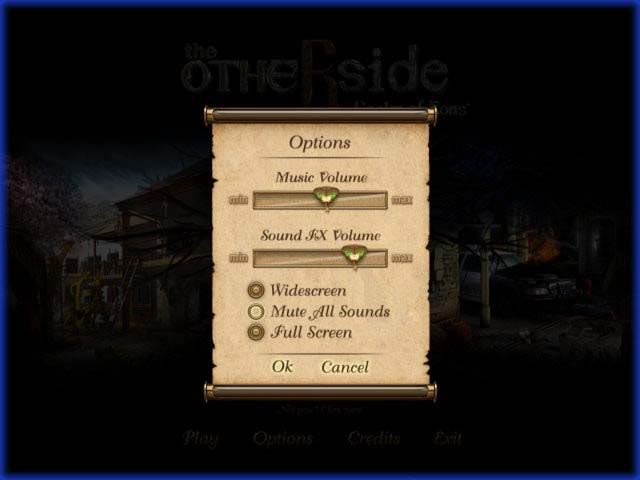
- Settings – Click on the "Options" button at the bottom of the games menu screen.
- You can adjust the game’s music and sound effect volume as well as change screen resolution size.
Sample Game Scene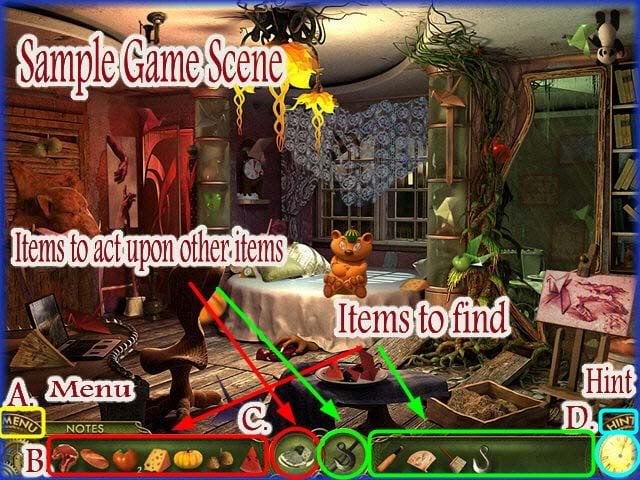
- A. Menu – Click on this button when you need to pause or exit out of the game during game play.
- B. Items to Find – Here you will find the items you are requested to find in the scene. This area extends to the left and right sides of the screen. As you find items they will be marked off with a green check mark.
- C. Active Item – Once you find all of the items you are required to find the icon in the center of the screen will become active. You are to take this item and drag it to an area of the scene and it acts upon that area. There are 2 areas in each game scene and you do not always use both at the same time but you can if you click on things in that order.
- D. Hint Button – This is the hint button at the lower right side of the screen. It is a clock face and when it is ready for use the word "HINT" will be lit up. In between uses it must recharge. Look at the hands on the clock and when it makes its way back to the top the hint is recharged. You have unlimited hints in the game.
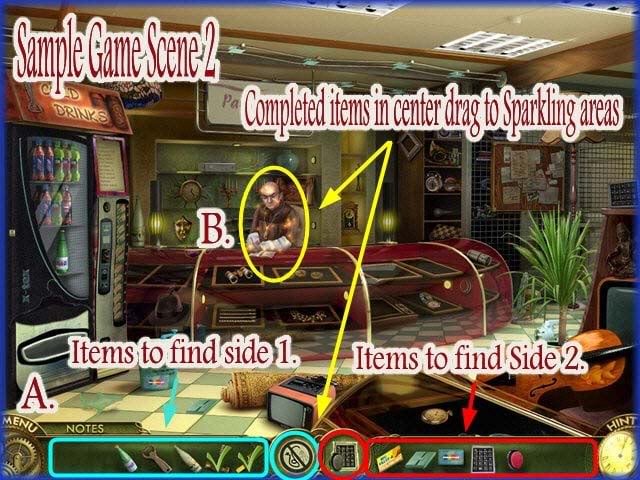
- Scene 2
- A. Note the two sides of hidden objects you can be required to find.
- B. When you see an area sparkling in the game that means you need to either click on it to get a closer look or you must drag an item to it which will act upon it in some way.
Notes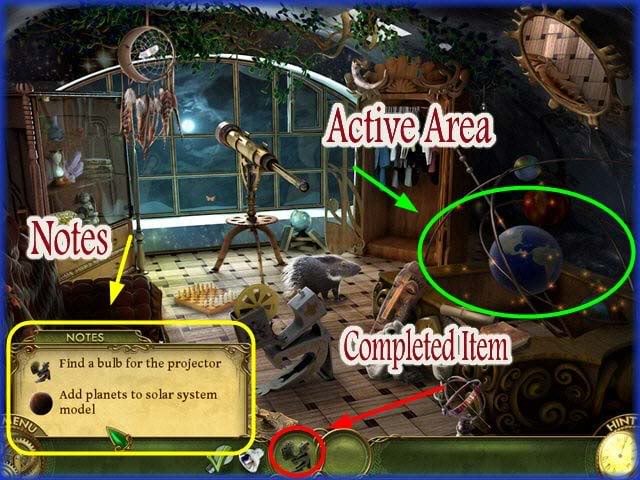
- There is a note section at the lower left side of the screen. Click on this for a list of things you must accomplish in the game. When you click on it the list lifts up where you can read it.
- As you complete items on the list they will cross off automatically.
- Note the sparkling area in the scene. When you see this you must click on it for a closer look or something in your inventory will act upon it.
Cursors
- Magnifying Glass Cursor – When you see this you can click on an item for a closer view.
- Arrow Cursor – When you see this cursor you can mouse over items to see what they are called.
- NOTE – When you have items in the center that are ready to be used somewhere in the scene you can mouse over it and it will tell you what to do if you need extra help.
Using Hints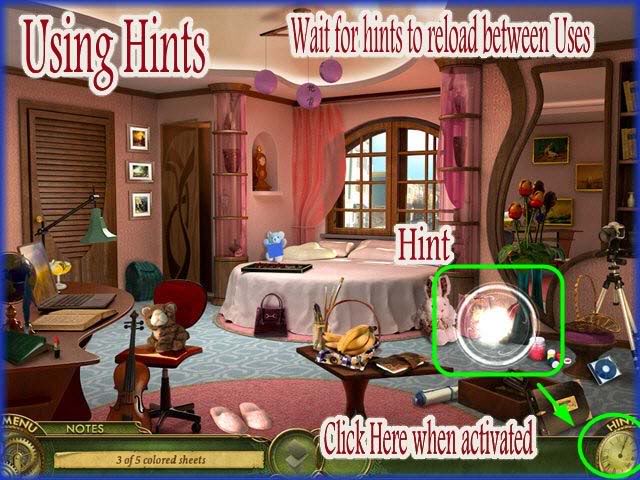
- The hint button is located at the lower right side of the screen.
- Hints are unlimited but must recharge for a few moments between uses.
- Hints can be used in the hidden object scenes and in the find the differences mini games but in all others it is inactive.
Useful Game Tips
- When you come to a new scene mouse over the entire area first to look for sparkling areas that may need a closer look.
- Do not skip the storyline if it is your first time playing as it gives you useful clues to help you play the game.
- There is no penalty for using the button or skipping a puzzle if needed.
- When using the walkthrough the "Find The Differences" items have been color coded to help you see them.
- If you have to place an item such as a ladder be sure to click on the item directly above it to get it to work.
- Use the "X" at the top right of the mini game screens to exit out of the scene.
- If you have to leave the game do NOT turn the computer off to do so. Be sure to exit out correctly or you will have to go back to the very beginning of the chapter you exited out of.
Walkthrough
- This walkthrough will take you from start to finish.
- Spoilers here! The answers to all of the hidden object searches and mini games where possible are shown here.
- It appears that the items in the hidden object scenes are the same each time you play the game.
- The items have been color coded where possible.
Chapter 1 – "Introduction/Tutorial"
Meet Miranda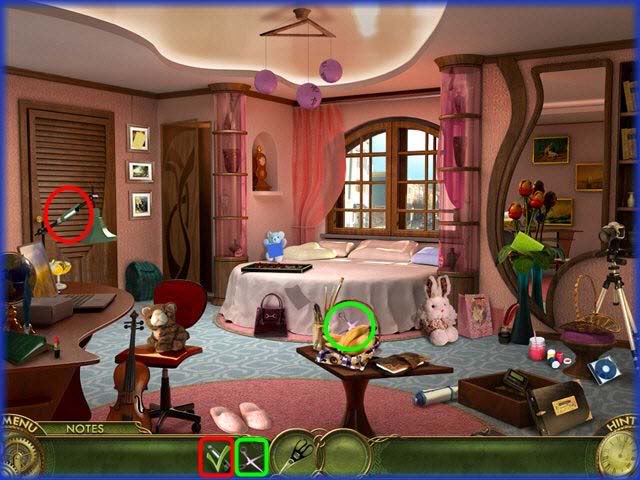
- Storyline – Here we meet Miranda as she is daydreaming of one day being a writer and is bored with her life. She receives a mysterious package at her door and when she opens it she finds an Origami book. After she makes several colored paper birds they combine and become a real bird that flies into her mirror..it appears to be a portal of some type. On the other side she meets "Jovie" a cute talking stuffed bear that has an affinity for losing and breaking things. She learns of a young girl "Louise" that needs here help and the adventure begins.
- Tutorial – The game will give a brief tutorial here to show you how to maneuver and what you need to do. The tutorial is summarized above in Game elements.
- Locate the knife and pair of scissors. They will combine and move to the center.
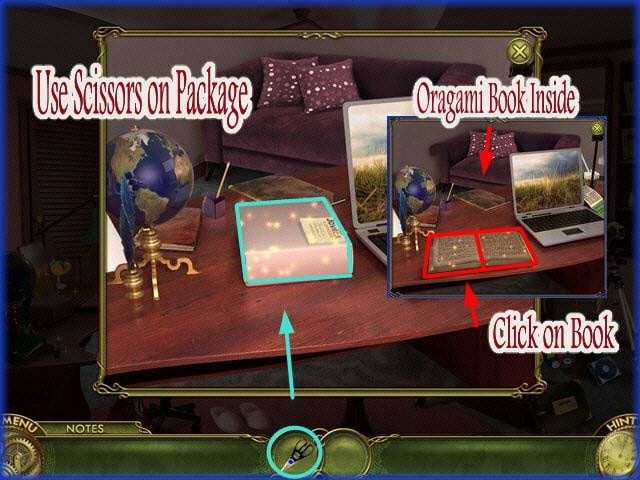
- Take the scissors and open the package Jovie has left.
- Click on the Origami book.
- You will be taken back into the bedroom.
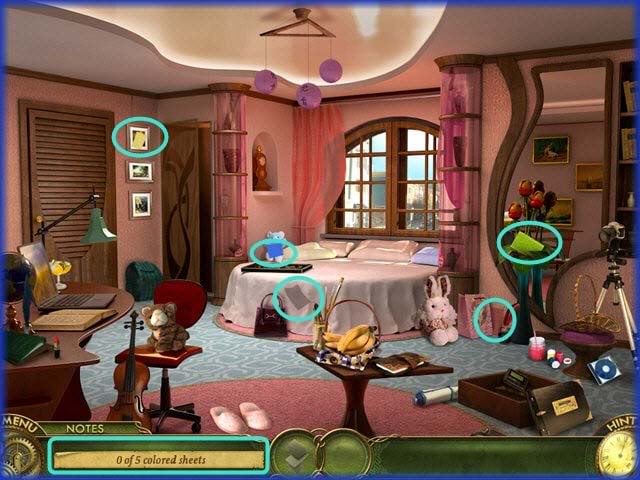
- Locate the 5 sheets of colored paper.
- Answer shown circled above.
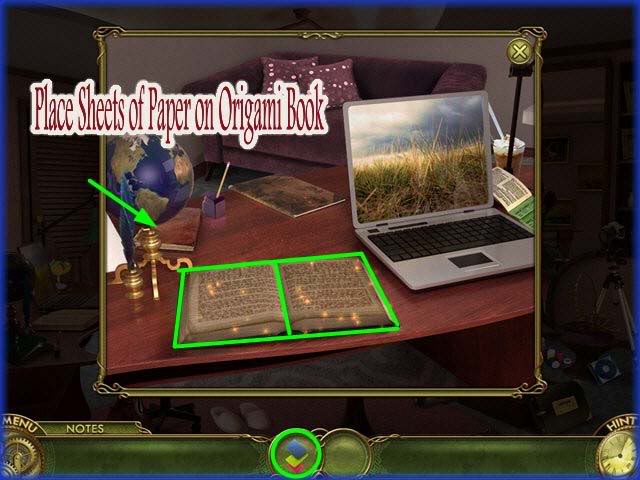
- Drag the colored sheets of paper to the Origami book.
- This will trigger a Mini Game.
Mini Game – Origami/Tile Placement Bird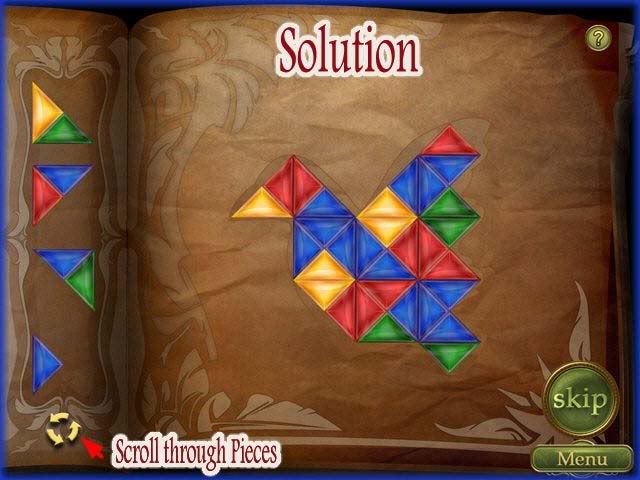
- In this game you are to place the tiles in the bird outline.
- You can start with any colors you wish but they must be positioned correctly within the grid.
- Once you place a tile you can only place additional tiles that have a color in common.
- The tiles you can use are located along the left of the screen.
- Use the circle of arrows at the bottom left to scroll through the tiles.
- You should be able to find whatever tile or combination of tiles you need.
- You can skip this puzzle if you wish by clicking on the "Skip" button at the lower right of screen once it activates. It takes a few moments to become active. There is no penalty for skipping this puzzle.
- A solution example is shown above you can either copy it or make your own as there are multiple solutions to this puzzle.
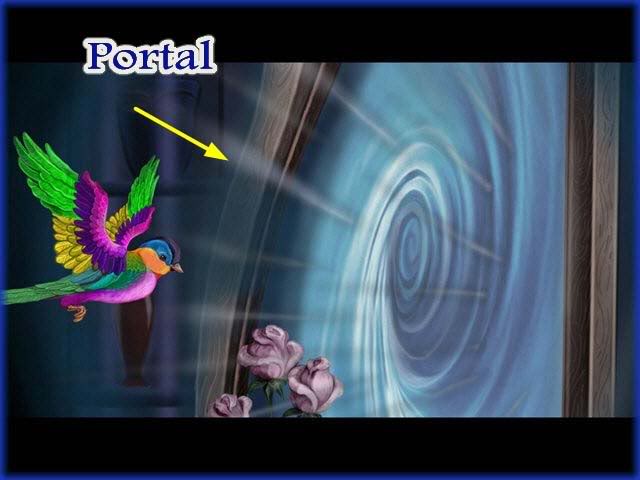
- Storyline – The paper bird becomes a real bird which flies through the mirror.
- Click on the Portal to have Miranda go through it.
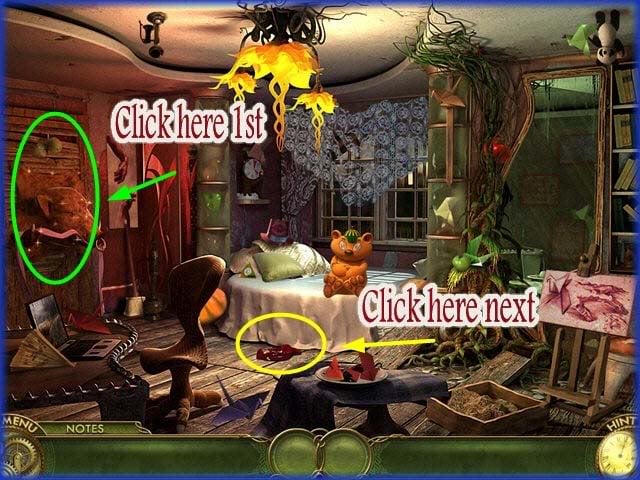
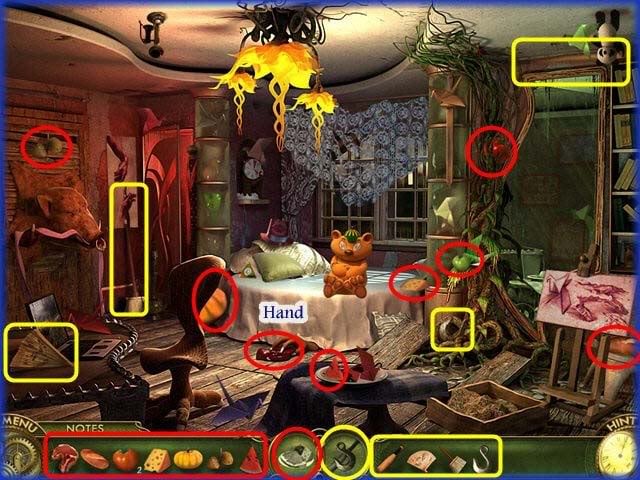
- You will now be asked to find several food items around the room.
- Click on the hand over the piece of meat in the center of the scene.
- When you go back to the scene you will notice a wild boar at the left side of the room.
- Click on the boar.
- You will see the boar is eating Jovie’s favorite scarf. You need to find something else to feed him so you can get the scarf back for Jovie.
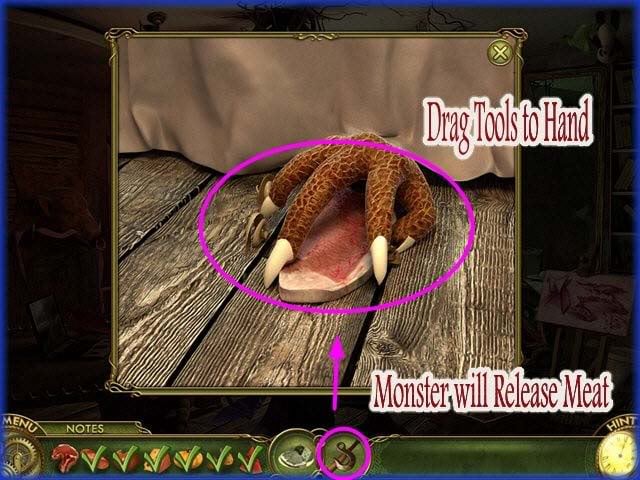
- Here you will see the monster’s hand over the meat.
- In order to get it you will need a tool.
- A new set of items will appear on the right side for you to find.
- You now are searching for food and a weapon.
- Once you find all of the weapon items in the room they will combine.
- Drag the weapon to the hand and it will release the meat.
- Find the remaining food items then click on the wild boar at the left of scene.
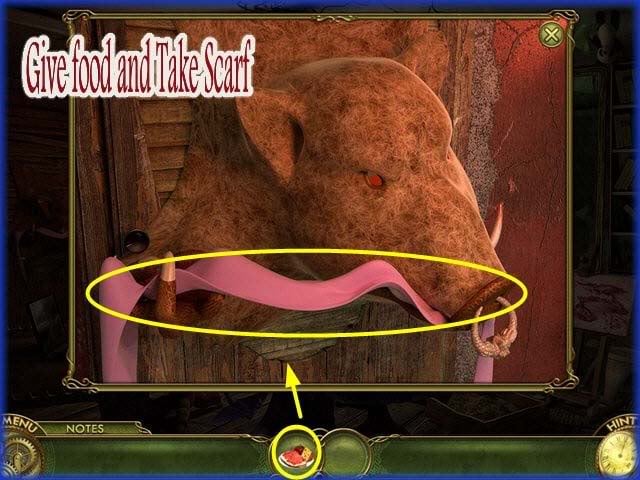
- Give the food to the boar and he will release the scarf.
- Jovie will now have his scarf.
Origami Birds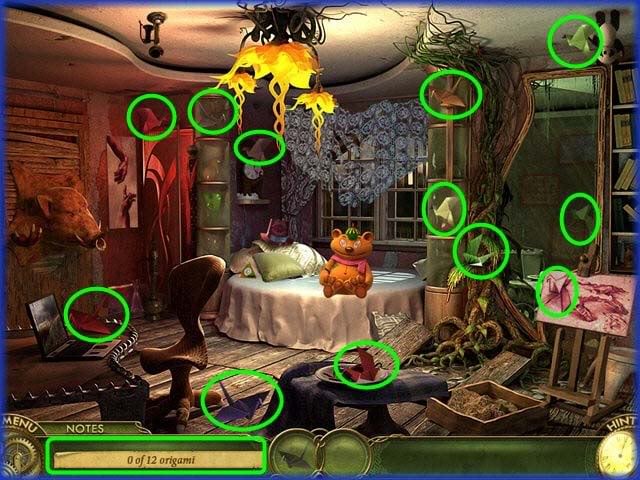
- Locate the 12 Origami birds shown circled above.
- Next click on the pillows on the bed.
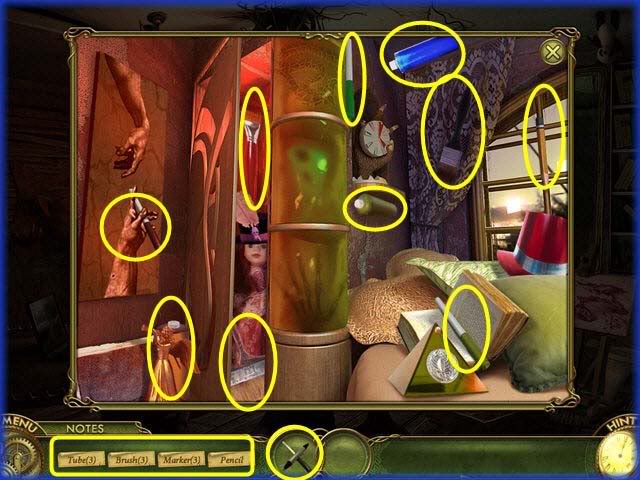
- Locate the 10 art supplies shown circled above.
- This will trigger a Mini Game.
Mini Game – Assemble the Note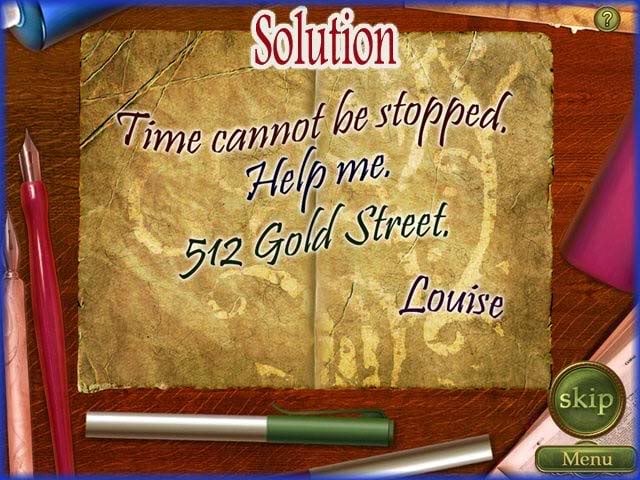
- Here you are to decipher the message by swapping the torn pieces of paper.
- You may click on a piece of paper and swap it with any other piece in the puzzle.
- Once a piece is correctly in place it will lock in.
- The message reads, "Time Cannot be stopped. Help Me. 512 Gold St. Louise"
- Miranda heads for that address.
- Walk her through the portal to the next location.
Chapter 2 – "Luxury Store"
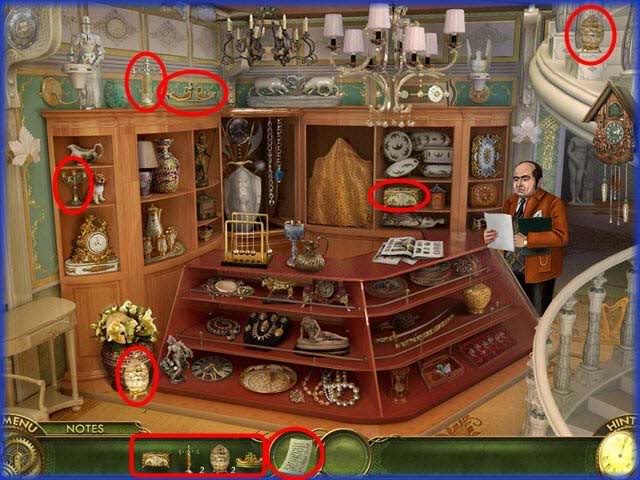
- Storyline – Miranda goes to the address and learns it is a luxury store that sells high end clocks and antiques.
- Locate the 6 items shown circled above.
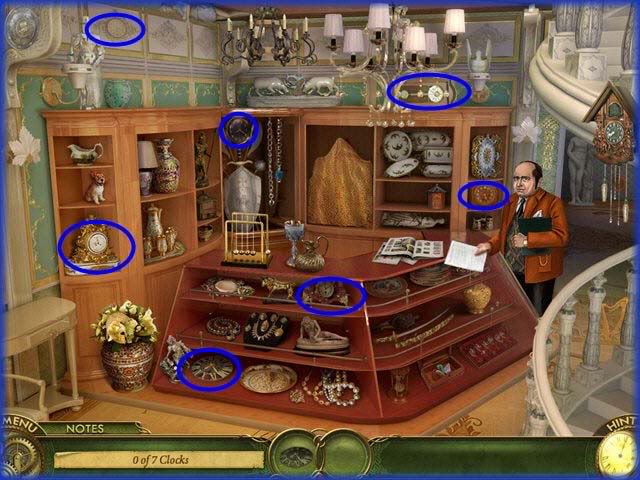
- Locate the 7 Clocks shown circled above.
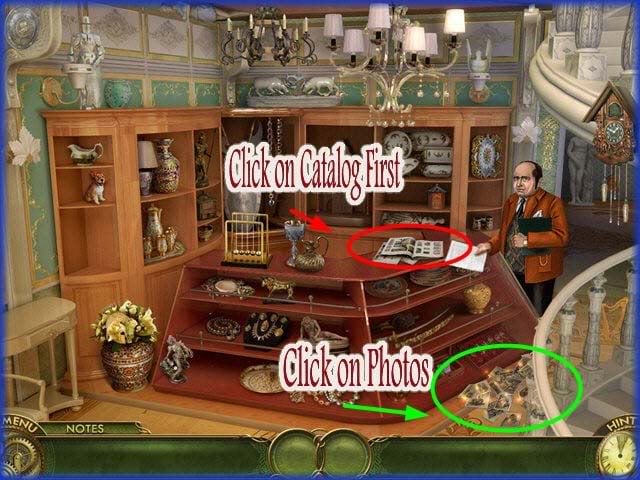
- Click on the Catalog of Antiques.
- The pictures will drop on the floor.
- Click on the pictures and it will trigger a Mini Game.
Mini Game – Find the Photograph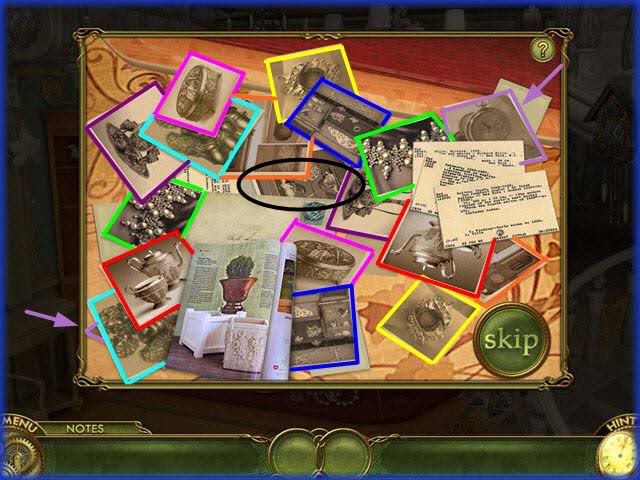
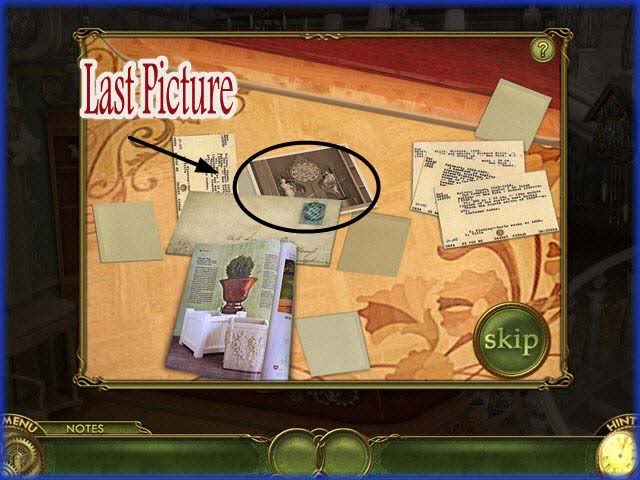
- Here you will match the pairs of photos and eliminate them until you have one picture without a mate.
- The pictures are color coded to show you how to match the pairs above.
- The image left over is shown in the second image above.
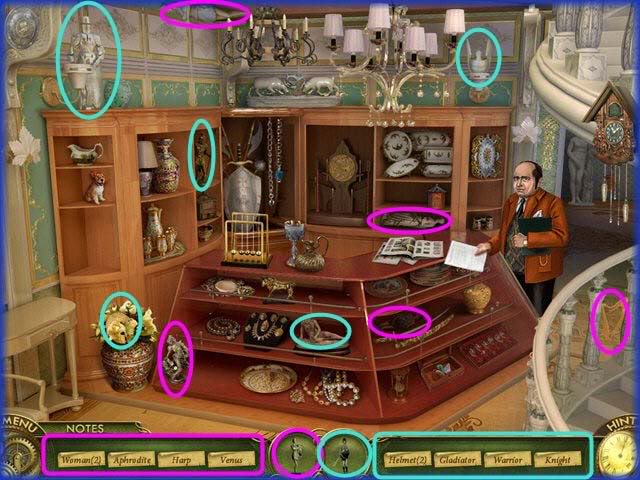
- The old clock needs to be restored.
- Locate the following items:
- Woman’s Statue – 2
- Aphrodite
- Harp
- Venus
- Man’s Statue
- Helmet -2
- Gladiator
- Knight
- Warrior
- When you find the items they will combine into the man and the woman statue that belongs on the old clock.
- Click on the old clock for a closer look.
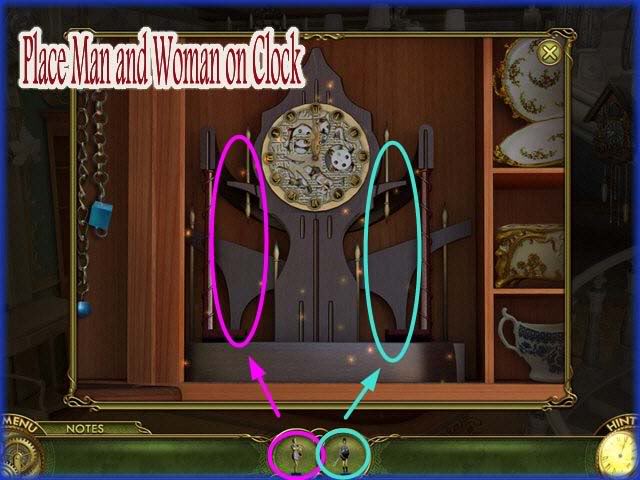
- Place the woman on the left side and the man on the right side of clock as shown above.
- Now you will need to find a key to wind it with.
- Once back in the store click on the table at the lower left side of scene.
Mini Game – Find the Keys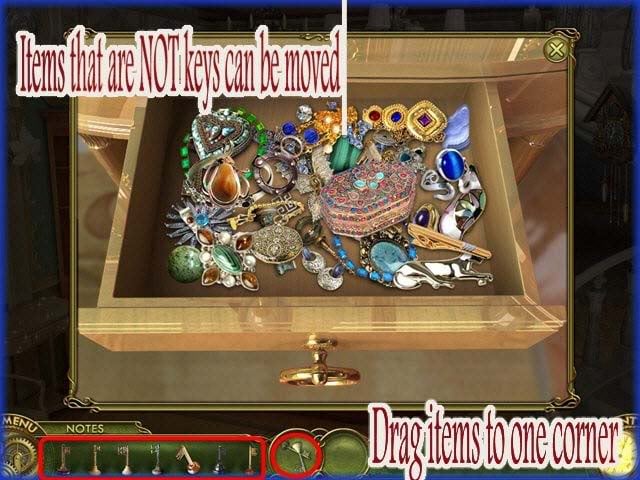
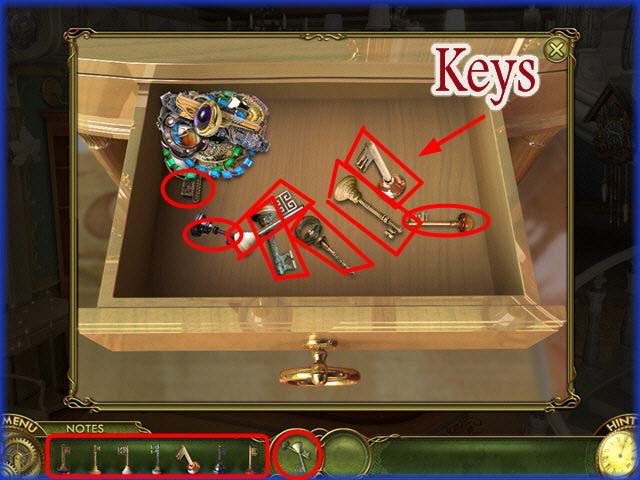
- Here you will need to locate 7 hidden keys.
- In this scene you can move items in the drawer.
- If you touch a key it will disappear but if you touch an item that is not a key you can move it.
- In the image above all of the items have been moved into one corner to show you the keys.
- You can do it this way or just click as you find them.
- Once finished go back to the old clock for a closer look.
Wind the Clock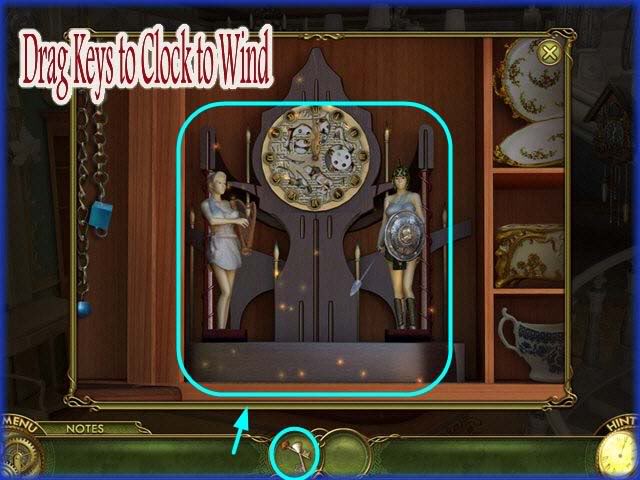
- Drag the completed Key to the clock to wind it.
- The clock begins to work and a beautiful bracelet appears.
Find the Glasses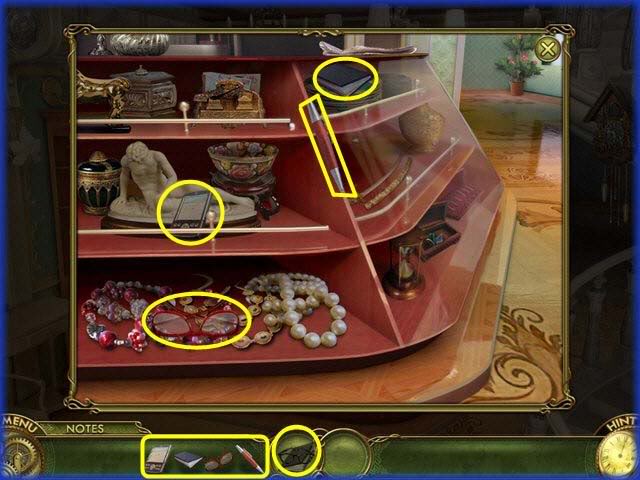
- Storyline – The shop owner states Miranda can keep the bracelet she found. She asks about the old clock and who made it. He states it was made by a man that recently lost his sister and had to be put in a mental hospital. He wasn’t sure what happened to the man after that. He states that he bought the old clock at a local pawn shop. Miranda asks for the address but first he needs to find his glasses.
- Click on the counter for a closer look.
- Find the 4 items in the scene which will combine to make his glasses.
- Get the address from the Store Owner.
Chapter 3 – "Pawn Shop"
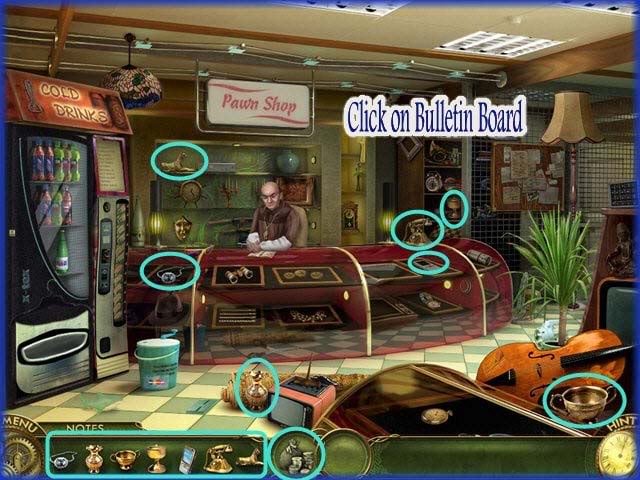
- Storyline – Miranda arrives at the pawn shop hoping to find more information.
- Locate the 7 items shown circled above.
- Click on the bulletin board when finished.
Locate the Price Tickets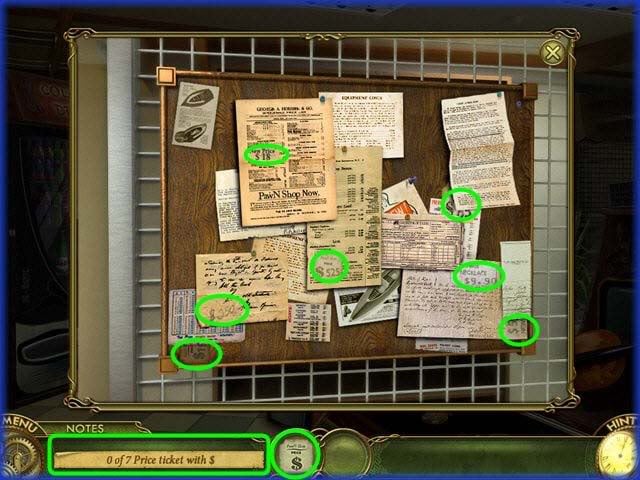
- Locate the 7 price tickets in the scene.
- Miranda thinks the prices are very high so she will need to see what she can pawn.
Find something to Pawn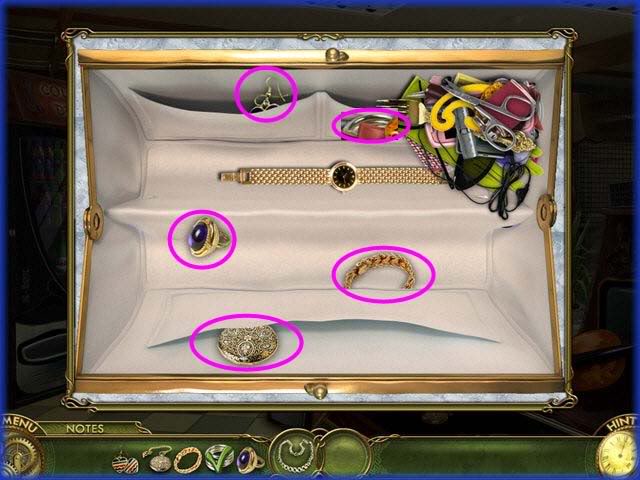
- Locate the 5 pieces of jewelry in the drawer.
- Here the items can be moved around.
- All the items in the image above have been moved to one side so you can see the items and where they are hidden.
- Once you find them they will combine into a necklace.
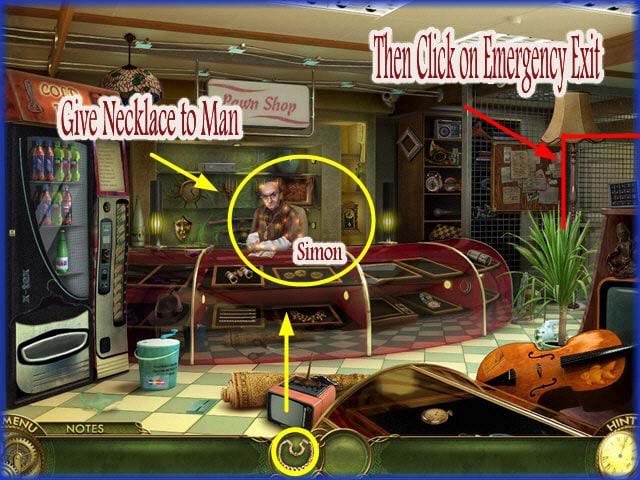
- Give the necklace to the Pawn shop owner "Simon"
- Storyline – Miranda asks about the information but he won’t give it to her.
- She will need to distract him so she can get the information.
- Click on the Emergency exit on the right side of scene. Once in the other room Miranda decides to short out the fuse box with a soda. Go back to the shop to get one.
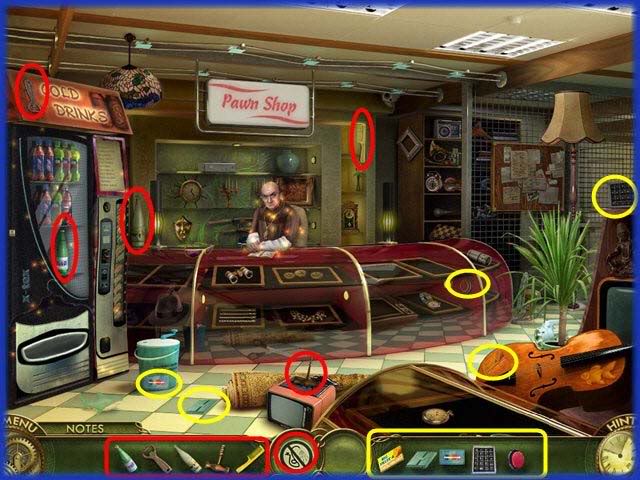
- Locate the 7 items to repair the control panel.
- This will trigger a search for items to repair the soda machine.
- Locate all the items shown above.
- Go back to Control Room.
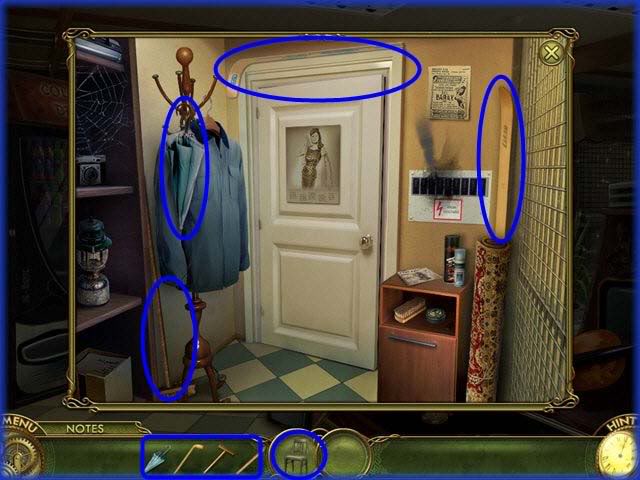
- Storyline – Miranda needs something to block the door with.
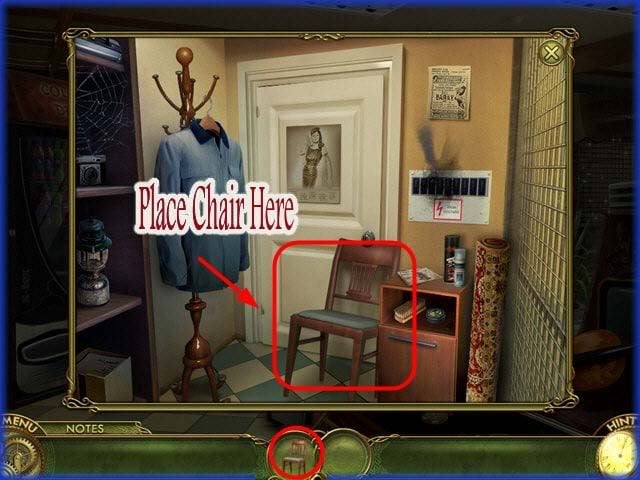
- Locate the 4 items that will combine to form a chair shown circled above.
- Once completed place the chair under the door as shown.
- Simon is distracted now so go back into main room of shop.
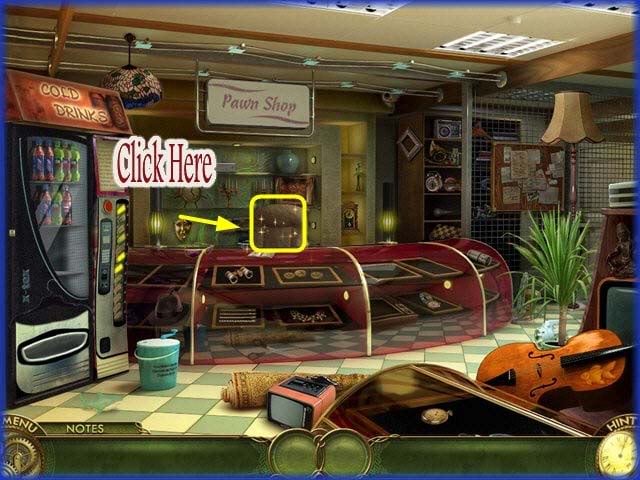
- Click on the area around empty chair to trigger a mini game.
Mini Game – Find the Name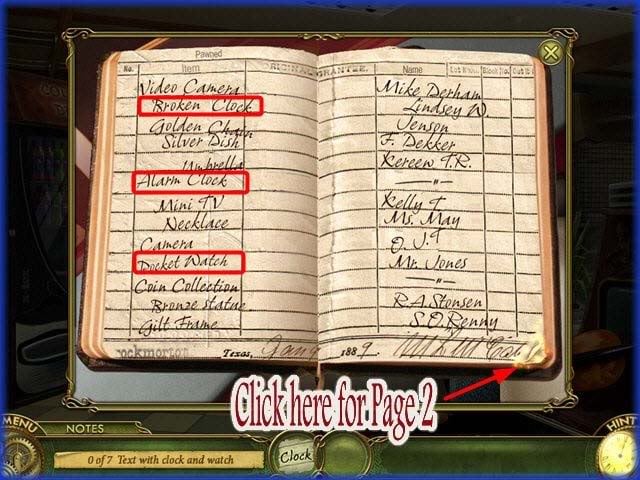
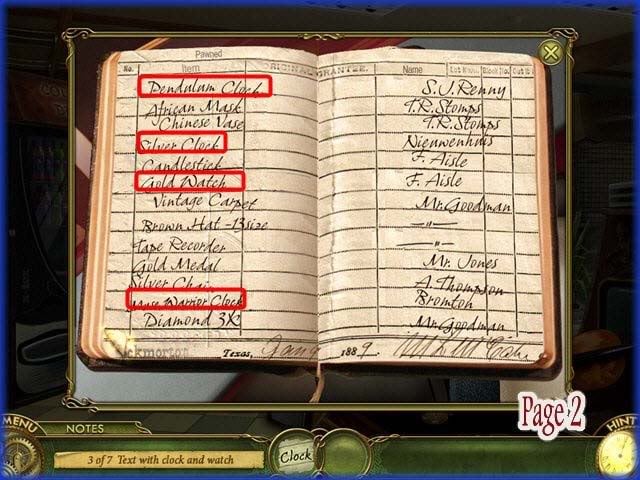
- Here you will click on any name with a mention of a "Clock" or "Watch."
- The answers are circled in red above.
- Be sure to click on the second page at the bottom right corner.
- Miranda now has a name to work with. The mystery person is "Bromton"
- She decides to head to the city archives to research.
Chapter 4 – "City Archives"
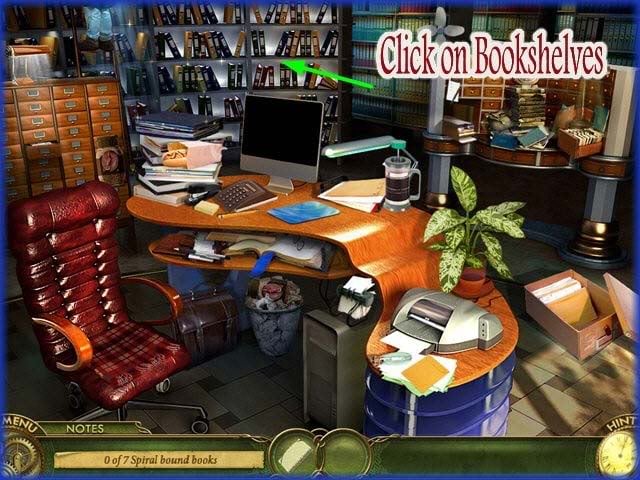
- Storyline – Miranda is determined to find the last known address of "Bromton"
- Click on the shelves at the back left of scene.
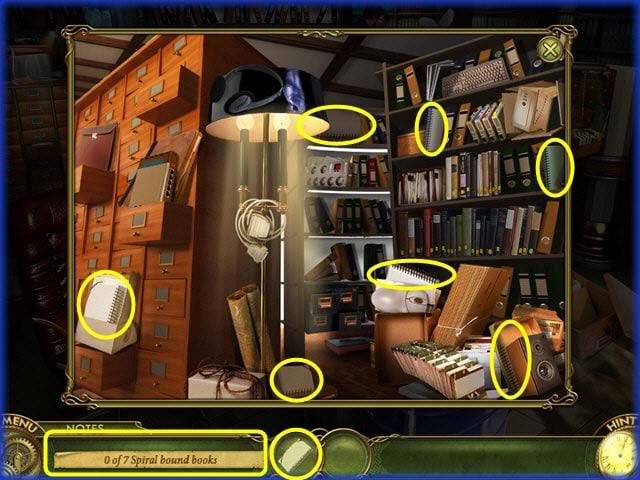
- Locate the 7 spiral bound books shown circled in the scene above.
- When finished you will be returned to the main scene.
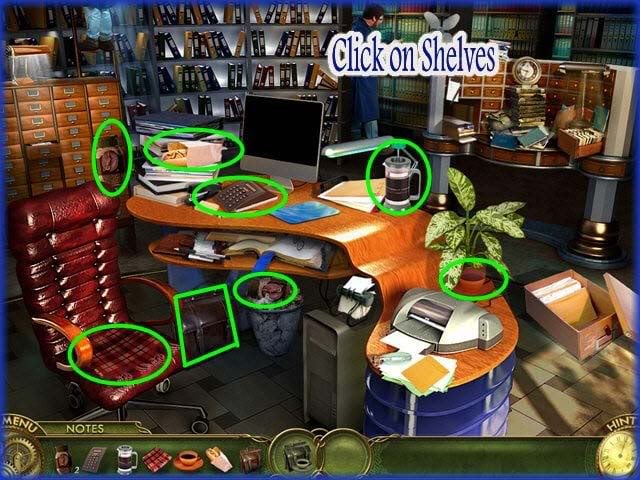
- Miranda needs to use the computer but there is a lot of clutter she will have to move it all out of the way.
- Locate the 8 items shown circled above.
- Click on the Shelves at the back left of scene.
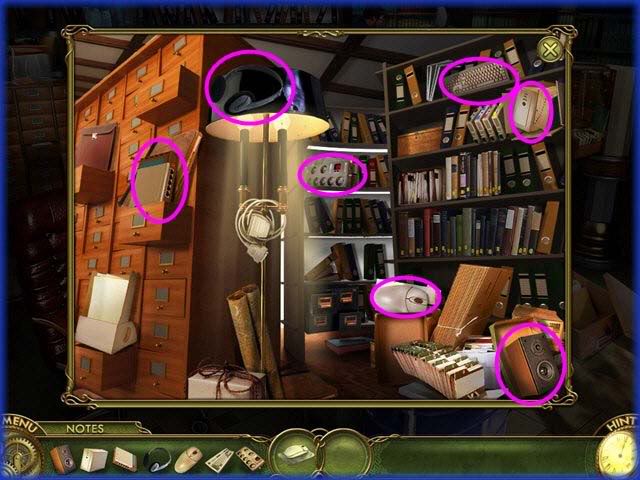
- Locate the 7 items in the scene shown circled above to repair the Monitor.
- Go back to computer.
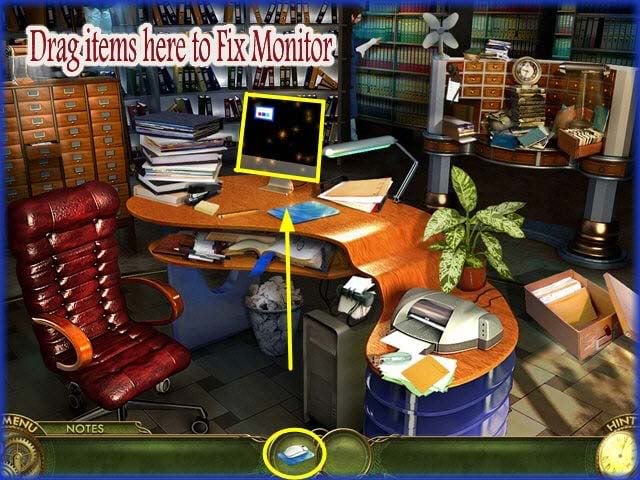
- Repair the Monitor by dragging the parts in the center of scene to it.
- Miranda learns the computer must be repaired as well.
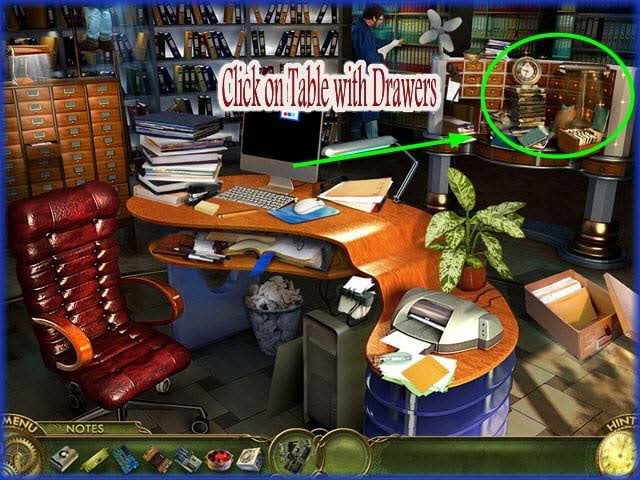
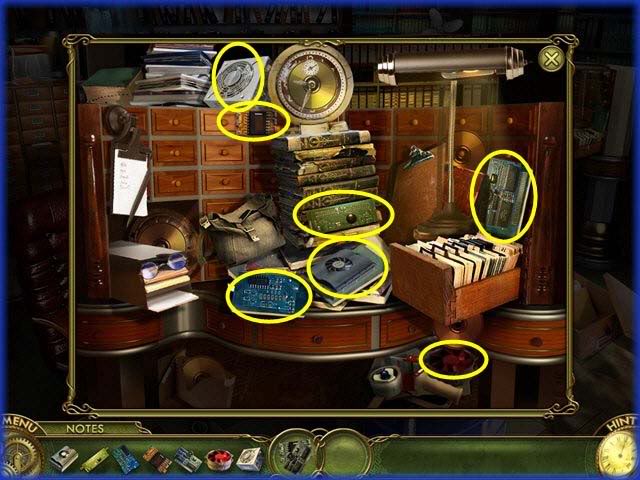
- Click on Table with drawers at back right of scene.
- Locate the 7 computer parts in the scene shown circled above.
Repair the Computer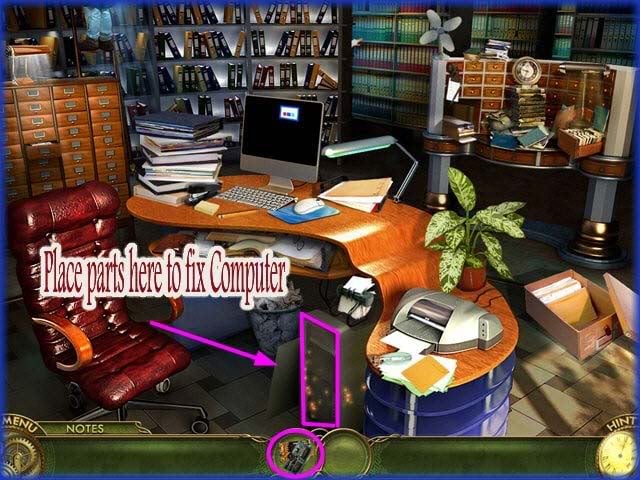
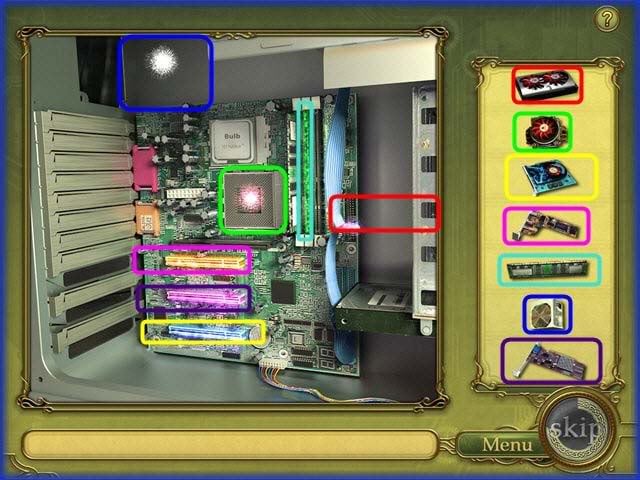
- Drag the parts to the computer as shown above.
- Place the parts in the computer as shown by color coding above.
Locate CD-ROM Discs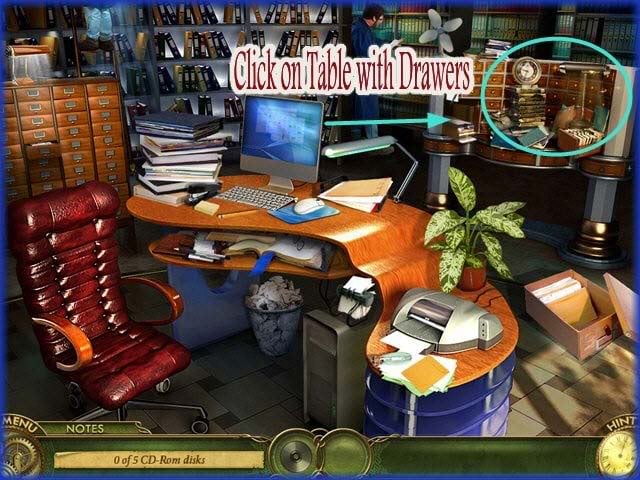
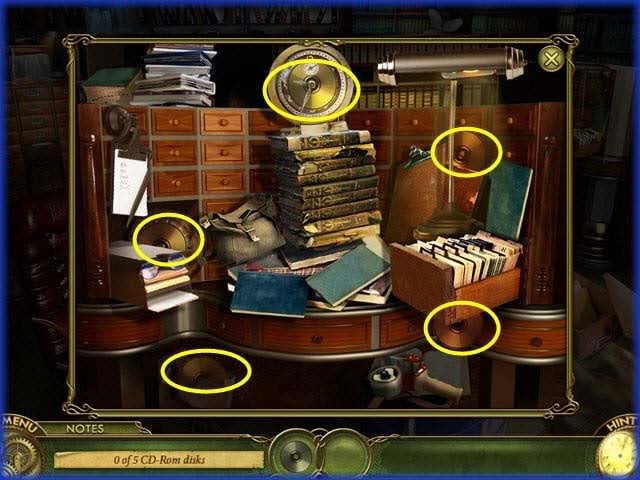
- Go back to the table with drawers at the back right of scene.
- Locate the 5 CD-ROM discs shown circled in the scene above.
Place CD in Drive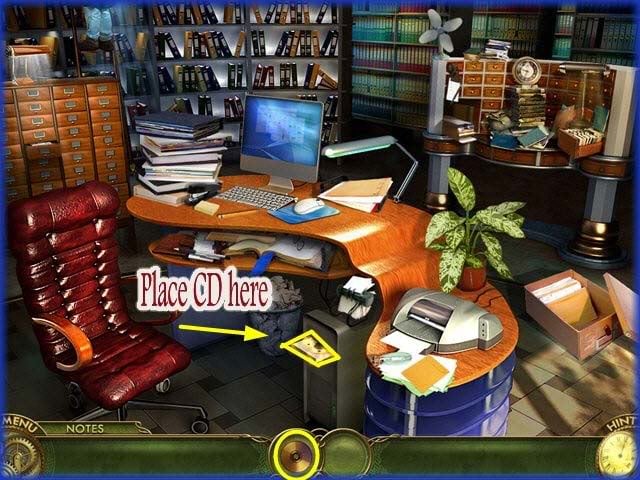
- Place the CD in the Drive as shown above.
- Storyline – Miranda finds an address tied to the name "Bromton" she is fairly certain that is the address of the old subway station. She will need to print out the map.
Repair the Printer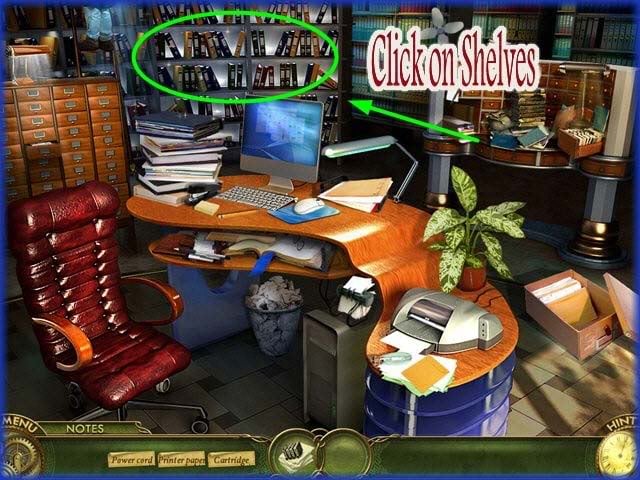
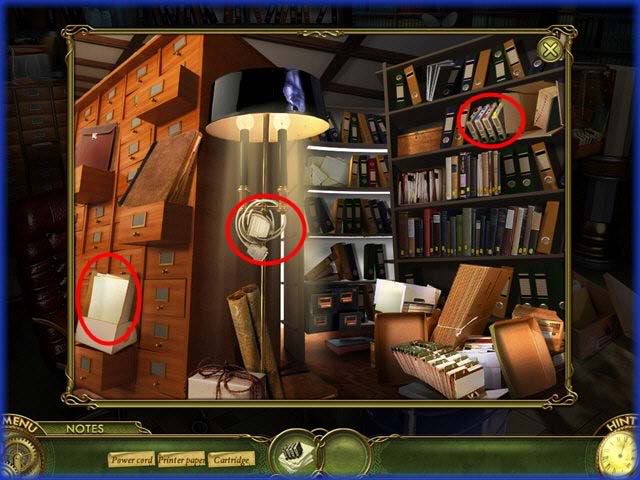
- The printer is broken.
- Go back to the shelves at the back left of scene.
- Locate the items to fix the printer shown circled above.
- Cartridges
- Power Cord
- Printer Paper
- Go back to Printer.
Print out the Map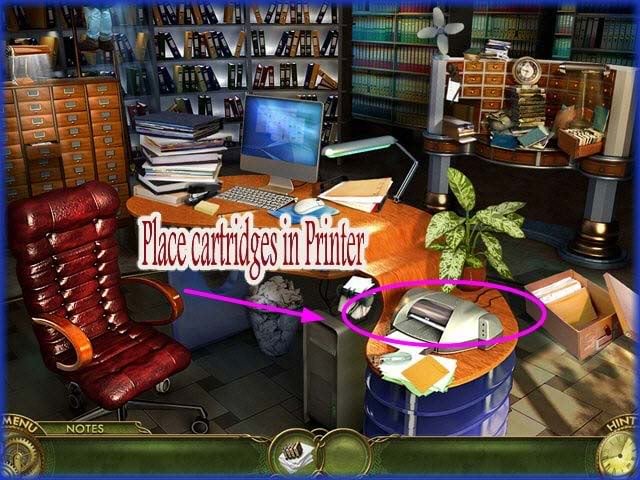
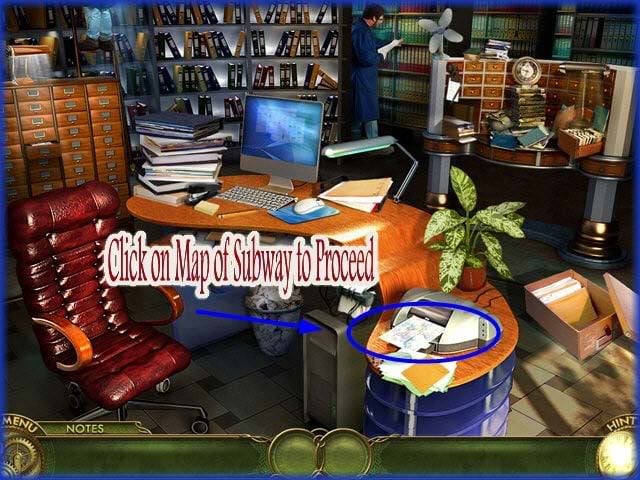
- Place the cartridges in the printer to repair.
- Click on the printer and print out map.
Chapter 5 – "Abandoned Subway Tunnel"
Blocked Passageway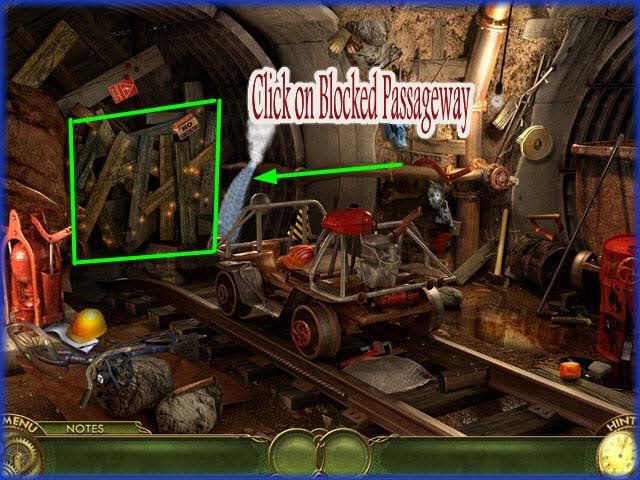
- Storyline – Miranda is correct the address is the long closed area of the subway. She has a hunch someone is living behind the boarded up areas. She finds the abandoned subway tunnel and must find a way in.
- Click on the boarded entrance.
Repair the broken water pipe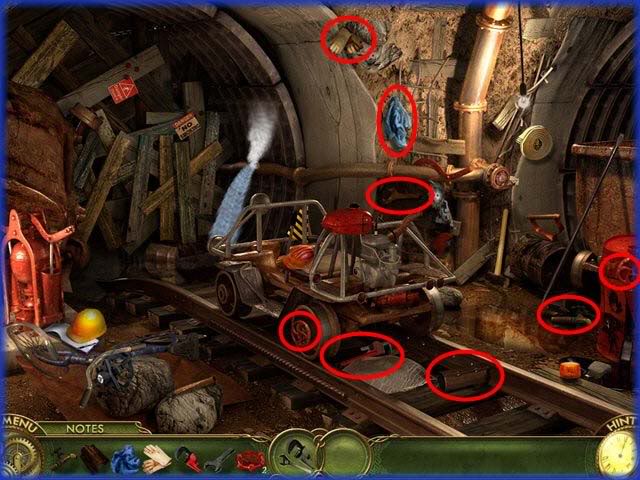
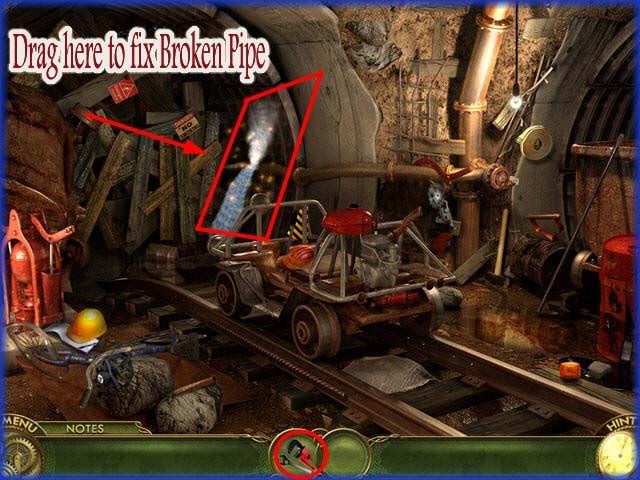
- Locate the 8 items hidden in the scene circled above.
- Drag items to repair the water pipe as shown above.
Repair the Pump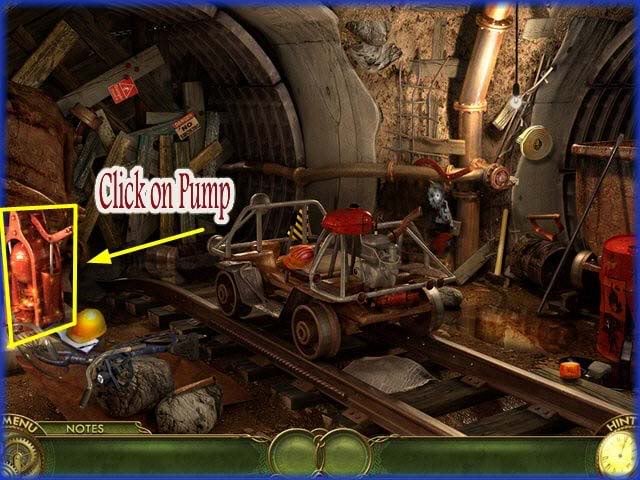
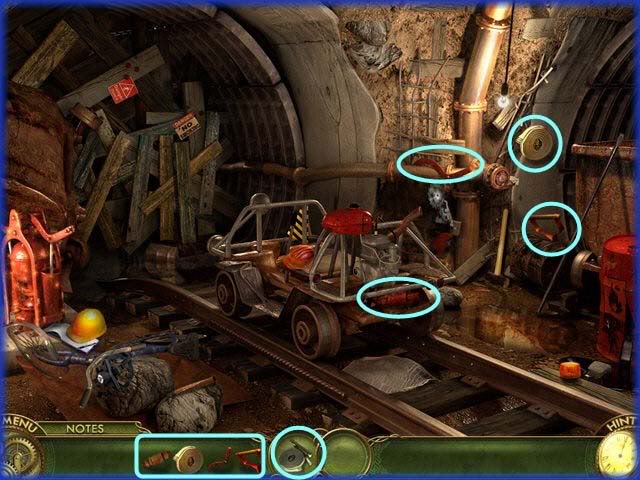
- Click on the pump. Learn that it is broken.
- Locate the 4 hidden items shown circled above.
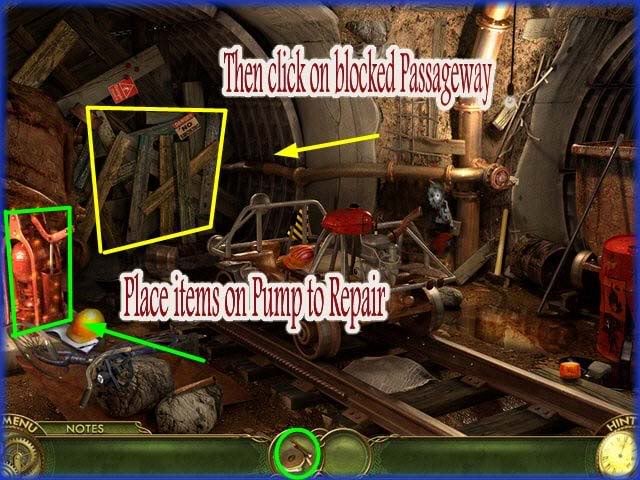
- Drag items to pump to repair it.
- Then click on the blocked passageway to continue.
Blocked passageway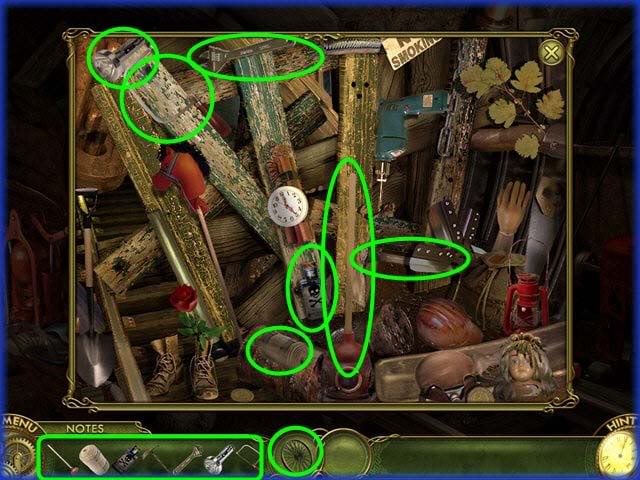
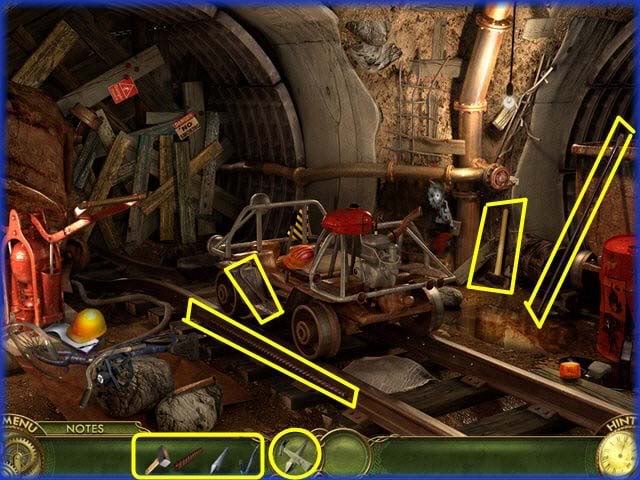
- Locate the 7 hidden items to loosen the boards over passageway shown above.
- Locate the 4 items shown circled above needed to remove the boards.
Get the Cart Working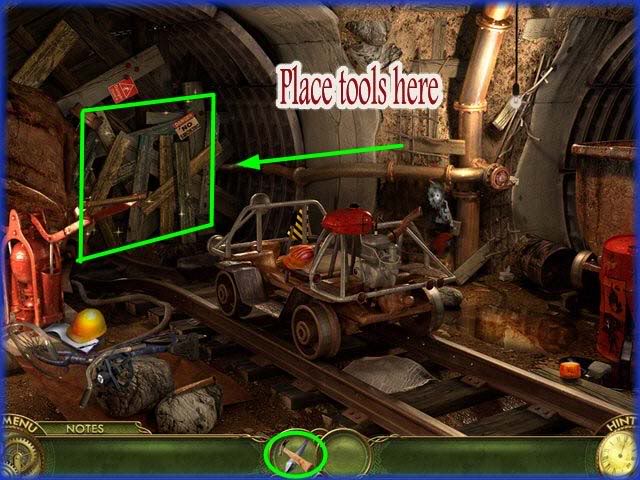
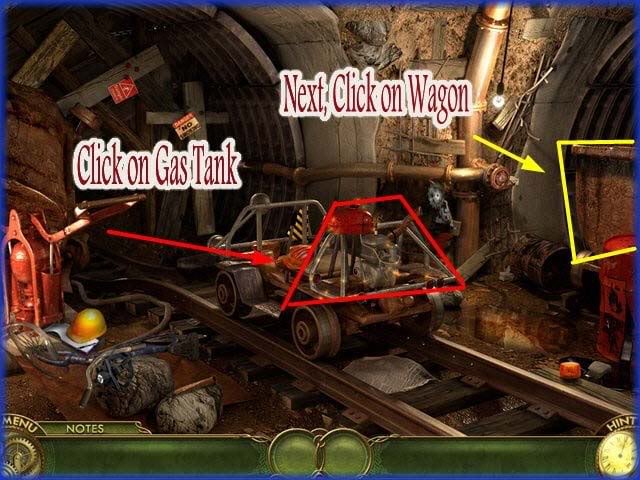
- Now the passageway is open but Miranda can’t walk it so she is going to repair the cart.
- Click on the gas tank and then on the wagon at the far right of scene for a closer look.
Locate Fuel/Place fuel in Cart.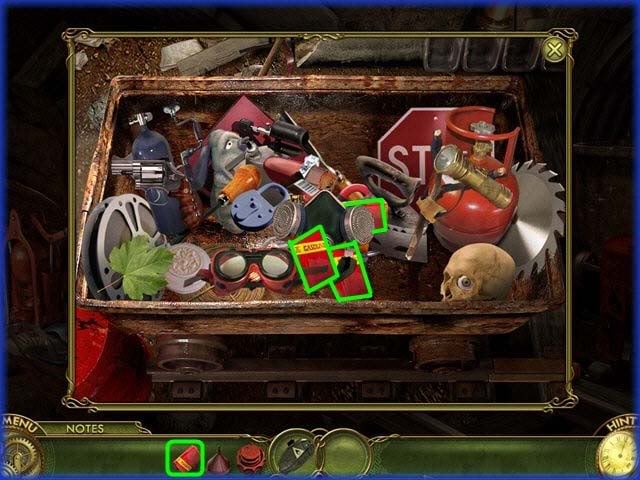
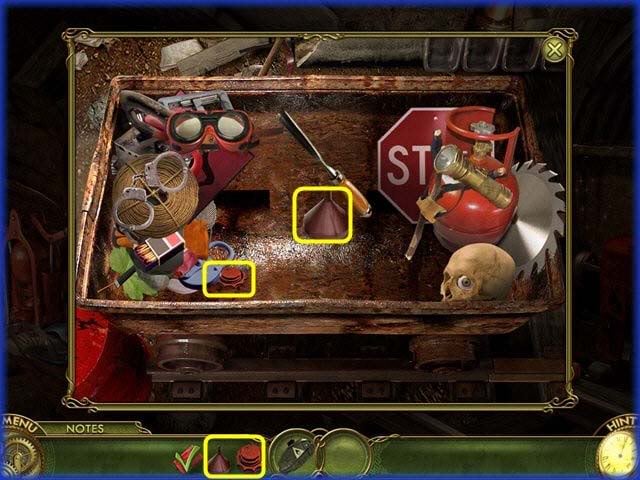
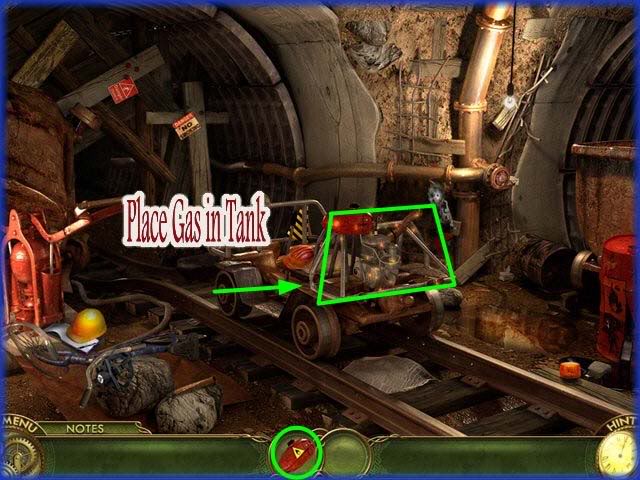
- Here you will need to locate the 5 items hidden in the scene.
- The other items in the scene can be moved.
- The items in the image have been moved out of the way to show you where they are located.
- Once you find all the items drag the fuel to the cart.
Repair the Headlights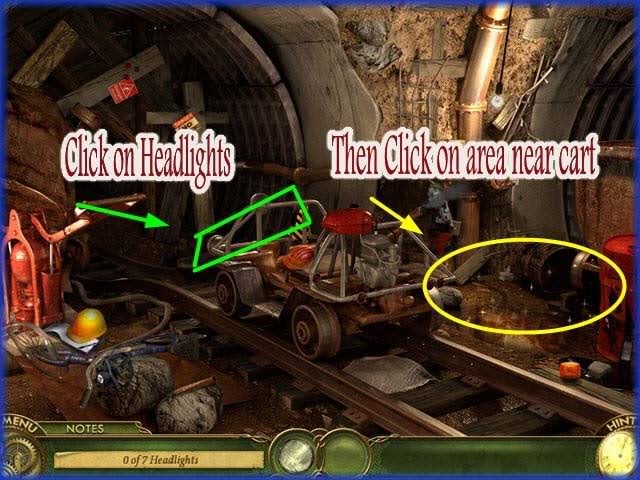
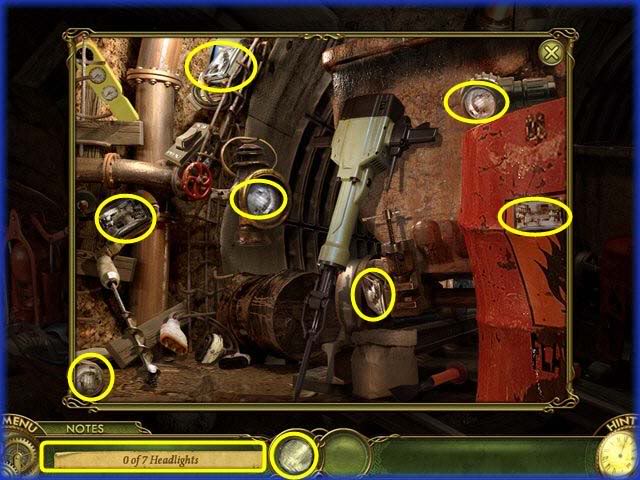
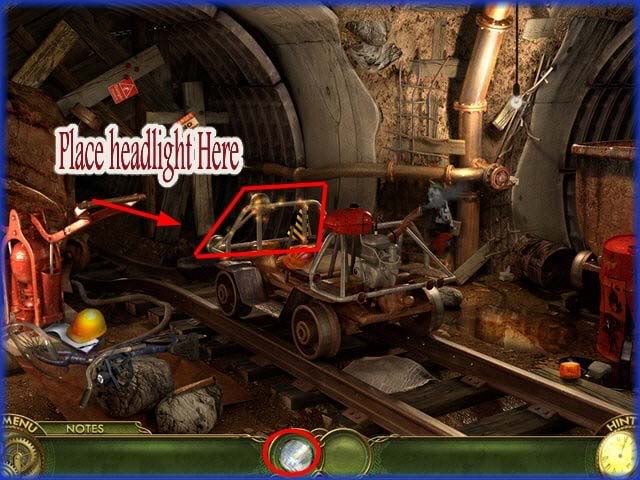
- Click on the headlights to learn they are broken.
- Next click on the area to the right as shown above.
- Locate the 7 headlights in the scene shown circled above.
- Repair the headlights by dragging them to the correct location shown above.
Start the Cart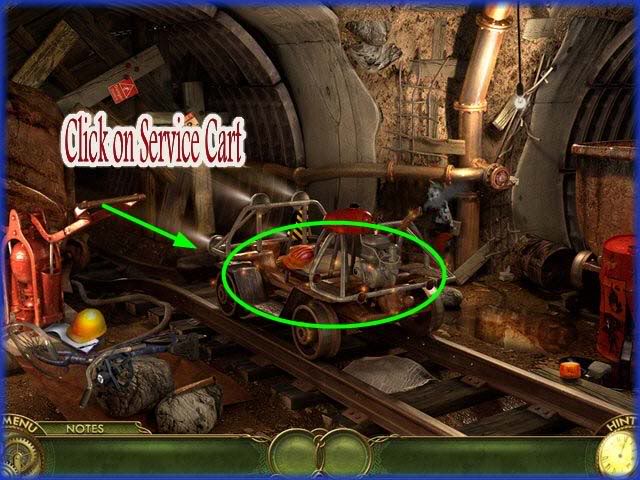
- Click on the cart which will trigger a Mini Game.
Mini Game – Drive the Cart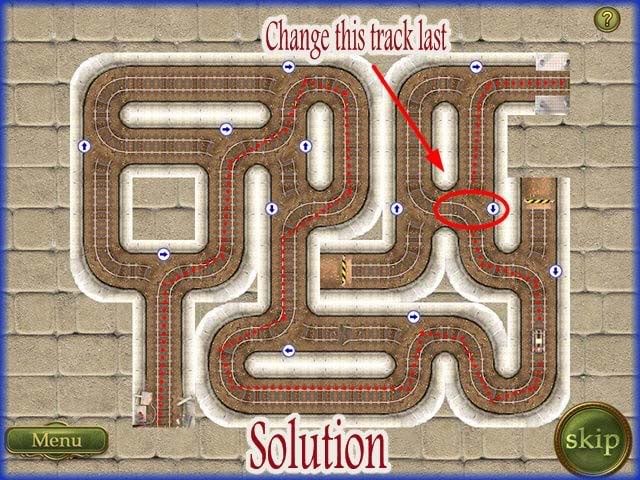
- In this mini game you are to drive the cart from one end of the track to the other.
- If you hit a roadblock you will start to move in the opposite direction.
- If you hit the yellow striped fences you will crash and go back to the very beginning.
- At the area with the blue arrows you can click on the track and change its direction.
- You will need to change the track before the cart drives over it.
- There are several ways this can be done and one is shown above.
- You will need to have the cart go down one incorrect lane and while it is going backwards change it then the cart can make the rest of the journey. This is shown marked above.
- Look at the diagram above and how the tracks are positioned.
- You can skip this puzzle if you wish by hitting the skip button at the lower right of the screen once it becomes activated after a few moments.
Chapter 6 – "Old Subway Station"
Clear away the debris.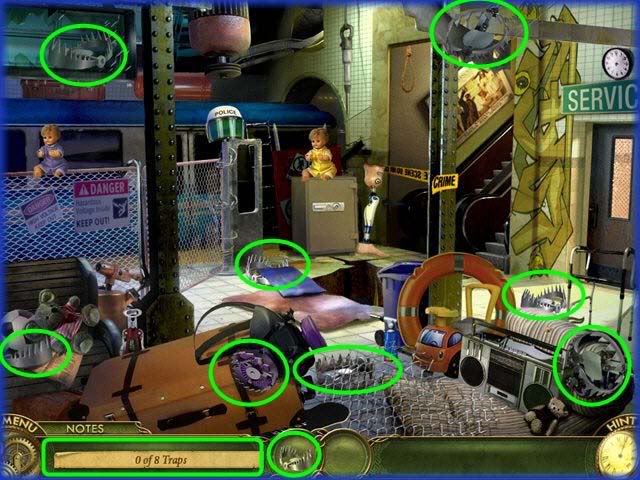
- Locate the 8 hidden traps in the scene shown circled above.
- Click on the escalator to the right.
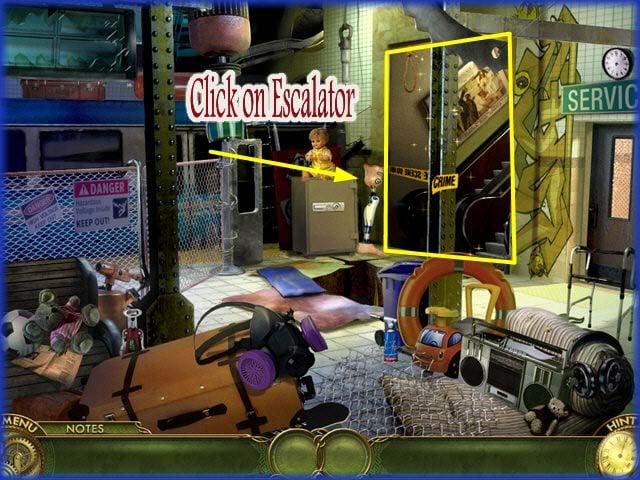
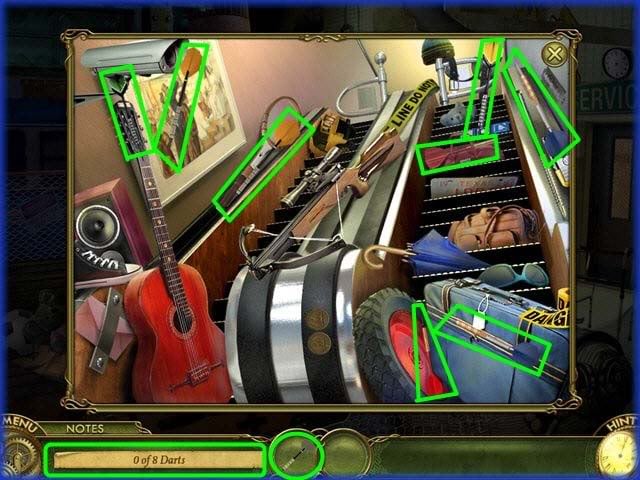
- Click on the escalator.
- Locate the 8 darts on the escalator shown circled above.
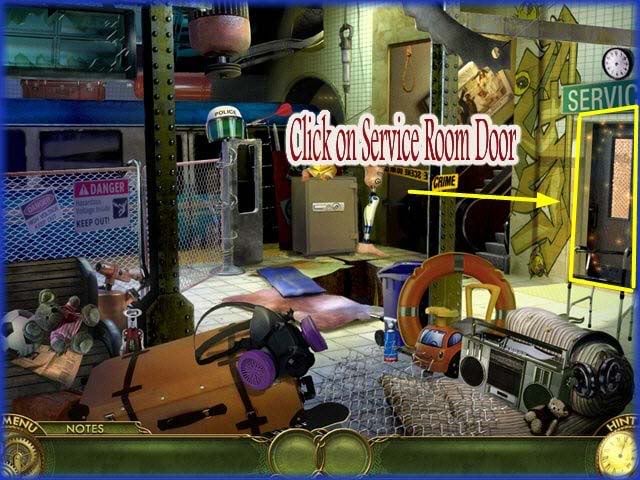
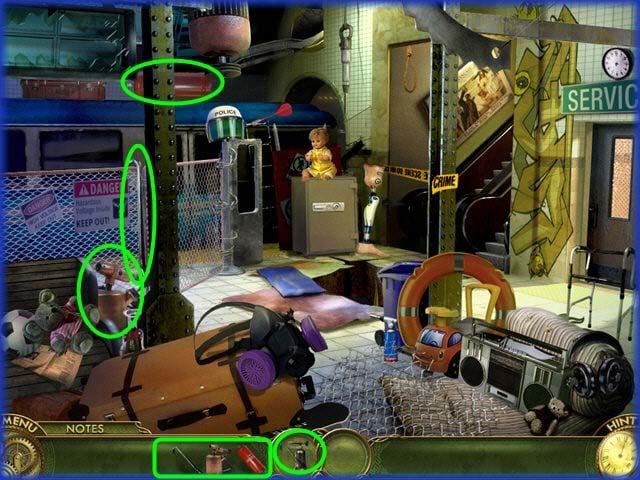
- Click on the gate in the back center of scene. It is an electrical gate. Gather tools to disarm it.
- Click on Service room door to the far right of scene.
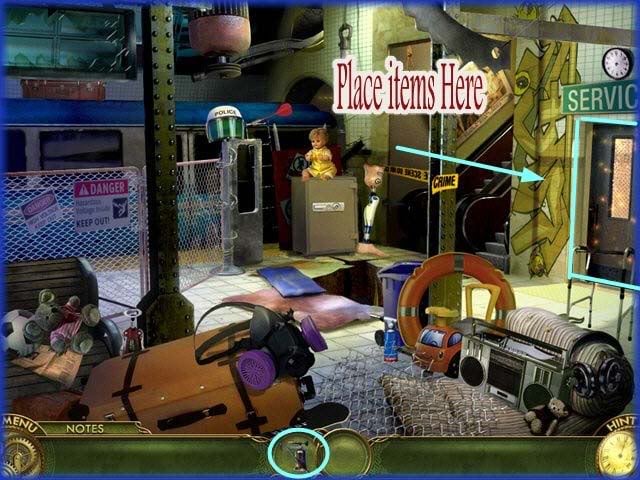
- Locate the 3 items hidden and circled in the scene above.
- Place the items on the Service room as shown above.
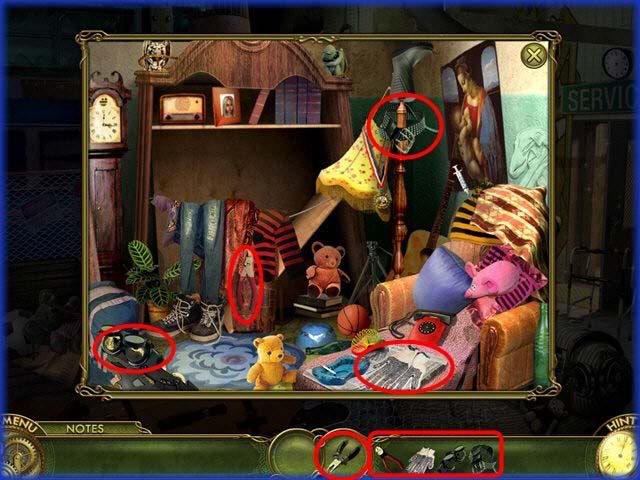
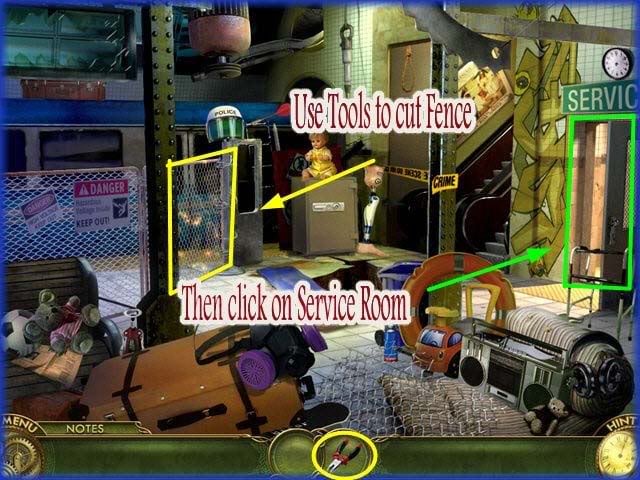
- Locate the 4 hidden items shown circled above.
- Use tools to cut the fence then click on the Service room door.
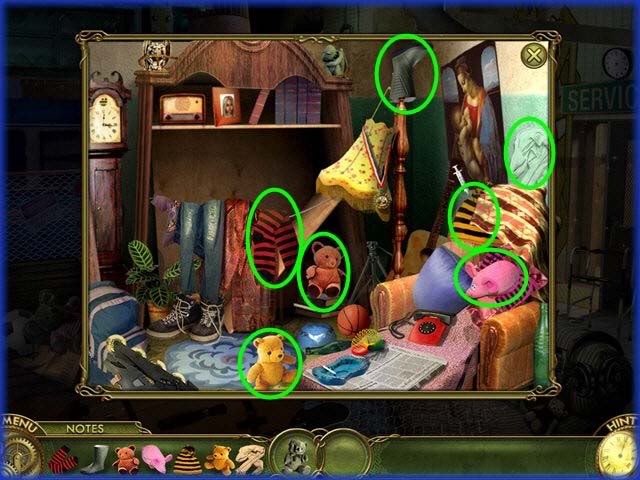
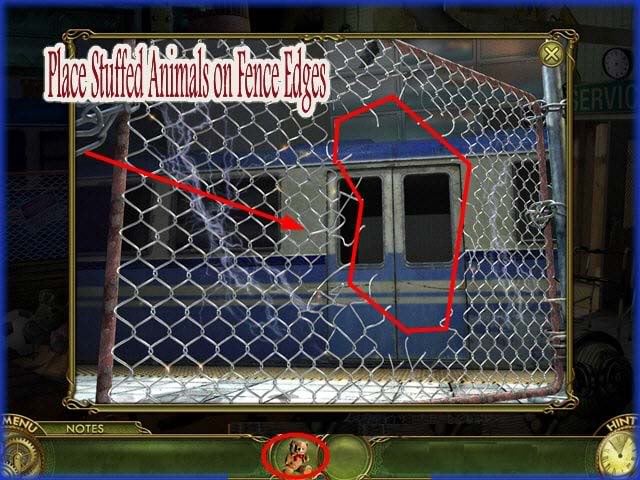
- Locate the 7 stuffed animals shown circled in the scene above.
- Place the stuffed animals on sharp edges of fence.
Find Items to Show to Michael.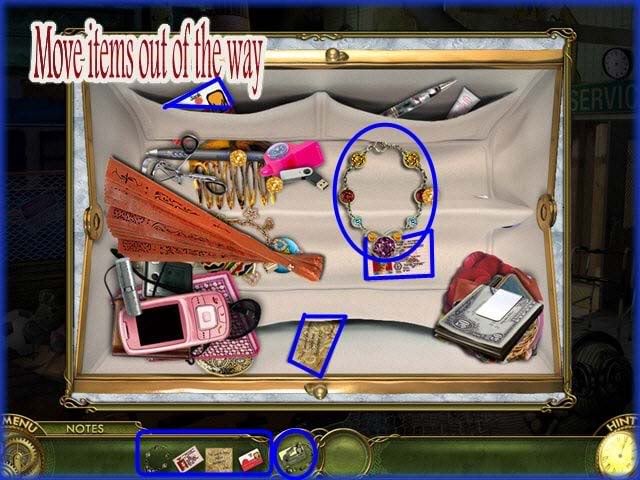
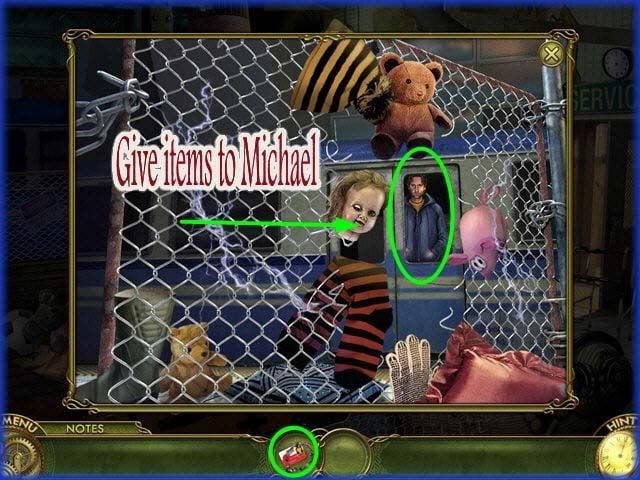
- Storyline – Miranda finds Michael and he wants nothing to do with her.
- She must find something to prove to him who she is and what she is doing.
- Locate the 4 items shown above.
- The items in the drawer can be moved.
- The items have been moved out of the way to show you their locations.
- After you find the items give them to Michael.
- Michael tells Miranda the story of how Louise was kidnapped and how he has been trying to find her for several years. He is very happy to accept her help and they head for Louise’s parents house.
Chapter 7 – "Louise’s House"
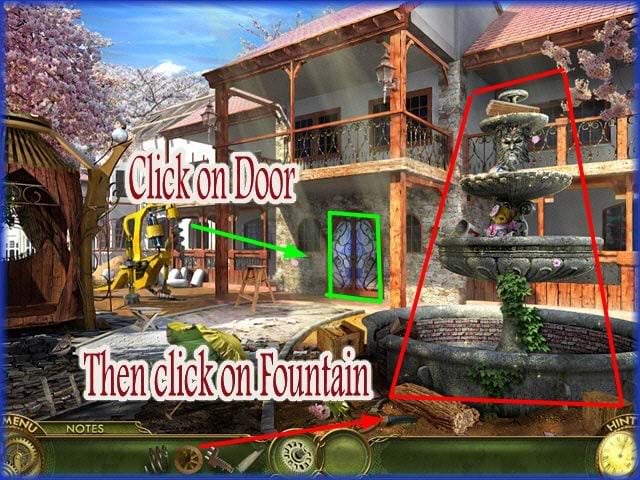
- Storyline – Miranda is now at the house. There are machines around from construction work but have been used for a long time.
- Click on the door and then the handle to learn that the lock is broken.
- Next click on the fountain to the right of the scene.
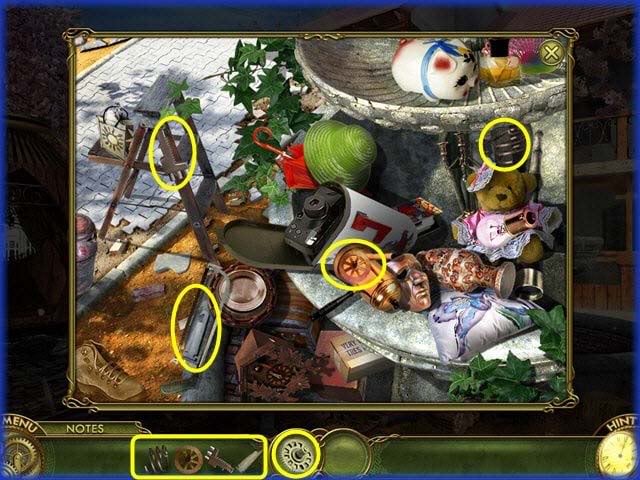
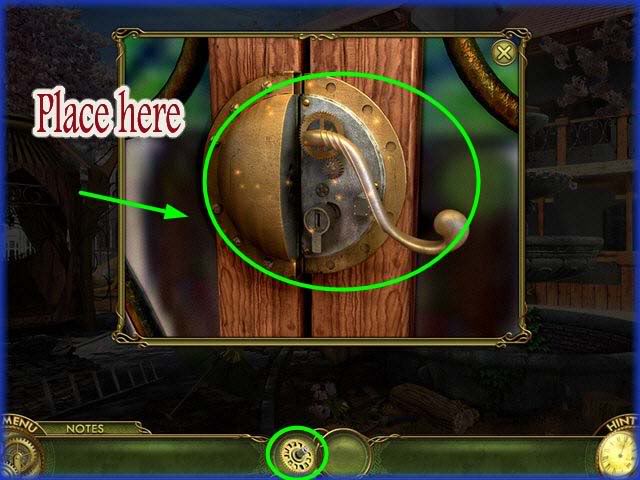
- Locate the 4 hidden items shown above.
- Place the items on the lock to repair.
- The doorway is filled with bags of cement so she will need to find another way in.
- For now she will explore the area.
- Go back to fountain for closer look.
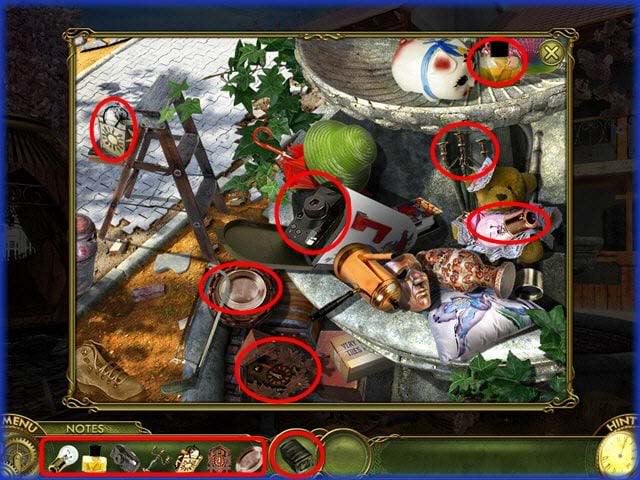
- Miranda decides to look around for clues.
- Locate the 7 items hidden around the fountain shown circled in the image above.
- Miranda finds a Toy chest but it is locked. She needs to find something to open it and sees a drill.
Drill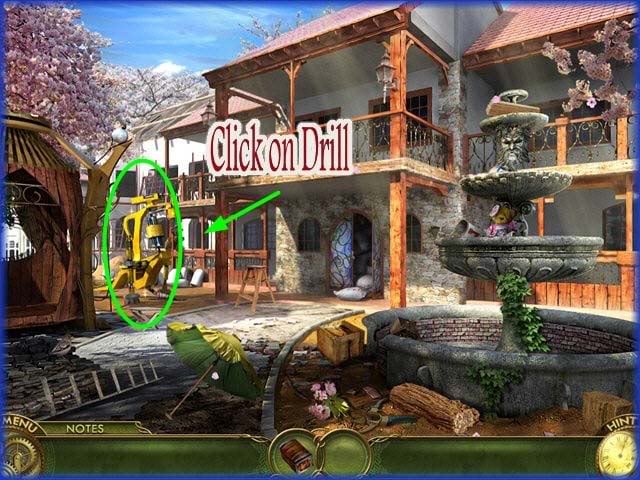
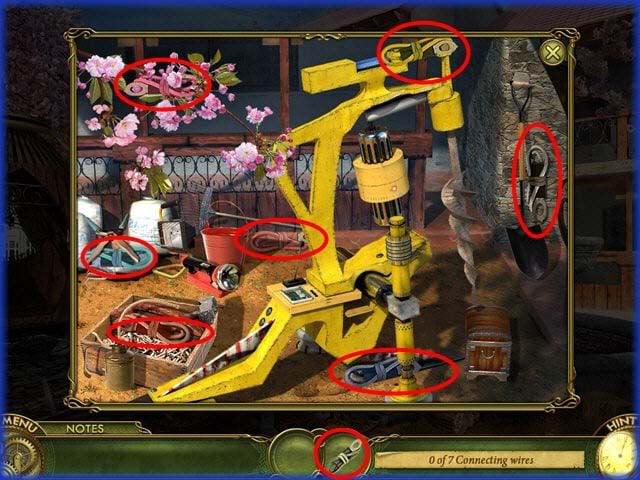
- Click on the drill to the far left of scene.
- Locate the 7 sets of connecting wires as shown circled above.
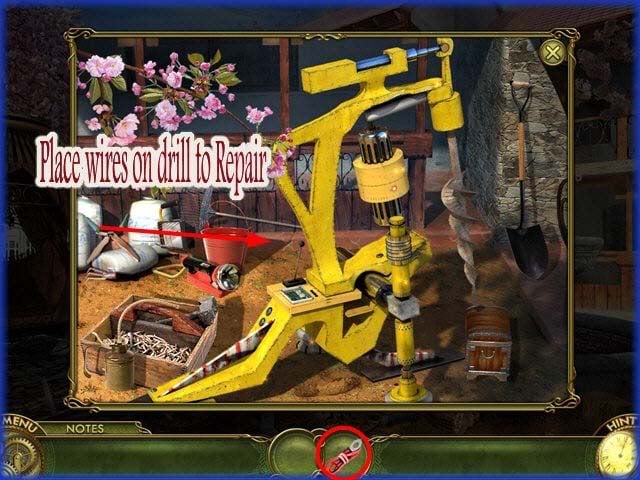
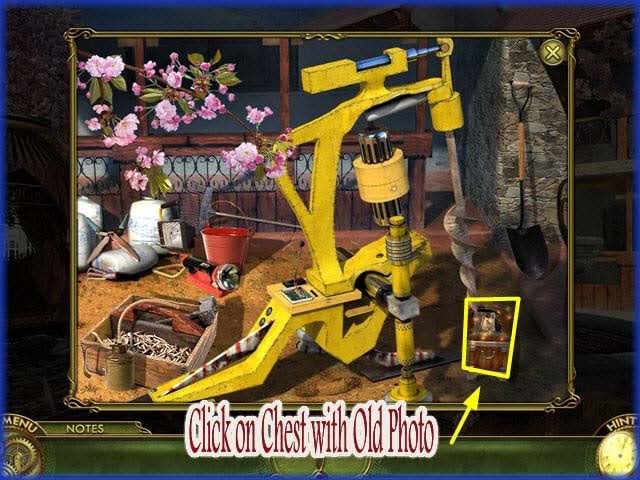
- Place connecting wires to repair drill.
- Drill then drills through the chest where you see a picture is inside.
- Click on the picture inside chest.
Getting Inside the House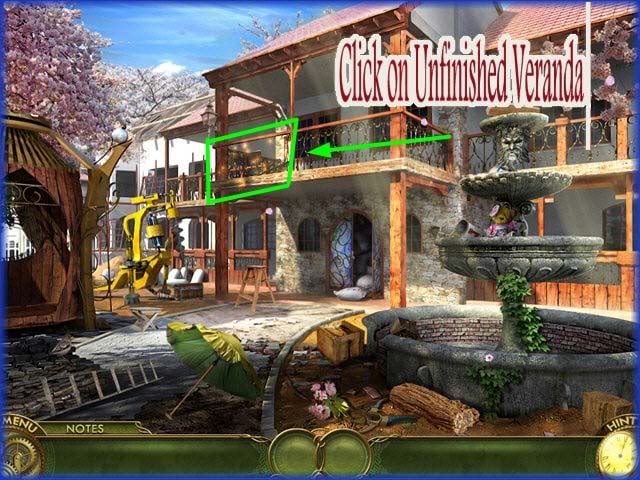
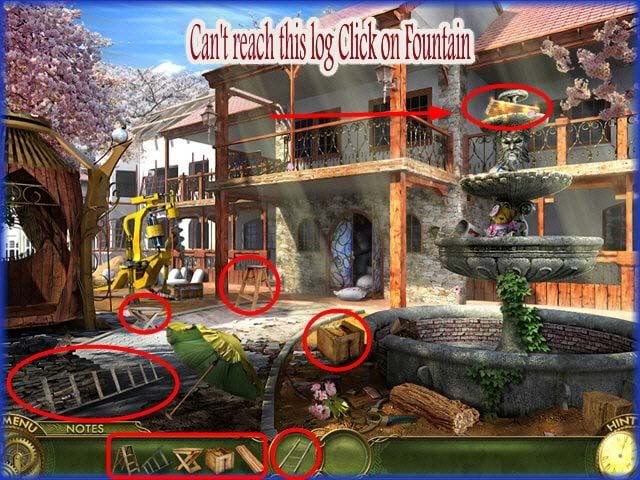
- Click on the unfinished veranda.
- Locate the 5 items hidden in the scene to form a ladder.
- There is one log she can’t reach at the top of the fountain so she will need to repair it to get the log.
- Click on open doorway at center of scene.
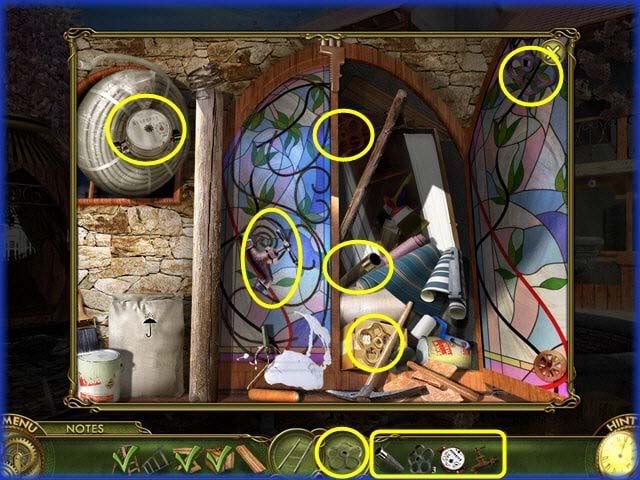
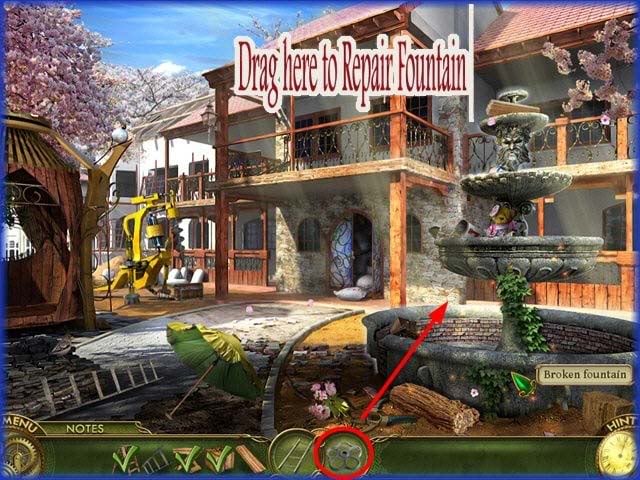
- Locate the 4 items in the scene circled above.
- Drag to fountain to repair it.
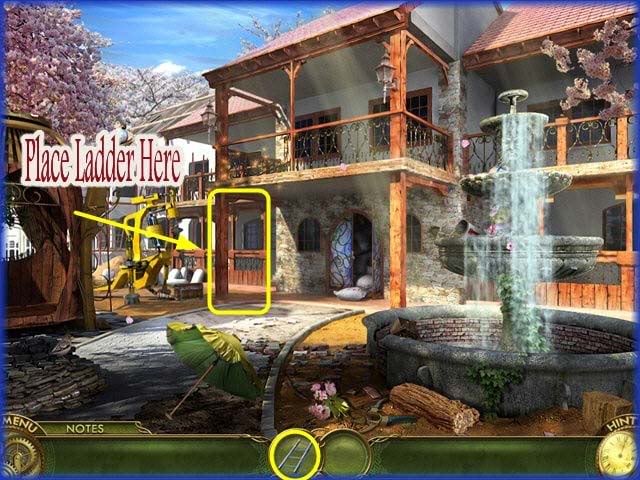
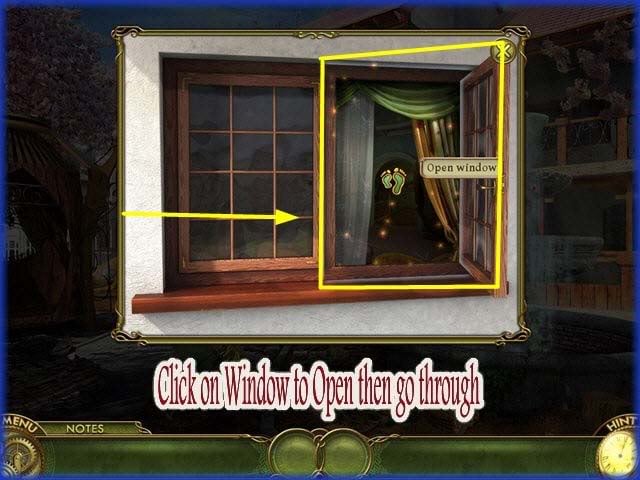
- Take final board and place the ladder under the unfinished veranda.
- Click on the window to open and walk through.
Inside Louise’s Room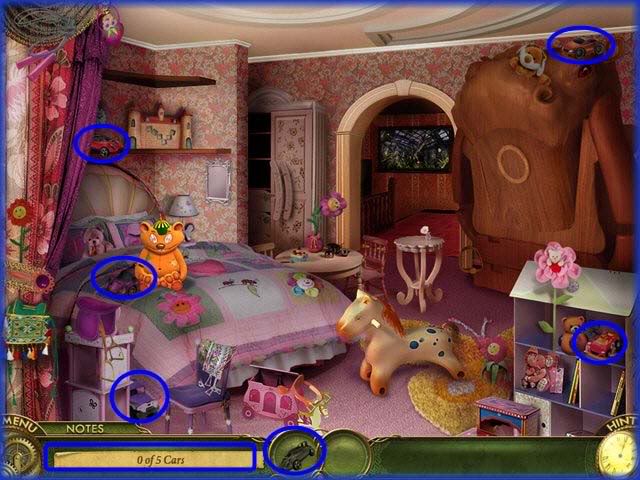
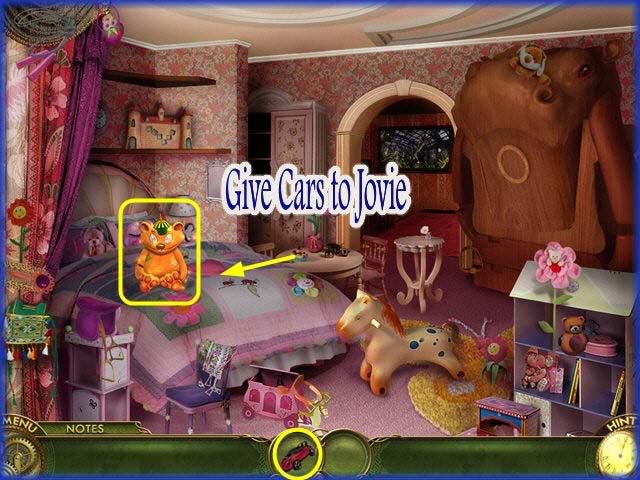
- Storyline – Miranda is inside the house in Louise’s bedroom. She meets up with Jovie and he has many things for her to look for.
- Locate the 5 cars for Jovie shown circled above.
- Give the cars to Jovie.
Repair the Rocking Horse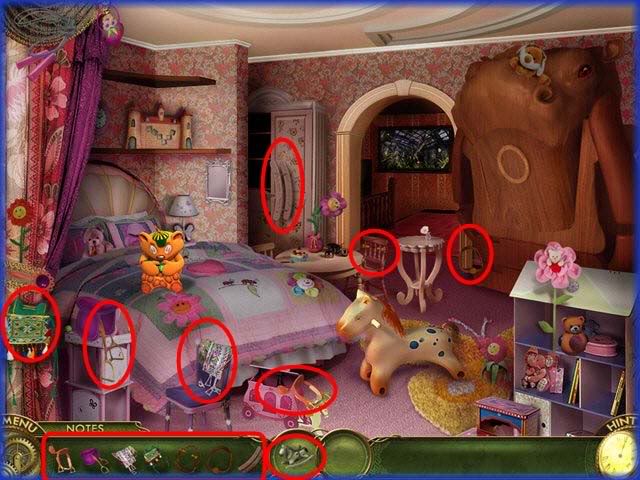
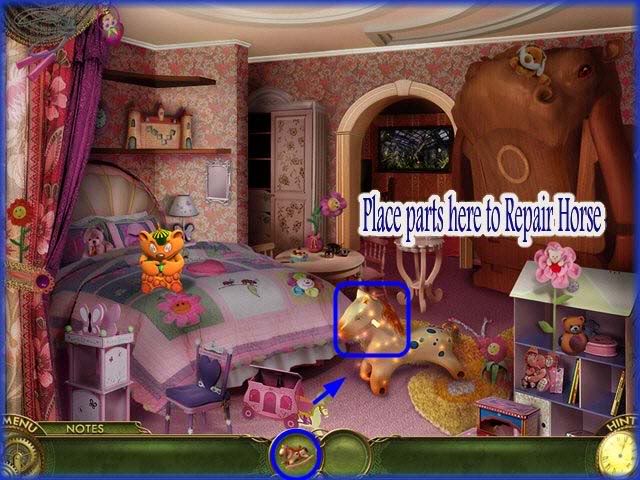
- Locate the 7 hidden pieces of the rocking horse shown circled above.
- Repair the rocking horse for Jovie.
Repair Jovie’s Flower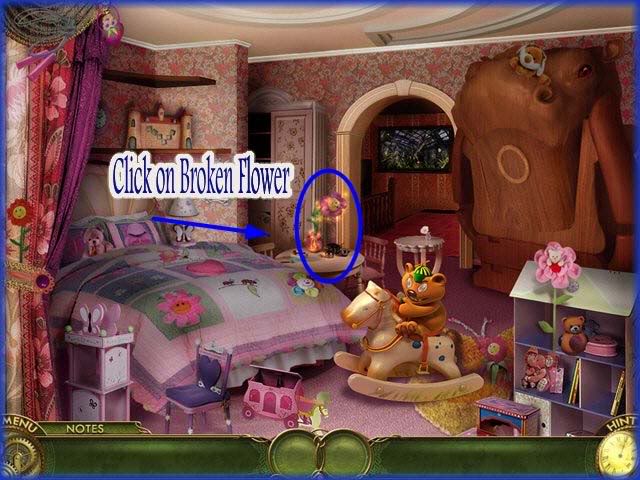
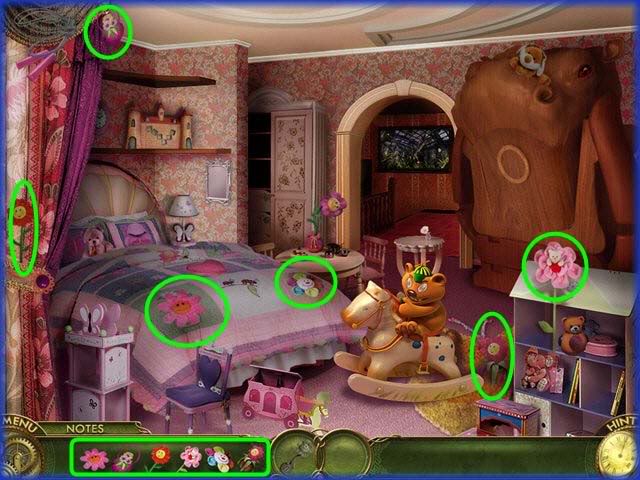
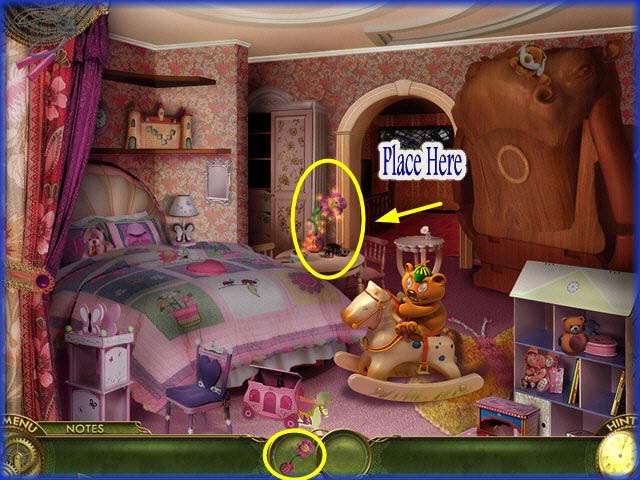
- Click on Jovie’s bent flower.
- Locate the 6 hidden objects in the scene shown circled above.
- Repair the flower for Jovie.
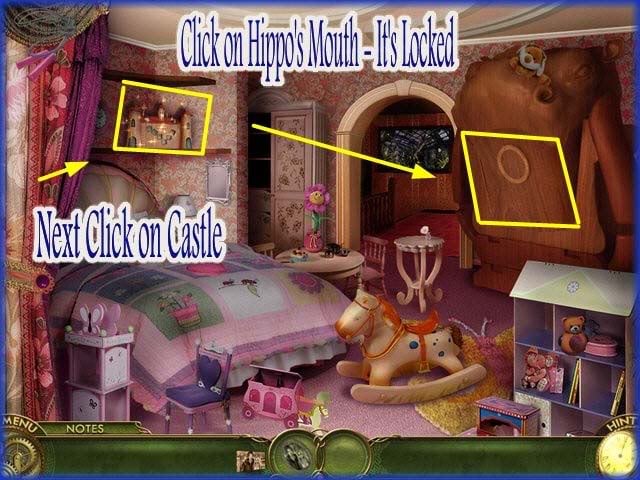
- Click on the Hippo’s Mouth and it is locked.
- Miranda is looking for a photo to fit in the frame to open it.
- Click on the castle in the upper left side of scene.
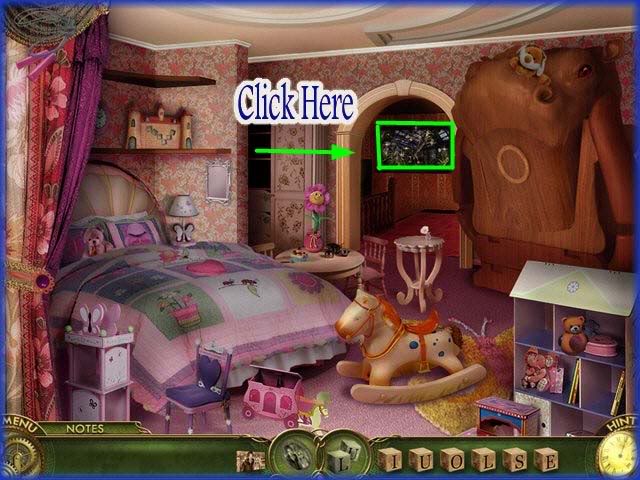
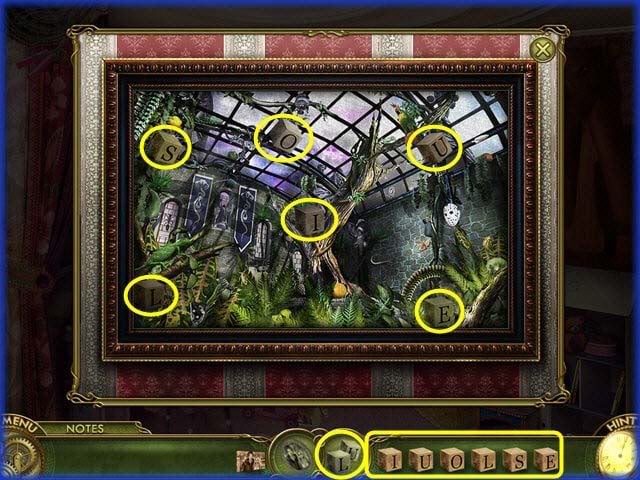
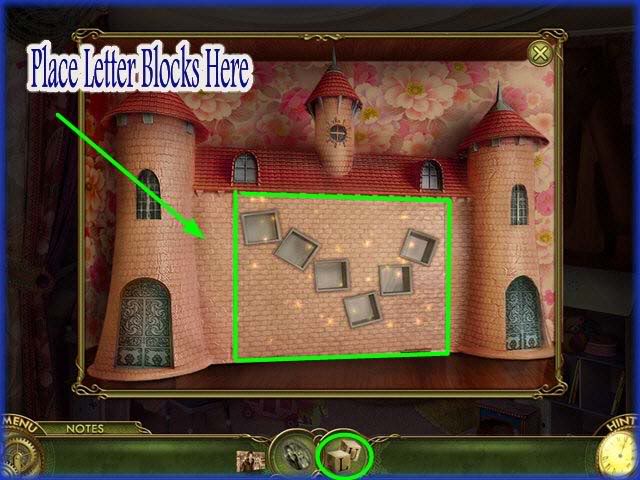
- Click on the stained glass window in hallway to find blocks.
- Locate the 6 blocks hidden in the scene shown circled above.
- Click on Castle and place the blocks in the slots as shown.
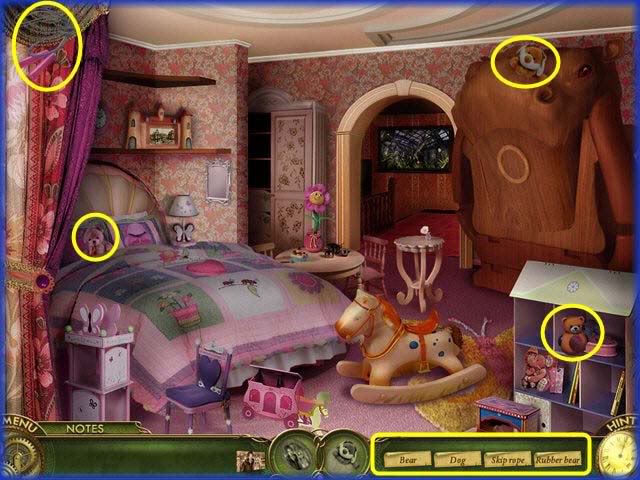
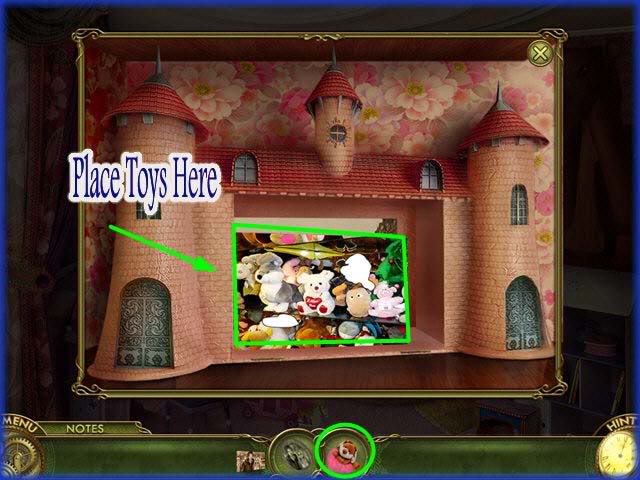
- Locate the 4 toys in the room as shown circled above.
- The items to search for are: Bear, Dog, Jump Rope, Rubber Bear
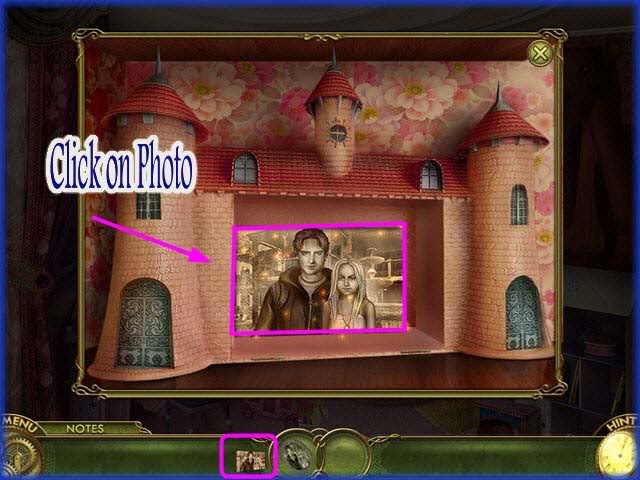
- Place the toys inside castle as shown.
- Click on the photo when it is revealed.
Place Photo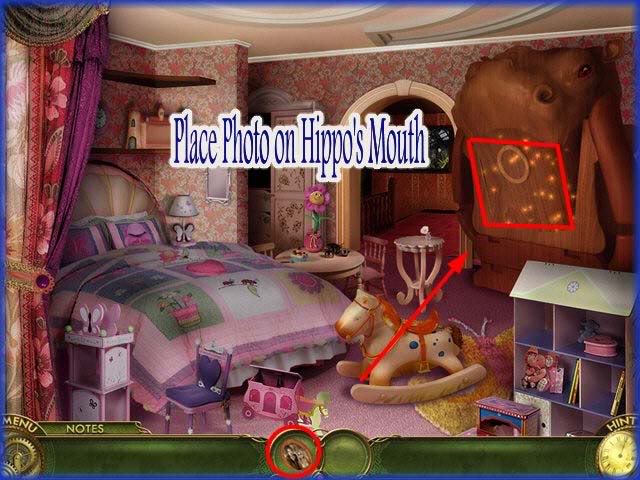
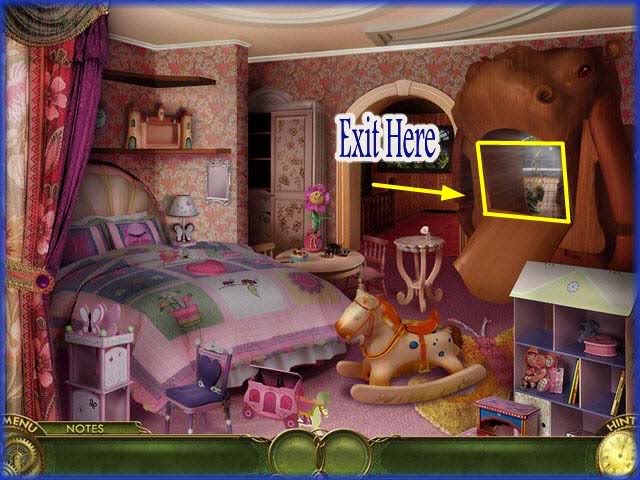
- Place the photo in the Hippo’s mouth.
- A secret entrance is revealed.
- Go through the door as shown.
Secret Room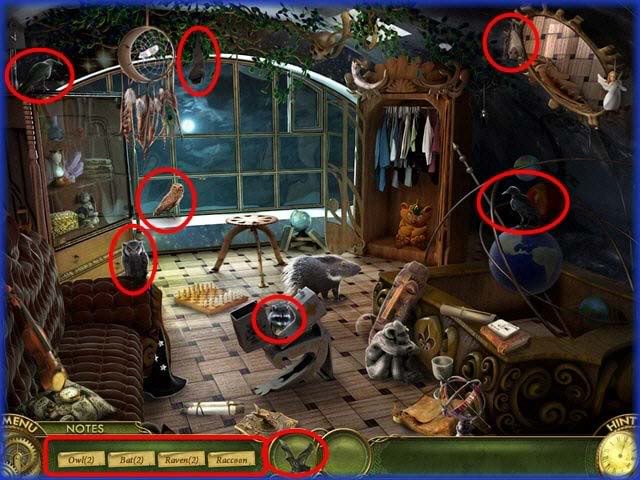
- Storyline – Miranda hears a noise coming from the back cabinet. It is Jovie! She needs to figure out what this room is for and what to do with Louise’s bracelet.
- Locate the 7 animals in the scene shown circled above.
Projector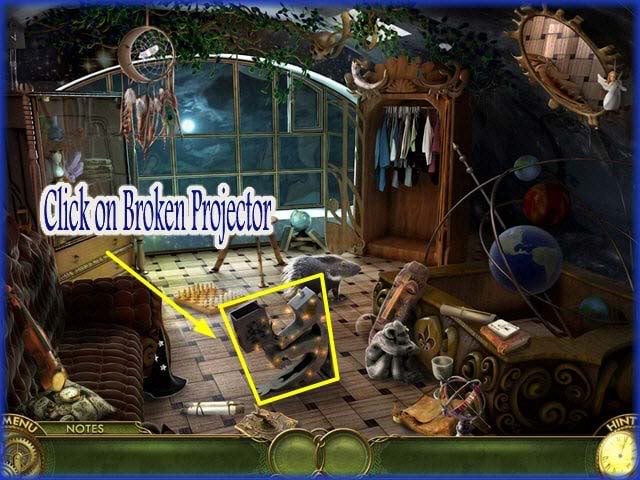
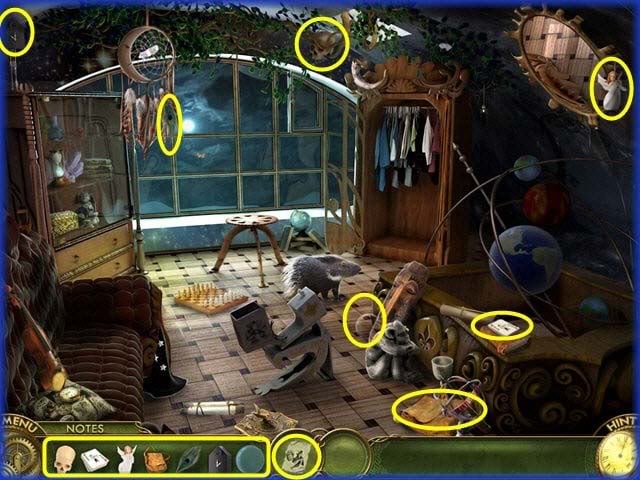
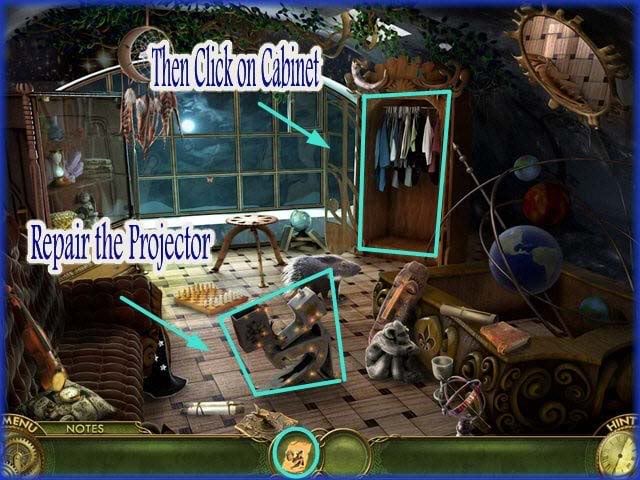
- Click on the projector.
- Locate the 7 hidden items shown circled above.
- Click on the projector to repair it.
- Click on Cabinet.
Light bulbs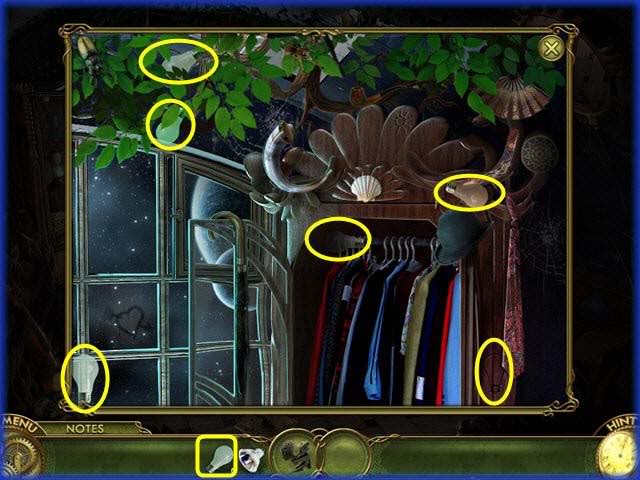
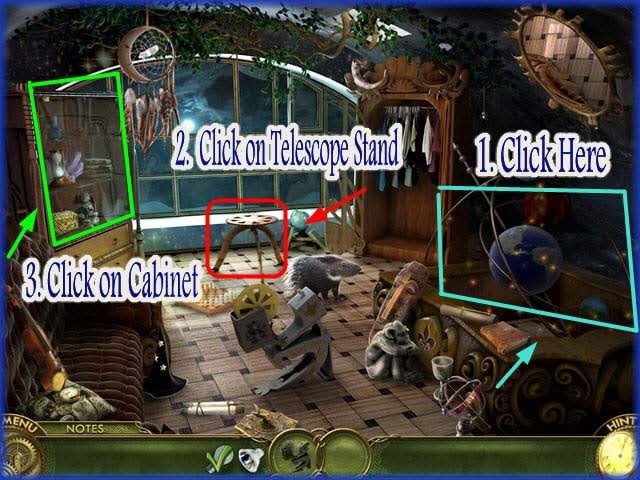
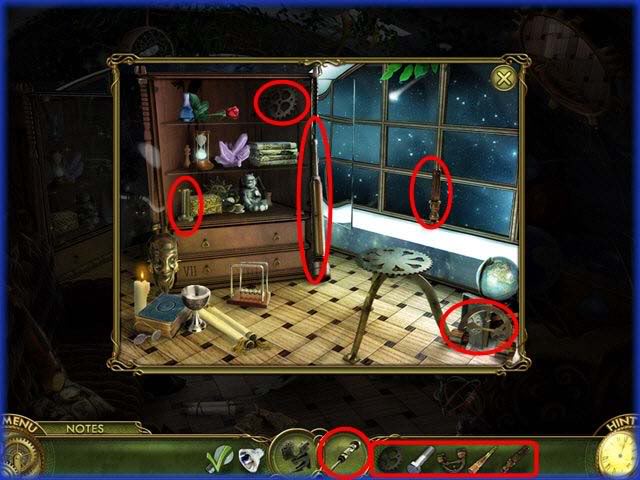
- Locate the 6 light bulbs in the scene.
- You can only find 5 so exit and click on the solar system model to find a light bulb but its locked.
- Click on the telescope stand.
- Click on Cabinet.
- Locate the parts to the telescope which are hidden and circled above.
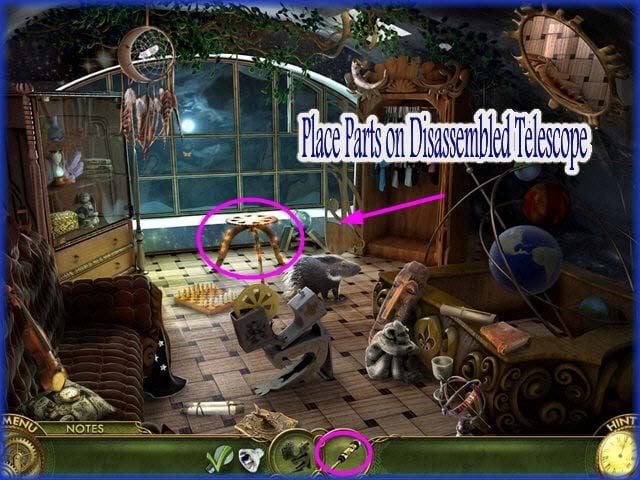
- Repair the telescope and place on stand.
- This will trigger a mini game.
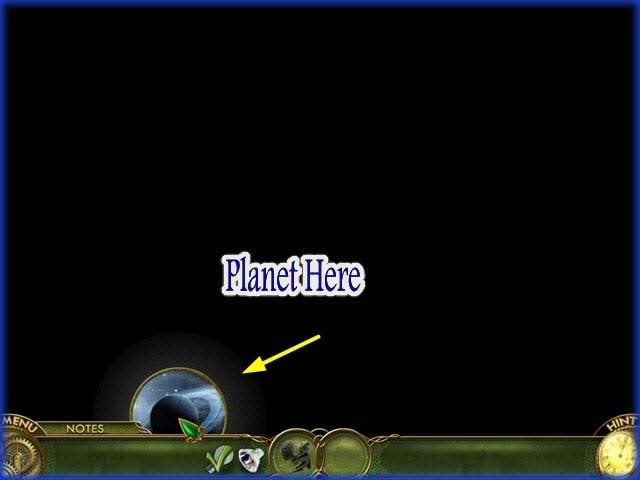
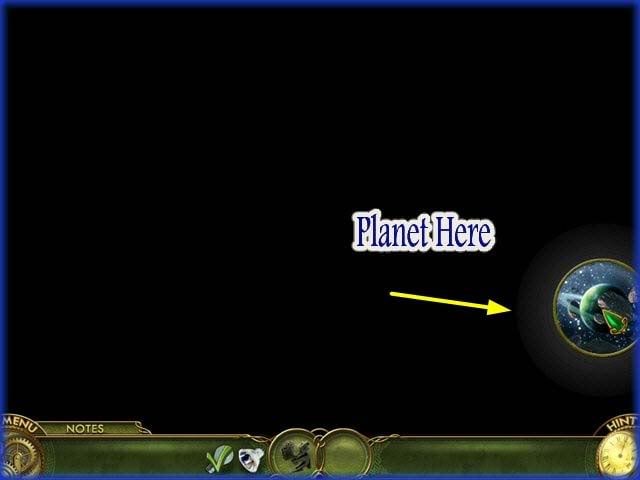
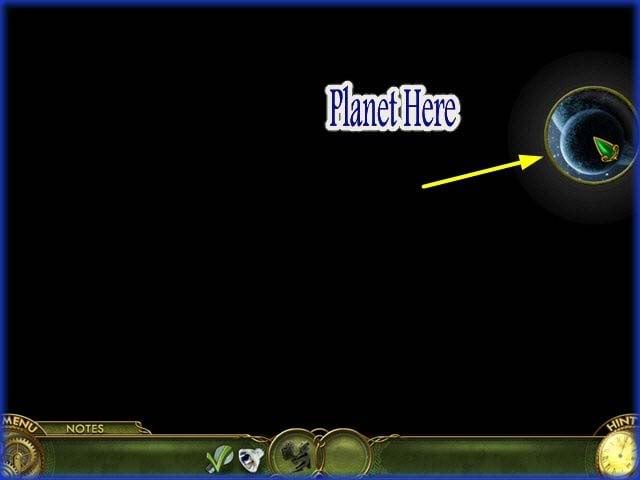
Mini Game – Locate the Planets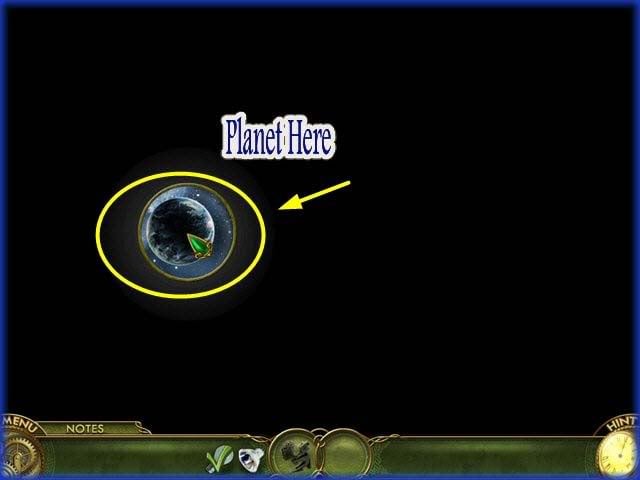
- Planet 1
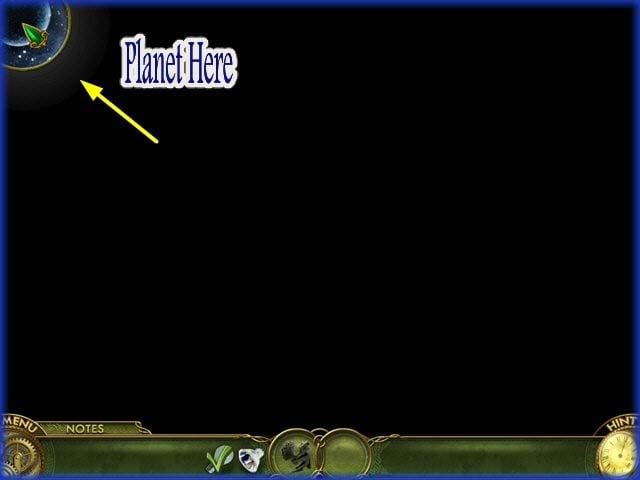
- Planet 2
- Planet 3
- Planet 4
- Planet 5
Add planets to Solar System Model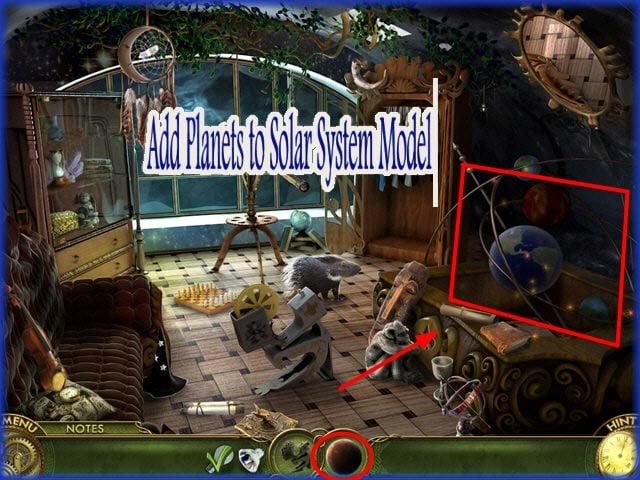
- Add planets to model as shown above.
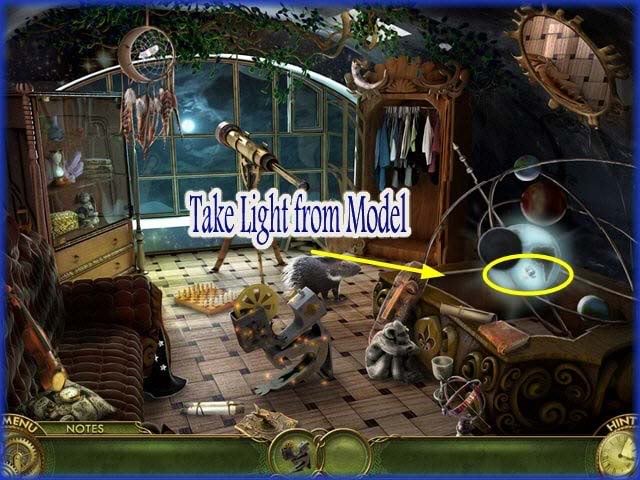
- Take the light bulb from the model.
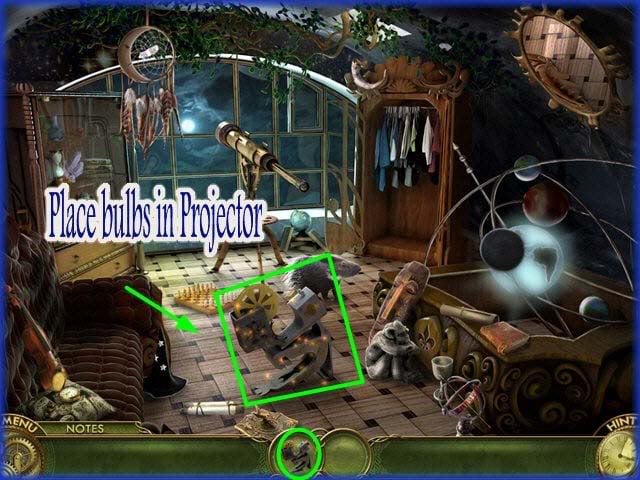
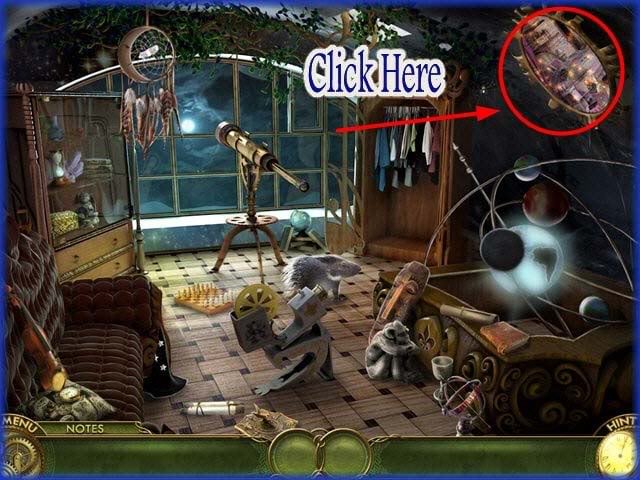
- Place the light bulb in the projector.
- Turn projector on.
- This triggers a Mini Game.
Mini Game – Find the Differences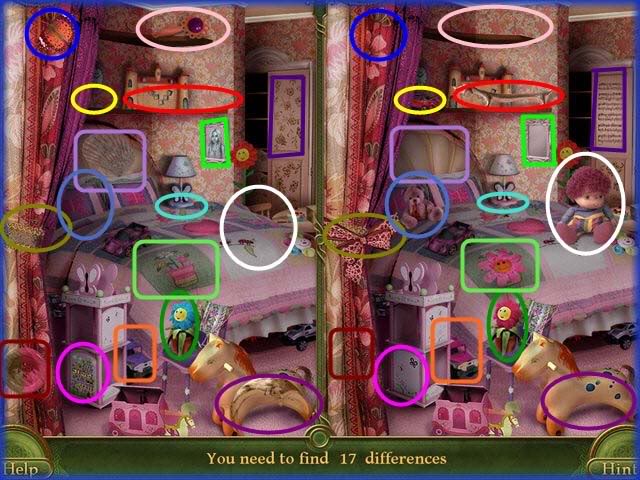
- Locate 17 differences between the side by side images above.
- The differences have been color coded to help you see them.
- Storyline – Louise appears and talks to Miranda. Louise tells her that she must bring her long lost doll.
- Miranda and Michael head for the Orphanage.
Chapter 8 – "Orphanage – Reception Room"
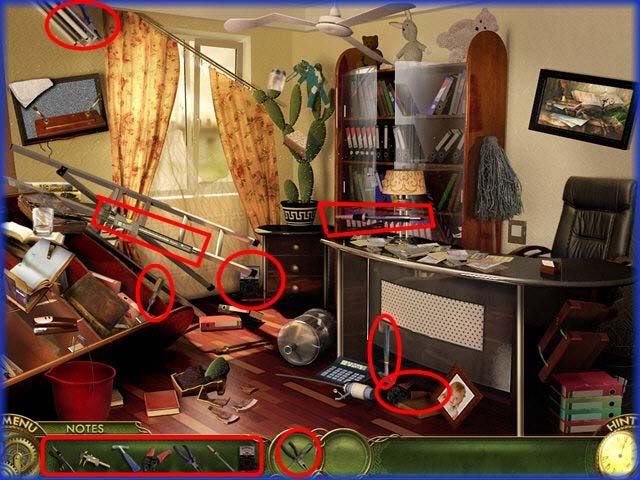
- Storyline – Miranda meets Helen the director of the Orphanage. She needs a lot of help organizing her office.
- Locate the 7 items shown circled above.
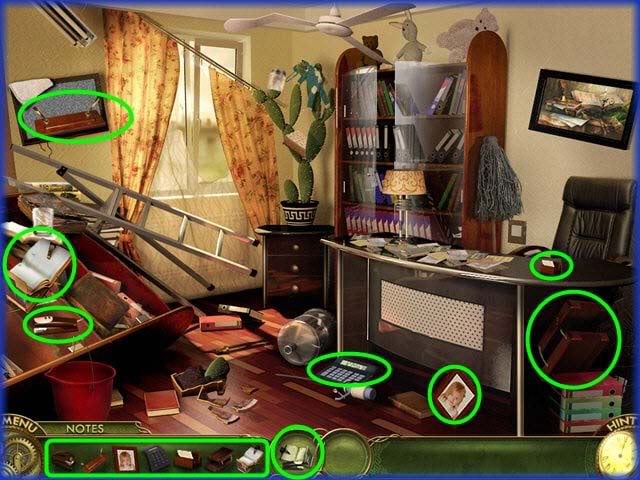
- Locate the additional 7 items hidden in the scene and shown circled above.
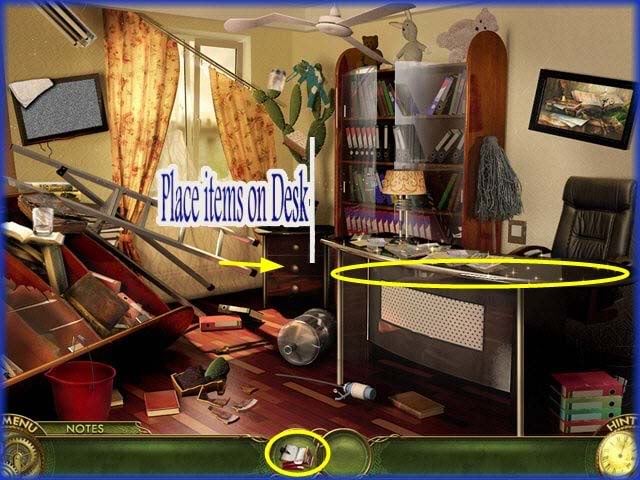
- Place the items on the desk as shown above.
Broken Pot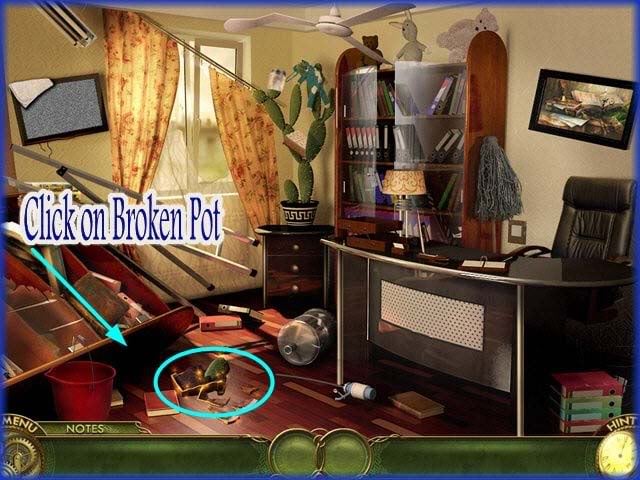
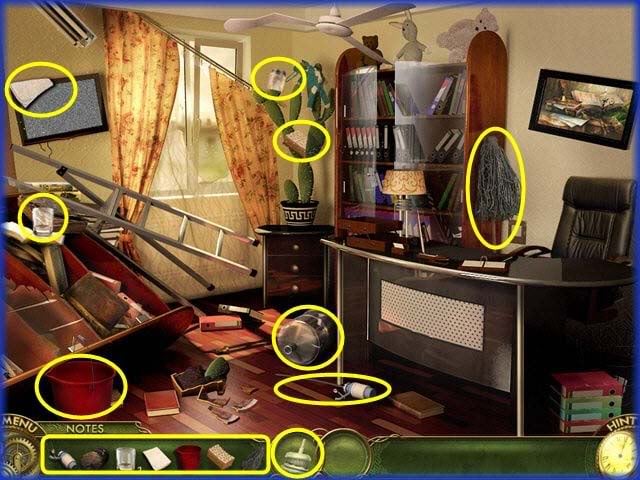
- Click on the broken pot.
- Locate the 8 hidden items circled in the scene above.
Books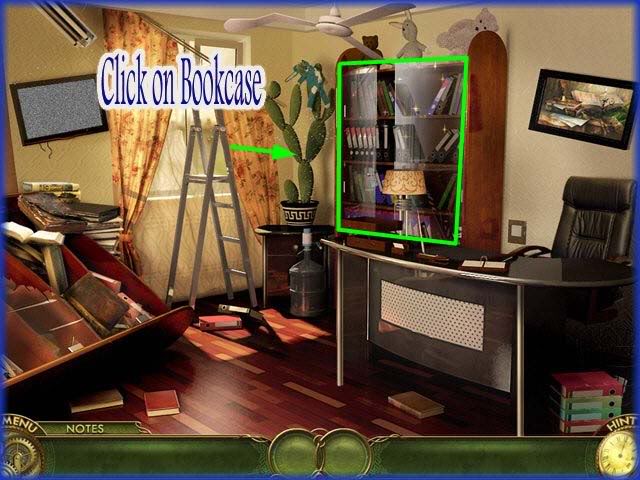
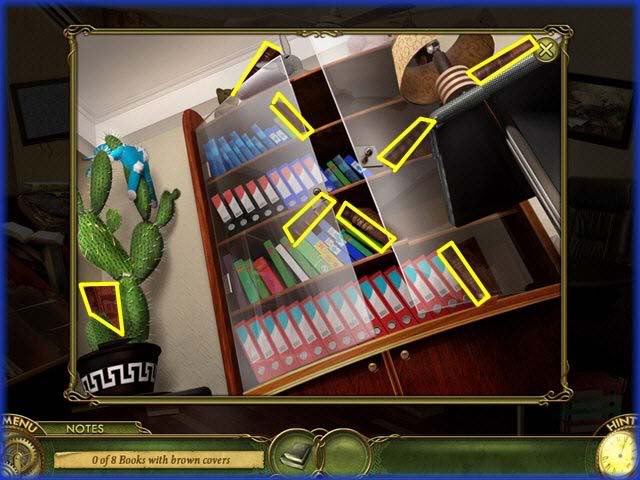
- Click on the bookcase on the far right of scene.
- Locate the 8 brown books shown circled above.
Banknotes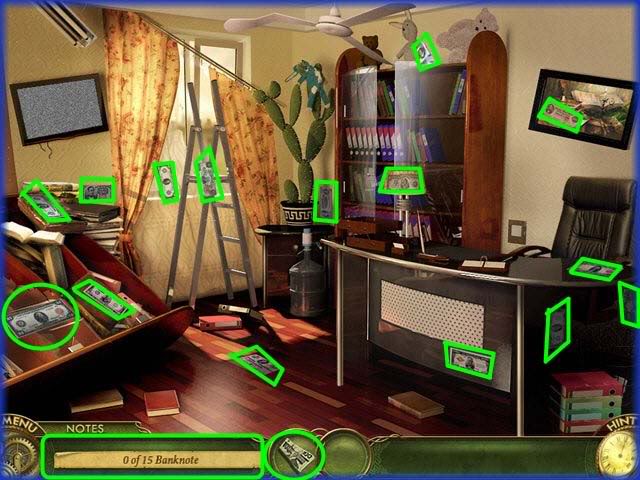
- Collect the 15 bank notes shown circled above.
Keys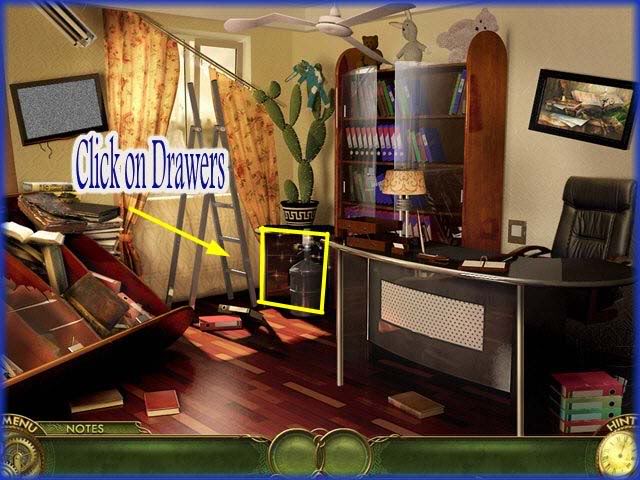
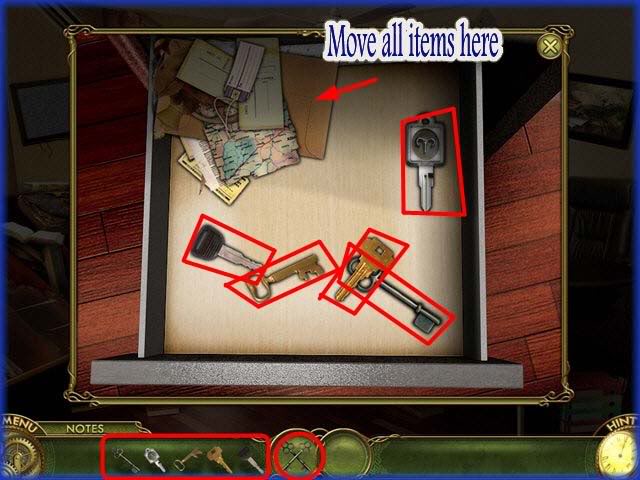
- Click on the drawers.
- Locate the 5 keys in the drawer
- You can move the other items in the drawer.
- All items have been moved to the side in the image above to show you the location of the keys.
Orphanage Storage Room
Shoes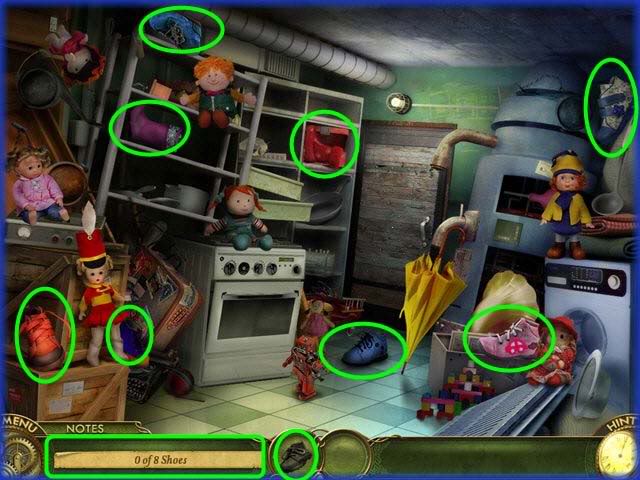
- Locate 8 shoes hidden and circled in scene above.
Dolls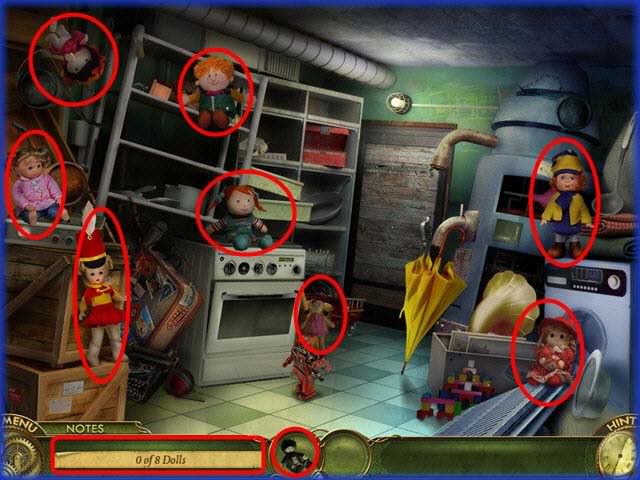
- Locate 8 dolls hidden and circled in scene above.
Reel to Reel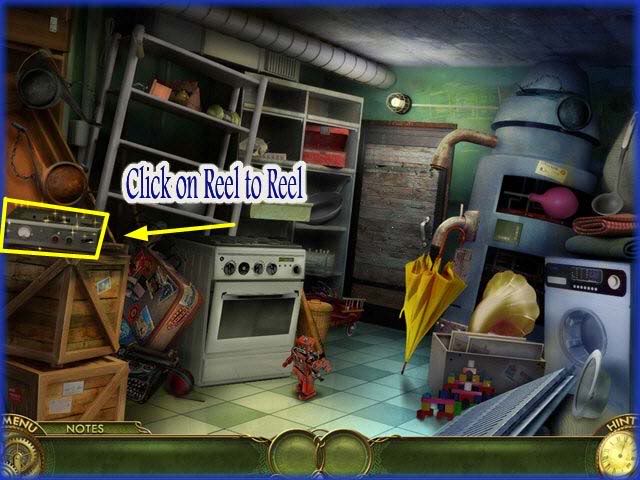
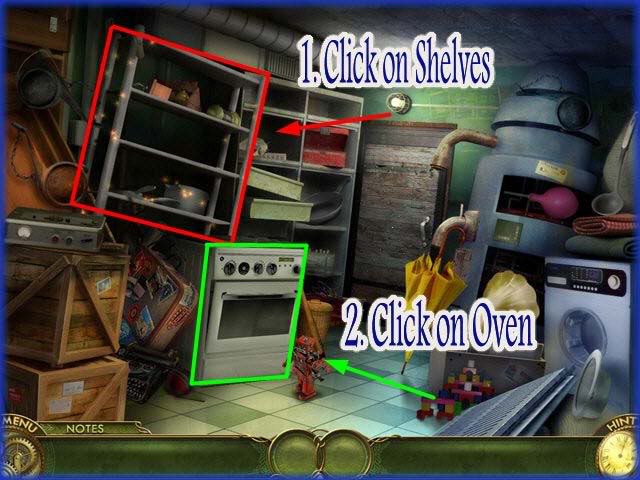
- Click on Reel to Reel note it is broken.
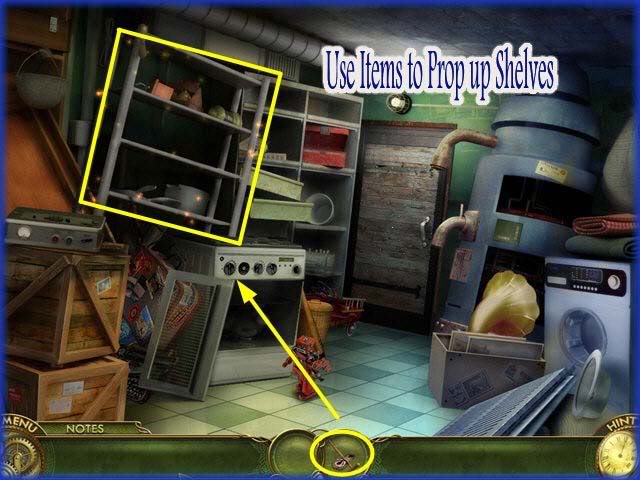
- Click on Shelves note they are about to fall over.
- Click on oven to find parts to hold up shelves.
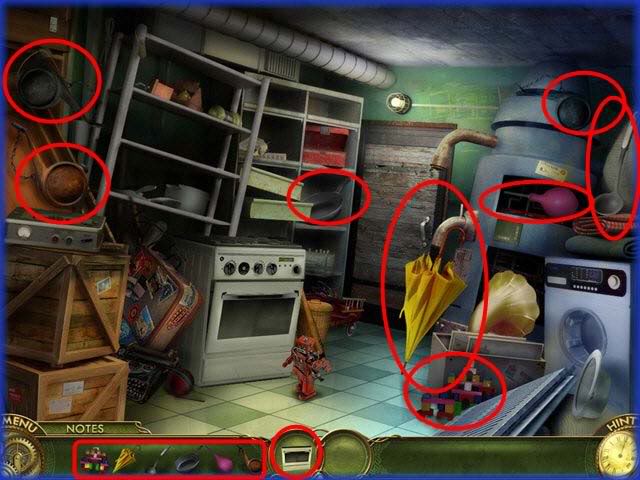
- Locate the 8 hidden items shown circled in scene above.
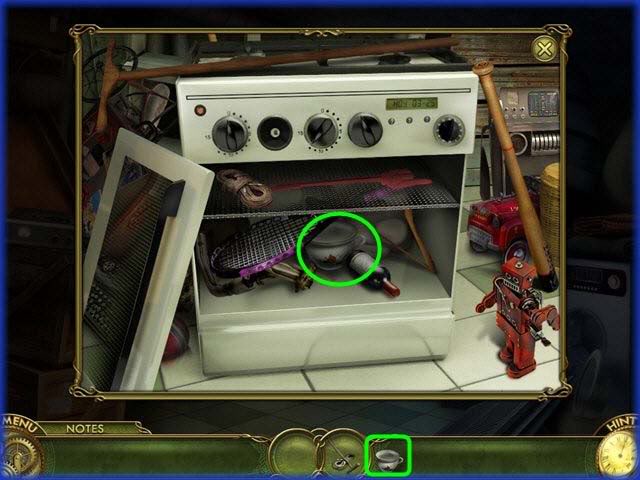
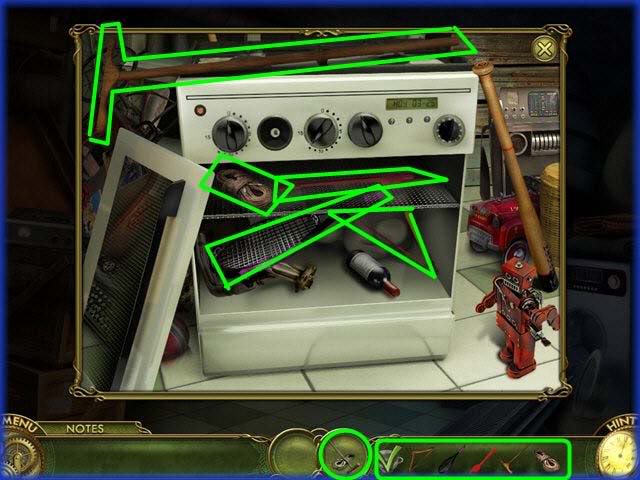
- Locate the teacup in the oven.
- Locate the 7 items inside the oven shown circled above.
- Place the items under the shelves to support them.
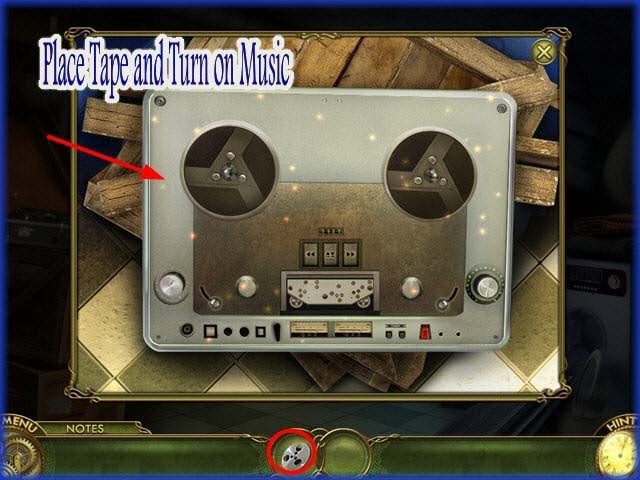
Play Music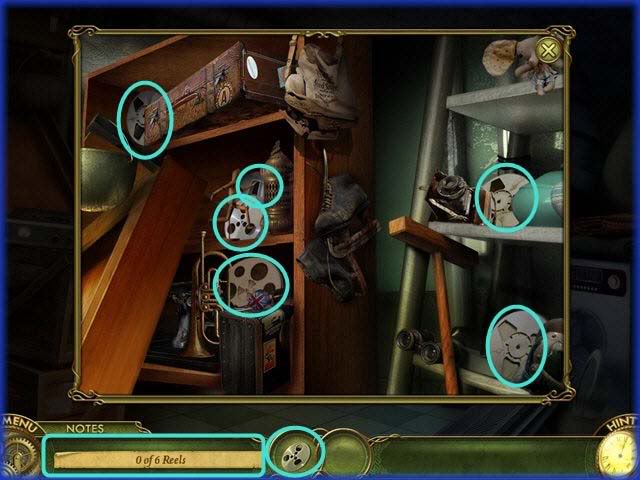
- Locate the 6 hidden reels in scene shown circled above.
- Place the tape and play music.
Take Doll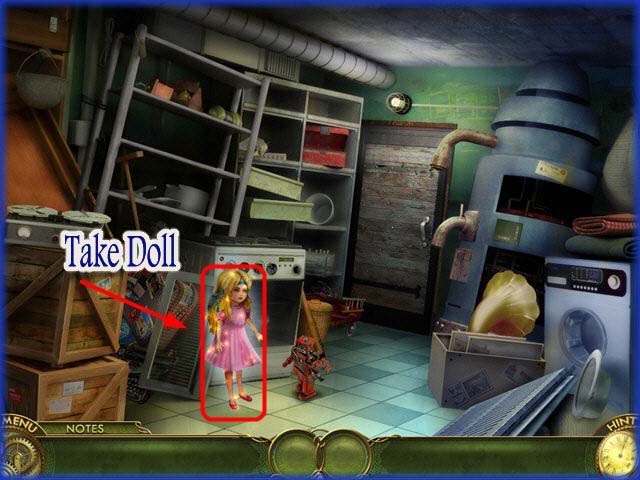
- Click on Louise’s doll.
Chapter 9 -"Otherside Room of Mirrors"
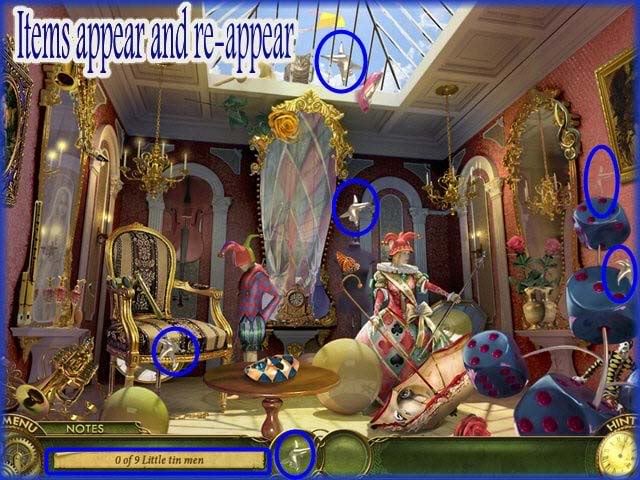
- Storyline – Members of Nord’s Order appear and try to take Miranda. Michael stays to fight them while she runs through a portal. She ends up in a room of mirrors with all kinds of strange things.
- Locate the 9 tin Men – NOTE – Not all of them are shown in the image above as the tin men appear and disappear throughout the scene. Once you have all 9 the tin men will tell Miranda they want her to "Play with the Joker"
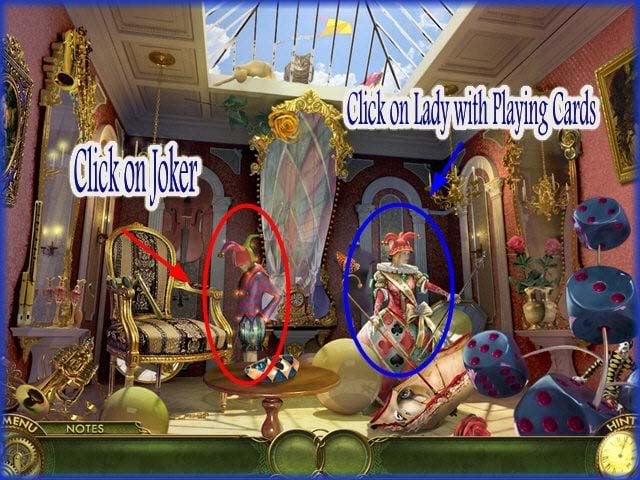
- Click on the Joker.
- Miranda thinks she should play cards with the Joker.
- Click on lady with the cards on right side of scene.
Lady with Cards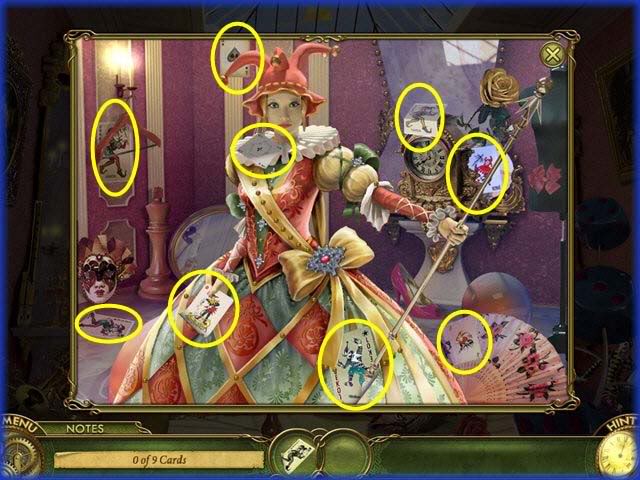
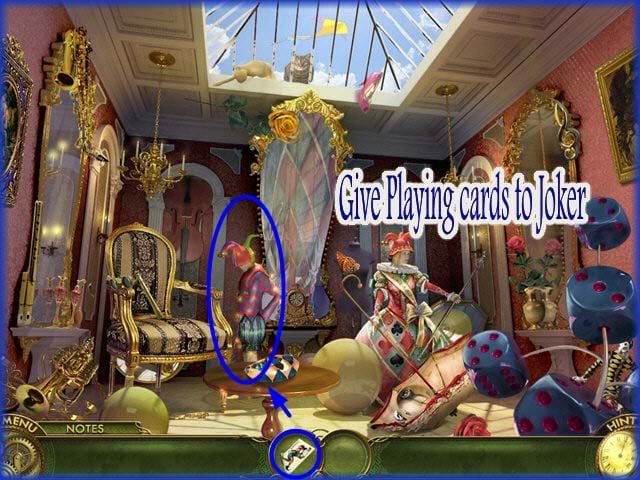
- Locate the 9 hidden cards in the scene as shown circled above.
- Give the cards to the joker.
- He isn’t happy and throws them all over.
Instruments
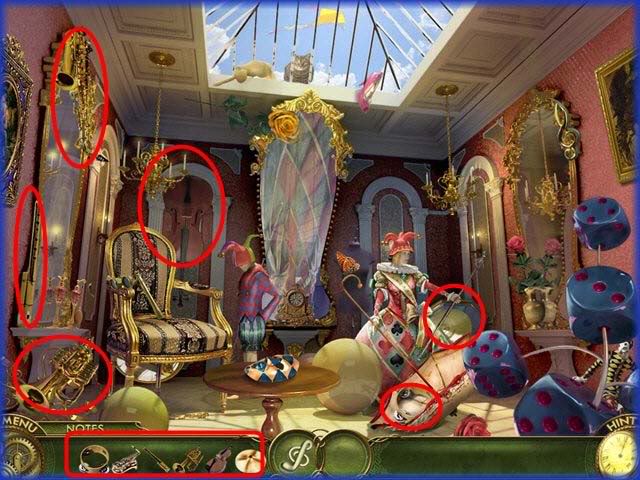
- Miranda guesses he might want her to play music.
- Collect the 6 instruments in the scene circled above.
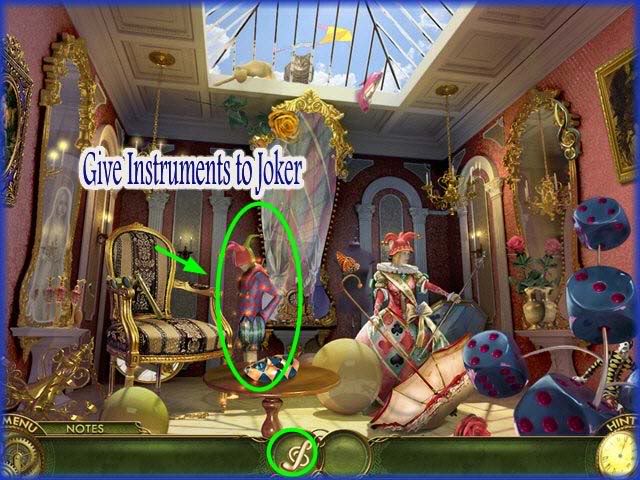
- Give the instruments to the Joker.
- The chandelier moves and causes the mirror to shatter.
- Miranda panics as that is her portal out.
- Click on Lady
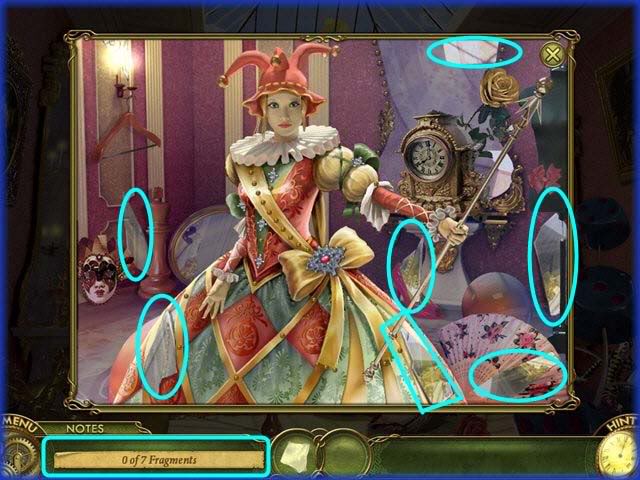
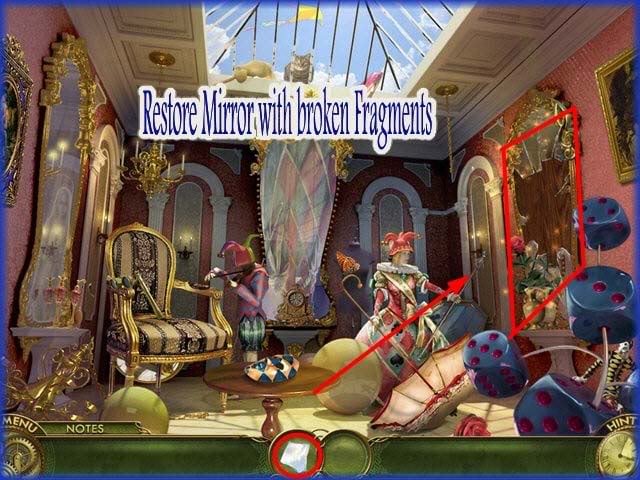
- Collect the 7 mirror fragments shown circled above.
- Repair the mirror which triggers a mini game.
Mini Game – Mirror Puzzle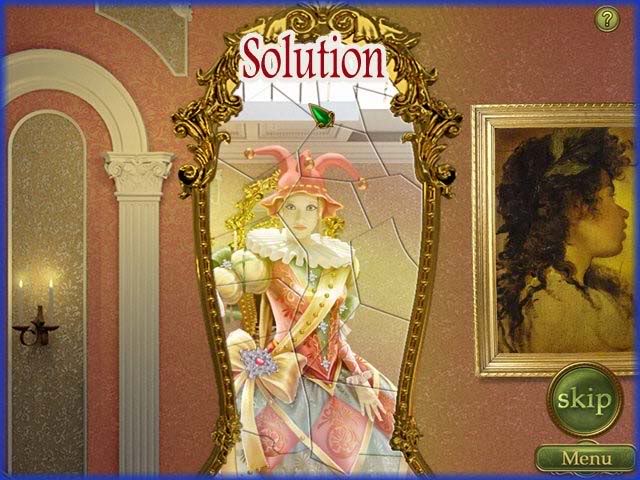
- Place the pieces of the puzzle together to form image.
- The pieces will lock into place if placed correctly.
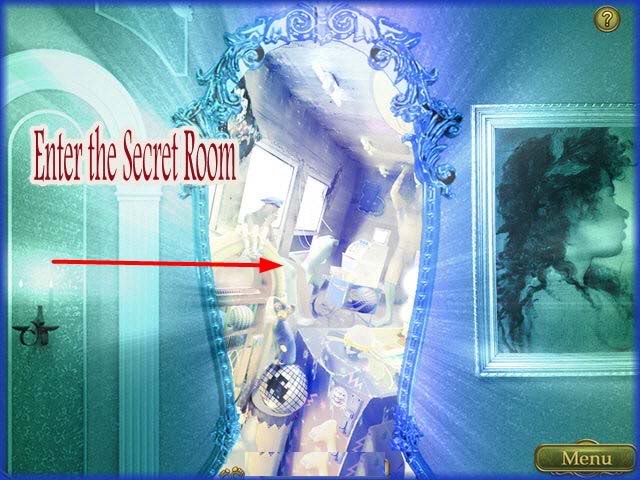
- Solution is shown above.
- Click on Secret passage.
Otherside Carnival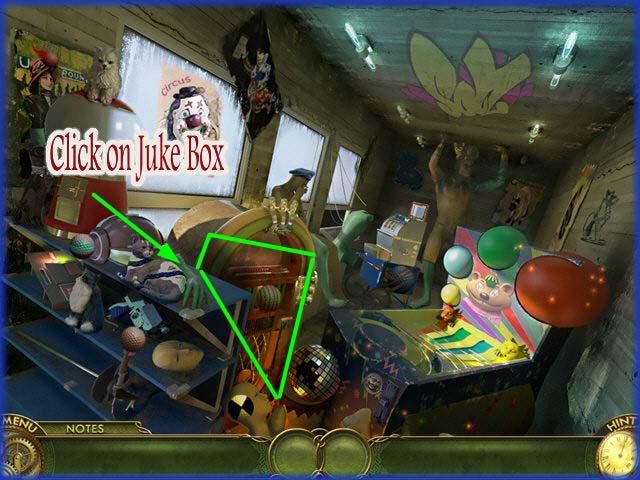
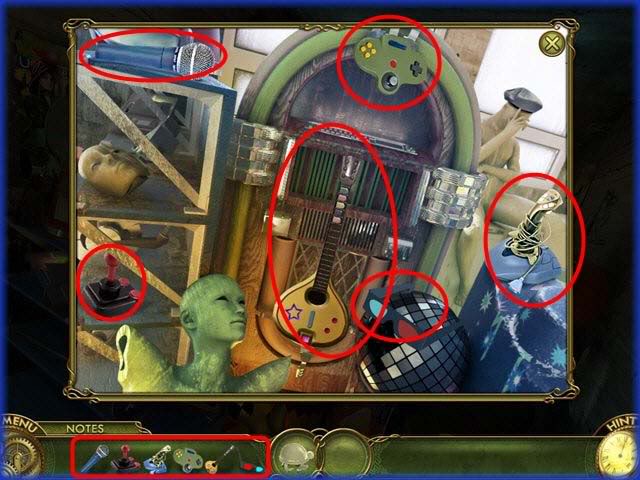
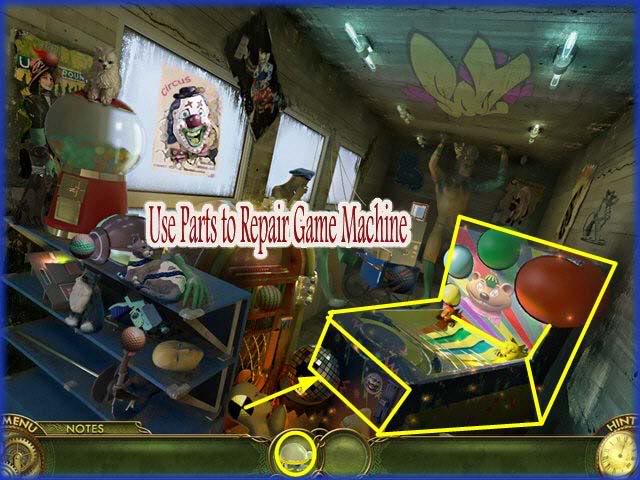
- Click on the Jukebox
- Locate the 6 hidden items in the scene circled above.
- Repair the game machine with items.
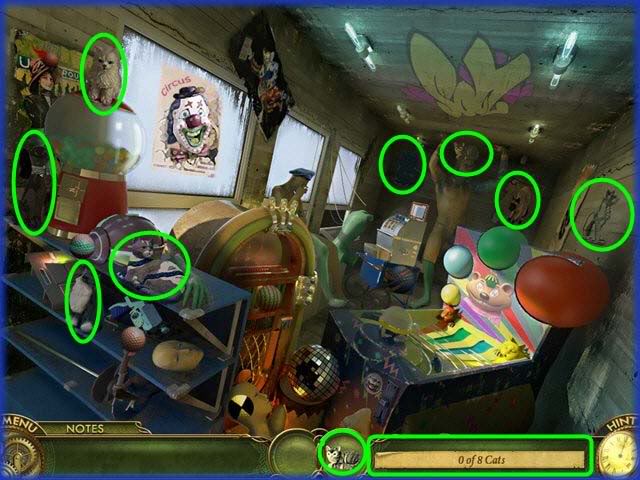
- Locate 8 cats shown circled above.
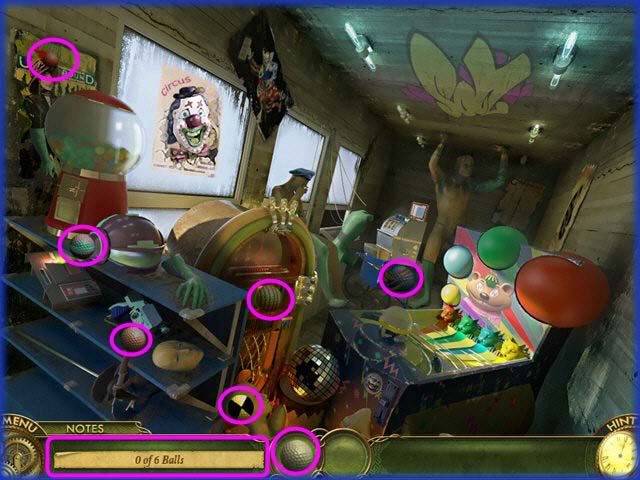
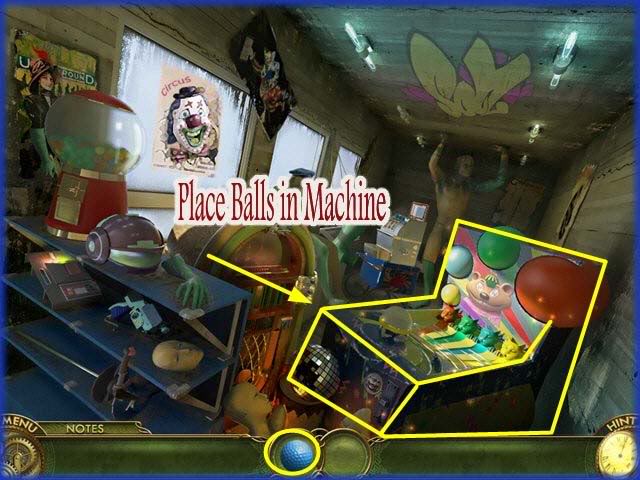
- Locate the 6 balls hidden in the scene above.
- Place the balls in the machine.
Cash Register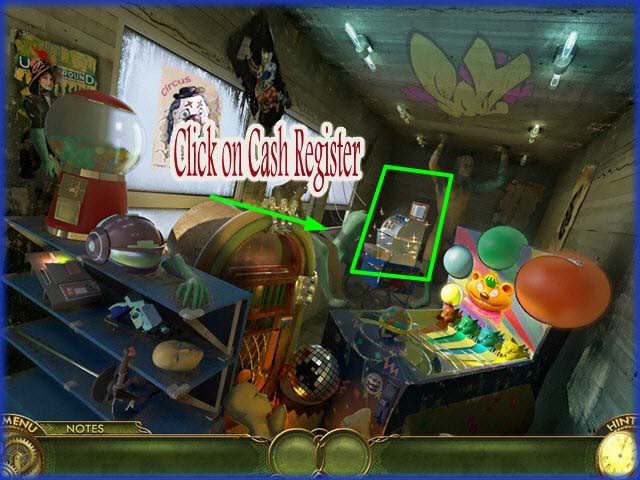
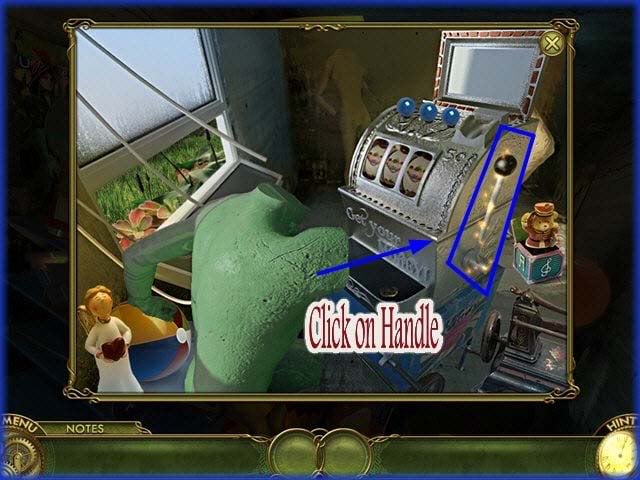
- Click on the cash register.
- Click on the handle.
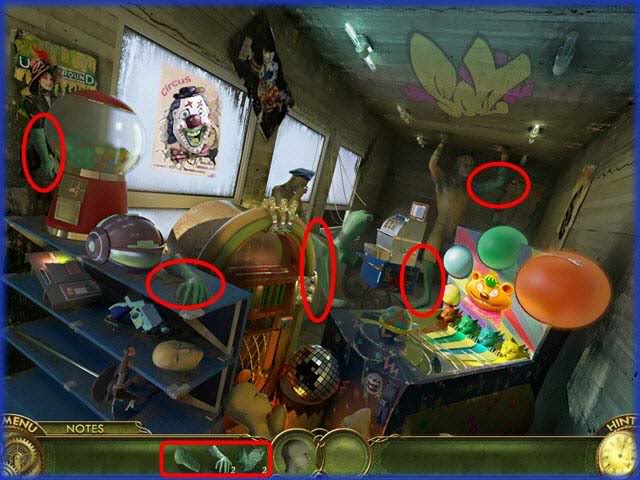
- Locate the 5 parts of the mannequin hidden and circled above.
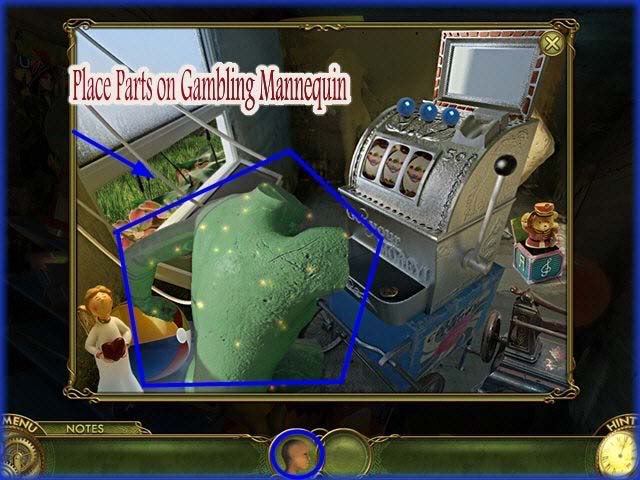
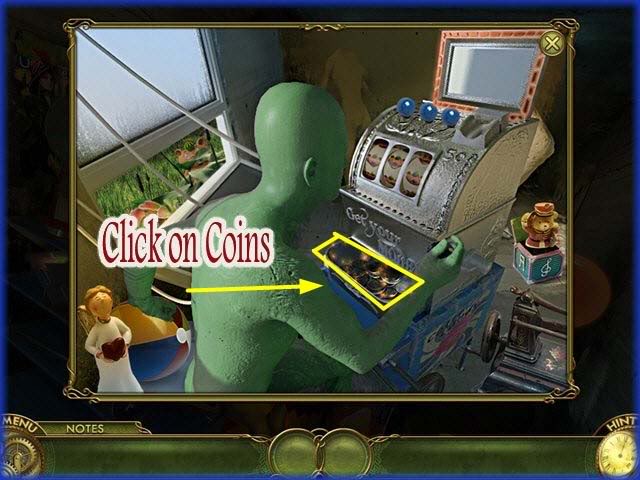
- Place the body parts on gambling mannequin.
- Click on the coins.
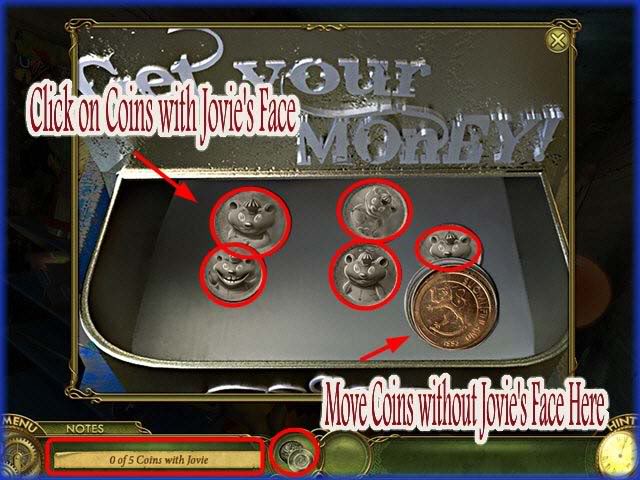
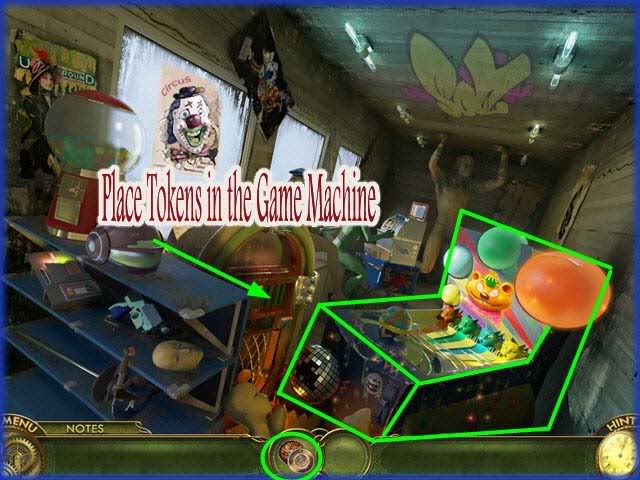
- Here you are to click on the 5 coins with Jovie’s face on them. If you click on the other coins you can move them out of the way.
- The image above shows all the coins moved to show where Jovie coins are located.
- Place the coins in the machine which triggers a Mini game.
Mini Game – Ball Shooter.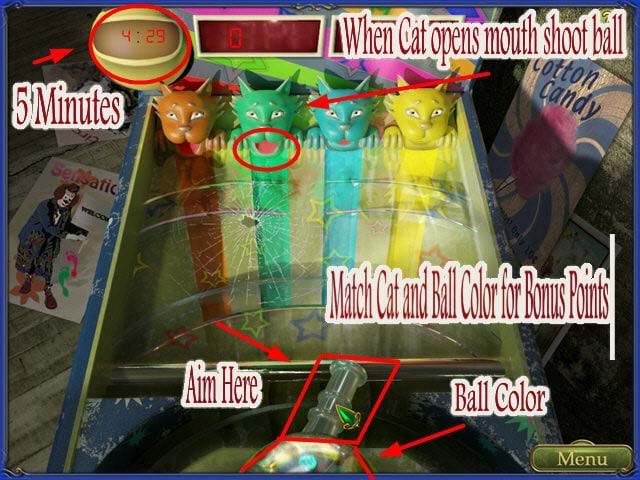
- Here you have an arcade type game where you shoot the colored balls into the cats mouths.
- The cats will open and close their mouths.
- In the tube you will see a colored ball.
- You can aim the tube using your mouse and fire by clicking the left mouse button.
- If you match the color of the ball and cat you will get extra points.
- You have a 5 minute timer to get 5 balls inside correctly.
- You can skip this game if you wish by clicking on the skip button at the lower right of scene once it activates.
Chapter 10 – "Otherside Amusement Park"
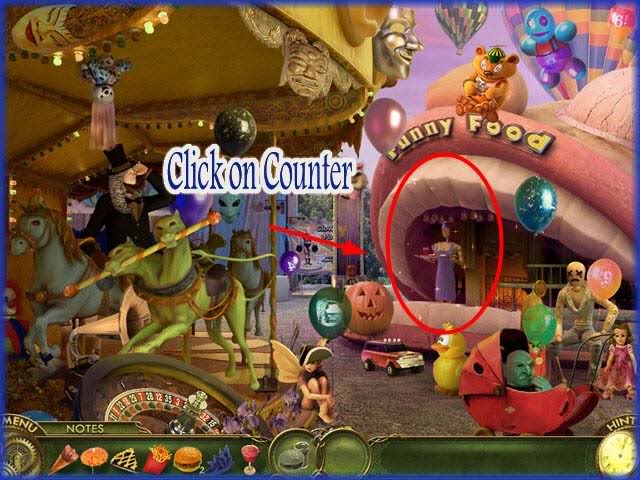
- Storyline – Louise appears and Miranda gives her the doll. All of a sudden, Nord’s men are after Miranda and she is able to jump through portals to escape. She lands in the Otherside Amusement park.
- Click on the Counter.
- Miranda meets up again with Jovie and he is hungry.
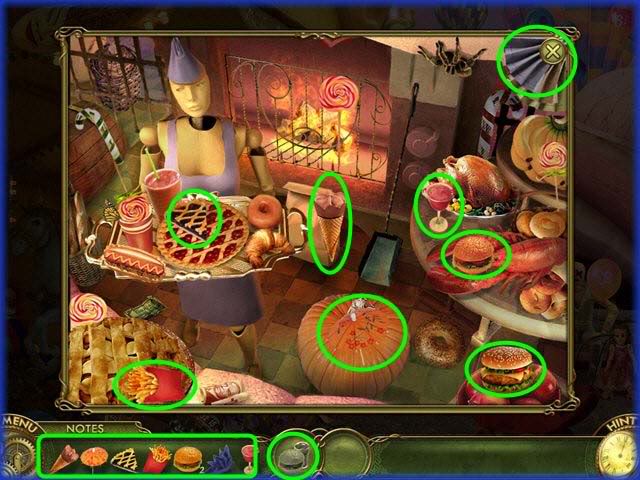
- Locate the 8 hidden food items circled above.
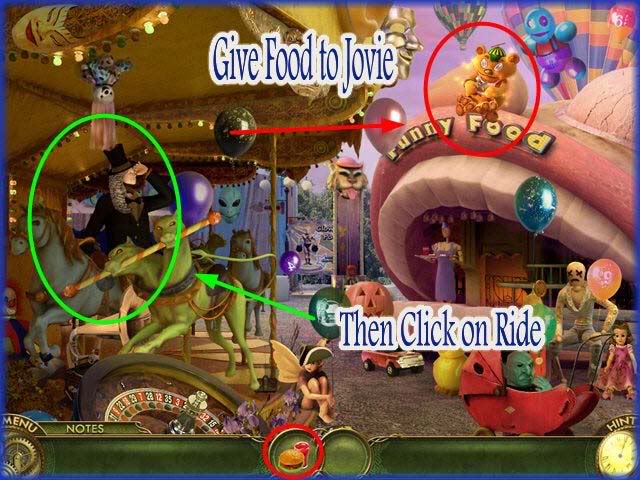
- Give the food to Jovie then click on ride to the left of the scene.
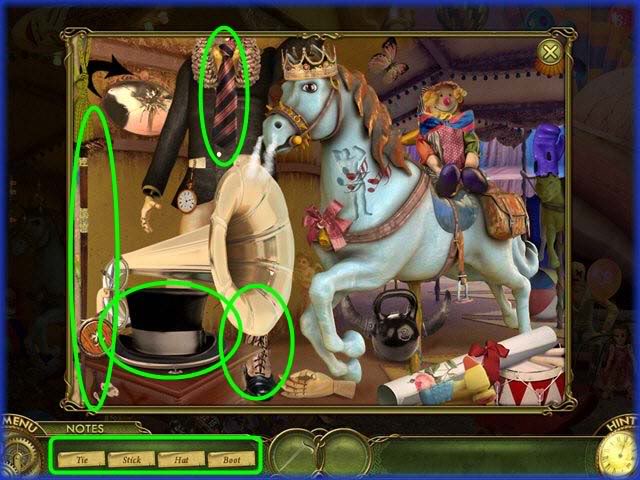
- Locate the 4 hidden items circled in scene above.
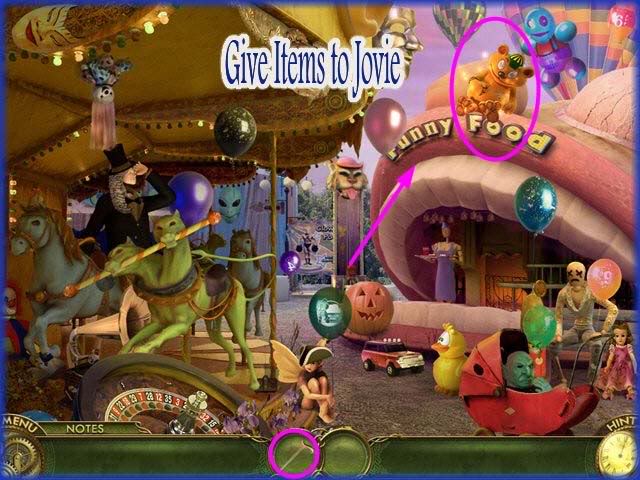
- Locate: Tie, boot, Stick and Hat.
- Give items to Jovie.
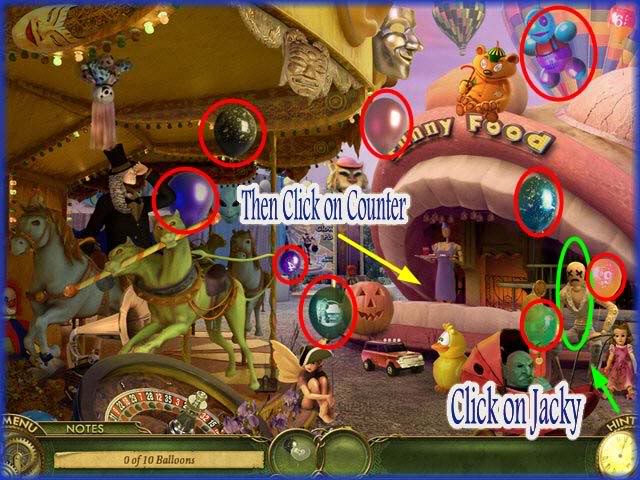
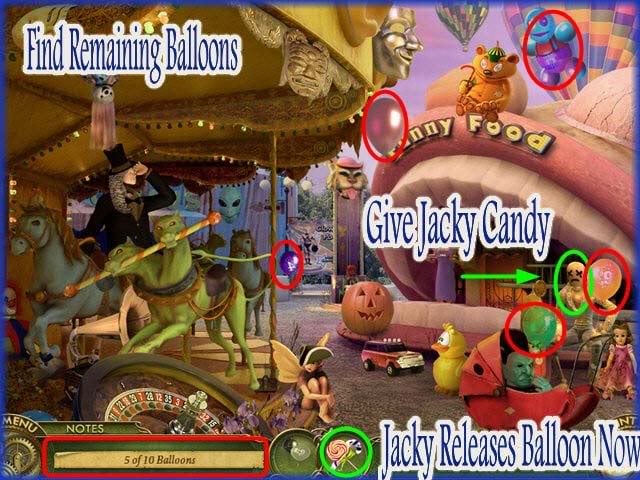
- Click to find the 10 balloons hidden in the scene.
- When you get to the balloon on the far right you will learn it is being held by "Jacky" he requires payment of candy to give up his balloon.
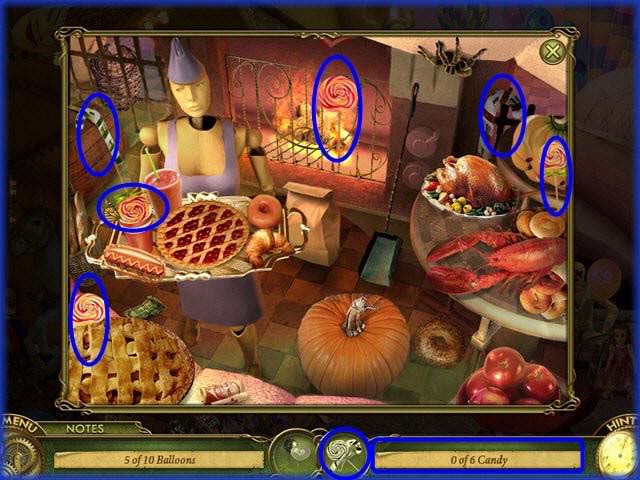
- Click on the counter to get candy for Jacky.
- Locate 6 pieces of candy hidden in scene above.
- When finished give candy to Jacky and he will release balloon to Miranda.
- Collect all of the remaining balloons.
- Next you need to top them off with air and Jacky requires more candy to do this.
- Click on the strength game in center back of scene.
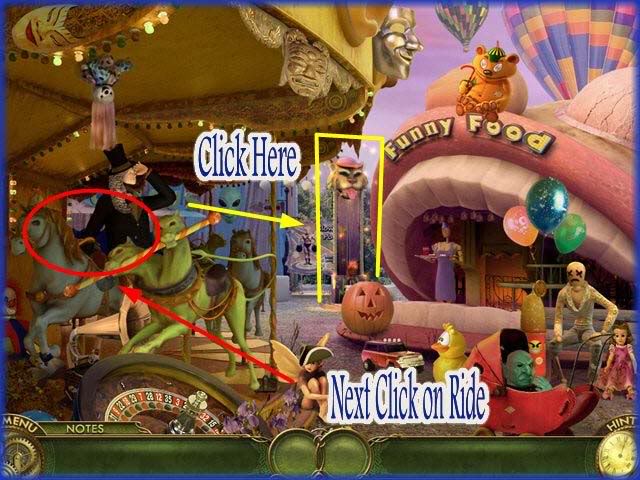
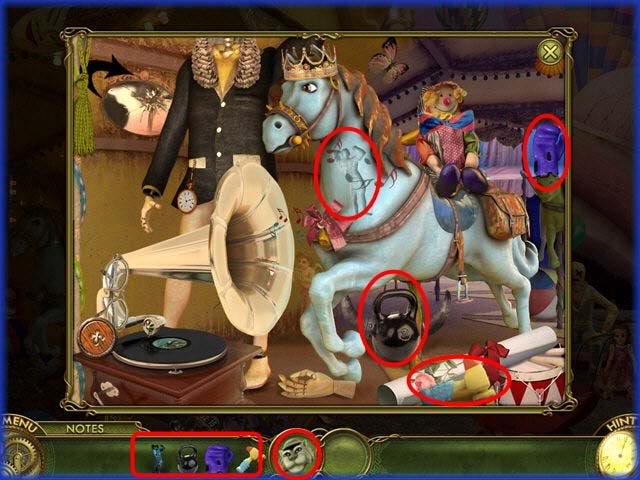
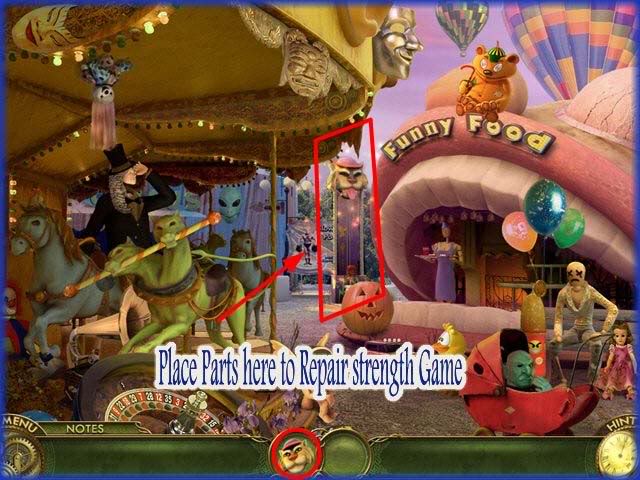
- The strength game is missing parts.
- Click on carousel ride again.
- Locate parts shown circled above.
- Drag them to game to repair.
- This triggers mini game.
Mini Game – Test Your Strength Game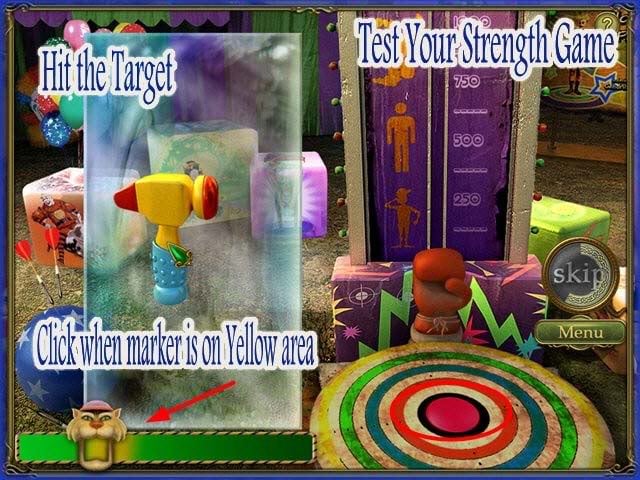
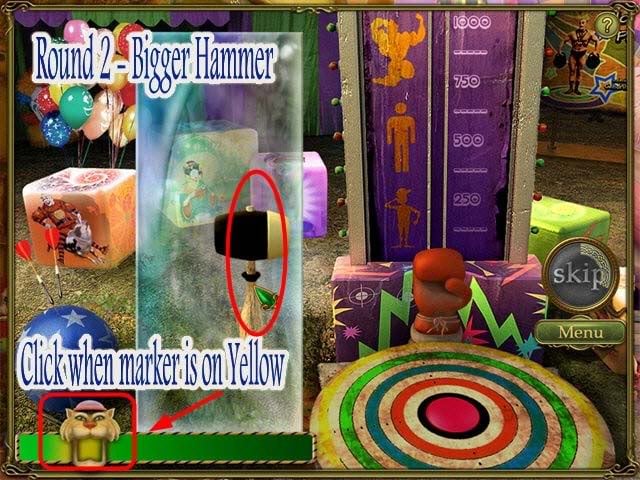
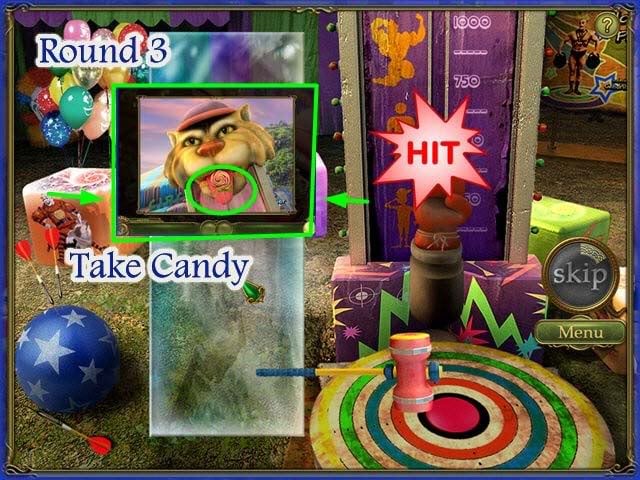
- In this game you will hit your hammer on the target with enough strength for a full hit.
- There is a bar at the bottom left. When the marker moves across it tells you how strong your hit will be.
- The yellow area is the strongest hit
- Click your mouse when the marker hits the yellow area and make sure your hammer is located in the right spot.
- There are three rounds to the game you must be successful with 3 different hammers.
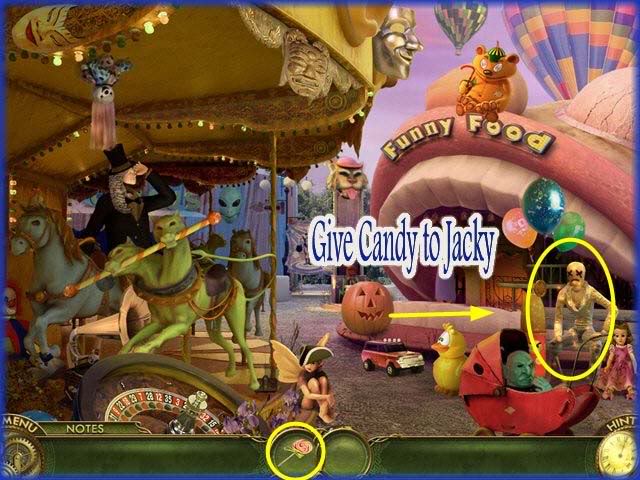
- Once you win the game you are given candy.
- Give candy to Jacky and he will inflate your balloons so you can proceed.
Chapter 11 – "Otherside Shooting Gallery"
Tickets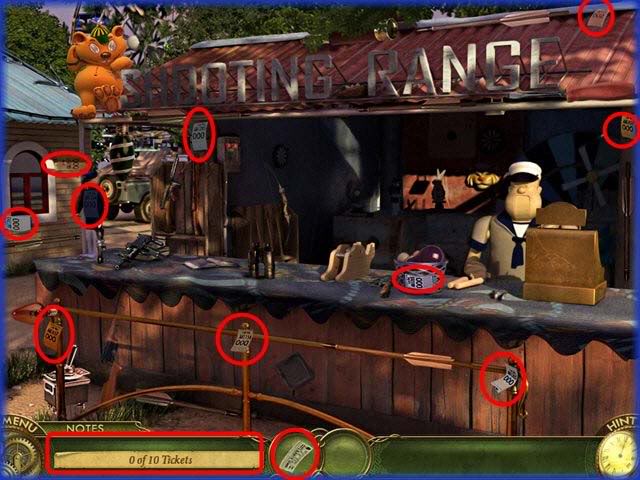
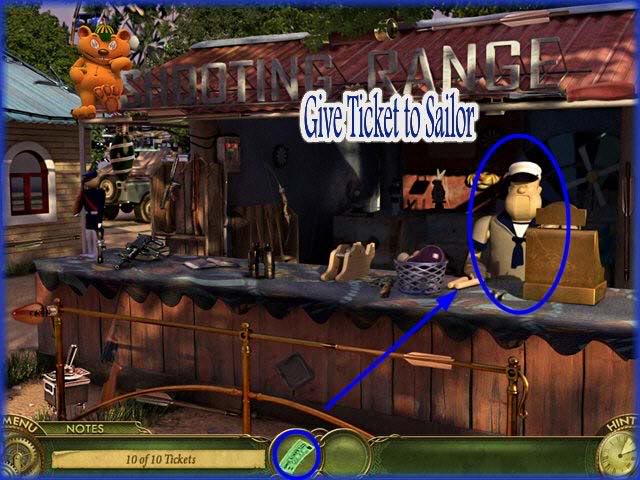
- Collect the 10 tickets hidden in the scene and give them to the Sailor at the register.
Fuse Box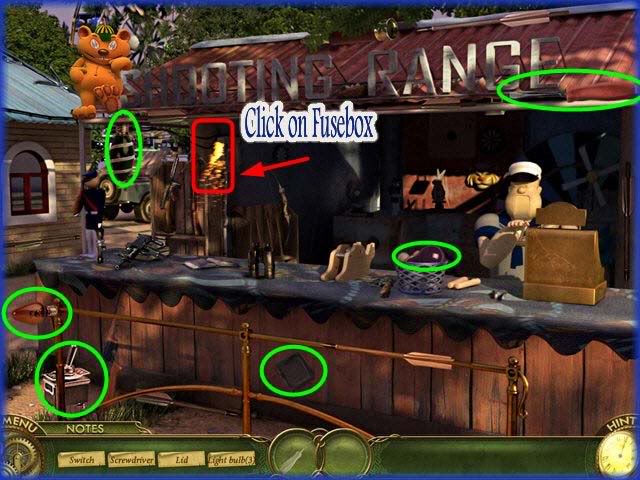
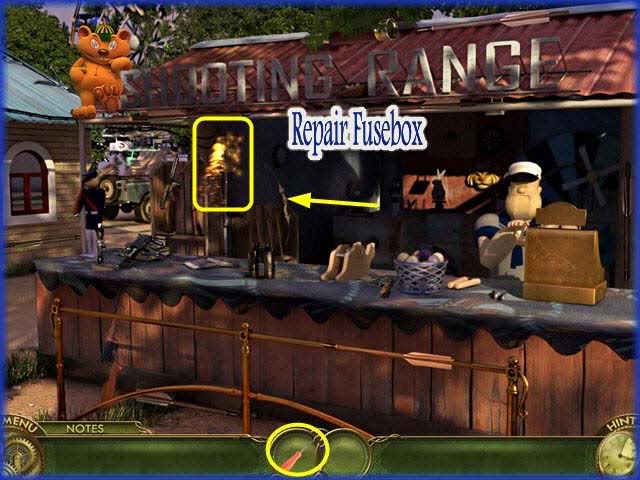
- Locate the 6 items hidden in the scene.
- 3 light bulbs, switch, lid and screwdriver.
- Repair the fuse box as shown above.
Guns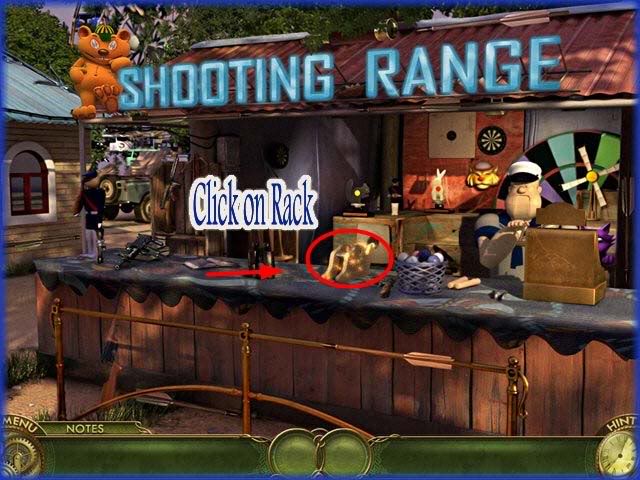
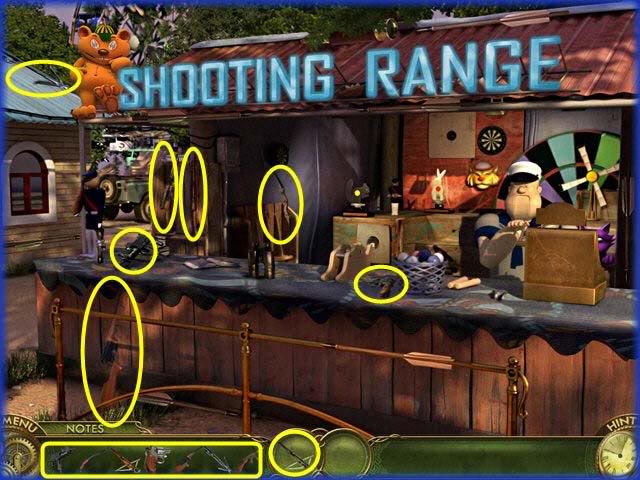
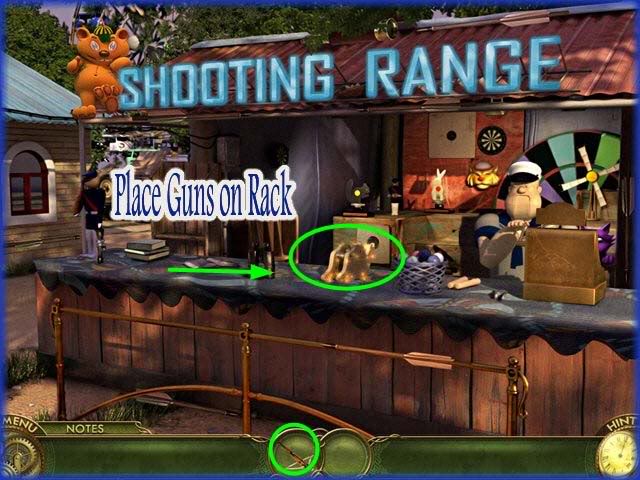
- Click on the gun rack.
- Locate the 7 guns hidden in the scene shown circled above.
- Place guns on the gun rack when finished.
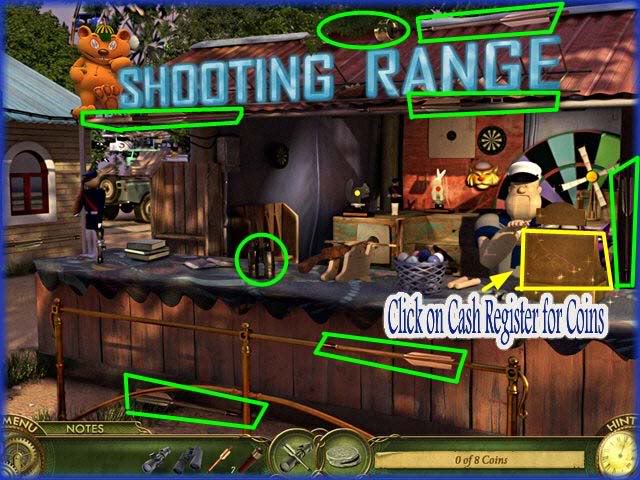
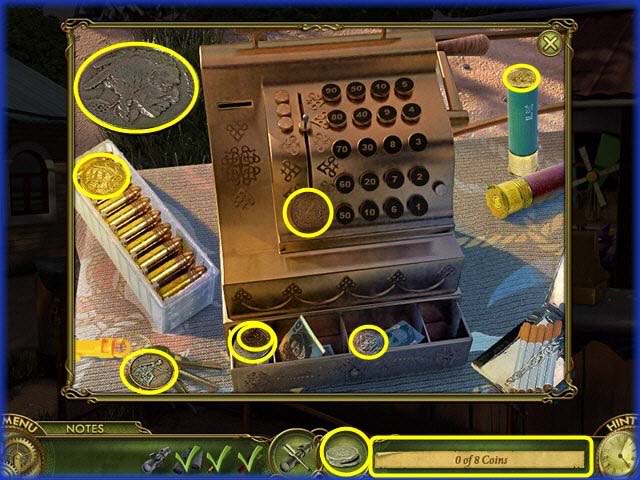
- Locate the 10 hidden items in the scene.
- Click on the cash register.
- Locate the 8 coins hidden beside the register.
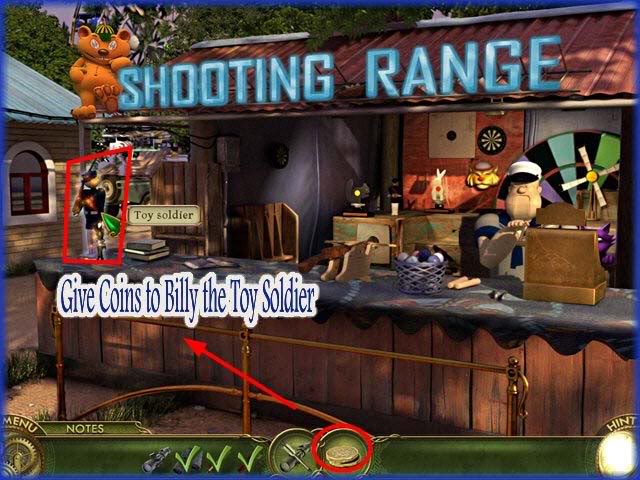
- Give the coins to Billy the toy soldier.
Mini Game – Shooting Gallery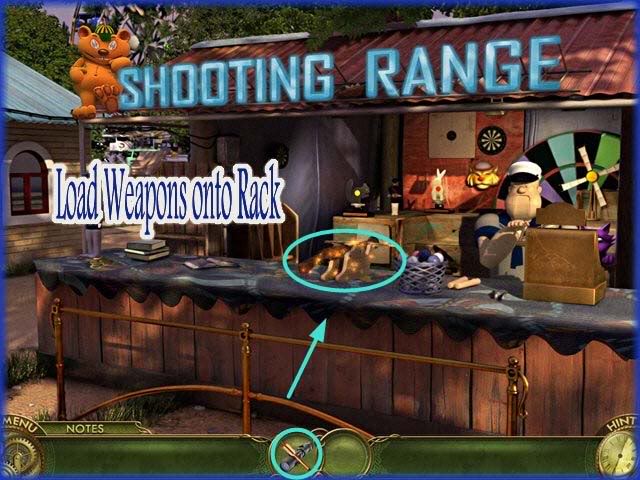
- Load the weapons onto the gun rack which triggers a mini game.
- Mini Game – Shooting Gallery
- Here you must locate the specific targets.
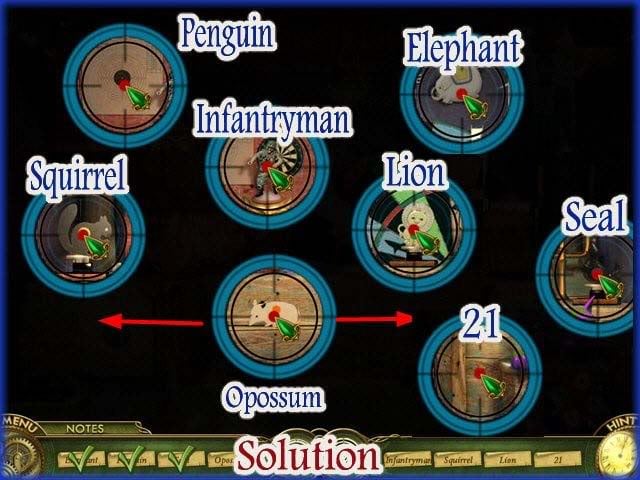
- You are looking for the Lion, Elephant, Squirrel, Seal, Infantryman, Opossum, Penguin and 21.
- Note – The Opossum is a moving target moving left to right as arrows above indicate.
- The location of all targets is shown above.
- In the game you can only see out of a very small area.
- Click the left mouse button to shoot the gun.
- NOTE – For the "21" you will need to shoot in the location shown 21 times to proceed.
Chapter 12 – "Otherside Ferris Wheel"
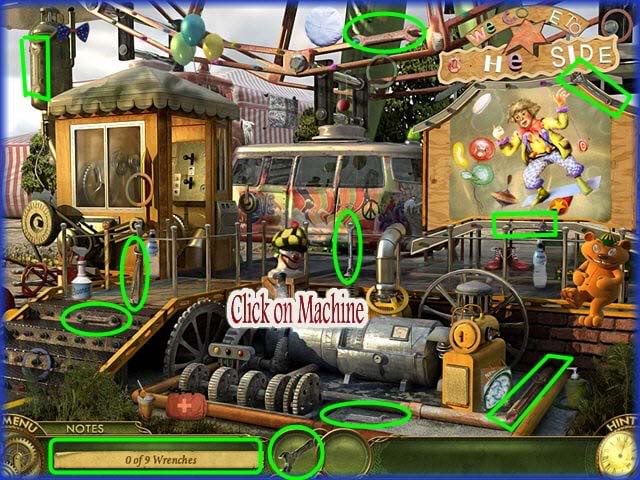
- Miranda must ride the Ferris wheel to the top and meet Louise to take her home.
- Collect the 9 wrenches hidden in the scene shown circled above.
- Next click on the machine.
Control Box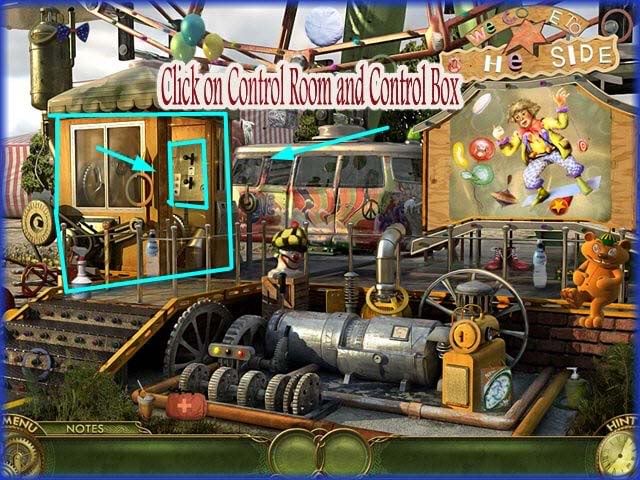
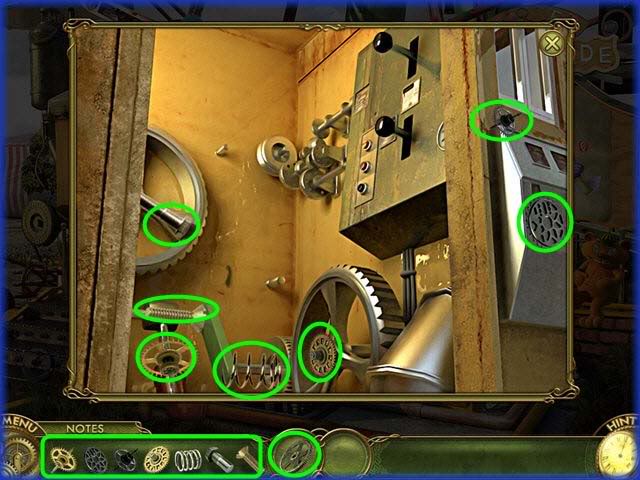
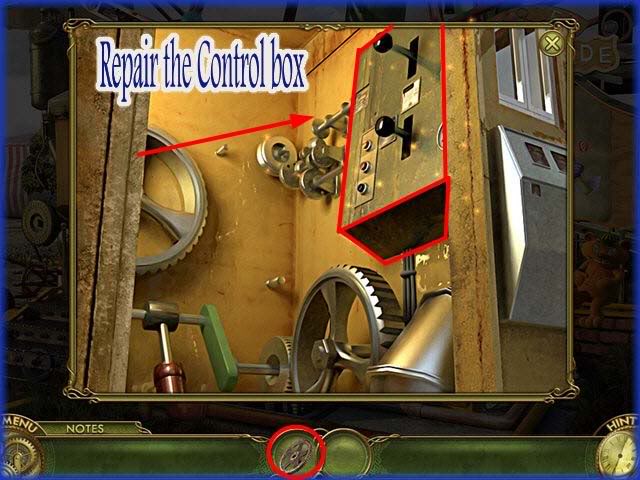
- Click on the control room and then the control box.
- Locate the 7 hidden items in the scene shown circled above.
- Repair the control box.
Clean the roof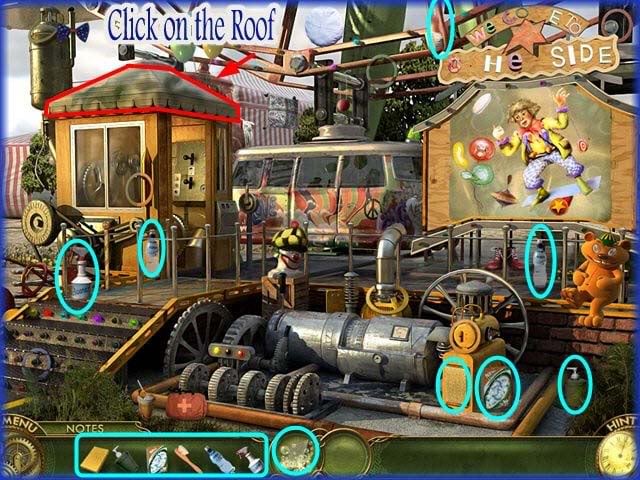
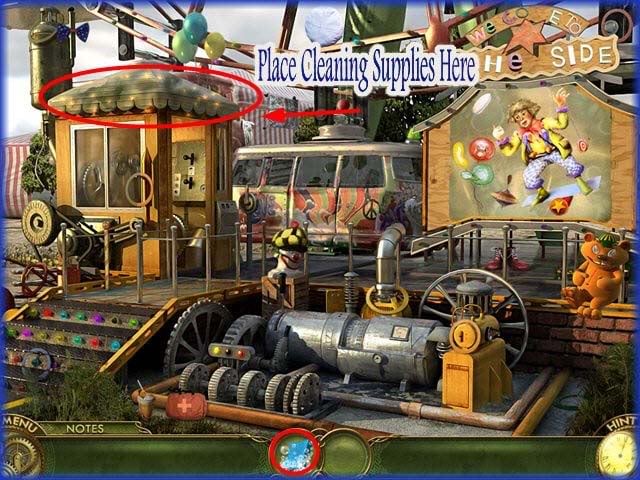
- Click on the roof
- Locate the 6 cleaning items hidden in the scene.
- Clean the roof of the Control room.
Clown Poster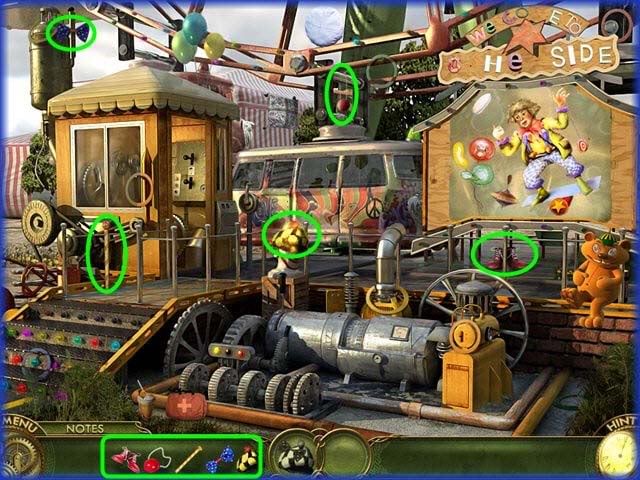
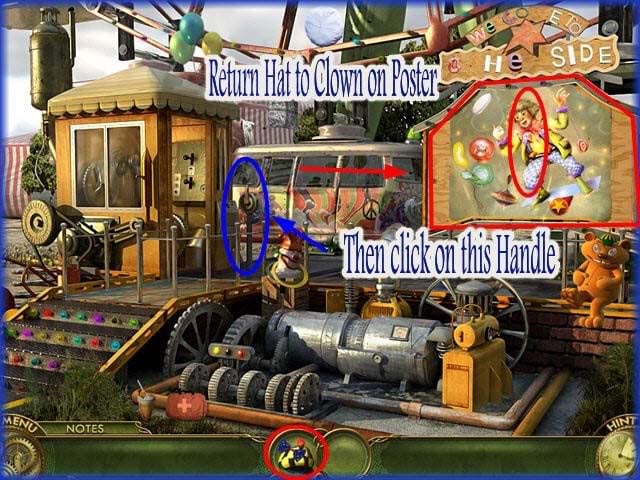
- Locate the clown’s items of clothing shown circled above.
- Place the items back on the poster which triggers a mini game.
Mini Game – Place the Tiles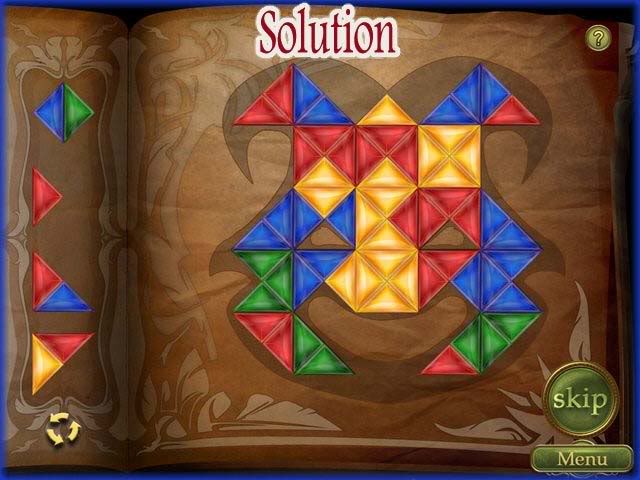
- In this game you are to place the tiles in the Clown face outline.
- You can start with any colors you wish but they must be positioned correctly within the grid.
- Once you place a tile you can only place additional tiles that have a color in common.
- The tiles you can use are located along the left of the screen.
- Use the circle of arrows at the bottom left to scroll through the tiles.
- You should be able to find whatever tile or combination of tiles you need.
- You can skip this puzzle if you wish by clicking on the "Skip" button at the lower right of screen once it activates. It takes a few moments to become active. There is no penalty for skipping this puzzle.
- A solution example is shown above you can either copy it or make your own as there are multiple solutions to this puzzle.
Safety First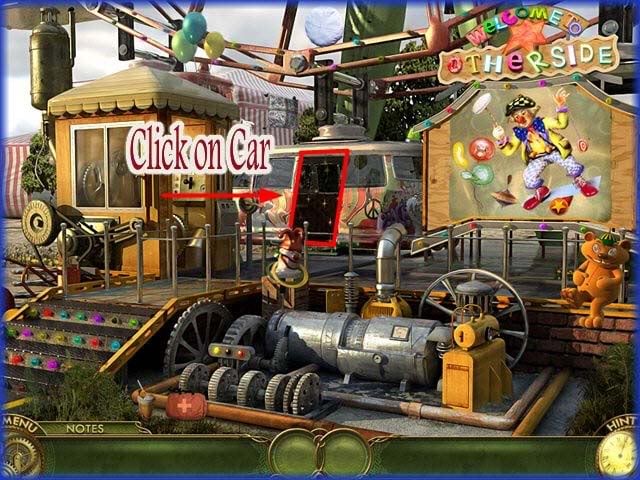
- Click on the car
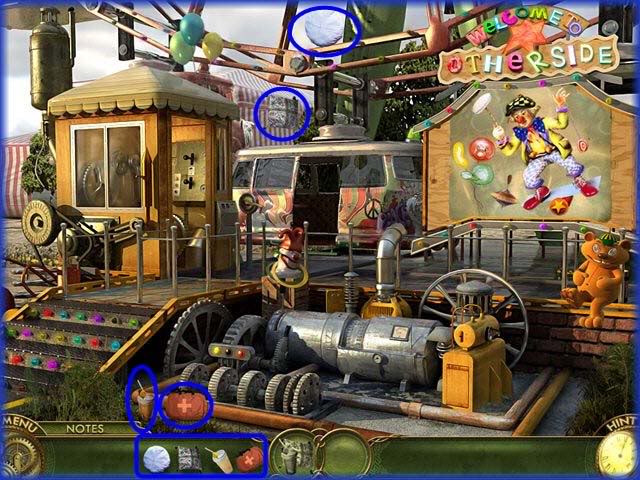
- Locate the 4 safety items shown circled in the image above.
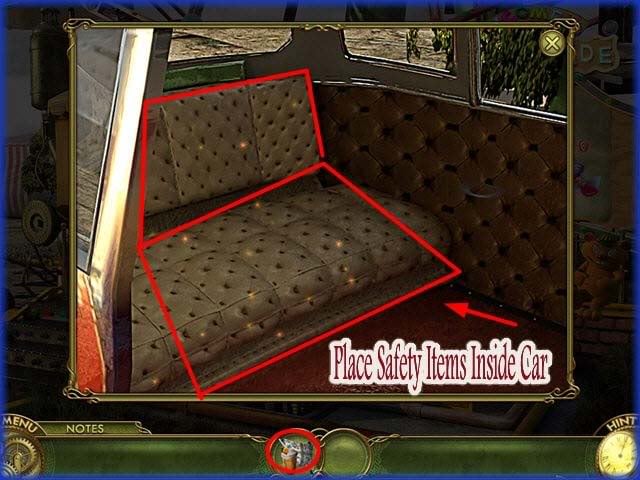
- Place the safety items inside the car.
- Storyline – Miranda rides the Ferris wheel and meets Louise. Louise tells her that she needs her favorite dress in order to come home. She needs her and Michael to find it and bring it to her.
- All of a sudden Miranda finds her self back to normal riding in a car headed to Louise’s house.
Chapter 13 – "Michael’s Makeshift Home"
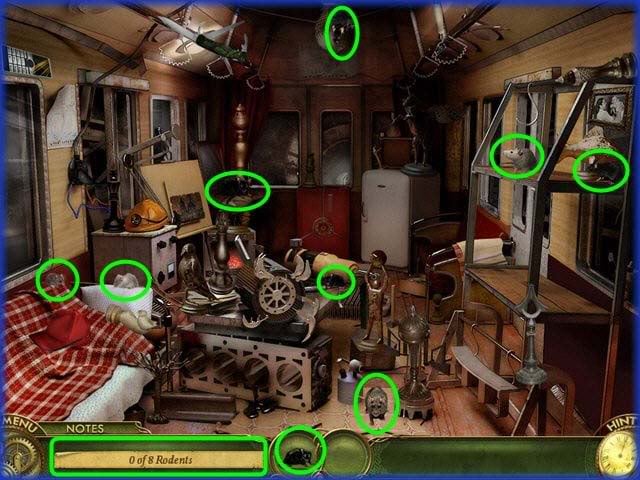
- Locate the 8 rodents hidden and shown circled above.
Mini Game – Find the Differences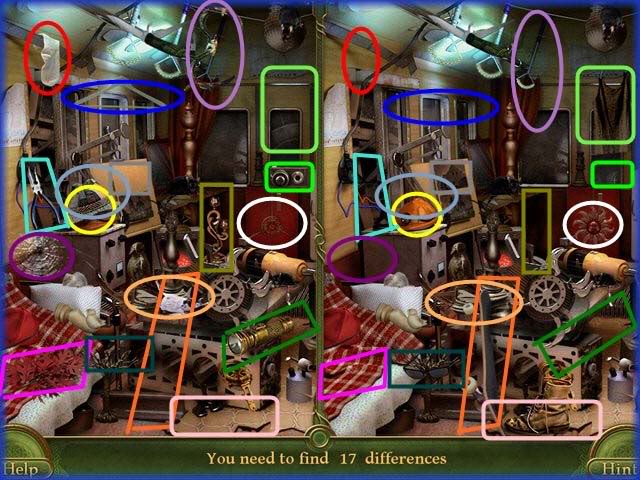
- Locate 17 differences between the side by side images above.
- The differences have been color coded to help you see them.
- You can not skip this puzzle but you can use hints if you get stuck.
Place Figurines back on Shelf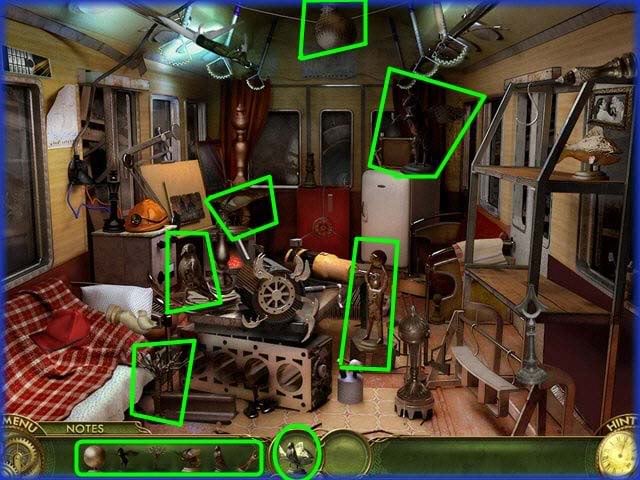
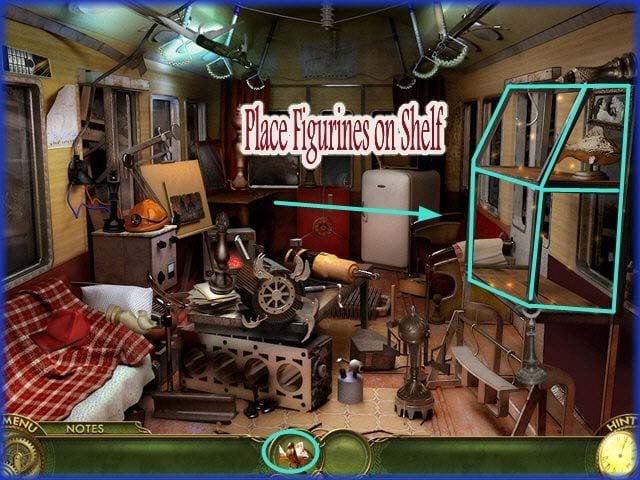
- Locate the 7 figurines hidden in the scene and circled above.
- Place the figurines back on the shelf.
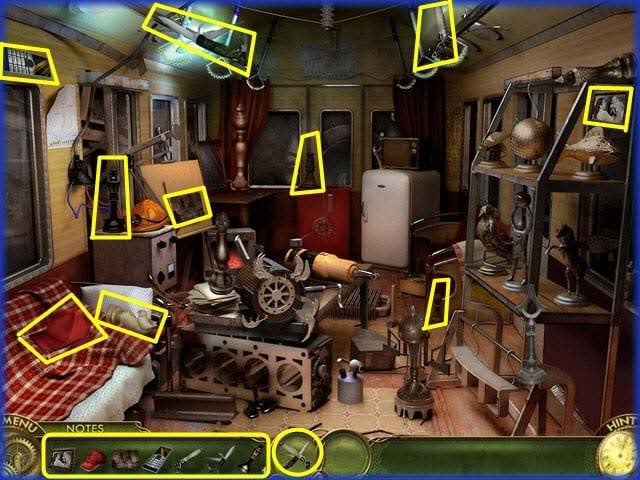
- Locate the 7 hidden items in the scene.
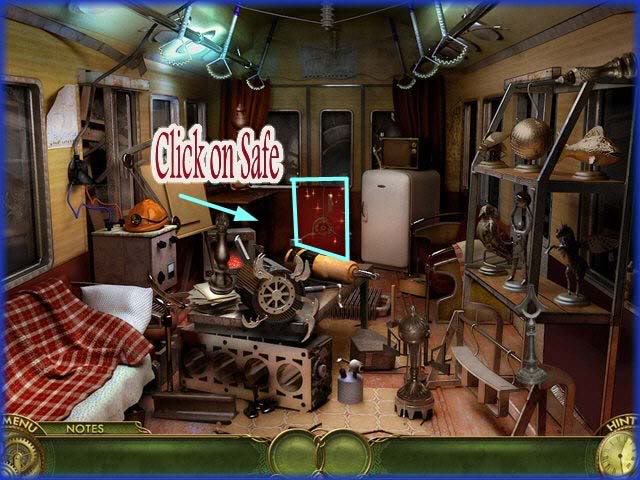
- Click on strange safe in back center of scene.
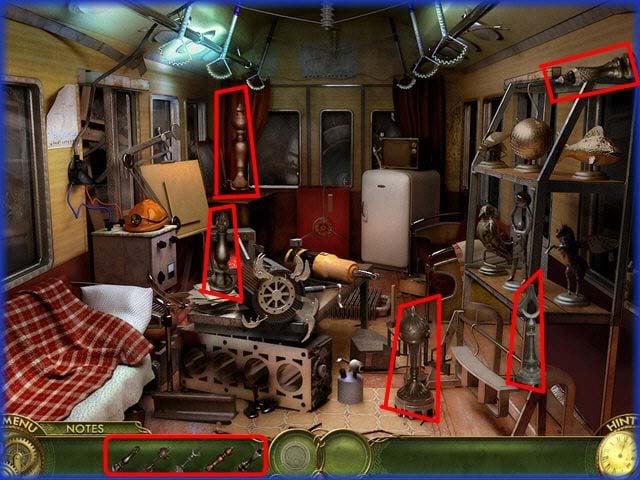
- Locate the 5 statues to make key.
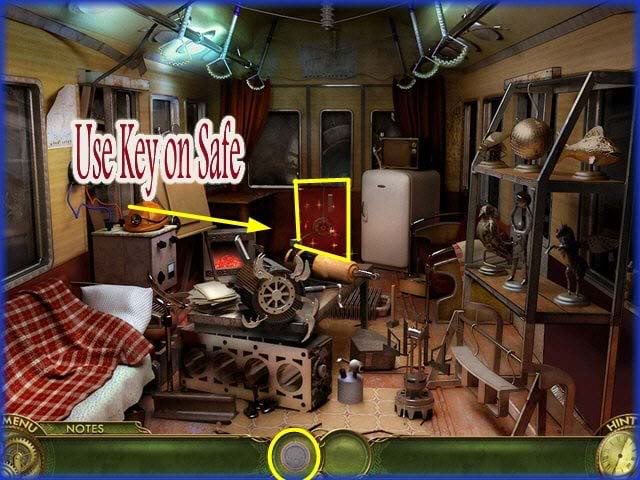
- Use the keys on safe.
Mini Game – Key to Safe/Puzzle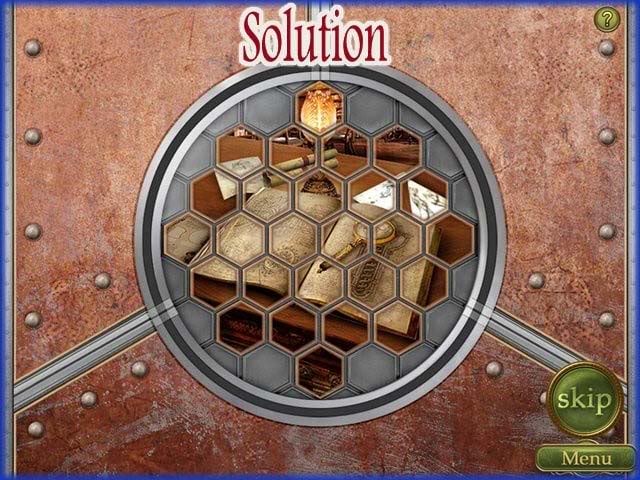
- Rotate the pieces around until the puzzle is complete.
- Solution is shown above.
- Miranda finds a folder inside with drawings and information Michael has gathered about the order.
- Storyline – Michael walks in and catches Miranda in his safe reading his file.
- He tells her they are on the way and they have to pack up and leave right now.
- She explains they need Louise’s dress be he insists they must leave right away.
Refrigerator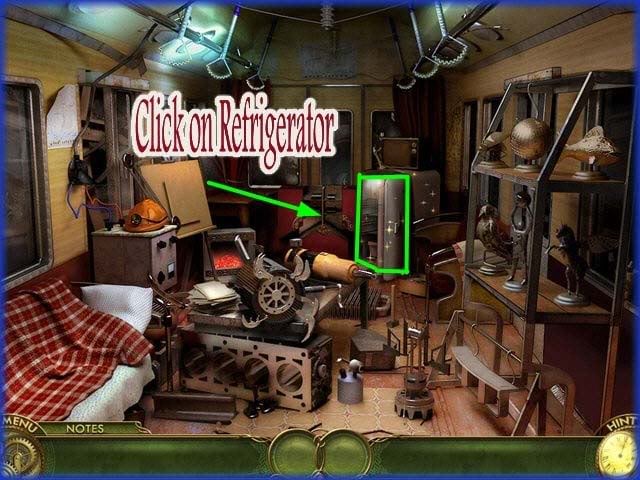
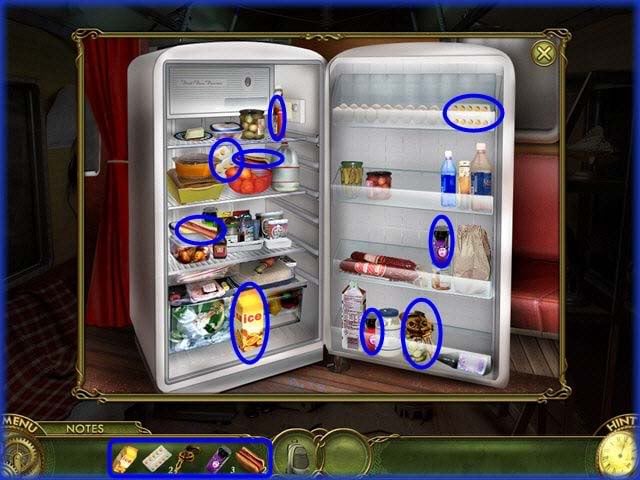
- Click on refrigerator.
- Locate the 9 items hidden in the scene and circled above.
Chapter 14 – "The Break In"
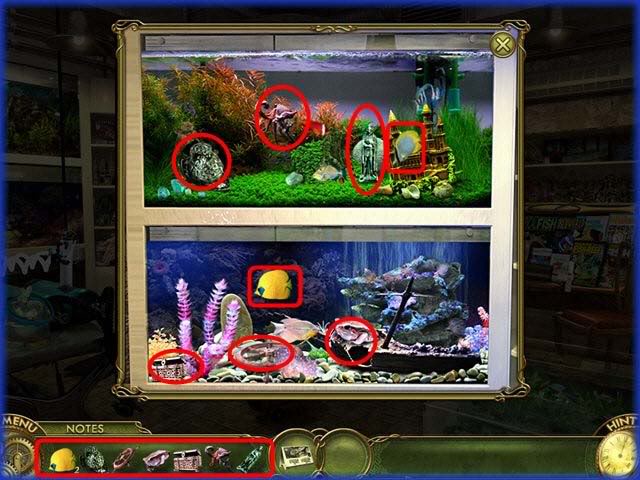
- Storyline – Miranda and Michael decide that they must try and break in through a local aquarium shops ventilation system to get to Louise. Miranda is hesitant and feels that getting the dress first is priority.
- They dress as Air conditioning repairmen and head out. They need to get into the air ducts without being noticed so Miranda is going to distract the aquarium owner.
- Locate the items hidden inside the aquarium which are shown circled above.
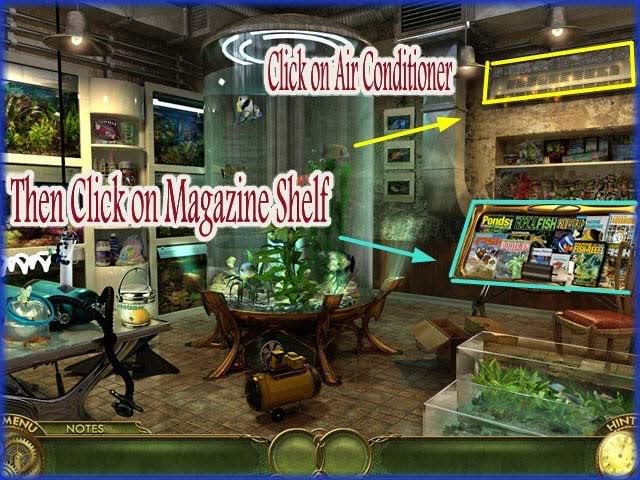
- Click on Air Conditioner.
- Next click on Magazine rack.
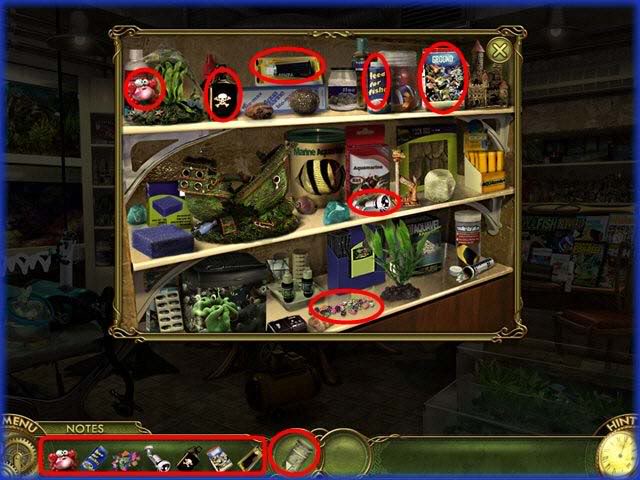
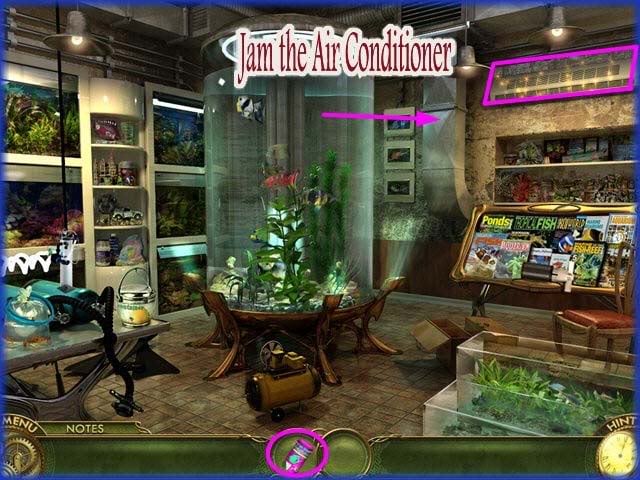
- Locate the hidden aquarium supplies shown circled above.
- Drag to Air conditioner to block it.
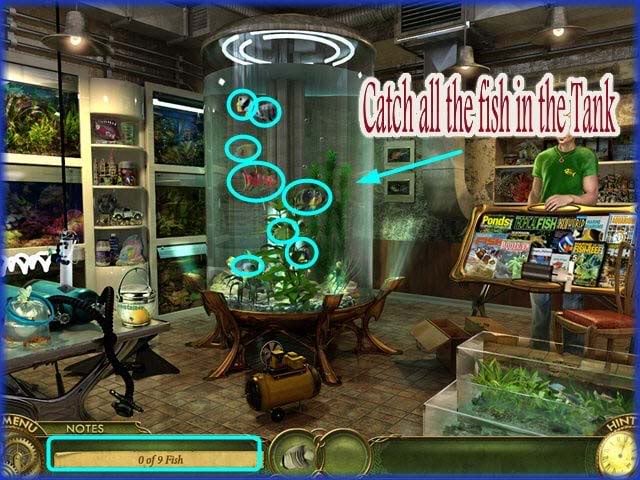
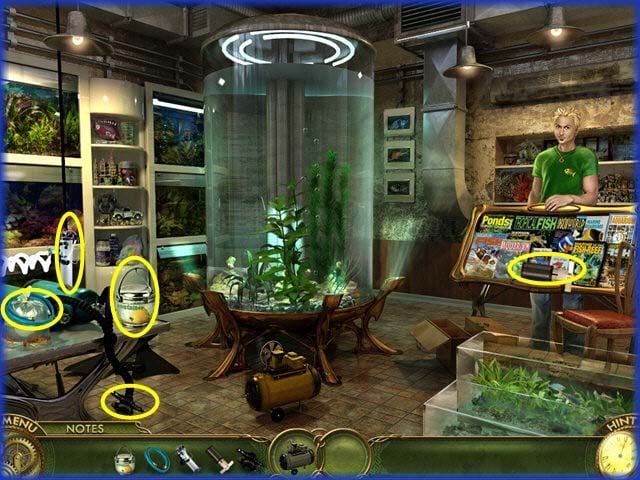
- Catch all 9 fish in the tank shown circled above.
- Locate the 5 hidden items circled in the scene above.
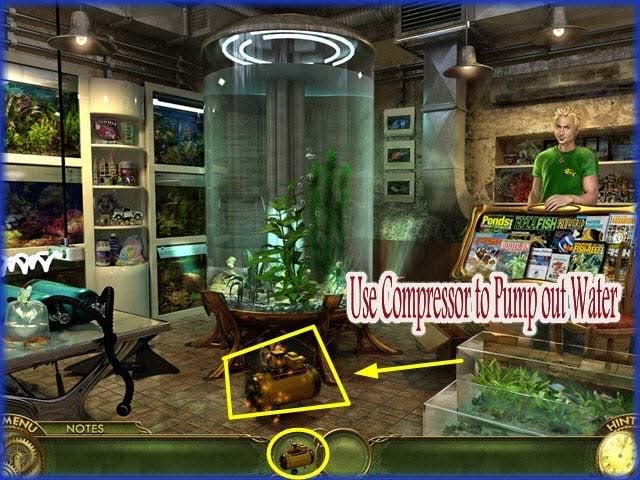
- Use the compressor to pump out the water.
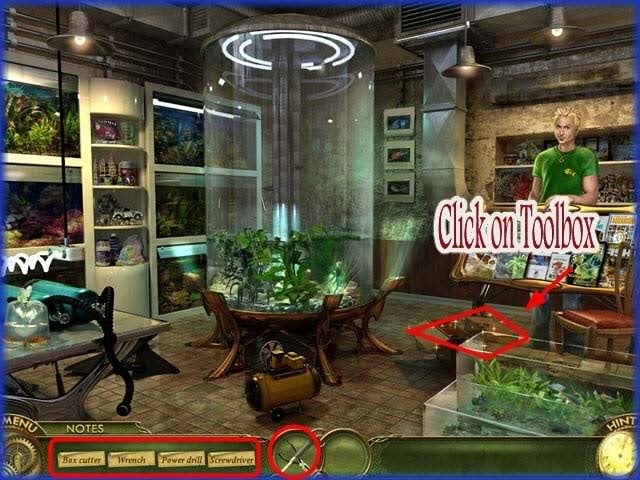
- Click on the toolbox
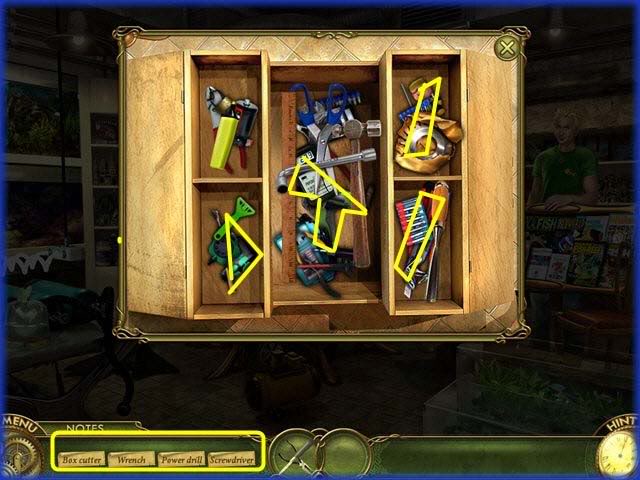
- Locate the 4 hidden items listed and shown circled above.
- Box Cutter, Wrench, Power Drill and Screwdriver.
- Note the items in the tool box can be moved.
- The items have been moved to show the location of the items on the list.
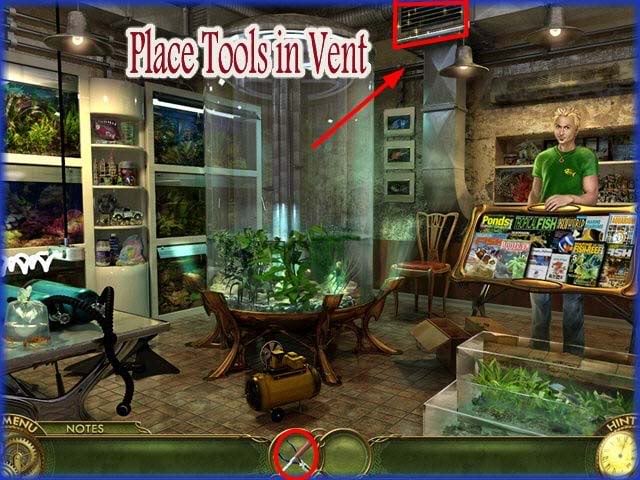
- Place tools in the vent.
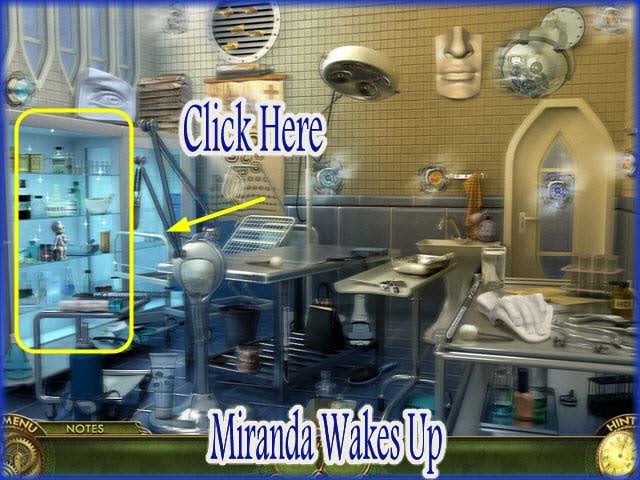
- Storyline – Miranda finds herself inside Nord’s Lair. She is able to get Louise’s dress but is caught by Nord’s men with a gas that knocks her out. She wakes up inside a medical treatment room.
- Click on the medicine cabinet at the left of the scene.
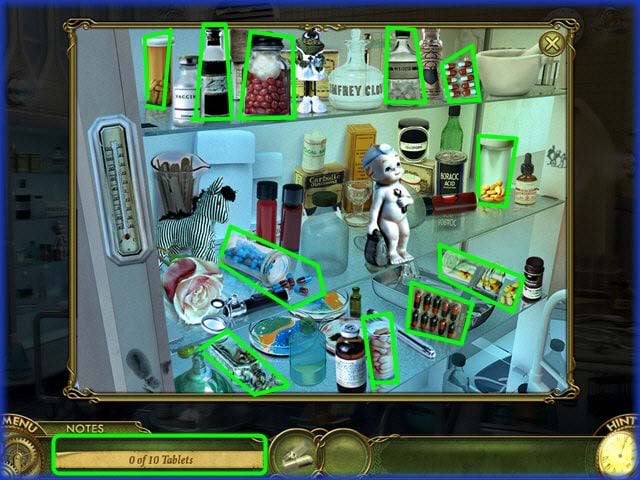
- Locate the 10 bottle of pills shown circled above.
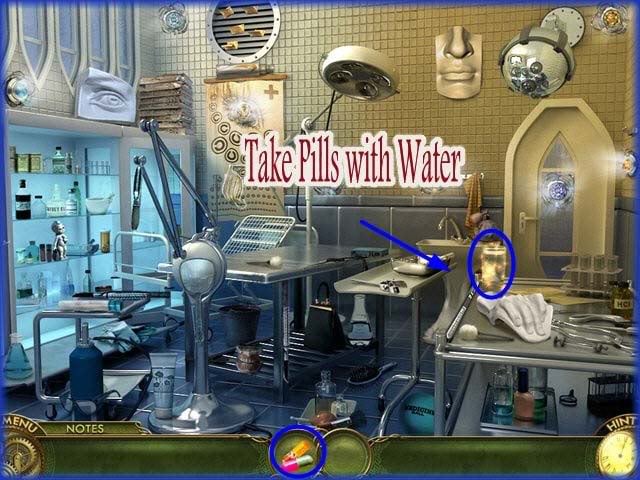
- Take the pills with a glass of water.
Miranda’s Purse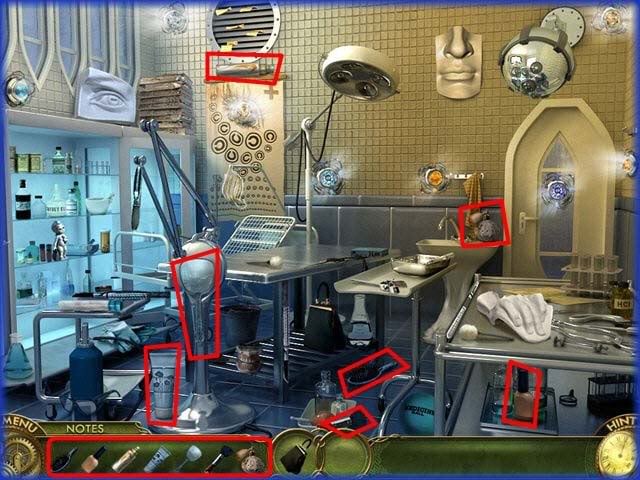
- Locate the 7 items from Miranda’s purse shown circled above.
Window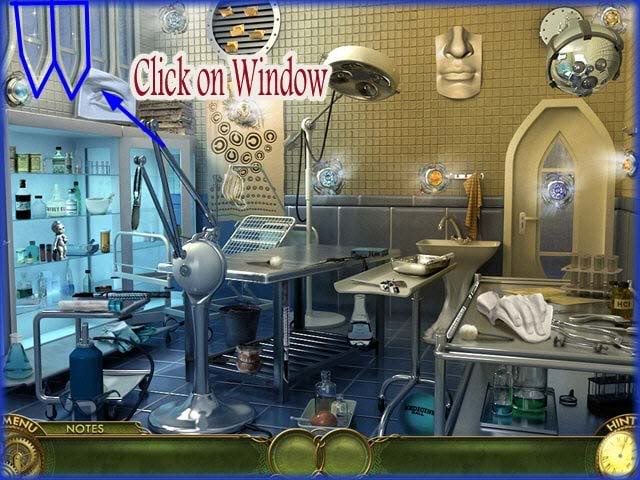
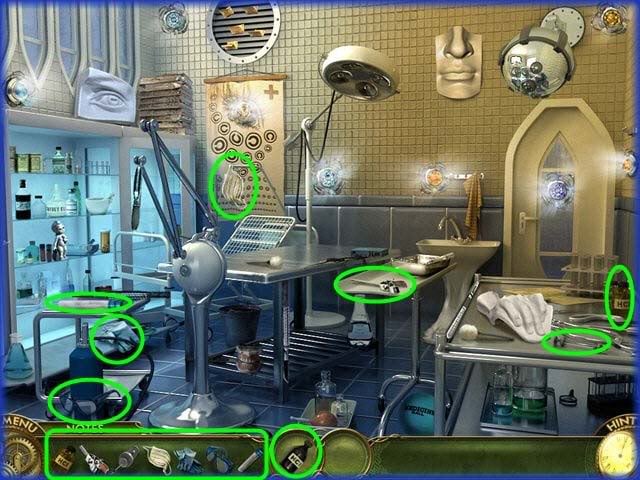
- Click on the window far left.
- Collect acid to pour on window.
- Search for 7 hidden items shown circled above.
Open Window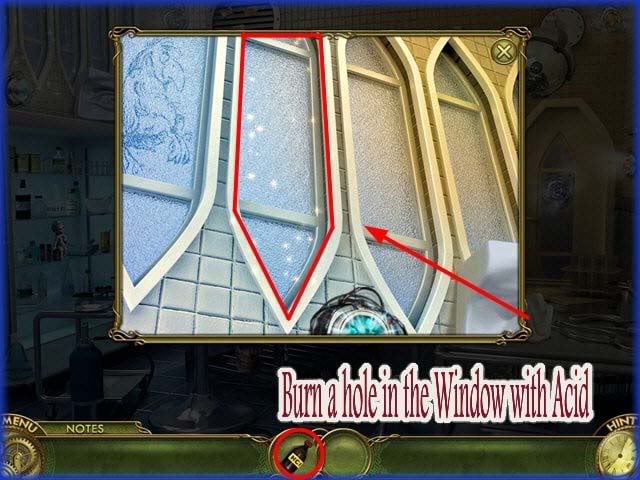
- Burn a hole in the window with the acid.
- Storyline – Louise shows up and tells Miranda not to exit out the window.
- She tells her to get rid of the protective crystals around the room.
Remove Crystals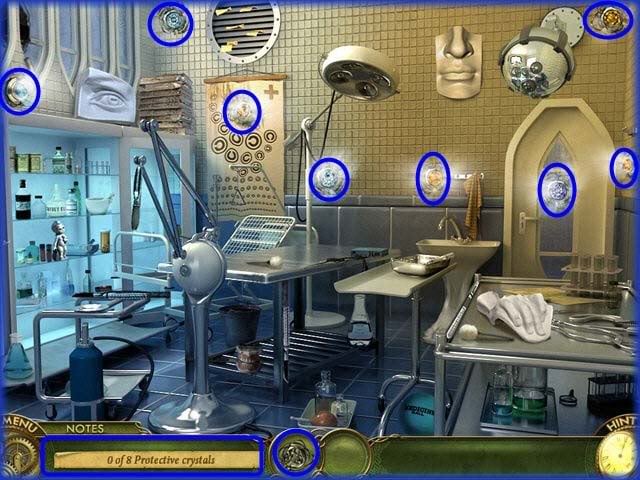
- Remove the 8 crystals as shown in the image above.
Make Paint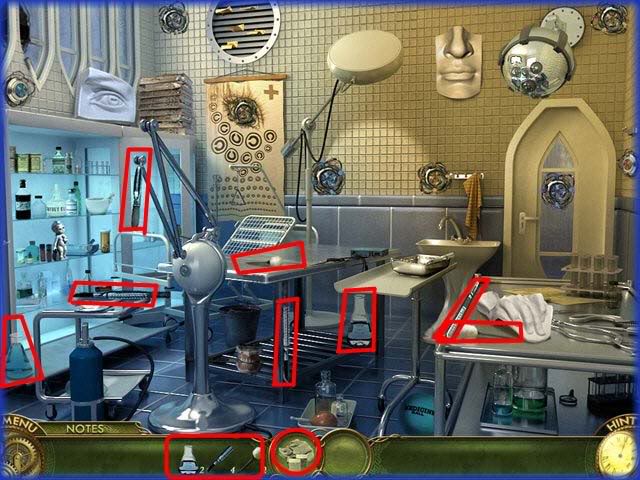
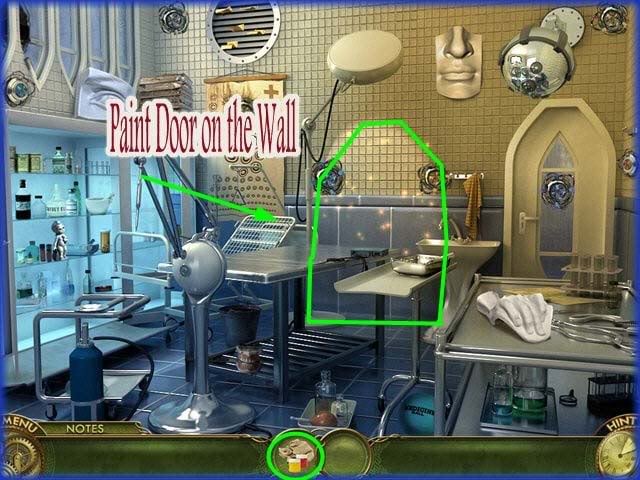
- Collect the 8 hidden items shown circled above.
- Paint the door on the wall.
Mini Game – Assemble the Door Puzzle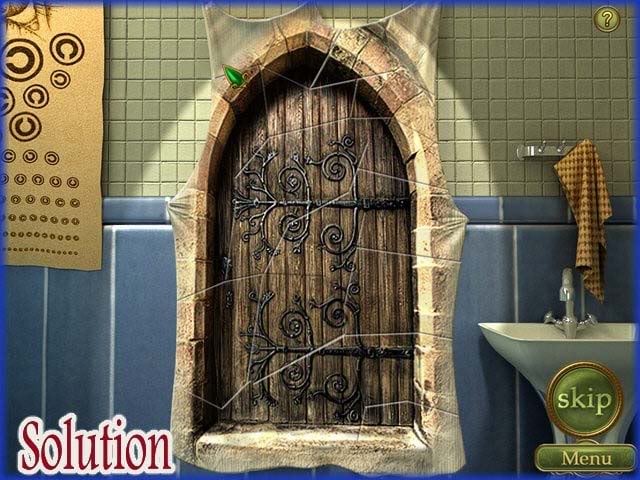
- Assemble the door puzzle.
- Pieces will lock in place when correctly placed.
- Solution is shown above.
- After door is drawn Miranda exits and heads for the Order to capture and destroy the order’s leader.
Chapter 15 – "Order Superior’s Room"
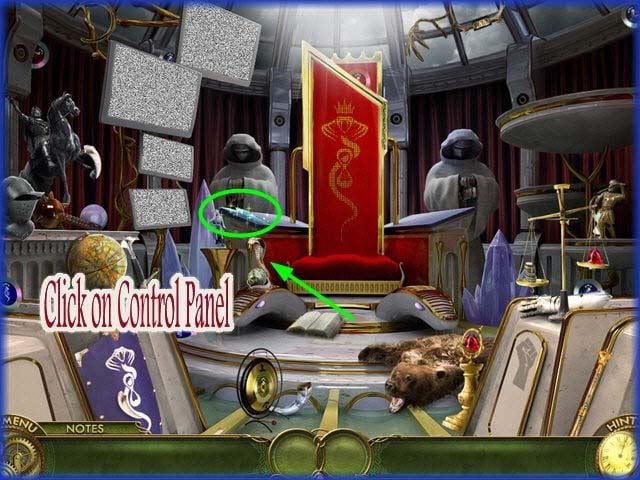
- Click on the control panel on the upper left of scene.
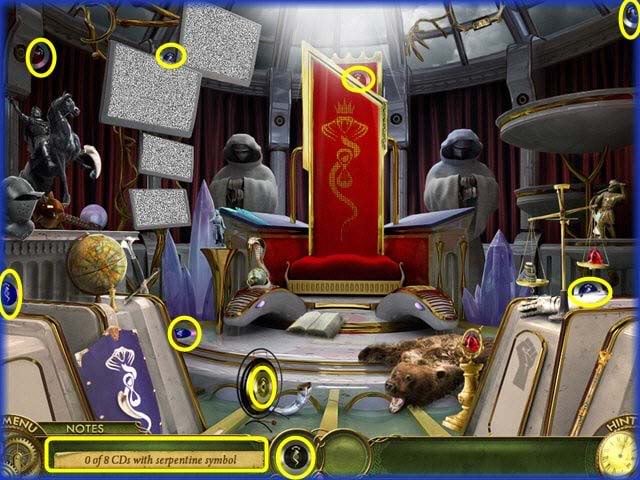
- Locate the 8 Serpentine CD’s hidden in the scene and circled above.
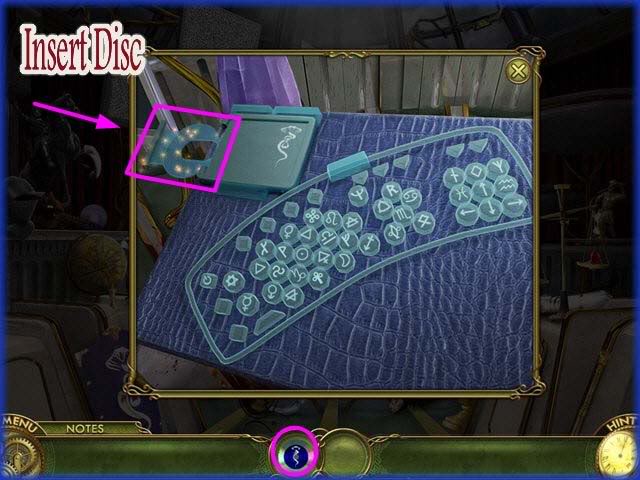
- Place the CD in the disc drive as shown.
Mini Game – Locate the Differences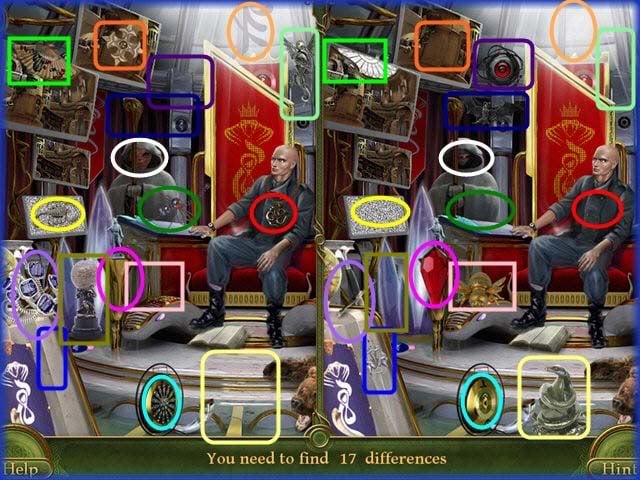
- Locate 17 differences between the side by side images above.
- The differences have been color coded to help you see them.
- You can not skip this puzzle but you can use hints if you get stuck.
Find Code on Control Panel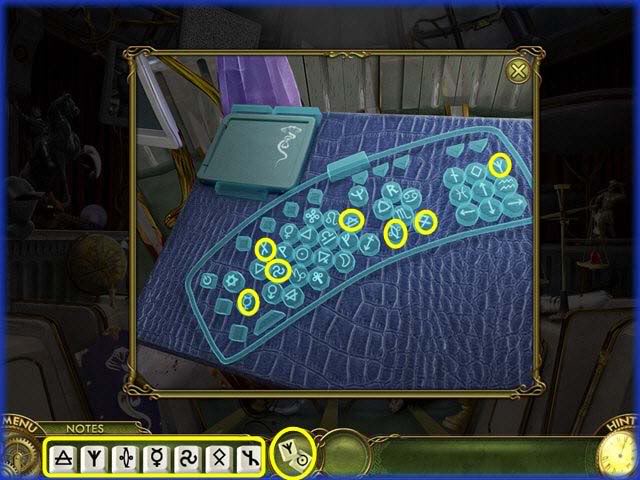
- Locate the keys on the keypad as shown circled above.
Assemble the Septors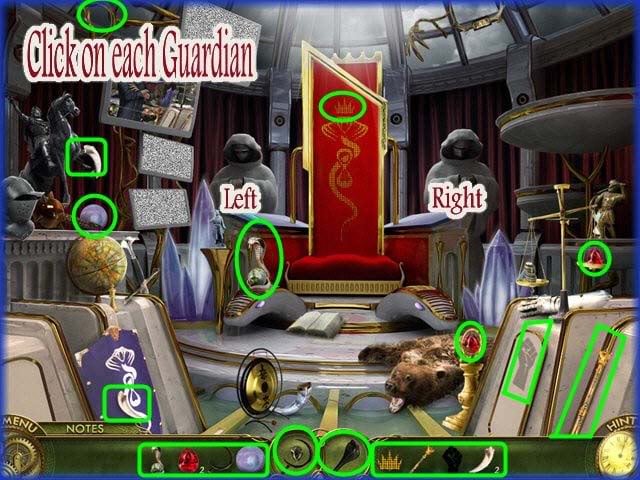
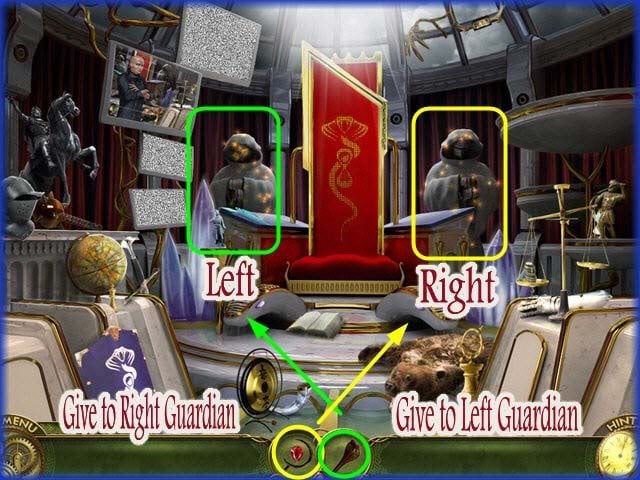
- Collect the items for both Guardian’s Septors shown circled above.
- Place the septors into the correct location.
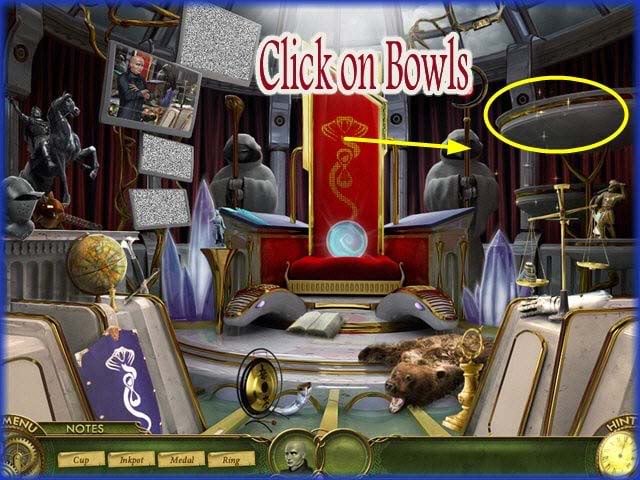
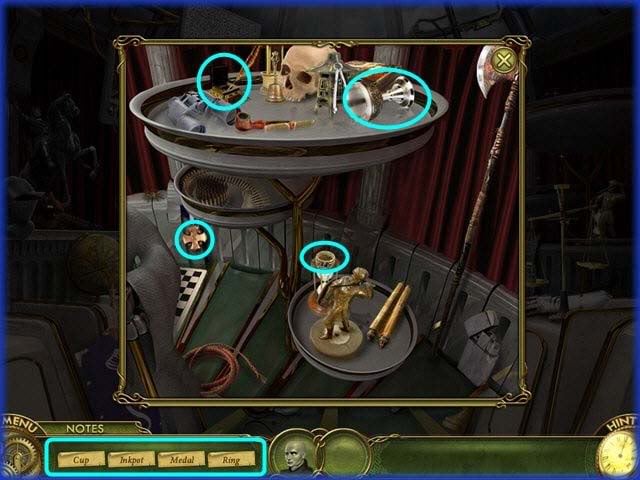
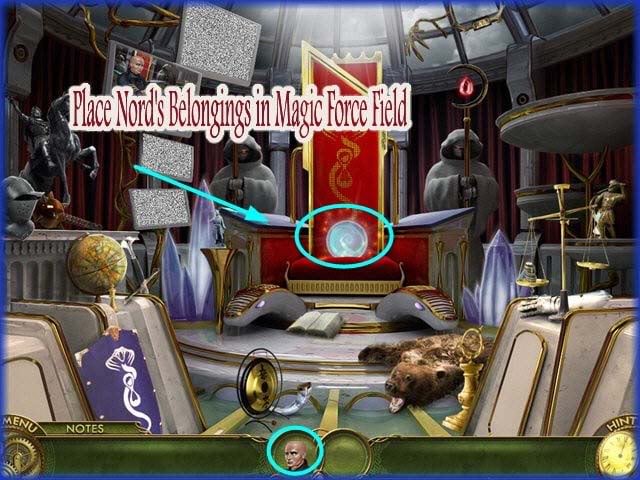
- Click on the bowls.
- Locate the 4 items that belong to Nord.
- Ring, Inkwell, Cup and Medal shown circled above.
- Place the items in the magic force field.
Mini Game – Place the Tiles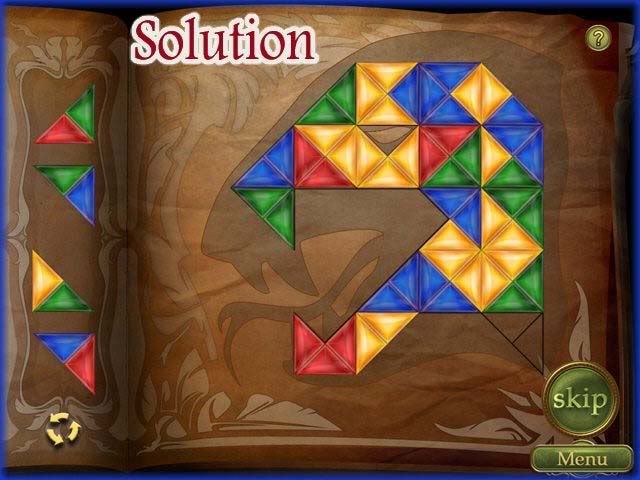
- In this game you are to place the tiles in the face’s outline.
- You can start with any colors you wish but they must be positioned correctly within the grid.
- Once you place a tile you can only place additional tiles that have a color in common.
- The tiles you can use are located along the left of the screen.
- Use the circle of arrows at the bottom left to scroll through the tiles.
- You should be able to find whatever tile or combination of tiles you need.
- You can skip this puzzle if you wish by clicking on the "Skip" button at the lower right of screen once it activates. It takes a few moments to become active. There is no penalty for skipping this puzzle.
- A solution example is shown above you can either copy it or make your own as there are multiple solutions to this puzzle.
- Storyline – Nord appears and tries to warn Miranda she has made a big mistake but she does not want to listen.
- She places him in the magic force field.
- Louise appears and all of a sudden she transform into this hideous woman known as, "The Destroyer" she tells Miranda that she has helped her and she will soon be destroying the World.
- Miranda is very shocked and upset.
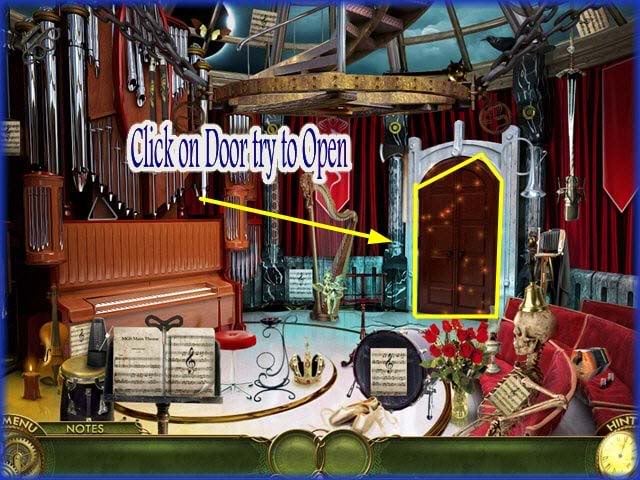
- The Destroyer locks her into a room and she must escape.
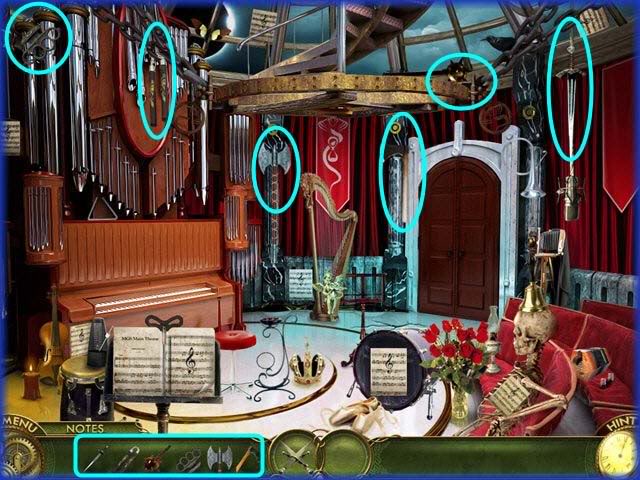
- Click on the door.
- Locate the 8 items in the room to make a weapon to open the door.
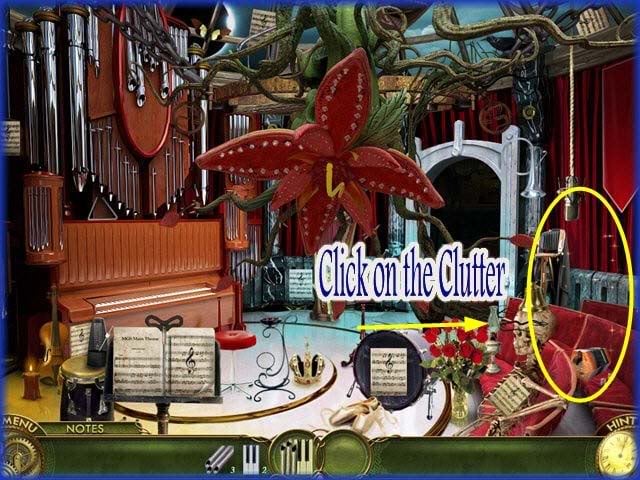
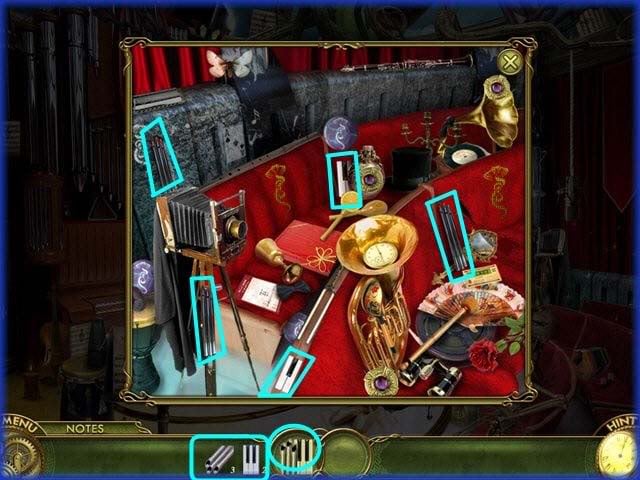
- Click on the clutter on the right side of the room.
- Locate the pieces of the organ shown circled above.
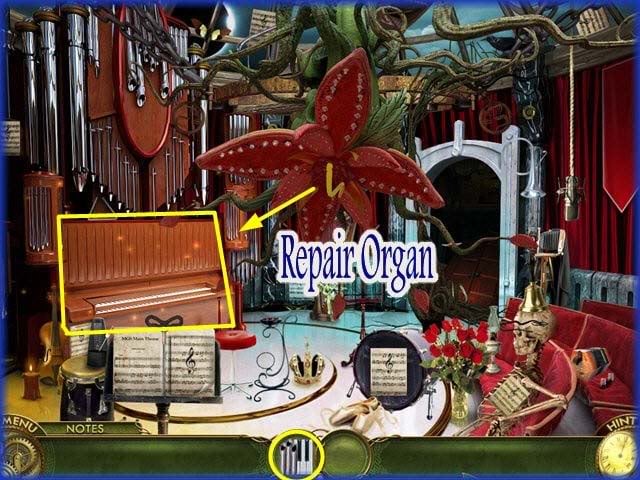
- Repair the Organ.
Tune the Organ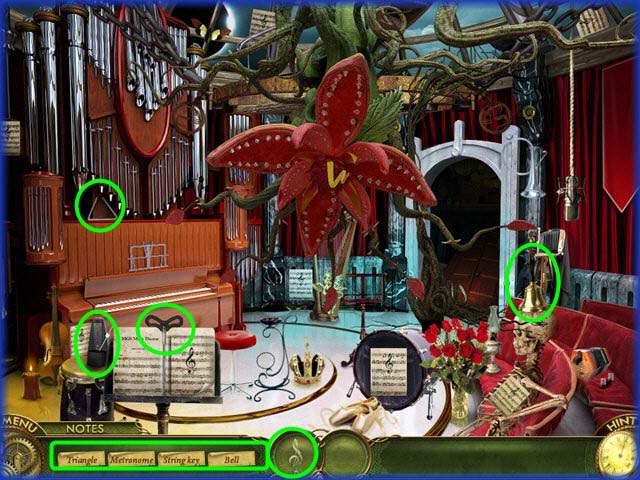
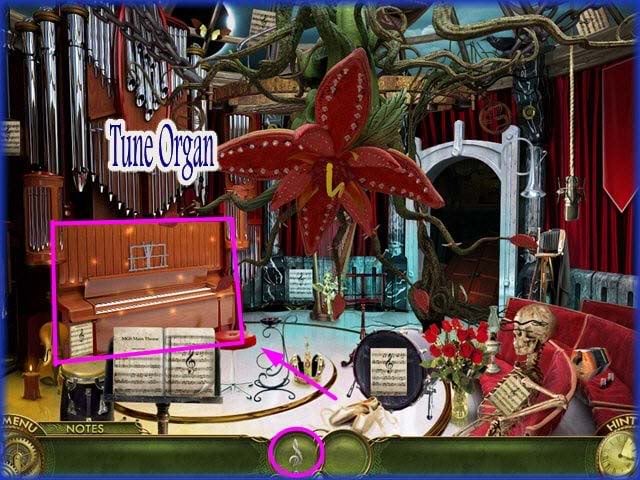
- Locate the 4 items hidden in the scene and circled above.
- String Key, Metronome, Bell and Triangle.
- Tune the Organ.
Locate the sheet music.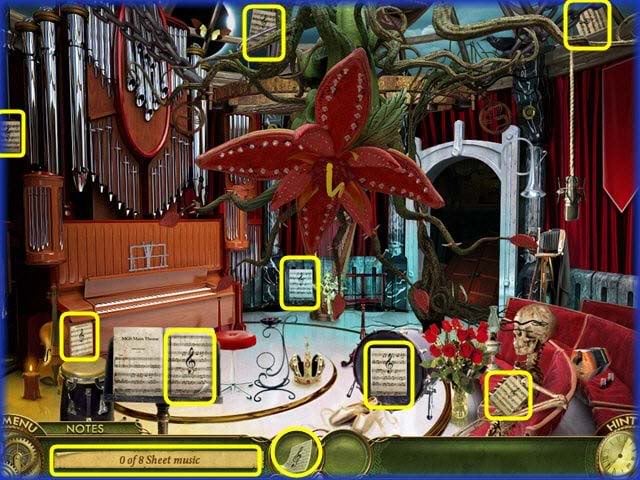
- Locate the 8 pieces of sheet music shown circled above.
- The organ plays and triggers a mini game.
Mini Game – Place the Tiles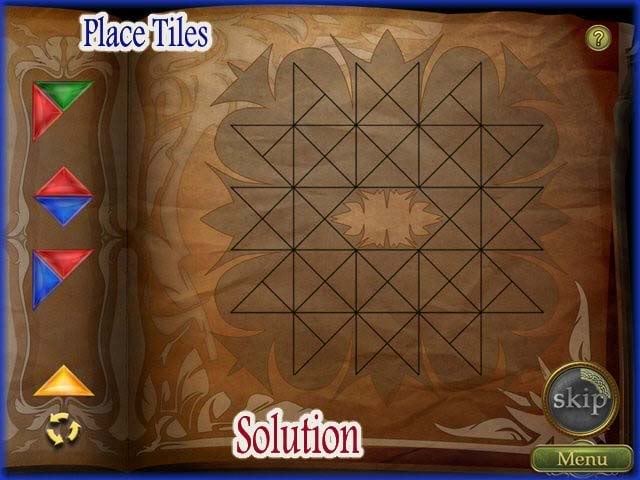
- In this game you are to place the tiles in the monster face outline.
- You can start with any colors you wish but they must be positioned correctly within the grid.
- Once you place a tile you can only place additional tiles that have a color in common.
- The tiles you can use are located along the left of the screen.
- Use the circle of arrows at the bottom left to scroll through the tiles.
- You should be able to find whatever tile or combination of tiles you need.
- You can skip this puzzle if you wish by clicking on the "Skip" button at the lower right of screen once it activates. It takes a few moments to become active. There is no penalty for skipping this puzzle.
- A solution example is shown above you can either copy it or make your own as there are multiple solutions to this puzzle.
- After the mini game the plant is asleep.
- Storyline – Miranda plans to release the staircase on top of the monster.
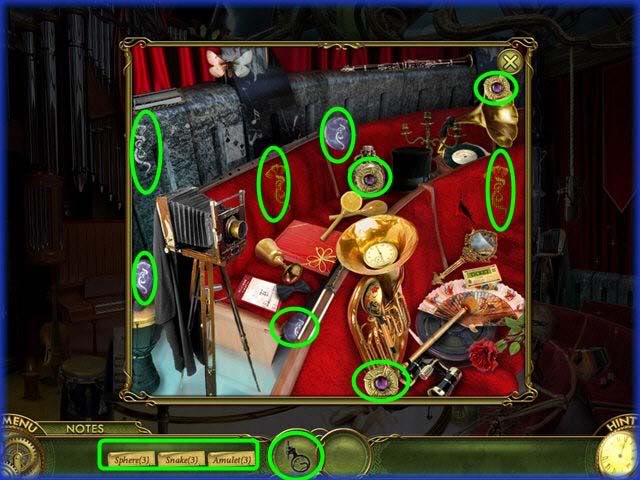
- Locate the hidden items shown circled above.
- Storyline –The staircase falls down and kills the monster.
- Now Miranda can escape.
Chapter 16 – "Otherside Street"
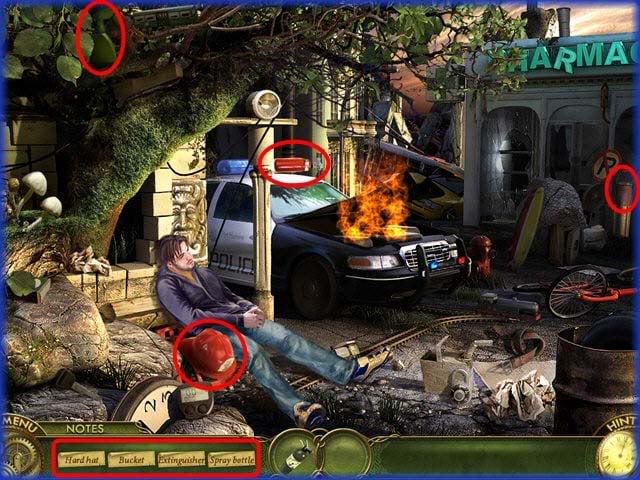
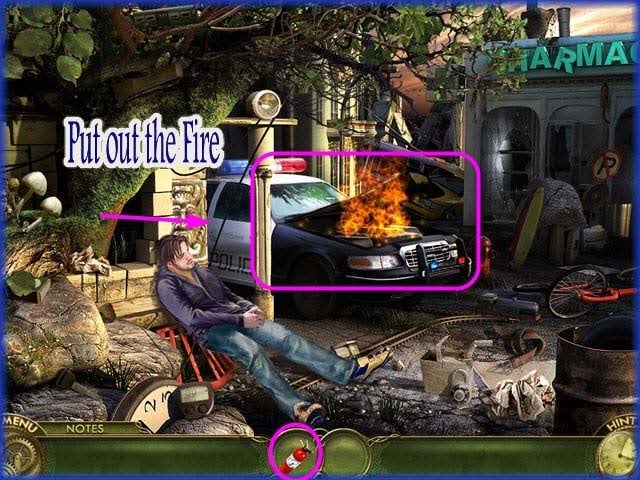
- Storyline – Miranda finds Michael unconscious on Otherside street.
- She needs to find a way to revive him and go after the destroyer.
- Locate the hidden items in the scene.
- Hard Hat, Bucket, Extinguisher, Spray Bottle.
- After you collect all of the items put out the fire.
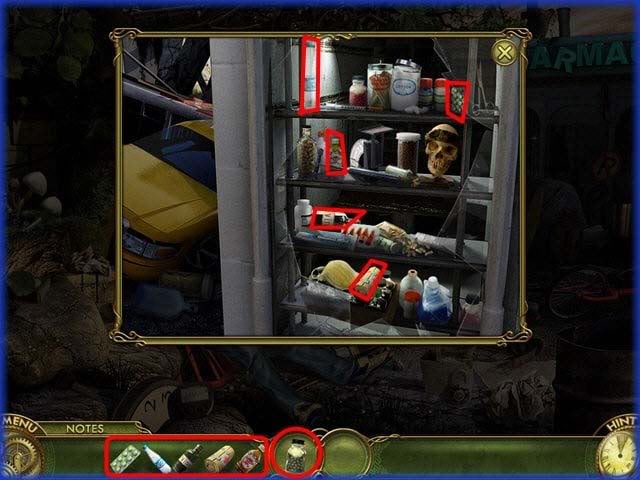
- Go inside the pharmacy at the right side of scene.
- Click on the shelf and find the hidden items shown and circled above.
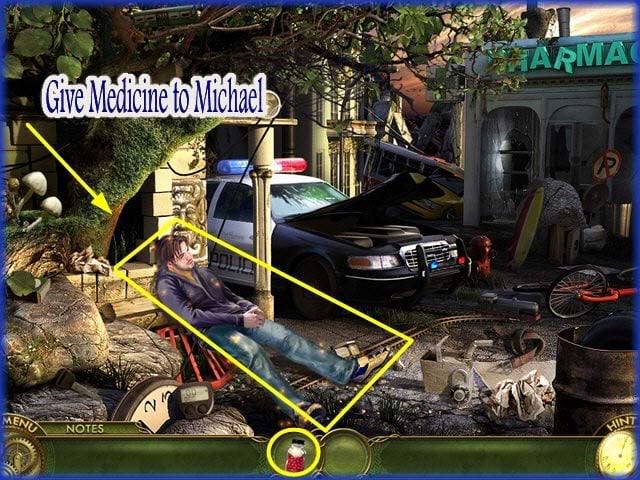
- Give the medicine to Michael to revive him.
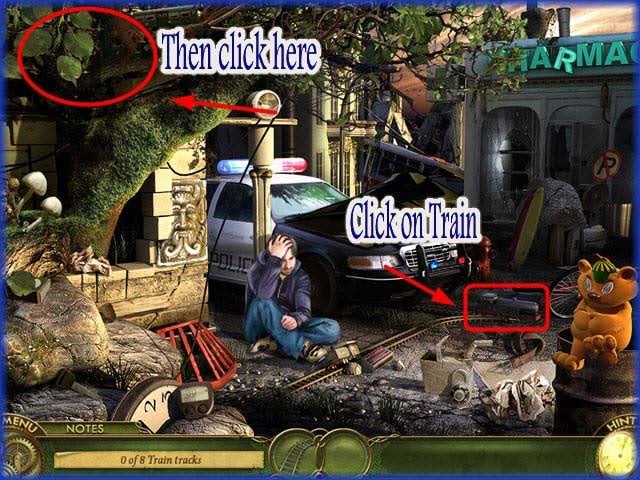
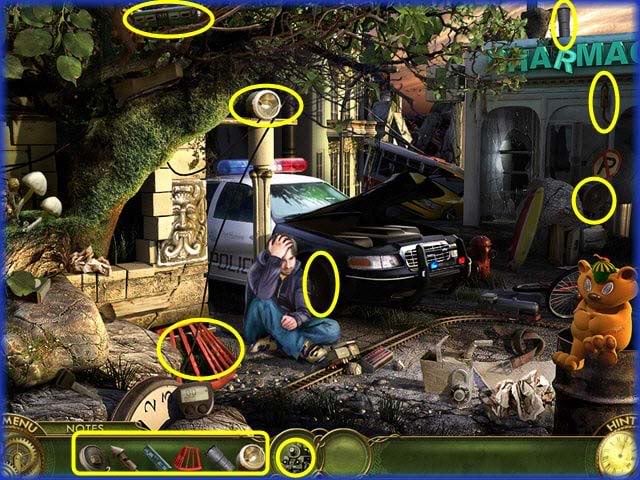
- Click on the Track
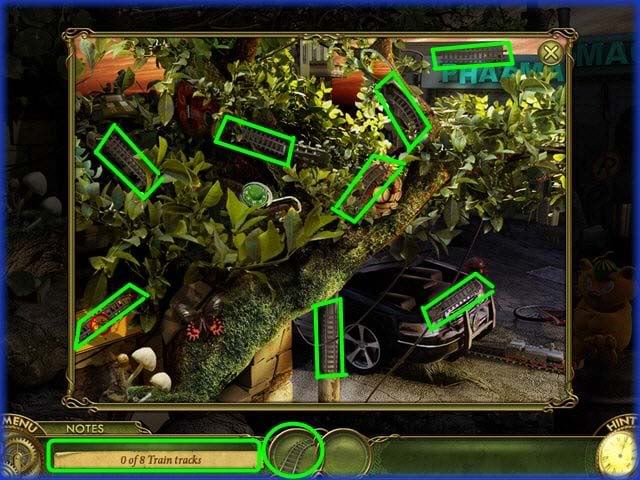
- Click on the tree.
- Locate all of the train tracks.
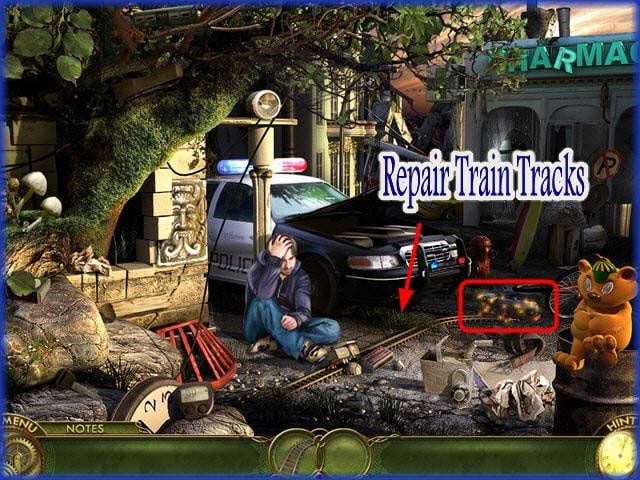
- Repair the tracks.
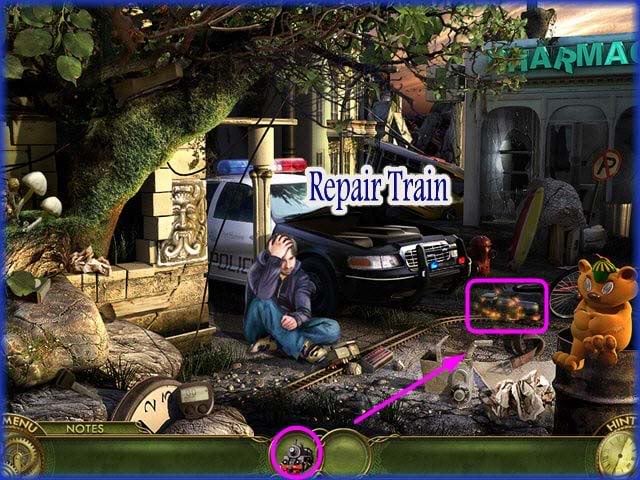
- Locate the train parts.
- Repair the train.
Start Fire in Train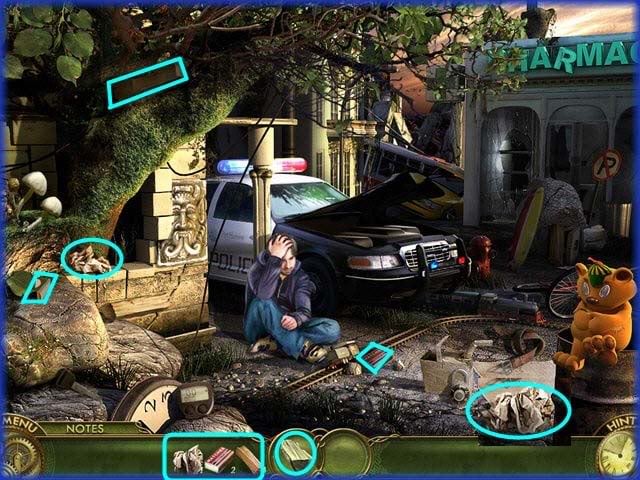
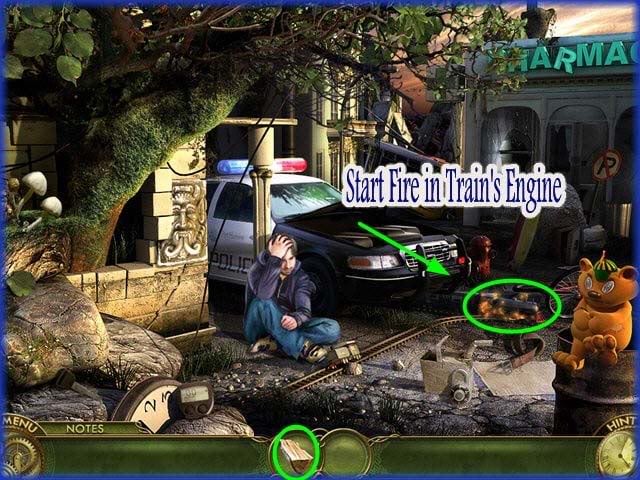
- Locate the 5 items hidden in the scene and circled above.
- Start fire in the train.
Chapter 17 – " Louise’s House"
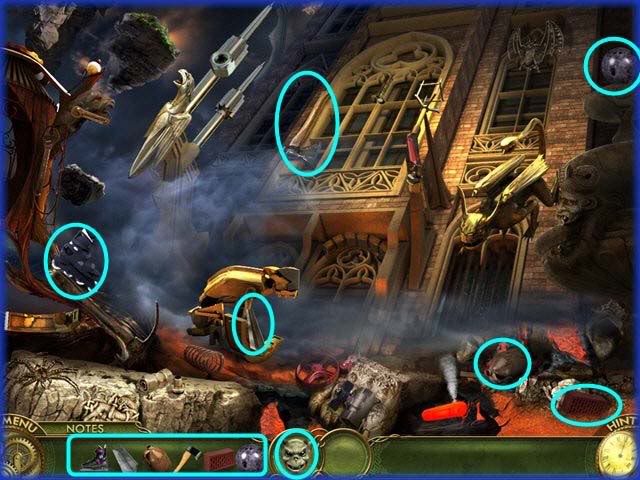
- Click on the door.
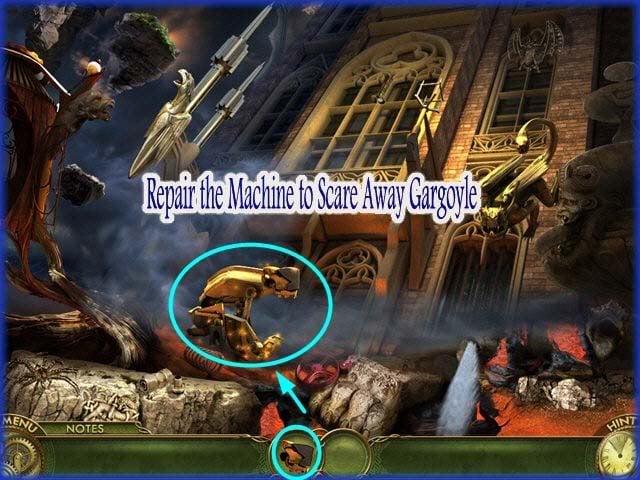
- The Gargoyle attacks you.
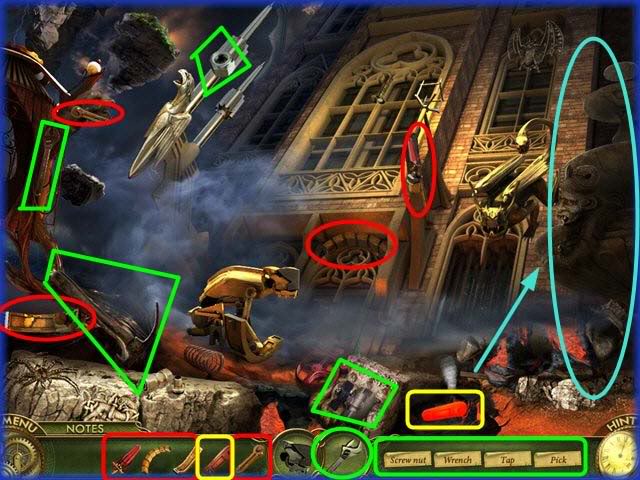
- Collect items to make a weapon.
- Collect items shown to repair fountain.
- When fountain is repaired collect box cutter and throw weapon at Gargoyle.
Gazebo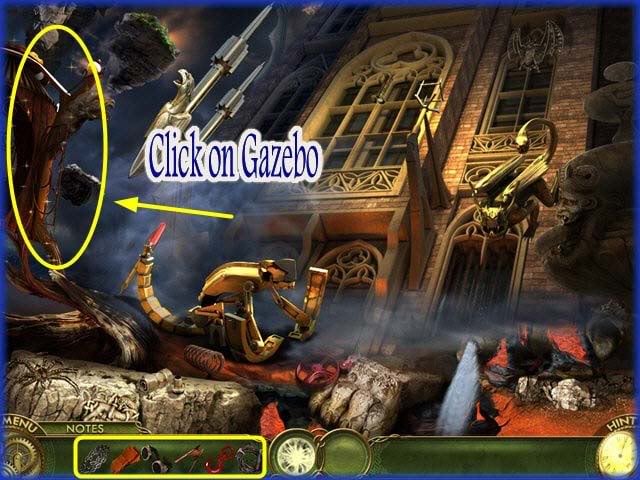
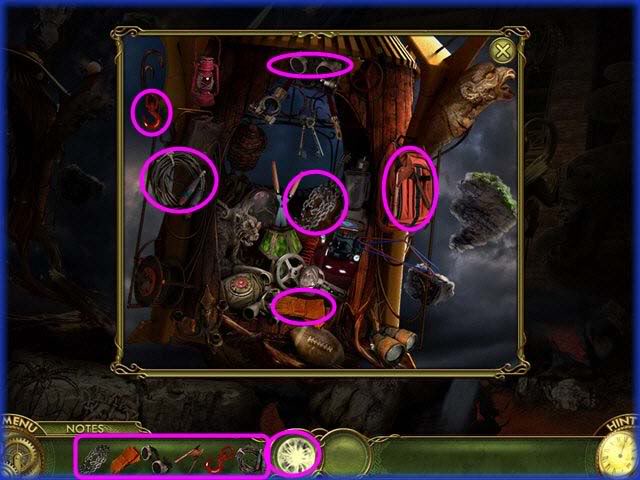
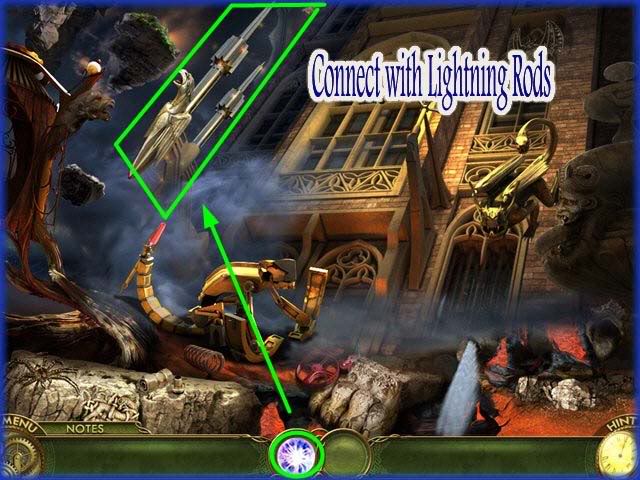
- Locate the hidden items shown circled.
- Place items on the lightning rods.
Hieroglyphics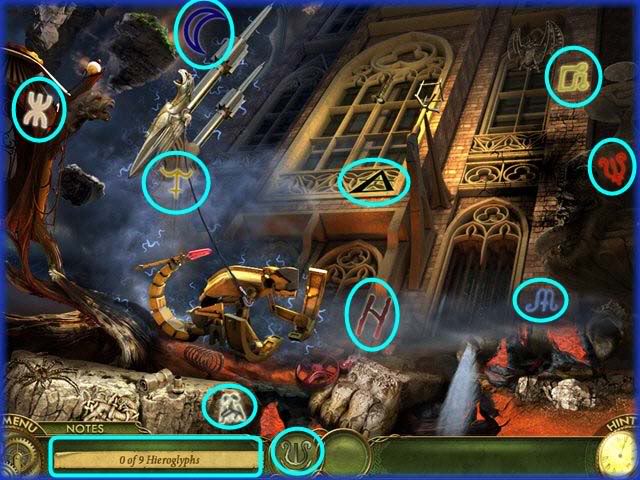
- collect the hieroglyphics.
- NOTE – The symbols flash on and off in the scene.
- They are shown in the image circled above.
- Triggers Mini Game
Mini Game – Place the Tiles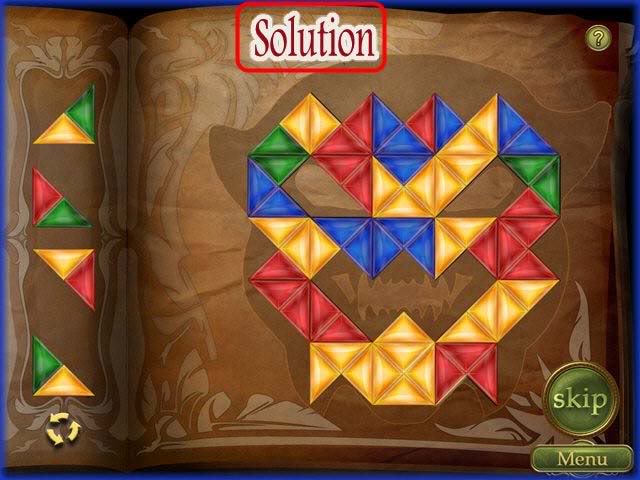
- In this game you are to place the tiles in the Gargoyle’s face outline.
- You can start with any colors you wish but they must be positioned correctly within the grid.
- Once you place a tile you can only place additional tiles that have a color in common.
- The tiles you can use are located along the left of the screen.
- Use the circle of arrows at the bottom left to scroll through the tiles.
- You should be able to find whatever tile or combination of tiles you need.
- You can skip this puzzle if you wish by clicking on the "Skip" button at the lower right of screen once it activates. It takes a few moments to become active. There is no penalty for skipping this puzzle.
- A solution example is shown above you can either copy it or make your own as there are multiple solutions to this puzzle.
- Storyline – Jovie arrives and he and Emily go inside the fortress.
- Jovie and Miranda meet with the Destroyer and she warns that the world is about to end.
- She is surprised to see Jovie as she put him away years ago. As she goes after him again he warns Miranda she needs to destroy the four towers.
The Four Towers
The Totem of Structure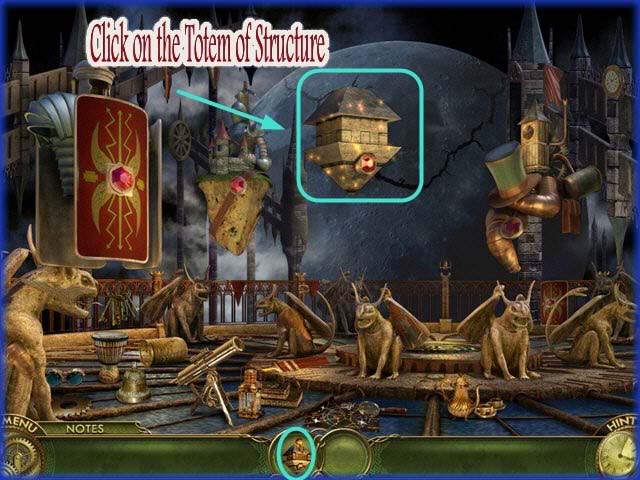
- Click on the Totem of Structure
- Triggers Mini Game
Mini Game – Puzzle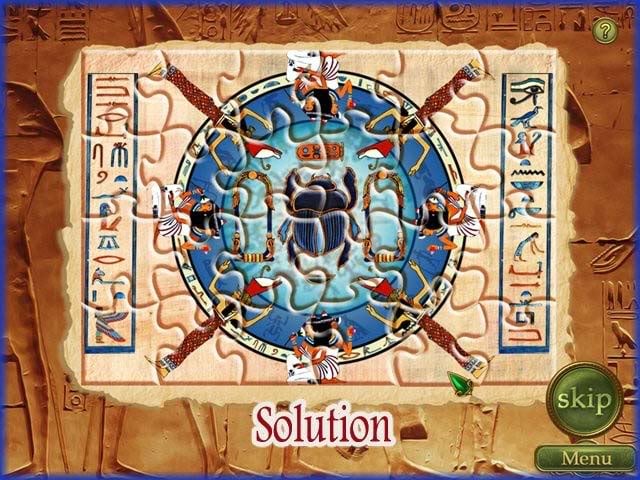
- Assemble the puzzle.
- Pieces will lock in place if placed correctly.
- Solution is shown above.
Totem of Defense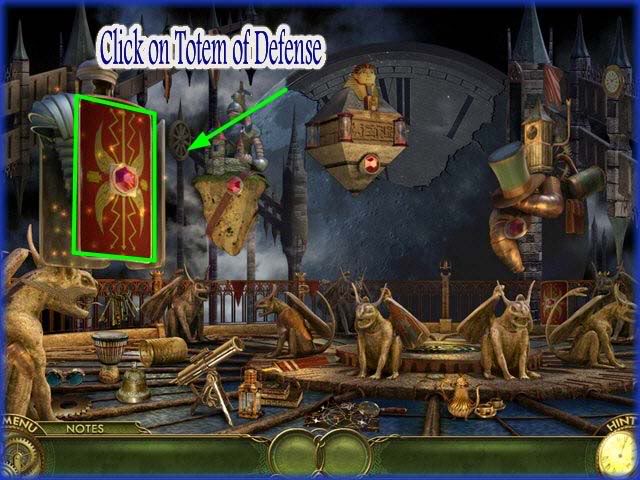
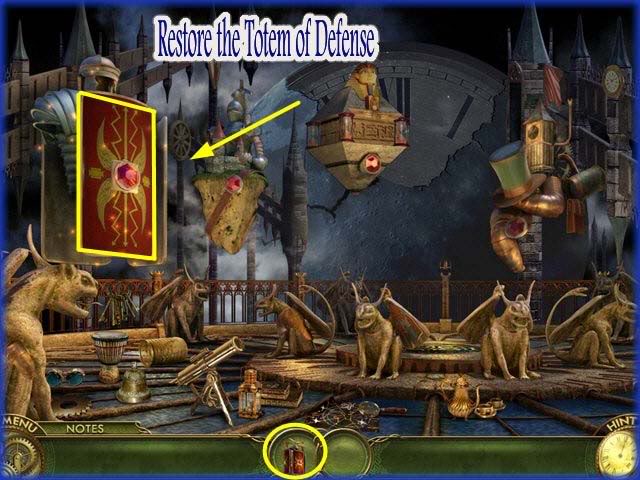
- Click on the Totem of Defense.
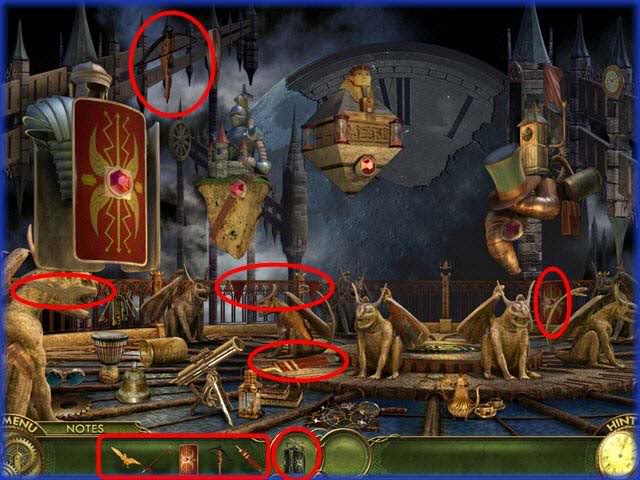
- Locate the hidden items shown circled above.
- Restore the tower of defense which triggers Mini game.
Mini Game – Hit the Target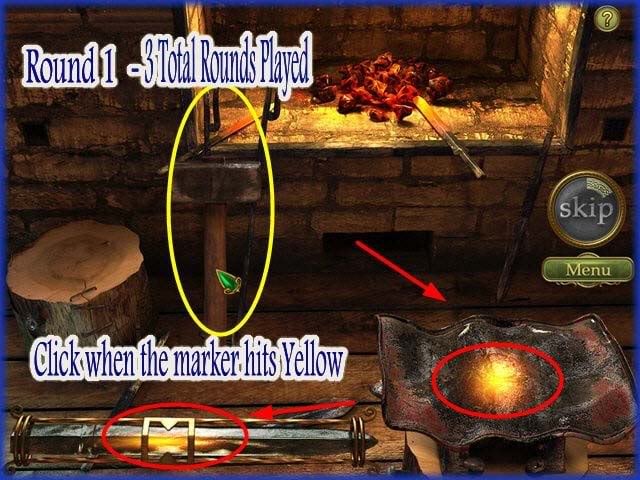
- In this game you will hit your hammer on the target with enough strength for a full hit.
- There is a bar at the bottom left. When the marker moves across it tells you how strong your hit will be.
- The yellow area is the strongest hit
- Click your mouse when the marker hits the yellow area and make sure your hammer is located in the right spot.
- There are three rounds to the game you must be successful with 3 different hammers.
- Each round straightens out the shield for the Totem of Defense.
- You may skip this puzzle if you choose.
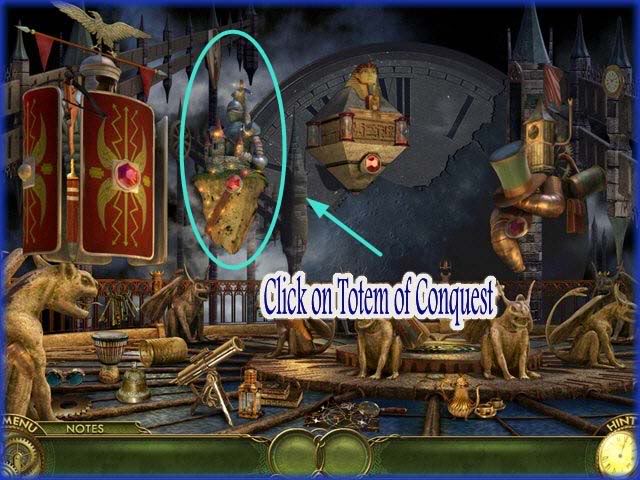
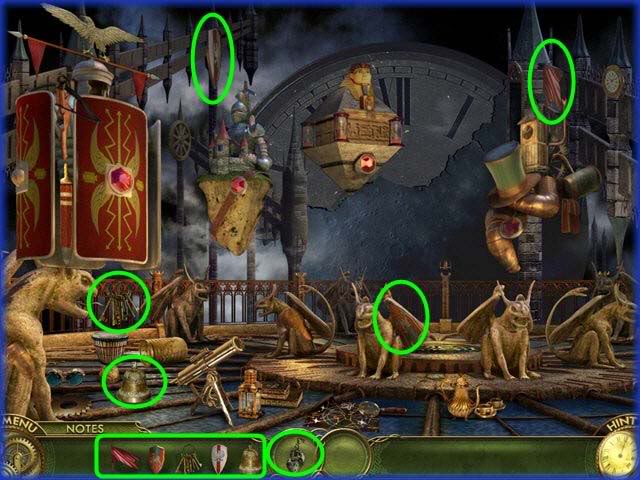
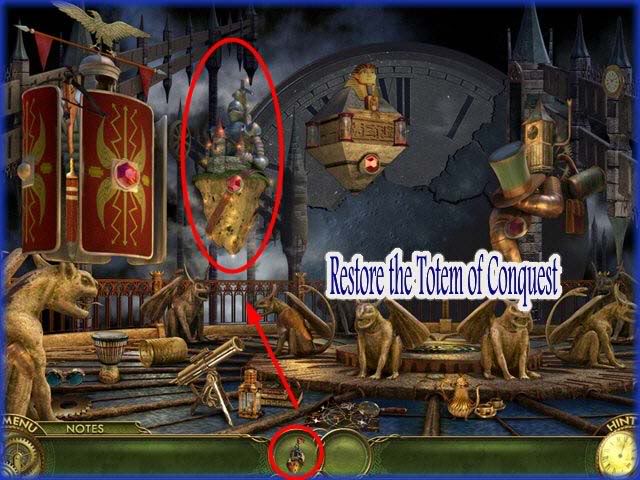
- Click on the Totem of Conquest.
- Locate the hidden objects shown circled above.
- Restore the Totem of Conquest which triggers a mini game.
Mini Game – Kill the Soldiers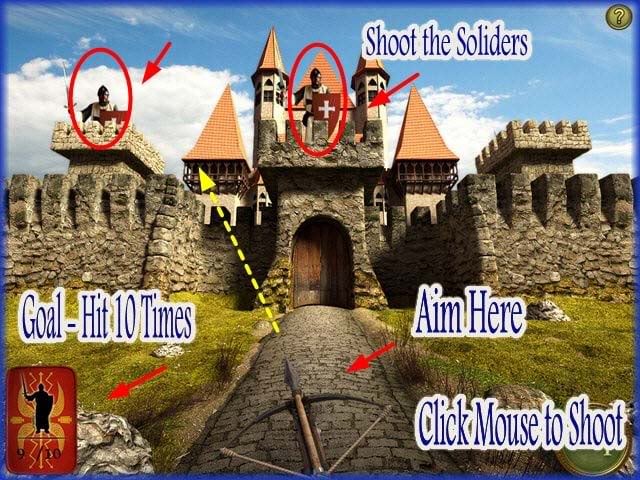
- In this game you need to shoot 10 soldiers.
- Aim with the bow at the bottom center using your mouse.
- Click to release the arrows.
- Click any of the 3 soldiers until you have 10.
- You can skip this puzzle if you choose once the skip button becomes active.
Totem of Innovation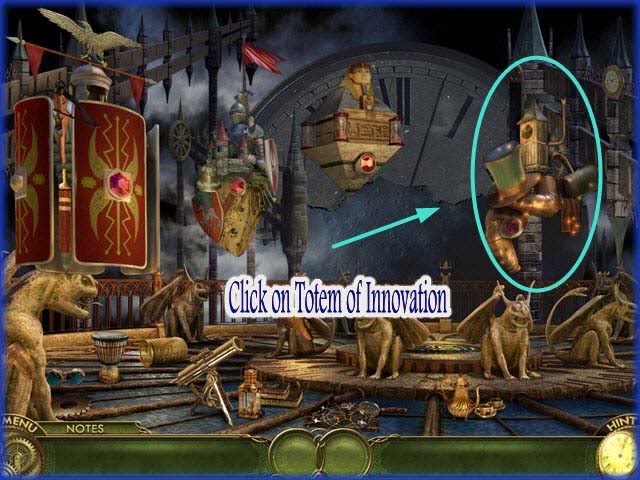
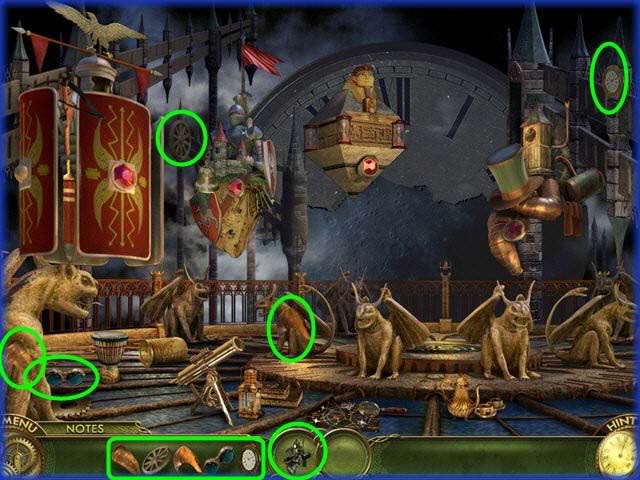
- Click on the Totem of Innovation.
- Locate the hidden items shown circled above.
- This triggers a mini game.
Mini Game – Driving Game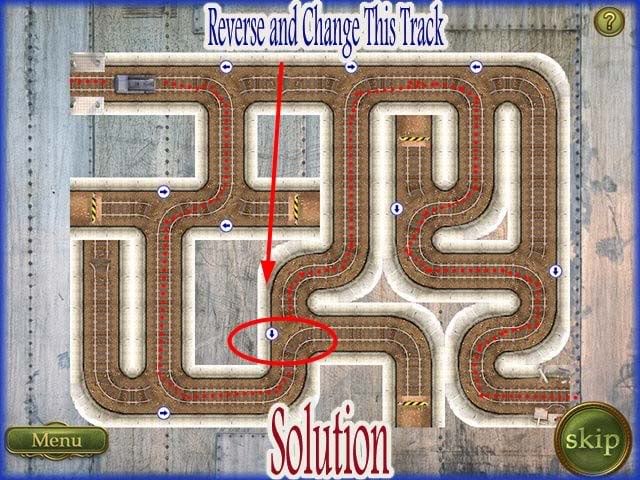
- In this mini game you are to drive the car from one end of the track to the other.
- If you hit a roadblock you will start to move in the opposite direction.
- If you hit the yellow striped fences you will crash and go back to the very beginning.
- At the area with the blue arrows you can click on the track and change its direction.
- You will need to change the track before the cart drives over it.
- There are several ways this can be done and one is shown above.
- You will need to have the cart go down one incorrect lane and while it is going backwards change it then the cart can make the rest of the journey. This is shown marked above.
- Look at the diagram above and how the tracks are positioned.
- You can skip this puzzle if you wish by hitting the skip button at the lower right of the screen once it becomes activated after a few moments.
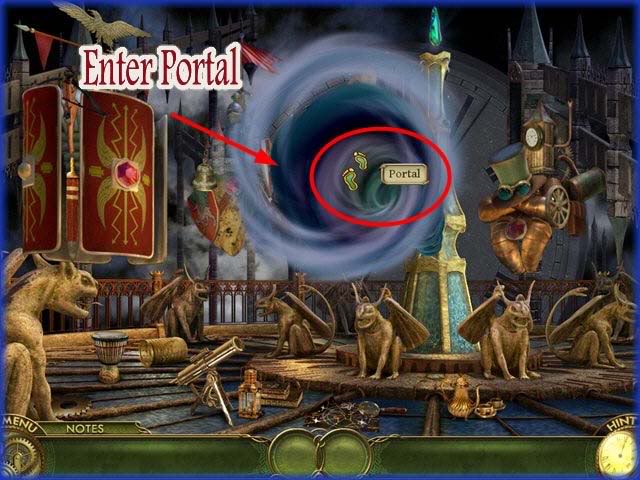
- After this game exit through the portal.
Fancy Workshop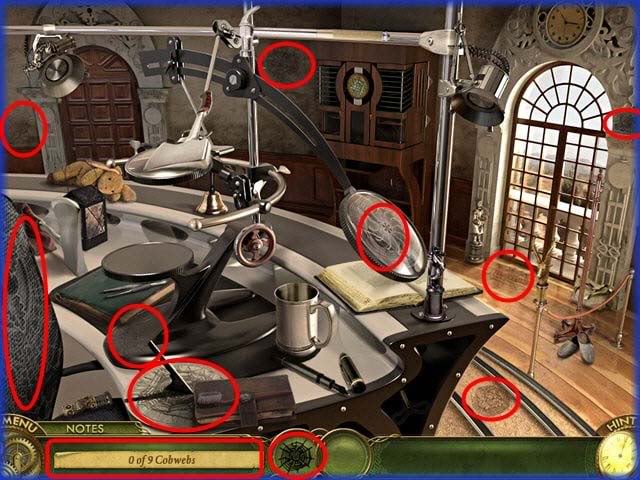
- Storyline – Miranda finds herself in a fancy workshop. She isn’t sure why she was sent here but she is looking for clues as to what to do next.
- Locate the 9 cobwebs in the scene shown circled above.
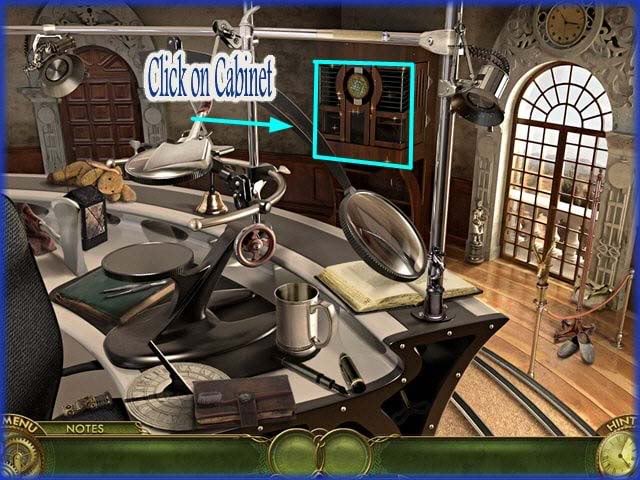
- Click on Cabinet far left side of scene.
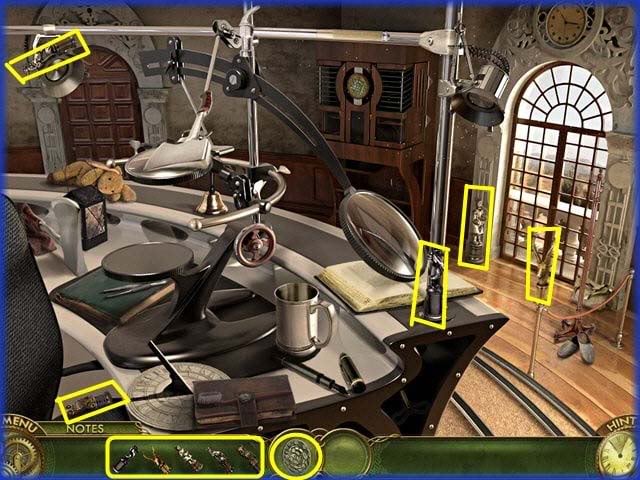
- Locate the hidden items shown and circled above.
- Triggers Mini Game.
Mini Game – Puzzle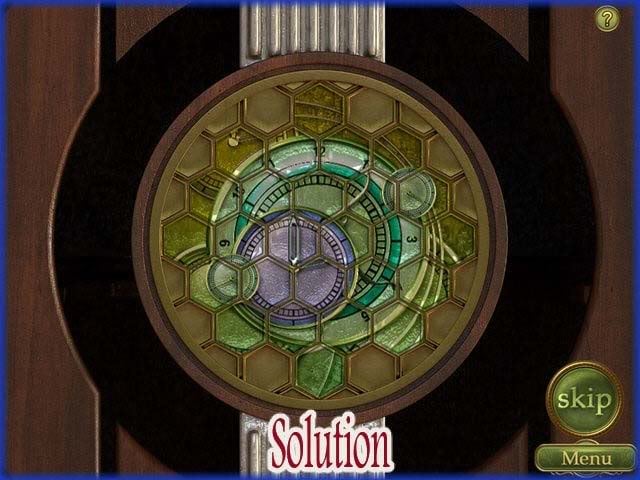
- Rotate the pieces until they come together to form the correct image.
- Solution shown above.
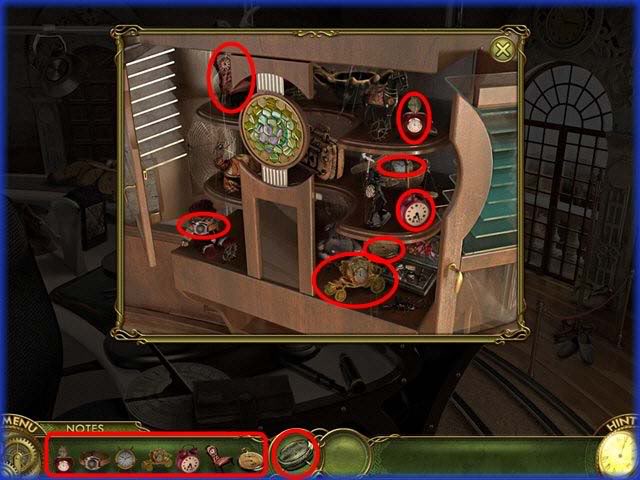
- Collect all the parts of the clock shown circled above.
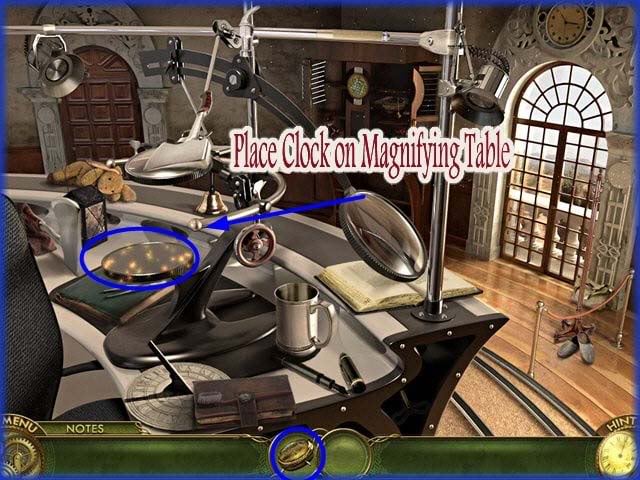
- Place the clock on the magnifying table as shown.
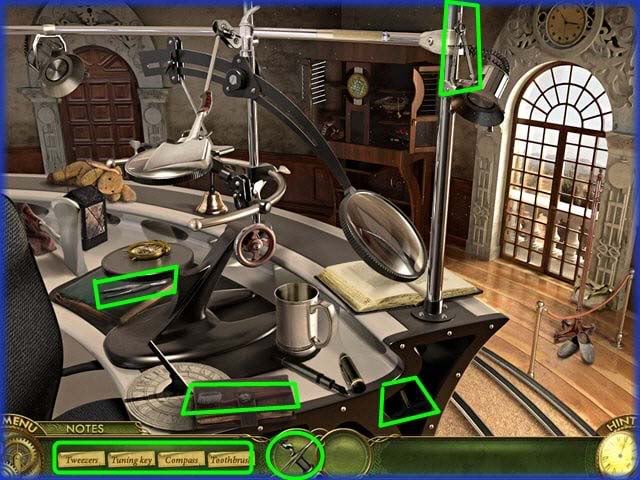
- Collect the tools hidden in the scene shown circled above.
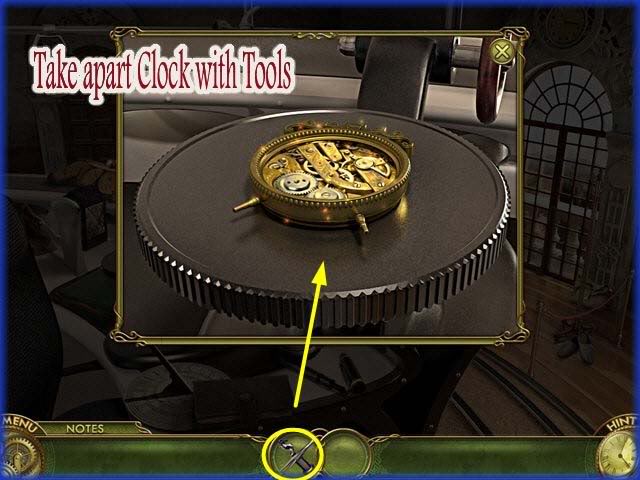
- Take apart clock with tools.
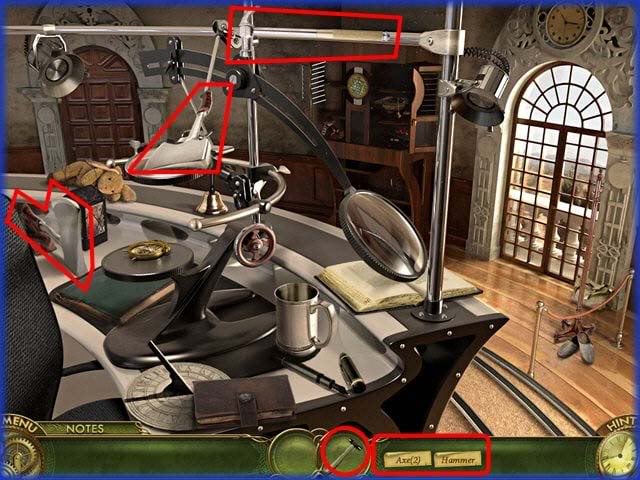
- Locate the tools as shown circled above.
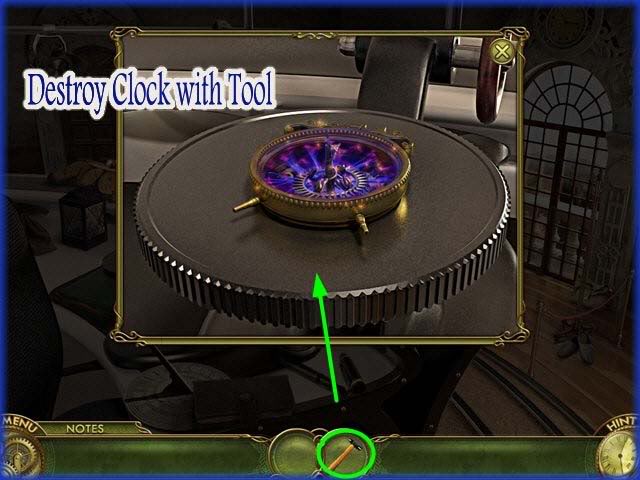
- Destroy the watch with the hammer.
- Storyline – With the destruction of the clock you see the destroyer explode into millions of pieces. Michael and Louise are restored and back together. The scene ends with Miranda receiving a package in the mail again. This time it is from Michael and Louise and it is a portrait of them together and happy. In the note Michael asks Miranda if she would be interested in writing a book about their adventures. She is finally going to realize her dream of becoming a writer.
Congratulations!
- Congratulations! You have completed The Otherside – Realms of Eons.
“;
More articles...
Monopoly GO! Free Rolls – Links For Free Dice
By Glen Fox
Wondering how to get Monopoly GO! free rolls? Well, you’ve come to the right place. In this guide, we provide you with a bunch of tips and tricks to get some free rolls for the hit new mobile game. We’ll …Best Roblox Horror Games to Play Right Now – Updated Weekly
By Adele Wilson
Our Best Roblox Horror Games guide features the scariest and most creative experiences to play right now on the platform!The BEST Roblox Games of The Week – Games You Need To Play!
By Sho Roberts
Our feature shares our pick for the Best Roblox Games of the week! With our feature, we guarantee you'll find something new to play!All Grades in Type Soul – Each Race Explained
By Adele Wilson
Our All Grades in Type Soul guide lists every grade in the game for all races, including how to increase your grade quickly!


