- Wondering how to get Monopoly GO! free rolls? Well, you’ve come to the right place. In this guide, we provide you with a bunch of tips and tricks to get some free rolls for the hit new mobile game. We’ll …
Best Roblox Horror Games to Play Right Now – Updated Weekly
By Adele Wilson
Our Best Roblox Horror Games guide features the scariest and most creative experiences to play right now on the platform!The BEST Roblox Games of The Week – Games You Need To Play!
By Sho Roberts
Our feature shares our pick for the Best Roblox Games of the week! With our feature, we guarantee you'll find something new to play!All Grades in Type Soul – Each Race Explained
By Adele Wilson
Our All Grades in Type Soul guide lists every grade in the game for all races, including how to increase your grade quickly!
The Omega Stone: Riddle of the Sphinx II Tips Walkthrough
Welcome to our strategy guide for The Omega Stone: Riddle of the Sphinx II. Walkthrough notes – You can choose the order in which you visit the locations. The order of this walkthrough is based on the order the travel-tickets you find. To travel to another location, get in the vehicle and give the ticket of your next location to Hump Allen. – On possibly dangerous moments, such as when you experiment with chemicals, get explosives or encounter lava lakes, save. It is possible to…
a:1:i:0;a:2:s:13:”section_title”;s:45:”The Omega Stone: Riddle of the Sphinx II Tips”;s:12:”section_body”;s:36230:”
Welcome to our strategy guide for The Omega Stone: Riddle of the Sphinx II.
Walkthrough notes
– You can choose the order in which you visit the locations. The order of this walkthrough is based on the order the travel-tickets you find. To travel to another location, get in the vehicle and give the ticket of your next location to Hump Allen.
– On possibly dangerous moments, such as when you experiment with chemicals, get explosives or encounter lava lakes, save. It is possible to die in this game, and then you will be taken to your last saving point.
– This walkthrough is designed to help you through the game, not to spoil every bit of storyline detail. At the beginning of each location, there is a list of locations of interest, which point you to places where you can find items that let you indulge further into the story.
WALKTHROUGH
Giza Plateau
Locations of interest
– The tent to your left, coming off the scaffolding.
The Ark
As you wake up confused, Gil informs you of what happened and takes you to the Chamber of Ages. When the game lets you play, you’re in front of the Ark. Left of the ark, you see a lamp; go there, and crawl through the little tunnel to reach a room with a pyramid in the middle.
Pyramid Room

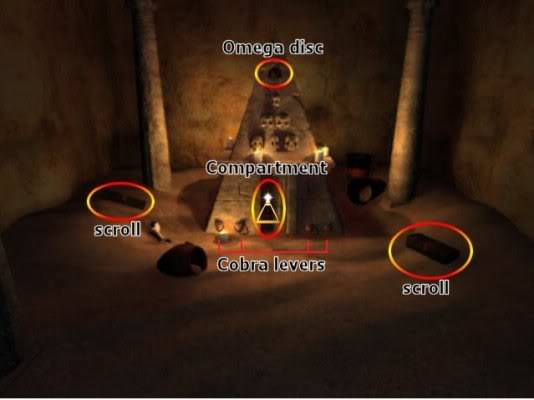
To the left and the right of the pyramid, on the floor, are two little cases. Open them and get the scrolls that are inside. Investigate the bottom of the pyramid and click on the middle stone to open a secret compartment, containing another scroll. Take it.
On the bottom of the pyramid, there are 4 cobra shaped levers. In order to take the Omega disc from the bottom of the pyramid, you need to press them in the order as instructed on the scrolls.
The order, from 1 on the left to 4 on the right, is:
1 333 4444 333 2 1 44 3 2 3333 1111 3333 4 1 222
Leave Giza
Leave the pyramid room and return to the ark; go past it and exit the Sphinx. When outside, turn right, pass under the scaffolding and as you come to the front of the Sphinx, turn right to see scaffolding going up. Go up, follow it and then walk to the helicopter to take it to your next location. This can be whichever one you like to do first, but I would suggest Stonehenge first.
Stonehenge
You are just here for now to trigger items to appear. As soon as you arrive, ask Hump to take you to Chichen Itza.
Chichen Itza
Tools from the back of the Hummer
Get out of the car and walk to the back of the Hummer. Open the trunk, and grab the grappling hook and the crowbar. Now get back in, and leave for Stonehenge.
Stonehenge
Locations of interest
– The drawers in the middle area of the van.
– The shower/bath room in the van.
– The drawers and shelves in the bed room in the van.
– The diary in the back pack on top of Stonehenge.
Arrival
You arrive at stonehenge in a van, with you sitting in the passenger’s seat. Look left behind you to see the back of the vehicle, and click to go there. Enter the room in the very back, the bedroom.
Bedroom
As you enter the bedroom, look to the shelves on your left to see a hat. Pick up the hat and take the coins that you find hidden under it.
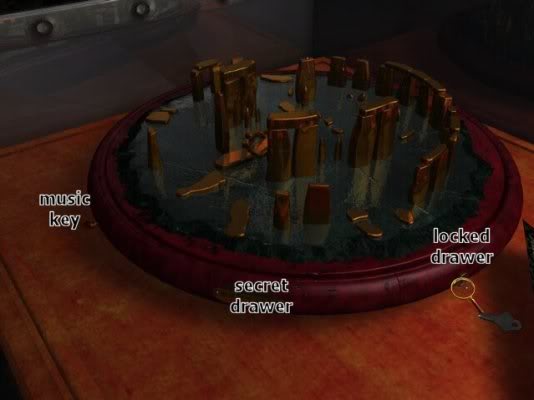
Look on the table in front of the mirror to find a music box. Find the key to the music box among a couple of letters on the right armrest in front of the van. Use the key on the keyhole on the right drawer of the music box, and turn the key on the left to play the music box. Open the secret drawer and grab the OmniDVR found inside.
Find the shovel

Return to the center of the van, turn to your right and exit through the door. Go to the gate straight ahead and open it. Turn left and follow the path all the way down to the intersection, and then follow the road untill you can go no further, where there’s a huge rock on your right side. On the other side of the road, you’ll find a shovel. Take it and walk back to the van.
Climb Stonehenge
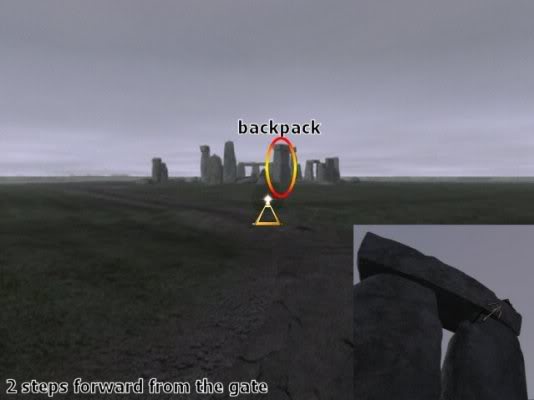
Coming from the road, to the left of the van there is a fence. Disregard the warning and just open it. Looking straight ahead, you can see Stonehenge. Go to the stone with the broken ladder at the bottom, and look up to see something on the edge of the top. Take the grappling hook from your inventory and throw it up there; now click on it to climb up. On top of Stonehenge, look down to see a back pack, and open it. Take the key inside, and optionally read the diary for more background story.
Disable the electrical fence
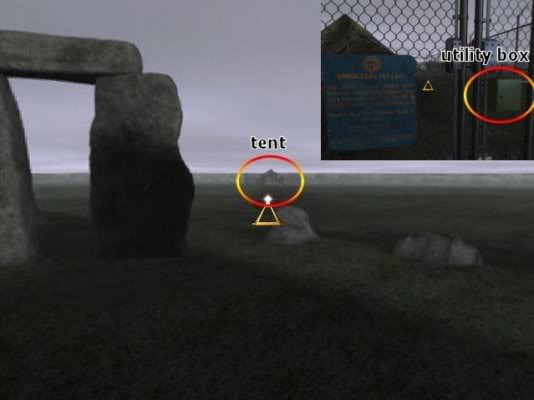
Click on the grappling hook to get down, and go forward to the tent area to find your way blocked by an electrical fence. Zoom in on the green utility box on the right of the fence, and open it with they key you found in the back pack. Swipe your Stonehenge location card, and enter the entrance code: 3306.
Excavation site
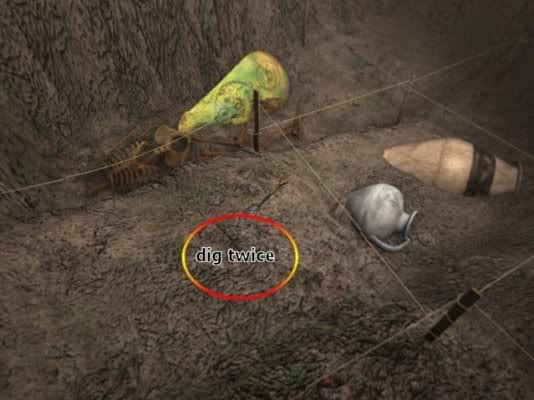
Walk through the fence to the excavation site, and walk into the ditch, to the far left. Turn around, take out the shovel and dig twice to find a case containing a scroll. Take it and return to the van.
Lord Bathlewaite’s Mansion
Locations of interest
– Crate in the basement.
– Book on the shelves under the basement staircase.
– Salon table in front of the back door on the first floor.
– Books on the top shelve in the study.
– Top floor of the mansion.
Next stop: Lord Bathelwaite
To trigger another letter you will need, visit another location and return to Stonehenge. Look on your right armrest and take the letter, which containts a map. Give it to Hump, and he will take you to the mansion of Lord Bathelwaite.
Lord Bathlewaite’s Mansion – maze
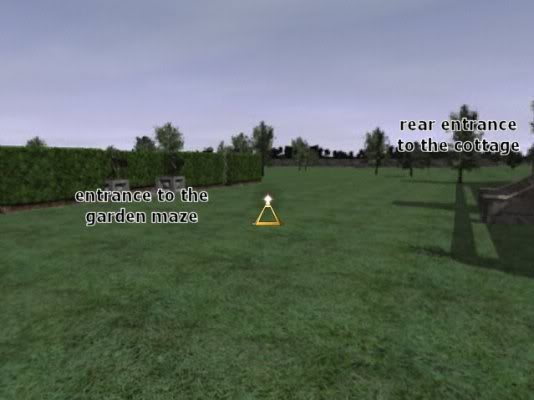
Map of the maze (click image to see the large version)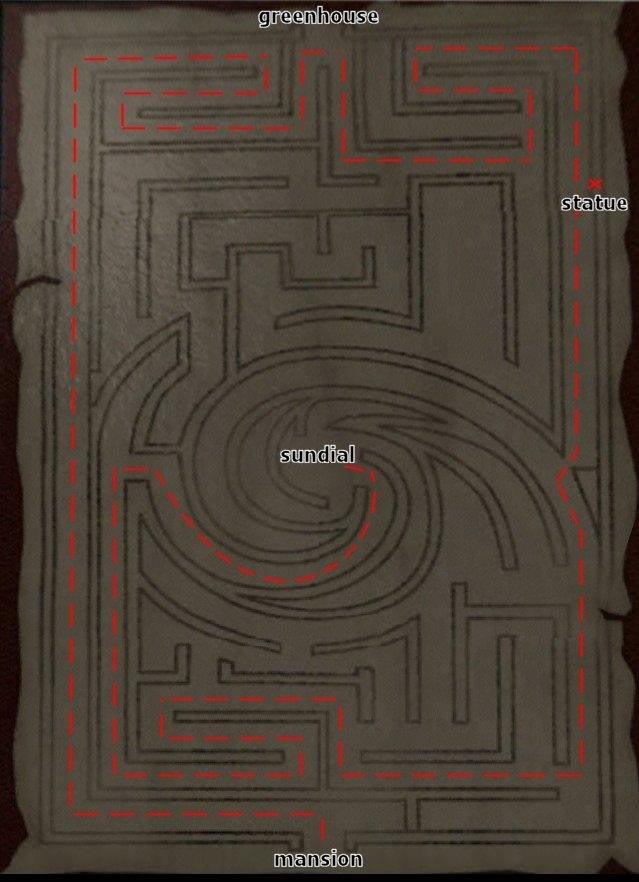
Get out the car and walk up to the door. Ring the intercom on the left side of the door, until you are answered, and refused entrance. Walk around the house to the back, and enter the garden maze. Find your way to the center of the spiraling maze, to find a seating area. Take the sundial, and then turn the knob. Now at the other side of the maze, you will find a greenhouse. (To get from the house to the greenhouse, just follow the maze via the outside)
Greenhouse
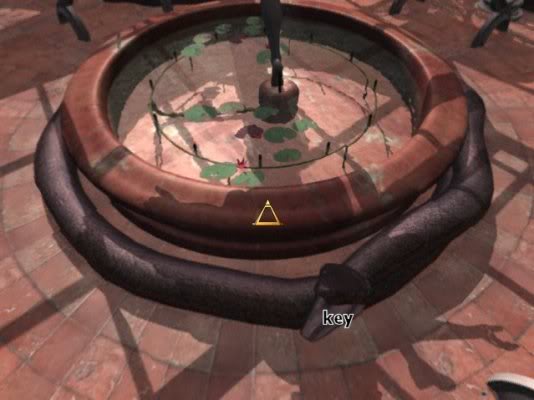
Enter the greenhouse and walk up to back of the statue in the middle. On the floor, curled around the statue, you will find a snake. Now that you’ve turned the knob in the maze, it’s mouth is open, and you can take the key to the mansion’s basement door.
Get in to the mansion
Alas the key you’ve got is not to the front door, but to the basement door. Return through the maze (to get through the maze, take a right and continue around the outside), and go to the right side of the house. Look down and you’ll see a basement door, which you can open with your key.
Explore the basement

When entering the basement, go to your left and use the crowbar from your inventory to open the crate. Open the case found inside, read the scroll, and take the Omega Stone from the crate. Walk around the staircase and look on the shelves under the stairs. Get the spoon next to the book, and go up the stairs.
Read the journal

Walk up to the back door, and notice the journal on the salon table. Read it, and flip through the pages untill you find a card in between the pages. Take it.
Talk to Bathlewaite
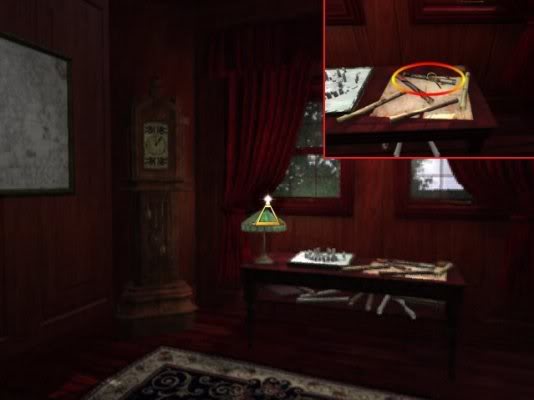
Enter the study to find Lord Bathlewaite busy writing. To your right, you will find a clock in the corner, and a table with maps. Go to the table, and grab the correct map (encircled on screenshot). Now turn to the clock, and Lord Bathlewaite will start to talk to you. After he’s said what was on his heart, look up at the clock and set it to the correct time: 09:55. Be carefull that the small hand appears to be on the 10, which actually comes down to shortly before 10. The clock will now open to reveal a secret passage. Go through, and go down the spiraling stairs.
Secret storage room
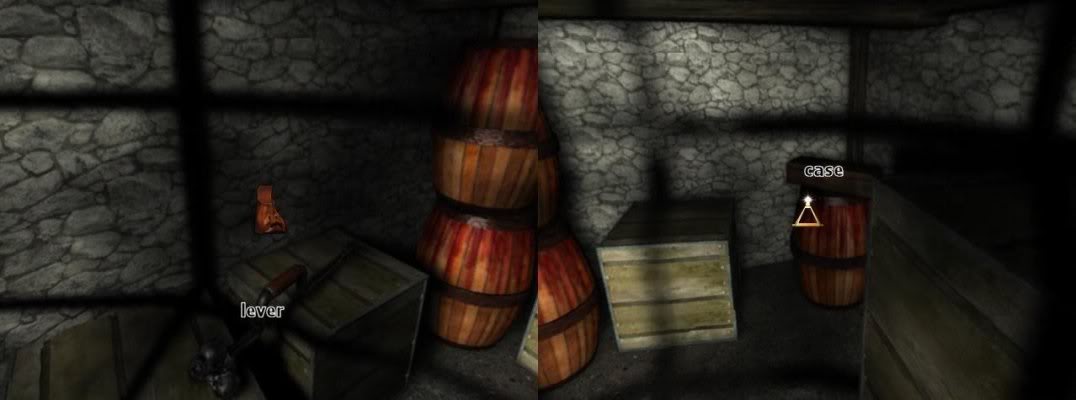
Look to your left to find a skull lever. Take it and add it to your inventory. In the back right corner you see a case; open it and grab the scroll found inside. Go back up and exit the mansion (just take the front door) and get in the car. Show the map you’ve found on the map table to Hump, and he will take you to the Celtic Compound.
Celtic Compound
Locations of interest
– Stone circles at the end of the tree paths.
– Book in the top of the tower.
– Telescope in the top of the tower.
– Tomb stones in the cemetary.
Open the gate
Walk up to the gate, and take the sun dial from your inventory. Place the sun dial in the middle of the gate, and it will act as a key and open the gate.
Open the tree tombs
Follow the path until you pass under a stone gate, and find a swamp with trees. On the front of these trees are 6 shields, each with a hole under it. Take the skull lever from your inventory and use it on these holes to ‘open’ the shield, revealing 6 tombs. Take the skulls from all of the tombs (one is missing its skull).
Inspect the tower
Between all the trees, there is a path. From the stone gate going straight forward, you will see a tall tower in the back. Follow the path there, cross the bridge, climb the ladder and open the door. Go up the stairs to a floor without any light, and then climb the ladder to find a sanctuary. Climb two more ladders to reach a floor with a table and food on it, and a scroll. Have a look at it, take a photo for later, and continue up to the sixth floor to find an alchemy workshop.
Take the two spoons from the table. On the table, there is one bowl sitting on the table, rather then on a stand. This bowl is filled with little crystals. Fill all your spoons with these crystals.
From there, take the ladder up and you will see a small trap door. Knock on it, and you will find the priest living in the tower not being too happy with your visit.
Inspect the priest’s room
You will need to leave the Celtic Compound, and then return to the tower to find the priest gone. Now go to the top floor, where you were previously denied entrance. Check the drawer in the little table, and take the spoon inside. Take the key hanging off the bed post, and go back down and leave the tower.
Celtic cross in the cemetary
When you’ve come down the tower and crossed the bridge, go right to find a cemetary. Use the key you’ve just found to open the gate, and walk to the gravestone in the back with a golden celtic cross on top of it. Take the cross, and return to the first floor of the tower.
Tower basement
When you enter the tower, look a little to the right and you see a niche with a cross indentation. Use the celtic cross on there as a key, and the stairs will move to reveal a ladder into the tower basement. Here you will find 6 swords hanging on the wall; take the first sword on the right side of the ladder, the only one you can take. Now head back to the mansion.
Lord Bathlewaite’s Mansion
Return the sword to the statue in the maze
Return to the mansion, and enter the maze. Find the statue without a sword on the far-right back of the maze (click here to see the maze map), and return the newly found sword to his hands. The statue will now move back and reveal a secret lawn.
Secret lawn
Enter the secret lawn area and continue until you find sort of a stone bunker and enter it. Inside you will find a small altar with the sixth skull, and a scroll. Take the skull (you can only look at the scroll) and return to the maze. As you enter the maze, the statue will automatically move back and return the sword. Now return to the celtic compound.
Celtic Compound
Find the hut
Return to the stone gate and counting from the stone gate, take the path between the second and the third tree on the left until you encounter a hut. Walk around the left until you find the door, and you see a fire burning inside. Behind the fire, you see an altar with 6 stands. Put all the skulls on these stands.
Alchemy
What you need to do now, is put the right amount of the different substances on the mesh in the middle of the plate in front of the skulls. Look at the signs on the spoons, and compare them with the chart in this guide, to figure out which spoon stands for which measurement.
warning:
the next puzzle will need to be done perfectly, or you can start the whole sequence all over. So make sure -if needed write it down- you don’t make any mistakes.
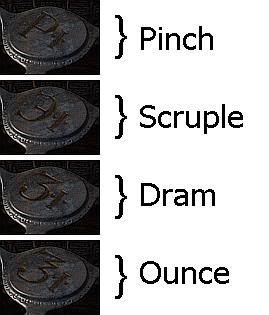
You can get the substances by opening the tops of the skulls. However, since the horse skull is empty, you’ll need to get the crystal yourself. Earlier in this guide, we already filled our spoons, so we can put 1 ounce and 1 scruple on the mesh. Now return to the tower, and get one more scruple of crystal.
Now add substances from the following skulls:
Bird skull: 1 ounce, 4 drams, 3 pinches
Snake skull: 4 drams, 2 pinches
Boar skull: 1 pinch, 1 dram
Swan skull: 14 ounces
Fish skull: 1 ounce, 4 drams, 4 scruples
Once you have all the substances added, walk over to the fire, grab a log of wood and put it on fire. Now take the burning piece of wood and take it to the mesh and put it on fire. If you’ve made a mistake, you will just see a bit of grey smoke and you need to start all over. If you’ve done it right, a magical cloud of smoke will twirl around and another Omega Stone will be revealed.
Next destination
You’re done on this side of the channel now, so return to the helicopter pick-up spot, and when you’re back in front of the mansion, give Hump the travel card for Stonehenge. When you arrive at Stonehenge, give Hump the travel card for East Island: your next destination.
Easter Island
Locations of interest
– Letters on the desk in the tent.
– Books and scrolls on the floor in the tent.
– Listen to the memory chip using the OmniDVR (found in the van in Stonehenge).
Get your stuff from the tent
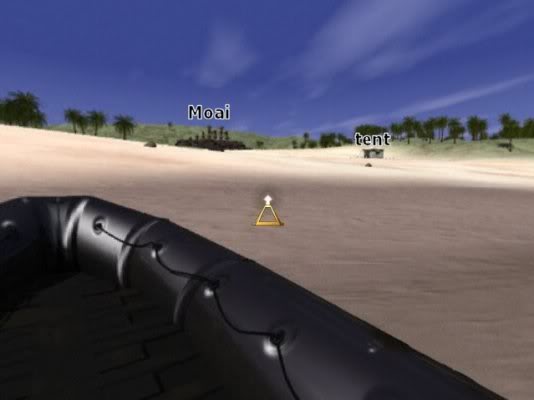
When you arrive on the beach, look up and you will see a tent on your right. Go in and read through the letters on the desk to find a memory chip. Facing the opening, in the left corner you will see two scrolls and a mask. Take the mask. On the other side, on top of a tree stump, you will find a detonator with a red button, and a pack of explosives. Take the explosives.
warning:
Do NOT press the detonator, or you will kill yourself and have to restart at your last save game.
Check the Moai
Walk further up the hill and check the Moai statues facing towards the island’s inland. Put on the black mask you just found, and walk up to the statue that has light coming from it’s eyes: the second from the left.
Blow up a piece of history
You are supposed to blow this statue up, so put the pack of explosives on it and return to your tent. Again, be warned that if you blow up the wrong statue, the island -including you- will be swallowed under a big hot stream of lava.
Easter Island cave
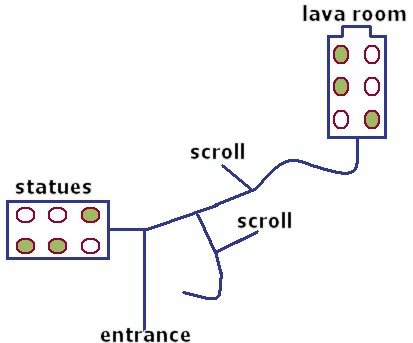
Go back up to the statues. Look down where there is now a missing statue, and you will find a big gaping hole in the ground. Drop down to find a cave complex. Go down through the tunnel, and take the first tunnel left to enter a room with six statues. Put the black mask on, and note which statues have light coming from their eyes.
Return to the main tunnel, and then take the first tunnel right, and then the first tunnel left to find a case with a scroll in it. Go back to the main tunnel, and now take the first left to find another case with a scroll.

Return to the main tunnel and continue around the two turns. When you arrive at a lake of lava, you will see a statue holding another Omega Stone at the other end. To cross the lake, you will need to turn the levers on both sides of you, in accordance with the order of the statues you saw earlier. Walk forwards, and if you turned the correct levers, the statues on the side will drop down and form a bridge for you. Cross it and grab the Omega Stone.
You’re done on Easter Island, so return to your boat, and give Hump the travel card for your next location: Devil’s Triangle.
Devil’s Triangle
Locations of interest
– Letter next to the map (memory chip inside).
warning:
Do not go into the water without your diving gear on, or you will drown and die.
Find the treasure
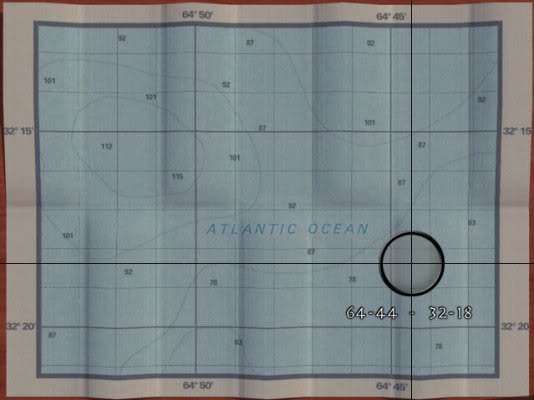
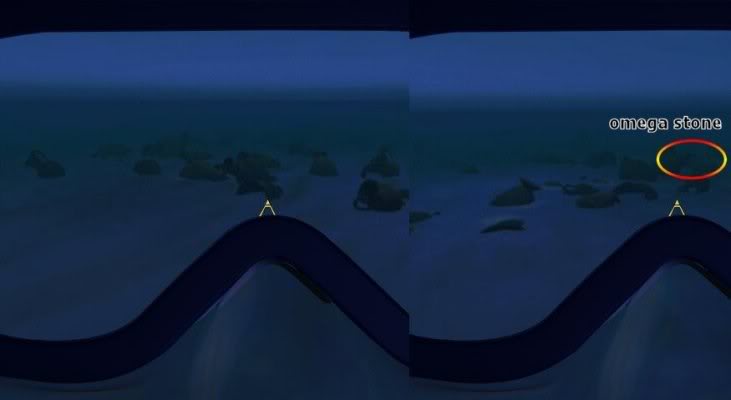
Check the map, and select the location 64-44 – 32-18 by scrolling over the map’s grid. When you arrive there, go to the back of the ship and put on the diving gear by clicking on it. Dive into the water, and you will see a lot of vases on the bottom of the sea. On the far right edge of this graveyard of vases, you will find a vase that has an Omega Stone in it. Retrieve it and return to the boat. Your next location is Chichen Itza.
Chichen Itza
Locations of interest
– Books in the big main tent.
– Map on the table.
– Ground floor entrance on the side of the pyramid.
– Column area in the Sacred Cenote’s flooded chamber.
– The king’s tomb
Climb down into the Sacred Cenote
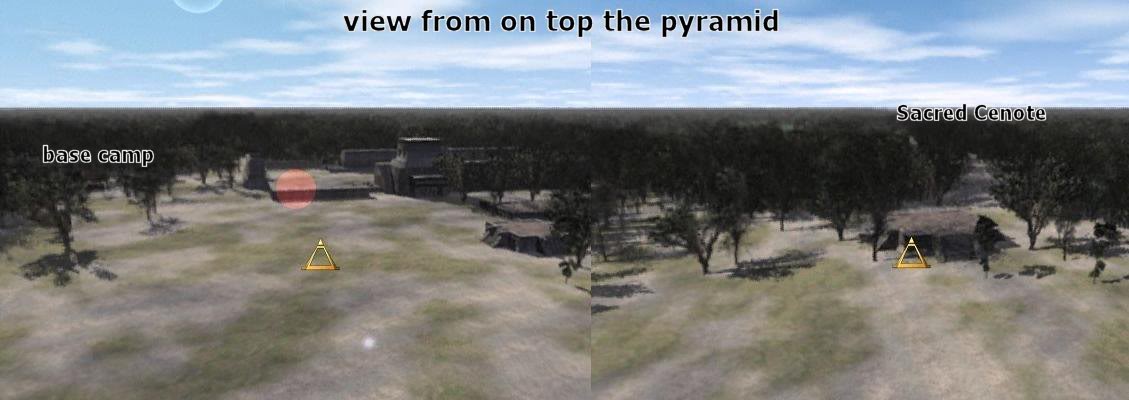
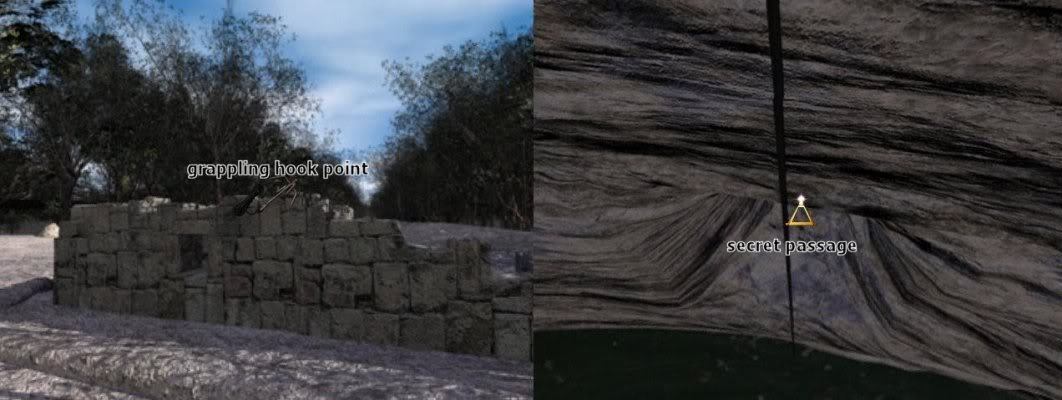
Upon arrival, step out of the hummer and walk towards El Castillo, the big Mayan pyramid. Walk up the pyramid, and on top, walk to the left side of the pyramid. Now look straight down the pyramid, and you will notice a path leading through a forest. Go down and follow that path to find a big hole in the ground. Use the grappling hook to climb down into this hole, and looking down, you will see a secret passage. Go through and go all the way down to enter the Sacred Cenote.
Find the jade skulls in the flooded chamber
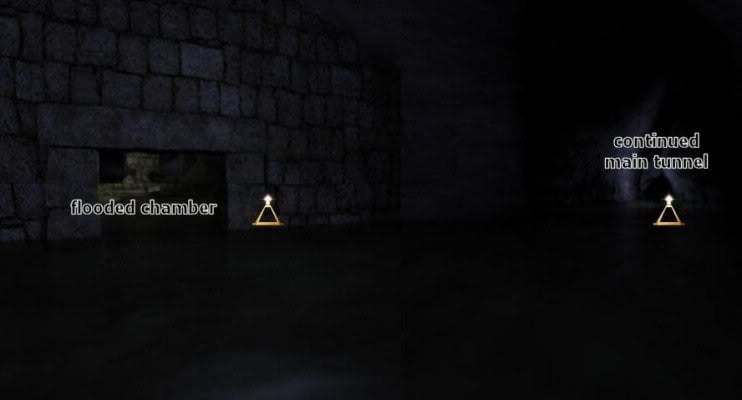
Wade through the water, through the tunnel, untill the cave widdens and you can see a flooded chamber to your left. Enter the chamber and walk over to the big stone in the water. When you stand next to it, look down into the water to find a jade skull, which you can pick up; Do so. Walk up the stairs, and on the floor in the middle archway, you will find another jade skull. Pick that one up as well.
Find the hidden staircase

Leave the flooded chamber and go left to continue through the main tunnel. In the next room you will come out, at first sight there are three tunnels branching off from here. Look closely on your right though, and you will see a clear spot on the floor. Walk over there and use the crowbar to reveal a hidden staircase. Go down.
King’s tomb

At the bottom of the staircase, you enter a big room with a big mayan statue right in front of you. Walk around the statue to the back to find a table with all kinds of offerings to the king. Take a closer look, and you will find another jade skull, and a Cenote bell. Take both and go back up the staircase.
Ceremonial chamber
Once back in the intersection room, go straight and after 4 steps into the tunnel, look up. You will see a shaft leading up, with steps carved into the wall. Climb up here to reach a ceremonial chamber. In this small room, you will see a number of ceramic plates on the floor. Inspect them to find another Cenote bell on them and take it.
Jade skull in the intersection room
Return to the intersection room, and turn left towards the continuation of the main tunnnel. Before you go in though, on your right you will find another jade skull. Take it, and enter the tunnel.
warning:
It is very easy to get completely lost in the tunnel system ahead, so it is advisable to save your game in case you want to return to this room and start your search over.
Find the inside pyramid
As you pass through the long tunnel, it will at some point open up a bit into a small rock-filled cave. Continue through the main tunnel, keep left, until you find yourself in a big hall: this is the inside of the El Castillo pyramid.
Inside El Castillo
When you enter, immediately go left behind the row of columns, and in the corner, you will find a rope. Take it. Now go to the platform in the center of the room, and look to the entrance you just came from. In the mouth of the panter statue on the right, you see something green: take yet another jade skull. Now track back to the intersection room, and down into the king’s tomb.
Open the king’s tomb
Walk up to the statue in the middle of the room, and click the rope you’ve just found on it to trigger a mechanism. In the back of a room, part of the wall falls down and reveals the actual tomb.
Open the sarcophagus
Open the sarcophagus’ lid to find the body of the king of the Maya’s. Near his hips, you see another jade skull, along with a mask. Get both.
Back to the pyramid
Go back up the stairs to the intersection room, and turn right into the main tunnel. Follow it back all the way into the inside of the El Castillo pyramid. Cross the platform room and continue through the corridor on the other side. This is a long corridor, so just keep going.
Have a look at the stone tablet you see on your way. Keep going until you get to another intersection room. Look to your left, and in between the rubble is another jade skull. Grab it, and instead of taking the tunnel left, continue even further through the main tunnnel. It will appear this is a dead end, but just before the end on the left, a a new tunnel branches off.
Death chamber
Go down and enter a death chamber with an impaled skelleton. To the right of the skelleton, on the floor, you can find another jade skull.
Get to the green pool room
Go back up and get back to the intersection room at this side of the pyramid. Go right and step through the broken wall, and follow the tunnel. 4 clicks in, you can pick up another jade skull. A little further down the tunnel, you can find another stone table. Keep following the tunnel until you find yourself in a room with a pool of green water.
Dive for bells
Dive down into the water, and find a passage to an underwater cave. In here, between the rounded rocks, you will find 2 cenote bells. Go back to the main pool, and look around the area with the wooden logs, to find 2 more bells, and a jade skull. You have now found everything you need to unlock the secrets of the Mayans.
Finding the skull room
Backtrack all the way to the first, large, intersection room. Turn around, and head back (it’s just easier this way) to the rock-filled cave area. Instead of heading straight through, go right and look for a small crack in between the stones. In front of it, is some rubble, but also a jade skull to pick up. Once you’ve found that one, crawl into this new tunnel and continue until you enter a small vestibule with drawings on the walls. Look in the corner to find a scroll with symbols, and continue until you find a big room filled with skulls on the walls and on a rack in the back.
Skull room
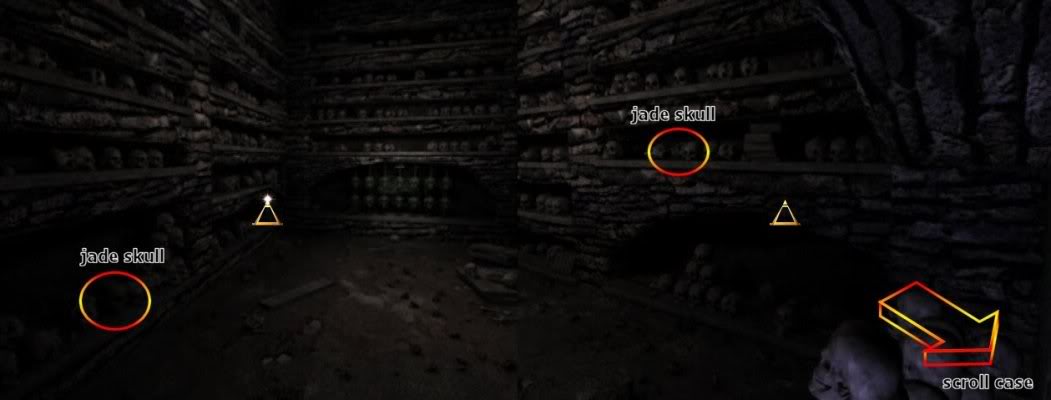
When you enter the room, look to the shelves on the left, and grab the jade skull on the bottom. Now turn around and grab the jade skull on the other side, on one of the upper shelves. Turn to the door, and you see stacks of skulls on either side of the door. Behind the left stack of skulls, you will find a scroll case, with a scroll in it.
Jade skull puzzle
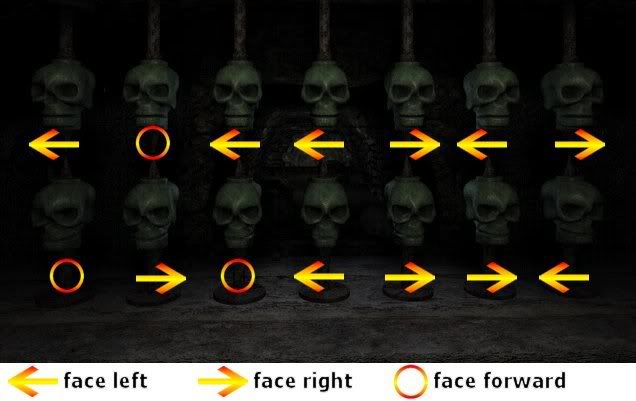
Walk up to the rows of jade skulls at the end of the room. The puzzle here is to turn the skulls so that they face in the correct direction. See the image above for this sollution. When you’ve succesfully solved the puzzle, the skulls will open and reveal a room hidden behind it. Crawl through, and you will see a stone door with a jade skull in front of it: pick it up.
Optional questing
Since in this walkthrough, you are given the sollutions to the puzzles, you don’t actually need to do this. But if for completion’s, or exploration’s sake you want to, here’s what to do with the bells.
Exit the underground area and climb the El Castillo pyramid. Enter the top and you will find a grate with a lock on it. Break the lock with your crowbar and go down and into the tunnels. You will end up in a room with several interesting things to see, and a bell stand on top of a big block. Hang the cenote bells on their stands, and play them in the following order: 5, 3, 1, 2, 6, 4.
If played correctly, the statue on the right will show 4 symbols in sequence. This is the sequence for the platform in the inside of the El Castillo pyramid, in the underground caves.
Lift into El Castillo

Now that you have all jade skulls, follow the tunnel back to the open cave, and turn right to go back to the inside of El Castillo, the room with the columns and the platform in the middle. Go stand on the platform, and press the buttons in the following order: S, E, W, N. If done correctly, a lift will take you up into the pyramid.
Jade skull door

Walk around to the other side, where an entrance can be found, guarded by red columns and two jaguar heads, and where you can see a golden plate in the middle. Walk up to the plate and place the correct skulls in their slots, as shown on the image above. Finally, place the skull mask over the skull in the middle, and the door will open.
Mayan omega disk
Enter the room to find a miniature version of El Castillo. In the very top of this pyramid, you finally find what you’ve been looking for: the last omega disk. Now return to the basecamp, and ask Hump to take you back to Giza Plateau.
Giza Plateau
This is just a short visit. Go to Gil’s tent, and read the letter he left for you on the desk. This letter also contains the last location card. Take it back to Hump, and get ready for a trip to Santorini Island.
Santorini Island
Locations of interest
– Letter on the desk in the back of the plane.
warning:
Do not go into the water without your diving gear on, or you will drown and die.
Gear up
Walk to the back of the seaplane and put on your diving gear. Dive down, and swim to the giant underwater pyramid.
Put the Omega Stones where they belong
Enter the chamber on top of the pyramid, and you will find a big circular device with 6 slots. Put the omega stones you have collected on this device, in the correct slots. Starting at the top, going clock-wise: Atlantis – Stonehenge – Giza – Chitzen Itza – Easter Island – Devil’s Triangle. When done correctly, you will receive the Omega Sun Stone.
Put the final Omega Stone in place
Take the new Omega Stone and swim down to the round structure in front of the pyramid. Inside, you will find another slot, in which you can place the Omega Stone. Do so, and the final movie scene will start.
CONGRATULATIONS! YOU HAVE FINISHED THE GAME.
ENJOY THE ENDING.
“;
More articles...
Monopoly GO! Free Rolls – Links For Free Dice
By Glen Fox
Wondering how to get Monopoly GO! free rolls? Well, you’ve come to the right place. In this guide, we provide you with a bunch of tips and tricks to get some free rolls for the hit new mobile game. We’ll …Best Roblox Horror Games to Play Right Now – Updated Weekly
By Adele Wilson
Our Best Roblox Horror Games guide features the scariest and most creative experiences to play right now on the platform!The BEST Roblox Games of The Week – Games You Need To Play!
By Sho Roberts
Our feature shares our pick for the Best Roblox Games of the week! With our feature, we guarantee you'll find something new to play!All Grades in Type Soul – Each Race Explained
By Adele Wilson
Our All Grades in Type Soul guide lists every grade in the game for all races, including how to increase your grade quickly!


