
Best Horror Games On Itch.io – July 2026
Across a bounty of subgenres.![Haze Seas Accessories Tier List [Best Accessories to Equip]](/wp-content/uploads/2026/07/haze-seas-accessories-tier-list.jpg "Haze Seas Accessories Tier List [Best Accessories to Equip]")
Haze Seas Accessories Tier List [Best Accessories to Equip]
The accessories with the best stat buffs in Haze Seas.
![[Roblox] Evomon Shiny Hunting Guide – Including Prismatic and Pris Shinies!](/wp-content/uploads/2026/06/evomon-shiny-hunting-guide.jpg "[Roblox] Evomon Shiny Hunting Guide – Including Prismatic and Pris Shinies!")

The Missing: Island of Lost Ships Walkthrough
The Missing: Island of Lost Ships is an interactive hidden object puzzle game created by Sulus Games. You will move from location to location solving hidden object hunts, mini-puzzles and picking up items to use in order to proceed in the game. Gamezebo’s strategy guide will provide you with detailed images, tips, information, and hints on how to play your best game.


- Prefer Gamezebo on Google

The Missing: Island of Lost Ships Introduction
The Missing: Island of Lost Ships is an interactive hidden object puzzle game created by Sulus Games. You will move from location to location solving hidden object hunts, mini-puzzles and picking up items to use in order to proceed in the game. Gamezebo’s strategy guide will provide you with detailed images, tips, information, and hints on how to play your best game.
General Tips
- This walkthrough is meant to be used as a guide to assist in solving mini-puzzles and acquiring all items in order to complete the game. You may explore locations in the order you wish, this walkthrough is written to take the most direct route to the game’s finish.
- Inventory objects will be written in CAPITALS and highlighted in yellow in the screenshots. The walkthrough will state, “Use the inventory item on the blah blah,” because it assumes you have the item. If you don’t have the item, on your keyboard, press CTRL+F (at the same time). In the text box, type the name of the item you are looking for and press ENTER. This will scan this page for the appearance of that word.
- Play the tutorial! It will explain gameplay elements. The tutorial is available in Casual and Normal Modes.
- Often you need to perform an action (i.e., place or collect an inventory item) in order for the game to progress. Before assuming the game has a glitch, go through your inventory and see if you can place any of your items anywhere or look for an item to pick up, switch to flip, etc.
- The Menu button at the bottom left of the screen gives access to the options screen and can bring you back to the main menu.
- From the Menu button, there’s a Help option. This explains gameplay and cursors.
- Items collected throughout the game go into your inventory, located at the bottom of your screen.
- The inventory can be locked. Hover your cursor over the inventory to show it, then click the padlock at the right of the inventory list.
- Closing a window – To close the zoom-in windows, click Close. Tip: If you can zoom in on the area again, you likely haven’t found everything you needed to find.
Difficulty Modes
- There are three difficulty modes.
- Casual Mode has faster filling Hint and Skip meters, sparkles indicate all active areas and the option to play the tutorial.
- Normal Mode has slower filling Hint and Skip meters, there are no sparkles to indicate active areas (including hidden object scenes) and the option to play the tutorial.
- Expert Mode has no Hint or Skip meter and there are no sparkles to indicate active areas. The tutorial is not available on Expert Mode.
- You can change the difficulty setting during the game from the Options menu.
Cursors
- The default cursor looks like an arrow.
- A magnifying glass indicates you can inspect the area more closely.
- A hand indicates you can pick up an item to add to your inventory.
- Gears indicate you can perform an action with an inventory item.
- Dialogue box indicates you can talk to someone.
- A large arrow indicates you can move in that direction.
- Move your cursor over every aspect of a scene and watch for it to change, it’s the only way to find everything, especially if playing in Normal and Extreme mode.
Hidden Objects scenes (HOS)
- Hidden object scenes provide a list, either written or silhouette images, of items to find. These items are different each game so only the inventory item will be indicated by a yellow highlight in the screenshots.
- Items written in white are available immediately.
- Items written in blue require an extra action to be found. These items will be indicated by white highlights in the screenshots. When you uncover an item written in blue, its name will turn white.
Journal, Tasks and Map
- The journal and map overlap. Hover your cursor over them to display a magnifying lens. Use the lens to choose either one.
- The journal is located at the bottom left of the screen.
- The journal has two tabs, Notes and Tasks.
- The journal glows when new information is added to it and stops glowing after you’ve opened the journal.
- The Notes tab records your progress and contains clues to solve puzzles.
- The Tasks tab shows your current tasks.
- Tasks appears at the bottom right of the screen, even in Expert mode.
- Items collected that are added to your journal will be highlighted in white in the screenshots.
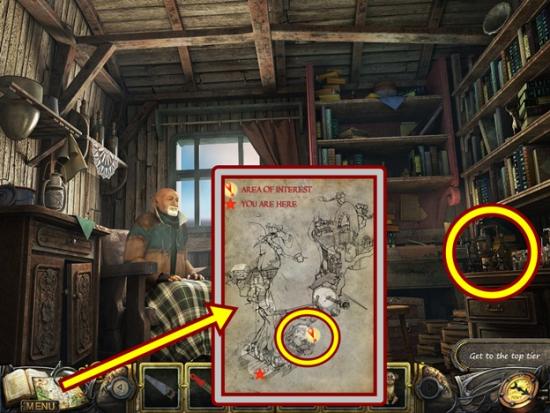
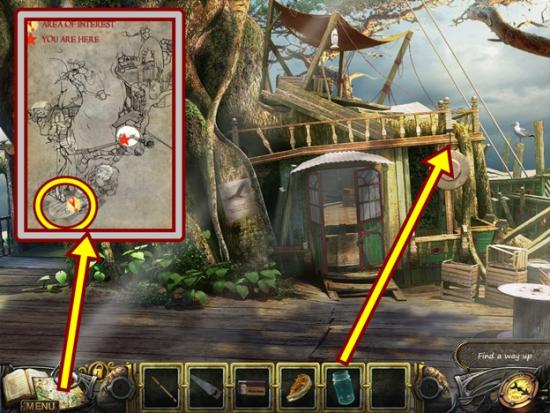
- The map is located at the bottom left. Your current location is indicated by a star. Areas of interest are indicated by an exclamation point.
- You can jump to locations using the map. Hover your cursor over an area on the map and wait for it to highlight (usually a little to the left of an exclamation point, if there is one), then click.
Hint and Skip
- The Hint and Skips options are only available in the Casual and Normal modes.
- The Hint button is located at the bottom right of the screen. After using a hint, the meter will recharge.
- Hints used in hidden object scenes will point out an item to find.
- Hints used during the adventure mode will point out what to focus on in the scene or in which direction to travel next.
- Skip allows you to skip mini-puzzles.
Chapter One
- From the main menu, click Play, then choose your difficulty setting (see above for more explanation).
- Watch the cutscene.

- If you are playing on Casual or Normal Mode, you will be given the option to play the tutorial. I recommend always playing the tutorial as it explains game elements.
- The inventory can be locked. Hover your cursor over the inventory to show it, then click the padlock at the right of the inventory list.
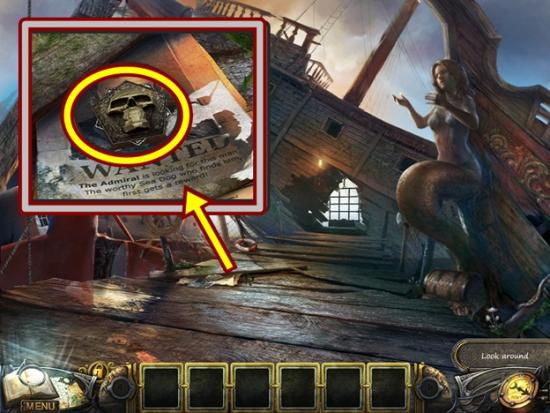
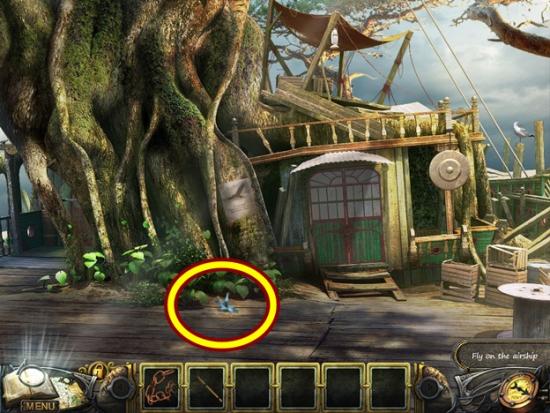
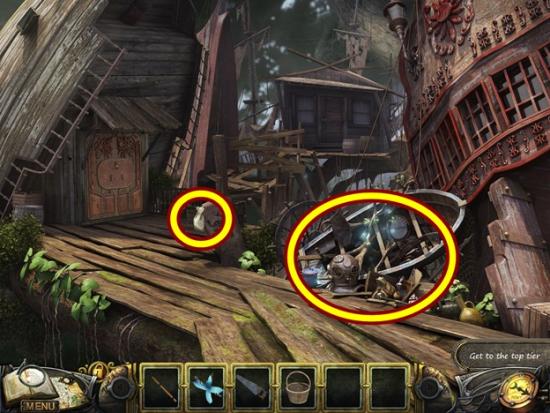
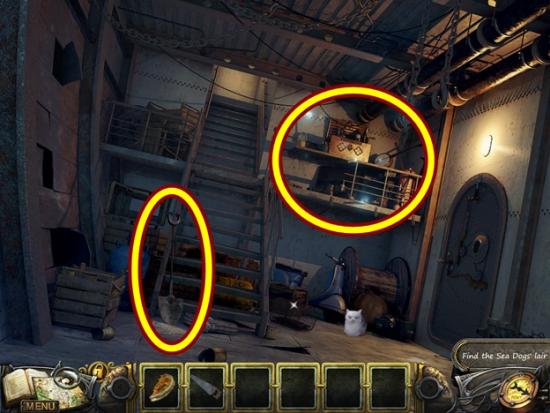
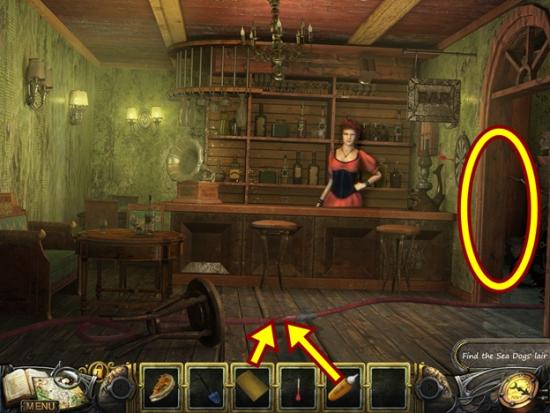
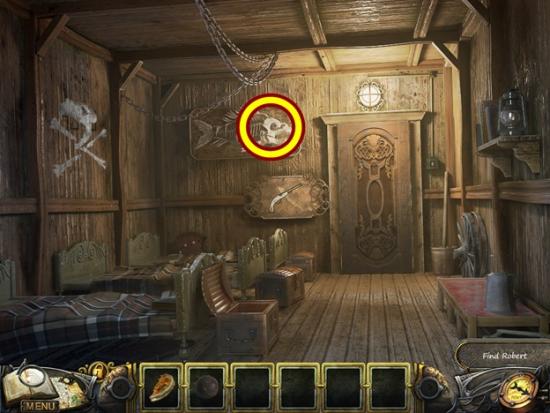
- Click on the plank.
- Take the SKULL.
- Read the Wanted poster. Click anywhere outside the window to close it.
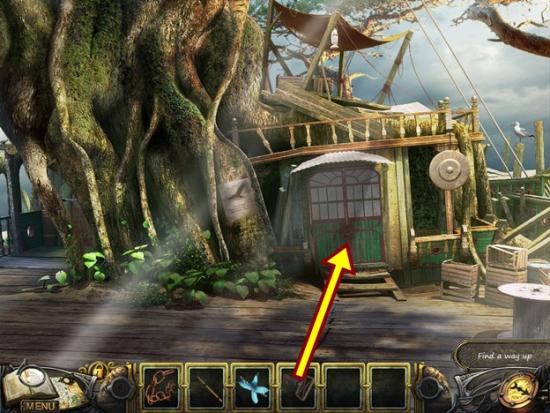
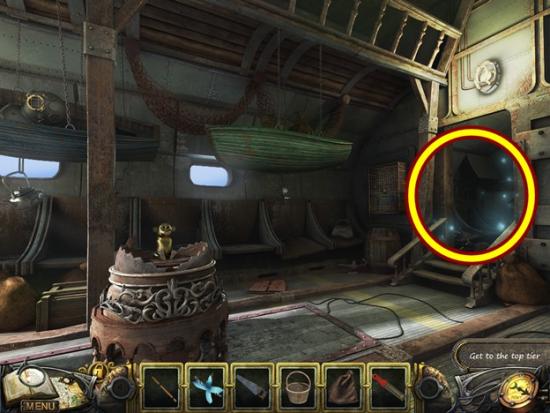
- Move forward into the ship.
- Watch the cutscene to meet Herbert, the ship’s mechanic.
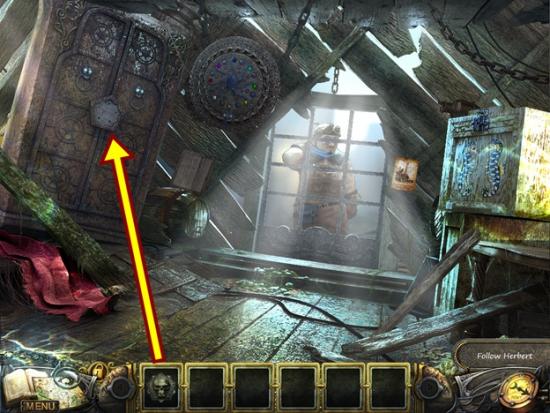
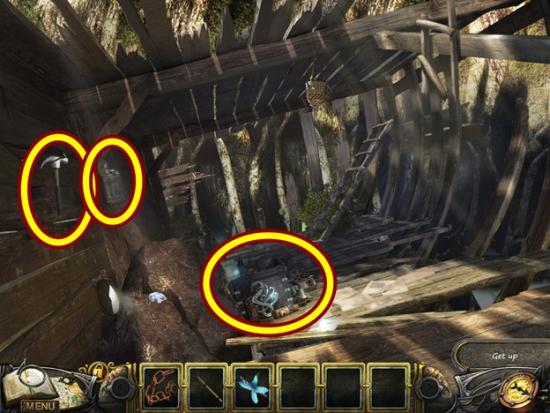
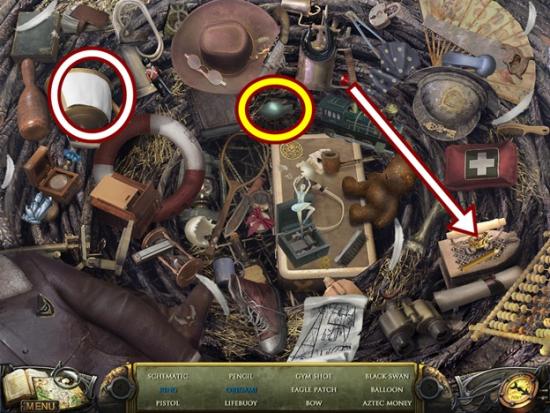
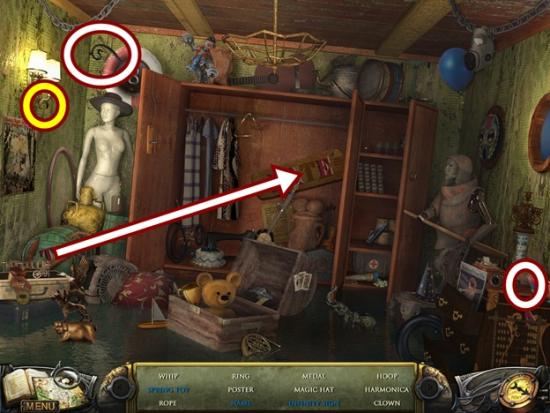
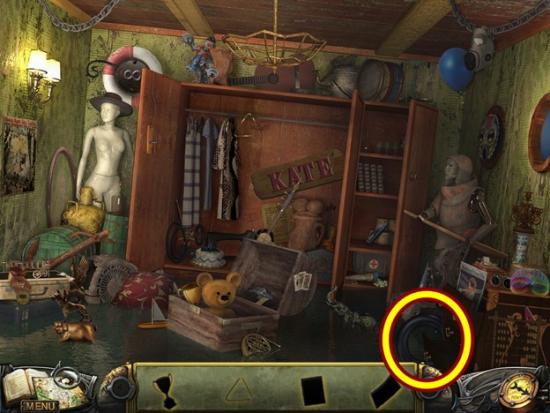
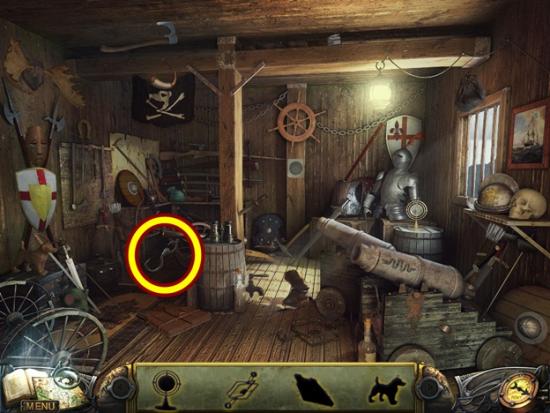
- Click on the wardrobe.
- Add the SKULL.
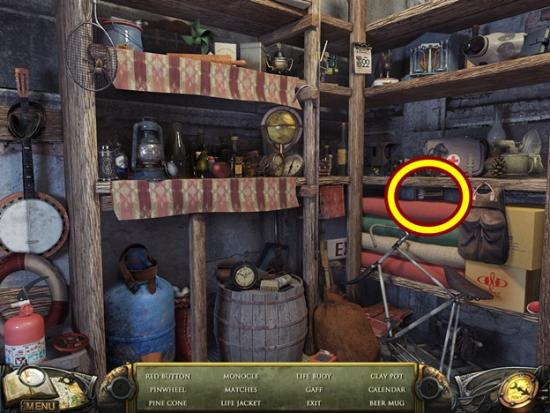
- Click on the wardrobe to start a hidden object hunt.
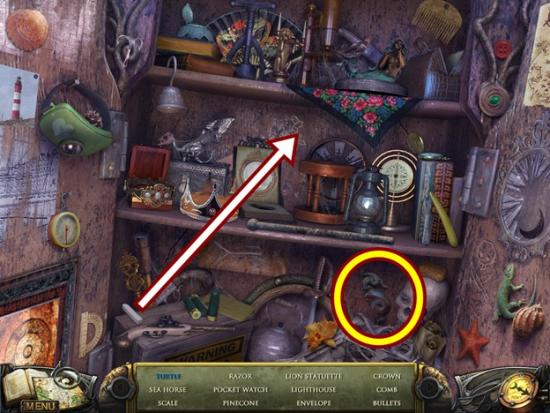
- Find all the objects. Use the chalk to finish the turtle drawing. A SEA HORSE is added to your inventory.
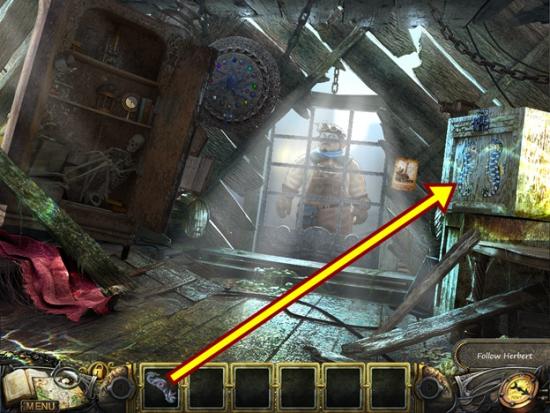
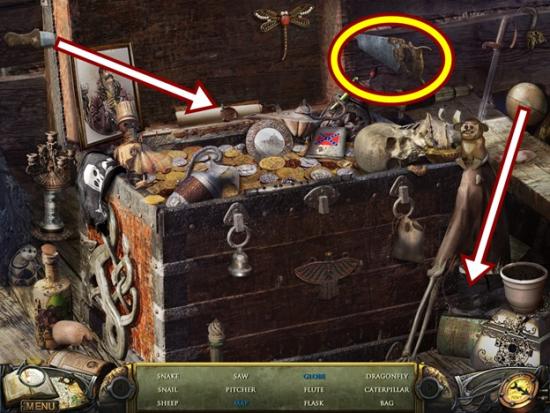
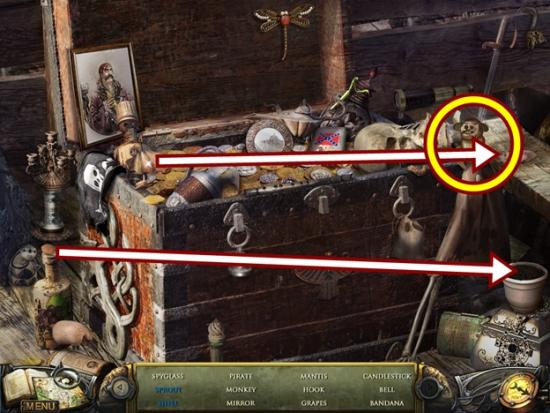
- Click on the chest.
- Add the SEA HORSE.
- Pull the handle.
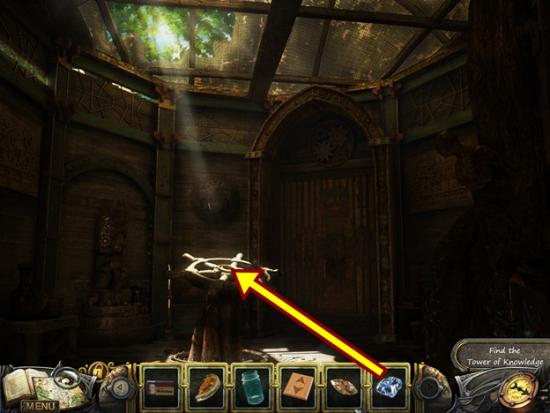
- When the chest opens, take the HARP.
- Move down.
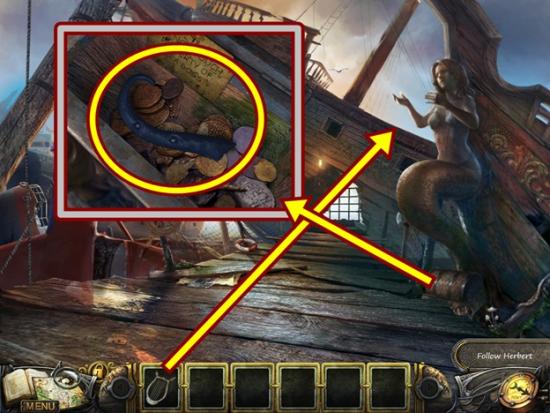
- Give the HARP to the mermaid statue.
- When the chest rises, click on it.
- Take the TENTACLE.
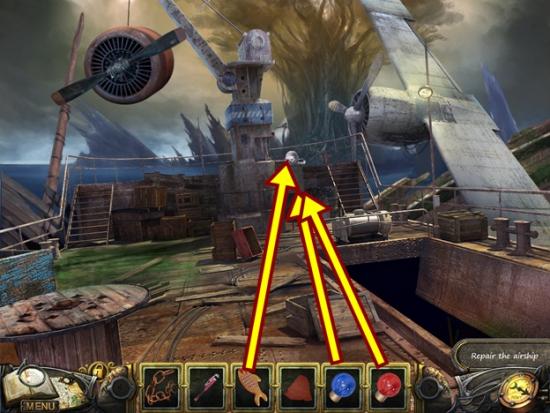
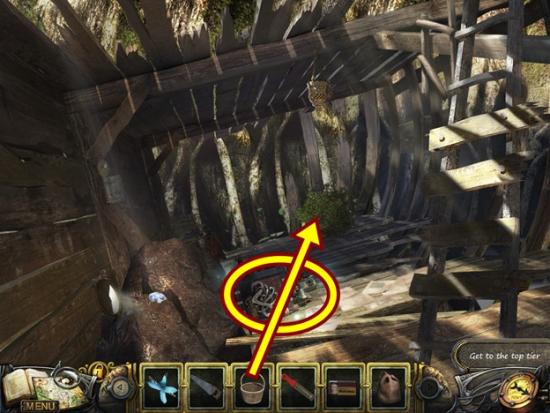
- Move forward into the ship.
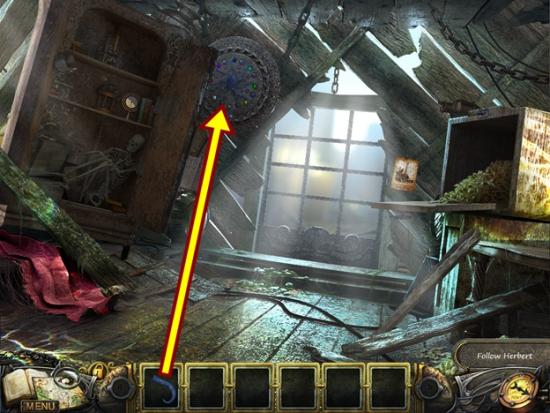
- Click on the octopus wall design.
- Add the TENTACLE.
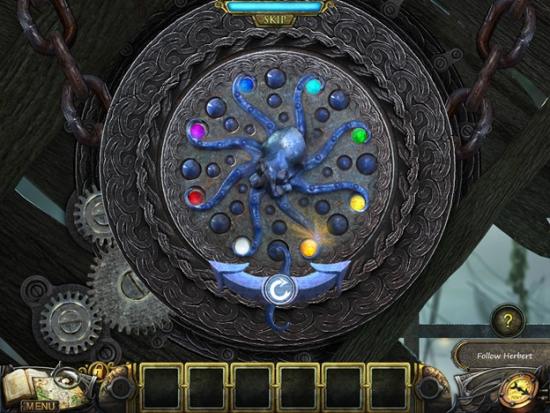
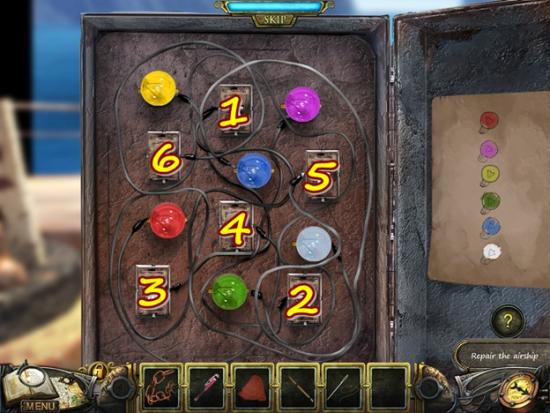
- A mini-puzzle starts.
- Rearrange the marbles so each marble’s colour matches the colour of the octopus’ eyes. Use the large arrows to rotate the octopus and click the rotating arrow to swap the marbles. When a tentacle is touching the rotating arrow button, note the eye colour.
- Solution:
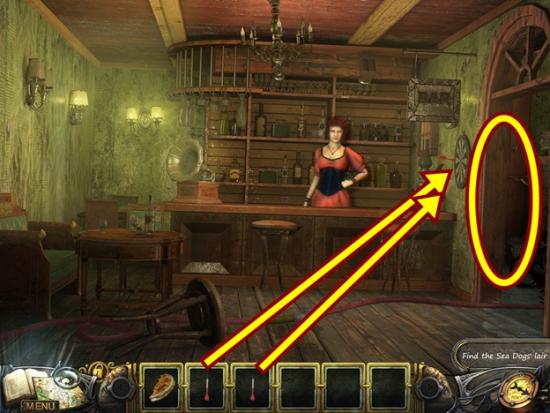
- Move forward to the dock.
- Watch the cutscene.
- Move left into the office.
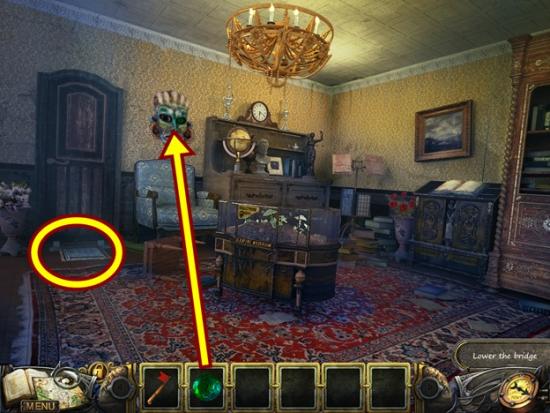
- Click on the book on display (at right).
- Turn the page, then take the PEARL and FLAG. Click anywhere outside the window to close it.
- Return to the dock.
- Click on the vending machine.
- Put the PEARL in the slot.
- Take the CRYSTAL. Click anywhere outside the window to close it.
- Return to the office.
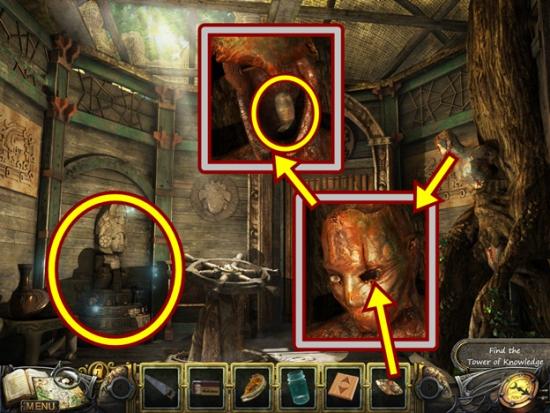
- Click on the mask on the wall.
- Add the CRYSTAL to the empty eye socket.
- When the mask opens, take the PUZZLE.
- Click on the bottom of the door to move the rug.
- Click on the bottom of the door.
- Add the PUZZLE.
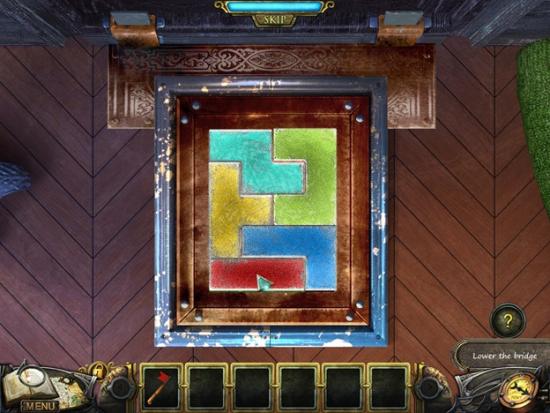
- A mini-puzzle starts.
- Fit all the puzzle pieces into the grid. Left-click to select and item and place it, right-click to rotate the piece. All pieces must be used.
- Solution:
- Click on the door to start a hidden object hunt.
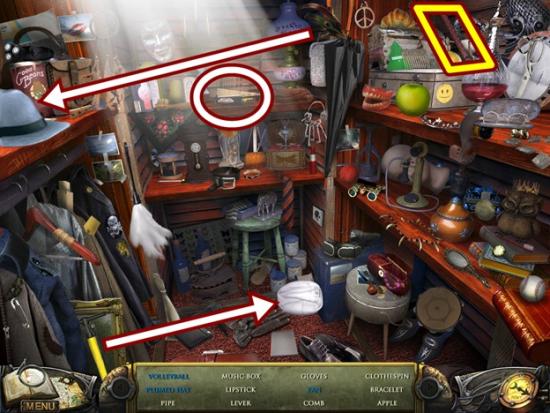
- Find all the objects. Pump the volleyball. Put the feather on the hat to make the plumed hat. Open the fan. A LEVER is added to your inventory.
- Move down.
- Watch the cutscene.
- Click on the bridge mechanism.
- Add the LEVER, then pull it.
- Move forward.
- Watch the cutscene.
- Move forward.
- Watch the cutscene.
- Move forward.

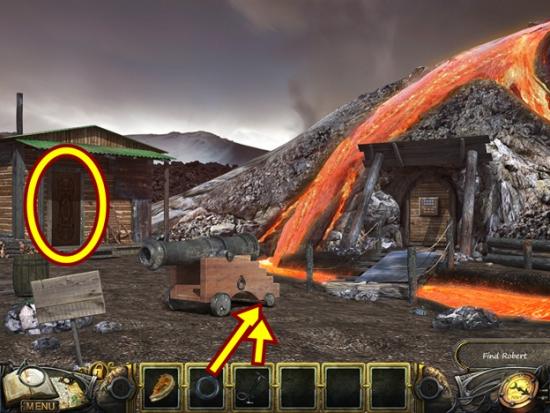
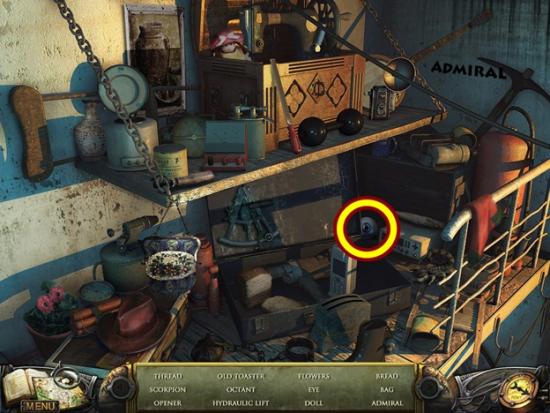
- Click on the crate.
- Move the panels and take the FIRE EXTINGUISHER.
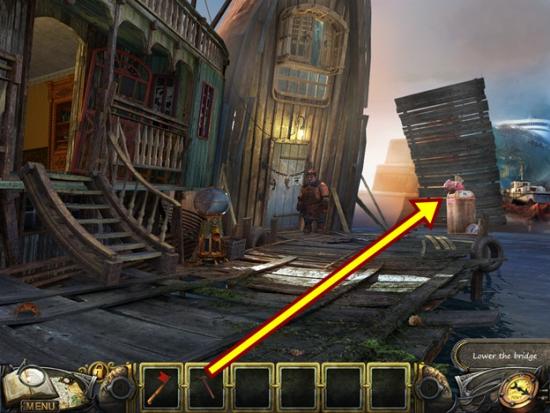
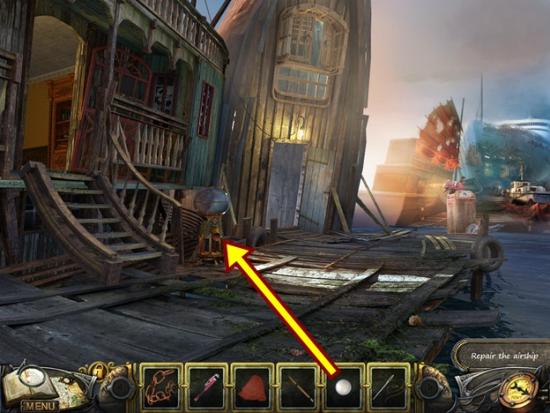
- Move down.

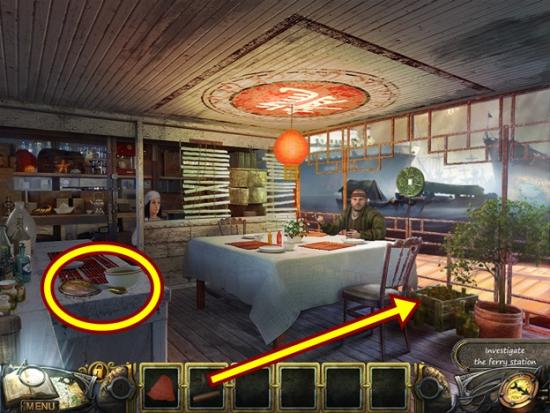
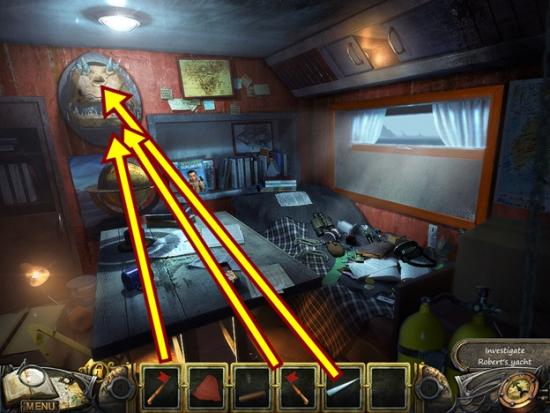
- Use the FIRE EXTINGUISHER on Robert’s yacht.
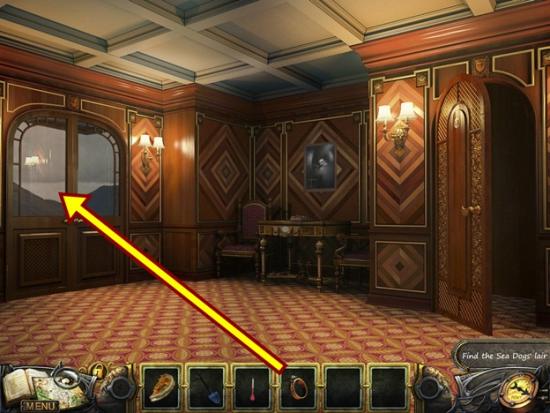
- Board Robert’s yacht.
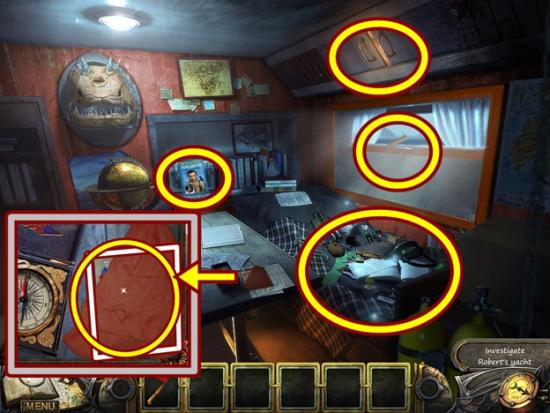
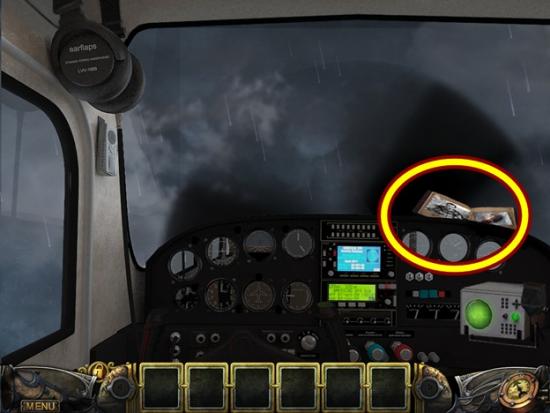
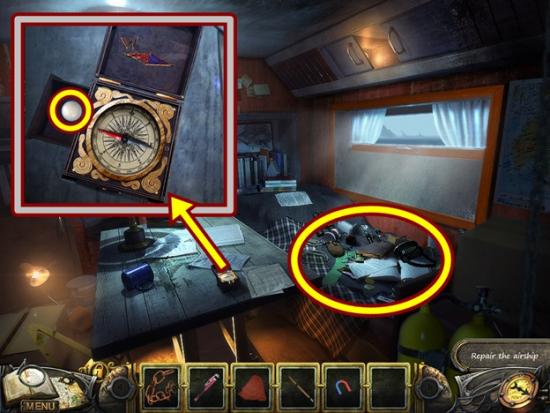
- Click on the compass on the table.
- Take the PATCH and the flag signal code (added to your journal). Click anywhere outside the window to close it.
- Click on the magazine. Open it and read the entries. Click to close the magazine.
- Click on the window and take the CORKSCREW.
- Click on the cabinet above the window.
- Open the cabinet and take the FLAG.
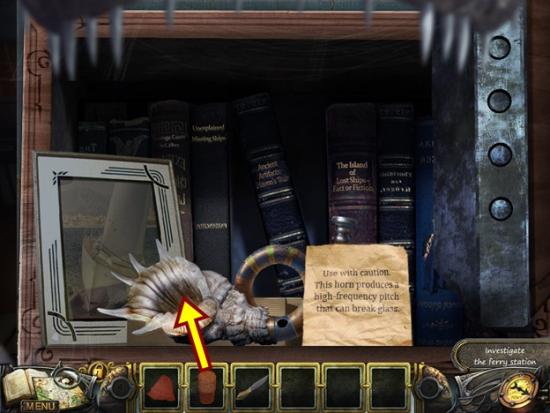
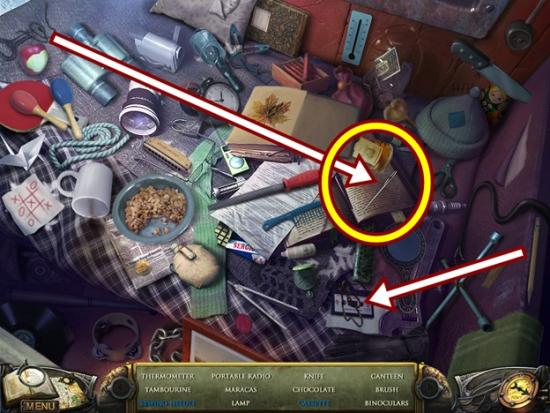
- Click on the bed to start a hidden object hunt.
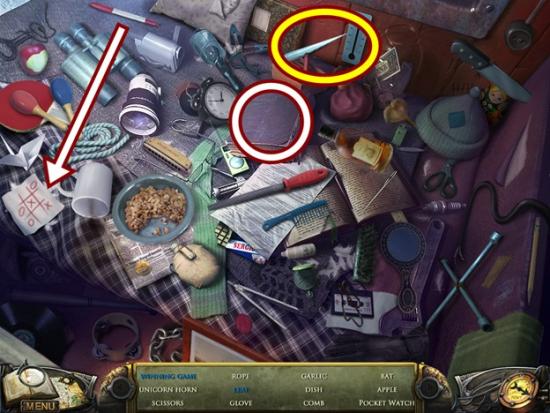
- Find all the objects. Use the red pen on the tic-tac-toe board to get a winning game. Open the book and take the leaf. A HORN is added to your inventory.
- Leave the yacht and go left into the restaurant.
- Watch the cutscene.
- Click on the counter on the left and take the KNIFE. Click anywhere outside the window to close it.
- Click on the crate of bottles.
- Use the CORKSCREW to get the CORK.
- Return to Robert’s yacht.
- Add the HORN to the sea creature’s head on the wall.
- Click on the sea creature.
- Add the two FLAGS.
- A mini-puzzle starts.
- Arrange the flags according to the flag signal code (in your journal) so they form the signal code for the number 6. There are three equations above each figure, each adding to 6. Notice how the equations are written. Arrange the first figure to signal 6 written normally, the second figure must signal 6 upside down and the third signals 6 backwards. Press the L and R buttons to manipulate the left and right arms.
- Solution:

- Read (and take) the note.
- Put the CORK in the horn, then take the SEASHELL.
- Move down two scenes, then move forward.
- Click on the oar.
- Use the KNIFE to cut the rope and take the OAR.
- Return to the office (move down three scenes, then go left into the office).
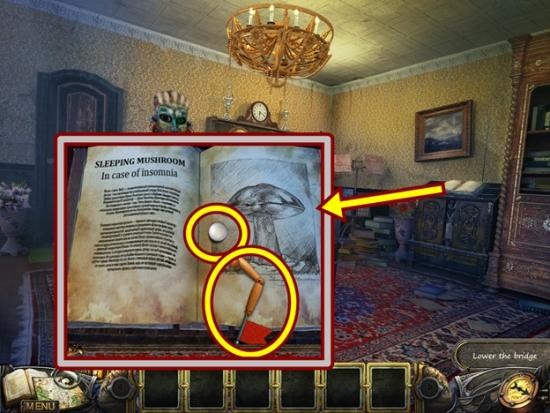
- Click on the sleeping mushroom tank.
- Use the SEA SHELL to break the glass, then use the KNIFE to cut and take a MUSHROOM.
- Leave the office and return to the restaurant.
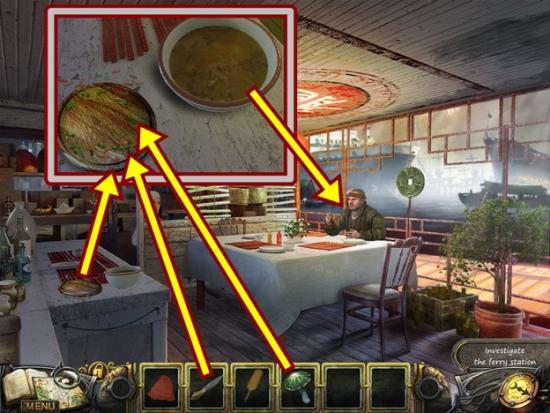
- Click on the left counter.
- Put the MUSHROOM on the cutting board.
- Slice the mushroom using the KNIFE, then add the sliced mushroom to the soup.
- Take the SOUP.
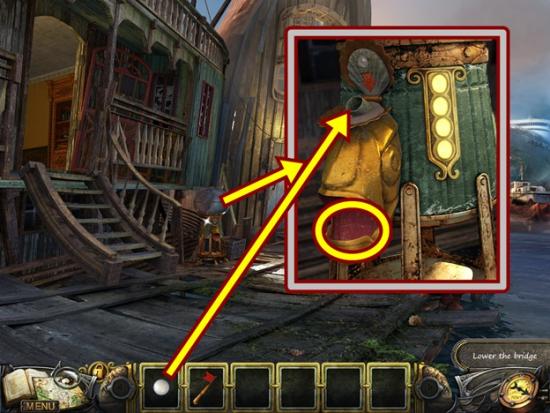
- Give the SOUP to the man and wait for him to pass out.
- Talk to the restaurant worker.
- Click on the man.
- A mini-puzzle starts.
- Move the items to get the key. You can’t wake the man so you must take the items very slowly. To move the items, click and drag the topmost item slowly to the right. Watch the meter at the top of the scene. As long as the meter is green or bronzy, you can keep dragging the item. If the meter goes red, quickly let go of your mouse button. At this point, the meter will either turn green, or the man will shift and you’ll have to start over again. When the topmost item is pulled far enough out of the way, it will lock and then you can move the next item. Move the next items all the way right. When dragging the next item(s), your cursor can go on top of a locked item and you can still drag the item you were dragging. If you wake the man, you will start from the very beginning of the puzzle. Patience is required to solve this puzzle.
- Solution:
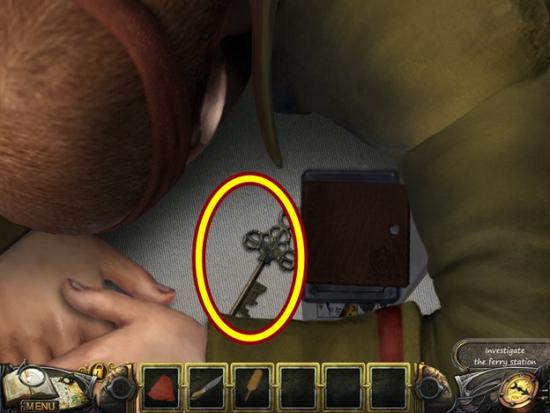
- Take the KEY.
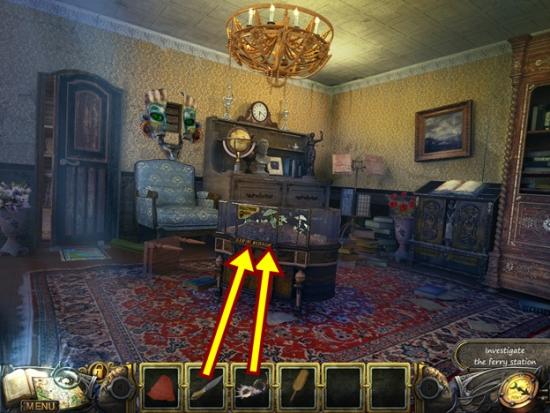
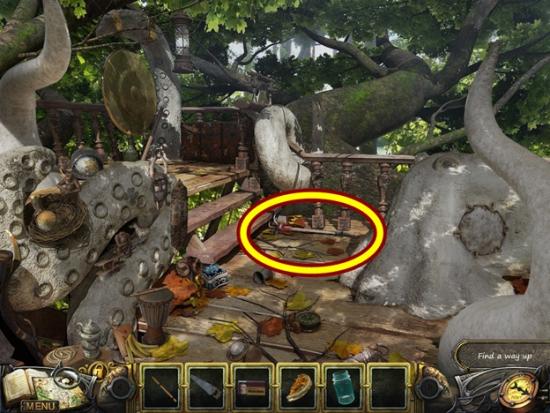
- Click on the shelves to start a hidden object hunt.
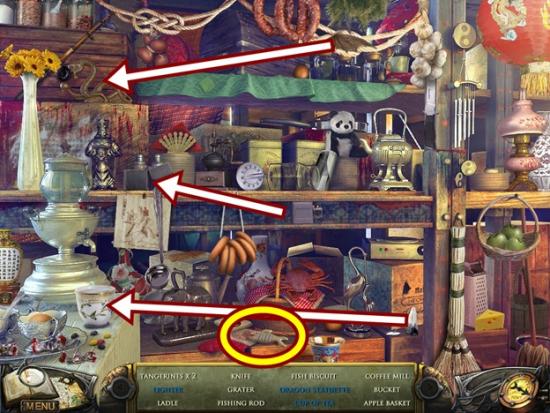
- Find all the objects. Put the lighter back together. Put the tea bag in the tea cup and take the cup of tea. Put the dragon statuette back together. A CAT BISCUIT is added to your inventory.
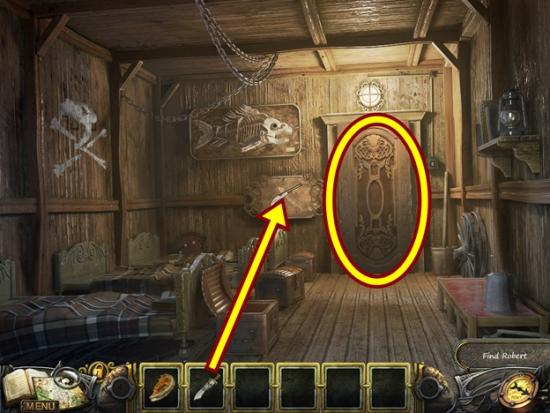
- Move down two scenes.
- Click on the door.
- Insert the KEY, then turn it.
- A CHAIN is added to your inventory.
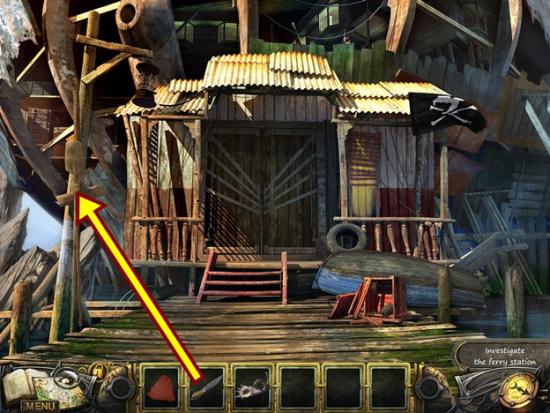
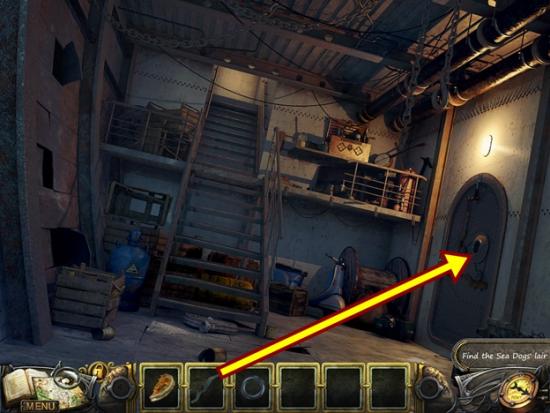
- Enter the ferry station.
- Watch the cutscene.
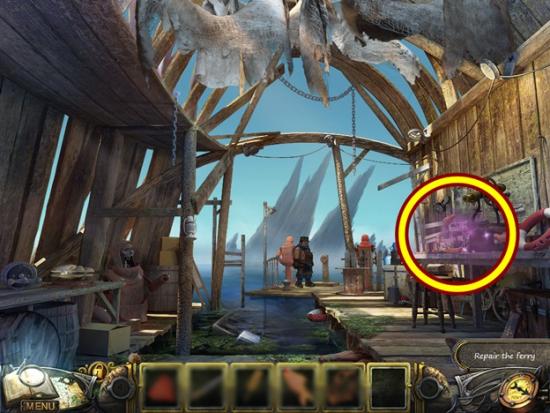
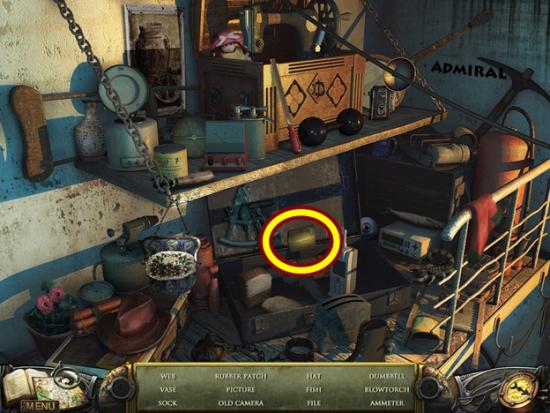
- Click on the worktable on the right to start a hidden object hunt.
- Find all the objects using the silhouettes as a guide. A WRENCH is added to your inventory.
- Move down three scenes.
- Click on the wheel.
- Use the WRENCH to remove the nut and take the WHEEL.
- Move forward into the ship.
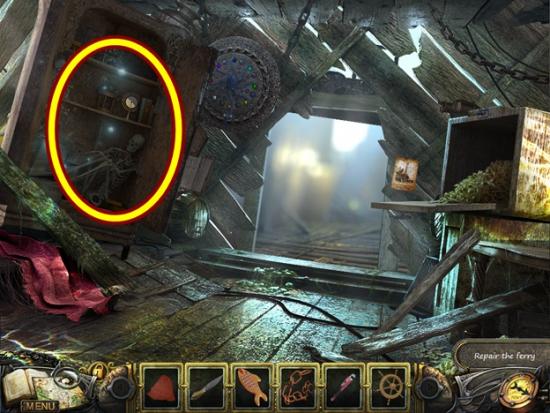
- Click on the wardrobe to start a hidden object hunt.
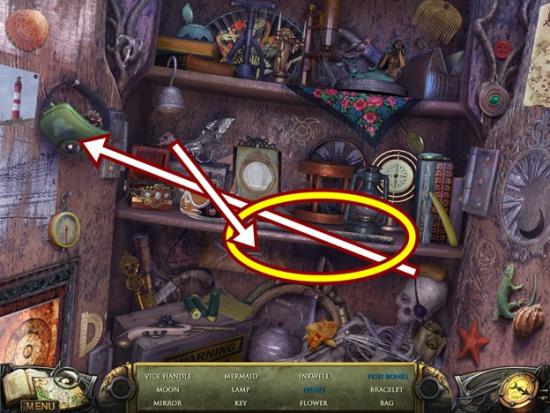
- Find all the objects. Put the fish head on the fish body, then take the fish bones. Use the sponge on the goggles, then take the heart. A VICE HANDLE is added to your inventory.
- Move forward, then through the door to the ferry station.
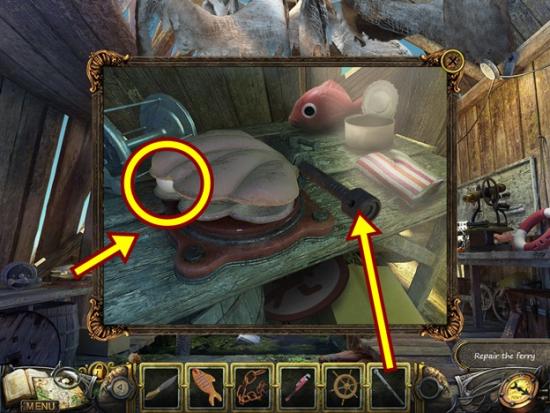
- Click on the worktable on the left.
- Add the VICE HANDLE, then turn it.
- When the oyster opens, take the PEARL.
- Move down one scene.
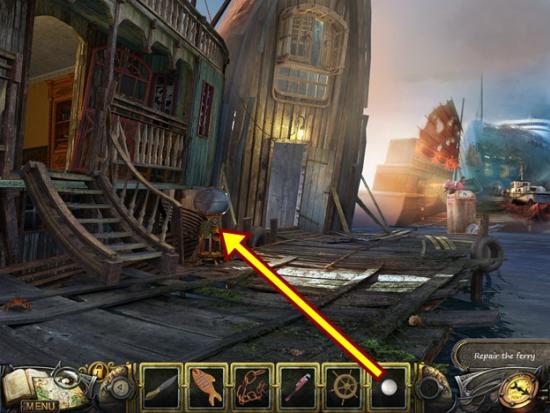
- Click on the vending machine.
- Insert the PEARL into the slot, then take the BEARING. Click anywhere outside the window to close it.
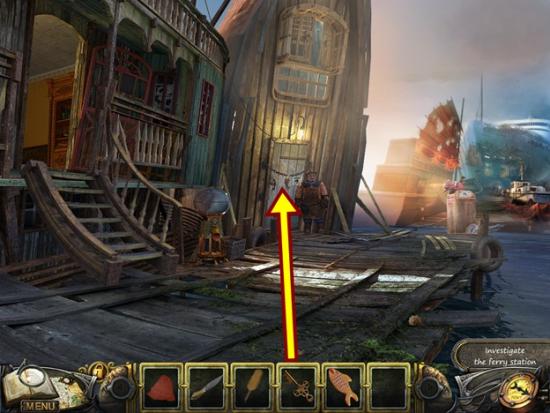
- Go back into the ferry station and move forward towards Herbert.

- Watch the cutscene.
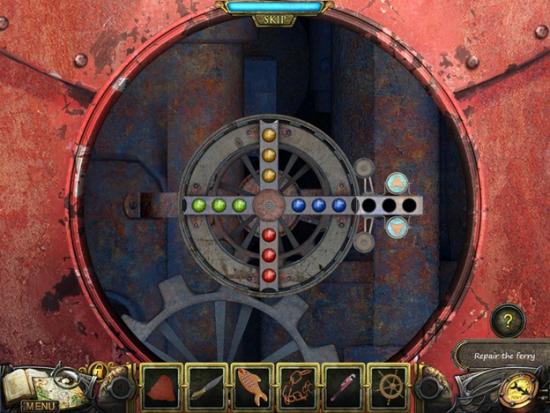
- Put the WHEEL on the base.
- Give the OAR to the robotic rower on the right.
- Click on the robotic rower on the left.
- Add the BEARING.
- A mini-puzzle starts.
- Rearrange the bearings so each arm is all one colour. Move the bearings using the external arm. Click on a bearing to move it into the external arm. Bearings cannot jump over each other. Let the most internal bearing determine which colour each arm should be. As there is no reset button, a step-by-step solution cannot be provided as you may have already moved some pieces.
- Solution:
- Watch the cutscene.
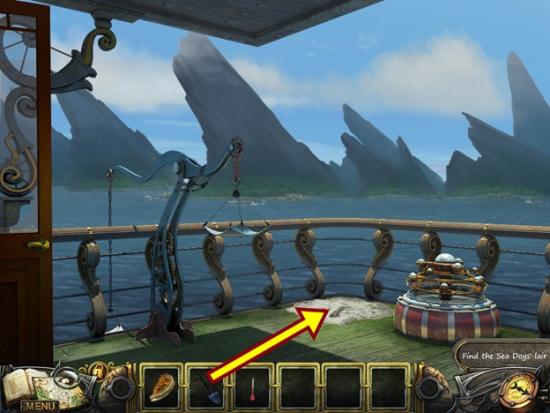
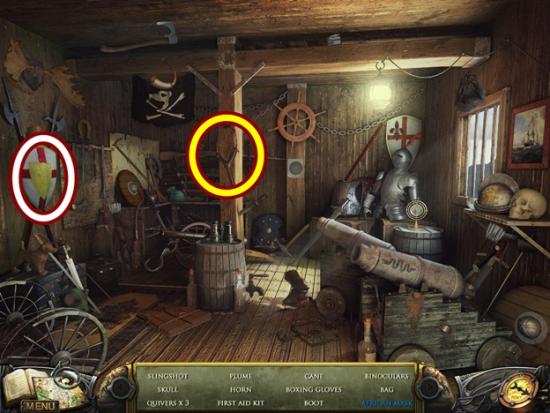
- Move forward to the hanger.
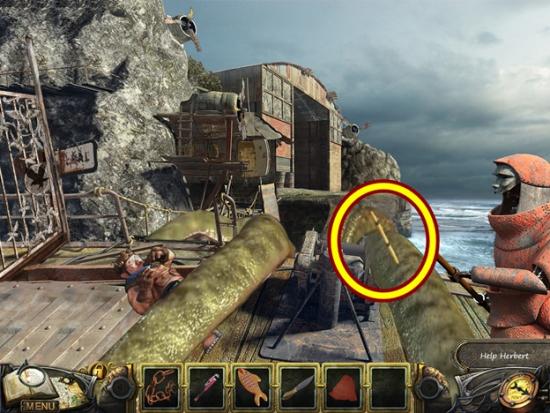
- Watch the cutscene.
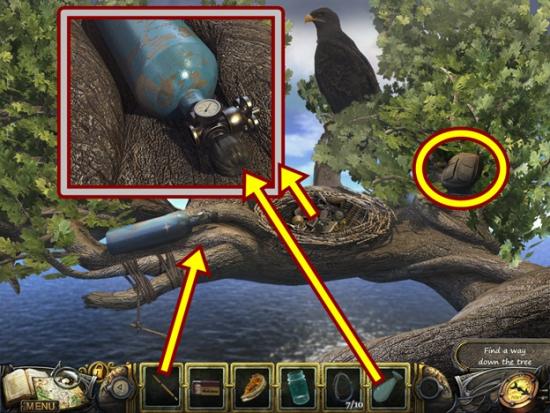
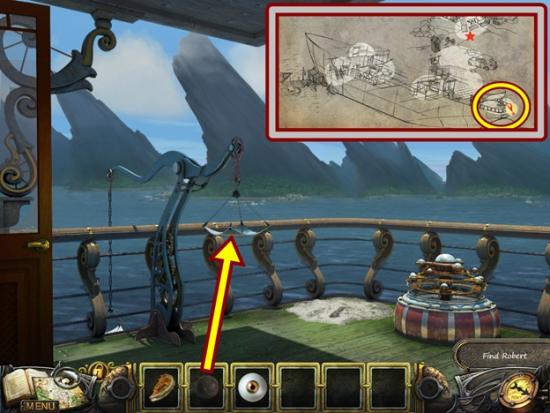
- Take the HARPOON out of the kraken’s tentacle.
- Move forward to the hanger.
- Watch the cutscene to meet Olivia.
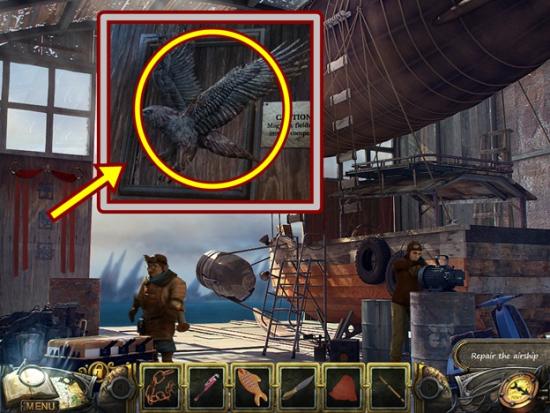
- Click on the left wall.
- Use the KNIFE to take the EAGLE.
- Move down.
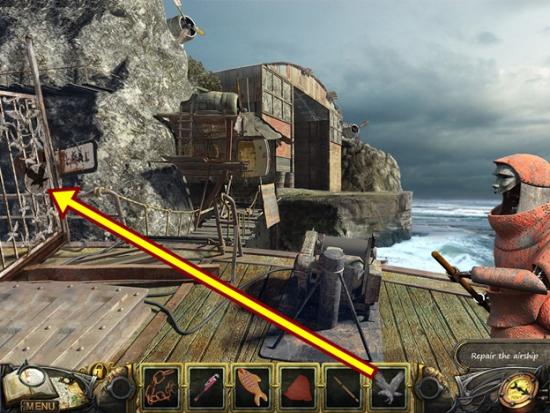
- Click on the gate.
- Add the EAGLE to the inset.
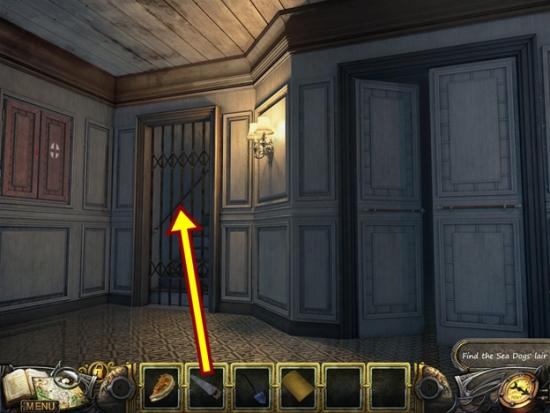
- Go through the gate.

- Click on the opening.
- Use the CHAIN to get the MAGNET.
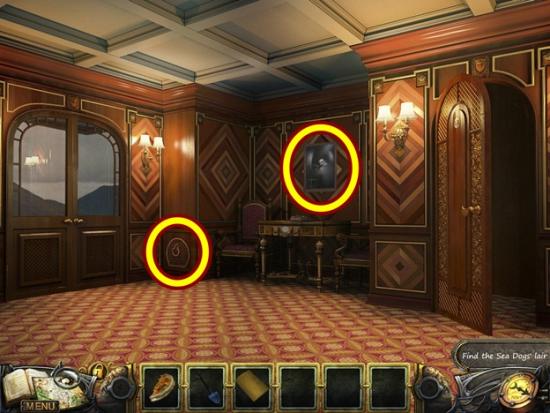
- Return to Robert’s yacht (move down three scenes, then move forward and board the yacht).
- Click on the compass on the table.
- Use the MAGNET to control the compass and get the red pointer to point west.
- When the drawer opens, take thePEARL.
- Click on the bed to start a hidden object hunt.
- Find all the objects. Use the thread on the needle, then take the needle and thread. Use the pencil to fix the cassette, then take it. A NEEDLE AND THREAD is added to your inventory.
- Move down two scenes to the dock.
- Click on the vending machine.
- Add the PEARL, then take the BLUE BULB. Click anywhere outside the window to close it.
- Go through the door to the ferry.
- Click on the worktable on the right to start a hidden object hunt.

- Find all the objects. Use the key in the padlock, then take the open lock. Use the red paint on the bulb, then take the red bulb. A RED BULB is added to your inventory.
- Move forward, then go left.
- Click on the cat (click directly on the cat, if you click below it, you will open a different window).
- Give the CAT BISCUIT to the cat.
- When the cat leaves, click on the panel.
- Add the RED and BLUE BULBS.
- A mini-puzzle starts.
- Turn the lights on in the order indicated on the poster. Determine which switch belongs to which bulb by tracing the wire from a bulb to a switch. It will be easier to use your cursor to follow the path.
- Flip the switches in the order indicated by the screenshot above.
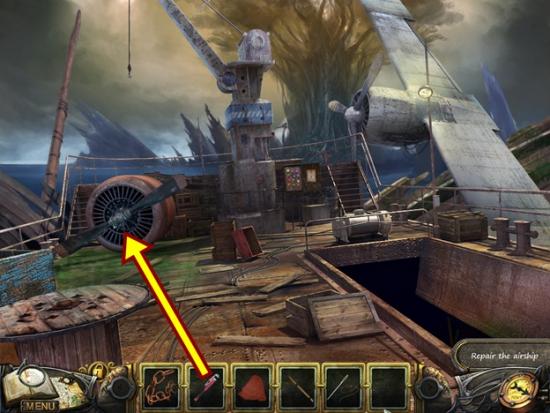
- Use the WRENCH to take the PROPELLER.
- Return to the hanger.
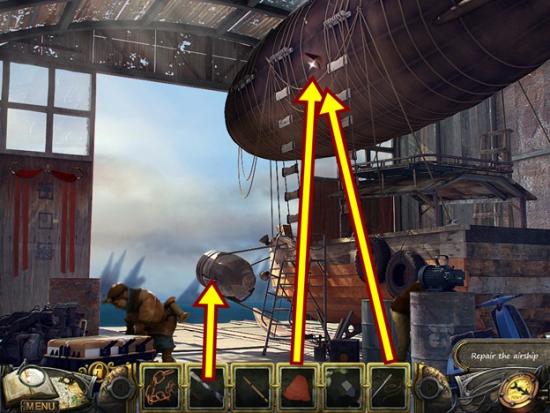
- Click on the hole on the dirigible.
- Add the PATCH, then attach it with the NEEDLE AND THREAD.
- Click on the propeller holder.
- Add the PROPELLER.
Chapter Two
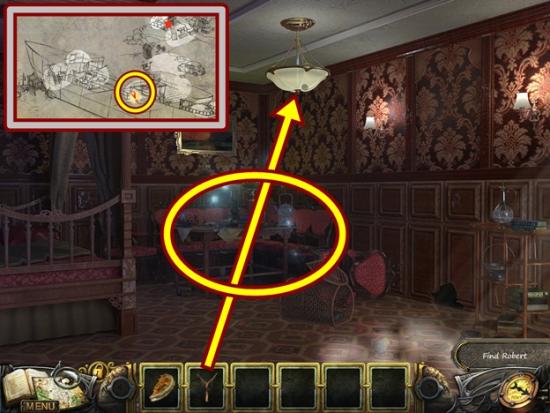
- Watch the cutscene.
- Click on the blue plant.
- Take the MEDICINE PLANT.
- Move left.

- Watch the cutscene.
- Take the KEY.
- Move down.
- Click on the door.
- Insert the KEY, then turn it.
- Go through the door.
- Watch the cutscene.
- Take the HAMMER.
- Click on the can on the wall.
- Take the NAILS.
- Click on the chest to start a hidden object hunt.
- Find all the objects. Put the globe in the holder, then take it. Use the knife to cut the wax seal, then take the map. A SAW is added to your inventory.
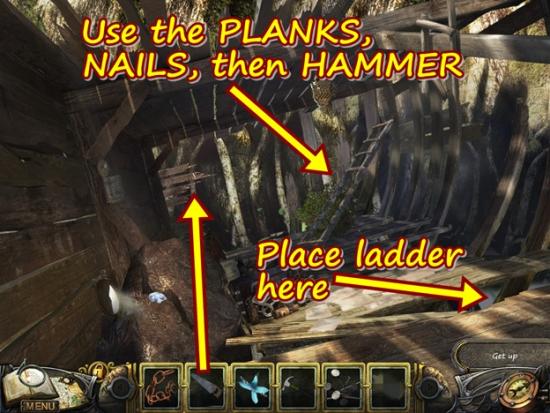
- Click on the broken boards.
- Use the SAW to take the PLANKS.
- Click on the ladder.
- Add the PLANKS, then the NAILS, then the HAMMER.
- Take the ladder and place it at the far right corner.
- Climb the ladder.
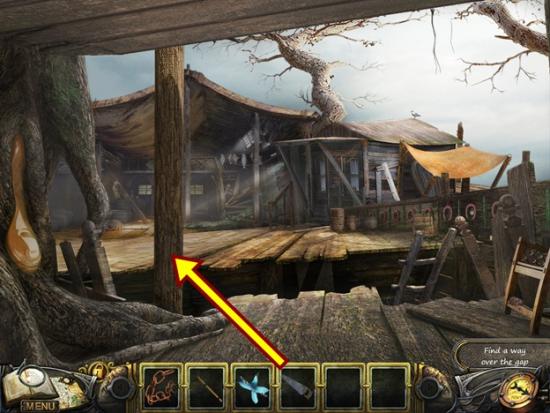
- Cut down the post with the SAW.
- Move forward.
- Watch the cutscene.
- Move forward.
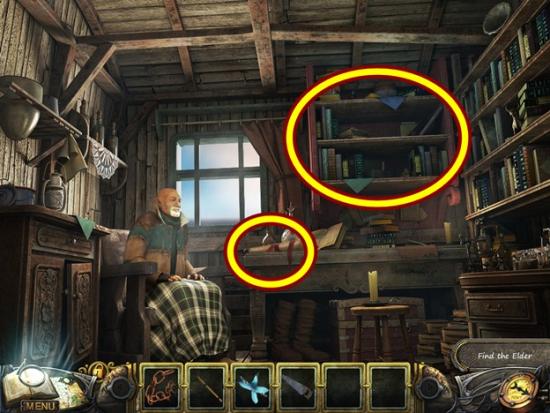
- Talk to the Elder.
- Pick up the scroll and read it. Click anywhere to close it.
- Click on the table on the right, then look at the ingredients for the potion you need to make. Click down to exit that scene.
- Click on the shelves to start a hidden object hunt.
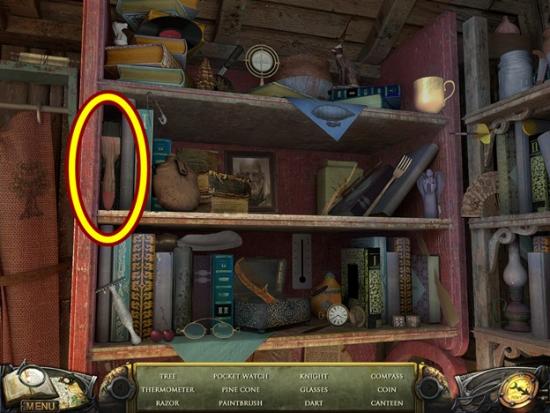
- Find all the objects. A BRUSH is added to your inventory.
- Move down two scenes.
- Use the BRUSH on the resin to get the RESIN BRUSH.
- Move forward.
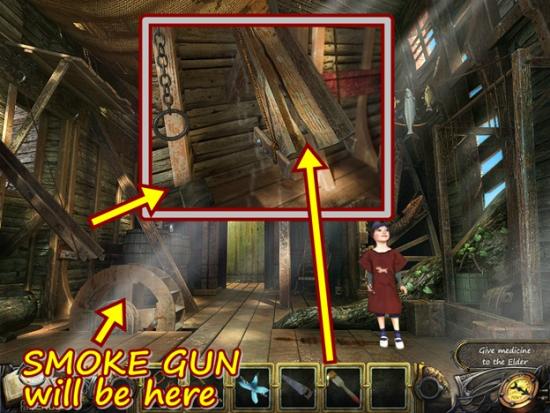
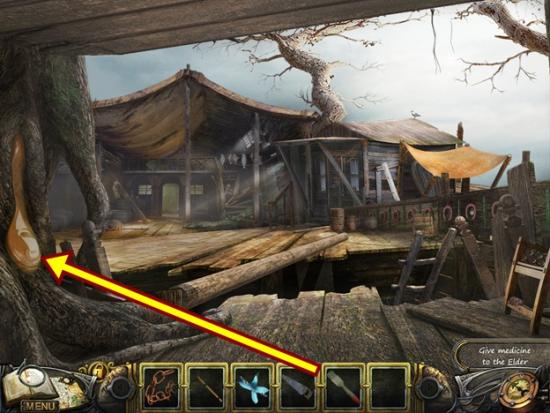
- Click on the wooden rail above the wheel.
- Seal the board with the RESIN BRUSH.
- When the wheel turns over, take the SMOKE GUN.
- Move down two scenes, then go left and move towards the elevator.
- Use the SMOKE GUN on the mosquitoes.
- A mini-puzzle starts. Shoot all the mosquitoes in three shots. Your cursor turns into a reticle. The mosquitoes swarm in groups. Aim the reticle at groups of mosquitoes, when there’s a group within the red circle, shoot. The game’s instructions say you have four shots but every time I took three shots and was unsuccessful, my mini-game restarted.
- When you are finished, click on the area of the elevator just left of the lever.
- Add the CHAIN.
- Move up.
- Watch the cutscene.
- Click on the basket.
- Use the HARPOON to take the BASKET.
- Take the left path.
- Take the POUCH.
- Click on the debris to start a hidden object hunt.

- Find all the objects. Use the file to carve a heart on the wood. Click on the net to reveal the boot. A THERMOMETER is added to your inventory.
- Move down and take the right path.
- Click on the doorway to start a hidden object hunt.
- Find all the objects. MATCHES are added to your inventory.
- Return to the elevator.
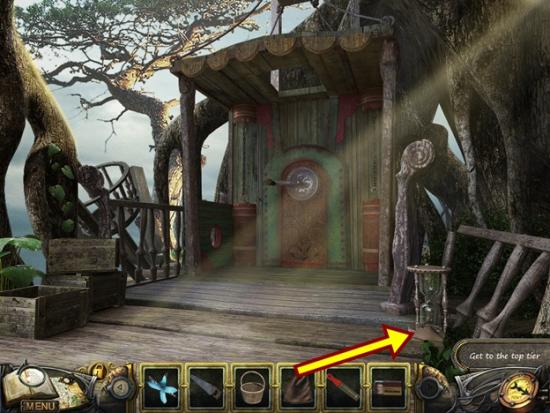
- Click on the broken hourglass.
- Use the POUCH to gather up sand to get the BAG OF SAND.
- Move down, then enter house and climb down the ladder.
- Click on the bush.
- Use the BASKET to get the BUSH BASKET.
- Click on the chest to start a hidden object hunt.
- Find all the objects. Put the shell pieces back together. Put the seed in the pot to get the sprout. A MONKEY 1 is added to your inventory.
- Return to the elevator, go up and take the right path.
- Click on the contraption.
- Place the BAG OF SAND on the contraption so you can take the MONKEY 2.
- Move down, then take the path on the left.
- Click on the door.
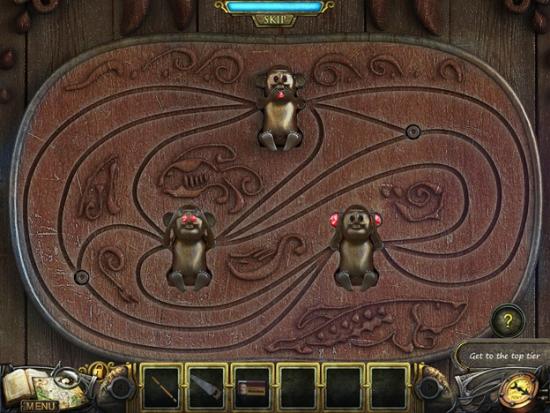
- Add the two MONKEYS.
- A mini-puzzle starts.
- Rearrange the monkeys’ arms so each arm is with the proper monkey. These are See No Evil, Hear No Evil, Speak No Evil monkeys. The jewels on each monkey indicate which one each is. Click on an arm to guide it along the rails. If it won’t move, it means another arm is blocking its path. Arms will only move unobstructed and will stop either at a monkey or one of the circles on the rails. As there is no reset button, a step-by-step solution cannot be provided as you may have already moved some pieces before consulting this walkthrough.
- Solution:
- Enter the monkey room.
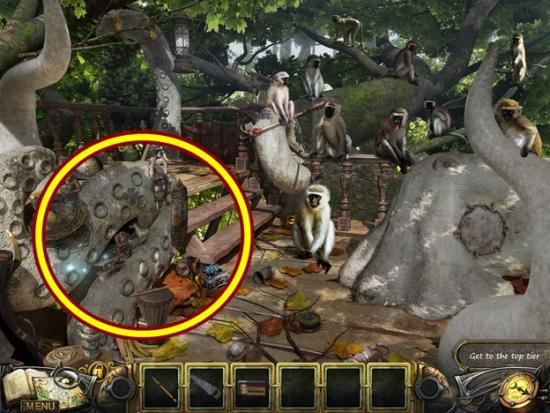
- Click on the area on the left to start a hidden object hunt.
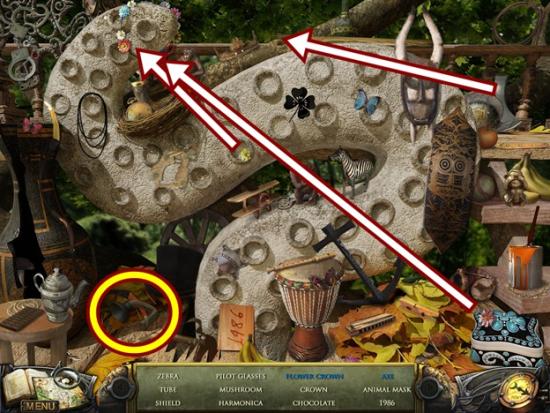
- Find all the objects. Put the two loose flowers on the flower crown. Put the axe blade on the axe handle to complete the axe. A TUBE is added to your inventory.
- Return to the Elder (you can use your map to jump to that area).
- Click on the right table.
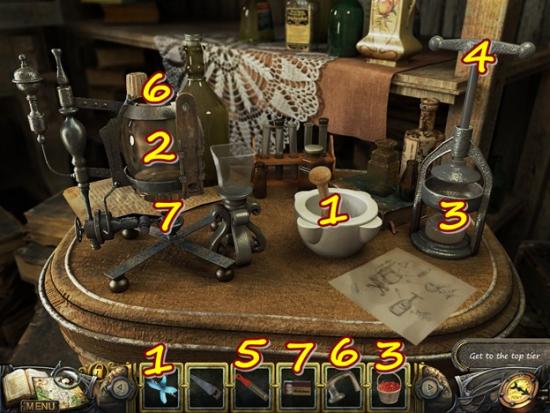
- Put the MEDICINE PLANT in the mortar (1), then grind it with the pestle (1). Pour the mixture into the spirit lamp (2).
- Put the BUSH BASKET in the juicer (3), then press the handle (4) down. Pour the juice in the spirit lamp (2).
- Put the THERMOMETER (5) in the spirit lamp (2).
- Put the TUBE on the spirit lamp (6). Lift the tube (lid).
- Use the MATCHES to light the spirit lamp (7).
- Close the tube (lid) (5).
- Take the POTION.
- Move down.
- Give the POTION to the Elder.
- Watch the cutscene.
- Take the MEDALLION HALF he gives you.
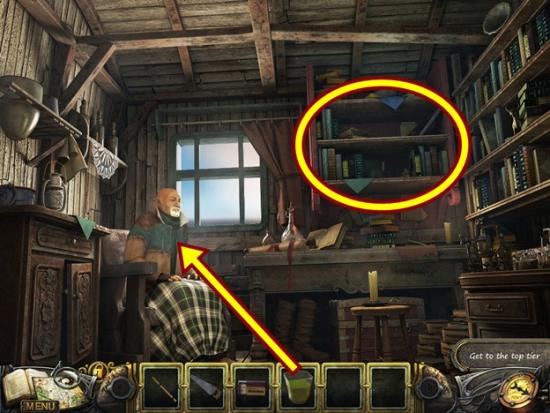
- Click on the shelves to start a hidden object hunt.
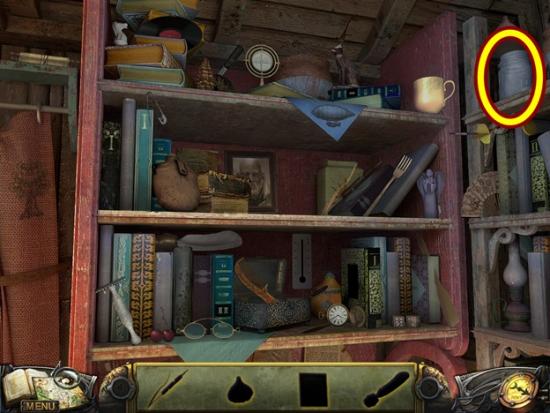
- Find all the silhouetted objects. A JAR is added to your inventory.
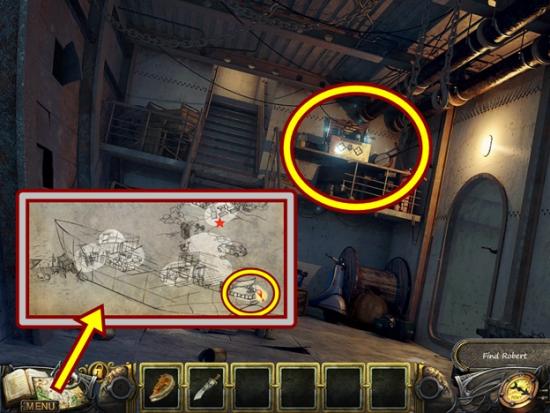
- Return to the second level of the house and go right to the airplane body (you can use your map to jump to that area).
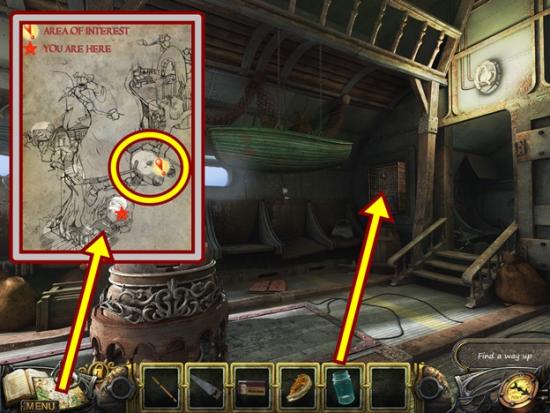
- Click on the panel.
- Use the JAR on the beetle to get the CLIPPER BEETLE.
- Move down three scenes.
- Click on the gong.
- Use the CLIPPER BEETLE to cut the rope, then take the GONG.
- Return to the monkey room (you can use your map to jump to that area).

- Click on the area at the left.
- Add the GONG.
- Pick up the stick and hit the gong to scare away the monkeys.
- Take the LEVER.
- Move down two scenes.
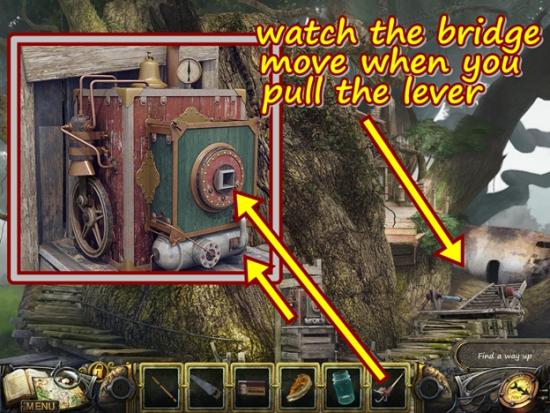
- Click on the mechanism.
- Add the LEVER.
- Pull the lever once. The lever moves the bridge (you can see it move when you pull the lever). The bridge must be pointing left. Click anywhere outside the window to close it.
- Cross the bridge.
- Watch the cutscene.
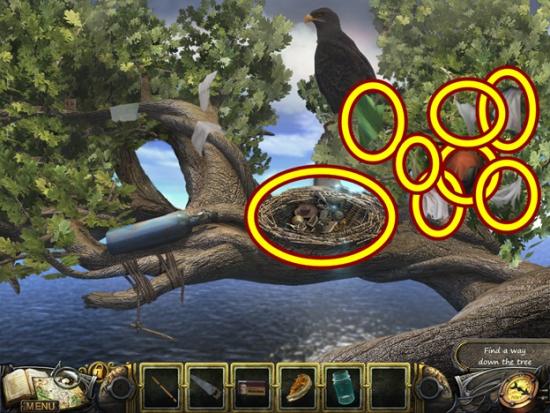
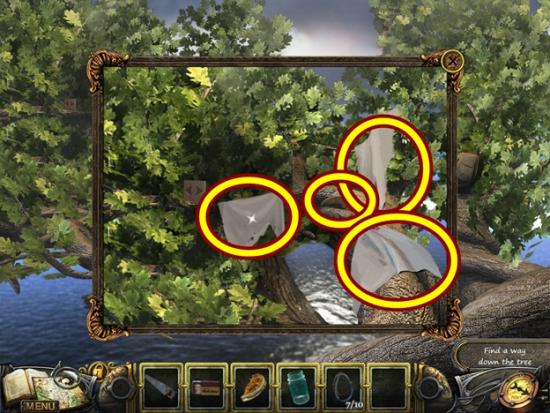
- Take the seven RAG pieces.
- Click on the nest to start a hidden object hunt.
- Find all the objects. Put the gem in the ring. Click on the paper five times to make origami. A BALL is added to your inventory.
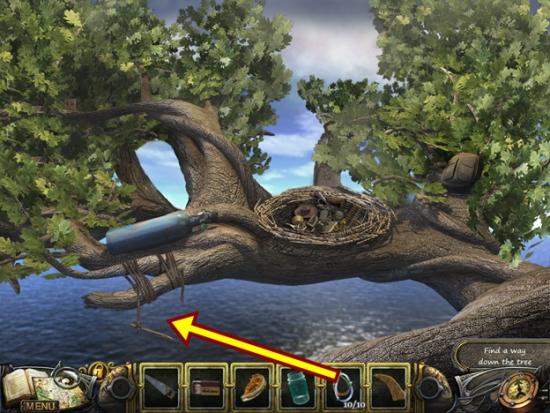
- Click on the backpack.
- Open the backpack and read the note. Click anywhere outside the window to close it.
- Click on the tank.
- Add the BALL.
- Pop the balloon with the HARPOON.
- When the eagle leaves, click on the rags.
- Take the three RAG and the CLAW. Click anywhere outside the window to close it.
- Use the RAGS on the broken rope ladder.
- Climb down.
- Return to the monkey room.
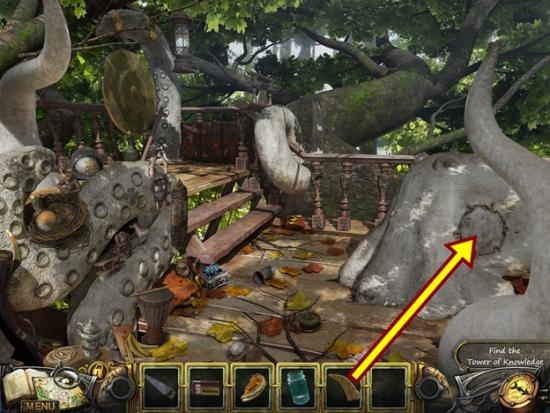
- Click on the inset on the rock.
- Add the CLAW.
- A mini-puzzle starts.
- Open all the latches. Click on a latch to change its position (i.e., if it’s closed, clicking on it will open it and vice versa, if it’s open, clicking on it will close it). The start of the puzzle has all the latches closed. Notice that clicking on a latch affects other latches. In the screenshot below, the latches are labelled clockwise 1-6. Latch 1 moves latches 1, 2 and 6. Latch 2 moves latches 2 and 3. Latch 3 moves latches 1 and 3. Latch 4 moves latches 4 and 5. Latch 5 moves latches 5 and 6. Latch 6 moves latches 3 and 6. Note that only latches 4 and 5 move themselves.
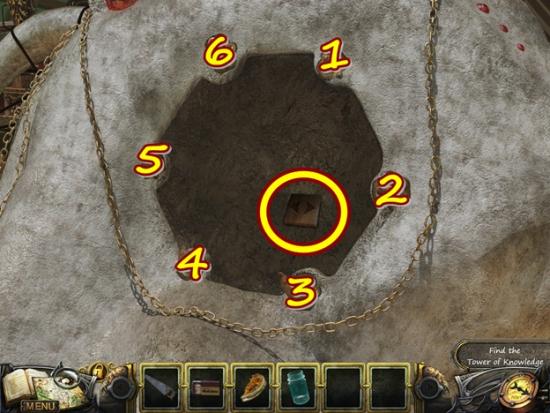
- There is no reset button to this puzzle, however if you were to start from the beginning (i.e., all the latches closed), press the following latches according the labels in the screenshot above, 5-6-3-2-1-4-5-1. There are many possible solutions to this puzzle.
- Take the TOWER DETAIL 1.
- Click on the area at the left to start a hidden object hunt.
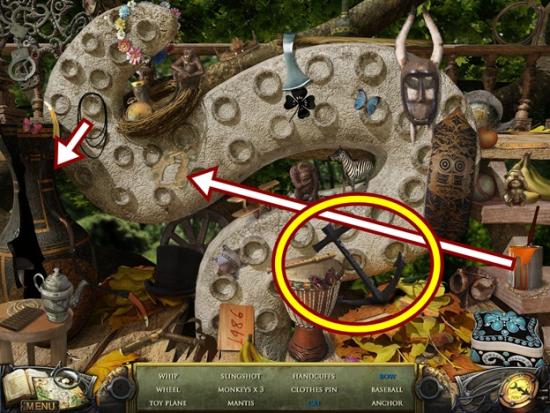
- Find all the objects. String the bow. Use the orange paint on the stencil to paint the cat. An ANCHOR is added to your inventory.
- Move down one scene.
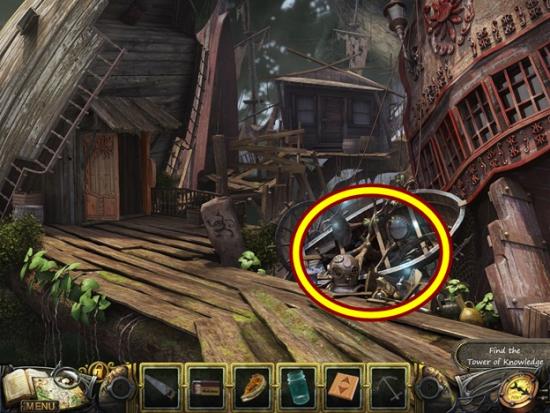
- Click on the debris to start a hidden object hunt.
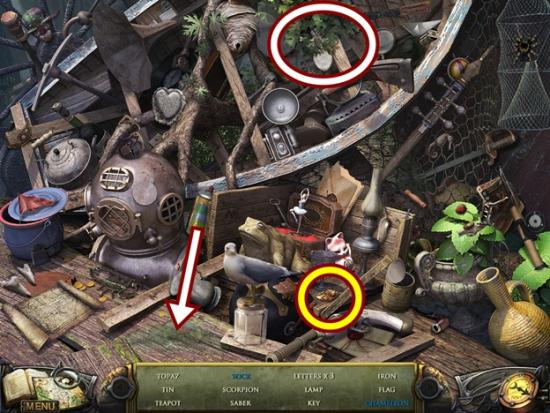
- Find all the objects. Move the leaves to take the sock. Use the spray paint on the ground to take the chameleon. A JEWEL EYE is added to your inventory.
- Move down three scenes, go through the door and climb down the ladder.
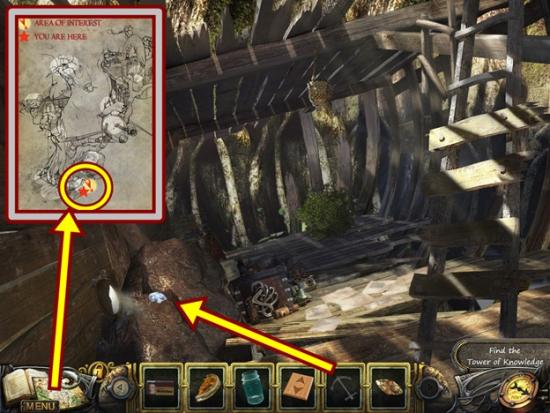
- Click on the rock.
- Use the ANCHOR to take the DIAMOND. Click anywhere outside the window to close it.
- Return to the upper level of the tree.
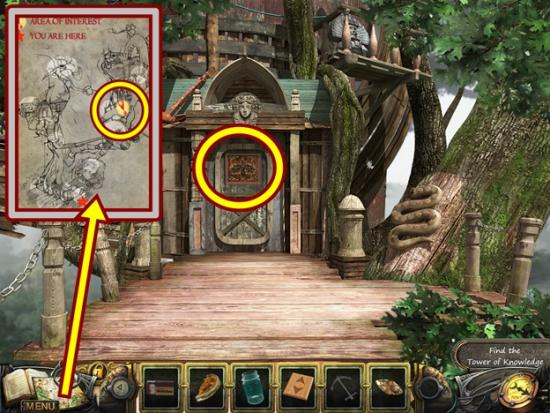
- Click on the door.
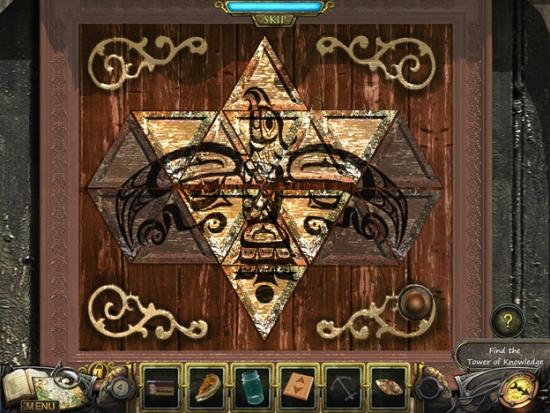
- A mini-puzzle starts.
- Adjust the triangles to recreate the image. Click on a triangle to move its surrounding triangles. As there is no reset button, a step-by-step solution cannot be provided as you may have already moved some pieces.
- Solution:
- Go through the door.
- Click on the wheel.
- Add the DIAMOND.
- Click on the statue on the right.
- Add the JEWEL EYE in the statue’s eye socket.
- Click on the face.
- Take the TORCH. Click anywhere outside the window to close it.
- Click on the altar to start a hidden object hunt.
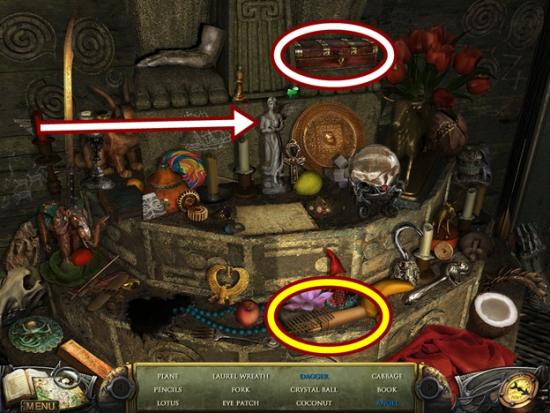
- Find all the objects. Add the wing to the angle statue. Open the chest and take the dagger. PENCILS are added to your inventory.
- Return to the child.
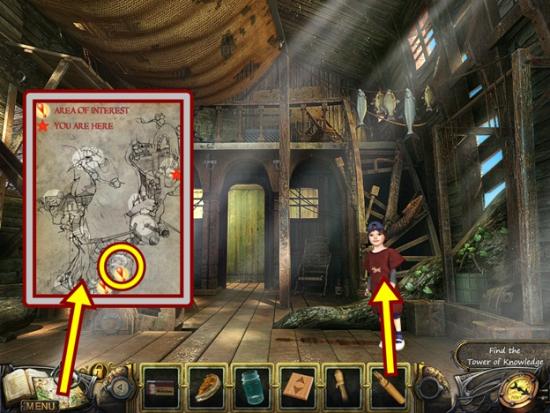
- Give the pencils to the child.
- Watch the cutscene.
- Take the GRABBER the child offers.
- Move down one scene.
- Use the TORCH on the resin to get the RESIN TORCH.
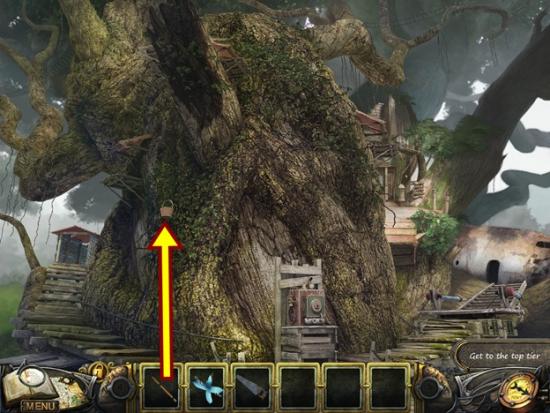
- Return to the tree top.
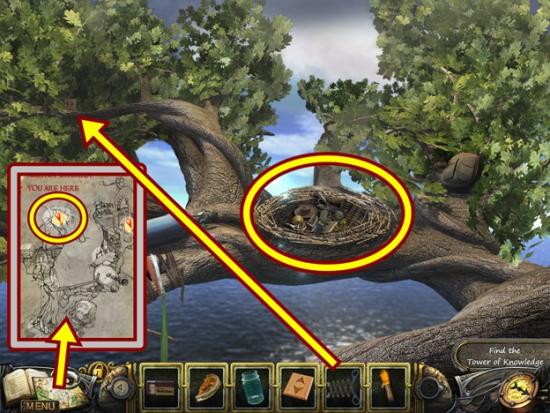
- Click on the tree branch on the left.
- Use the GRABBER to read the tile, then take the TOWER DETAIL 2.
- Click on the nest to start a hidden object hunt.
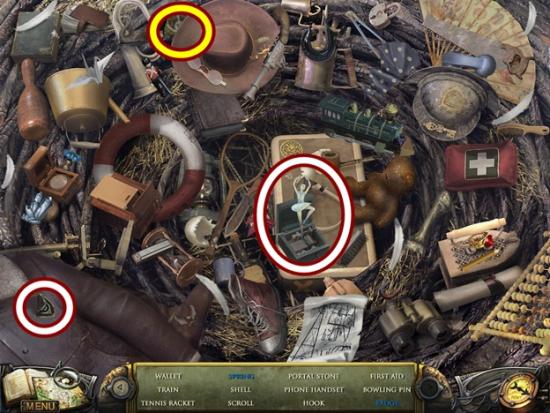
- Find all the objects. Click on the music box to get the spring. Lift the shirt flap to take the badge. A PORTAL DETAIL 2 is added to your inventory.
- Return to the upper tree house (you can use your map to jump to that area).
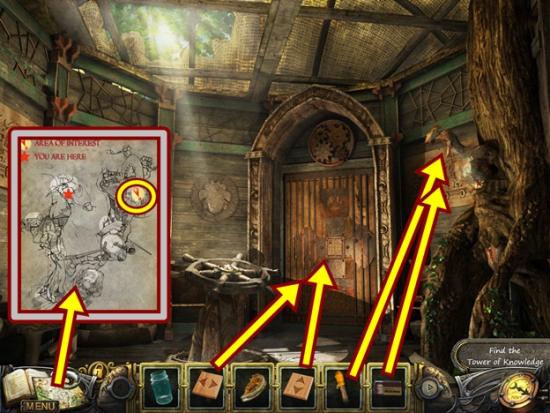
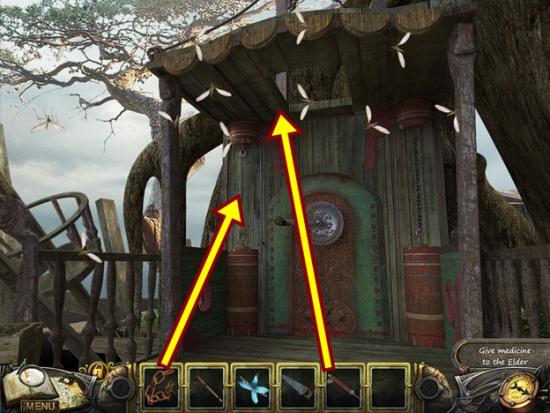
- Click on the statue at the right.
- Add the RESIN TORCH, then light it with the MATCHES.
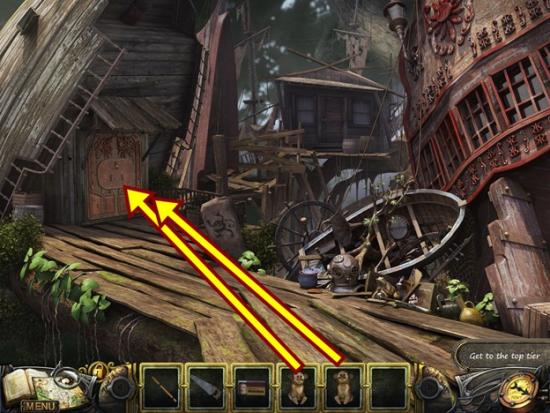
- Click on the door.
- Add the two TOWER DETAILS.
- A mini-puzzle starts.
- Use the arrows and arrowed tiles to move the gem tile to the bottom right position. The external arrows will move the row or column in that direction. The arrowed tiles can be moved around the board to change the positions of the external arrows.
- Your first step is to get the horizontal arrowed tile up to the top row, then you can move the gem tile. As there is no reset button, a step-by-step solution cannot be provided as you may have already moved some pieces.
- Just keep using the arrowed tiles to move the gem tile.
- The solution looks like this:
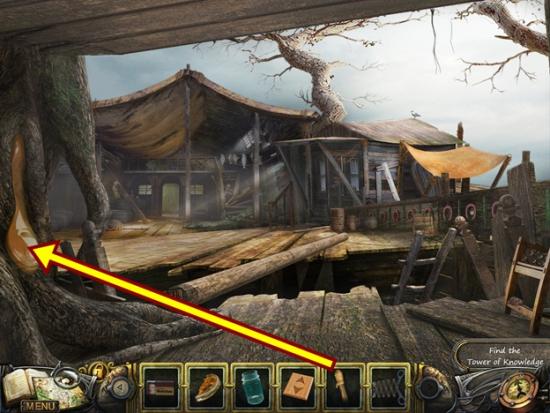
- Move through the door to the tower of knowledge.
- Watch the cutscene.
- Take the SNAKE DETAIL.
- Move down.
- Click on the altar to start a hidden object hunt.
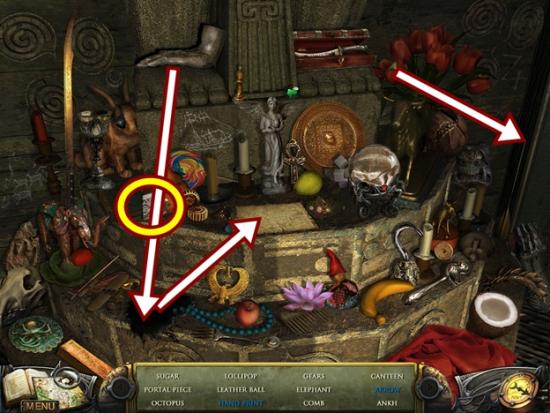
- Find all the objects. Put the hand statue on the ink spill, then press it on the paper to get the hand print. Put the arrow head on the arrow shaft, then take the arrow. A PORTAL DETAIL 3 is added to your inventory.
- Move down.
- Click on the snake body.
- Add the SNAKE DETAIL.
- Put the JAR underneath the snake’s mouth to get ACID.
- Return to the body of the airplane. If you don’t use the map to jump, you must move down one scene and then click on the mechanism and pull the lever to move the bridge.
- Click on the panel.
- Use the ACID to melt the grate, then take the PORTAL DETAIL 1.
- Click on the doorway to start a hidden object hunt.
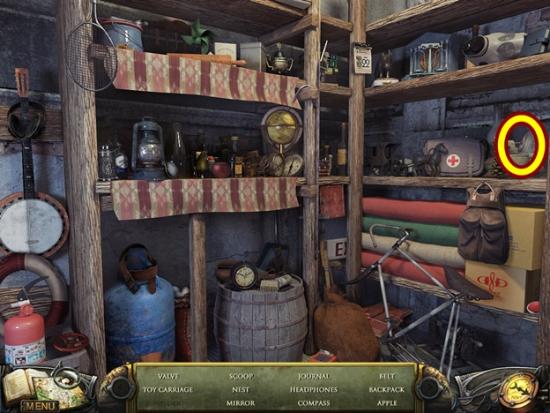
- Find all the objects. A MIRROR is added to your inventory.
- Return to the scene with the ladder (you can use your map to jump to that area).
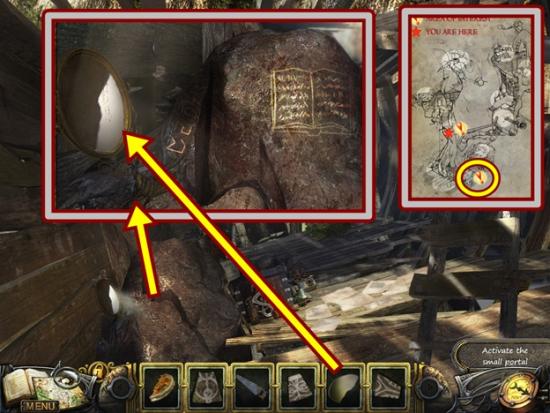
- Click on the rock.
- Add the MIRROR.
- Get the CODE. Click anywhere outside the window to close it.
- Return to the tower of knowledge (you can use your map to jump to that area).
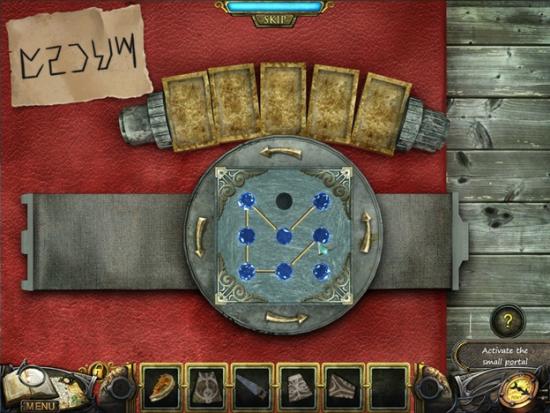
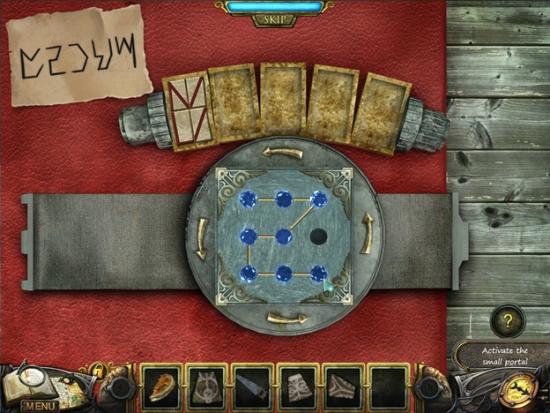
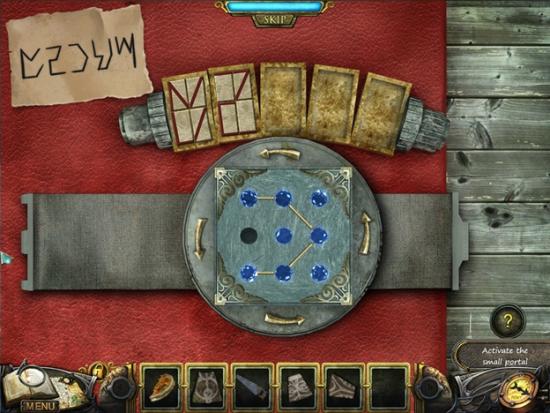
- Click on the book.
- A mini-puzzle starts.
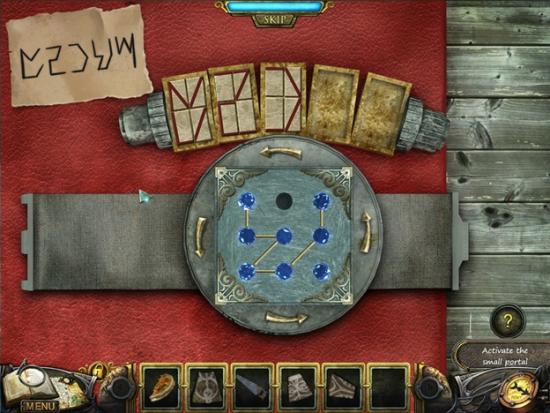
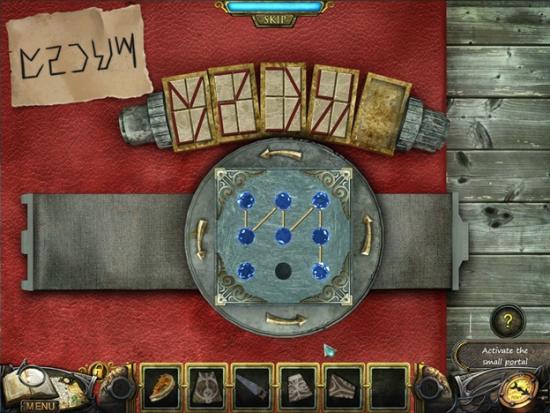
- Recreate the runes using the gems. Click and drag from gem to gem to create lines to recreate each rune (from left-to-right). Rotate the gem wheel as needed. Do not let go of the mouse button until you are finished recreating a rune.
- Solutions:
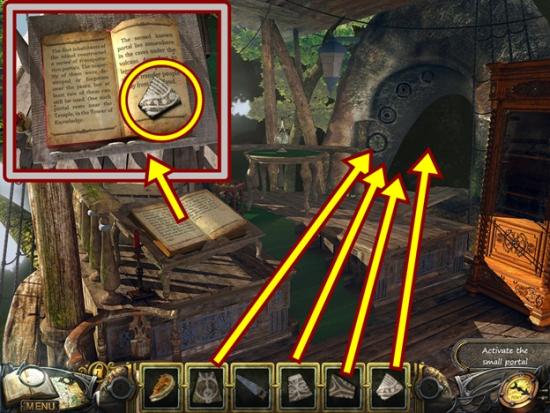
- Click on the book.
- Read the entry, then take the PORTAL DETAIL 4.
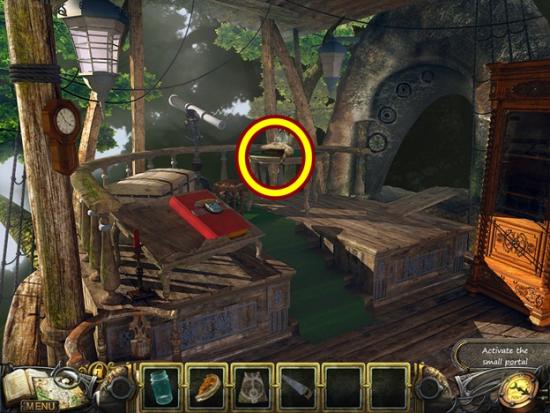
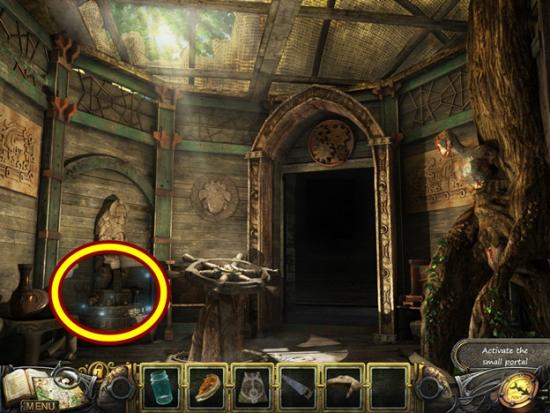
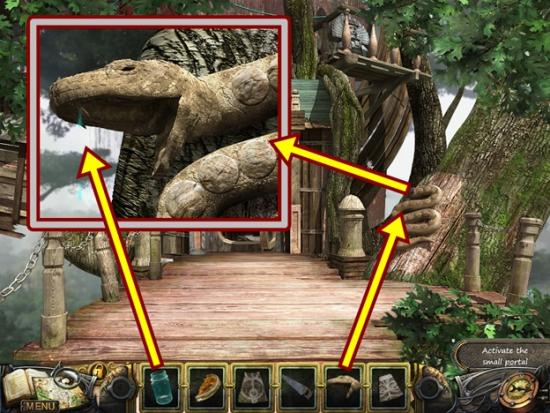
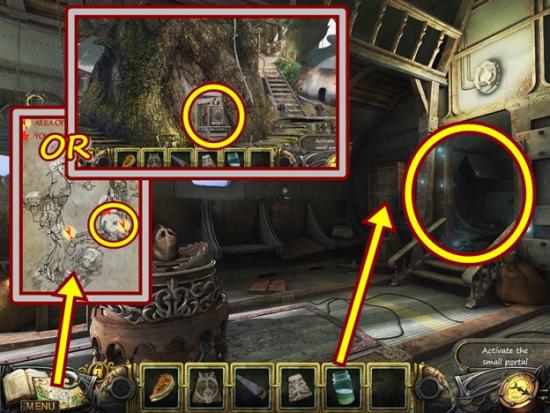
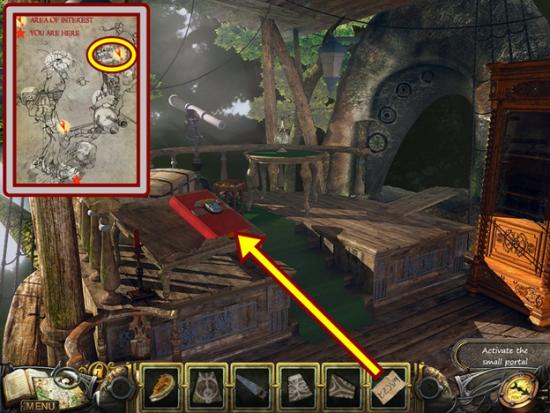
- Click on the small portal.
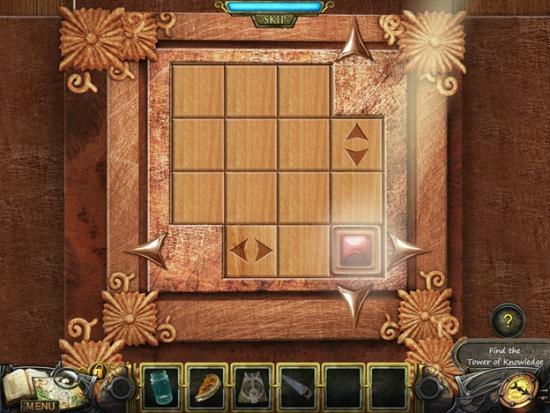
- Add the four PORTAL DETAILS.
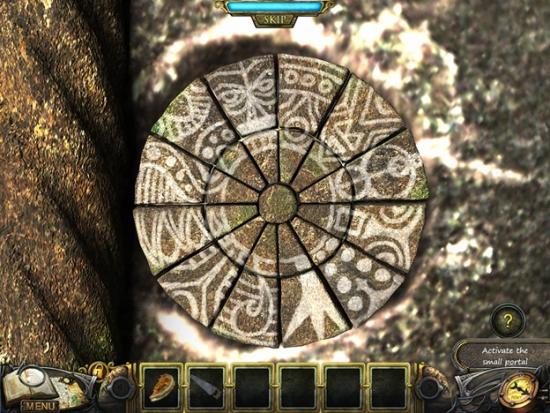
- A mini-puzzle starts.
- Rearrange the outer tiles so each matches the pattern on the inner tiles. Click on two adjacent tiles to swap their positions. As there is no reset button, a step-by-step solution cannot be provided as you may have already moved some pieces.
- Solution:
- Click on the portal.
Chapter Three
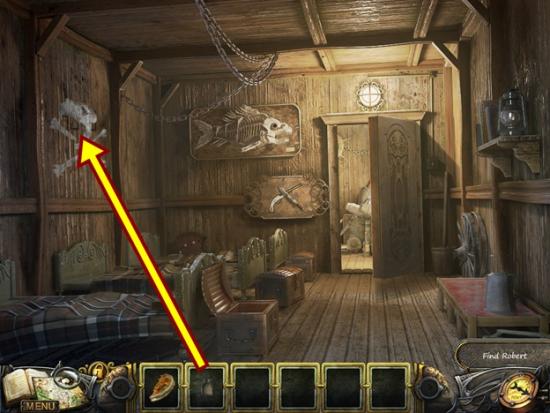
- Take the SHOVEL.
- Click on the second level to start a hidden object hunt.
- Find all the objects. RUBBER is added to your inventory.
- Go up the stairs.
- Click on the grate.
- Use the SAW to cut the log.
- Go up the stairs.
- Take the DOOR OF THE CELL.
- Click on the picture to add information to your journal.
- Move down and go through the door on the right into the tavern.
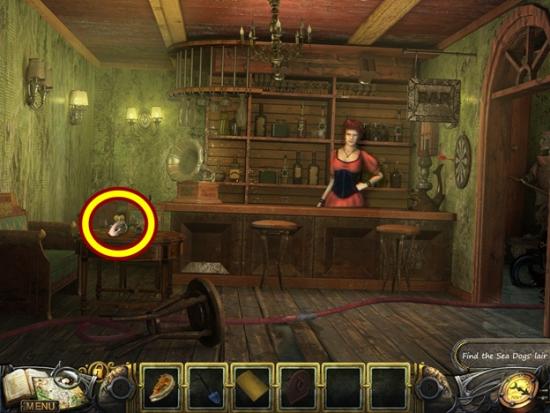
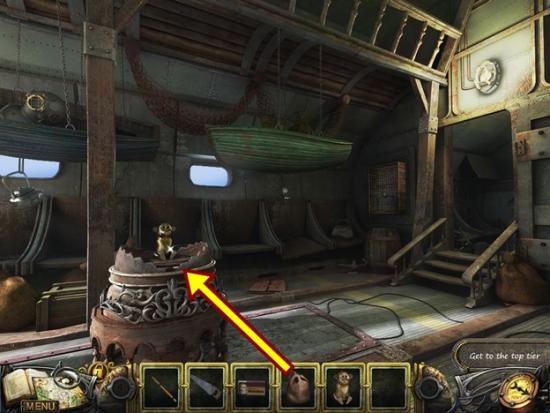
- Take the CLOCKWORK MOUSE.
- Talk to Kate, the barmaid.
- Move down two scenes to the cargo compartment.
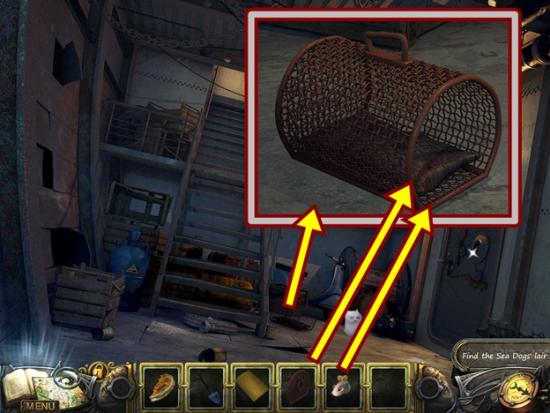
- Click on the small cage.
- Add the DOOR OF THE CELL, then the CLOCKWORK MOUSE.
- Take the CAT.
- Go up two flights of stairs and go through the door on the right into the bedroom.
- Put the CAT anywhere on the scene to chase away the mice.
- Click on the mouse hole.
- Take the DART 1.
- Click on the table to start a hidden object hunt.
- Find all the objects. Put the rose on the stem to complete the rose. Open the chocolate wrapper to take the chocolate. GLUE is added to your inventory.
- Return to the tavern.
- Click on the hose on the floor.
- Add the GLUE, then the RUBBER.
- Click on the doorway to start a hidden object hunt.
- Find all the objects. Put the “T” on the sign to get the name. Pull the lever to turn the 8 into an infinity sign. Click on the spring toy to expand it. A RING is added to your inventory.
- Move down, then go up the stairs.
- Click on the doors.
- Use the RING to break the glass, then pull the handle.
- Go out to the balcony.
- Click on the floor.
- Use the SHOVEL to dig up the DART 2.
- Return to the tavern.
- Click on the dartboard.
- Add the two DARTS.
- A mini-puzzle starts.
- Shoot three darts to beat the score of 120. The cursor turns into an unsteady reticle. As best you can determine, hover your cursor over the bullseye and wait for the centre target to be directly over the reticle, then click to shoot. Hitting the bullseye is 50 points and hitting the outer green ring is 25 points. Aim for the bullseye every time. If you don’t beat 120, you have to start over from 0. This puzzle requires patience.
- When you are finished, talk to Kate, then take the HATCH-DOOR LEVER.
- Click on the doorway to start a hidden object hunt.
- Find all the silhouetted objects. A FLAT TIRE is added to your inventory.
- Return to the cargo compartment.
- Click on the hatch door.
- Add the HATCH-DOOR LEVER.
- Go outside.
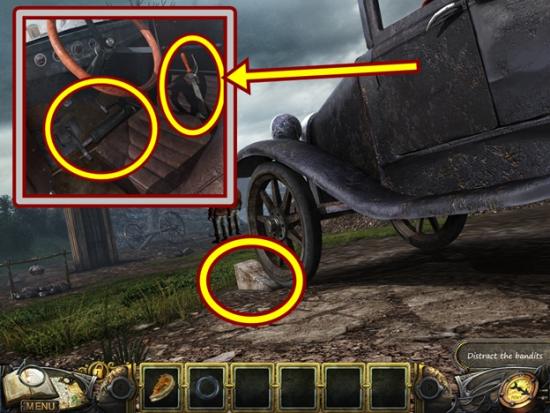
- Open the car door and look inside.
- Take the PUMP, then pull the brake.
- Push the wedge.
- Move forward.
- Click on the cannon.
- Add the FLAT TIRE, then add the PUMP.
- Push the pump.
- Take the CANNON BALL.
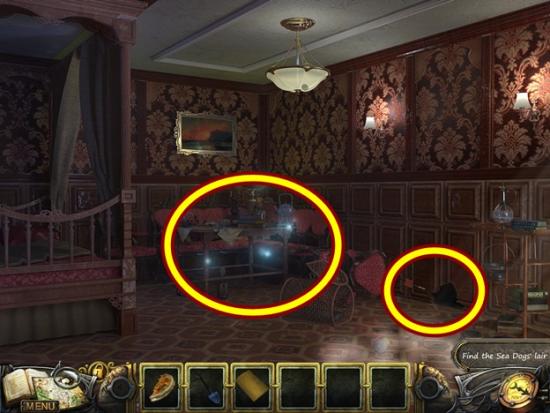
- Open the door and enter the cabin.
- Click on the fish bones.
- Take the BROWN EYE.
- Return to the balcony (you can use your map to jump to that area).
- Click on the scale.
- Add the CANNON BALL.
- When the other scale rises, click on it and take the SWORD.
- Return to the cargo compartment.
- Click on the second level to start a hidden object hunt.
- Find all the objects. A BLUE EYE is added to your inventory.
- Return to the cabin (you can use your map to jump to that area).
- Click on the mounted gun
- Add the SWORD.
- Click on the door to start a hidden object hunt.
- Find all the objects. Lower the shield to reveal the African mask. A SLINGSHOT is added to your inventory.
- Return to the bedroom.
- Use the SLINGSHOT on the ceiling lamp.
- Take the GREEN EYE.
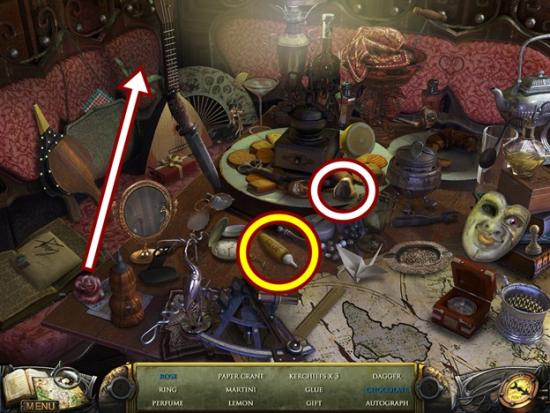
- Click on the table to start a hidden object hunt.
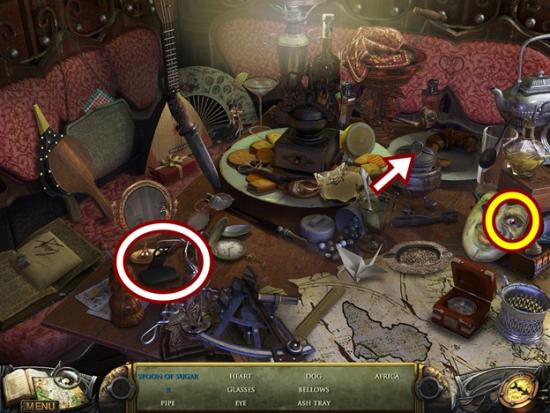
- Find all the objects. Uncover the sugar bowl, then dip the spoon in it. Click on the magnifying glass to reveal the R. A PINK EYE is added to your inventory.
- Return to the balcony.

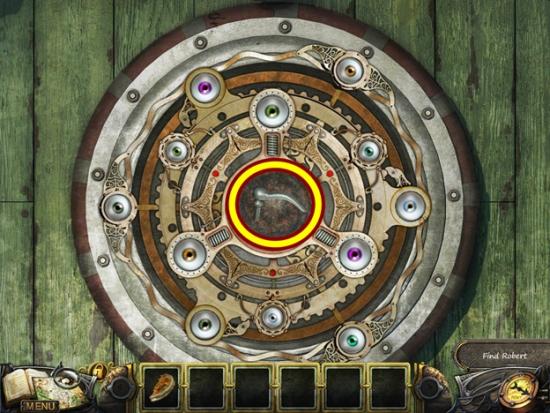
- Click on the contraption.
- Add the PINK EYE, BROWN EYE, BLUE EYE and GREEN EYE.
- A mini-puzzle starts.
- Find the identical pairs of eyes. Click on two eyes to reveal their colour. If you are incorrect, the eyes close and the rings rotate. If you are correct, the eyes remain open and the rings do not rotate. Try to keep track of the colours on the rings.
- Solution:
- Take the HANDLE.
- Move down two scenes.
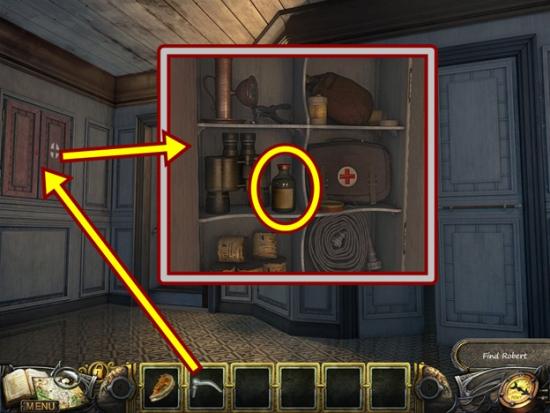
- Click on the cabinet.
- Add the HANDLE, then turn it.
- Take the SOLVENT.
- Return to the cabin.
- Click on the graffiti on the wall.
- Add the SOLVENT to remove the paint.
- Take note of the code 4573 (added to your journal). Click anywhere outside the window to close it.
- Click on the door to start a hidden object hunt.
- Find all the silhouetted objects. A HOOK is added to your inventory.
- Move down.
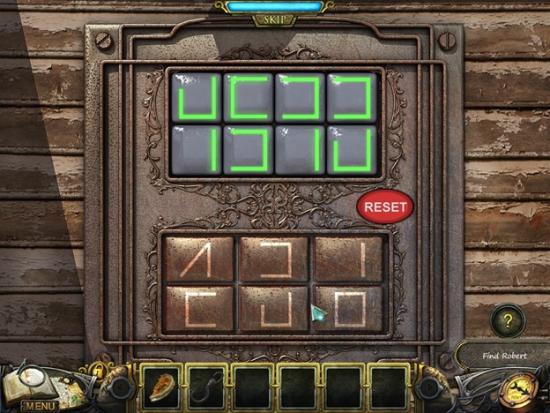
- Click on the door.
- A mini-puzzle starts.
- Press the symbols to recreate the code you saw in the cabin, 4573. There’s no delete button so if you make a mistake, you have to click Reset and start from the beginning.
- Solution:
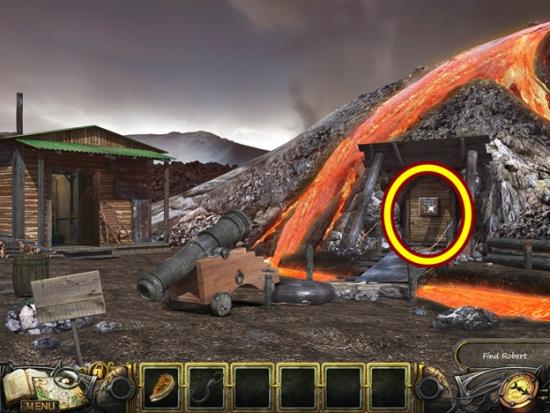
- Enter the lair.
- Watch the cutscene.
- Click on the grate.
- Add the HOOK.
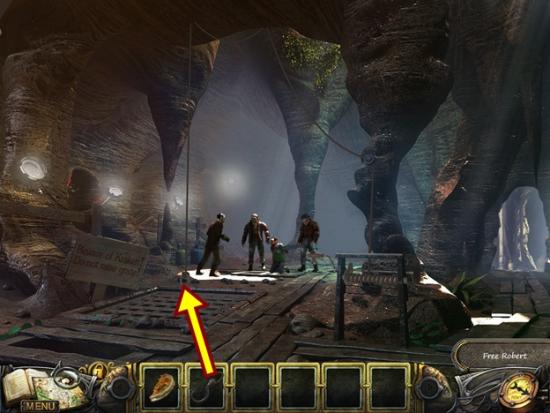
- Watch the cutscene.
- Take the MEDALLION HALF to make the HEAVEN’S TEAR.
- Talk to Robert.
- Move right.
- Watch the cutscene.
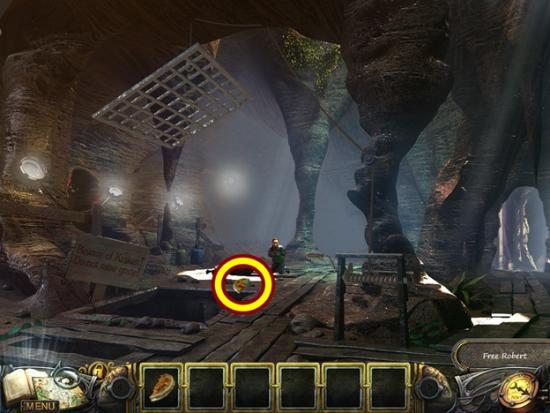
- Take the PLANK.
- Click on the cart to start a hidden object hunt.
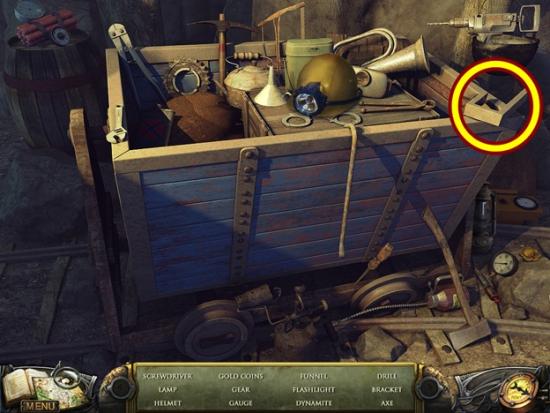
- Find all the objects. A BRACKET is added to your inventory.
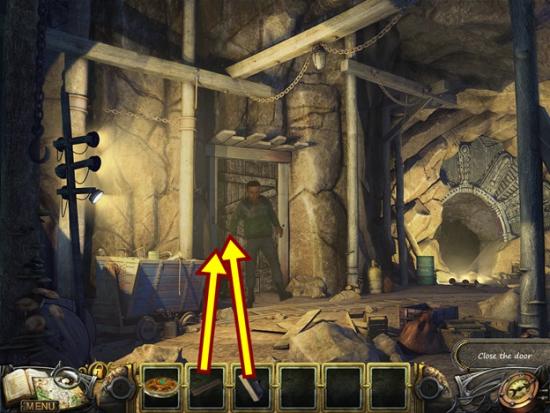
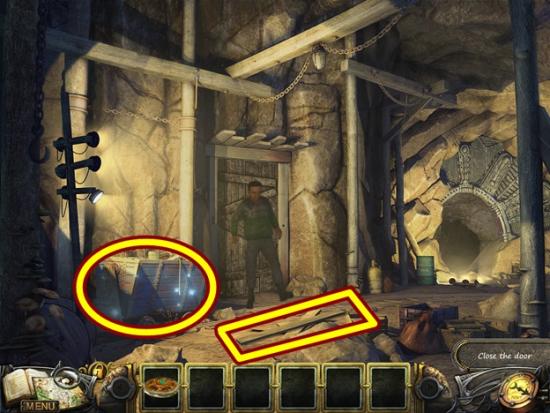
- Click on the door.
- Add the BRACKET, then the PLANK.
- Move forward through the tunnel.
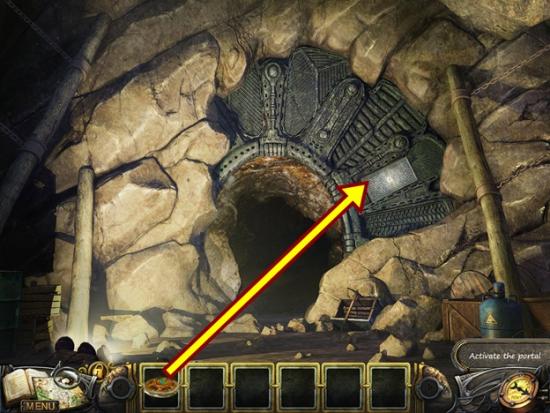
- Click on the tunnel.
- Add the HEAVEN’S TEAR.
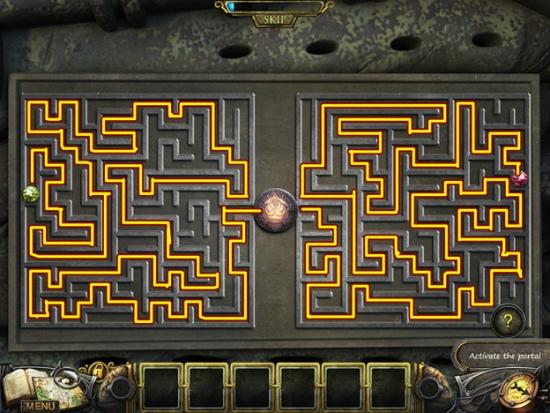
- A mini-puzzle starts.
- Move the gems through the labyrinth to the Heaven’s tear. Click and drag the gems.
- Solution:
- Watch the cutscene.
Congratulations! You have completed Gamezebo’s walkthrough for The Missing: Island of Lost Ships. Be sure to check back often for game updates, staff and user reviews, user tips, forums comments and much more here at Gamezebo!

More articles...
-
Best Horror Games On Itch.io – July 2026
Across a bounty of subgenres. -
Haze Seas Accessories Tier List [Best Accessories to Equip]
The accessories with the best stat buffs in Haze Seas.