
Grow A Garden 2 Base Price List
What's the most valuable crop?![Evomon Best Starter [Leafbun, Blazpup, or Bubble?]](/wp-content/uploads/2026/06/evomon-best-starter.jpg "Evomon Best Starter [Leafbun, Blazpup, or Bubble?]")
Evomon Best Starter [Leafbun, Blazpup, or Bubble?]
Grass-type, Fire-type, or Water-type?![Evomon Tier List [META and BEST Evomon]](/wp-content/uploads/2026/06/evomon-tier-list.jpg "Evomon Tier List [META and BEST Evomon]")
Evomon Tier List [META and BEST Evomon]
The Evomon dream team.
![[Roblox] Evomon Shiny Hunting Guide – Including Prismatic and Pris Shinies!](/wp-content/uploads/2026/06/evomon-shiny-hunting-guide.jpg "[Roblox] Evomon Shiny Hunting Guide – Including Prismatic and Pris Shinies!")
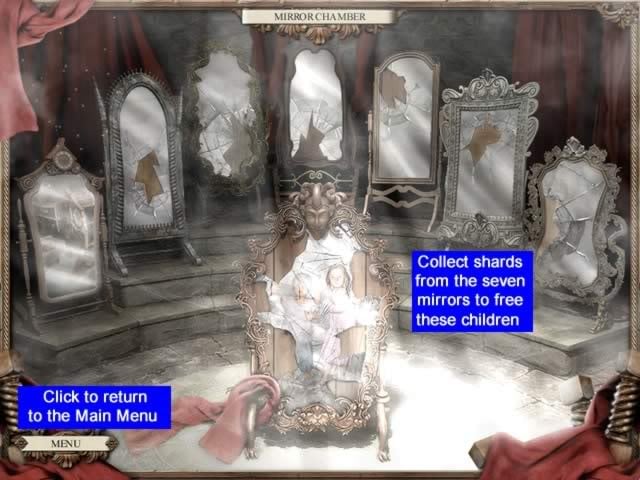
The Mirror Mysteries Walkthrough
Welcome to Gamezebo's walkthrough for The Mirror Mysteries. Navigation: General TipsMirror 1: Giant Clock WorldMirror 2: Frozen WorldMirror 3: Volcano WorldMirror 4: Dwarwen WorldMirror 5: Forrest WorldMirror 6: Toy WorldMirror 7: House Reflection World General Tips Goal: Repair the main mirror to retrieve the children by collecting shards from worlds contained in each of the seven mirrors. There is no timer or option for a timed mode. No score is kept.Each …


- Prefer Gamezebo on Google

a:1:i:0;a:2:s:13:”section_title”;s:32:”The Mirror Mysteries Walkthrough”;s:12:”section_body”;s:74842:”Welcome to Gamezebo’s walkthrough for The Mirror Mysteries.
Navigation:
- General Tips
- Mirror 1: Giant Clock World
- Mirror 2: Frozen World
- Mirror 3: Volcano World
- Mirror 4: Dwarwen World
- Mirror 5: Forrest World
- Mirror 6: Toy World
- Mirror 7: House Reflection World
General Tips
- Goal: Repair the main mirror to retrieve the children by collecting shards from worlds contained in each of the seven mirrors.

- There is no timer or option for a timed mode.
- No score is kept.
- Each of the seven mirrors contains a world with characters that will provide shards in return for collecting objects and completing tasks for them.
- Each world contains a varying number of locations that must be completed.
- All objects for a location must be collected before a new location is revealed.
- Some tasks require completing a mini-puzzle to continue. The puzzles can be skipped after a short delay while the Skip bar fills.
- Some objects collected at a location will be placed in a Shared Items inventory to be used elsewhere.
- There are unlimited Hints available but it takes time for the Hint to recharge.
- Clicking Hint produces a glowing circle in the general area of a piece or where an object should be placed.
- Hints cannot be directed to show a specific object.
- A tutorial will walk you through selecting the first three pieces.
- Once all pieces of an object have been collected, the assembled part will appear as a completed object in the box.
- If an assembled object is used in that location, the words "Found Place It!" will appear above the box. Move the mouse around the scene to find where to place the object. An outline of the object and blue rotating cog wheels will show you when you have found the placement location.
- If an object is used elsewhere, it will float up to the Shared Items list.
- Some locations will have dimmed parts or objects in the box. This indicates something needs to be done first to retrieve the object. This could be completing a mini-puzzle or clicking on a highlighted area in the screen where the object is located.
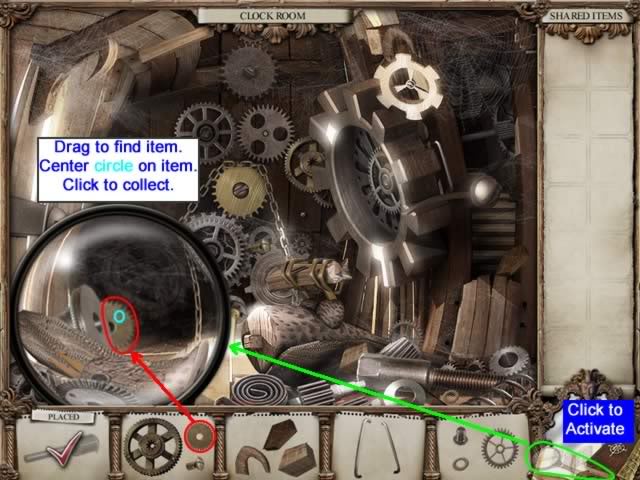
- A Magnifying Glass is available for hard-to-see objects. Activate it by clicking on the Magnifying Glass Icon or right-clicking your mouse button.
- There is a small circle in the middle of the enlarged area (indicated by the small aqua circle above). When you find the object you’re looking for, place the circle over it and click to select it.
- Return to normal view by clicking on the icon again or by right-clicking your mouse button.
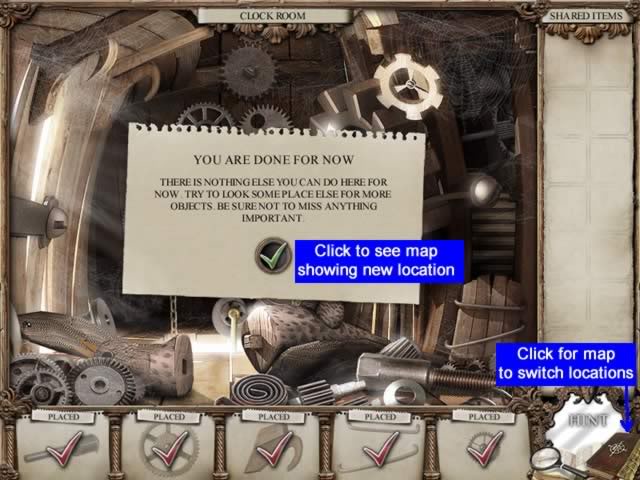
- When you have done as much as possible at a location, a message appears saying "YOU ARE DONE FOR NOW". A new location is now available. Click the message to reveal a map showing the new location.
- Use the map to navigate among locations.
- The map will also show the number of objects to be collected at a location and the number of objects to place from the Shared Items.
- Click the Book icon to return the Mirror Chamber to exit the game.
Walkthrough
There is a short clip that introduces the characters and sets the story line for play.
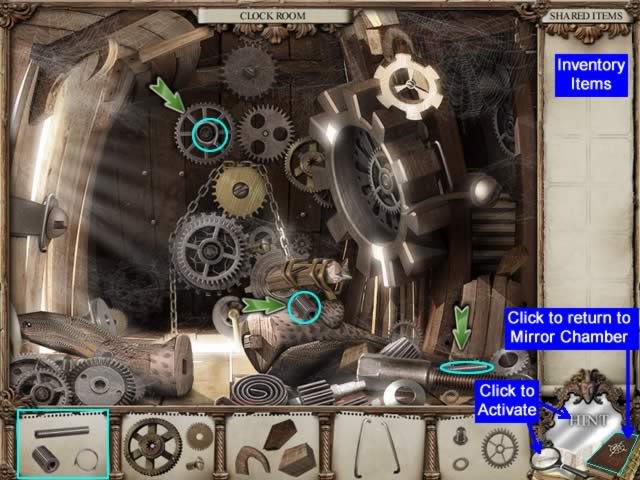
Mirror 1: Giant Clock World
This world involves reassembling a clock to working order.
Location: Clock Room
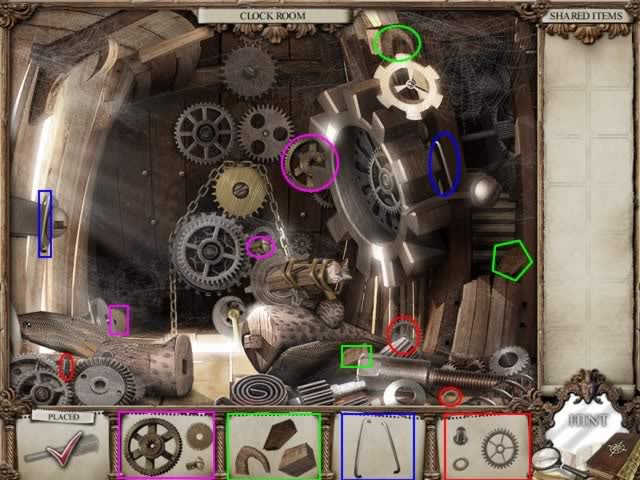
- The color surrounding each box corresponds with the circled location of the parts in the scene.
- You do not necessarily have to place objects immediately after they are completed.
- When placing an item, the cursor will turn to an arrow and cogs and an outline of the object will appear.
- Once all objects have been placed, click the "YOU ARE DONE FOR NOW" message box that appears.
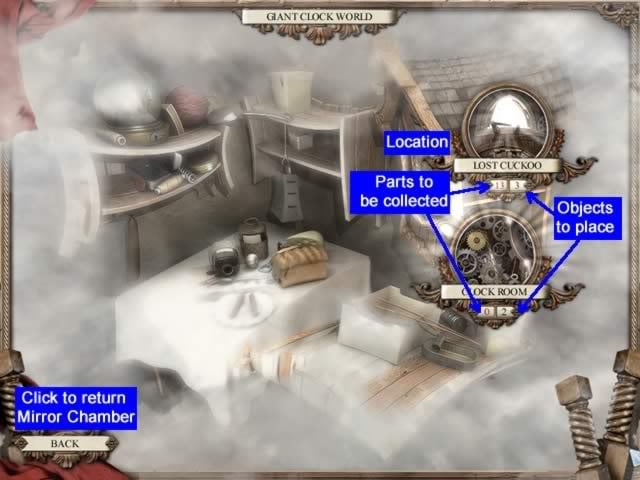
- The map for Giant Clock World shows the new location, the number of parts to be collected at that location (13) and the number of objects to be placed (3). Note that the Clock Room location shows you have collected all the parts but that there are still two objects to place. These will be collected at other locations and placed in Shared Items.
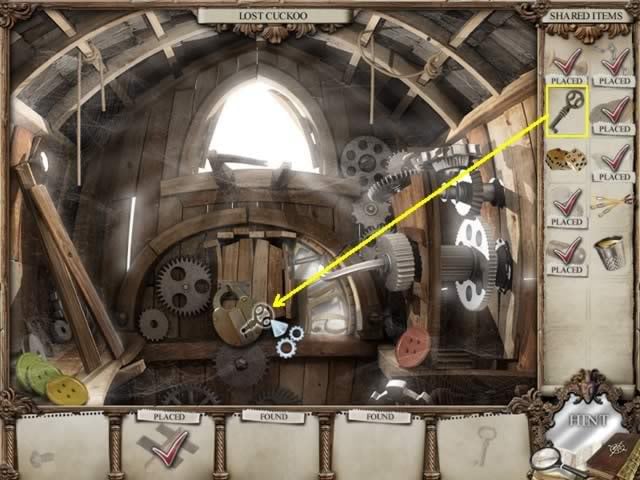
Location: Lost Cuckoo
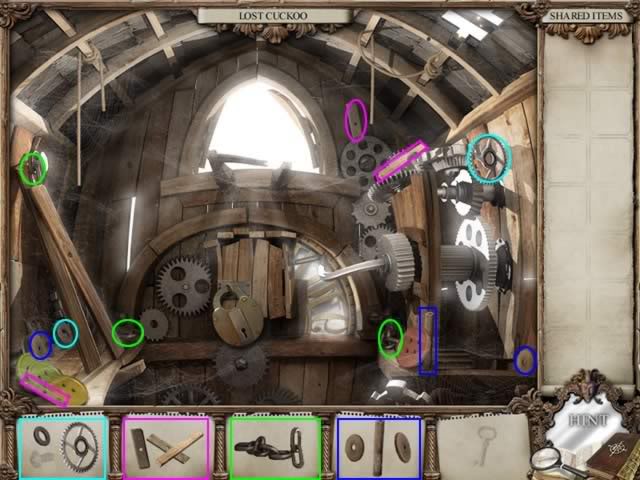
- Note the dimmed Bolt and Key. These cannot be collected yet.
- The lock blocks the entrance to a hidden area in the scene and needs a key. You are told the key is located elsewhere.
- Collect the parts shown in each box. They are outlined on the screen with the corresponding box color.
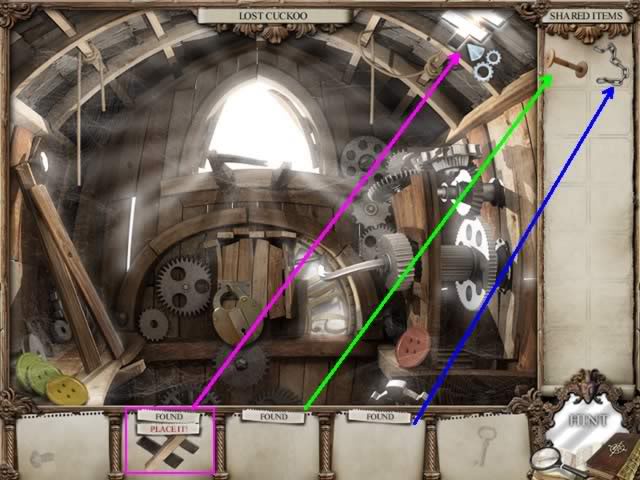
- Repair the roof by placing the boards collected in the second box on the roof where indicated.
- Note that two of the assembled objects went to Shared Items and two (dimmed) parts cannot be collected yet.
- Click the message box to open a new location.
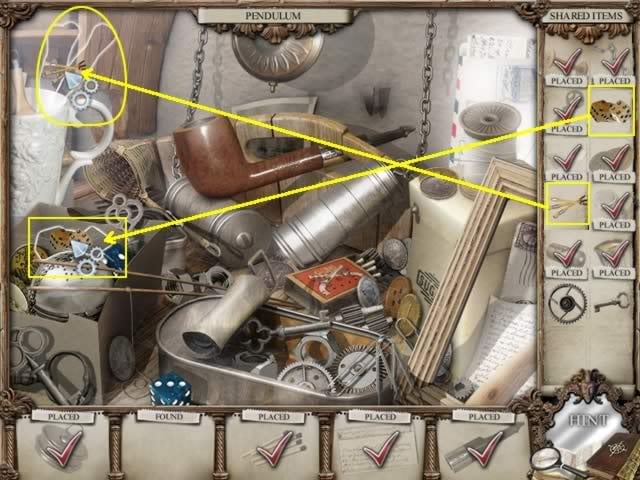
Location: Pendulum
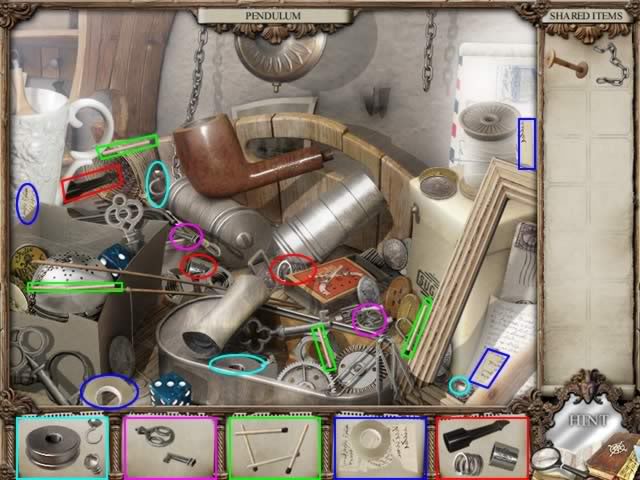
- Collect the parts shown in each box. They are outlined on the screen with the corresponding box color.
- Place the completed objects as shown
- Place the Chain from the Shared Items as shown
- Note that the Key was added to the Shared Items
- You are finished with this scene for now. Click the message box to open a new location on the map.
Location: Messy Kitchen
- Collect the parts shown in each box. They are outlined on the screen with the corresponding box color.
- Note the dimmed thimble in the blue object box. It cannot yet be found in this scene.
- Place the Screws in cup as shown. All the other assembled objects went to Share Items
- You are finished with this scene for now. Click the message box to open a new location on the map.
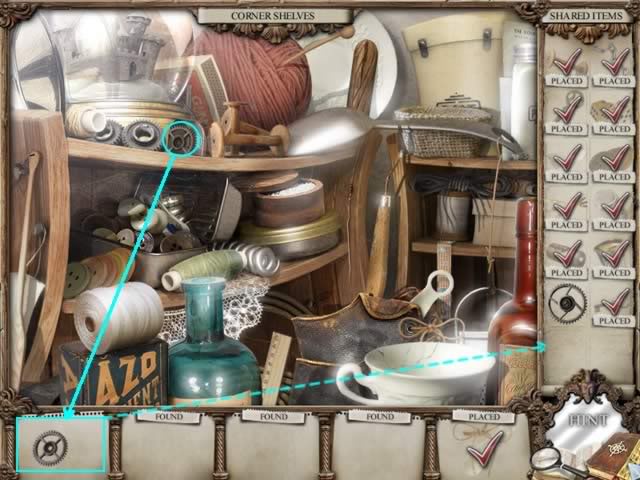
Location: Corner Shelves
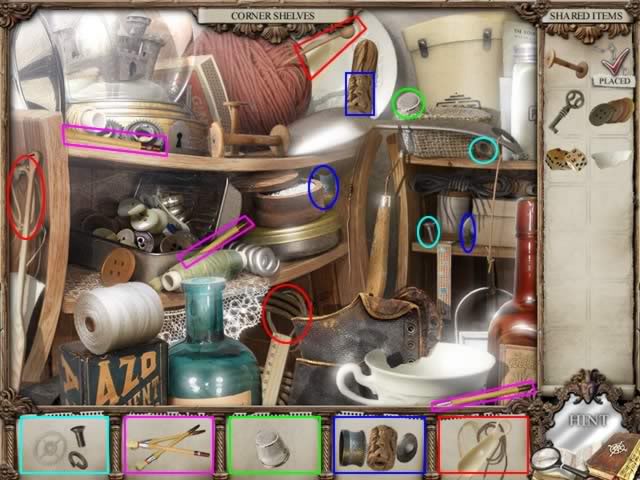
- Collect the parts shown.

- All completed objects except the Shoe Parts went to Shared Items.
- From Shared Items, place the Spool, Buttons and Cup Rim.
- The Shared Items Key is not used in this location.
- You are finished with this scene for now. Click the message box to see the status of each location on the map.
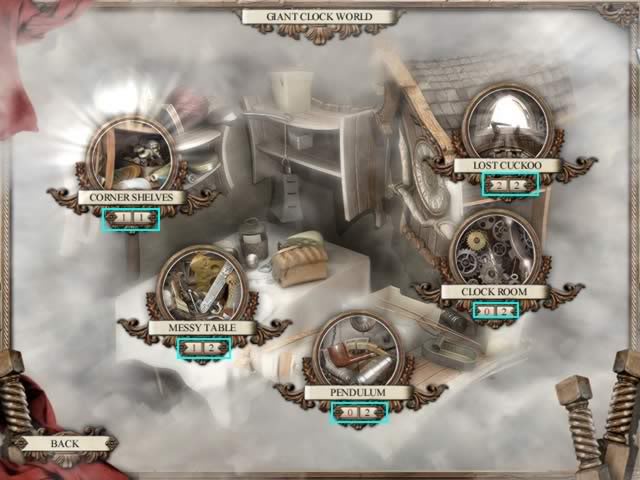
- To complete this world and retrieve the shards, you must complete each location:
- Lost Cuckoo – 2 pieces remain to complete an object; 2 objects to place
- Clock Room – 0 pieces remain to complete an object; 2 objects to place
- Pendulum – 0 pieces remain to complete an object; 2 objects to place
- Messy Table – 1 piece remains to complete an object; 2 objects to place
- Corner Shelves – 1 piece remains to complete an object; 1 object to place
- At this stage, placing Shared Items will reveal hidden locations or tasks needing to be completed to finish the location.
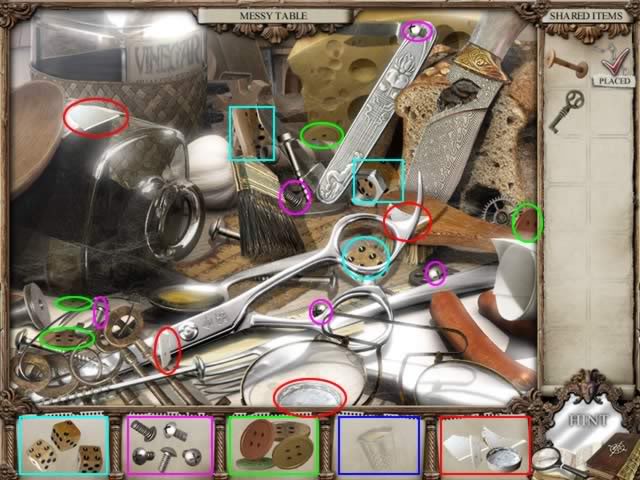
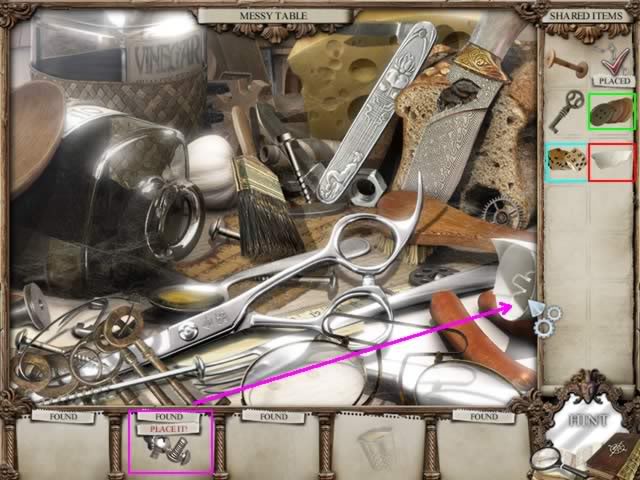
Location: Messy Table
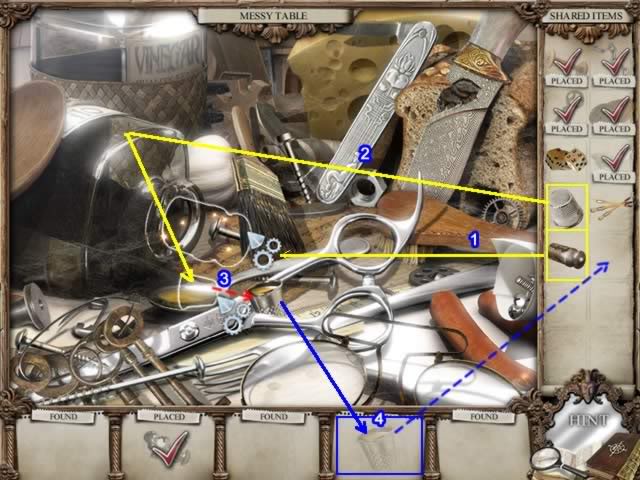
- Place the Stopper from Shared Items into the bottle to stop the drip.
- Take the Thimble from Shared Items and place it in the oil on the spoon.
- The Thimble will fill with oil and appear inside the scissor handles.
- Click on the Filled Thimble on the screen to complete this scene. The Filled Thimble will go to Shared Items.
You have completed this location. Click on the Lost Cuckoo thumbnail on the map.
Location: Lost Cuckoo
- Use the Key from Shared Items for the lock to open the blocked passageway.
- The lock will fall away and the door will glow.
- Click on the glowing door to open the area.
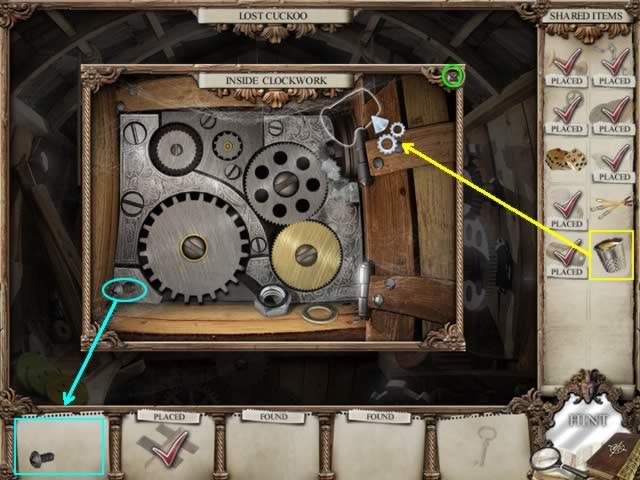
Location: Lost Cuckoo – Inside Clockwork
- Click on the Bolt to complete this object. It will meld with the piece collected earlier and form a gear that goes to Shared Items.
- Place the Filled Thimble of oil as shown. The gears will turn
- Note that the key in the last box is still dimmed . This means it cannot be found in this scene.
- Exit this location and return to the Lost Cuckoo.
Location: Lost Cuckoo
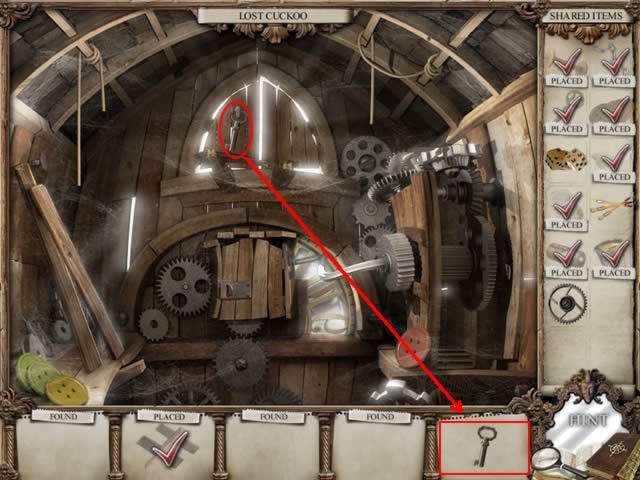
- The Key is now available to collect. Click it to send it to Shared Items.
- The message now says "THIS SCREEN IS FINISHED". There is nothing more to do at this location.
Location: Giant Clock World Map
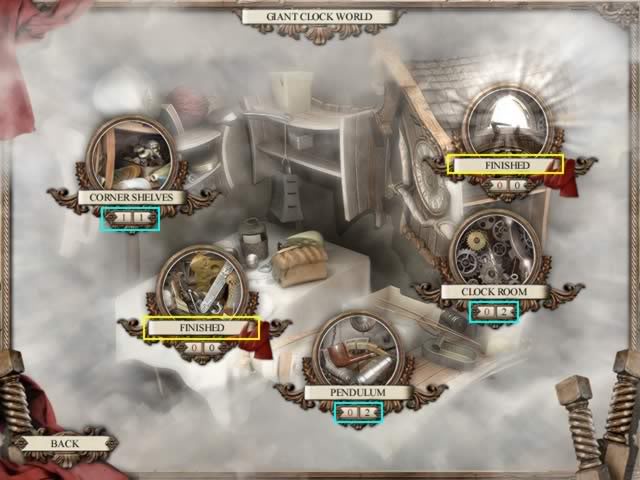
There are still inventory items to be collected and objects to be placed.
To complete this mirror world, go to the following locations and proceed as follows:
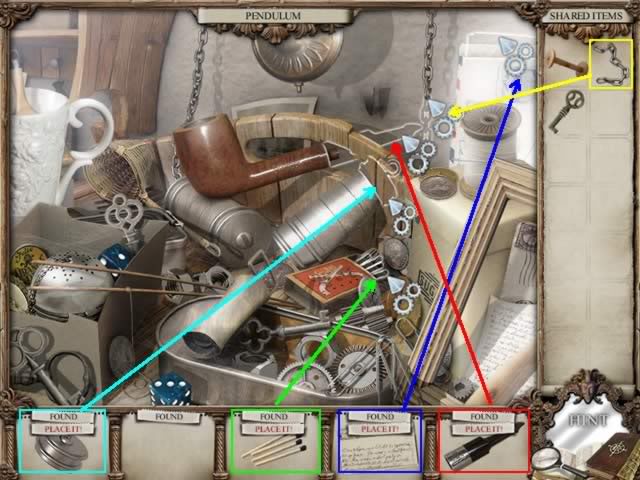
Location: Pendulum
- Place the Dice and Brushes from Shared Items and place them as shown. You are now finished with this location.
- Click the "SCREEN IS FINISHED" message box to return to the map and continue to the next location.
Location: Corner Shelves
- Use the Key from Shared Items to open the lock at the base of the snow globe.
- Click on the Gear inside the box to finish the object and add it to Shared Inventory. This location is now complete.
- Click the "SCREEN IS FINISHED" message box to return to the map and proceed to the last location.
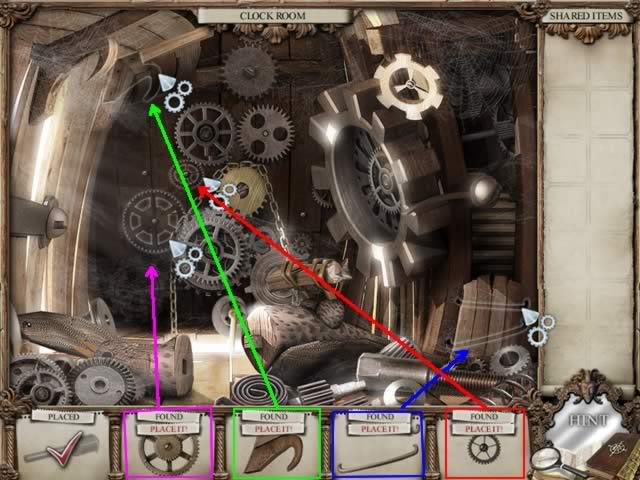
Location: Clock Room

- There are two inventory items remaining: two gears. Place them as shown on the gear wall.
- The mouse says you will now receive two mirror shards. You are not shown them and do not need to click anywhere to collect them.
- Click the "SCREEN IS FINISHED" message box.
You have completed the Giant Clock World mirror.
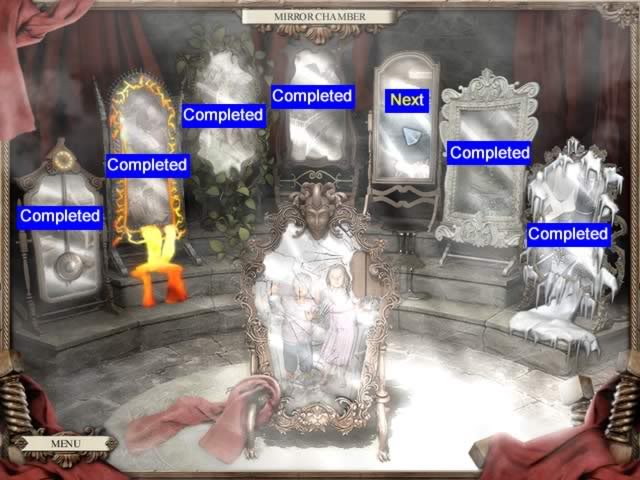
Location: Mirror Chamber
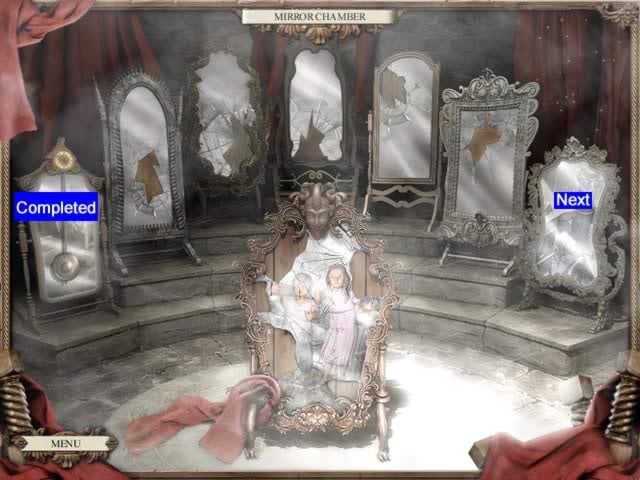
One shard is placed in the main mirror with the children. The second shard is placed in the last mirror to open this world.
Click on the glowing mirror to continue.
Mirror 2: Frozen World
Your goal for this world is to find a gift the king can give his wife to apologize and get her to return to the kingdom.
Location: Throne Room

- Collect the parts shown in each box. They are outlined on the screen with the corresponding box color.
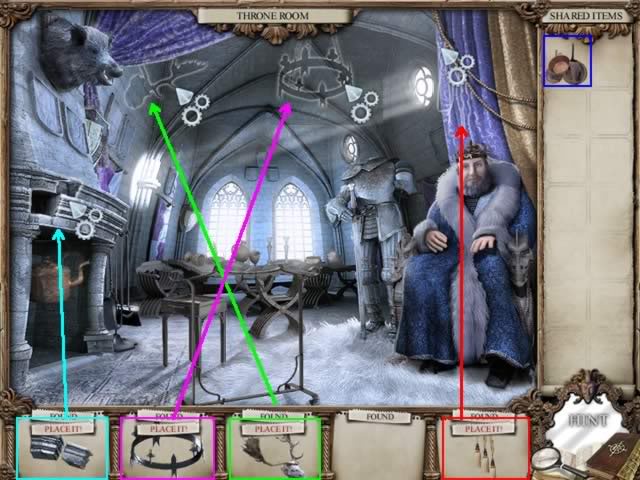
- Place the objects as shown. Note the Pans went to Shared Items.
- Click the "YOU ARE DONE FOR NOW" message box to continue to the next location
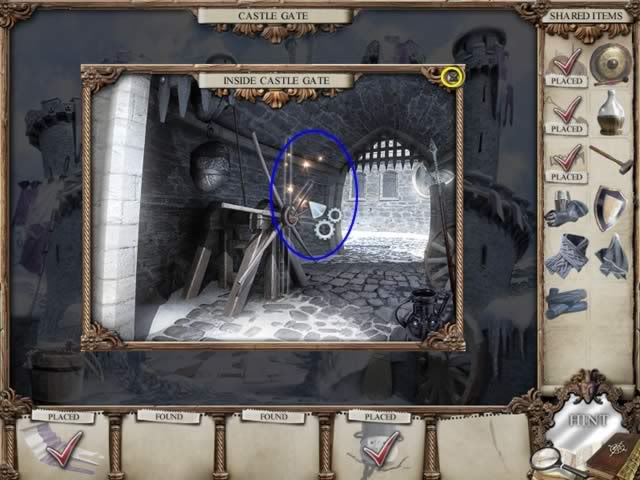
Location: Castle Gate
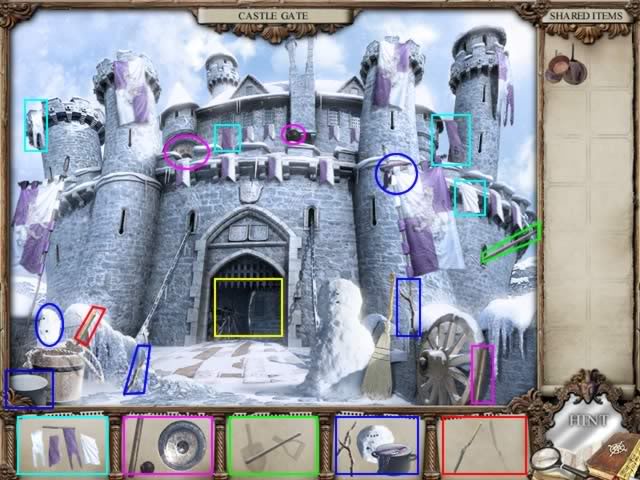
- Collect all the object pieces as shown.
- The entrance to the castle (shown in a yellow box) is another area to investigate. Click on the gate to enter the area.
Location: Castle Gate – Inside Castle Gate
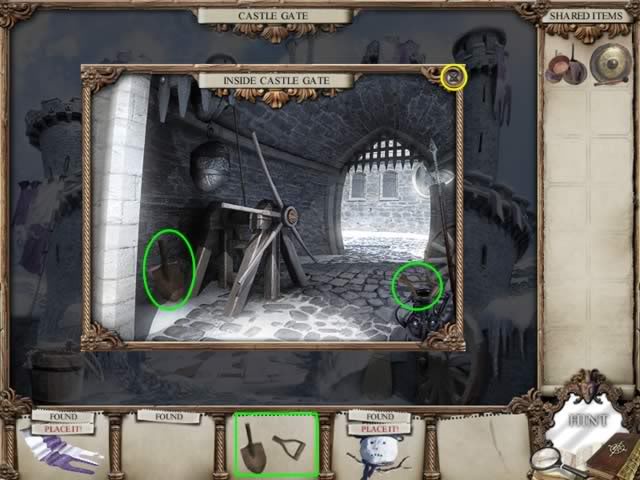
- Pick up the two pieces of the shovel. Close this area to return to the Castle Gate.
Location: Castle Gate
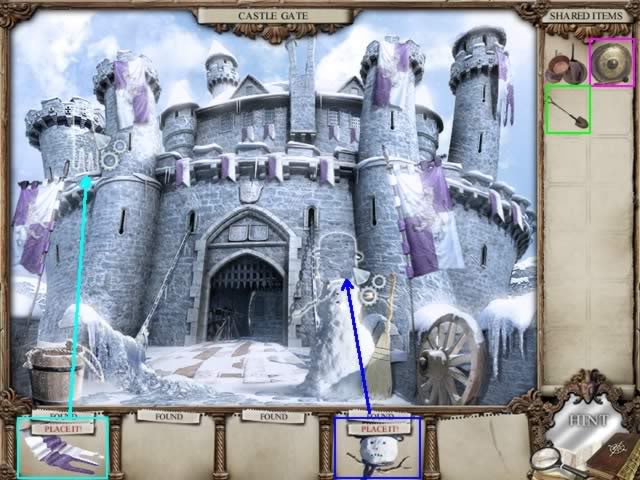
- Place the Banner and Snowman’s Head as shown.
- The Gong and Shovel go to Shared Items.
- Click the "YOU ARE DONE FOR NOW" message box to continue to the next location.
Location: Castle Kitchen
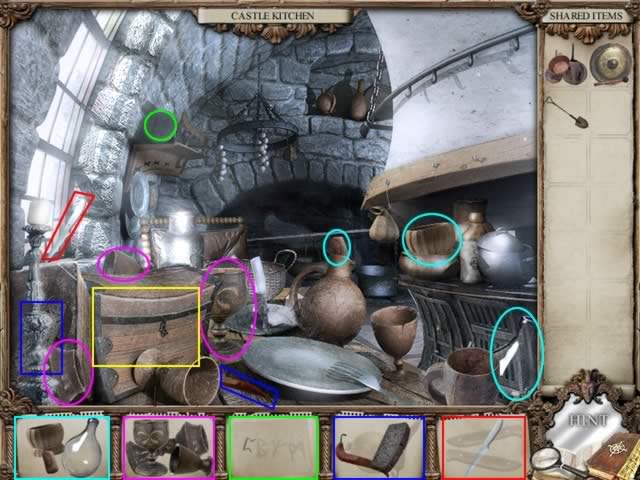
- Collect all the object pieces as shown.
- The Wooden Chest (outlined in yellow) is another area to investigate.
- Click on the Chest to enter the area
Location: Castle Kitchen – Inside Wooden Chest

- Collect the two parts of the knife handle, pepper, onion and sheet of paper
- Close the area to return to the Castle Kitchen
Location: Castle Kitchen
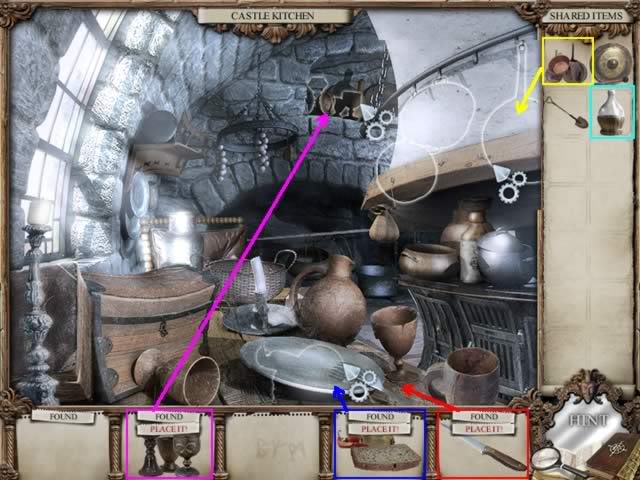
- Place the Goblets, Food, and Knife as shown.
- The Wine Bottle is added to Shared Items.
- Place the Pans from the Shared Items.
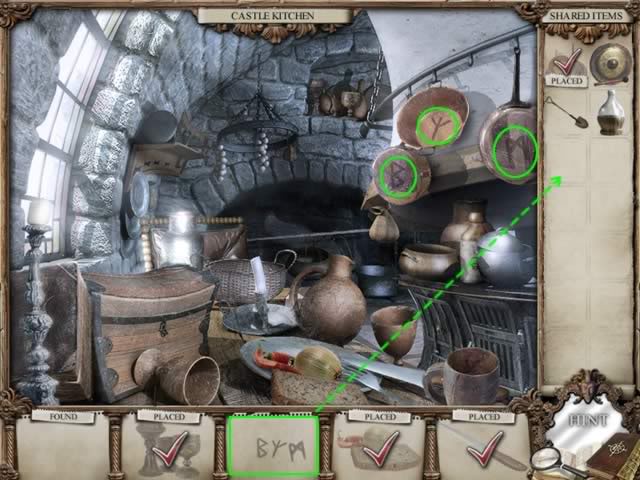
- When the Pans are placed, runes to complete the writing on the paper are revealed.
- Click each rune to add it to the paper.
- The completed Rune Paper is added to Shared Items.
- Exit this location.
Location: Old Armory
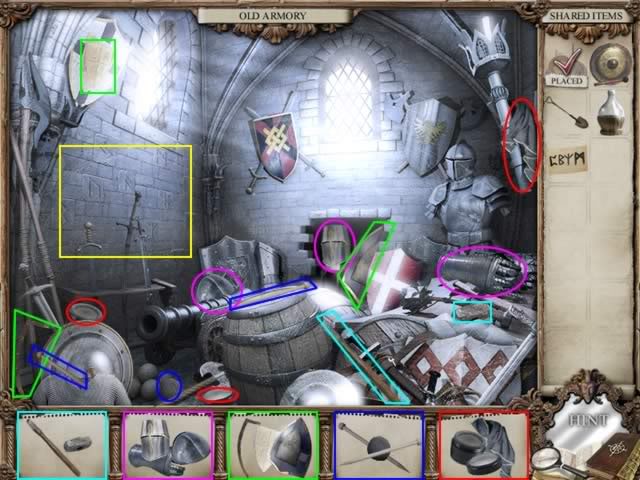
- Collect the object pieces as shown.
- Nothing is placed at this location and all objects collected go to Shared Items.
- Place your mouse on the wall behind the swords (highlighted in yellow) and click to open this area.
Location: Old Armory – Rune Wall
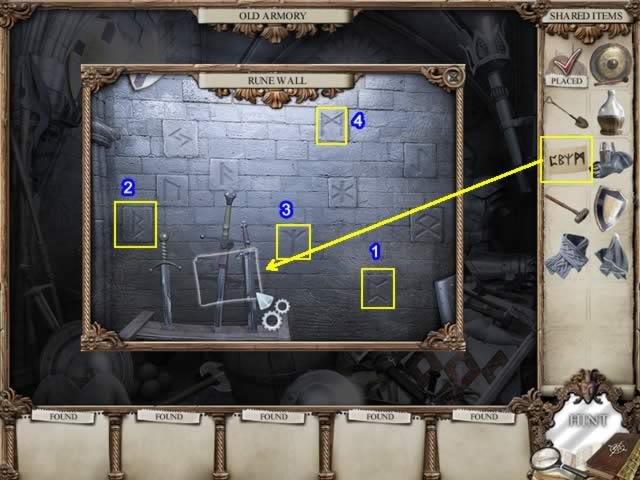
- Place Rune Paper from the Shared Items.
- Clicking on tiles with runes on the will turn them on or off.
- Click on the runes currently highlighted to turn them off.
- Click on the rune tiles in the same sequence shown on the Rune Paper to turn them on.
- Exit to the Old Armory.
This location is complete.
Location: Frozen Garden
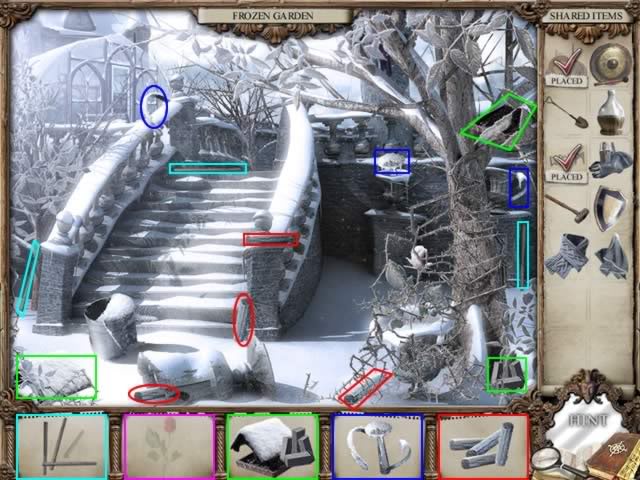
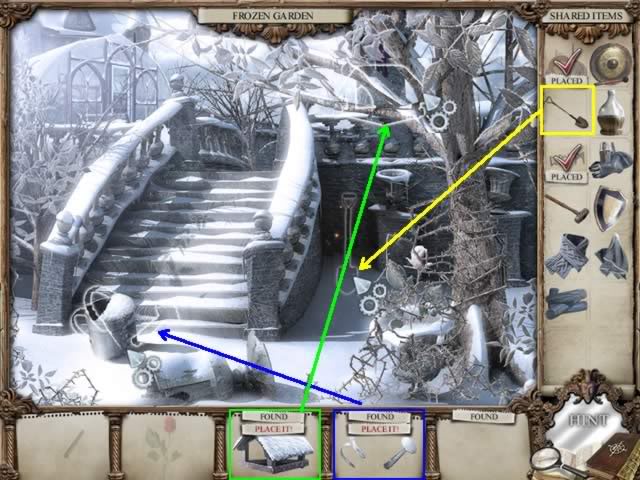
- Collect the pieces then place the objects as shown.
- Placing the shovel uncovers the dimmed stick. Click on it to send it to Shared Items.
- This completes this location for now.
All that remains to complete this world is to place inventory items and collect the remaining objects.
From the map, go to the following locations:
Location: Castle Gate
- Click on the gate to enter the area
Location: Castle Gate – Inner Castle Gate
- Place the Spokes to complete the mechanism for lifting the drawbridge
- Exit from this location and return to the Castle Gate
Location: Castle Gate
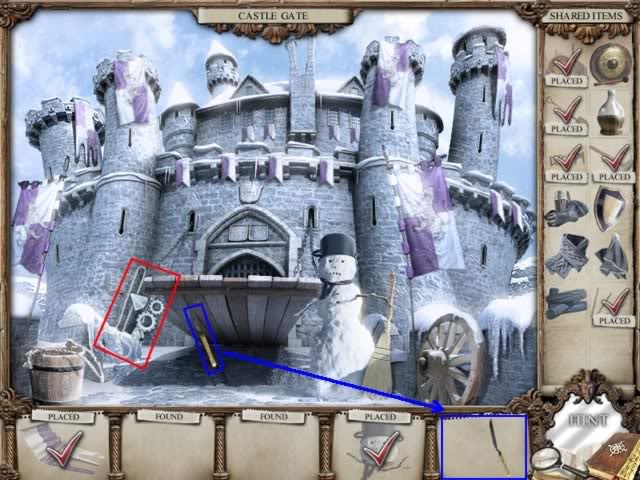
- Use Hammer from Shared Objects to break ice on the drawbridge.
- The drawbridge will lift and the dimmed piece of the Shears will become visible.
- Click on the piece to put the completed object into Shared Items.
- This location is complete
Location: Frozen Garden
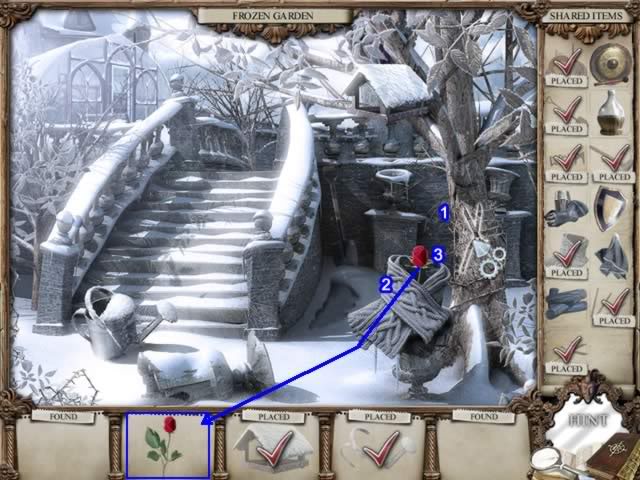
- Use the Shears on the thorns entwined on the tree and surrounding the frozen rose.
- Place the Scarf around the frozen rose to melt the ice.
- Select the Rose to complete this location and add it to Shared Inventory.
This location is complete.
Location: Throne Room
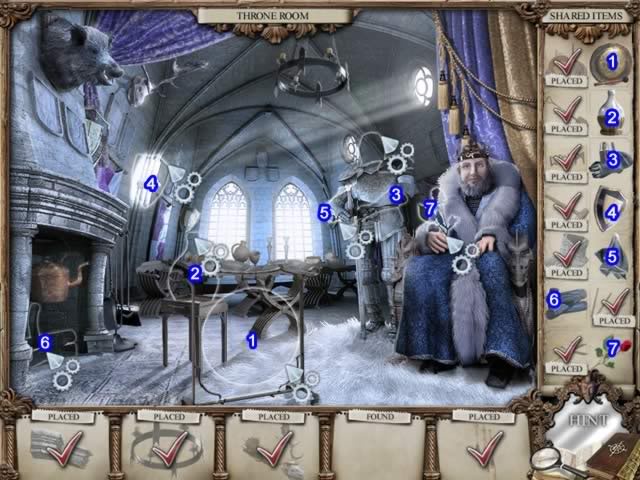
- Place the items from inventory to their corresponding number in the scene
- The king is so delighted you gave him the last surviving rose in the kingdom for his wife; he gives you two mirror shards.
You have completed the Frozen World mirror.
Location: Mirror Chamber
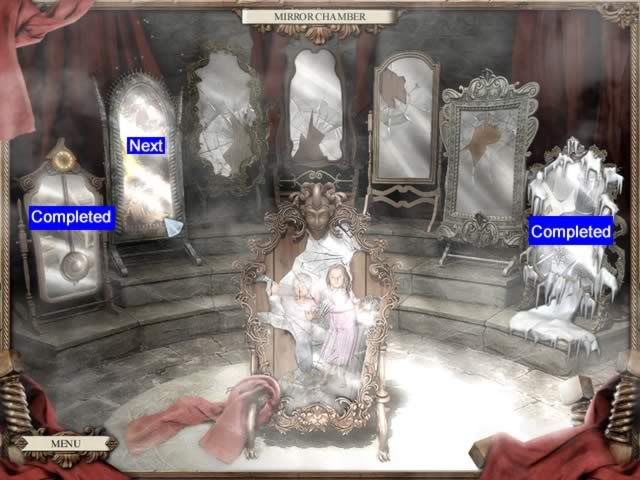
One shard is placed in the main mirror with the children. The second shard is placed in the second mirror to open this world.
Click on the glowing mirror to continue.
Mirror 3: Volcano World
The goal is to find the missing gem for the queen’s necklace so she can return to the king.
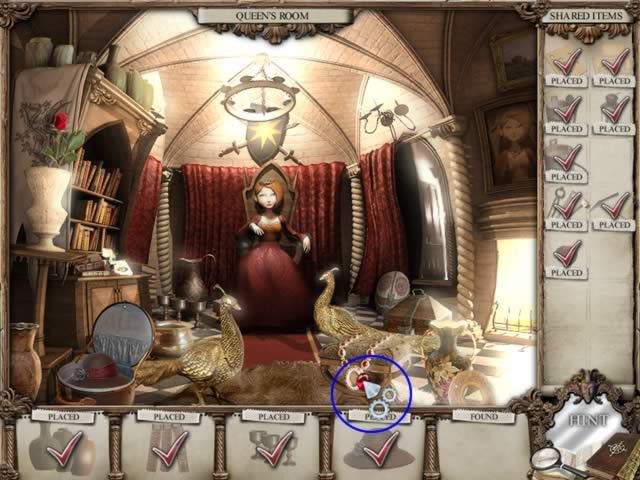
Location: Queen’s Room
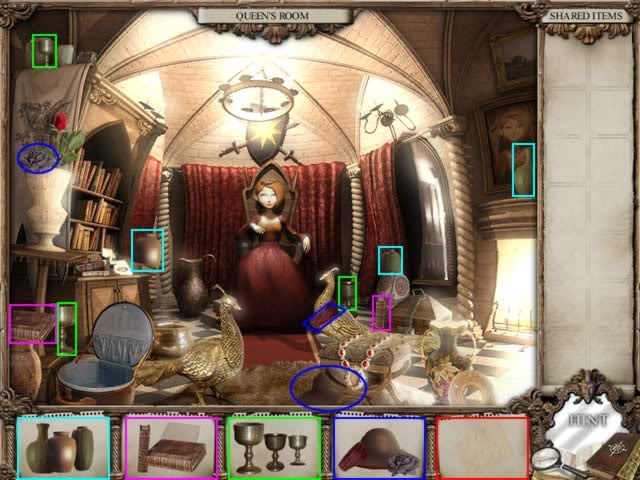

- Collect the object pieces.
- Place the assembled objects as indicated
- Place the cursor on the bookshelf to reveal the hidden area. Click to open it
Location: Queen’s Room – Queen Odelia’s Bookcase
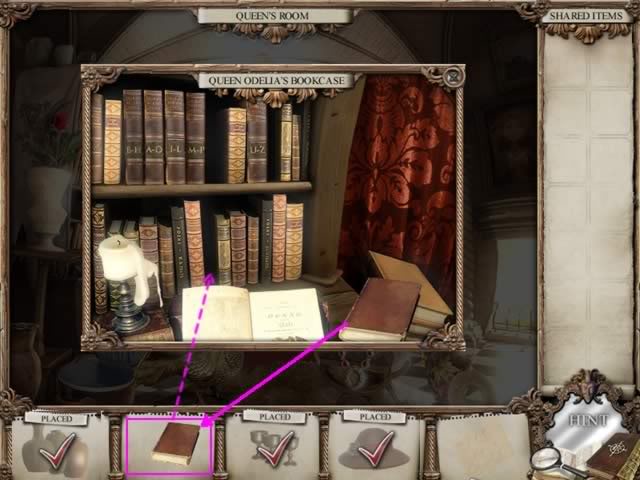
- Collect the book on the desk to complete the three book object.
- Place the books on the shelf
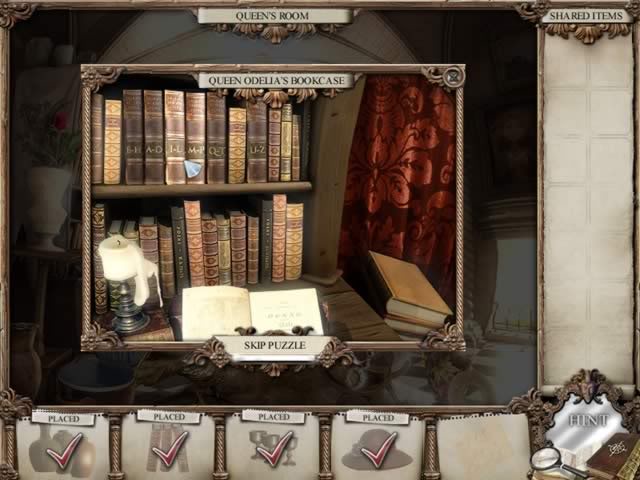
- The alphabetically lettered books are highlighted in pairs as the mouse moves over them. They need to be put in the correct order.
- Clicking on two books exchanges their position. The completed order is:
- A-D
- E-H
- I-L
- M-P
- Q-T
- U-Z
- Clicking on two books exchanges their position. The completed order is:
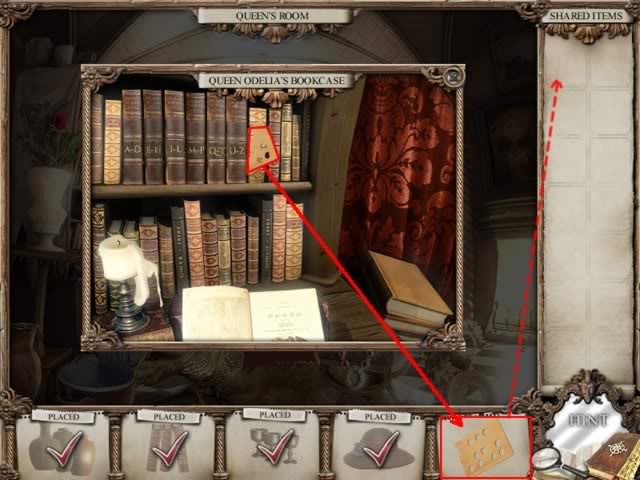
- When the books are in their proper order a yellow Punch Card appears. Click on the card to send it to Shared Items.
- Exit this location
Exit the Queen’s Room
Location: Blacksmith
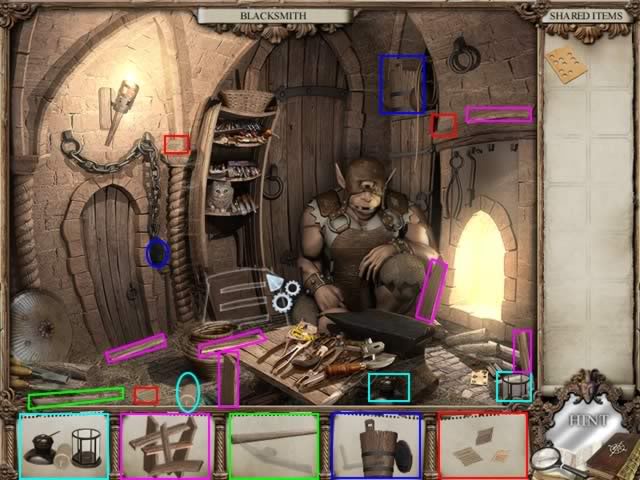
- When all the pieces are assembled, place the step ladder on its location in front of the book shelf.
- The basket on top of the shelf turns on its side and reveals the last piece for the Bucket.
- Click on the Bucket to send it to Shared Items and exit this location.
Location: Dark Cellar
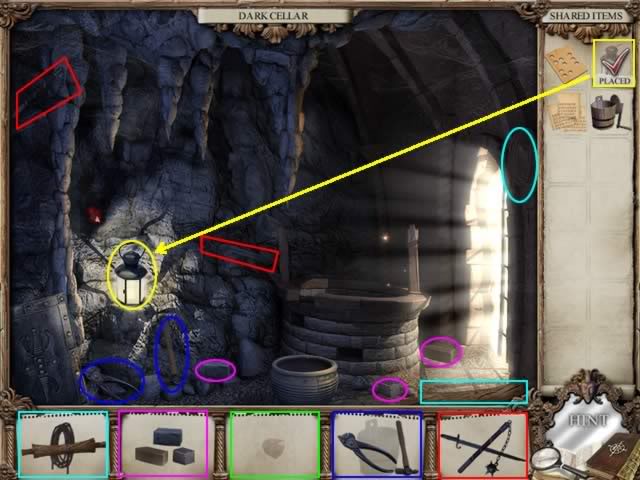
- First place the Lantern in its position on the rock to illuminate the cellar
- Select the pieces as indicated
- Place the Missing Bricks in the well wall.
- Place the Sword and Mace with the shield on the far left corner.
- After placing the well Rope Assembly (indicated in aqua) and the Bucket from Shared Items, the now-dimmed Full Bucket will appear to the left side of the well. Click it to add it to Shared Items. Continue to the gem cutter’s workshop.
Location: Workshop
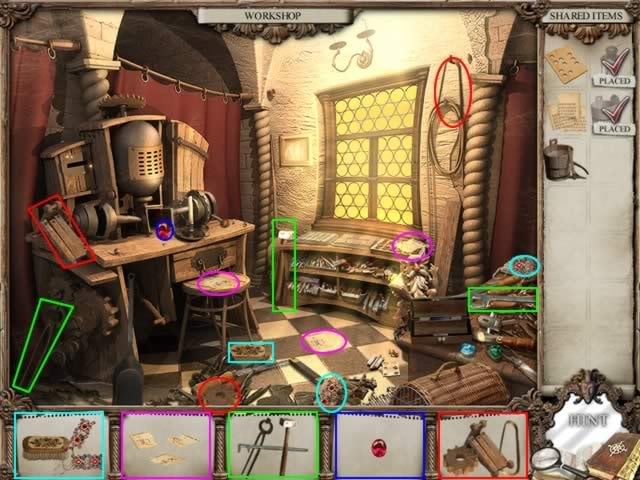
- Collect the pieces as shown.
- Place the Jewelry (aqua) and Machine Assembly (red) as shown.
- Place the Punch Card from Shared Items in the machine slot.
- To place the Paper Scraps, click on the highlighted square by the window outlined in pink. This will open the Sander Rune Manual.
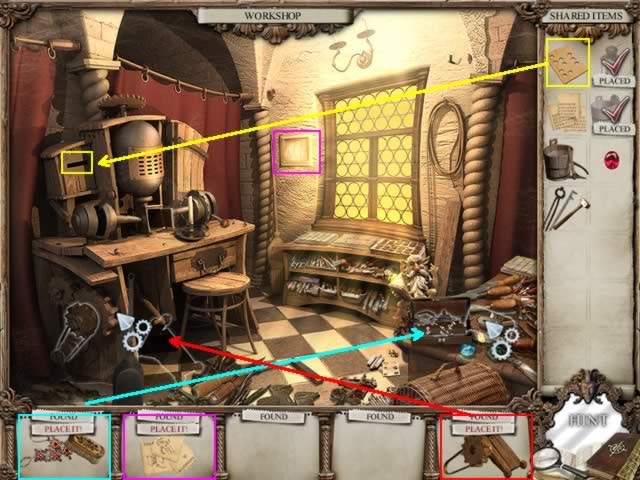
Location: Workshop – Sander Rune Manual
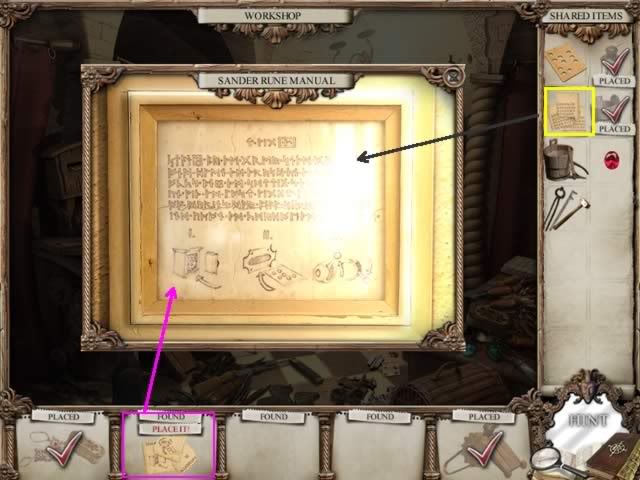
- Drag the Paper Scraps to the Manual and you’ll see half of a manual to operate the sander.
- Drag the other Paper Scraps from Shared Items to complete the manual. Note the diagram on the bottom, it shows the steps to operate the machine. Close the location.
You are now temporarily finished with the Workshop
Location: Volcano World Map
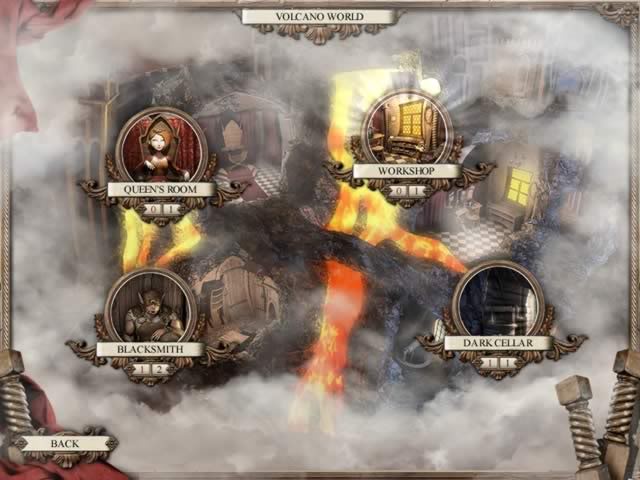
All that remains to complete this world is to place inventory items and collect the remaining objects.
Go to the following locations and proceed as indicated:
Location: Blacksmith
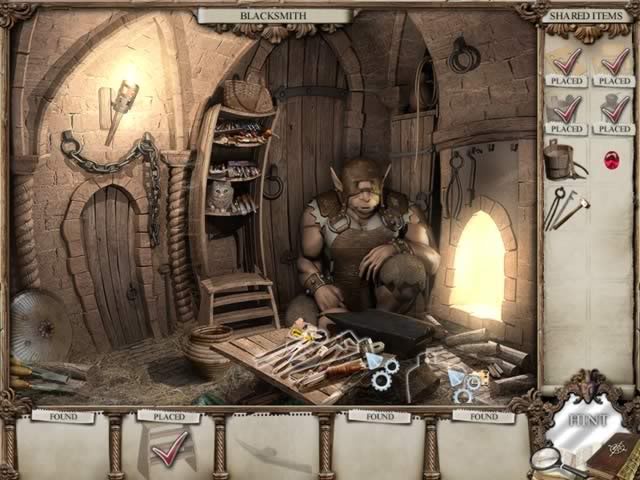
- Place the tools on the table
- Place the bucket full of water next to the table
- Collect the pickax head from the anvil to complete this location
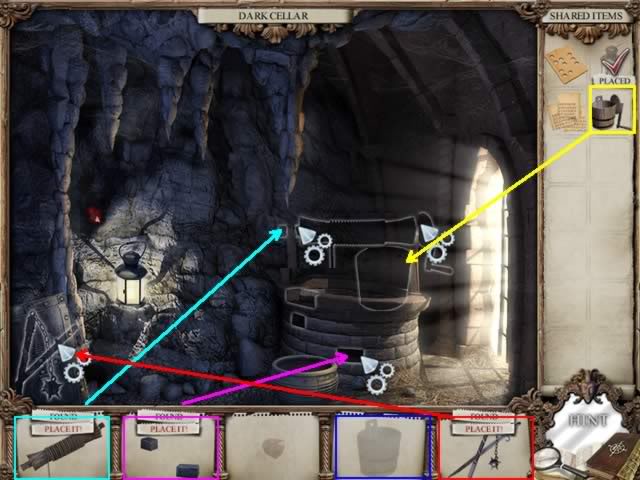
Location: Dark Cellar
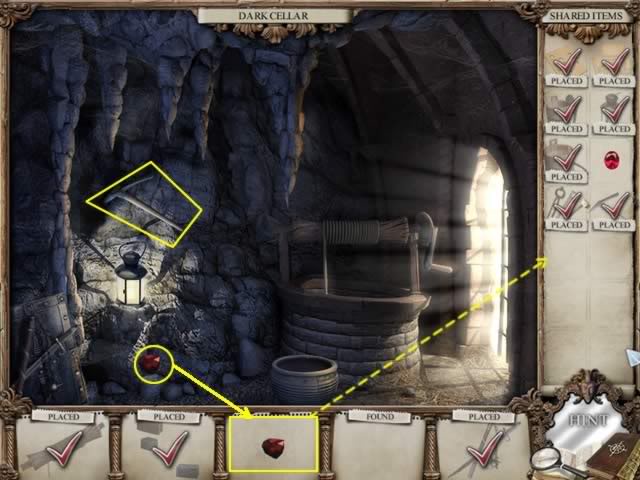
- Place the pickax next to the red stone on the wall of the cave
- The stone will fall to the ground. Click on it to add it to Shared Items.
- This location is now complete
Location: Workshop

Based on the diagram in the Sander Rune Manual, do the following:
- Place the dark red stone just collected from the Dark Cellar and place it in the glowing box of the sander (highlighted in the blue box).
- Move the levers to the position shown in the Manual: move the left lever up and the right lever down.
- Clicking the machine completes this location.
Location: Queen’s Room
Place the Red Stone in the necklace. The Queen will give you the two mirror shards.
You have completed the Volcano World mirror.
Location: Mirror Chamber
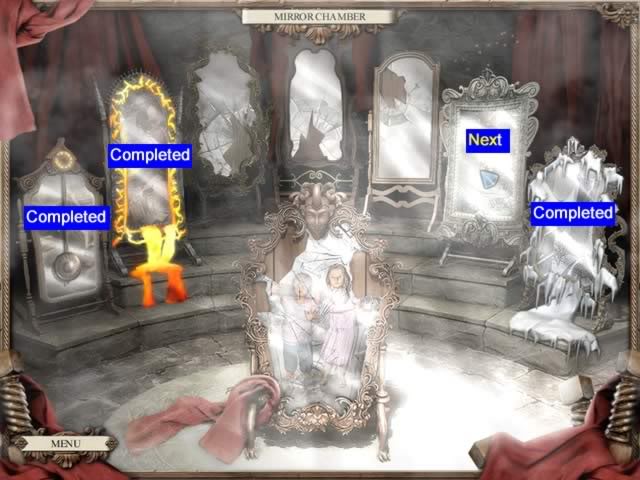
One shard is placed in the main mirror with the children. The second shard is placed in the sixth mirror to open this world. Click on the glowing mirror to continue.
Mirror 4: Dwarwen World
The goal is to help restore the destroyed hall
Location: Hallway
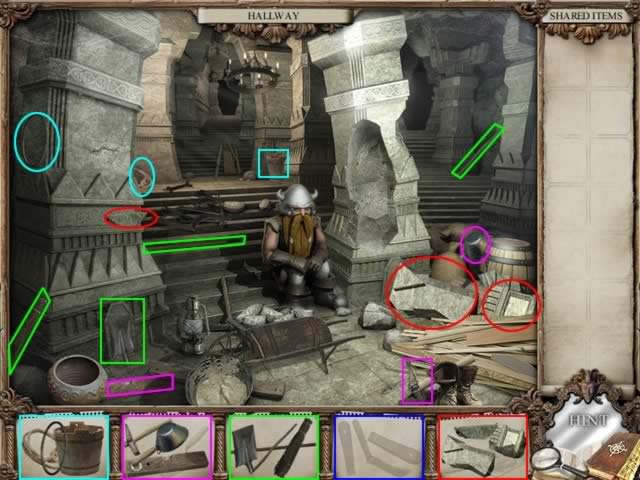
- Collect the pieces as shown
- Collecting the stones (circled in red) will uncover a wooden box. Click on the box to open the area.
Location: Hallway – Inside Wooden Box
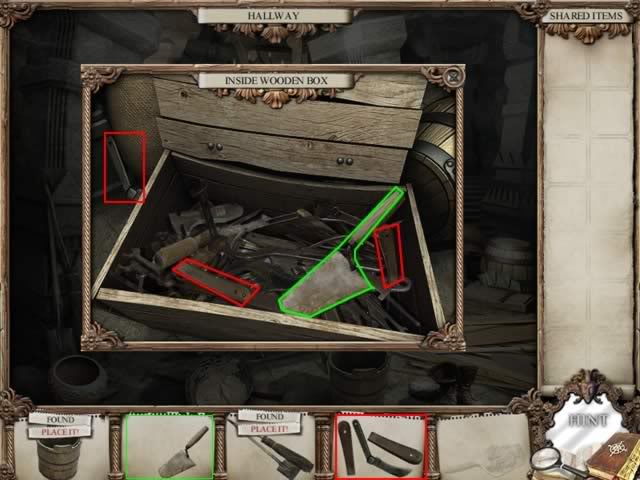
- Retrieve the additional tools
- Exit this location
Location: Hallway
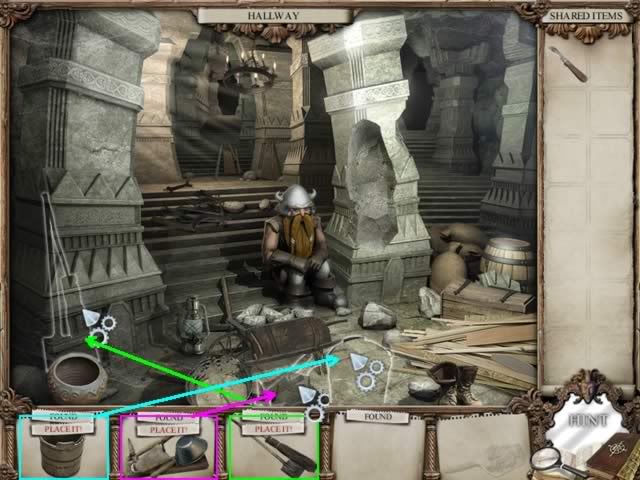
- Place the Bucket and Tools.
- Continue to the next location.
Location: Alchemy Lab
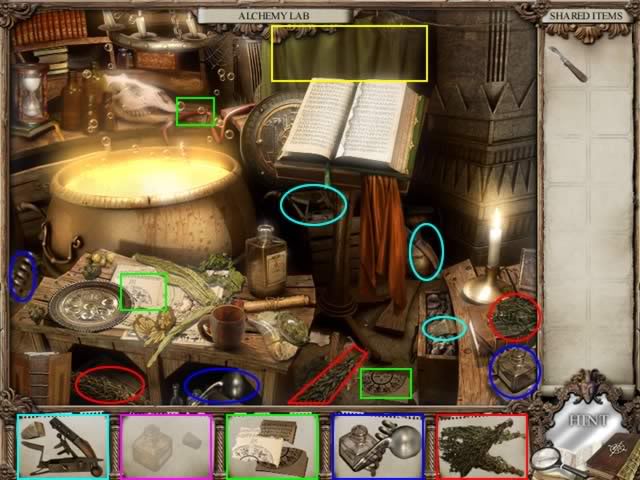
- Pick up the parts for each object.
- Click on the green curtain in the background (noted in yellow) to open a hidden location.
Location: Alchemy Lab – Table Behind Curtain
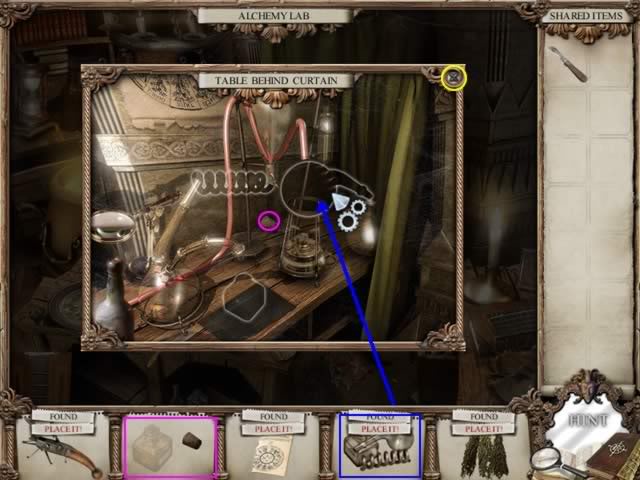
- Collect the cork for the bottle
- Place the equipment as noted
Close this location to return to the lab
Location: Alchemy Lab
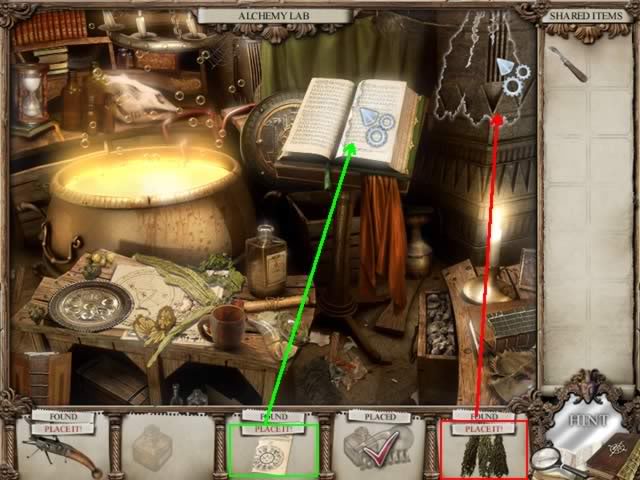
- Place the Herbs in the upper right corner.
- After you restore the missing page to the book you are told you have uncovered a "Fleeing Potion" and must add the ingredients in the proper order.
- Although the instrument in the first box says it is ready to place, you cannot place it in the lab yet.
- Continue to the next location
Location: Statue Garden
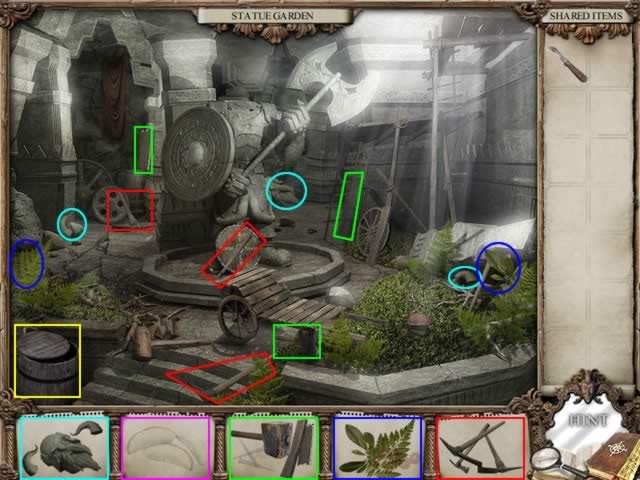
- Collect the pieces as indicated.
- The wooden barrel in the lower left corner (highlighted in yellow) is another area at this location. Click on it to open the area.
Location: Statue Garden – Inside Wooden Barrel
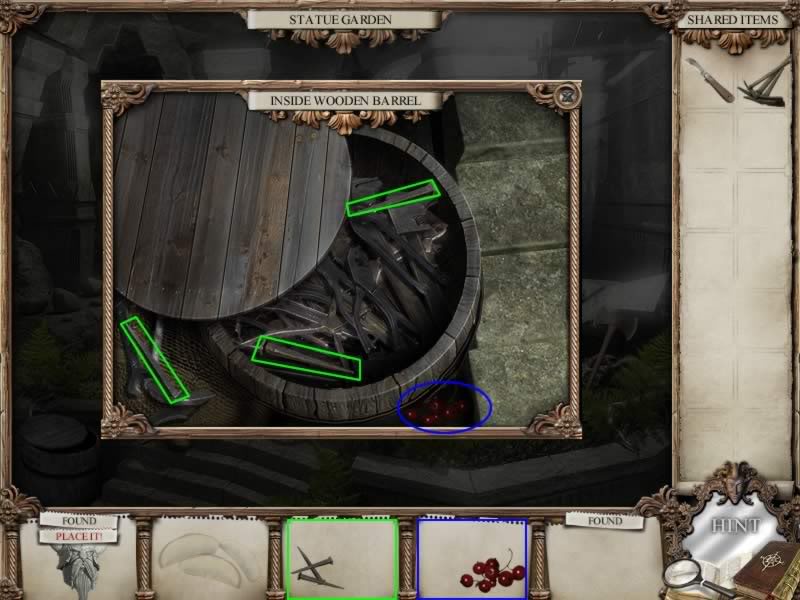
- Collect the Berries and three Nails.
- Exit the location.
Location: Statue Garden
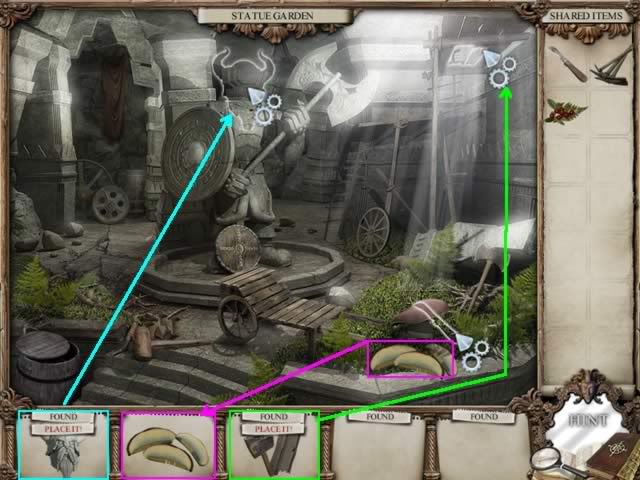
- Place the Head on the statue and repair the roof with the Boards as shown.
- The Picks and Berries go to Shared Items.
- Once the hole in the roof has been repaired, the mushroom grows. Use the Knife from Shared Items to slice it.
- Collect the Mushroom Slices for Shared Items.
- This location is complete.
Location: Mine Drift
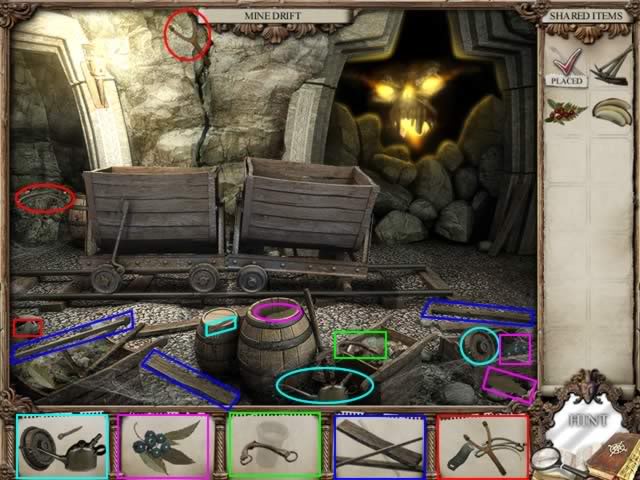
- Collect the objects as indicated.
- The Berries will go to Shared Items
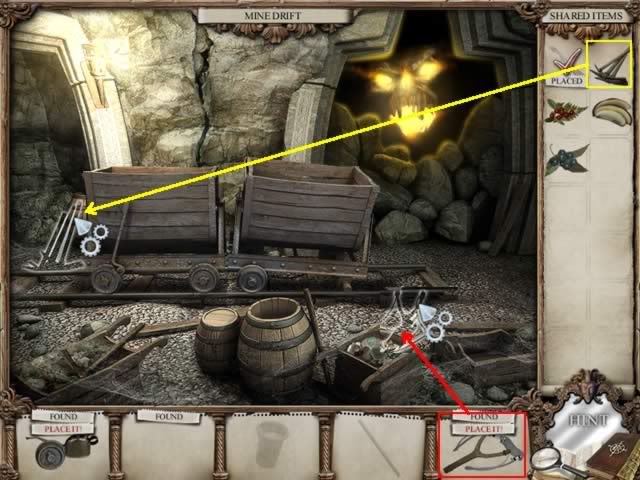
- Place the Slingshot and Picks from Shared Items as shown;
- The Oil and Wheel pieces have been found but cannot be placed yet.
- Exit this location
Location: Alchemy Lab
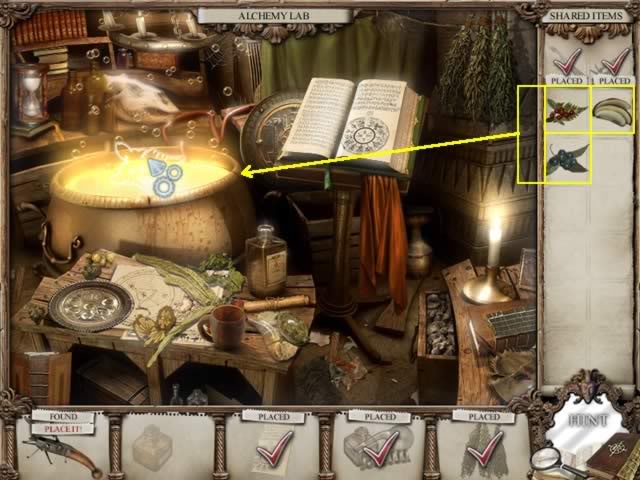
- Place Berries and Mushrooms from Shared Items into the cauldron in this order:
- Red Berries
- Mushroom Slices
- Blue Berries.
- Click on curtains to go to table
Location: Alchemy Lab – Table Behind Curtain
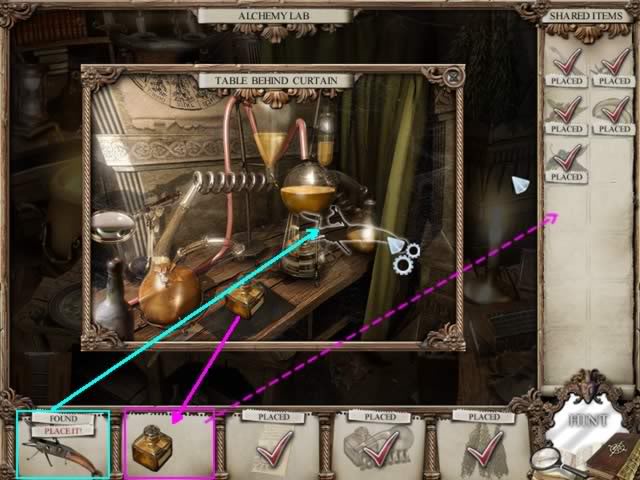
- Place Instrument on the potion distiller
- Collect filled Bottle of Fleeing Potion for Shared Items
- Close this location
The Alchemy Lab location is complete.
Location: Mine Drift
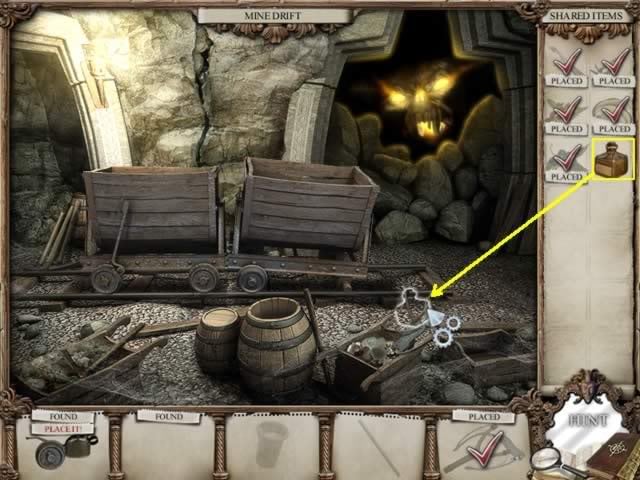
- Place Fleeing Potion in Slingshot. The Mors creature flees.
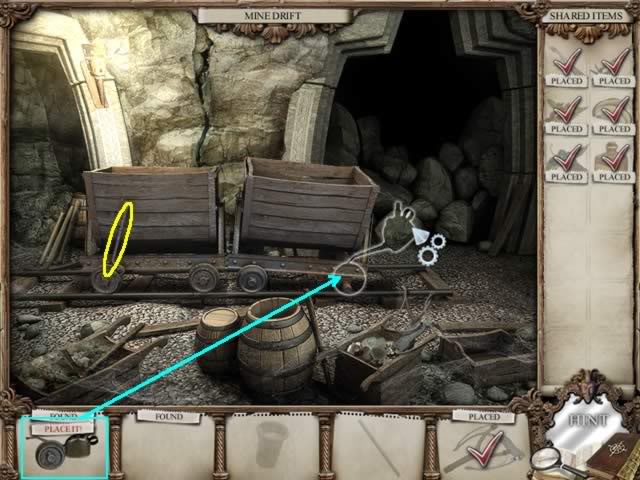
Complete the location as follows:
- Place the Wheel and Oil on the cart.
- Pull the lever on the rear cart.
- The cart will move forward enough to reveal the last part of the track.
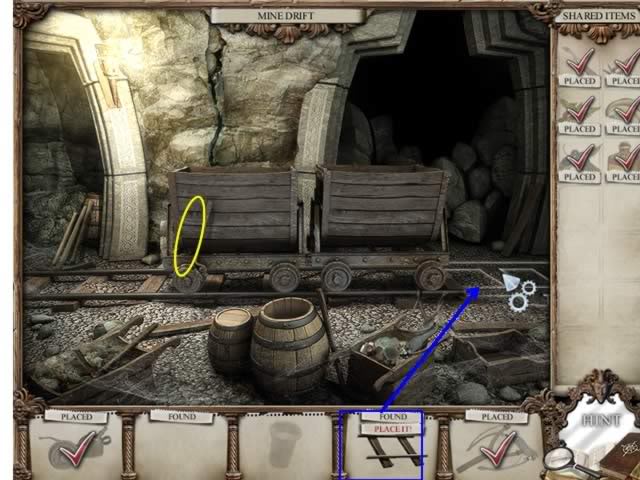
- Place the completed Track in front of the cart.
- Pull the lever again and the cart will roll forward to reveal a bucket catching drops of water from the wall.
- Click on the bucket to complete this location and add the Bucket of Water to Shared Items.
Location: Hallway
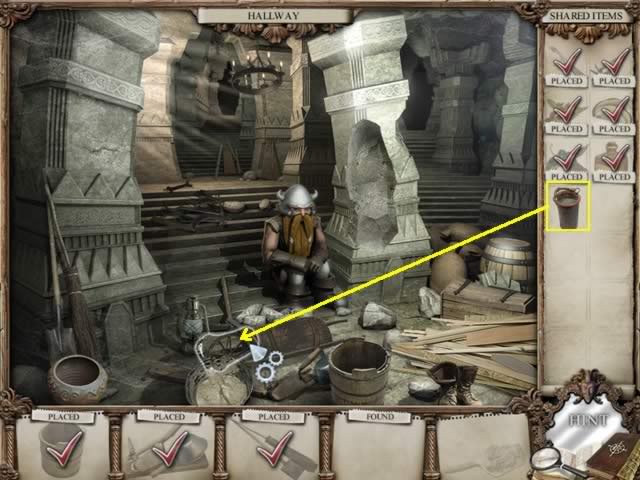
- Add the Bucket of Water from Shared Items to the cement mixture.
- The Trowel with cement is now available. Click on the Trowel.
- The stones to repair the column appear with the cement affixed to the back.
- Affix the Column Stones to complete the location.
You have completed the Dwarwen World mirror.
Location: Mirror Chamber
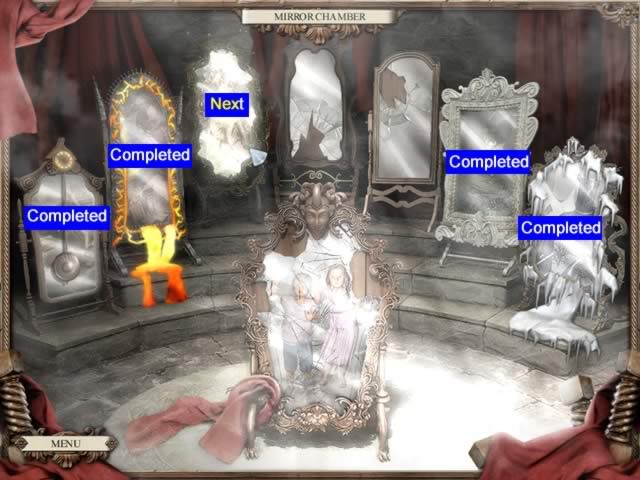
One shard is placed in the main mirror with the children. The second shard is placed in the third mirror to open this world. Click on the glowing mirror to continue.
Mirror 5: Forrest World
Goal: Collect missing buttons and help Rupitto prepare for the Faun celebration.
Location: Bedroom
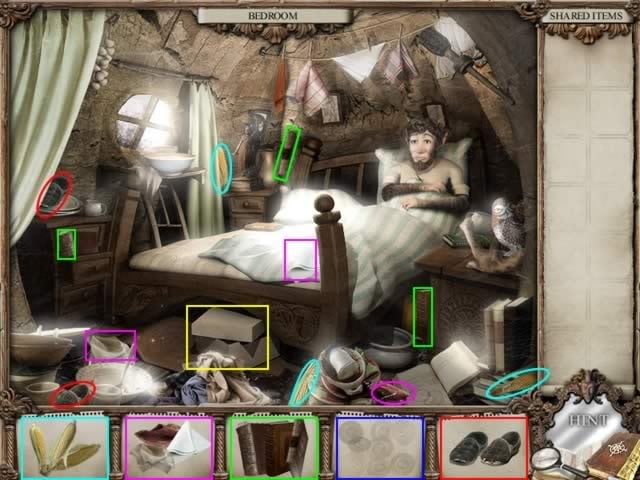
- Collect all the objects as shown.
- The box at the foot of the bed (highlighted in yellow) is another location. Click on it to open the area.
Location: Bedroom – Inside Sewing Box
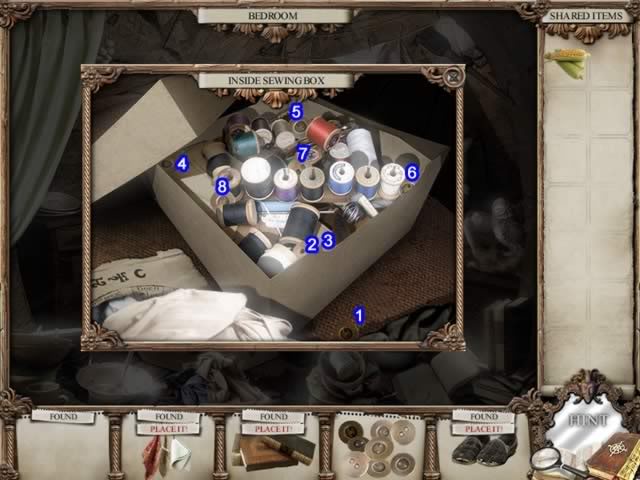
- The button locations are numbered
- The third button is under the second button
- Exit this location to return to the Bedroom
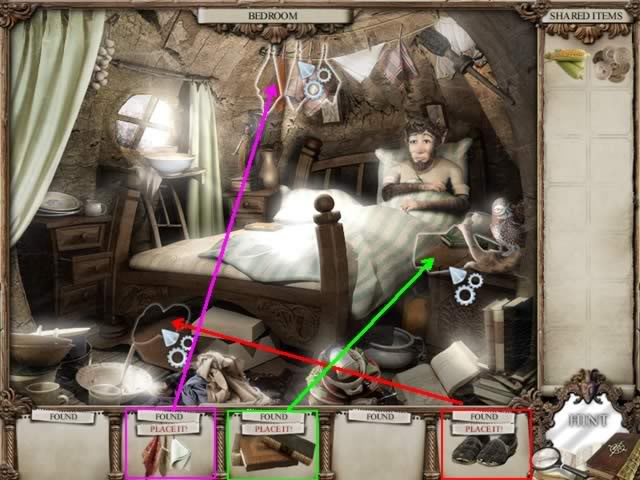
Location: Bedroom
- Place the objects as indicated. This will complete this location for now.
Location: Dining Room
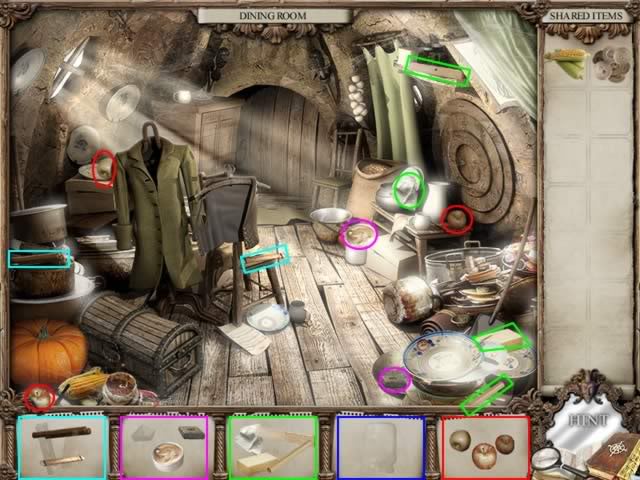
- Collect the items as shown.
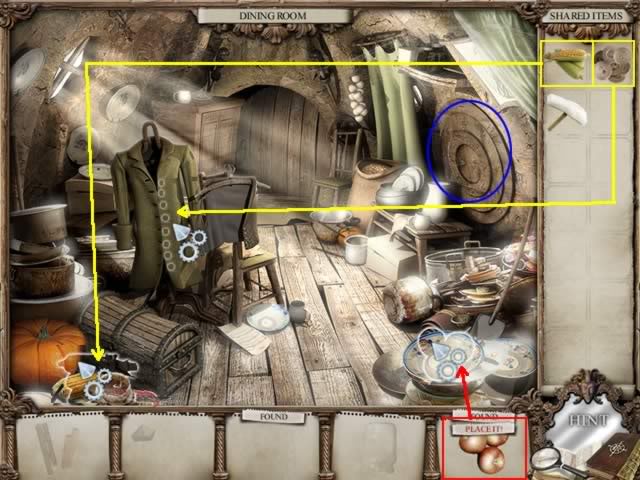
- Place the Corn, Apples and Buttons.
- There is another location in this room. Place your mouse over the circles on the wall on the right side of the room (circled in blue) to access a puzzle to open it.
Location: Faun’s Secret Stash
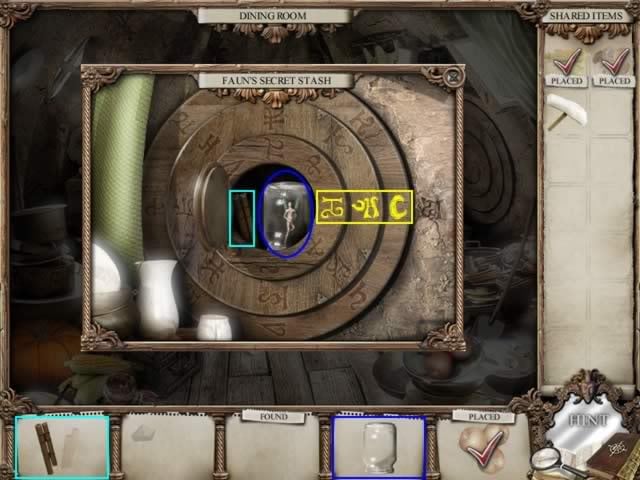
- Click on the dials until they are in the sequence shown.
- Collect the first part of the Pan Pipe.
- Free the fairy and collect the Jar.
- Close this location
- Leave the Dining Room
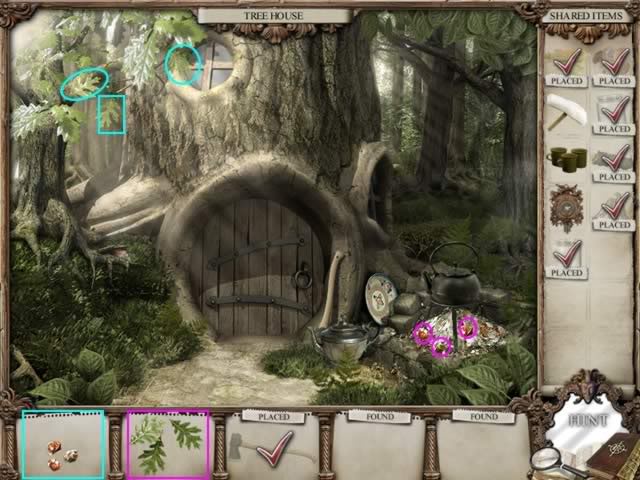
Location: Tree House
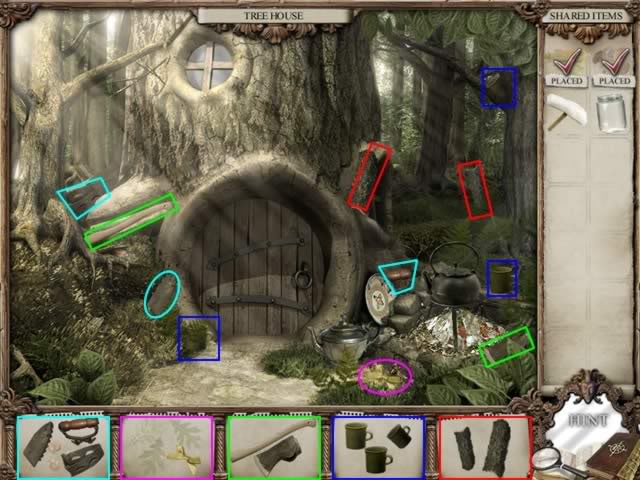
- Collect the items as shown.
- The only item to place is the Ax. It goes to the right of the door.
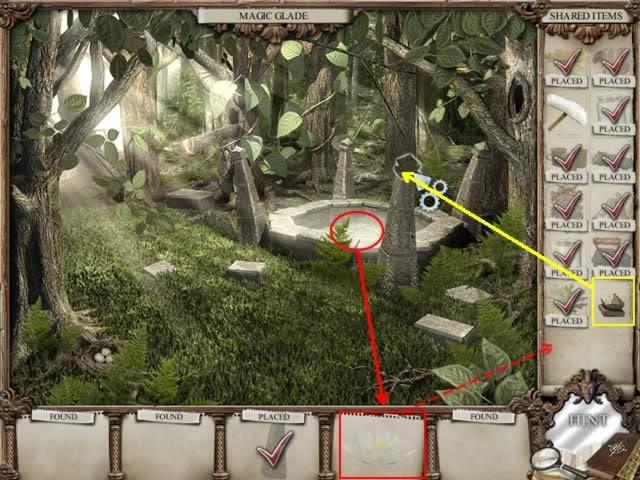
Location: Magic Glade
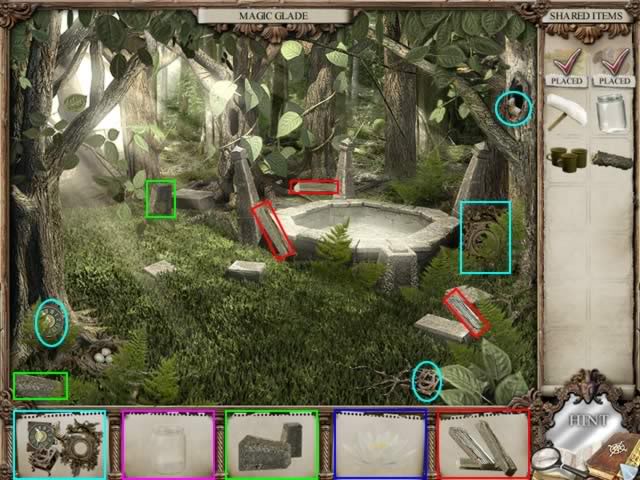
- Find and collect the pieces of the objects as shown.
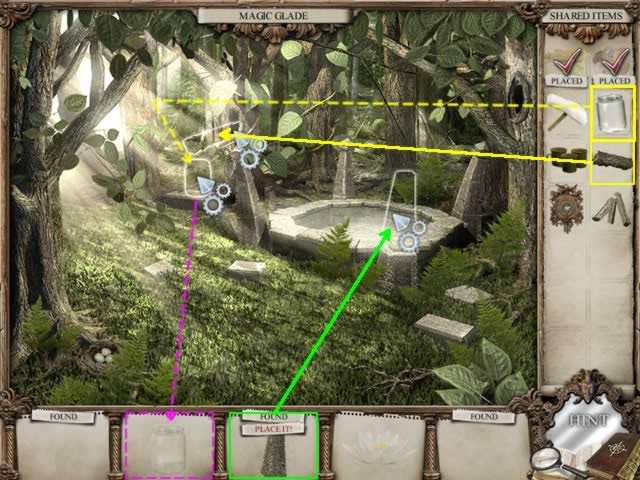
- Place the Column then the Wood from Shared Items. The Wood forms a trough for water to drip.
- After the Wood has been placed, the location becomes active to place the empty Jar from Shared Items to collect the dripping water.
- Click the now partially filled Jar to temporarily complete this location and add the Water Jar to Shared Items.
To complete this world, return to the following locations:
Location: Tree House
- Pour the water from the Jar in Shared Items to the base of the tree and add the Wood to the fire to activate the rest of the location.
- Collect the Coals and Oak Leaves as shown.
- The coals will be added to the iron to make it hot. The Hot Iron and Oak Leaf Boutonniere are added to Shared Items.
- This location is now complete
Location: Dining Room
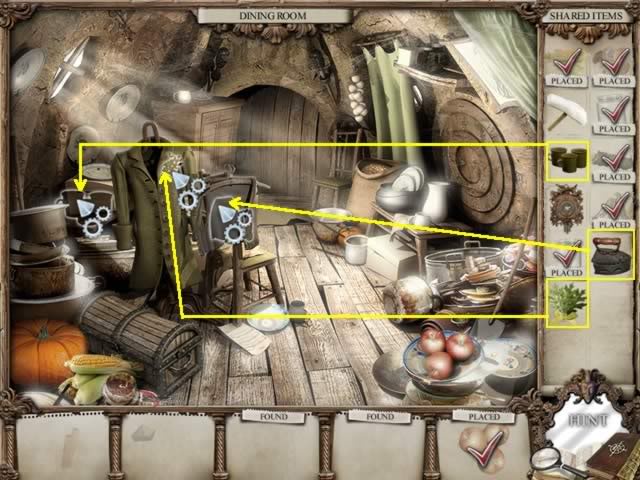
- Place the Mugs, Iron and Boutonniere as shown to activate the rest of the scene.
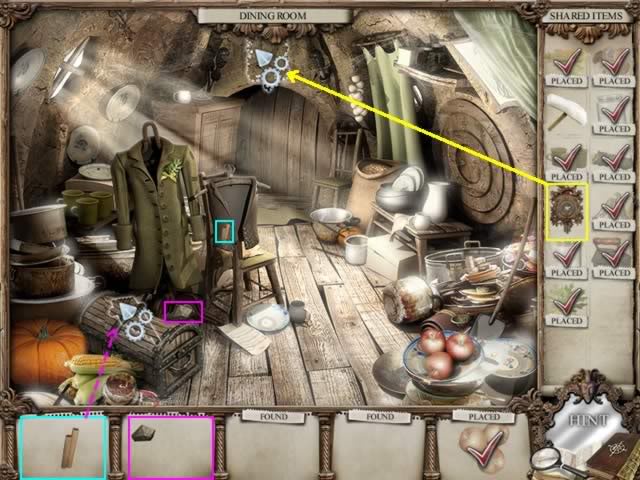
- Collect the Cap Stone and the remainder of the Pan Pipe.
- Place the completed Pan Pipe on the chest and the Cuckoo Clock on the wall above the door.
- This location is now complete.
Location: Magic Glade
- Place the Cap Stone from Shared Items on the column.
- The flower is now accessible. Collect the Flower for Shared Items.
- This location is complete.
Location: Bedroom
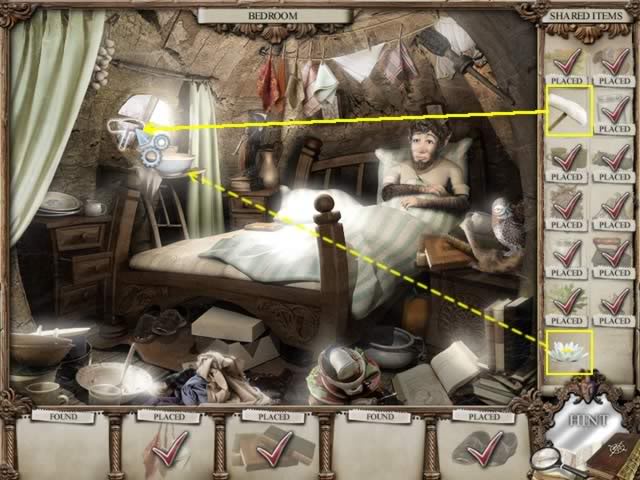
- Use the Squeegee from Shared Items on the window.
- The bowl under the window will become active.
- Place the Flower from Shared Items into the bowl.
- Accept your two mirror shards
You have completed the Forrest World mirror.
Location: Mirror Chamber
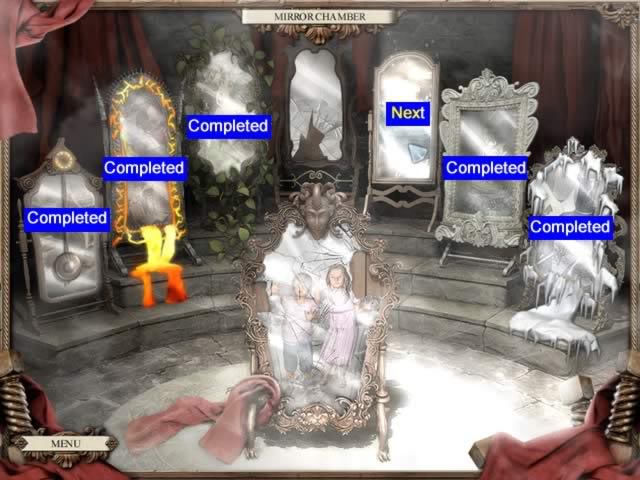
The main mirror with the children has almost all the shards restored. Click the fifth mirror to continue.
Mirror 6: Toy World
Goal: Fix the leak in the fish bowl to stop the water from seeping out and find Nimbus some food.
Location: Misty Shelf
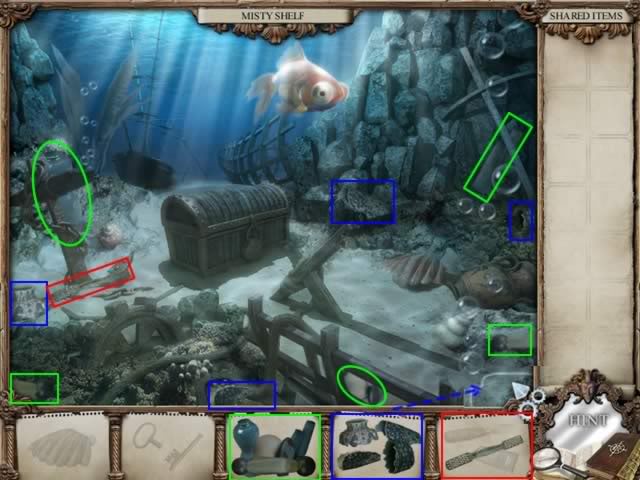
- Collect the available items
- The assembled Jar can be placed in the lower right corner.
Location: Little Ship
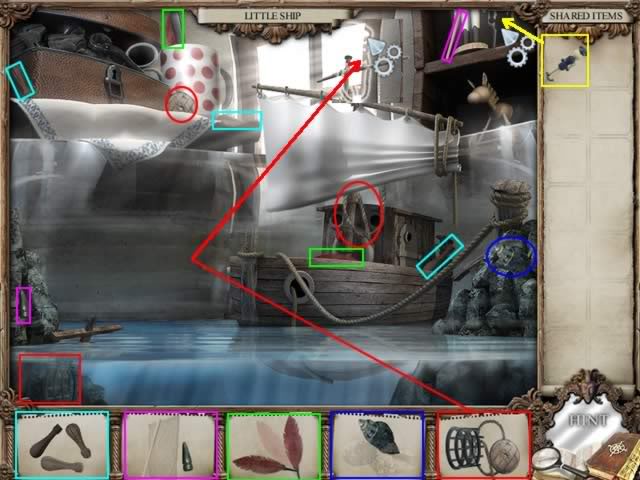
- Select the available items as shown.
- Place the Wooden Soldier from Shared Items on the shelf in the upper right corner.
- Placed the assembled Crow’s Nest on top of the mast of the ship (by the window)
- These are the only items than can be placed for now.
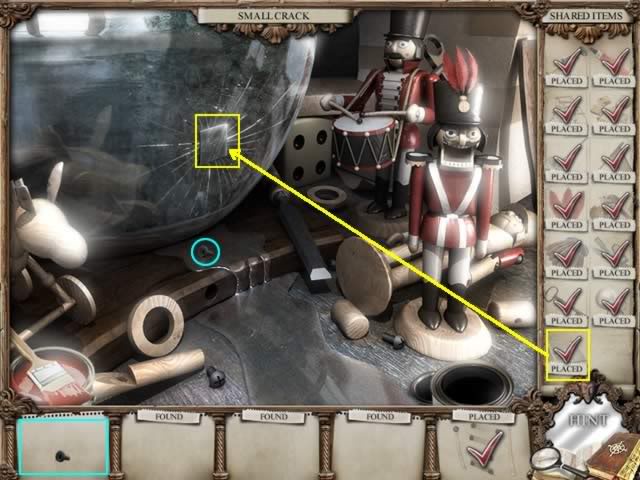
Location: Small Crack
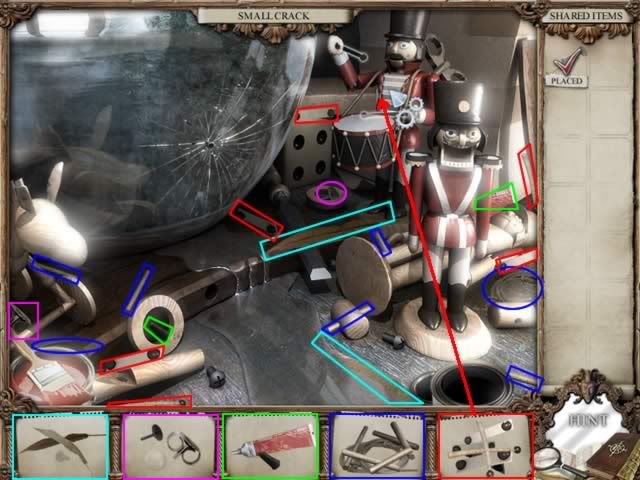
- Collect the items. Some items are partially hidden. If necessary, click on the above photo for an enlarged image to see the items.
- Complete the Drum Major’s uniform.
- The Glue and Rope Ladder go to Shared Items.
- This scene is temporarily completed.
Location: Toy House
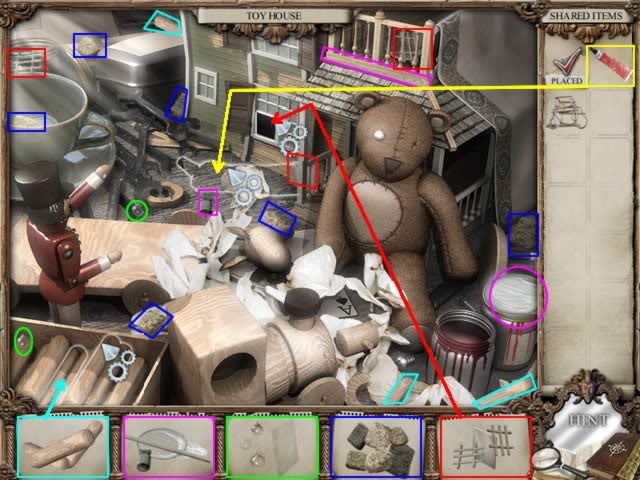
- Collect the pieces as shown.
- Place the completed Window in the house (shown in red)
- Place the Logs in the box.
- Place the Glue from Shared Items in front of the house.
- Move your cursor to the cap on the Glue. It will glow white. Click on the cap. A final Glue Droplet will appear. Collect the droplet.
Location: Little Ship
- Place the Rope Ladder from Shared Items from the rocks to the boat. This will activate a new location. Place your cursor on the door of the ship. It will turn white. Click to enter the area.
Location: Little Ship – Inside Ships Cabin
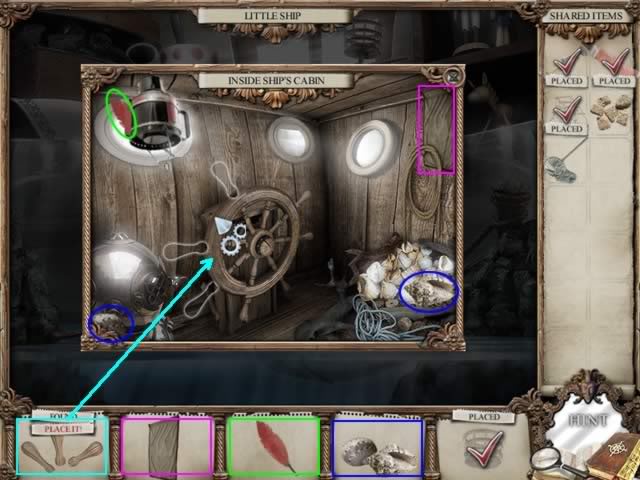
- Collect the items from this location.
- Place the Handles on the ship’s steering wheel.
- Exit this location and the Little Ship
Location: Misty Shelf
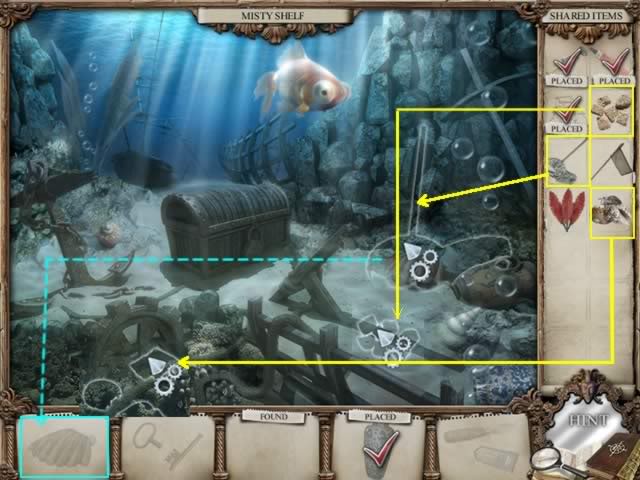
- Place the Shells from Shared Items.
- Place the Net from Shared Items. The large Oyster Shell will become available. Collect it for Shared Items.
- Give Nimbus the Fish Food. The Chest location is now available.
Location: Misty Shelf – Inside Old Chest
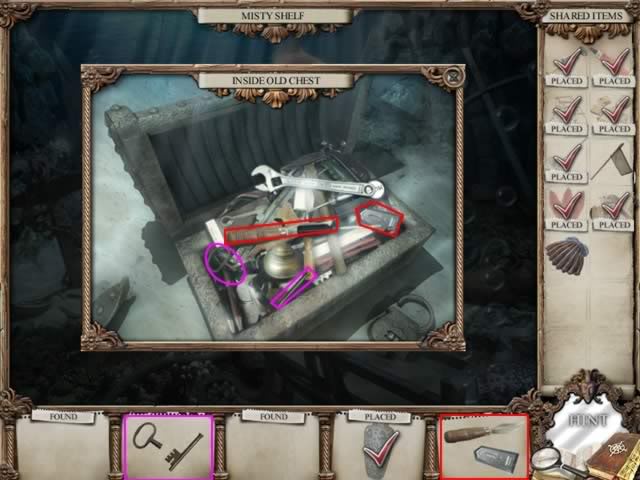
- Collect the Key and Tools.
- Exit this location and the Misty Shelf
Location: Little Ship
- Place the tools just collected in the box in the upper left corner.
This location is complete.
Location: Small Crack
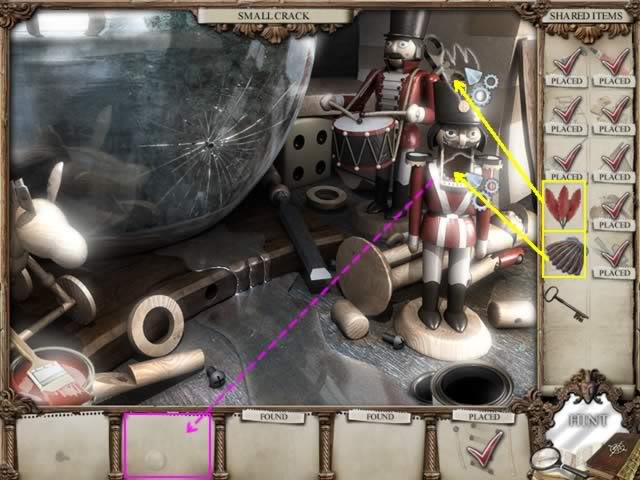
- Place the Feathers on the hat.
- Click on the Nut Cracker’s mouth and it will open.
- Place the Oyster in the mouth. The Nut Cracker will crack the shell and reveal the Pearl.
- Collect the Pearl for Shared Items
Location: Toy House
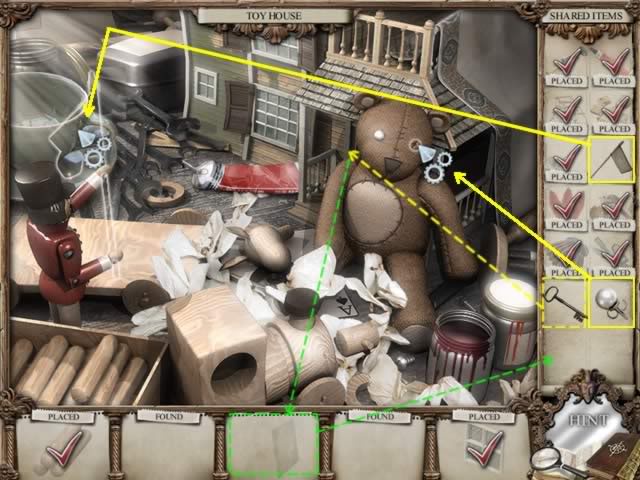
- Place the Flag collected from Shared Items into the soldier’s hands.
- Place the Pearl Earring on the bear’s eye.
- The bear will fall aside revealing a Side Door location.
- Place the Lock in the Side Door lock. It will open revealing the piece of Glass.
- Collect the Glass with the three glue droplets on it. The object will go to Shared Items.
- Exit the Side Door and Toy House locations.
Location: Small Crack
- Place the glued glass piece onto the fish bowl.
- This will make the small screw available. Collect it.
- The screw completes the Fronds object for Shared Items.
Location: Misty Shelf
Anchor the Fronds in place in the fish bowl and collect the two mirror shards.
You have completed the Toy World mirror.
Location: Mirror Chamber
There is only one World left to complete. Click the mirror to enter.
Mirror 7: House Reflection World
Location: Old Hallway
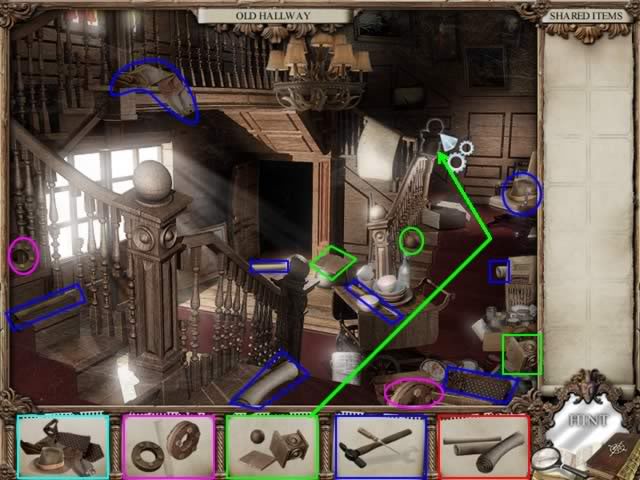
- Collect the items as shown.
- Place the completed banister knob.
- The other completed items go to Shared Items.
Location: Boiler Room
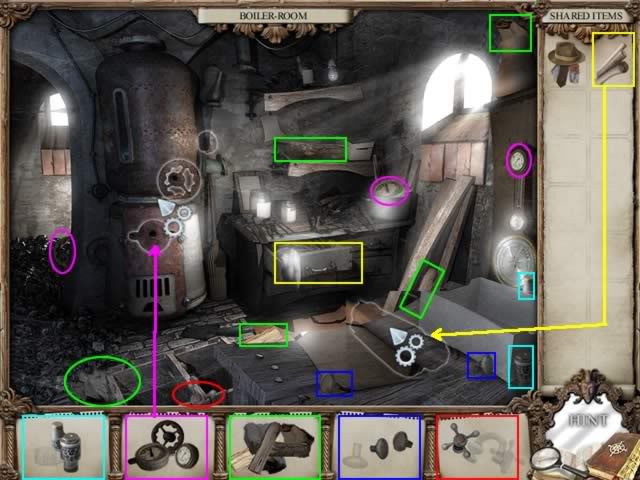
- Collect the items as shown.
- Place the Boiler Parts as shown.
- Place the Scrolls from Shared Items on the desk.
- Click on the drawer in the cabinet (outlined in yellow) to open this location
Location: Boiler Room – Inside Tool Drawer
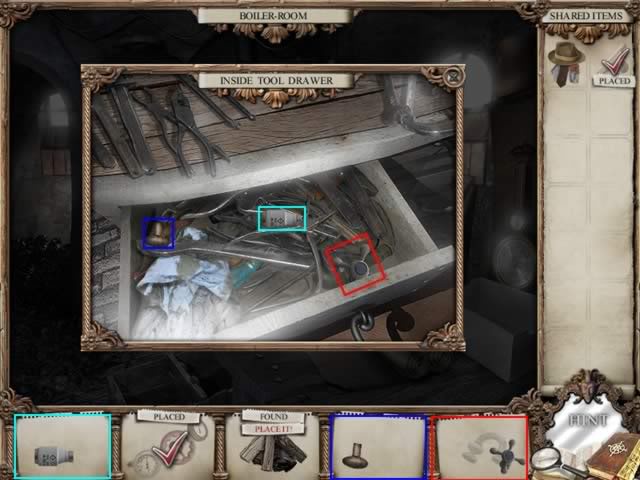
- Collect the available parts.
- Close this location.
- The Boiler Room is temporarily complete.
Location: Bathroom
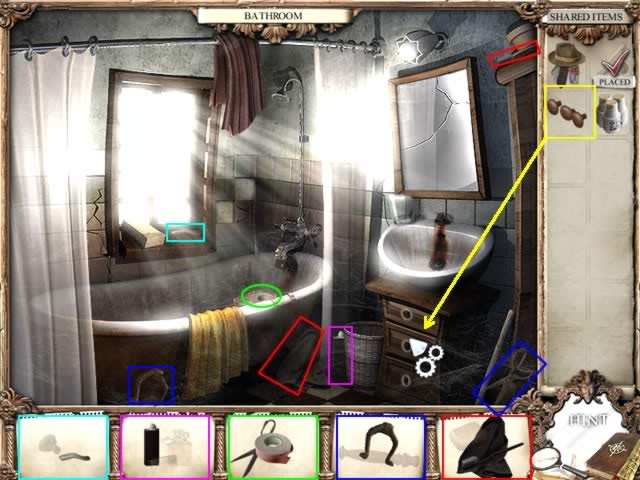
- Collect the available parts.
- Place the Drawer Knobs from Shared Items onto the sink cabinet
- The middle drawer location is now available. Click it to collect more parts.
Location: Bathroom – Inside Drawer
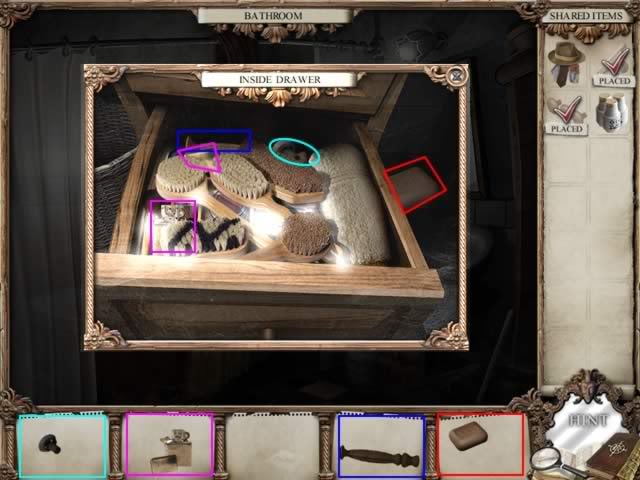
- Collect the remaining object parts
- Close this area.
Location: Bathroom
- Place the Towel, Toothbrush and Soap on the side of the sink.
- This location is temporarily complete
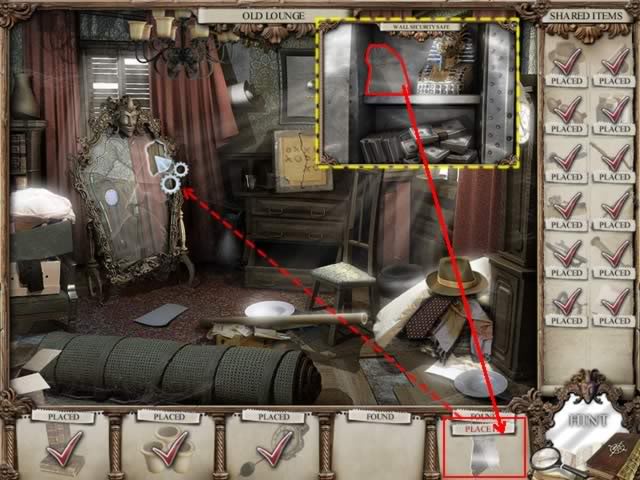
Location: Old Lounge
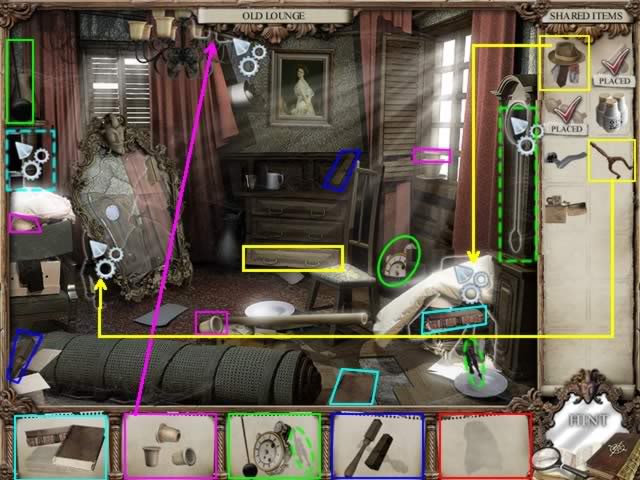
- Collect the items as shown.
- Place the Light Cups on the chandelier.
- From Shared Items, place the Clothes and Mirror Stand.
- After these items are placed, the Clock Hands will be revealed by the plate in the lower right corner (highlighted in dashed green). Collect the Hands and place the completed Clock Parts on the clock (highlighted in dashed green).
- Note the bottom drawer is a location within a location. Click to open this area.
- Collect the last Book and Banister Support from the drawer.
- Place the Completed Book Set in the book case on the left side of the scene (highlighted in dashed aqua).
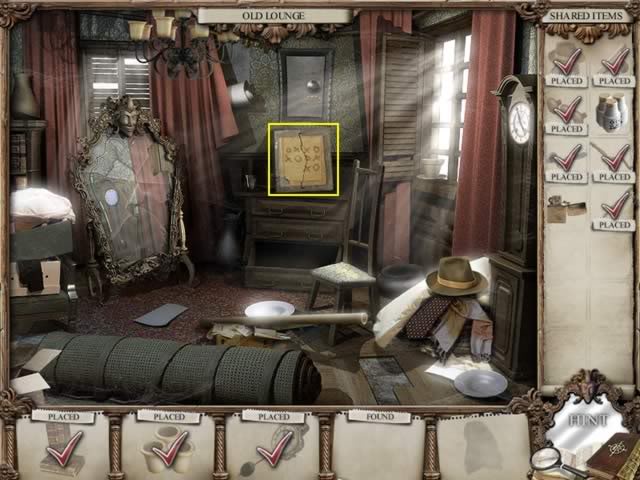
-
- The picture on the back wall will fall aside revealing a wall safe and a diagram on the back of the picture. Make a note of the "x" and "o" pattern on the diagram.
- The safe cannot be opened yet.
- Exit this location.
Location: Old Hallway

- Place the Banister Support as shown.
- The Old Fuse Box on the back wall can now be accessed (highlighted in yellow)
- Click on the area then place the Handle from Shared Items on the Fuse Box door. Click to open it.
Location: Old Hallway – Very Old Fuse Box
- Place the three Fuses from Shared Items into the Fuse Box. The will align in the far left fuse column. There are already two fuses in place.
- Clicking on a fuse will cause it to move to the empty slot in its row.
- The correct placement of the fuses is based on the diagram that was on the back of the portrait in the Old Lounge. Turning the diagram around so the two single fuses form the first row, the diagram looks like this:
- O X
- X O 0 X
- O X X O
O = Fuse; X = No Fuse
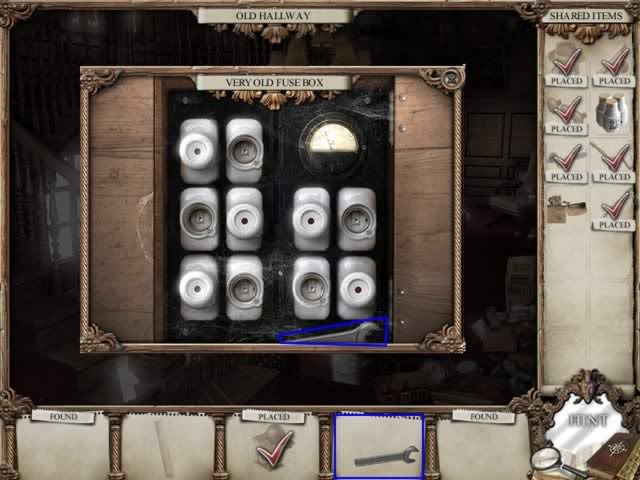
- The correct placement of the fuses is shown above. The voltage meter now shows there is power.
- Collect the wrench to complete the tool collection then exit this location.
Location: Old Hallway
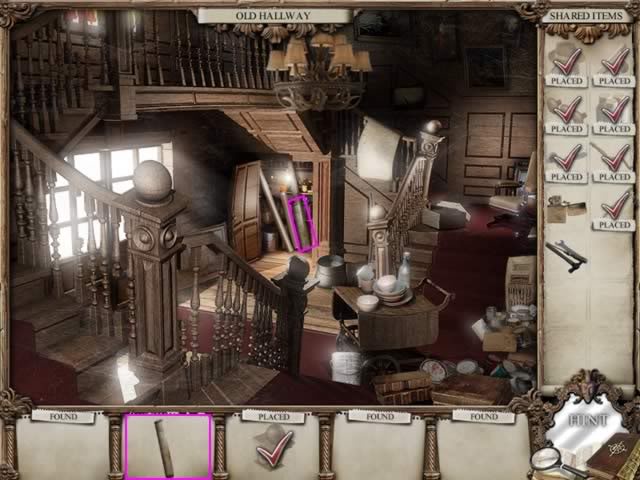
- There are now lights on in the closet against the back wall so the remaining item can be seen.
- Collect the pipe for Shared Items.
This location is complete.
Location: Boiler Room
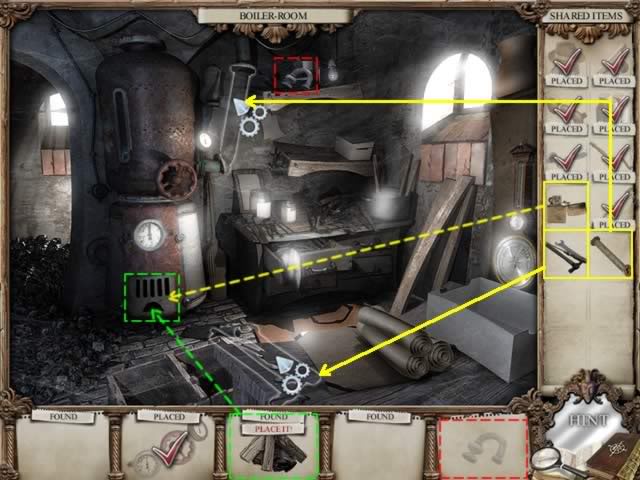
- Place the Tools and Boiler Pipe as shown.
- The door to the boiler will open.
- Place the Wood in the boiler and use the Lighter from Shared Items to light it.
- The last part of the faucet becomes visible on the top shelf (outlined in red). Collect it.
This location is now complete.
Location: Bathroom
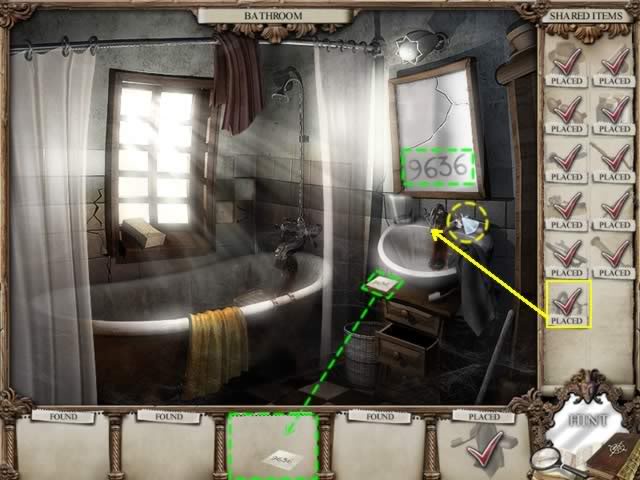
- Place the Faucet fixture on the sink.
- Click on the hot water knob to turn on the water.
- The mirror will fog up and the number "9636" will appear as will a piece of paper with the number on it.
- Collect the numbered paper.
This location is complete.
Return to the Old Lounge and click on the safe on the back wall.
Location: Old Lounge – Wall Security Safe
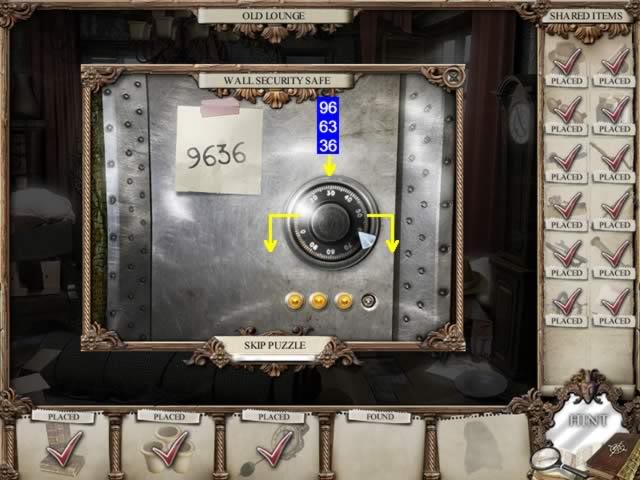
- Place the piece of paper with the safe combination on it on the outside of the safe.
- You will click on one side or the other of the dial to open the safe. You will not have drag the mouse on the dial to slowly rotate it to get the correct number; the number you need will be the last click.
- Click on the right side of the knob to advance the combination dial until you reach the number "96". The first of the three yellow lights will come on.
- Click on the left side of the knob to reverse direction. Click until you reach the number "63". The second yellow light will come on.
- Click on the right side of the knob to get the number "39". The last yellow light is now lit.
- Click on the safe to open it and retrieve the last mirror shard.
- Place the shard in the mirror as shown.
Location: Blanket Outside House
- Tommy and Charlotte wake you up from your bad dream.
Congratulations! You have completed the game!
“;

More articles...
-
Grow A Garden 2 Base Price List
What's the most valuable crop? -
Evomon Best Starter [Leafbun, Blazpup, or Bubble?]
Grass-type, Fire-type, or Water-type? -
Evomon Tier List [META and BEST Evomon]
The Evomon dream team.