
Best Horror Games On Itch.io – July 2026
Across a bounty of subgenres.![Haze Seas Accessories Tier List [Best Accessories to Equip]](/wp-content/uploads/2026/07/haze-seas-accessories-tier-list.jpg "Haze Seas Accessories Tier List [Best Accessories to Equip]")
Haze Seas Accessories Tier List [Best Accessories to Equip]
The accessories with the best stat buffs in Haze Seas.
![[Roblox] Evomon Shiny Hunting Guide – Including Prismatic and Pris Shinies!](/wp-content/uploads/2026/06/evomon-shiny-hunting-guide.jpg "[Roblox] Evomon Shiny Hunting Guide – Including Prismatic and Pris Shinies!")

The Magicians Handbook II: BlackLore Walkthrough
Welcome to Gamezebo's strategy guide for Magician's Handbook II: BlackLore. Strategy Guide Table of ContentsStarting the Game General Tips Mini-games and Puzzles Chapter 1-A New Friend Chapter 2-The Watchers Chapter 3-Blacklore's Scrolls Chapter 4-The Secret Room Chapter 5-Heroes and Statues Chapter 6-A Forsaken Land Chapter 7-Black Magic Chapter 8-The Magical Plane Chapter 9-The Magical Gallery Chapter 10-Wise Old Trees Chapter 11-The Fairy Queen End GameStarting the Game Make you…


- Prefer Gamezebo on Google

a:1:i:0;a:2:s:13:”section_title”;s:48:”The Magicians Handbook II: BlackLore Walkthrough”;s:12:”section_body”;s:81529:”
Welcome to Gamezebo’s strategy guide for Magician’s Handbook II: BlackLore.

Strategy Guide Table of Contents
Starting the Game
General Tips
Mini-games and Puzzles
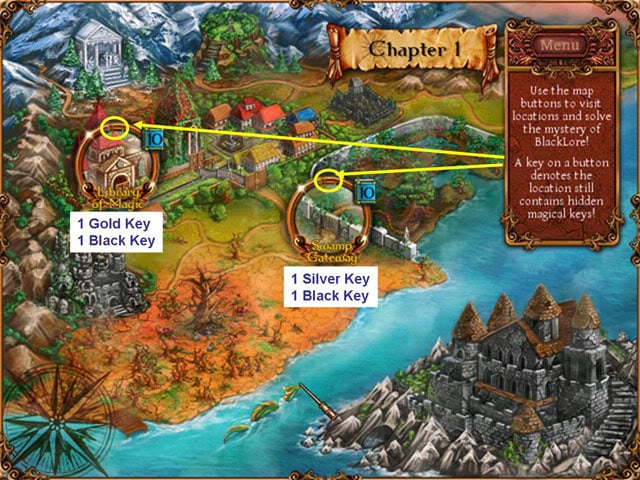
Chapter 1-A New Friend
Chapter 2-The Watchers
Chapter 3-Blacklore’s Scrolls
Chapter 4-The Secret Room
Chapter 5-Heroes and Statues
Chapter 6-A Forsaken Land
Chapter 7-Black Magic
Chapter 8-The Magical Plane
Chapter 9-The Magical Gallery
Chapter 10-Wise Old Trees
Chapter 11-The Fairy Queen
End Game
- Make your selections from the Difficulty Level and Story Detail modes. These choices may NOT be changed after the game is underway.
- To change these, you need to create a New Game with a new Player name.
Difficulty Levels
You must choose one of two Difficulty Levels:
- Casual: Object finding and puzzle solving fun without the stress of a timer!
- Apprentice: All the fun but with the added challenge of a timer!
Story Detail
You must also choose one of two levels of Story Detail:
- Short & Sweet: A shorter story but gets you to the action quick!
- Long & Complete: Full story with all the great details!
This Strategy Guide uses the "Casual" and "Long & Complete" Settings. We’ll help you try to achieve an "A" average Grade level on the game (more on Grades below).
- Magician’s Handbook II might be a bit challenging for even seasoned Hidden Object Gamers, and that’s a good thing! It’s a complex game and seems to be designed for seasoned players of HOGs. Ah, well, if you’re a beginner you can still have lots of fun!
- Everything you do in this game has a reason and it all relates to the theme of the game.
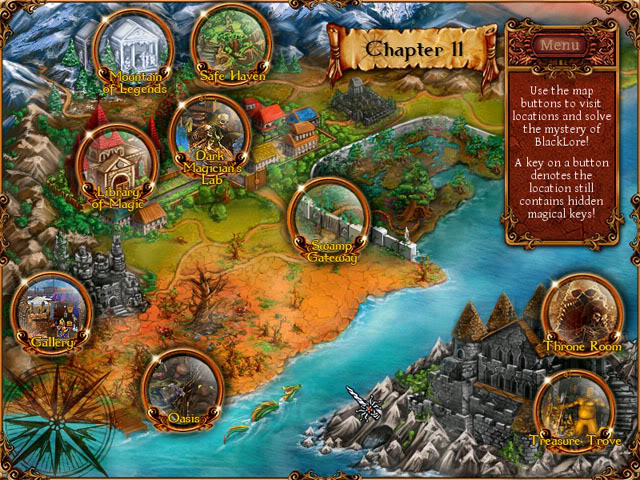
Chapters
- There are 11 Chapters, each consisting of several Locations which you may explore at will, and switch between Locations by returning to the Map within a Chapter.
- Chapters usually include one or more Minigames after you have completed the Hidden Object Locations (see below).
- While you’re getting started, the Fairy "Corrigan" will be your tutor when new features are introduced. Remember that name.
Map
- Each Chapter has a Map showing you the various Locations you may visit to find the Enchanted Objects.
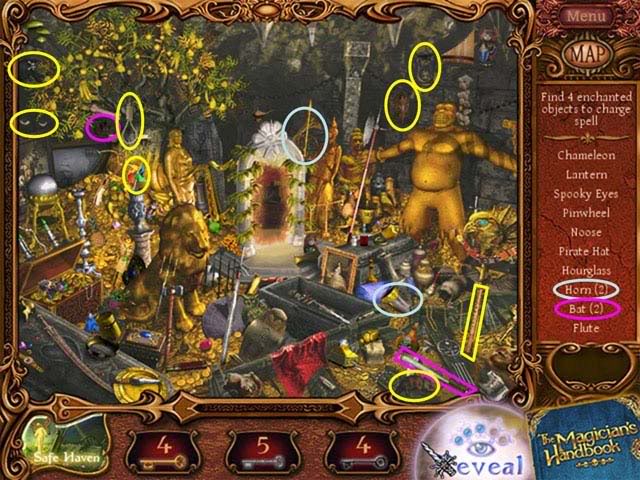
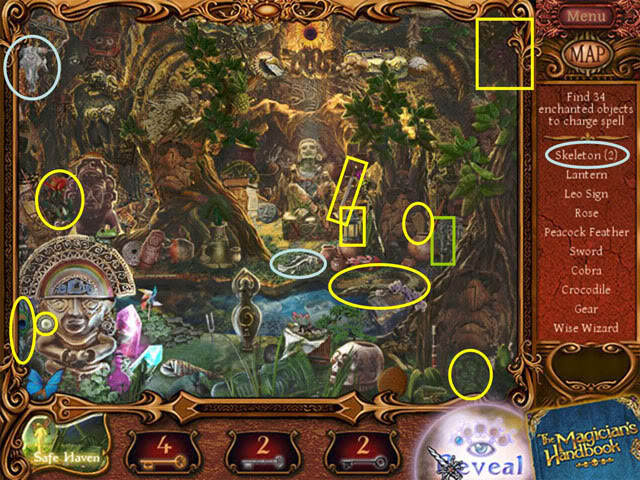
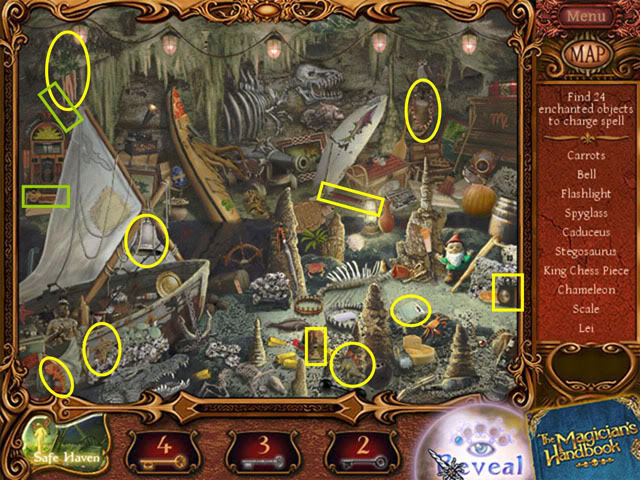
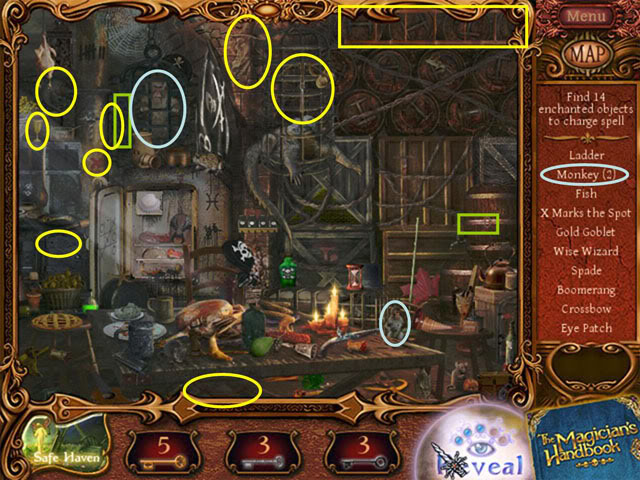
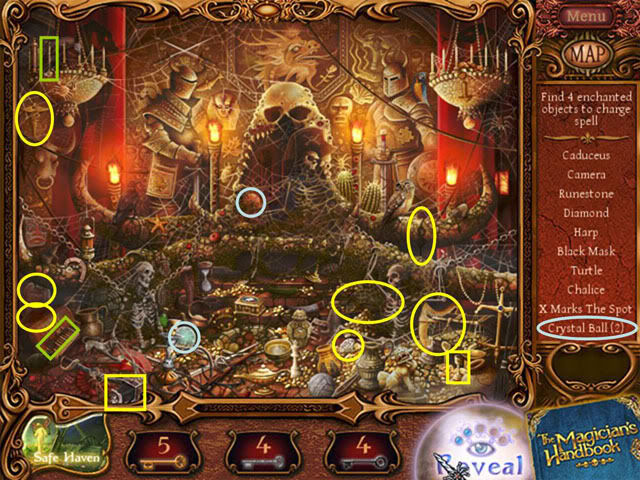
- Each Location has 10 Enchanted Objects to find, but you don’t need to find all of them, only enough to fulfill the requirements of the Chapter, unless you want the top Grade A for the Chapter, in which case you need to find ALL the Objects in every Location.
- If you are playing in Apprentice (timed) mode and you get stuck on one Location, return to the Map and explore the other Locations in the Chapter. Keep visiting the Locations where you have the most Objects to find.
- This Strategy Guide visits the Locations in order from Left to Right, Top to Bottom on the Map. There is no required order for you to visit the Locations.
- If the Map button has a Key on the top, there are hidden Keys to find there (more below about Keys).
- If the Map button has a Puzzle Piece on it, it represents a Puzzle (at the end of a Chapter).
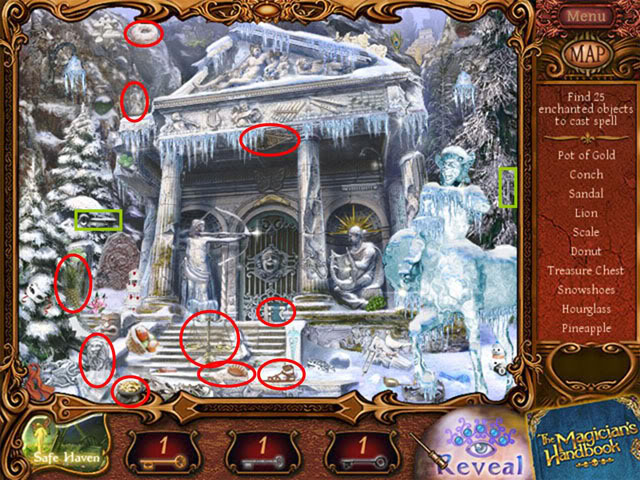
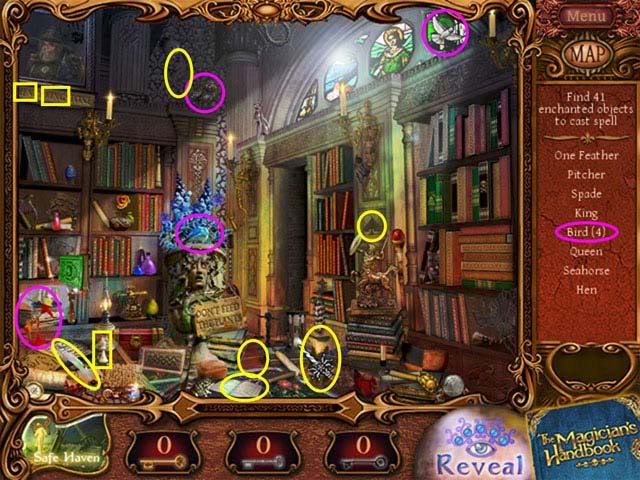
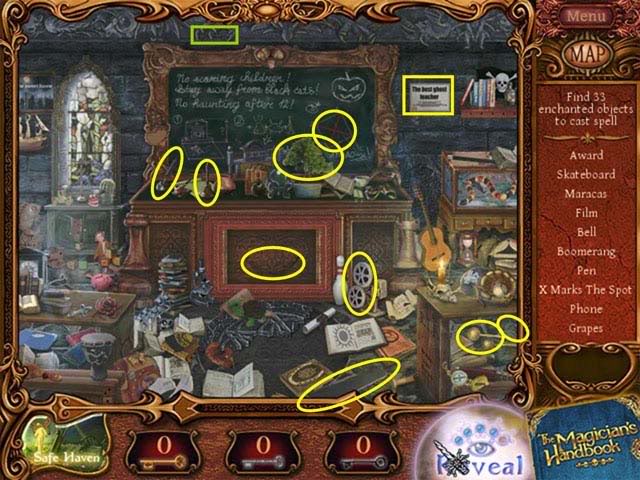
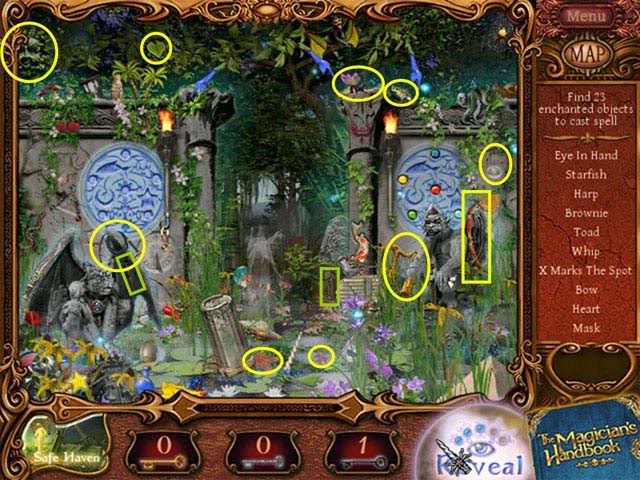
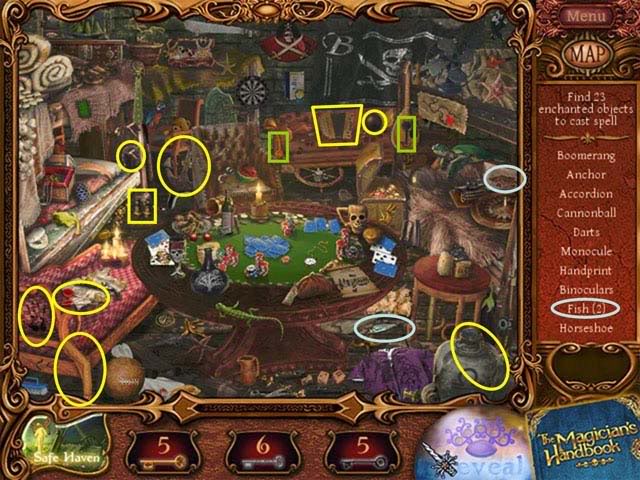
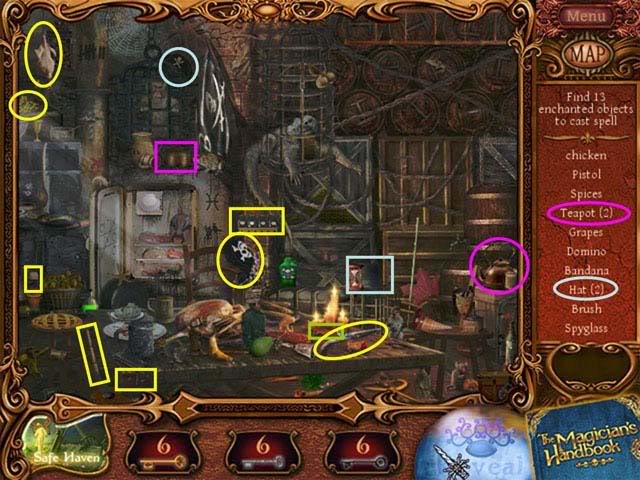
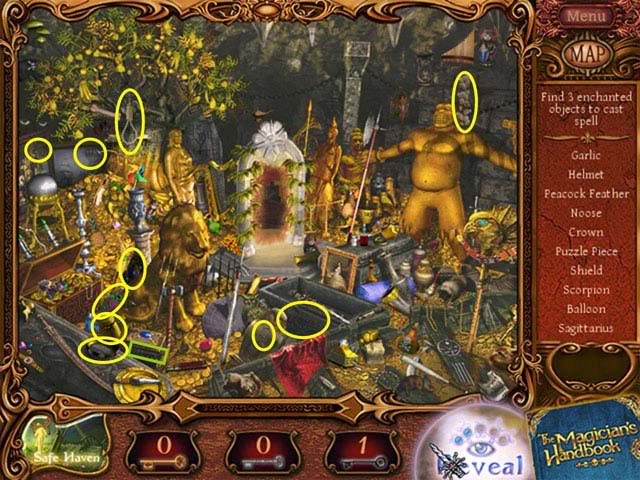
"Enchanted" (Hidden) Objects Scenes
- The game designers are deviously clever in hiding the Hidden/Enchanted Objects. They use all the tricks: for example, blending the color of the Hidden Object with the background! Sometimes you need to find a WORD spelled out. Many Objects are very tiny.
- For the most part, the game is fair and all the Hidden Objects are plainly visible, but not immediately obvious. For example: the game will not show one 1/10 of an Object such as only the tuning pins on a guitar or only the beak of a bird.
- Many Locations are very dark (and spooky), so you might want to turn UP the brightness on your monitor (and turn DOWN your room lighting). Except for the Locations (such as "Mountain of Legends") that are very bright where you might want to turn DOWN the brightness on your monitor. Your mileage may vary.
- Tip: If an Object appears in the list with a number following it, such as "Birds (4)" that means you need to find four Birds, but it only counts as one "Object" toward your game goals. They will be outlined in a different color on the screen shot to help you find all the items in the group.
- If you find two or more Objects in rapid succession, you receive a "QuickFind" bonus that increases your Grade for the Chapter. So identify several Objects visually, and then click on them quickly to get the QuickFind bonus.
- Clicking on too many wrong Objects too fast ("Mis-Clicks") will reduce your available time (if playing in Apprentice Mode) AND reduce your Grade for the Chapter. You’ll hear a faintly sad descending melody if you commit a Mis-Click.
- There a RANDOM factor which gives the game much more replay value, but it also might mean that the screen shots contained in this Guide might not exactly your experience. However, most of the Locations must be re-visited several times, and the Objects don’t seem to move around, so you might find that an Object that we found in Chapter 1 is required for you in Chapter 3 or 4 or 10. Again, you’re mileage may vary.
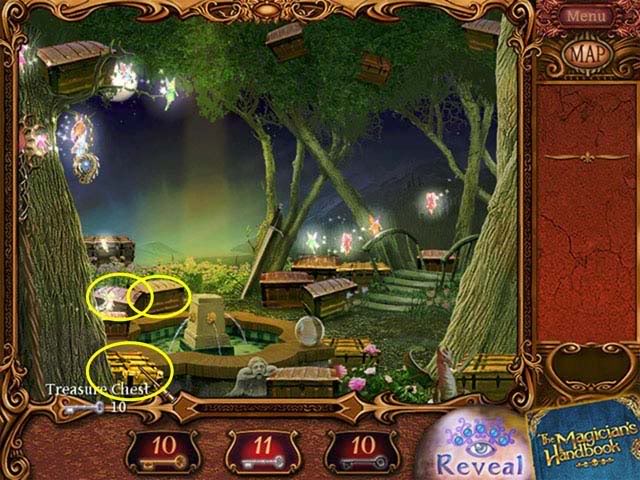
Keys
- Each Location may also contain hidden Gold, Silver, or Black "Keys" which are not listed on your required Objects list. The Keys allow you to unlock Chests in the Safe Haven.
- If a Location has hidden Keys remaining, they will be listed on the Map when your mouse hovers over the button for the Location.
- Note: You won’t hear about Keys or be able to select the Keys until you enter one of the first Locations in Chapter 1, return to the Map and then back to any Location. The Fairy "Corrigan" is your tutor.
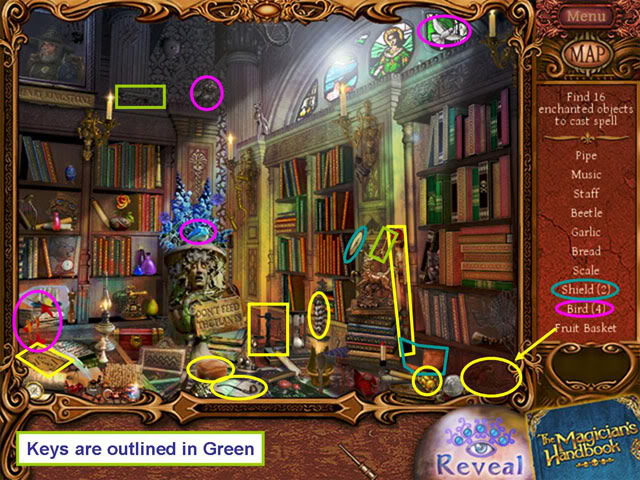
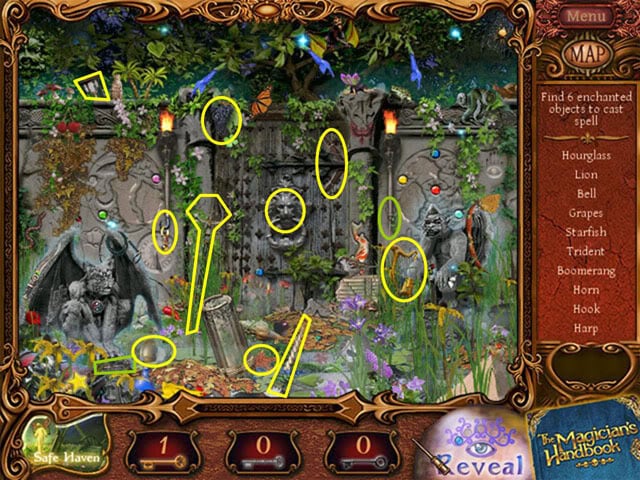
- Tip: Find the Keys FIRST so you don’t lose the chance to collect them if you later find all the other Objects in the Location. Keys are outlined in GREEN in the screen shots. They can be devilishly disguised and very hard to find.
- If you miss a Key, don’t worry too much about it, because it will still be in the Location for you to collect later. You revisit all of the Locations several times.
- For the most part, this Guide will help you collect all the Keys, but using them is up to you.
- At the beginning of Chapter 6, we’ll visit the Safe Haven to use the Keys collected so far to buy a powerful Wand.
Hints
- You start each Chapter with 5 Hints that are invoked by the Reveal button at the lower right side of the screen.
- After you use up your 5 Hints, the Reveal button will slowly recharge in about 2 minutes.
- You can also gain additional hints by invoking the "Reveal Spell" that you can unlock in the Safe Haven, which will restore your Hints to 5 (so use up all your hints before invoking the Reveal Spell).
Grades
- You will be "Graded" on your performance in the game, no matter which Difficulty Level you choose.
- Grades are dependent on the number of Hidden Objects you find, QuickFind bonuses, number of "Reveals" unused, and other factors. The highest Grade you can receive is A+.
- Finding the minimum number of Objects in each Chapter will get you a Grade of C.
- You can choose to continue to find ALL the Objects in a Chapter, which will increase your Grade to A or better.
- You need an average grade of A or better in all Chapters in order to unlock the Wand of Keys, which is NOT available from the Safe Haven.
- If you are not satisfied with your Grade, or do something that reduces your Grade (such as skipping a Puzzle or "Mis-Clicking" too much), you can Restart any Chapter from the page in the Magician’s Handbook as long as you have not already completed the Chapter.
Annoying/Amusing Distractions
- In many of the Locations you will be distracted by things like flying Magic Books, Carnivorous Flowers, Ghosts, Mist or Smoke, etc.
- You can safely ignore these things; they are not harmful. But you can also click on them to get rid of them if they are annoying or distracting you.
- The Repel Spell (unlocked in the Safe Haven) will also get rid of annoying distractions.
Mini-games and Puzzles
There are a variety of mini-games and Puzzles which are very much different from "jigsaw puzzles", "torn letters/pictures" and others you might be used to from other Hidden Object games:
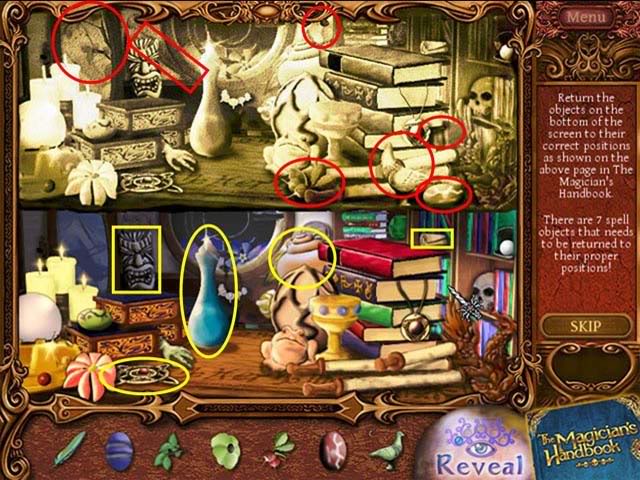
Learning Spells
- To learn a new Spell (such as "Fire", "Wind", "Petrify", "Heal", or "Detect"), you must return Spell Objects to their proper place in a split window, with a page from the Magic Handbook across the top of the screen (as a guide) and a colorful Scene at the bottom window.
- Click on a Spell Object in the bottom list, and then click it the lower window to return the Spell Object to its proper place.
- If you leave a Learning Spell Scene (return to the Map) before completing it, you will need to start over at the beginning when you return.
- The Spells you learn in this mode are Permanent, and you may re-use them throughout the game during Puzzle Solving.
- You MUST learn these Spells, because they are required for Puzzle Solving.
- The Reveal button is available and will recharge during Spell Completing.
Puzzle Solving
- To solve Puzzles, you need to use the Permanent Spells you have learned on Objects in a Location. To activate a Spell, click on it in the bottom list and then click on an Object in the Location to apply the Spell.
- As you move your cursor around the Location, text will appear that might give you clues as to how to use the Spell. However, not all Objects will display helpful text.
- To de-activate a Spell, or select a different Spell, click on it in the Spell Window at the bottom of the Scene.
- If you leave a Puzzle Solving Location (return to the Map) before completing it, you will need to start the Puzzle over at the beginning when you return.
- If you SKIP a Puzzle (only available after a few minutes of trying) you will receive a grade of C for the Chapter.
- There is no penalty for Mis-Clicks while Solving Puzzles.
- The Reveal button is available and will recharge during Puzzle Solving.
Fairy Finding
- You are given directions to find the location of a Fairy in the Location and use a Permanent Spell to free it from Blacklore’s enchantment.
- The directions might say "Follow the line from [clue] past the [clue] to the [clue]" or "To the right of [clue] and above [clue] but below [clue]"
- As you click on each Object in a clue a red "X" will appear on it to let you know that you have found the right Object.
- When you click on the target Object using the proper Spell, you release a Fairy from Blacklore’s evil enchantment and the Fairy returns to the Safe Haven.
- Again, due to the Random Factor, your results might be different than what’s contained here, but once you get the knack of it, these Fairy Finding puzzles are not too hard.
- The Reveal button is available and will recharge during Fairy Finding.
Safe Haven
- The Safe Haven is a special Location where time stands still (if you are in Apprentice mode).

- You may return to the Safe Haven from any Location for a break and to visit all the Fairies you rescue.
- You may use the Keys you have gathered to open Chests which contain Wand Upgrades, One-Time Magic Spells (Increase Reveals, Repel, etc.) and other surprises.
- Each Chest requires a particular set of keys, such as 1 Black, 7 Silver, or 10 Gold.
- The contents of the Chests are randomized, but you can assume that the more keys required, the more valuable the contents.
- Tip: Don’t use up your Keys early in the game. Wait until you have 10 Gold, 10 Silver, and 10 Black keys and then unlock those Chests to receive the "Wand of Enchanted Objects." We’ll do that at the start of Chapter 6 in this Strategy Guide
- There is one Wand that you can’t unlock in the Safe Haven, the "Wand of Keys", which will help you track down the hidden Keys throughout the game. To unlock the Wand of Keys, you need to complete the game with an "A" grade average through all the Chapters.
Fairy Queen Statue Pieces
- The goal of the final Chapter 11 of the game is to find all the pieces of the Fairy Queen Statue. There is one piece findable at each Location that you visit.
- You will need to use your Detect Spell to find the pieces, which are all hidden by Dark Magic ("ooooh").
- Minimum/total Objects to find: 16/20
- Permanent Spell to learn: Wind
- Note: you won’t hear about the Keys until you enter one of the first Locations, go to the Map and return to a Location again.
- The Fairy "Corrigan" explains the basics of the game to you, and will re-appear at various points in the game to give you quick tutorials on new features.
Library of Magic
- Keys: 1 Gold, 1 Black
Swamp Gateway
- Keys: 1 Silver, 1 Black
Magician’s Handbook
- After you collect at least 16 Objects in these two Locations, you can proceed to learn your first Spell or you can continue to search until you find all the Objects in order to improve your Grade for the Chapter.
- The Magician’s Handbook lists your goals for each Chapter and also allows you to select new Wands as you unlock their parts in the Safe Haven.
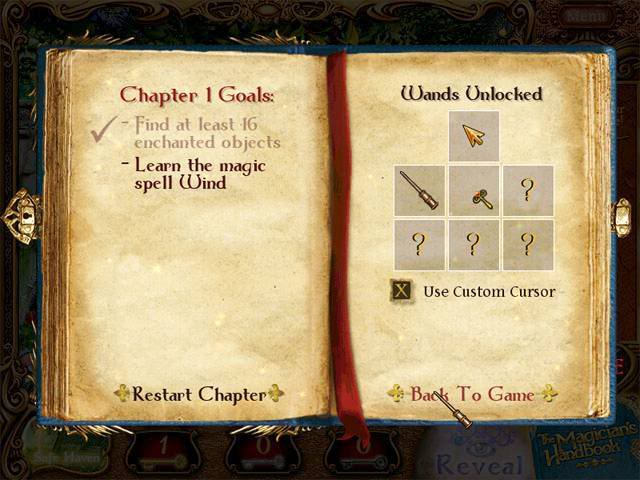
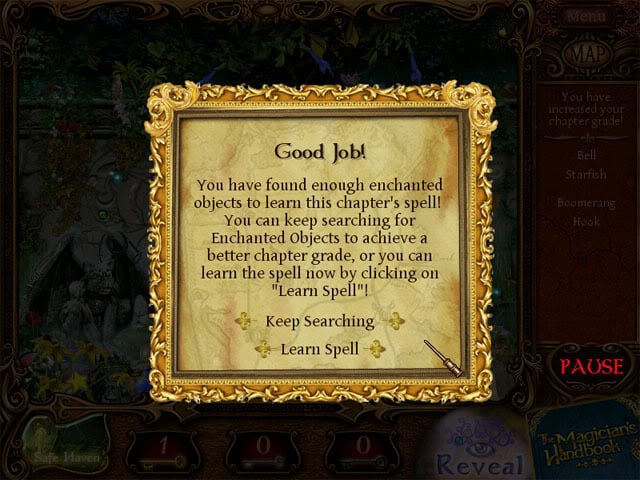
- After you have found enough Enchanted Objects to complete the requirements for the Chapter, you will see this screen:
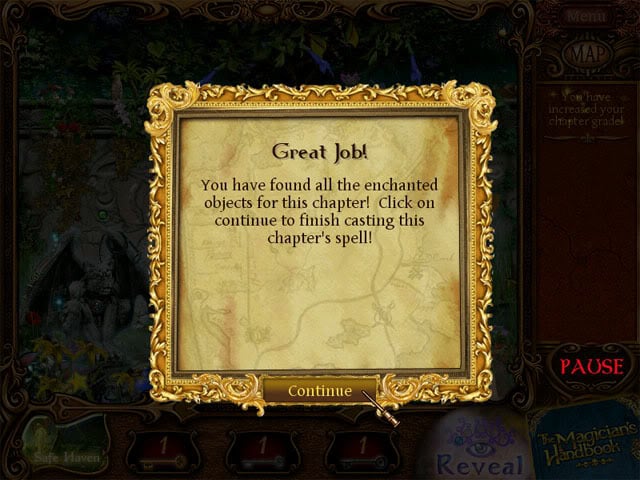
- If you find ALL the Objects for the Chapter, you will see this screen:
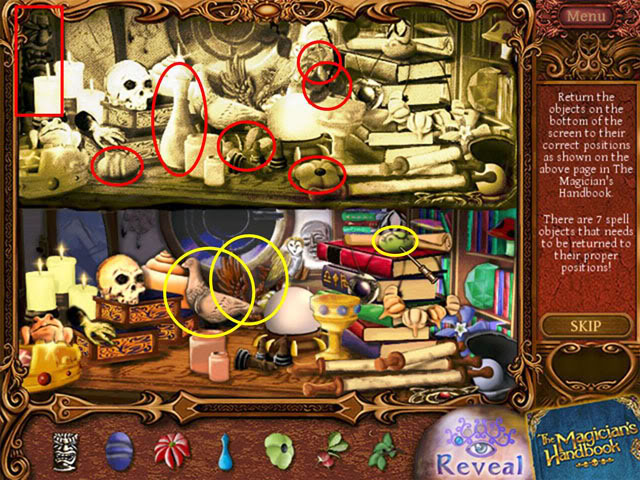
Learn the Wind Spell
- Now you get to learn your first Permanent Spell, "Wind".
- You will need to place each Spell Object in the bottom window using the page from the Magician’s Handbook displayed in the top window as a guide. The Fairy will help you place the Phoenix and then you need to place 7 more Spell Objects.
- You may also use the Reveal button for help.
- Remember, this is also randomized, so your list of Objects may be different from those shown here.
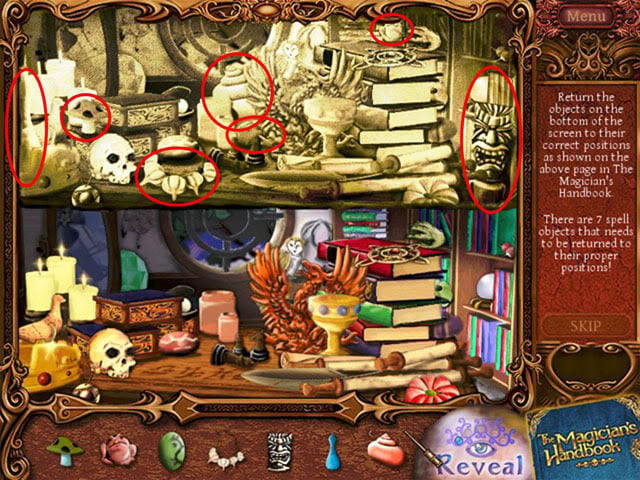
- The Red circles indicate the spots for the remaining Objects.
- Mis-Clicks are NOT penalized during Spell Learning.
Puzzle: Swamp Gateway
- This Chapter ends with a Puzzle, in this case at the Swamp Gateway. You’ll need to use the Wind Spell to solve the puzzle.
- The Fairy demonstrates how to use the Wind Spell to blow away leaves hiding the first piece of the wall. Find the rest of the wall pieces and return them to where they belong.
- Your Reveal button will slowly recharge while you are solving a puzzle, giving you additional hints.
- The Skip button will not be available until after some time while you are working on a Puzzle. If you skip the puzzle, you will receive a "C" Grade for the Chapter!
- The Restart button lets you to start over at the beginning of the Puzzle.
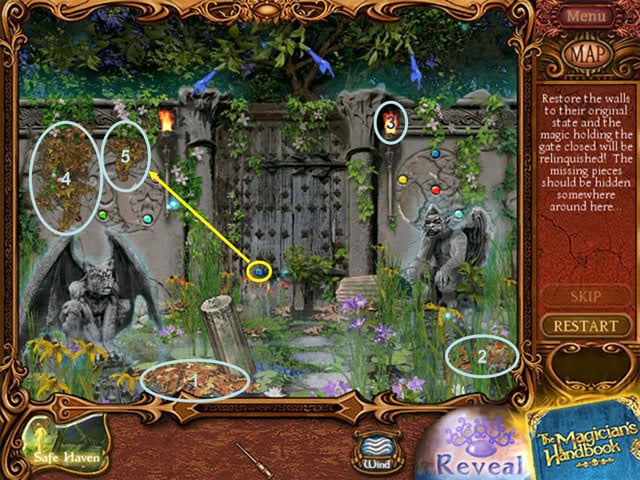
- In the screen shot above, the light blue circles show where you should use the Wind Spell to reveal wall pieces. The screen shot below shows you where the pieces go.
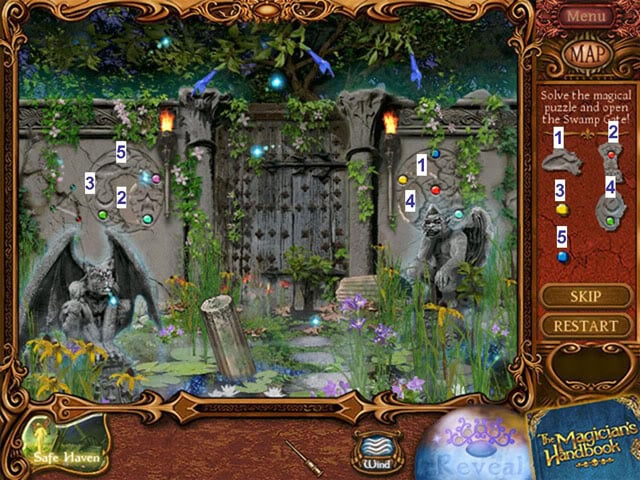
- Congratulations! You should have finished Chapter 1 with at least a Grade of "A", if not higher.
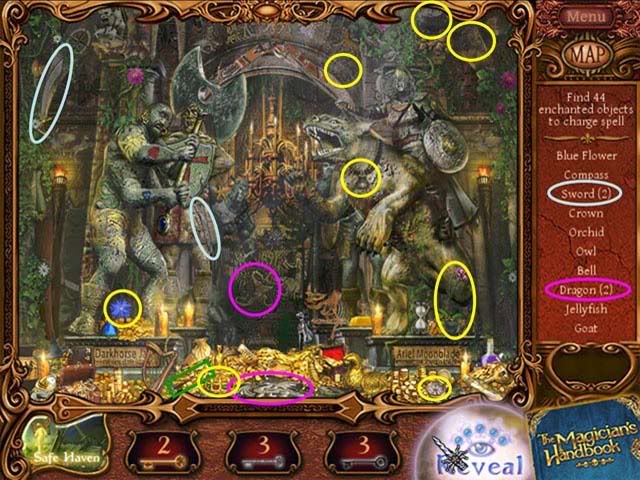
Chapter 2-The Watchers
- Minimum/total Objects to find: 25/30
- Permanent Spell to Learn: Fire
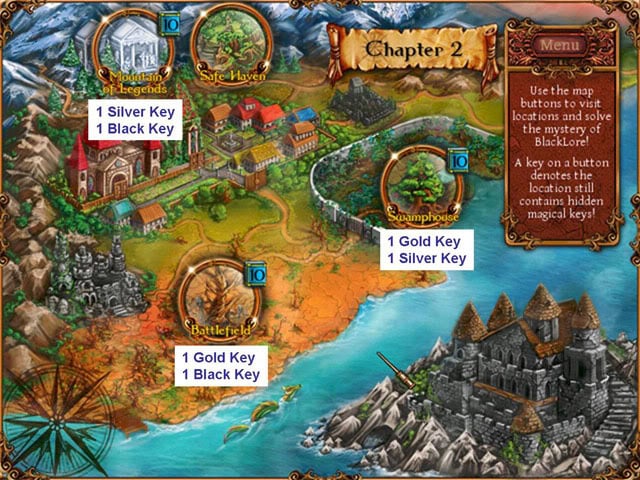
Mountain of Legends
- Keys: 1 Silver, 1 Black
Battlefield
- Keys: 1 Gold, 1 Black
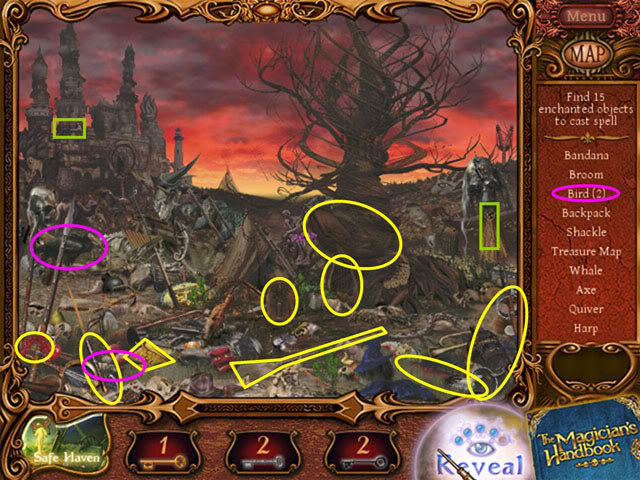
Swamphouse
- Keys: 1 Gold, 1 Silver
Learn the Fire Spell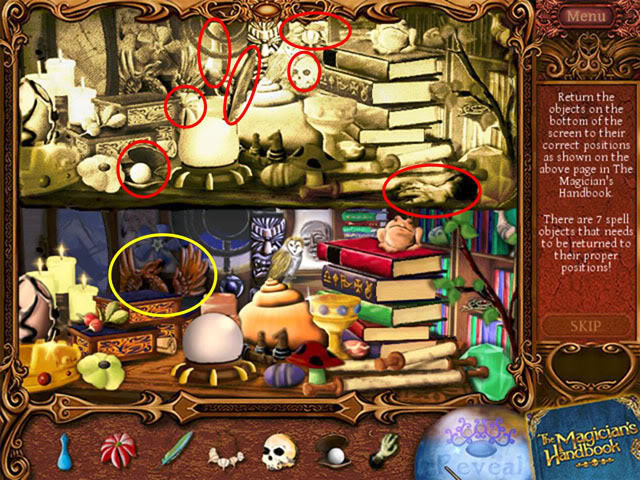
- There are eight (8) Spell Objects to place for this Spell. The Phoenix has already been placed and is circled in Yellow. The Red circles indicate the spots for the remaining Objects.
Puzzle: Mountain of Legends
- Keys: (none)
- You’ll need to use the Fire Spell to solve this puzzle.
- Use the Fire Spell on each of the areas outlined in Red above.
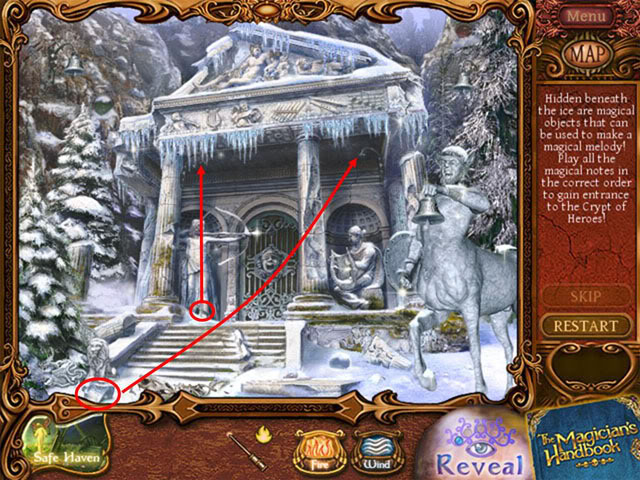
- Two bells are revealed. They need to be placed on the Hooks under the roof of the building.
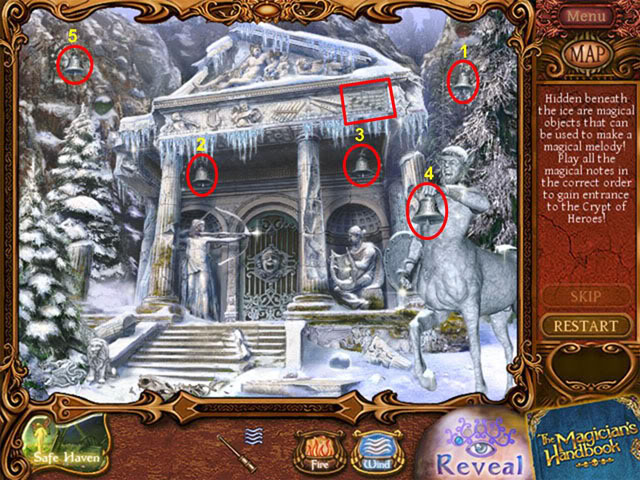
- Notice the musical scale on the roof of the building. You need to play the 5 bells in order of descending pitch.
- You’ll need to listen to the pitch of each bell and sort them out, because the pitches can be randomized.
- Use the Wind spell to ring the bells in descending order of pitch to complete the Puzzle.
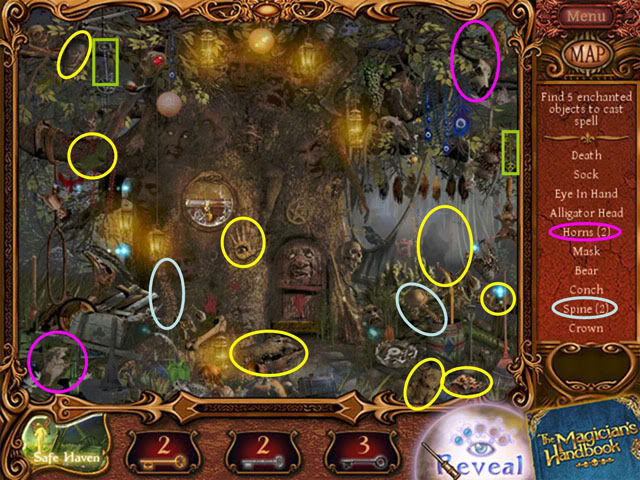
- Minimum/total Objects to find: 26/30
- Find a Fairy Scroll
- Release Six Fairies
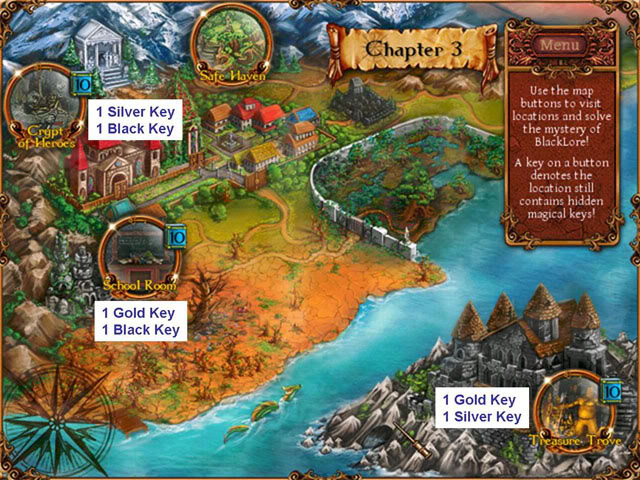
Crypt of Heroes
Keys: 1 Silver, 1 Black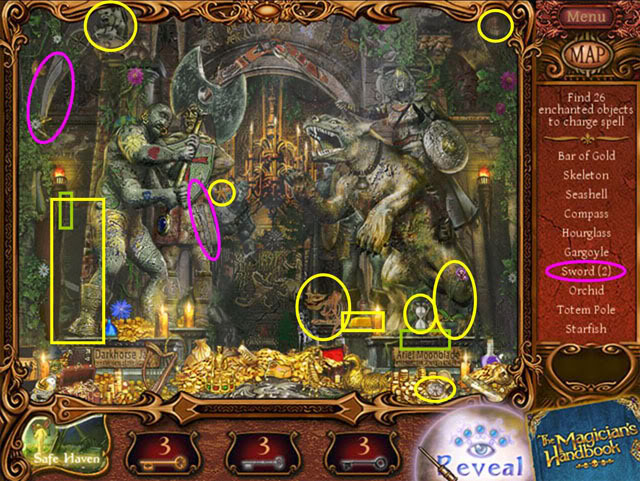
School Room
- Keys: 1 Gold, 1 Black
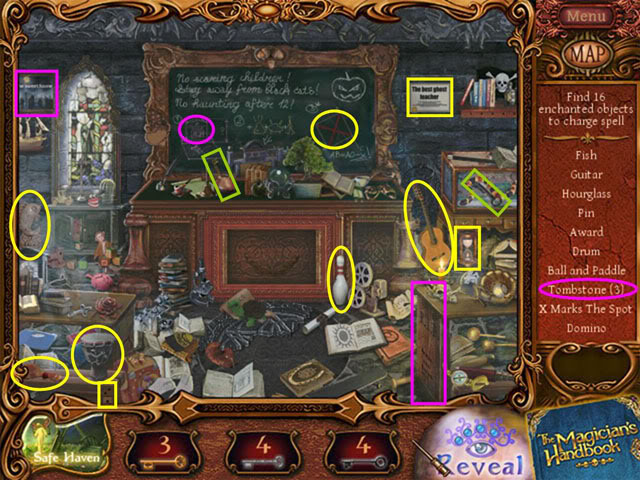
- You’ll find Ghosts appearing at random here. You can safely ignore them; they are not harmful. If they annoy you or obscure your view, just click on them to erase them.
Treasure Trove
- Keys: 1 Gold, 1 Silver
Puzzle: Swamphouse
- You need to close all the eyes of the Watchers by lighting lanterns with your Fire Spell.
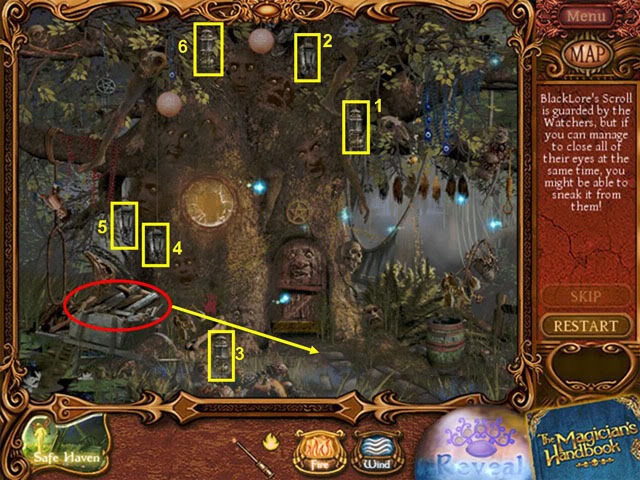
- Use your Fire Spell on each of the lanterns to turn them on or off. You will find that some lanterns affect others (turning them on or off, as well). This solution is the one that worked for me, but you might have different results due to the randomizing in the game.
- Remember that you can "Restart" at any time if you get stuck.
- After you have lanterns 1-6 lit, take the wood (circled in red), place it in front of the door and light it with your Fire Spell to close the eyes of the final Watcher on the door.
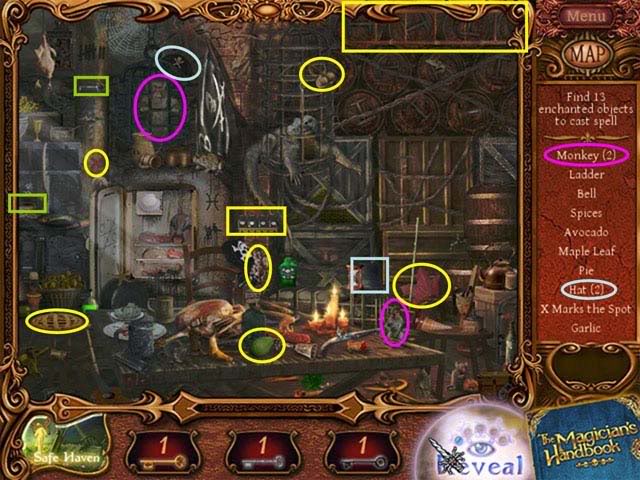
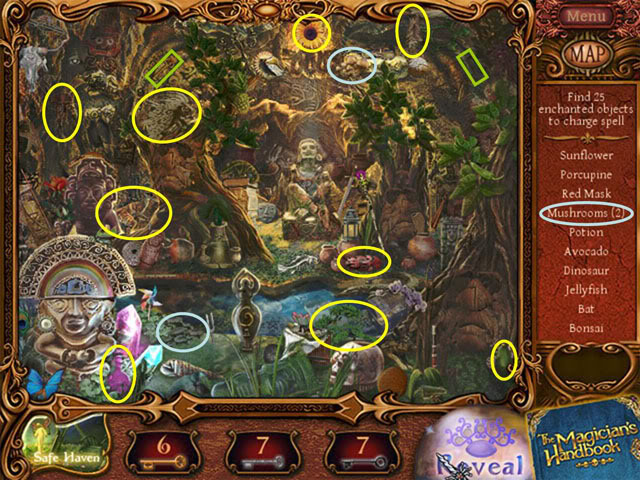
Fairy Finding: Blacklore’s Cove
- Keys: 1 Silver, 1 Black
- The Fairy Corrigan will teach you how to find the first Fairy by following the clues and using a Spell to release the Fairy.
- Click on each Object mentioned in the clue, displaying a red "X", then determine the target Object, select the proper Spell, and click on the target to release the Fairy.
- Remember, your results may be different due to the random factor in the game.
- Don’t forget to collect the Keys first!
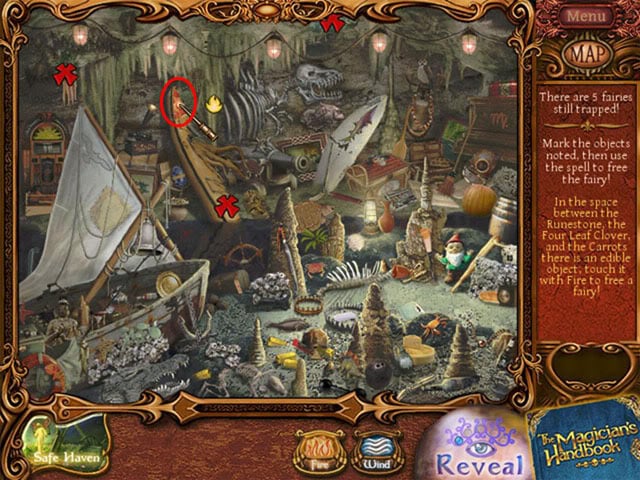
- In the space between the Runestone, the Four Leaf Clover and the Carrots, there is an edible Object; touch it with Fire to free a Fairy!
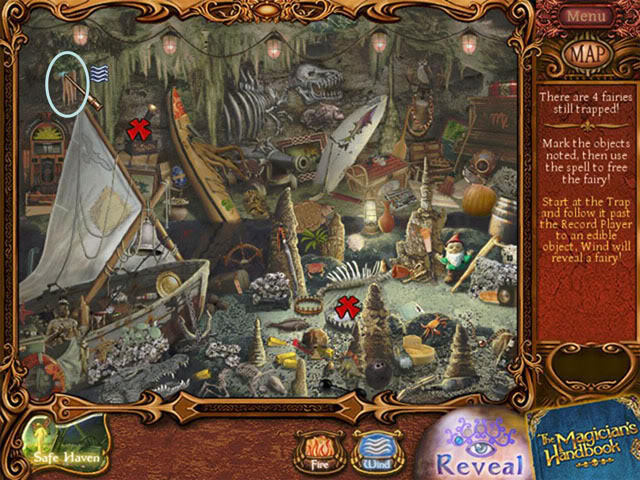
- Start at the Trap and follow it past the Record Player to an edible Object; Wind will reveal a Fairy!
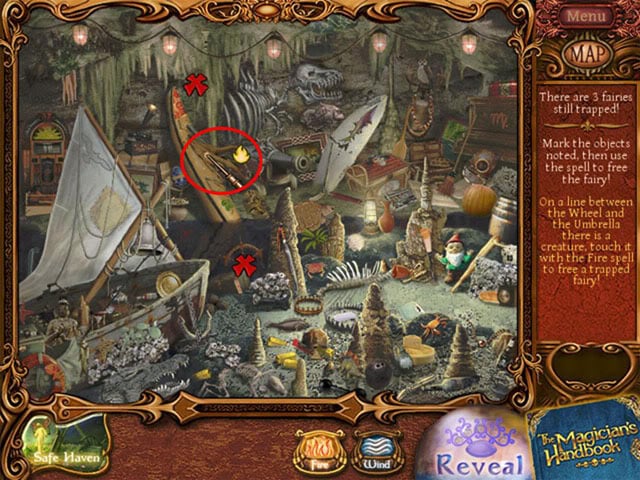
- On a line between the Wheel and the Umbrella there is a creature; touch it with the Fire Spell to free a trapped Fairy!
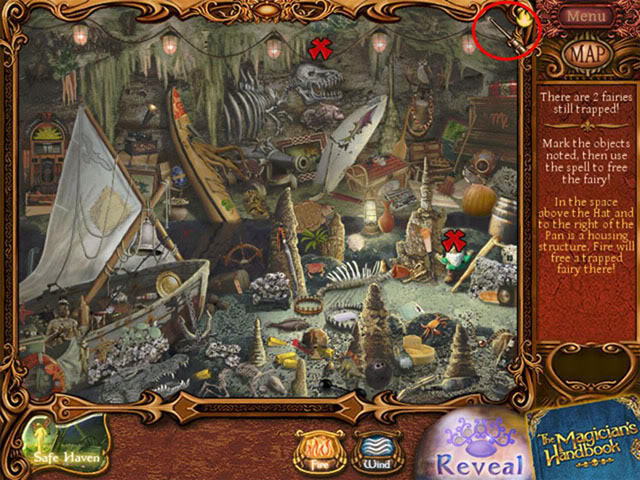
- In the space above the Hat and to the right of the Pan is a housing structure; Fire will free a trapped Fairy there!
- The "housing structure" is an upside-down igloo.
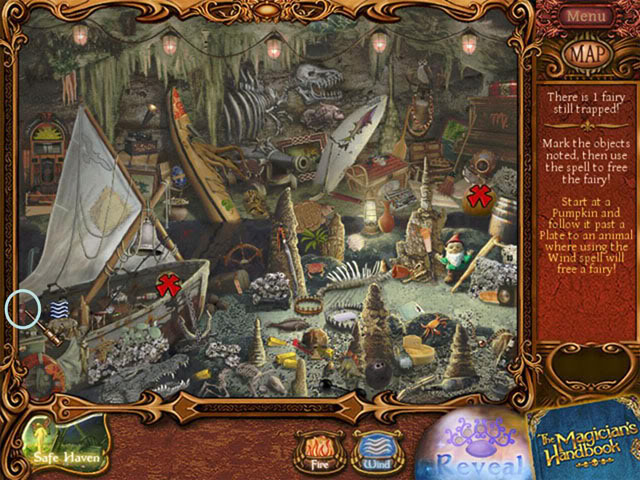
- Start at the Pumpkin and follow it past a Plate to an animal where using the Wind Spell will free a Fairy!
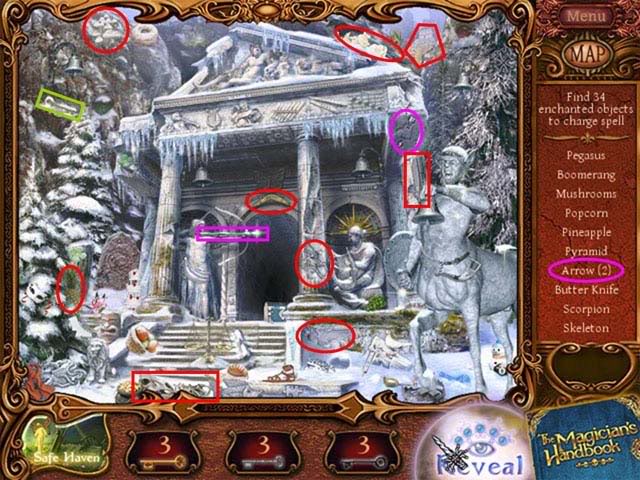
Chapter 4-The Secret Room
- Minimum/total Objects to find: 33/40
- Permanent Spell to Learn: Petrify

Swamp Gateway
- Keys: 1 Gold
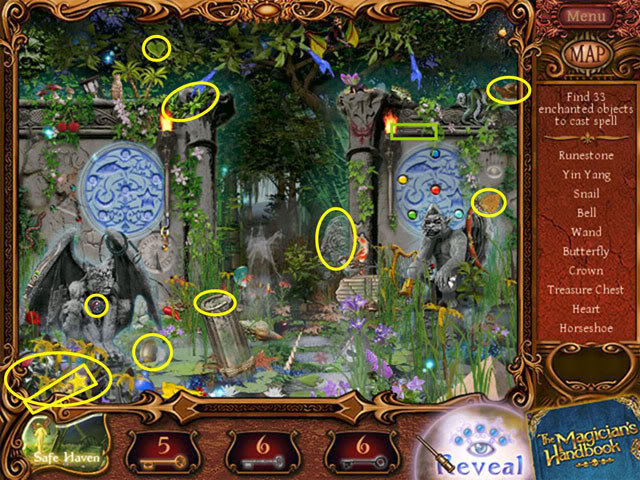
Blacklore’s Cove
- Keys: (none)

Living Quarters
- Keys: 1 Gold, 1 Silver
Throne Room
- Keys: 1 Silver, 1 Black
Learn the Petrify Spell
- The Petrify Spell turns Objects to stone or turns them from stone back to their original condition.
- There are 10 Spell Objects to replace in this Scene.
- In the screen shot, the first three Spell Objects (already placed) are circled in the lower window and the remaining 7 Spell Objects’ places are circled in the upper window.
Puzzle: Library of Magic
- Keys: 1 Silver
- This is probably the most complex Puzzle you will have encountered in the Game so far and even if you NEVER need to use Walk Throughs, this is probably where you might start needing help.
- In this Puzzle you’ll need to use all the Permanent Spells you have learned: Wind, Fire, and Petrify.
- Remember that during Puzzle Solving, you get no penalty for Mis-Clicks and you can use the Reveal button for help.
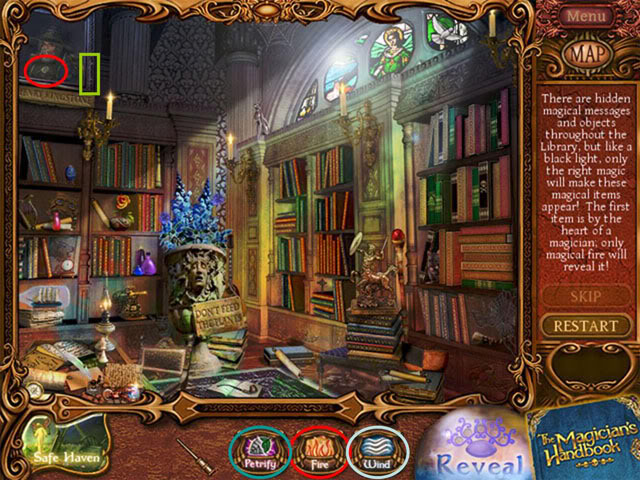
- Don’t forget to collect the Silver Key!
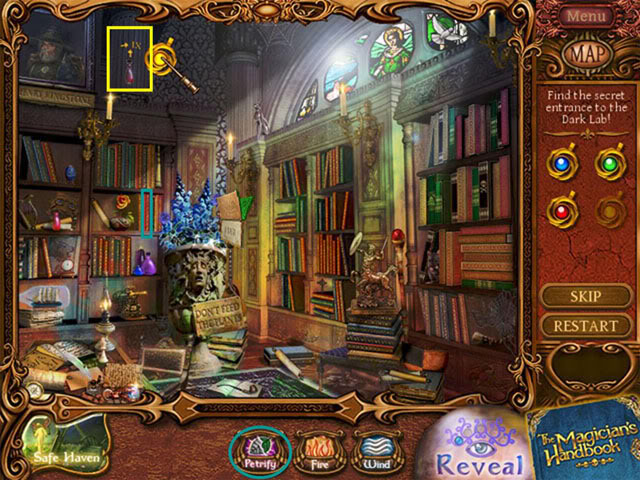
- First, following the clue, use the Fire Spell on the portrait of the wizard in the upper left corner.
- A magical Blue amulet appears. Move the Blue amulet around until part of the Scene reacts with flashes and music. This reveals a clue. Use the additional amulets you will discover in a similar way.
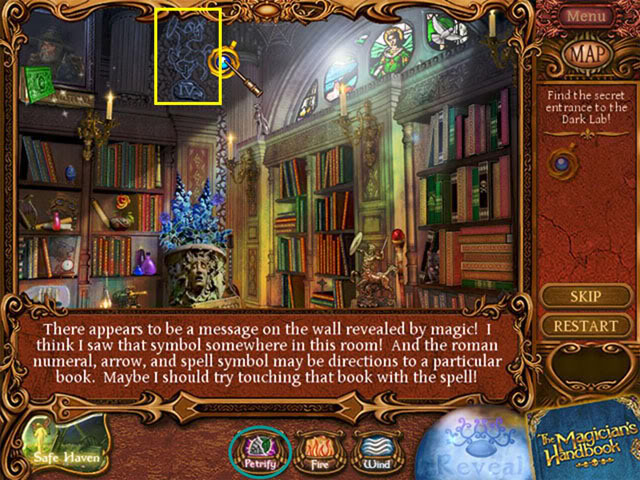
- The clue from the wall indicates the Centaur statue, 4 books down, and the Petrify Spell.
- You will reveal a Green Amulet.
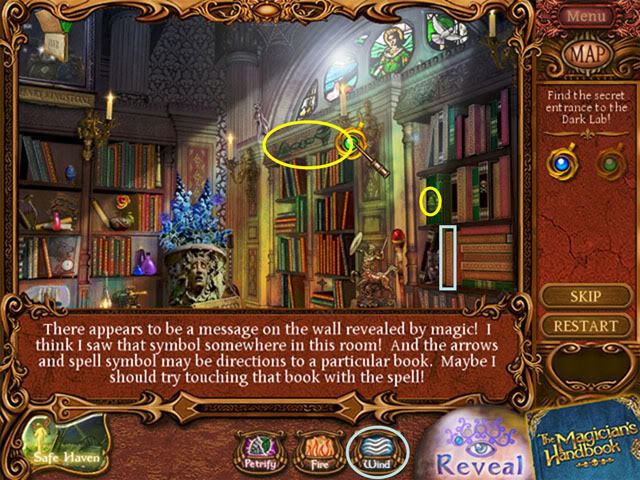
- The Green Amulet will reveal a clue above the bookcase that indicates "Tree, Right, Down, Right, Wind."
- Use the Wind Spell on the book indicated to reveal a Red Amulet.
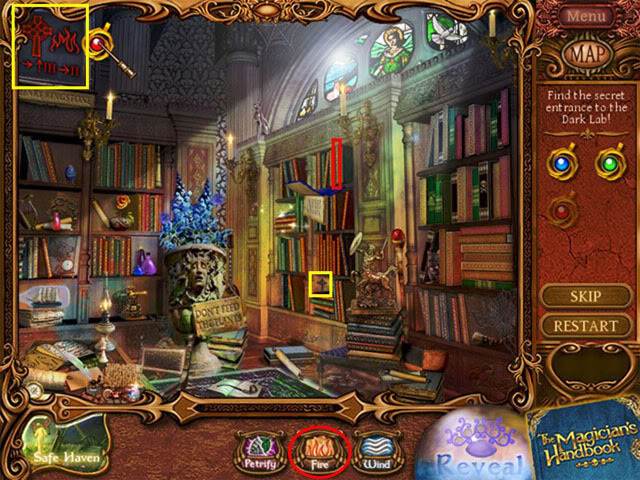
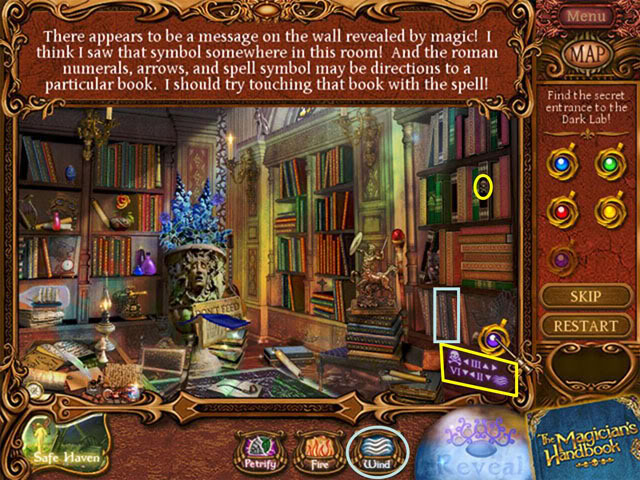
- The Red Amulet will reveal a clue on the Wizard’s Portrait that indicates "Cross, Right, Up 3, Right 2, Fire."
- Use the Fire Spell on the book indicated to reveal a Gold Amulet.
- The Gold Amulet will reveal a clue on the Left Column as indicated, for "Potion, Up, Right 4." Additional parts of the clue appear on the right column, but they couldn’t both be displayed in the screen shot at once.
- Granted, it’s not a very clear clue here, but just use the Petrify Spell on the book indicated to reveal a Purple Amulet.
- The Purple Amulet will reveal a clue that indicates "Skull, Left 3, Up, Right 4, Down, Left 2, Down, Wind."
- Use the Wind Spell on the book indicated to complete the puzzle and open the Secret Door to the Dark Magician’s Lab.
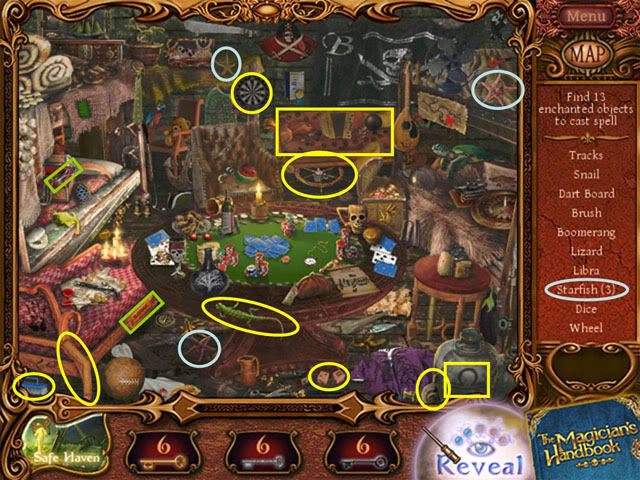
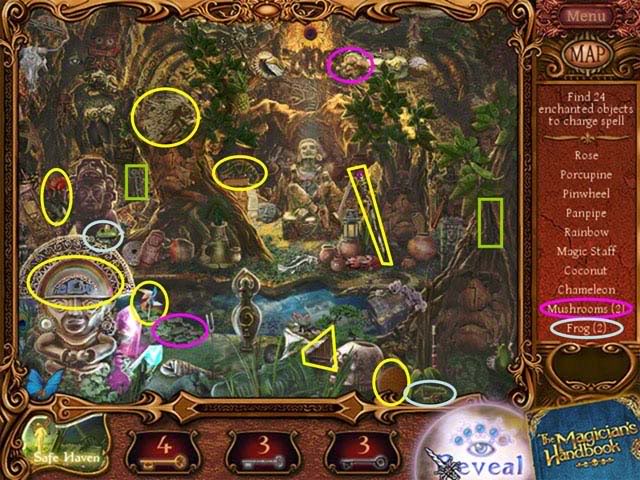
Chapter 5-Heroes and Statues
- Minimum/total Objects to find: 34/40
- Find a Fairy Scroll
- Free Six Fairies

Mountain of Legends
- Keys: 1 Silver, 1 Black

Dark Magician’s Lab
- Keys: 1 Gold, 1 Black
Battlefield
- Keys: 1 Gold
Swamphouse
- Keys: 1 Silver
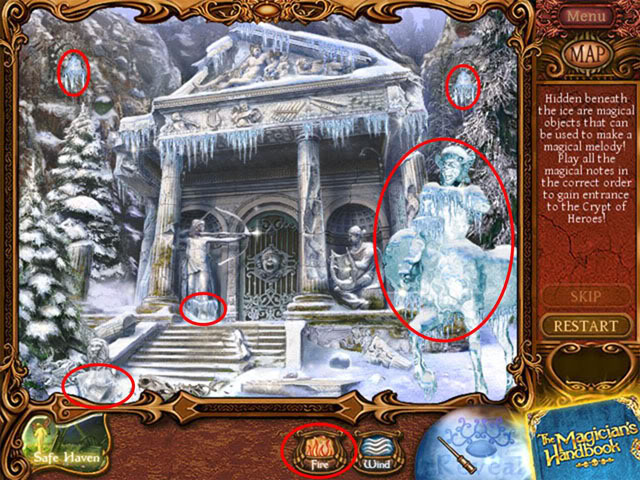
Crypt of Heroes Puzzle
Keys: 1 Gold
- This is another very challenging Puzzle. There are pieces of 6 statuettes hidden around the Scene.
- You must find and reassemble all the statuettes and place them on the pedestals at the bottom of the Scene in the proper places.
- Some of the pieces need to be changed with a magic Spell before you can obtain them.
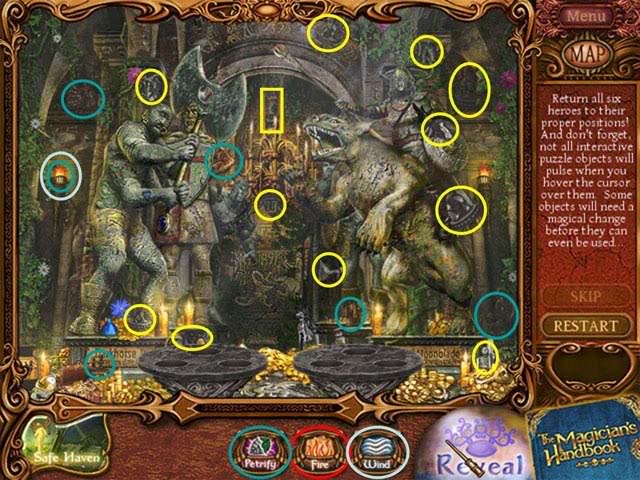
- Select items highlighted in Yellow and they will assemble into statuettes on the right side of the screen.
- Use the Petrify Spell on items highlighted in Turquoise, and then click them again to add them to your inventory on the right side of the screen.
- Use the Wind Spell on the Torch at the left side of the screen, then use the Petrify Spell on the Object revealed. Click again to add it to your inventory.
- Now all the statuettes are complete and you need to place them in the proper spots on the pedestals.
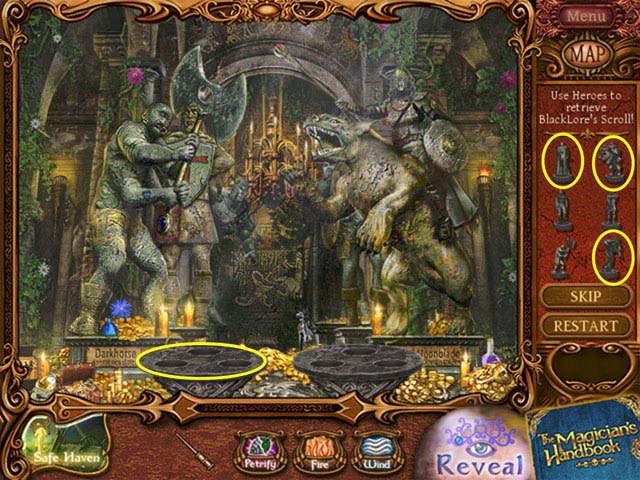
- First, place the three highlighted statuettes on the Left Pedestal.
- Next, place the remaining three statuettes on the Right Pedestal.
- The pedestals will descend and you earn another Fairy Scroll.
- We missed the Gold Key here, don’t worry, we’ll get it later on.
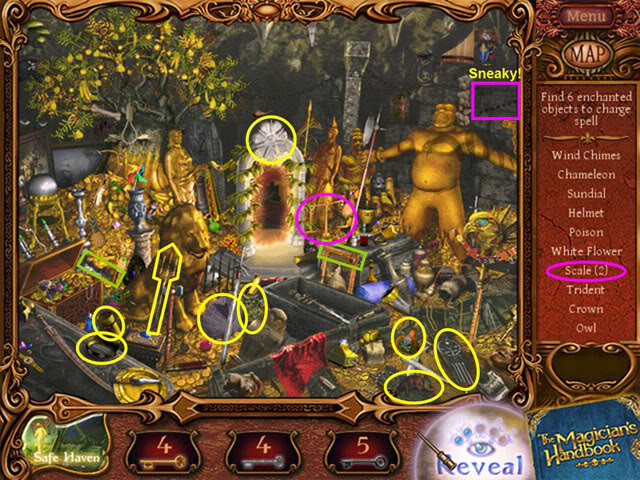
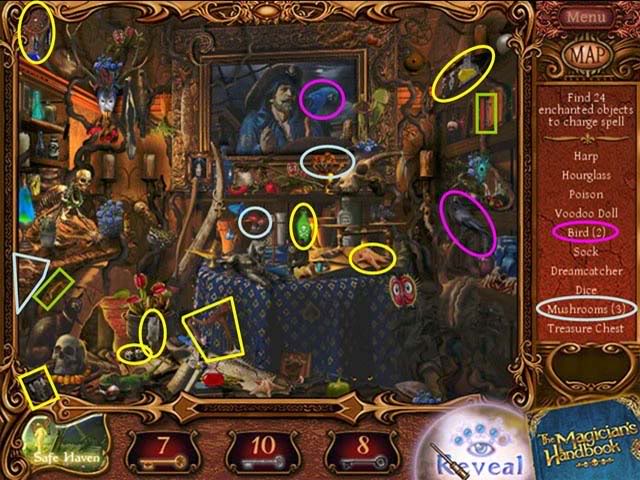
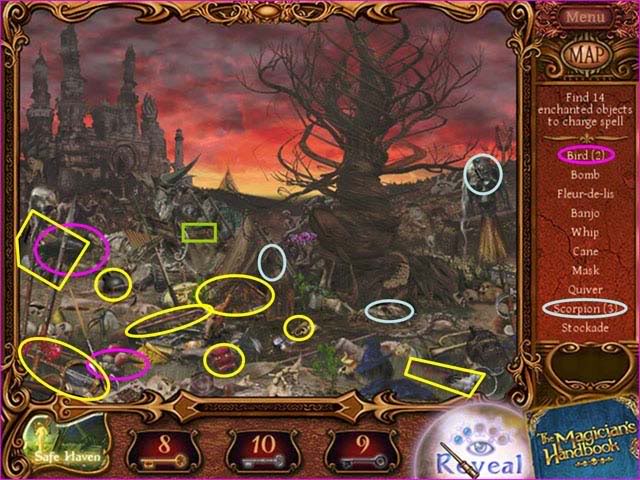
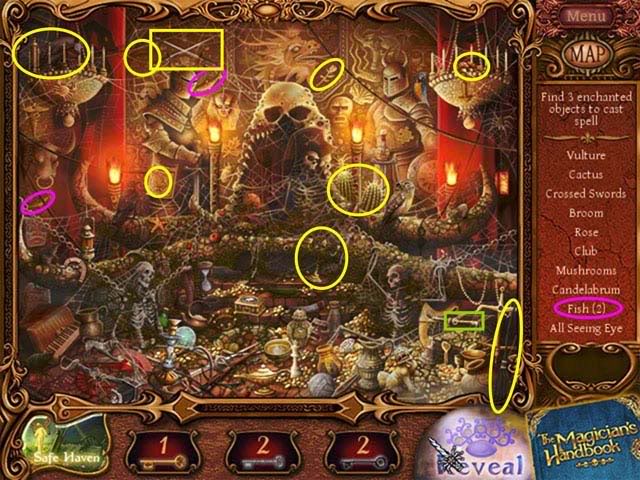
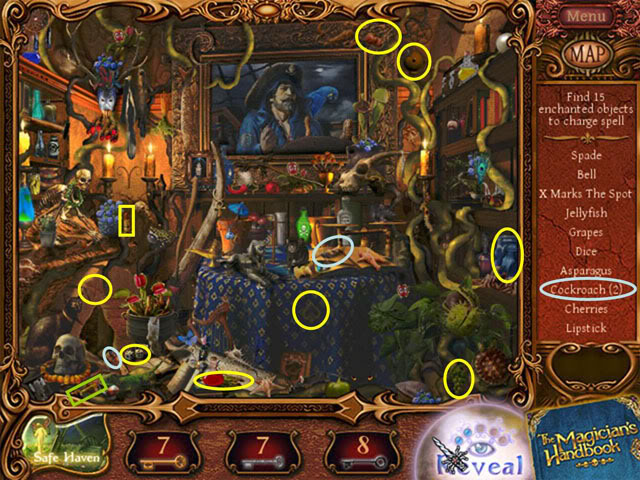
Fairy Finding: Treasure Trove
- Keys: 1 Gold, 1 Black
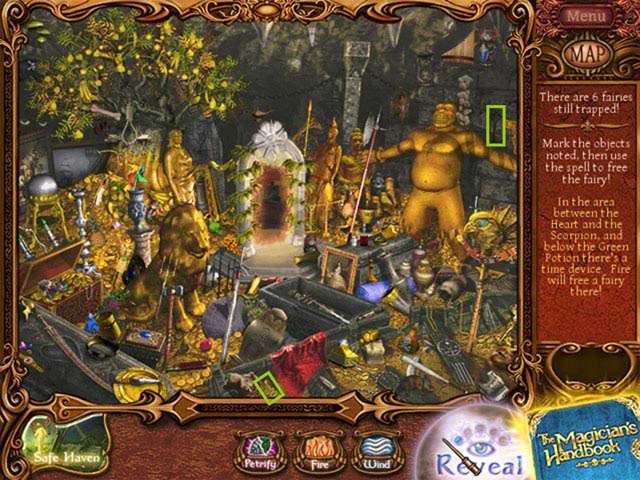
- First, grab the Keys!
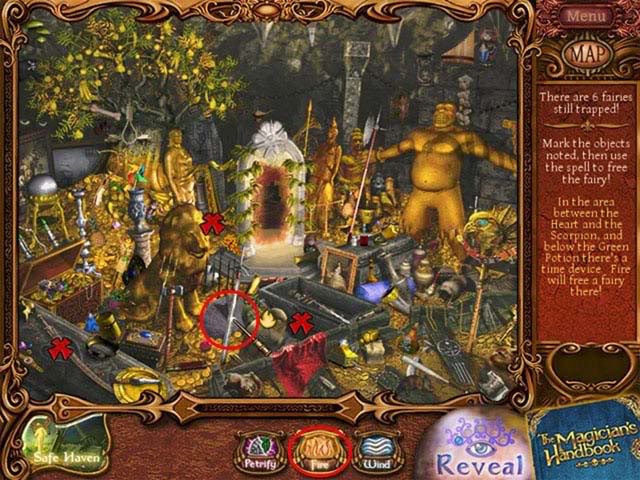
- In the area between the Heart and the Scorpion, and below the Green Potion, there’s a time device. Fire will free a Fairy there!
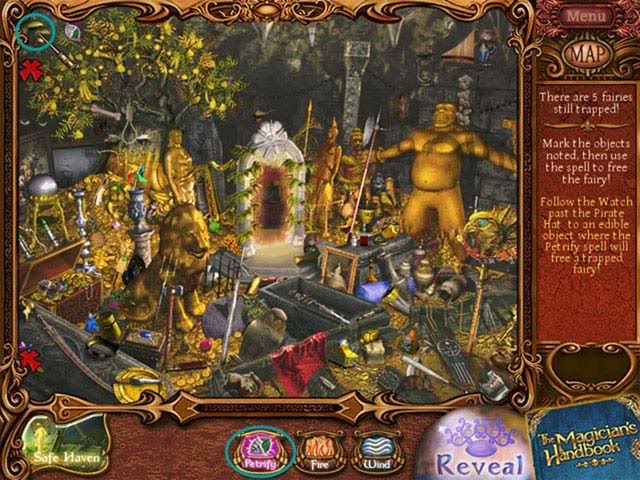
- Follow the Watch past the Pirate Hat to an edible Object where the Petrify spell will free a trapped Fairy!
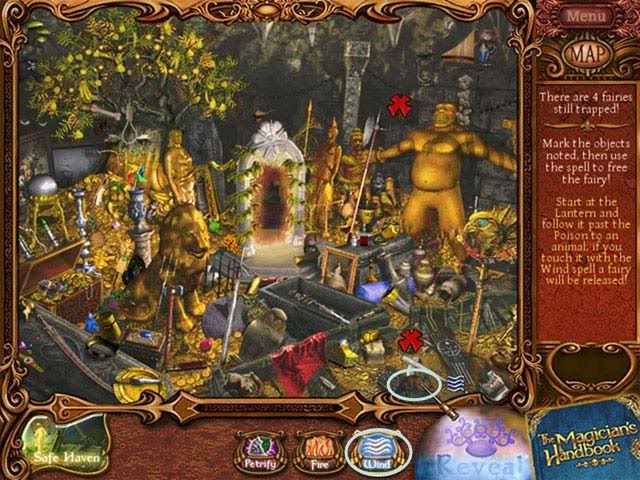
- Start at the Lantern and follow it past the Potion to an animal, if you touch it with the Wind spell a Fairy will be released!
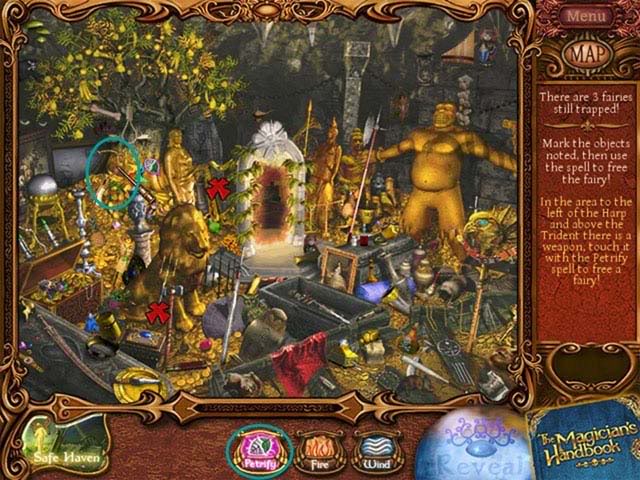
- In the area to the left of the Harp and above the Trident there is a weapon, touch it with the Petrify spell to free a Fairy!
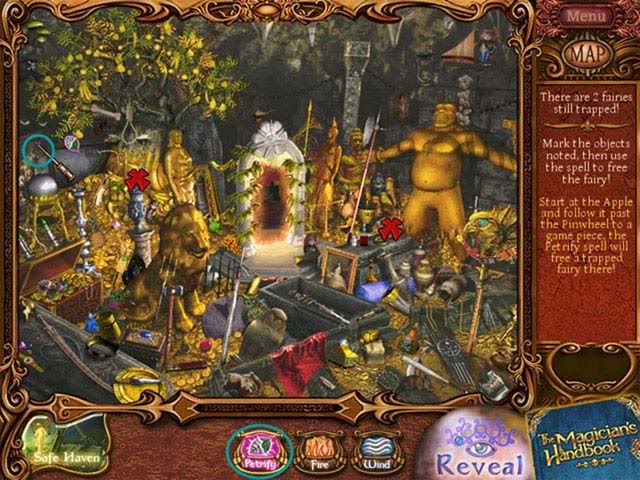
- Start at the Apple and follow it past the Pinwheel to a game piece, the Petrify spell will free a trapped Fairy there!
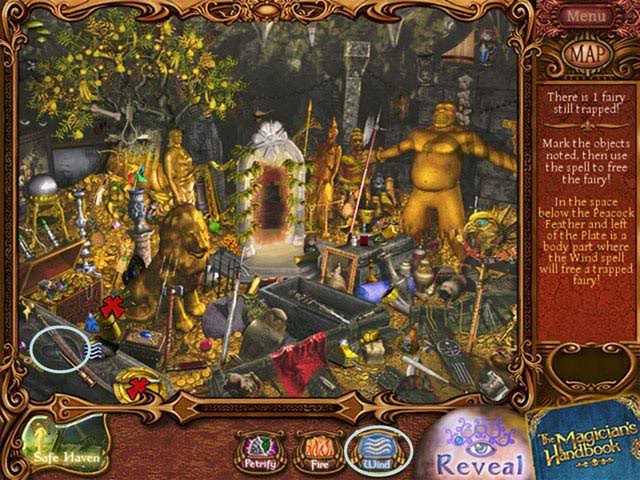
- In the space below the Peacock Feather and left of the Plate is a body part where the Wind spell will free a trapped Fairy!
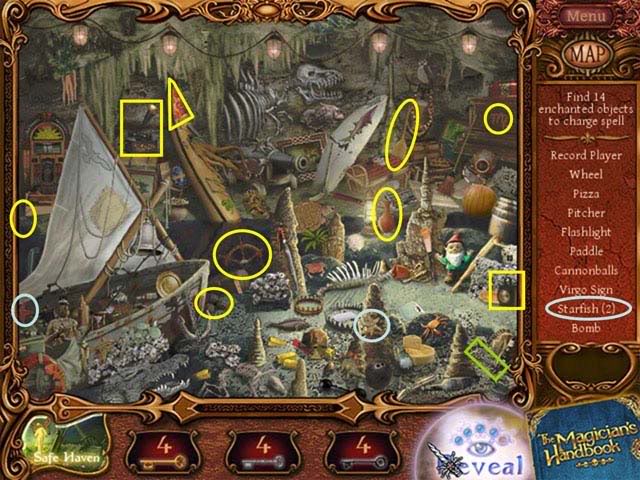
Chapter 6-A Forsaken Land
- Minimum/total Objects to find: 43/50
- Permanent Spell to Learn: Heal
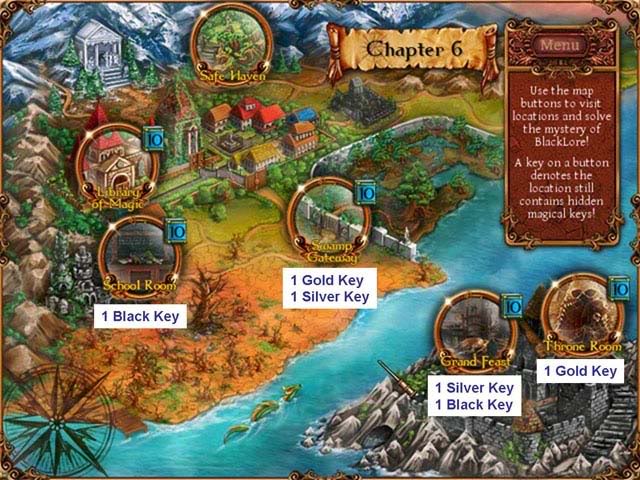
Safe Haven
- Now that we have accumulated at least 10 of each type of Key, let’s go to the Safe Haven and say "Hi" to the 12 fairies you have released so far.
- If you haven’t found 10 of each Key so far, don’t worry about it. Come back to the Safe Haven later.
- Choose the Chests that require 10 Gold, 10 Silver, and 10 Black Keys. The identification of the Chests may differ in your experience, because of the Random factor.
- You should find all three pieces of the "Wand of Enchanted Objects", which will occasionally PULSE when you are near Enchanted Objects.
- This is the most powerful Wand you can acquire in the Safe Haven!

- Go to the Magician’s Handbook and select the Enchanted Object Wand.
- Then, "Back to Game"
Library of Magic
- Keys: (none)
School Room
- Keys: 1 Black
Swamp Gateway
- Keys: 1 Gold, 1 Black
- Note: A "Brownie" is a type of Fairy here, not the chocolate cake-like snack.
Grand Feast
- Keys: 1 Silver, 1 Black
Throne Room
- Keys: 1 Gold
Learn the Heal Spell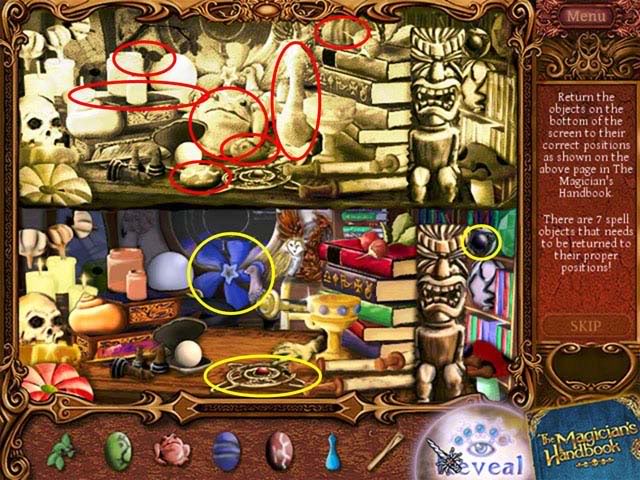
- There are a total of 10 Spell Objects to place.
- The first three Spell Objects have been already placed in the lower window and circled in Yellow.
- Red indicates the places for the remaining Objects.
Puzzle: Battlefield
- Keys: 1 Silver, 1 Black
- Goal: Convince the Tree open the entrance to the Oasis
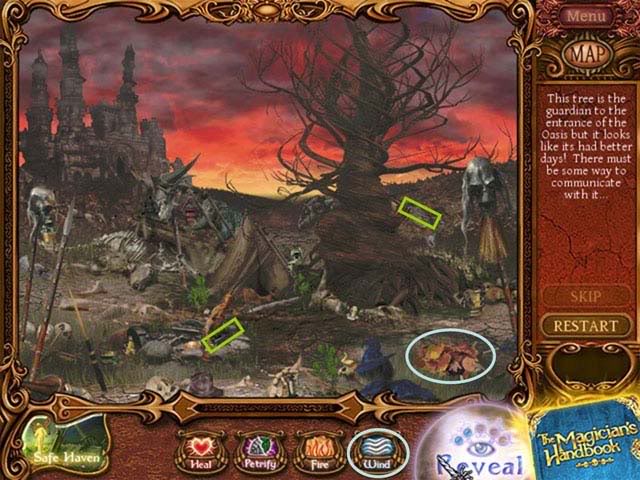
- First, Grab the KEYS!
- Use the Wind Spell on the leaves.

- Find all the Objects. You’re picking up a shovel and the pieces of four lanterns.
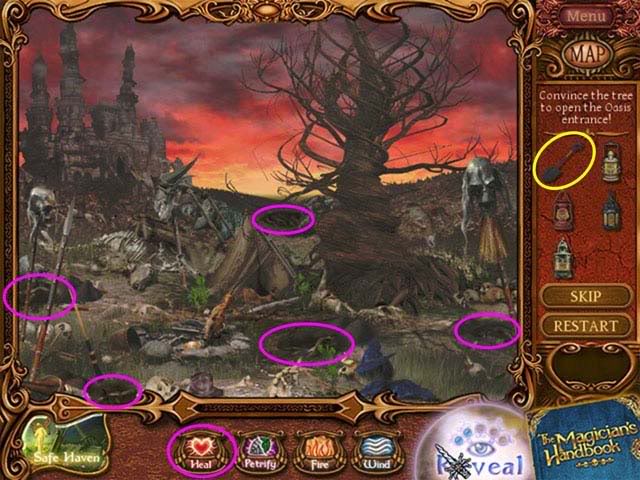
- Dig with the shovel in the areas indicated to expose the Tree’s roots. The areas to dig in look like broken dried mud.
- Use the Heal Spell on the exposed roots.
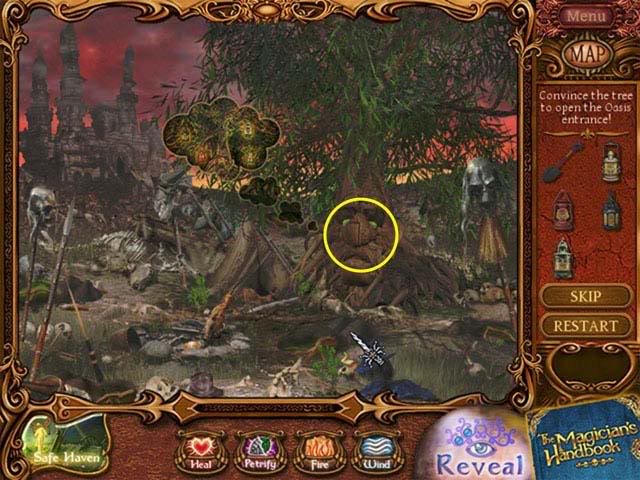
- Click on the revived tree and it will show you where to place the lanterns.
- When you have a lantern in a possible place, the text "Lantern Hook" will appear, but it’s still a bit tricky.
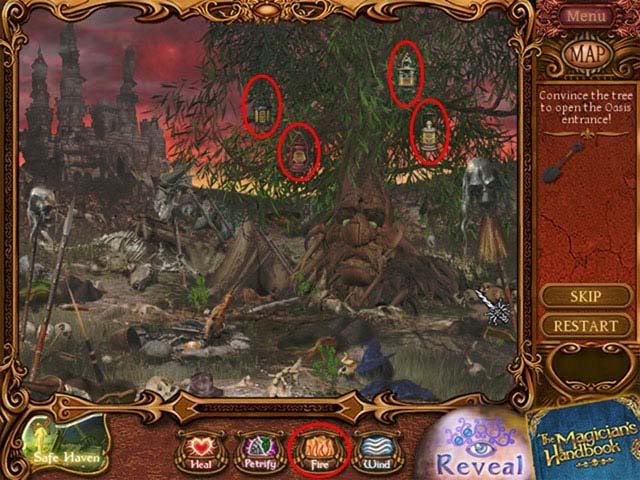
- Place the lanterns as shown.
- Use the Fire Spell on each lantern to light it.
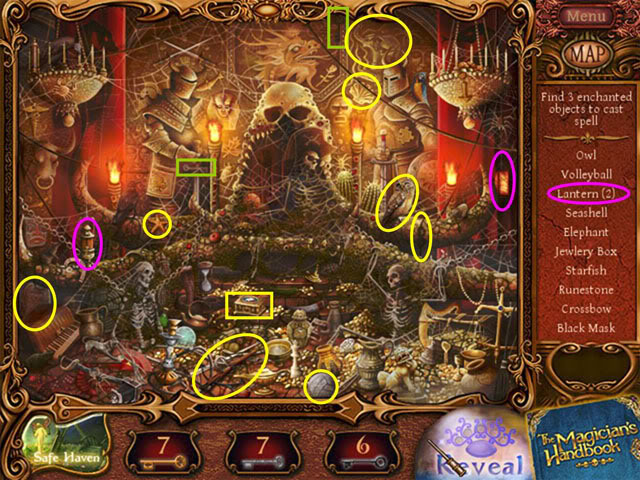
Chapter 7-Black Magic
- Minimum/total Objects to find: 44/50
- Find a Fairy Scroll
- Free Six Fairies
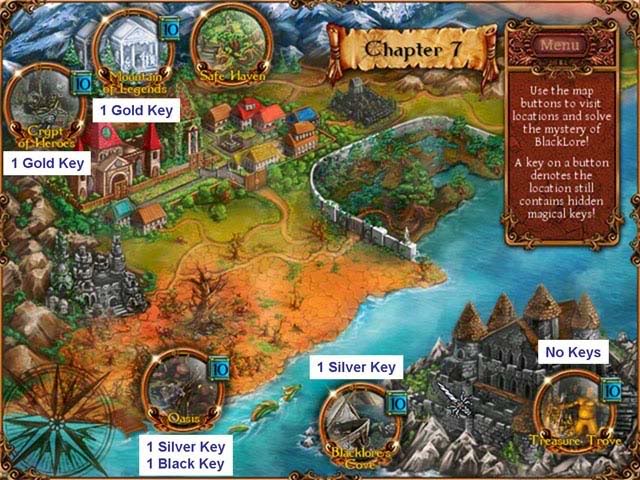
Crypt of Heroes
- Keys: 1 Gold
- There’s that Gold Key we missed during the Puzzle-it was hidden by the left pedestal! Very sneaky!
Mountain of Legends
- Keys: 1 Gold
Oasis
- Keys: 1 Silver, 1 Black
Blacklore’s Cove
- Keys: 1 Silver
- The "Flashlight" is a bit unusual, eh?
Treasure Trove
- Keys: (none)
Puzzle: Dark Magician’s Lab
- Keys: 1 Silver
- This is another complex Puzzle, so hold on to your hat (or wand, as the case may be).
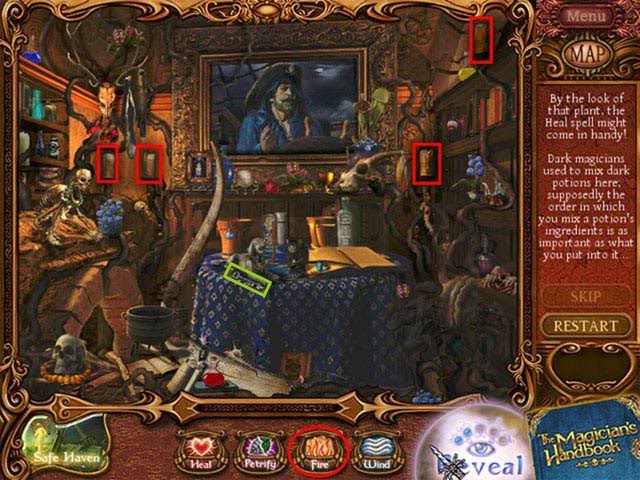
- First, Grab the Key!
- Next, use the Fire Spell to light the candles as indicated.

- Use the Heal Spell to heal the plant’s roots as indicated.

- Grab the test tube and notice the three colored potions.
- The plant will tell you what it wants when you place your wand over its mouth.
- Use the test tube on the potions to fill it with what the plant wants, then use the test tube on the plant’s mouth to feed it.
- The test tube can contain up to 3 portions of a mixture of potions as follows:
Color RedBlue
Yellow Green 1 1 Light Green
1 2 Dark Green
2 1 Orange 1 1 Light Orange
1 2 Dark Orange
2 1 Purple 1 1 Light Purple
2 1 Dark Purple
1 2 Black 1 1 1 Cyan ? ? ?
- Keep feeding the plant until it is satisfied. You need to feed it 5 times.
- You need to pick up the test tube again before mixing each combination.
- The order in which you mix the potions is somehow important. If Blue+Yellow doesn’t please the plant, try Yellow+Blue.
- If you get the wrong color, it’s OK to feed it to the plant, but it won’t satisfy it. Just keep going or Restart if you get frustrated.
- There is no way to mix the Cyan color that we found (so far). Pick up the test tube, then use the Reveal button to create a Cyan potion.
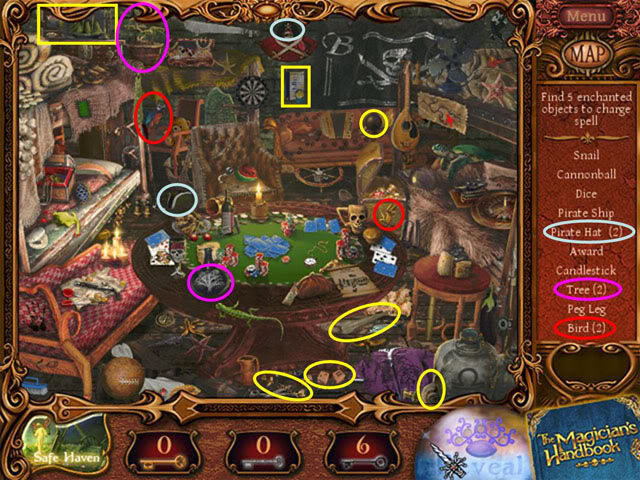
Fairy Finding: Throne Room
- Keys: 1 Silver, 1 Black
- Rescue Six Fairies
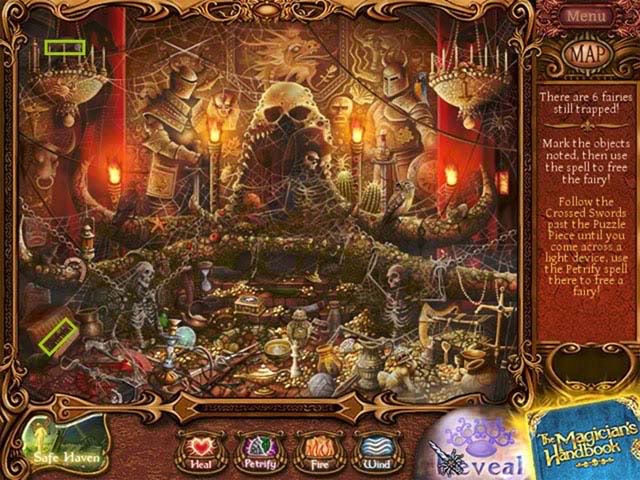
- First, Grab the Keys!
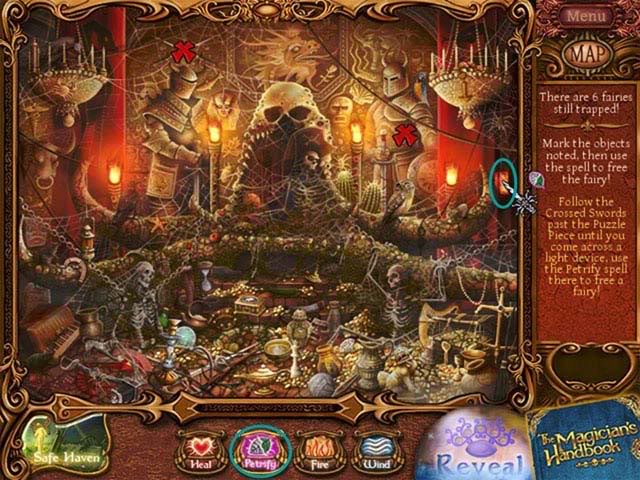
- Follow the Crossed Swords past the Puzzle Piece until you come across a light device; use the Petrify spell there to free a Fairy!
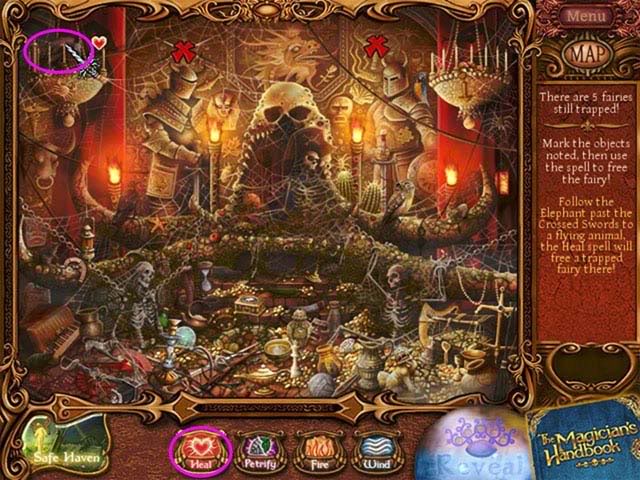
- Follow the Elephant past the Crossed Swords to a flying animal; the Heal spell will free a trapped Fairy there!
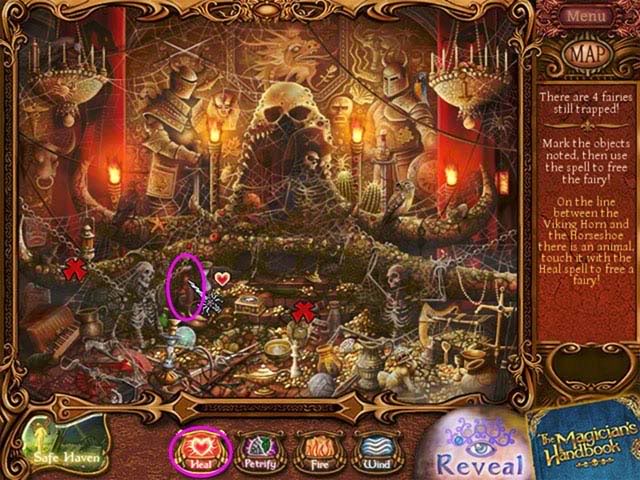
- On the line between the Viking Horn and the Horseshoe, there is an animal; touch it with the Heal spell to free a Fairy!
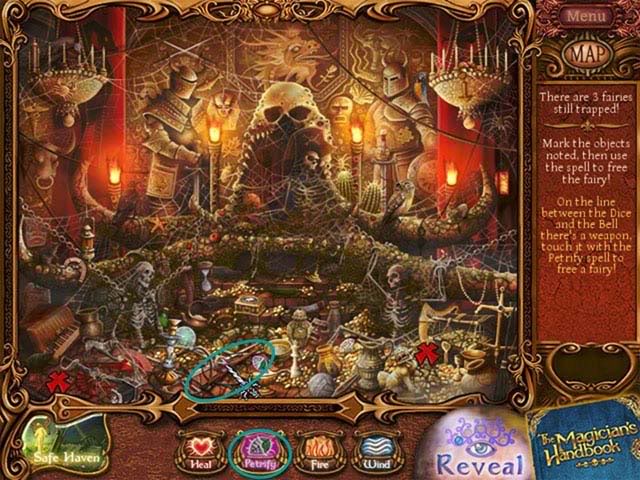
- On the line between the Dice and the Bell there’s a weapon; touch it with the Petrify spell to free a Fairy!
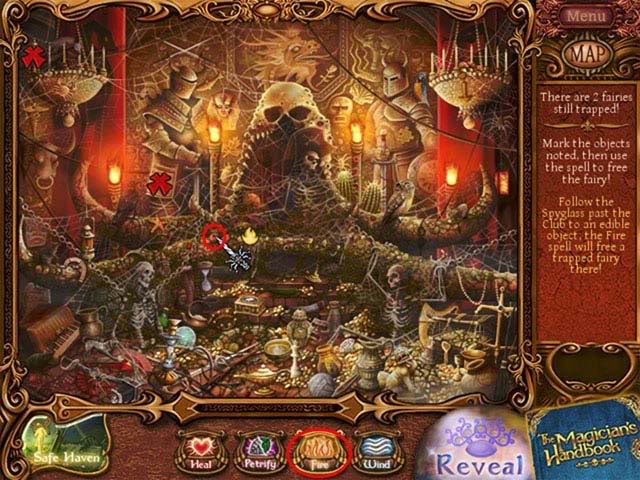
- Follow the Spyglass past the Club to an edible object; the Fire spell will free a trapped Fairy there!
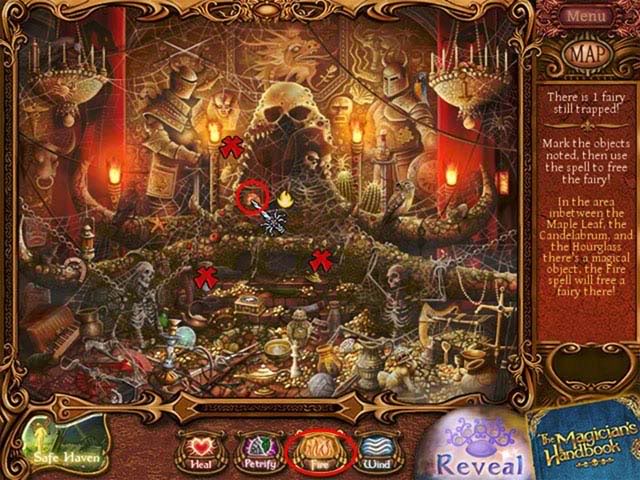
- In the area in between the Maple Leaf, the Candelabrum, and the Hourglass, there’s a magical object; the Fire spell will free a Fairy there!
- Minimum/total Objects to find: 53/60
- Permanent Spell to Learn: Detect
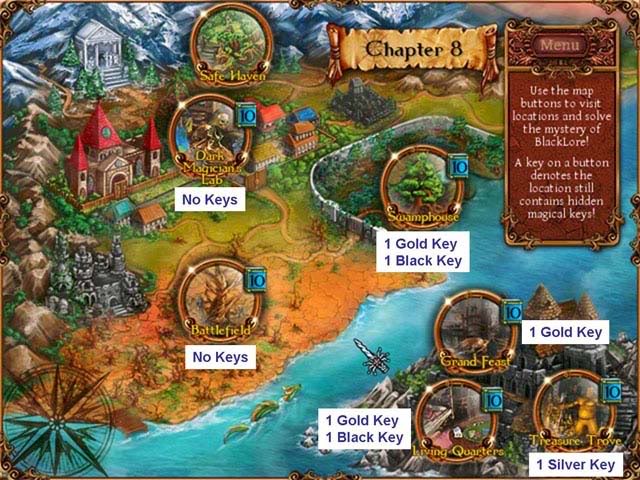
Dark Magician’s Lab
- Keys: (none)
Battlefield
- Keys: (none)

Swamphouse
- Keys: 1 Gold, 1 Black
Living Quarters
- Keys: 1 Gold, 1 Black
Grand Feast
- Keys: 1 Gold
Treasure Trove
- Keys: 1 Silver
Learn the Detect Spell
- There are a total of 12 Spell Objects to place.
- Five Spell Objects have already been placed in the bottom window and circled in Yellow.
- Red indicates the places for the remaining 7 Spell Objects.
- You have now learned the Detect Spell.
Puzzle: School House
- Keys: 1 Gold, 1 Silver
- You’ll need to use the Detect Spell to solve this puzzle.
- First, Grab the Keys!
- Next, use the Detect Spell as indicated to find the 8 pieces of the broken Seal in the floor.

- You finally get to do a jigsaw puzzle (sort of)!
- Place the 8 pieces of the Seal in the floor. Each piece will only fit in one place.
- When the Seal is complete, a stairway appears to the Gallery.
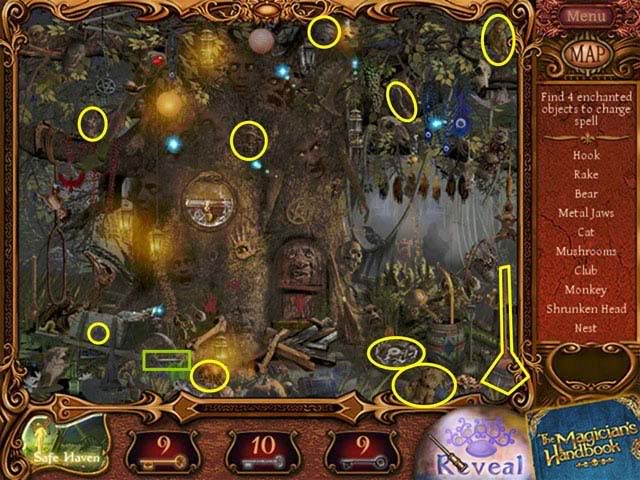
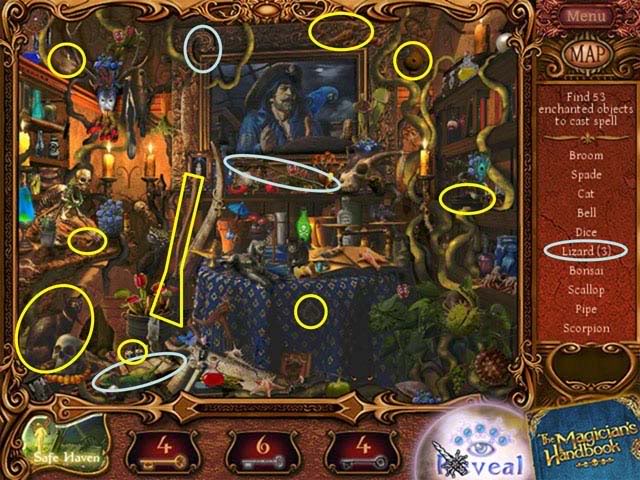
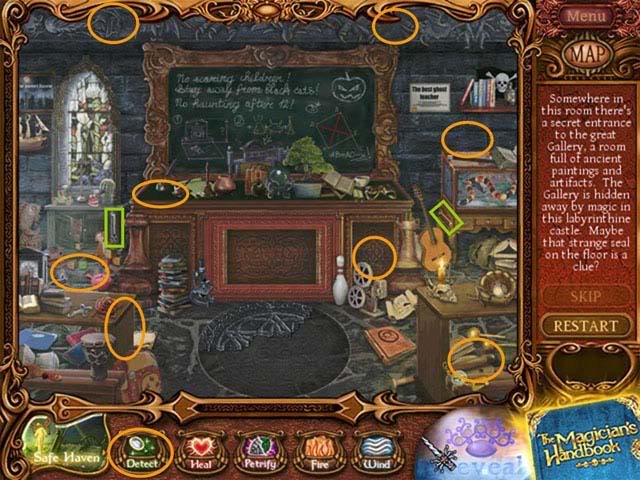
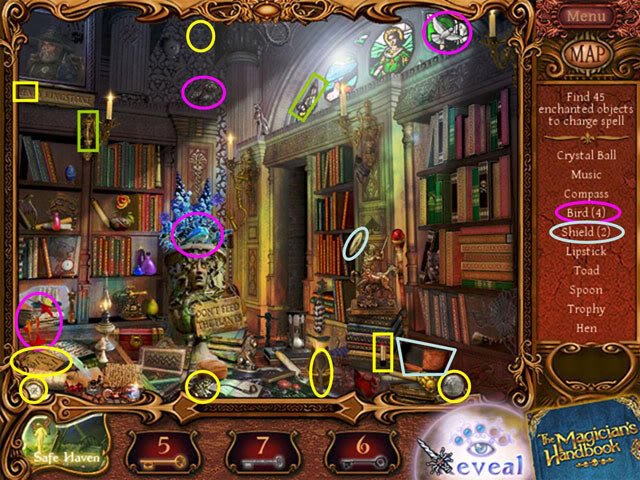
Chapter 9-The Magical Gallery
- Minimum/total Objects to find: 53/60
- Find a Fairy Scroll
- Release Six Fairies
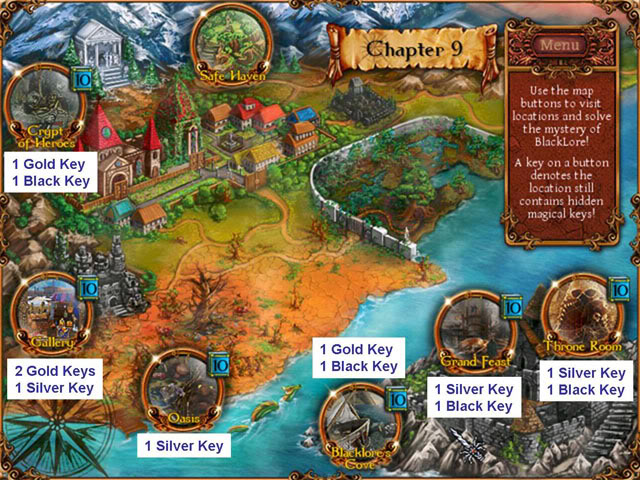
Crypt of Heroes
- Keys: 1 Gold, 1 Black
- Note that "Moon" appears as part of a word in one of the titles under the Right column.
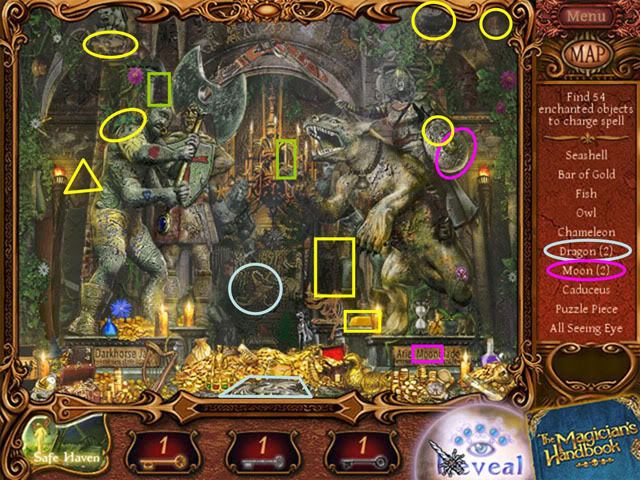
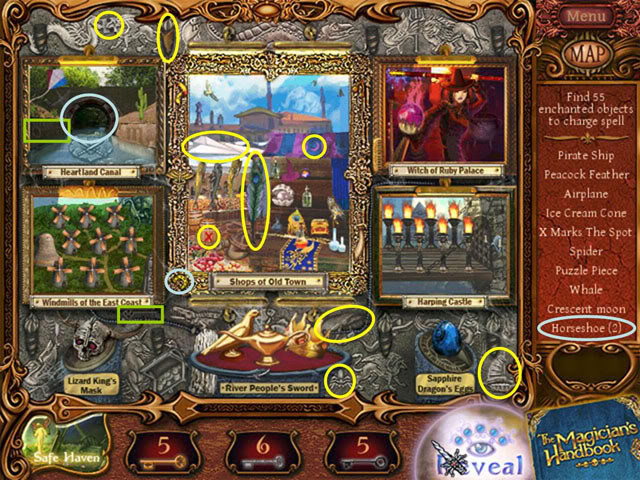
Gallery
- Keys: 2 Gold, 1 Silver
- Notice that "Heart", "Lizard" and "Ruby" appear as words in the titles of the paintings.
Oasis
- Keys: 1 Silver
Blacklore’s Cove
- Keys: 1 Gold, 1 Black
Grand Feast
- Keys: 1 Silver, 1 Black
Throne Room
- Keys: 1 Silver, 1 Black
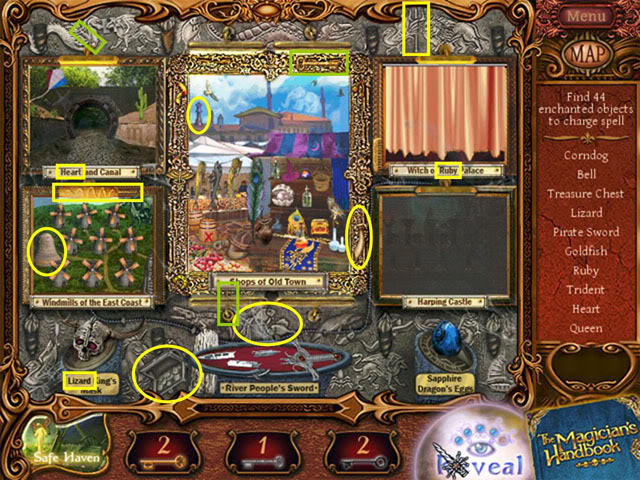
Puzzle: Gallery
- Keys: (none)
- You’ll need to use several of your Magic Spells to solve the Puzzle.
- This is yet another complicated puzzle, so hold on to your Wands!
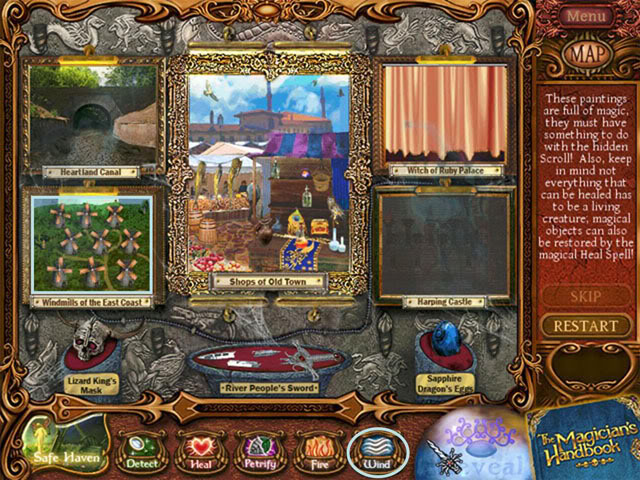
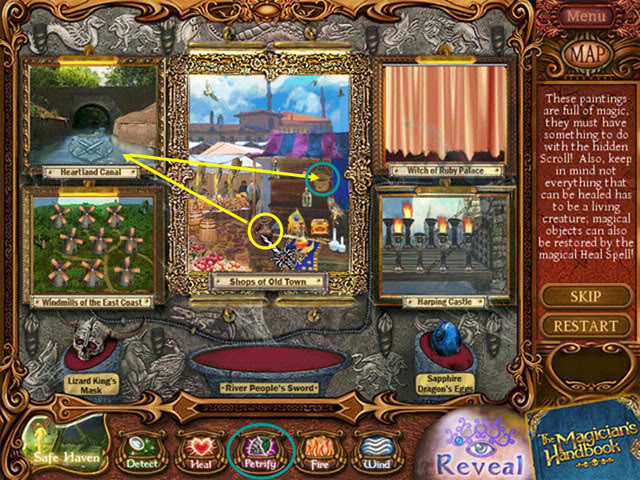
- Use the Wind Spell on the windmills to reverse some of them until they are all spinning in the SAME direction (clockwise or counter-clockwise, doesn’t matter which direction).
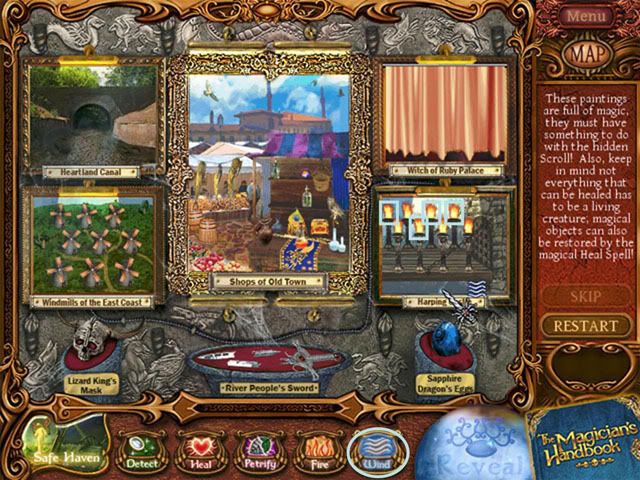
- Use the Wind Spell on the torches indicated to blow them out.
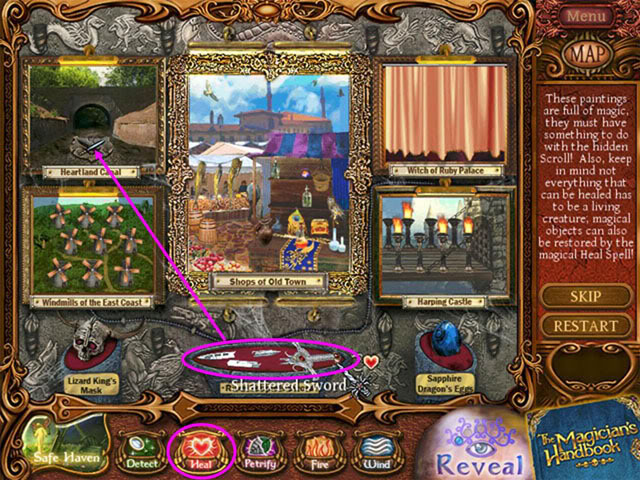
- Use the Heal Spell on the Shattered Sword and then place the Restored Sword in the Heartland Canal picture. Water appears in the canal.
- Pick up the Pitcher and fill it with water from the Canal, then pour the water into the Bucket.
- Use the Petrify Spell on the Bucket to make it heavier and raise the curtain on the final painting.
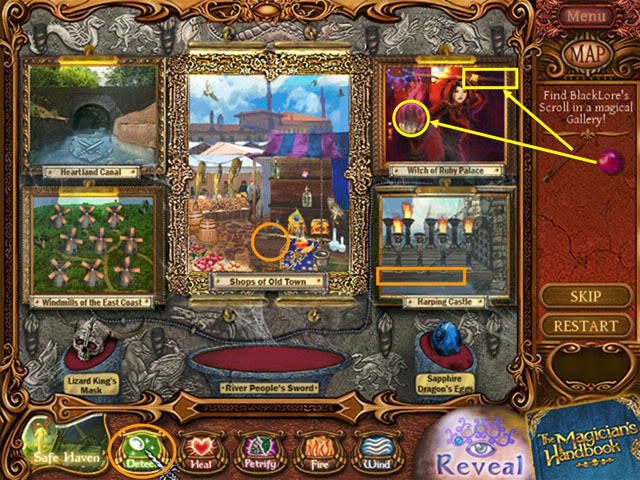
- Use the Detect Spell on the spaces indicated to find the Witch’s Orb and Wand.
- Place them in the spaces indicated to complete the Puzzle.
- Whew! Wasn’t that Fun?
Fairy Finding: Living Quarters
- Keys: 1 Silver
- Release Six Fairies
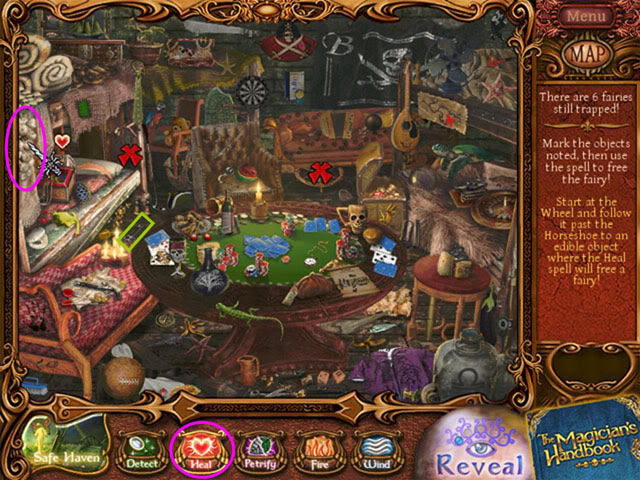
- First, Grab the Key!
- Start at the Wheel and follow it past the Horseshoe to an edible object where the Heal Spell will free a Fairy!
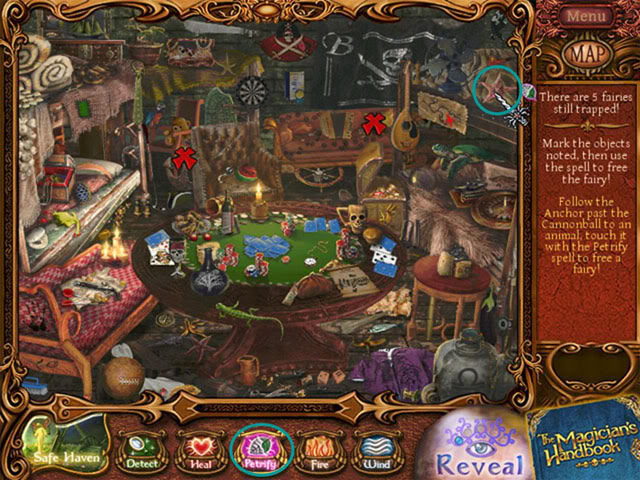
- Follow the Anchor past the Cannonball to an animal; touch it with the Petrify Spell to free a Fairy!
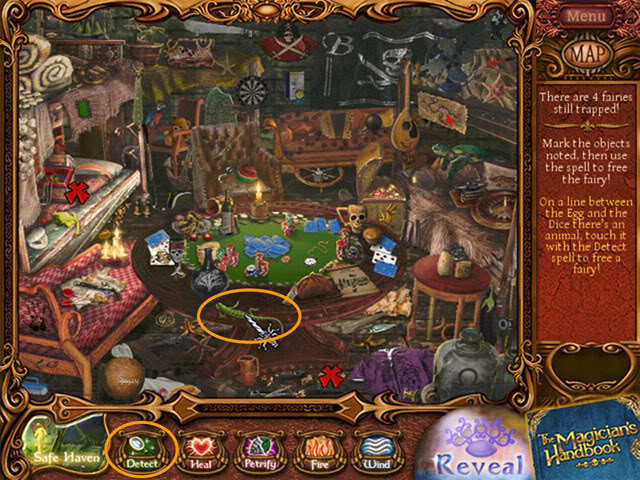
- On a line between the Egg and the Dice, there’s an animal; touch it with the Detect Spell to free a Fairy!
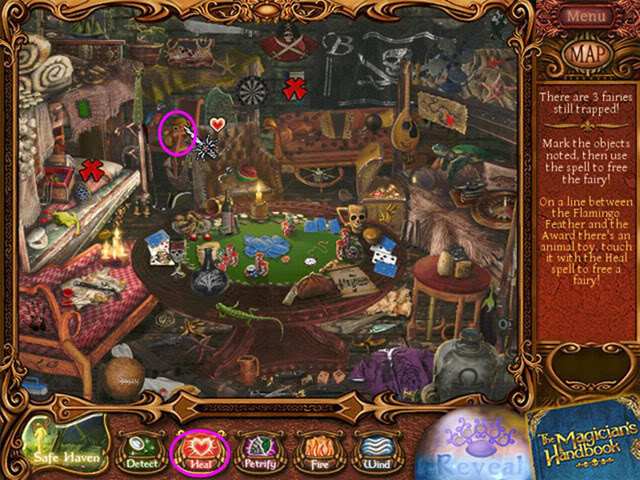
- On a line between the Flamingo Feather and the Award there’s an animal toy; touch it with the Heal Spell to free a Fairy!
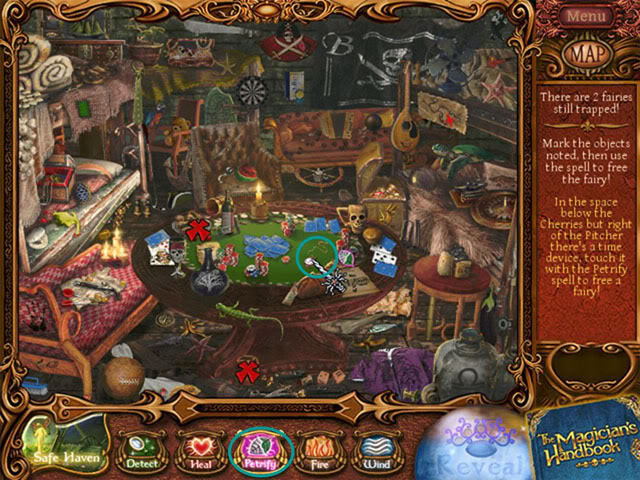
- In the space below the Cherries but right of the Pitcher there’s a time device; touch it with the Petrify Spell to free a Fairy.

- In the area above the Eggplant and below the Pipe, and to the right of the Cannonball there’s a magical object; use Fire to free a Fairy there!
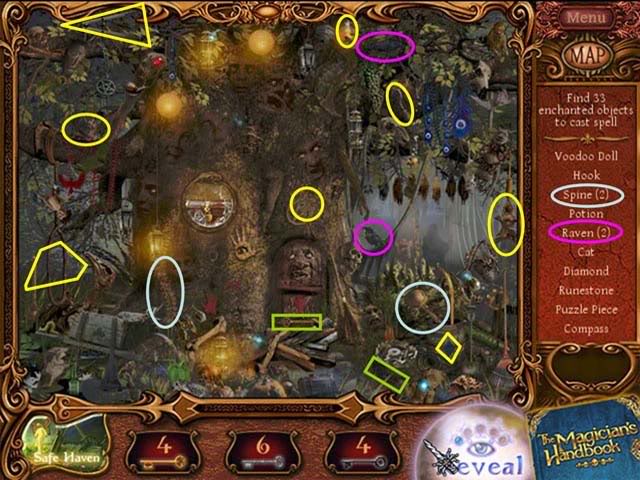
Chapter 10-Wise Old Trees
- Minimum/total Objects to find: 54/60
- Find a Fairy Scroll
- Release Six Fairies

Gallery
- Keys: 1 Silver, 1 Black
Library of Magic
- Keys: 1 Gold, 1 Black
School Room
- Keys: (none)

Oasis
- Keys: 1 Gold, 1 Black
Dark Magician’s Lab
- Keys: 1 Gold, 1 Black
- We missed a Black Key there, but not to worry.
Living Quarters
- Keys: (none)
Puzzle: Oasis
- Keys: (none)
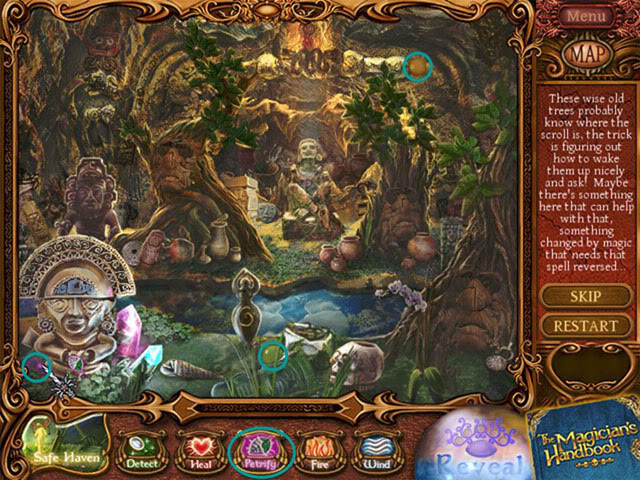
- Use the Petrify Spell to restore three Rounded Stones to colored Orbs, then collect the Orbs.
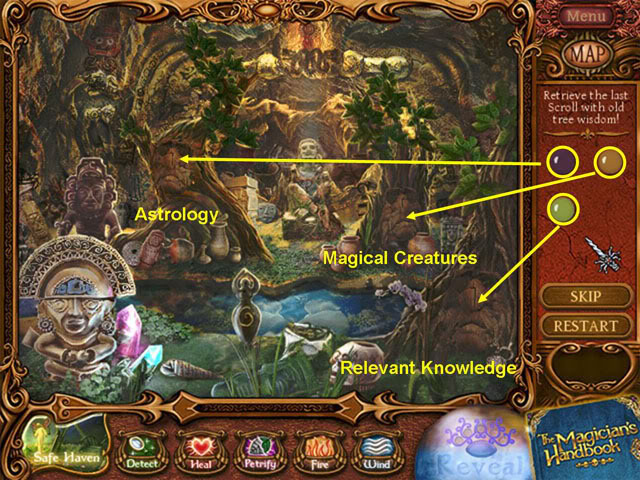
- Place each orb on one of the Magical Trees and then answer their questions.
- It actually doesn’t matter which Tree you place each Orb on, but you will be asked questions based on the color of the Orb you place.
- There are randomized questions for each category. If you answer a question incorrectly, you will need to start over with that Tree and answer 4 questions correctly.
- You might need to do research outside of the Game to answer some of the questions if you don’t already know the answers about Astrology and Magical Creatures.
- We have no idea what these questions have to do with the game (except for the Relevant Knowledge ones), but this IS a bit different and refreshing before you enter the final stages of the game.
- The following questions and answers are a sample of what you might see, you may get different questions.
- The Purple Orb will generate questions about Astrology:
– Which sign is for the date October 23 to November 24? Scorpion
– Which sign is for the date April 20 to May 20? Bull
– Which symbol represents the sign Libra? Scale
– Which symbol represents the sign Aries? Ram
- The Gold Orb will generate questions about Magical Creatures:
– Which magical creature is part woman and part bird and lures its prey by seductive singing? Siren
– What creature has the body of a man but the head of a bull? Minotaur
– What is the name of the mythological dog with 3 heads? Cerberus
– Medusa is the only mortal amongst these three mythological sisters… Gorgons
- The Green Orb will generate questions about Relevant Knowledge:
– What is the name of the Fairy helping you defeat Blacklore? Corrigan
– What do the Blacklore’s Cove, the Living Quarters, the Treasure Trove, and the Throne Room Locations have in common? Blacklore’s Base
– What is the name of the creatures that guard the Swamphouse? Watchers
– Who frequents the School Room in the nearby castle? Ghosts
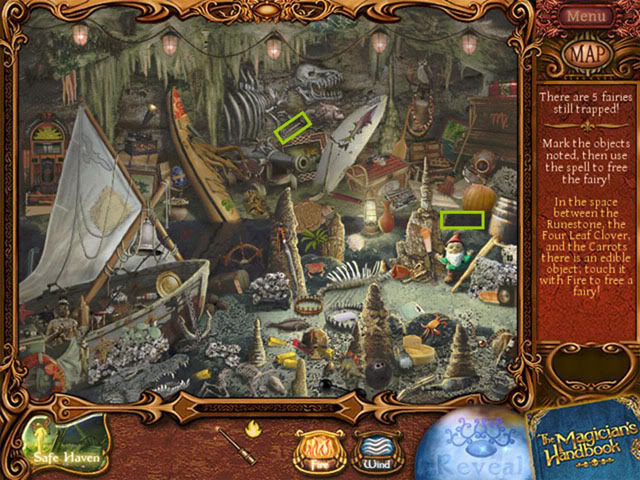
Fairy Finding: Grand Feast
- Keys: (none)
- Free Six Fairies
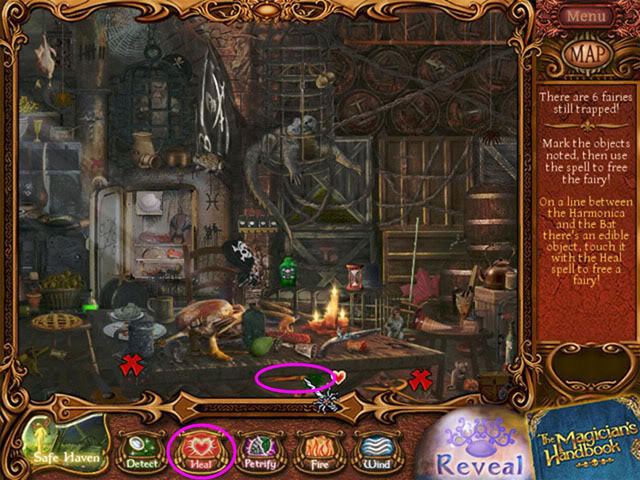
- On a line between the Harmonica and the Bat there’s an edible object; touch it with the Heal Spell to free a Fairy!
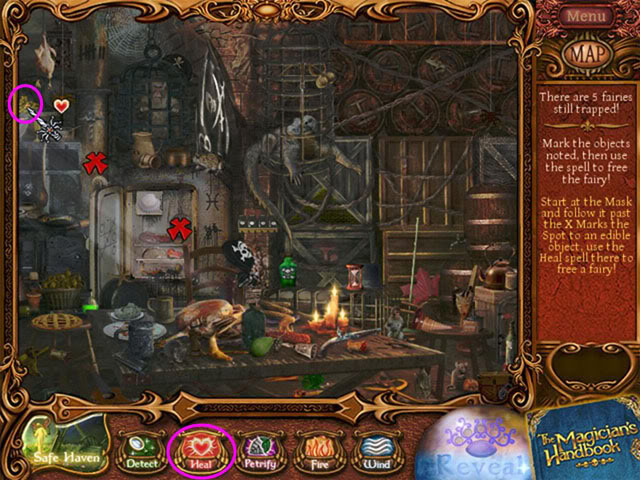
- Start at the Mask and follow it past X Marks the spot to an edible object; use the Heal Spell there to free a Fairy!
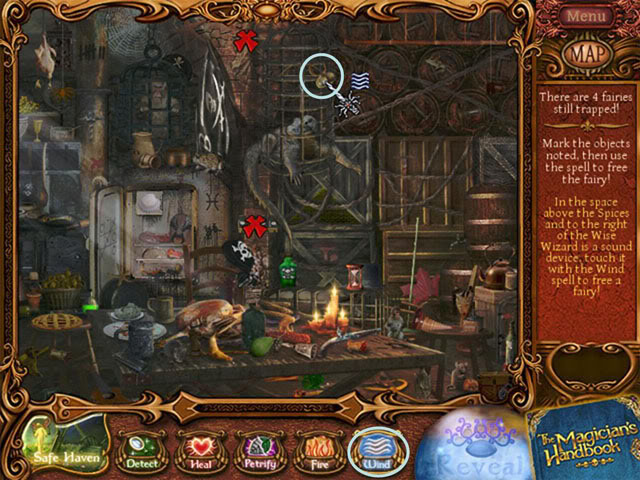
- In the space above the Spices and to the right of the Wise Wizard is a sound device; touch it with the Wind Spell to free a Fairy!
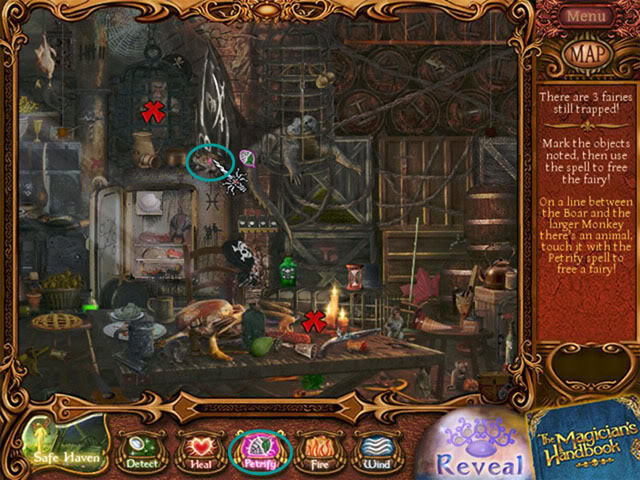
- On a line between the Boar and the Larger Monkey there’s an animal; touch it with the Petrify Spell to free a Fairy!
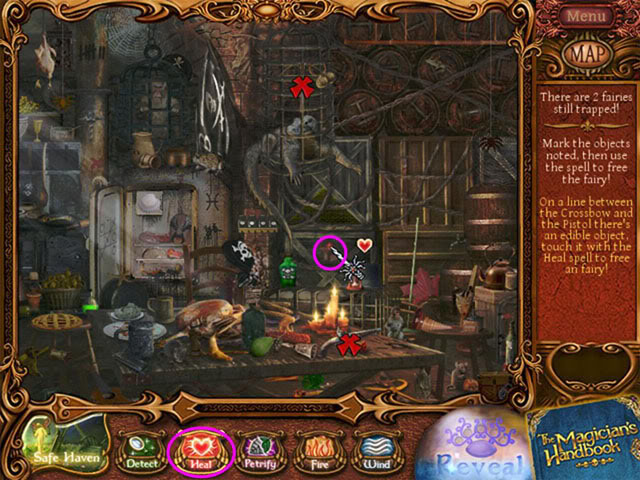
- On a line between the Cross bow and the Pistol there’s an edible object; touch it with the Heal Spell to free a Fairy!
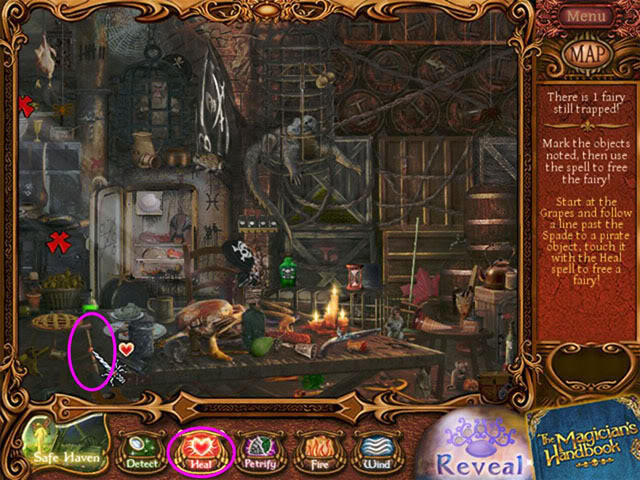
- Start at the Grapes and follow a line past the Spade to a pirate object; touch it with the Heal Spell to free a Fairy!
- Goal: Find 8 Missing Pieces of the Fairy Queen Statue.
- This is a REALLY DIFFICULT stage, but it’s also the end of the Game.
- If you have found any "Increase Reveals" spells in the Safe Haven, now would be an excellent time to invoke them after you use up the 3 free Reveals you get at the start of Chapter 11.
- There might also be a few random Keys around that you forgot to pick up along the way. Not that important now, though.
- The exact position of the Fairy Queen Statue pieces can vary in each Location, so at this point you’re on your own.
- You need to use your Detect Spell in each of the following locations (and the list of Locations can vary at this point, also). There is really no point in providing screen shots because the pieces are so randomly located.
– Gallery
– Library of Magic
– Mountain of Legends
– Oasis
– Dark Magician’s Lab
– Swamp Gateway
– Treasure Trove
– Throne Room
End Game
- You hear the story from the Fairy Corrigan the Fairy about how this all came to be.
- You have also unlocked a new Difficulty Level "Magician" with even less time and only 3 Hidden Objects listed at once.
- All the Wands you collected in the previous play will still be available to you.
- If you followed this guide, you should have received an average Grade of "A" or better.
- Enjoy re-playing the game!
Thanks for using this Strategy Guide. Please post any errata or suggestions on the Forum for this game on Gamezebo. We DO listen!
“;

More articles...
-
Best Horror Games On Itch.io – July 2026
Across a bounty of subgenres. -
Haze Seas Accessories Tier List [Best Accessories to Equip]
The accessories with the best stat buffs in Haze Seas.