The Lost Inca Prophecy Walkthrough

Welcome to Gamezebo's walkthrough for The Lost Inca Prophecy. Let's go with Acua and Juan on their adventure to discover the secret of the ancient Inca's knowledge. GENERAL INFORMATION The Lost Inca Prophecy has two types of game play.  It combines Match 3 games and hidden object games. The game is divided into four chapters.  Each chapter contains twenty four Match 3 games and four hidden object games.  There is one hidden object game at…

By
Share this
  • Share this on Facebook
  • Share this on Twitter

a:1:i:0;a:2:s:13:”section_title”;s:34:”The Lost Inca Prophecy Walkthrough”;s:12:”section_body”;s:28867:”

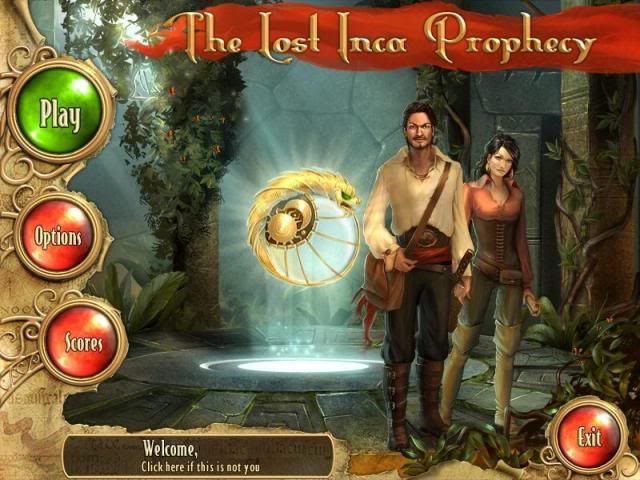
Welcome to Gamezebo’s walkthrough for The Lost Inca Prophecy.

Let’s go with Acua and Juan on their adventure to discover the secret of the ancient Inca’s knowledge.

GENERAL INFORMATION

  • The Lost Inca Prophecy has two types of game play.  It combines Match 3 games and hidden object games.
  • The game is divided into four chapters.  Each chapter contains twenty four Match 3 games and four hidden object games.  There is one hidden object game at the beginning of each chapter, two in the middle and one at the end.
  • Hints in the hidden object games are unlimited but you must wait for them to recharge.  A magnifying glass will appear over the area you need when you use a hint.
  • There are no timers in this game.
  • If you exit and quit the game in the middle of a level your progress will not be saved.  You will be taken to the beginning of the level when you restart the game.  You don’t go back to the beginning of the chapter, just the individual game level you are playing.
  • You can read Acua’s entries in her Travel Journal as you move through the game but you cannot turn the pages back and read past entries.
  • In addition to the normal Options for the game set up there is one titled Slow PC. You can check this option box to reduce the level of detail so that you can play the game on slower computers.

MATCH-3 GAMEPLAY AND TIPS   

General Gameplay

  • The goal of each Match 3 game is to clear all of the colored tiles from the grid down to the dark brown layer.  When this is complete, a piece of an object will appear at the top of the grid.  You then have to clear all the tiles below that object piece so it can fall off the bottom of the grid and go into your inventory.


Game Mechanics

  • There are different ways to set up the Match 3 game play.  You can choose from a combination of two Game Geometries and three Game Mechanics.
  • Game Geometries allows you to choose the shape of the tiles on your Match 3 grid. You can choose from a hexagonal pattern, a square pattern, or let the game computer randomly choose either of these patterns for you.
  • Game Mechanics allows you to choose the mechanics of the way the tokens can be combined to clear the board.  If you have a difficult time with a particular level, you can restart the level and choose a different Game Mechanic.
  • Chain Mechanics – Click a token then move your mouse over the matching neighboring tokens to highlight them.  Click again to end the selection and break the tiles under the highlighted tokens.
  • Group Mechanics – Click groups of three or more matching adjacent tokens to break the tiles under them.
  • Swap Mechanics – Click on a token then click a neighboring token to swap them.  You must make straight lines of at least three matching tokens to break the tiles under the tokens. 

Power-ups and Other Useful Tokens

  • There are power up buttons displayed at the lower left of your screen.  The hammer power up is the first one available to you and the others are unlocked as you continue to progress through the levels.  Each power up is filled as you make matches.  You can see what kind of token activates each power up at the bottom left of each power up button.  The token that activates each power up changes with each level. You can hold your cursor over each to power up button to get more information about it.
  • Hammer Power Up – It breaks a token and all the underlying layers.  Click on it then click on the tile you want to break. 
  • Bomb Power Up – It throws a bomb that destroys the surrounding tiles.  Click on it then click on the tile where you want the bomb to fall. 
  • Lightening Power Up – It spawns many lightening bolts that destroy random tokens on the playing grid.  Click on it to unleash the lightening bolts.
  • Shuffle Power Up – It shuffles the tokens on the playing grid.  Use it when you have no available matches left.
  • Feathered Serpent – This lights up when you make a match and you break at least one colored tile.  When you make six consecutive matches that break tiles, it will release lightening that destroys random tokens.  If you make a match but don’t break any tiles the Feathered Serpent will reset to empty and you have to start the six consecutive moves again.
  • Power Up Totem Token – There are two versions of this token. They appear on the playing grid when you break a large number of tiles.  Click on it and it will either destroy tokens around it or destroy random tiles on the grid. 
  • Rainbow Token – In the Chain Mechanics mode this tile can be used in combination with any other token to make a longer chain.  

Locked Tiles and Multiple Layer Tiles

  • There are several challenges to the game play in the form of locked and layered tiles.  In general you have to break tokens over or near these barriers to destroy them.
  • Ice Frozen Tokens and Rope Tied Tokens – They must be matched once to free them then matched again to break them. 
  • Wooden Barrier – Matches must be made adjacent to them in order to clear the barrier.
  • Gold Tokens – These tokens are layered gold, silver then green, so they must be broken three times to clear them.
  • Silver Tokens –   These tokens are layered silver then green, so they must be broken twice to clear them.
  • Stone Tile Barrier – This barrier can be broken by exploding a Bomb Power Up next to it.  It can also be broken if a Power Up Totem Token happens to be in a space next to it when you exploded it.

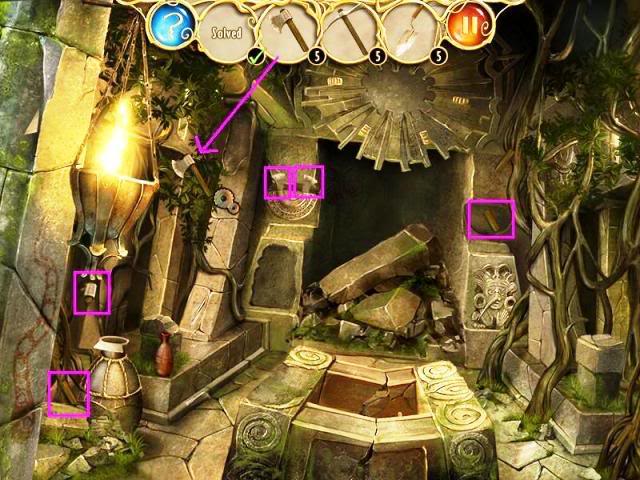
HIDDEN OBJECT TIPS AND WALKTHROUGH

General Gameplay

  • If the green Start Button in the lower right corner shows a magnifying glass then the next level will be a hidden object game.
  • The hidden object inventory is shown at the top of the screen.  You must find the four objects that are shown in the inventory.  Each object is broken into five parts.  In some of the hidden object games, some of the pieces that you must find are not revealed until you complete and place other objects in the scene.
  • The small number near each inventory picture indicates how many parts of the object are still left to find.
  • When an inventory object is complete you should click on it and it will attach to your cursor.  Move around the scene until moving gears appear beside the object, then click to see if that is the correct place for the object.  The object will go into place when you discover the correct place for it in the scene.
  • Some of the hidden object games start with the inventory complete and all you have to do is place each of the four inventory items where they belong in the scene.

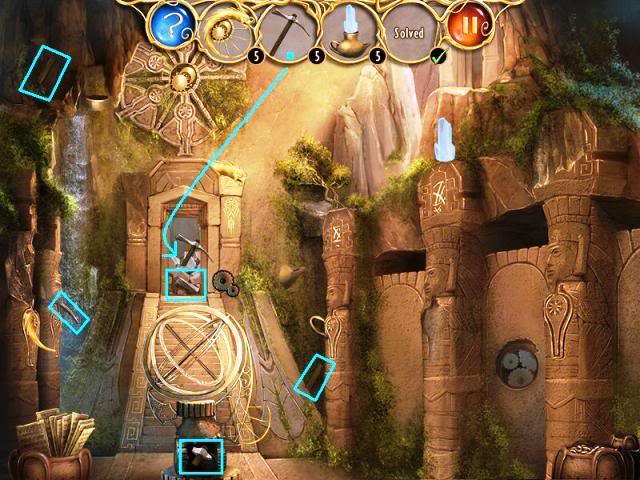
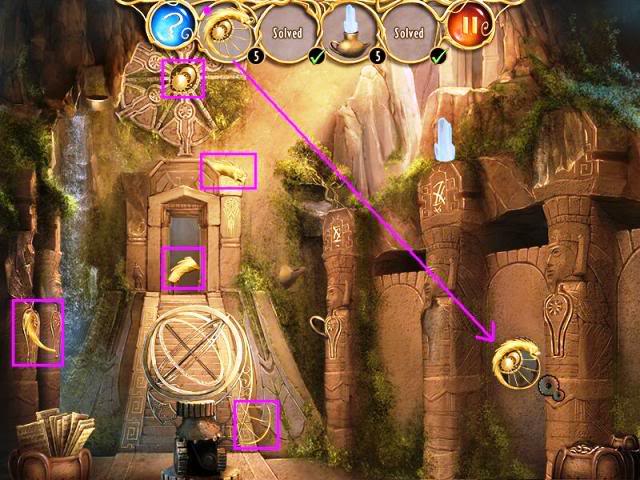
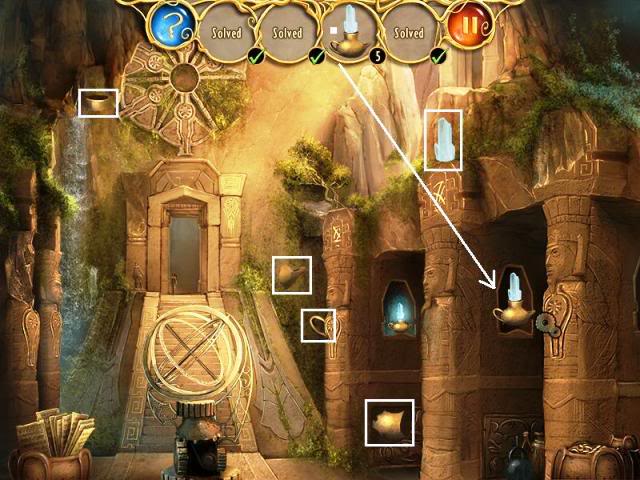
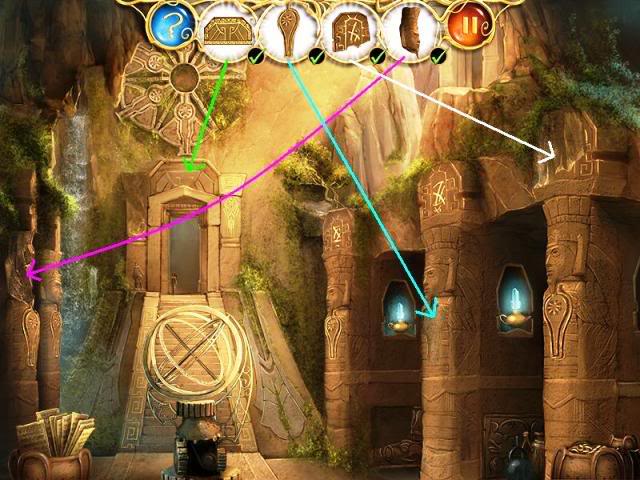
Hidden Object Walkthrough

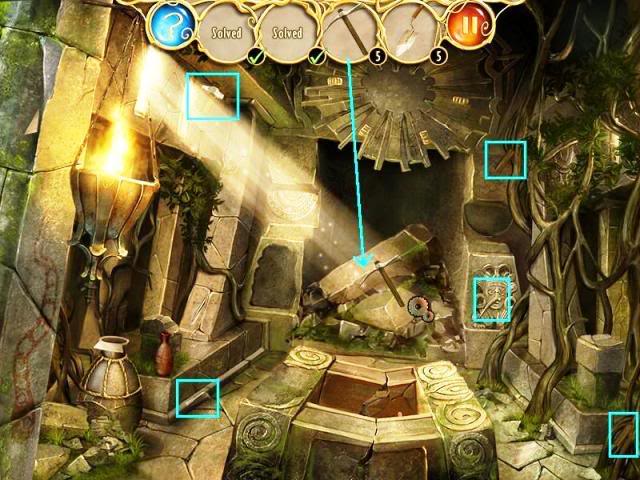
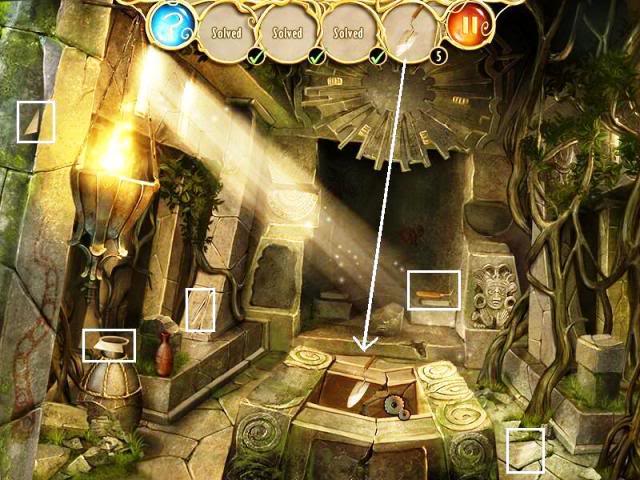
Chapter 1 – On the Trail of the Inca

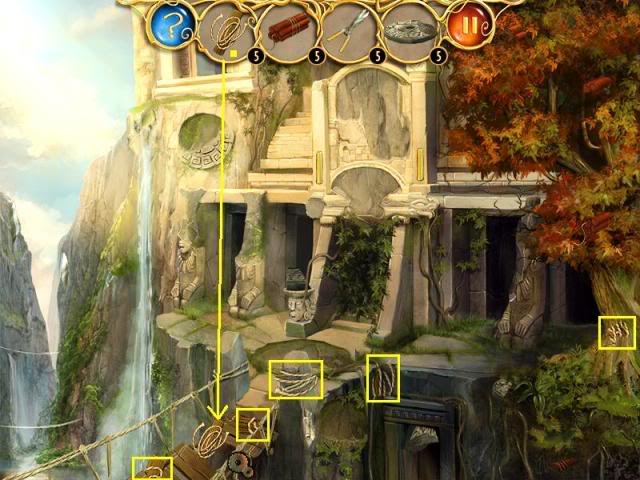
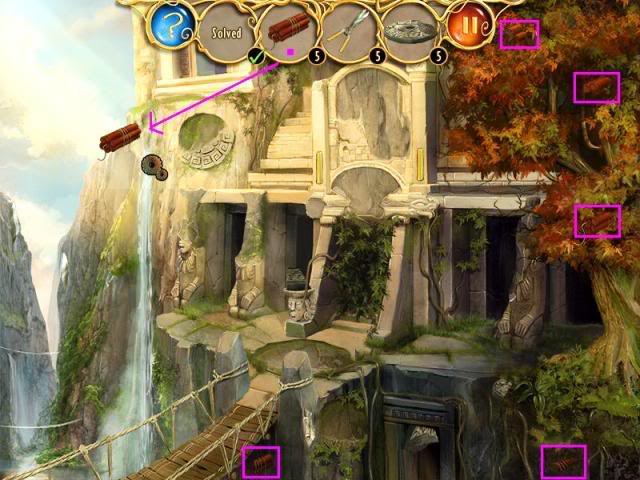
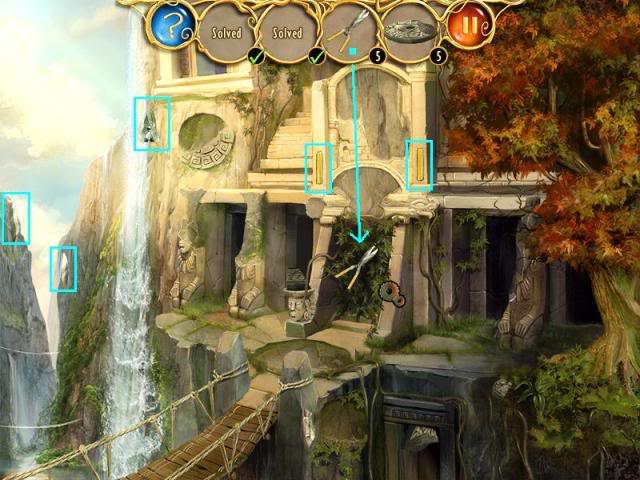
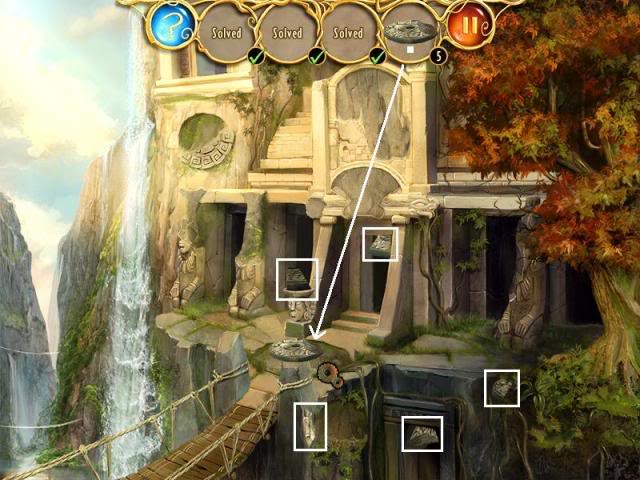
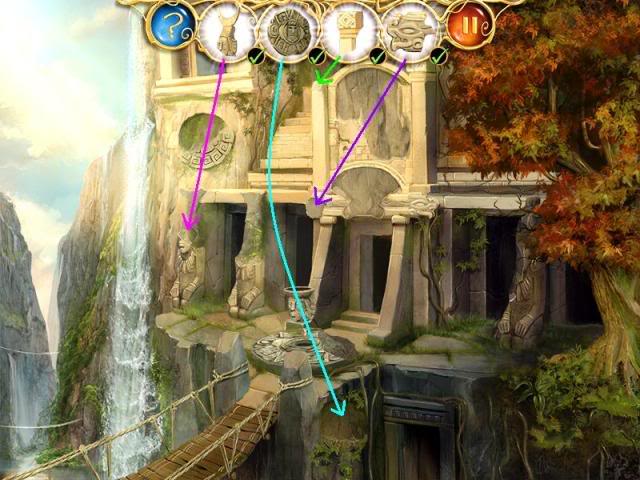
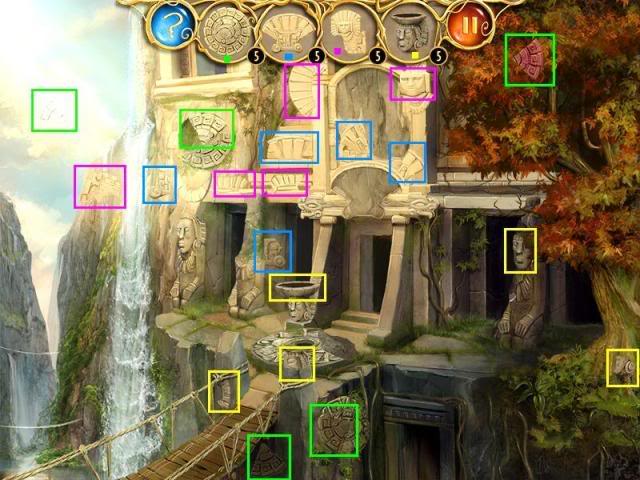
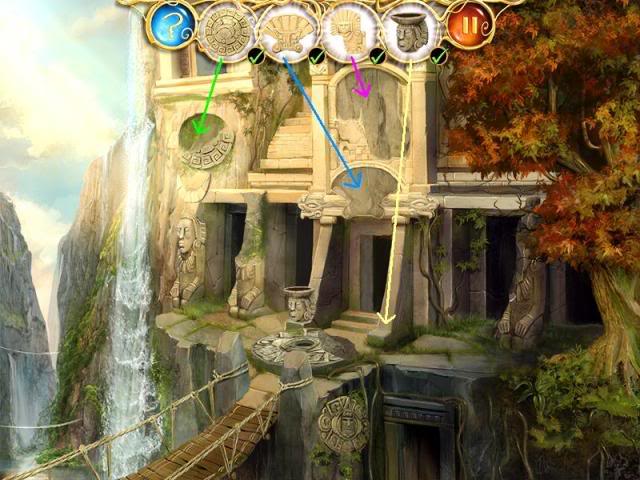
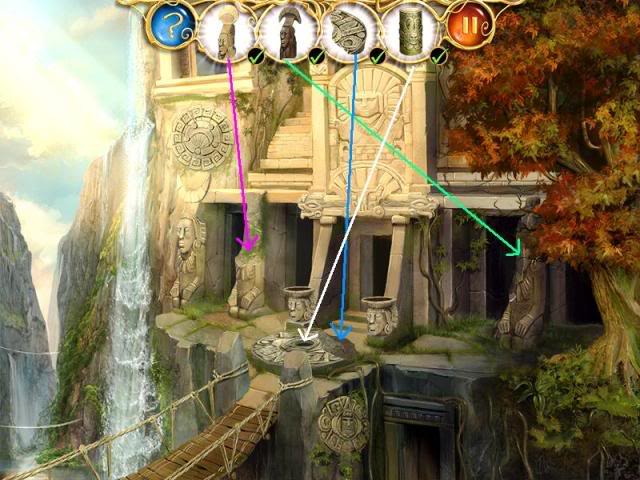
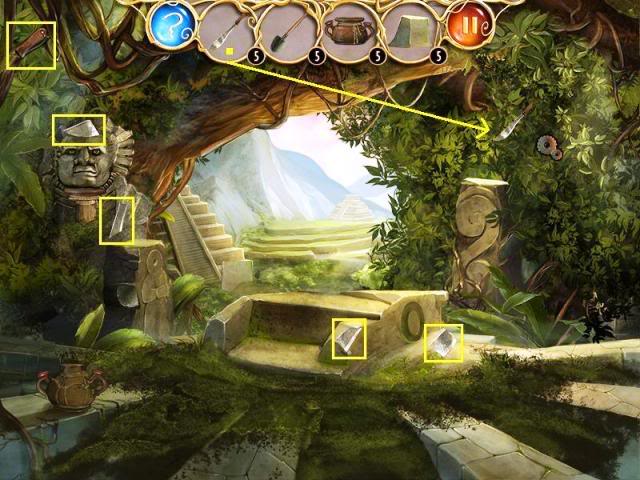
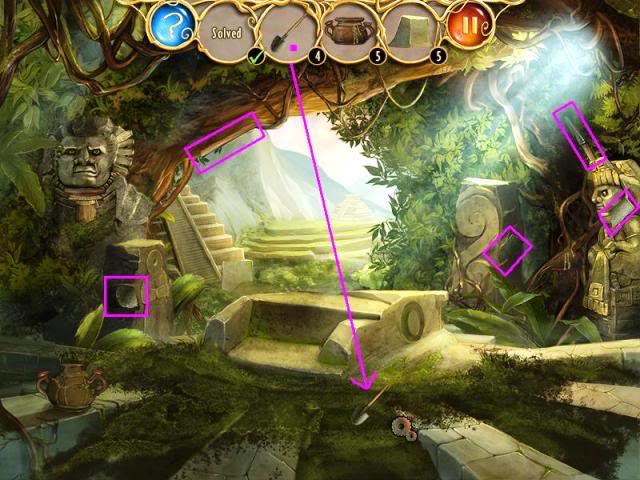
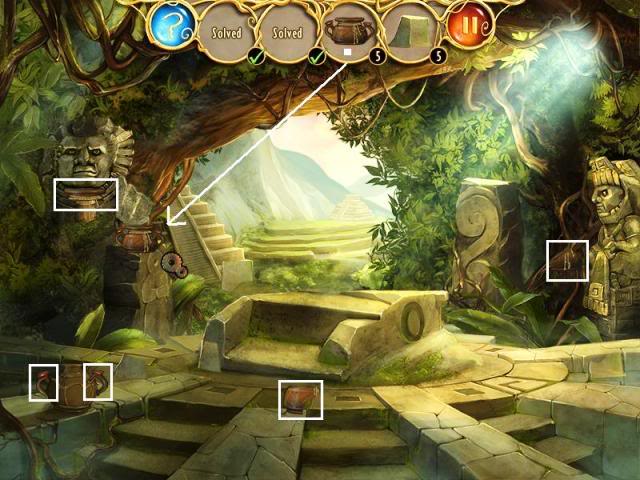
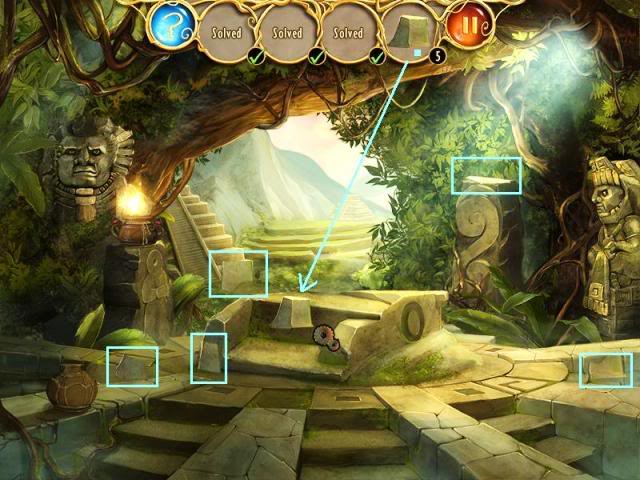
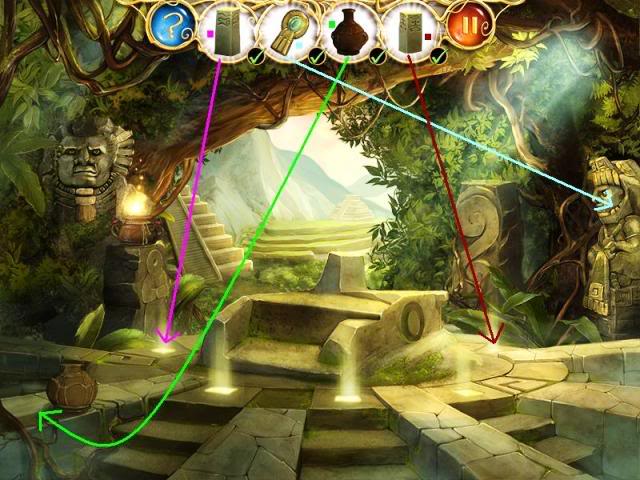
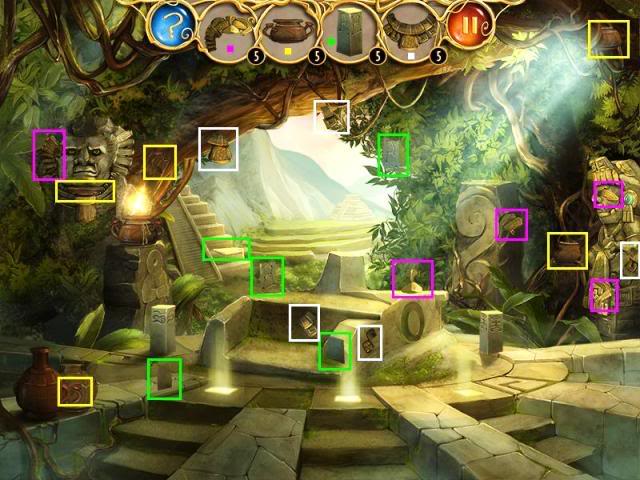
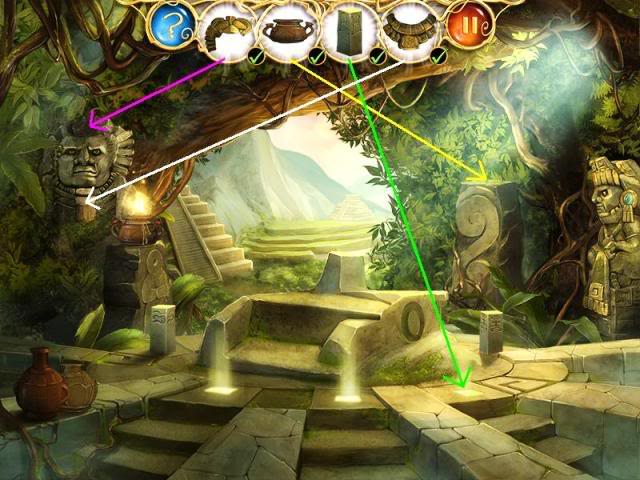
Hidden object game 1- 1

  • Find the parts of the mask and Apu, the god of rain and thunder, will become your guide.
  • Find the parts of the axe and put it where it belongs to reveal a piece of the pick axe.
  • Please look at the screen shot for the locations of the pieces and the correct place for the axe. 
  • Find the parts of the pick axe and put it where it belongs to reveal a piece of a digging spade.
  • Please look at the screen shot for the locations of the pieces and the correct place for the pick axe. 
  • Find the parts of the digging spade and put it where it belongs to finish the level.
  • Please look at the screen shot for the locations of the pieces and the correct place for the digging spade. 

Hidden object game 1- 2

  • In this hidden object game you must place the four items that are in your inventory at the top of the scene into their proper places within the scene.
  • Please look at the screen shot for the correct placement of the four inventory objects. 

Hidden object game 1- 3

  • Find the pieces of the four objects that are in your inventory at the top of the scene.
  • Please look at the screen shot for the correct locations of the pieces of the four inventory objects. 
  • Place the four objects that you have found and assembled into their proper places within the scene.
  • Please look at the screen shot for the correct placement of the four inventory objects. 

Hidden object game 1- 4

  • In this hidden object game you must place the four items that are in your inventory at the top of the scene into their proper places within the scene.
  • Please look at the screen shot for the correct placement of the four inventory objects. 

Chapter 2 – Conquering the Heights

Hidden object game 2 – 1

  • Find the parts of the rope with wood and put it where it belongs to reveal a piece of the dynamite.
  • Please look at the screen shot for the locations of the pieces and the correct place for the rope with wood. 
  • Find the parts of the dynamite and put it where it belongs to reveal a piece of the shears.
  • Please look at the screen shot for the locations of the pieces and the correct place for the dynamite. 
  • Find the parts of the shears and put it where it belongs to reveal a piece of the round stone.
  • Please look at the screen shot for the locations of the pieces and the correct place for the shears. 
  • Find the parts of the round stone and put it where it belongs to finish the level.
  • Please look at the screen shot for the locations of the pieces and the correct place for the round stone. 

Hidden object game 2 – 2

  • In this hidden object game you must place the four items that are in your inventory at the top of the scene into their proper places within the scene.
  • Please look at the screen shot for the correct placement of the four inventory objects. 

Hidden object game 2 – 3

  • Find the pieces of the four objects that are in your inventory at the top of the scene.
  • Please look at the screen shot for the correct locations of the pieces of the four inventory objects. 
  • Place the four objects that you have found and assembled into their proper places within the scene.
  • Please look at the screen shot for the correct placement of the four inventory objects. 

Hidden object game 2 – 4

  • In this hidden object game you must place the four items that are in your inventory at the top of the scene into their proper places within the scene.
  • Please look at the screen shot for the correct placement of the four inventory objects. 

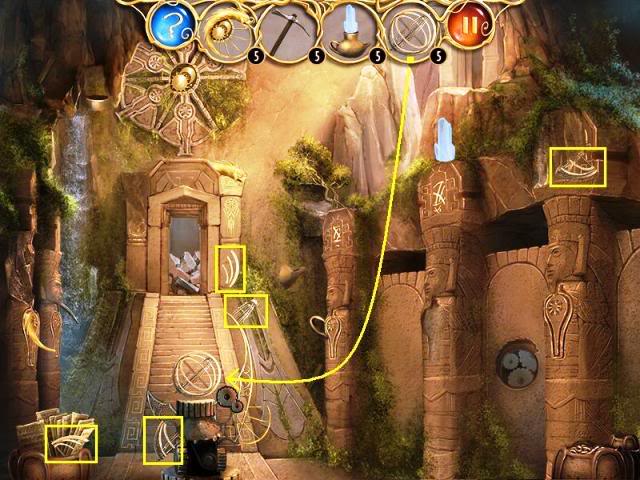
Chapter 3 – Heart of the Intihuatana

Hidden object game 3 – 1

  • Find the parts of the machete and put it where it belongs to reveal a piece of the shovel.
  • Please look at the screen shot for the locations of the pieces and the correct place for the machete. 
  • Find the parts of the shovel and put it where it belongs to reveal a piece of the pottery.
  • Please look at the screen shot for the locations of the pieces and the correct place for the shovel. 
  • Find the parts of the pottery and put it where it belongs to reveal a piece of the stone.
  • Please look at the screen shot for the locations of the pieces and the correct place for the pottery. 
  • Find the parts of the stone and put it where it belongs to finish the level.
  • Please look at the screen shot for the locations of the pieces and the correct place for the stone. 

Hidden object game 3 – 2

  • In this hidden object game you must place the four items that are in your inventory at the top of the scene into their proper places within the scene.
  • Please look at the screen shot for the correct placement of the four inventory objects.  

Hidden object game 3 – 3

  • Find the pieces of the four objects that are in your inventory at the top of the scene.
  • Please look at the screen shot for the correct locations of the pieces of the four inventory objects. 
  • Place the four objects that you have found and assembled into their proper places within the scene.
  • Please look at the screen shot for the correct placement of the four inventory objects. 

Hidden object game 3 – 4

  • In this hidden object game you must place the four items that are in your inventory at the top of the scene into their proper places within the scene.
  • Please look at the screen shot for the correct placement of the four inventory objects. 

Chapter 4 – The Sun Temple

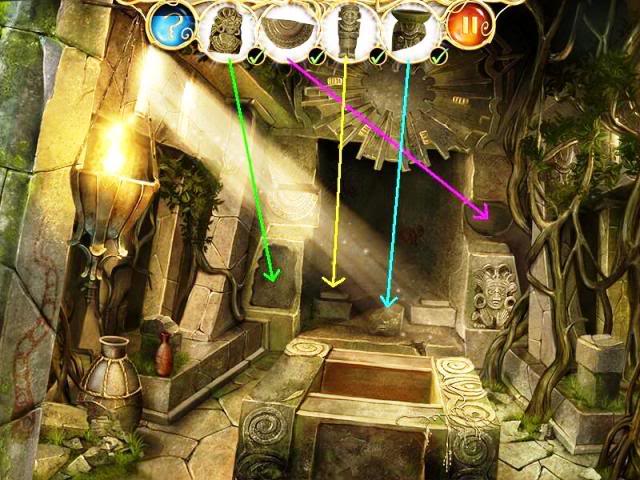
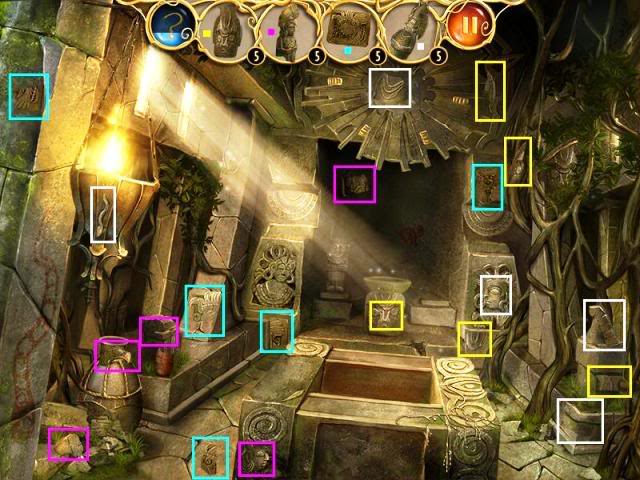
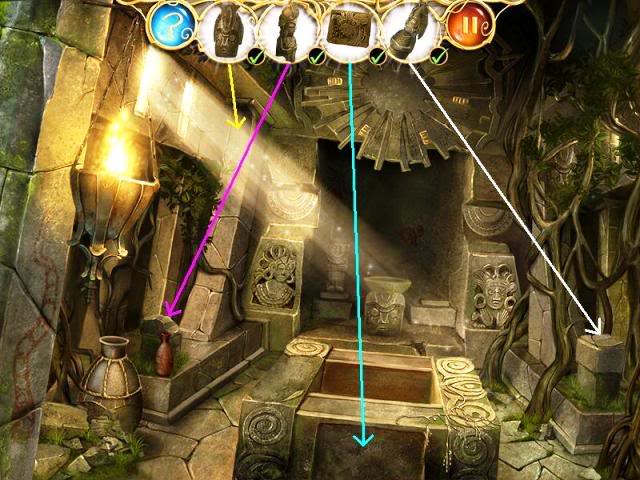
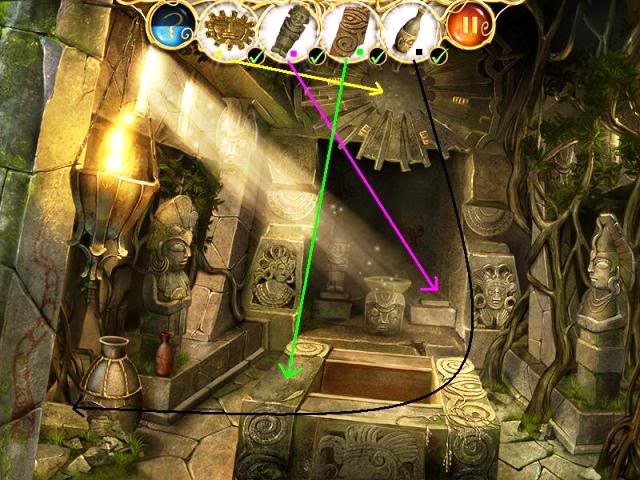
Hidden object game 4 – 1

  • Find the parts of the gyroscope and put it where it belongs to reveal a piece of the pick axe.
  • Please look at the screen shot for the locations of the pieces and the correct place for the gyroscope. 
  • Find the parts of the pick axe and put it where it belongs to reveal a piece of the feathered serpent symbol.
  • Please look at the screen shot for the locations of the pieces and the correct place for the pick axe. 
  • Find the parts of the feathered serpent symbol and put it where it belongs to reveal a piece of the crystal lamp.
  • Please look at the screen shot for the locations of the pieces and the correct place for the feathered serpent symbol. 
  • Find the parts of the crystal lamp and put it where it belongs to finish the level.
  • Please look at the screen shot for the locations of the pieces and the correct place for the round stone. 

Hidden object game 4 – 2

  • In this hidden object game you must place the four items that are in your inventory at the top of the scene into their proper places within the scene.
  • Please look at the screen shot for the correct placement of the four inventory objects. 

Hidden object game 4 – 3

  • Find the parts of the carved stone ruin and put it where it belongs.
  • Please look at the screen shot for the locations of the pieces and the correct place for the carved stone ruin. 
  • Find the parts of the wedge shaped stone carving and put it where it belongs.
  • Please look at the screen shot for the locations of the pieces and the correct place for the wedge shaped stone carving. 
  • Find the parts of the dark brown vessel and put it where it belongs.
  • Please look at the screen shot for the locations of the pieces and the correct place for the dark brown vessel. 
  • Find the parts of the parchment tablet and put it where it belongs to end the level.
  • Please look at the screen shot for the locations of the pieces and the correct place for the parchment tablet. 

Hidden object game 4 – 4

  • In this hidden object game you must place the four items that are in your inventory at the top of the scene into their proper places within the scene.
  • Please look at the screen shot for the correct placement of the four inventory objects.
  • When you complete this level you will have reconstructed the Golden Scepter of Pacarit Ambo, the first Inca king.   

Congratulations you have completed your adventure with Acua and Juan and helped them discover the Lost Inca Prophecy!

“;