
Best Horror Games On Itch.io – July 2026
Across a bounty of subgenres.![Haze Seas Accessories Tier List [Best Accessories to Equip]](/wp-content/uploads/2026/07/haze-seas-accessories-tier-list.jpg "Haze Seas Accessories Tier List [Best Accessories to Equip]")
Haze Seas Accessories Tier List [Best Accessories to Equip]
The accessories with the best stat buffs in Haze Seas.
![[Roblox] Evomon Shiny Hunting Guide – Including Prismatic and Pris Shinies!](/wp-content/uploads/2026/06/evomon-shiny-hunting-guide.jpg "[Roblox] Evomon Shiny Hunting Guide – Including Prismatic and Pris Shinies!")

The Legend of Crystal Valley Tips Walkthrough
Check out our strategy guide for The Legend of Crystal Valley. GENERAL TIPS Controls White cursor – A white cursor means that no actions are possible. Yellow cursor – When the cursor turns yellow, it means that Eve can walk to that location. Blue cursor – This signifies that Eve can go on to the next scene. If you’ve already been to that location, you can double-click to fast-travel to the scene and skip watching Eve walk. Green cursor – When the cursor turns green, it means that E…


- Prefer Gamezebo on Google

a:1:i:0;a:2:s:13:”section_title”;s:33:”The Legend of Crystal Valley Tips”;s:12:”section_body”;s:77855:”
Check out our strategy guide for The Legend of Crystal Valley.
GENERAL TIPS
Controls
- White cursor – A white cursor means that no actions are possible.
- Yellow cursor – When the cursor turns yellow, it means that Eve can walk to that location.
- Blue cursor – This signifies that Eve can go on to the next scene. If you’ve already been to that location, you can double-click to fast-travel to the scene and skip watching Eve walk.
- Green cursor – When the cursor turns green, it means that Eve can interact with an object or character.
- Magnifying glass – This indicates that an area or item might be important. Click when you see the magnifying glass for more information. Note: Sometimes you should click on an area more than once to receive more information.
Keyboard shortcuts
- Hold down SPACE BAR to make Eve walk faster.
- Press the “F1” key to display the Help window.
Magic and Items
- Open your inventory by clicking “Inventory” in the upper right of the screen. Access your magic spells by opening your inventory and clicking the Magic tab.
- To use an item or spell on another object, click the inventory item or spell once to select it (you should now see it attached to the mouse cursor), scroll to the object you want to use it on, and click a second time.
- To use an item or object on Eve, double-click it.
- In other words, if you want to shrink Eve herself, double-click on the Shrink spell. If you want to shrink another object, click once on the Shrink spell to select it, then click on the object you want to shrink.
- If Eve is tiny and you want to make her big again, just cast the Shrink spell a second time.
- You can combine items in the inventory by selecting the first item, and clicking on the second inventory item you wish to combine it with
Conversations
- Once you’ve already talked about a topic with someone, the text turns from white to yellow. Make sure you select all the dialogue options before ending the conversation.
- The diary is literally a copy of all conversations in the game
WALKTHROUGH
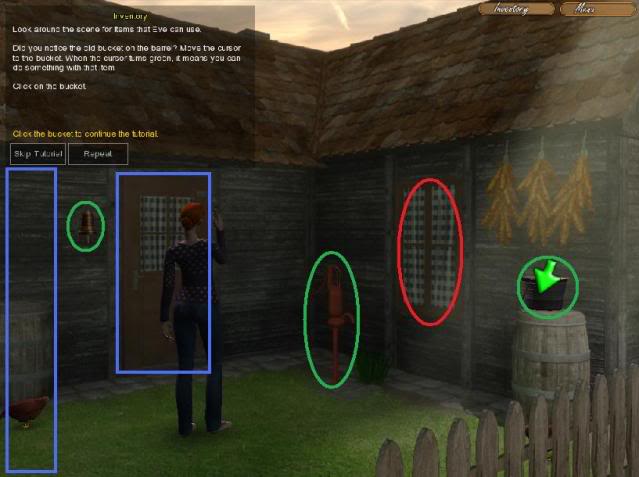
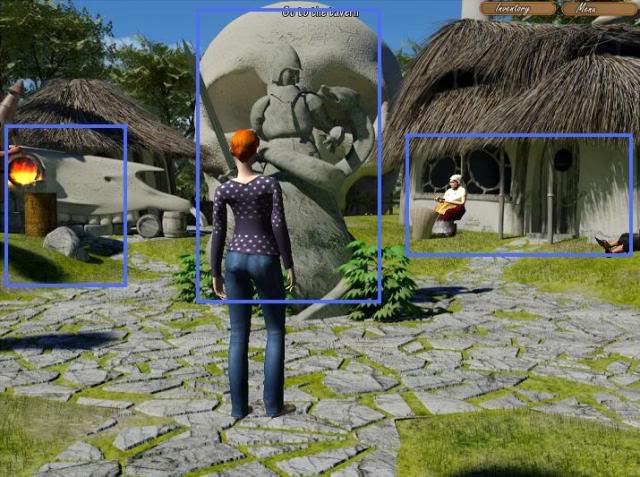
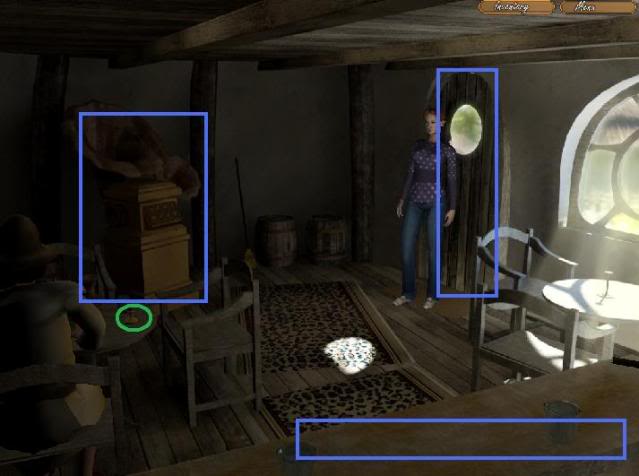
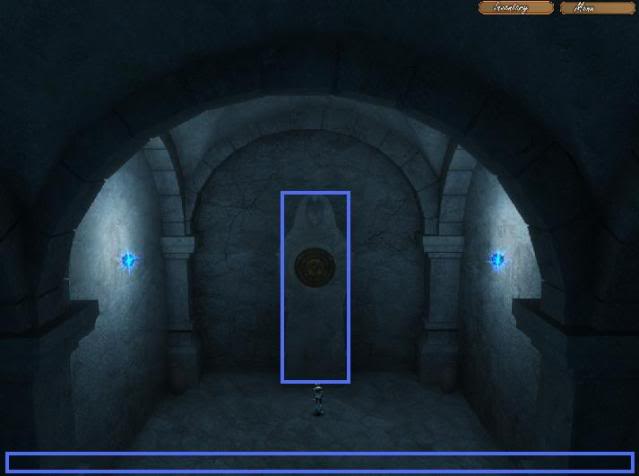
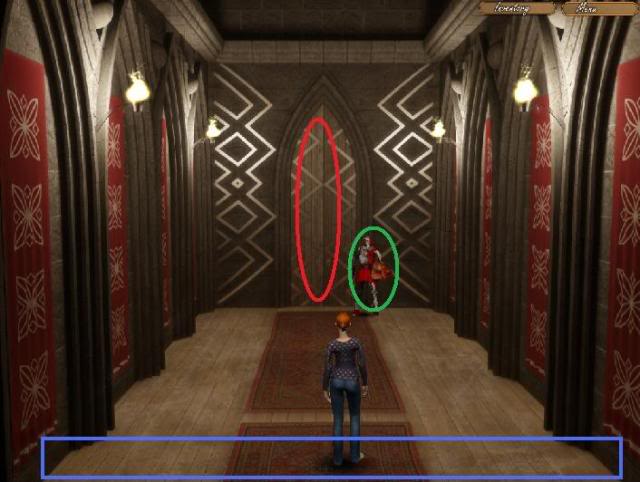
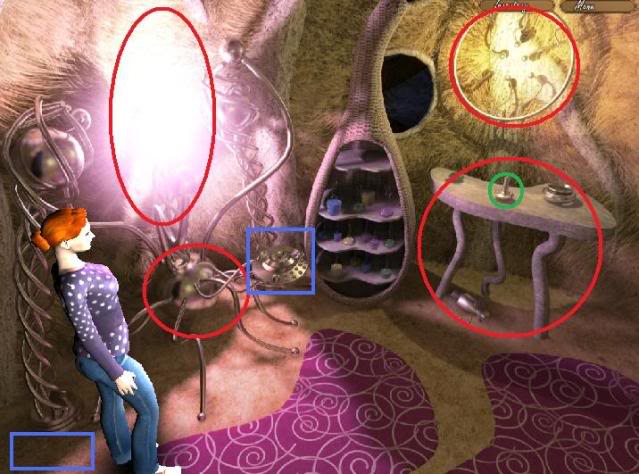
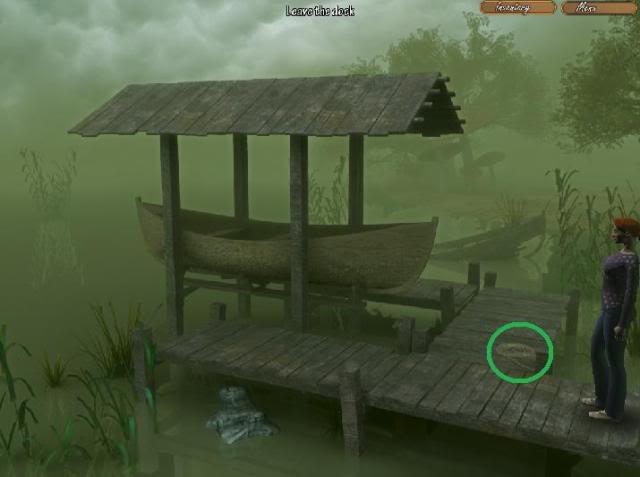
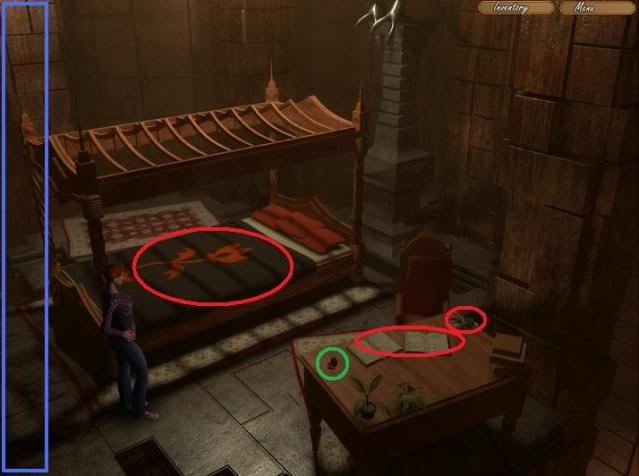
A note about the screenshots: In general, items I’ve circled in green are either things that you can pick up, or people that you can talk to. Items circled in red are ones that you can examine. I’ve also marked the exits in blue so you can see where on the screen you have to click to go to a new location.
TUTORIAL
Farm House Entrance
- Read the instructions about how to control Eve, then scroll your mouse over to the right side of the screen until you see the cursor turn blue and the words “Go to the front door” appeal across the top of the screen. Click to make Eve walk to the front yard.
Front Yard

Items to examine: A window
Items to take: An empty bucket
Items to use: A pump; a bell
Exits: Enter the house; Return to the farm entrance
- Here you’ll learn about inventory items. Follow the prompt and click on the bucket that the giant green arrow is pointing to in order to pick it up. (Click on the bucket, then click on the Hand icon to add it to Eve’s inventory.) You can see what’s in your inventory at any time by clicking the Inventory button in the top right corner of the screen.
- Follow the prompts again. Click on the Inventory button, click on the bucket to select it, then click on the red pump in the center of the screen. (You’ll know you’re in the right place when the words “a pump” appear.) Click on the pump to set the bucket down in front of it, then click the pump again select the Hand icon to pump water into the bucket.
- Click on the large brown door to enter the farmhouse.
Farmhouse
Hallway
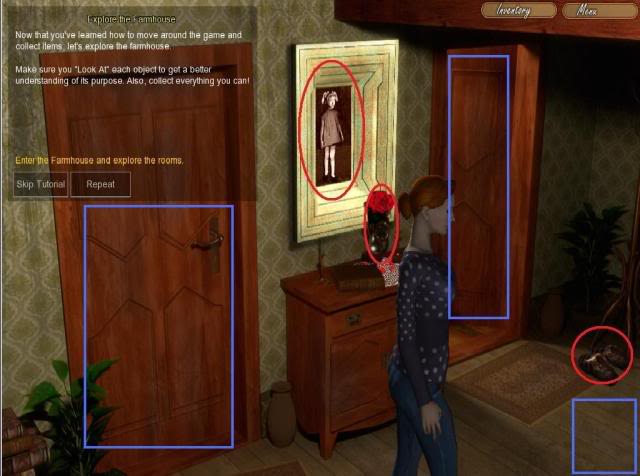
Items to examine: Eve’s Portrait; A Rose; Slippers
Exits: Go Left through the doors; Go Right through the doors
- Examine the three items with your magnifying glass, then take the left doors first.
Dining room
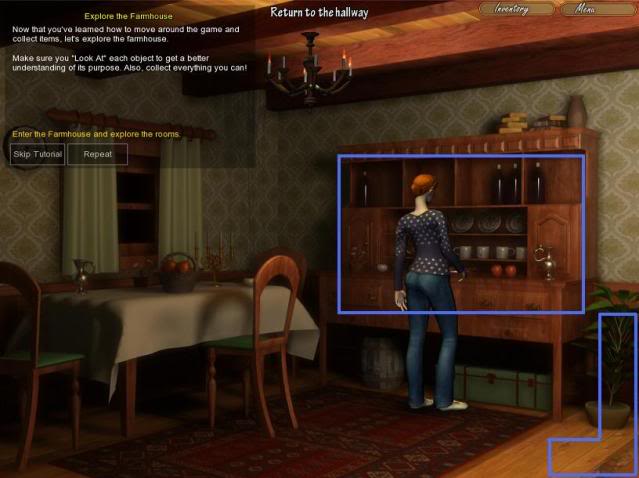
Exits: Approach the cupboard; Return to the hallway
- Click on the cupboard to take a closer look.
Cupboard

Items to take: bottle; statue; kitchen knife
Items to examine: plates; tea cups; a pie;
Exits: Step away from the cupboard.
- Click on the bottle in the upper left and examine it twice to discover that it contains petroleum. Then click the Hand icon to pick it up.
- Examine and pick up the statue to the right of the bottle.
- Examine the row of plates, the row of tea cups, and the pie.
- Finally, pick up the kitchen knife.
- Scroll your mouse to the bottom of the screen until the cursor turns blue, then click to step away from the cupboard.
- Return to the hallway, and go through the right doors.
Study
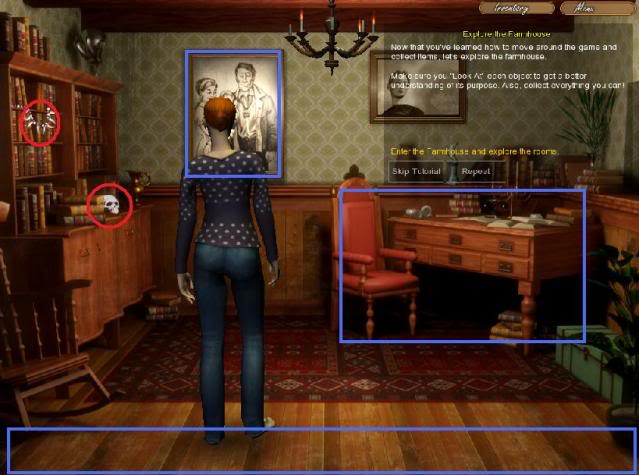
Items to examine: skull; a necklace;
Exits: Return to the hallway; Approach the study desk; Approach the family portrait
- Examine the skull and necklace, then approach the family portrait.
Family Portrait
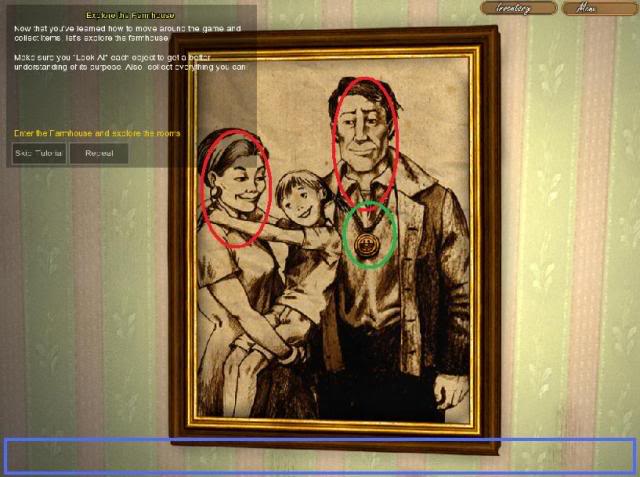
Items to examine: a portrait of Eve’s mother; A portrait of Eve’s father
Items to take: a medallion, a scroll
Exits: Step away from the portrait
- Examine Eve’s mother and father in the painting, then click on the medallion. When you do, the painting will move to the side to reveal a hidden compartment in the wall with a scroll in it. Take the scroll, then step away from the painting and approach the study desk.
Study Desk
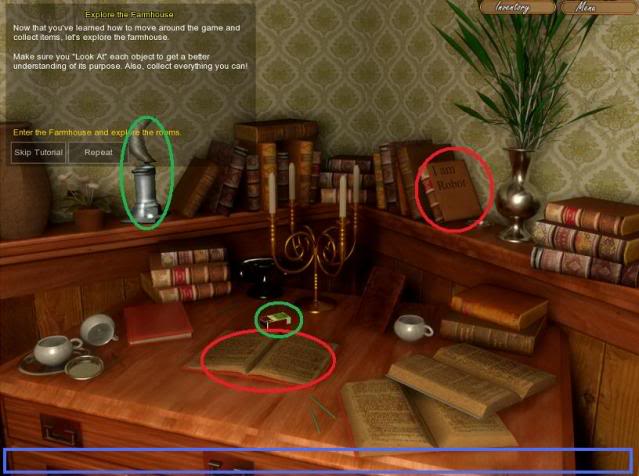
Items to examine: “I Am Robot” book; a notebook
Items to take: Matches; Statue of the moon
Exits: Step away from the study desk
- Exit the study and the farmhouse and go back to the Farm House Entrance.
Farm House Entrance
Items to examine: a sign; chicken
Exits: Go to the backyard; Go to the front yard
- Examine the sign and the chicken, then walk to the backyard.
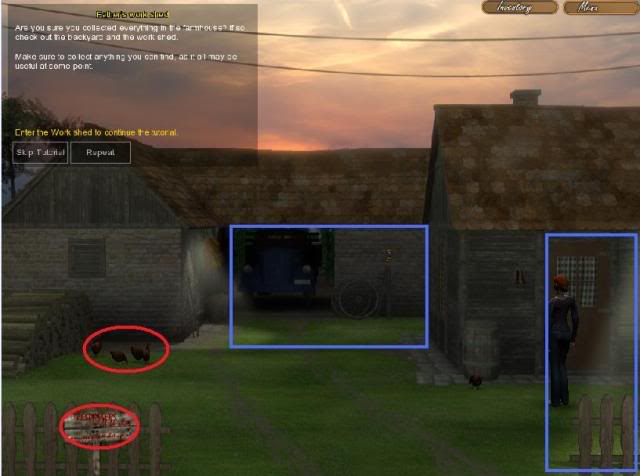
Back Yard
Items to examine: A wheel; A pickup truck
Items to take: An old lamp
Exits: Enter the work shed; Return to the farm entrance
- Click on the workshed door to enter it.
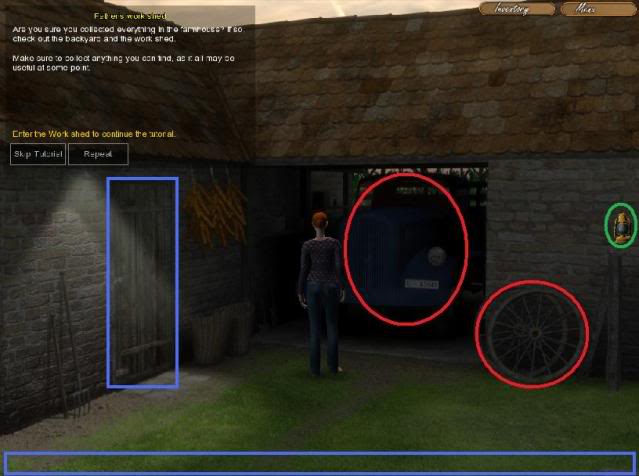
Work shed
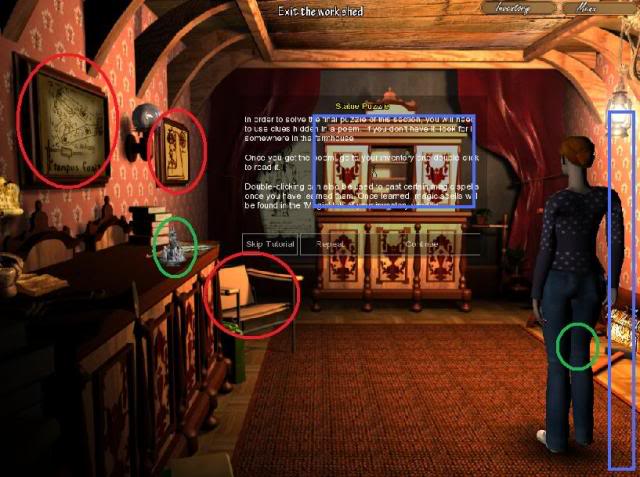
Items to examine: Blueprints; a blackboard; a chair
Items to take: Statue of the devil; a flashlight
Exits: Exit the work shed; Approach the closet
- It’s too dark in here. Follow the tutorial to learn about how to combine items in your inventory to make a working lamp. Then, re-enter the work shed.
- Examine and take all of the items.
- Once the Tutorial finishes, click “Close” to get rid of the window.
- Open your inventory and double-click on the poem (it looks like a scroll) to read it.
- The text reads:
Oh, my Maiden with hair so fair,
Fairer even than the moonlight above,
Come down to me, your loyal knight.
For no dragons from the west,
No monsters from the east,
Not even the Devil from the depths of Hell
May harm us while I hold you
In my hands.
Approach the closet.
Closet
- The poem is a riddle about how you have to place the statues in a certain order in the closet. Start by picking up the three remaining statuettes, then study the poem closely for clues about which spots on each of the four shelves to place the six statuettes in your inventory.
SOLUTION:
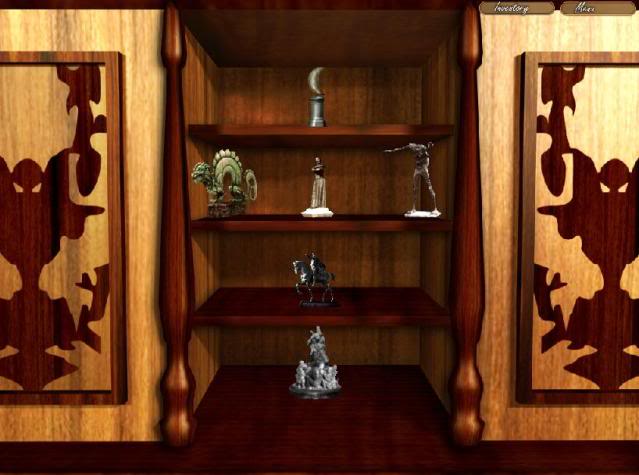
Moon – Top shelf, center
Dragon – Second shelf, left
Maiden – Second shelf, center
Monster – Second shelf, right
Knight – Third shelf, center
Devil – Fourth shelf, center
- When you arrange the statues correctly, a hole will be revealed on the back wall of the shed, to the left of the closet. Click on it.
THE CAVE
Cave Entrance
- There’s nothing you can do in here except click up ahead to go to the cave hallway.
Cave Hallway
Items to examine: A cage
Exits: Cave Entrance; Proceed along the path in the cave
- Examine the cage, then proceed along the path in front of you.
Cave crossroads
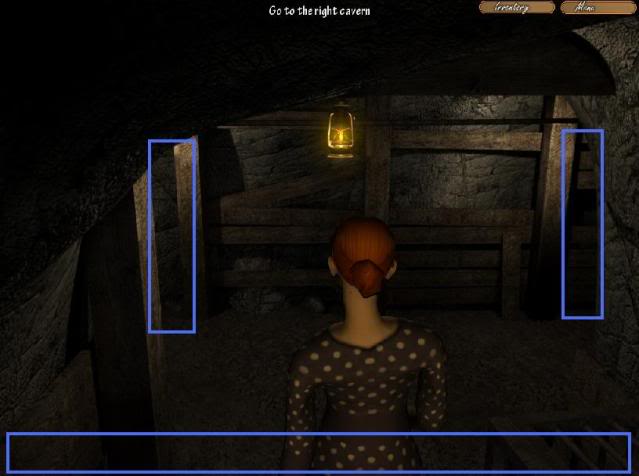
Exits: Go to the left cavern; Go to the right cavern; Return to the cave hallway
- Here, the path forks off to the left and right. Take the right path for now.
Right cavern
Items to examine: Cage
Exits: Approach the cage; Return to the cave crossroads
- There’s a strange creature locked in the cage on the right. Click the cage to approach it. Then, click on the creature to examine it.
- Open your inventory and select the hairclip, then click on the cage to pick the lock and free the creature. Once it’s free, click on it to examine it.
- Go back to the crossroads, and enter the left cavern.
Left cavern
Items to examine: A rope; A wagon; A Switch.
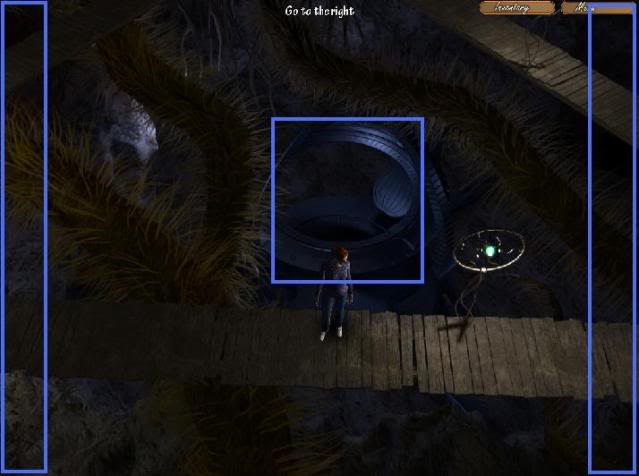
Exits: Return to the cave crossroads; (Go to the cave exit)
- Examine the rope, wagon, and switch. Hmm. It looks like we have to get that wagon moving somehow.
- Open your inventory and select the kitchen knife, then use it on the rope to cut it.
- Click on the switch to pull it, and the wagon of rocks will crash through the blockage to the left, opening up more of the cave to explore.
- Click on the new exit on the left to walk through.
Cave Exit
- Phew, some daylight and fresh air! Click anywhere outside to leave the cave. Did you notice the creature you freed earlier flying away to its freedom?
VILLAGE OF TRISGON
Crossroad
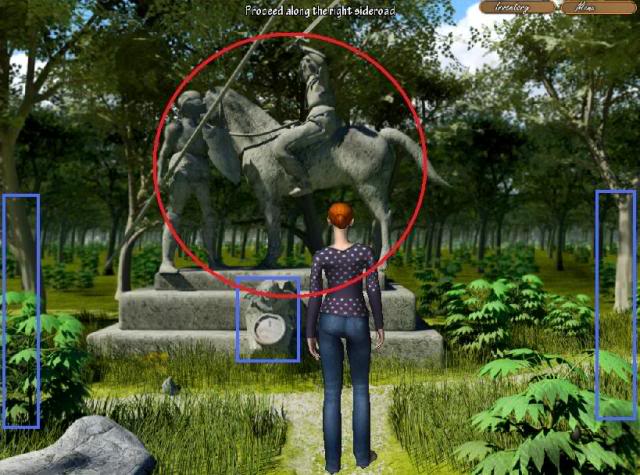
Items to examine: A statue
Exits: Approach the lock; Proceed along the left sideroad; Proceed along the right sideroad
- Examine the statue, and approach the lock and examine it, making note of the keyhole.
- Head along the right sideroad.
Cottage
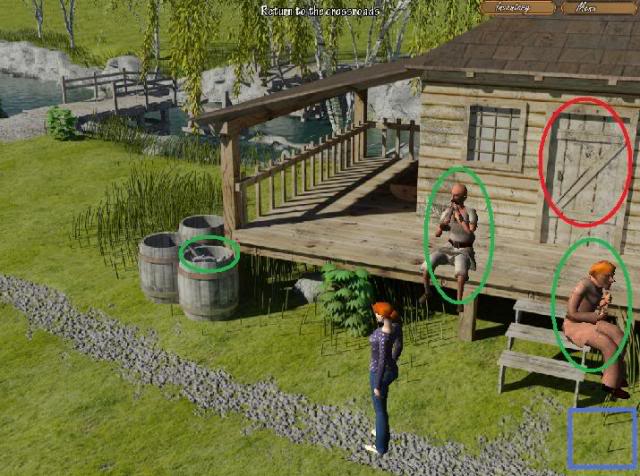
Items to examine: Cottage
Items to take: A fish (from the barrel)
People to talk to: Fisherman Dejan, Jozo
Exits: Go to the bridge; Return to the Crossroads
- Examine the cottage, take the fish from the barrel (eww…), then click on Fisherman Dejan to start a conversation.
- Talk to Fisherman Dejan thoroughly, selecting all possible dialogue options.
- Ok, so Dejan wasn’t very helpful. Talk to Jozo next.
- Go to the bridge.
Bridge
- Looks like the bridge has been destroyed. Examine the broken middle of the bridge. There’s nothing you can do here now, so go back to the cottage and talk to Fisherman Dejan again. A new conversation topic has opened up.
- As Fisherman Dejan what happened to the bridge, then run through the rest of the dialogue options.
- There’s nothing more you can do here for now, so retrace your steps back to the crossroad, and take the left sideroad.
Left Sideroad
Items to take: A bell
Exits: Return to the crossroads; Go along the path
- Take the tiny bell along the path, then follow the left sideroad until you come to a village.
Village Entrance
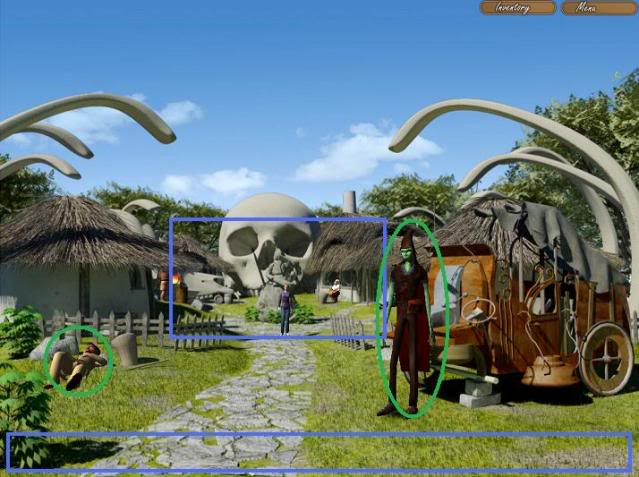
People to talk to: Karim; Konoba the Butler
Exits: Exit the village; Go to the main square
- Talk to Konoba the Butler, making sure to ask him about his wheel, and Eve’s father Ian. He suggests trying to find him in the city, but to get there we’ll have to fix the bridge.
- Next, talk to Karim. He’s a bit grumpy and not much help.
- Go to the main square
Main Square
Exits: Approach the statue; Go to the blacksmith; Go to the tavern.
- Approach the statue and examine it.
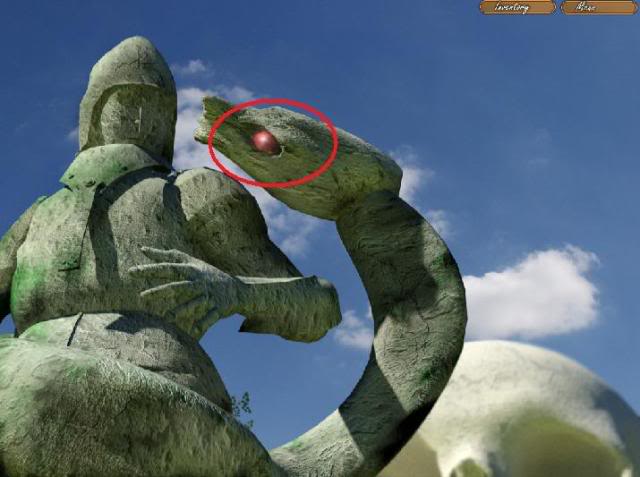
Statue
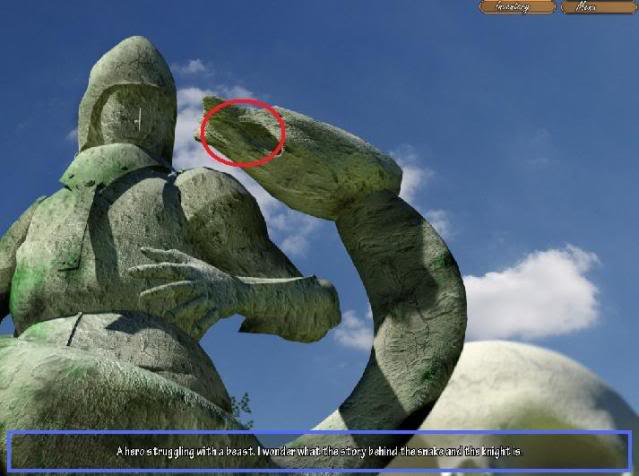
Items to examine: Statue of a hero
Exit: Step away from the statue
- Examine the statue of a hero; it appears that the monster’s eye is missing.
- Step away from the statue, and head left to the blacksmith’s.
Blacksmith
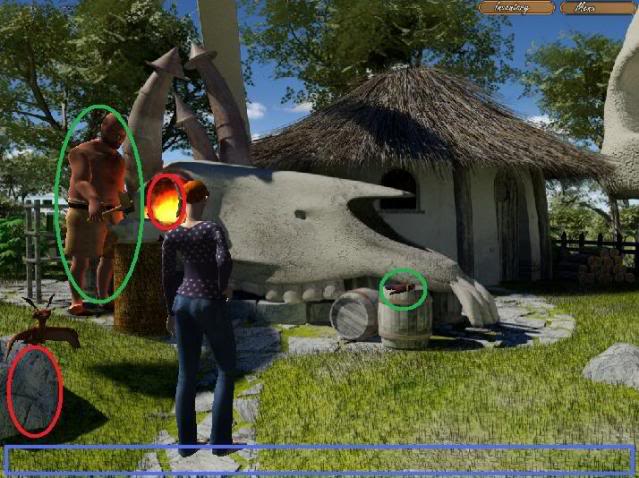
Items to examine: A rock; a forge
Items to take: Blacksmith’s gloves
People to talk to: Kovac the Blacksmith
Exits: Return to the main square
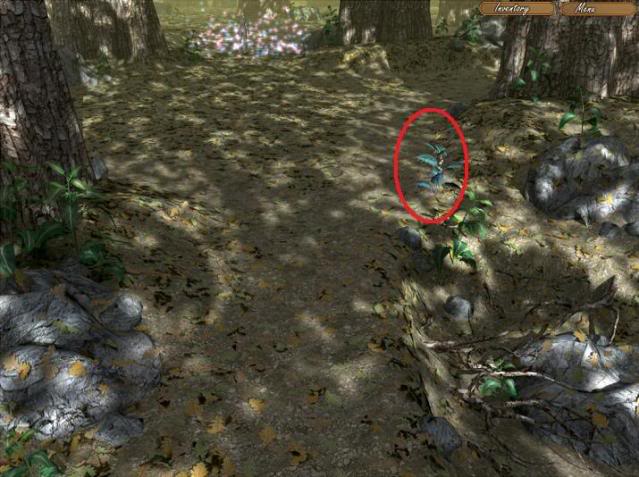
- There’s a winged creature sitting on a rock here. Could it be the same one you rescued? Unfortunately you can’t interact with it, so examine the rock instead. Exciting!
- Talk to Kovac the Blacksmith. Ask him to repair the wheel – it seems you need to get a coin somehow. Ask him about the creature to learn more about your little friend.
- There’s only one place left to go: Head back to the village square, then walk right to the tavern.
In front of the tavern
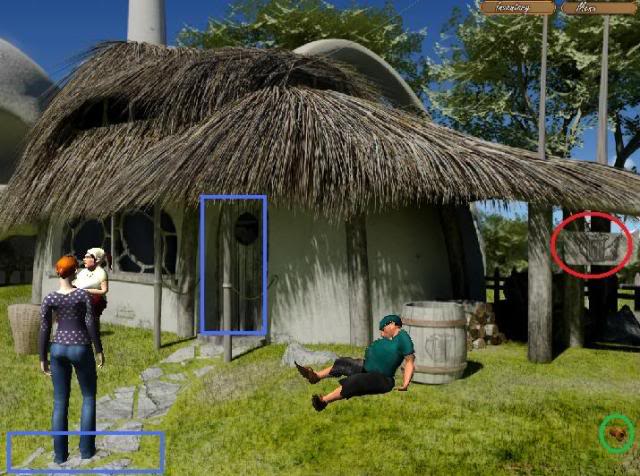
Items to examine: A sign
Items to take: A bell
People to talk to: Barmaid Hilge; Bobo
Exits: Return to the main square; Enter the tavern
- Take the bell.
- Talk to Barmaid Hilge thoroughly until she gives you the hairpin. It looks like you’ll need to find the ruby that’s missing from the statue’s eye.
- Next, talk to Bobo.
- Enter the tavern.
Tavern
Exits: Exit the tavern; Go to the tap-room; Approach the music box
Items to take: Sleeping powder
People to talk to: Milan
- Talk to Milan thoroughly, until he gives you the coins.
- Go to the tap-room.
Tavern – Tap-Room
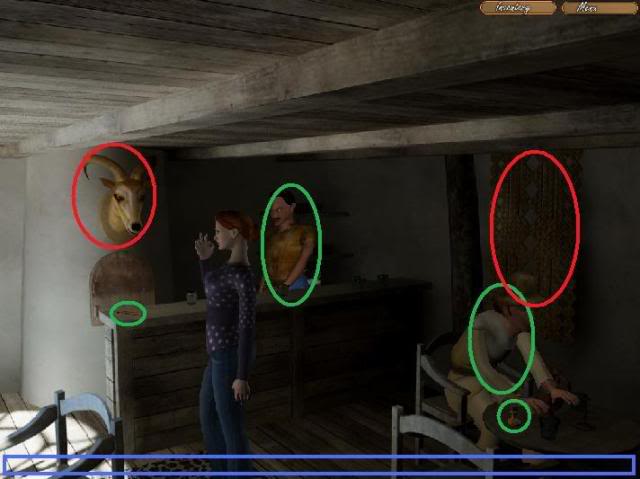
Exits: Leave away from the tap room
Items to examine: A trophy; a tapestry
Items to take: Sleeping powder; Key
People to talk to: Bartender Faris; Milan
- Talk to Bartender Faris. There isn’t much you can do right now, but at least you have some money! Go back to the blacksmith.
Blacksmith
- Talk to the blacksmith again. A new conversation topic has opened up about the curse. Ask him about repairing the wheel again and he will do it now that you have a coin to hand over. The repaired wheel will automatically appear in your inventory.
- Return to the village entrance.
Village Entrance
- Talk to Konoba again, and select the new dialogue option, 3. “Here, I repaired your wheel!” He gives you a bell in return. Finish talking to him.
- You should now have three bells in your inventory. Go back to the tavern entrance.
In front of the tavern
- Talk to Bobo again, and select the new dialogue option that gives him the three bells. He tells you the order that you have to press the music box buttons in the tavern in order to fix it. Make note of the pattern, then go into the tavern. (You can ask Bobo to repeat the pattern at any time by simply talking to him again.)
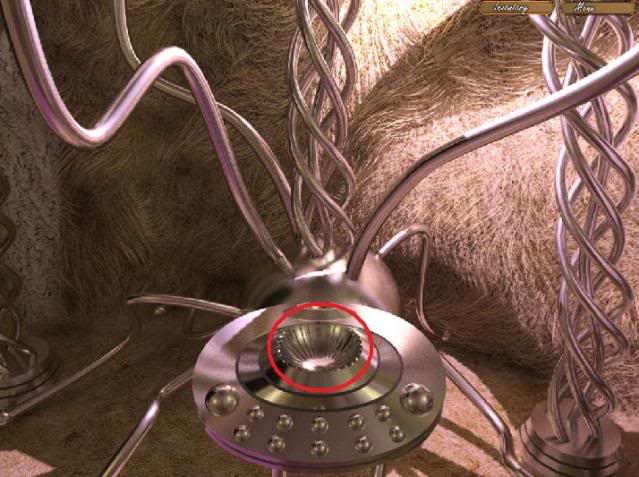
- Enter the tavern, and approach the music box.
At the music box

- Press the buttons in the order shown in the screenshot above.
- When you’ve entered the pattern correctly, the top of the music box will pop open. Click on the music box mechanism inside to take it.
- Leave the tavern and go to the blacksmith.
Blacksmith
- Talk to the blacksmith and select the new dialogue option, to ask him to fix the music box mechanism. You’ll have to hand over the hatpin that you got from Barmaid Hilge, and the second coin. Once you have the fixed mechanism in your inventory, head back to the tavern.
Tavern
- Approach the music box, select the repaired music box mechanism from your inventory by clicking on it, and click it into the music box. Yay, it’s repaired!
- Go to the Tap-Room, and talk to Bartender Faris. Select the new dialogue option, 3. “So, about that beer…” He’ll give you a beer.
- Click on the key sitting on the bar. A dialogue will open… convince Faris to give the key to you.
- Now, talk to Milan again. Give him the beer, and he’ll let you take the bottle of sleeping powder on the table.
- Remember that statue at the crossroads that had the statue with the keyhole in it? Return there.
Crossroads
- Approach the lock.
- Open your inventory and select the gold key. Click on the keyhole to reveal a compartment. Take the ruby.
- Go back to the village and approach the statue on the center of town. Place the ruby into the eye socket of the monster.
- After you replace the ruby, Barmaid Hilge calls to you. Go and see her outside the tavern.
In front of the tavern
- Talk to Barmaid Hilge, and she tells you that the townspeople have repaired the bridge.
- Leave the village and go back along the right road, past the cottage, until you reach the bridge. You can now walk across it. (Click near the upper edge of the screen when the cursor turns blue.)
- Enter the magic forest.
THE MAGIC FOREST
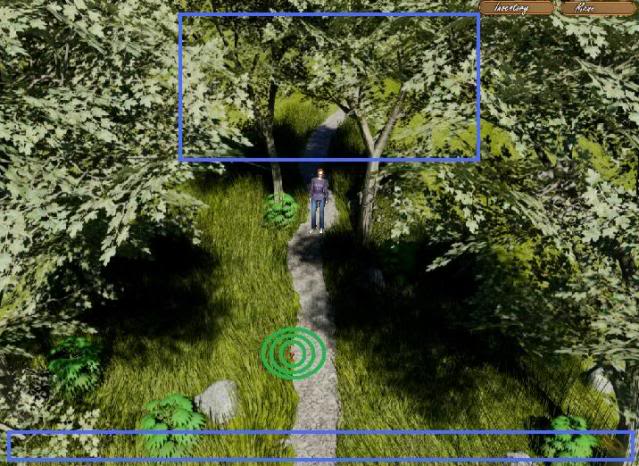
Forest crossroads
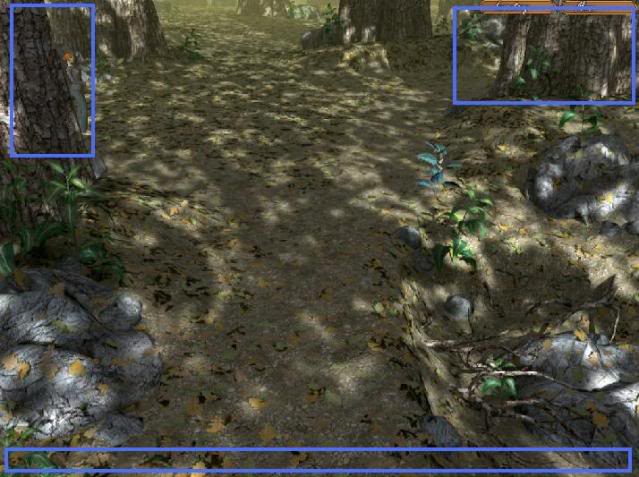
Exits: Exit the magic forest; Go to the left; Go to the right
- Take the right path first, and examine the large trunk blocking the path. You’ll have to find some wya to move it.
- Go back to the crossroads and take the left path.
Forest – left path
- Open your inventory and select the sleeping powder, then click on the fish in your inventory. You now have a fish mixed with sleeping powder.
- Talk to Giant Burek. Read through all of the dialogue options, then select 3. “Would you be interested in this fish?” then “Here, take it.”
- After Burek eats the fish, he’ll fall asleep. Click the bag around his neck to take Burek’s Magic Potion.
- Open your inventory and double-click on the potion to use it.
- Go back to the crossroad and you’ll see a sparkly area and a new path to take: Go Forward
The Witch Hut
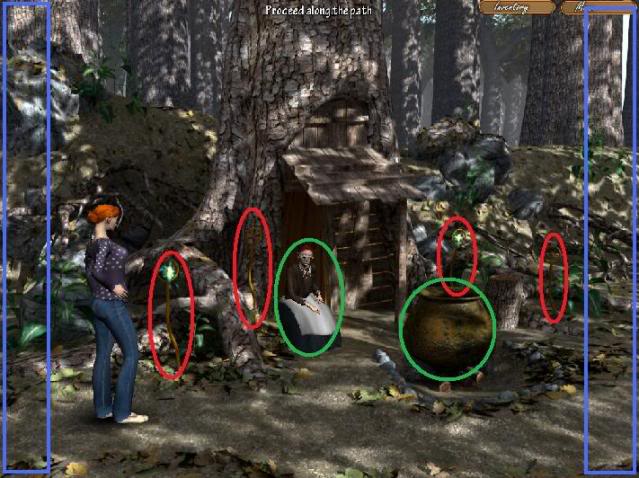
Items to examine: Magic staff x 4
Items to use: A pot
People to talk to: Lepinya the Witch
Exits: Return to the forest crossroads; Proceed along the path
- Talk to Lepinya. Before she can help you, she wants you to find three plants. She gives you a map that you can look at by opening your inventory and double-clicking.
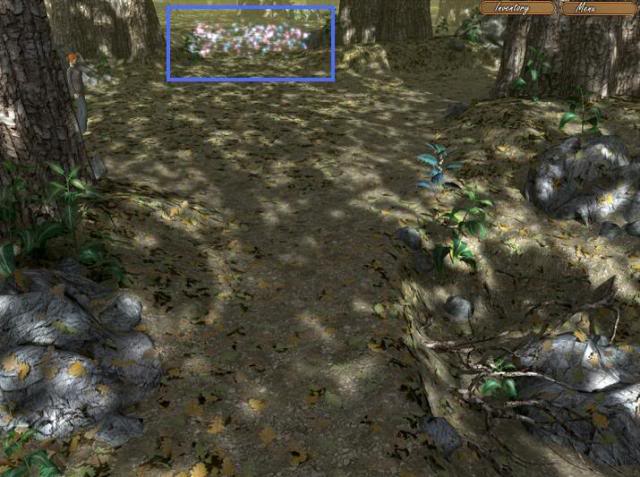
The three plants
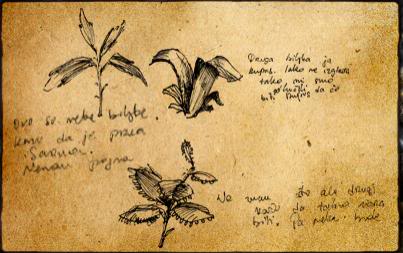
- Here are the locations of the three plants:
- Plant #1: Forest Crossroads
- Plant #2: Forest – Right Path
- Plant #3: Crypt Entrance (read the next section for instructions on how to get the third plant.)
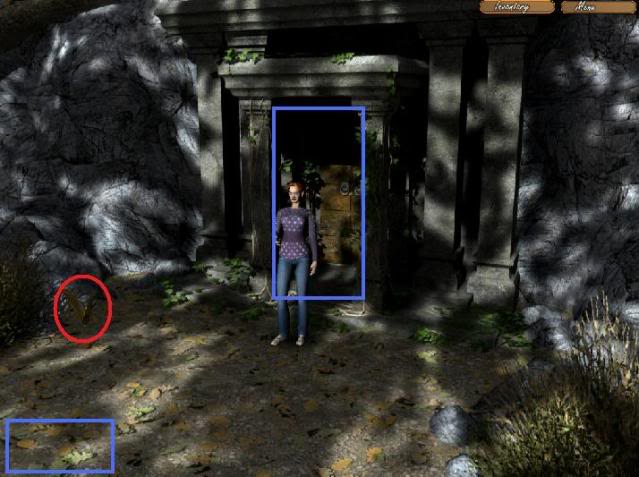
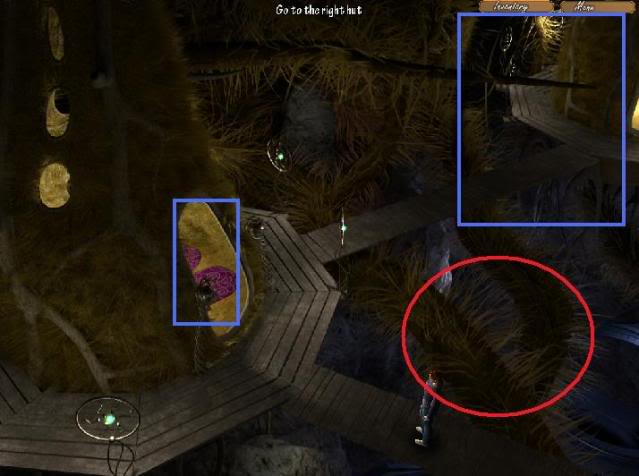
Outside the Crypt
- Examine the bush in front of the crypt. You need something to help you get through the thorns.
- Open your inventory and click on the blacksmith’s gloves.
- Walk past the bushes once they’re cleared.
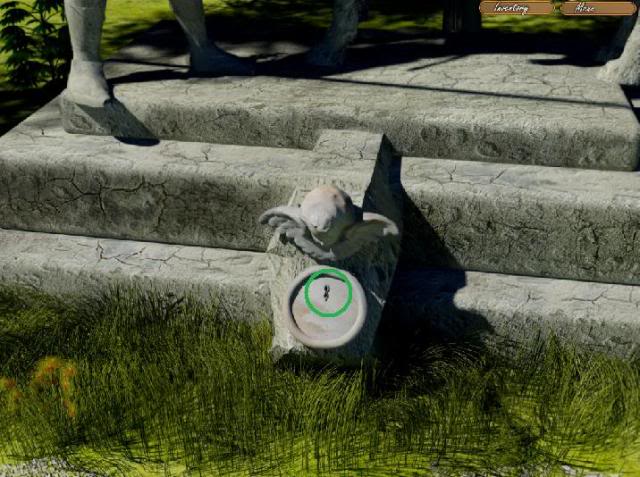
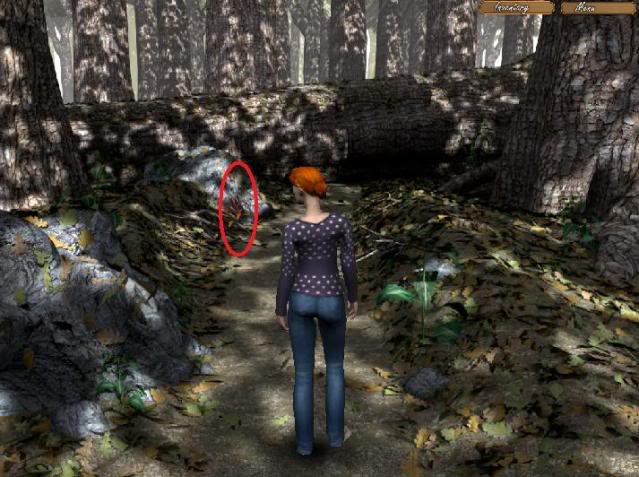
Crypt Entrance
Exits: Leave the crypt entrance; Crypt Entrance
- The plant is off to the left (see screenshot below).
- Take the three plants back to the witch.
The Witch Hut
- Talk to Lepinya and select the new dialogue option to give her the plants. She’ll give you a medallion,. Keep talking to her to learn what you must to in order to travel to the city. Make sure you read everything, including the “magic words.”
- Exit to the right and go back to the crypt. Click on the door to approach the front door of the crypt.
The Crypt – Front Door
Items to examine: Stone door; A skull on the wall; A guardian
Items to take: A metal finger
Exits: Leave the crypt; Enter the crypt.
- Click on the Guardian to take the metal finger. You can also examine him, as well as the skull and crypt door.
- Open your inventory and click on the metal finger, then click on the skull keyhole. The door to the crypt will open.
- Enter the crypt.
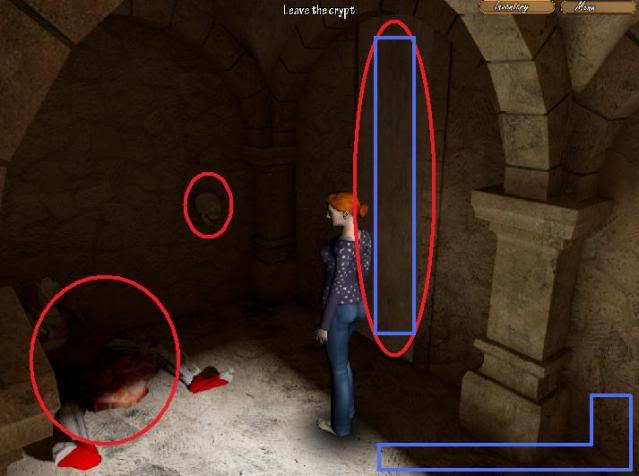
The Crypt
Items to examine: Strange lights x2
Exits: Exits the crypt; Go to the left; Go to the strange mirror
- Walk up to the strange mirror.
The Strange Mirror
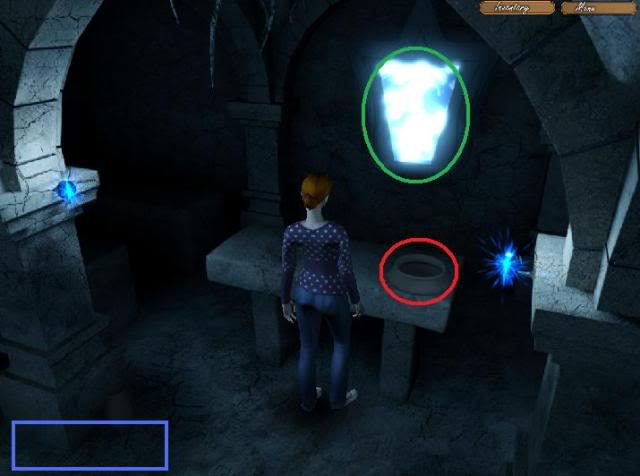
Items to examine: A ceramic pot
Items to use: A strange mirror
Exit: Step away from the strange mirror
- Click on the mirror, and speak the magic words, 3. “komisakomako”
- Take the book of sorcery that appears on the table after you speak the correct magic words (you might have to move Eve out of the way to see it.)
- When you have the book, leave the crypt and go back to the witch’s hut.
The Witch Hut
- Talk to Lepinya and select the new dialogue option, 3. “I’ve been to the crypt.” She will teach you your first magic spell. Finish talking to her about how to get to the city. Let’s take her advice and take a look inside the pot before we leave.
- Go back to the crypt’s main room (where the mirror and strange lights are), and this time head left.
Crypt – Jammed Door

Items to examine: Another skull mechanism; Jammed door
Exits: Step away from the blocked doors; Go to the hidden room
- It’s time to use your Shrink magic to pass through the tiny opening. Open your Magic menu by clicking the Inventory button, then clicking on “Magic,” and double-click on the Shrink spell to use it.
- Now, click on the small opening to go to the hidden room.
Hidden Room
Exits: A sarcophagus close up; Go back
- Click on the sarcophagus to zoom in on it.
Sarcophagus Puzzle
- Remember the pattern in Lepinya’s pot? You have to rotate the symbols on the sarcophagus so that the symbols match.
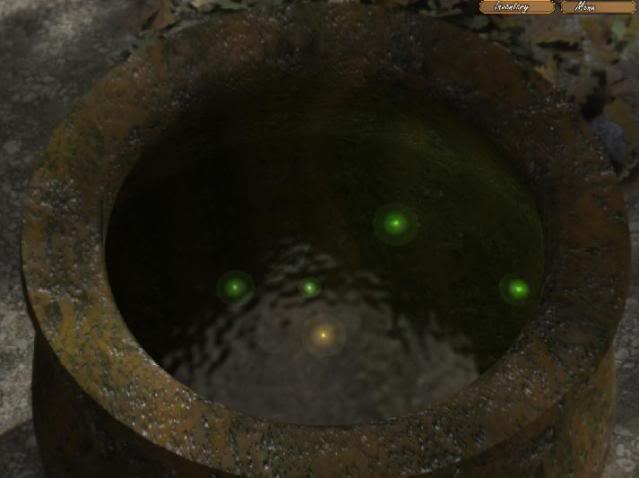
- Scrolling your mouse over the left side of the puzzle with allow you to rotate the circles to the right; while scrolling your mouse over the right side of the puzzle will let you rotate the circles to the left.
- The gold ball in the cauldron refers to the nob in the center of the circles.
- Using pot orbs as a guide, rotate the circles until they mimic the design (see screenshot). Once an orb locks in place, it will no longer move.
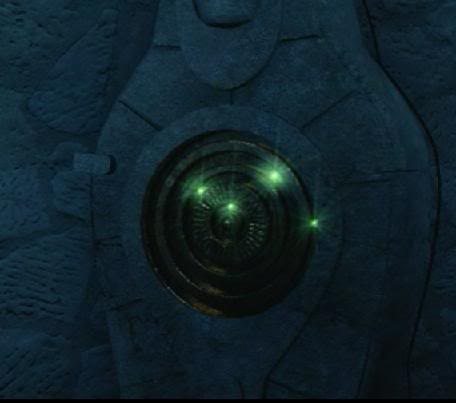
- After a cutscene, you’ll find yourself in the portal chamber.
Portal Chamber Entrance
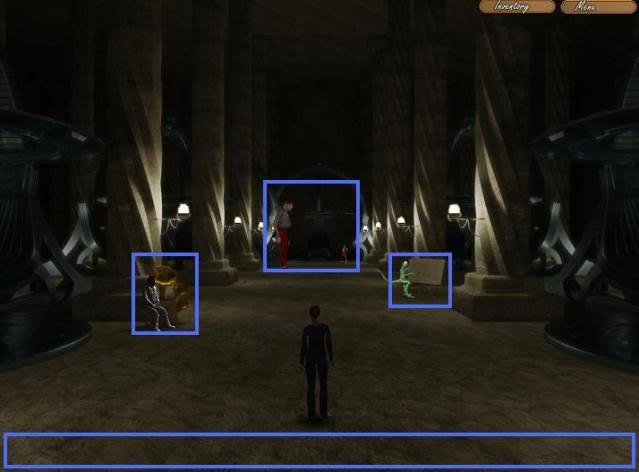
Exits: Go back to the crypt; Go to the man; Go to the giant; Go to the painter
- Let’s visit “the man” on the left first.
The Man (Melvis)
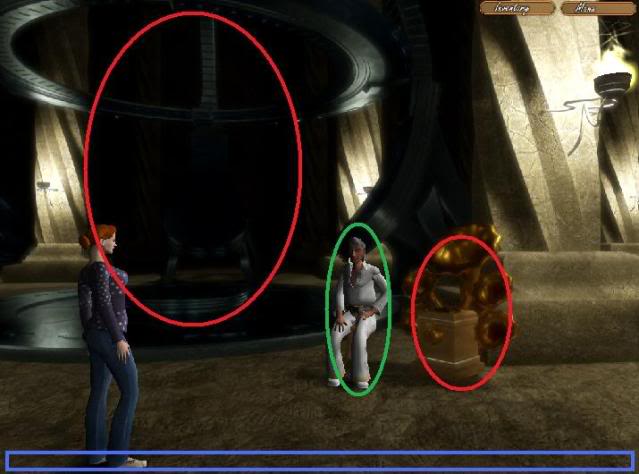
Items to examine: A portal; Weird-looking gramophone
People to talk to: Melvis the Duke
Exits: Return to the Portal Chamber entrance
- Talk to Melvis thoroughly. You’ll learn that he wants a particular medallion, and has the city medallion that you want. Click on the medallion in your inventory (the one that looks similar to your father’s) and click it on Melvis to give it to him. In return, he gives you the city medallion.
- Next, go to the painter.
The Painter
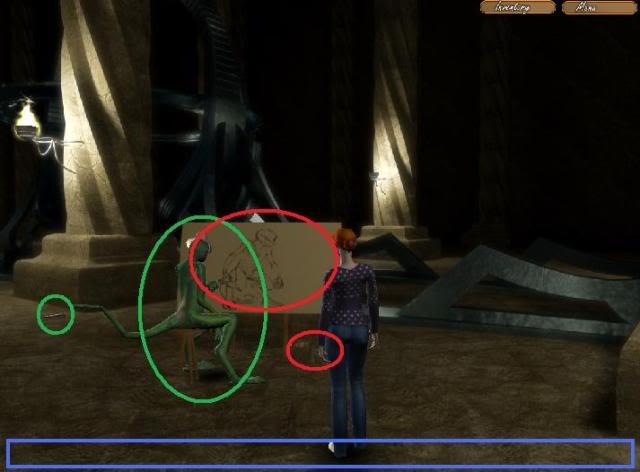
Items to examine: A painting; Painting equipment
Items to take: A screw
People to talk to: Lizzard
Exits: Return to the portal chamber entrance
- Talk to Lizzard thoroughly.
- Go to the giant.
Approaching the Giant
Items to take: A screw
Exits: Return to the portal chamber entrance; Go to the giant
- In the hallway before you approach the giant is a tiny screw for you to pick up.
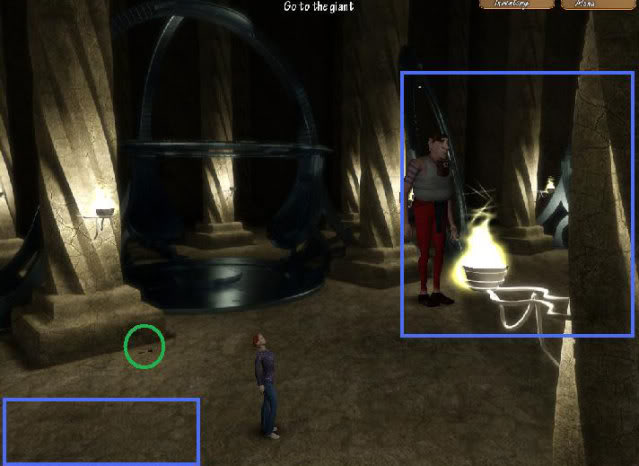
The Giant
People to talk to: Kyfla
Exits: Return to the portal chamber; Go to the portal guardian
- Talk to Kyfla thoroughly. Make sure you select the dialogue option where you hand over the two screws from your inventory. In return, he’ll give you a SAT1123 rock.
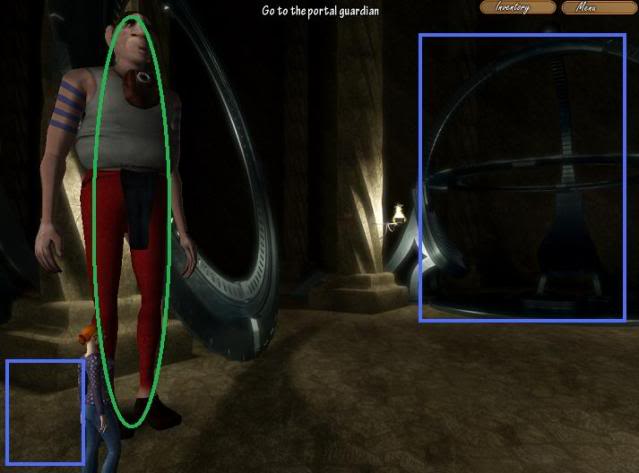
- Exit to the right to approach the portal guardian.
Portal Guardian
- Talk to Unit 52 (the portal guardian) and show him your medallion to the city. You’ll be transported there.
THE CITY
Main Square
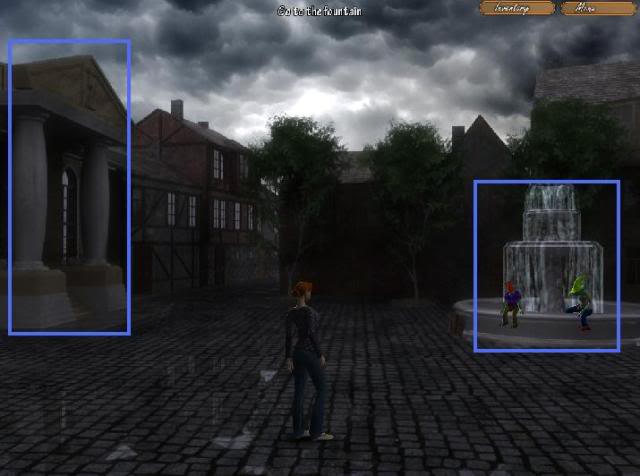
Exits: Go to the library; Go to the fountain
- Go left to the library.
Library Entrance
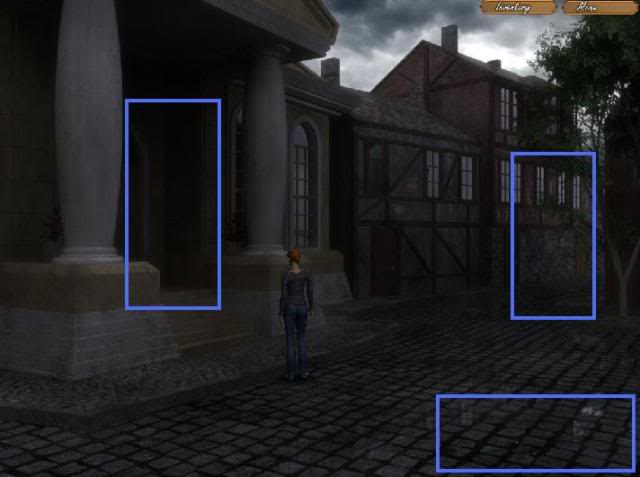
Exits: Main square; Enter the library; Go to the street
- Enter the library.
Library – Lounge
- Click along the bottom of the screen to walk further into the library.
Library
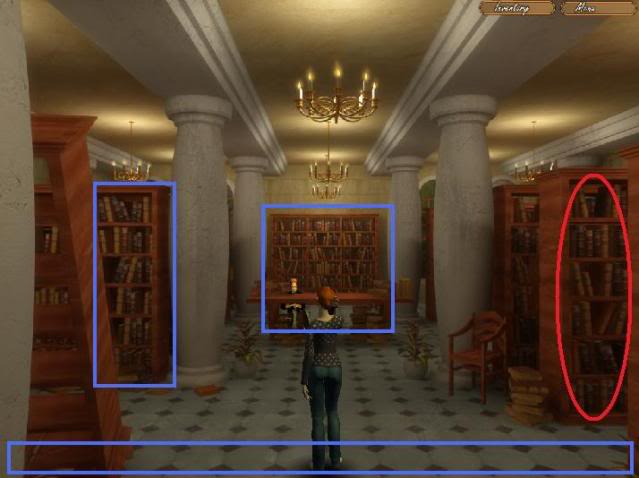
Items to examine: A bookshelf
Exits: Return to the lounge; A broken shelf; Proceed to the table
- Proceed to the table.
Library – Table
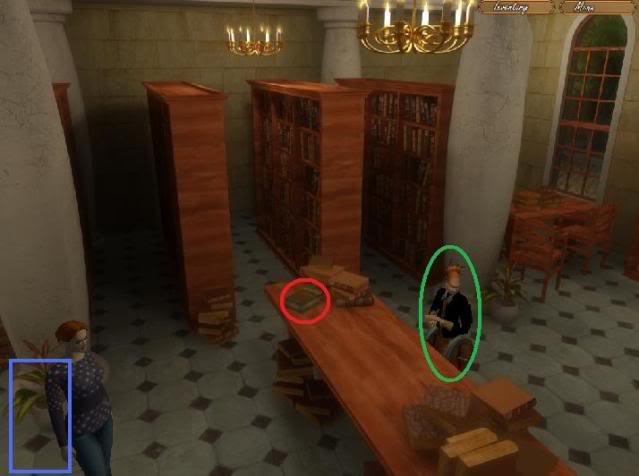
Items to examine: Librarian’s book
People to talk to: Ferofka the Librarian
Exits: Leave the table
- Talk to Ferofka until she gives you the worn out ball.
- Leave the library, and go to the fountain.
Fountain
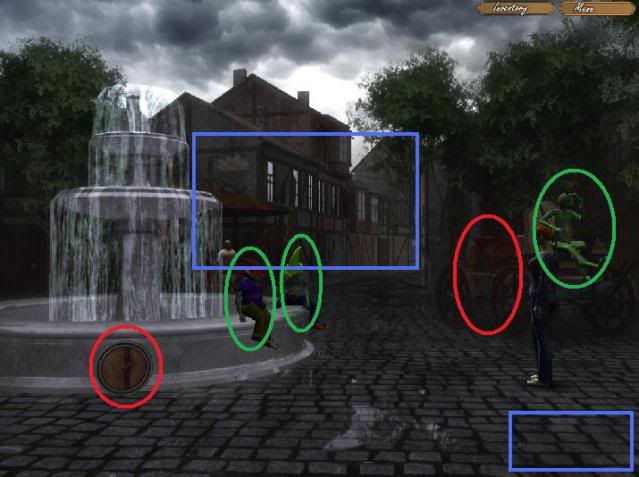
Items to examine: A wheel; A chariot
People to talk to: Petar the Driver; Willy; Harry
Exits: Proceed to the street; Main square
- Talk to either Harry or Willy (both boys will say the same things) to give the boys their ball back. You’ll get the wheel in return.
- Take the wheel back to Ferofka at the library.
Library – Table
- Talk to Ferofka again, then talk the Librarian’s Book on her desk.
- Exit the library and go back to the fountain. Take the north exit called “Go to the street.”
- Walk past the butcher for now and continue along the street to the next screen where you’ll see a man playing a guitar. On the left is the flower shop. Click the door to enter.
Flower Shop
- You can examine the row of flowers along the left, the flower pots along the back wall, and the big blue flower in front of Tratincica.
- Talk to Tratincica. He’ll give you a rose. When you give him the librarian’s book, he’ll reward you with the Marishka Hladnis.
Library – Table
- Return to the library and talk to Ferofka again. She gives you a gold coin and finally lets you read the Encyclopedia.
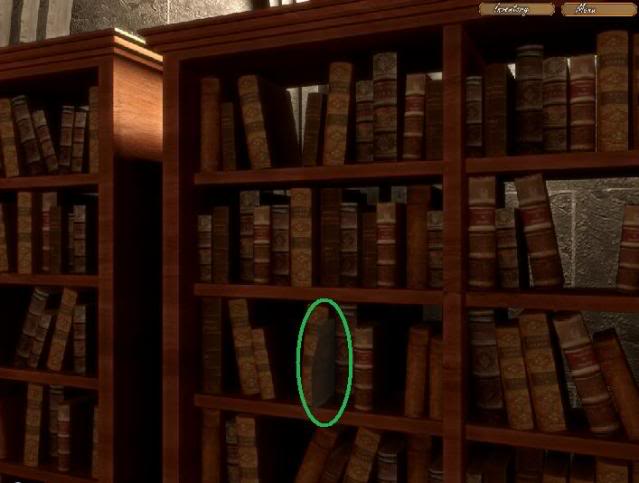
- Go back to the main room of the library, and go to the broken bookshelf.
Broken bookshelf
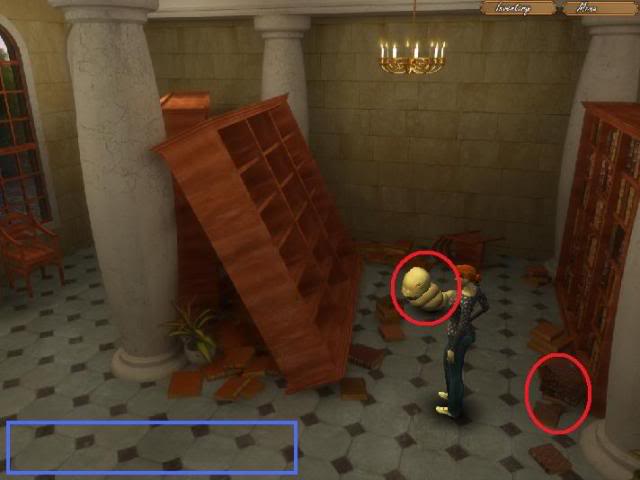
Items to examine: Scattered books; A bookworm
Exits: Go back
- Click on the bookworm to be treated to one of the most annoying sound effects in the history of videogames! Other than that, there’s not much else you can do here.
- Leave the library.
- At this point, you can head north up the street and talk to Betty and Omero if you want, but there’s nothing you can actually do there.
- Go back to the fountain, then head north up the street. Stop at the butchers.
Butcher’s
- Talk to Argovth the Butcher. His meat is spoiling because he has nothing to keep it cool with. You end up giving him the Marrishka Hladnis plant from your inventory and he says he’s indebted to you. This will come in handy later on.
- Head north along the street and stop in front of the flower shop. Talk to Frula the musician, and give him a coin to learn more about Isaac.
- Head north and continue along the street.
Path
- The path takes you out of the city. Along the pathway you see… a broken Cadillac?? Click on the Cadillac and select the Hand icon to add a broken car part to your inventory. Continue along the path to the right.
Mansion – Gate
- Examine the dog barking at the gate. If only you had something to give him…
- Return to the city, and head over to the butcher’s stall.
Butcher’s
- Talk to Argovth again and he’ll give you a bone for the dog. Return to the mansion. Open your inventory and click on the bone, then click on the dog. The gate swings open. Click on the gate to enter the courtyard.
Villa
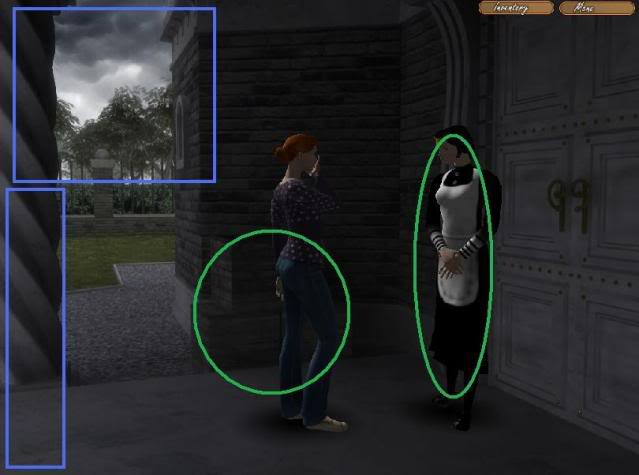
Items to take: Boxes
People to talk to: Betty the Maid
Exits: Return to the courtyard; Go to the backyard.
- Approach the entrance to the villa, and talk to Betty the maid. She asks you to talk to Omero for her.
- Before you leave, click on the boxes to take a bottle of rum.
- Go back to the city center, and head north of the library to the alleyway where Omero and the other Betty are.
Betty and Omero
- Talk to Omero and give him the rose. In return, he gives you a letter to take to Betty the Maid. Go back to the villa one again.
Villa
- Talk to Betty and give her the letter. She opens a window for you.
- Instead of returning to the courtyard, click the top left part of the screen to go to the backyard.
Villa – Backyard
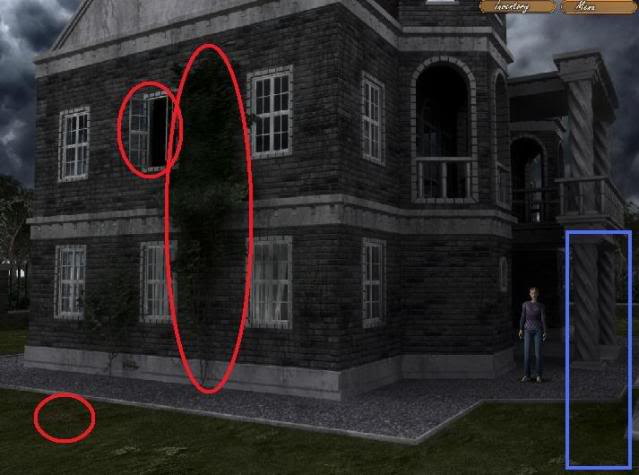
Items to examine: A window; Ivy; Fertile soil
Exits: Return to the entrance to the villa
- You can’t do anything here for now, so go back to the fountain and talk to Petar the chariot driver.
Fountain
- Ask Petar to take you to the lighthouse. You’ll arrive near the dock. Click on the dock to walk there.
Dock – City side
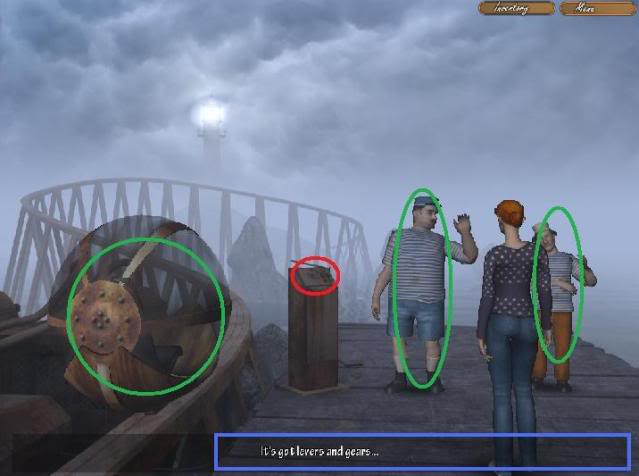
Items to examine: A control panel
Items to use: A wagon
People to talk to: Sailor Jim, Sailor Tom
Exits: Return to the chariot
- Talk to either of the fishermen, and hand over the rum. The mechanism needs to be fixed before you can use the wagon.
- Open your inventory and select the carburator, then click it on the control panel. Voila!
- Talk to the sailors again.
- Now, click on the wagon to use it to travel to the other side of the lake.
Dock – Lighthouse side
Items to use: Wagon
Items to take: Veronika Veronika plant
People to talk to: Mikhail
Exits: Go towards the lighthouse
- Talk to Mikhail, then go up the stairs to the lighthouse and enter it.
Lighthouse
- There are three symbols here that you can rotate. Click once on the bottom symbol (the crystal will turn yellow), then click once on the left-most symbol. The crystal should go dark. Ugh oh. Better go and tell Mikhail.
Dock – Lighthouse Side
- After you tell Mikhail that the lights are off in the lighthouse, he’ll storm away. Now you can pick up the Veronika Veronika plant on the dock. Click on the wagon to head back across the lake.
- Once you’re back on the other side, talk to Petar the driver and ask him to take you back to the city.
- Back in the city, head to the florist’s and talk with Tratincica again. He gives yu some magic beans in return. Head back to the villa, and around to the backyard where the open window and ivy are.
Villa – Backyard
- Open your inventory and click on the magic beans, then click on the patch of fertile soil on the grass.
- Aha! Click on the magic beanstalk that sprouts up to climb up into the window.
Villa – Interior
Exits: Return to the backyard; Go to the corner
Villa – Interior – Corner
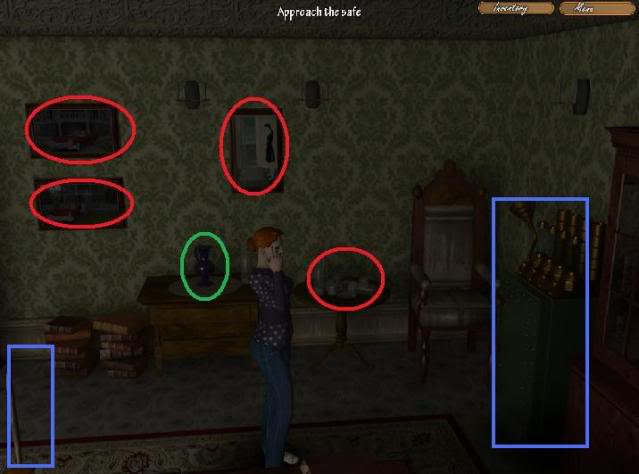
Items to examine: A painting x 3; A saucer
Items to take: A vase
Exits: Approach the safe; Return to the center
- Take the vase on the table, then approach the safe.
Villa – Safe
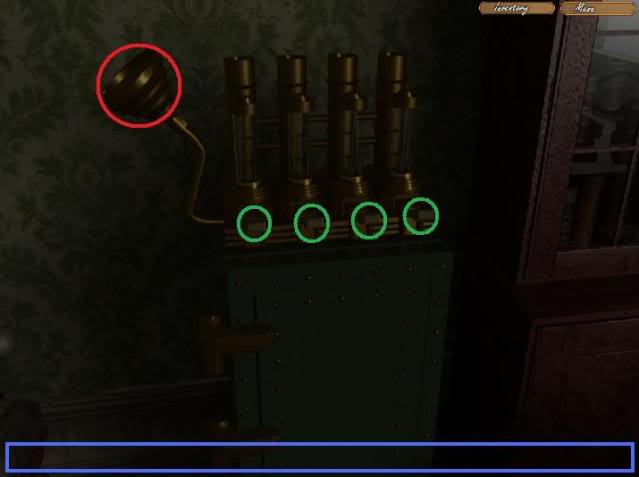
Items to examine: A filler
Items to use: Move bar x 4
Exits: Step away from the safe
- Examine the filler. Then, open your inventory and select the vase filled with water, and click on the filler to fill the tubes with water.
- According to the piece of paper on the desk in this room, the tubes need to be arranged in the following order: empty, full, full, empty.
- Pulling levers have the following results:
- 4 – raises 4, lowers 1
- 3 – raises 3, lowers 2
- 2 – raises 2, lowers 4
- 1 – raises 1, lowers 3
- SOLUTION: Press the buttons in the following order: 2, 3, 4, 4, 4, 4, 3, 3, 3, 2, 2, 2, 2, 2
- When done correctly, the safe will pop open (see the screenshot below)
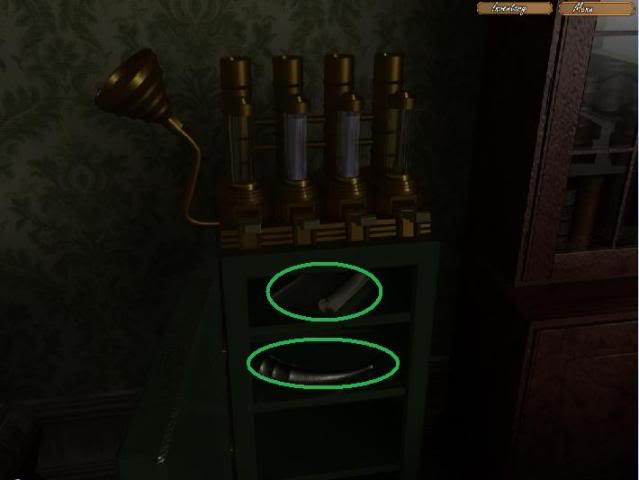
- Take the letter and the horn inside the safe.
- Go back to the city center, and ask Petar the Driver to take you to see the Count.
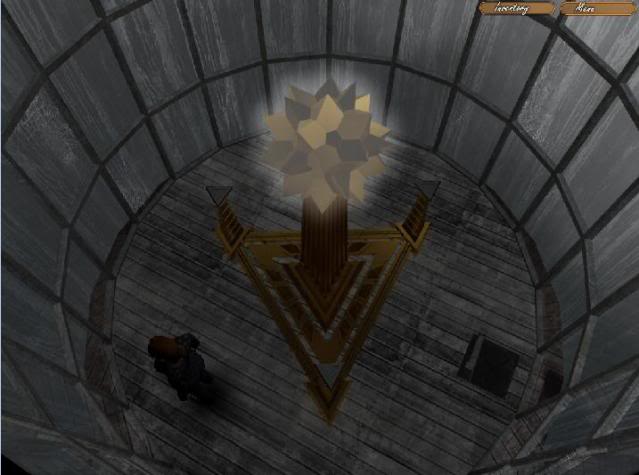
COUNT’S TOWER
- Walk through the gate, then click on the tower to approach it. As Eve walks across the chasm, she’ll summarize what she has learned so far. When you reach the massive gate, open your inventory and double-click on the horn. The gates will swing open. Enter the tower.
Count’s Tower – Interior
- There’s only one exit here: Forward towards the elevator.
Elevators
- There are four elevators here, one of which is raised off the floor. Enter the first elevator, which will take you to a library
Library
Items to examine: Knight’s armor
Items to use: Return to the elevator
Exits: Approach the display books; Approach the bookshelf.
- Back in the Library, approach the displayed books. Take note of the text in the open book.
- Next approach the bookshelf (the area is shown in the screenshot) and click on the piece of paper to learn a spell – Telekinesis. Click along the bottom of the screen to exit back out to the Library.
- Go back down the elevator to the main elevator room.
- Open your inventory, click on the Magic tab, and click once on the Telekinesis spell to select it, then click on the raised elevator. You can now enter the third elevator.
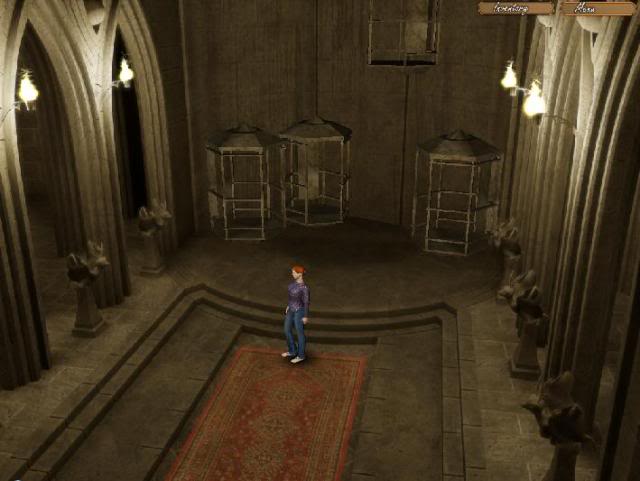
Vatram’s Cage
Items to examine: Eggs
People to talk to: Vatram
Exits: Return to the hallway; Approach the bars.
- Talk to Vatram, the “ghost dragon.” Vatram offers to teach your a new spell, Blizzard, but first you must deliver an egg to another dragon… also named Vatram.
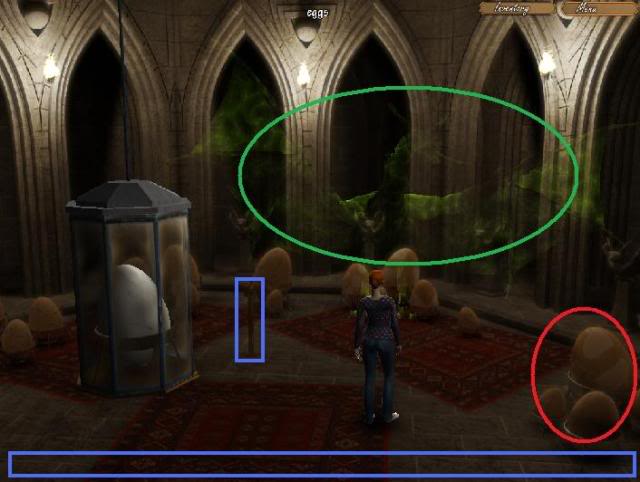
- Click on “Approach the bars” to zoom in on a puzzle.
Approach the Bars puzzle
- There are four levers here. Click the levers so that they’re in the following position: Up, Up, Down, Up.
- The glass case around the egg will rise, but it’s still too big for you to take.
- Open your inventory, click on the magic tab, and click once on the Shrink spell, then click on the egg to shrink it.
- Take the egg, then talk to Vatram again to learn the Blizzard spell.
- Return to the elevator room and go up Elevator 2.
Hall
Items to examine: Massive wooden doors
People to talk to: Unit 42
Exits: Return to the elevator.
- Talk to Unit 42. Looks like you can’t reason with him. Open your inventory, click the Magic tab, then click once on the Blizzard spell to select it. Click on Unit 42.
- Now that he’s out of the way, you can pass through the doors.
Dining Room
- The Count is sitting at the table. Talk to him thoroughly, until he casts a spell on you.
Jail Cell
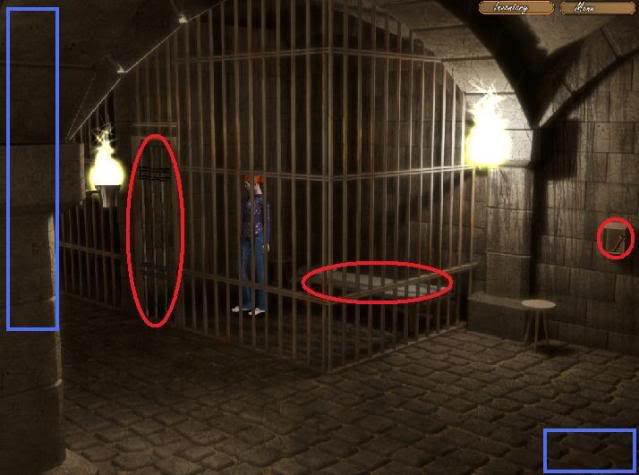
Items to examine: A bed; Cell doors; Key
Exits: Go to the left; Go to the right
- Open your inventory, click the Magic tab, and click once on your Telekinesis spell to select it, then click on the keys.
- Click on the keys in your inventory to select them, then click on the cell doors.
- Leave the cell and go to the right.
Dungeon – Right Room
Items to examine: Doors to the dungeon; A broken hatch
Items to take: An axe
Exits: Return to the cell
- Pick up the axe head, then return to the cell and take the exit to the left.
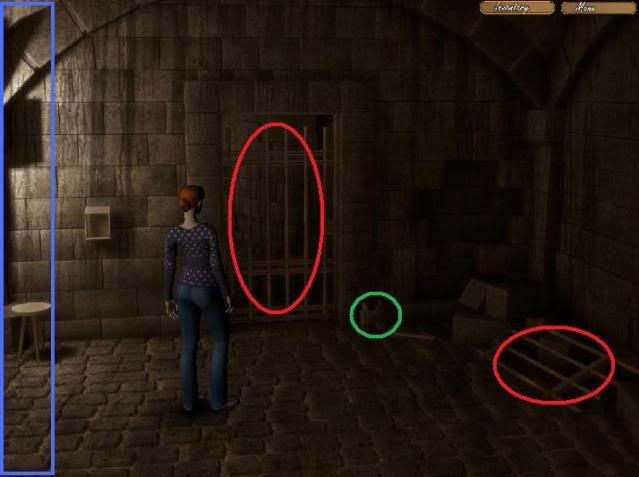
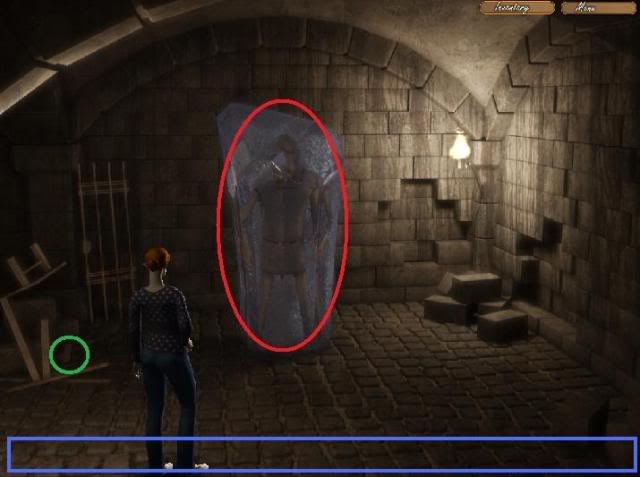
Dungeon – Left Room
Items to take: A handle
Items to examine: A frozen man
Exits: Return to the cell
- Take the handle from the rubble on the left-hand side.
- Open your inventory and click on the handle, then click on the axe head to fit the two pieces together. Click on the axe, then click on the frozen man to thaw him.
- Click on Rales Ty.
THE ANGELS
Portal crossroads
- Exits: Go to the portal; Go to the left; Go to the right
Huts
Items to examine: Large hairs
Exits: Enter the left hut. Go to the right hut.
- Enter the left hut.
Left Hut (Rales Va)
- Talk to Rales Va thoroughly, and learn about how you muct help Rales Ka.
- When you talk to Rales Va, you will automatically zoom in on an area of the hut….
Rales Va’s Hut (Zoomed In)
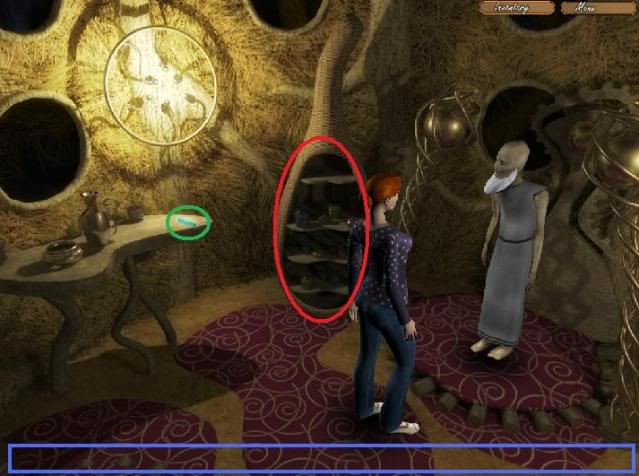
Items to examine: Small shelves
Items to take: Crystal
Exits: Enter the left hut.
- Take the crystal on the table.
- Go back to the main part of the hut, and click on the door in the upper right to exit.
- Click in the upper right to cross the bridge going towards the second hut.
Approaching the Right Hut
Exits: Enter the right hut; Go left; Go to the left hut.
- Enter the right hut.
Right Hut (Rales Ka)

Items to examine: A symbol on the wall.
Items to take: Crystal
People to talk to: Rales Ka
Exits: Exit the hut
- Take the pink crystal on the table. You can try to talk to Rales Ka, but you won’t get very far.
- Exit the hut by clicking the lower left corner of the screen. Once you’re outside, click the lower left corner of the screen again to continue down the walkway.
- You’ll arrive at a glowing pink hut. Enter it.
Glowing Pink Hut
Items to examine: A table; A strange symbol; A strange light; A strange device
Items to take: A controller
Exits: Exit the hut; Approach the device
- Take the controller from the table. Open your inventory, click on the first crystal, then click on the controller to fit the two items together. Fit the second crystal into the controller as well. Now, approach the device in the hut for a closer look.
- Open your inventory and click on the controller, then click it onto the device (see screenshot).
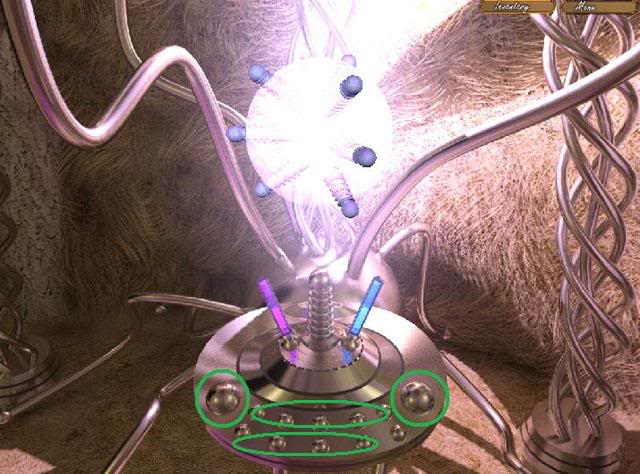
- There are two rows of smaller buttons, with a large button on either side. The two large buttons rotate the device, and the smaller buttons cause parts of it to extend or retract. To solve the puzzle, all of the parts must be extended.
- SOLUTION:
- Assume the buttons are labelled as follows: top row, starting from left, 1, 2, 3, 4, 5; and bottom row, starting from left, 6, 7, 8, 9 (the 10th button can’t be pressed down).
- Press the buttons in the following order: 1, 2, 3, 4, 5, 6, 7, 8, 9, 4, 8
- Leave the hut and take the bottom exit. Enter the Right Hut.
Right Hut
- Talk to Rales Ka thoroughly, then open your inventory and double-click on your father’s medallion to use it.
DRAGON CAVE
Cave entrance
- You find yourself in a cave. You can examine a couple of the crystals on the wall. Click forward to approach the crossroads.
Crossroad
- There are left and right exits here. Go to the left.
Left Path
- There are two chambers here, a left and a right. Go to the right one and you’ll approach a safe.
Left Path – Right Chamber – Safe
- Open your inventory, click once on your Blizzard spell, and click on the padlock. Click on the padlock a second time to open the safe. Take the helmet inside.
- Head back out to the crossroads, and take the right path.
Right Path
Items to take: Shield
People to talk to: Misho; Mate
Exits: Go deeper into the cave; Go back to the crossroads
- Talk to either Misho or Mate to learn about what you must do next.
- If you continue deeper into the cave, you’ll encounter an impenetrable wall of fire. Instead, go back to the crossroads, take the left path, and take the left path to head down to the water.
- Click on the machine hooked up to the two hoses near the water to zoom in on a valve puzzle
Valve Puzzle
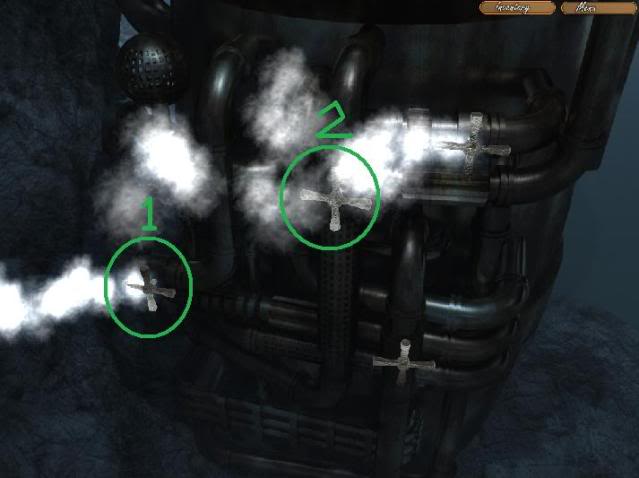
Turn the two valves in the order shown above (leftmost valve, then second-from-left).
- The water will drain to reveal a suit of armor. Open your inventory, click the Magic tab, and click once on your Telekinesis spell to select it, then click on the Armor.
Right Path
- Return to the room where Misho and Mate are. Pick up the shield in this room if you haven’t already.
- Open your inventory, and combine the Armor, Shield and Helmet. Now you have a complete set. Double click on the suit or armor to wear it.
- Now you can walk deeper into the cave and walk through the fire.
She-Vatram’s Cave
- You’ll find yourself standing before another dragon.
- Take off your armor by double-clicking it in your inventory, then talk to She-Vatram.
- Talk to the dragon thoroughly, and give her the egg. She’ll tell you what you have to do next. Once you’re finished, you can click on the exit behind her wing to leave the cave.
- Leave the mine and enter the swamp.
THE SWAMP
Giant Mushrooms
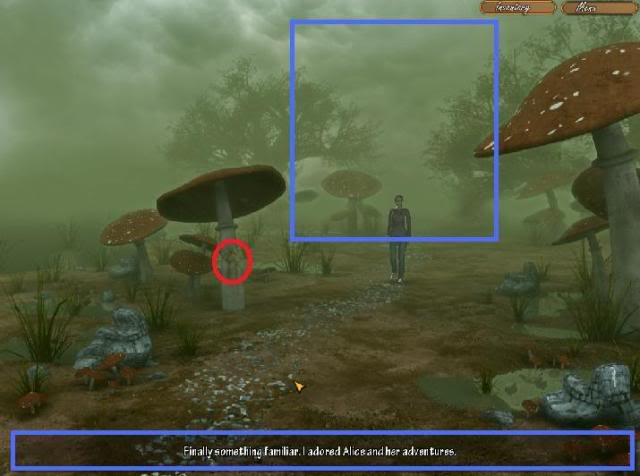
Items to examine: A huge mushroom
Exits: Leave the swamp; Continue along the path
Straw Cabin
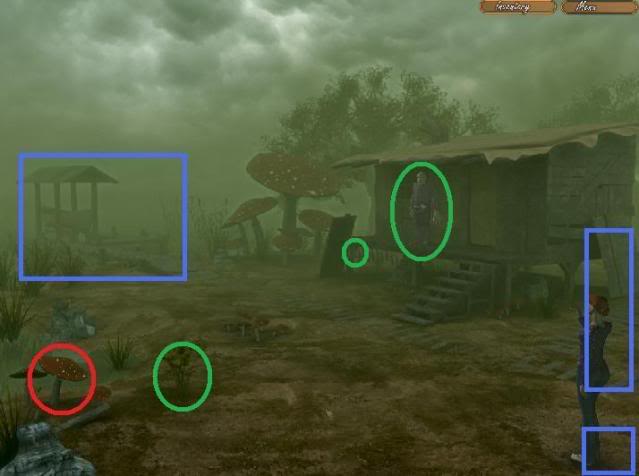
Items to examine: A small mushroom
Items to take: A plant; A fish
People to talk to: Martin
Exits: Return to the huge mushrooms; Go behind the straw hut; Approach the dock
- Take the plant and the fish.
- Talk to Martin, and he’ll fill you in on a few problems you need to help him with.
- Then, go back to the straw hut and walk around behind it.
Huge Tree
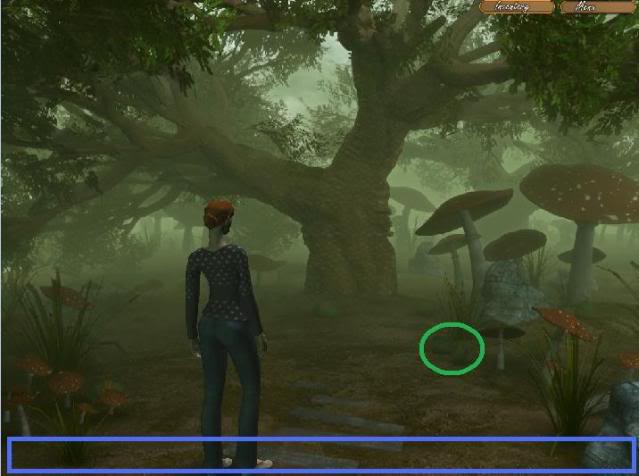
- Pick up the large acorn at the foot of the tree.
- Go back to the swamp entrance in the screen with the huge mushrooms. Open your inventory, click on the empty acorn and click on the spot on the giant mushroom stalk that’s oozing sap to fill the acorn with sap.
- Open your inventory and combine the plant with the acorn cup to create a glue kit. Go to the dock.
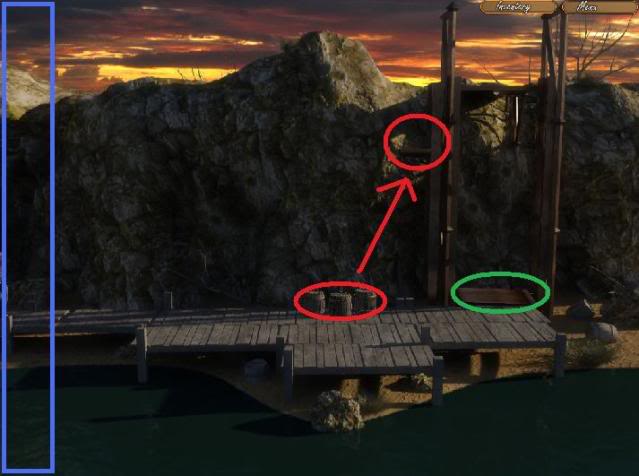
Dock
Items to examine: Sunken boat; Boat;
Items to take: Rope
- Grab the coil of rope that’s sitting there.
- Use the glue kit on the boat.
- Go back and talk to Martin. He gives you a hook, and goes to stand by the dock. Talk to Martin again to get into the boat and go out onto the lake.
Lake
- Click the right part of the screen to go deeper into the lake.
Lake – Monster
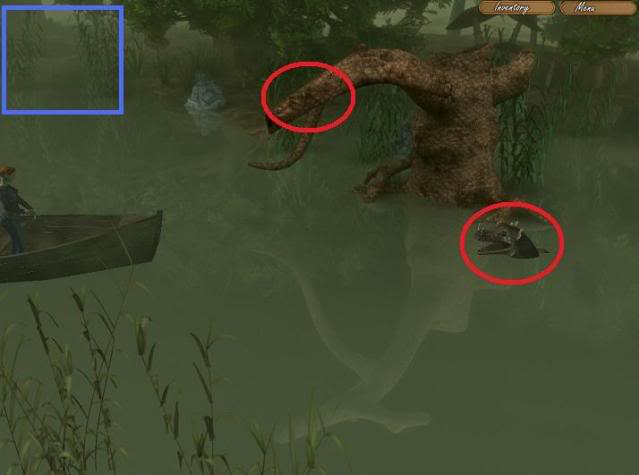
Items to examine: Monster; A branch
Exits: Go towards the dock
- Open your inventory and combine the rope, fish and hook.
- Next, click on your fishing rod and click on the overhanging branch.
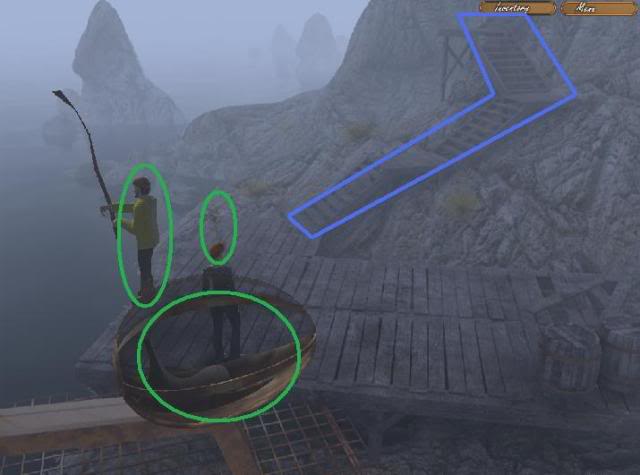
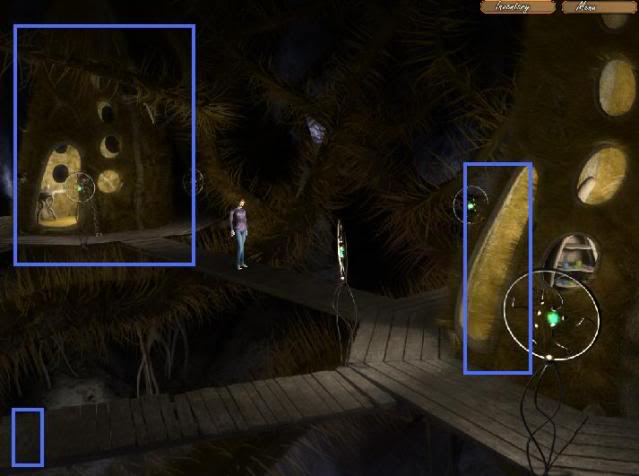
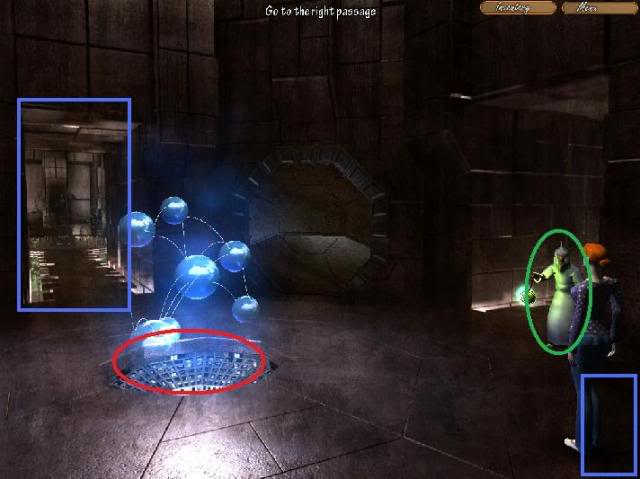
- Continue on to the right until you land at a dock. Walk along the dock until you reach an elevator.
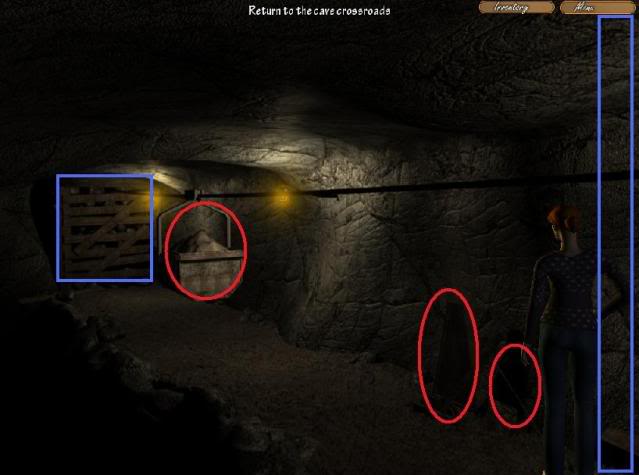
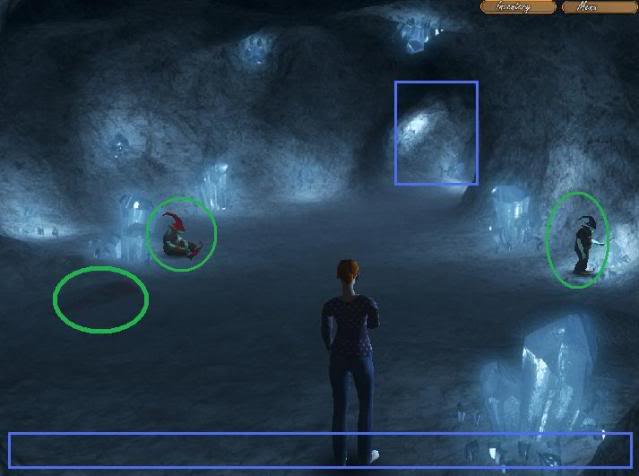
Elevator
Items to examine: Barrels; Elevator; Elevator Platform
Exit: Return to the boat
- Walk onto the elevator floor (circled in green in the screenshow).
- Then, use your Telekinesis magic to pick up a barrel and place it on the elevator platform (the platform and barrels are both circled in red). Do this with the other two barrels as well. When you’ve finished, the elevator will raise with Eve on it.
- Follow the path towards the Ziggurat.
ZIGGURAT
Brozz the Giant
- Talk to Brozz.
- Open your Magic tab and double-click on the Shrink spell to Shrink Eve. Then talk to Brozz again.
Brozz’s Mouth
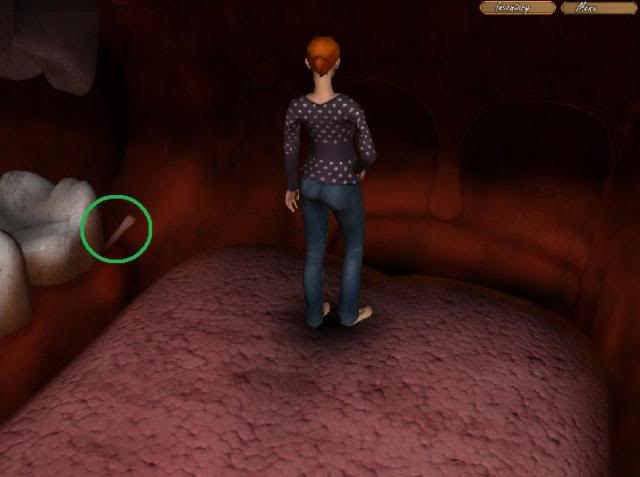
- Walk further into Brozz’s mouth. Behind his back left molar, you’ll see the bone shard. Click on it to pull it out. Click on the bottom of the screen to leave Brozz’s mouth.
- Double-click on the Shrink spell again to return Eve to her normal size.
- Talk to Brozz thoroughly, until he opens a bridge for you to enter the Ziggurat.
Broken Bridge
- You find yourself faced with a second broken bridge. The only thing connecting the two sides is a single wire.
- Double-click on your Shrink spell to shrink Eve. She’s now small enough to walk across the wire. Click on the other side of the platform to make her walk across.
Pillars Puzzle
- There are four pillars here, and they each contain a panel with three colored lights: Green, Yellow and Blue.
- Rotate each of the panels so that the green light is on top (two of the panels are like this already, so you only need to rotate the other two.)
- When you do it correctly, beams of colored lights will connect all four pillars.
- Step onto the platform in the center and it will lower you to a new area.
Crossroads

Exits: Return to the path (goes to the elevator; Go forward; Go to the let; Go to the right
- Walk along the path until you reach a four-way crossroad. Here you’ll meet Alfred the Butler. Talk to him thoroughly.
- Go to the right first.
Right Room – Deactivated Robots
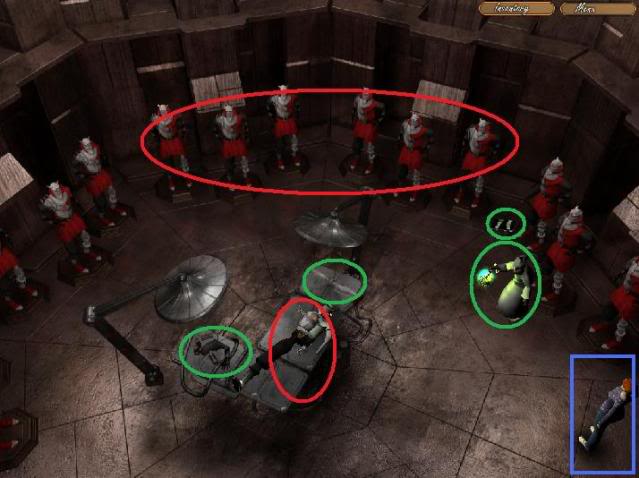
Items to examine: Broken robot; Deactivated robots
Items to take: Robot’s broken arm; Robot’s broken leg; A torn part of the plan
People to talk to: Alfred
Exits: Return to the crossroads
- Examine the broken robot, pick up the robot’s broken arm and leg off of table, take the torn part of the plan on the floor near Alfred, and talk to Alfred.
- Exit the room and go back to the crossroads. Go forward (north).
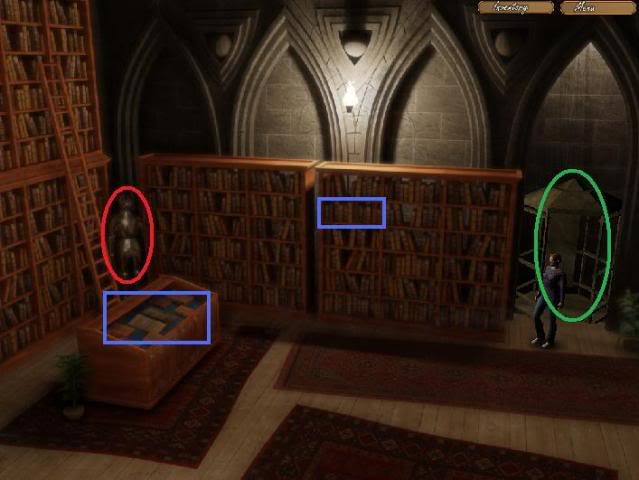
Library
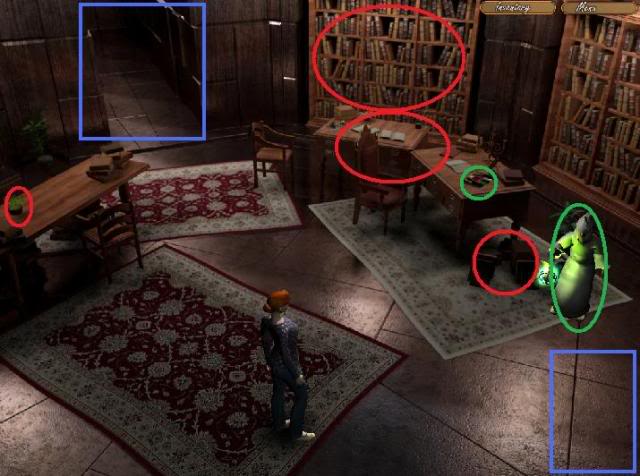
Items to examine: A stack of books; A work desk; A bookshelf; A plant in a pot
Items to take: A torn part of the plan
People to talk to: Alfred
Exits: Return to the crossroads; Go through the passage
- Take the torn plan piece from the table, and talk to Alfred. Then, go back to the crossroads and take the left passage.
Left Room – The Great Engine
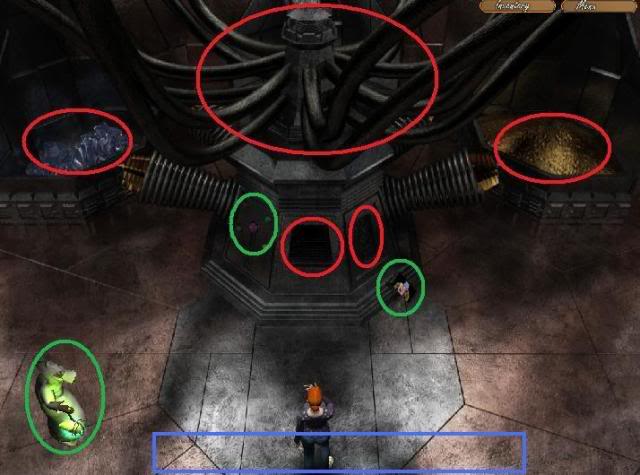
Items to examine: A repairing slot; A plans slot; A large pile of crystals; Large heap of gold dust; Huge conduits
Items to use: A red button; A green button; A blue button; A yellow button; A purple button
Items to take: A torn part of the plan
People to talk to: Alfred
Exits: Return to the crossroads
- Take the third and final torn part of the plan. Open your inventory and fit the three pieces together.
- Click on the robot plan to select it, then click on the plan panel (the highlighted panel to the right of the repair slot).
- Take the robot arm from your inventory and place it in the repair slot.
- Press the yellow button, then the purple button.
- Take the repaired robot arm from the slot.
- Now take the robot leg and put it in the repair slot. Press the green button, then the purple button. Take the repaired leg.
- Leave this room and go back to the right passage to the room with the deactivated robots.
Right Room – Deactivated Robots
- Click on the arm in your inventory and click on the broken robot to replace his arm. Do the same thing with the leg.
- Now talk to Android-234 mark 3 thoroughly until you receive a key.
- Go back to the crossroads, take the north passage and go through the library to the large doors.
- Use the key on the big doors to pass through.
Hologram Passage
Items to examine: Hologram of the planets
People to talk to: Alfred
Exits: Return to the passage; Go to the left passage; Approach the massive doors; Go to the right passage
- Talk to Alfred. He isn’t much help. Head along the left passage, and approach the statue.
Left Passage – Statue
- Get as close as you can to the statue, and take the golden rose she’s holding.
- Retrace your steps and go through the right passage.
Right Passage – Sleeping Quarters
Items to examine: A book; Cups
Items to take: A ring box
Exits: Leave the sleeping quarters
- Go back to the center room and approach the doors.
The Massive Doors
- There’s a locking mechanism here with three slots: Big, Medium and Small. Place the golden rose in the large slot, the medallion in the medium slot, and the ring in the tiny small slow below.
- You can now go through the massive doors.
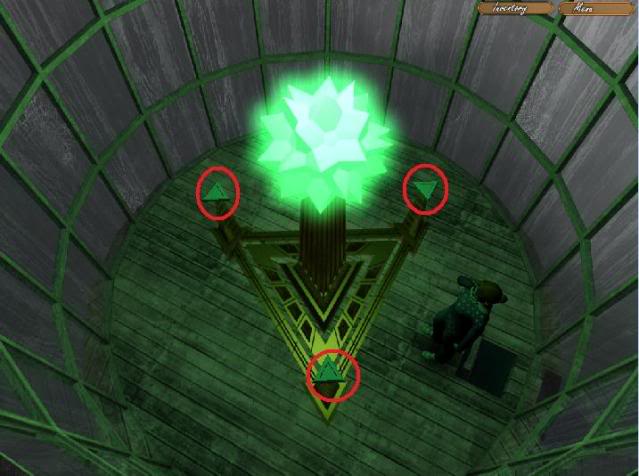
Organ Room
- Approach the organ, and examine the female robot playing it. This is getting very creepy. Go and stand on the green platform. On the next level, you’ll see a large triangular platform. Approach it.
Triangle Puzzle
- This is a “Simon Says” puzzle. All you have to do is repeat the pattern that flashes by clicking on the correct colors.
- After you complete the puzzle, the second green platform will lower. Click on it. Step onto the platform, and enjoy the final cutscene. You’ve just completed the game!
“;

More articles...
-
Best Horror Games On Itch.io – July 2026
Across a bounty of subgenres. -
Haze Seas Accessories Tier List [Best Accessories to Equip]
The accessories with the best stat buffs in Haze Seas.