
Best Horror Games On Itch.io – July 2026
Across a bounty of subgenres.![Haze Seas Accessories Tier List [Best Accessories to Equip]](/wp-content/uploads/2026/07/haze-seas-accessories-tier-list.jpg "Haze Seas Accessories Tier List [Best Accessories to Equip]")
Haze Seas Accessories Tier List [Best Accessories to Equip]
The accessories with the best stat buffs in Haze Seas.
![[Roblox] Evomon Shiny Hunting Guide – Including Prismatic and Pris Shinies!](/wp-content/uploads/2026/06/evomon-shiny-hunting-guide.jpg "[Roblox] Evomon Shiny Hunting Guide – Including Prismatic and Pris Shinies!")

The Fool Walkthrough
Welcome to The Fool walkthrough on Gamezebo. The Fool is a Hidden Object game played on the PC and created by Magic Indie. This walkthrough includes tips and tricks, helpful hints, and a strategy guide on how to complete The Fool.


- Prefer Gamezebo on Google

The Fool – Game Introduction
Welcome to The Fool walkthrough on Gamezebo. The Fool is a Hidden Object game played on the PC and created by Magic Indie. This walkthrough includes tips and tricks, helpful hints, and a strategy guide on how to complete The Fool.
General Tips

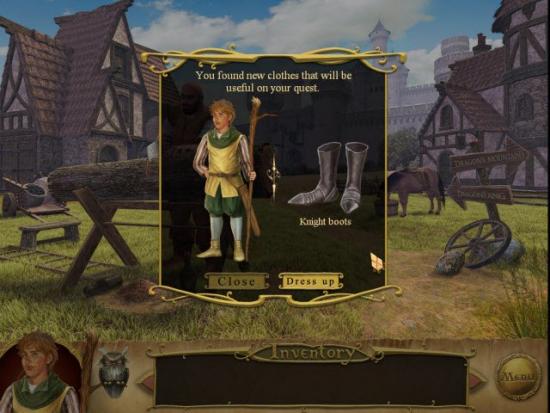
• Dress Up Feature. As you progress through the Game you will find different clothing items. When you gather a clothing item you will be represented with special pop up window. Click on “Dress Up” to put on the clothing items you find.
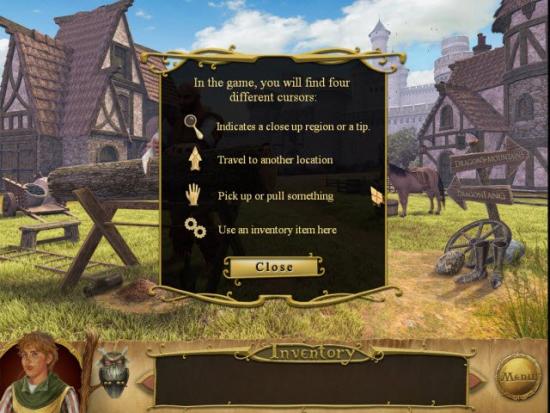
• Gear Mouse Icon represents areas that can be interacted with an Item.
• Magnifying Glass Mouse Icon represents areas that you can examine.
• Hand Mouse Icon represents Items that can be picked up.
• There are two Game Modes available, Casual Mode and Advanced Mode.
• Casual Mode features faster refilling Hint Button and Skip Option; Active Areas will also sparkle.
• Advanced Mode features slower filling Hint and Skip; Active areas will not sparkle.
• In Casual Mode the Hint Meter takes approximately 45 seconds to refill.
• You have unlimited Hints.
• In Casual Mode the Skip Option will take approximately 1 minute to fill.
• Hidden Object Scenes will feature some Orange Items. These Item require extra steps to gather.
• Hidden Objects Scenes will vary each time you play.
• There are five Chapters.
Interface
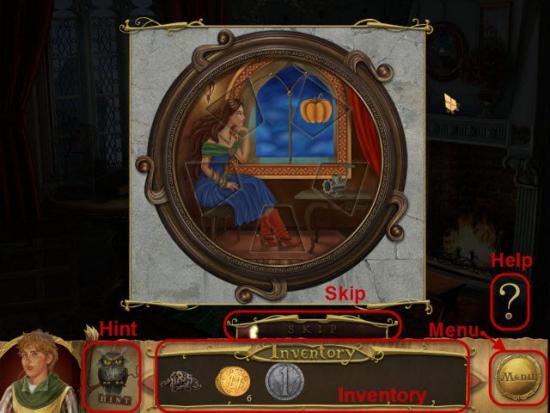
Menu – The Menu allows you access to the main functions.
Hint – Hint Meter is unlimited. Use as often as you like. Once the Sign, under the Owl is fully colored again, the Hint option is available once more.
Inventory – Contains your current items collected.
Skip Puzzle -The Skip Button is used to skip any Mini-Game.
Help – The Question Mark provides help and and directions for the current Mini-Game.
Guide Tips
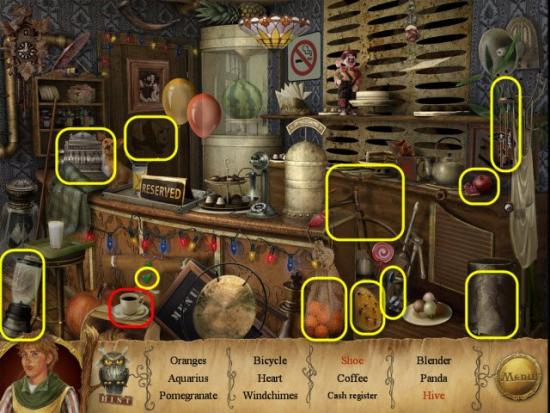
• Hidden Objects are highlighted in Yellow.
• Items are highlighted in Red.
• Interactive Areas are highlighted in Green.
• Locations are highlighted in Blue.
Walkthrough: Chapter 1 – Dragon Fang
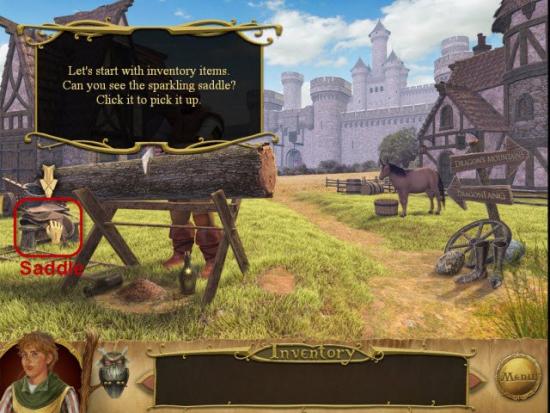
This guide starts with the Tutorial.
Gather the Saddle highlighted in Red.
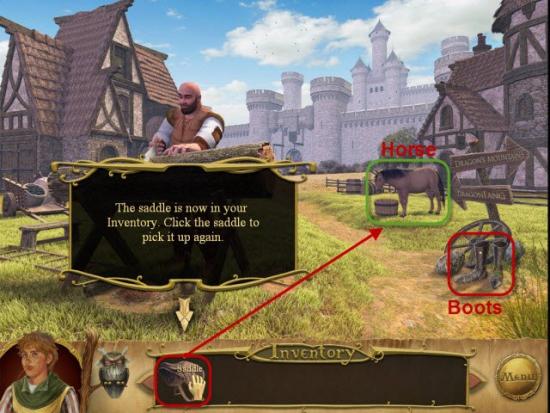
Place the Saddle, highlighted in Red, onto the Horse, highlighted in Green.
Gather the Boots highlighted in Red.

Click “Dress Up” to wear the Boys.
Click “Close” to exit the screen.
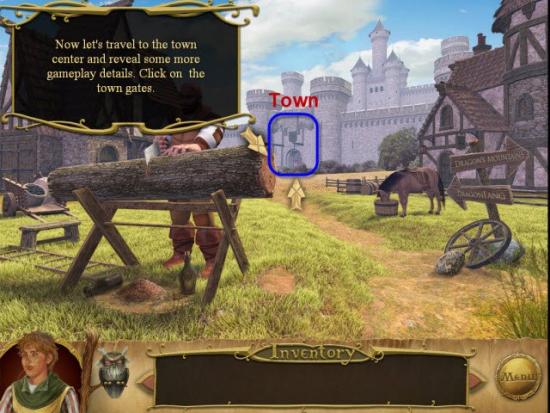
Head to the Town.
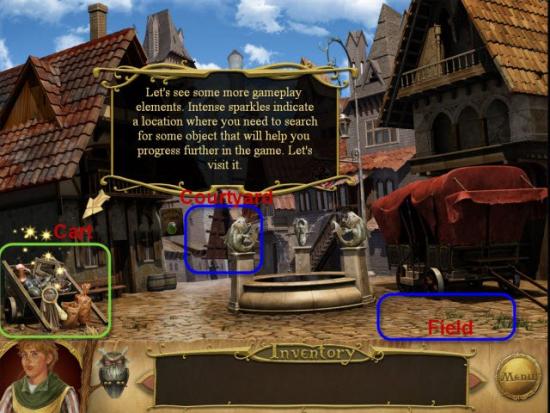
Examine the Cart highlighted in Green.
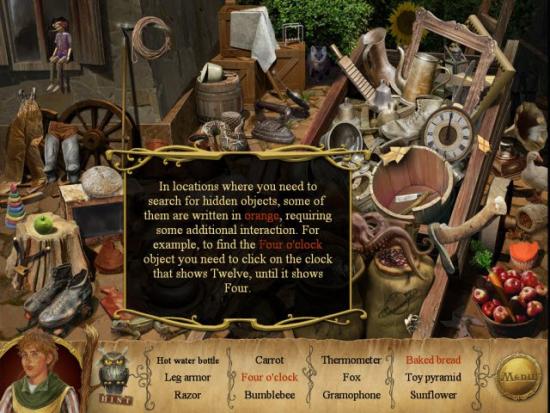
Click on the Clock, four times, then gather the Clock.
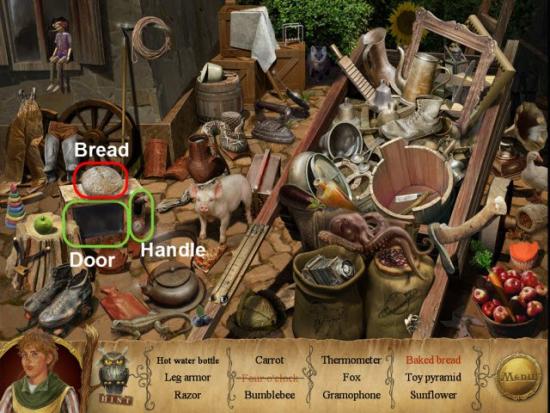
Open the Door of the Oven highlighted in Green.
Gather the Bread highlighted in Red.
Place the Bread inside the Oven.
Close the Oven Door.
Pull the Lever highlighted in Green.
Open the Oven Door.
Gather the Bread.
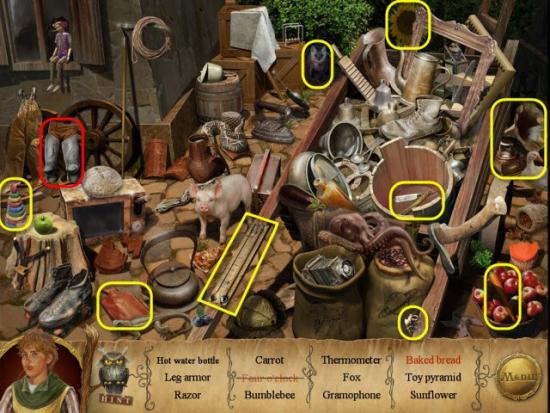
Gather the Leg Armor highlighted in Red.
Gather the Hidden Objects highlighted in Yellow.
“Dress Up” with the Boots.
Return to the Field.
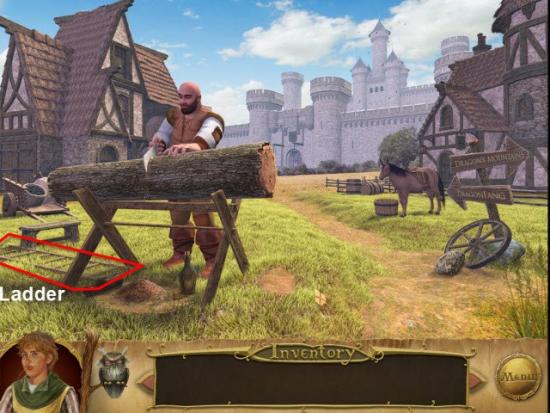
Gather the Ladder highlighted in Red.
Enter the Town again.
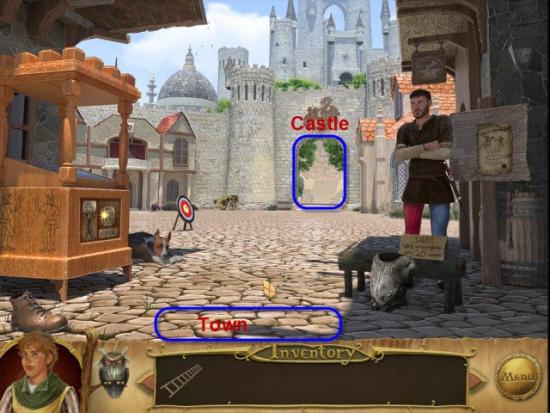
Move forward to the Courtyard.
Move forward to the Castle.
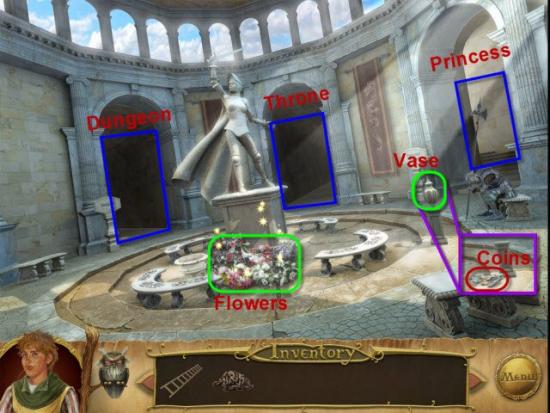
Knock the Vase, highlighted in Green, onto the Ground.
Gather the Coins highlighted in Red.
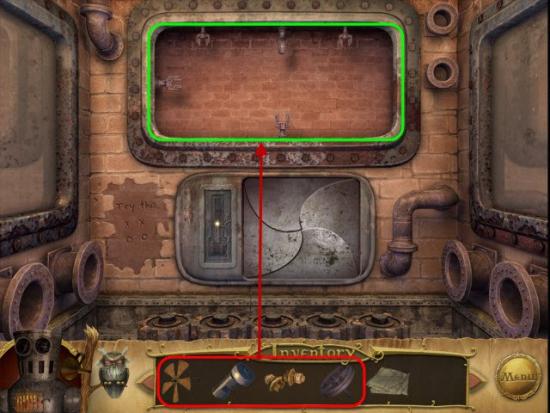
Examine the Flowers highlighted in Green.
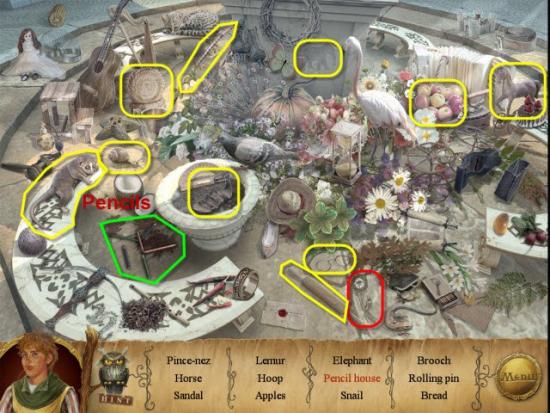
Click to turn each of the colored Pencils, highlighted in Green, until they form the Shape of a House.
Gather the Brooch highlighted in Red.
Gather the Hidden Objects highlighted in Yellow.
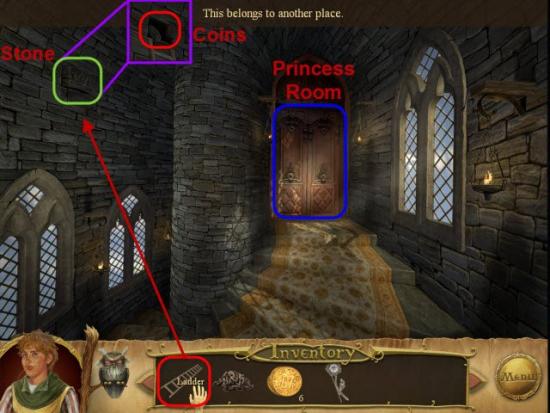
Take the Right Path, highlighted in Blue, to the Princess.
Place the Ladder, highlighted in Red, onto the Wall.
Move the Brick highlighted in Green.
Gather the Coins highlighted in Red.
Continue onto the Princess’s Room.
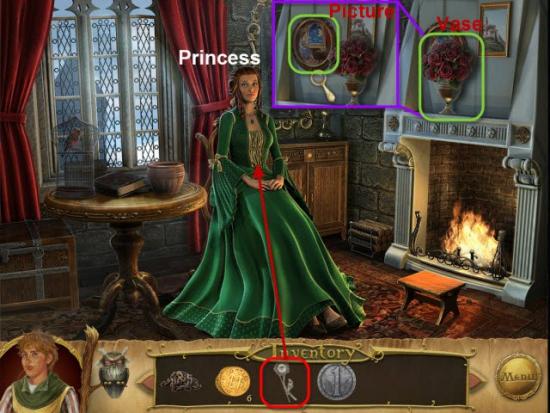
Talk to the Princess.
Give the Brooch, highlighted in Red, to the Princess.
Move the Flower Vase, highlighted in Green, on the Mantel.
Examine the Picture on the wall behind the Flower Vase.
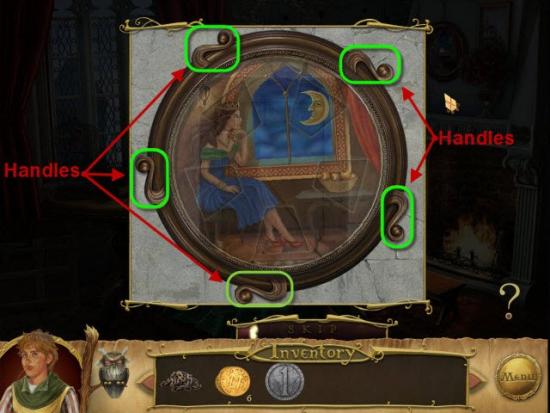
To solve this Mini-Game you need to change the five Areas to the most appropriate scene.
Click on the Handles to rotate through a set of Images.
Once all Areas show the correct Image, the Cache will be revealed.

Gather the Coins and Lock Pick highlighted in Red.
Go Back two screens.
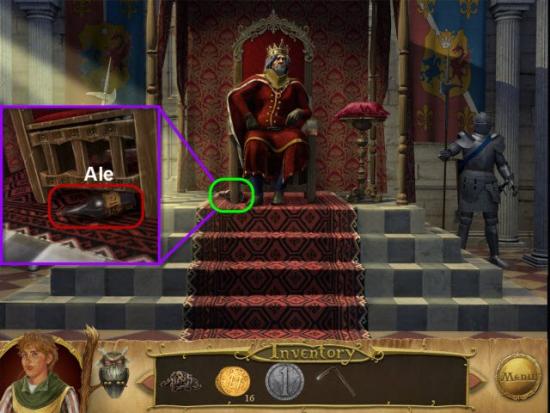
Head to the Center Path, toward the Throne Room.
Examine the Base of the Throne.
Gather the Bottle of Ale.
Go Back one screen.
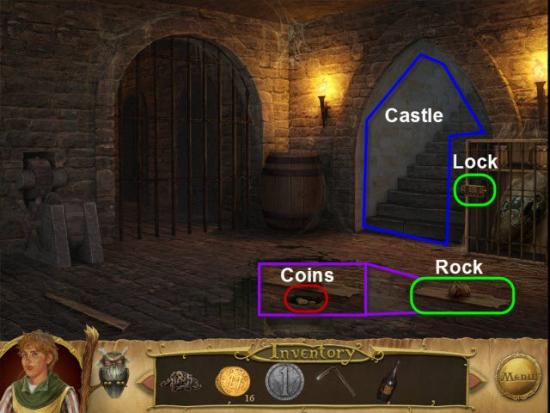
Take the Left Path toward the Dungeon.
Move the Rock highlighted in Green.
Gather the Coins highlighted in Red.
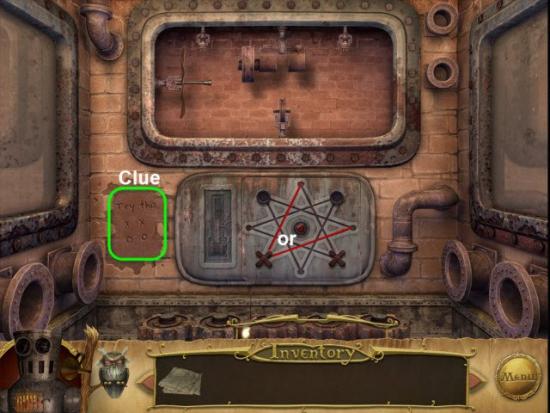
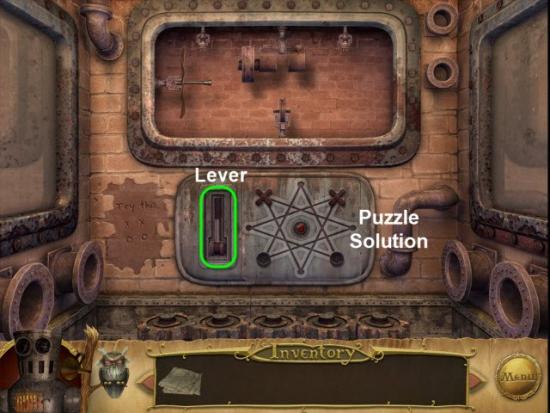
Examine the Lock highlighted in Green.
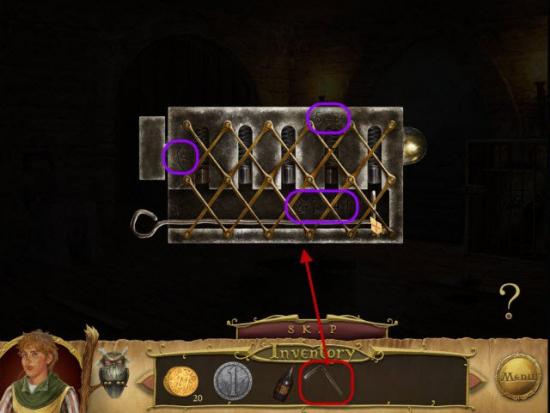
To solve this Mini-Game you will need to Pick the Lock using the Lock Pick highlighted in Red.
Note the three math equations, highlighted in Purple, around the Lock.
Using these equations you now know need to pick Tumbler 2, 3, and 5.
The Tumblers must be picked in the correct order.
Solution: Pick Tumbler 5, Tumbler 2, and then Tumbler 3.
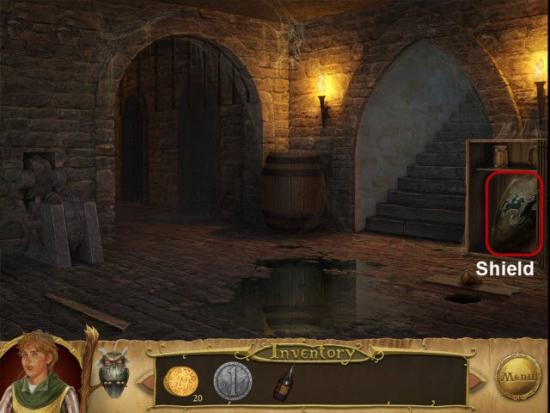
Gather the Shield highlighted in Red.
“Dress Up”.
Return to the Castle.
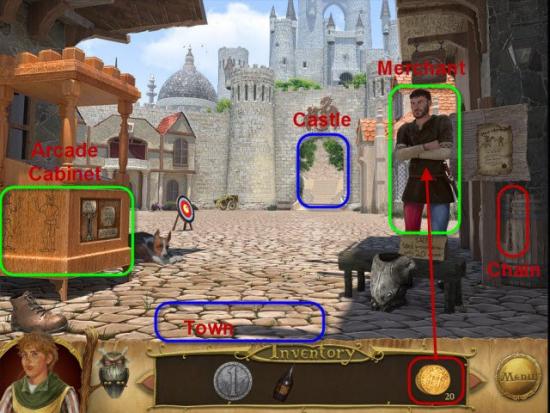
Go Back to the Courtyard.
Gather the Chain highlighted in Red.
Give the 20 Gold Coins, highlighted in Red, to the Merchant, highlighted in Green.
Receive the Breastplate Armor.
“Dress Up”
Examine the Arcade highlighted in Green.
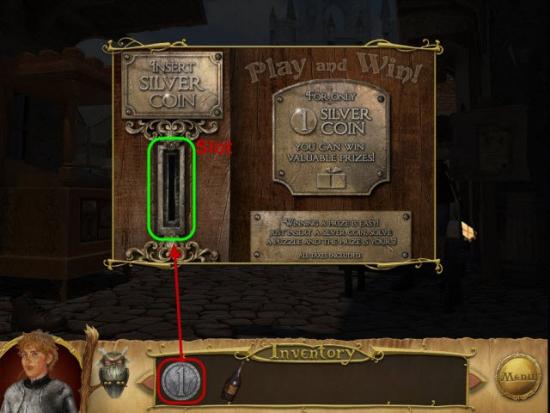
Insert the Silver Coin, highlighted in Red, into the Slot, highlighted in Green.
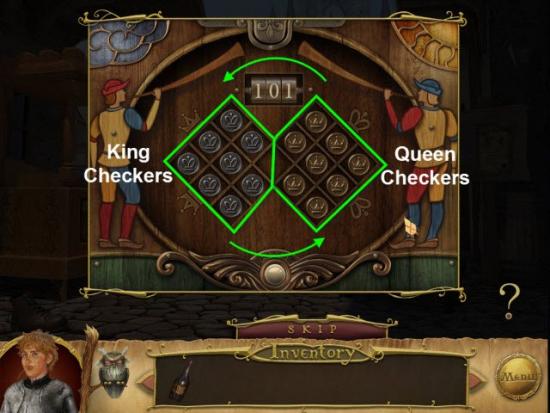
To solve this Mini-Game you will need to move all the Queen Checkers to the left and all the King Checkers to the right.
Checkers can move into an unoccupied spot.
Checkers can only jump one Checker at a time.
Checkers are only able to jump Checkers of their opposite.
For example, King Checkers can only jump Queen Checkers and vice-versa.
You have only 110 moves in which to accomplish your goal.
As always if your stuck you can Skip any Puzzle after about one minute.
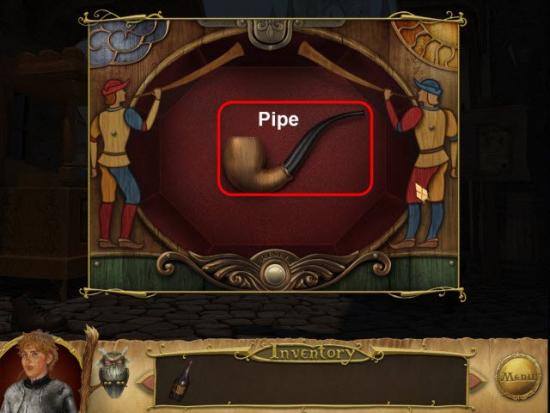
Gather the Pipe highlighted in Red.
Return to the Dungeon.
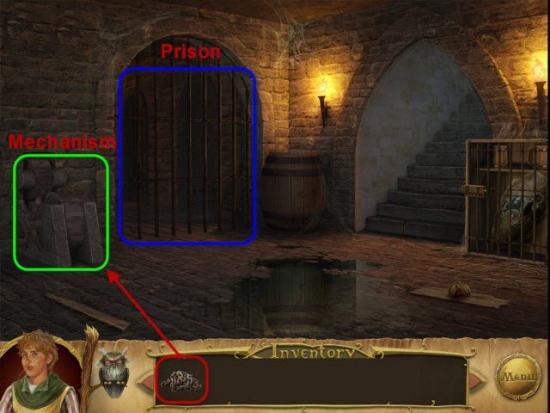
Place the Chain, highlighted in Red, into the Mechanism, highlighted in Green.
Turn the Mechanism to open the Prison.
Enter the Prison.
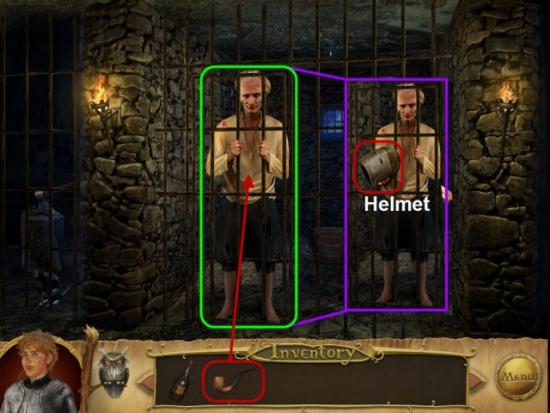
Give the Pipe, highlighted in Red, to the Prisoner, highlighted in Green.
The Prisoner will offer the Helmet.
Gather the Helmet highlighted in Red.
“Dress Up”
Return to the Field.
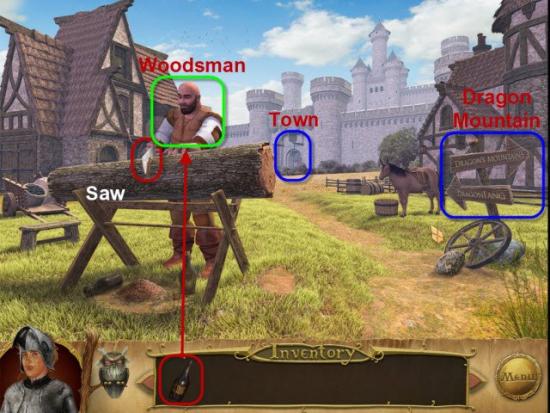
Give the Ale, highlighted in Red, to the Woodsman, highlighted in Green.
Gather the Saw highlighted in Red.
Head toward Dragon Mountain.
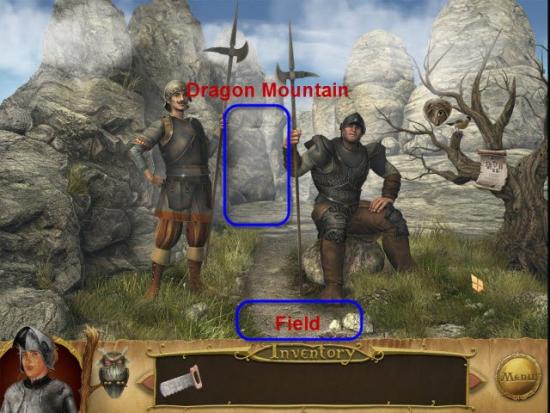
Continue pass the Guards onto Dragon Mountain.
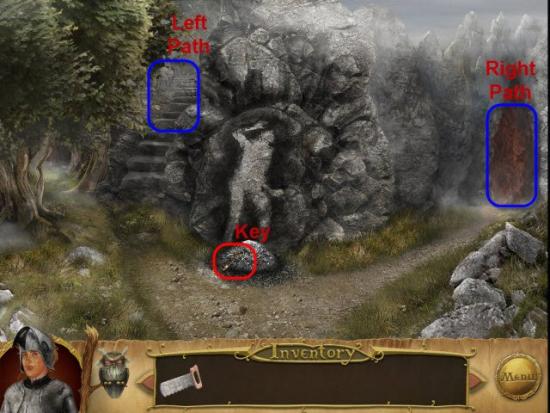
Gather the Key highlighted in Red.
Take the Left Path up the stairs.
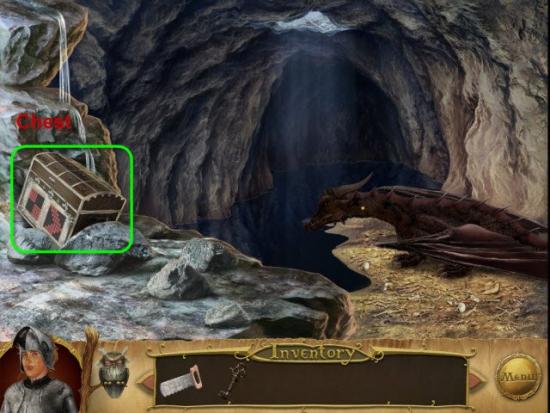
Examine the Chest highlighted in Green.
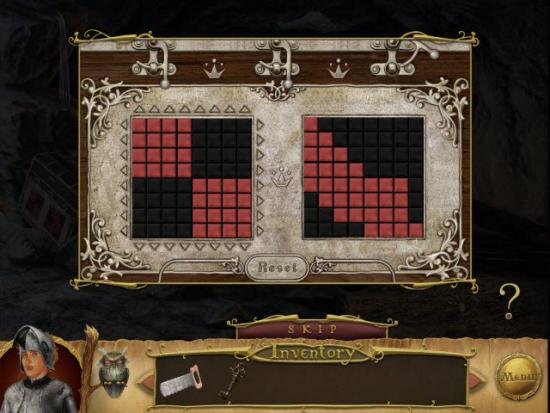
You will be faced with three Puzzles in this Mini-Game.
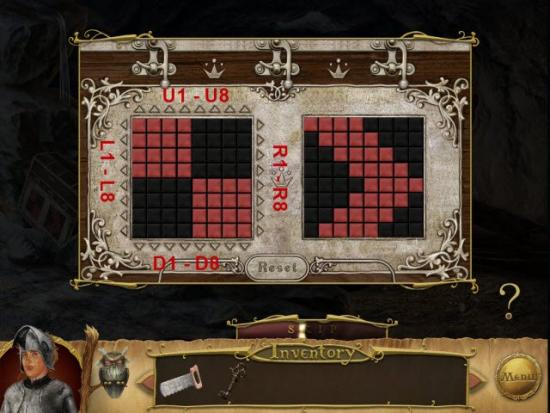
Your goal is to move the Blocks on the Left to match the design on the Right.
Clicking on the Arrows around the Square will move all blocks in the corresponding Row or Column.
For ease of use the Arrows on the Left are labeled, from top to bottom; L1 – L8
The Arrows on the Right are labeled, from top to bottom; R1-R8.
The Arrows on Top are labeled, from left to right; U1-U8.
The Arrows on the Bottom are labeled, from left to right; B1-B8.
Example: R4-2 would mean click the Arrow on the Right side, fourth from the Top, two times.
Solution: R2-1, R3-2, R4-3, L6-1, L7-2, L8-3
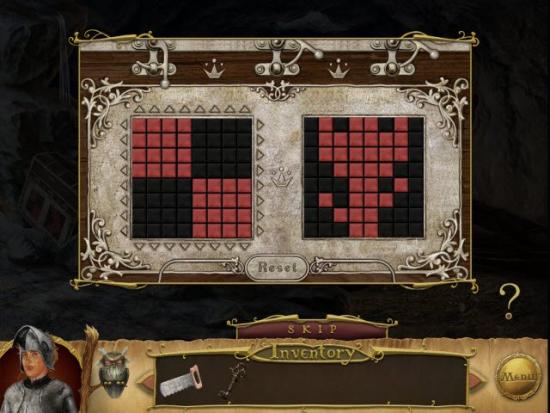
Puzzle Two.
Solution: D2-1, D3-2, D4-3, L5-1, L6-1, L7-1
Puzzle Three.
Solution:
• R1-1, R2-1, R3-1, R4-1, D2-2, L6-1
• U2-2, R6-1, D3-3, L7-1, U3-2, R7-1
• L1-1, L2-1, L3-1, L4-1, R3-2, R4-2
• U6-2, R6-3, U6-1, L5-1, U6-1, L6-3
• R5-1, U7-1, R5-1, U8-5, L1-1, L2-1
• L3-1, L4-1
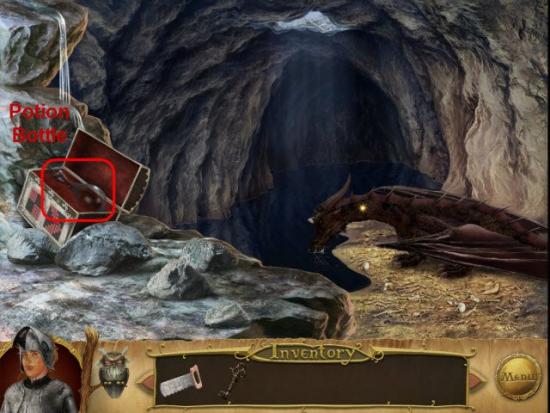
Gather the Potion Bottle highlighted in Red.
Return to Town.
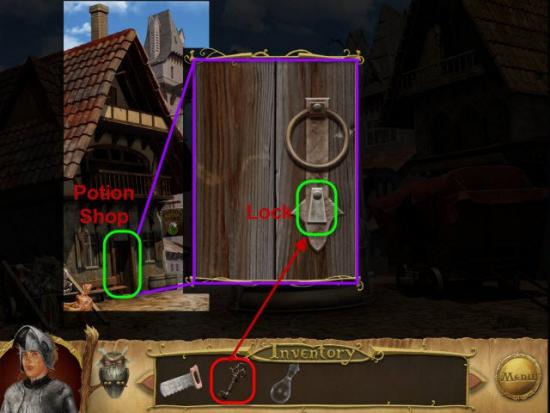
Examine the Potion Store highlighted in Green.
Place the Key, highlighted in Red, into the Lock, highlighted in Green.
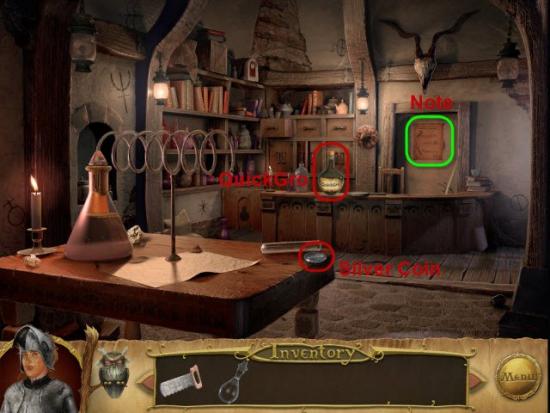
Gather the Silver Coin and QuickGro Potion Bottle highlighted in Red.
Examine the Note highlighted in Green.
Exit the Potion Shop.
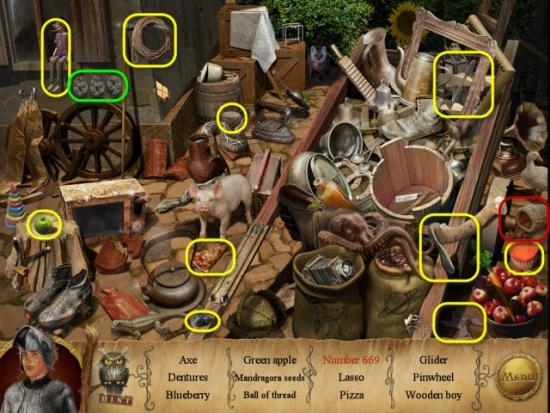
Examine the Cart again.
Click the Numbers, highlighted in Green, until the read 669.
Gather the Mandragro Seeds highlighted in Red.
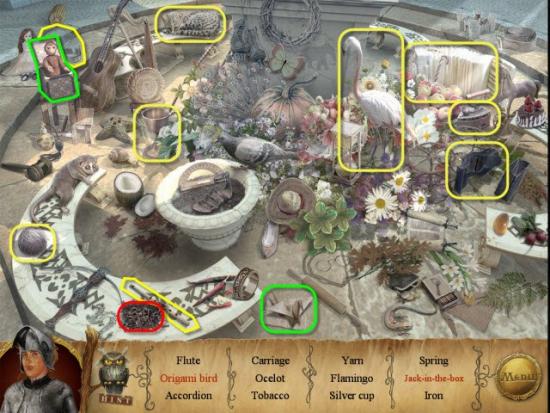
Gather the Hidden Objects highlighted in Yellow.
Head to Courtyard.
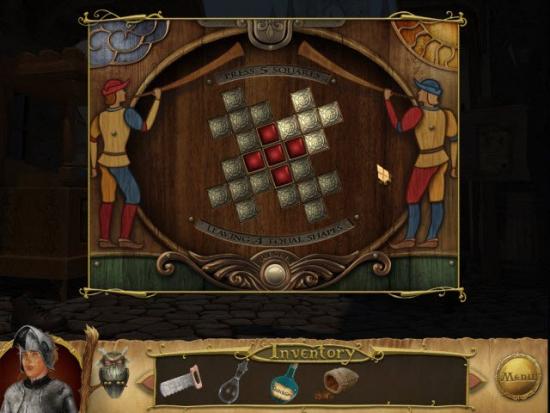
Examine the Arcade.
Enter the Silver Coin.
To Solve this Mini-Game you need to click 5 squares leaving four identically shaped configurations.
See Image for the Solution.
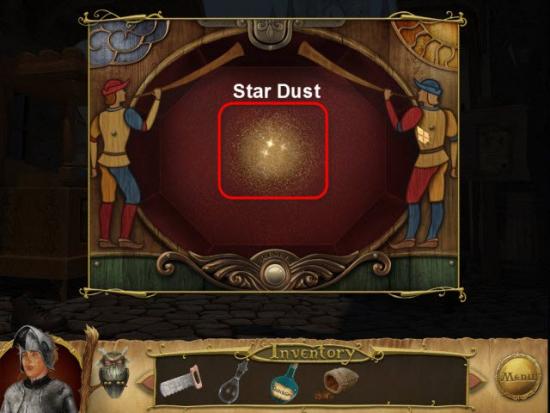
Gather the Star Dust highlighted in Red.
Enter the Castle.
Examine the Flowers at the Base of the Statue once again.
Click the Jack in the Box once, highlighted in Green, then click on the Paper four times to fold the Paper Bird, highlighted in Green.
Gather the Tobacco highlighted in Red.
Gather the Hidden Objects highlighted in Yellow.
Take the Right Path to the Princess’s Room.
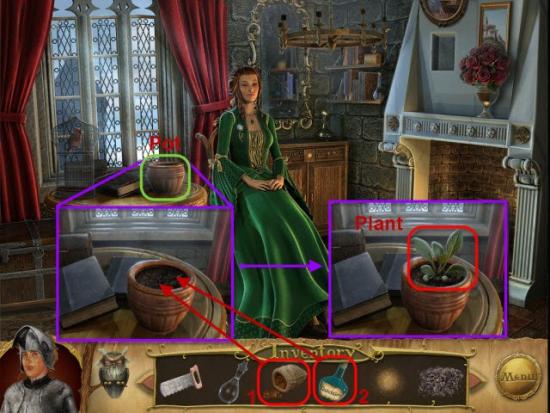
Examine the Pot highlighted in Green.
Place the Mandragro Seeds, highlighted in Red, into the Pot.
Use the QuickGro on, highlighted in Red, on the Pot.
Finally, gather the Plant, highlighted in Red.
Receive the Mandragro Root.

Head down to the Dungeon, into the Prison.
Give the Tobacco, highlighted in Red, to the Prisoner, highlighted in Green.
He will offer you the Unicorn Horn.
Gather the Unicorn Horn highlighted in Red.
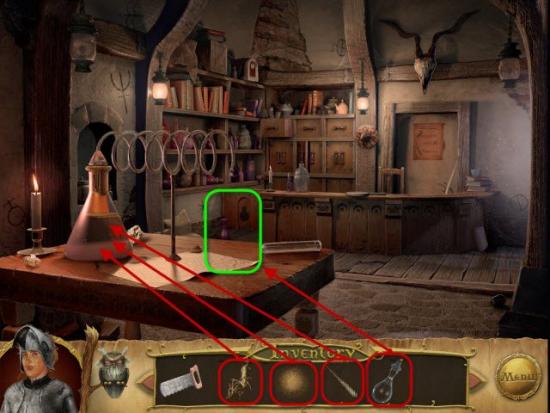
Return to the Potion Store.
Place the Empty Flask, highlighted in Red, onto the Table, highlighted in Green.
Next place the Mandragro Root, Star Dust, and Unicorn Horn, in that order, into the second Flask.
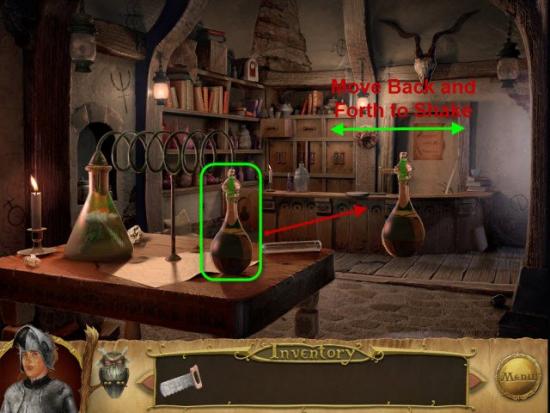
Gather the Flask and Shake the Flask side to side to mix the Potion.
Receive the Sleeping Potion.
Head back to Dragon Mountain.
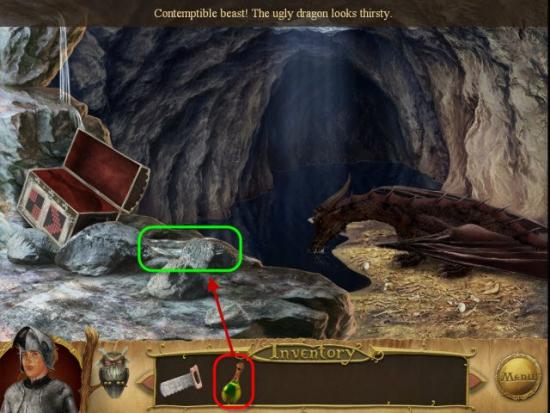
Take the Left Path again.
Pour the Sleeping Potion, highlighted in Red, into the Water, highlighted in Green.
Head Back one screen.
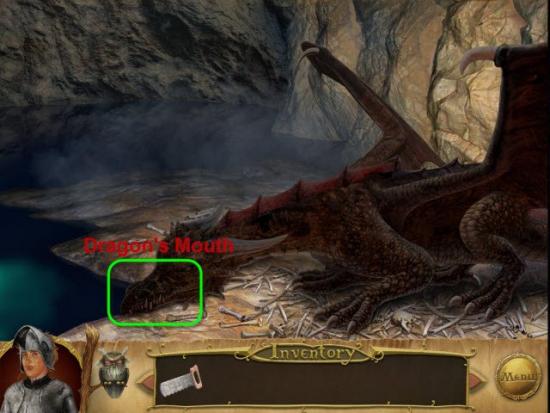
Take the Right Path this time.
Examine the Dragon’s Mouth.
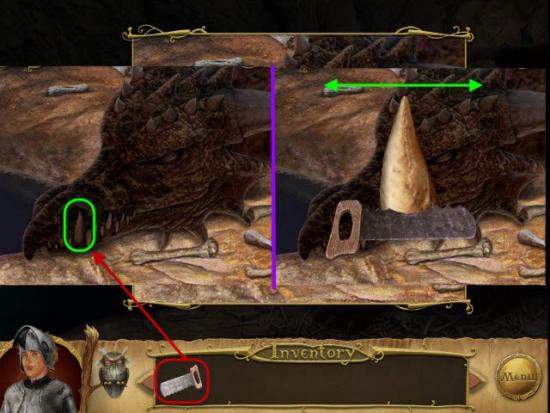
Use the Saw, highlighted in Red, on the Tooth, highlighted in Green.
Saw back and forth until the Tooth comes free.
Receive the Dragon’s Tooth.
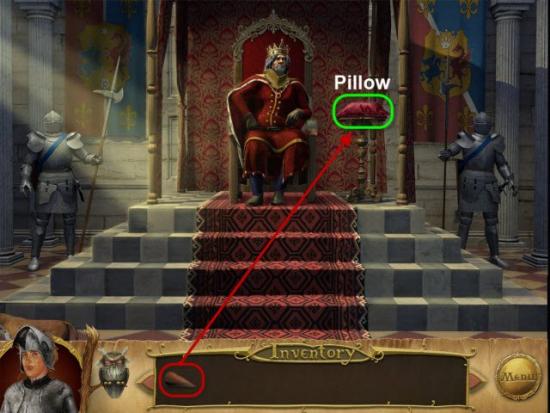
Return to the Castle.
Enter the Throne Room.
Place the Dragon’s Tooth, highlighted in Red, onto the Pillow, highlighted in Green.
Chapter 2: Mortenland
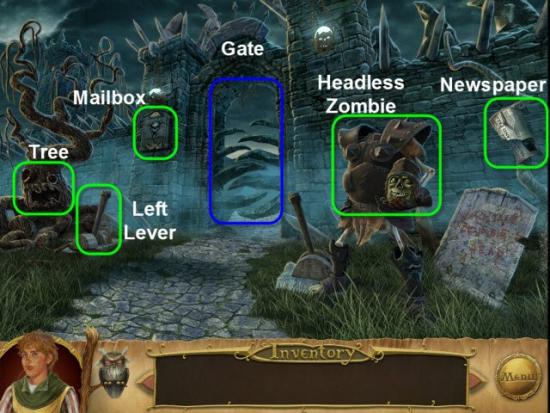
Talk to the Headless Zombie.
Examine the Newspaper highlighted in Green.
Examine the Tree highlighted in Green.
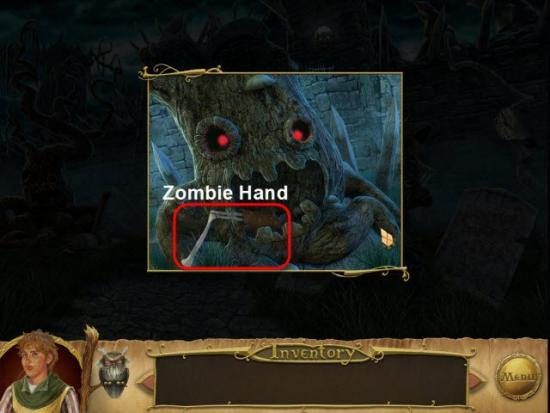
Gather the Zombie Hand highlighted in Red.
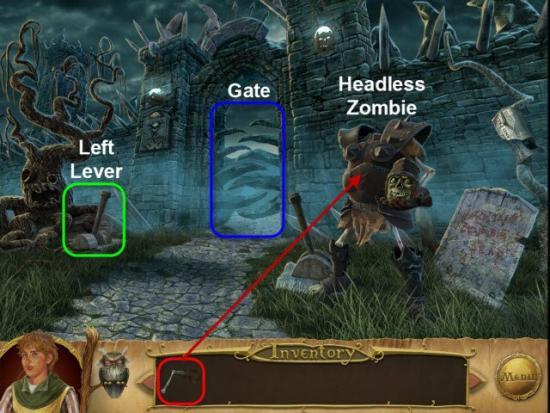
Give the Zombie Hand, highlighted in Red, to the Headless Zombie.
On three pull the Left Switch.
Enter through the Gate.
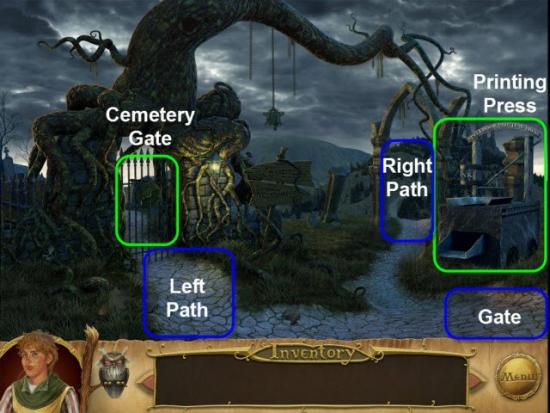
Take the Right Path.
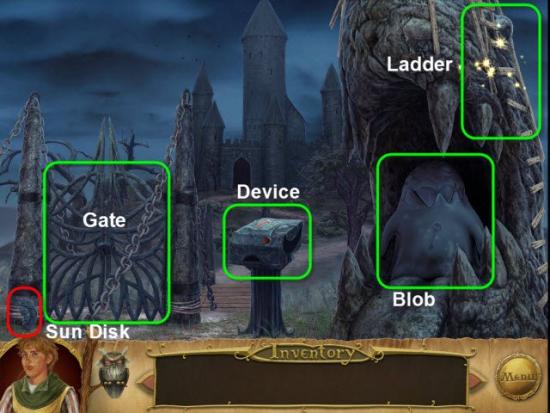
Gather the Sun Disk highlighted in Red.
Examine the Ladder.

Click to move the Mirror highlighted in Green.
Click to move the Hat highlighted in Green.
Click the Pulley, highlighted in Green, four times to lower the Dolls Head.
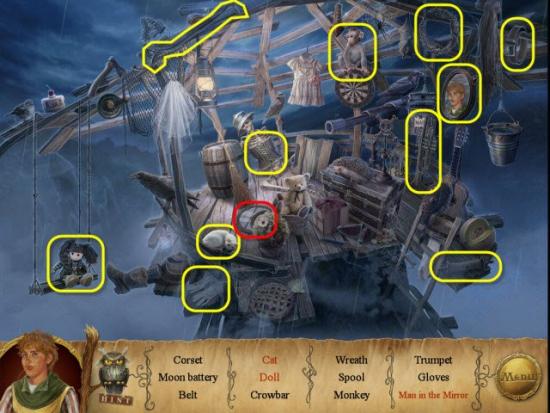
Gather the Moon Battery highlighted in Red.
Gather the Hidden Objects highlighted in Yellow.
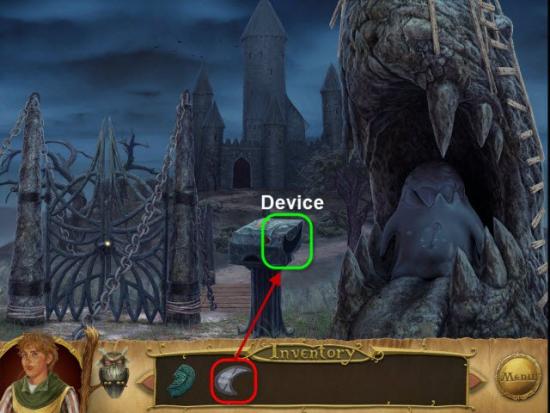
Use the Moon Battery, highlighted in Red, on the Device, highlighted in Green.
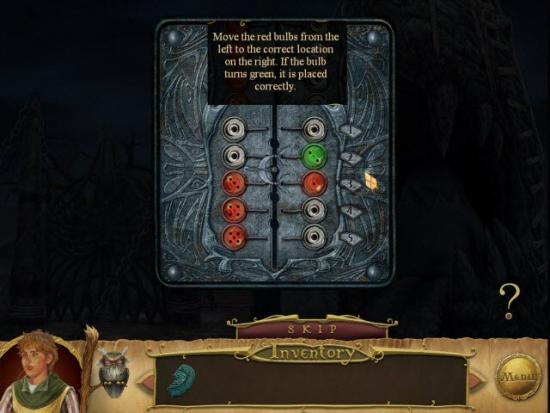
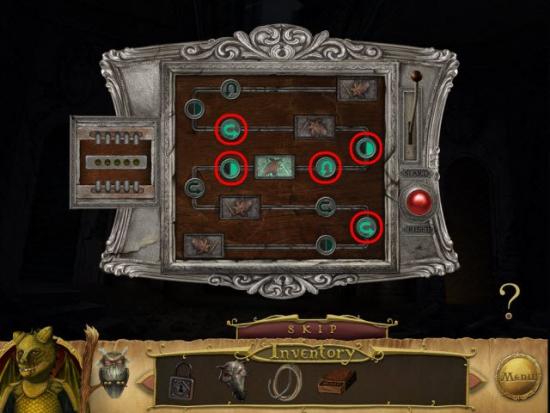
To solve this Mini-Game move all the Red Circles into the numerical order on the Right Side.
Once the Circles are in the correct order they will turn Green.
Once all five Circle are Green, you will receive the Digging Permit.
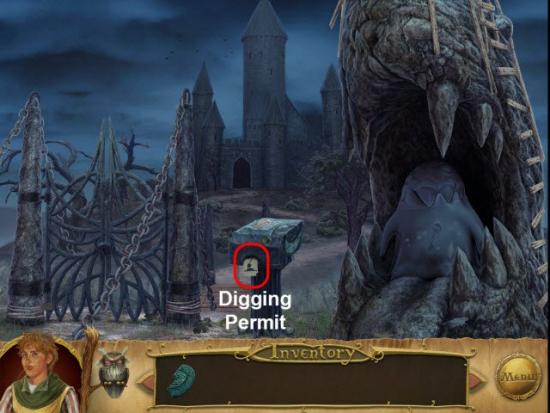
Gather the Digging Permit highlighted in Red.
Head Back one screen.
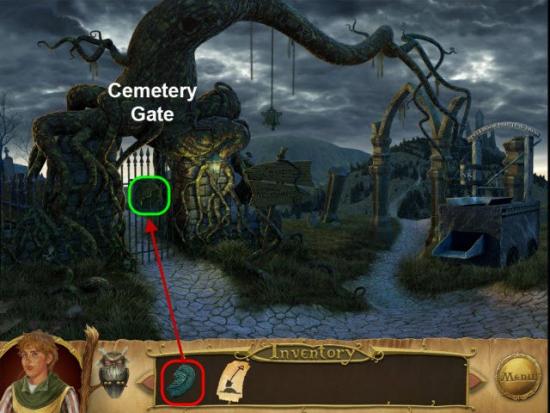
Place the Sun Disk, highlighted in Red, onto the Gate, highlighted in Green.
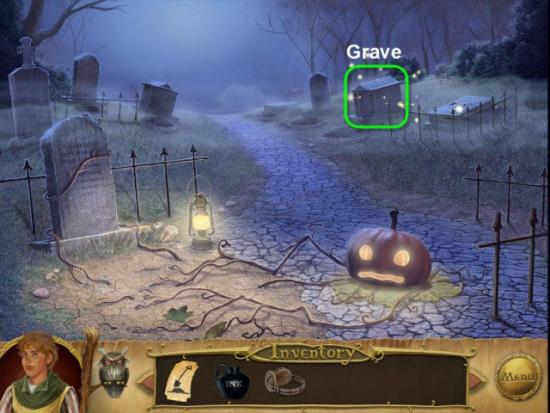
Enter the Cemetery.
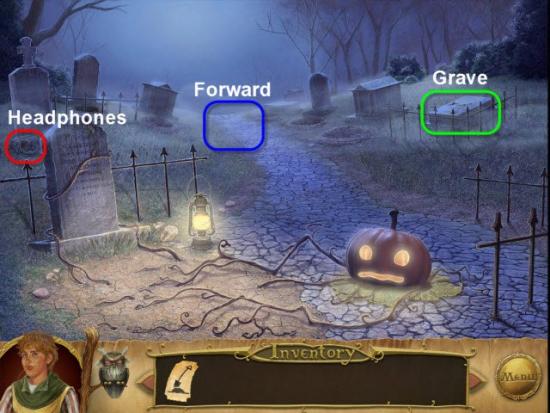
Gather the Headphones highlighted in Red.
Examine the Grave highlighted in Green.
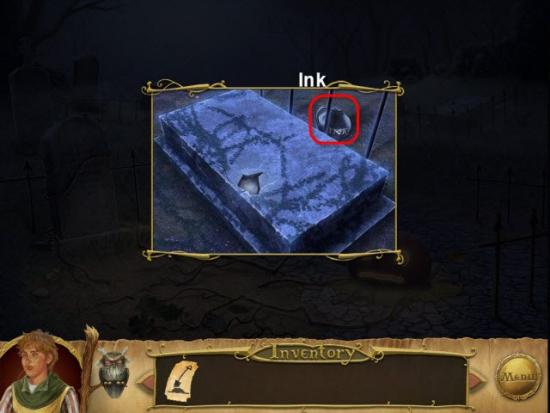
Gather the Ink highlighted in Red.
Exit back to Cemetery.
Head forward into the Cemetery.
Move Back one screen.
Examine the Grave highlighted in Green.
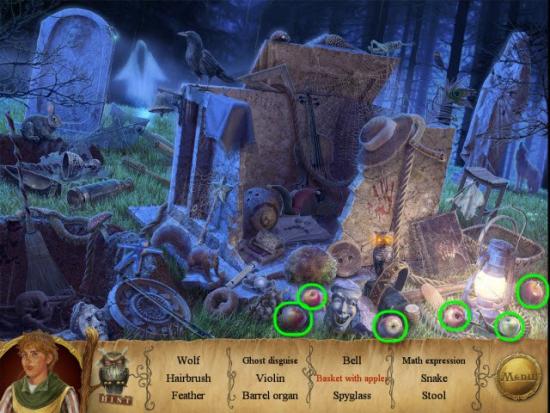
Gather all the Apples highlighted in Green.
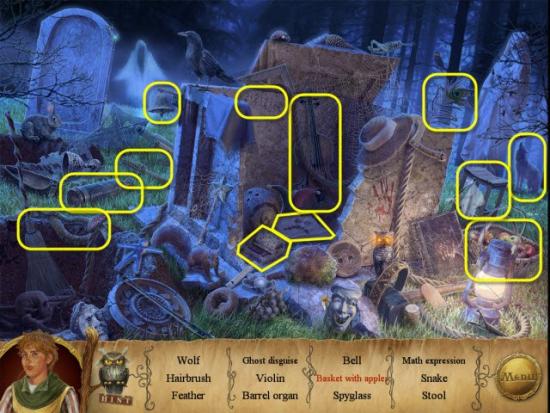
Gather the Hidden Objects highlighted in Yellow.
Receive the Ghost Disguise.
“Dress Up”.
Head forward once again.
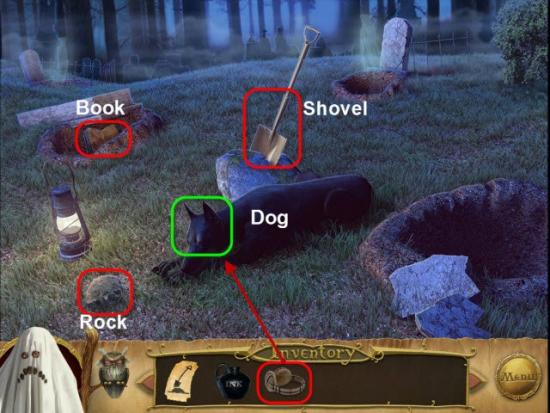
Place the Headphones, highlighted in Red, onto the Dog’s Head.
Gather the Rock and Book highlighted in Red.
Click the Shovel, highlighted in Red, four times to gather it.
Head Back one screen.
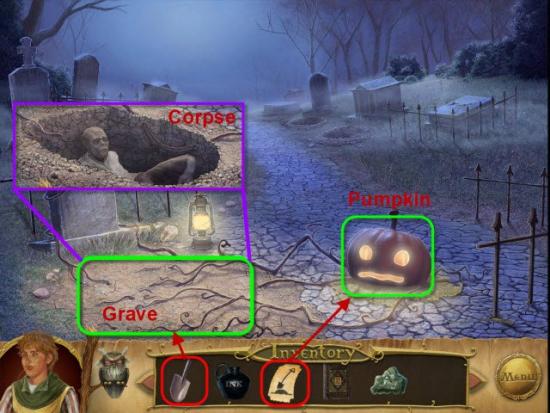
Give the Permit, highlighted in Red, to the Pumpkin, highlighted in Green.
Use the Shovel, three times, on the Grave, to dig up the Corpse.
Gather the Corpse highlighted in Red.
Head Back one screen.

Take the Right Path.
Gather the Key highlighted in Red.
Use the Key on the Gate.
Enter the Castle.
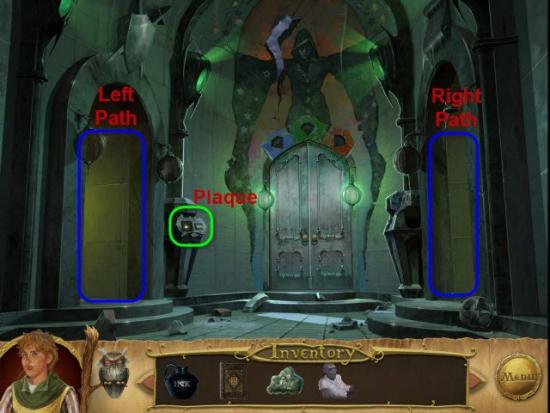
Examine the Plaque highlighted in Green.
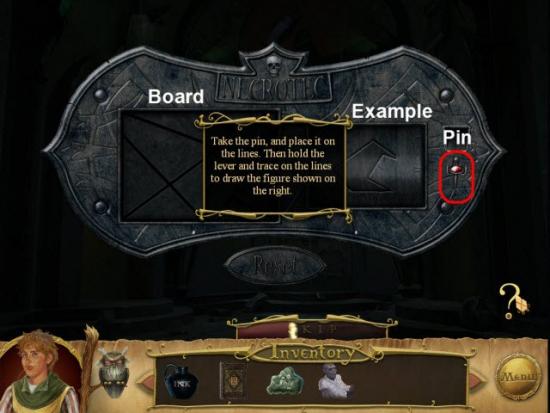
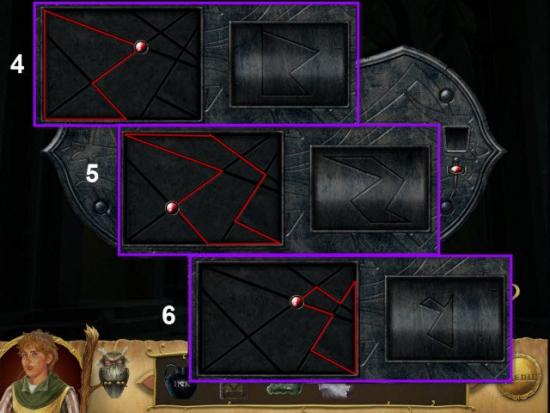
To solve these six Puzzles, in this Mini-Game, you need to trace the outline of the Image on the Right on the Board on the Left using the Pin, highlighted in Red.
Select the Pin and place it on the Board, on the Left.
Next Drag the Pin around the outline of the Shape, matching the Image on the Right.
If you make a mistake, click Reset and try again.
Solutions in the Images below. The Pin placement is represented by a Red Circle.
The Pin can be placed at any point in the Outline.
The Outline Solution is highlighted in Red.
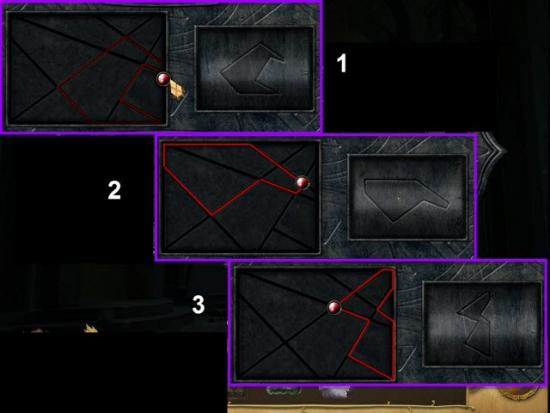
Gather the Green Diamond highlighted in Red.
Take the Left Path.
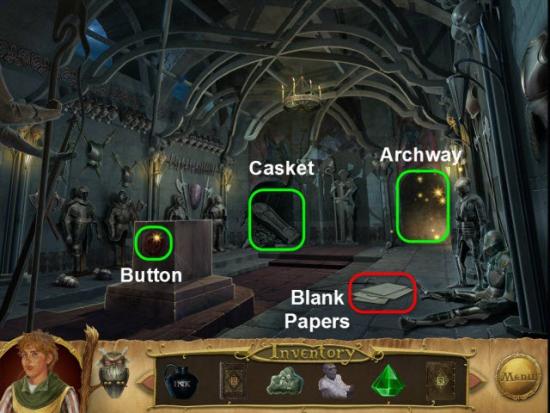
Gather the Papers highlighted in Red.
Examine the Archway highlighted in Green.
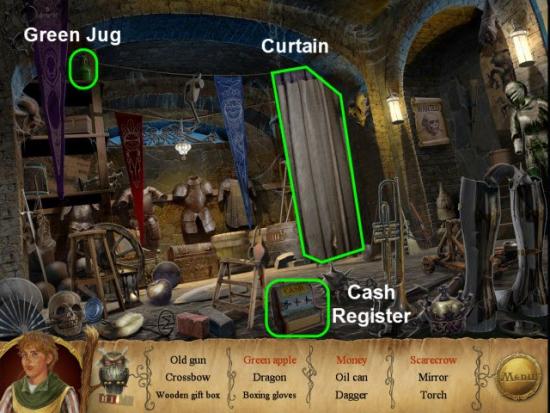
Click to open the Cash Register, highlighted in Green.
Move the Curtain highlighted in Green.
Knock the Green Jug off the shelf, highlighted in Green.
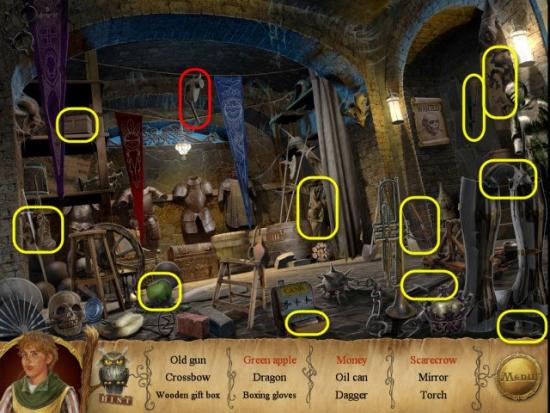
Gather the Oil Can highlighted in Red.
Gather the Hidden Objects highlighted in Yellow.
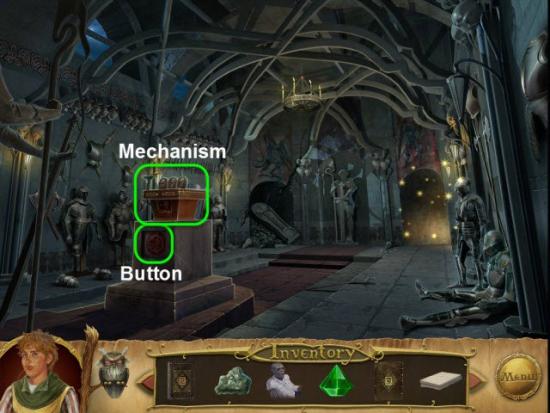
Push the Button on the Pedestal.
Examine the Mechanism, on top of the Pedestal, highlighted in Green.
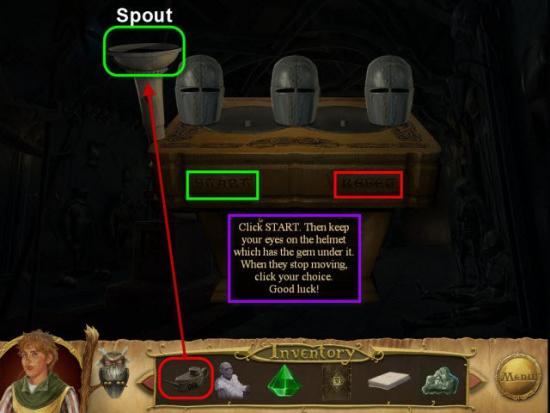
Place the Oil Can, highlighted in Red, into the Spout, highlighted in Green.
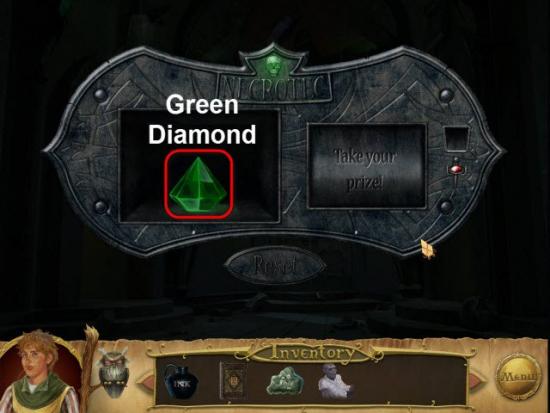
Click Start, to start the Mini-Game.
To solve this Mini-Game fin the Helmet the Diamond is hiding under.
Keep your eye on the Helmet, with the Diamond under it.
Once the Helmets have finished shuffling, choose the Helmet with the Diamond under it.
If you lose track, you can Reset the Puzzle or use the Skip option.
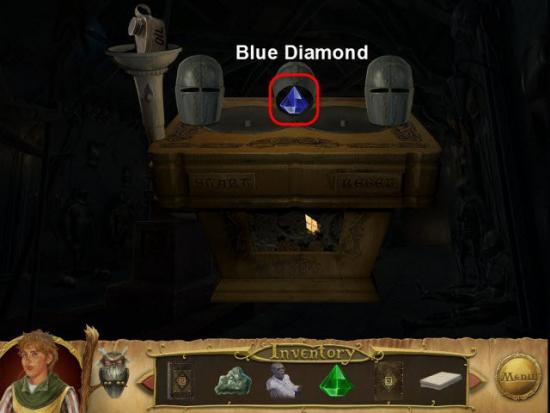
Gather the Blue Diamond highlighted in Red.
Go Back three screens.
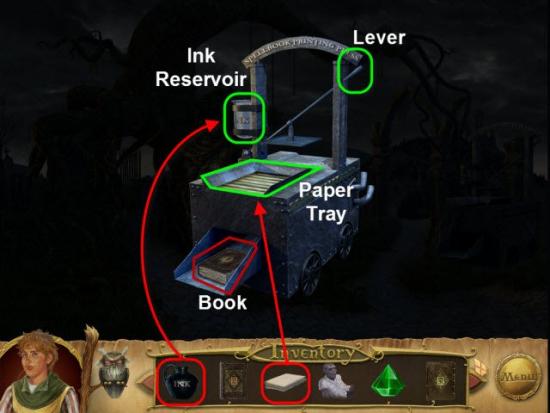
Examine the Printing Press.
Place the Papers on the Paper Tray.
Place the Ink in the Ink Reservoir.
Pull the Lever until the Book is printed.
Gather the Book highlighted in Red.
Return to the Castle.
Take the Right Path.
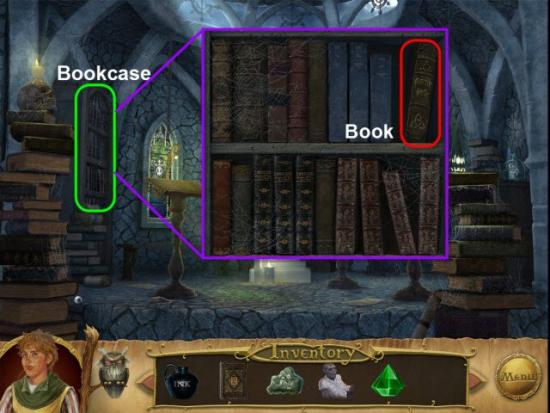
Examine the Bookcase highlighted in Green.
Gather the Book highlighted in Red.
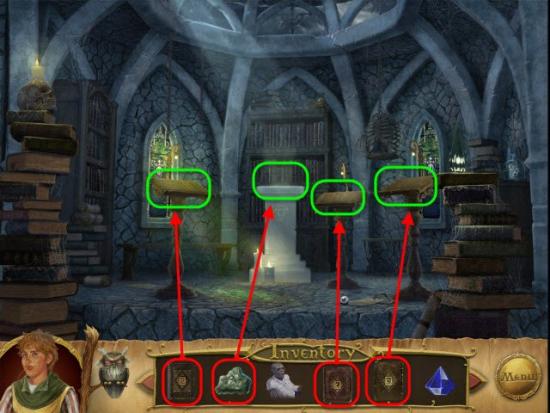
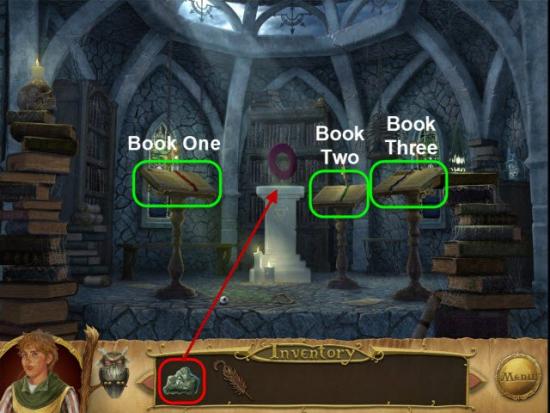
Place the three Books, highlighted in Red, onto the three Pedestals, highlighted in Green.
Place the Clay, highlighted in Red, onto the Altar, highlighted in Green.
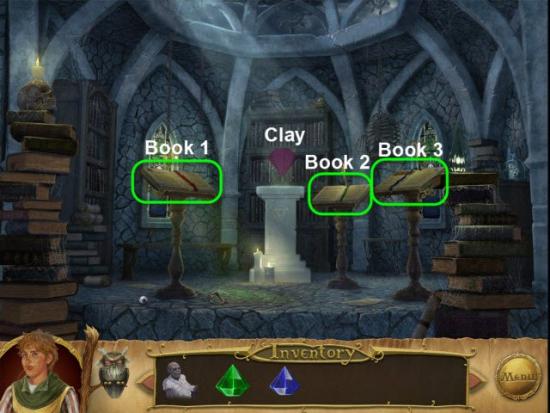
Click on Book One until the Clay is Diamond Shaped.
Click on Book Two until the Diamond Shape is Crystal Material.
Click on Book Three until the Crystal Diamond is Red.
Receive the Red Diamond.
Go Back one screen.

Place the Green, Red, and Blue Diamond into the Archway.
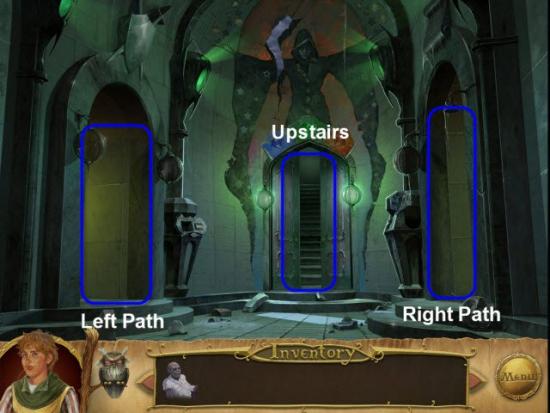
Climb the Stairs.
Gather the Clay highlighted in Red.
Place the Corpse, highlighted in Red, onto the Outline.
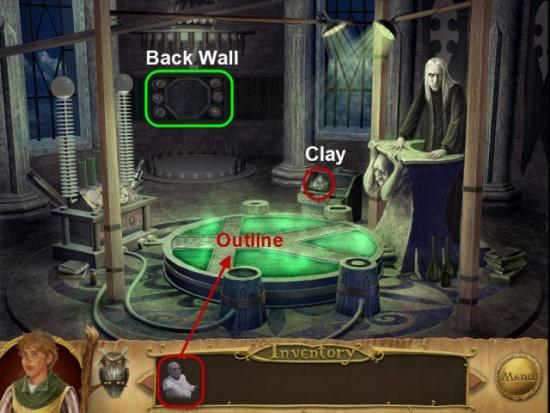
Examine the Back Wall.
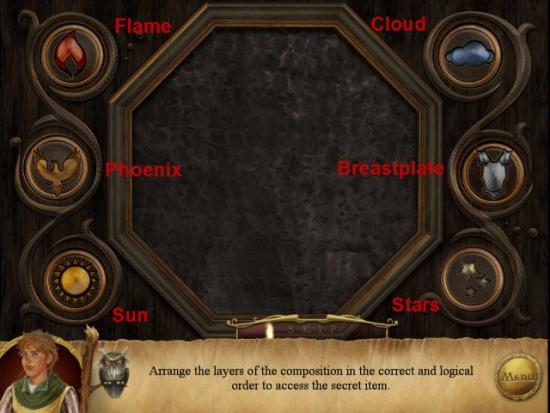
For this Mini-Game you need to add each of the Elements to the Image in the correct order.
Click each Button to add or remove an Element from the Image.
Solution: Sun – Stars – Cloud – Flame – Phoenix – Breastplate.
Gather the Phoenix Feather highlighted in Red.
Head Back one screen.
Take the Right Path.
Place the Clay, highlighted in Red, onto the Altar.
Click Book One until the Clay is Ring Shaped.
Click Book Two until the Ring Shape is Golden.
Click Book Three until the Golden Ring is Metal.
Receive Gold Metal Ring.
Return to the Cemetery.
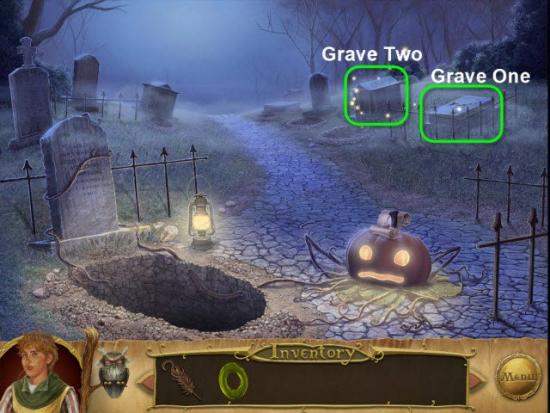
Examine the Second Grave highlighted in Green.
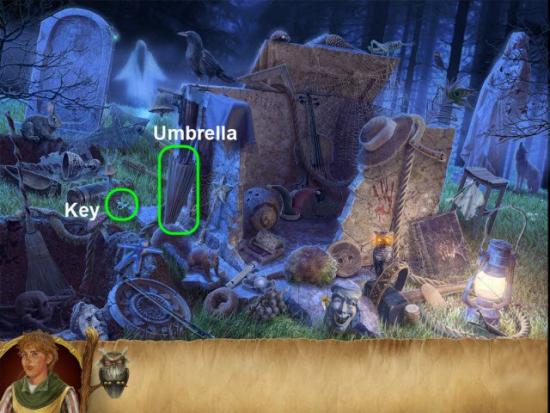
Click to open the Umbrella highlighted in Green.
Click the Key on the Ballerina, highlighted in Green, until the Ballerina starts dancing.
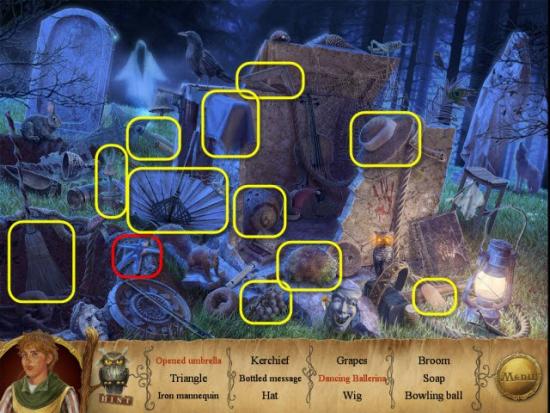
Gather the Mannequin highlighted in Red.
Gather the Hidden Objects highlighted in Yellow.
Return to the Castle.
Take the Left Path.
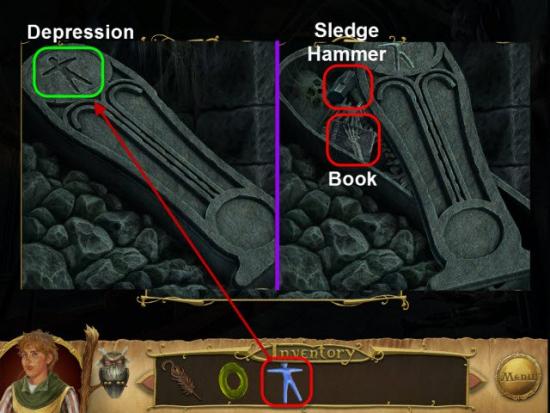
Examine the Casket highlighted in Green.
Place the Mannequin, highlighted in Red, into the Depression, highlighted in Green,
Gather the Book and Sledge Hammer highlighted in Red.
Return to the Cemetery.
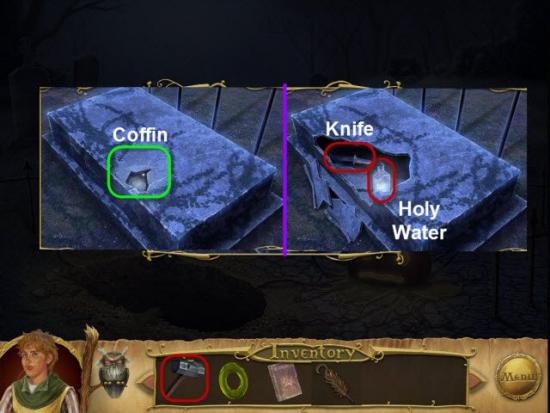
Examine Grave One.
Use the Sledge Hammer, highlighted in Red, on the Coffin, highlighted in Green.
Gather the Holy Water and Knife highlighted in Red.
Return Back to the Starting Area.
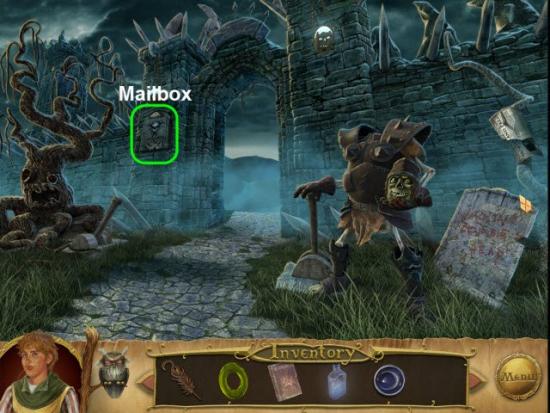
Examine the Mailbox highlighted in Green.
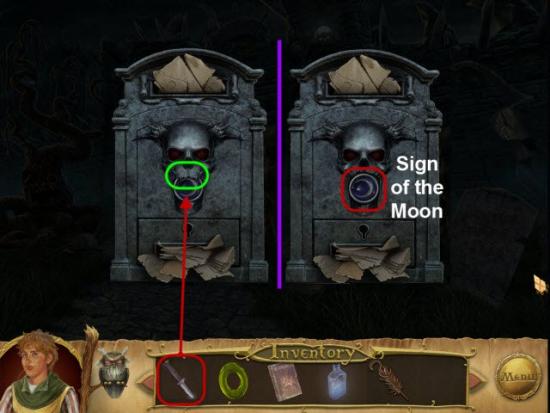
Use the Knife, highlighted in Red, on the Mailbox.
Gather the Sign of the Moon highlighted in Red.

Return to the Castle.
Climb the Stairs.
Place the Book on the Podium.
Place the Holy Water, Gold Ring, Phoenix Feather, and Sign of the Moon in their corresponding Slots.

Enter the Portal.
Chapter 3 – Steam City
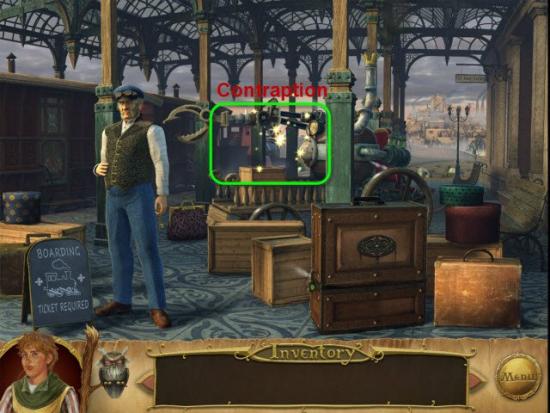
Examine the Contraption highlighted in Green.
Push the Red Button highlighted in Green.
Click the Ticket Pieces several time, until the Ticket is pieced back together again.
Gather the Train Ticket highlighted in Red.
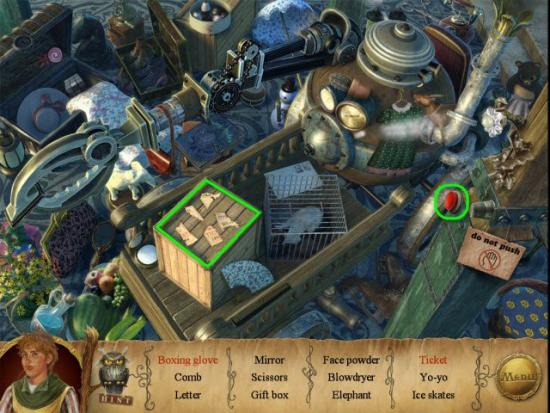
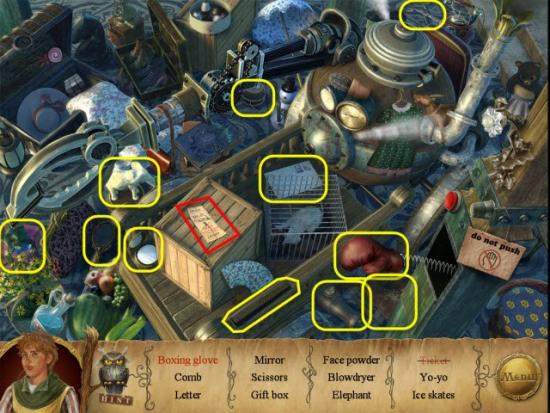
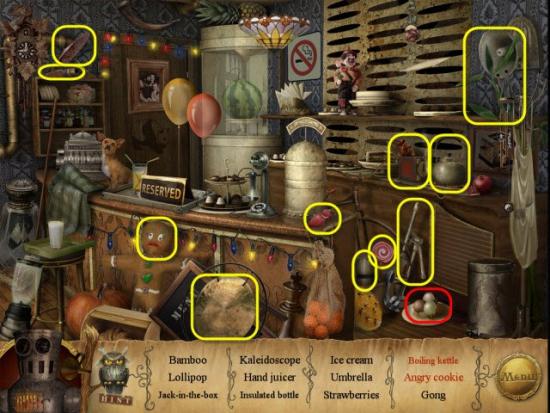
Gather the Hidden Objects highlighted in Yellow.
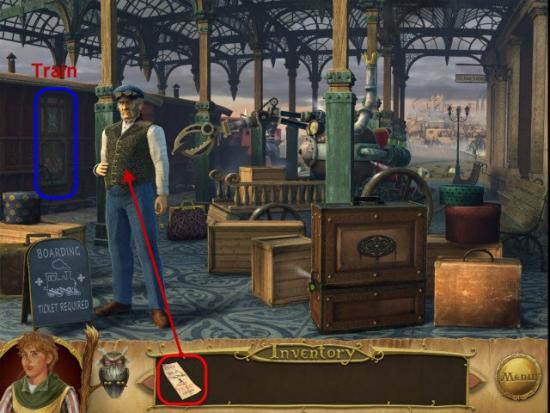
Give the Ticket, highlighted in Red, to the Conductor.
Enter the Train highlighted in Blue.
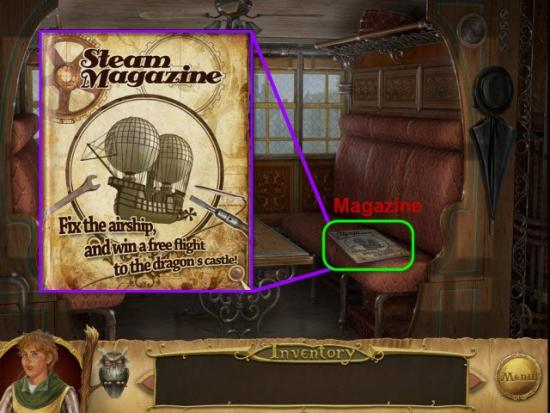
Examine the Magazine highlighted in Green.
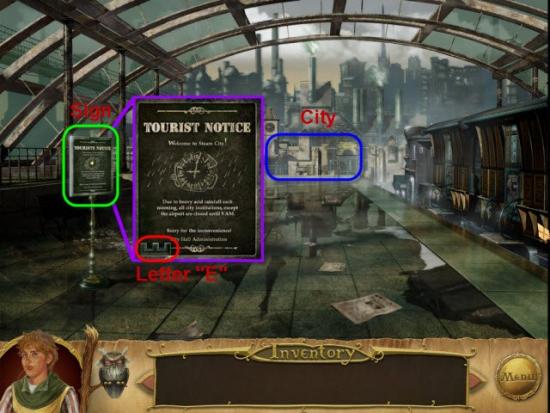
Examine the Sign highlighted in Green.
Gather the letter “E” highlighted in Red.
Enter the City highlighted in Blue.
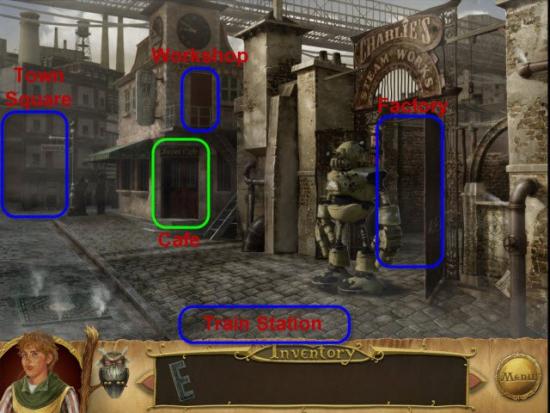
Take the Left Path, toward Town Square, highlighted in Blue.
Head toward the Airport highlighted in Blue.
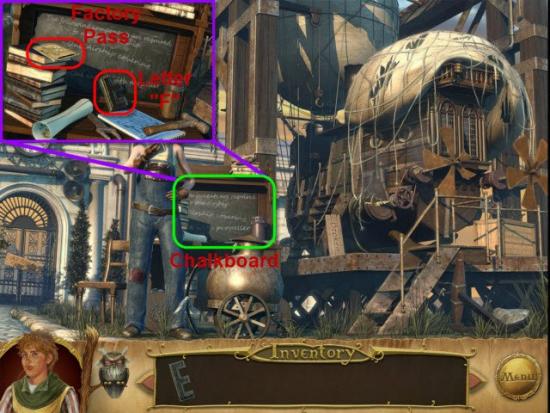
Examine the Chalk Board highlighted in Green.
Gather the Letter “F” and the Factory Pass highlighted in Green.
Head Back two screens.
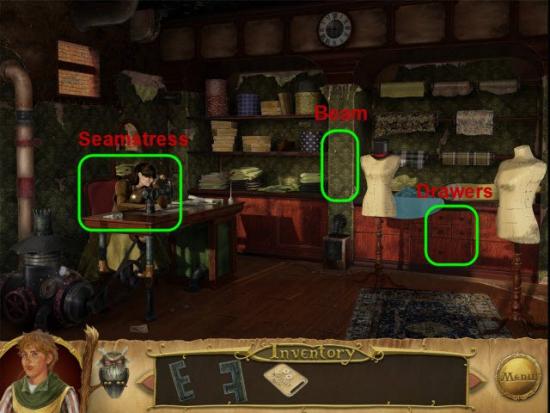
Enter the Workshop.
Examine the Beam highlighted in Green.

Pull back the Wallpaper highlighted in Green.
Take the Museum Ticket highlighted in Red.
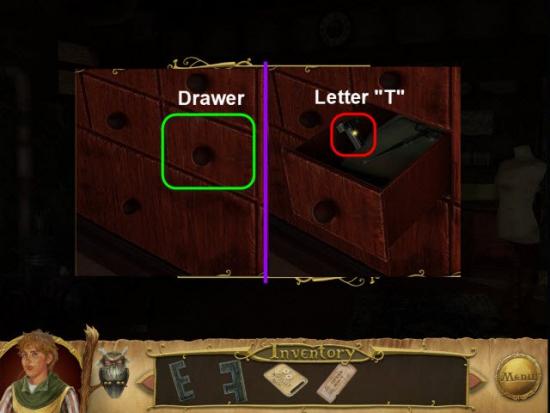
Examine the Drawers.
Open the Drawer highlighted in Green.
Gather the letter “T” highlighted in Red.
Head Back one screen.
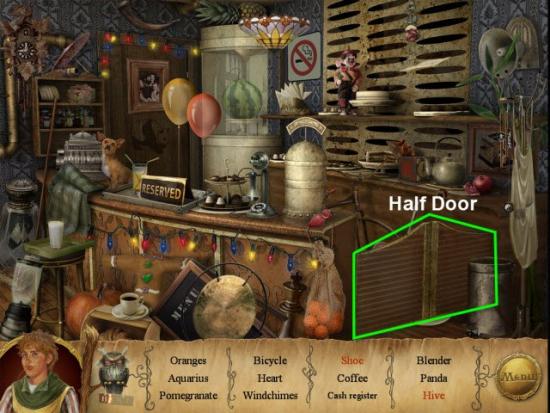
Examine the Cafe.
Open the Half Door highlighted in Green.
Gather the Coffee highlighted in Red.
Gather the Hidden Objects highlighted in Yellow.
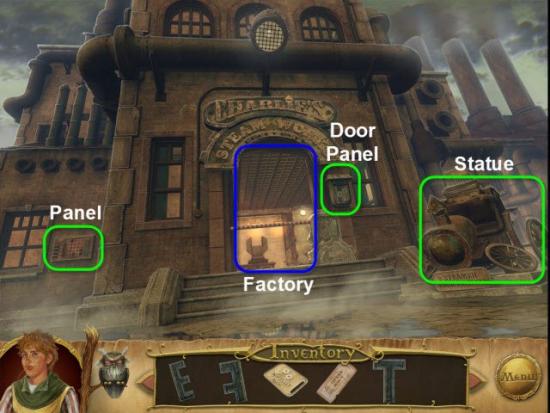
Enter the Gate to the Factory.
Examine the Panel next to the Window.
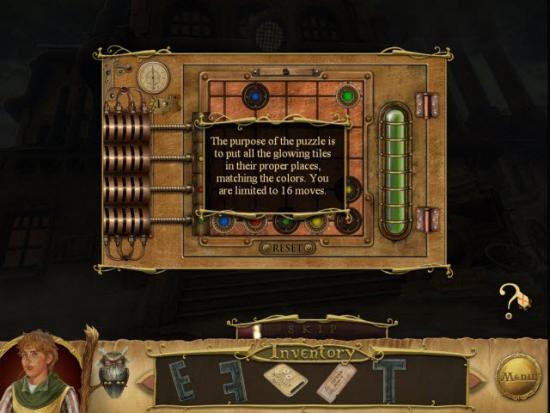
To solve this Mini-Game you need to move the Circular Tiles to their matching colors.
Click on a Circular Tile and then Direction which you wish to move the Circular Tile.
Circular Tiles will keep moving until they reach the edge of the Board or run into another Obstacle.
You are limited to 16 moves.
Solution:
• Blue-Up, Red-Up, Green-Left, Green-Down, Yellow-Up
• Red-Right, Blue-Right, Red-Down, Red-Right, Red-Down
• Red-Left, Yellow-Down, Yellow- Right, Red-Right

Gather the Key highlighted in Red.
Examine the Door Panel.
Insert the Factory Pass, highlighted in Red, into the Door Panel.
Enter the Factory.
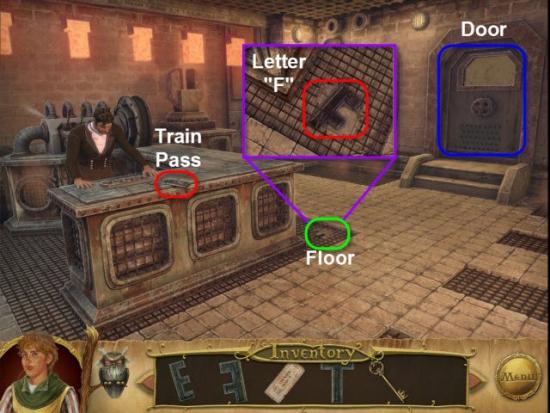
Gather the Train Pass highlighted in Red.
Examine the Floor highlighted in Green.
Gather the letter “F” highlighted in Red.
Click to Open the Door highlighted in Blue.
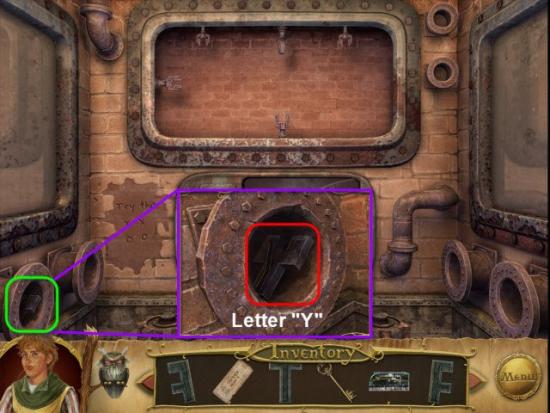
Enter the Machine Room.
Examine the Pipe, highlighted in Green, gather the letter “Y”, highlighted in Red.
Head Back two screen.
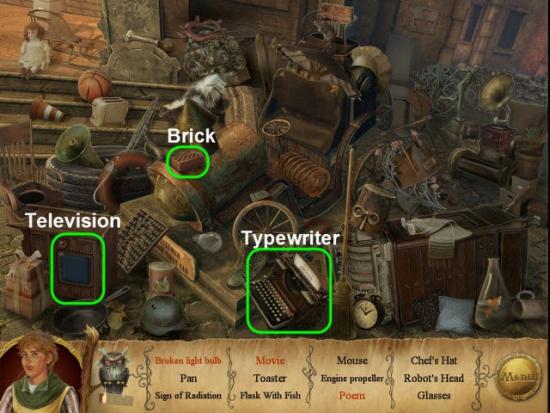
Examine the Statue.
Push the Brick highlighted in Green.
Click the Television until the Movie shows up.
Click on the Typewriter, several times, until the Poem is completed.
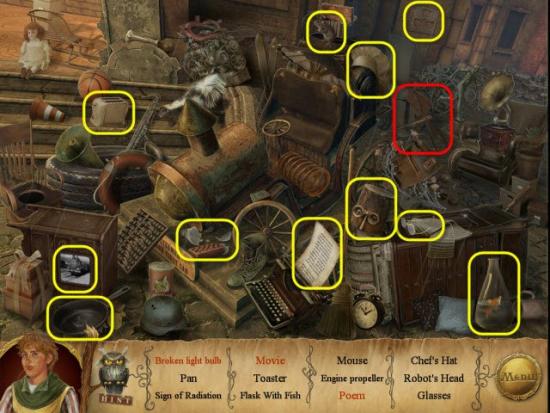
Get Engine Propeller highlighted in Red.
Gather the Hidden Objects highlighted in Yellow.
Return to the Train Station.
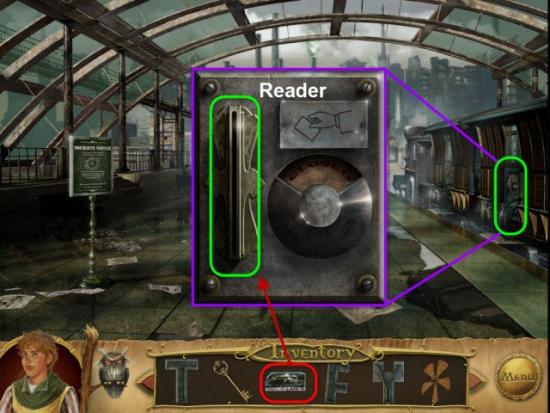
Examine the second Train Car.
Swipe the Train Pass, highlighted in Red, through the Reader, highlighted in Green.
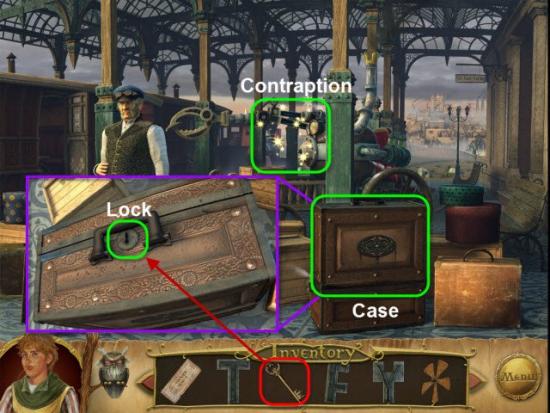
Examine the Case.
Use the Key, highlighted in Red, on the Lock, highlighted in Green.
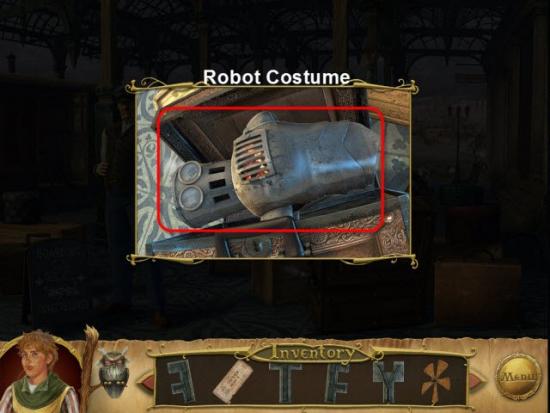
Open the Case.
Gather the Robot Costume highlighted in Red.
“Dress Up”.
Examine the Contraption.
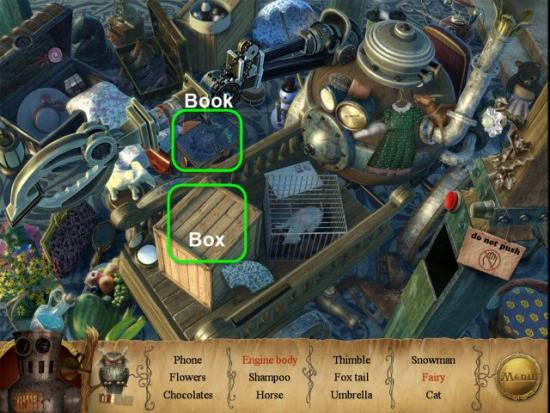
Open the Box highlighted in Green.
Open the Book and turn the Pages several times until the Fairy Image appears.
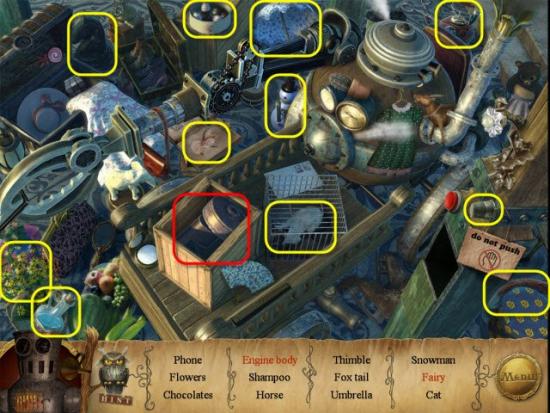
Gather the Engine Body highlighted in Red.
Gather the Hidden Objects highlighted in Yellow.
Board the Train once again.
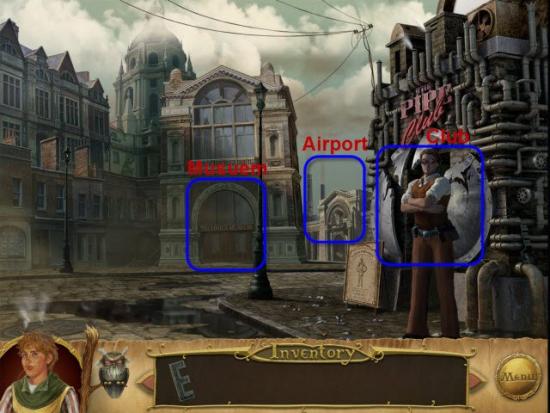
Return to the Town Square.
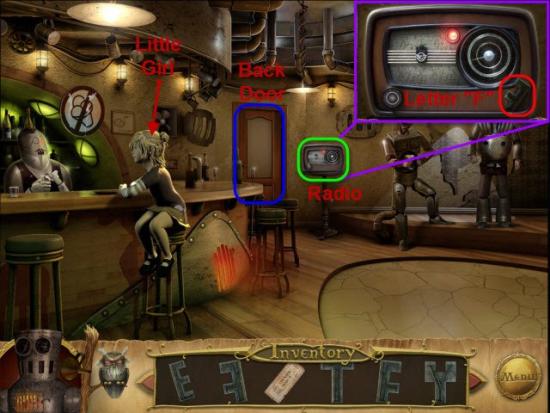
Enter the Club.
Talk to the Little Girl sitting at the Bar.
Examine the Radio, highlighted in Green, next to the Stage.
Gather the letter “F” highlighted in Red.
Exit through the Back Door highlighted in Blue.
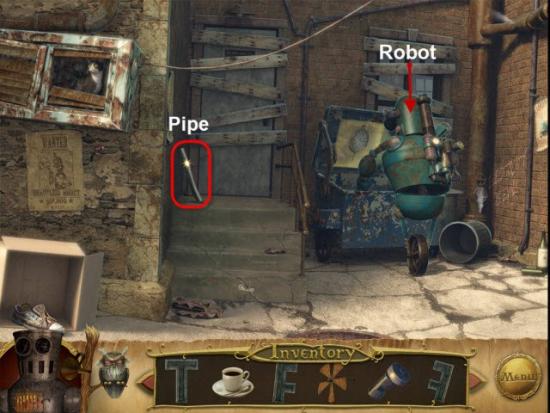
Gather the Pipe highlighted in Red.
Talk to the Robot.
Head Back two screens to the Town Square.
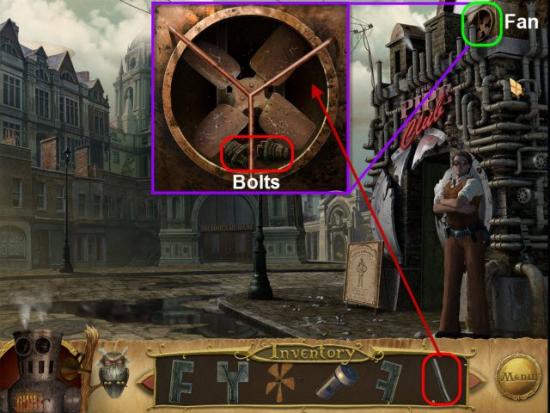
Examine the Fan, highlighted in Green, above the Club entrance.
Place the Pipe, highlighted in Red, into the Fan.
Gather the Bolts highlighted in Red.
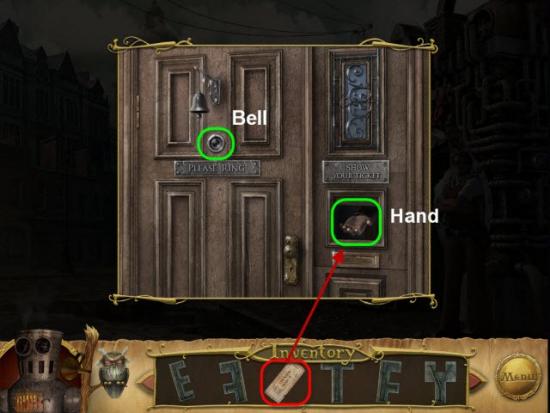
Head toward the Museum.
Ring the Bell highlighted in Green.
Place the Museum Ticket, highlighted in Red, onto the Hand, highlighted in Green.
Enter the Museum.
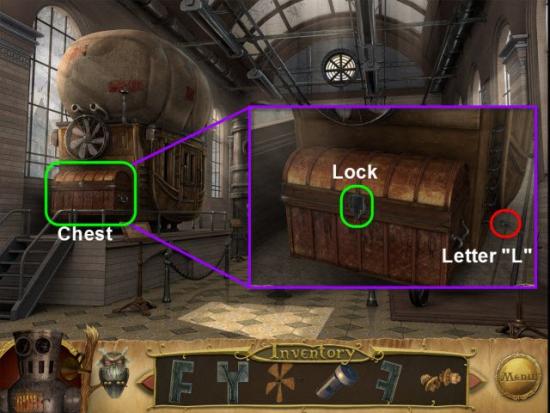
Examine the Chest highlighted in Green.
Gather the letter “L” highlighted in Red.
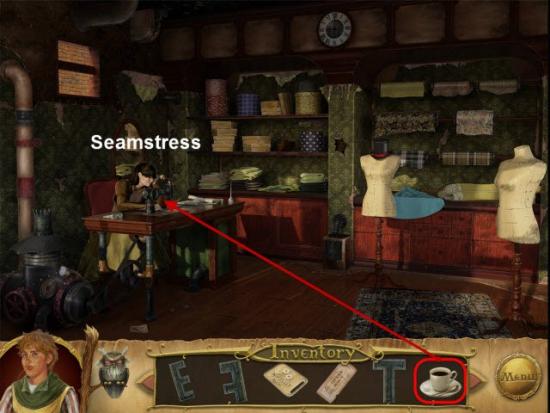
Return to the Workshop.
Give the Coffee, highlighted in Red, to the Seamstress.
Head Back one screen.
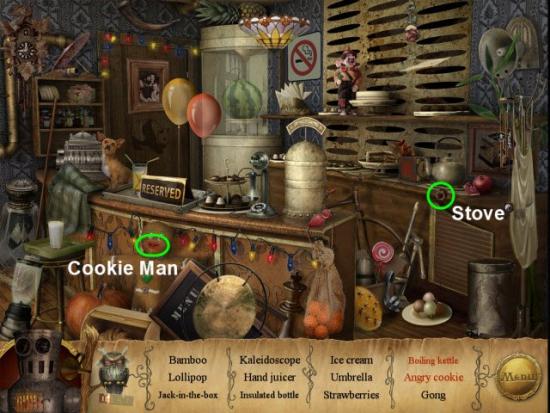
Examine the Cafe once again.
Click to turn on the Stove highlighted in Green.
Click on the Cookie Mans Face highlighted in Green.
Gather the Ice Cream highlighted in Red.
Gather the Hidden Objects highlighted in Yellow.
Return to the Club.
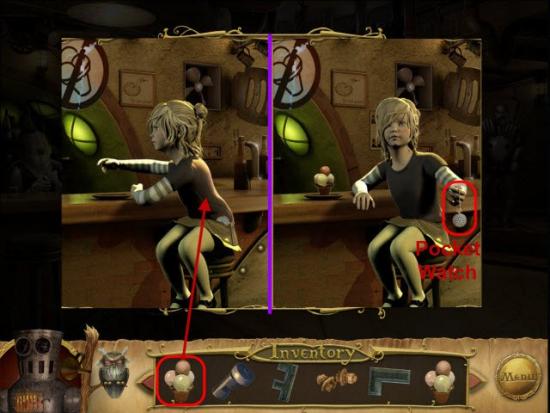
Give the Ice Cream, highlighted in Red, to the Little Girl at the Bar.
Gather the Pocket Watch highlighted in Red.
Head out the Back Door.
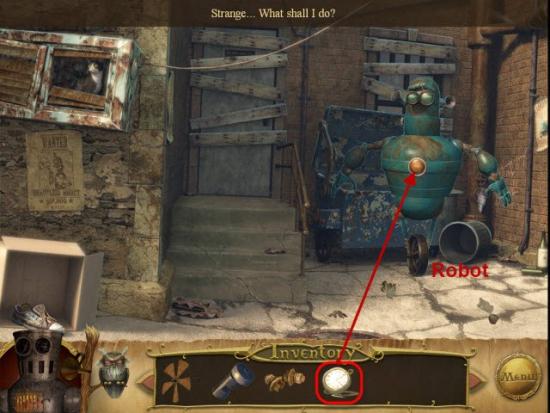
Give the Pocket Watch, highlighted in Red, to the Robot.
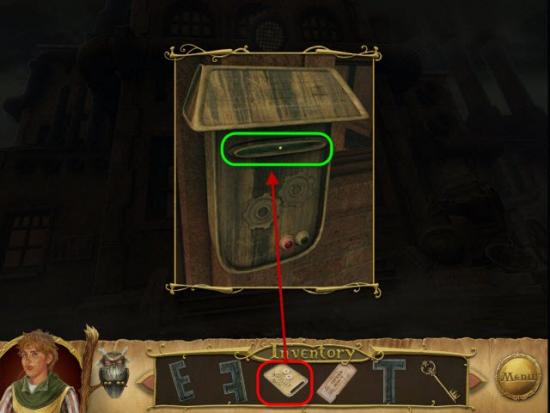
Examine the Dumpster.
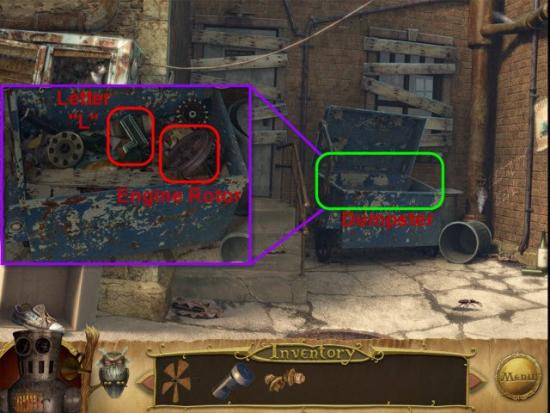
Gather the letter “L” highlighted in Red.
Gather the Engine Rotor highlighted in Red.
Return to the Museum.
Examine the Chest once again.
Examine the Lock on the Chest.
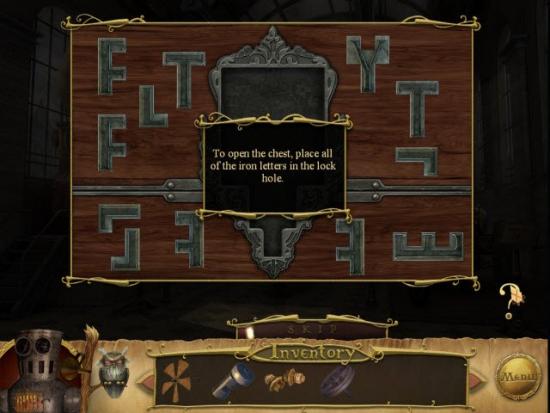
Place all the Letters from your Inventory on the Lock.
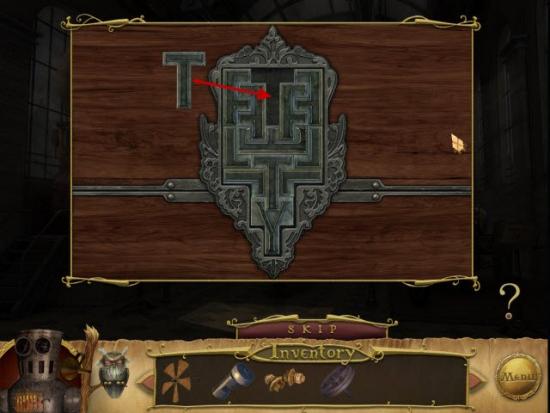
To Solve this Mini-Game, place all the Letters into the Lock in the correct order to unlock the Chest.
See Image for Solution.
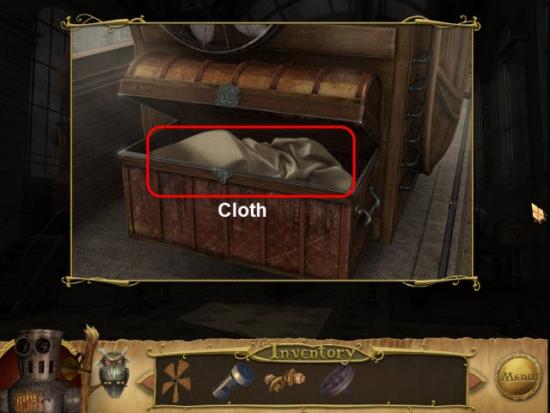
Gather the Cloth highlighted in Red.
Return to the Workshop.
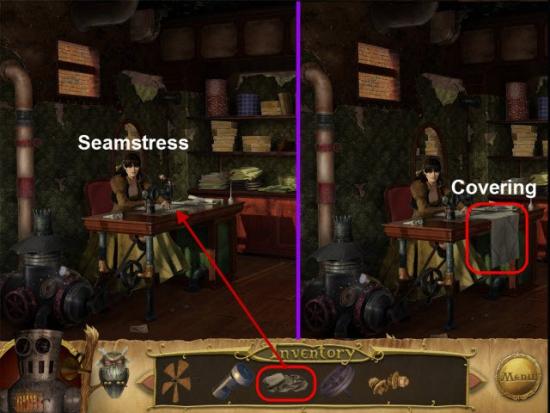
Give the Cloth, highlighted in Red, to the Seamstress.
Gather the Covering highlighted in Red.
Head Back one screen.
Enter the Factory.
Enter the Machine Room.
Place the four Engine Parts, highlighted in Red, into the Holders, highlighted in Green.
To Solve this Mini-Game, notice the Markings on the Wall highlighted in Green.
You need to rearrange the “X” and “O” to the matching positions in the Markings.
Grab and Drag the Pieces along any open path.
Pieces only move in straight lines from one point to opposite point.
Two Pieces can not occupy the same Spot.
Once the Pieces are in the correct order, the Lever will open.
Pull the Lever to assemble the Engine.
Receive the Engine highlighted in Red.
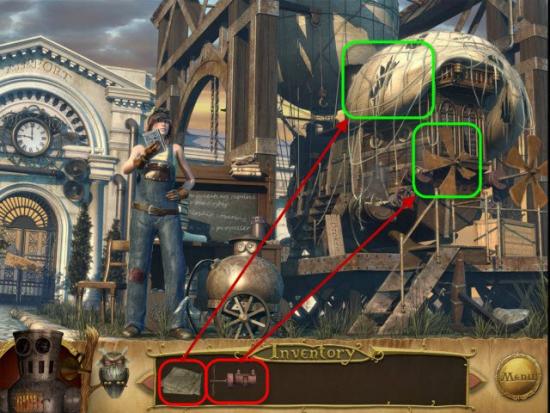
Return to the Airport.
Place the Engine, highlighted in Red, on the Air Ship, highlighted in Green,
Place the Covering, highlighted in Red, onto the Air Ship, highlighted in Green.
Chapter 4 – SkyLine
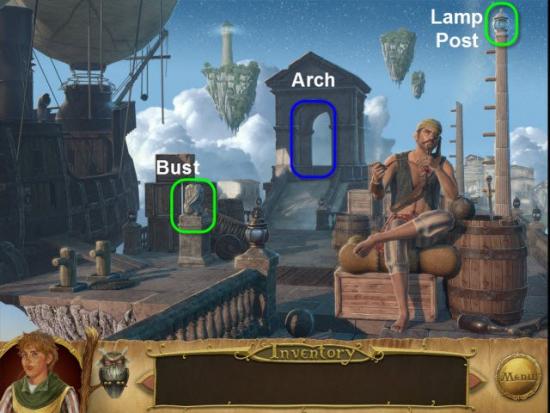
Examine the Bust highlighted in Green.
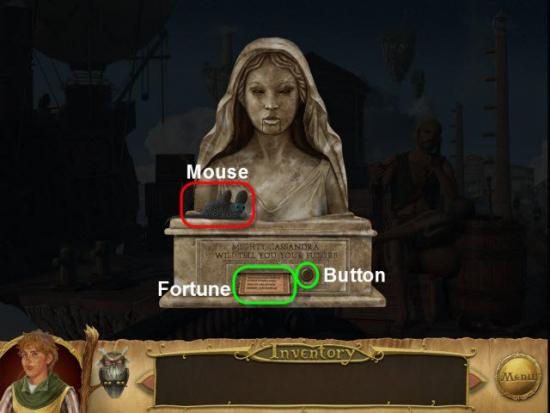
Gather the Mouse highlighted in Red.
Click the Button highlighted in Green.
Examine the Fortune that prints.
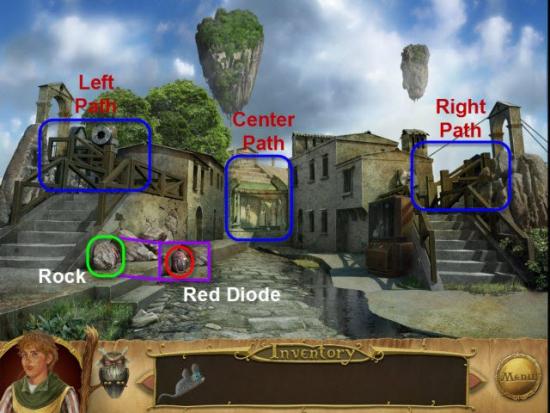
Head through Arch into the Town.
Move the Rock highlighted in Green.
Gather the Red Diode highlighted in Red.
Take the Right Path toward the Observatory.
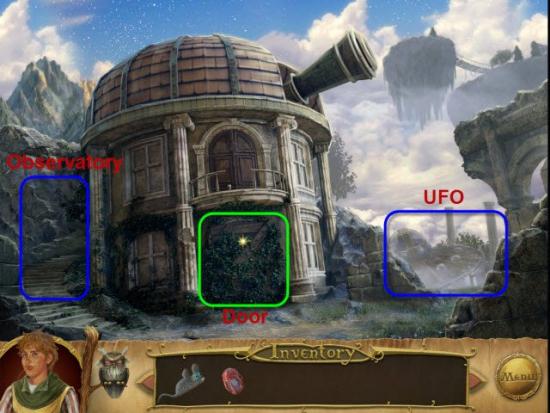
Examine the Observatory Doors highlighted in Green.
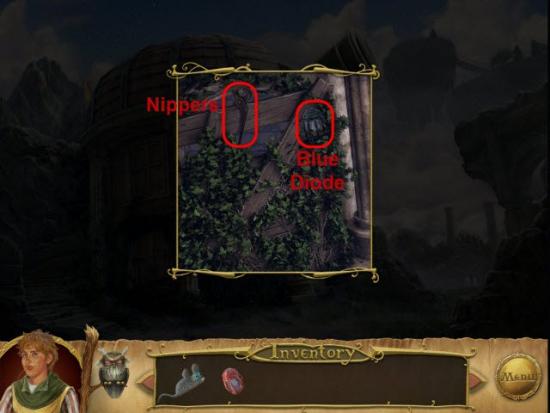
Gather the Blue Diode and Nippers, highlighted in Red.
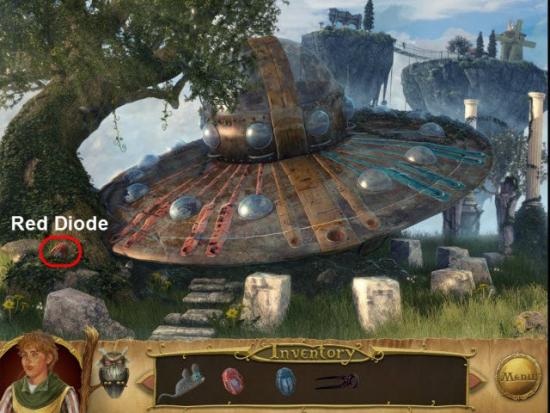
Take the Right Path toward the UFO.
Gather the Red Diode highlighted in Red.
Head Back one screen.
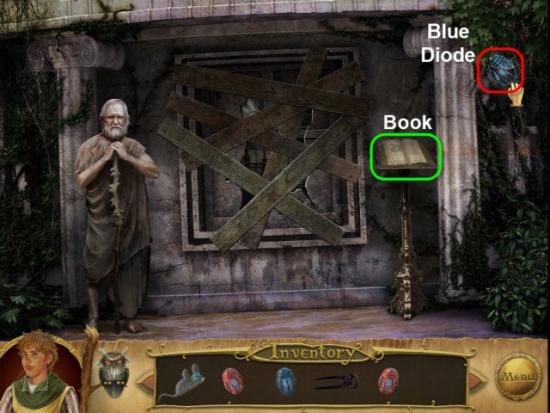
Take the Left Path to the Observatory.
Gather the Blue Diode highlighted in Red.
Examine the Book highlighted in Green.
Head Back two screens to Town.
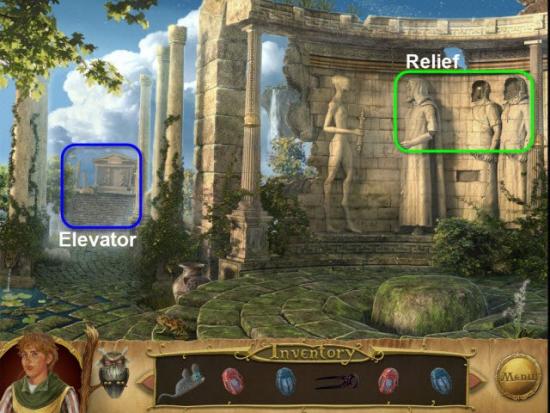
Take the Center Path toward the Relief.
Examine the Relief highlighted in Green.
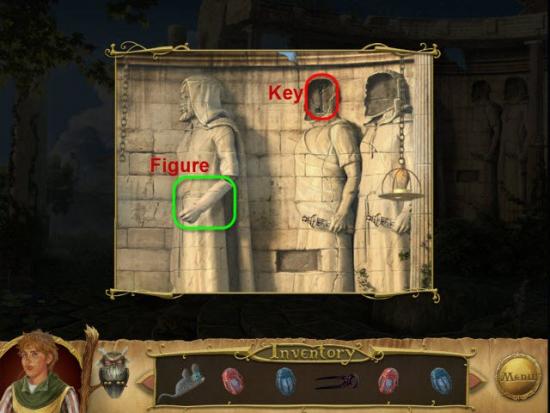
Gather the Key highlighted in Red.
Examine the Figure highlighted in Green.
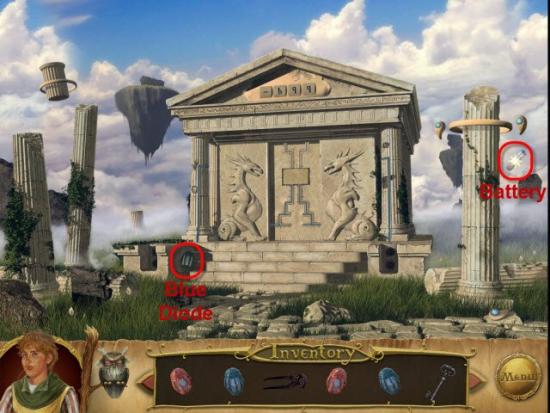
Take the Left Path toward the Elevator.
Gather the Blue Diode and Battery highlighted in Red.
Head Back three screen, all the way to the Docks.
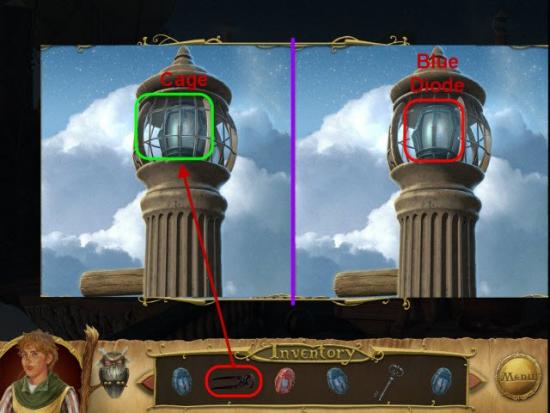
Examine the Lamp Post.
Use the Nippers, highlighted in Red, on the Cage surrounding the Light.
Gather the Blue Diode highlighted in Red.
Return to Town.
Take the Right Path toward the Observatory.
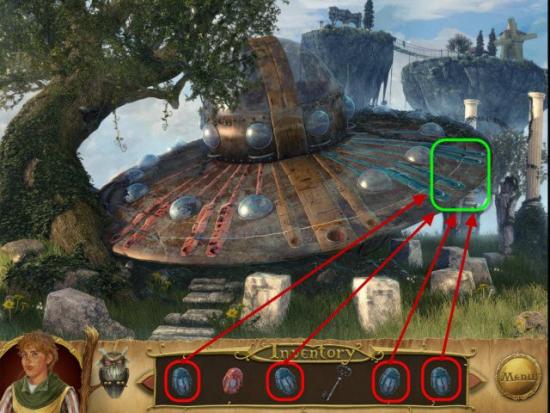
Take the next Right Path to the UFO.
Place the four Blue Diodes, highlighted in Red, into the Slots on the UFO, highlighted in Green.
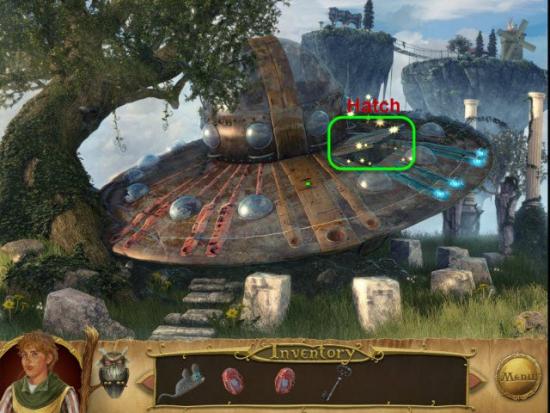
Examine the Hatch highlighted in Green.
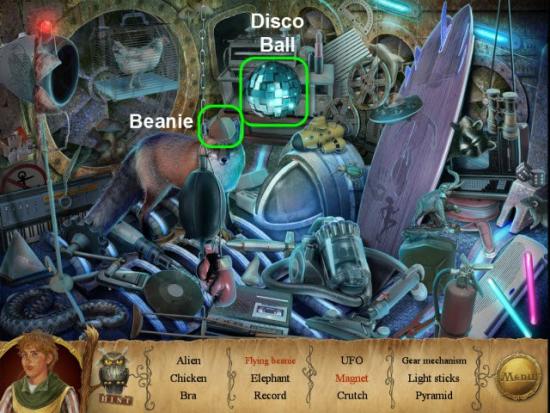
Push the Disco Ball until it swings and reveals the Magnet.
Click on the Beanie several times until it starts floating.
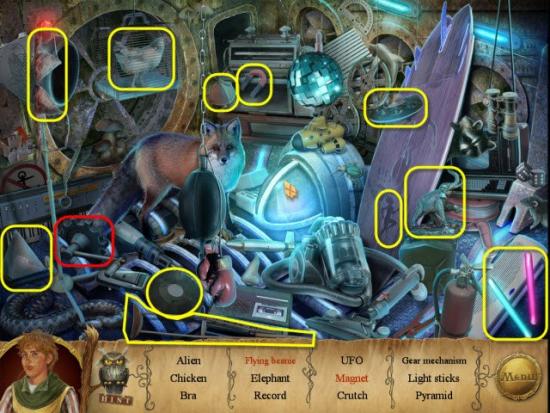
Gather the Gear Mechanism highlighted in Red.
Gather the Hidden Objects highlighted in Yellow.
Head Back two screens, to Town.
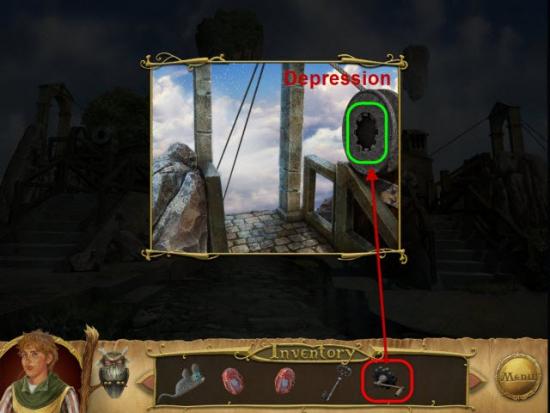
Take the Left Path toward the Bridge.
Place the Gear Mechanism, highlighted in Red, into the Depression, highlighted in Green.
Click the Handle to raise the Bridge.
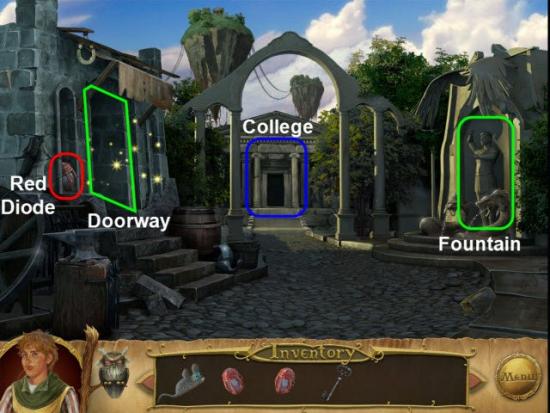
Cross the Bridge.
Gather the Red Diode highlighted in Red.
Examine the Doorway highlighted in Green.
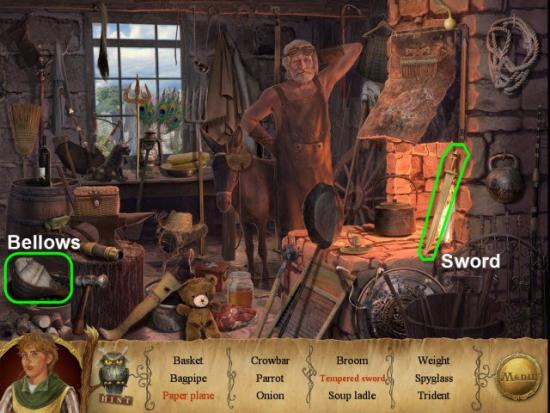
Click the Bellows highlighted in Green.
Click on the Sword highlighted in Green.
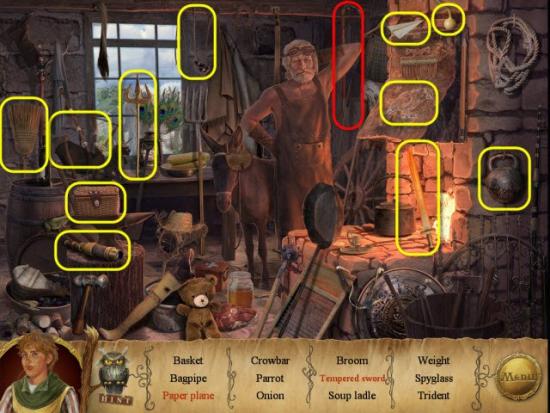
Gather the Crowbar highlighted in Red.
Gather the Hidden Objects highlighted in Yellow.
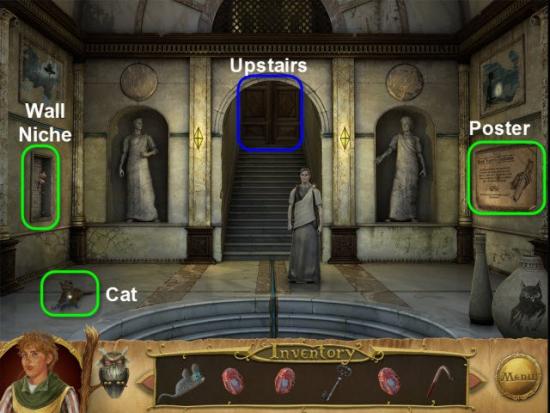
Head forward toward the College.
Examine the Poster highlighted in Green.
Examine the Cat.
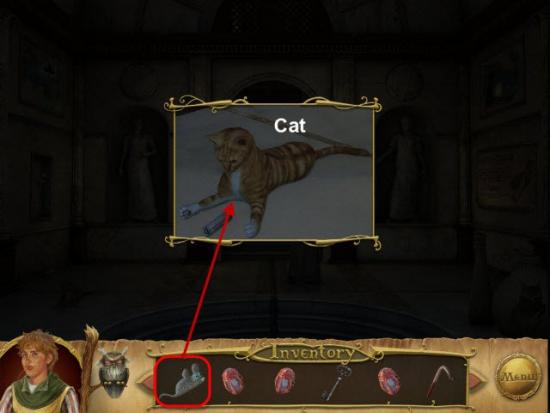
Give the Mouse, highlighted in Red, to the Cat.
Receive the Battery.

Examine the Wall Niche.
Gather the Key highlighted in Red.
Head Back two screens to Town.
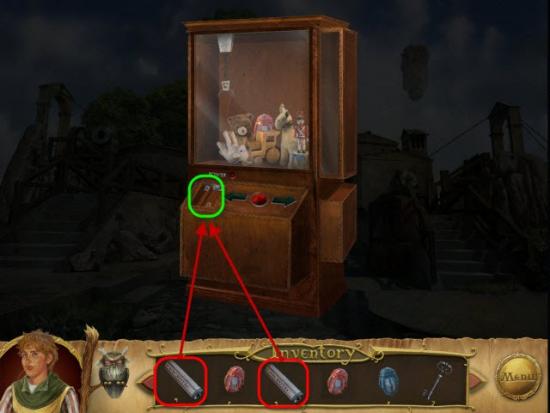
Examine the Claw Machine.
Place the two Batteries, highlighted in Red, into the Claw Machine, highlighted in Green.
Your goal is to retrieve the Red Diode.
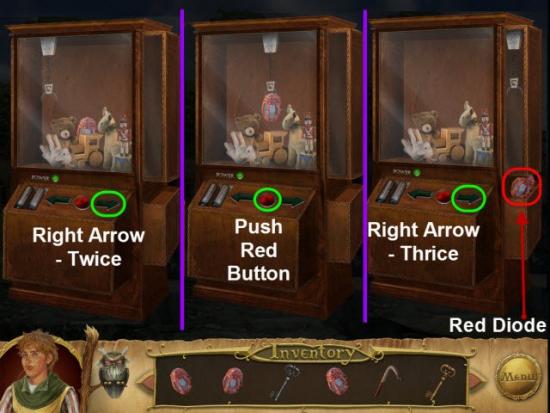
Click the Right Arrow twice.
Push the Red Button.
Click the Right Arrow three more time.
Gather the Red Diode highlighted in Red.
Take the Right Path toward the Observatory.
Take the Right Path to the UFO.
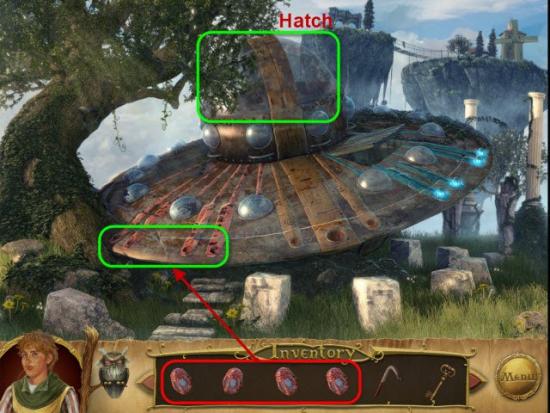
Place the four Red Diodes, highlighted in Red, into the Slots, highlighted in Green, on the UFO.
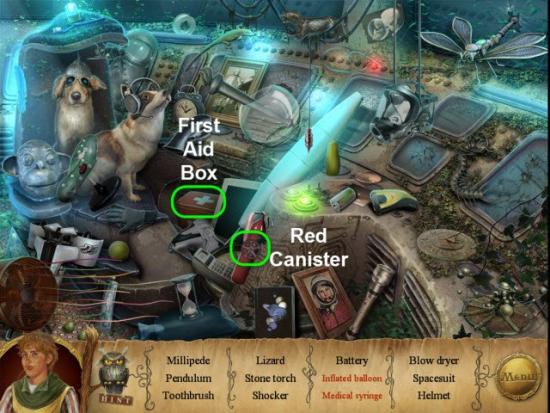
Examine the Hatch.
Open the First Aid Box highlighted in Green.
Click on the Red Canister highlighted in Green.
Gather the Stone Torch highlighted in Red.
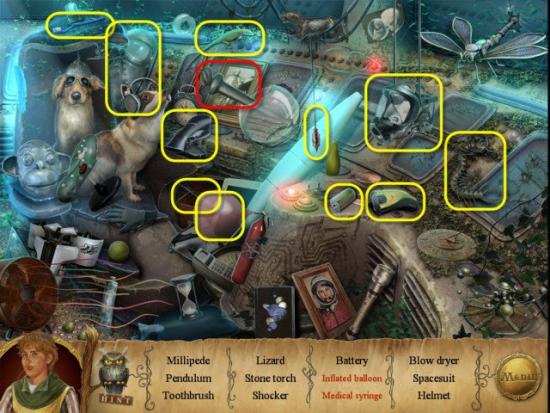
Gather the Hidden Objects highlighted in Yellow.
Head Back one screen.
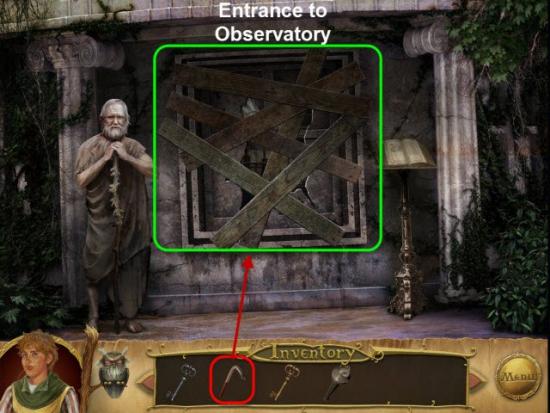
Take the Left Path up to the Observatory.
Use the Crowbar, highlighted in Red, to remove all six Boards, highlighted in Green.
Enter the Observatory.
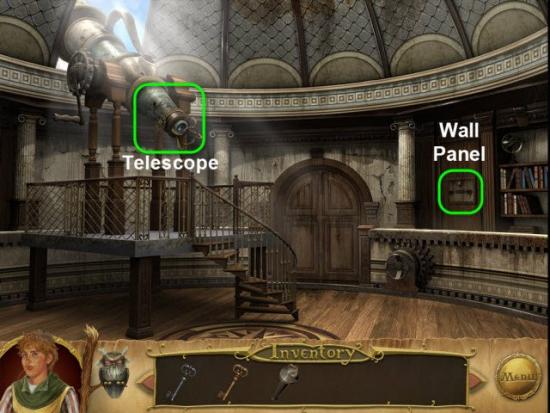
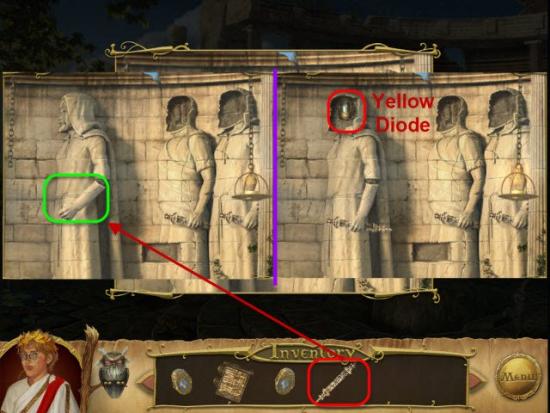
Examine the Wall Panel highlighted in Green.
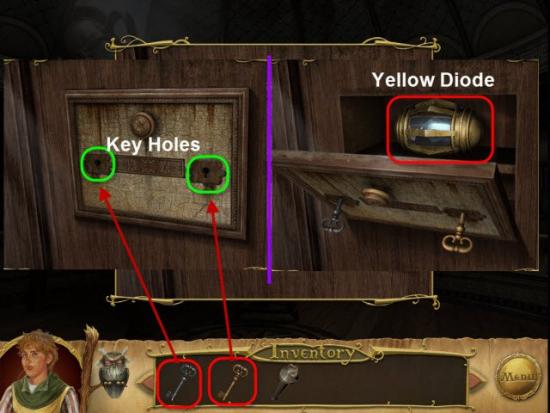
Place the two Keys, highlighted in Red, into the Locks, highlighted in Green.
Gather the Yellow Diode highlighted in Red.
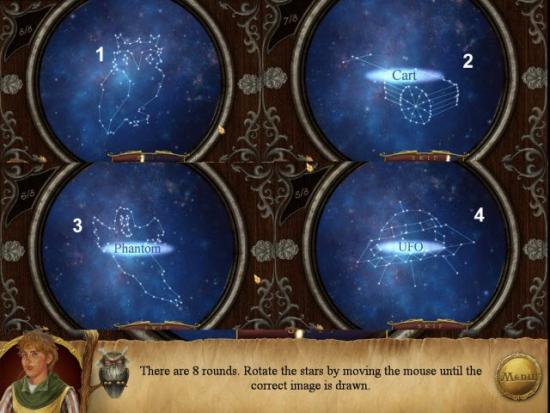
Examine the Telescope.
Click the Telescope to start a Mini-Game.
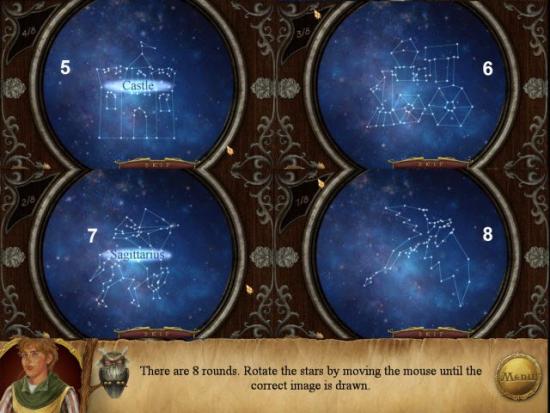
This Mini-Game features eight different puzzles.
Rotate the Star Images by moving your Mouse around the Screen until the Image is formed.
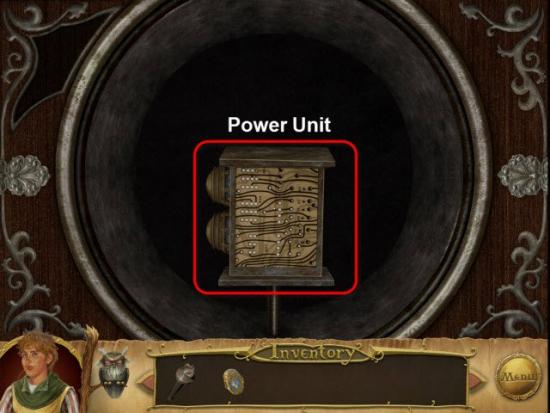
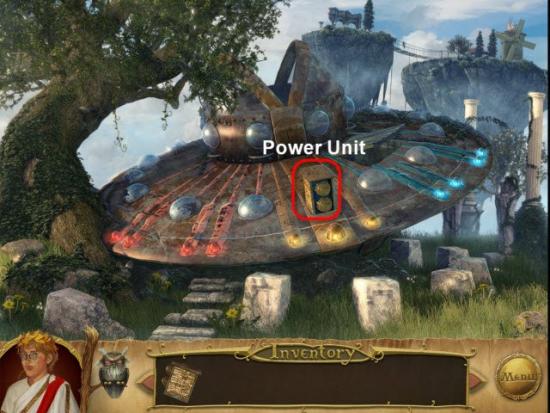
Gather the Power Unit highlighted in Red.
Head Back four screens to the Town.
Take the Left Path across the Bridge.
Examine the Doorway.
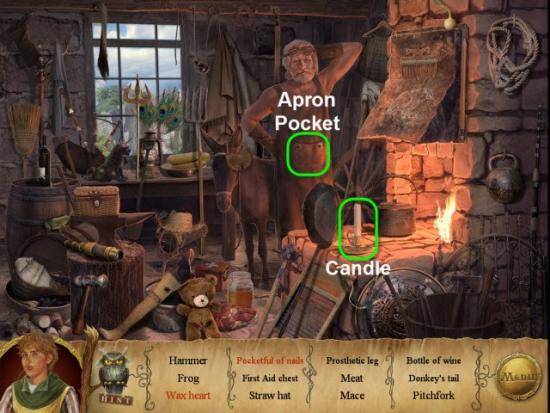
Knock over the Candle highlighted in Green.
Open the Apron Pocket on the Blacksmith highlighted in Green.
Gather the Hammer highlighted in Red.
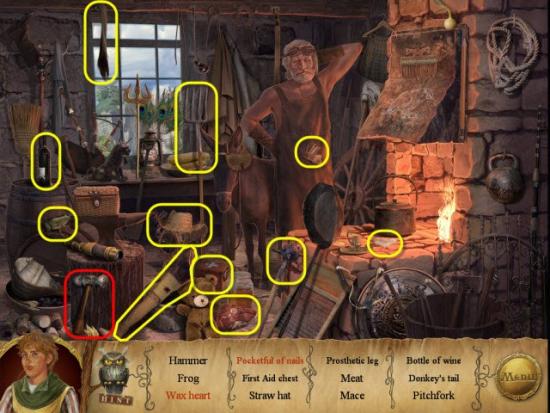
Gather the Hidden Objects highlighted in Yellow.
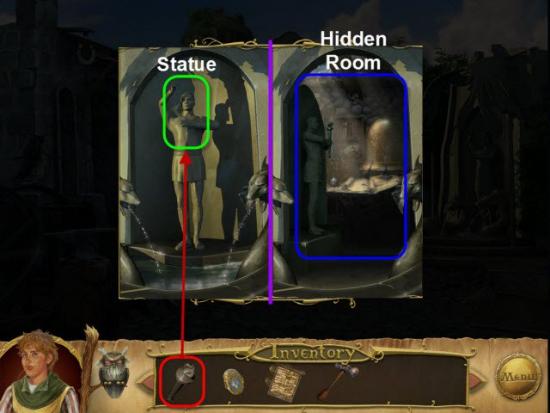
Examine the Fountain.
Place the Stone Torch, highlighted in Red, into the Statue’s Hands, highlighted in Green.
Enter the Room behind the Fountain.
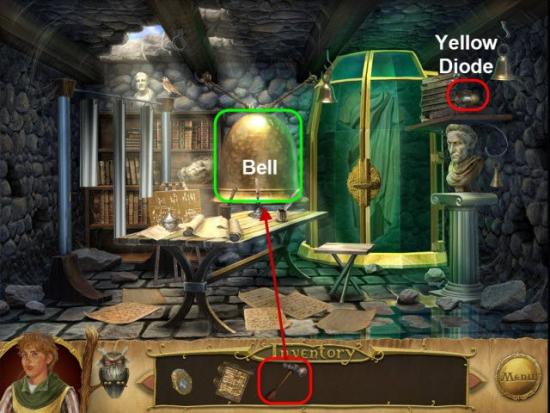
Gather the Yellow Diode highlighted in Red.
Use the Hammer, highlighted in Red, to hit the Bell, highlighted in Green.
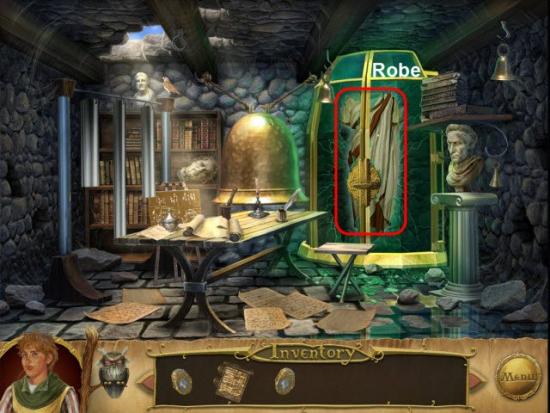
Gather the Robe highlighted in Red.
“Dress Up”
Head Back one screen.
Head to the College.
Head Upstairs.
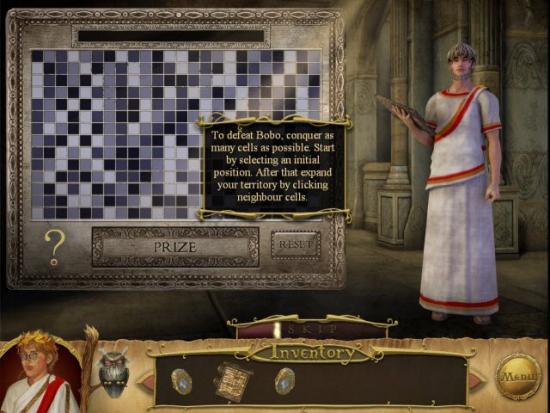
You must defeat the Professor at his Mini-Game.
To win the Mini-Game you must capture more of the Board than your opponent.
Click on a Starting Square.
Taking alternating turns, click on other adjacent Squares to your Starting Square.
All Squares of the same color and adjacent to already captured Squares will be captured.
Tips:
• Choose a centralized Square.
• Choose a Starting Square with a large number of similar colored Squares adjacent to your Starting Square.
• If you run out of adjacent Squares to capture, choose a new Starting Square from any Squares that have not been already captured.
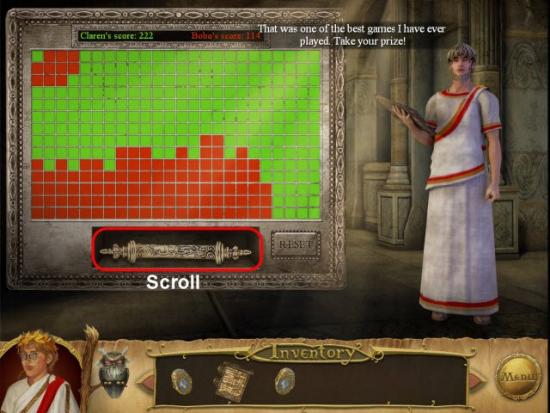
Gather the Scroll highlighted in Red.
Head Back two screens, to Town.
Head down the Central Path toward the Mural.
Examine the Mural.
Place the Scroll, highlighted in Red, onto the Mural, highlighted in Green.
Gather the Yellow Diode highlighted in Red.
Head Back one screen.
Take the Right Path toward the Observatory.
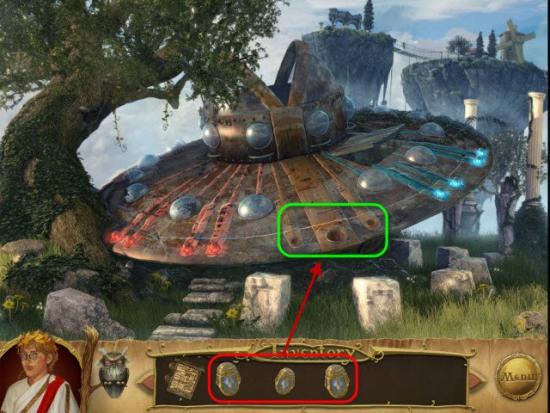
Take the Right Path to the UFO.
Place the three Yellow Diode, highlighted in Red, into the UFO, highlighted in Green.
Gather the Power Cell highlighted in Red.
Head Back two screens to Town.
Take the Center Path toward the Mural.
Take the Left Path to the Elevator.
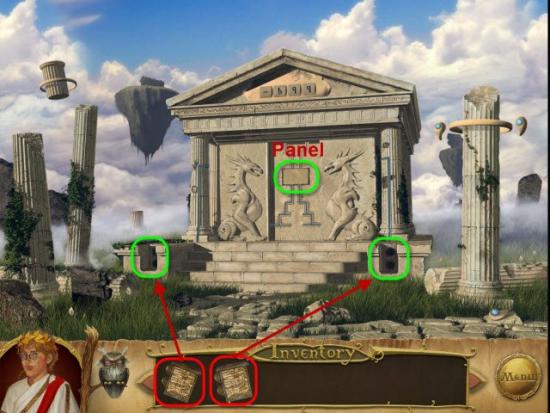
Place the two Power Units, highlighted in Red, in the Recesses, highlighted in Green.
Examine the Panel highlighted in Green.

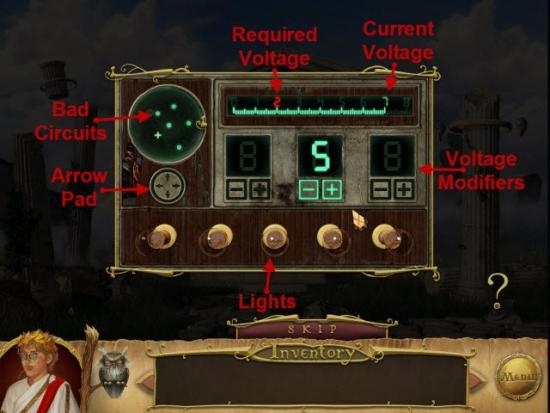
This Mini-Game consists of five Puzzles.
Click on the Arrow Pad to move the Cursor and select one of the Bad Circuit.
The Bad Circuits are represented by Green Dots on the Display Screen.
Once you have selected a Bad Circuit you need to set the Voltage to the Indicated Voltage.
You will have three Voltage options.
Click the Plus or Minus Signs until you have set the Voltage to the correct Voltage.
Solutions:
• Light 1 – [+7], [-5], [+2]
• Light 2 – [+1], [+7], [-5]
• Light 3 – [+1], [+6], [-5]
• Light 4 – [+5], [+3], [-2]
• Light 5 – [+1], [+3], [+4]
Enter the Elevator.
Pull the Lever highlighted in Green.
When the Elevator stops.
Pull the Lever once again.
Open the Door and Exit.
Chapter 5 – Dragon’s Castle
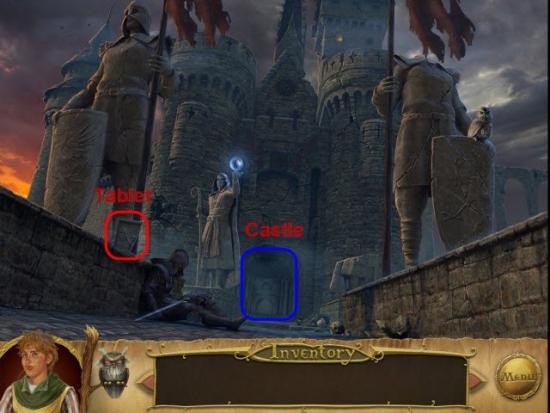
Gather the Tablet Piece highlighted in Red.
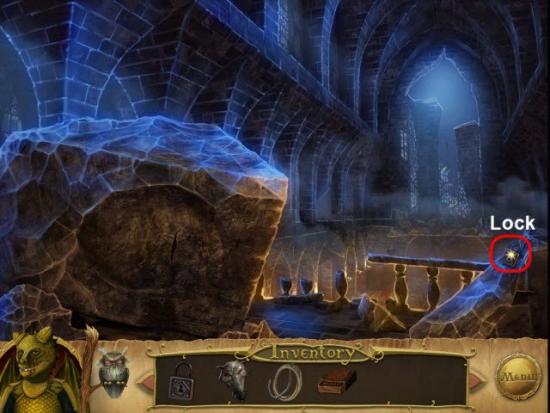
Head toward the Castle.
Gather the Lock highlighted in Red.
Take the Right Path to the Dining Room.
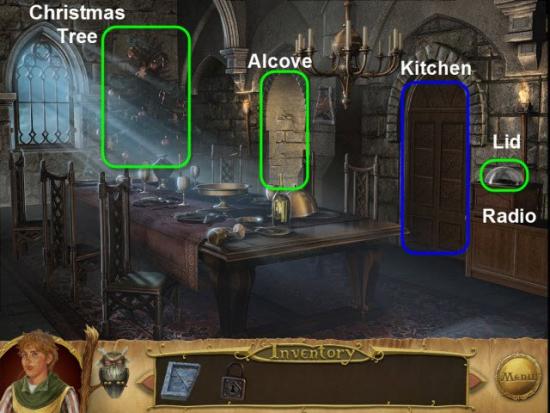
Gather the Tablet Piece highlighted in Red.
Open the Lid highlighted in Green.
Examine the Radio.
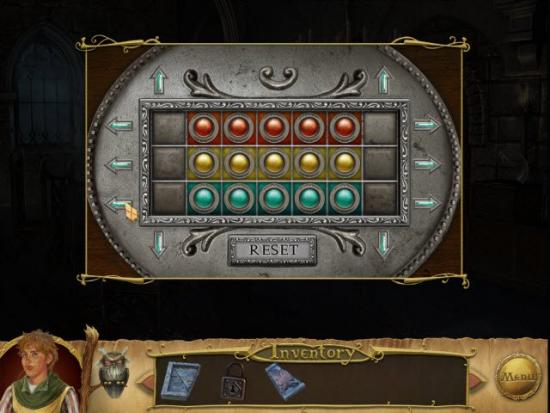
To Solve this Mini-Game you need to rearrange the Colored Balls onto their matching Colored Backgrounds.
Use the Arrows around the Board to slide the Colored Balls around the Board.
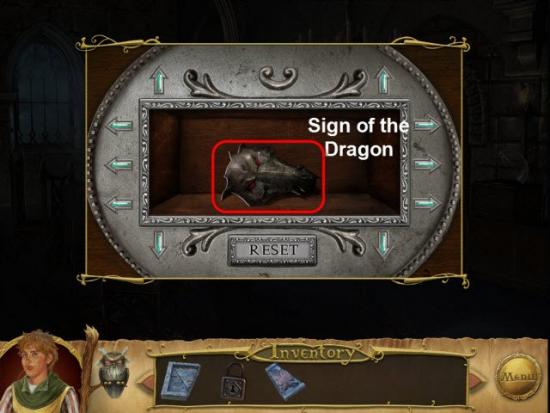
Gather the Sign of the Dragon highlighted in Red.
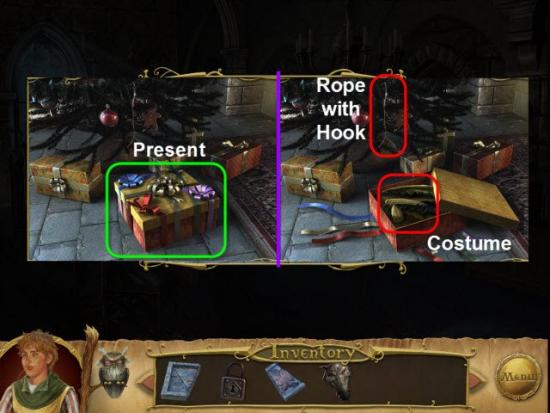
Examine the Christmas Tree.
Unwrap the Present highlighted in Green.
Gather the Costume.
“Dress Up”
Gather the Rope and Hook highlighted in Red.
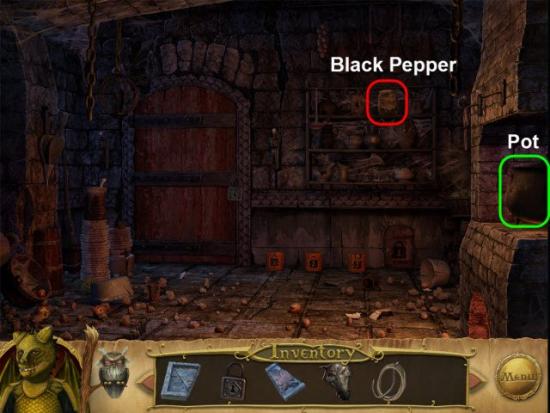
Enter the Door to the Kitchen.
Gather the Black Pepper highlighted in Red.
Return to the Dining Room.
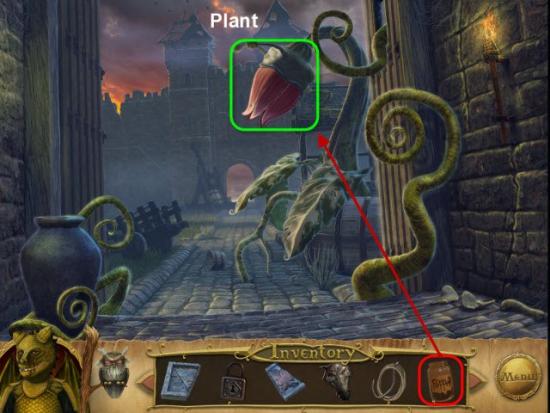
Examine the Alcove.
Use the Black Pepper, highlighted in Red, on the Plant, highlighted in Green.
Gather the Tablet Piece highlighted in Red.
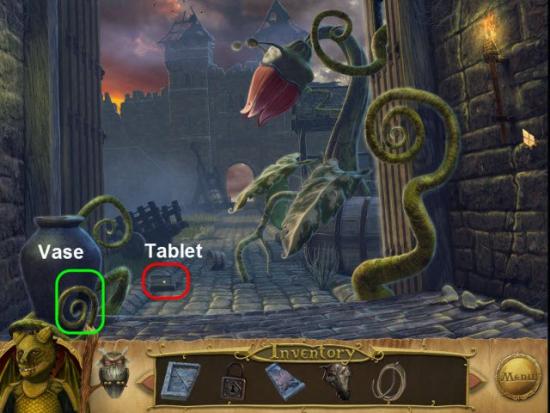
Examine the Vase highlighted in Green.

Gather the Wet Matches highlighted in Red.
Return to the Kitchen.
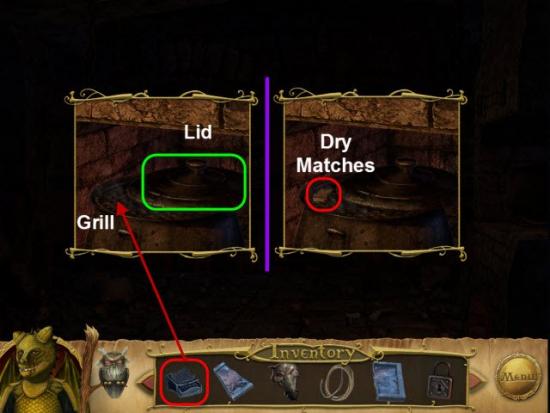
Examine the Pot.
Move the Lid highlighted in Green.
Place the Wet Matches, highlighted in Red, onto the Grill, highlighted in Green.
Take the Dry Matches from the Grill.
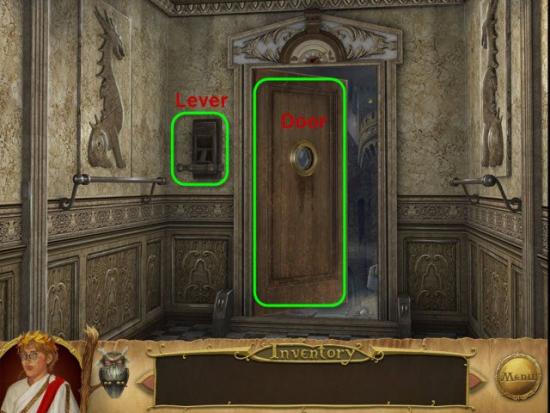
Return to the Castle Entrance.
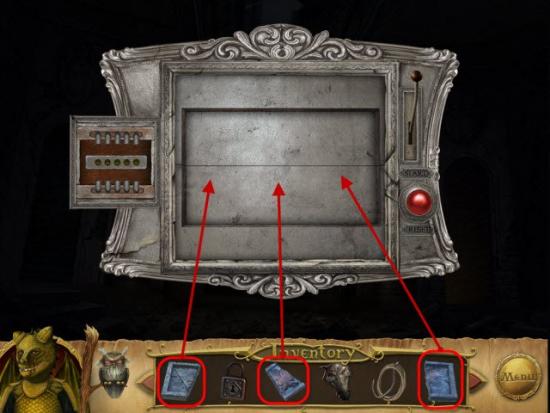
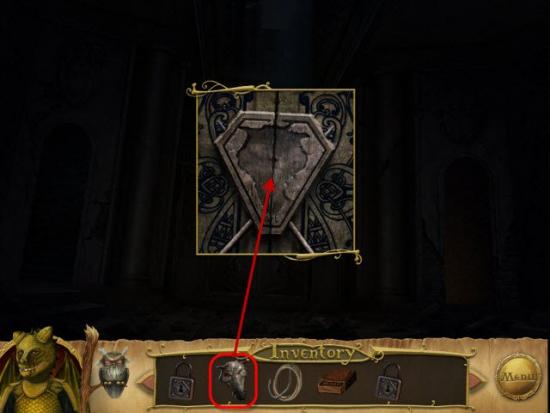
Examine the Panel.
Place the three Tablet Pieces into the Panel.
To Solve this Mini-Game you need to trigger the correct Effects so that the Moving Tile will match each of the Tiles on the Path.
If the Moving Tile doesn’t match a Tile along the Path, the Puzzle will reset.
See the Image for the Solution to the Puzzle.
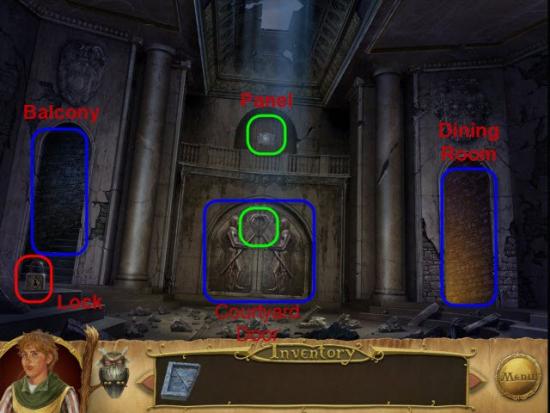
Take the Left Path to the Balcony.
Gather the Lock highlighted in Red.
Return Downstairs.
Examine the Courtyard Door.
Place the Sign of the Dragon, highlighted in Red, into the Door, highlighted in Green.
Enter the Courtyard.
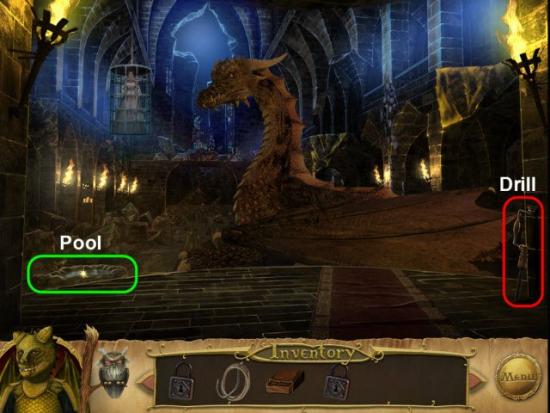
Gather the Drill highlighted in Red.
Examine the Pool highlighted in Green.
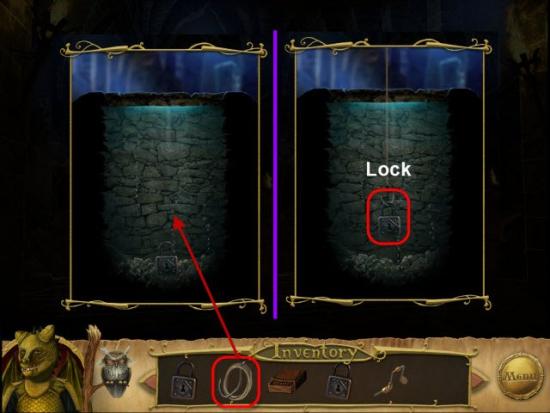
Use the Rope and Hook, high in Red, on the Water.
Move the Rope and Hook back and forth until Hook the Lock.
Pull the Lock up out of the Water.
Receive the Lock.
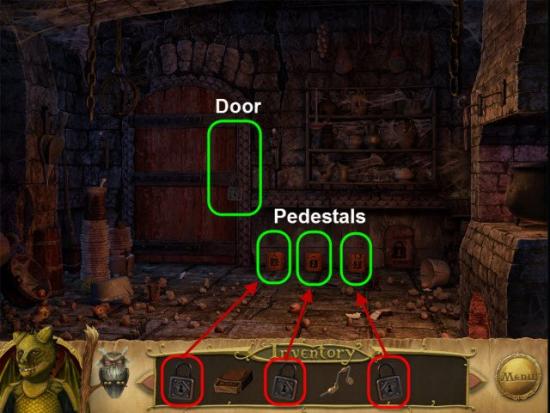
Return to the Kitchen
Place the three Locks, highlighted in Red, onto the Pedestals, highlighted in Green.
Examine the Door.

Click on the Beans, highlighted in Green, until a Smiley Face forms.
Turn on the Faucet on the Barrel highlighted in Green.
Grab the two Picture Pieces and pull them together with the center Picture Piece.
Receive the Dragon Photo.
Gather the Dynamite highlighted in Red.
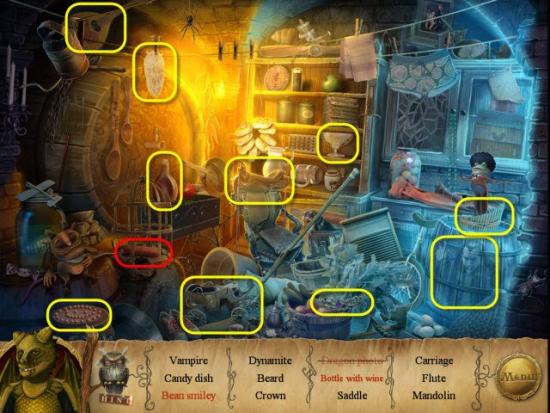
Gather the Hidden Objects highlighted in Yellow.
Return to the Balcony.
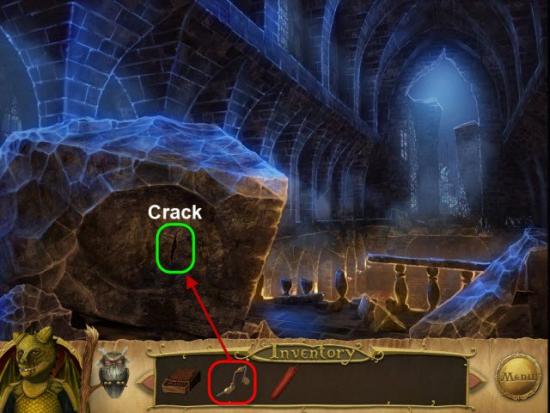
Use the Drill, highlighted in Red, on the Rock highlighted in Green.
Turn the Drill until a Hole is formed in the Rock.
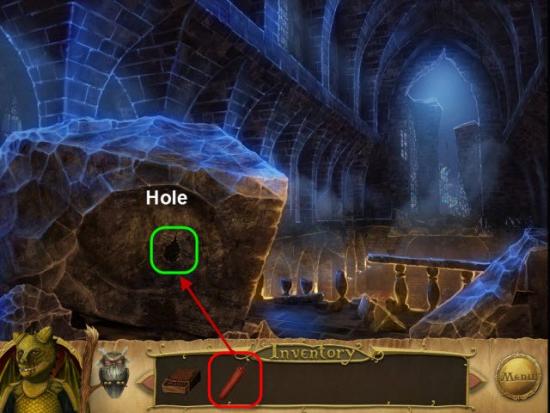
Place the Dynamite, highlighted in Red, into the Hole in the Rock, highlighted in Green.
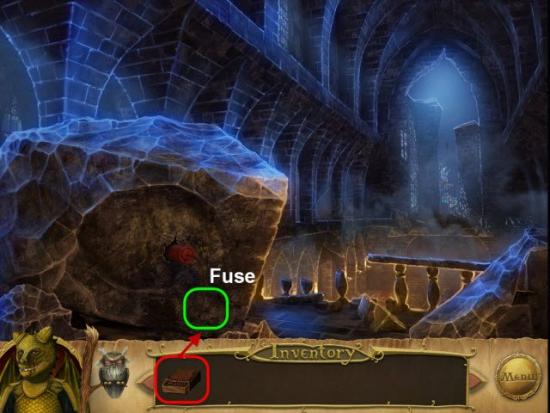
Use the Dry Matches, highlighted in Red, to lite Fuse on the Dynamite, highlighted in Green.
Congratulations you have finished The Fool Game.

More articles...
-
Best Horror Games On Itch.io – July 2026
Across a bounty of subgenres. -
Haze Seas Accessories Tier List [Best Accessories to Equip]
The accessories with the best stat buffs in Haze Seas.