- Wondering how to get Monopoly GO! free rolls? Well, you’ve come to the right place. In this guide, we provide you with a bunch of tips and tricks to get some free rolls for the hit new mobile game. We’ll …
Best Roblox Horror Games to Play Right Now – Updated Weekly
By Adele Wilson
Our Best Roblox Horror Games guide features the scariest and most creative experiences to play right now on the platform!The BEST Roblox Games of The Week – Games You Need To Play!
By Sho Roberts
Our feature shares our pick for the Best Roblox Games of the week! With our feature, we guarantee you'll find something new to play!Type Soul Clan Rarity Guide – All Legendary And Common Clans Listed!
By Nathan Ball
Wondering what your odds of rolling a particular Clan are? Wonder no more, with my handy Type Soul Clan Rarity guide.
The Fall Trilogy: Chapter 3 – Revelation Walkthrough
Welcome to the The Fall Trilogy: Chapter 3 – Revelation walkthrough on Gamezebo, written by Lynne Basinet. The Fall Trilogy: Chapter 3 – Revelation is an interactive, adventure, hidden object game played on PC, created by Kheops Studio. This walkthrough includes tips and tricks, helpful hints, and a strategy guide for how to complete The Fall Trilogy: Chapter 3 – Revelation.
The Fall Trilogy: Chapter 3 – Revelation – Game Introduction
Welcome to the The Fall Trilogy: Chapter 3 – Revelation walkthrough on Gamezebo, written by Lynne Basinet. The Fall Trilogy: Chapter 3 – Revelation is an interactive, adventure, hidden object game played on PC, created by Kheops Studio. This walkthrough includes tips and tricks, helpful hints, and a strategy guide for how to complete The Fall Trilogy: Chapter 3 – Revelation.
Copyright Information
This walkthrough was created by Lynne Basinet, for gamezebo.com, and is protected under US and International Copyright laws. Any unauthorized use, including re-publication, in whole or in part, without permission, is strictly prohibited.
General Information
- Main Menu
- Options: Located at the upper left, click to adjust the Voice, Music and Sound volumes; turn Full Screen and Custom Cursors on and off and adjust the Screen Resolution
- Help: Located within the Options Menu, click to access extensive gameplay information and will give you the information you need on all the elements within the game.
- Credits: Located within the Options Menu, click to access information about the development team.
- Play: Located at the upper right, click to begin a game. After you’ve begun a game, Play will change to Continue.
- Quit: Located at the lower left, click to exit the game. All progress will be automatically saved.
- Change Player: Located at the lower right, click to add or delete up to 7 profiles, with a maximum of 12 characters (letters, numbers and symbols).
- Game Modes
- Casual Mode: The Hint and Skip buttons charge more quickly, all active areas are highlighted with sparkles and the default navigation is by clicking arrows at the sides, or top and bottom of the screen.
- Adventure Mode: The Hint and Skip buttons charge more slowly, no active areas are highlighted and the default navigation is by 360 degree (Free View), right mouse button, click and drag. You may change this by clicking on the Menu button (during gameplay) and then changing 360 degrees to NO.
- Game Screens
- Menu: Located at the lower left, click to access Options, Help, 360-degree navigation and the Main Menu. Note that you must click on the Menu button; pressing the Esc key, on your keyboard, has no effect.
- Tasks: Located just above the Menu button, click to view a list of your current objectives
- Clue Gauge: Open your Task list, click on the Clue Gauge button (“?+”) and then click on one of the objectives in your list. You’ll receive a hint on what you need to do next. The Clue Gauge takes time recharge after each use.
- Hint: Located at the lower right, click to reveal a random item from your current search list. This will change to a Skip button (or Easy button, and then a Skip button, when available) during Puzzles and Minigames. The Hint/Easy/Skip buttons take time to charge/recharge.
- Map: Located just to the left of the Hint button (the icon is a Compass Star), click to view a layout of the areas you’ve visited.
- Inventory: Located at the bottom of the screen, this will contain your tools, task information and/or a list of search items.
- Cursors
- Click on the Help button, in Options, to view a complete list of all the cursors you’ll encounter in the game.
- Gameplay
- Finding tools, completing tasks, minigames and puzzles, and navigating through the different areas to complete objectives.
- During some Puzzles and Minigames, you’ll be offered the opportunity to switch to Easy mode, after the button charges. Easy mode, especially during item construction, allows correctly placed pieces to be locked into place. In Normal mode, they will not lock into place. In both cases, you’ll see a green flash when pieces are placed in the correct location; however, for object construction where you must layer items, you may need to remove it temporarily to place another item in the same area.
Gameplay and Guide Tips
- If you haven’t played either of the 2 previous games in this series, it is highly recommended that you view all the Help files, use the Tutorial and read all Tips and Directions offered. This game employs some non-standard functions and it’s best if you’re aware of them to make your gameplay more enjoyable and problem free.
- This guide assumes you’ve read the General Information, used the in-game Tutorial and/or Help features or otherwise familiarized yourself with the gameplay. Exiting close-ups, clicking through dialogs, how to use inventory items (other than what to use and where), and similar, ongoing functions, will not be mentioned in the walkthrough text.
- The Help function contains detailed information about numerous game functions, cursors and other valuable information. It is highly recommended you review these to make sure you know how everything functions. Click YES to use the Tutorial for more detailed information on game functions.
- In this walkthrough, solutions for Puzzles and Minigames will be shown in either an image or video (only if the solution steps are long or complex). Most Puzzles and Minigames, with random solutions, will have strategies or steps for solving them.
- You may exit some Close-Up Areas (non-object search areas) and return to previous locations by clicking on the “X,” located at the upper left, or by clicking outside the Close-Up Window. Exit rooms by clicking on the circular arrow, near the bottom of the screen or directional arrows located on the left or right. Note that you will enter some rooms, or Close-Up Areas, automatically, for object searches. You cannot exit these; you must complete them to proceed.
- Once you begin most Puzzles or Minigames, you cannot exit (some that open in small windows can be closed); you must complete them to continue. Click on the Information (“i”) button (located just to the left of the Skip button) for instructions on solving the Puzzle. Click on the Reset (circular arrow) button (located just below the Information button) to restart the Puzzle. In some Puzzles you can switch into Easy mode after the button has charged. Note that once you switch to Easy mode, click on the Reset button to switch back to Normal mode and restart the timer. You can only Skip the Puzzle after you’ve switched into Easy mode and the Skip button has charged.
- Navigate by either clicking on the directional arrows (at the sides), circular arrow (bottom of the screen, to return to previous areas, only) or by holding down your right mouse button (only if 360 degree Free View is enabled) and dragging in the direction you wish to view (left, right, up or down). You may also use the Arrow Keys on your keyboard instead of using your mouse. Note 360 degree viewing is directly controlled by the mouse button, or arrow keys, and there is no free rotation by moving your cursor. Click on the Menu button to turn 360 degree Free View on or off.
- Some Tutorial items are required and you’ll be given tips (either on the screen or in the Inventory area), when you come across a new function (for example, you’ll be given instructions on how to use 360 degree Free View and how to turn it on and off).
- Click (you may also use the Space bar) to progress quickly through dialogs and text, and to skip cutscenes.
- In Casual mode, the Hint, Clue Gauge and Easy (if available) buttons charge/recharge in 30 seconds and the Skip button in 120 seconds (2 minutes). In Adventure mode, the Hint, Clue Gauge and Easy (if available) buttons charge/recharge in 60 seconds and the Skip button in 180 seconds (3 minutes). Note that all Object Searches, Puzzles and Minigames begin with the Hint/Easy/Skip button discharged; you’ll have to wait for them to charge before use. The Clue Gauge remains charged until you use it.
- In this walkthrough, Object Searches consist of either close-ups, where you find a short list of specific items, or general areas, where you need to find single items or multiples of a single item. All items will be indicated in green, Active Areas in white (single instance) or by numbers/letters (multiple instances). Additional/Alternate colors, numbers, arrows, lines and/or letters will be used where necessary and for clarification.
- When told to turn (to the right or left) it is assumed you are at the location shown in the image and know how to use the 360 degree Free View to do this, or to use the visible arrows (if you have 360 degree turned off). If you are in a different part of a Room, navigate to the area needed. Specific instructions to do this will not be mentioned in the walkthrough text.
Walkthrough
Create your profile, adjust the Options if you like, click on Play, select your gameplay mode (Casual or Adventure) and watch the opening movie.
Sections 1 – 10
1 – Ground Floor
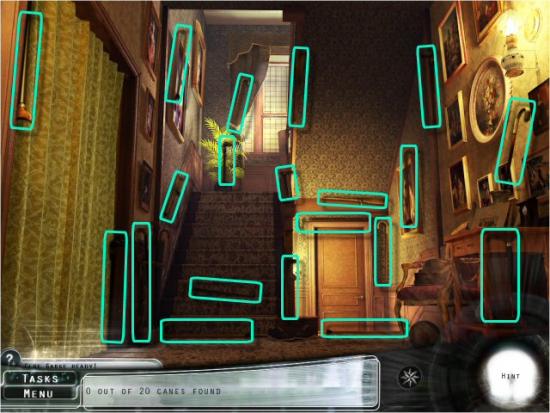
Collect 20 Canes.

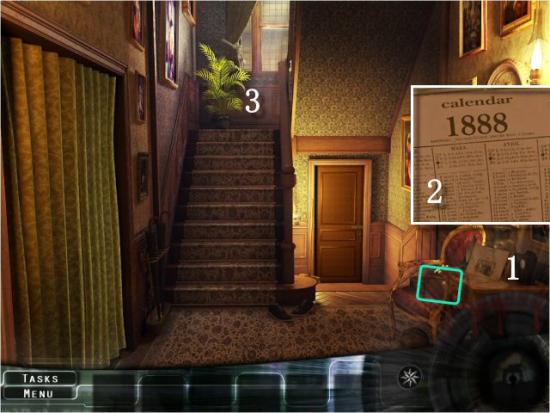
Click on the Side Table (1), click on the Calendar (2), collect the Doctor’s Bag and then head upstairs (3).
2 – Second Floor
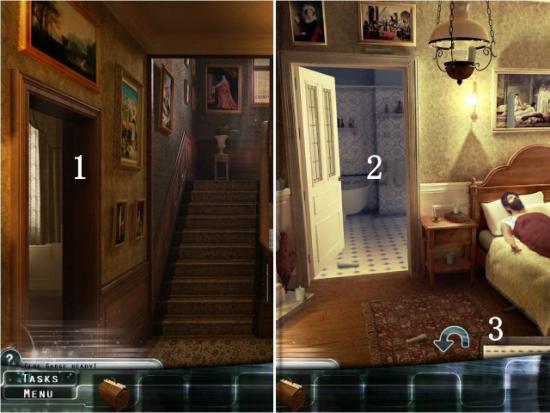
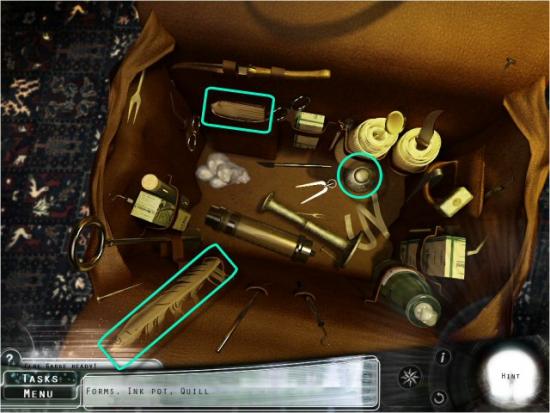
Enter the Patient’s Room (1), complete the Object Search (see next image) and then enter the Bathroom (2). Click on the Form (3) to minimize it; click again to maximize it.
Collect the listed items.
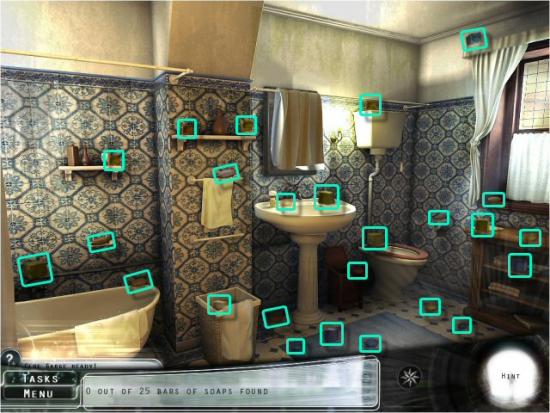
Collect 25 Bars of Soap
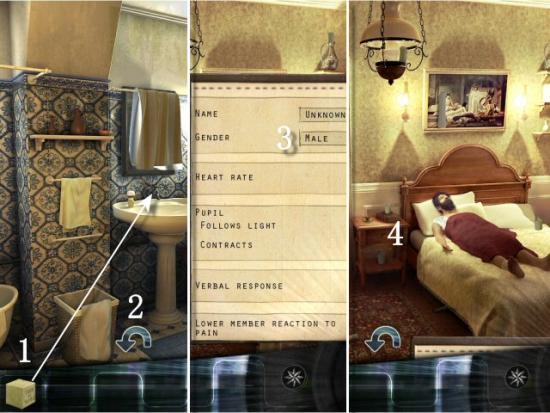
Use the Bar of Soap on the Sink (1), return to the Patient’s Room (2), enter the Patient’s Gender on the Form (3 – Male) and then click on the Nightstand Drawer (4).
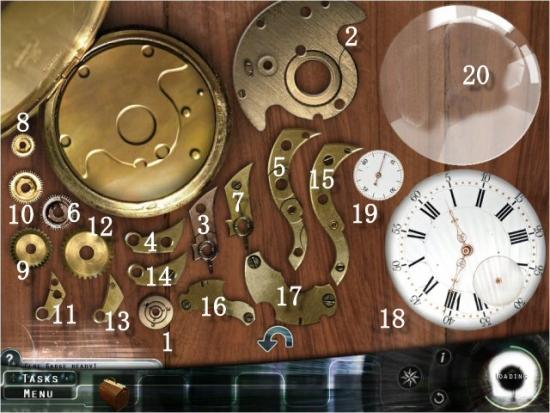
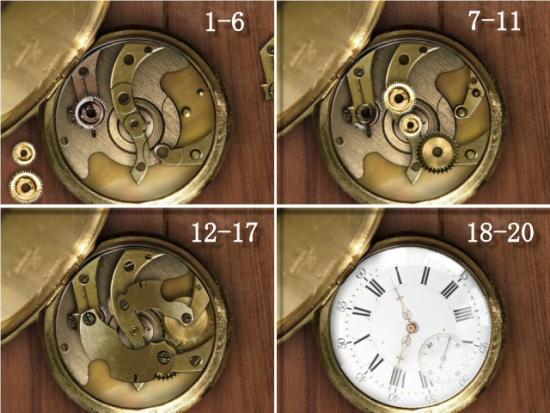
The object is to reconstruct the Watch in the correct order. Click on a piece, drag it to the correct location and then click to place it. In Normal mode, all pieces will remain movable until the puzzle is complete. In Easy mode, pieces will lock into place, once placed correctly. When a piece is placed correctly, you’ll see a brief, green flash. Note that you will see the green flash in Normal mode, even if the piece is placed out of order. You may need to remove it and place a different piece, first. If you like, you may rearrange the location of the pieces on the table. Refer to the first image for the Order and the subsequent image for the Placement Locations of all 20 Pieces.
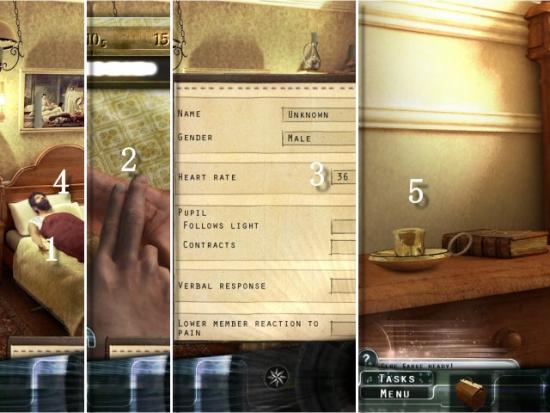
Click on the Patient’s Wrist (1), click on the correct spot to take his Pulse (2), count the beats and then enter the Heart Rate on the Form (3 – 36). There are 9 beats in 15 seconds. Multiply 9 times 4 (15 seconds times 4 equals 1 minute) and the result is 36 beats per minute. Click on the Patient (4) and then collect the Candle Holder (5).
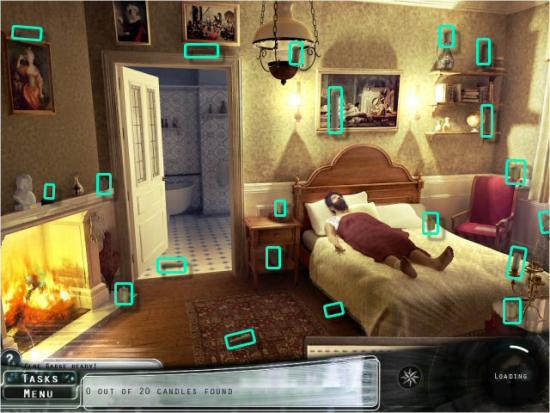
Collect 20 Candles.
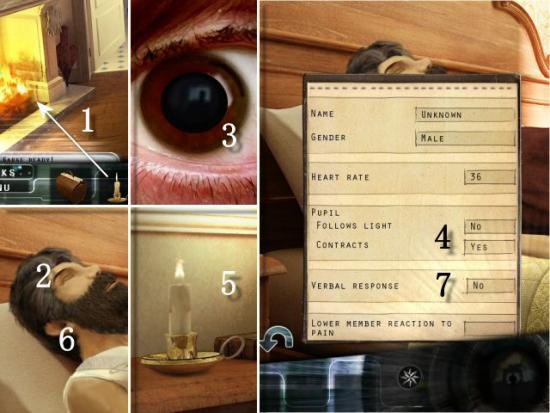
Use the Candle on the Fireplace (1), click on the Patient, click on his Eye (2) and use the Candle to check the Patient’s Pupils (3 – move the Candle across the Pupil; once is enough). Replace the Candle on the Nightstand (4), enter the Pupil Information on the Form (5 – No and Yes), click on the Patient’s Ear (6) and then enter the Voice Response Information on the Form (7 – No).
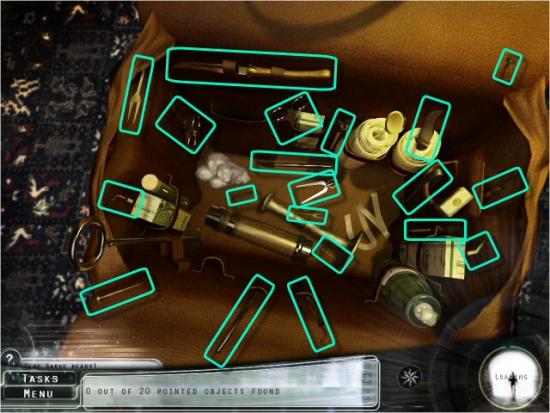
Collect 20 Pointed Objects.
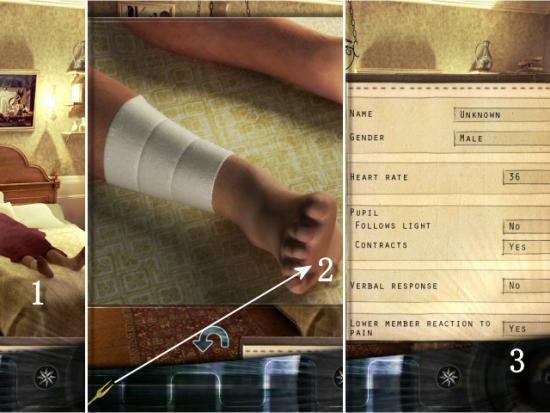
Click on the Patient’s Foot (1), use the Pointed Object (2) and then enter the Reaction to Pain Information on the Form (3 – Yes).
3 – Ground Floor
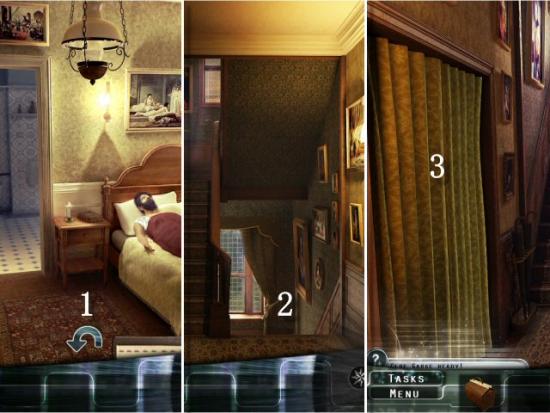
Exit the Patient’s Room (1), return Downstairs (2) and then click on the Curtains (3).
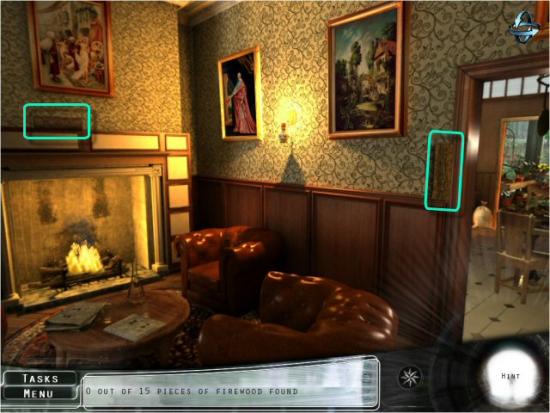
Working around the room, from right to left, collect 15 Pieces of Firewood. Note that you may do this in any order you like.
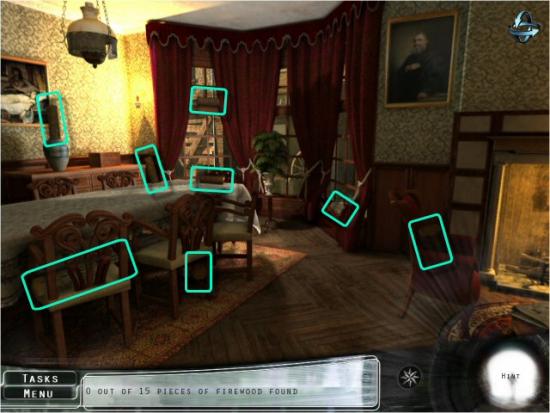
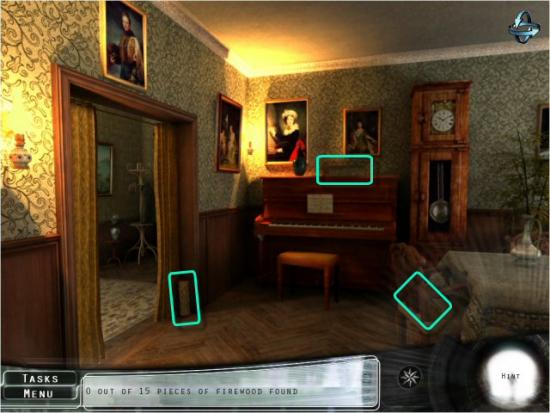
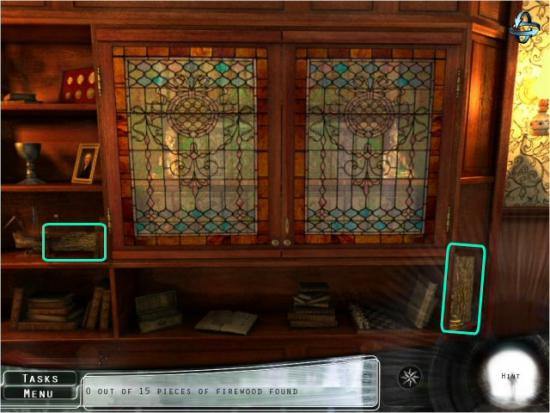
4 – Second Floor
Exit the Living Room (1 – between the Cabinet with the Stained Glass Doors, on the right, and the Piano, on the left), return Upstairs to the Patient’s Room and use the Firewood on the Embers (2).
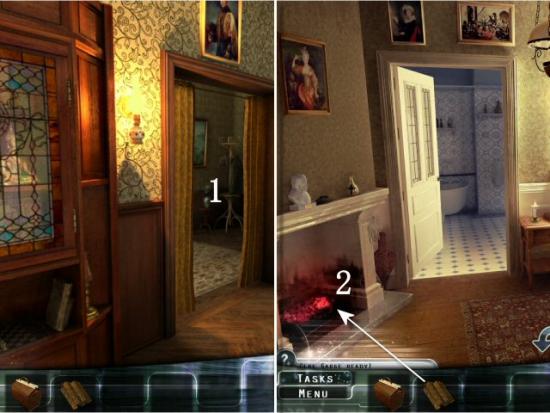
Collect the listed items. Note that the additional items will appear after you collect the first few.
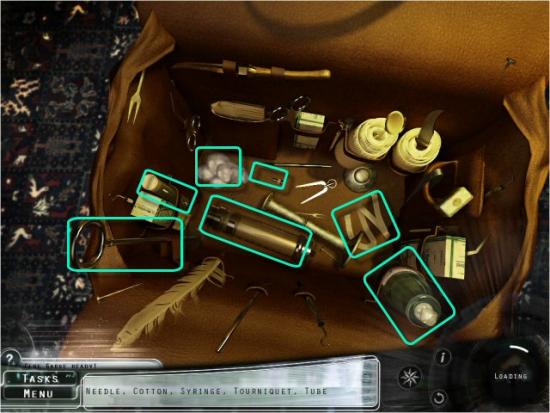
5 – Ground Floor
Return Downstairs, enter the Living Room and then continue straight into the Kitchen. Collect 20 Deep Containers.
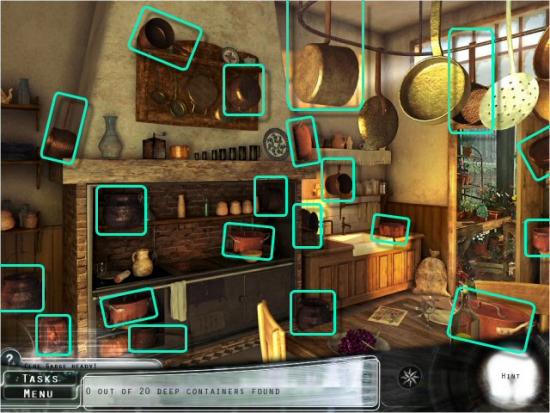
Use the Pot on the Faucet (1), place the Pot of Water on the Stove (2) and then click on the Hot Box Door (3). Return to the Foyer (click left into the Living Room and then click left again), click on the Basement Door (4) and then slide the Latch open (5 – click and drag the Latch all the way to the left).
ft3r22
6 – Basement
Working around the room, from right to left, collect 18 Briquettes of Charcoal. Note that you may do this in any order you like.
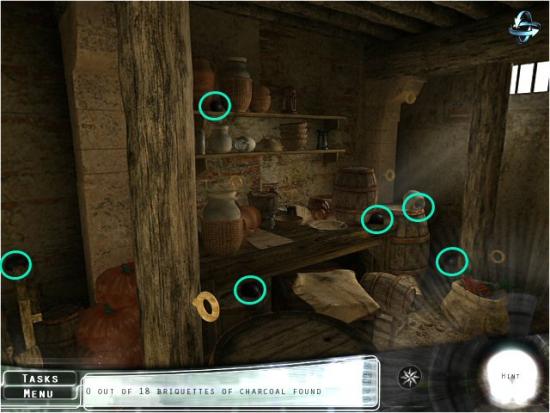
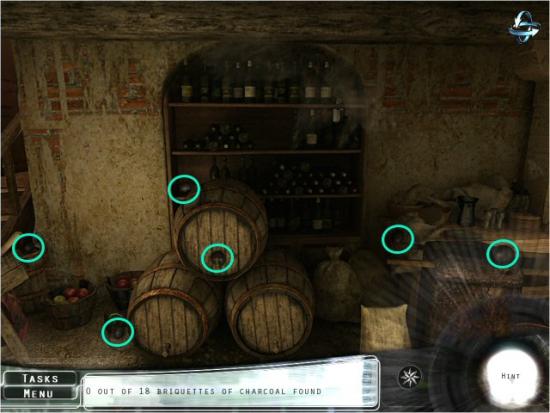
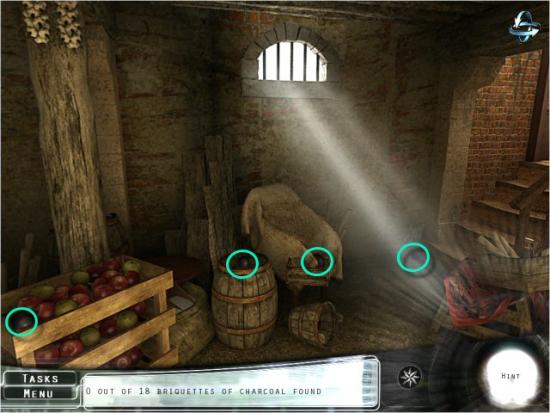
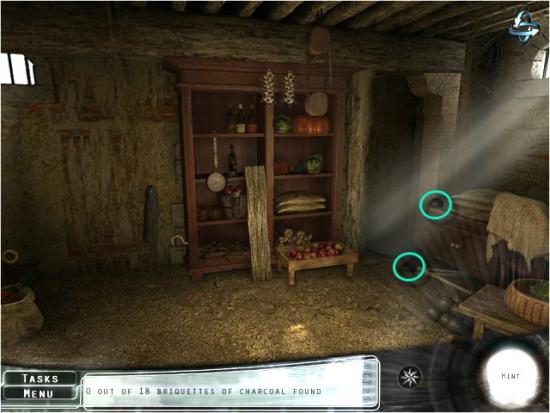
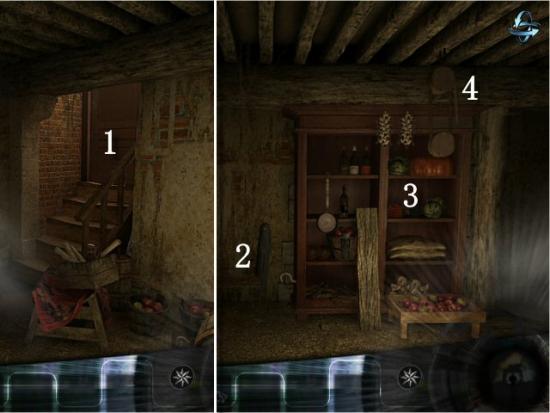
Click on the Basement Door (1), turn to the left, click on the Moving Scarf (2), click on the Shelf (3) and then click on the Hoist (4).
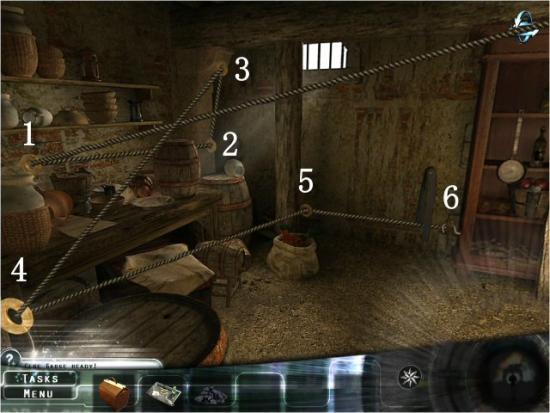
Turn to the left, click on each of the 5 Eye Bolts, to thread the Rope, and then click on the Hook. You need to thread the Rope through the Eye Bolts in the correct order before clicking on the Hook.
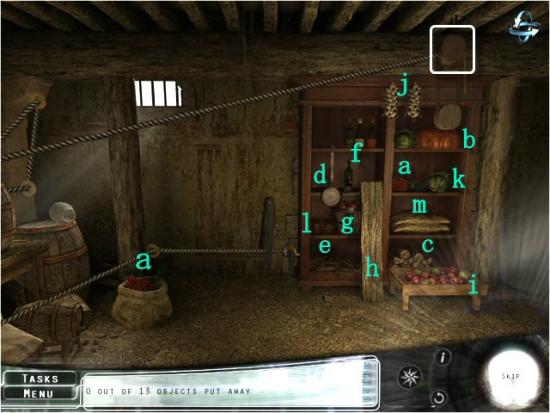
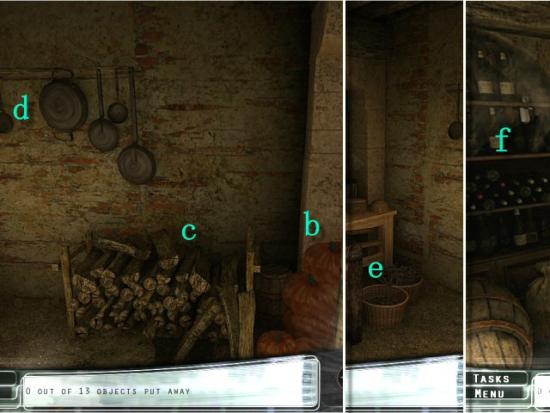
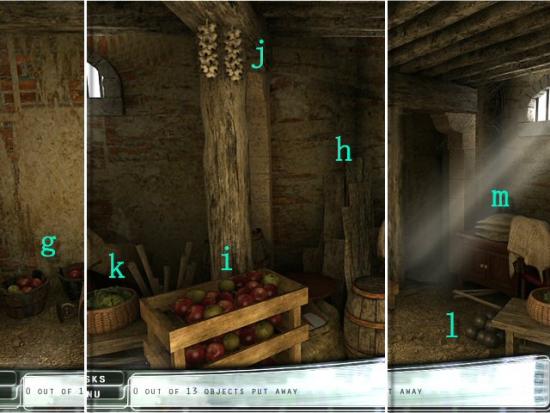
Turn back to the right, click on the Hoist and then put the 13 Objects Away. Click on an item, from the Shelves, and then move around the Basement to place it in its proper location. Return to the Shelves and repeat for the remaining items. Refer to the first image for the Items and the subsequent images for the Placement Locations. The order shown is based on moving from right to left, around the Basement; you may do them in any order you like.
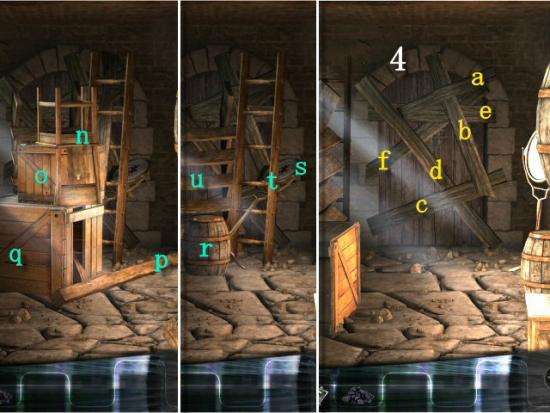
Click on the Hoist (1), enter the Passageway (2) and then clear all the Debris (3). You must click on each piece in a specific order to release pieces underneath. Refer to the first image for the initial items and the subsequent image for the remaining items. When all the Debris is gone, remove the Boards (4) in the order shown.
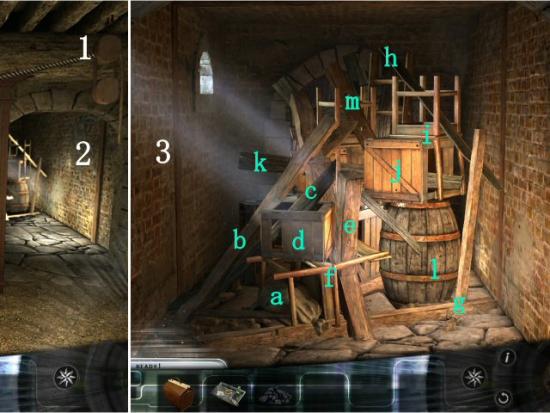
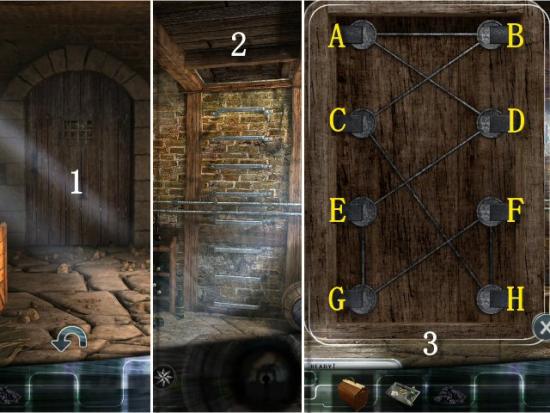
Click on the Door (1) and then click on the Trap Door (2). The object is to Disengage the Locks (3). You must click on each Lock, in a specific order, to release them all.
1 releases 1, 2 and 4 | 2 releases 1, 2 and 3 | 3 releases 2, 3 and 8 | 4 releases 1, 4 and 5 |
5 releases 4, 5 and 7 | 6 releases 6, 7 and 8 | 7 releases 5, 6 and 7 | 8 releases 3, 6 and 8 |
In Normal mode, click on all the Locks, in order: 1, 2, 3, 4, 5, 6, 7 and 8. If you switch into Easy mode, Locks 6 and 8 will be disengaged; click on Locks 2 and 5 to disengage the rest. Note that clicking on Locks 3, 6, 7 or 8, in Easy mode, before clicking on any others, will engage Locks 6 and/or 8 again, and change your solution strategy.
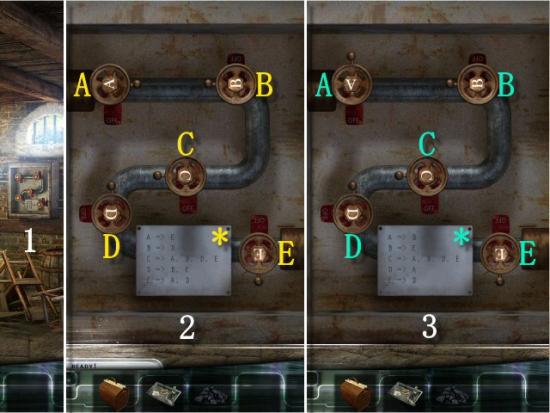
Click on the Gas Controls (1); the object is to turn off the Gas. Clicking a Valve turns itself, and one or more others, one-quarter turn. In Normal mode (2), note the Chart (*) showing which Valves also turn others.
Valve A turns A and E | Valve B turns B and D | Valve C turns A, B, C, D and E |
Valve D turns B, D and E | Valve E turns A, D and E |
In Normal mode, click on the following Valves: D, B, C three times and E twice.
If you switch into Easy mode (3), both the initial orientation and the Chart change. Note the Chart (*) showing which Valves also turn others.
Valve A turns A and B | Valve B turns B and E | Valve C turns A, B, C, D and E |
Valve D turns D and A | Valve E turns D and E |
In Easy mode, click on the following Valves: A three times, B three times and C three times.
7 – Ground Floor
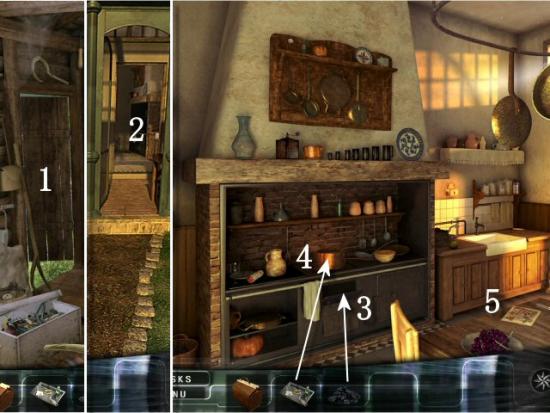
Exit through the Trap Door (1), click on the Shed Door (2), click on the Wooden Box (3) and then collect 20 Screwdrivers.
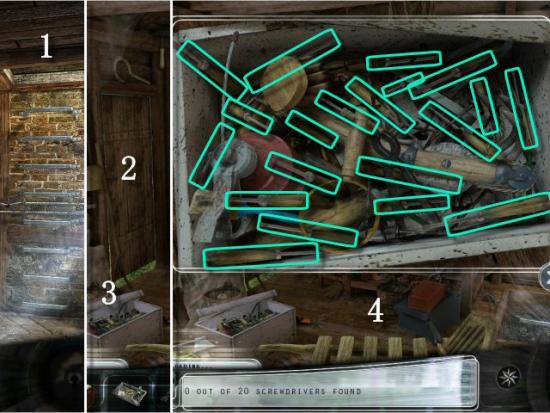
Click on the Shed Door (1) and use the Screwdriver on all 4 Screws (2).
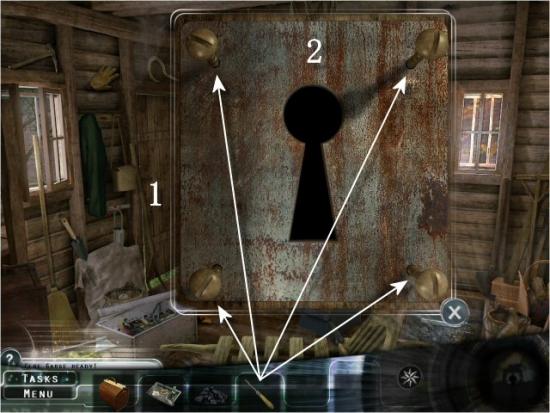
The object is to move all 3 Red Bars out of the Lock. Click and drag the bars to make spaces so that you can move the Red Bars. In Normal mode, this takes 32 moves. Click on the following for the video solution.
In Easy mode, one of the Red Bars is already out of the Lock, so you only need to move 2 more. This takes 12 moves. Click on the following for the video solution.
Exit the Shed (1) and enter the Kitchen (2 – click forward and then click left). Use the Charcoal in the Hot Box (3), use the Medical Instruments in the Pot (4) and then click on the Magazine (5).
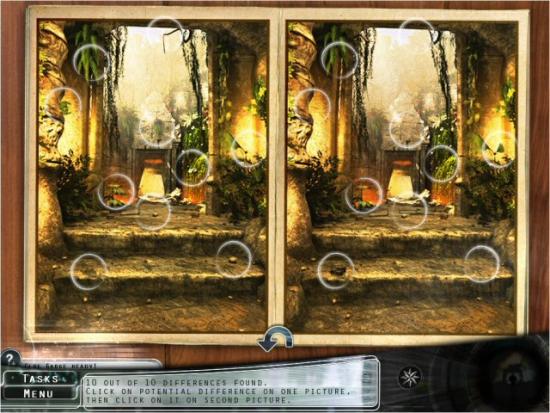
Find the 10 differences. Click on a difference in one photo and then click on the same area in the opposite photo.
8 – Second Floor
Click on the Sterilized Instruments and use them on the Sink (1). Return upstairs to the Patient’s Room (click left twice, click upstairs and then click left into the Patient’s Room) and click on the Patient’s Arm (2).
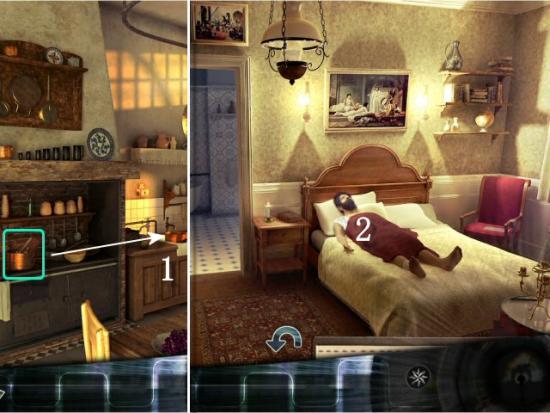
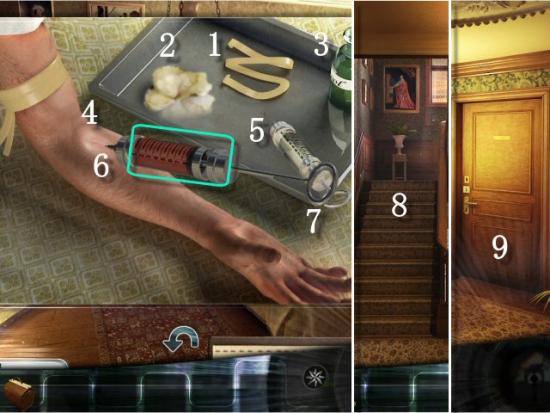
Use the Tourniquet (1) on the Patient’s Arm, use the Cotton (2) on the Bottle of Alcohol (3) and swab the Patient’s Arm (4) with the Cotton. Use the Syringe (5) on the Vein (6), click and drag the Needle into the Vein (click and drag the Syringe to the left, into the Vein), click and drag the Plunger (7 – click and drag the Plunger to the right) to collect the Blood and then collect the Blood Sample. Exit the Patient’s Room, click upstairs to the Attic (8), click on the Attic Door (9) and then return to the Ground Floor (click downstairs twice).
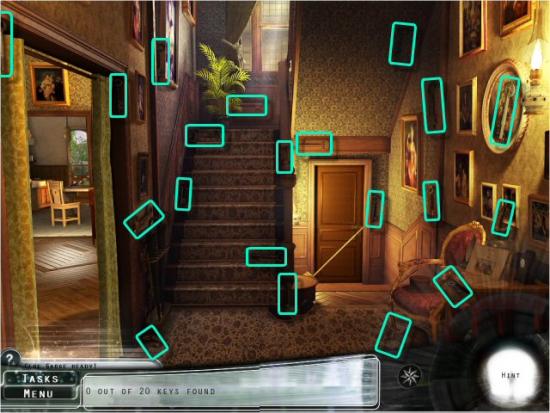
Collect 20 Keys. Note that one of the Keys is inside the Drawer on the Side Table; click on it to open.
9 – Attic
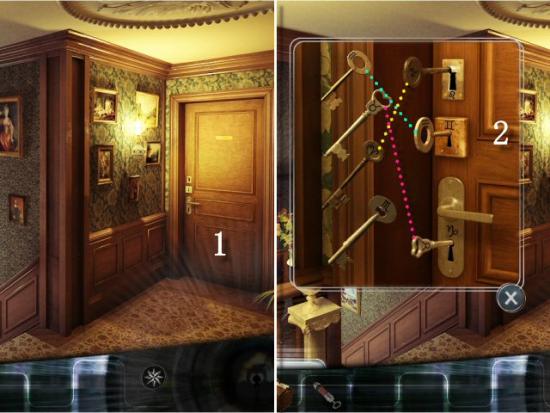
Return to the Attic (click upstairs twice) and click on the Attic Door (1). You must insert the correct Keys in the 3 Locks (2). In Normal mode, you must choose 3 correct Keys, out of 4. In Easy mode, one Key is already inserted and you must choose 2 correct Keys, out of the remaining 3. The solution is the same for both modes.
- The Aries Key goes in the Leo Lock.
- The Aquarius Key goes in the Gemini Lock.
- The Taurus Key goes in the Capricorn Lock.
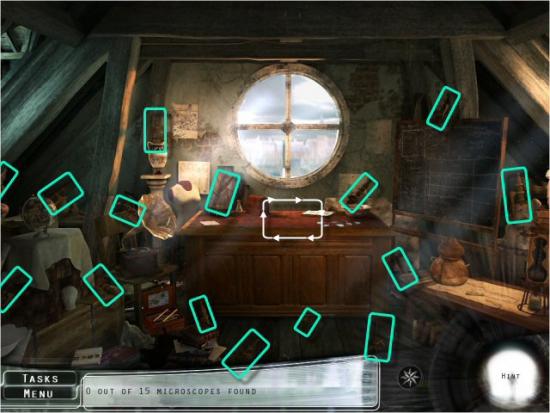
Collect 15 Microscopes and then click on the Desk.
Click on the Morse Code (1), use the Microscope Parts on the Desk (2) and then reassemble the Microscope (3). Click and drag each piece into position. When placed correctly, they’ll lock into place. In Normal mode, right click and drag, in either direction, to rotate a piece. In Easy mode, all pieces are oriented properly. When complete, use the Blood Sample on the Slide (4).
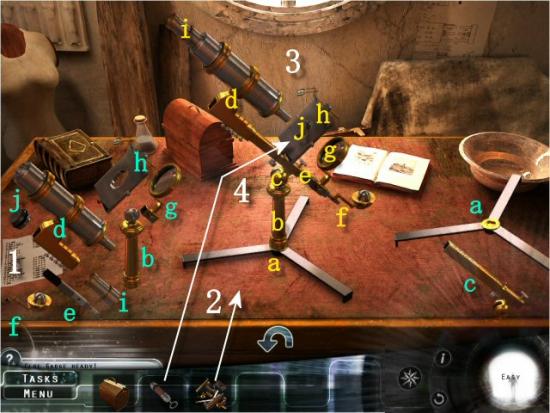
The object is to find and click on all the White and Red Blood Cells (30 of them). In Normal mode, they move around fairly quickly. In Easy mode, they move around much more slowly. The location of the Blood Cells is completely random; however, if you park your cursor, most of the Blood Cells should pass by the location, eventually, if you’d rather not continue moving around and look for them. Click on the following video for a short example of gameplay.
10 – Ground Floor
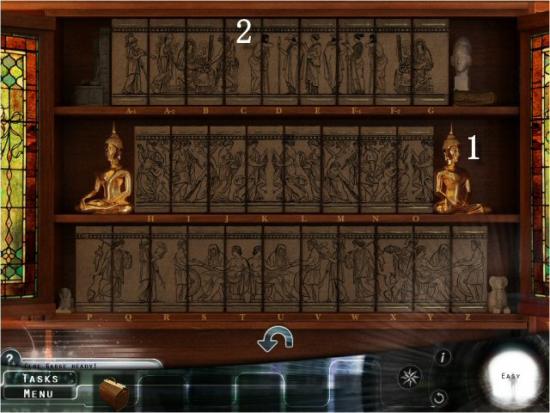
Return to the Living Room (click back twice, click downstairs twice and then click left), turn to your right until you’re facing the Cabinet (with the Stained Glass Doors), click on the Doors and then click on the Buddha (1). The object is to rearrange the Books to form 3 long, horizontal Images. Click on a Book and then click on another to switch their places. In Normal mode, all the Books are out of order. In Easy mode, the bottom row of Books is placed correctly and locked. When complete, click on Book C (2).
Sections 11 – 17
10 – Ground Floor
Return to the Living Room (click back twice, click downstairs twice and then click left), turn to your right until you’re facing the Cabinet (with the Stained Glass Doors), click on the Doors and then click on the Buddha (1). The object is to rearrange the Books to form 3 long, horizontal Images. Click on a Book and then click on another to switch their places. In Normal mode, all the Books are out of order. In Easy mode, the bottom row of Books is placed correctly and locked. When complete, click on Book C (2).

11 – Basement
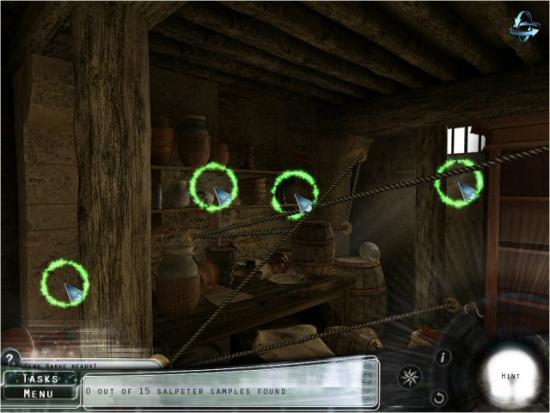
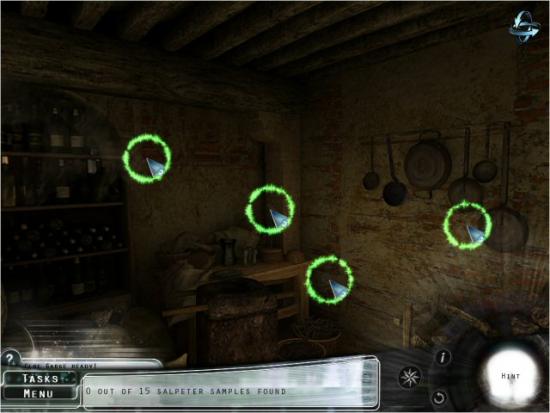
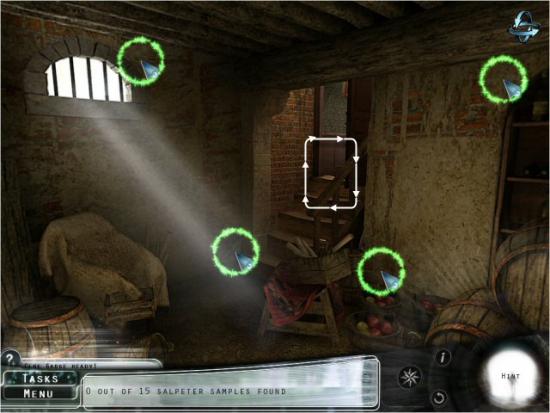
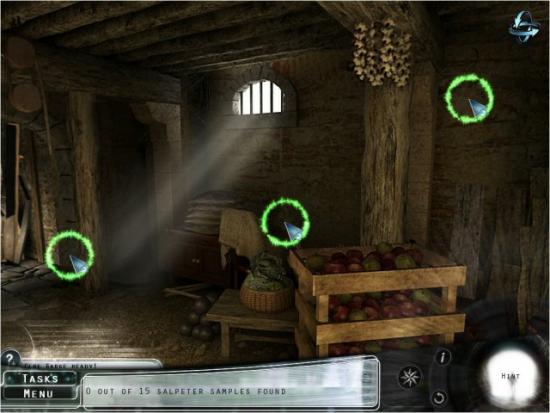
Return to the Basement (click back, turn to the right, click on the left and then click on the Basement Door; you’ll have to slide the Latch to the left, again). Find 15 Saltpeter. The items are not visible (they may be slightly visible, but not to a large enough degree that you’ll be able to see them), you’ll need to find them with your cursor. As you move your cursor, a large ring of white, sparking stars follows it. As you get closer to an item, the circle becomes smaller and smaller. When you’re over an item, it will turn from white to green; click to collect the item. Make sure you move slowly or you may miss the items. Continue around the Basement, from right to left, until you’ve collected all 15. Note that you may do this in any order you like.
12 – Ground Floor
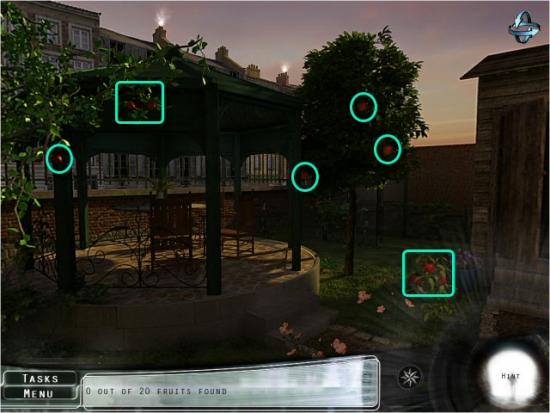
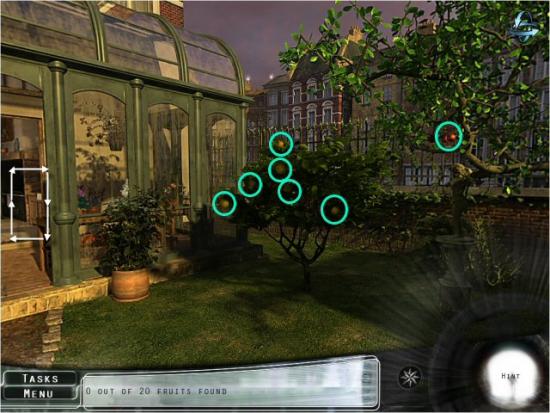
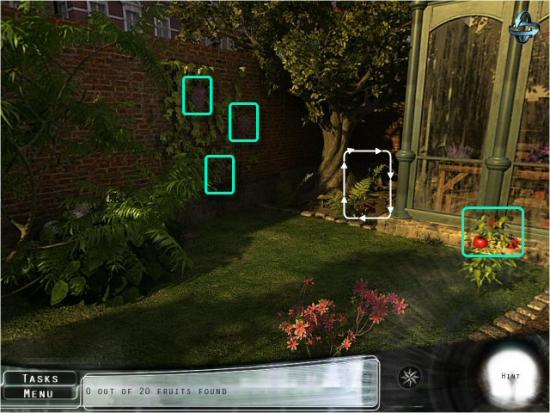
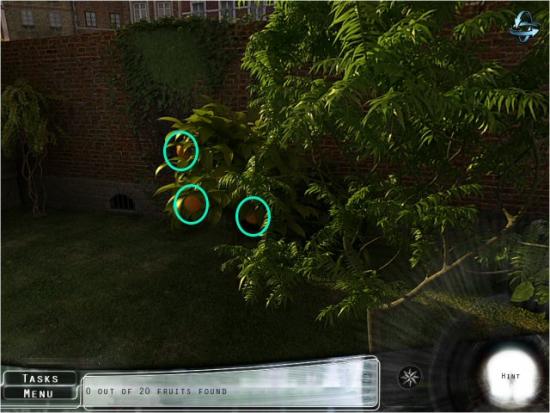
Return to the Kitchen (move back to the right, click on the Steps to exit the Basement, click left and then click forward into the Kitchen) and go outside (click right into the Veranda and then click right into the Yard). Working around the Yard, from right to left, Collect 20 Fruits. Note that you may do this in any order you like.
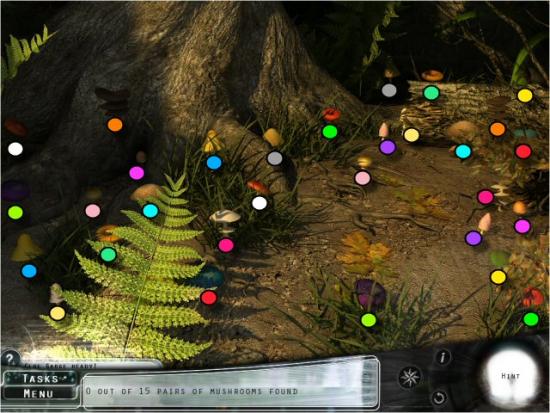
Move back to the right and click on the side of the Tree. Collect 15 Pairs of Mushrooms.
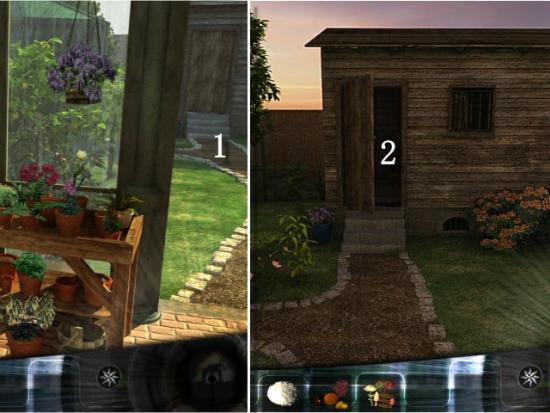
Move back to the right and return to the Veranda. Return to the Yard (1) and then Enter the Shed (2).
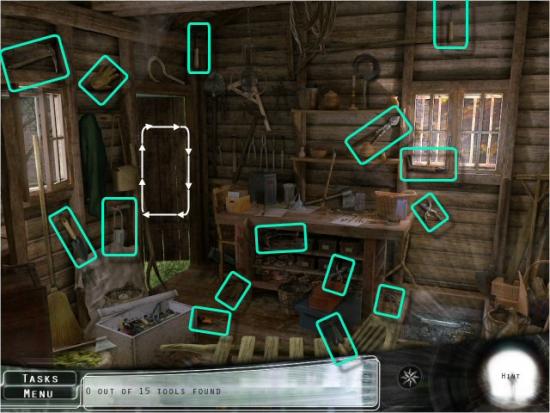
Collect 15 Gardening Tools.
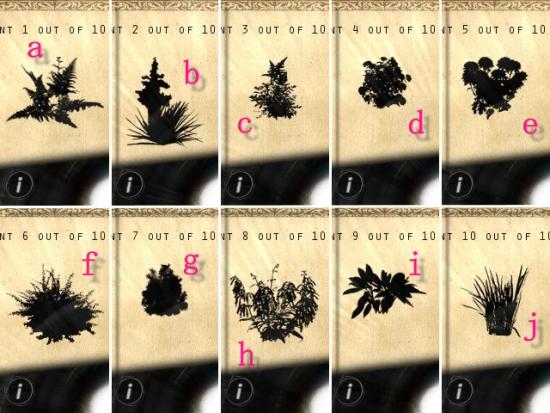
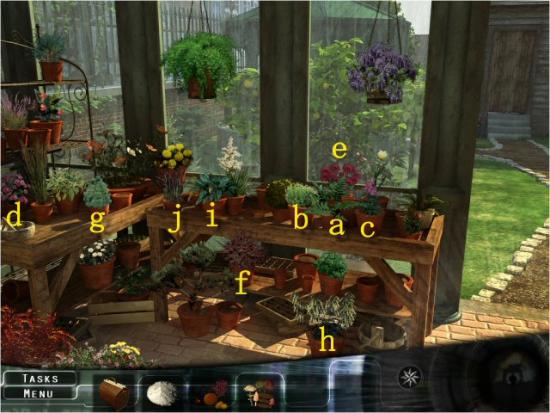
Return to the Veranda (click left to exit the Shed and then click forward to enter the Veranda). Collect 10 Medicinal Plants. Refer to the first image for a silhouette of each Plant and then refer to the second image for their locations.
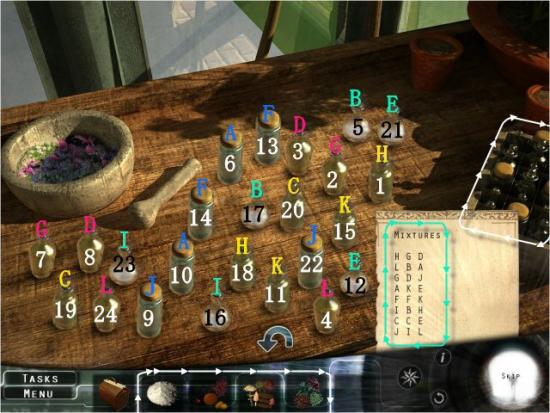
Use the Saltpeter, Fresh Fruits, Mushrooms and Medicinal Plants on the Bottles (you may use them in any order and on any bottle you like; they’ll automatically trigger the correct items). The object is to click on the correct sequence of Bottles, in groups of 3, according to the Mixtures Chart. Note that it doesn’t matter which Bottles as long as they have the correct Letters and are clicked on in the correct order. Refer to the image for the Letters found on each Bottle and the order to click on them. Note that there is more than one correct solution.
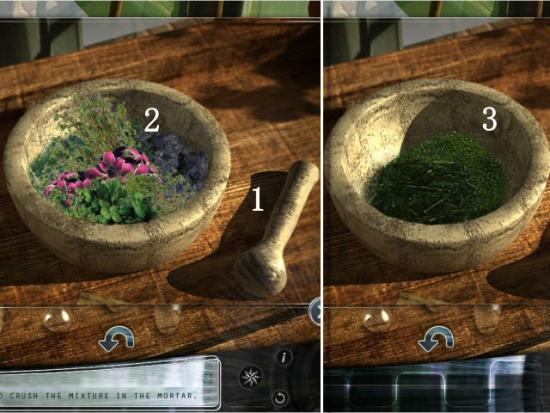
Click and drag the Pestle (1) until the Mixture (2) is smooth and then collect the Paste (3).
13 – Attic
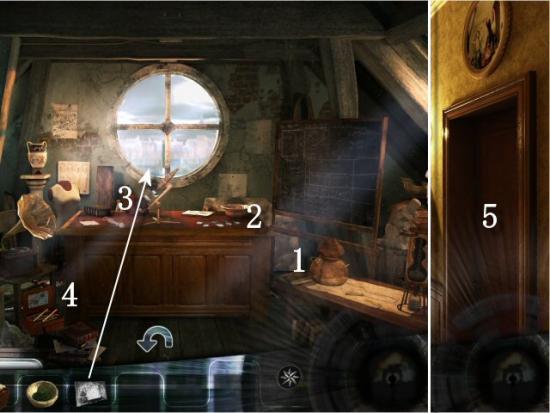
Return to the Attic (click back, click left 3 times, click upstairs twice and then click on the Attic Door), click on the Still (1) and then click on the Broken Photographic Plate (2). When complete, use the Photographic Plate on the Window (3), click on the Still and then click on the Toy Construction Set (4). Return to the Second Floor (click back and then click downstairs) and then click on the Son’s Door (5).
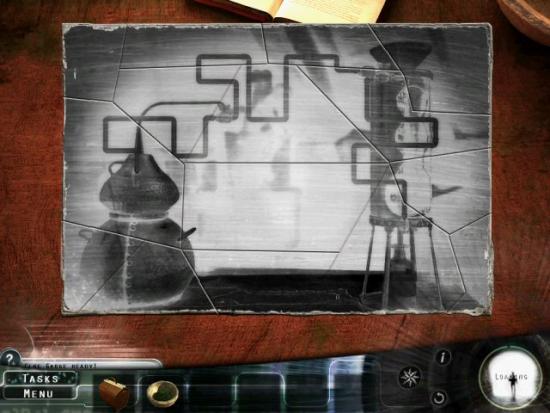
Reassemble the Photographic Plate. Click and drag each piece into position. When placed correctly, they’ll lock into place. In Normal mode, right click and drag, in either direction, to rotate a piece. In Easy mode, all pieces are oriented properly.
14 – Second Floor
Click on the Closet Door, put the 16 Objects away and then click on the Closet Door, again.
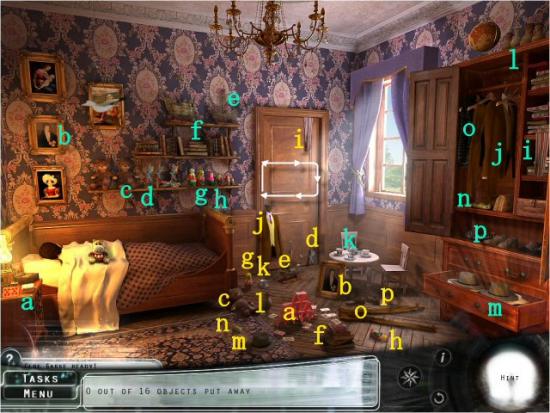
Collect 20 Plastic Tubes.
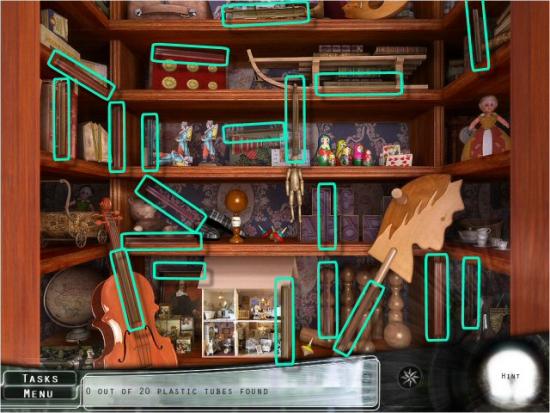
15 – Attic
Return to the Attic (click back, click left, click upstairs and then click on the Attic Door), use the Mixture on the Boiler (1) and use the Plastic Tubes on the Still (2).
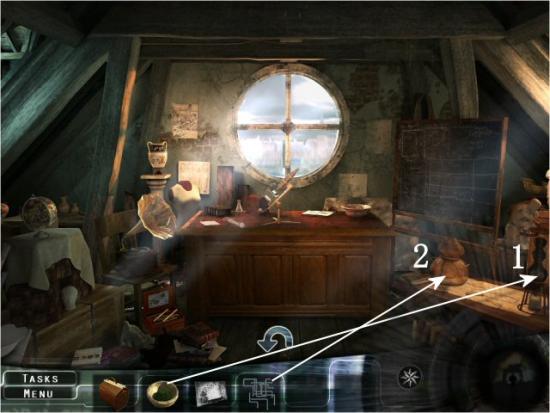
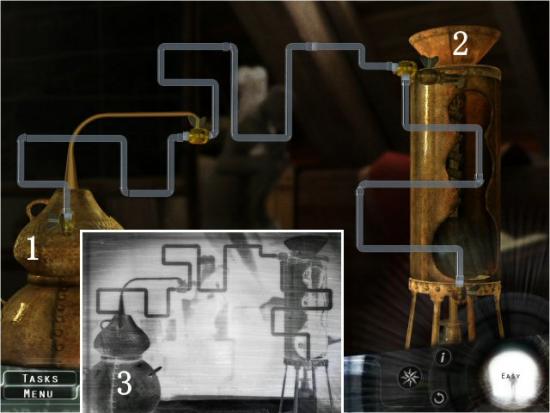
The object is to connect the Still (1) to the Boiler (2) using the 9 Pieces of Plastic Tube; the diagram for connecting the tubes is on the Photographic Plate (3). If you’d like to look at it again, exit the Puzzle, use it on the Window and then return to the Puzzle. In Normal mode, you must place all the Tubes. In Easy mode, the first 3 Tubes, connected to the Still, are already placed. The solution is the same for both. If you like, you can move the Tubes around to clear the center area. You may place the Tubes in any order you like.
16 – Ground Floor
Return to the Kitchen (click back, click downstairs twice, click left and then click forward into the Kitchen), use the Still on the Stove (1) and then click on the Magazine (2).
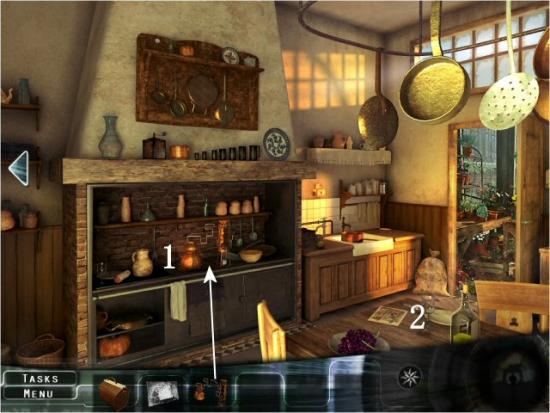
Find the 10 differences. Click on a difference in one photo and then click on the same area in the opposite photo. Note that the photo on the right is flipped upside down.
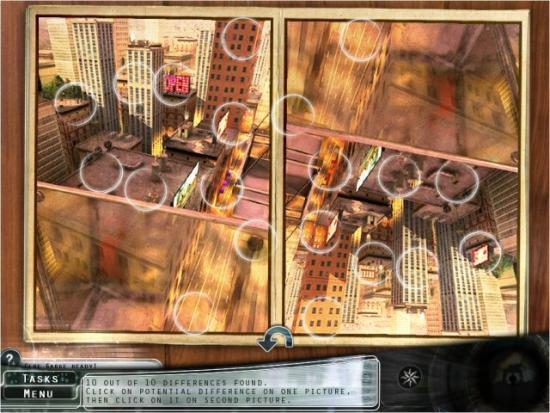
17 – Second Floor
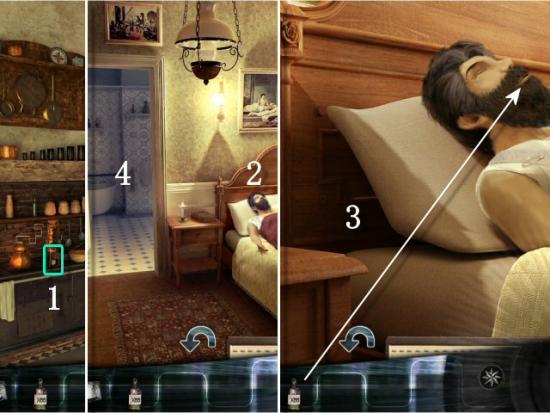
Collect the Remedy (1) and return to the Patient’s Room (click left twice, click upstairs and then click left into the Patient’s Room). Click on the Patient (2), use the Remedy on the Patient (3) and then enter the Bathroom (4).
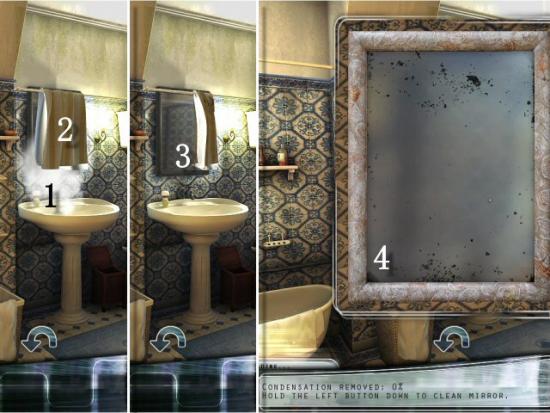
Click on the Faucet (1), remove the Towel (2) and clear away the Condensation (3 – click and drag your cursor over the Mirror until it’s completely clear).
Advance through the dialogs and watch the final cutscenes. Congratulations! You’ve completed The Fall Trilogy: Chapter 3 – Revelation.
After the final cutscenes end, you’ll get to view your Statistics. A message indicates that you can get a higher score by replaying the game. You cannot replay the game on your same profile; you’ll need to replay the game under a new profile.
More articles...
Monopoly GO! Free Rolls – Links For Free Dice
By Glen Fox
Wondering how to get Monopoly GO! free rolls? Well, you’ve come to the right place. In this guide, we provide you with a bunch of tips and tricks to get some free rolls for the hit new mobile game. We’ll …Best Roblox Horror Games to Play Right Now – Updated Weekly
By Adele Wilson
Our Best Roblox Horror Games guide features the scariest and most creative experiences to play right now on the platform!The BEST Roblox Games of The Week – Games You Need To Play!
By Sho Roberts
Our feature shares our pick for the Best Roblox Games of the week! With our feature, we guarantee you'll find something new to play!Type Soul Clan Rarity Guide – All Legendary And Common Clans Listed!
By Nathan Ball
Wondering what your odds of rolling a particular Clan are? Wonder no more, with my handy Type Soul Clan Rarity guide.


