![Digimon UP Tier List [Supports, Buddies, and Partners]](/wp-content/uploads/2026/07/digimon-up-tier-list.jpg "Digimon UP Tier List [Supports, Buddies, and Partners]")
Digimon UP Tier List [Supports, Buddies, and Partners]
These Digimon will get you UP the leaderboard.

![Haze Seas Boss Drops [Chances, Locations, and How to Spawn]](/wp-content/uploads/2026/07/haze-seas-boss-drops.jpg "Haze Seas Boss Drops [Chances, Locations, and How to Spawn]")

Welcome to the walkthrough for The Fall Trilogy – Chapter 2: Reconstruction on Gamezebo. The Fall Trilogy – Chapter 2: Reconstruction is an adventure game for the PC created by Kheops Studio. This walkthrough includes tips and tricks, helpful hints, and a strategy guide to complete The Fall Trilogy – Chapter 2: Reconstruction.
Welcome to the walkthrough for The Fall Trilogy – Chapter 2: Reconstruction on Gamezebo. The Fall Trilogy – Chapter 2: Reconstruction is an adventure game for the PC created by Kheops Studio. This walkthrough includes tips and tricks, helpful hints, and a strategy guide to complete The Fall Trilogy – Chapter 2: Reconstruction.
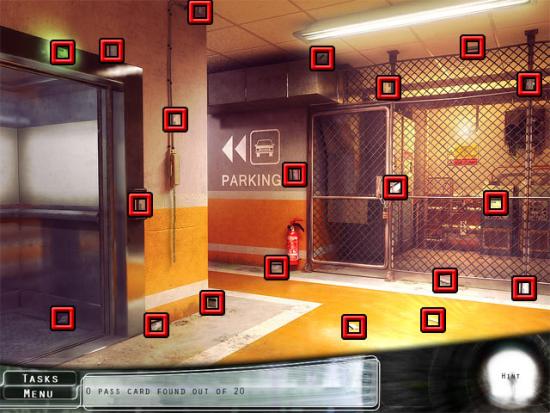
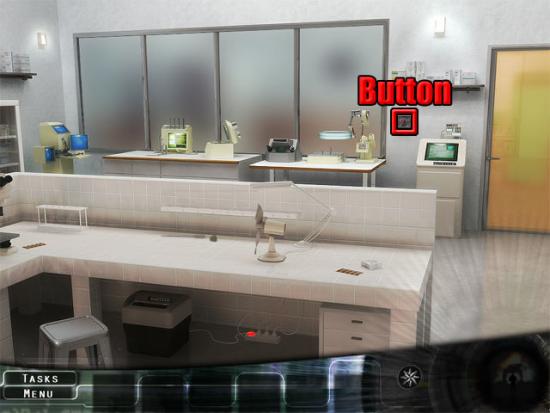
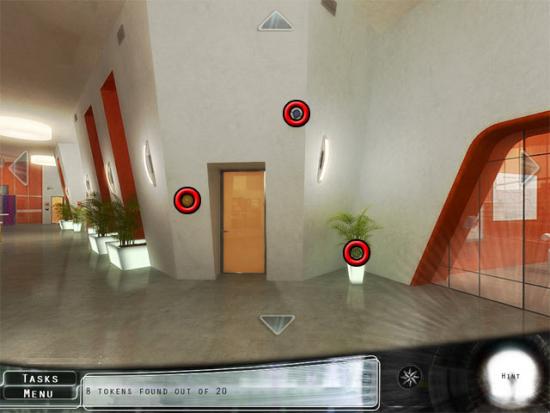
The game starts in the hall. Select the tasks button at the bottom-left corner of the screen to view the current tasks that need to be completed. Select the telephone on the wall and John will be told to go to the 13th floor. Enter the elevator and press one of the buttons on the panel to see that a pass card is required. Exit the elevator and find the twenty passcards:

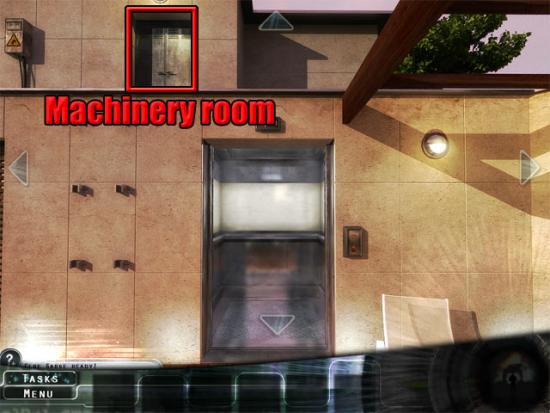
Enter the elevator and use the elevator pass card on the slot. Select button 20 to travel to the top floor. Exit the elevator. Look right four times and examine the elevator machinery room:
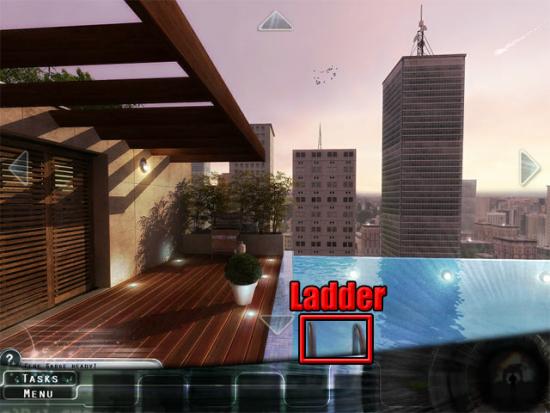
Look left four times and take the ladder from the pool:
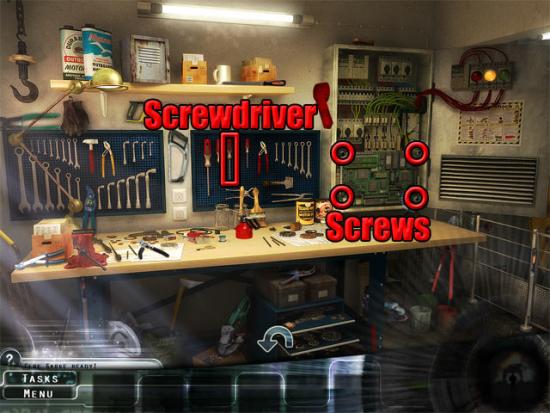
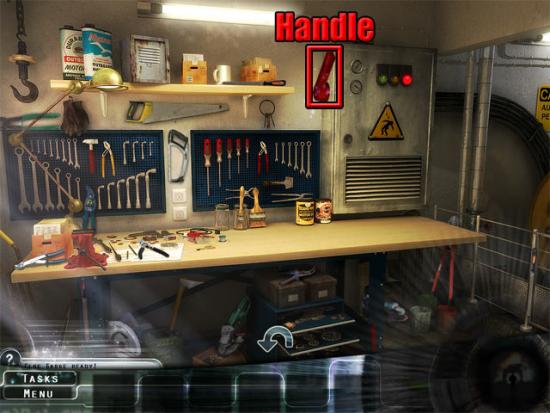
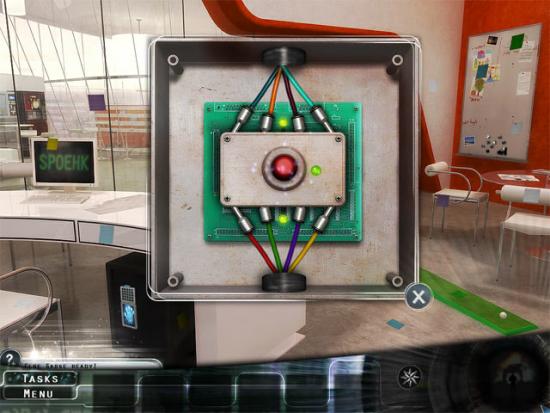
Look right four times and use the ladder on the elevator machinery room. Enter the elevator machinery room. Open the cabinet and examine the motherboard. Take the middle screwdriver and use it on the screws:
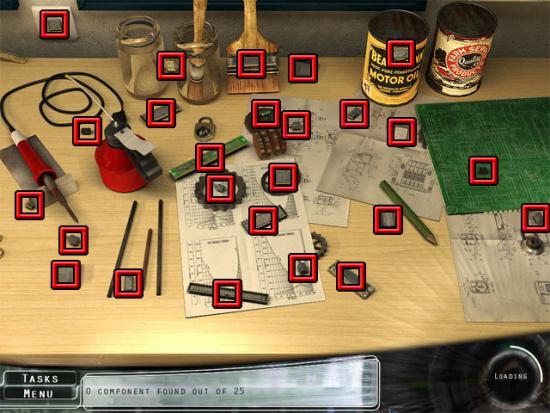
Move to the motherboard and find the 25 components:
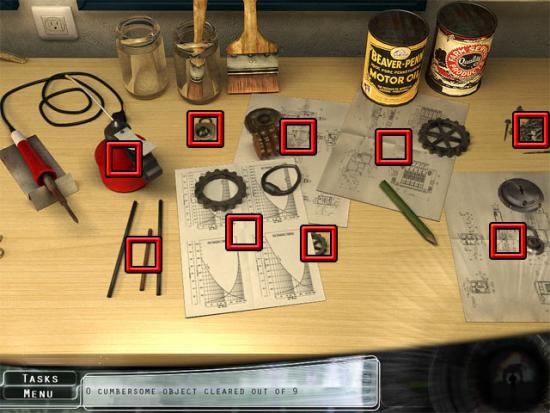
Clear the 9 cumbersome objects:
Use the motherboard on the desk and put all of the components back in the correct places:
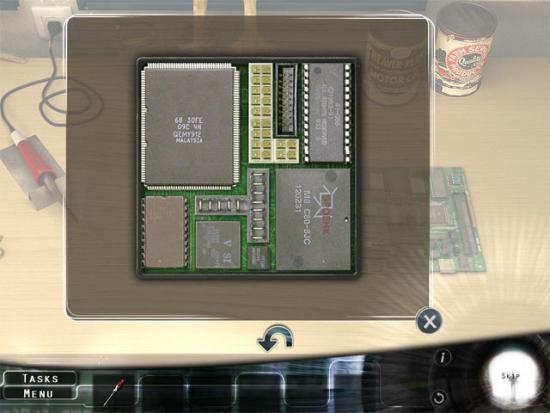
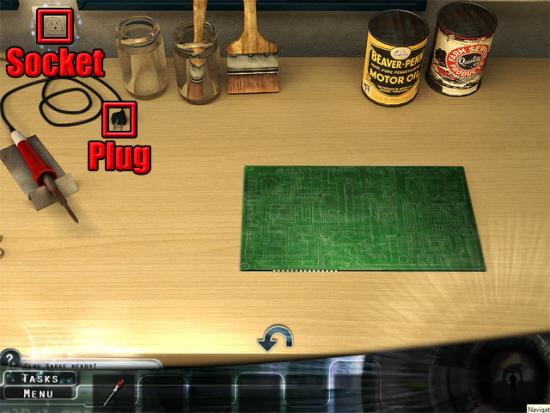
On casual mode, two of the components will already be placed on the motherboard. You will need to place all of the components on normal mode. Select the soldering plug at the top-left corner of the desk and use it on the socket:
Take the soldering iron and use it on the motherboard to play the soldering mini-game. The aim in the mini-game is to solder the components in the same order that is shown. The sequence is random and varies from one game to the next. If you forget the current sequence, put the soldering iron down on the holder and then pick it up again to display the sequence. After completing the mini-game, use the motherboard on the cabinet and use the screwdriver on the four screw holes. Close the cabinet door and pull the red handle to repair the elevator:
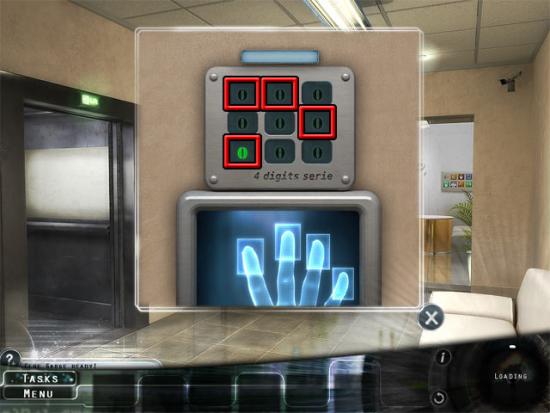
Move back to exit the elevator machinery room. Look down, right and enter the elevator. Press button 13 on the panel and exit the elevator. Move forward to the reception area. On casual mode, you will be able to enter the reception area straight away. On adventure mode, the panel at the left side of the door will become active. Select the panel to play a mini-game. Press the buttons shown below to complete the mini-game:
Enter the reception area and listen to the message left on the phone. In the answering machine mini-game, slide the sparkling number into the top-left tile and then press the delete button. Next, put all of the buttons back in the correct order to complete the mini-game. The directions to complete this mini-game on easy mode are shown below:
Right dash: Right
5: Down
6: Left
3: Down
2: Right
6: Up
4: Right
1: Down
6: Left
Press the red delete button
Top dash: Right
1: Up
4: Left
Top dash: Down
2: Left
3: Up
Top dash: Right
5: Up
Bottom-right dash: Left
The directions to complete this mini-game on normal mode are shown below:
Dash: Right
5: Down
4: Right
7: Up
5: Left
4: Down
2: Down
1: Right
7: Up
Press the red delete button
Top dash: Down
1: Left
2: Up
4: Up
5: Right
Left dash: Down
4: Left
5: Up
Right dash: Left
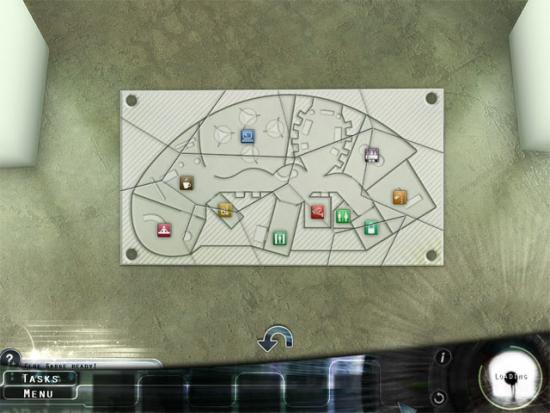
Look right three times and examine the map on the wall. Select all of the spiders and the map will break into pieces. In easy mode, click and hold the left mouse button on a piece to move it. Pieces will connect to other pieces when they are placed correctly. In normal mode, you will need to right click and rotate the pieces before moving them. The completed map is shown below:
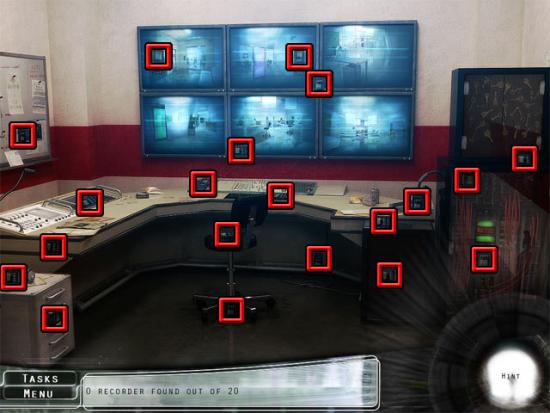
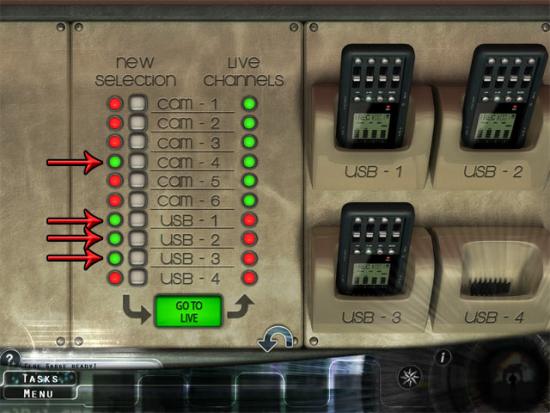
Select the red door to enter the video surveillance room. Examine the sparkling panel and examine the digital recorder in USB slot 4. Find the twenty recorders:
Remove the broken recorder from USB slot 4. Use the three digital recorders on the other USB slots. Select the following buttons:
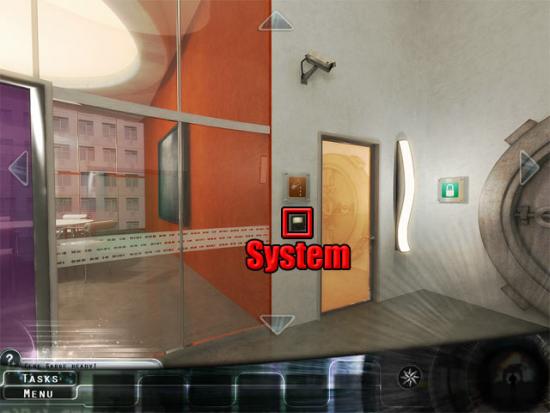
Move back twice to exit the video surveillance room. Look left once and move forward to the laboratory door. Examine the shape recognition system at the left side of the door:
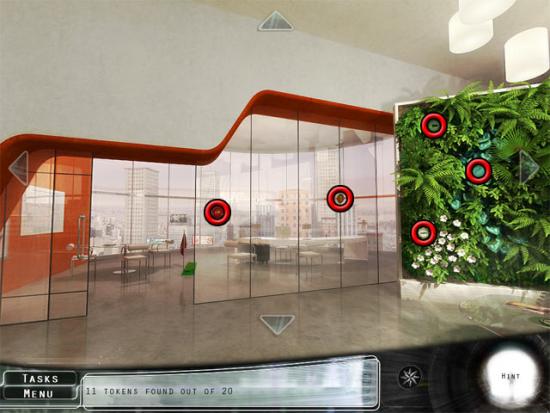
Look left four times and move forward twice to the lounge. Look left and enter the top management office. Press the red button at the right side of the room to play the wire mini-game. Connect the wires correctly:
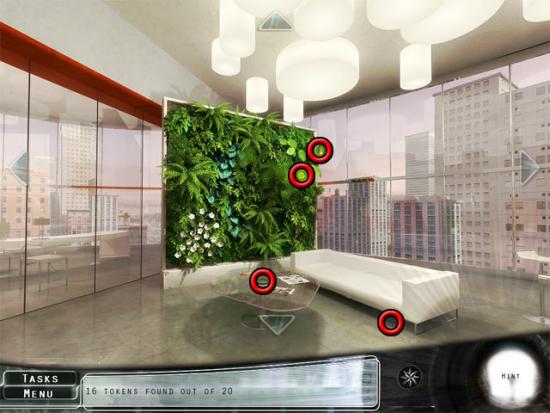
Press the red button to switch on the LCD partition. Examine the bulletin board at the right side of the room and complete the puzzle:

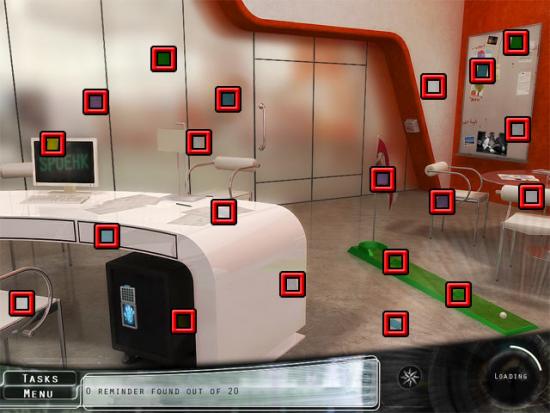
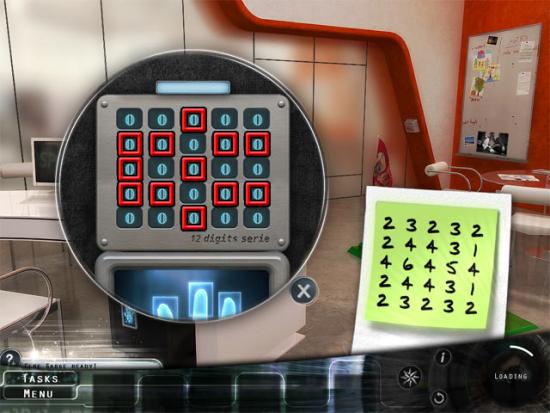
Move back from the puzzle and the guard will leave. Examine the keypad on the safe under the desk and press any three buttons to look away from the safe. Find the twenty reminders:
Select the correct buttons on the keypad to change the numbers to the ones shown on the reminder:
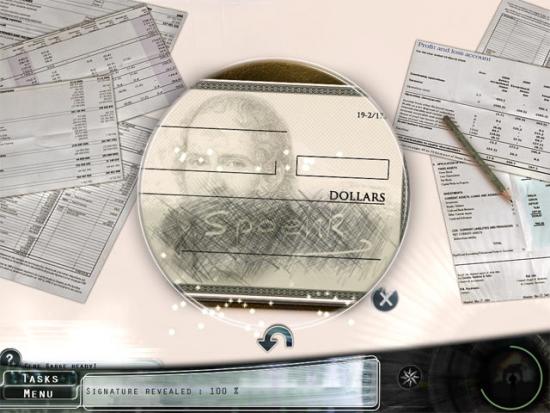
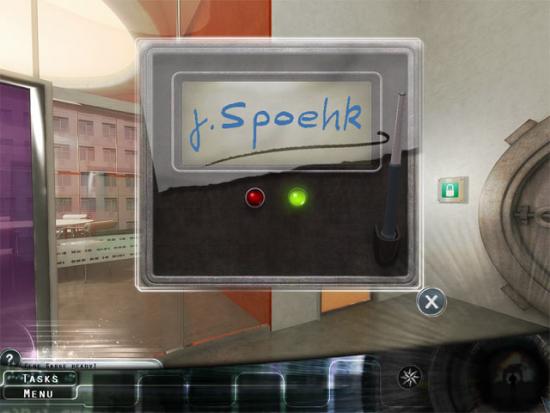
Select the safe to put the chequebook on top of the desk. Examine the chequebook and then examine the cheque in the close-up view. Select the pencil and hold down the left mouse button while moving the cursor over the cheque to reveal the signature. Keep doing this to reveal 100% of the signature:
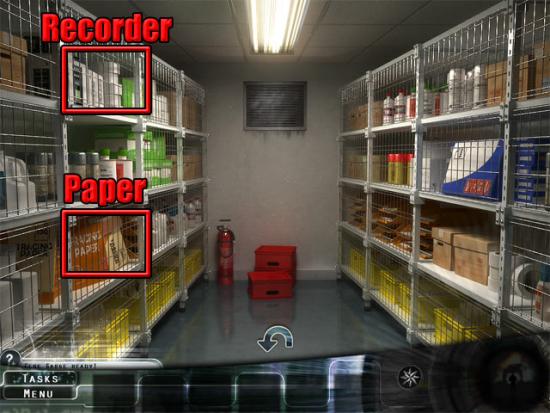
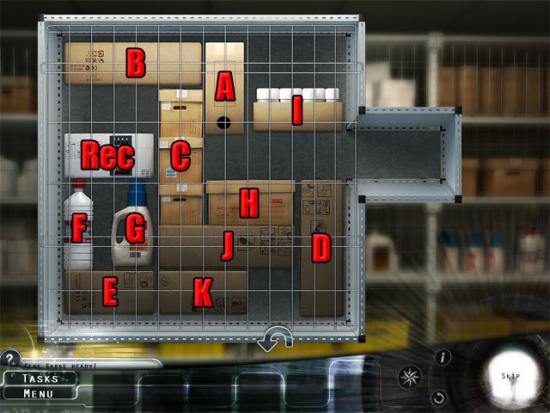
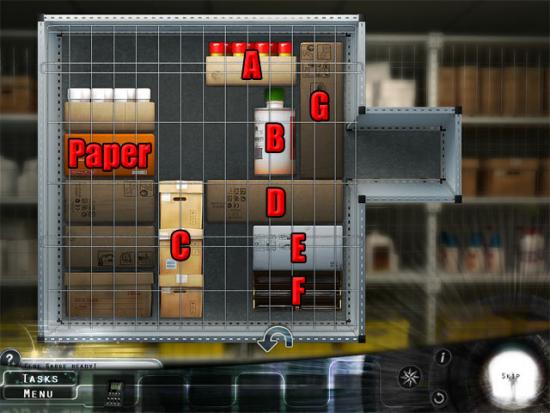
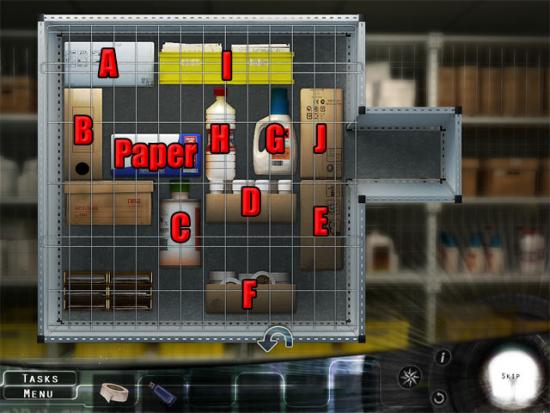
Exit the management office, turn right twice and enter the storeroom. The digital recorder and the tracing paper shelves are shown below:
Examine the sparkling digital recorder shelf to play the sliding block mini-game. The solution for the easy difficulty is shown below the image:

A: Right 3
B: Left 3
C: Up 2
D: Up 1
E: Right 3
F: Up 1
G: Up 1
H: Left 2
C: Down 3
A: Left 3
D: Up 1
Rec: Right 3
C: Up 2
I: Left 1
J: Left 2
K: Down 2
Rec: Right 3
The solution for the normal difficulty is shown below the image:
A: Down 1
B: Right 3
C: Up 1
D: Up 1
K: Right 2
E: Right 2
F: Down 1
G: Down 1
H: Left 3
A: Down 1
I: Left 1
D: Up 1
J: Right 1
C: Down 2
I: Left 3
A: Up 1
C: Up 2
H: Right 3
F: Up 1
G: Up 1
E: Left 2
C: Down 3
B: Left 3
A: Up 1
Rec: Right 3
C: Up 2
K: Left 2
J: Left 1
D: Down 2
Rec: Right 3
Examine the sparkling tracing paper shelf to play another sliding block mini-game. The solution for the easy difficulty is shown below the image:
A: Left 3
B: Up 1
Paper: Right 3
C: Up 3
D: Left 1
E: Left 2
F: Left 2
G: Down 3
Paper: Right 3
The solution for the normal difficulty is shown below the image:
A: Right 1
B: Right 2
C: Up 2
D: Right 1
E: Down 3
F: Left 3
G: Up 1
Paper: Right 3
E: Up 3
D: Left 1
C: Down 3
Paper: Right 3
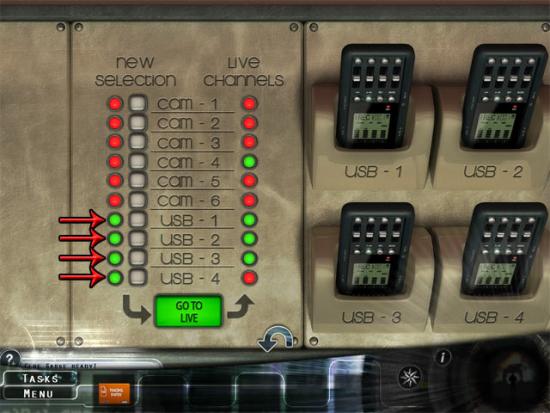
Exit the storeroom. Look left, move forward and look right. Enter the video surveillance room and examine the control panel. Insert the final digital recorder into USB slot 4. Press the following new selection buttons and then select the green Go to Live button:
Exit the video surveillance room. Return to the management office and examine the chequebook on top of the desk. Use the tracing paper on the signature. Take the pencil and use it on the cheque. Exit the management office. Look right twice and then move forward twice to the laboratory door. Examine the shape recognition system at the left side of the door. Use the important signature on the system and then select the stylus. Move the cursor over the red letter J in the signature and hold the left mouse button down, then follow the outline of the letter with the stylus. If done correctly, the letter will become blue. Do the same thing for the dot and remaining letters of the signature:
Enter the laboratory and press the red button on the wall:
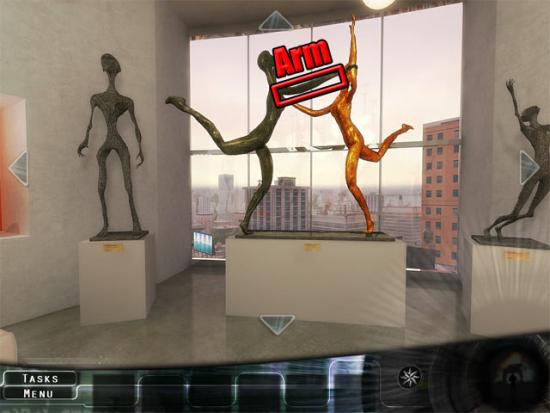
Exit the laboratory. Move forward to the reception desk, look right twice and enter the waiting room. Look left and select the arm on the statue to move it:
Look left twice and examine the sign below the Diamond Sutra:
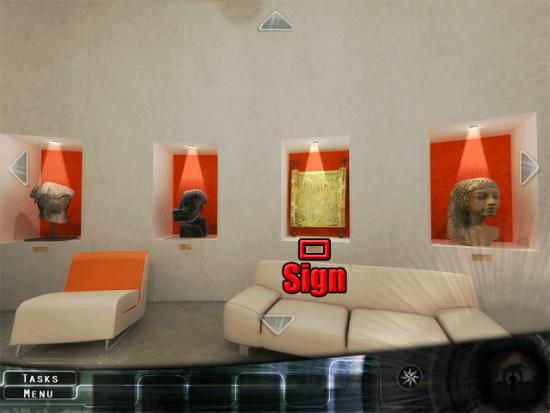
The numbers 204-565 are shown on the sign. Look left and move forward to the reception desk. Look right and move forward to the lounge. Look left three times and enter the storeroom. Select the sparkling vent to see that a map and a flashlight is needed. Exit the storeroom. Look left, move forward, look right and enter the video surveillance room. Take the flashlight and examine the safe:
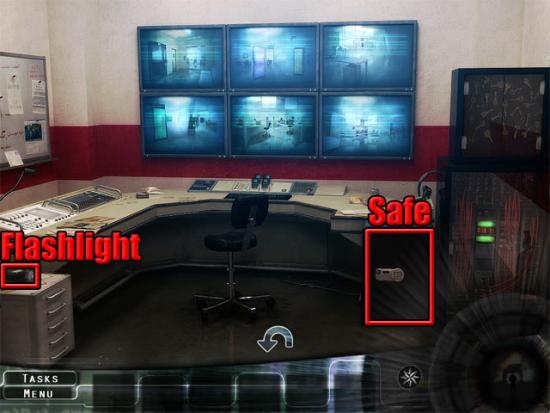
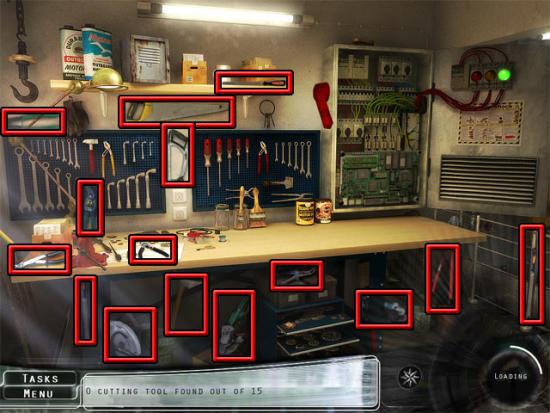
Enter the combination 204565 on the keypad and then press the V button. Select the safe to take the air conditioning map. Exit the video surveillance room. Look right three times and move forward, then look left and enter the storeroom. Examine the vent again to see that the temperature needs to be raised. Exit the storeroom. Look left and move forward, then look right twice and open the glass doors to enter the hall. Enter the elevator and select button P2. Examine the sparkling gate to find out that cutting tools are required. Enter the elevator and select button 20. Exit the elevator. Look right three times and enter the elevator machinery room. Find the 15 cutting tools:
Return to the elevator and select button P2. Exit the elevator and use the cutting pliers on the door. Go through the hole in the fence and open the door to the temperature control panel. The aim in this mini-game is to set the needles of the four dials to the orange zone by placing the buttons correctly:
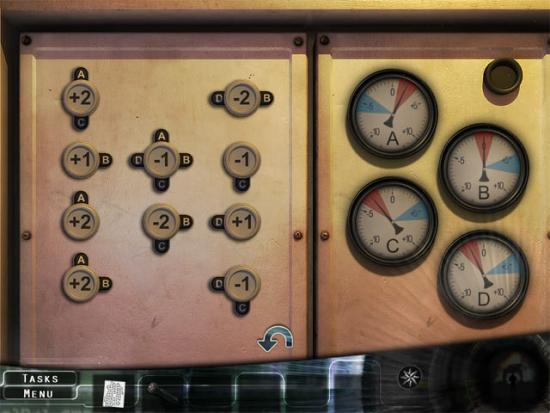
The two middle buttons are not visible in easy mode, but the solution for the outer eight buttons is the same on both difficulties. Return to the elevator and select button 13. Return to the storeroom and enter the vent. Follow the directions shown below the image to enter the secure room:
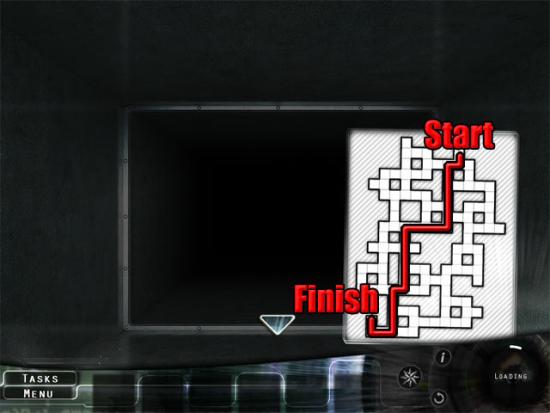
1: Move forward
2: Turn right
3: Turn left
4: Move forward 5
5: Turn right
6: Move forward 3
7: Turn left
8: Move forward 5
9: Turn right
10: Turn left
11: Move forward 3
12: Turn right
13: Move forward
14: Turn right
15: Select the vent
16: Enter the secured room
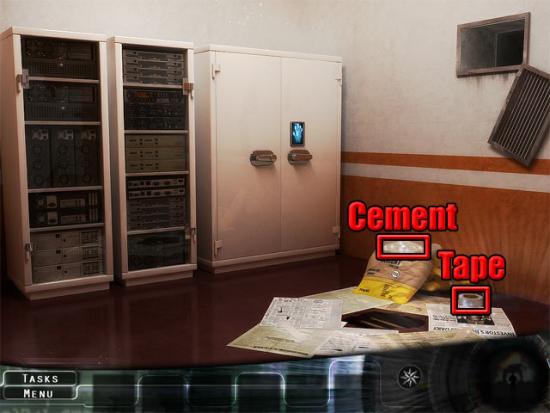
Examine the cabinet and select one of the fingerprints. Move back and take the cement powder and sticky tape:
Examine the cabinet again and use the cement on the fingerprints. Use the sticky tape on the five matching fingerprints:
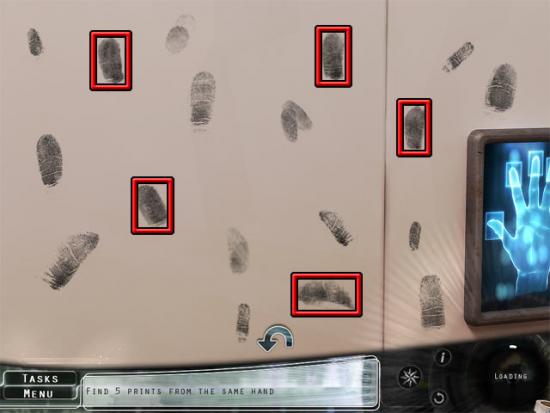
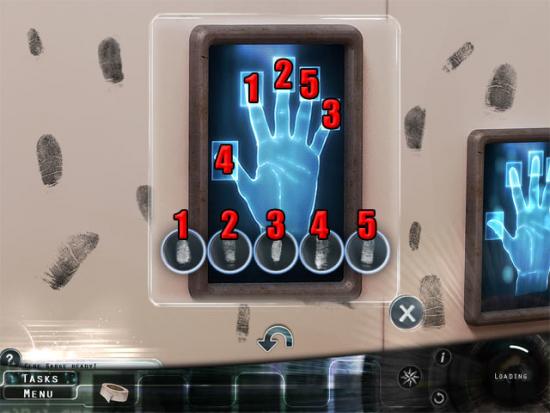
There are less fingerprints on easy mode but the actual fingerprints to select are the same on both difficulties. Put the prints on the correct fingers:
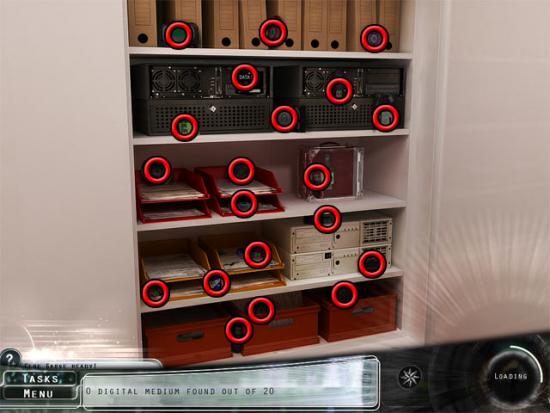
Open the cabinet and find the twenty digital medium items:
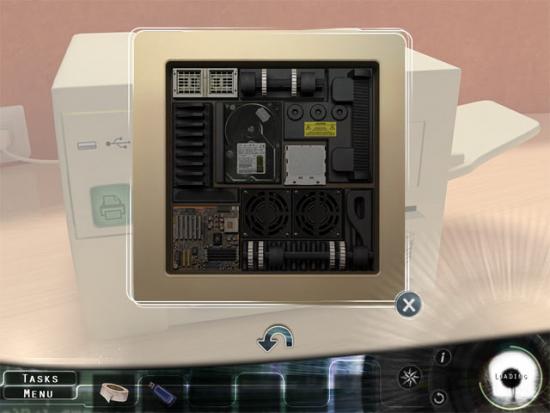
Back away from the cabinet and enter the vent to return to the storeroom. Exit the storeroom. Look left twice and enter the computer room. Examine the printer on the desk and press the green button. Open the bottom tray and put all of the components back in the correct places:
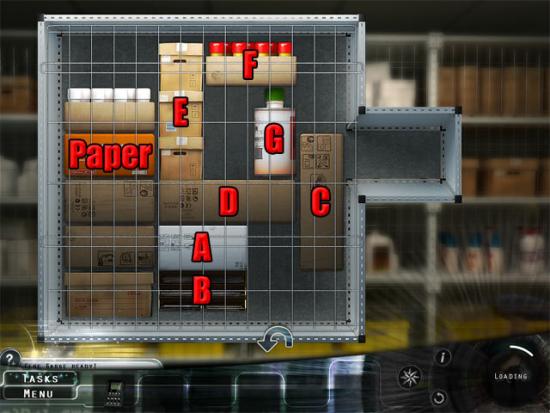
Open the top tray to see that there is no paper. Return to the storeroom and examine the sparkling shelf at the right side of the room to play another sliding block mini-game. The solution for the easy difficulty is shown below the image:

A: Left 2
B: Down 3
A: Right 2
C: Down 2
D: Down 2
Paper: Right 3
E: Down 1
F: Left 1
G: Left 1
H: Up 1
Paper: Right 3
The solution for the normal difficulty is shown below the image:
I: Right 1
A: Right 1
B: Up 1
Paper: Left 1
C: Up 2
D: Left 1
E: Down 1
F: Left 1
G: Down 3
D: Right 2
C: Down 2
H: Down 2
Paper: Right 3
B: Down 1
A: Left 1
I: Left 1
J: Up 1
Paper: Right 3
Return to the computer room and examine the printer. Open the top tray and use the ream of paper on it. Close the top tray. Use the pen drive on the slot at the top-left corner of the printer and then press the green button. Select the document. Take the scissors at the top-right corner of the screen and use them on the document to play the two-faced puzzle mini-game. Left click and hold to move the pieces around, and right click a piece to turn it over. One side of the completed document is shown below:

The other side of the completed document is shown below:
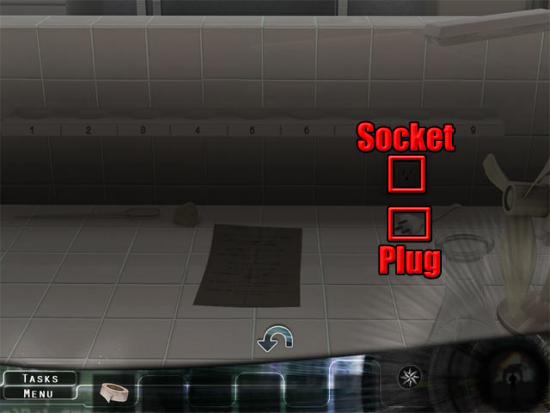
Use the sticky tape on the document and it will be added to the inventory. Exit the computer room and return to the laboratory. Examine the sparkling area on the counter. Use the document on the counter. Select the plug and use it on the socket:
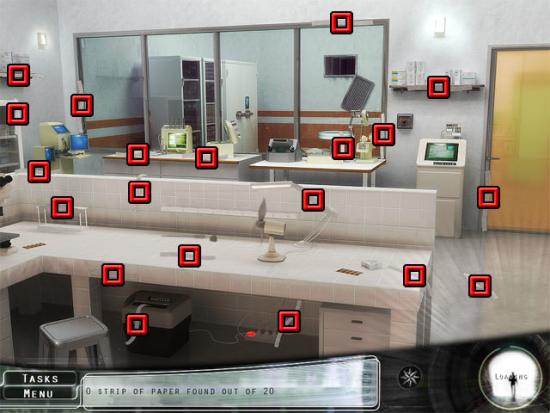
Find the twenty strips of the paper:
Assemble the strips to make the original document. Left click and hold to move the pieces around. On normal difficulty you will also have to right click and rotate the strips to the correct position. The completed document is shown below:
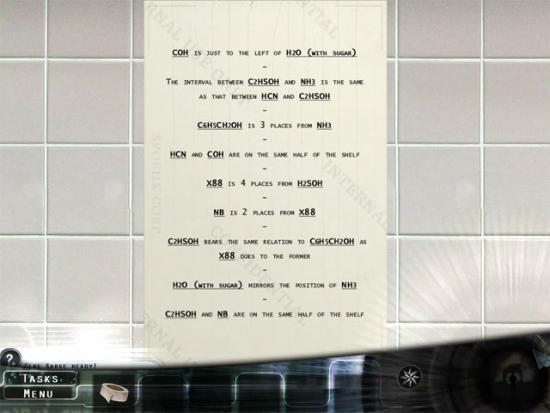
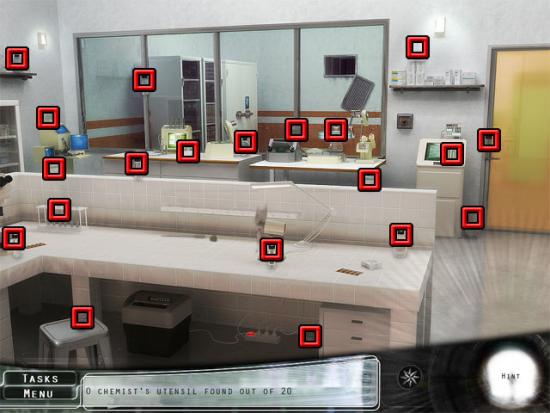
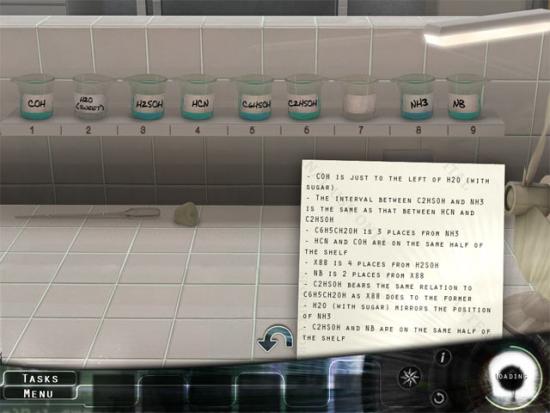
Use the sticky tape on the document. Find the twenty chemist’s utensils:
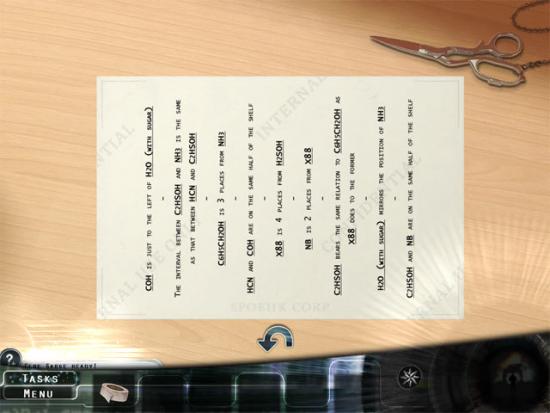
Examine the counter and then use the chemist’s lab equipment on the counter. Place the beakers according to the rules on the document:
Exit the laboratory and move forward twice to the lounge. Look right and move to the beverage dispenser. Select the coin slot to see that tokens are needed. Move back and find eight tokens:
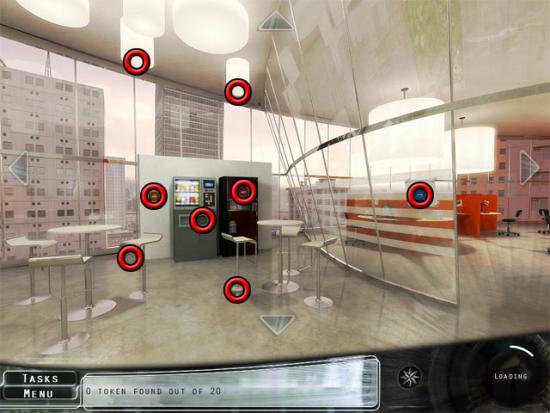
Look right three times and find three tokens:
Look right twice and find five tokens:
Look right and find four tokens:
Look right and move forward to the beverage dispenser. The aim in this mini-game is to enter the correct equation for the numbers displayed below the cans, and then press the check button to collect the can. Use a token on the coin slot before entering the equation for each can. The following equations are used on easy difficulty:
40 = 9 x 4 + 4
90 = 9 x 9 + 9
30 = 6 x 4 + 6
216 = 9 x 6 x 4
The following equations are used on normal difficulty:
145 = 9 x 4 x 4 + 1
100 = 6 x 4 x 4 + 4
333 = 9 x 9 x 4 + 9
1944 = 9 x 9 x 6 x 4
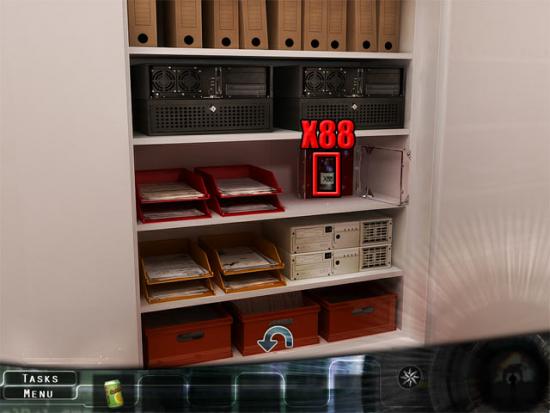
Return to the storeroom and go through the vent to the secured room. Open the cabinet and take the X88 component:
Go back through the vent to the storeroom. Exit the storeroom and return to the laboratory. Examine the counter and add the X88 and the sweet drink to the empty beakers. Select the piece of paper at the bottom-right corner of the screen to view the position of the beakers and the quantity that needs to be added to the flask:
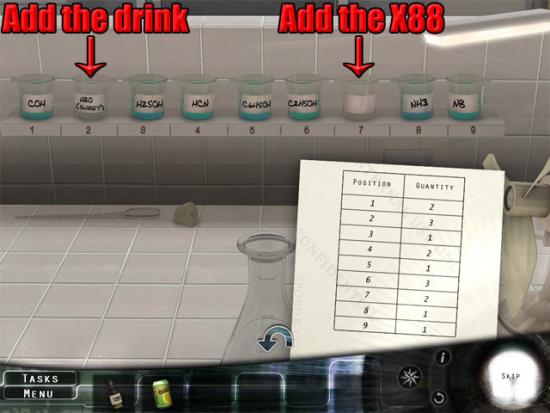
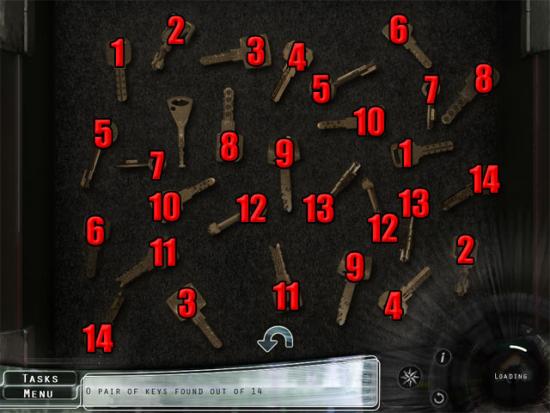
Look at the first item on the piece of paper to see that two drops from the beaker at position 1 need to be added to the flask. Pick up the dropper and select beaker 1, then select the flask to add one drop. Do this one more time to add a second drop. Add the quantities from the remaining beakers in the same way to complete the mini-game. Take the stopper and use it on the beaker to add the erlenmeyer to the inventory. Exit the laboratory and return to the elevator. Examine the sparkling pass card slot to see that the pass card has been taken. Return to the video surveillance room and examine the sparkling key cabinet. Find the fourteen pairs of keys:
Exit the video surveillance room and return to the elevator. Use the elevator master key on the keyhole above the card slot. Select button 20 to travel to the top floor. Exit the elevator. Look right twice and move forward. Select the cradle to complete the game.
