- Wondering how to get Monopoly GO! free rolls? Well, you’ve come to the right place. In this guide, we provide you with a bunch of tips and tricks to get some free rolls for the hit new mobile game. We’ll …
All Grades in Type Soul – Each Race Explained
By Adele Wilson
Our All Grades in Type Soul guide lists every grade in the game for all races, including how to increase your grade quickly!Best Roblox Horror Games to Play Right Now – Updated Weekly
By Adele Wilson
Our Best Roblox Horror Games guide features the scariest and most creative experiences to play right now on the platform!All Legacy Piece Races and Buffs – Should You Reroll?
By Adele Wilson
Our Legacy Piece Races guide discusses the buffs that each race provides, their rarities, and if you should reroll or save your spins!
The Dracula Files Walkthrough
Welcome to Gamezebo's walkthrough for The Dracula Files.GENERAL INFO The List: All items in the List must be completed to clear an area. Some items to find are random, and some are special inventory items that can be collected and used elsewhere in the scene. Mystic Mirror: when an item is click on in the list, its silhouette will be revealed in the Mystic Mirror, the gray orb in the lower left of the screen. All-Seeing Eye (Hints): To use a hint, first click on the item in the Lis…
a:1:i:0;a:2:s:13:”section_title”;s:29:”The Dracula Files Walkthrough”;s:12:”section_body”;s:20877:”
Welcome to Gamezebo’s walkthrough for The Dracula Files.
GENERAL INFO
The List: All items in the List must be completed to clear an area. Some items to find are random, and some are special inventory items that can be collected and used elsewhere in the scene.
Mystic Mirror: when an item is click on in the list, its silhouette will be revealed in the Mystic Mirror, the gray orb in the lower left of the screen.
All-Seeing Eye (Hints): To use a hint, first click on the item in the List that you wish to reveal, then click on the eye in the lower right corner of the screen. There are unlimited hints, but they take time to recharge.
WALKTHROUGH
STOKER HOTEL
Stage 1: Draco’s Study

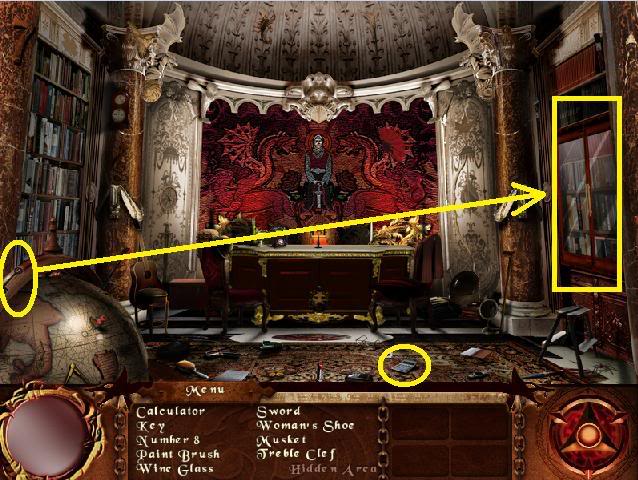
Key items: calculator, key
Puzzle item: Number 8
- After you’ve found the calculator, click on it in the inventory. Press the following buttons: 4 + 4 =
- A number 8 will appear on the calculator’s screen. Click on the 8.
- NOTE: Any combination of numbers that adds up to 8 will work.
Use the key on the cabinet on the right to enter the Hidden Area.
Stage 2: Signs of Struggle
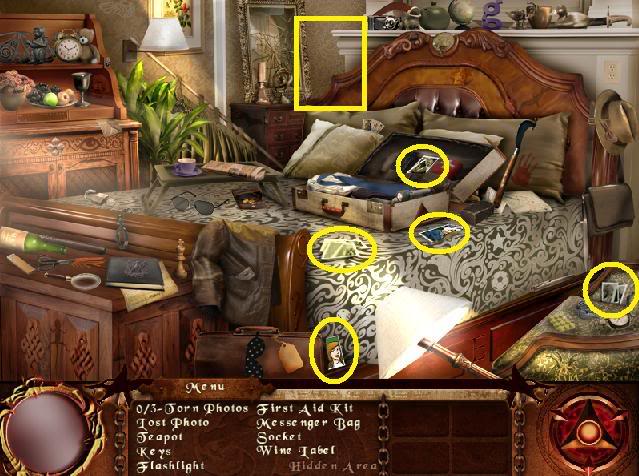
Key items: Lost Photo (x2), Torn Photos (x3)
Signs of Struggle – Hidden Area
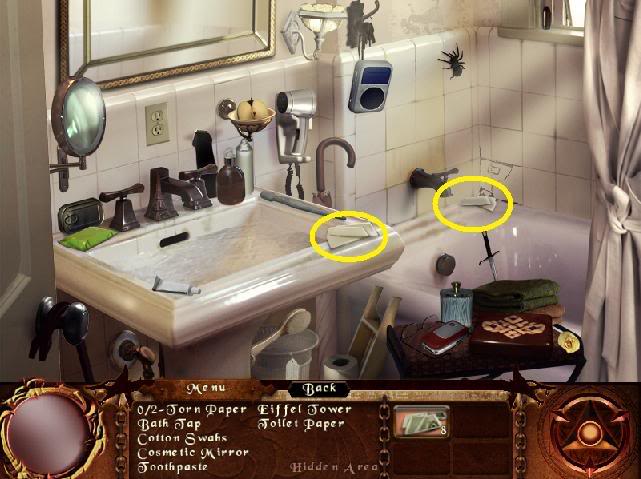
Key items: Torn Paper (x2)
Stage 3: PUZZLE: Where is Mark?
Reassemble the torn papers pieces into the image shown above.
DRACO WINERY
Stage 4: Not Part of the Tour
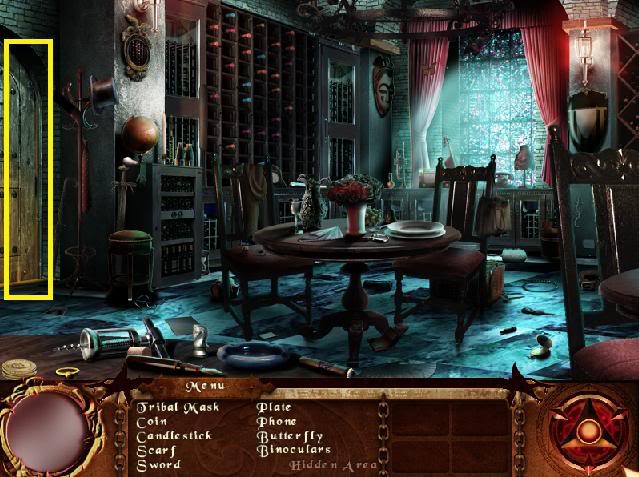
There are no key items to find in this scene. Just find everything on the list, then head to the hidden area through the door on the left.
Not Part of the Tour – Hidden Area
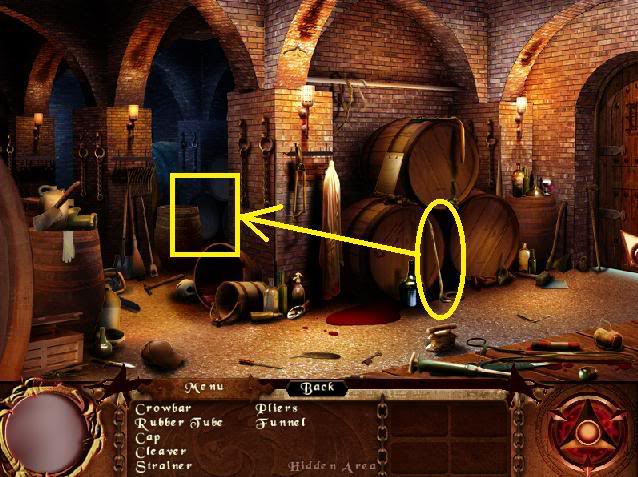
Key items: Crowbar
Use the crowbar to pry open the lid of the barrel outlined in the screenshot above.
Stage 5: A Cry for Help
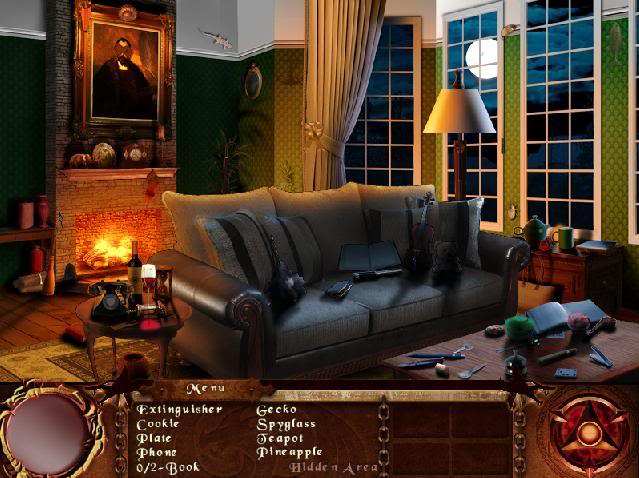
Key items: Fire extinguisher
Use the fire extinguisher on the fireplace to put the fire out, and reveal the hidden area in this scene.
Stage 6: PUZZLE: Out of the Frying Pan
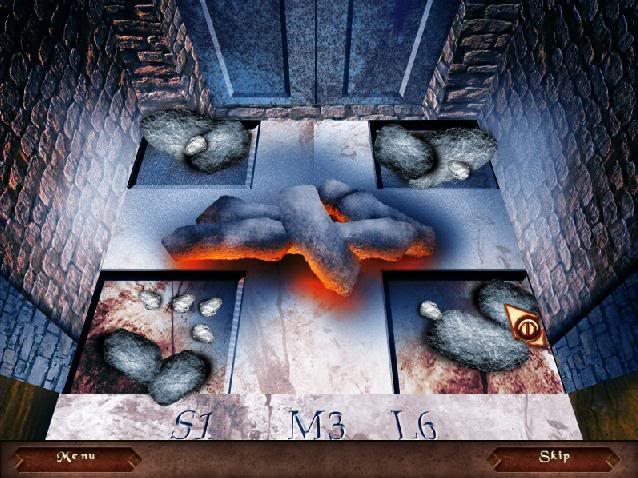
- In this puzzle, you have to distribute the weight of the stones evenly across the four panels on each corner of the floor. Drag and drop the stones to move them.
- To solve the puzzle, you need to know that 2 medium stones = the weight of 1 large stone; and 3 small stones = the weight of 1 medium stone.
Solution:
Place 1 large stone, 1 medium stone, and 1 small stone in each of the three corners. In the final corner, place 2 medium stones and 4 small stones.
Stage 7: Prisoners in the Dungeon
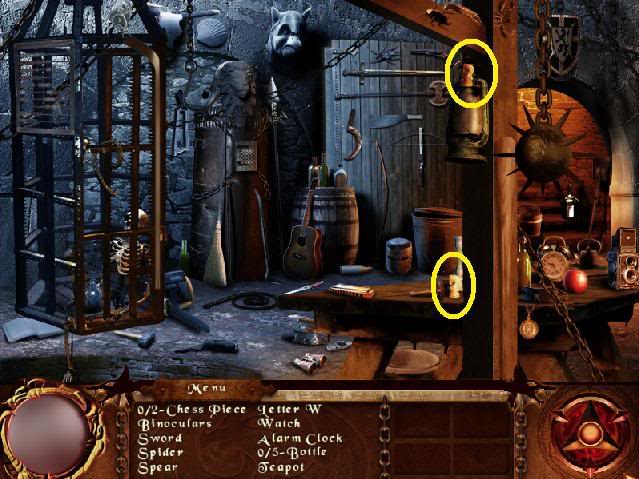
Key items: Chess piece x 2
Stage 8: PUZZLE: Four Knights
- Using regular chess moves, swap the black knights with the white ones.
- If you’re unfamiliar with chess, you can click on any of the pieces and the squares you can move to will be highlighted in green.
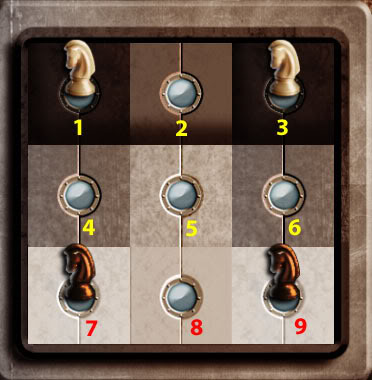
In the screenshot above, I’ve labelled each square from 1 to 10. Using the diagram as a guide, move the pieces in the following order (solution provided by eGames):
- 1 to 6 (take the piece on 1, move to 6)
- 9 to 4
- 7 to 2
- 6 to 7
- 2 to 9
- 7 to 2
- 3 to 8
- 4 to 3
- 9 to 4
- 8 to 1
- 3 to 8
- 4 to 3
- 1 to 6
- 6 to 7
- 2 to 9
- 8 to 1
STOKER HOTEL
Stage 9: Got Garlic?
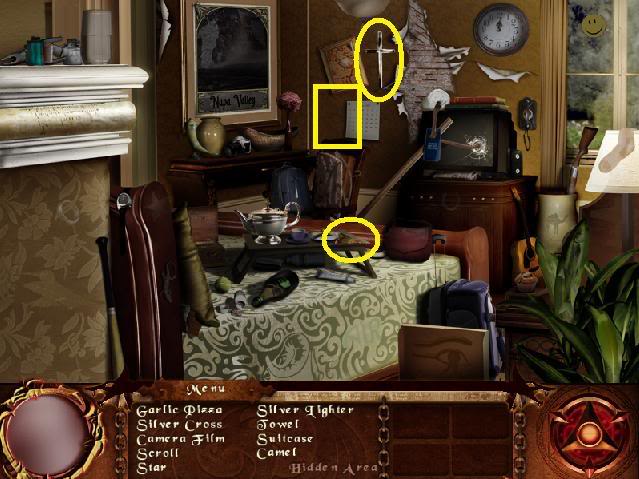
Key items: Garlic pizza, silver cross
The hidden area is underneath the crooked picture on the wall.
Got Garlic? – Hidden Area
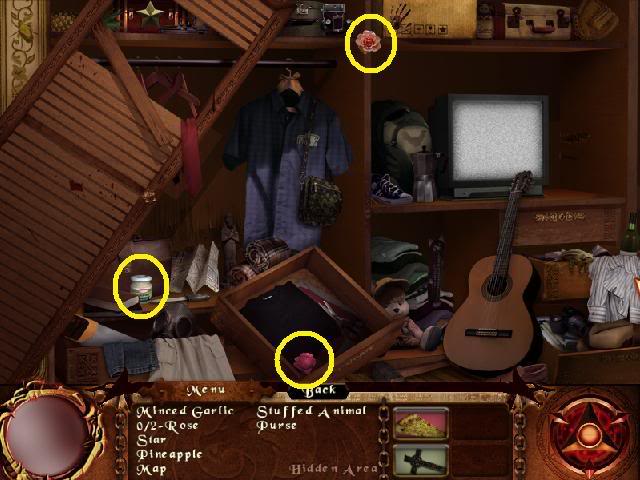
Key items: Minced garlic, rose (x2)
Stage 10: PUZZLE: An Old Game Remembered
- This is a memory matching game where you have to pair two cards to clear them from the board. Click on any two cards to turn them over. If the two cards are a pair, they will disappear.
- The goal is to match the vampire cards with things that can hurt them. Each vampire has a specific weakness written on the card, such as Garlic or Seeds. Find the item that matches the card. So, for example, match the Garlic Vampire card with the Garlic card.
VAN HELSING ESTATE
Stage 11: The Van Helsing Estate
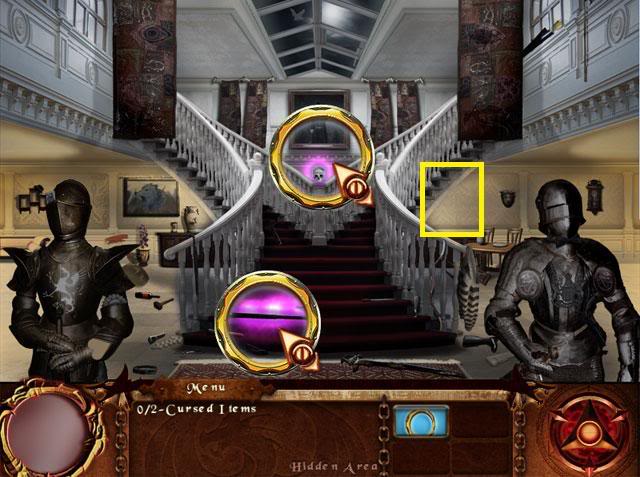
In this level you’ll have to use the Spirit Glass to find the two Cursed Items. Click on the Spirit Glass, which is in your inventory, and move it around the screen. When you pass over a cursed item, it will be highlighted in purple.
The two cursed items, and the location of the hidden area, are shown in the screenshot above.
The Van Helsing Estate – Hidden Area
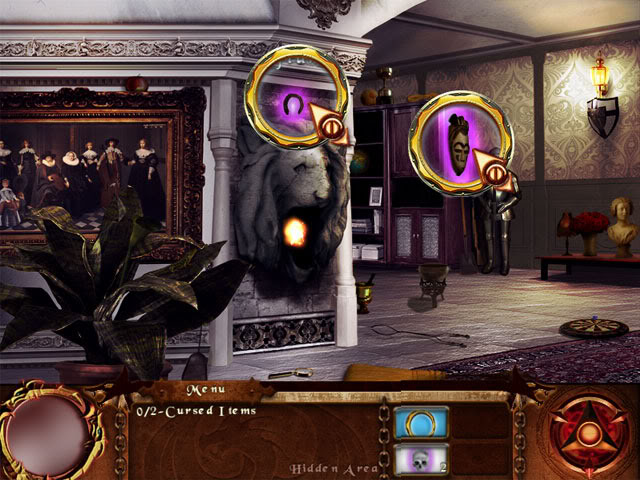
Find two more cursed items here.
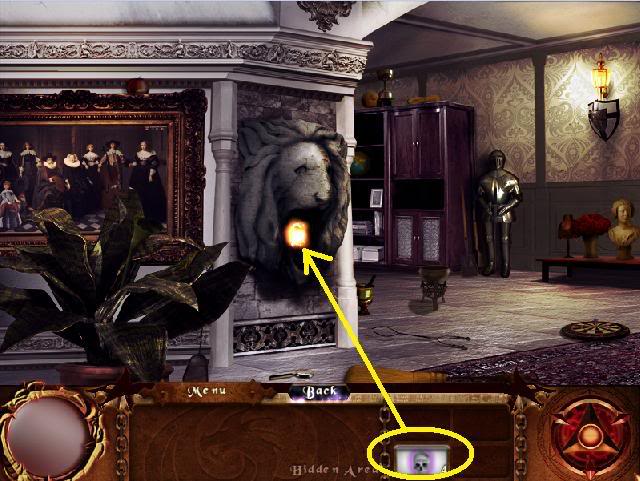
Once you’ve found them all, click on the cursed items in the inventory and throw them into the fire burning in the lion’s mouth.
Stage 12: PUZZLE: Dark Visitor
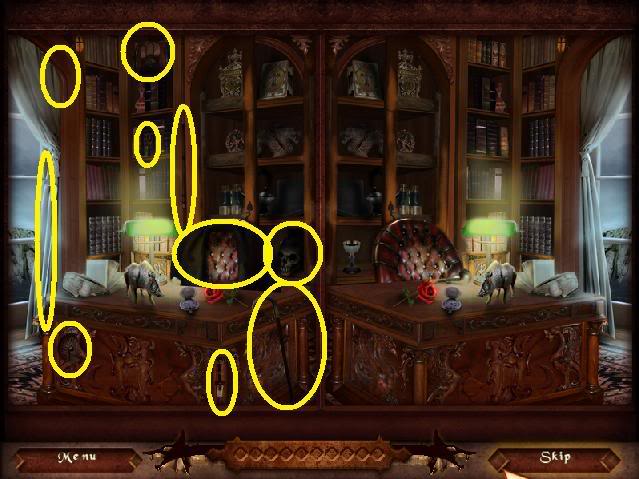
This is a spot-the-difference puzzle. Compare the two mirror images side by side and click on the items that only appear on one side.
Stage 13: A Cure for the Cursed
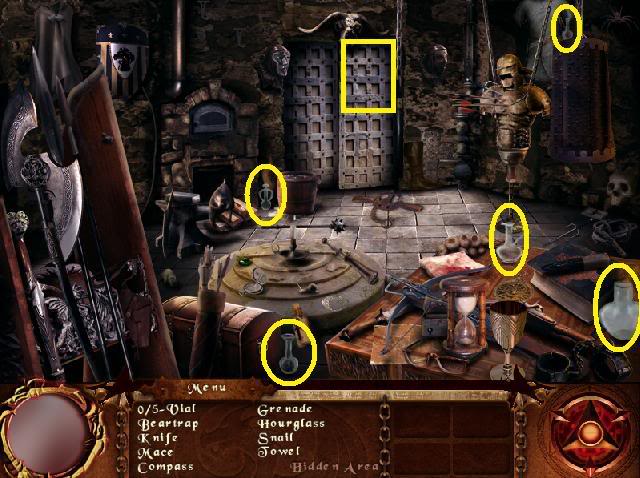
Key items: Vial (x5)
Click on the upper part of the right door to enter the Hidden Area.
A Cure for the Cursed – Hidden Area
Key items: Vial (x5)
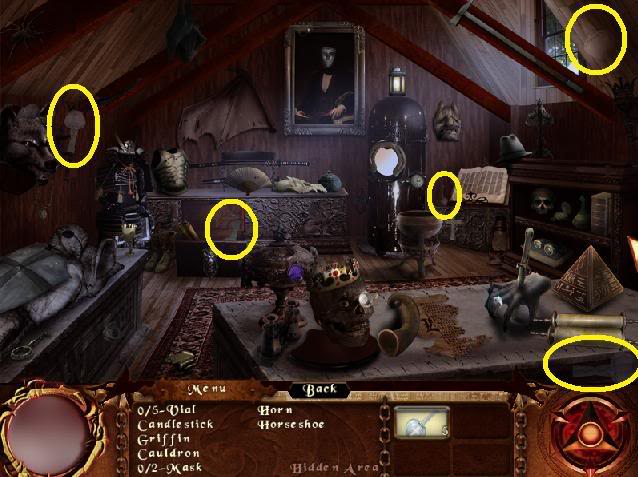
Stage 14: A Dark Dark Basement
Lights Off
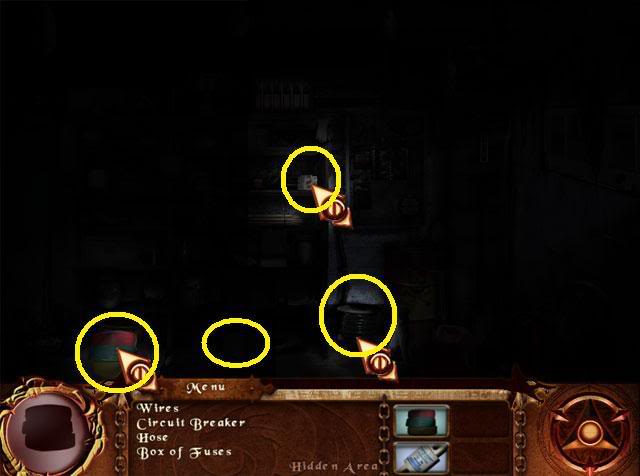
Find the four items to repair the fusebox by shining the flashlight over the darkened scene. (See screenshot above.)
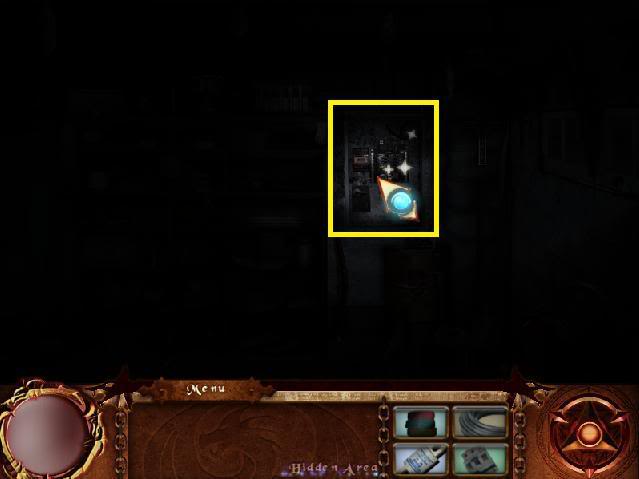
Click on the fusebox to zoom in.
A Dark Dark Basement – Hidden Area – Fusebox
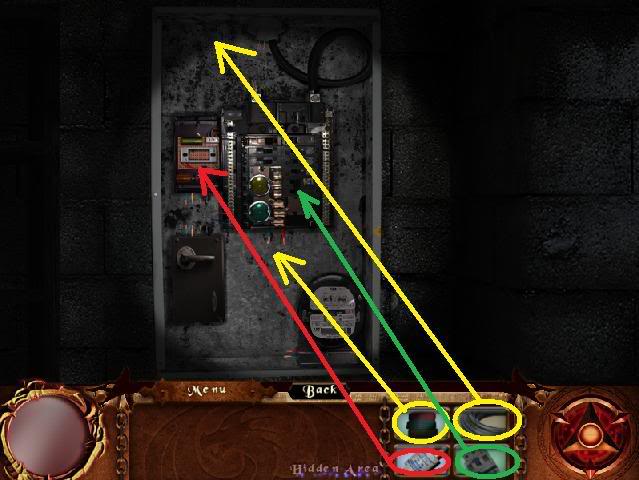
Replace the items to repair the fusebox. This puzzle is very easy (outlines show you exactly where to put everything).
A Dark Dark Basement – Lights On
That’s better! Now you can see. The items to collect here are all random.
Stage 15: PUZZLE: Monster Hunting 101
This is another memory matching game. Again, match the monster cards with their weaknesses to clear them, such as Werewolf and Silver Bullets.
Stage 16: PUZZLE: Portrait of a Lycanthrope
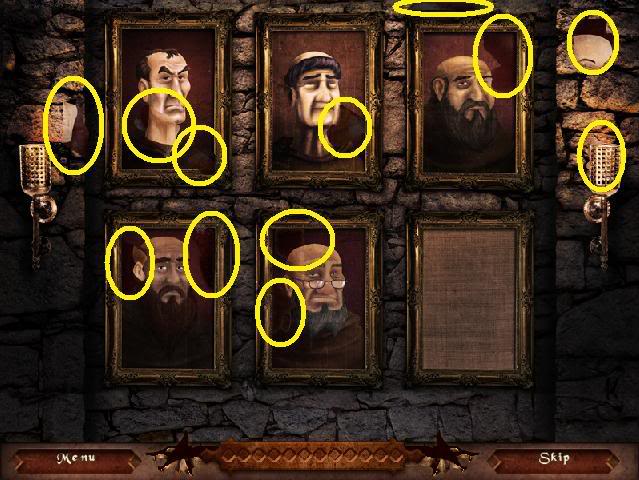
Find the torn pieces of the painting to put it back together.
MUETE MONASTERY
Stage 17: Who’s Afraid of the Big Bad Wolf?
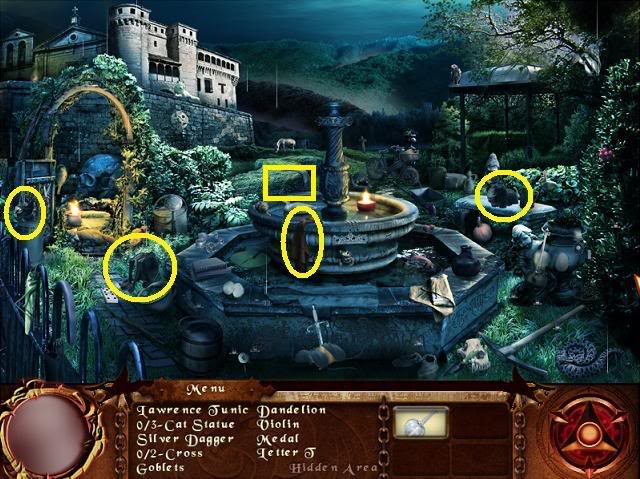
Key items: Lawrence tunic, cat statue (x3)
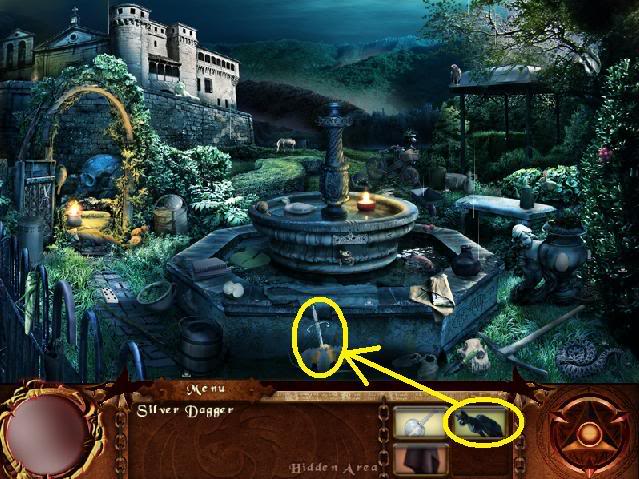
- Use the cat statue to scare the mice away from the silver dagger so that you can pick the dagger up.
- Click on the bushes to the upper left of the fountain to enter the secret area.
Who’s Afraid of the Big Bad Wolf? – Secret Area
The objects to find here are all random.
TALBOT PARK
Stage 18: Where the Wolfsbane Blooms
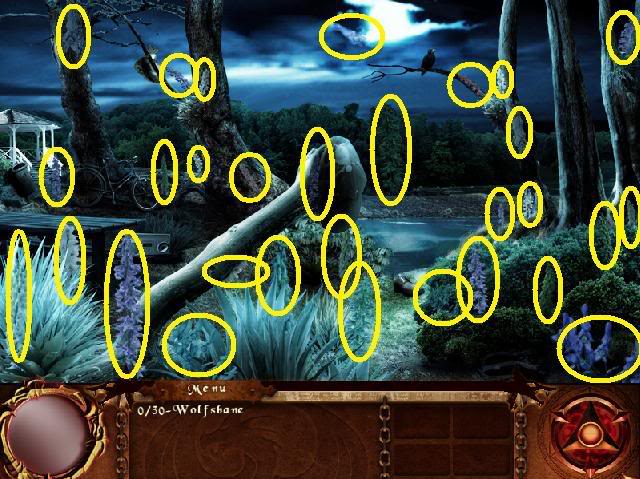
Find 30 Wolfsbane.
MUETE MONASTERY
Stage 19: The Sacred Grotto
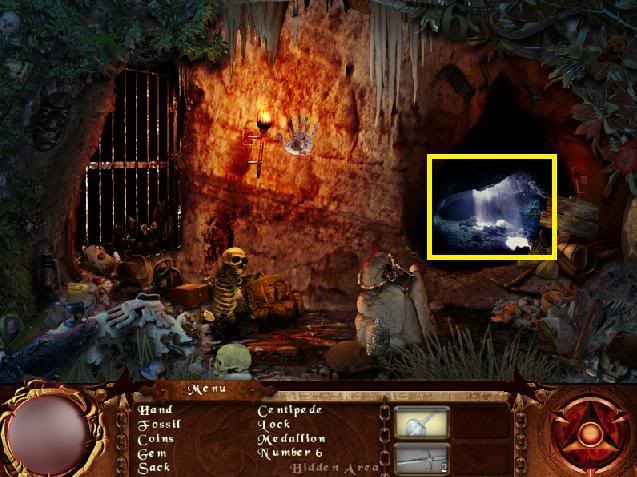
All of the items to find here are random. Click on the sunlit area to enter the hidden area.
The Sacred Grotto – Hidden Area
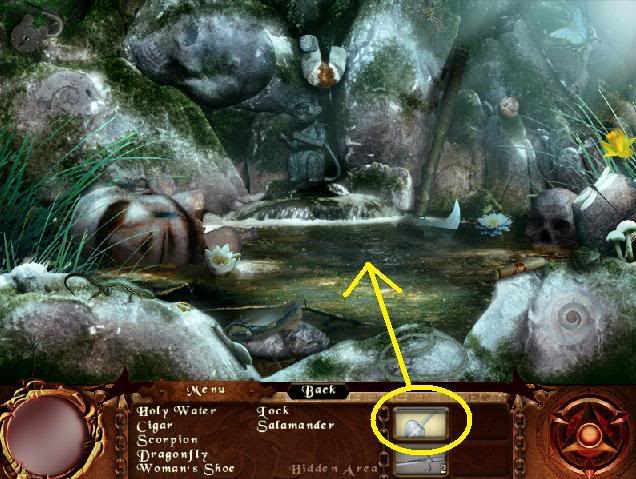
Use the vail from your inventory on the sacred pond to collect the holy water.
Stage 20: PUZZLE: Wolves at the Gate
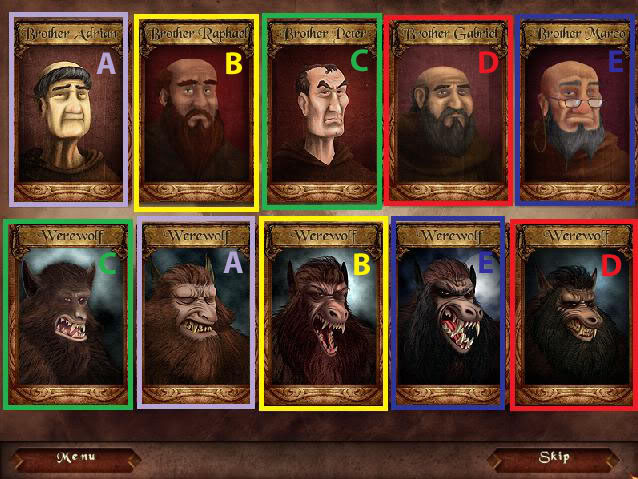
- The goal of this puzzle is to match each Brother with his werewolf counterpart. Each pair is indicated using the same color in the screenshot above.
- Note: Click on the Brother first, then on the werewolf.
TRANSYLVANIAN FOREST
Stage 21: Into the Woods
The items to find here are all random. There’s a mist cloud in this scene that makes it hard to see certain objects. Wait for it to float to the other side of the screen, and the items underneath it will be revealed.
Stage 22: PUZZLE: Reflection of Evil
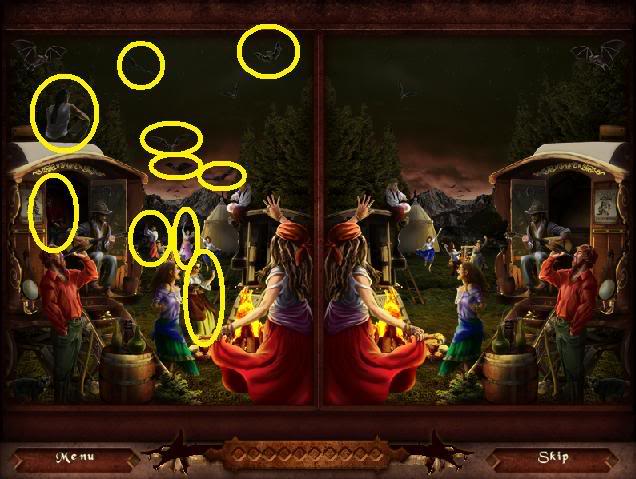
Spot the differences between the two images. (Note: all the differences will be people or bats that appear in the left scene but not in the right.)
HIDDEN GRAVEYARD
Stage 23: A Grave Destination
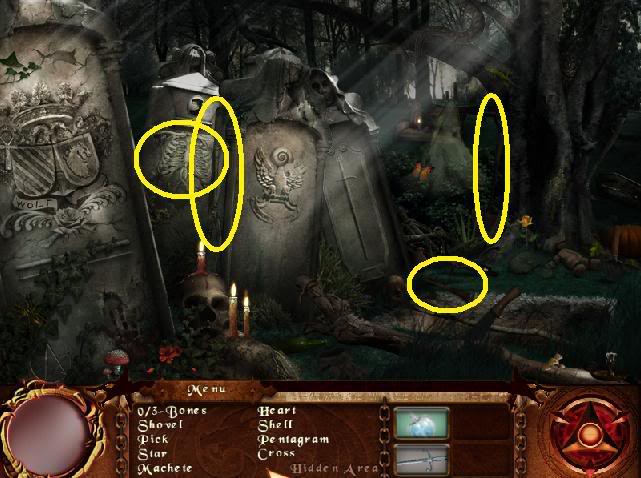
Key items: Shovel, bones (x3)
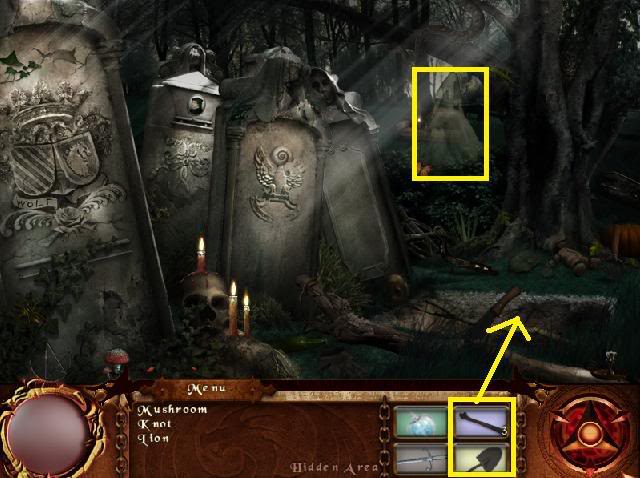
Place the bones into the open grave in the lower right corner, then use the shovel to cover up the dirt. The ghost will disappear, and you can now enter the hidden area.
A Grave Destination – Hidden Area
All the items to find here are random.
Stage 24: PUZZLE: Tomb of the Silver Spike
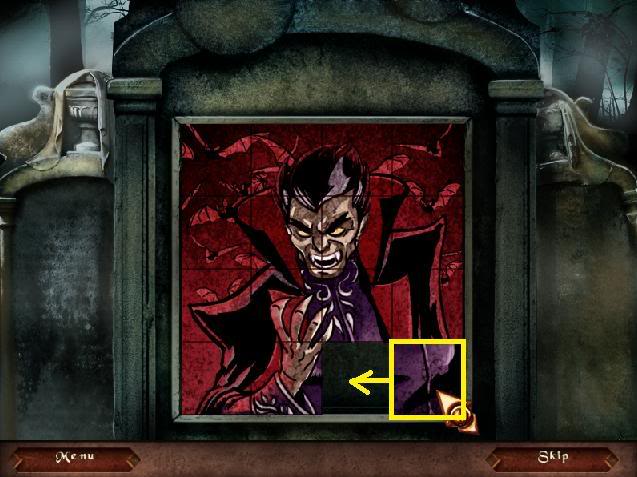
Slide the tiles to make the picture shown in the screenshot above.
DRACO WINERY
Stage 25: Locked Up
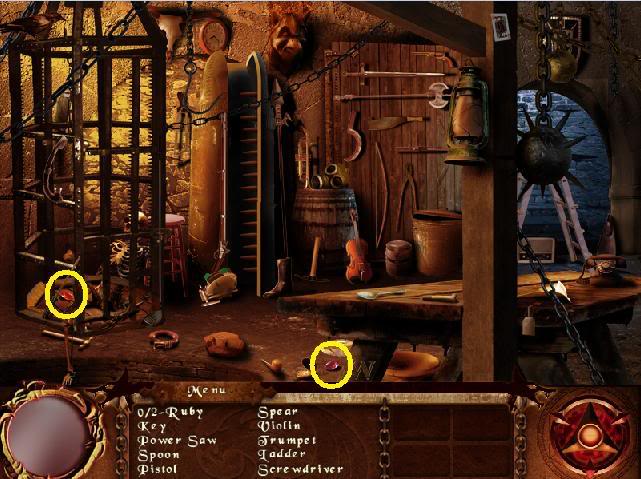
Key items: Ruby (x2)
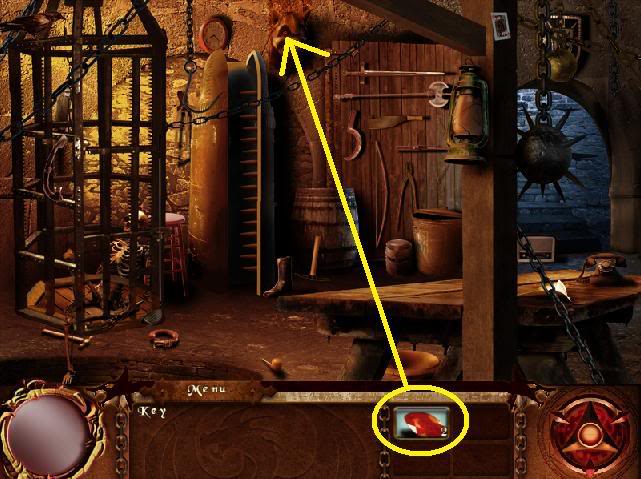
Place each ruby in the gargoyle to receive the key.
Stage 26: PUZZLE: Six Knights
SOLUTION COMING SOON
Stage 27: Lair of the Vampire
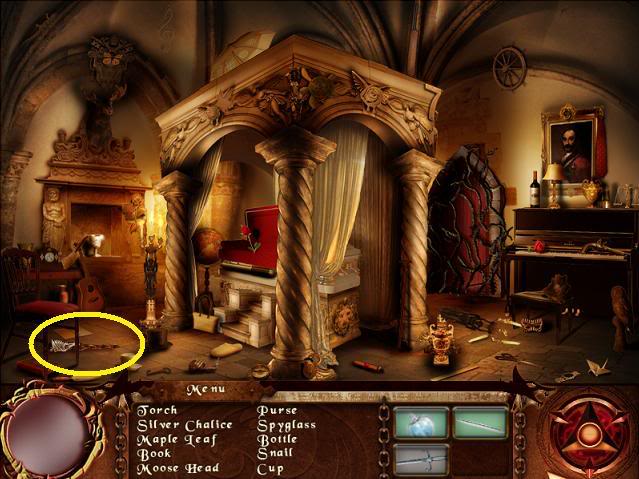
Key item: Torch
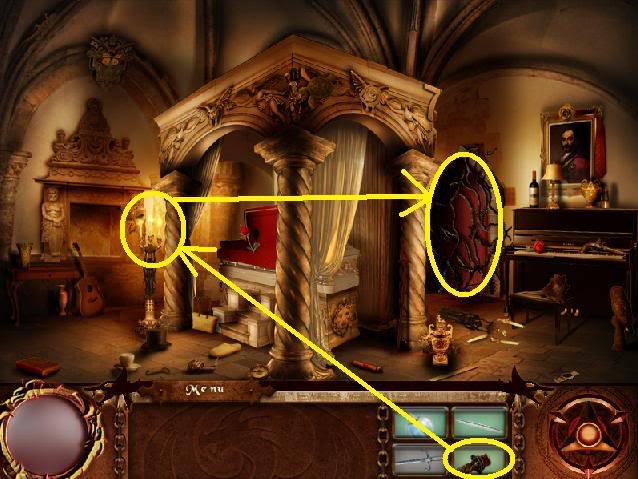
Use the torch on the lit candles near the bed, then use the lit torch on the vine-covered door.
Stage 28: PUZZLE: Coffin of the Black Dragon
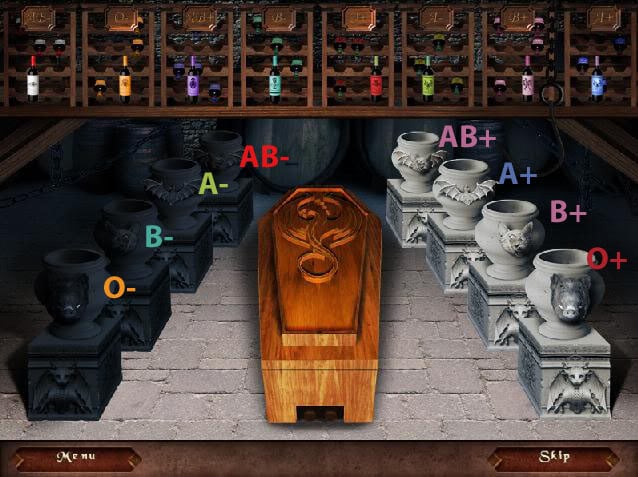
The goal is to pour the correct vintage of wine into the correct cauldron.
Solution:
Left column, top to bottom: AB-, A-, B-, O-
Right column, top to bottom: AB+, A+, B+, O+
Stage 29: PUZZLE: A Duel with Draco
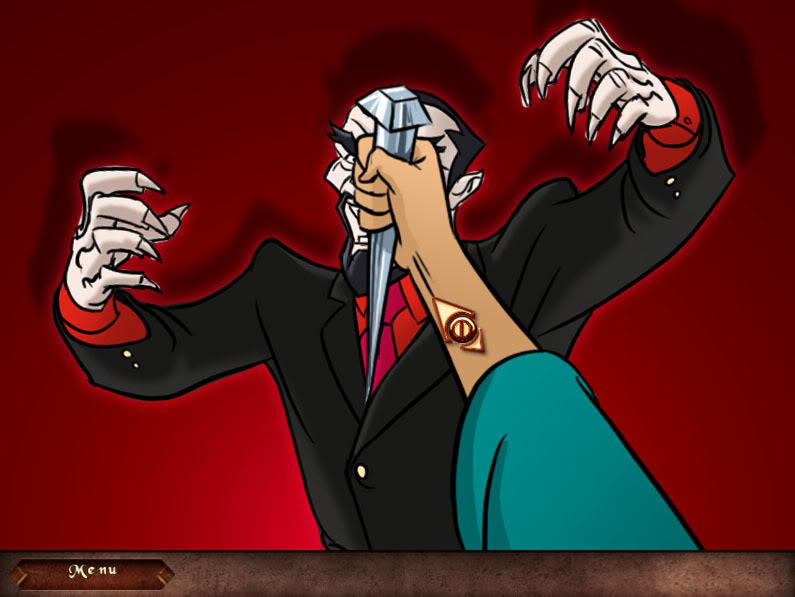
Aim the stake over Draco’s heart.
Final Stage: The Black Dragon Revealed
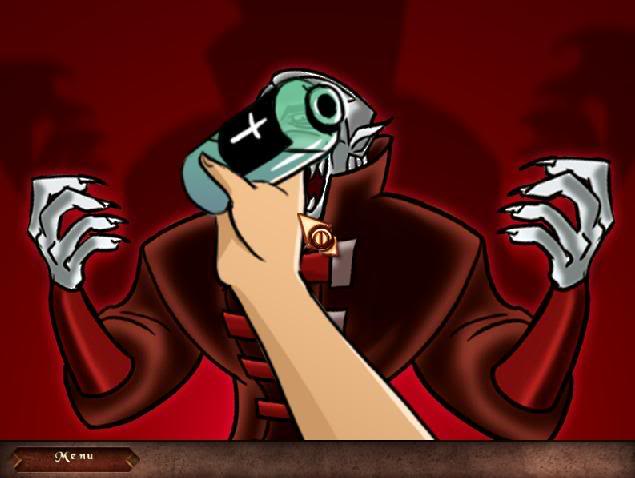
Click to sprinkle the holy water on the Black Dragon.
Congratulations, you’ve won the game!
“;
More articles...
Monopoly GO! Free Rolls – Links For Free Dice
By Glen Fox
Wondering how to get Monopoly GO! free rolls? Well, you’ve come to the right place. In this guide, we provide you with a bunch of tips and tricks to get some free rolls for the hit new mobile game. We’ll …All Grades in Type Soul – Each Race Explained
By Adele Wilson
Our All Grades in Type Soul guide lists every grade in the game for all races, including how to increase your grade quickly!Best Roblox Horror Games to Play Right Now – Updated Weekly
By Adele Wilson
Our Best Roblox Horror Games guide features the scariest and most creative experiences to play right now on the platform!All Legacy Piece Races and Buffs – Should You Reroll?
By Adele Wilson
Our Legacy Piece Races guide discusses the buffs that each race provides, their rarities, and if you should reroll or save your spins!


