![Digimon UP Tier List [Supports, Buddies, and Partners]](/wp-content/uploads/2026/07/digimon-up-tier-list.jpg "Digimon UP Tier List [Supports, Buddies, and Partners]")
Digimon UP Tier List [Supports, Buddies, and Partners]
These Digimon will get you UP the leaderboard.


![Haze Seas Boss Drops [Chances, Locations, and How to Spawn]](/wp-content/uploads/2026/07/haze-seas-boss-drops.jpg "Haze Seas Boss Drops [Chances, Locations, and How to Spawn]")

Welcome to Gamezebo's strategy guide for The Dark Hills of Cherai. General Tips Main menu The left stone displays the current player name. To change players, select the stone below that says "If this is not you click here" to display the profile selection. The profile selection allows you to add new players and delete current players. Adding a new player displays the Add Player window. The Add Player window prompts for a name, then displays the options of different gameplay…

a:1:i:0;a:2:s:13:”section_title”;s:36:”The Dark Hills of Cherai Walkthrough”;s:12:”section_body”;s:48549:”
Welcome to Gamezebo’s strategy guide for The Dark Hills of Cherai.
General Tips
Main menu

In-game options and windows
Main Quest
Hidden object locations
Mini-games
Walkthrough
Part 1 – Tara
Path to Wyatt’s House
Select the Grandha scroll at the bottom-left corner of the screen. It can be helpful to refer to the Grandha frequently throughout the game, as notes and hints are added as you progress through the adventure. Select the X button at the bottom-right corner of the Grandha to close it. Select the blind monkey and the deaf monkey and they will be added to the inventory:
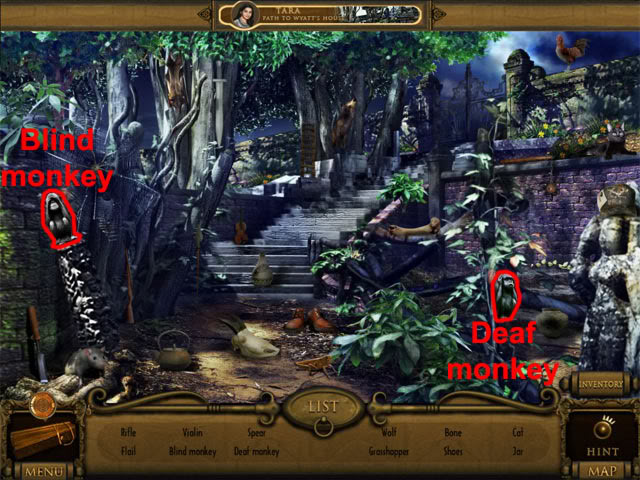
Find the rest of the hidden objects to receive the magic herb. Select the gate at the top of the steps to move to the next area.
Wyatt’s House Gate
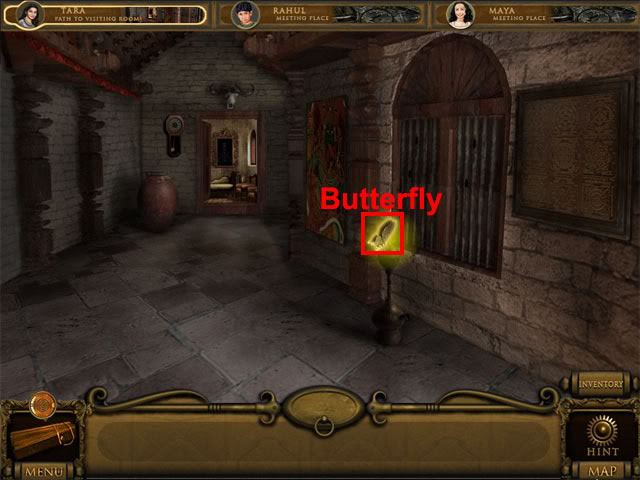
Take the mute monkey. Select the golden butterfly:
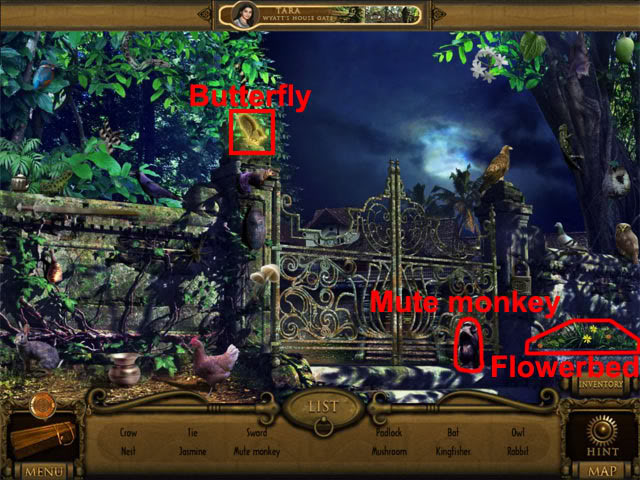
The butterfly says that it will mention information about the village as you progress through the game. Find the rest of the items and the flowerbed will become an interactive area. Examine the flowerbed to see a stone with three holes in it.
There is an icon below each of the holes on the stone: An ear below the left hole, an eye below the middle hole and a mouth below the right hole. Put the deaf monkey on the left hole, the blind monkey on the middle hole and the mute monkey on the right hole:
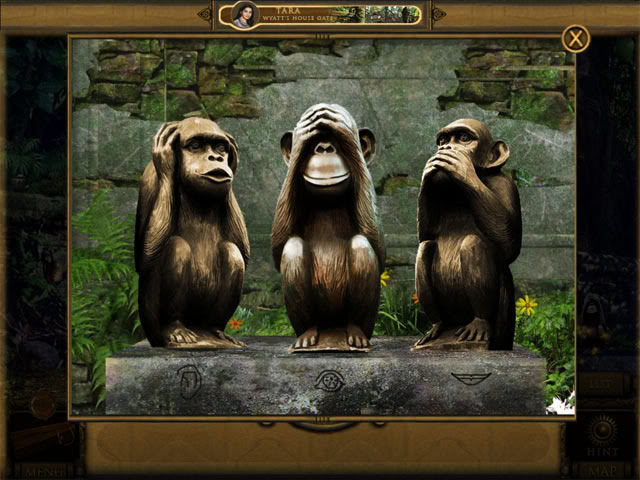
Move north through the gateway to the entrance of Wyatt’s house.
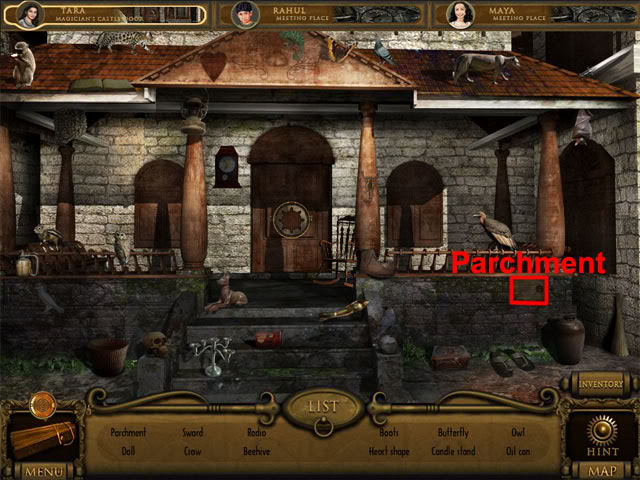
Wyatt’s House Entrance
Select the six parchments and six gems:
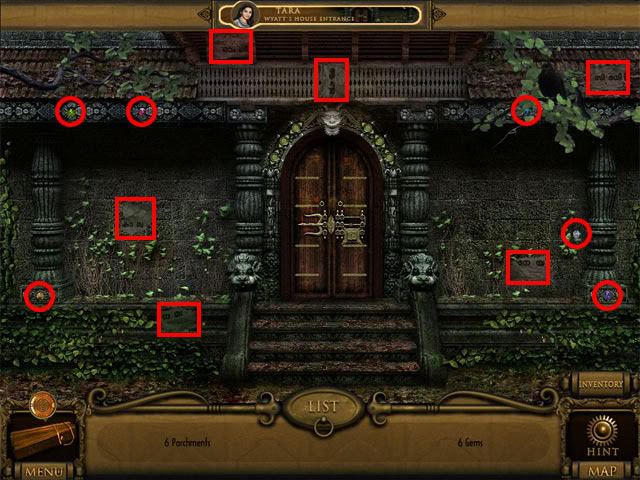
After finding the six parchments and six gems, examine the top of the door to view six holes with colored outlines. Match the gems to the holes that have the same colors:
After putting the gems in the correct places, take the key from the gargoyle’s mouth. Select the key from the inventory and then use it on the door to view the door puzzle.
The aim in the door puzzle is to rearrange the letters so that they follow the same order as the parchment in the top-left corner of the screen. A letter will darken when it has been placed in the correct place. The correct layout for the letters is shown below:
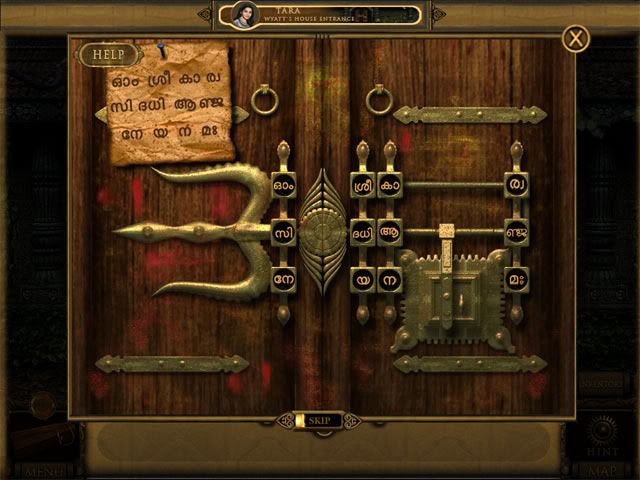
Move north through the doorway to the inner courtyard of the house.
Inner Courtyard
Select the golden butterfly:
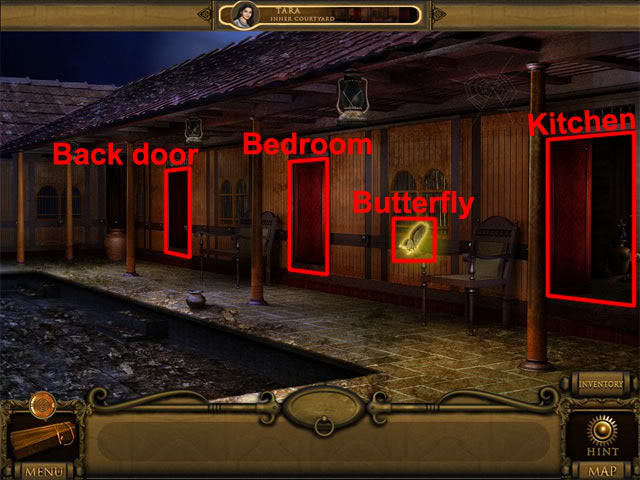
The butterfly says that Wyatt hid a treasure in the house. Go through the right doorway to enter the kitchen.
Wyatt’s Kitchen
Select the knife and the match box:
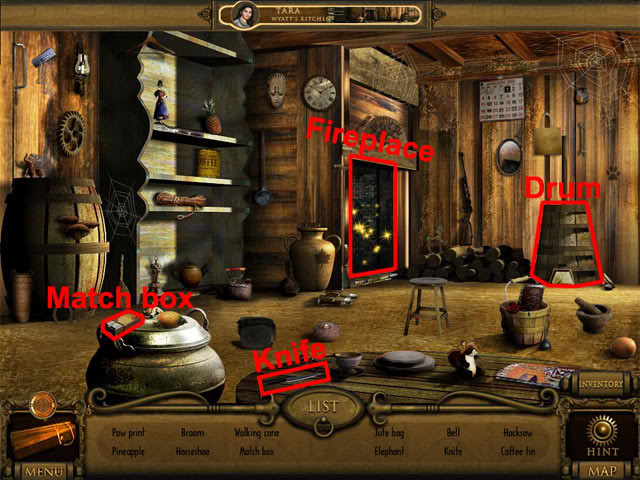
Find the remaining hidden objects. Use the match box on the fireplace and take the key that drops out. Select the drum to see the coin puzzle:
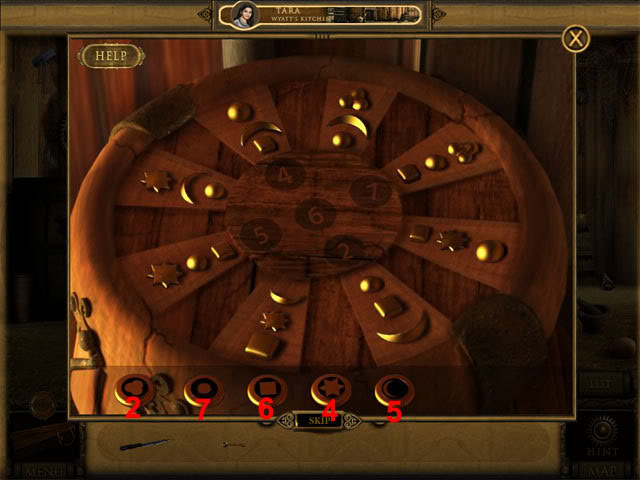
The aim in the coin puzzle is to place the coins on the correct numbers so that the symbols light up. The order of the numbers on top of the drum are random. To start with, look at the number of different symbols on the drum. There are two clovers, seven dots, six squares, four stars and five moons. Put the clover coin on the number 2, the dot coin on the number 7, the square coin on the number 6, the star coin on the number 4 and the moon coin on the number 5. After the five coins have been placed on the correct numbers, the drum will open and a sack will be shown. Use the knife on the sack to open it. Take the rope ladder from the sack. Move south to the inner courtyard.
Inner Courtyard
Go through the middle doorway to enter Wyatt’s bedroom.
Wyatt’s Bedroom
Select the crowbar:
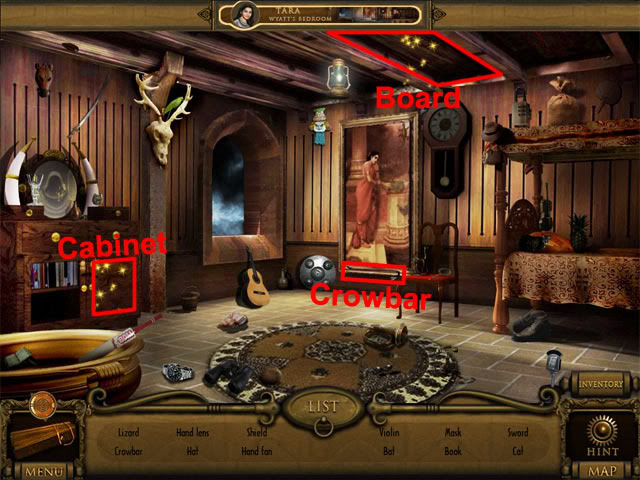
Find the remaining hidden objects. Examine the board on the ceiling and then use the crowbar on the board to reveal an eyeball. Take the eyeball. Select the cabinet at the left side of the room to see a clock. The discs on the clock can be rotated by moving the mouse cursor over one of the discs, holding down the left mouse button and then moving the mouse up or down.
There is a thin red line on each of the discs. Firstly, rotate all of the discs so that the red line is horizontal, and the Roman numerals appear in the same order as they would in a clock. The correct disc order is shown below:
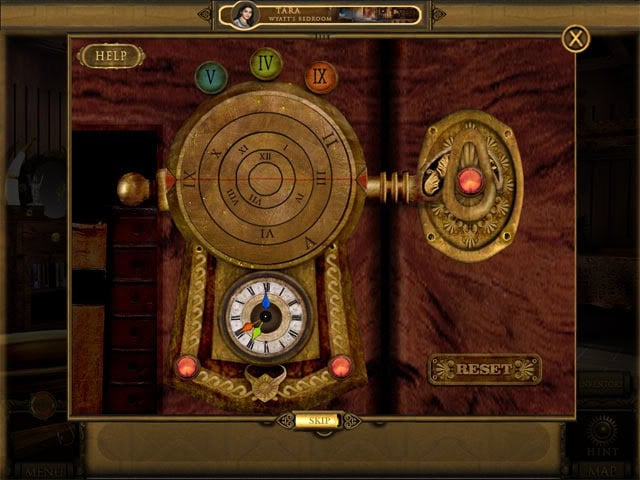
When the discs have been placed correctly, yellow sparks will appear and Roman numerals will be placed above the discs. The order of the Roman numerals is random. As an example of how to solve this section of the puzzle, if the Roman numerals are displayed as blue V, green IV and red IX, then the blue arrow on the clock face would be moved to V, the green arrow to IV and the red arrow to IX. When the arrows on the clock face have all been pointed toward the hours shown on the Roman numerals above the discs, the cabinet will open. Take the lamp from the cabinet. Move south to return to the inner courtyard.
Inner Courtyard
Examine the left door.
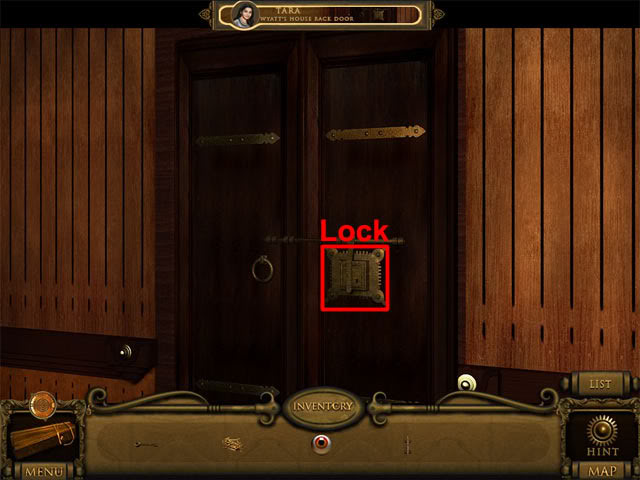
Wyatt’s House Back Door
Use the key on the lock:
Move north through the doorway to go behind Wyatt’s house.
Behind Wyatt’s House
Move north to the snake temple gate.
Snake Temple Gate
Select the twelve snakes:
Select the symbol on the gate. Select the bush to see a tile puzzle:
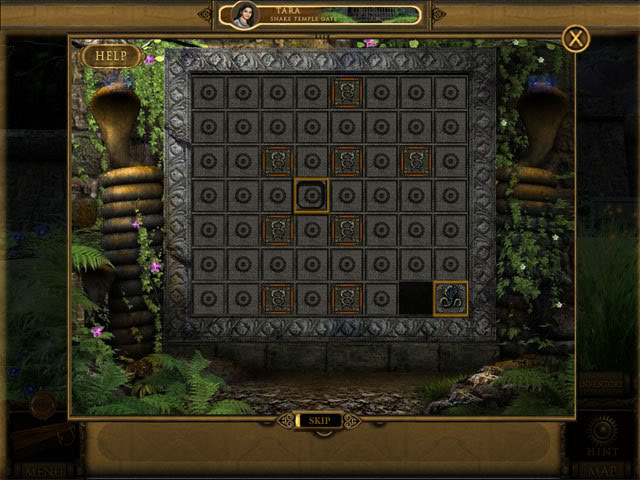
The positions of the tiles are random. The aim in the tile puzzle is to move the flashing snake tile in the corner of the puzzle to the flashing tile in the center. This is done by moving the movable non-flashing tiles out of the way so that the flashing corner tile can be moved. Move north through the gateway after solving the puzzle.
Snake Temple
Find all of the hidden objects. Examine the sparkling area at the right side of the snake temple to see a stone platform. Use the lamp on the top of the platform and then examine the sparkling area again to see the snake tile puzzle:
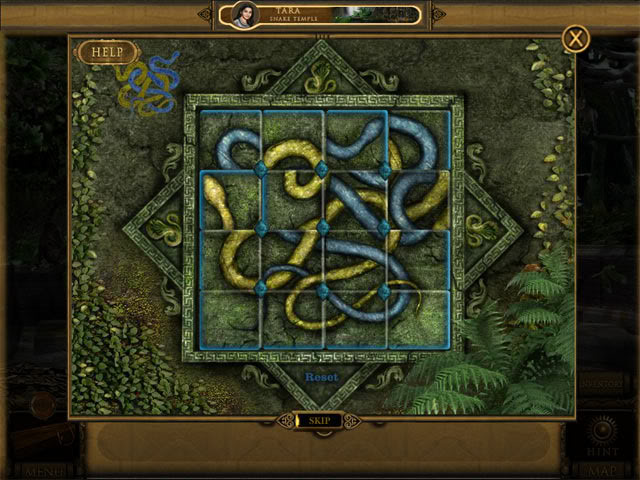
The starting positions of the tiles is random. Select the blue diamonds around the edges of the tiles to move them. The aim is to make the main tiles look the same as the small image above the top-left corner of the tiles:
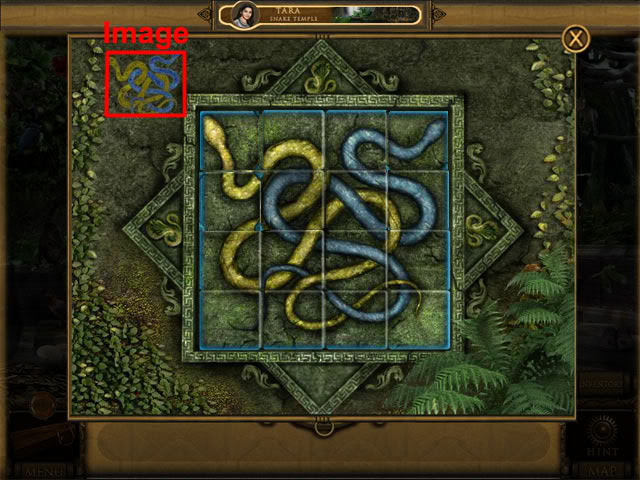
Complete the puzzle and then take the gem. Select the sparkling area at the bottom of the tree to wake Rahul. Select Rahul’s icon at the top-right corner of the screen to switch to him.
Part 2 – Rahul
Rahul’s Bedroom
Select the parchment and the torch:
Find the remaining hidden objects. Select the scrolls on the wall to start the scrolls mini-game. The aim is find all of the matching pairs of scrolls to clear the board. Take the key after the board has been cleared. Examine the drawers and then use the key on the lock. Take the bowl of cat food from the drawer. Examine the drawers again to see the cat. Give the cat food to the cat to receive a message from Tara, which mentions that she thinks Arjun has gone to Wyatt’s house to find the treasure. Move south and then north to the forest.
Forest
Find twelve butterflies:
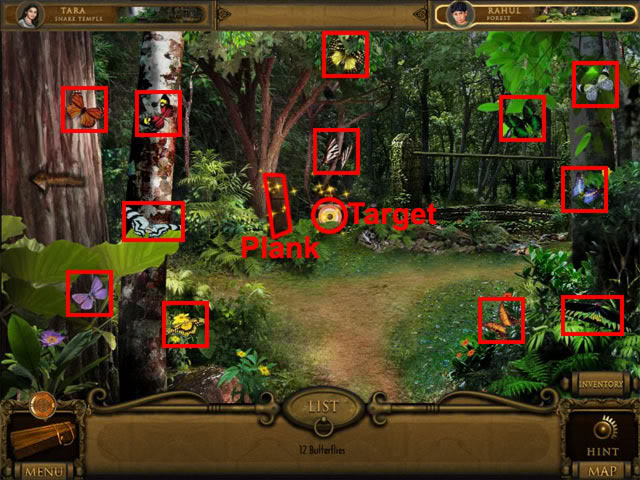
Take the wooden plank. Select the sparkling target to start the knife-throwing mini-game. The aim here is to throw knives at the dartboard to score more than 120 points. Select a knife and drag it to the position shown below:
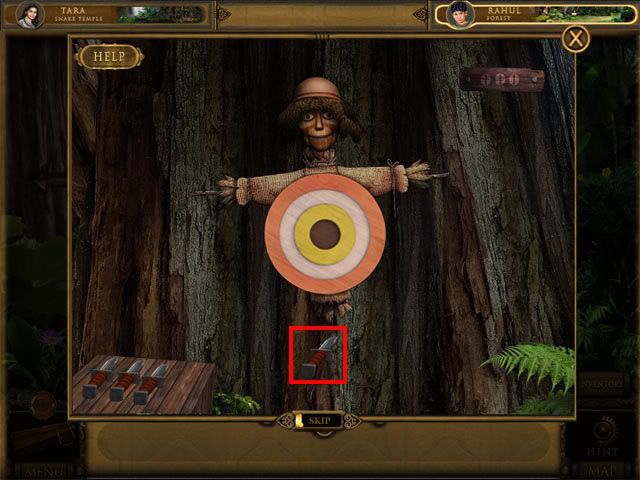
Release the mouse button to throw the knife at the target. Keep throwing knives until a score of 120 points or more is achieved. Take the gem from the mouth of the scarecrow. Move east to the abandoned well.
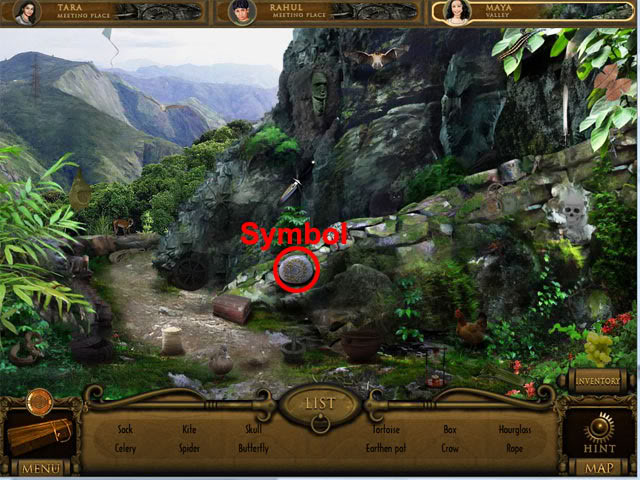
Abandoned Well
Take the eye ball, parchment, axe and snake idol:
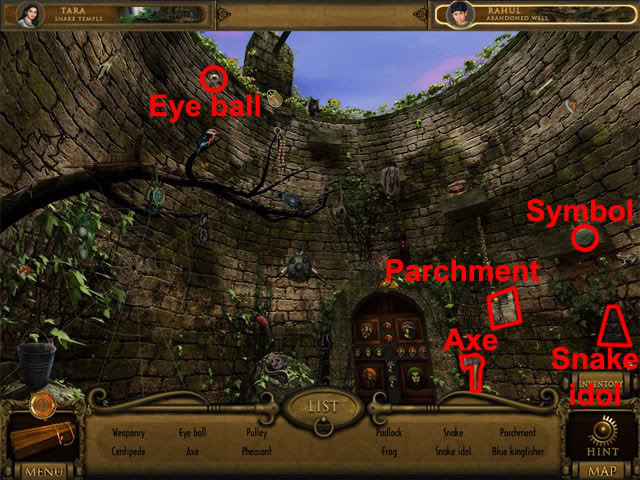
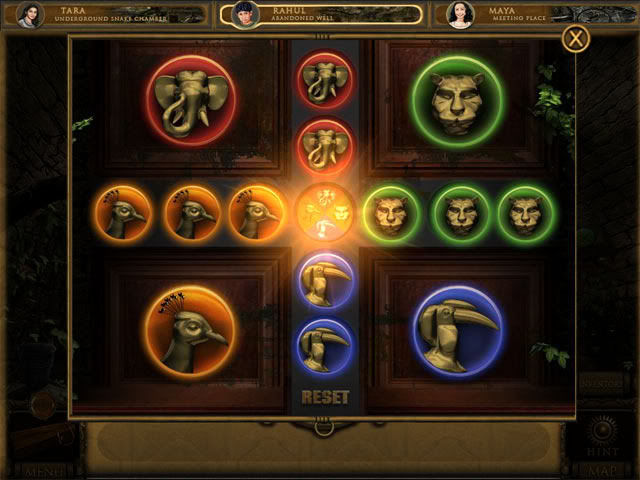
Select the symbol. Find the rest of the hidden objects. Select the door to start the animal coins mini-game:
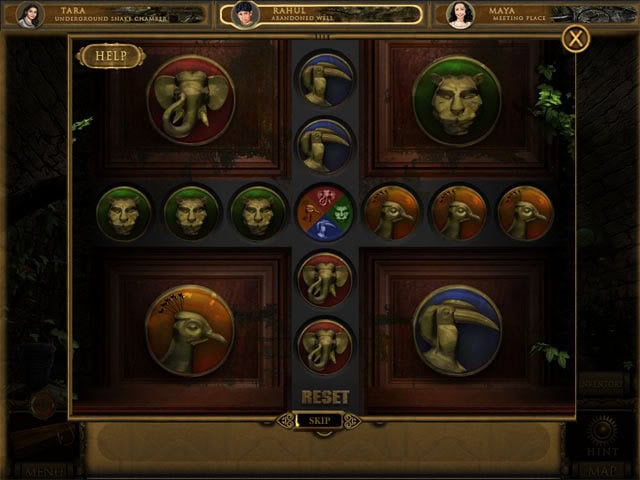
The aim in this mini-game is to move the animal coins so that they match the order shown on the middle coin. Coins only move in one direction and only one coin can be jumped at a time. The completed puzzle should look like this:
Move north to the tunnel.
The Tunnel
Select the golden butterfly:
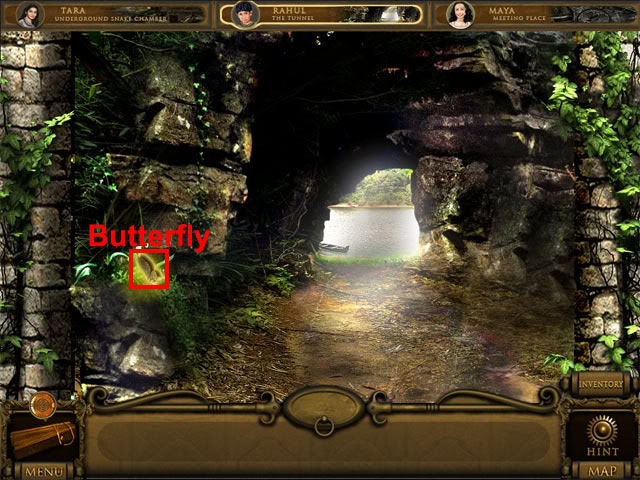
The butterfly says that the tunnel leads to the other side of the valley where the evil wizard Digambar lives. Move north to the riverside.
Riverside
Find all of the hidden objects. Select the figurine:
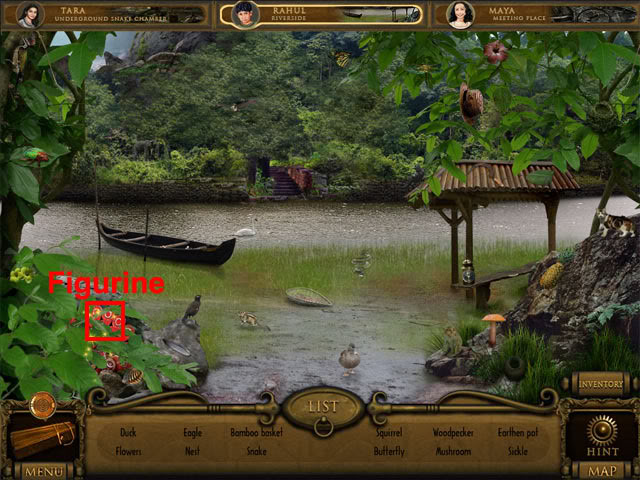
Find all of the shapes on the figurine and drag them to the correct slots at the top of the screen:

Take the gem after all of the pieces have been placed correctly. Select the map and then select the forest.
Forest
Move west from the forest to arrive at the meeting place.
Meeting Place
Select Tara’s icon at the top of the screen to switch to her.
Part 3 – Tara
Snake Temple
Select the map and then travel to behind Wyatt’s house.
Behind Wyatt’s House
Move east to arrive at the meeting place.
Meeting Place
Now that both Tara and Rahul are at the meeting place, items can be transferred between them. Select the snake idol from Rahul’s inventory and put it on Rahul’s slot on the wheel, then press the top arrow to rotate the wheel toward Tara. The snake idol will then be transferred from Rahul’s inventory into Tara’s inventory. Move north-west to go behind Wyatt’s house.
Behind Wyatt’s House
Select the map button and then select the snake temple.
Snake Temple
Use the snake idol on the sparkling area at the middle of the tree and the hatch will open. Go down the hatch to enter the underground snake chamber.
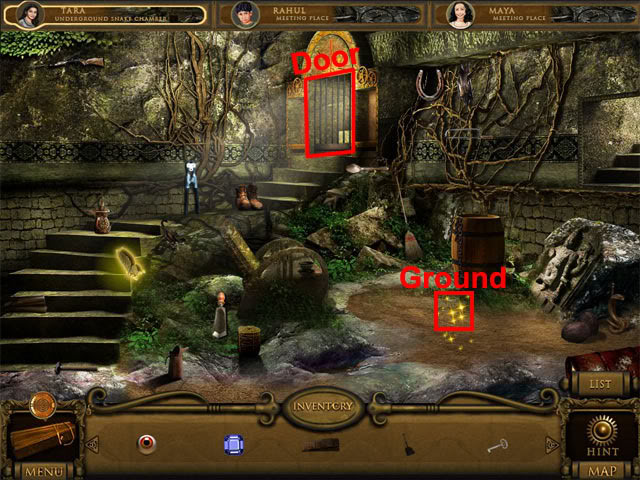
Underground Snake Chamber
Select the golden butterfly:
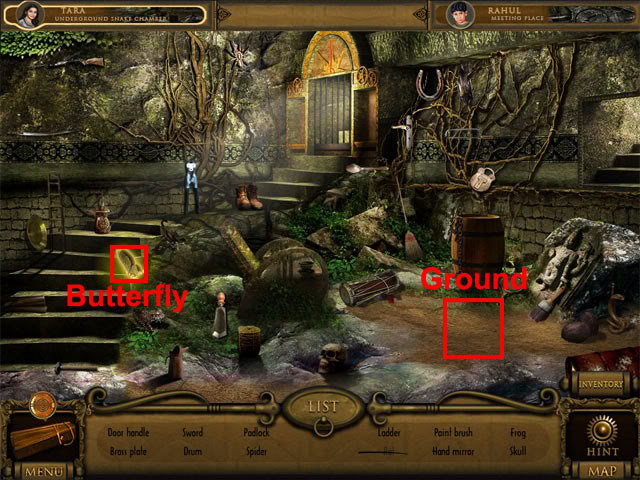
The butterfly says that this must have been one of the chambers that the king had built when fleeing from the court magician. Find all of the hidden objects. Select the ground below the barrel and then select the ground again in the close-up to wake Maya, who becomes the third playable character in the game. Select the map and return to the meeting place.
Meeting Place
Select Maya’s icon to switch to her.
Part 4 – Maya
Grandma’s Bedroom
Take the shovel and the parchment:
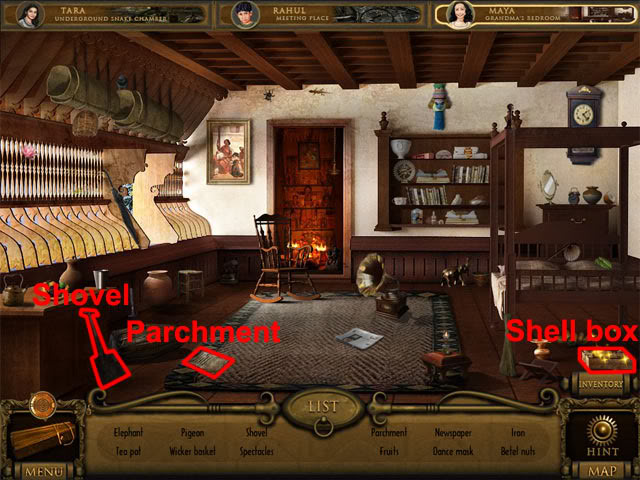
Find the remaining hidden objects. Select the shell box at the right side of the room to start the shell board mini-game:
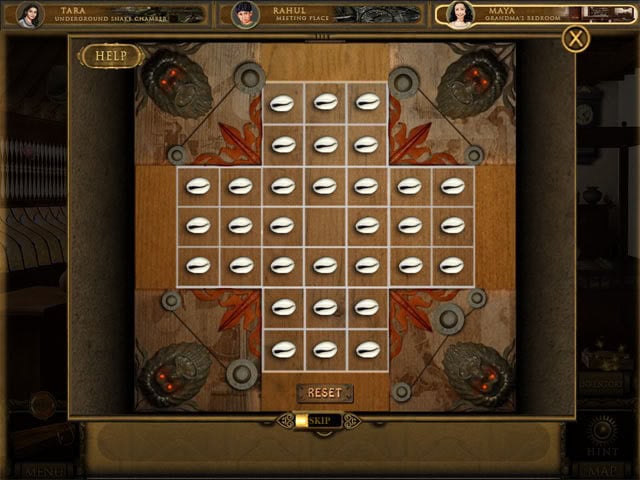
The shells are moved by holding down the left mouse button when the mouse cursor is over a shell and then moving the mouse. The aim in the mini-game is to jump over shells on the board until there are a maximum of three shells remaining. Take the red gem after completing the puzzle. Move south to Grandma’s house.
Grandma’s House
Go through the doorway to enter the path to the wayside shed.
Path to Wayside Shed
Select the golden butterfly and it will mention that Arjun is being held captive by Digambar. Take the banana:
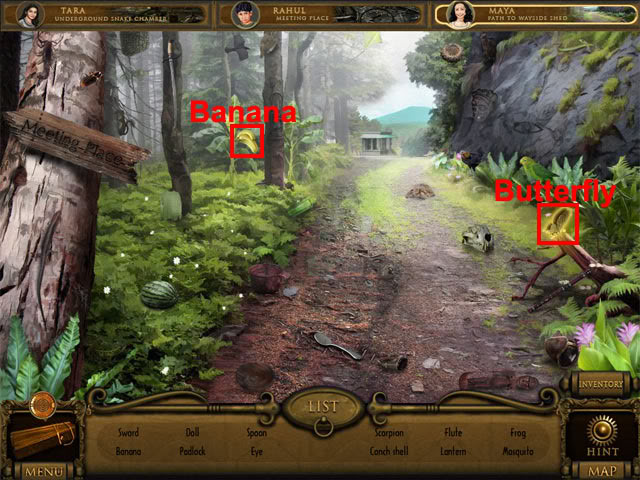
Find the remaining hidden objects. Move north to the wayside shed.
Wayside Shed
Take the oar and the parchment:
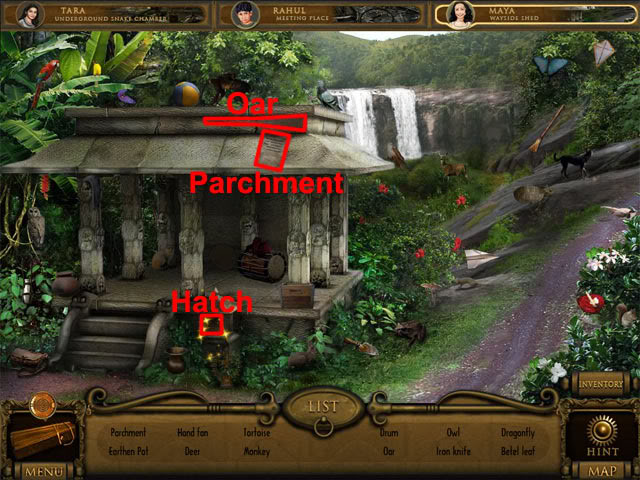
Find the remaining hidden objects. Move east to the broken bridge.
The Bridge
Take the eye ball:
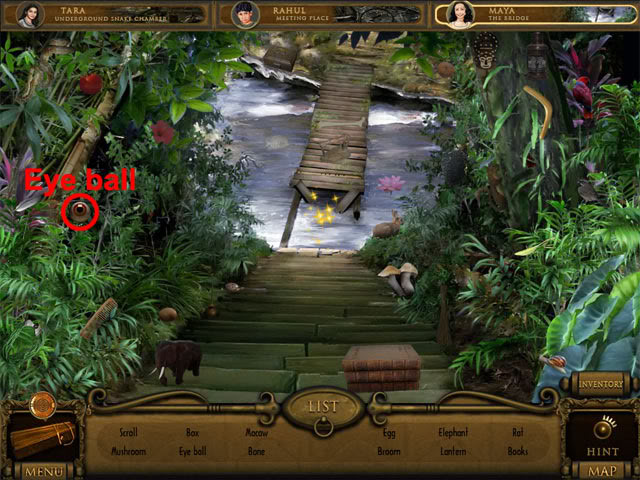
Find the remaining hidden objects. Move south twice and then west to arrive at the meeting place.
Meeting Place
Transfer the bananas and shovel from Maya’s inventory to Tara’s inventory. Switch to Tara.
Part 5 – Tara
Meeting Place
Move north-west behind Wyatt’s house and then move north twice to the snake temple.
Snake Temple
Give the banana to the sparkling monkey at the left side of the area and then take the key. Go down the hatch to arrive in the underground snake chamber.
Underground Snake Chamber
Examine the sparkling ground below the barrel:
Use the shovel on the ground to reveal a yellow gem. Take the gem. Select the door to start a balancing weight mini-game. The aim in this mini-game is to place the weights so that the scales are correctly balanced. The correct weights are shown below:
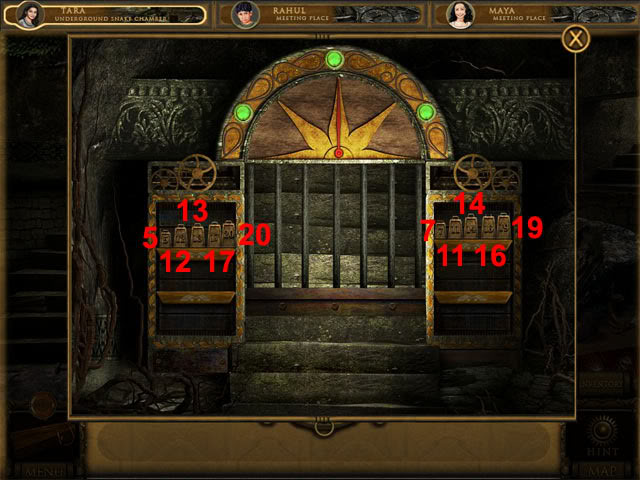
The doorway will open when the mini-game has been completed. Go through the doorway to arrive in the valley.
Valley
Take the water can:
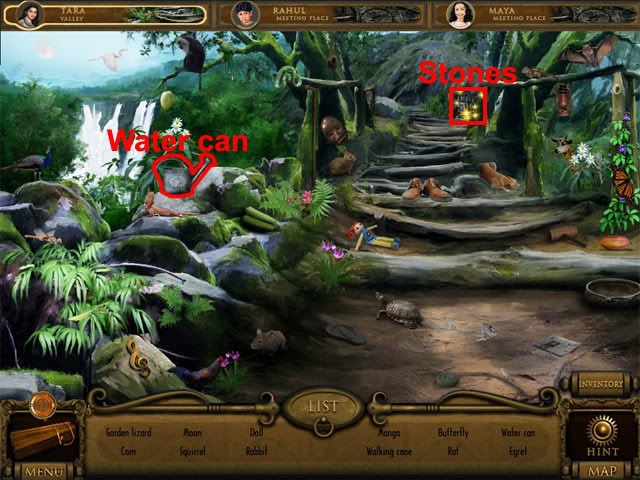
Find the remaining hidden objects. Select the stones to start a mini-game. The aim is to move the smaller stones so that the picture engraving can be moved down to the bottom of the puzzle:
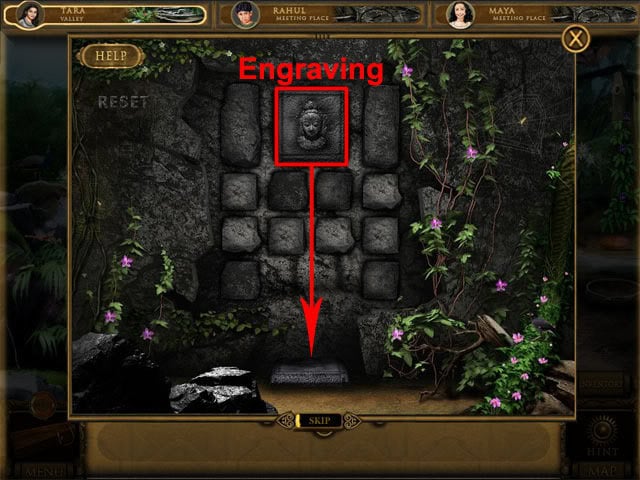
Take the clear gem after the puzzle has been completed. Move north up the stairs to the hilltop.
Hilltop
Select the golden butterfly:
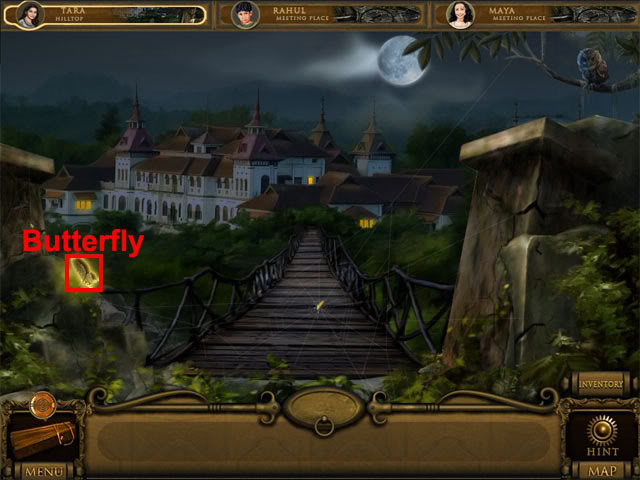
The butterfly says that the castle ahead was built by the king of Cherai for his court magician. Move north to the castle gate.
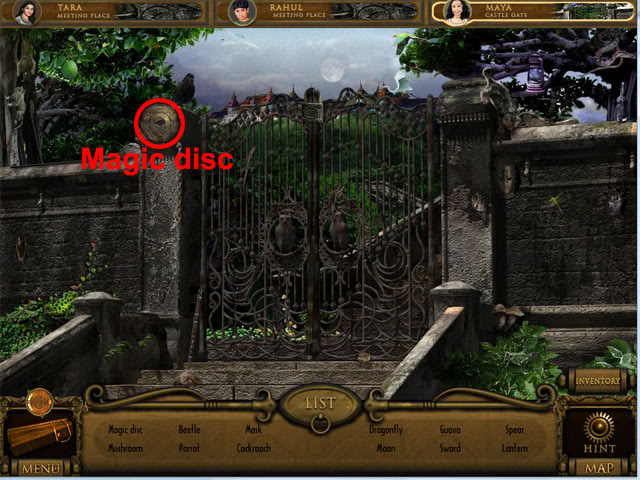
Castle Gate
Find all of the hidden objects and a sparkling area will become visible at the left side of the gate. Select the sparkling area to view the pipe mini-game. Select the pieces of the pipes to turn them so that a pipe is joined between the two end pieces:
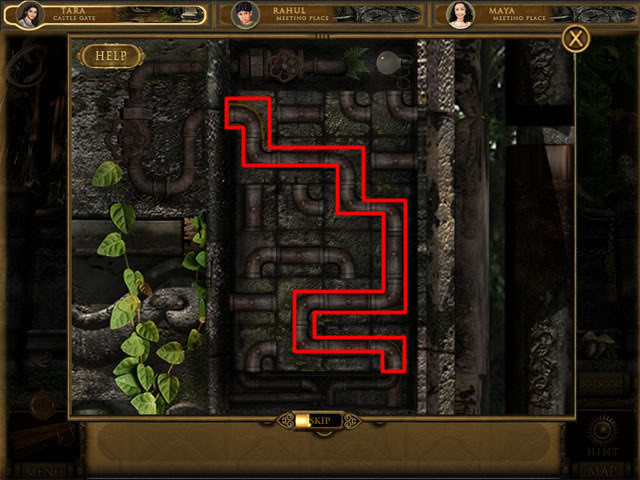
Move north through the gateway and then continue north to the basil platform.
Basil Platform
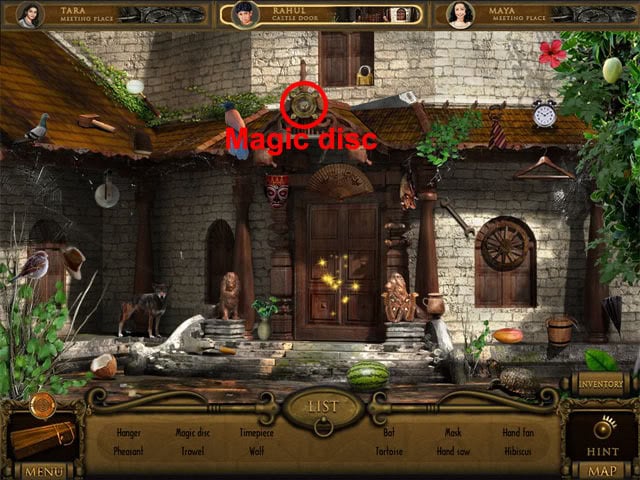
Take the magic disc:
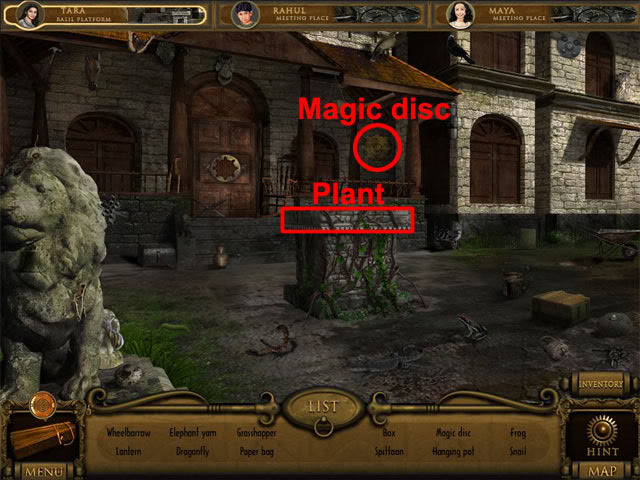
Find the remaining hidden objects and the plant on top of the basil platform will start to sparkle. Use the watering can on the plant and it will grow. Select the basil platform to see a jigsaw puzzle. Move pieces from the right side of the puzzle and place them in the correct places on the main puzzle. The completed puzzle is shown below:
Take the anchor from the hole after the jigsaw has been solved. Tara will fall down to the underground basil chamber.
Underground Basil Chamber
Select the symbol. Take the eye ball and the parchment:
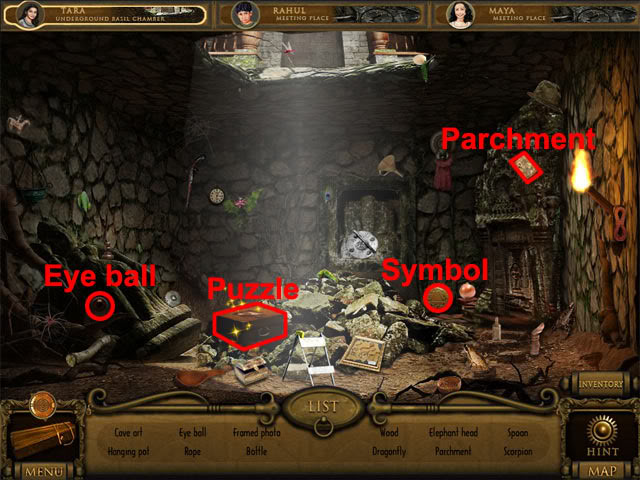
Find the remaining hidden objects. Select the puzzle to see the tangram pieces mini-game. The aim is to put all of the pieces in the outline on the board. The pieces can be rotated by putting them in the wheel. Select the undo button to move back one move, or the reset button to start the puzzle over again. One way of completing the puzzle is shown below:
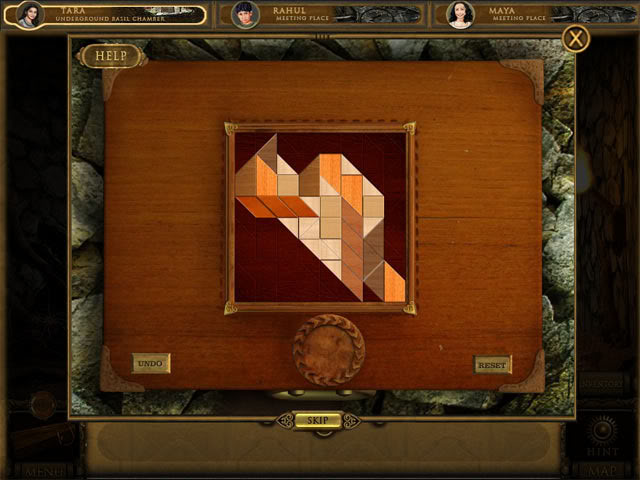
Take the green gem after the mini-game has been completed. Use the anchor on the sparkling door at the top of the screen to create a path ahead. Move up to the magician’s castle door.
Magician’s Castle Door
Take the parchment:
Find the remaining hidden objects and the door will start to sparkle. Three magic discs are needed to unlock the door, so Tara will need to return here later on. For now, select the map and return to the meeting place.
Meeting Place
Transfer the key and two eye balls from Tara’s inventory to Maya’s inventory. Transfer the eye ball and wooden plank from Rahul’s inventory to Maya’s inventory. Switch to Maya.
Part 6 – Maya
Meeting Place
Move east and then north to the wayside shed. Select the sparkling area to view a close-up of the locked door. Use the key on the lock to open the door and then take the green gem. Move north-east to the bridge.
The Bridge
Use the wooden plank on the broken section of the bridge. Move north across the bridge to the valley.
Valley
Select the symbol:
Find all of the hidden items. Move east through the entrance into the cave.
The Cave
Select the sparkling rock to start the lines mini-game. The aim is to drag the golden nodes so that all of the lines are untangled. One way of solving the puzzle is shown below:
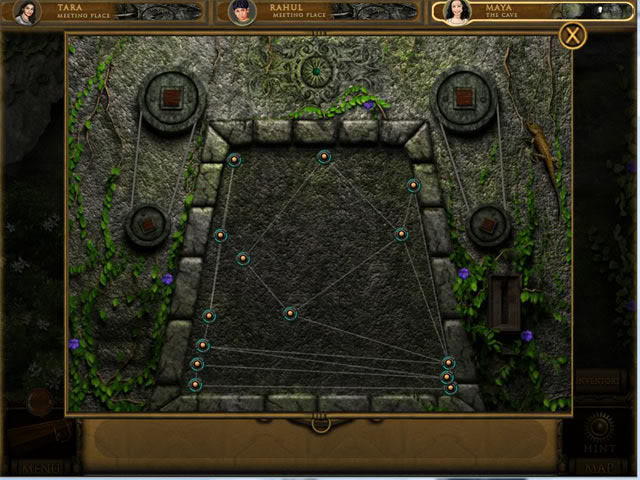
Move north through the passage after solving the puzzle.
Castle View
Select the golden butterfly:
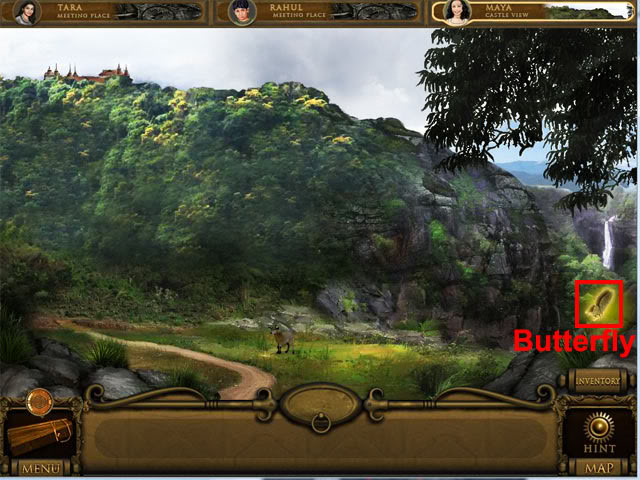
The butterfly says that the magician’s chant will only work on a full moon, which will happen in 24 hours time. Move north to the castle gate.
Castle Gate
Take the magic disc:
Find the remaining hidden objects. Examine the sparkling area on the front of the gate to see the owls. Use the four eye balls on the owls to open the gate. Go through the gate and continue north to the castle door.
Castle Door
Find all of the hidden objects. Select the sparkling area on the door to see a lock puzzle. The aim in this puzzle is to drag the discs from the right rod to make the same stack on the left rod. The middle rod can be used to store the discs. Smaller discs can only be placed on top of larger discs, not the other way around. The completed puzzle is shown below:
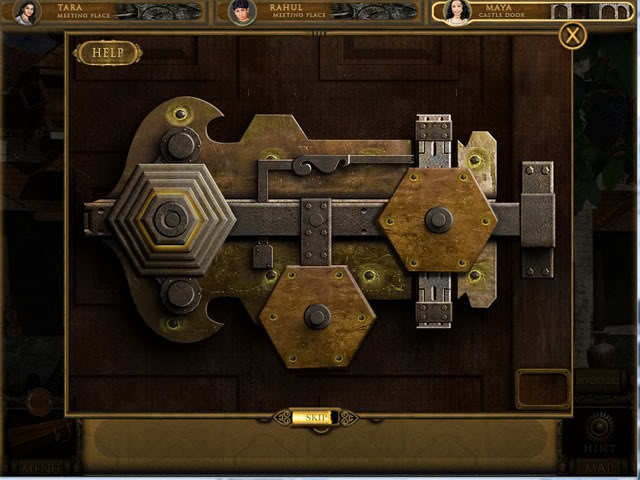
Go through the doorway after completing the puzzle to enter the inner hall.
Inner Hall
Select the golden butterfly:
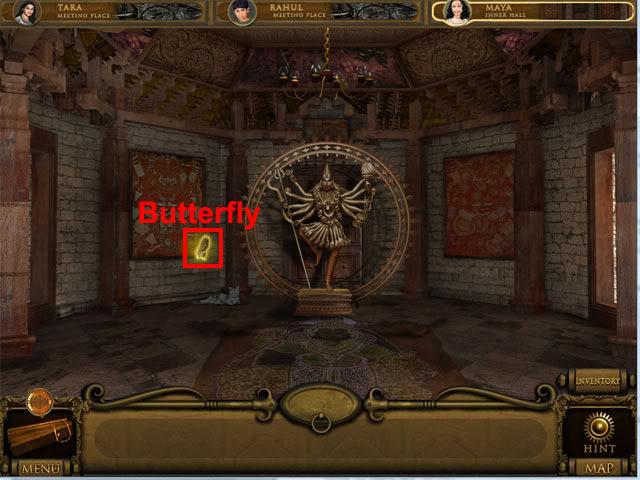
The butterfly warns against the treasure falling into the wrong hands. Move west to the castle hall.
Castle Hall
Find all of the hidden objects. Move east to the magician’s bedroom.
Magician’s Bedroom
Take the scissors. Select the butterfly:
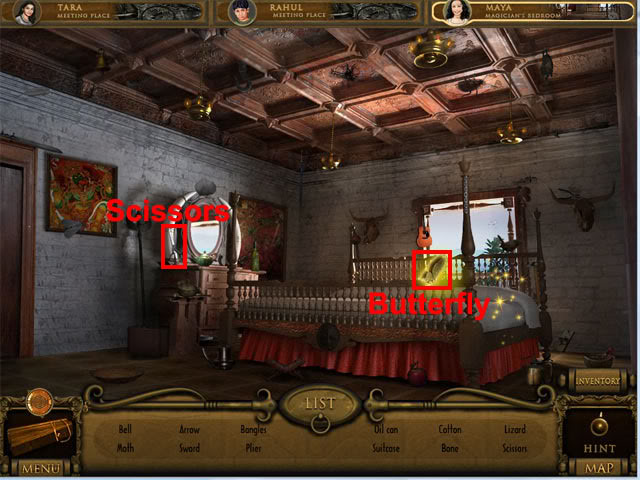
The butterfly says that the only way to destroy the magician is to defeat the magician is to destroy his statue. Find the remaining hidden objects. Examine the sparkling area on the bed. Use the scissors on the mattress and then take the key. Move east to the lair.
Evil’s Lair
Find all of the hidden objects. Select the sparkling area at the back of the room to view the goddess puzzle. The aim is to put the items around the edge of the disc into the correct hands of the goddess. The completed puzzle is shown below:
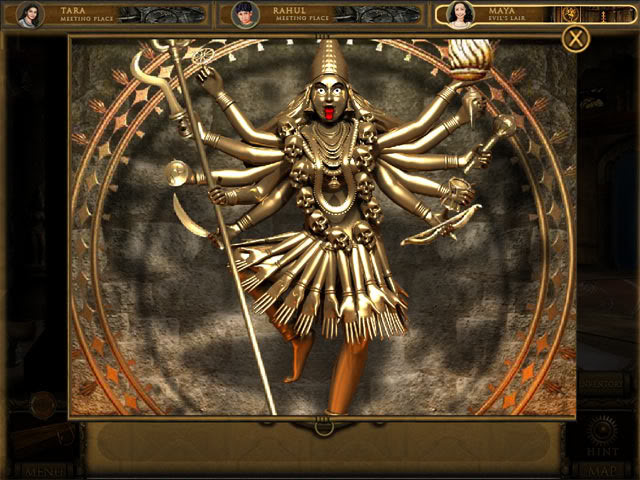
Take the gem after completing the puzzle. Move east to the room of prisms.
Room of Prisms
The aim in this room is to move the prisms so that the light reflects off all of the crystals. The completed puzzle is shown below:

After the stairs are revealed, select the map and return to the meeting place.
Meeting Place
Transfer the rope ladder from Tara’s inventory to Rahul’s inventory. Transfer the oar and the key from Maya’s inventory to Rahul’s inventory. Switch to Rahul.
Part 7 – Rahul
Meeting Place
Move south-west to the forest.
Forest
Select the map and return to the riverside.
Riverside
Use the oar on the boat to cross over to the other side of the river.
River Bank
Move north and then up to reach the valley.
Valley
Find all of the hidden objects. Use the rope ladder on the sparkling area at the bottom of the cliff. Climb up the ladder to the castle viewpoint and then move north to the castle gate.
Castle Gate
Find all of the hidden objects and the gate will begin to sparkle. Select the sparkling area on the gate to view the vessel mini-game. Start by selecting the vessel at the top of the screen so that it drops down:
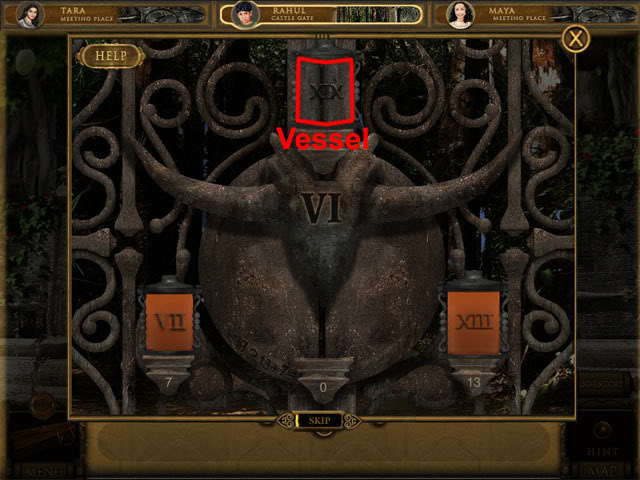
The aim now is to put six litres of oil in the middle vessel. To do this, pour the left vessel into the middle vessel. Pour the right vessel into the middle vessel. Pour the right vessel into the left vessel. Pour the middle vessel into the right vessel to leave six litres in the middle vessel:
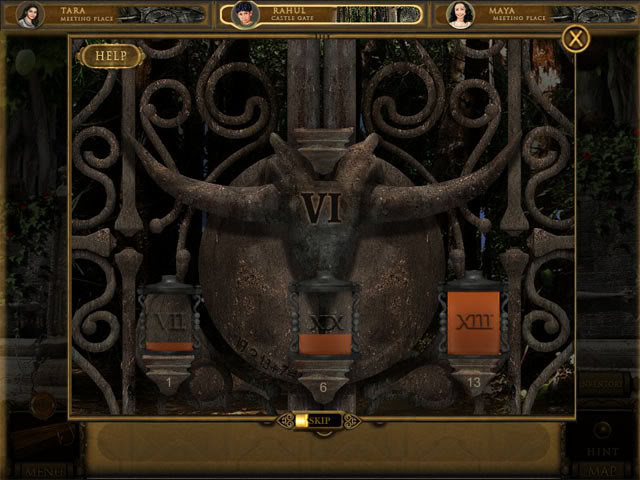
Select the middle vessel to complete the puzzle. Move forward to arrive at the path to the castle door.
Path to Castle Door
Select the golden butterfly:
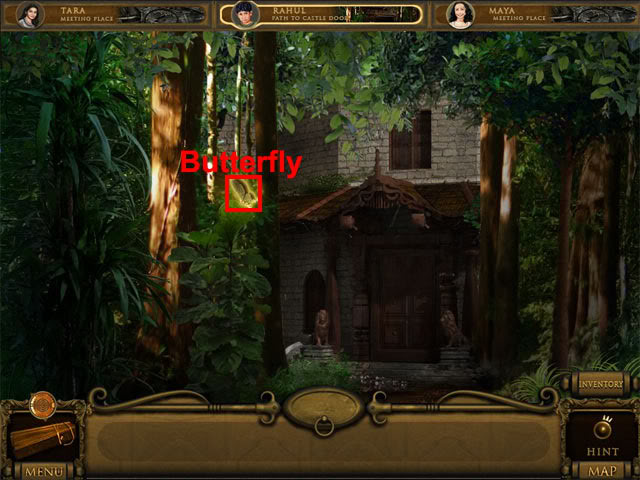
The butterfly mentions that Digambar is a descendant of the court magician. Continue north to the castle door.
Castle Door
Take the magic disc:
Find the remaining hidden objects. Examine the sparkling area of the door and then use the axe on the door. Go through the hole in the door.
Way to Storage Chamber
Go downstairs to the storage room.
Storage Room
Take the parchment:
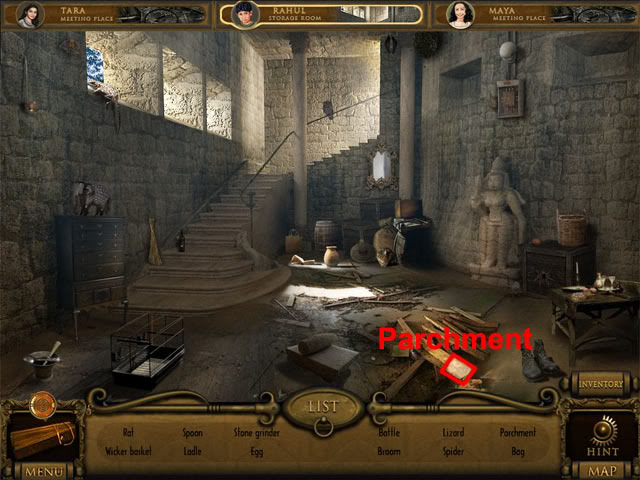
Find the remaining hidden objects. Move east to the way to durbar hall.
Way to Durbar Hall
Select the golden butterfly:
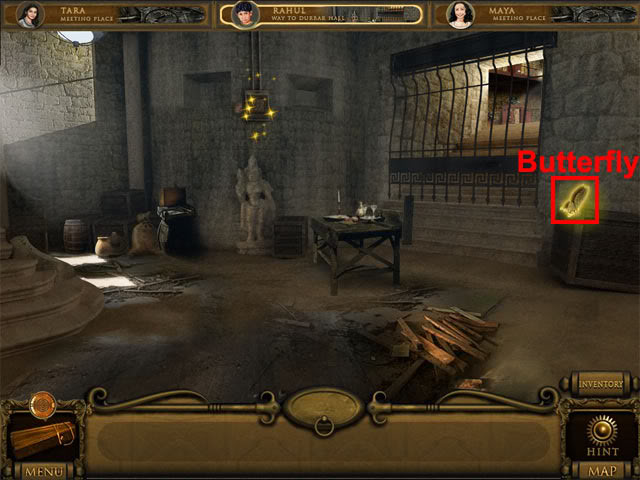
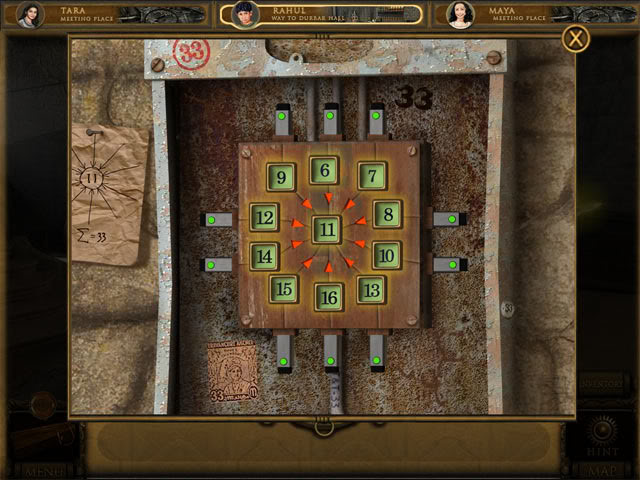
The butterfly says that the king of Cherai was Rahul’s ancestor. Select the sparkling area to view a combination puzzle. Make number 11 the middle tile. The aim now is to switch the numbers so that all lines add up to 33. One way of completing the puzzle is shown below:
Go upstairs to the durbar hall.
Durbar Hall
Find all of the hidden objects. Select the sparkling area to view the cabinet. Use the key on the cabinet to unlock it. Take the paper strip with the number 51 on it. Move west through the doorway to the throne room.
Throne Room
Select the symbol:
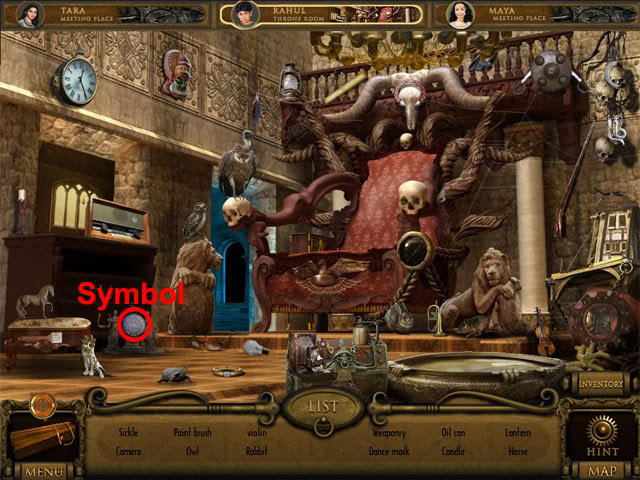
Find all of the hidden objects. Move north through the doorway to the room of darkness.
Room of Darkness
Use the torch on the room to see a maze. Select the footsteps at the bottom-right corner of the maze and then drag them through the maze without touching any of the walls:
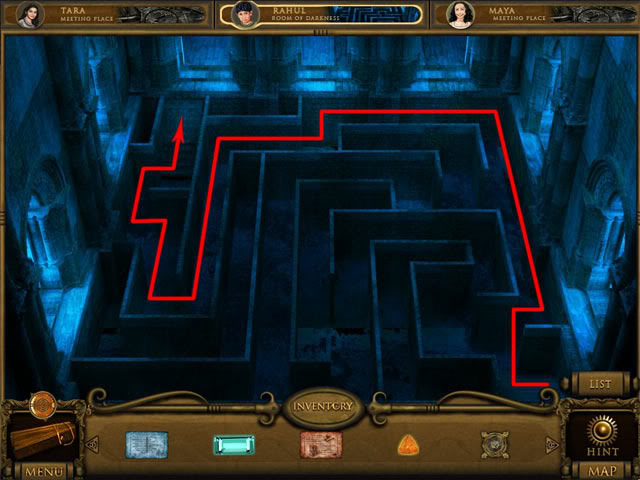
Select the map and return to the meeting place.
Meeting Place
Transfer the magic disc from Maya’s inventory to Tara’s inventory. Transfer the magic disc from Rahul’s inventory to Tara’s inventory. Switch to Tara.
Part 8 – Tara
Meeting Place
Move north-west to behind Wyatt’s house.
Behind Wyatt’s House
Select the map and return to the magician’s castle door.
Magician’s Castle Door
Select the sparkling area on the door. Use the three magic discs on the door. Notice the diagram at the bottom-left corner of the screen which shows the correct order for the discs. Rotate the discs into the correct order:
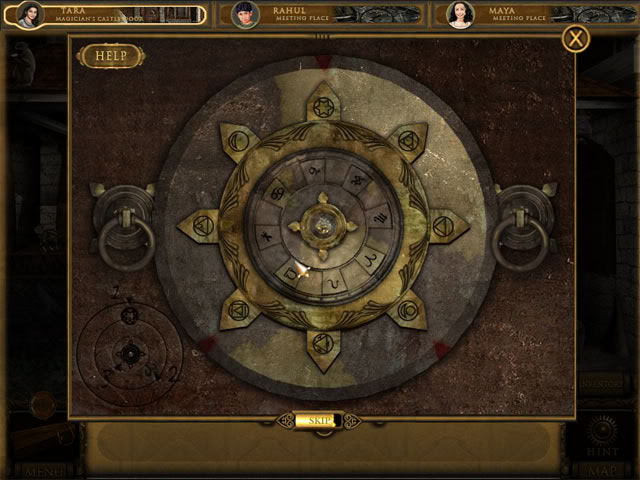
Move north to the path to visiting room.
Path to Visiting Room
Select the golden butterfly:
The butterfly says that Tara is very close to freeing Arjun. Continue north to the castle visiting room.
Castle Visiting Room
Select the symbol. Take the paper, key and the parchment:
Note that there are two locations where the parchment can be found in this location. Find the remaining hidden objects. Move east to the castle library.
Castle Library
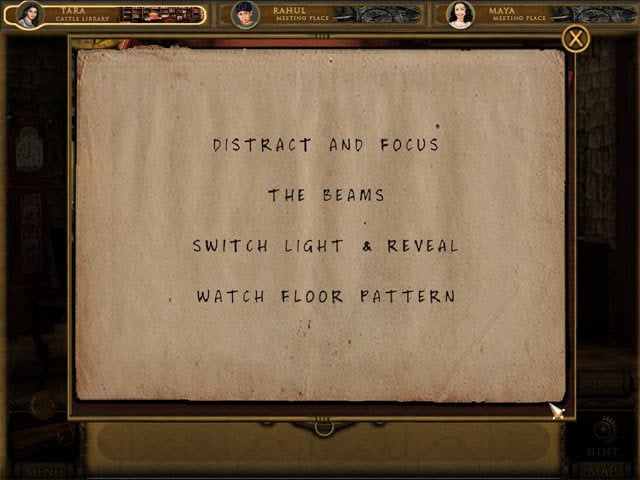
Find all of the hidden objects. Examine the left sparkling area to see a close-up of the desk. Use the blank paper on the desk to start a mini-game where the correct letters must be entered. Each letter that is entered will change other letters on the paper, and the aim is to enter the correct letter in every slot so that a sentence is revealed. Enter the following lines:
Examine the right sparkling area to see a close-up of the cabinet. Use the key in the lock to unlock the cabinet. Take the strip of paper with the number 39 on it. Move east to enter the prison.
The Prison
Find all of the hidden objects. Examine the sparkling area to see the lock. So far we have collected two paper strips, one with the number 39 and the other with the number 51. Enter 3951 as the combination to unlock the door:

After the cutscene, move east to the room of patterns.
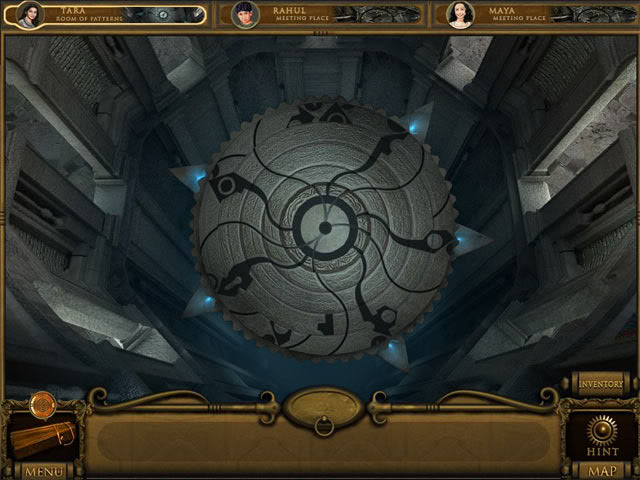
Room of Patterns
Move the discs to the correct positions so that the pattern is joined from the outer disc to the inner disc. The completed pattern is shown below:
Move north over the bridge to the magician’s room.
Magician’s Room
Use the potion bottle on the pool. Use the eight parchments on the book, placing them in the order of the current color that is shown in the book. Select the statue to view the final puzzle. Use the nine gems on the glowing areas on the statue, placing them according to the color that is shown in the glowing areas on the statue to complete the game.
“;
