- Wondering how to get Monopoly GO! free rolls? Well, you’ve come to the right place. In this guide, we provide you with a bunch of tips and tricks to get some free rolls for the hit new mobile game. We’ll …
Best Roblox Horror Games to Play Right Now – Updated Weekly
By Adele Wilson
Our Best Roblox Horror Games guide features the scariest and most creative experiences to play right now on the platform!The BEST Roblox Games of The Week – Games You Need To Play!
By Sho Roberts
Our feature shares our pick for the Best Roblox Games of the week! With our feature, we guarantee you'll find something new to play!All Grades in Type Soul – Each Race Explained
By Adele Wilson
Our All Grades in Type Soul guide lists every grade in the game for all races, including how to increase your grade quickly!
The Dark Hills of Cherai: The Regal Scepter Walkthrough
Welcome to The Dark Hills of Cherai: The Regal Scepter walkthrough on Gamezebo. The Regal Scepter is a hidden object adventure game played on the PC created by Big Fish Games. This walkthrough includes tips and tricks, helpful hints, and a strategy guide for how to complete The Dark Hills of Cherai: The Regal Scepter.
The Dark Hills of Cherai: The Regal Scepter – Game Introduction
Welcome to The Dark Hills of Cherai: The Regal Scepter walkthrough on Gamezebo. The Regal Scepter is a hidden object adventure game played on the PC created by Big Fish Games. This walkthrough includes tips and tricks, helpful hints, and a strategy guide for how to complete The Dark Hills of Cherai: The Regal Scepter.
General Tips
- When starting a new game, you can choose between two difficulty modes: Casual or Expert. Casual Mode features skip and hint buttons that recharge faster, as well as active zones being highlighted. Expert Mode features slower hint and skip button charges, as well as active zones not being highlighted.
- In the bottom left corner of the screen is a gold mirror holding a reflection of the King. You can click on it for helpful progress hints.
- In the bottom left corner of the screen is also a book called the Grandha. This will be your journal. It will keep track of storyline progression, as well as helpful hints you find along your way.
- In the bottom right corner of the screen is the Peacock, which will act as your hint button. Once the Peacock’s feathers are fully fanned and glow, you can click on the Peacock for a hint that will show you were an item is, or notify you if none are to be found. You can also pick up items from your inventory and drop it on the Peacock (once fully charged) for a vision of where it should be used. This is very helpful during your journey, especially if you don’t know who should have an item or where it should be used.
- In the bottom right corner of the screen is also the Map. You can use this to keep track of where you are. In addition, you can use the Map (after progressing a certain distance in the game) to instantly move from one location to another, limiting backtracking. The Map will also keep track of where other characters are located (you can switch between them from here, too), whether or not an area has been completed or is pending, the location of hidden object areas, and your current location.
- Also in the bottom right corner of the screen is the Meeting Place model. After you’ve progressed a certain distance in the game, this small replica will appear here. You can use it to be instantly whisked back to the Meeting Place.
- At the top of the screen, characters and their corresponding location will be listed. You can click on their name at the top of the screen to instantly assume their journey. Note, once you start playing with multiple characters, it’s highly suggested you leave them in the Meeting Place before transferring characters, as this makes things much quicker and easier.
- The Meeting Place is a special location where the three main characters can meet. You can transfer items between characters by selecting an item from one inventory list, placing it on the rotating wheel, and then choosing in which direction to rotate it, thereby giving it to another character. You will be using this feature often in the game, another reason why you should keep characters not currently being played in the Meeting Place.
- Hints are unlimited, however they require time to recharge after use.
- Skip buttons may be used during puzzles after a preset amount of time has passed.
- Inventory items are located at the bottom of the screen and are identified with CAPS in the guide below.
- Once you start collecting Power Stones, they will be kept on flower petals on one of the flowers on either side of your screen. There are 12 in total.
- Locations in the guide below are called by their in-game names. When a character switch is made, it will appear as such: i.e. –TARA–.
Chapter 1: The Journey Begins
Front Yard
- Click on the document and the LONG CHAIN lying on the ground near the elephant.
- Enter through the doorway on the left.
Store House
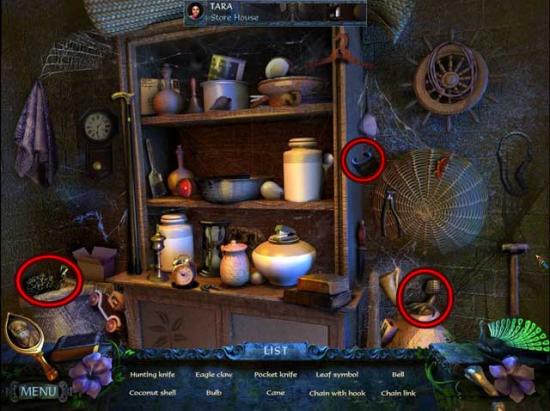
- Click on the hidden object area over the shelf on the right.
- Find the objects listed at the bottom of the screen. Objects with the exception of the Key Items are randomized. The Key Item(s) are shown below.

- Upon completing the area, the CHAIN LINK, the EAGLE CLAW, and the CHAIN WITH HOOK will be added to your inventory.
- Use the CHAIN WITH HOOK on the bronze elephant door knocker on the far wall.
- Click on the open sack in the far left corner of the room to add the CHARCOAL to your inventory.
- Return to the Front Yard.
Front Yard
- Use the LONG CHAIN on the elephant’s trunk, then take a closer look at the gap in the chain in front of the doorway to the Store House.
- Use the CHAIN LINK on the gap in the chain to repair it, then click on the elephant to have it tug the chain.
- Enter the Store House.
Store House
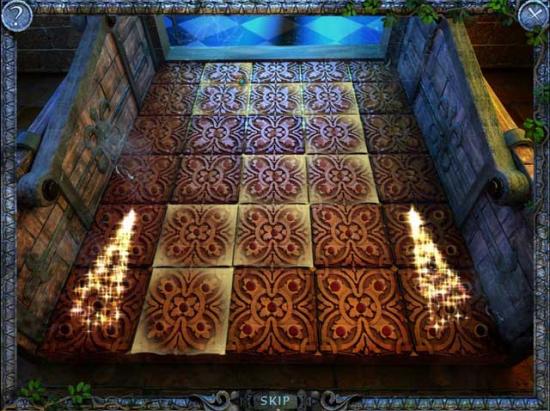
- Click on the new spiked path that has appeared.
- Chart out the path along the right tiles to get to the Secret Chamber. Some of the tiles have concealed spikes within them, while the rest are safe to step on. Clicking on the wrong tile will trigger the spikes, in which case you’ll have to start over again. The solution is shown below.
- Enter the Secret Chamber.
Secret Chamber
- Take a closer look at the gold eagle statue. Use the EAGLE CLAW on the missing left leg to open a secret panel, revealing a key. Click on the EAGLE KEY to add it to your inventory.
- Click on the IVORY HANDLE on the elephant statue to add it to your inventory.
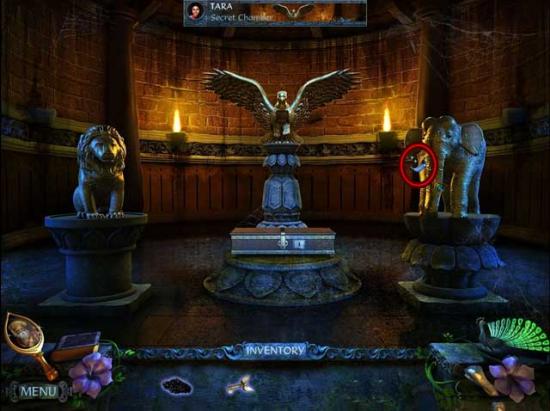
- Use the EAGLE KEY on the chest beneath the eagle statue to open it, triggering a close-up.
- Click on the platform within the box to raise it, then use the IVORY HANDLE on the left portion of the box. Place the CHARCOAL on the first sheet of paper. Now, click the handle on the right to reveal what’s on the paper. Click on the handle on the left to move the charcoal over to the next piece and repeat the process until they’re all revealed. Once completed, you will obtain the Map, which will be located in the lower right corner of the screen.
- Return to the Front Yard.
Front Yard
- Click on the doorway at the far end of the yard. Yakshi will be banished and you can proceed through.
Palace Gate
- Examine the closed gate and the wooden panel beneath the statue. There’s nothing for you to do here now, but take note of these things and proceed forward to the next area.
Eagle Temple
- Click on the piece of paper lying on the ground to add it to the Grandha.
- Click on the hidden object area over the bushes in the background.
- Find the objects listed at the bottom of the screen. Objects with the exception of the Key Items are randomized. The Key Item(s) are shown below.
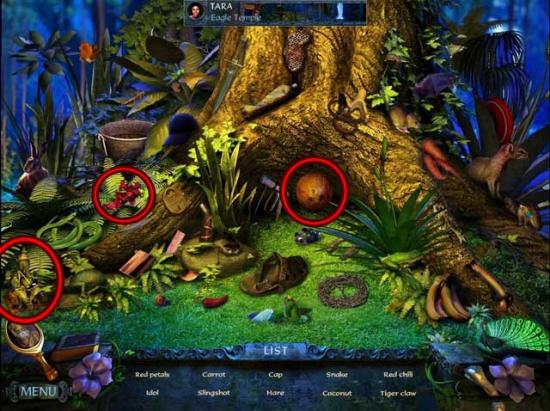
- Upon completing the area, the RED PETALS, the IDOL, and the COCONUT will be added to your inventory.
- Take a closer look at the empty alcove on the left of the screen, near the Eagle Temple entrance. Place the IDOL in the alcove, then drop the COCONUT on the stone in front of it and finally place the RED PETALS on the stone.
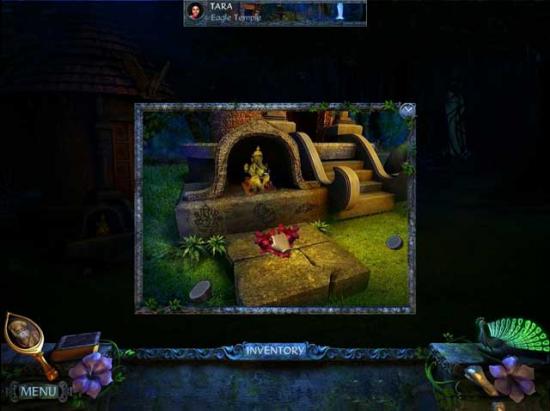
- Enter the Temple and proceed down the Underground Stairs.
Meeting Place
- Maya is now playable. Click on her tab in the upper right corner of the screen to assume her role.
–MAYA–
Backyard
- Click on the hidden object area on the right.
- Find the objects listed at the bottom of the screen. Objects with the exception of the Key Items are randomized. The Key Item(s) are shown below.
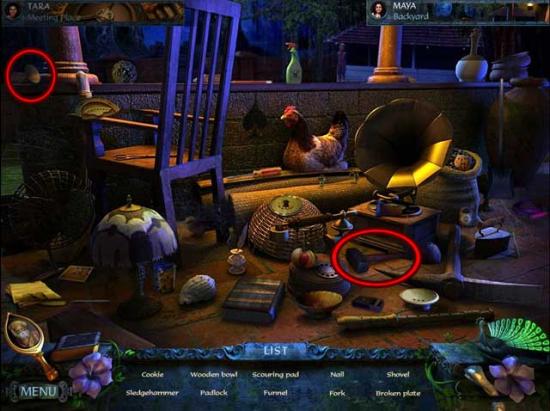
- Upon completing the area, the SLEDGEHAMMER and the FUNNEL will be added to your inventory.
- Click on the King’s ghost to talk with him before proceeding forward into the next area.
Chariot Grounds
- Click on the pile of wood beneath the cart for a closer view. Remove the topmost piece of wood and repeat this until the entire pile is gone, revealing the HOOK ARROW. Click on it to add it to your inventory.
- Click on the cart to trigger a puzzle.
- The chest surrounded by wooden blocks has to be brought to the bottom. Click and drag the chest and blocks in order to complete the puzzle. Refer to the screenshots below for the solution.

- Upon completing the puzzle, click on the TIGER AMULET to add it to your inventory.
- Proceed up the stairs on the left.
Elephant Temple
- Click on the hidden object area within the hut at the far end.
- Find the objects listed at the bottom of the screen. Objects with the exception of the Key Items are randomized. The Key Item(s) are shown below.
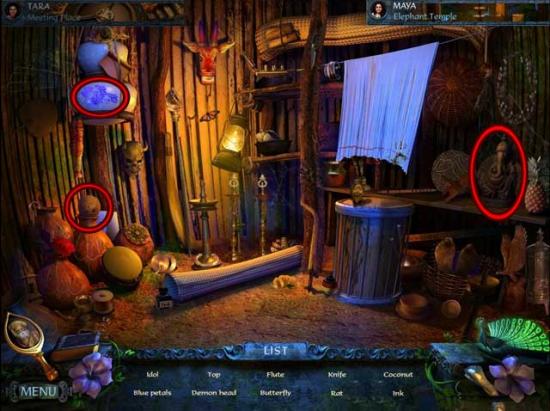
- Upon completing the area, the IDOL, the BLUE PETALS, and the COCONUT will be added to your inventory.
- Back in the main Temple area, take a closer look at the small alcove on the left at the foot of the Temple entrance. Place the IDOL in the alcove, then use the COCONUT on the stone to split it, then use the BLUE PETALS on the stone.
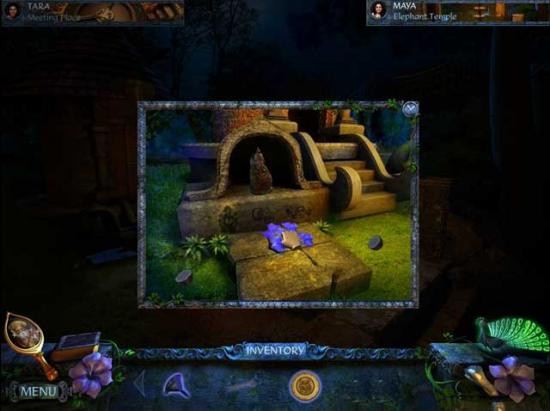
- Enter the Temple and proceed down the Underground Stairs.
Meeting Place
- Have Maya give Tara the FUNNEL, then click on Tara to resume playing as her. Proceed up the steps. Upon exiting the Meeting Place, a small temple model will appear in the lower right corner of your screen. You can click this at anytime to immediately warp back to the Meeting Place.
–TARA–
Eagle Temple
- Click on the hidden object area over the bushes at the far end of the area.
- Find the objects listed at the bottom of the screen. Objects with the exception of the Key Items are randomized. The Key Item(s) are shown below.
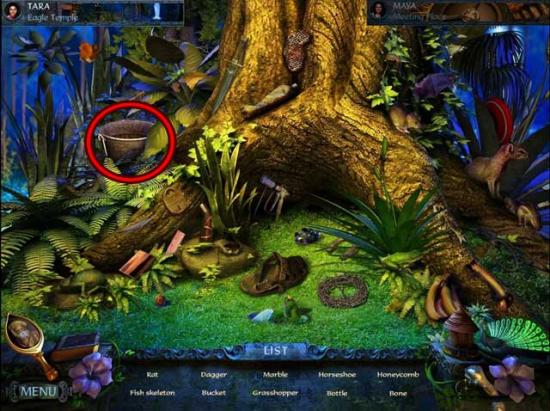
- Upon completing the area, the BUCKET will be added to your inventory.
- Return to the Palace Gate.
Palace Gate
- Take a closer look at the panel beneath the statue. Use the FUNNEL on the left box filled with sand.
- Go back to the Store House.
Store House
- Click on the hidden object area over the shelves on the right.
- Find the objects listed at the bottom of the screen. Objects with the exception of the Key Items are randomized. The Key Item(s) are shown below.
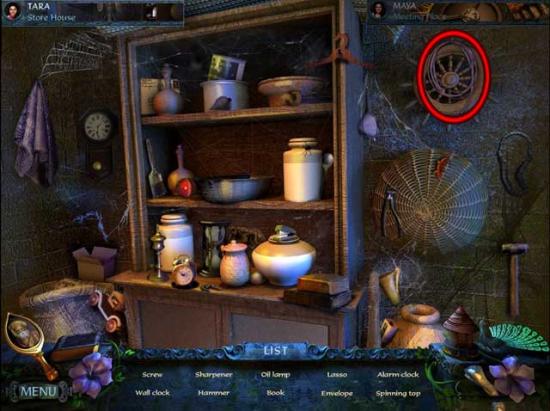
- Upon completing the area, the LASSO will be added to your inventory.
- Take a closer look at the window on the left. Use the BUCKET on the rope, then wait until it’s brought back up. Click on the FILLED BUCKET to add it to your inventory.
- Return to the Palace Gate.
Palace Gate
- Click on the panel beneath the archer statue again for a closer look. Use the FILLED BUCKET on the Funnel, then click on the RED URN that lowers into the lower right box to add it to your inventory.
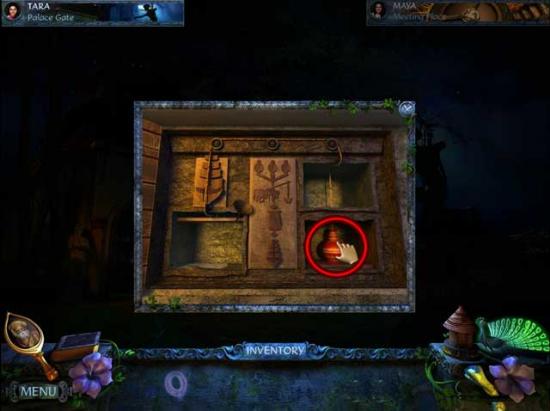
- Return to the Meeting Place.
Meeting Place
- Have Tara give Maya the LASSO. Click on Maya to resume playing as her and exit the Meeting Place.
–MAYA–
Elephant Temple
- Click on the hidden object area over the hut.
- Find the objects listed at the bottom of the screen. Objects with the exception of the Key Items are randomized. The Key Item(s) are shown below.
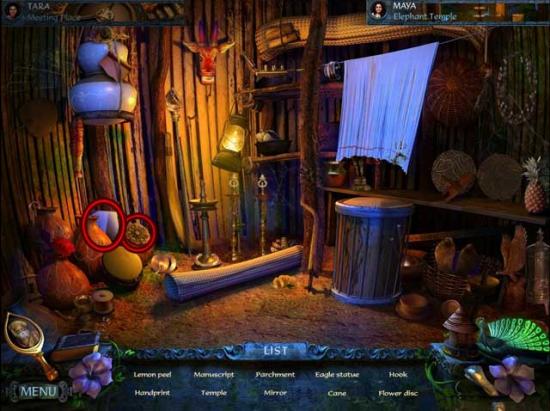
- Upon completing the area, the FLOWER DISC and the MIRROR will be added to your inventory.
- Go down to the Chariot Grounds.
Chariot Grounds
- Use the LASSO on the OX and click on it to add it to your inventory.
- Rahul is now playable and has started his journey. Click on the tab with his name in the middle of the top portion of the screen to assume his role.
Chapter 2: Rahul Appears
–RAHUL–
Cannon Tower Premises
- Click on the piece of paper lying on the ground to add it to the Grandha.
- Take a closer look at the cracked rock propped against the wall. Take note of it, then proceed down the path to the right.
The Fortress
- Click on the hidden object area on the far left.
- Find the objects listed at the bottom of the screen. Objects with the exception of the Key Items are randomized. The Key Item(s) are shown below.
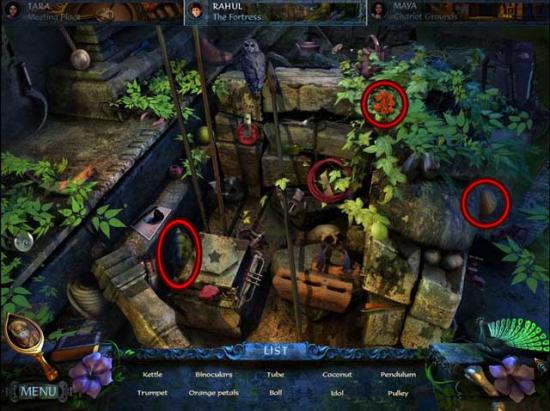
- Upon completing the area, the ORANGE PETALS, the COCONUT, and the IDOL will be added to your inventory.
- Take a closer look at the small maze-like panel lying on the ground near the bottom of the screen.
- Lead the goldfish through the maze to the button on the other end. Tap the water to give the fish directions. You will be controlling the orange goldfish in the lower left corner of the screen and trying to avoid run-ins with the yellow goldfish swimming throughout the maze. The path solution is shown below (be careful to watch the yellow goldfishes’ patterns to avoid them! Use other branches of the maze as necessary to keep from crossing their path, waiting for them to swim by before proceeding).
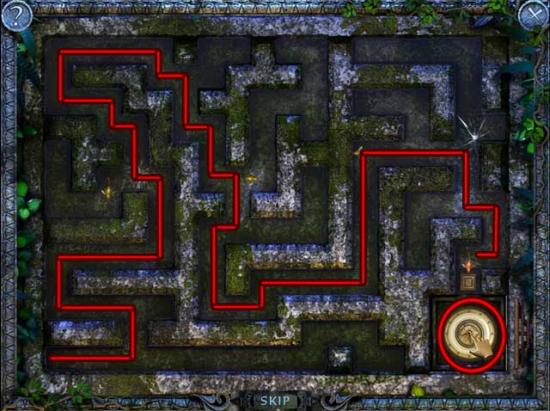
- Upon completing the puzzle, the HORSE AMULET will be added to your inventory.
- Take a closer look at the Temple entrance on the right. After a brief cutscene, click on the former location of the Temple for a closer look and to see it’s fallen to the bottom of a chasm.
- Examine the other areas here and take note of them, then return to the Cannon Tower Premises.
Cannon Tower Premises
- Click on the hidden object area between the tower and the wall.
- Find the objects listed at the bottom of the screen. Objects with the exception of the Key Items are randomized. The Key Item(s) are shown below.
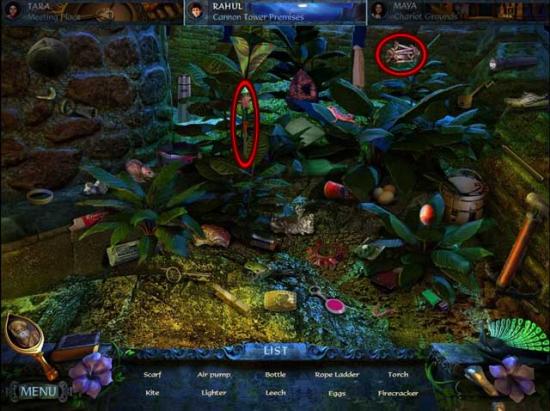
- Upon completing the area, the ROPE LADDER and the FIRECRACKER will be added to your inventory.
- Return to The Fortress.
The Fortress
- Take a closer look at the steps on the right again. Use the ROPE LADDER on the edge of the stairs, then proceed down.
Lion Temple
- Click on the small ruined alcove in front of and to the right of the Temple. Use the IDOL on the alcove, then split the COCONUT on the stone, followed by sprinkling the ORANGE PETALS on the stone.
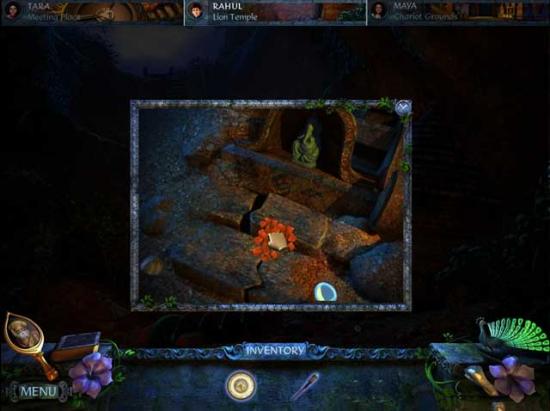
- Enter the Temple and proceed down the Underground Stairs.
Meeting Place
- Once in the Meeting Place, select Maya from the top right corner to assume her role again.
–MAYA–
Chariot Grounds
- Click on the Meeting Place in the lower right corner of the screen to be instantly transferred there.
Meeting Place
- Have Rahul give Maya the FIRECRACKER.
- Have Maya give Tara the FLOWER DISC.
- Have Maya give Rahul the SLEDGEHAMMER and the HOOK ARROW.
- Resume the role of Rahul and exit the Meeting Place.
–RAHUL–
- Proceed back to the Cannon Tower Premises.
Cannon Tower Premises
- Click on the hidden object area between the tower and the wall.
- Find the objects listed at the bottom of the screen. Objects with the exception of the Key Items are randomized. The Key Item(s) are shown below.
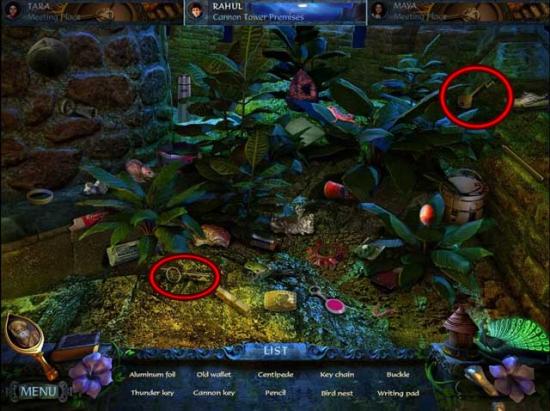
- Upon completing the area, the CANNON KEY and the THUNDER KEY will be added to your inventory.
- Take a closer look at the cracked stone propped up against the wall. Use the SLEDGEHAMMER to break apart the stone, revealing a lever-based mechanism. Take note of it and return to the Meeting Place.
Meeting Place
- Assume the role of Maya and exit the Meeting Place.
–MAYA–
Elephant Temple
- Use the FIRECRACKER on the fountain of lit flames to obtain the LIT FIRECRACKER.
- Go to the Chariot Grounds.
Chariot Grounds
- Take a closer look at the yellow squares on the side of the cart. They’re actually mirrors. Use the MIRROR on the empty middle slot to restore it.
- Back in the main area, take a closer look at the puzzle on the wall on the left on which the light is shining.
- The painting on the wall is in a state of disorder. Click the buttons to slide the tiles around. Use this method to restore the painting. The solution is shown below.
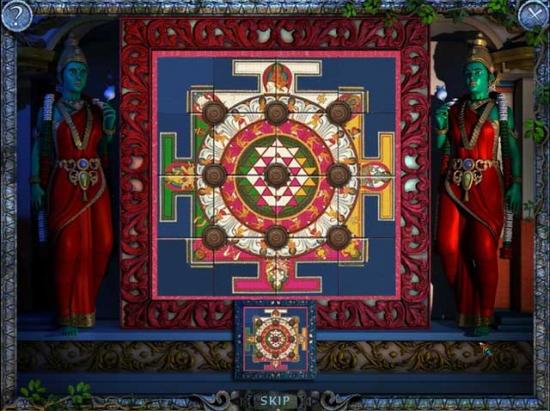
- Upon completing the puzzle, you’ll acquire the POWER STONE (1/12). This won’t be added to your inventory, but will rather appear on the flower in the lower left corner of your screen.
- Try to proceed down the path ahead, but creatures of the night will block your way. Use the LIT FIRECRACKER on the area to frighten them away and proceed forward.
Ox-driven Mill
- Take a closer look at the stump on the left at the foot of the steps. Click on the AXE until it’s wriggled out of the wood and added to your inventory.
- Use the OX on the mill in the middle of the clearing, then click for a closer view. Take note that it looks like urns could fit into the slots.
- Exit the close-up and pick up the small piece of paper between the mill and the doorway on the right to add it to the Grandha.
- You may choose to take the path to the right, but there’s nothing you can do there just yet. Instead, take the path to the left.
Kalaripayattu Arena
- Click on the hidden object area over the box on the right.
- Find the objects listed at the bottom of the screen. Objects with the exception of the Key Items are randomized. The Key Item(s) are shown below.
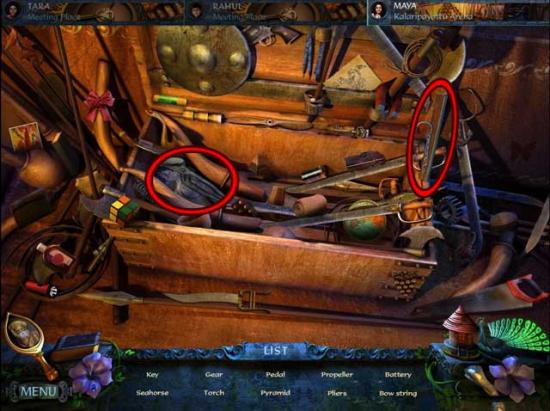
- Upon completing the area, the PLIERS and the PEDAL will be added to your inventory.
- Back in the main area, click on the shield in the upper left corner, the one with the red fabric beneath it. Both will fall to the floor. Click on the SHIELD to add it to your inventory.
- Continue forward into the next room.
Weapon Forgers Furnace
- Click on the CHAIN CUTTER and the LEFTOVER FOOD sitting on the table on the right to add them to your inventory.
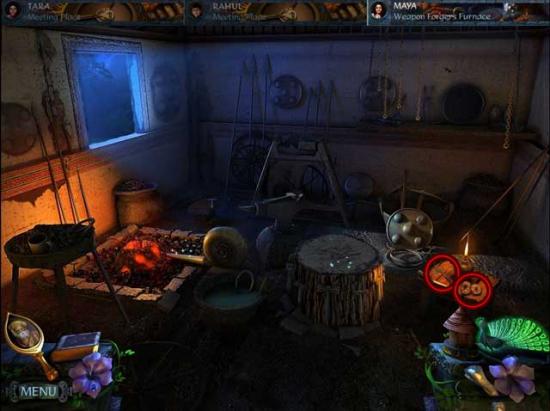
- Take a closer look at the sharpener machine at the back of the room. Use the PEDAL on the broken one at the foot of the sharpener to replace it.
- Take a closer look at the stump. Place the SHIELD on it.
- There’s nothing left to do here at the moment, so return to the Meeting Place.
Meeting Place
- Have Tara give Maya the RED URN.
- Exit the Meeting Place as Maya and return to the Ox-driven Mill.
Ox-driven Mill
- Take a closer look at the mill in the middle of the clearing. Use the RED URN on the red slot, then return to the Meeting Place.
Meeting Place
- Assume the role of Tara and exit the Meeting Place, returning to the Palace Gate.
–TARA–
Palace Gate
- Take a closer look at the gate. Attempt to use the Flower Disc, however the gate is now covered in carnivorous plants.
- Return to the Meeting Place.
Meeting Place
- Assume the role of Maya and exit to the Backyard.
–MAYA–
Backyard
- Click on the hidden object area on the right.
- Find the objects listed at the bottom of the screen. Objects with the exception of the Key Items are randomized. The Key Item(s) are shown below.
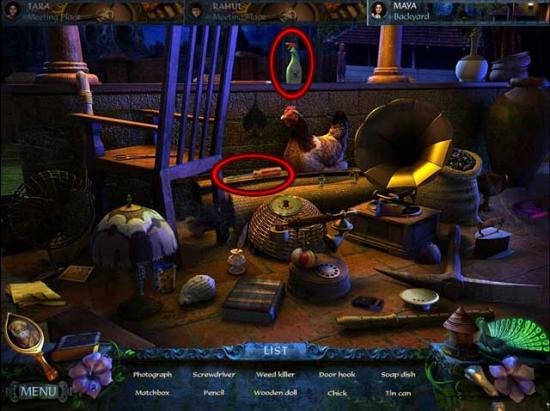
- Upon completing the area, the WEED KILLER and the SCREWDRIVER will be added to your inventory.
- Return to the Meeting Place.
Meeting Place
- Have Maya give Tara the WEED KILLER, the SCREWDRIVER, and the PLIERS.
- Have Rahul give Tara the SLEDGEHAMMER.
- Assume the role of Tara and exit to the Palace Gate.
–TARA–
Palace Gate
- Use the WEED KILLER on the plants to kill them off, then use the FLOWER DISC on the groove in the gate to open it. Proceed inside.
Durbar Hall
- Take a closer look at the small table in the middle of the hall. Use the SCREWDRIVER to remove each of the screws, then click on the SUN CREST to add it to your inventory.
- Take a closer look at the throne at the far end of the hall. Use the SLEDGEHAMMER to break the glass beneath it. Make sure it’s completely gone. There’s a puzzle beneath but you can’t complete it just yet.
- Take a closer look at the door on the far left of the hall. Use the PLIERS to remove the nails and proceed inside.
Room of Light
- Click on the CROSSBOW and the DOOR HANDLE to add them to your inventory.
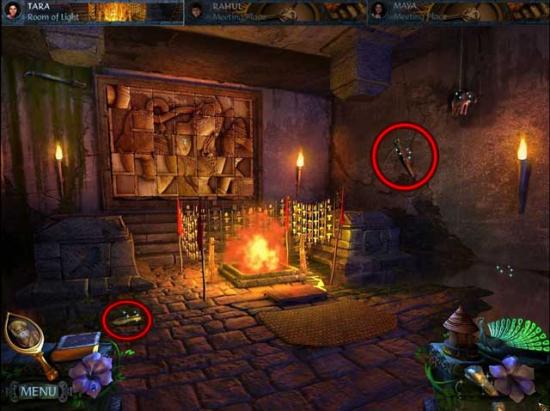
- Click on the large puzzle/frame on the back wall to trigger a puzzle.
- The wall carving is in a state of disorder. Click two tiles successfully to swap their positions. Use this method to restore the wall carving to its original form. The solution is shown below.
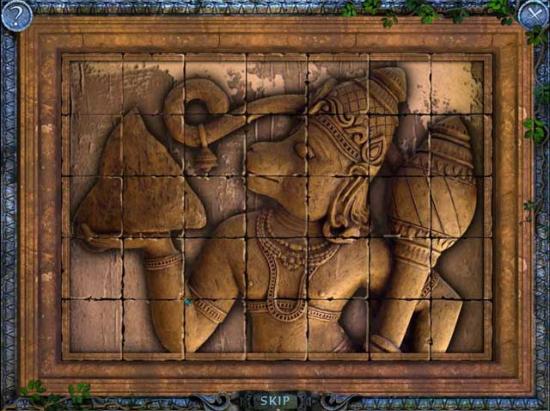
- Upon completing the puzzle, click on the red POWER STONE (2/12) that appears to collect it.
- Exit back to Durbar Hall.
Durbar Hall
- Take a closer look at the door on the left. Use the DOOR HANDLE on the gold knocker to unlock it, then proceed into the next room.
Corridor to Treasury
- There will be a cutscene upon entering this area. Once it’s finished, return to the Meeting Place.
Meeting Place
- Have Tara give Rahul the CROSSBOW.
- Have Tara give Maya the SUN CREST.
- Assume the role of Rahul and exit to The Fortress.
–RAHUL–
The Fortress
- Take a closer look at the ruins on the left. Use the CROSSBOW on the stand, then use the HOOK ARROW on the crossbow. You’ll need one more thing to make it work.
- Exit the close-up and a hidden object area will appear in the bottom left corner.
- Find the objects listed at the bottom of the screen. Objects with the exception of the Key Items are randomized. The Key Item(s) are shown below.
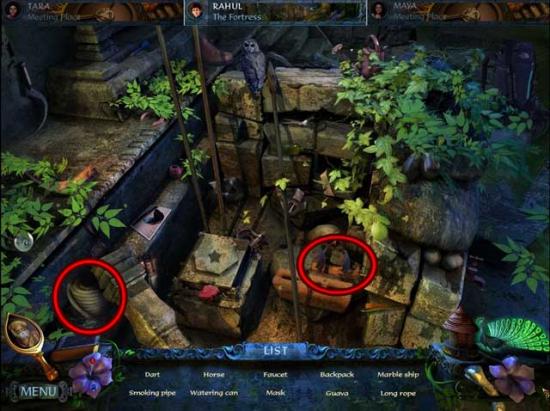
- Upon completing the area, the MARBLE SHIP and the LONG ROPE will be added to your inventory.
- Take a closer look at the area with the crossbow again (the ruins on the left). Use the LONG ROPE on the crossbow, then click on it to fire.
- Back in the main area, proceed up the rope and to the next area.
Fortress Courtyard
- Click on the paper lying on the ground to add it to the Grandha.
- Click on the folded SHIP SAIL lying near the doorway on the right to add it to your inventory.
- Take a closer look at the panel on the left wall. Use the CANNON KEY on the slot, then click on the lever to open it. Click on the GUN POWDER inside to add it to your inventory.
- Enter the doorway on the right.
Hidden Dock
- You’ll arrive just in time to see the sail on the boat burning up.
- Click on the hidden object area on the right.
- Find the objects listed at the bottom of the screen. Objects with the exception of the Key Items are randomized. The Key Item(s) are shown below.
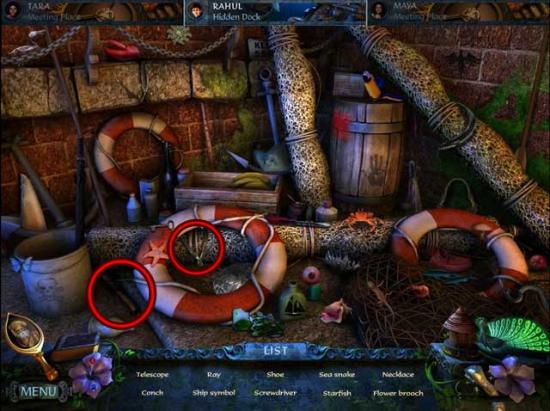
- Upon completing the area, the TELESCOPE and the NECKLACE will be added to your inventory.
- Click on the DEAD FISH sitting atop the barrel towards the bottom of the screen to add it to your inventory.
- Use the SHIP SAIL on the boat to restore it. However, it has a tear.
- Take a closer look at the wooden panel on the back brick wall. Use the MARBLE SHIP on the slot, then click on the ORANGE URN that’s revealed to add it to your inventory.
- Return to the Meeting Place.
Meeting Place
- Have Rahul give Maya the ORANGE URN.
- Assume the role of Maya and exit to the Elephant Temple.
Chapter 3: Accessing the Tower
–MAYA–
Elephant Temple
- Take a closer look at the yellow and orange panel on the ground between the Temple and the fire fountain. Use the SUN CREST on the slot to stop the spikes, then click on the BLUE URN inside to add it to your inventory.
- Return to the Ox-driven Mill.
Ox-driven Mill
- Take a closer look at the mill. Use the ORANGE URN and the BLUE URN in their respective slots. Take note you won’t be able to collect oil without a container of some sort.
- Exit the close-up and enter through the doorway on the left.
Kalaripayattu Arena
- Click on the hidden object area over the box on the right.
- Find the objects listed at the bottom of the screen. Objects with the exception of the Key Items are randomized. The Key Item(s) are shown below.
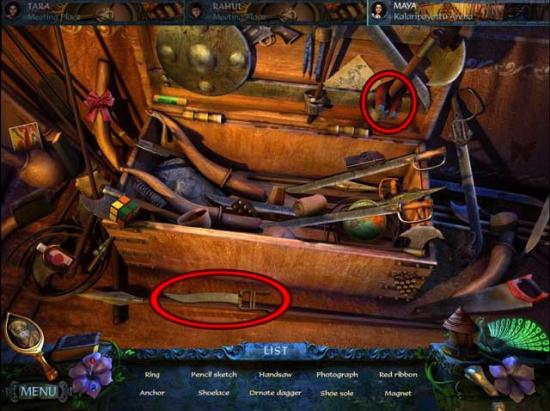
- Upon completing the area, the ORNATE DAGGER and the MAGNET will be added to your inventory.
- Take a closer look at the panel on the ground in the middle of the room. Use the ORNATE DAGGER on the bottom empty slot to reveal the LARGE LEVER. Click on it to add it to your inventory.
- Return to the Meeting Place.
Meeting Place
- Have Maya give Rahul the LARGE LEVER.
- Assume the role of Rahul and exit to the Cannon Tower Premises.
–RAHUL–
Cannon Tower Premises
- Take a closer look at the slot in the wall where the rock formerly stood. Use the LARGE LEVER on the gear mechanism to open the door of the tower.
- Enter the tower.
Top of the Tower
- Click on the SACK draped over the stone on the far right to add it to your inventory.
- Take a closer look at the cannon. Use the GUN POWDER on it. There’s more to do, but we can’t do it just yet.
- Place the TELESCOPE in the stand on the left. If you choose to look through it, there’s nothing to see just yet.
- Click on the middle of the hanging lantern to swing it and break it in half. Collect the INSIGNIA inside to add it to your inventory.
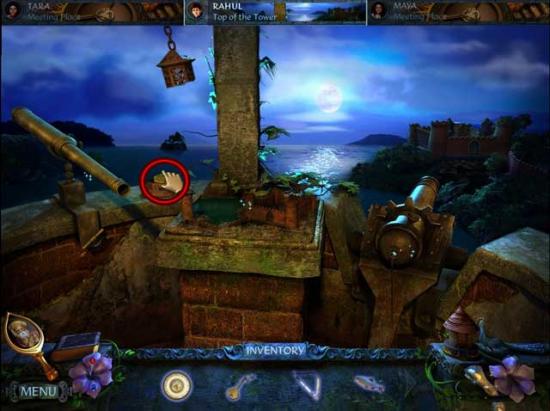
- Take a closer look at the mini fort replica in the middle. Slide the mirror on the rail track into the correct position (shown below), then click on the red button at the top of the tower for a clue as to what you should do.
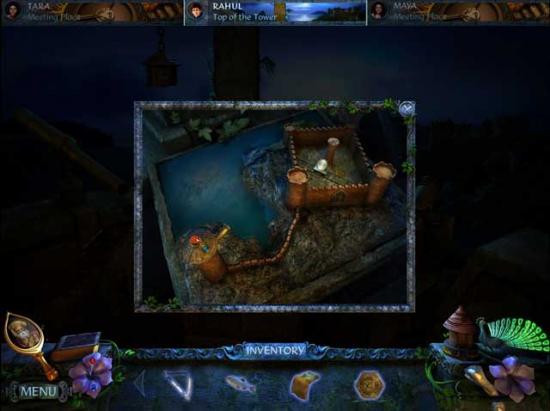
- Return to the Hidden Dock.
Hidden Dock
- Click on the hidden object area on the right.
- Find the objects listed at the bottom of the screen. Objects with the exception of the Key Items are randomized. The Key Item(s) are shown below.
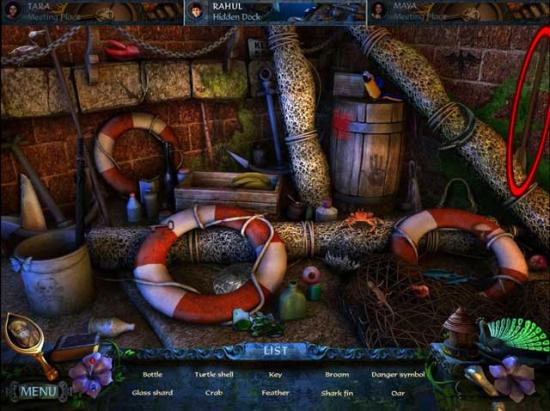
- Upon completing the area, the OAR will be added to your inventory.
- Return to the Meeting Place.
Meeting Place
- Have Rahul give Maya the INSIGNIA.
- Have Rahul give Tara the SACK.
- Assume the role of Tara and exit back to Durbar Hall and the Room of Light.
–TARA–
Room of Light
- Use the SACK on the puddle of water on the right, then click on it to obtain the WET SACK.
- Go to the Corridor to the Treasury.
Corridor to Treasury
- Use the WET SACK on the fire to put it out, then proceed forward.
Treasury
- Click on the hidden object area over the cabinet at the back of the room.
- Find the objects listed at the bottom of the screen. Objects with the exception of the Key Items are randomized. The Key Item(s) are shown below.
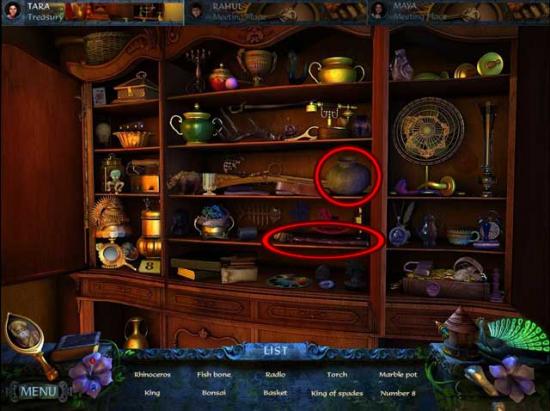
- Upon completing the area, the MARBLE POT and the TORCH will be added to your inventory.
- Click on the closed box sitting on the floor to trigger a puzzle.
- The eagle squares have to be brought together to fill the space indicated in the box. Use the buttons along the side of the box to move the squares to their destination. The solution is shown below.
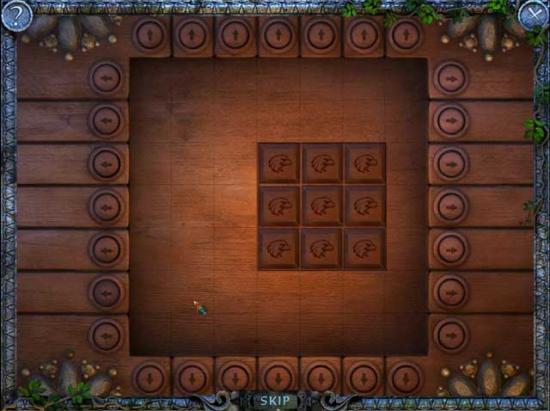
- Upon completing the puzzle, you will acquire the EAGLE AMULET.
- Return to the Eagle Temple.
Eagle Temple
- Use the TORCH on the dripping oil to obtain the TORCH WITH OIL.
- Go to the Meeting Place.
Meeting Place
- Have Tara give Maya the TORCH WITH OIL and the MARBLE POT.
- Assume the role of Maya and go to the Elephant Temple.
–MAYA–
Elephant Temple
- Use the TORCH WITH OIL on the fire fountain to obtain the BURNING TORCH.
- Go to the Ox-driven Mill.
Ox-driven Mill
- Enter through the doorway on the right.
Sacred Pool
- Take a closer look at the closest statue on the left. Use the MARBLE POT on the statue to trigger a panel to appear.
- Click on the panel on the wall in the gap between the statues on the left. Once in the close-up, click the lever on the right, revealing the numbers 1765. Click on the numbers to add the DATE PLATE to your inventory.
- Click on the pagoda in the middle of the pond to trigger a puzzle.
- Click the red buttons to shift the positions of the of the discs. Click the discs to rotate them. Click the buttons between the discs to swap the sections facing each other. The aim is to ensure that sections of the same color face each other. A possible solution is shown below.
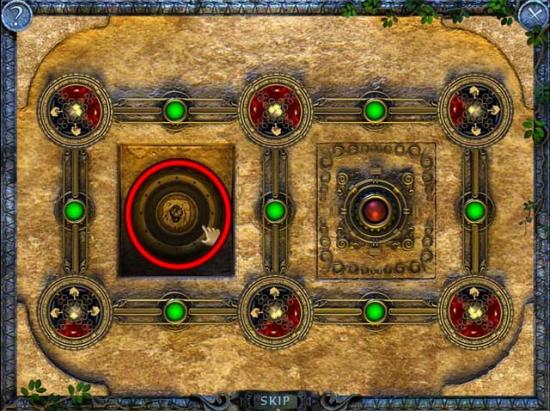
- Upon completing the puzzle, click on the LION AMULET to add it to your inventory.
- Go back to the Weapon Forgers Furnace.
Weapon Forgers Furnace
- Take a closer look at the shield sitting on the stump. Use the INSIGNIA on the middle of the shield and click to obtain the SHIELD WITH INSIGNIA.
- Go back to the Meeting Place.
Meeting Place
- Have Maya give Rahul the BURNING TORCH, the SHIELD WITH INSIGNIA, and the MAGNET.
- Assume the role of Rahul and exit to the Fortress Courtyard.
–RAHUL–
Fortress Courtyard
- Take a closer look at the warrior statue to the left of the pinnacle. Use the SHIELD WITH INSIGNIA on the statue, then pick up the SWORD it drops to add it to your inventory.
- Enter the Hidden Dock.
Hidden Dock
- Take a closer look at the chain hanging to the right of the sail. Use the MAGNET on the chain.
- Click the lever on the edge of the dock to lower the chain into the water. When it comes back up, it will have the ELEPHANT AMULET attached to the magnet. Click on it to add it to your inventory.
- Return to the Meeting Place.
Meeting Place
- Have Rahul give Maya the SWORD.
- Assume the role of Maya and exit to the Weapon Forgers Furnace.
–MAYA–
Weapon Forgers Furnace
- Take a closer look at the fire pit on the left. Use the SWORD on the coals, then click on the bellows to melt the hilt.
- There’s nothing more to do here at the moment, so return to the Meeting Place.
Meeting Place
- Have Maya give Tara the DATE PLATE.
- Assume the role of Tara and exit to Durbar Hall.
–TARA–
Durbar Hall
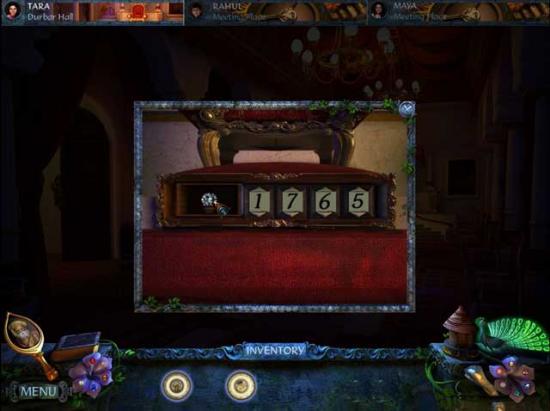
- Take a closer look at the throne at the back of the hall. Use the DATE PLATE on the empty plaque on the left to trigger a puzzle.
- Once the Date Plate is inserted, click on the numbers so that they say “1765” just like the plate. Once completed, the plate panel will open, revealing a white POWER STONE (3/12). Click on it to collect it.
- Return to the Treasury.
Treasury
- Click on the cabinet at the back of the room for a hidden object area.
- Find the objects listed at the bottom of the screen. Objects with the exception of the Key Items are randomized. The Key Item(s) are shown below.
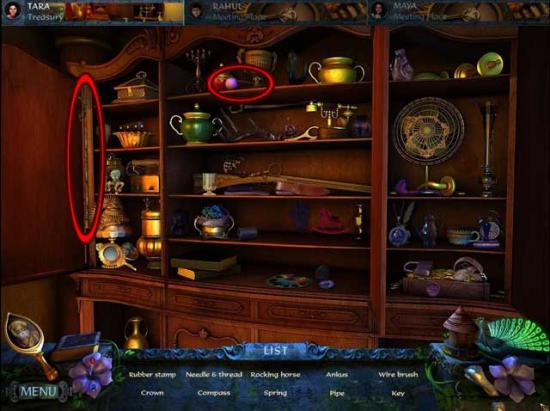
- Upon completing the area, the ANKUS and the NEEDLE & THREAD will be added to your inventory.
- Go to the Room of Light.
Room of Light
- Use the ANKUS to knock down the BLUNT MACHETE in the upper left corner of the screen and add it to your inventory.
- Return to the Meeting Place.
Meeting Place
- Have Tara give Rahul the NEEDLE & THREAD.
- Have Tara give Maya the BLUNT MACHETE.
- Assume the role of Rahul and exit to the Hidden Dock.
–RAHUL–
Hidden Dock
- Take a closer look at the rip in the sail. Use the NEEDLE AND THREAD to repair it.
- Now that the boat is fixed, proceed through the arch to the next area.
Shipwreck
- Click on the EMPTY CANISTER in front of the barrel on the right (the one on the ship) to add it to your inventory.
- Click on the chain hanging over the bow on the left to pull it up, then click on the ANCHOR MOTIF to add it to your inventory.
- Proceed down into the ship.
Captain’s Chamber
- Click on the OCTOPUS MOTIF on the right to add it to your inventory.
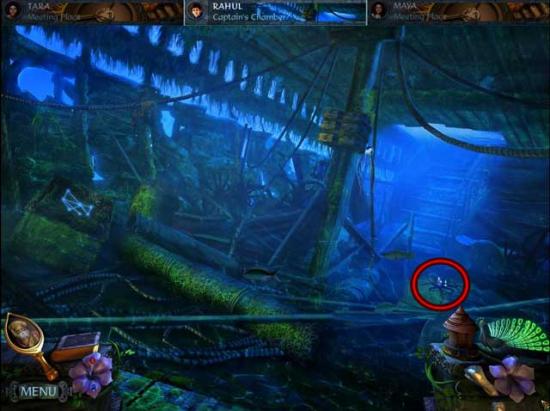
- Click on the box with the constellation on the left to trigger a puzzle.
- Untangle the strings to open the chest. Drag the marbles/pins around to untangle them and solve the puzzle. The solutions are shown below.
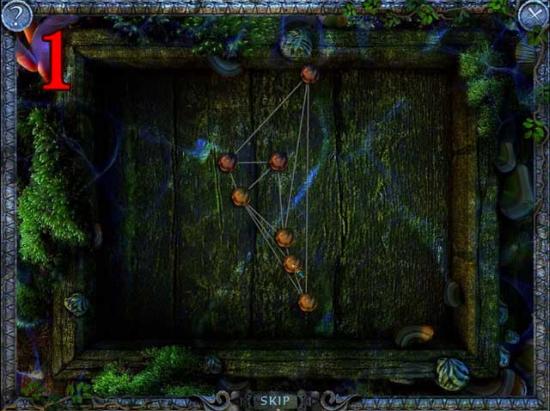
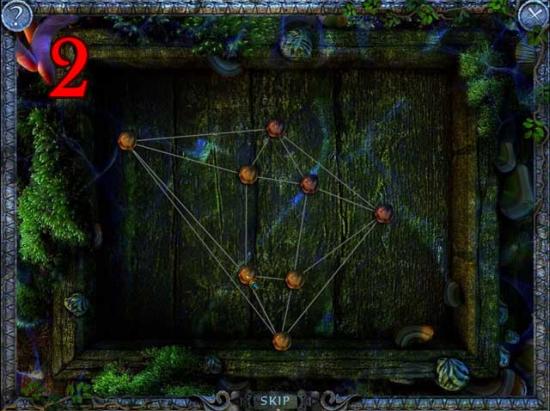
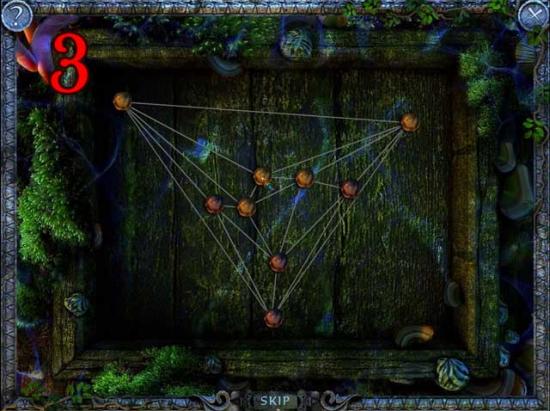
- Once you’ve completed the puzzle, click on the POWER STONE (4/12) to add it to your inventory.
- Click on the box attached to the upper portion of the beam in the center of the area. An aggressive octopus will keep you from examining it further.
- Return to the Meeting Place.
Meeting Place
- Have Rahul give Maya the EMPTY CANISTER and the OCTOPUS MOTIF.
- Assume the role of Maya and exit to the Ox-driven Mill.
–MAYA–
Ox-driven Mill
- Click on the plaque on the ground at the bottom of the steps on the right for a closer view. Use the OCTOPUS MOTIF on the groove to raise the plaque, revealing a box. Click on the OCTOPUS INK inside to add it to your inventory.
- Take a closer look at the mill. Use the EMPTY CANISTER on the close-up, then click the mill to operate it. Once complete, click on the purple-glowing FILLED CANISTER to add it to your inventory.
- Return to the Weapon Forgers Furnace.
Weapon Forgers Furnace
- Click on the sharpener at the back of the room. Use the BLUNT MACHETE on the sharpener, then once it’s sharpened, click on the SHARP MACHETE to add it to your inventory.
- Return to the Meeting Place.
Meeting Place
- Have Maya give Rahul the OCTOPUS INK and the FILLED CANISTER.
- Have Maya give Tara the SHARPENED MACHETE.
- Assume the role of Rahul and exit to the Shipwreck.
–RAHUL–
Shipwreck
- Use the FILLED CANISTER on the flamethrower device. It will need a nozzle before it can be fully restored.
- Enter the Captain’s Chamber.
Captain’s Chamber
- Use the OCTOPUS INK on the octopus that keeps blocking your way to the box on the upper portion of the beam to get rid of it, then examine the box for a closer view.
- You will need to insert amulets in the grooves here. Place the ELEPHANT AMULET and the HORSE AMULET in their proper positions, then return to the Meeting Place to retrieve the rest.
Meeting Place
- Have Tara give Rahul the EAGLE AMULET.
- Have Maya give Rahul the TIGER AMULET and the LION AMULET.
- Exit the Meeting Place back to the Captain’s Chamber.
Captain’s Chamber
- Examine the upper portion of the beam again. Place the EAGLE AMULET, the TIGER AMULET, and the LION AMULET in their proper locations. There’s still one missing.
- Return to the Meeting Place.
Meeting Place
- Assume the role of Tara and exit to the Eagle Temple.
–TARA–
Eagle Temple
- Use the SHARP MACHETE on the creepers blocking the path in the upper right corner of the screen, then proceed forward.
Waterfall
- Take a closer look at the stone lying on the middle of the ground to trigger a puzzle.
- The coins with the animals symbols have to be moved to the indicated locations. Click and drag each symbol to shift its position. The solution is shown below.

- Upon completing the puzzle, click on the RAM AMULET to add it to your inventory.
- Examine the other areas of interest here if you wish, however there’s nothing more you can do here at the moment.
- Return to the Meeting Place.
Meeting Place
- Have Tara give Rahul the RAM AMULET.
- Have Rahul give Tara the DEAD FISH.
- Have Maya give Tara the AXE.
- Assume the role of Rahul and exit to the Captain’s Chamber.
–RAHUL–
Captain’s Chamber
- Examine the box at the top of the beam again. Place the RAM AMULET in its correct slot (the slots and respective amulet positions are shown below) to release the mechanism, then click on the WAX BLOCK.
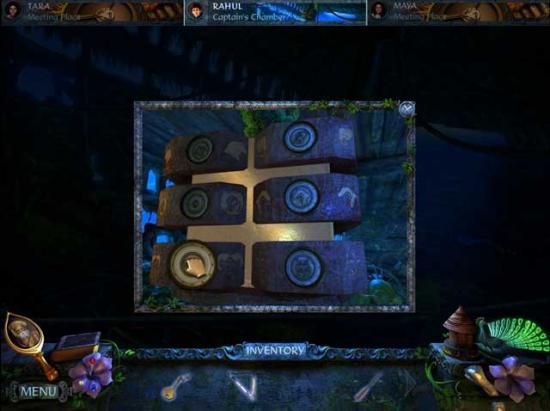
- Upon clicking on the WAX BLOCK, it will be added to your inventory along with the RAM AMULET, the TIGER AMULET, the ELEPHANT AMULET, the HORSE AMULET, the LION AMULET, and the EAGLE AMULET again.
- Return to the Meeting Place.
Meeting Place
- Assume the role of Tara and exit to the Waterfall.
–TARA–
Waterfall
- Take a closer look at the pile of branches and twigs on the right. Use the AXE to break them apart, then click on the NOZZLE lying beneath to add it to your inventory.
- Take a closer look at the alligator on the left. Use the DEAD FISH on the alligator to trigger it to move away, then click on the SHEARS to add them to your inventory.
- Return to the Meeting Place.
Meeting Place
- Have Tara give Rahul the NOZZLE.
- Assume the role of Rahul and exit to the Shipwreck.
–RAHUL–
Shipwreck
- Use the NOZZLE on the flamethrower to restore it to working order, then place the WAX BLOCK in front of it. Click on the lever to activate the flamethrower and melt the block, revealing the ENGRAVED ROLLER inside. Click on it to add it to your inventory.
- Return to the Meeting Place.
Chapter 4: The Second Map Piece
Meeting Place
- Have Rahul give Tara the ENGRAVED ROLLER.
- Assume the role of Tara and exit to the Store House.
–TARA–
Store House
- Click on the open sack in the upper left corner of the room to add the CHARCOAL to your inventory.
- Proceed into the next room.
Secret Chamber
- Take a closer look at the box beneath the eagle statue. Use the ENGRAVED ROLLER on the box, then use the CHARCOAL on the first sheet of paper. Click the ivory handle on the left to roll the charcoal over the paper, then click the ivory handle on the right to switch it over to the next piece of paper. Repeat this process until the markings on all the pieces of paper have been revealed.
- Once finished, the lion statue will move, revealing a secret compartment in the floor. Click for a closer view. Look familiar?
- Return to the Meeting Place.
Meeting Place
- Have Rahul give Tara the ANCHOR MOTIF.
- Exit back to the Secret Chamber.
Secret Chamber
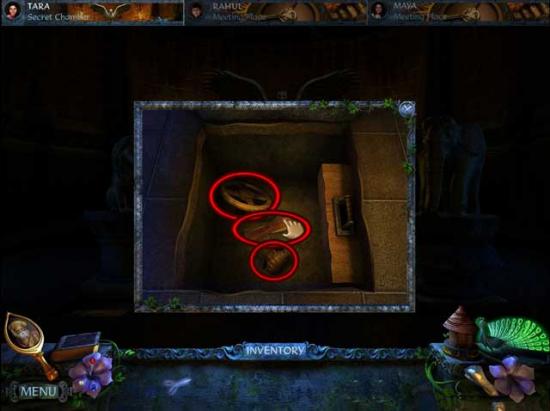
- Take a closer look at the hidden compartment beneath the lion statue again. Use the ANCHOR MOTIF on the groove to open the panel, then click on the MANUSCRIPT, the TRIANGLE HANDLE, and the CRANK WHEEL to add them to your inventory.
- Return to the Waterfall.
Waterfall
- Take a closer look at the stone mechanism to the right of the drawbridge. Use the CRANK WHEEL on the top portion of the stone, then click on it to rotate it.
- A new path will be revealed. Enter the doorway beneath the waterfall.
Cavern
- Take note of the chains on the wall, then examine the tomb to trigger a puzzle.
- The block has to be rolled across the grid so that it can be pushed into the square hole at the end. Use the arrows which appear around the block to move it around. Roll the block over the round buttons that appear later to bridge the gaps. Some examples on key locations on where to put the block in order to progress, as well as some progress shots, are shown below for each portion of the puzzle.


- Upon completing the puzzle, the PEACOCK AMULET will be revealed. Click on it to add it to your inventory.
- Return to the Meeting Place.
Meeting Place
- Have Tara give Maya the MANUSCRIPT.
- Have Maya give Tara the CHAIN CUTTER.
- Have Tara give Rahul the TRIANGLE HANDLE.
- Return to the Cavern.
Cavern
- Take a closer look at the chains hanging from the upper portion of the left wall. Use the CHAIN CUTTER on each of the chains, then when the stone panel is removed click on the CRANK HANDLE to add it to your inventory.
- Go outside.
Waterfall
- Take a closer look at the stone platform to the right of the drawbridge. Use the CRANK HANDLE on the right side of the stone, then click on it to lower the drawbridge.
- Proceed across into the next area.
Jungle Retreat
- Take a closer look at the broom bottom propped up against the rock on the left. Click on the broom, but it will fall apart.
- Enter the building on the left.
Inside Jungle Retreat
- Click on the hidden object area on the right.
- Find the objects listed at the bottom of the screen. Objects with the exception of the Key Items are randomized. The Key Item(s) are shown below.
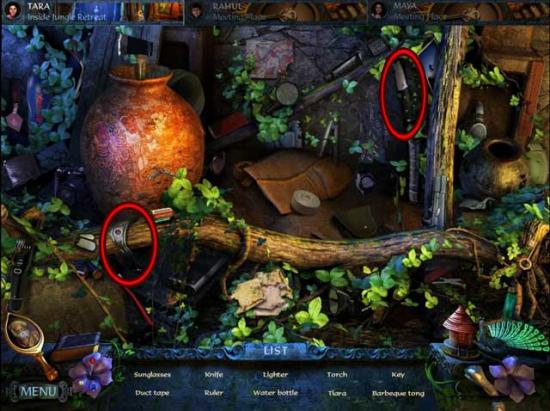
- Upon completing the area, the TIARA and the KNIFE will be added to your inventory.
- Examine the statue at the end of the room. Missing anything familiar?
- Return to the Meeting Place.
Meeting Place
- Have Rahul give Tara the NECKLACE.
- Return to Inside Jungle Retreat.
Inside Jungle Retreat
- Take a closer look at the statue on the other end of the room. Use the TIARA and the NECKLACE on the statue to restore them. However, it’s missing one more piece of jewelry.
- Return outside.
Jungle Retreat
- Proceed forward into the next area.
Ashram
- Examine the various areas here– the boat needs an oar, for example.
- Click on the hut to trigger a puzzle.
- Light the lamps along the edges of the square in the middle. The rest must remain unlit. The archer statue can shoot arrows to light the lamps in front of it. The fan above can extinguish the flames right below it. The solution is shown below.
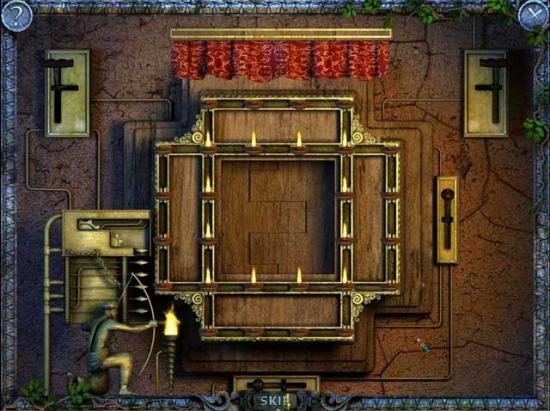
- Upon completing the puzzle, click on the red POWER STONE (5/12) to collect it.
- Backtrack to Durbar Hall and enter the Corridor to Treasury.
Corridor to Treasury
- Take a closer look at the painting hanging on the wall to the left. Use the KNIFE to cut the canvas, then click on the PRINCE PUPPET beneath to add it to your inventory.
- Return to the Meeting Place.
Meeting Place
- Have Rahul give Tara the OAR.
- Return to Ashram.
Ashram
- Take a closer look at the boat on the right. Use the OAR on the boat, then proceed forward via the route on the right.
Cobra Hood
- Click on the hidden object area over the tent.
- Find the objects listed at the bottom of the screen. Objects with the exception of the Key Items are randomized. The Key Item(s) are shown below.
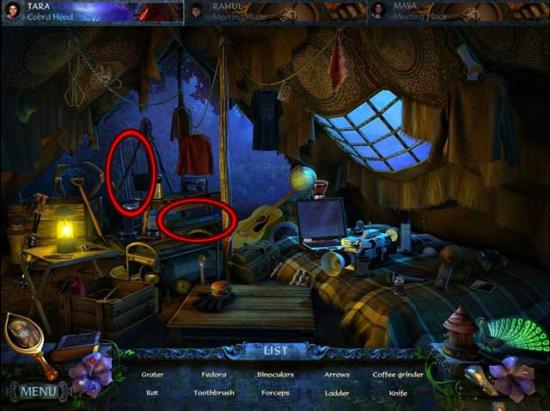
- Upon completing the area, the LADDER and the ARROWS will be added to your inventory.
- Examine the other elements in this area if you’d like, but there’s nothing left to do here at the moment.
- Return to Durbar Hall and the Room of Light.
Room of Light
- Use the LADDER against the wall on the right, then click on the hanging elephant-shaped WATERING CAN to add it to your inventory.
- Return to the Meeting Place.
Meeting Place
- Have Tara give Maya the WATERING CAN.
- Assume the role of Maya and exit to the Sacred Pool.
–MAYA–
Sacred Pool
- Use the WATERING CAN on the Sacred Pool to obtain the FILLED CAN.
- Go back to the Ox-driven Mill.
Ox-driven Mill
- Take a closer look at the far back wall. Use the MANUSCRIPT on the groove to move the wall aside and gain access to a new area.
The Library
- Take a closer look at the book stand on the left to view a series of clues as to what needs to happen next. Talk to the meditating man as well.
- Take a closer look at the right side of the foot of the stairs. Use the LEFTOVER FOOD on the floor, then when the RAT comes out, click on it to add it to your inventory.
- Take a closer look at the device on the upper platform of the stairs, on the far left to view a puzzle.
- The lid will open when every soldier statue has a sword in hand. Click on each statue so that it picks up the sword in front of it. Click on a statue holding a sword to place the weapon back. There are several solutions to this puzzle. Our solution was as follows (refer to the screenshot below as reference): 2, 7, 3, 8, 4, 1, 5 (x7), 6 (x2), 7.
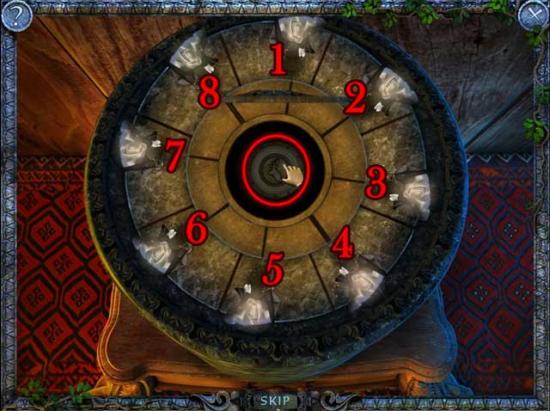
- Upon completing the puzzle, click on the DEER AMULET to add it to your inventory.
- Examine the box at the top of the stairs– it needs keys.
- Enter through the mirror on the left into the next area.
Kathakali Academy Gate
- Click on the photo lying on the ground near the tree.
- Examine all the elements around this area: the missing mask, the tree, and the puppet show. There’s nothing you can do just yet, so proceed to the right and into the next area.
Props Room
- Click on the hidden object area in the left corner.
- Find the objects listed at the bottom of the screen. Objects with the exception of the Key Items are randomized. The Key Item(s) are shown below.
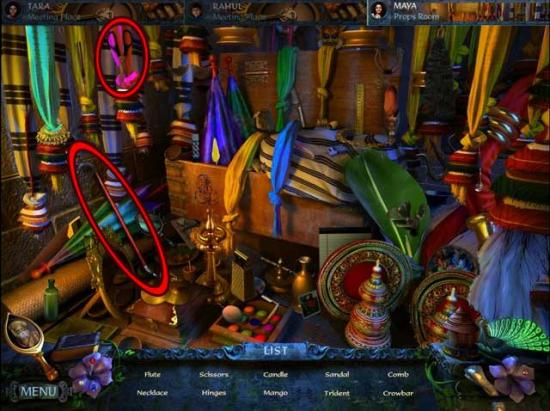
- Upon completing the area, the CROWBAR and the SCISSORS will be added to your inventory.
- Click on the PEACOCK MOTIF and the THREAD SPOOL to add them to your inventory.
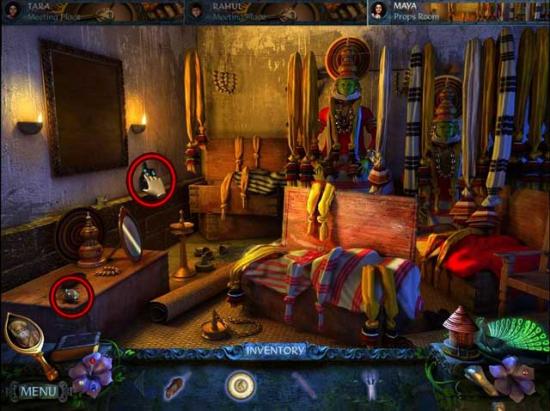
- Click on the leftmost dummy on the back wall for a closer view. Click on the LONG HOOK holding it up to add it to your inventory.
- Return to Kathakali Academy Gate.
Kathakali Academy Gate
- Take a closer look at the tree. Use the LONG HOOK to retrieve the BLUE RITUAL DUST and add it to your inventory.
- Return to The Library.
The Library
- Enter through the mirror portal on the right.
Cliffside Ruins
- Click on the sketch lying on the ground for a clue as to what should happen next.
- Click on the EAGLE SHIELDS and the SHOVEL to add them to your inventory.
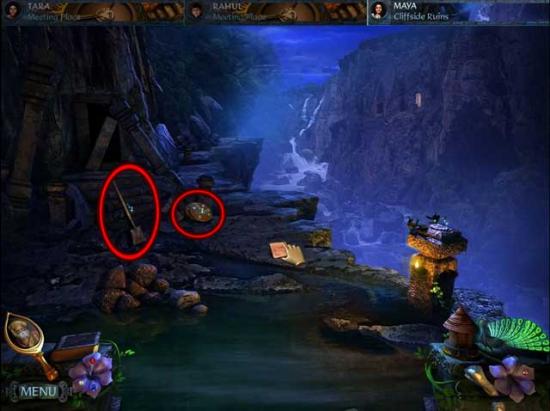
- Take a closer look at the pile of rocks towards the left. Use the CROWBAR to remove the rocks, then click on the RED RITUAL DUST hidden beneath to add it to your inventory.
- Examine the other areas if you wish, but there’s nothing left to do here at the moment. Return to the Meeting Place.
Meeting Place
- Have Maya give Tara the FILLED CAN, the SCISSORS, and the THREAD SPOOL.
- Have Maya give Rahul the SHOVEL.
- Have Tara give Maya the PRINCE PUPPET.
- Assume the role of Tara and exit to the Jungle Retreat.
–TARA–
Jungle Retreat
- Take a closer look at the scattered broom bottom lying against the rock on the left again. Use the THREAD SPOOL to restore the BROOM, then click on it to add it to your inventory.
- Take a closer look at the ritual setup on the right. Use the SCISSORS to cut each of the four strings attached to the middle, then click on the TRIDENT to add it to your inventory.
- Proceed forward to Ashram.
Ashram
- Take a closer look at the stone with scattered leaves on top of it, on the ground in front of the hut. Use the BROOM to sweep away the leaves, revealing a conch-shaped groove.
- Proceed forward to Cobra Hood.
Cobra Hood
- Take a closer look at the hidden object area over the tent.
- Find the objects listed at the bottom of the screen. Objects with the exception of the Key Items are randomized. The Key Item(s) are shown below.
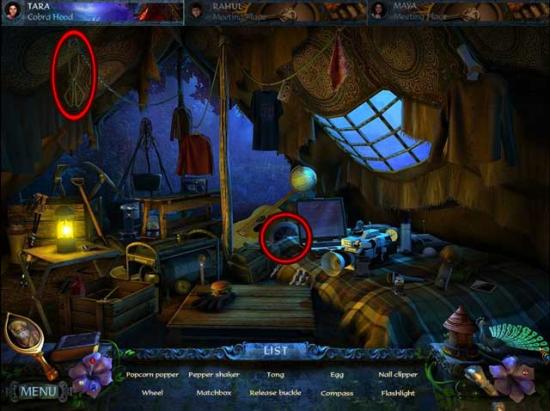
- Upon completing the area, the WHEEL and the TONG will be added to your inventory.
- After a talk with the King, return to the Meeting Place.
Chapter 5: Opening Cobra Gateway
Meeting Place
- Have Tara give Rahul the WHEEL.
- Have Tara give Maya the TONG.
- Assume the role of Maya and exit to the Weapon Forgers Furnace.
–MAYA–
Weapon Forgers Furnace
- Take a closer look at the fire pit on the left. Use the TONG to retrieve the POWER STONE (6/12).
- Go to Kathakali Academy Gate.
Kathakali Academy Gate
- Take a closer look at the shadow puppet stage on the left. Use the PRINCE PUPPET on the stage.
- Continue to the Props Room.
Props Room
- Click on the hidden object area in the corner.
- Find the objects listed at the bottom of the screen. Objects with the exception of the Key Items are randomized. The Key Item(s) are shown below.

- Upon completing the area, the MAGICAL MIRROR and the METAL PEACOCK will be added to your inventory.
- Return to the Cliffside Ruins.
Cliffside Ruins
- Take a closer look at the pedestal on the right. Use the METAL PEACOCK on the pedestal to raise a secret elevator, revealing the BANGLE. Click on it to add it to your inventory.
- Return to the Meeting Place.
Meeting Place
- Have Rahul give Maya the THUNDER KEY.
- Have Maya give Tara the BANGLE.
- Assume the role of Tara and exit to Inside Jungle Retreat.
–TARA–
Inside Jungle Retreat
- Click on the hidden object area on the right.
- Find the objects listed at the bottom of the screen. Objects with the exception of the Key Items are randomized. The Key Item(s) are shown below.
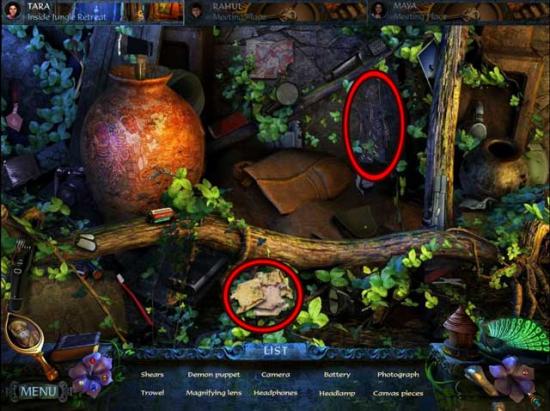
- Upon completing the area, the DEMON PUPPET and the CANVAS PIECES will be added to your inventory.
- Take a closer look at the statue at the far end of the room. Use the BANGLE on its wrist, then click on the orange POWER STONE (7/12) within its hand to collect it.
- Go to the Meeting Place.
Meeting Place
- Have Tara give Maya the DEMON PUPPET and the CANVAS PIECES.
- Assume the role of Maya and exit to The Library.
–MAYA–
The Library
- Take a closer look at the box at the top of the stairs. Use the THUNDER KEY on the middle slot to activate it.
- Go to Kathakali Academy Gate.
Kathakali Academy Gate
- Take a closer look at the shadow puppet stage on the left. Use the DEMON PUPPET on the stage to reveal a hidden compartment containing the WATER AMULET. Click on it to add it to your inventory.
- Proceed to the Props Room.
Props Room
- Use the CANVAS PIECES on the frame hanging on the wall on the left, then click on it to trigger a puzzle.
- The canvas pieces have to be put together inside the frame. Click on each piece to pick it up and move it to the intended position (it will lock into place when correct). Double-click to rotate the piece (note, you will have to literally double-click, you cannot use the right mouse button). Recreate the image to solve the puzzle. The solution is shown below.
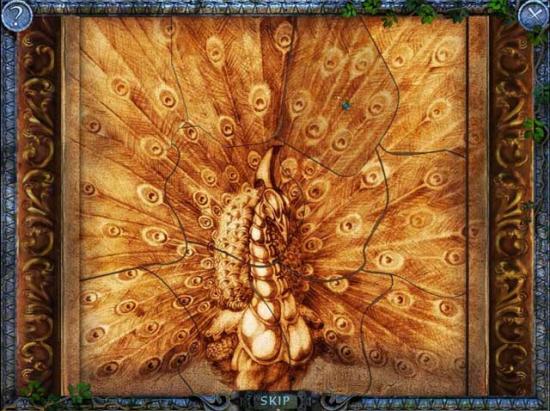
- Upon completing the puzzle, click on the white POWER STONE (8/12) that appears to collect it.
- Return to the Meeting Place.
Meeting Place
- Assume the role of Rahul and exit to the Lion Temple.
–RAHUL–
Lion Temple
- Take a closer look at the small house-like structure buried partway underground on the left. Use the SHOVEL to dig it out, then click to open it and collect the SUN KEY hidden inside.
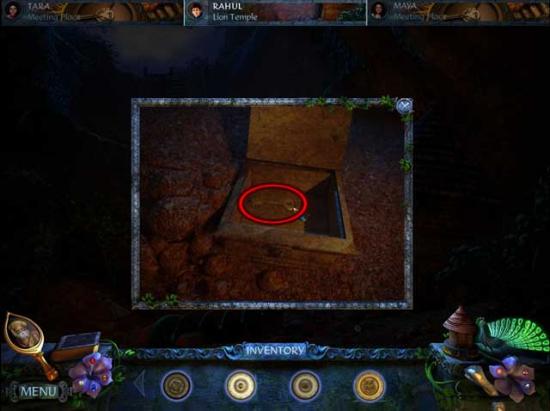
- Go to the Fortress Courtyard.
Fortress Courtyard
- Take a closer look at the mirror on rails on the left. Use the WHEEL to repair the trolley and click to move it aside. Click on the FUSE WIRE revealed beneath to add it to your inventory.
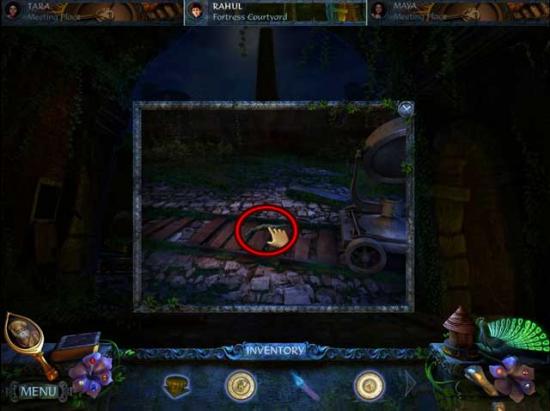
- Return to the Top of the Tower.
Top of the Tower
- Use the FUSE WIRE on the cannon, then use the BURNING TORCH to light the fuse and fire it.
- While you’re up here, you may also choose to look through the telescope. Notice a lit symbol has appeared. Maya’s quest with the keys relates directly to what Rahul sees through the telescope.
- Return to the Fortress Courtyard.
Fortress Courtyard
- Take a closer look at the large pile of rubble where the tower previously stood. Click on the box in the rubble to open it, revealed a green POWER STONE (9/12). Click on it to collect it.
- Go to The Fortress.
The Fortress
- Take a closer look at the door at the far end of the area. Use the TRIANGLE HANDLE on the slot to open the door, then proceed through.
Tribal Village
- Take a closer look at the gold plaque hanging on the wall on the left to trigger a puzzle.
- Place the tiles with symbols on the corresponding slots. Keep an eye on the slots for clues. The solution is shown below.
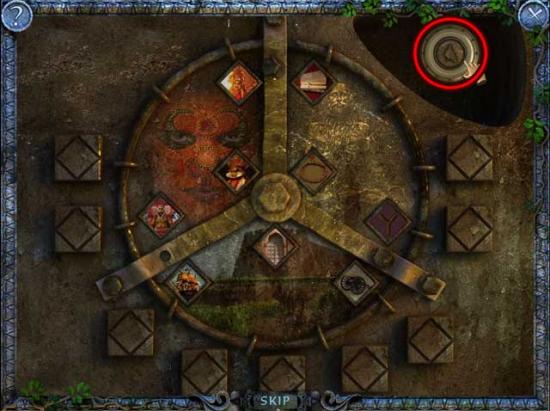
- Upon completing the puzzle, click on the DOVE AMULET to add it to your inventory.
- Back in the main area, click on the stone in the far corner to view a clue that will be added to the Grandha.
- Take note of the eagle, then proceed right to the next area.
Hermit Mountaintop
- Click on the paper lying on the ground for a clue. There’s nothing left to do here at the moment, so return to the Tribal Village.
Tribal Village
- Proceed through the stone gate to the next area.
Tree of Life
- Click on the hidden object area over the carts across the pond.
- Find the objects listed at the bottom of the screen. Objects with the exception of the Key Items are randomized. The Key Item(s) are shown below.
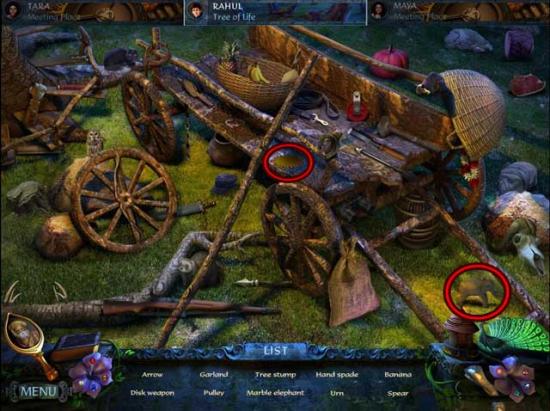
- Upon completing the area, the MARBLE ELEPHANT and the DISK WEAPON will be added to your inventory.
- Take a closer look at the flowers on the right to trigger a puzzle.
- Click the glowing buds to make them bloom. Clicking flowers of the same color will cause them to disappear. Match all the flowers to solve the puzzle. An example is shown below.
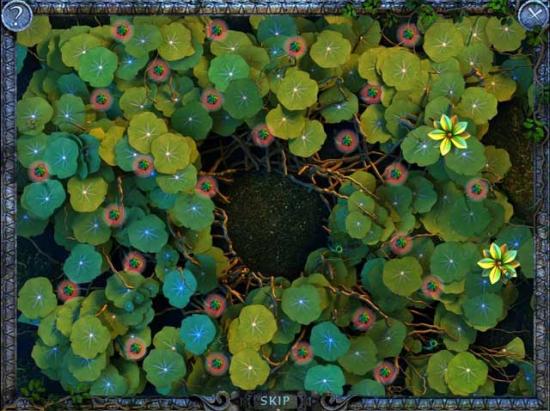
- Upon completing the puzzle, click on the SAPLING that appears in the middle to add it to your inventory.
- Take a closer look at the remaining areas here to get an idea of what to do next, though there’s nothing more you can do here at the moment.
- Return to the Meeting Place.
Meeting Place
- Have Rahul give Maya the SUN KEY and the SAPLING.
- Have Maya give Rahul the RAT.
- Have Tara give Rahul the FILLED CAN.
- Return to the Tribal Village.
Tribal Village
- Take a closer look at the eagle sitting on the top of one of the wall posts. Give the eagle the RAT. When the EAGLE lands on the ground, click on it to add it to your inventory.
- Go to the Tree of Life.
Tree of Life
- Use the FILLED CAN on the tree on the left. It will drop an orange POWER STONE (10/12) onto the lily pads. Click on it to collect it.
- Return to the Meeting Place.
Meeting Place
- Have Rahul give Tara the MARBLE ELEPHANT.
- Assume the role of Tara and exit to the Cobra Hood.
–TARA–
Cobra Hood
- Take a closer look at the small pedestal with the glowing elephant on the ground. Use the MARBLE ELEPHANT on the glowing silhouette to raise a platform. Click on the GOLD COIN that appears to add it to your inventory.
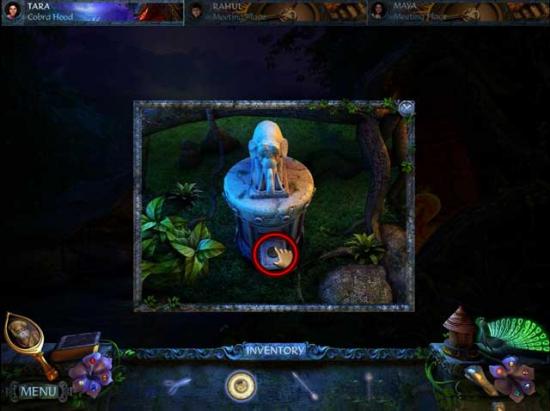
- Click on the flaming snake for a clue.
- Return to the Meeting Place.
Meeting Place
- Have Rahul give Tara the EAGLE.
- Have Tara give Maya the GOLD COIN.
- Return to the Cobra Hood.
Cobra Hood
- Use the EAGLE on the flaming snake to remove it, then proceed through to the next area.
Chapter 6: Preparing the Ritual
Cobra Gateway
- Take a closer look at the red circle on the floor beneath the two warriors.
- Click the buttons at the center of each disc to rotate it. Rotate the discs to swap the sections highlighted. Solve the puzzle by bringing the eagles, elephants, and lions to their respective discs. The solution is as follows (refer to the screenshot below): 1, 2, 1, 2.
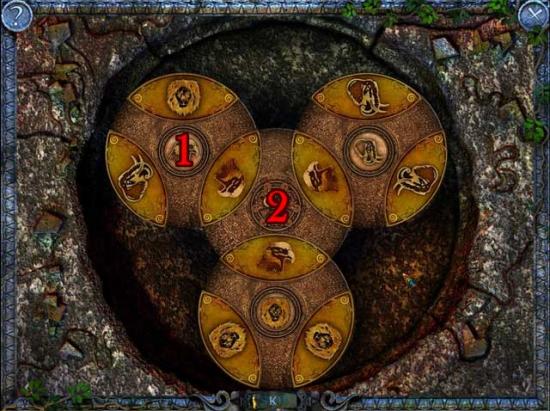
- Upon completing the puzzle, click on the TREE AMULET to add it to your inventory.
- Note the warriors are missing their shields.
- Return to the Meeting Place.
Meeting Place
- Have Maya give Tara the EAGLE SHIELDS.
- Return to Cobra Gateway.
Cobra Gateway
- Click on the warrior statues for a closer look. Use the EAGLE SHIELDS on the statues. Next, click on the statues so that each is standing right in front of one of the cobras on either side of the room.
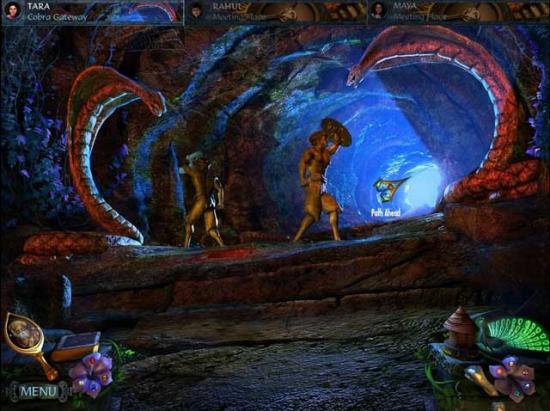
- Return to the Meeting Place.
Meeting Place
- Have Tara give Rahul the TRIDENT.
- Assume the role of Maya and exit to The Library.
–MAYA–
The Library
- Click on the box at the top of the steps for a closer view. Use the SUN KEY on the slot on the right to activate it.
- Go to the Cliffside Ruins.
Cliffside Ruins
- Take a closer look at the far edge of the cliff. Use the SAPLING on the dirt to have it grow into a bridge.
- Proceed across and into the next area.
Rock Doorway
- Yakshi is waiting for you and blocking your path. Use the MAGICAL MIRROR on Yakshi to trap her, then click on the YAKSHI MIRROR to add it to your inventory.
- Take a closer look at the gold decoration on the left.
- A design of the Golden Eagle has been engraved on the concentric rings. Rotate the rings to recreate the design. The solution is shown below.
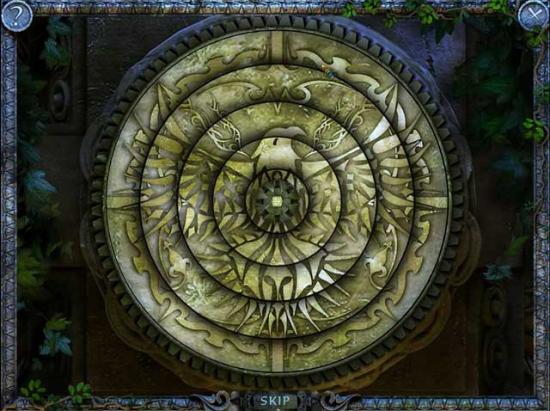
- Upon completing the puzzle, click on the light green POWER STONE (11/12) to collect it.
- Take a closer look at the gold statue on the right. It’s entangled in creepers.
- Return to the Meeting Place.
Meeting Place
- Have Tara give Maya the SHEARS.
- Return to the Rock Doorway.
Rock Doorway
- Take a closer look at the gold statue on the right again. Use the SHEARS to cut the creepers away. Once they’re all gone, click on the HERMIT STATUE to add it to your inventory.
- The rock door will open, but you can’t enter just yet.
- Return to the Sacred Pool.
Sacred Pool
- Take a closer look at the bottom stone steps bordering the pool. Use the GOLD COIN on the small slot to remove the stone, then click on the ORANGE RITUAL DUST inside to add it to your inventory.
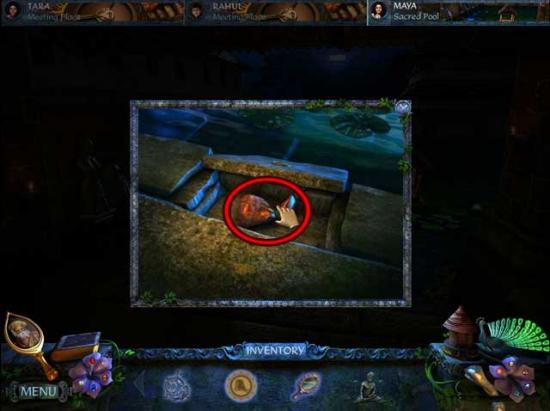
- Return to the Meeting Place.
Meeting Place
- Have Maya give Tara the YAKSHI MIRROR.
- Assume the role of Tara and go to the Room of Light.
–TARA–
Room of Light
- Upon entering the room, the eagle will drop off the flaming snake.
- Take a closer look at the stone pedestal on the left. Use the YAKSHI MIRROR on the groove.
- There’s more to do here, but you can’t do more just yet. Return to the Meeting Place.
Meeting Place
- Have Tara give Rahul the ARROWS.
- Have Maya give Rahul the HERMIT STATUE.
- Assume the role of Rahul and exit to the Tree of Life.
–RAHUL–
Tree of Life
- Click on the hidden object area over the carts.
- Find the objects listed at the bottom of the screen. Objects with the exception of the Key Items are randomized. The Key Item(s) are shown below.
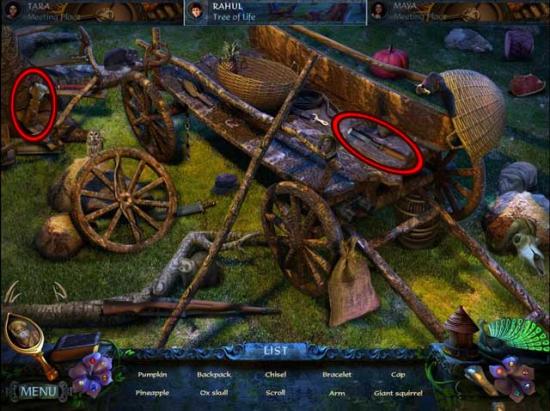
- Upon completing the area, the ARM and the CHISEL will be added to your inventory.
- Take a closer look at the stone table across the pond. Use the CHISEL on the key to loosen it, then click on the FLAME KEY to add it to your inventory.
- Go to the Hermit Mountaintop.
Hermit Mountaintop
- Take a closer look at the stone tablets lying on the ground. Use the HERMIT STATUE on the pedestal in front of them to open a doorway to a new area.
- Don’t leave just yet, though. Take a closer look at the archer on the left. Use the ARM on the statue, then use the ARROWS on the arm.
- Take a closer look at the top of the pinnacle in the distance. Use the TRIDENT on the thin slot beneath the closed eye to open it, then click on the LIGHTNING AMULET to add it to your inventory.
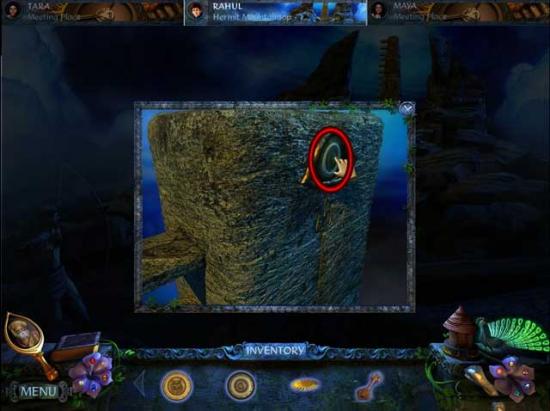
- Enter through the doorway in the ground between the two small statues.
The Dolmen
- Take a look around– there’s a puzzle/code tablet on the left, and a familiar-shaped groove on the right.
- Return to the Meeting Place.
Meeting Place
- Have Rahul give Maya the FLAME KEY.
- Have Maya give Rahul the PEACOCK MOTIF.
- Return to The Dolmen.
The Dolmen
- Take a closer look at the panel on the wall on the right. Use the PEACOCK MOTIF on the groove. The panel will open, revealing a green POWER STONE (12/12).
- Return to the Meeting Place.
Meeting Place
- Assume the role of Maya and go to The Library.
–MAYA–
The Library
- Examine the box at the top of the stairs. Use the FLAME KEY on the lock on the left to activate it.
- Return to the Meeting Place.
Meeting Place
- Have Maya give Tara the BLUE RITUAL DUST, the RED RITUAL DUST, and the ORANGE RITUAL DUST.
- Assume the role of Rahul and go to the Top of the Tower.
–RAHUL–
Top of the Tower
- Take a closer look at the telescope on the left. You should now be able to see three distinctive symbols. Remember them!
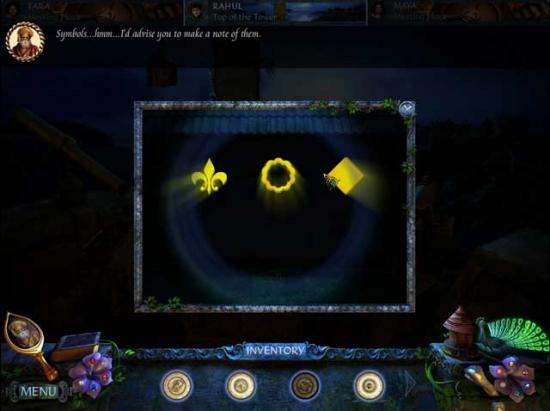
- Go back to The Dolmen.
The Dolmen
- Take a closer look at the tablet with the symbols on the left. Input the code according to the symbols seen through the telescope. The solution is shown below. (Note: You absolutely must have had Maya complete the key quest and Rahul have seen these symbols through the telescope, otherwise the code will not work.)
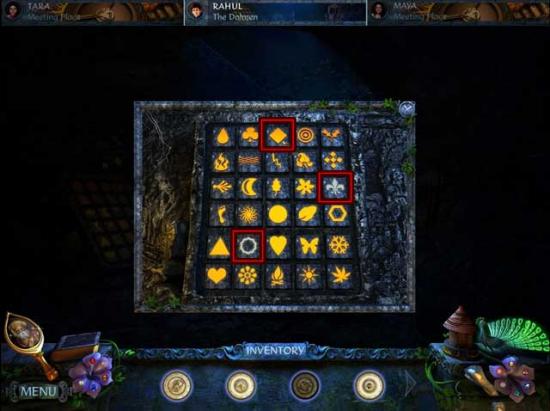
- A secret doorway will open. However, before we continue, return to the Meeting Place.
Meeting Place
- Have Rahul give Tara the DISK WEAPON.
- Assume the role of Tara and go to Ashram.
–TARA–
Ashram
- Take a closer look at the top of the hut. Use the DISK WEAPON to knock the mask down, then pick up the MASK and add it to your inventory.
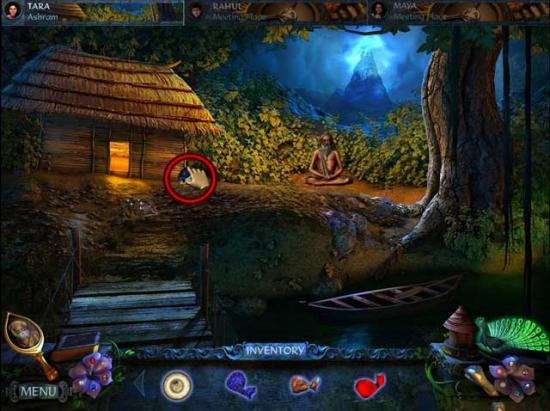
- Return to the Meeting Place.
Meeting Place
- Have Tara give Maya the MASK.
- Assume the role of Maya and go to Kathakali Academy Gate.
–MAYA–
Kathakali Academy Gate
- Take a closer look at the post on the right. Use the MASK over the groove with the candle to open up a secret compartment, revealing the CONCH TALISMAN. Click on it to add it to your inventory.
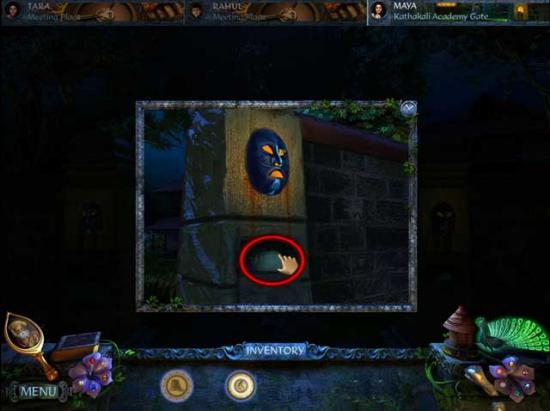
- Return to the Meeting Place.
Meeting Place
- Have Maya give Tara the CONCH TALISMAN.
- Assume the role of Tara and go to Ashram.
–TARA–
Ashram
- Take a closer look at the plaque on the ground in front of the hut. Use the CONCH TALISMAN on the groove in the stone to reveal the MANTRA. Click on it to add it to your inventory.
- Go back to the Room of Light.
Room of Light
- Place the MANTRA on the stand in front of the fire. Then, use the ORANGE RITUAL DUST, the BLUE RITUAL DUST, and the RED RITUAL DUST on the fire in that order.
- Once finished and after a brief cutscene, go back to the Cobra Gateway.
Cobra Gateway
- Proceed through the tunnel.
Chapter 7: The Finale
Dungeon
- Take a closer look at the Guardian Peacock statue in the middle of the room– it’s missing its feathers.
- Proceed through the portals at the far end of the room. Each portal will put you in the shoes of either Tara, Maya, or Rahul revisiting places they’ve been. You’ll need to find the missing Peacock feathers. There’s one in each room/location for each of the siblings, so the best strategy is to move forward room by room and grab the feathers as you go. The feathers are easy to find, so their individual locations won’t be shown. However, refer to the example below to see what a Peacock feather typically looks like in a location– it’s always green and floating.
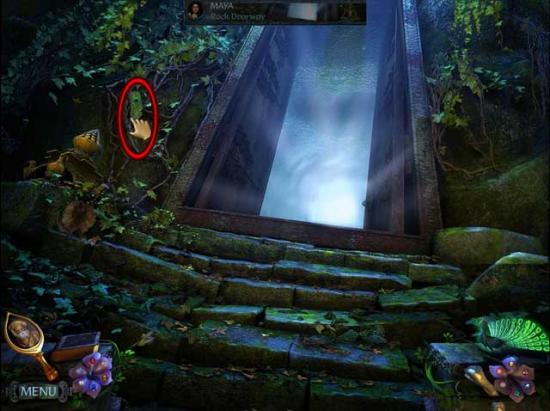
- Once you’ve collected all the feathers and you’re back in the Dungeon, click on the Guardian Peacock statue in the middle of the room for a closer view. Use the LUSH FEATHER, the LONG FEATHER, and the SMALL FEATHER on the statue so that all of its feathers are restored.
- Watch the cutscene that follows.
Underground Cavern
- Take a closer look at the stone plaque with the gold circle to the right of the large doors. Place all of the AMULETS you’ve found onto the Peacock– they will automatically find their correct location.
- Once you’ve placed all the amulets, the door will open. Click on the open doorway.
Final Chamber
- Memorize the symbols that appear before the sun sign– they always come in 3’s. After the blue glow appears, click on the medallions on the right in the same order as indicated by the symbols that appeared. Complete each round ahead of Vishwarood to launch a magical pulse at him. Vishwarood is fast, so it’s a good idea to look for the symbols’ location on the right as they are shown. Place your mouse cursor over the first, ready to click the moment the glow appears.
- Defeat Vishwarood to gain possession of the Regal Scepter.
Congratulations! You’ve completed The Dark Hills of Cherai: The Regal Scepter!
More articles...
Monopoly GO! Free Rolls – Links For Free Dice
By Glen Fox
Wondering how to get Monopoly GO! free rolls? Well, you’ve come to the right place. In this guide, we provide you with a bunch of tips and tricks to get some free rolls for the hit new mobile game. We’ll …Best Roblox Horror Games to Play Right Now – Updated Weekly
By Adele Wilson
Our Best Roblox Horror Games guide features the scariest and most creative experiences to play right now on the platform!The BEST Roblox Games of The Week – Games You Need To Play!
By Sho Roberts
Our feature shares our pick for the Best Roblox Games of the week! With our feature, we guarantee you'll find something new to play!All Grades in Type Soul – Each Race Explained
By Adele Wilson
Our All Grades in Type Soul guide lists every grade in the game for all races, including how to increase your grade quickly!


