- Wondering how to get Monopoly GO! free rolls? Well, you’ve come to the right place. In this guide, we provide you with a bunch of tips and tricks to get some free rolls for the hit new mobile game. We’ll …
Best Roblox Horror Games to Play Right Now – Updated Weekly
By Adele Wilson
Our Best Roblox Horror Games guide features the scariest and most creative experiences to play right now on the platform!The BEST Roblox Games of The Week – Games You Need To Play!
By Sho Roberts
Our feature shares our pick for the Best Roblox Games of the week! With our feature, we guarantee you'll find something new to play!All Grades in Type Soul – Each Race Explained
By Adele Wilson
Our All Grades in Type Soul guide lists every grade in the game for all races, including how to increase your grade quickly!
The Clockwork Man: The Hidden World Walkthrough
Welcome to The Clockwork Man: The Hidden World walkthrough on Gamezebo.com. The Clockwork Man: The Hidden World is a Hidden Object game for the PC created by Total Eclipse Games and published by Real Arcade. This walkthrough includes tips and tricks, helpful hints, and a strategy guide on how to complete The Clockwork Man: The Hidden World.
The Clockwork Man: The Hidden World – Game Introduction
Welcome to The Clockwork Man: The Hidden World walkthrough on Gamezebo.com. The Clockwork Man: The Hidden World is a Hidden Object game for the PC created by Total Eclipse Games and published by Real Arcade. This walkthrough includes tips and tricks, helpful hints, and a strategy guide on how to complete The Clockwork Man: The Hidden World.
General Information
Main Menu
- On the Home page, there are options to adjust the music volume, sound volume, ambience volume, and voice volume individually. You can also access these options from within the game.
- For display options, you can toggle between Full Screen and Windowed mode. You may choose to Show the Tutorial while playing the first part of the game. There is no option to turn off the custom cursor.
- Click on Change Player from the main menu to create, delete, or use an existing profile. You may create up to 6 profiles.
- You may skip a line of dialogue by clicking on the screen. It will immediately advance to the next line of dialogue.
- You may also skip an entire cut scene by clicking on the Skip button on the top right of the screen (but we recommend not skipping the cut scenes!).
- If you’ve accidentally skipped a cutscene or just want to replay a favorite scene, head back to the Main Menu and click on Cutscenes. You will only be able to watch scenes that you’ve already encountered.
How to Play
- While playing the game, you’ll sometimes come across Zoomable scenes, in which you can move forward or backward. There are 4 ways to move within a zoomable scene: via the arrows on the screen, the arrows on your keyboard, the mouse wheel, or by dragging your mouse back and forth.
- Scrolling scenes also work the same way, but from left to right. To navigate, use the arrow buttons on the screen or the arrow keys on your keyboard, or drag your mouse in the desired direction. The same goes for Vertical Scrolling scenes, which move from top to bottom.
- The Journal, on the bottom right of the screen, will flip open when a new entry is added – such as clues, drawings, observations, and more details to the story. You can use your keyboard arrow keys to flip through its pages.
- The Map icon on the bottom right lets you travel between locations. New locations are added as you progress further into the game. When a new location is available, the Map icon will blink and display a thumbnail of it.
- The Task List tells you what to need to do to progress in the game. Click on the Task List to put it away.
- Objects that you pick up will go into your Inventory. Move your cursor to the top of the screen to show the Inventory, and move your cursor away to hide it. You can sometimes combine objects to create a new one.
- While hovering your cursor around the screen, it will sometimes change into special icons:
- A hand icon indicates that you can pick up an object.
- A gears icon means that you can interact with an object or a location.
- A magnifying glass signifies that you can take a closer look at the area.
- When in a Close-up scene, click anywhere outside the pop-up window to exit. You’ll see the cursor change into an Exit icon.
- In a Hidden Object scene, the items listed in yellow will go into your inventory. Or they may appear in your journal as important notes or clues.
- There are No Penalties for quick and random clicking, so you can click all over the screen as much as you like.
- Puzzles have no Skip option. However, a Hint will guide you on how to solve the puzzle, and after that you’ll be able to solve it yourself.
- Throughout the game, Sprocket will be equipped with various Hint Gadgets:
- Advanced Object Locator gadget – shows the location of a random item in a scene
- Object Database gadget (starting Chapter 1) – shows an image of a selected object from your list
- Sonar Gadget (starting Chapter 3) – for a few seconds, reveals the location of all relevant objects in a scene
- Progressive Hint – gives you a hint or tip on what to do next; will also help you to solve puzzles
- Hints need to be recharged before you can use them again. Some hint gadgets recharge faster than the others. If there are no objects to find in a scene, the object locator and database gadgets will be unavailable.
Hints and Tips
- While the game loads, various tips will pop up. For your convenience, here is a compilation of tips we’ve encountered.
- Don’t want a Tutorial? Access the Options panel from the Main Menu and turn it off.
- Your Task List is a quick way to see what needs to be done.
- Read your Journal often. Apart from useful clues, it makes for a richer story experience.
- Map areas will have different symbols depending on what you can do in them.
- The game will not penalize you for over-clicking. No fuzzy moving cursors here, folks (you could get a sore finger though!).
- Use the Advanced Object Locator Gadget to find useful items inside and outside seek and find mode.
- The Object Database Gadget recharges faster than the others.
- You can’t click on things while the Sonar Gadget is active. Notice the locations of objects for future clicking!
- Puzzles are not skippable. The Hint gadget will aid a lot and occasionally solve them for you.
- Try to combine items in your inventory to create new items.
Walkthrough
A Tutorial is available at the start of the game. You may skip it, but when playing the game for the first time, we recommend that you take the tutorial.
Since the lists of items to find changes every time you play the game, the objects marked in the screenshots below may differ from those in your game.
Prologue
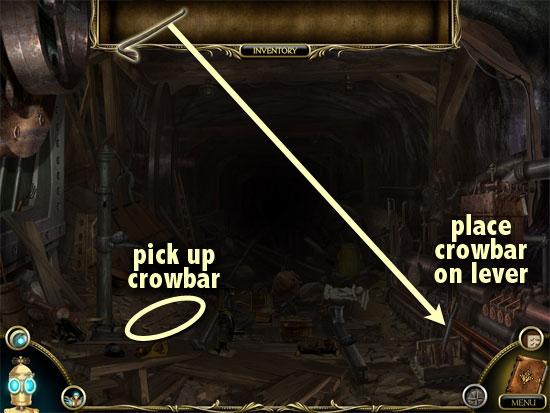
ABANDONED MINES – TUNNEL

- Pick up the crowbar.
- Take the crowbar from your inventory and place it on the lever. Click on the lever to light up the tunnel.
- Zoom in towards the back of the tunnel.
ABANDONED MINES – RAIL TRACKS
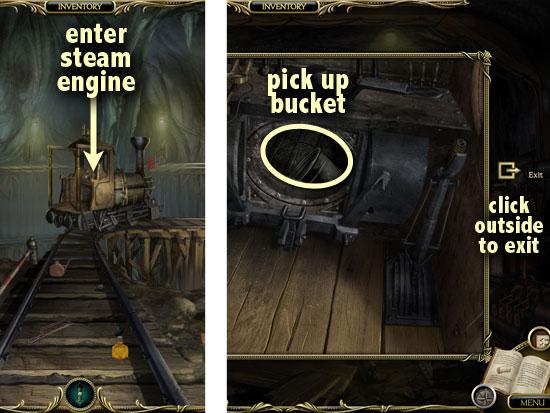
- Take a closer look at the steam engine.
- Click on the furnace door to open it.
- Take the Bucket from inside the furnace.
- Click outside the steam engine to return to the mines.
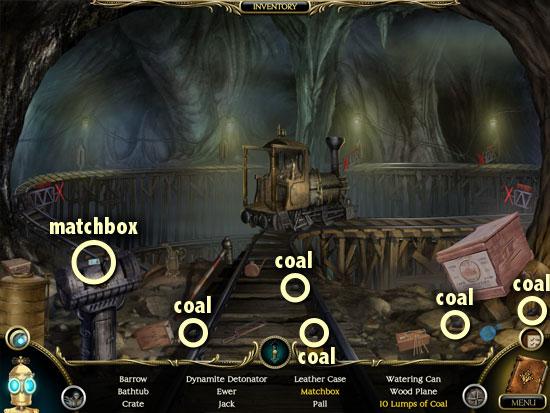
- Find the items on the list.
- Some of them are in the inner mines; some are in the outer tunnel.
- Use the zoom controls to switch between the two areas.
ABANDONED MINES – TUNNEL
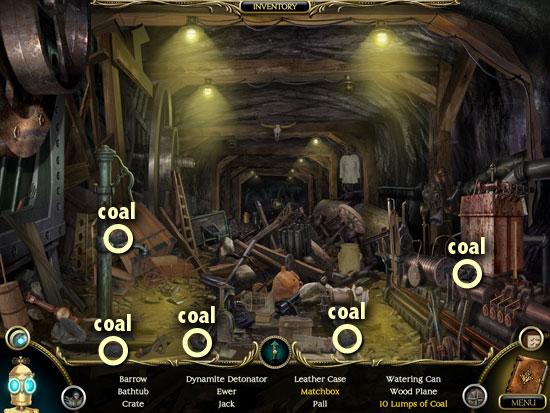
- When completed, a Matchbox and a Pile of Coal will go into your inventory.
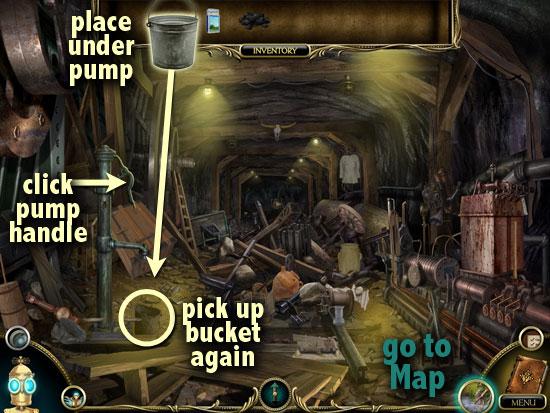
- Take the Bucket from your inventory and place it under the water pump.
- Click on the water pump handle to try filling the Bucket.
- Pick up the Bucket again.
- Click on the Map icon on the bottom right of the screen.
- Go to the Village Stream.
VILLAGE STREAM
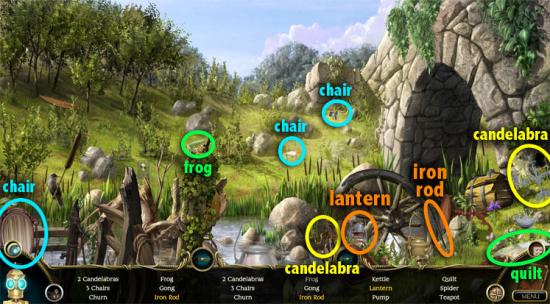
- Find the items on the list.
- When completed, an iron Rod and a Lantern will go into your inventory.
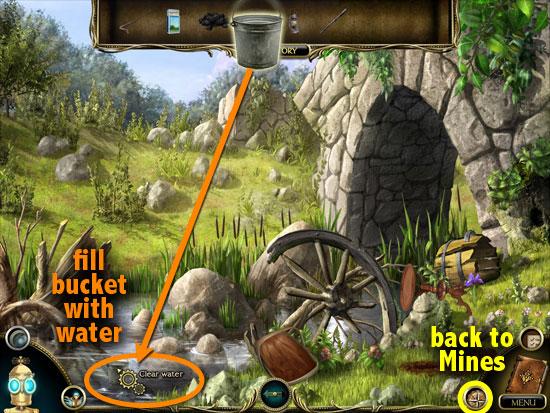
- Take the Bucket from your inventory and scoop up some water from the stream.
- Click on the Map icon and go back to the Abandoned Mines.
ABANDONED MINES – RAIL TRACKS
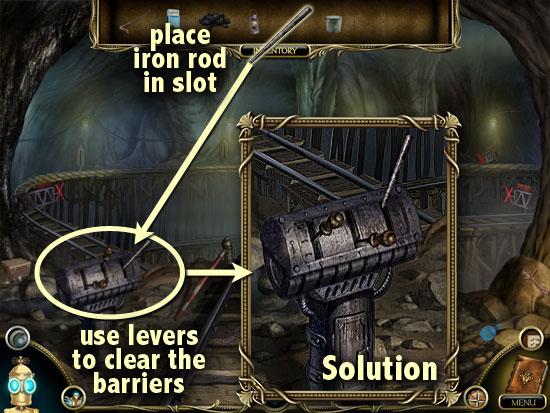
- Go forward to the train tracks.
- You’ll need to clear the rail barriers, but a lever is missing from the control panel.
- Take the Rod from your inventory and insert it in the missing lever slot.
- Click the levers to find the correct positions that will clear all the barriers. Each lever controls 2 barriers.
- The solution is as follows: Left lever -middle position. Center lever – bottom position. Right lever – top position.
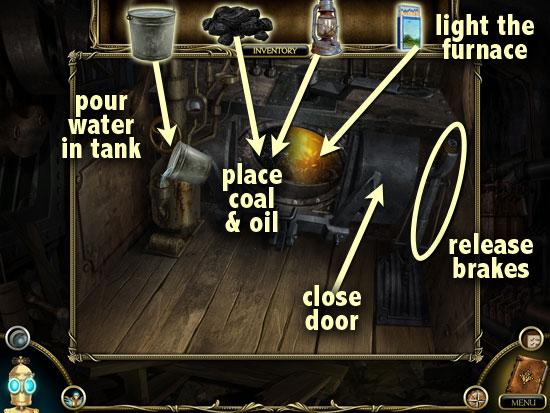
- Zoom in on the steam engine.
- Pour water from the Bucket into the water tank.
- Place the Coal inside the furnace.
- Next, pour some oil from the Lantern.
- Use the Matchbox on the oiled coals to light the furnace.
- Close the furnace door and release the brake.
Chapter 1: London, England – Four days earlier
PARENTS’ BEDROOM
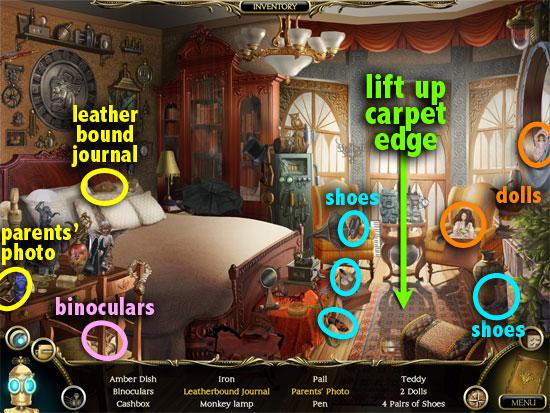
- Find the items on the list.
- Lift up the carpet edge. You’ll need a tool to pry the floor planks open.
- Click on the Map icon and go to the Parents’ Attic.
PARENTS’ ATTIC
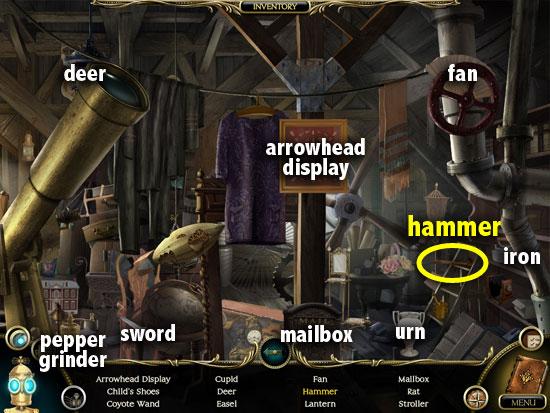
- Find the items on the list.
- When completed, a Hammer will go into your inventory.
- Go back to the Parents’ Bedroom.
PARENTS’ BEDROOM
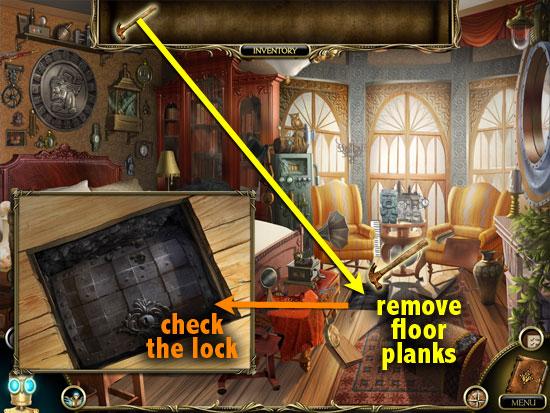
- Take the hammer from your inventory and use it twice to remove both floor planks.
- Examine the floor safe. Try opening the chest lock.
CEMETERY
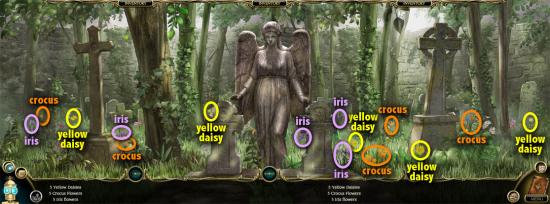
- Click on the Map icon and go to Kensal Green Cemetery.
- Gather the flowers on the list.
- When completed, a bunch of Flowers will go into your inventory.
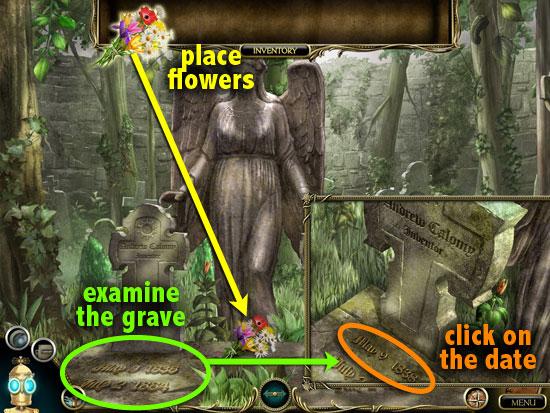
- Take the Flowers from your inventory and place them on the graves beneath the angel.
- Zoom in on Father’s grave.
- Click on the birthdate.
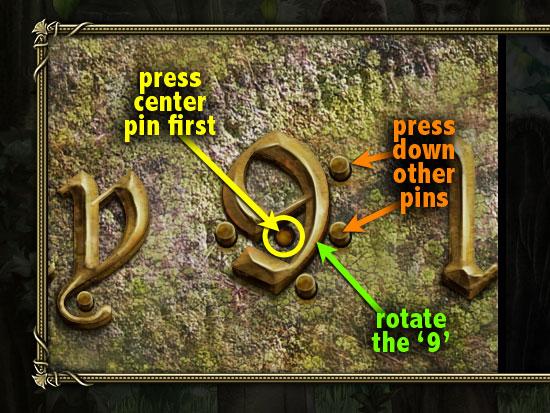
- Push down the pins in the right order so that all will remain pressed down.
- Click the center pin first. All the other pins will stay down after that.
- Click on the “9” to rotate it.
- A heart-shaped socket will appear on the angel’s chest.
- Return to the Attic.
PARENTS’ ATTIC
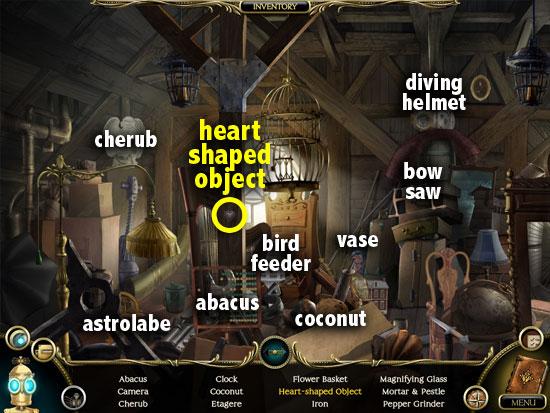
- Find the items on the list.
- When completed, a Heart-shaped Locket will go into your inventory.
- Return to the Kensal Green Cemetery.
CEMETERY
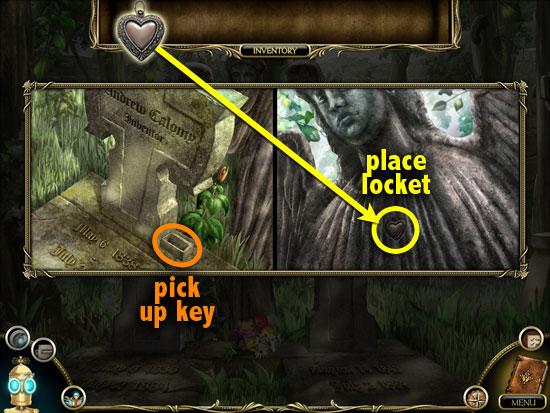
- Zoom in on the stone angel.
- Take the Heart-shaped Locket from your inventory and insert it in the Heart-shaped Socket on the angel’s chest.
- A box pops out from beneath the grave cross. Pick up the Key inside.
- Go back to the Parents’ Bedroom.
PARENTS’ BEDROOM
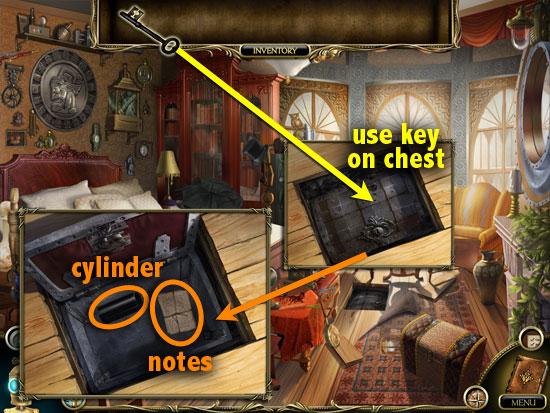
- Zoom in on the floor safe.
- Take the Key from your inventory and use it to open the chest lock.
- Take the Cylinder and the Handwritten Notes.
- Click on the Map icon and go to the Professor’s Office.
PROFESSOR’S OFFICE
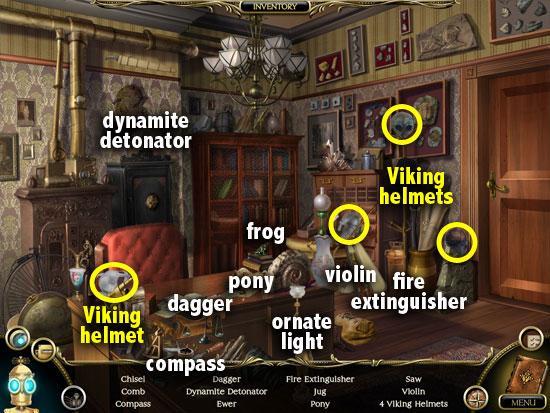
- Find the items on the list.
- Click on the broken vase on the floor.
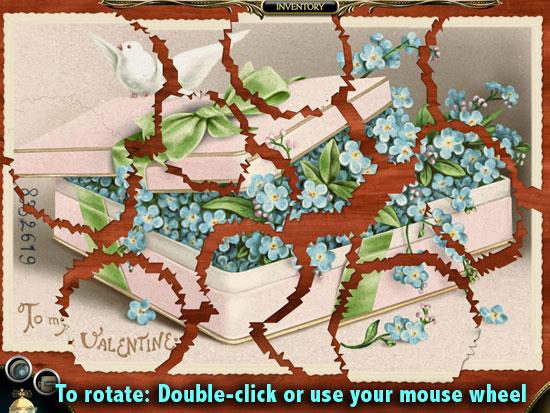
- Assemble the pieces of the Valentine postcard.
- Double-click or use the mouse wheel to rotate a piece clockwise.
- When two pieces fit correctly, they will lock together.
- There is no Skip option for this puzzle. However, using a Hint will show two pieces that go together.
- The puzzle in the screenshot above is left undone to show where each piece belongs.
- When completed, the code and notes will be added to your journal.
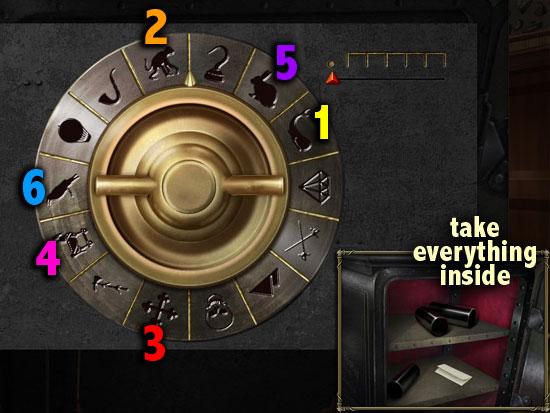
- Zoom in on the wall safe.
- Click on the safe dial.
- Find the correct six symbols, referring to the postcard notes in your Journal.
- The code on the postcard is 832619.
- These correspond to the following books on the list: Moby Dick, The Origin of Species, the Bible, The Iliad, Alice in Wonderland, and The Raven.
- The symbols representing these books are: whale, monkey, cross, Trojan horse, rabbit, raven.
- Click on the symbols in the order listed above.
- Take all the items inside the safe. The 3 cylinders will go into your inventory.
Chapter 2: Ballyscath, Ireland – Two days later
VILLAGE SQUARE
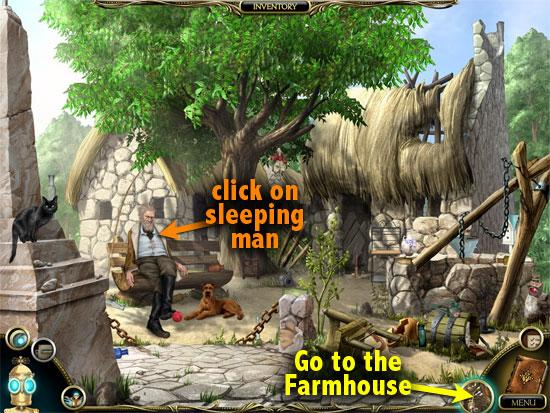
- Click on the sleeping man.
- Click on the Map icon and go to the Farmhouse.
FARMHOUSE
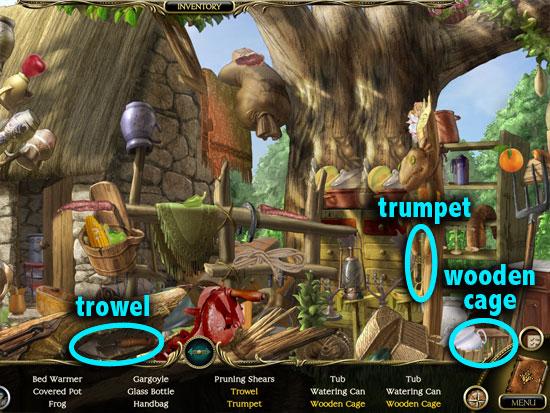
- Find the items on the list.
- When completed, a Cage, Trowel and Trumpet will go into your inventory.
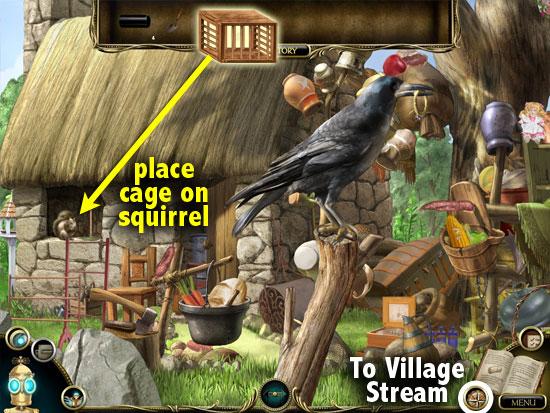
- Take the Cage from your inventory and place it on the squirrel in the cottage window.
- Click on the Map icon and go to the Village Stream.
VILLAGE STREAM
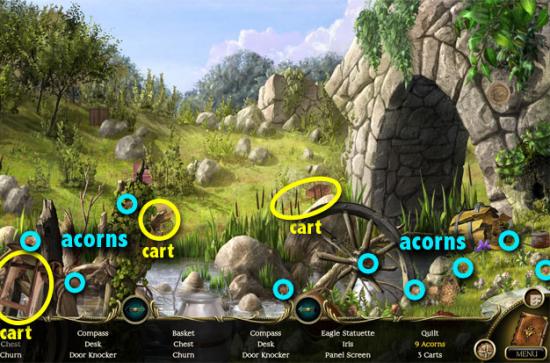
- Find the items on the list.
- When completed, a pile of Acorns will go into your inventory.
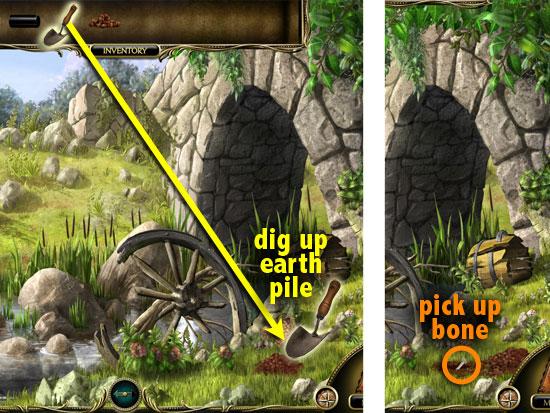
- Take the Trowel from your inventory and dig up the earth pile on the ground.
- Dig 4 times until a Bone is unearthed. Pick up the Bone.
- Click on the Map icon and return to the Village Square.
VILLAGE SQUARE
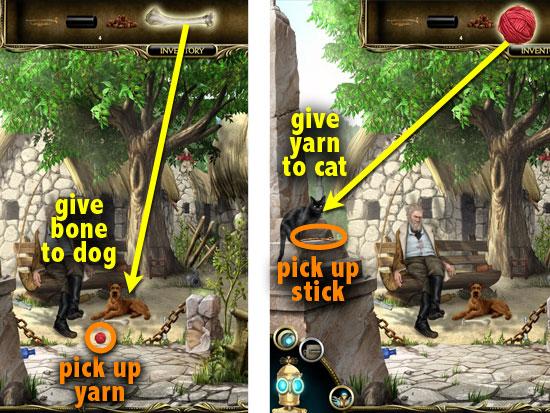
- Take the Bone from your inventory and give it to the dog.
- A ball of Yarn rolls forward. Pick up the Yarn.
- Take the Yarn and toss it at the cat, which runs away.
- A Piece of Red String goes into your inventory.
- Pick up the Oak Stick from where the cat was standing.
- Click on the Map icon and return to the Farmhouse.
FARMHOUSE
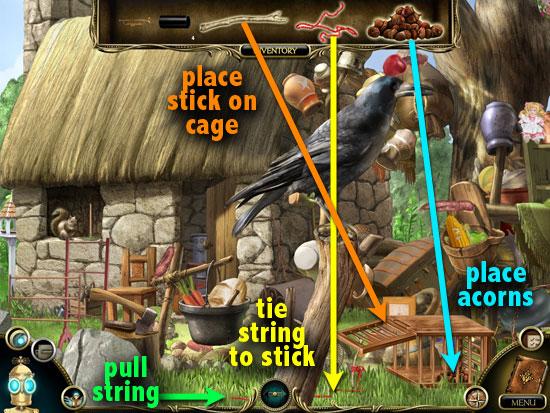
- Take the branch of Oak from your inventory and place it on the cage.
- Take the Piece of Red String from your inventory and tie it to the bottom of the stick.
- Place the Acorns inside the cage.
- Once the squirrel is inside the cage, pull the tied string.
- The squirrel will be added to your inventory.
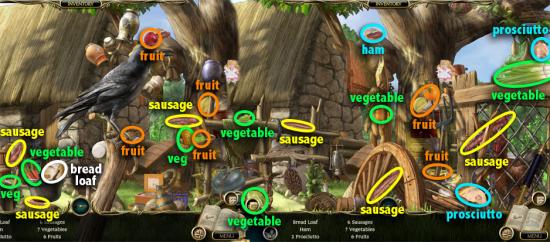
- Find the food items on the list.
- After chatting with Martha, a Cup of Tea will go into your inventory.
- Click on the Map icon and go back to the Village Square.
VILLAGE SQUARE
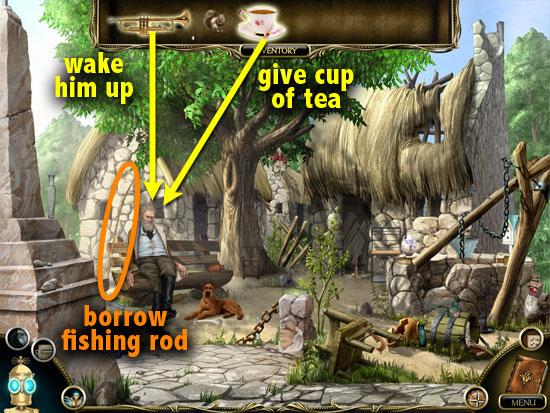
- Take the Trumpet from your inventory and use it on the sleeping man.
- Once Patrick is awake, give him the Cup of Tea from your inventory.
- Borrow the fishing rod leaning on the bench beside Patrick.
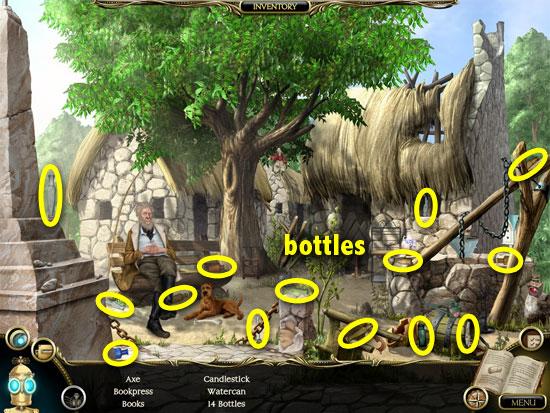
- Find the items on the list.
- When completed, the Fishing Rod will go into your inventory.
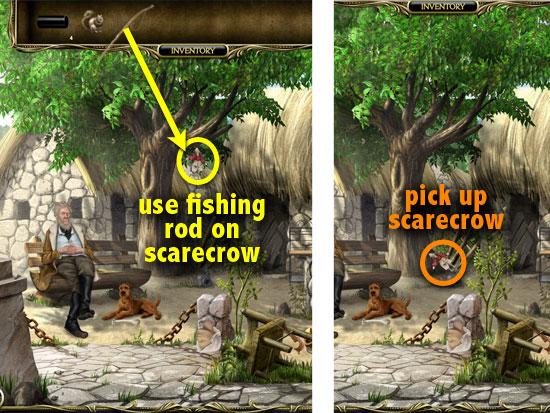
- Use the Fishing Rod to reach the scarecrow on the tree branch.
- Pick up the Mini Scarecrow that has fallen to the ground.
- Click on the Map icon and go to the Farmhouse.
FARMHOUSE
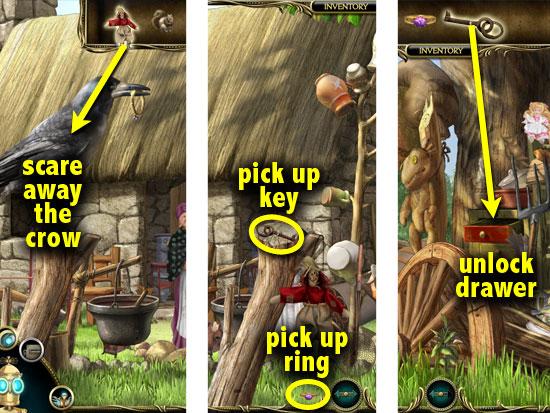
- Take the Mini Scarecrow from your inventory and place it on the crow.
- The crow drops the ring on the ground. Pick up the Ring.
- Also, pick up the Key from where the crow was perched.
- Take the Key from your inventory and use it to unlock the red drawer.
- Zoom into the open drawer.
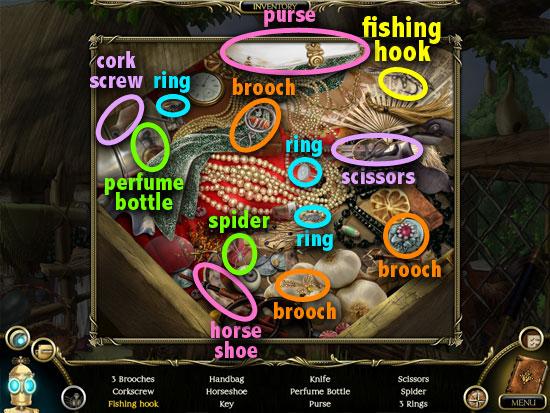
- Find the items on the list.
- When completed, a Fishing Hook will go into your inventory.
- Click on the Map icon and go to the Village Stream.
VILLAGE STREAM
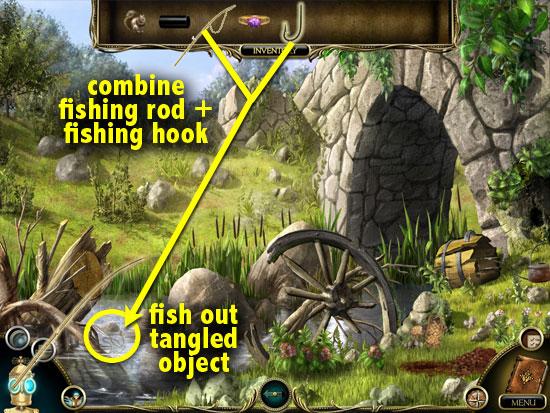
- In your inventory, combine the Fishing Rod and the Fishing Hook.
- Use the repaired Fishing Rod to retrieve the tangled object from the stream.
- The 5th cylinder will go into your inventory.
- Click on the Map icon and go back to the Village Square.
VILLAGE SQUARE
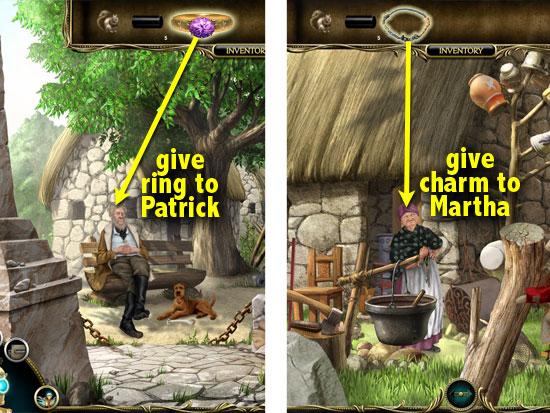
- Take the Ring from your inventory and give it to Patrick.
- Martha’s charm will go into your inventory.
- Click on the Map icon and return to the Farmhouse.
FARMHOUSE
- Martha confirms that the cylinder is the object she threw into the stream.
- Take Martha’s Charm from your inventory and give it to her.
Chapter 3: The Submarine – Present time
NOTE: This chapter is available in the Premium and Ultimate Editions only.
SUBMARINE EXTERIOR
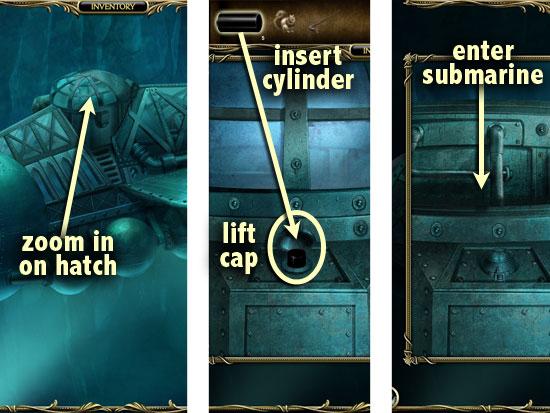
- Zoom in on the entrance hatch.
- Lift the cap in front of the entrance hatch.
- Insert one of the Cylinders from your inventory into the circular opening.
- The hatch opens. Click on the ladder to descend.
NAVIGATION ROOM
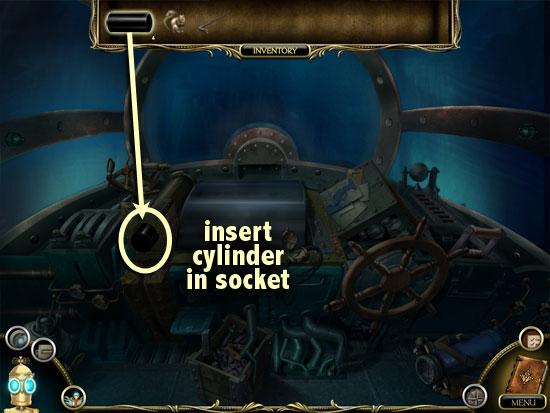
- On the left of the cockpit is another circular socket.
- Insert another Cylinder from your inventory into the socket.
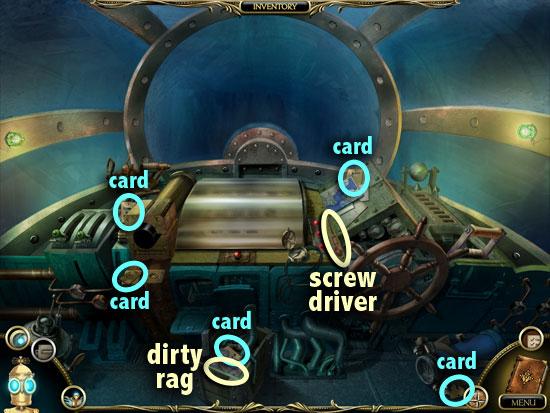
- Pick up a Screwdriver, dirty Rag, and 5 Metallic Cards.
- Click on the Map icon and go to the Engine Room.
ENGINE ROOM
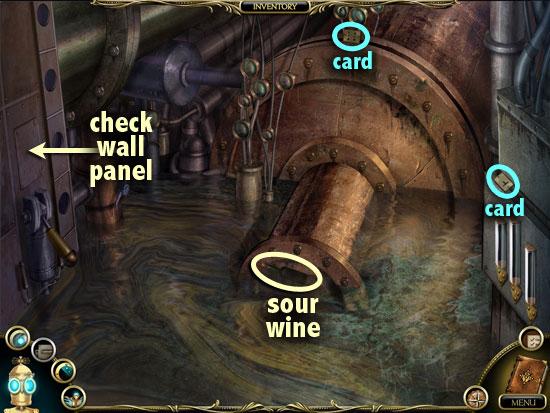
- Pick up a bottle of sour Wine and 2 Metallic Cards.
- Zoom in on the wall panel on the left, above the lever.
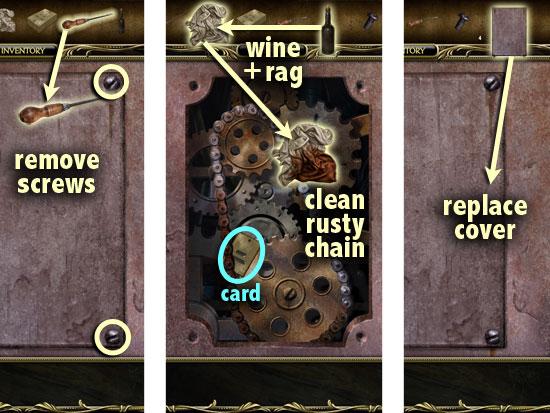
- Use the Screwdriver from your inventory to remove all 4 screws.
- Click on the panel plate to remove it. The panel goes into your inventory.
- Pick up 1 Metallic Card.
- In your inventory, combine the sour Wine with the dirty Rag.
- Use the soaked rag to clean the rusty chain 4 times.
- Take the panel from your inventory and replace it on the wall.
- Exit the close-up view.
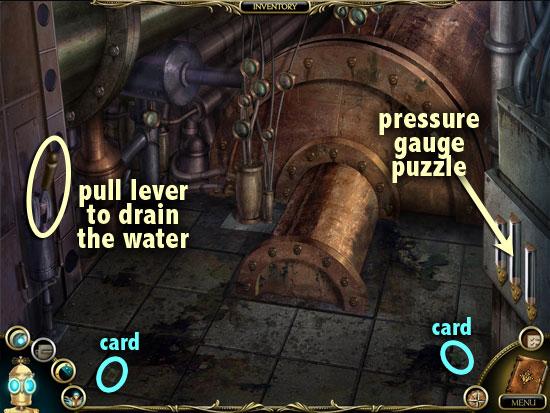
- Pull the large lever below the panel.
- Once the water is drained, take the last 2 Metallic Cards on the floor.
- Zoom in on the pressure gauge system on the right wall.
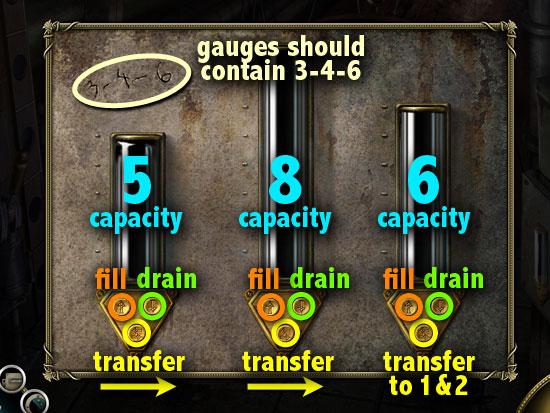
- The gauges’ maximum capacities are 5, 8, and 6 from left to right.
- The numbers 3-4-6 scratched above indicate that the gauges should contain 3, 4, and 6 units of liquid, from left to right.
- The 2 top buttons below each gauge are used to fill and drain.
- The lower button transfers liquid to the gauge on its right. The rightmost gauge will transfer its contents equally between the other two.
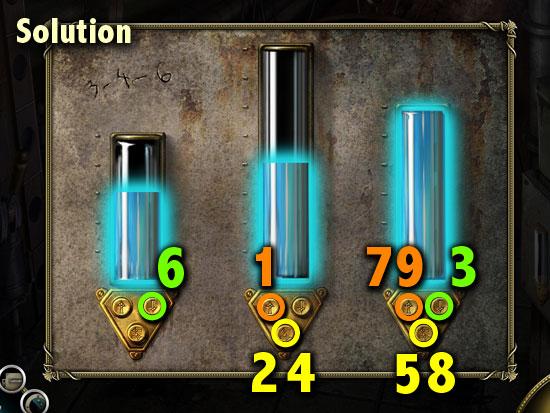
- Solution: first, make sure all the gauges are empty. Then do the following:
- Fill up the center gauge.
- Transfer from the center.
- Drain the right gauge.
- Transfer from the center.
- Transfer from the right.
- Drain the left gauge.
- Fill up the right gauge.
- Transfer from the right.
- Fill up the right gauge.
- Return to the Navigation Room.
NAVIGATION ROOM
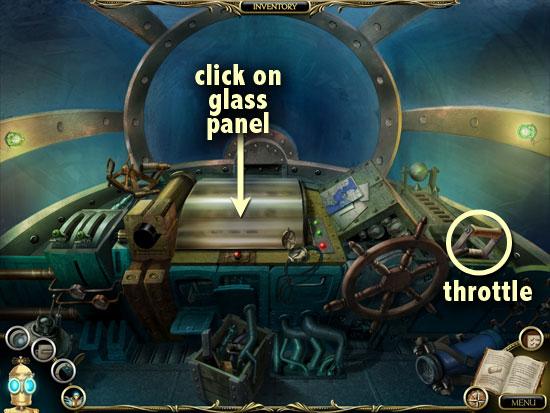
- Zoom in on the glass panel.
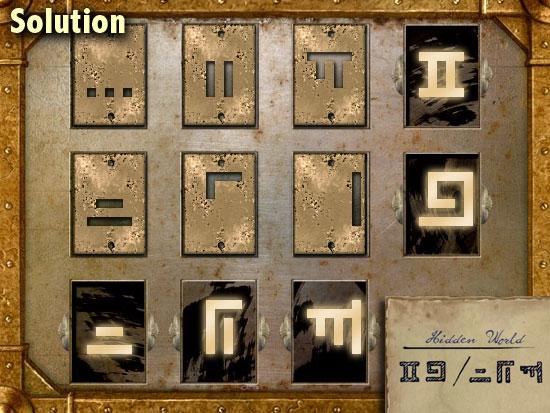
- Set the coordinates for the Hidden World by choosing the 6 correct metallic cards and placing them in their proper positions.
- The coordinates for the Hidden World are on page 13 of the journal.
- As you place the cards on the slots, the markings of each row and column will be combined on the 5 black areas.
- These should look like the symbols on the 5 coordinates. The symbols on the black areas should go in this order: from top to bottom, and then from left to right.
- Pull the throttle to start the submarine.
Chapter 4: The Cavern – Four days later
CAVERN
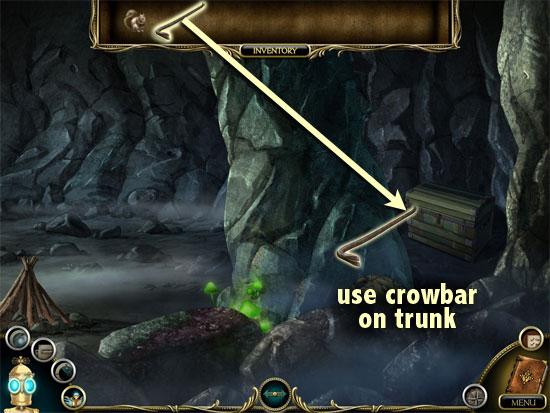
- Use your Crowbar to open the locked trunk on the right side of the cavern.
- Zoom in on the open trunk.
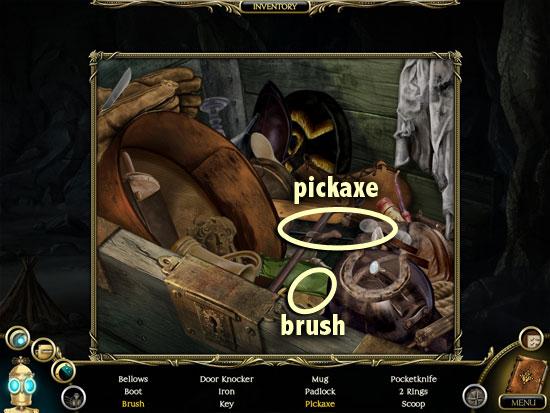
- Find the items on the list.
- When completed, a Brush and a Pickaxe will go into your inventory.
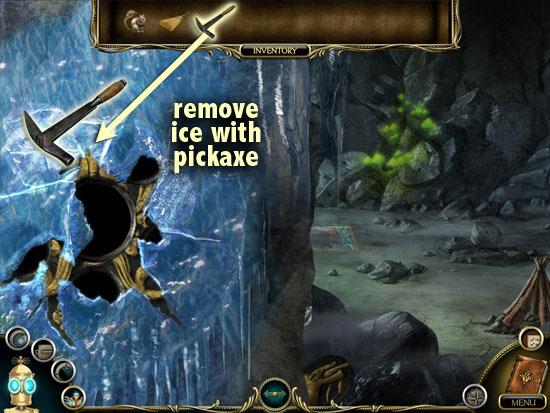
- Use your Pickaxe on the frozen stone carving.
- Keep removing the ice until the whole carving is revealed.
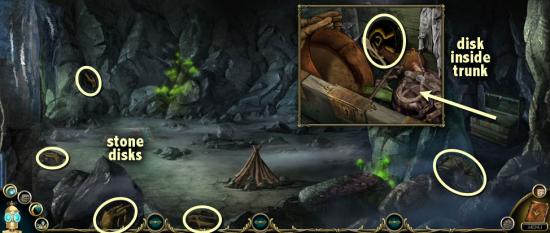
- Pick up the 6 stone disks scattered around the cavern.
- One disk is inside the trunk.
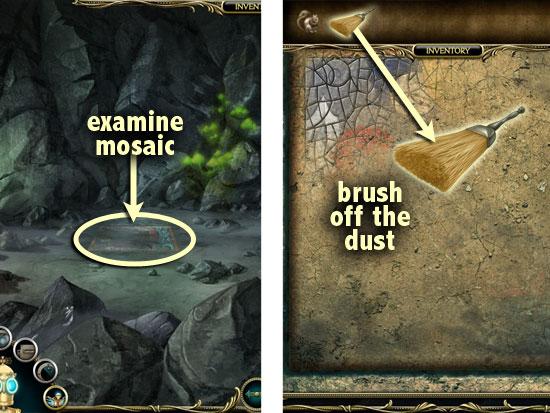
- Zoom in on the mosaic on the floor.
- Use your Brush to remove the dust from the mosaic.
- Keep cleaning it until the mosaic is revealed.
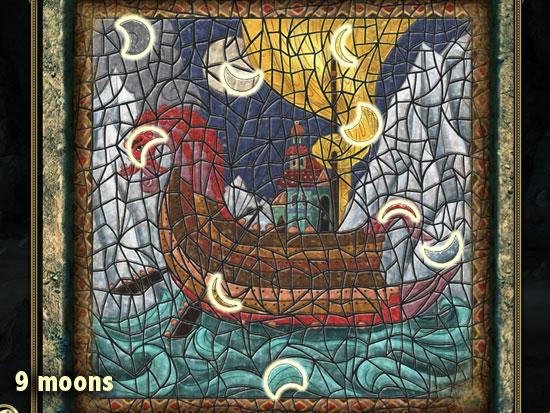
- Find 9 stone moons.
- The moons will go into your inventory.
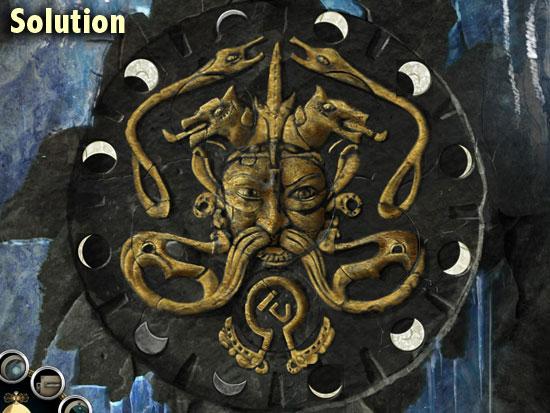
- Place the moons and stone disks in their proper slots.
- The moons form a pattern repeatedly around the carving: large, medium, small, large, medium, small and so forth.
- The face disk goes in the center, the jackals on top, the ivy on the sides, and the circular symbol at the bottom.
- Rotate the disks to complete the carving.
PLATEAU
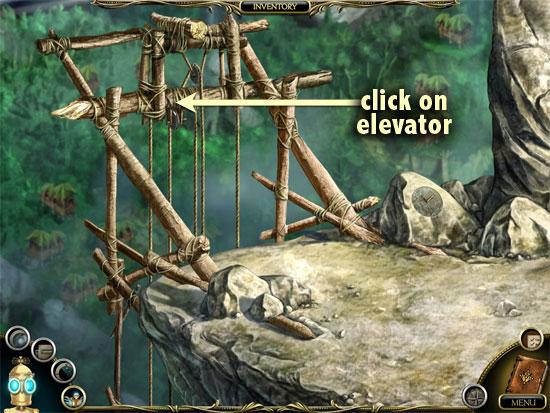
- Click on the wooden elevator to raise it up.
Chapter 5: The Hidden World
TUNDRA
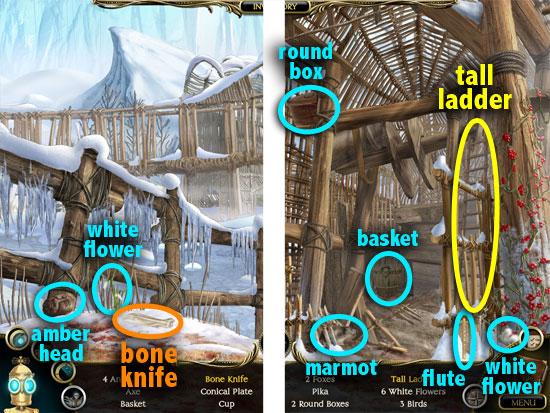
- Find the items on the list.
- A bone Knife and a Ladder will go into your inventory.
- Click on the Map icon and go to the Woodland.
WOODLAND
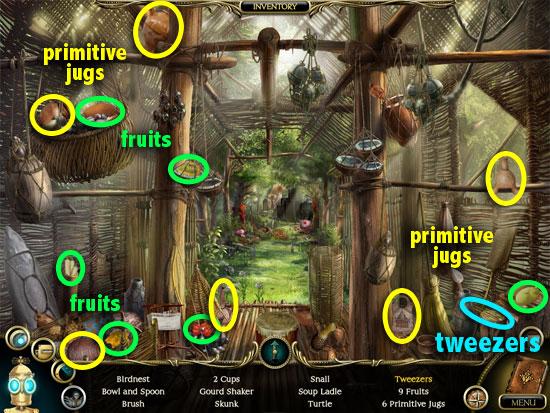
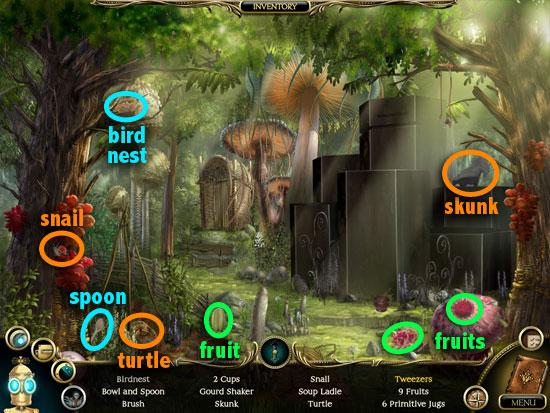
- Find the items on the list, zooming in and out of the hut.
- A pair of Tweezers will go into your inventory.
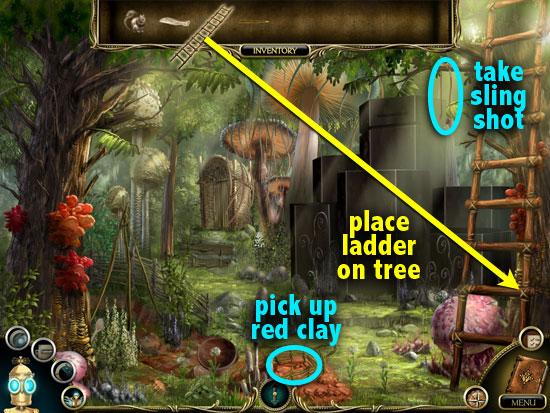
- Place the Ladder from your inventory on the tree. Take the slingshot.
- Pick up some red Clay from the ground.
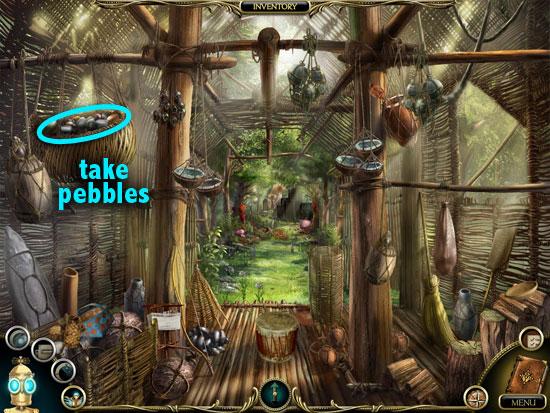
- Go into the hut and take some Pebbles from the hanging basket on the left.
- Click on the Map icon and go to the Desert.
DESERT
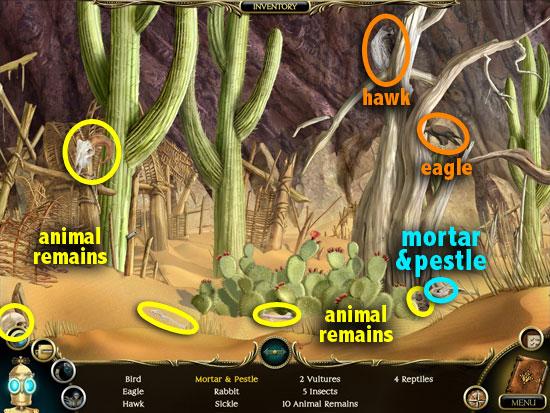
- Find the items on the list.
- A mortar and pestle will go into your inventory.
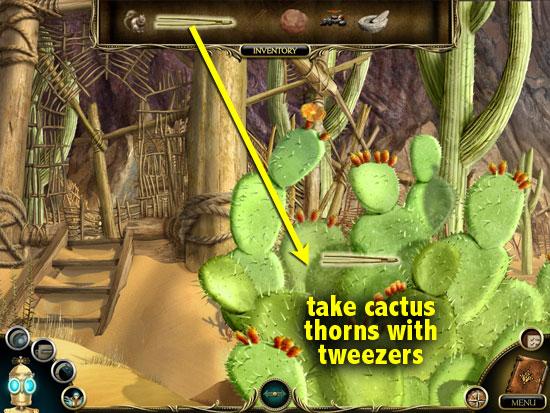
- Use the Tweezers to gather some cactus thorns from the large cactus.
- Click on the Map icon and go to the Rainforest.
RAINFOREST
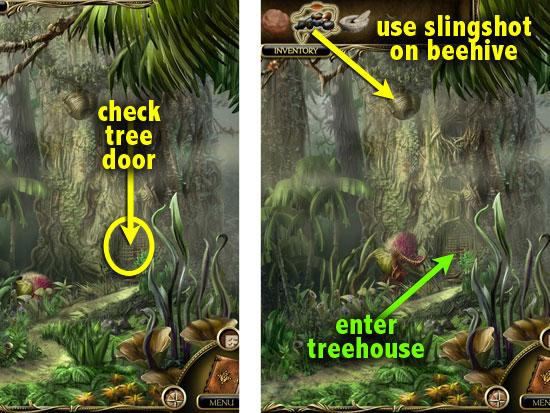
- Examine the tree door. A carnivorous plant snaps at you.
- Use the Slingshot and pebbles on the beehive.
- Shoot at the beehive to make it fall on the carnivorous plant.
- Zoom in on the door of the treehouse.
RAINFOREST TREEHOUSE
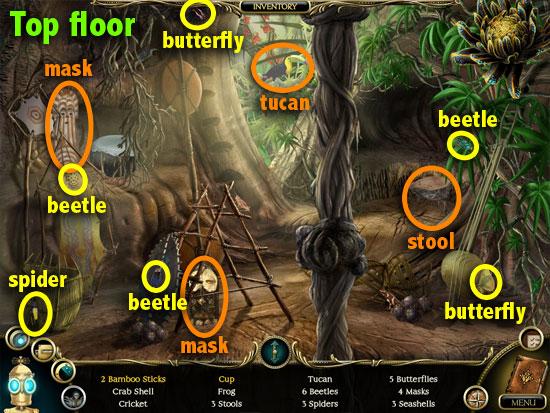
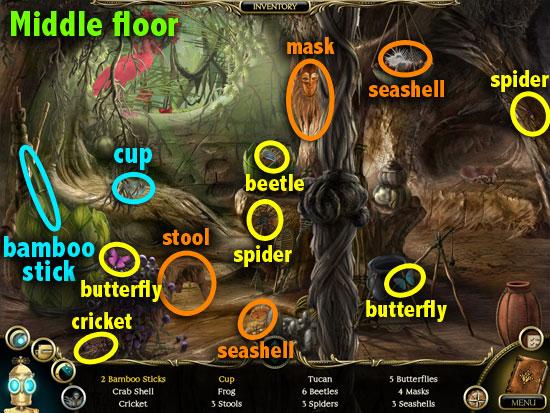
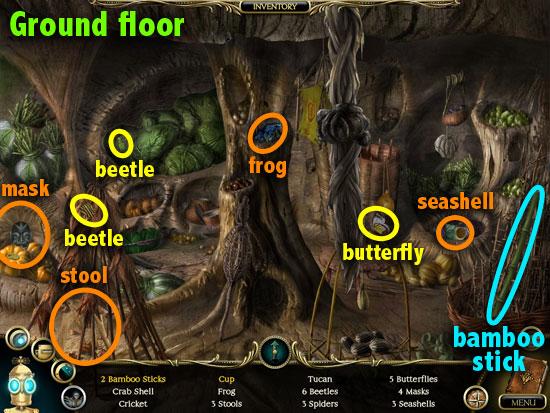
- Find the items on the list.
- Two Bamboo sticks and a drinking Cup will go into your inventory.
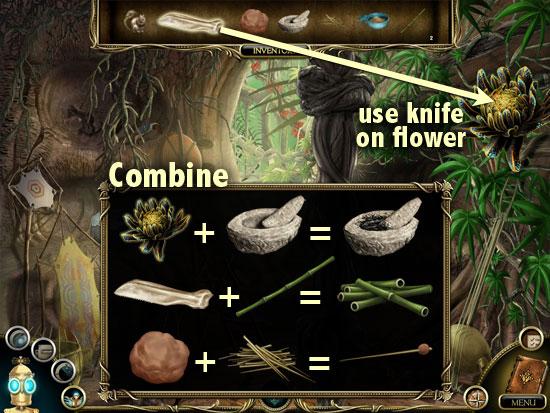
- Use the bone Knife to cut the musky flower on the top right of the scene.
- In your inventory, combine the musky Flower with the mortar and pestle.
- Cut the Bamboo sticks with the bone Knife to make blowguns.
- Combine the Clay with the cactus needles to make darts.
- Go back to the Tundra.
TUNDRA
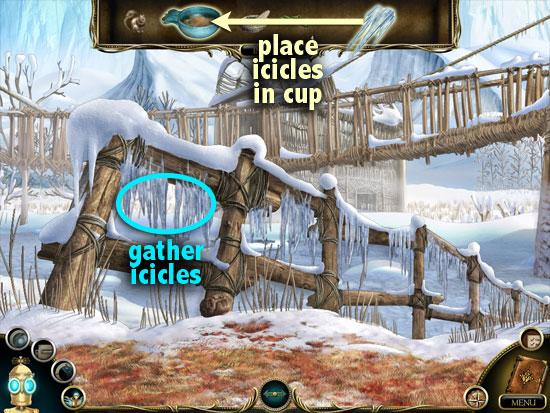
- Snap off some Icicles hanging from the fence.
- In your inventory, place the Icicles in the drinking Cup.
- Switch to another location to make the Icicles melt.
DESERT
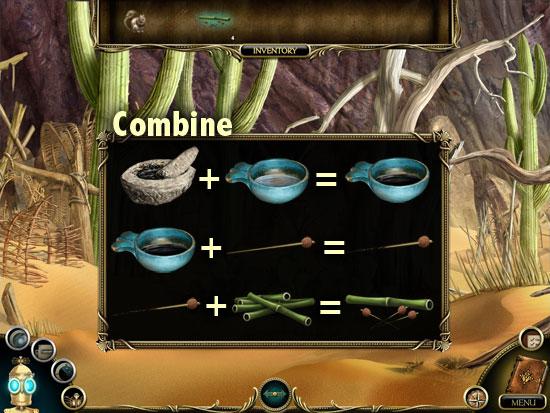
- Mix the flower Paste with the cup of Water.
- Coat the Darts with the tranquilizing Liquid.
- Place the darts on the Blowguns.
- Return to the Tundra.
Chapter 6: The Fall of Darkness
DESERT
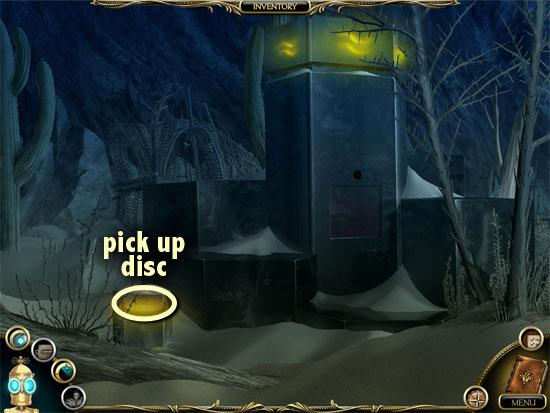
- Pick up the disk from the Obsidian pedestal.
TUNDRA
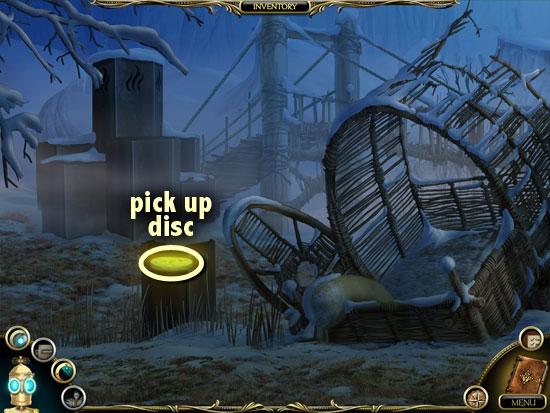
- Pick up the disk from the Obsidian pedestal.
RAINFOREST
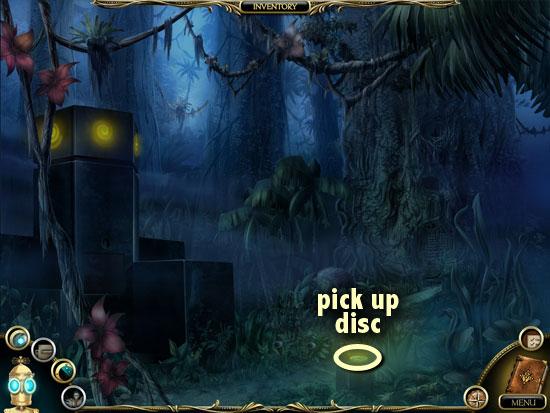
- Pick up the disk from the Obsidian pedestal.
WOODLAND
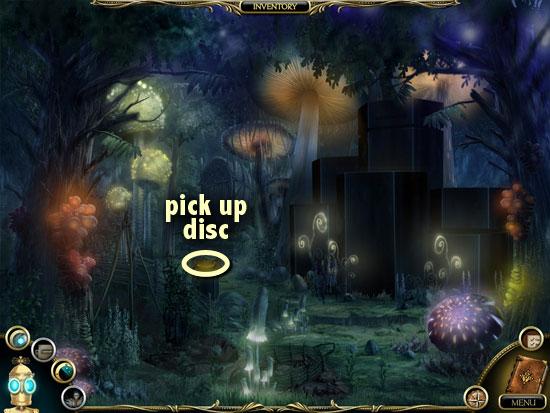
- Pick up the disk from the Obsidian pedestal.
- Go to the Overlook Plateau.
OVERLOOK PLATEAU
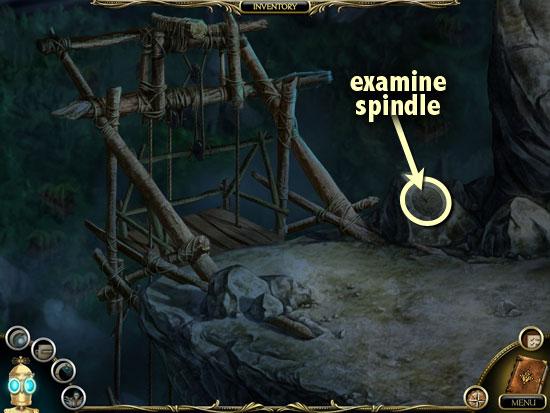
- Zoom in on the spindle on the large rock.
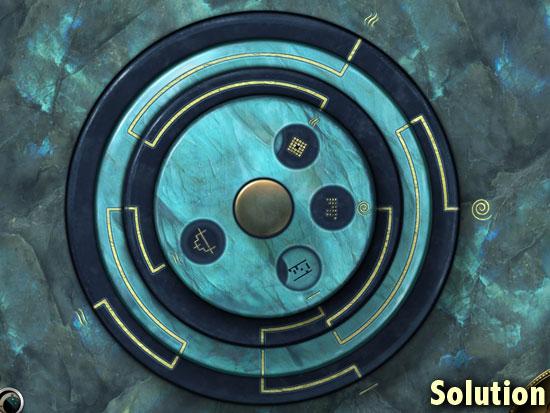
- From your inventory, place the 4 disks on the center spindle.
- Rotate the disks so that the lines connect matching symbols from the stone to the innermost disk.
- Start with the outermost disk and work your way inward, making sure the lines are connected.
- Clicking on the right side of a disk rotates it clockwise; clicking on the left rotates it counter-clockwise.
- Diagrams for the 4 element puzzles are added to your journal.
- Go to each of the 4 stations to activate them.
RAINFOREST
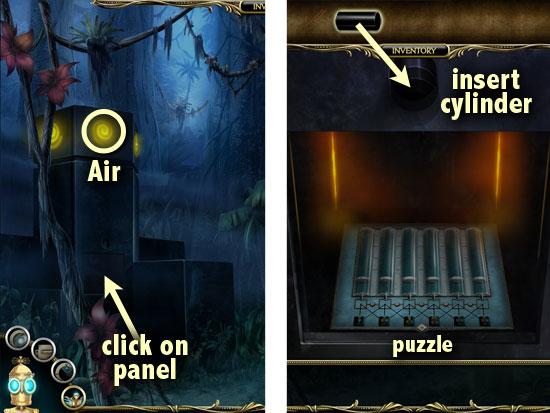
- The symbol above this station is that of Air.
- Zoom in on the panel.
- Take the Cylinder from your inventory and place it into the round opening.
- Click on the contraption to solve the puzzle.
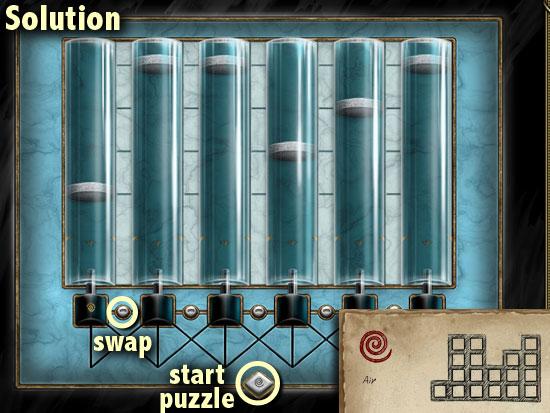
- Click on the white diamond button to blow air into the pipes, lifting the discs upwards.
- Refer to Air puzzle diagram in the journal to see the how high a disc should be in each pipe.
- The round button in between two pipes swaps their air strength levels.
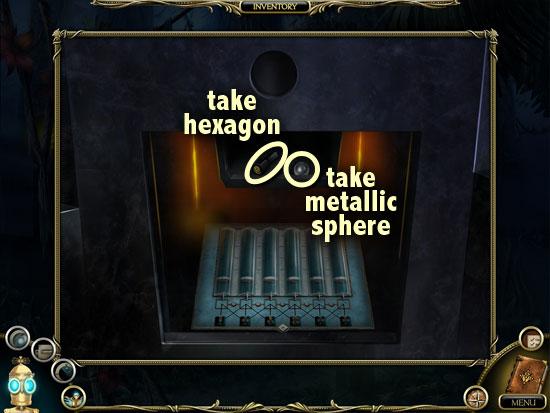
- Take the Metallic Sphere and hexagonal artifact that appear.
- Go to the next station.
WOODLAND
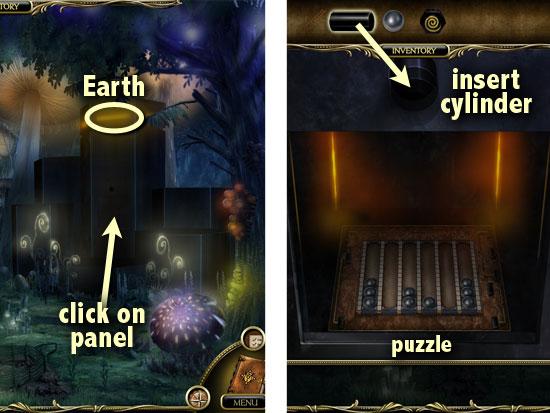
- The symbol above this station is that of Earth.
- Zoom in on the panel.
- Take the Cylinder from your inventory and place it into the round opening.
- Click on the contraption to solve the puzzle.
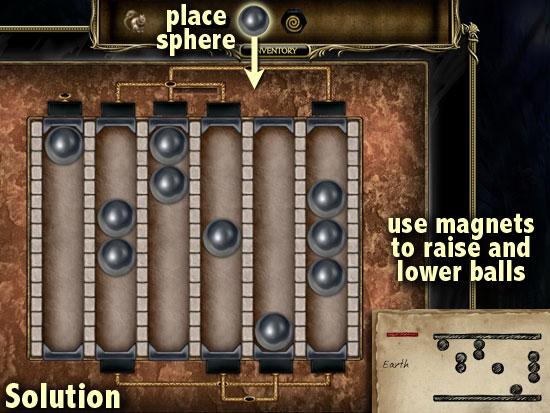
- Take the Metallic Sphere from your inventory and place it on the puzzle.
- Refer to the Earth diagram puzzle in the journal.
- Move the balls between columns until you have the correct number of balls in each.
- Then, use the bars with magnets to raise or lower the balls according to the diagram.
- To make balls hover, place magnets on both ends of its column.
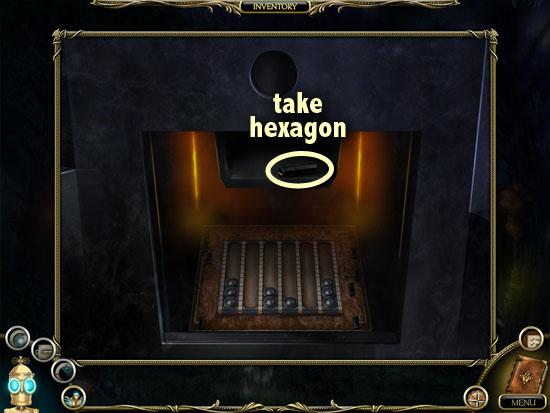
- Take the hexagonal artifact that appears.
- Go to the next station.
DESERT
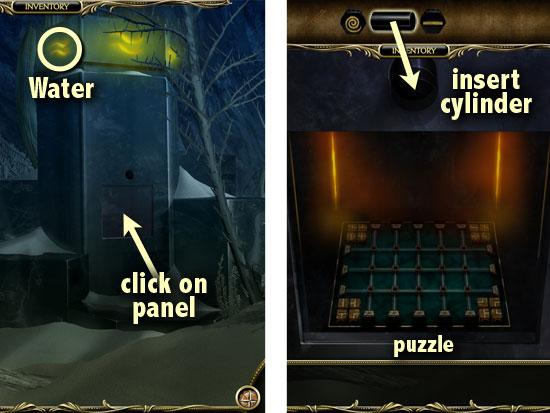
- The symbol above this station is that of Water.
- Zoom in on the panel.
- Take the Cylinder from your inventory and place it into the round opening.
- Click on the contraption to solve the puzzle.
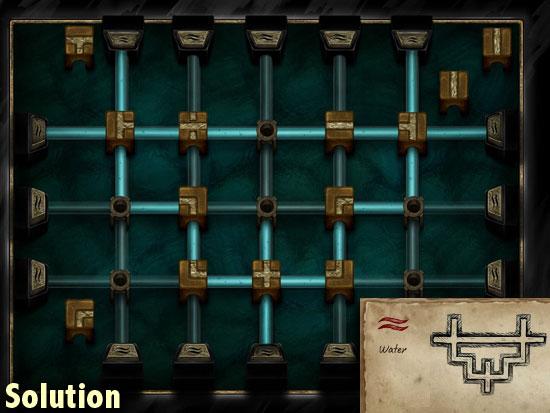
- The buttons on the edges of the puzzle start and stop the flow of water.
- The valve junctions control the direction of the water.
- Refer to the Water diagram puzzle in the journal to see what the flow of water should look like.
- Not all the valve junctions will be used.
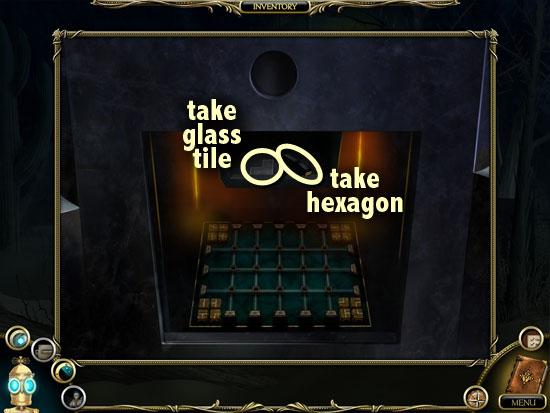
- Take the Glass Tile and hexagonal artifact that appear.
- Go to the next station.
TUNDRA
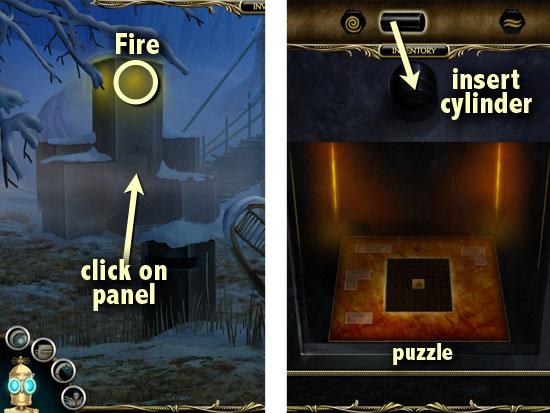
- The symbol above this station is that of Fire.
- Zoom in on the panel.
- Take the Cylinder from your inventory and place it into the round opening.
- Click on the contraption to solve the puzzle.
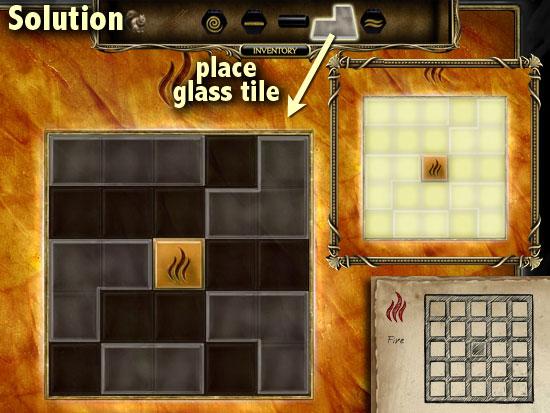
- Take the Glass Tile from your inventory and place it on the puzzle.
- Refer to the Fire diagram puzzle in the journal.
- Arrange the 5 glass tiles on the grid so that all the squares are lit up.
- A glass tile lights up the squares it’s placed on, as well as the surrounding squares by half.
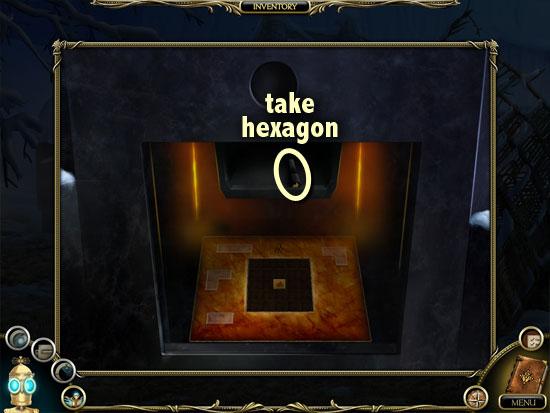
- Take the hexagonal artifact that appears.
- On the map, go to the Machine Entrance.
MACHINE ENTRANCE
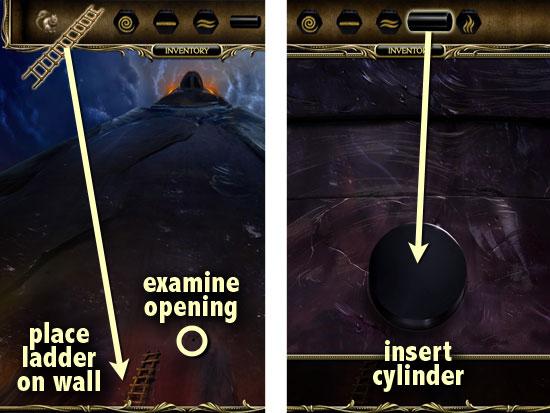
- Take the Ladder from your inventory and place it on the wall.
- Zoom in on the circular opening.
- Place the Cylinder in the circular socket.
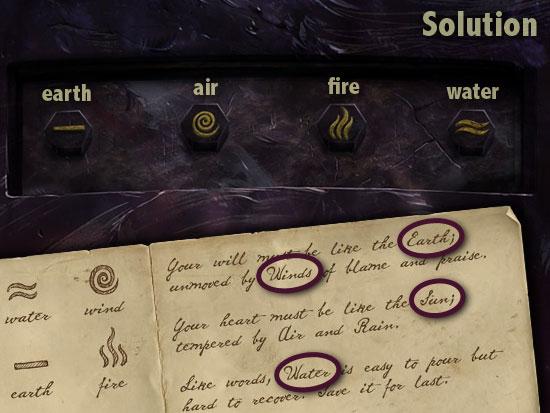
- Place the 4 Hexagons on the slots.
- Arrange them according to the poem on page 14 of the journal.
- The poem mentions Earth first, then Wind, then Sun (Fire), and last is Water.
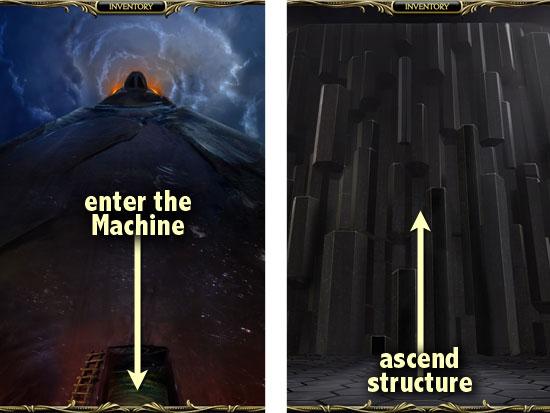
- The door to the Machine opens. Click on the entrance to find the Chief.
- Click on the pillar structure to confront Ransom.
THE END
- After the game is over, you may read the Journal pages from the Main Menu. You may also rewatch all the Cutscenes.
- However, if you click on Play using the same profile, your progress will be erased and the Cutscenes will be locked again.
- When starting a new game, you may want to consider creating a new profile instead, so that your old profile is saved.
More articles...
Monopoly GO! Free Rolls – Links For Free Dice
By Glen Fox
Wondering how to get Monopoly GO! free rolls? Well, you’ve come to the right place. In this guide, we provide you with a bunch of tips and tricks to get some free rolls for the hit new mobile game. We’ll …Best Roblox Horror Games to Play Right Now – Updated Weekly
By Adele Wilson
Our Best Roblox Horror Games guide features the scariest and most creative experiences to play right now on the platform!The BEST Roblox Games of The Week – Games You Need To Play!
By Sho Roberts
Our feature shares our pick for the Best Roblox Games of the week! With our feature, we guarantee you'll find something new to play!All Grades in Type Soul – Each Race Explained
By Adele Wilson
Our All Grades in Type Soul guide lists every grade in the game for all races, including how to increase your grade quickly!


