![Digimon UP Tier List [Supports, Buddies, and Partners]](/wp-content/uploads/2026/07/digimon-up-tier-list.jpg "Digimon UP Tier List [Supports, Buddies, and Partners]")
Digimon UP Tier List [Supports, Buddies, and Partners]
These Digimon will get you UP the leaderboard.


![Haze Seas Boss Drops [Chances, Locations, and How to Spawn]](/wp-content/uploads/2026/07/haze-seas-boss-drops.jpg "Haze Seas Boss Drops [Chances, Locations, and How to Spawn]")

Welcome to Gamezebo's strategy guide for The Cameron Files: Secret at Loch Ness. WALKTHROUGH Prior to launching a new game, you'll be able to watch a scene featuring the game's hero, Detective Allan Parker Cameron, sitting at his desk reminiscing about the events that he witnessed while investigating the secret of Loch Ness. ========================= Monday, December 17: ========================= After starting a new game, the opening scene shows Cameron arriving a…
a:1:i:0;a:2:s:13:”section_title”;s:50:”The Cameron Files: Secret at Loch Ness Walkthrough”;s:12:”section_body”;s:40703:”
Welcome to Gamezebo’s strategy guide for The Cameron Files: Secret at Loch Ness.
WALKTHROUGH
Prior to launching a new game, you’ll be able to watch a scene featuring the game’s hero, Detective Allan Parker Cameron, sitting at his desk reminiscing about the events that he witnessed while investigating the secret of Loch Ness.
=========================
Monday, December 17:
=========================
After starting a new game, the opening scene shows Cameron arriving at the MacFarley mansion. While the lord of the mansion is away, the butler will instead inform the Lady MacFarley that Cameron has arrived as he is shown to the sitting room to wait for her arrival.
Take a step forward and the Lady MacFarley will enter the room. She’s an old woman, and she’s worried over the fact that her husband has disappeared. As she rambles on about the circumstances surrounding his disappearance, her vision starts to become hazy and she eventually faints. The butler will take her to her room so that she can recover and will let Cameron know that his belongings have been taken to the guest room where he will be staying for the time being.
There’s not much Cameron can do at this point because he currently does not have anything in which to carry the items he finds. Let’s check out the guest room to retrieve his things. Leave through the door Cameron originally entered and climb up the stairs to the right until you reach the second floor. Cameron’s room is the second door on the left.
Walk over to the other side of Cameron’s room and read the note that was left on his table. It looks like someone named Bruce McGrab wants to hire Cameron by paying him double what the MacFarleys are paying him for his services and he also wants the Cameron crystal. Walk over to the bed and pick up the bag lying on it so that Cameron will now have an inventory system, which can be accessed by right-clicking. Now that he has something to carry things in, it’s time to start sleuthing! Let’s start by first returning to the sitting room.
Read the newspaper on the desk to read about a theft at the Edinburgh museum. If you remember, Lady MacFarley dropped something in the couch before she passed out. Check out the couch and lift up the cushion to find a locket. When you open the locket, you’ll find a small key and some pills hidden inside. Take them and leave the sitting room through the door near the couch.
Walk down the hallway ahead of you and go through the wooden door to the right to find the kitchen. Open the small cabinet on the wall to the right and take the passkey that’s hanging to the far right side of it. Walk over to the sink near the fireplace and pick up the rag. Return to the kitchen door and this time walk past the small cabinet and look at the small work table to the left. Open the drawer to find some matches as well as a candle.
After Cameron retrieves those items, a bell will ring with Lady MacFarley’s name underneath it. She must want something, so walk over to the dumbwaiter to see a piping hot cup of tea waiting inside. Pull the lever to send it up to the second floor before turning right and heading up the stairs at the end of the kitchen area.
When you’ve reached the second floor, turn to the right and walk through the next door to enter the laundry room. You’ll find the tray with the cup of tea waiting in the dumbwaiter that’s found here. Take the cup of tea because now Cameron’s going to have to deliver it to Lady MacFarley.
Leave the room and head into the main area of the second floor. Lady Mac Farley’s room is the door to the right of the top of the stairs. Cameron comments that Lady MacFarley needs to lay off the caffeine, so she’s going to want something to help her sleep. Before giving her the tea, go into the inventory and drug it using the pills. Once you’ve given her the drugged tea, she’ll proceed to ramble on about something regarding the three crystals and how she is looking for them. She also says something about a banshee found walking around in the park near the Celtic cross can help and if Cameron is the man that can get things done, he can take a look at her chest of jewels. After she’s done talking, the drugs will kick in and she’ll fall asleep. I guess that just wasn’t her cup of tea, now was it?
While she is sleeping, open the dresser near her bedroom door and pick up the bottle of chloroform found inside the top drawer. Walk over to the other side of the bed and look at the table with the mirror. Open the drawer and take a rolled up picture of the banshee.
Go up the little stairs to the bathing area in the corner of the room and open the jewelry box that’s sitting on the sink using the small key in the inventory and take the attic key that’s being kept inside.
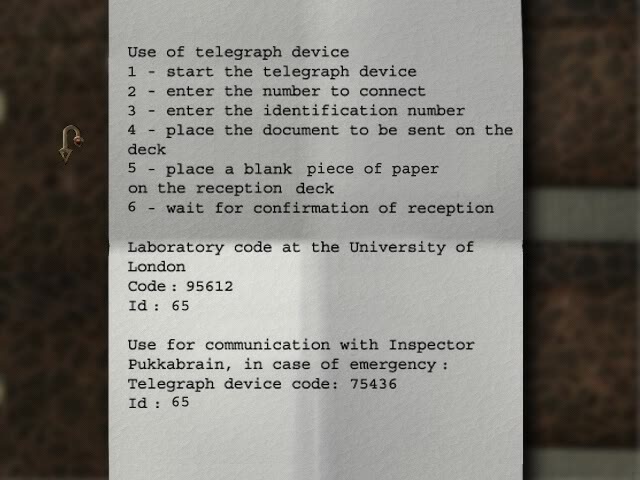
Leave the Lady’s room and use the passkey on the next door down to enter the Lord’s room. Walk over to the bookcase in his room and open it. Between two books is a small piece of paper. Read it to see that it’s a memo on how to use the telegraph device. Walk over to the desk near the window and open the drawer. Make a note that the Lord had an appointment with Bruce McGrab at the distillery. If you move the cursor to the left, it’ll change to an arrow pointing in that direction. Click it to see that some fingerprints were left on the desk. In order to lift them, sprinkle some of Cameron’s copper oxide powder on them and then pour the ink over it. Use a blank piece of paper to lift the fingerprints and now we’ll have to figure out to whom they belong.
Leave the room and head to the end of the area. Turn left and head upstairs to enter the hallway leading the attic. It’s a bit of a long hallway, and once you reach the door at the end, unlock it using the attic key and Cameron will step into the attic.
As soon as Cameron is inside, the door will swing shut and lock him in pitch black darkness. First thing we need to do is look for a source of light to use. Turn to your right to spot a candle stick, which is exactly what we need. Put the candle into the stick and light it with the matches to shed some light on the situation.
Walk back to the door and turn left to find an open crate. Take the crowbar that’s sitting inside. Continue to head towards the left wall to find a cabinet with a candle sitting on top of it. Open it to find a map of the manor. You can look at the map at any time by accessing the inventory and clicking on the icon in the lower right corner.
Head towards the northern end of the room, near the windows, to find another cabinet that has a photo album sitting on top of it. Open the album to find a picture of Allan Cameron’s father, Sean as well as pictures of Bruce McGrab and several members of the MacFarley clan. Take the picture of Lord Alistair MacFarley before heading up the small set of stairs to the right.
As Cameron turns around and walks back down the stairs, something suddenly catches his attention. Use the crowbar to pry the boards off the window and Cameron will spot what appears to be the mystical Loch Ness Monster! Take a picture of the creature with the camera and now we’ll have to find a way out of this god forsaken attic.
Cross to the other side of the room to find a locked door. Use the crowbar to open it and walk down to the end of the hall to find a trap door leading back down into the laundry room.
After Cameron climbs down the ladder, the banshee will suddenly appear and beckon him to follow. We’ll follow her eventually, but we need to get a few things first and our first stop is to the sitting room.
Go over to the fireplace and look at the liquor table sitting nearby. Pour the bourbon into a glass and the Cameron crystal will come falling out. Take it out of the glass and then leave the room through the same door you used to enter.
Head through the door across the hall to find the ballroom. Walk over to the liquor cabinet sitting across the way and remove the carafe of mead from inside it. Go to the other side of the room and open the display cabinet with the knife. Open the box to find a copy of the Auld Alliance Treaty, which Cameron should take with him. The last item on the list that we need to get the banshee to re-appear is the flowers, that means finding the greenhouse.
Leave the room and exit out through the front door. Outside, turn to the right and follow the road down as it forks out to the left and you’ll spot the greenhouse in the distance. Head inside the greenhouse and walk down to the end of the table to find the flower we need. Cut it off using the knife and we’ll have everything we need to meet the banshee.
Walk back to the front door of the manor and turn right. You’ll find the Celtic cross sitting near the shoreline. Head to it and place the flower and mead at its base. The banshee re-appears to greet Cameron to explain more about the three crystals and to warn him against women and whiskey.
=========================
Tuesday, December 18:
=========================
When you leave the bedroom, you’ll hear some muffled voices off in the distance, which makes our first goal figuring out where they’re coming from and what they’re saying.
Follow the sound to the hallway near the Lord’s room and if you try to go upstairs, the voices will suddenly quiet. Head downstairs instead and open the door to the left of the stairs to enter the library.
Upon entering, you’ll hear the sound of a record player skipping, making it hard for hear the voices. Walk over and turn it off to hear the voices coming from the room above you. You’ll find a spiral staircase in the room, so walk up to the stairs until you can go no further. There is a trap door hiding in the ceiling near the right wall. Once you’ve found it, open the door to eavesdrop on a conversation between Lord MacFarley’s daughter, Moira and Bruce McGrab. McGrab is on the hunt for the MacFarley crystal, and he wants to search for it in the Lord’s office.
After the conversation is over, walk back down the stairs and leave the library and return to the main foyer of the manor. Once you’ve arrived, you may notice something that wasn’t there before. On the bench near the staircase you’ll find a small briefcase. I suppose the owner may be wandering around trying to look for it, so let’s root around inside of it to see if we can’t figure out who it belongs to.
We may not have found any sort of identification inside the bag, but there is a signet ring as well as a letter that Cameron can thieve out of it as you never know when a strange ring may serve a purpose. After Cameron is done, a man suddenly comes walking down the stairs. Bruce McGrab will introduce himself to Cameron and he wants to know if he’s had time to think about his offer and he also wants for Cameron to meet him at his distillery so that they can discuss it. I guess that’s where we’re going to be headed to next, once we find a boat that will take us down the river to where the distillery is located.
You know, the good thing about having the map is that you know where everything is located. What you may not have realized is that it also serves as a quick way to get around the island. You can either take the long way or the shortcut. Only fools take the long way, so let’s use the shortcut like any intelligent human being would. Go into the inventory and open the map. Click on the stone bridge and Cameron will automatically appear there. See how quick that was?
Rather than crossing the bridge, turn around and backtrack along the path a little ways. When you look to your left, you’ll find a small dock with a boat tied to it. The boat is exactly what we need, so walk down to the docks. Pick up the oars and hop in the boat and watch as Cameron rows down the river to the distillery. He’ll spot a guard heading inside, so we’ll have to keep on our toes if we’re to avoid getting caught.
You could just walk up to the door and hope the guard lets you in, but he’ll say that the distillery is closed. We need to find a way in and see exactly what is going on in there, so I guess we’re just going to have to sneak in. As you walk along the edge of the building, you can peek in through the window near the door and see the guard sitting around in his office.
As you continue along towards the waterwheel, take a look at the barrels to find a pair of pliers hiding in between them. Pick them up and continue on your way. You’ll see a trench leading into the distillery with water flowing down it and follow it to reach a padlocked door. Cut the chain using the pliers and enter the distillery.
You’ll see several glass bottles lying on the ground. If Cameron should step on one, it’ll make some noise and alert the guard to his presence, resulting in Cameron’s death. Save your game and continue on by heading forward from the door before turning right and going through the next door.
We need to put the guard out of commission so that we can explore the area unmolested. Enter his office to the right and without making a sound, go into the inventory and pour some chloroform into the rag. Use it on the guard and he’ll pass out from it. Look at the bag hanging off his chair to find a book entitled The Grand Book of Kelia. You can read it if you want, but unless you can read the language, you won’t be able to make much out of it at this point.
Pick up the cane lying on the floor near the guard and you’ll realize that you’re holding Lord MacFarley’s cane! Open the top of the cane to find a chest key. Pick up the cane before leaving the distillery.
Once you’re outdoors again, cross the plank and walk over to the waterwheel. Use the cane to jam the waterwheel and stop the flow of water down the trench. Return inside the distillery and when you look where the trench ends, you’ll see that the water covered up a hidden trap door. Open it to find a ladder leading down and climb down to enter the cellar.
Go forward into the cellar and you’ll find an electric chair sitting along the wall to the right. What could that be doing down here, and why is it blocking that door? Look at the chest sitting underneath it to find several metal disks. Take them and then push the chair out of the way. Use the ring to unlock the door and carry on through it to enter an underground cavern.
Move along the path until you see that the path branches off into three different directions, each with three different pictures indicating where they lead. Follow the path with the MacFarley coat of arms above it and you’ll eventually come to a room situated inside the manor. As you look in the chests around you, you’ll find some diving equipment. Exit through the next door to find yourself outside near the path leading to the greenhouse.
Head back inside the manor through the front door and return to the library. If you remember, the engraving on the cane looks pretty familiar. It looks exactly like the one found in the niche in the corner of the library.
Use the cane on the engraving in the niche and you’ll discover Lord MacFarley’s office! Head into the office and look at the glass bookcase nearby. Use the chest key on the bottom right door of the cabinet to find a safe and a message engraved in Latin on the inside of the door. The combination seems to be a special sequence of Roman numerals. Take a peek at the Auld Alliance Treaty and use the year that the treaty was written to unlock the safe: MCCXCV.
Remove the paper that’s sitting inside the safe to find some directions about an armchair. It also shows a picture of a metal gauntlet and a diagram of the chair.
Head up the spiral staircase until you reach the tower laboratory. That’s an odd chair sitting in the hallway. When you’re inside the lab, look at the work table to find a metal glove and a window handle. Take them both and then head back downstairs.
The odd chair must be the one that we saw in the diagram. Take a closer look and from your perspective, manipulate the chair in this fashion:
Push the metal button at the top left and then the one at the top right.
– Lift the right and then the left armrests.
– Pull the right metal rod and the left metal rod.
If successful, the seat of the chair lifts up and reveals the MacFarley crystal hidden underneath it. Pick it up using the metal gauntlet and as you pull back from the chair, there’ll be a sequence in which the maid enters the library and shuts Cameron inside the office. You’re now on a timer as you try to find a means of escaping the room. Luckily, the exit isn’t far from where you are now. Turn left from the chair and continue down the hall a little bit until you see a window on the right. Use the handle on it and Cameron will make his escape.
As Cameron climbs down the rope, someone will cut it with an axe, sending Cameron plummeting into the moat below. Just when you thought he was done for, our hero awakes to find himself back in the manor with Moira MacFarley and a large Scottish man, Fergus Mohr, standing over him. Moira explains what she knows to Cameron and mentions that because of what Lord MacFarley is afraid of, he sent some documents to Scotland Yard and they only need the Grand Book of Kelia to compare them to. Moira will then entrust the task of telegraphing Scotland Yard all the documents Cameron is currently carrying to him so that they can compare them to the notes that the Lord had previously sent to them.
=========================
Wednesday, December 19:
=========================
Head down to the library and re-open the Lord’s secret office. Rummage through his desk by opening the drawer and you’ll find a dagger and a key to take with you. Go upstairs to the laboratory and use the key that you just obtained to unlock the metal door in the middle of the room.
Here you’ll find the telegraph that you need to use to contact Scotland Yard. Follow the directions that Cameron has in his inventory to operate the telegraph.

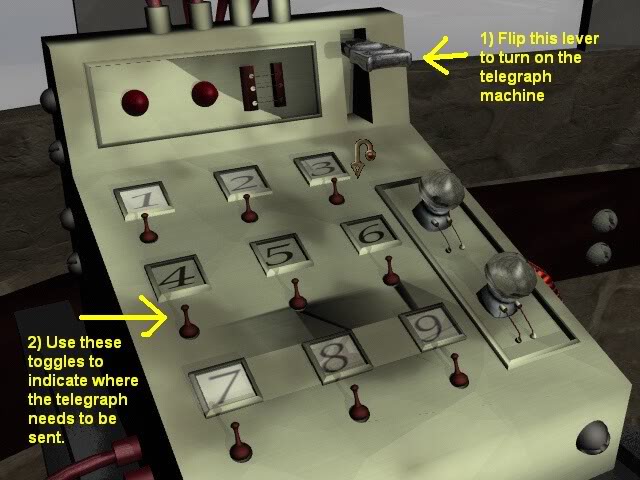
Flip the lever at the top right down in order to power up the telegraph. The next step is to indicate where the telegraph needs to be sent. Flip the toggles to enter the code 75436 for Scotland Yard. Follow it up by flipping the toggles for 65 to enter in the identification code that properly identifies Lord MacFarley as being the sender.
Leave the close-up view of the telegraph machine and look at the contraption to the right of it instead. This is where the telegraphs are sent and received. The panel in front of you is used to send telegraphs and so place Moira’s code on it followed by the fingerprints and the photo of the Loch Ness Monster.
Once you’re done sending them and you leave the close-up view, you’ll hear a bell ring indicating that a telegraph has been received. Look at the left panel and pick up the telegraph from Scotland Yard once the machine has finished printing it.
Read their answer that primarily says that they’ll take a look at what Cameron sent them and have a response in a little while. I guess we’ll have to kill some time in order to let the inspectors at Scotland Yard do their job.
Open the cabinet near the stairs and pick up the raven statuette and the book on the shelf below. When you read the book, it’ll explain that Lord MacFarley, Bruce McGrab, and the butler Avit Kumar Shastra were conducting experiments utilizing the crystals, which resulted in creating holograms of objects.
Return down into the laboratory and walk over to the end of the work table to find the hologram machine. Place the amber & silver discs as well as the raven statuette and MacFarley crystal to activate the machine. Read the message that displays on the holographic raven. Once you’re finished, retrieve the crystal and statue. You’ll soon hear another ring, meaning that another telegraph has arrived.
Go upstairs and check out the telegraph machine to receive two messages from Scotland Yard as well as a drawing. They say that the fingerprints found in the Lord’s room belong to Bruce McGrab and that the photo of the Loch Ness Monster is actually a picture of a submarine used by Lord MacFarley, and the illustration is to prove that fact.
Return to the office and look at the picture of Lord MacFarley that is hanging behind his desk above a dresser. Move the picture to uncover a lock box and pick the lock using the dagger. Remove the key and poem found inside before using the map to travel to the chapel.
When you attempt to unlock the chapel using the key, the key breaks off in the lock. The banshee will appear from behind Cameron and give him more clues to decipher. In order to get into the chapel, we’ll have to scale up to the roof and climb in from above. We’ll need a rope first, and to find one, use the map to go to the stone bridge.
Return to the boat ramp and use the pliers on the chest to break off the lock. Open it to find a grapple and some rope. Head back to the chapel and go around the chapel to the right. There is a spot here that Cameron can use to climb up, but first you’ll need to go into the inventory and combine the grappling hook with the rope.
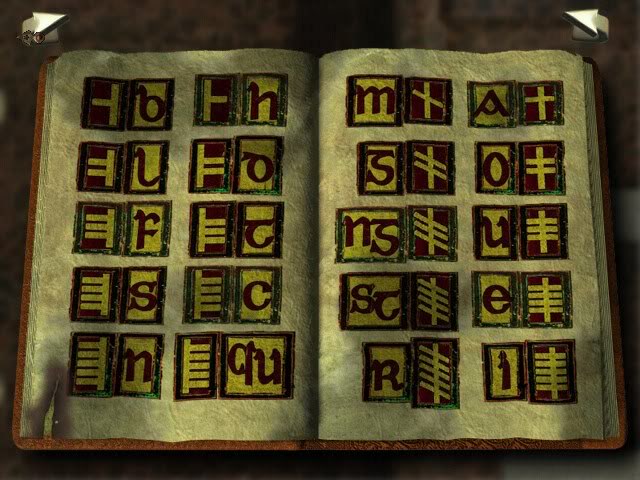
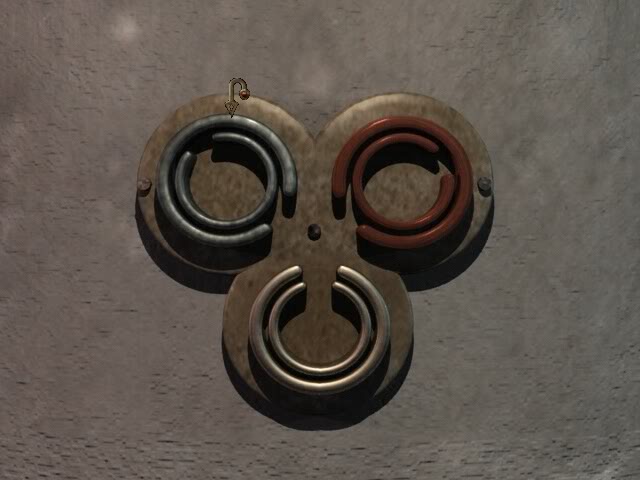
Use the grappling hook to scale up to the roof and you’ll find another puzzle to solve. You can figure it out on your own, or you can use the screenshots below to help. In order to solve the puzzle, you’ll need to decipher the symbols and spell out the word ‘Sirdach’. Open the Grand Book of Kelia and turn to the second to last page to find out which symbol corresponds to which letter of the alphabet.
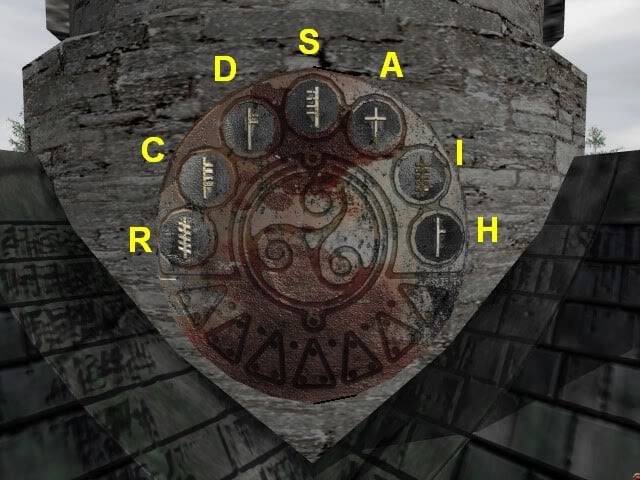
Once you’ve correctly punched in the word, the stone will open to reveal an alternative entrance into the chapel. Use the grappling hook to rappel down to the floor below. You can look at the wall to the left of your present position for a clue as to what to do next, but it’s just easier to explain it to you.
What you need to do is turn the stone tablets around you so that the faces on each one are looking at the cross on the floor.


When they’re in the correct position, a trap door will open up leading down into a crypt. Follow the stairs down and take the Celtic triskel that’s sitting atop the pedestal in front of you. As soon as you take it, however, the pedestal lowers and closes the door behind you.
Put the raven statuette on the pedestal in place of the triskel and the door in front of you that has the raven marking on it will open. Head through the door to find yourself outside. Use the map to return to the manor.
Upon arrival, Cameron will find Avit walking near the stairs. He’ll stop to talk to him about what he has learned and Avit will fill him in with the rest of the details to conclude this day.
=========================
Thursday, December 20:
=========================
Leave the guest room and head downstairs to the sitting room. As soon as you step inside the sitting room, you’ll hear a strange sound coming from outside. Peer out the window near the pool table to see that the Loch Ness Monster has returned! Cameron decides he wants to get to the bottom of this mystery by checking out what’s at the bottom of the lake. In order to do this, however, we need some diving equipment.
Use the map to go to the greenhouse and look at the wheelbarrow next to the door to find an air hose. Pick it up and Cameron will haul the wheelbarrow to the manor’s cellar.
Inside the cellar, open the cabinet and take the diving suit and then walk over to the chest near the grille and take the diving helmet and boots. You’ll also need an air pump, which is to the right when you turn around and face away from the grille. It’s too heavy for Cameron to lift, but he suggests talking to Fergus Mohr for assistance.
Return to the greenhouse and head inside to find Fergus Mohr tending to the plants. He’ll help Cameron get everything set up and when you next find our hero, he’ll be standing at the bottom of the lake.
=========================
The Underwater Maze:
=========================
It’s very easy to get lost as you move around down here, so as you try to find your way through the maze, try to find markers to mark your spot in case you end up having to backtrack.
The way back to the surface is to your left, but it is currently inaccessible at this point. If you look at the ground around you, you’ll spot a broken bicycle lying near your feet. Use this as a marker to mark the starting point of the maze.
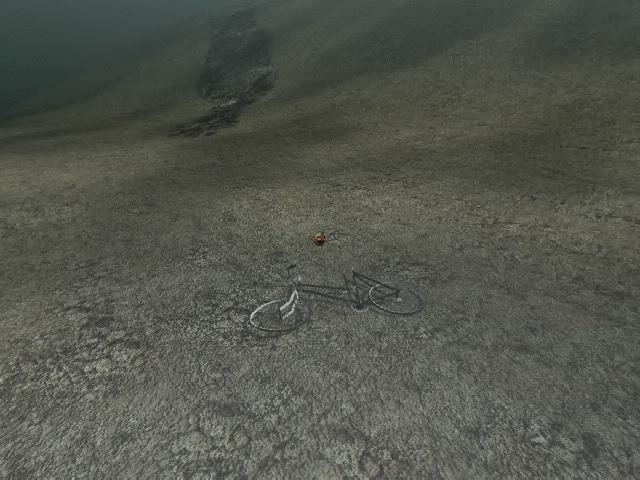
With the shore to your left, head forward twice until you see the wreck of a boat to your right.
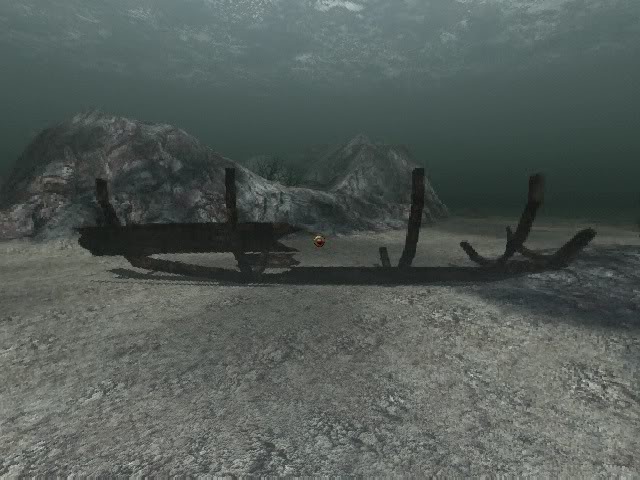
Turn left when you see the boat wreck and head forward to see a rock formation. From the formation, turn to the right and continue forward. Turn left and continue on until you see a couple of plants growing on the sea bed.
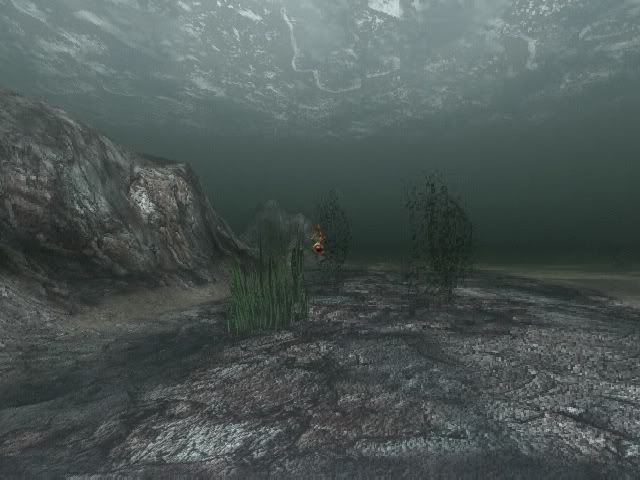
When you see the two plants, turn right and continue forward. You’ll spot an enormous rock to the right and when you see it, turn left from that point.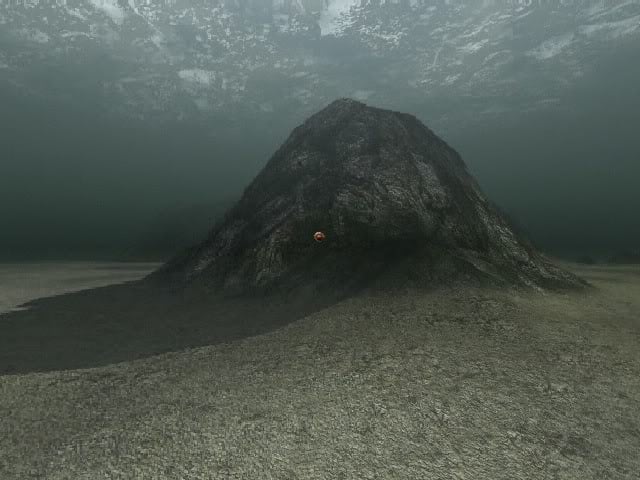
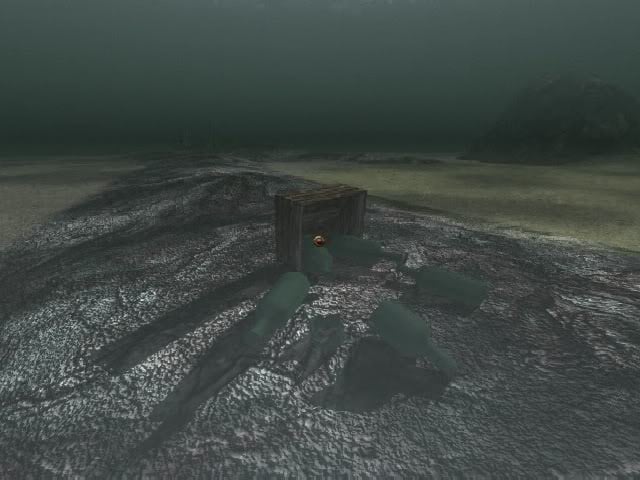
Turn left when you see the cliff in front of you and a broken crate of bottles behind you.
As you continue forward from that point, you’ll spot another piece that broke off a boat. Turn to the left at the spot and continue forward until you see a skeleton to the right. Pick up the broken bottle lying at Cameron’s feet before continuing on.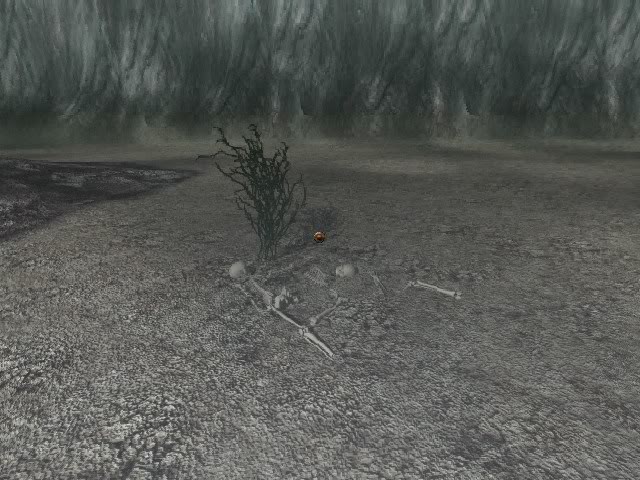
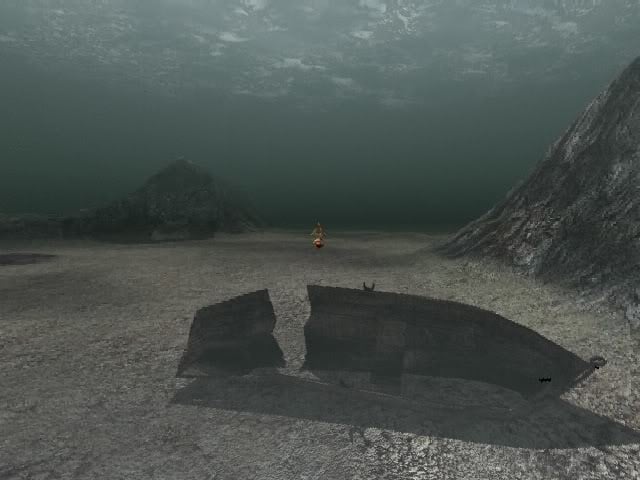
When you see this broken boat, you’ll be getting pretty close to where we’re trying to go. Place the cursor over the boat and continue on from that point.
Continue forward and turn right at the flat area and eventually you’ll arrive at a moss-covered door. When you find it, use the broken bottle on it to remove some of the moss and find a couple of ravens engraved on the door.
Now it’s time to turn around and head back to shore so that we can find a means of opening the door. Just as you begin the trek back, Cameron realizes he’s having a hard time breathing and that means if you don’t get back to shore quickly, he’ll drown. Retrace your steps back to the starting point and up to the shore to find yourself standing on a rocky outcropping.
Climb up by turning right and then left and you’ll realize why Cameron wasn’t getting any air. Someone knocked out Fergus Mohr, so let’s return to the manor to find out what happened. As you continue to the manor, you’ll hear Moira scream.
Look inside Lord MacFarley’s secret office in the library to find that it has been ransacked. As you attempt to head upstairs, Lady MacFarley suddenly makes an appear to inform Cameron that Moira has been taken. She keeps a pistol in the dresser in her room, so let’s go retrieve it before we set off to rescue Moira.
The pistol is inside the dresser with the mirror, and once you have it, use the map to go to the distillery. Head towards the waterwheel and before you go through the door, pick up the bag of sawdust to the right. Head inside and as go through the next door, you’ll hear the door being locked behind you. Go through the main door and watch as Cameron is knocked unconscious by the maid.
Cameron will awaken inside the distillery’s cellar and you’ll now have to find a way to escape. Take the leather strap hanging on the wall across from you and tie one end to the bars near the corner of the room and tie the other to the winch across from it. Use the winch and it’ll yank the bars out of the wall, creating an opening for Cameron to use to escape. Save your game before retrieving Cameron’s bag from the ground near his feet.
As soon as Cameron picks up his bag, you’ll see the maid leaving the distillery. She’ll spot Cameron and level her gun at him. Before the timer runs out and Cameron is shot, use the revolver to shoot the bag hanging above the maid to have it fall on her and knock her out. Look at her body and inspect the bag that’s lying next to her. Remove the book and watch as the banshee appears to inform Cameron that tomorrow is the shortest day of the year before this day concludes.
=========================
Friday, December 21:
=========================
Open the inventory and read McGrab’s notebook to learn some clues for what is coming up a little later. Waste no time and go straight to the manor’s cellar by using the map to go to the greenhouse and walking over from there.
Return to the fork in the underground cave and follow the path with the raven above it. At the end, you’ll find a rock with a triskel on it as well as a pair of stone wheels next to it. You’ll notice that the cursor changes when you move it over the rock, meaning that it can’t be moved right now.
In order to move the rock, look at the wheels next to you.
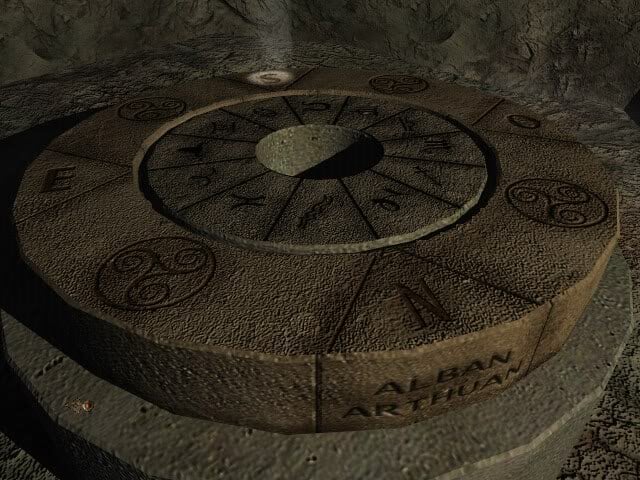
Move the outer wheel until the N is under the beam of light. Move the inner wheel until the sign of Capricorn is almost under the N and you hear a grinding sound. The rock will have moved so that Cameron can continue on.
When you emerge, you’ll find yourself inside of McGrab’s secret hideout. Walk up the stairs and follow the path around to the left. Look through the nearby window and you’ll find Lord MacFarley! He’s unconscious, and he’s hooked up to an electric chair so we’ll have to find a way to rescue him. Proceed around his room and head down to the next hallway.
When you look through the next window, you’ll see McGrab holding a meeting with the rest of his conspirators, who are hooded and therefore we’re unable to tell who they are. After they leave, quickly move to the right to hide and then you’ll be allowed to roam throughout the hideout unhindered.
Enter McGrab’s office and look at the strange apparatus on the wall behind the desk. Turn it on to unlock the other doors in the hideout.

Look at his desk and take the chest sitting on it. Look in his drawer to find a platinum key and a pair of metallic pliers. When you turn around and leave the room, you’ll notice a strange control panel on the pillar. Move the two upper circles to open the doors to the other rooms.
Go into the room to the left to enter the laboratory. Read the book on the shelf to the right to learn how to make gunpowder and dynamite. Open the cabinet across the room and take the beakers of glycerol, sulfuric acid, and nitric acid in addition to those, you’ll also receive a pipette. Now it’s time to set Lord MacFarley free.
Leave the room and turn left to enter the Lord’s cell. You’ll have to very careful about this as one wrong move will kill him. Follow the wires running from the Lord’s head to their power source, which is sitting on the table next to him.
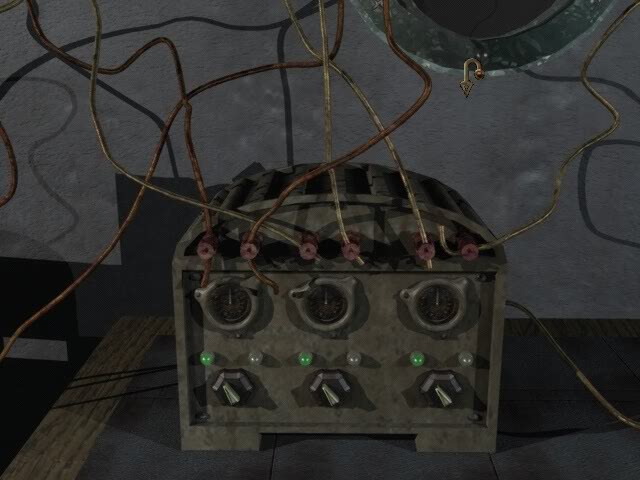
Look closely at the control box and to set Lord MacFarley free, turn off the center switch, then the right switch, and turn off the left switch last. Pick up the bottle of water next to the control box and give it to Lord MacFarley and he’ll regain his senses. After Cameron fills him in on what has happened, he’ll set off for his observatory to prepare the laser.
Save your game now because as you leave the room, you’ll be given two choices: Save Moira or make the dynamite. You’ll have plenty of time to do both, so let’s go ahead and make the dynamite now and save us some trouble later.
Go into the laboratory and look at the beaker at the end of the table to the left.
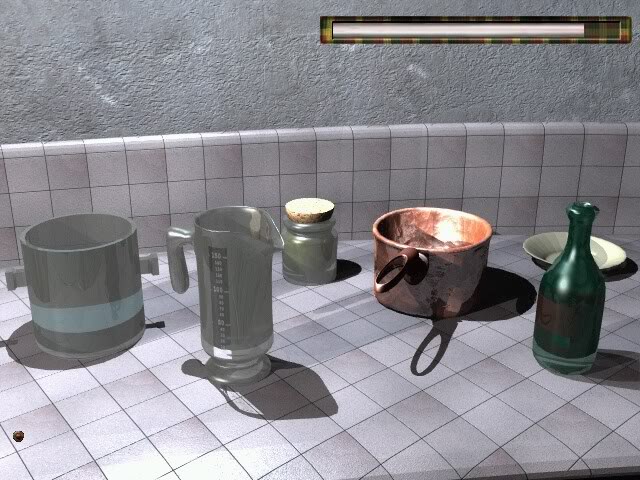
Pour the nitric acid into the center beaker four times and then pour the sulfuric acid into it four times as well. Put some glycerol into the beaker once and pour the mixture into the beaker to the left. Place the pipette into the left beaker and pour the sawdust into the beaker on the right. Pipette the mixture into the beaker containing the sawdust to stabilize the newly-made nitroglycerin.
Leave the laboratory and follow the hallway to the right. You should spot an entryway to the right and when you head through it, you should see a small hatch on the floor to the right. When you look above it, you’ll see a keypad. Use the code 421 to open the hatch and climb down the ladder.
Proceed into the docking area to find the submarine docked here, as well as Moira hanging over the water inside of a cage. Turn left and walk over to the control panel. Sitting near it is a small bucket and when you look inside of it, pick up the starry key found inside.
When you look at Moira’s cage, you’ll see that the rope holding it up runs towards a control panel at the other side of the room. Walk over it and look closely at the panel. Use the starry key on the left side of it and then move the cursor below the lever before pulling it.
The cage will be brought back to solid ground, so walk over to Moira’s cage and use the pair of bolt cutters to cut the chain locking the cage to set Moira free. Now let’s blow this popsicle stand!
Walk onto the submarine and head towards where the ballast is located. Put the nitroglycerin on it and now we’ll have to retrieve the triskel. Go back upstairs and head into the hallway on the other side of the room. There’s another entry way to the right of McGrab’s office and when you head into it, you’ll find a door with a triskel on it and another keypad on the wall to the right. Use the code 532 to unlock the door and head inside.
Go around the column to the right and look at the door. Use the platinum key to unlock the door before opening it. Place the chest next to the chamber and use the metallic pliers to pick up the triskel. Put the triskel in the chest and then take the chest with you. We’re finished at the hideout, so make your way out to the underground cave and then use the map to travel to the manor.
Return to the library and walk up the observatory after using the cane to unlock the office. You’ll find Moira waiting for Cameron here. Once they’re done talking, look through the window to the right to see the submarine departing. Quickly use the laser on the center of the submarine to destroy it and Moira will thank Cameron for everything that he has done for them. There’s one last thing to do before this game is over, and that is paying a visit to the banshee at the Celtic cross.
Use the map to travel to the Cross and place the chest containing the triskel at the base of the cross. The banshee will appear one last time and thank Cameron. Everything will go back to being a part of legends and the banshee will reappear when circumstances dictate it.
This concludes The Cameron Files: Secret at Loch Ness!
“;
