
Best Horror Games On Itch.io – July 2026
Across a bounty of subgenres.![Haze Seas Accessories Tier List [Best Accessories to Equip]](/wp-content/uploads/2026/07/haze-seas-accessories-tier-list.jpg "Haze Seas Accessories Tier List [Best Accessories to Equip]")
Haze Seas Accessories Tier List [Best Accessories to Equip]
The accessories with the best stat buffs in Haze Seas.
![[Roblox] Evomon Shiny Hunting Guide – Including Prismatic and Pris Shinies!](/wp-content/uploads/2026/06/evomon-shiny-hunting-guide.jpg "[Roblox] Evomon Shiny Hunting Guide – Including Prismatic and Pris Shinies!")

The Agency of Anomalies: Mystic Hospital Walkthrough
Welcome to the Agency of Anomalies: Mystic Hospital walkthrough on Gamezebo, written by Lynne Basinet. The Agency of Anomalies: Mystic Hospital is an interactive, adventure hidden object game played on PC, created by Orneon. This walkthrough includes tips and tricks, helpful hints, and a strategy guide for how to complete The Agency of Anomalies: Mystic Hospital.


- Prefer Gamezebo on Google

The Agency of Anomalies: Mystic Hospital – Game Introduction
Welcome to the Agency of Anomalies: Mystic Hospital walkthrough on Gamezebo, written by Lynne Basinet. The Agency of Anomalies: Mystic Hospital is an interactive, adventure hidden object game played on PC, created by Orneon. This walkthrough includes tips and tricks, helpful hints, and a strategy guide for how to complete The Agency of Anomalies: Mystic Hospital.
General Information
- Main Menu
- Profiles: Click on “Not you?” to create up to 8 profiles, with a maximum of 12 characters (letters and numbers, only).
- Options: Adjust the Music and Sound volumes and turn Full Screen, Wide Screen and Custom Cursors on and off.
- Help: Contains information about the Game Cursors, Buttons and various Functions.
- High Scores: Click here to view how long you’ve played the game. The list is pre-populated with fictional names and scores.
- Credits: View information about the development team.
- Extras: Contains Minigames, Strategy Guide, Achievements and the Bonus Adventure. Note that the Minigames and Bonus Adventure are locked until you complete the main game.
- Game Screens
- Menu: located at the lower left, click to access Resume, Help, Options, Strategy Guide and the Main Menu. You can also press the Esc key on your keyboard to bring it up. Press again to dismiss it.
- Anomalous Activity Detector (aka: AAD): located at the lower right, click to highlight an area in general areas and then click on the item to reveal an image of your next task. It changes to a Hint button in Object Searches and a Help/Instruction button (“?”) during minigames and puzzles.
- Nexus Machine: located at the lower right, just above the AAD. You won’t use this until the end of the game, after you’ve collected all 5 Nexus Tubes. During minigames and puzzles, it changes to a Skip button.
- Inventory: located at the bottom of the screen, it contains items you collect, to use elsewhere. If there are more than 8 items, use the arrows, at the left and right, to scroll through your items.
- Top Secret Folder: located at the lower left, just above the Menu button, click to review the Top Secret Items you’ve collected and to replay game movies/cutscenes.
- Notebook: located at the lower left, just to the right of the Top Secret Folder, click to view your current objectives (Goals tab) and your activity to date (Story tab).
- Gameplay
- Gameplay consists of interactive tasks, collecting inventory items, completing object/interactive searches, navigating through different areas and solving minigames and puzzles.
- Object Searches contain between 1 and 3 items in Red that require you to complete a task to collect or find them.
- Interactive Searches contain items that you need to place into the scene with their associated objects.
- Collect 20 Postcards (optional).
- Find 6 Top Secret Files (optional).
- Find 5 Nexus Tubes (required).
- Special Features
- Game Mode: you may choose either Casual (Hint and Skip buttons charge more quickly and all active areas are highlighted) or Advanced (Hint and Skip buttons charge more slowly and active areas aren’t indicated). Note that all Object Search scenes will be indicated, in both modes.
- Strategy Guide: access the Strategy Guide by clicking on the Menu Button, during gameplay, and click on the Strategy Guide button. Click on the page number to go back and forth.
- Achievements: A list of Awards for completing various game elements.
- Minigames: once unlocked (by completing the main game), you may replay all minigames you completed during regular gameplay (Collector’s Edition only).
- Bonus Chapter: complete the main game to access this additional chapter (Collector’s Edition only).
Gameplay and Guide Tips
- This guide assumes you’ve read the General Information, used the in-game Tutorial and/or Help features or otherwise familiarized yourself with the gameplay.
- When you first begin, you’ll have an option to view a tutorial that will take you through gameplay mechanics.
- The Hint and Skip buttons recharge/charge in 60 seconds, in Casual Mode, and 120 seconds (2 minutes) in Advanced Mode.
- The game is somewhat non-linear. Although some areas/tasks aren’t available until after you complete other tasks, you may complete any available areas and tasks, in any order you choose.
- Many items can be clicked on; however, they won’t be mentioned unless they’re necessary for game progression. DO click on them so you have a better gaming and more immersive story experience. Occasionally, an item won’t be active until later in the game, or after you complete a task. Those items will be mentioned only when they become active.
- Rapid mis-clicking will briefly pause gameplay.
- Object Search lists will contain between 18 and 24 items, although only 12 will be shown when you first begin. The other items will be added as you eliminate the initial items. Search lists are nearly identical, except for 1 or 2 items, and all items will be shown in the walkthrough images. The Inventory Item will be added after you complete the original list.
- Interactive Search lists will contain between 10 and 14 items, although only 8 will be shown. Use the Inventory Arrows to scroll to the additional items. Click on an item and then click on its associated object to eliminate it.
- Hover your mouse cursor over an Inventory Item for a description.
- After you’ve collected a Top Secret File, click on the photo to replay the cutscene.
- If you’re not sure what to do next, check your Notebook (Goals tab) or use the AAD.
- Be sure to check your Notebook (Story tab) often. It will contain information and clues to solve puzzles.
- Items in Object Search lists will be highlighted with a Lower Case Letter and listed in a table in the walkthrough text. Interactive Items will be highlighted with a Number and completion directions listed in the walkthrough text.
- Items in Interactive Searches will be highlighted with Lower Case (list items) and Upper Case (scene items) Letters.
- Inventory Items will be highlighted in yellow, Postcards in green, Top Secret Files in blue, Nexus Tubes in pink and Interactive Areas in white (or white letters/numbers). Additional/Alternate colors, numbers, arrows, lines and/or letters will be used where necessary and for clarification.
- Note that some items were renamed, in this walkthrough, to fit inside charts or with more logical/recognizable English names.
Walkthrough
Create your profile, choose your Game Mode, adjust the options, if you like, click on Start and then watch the opening movie.
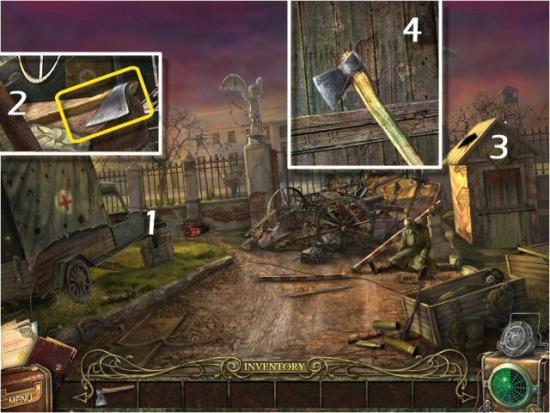
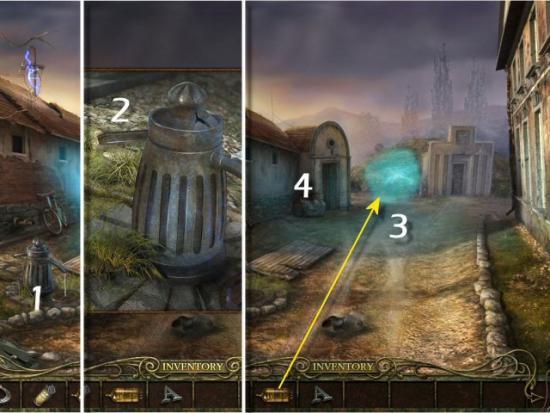
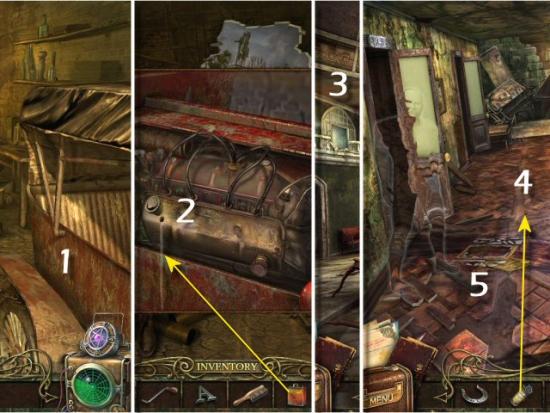
1 – Alexander Sylvani: Lightning
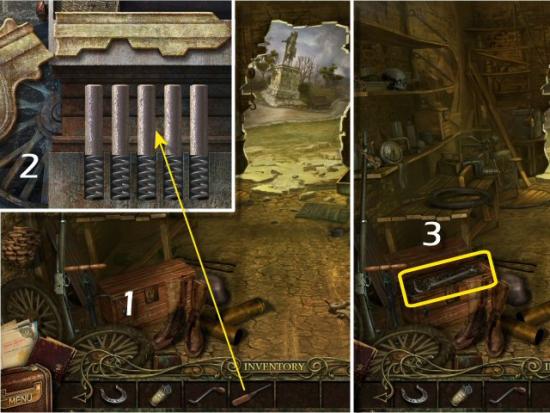
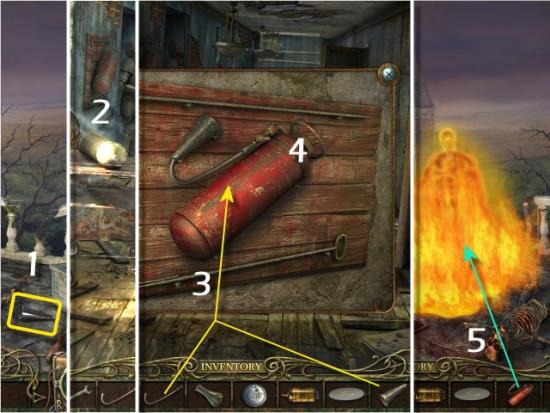
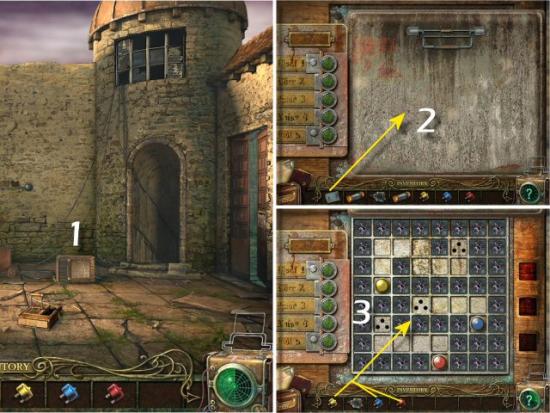
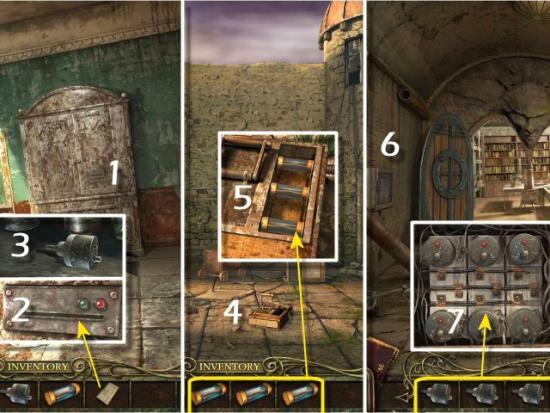
Open the Truck Door (1), collect the Axe (2) and then click on the Guard House (3). Use the Axe on the Door (4 – click 3 times) and then click on the Open Doorway.

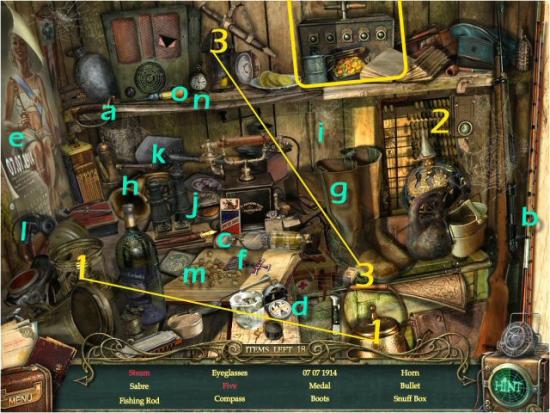
Find all the items in the list.
a. Saber | b. Fishing Rod | c. Eyeglasses | d. Compass | e. 07 07 1914 |
f. Medal | g. Boots | h. Horn | i. Bullet | j. Snuff Box |
k. Spade | l. Head Phones | m. Bread Crumbs | n. Watch | o. Awl |
Interactive Items
- Steam: Use the Tea Kettle on the Burner and then click on the Steam.
- Five: click on the Abacus until 5 beads have been moved to the left, on the top row, and then click on it.
- Lit Lantern: Use the Matches on the Lantern and then click on the Lit Lantern.
Inventory Item: Detonator
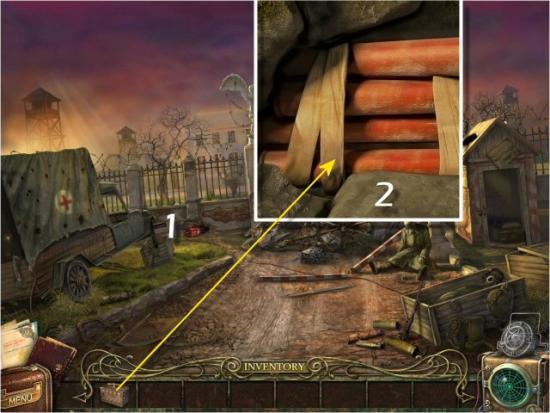
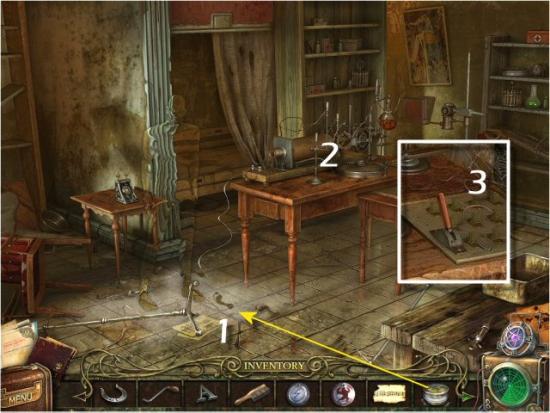
Click on the Dynamite (1) and use the Detonator (2).
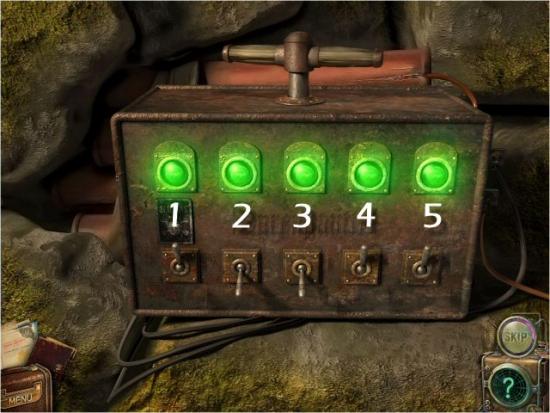
The object is to illuminate all the lights on the Detonator. The Switches turn on the following lights:
Switch 1: 3
Switch 2: 1, 2, 3 and 4
Switch 3: 3, 4 and 5
Switch 4: 1 and 5
Switch 5: 2 and 4
Click on Switch 1, 4 and 5, in any order, to illuminate all 5 lights.
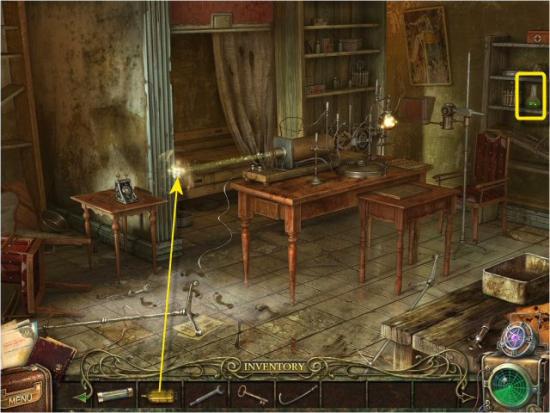
Head through the Gate (1), collect Top Secret File #1, Postcard #1 and the Horseshoe, and then head toward the Hospital (2).
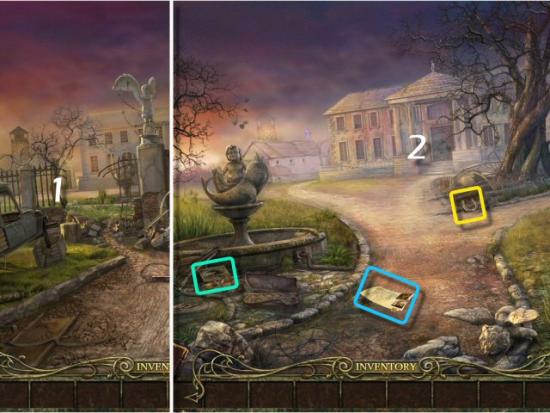
Collect Postcard #2, head left to the Porch (1), collect the Smoke Grenade, Key and Postcard #3, and then click on the Bench (2).
Find all the items in the list.
a. Syringe | b. Ring | c. Leaf | d. Newspaper | e. Razor |
f. Coin | g. Vase | h. Umbrella | i. Bell | j. Slippers |
k. Pistol | l. Cap | m. Spoon | n. Screwdriver | o. Tray |
p. Eyeglasses | q. Moss | r. Pills | s. Thermometer |
Interactive Items
- Toy Ship: Use the Hammer on the Ship in the Bottle and then click on the Toy Ship.
- Black Cat: Use the Paintbrush on the Painting and then click on the Black Cat.
- Heart: Use the Needle and Thread on the Embroidery Hoop and then click on the Heart.
Inventory Item: Gramophone Crank

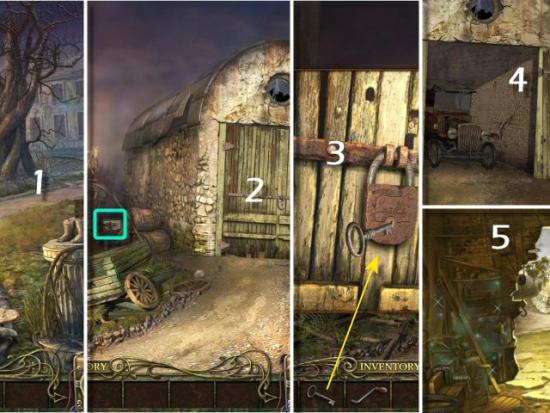
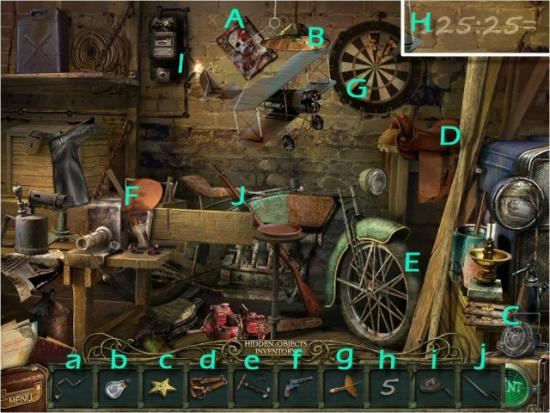
Return to the Path (click back 2 times) and head right to the Garage (1). Collect Postcard #4, click on the Garage Door (2) and use the Key in the Lock (3). Enter the Garage (4) and then click on the Shelves (5).
Match all the items in the list to their associated objects.
a. Brace | A. X | b. Bulb | B. Lamp | c. Star | C. Epaulet |
Stirrups | Saddle | Pump | Tire | Revolver | Holster |
d. Dart | D. Dartboard | e. 5 | E. Ratio* | f. Tape | F. Wire |
g. Bayonet | G. Rifle |
*This will appear after you use the Dart on the Dartboard
Inventory Item: Lock Pick (you’ll receive this automatically)
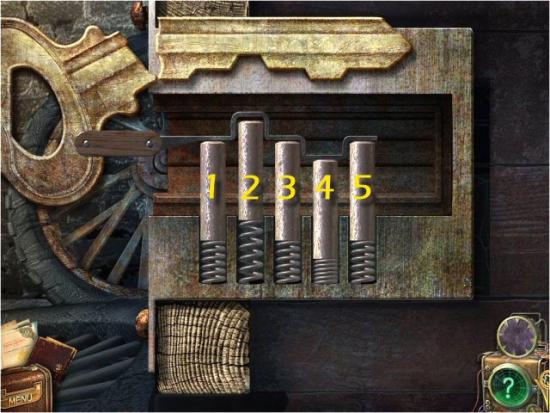
Click on the Chest (1) and use the Lock Pick on the Tumblers (2). Once complete, collect the Crowbar (3).
The object is to arrange the Tumblers to fit the shape of the slots on the Key. Each Tumbler has 3 positions. They start out at the top, click once to lower it one notch, click again to lower it another notch and click a third time to return it to the starting position. The solution is always the same and you may click on the Tumblers in any order you like. Once they’re in the correct position, they Lock will open automatically. The solution is:
- Tumbler 1: lower one notch (click once)
- Tumbler 2: leave at the highest position (don’t click on this one)
- Tumbler 3: lower one notch (click once)
- Tumbler 4: lower two notches (click twice)
- Tumbler 5: lower one notch (click once)
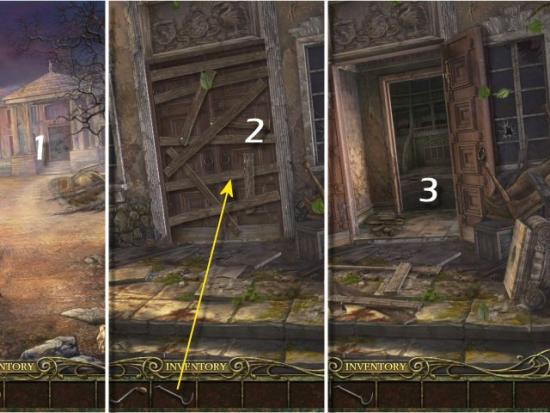
Return to the front of the Hospital (1 – click back twice and then forward once), use the Crowbar on the Door (2 – click 5 times) and then enter the Hospital (3).
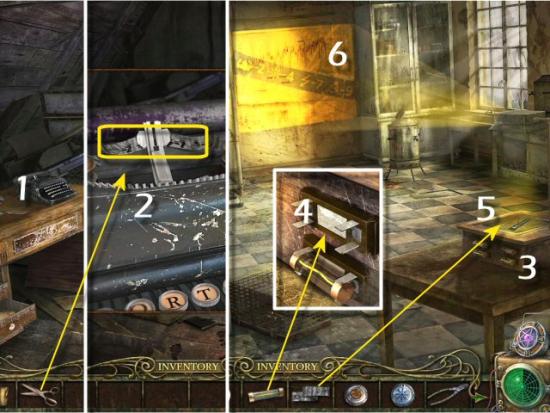
Collect Postcard #5, open the Crate (1), collect Top Secret File #2 and then continue through the Double Doors (2) to the Office.
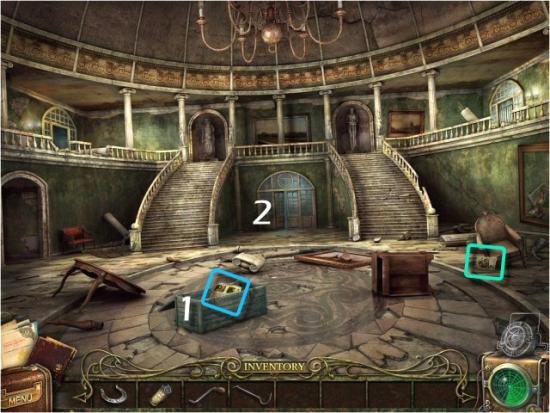
Collect the Letter A (on the left), Postcard #6, Nexus Tube #1 and then click on the Torn Photograph (on the left side of the Desk, at the right).
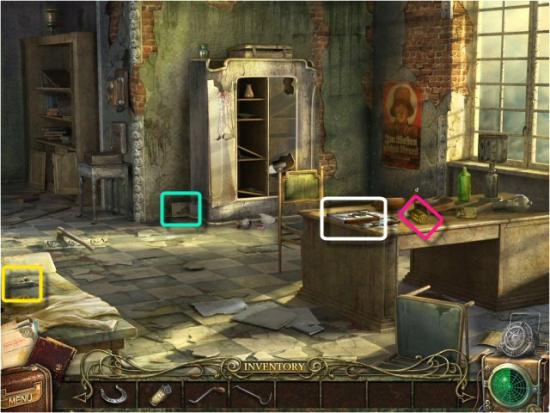
The object is to reassemble the Photograph. Click on any black and white square and then click on another to switch their places. Once they’re in the correct position, they’ll lock into place and change to a sepia tone.
Return to the Path (click back 3 times) and then continue forward on the left (1). Move the Shoe (2), collect the Valve (3) and then return to the Path (click back once). Click on the Pipe (4), use the Valve on the Valve Stem (5), use the Crowbar on the Grating (6) and then click on the Open Grate.
The object is to assemble the Pipes so that the water flows to the Valve. Click on a section of Pipe and place it into the grid. Once placed correctly, the Pipe will lock into place. When complete, click on the Pipe and then click on the Valve.
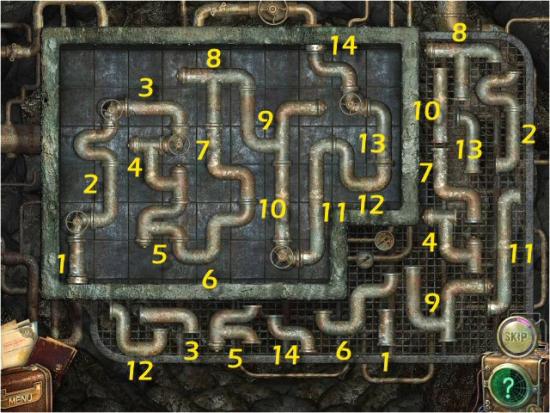
Click on the following for a video solution.
Return to the left side of the Hospital, click on the Pump (1), click on the Handle (2) and then use the Nexus Tube on the Energy (3). When complete, enter the Building on the left (4).
2 – Eric Weissman: Telekinesis
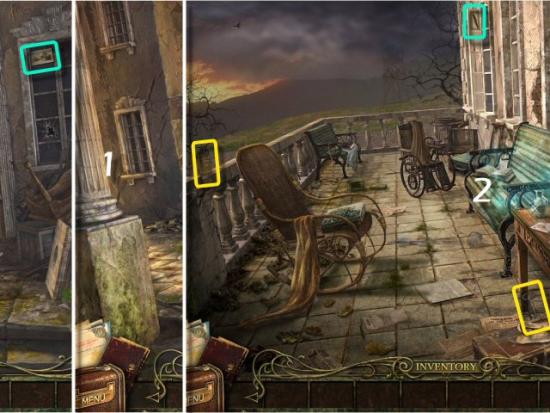
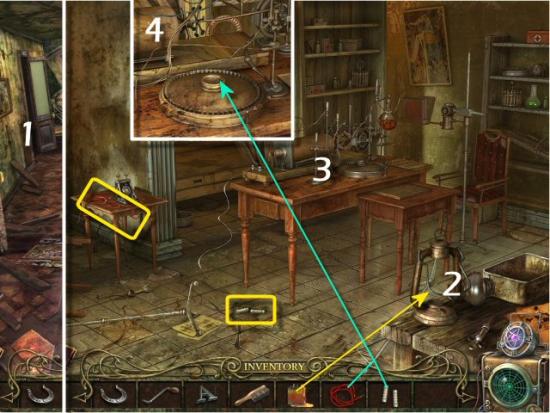
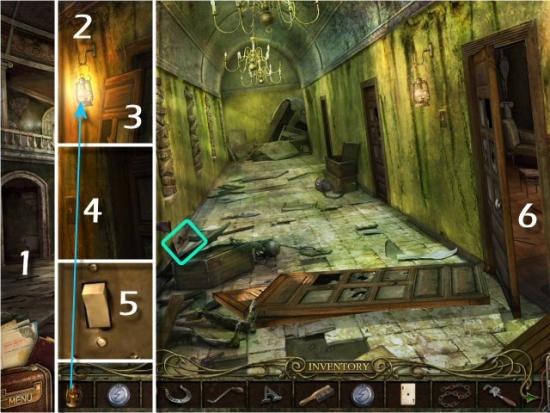
Collect Postcard #7, the Brush, Gas Can and Battery, return outside (click back) and then enter the Building on the right.
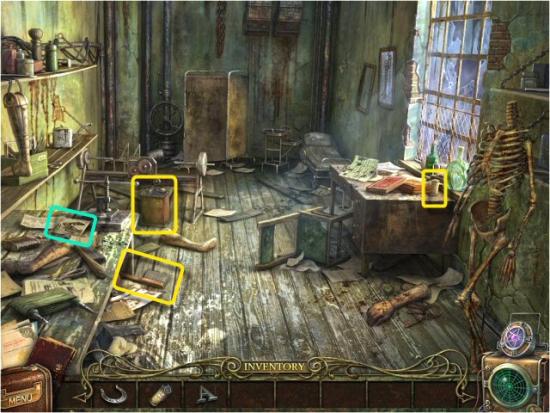
Collect Postcard #8 and the Bulb and then click on the Flashlight (1). Use the Battery and Bulb on the Flashlight (2), collect the Flashlight and then click on the Electrical Panel (3).
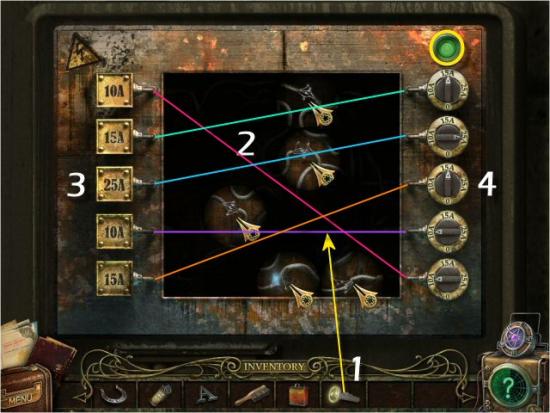
Use the Flashlight on the Panel (1) and then repair all the Broken Wires (2). Move the Flashlight (your cursor) around to locate them and click on each Broken Wire to repair it – the Light will turn yellow. Next, trace the wiring, from the Junctions (3) to the Fuses (4), by moving the Flashlight (your cursor) along the path of the wiring. Finally, turn the Fuses so the proper amperage goes to each Junction. Click on each Fuse so the Arrow points to the correct amperage: 15, 25, 15, 10 and 10. Each time you click on a Fuse, the Arrow rotates once, in a clockwise direction – the Light will turn green.
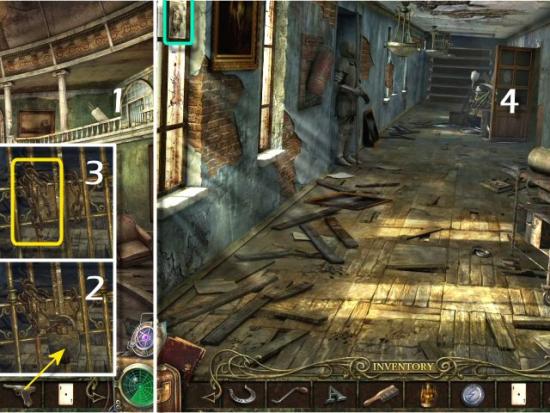
Return to the Garage (click back twice, right once and then enter the Garage), click on the Car (1) and use the Gas Can on the Fuel (2). Return to inside the Hospital (click back twice and forward twice) and then enter the upstairs, left Corridor (3). Use the Smoke Grenade in the Hall (4 – click anywhere) and then click on the Broken Glass (5).
The object is to reassemble the Broken Glass. Click on a piece, drag it inside the frame and then click to place it. If placed correctly, it will lock into place. Note that you don’t need to rotate any pieces; they will orient themselves, automatically.
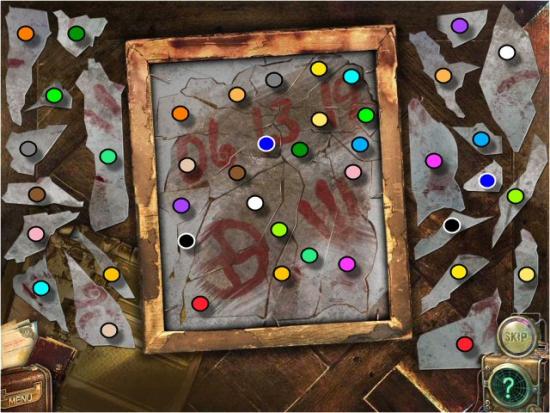
Click on the following for a video solution
Enter the far Door (1), collect the Wire and Insulators, use the Gas Can on the Empty Lantern (2) and collect the Lit Lantern. Click on the Table (3), Use the Wire and Insulators on the X-Ray Machine (4 – click anywhere, in either order) and then return to the Corridor (click back).
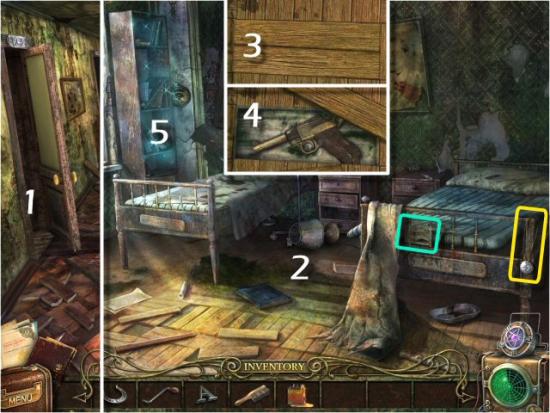
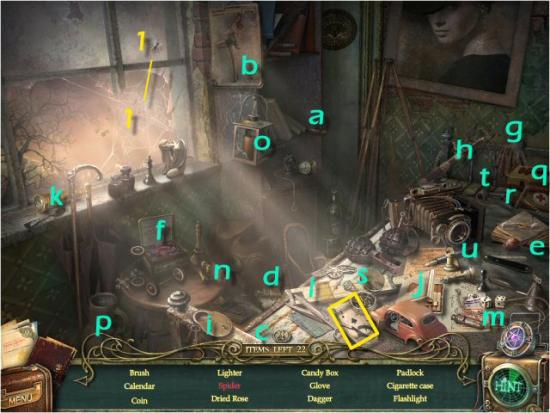
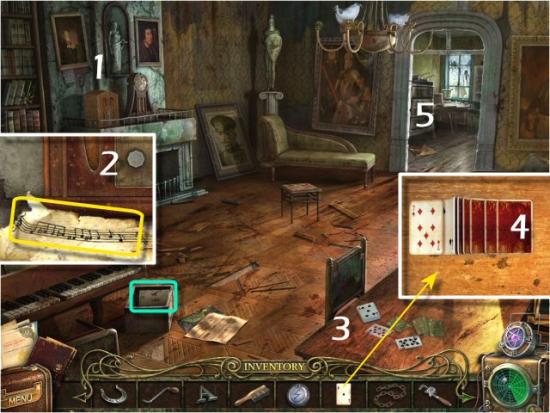
Enter the near Door (1) and collect Postcard #9 and the Lightning Medal. Click on the Floor (2), click on the Loose Board (3), collect the Pistol (4) and then click on the Bookshelf (5).
Find all the items in the list.
a. Brush | b. Calendar | c. Coin | d. Lighter | e. Dried Rose |
f. Candy Box | g. Glove | h. Dagger | i. Padlock | j. Cigarettes |
k. Flashlight | l. Ruler | m. Dice | n. Bullets | o. Lantern |
p. Jug | q. First Aid | r. Corkscrew | s. Ring | t. Pipe |
u. Pen |
Interactive Items
- Spider: use the Fly on the Spider Web and then click on the Spider.
Inventory Item: Playing Card
Return to the Foyer (click back twice), click on Gate at the upper right (1), use the Pistol on the Lock (2) collect the Chain (3) and then enter the Corridor. Collect Postcard #10 and then enter the open Door (4).
Collect Postcard #11 and the Wrench, click on the bottom Drawer (1), collect the Tin Box (2), move the Pillow (3) and then click on the Journal (4).
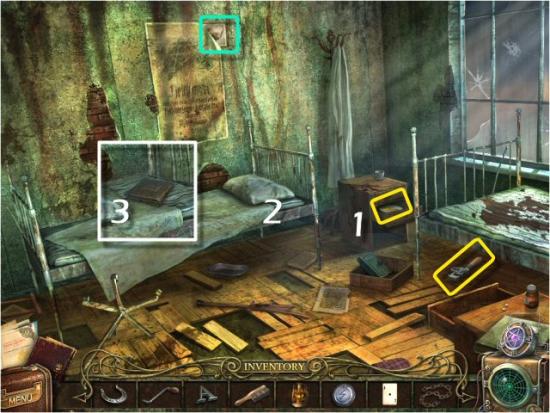
The object is to select the missing item on the right and place it on the image on the left. After you place the correct item, the page will turn to the next image. There are 12 images in total.
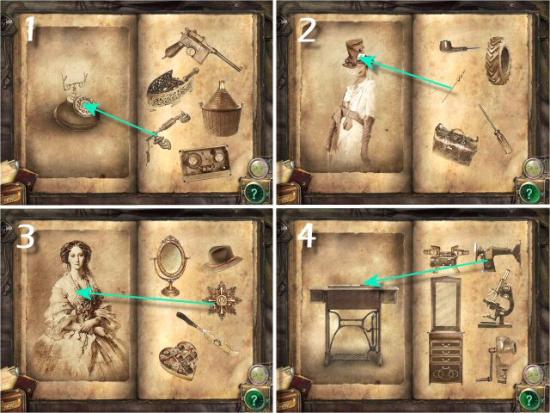
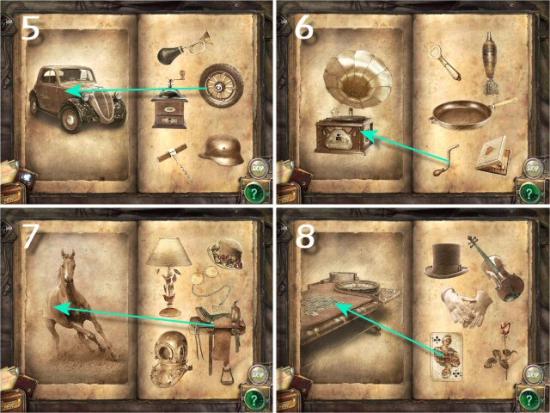

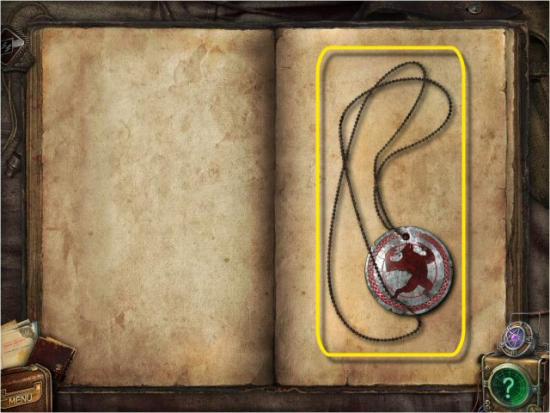
Collect the Werewolf Medal from the last page.
Return to the Foyer (click back twice) and enter the lower left Corridor (1). Use the Lantern on the Hook (2), move the Broken Doors (3), click on the Wall Switch (4) and then turn on the Lights (5). Collect Postcard #12 and then enter the Room (6).
Collect Postcard #13, click on the Radio (1), click on the Dial (2 – click 3 times) and collect the Music Score. Click on the Deck of Cards (3) and use the Playing Card on the Table (4). When complete, enter the Kitchen (5).
The object is to eliminate the cards in your Tableau (A) by playing a card that matches the uppermost card, in suit or number, in the Foundation (B). The next card you play from your Tableau must match the one you played to the Foundation, again by suit or number. Continue playing until you’ve eliminated all the cards in your Tableau, to reveal a Code (C). Note that the solution is always the same; however, the order of the cards in your Tableau may be different. Pick up each card and place it on the Foundation. The solution for the order of play is:
- Ace of Hearts
- Queen of Hearts
- Queen of Spades
- 2 of Spades
- 5 of Spades
- 5 of Clubs
- King of Clubs
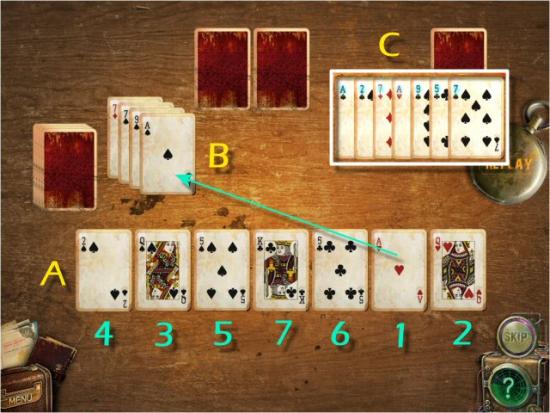
Click on the following for an example of how to play.
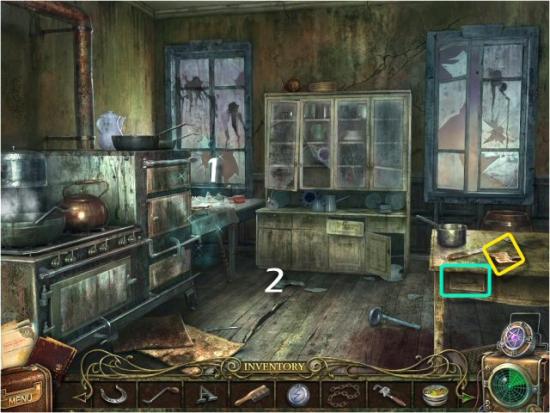
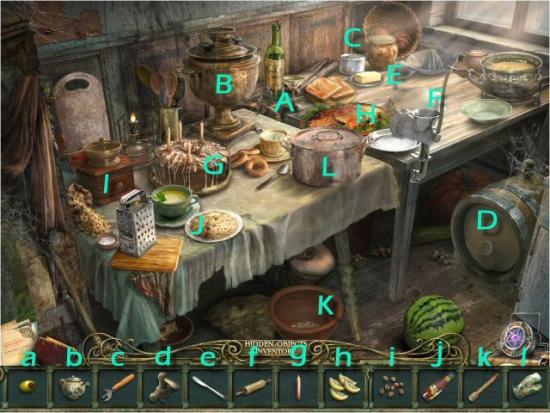
Collect Postcard #14 and the Bread Crumbs, and then click on Table (1). When complete, click on the lower, left Cabinet (2).
Match all the items in the list to their associated objects.
a. Olive | A. Martini | b. Teapot | B. Samovar | c. Opener | C. Can |
d. Tap | D. Keg | e. Knife | E. Butter | f. Roll. Pin | F. Dough |
g. Candle | G. Cake | h. Lemons | H. Fish | i. Coffee | I. Grinder |
j. Ketchup | J. Spaghetti | k. Pestle | K. Mortar | l. Hot Pad | L. Lid |
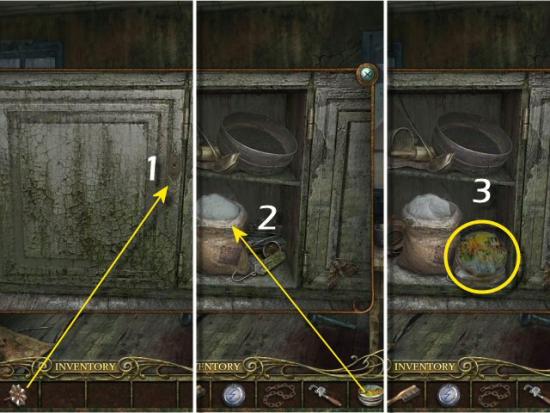
Inventory Item: Cupboard Handle (you’ll receive this automatically).
Use the Cupboard Handle on the Door (1), use the Tin Box on the Flour (2) and collect the Box with Flour (3).
Return to the upstairs, right Corridor (click back 3 times and then right through the upstairs Doorway), use the Wrench on the Wheel (1), move the Cart out of the way (2) and then enter the Room (3)
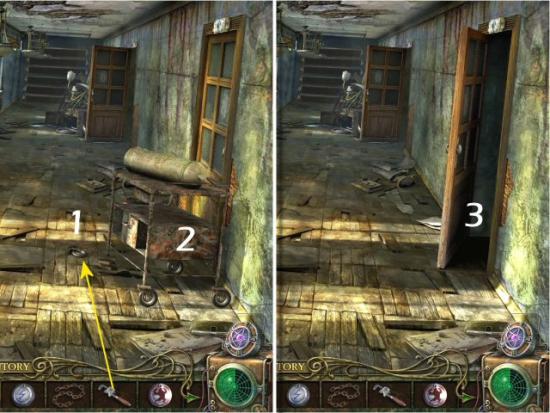
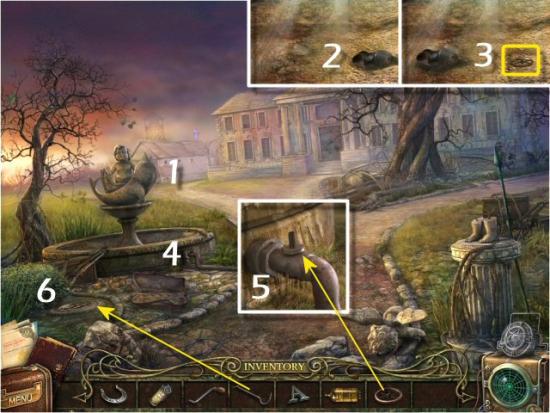
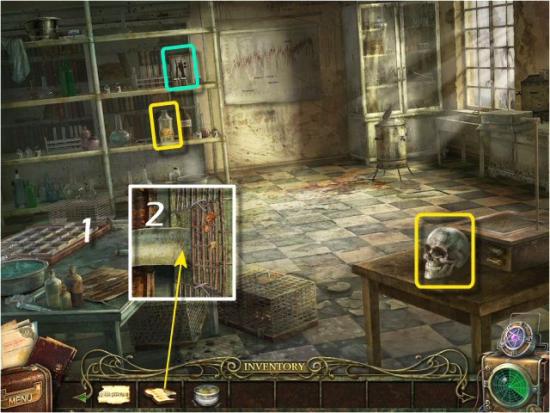
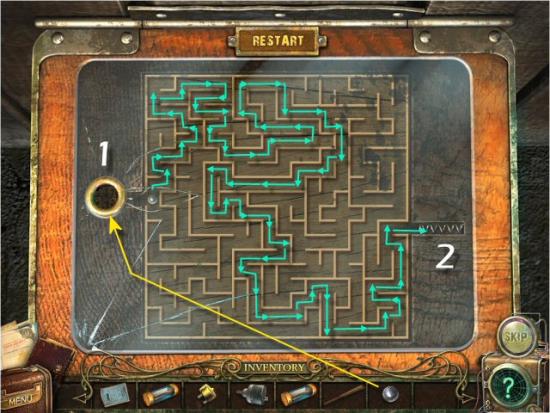
Collect Postcard #15, the Acid Bottle and the Skull, click on the Mouse Labyrinth (1) and then use the Crumbs on the Exit (2). [“Need to fix the image and get rid of 3”]
The object is to open the correct Gates to allow the Mouse to navigate the Labyrinth to the Exit. Broken Gates will turn red when you click on them; you’ll have to choose another Gate, to direct the Mouse in a different direction. Once the Mouse passes through a Gate, it will close behind him. Click on the Gates, in the order shown in the following screenshot, to get the Mouse through the Labyrinth. Collect the Fuse after the Mouse exits the Labyrinth.
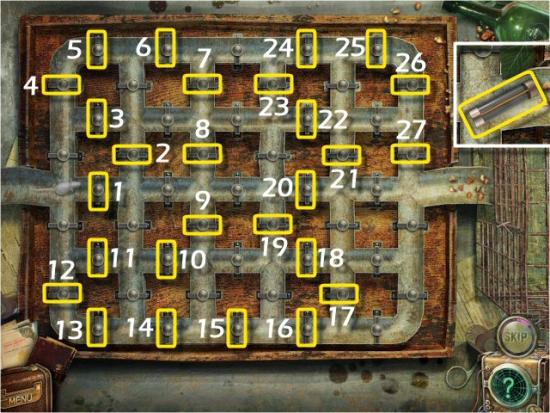
Click on the following for the video solution.
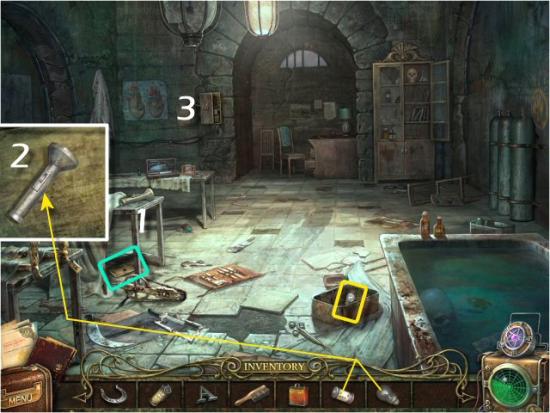
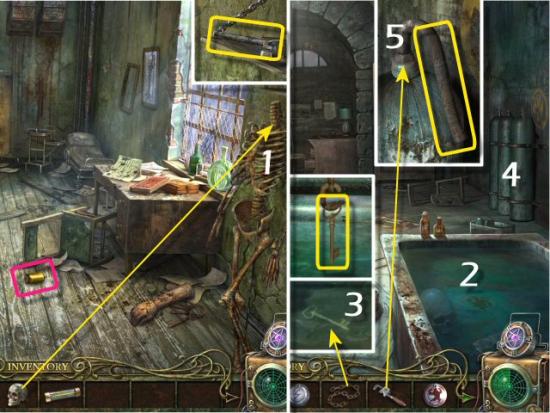
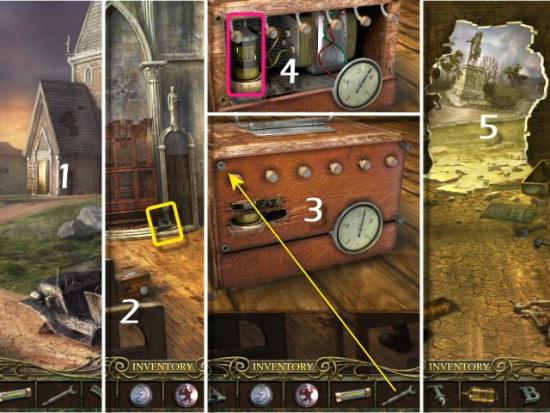
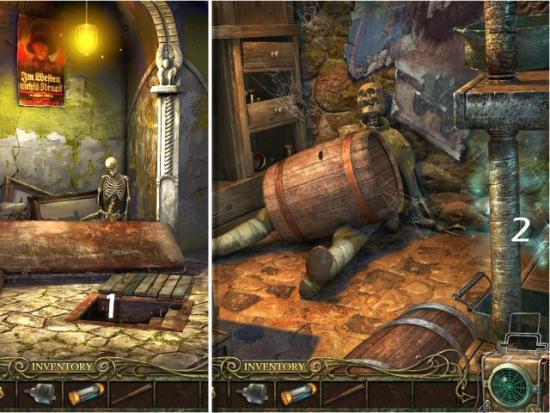
Return to the left side of the Hospital (click back 4 times and forward once, on the left) and enter the Building on the left. Use the Skull on the Skeleton (1), collect the Hex Wrench (on the shelf behind the Skeleton), and Nexus Tube #2, exit from the Building (click back once) and then continue forward into the other Building.
Click on the Vat (2), use the Chain on the Key (3) and collect the Key. Click on the Tanks (4), use the Pipe Wrench on the Nut (5) and collect the Hose.
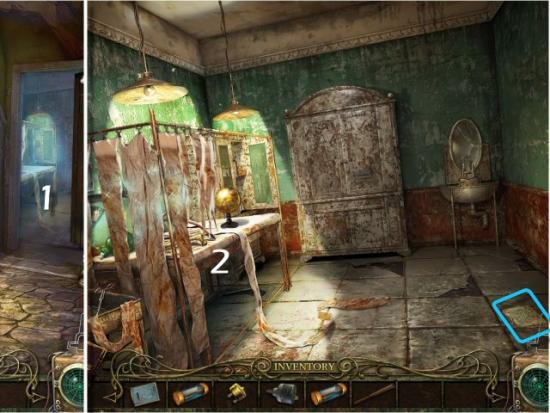
Return to the upstairs, left Corridor in the Hospital (click back twice, forward twice and then left, through the upstairs Doorway) and enter the far Door on the left. Use the Tin of Flour on the Floor (1), click on the Table (2) and then click on the Switch (3).
Use the Nexus Tube on the Energy, collect the Distilled Water and then return to the downstairs, left Corridor (click back twice and then left, through the downstairs Doorway).
3 – Lynden Beck: Fire
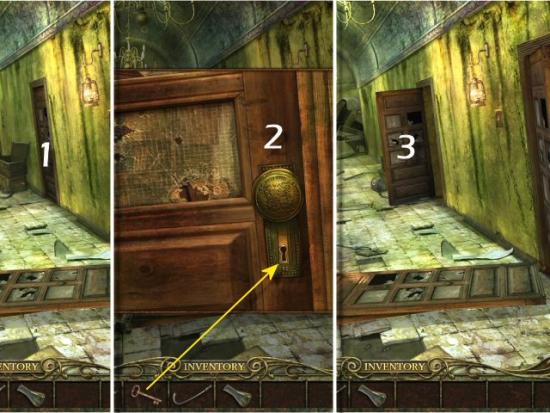
Click on the middle Door (1), use the Key in the Lock (2) and then enter the open Door (3) to the Study.
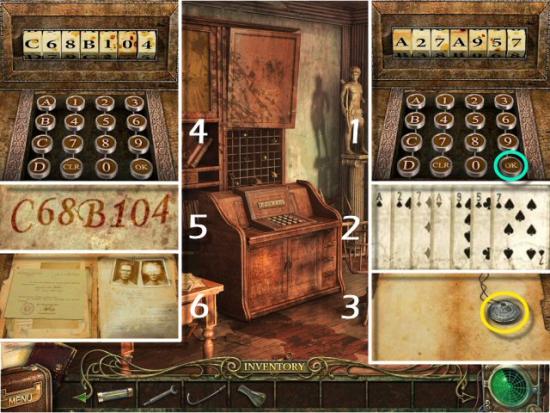
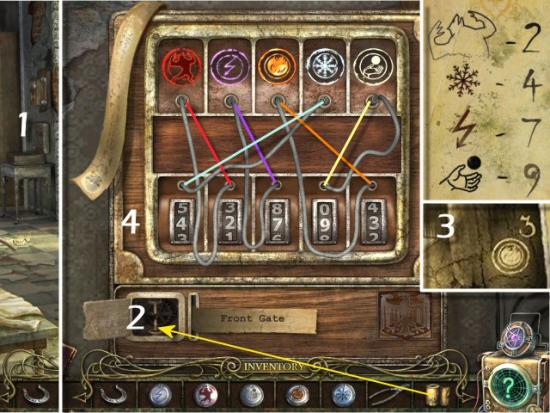
Collect Postcard #16 and click on the Safe (1). When complete, click on the Document Machine (6). Enter the Code you found from completing the Glass Puzzle (2 – check your Notebook: 6 13 19. Note that each Dial is numbered from 0 to 25; keep clicking until you get to the correct number (3). Click on the Scrap of Paper (4) and then collect the Safe Handle (5).
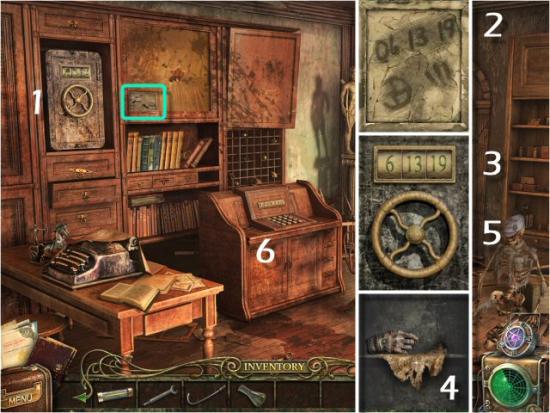
Enter the Code, on the Keypad (1), from the Card Game (2 – check your Notebook: A 2 7 A 9 5 7), click the OK Key (green) and collect the Fire Medal (3). Enter the Code from the Safe (4 – check your Notebook: C 6 8 B 1 0 4), click the OK Key (5) and you’ll automatically receive Top Secret File #3 (6).
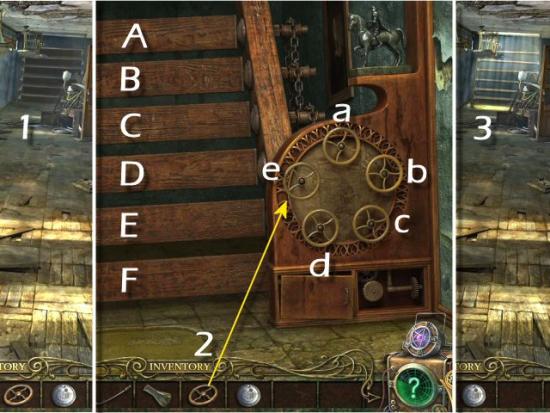
Return to the upper, right Corridor (click back twice and then right, through the upstairs Doorway), click on the Collapsed Stairs (1) and then use the Safe Handle on the Stair Mechanism (2). The object is to turn the Wheels to rotate all the Steps to the horizontal position. Click on a Wheel to rotate 2 Steps to horizontal; click again to return them to vertical. The Wheels rotate the Steps as follows:
- Wheel a: Steps A and C
- Wheel b: Steps C and E
- Wheel c: Steps A and D
- Wheel d: Steps B and D
- Wheel e: Steps D and F
The solution is to turn Wheels b, c, d and e, in any order, to lower all 6 Steps to the horizontal position. When complete, continue up the Stairs (3) to the Attic.
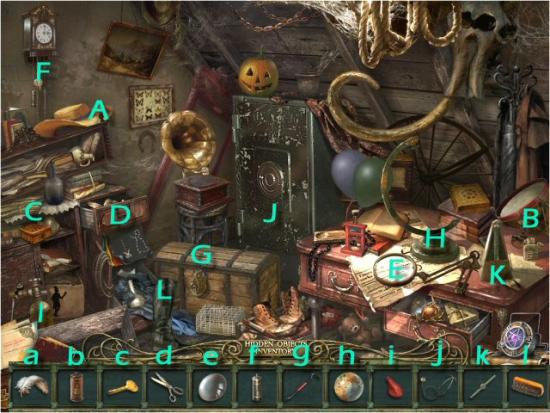
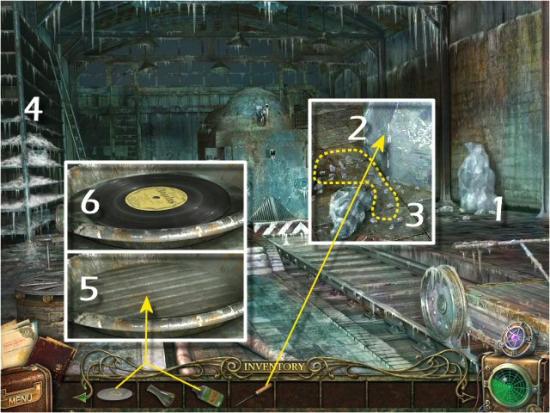
Collect Nexus Tube #3, Postcard #17 and then click on the Debris (1), at the left side of the Shelves. When complete, exit through the Window (2) to the Balcony.
Match all the items in the list to their associated objects.
a. Feather | A. Hat | b. Gas | B. Lighter | c. Key | C. Box |
d. Scissors | D. Paper | e. Lens | E. Magnifier | f. Weight | F. Clock |
g. Jimmy | G. Lock | h. Globe | H. Stand | i. Balloon | I. Helium |
j. Stethoscope | J. Safe | k. Pointer | K. Metronome | l. Brush | L. Boot |
Inventory Item: Record (you’ll receive this automatically)
Collect the Nozzle (1), return to the Corridor (click back twice) and click on the Fire Extinguisher (2). Use the Hose and Nozzle (3 – in either order), collect the Fire Extinguisher (4), return to the Balcony (click forward twice) and then use the Fire Extinguisher on Lynden Beck (5).
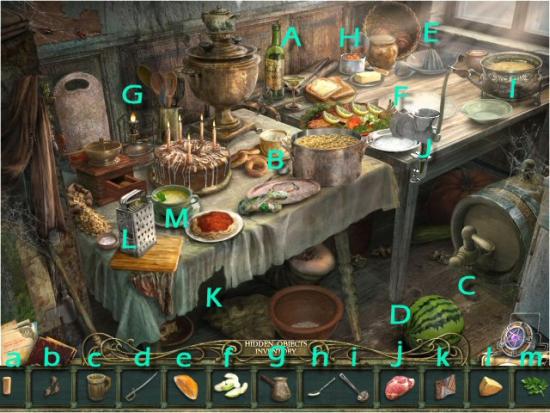
Return to the Kitchen (click back 3 times, left through the downstairs Doorway, right through the near Door and forward into the Kitchen) and click on the Table. Match all the items in the list to their associated objects.
a. Cork | A. Bottle | b. Tea | B. Cup | c. Mug | C. Keg |
d. Saber | D. Melon | e. Orange | E. Juicer | f. Apple | F. Dough |
g. Carafe | G. Burner | h. Spoon | H. Caviar | i. Ladle | I. Pot |
j. Meat | J. Grinder | k. Patch | K. Rip | l. Cheese | L. Grater |
m. Parsley | M. Soup |
Inventory Item: Valve Handle (you’ll receive this automatically).
Return to the Balcony (click back 3 times, right, through the upstairs Doorway and then forward twice), click on the Tank (1), use the Valve Handle (2 – click anywhere) and then use the Nexus Tube on the Energy (3). When complete, continue forward to the Graveyard (4).

4 – Chris: Ice
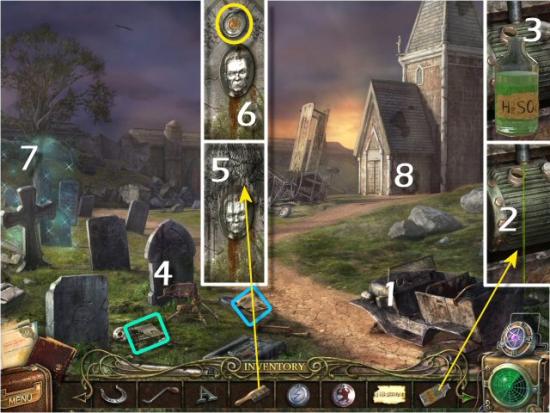
Collect Postcard #18 and Top Secret File #4, click on the Car Body (1), use the Acid Bottle on the Acid (2) and then collect the Bottle (3). Click on the Gravestone (4), use the Brush (5), collect the Fire Medal (6) and then click on the area behind the Cross Gravestone (7). When complete, click on the Chapel Doors (8).
Find all the items in the list.
a. Lamp | b. Glove | c. Wheel | d. Crescent | e. Valve |
f. Spade | g. Record | h. Binoculars | i. Syringe | j. Moth |
k. Metronome | l. Rope | m. Bone | n. Helmet | o. Key |
p. Book | q. Rifle | r. Gargoyle | s. Hook | t. Razor |
u. Pipe | v. Comb | w. Bottle |
Interactive Item
- Golden Bracelet: Use the Cheese on the Crow and then collect the Bracelet.
Inventory Item: Letter T

Use the Notes above the Keyboard (1). The object is to repeat the notes that are played. Following the Musical Score (2), click on the Keys (3) to play the Notes.
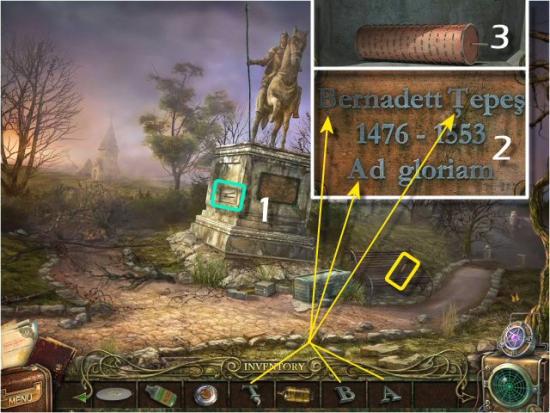
Enter the Chapel (1), collect the Letter B and click on the Lantern (2). Use the Hex Wrench (3 – click anywhere), collect Nexus Tube #4 (4), return to the Garage (click back 7 times, right and then forward) and then continue through the Hole in the back of the Garage (5) to the Monument.
Collect Postcard #19 and the Ice Pick, and then click on the Monument Plaque (1). Use the Letters in the Empty Spaces (2 – B, T and A), collect the Piano Roll (3) and then return to the Chapel (click back 3 times, forward twice, right, forward 3 times and then enter the Chapel).
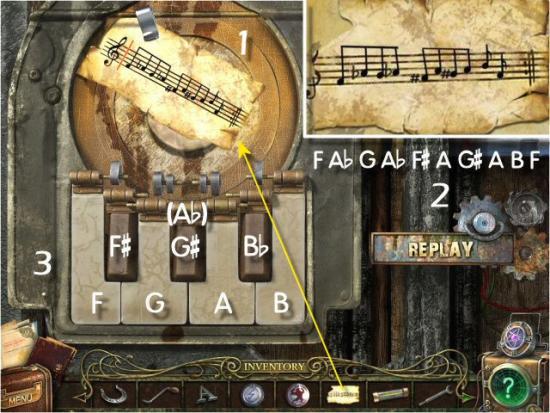
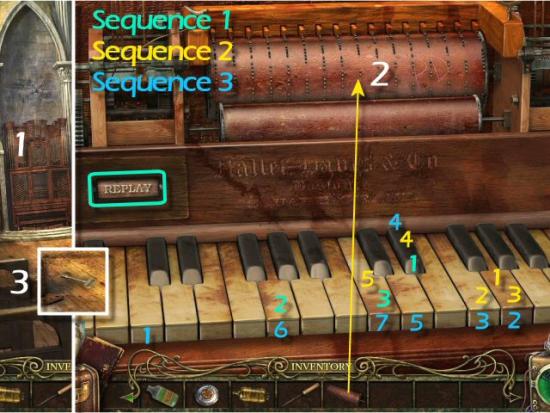
Click on the Organ (1) and use the Piano Roll (2). The object is to repeat the notes played. You’ll play 3 rounds of 3, 5 and 7 notes. Watch the sequence of Keys played and then click on those Keys to repeat the sequence. If you miss any notes, click the Replay button (green) to repeat it. When complete, collect the Key (3).
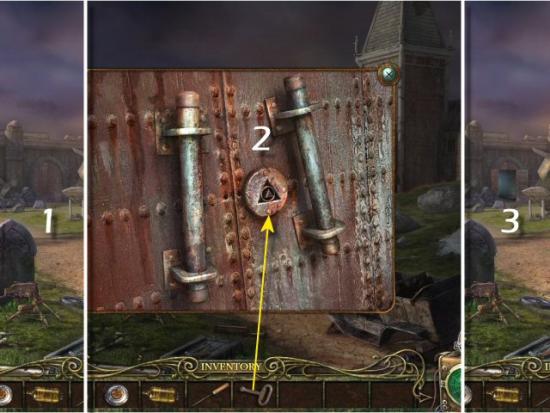
Return to the Graveyard (click back once), click on the Ice Barn Door (1), use the Key (2) and then enter the Ice Barn (3).
Click on the Block of Ice (1), use the Ice Pick (2) and collect some Ice (3). Click on the Shelves (4), use the Record and Acid (5 – in either order) and collect the Clean Record (6).
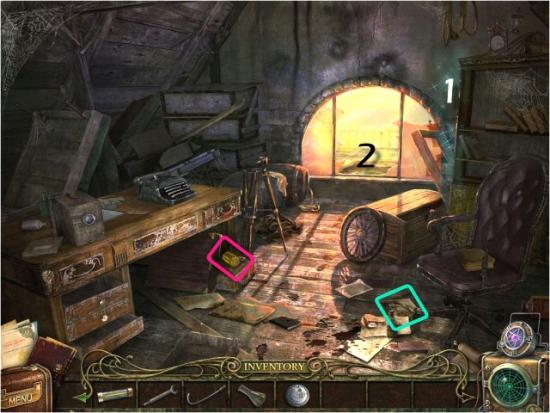
Return to the Attic (click back 3 times) and click on the Debris (1), at the left side of the Shelves. When complete, click on the Tray (2).
Match all the items in the list to their associated objects.
a. Cigar | A. Cutter | b. Record | B. Player | c. Drumsticks | C. Drum |
d. Woman | D. Man | e. Letter | E. Word | f. Cuckoo | F. Clock |
g. Cheese | G. Trap | h. Italy | H. Globe | i. Butterfly | I. Display |
j. Balloon | J. Balloons | k. Coin | K. Bank | l. Laces | L. Boots |
m. Tusk | M. Skull | n. Candle | N. Pumpkin |
Inventory Item: Spirit Lamp (you’ll receive this automatically).

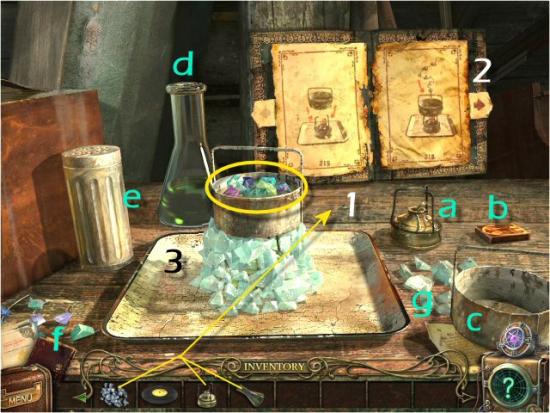
Use the Ice, Spirit Lamp and Distilled Water on the Desk (1 – click anywhere). Page through the Journal (2 – click on the right and left arrows); note that the Instructions are out of order. Note the proper order and use the Ingredients according to the Instructions. Simply click on each one and it will automatically be placed in the Tray (3). The solution is:
- Spirit Lamp
- Matches
- Container
- Distilled Water
- Salt
- Catalyst Crystals
- Ice
Collect the Crystals and then return to the Hangar (click forward twice and then enter the Ice Barn).
Click on the Crystal Gun (1), use the Crystals (2 – click anywhere) and then place all the Crystals in their correct positions. Click on the Crystal Gun, use the Nexus Tube on the Energy (3) and then collect the Ice Medal.
5 – Karl Lycaon – Werewolf
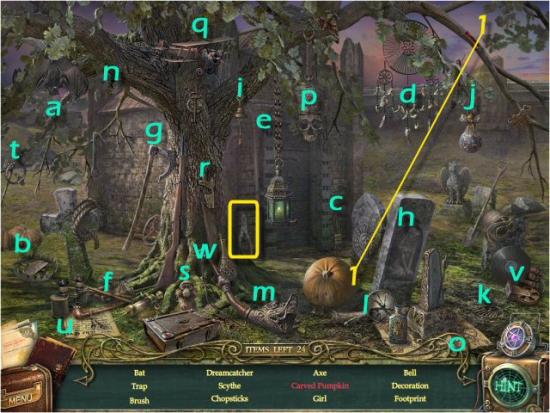
Return to the Graveyard (click back once) and click on the area behind the Cross Gravestone. Find all the items in the list.
a. Bat | b. Trap | c. Brush | d. Dreamcatcher | e. Scythe |
f. Chopsticks | g. Axe | h. Girl | i. Bell | j. Decoration |
k. Footprint | l. Mirror | m. Horn | n. Lizard | o. Map |
p. Mask | q. Airplane | r. Saw | s. Monkey | t. Buckle |
u. Newspaper | v. Dynamite | w. Vase |
Interactive Items
- Carved Pumpkin: Use the Knife on the Pumpkin and then click on the Pumpkin.
Inventory Item: Pliers
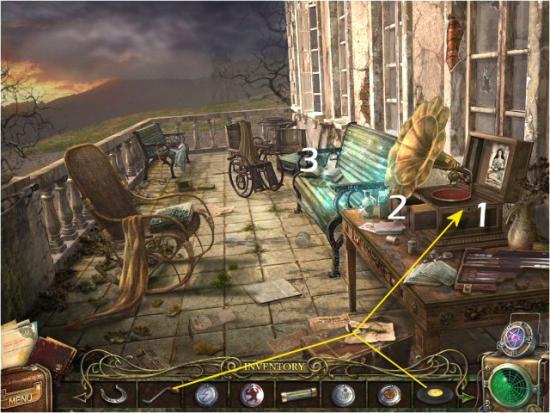
Turn to the Porch (click back 5 times and then left), use the Crank and Record on the Gramophone (1), click on the Note (2) and then click on the Bench (3).
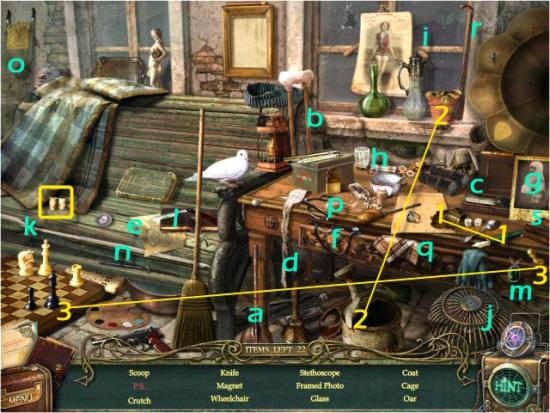
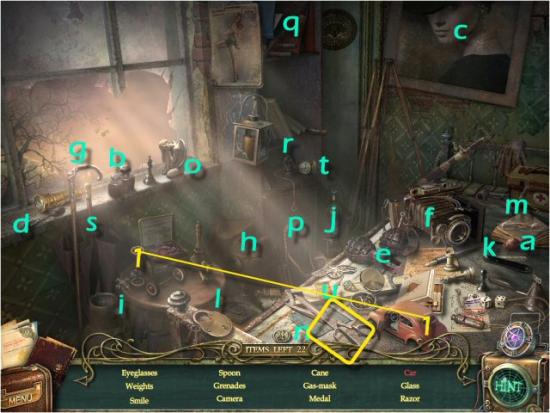
Find all the items in the list.
a. Scoop | b. Crutch | c. Knife | d. Magnet | e. Wheelchair |
f. Stethoscope | g. Frame | h. Glass | i. Coat | j. Cage |
k. Oar | l. Notebook | m. Medallion | n. Nail | o. Stretcher |
p. Scissors | q. Handkerchief | r. Cane | s. Wood Box |
Interactive Items
- P.S: Use the Pen on the Paper and click on the Note.
- Flower: Use the Watering Can on the Flower Pot and click on the Flower.
- Chess Queen: Use the Pawn on the Chessboard and click on the Queen.
Inventory Item: Paper Roll
Return to the upper, left Corridor in the Hospital (click back once, forward once and then left), enter the near Door and then click on the Shelves.
- Car: Use the Axles on the Car Body and click on the Car.
Inventory Item: Scissors
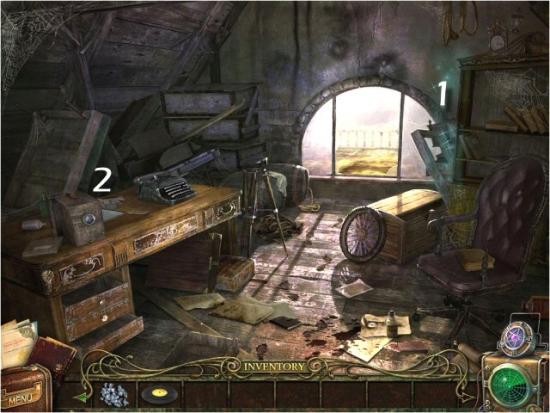
Return to the Attic (click back twice, right and then forward) and click on the Typewriter (1), use the Scissors on the Ink Ribbon (2) and then collect the section of Ribbon. Return to the Corridor (click back once), enter the near Door and then click on the Overhead Projector (3). Use the Fuse in the Holder (4), use the Typewriter Ribbon on the Projector Plate (5) and then click on the Projection (6).
Return to the Office (click back twice and then forward once), click on the Teletype Machine (1) and use the Paper Roll on the Spindle (2). Using the Codes (3) from the Projection (check your Notebook – Werewolf = 2, Ice = 4, Lightning = 7 and Telekinesis = 9) and the Photo on the Desk (check your Notebook – Fire = 3), click on each Dial (4), connected to each Image, and enter the numbers: 4 2 7 9 3.
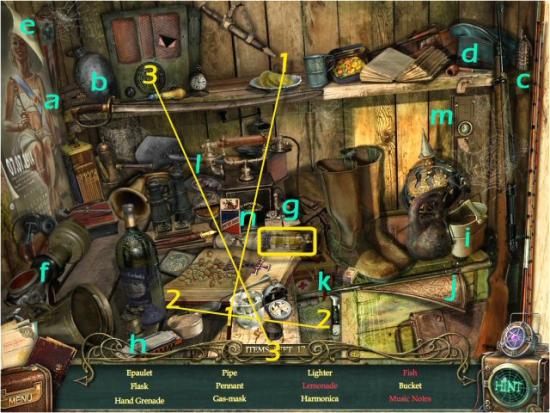
Return to the Front Gate (click back 4 times) and click on the Guard House.
- Lemonade: Use the Lemon on the glass and click on the Lemonade.
- Fish: Use the Knife on the Can and click on the Fish.
- Music Notes: Use the Knob on the Radio and click on the Music Notes.
Inventory Item: Nexus Tube #5
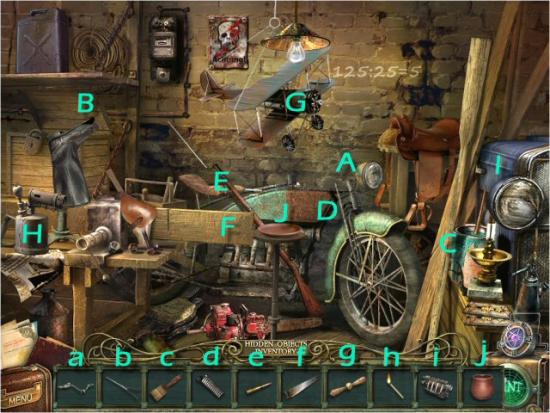
Return to the Garage (click forward once, right and then enter the Garage) and click on Shelves. Match all the items in the list to their associated objects.
a. Handlebar | A. Motorcycle | b. Needle | B. Boot | c. Brush | C. Paint |
d. Spring | D. Forks | e. Cartridge | E. Rifle | f. Saw | F. Board |
g. Propeller | G. Plane | h. Match | H. Blowtorch | i. Motor | J. Car |
k. Pot | K. Saucer |
Inventory Item: Oar (you’ll receive this automatically).
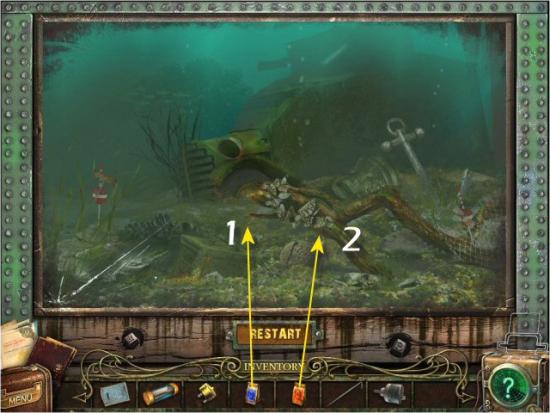
Return to the Monument (click forward) and continue right (1) to the Dock. Collect Postcard #20, use the Pliers on the Motor (2 – you’ll automatically receive the Wire), use the Oar on the Boat (3) and then collect the Fishing Net.
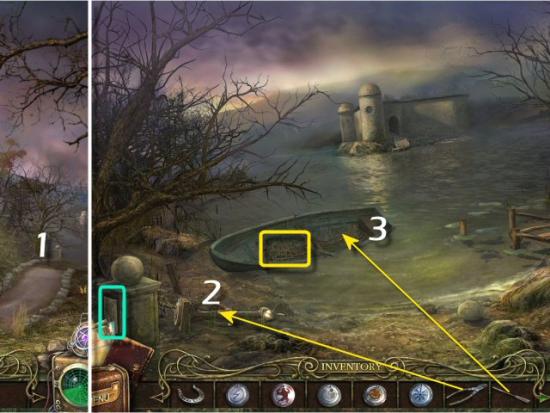
Return to the Study (click back 4 times, forward twice, left and then enter the far Door) and click on the Telephone (1). Using the Codes (2) from the Gramophone, Office and Projection (check your Notebook), dial the Number (3 – 3 9 7 4 2) and then enter the Elevator (4).
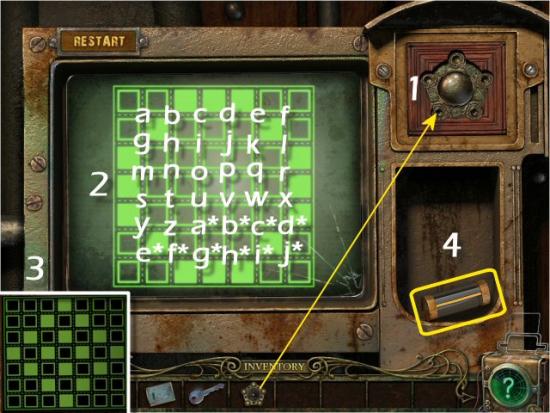
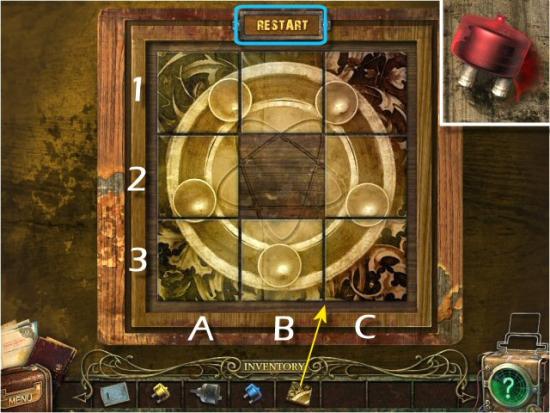
Collect Top Secret File #5, click on the Panel (5), use the Medals in the slots (6) and then click on the Lever (7).
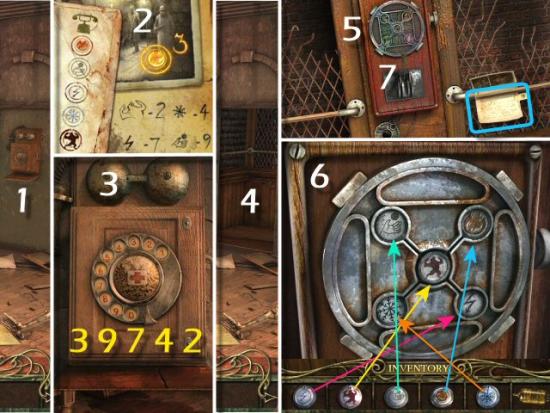
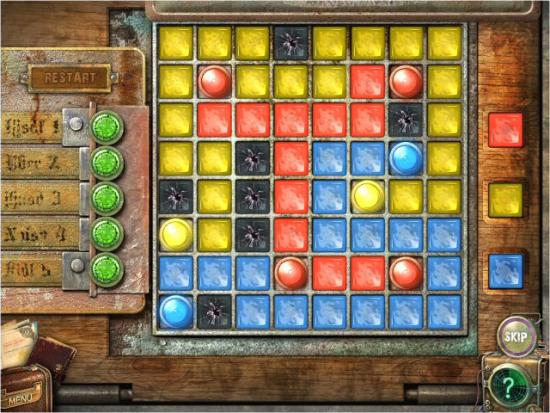
The object is to illuminate all 16 Bulbs. Each time you click on a Bulb, it will turn Green and you’ll be given 2 Bulbs to choose from, for your next click. Continue clicking on Bulbs until they’re all Green. If you make an incorrect choice, and end up with no more Bulbs to choose from, click on the Restart button (blue) to replay. Look at the screenshot for the solution.
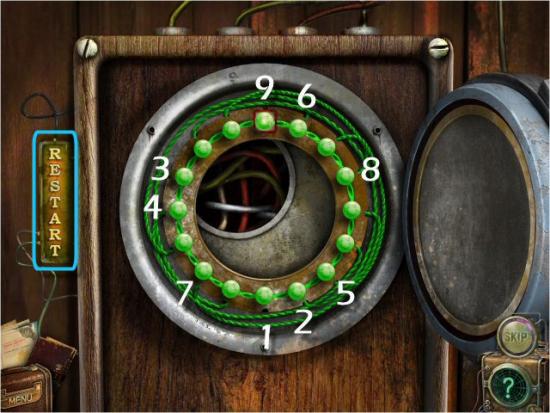
Click on the following for the video solution.
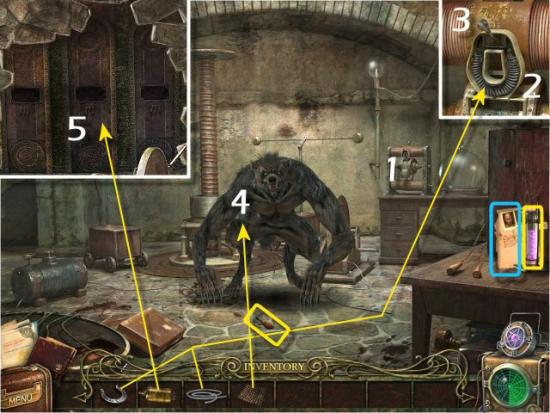
Exit the Elevator (click back once), click on the Device (1), use the Horseshoe and Wire (2) and click on the Lever (3). Use the Net on Karl Lycaon (4), collect the Screwdriver, Ectoplasm and Top Secret File #6 and then use the Nexus Tube on the Energy (5 – on the back wall).
6 – Dr. Odin Dagon
Return to the Foyer (click back, click on the Elevator Lever and then click back 3 times) and enter the upstairs, right Corridor. Click on the Plaques above each Door (1 and 2), use the Screwdriver (green) on each Plaque (3 and 4 – click once, anywhere on the Plaque) and then collect them. Return to the Foyer (click back), enter the upstairs, left Corridor and repeat for each Door (5 and 6) and Plaque (7 and 8). When complete, return to the Basement (click back, left downstairs, enter the far Door, enter the Elevator, click the Lever and then exit the Elevator).
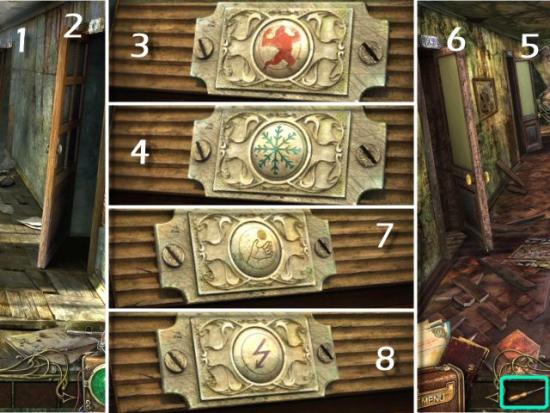
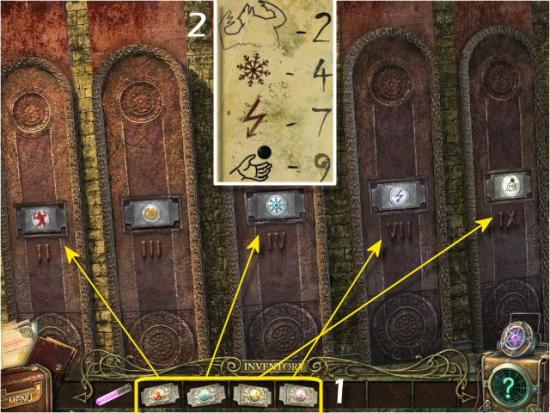
Click on the Wall and place the Nameplates in the Empty Slots (1). The Fire Nameplate is already placed, but check your Notebook for the correct placement of the others (2 – II = 2, IV = 4, VII = 7 and IX = 9). When complete, continue forward.
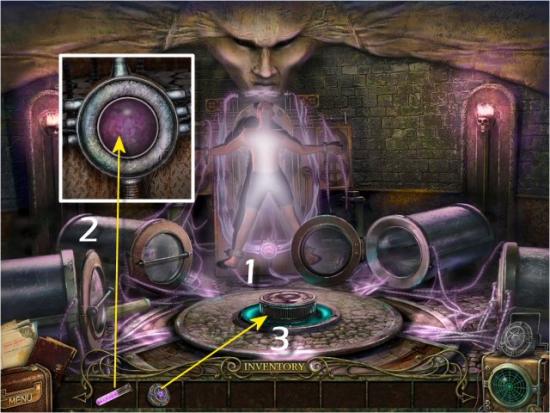
Click on the Portal (1), use the Ectoplasm (2), use the Nexus on the Floor (3) and then click on it.
The object is to illuminate all 5 lights and then rearrange them so they’re in the correct spot. To illuminate the lights, click on them in an upside-down star pattern.
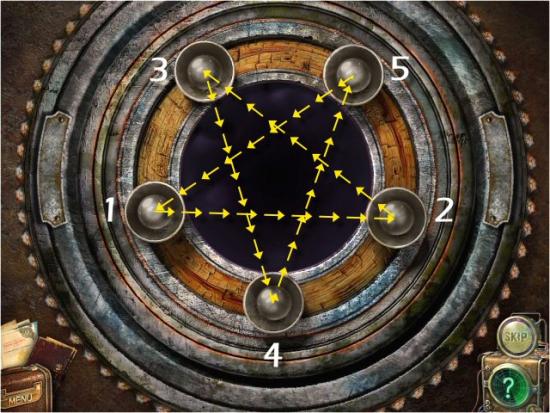
Next, you must move the lights to their matching colored holders. When you click on a light and then click on one of the 2 other lights, on a direct path, those 2 lights will switch places and then the ring will rotate one space in a counter-clockwise fashion. Once the lights are placed correctly, the holders will glow. There are several solutions, depending on where you begin. Only one is shown.
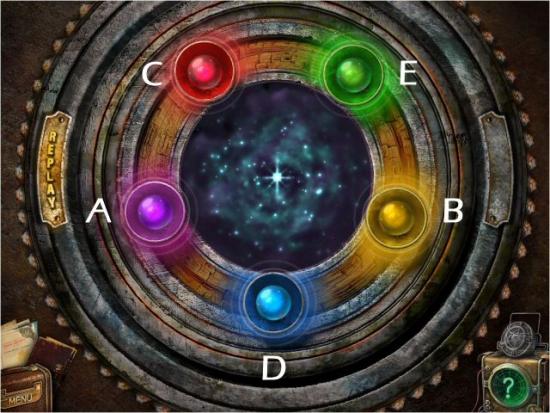
Click on the following for a video solution.
Watch the ending movie and credits. Congratulations! You’ve completed The Agency of Anomalies: Mystic Hospital.
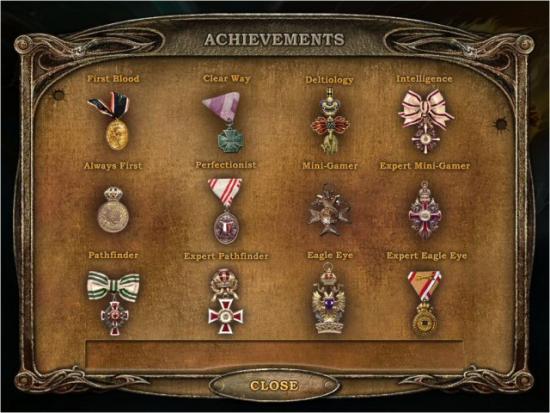
Achievements
- First Blood – First monster neutralized
- Always First – First place in High Scores
- Pathfinder – 1 Object Search completed without penalties
- Clear Way – All monsters and boss neutralized
- Perfectionist – All Minigames and Object Searches completed
- Expert Pathfinder – All Object Searches completed without penalties
- Deltiology – All 20 Postcards found
- Mini-gamer – 1 Minigame completed without skipping
- Eagle Eye – 1 Object Search completed without a Hint
- Intelligence – All 6 Top Secret Files found
- Expert Mini-gamer – All Minigames completed without skipping
- Expert Eagle Eye – All Object Searches completed without Hints
Postcard Locations
- At the base of the Fountain, outside the Front Gate.
- In the upper, left pane of the Window to the right of the Hospital’s Door.
- On the Porch, at the upper, right.
- Outside the Garage, on the broken Cart at the left.
- In the Hospital Foyer, next to the broken Chair on the right.
- In the Office (through the Double Doors), on the floor, to the left of the Cabinet on the back wall.
- Inside the left Building, on the left side of the Hospital, on the Table at the left.
- Inside the back Building, on the left side of the Hospital, underneath the middle table on the left.
- Inside the Hospital, in the first (near) room, in the upstairs, left Corridor, on the Footboard of the Bed on the right.
- Inside the Hospital, in the upstairs, right Corridor, in the first Window, at the upper, left.
- Inside the Hospital, in the upstairs, right Corridor, inside the last (far) room, behind the upper, right corner of the Poster on the wall.
- Inside the Hospital, in the downstairs, left Corridor, on the floor at the left.
- Inside the Hospital, in the downstairs, left Corridor, inside the Parlor (near door), in the box underneath the Piano, on the left.
- Inside the Hospital, in the downstairs, left Corridor, inside the Kitchen (through the doorway in the Parlor), on the front of the Table on the right.
- Inside the Hospital, in the upstairs, right Corridor, in the first (near) room, on the right side of the second Shelf at the back.
- Inside the Hospital, in the downstairs, left Corridor, inside the Study (far door, after you unlock it), just to the right of the Safe on the left.
- Inside the Hospital, in the upstairs, right Corridor, in the Attic (after you lower the Stairs at the end of the Corridor), on the floor, at the right, just below the Chair.
- In the Graveyard, below the Balcony outside the Attic, between the 2 Gravestones on the left.
- On the left side of the Monument, after you go through the Hole at the back of the Garage.
- At the Dock, on the left side of the Column at the lower left, to the right of the Monument area.
Top Secret File Locations
- In the middle of the Path, outside the Front Gate.
- Inside the Crate (click to open it), in the Hospital’s Foyer.
- You will receive this after you enter the 2nd Code on the Document Machine in the Study.
- In the Graveyard, to the right of the Gravestone nearest the Path.
- Inside the Elevator in the Study, on the right.
- In the Basement, after you neutralize the Werewolf, on the Table at the right.
Bonus Chapter
In the Collector’s Edition, after completing the main game, you now have access to replay 8 Minigames. Click on Extras and then click on the Minigames button.
- Fountain Pipes
- Secret Photo
- Broken Glass
- Anomalous Cards
- Rat Race
- Organ Melody
- Crystal Gun
- Final Game
To access the Bonus Chapter, click on Extras and then click on Bonus Adventure. Note that you don’t have the option to play in Advanced Mode; gameplay will be in Casual Mode.
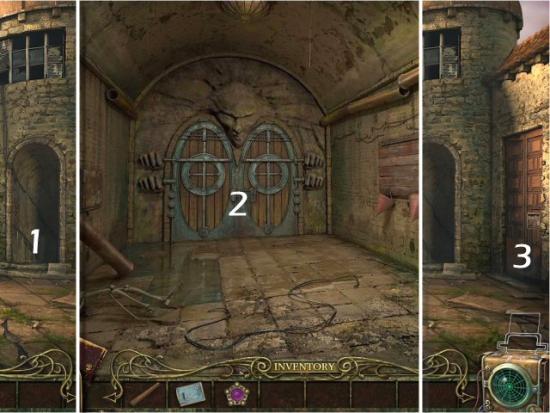
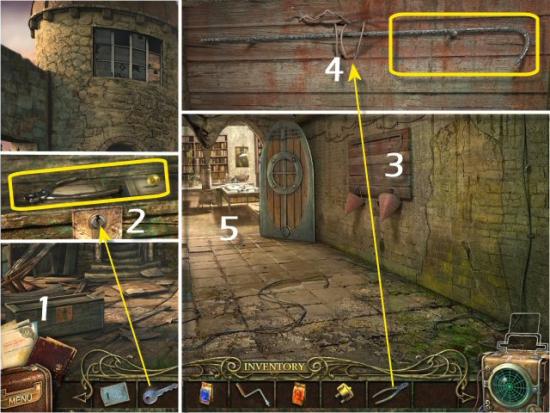
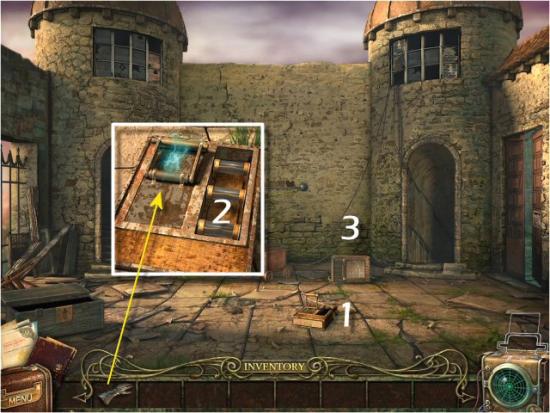
Collect the Plank and the Torn Portal Schematic, enter the Left Tower (1) and click on the Table (2) at the right. When complete, click on the Trunk (3) at the left.
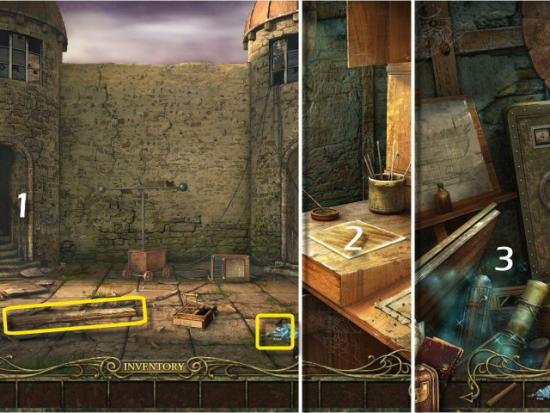
The object is to reassemble the Schematic. Use the Torn Portal Schematic (1 – click anywhere) on the Table. Click on a piece, drag it inside the frame and then click to place it. If placed correctly, it will lock into place. Note that you don’t need to rotate any pieces; they will orient themselves, automatically. Collect the restored Schematic (2).

Click on the following for a video solution.
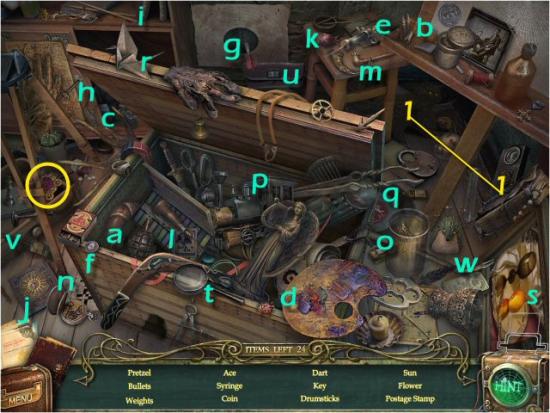
Find all the items in the list.
a. Pretzel | b. Bullets | c. Weights | d. Ace | e. Syringe |
f. Coin | g. Dart | h. Key | i. Drumsticks | j. Sun |
k. Flower | l. Stamp | m. Pipe | n. Crossword | o. Frog |
p. Train | q. Record | r. Crane | s. Apple | t. Magnifier |
u. Brush | v. Purse | w. Feather |
Interactive Item
- Cat: Click the Electric Lantern to reveal the Cat and then click on the Cat.
Inventory Item: Purple Medal
Return to the Courtyard (click back), enter the Right Tower (1) and then click on the Doors (2) at the back. When complete, return to the Courtyard (click back) and click on the Doors (3) on the right.
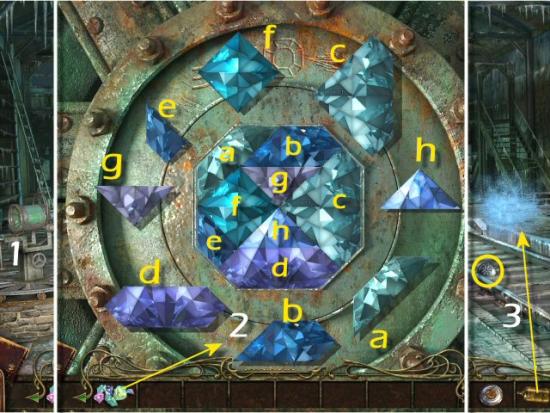
Use the Purple Medal in the Empty Slot (1). The object is to rotate quadrants of 4 Squares, in the Grid (2), to match the Image (3) revealed after you place the Purple Medal in the Slot. Each time you click on a quadrant, the 4 Squares rotate once in a counter-clockwise fashion. The solution is:
1. click “a” once | 2. click “c” once | 3. click “d” 3 times |
4. click “e” 3 times | 5. Click “f” once | 6. click “h” once |
7. click “i” 3 times | 8. Click “l” once | 9. click “n” once |
When complete, collect the Copper Gears (4).

Click on the following for a video solution.
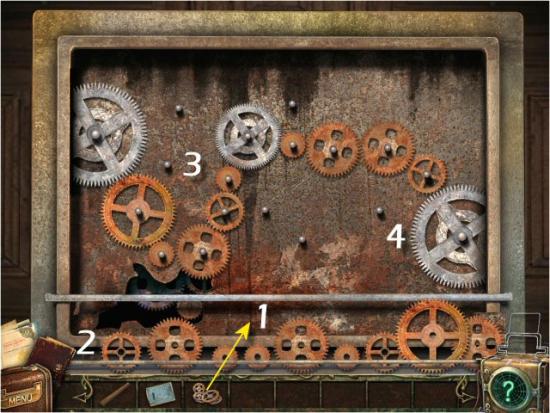
Use the Gears on the Panel (1 – click anywhere). The object is to place all the Gears (2) onto the Empty Posts (3) so they all connect to the Gear, at the lower right (4). Once placed correctly, the lower, right Gear will rotate and open the Doors.
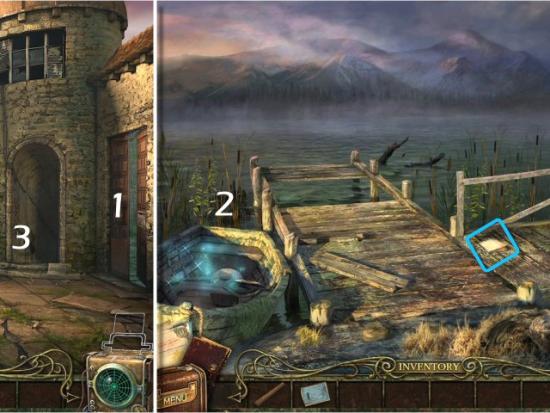
Enter the Open Doors (1) to the Pier, collect the Note and then click on the Boat (2). When complete, return to the Right Tower (3 – click back once and then enter through the Right Archway) and click on the Doors, again.
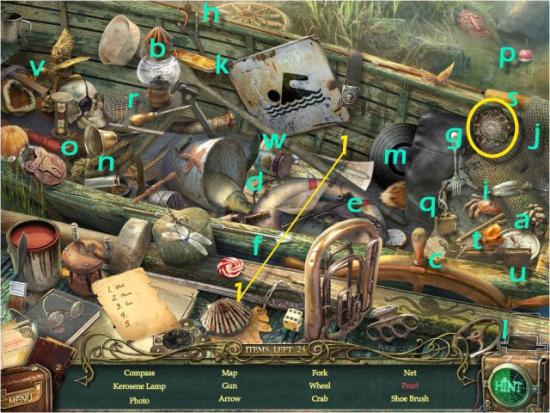
Find all the items in the list.
a. Compass | b. Lamp | c. Photo | d. Map | e. Gun |
f. Arrow | g. Fork | h. Wheel | i. Crab | j. Net |
k. Brush | l. Valve | m. Record | n. Knot | o. Dynamite |
p. Float | q. Lighter | r. Cage | s. Rod | t. Flower |
u. Notebook | v. Hammer | w. Anchor |
Interactive Item
- Pearl: Use the Knife on the Clam and click on the Pearl.
Inventory Item: White Medal
Use the White Medal in the Empty Slot (1). The object is to rotate quadrants of 4 Squares, in the Grid (2), to match the Image (3) revealed after you place the White Medal in the Slot. Each time you click on a quadrant, the 4 Squares rotate once in a counter-clockwise fashion. The solution is:
1. click “a” once | 2. click “e” 3 times | 3. click “h” twice |
4. click “c” twice | 5. click “k” once | 6. click “o” 3 times |
7. click “f” 3 times | 8. click “j” once | 9. click “m” once |
10. click “h” 3 times | 11. click “v” twice | 12. click “x” twice |
When complete, collect the Red Fish Food (4), return to the Left Tower (click back and then enter through the Left Archway) and click on the Trunk, again.

Click on the following for a video solution.
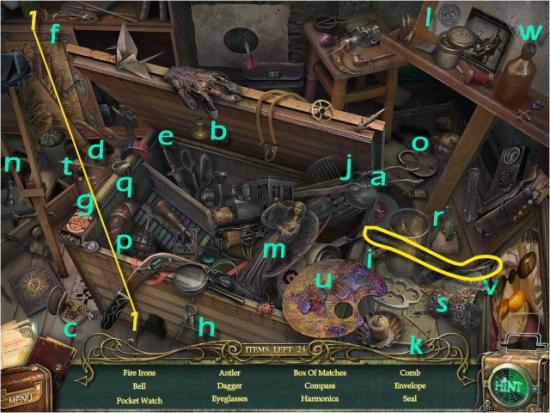
Find all the items in the list.
a. Fire Irons | b. Bell | c. Watch | d. Antler | e. Dagger |
f. Eyeglasses | g. Matches | h. Compass | i. Harmonica | j. Comb |
k. Envelope | l. Seal | m. Angel | n. King | o. Lock |
p. Grenade | q. Ring | r. Pincushion | s. Goblet | t. Pills |
u. Palette | v. Silver Bar | w. Web |
Interactive Item
- Mouse: Use the Cheese on the Hole and click on the Mouse.
Inventory Item: Crowbar
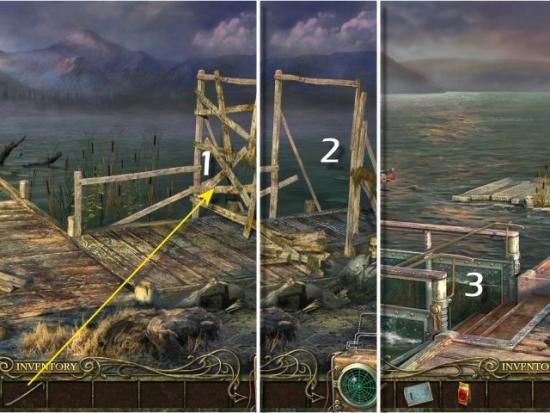
Return to the Pier (click back and then right, through the Open Doors). Use the Crowbar on the Boards (2 – click 3 times), continue right, to the Dock (3) and then click on the Steps (3).
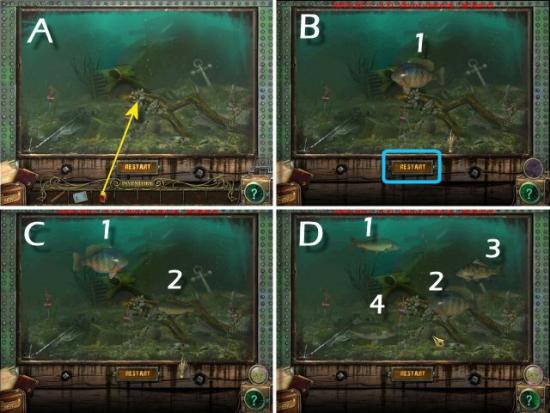
Use the Red Fish Food in the Water (1 – click anywhere). The object is to repeat the sequence of Fish that arrive and glow green. You’ll play 3 rounds of 1, 2 and 4 Fish. Watch the sequence of Fish and then click on those Fish, in the same order, to repeat the sequence. If you miss any, click the Restart button (blue) to begin again. Make sure to wait until the sequence is completely finished before you begin to click on any Fish or you’ll get an error, as if you clicked on the incorrect Fish. When complete, you’ll receive the Toolbox Key.
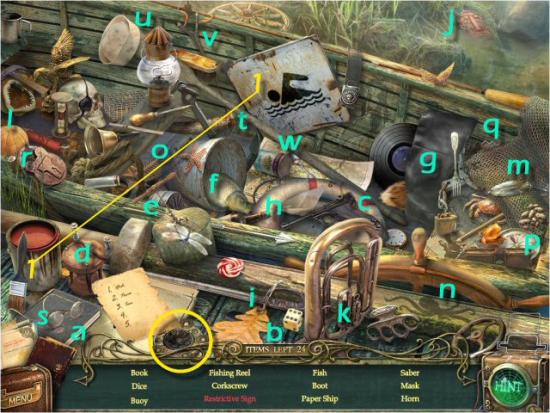
Return to the Pier (click back once) and click on the Boat at the left. When complete, When complete, return to the Right Tower (click back once and then forward through Arch) and click on the Doors, again. Find all the items in the list.
a. Book | b. Dice | c. Buoy | d. Reel | e. Corkscrew |
f. Fish | g. Boot | h. Ship | i. Saber | j. Mask |
k. Horn | l. Pumpkin | m. Lure | n. Octopus | o. Bone |
p. Peanuts | q. Trap | r. Lock | s. Eyeglasses | t. Bugle |
u. Cap | v. Slingshot | w. Spoon |
Interactive Item
- Restrictive Sign: Use the Paintbrush on the Swimming Sign and click on the Restrictive Sign.
Inventory Item: Black Medal
Use the Black Medal in the Empty Slot (1). The object is to rotate quadrants of 4 Squares, in the Grid (2), to match the Image (3) revealed after you place the Black Medal in the Slot. Each time you click on a quadrant, the 4 Squares rotate once in a counter-clockwise fashion. The solution is:
1. click “h” once | 2. click “k” once | 3. click “b” 3 times |
4. click “e” once | 5. click “s” twice | 6. click “g*” once |
7. click “c*” once | 8. click “m” 3 times | 9. click “p” once |
10. click “x” twice | 11. click “i*” 3 times | 12. click “f*” 3 times |
13. click “n” 3 times | 14. click “p” twice | 15. click “r” 3 times |
16. click “b*” once | 17. Click “o” twice | 18. click “q” twice |
19. click “v” once | 20. click “o” 3 times | 21. click “p” twice |
22. Click “b*” once | 23. click “v” once | 24. click “h*” once |
25. Click “i*” 3 times |
When complete, collect the Fuse (4).
Click on the following for a video solution.
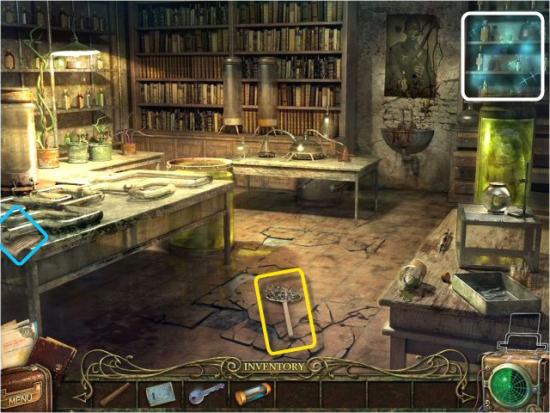
Enter the Laboratory (click forward), collect the Note and the Net and then click on the Bookshelves on the right.
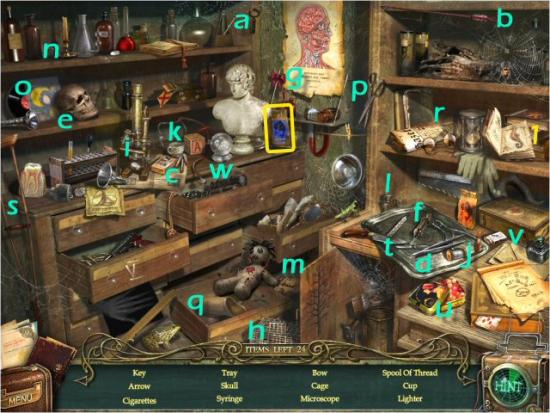
Find all the items in the list.
a. Key | b. Arrow | c. Cigarettes | d. Tray | e. Skull |
f. Syringe | g. Bow | h. Cage | i. Microscope | j. Spool |
k. Cup | l. Lighter | m. Mousetrap | n. Candle | o. Moon |
p. Scissors | q. Slippers | r. Newspaper | ||
Interactive Item
- Fish: Click on the Book twice and then click on the Fish.
Inventory Item: Blue Fish Food
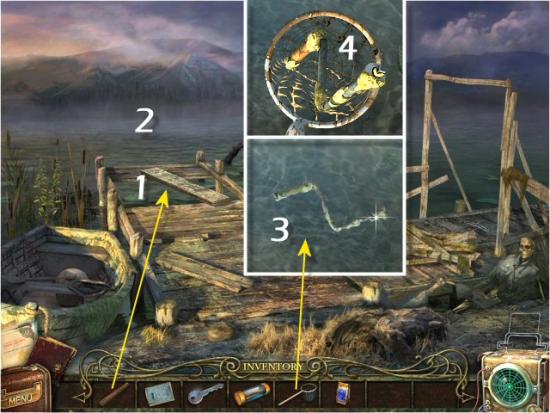
Return to the Pier (click back once and then right through the Doors), use the Plank (1), click on the Water (2), use the Net (3) and then collect the Handle (4).
Return to the Courtyard (click back once), click on the Toolbox (1), use the Key (2) and then collect the Nippers and Yellow Bulb. Enter the Right Tower, click on the Wall Rack (3), use the Nippers on the Wire (4), collect the Hook and then enter the Laboratory (5).
Click on the Vat (1), use the Handle (2 – you’ll automatically receive the Clean Handle) and then click on the Bookshelves (3).
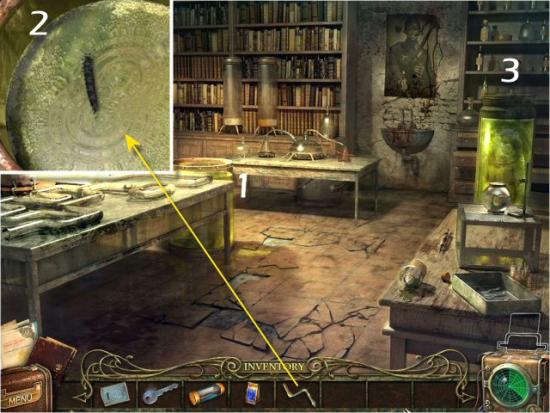
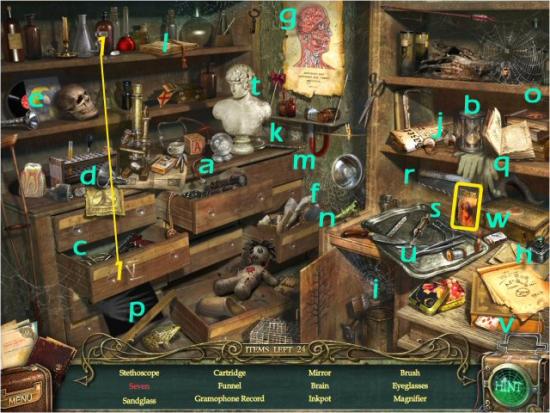
Find all the items in the list.
a. Stethoscope | b. Sandglass | c. Cartridge | d. Funnel | e. Record |
f. Mirror | g. Brain | h. Inkpot | i. Brush | j. Eyeglasses |
k. Magnifier | l. Bookmark | m. Magnet | n. Grasshopper | o. Star |
p. Ruler | q. Gloves | r. Saw | s. Pliers | t. Bust |
u. Tweezers | v. Ten | w. Matches |
Interactive Item
- Seven: Use the Chalk (click twice) on the “V” to create “VII.”
Inventory Item: Orange Fish Food
Return to the Dock (click back twice, right through the Open Doors and then right from the Pier), click on the Boat (1), use the Handle (2), collect the Resistor (3) and then click on the Stairs (4).
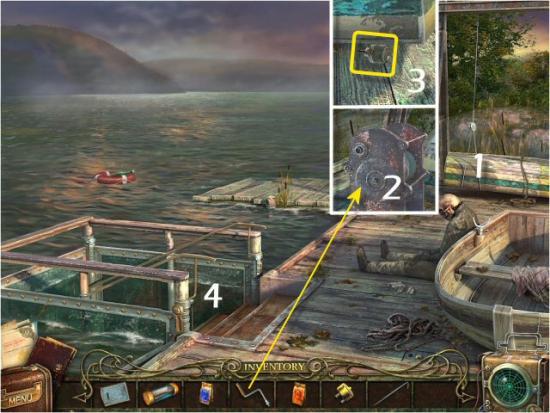
Use the Blue Fish Food in the Water (1). The object is to repeat the sequence of Fish that arrive and glow green. You’ll play 4 rounds of 4, 5, 7 and 8 Fish. Watch the sequence of Fish and then click on those Fish, in the same order, to repeat the sequence. If you miss any, click the Restart button (blue) to begin again. Note that once you complete a sequence you won’t have to repeat it. Make sure to wait until the sequence is completely finished before you begin to click on any Fish or you’ll get an error, as if you clicked on the incorrect Fish. When complete, you’ll receive the Corkscrew.
Click on the Steps, again, and repeat with the Orange Fish Food (2). You’ll play 5 rounds of 3, 5, 7, 9 and 12 Fish, and you’ll receive the Fuse when complete.
Click on the following for the video solutions. Note that extra animations have been edited out.
Use the Hook on the Buoy (1), click on the Bottle (2) and use the Corkscrew on the Bottle (3 – click anywhere). A Code will automatically be entered in your Notebook.
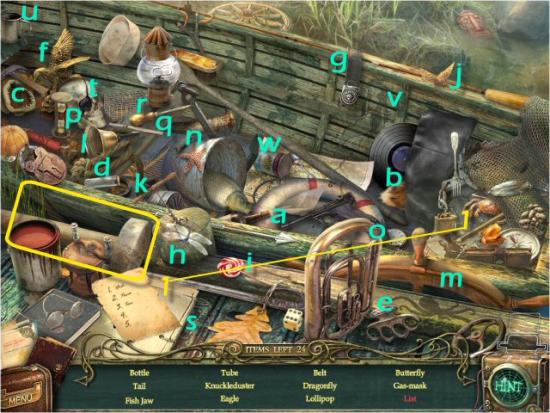
Return to the Pier (click back once) and click on the Boat at the left. Find all the items in the list.
a. Bottle | b. Tail | c. Jaw | d. Tube | e. Knucklebuster |
f. Eagle | g. Belt | h. Dragonfly | i. Lollipop | j. Butterfly |
k. Gas Mask | l. Bell | m. Ship’s Wheel | n. Starfish | o. Watch |
p. Sandglass | q. Scalpel | r. Screwdriver | s. Papers | t. Patch |
u. Cup | v. Mermaid | w. Can |
Interactive Item
- List: Use the Pencil on the Paper and click on the List.
Inventory Item: Sledge Hammer
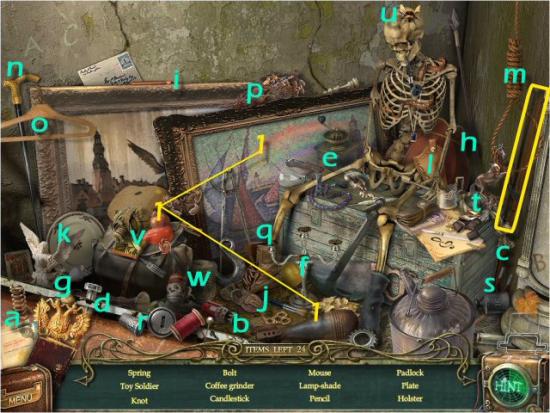
Return to the Right Tower (click back once and then enter the Right Archway) and use the Sledgehammer on the Wall (1). Enter the Opening into the Hidden Passage (2), and then click on the Debris (3). When complete, click on the Trap Door (4).
Find all the items in the list.
a. Spring | b. Toy Soldier | c. Knot | d. Bolt | e. Coffee Grinder |
f. Candlestick | g. Mouse | h. Lampshade | i. Pencil | j. Padlock |
k. Plate | l. Holster | m. Noose | n. Cane | o. Hanger |
p. Flowers | q. Shoe | r. Button | s. Weight | t. Chocolate |
u. Bumblebee | v. Pepper | w. Monkey |
Interactive Item
- Rainbow: Use the Paintbrush on the Yellow Paint, use it on the Rainbow and then click on the Rainbow.
Inventory Item: Tripod Leg
Head down the Steps to the Cellar (1) and click on the Shelves (2).
Find all the items in the list.
a. Cobweb | b. Ship | c. Corkscrew | d. Kerchief | e. Statuette |
f. Rake | g. Barrel | h. Yarn | i. Mushrooms | j. Snail |
k. Car | l. Bat | m. Whip | n. Mousetrap | o. Tweezers |
p. Wood Louse | q. Moss | r. Domino | s. Tin | t. Cutting Board |
u. Knucklebuster | v. Cup | w. Raincoat |
Interactive Item
- Nut Kernel: Use the Walnut on the Nutcracker and click on the Nut Kernel.
Inventory Item: Hammer

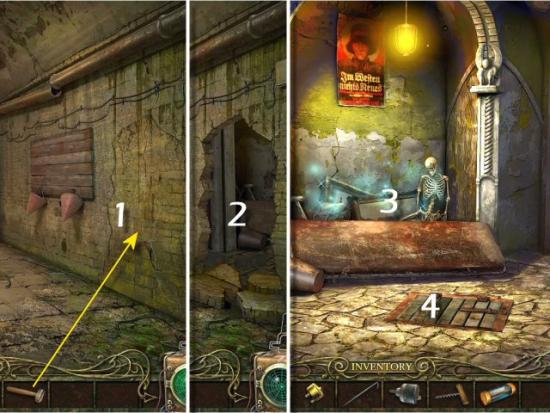
Use the Hammer on the Crate (1), collect the Steel Ball (2), return upstairs (click back once) and click on the Right Door (3).

Use the Steel Ball in the Hole (1). The object is to move the Steel Ball through the Maze, to the Spring (2). Click and drag the Steel Ball around the Maze until you reach the Spring. Make sure to move the Ball all the way to the right, so the Spring will compress.
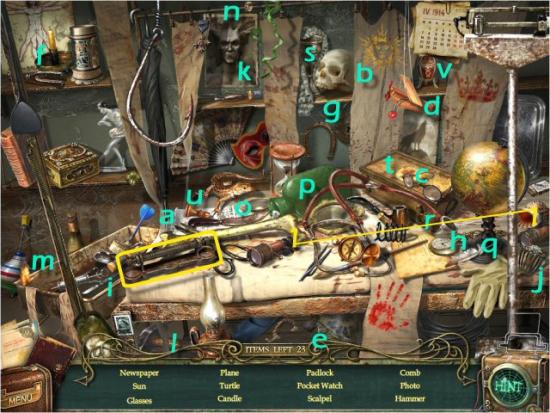
Enter the Door into the Operating Room (1), collect the Note and then click on the Operating Table (2).
Find all the items in the list.
a. Newspaper | b. Sun | c. Glasses | d. Plane | e. Turtle |
f. Candle | g. Padlock | h. Watch | i. Scalpel | j. Comb |
k. Photo | l. Hammer | m. Butterfly | n. Ring | o. Knife |
p. Hotwater Bottle | q. Feather | r. Stethoscope | s. Wig | t. First Aid |
u. Chess Piece | v. Egg |
Interactive Item
- Binoculars: Use the Binocular half on the other and then click on the Binoculars.
Inventory Item: Door Handle
Return to the Left Tower (click back 3 times and then enter the Left Archway), click on the Safe (1) and enter the Code from the Bottle on the Dock (2 – check your Notebook – 16 3 20). Note that each Dial is numbered from 0 to 25; keep clicking until you get to the correct number (3). Collect the Blue Bulb (4), use the Tripod Leg on the Tripod (5) and then collect the Key (6).
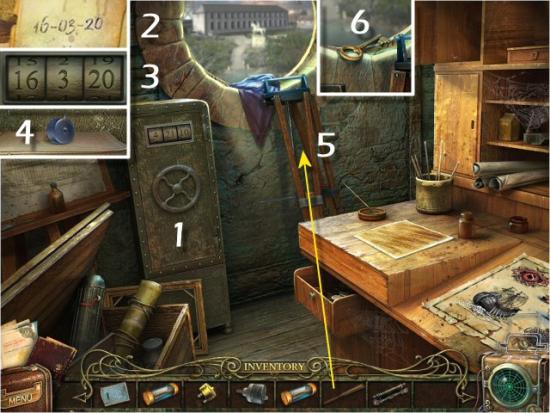
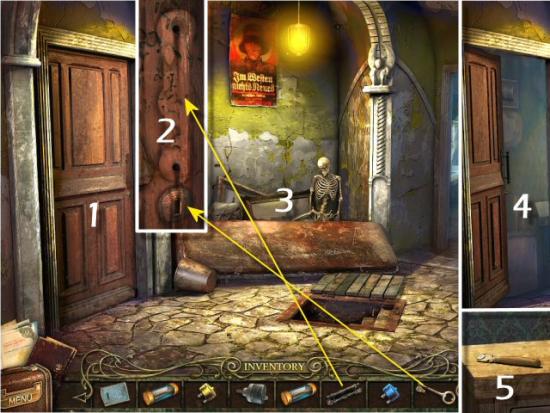
Return to the Hidden Passage in the Right Tower (click back once, enter the Right Archway and then click right through the Hole in the Wall), click on the Door (1), use the Door Handle and Key (2 – in either order) and then click on the Debris (3). When complete, enter the Open Door into the Bedroom (4) and collect the Glass Cutter on the Desk (5).
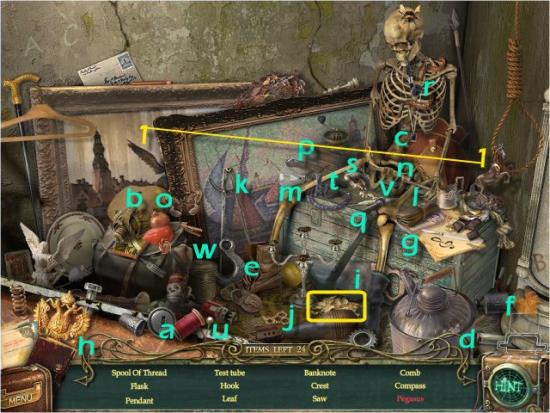
Find all the items in the list.
a. Thread | b. Flask | c. Pendant | d. Test Tube | e. Hook |
f. Leaf | g. Banknote | h. Crest | i. Saw | j. Comb |
k. Compass | l. Purse | m. Bulb | n. Toothbrush | o. Onion |
p. Pocket Knife | q. Anchor | r. Pipe | s. Pills | t. Beads |
u. Pin | v. Thermometer | w. Twine |
Interactive Item
- Pegasus: Use the Wings on the Horse and click on the Pegasus.
Inventory Item: Torn Telescope Schematic
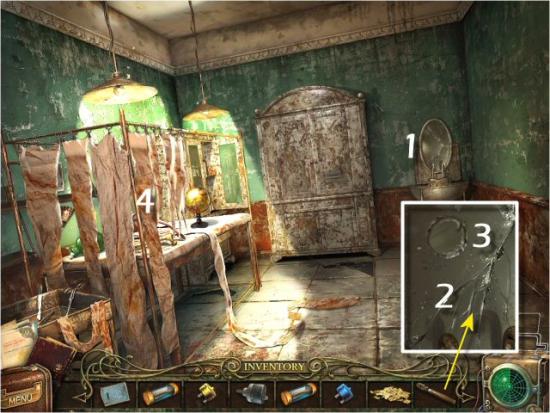
Return to the Operating Room (click back and then enter the Door on the right), click on the Mirror (1), use the Glass Cutter (2 – click anywhere), collect the Mirror Piece (3) and then click on the Operating Table (4).
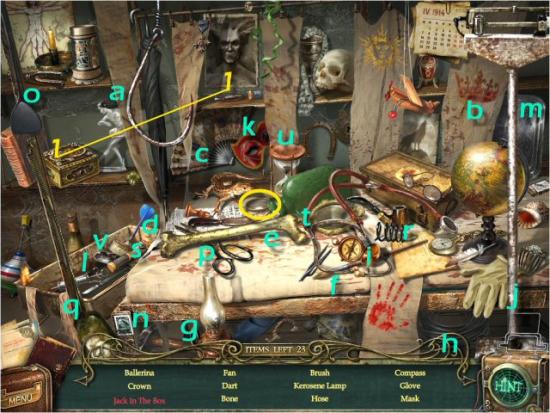
Find all the items in the list.
a. Ballerina | b. Crown | c. Fan | d. Dart | e. Bone |
f. Brush | g. Lamp | h. Hose | i. Compass | j. Glove |
k. Mask | l. Syringe | m. Tray | n. Stamp | o. Spatula |
p. Scissors | q. Scoop | r. Spring | s. Jaw | t. Mirror |
u. Sandglass | v. Spoon |
Interactive Item
- Jack in the Box: Use the Handle on the Box and click on the Jack in the Box.
Inventory Item: Lens
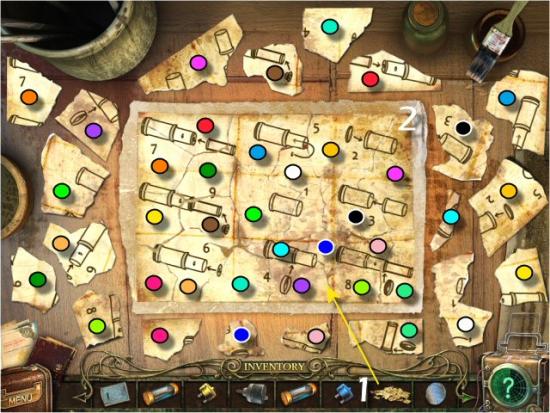
Return to the Left Tower (click back 3 times and then enter the Left Archway) and click on the Table. Use the Torn Telescope Schematic (1 – click anywhere) on the Table. Click on a piece, drag it inside the frame and then click to place it. If placed correctly, it will lock into place. Note that you don’t need to rotate any pieces; they will orient themselves, automatically. Collect the restored Schematic (2).
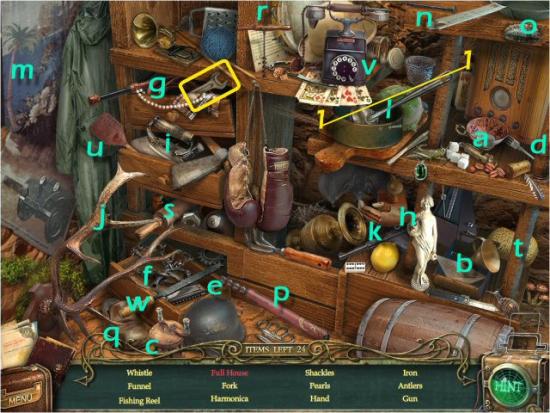
Return to the Cellar in the Hidden Passage (click back once, enter the Right Archway, click right into the Hidden Passage and then down the Steps into the Cellar) and click on the Shelves. Find all the items in the list.
a. Whistle | b. Funnel | c. Reel | d. Fork | e. Harmonica |
f. Shackles | g. Pearls | h. Hand | i. Iron | j. Antlers |
k. Gun | l. Ladle | m. Palm | n. Nail | o. Pan |
p. Cudgel | q. Slipper | r. Tambourine | s. Rolling Pin | t. Sponge |
u. Flyswatter | v. Telephone | w. File |
Interactive Item
- Full House: Use the King on the Cards and click on the Full House.
Inventory Item: Wrench
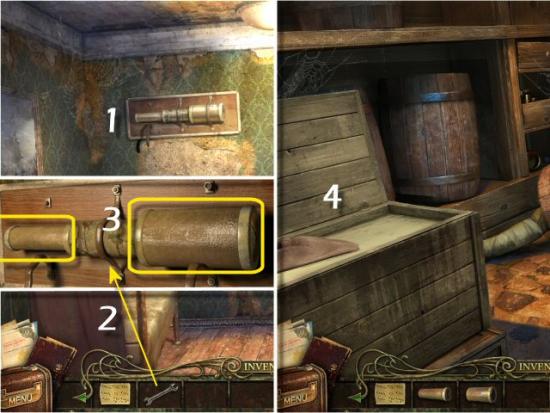
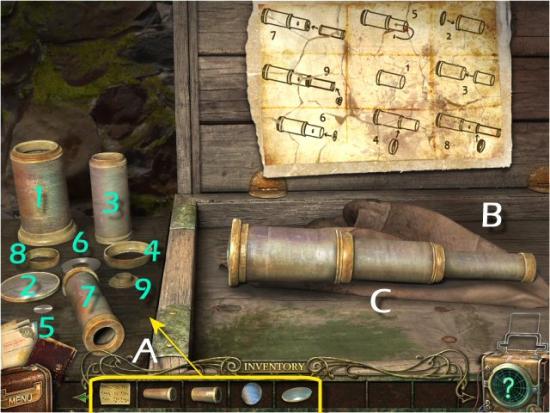
Return to the Bedroom (click back and then enter the Left Door), click on the Telescope (1), use the Wrench (2) and then collect the Eye and Front Telescope Pieces (3). Return to the Cellar (click back and then down the Steps to the Cellar) and click on the Crate at the left (4).
Use the Schematic and Telescope Pieces (A – click anywhere); note that the Instructions are out of order. Note the proper order and use the Telescope Parts according to the Instructions. Simply click on each one and it will automatically be placed on the Cloth (B). Collect the Telescope (C) and return to the Left Tower (click back 3 times and then enter the Left Archway).
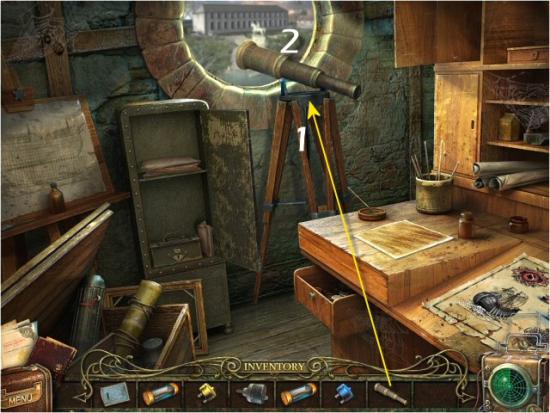
Use the Telescope on the Tripod (1) and then click on the Telescope (2).
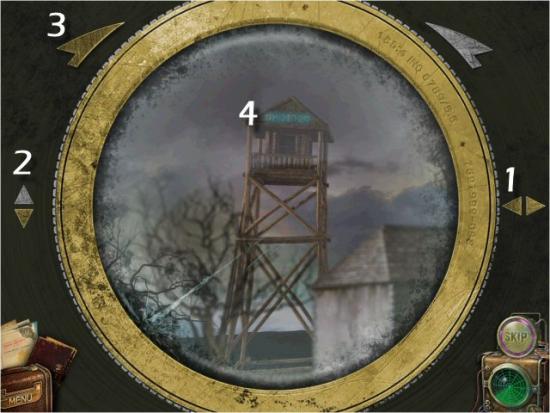
Adjust the View by clicking on the Left/Right and Up/Down Arrows. Click and hold the Left Arrow (1) until it comes to a stop and then click and hold the Up Arrow (2) until the Water Tower is centered in the image. Click and hold the Focus Arrow (3) until the image comes into sharp focus and the Number, at the top of the Water Tower, begins to glow (4).
Return to the Bedroom (click back once, enter the Right Archway, click right through the Hole in the Wall and then enter the Left Door), click on the Desk Drawer (1), enter the Code from the Water Tower in the Telescope (2 – check your Notebook: N X S 4 7 2 T). Note that the “N” and the “4” are already entered. The numbered Dials contain the numbers from 1 to 9; the lettered Dials contain only 9 letters. Click on each Dial until you get to the correct letter or number. Click the first Dial 4 times, the second Dial 7 times, the third Dial 7 times, the fourth Dial once and the fifth Dial 4 times (3). Return to the Passage (click back) and click on the Debris (4). When complete, return to the Bedroom and click on the Open Drawer (5).

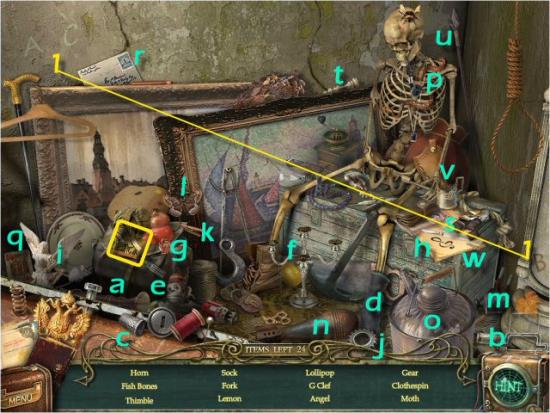
Find all the items in the list.
a. Horn | b. Fish Bones | c. Thimble | d. Sock | e. Fork |
f. Lemon | g. Lollipop | h. G Clef | i. Angel | j. Gear |
k. Clothespin | l. Moth | m. Magnet | n. Missile | o. Gas Can |
p. Snake | q. Card | r. Stamp | s. Scalpel | t. Chess Piece |
u. Spear | v. Glass Holder | w. Paperclip |
Interactive Item
- ABC: Use the “B” on the “A” and “C” and click on the “ABC.”
Inventory Item: Puzzle Tile
Use the Puzzle Tile on the Board (click anywhere). The object is to rearrange the Tiles to form a complete Image. Click on any Tile and it will slide to the Empty Space. Click the Restart button (blue) if you want to begin again. When complete, collect the Red Bulb. The solution is:
1. click B 1 | 2. click C 1 | 3. click C 2 | 4. click C 3 | 5. click B 3 | 6. click B 2 |
7. click C 2 | 8. click C 3 | 9. click B 3 | 10. click A 3 | 11. click A 2 | 12. click B 2 |
13. click B 3 | 14. click C 3 | 15. click C 2 | 16. click B 2 | 17. click A 2 | 18. click A 1 |
19. click B 1 | 20. click B 2 | 21. click A 2 | 22. click A 1 | 23. click B 1 | 24. click B 2 |
25. click C 2 | 26. click C 1 | 27. click B 1 | 28. click B 2 |
Click on the following for a video solution.
Return to the Courtyard (click back 3 times), click on the Portal (1), use the Schematic on the Clipboard (2) and the Bulbs in the Empty Slots (3) – click anywhere). Return to the Laboratory (enter the Right Archway and then click forward) and click on the Shelves.
Find all the items in the list.
a. Medallion | b. Hammer | c. Frog | d. Gun | e. Croc. Skull |
f. Pad of Paper | g. Flashlight | h. Knife | i. Crystal Ball | j. Block |
k. Tree | l. Ampoule | m. Cross | n. First Aid | o. Paper Plane |
p. Tooth | q. Spider | r. Test Tube | s. Thermometer | t. Pill |
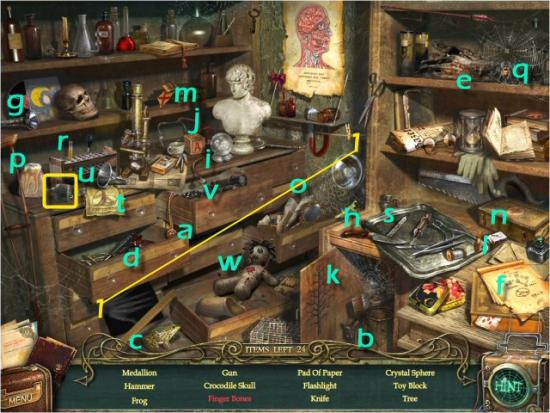
u. Monocle | v. Domino | w. Voodoo Doll |
Interactive Item
- Finger Bones: Use the X-Ray on the Lamp and click on the Finger Bones.
Inventory Item: Resistor
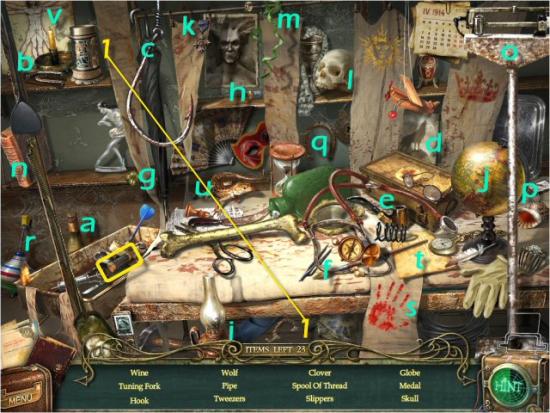
Return to the Operating Room (click back once, enter the Hole in the Wall and then enter the Right Door) and click on the Operating Table. Find all the items in the list.
a. Wine | b. Tuning Fork | c. Hook | d. Wolf | e. Pipe |
f. Tweezers | g. Clover | h. Spool | i. Slipper | j. Globe |
k. Medal | l. Skull | m. Ribbon | n. Book | o. Scale |
p. Shell | q. Horseshoe | r. Spinning Top | s. Hand Print | t. Envelope |
u. Lizard | v. Da Vinci Sketch |
Interactive Item
- Mug: Use the Handle on the Cup and click on the Mug.
Inventory Item: Fuse
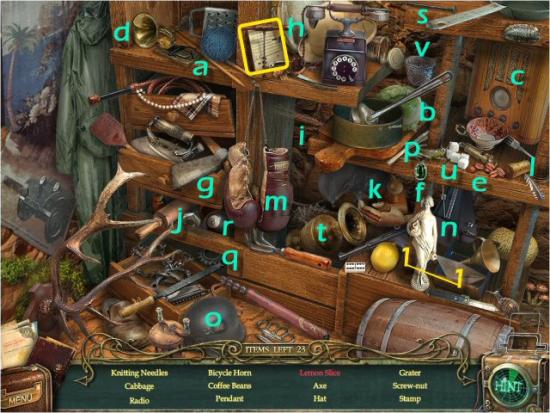
Return to the Cellar (click back once and then down the Steps to the Cellar) and click on the Shelves. Find all the items in the list.
a. Knitting Needles | b. Cabbage | c. Radio | d. Bicycle Horn | e. Coffee Beans |
f. Pendant | g. Axe | h. Hat | i. Grater | j. Hex Nut |
k. Stamp | l. Cork | m. Boxing Gloves | n. Metronome | o. Helmet |
p. Grasshopper | q. Gear | r. Billiard Ball | s. Wheat | t. Vase |
u. Sugar Cubes | v. Wineglass |
Interactive Item
- Lemon Slice: Use the Knife on the Lemon and click on the Lemon Slice.
Inventory Item: Punch Card
Return to the Operating Room (click back once and then enter the Right Door), click on the Cabinet (1), use the Punch Card (2) and collect the Resistor (3). Return to the Courtyard (click back 3 times), click on the Switch (4) and use the Fuses in the Slots (5 – click anywhere). Return to the Right Tower, click on the Panel (6) and use the Resistors (7). Return to the Left Tower and click on the Chest.
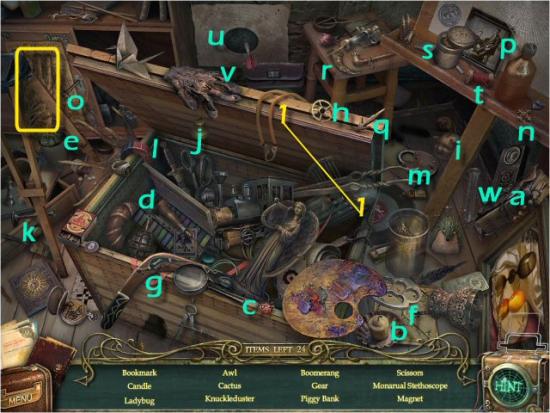
Find all the items in the list.
a. Bookmark | b. Candle | c. Ladybug | d. Awl | e. Cactus |
f. Knucklebuster | g. Boomerang | h. Gear | i. Piggy Bank | j. Scissors |
k. Stethoscope | l. Magnet | m. Lighter | n. Medal | o. Map |
p. Photo | q. Arrowhead | r. Claw | s. Snuff Box | t. Spool |
u. Target | v. Torn Glove | w. Tube |
Interactive Item
- Slingshot: Use the Rubber Bands on the Holder and click on the Slingshot
Inventory Item: Rubber Gloves
Return to the Courtyard (click back once), click on the Switch Box (1), use the Rubber Gloves (2) and then click on the Portal (3).
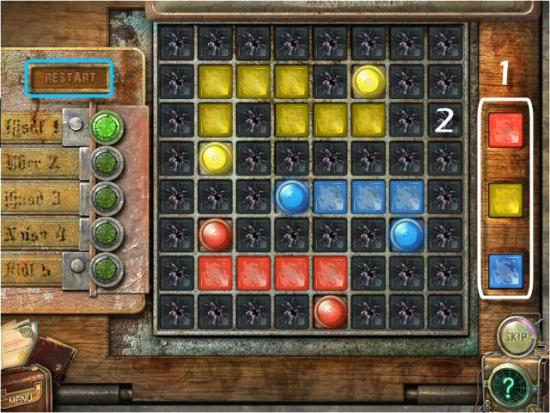
The object is to complete the Circuits between each of the Bulbs. Click on one of the Colored Tiles at the right (1) and then click on each of the Empty Squares (2) of the same color that will connect those Bulbs. Click on the Tile’s Holder and then click on another Tile to change colors. Repeat for the second and third colors. You’ll play 5 rounds. If you make a mistake, click on the Restart button (blue) to begin again. Once you complete a round, you won’t need to replay it. Note that in Round 2, you don’t need to fill every empty space; you only need to fill those Tiles so the circuits are complete.
Round 1
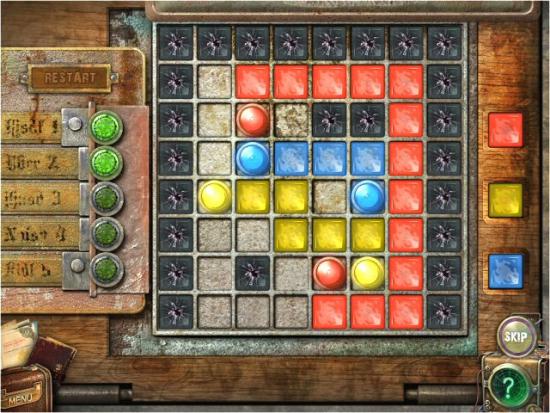
Round 2
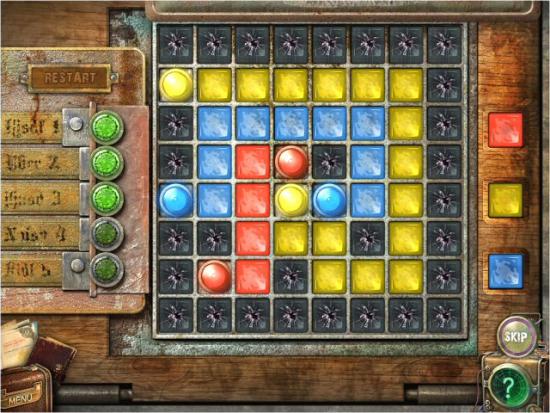
Round 3
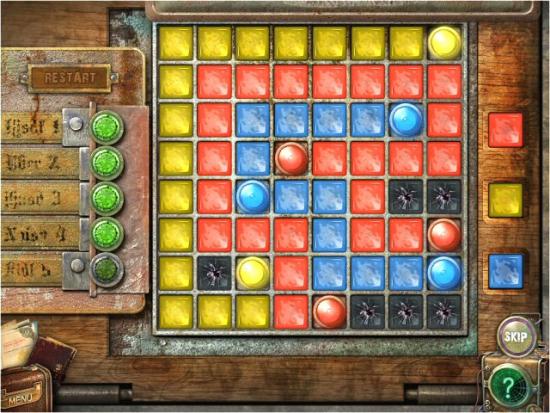
Round 4
Round 5
Congratulations! You’ve completed the Bonus Chapter of Agency of Anomalies: Mystic Hospital.

More articles...
-
Best Horror Games On Itch.io – July 2026
Across a bounty of subgenres. -
Haze Seas Accessories Tier List [Best Accessories to Equip]
The accessories with the best stat buffs in Haze Seas.